Leaderboard
-

siteunseen
Free Member10Points15,115Posts -
EuroDat
Free Member7Points3,309Posts -

240260280
Free Member6Points4,442Posts -
Reptoid Overlords
Free Member4Points805Posts


Popular Content
Showing content with the highest reputation on 09/01/2019 in all areas
-
6 pointsMy favorite months are about to be here, finally get to drive the Zs! Enjoy the leaves twirling behind my car. Maybe I'll finally buy a Go=Pro camera for video? EDIT: ...swirling behind my car. Leaves with a baton?6 points
-
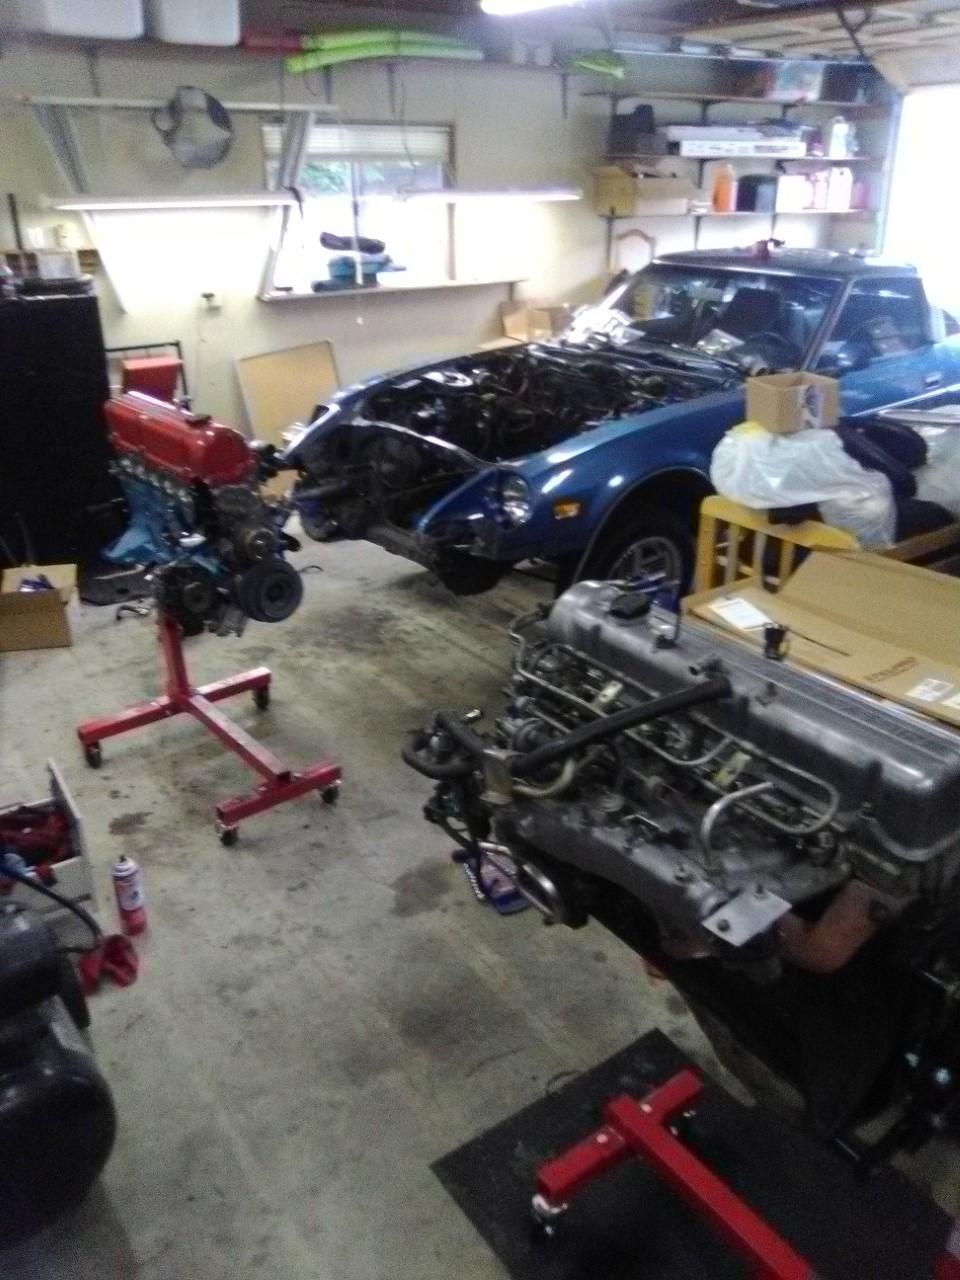
Finally drove Blue around the block. I have been ignoring and mistreating Blue for many years. I just put a new brake system on it and wheel spacers. The cunning plan is to add a G-nose and ZG flares but keep stockish wheels to reduce rolling resistance for highway cruising (and spacers to fill flares and widen stance). A low ratio R180 differential, AC, ultra sound proofing, and an 88mm P90 engine will make it run long. It looks very hillbilly at the moment lol. If the spacers are difficult to tame then Diamond Customs here I come. Sadly it will eventually be Japanese racing white so Blue will go bye bye.

 3 points
 -
3 pointsI ran all the aforementioned measurements, and could find no reason to suspect I had a problem. Cylinder head to deck thickness was in line with bolt head to deck distance(with washers taken into account), so I moved forward. Head bolts lubed and torqued in 20 ft lb increments to 65 ft lbs with no binding or complaining. Made it as far as just before you get the front cover on and begin installing and setting the oil pump and shaft. Now to put a beer in my hand. Thanks to all that helped. It's much appreciated. Sent from my Coolpad 3310A using Tapatalk3 points
-
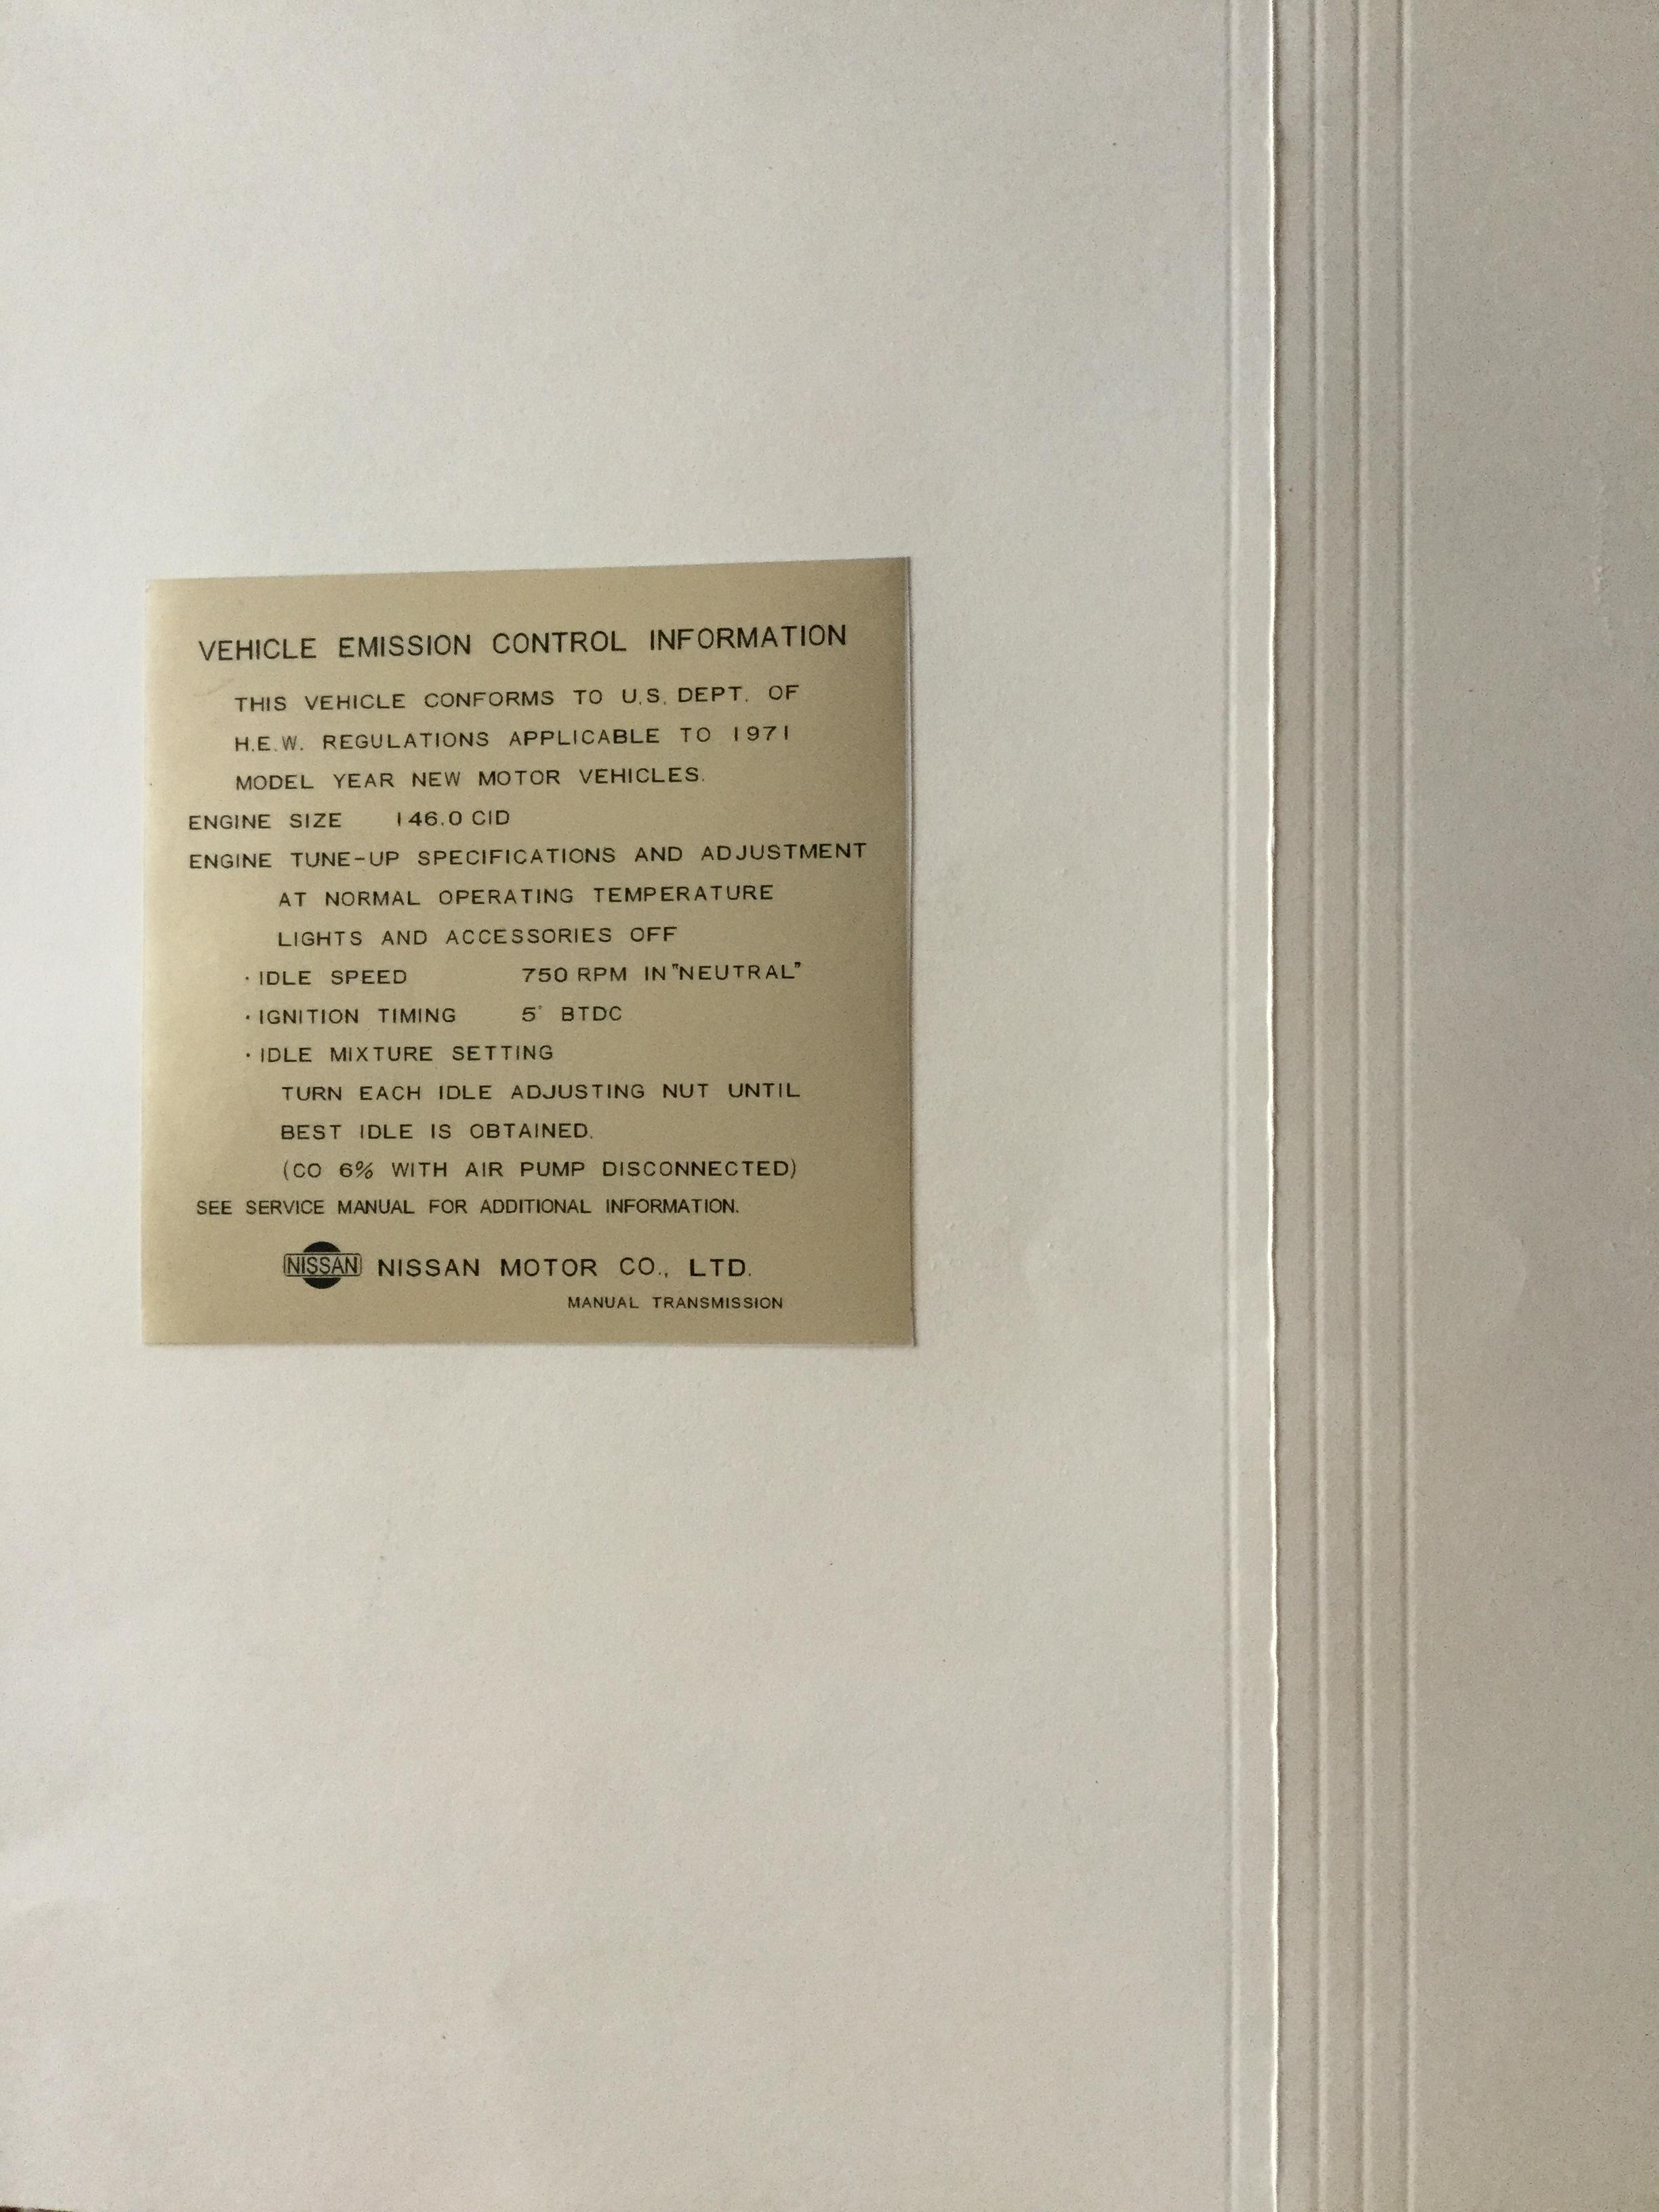
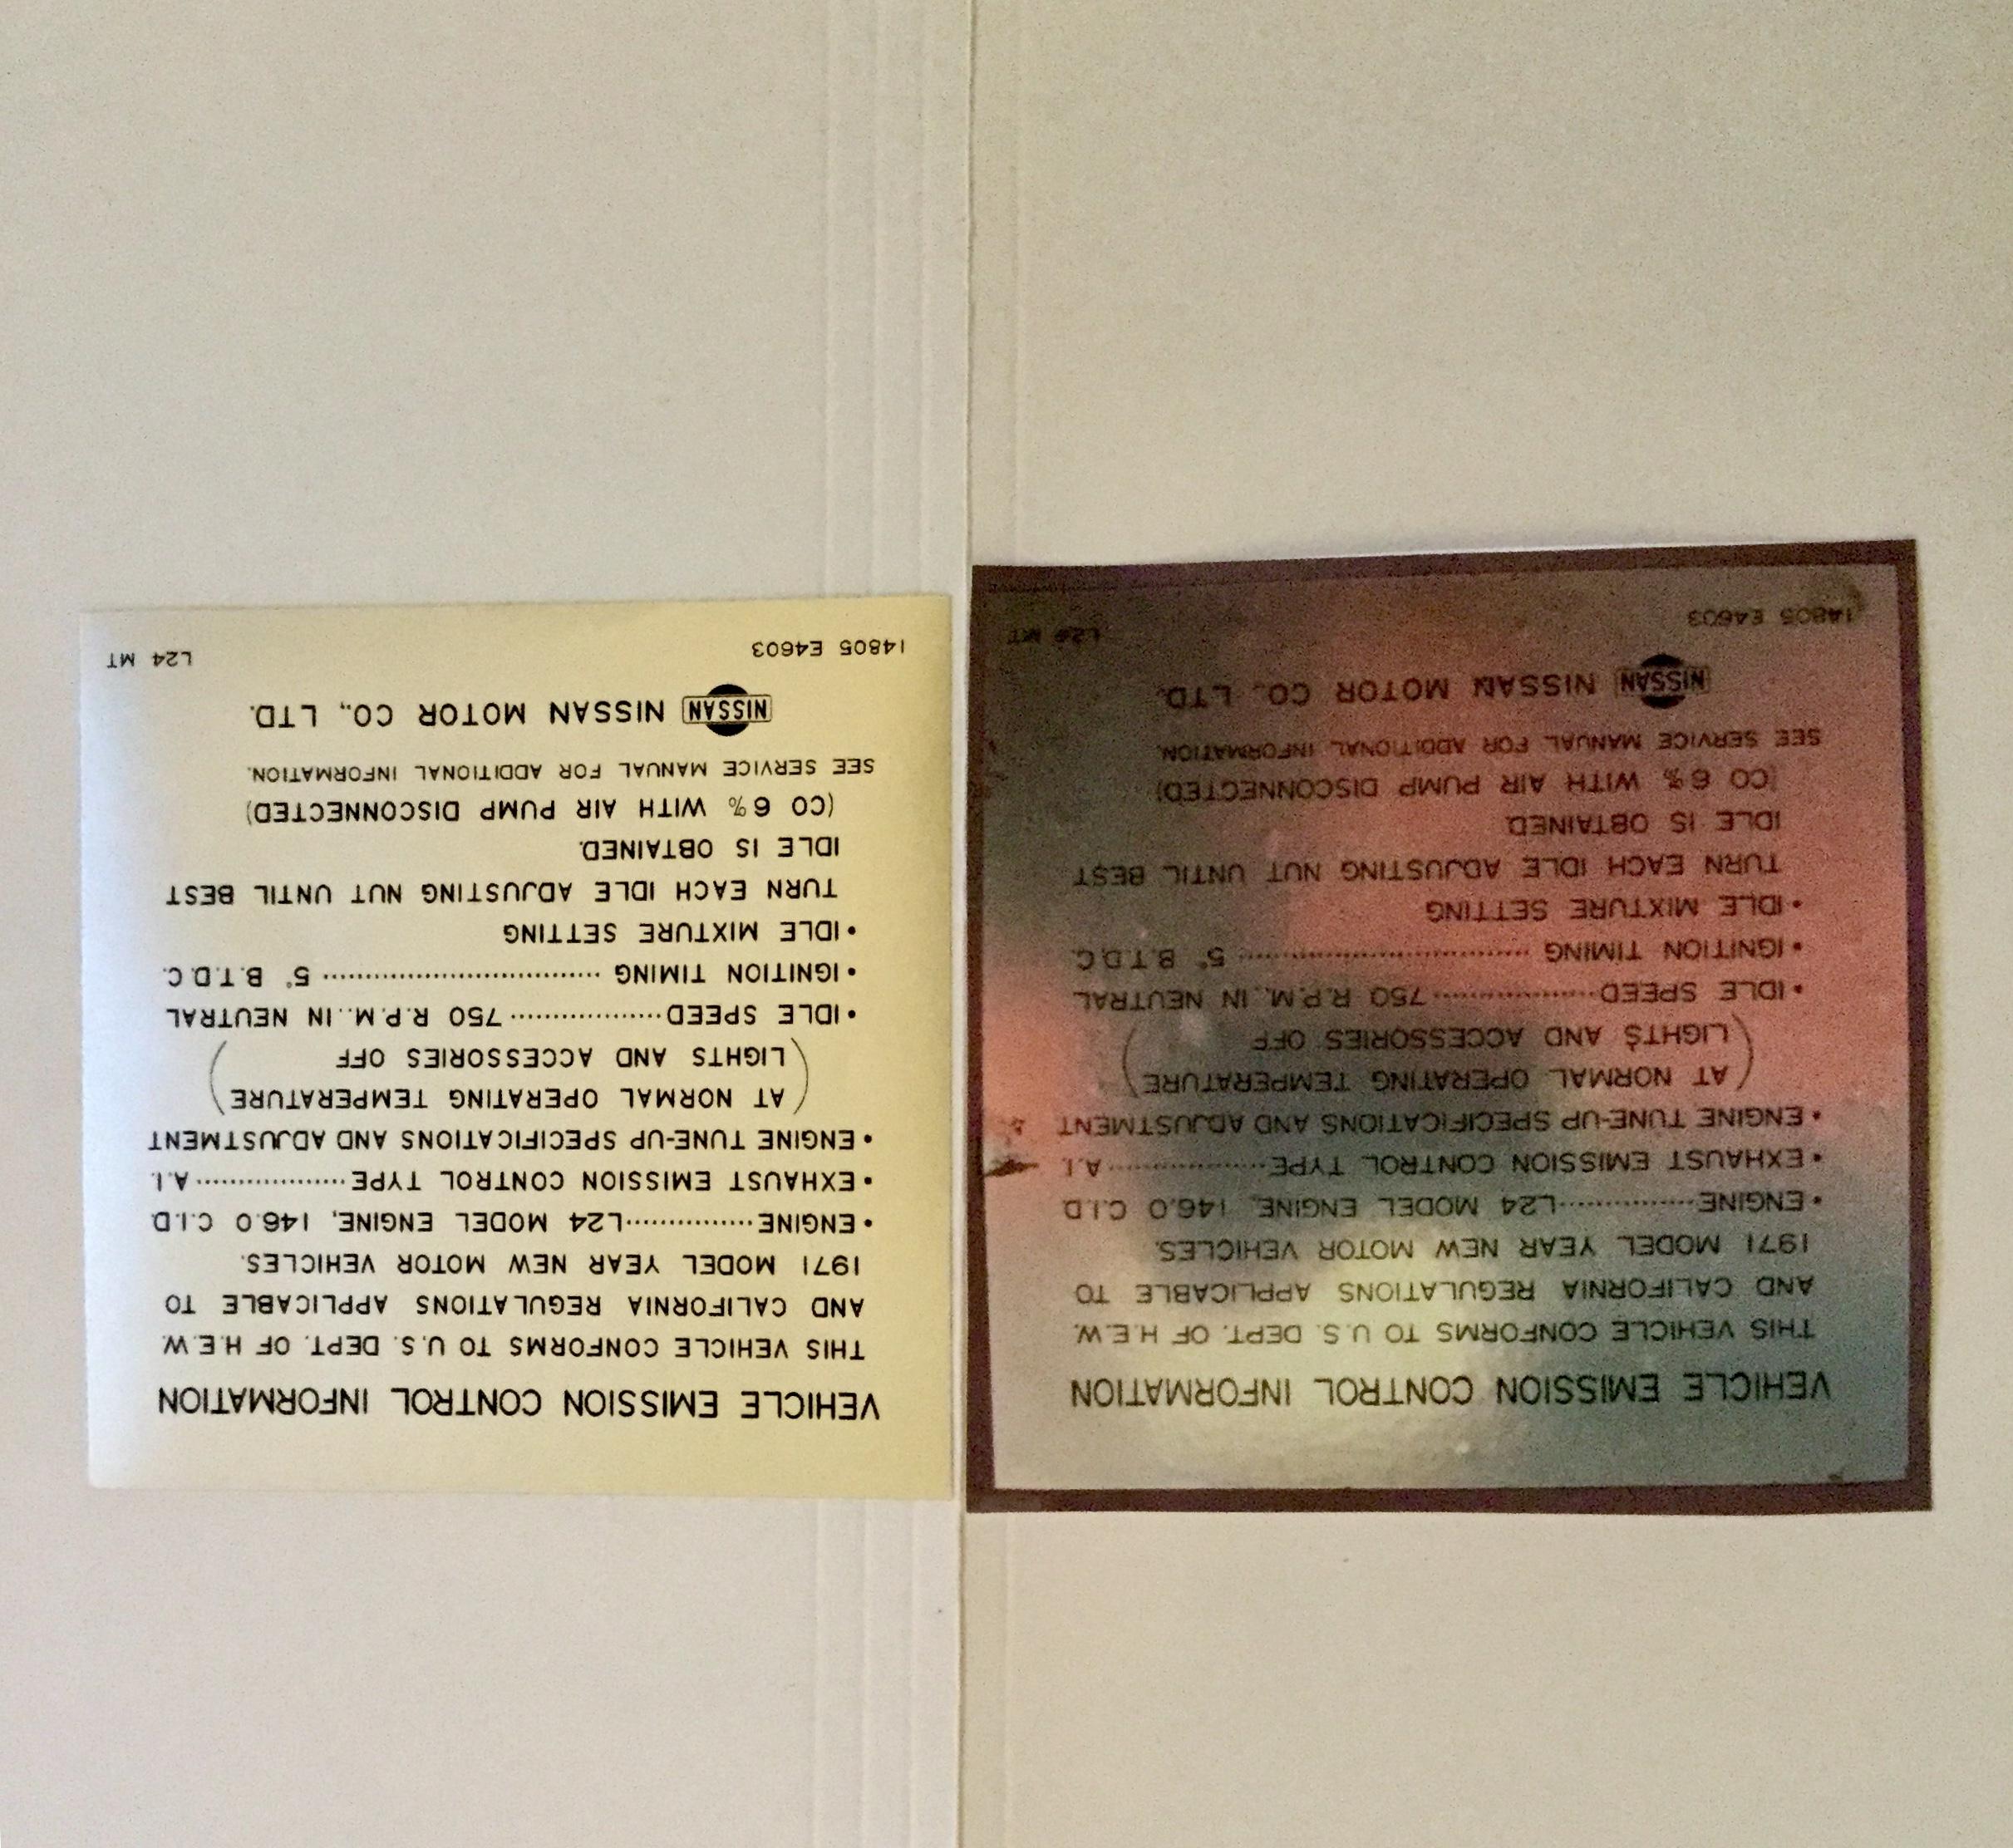
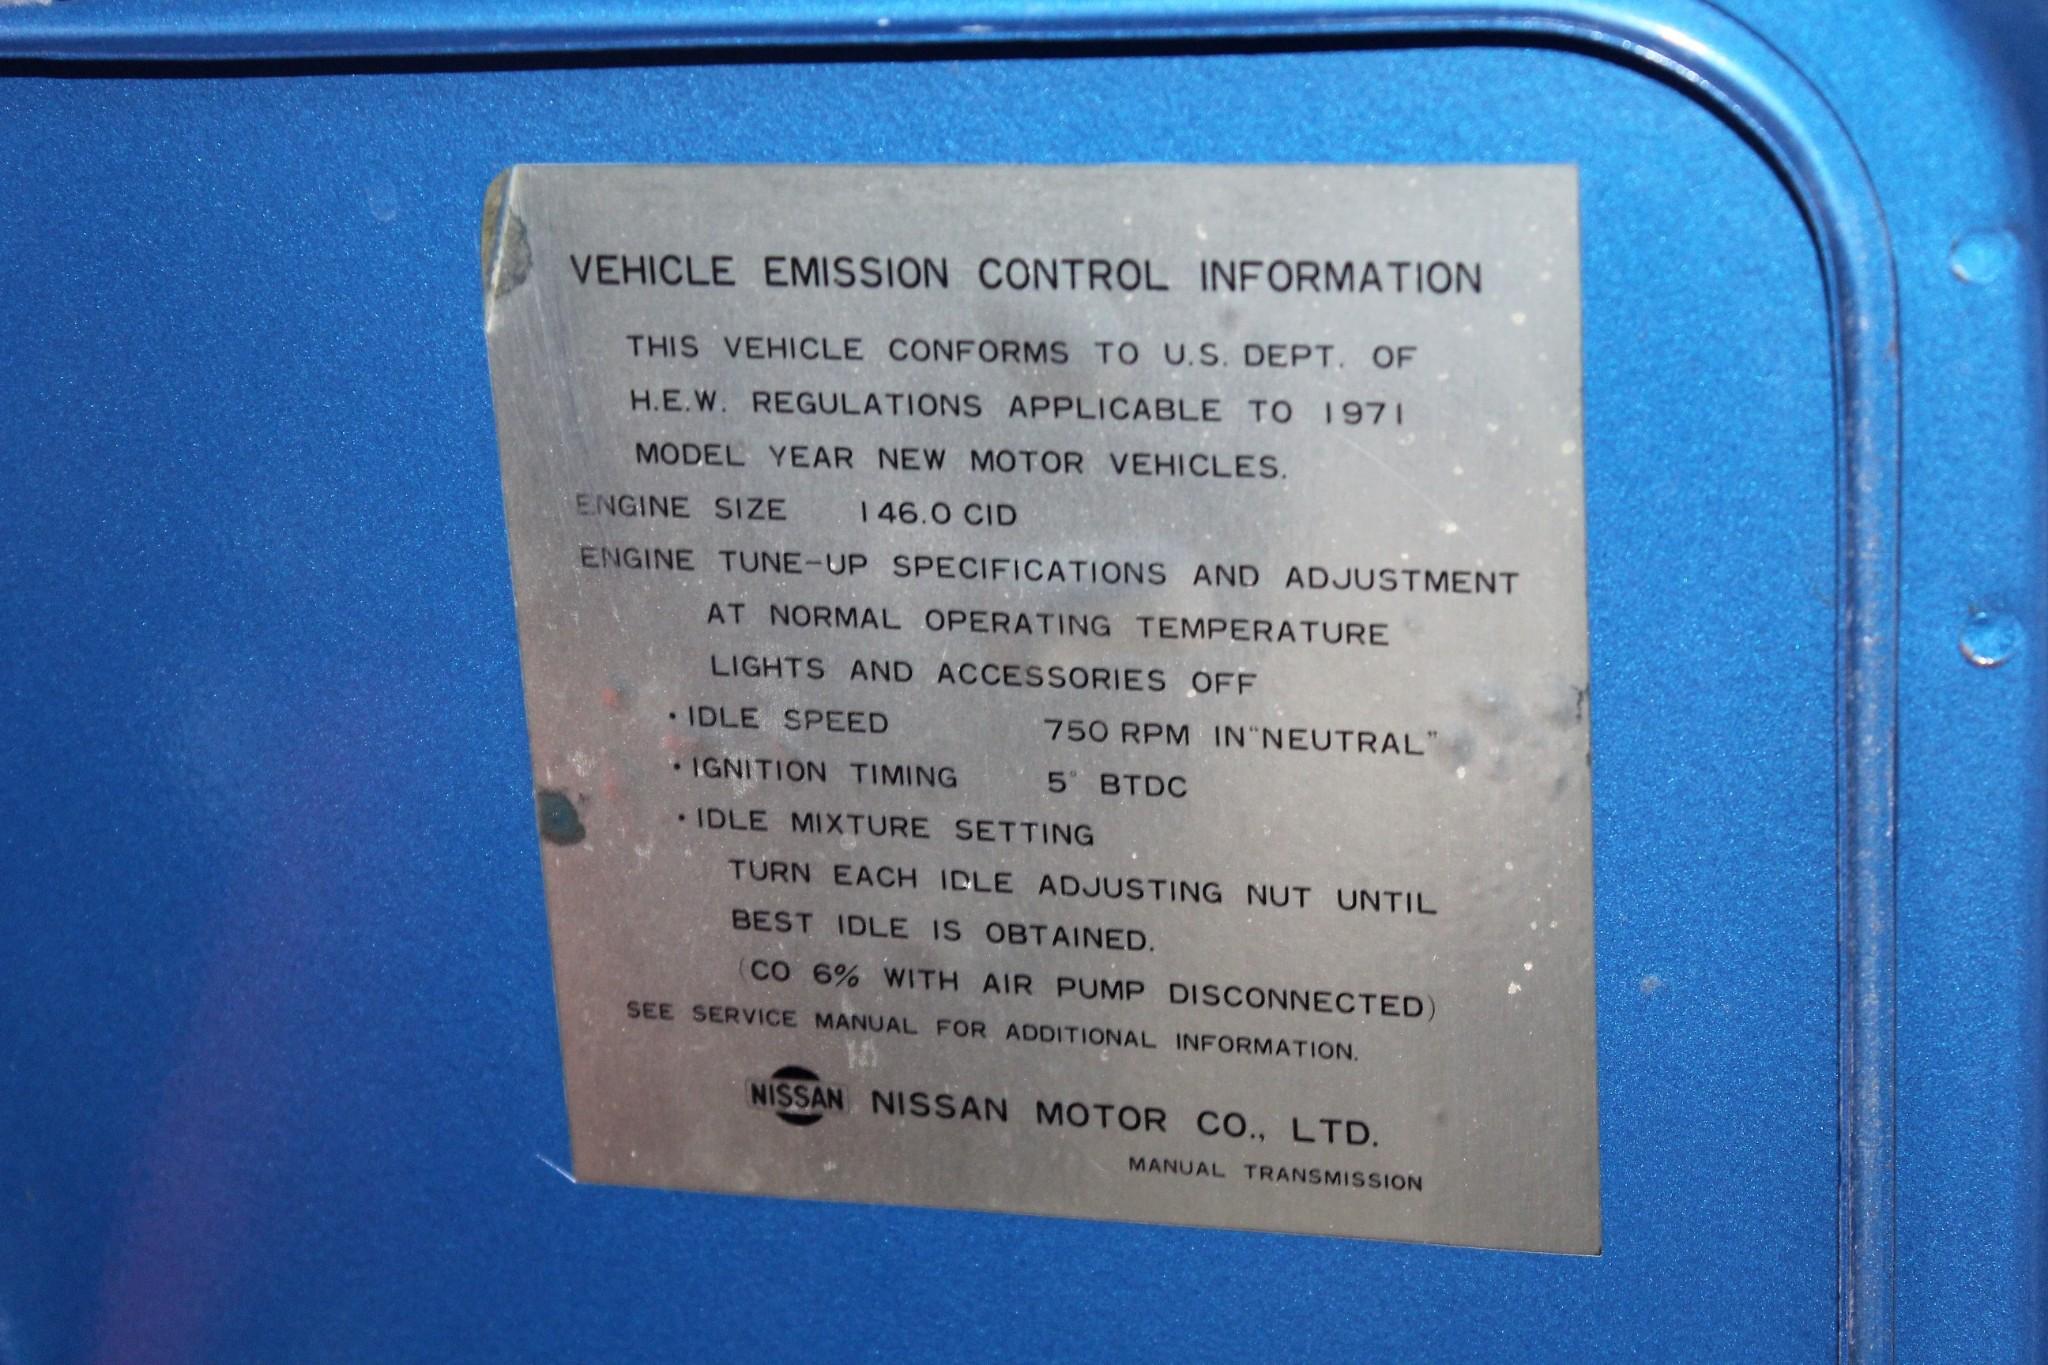
DannDZ, when I restored my car, I needed the correct emissions decal for my 1/71 car which was imported through Los Angeles I ended up having the correct 71 emissions decals for both car that entered the country through California, and all the other domestic ports of entry. These decal are very correct and have not been offered for sale yet, but would sell to anyone interested. The first picture is a reproduction of the third picture, and the second picture is of both the original and reproduction California decal. Dan


 3 points
 -
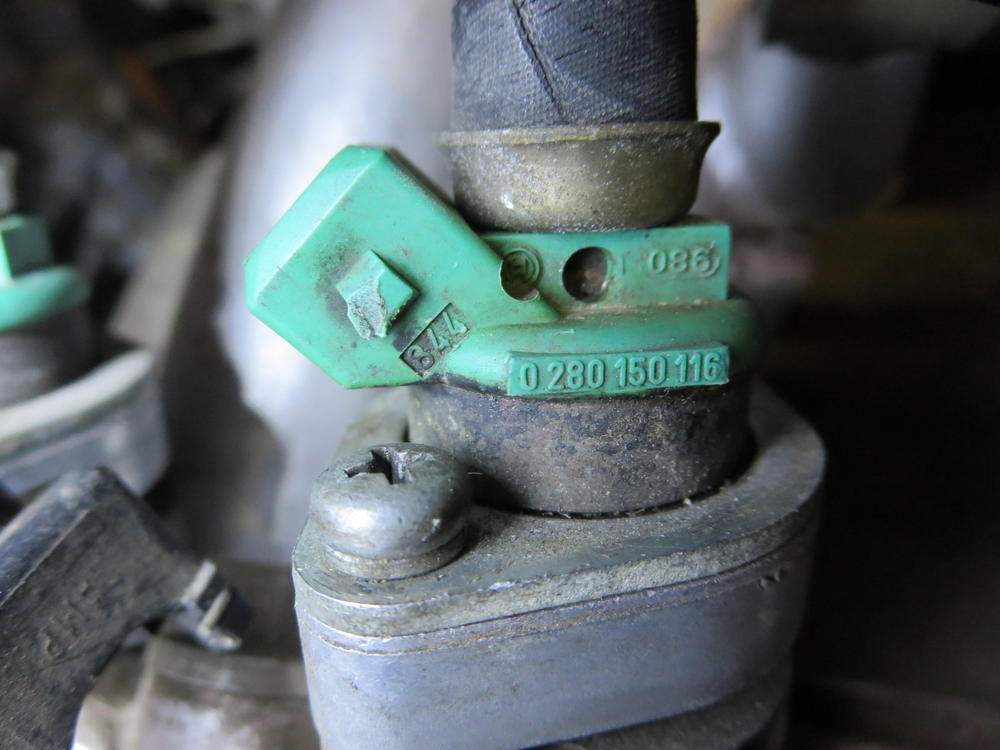
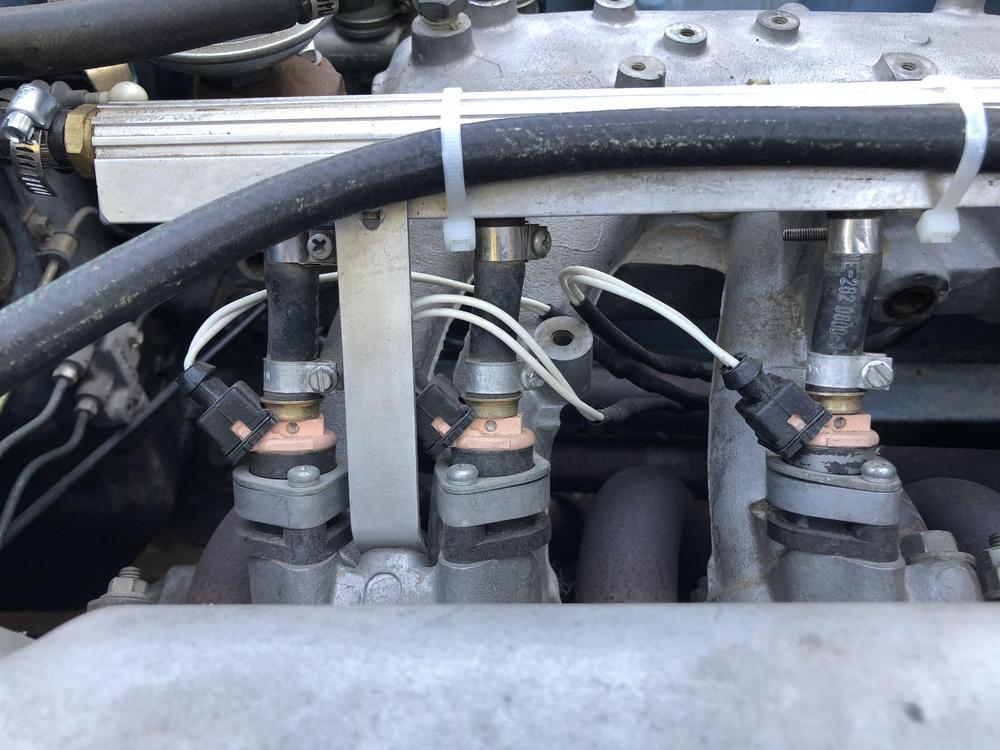
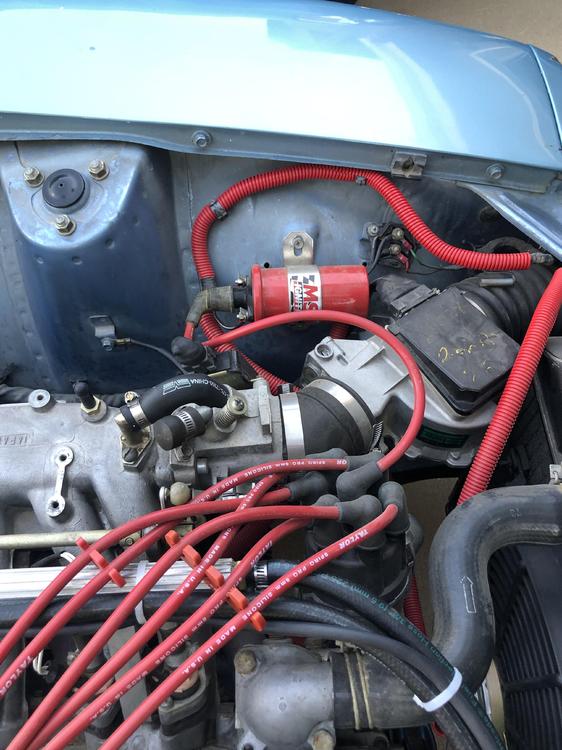
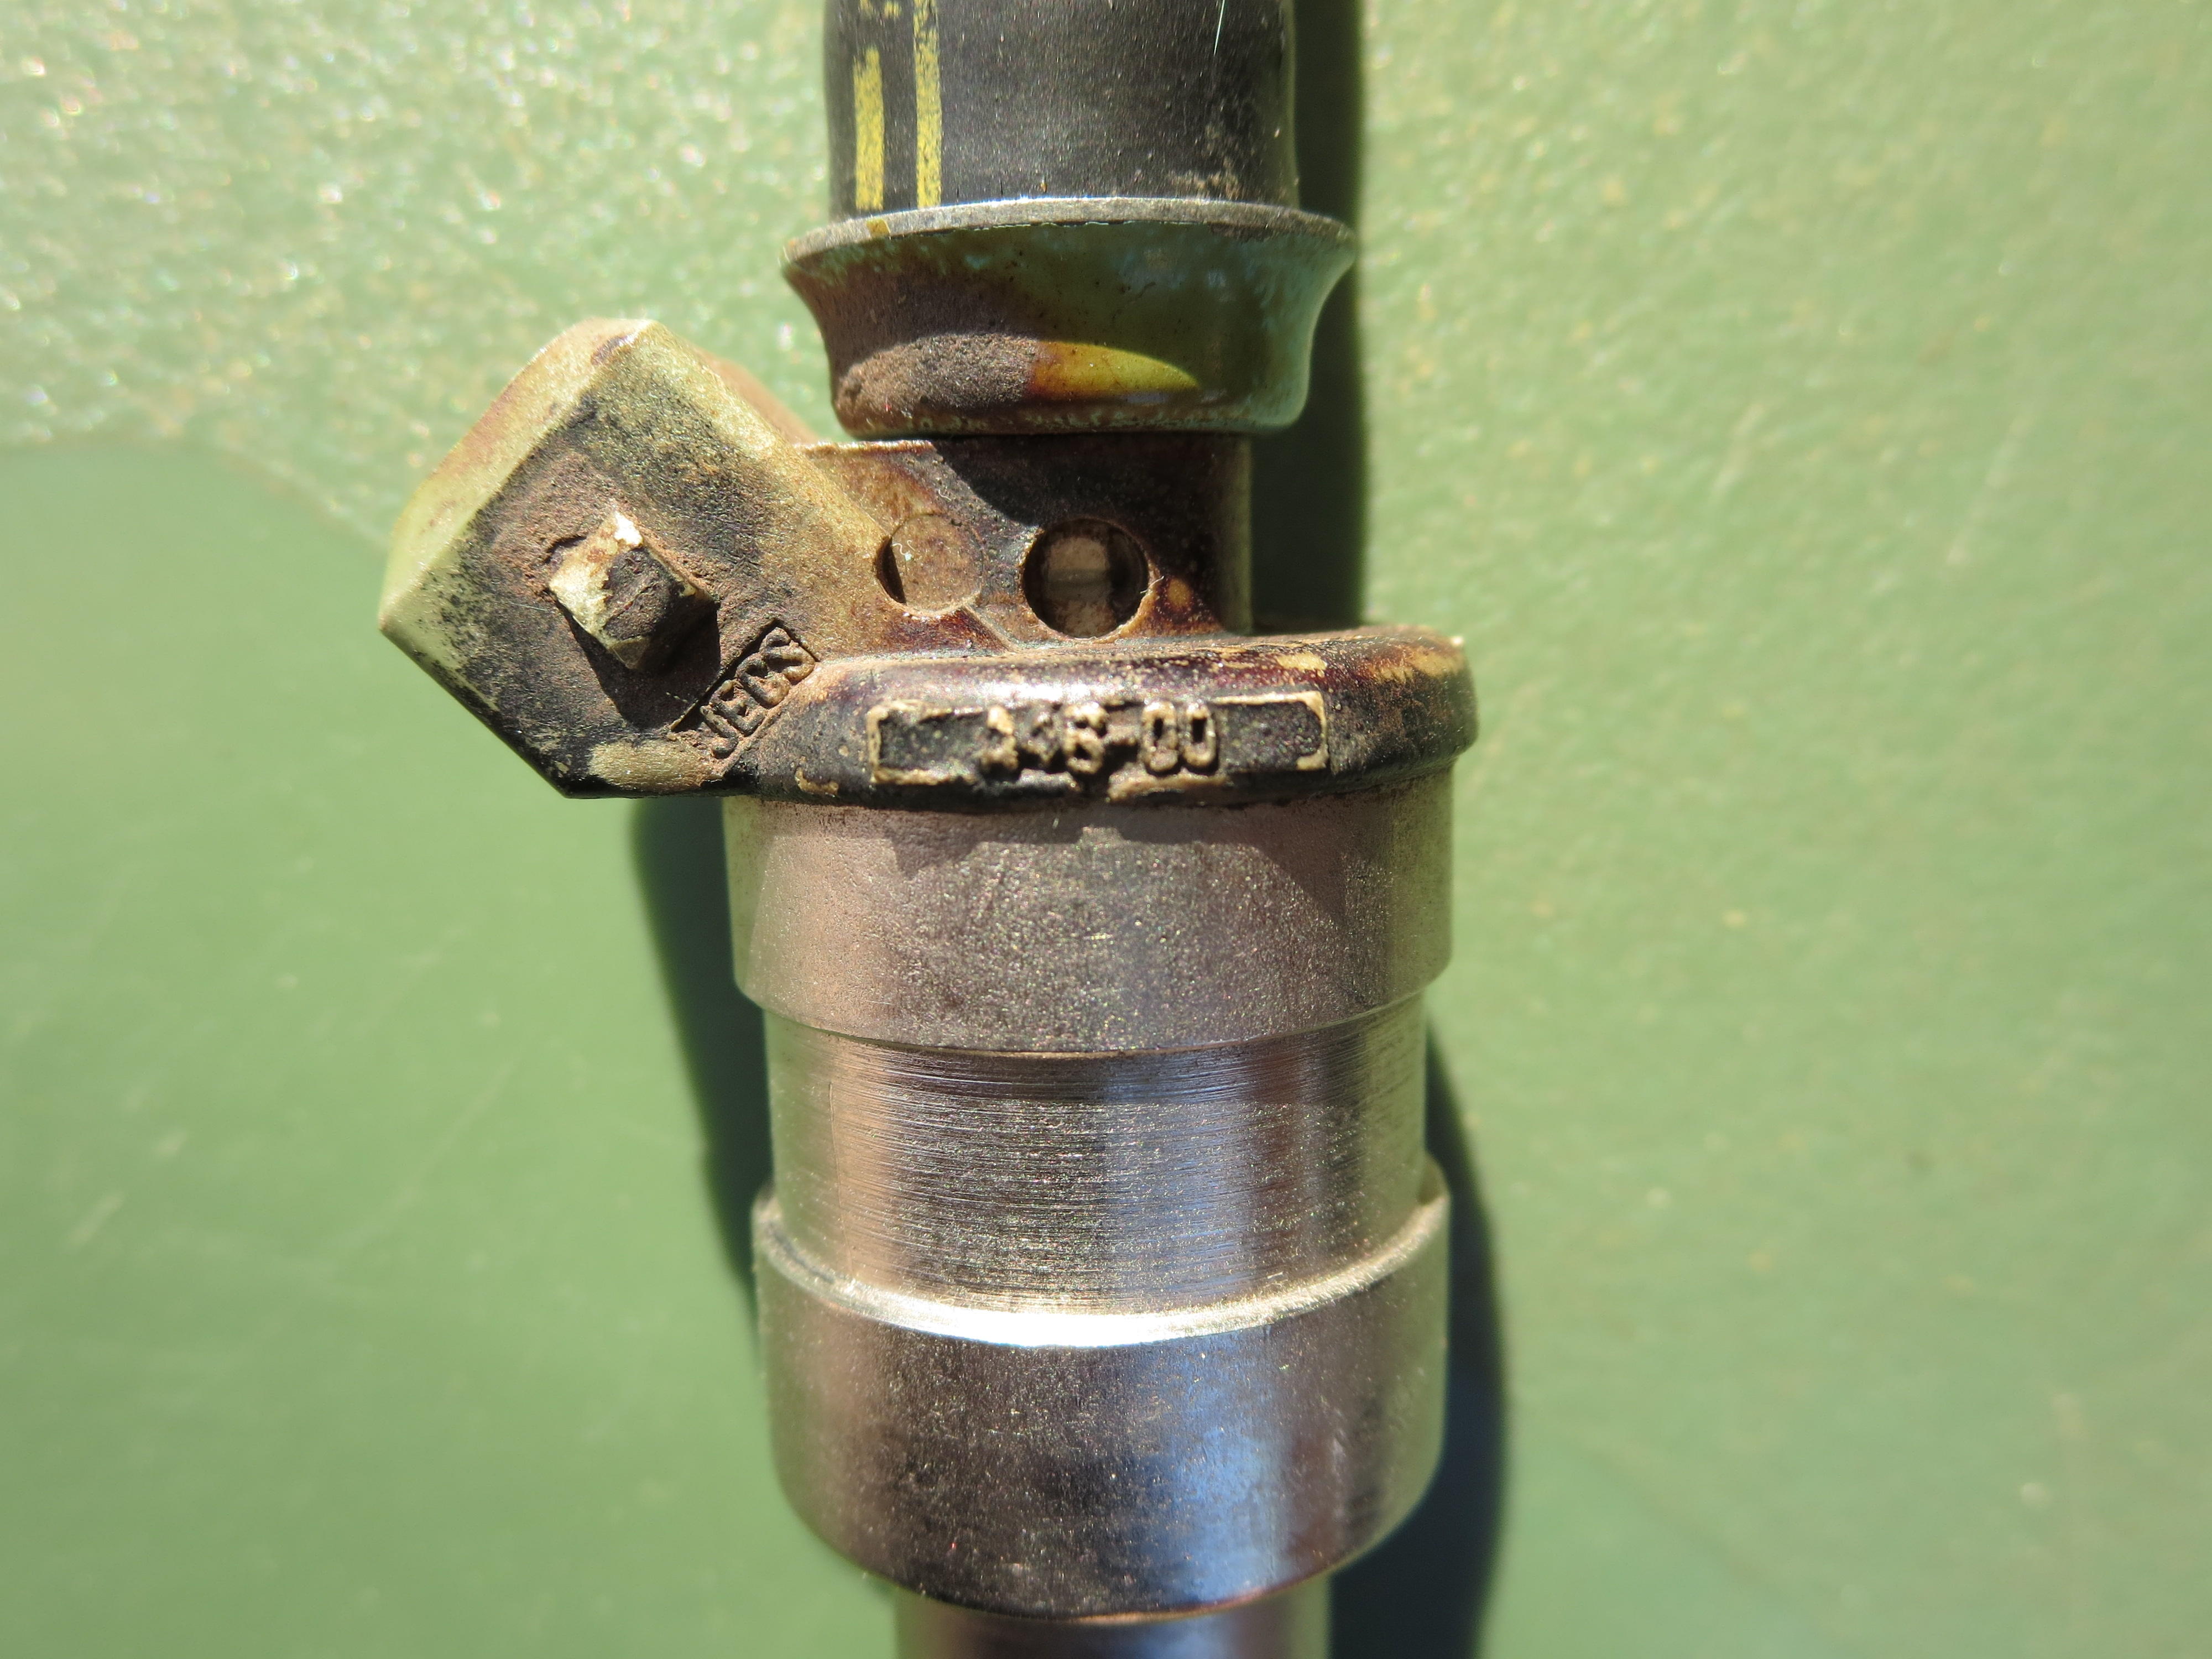
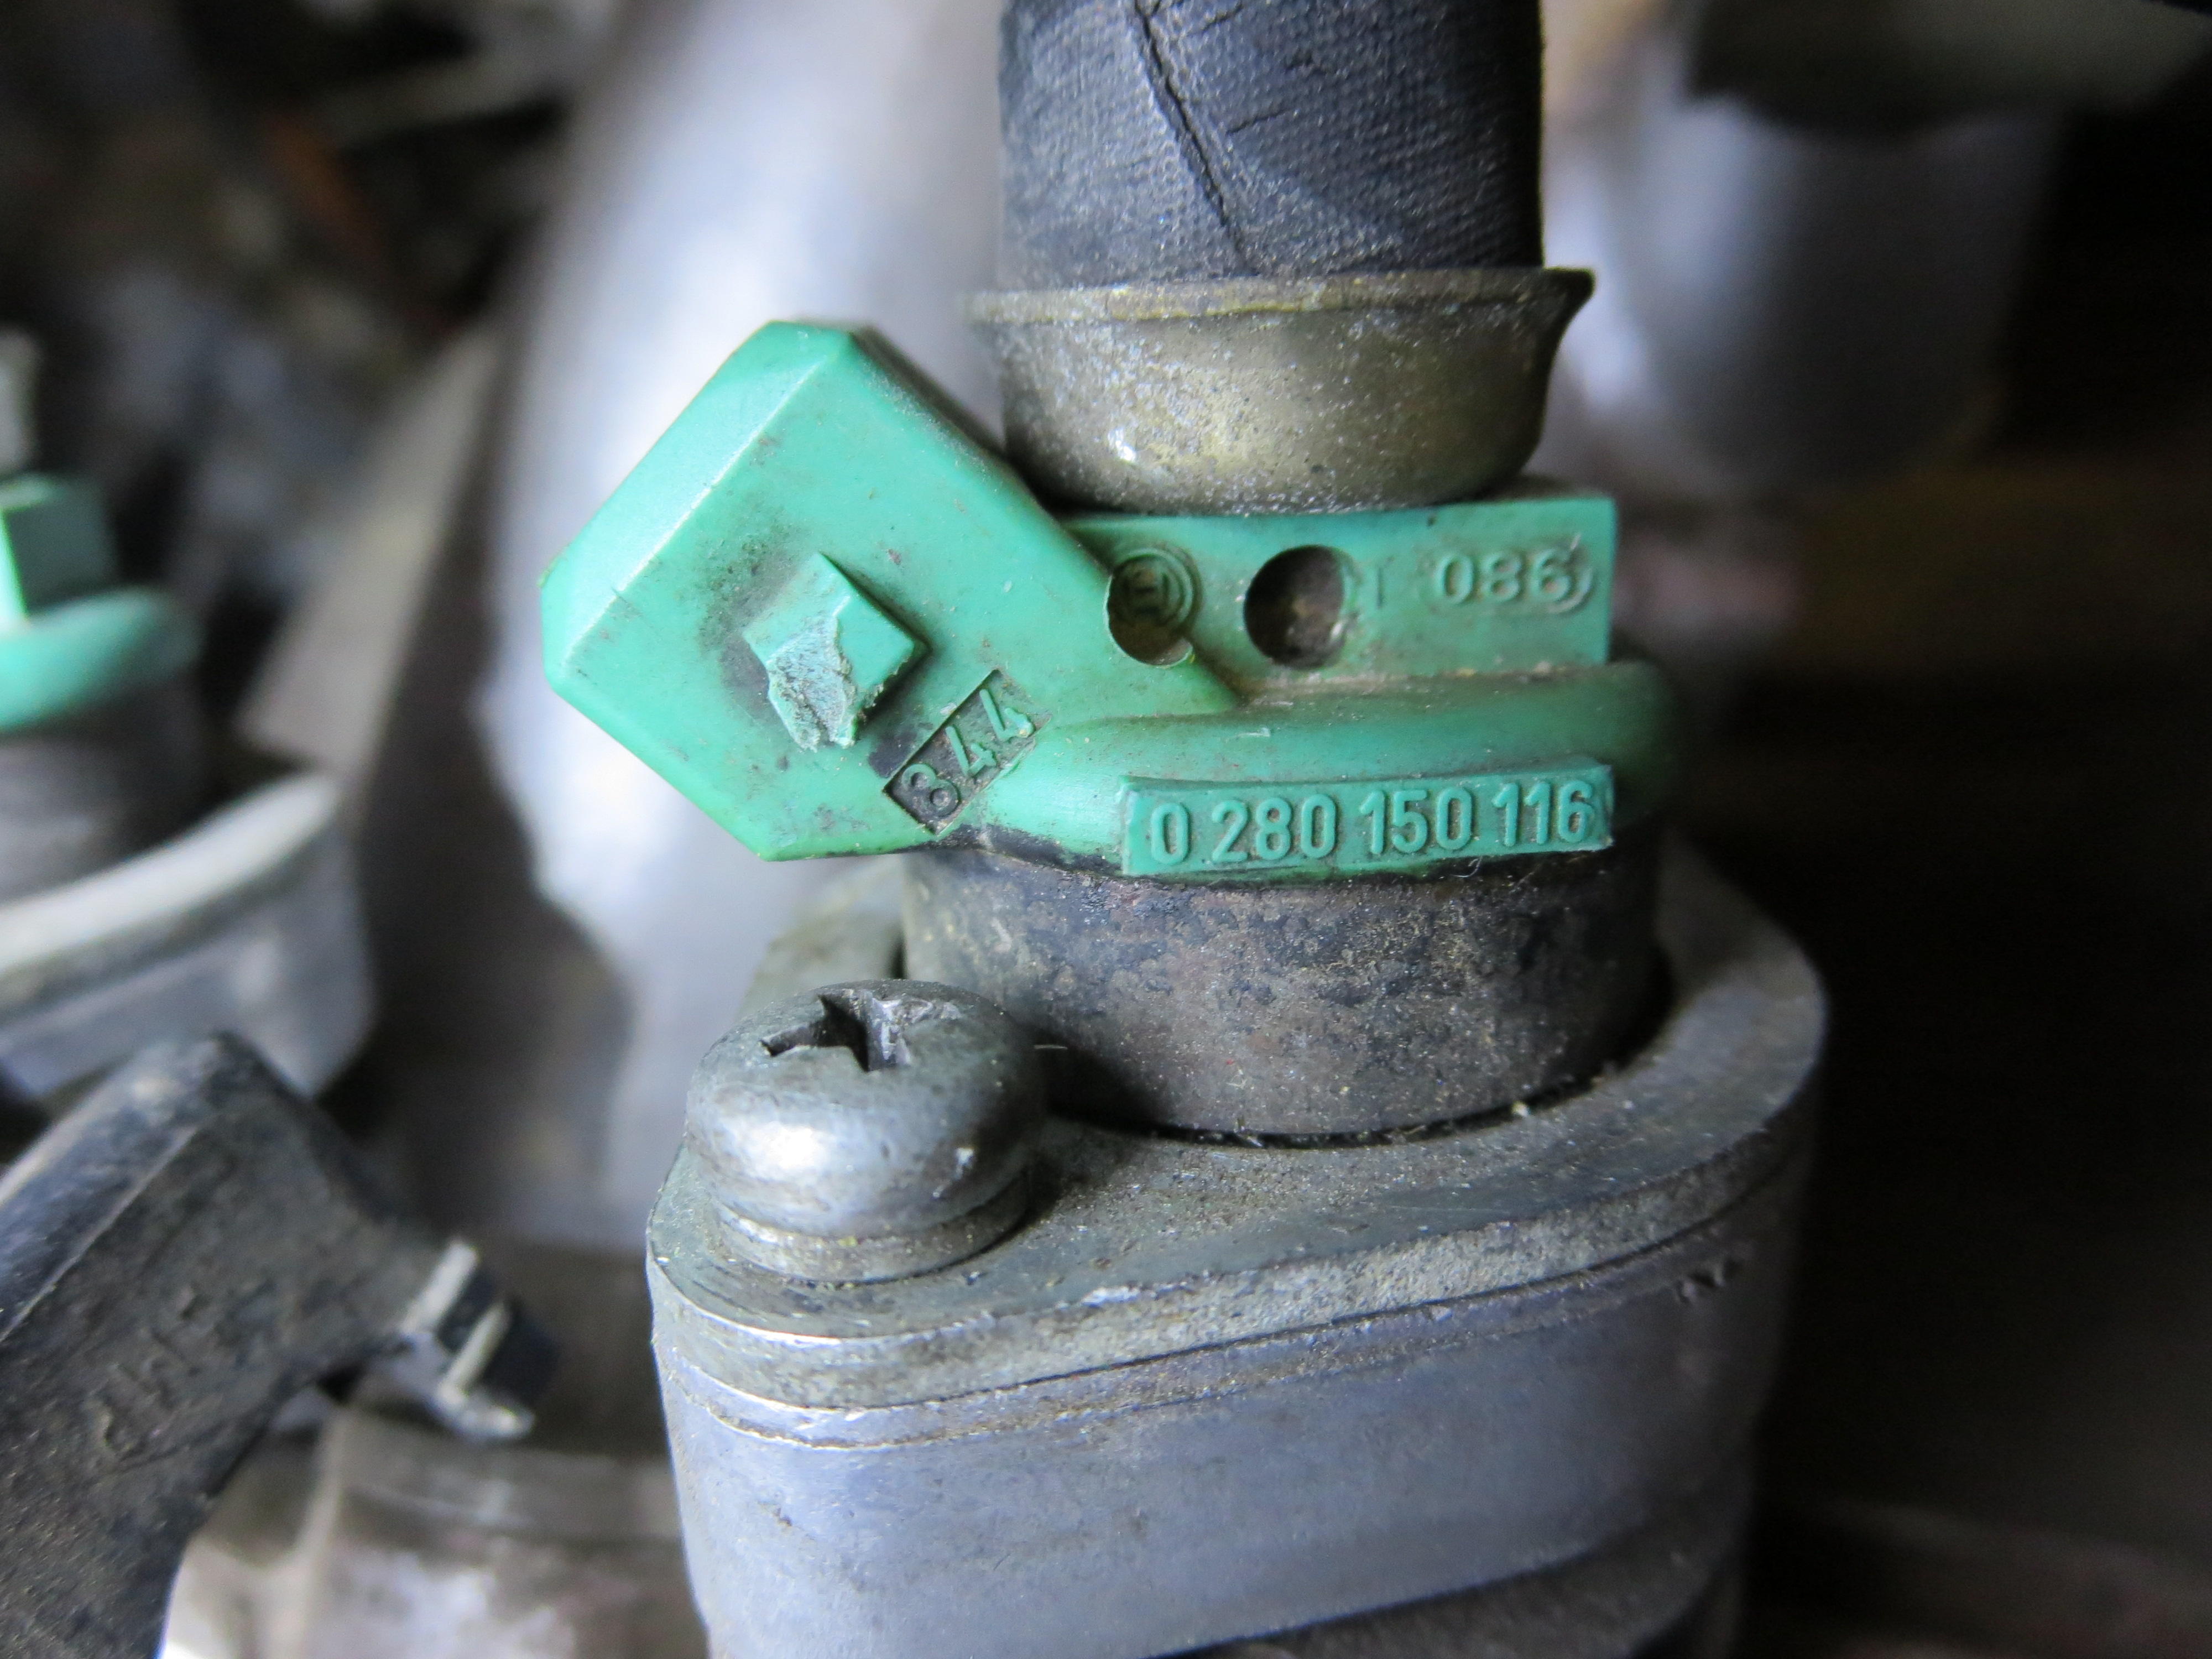
Reading through the thread again. Everyone's covering a lot of ground in a short time. I'm with Site and Zed on the usefullness of the fuel injection test kit. If you want spend money, subsribe to this site. Money well spent. You will help the site and the members are all willing to help with advice. You could be right on a bad fuel pressure gauge. A new one will set you back $5 to $10. Replacing it would be a good idea. I think I would concentrate on one thing at a time. Before buying anything, except fuel gauge, I would try to get the fuel pressure adjusted to spec. The fpr seems to react to vacuum correctly so you should be able to use it. Check the specs for the injectors are correct etc. What concerns me is the low pressure. If it is really so low it could be to compensate big injectors. The origjnal injectors are 185cc, but you could have larger capacity injectors. Can you get a really close photo of the injector with part number?

 2 points
 -
2 points
-
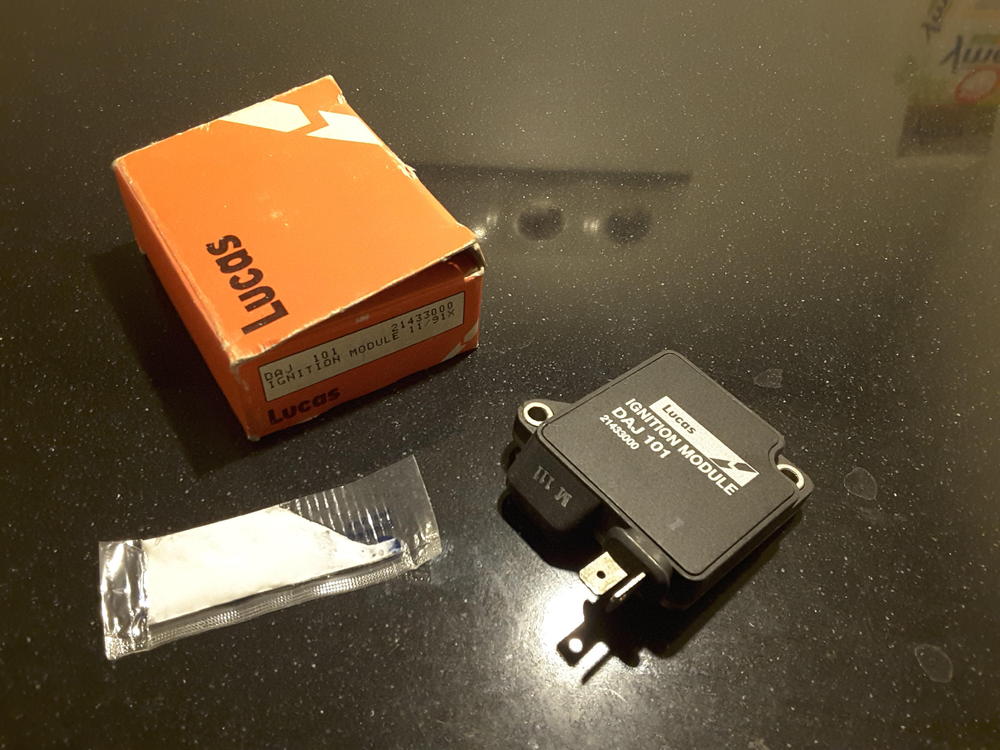
1 pointThose E12-80 matchboxes are available also available in bosch, lucas and other European manufacturers. A bit like the efi system which is esentually a copy of the bosch jetronic. I have nos spare Lucas and a boch units still in their boxes.
 1 point
 -
I understand. I'm walking into an area where you all have great experience and I'm the nub. I'm bound to get overwhelmed till I at least start to catch up. Not a problem.1 point
-
We have bombarder this fellow. I apologize for the group. It's a game we play, who's first with the answer. My smartphone is like the Coleco football game I played when I was a kid.
 1 point
 -
Did we ever ask how the car runs now? I don't think so... What the heck is a injector test kit? New one to me but best of luck with the results.1 point
-
I'm 50 and make bad decisions. It never stops.1 point
-
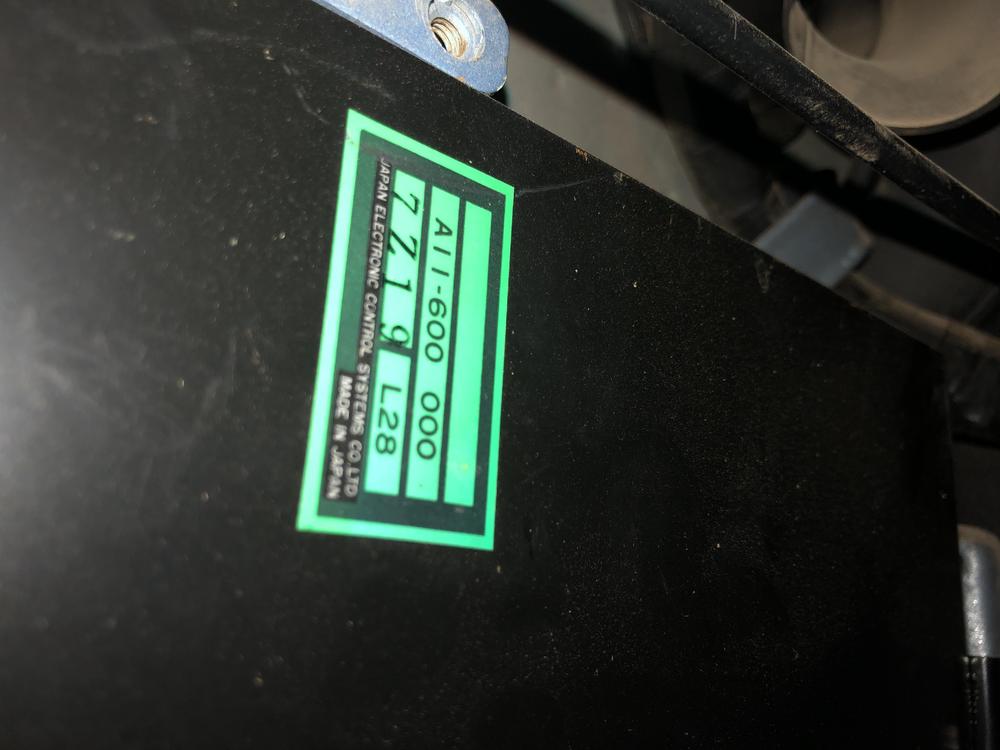
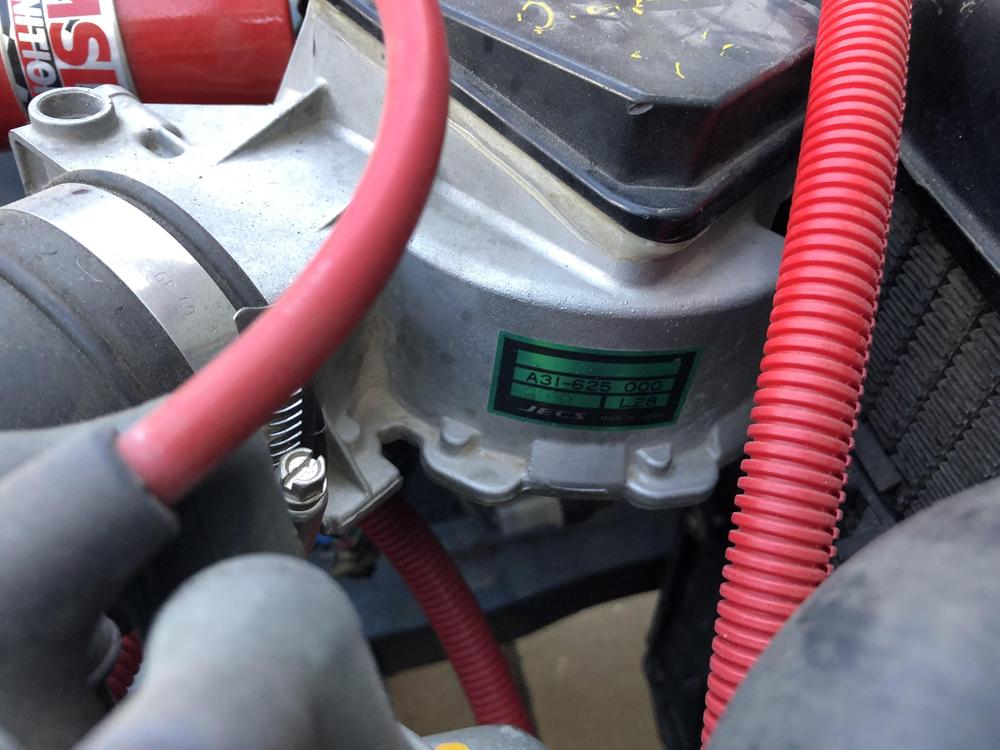
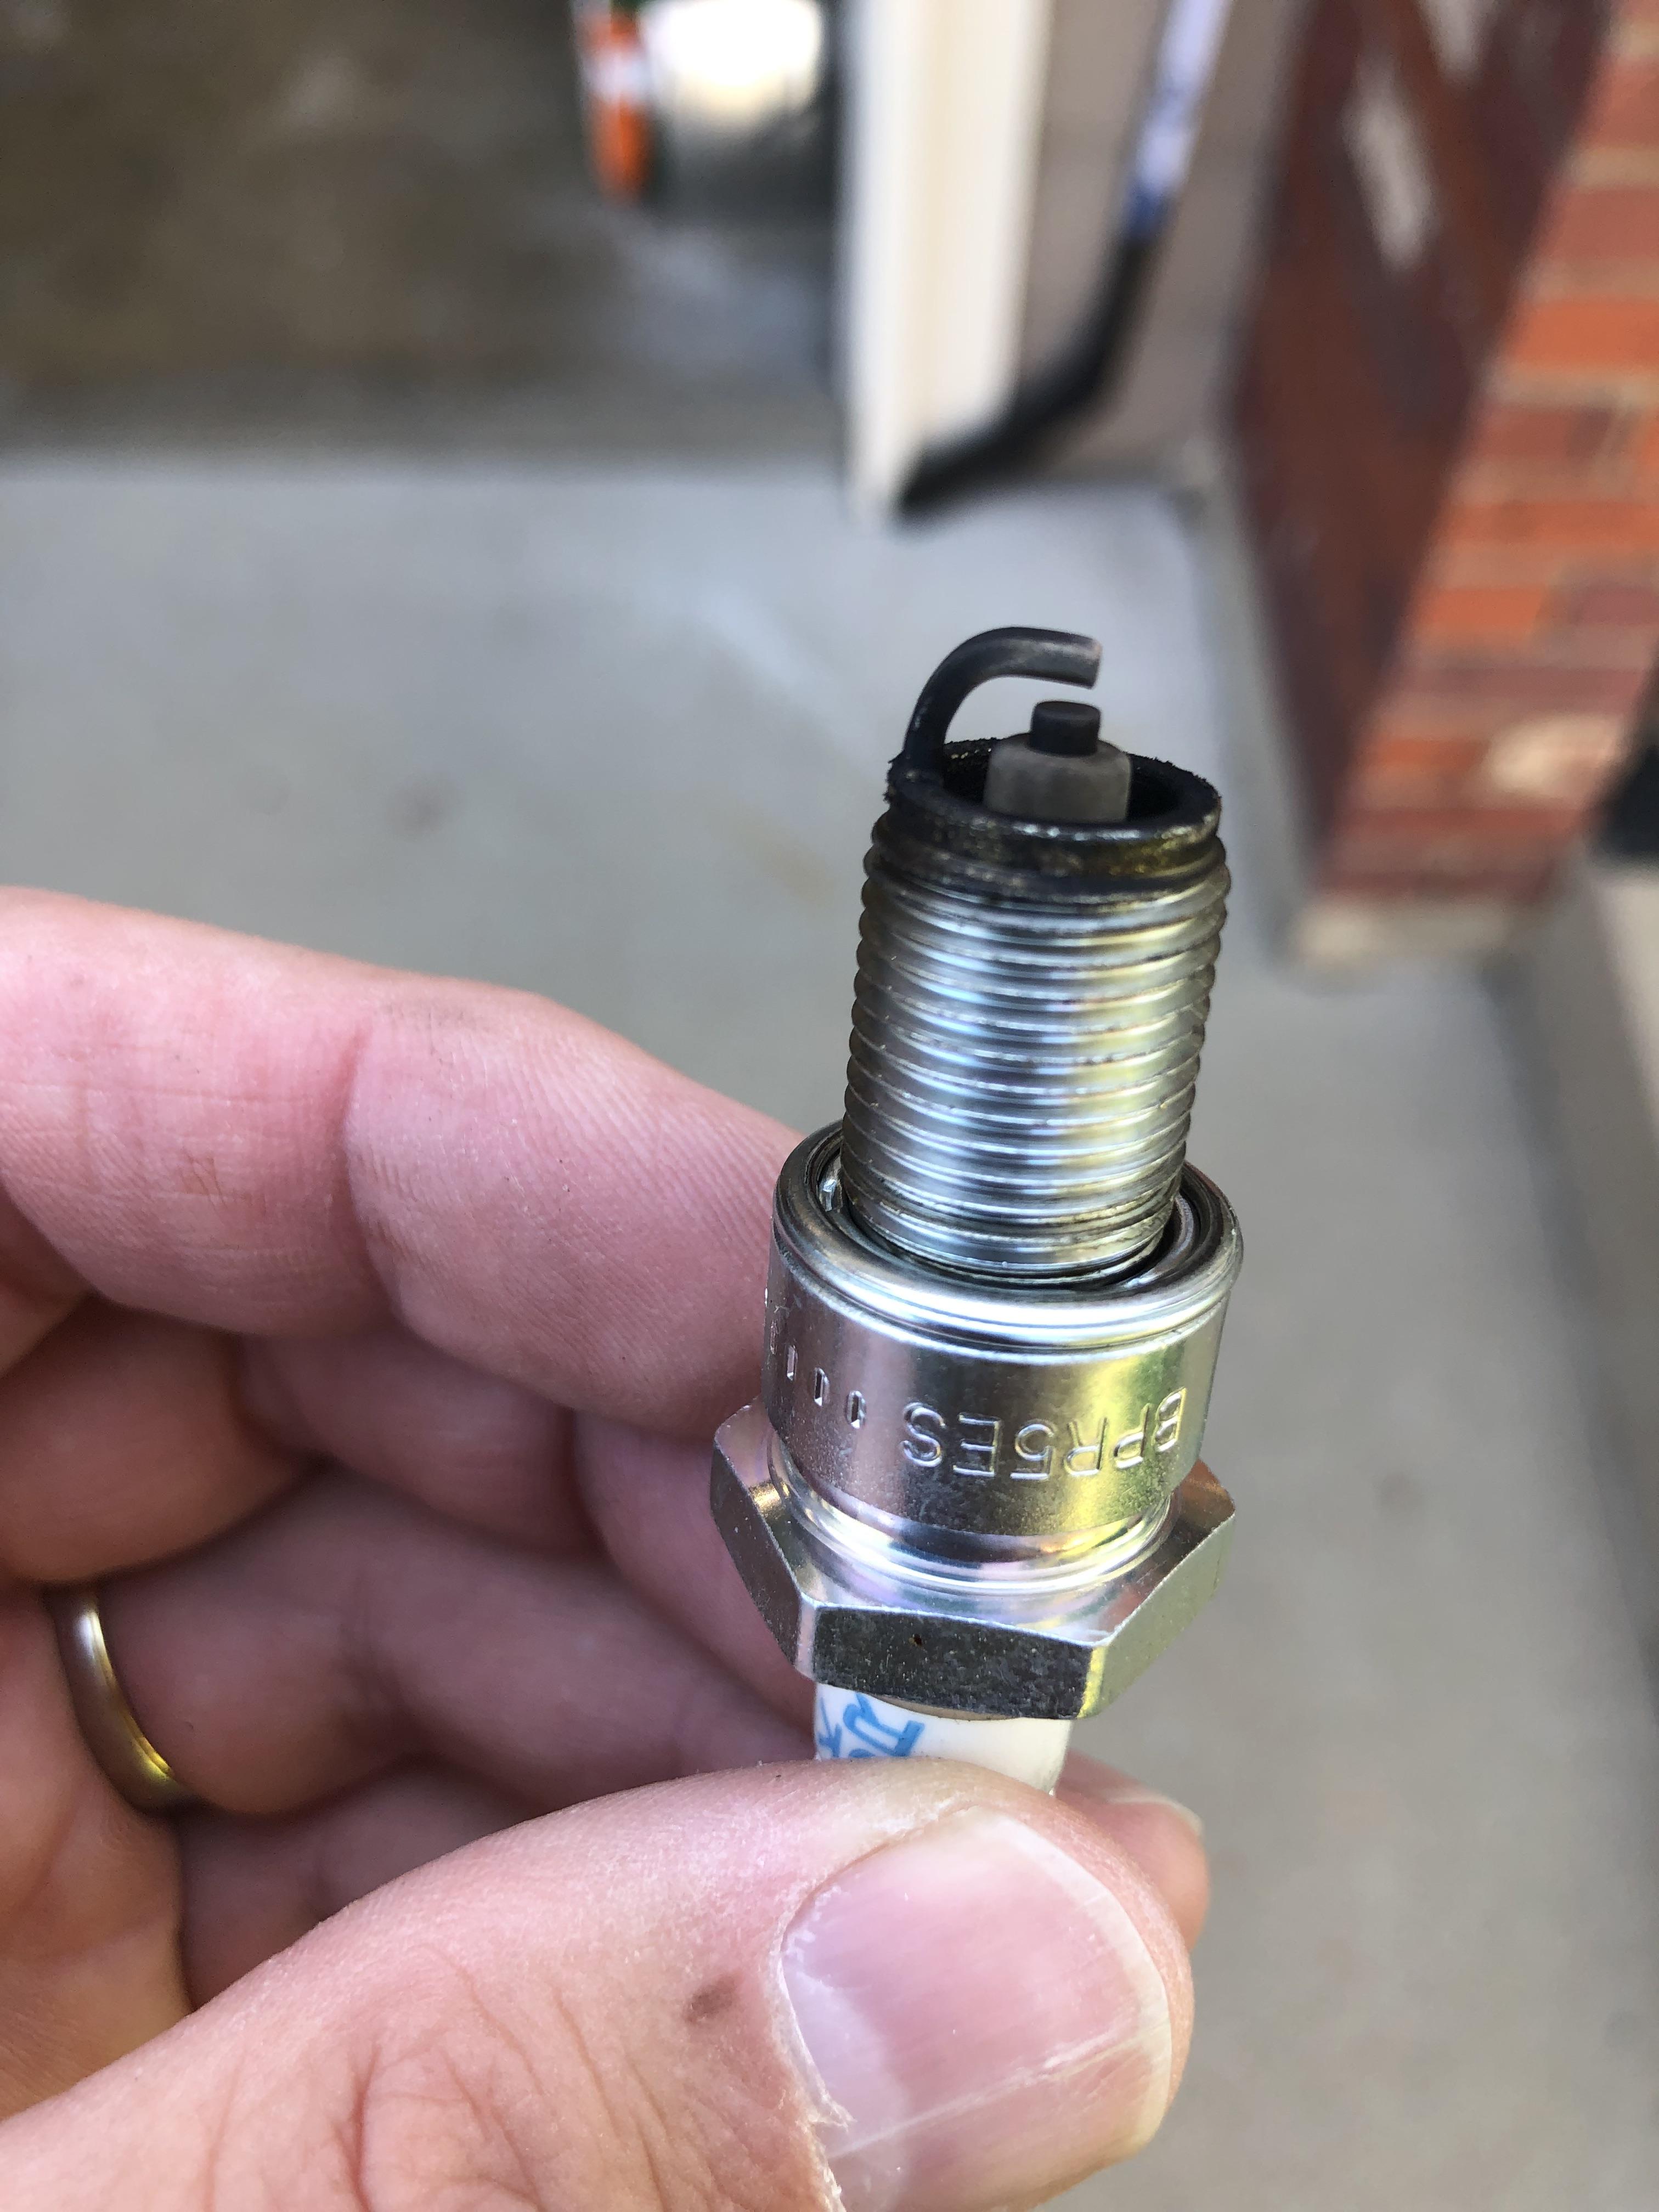
First of all, I just want to say thank you to everyone. It's awesome getting all of this advice, even if it's somewhat overwhelming. So much we still have to learn. Here are a bunch of pictures. Hope is helps with a few of the questions. Just let me know what I'm missing of where to change angle and I'll go take more. The car is a 280z (they mistakenly put 280zx on the emissions). VIN is HLS30-432877. Engine block is stamped L28 652773. Not sure how to look that up to know where it came from, but I was told it was purchased to put into the frame by previous owner. Don't know much more about it than that... ECU appears to be OE (attached pic), though I didn't pull it out fully. AFM appears to be JEGS after market. I'm not sure how to check to see if cams are original, but will research. Spark plugs were changed when we redid all of the fuel and liquids. Probably 30 miles of driving and a decent amount more idling as we worked on different parts getting it running. They're pretty dirty (see picture). I'll get new ones to use for testing.
 1 point
 -
1 pointThe puddle of fluid could be inside the brake booster or soaking the firewall insulation.1 point
-
1 pointI'm going to guess it's the brake master cylinder. Pull the rubber boot off the end of the master cylinder to see if there's brake fluid in the boot.1 point
-
1 pointSo the one caveat to this whole thing is that the original person that looked at them said they weren't repairable. I'm not sure if it's because they didn't have the tools or if they are literally that bad. I'll just have to have them looked at.1 point
-
1 pointLargest wheel shop . Send all 4 for 500 they will come back like new. https://www.detroitwheelandtire.com/wheel-repair-refinish1 point
-
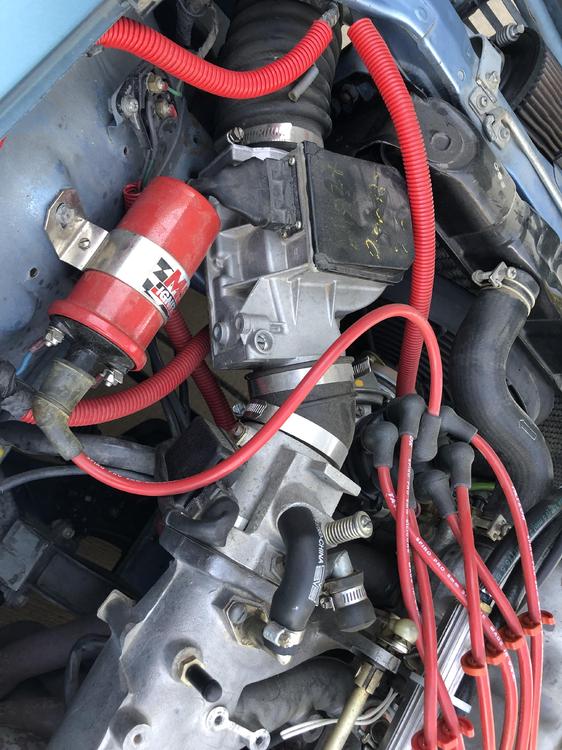
As mentioned prior, there's a whole lot modified on that system, and much of it done poorly. PCV connected, but valve cover vented to atmosphere. AFM mounted sideways. Static fuel pressure instead of varying with manifold vacuum. I don't think that's a stock throttle body. Looks like they threw an aftermarket one at the car because it's supposed to be "better". What's with the short stub of tubing that comes off the throttle body and goes to where the cold start valve used to be? Which side of that throttle butterfly does that tube come from??? It looks like the butterfly may be completely bypassed by that tube? Hopefully on that aftermarket TB, it comes from the high vacuum side, because if not... Sheesh! My humble opinion? The easiest route forward is to put most of it back to stock. Either that, or you will need an expert. Pay for one, or become one yourself. See if you can get the box of old parts the neighbor kid took off and put most of them back on. Someone threw a lot of time and effort at that engine, but I don't think they did it any good.1 point
-
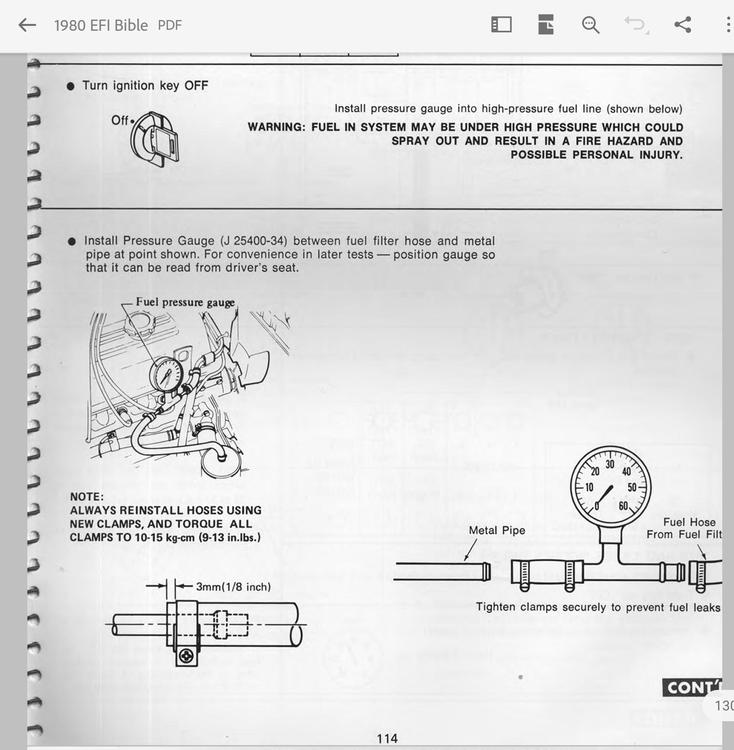
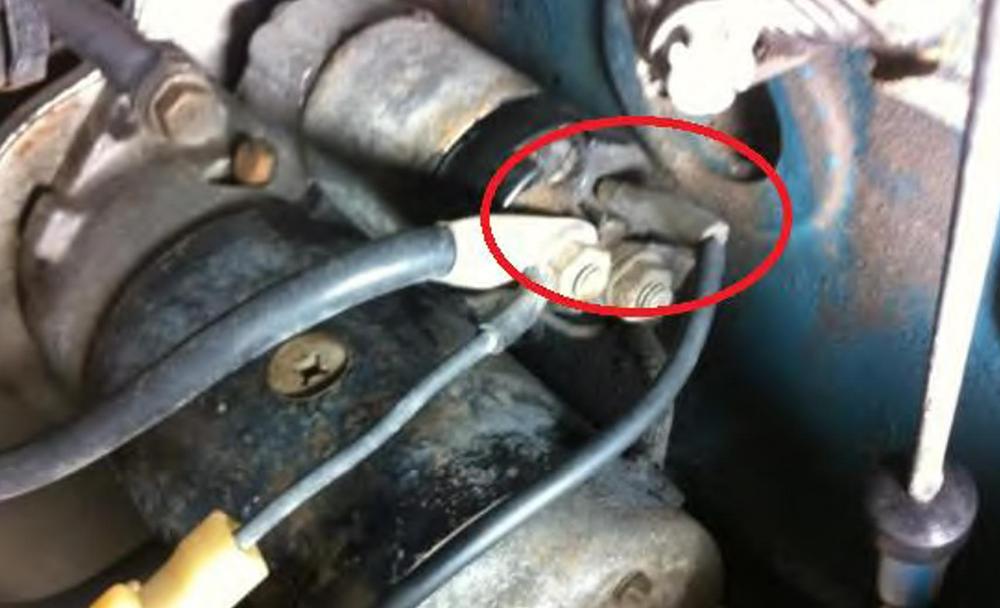
I do that if I want to crank the engine and I'm on my own. Also have a couple aligator clips with a button swicth so I can work on the manifold side and crank it from there. The fuel pump: To run the pump you need someone in the car to hold the key in the start position. You don't want to crank the engine endlessly. Same procedure, remove the wire with spade terminal fron the starter. Get someone or do it yourself to turn ignition key to start and hold it there. That will run the pump, but won't crank the engine regardless of oil pressure or afm vane position in the pre mid 1977 models. Don't try to prime the pump with everything intacted. Disconect the hose after the fuel filter or directly after the pump damper and let the pump free flow first. Note: If it has been sitting for a long time it could be full of air. You will then have a difficult time getting pressure. These pumps don't like pumping dry, and you can damage them quicking if you ae not carefull. A dry pump will never build up enough pressure to open the fuel pressure regulator and create a flow to prime the system. 1. I would diconnect the wire (with spae terminal) to the starter motor. 2. Disconnect the fuel line after the pump and run it into a container. 3. Hold key in start position and let fuel run into container for approx. 1 minute and check fuel quanity. Should be about 2 litres. 4. Connect the fuel line and then disconnect the fuel line after the filter. Hold key in start position again until fuel flows. 5. Fit a pressure gauge in the line after fuel filter (see photo of efi bible) and run pump again using key in start position. You shouls see 36psi. 6. Stop pump and see if system holds pressure. I'll post a leak down test for that later if you want.
 1 point
 -
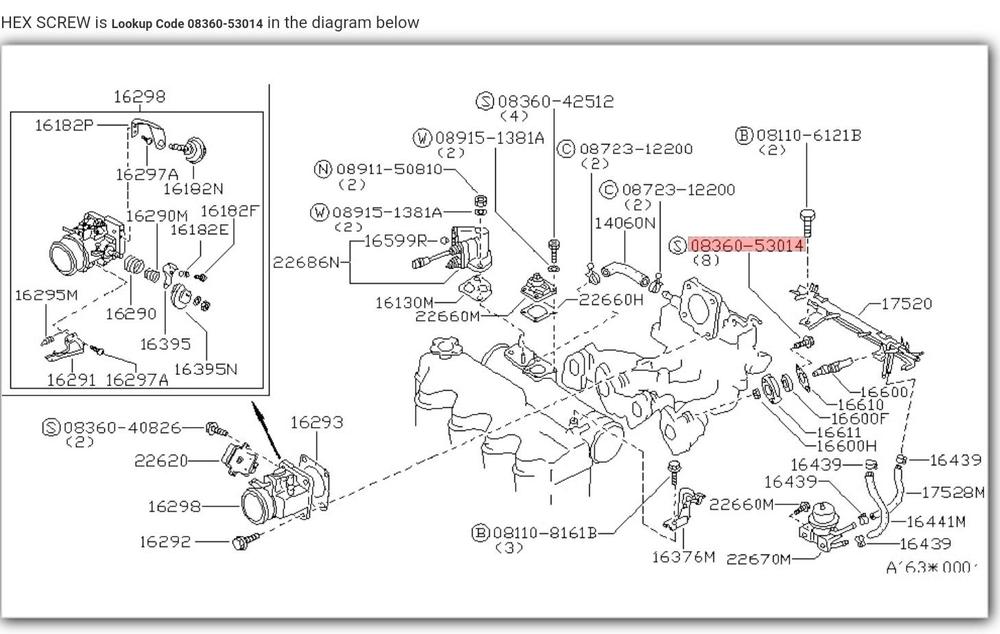
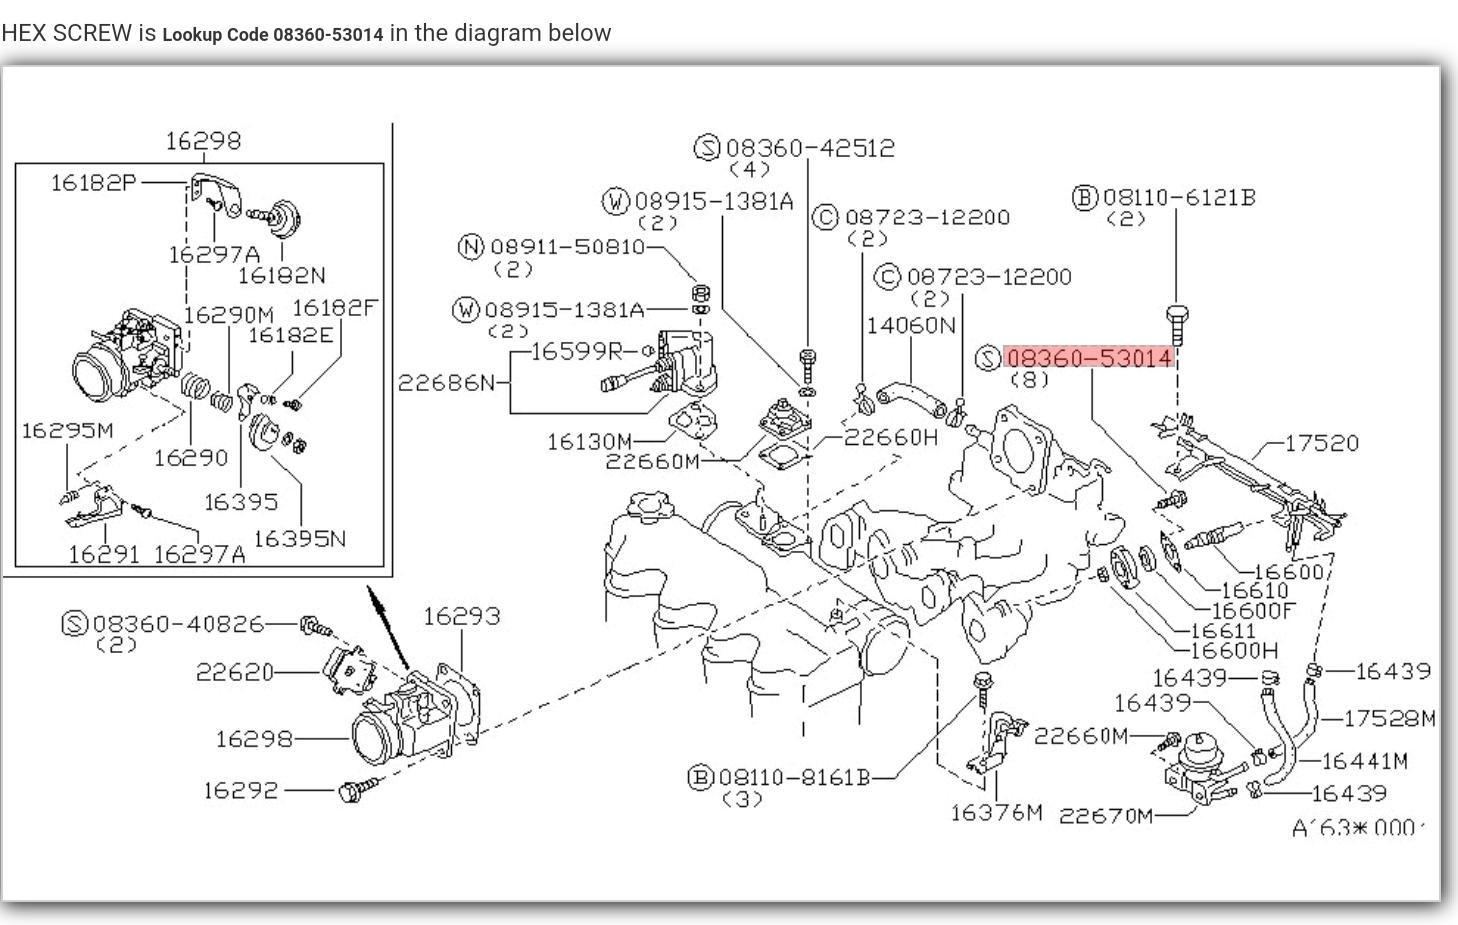
You can order the hex head bolts through your local Nissan dealer. I paid €0.68each two years ago. The part number has changed a couple of times which makes it harder to find. P/N: 08360-53014 or 01121-02981 I don't mind ebay sellers trying to make a buck by parallel selling. He is not too over priced ($14 to Nissan $9.85), but it's the shipping we have to pay to get it to Europe that bugs me.

 1 point
 -
1 point
-
1 point
-
I used Sta-lube gl-4 85w-90 gear oil from Napa 11.49 a qt when I refilled mine Sent from my iPhone using Tapatalk1 point
-
Enjoy those swirling twirling autumn leaves, Cliff! We don't get them here in the desert. Dennis1 point
-
1 pointI've only ever seen two length head bolts*, and the positions are pretty easy to figure out... Long ones go through the cam towers and the short ones go everywhere else. Five long ones for five cam towers. *I did see in the 1972 FSM where they referenced three bolt lengths. So that's either a feature of the early cars, or a typo. I've never worked on one that early, so I can't verify the lengths.1 point
-
1 pointBrake systems don't like to sit. If it were mine I would start on one end and replace all the seals on the way to the other. Booster is a definite possibility1 point
-
He was a high school kid. Why do they do anything? I know my high schooler doesn't always make the best of decisions... But wish it would have been left closer to stock.1 point
-
1 point
-
bearings at the top of the front struts are worth getting. also the ball and socket tension/compression kit does wonders for steering through corners and bumps1 point
-
Filling and draining might be a waste of fluid and money. If it works well from the beginning then it's probably fine. I had one that had sat for quite a while, there must have been rust on the cones because it was very grabby when shifting, the synchros weren't working right. It took a while to wear back in after I finally tried a funky Swepco/ATF blend to use in it. But it was great once it got a few hundred miles on it. Maybe start with a cheap throwaway fluid to purge any rust particles then fill it with Redline. Don't abuse it just run it through the gears until it stabilizes then switch to the spendy fluid.1 point
-
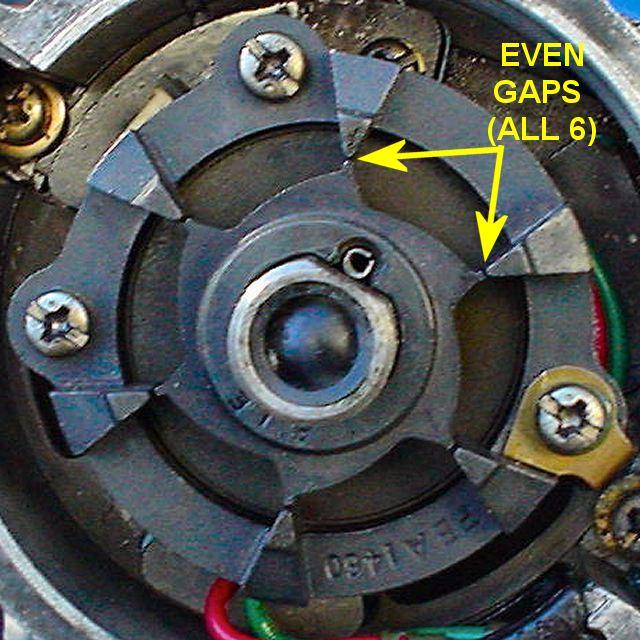
1 pointYou should also make sure the middle rotor is centered to the stator. Easy to do and they get out of whack. I was looking and "Blue" popped up! So thanks again! Now I won't do the whole @yomamma's.
 1 point
 -
Btw. An easy way to run the pump is to remove the spade terminal from the starter motor and turn the key to start. That will override the safety feature (oil pressure switch or flow switch in the afm) without running or cranking the engine continuously.
 1 point
 -
1 pointThere's nothing like a good mystery story... As luck would have it, I have in my workshop a fully-reconditioned, stripped-down L24 block sitting on an engine stand. I also have a depth gauge! What I discovered is quite interesting... The block has 7 head-bolt holes along each side. The depth of all of the holes along the passenger (right) side of the block is 26.5mm Things are much more interesting along the driver (left) side. Numbering from front to rear, the hole depths are as follows: 1. 32.0mm 2. 29.0mm 3. 25.5mm 4. 32.0mm 5. 26.5mm 6. 32.0mm 7. 28.5mm These measurements should be considered accurate to +/- 0.5mm. Nevertheless, there's a substantial variation along the passenger-side. Why is this? I'd have to look at the head casting (not convenient). However, I expect that height of the bosses for the head bolts have variations as well. You also have to take into account that there are three different lengths of head bolts (the parts manual calls them 'S', 'M', and 'L'). They may have different threaded lengths, too, but I don't have a set conveniently available to check this. It seems to me that -- properly assembled -- each head bolt should end up with relatively full engagement of its threaded length. If you get their locations of the S, M, and L bolts mixed up, you may end end up with problems. I can't find any info in the L24 FSM. It only offers this cheerful note: 'Three different types of bolts are use (So be careful when in installing).' My Haynes manual does have a bolt diagram -- although it says there are only 2 different bolt lengths - 'Short' (S) and 'Long' (L). With that noted, Haynes says: Passenger Side: all 'S' Driver's Side - from front to rear: L - L - S - L - S - L - L Maybe Tom Monroe's book, Rebuilding Your Nissan/Datsun L24 Engine' offers more detailed info. Unfortunately, I've misplaced my copy. As a first step, I suggest that you use a depth gauge (or a 'calibrated' piece of wire) to ensure that all of the hole depths in your block are about the same as my measured depths. I'm pretty sure that they will be. It seems inconceivable that just the tip of a bolt would break off at the bottom of its hole. If one of these bolts snaps off, it's going to happen at the top of the threaded part, not half-way or three-quarters of the way down, so you should be able to clearly see the top of the broken bolt sitting at or slightly beneath the top deck of the block. BTW, all of the bolt holes are blind. That is, none are open at the bottom to some other water/oil passageway.1 point
-
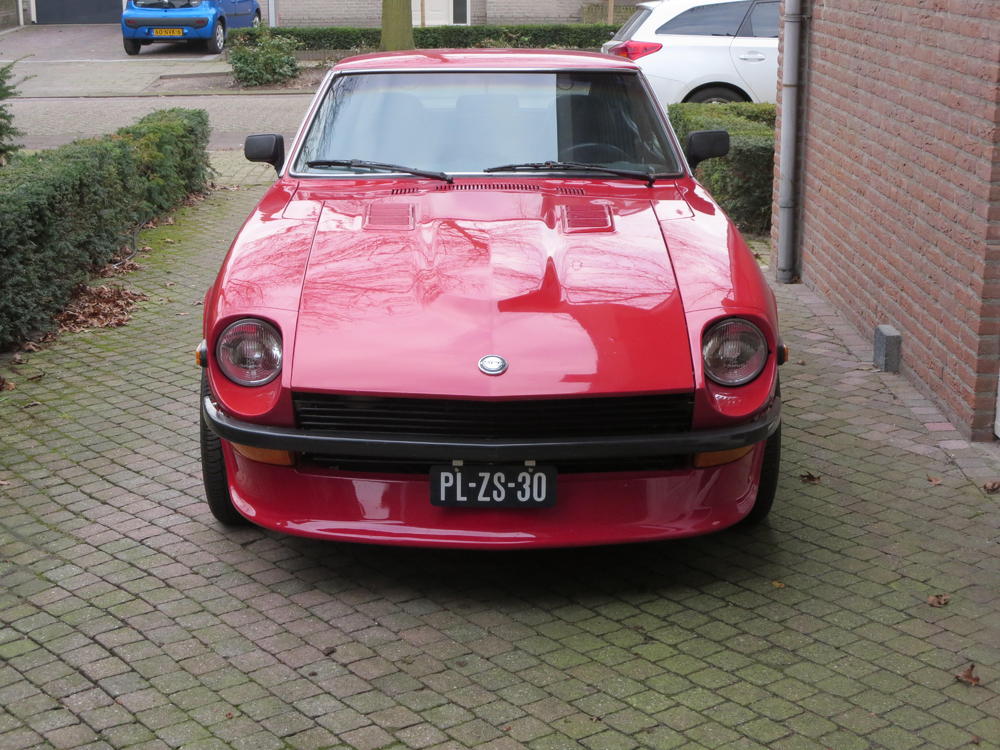
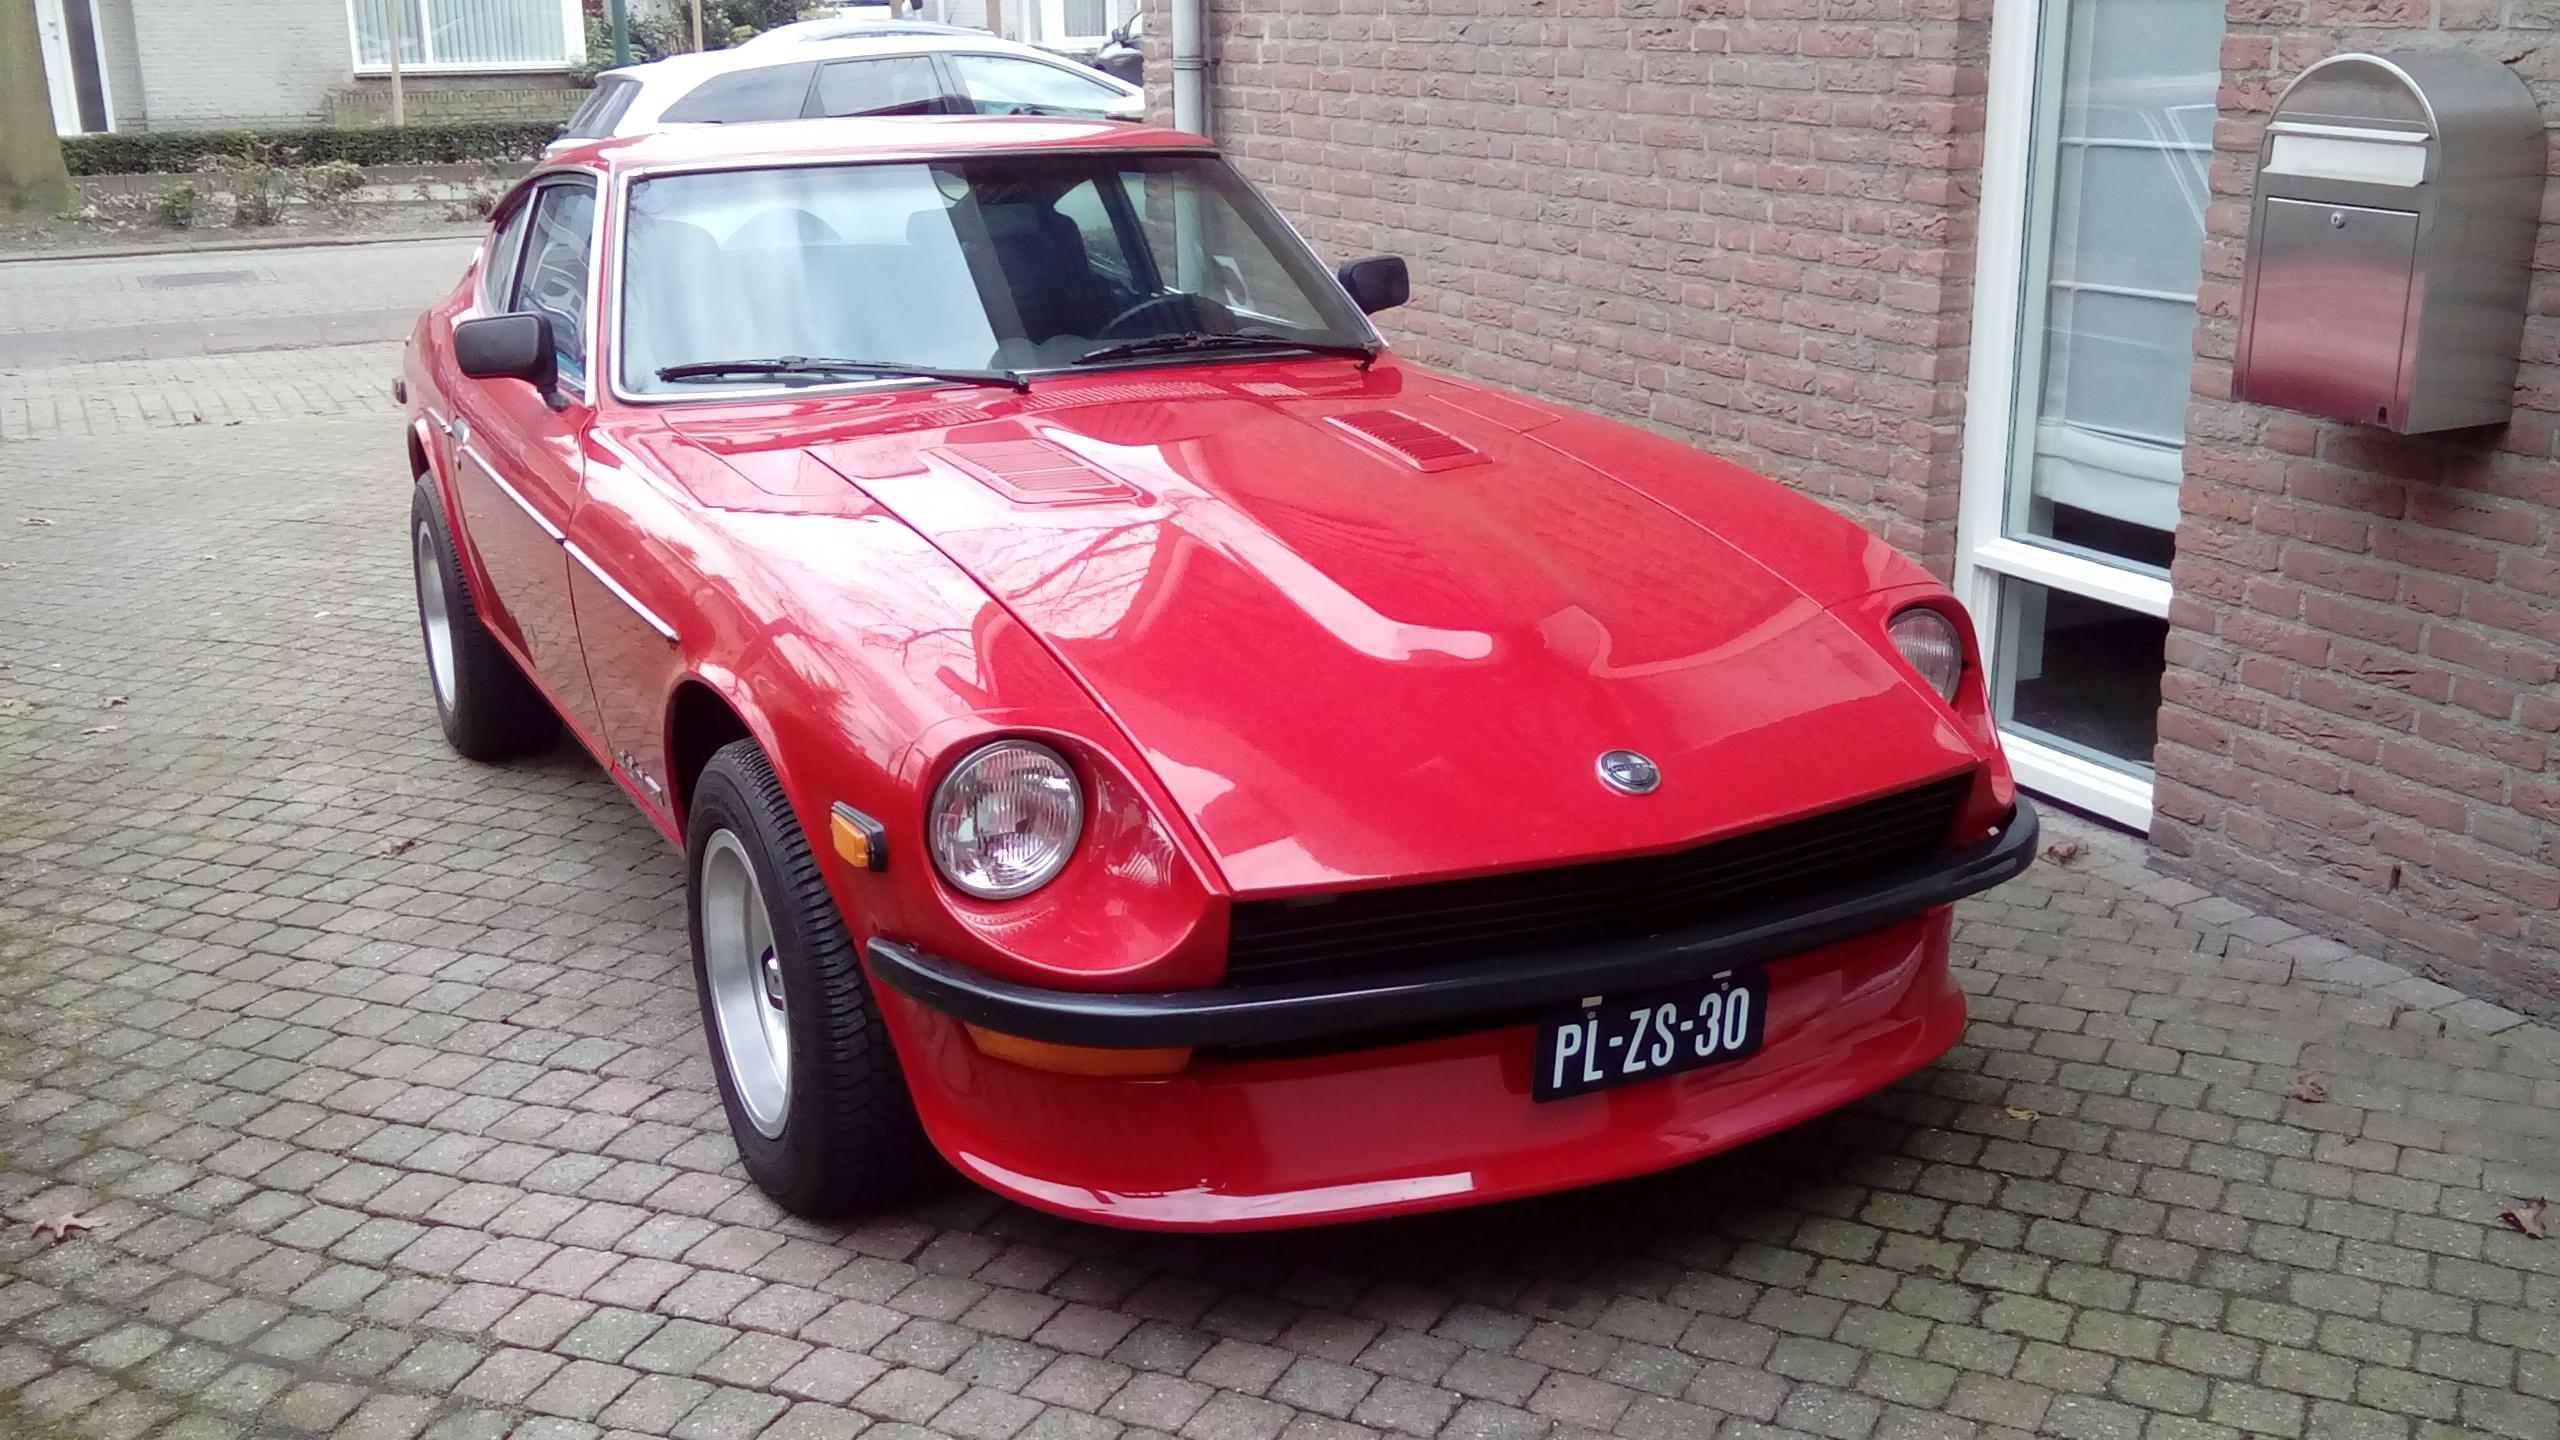
1 pointI went for the Type 1 fibreglass for the 240Z since fitting the 240 valence is not possible with the lower 280Z frame. Looks neat with the modified 240Z grill.

.thumb.JPG.8ef0ef0e0442b66412f0e37b2ac1fe0f.JPG)
 1 point
 -
1 pointAs @Zed Head said, they have a bad habit of corroding. I'm glad to hear it runs again.1 point
-
1 point@SteveJ @wal280z after 12 years the car OFFICIALLY runs. It was the ignition relay causing the problems. I bought the "starter" relay mentioned above and after the fuel pumped in it started. WHOOOOOO!! Thanks for the help!1 point
-
1 point
-
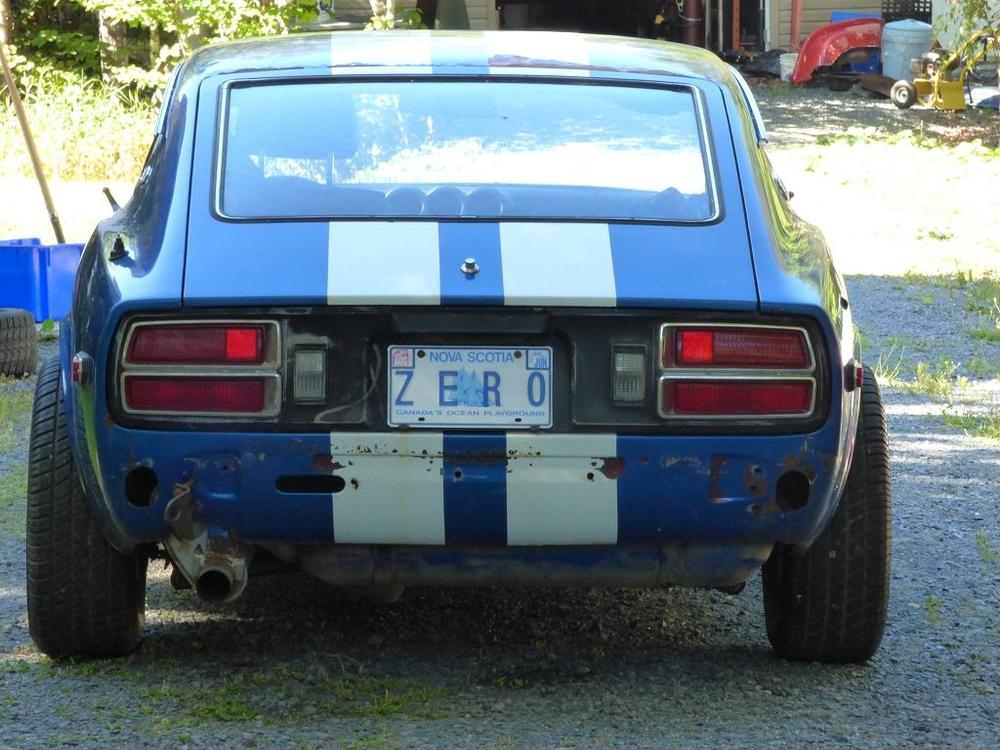
I agree with Alan's assessment. Seems like a nice survivor S30-S (Fairlady Z-S). It's actually a twin to the blue S30-S I bought last year from Michigan that 240260280Z posted a link to above. Note there is no provision for an inspection light in the engine bay and the antenna looks to be the manual extending and locking version that came with the base AM radio (same as my car has). Would be nice to see more interior shots to see if it has all the original rubber mats that Alan posted pictures of. In addition to the front mats there are small mats behind the seats and in the rear hatch area. Curious if it has a clock or the standard blanking plate for the Z-S ( as mine does) and if it has the standard Z-S four speed or was upgraded to the five speed as mine was. Does the dash have any cracks? Original radio? Things like that will also affect the value. -Mike Sent from my SM-G935P using Tapatalk1 point
-
Really appreciate the offer but I don't need a set anymore. Bought a set of stubs and the guy that sold them to me was nice enough to include the spacers?1 point
-
Thanks for posting my article. I've attached a photo of a random 240 clock , which is the one that Jeff has, and this is what causes most the 240 clocks to stop. I have worked on many 240 clocks over the years and it's always the same thing. If you add oil this is what you will end up with. If you try to clean things in place you can't do a very good job and you will damage parts. There are plastic parts in the clock (some plastic motors in later 240 clocks) which can be attached by several cleaners. I use only IPA (alcohol) which does a good job, but you need to scrub the parts to get the gunk off . The 280 clocks have a completely different design which uses plastic gears against metal. If you oil on these parts you can degrade the plastic over time. There is nothing in this clock that needs be oiled. The 2 main rotating components are metal against nylon. Nylon is self lubricating and it shouldn't be oiled . Again this clock mechanism needs to be disassembled and cleaned, not oiled. The main failure of the 280 mechanical clock is the circuit board. I do repair these and sell them on my web site. Anyone can usually repair either of these 2 clocks, it just takes time and patience or you can send it to me. Just my 2c.....Ron PS: The first photo is the 240 clock and the second is the 280 clock
 1 point
 -
1 point
-
Thats interesting @ZCarFever my 7/70 car with a black interior has the access covers. I wonder if different colors had the panel with covers introduced at different dates to use up existing inventory.1 point
-
Oh crap... So when I said crank revolutions, I meant cam revolutions. I was spinning stuff and counting, but in all the excitement, I kinda lost track myself. I changed the original post to fix that mistake. Thanks for the help guys!1 point
-
1 pointHoly hell boys! Been awhile , update is..... All rust is removed and repaired. Epoxied the bttm and seam sealed er up and today I put on the final 2nd coat of undercoating (herculiner) I chose this stuff because I had used it on my bro co and I a used that thing hard in the bush, she held strong so I assume in this application under a car instead of a beast she will hold up fine. Pretty friggen excited to bolt on a few suspension pieces and get this thing off the stand and on ots wheels. Next up is a bit of a break from it, then set and adjust door gaps and hood /tailgate stuff. Should be ready to epoxy the body and start in on skim coats of bondo by the fall. Yay! Sent from my SM-N960W using Tapatalk1 point
-
1 pointVery well then. I will clean with solution and brush before sending the bolt in by hand. If no further action is required then i will move forward. Thanks. Sent from my Coolpad 3310A using Tapatalk1 point
-
1 pointThe head bolts, like ALL M10 female threaded holes in the block, are 1.50 mm pitch. Pretty much all other M10 bolts on the car are 1.25mm pitch, certainly all the suspension related bolts.1 point
-
Change oil. Put fresh gas in tank. Remove Valve Cover. Pour oil over cam and rocker lobes. Disconnect 12v lead to coil. Crank engine while pouring oil on cam. Keep cranking until pumped oil comes out of cam lobe holes. Once you verify oil is pumping, you can then close valve cover, reconnect 12v to coil, and start car.1 point
-
1 pointThere is a hole under the antenna area for a water drain. Often the drain hose separates leaving a hole between the interior and muffler area.1 point
-
1 pointWhat everyone has said so far, rubber floor plugs, door, tail light, and hatch weatherstripping, take it all to heart. One other possibility is the hole for the antenna drain hose. Crawl under the car to make sure you have a good grommet for that drain hose hole. While you are under there, see if you see daylight between the edge of the rear floor next to the quarter panel.1 point
-
1 pointThat vinyl covered cardboard finishing panel on the inside of the hatch needs to be sealed all around its perimeter. There's a gap around the latch mechanism that lets fumes get sucked in. The area at the back of the car is a high pressure zone compared to the inside of the car. Ironically, the problem gets worse when you open the windows because the air flowing by the windows pull air out, which gets replaced from the back end.1 point
-
There's one thing that still puzzles me in all of this: I owned my first Z (a 1972) from 1977 until 1981 and logged about 40 thousand miles of driving with it -- much of that at freeway speeds on regular trips between Toronto and Montreal (~ 300 miles, each way). I do not recall ever smelling exhaust fumes inside the car during those drives, nor feeling any effects while driving (which I surely would have over 4 hours of driving). The car was bone-stock and all-original (e.g. no weatherstrip replacement, no new taillight seals, no rear or front spoiler spoiler, no special exhaust tip, no replacement grommets, no caulking -- nothing). So I'm reasonably comfortable in saying that there was nothing in the design of the later-version cars (i.e. with the cabin air extractor vents located on the sail panels) that led to exhaust fumes being sucked into the cabin. Not, at least, when everything was left in original configuration and all of the grommets and seals and weatherstripping were in good shape and and the body seams were in proper alignment. In fact, I don't think that even the addition of an aftermarket exhaust system changed that, because I don't recall reading any warnings or tales of woe, back in the day, about exhaust fume issues showing up after an Abarth/ANSA/Stebro/etc. performance exhaust system had been added -- something which hundreds, if not thousands, of Z-owners did in the 1970's. I have a different opinion about the early-version cars with the cabin air extractor vents located on the hatch panel. I think that design may have been inherently weak, even when the cars were fairly new, because the open water-drainage tubes provided a secondary airflow exit (or entrance, depending on the circumstances) at an aerodynamically-undesirable location that also happened to be fully exposed to exhaust fumes caught in the 'bubble' that sets up behind the rear valence/trim panels when the car is in motion. Once the 'one-way' flaps and/or the hatch interior trim panel started to get tired, or the hatch interior trim panel was improperly installed, you had all the necessary ingredients for exhaust fumes being sucked back into the cabin -- esp. when the side windows were opened a bit and changed the pressure differential between the cabin interior and the location of the drain tube exits. I don't think this arrangement could be called a 'defect', because Nissan development engineers surely would have noticed the problem during the car's development. However, problems must have begun to be reported after the cars had been in owners' hands for a year or so. The change to the air extraction design was a costly move for Nissan and I don't think they would have taken it without figuring that they had no other choice. I wonder if anyone with 1970's driving experience with a Series 1 car would care to comment on whether they have any recollections of exhaust fumes coming up into the cabin?1 point


.JPG.5ac43e550e1e25a29f52eb39b67e449f.JPG)