EuroDat
Community Member
-
Joined
-
Last visited
Everything posted by EuroDat
-
What are your plans exactly? Is it mainly for looks? Are you planning to race the car? Are you having problems with the current brakes? A lot of the rear-disc conversions are mainly aesthetic. They look great, but they don't necessarily perform better than a properly working set of original drums. You'll find plenty of posts claiming a huge improvement after fitting rear discs, and that may be true. But often the improvement is simply because the original drums were worn, seized or badly adjusted. Unless you're going to a significantly larger brake setup, the difference may not be as big as you'd expect. I'm not a big fan of rear-disc conversions myself. The main concern is brake balance between the front and rear. The original system was designed and tested as a complete system, so I'd be cautious about judging a conversion based on a few hard stops in a parking lot. Brakes are a pretty important safety system! If it's mainly for aesthetics, the 280ZX rear setup is a fairly straightforward option. The 1979 to 81 rotors fit the 280Z four-stud hubs after removing the backing plates. You can also use the 1981 to 84 Maxima brackets (P/N 44155-04S10), or aftermarket adapters if they're still available. The 280ZX calipers have an integral handbrake mechanism, so with some fiddling you can use the original 280Z handbrake cables. A couple of things to note with the Maxima brackets and 280ZX calipers: you need to dismantle the stub axle to install the brackets (aftermarket brackets don't need dismantling the stub axle), and the calipers need to be swapped side-to-side. The 280ZX calipers sit behind the axle, while on the 280Z they'll be mounted in front. So the right hand "R" caliper goes on the left and vice versa. Otherwise, you won't be able to bleed them properly or use the handbrake mechanism. You can buy kits to do this and that would probably be the easiest way to go, but more expensive. There are other combinations of this set up out there. The 1985 to 87 Maxima calipers with the 1982/83 280ZX rotors and a custom bracket where also common. These are all what they call Stage 1 disc brake conversions. This setup is often paired with the Sumitomo S12+8 four piston front calipers. These were used on various Toyota 4Runner trucks and bolt straight onto the 280Z using the original 89mm mounting spacing, and pair up to the original 280Z rotors, although some backing-plate trimming is required. With the larger front/rear setup, I'd also consider upgrading the original 7/8" master cylinder to a 15/16" 1979 to 81 280ZX unit with p/n: 46010-N4700 for exmple or a 1" Wilwood. Otherwise, you may end up with a very long pedal due to the increased fluid volume required. There was some forum thread about the 720 truck (1981 to 86) long ago mentioning the 15/16" MC with p/n: 46010-F2700, but I'm not sure if it fits the booster.
-
I agree with Patcon, it will definitely buy you some time. How long depands if you keep it dry, it could last for years before you need to seriously think about replacing the floors. Just be careful when cleaning around the pinholes. Those pinholes are the result of rust creeping through the metal, so the surrounding metal can (most likely) be very thin in places.
-
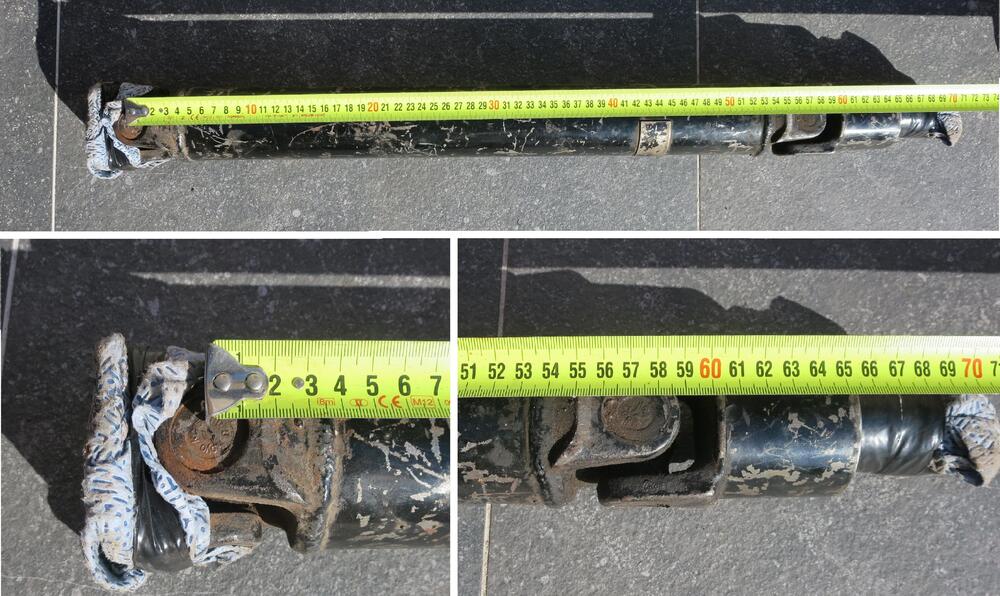
If the difference is about 1-1/2", then you probably have a Series 1 shaft (shorter of the three) and two from a later model 240Z. On the Series 1 240Z, the differential was mounted slightly forward of the rear wheel axle centerline. The 280Z, with the R200 differential, used a different shaft with non-serviceable universal joints. The early series 1 is about 21,26" (540mm) between uni-joint centers The later 240Z is 22.5" (572mm) between uni-joint centers
-
https://www.classiczcars.com/files/file/140-fs5w71b-fs5w71c-rebuild-parts-list/?_rid=25317 Spare parts list.
-
To remove the rear seal, just gently tap a medium-sized flat-blade screwdriver between the shaft and the seal, then pry it out. It’s good to be cautious, but I think you may be overthinking it a little. Don't tap a screwdriver in between the housing and the seal outer edge. That can damage the housing and create futures leakages. Oh, and do what Yarb suggested. If you’re replacing these seals because you’re concerned they might leak, then the speedo O-ring, striking rod seal, and O-ring are just as likely to leak if you leave them unchanged. Removing the rear extension housing is not as hard as it seems. The parts you will need: Front cover gasket. 32112-08U01 Front seal 30/45 × 8 mm NOK: AH1679G Nissan: 32114-Y4000 Rear seal 35/50 × 11 mm NOK: 400402N Nissan: 32136-U010A Striking rod and speedo O-ring 24 × 2.5 mm (ID × CS). 32710-14600 Striking rod inner seal 14/20 × 4.2 mm. 32858-U6702 Speedo pinion seal 10/16 × 4.2 mm. 32709-14600 Reverse checking assembly o-ring (later 5-speed models) 22 × 2.5 mm. No Nissan part number available Selector checking springs (3 pieces) 32830-20100 Selector return spring 32852-24901 All those parts shouldn't cost more than $30 - $40 max. You can also find a spare parts list in the document section on this site.
-
The pin has a flat on one side that matches the shoulder on the striking rod guide. This prevents the pin from rotating in the guide, which would otherwise wear both the pin and the guide hole, creating excess clearance and eventually causing rattles and a sloppy shifter. It looks like the original plastic bushings are long gone. Personally, I would replace them with the original Nissan plastic bushings. The brass bushings will work, but because brass is harder, it can increase wear on the surrounding metal components over time. Another thing to consider is the condition of the pin and the striking rod guide itself. If they have already worn due to metal-to-metal contact, fitting brass bushings may make any existing clearance more prone to rattles. The original plastic bushings tend to absorb vibration and provide a degree of isolation, making them more forgiving in a worn assembly.
-
For reference: A few things to consider if your shifter lever vibrates or has the familiar rattling noise: If you've fitted an aftermarket gear knob, make sure it isn't much heavier than the original. Weight is important. The shifter lever moves with the drivetrain vibrations, while a heavier knob has more inertia and lags behind, which can amplify vibration and rattling. It's a similar principle to reducing unsprung weight in a suspension system. Check the rear transmission mount for wear, cracks, or sagging. A worn mount allows more drivetrain movement, which is often transmitted to the shifter lever. Also make sure the crossmember bolts are the correct length and aren't bottoming out in the mount. Inspect the propeller shaft for missing balance weights and check the universal joints (U-joints) for wear or play. Finally, one of the biggest causes of premature bushing wear: don't rest your hand on the gearknob while driving. Many people do it without thinking, but it constantly applies pressure to the selector mechanism and can wear the bushings much faster than normal.
-
I prefer the original Nissan type, probably because I worked at a Nissan dealership as a transmission, brake, and clutch mechanic. The reason we didn't use brass bushings was that the original plastic bushings were designed as sacrificial parts. They are the softer component, so they wear instead of the surrounding parts. Replacing them was a routine maintenance job. Brass bushings are much harder and won't wear out as quickly, but they can cause increased wear on the mating components instead. Of course, it also depends on how much you drive the car. If you do choose brass bushings, make sure to lubricate them regularly. The original plastic bushings don't require lubrication, but the brass ones do. Without proper lubrication, the brass bushings can wear prematurely and may also increase wear on the mating components.
-
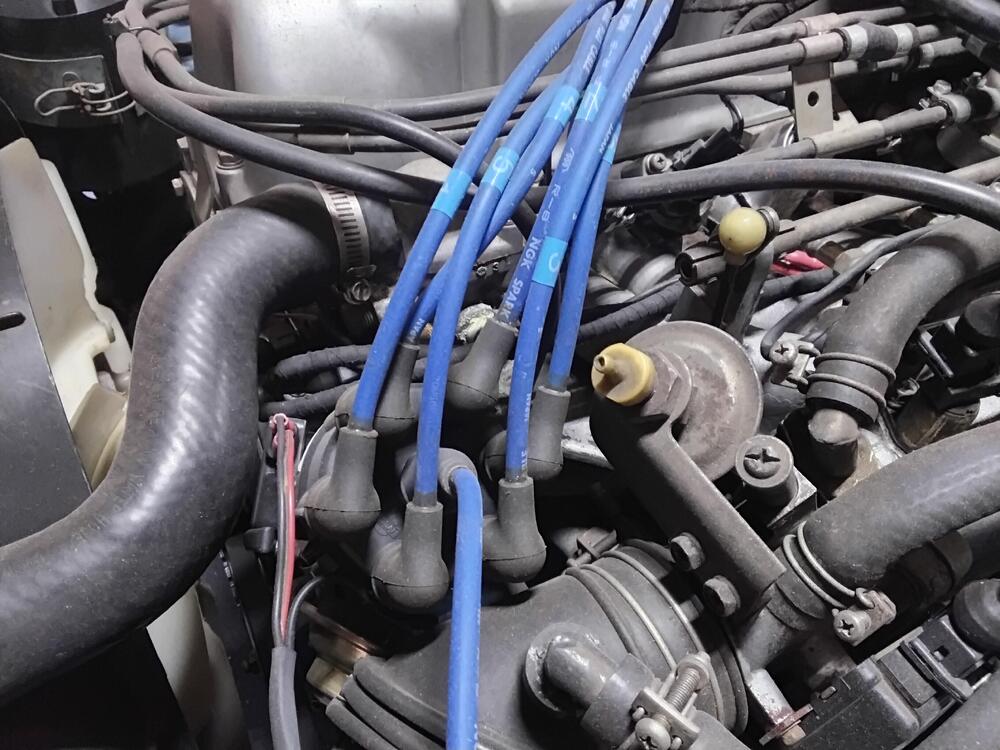
The nozzle in your photo does not have a vacuum hose conne ted to it. It is a restricted open outlet to retart the diaphragm action. See photo of my 280Z. I can check my car tonight and get back to you with the other connections. Mine is still more or less original.
-
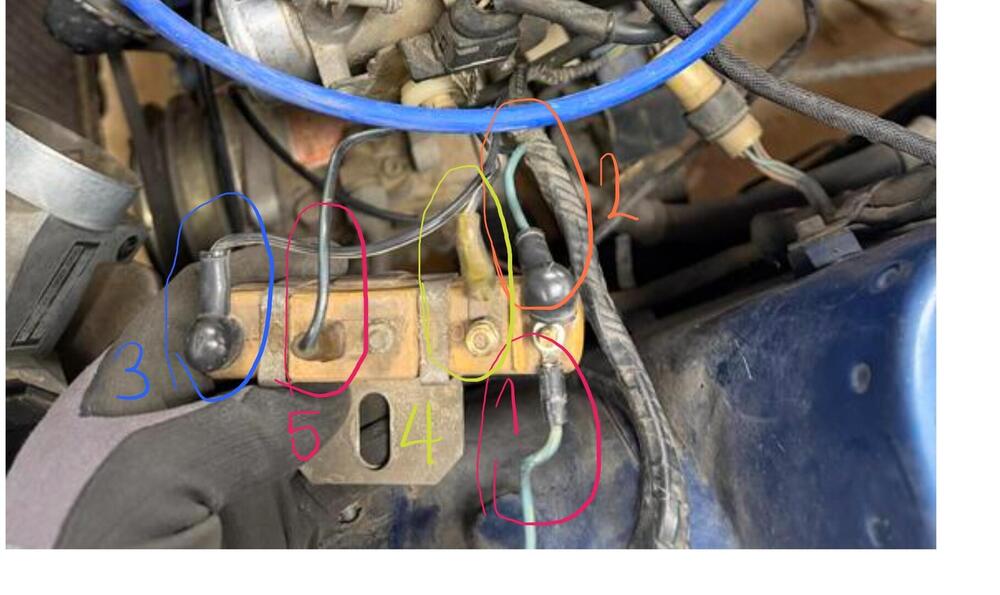
I’m not sure I fully understand your comment about the blue wire—there are two visible on the ballast resistor in your photo. The light blue wire to the coil negative (-) The light blue wire from the TIU, located in the passenger-side kick panel in the cabin The black/white stripe wire from the ignition switch (ON position) goes to the ballast resistor (0,9 ohm) The white/black stripe wire to the coil positive (+), supplying reduced voltage via the ballast resistor Additionally: The black wire from the ignition switch (START position) acts as a bypass for part of the ballast resistor, reducing it to 0,4 ohm, increasing the voltage to the coil during cranking. This compensates for the voltage drop caused by the high current draw of the starter motor. I made a strip to bridge the three points 3, 4 and 5 on my ballast resistor for my 280Z some years back. That way the coil will get full battery voltage all the time. Here are some photos. If you want more detail, let me know?
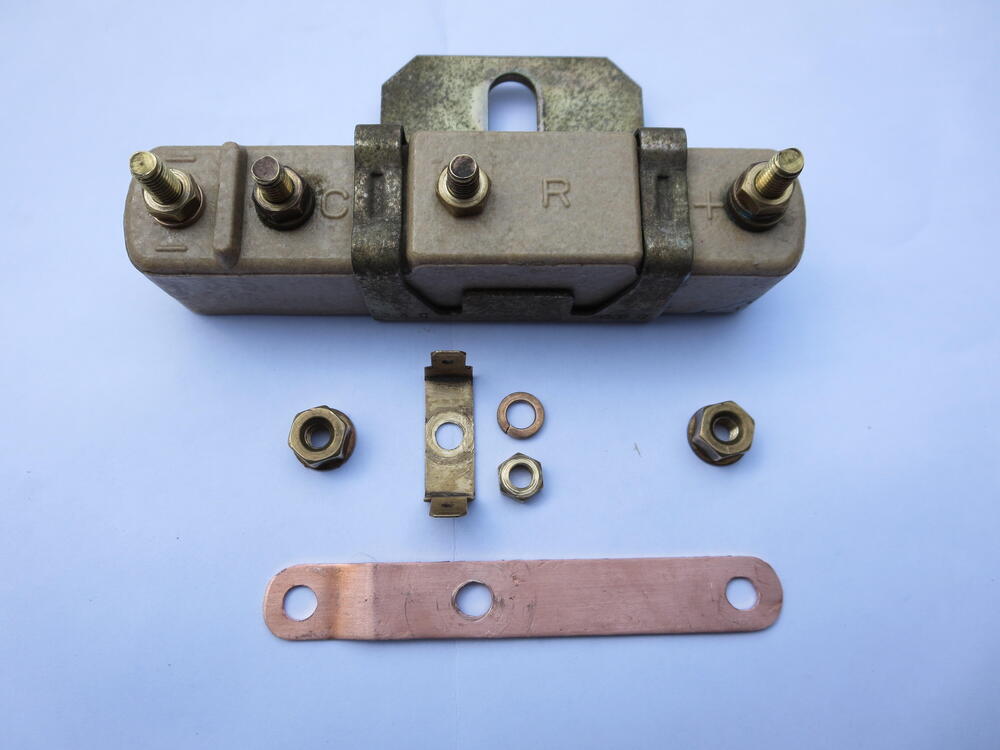
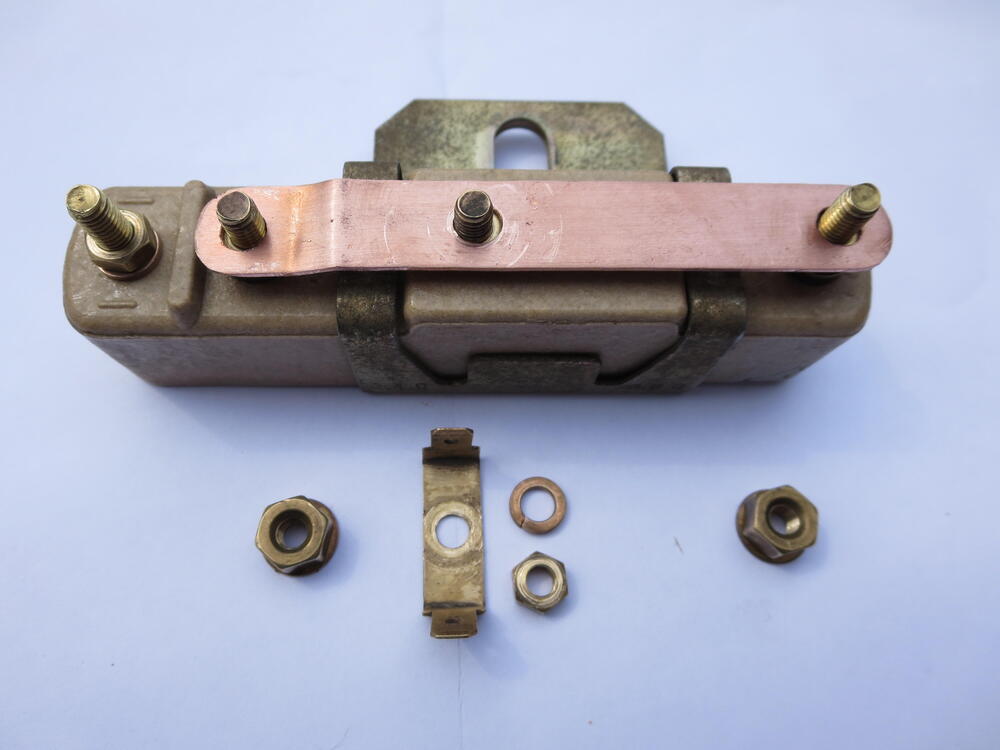
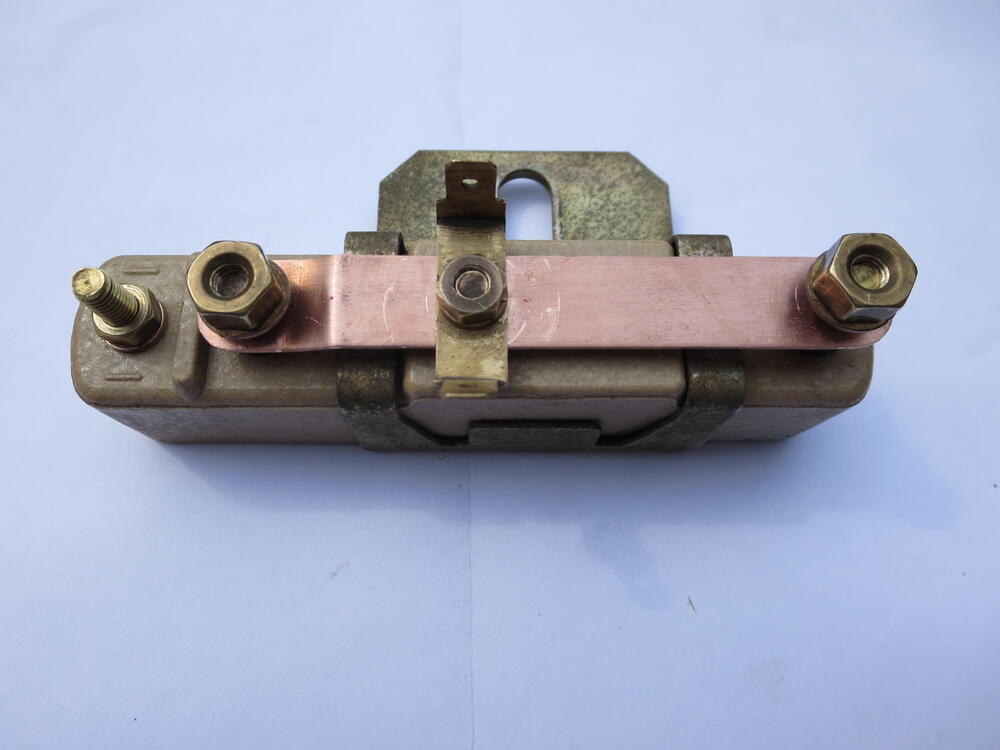
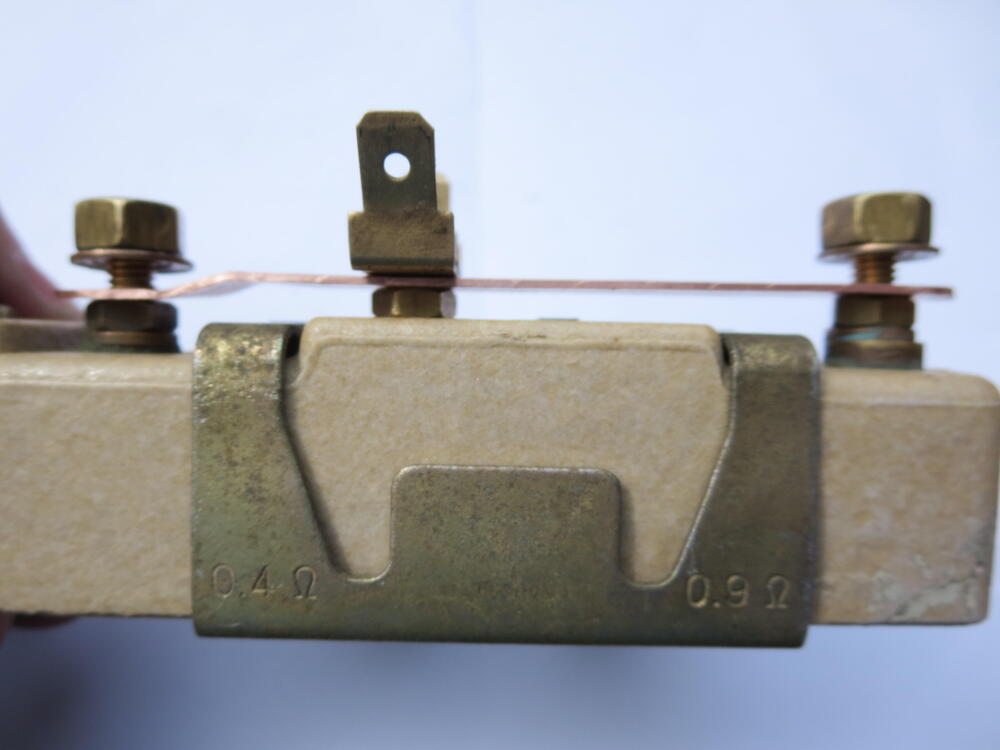
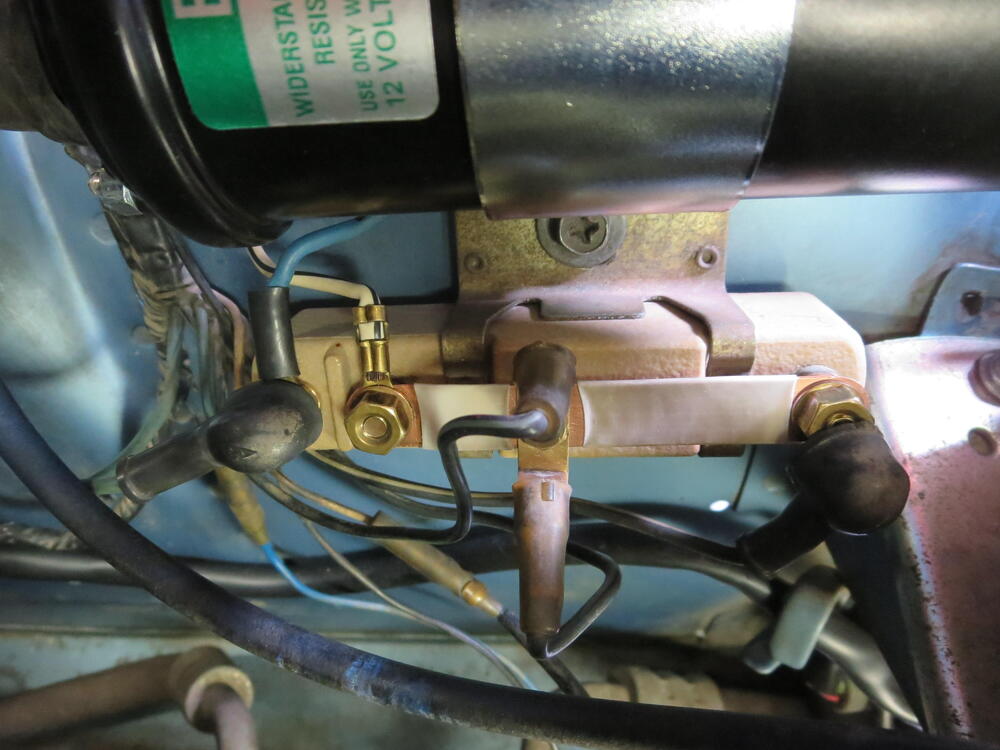
-
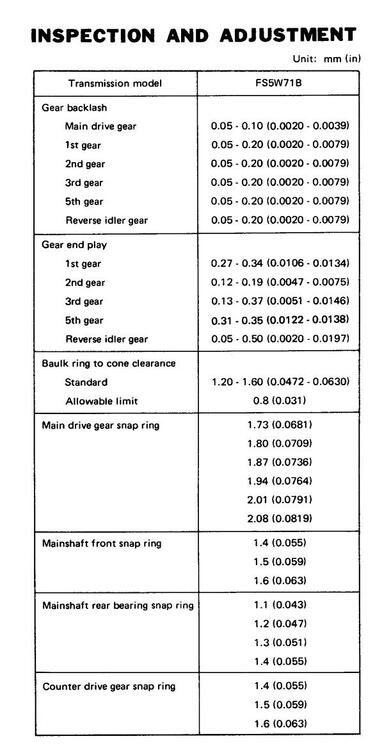
I may be a bit late to the discussion, but based on the first few posts, it sounds like the transmission may have been rebuilt by the previous owner, with incorrect snap ring selection resulting in insufficient internal clearance. Excessively tight clearances can restrict proper lubrication of the gears on the shaft, causing them to overheat and bind. This can create a condition where the transmission appears to remain engaged even when in neutral. It would also be consistent with the noise you’re describing. Do you know if the previous owner carried out any work on the transmission? This reminds me of a customer where I worked years ago, he brought in a car with similar symptoms and said, “I just rebuilt the transmission and now it’s started doing this.” That was about 40 years ago, but your issue sounds very familiar.
-
When you say, “first test drive the car constantly popped out of 1st gear followed by a slight bang” does this occur specifically on throttle lift (deceleration), or does it disengage regardless of load conditions? Won't stay in gear. Has the transmission been used since the rebuild by the previous owner? If not, possible causes could include incorrect shaft endplay or a snap ring that has not been properly seated or installed. Is the plastic cup on the control lever fully inserting into the striking rod? I’m asking because the control lever and striking guide must be correctly matched to ensure proper insertion and therefore travel of the shift forks. On some versions, the ears on the striking guide differ in height, which can affect engagement across all gears. If the previous owner mixed different components during the rebuild, this could be the cause of your problem.

-
You could look through these threads on similar issues. It’s a bit difficult to diagnose when you can only use first gear. The “bang” could be the result of torsional energy in the drivetrain being suddenly released when the transmission jumps out of gear.Shifting gears while the car is stationary doesn’t really tell us much, unfortunately.
-
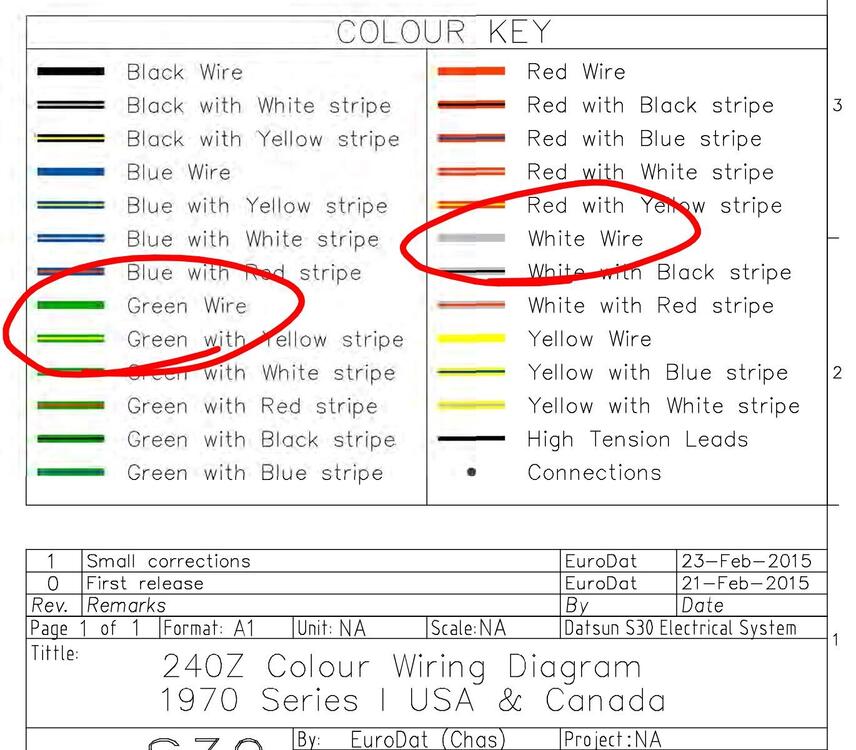
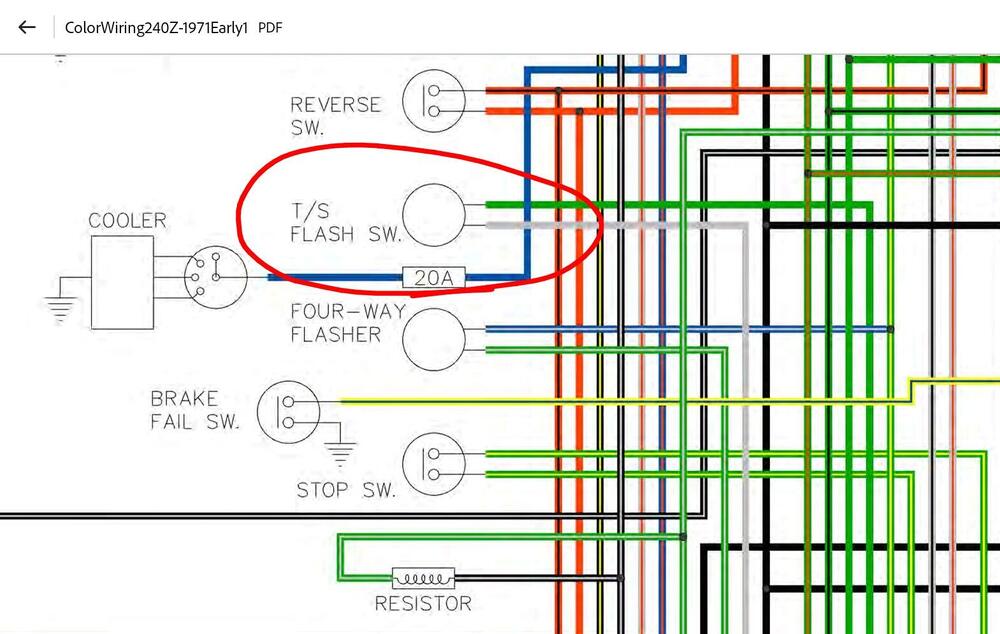
Just looking through the wiring diagram, the white and green wires seem like they might be for the turn signal switch. There are two flasher units: one for the turn signals and one for the hazard lights. I could be mistaken, but this is the only combination that matches the wiring diagram. I’m not sure why they have male spade terminals. Don’t the flashers normally have male spade terminals?

-
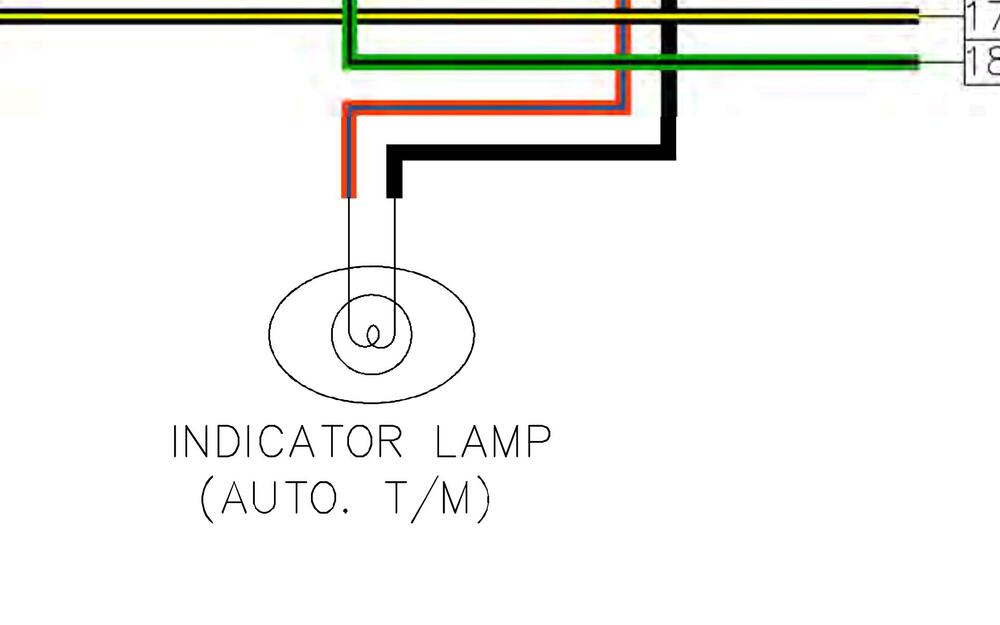
That’s quite a few replies in a short time. I have an answer to your question about the loose wiring. The two wires—red with a blue stripe and the black wire—are most likely for the automatic transmission selector light. They match the colour combination. The wiring is there but simply not connected in manual cars.

-
A warped drum meaning it’s out of round. I’m not entirely sure how that would happen on these cars, as the drums are quite robust in design. It will be interesting to see if that turns out to be the issue, especially if it’s the same side with the seized adjuster. That seized adjuster doesn’t quite make sense either. In my experience, seized adjusters are usually caused by the car sitting for a long time, they rust up and stop adjusting, which typically results in a long brake pedal. But how would it over-adjust and then seize? One possibility is that it was installed incorrectly, they switched the adjusters, left adjuster in the right side and visa versa. I don't know if this is even possible, sinse I never tries it. If it over-adjusted, it could have caused the brakes to drag, leading to overheating. That heat could potentially warp the drum especially when the brakes shoes keep pressure when it is standing still and very hot. It could also cause the adjuster to seize. It’s just a theory, but it could explain the symptoms.
-
Have you tried reaching out to these guys in South Australia? They’ve been around since the ’90s. A workmate of mine used to buy Bluebird parts from them years ago. Even if it’s not listed on their website, there’s a good chance they might still have some old stock tucked away out the back. Datsport510/1600 Early Outer Dash Air Duct Hoses (Pair) | Hailes...Early style outer dash air duct hose pair for Datsun 510/1600 (up to Sept 1969). 3D printed flexible TPU replacements for cracked originals.
-
The middle one looks like a tool used to release the circlip on the window mechanism handle.
-
I’m really digging deep into my memory, but I believe it came from a Nissan 720 4x4 front differential. They were used to add a bit of extra durability, though I’m not sure whether they were aftermarket or original in Australia. We had a 720 dual cab as a workshop vehicle, and it was fitted with them. I remember trying to straighten one after running off the berm on a coal stockpile. The “K” is simply a casting stamp that started appearing around 1980. I beleive it doesn’t seem to guarantee any specific configuration; most likely it’s just a foundry mark used for traceability. All of the differentials with the K-case had four pinions, that part I’m fairly certain about, and this version would have snap-in stub axles rather than the bolted type. It most likely uses the 115 mm ring gear. Earlier units had the 110 mm ring gear with smaller bolts. If it's from a Datsun or Nissan it's most probably this. You could buy a lot of this equipment directly through Nissan, such as vent extensions and hoses routed to higher points in the engine bay to prevent water from entering the differentials, transmission etc.
-
I don't know of any way to tell the difference externally in the two ZX close ratio boxes other than opening it up and counting gear teeth.
-
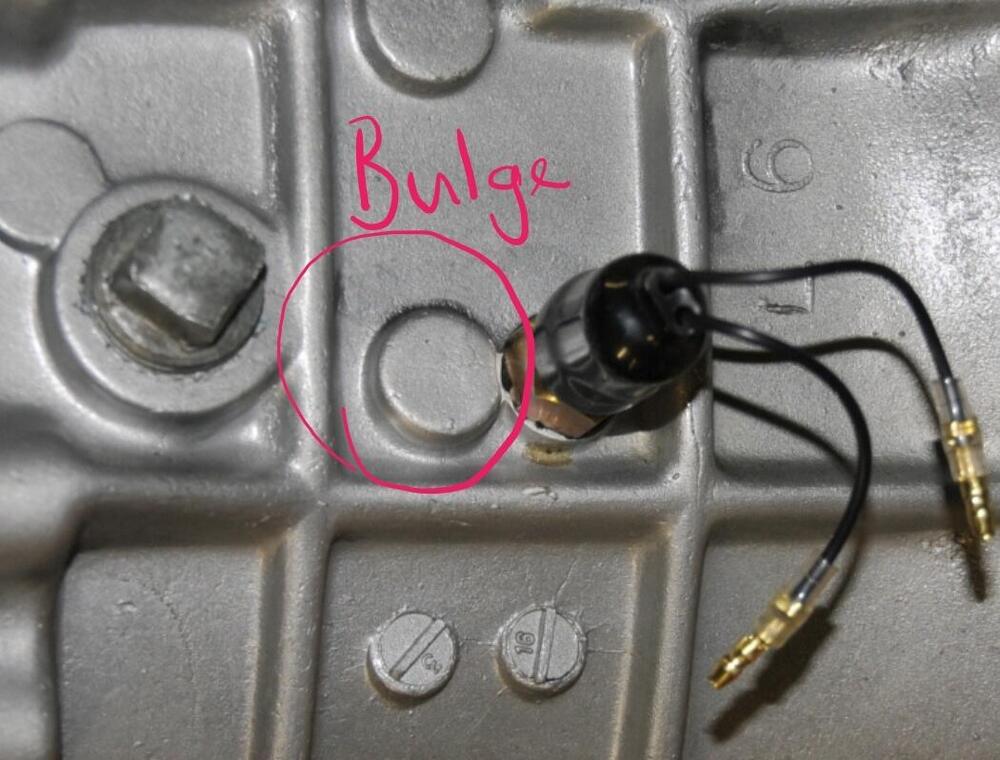
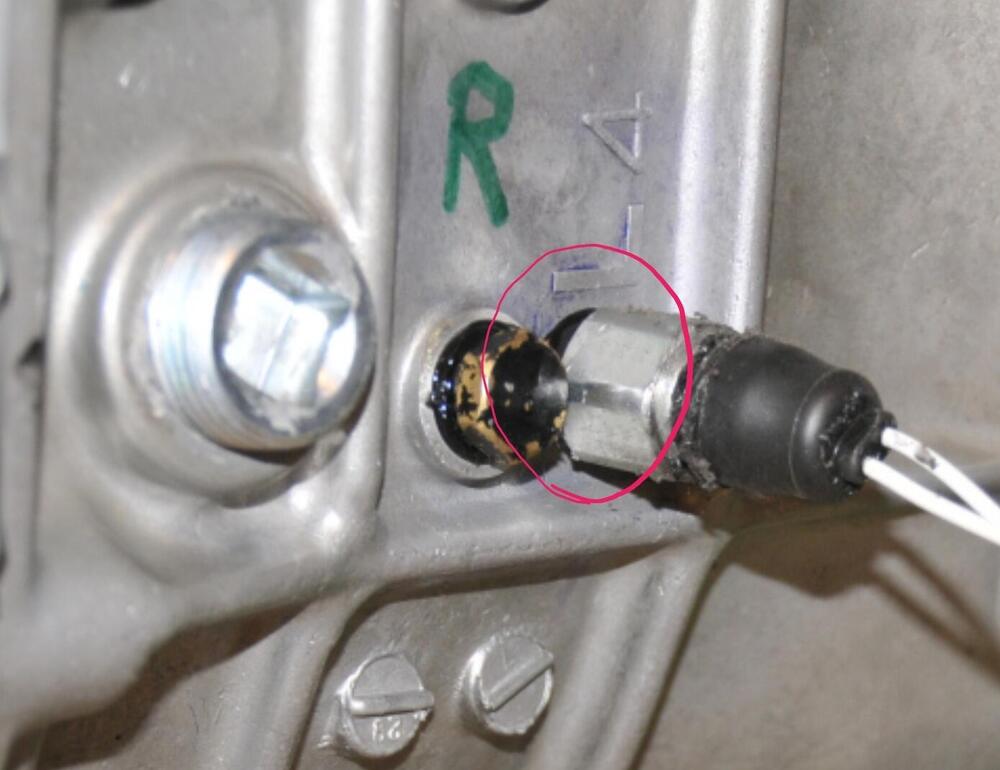
I’ve seen photo's of F4W71B transmission cases where the reverse switch was fitted in the FS5W71B location. It can be done, but I wouldn’t recommend it. The case is relatively thin in that area and lacks the additional reinforcement (the bulge) that the FS5W71B has. As a result, the switch sits deeper into the case (4 - 5mm), and there is also the risk of leaks. Funny the 5 speed has the bulge where the 4 speed reverse switch would be. F4W71B with reverse switch move to foreward position. The FS5W71B has a bulge for a switch in rearward position where the F4W71B reverse switch would be fitted. The F4W71B does not have the extra bulge. Here is the No weld mod on the cross member. I have never seen it, only photos. Some one thinking out of the box. Very rigid fitment and and vibration will be more noticable.

-
I have done three of these conversions, one was with the F4W71B and helped two others do theirs. To convert an FS5W71B or F4W71B to an FS5W71C, you need the following: Parts Required: Front transmission case from an FS5W71B or F4W71B Front cover from an FS5W71C Gaskets and seals (optional full bearing kit) Two M14×1.5 oil drain plugs with seals. Used to replace the neutral and 5th-gear switches in the rear extension housing. Optional aftermarket shifter. Required Modifications: Front Transmission Case Enlarge the front countershaft bearing bore from 56 mm to 62 mm. There is an option of fitting the 71B countershaft bearing to a 71C countershaft, but this is not recommended. Enlarge the 1st/2nd gear fork rod bore from 14 mm to 16 mm Remove 3 mm from the inner surface around the countershaft bearing. This provides clearance for the larger front countershaft gear. Speedo adapter F4W71B / early FS5W71B. These use a locking plate above the speedo adapter. Add an additional flat section opposite the original one. This allows the locking plate to sit under the speedo adapter instead of above it Rear Transmission Crossmember Move the center section 30 mm rearward. Requires cutting and welding No-weld option: Cut a slot in the anchor bushes 28 mm from the rear using a thin cutting disc The body tab slides into this slot Use a 30 mm spacer tube and longer bolts Driveshaft: Shorten the propeller shaft by 50 mm Alternatively, on a late 240Z you can use an early 240Z driveshaft (the version with the forward-mounted differential) Reverse Switch (F4W71A case only) Extend the notch in the selector rod for the reverse switch Probably missing a couple small things like console rubber boot mod, but this is the basics.
-
I have found NOS parts in UAE ans Qatar. They are mostly for the Skyline C110, C111 and C210's, but some of the parts are also used in the S30.
-
Looks like you’ve just found the buy of the century. Ten years ago, these transmissions cost around $2,300 new, and the last time I checked they were no longer available through Nissan. As you mentioned, judging by the reverse gear, it looks practically new—barely used.
-
Do you plan to do the convert yourself or through a specialist?