Leaderboard
-

Terrapin Z
 Subscriber
 4Points1,341Posts
 -
rcb280z
Subscriber4Points2,392Posts -
EuroDat
Free Member3Points3,312Posts -
Patcon
Subscriber2Points11,182Posts


Popular Content
Showing content with the highest reputation on 01/15/2019 in all areas
-
2 pointsMaybe another? https://losangeles.craigslist.org/sgv/cto/d/pasadena-1977-datsun-280z/6773909122.html2 points
-
1 pointIs that a newer Prius, not 20 years old, in one of the pictures? Enlarge the photo of the rear license plate and read the year on the sticker in the top right corner. I think the green ones were fairly recent. Dennis1 point
-
1 point
-
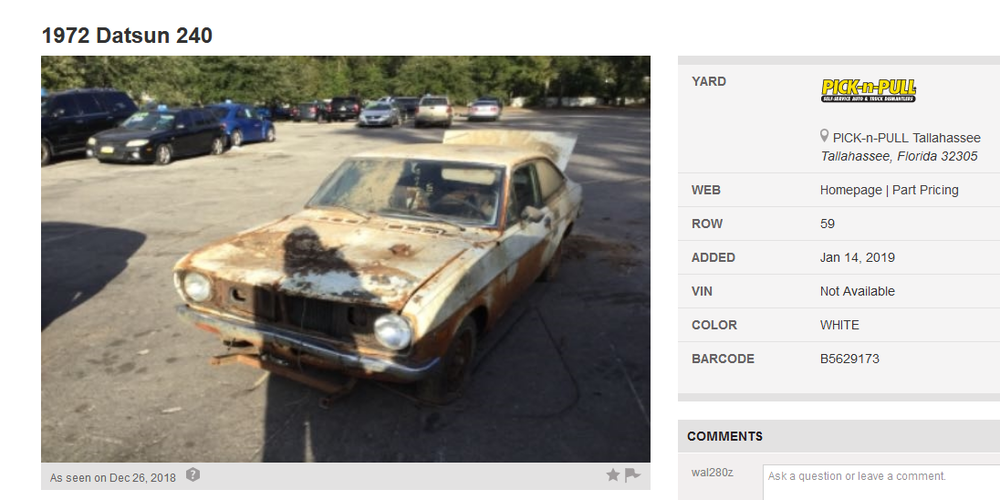
Just got this alert from my "DATSUN ALL YARDS" search... We all know this isn't a 240.....
 1 point
 -
I don't recall any other substitute for the blower, but mine still works like a champ. Also be sure to replace the foam seals on the heater box mode door and where the air duct connects to the center dash vents. That will increase air flow dramatically.1 point
-
1 pointWow, an automatic on a series 1. That doesn't seem right. Too bad there are no engine pics.1 point
-
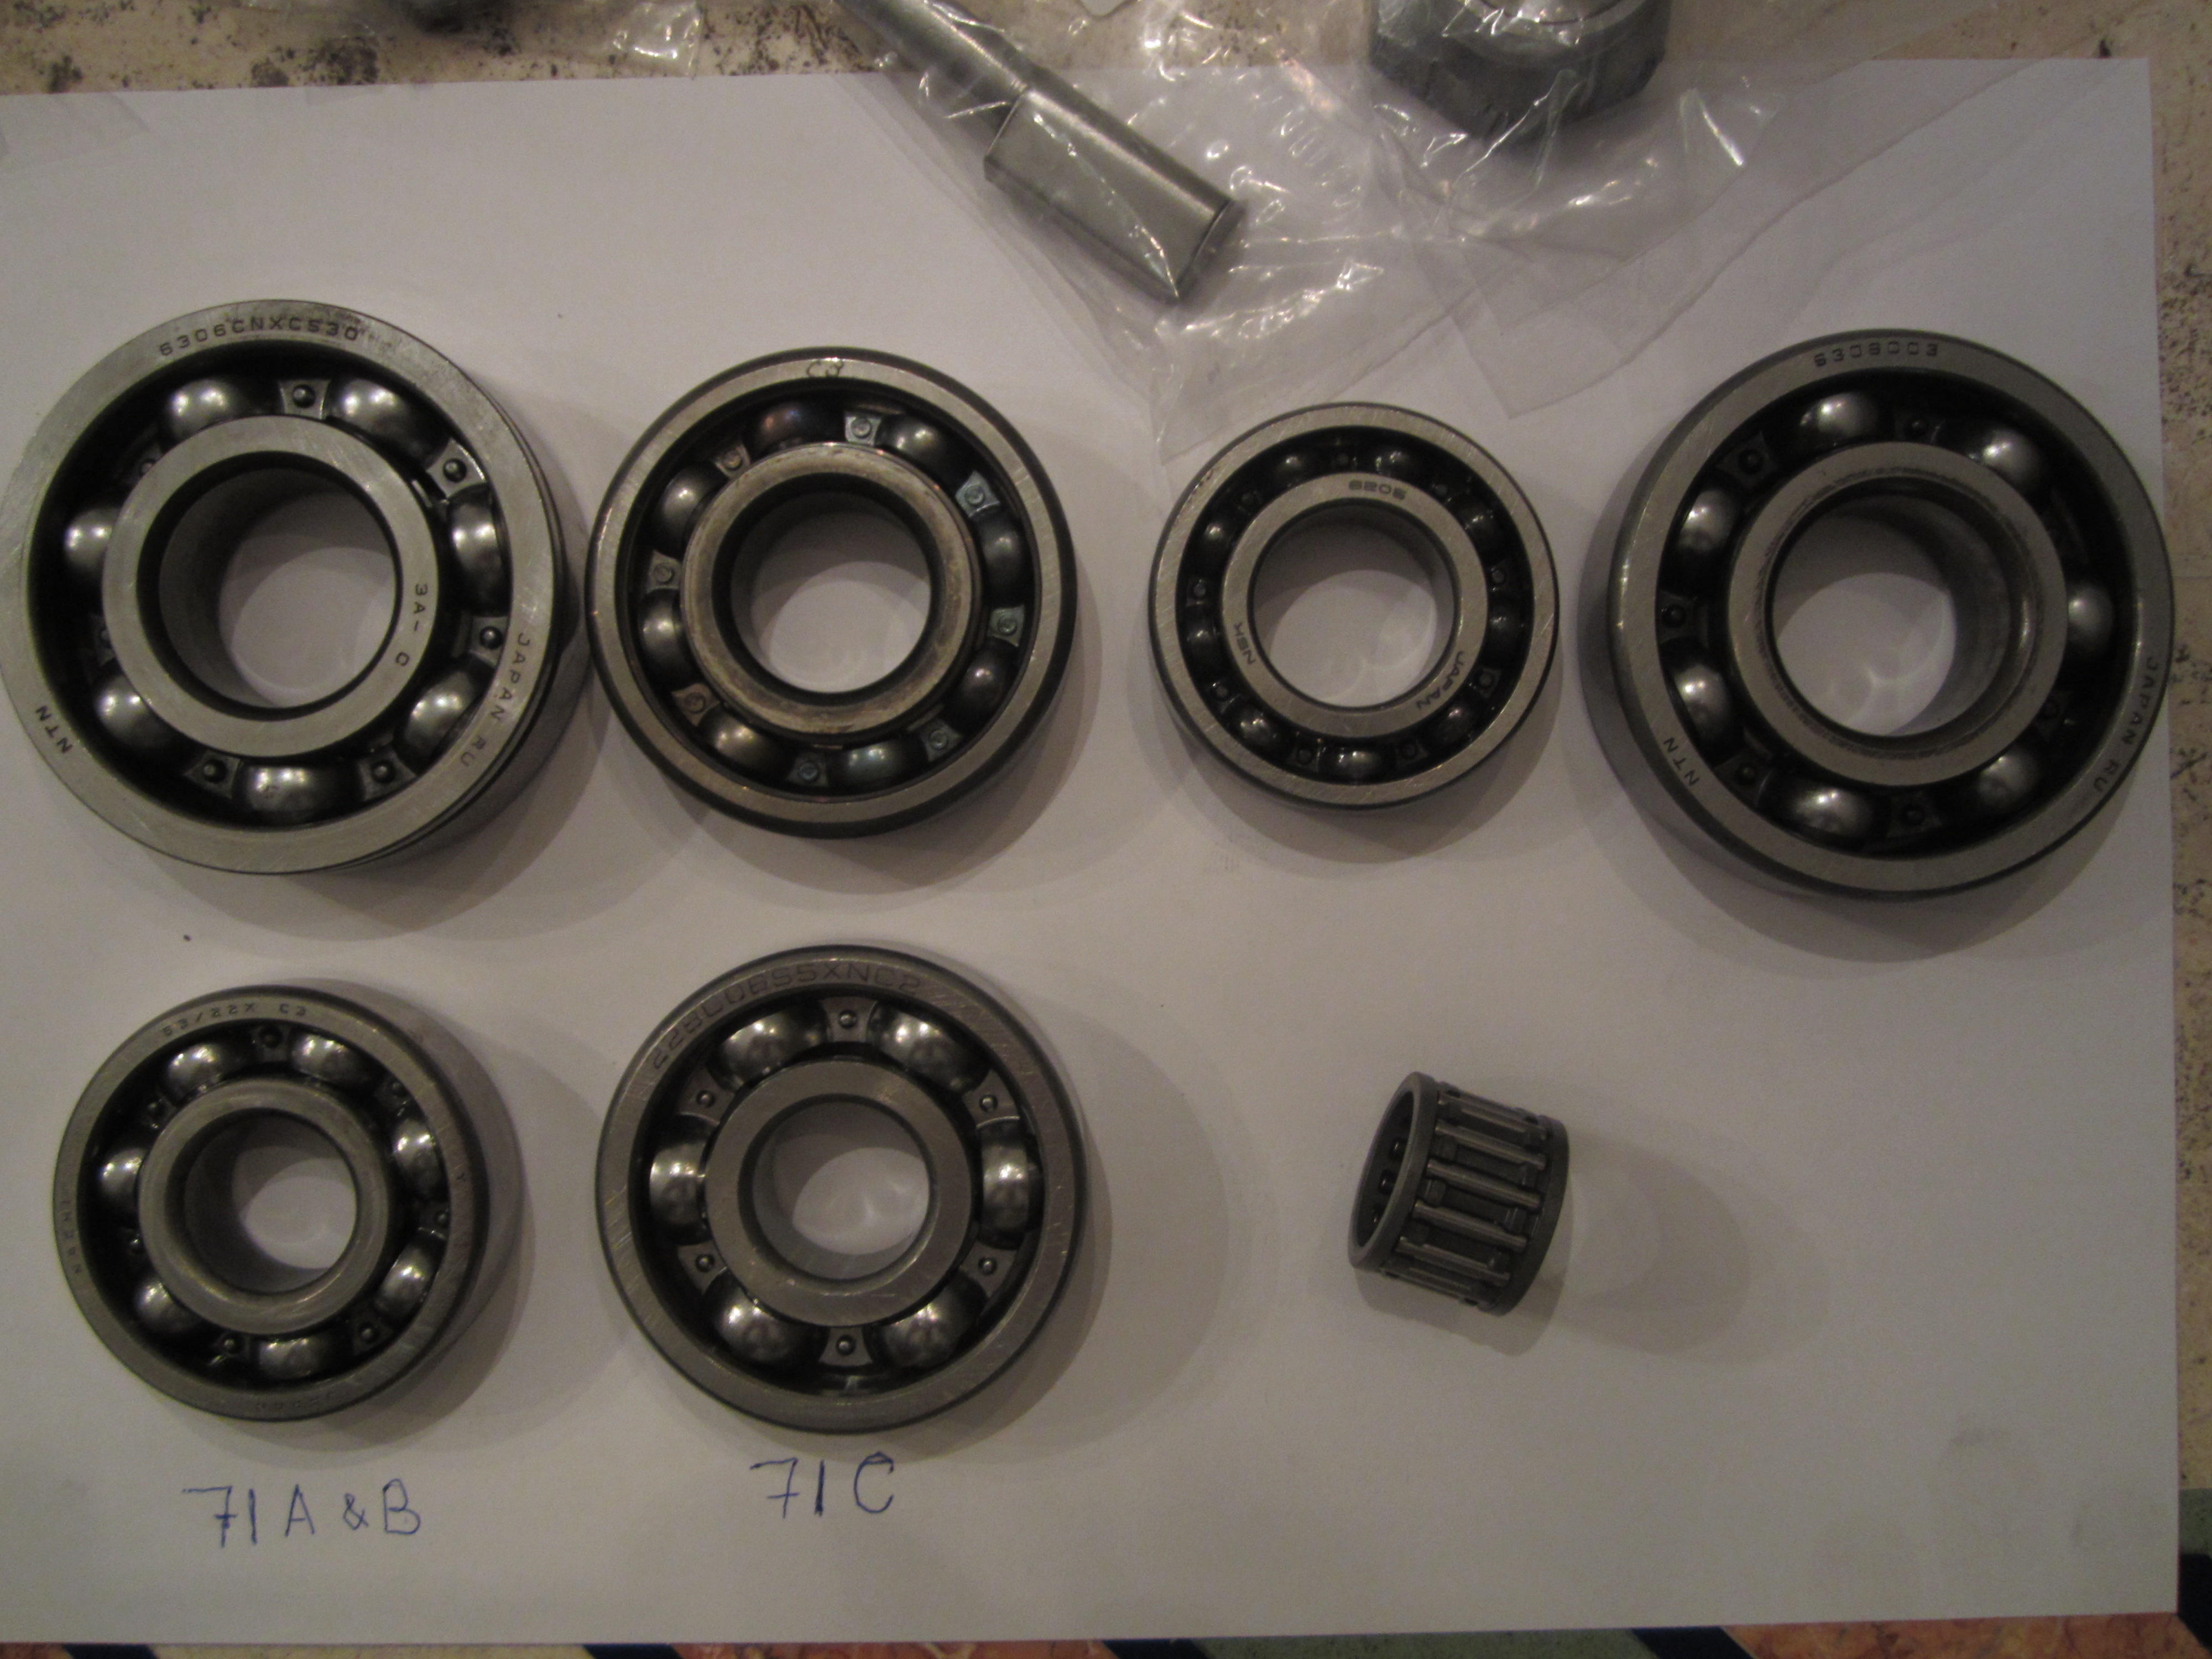
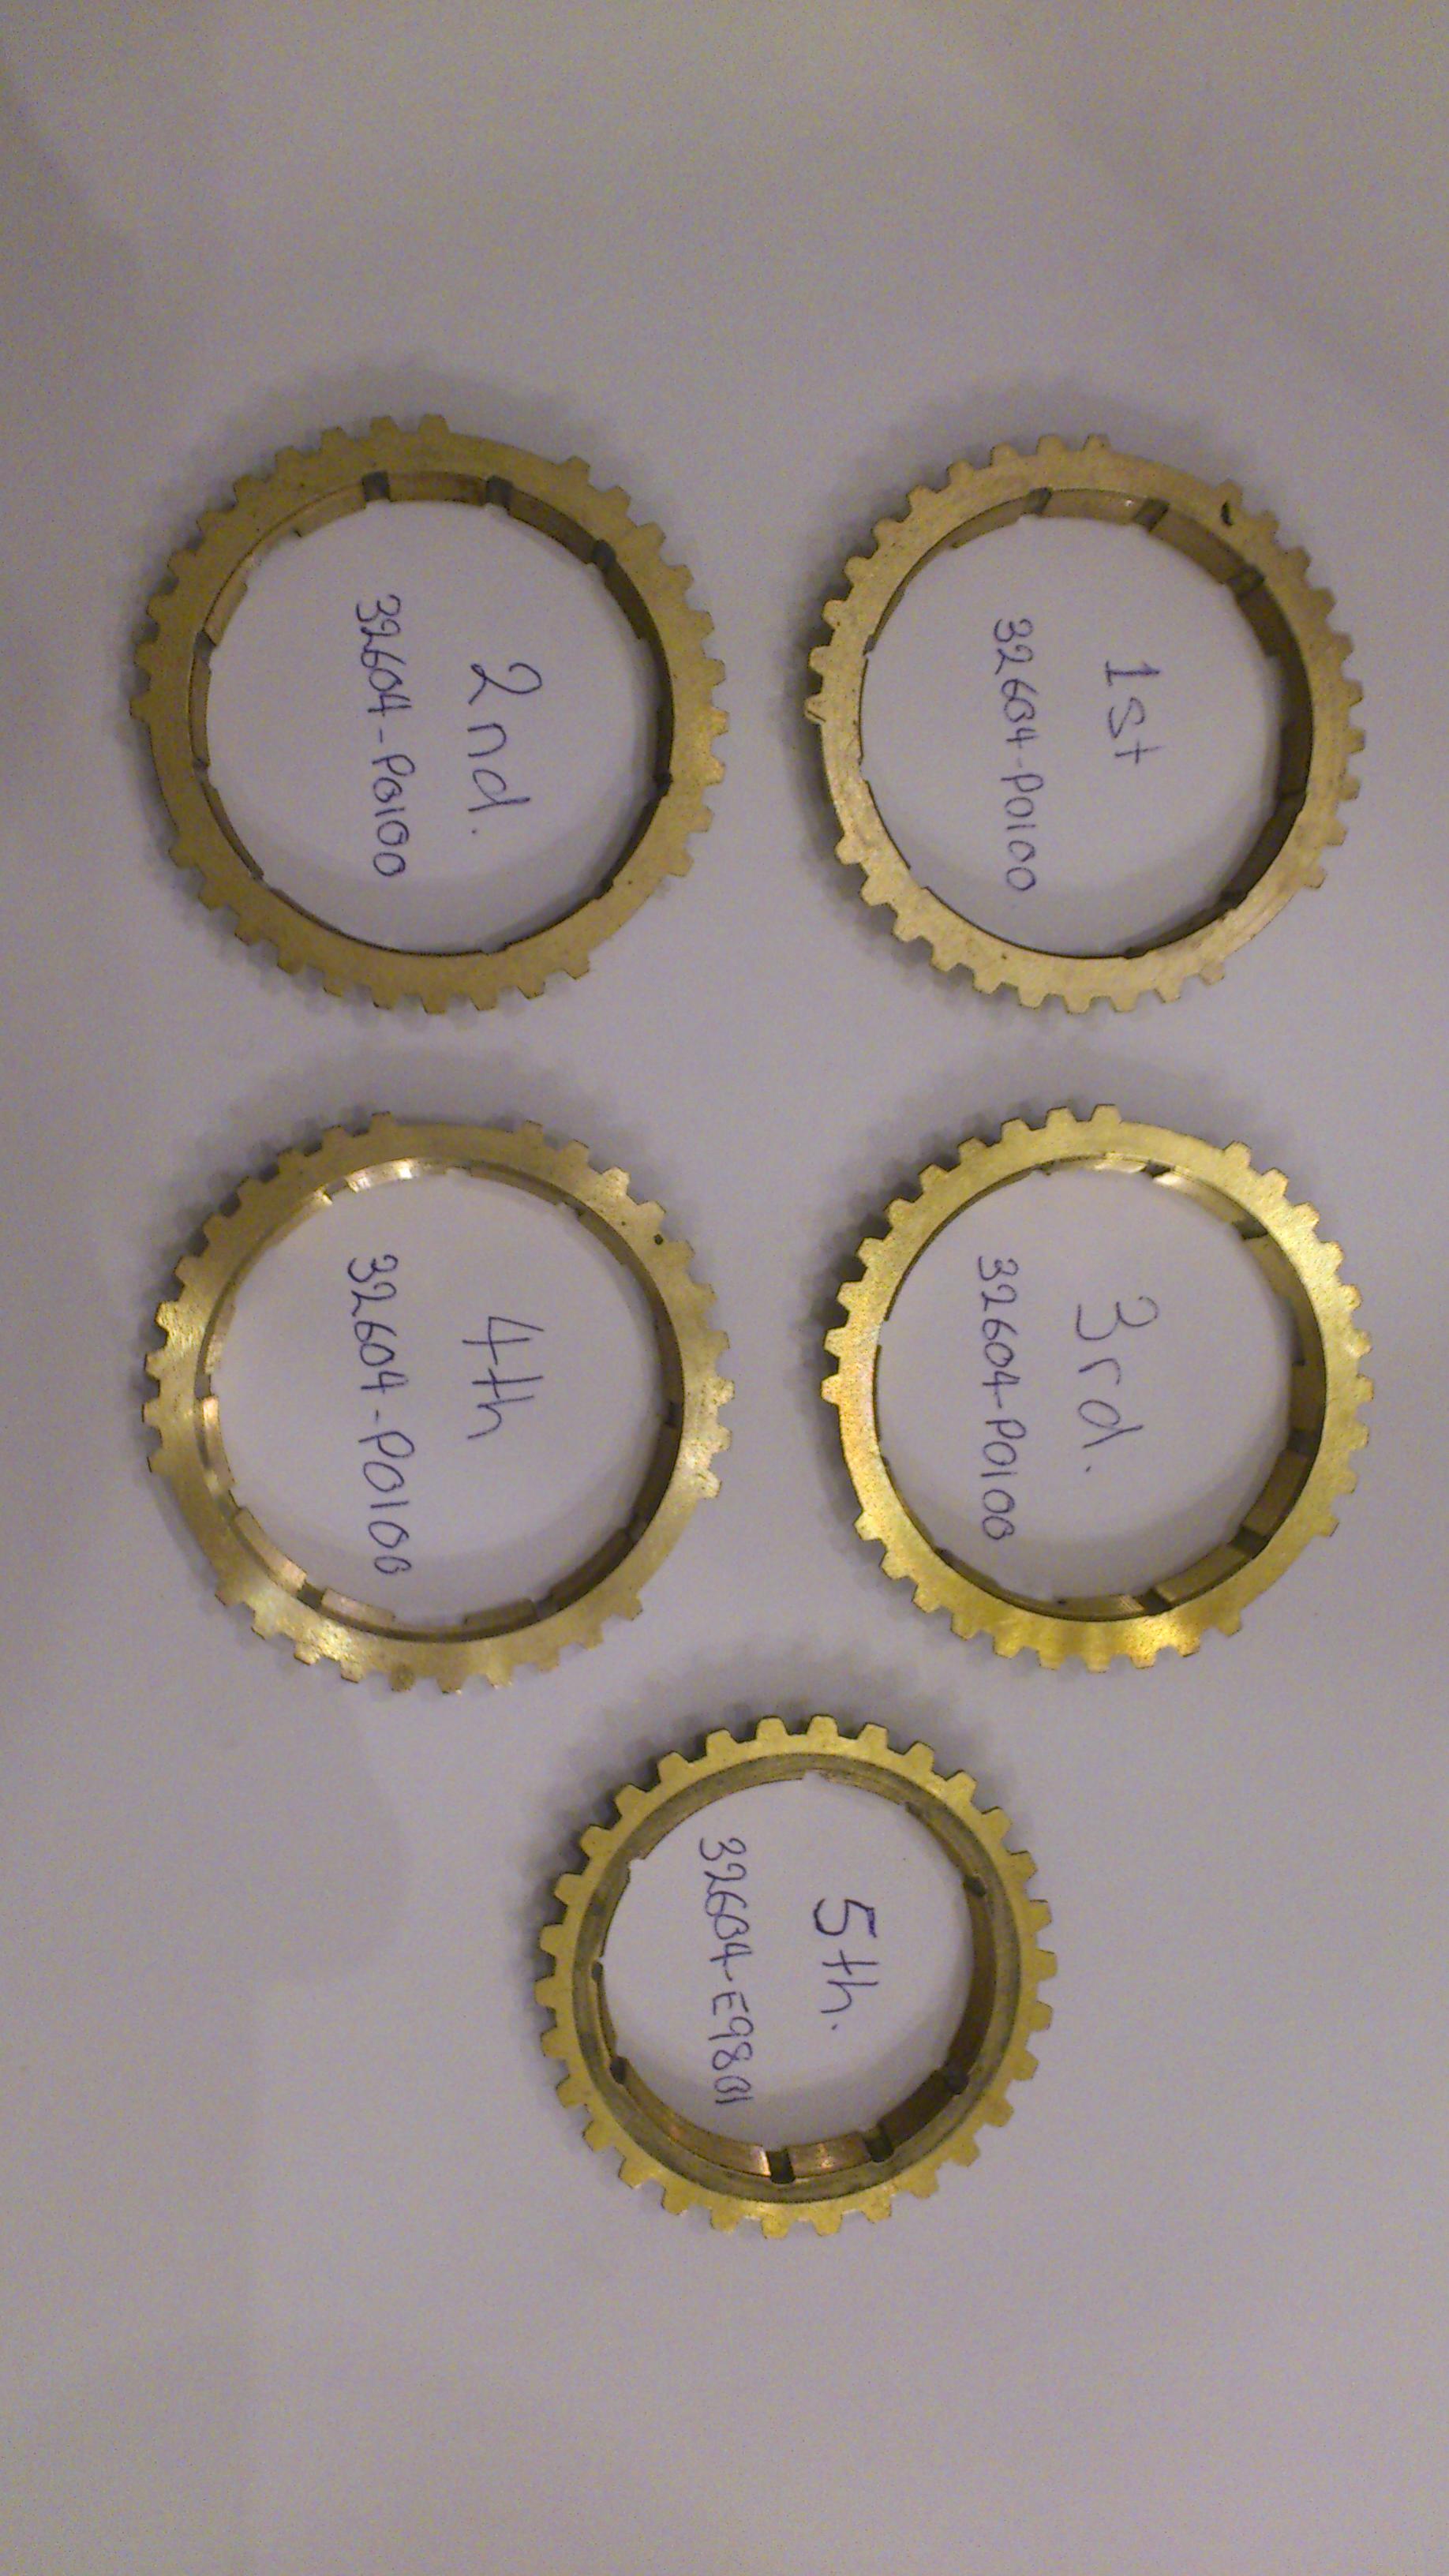
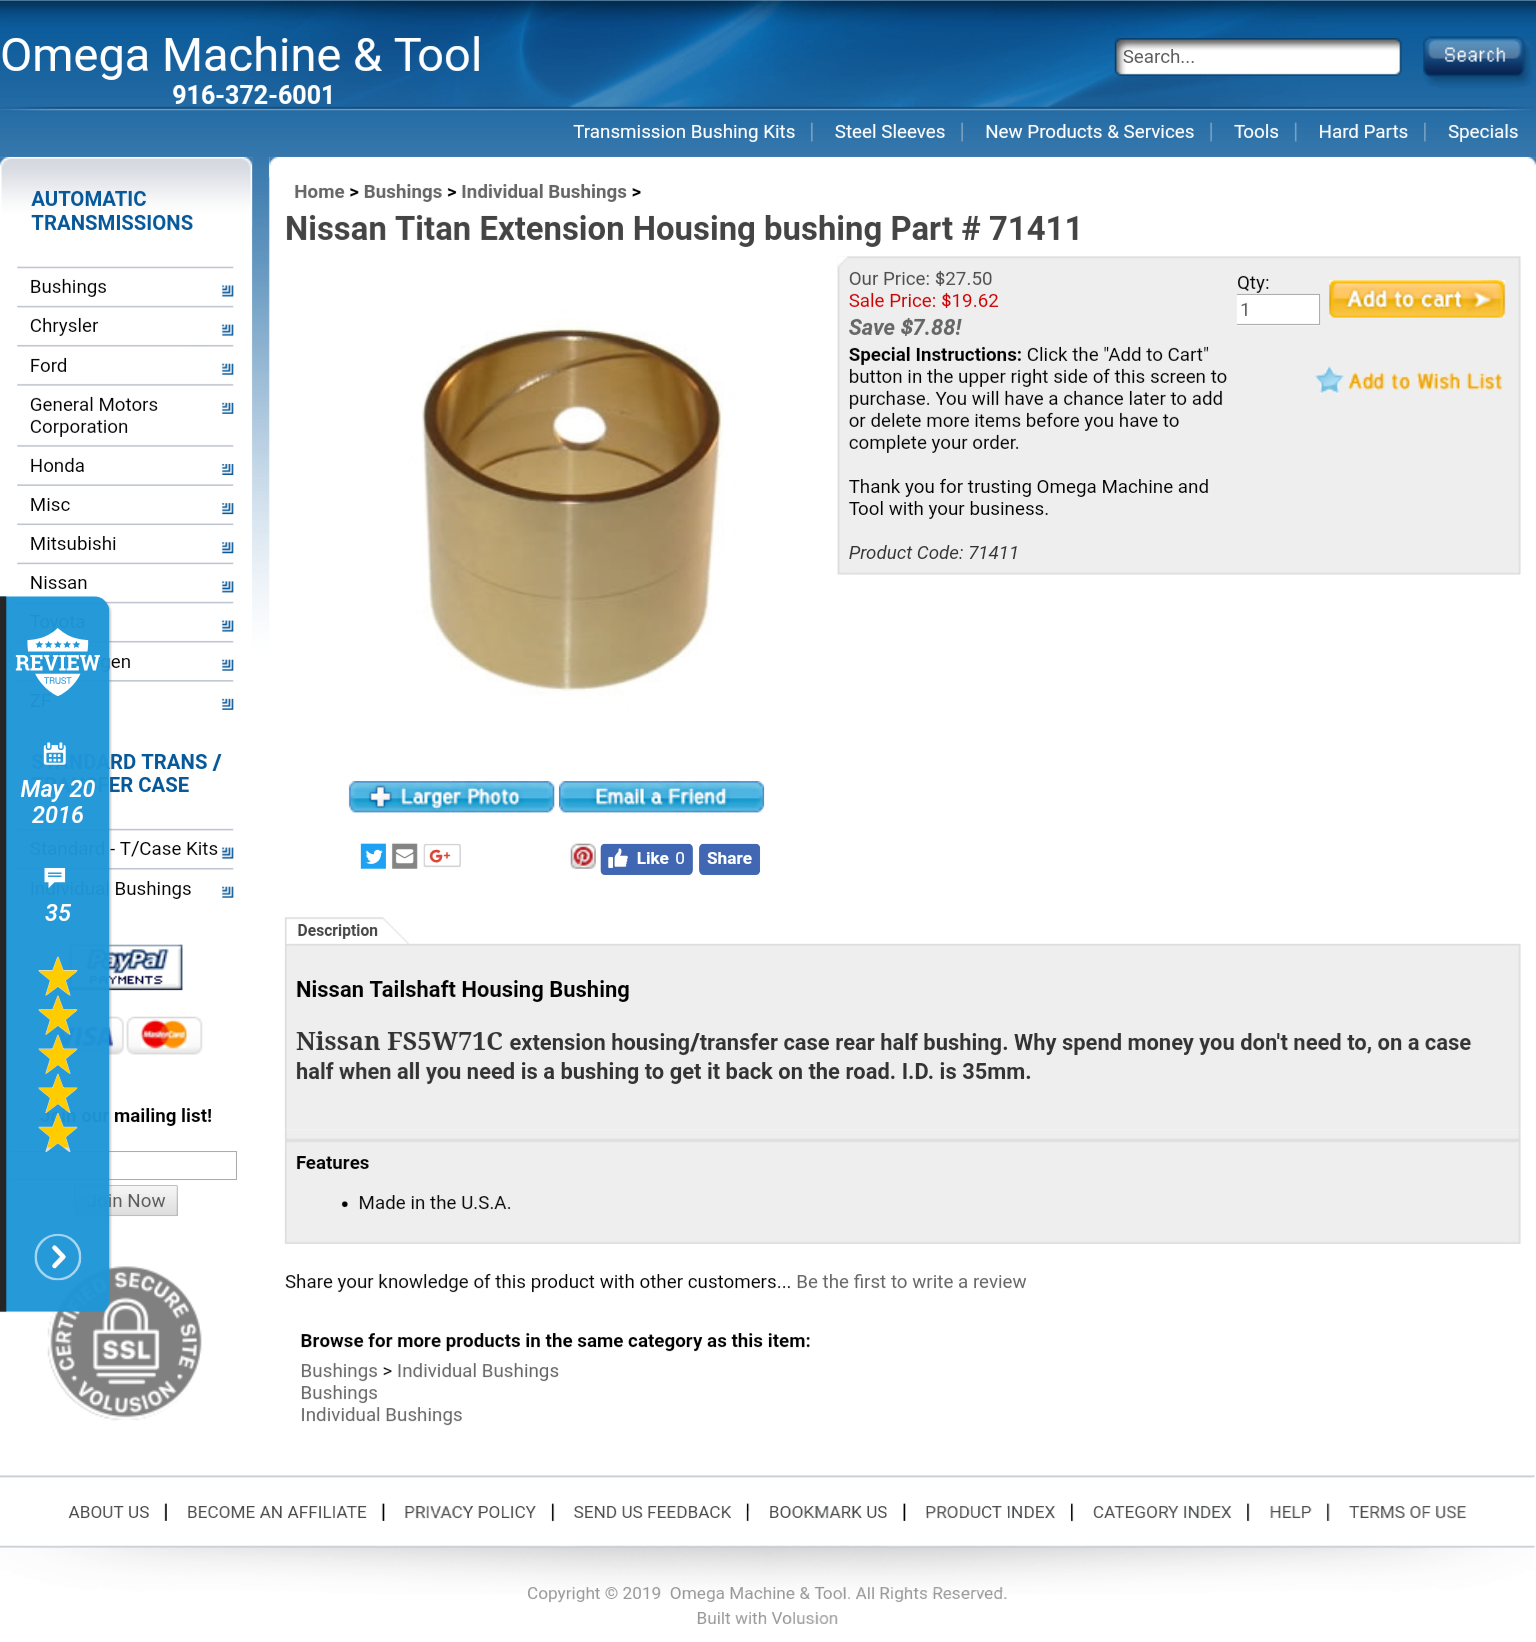
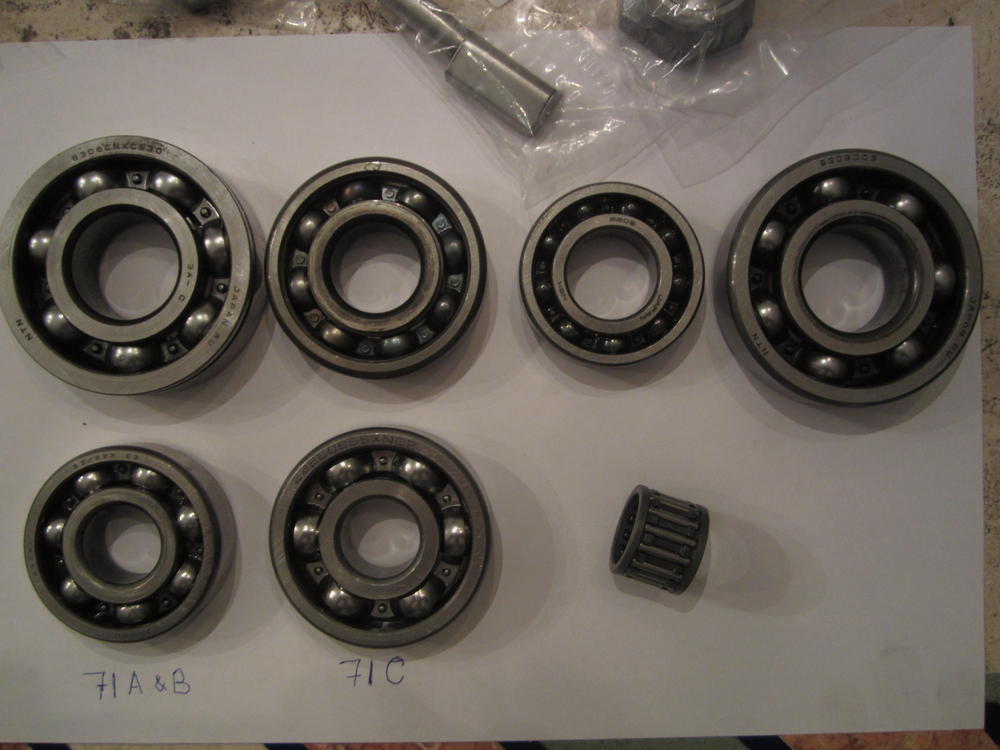
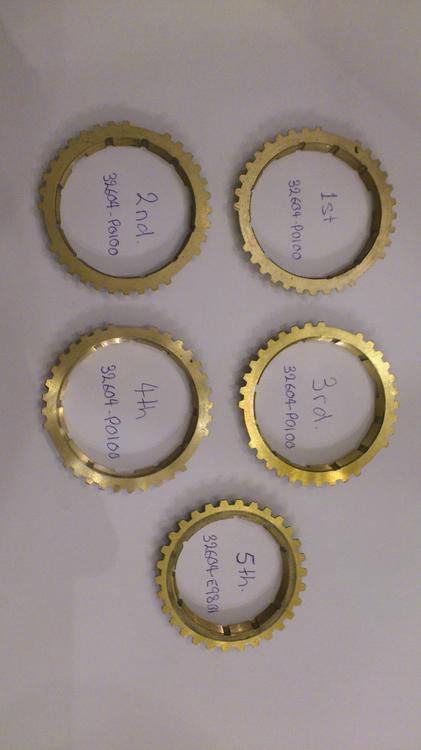
1 pointIf you have any questions. Feel free to ask. Most of the parts in my list were for my 71B, but will fit the 71C. Main difference is the selector control section and the front cluster shaft bearing. The bearing kit will have all the main bearings, front gasket and rear oil seal. Optional are the synchro rings (Baulk rings). I ordered all the parts through Nissan with the exception of the Omega rear extension bush. You may not need these parts, but I would reccomend replacing all the seals and o-rings. Most of them are not included in the bearing revision kit. See photos for the bearings, synchros and rear extension bush.
 1 point
 -
1 pointI had forgot all about this thread until @Elliott000 had some questions about the set up. I have about 2000 mi. on these shafts now and no problem of any kind, working perfectly.1 point
-
1 pointThe Nissan fuel pump control relay is an odd one, with two solenoid switches in it. The 5 pin that you showed won't work directly as a replacement, since it only has one solenoid. If your relays are still installed on the car you might try unplugging your oil pressure switch and turning the key On. The fuel pump might run then if the oil pressure switch side of the the relay is intact. The pump will lose power when you turn the key off, so it will only be dangerous in a car accident. Might get you by. It seems odd that both relays would be bad, unless the car has been under water. Any chance that you wrote down the results of your tests? There might be a simple short term solution based on test results. The fuel pump relay itself is a common 4 pin relay, easy to replace.1 point
-
1 pointLooks to stop very well. Clean and or replace electrical connectors under the hood. Injector connectors, etc. I replaced all my pig tails with new ones. Check all vacuum lines, including PVC, AAR, etc. Also the AFM to the throttle body boot.1 point
-
1 pointIs it just me, or does anyone else see disco balls when they see this pic?1 point
-
1 pointYou have a well thought out plan! Enjoy reading your post. I've always read CTS, coolant temp sensor, FWIW.1 point
-
1 point$750 for the headlight covers includes rivnut / nutsert as hardware.1 point
-
1 pointRe the snapped-off manifold fastener: You're looking at a steel fastener stuck in an aluminum head. The dissimilar-metal corrosion along the threads can be really difficult to break free. If you lead off by trying to get it out with a screw extractor, do not use a cheap one and do not get too aggressive. It's a lot easier to drill out the fastener for a helicoil if it doesn't have a snapped-off screw extractor stuck inside it. Some people swear by the use of a reverse-twist drill bit. Might be worth a try... if you can find a place nearby that sells them. Using heat from a bottle torch is a problem. Too much flame spread, not enough focused heat. An oxy-acetylene torch with a fine-tip flame might work, if you've got one. One heating option that probably will work (and makes it unnecessary to do any drilling) is to use a MIG to progressively build up an extension onto the top of the fastener (looks like you need at least 1/4" build-up here). Once you get it above the surface of the head, you should be able to tack a nut onto the welded-up extension. With all of the heating shock from the MIG work, you'll should then be able to twist out the fastener with a wrench. Notice that I used the word, 'should'.1 point
-
Carl....That makes sense. Seems like with the current interest in the 240Zs, they are coming out of the wood work, but with only that few left, collectors starting to hold on to them and normal attrition, I would think that their value will continue to climb. Missed you in Atlanta....hope to see you soon. Regards Guy1 point
-
1 pointI found my document with all the part numbers. It's in 2012, so the prices won't be valid and some parts are now nla. Tranny_Rebuild_FEB2012.pdf1 point
-
1 pointHi Odinspeenbone Welcome to the forum. As you probably already noticed, plenty of willing members to offer advice where needed. Looking at your photos, I would rebuild it. You mentioned in your first post, you found a tooth or a piece of one. Most probably from the reverse gear. The reverse gear can look very ragged, and still function well. Can you post a photo of the piece and maybe locate where it came from? Points to check before going forward with rebuild. - Look for cracks in the gears. A small chip will be ok, but cracks and signs of shattered teeth are a red flag. - Syncho rings. Was the gearbox changing gears without grinding befoe the bearing fell apart? If not measure the rings against the specs, see manual for guidance. The external teeth look OK on the photos, but that is not what makes a good synchro ring. The small grooves on the inside are important and the wear is determined by measuring the distance between the synchro cone and the gear. Note: Be carefull running your fingers around the inside. The small grooves can be razor sharp, especially on new rings. If the synchros are within spec, you only need a bearing kit and seals. - Once it's all dismantled, check the shafts are straight and within tolerance. Bent shafts can caused the transmission to jump out of gear. Didn't do it with worn bearing because the worn bearings had enough play to compensate. - Use a good quality GL-4 transmission oil suitable for brass synchro rings. Redline MT-90 or the GM transmission oil are commonly refered too. The GM part numbers are AC DELCO USA p/n: 88900399. GM USA p/n is: 12377916. I can post the part numbers for all the seals if you want to order then individually. Best would be to order a bearing kit and the rest of the seals, o-rings separately. A kit like this would be what you would want for the bearings. They also sell bearing kits with synchros, but I have had poor performance from the aftermarket rings and endd up sourcing the rings from Nissan. DTS-BK133 $129.89 http://www.drivetrain.com/parts_catalog/manual_transmission_overhaul_kits/nissan_f5w71_overhaul_kit.html1 point
-
1 pointOMG... I have a new 401K account in my garage... oh wait, I only have 280 parts..... Guess I have to keep my day job.1 point
-
for me there were a couple of issues that made me decide to do the conversion: 1. on the highest setting the fan made a lot of air noise but very little air flow - severe fogging of the glass is a problem as its my dd and it does rain in seattle from time to time. 2. the motor was clearly in trouble, as it would screech and howl intermittently, loud enough to drown out the radio. i haven't actually driven the car yet with the new fan (still getting the head replacement finished) but i'm hoping it makes a difference. when i compared the two impeller designs i noticed 3 things: 1. the honda fan is larger in diameter, so the blades are traveling faster at the same motor rpm. since the blower housing remains the same size, the blades are closer to the side walls of the housing. maybe this has an effect on the amount of air that is engaged, reducing turbulence/inefficiency at the outside of the blade area? 2. the blades are smaller, and there are more of them, maybe a more efficient design? 3. the oem motor mount is set on spacers that put the impeller 1/2" farther away from the back of the blower housing. the honda fan doesn't use those, so the impeller pushes right up close to the back wall of the blower housing. perhaps this engages more air and/or reduces leakage around the impeller? i have no training in airflow design, so this is all just my conjecture... all i can say is the honda blower is much quieter and moves more air.1 point
-
1 point