


Leaderboard
-

siteunseen
Free Member6Points15,115Posts -

240260280
Free Member5Points4,442Posts -
Captain Obvious
Free Member2Points10,081Posts -
Mark Maras
Free Member2Points3,719Posts


Popular Content
Showing content with the highest reputation on 01/11/2019 in all areas
-
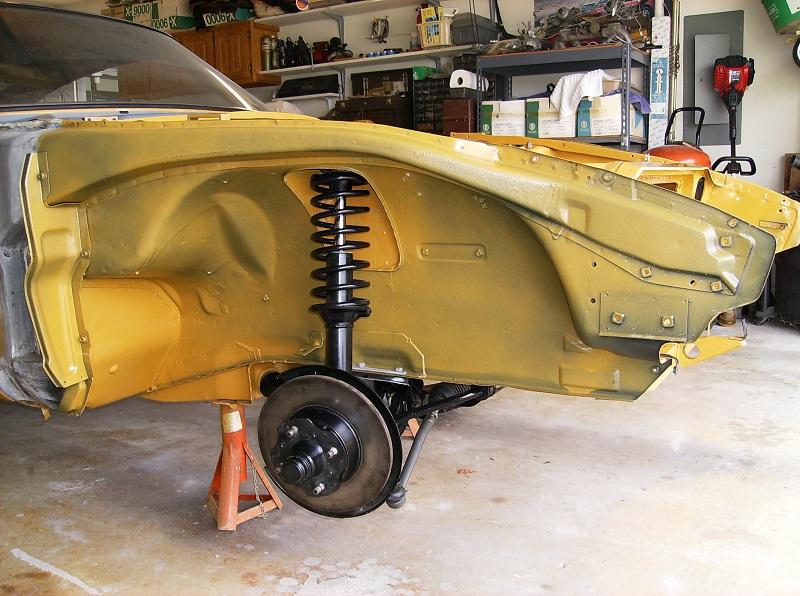
2 points2 pointsUhhh.... About the A/C. That car left the factory without A/C. It's got the non-A/C climate control head unit. And there's a suspicious looking knob near the driver's right knee? I suspect that's the control for the (clearly aftermarket installed) A/C system: And something else that caught my eye... The tach says 1K, but the temp, oil pressure, and fuel are off scale to the left like the engine isn't running? Either the engine is stone cold, running on vapors from an empty tank and the mains are shot and can't generate any oil pressure, or... The tach is stuck: It may be a nice car, but I think the description is a little over the top. And all those pics and not one of the underside. I wouldn't ever ever ever buy a Z without seeing the underside first. Ever.2 points2 pointsMost of the bolts in the video looked like they needed the threads chased too. I'll stick with my tap and die set.2 pointsThey easier to catch when they use a walker! Making them tricycle motors.2 points2 pointsLighting is key, you can't have too much light especially as your eyes get older. The floor painted a light colour really helps as well.2 points2 pointsI have a three bedroom house that I rent out and I live in the garage apartment in the back.
 2 points1 pointOh, that dog just ain't gonna hunt! You are not going to find a series one with " something less than a quarter million miles". Or, you're going to pay dearly for a restored example. I have been wondering what all the obsession over mileage is all about. Yea, the dealer's a schmuck. So what! You can't just take someone's word and buy a car from the pictures. Well, you can; just look at how I bought 27th. As Beck put it; "How much worse could it be?" I would encourage looking at the car and dealing with the dealer. Point out all the non-original pieces and get him off his 'all original' spiel. We could make a list of all the stuff that is a replacement and not "correct". And the serial # is not that low. Hell, you know a guy who has 26 and 27! If it turns out to be a good running, soild car, it's probably worth the $20 grand. Offer cash and be prepared to turn and walk.1 point1 pointI really do appreciate everyone's advice. I'll try not to post everything I see :-). And I'll work on the patience part (never been a strong suit of mine). I've got my boss ... er ... wife to tolerate me spending "less than a Tesla" on the Z car of my dreams, and I even have space (or will) in the garage for it. Now I just need to not rush into it. Now, if anyone knows of a Series 1 240Z in dark green with butterscotch interior, manual transmission and something less than a quarter of a million miles ....1 point1 pointThere is some amazing stuff going for auction here. http://bhauction.jp/en/1 point1 pointSo the 432 "project" sold for ~$64K USD. It seemed like a fair price.
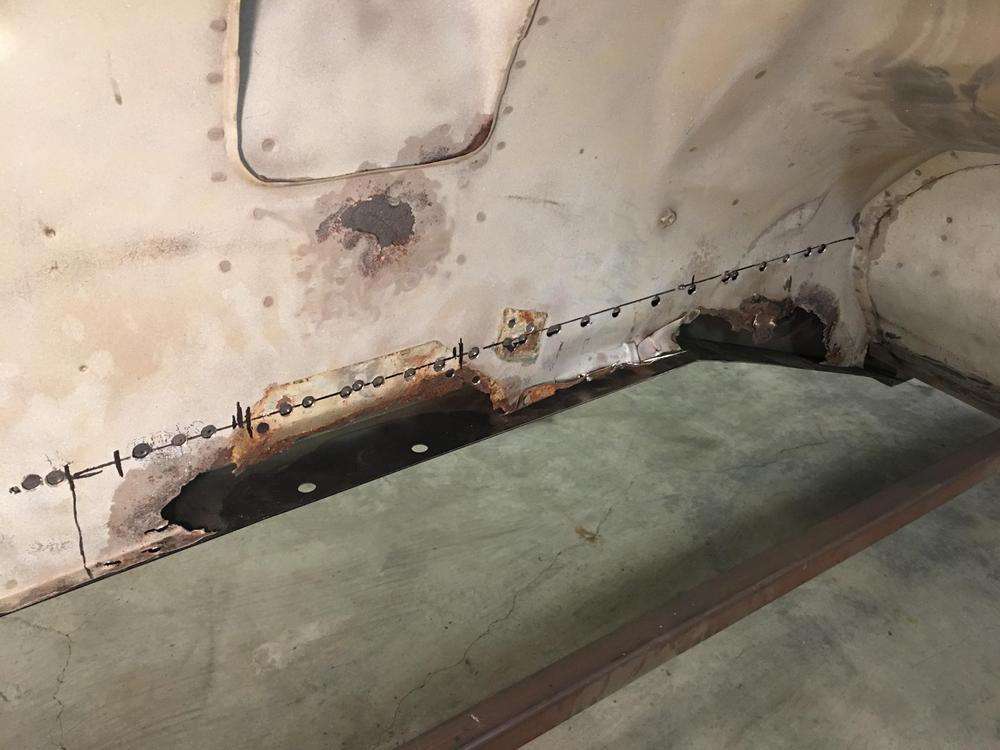
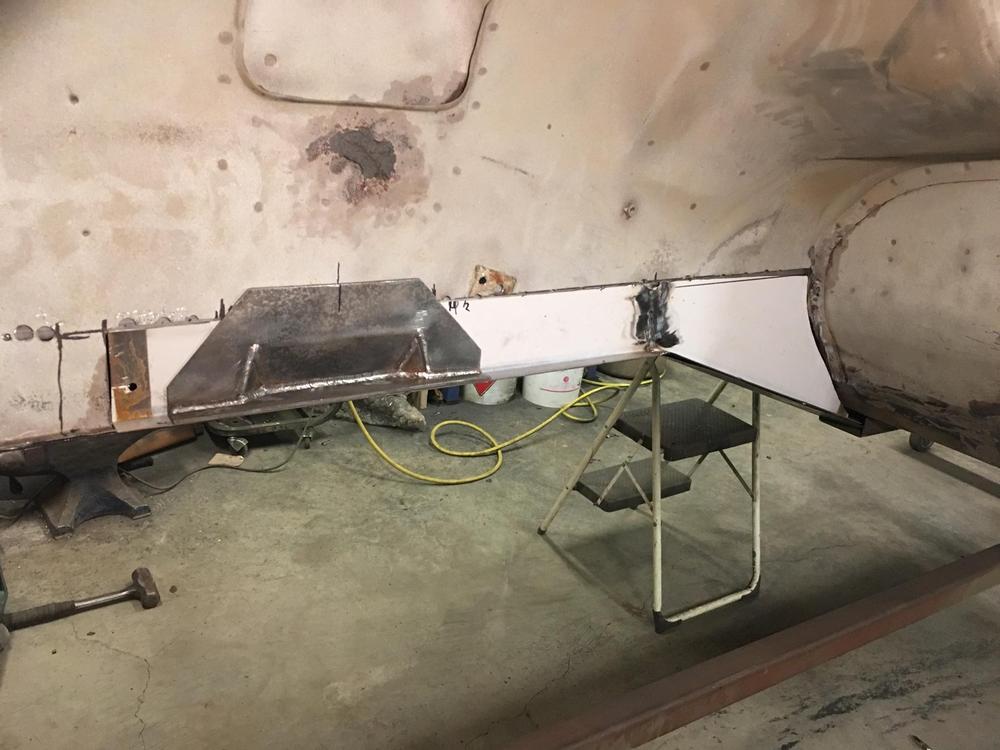
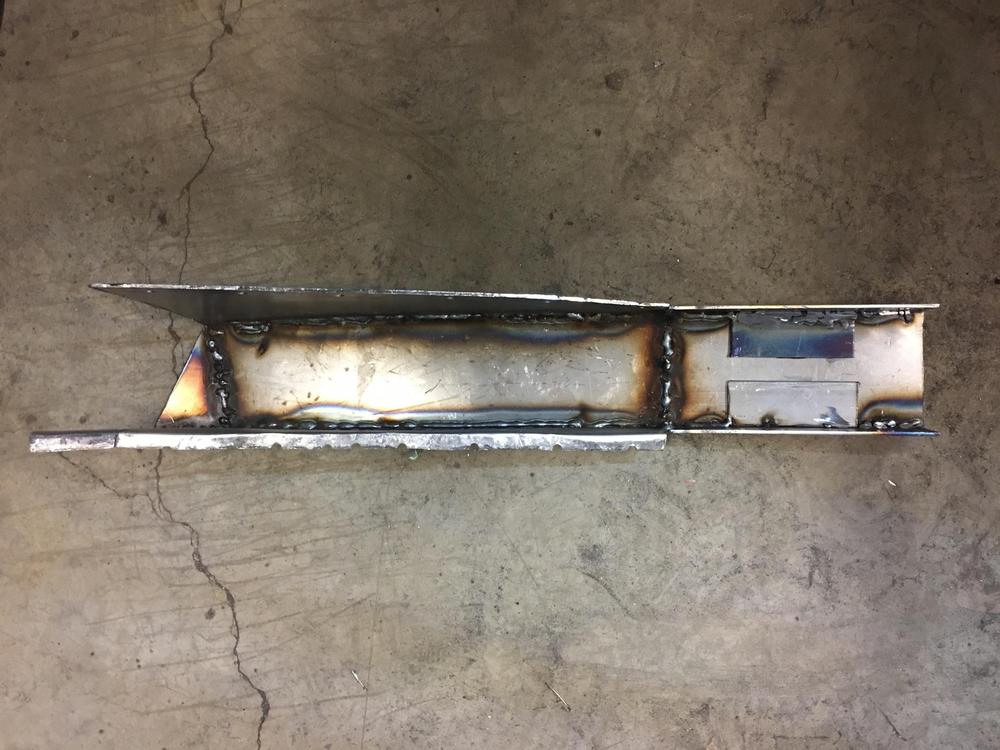
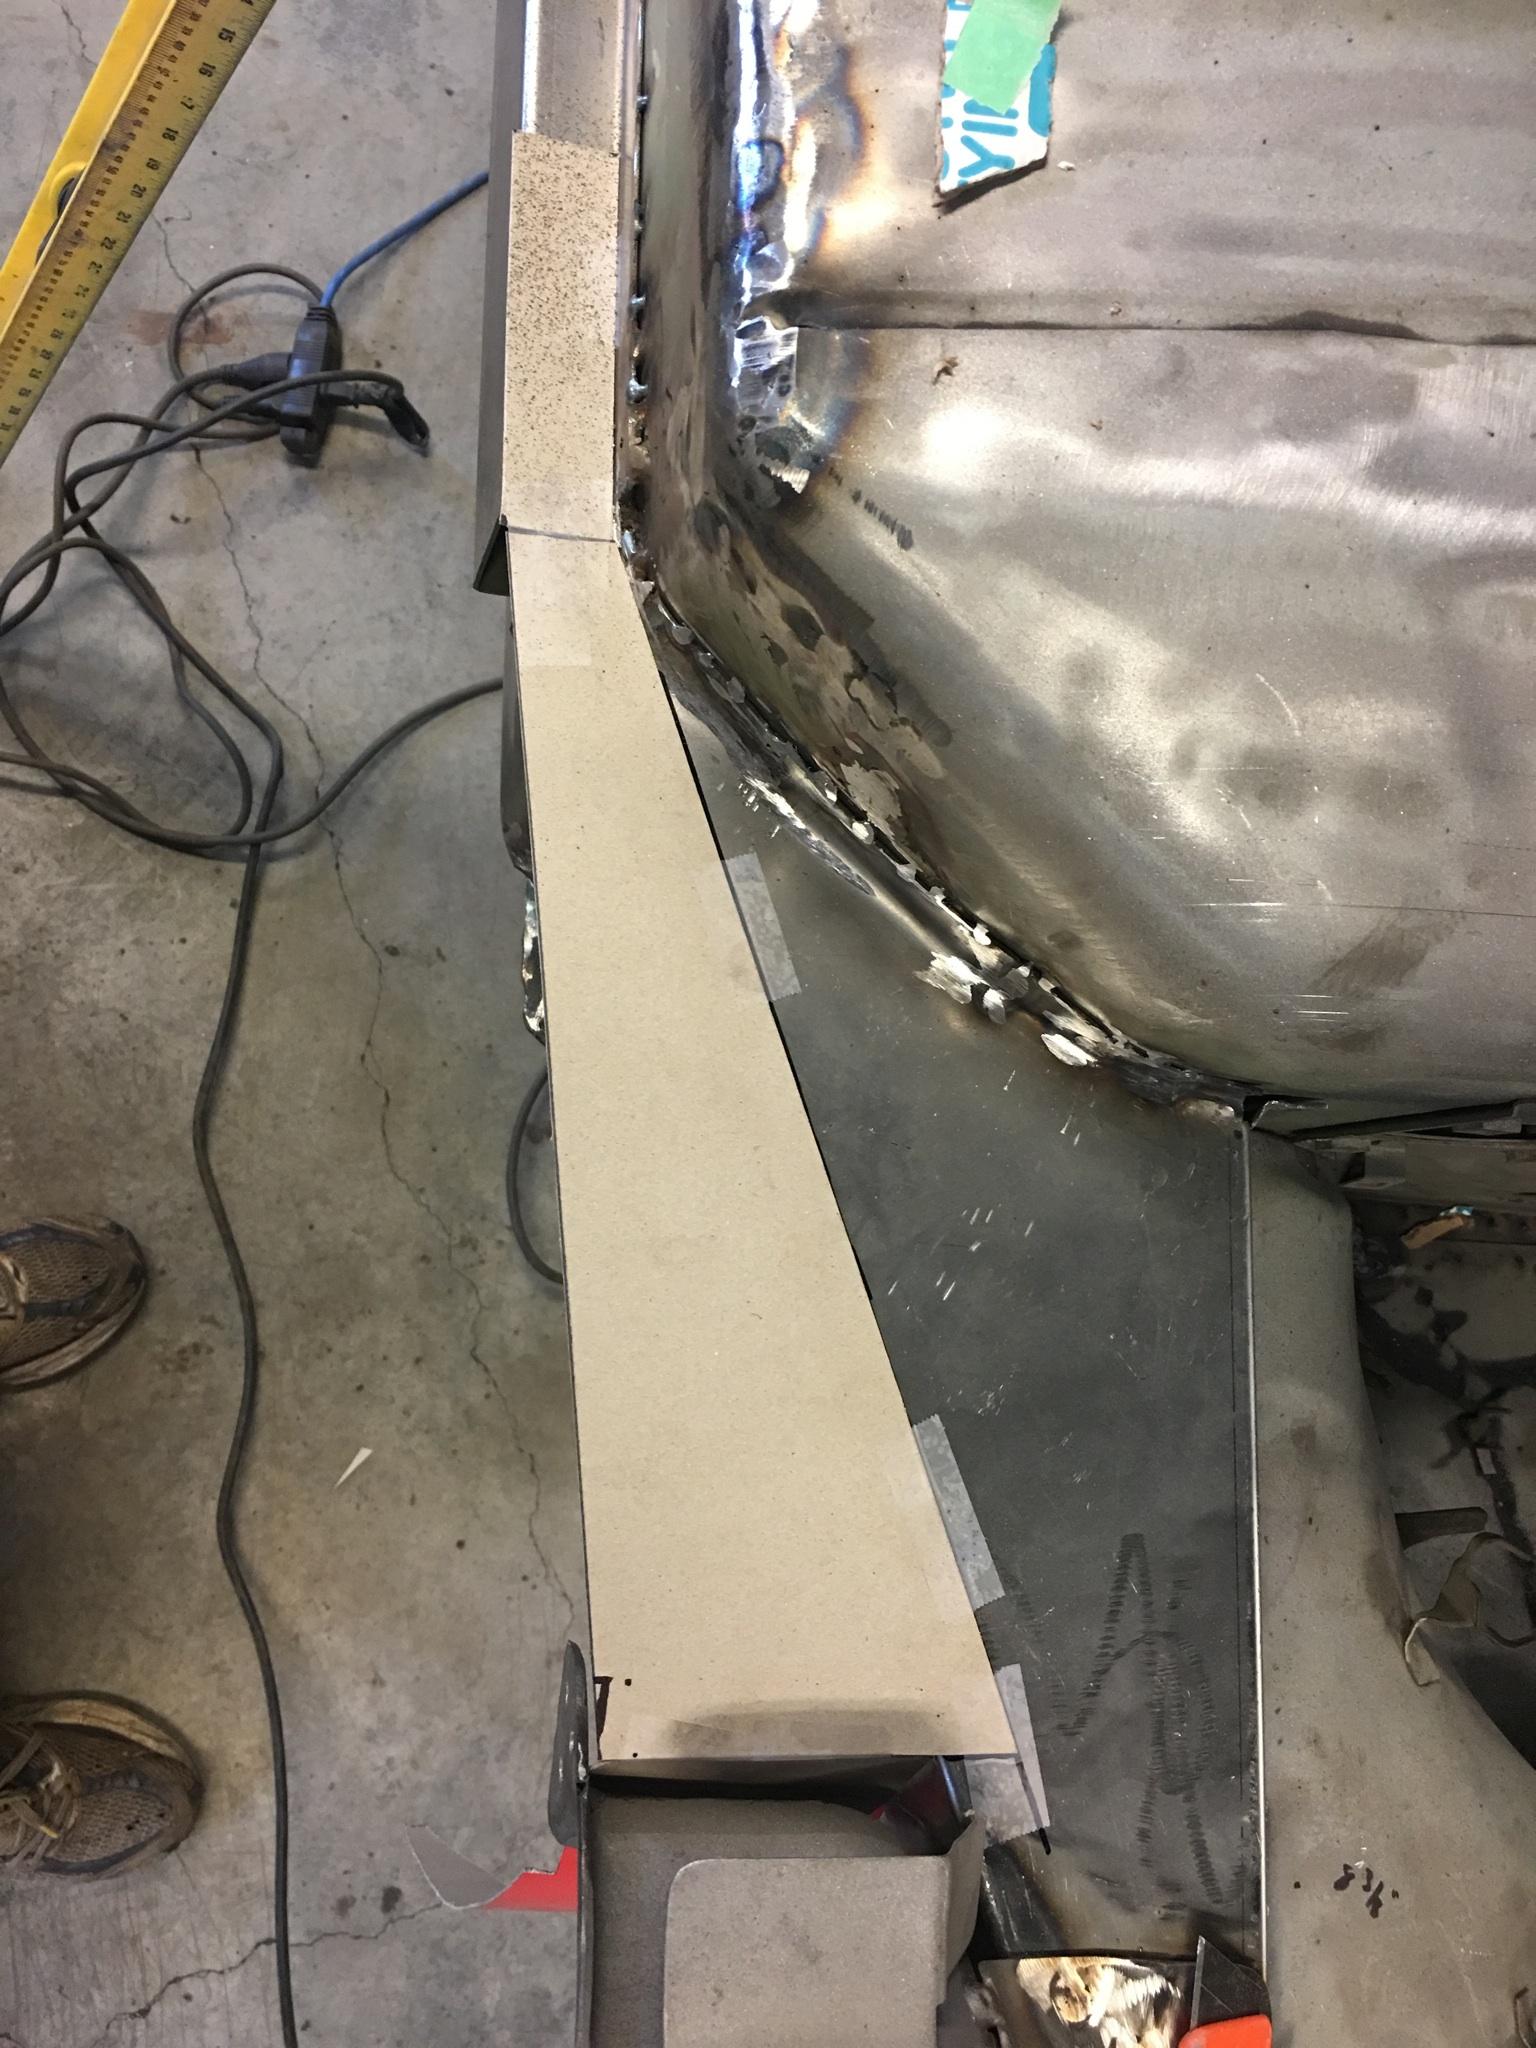
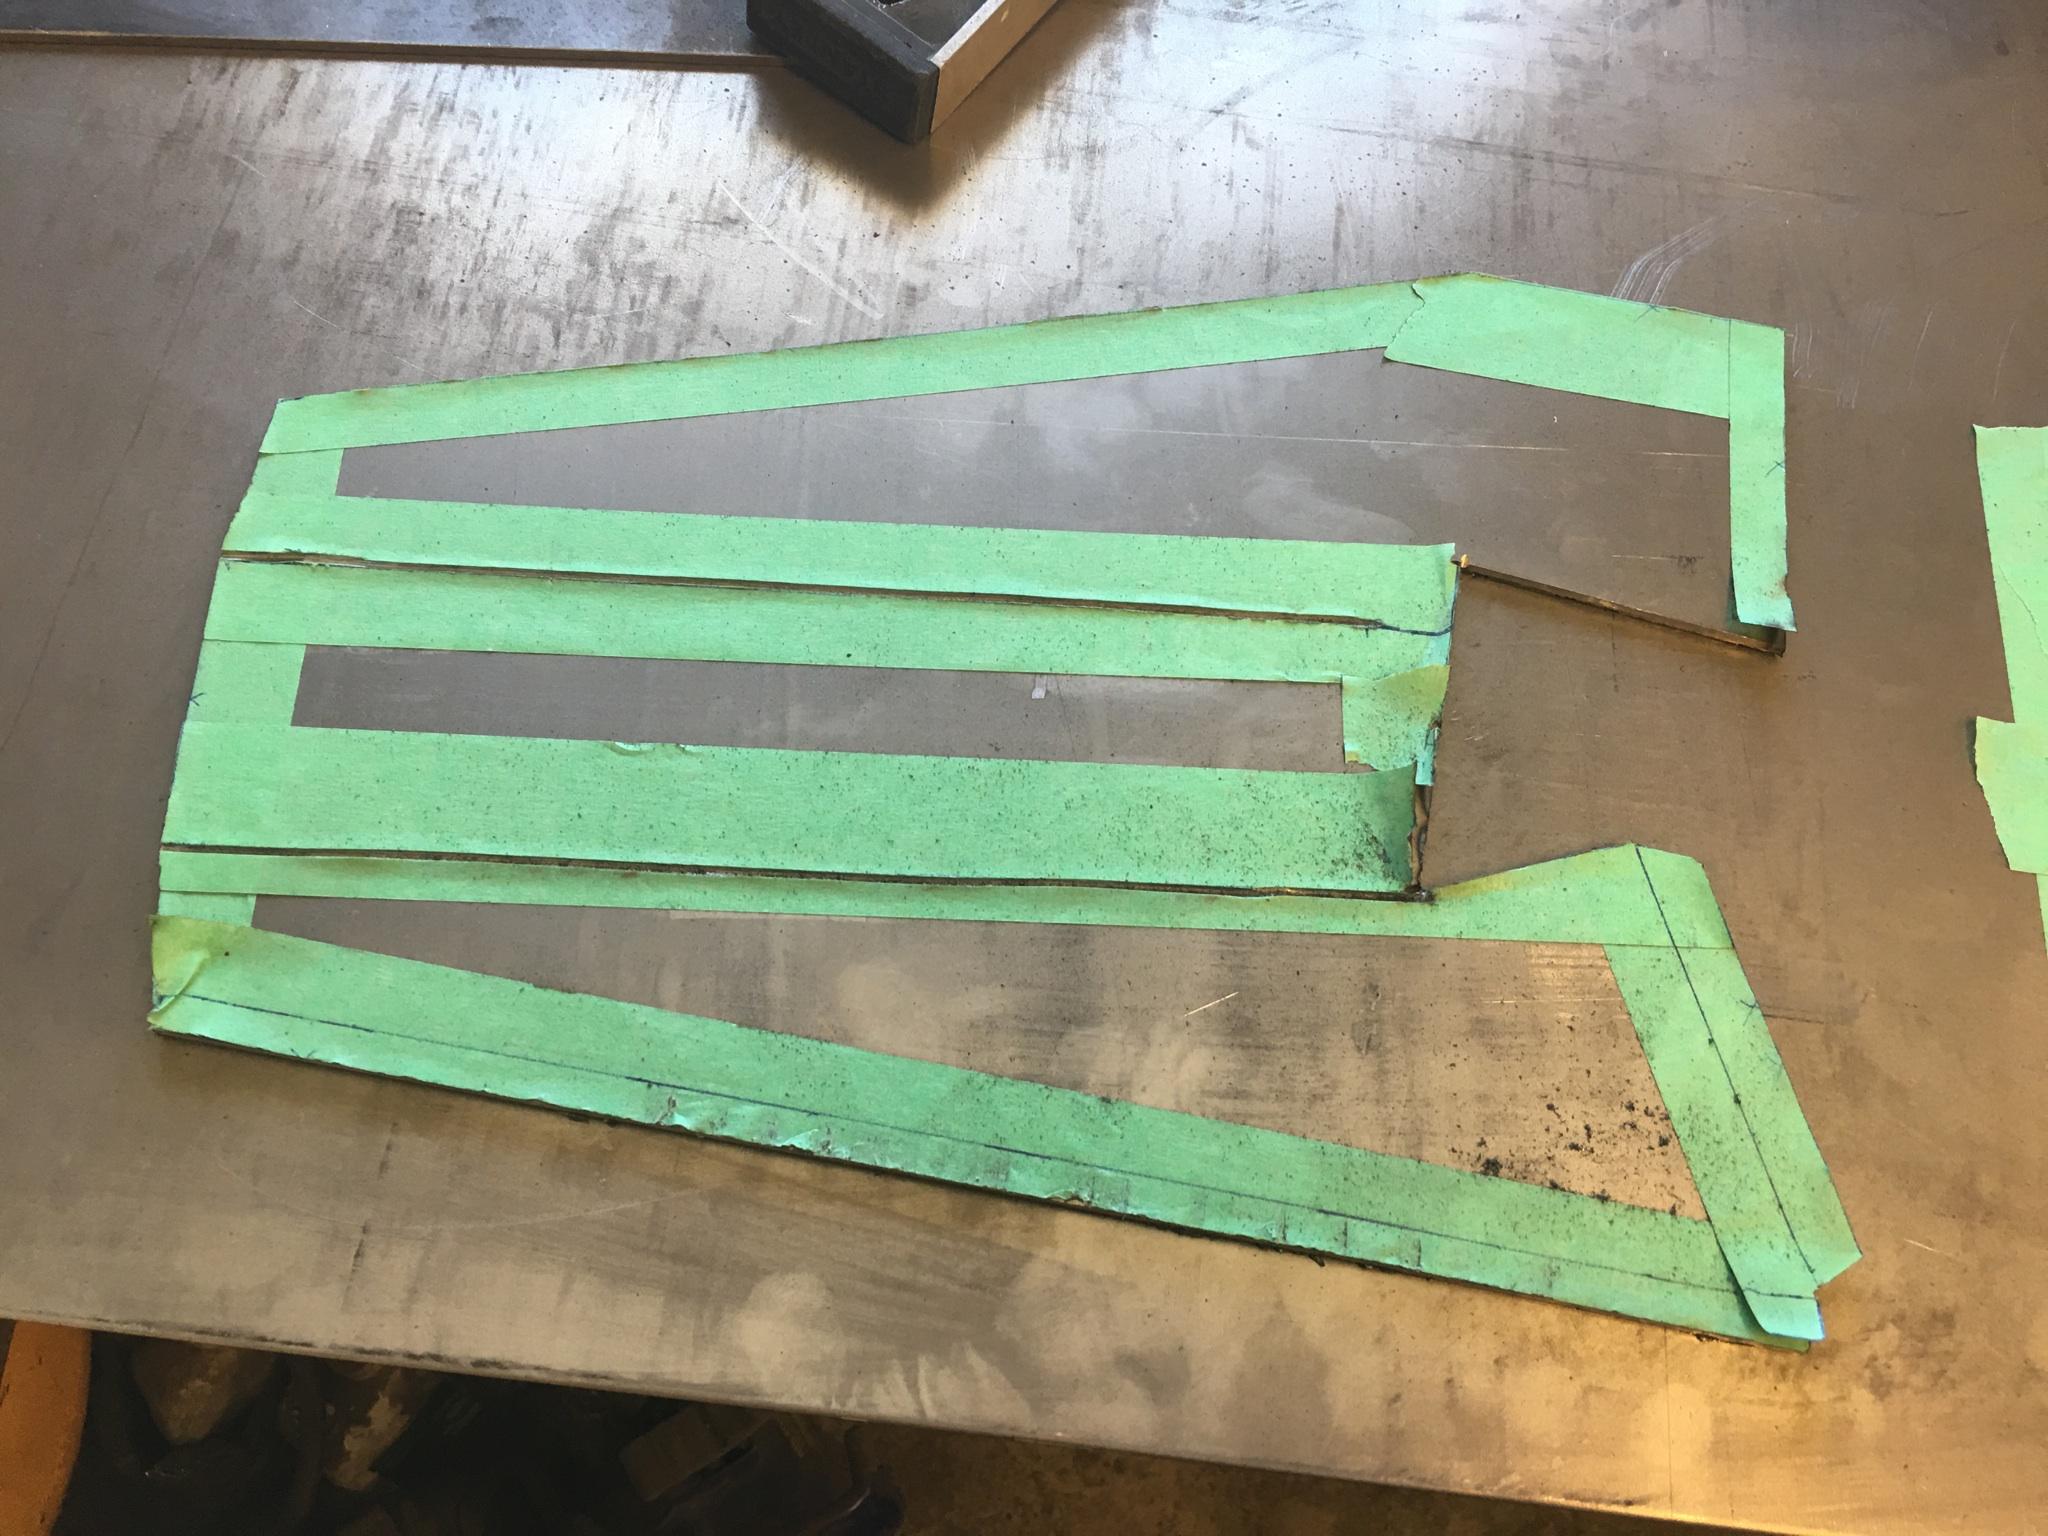
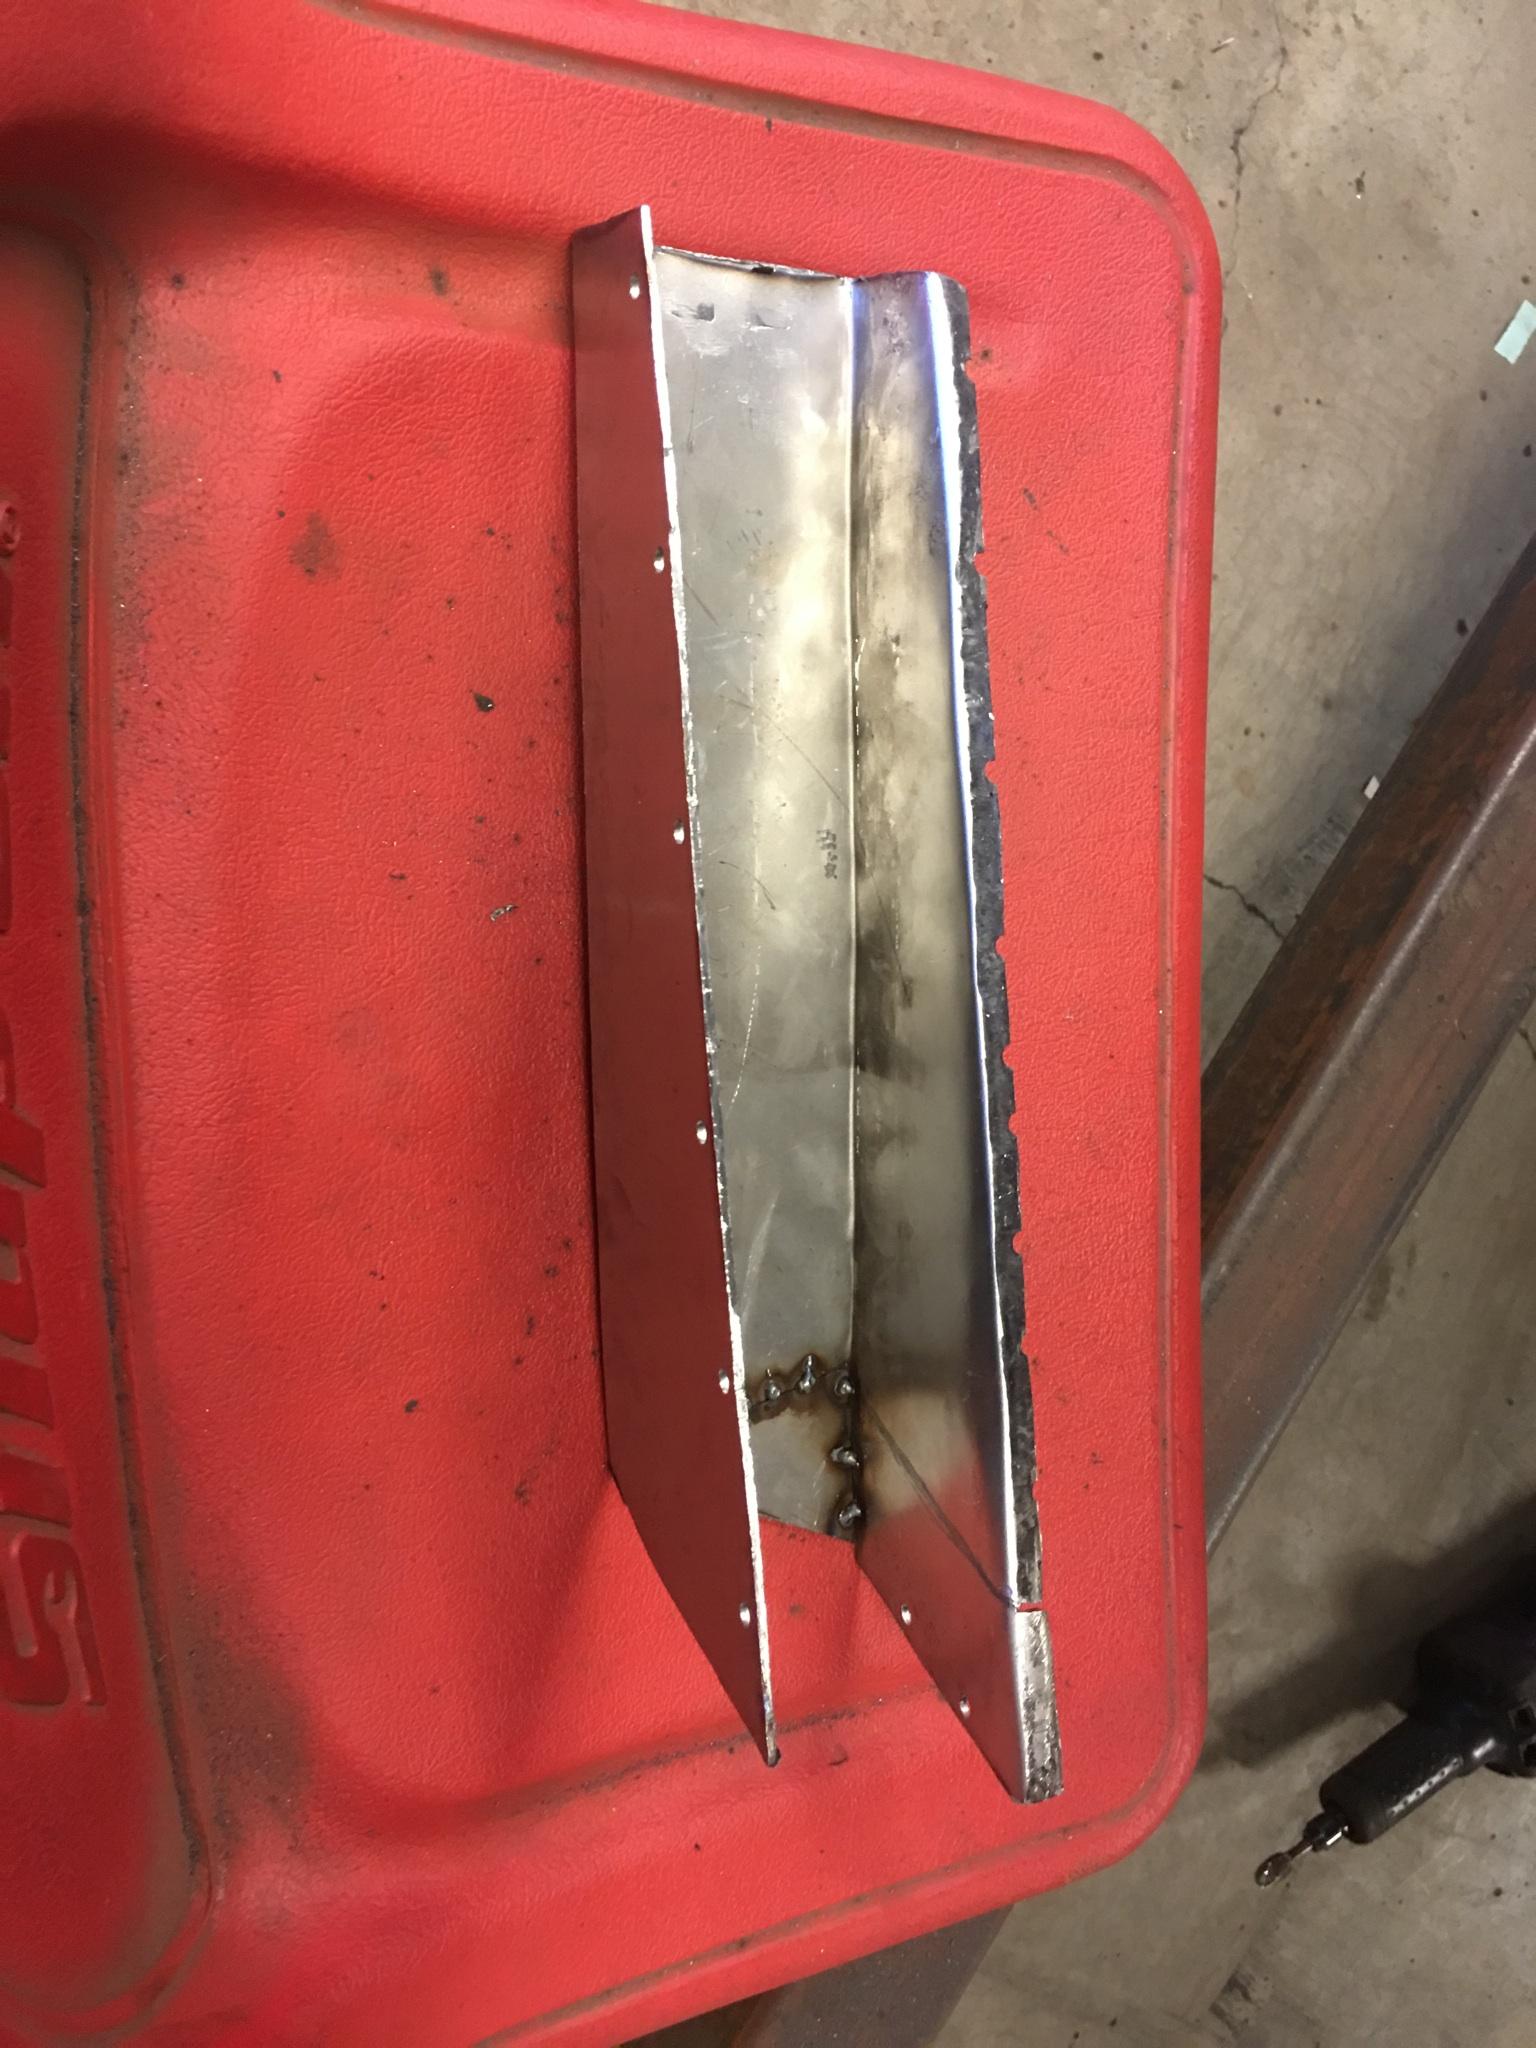
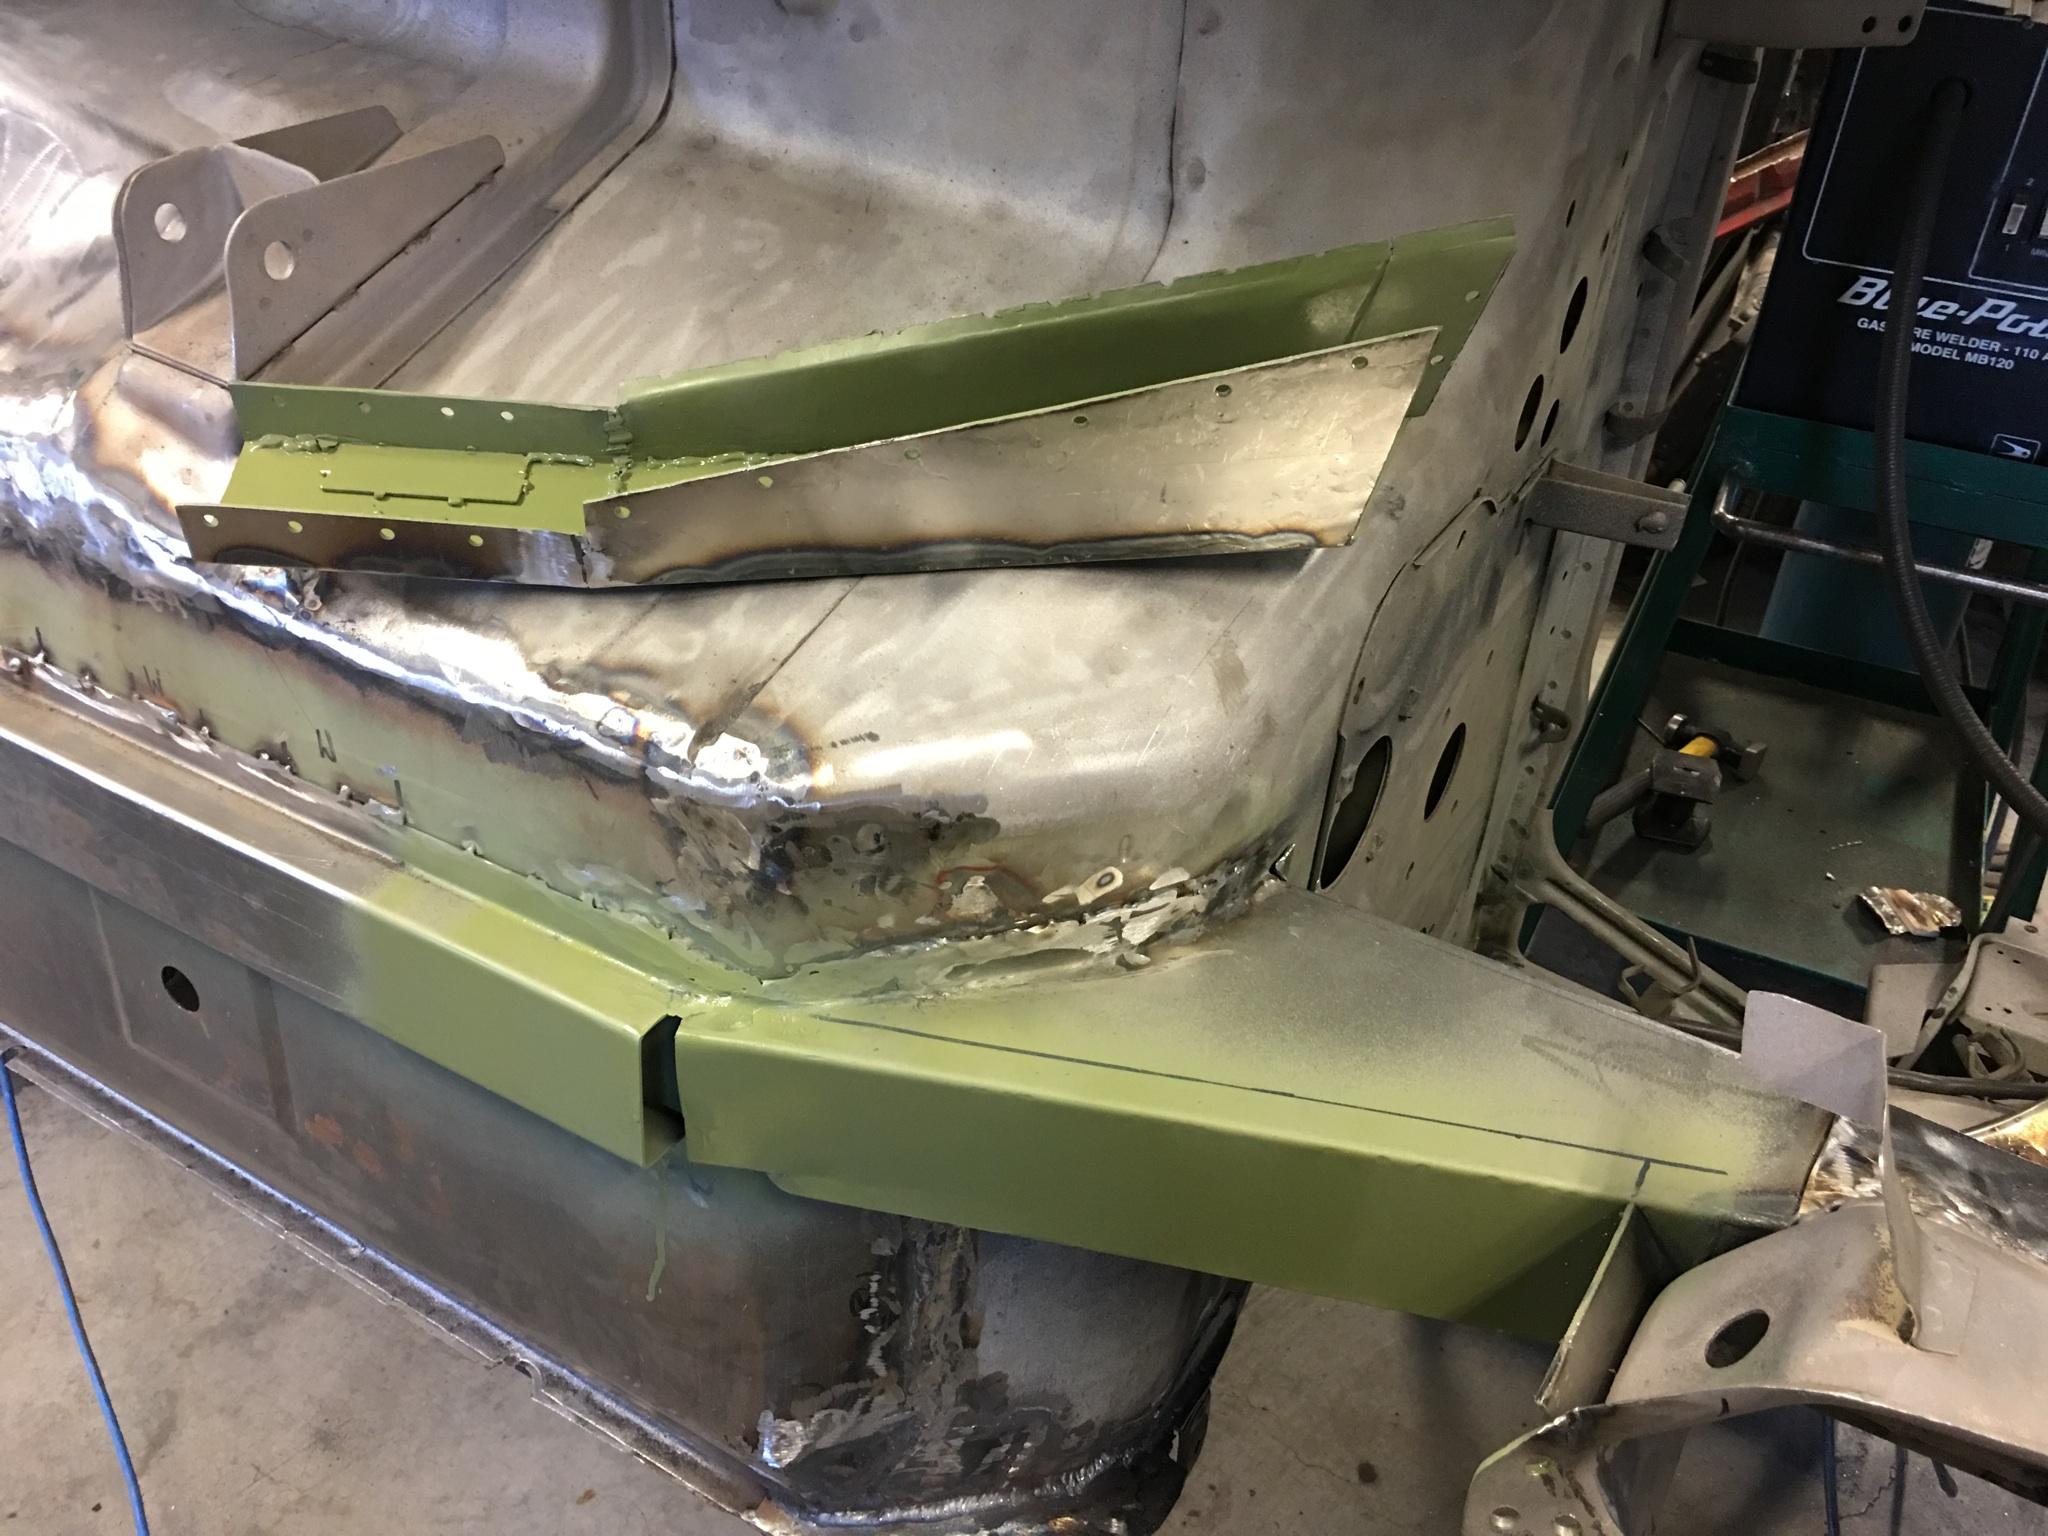
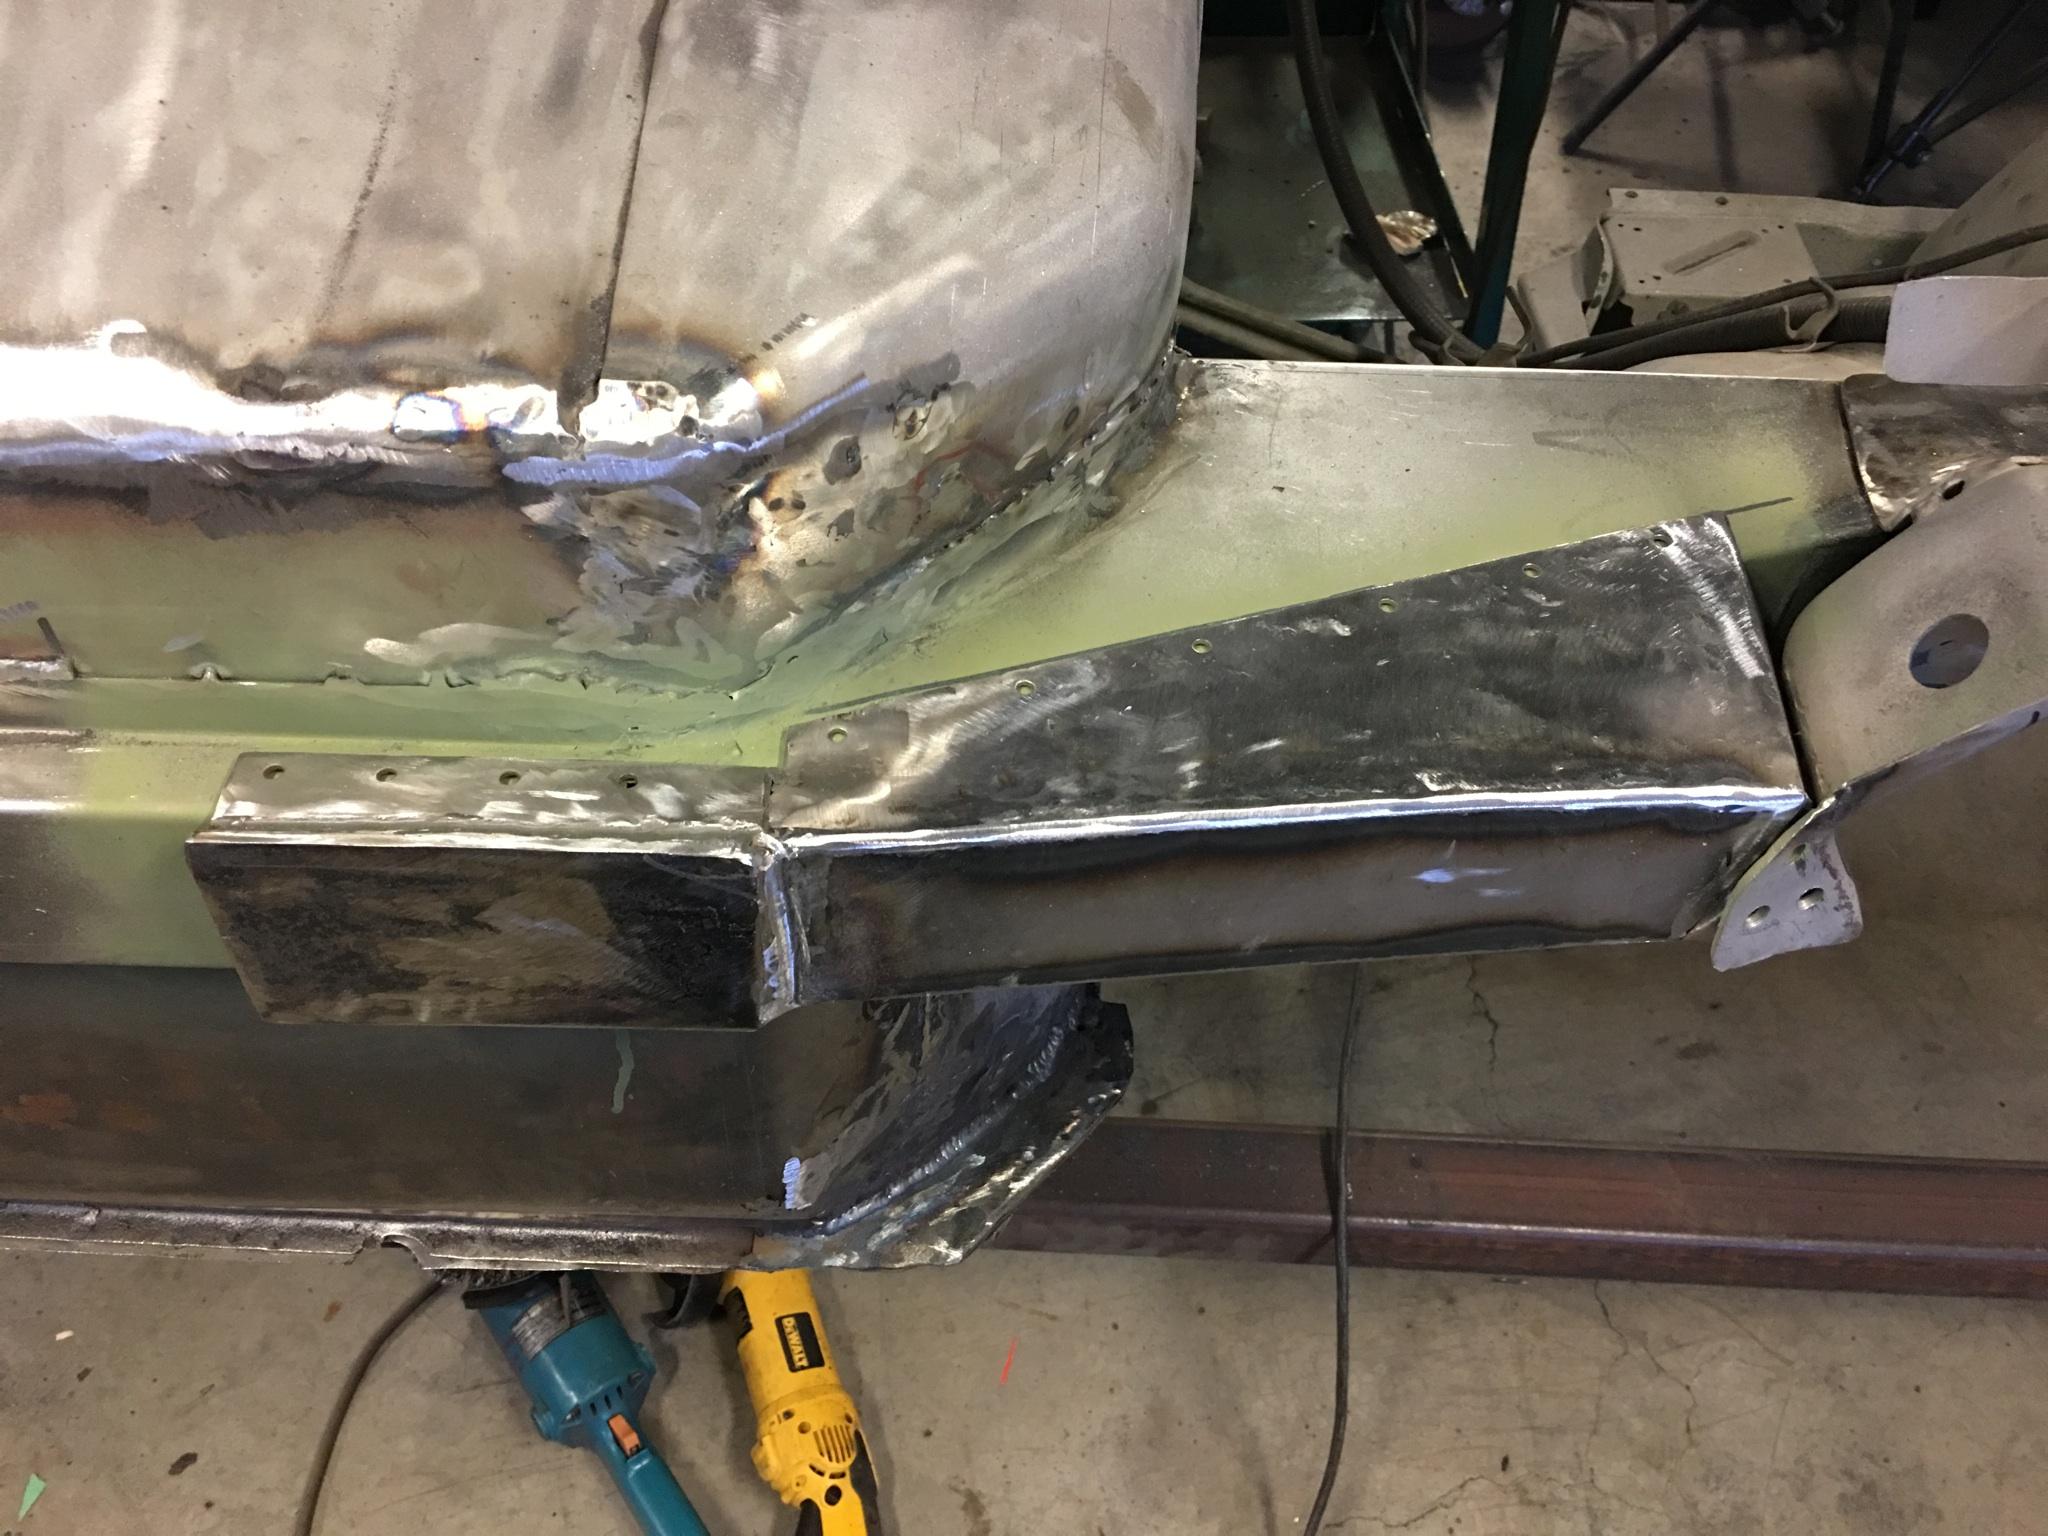
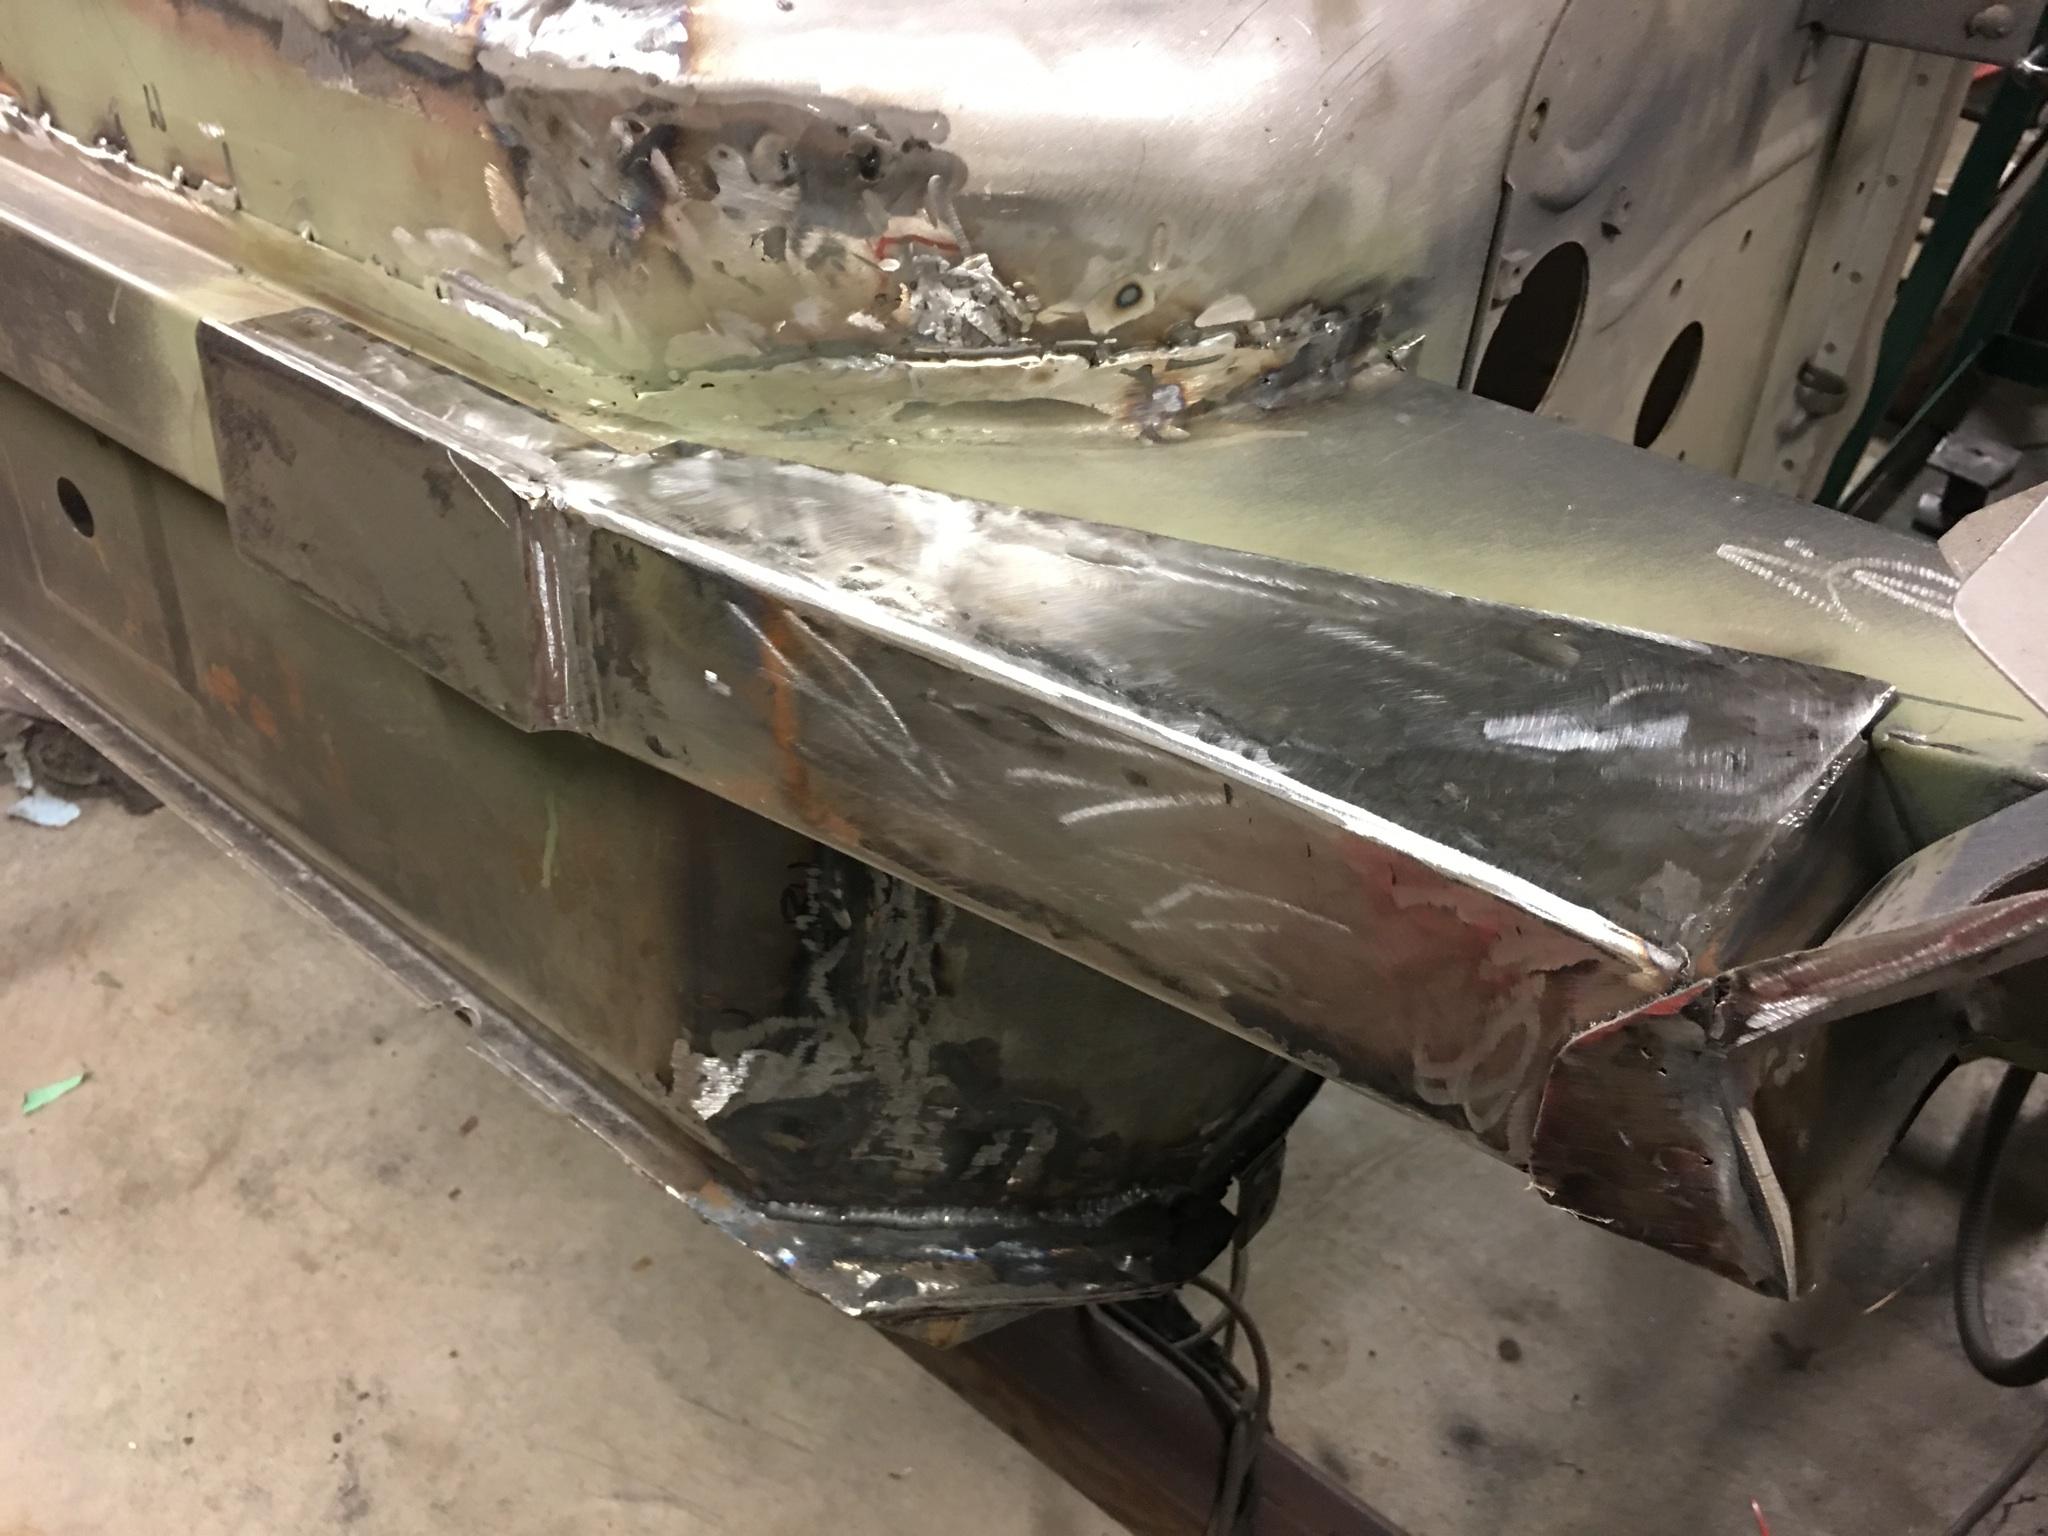
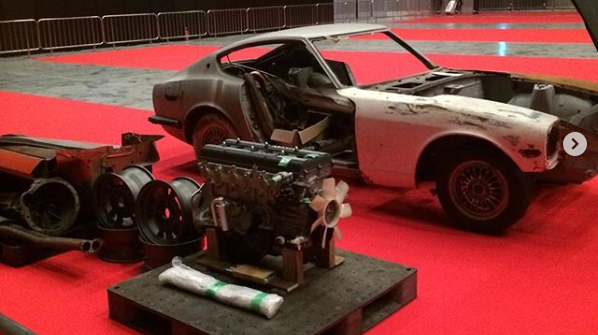 1 point1 pointThe winning bidder only placed on bid. I often wonder sometimes if the scammers bid on their own cars if the bid price isn't high enough. They win the car back, pay themselves to complete the eBAY transaction, then sell the car again under a new user name. Lot of tricks to scamming people out of their dollars. Maybe.......maybe not. When the ad's are questionable like this one, and the voice responses from the calls are sketchy too. Makes me wonder. JMO I just search for Datsun, you never know what category people list their cars and parts under. @197TZ patients pays off, you'll find the car thats right for you. Of course, feel free to check in here for good advise and insight. Collectively we have seen and bought a lot of cars. I found mine on Craigslist, but had look for about 8 months to find the one that I was comfortable with and could afford.1 point1 point@Kats take a look at this, Sent from my iPhone using Classic Zcar Club mobile1 point1 point1 pointI noted that the other 432 in the auction was fitted with the same reproduction KS 'Rally Mag' wheels too. Personally speaking, I don't think this kind of high profile 'showbiz' type auction is suited to the automotive world in Japan. When you buy one of these cars, everyone knows what you have paid. That's not a good thing for many Japanese enthusiasts. In my experience, they would usually prefer to keep that information away from their wife/family/work colleagues/friends...1 pointupper quarter window seal used on the 69-73 240z I have 2 in stock https://www.240zrubberparts.com/apps/webstore/products/show/44234161 point1 point1 pointThis section has no aftermarket parts available. You will need to fabricate the section between the front rail and floor pan rails.
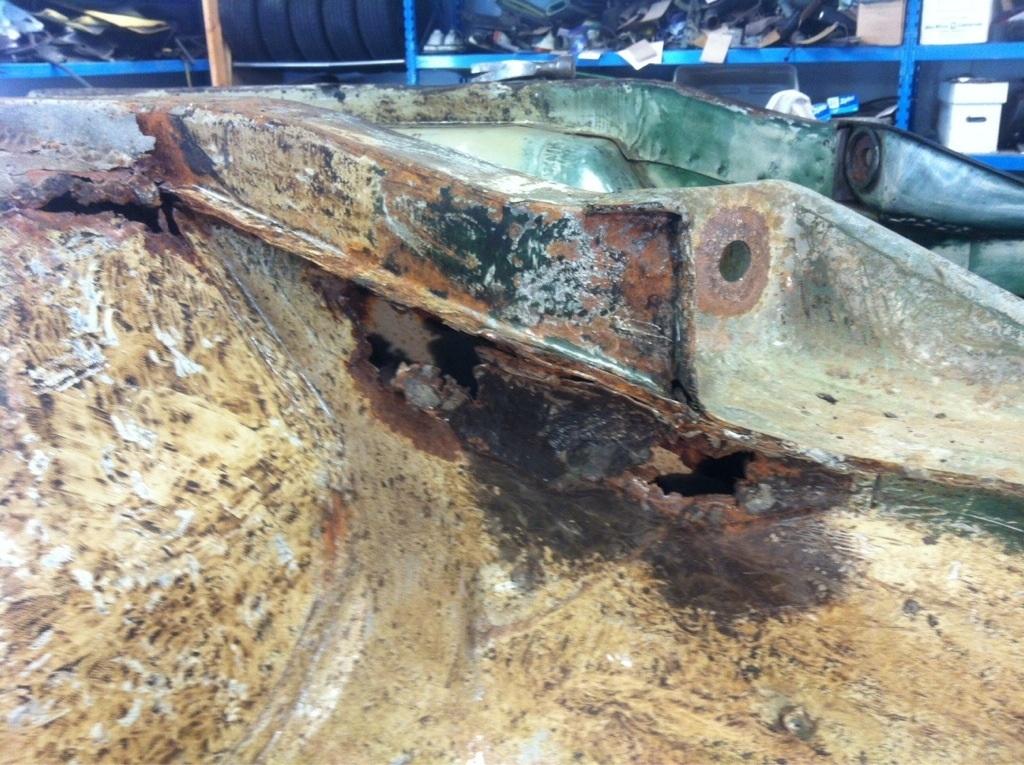


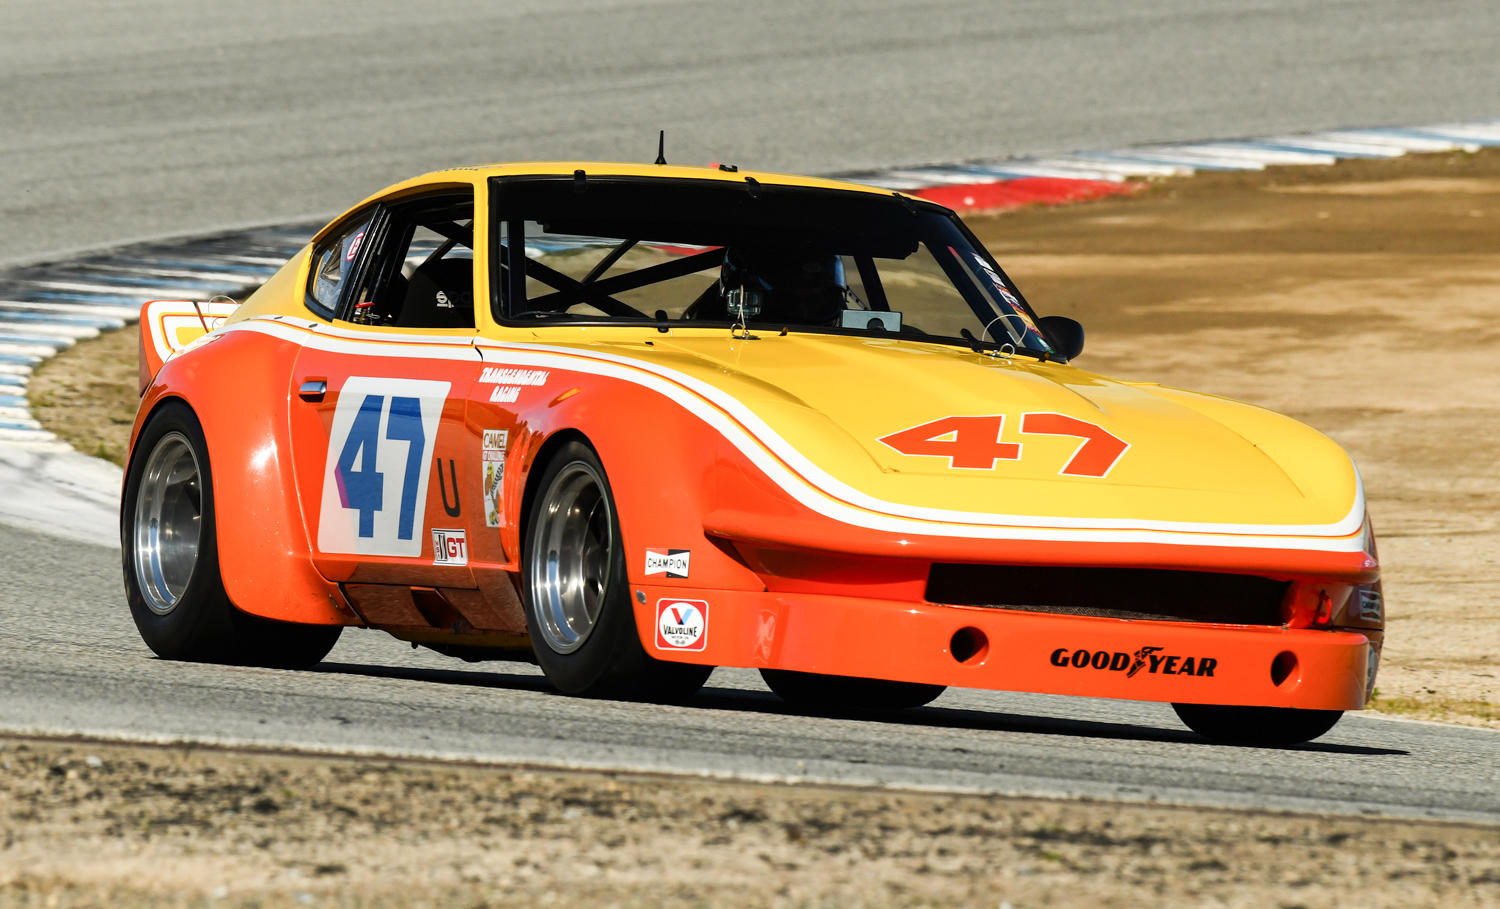
 1 point1 point1 point1 pointFrom Vintage Racecar, here's an article on the IMSA racing icon (photo credited to Dennis Gray) https://vintageracecar.com/frisselle-and-the-z
 1 point1 pointAgreed these shops are just glorified car flippers, with a thesaurus of adjectives to describe the cars they flip. I am sure they will offer to help you with financing, and perhaps offer to sell you an extended warrantee. Personally I'd steer clear. JMHO1 point1 pointCurrently no updates on the Z since it's still in winter sleep . When I take it out again it needs APK ( 2 yearly technical condition check from goverment for all motorvehicles ). Also then will give it some new oil and filter and the valves need adjustement. I'm planning on rebuilding the 4 speed in the future, since it has never had a rebuild since it came out of the factory, and I do feel slight vibration into the shifter and in the steering wheel I think the gearbox has something to do with this, since I eliminated everything else. Does anyone have a good adress for this here in West Europe ? Or The Netherlands ? Also good news from the RDW here ( Goverment Vehicle Departement ): currently the APK rules no longer apply for vehicles before 1 januari 1960, but in 1 or 2 years this will be changed to 50 years and older ( 50 years barrrier moves with time.. ). So this means my Z and the Mustang who are near 50 years old will no longer need that 2 yearly road check. It's a big relief for other classic car owners aswell I think... Another update: The Mustang is done, and I'm waiting for spring to arrive to give it also APK and get it on the road, then I can start adjusting the ignition and carburetor. I also installed a 12v vacuum pump + Canister to assist the brakes, since the engine wasn't pulling enough vacuum ( familiar problem with big cams ) to operate the booster. Also did a rebuild on the floor shifter, feels solid again :) . When I was breaking in the new cam ( had to replace valve springs afterwards for the stiffer ones from the camshaft kit ), I heard the drivers side exhaust leaking. Was a pain in the arse to take it off, but eventually got there, and found the header flange was missing some material on the number 8 exhaust port for sealing. So I welded it up and leveled the flange again, put new thicker gasket in between and now it's sealed thankfully. Also better copper gaskets between the headers and exhaust, This build was a pain ( took about 2 years from engine out, sourcing parts in the US and back in ), since space is so tight on everything, compared to the Z's engine bay space, this thing is a hell to work on ! During the cam break in, I noticed dash gauges not working, eventually took the whole god damn dash out to eventually find with a multimeter it was just a bad contact in a connector I could acces near the gas pedal lol. To bad for American Autowire quality ?! WTF no water proof connectors ?! Here's some pictures ( video will follow later, having some troubles uploading )1 point1 pointHey Kats, Is this your overflow bottle? https://page.auctions.yahoo.co.jp/jp/auction/w275317099 21515-E4201 Not cheap at $952.38 USD buy it now price.1 point1 pointI see these guys at most of the car meets here. Super friendly guys who are very passionate about what they do.1 pointThanks for the input all. Maybe this is the quick fix that I was praying for, and I can get back to enjoying the car instead of trying to remedy gremlins. Now I am looking forward to the spring so I can test and trial.1 pointManaged to get all the seals replaced, pretty easy for me to get the screws out and everything went smoothly. Thanks again!1 point1 pointPretty hard to get a feedback rating this low. I've never seen one that bad. And they have 496 transactions. Beware.
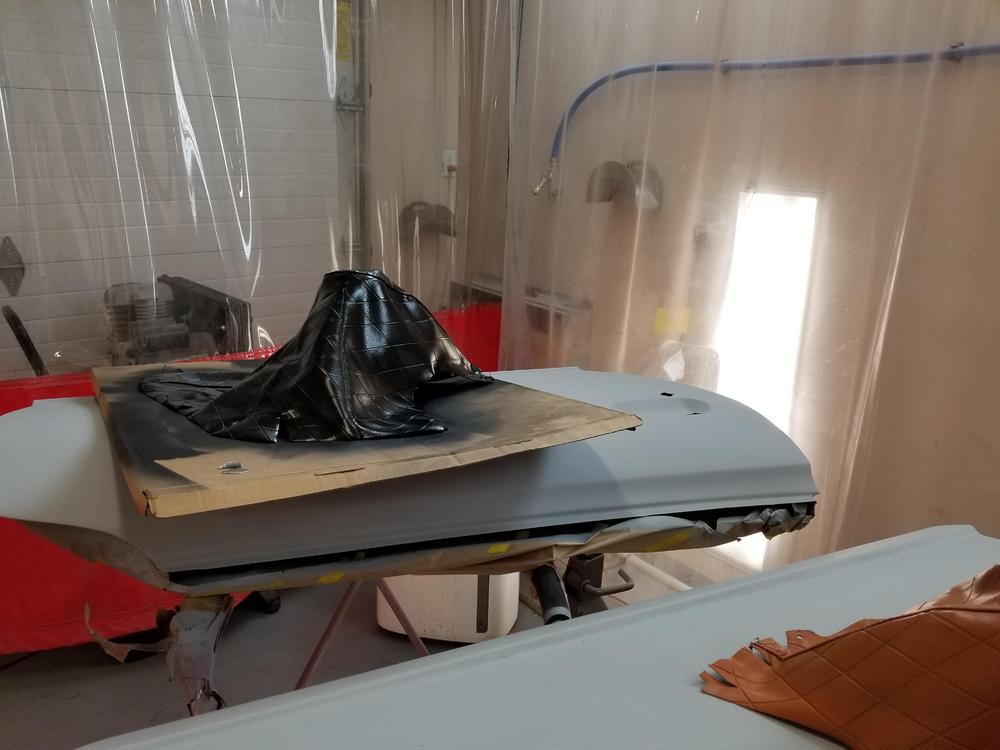
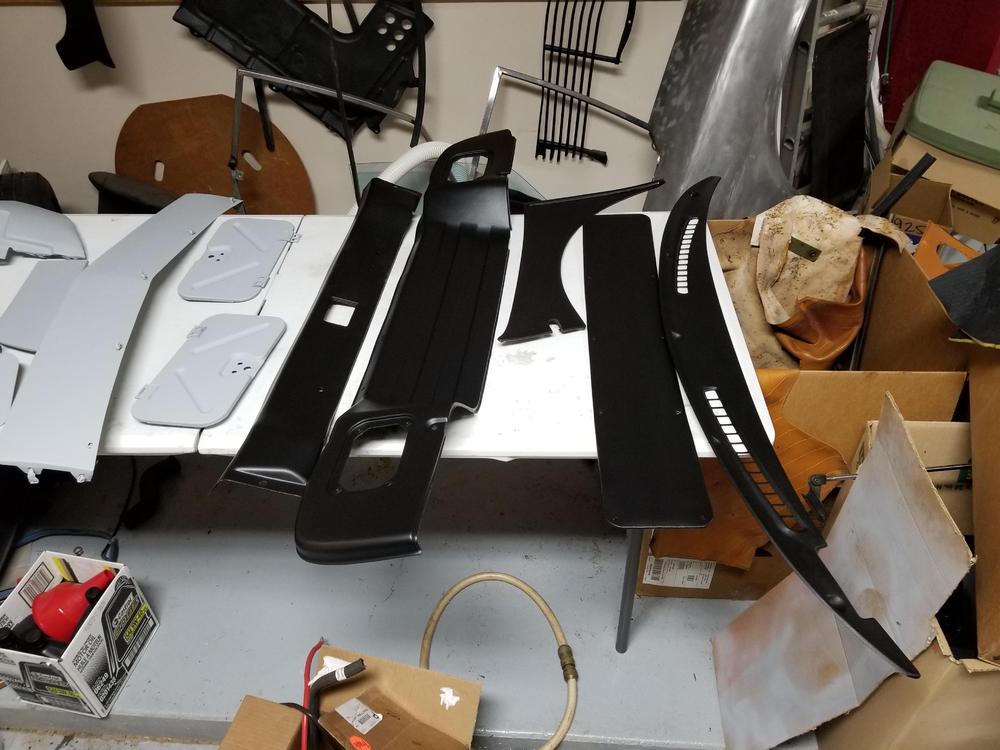
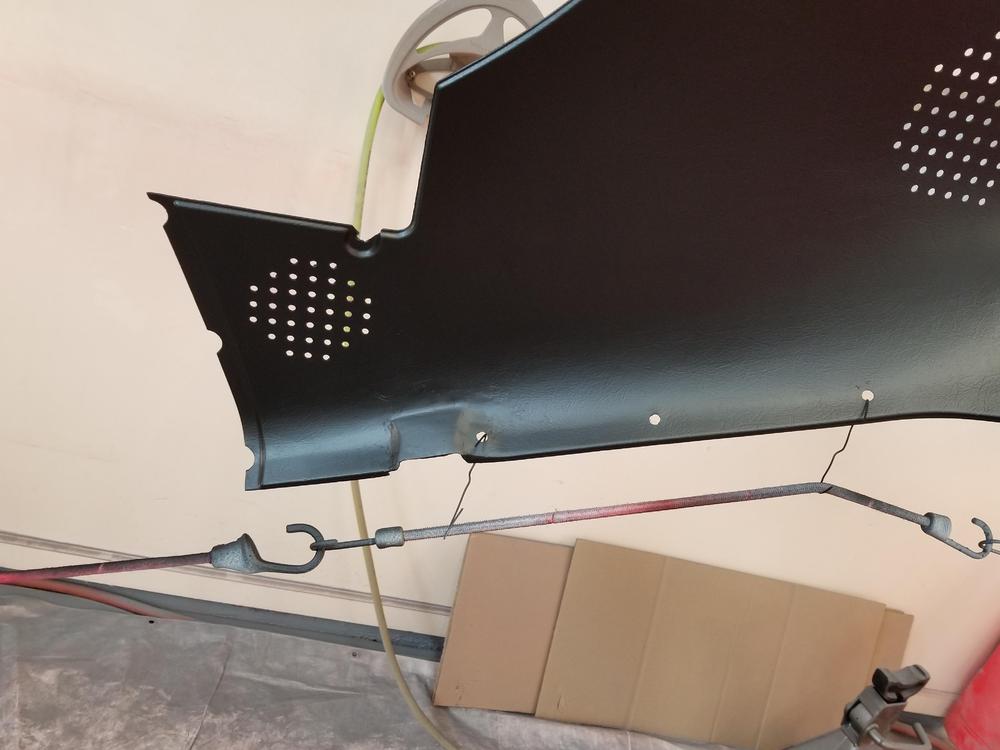
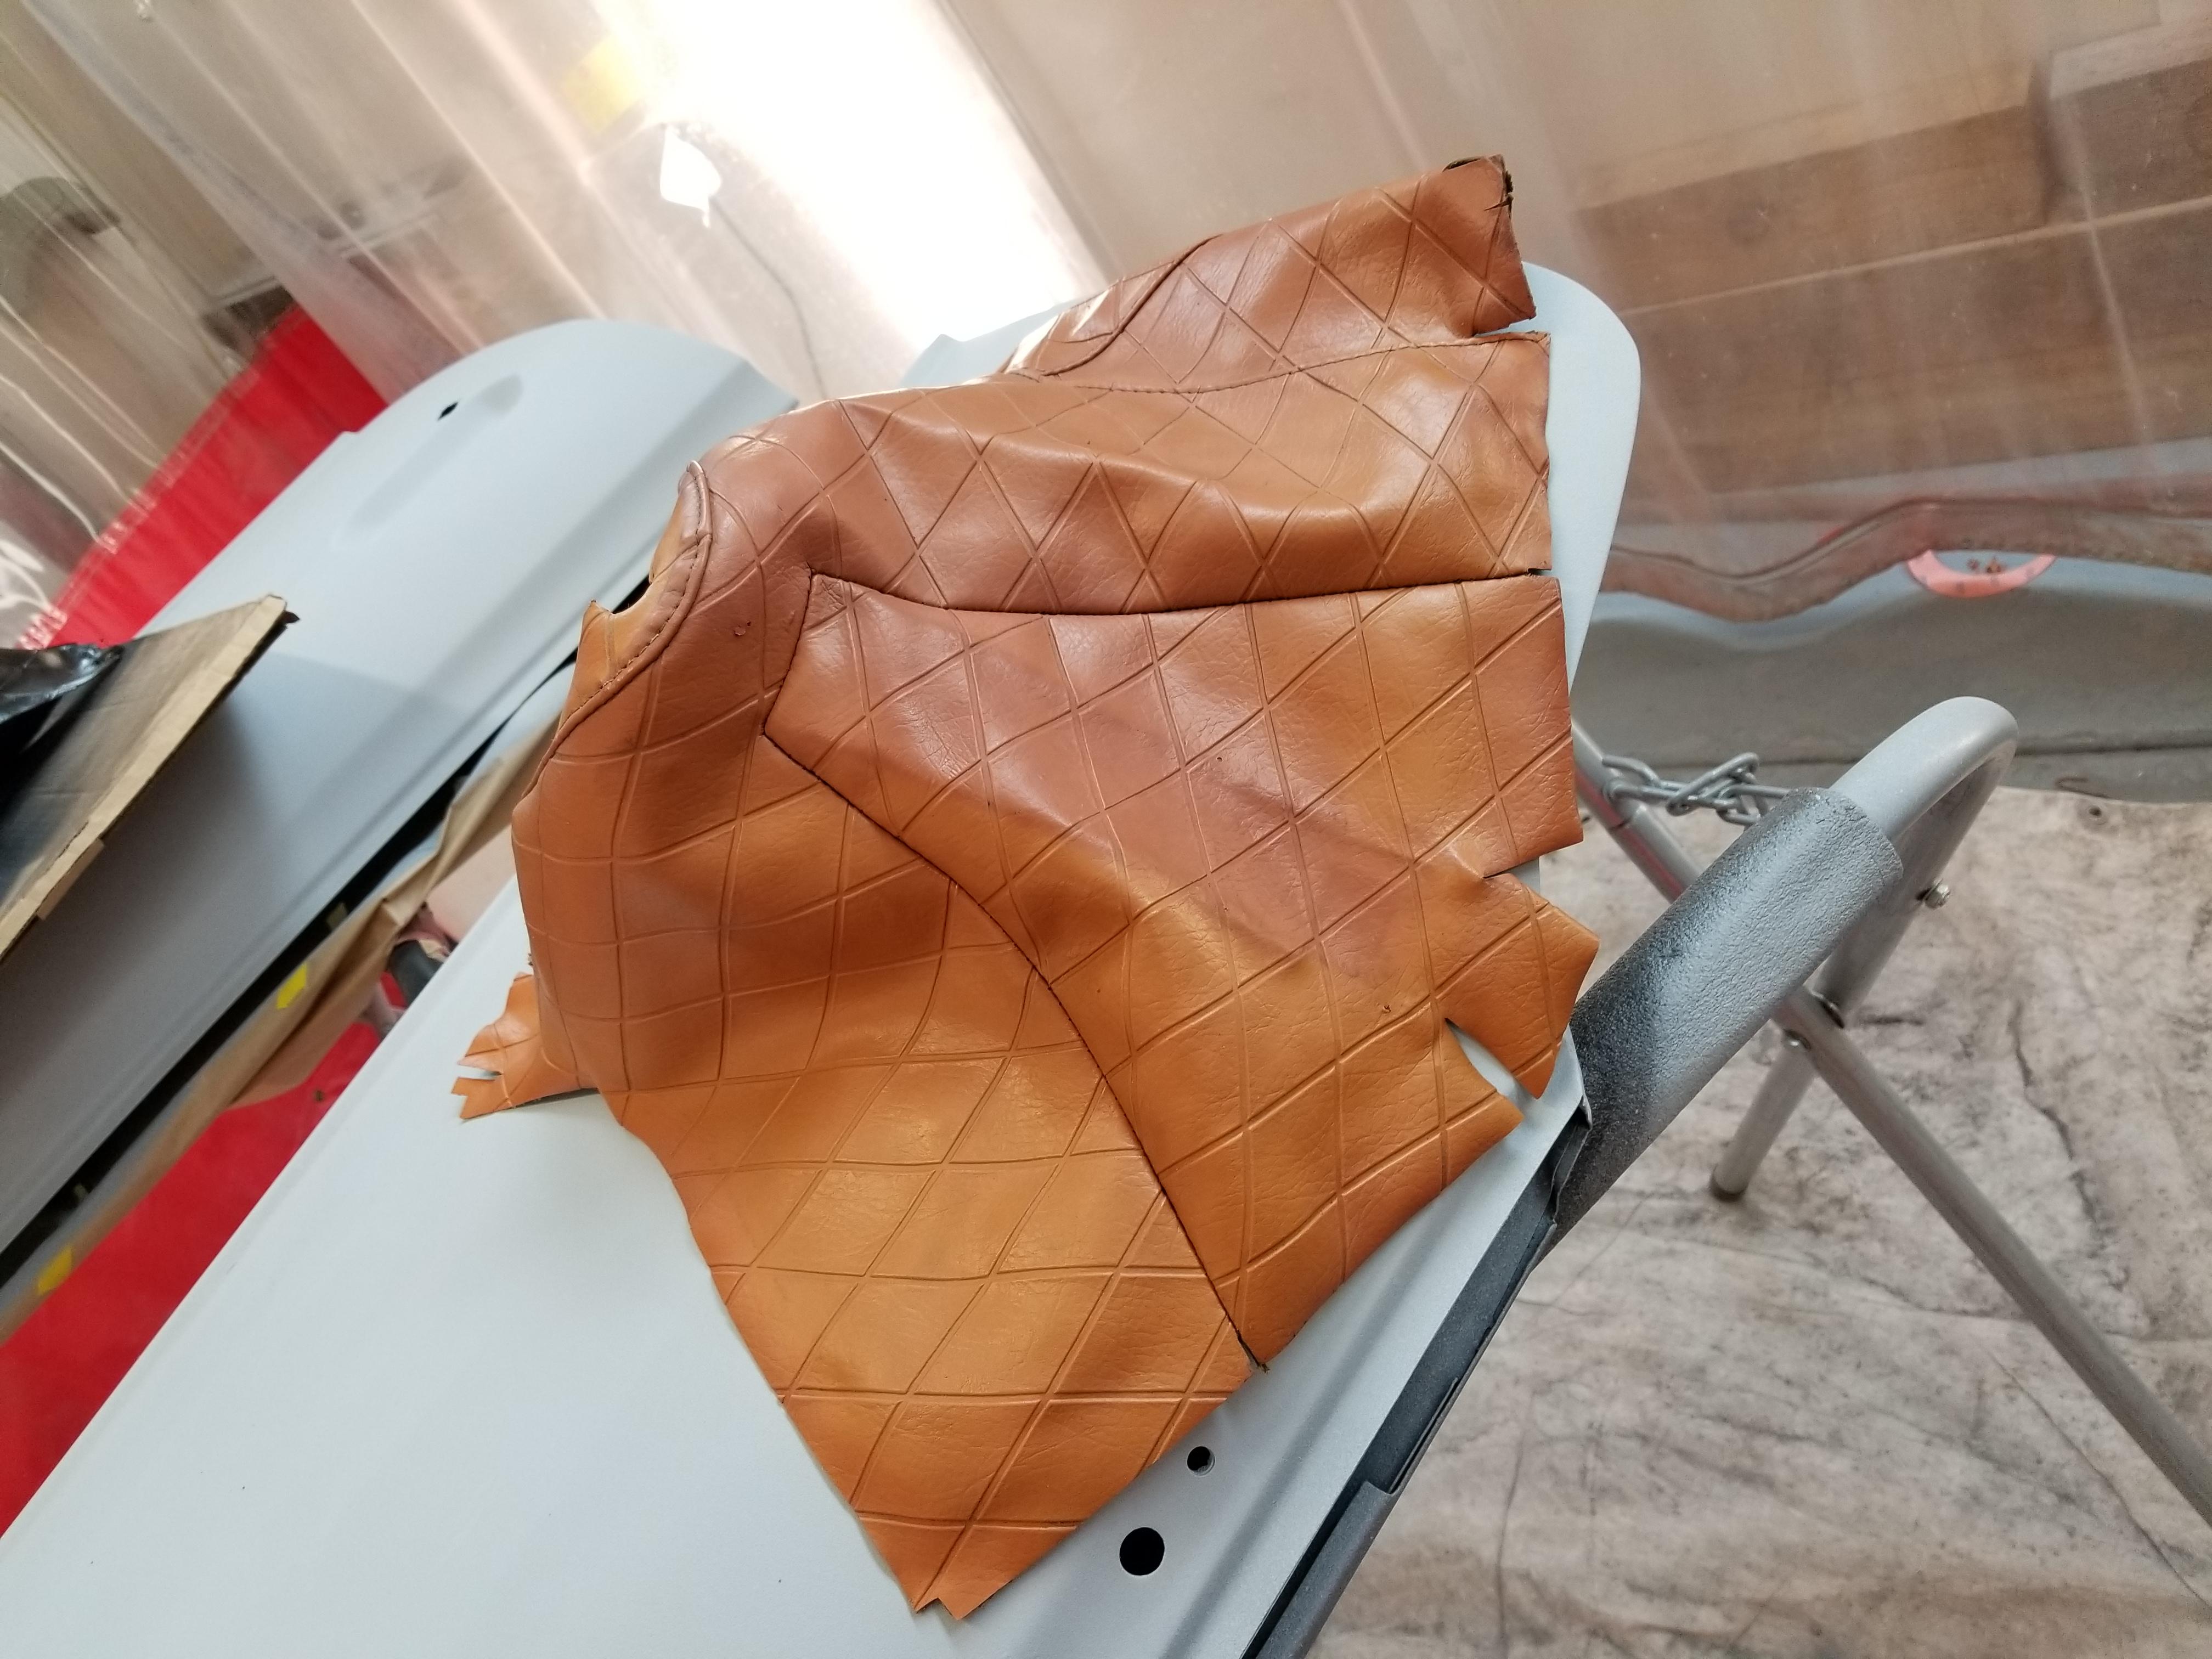
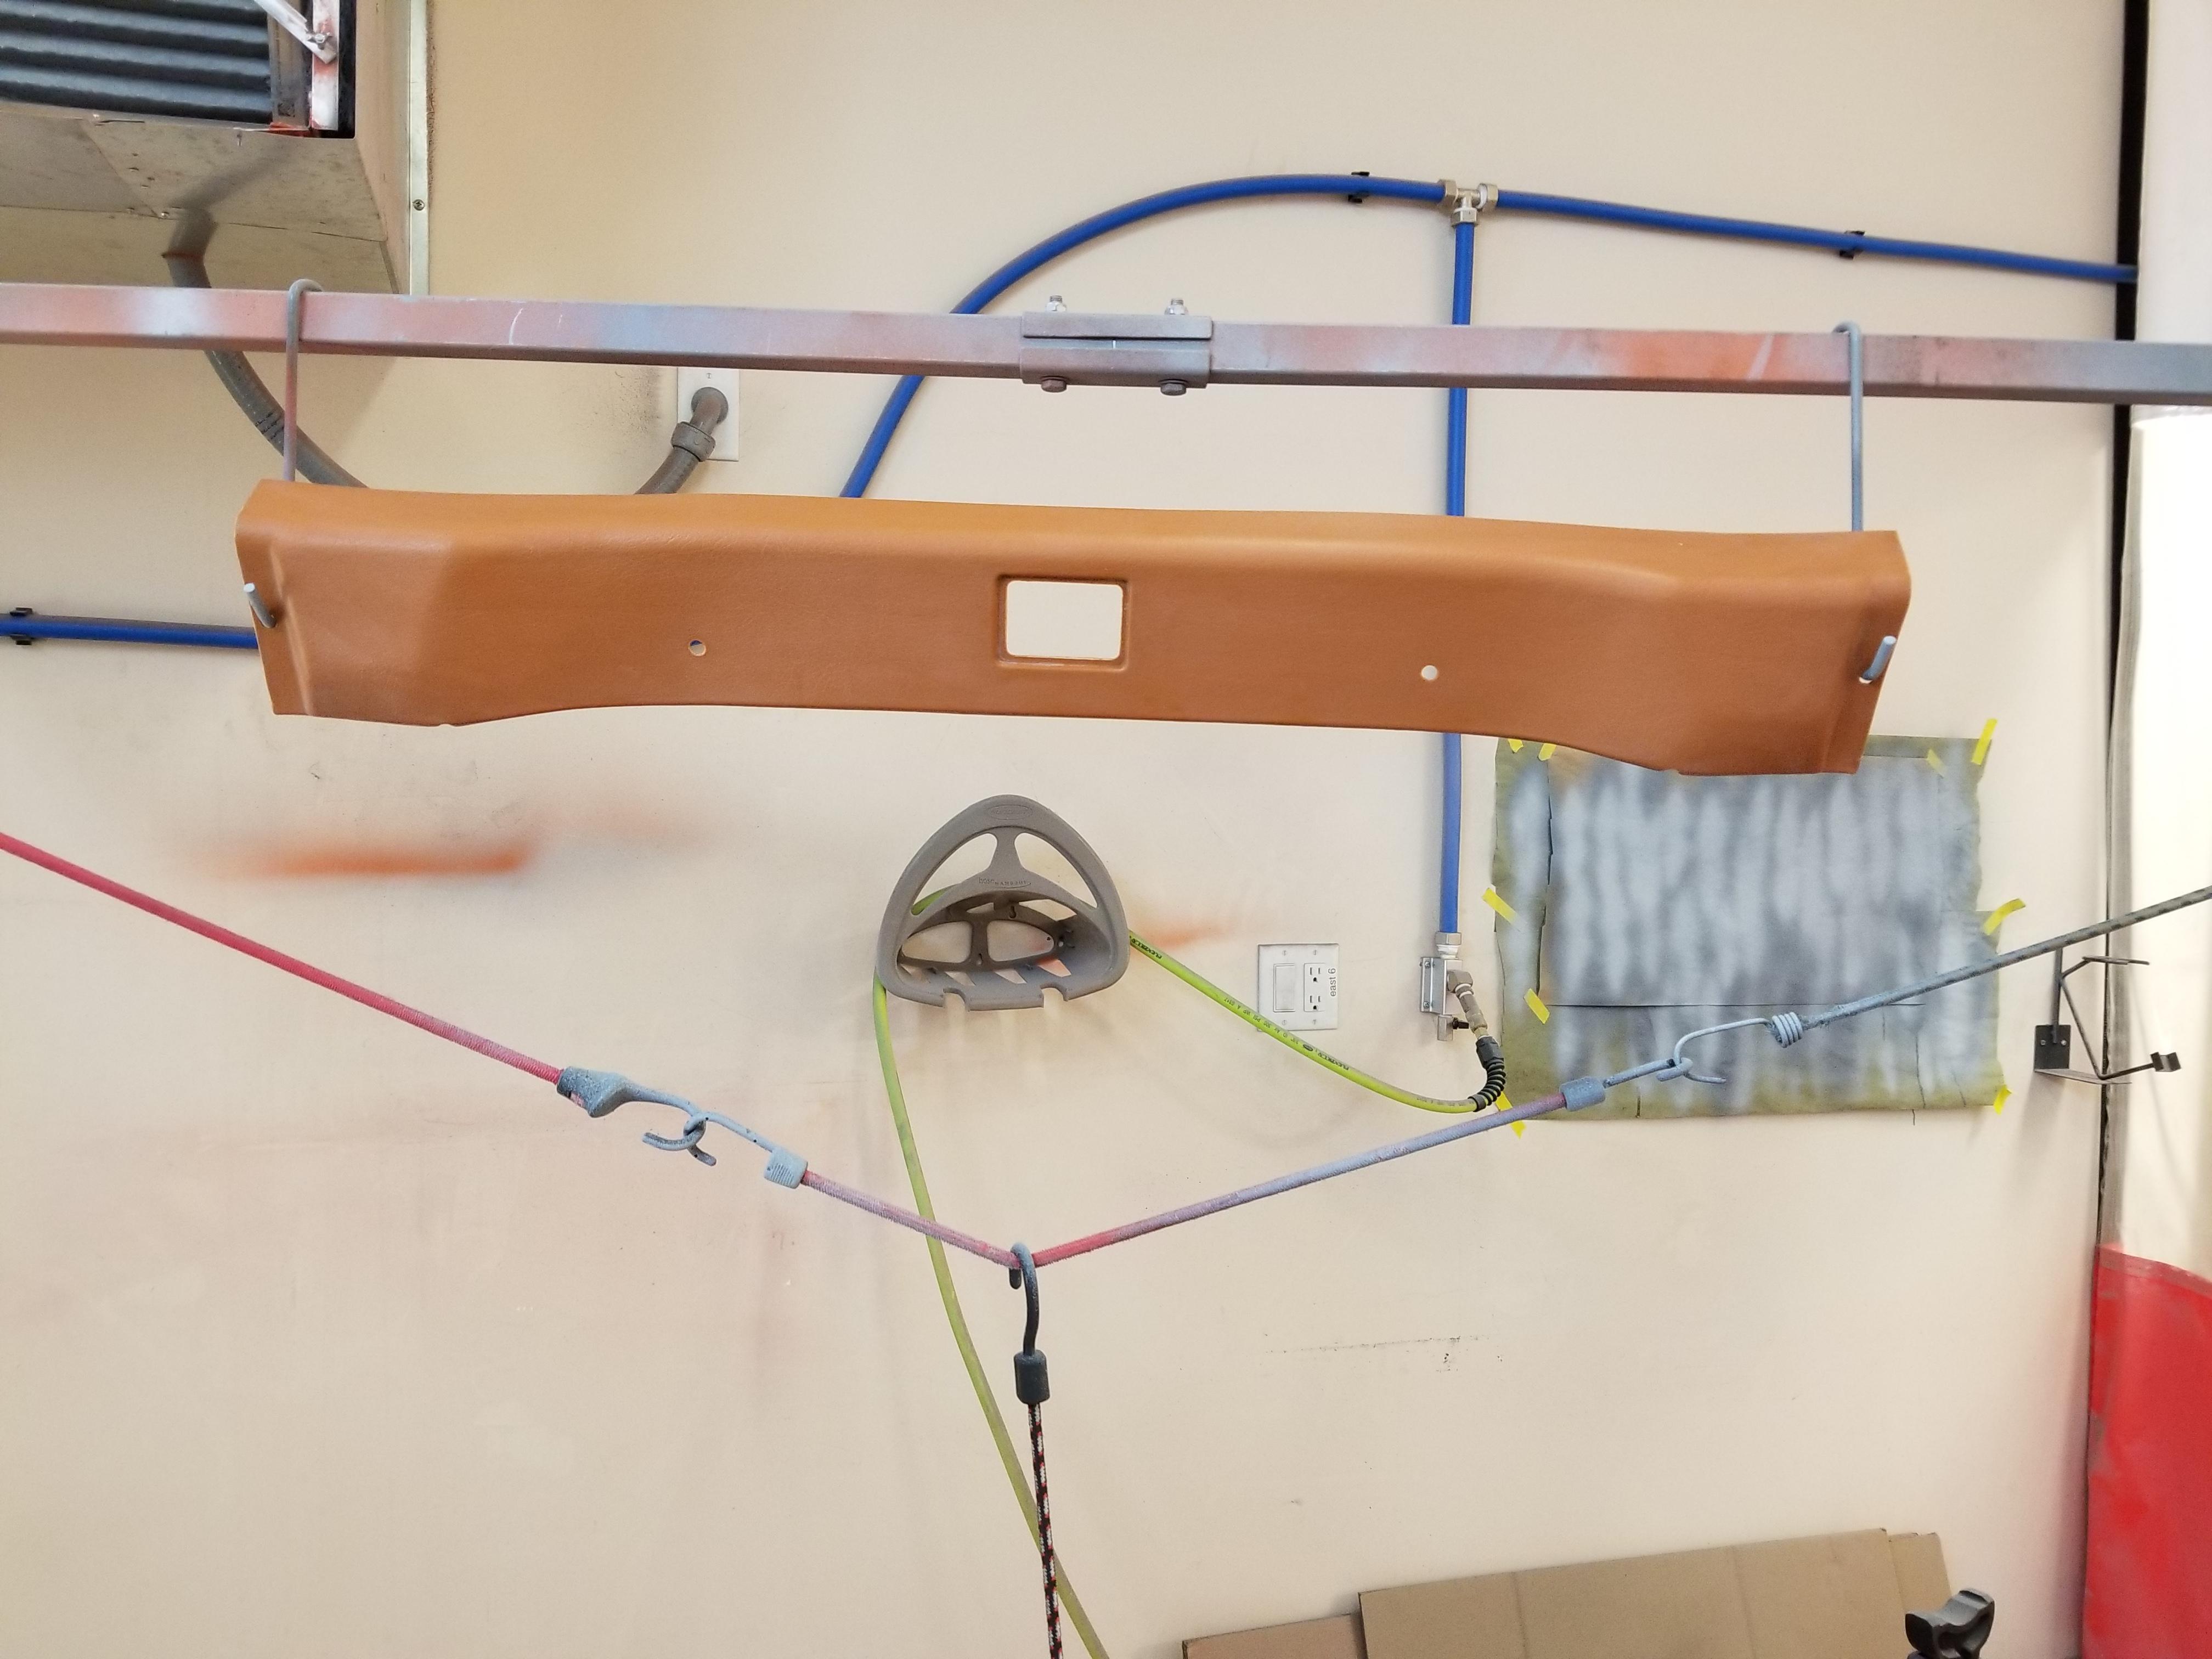
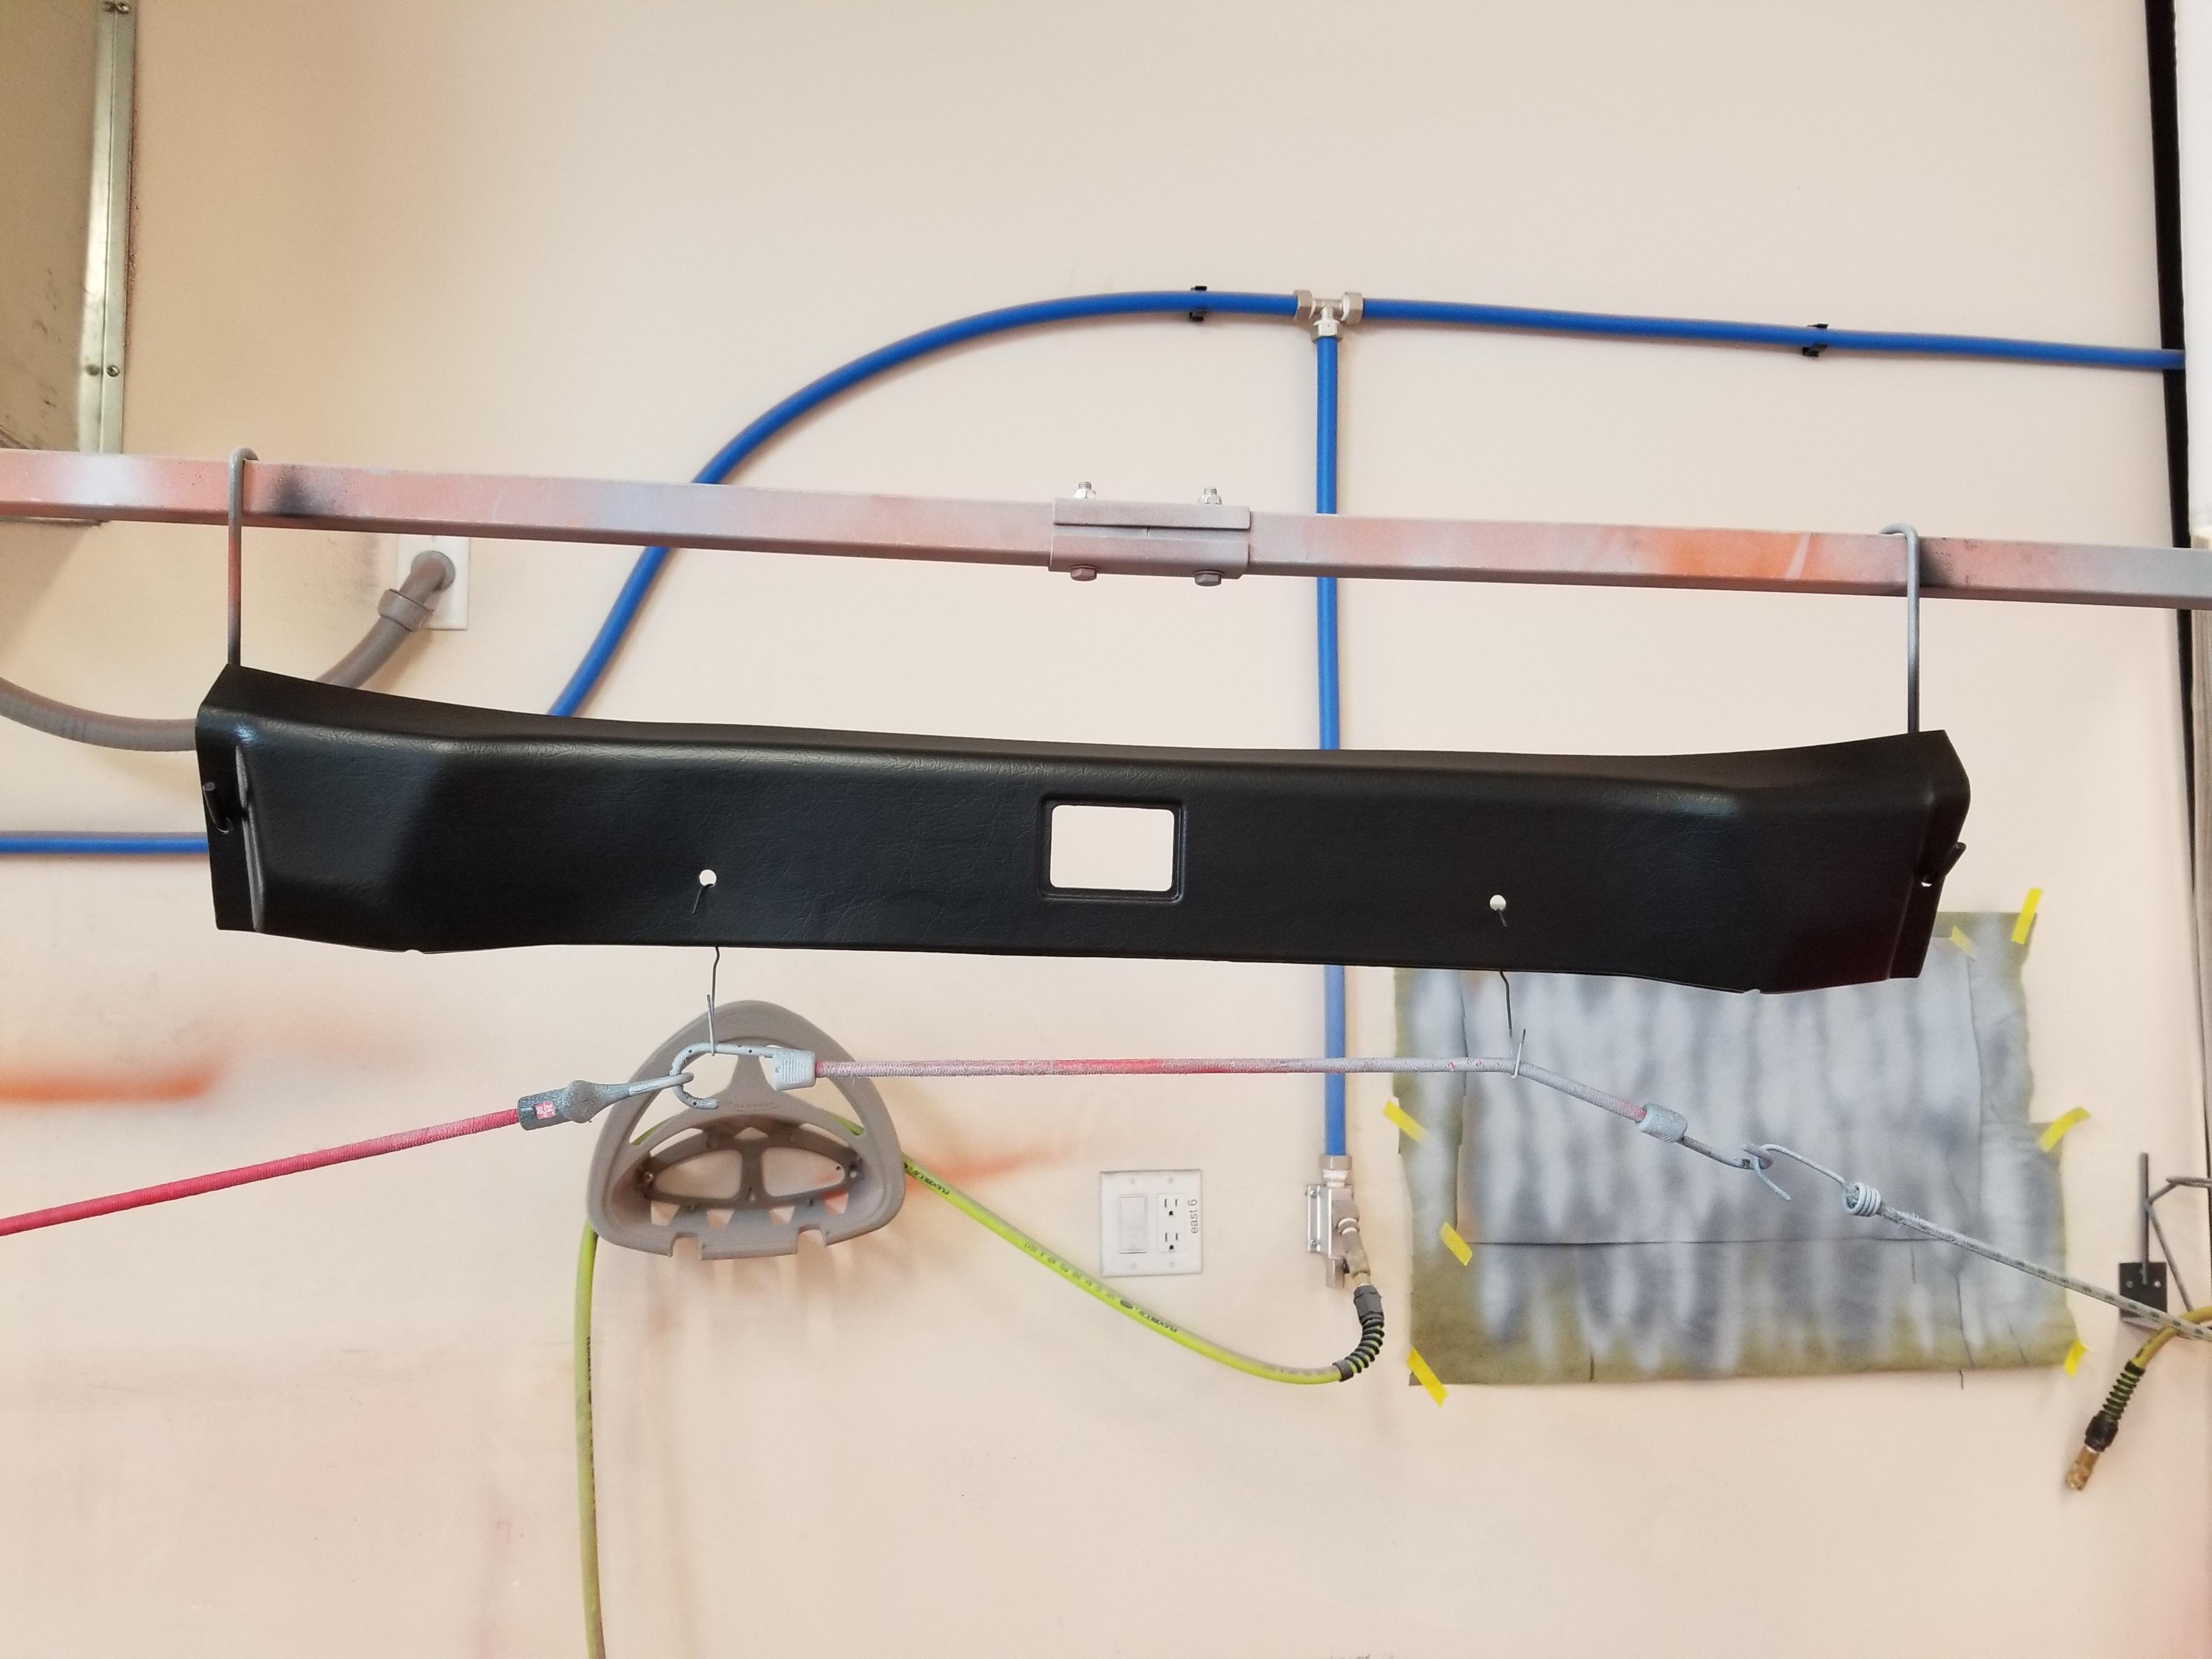
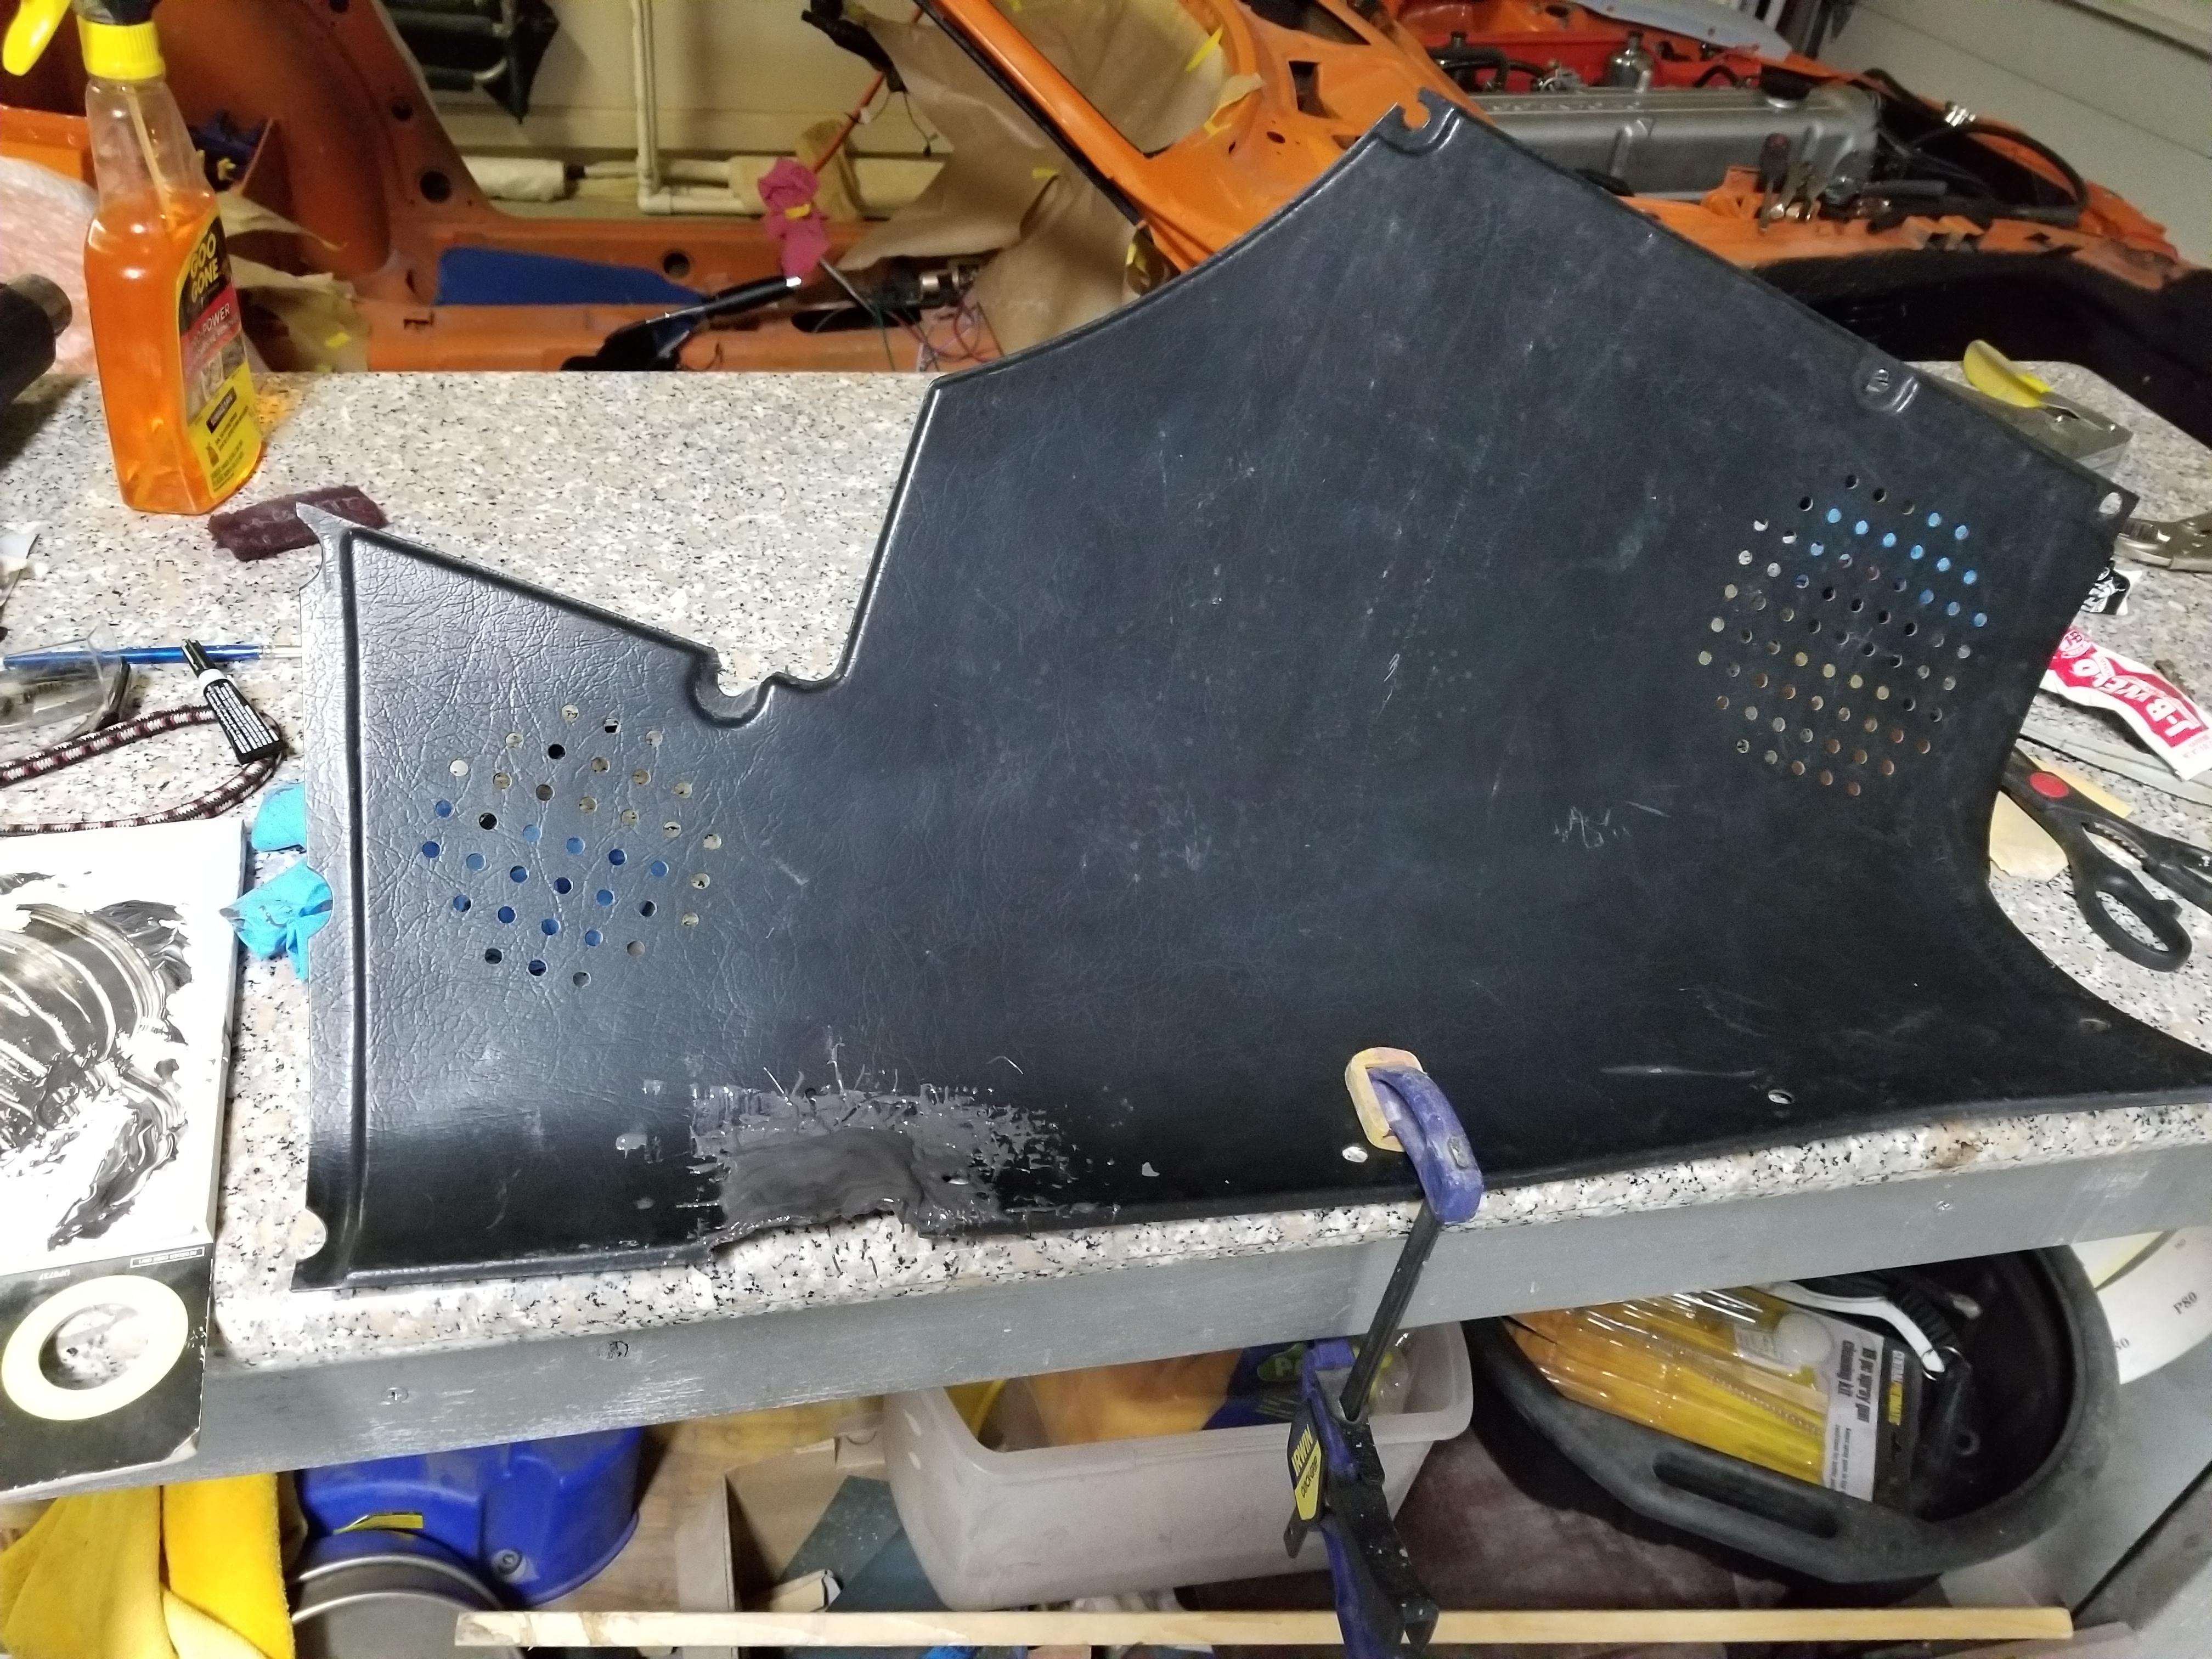
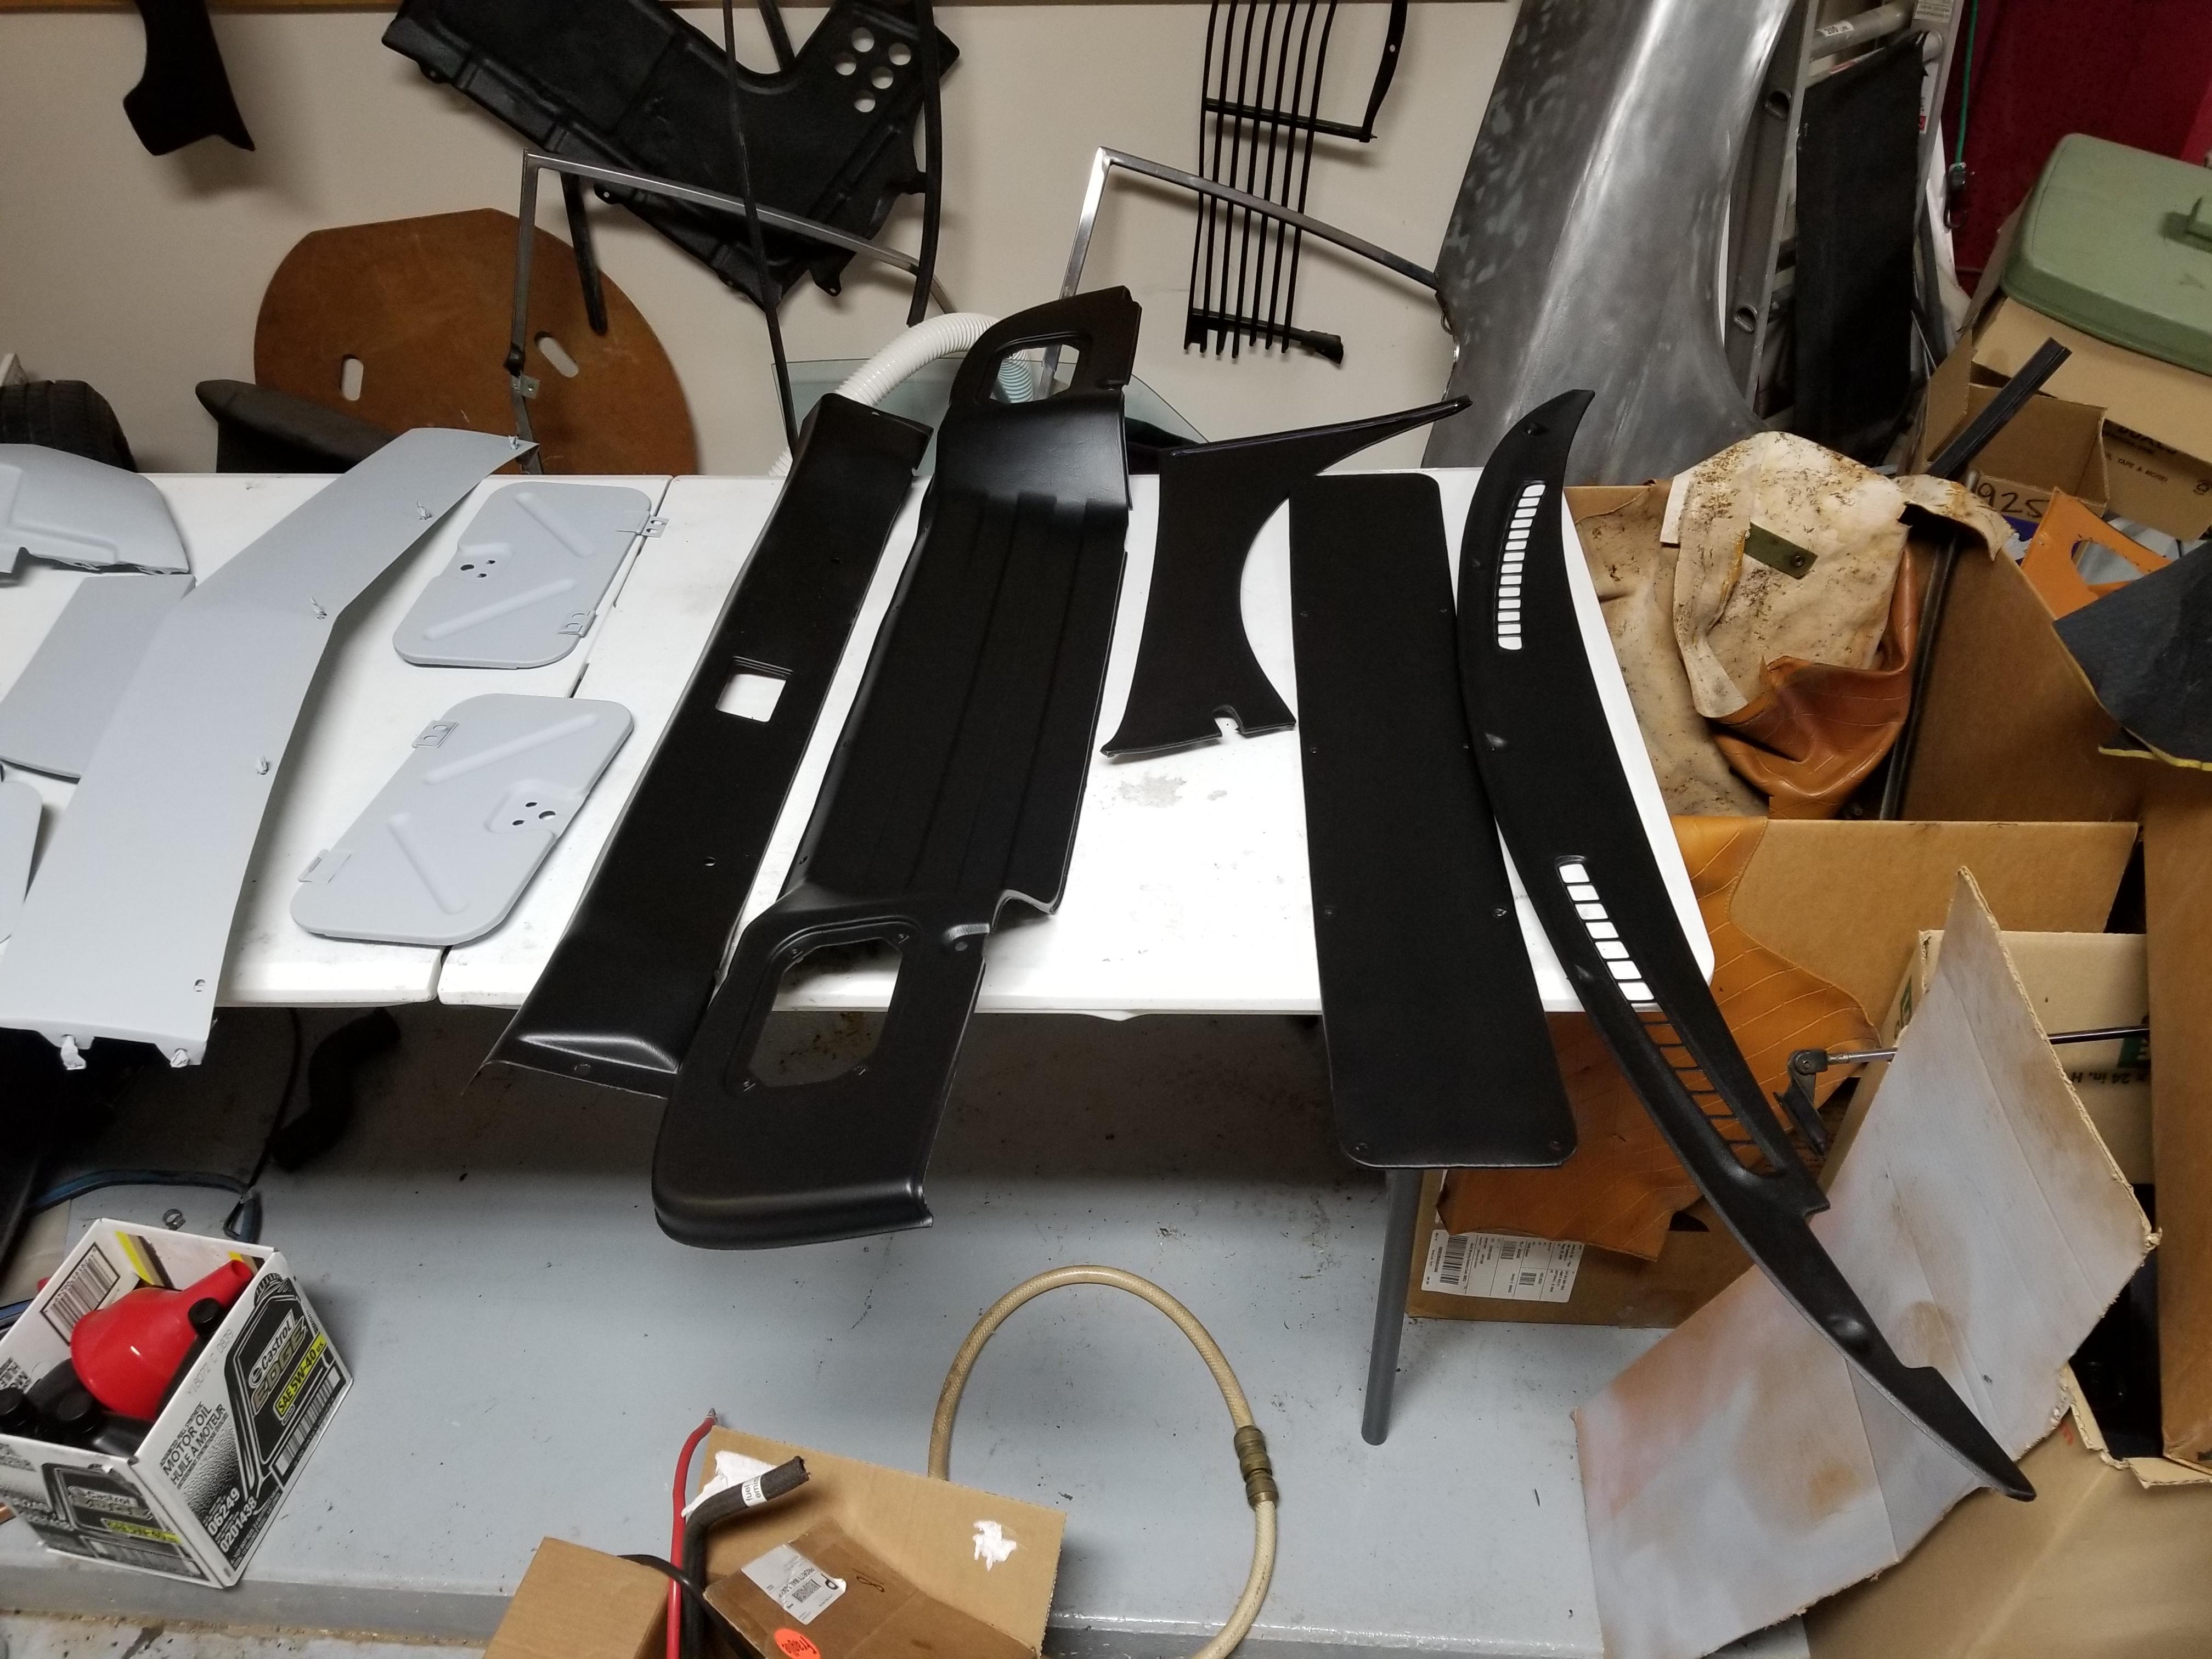
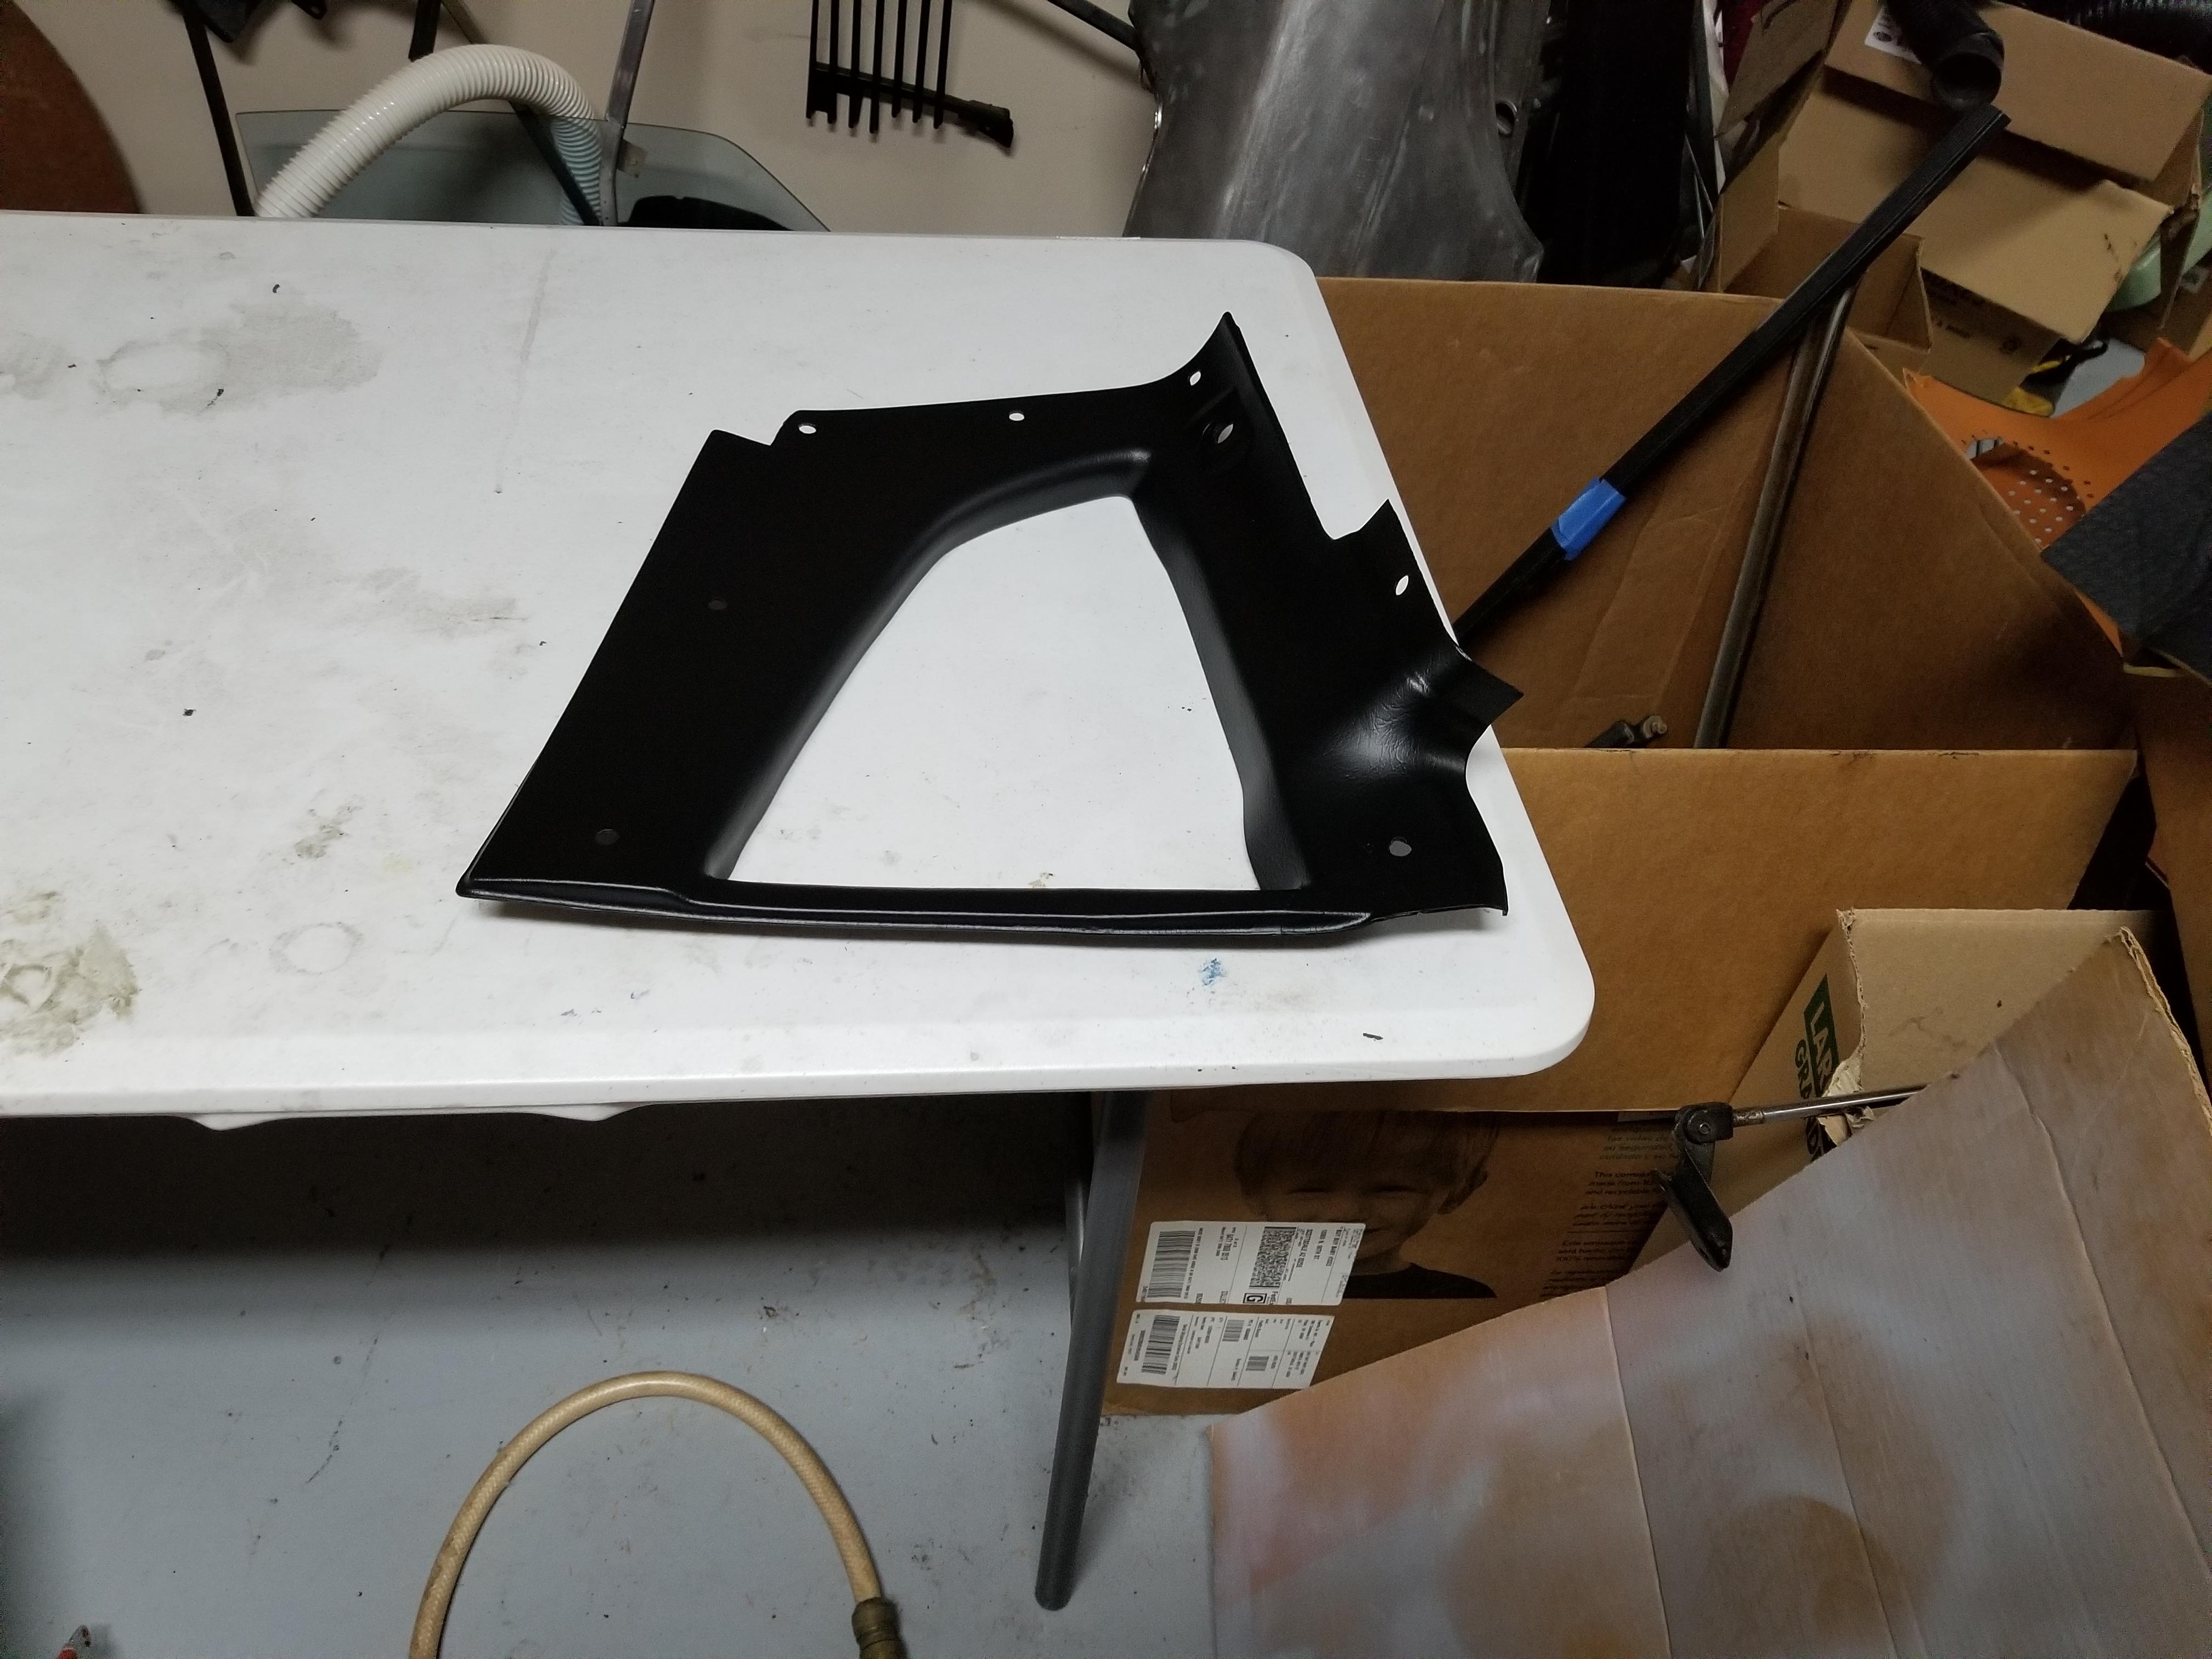
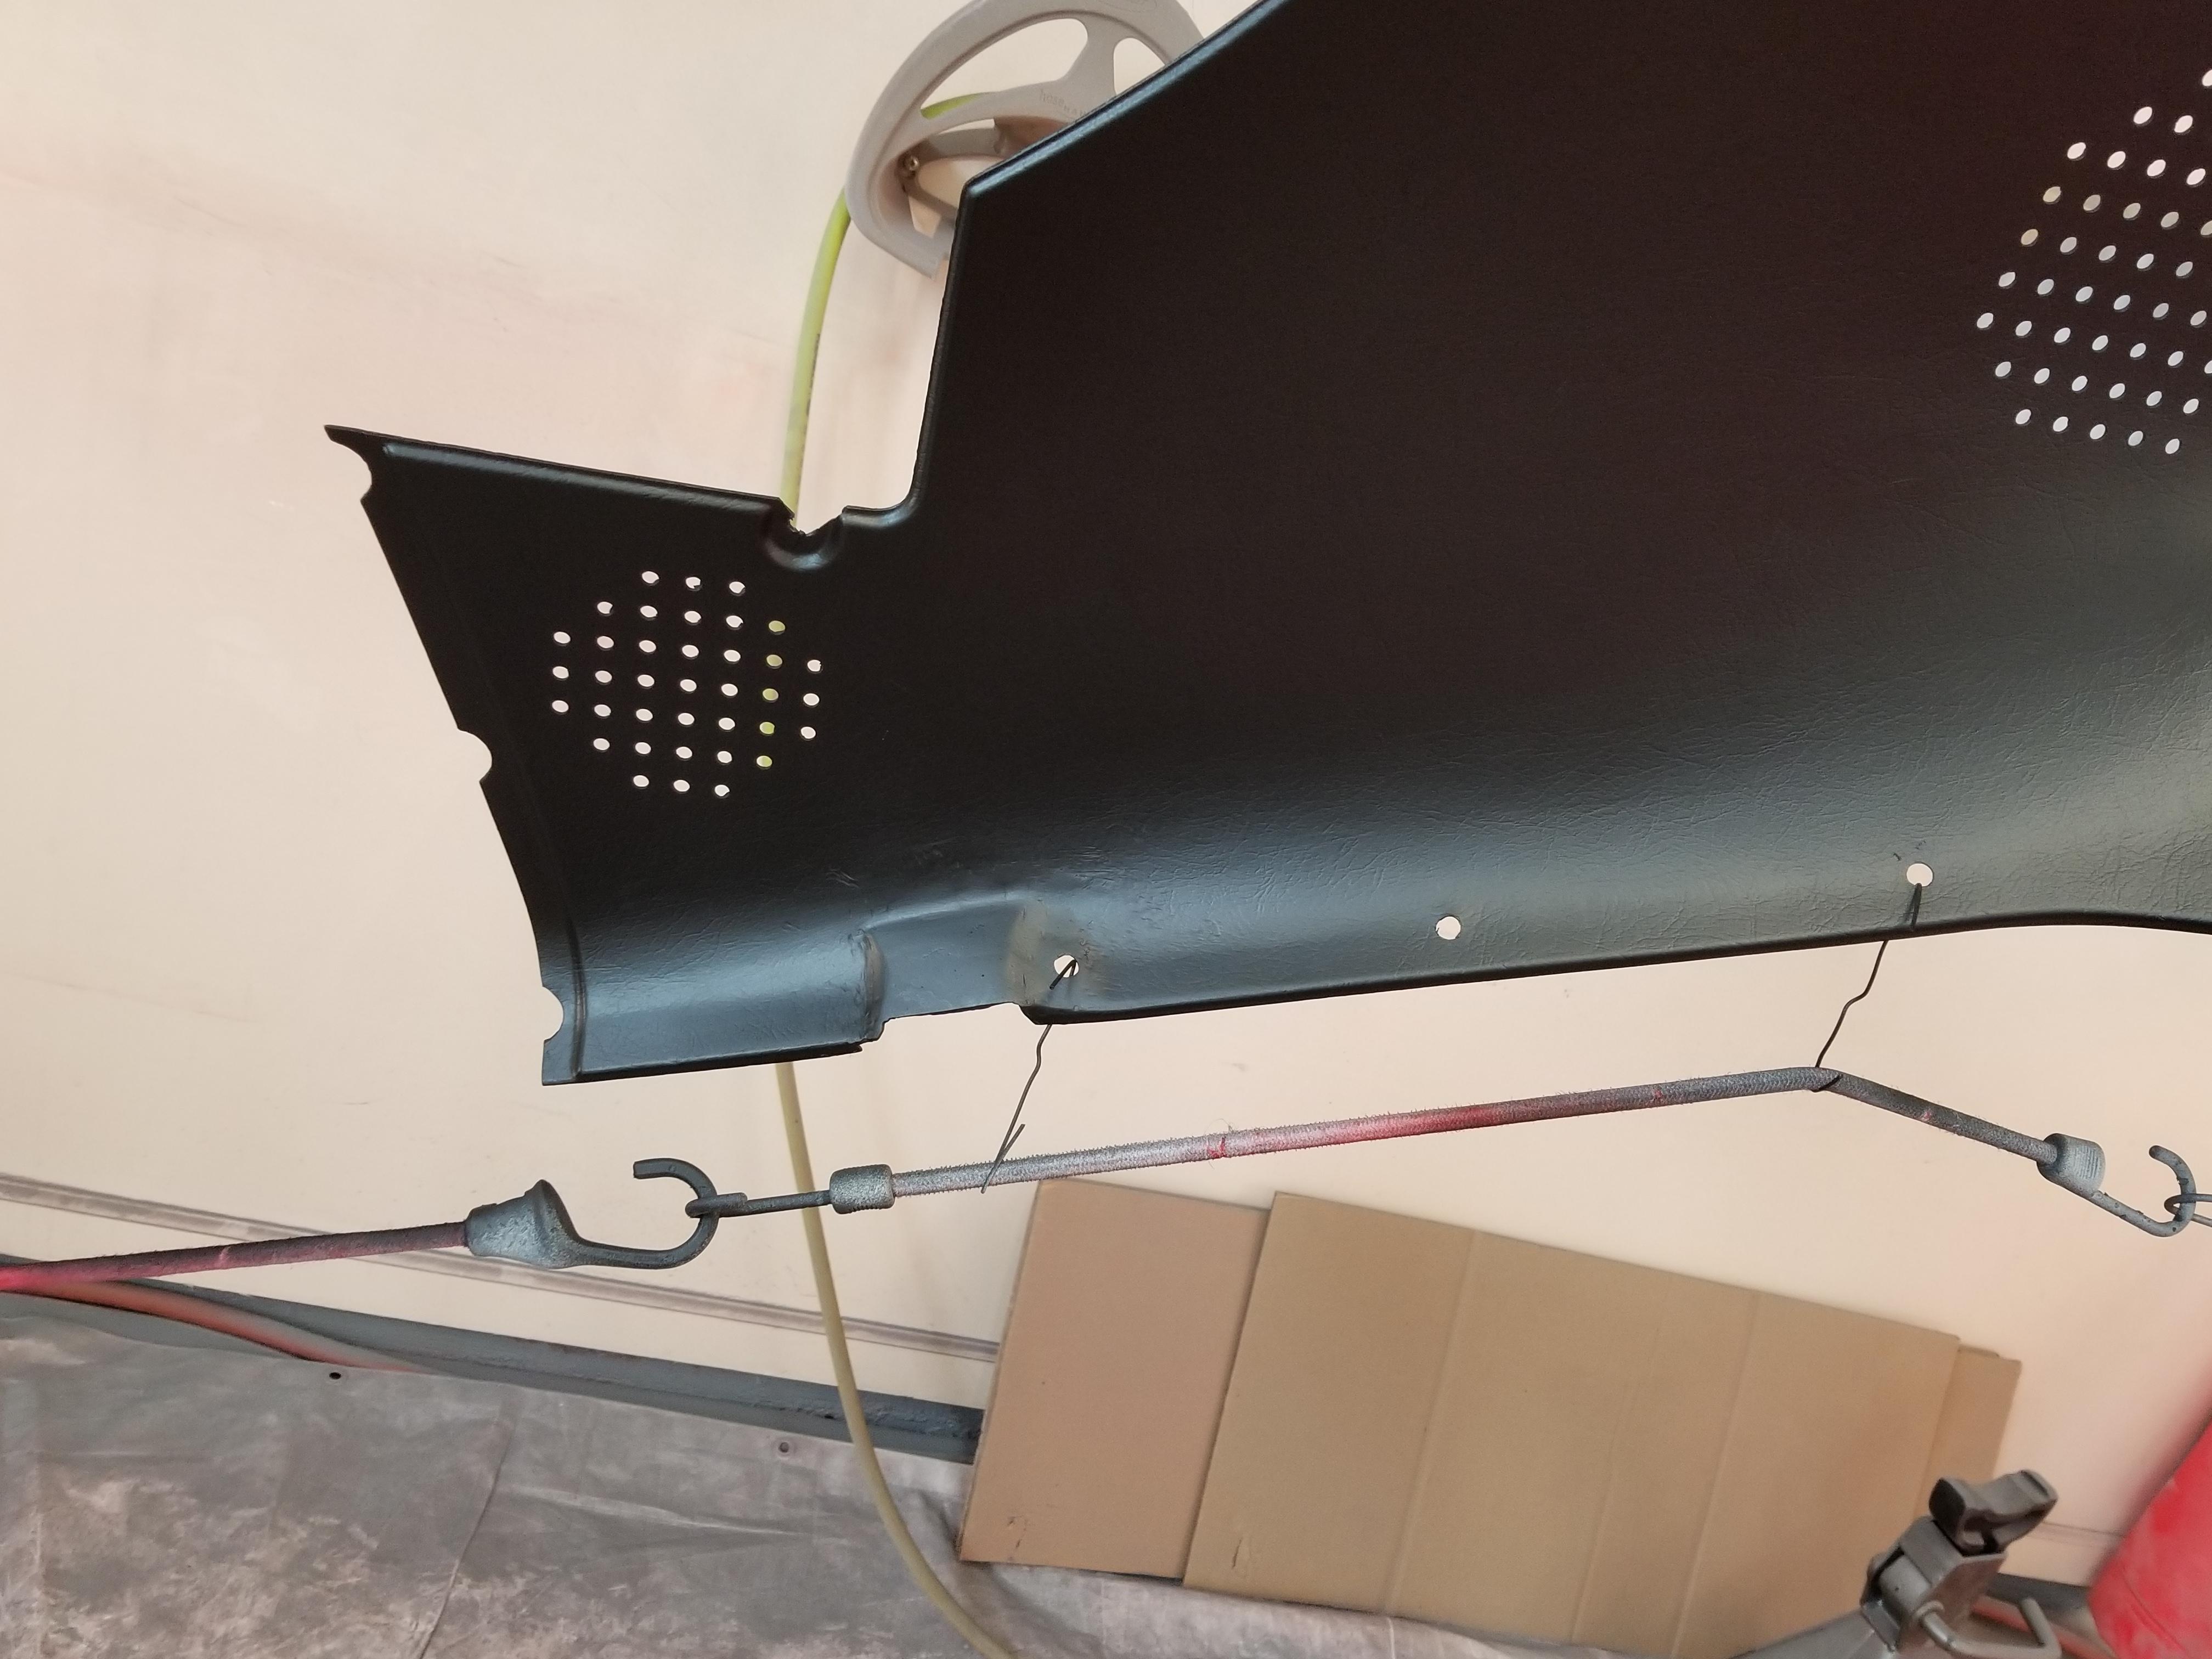
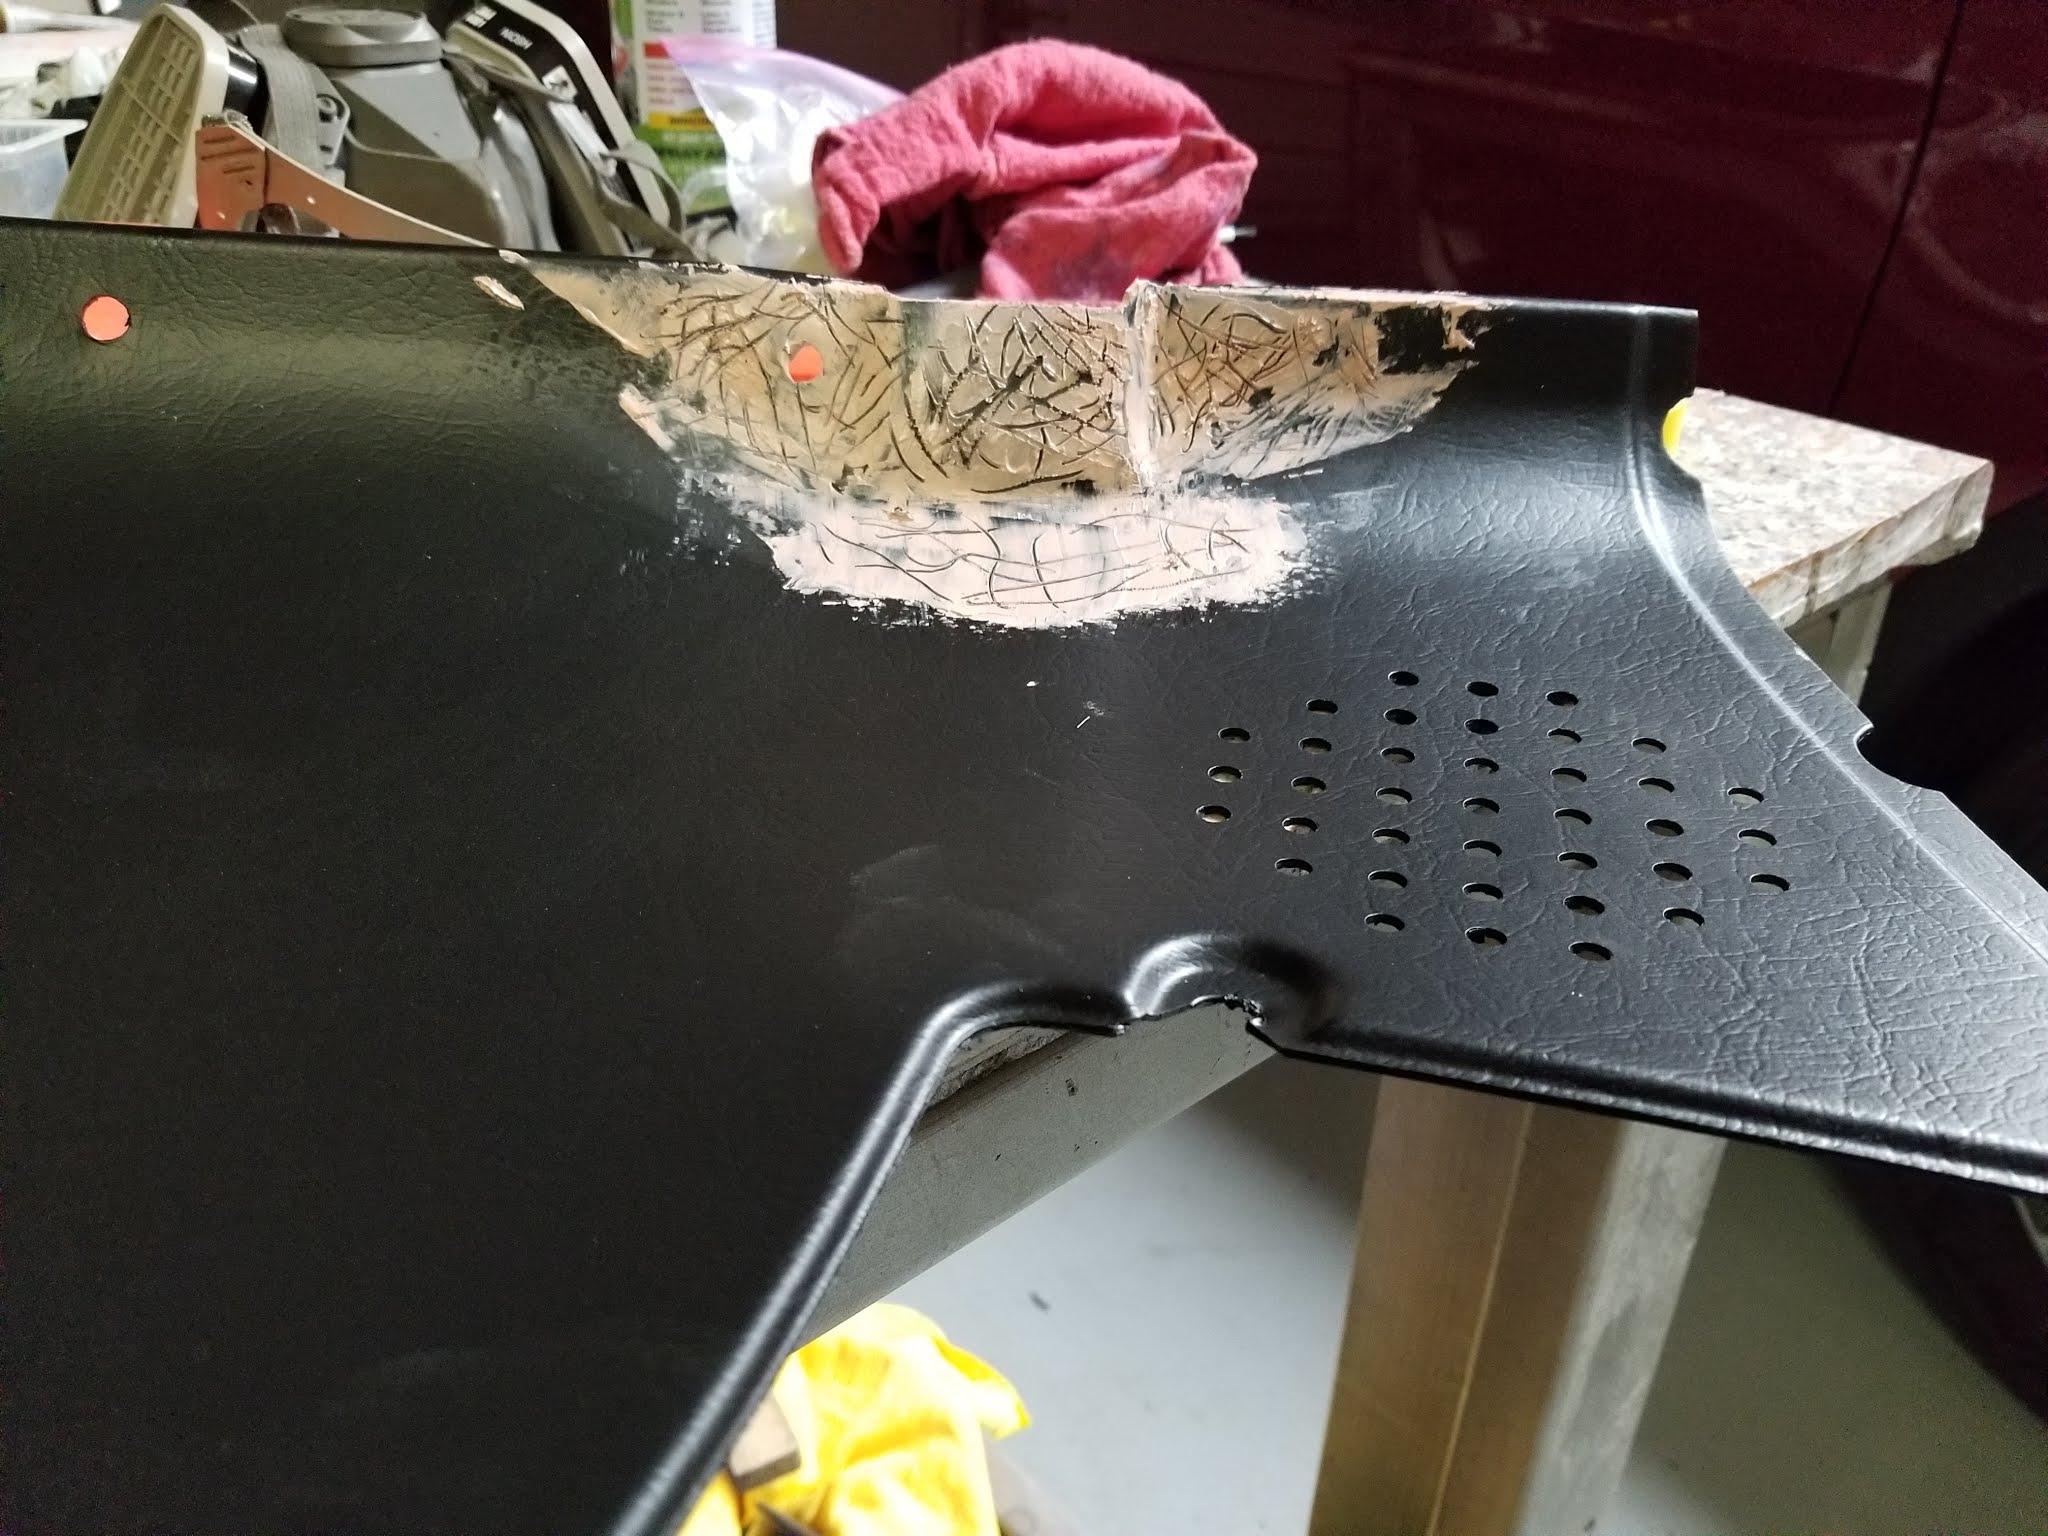
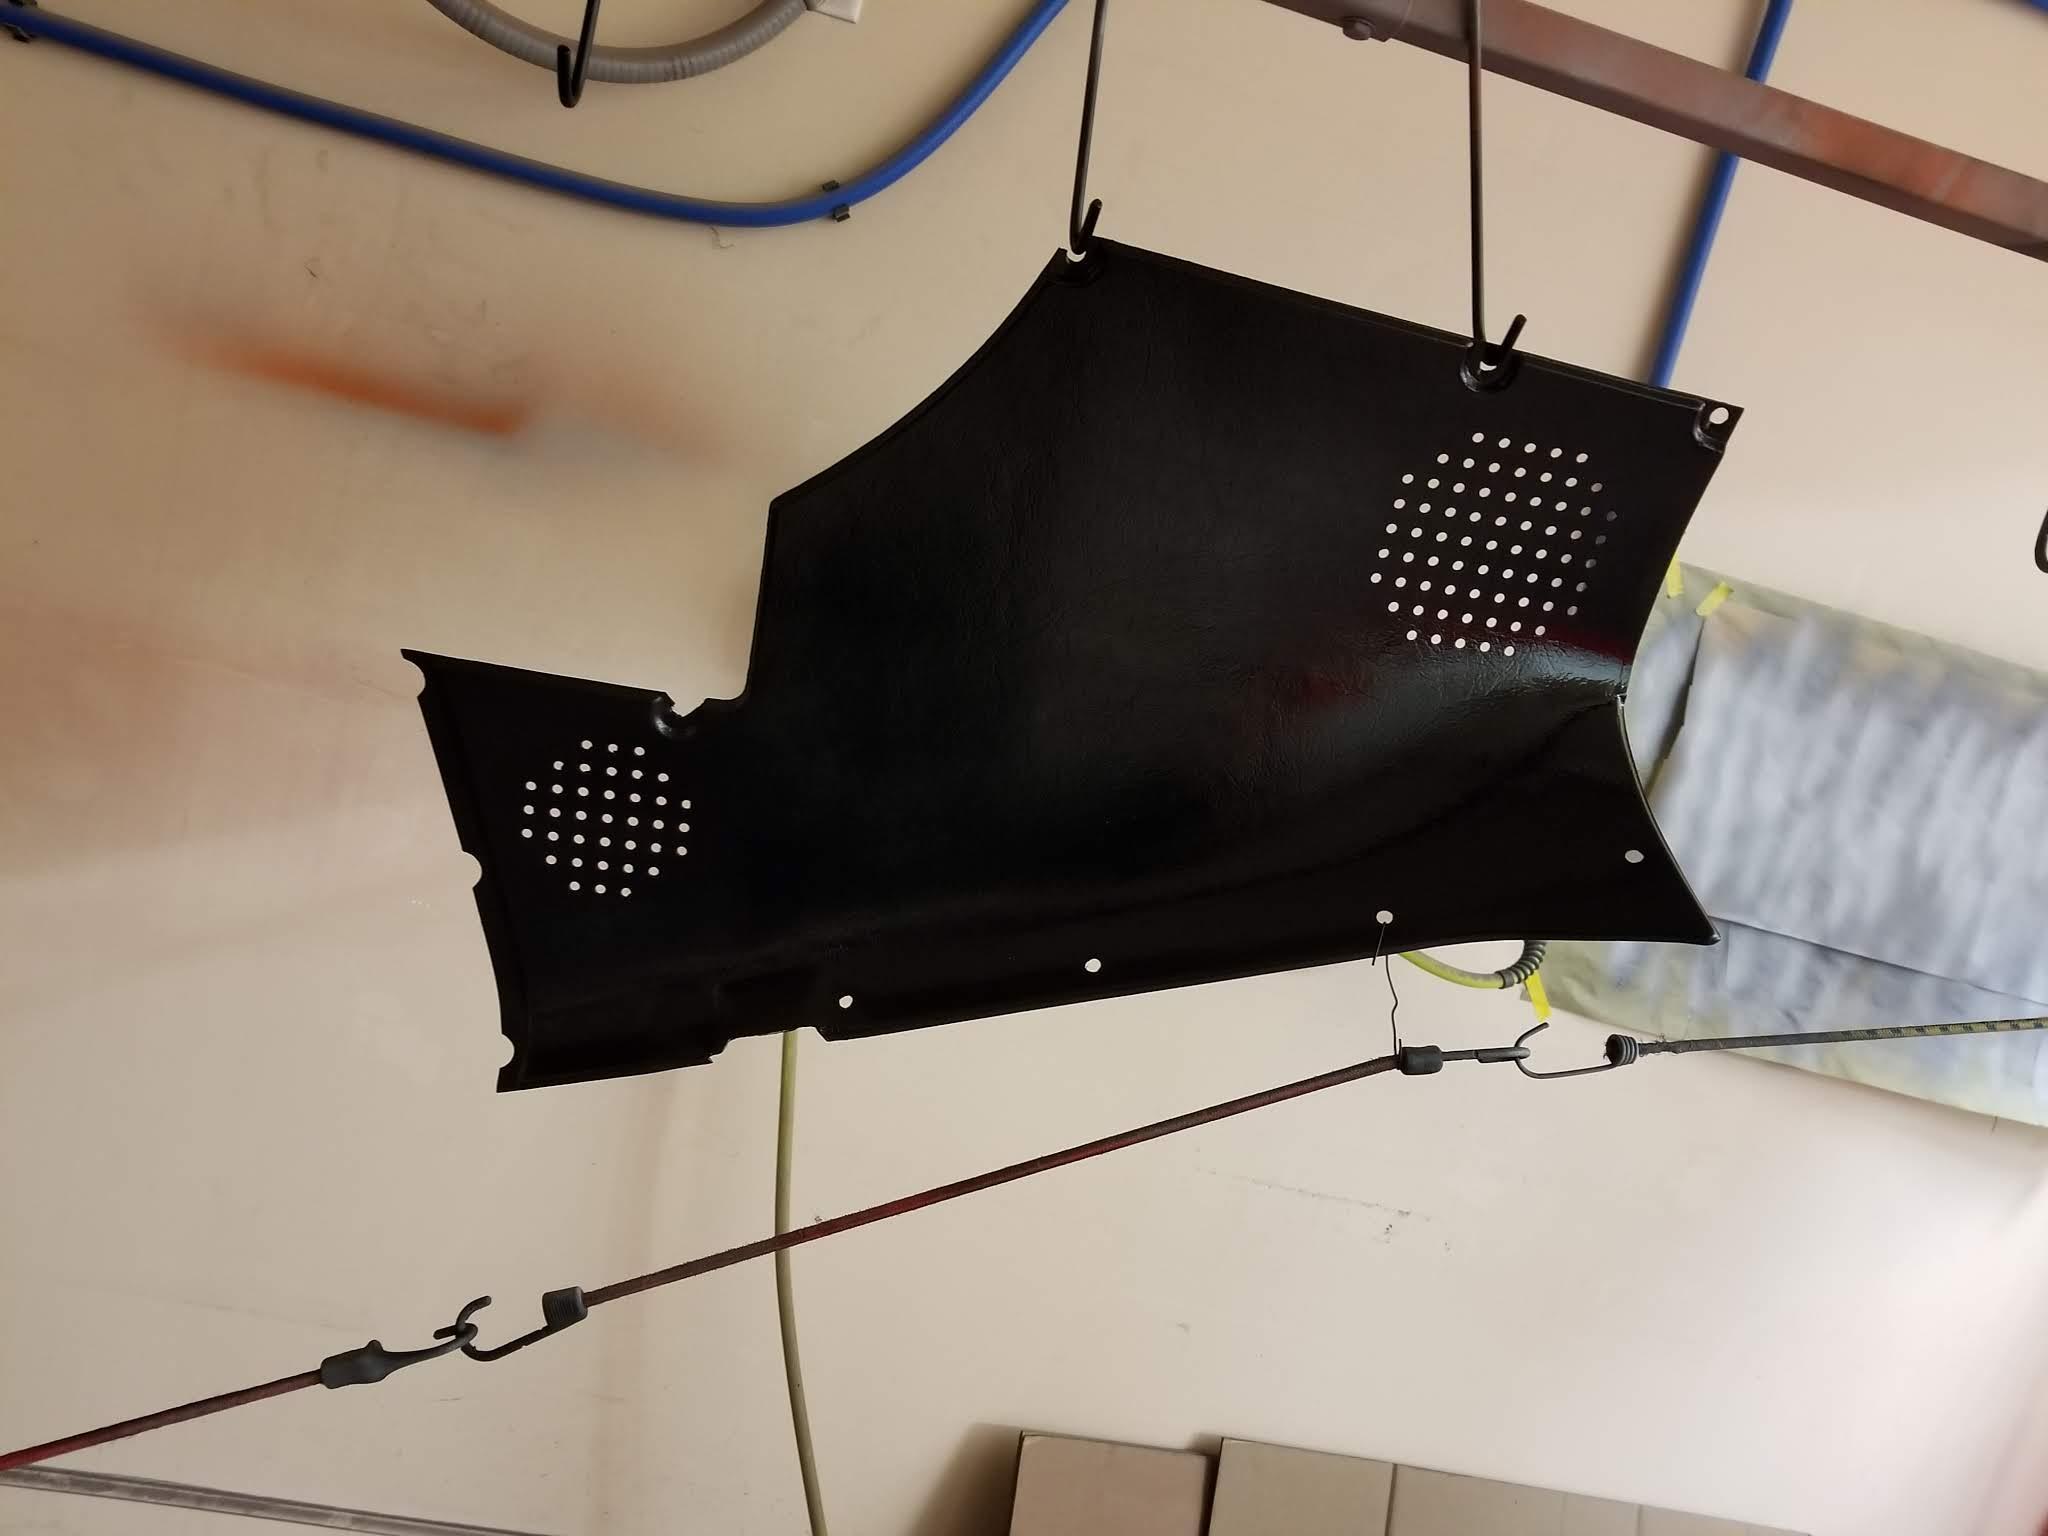
 1 pointI've met you in person Cliff. We need to talk about your choices of girlfriends. ?1 point1 point1 pointI'm no expert but you've described what many of us have gone through with seemingly '77 & '78s only. The ecu needs a little help on the coolant temp sensor that adds more fuel. Google "fuel tweak classiczcars.com" and read a few threads. I had to do it to my '77 and the way I found my problem was to clamp off the return fuel line about half way, increasing the fuel pressure. It ran better right away so reported back on here and was told to try the potentometer add on. Car runs strong all through the rpms now. Here's what I followed... http://www.atlanticz.ca/zclub/techtips/tempsensorpot/index.html Thank you @2402602801 point1 pointNot my idea. Must have been the original engine builder. I just use punch marks or an engraving tool to write on the side in the web1 point1 pointFirst of all, congrats on the new place and a dedicated space for the Z. My advice is to get rid of anything you haven't used over the last 2-3 years (or needed to finish the Z). Don't sell it, this will just take time and effort. Give it away. Once you have done this, you can focus on the Z and you'll have space to do it. All that *stuff* isn't necessary, believe me.1 pointI contacted the 3543 eBay seller and he said that he had listed the car with a guy on consignment and that the consignment guy had changed the ownership and the mileage in the ad. But then he still tried to say inhis message to me that mileage was unknown and didn't answer my direct question about the older 249,000 mile claims. So, still a little sketchy even by direct contact through eBay. I also gave him the link to this thread twice, but no response. He even added the old "little old lady" clause. "Elderly Owned always garaged Kept beauty". Just a guy trying to sell an old classic. Even if this isn't the same guy it's probably the same consignment shop. Might be why the guy knows the details of old 240Z's.1 pointSo, I thought it would be a good idea to update the thread regarding the change of interior color. I must admit that I was leery of changing the color of vinyl with a paint/dye. Our vinyl was in fairly good shape and it is quite expensive to replace all of the vinyl and plastic, so I thought it would certainly be worth a try. After a reasonable amount of research, I decided to use the SEM product line. I also decided for once in my life to strictly follow SEM’s process. I had two pieces of vinyl that were damaged through exposure to the sun. But even these pieces turned out well, and I do not think it was purely due to the fact that I was going from tan to black. I think the result would have been just as good if I repainted them in the tan color. Anyway, the result was truly amazing. Every vinyl piece came out looking brand new. It is nearly impossible to tell that they have undergone a restoration and a color change. Yes, there may be a seam that if pulled when installing might show the original color. I plan to touch up these spots after I install the interior. You can avoid this possibility by spraying the back of the material at least on the seams. I did have a spot or two where there are cuts/splits in the vinyl, and one very small hole. I simply took some black vinyl and superglued it on the back of the piece. I did this for two reasons: to reinforce the area so the cut/split did not grow and in case the material was pulled during installation it would merely expose the added black vinyl. Once these areas were painted, I could not spot them easily. The plastic trim was in relatively good shape considering that it is 45+ years old. One of my rear quarter pieces had been hacked up by a previous owner who was attempting some ridiculous change to the speaker areas using a machete. A replacement panel came with the car so I used that. A few other panels had chips where material was missing. These few areas were of the 1- 2 sq. in. category. Some panels had cracks, mostly at the edge of the panel, some minor and some more considerable, but all required attention or the crack would have continued to grow. I found a product called Q-Bond. It is an interesting process. For a crack I cut a “V” groove in the back of the plastic and cleaned the area around the crack. They give you what seems to be a graphite like powder. You sprinkle the powder into the grove. Since it is primarily the back I sprinkled it liberally around the groove as well. If the crack cannot be completely closed in the front of the panel you place a piece of tape on the front covering the cracked area. I used yellow tape that I have experience with from painting a car. It sticks well, but can easily be removed and has never damaged an area that I have used it on. The graphite like material can’t fall through the crack because of the tape. Q-Bond also provides what they call super-glue. Looks just like what you buy in the hardware store. You dribble a few drops on top of the graphite that is mounded on the back of the crack. It seeps in and sets up in less than 30 seconds. I gave it a few hours and then sanded the front of the panel to insure that the filling was level with the front surface. We painted the panel with the SEM product and where it was just a crack you could not tell that anything had been done. The crack line looked like it was part of the original pattern on the plastic. Where major repair was required, I used J_B weld to fill a missing area. The J-B weld patch as well as any other areas on the front of the panel that needed to be sanded were rendered flat with no grain. I tried scribing lines with a pin in some thin putty but this wound up looking like scratches. I have read about graining pads, but I think they perform better on vinyl/leather than a hard plastic panel. I decided to use a textured paint from SEM. This will not imitate grain, but I thought it would be better than leaving it flat. You don’t have a lot of control other than varying the distance of the nozzle from your work to produce less texture. I lightly sanded the texture and tried to blend it into the original grain. I then repainted the panel to get a consistent color. Its not perfect but if you are not looking for it you can’t spot it and the panel is repaired. Where I was missing a lot of material, I added some plastic pieces cut from the panel that I replaced. I super glued these to the back of the panel I was repairing and then used JB-Weld to bring the repair level with the rest of the panel’s surface. This also worked really well. Its strong, but it is ugly. Once again, I used the texture and sanded it and then painted the entire panel. It will not pass concourse inspection but it definitely is cheaper than replacing the panel, and it is a sound repair and it is another piece of authenticity - a 45 year old piece of trim that looks pretty good. As an example this is the vinyl that covers the rear shock tower. It has been cleaned with a mild soap, and Scrubbed with a gray scotch brite pad using SEM soap. You can see signs of fading from the sun. Here is one of the shock tower vinyl sections painted. Plastic panels - this is the interior overhead where the dome light mounts in the middle. I was amazed at how nicely the plastic and the vinyl cleaned up. This is one of the rear hatch area panels. It installs behind the rear wheel. It had some cracking and it also had a missing section around one of the mounting holes. The first picture shows all of the repair work - cracks at edges and the missing section around one of the mounting holes. The picture below show the panel after paint has been applied. You can see the patch area. The only issue with this panel is the total lack of grain in the repair area. It was noticeable and so I pushed on. Here is the my first crude attempt at trying to see if I could imprint some grain. This looks awful here but it was even worse when color was applied. The next picture is of the panel with everything having been sanded. It has the benefit of the texture paint having been applied, and color over that. The rest of the plastic and vinyl came out even better and I was very satisfied that we were able to save so much of the original car. Can't wait to see all of the vinyl and the trim panels go back in the car. Unfortunately, I completely rewired all of my electrical harness, and don't want to assemble the interior until after I test everything. Testing the harness is waiting on a new dash. Early on in the restoration I tried repairing the dash, but it crumbled and my total lack of expertise inspired me to try wrapping the skeleton with vinyl. Twice I thought I was going to get away with it but alas the speedometer and the tachometer wells could not be done by me to my satisfaction. I then searched for someone in need of some extra cash but every shop that I went to said that it was so difficult that they would have to charge enough to fund their son's first year at Harvard. Next step on the road to wasting a fortune was a full cap. I would have stuck with the cap, but this car is for my son, and I worried that the cap would not do well in the cold climate that he lives in. The overall restoration is coming out pretty good and to be honest the cap just didn't match what we were able to achieve with the rest of the car. I am currently on a wait list for a replacement dash pad. products that we used: 1. Gray Scotch Brite pads 2. Dawn dish soap 3. SEM Soap 4. Vinyl/leather prep or plastic Prep 5. SEM Sand Free (adhesion promoter) 6. SEM Color Coat Satin Black 7. Q-Bond 8. J-B Weld The following URL is valuable in terms of a reference for the SEM products that you will need and the overall process. https://www.semproducts.com/product/color-coattm-mixing-system/system#product-videos I suggest you watch the video. I also watched this video. Their humor is a bit tiring but I found it before the SEM youtube and it encouraged me to give it a try. episode 128 Dyeing Door Panels and dash pads Autorestomod. Bottom line: If you are thinking about refreshing your plastic interior trim or your vinyl – DO NOT hesitate The SEM process works, at least if you diligently follow their instructions. They have a complete line of colors and you can even mix a color to match something. If you have plastic that needs repair within reason you can successfully restore your plastic panel cracks with Q-Bond. I am sure that there are other products out there that work just as well but I have not tried them and because these have worked so well for me I probably will not experiment with anything else in the future. The one thing that I do want to try is grain imprinting using those grain pads. Hope this helps.


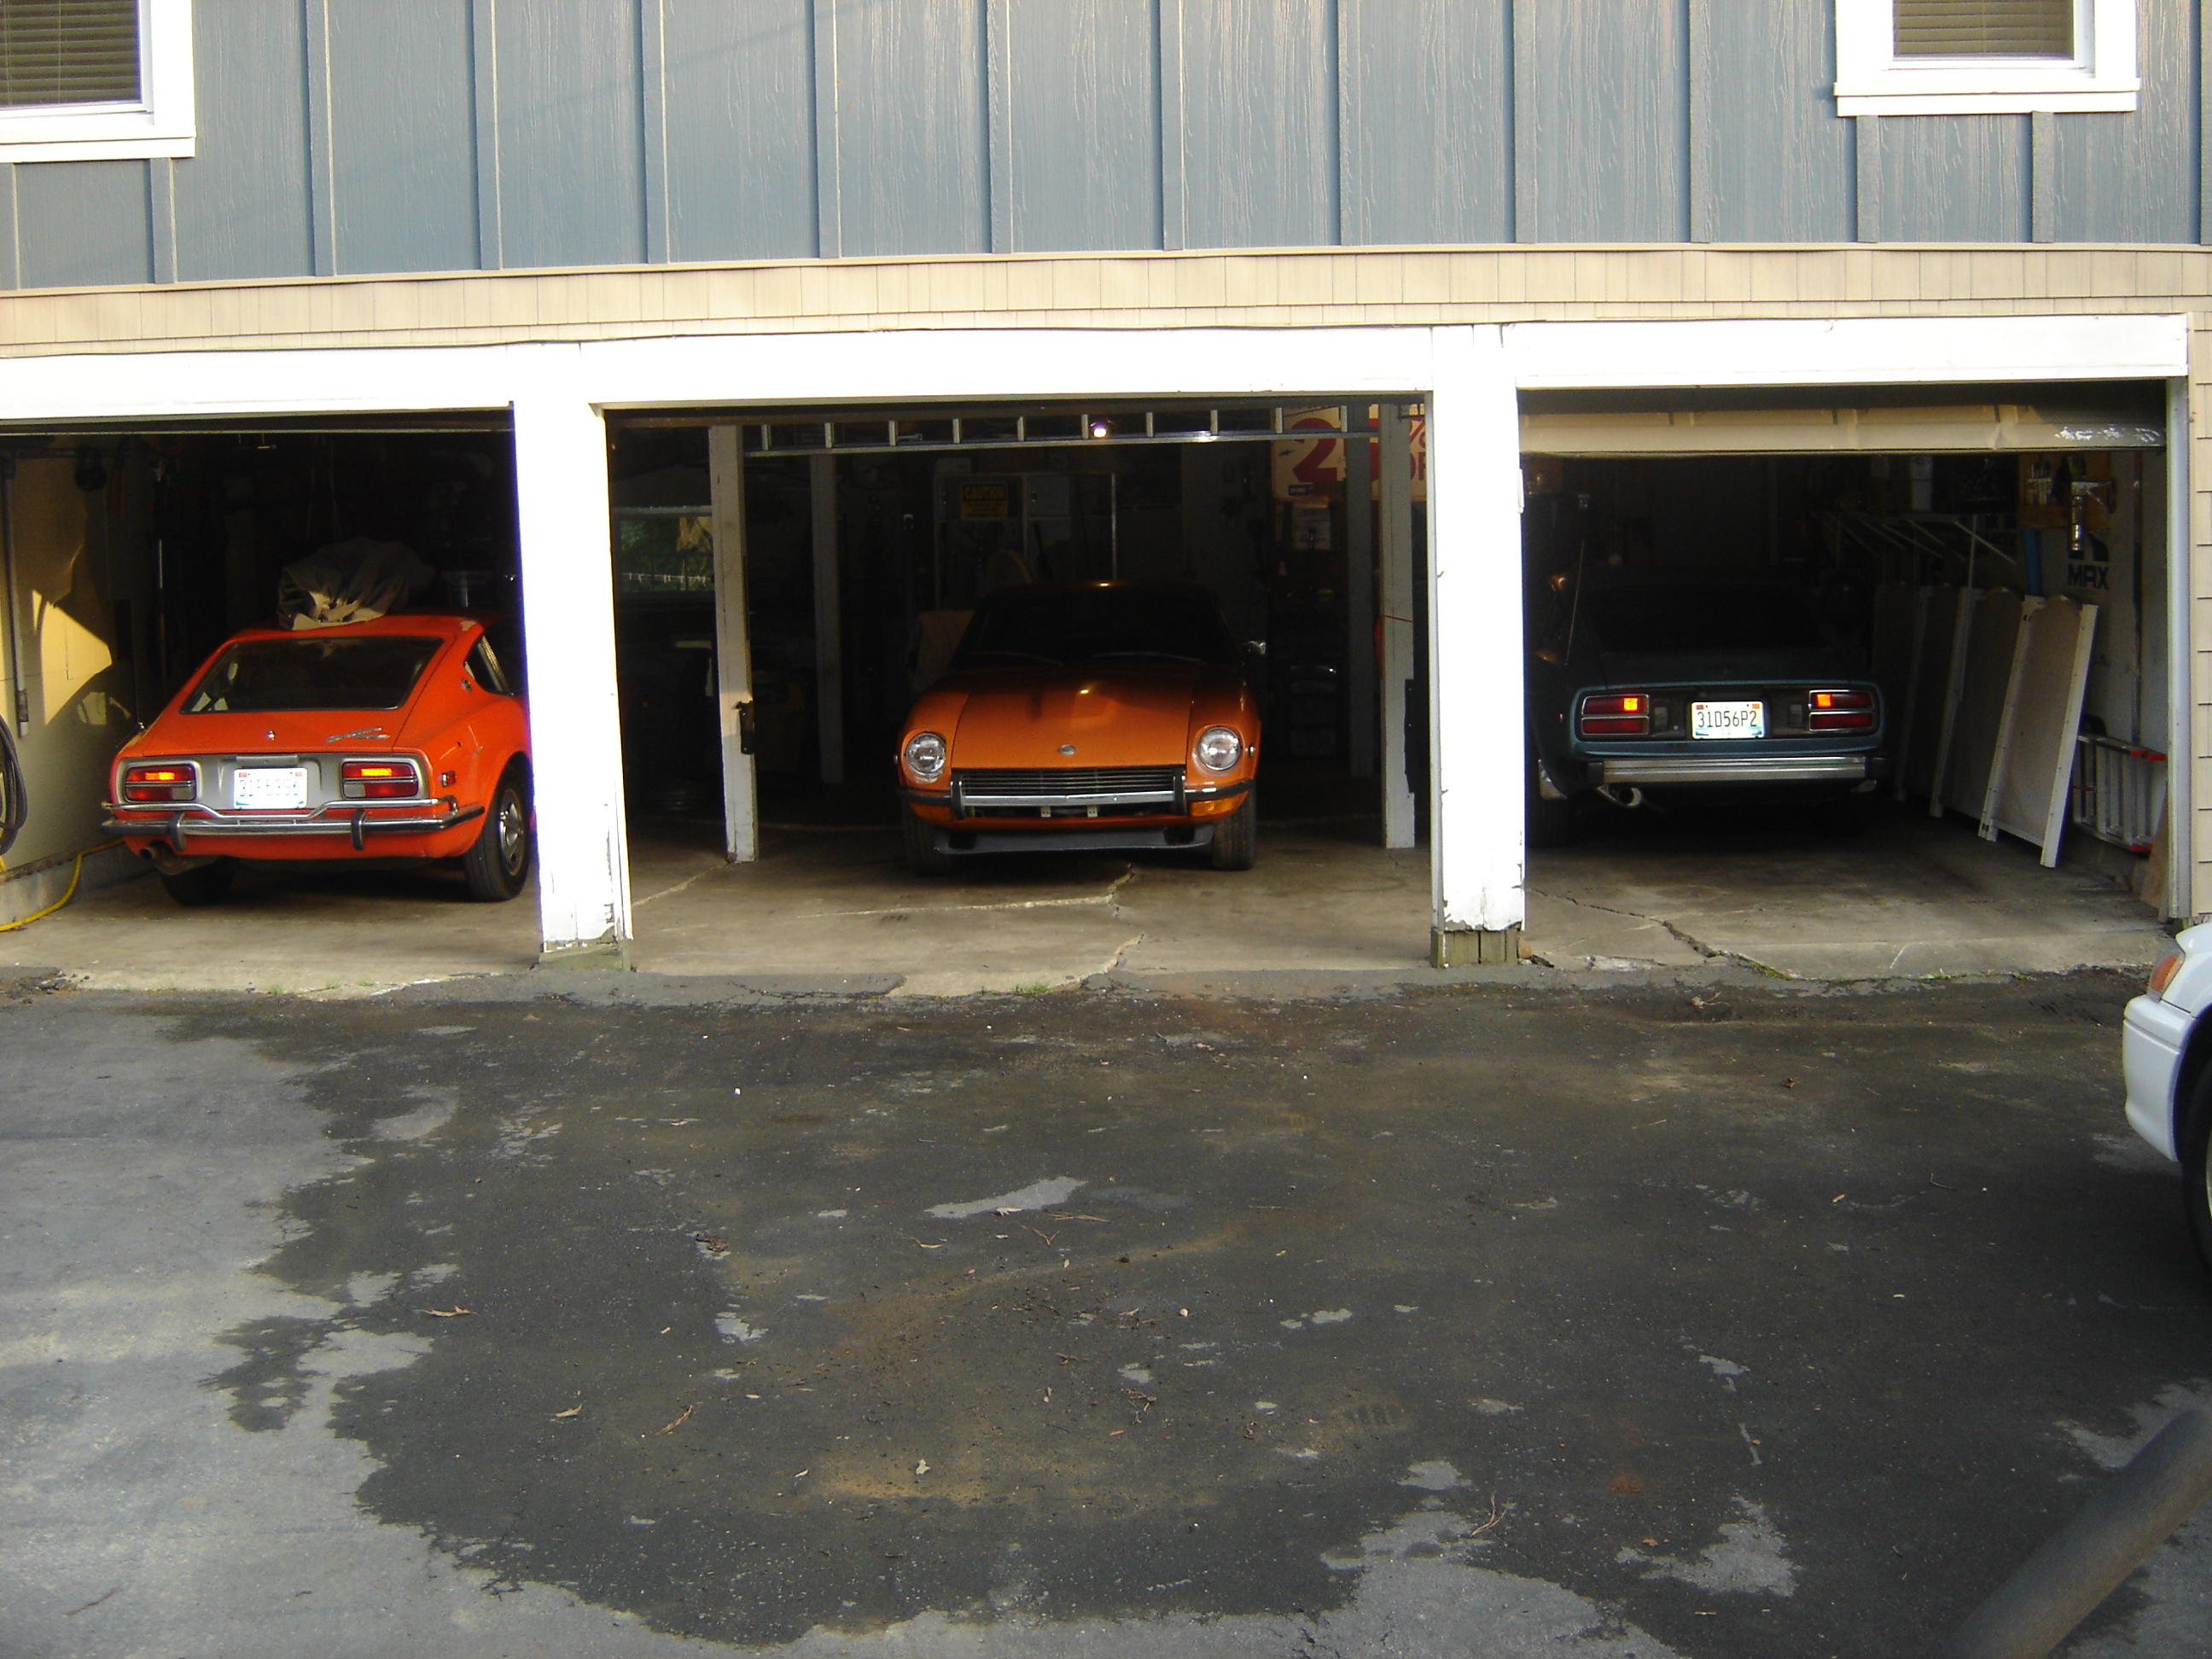
 1 point1 pointAnd I thought I was the only one........ As far as improving on the garage, I would install as many LED shop lights as you can.1 point1 pointCongrats on the new digs. My long-time dream is a 3-car garage with a small cottage attached. Then my wife slaps me awake and says "You're having that dream again. It ain't gonna happen, deal with it!"1 point1 pointGo to a ReStore shop and buy used all-wood cupboards to get you going. (Sort of like a goodwill but with building materials). You can get great shelves at home depot. Edsal make units and parts to customize nicely. They also sell under Husky and other brands. https://www.homedepot.com/b/Storage-Organization-Shelving-Industrial-Shelves-Units/Edsal/N-5yc1vZcksqZ1po/Ntk-tagger/Ntt-shelves?NCNI-5&storeSelection=2408,2414,2409,2407,24041 point1 pointRun power all over the place and consider adding ventilation fans from outside air into the shop, and from the shop to outside. And industrial shelving.... lots of it...1 point1 pointyeah make some shelves and a big counter top, you can do it with some 2x4 and plys. if you can get your hands on a steel sink, that would ideal ideal.1 point1 pointPoop brown? (Sorry, Poop Brown Metallic...) That's my car's original color. Guess there were a lot of those...1 point1 pointWhat is that hose thing with the orange shut-off valve? It could use some critical early pieces but it has a lot of correct stuff. The seats look newly recovered and the door cards look new. Could use a rear deck carpet. Clean the overspray off the gas tank.1 point1 pointI sprayed the front wheel wells with truck bed liner, then followed up with a light dusting of color. No problems with paint adhesion. I avoided the spraying bed liner in the shock towers as I did not want to provide a place for dirt, moisture, ...etc. to begin a build-up. The towers were done with POR-15 topped by brush-on color. Jim
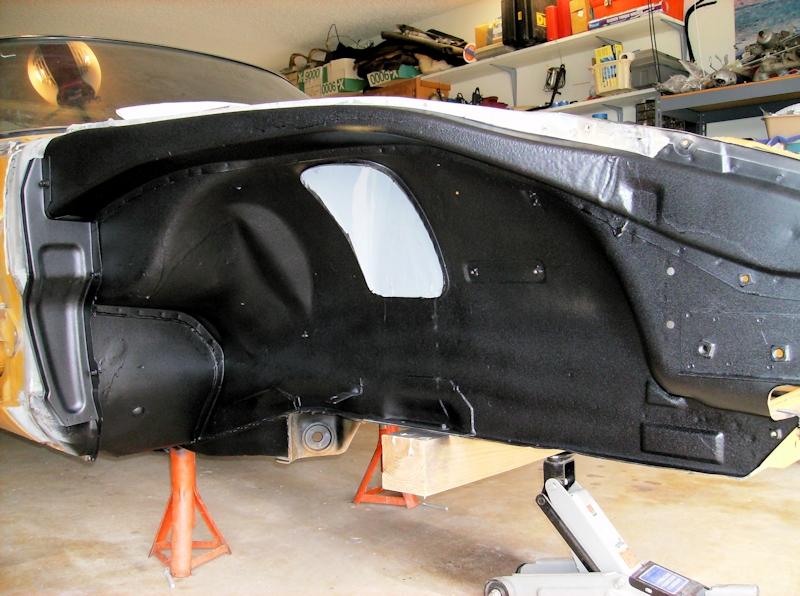
 1 point


Important Information
By using this site, you agree to our Privacy Policy and Guidelines. We have placed cookies on your device to help make this website better. You can adjust your cookie settings, otherwise we'll assume you're okay to continue.