


Leaderboard
-

conedodger
Free Member3,048Points11,316Posts -

Patcon
 Subscriber
 1,746Points10,937Posts
 -
.JPG.cfcada9cf1c1b502df3f5f2f2ca3ff36.JPG)

SteveJ
Free Member1,535Points9,579Posts -

Captain Obvious
Free Member1,455Points9,869Posts
Popular Content
Showing content with the highest reputation since 03/30/2022 in all areas
-
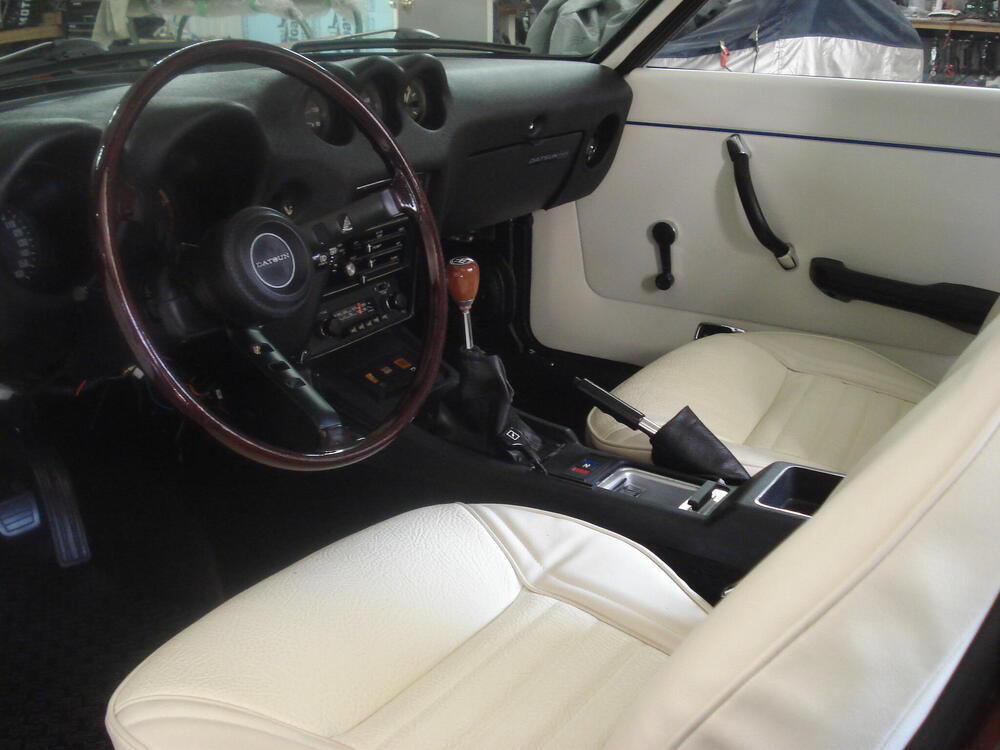
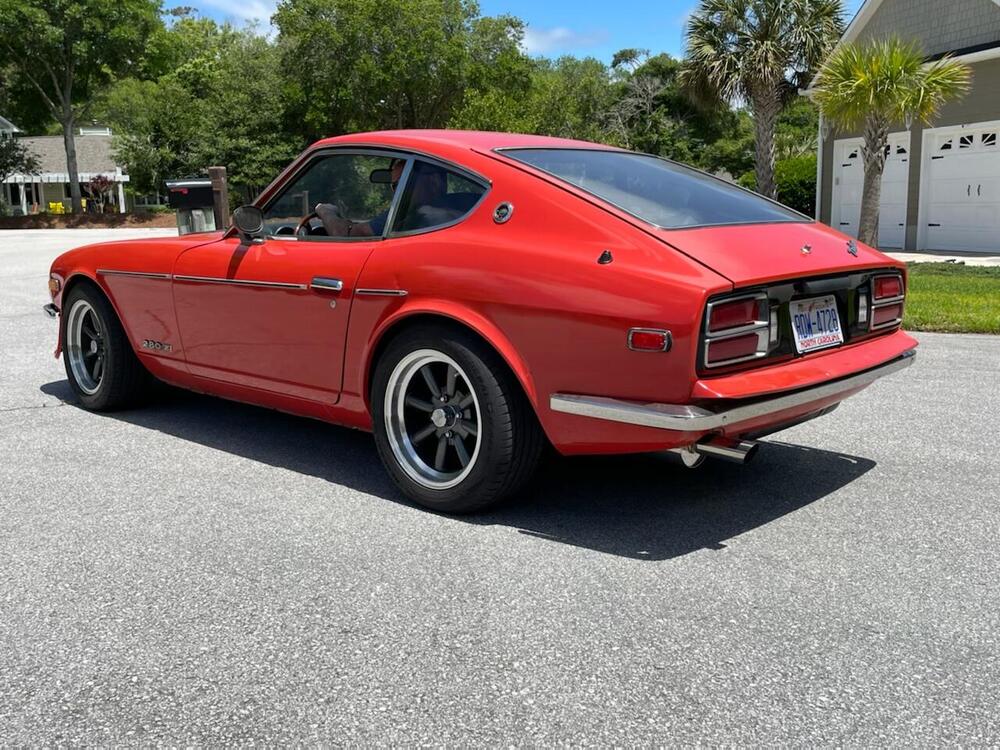
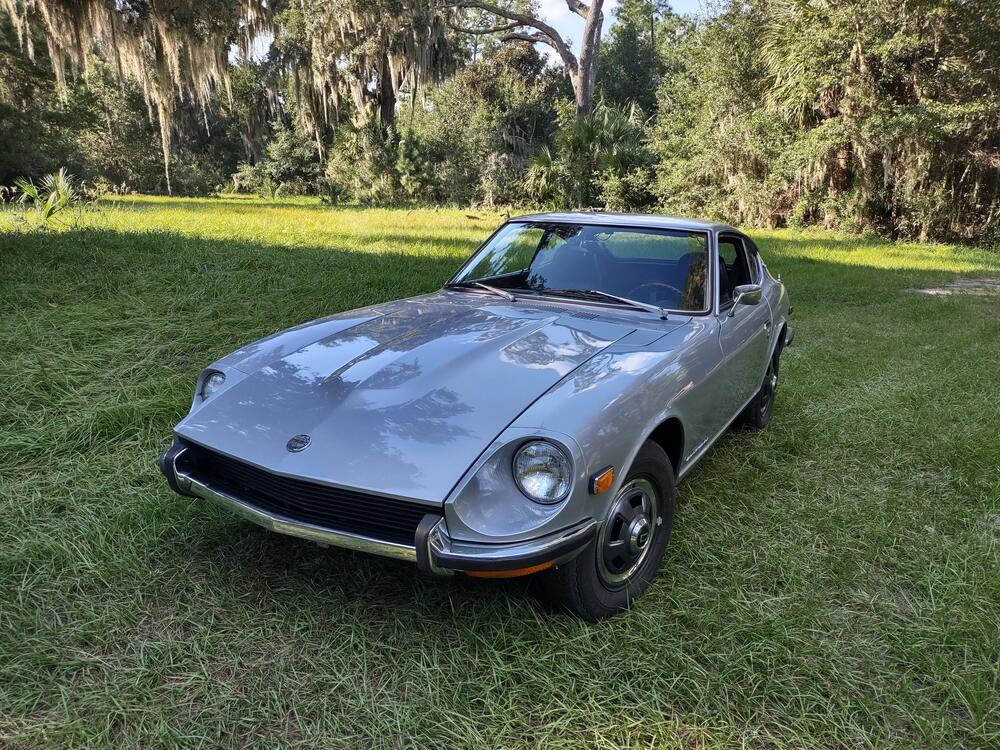
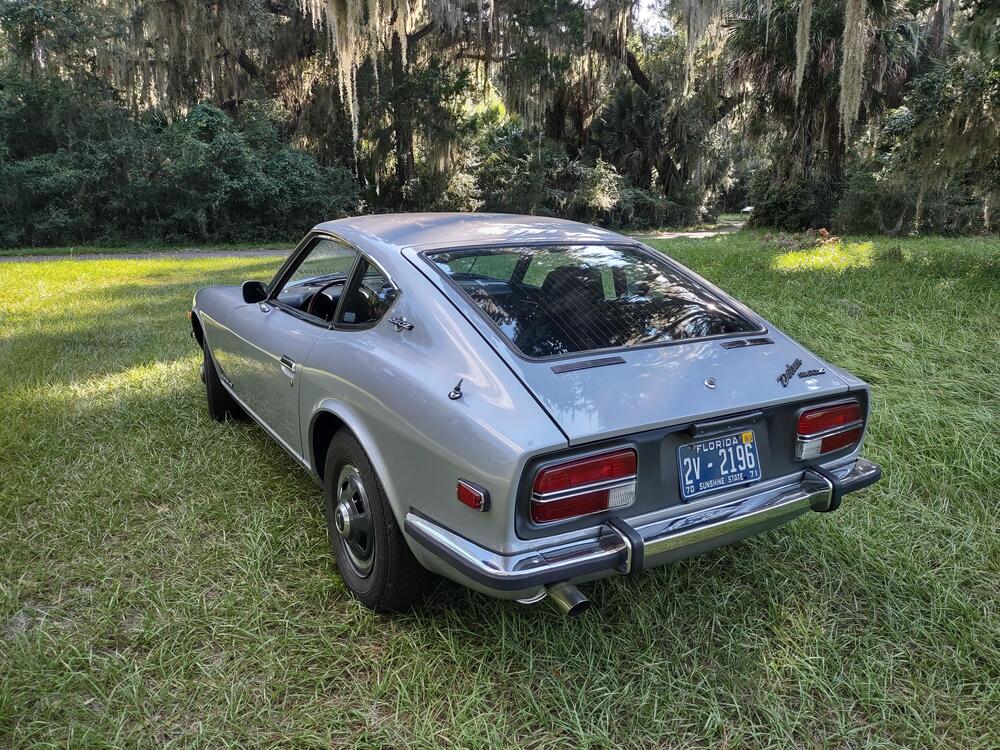
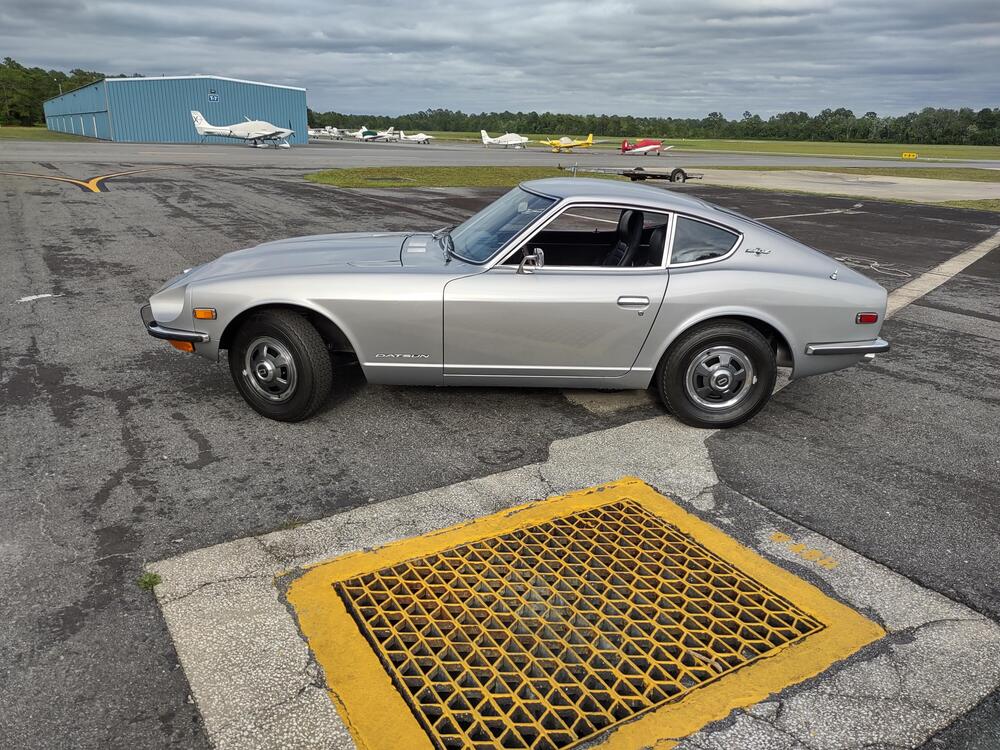
 17 pointsAfter several years, a lot of $, work and help from many of you guys, I now have a 2023 1973 240Z. Here are a few pics. Thanks again to all of you. It's hard to tell from the photos but when I painted it, I incorporated gold micro sequence metal flake in an intercoat layer of paint. When it sits in the sun, it sort of twinkles.
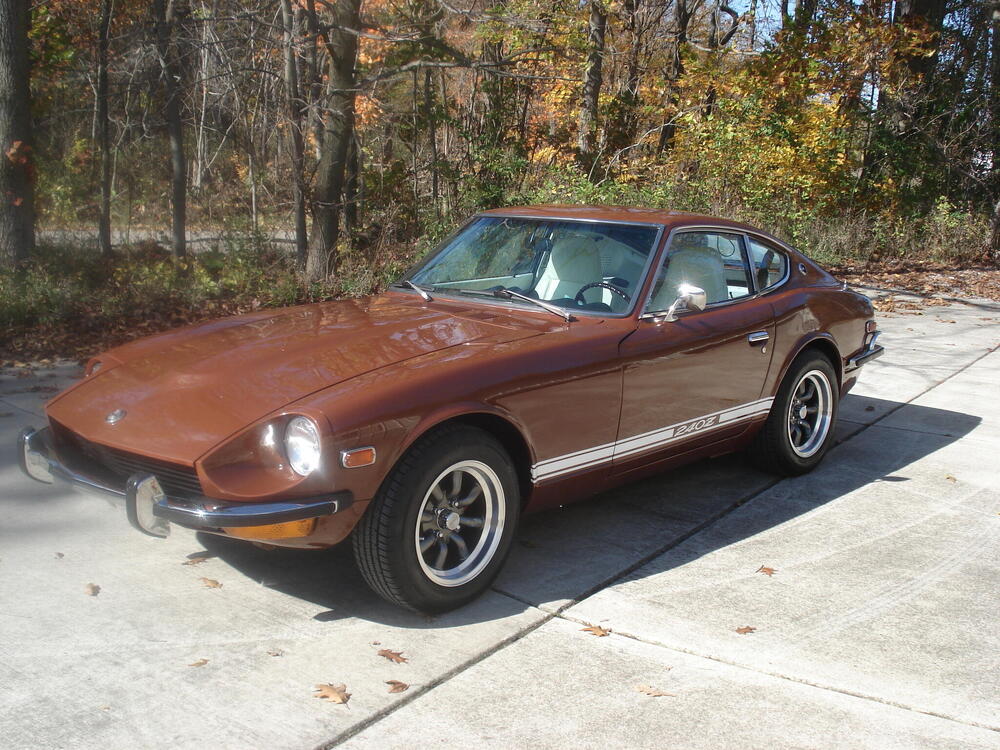


 17 points
 -
 15 pointsGents, I wanted to get on here and let you all know briefly why I’ve been gone and that I’m back. I’ll keep it brief and if you want to more details send me a message. About 8-9 months ago I had a medical incident that was a wake up call for me. It ended up with my in the ER with a doctor standing over me with cardiac paddles telling me they’re going to have to smock me. My job is 100% contingent on my health. Shortly after I notified the company I was placed on medical hold, and have been in this status until recently. This medical event was a watershed moment for me and I spent some time reflecting on my lifestyle and then came up with a game plan. I determined it was time to “Reset my life”. I had to reevaluate all my actions that impact me and make changes. This medical event opened up a host of other boxes with the FAA drilling down into every medical aspect of me. I had many doctors visits, saw specialists and found I had some blood work items out of normal ranges too. I had to do a couple sleep studies and so on. It was painful! It didn’t help I ran into incompetent people along the way which made me realize how broken our medial system is. I can dive into that later but because of incompetence and financial incentives by secondary medical providers who were calling themselves “experts” I was going to have to do treatment I didn’t need or want, So I had to become my own advocate and spent countless hours researching and educating myself. I read several book by “real” experts and had great advice from friends who are physicians. I became a pseudo expert is some medical areas and with the actions I implemented I turned everything around, I’d go see my doctor and we’d discuss items that he really knew nothing about. I was shocked at how our medical system works and how it is incentivized. So what did I do to reset my life. I changed everything; my Diet, Exercise, Nutrition , Sleep, and Stress; it all had to be changed. Because I didn’t have time to figure out exactly what I needed to do I used the “cast a wide net approach”. Do it all and hopefully i fix these issues. This ultimately worked, it wasn’t easy. I had to be disciplined and methodical and I was. In this time, I’ve lost 24 pounds, ( I wasn’t really heavy to begin with), I exercise for 60-90 mins 5 days a week (running 15-20 miles a week), taking multiple vitamins and supplements, track my sleep and O2 saturation every night, and removed all stressful activities I can. I stopped drinking alcohol, removed all sugar from my diet, The second order effects are many. First I feel better than I did 10 years ago, I’m never tired, I have more mental clarity, I dropped my LDL cholesterol 70 pts without medication, blood work is now normal, I sleep great. I stopped working on my car during this time for the most part. I did a little here and there but it hasn’t had anything really done to it. I do drive it now and then. I had to refocus my life and that meant 100% commitment to the things I determined were more important after evaluating everything. The tenants were: Family, Faith, Friendships, Spiritual and Mental Heath and overall personal Wellness. Everything else was placed on hold. The bottoms line is this long post is I’m back, I’m better, I’m going back to work in 2 weeks. This event was a blessing in disguise. That’s my story!15 points
 -
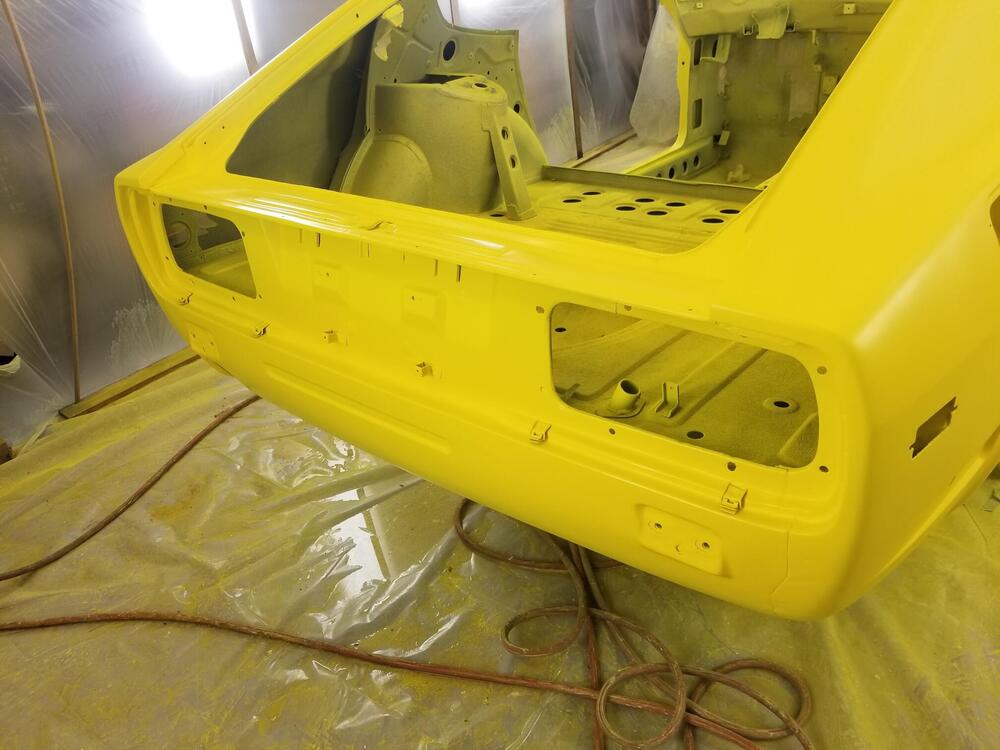
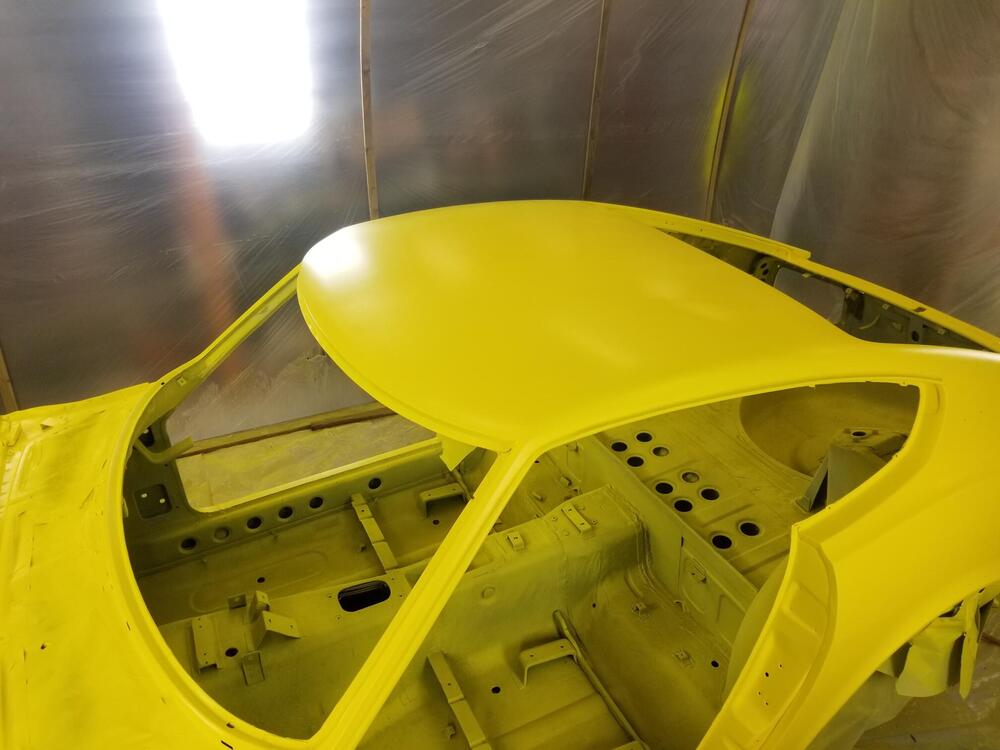
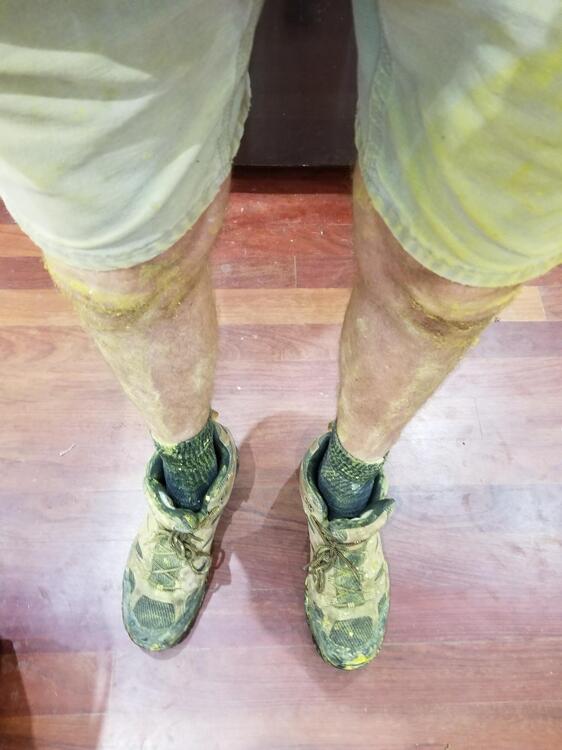
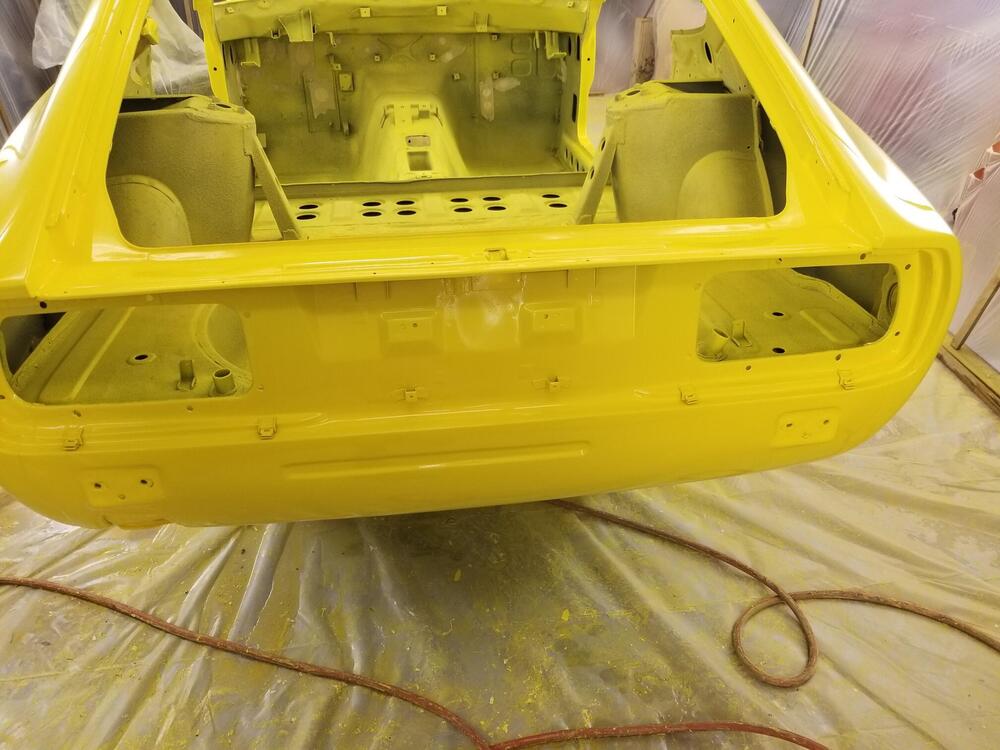
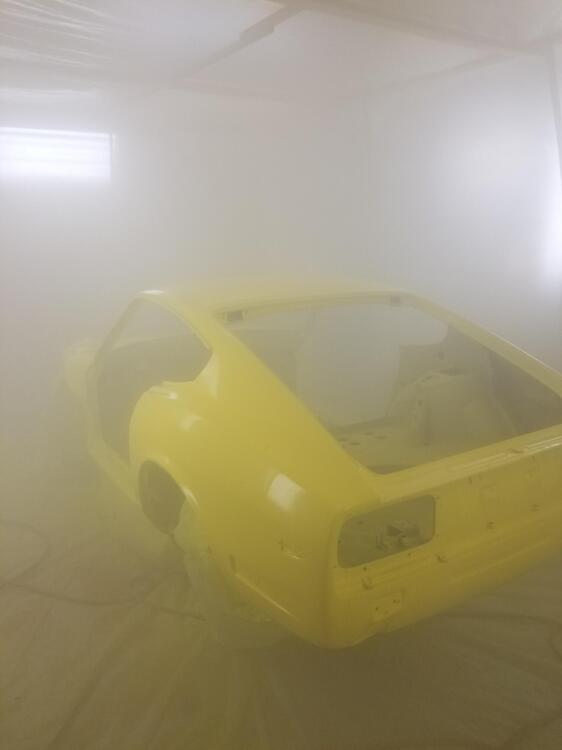
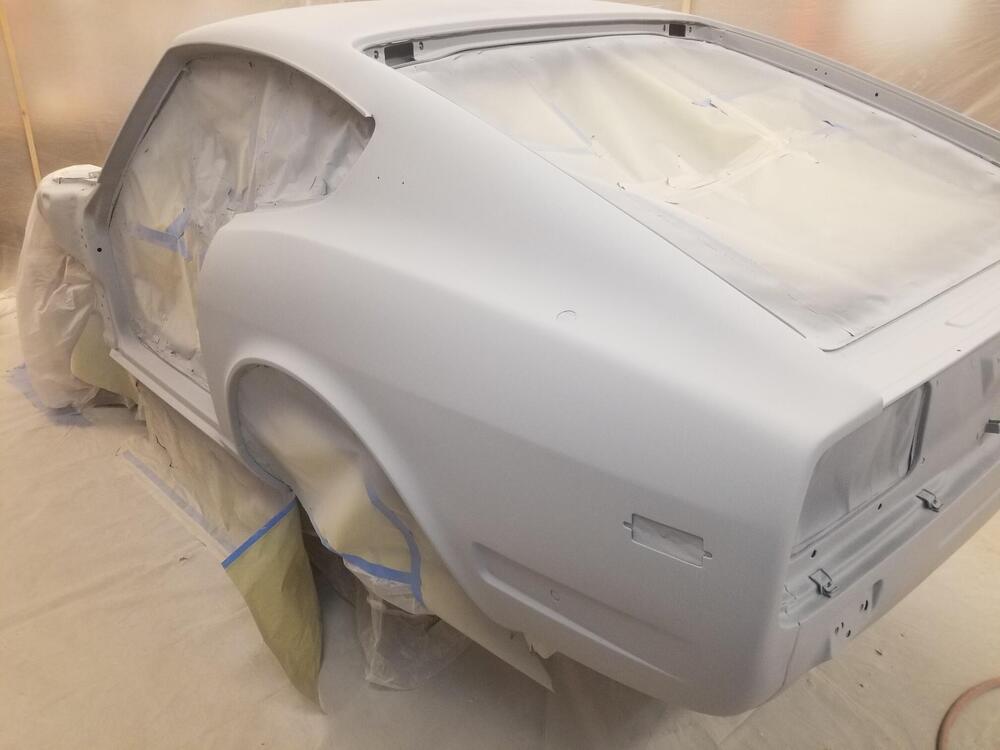
13 pointsToday A bright gallon Here is the yellow basecoat I think that was 3 coats of base. There were some areas that had a little gray show through and they were super hard to get covered with the yellow. It's just so transparent! 3 coats of clear. Overall, not too bad but one of my cans of clear had a little rust on it and it ended up in the mixing cup. the paint screens didn't get it all. So there are a few brown specs in the clear. I will have to cut them out. Hopefully I won't have to reclear. It's progress though. My booth didn't totally work the way I wanted. My intake fan filter ended up clogging with exhaust paint overspray coming back in another door of the shop. At the end the booth was pretty foggy! Don't light a match!! I probably should have worn my Tyveck suit but it was already hot in the booth... Colour!!!!
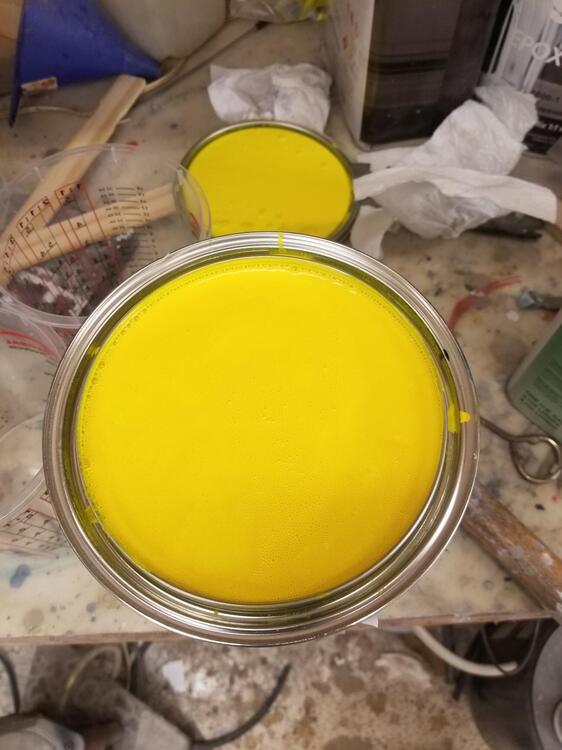
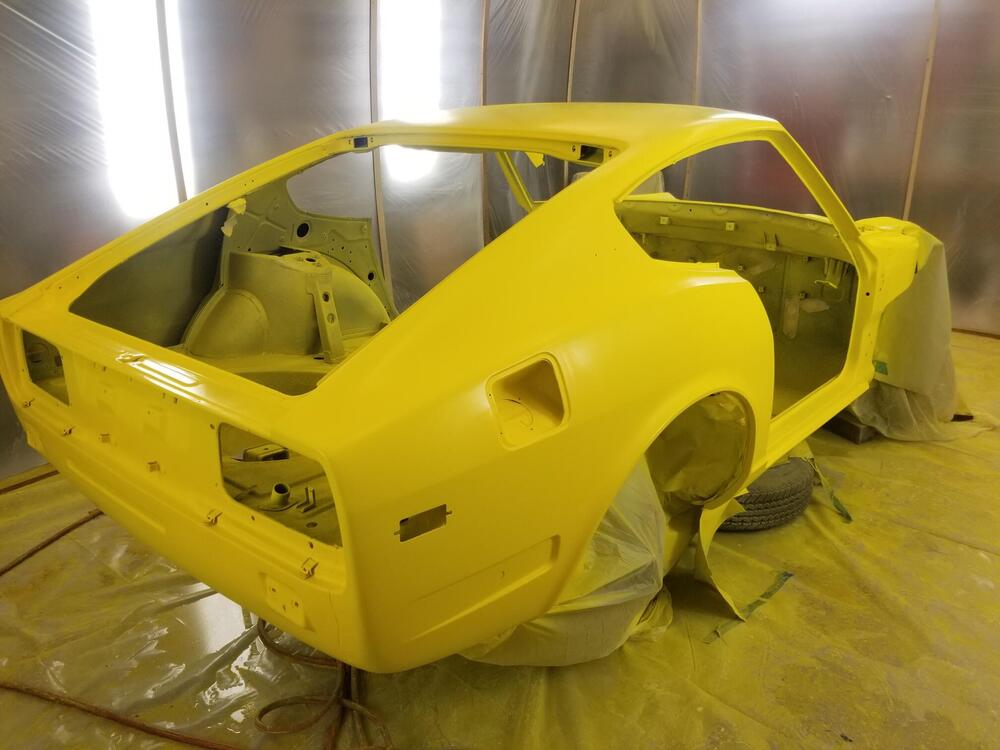


 13 points
 -
 11 points
 -
11 pointsI've been replacing all of my 11 year old fuel hoses with braided cover hoses and decided to do the flow guide valve vapor hoses for a consistent appearance. My valve cover breather hose was already a OE braided unit but I gave it quick inspection. Uh Oh - big crack at one end, time to replace it as well. A visit to MSA showed me a repro unit for (choke!) $90! 😲 So it was back to Belmetric for possible options. The valve cover fitting is 16mm in diameter but Belmetric only has 14mm and 17mm hoses. The breather hose is about 14" so I ordered two feet of the 17mm hose at the most attractive price of $7.15/ft. (today it is $8.01). At 1mm oversize, obviously it is an easy fit but the OE circular spring clamps hold it securely in place on the valve cover and air filter box. All of the hoses at Belmetric are from Germany and are typically marked so on the hose. If you don't want the word Germany on your Japanese car, the markings can easily be removed with a vigorous rubbing with mineral spirits. I really like the feel of $75 still in my pocket! 😁 https://belmetric.com/m17x21-braided-continental-hose-rh17-n203701/
 11 points
 -
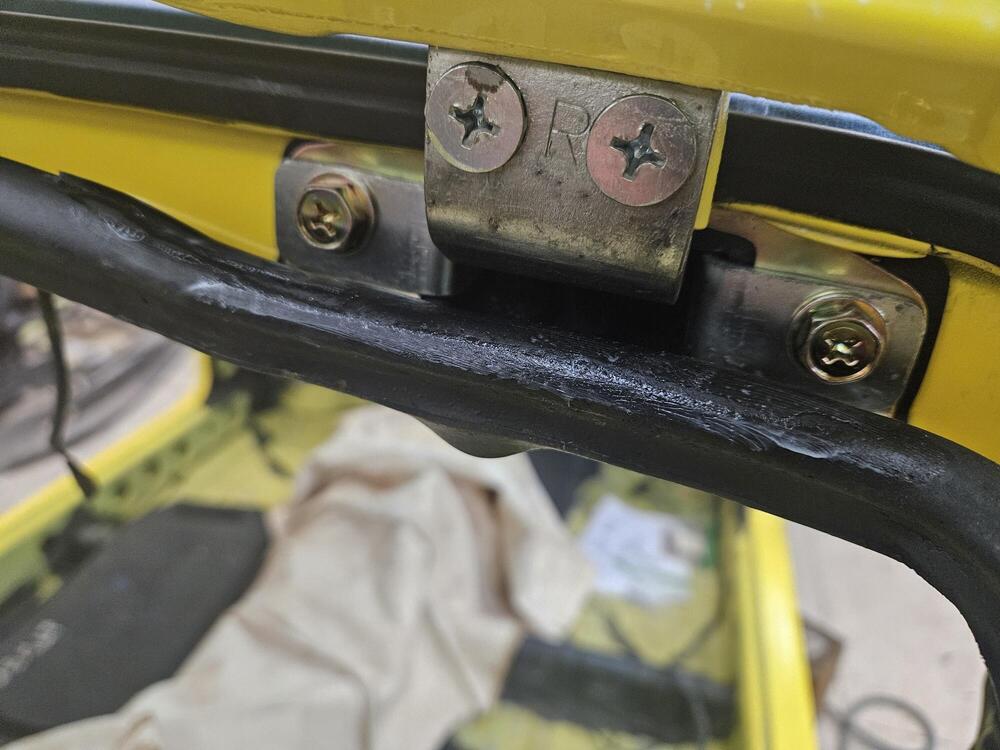
 Some of you have dealt with this little annoyance, and I have found a perfect solution. When doing a full restoration, or at least the full interior, you often have to replace the head liner and the A pillar vinyl, as well as the vinyl trim that goes across the top of the windshield where the sun visors and rear view mirror mount. While I won’t discuss the pain of installing these items, what I have found is even more of a pain, is finding the nine M5 threaded holes to put the visor and mirror mount back in. All that fresh painfully installed lovely vinyl, and 9 secret little holes you have to find to poke holes through. Get out the pokey thingy of your choice and start poking until you find them. If you put some kind of thin foam behind the vinyl like you’re supposed to, those damn holes are just a nightmare to sleuth out. Not any more! I put some nice long M5 grub screws in the nine threaded holes, THEN do the upholstery. Then finding the tips of them sticking out is easy! Make little “X” slits to expose them, grab your M3 hex key, back them out and screw in the visor and mirror mounts. Five minutes each! Easy peasy.
 10 points
 -
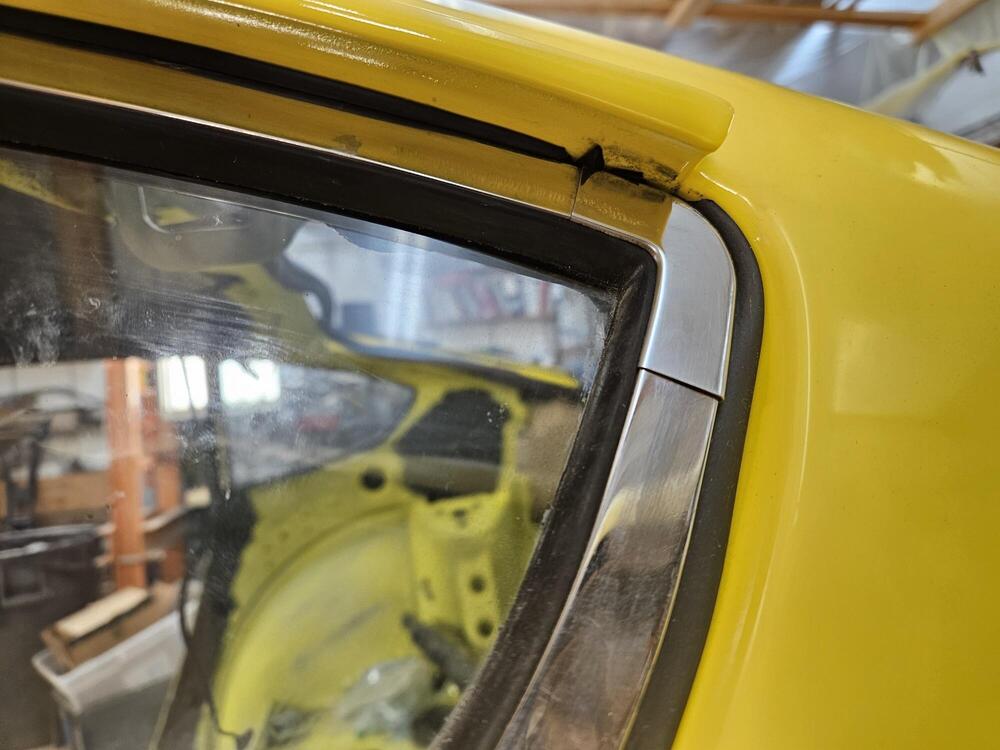
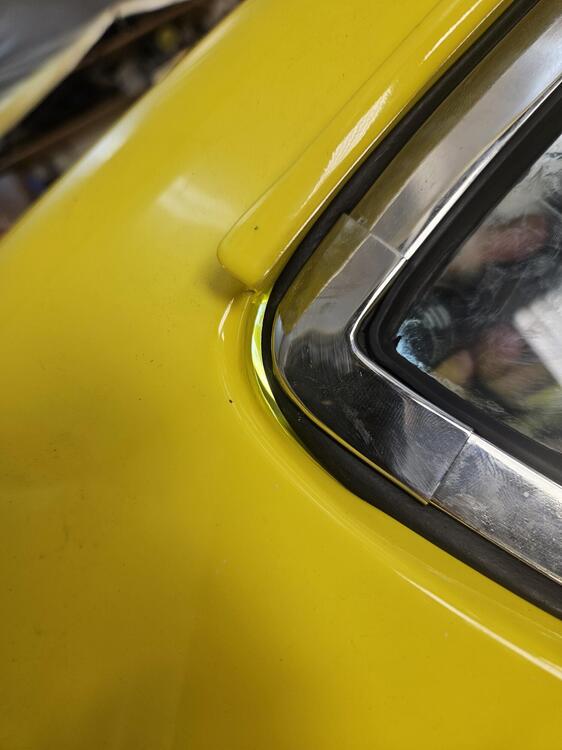
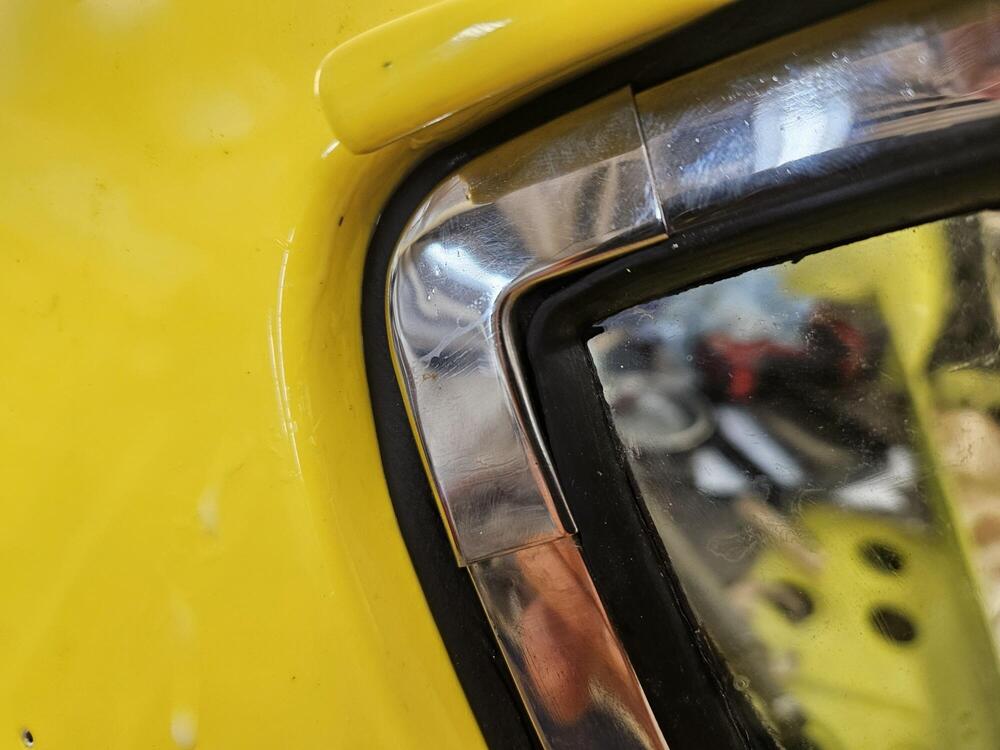
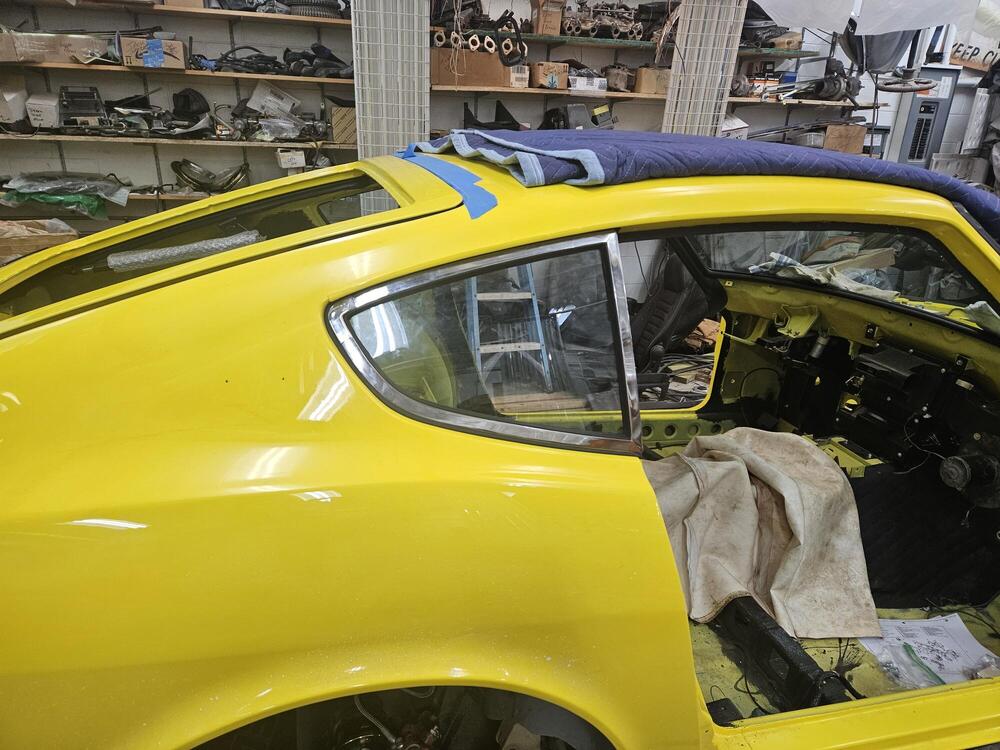
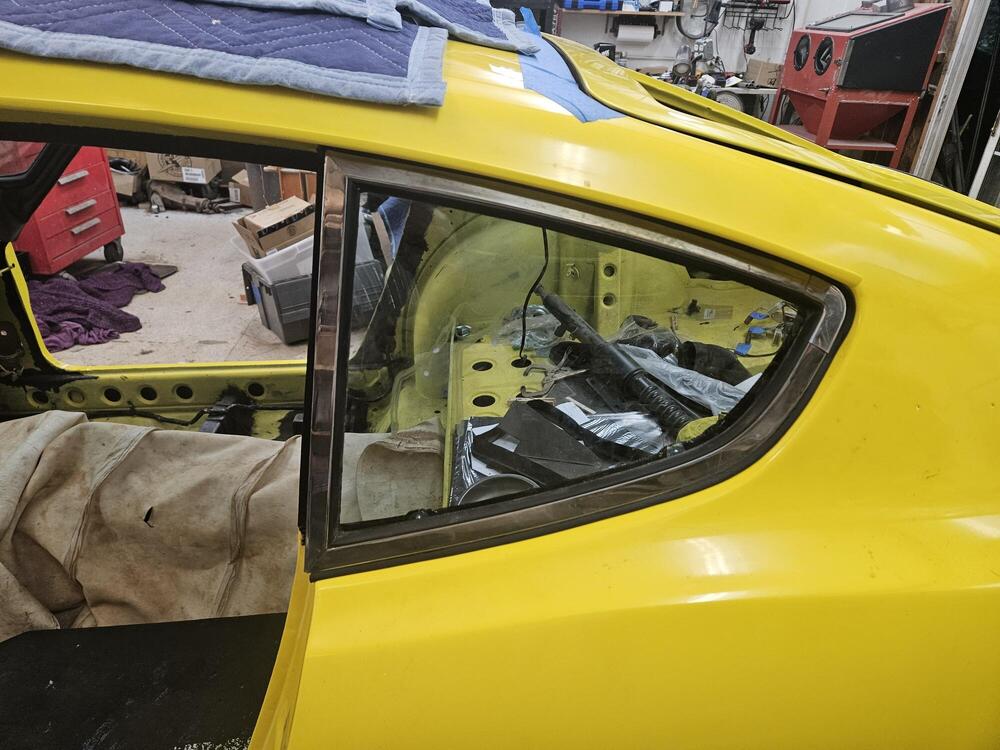
10 pointsCody worked on the brake booster some. I found a longer clevis. It also has a larger diameter pin which fits better in the pedal This brought the pedal height up and against the brake switch We messed with quarter windows last weekend. It was frustrating. Probably one of the tougher jobs to do, especially by yourself and get them right. We did get them installed last weekend. I wrapped a string around them to make it easier to get the lip turned out properly. But at the back of the drivers side window, it got really tight to the body and the seal ripped instead of turning out. On the passenger side, I wrapped the seal too tight to the glass and it didn't seal at the back corner of the glass Fortunately for some odd reason I had an extra set of quarter window seals. So this week in the evenings I redid the quarter window seals. We put them back in yesterday They both pretty much seal but they're still not quite right. The passenger side gap closed up but the seal turns in a little at the back becuase it doesn't have enough pressure on it to make it flair evenly. The drivers side does the same thing but in a different location. I visited Inline6 this week and saw his immaculate car. He said he used a slice of a bondo spreader to work the lips out from the inside of the car. It is flexible to put it down between the glass frame and the body to push from the inside. Tips for quarter windows. Grannyknots pick idea works really good to help manipulate the frames. Also just get the screws all started then work on getting the lips all turned out. The windows will still move a little until they're all the way tightened down. Also if the doors are off you can use the door jamb up by the door hinges to help push with your foot to get enough force to push the window back in place I finished the inner weatherstrip on the hatch yesterday and got the hatch back on. It sits a good bit proud of the body because it's so new. Hopefully it will relax over time I also used some silicone grease on the weatherstrip at the hood hinges to keep the hinge screws from nipping the weatherstrip. Seems to be working


 10 points
 -
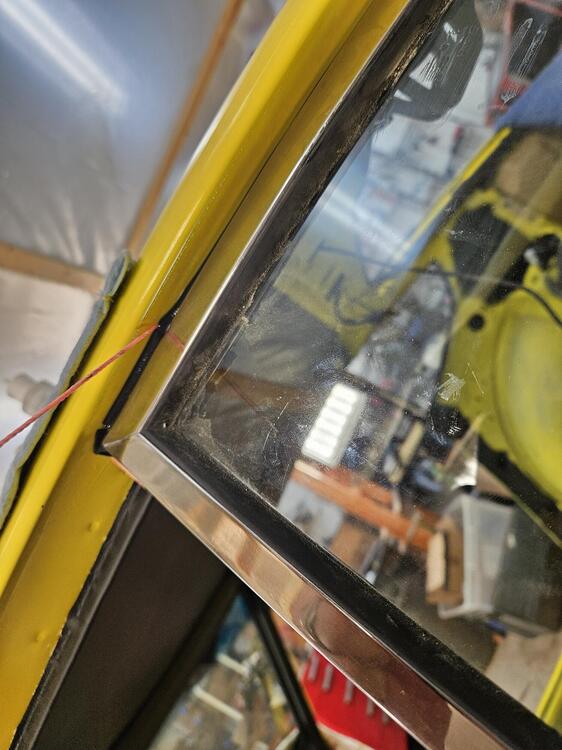
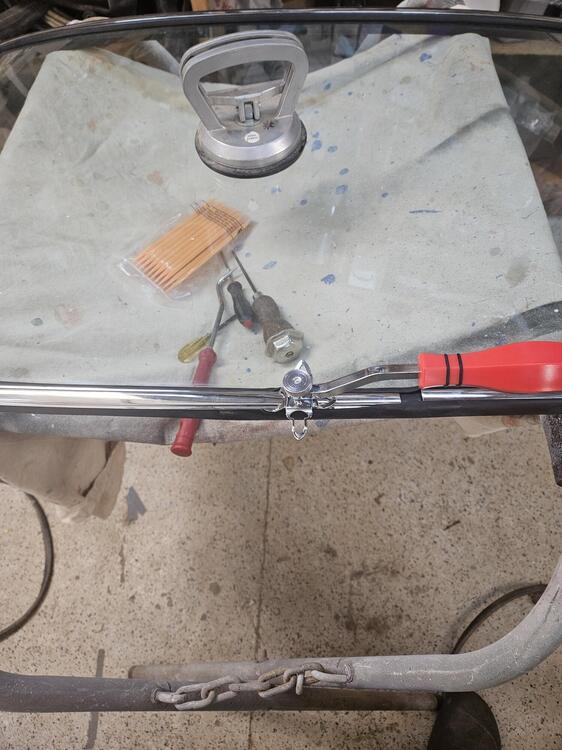
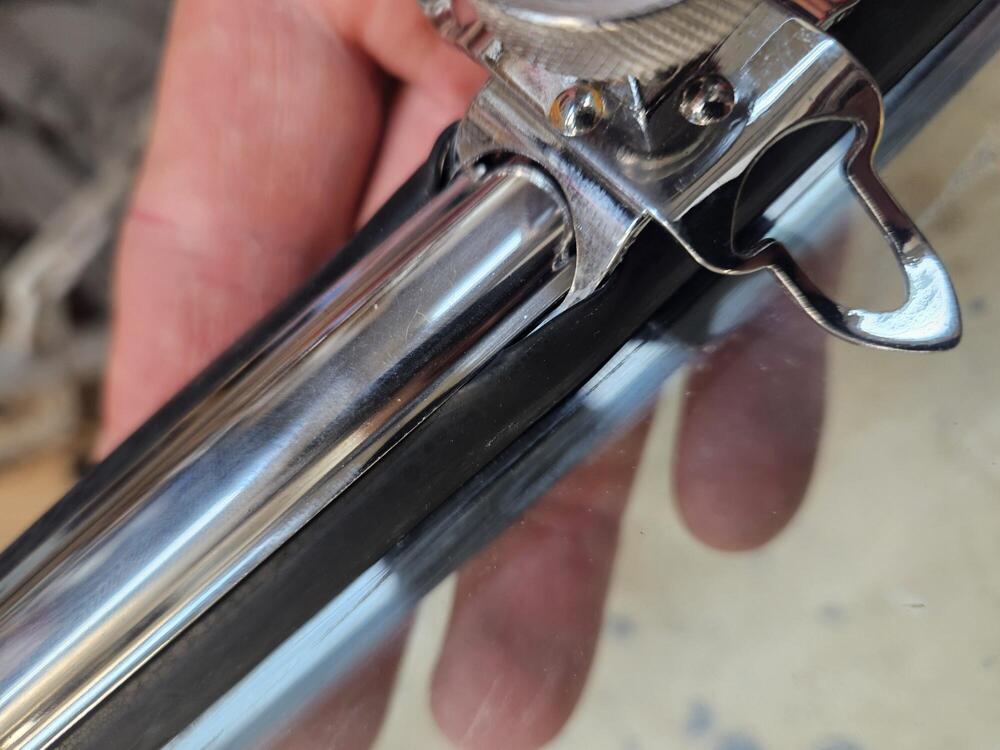
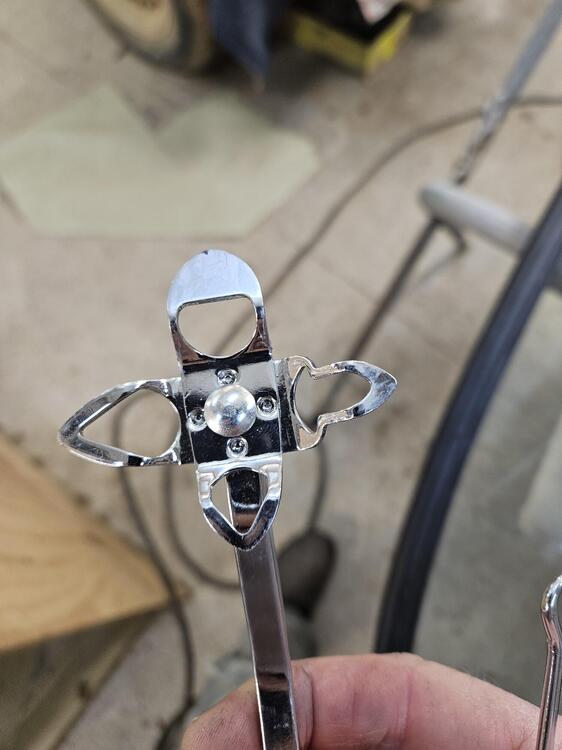
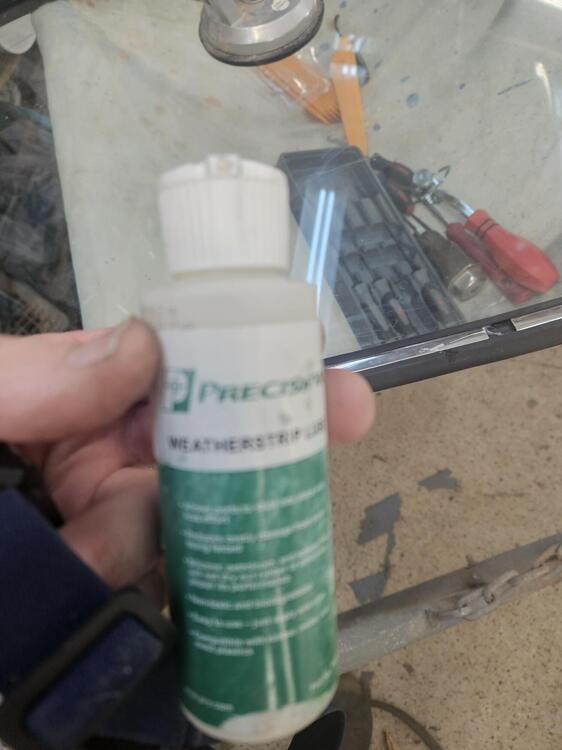
10 pointsSo I lied, I ordered a new windshield gasket from Zcardepot. It wasn't a lot of money and I could afford the little bit of lost time. The second one I got was not a "Precision" gasket. I actually like it better. It seems softer and possibly a little larger and the welded corners look really good. So I had a go at the stainless trim again. I bought some tools on Amazon, because who doesn't like new tools! 😉 So this is a windshield trim tool. There are some vintage windshield styles that use a rubber insert to log the glass in. I wasn't sure this tool would have a tip that was large enough for the stainless trim. Cody was helping me here hold the gasket to the glass and keep it in line with the trim I used the Precision gasket lube to make it easier for the edges of the rubber to move around the trim. The gasket isn't quite right in the lower corners yet, but I was thinking the car would force this corner into shape? We got the trim in with one really small nick. It's almost unnoticeable. So hopefully next weekend we will install the glass


 10 points
 -
10 points
-
 10 pointsWell, it has been long overdue, but I finally had a 2 post lift installed on Tuesday. It is a 9,000 lb. symmetrical lift I got from the Lift Superstore. They have a shop about an hour from me. Two guys delivered it and installed it in about 4 hours. I am going to christen it tomorrow by doing the brakes on my truck.
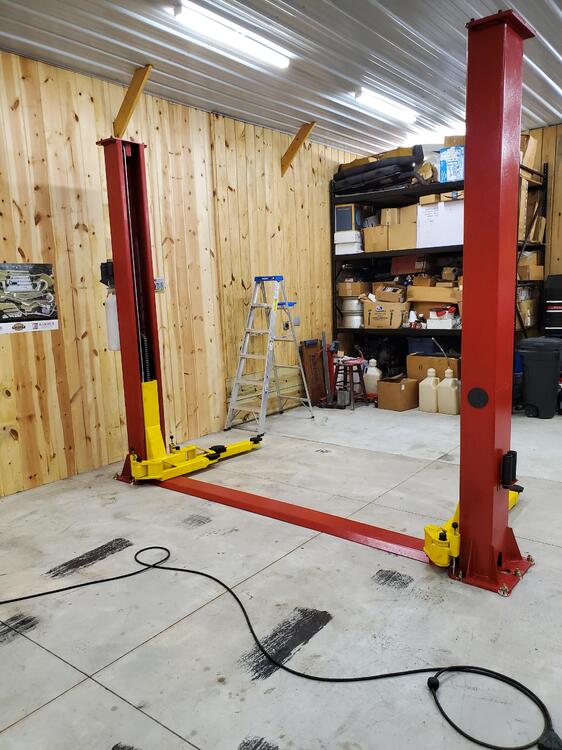 10 points
 -
 Hi Alan, Mr.Matsuo too. When I asked Matsuo-san “wood or plastic” 20 years ago, he explained how our wood steering wheel was made. Matsuo-san said “ real wood is pressed with liquid like plastic in a very strong force. Wood but same time plastic. That is what IZUMI doing”. Matsuo-san’s statement is for how, not for what we should call it. Matsuo-san was surprised and delighted, then said “ what a enthusiastic discussion (in the classiczcar.com), you guys are OTAKU, interesting!” When Matsuo-san talked about steering wheel, he always say” ウッド ハンドル” (wood steering wheel). This may sounds incorrect for someone, but do we really need to say in a different way and advise Matsuo-san not to call it wood? Probably he would say “I didn’t even think about there is a point of view that it should not be called or regarded wood steering wheel. You guys are great! But I still call it wood steering wheel”… I feel very comfortable that Nissan and Izumi called it “wood”. I have never felt I am cheated. Alan’s anatomy, that is fascinating and the pictures speak themselves. This picture was taken 8th May 2003 in Mr.Matsuo’s studio. Matsuo-san told me and showed me a lot of interesting stuff to me. A Memorial Day for me. Kats
 10 points
 -
 10 pointsBest present ever! My neighbors, young money makers with 2 young babies that i took under my wing, helping in their yard and feeding their animals just dropped of my present. I'm speechless... There really are Christmas miracles.
 10 points
 -
 10 pointsA few weeks ago I traded in my 2015 Pathfinder for a Frontier Pro-4X Crew Cab. There was a poster on the wall and I said "doesn't that go with my new truck?". They took down the poster and gave it to me.
 10 points
 -
10 pointsThere are many forces at play right now and more complicated that the average Joe really understands. 1. The Pandemic - this was the catalyst not the cause of shortages, shortages lead to supply/ demand going out of balance and thus higher prices ensued . Federal free money (Covid stimulus checks) while necessary to keep some people afloat they forced out of work through the demand curve way outside the normal. It also upset the labor market. Some people decided not to work even when they could. 2. The Federal Reserve printing money since QE1 (circa - Nov 2008) which accelerated through QE4 expanding the Fed balance sheet has created a glut of cash in the economy and very low interest rates, this further disrupts the supply/demand balance. Cheap money encourages poor spending decisions. When a 5 yr loan is 1% people borrow more money and buy more crap. 3. Energy costs have soared. It began well before Putin attacked Ukraine. A couple things happened here. One when the economy began to turn back on demand for fuel outpaced production. Oil and gas companies were caught in a bullwhip effect. In June of 2020 there was a glut of crude oil that left them scrambling to find space to store oversupply. Crude tumbled to $9.12 a barrel in April 21. When the world economy started to turn back on suppliers had basically turned off the spigot. 4. New leadership - our new President enacted policies that make it challenging to explore oil and drill for oil and gas. He stopped renewing off shore drilling leases and exploring or drilling on Federal lands. Billions invested by oil companies in pipelines were scrapped and sit partially complete or dormant meaning fuel has to be trucked and brought in on rail. He had publicly stated in his campaign he would End All Fossil Fuels. The oil companies have decided it’s too risky to invest in further production so they aren’t producing as much and in an unfriendly environment can take consumers to the cleaners with low supply. 5. Putin steps in and kicked over the apple cart. With sanctions on Russian, oil and gas supply’s are further inhibited. Russia is rich in natural resources, fertilizer, minerals, lumber, grain. Ukraine was also. Now we have soaring prices on things like Nickel, copper etc. 6. Labor shortages - Again the pandemic caused a major disruption in America’s labor force, some have referred it as the “Great Resignation” in 2021 47 million Americans quit their jobs. Labor is way more expensive now and this directly impacts a companies bottom line. When China stops the lock downs and comes back online, we are really going to see energy prices soar. Hold on for a wild ride. Cliff, great story about the landlord. This is how it’s supposed to work. You raise prices too much people go somewhere else. This is how the free market is supposed to work BUT in our modern complex society we have serious barriers to entry now. Oil companies or chip manufacturers don’t have to worry so much about competition driving prices down because you just can’t build a chip factory overnight or a oil mining company, These companies have the market by the balls now. This is not how the market is supposed to work. What’s supposed to happen is competition is supposed to drive prices down but that can’t happen now in many markets. Trying not to to be political just trying to lay it all out there, because there is a complete lack of understanding out there..10 points
-
 10 pointsThis restoration shop is a full service business. Classic Car Restorations in Bradenton, Florida. Complete services from paint and body work to interior work to full reassembly. Many thanks to Brian and his crew for excellent work and specific attention to detail. They fixed some poor welding work and fixed some other metal that had been covered over in Bondo. Once I get the car rolling and running, she will go back for the interior installation - butterscotch. For 26th, I chose a two stage acrylic with a clear coat. The underside is textured in a colorised product called Raptor. I decided to texture the wheel wells and inner fenders. The interior finish is just the base coat which is why it looks a little dull

 10 points
 -
10 pointsIt has been one long journey. Three different body shops, years of storage, but she will be coming home next week to begin the reassembly process. Finally!


 10 points
 -
 10 pointsToday marks 15 years since I joined this forum. When I bought my brand new 1971 240Z 51 years ago I could not have imagined that I would still own it in 2022 and rely on maintenance advice and encouragement from a global community of Z owners. I would like to thank everyone who has helped and entertained me for the last 15 years, especially Cliff and Charles. Of all the car forums I follow, this one is the most friendly and helpful. I always feel that I leave with more than I bring. Thanks, Dennis10 points
 -
10 points
-
 9 points9 points
9 pointsJapanese People don’t care about cars which were sold outside of Japan. My US 240Z has never been invented to Nostalgic Hero magazine. I know some people still think it is a fake of S30. The average sales price is backing up what I am saying. A Fairlady-Z 2/2 is now pricing double or triple of an US 240Z. Am I sad looking at those things? Maybe. But anyway I have my beautiful US 240Z which makes me so proud. People living in overseas don’t care about Japanese Fairlady Z cars. I have seen a lot of people don’t like G-nose because simply it looks ugly to them. Also people don’t like 2- liters cars, Z432 is not an exception. People don’t need information because they don’t use it for their cars. That is why I am here, and my friends here. I want people to know whole range of our cars. I believe looking into various types of our cars make us fun to enjoy better. Kats9 points
This discussion might fit better in a different thread. Not the BAT one..9 points
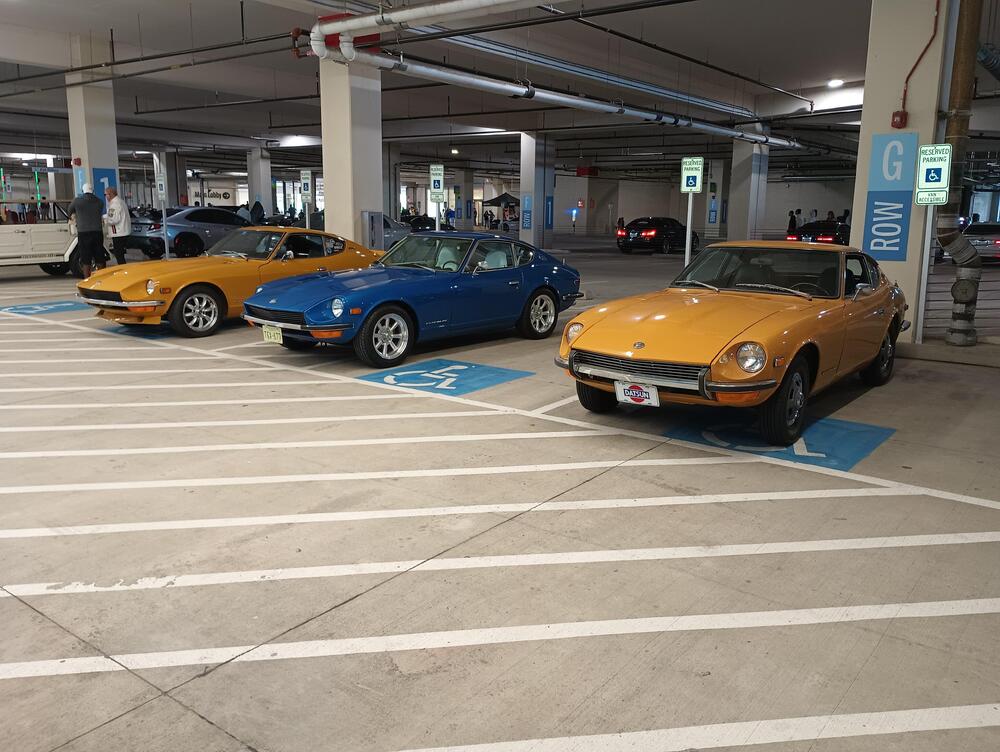
Attended a Hagerty Cars & Caffeine event this morning, co-sponsored by Liberty Mutual and held in their parkling garage. Joining me were fellow members @Dens240 and @zed2. After the cars thinned out we were able to get our rides together for a pic. That is Dennis' beatifully restored blue over white '72 and Keith's very original '70 parked beside me. There was probably close to $5-6 milion worth of exotics at the gathering with a Ferrari F40 as a featured display car.
9 points9 points
9 pointsJapanese People don’t care about cars which were sold outside of Japan. My US 240Z has never been invented to Nostalgic Hero magazine. I know some people still think it is a fake of S30. The average sales price is backing up what I am saying. A Fairlady-Z 2/2 is now pricing double or triple of an US 240Z. Am I sad looking at those things? Maybe. But anyway I have my beautiful US 240Z which makes me so proud. People living in overseas don’t care about Japanese Fairlady Z cars. I have seen a lot of people don’t like G-nose because simply it looks ugly to them. Also people don’t like 2- liters cars, Z432 is not an exception. People don’t need information because they don’t use it for their cars. That is why I am here, and my friends here. I want people to know whole range of our cars. I believe looking into various types of our cars make us fun to enjoy better. Kats9 points
This discussion might fit better in a different thread. Not the BAT one..9 points
Attended a Hagerty Cars & Caffeine event this morning, co-sponsored by Liberty Mutual and held in their parkling garage. Joining me were fellow members @Dens240 and @zed2. After the cars thinned out we were able to get our rides together for a pic. That is Dennis' beatifully restored blue over white '72 and Keith's very original '70 parked beside me. There was probably close to $5-6 milion worth of exotics at the gathering with a Ferrari F40 as a featured display car.
 9 points
I drove my '72 to the local grocer's and picked up some supplies. I do today what I plan on doing the New Year. Hopefully I want have a heart attack.
9 points
I drove my '72 to the local grocer's and picked up some supplies. I do today what I plan on doing the New Year. Hopefully I want have a heart attack. 9 points
 9 points
I've got some 12 year old bourbon that was barreled when that thread started.9 points
9 points
I've got some 12 year old bourbon that was barreled when that thread started.9 points 9 pointsJust thought I would say 'Hi' to all of the regulars and give a bit of an update. I took a break from the classiczcars site as life has been pretty busy. My wife and I moved last year from San Diego,CA to Boise, ID, so the move in and getting set-up has kept us pretty busy. I also picked up a job that kept me way too busy but that is now in the past. I now consider myself semi-retired and will probably do odd jobs on the side, or perhaps do another resto now that I am mostly settled. Wife says it's hard for me to sit still, so I am sure I will always be doing something. We bought our dream home in the foothills of Boise and we should be here for quite some time. The house is huge, has incredible views of the Boise foothills all around us, and also has a 1500 Sq-ft garage that currently contains a 20 ft Geo-Pro trailer and 7 cars. I am cheating a bit as I have one of the Z's up on a lift, but the other vehicles are all on the Epoxy coated floor. Also had a large heater installed so I can keep the garage at 55 degrees F all winter long. I can crank it up with the thermostat if I want to work out there for a while. Z-wise, it's been a pretty good year for the restorations. The last Z I restored, took first in the Japanese class at the La Jolla Concours in April. The owner was thrilled and it was a tremendous event. It was a nice way to start the year. In July, @jayhawk Blue '73 took first in the Japanese class at the 66th Hillsborough Concours de Elegance. That blue is still one of my favorite Z colors. And last but not least, a side job that I did and posted mostly on IG took third in the 240Z category at the JCCS in September. Pretty impressive given the large number of 240Z entrants at that show. Unlike my other restos, it was not a complete resto, but still looked good enough to place. So, it was a pretty good year for the Z's. I did enter my white Z in one of the local car shows here in Boise. The venue was nice, but the car culture appears to be a bit different than So-Cal. First off, not many foreign cars. Also, flashy colors and aftermarket mags seem to go over much better than an all original vehicle. Sadly, I think if I brought my beater yellow Z (with black side stripes and panasports) and my dad's original '70, the yellow Z would get a lot more looks and draw the larger interest. A bit disappointing, but maybe it was just the couple of shows that I attended. Will have to see how this developes in the future. Also, I stopped at the Z Doctor's shop here in Boise. Nice to have someone to talk Z's with. Anyway, I should be a bit more active on here now that I am caught up with most things. Will most likely be at ZCON 2023 and may even bring a car. Thanks for the support. Best regards, Rich9 points
9 pointsFinally, after dozens of orders, I struck gold (or yellow) with the magnet.
9 pointsJust thought I would say 'Hi' to all of the regulars and give a bit of an update. I took a break from the classiczcars site as life has been pretty busy. My wife and I moved last year from San Diego,CA to Boise, ID, so the move in and getting set-up has kept us pretty busy. I also picked up a job that kept me way too busy but that is now in the past. I now consider myself semi-retired and will probably do odd jobs on the side, or perhaps do another resto now that I am mostly settled. Wife says it's hard for me to sit still, so I am sure I will always be doing something. We bought our dream home in the foothills of Boise and we should be here for quite some time. The house is huge, has incredible views of the Boise foothills all around us, and also has a 1500 Sq-ft garage that currently contains a 20 ft Geo-Pro trailer and 7 cars. I am cheating a bit as I have one of the Z's up on a lift, but the other vehicles are all on the Epoxy coated floor. Also had a large heater installed so I can keep the garage at 55 degrees F all winter long. I can crank it up with the thermostat if I want to work out there for a while. Z-wise, it's been a pretty good year for the restorations. The last Z I restored, took first in the Japanese class at the La Jolla Concours in April. The owner was thrilled and it was a tremendous event. It was a nice way to start the year. In July, @jayhawk Blue '73 took first in the Japanese class at the 66th Hillsborough Concours de Elegance. That blue is still one of my favorite Z colors. And last but not least, a side job that I did and posted mostly on IG took third in the 240Z category at the JCCS in September. Pretty impressive given the large number of 240Z entrants at that show. Unlike my other restos, it was not a complete resto, but still looked good enough to place. So, it was a pretty good year for the Z's. I did enter my white Z in one of the local car shows here in Boise. The venue was nice, but the car culture appears to be a bit different than So-Cal. First off, not many foreign cars. Also, flashy colors and aftermarket mags seem to go over much better than an all original vehicle. Sadly, I think if I brought my beater yellow Z (with black side stripes and panasports) and my dad's original '70, the yellow Z would get a lot more looks and draw the larger interest. A bit disappointing, but maybe it was just the couple of shows that I attended. Will have to see how this developes in the future. Also, I stopped at the Z Doctor's shop here in Boise. Nice to have someone to talk Z's with. Anyway, I should be a bit more active on here now that I am caught up with most things. Will most likely be at ZCON 2023 and may even bring a car. Thanks for the support. Best regards, Rich9 points
9 pointsFinally, after dozens of orders, I struck gold (or yellow) with the magnet. 9 points
I'm relaxing at home when I got a call from a number I didn't recognize. Since the caller left a voicemail, I played it. He told me he got my number from a friend. He has a 78 that he drove to the gas station, and it wouldn't "catch". He said another friend worked on the car, but that friend wasn't available. I called him back and found out that the engine would turn but wouldn't fire. Knowing that the friend who worked on the car is a very good Z wrench, I knew I had to run through possible esoteric solutions. "Beat on the ECU." "What?" "Hit the ECU with the side of your fist. Just bang on it a couple of times. Then try to start your car." "Where is it?" "When you're sitting in the car, it's by your left leg on the kick panel." "I see a piece of plastic there." "Yep. Hit it." "Oh my God. It worked." I told him he might need to replace the ECU. It looks like MSA is out of them for right now. When I told the story to another friend, he responded, "Percussive maintenance." What can I say? He's right.9 points
9 pointsStacked some high build right before supper. Hopefully it will block out pretty close without needing too much more work
9 points
9 pointsI'm relaxing at home when I got a call from a number I didn't recognize. Since the caller left a voicemail, I played it. He told me he got my number from a friend. He has a 78 that he drove to the gas station, and it wouldn't "catch". He said another friend worked on the car, but that friend wasn't available. I called him back and found out that the engine would turn but wouldn't fire. Knowing that the friend who worked on the car is a very good Z wrench, I knew I had to run through possible esoteric solutions. "Beat on the ECU." "What?" "Hit the ECU with the side of your fist. Just bang on it a couple of times. Then try to start your car." "Where is it?" "When you're sitting in the car, it's by your left leg on the kick panel." "I see a piece of plastic there." "Yep. Hit it." "Oh my God. It worked." I told him he might need to replace the ECU. It looks like MSA is out of them for right now. When I told the story to another friend, he responded, "Percussive maintenance." What can I say? He's right.9 points
9 pointsStacked some high build right before supper. Hopefully it will block out pretty close without needing too much more work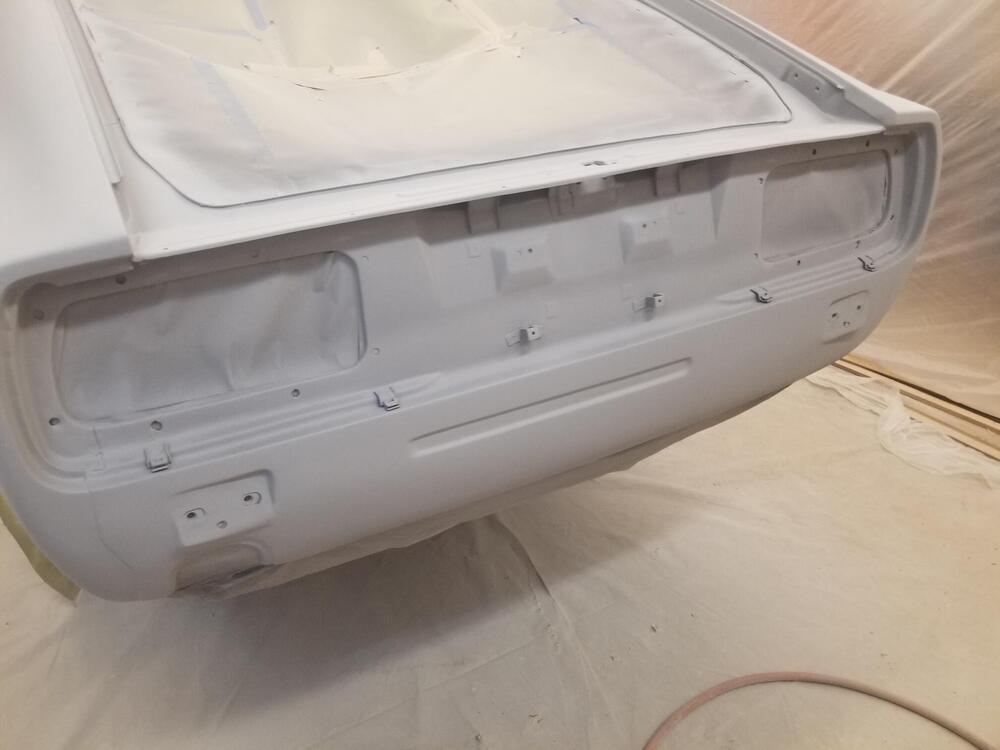

 9 points
Finally got the car on the road today. Put about 20 miles on it and it ran flawlessly. Suspension is smooth, I have a small knock on the right rear in need to investigate when I’m bumps but it’s bad. Otherwise it’s running great. I need to attack my electrical gremlins next . Ride height with the Eibachs and Koni’s is perfect in my opinion. Here are some pics from today.
9 points
9 pointsFinally got the car on the road today. Put about 20 miles on it and it ran flawlessly. Suspension is smooth, I have a small knock on the right rear in need to investigate when I’m bumps but it’s bad. Otherwise it’s running great. I need to attack my electrical gremlins next . Ride height with the Eibachs and Koni’s is perfect in my opinion. Here are some pics from today.

 9 points
8 pointsToo funny! 😂 I routinely see cars with large rusted holes in them. They seem to work fine. Also in my state there are zero vehicle inspections! No smog, no emissions, no brake light check etc. It doesn't seem to create carnage on the roads. What does seem to create great issues is the invention of the smart phone! Which some drivers can't seem to put down long enough to get to where they're going!8 points
8 pointsI figured I would let the cat out of the bag. From September 2020 at the unveiling, I thought that Nissan finally designed a Z I would want to buy new. I was too young to buy an S30 or S310 new. I was young and broke when the Z31 and Z32 came out, and I never was really taken by the Z33 or Z34. Yes, the RZ34 is a Z34 with a new wrapper, but I really liked the heritage touches. To me it looks more like a GT car and less boy racer. When I talked to a couple of Nissan people during the pre-sales road shows, they confirmed New Sight Orange would be coming. The first Z I remember was a 260Z in New Sight Orange. It was owned by a former NASA test pilot, and I lived down the street from him. A friend's father bought the car and got it back on the road. My friend got to enjoy it for a few years before the car was hit by an uninsured motorist. My first Z, a 73 was originally New Sight Orange, though someone with questionable taste had it repainted a color similar to Metallic Gold, though it looked worse than a MAACO paint job. I still have that car and hope to return it to New Sight Orange some day. I was excited to hear that Nissan was holding to its word that orange was coming back, but my excitement diminished when I learned it was on the Heritage Edition only with a sticker of $62K (plus whatever the dealers think they can charge for a special edition). So I set about looking for an alternative. I noticed that dealers were finally coming off sticker price for the Z. On the other hand most of those Zs were Gun Metallic. While I don't worry too much about color, I didn't really want grey. No blue Zs with manuals were popping up nearby, but finally a Z in Sport trim showed up at one of the closest dealers sporting Ikazuchi Yellow Pearl paint. I took it for a test drive, and the wife loved it. It felt right for my new daily driver, so a couple of hours later I drove it home. The new Z has very good acceleration as one would expect with 400HP on tap. The steering feels extremely light at low speeds, but the feel improves as speed increased. With no limited slip, it's easy to spin the tire a little getting into traffic. The seats are comfortable, and the shifter is in easy reach. The clutch engages higher than I think it should, but I am just going to live with that. The blind spots are huge, but the blind spot warning system seems to work well. The view out the rear window is small, too. I have an Android phone, so one of the USB slots is taken by the phone if I want to use navigation. If you want more creature comforts, or if you are planning on tracking the car, go for the Performance trim. The yellow pearl paint stands out, but it doesn't look like a taxi, even with the black roof. I have experienced one problem with the car so far. Yesterday, the TPMS monitoring system lost communications with all 4 tires. I drove the car around for a while, and the system found the left front, though that didn't last. I guess I'll see how good the local service department is.
9 points
8 pointsToo funny! 😂 I routinely see cars with large rusted holes in them. They seem to work fine. Also in my state there are zero vehicle inspections! No smog, no emissions, no brake light check etc. It doesn't seem to create carnage on the roads. What does seem to create great issues is the invention of the smart phone! Which some drivers can't seem to put down long enough to get to where they're going!8 points
8 pointsI figured I would let the cat out of the bag. From September 2020 at the unveiling, I thought that Nissan finally designed a Z I would want to buy new. I was too young to buy an S30 or S310 new. I was young and broke when the Z31 and Z32 came out, and I never was really taken by the Z33 or Z34. Yes, the RZ34 is a Z34 with a new wrapper, but I really liked the heritage touches. To me it looks more like a GT car and less boy racer. When I talked to a couple of Nissan people during the pre-sales road shows, they confirmed New Sight Orange would be coming. The first Z I remember was a 260Z in New Sight Orange. It was owned by a former NASA test pilot, and I lived down the street from him. A friend's father bought the car and got it back on the road. My friend got to enjoy it for a few years before the car was hit by an uninsured motorist. My first Z, a 73 was originally New Sight Orange, though someone with questionable taste had it repainted a color similar to Metallic Gold, though it looked worse than a MAACO paint job. I still have that car and hope to return it to New Sight Orange some day. I was excited to hear that Nissan was holding to its word that orange was coming back, but my excitement diminished when I learned it was on the Heritage Edition only with a sticker of $62K (plus whatever the dealers think they can charge for a special edition). So I set about looking for an alternative. I noticed that dealers were finally coming off sticker price for the Z. On the other hand most of those Zs were Gun Metallic. While I don't worry too much about color, I didn't really want grey. No blue Zs with manuals were popping up nearby, but finally a Z in Sport trim showed up at one of the closest dealers sporting Ikazuchi Yellow Pearl paint. I took it for a test drive, and the wife loved it. It felt right for my new daily driver, so a couple of hours later I drove it home. The new Z has very good acceleration as one would expect with 400HP on tap. The steering feels extremely light at low speeds, but the feel improves as speed increased. With no limited slip, it's easy to spin the tire a little getting into traffic. The seats are comfortable, and the shifter is in easy reach. The clutch engages higher than I think it should, but I am just going to live with that. The blind spots are huge, but the blind spot warning system seems to work well. The view out the rear window is small, too. I have an Android phone, so one of the USB slots is taken by the phone if I want to use navigation. If you want more creature comforts, or if you are planning on tracking the car, go for the Performance trim. The yellow pearl paint stands out, but it doesn't look like a taxi, even with the black roof. I have experienced one problem with the car so far. Yesterday, the TPMS monitoring system lost communications with all 4 tires. I drove the car around for a while, and the system found the left front, though that didn't last. I guess I'll see how good the local service department is. 8 points
8 points
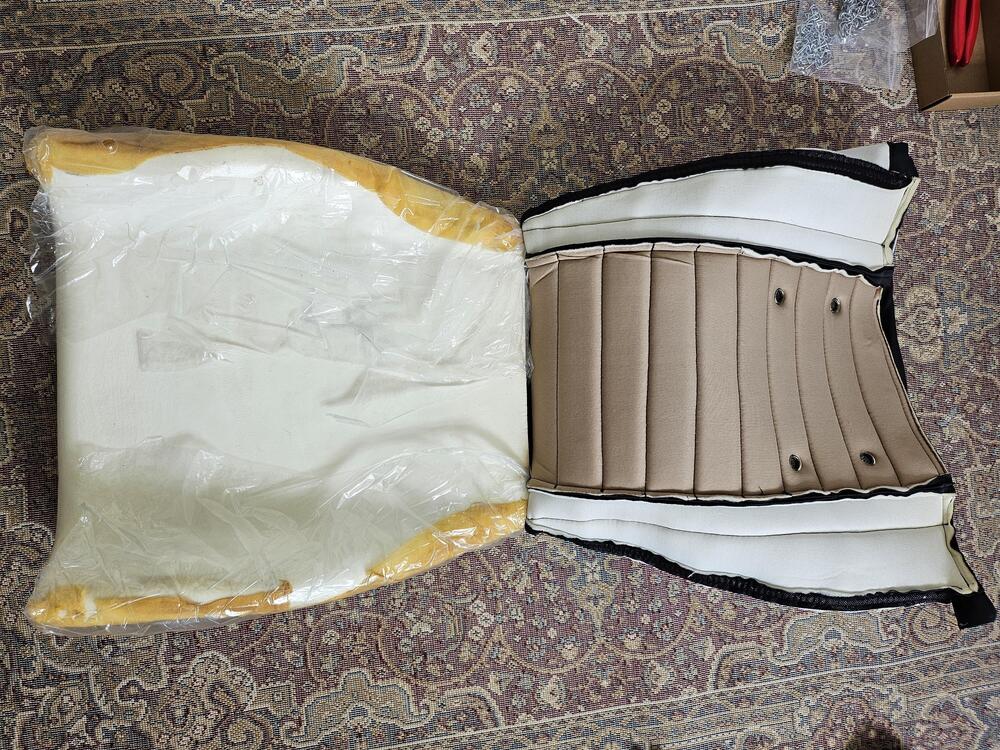
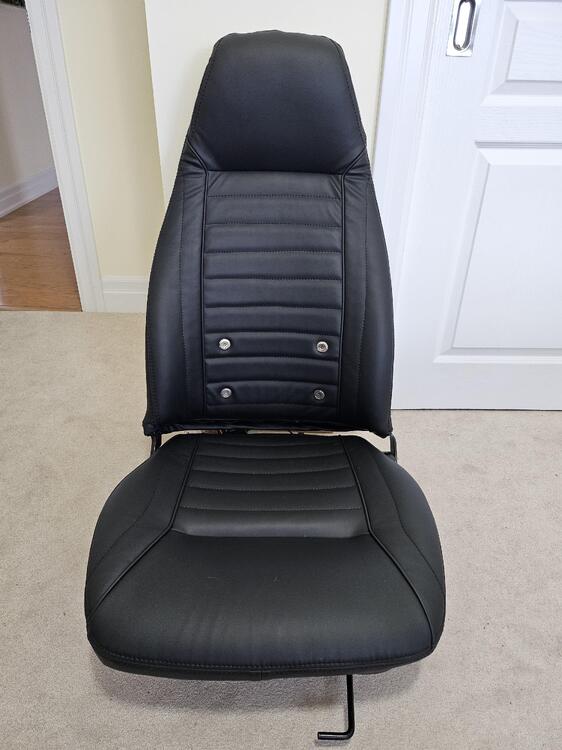
8 points I just re-covered my passenger seat with the Interior Innovations cover that I bought from @KenFirch a while back. I purchased the replacement foam from Interior Innovations as well. I wasn't really looking forward to the job. It sounded like it was a bit of a pain, but it went very well and didn't take me more than a couple of hours. I thought I'd add a couple of things to this thread that might help people doing it in the future. My car is a 1971 240 (the one @grannyknot has been working on in a current build thread), but the seats seem to be from a 280Z. They have the metal "springs" in the seat bottom rather than the webbing. They've been recovered previously (the covers were obviously not original), but the foams seemed to be original. A couple of things made the job easier, as described here. There was a thin sheet of plastic covering the foam of the seat back. It seemed to be professionally made to fit the seat, but I don't know whether it was something that came from the factory. It was a little worse for wear, but I was able to reuse it. I was also able to leave the very thin layer of foam on the metal seat back. It was wrapped around and over the edges of the foam on the front of the seat back, but I was able to peel it off. I first glued the edges of the new foam to the metal seat back. I used Lepage Multi-Purpose Spray Adhesive and it held very well through the rest of the work. The plastic on the top of the seat back made it easy to slip the top of the new cover over the seat back down to the point where I needed to hog ring it to the metal back. Once I'd done that (more on that in a minute), I was able to very easily roll the rest of the cover down over the rest of the back. When using the tangs to secure the front and back of the cover to the bottom of the seat back, it was easy to pull the material down far enough. This was probably because it could slide easily on the plastic sheet. I was able to hog ring the cover to the metal back through the slot without too much trouble. I first used plastic cable ties to pull the wire on the metal seat back and the wire in the seat cover insert together, then used the hog ring pliers I bought to add the hog rings. I was going to cut the cable ties off afterwards, but decided to simply trim them instead. I can't see them doing any harm, and they're providing extra holding power. When I did the seat bottom, I first used the tangs to pull the cover down tight on the foam and metal seat base. Once I'd done that, it made the job of attaching the hog rings much easier because the foam was quite compressed. I used the cable ties again, which made it very easy to attach the hog rings. I do kind of wonder whether you could do this job with the cable ties and not bother with hog rings at all. Maybe they'd wear through over time. So I would suggest using a plastic wrap over the seat back, attaching the seat bottom cover using the tangs before doing the hog rings, and using cable ties to pull parts together when installing the hog rings. I'll be doing the driver's seat over the next few days, so I'll get a chance to do this again. Hopefully it will go as well as this one did.

 8 points
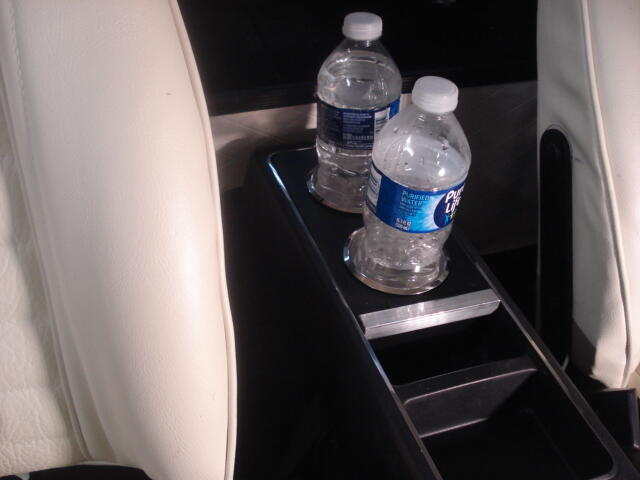
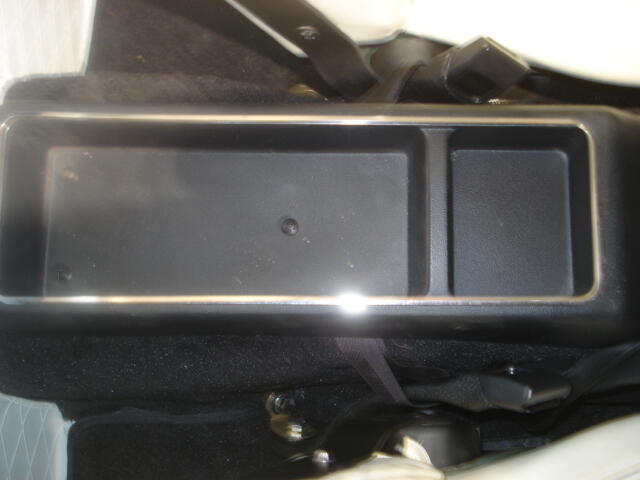
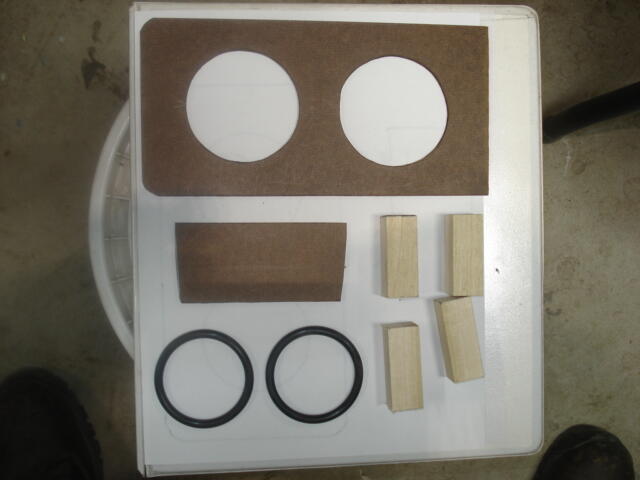
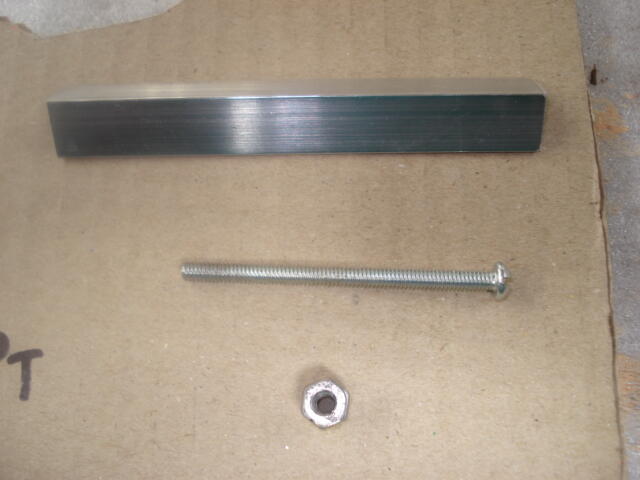
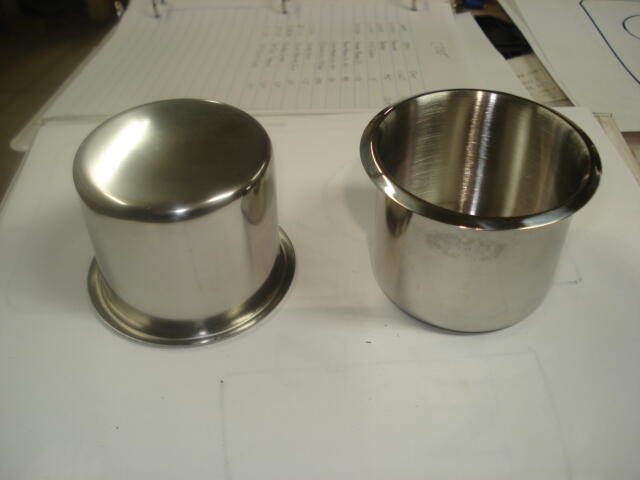
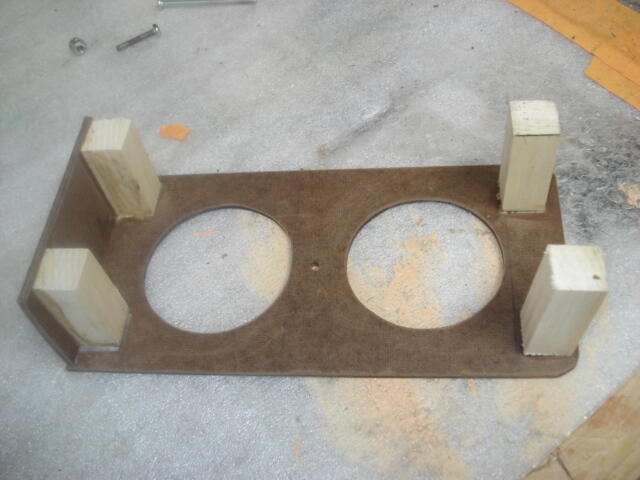
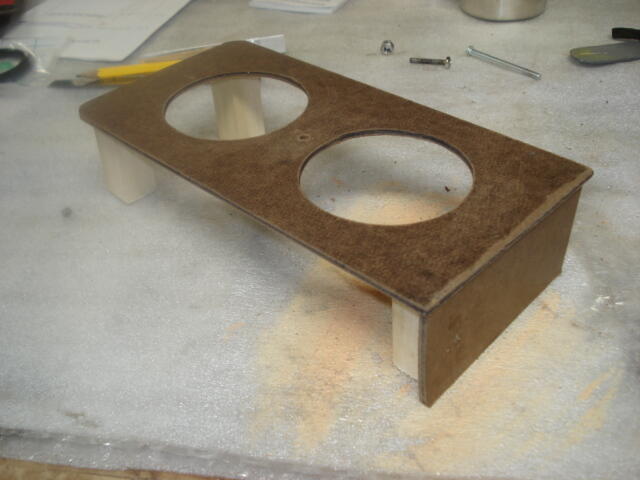
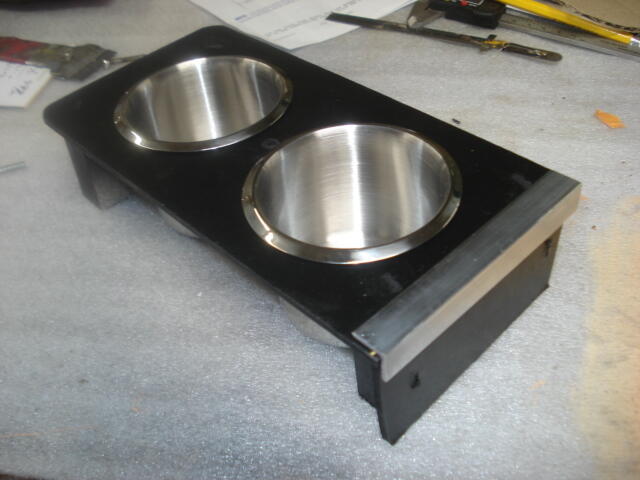
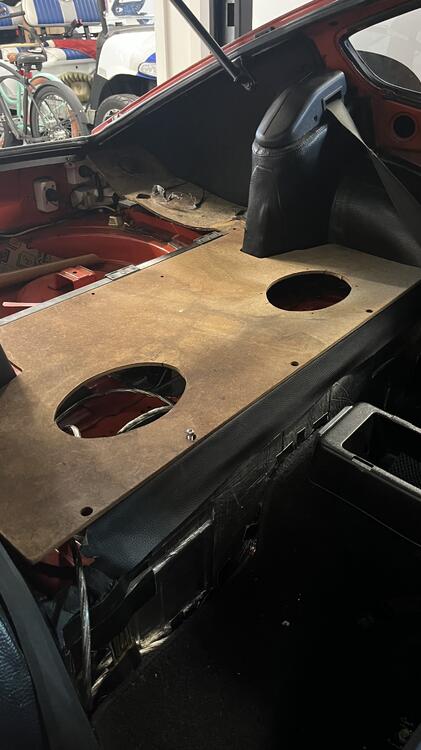
It seems over the years we've come to love cup holders in our vehicles. Unfortunately, they were unheard of when our Z cars were built. So I decided to fabricate some. They came out pretty good, so I thought I'd share the details with the group. Mine is a 1973 but I'm pretty sure earlier Z's are the same. I have about $20 in the build. See Pics of finished product and original consol. Material List: (see Material list 1 & 2 photos) Piece of hardboard or paneling 1/8" thick (2) Orings 2-1/4" I.D 1/4" thick (4) pcs of 3/4" x 3/4" x 2" long wood pieces for legs. You could also use round dowel rods if that what you have (2) SS cup holders. I got mine on ebay for $9.50 for the pair. Size is important and not all the ones offered on ebay are the same size. Look for a size that is 2.7" I.D; 2.2" OAH; 3.15" OA Dia (at the lip). The item # on ebay for the ones I bought was 145114090133 (not sure it the same vendor is still listed) See photo. (1) 8-32 x 2-1/2" long screw with nuts (2) or a #8 sheet metal screw the same length. If you look at material list 2 photo, what I did was braze two 8-32 nuts together to make a threaded sleeve then used JB Weld to attach them to the bottom of the consol (1) pcs 1/2" x 1/2" x 1/16" aluminum angle 4-1/2" long. I attached it to the front of the assembly using 3M Auto trim tape to give the assembly a more finished look. This is optional. You will also need 2-9/16" hole saw All the dimensions included are approximate and based on my installation. Some modifications and fitting may be necessary to fit your application. After cutting the holes for the cup holders, they will still need to be enlarges some to fit the holders. I used a Dremel with a sanding wheel for this job. Go slow and test fit often. You want the holders to fit snug in the holes. The o-rings go on the bottom of the cut out to provide additional grip on the holders (see photo) Note that the legs are set slightly in from the edges on all four sides. This is to compensate for the slight taper on the sides of the original consol. I attached the legs and the front panel using Elmers glue and wire brads (small screws would also be acceptable) The 3/16" hole between the cup holders is for the bolt (or screw) that attached the assembly to the original consol. Note also the small area in front of the cupholders is ideal for your cell phone
8 points
8 pointsIt seems over the years we've come to love cup holders in our vehicles. Unfortunately, they were unheard of when our Z cars were built. So I decided to fabricate some. They came out pretty good, so I thought I'd share the details with the group. Mine is a 1973 but I'm pretty sure earlier Z's are the same. I have about $20 in the build. See Pics of finished product and original consol. Material List: (see Material list 1 & 2 photos) Piece of hardboard or paneling 1/8" thick (2) Orings 2-1/4" I.D 1/4" thick (4) pcs of 3/4" x 3/4" x 2" long wood pieces for legs. You could also use round dowel rods if that what you have (2) SS cup holders. I got mine on ebay for $9.50 for the pair. Size is important and not all the ones offered on ebay are the same size. Look for a size that is 2.7" I.D; 2.2" OAH; 3.15" OA Dia (at the lip). The item # on ebay for the ones I bought was 145114090133 (not sure it the same vendor is still listed) See photo. (1) 8-32 x 2-1/2" long screw with nuts (2) or a #8 sheet metal screw the same length. If you look at material list 2 photo, what I did was braze two 8-32 nuts together to make a threaded sleeve then used JB Weld to attach them to the bottom of the consol (1) pcs 1/2" x 1/2" x 1/16" aluminum angle 4-1/2" long. I attached it to the front of the assembly using 3M Auto trim tape to give the assembly a more finished look. This is optional. You will also need 2-9/16" hole saw All the dimensions included are approximate and based on my installation. Some modifications and fitting may be necessary to fit your application. After cutting the holes for the cup holders, they will still need to be enlarges some to fit the holders. I used a Dremel with a sanding wheel for this job. Go slow and test fit often. You want the holders to fit snug in the holes. The o-rings go on the bottom of the cut out to provide additional grip on the holders (see photo) Note that the legs are set slightly in from the edges on all four sides. This is to compensate for the slight taper on the sides of the original consol. I attached the legs and the front panel using Elmers glue and wire brads (small screws would also be acceptable) The 3/16" hole between the cup holders is for the bolt (or screw) that attached the assembly to the original consol. Note also the small area in front of the cupholders is ideal for your cell phone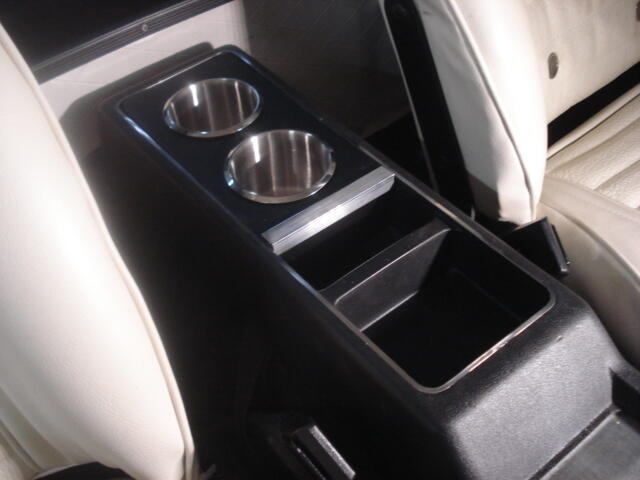

 8 points
 I'm happy to say this car is an unrestored example, other than a respray several years ago. Well documented 50,000 mile car. Sat in storage most of its life.
 8 points
So I wanted to be sure the motor was still viable. So I hooked it up to a battery sitting on a trailer and spun it over with a remote starter switch. It spun freely with no plugs in it. So then I wanted to try to fire it over. It didn't have any carbs or exhaust on it. I messed with it for a while. Tried three different coils and two distributors called SteveJ to make sure I knew what I was doing. I then put the matchbox dizzy back in and got it to run on ether. I have a set of Ztherpay carbs that are evidently from 2011 that still look surprisingly good. They were on this engine and I will clean them up and reuse them for now 20231007_172650_447749883773934.mp4 It lives!!!8 points
8 points
8 pointsSo I wanted to be sure the motor was still viable. So I hooked it up to a battery sitting on a trailer and spun it over with a remote starter switch. It spun freely with no plugs in it. So then I wanted to try to fire it over. It didn't have any carbs or exhaust on it. I messed with it for a while. Tried three different coils and two distributors called SteveJ to make sure I knew what I was doing. I then put the matchbox dizzy back in and got it to run on ether. I have a set of Ztherpay carbs that are evidently from 2011 that still look surprisingly good. They were on this engine and I will clean them up and reuse them for now 20231007_172650_447749883773934.mp4 It lives!!!8 points 8 pointsHey Yarb thanks, I really like helping when I can. I have been helped many times from this site and when I can pay back I do.8 points
There. See? It was the loose dizzy cap. Guess it went wonky (sorry for the technical term) above 4k. I knew if I asked you guys would help me solve it! Even if only in spirit..... So what did we learn today? -Misfires can cause a lean condition as read on the AFR gauge, just like the reverse. -Change a bunch of stuff and get the same result? You are changing the wrong stuff. -Tunnel vision is blinding.8 points
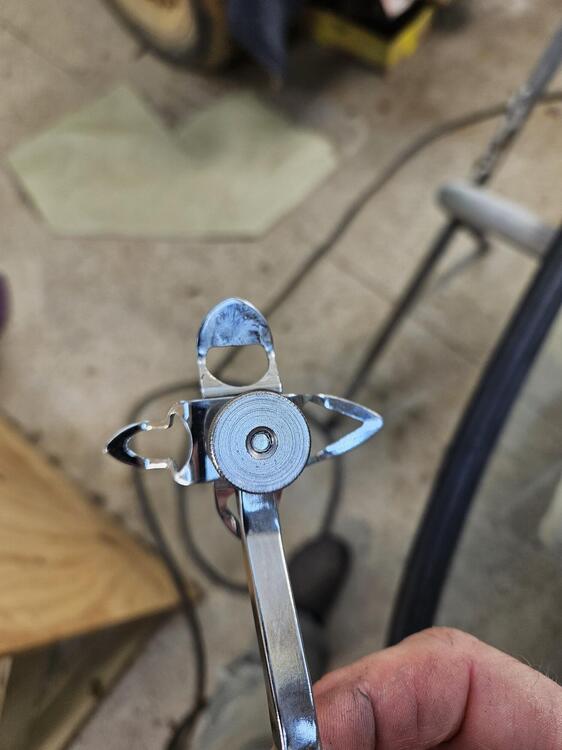
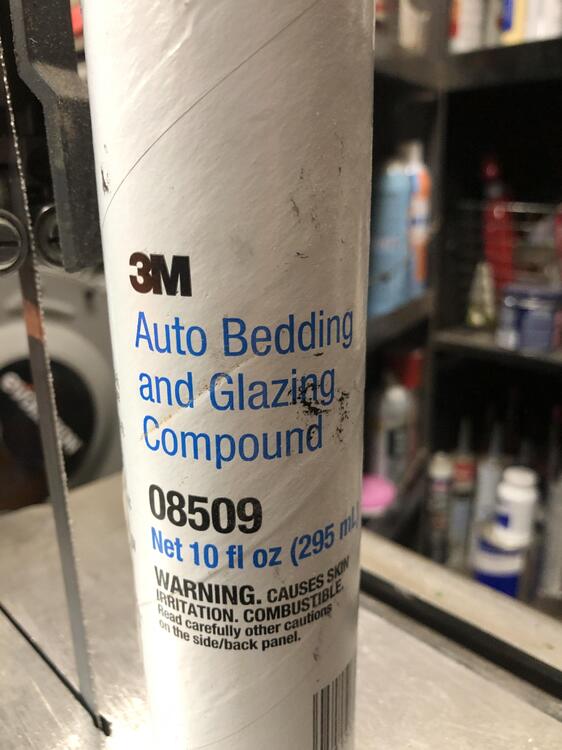
8 pointsExcellent write up. If I may add a couple of personal experience notes. 1. Putting the cord in the groove. I use a short piece of brass tubing, 1/4 OD or something, 4 inches longish, whatever will let your cord of choice pass through easily. Poke the end of the tube into the groove and drag it along, it will deposit the cord in the groove like magic. Should take you literally 30 seconds to do the entire circumference. 2. Lube. Tried all kinds of wet lubes, none were all that useful. If you feel compelled to use lube, try corn starch. Dry, stays put, cheap, easy clean up (blows away without doing anything actually) and makes rubber slippery without being greasy or drys out like soap. 4. Spend more time than you think you should getting the gasket/glass sitting as low and close into the window channel as you can, flush with the body all around, and centered left right. This will ensure an easy cord pull as the rubber lip is nice and close to the pinch weld. 3. Biggest trick of all is to use two cords instead of one. Start one top center and go around left, end at bottom center. Same for the right. Leave a foot at each end top and bottom. Pull a bit of the bottom, left and right six inches, then repeat on the top, left and right, continue left and right, balancing your pull top and bottom. Go around bottom corners first, then the top, though it really doesn’t matter. Why is this such a great deal? Balance. All the problem I had during the first dozen installs revolved around gravity. I always started at the pull at the bottom and ended at the top, if I went the other way, gravity would pull down and make the bottom sit far too far away from the pinch weld. At least if you set the bottom first, then the top is likely to stay closer. Still by the time you get around the top corners 3 of the 4 sides are in, and the top “tends” to be farther away from the pinch weld than is ideal and you end up fighting to get that rubber lip over the pinch weld. If you do the top and bottom at the same time, you have balanced gravity and trap the glass top and bottom, which are also the longer edges, so by the time you get to the sides, it’s all over but the beer drinking. You can also see if you’re slightly off center left/right before you do the sides, and have a chance of easily pushing it back out to start over. You do NOT want it off center of course. Leads to leaks. Bad enough that most seals I see don’t have molded bottom corners. Rubber never seems to sit right often exposing those bottom corners. Sealant time. See the picture below of what I use. Doing this balanced technique, I often don’t need a second person pushing on the glass from the outside. As long as ensure you get the glass/gasket down as tight to the body as possible before you start and maybe get out a couple of times to push it down as you get going around the top, or just before you start going around the corners. If you’re a social person, then get four buddies, one on each corner and you’ll be done in 5 minutes. 4. Setting the lip over the pinch weld. As you pull cord and the rubber lips slips over the pinch weld, I spend a few moments pushing the lip firmly down onto the pinch weld, seating it more completely than just where ever it sits after the rope passes that point. Makes double sure the glass is pulled down into place. I use a flat plastic tool to get between the glass and lip and press the lip away from then down over the pinch weld. I use a 5/32 white nylon cord, but I like the idea of thick string trimmer cord. Should have less friction. Whatever you use, wear thick leather gloves so you can pull without pain. Too old for that grin and bear it crap.
8 pointsHey Yarb thanks, I really like helping when I can. I have been helped many times from this site and when I can pay back I do.8 points
There. See? It was the loose dizzy cap. Guess it went wonky (sorry for the technical term) above 4k. I knew if I asked you guys would help me solve it! Even if only in spirit..... So what did we learn today? -Misfires can cause a lean condition as read on the AFR gauge, just like the reverse. -Change a bunch of stuff and get the same result? You are changing the wrong stuff. -Tunnel vision is blinding.8 points
8 pointsExcellent write up. If I may add a couple of personal experience notes. 1. Putting the cord in the groove. I use a short piece of brass tubing, 1/4 OD or something, 4 inches longish, whatever will let your cord of choice pass through easily. Poke the end of the tube into the groove and drag it along, it will deposit the cord in the groove like magic. Should take you literally 30 seconds to do the entire circumference. 2. Lube. Tried all kinds of wet lubes, none were all that useful. If you feel compelled to use lube, try corn starch. Dry, stays put, cheap, easy clean up (blows away without doing anything actually) and makes rubber slippery without being greasy or drys out like soap. 4. Spend more time than you think you should getting the gasket/glass sitting as low and close into the window channel as you can, flush with the body all around, and centered left right. This will ensure an easy cord pull as the rubber lip is nice and close to the pinch weld. 3. Biggest trick of all is to use two cords instead of one. Start one top center and go around left, end at bottom center. Same for the right. Leave a foot at each end top and bottom. Pull a bit of the bottom, left and right six inches, then repeat on the top, left and right, continue left and right, balancing your pull top and bottom. Go around bottom corners first, then the top, though it really doesn’t matter. Why is this such a great deal? Balance. All the problem I had during the first dozen installs revolved around gravity. I always started at the pull at the bottom and ended at the top, if I went the other way, gravity would pull down and make the bottom sit far too far away from the pinch weld. At least if you set the bottom first, then the top is likely to stay closer. Still by the time you get around the top corners 3 of the 4 sides are in, and the top “tends” to be farther away from the pinch weld than is ideal and you end up fighting to get that rubber lip over the pinch weld. If you do the top and bottom at the same time, you have balanced gravity and trap the glass top and bottom, which are also the longer edges, so by the time you get to the sides, it’s all over but the beer drinking. You can also see if you’re slightly off center left/right before you do the sides, and have a chance of easily pushing it back out to start over. You do NOT want it off center of course. Leads to leaks. Bad enough that most seals I see don’t have molded bottom corners. Rubber never seems to sit right often exposing those bottom corners. Sealant time. See the picture below of what I use. Doing this balanced technique, I often don’t need a second person pushing on the glass from the outside. As long as ensure you get the glass/gasket down as tight to the body as possible before you start and maybe get out a couple of times to push it down as you get going around the top, or just before you start going around the corners. If you’re a social person, then get four buddies, one on each corner and you’ll be done in 5 minutes. 4. Setting the lip over the pinch weld. As you pull cord and the rubber lips slips over the pinch weld, I spend a few moments pushing the lip firmly down onto the pinch weld, seating it more completely than just where ever it sits after the rope passes that point. Makes double sure the glass is pulled down into place. I use a flat plastic tool to get between the glass and lip and press the lip away from then down over the pinch weld. I use a 5/32 white nylon cord, but I like the idea of thick string trimmer cord. Should have less friction. Whatever you use, wear thick leather gloves so you can pull without pain. Too old for that grin and bear it crap.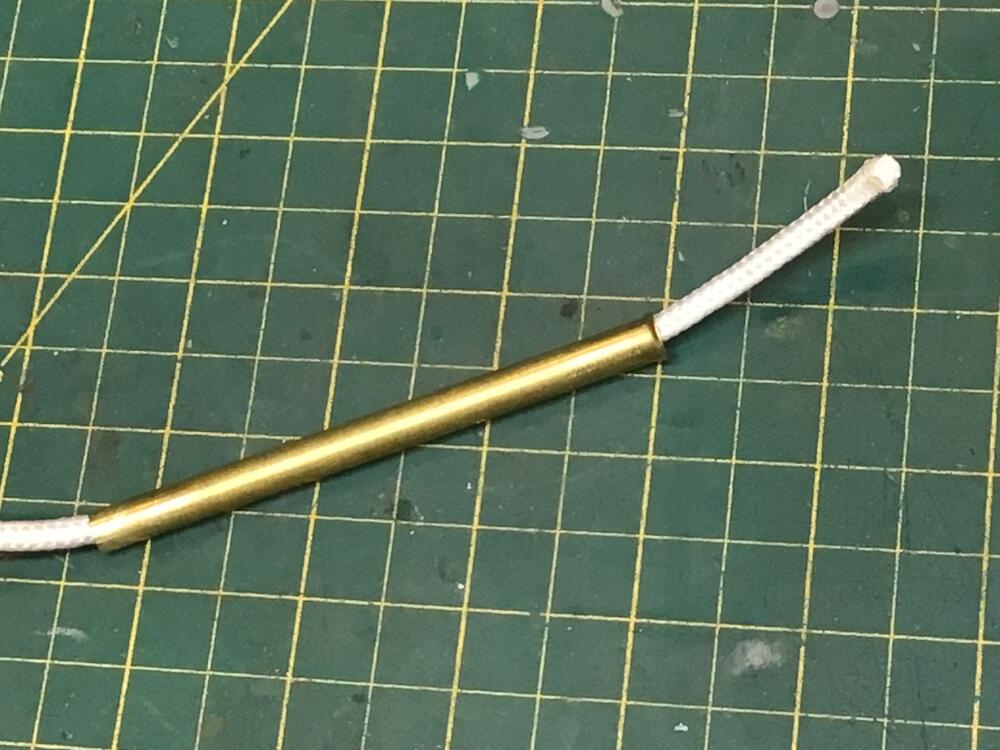

 8 points
He's changed a lot in 5 years! He's 6'7"+. He's a Caterpillar heavy equipment field mechanic
8 points
8 pointsHe's changed a lot in 5 years! He's 6'7"+. He's a Caterpillar heavy equipment field mechanic.thumb.jpeg.a49983ec06b2e1d3191817a3ea7f78d1.jpeg) 8 points
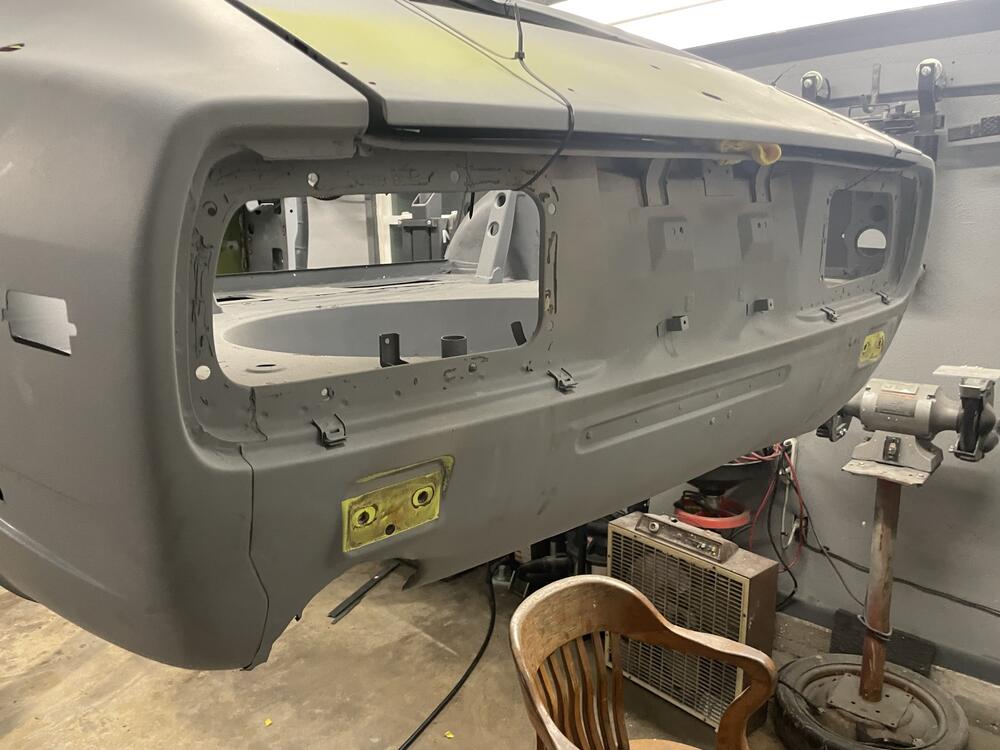
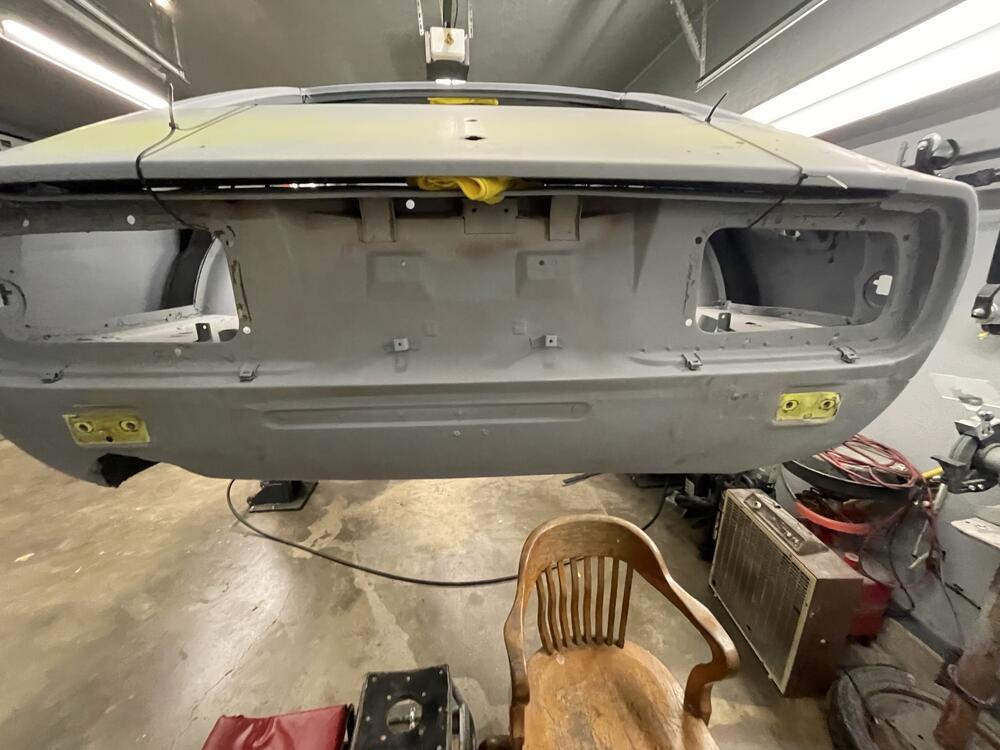
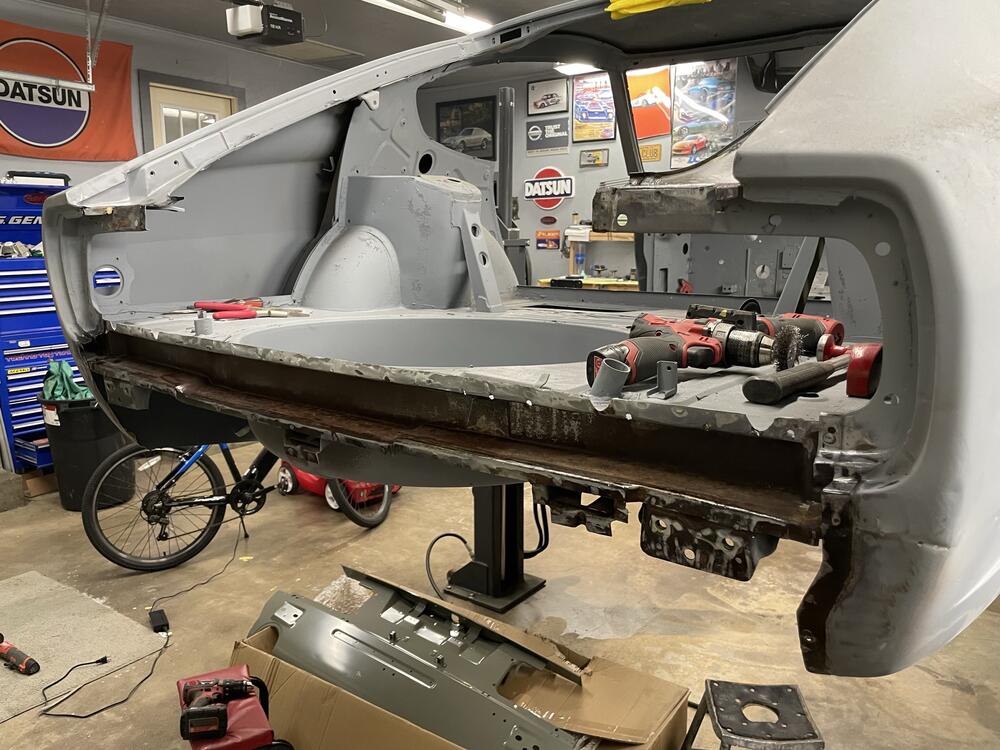
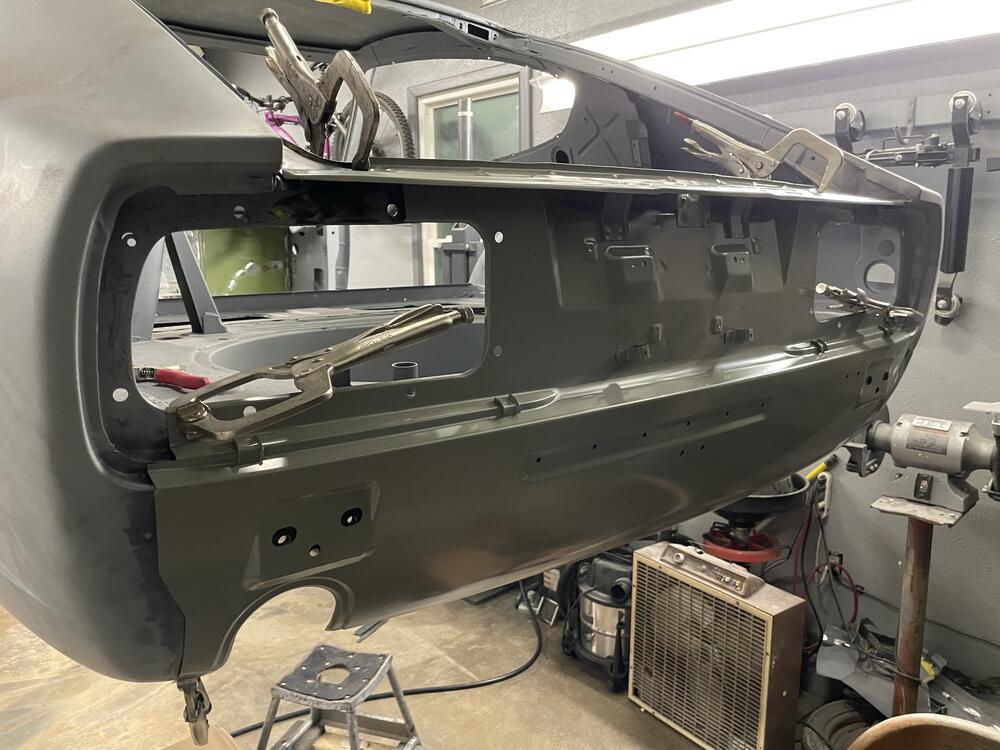
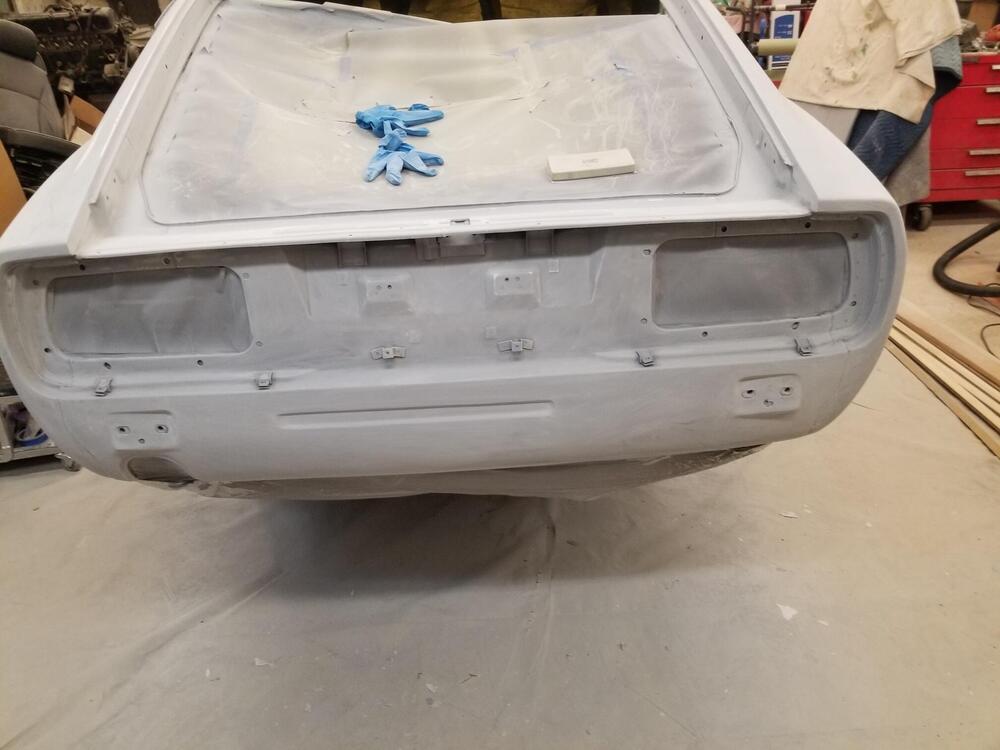
8 points 8 pointsLast of the major metal work was replacing the tail light panel. The original panel had seen better days with the center section pushed in from the rear bumper, some damage around the RH quarter, and at some point someone cut the panel around the exhaust tip for a larger muffler. Rather than fixing each of these areas, replacing the entire panel from Resurrected Classics was the path taken. Overall the panel was a nice piece. Had the right amount of crown across the surface, all the wiring tabs were placed corrected and it fit well to the existing metal with some trimming. Overall removing the existing panel wasn't bad. Just take your time and ensure each spot weld has been drilled out. First fitment of the panel. I'd say out of the box it was 85-90% there in terms of a direct fitment. Biggest job during this was ensuring the seam between the quarter panels and the new metal lined up. While they didn't fit perfectly from the factory, I think we got the new panel pretty close with a bit of trimming.


 8 points
So as an update. I tried softening the rubber caps that go to the fuel sender. I tried silicone spray like Mark suggested. Nothing... Now these were rock hard, we were afraid to flex them for fear of breaking them. I wish I had made a video... So I tried Wintergreen oil but instead of water and heating them I used denatured alcohol 1:1. I heated the rubber parts slightly with a heat gun. Let soak overnight. AMAZING!! They were tremendously soft. I mean really good. It has been a week since I pulled them out and they are still nice and soft. I ordered some more oil because I needed more volume. I am going to try it on Cody's Goon's filler neck. Sort of an unobtainium piece...8 points
First car meet of the year And Cousin Eddie showed up
8 points
8 pointsSo as an update. I tried softening the rubber caps that go to the fuel sender. I tried silicone spray like Mark suggested. Nothing... Now these were rock hard, we were afraid to flex them for fear of breaking them. I wish I had made a video... So I tried Wintergreen oil but instead of water and heating them I used denatured alcohol 1:1. I heated the rubber parts slightly with a heat gun. Let soak overnight. AMAZING!! They were tremendously soft. I mean really good. It has been a week since I pulled them out and they are still nice and soft. I ordered some more oil because I needed more volume. I am going to try it on Cody's Goon's filler neck. Sort of an unobtainium piece...8 points
First car meet of the year And Cousin Eddie showed up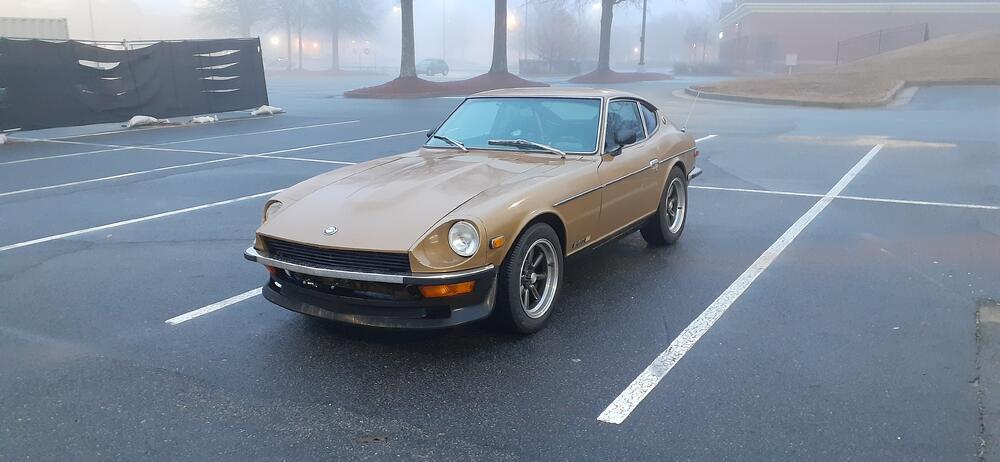
 8 points
The local store ( like Home Depo) has soft rubber, and it worked quite well. It looked not bad I think. Kats
8 points
8 pointsThe local store ( like Home Depo) has soft rubber, and it worked quite well. It looked not bad I think. Kats


 8 points
Gents, I’ve been off the net that past month or so. Life, family, work and other issues have kept me away from my time in the garage with the Z. Currently sitting in the Paris airport waiting to return to the US. It’s been an 11 day trip and I’m ready to be home with the family and back to work in the garage. Here’s where I left off last time with the car. Working on the stereo speaker install, the work it a bit tedious because of my OCD. I bought some 6x9 speakers to build a box below the deck to improve the sound quality. I have a couple more days of work to do there. This is my extra deck, so I can always go back to OE look. My headers came in about a month ago from ZStory. They look great, very happy with the stuff he puts out. I had been waiting a long time for this last part of his system so that’s in the works too. Im taking it this week to get ceramic coated, for heat transfer mitigation. The car has been driving great, the more miles I put on it the more the kinks seems to be getting worked out. I have a couple issues to address. I also finished the from carbon fiber lip install. I like this much better that the xenon valance. I’ll post a few pics. 1. High Idle - car idles fine on start but after driving it around and coming to a stop the idle will hover around 1000-1100 RPM. In order to get it back down I have to pump the accelerator one time and then it returns to 800. Let me know if anyone has a clue why it does this but it’s pretty consistent. 2. I have a rattle on my right rear strut. I think I have the spacer loose from the shocks bouncing around there.. I’m not motivated right not to pull it out .and address it. 3. A small oil leak. Getting about 10 ml of fluid that appears to come from near the passenger side closer to transmission. I think it’s coming from the reverse switch but haven’t confirmed it. Got a new gaskets waiting to be installed.
8 points
8 pointsGents, I’ve been off the net that past month or so. Life, family, work and other issues have kept me away from my time in the garage with the Z. Currently sitting in the Paris airport waiting to return to the US. It’s been an 11 day trip and I’m ready to be home with the family and back to work in the garage. Here’s where I left off last time with the car. Working on the stereo speaker install, the work it a bit tedious because of my OCD. I bought some 6x9 speakers to build a box below the deck to improve the sound quality. I have a couple more days of work to do there. This is my extra deck, so I can always go back to OE look. My headers came in about a month ago from ZStory. They look great, very happy with the stuff he puts out. I had been waiting a long time for this last part of his system so that’s in the works too. Im taking it this week to get ceramic coated, for heat transfer mitigation. The car has been driving great, the more miles I put on it the more the kinks seems to be getting worked out. I have a couple issues to address. I also finished the from carbon fiber lip install. I like this much better that the xenon valance. I’ll post a few pics. 1. High Idle - car idles fine on start but after driving it around and coming to a stop the idle will hover around 1000-1100 RPM. In order to get it back down I have to pump the accelerator one time and then it returns to 800. Let me know if anyone has a clue why it does this but it’s pretty consistent. 2. I have a rattle on my right rear strut. I think I have the spacer loose from the shocks bouncing around there.. I’m not motivated right not to pull it out .and address it. 3. A small oil leak. Getting about 10 ml of fluid that appears to come from near the passenger side closer to transmission. I think it’s coming from the reverse switch but haven’t confirmed it. Got a new gaskets waiting to be installed.
 8 points
Hi , I can’t stop doing this, a guitar with a Z. I finally met my dream guitar, it has a stamped JUN 1969 (my birthday is 18th June 1969) on the neck and it is a Lake Placid Blue ! The Internal electrical parts are mixed with a few 1966 and mostly 1969 which are looked to be original. The amplifier is 1968 made which is the best combination for the guitar. Made in USA guitar and amp spent 53 years in the USA. Other one is made in Japan 1970 240Z spent 51 years in the USA . Now they met each other in Japan and started to belong to a 53 year old Japanese owner. Thanks to the large luggage room, I guess designers and engineers might expect for younger generations to have full load of musical instruments on the deck . My guitar and amp fitted just like bespoke. Kats
8 points
8 pointsHi , I can’t stop doing this, a guitar with a Z. I finally met my dream guitar, it has a stamped JUN 1969 (my birthday is 18th June 1969) on the neck and it is a Lake Placid Blue ! The Internal electrical parts are mixed with a few 1966 and mostly 1969 which are looked to be original. The amplifier is 1968 made which is the best combination for the guitar. Made in USA guitar and amp spent 53 years in the USA. Other one is made in Japan 1970 240Z spent 51 years in the USA . Now they met each other in Japan and started to belong to a 53 year old Japanese owner. Thanks to the large luggage room, I guess designers and engineers might expect for younger generations to have full load of musical instruments on the deck . My guitar and amp fitted just like bespoke. Kats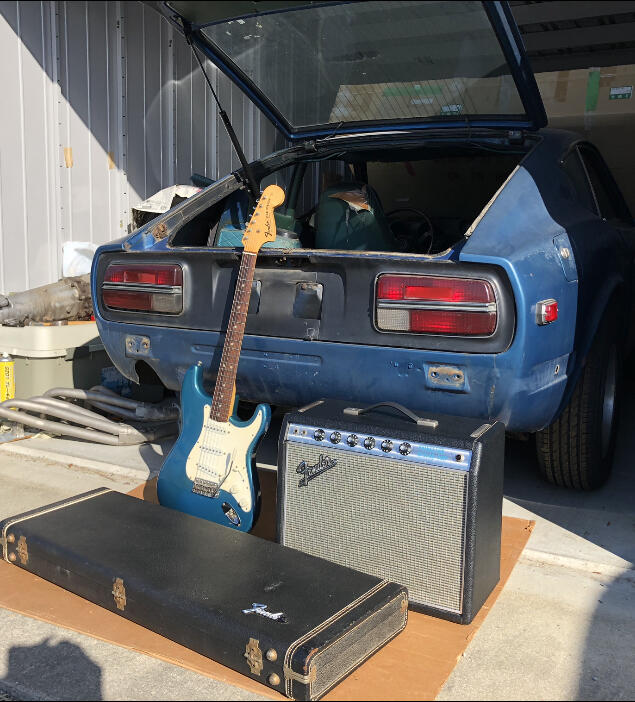
 8 points
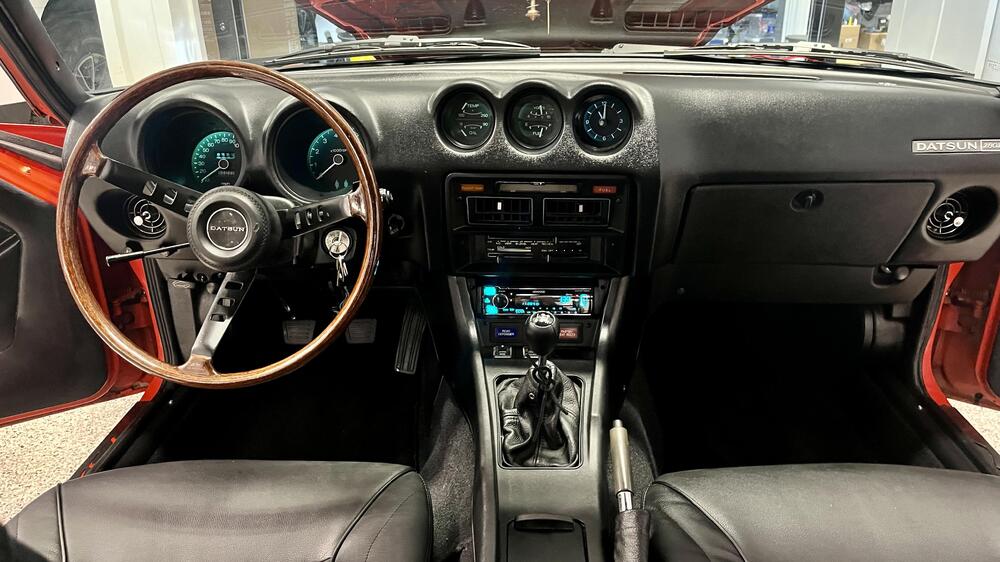
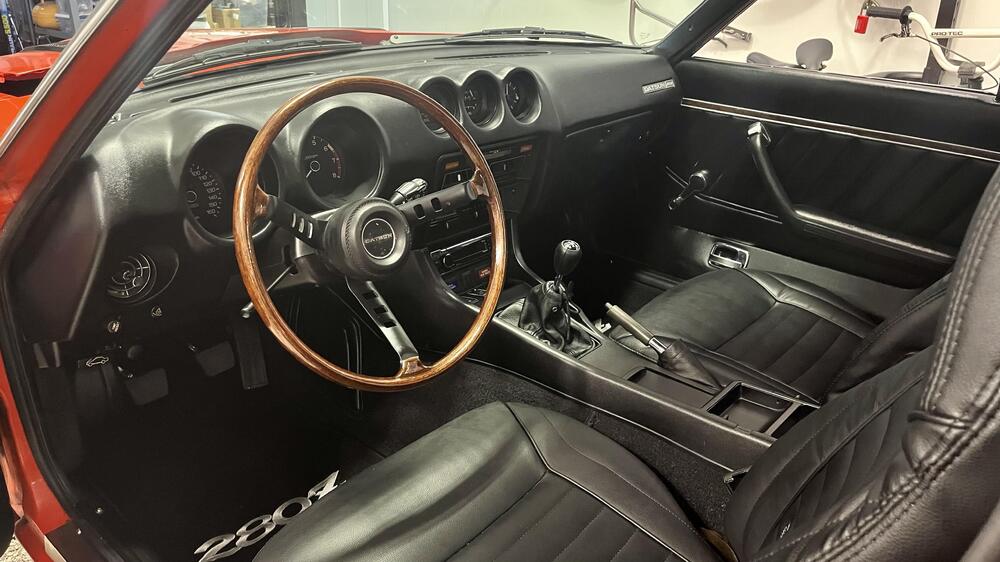
Wrapping up the interior. I’m pretty happy with the outcome. It’s not perfect but it has come a long way. I wish I had great pics of the interior to show the before and after. The bottom line my car had no interior and no seats when I bought it. Everything is new or something I either bought or salvaged. The only interior pieces that I had were the plastic panels that go around the rear quarter windows. The headliner was also in good shape and required no work. There was no vinyl on the shock towers or wheel wells. I salvaged mine off a junked Z in a salvage yard. You can see in the before pics the interior was just bare metal. Still haven’t figured on the center console arm rest mechanism. I have all the parts (springs and wires ) just haven’t figured out how is works yet. I also need new sun visors, or to have mine refurbished.
8 points
8 pointsWrapping up the interior. I’m pretty happy with the outcome. It’s not perfect but it has come a long way. I wish I had great pics of the interior to show the before and after. The bottom line my car had no interior and no seats when I bought it. Everything is new or something I either bought or salvaged. The only interior pieces that I had were the plastic panels that go around the rear quarter windows. The headliner was also in good shape and required no work. There was no vinyl on the shock towers or wheel wells. I salvaged mine off a junked Z in a salvage yard. You can see in the before pics the interior was just bare metal. Still haven’t figured on the center console arm rest mechanism. I have all the parts (springs and wires ) just haven’t figured out how is works yet. I also need new sun visors, or to have mine refurbished.


 8 points
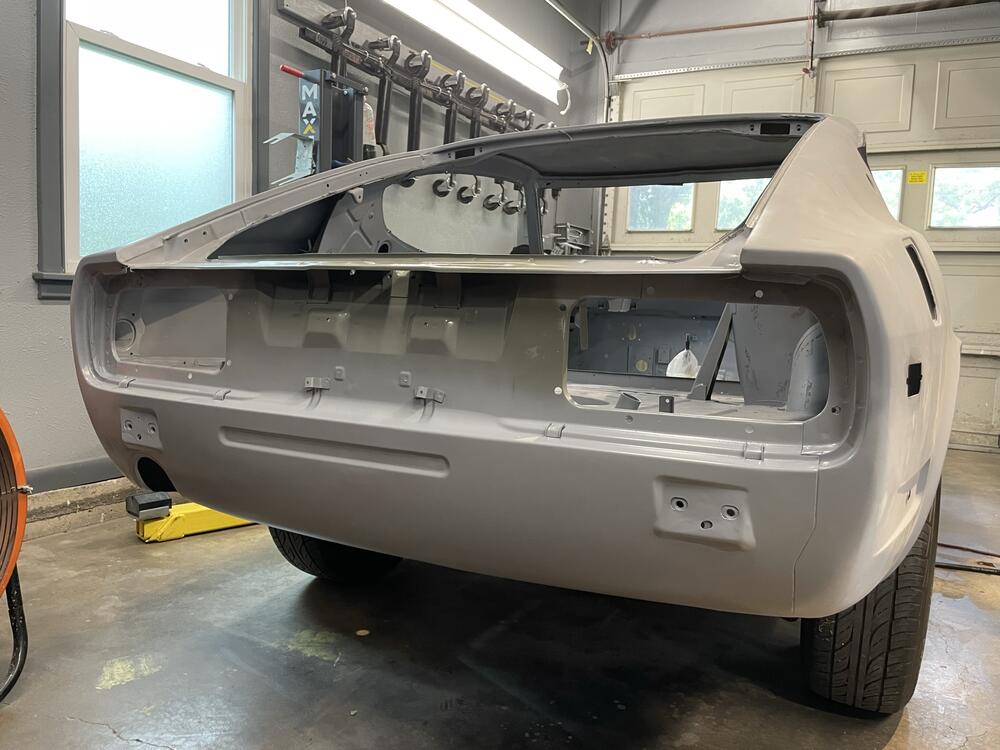
I believe it's all blocked now. I will unwrap it and check-sand it. Then on to rebuilding the booth and getting ready for color
8 points
8 pointsI believe it's all blocked now. I will unwrap it and check-sand it. Then on to rebuilding the booth and getting ready for color

 8 points
 Some more progress, some with pics and some without: Seat belts bolted in. I have some M3 x 0.6 screws on order for the mechanism covers for the seats. Carpet-style dash cover added. The guy who was going to sell his crack-free dash backed out, so I'm going to have to go to Plan B (or C or D). New handbrake boot installed. Found the shift pattern emblem for the top of the shift knob, reattached. Realized I connected the wiper motor arm 180 degrees off (it's nice when the wipers go DOWN when activated), fixed. Driver's door adjusted. It took a really hard slam to shut before; it's better now, though still not as good as the passenger door, which is 100% PERFECT. Need a bit more love. Inner and outer door sills on (thread here) I did my best to clean the outers, but they still have some "patina." I'm OK with it for now. Still working through some electrical issues, as detailed in this thread. Drove it around the neighborhood last night, and it's like a different car compared to when I first got it back on the road in mid-2020: Then, it could barely make it up the (shallow) hill in front of the house, and it was misfiring all over the place, no brakes, etc etc. Now, it brakes and turns very well, and has only some slight misfiring when warmed up, all of which I'm hoping to dial out when the Colortune arrives and I get it timed perfectly. And once I get all the lighting operational, it will be fully road-worthy. So excited. Finally persuaded my wife to take a pic of me with the car. Here's your intrepid scribe next to the car that will have been in the family for a full 50 years come October:
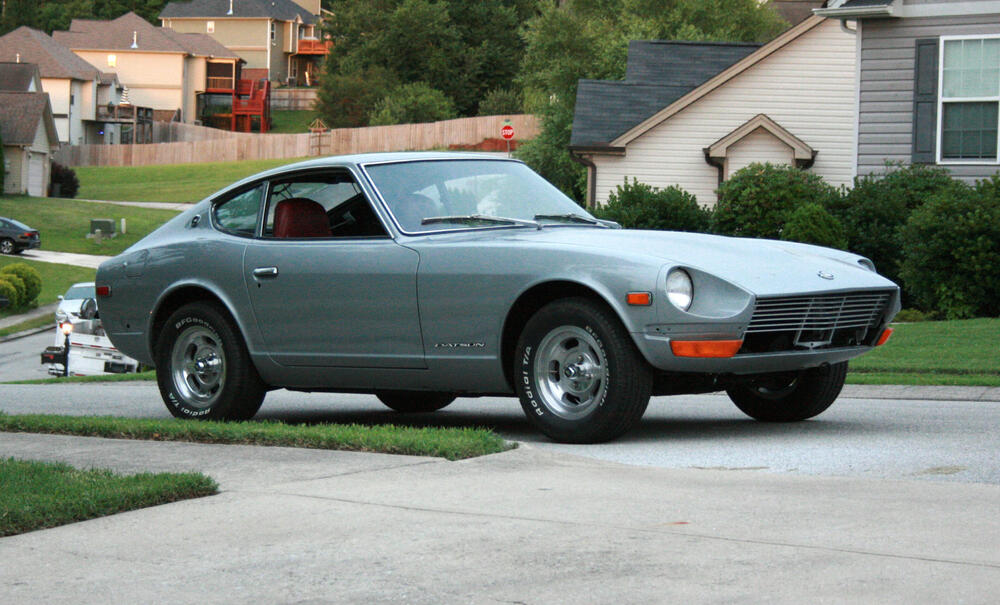
 8 points

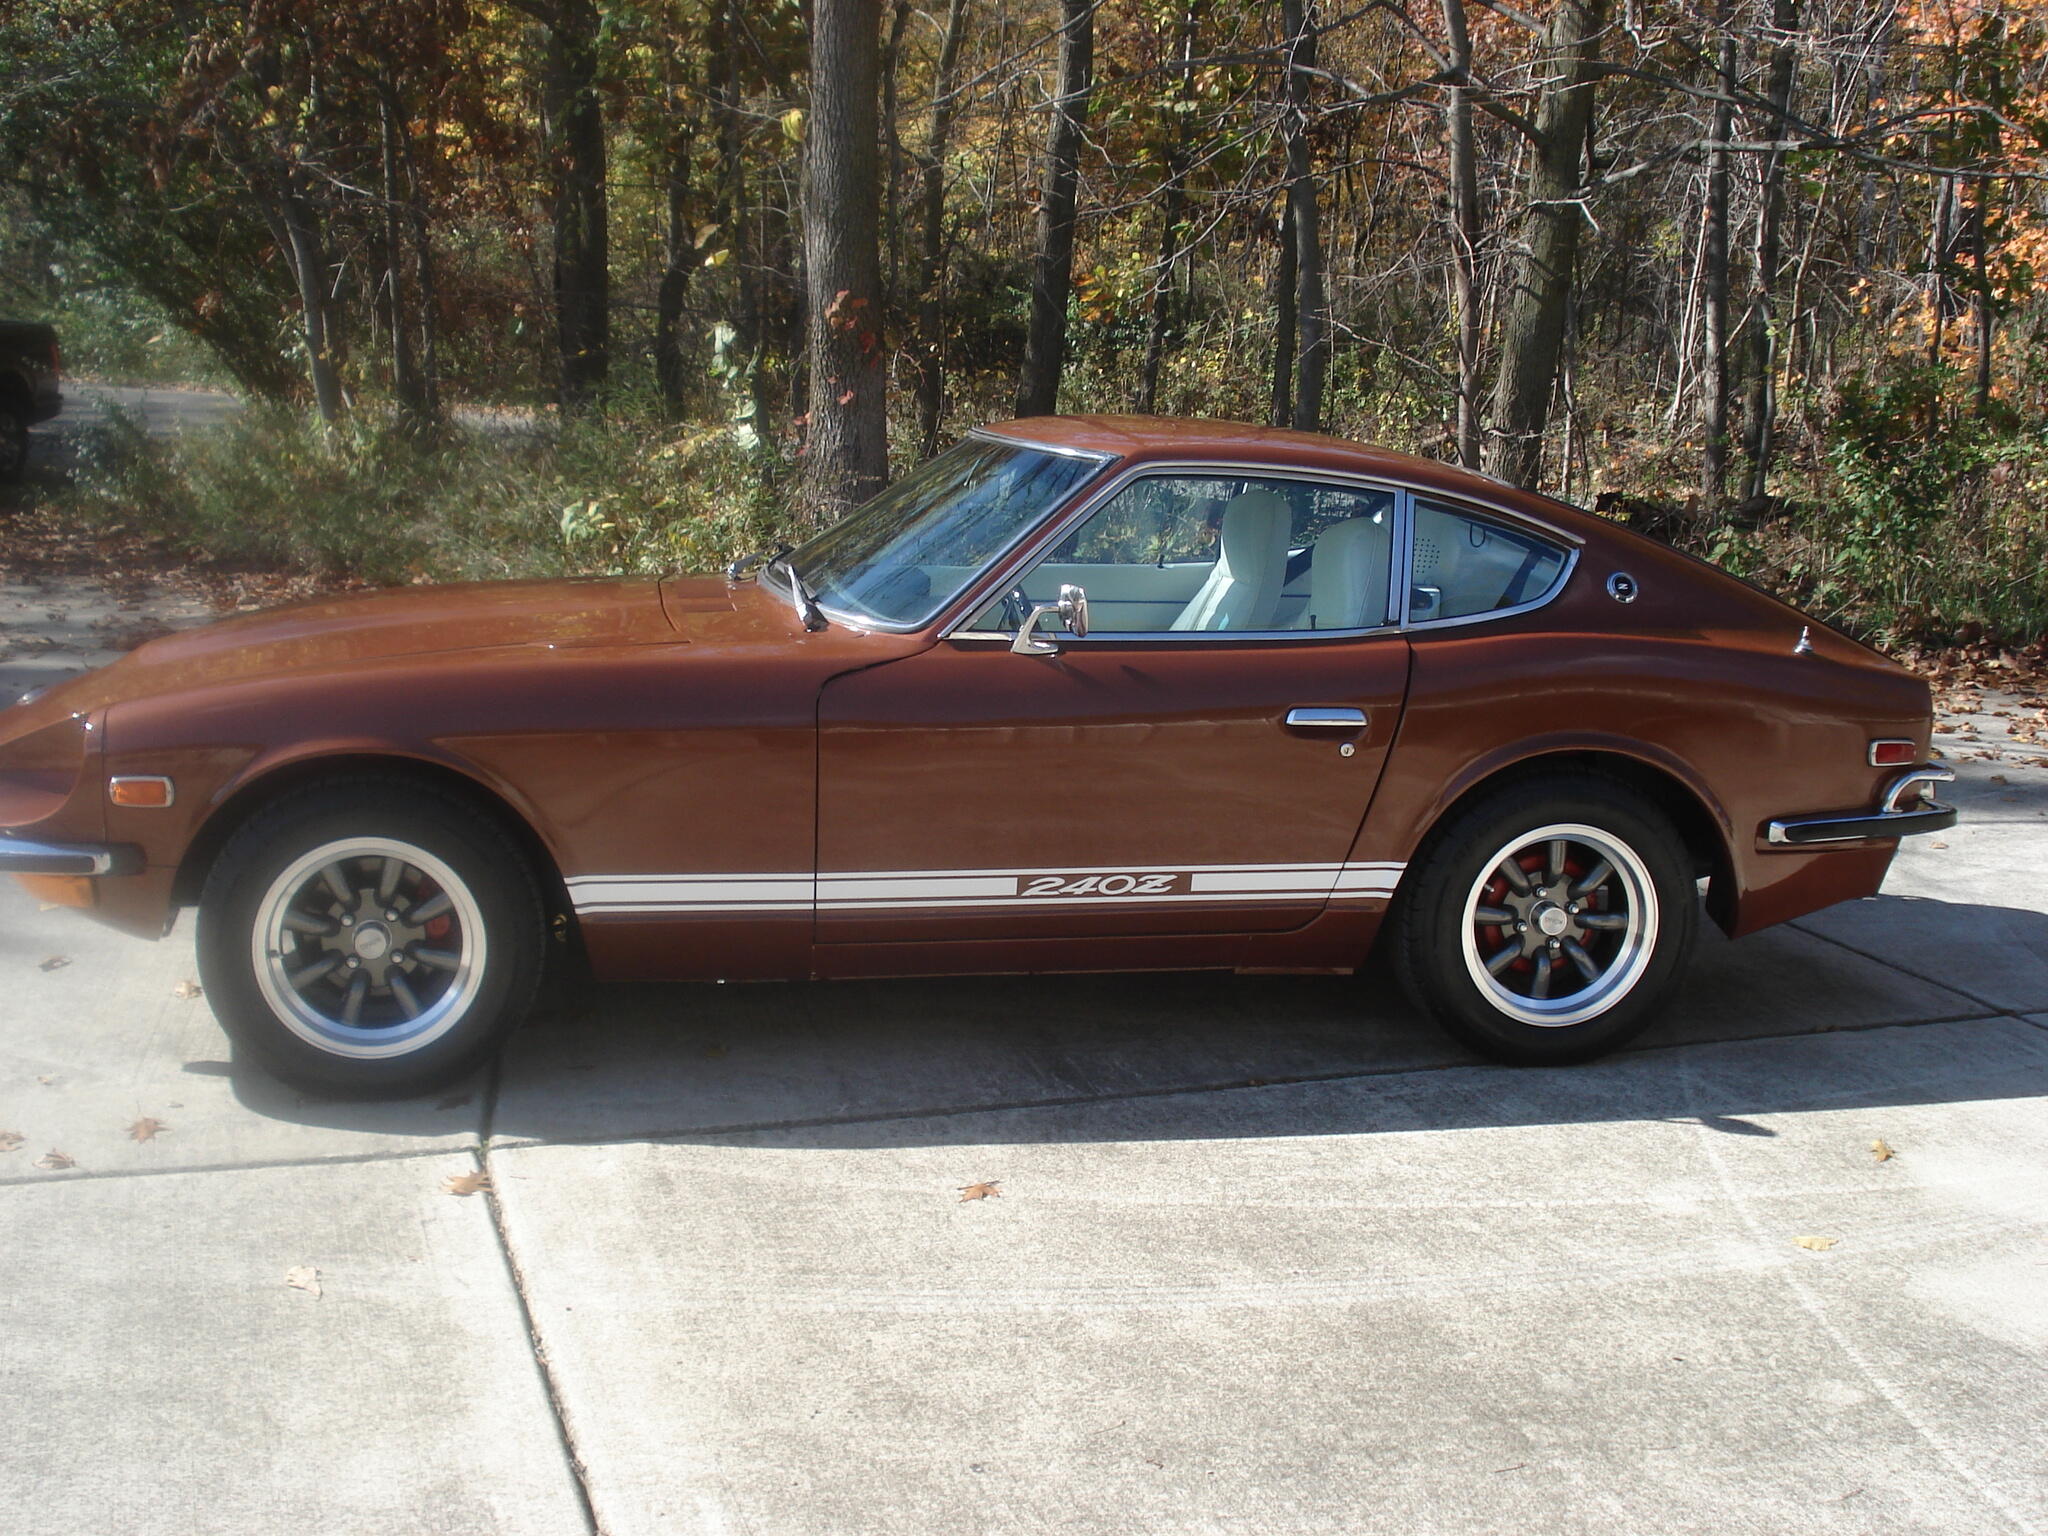
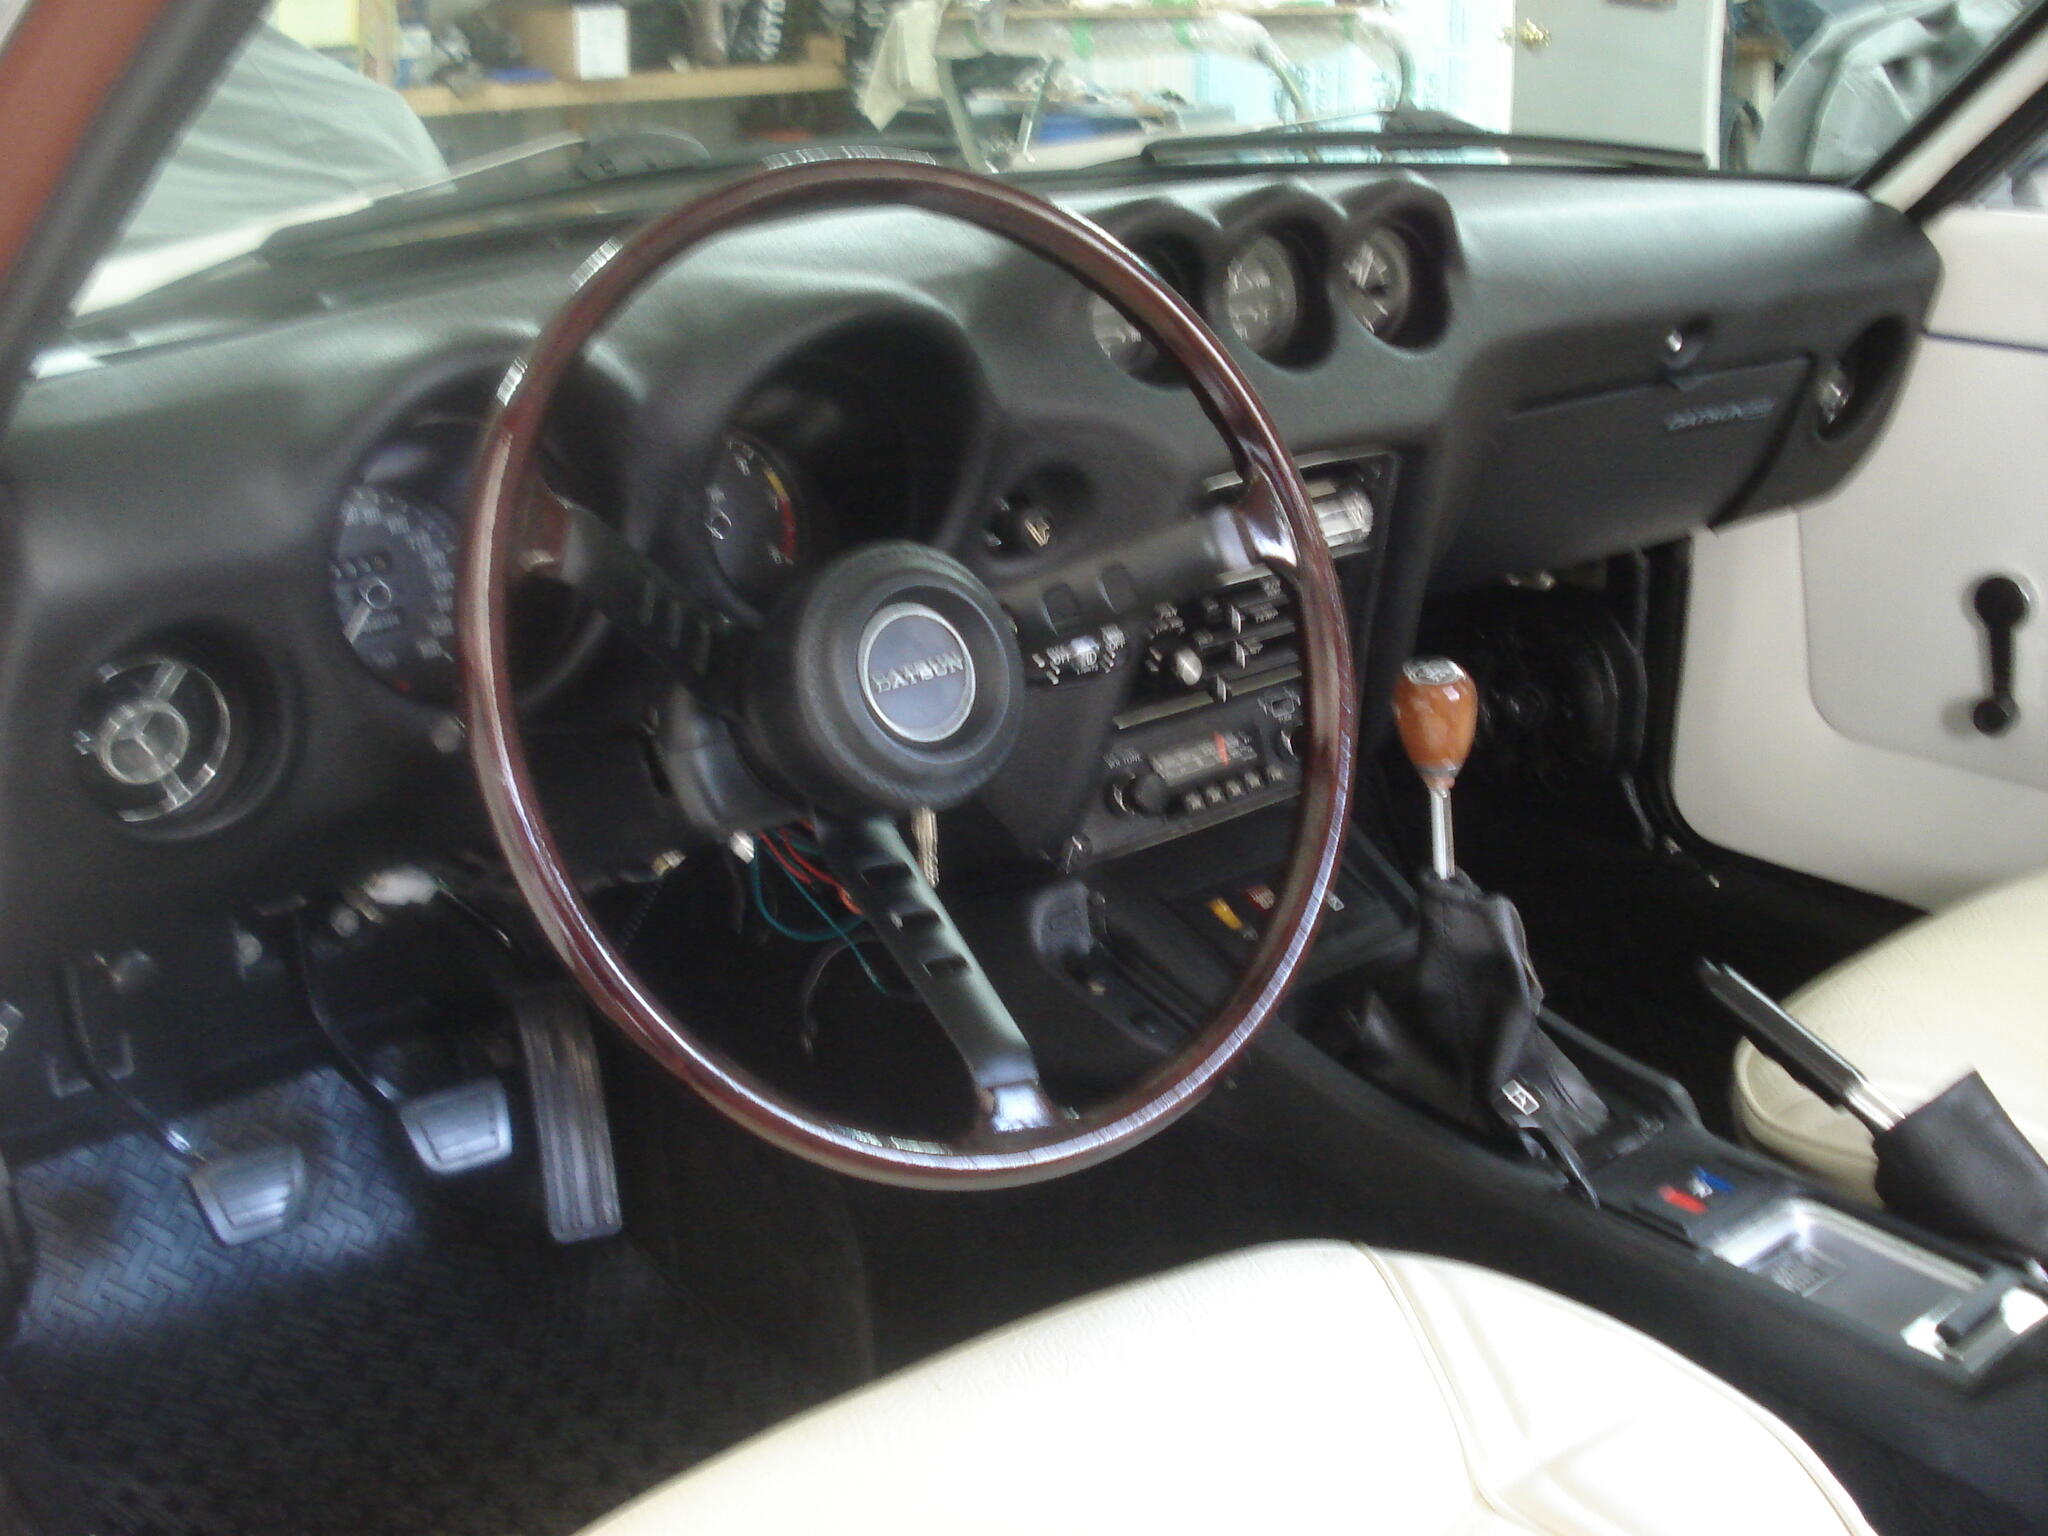
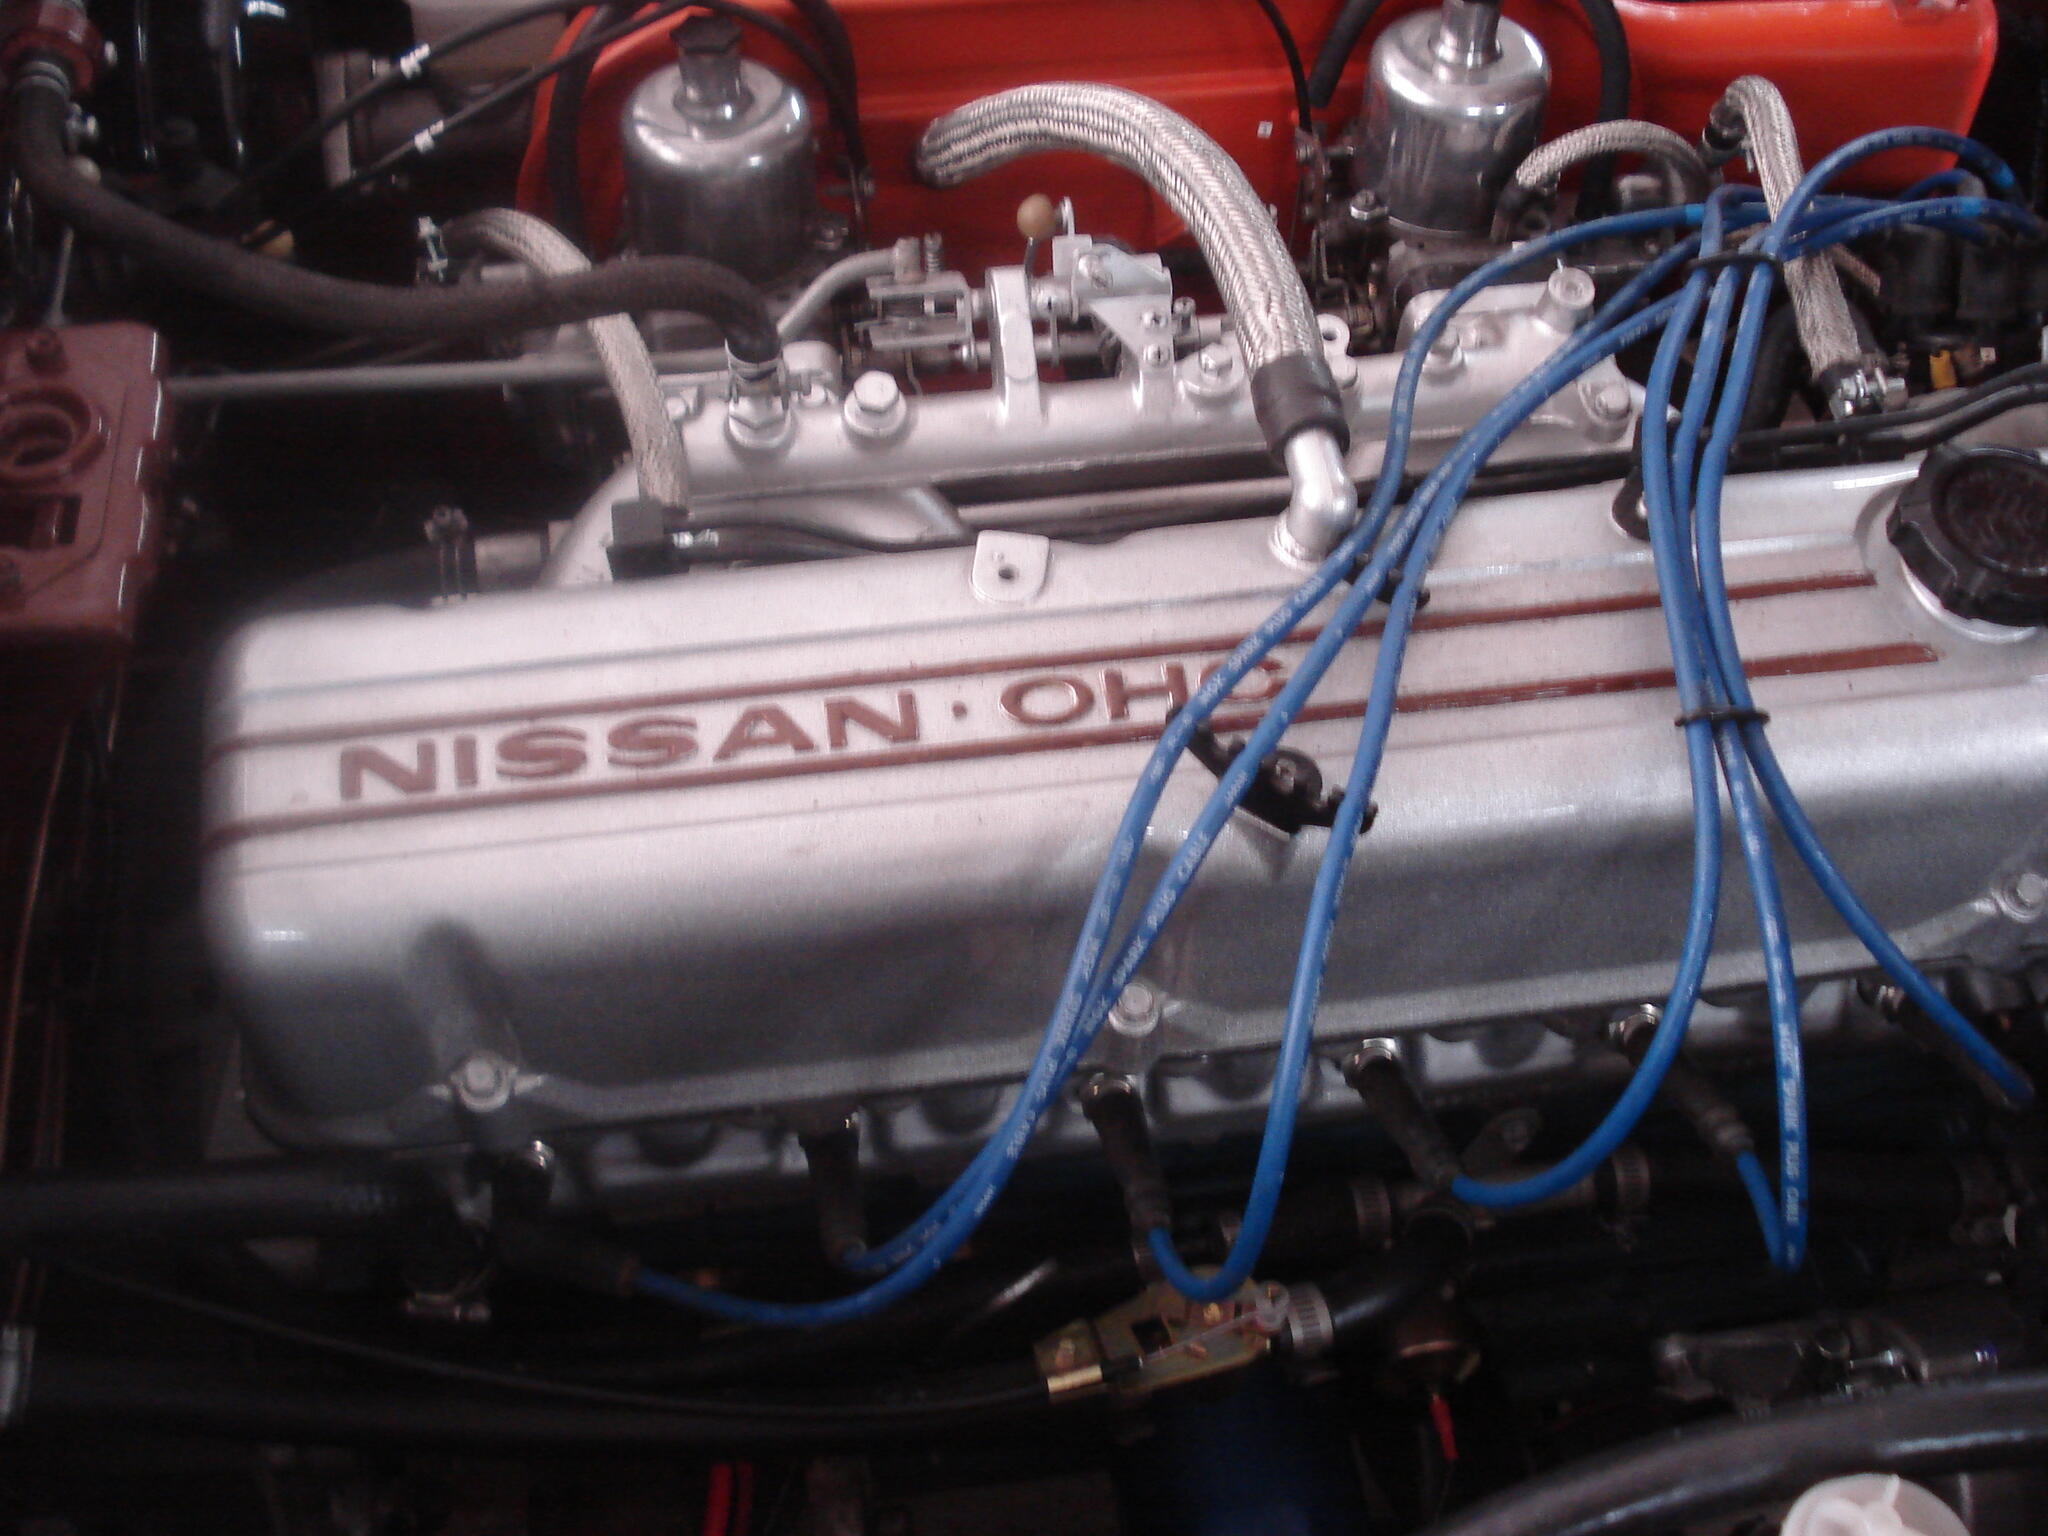

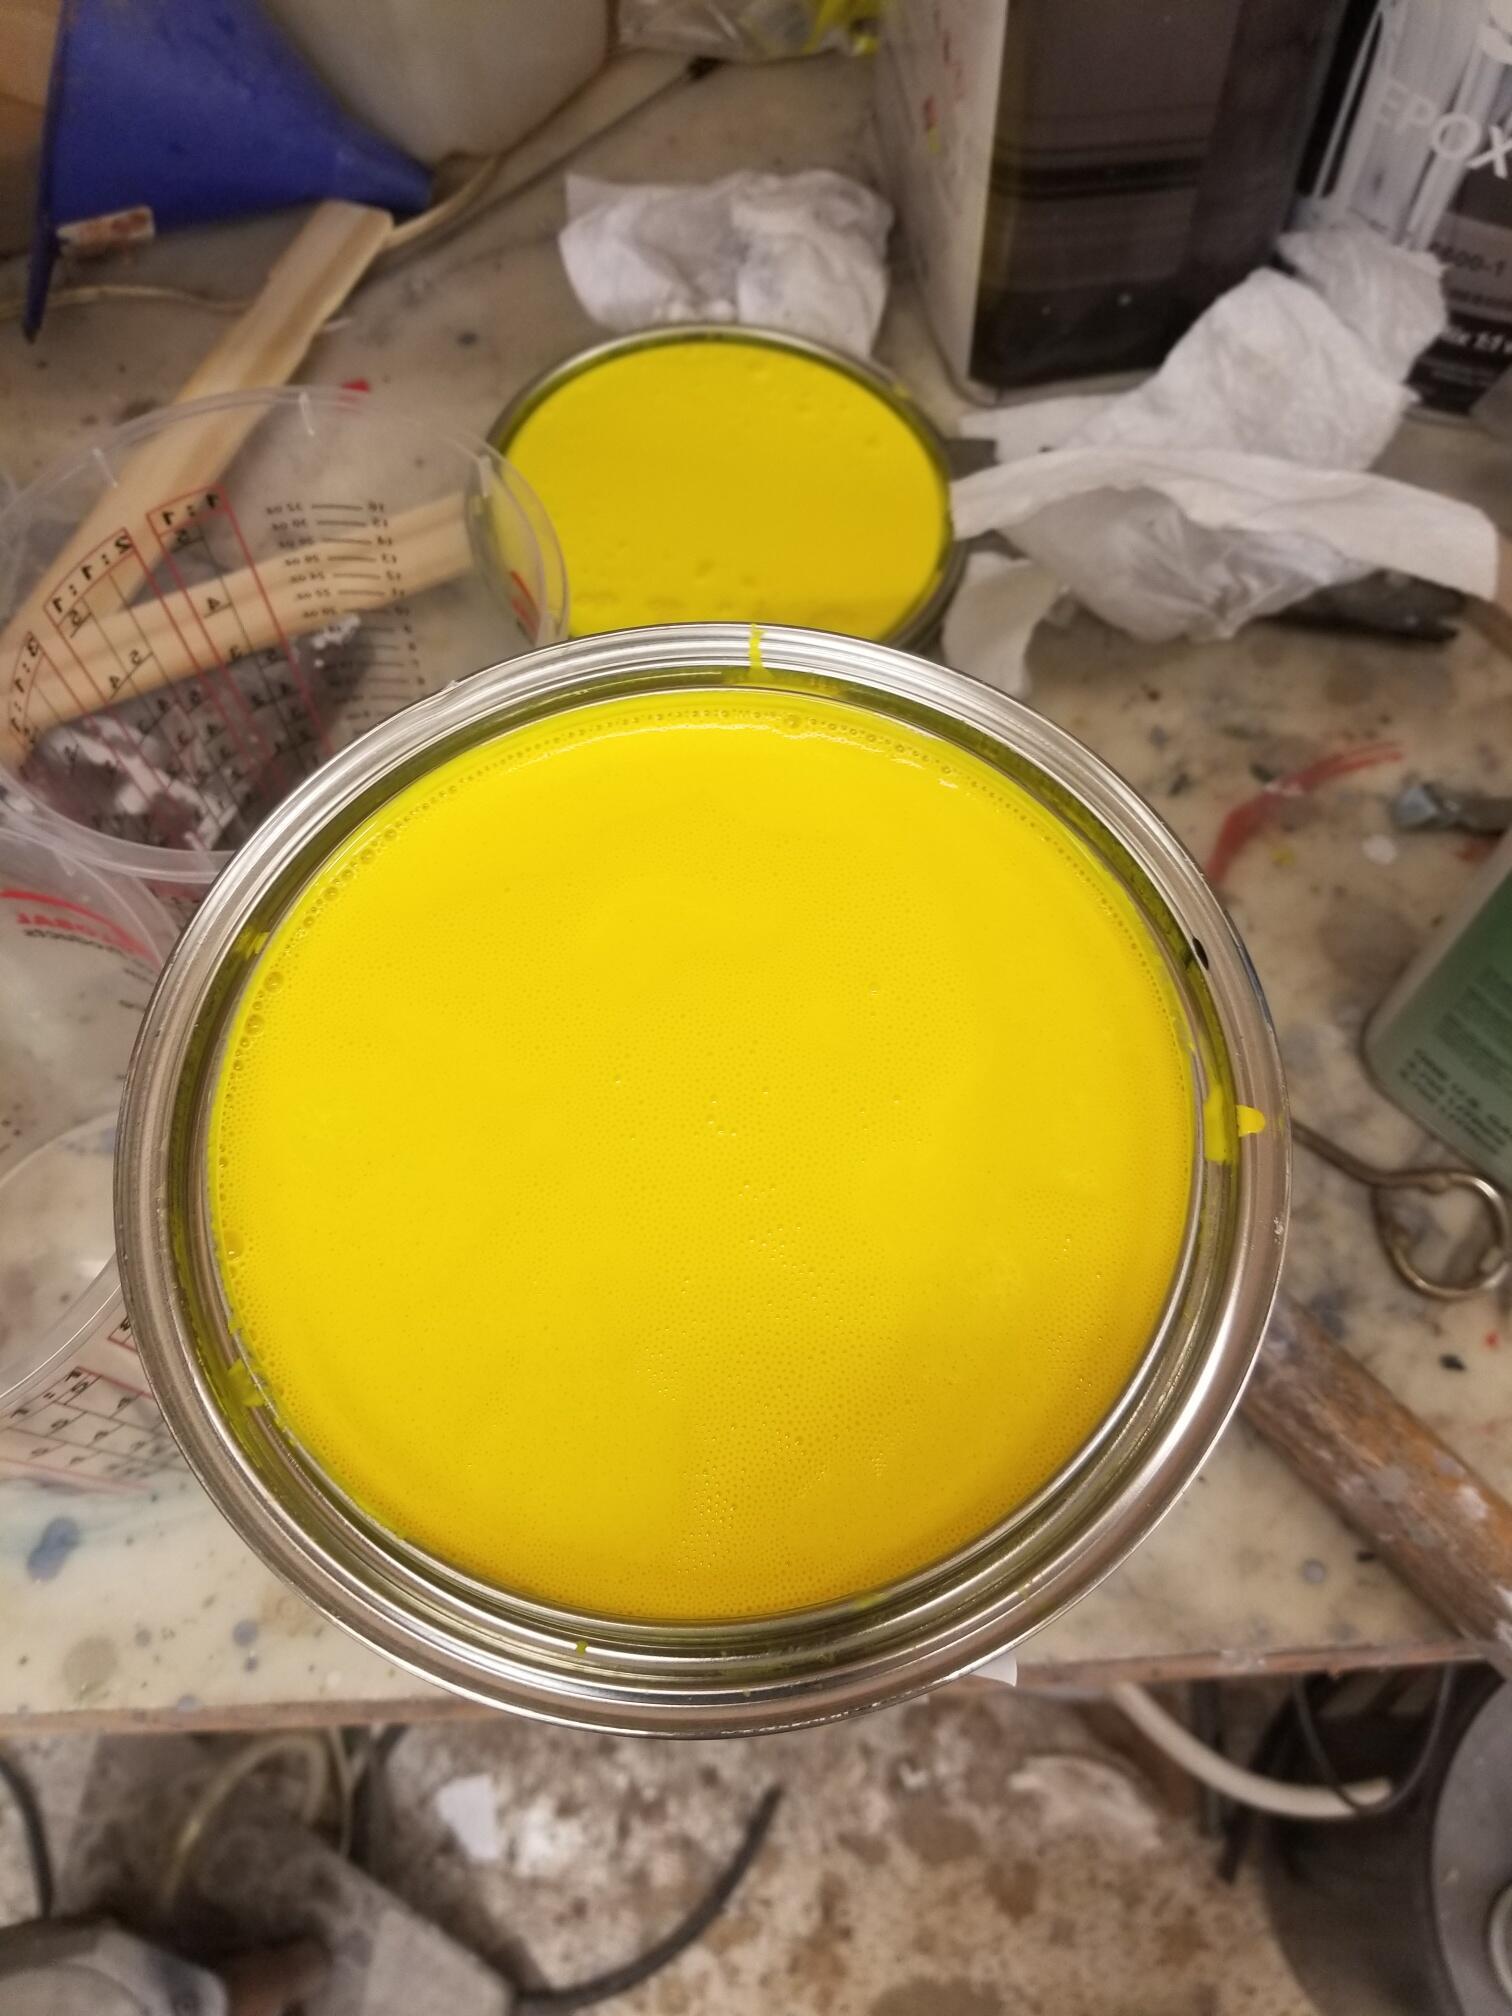

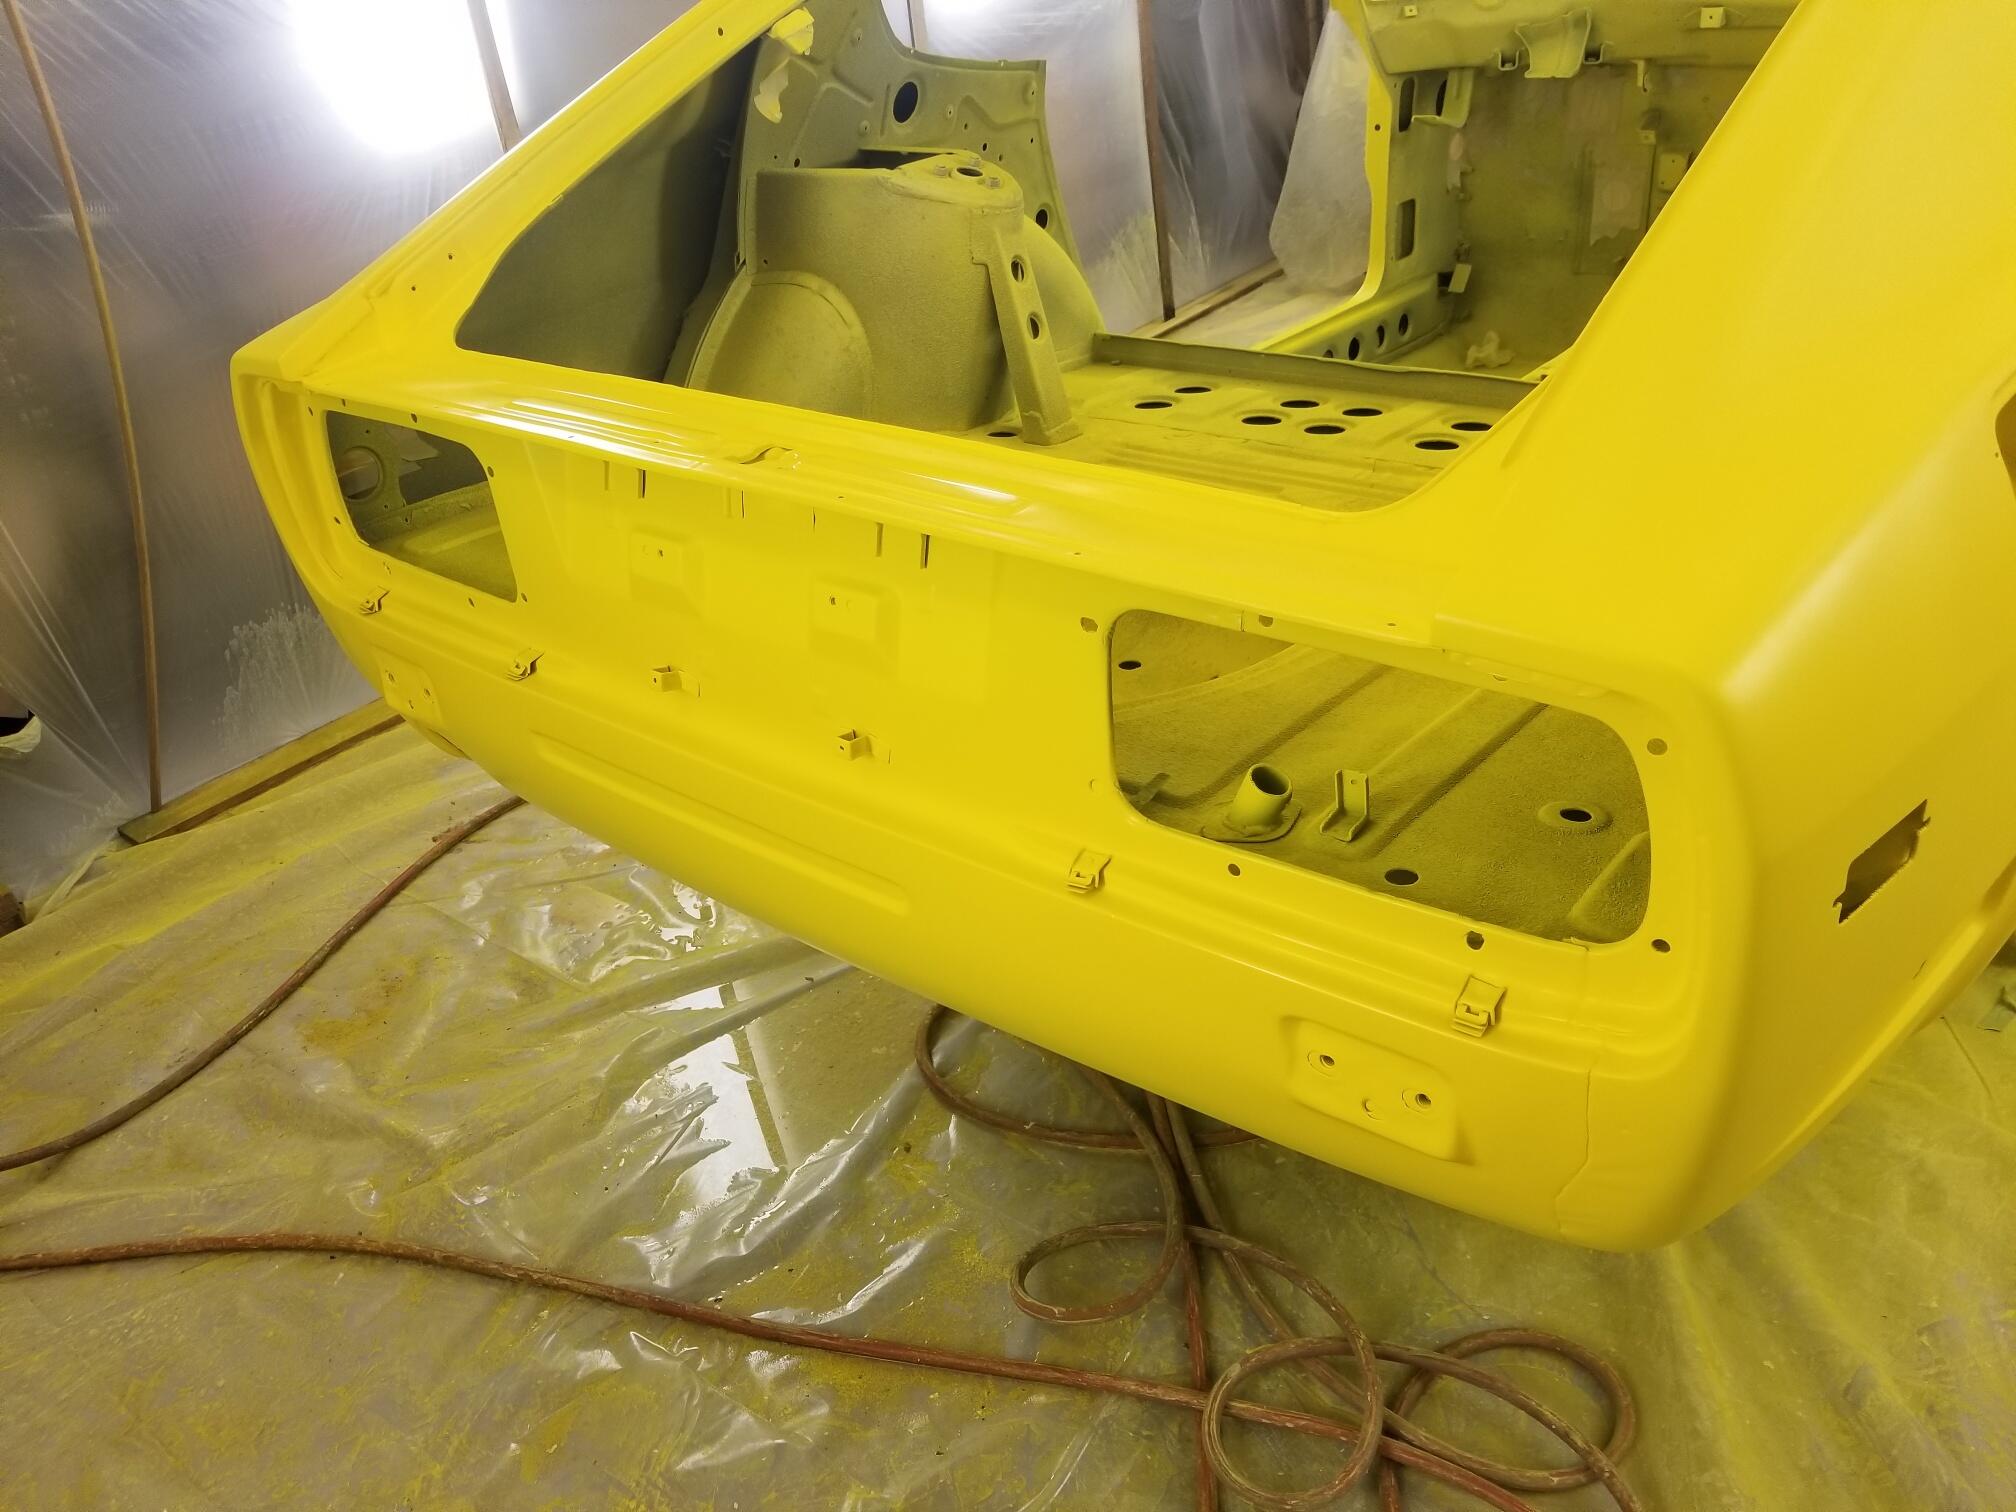


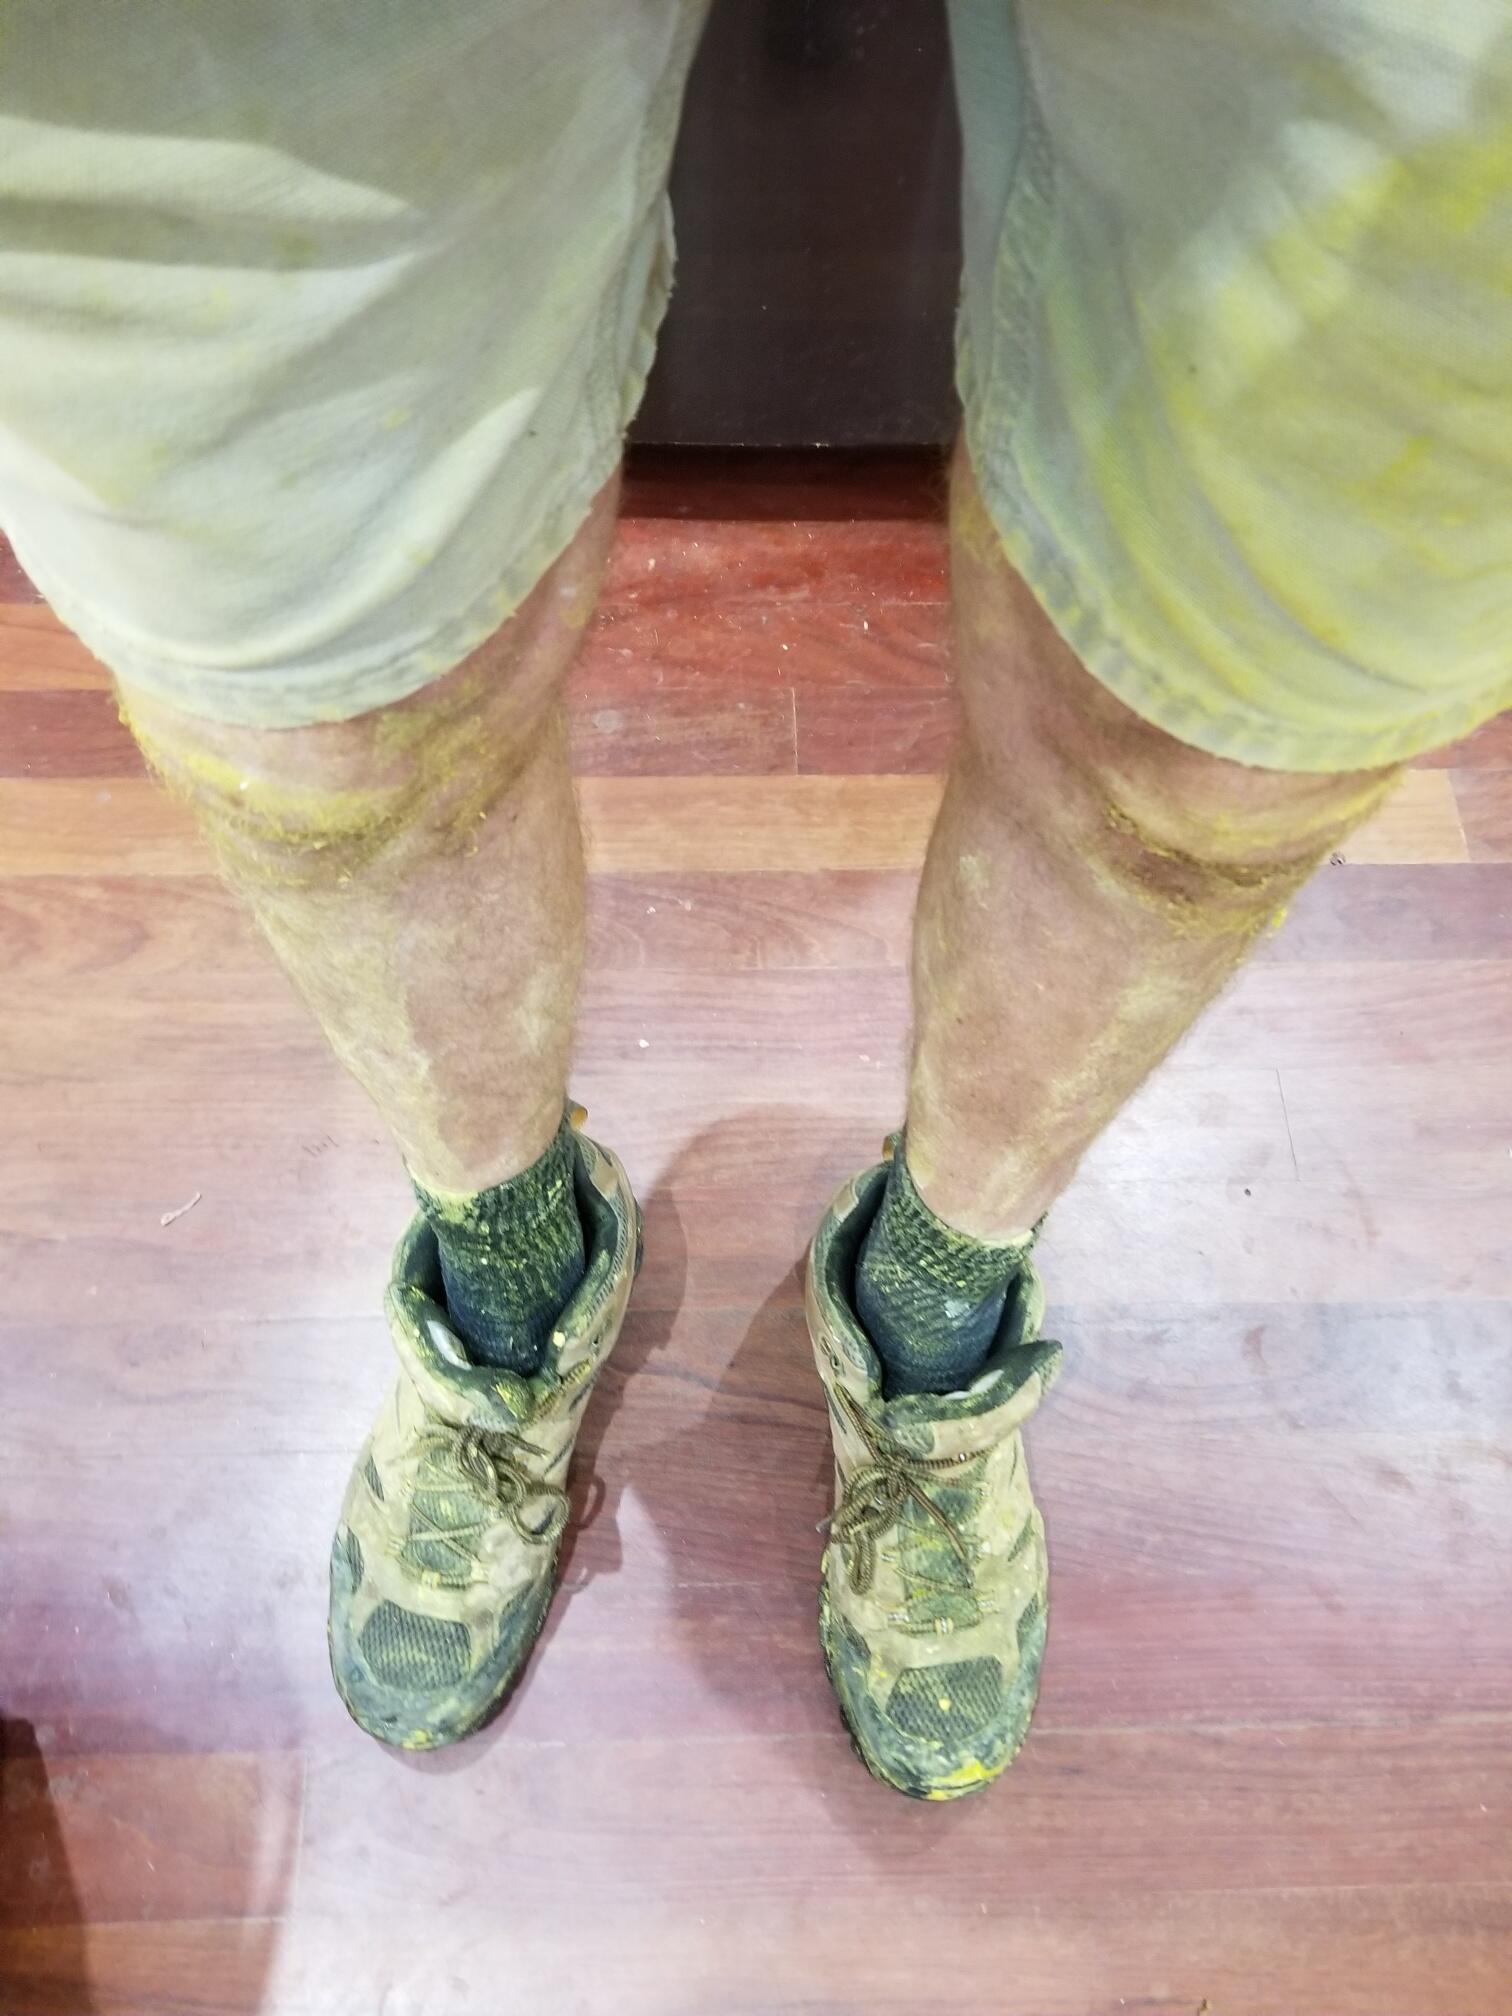
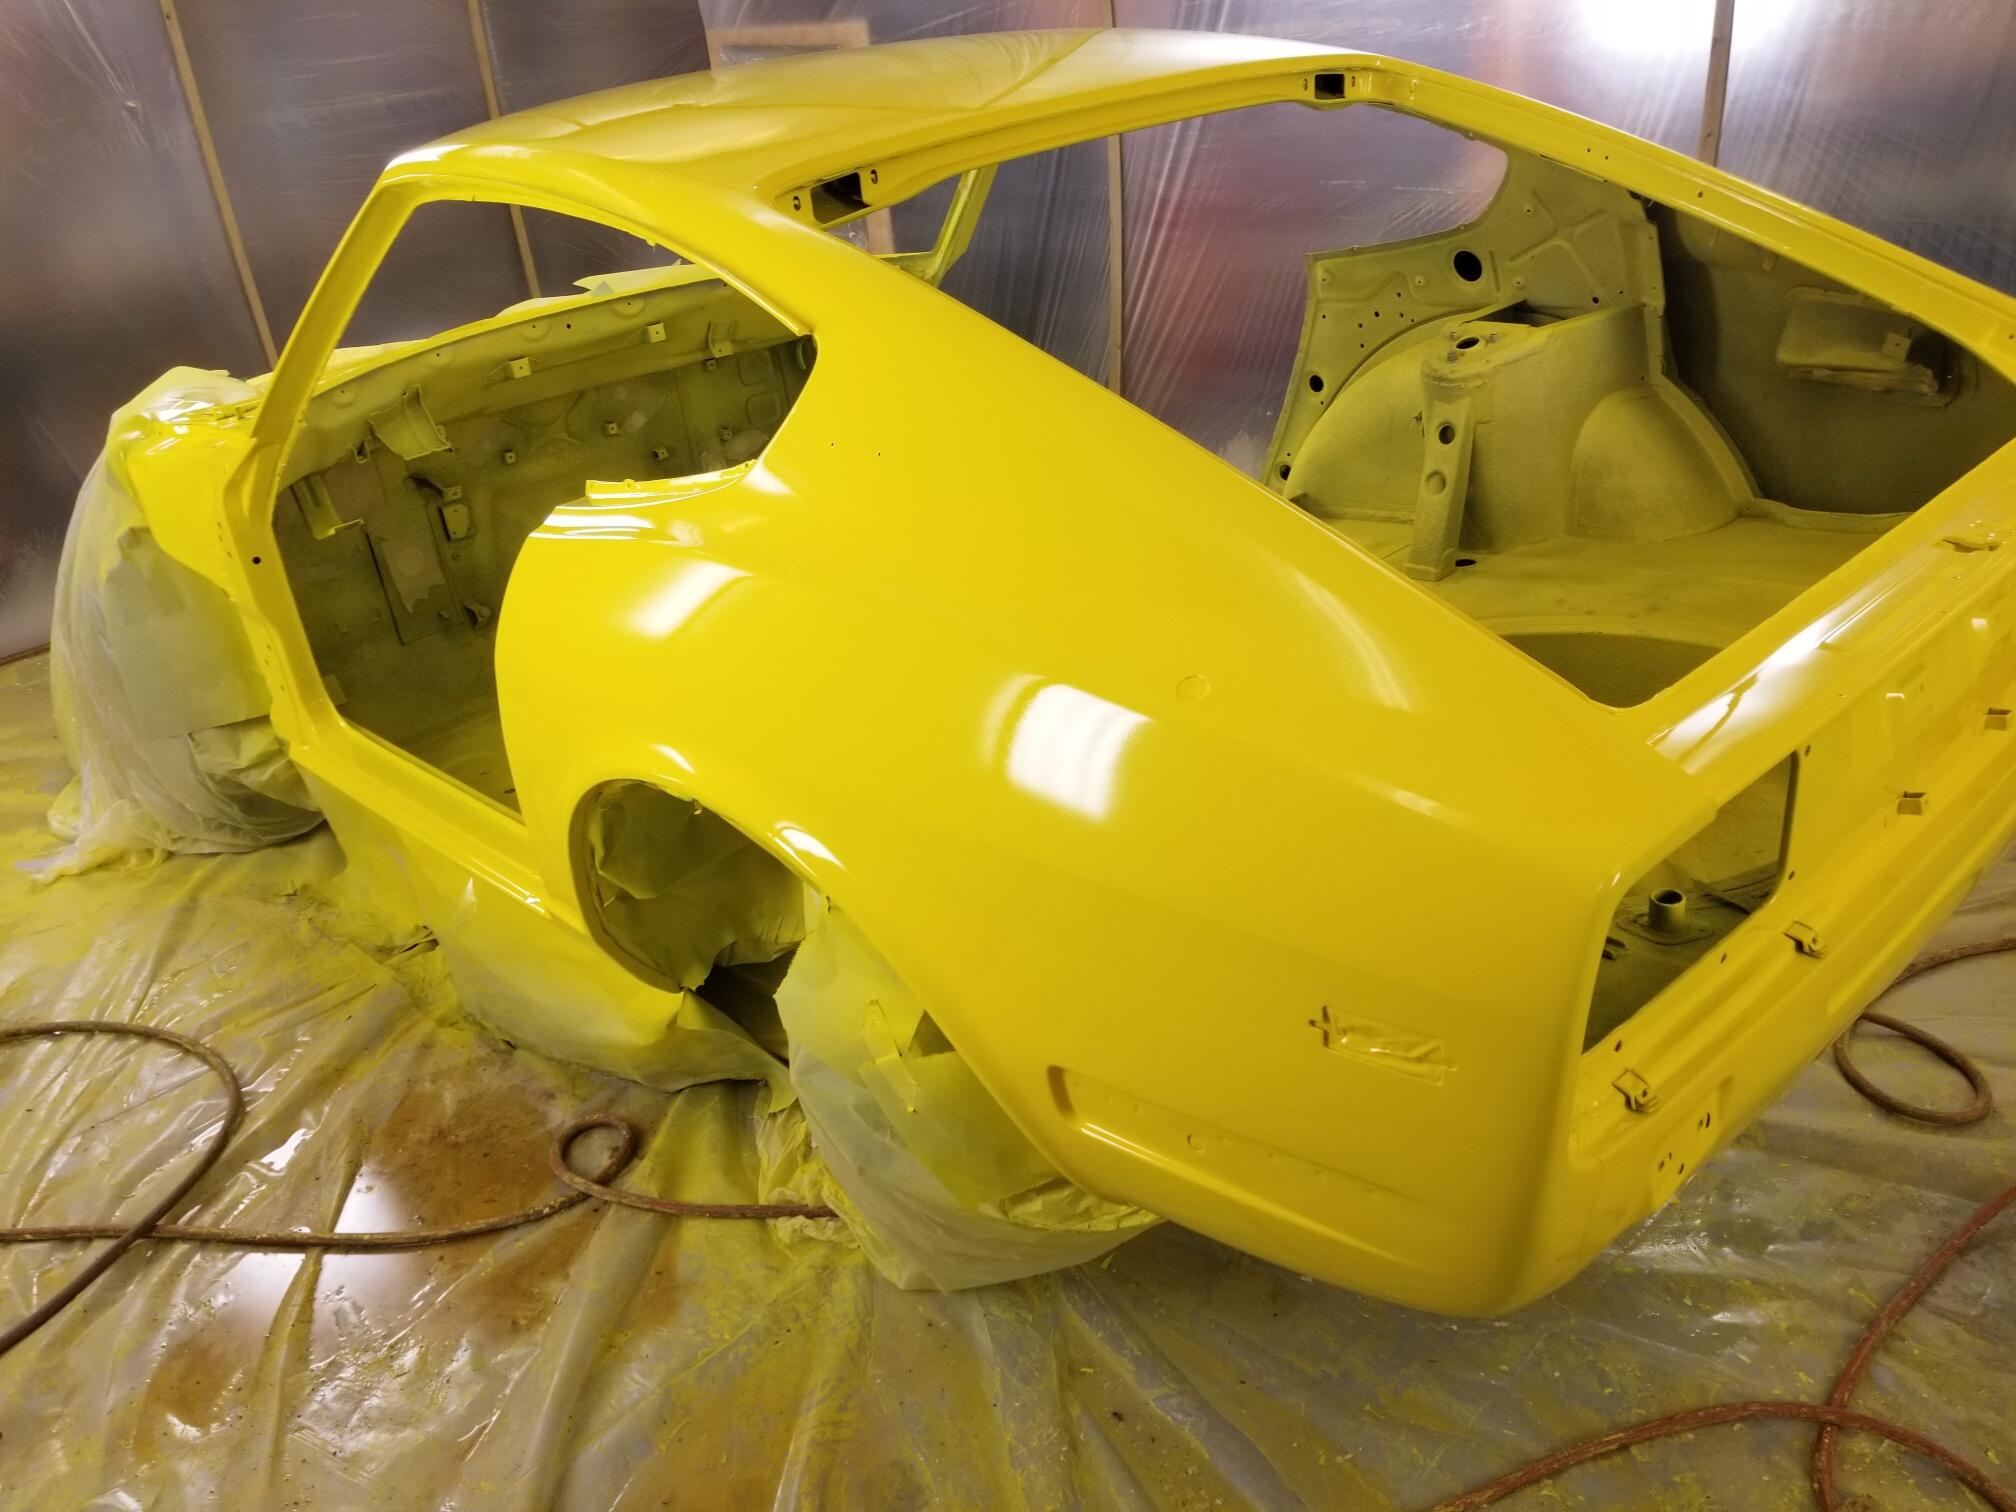
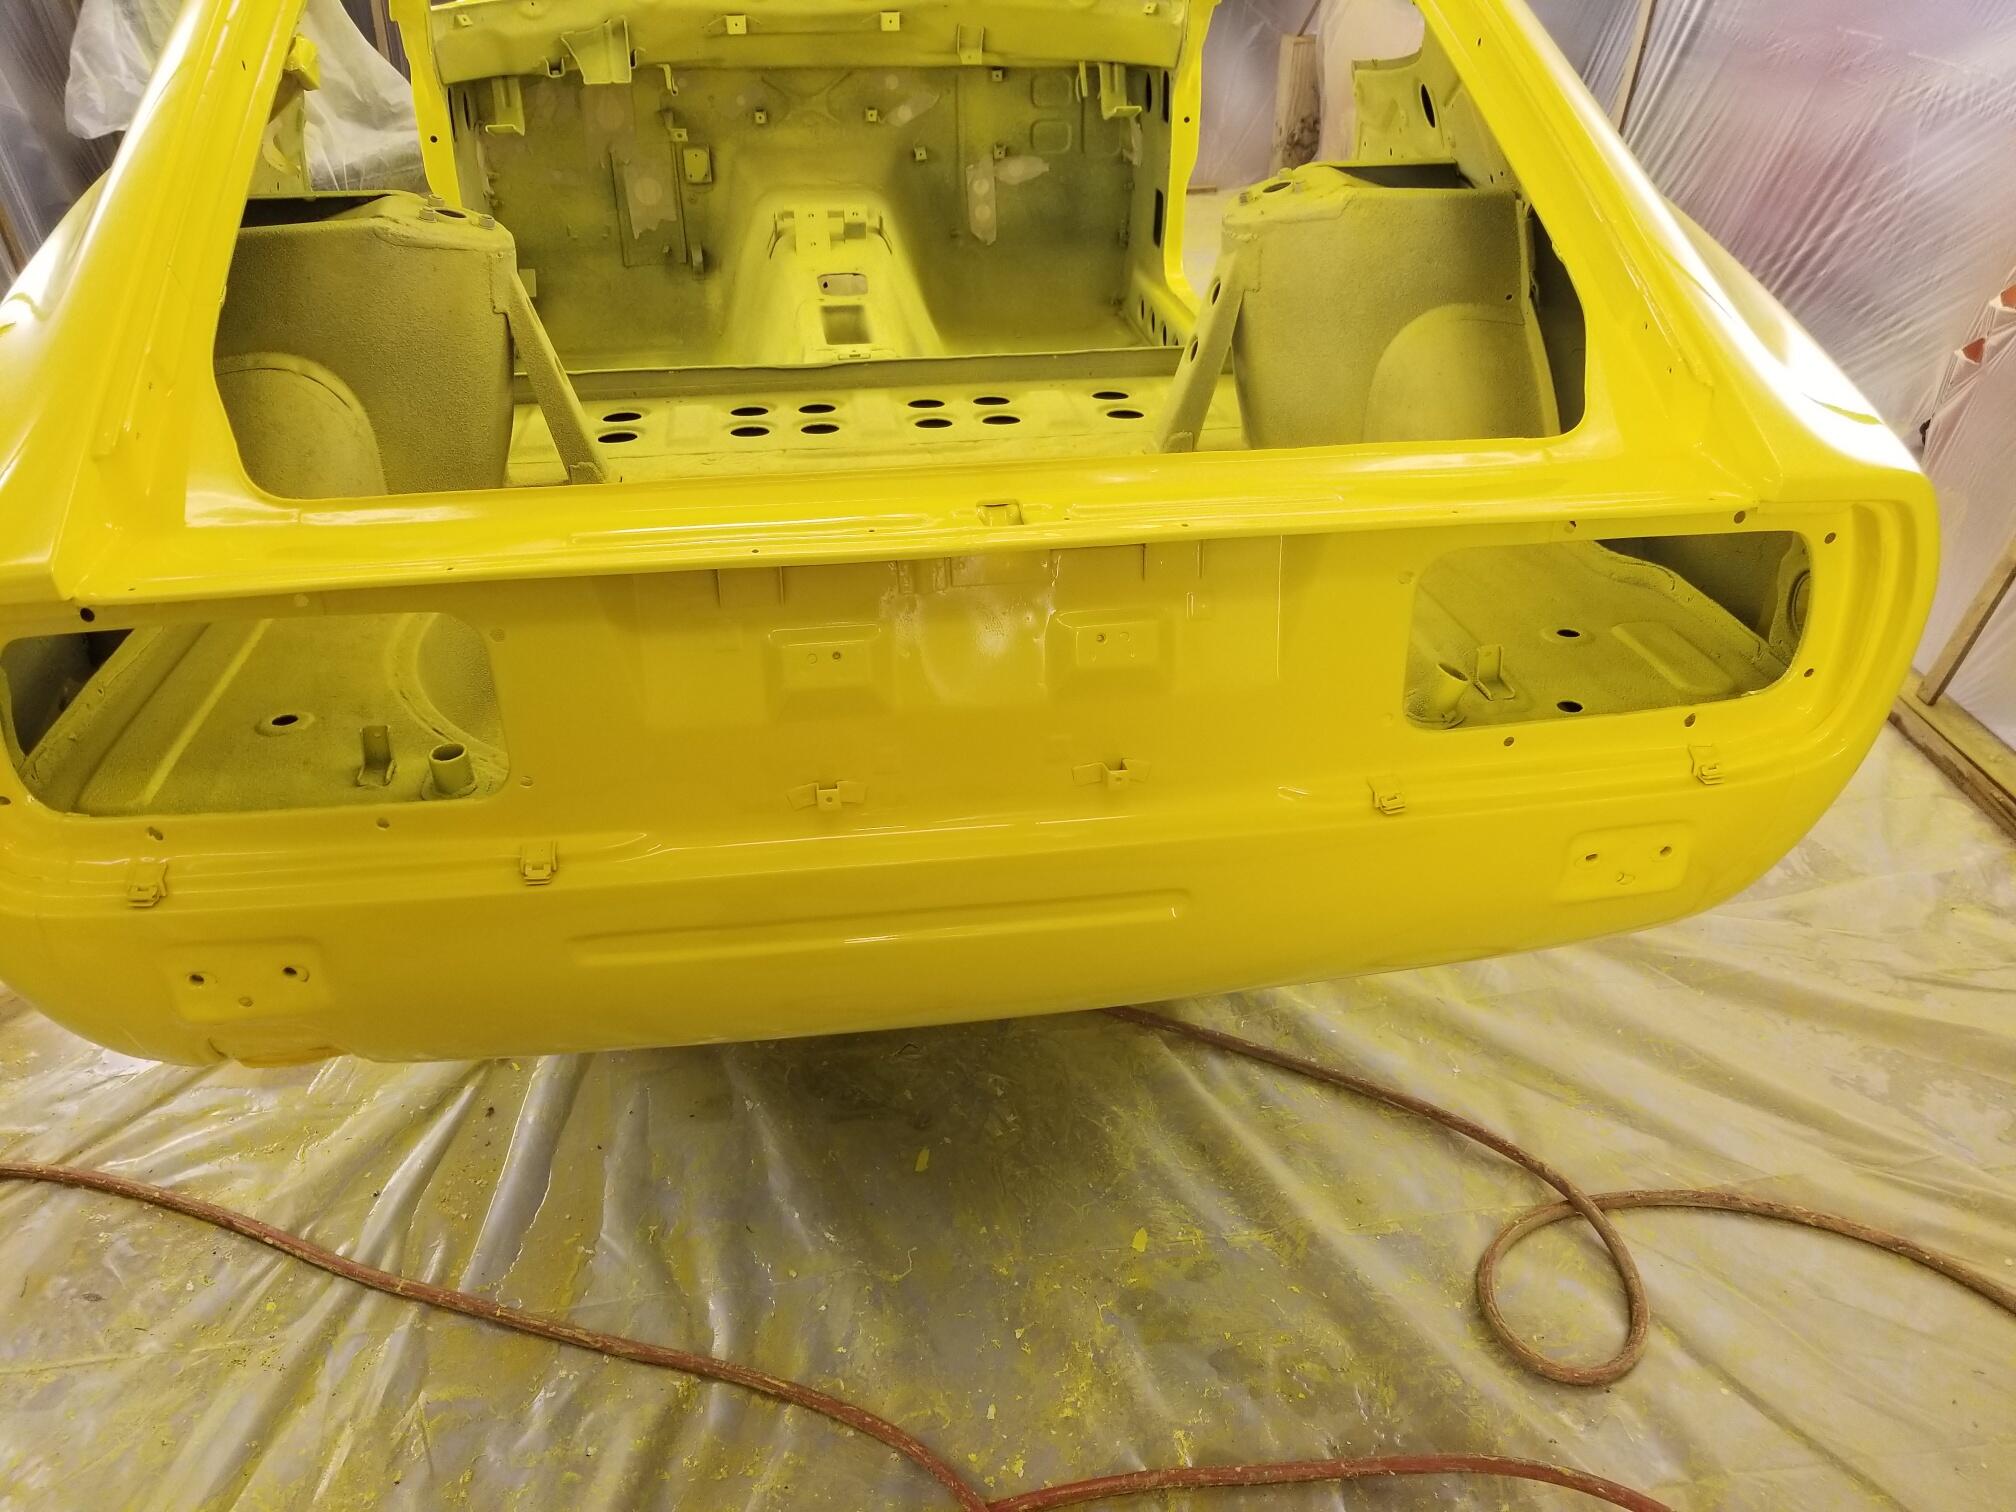
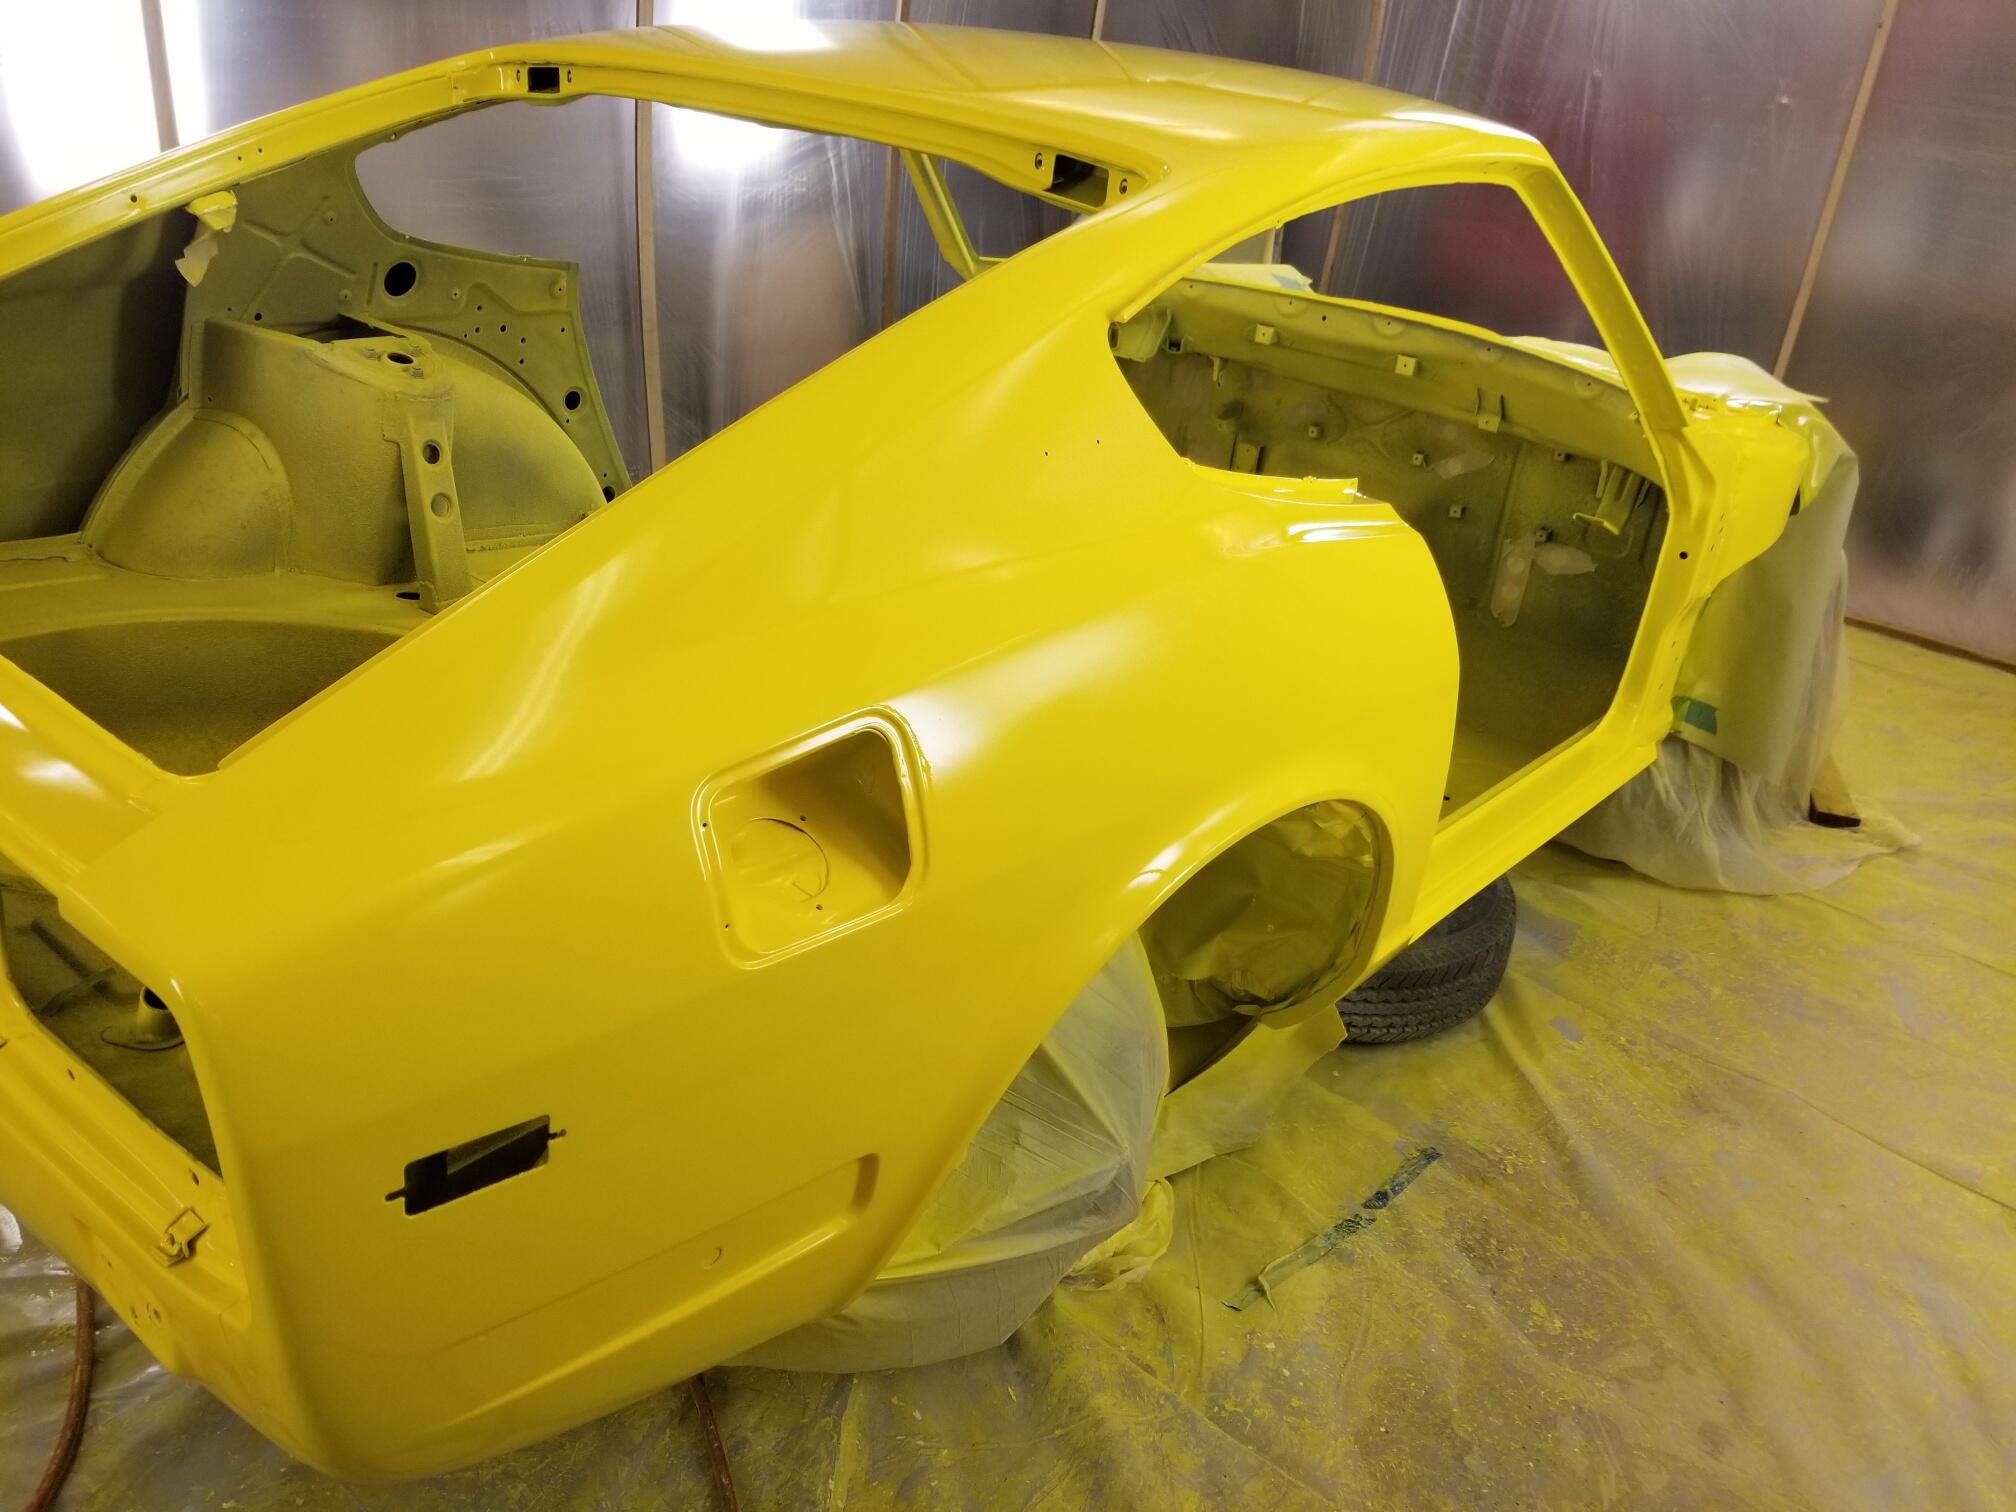

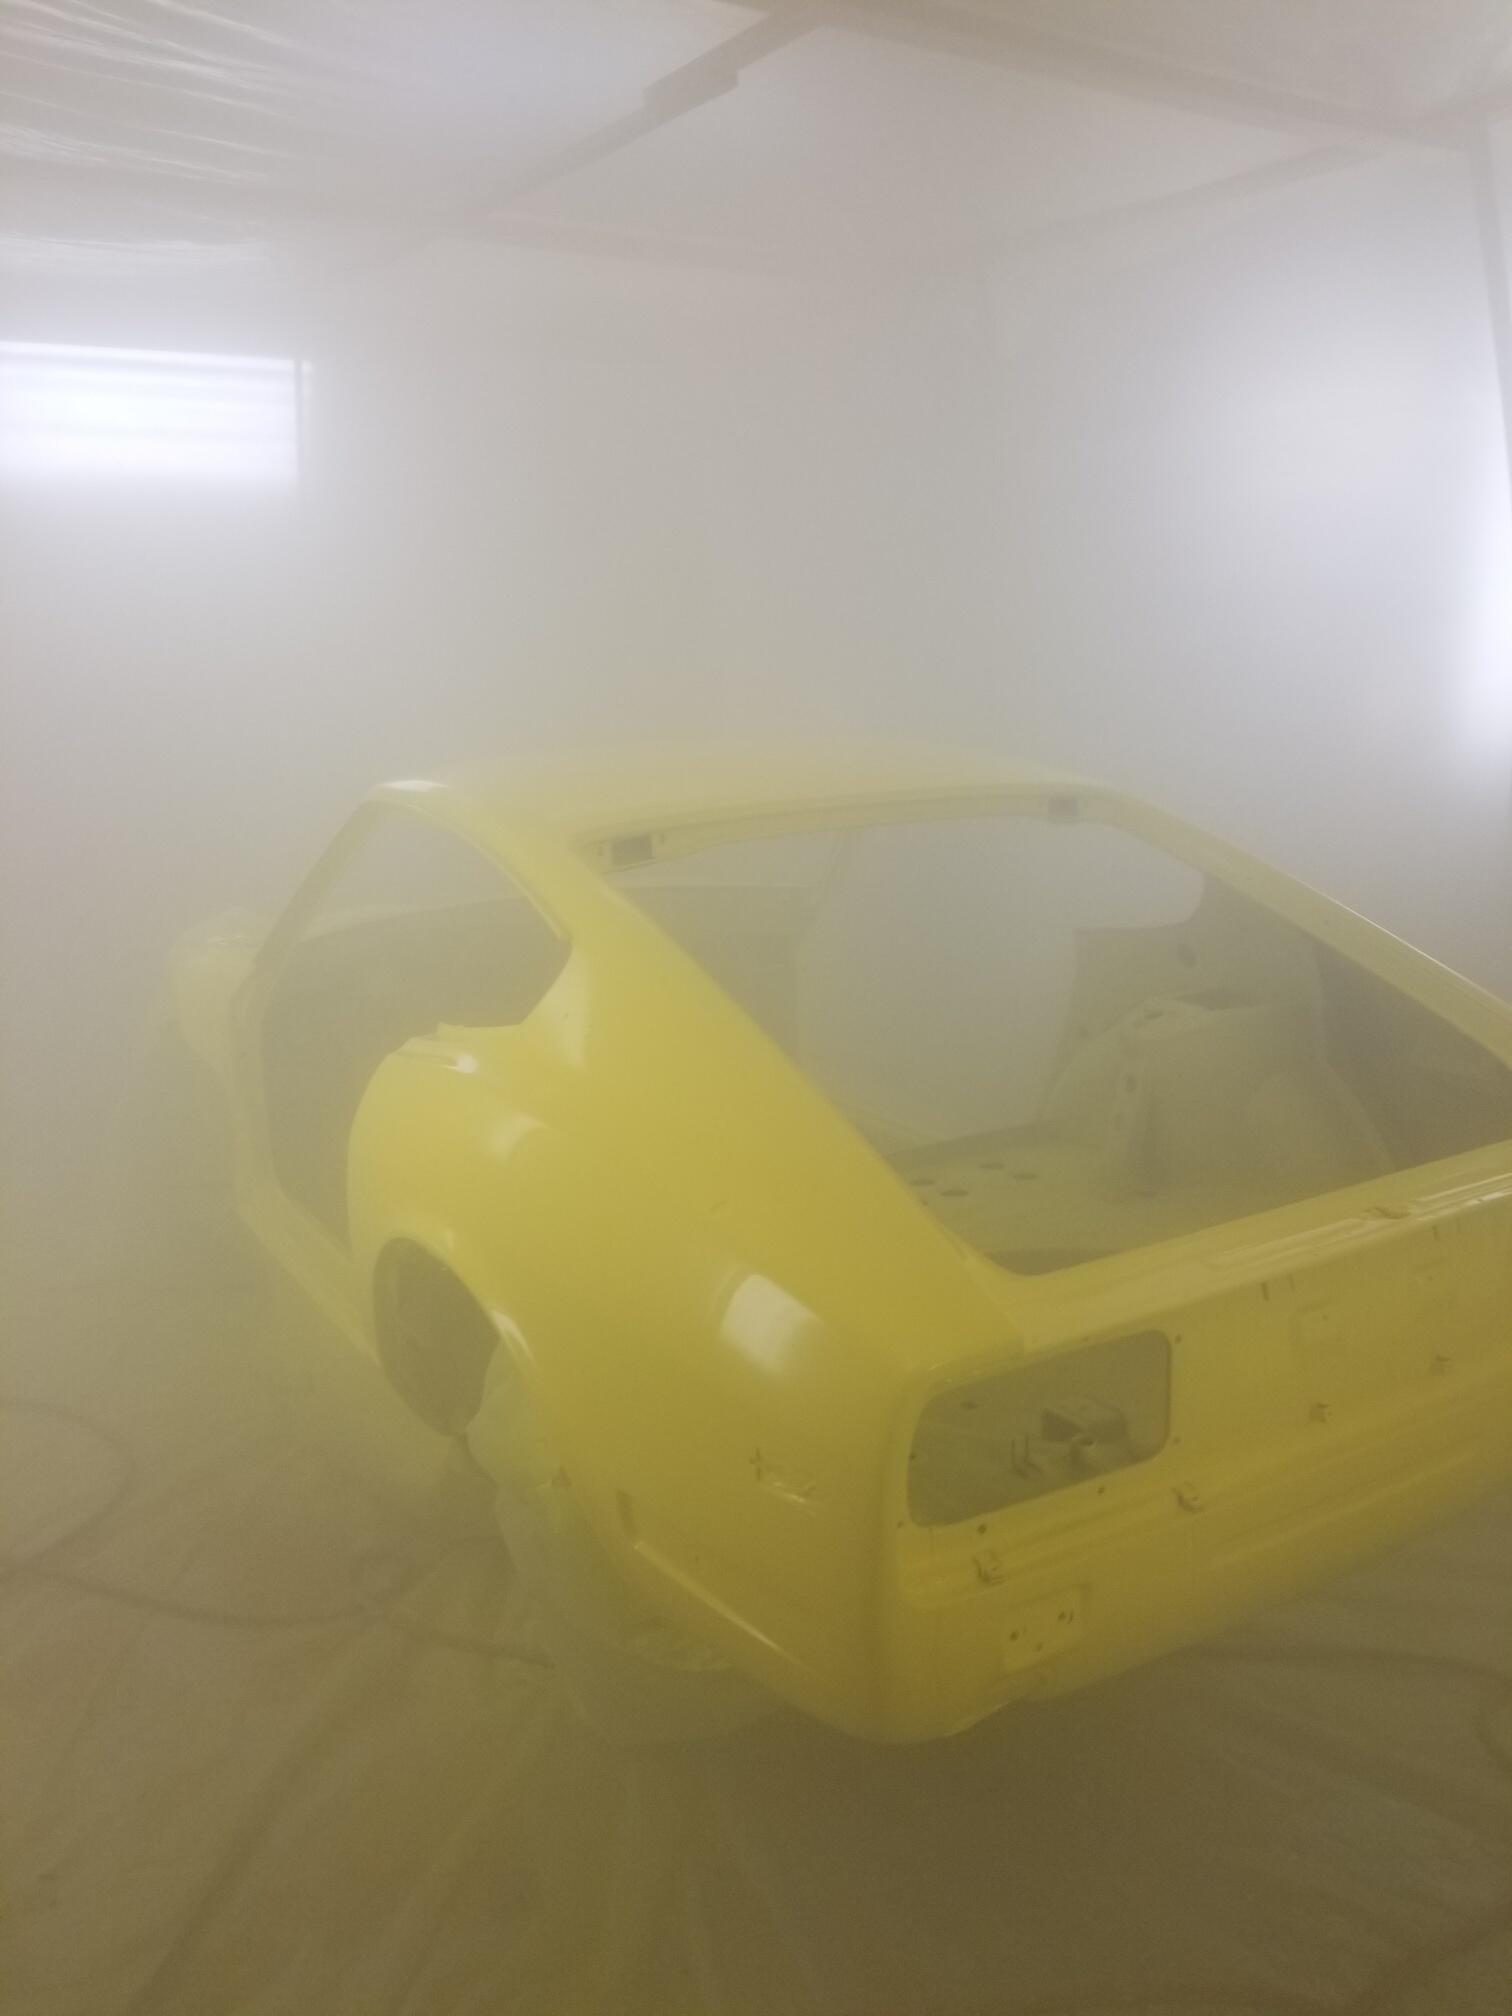
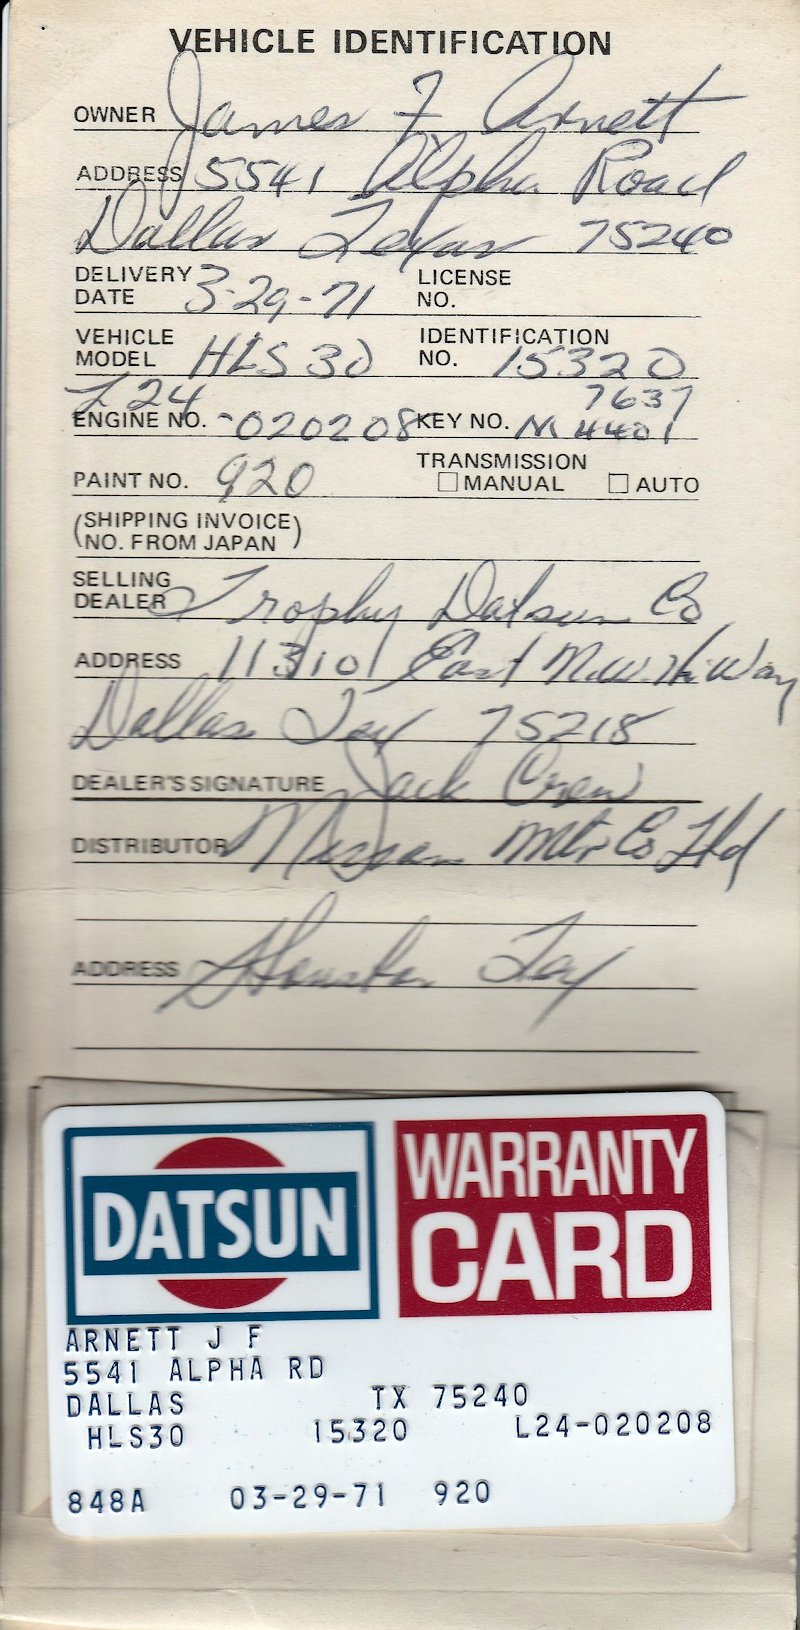


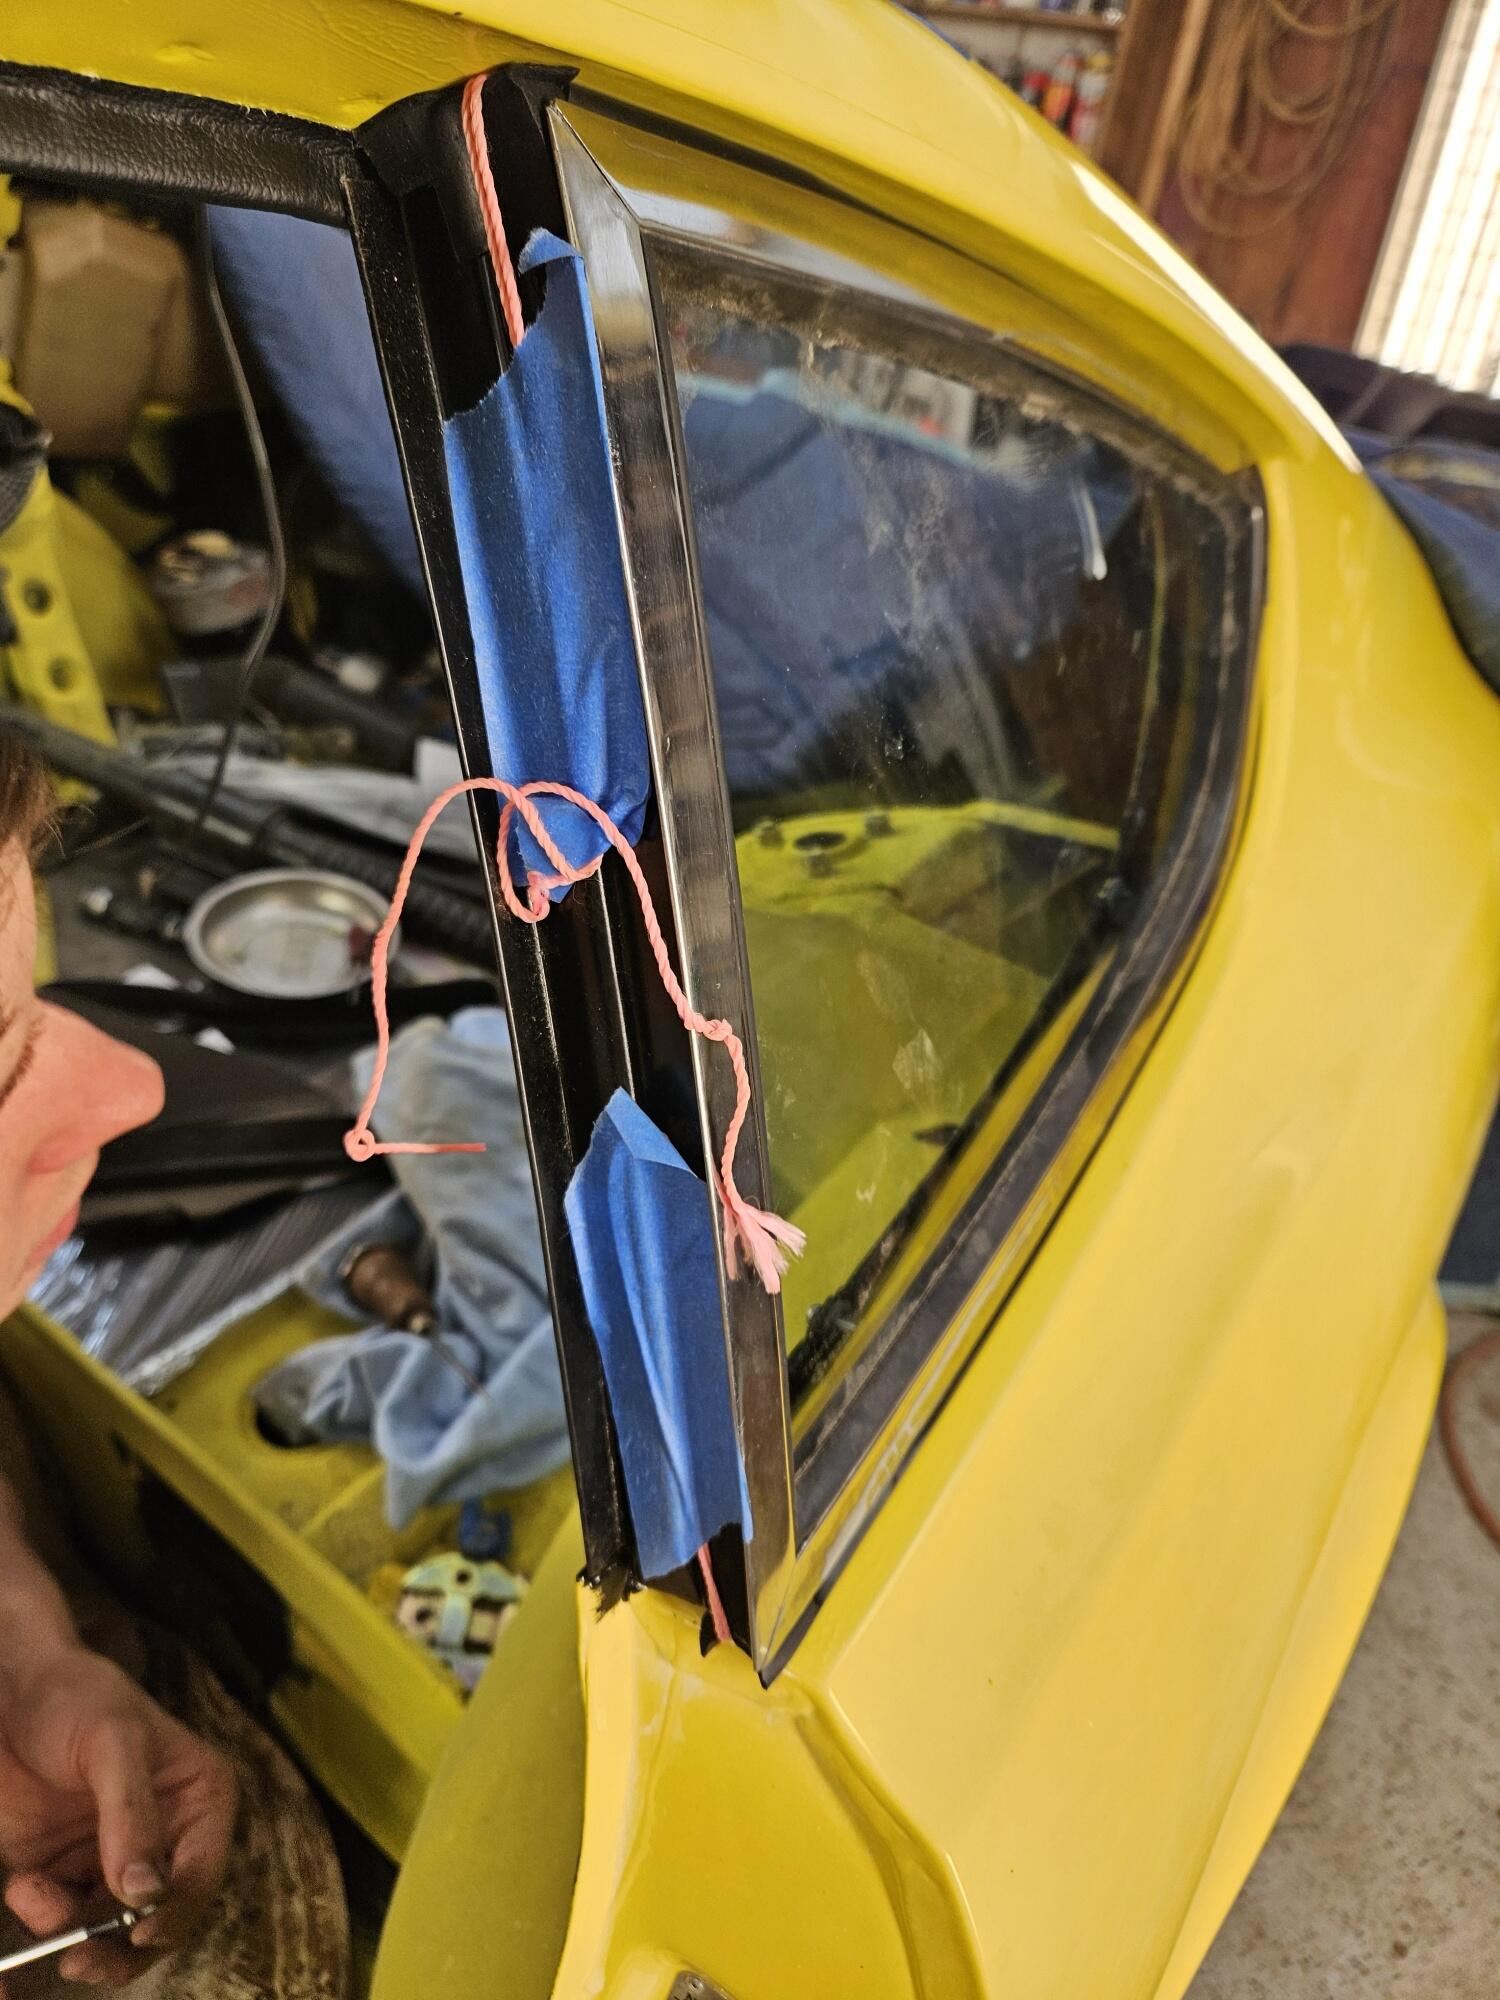


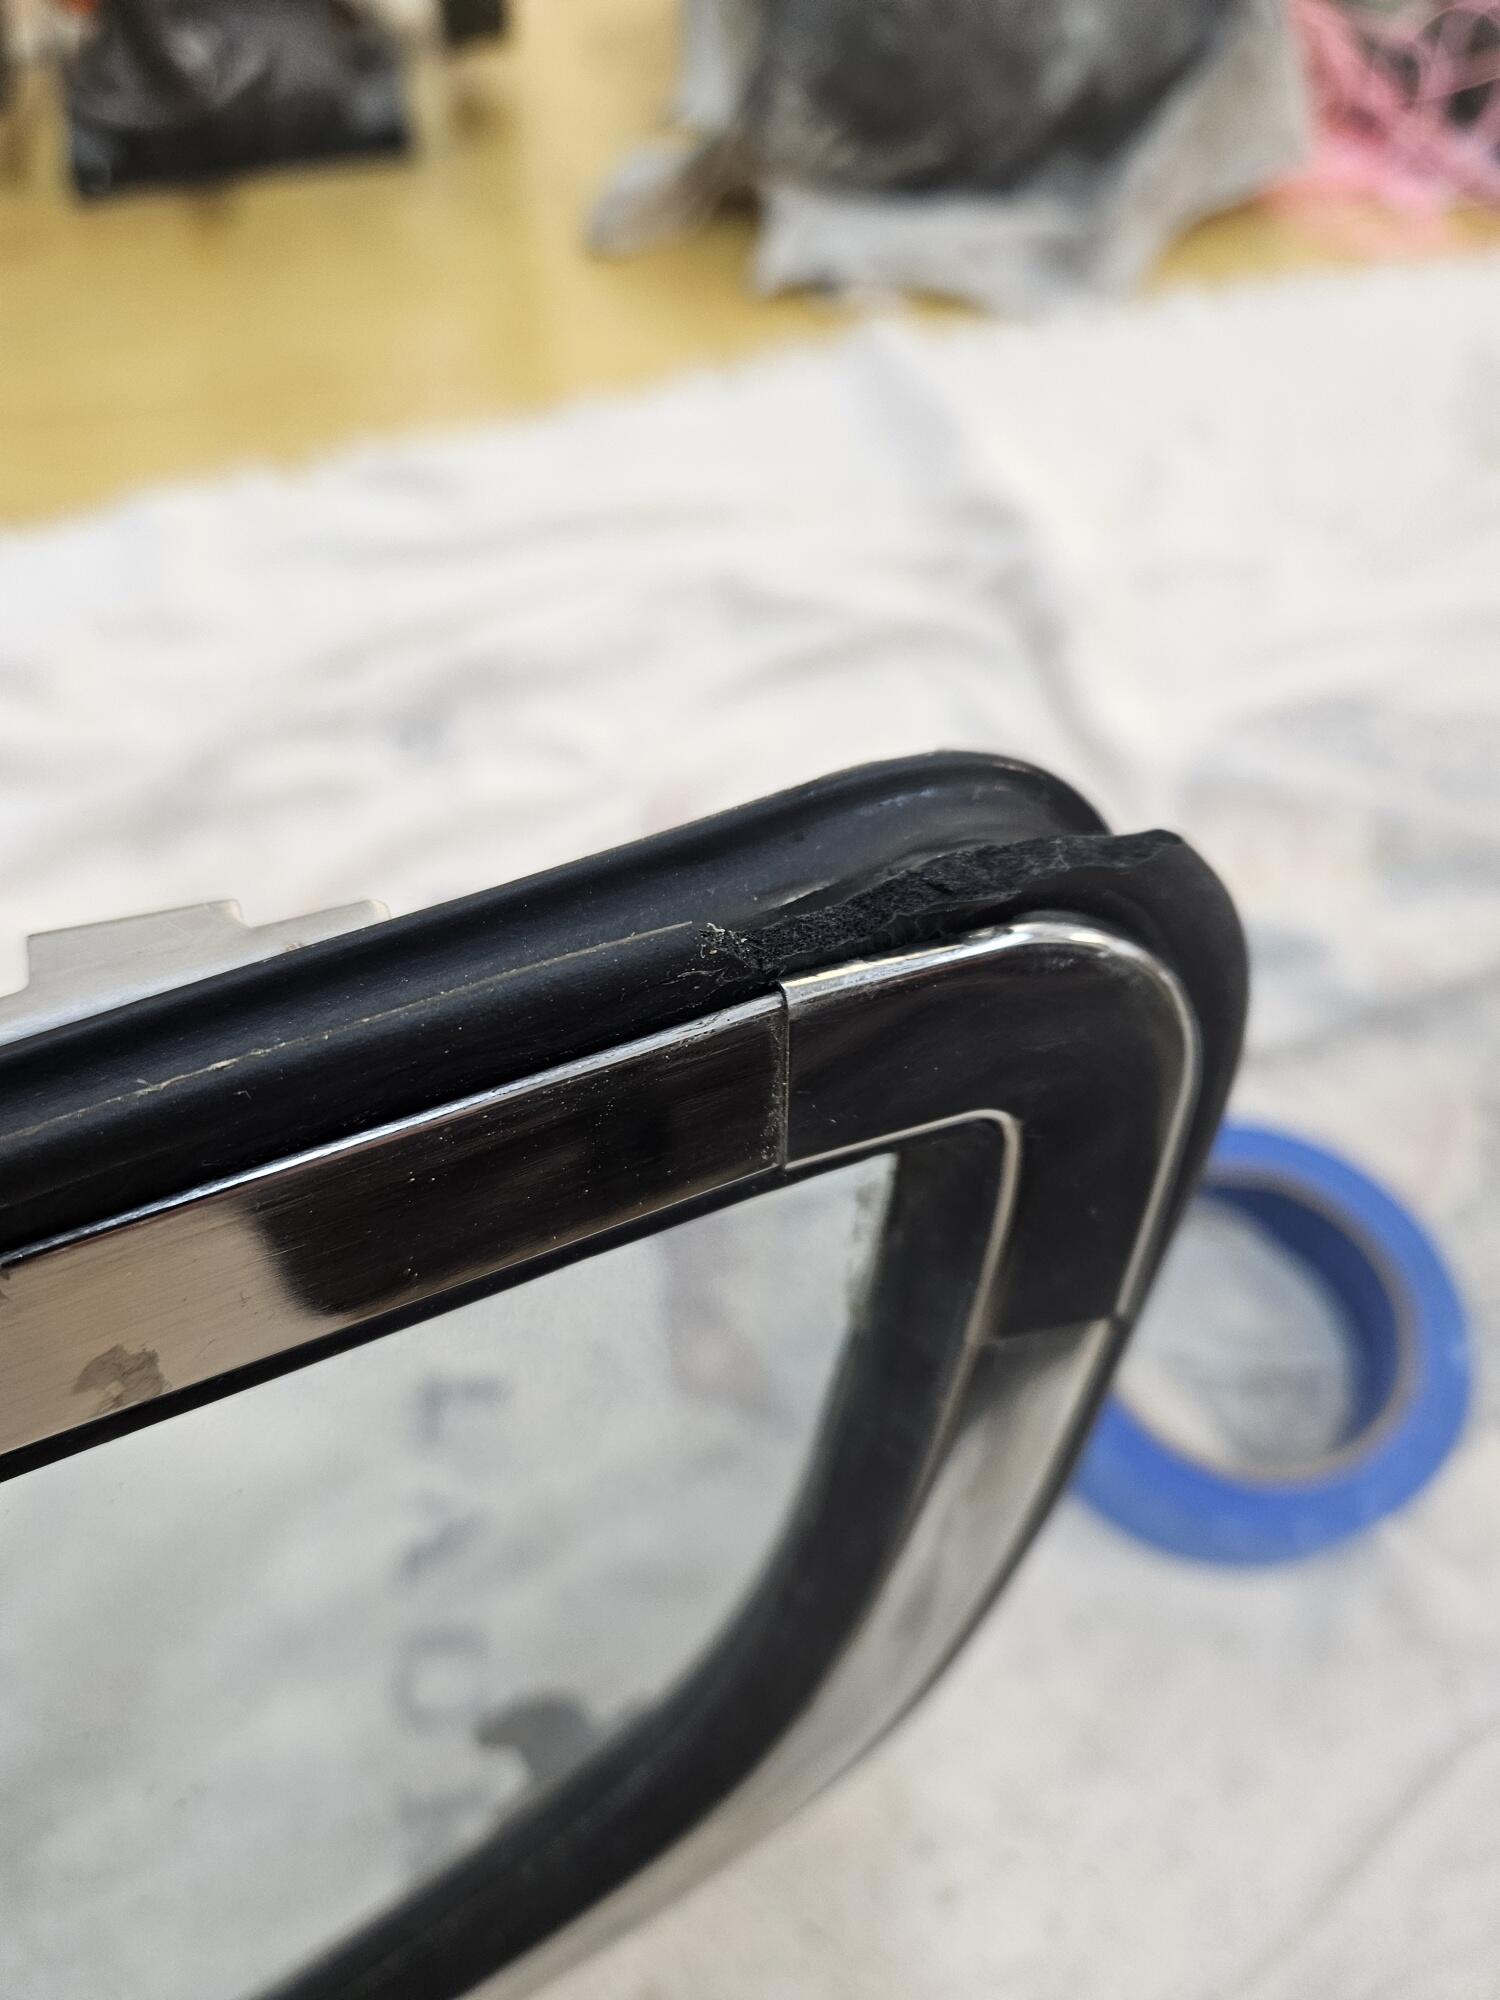
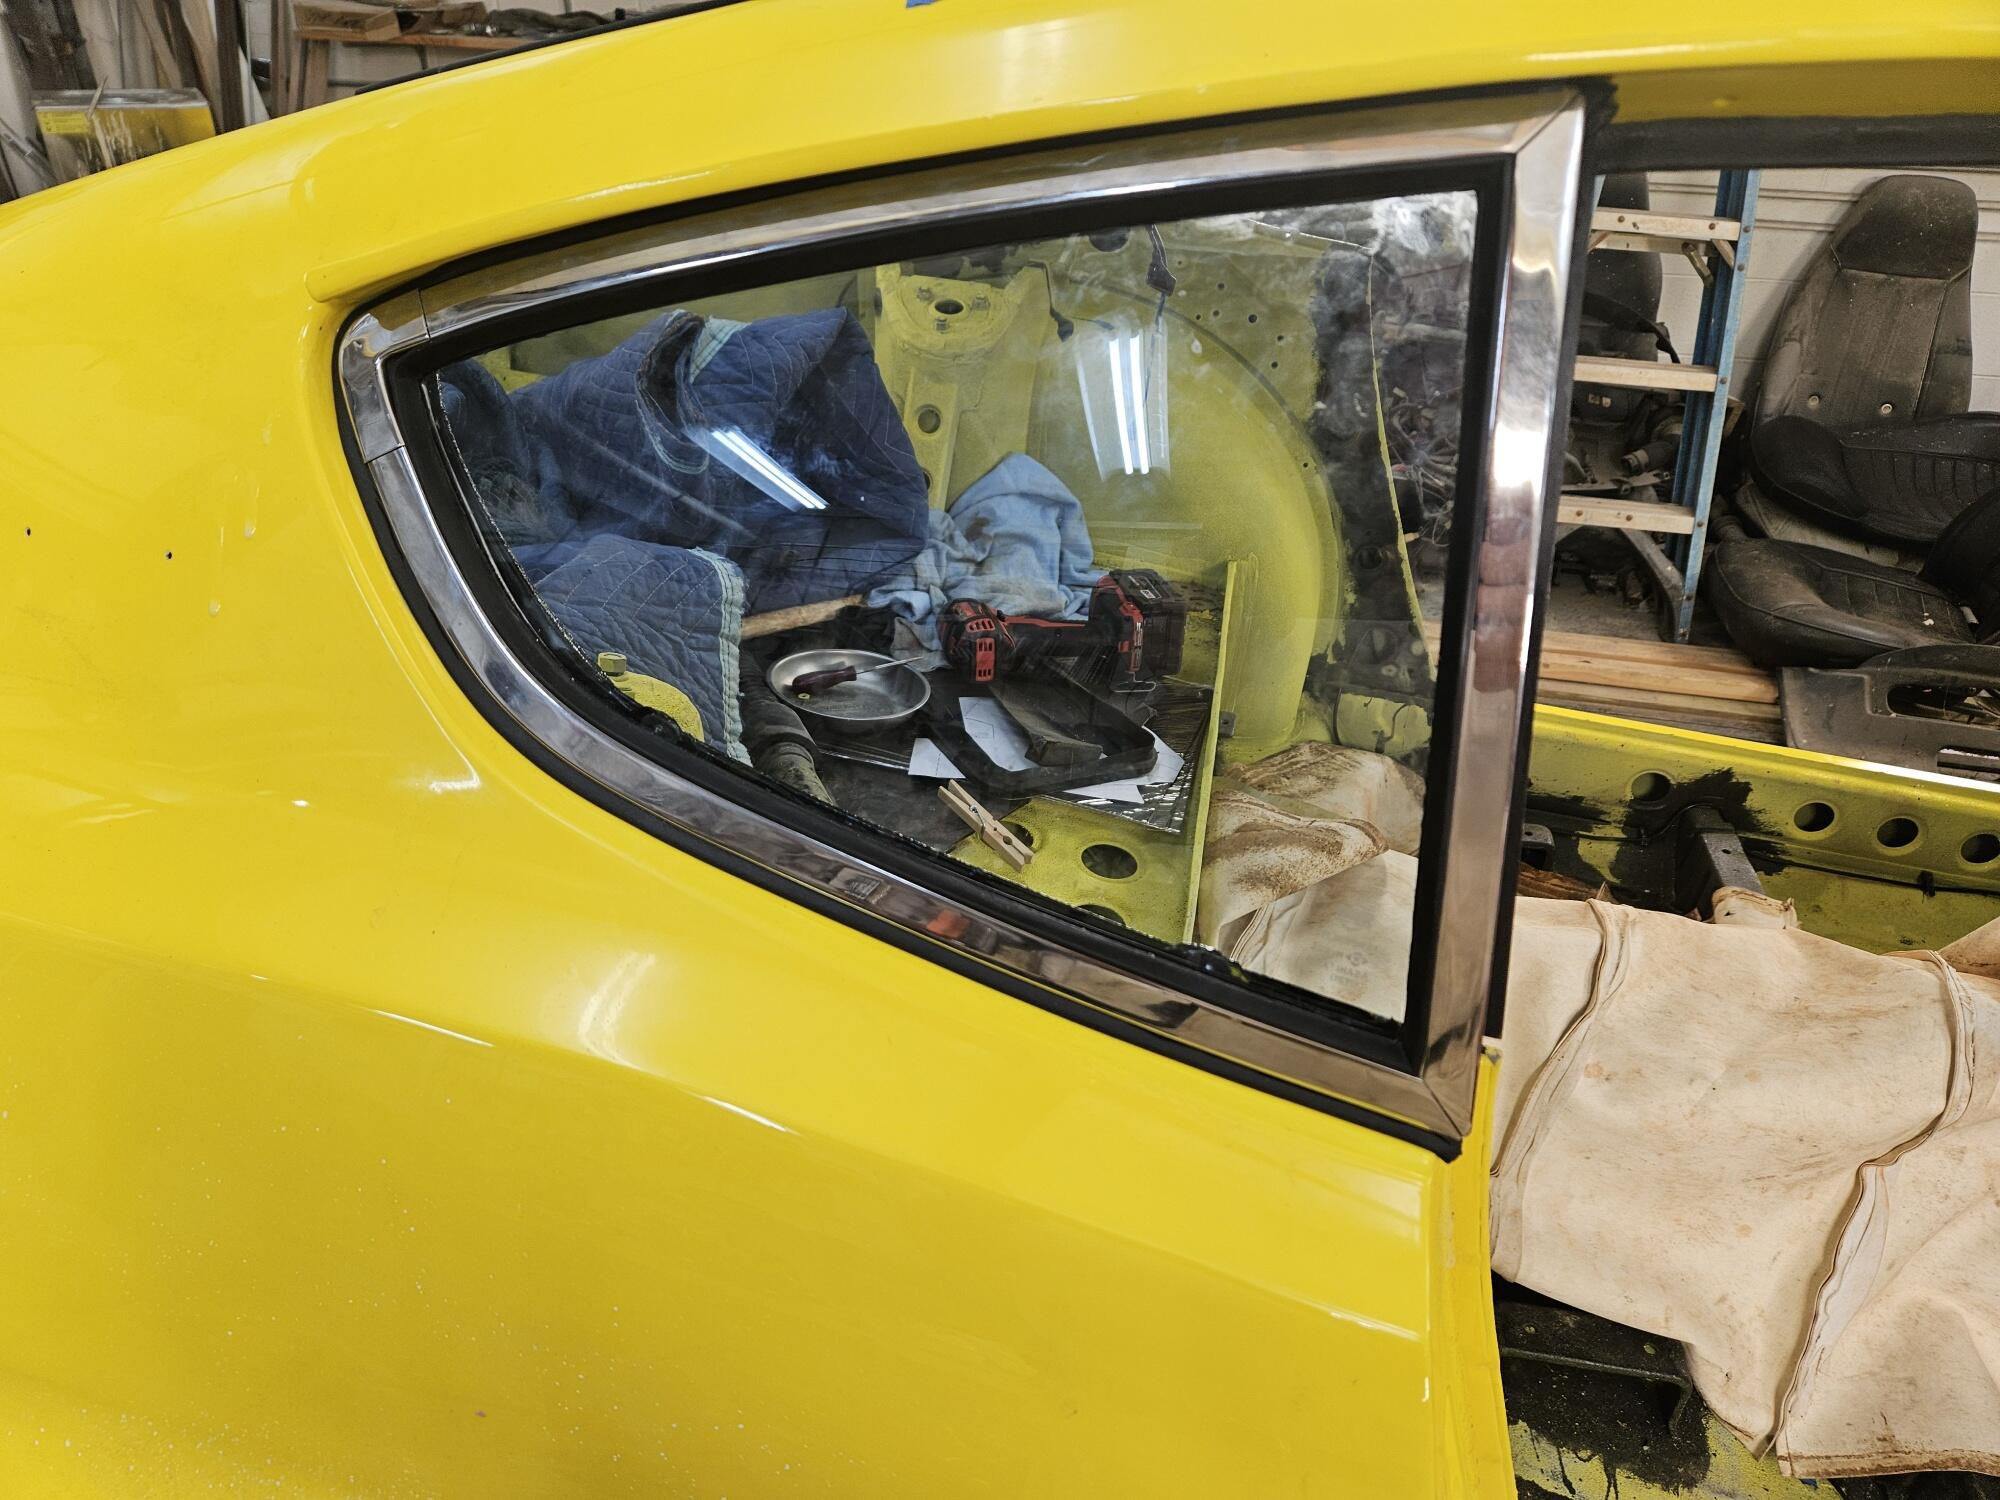

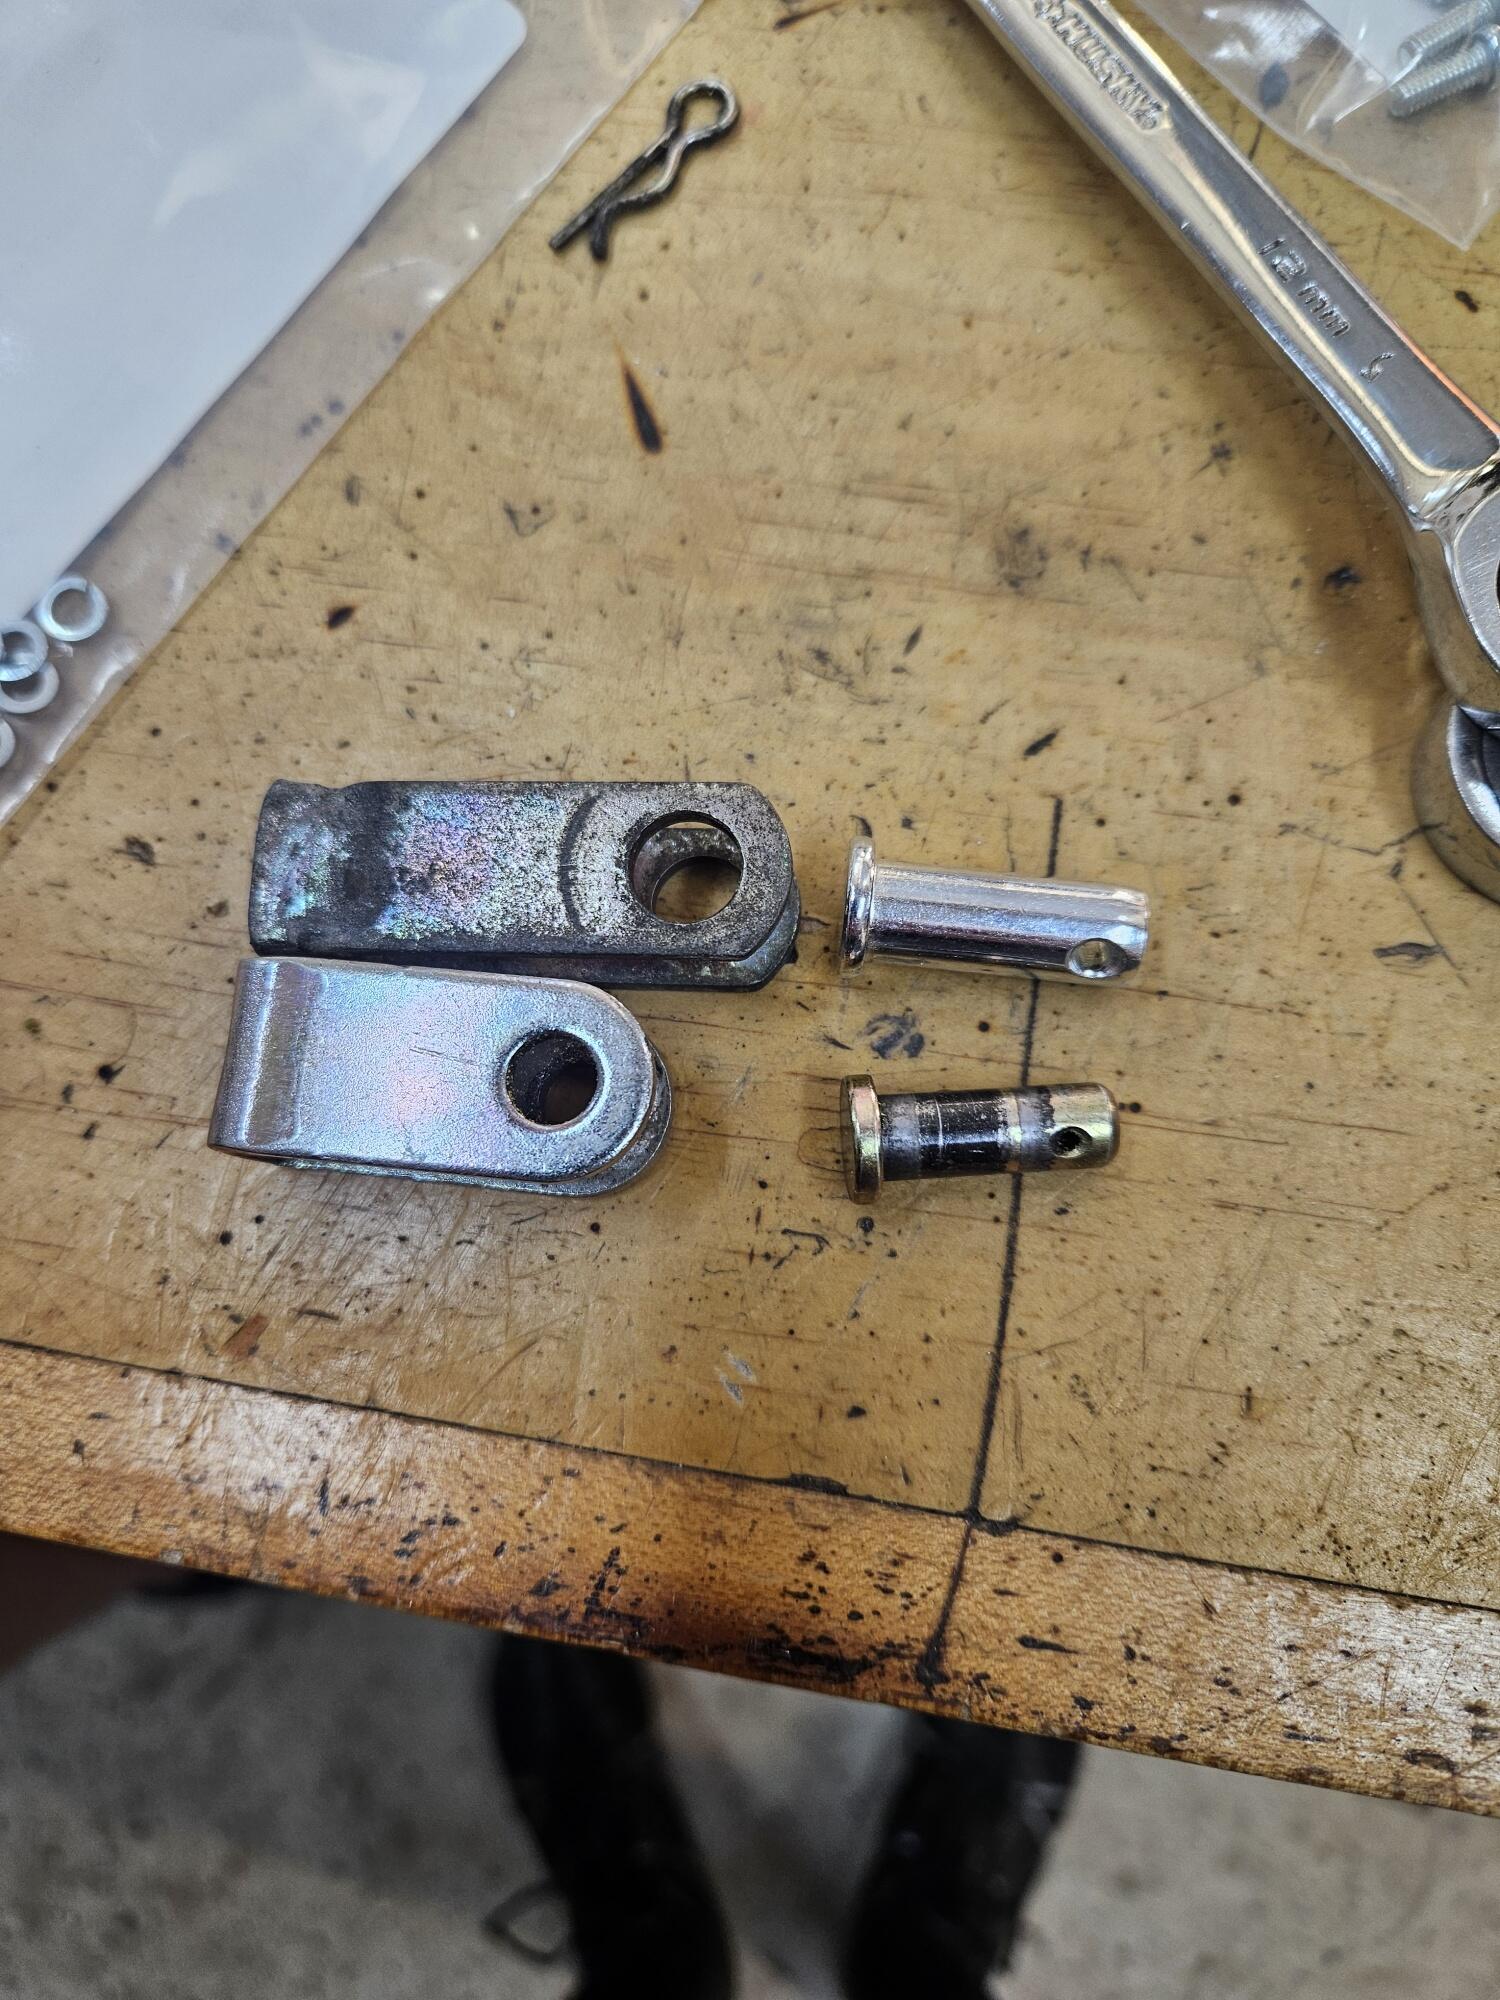

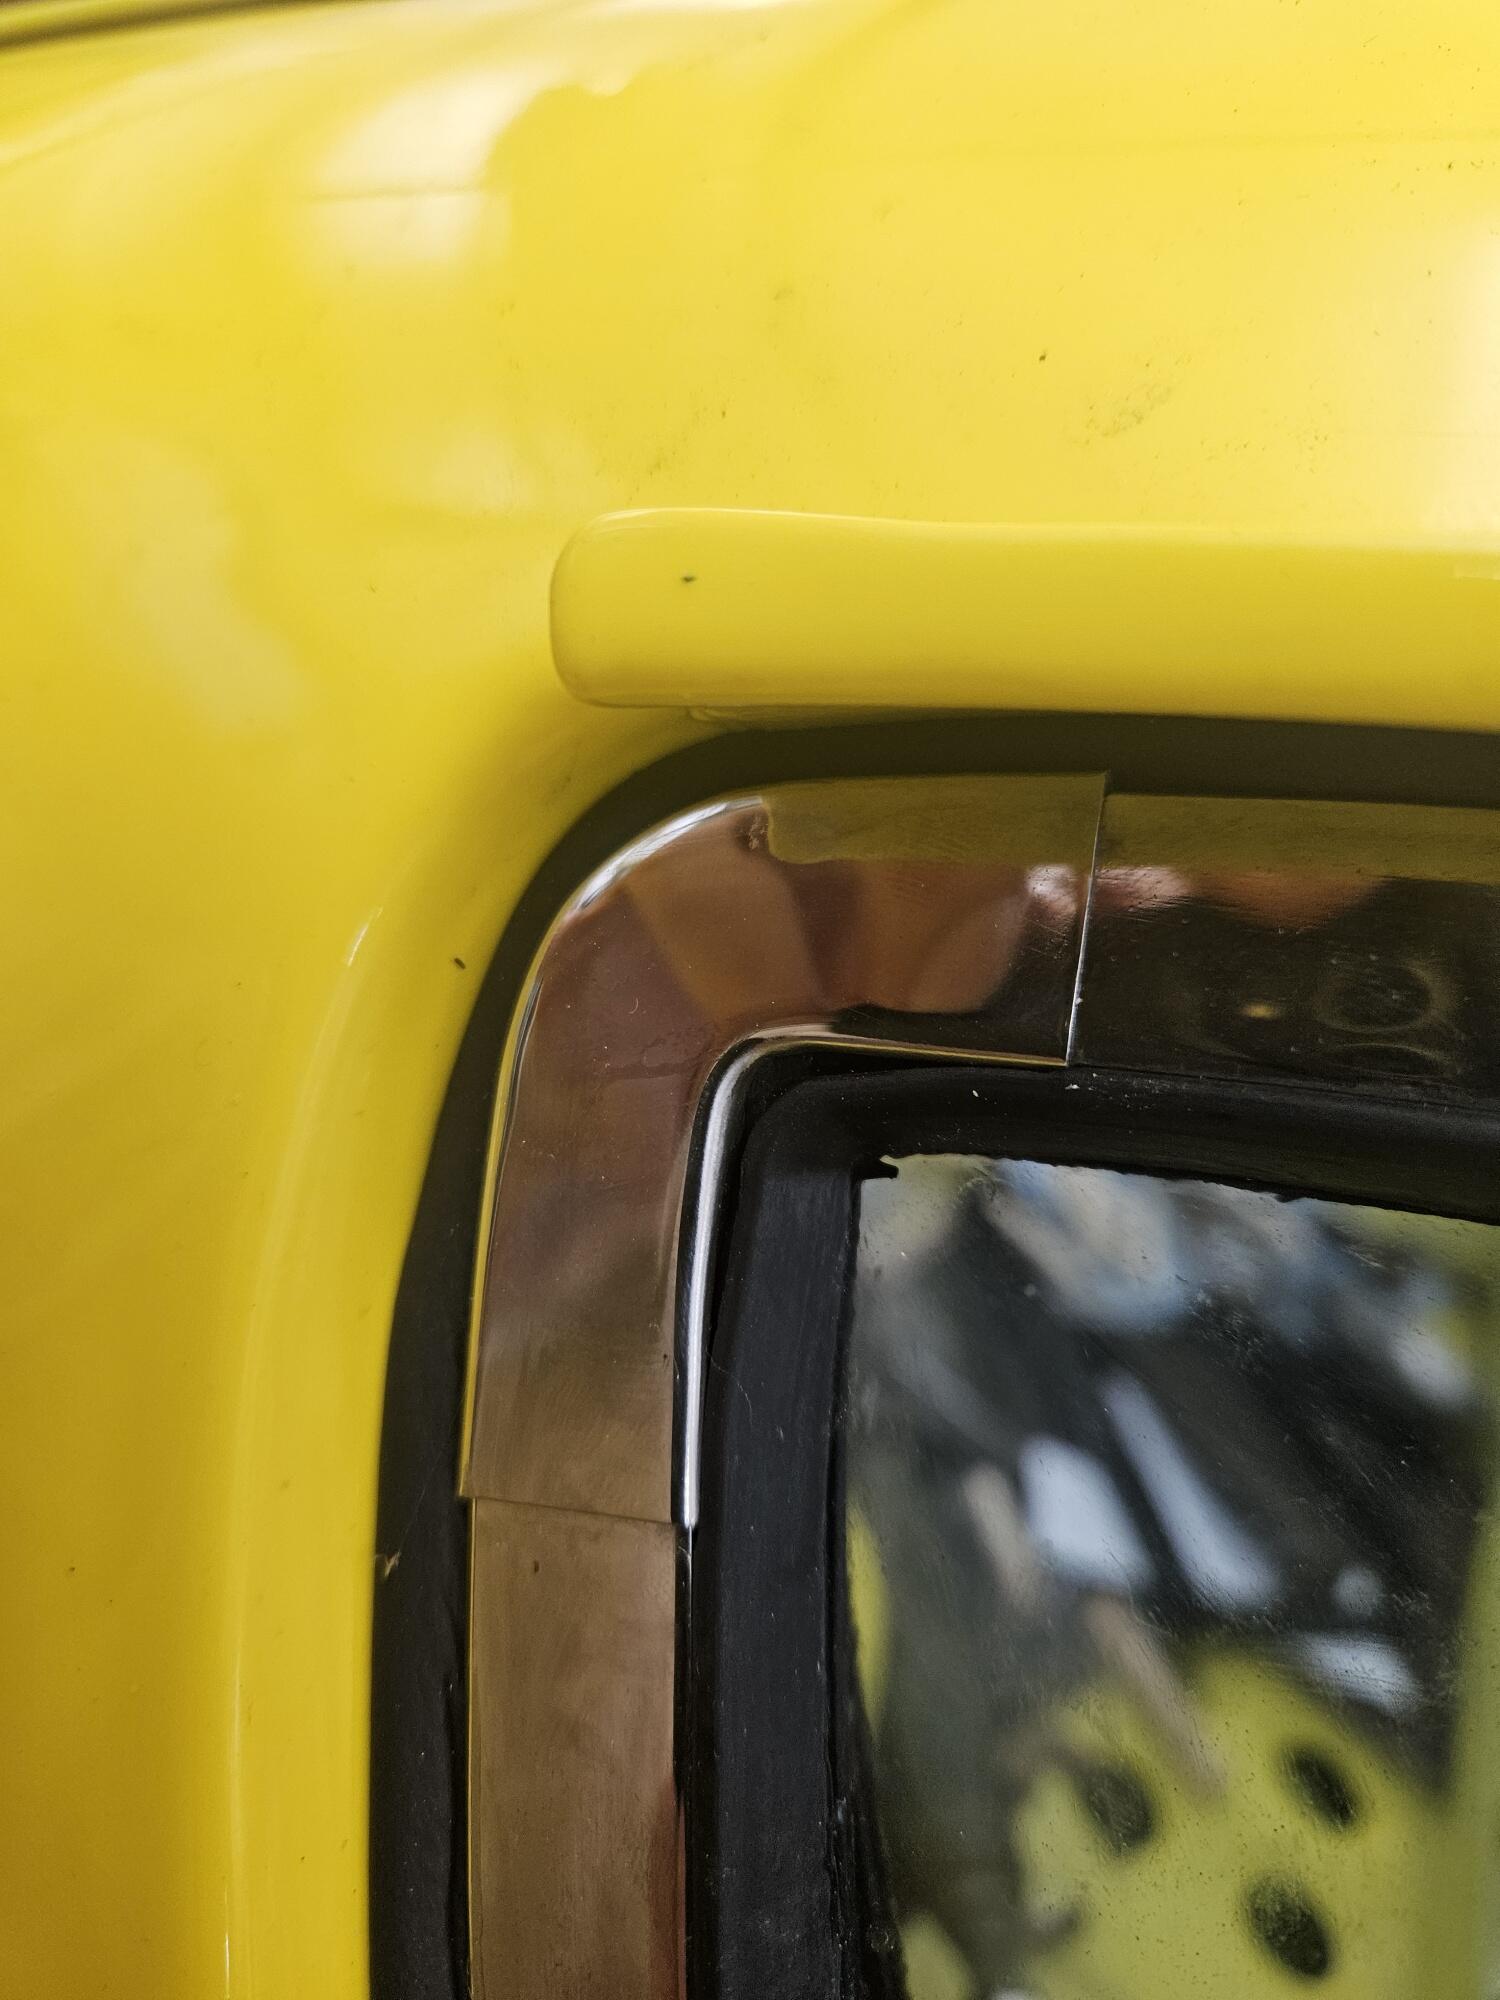
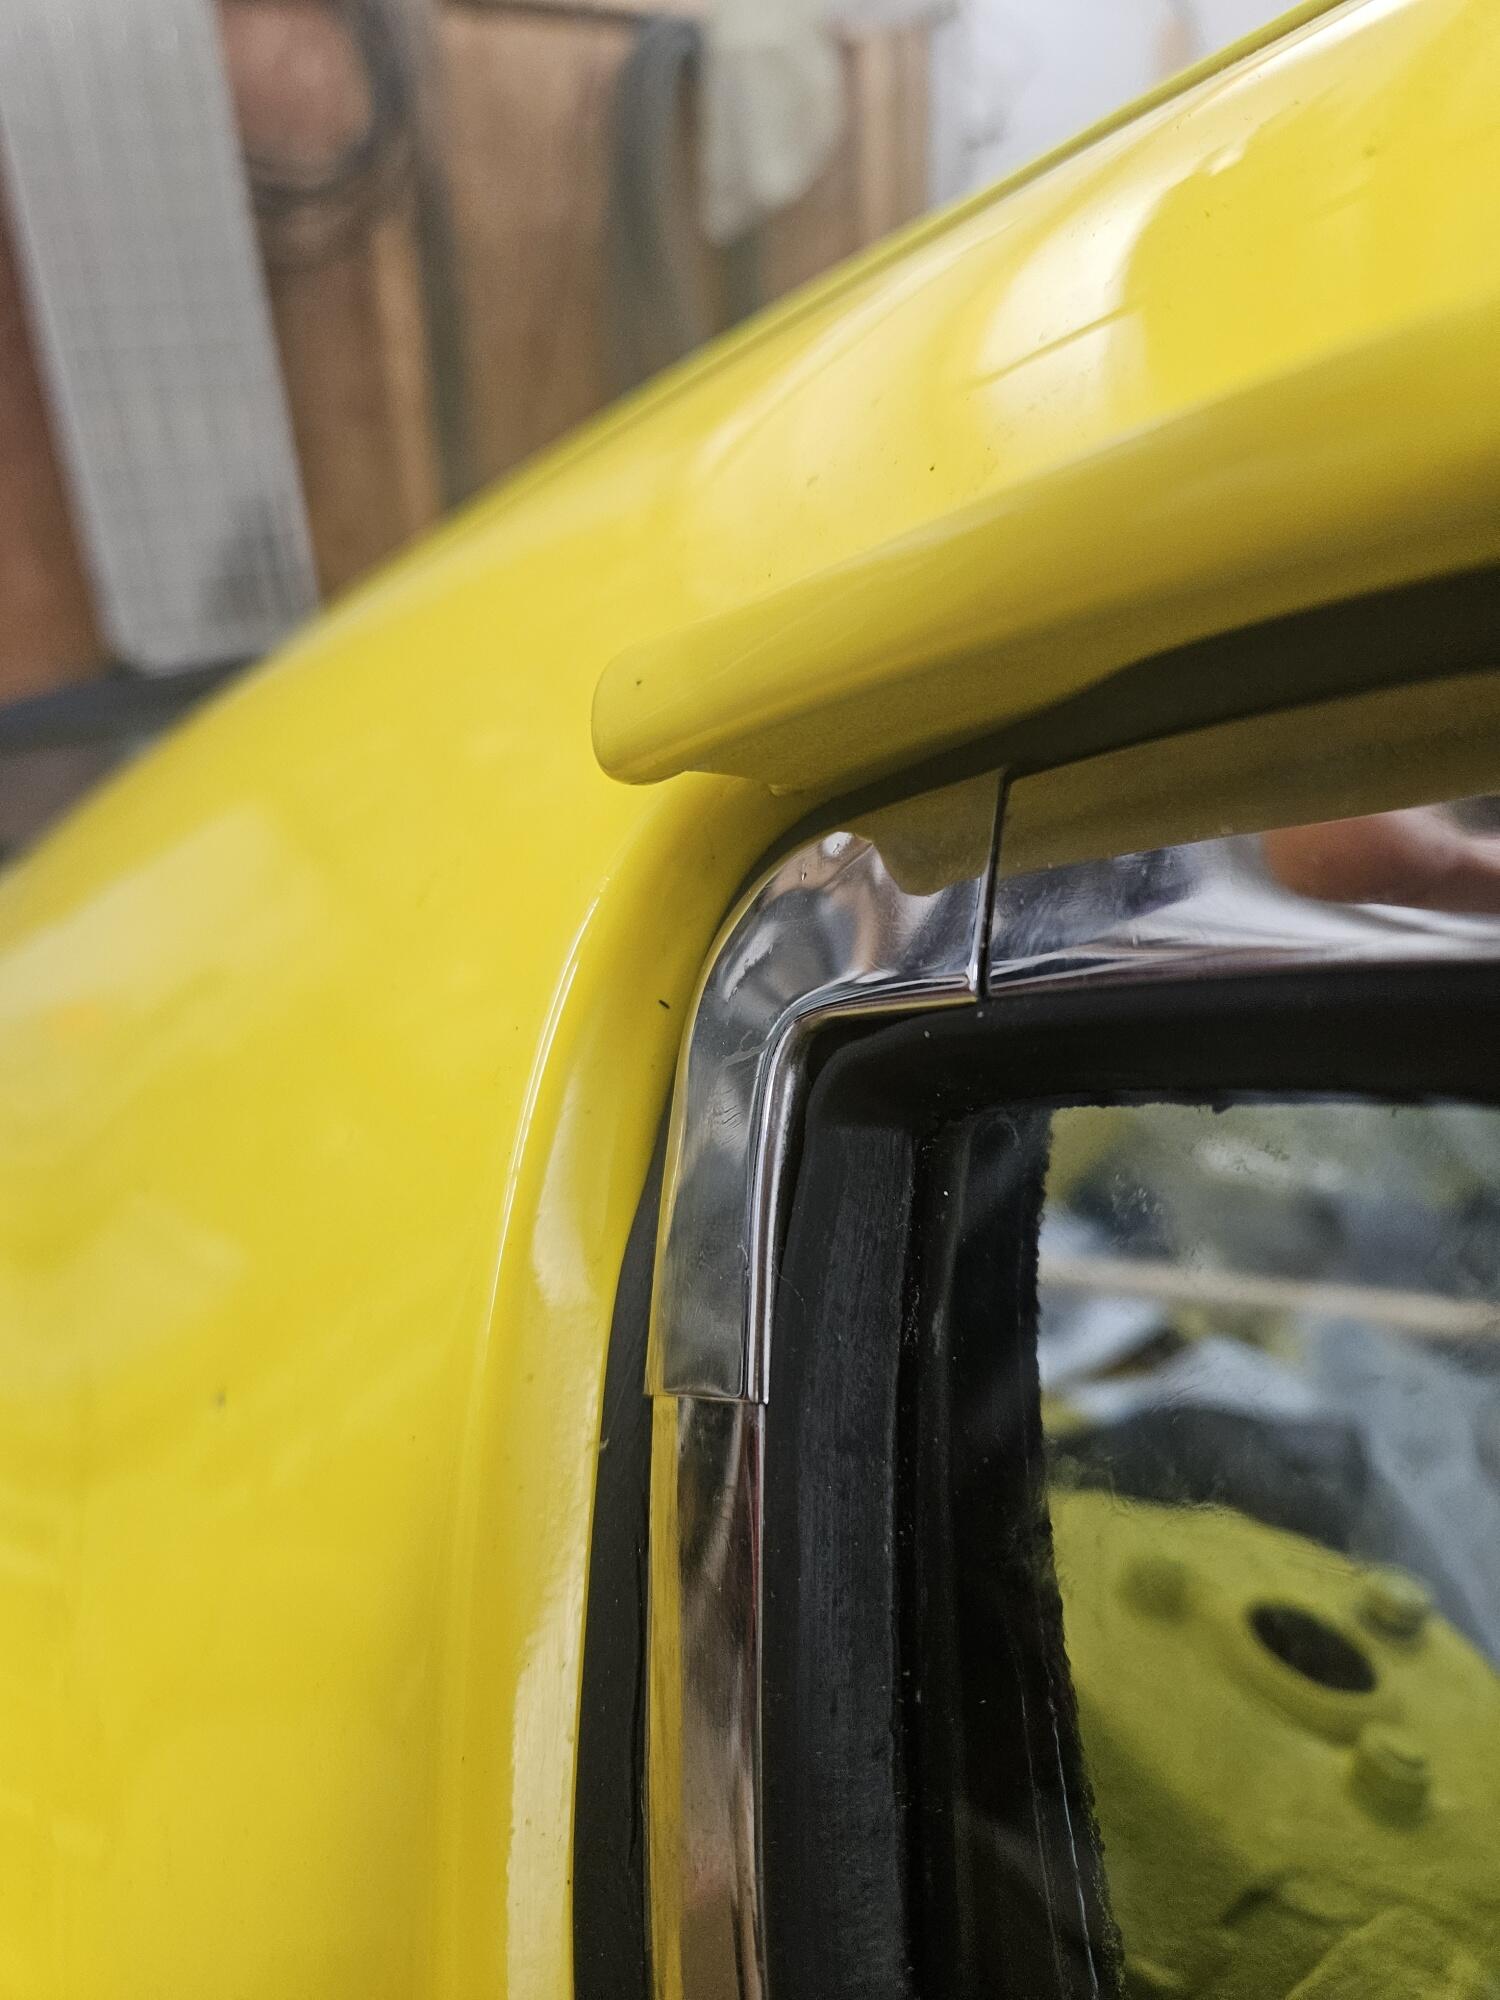

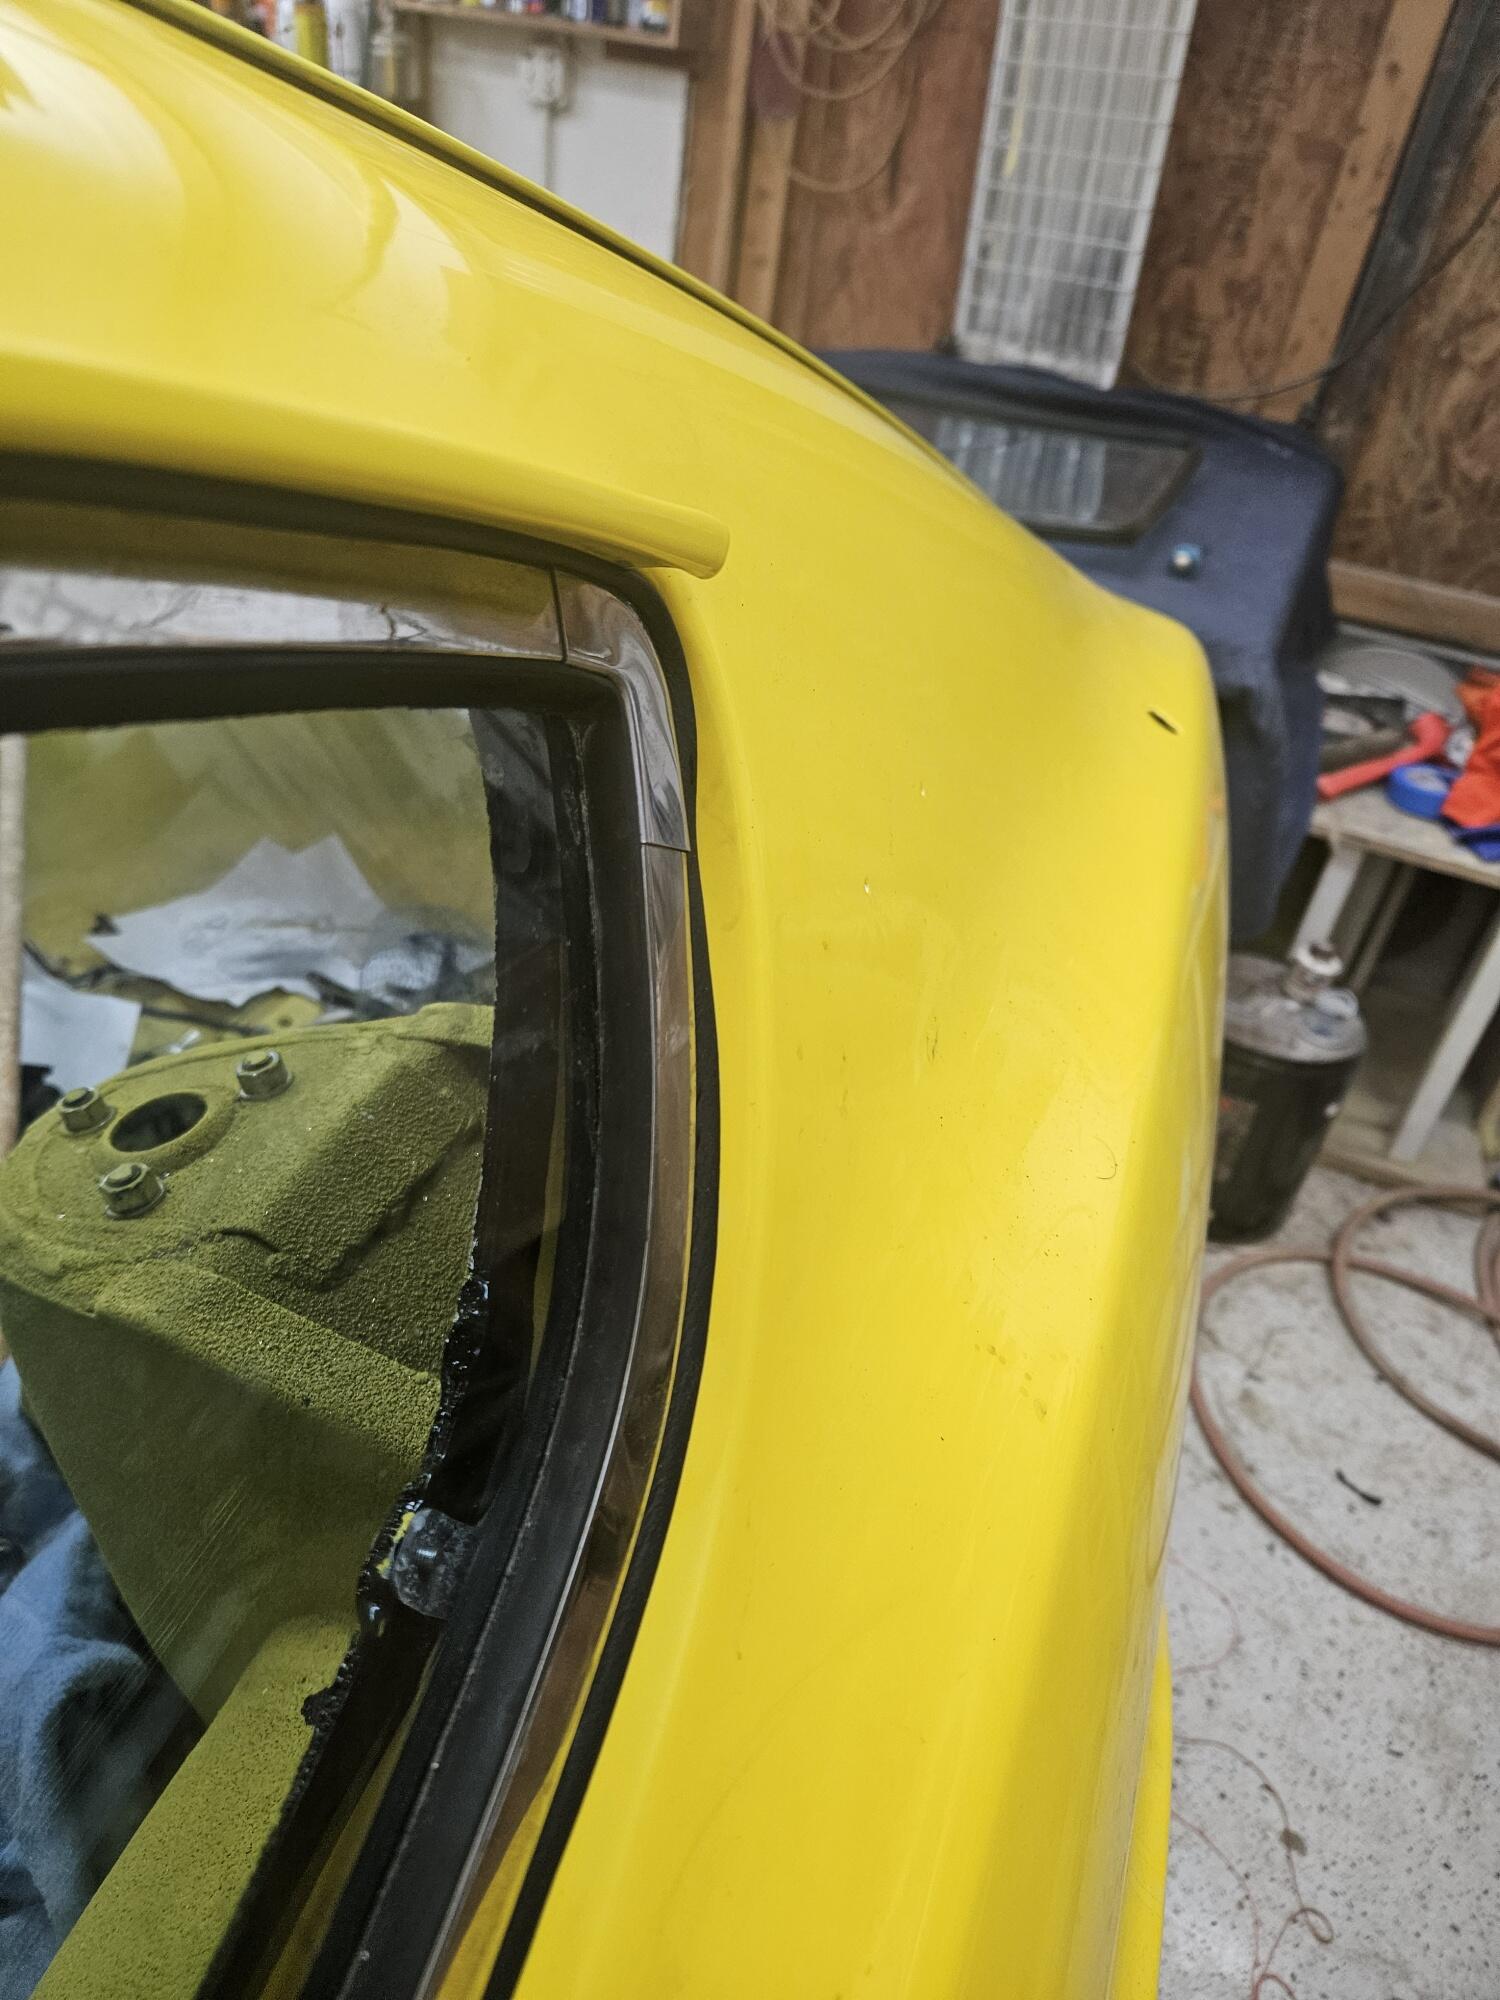
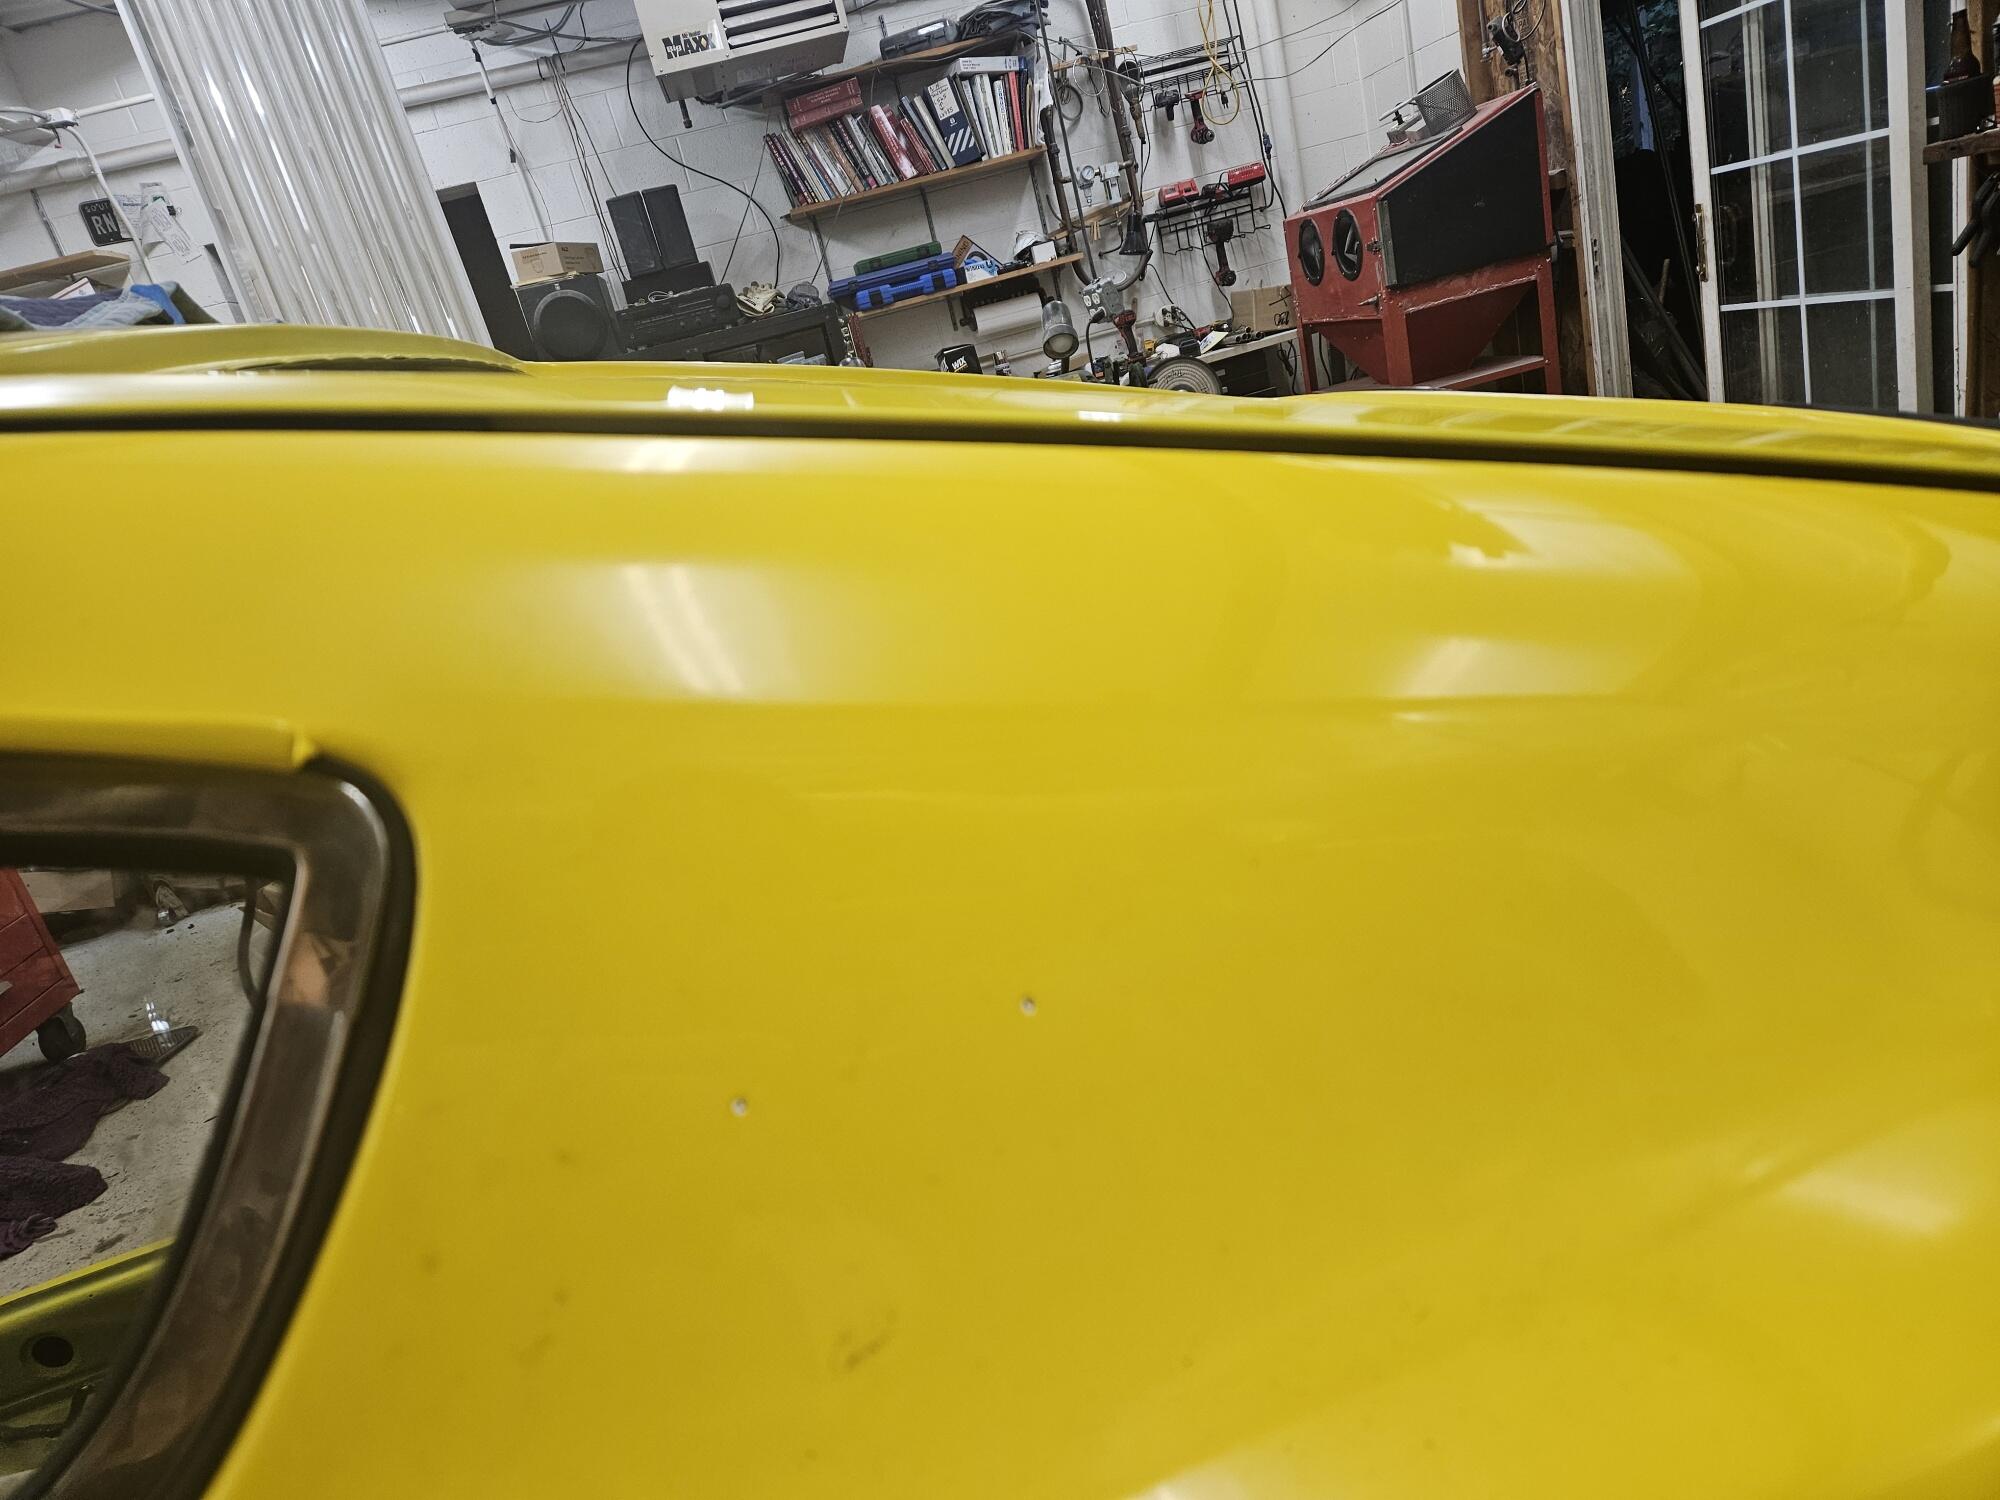


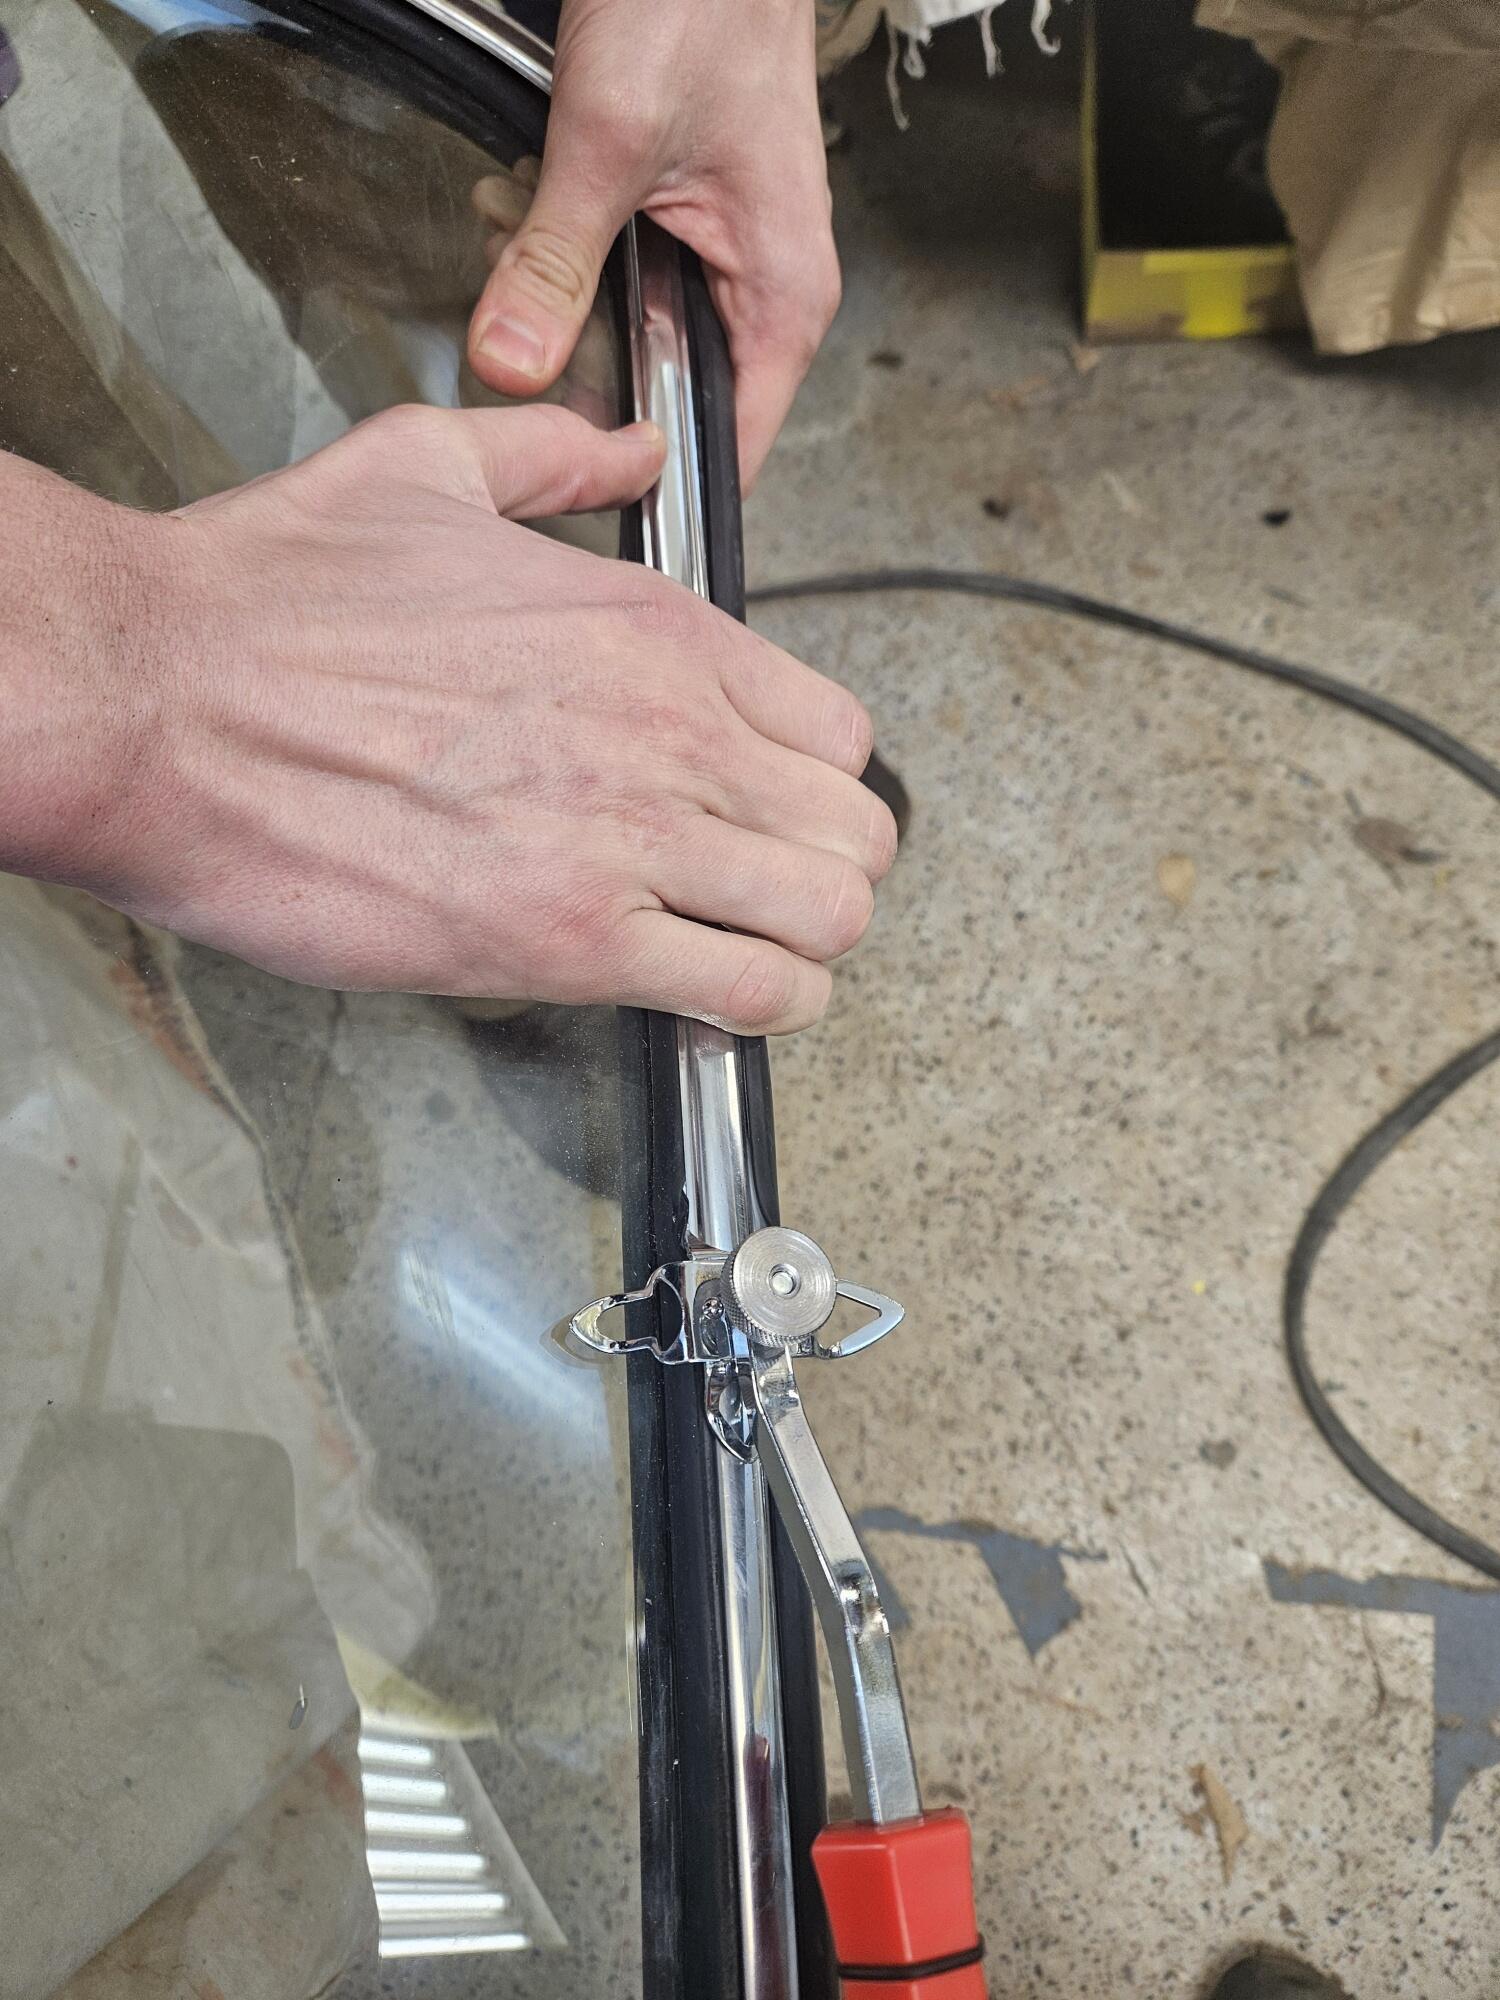
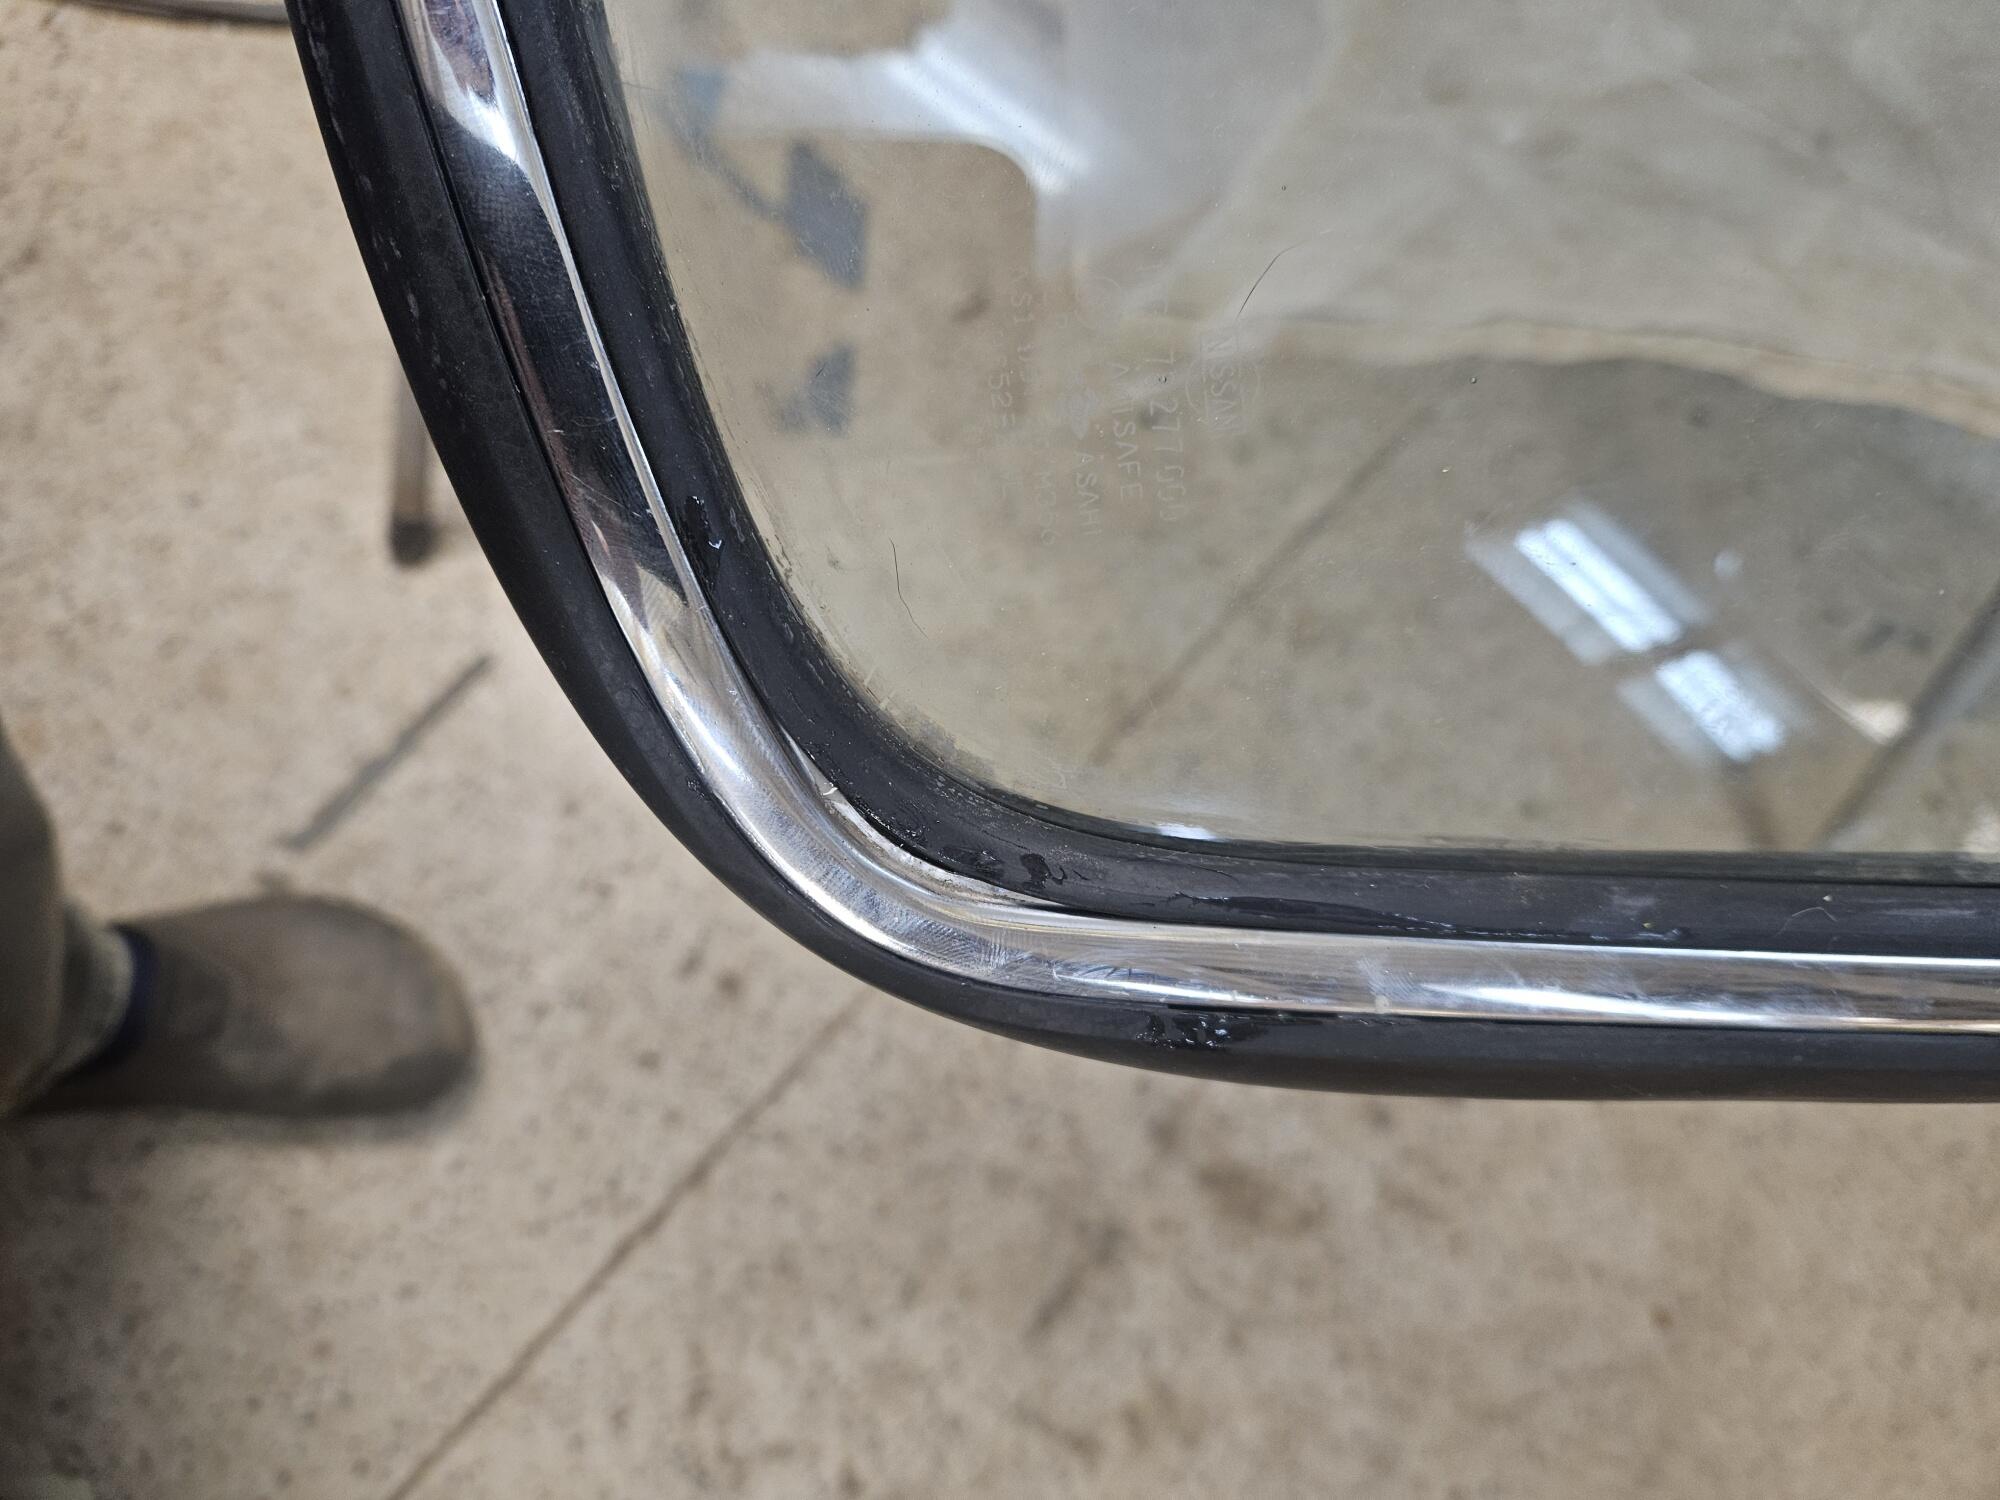

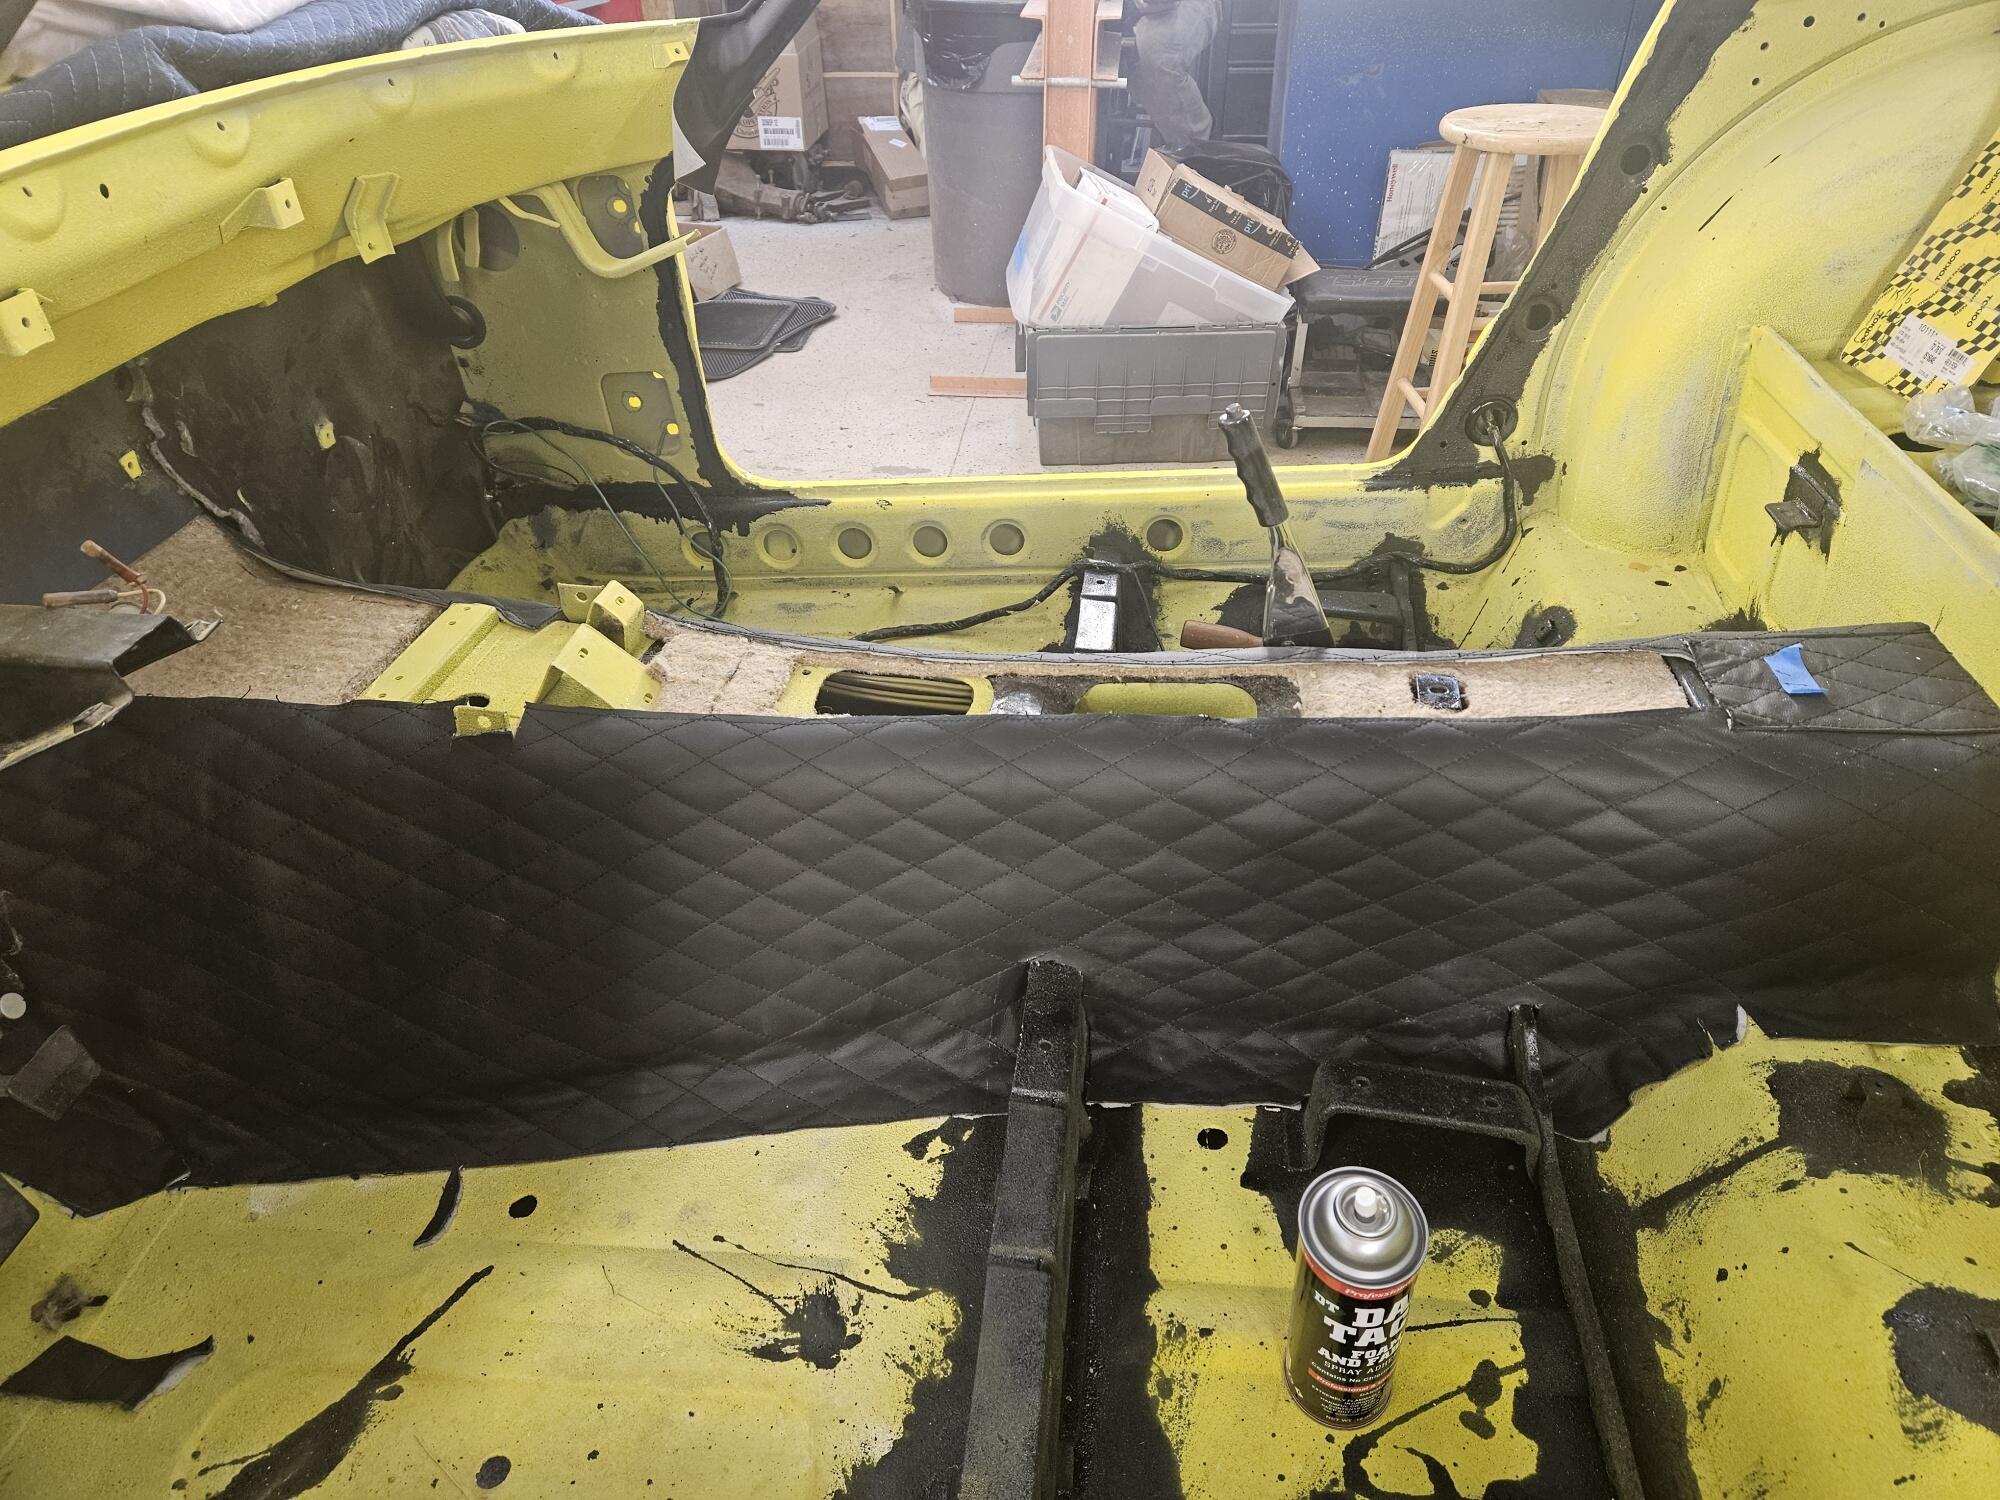
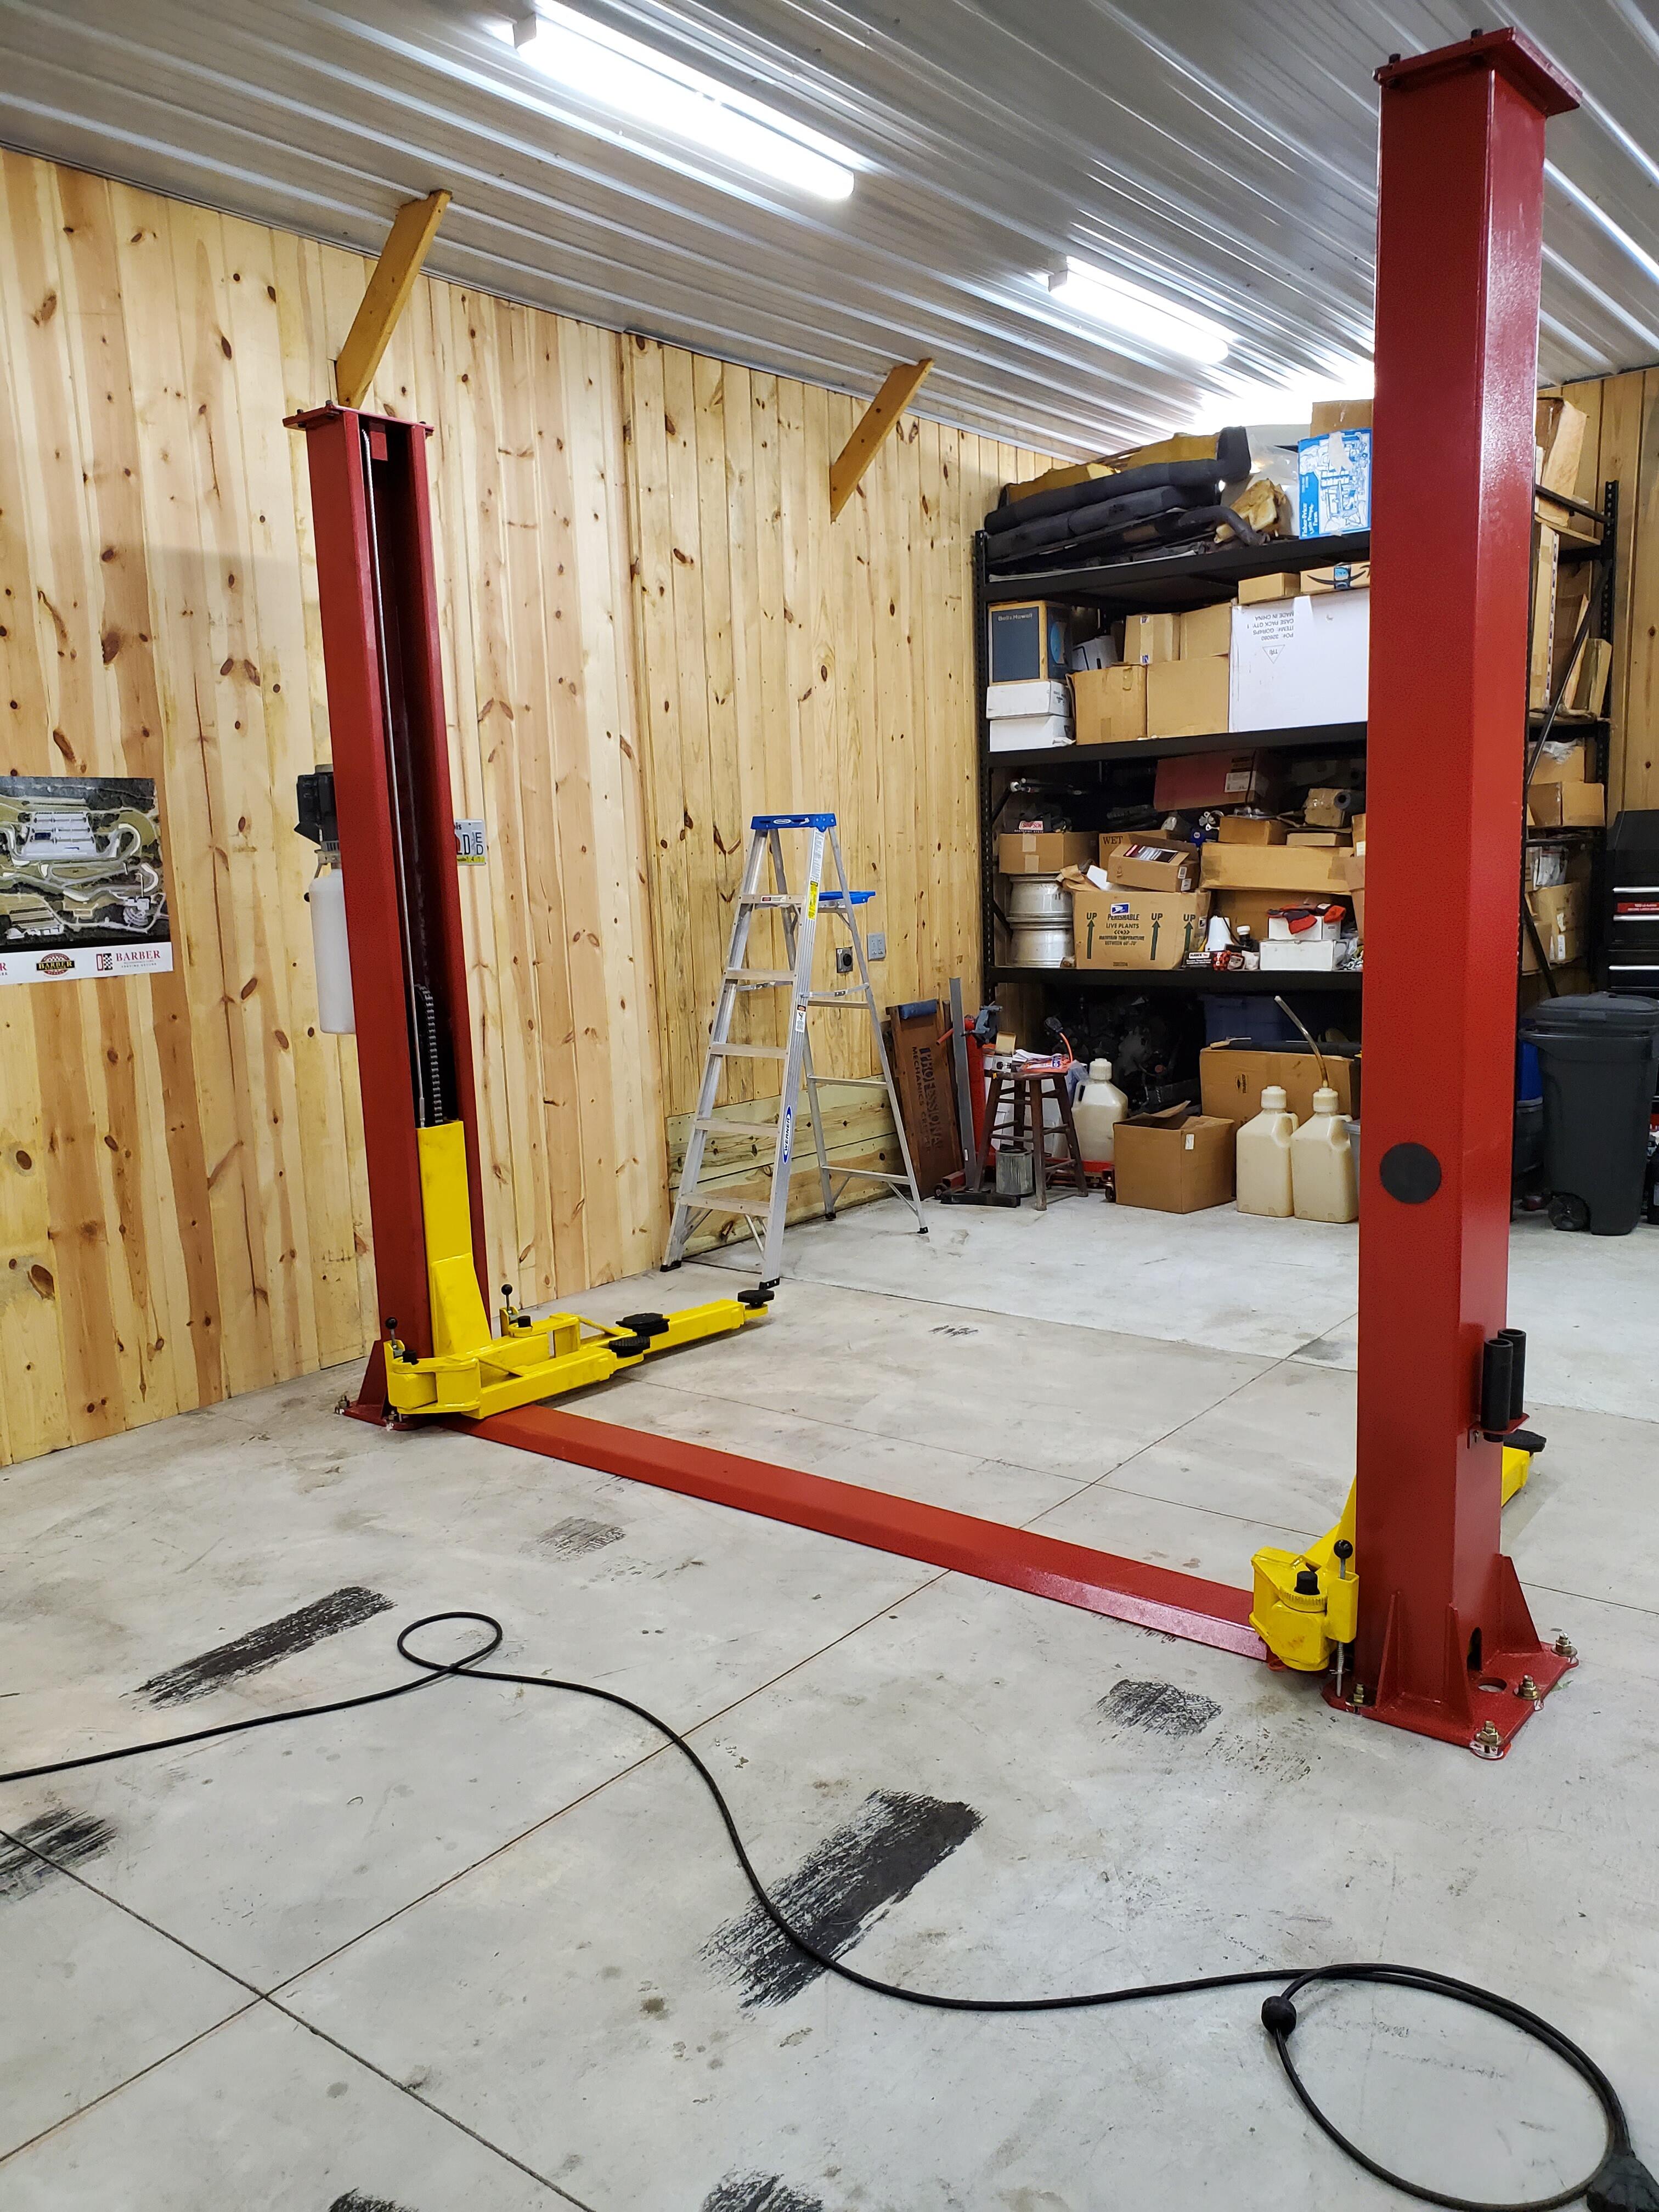
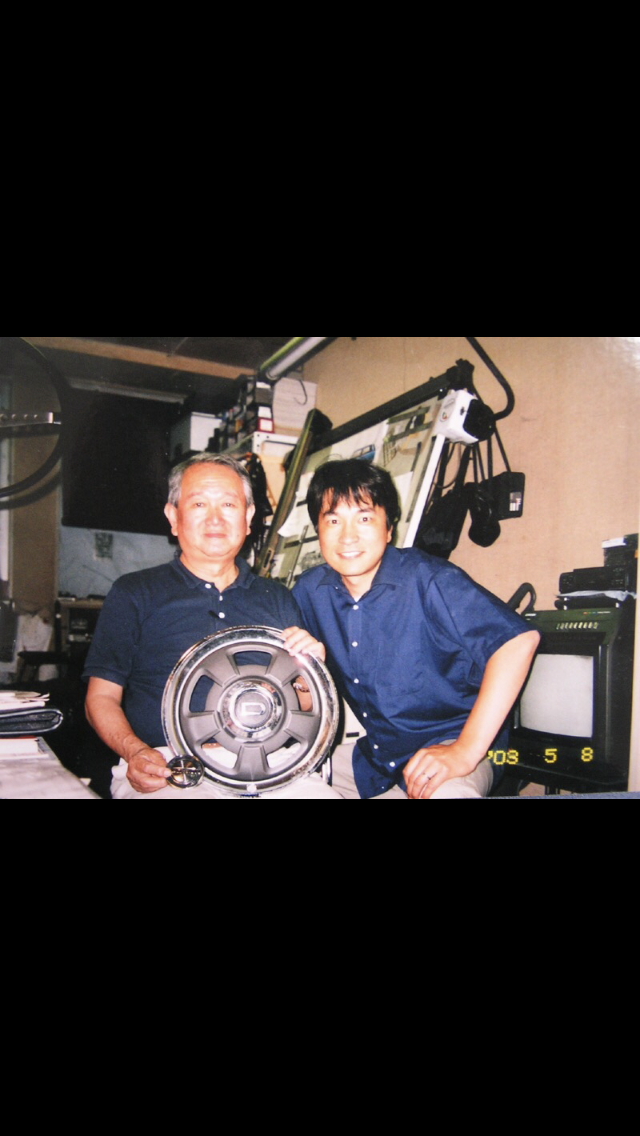


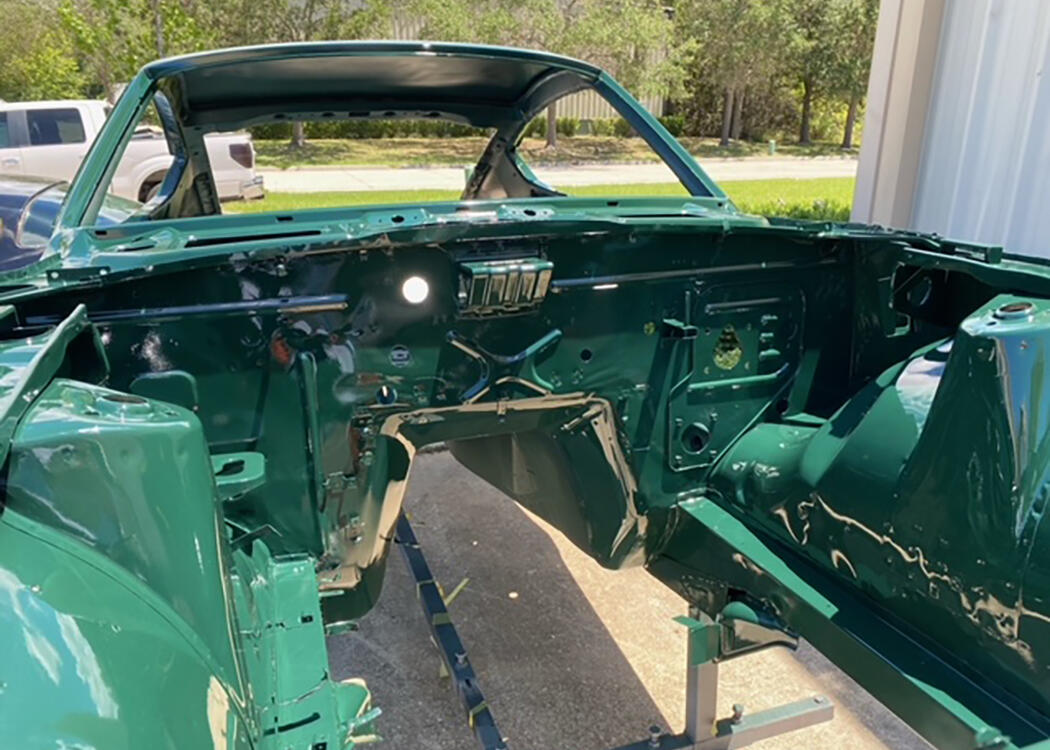
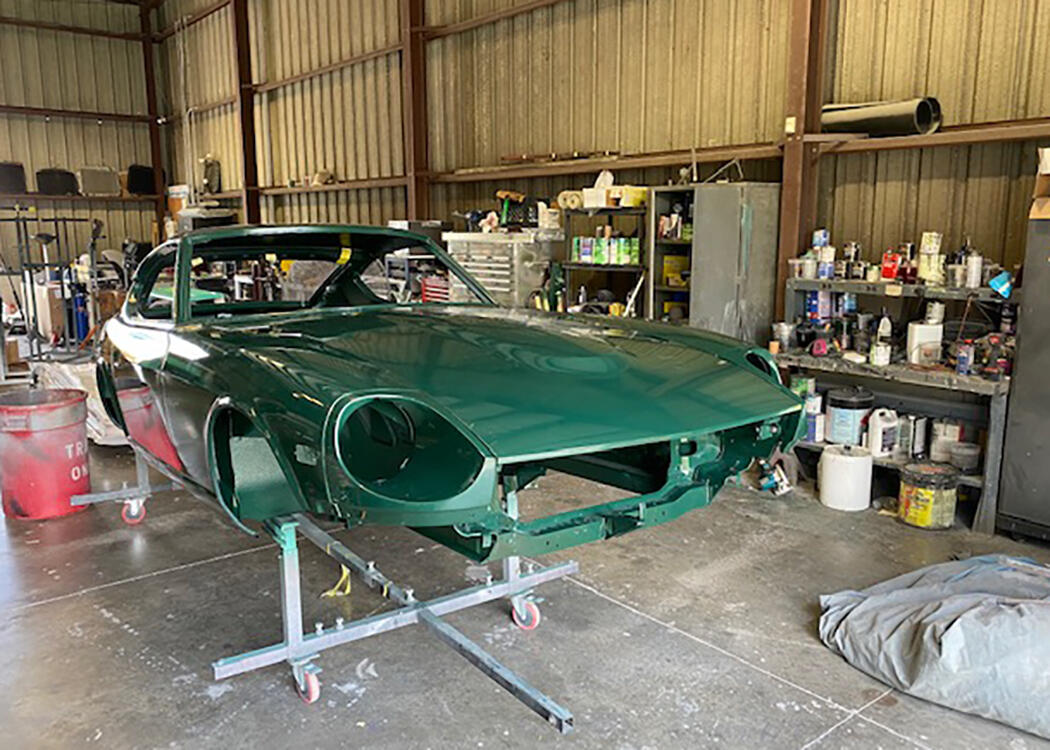
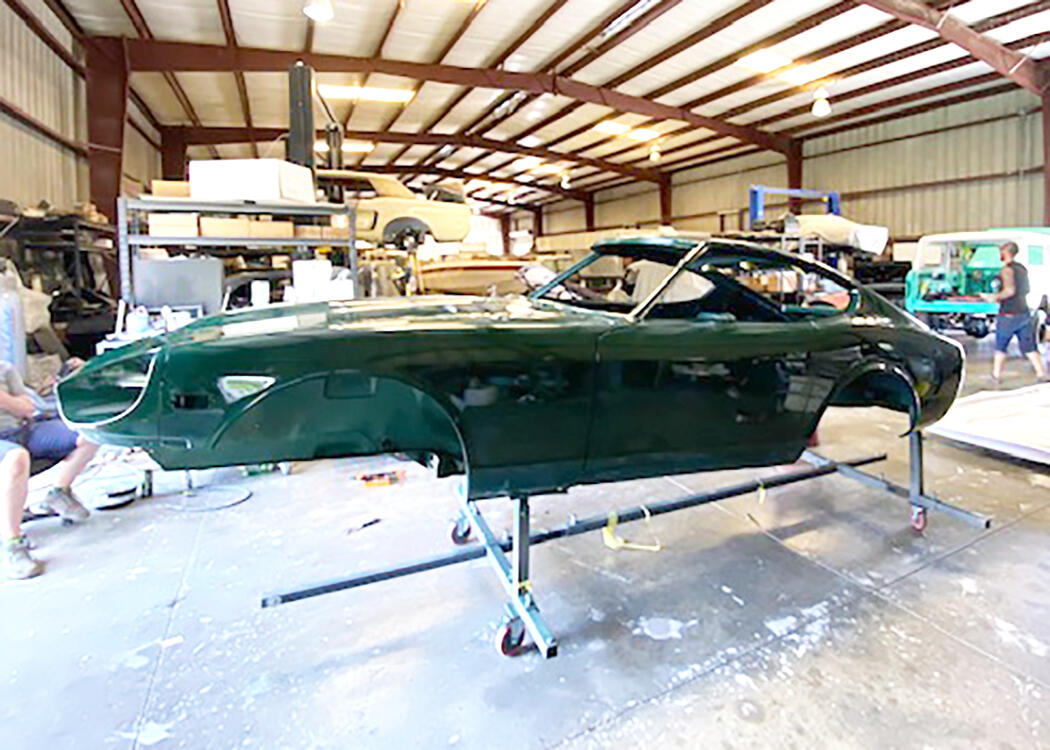
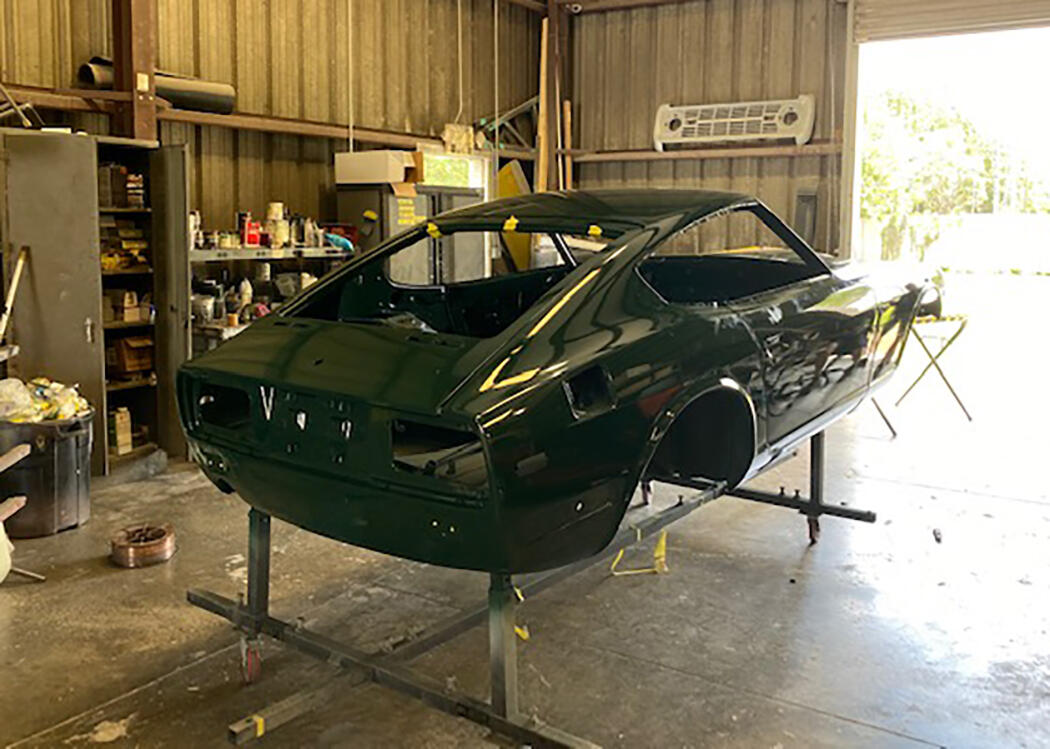
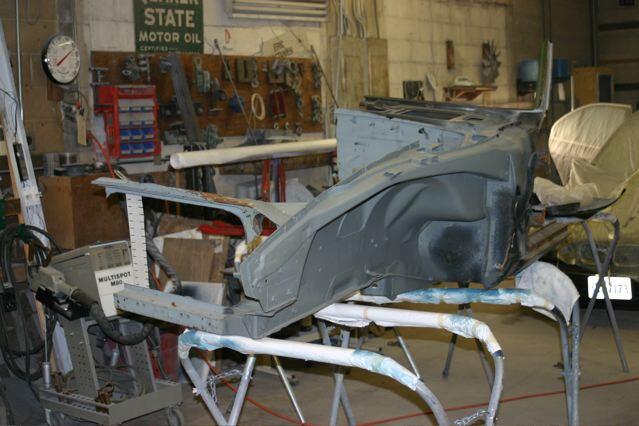
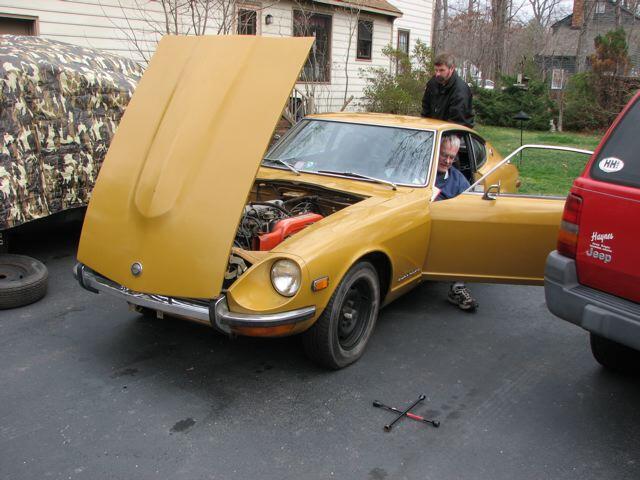

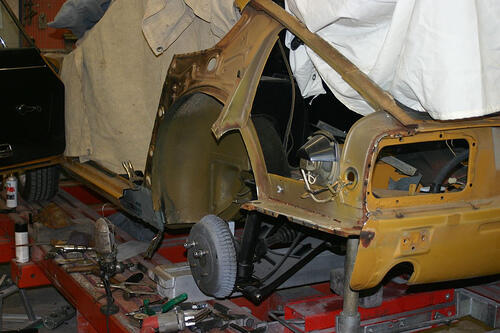

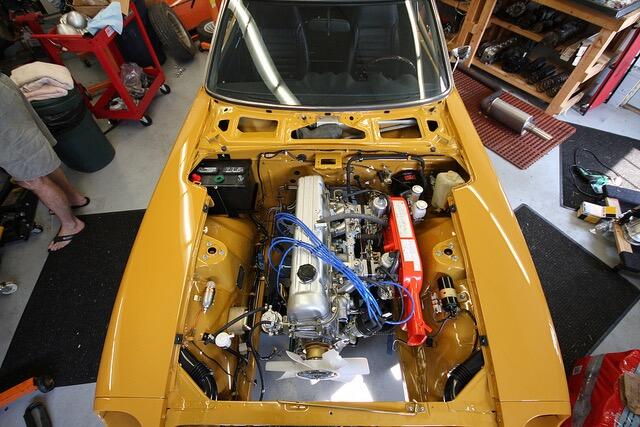
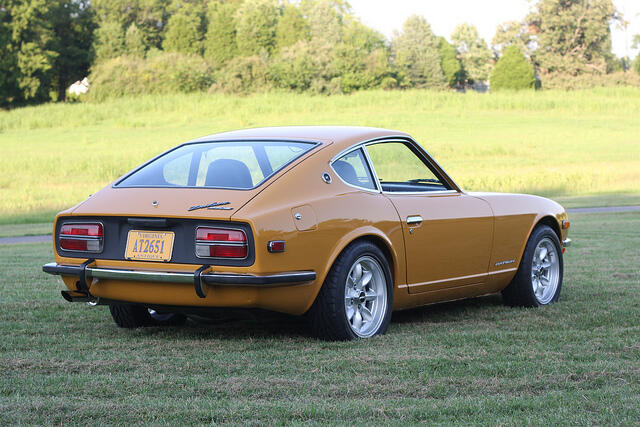
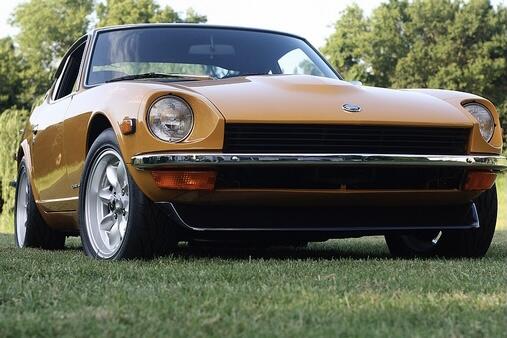
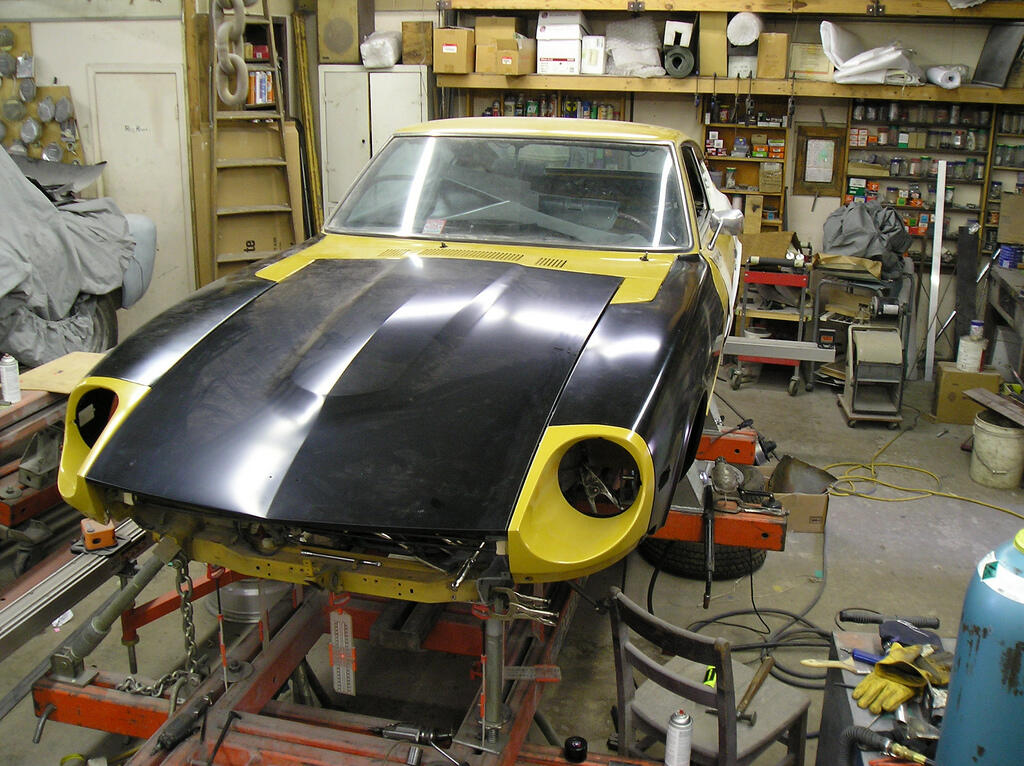
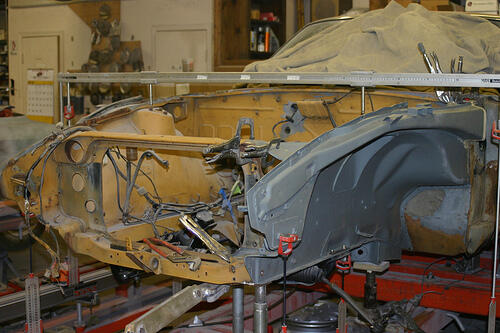
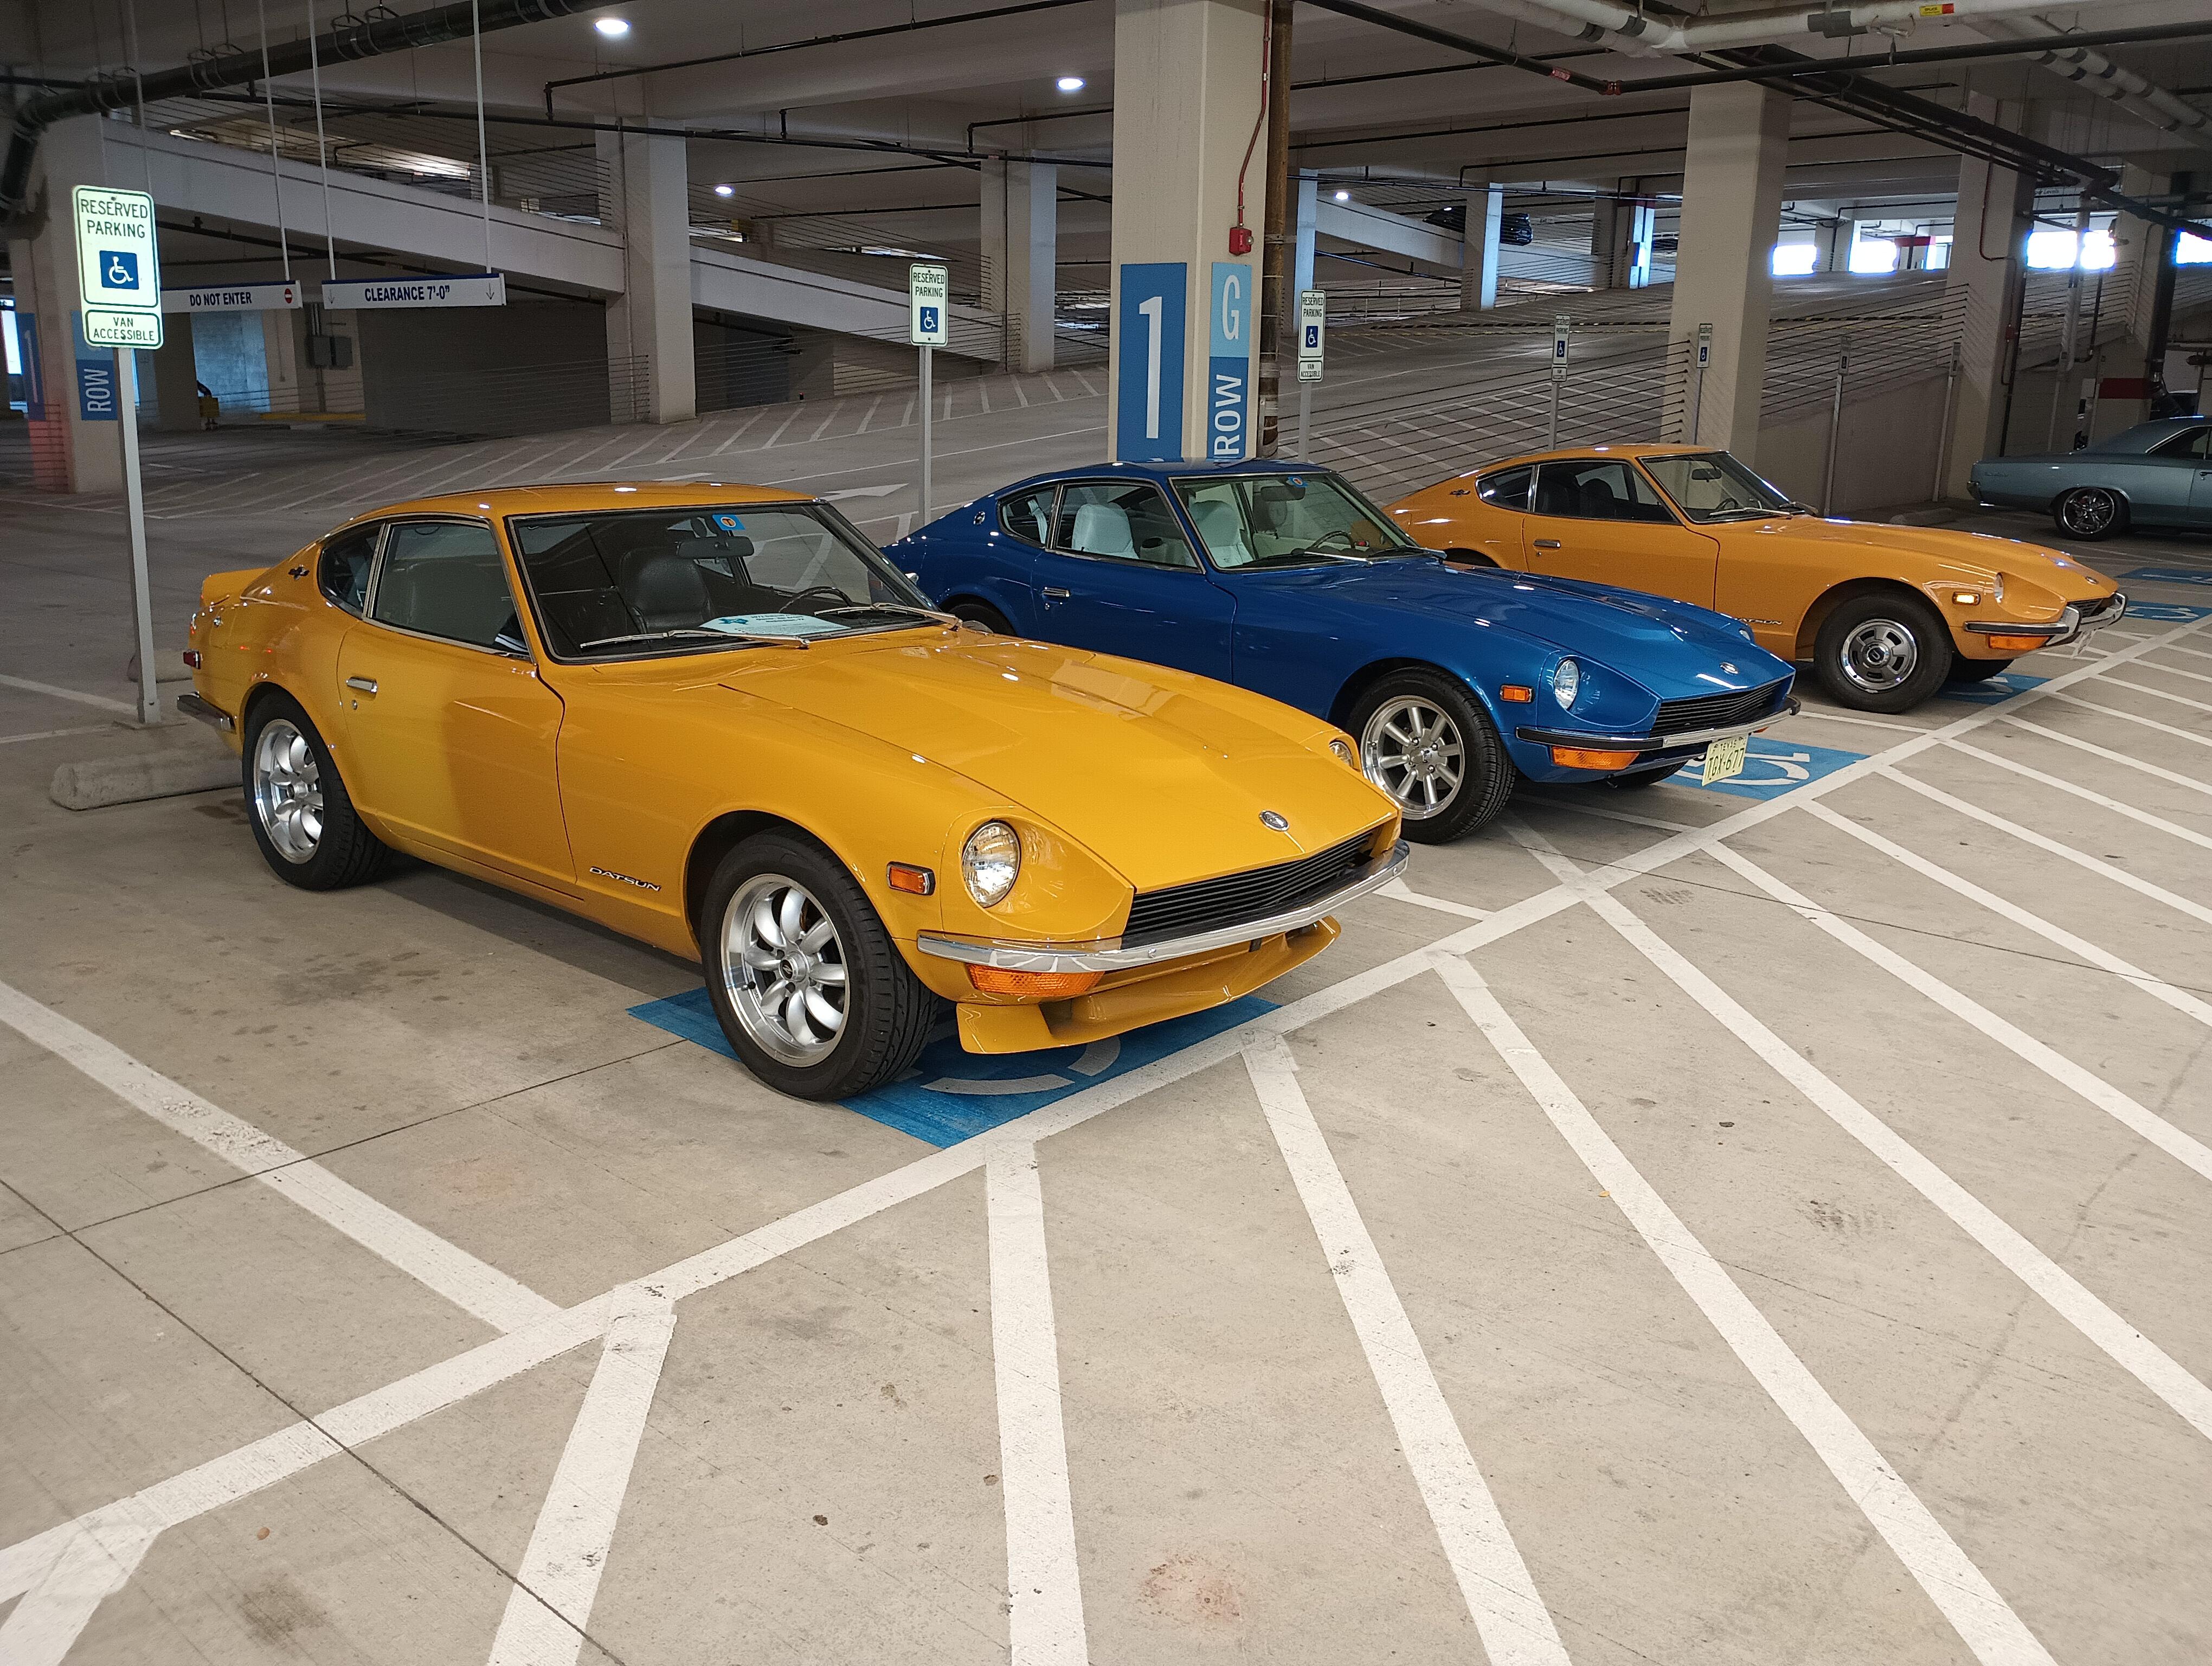


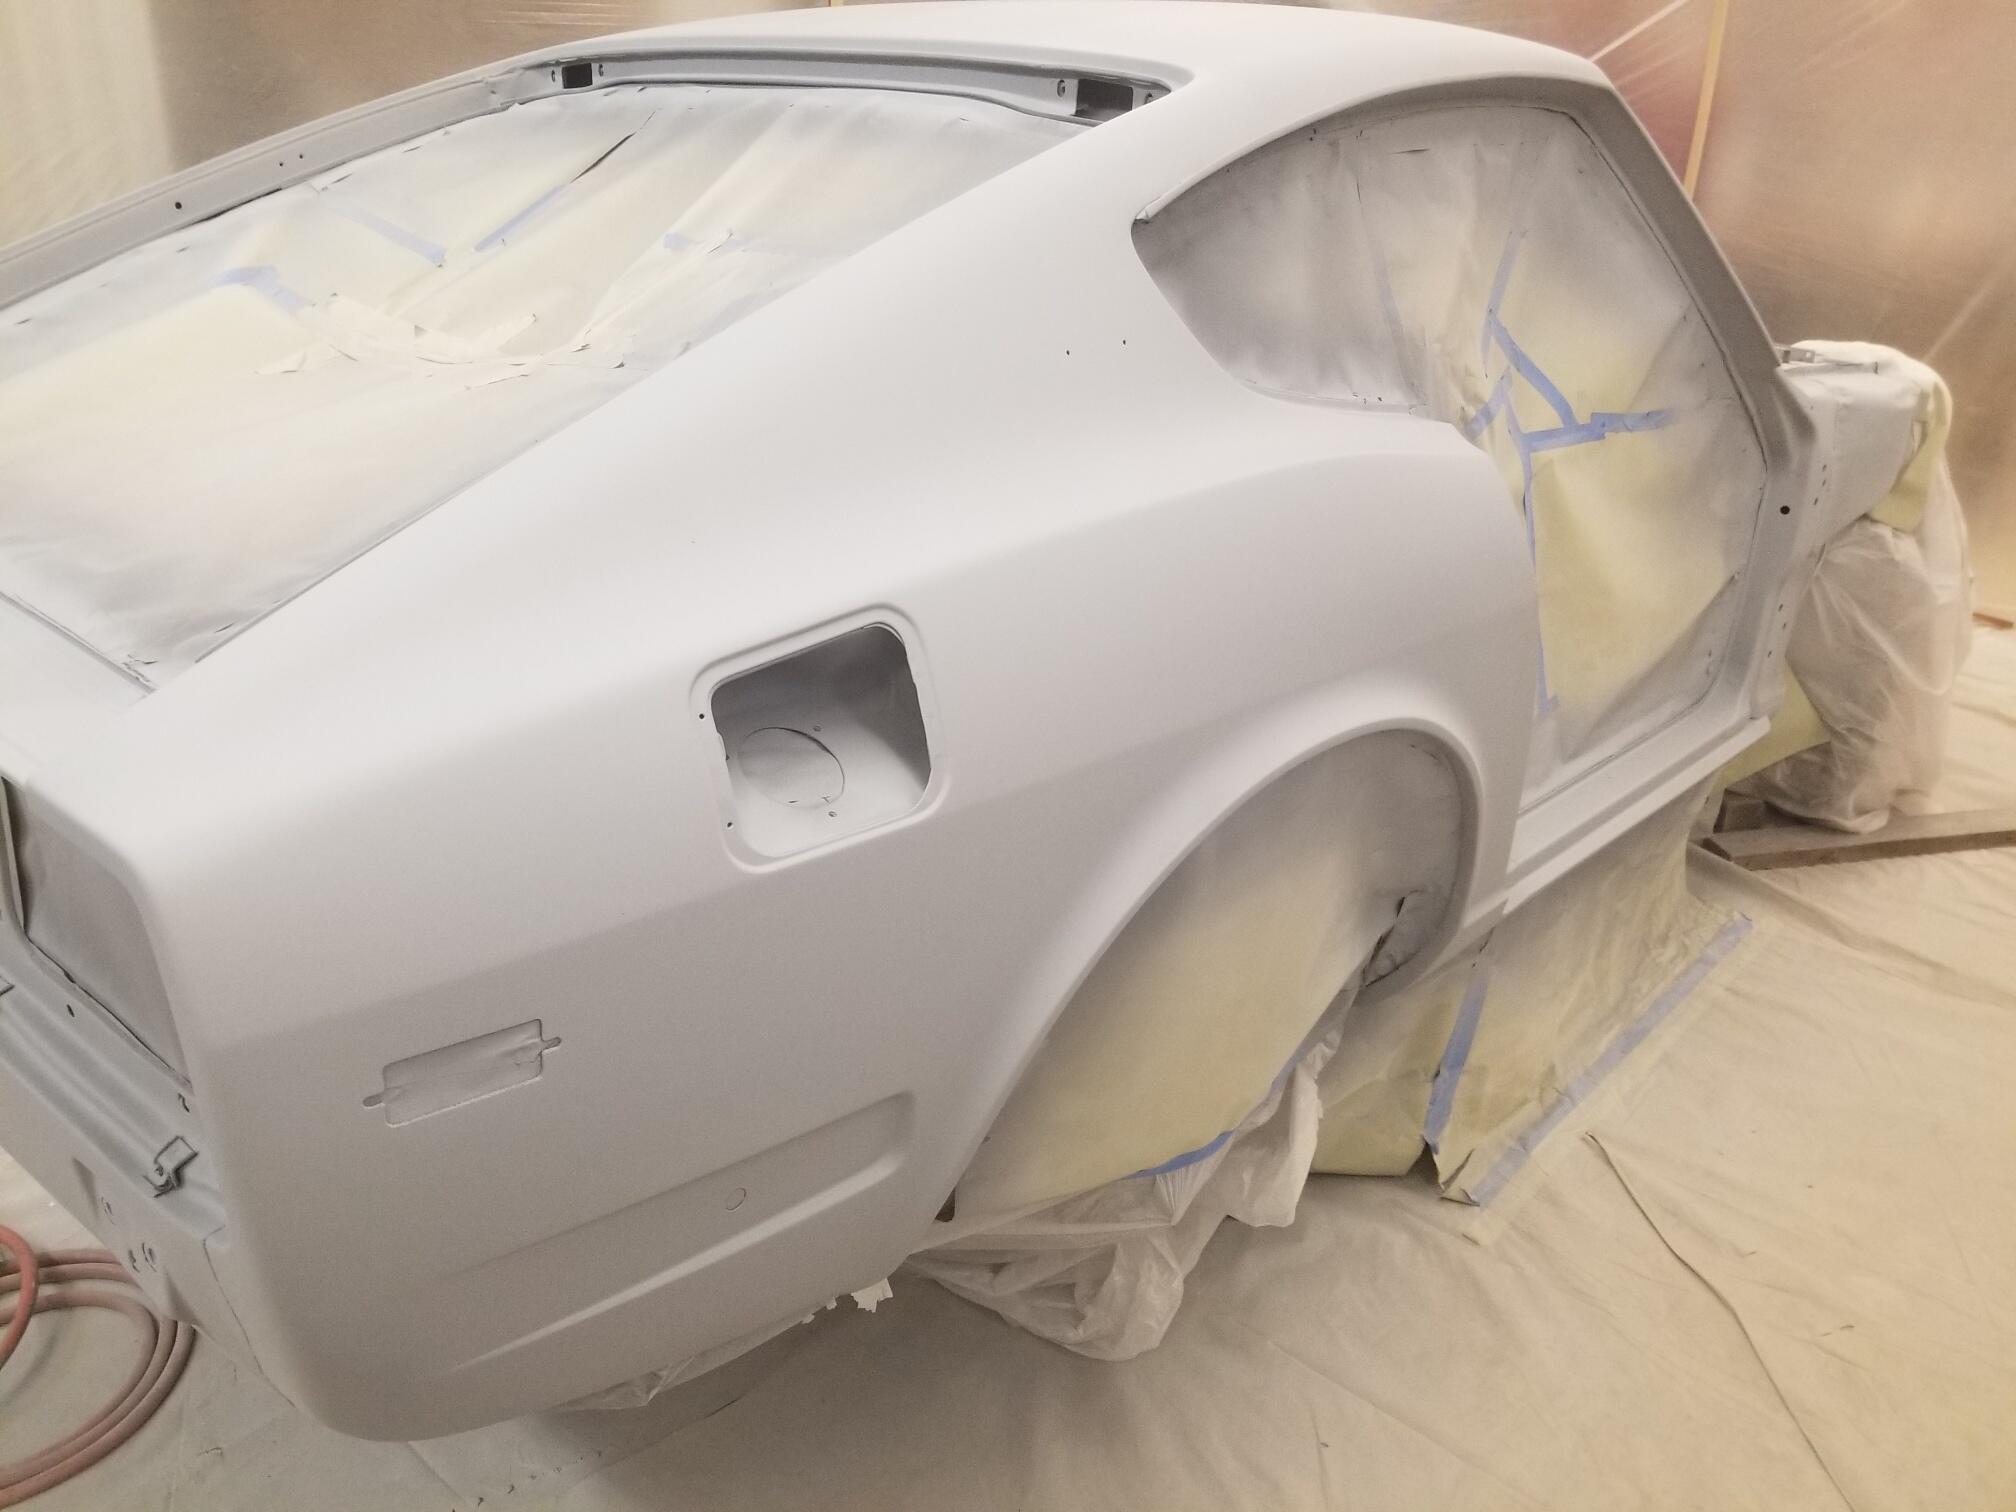

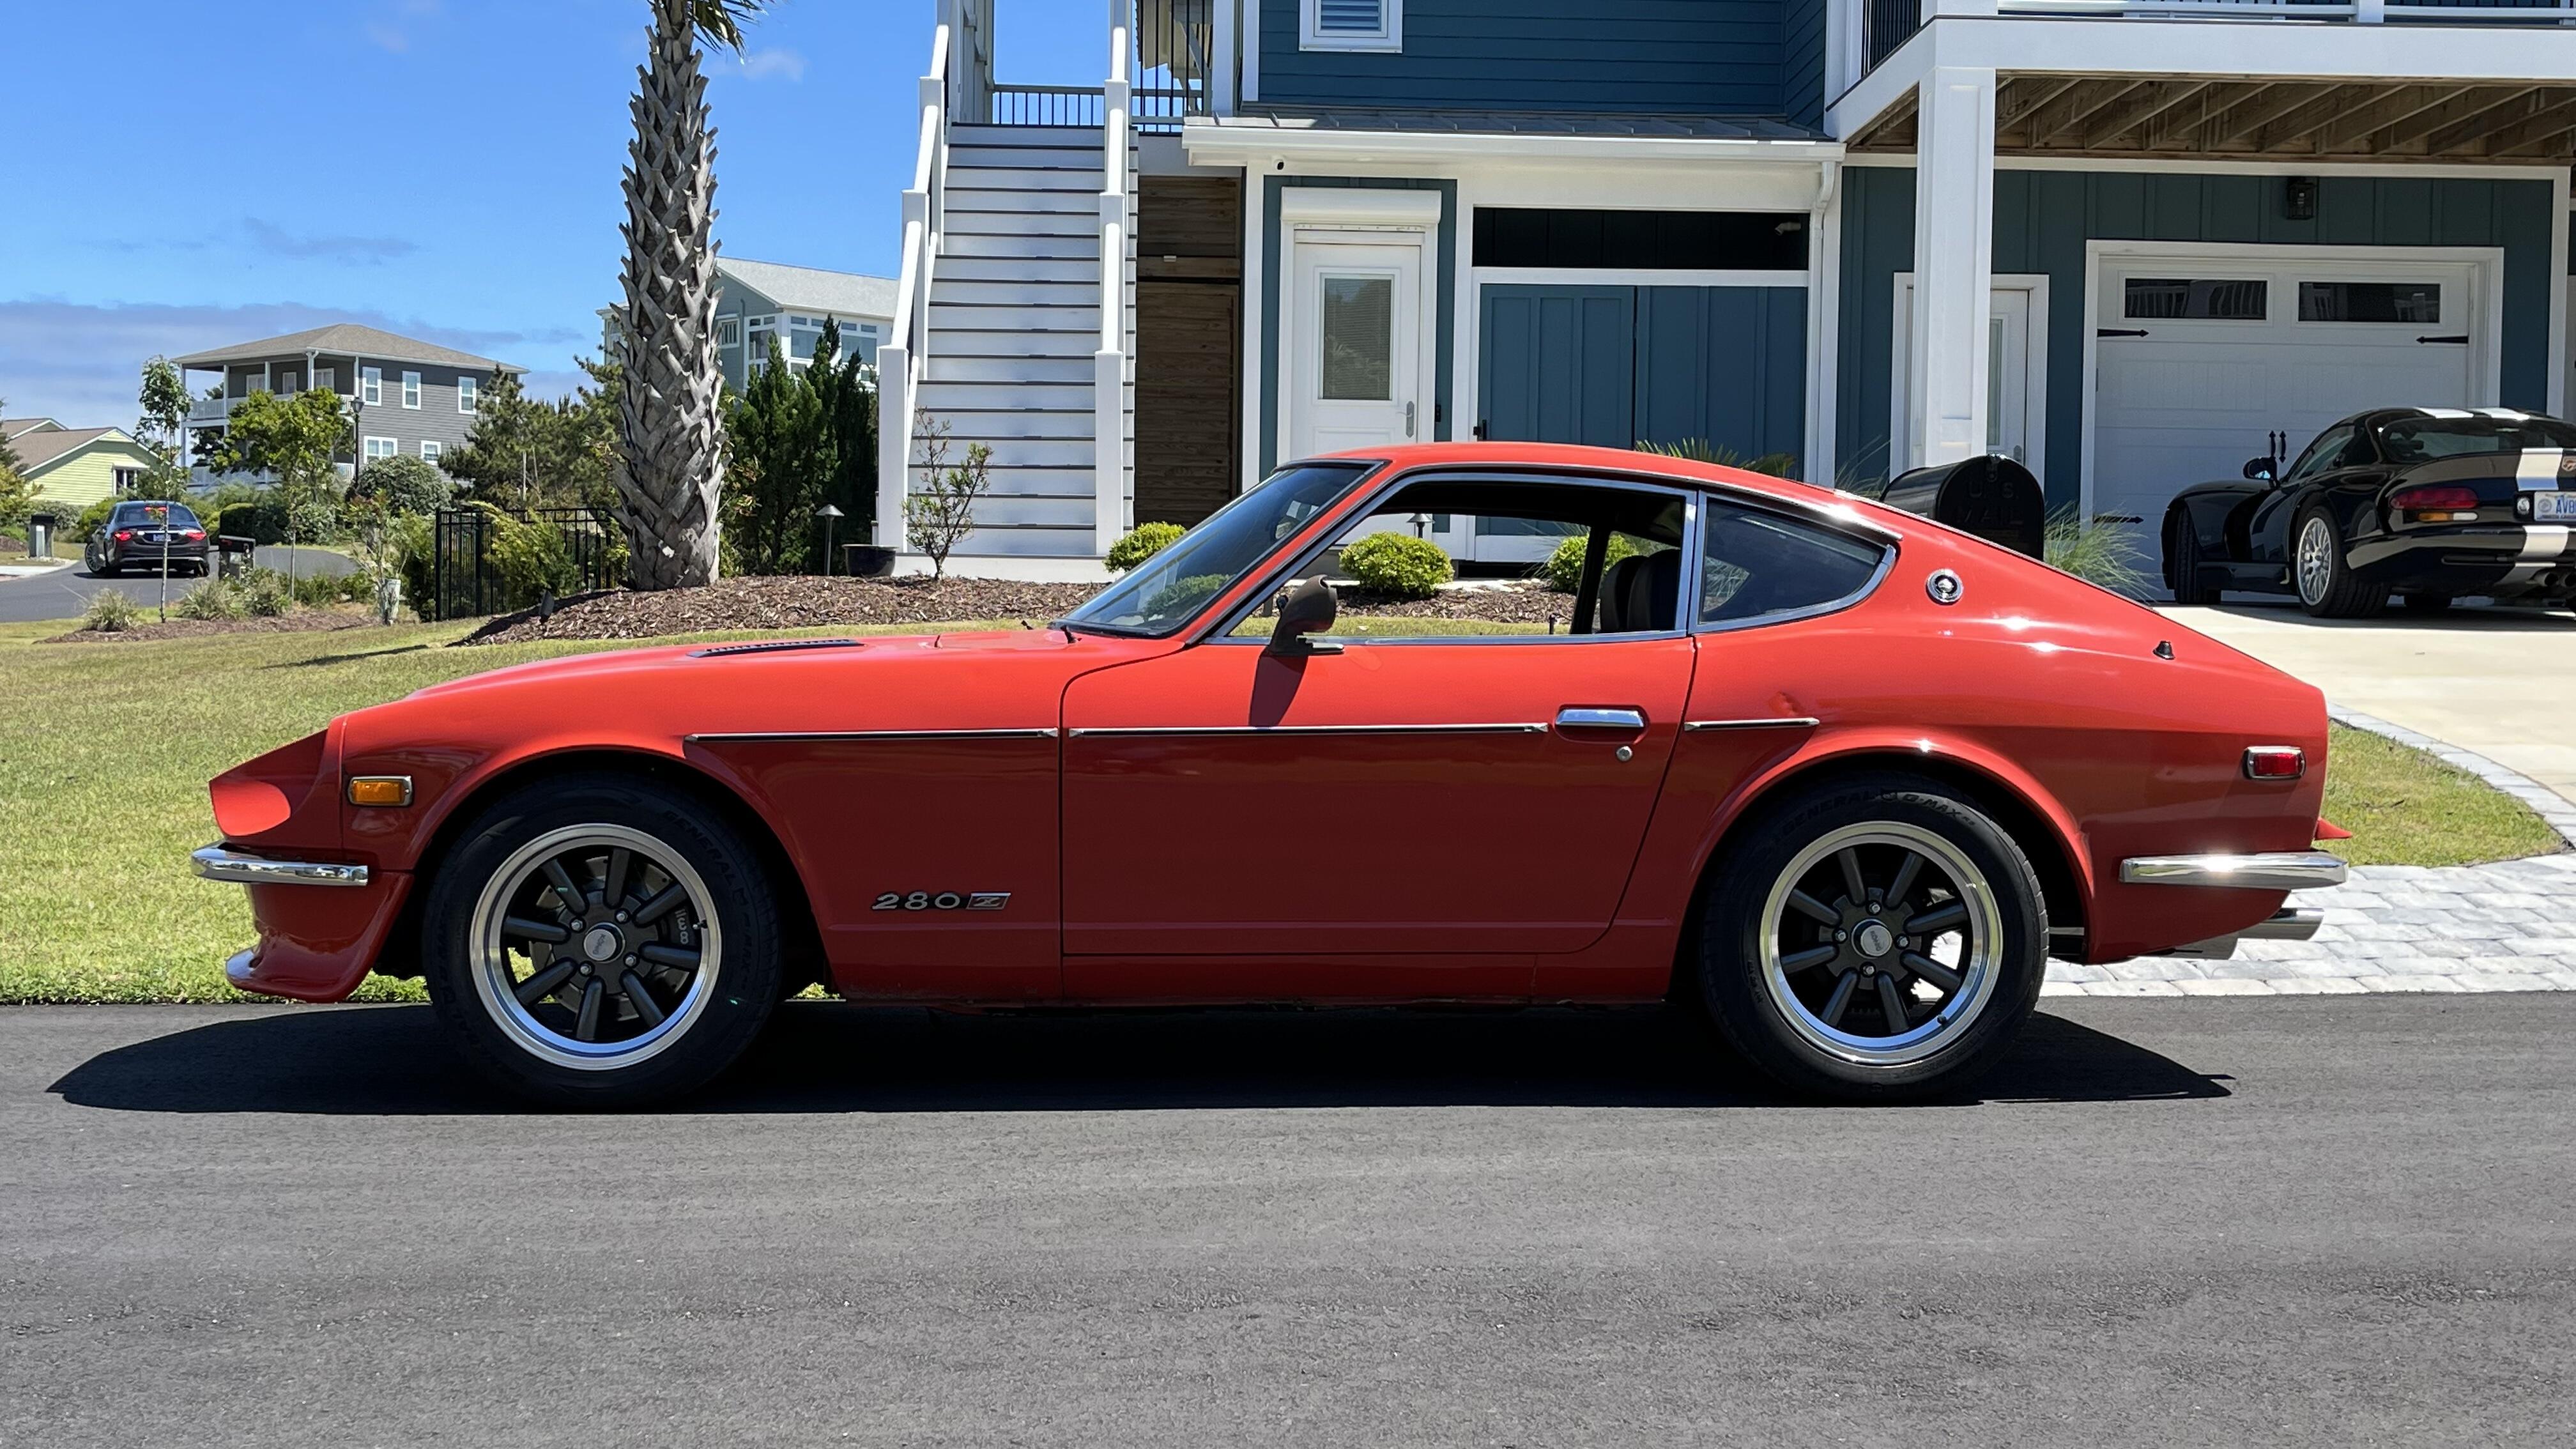

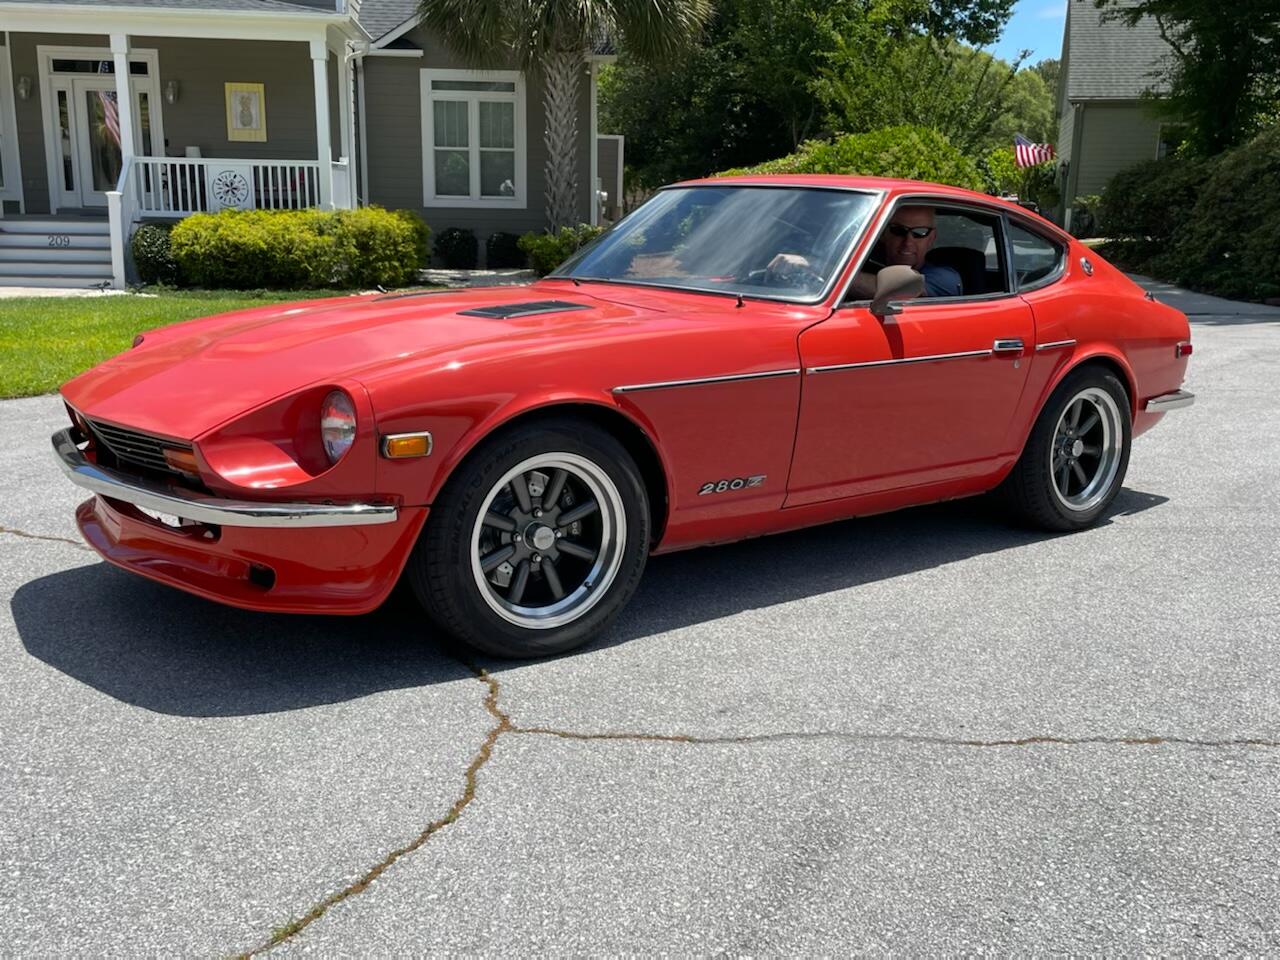


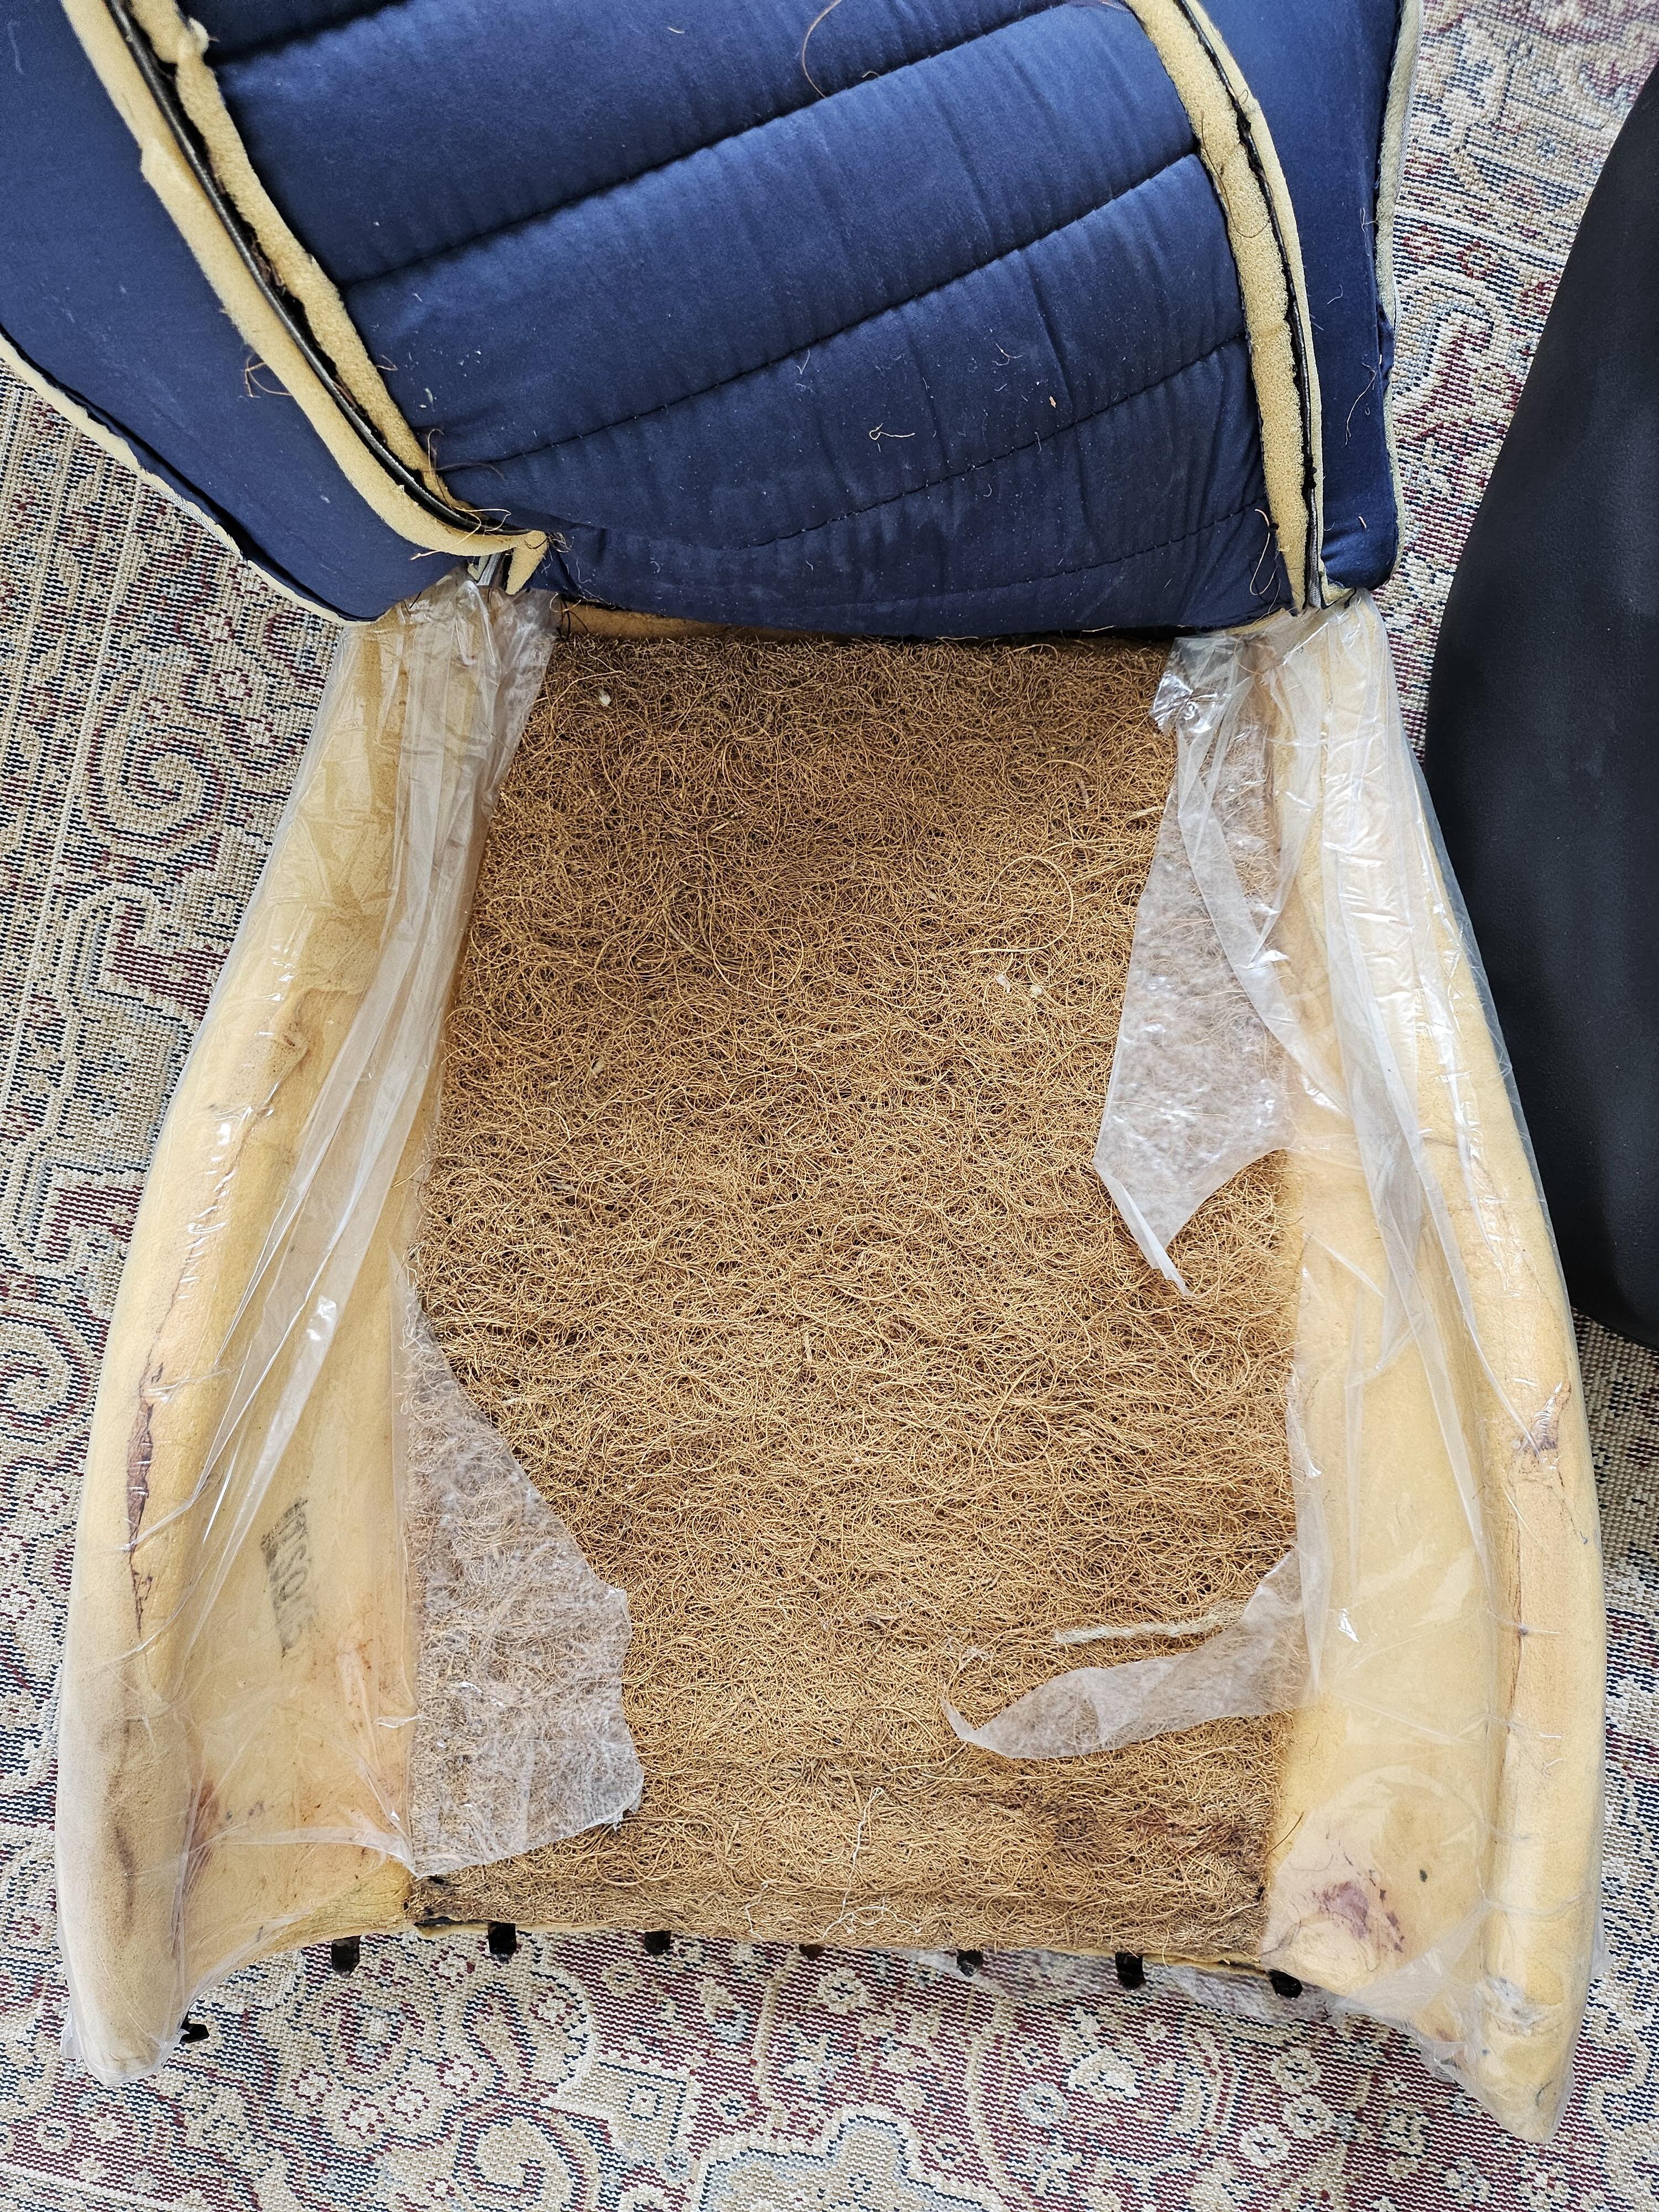
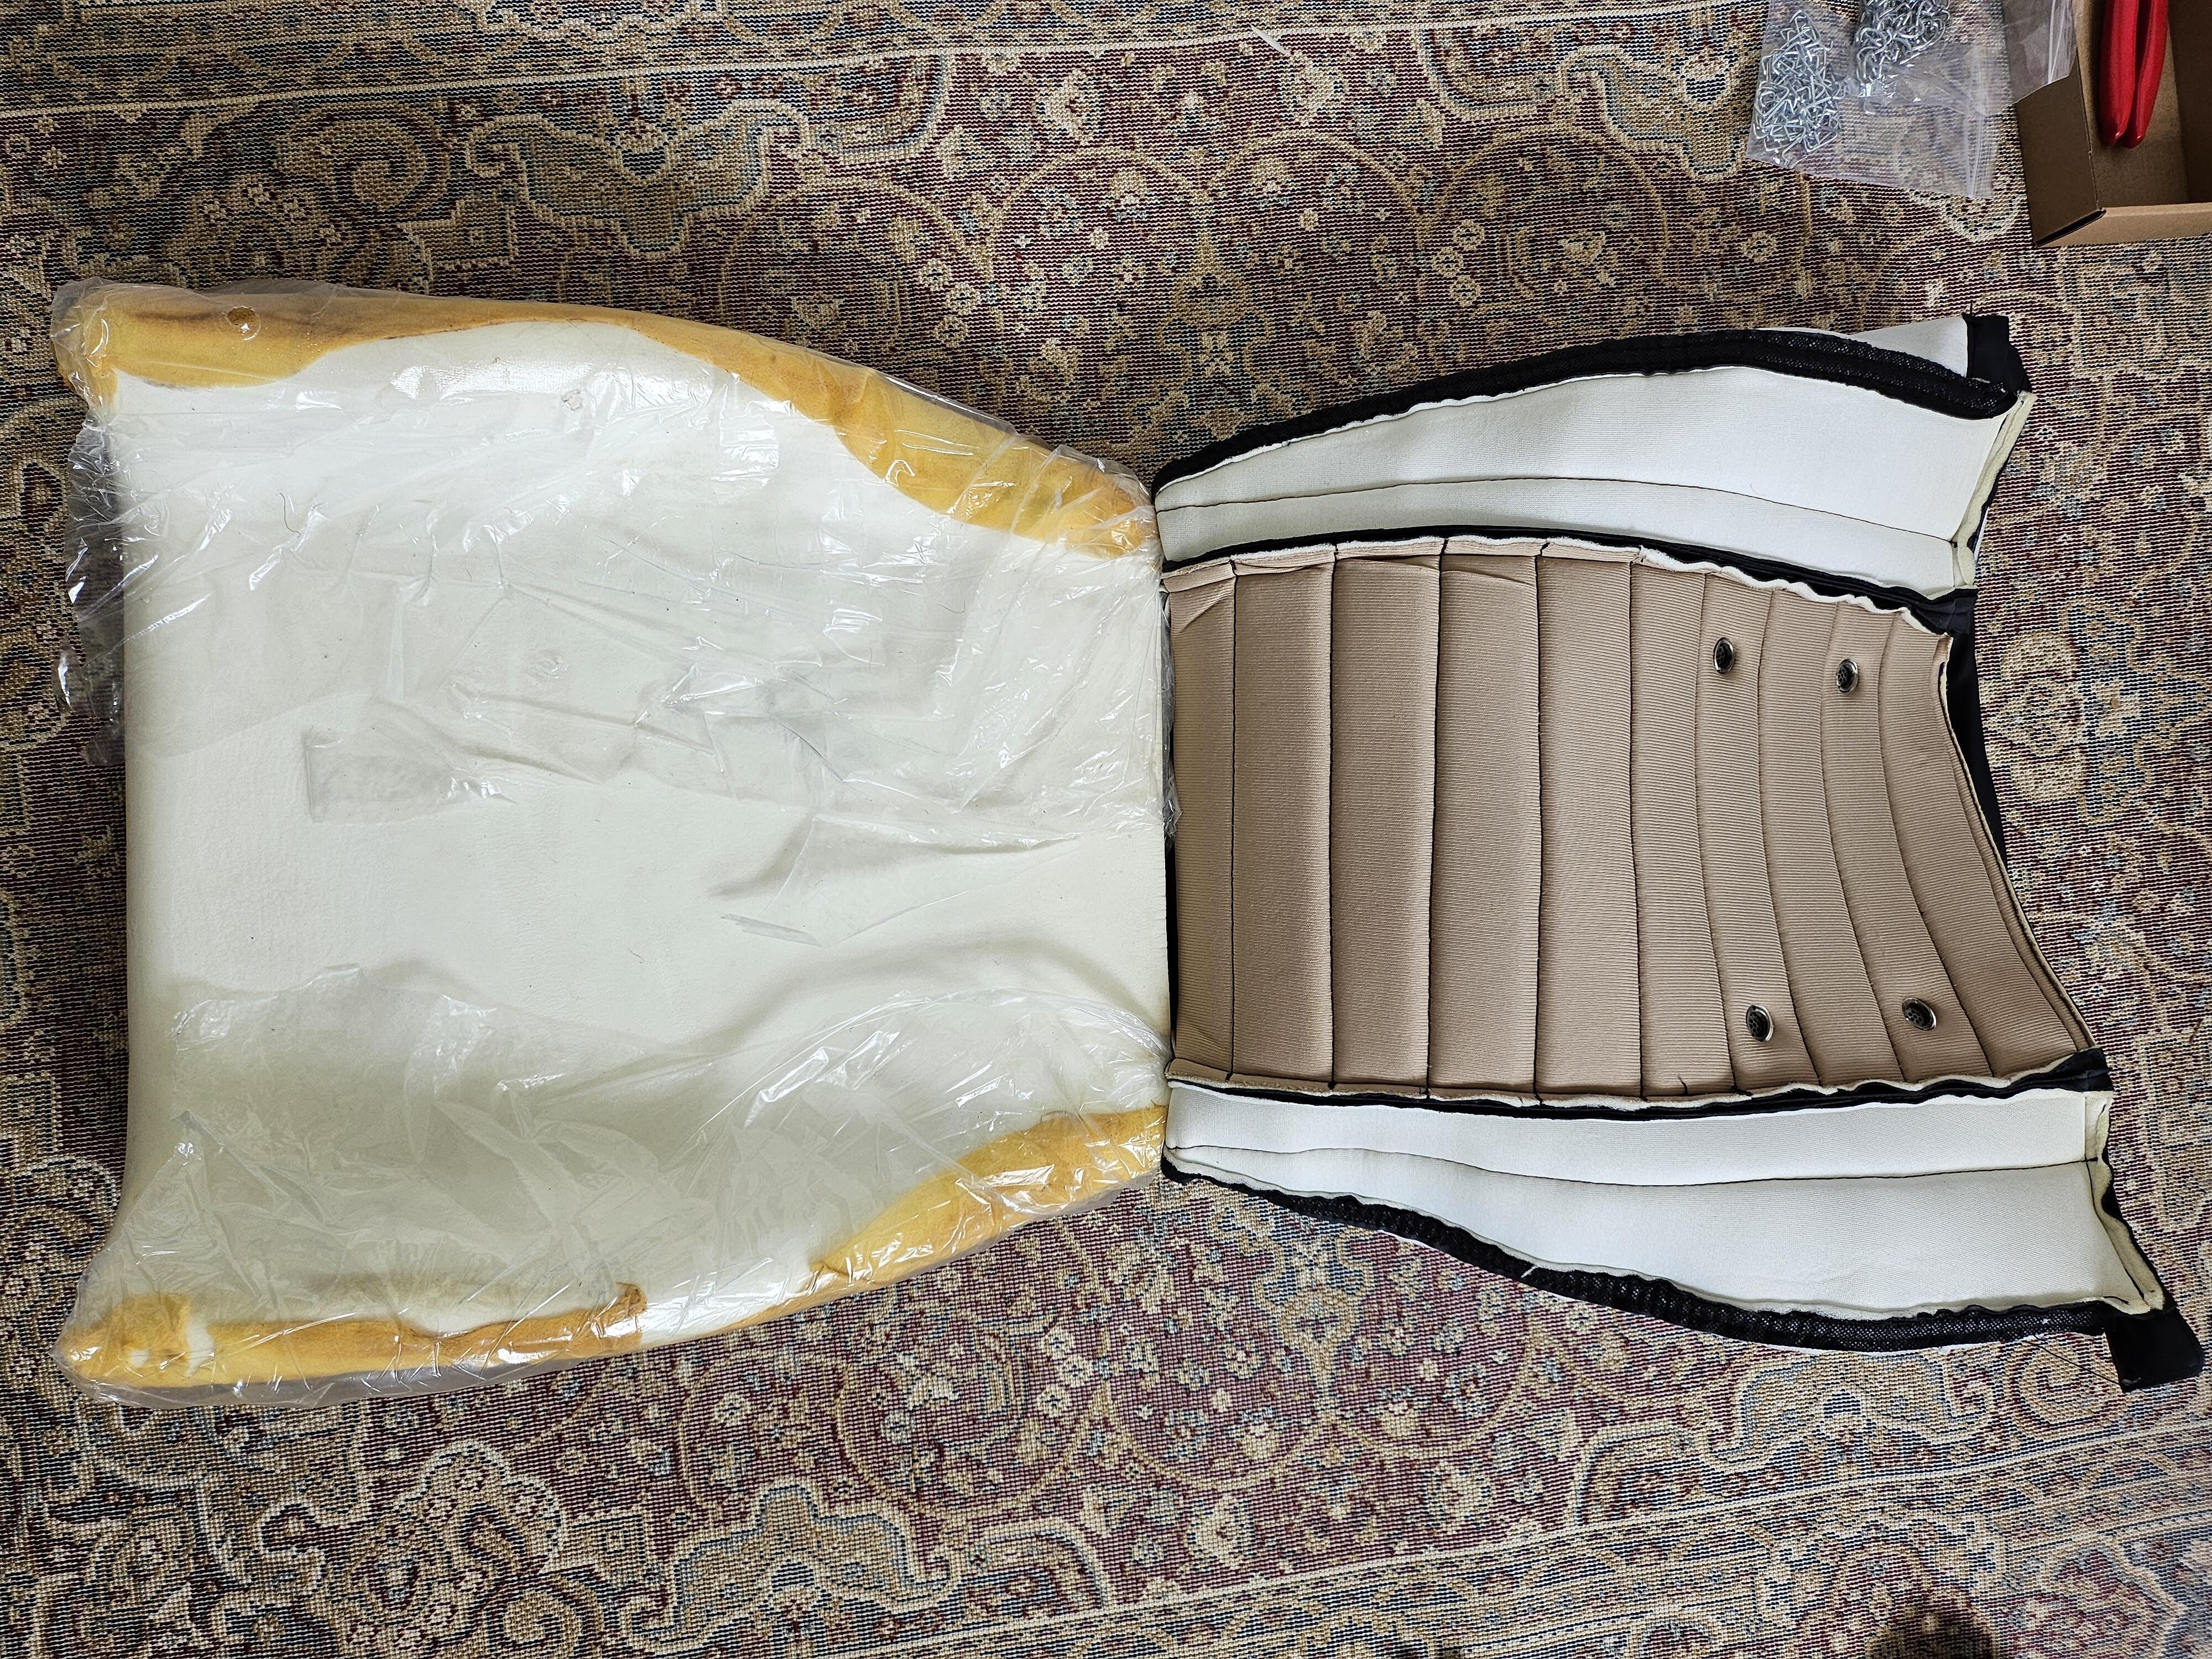
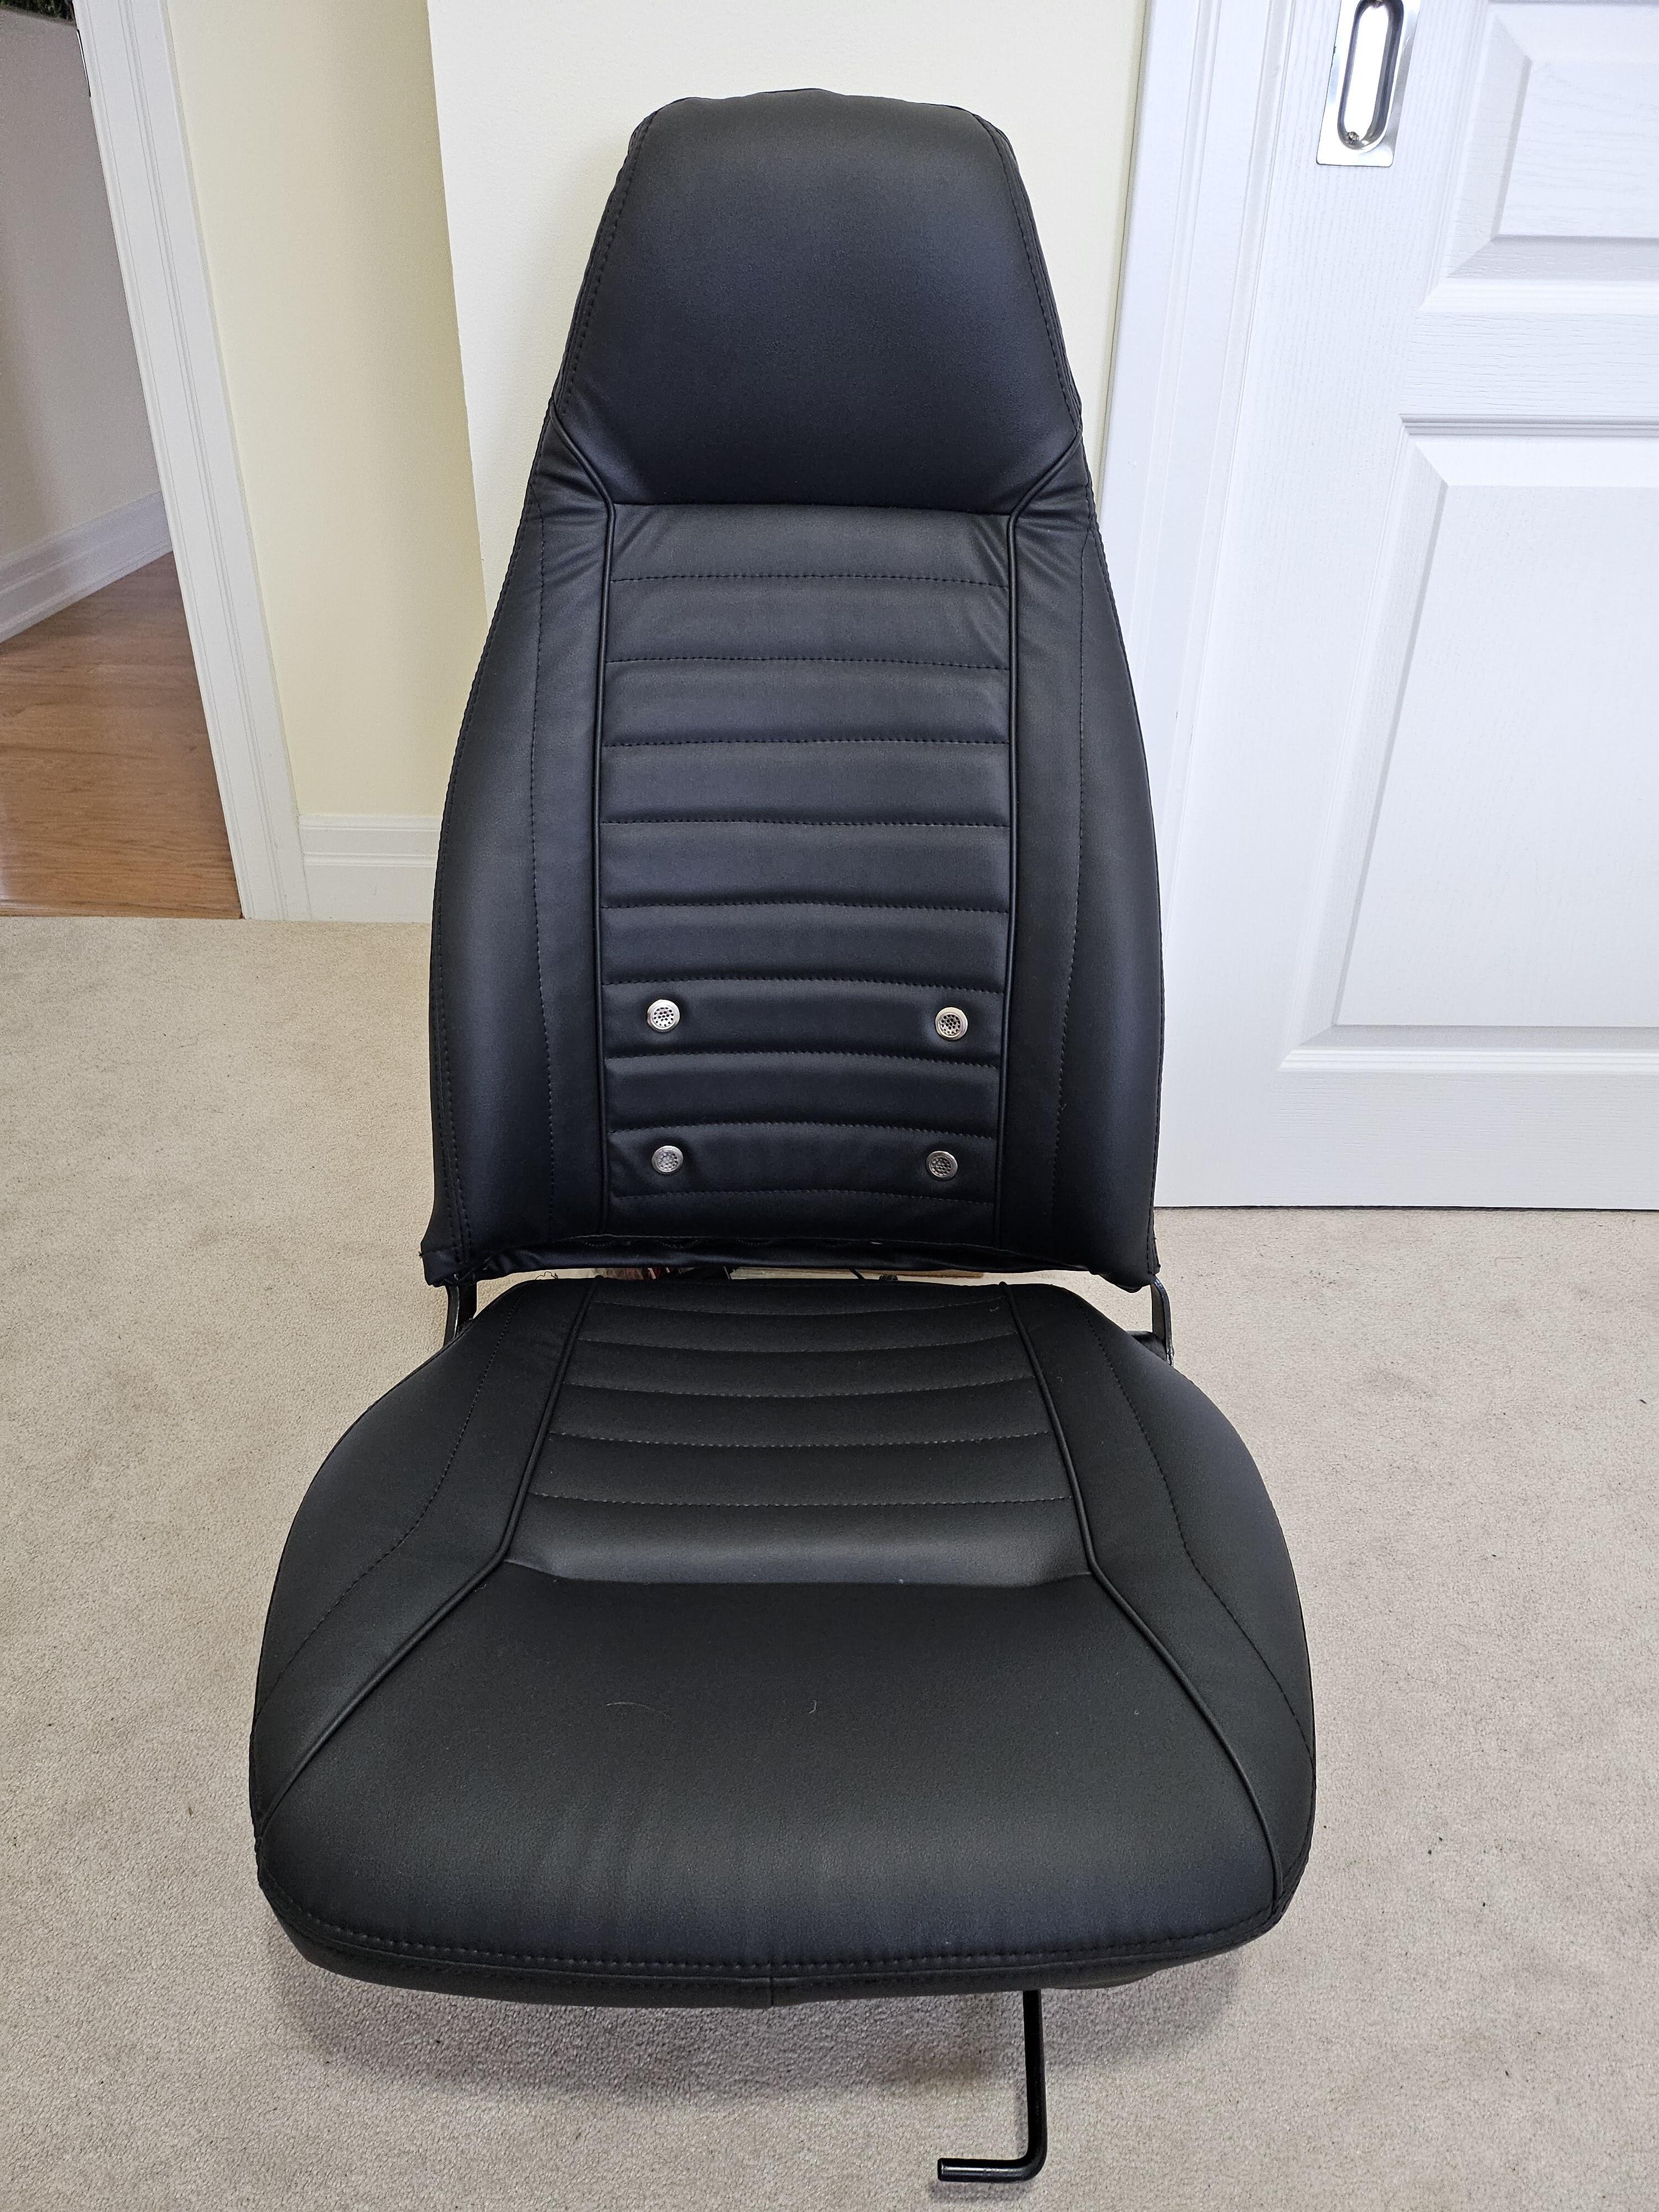
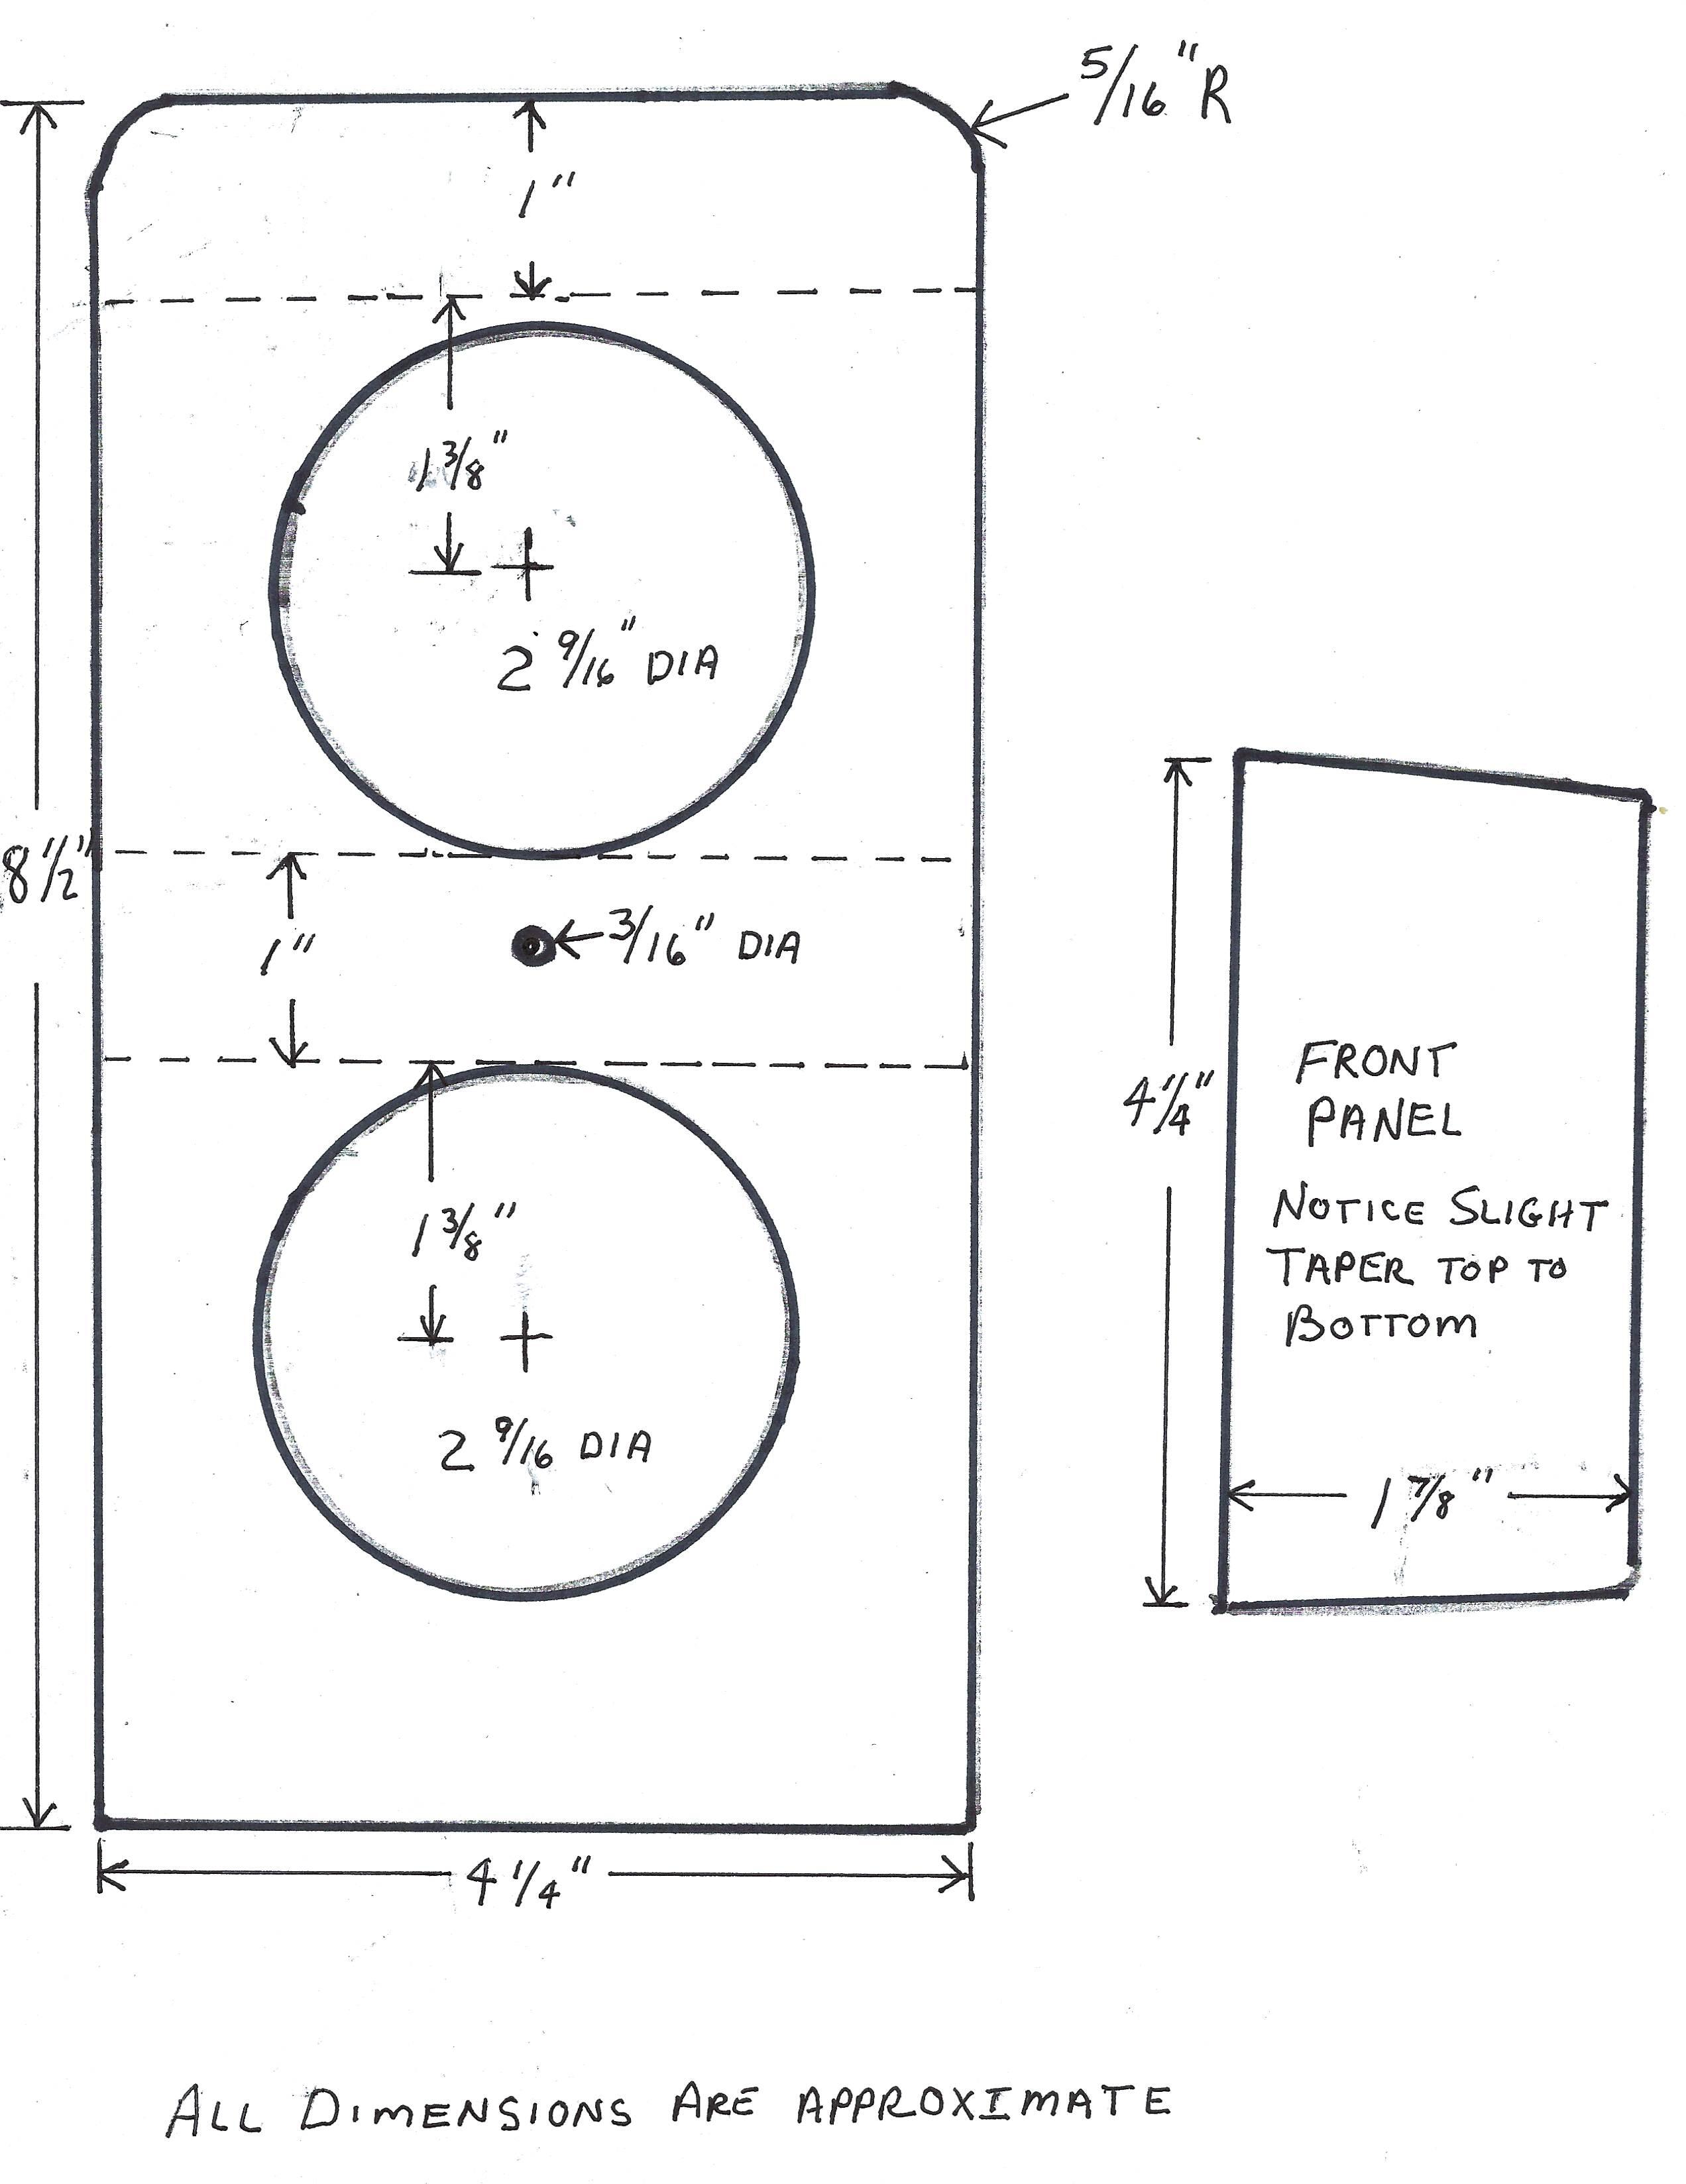
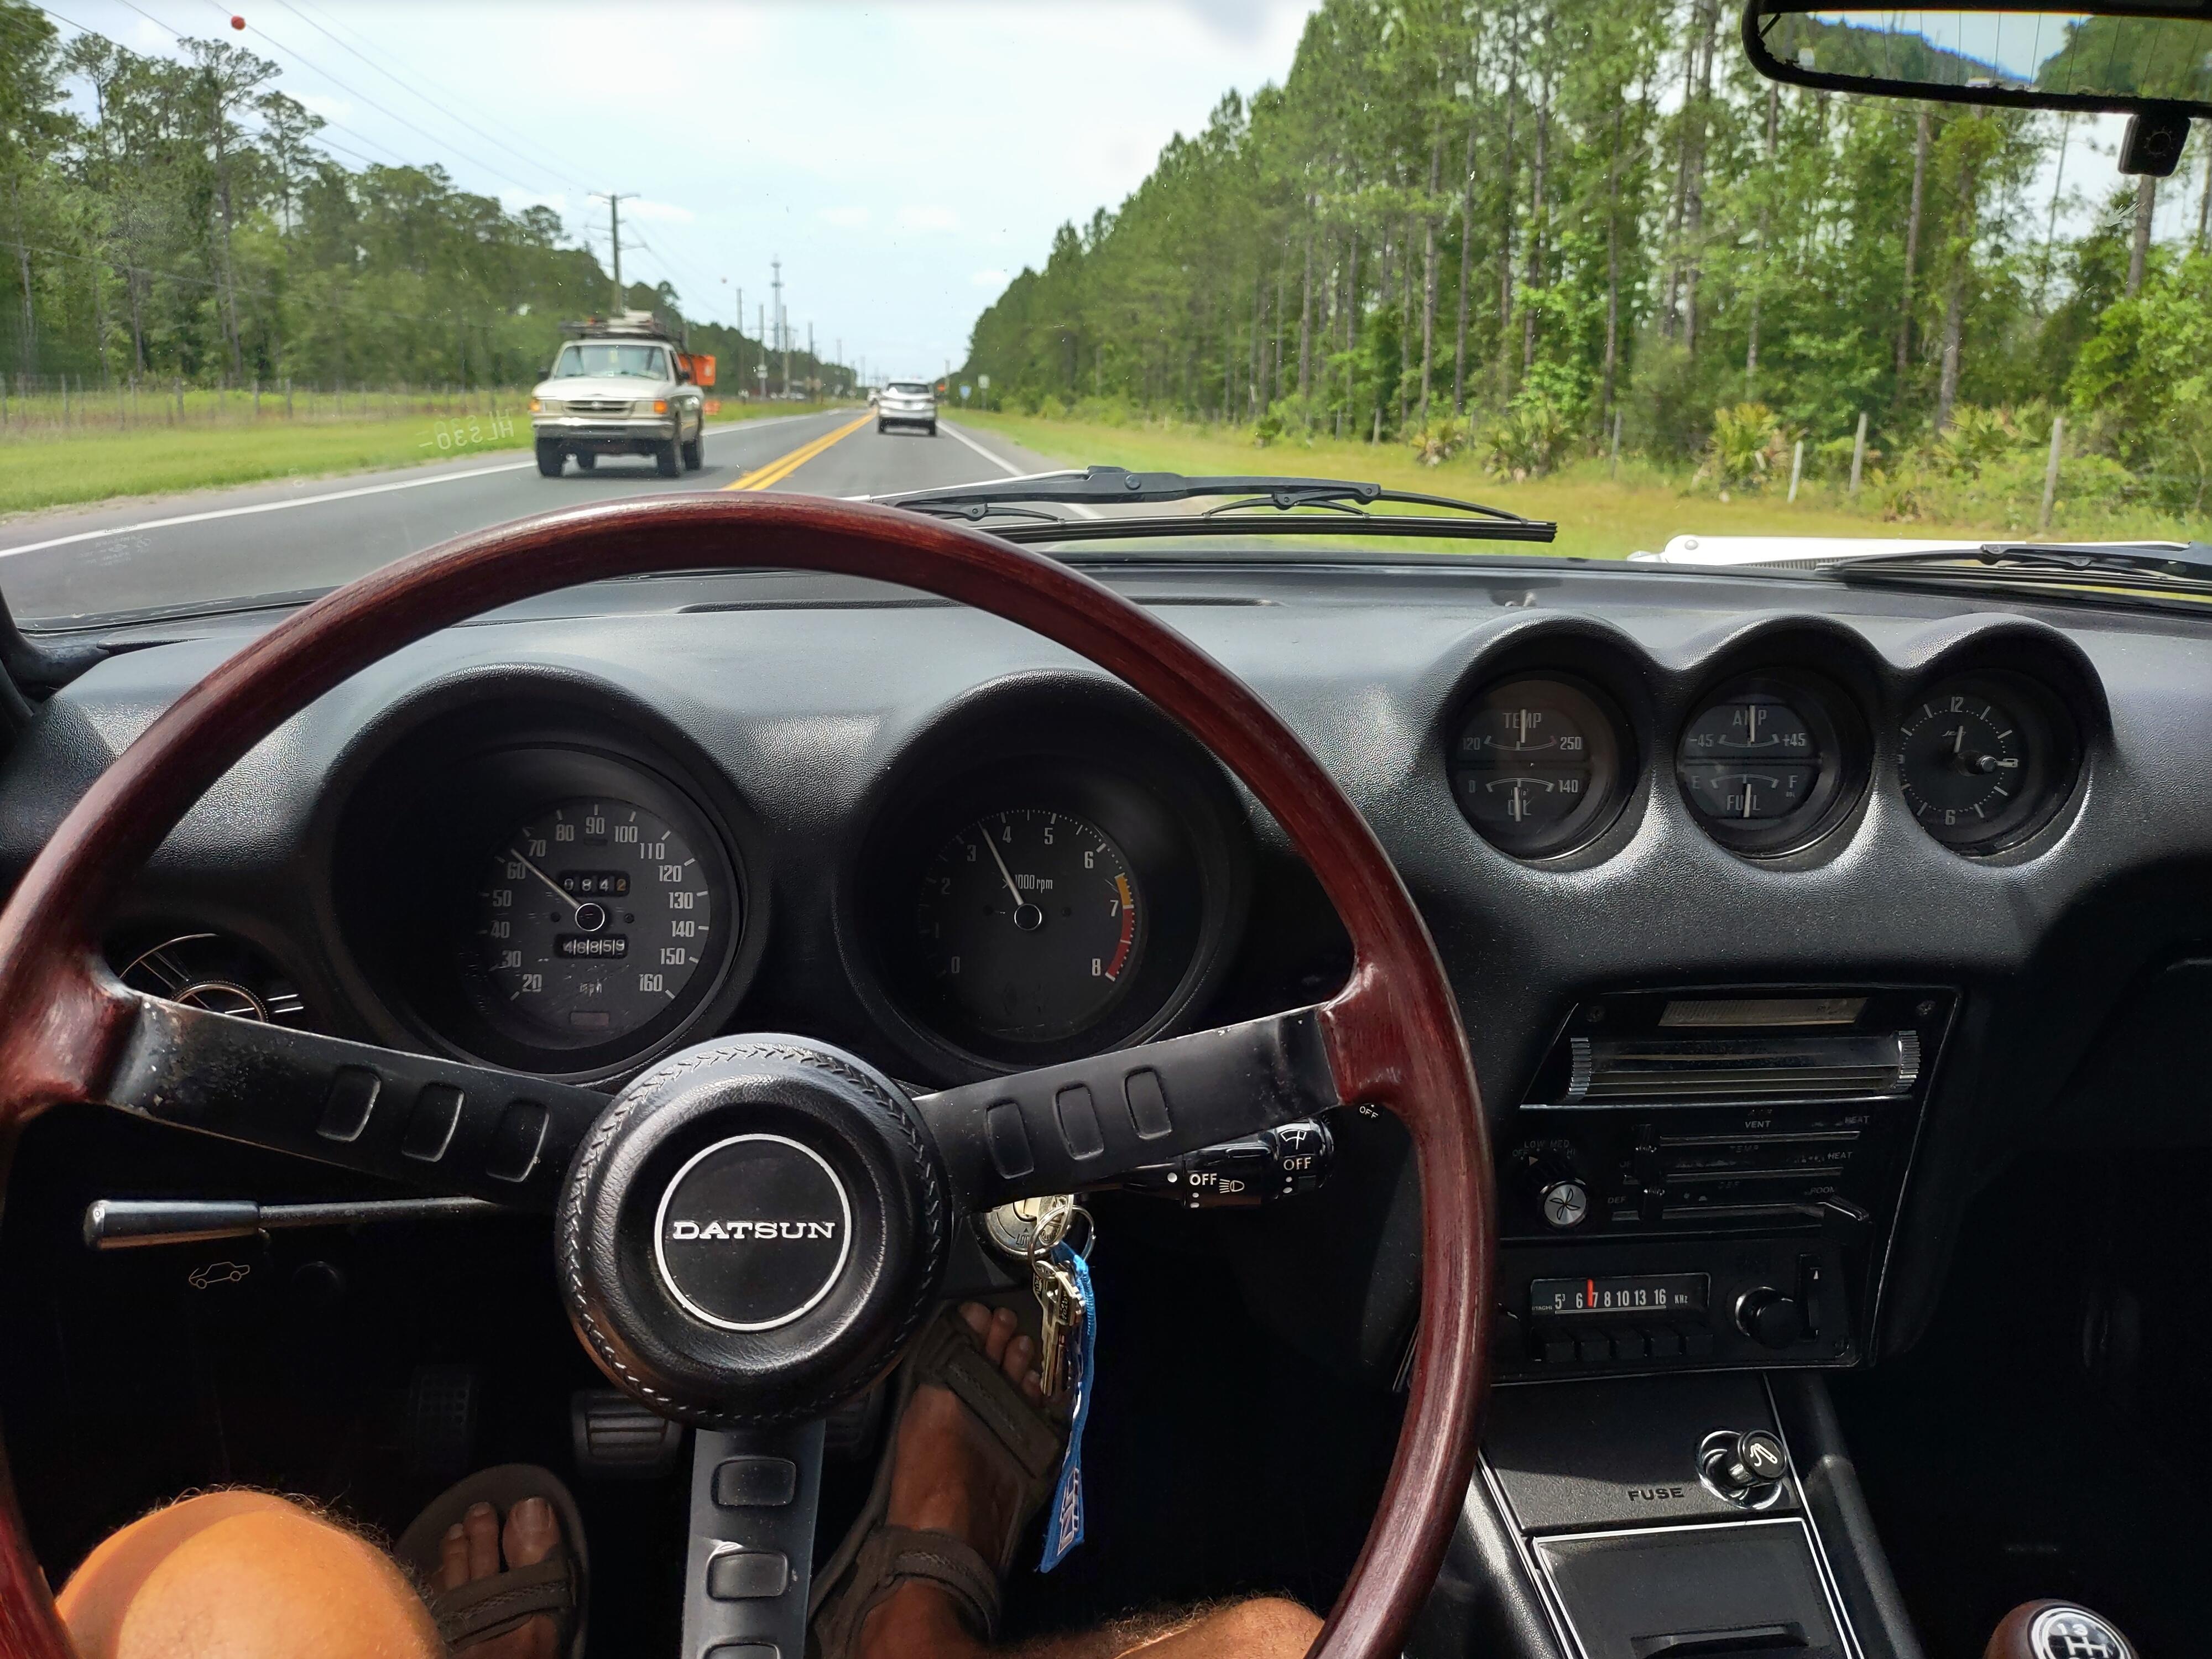
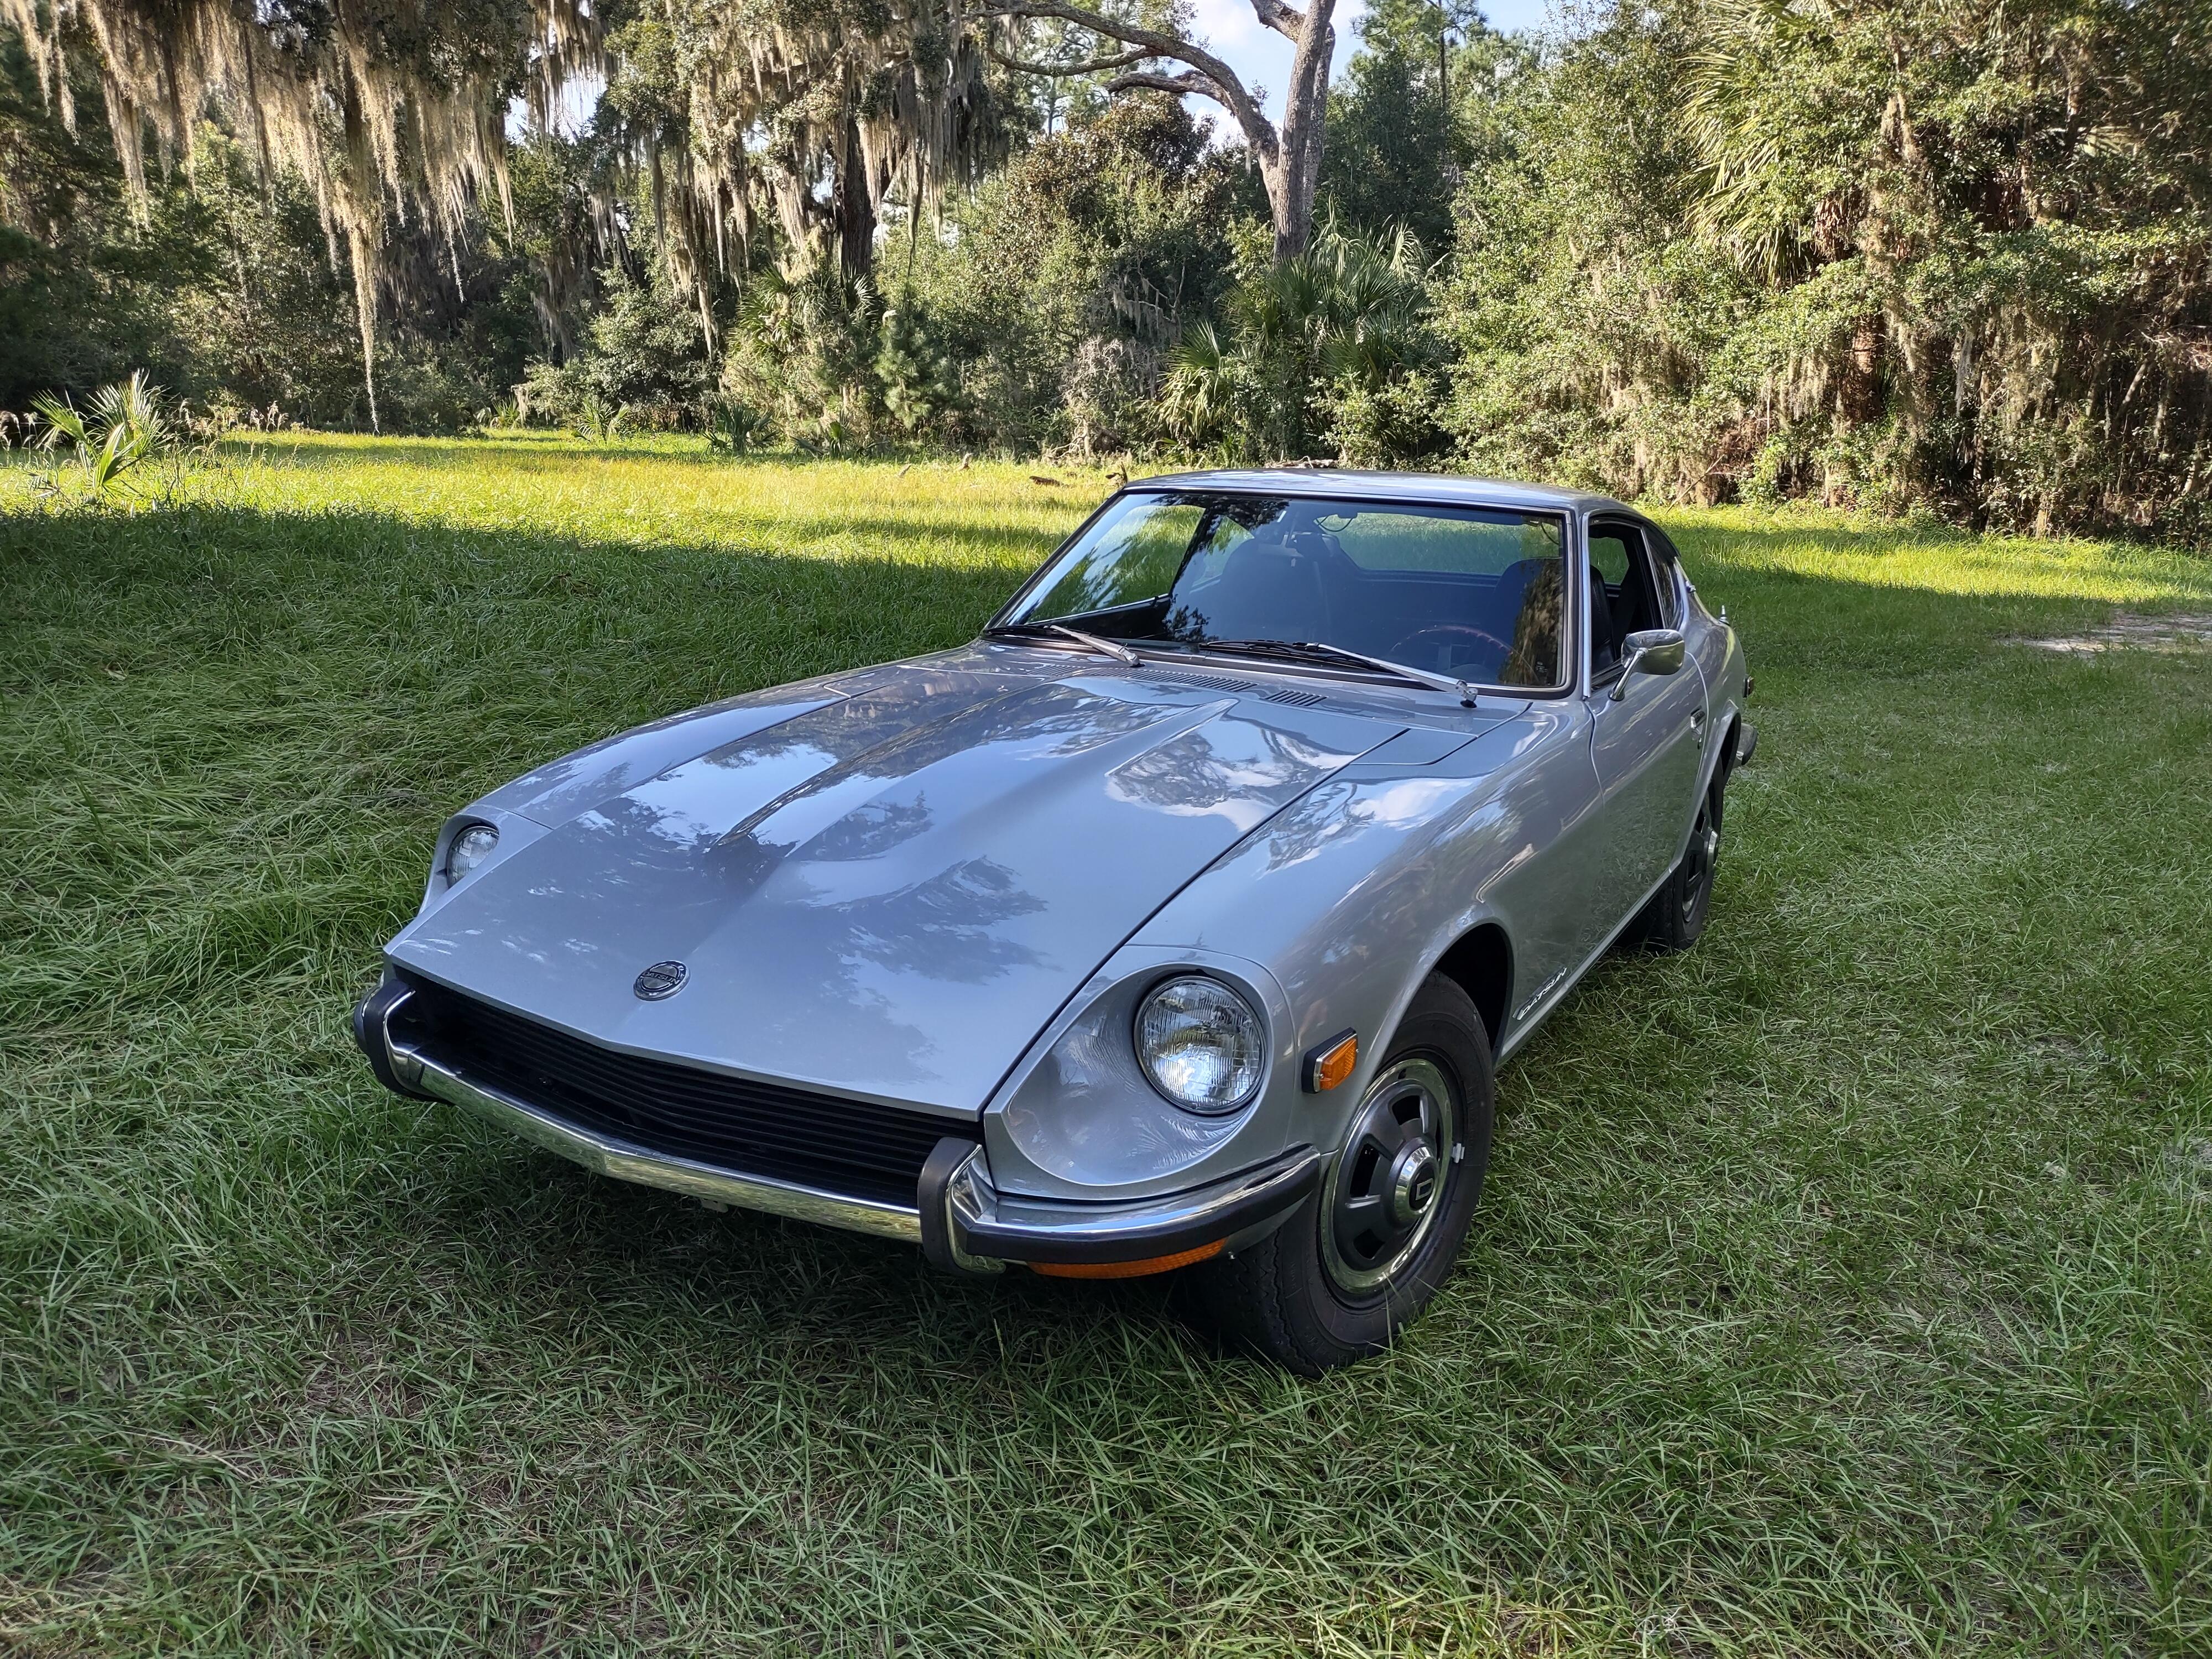


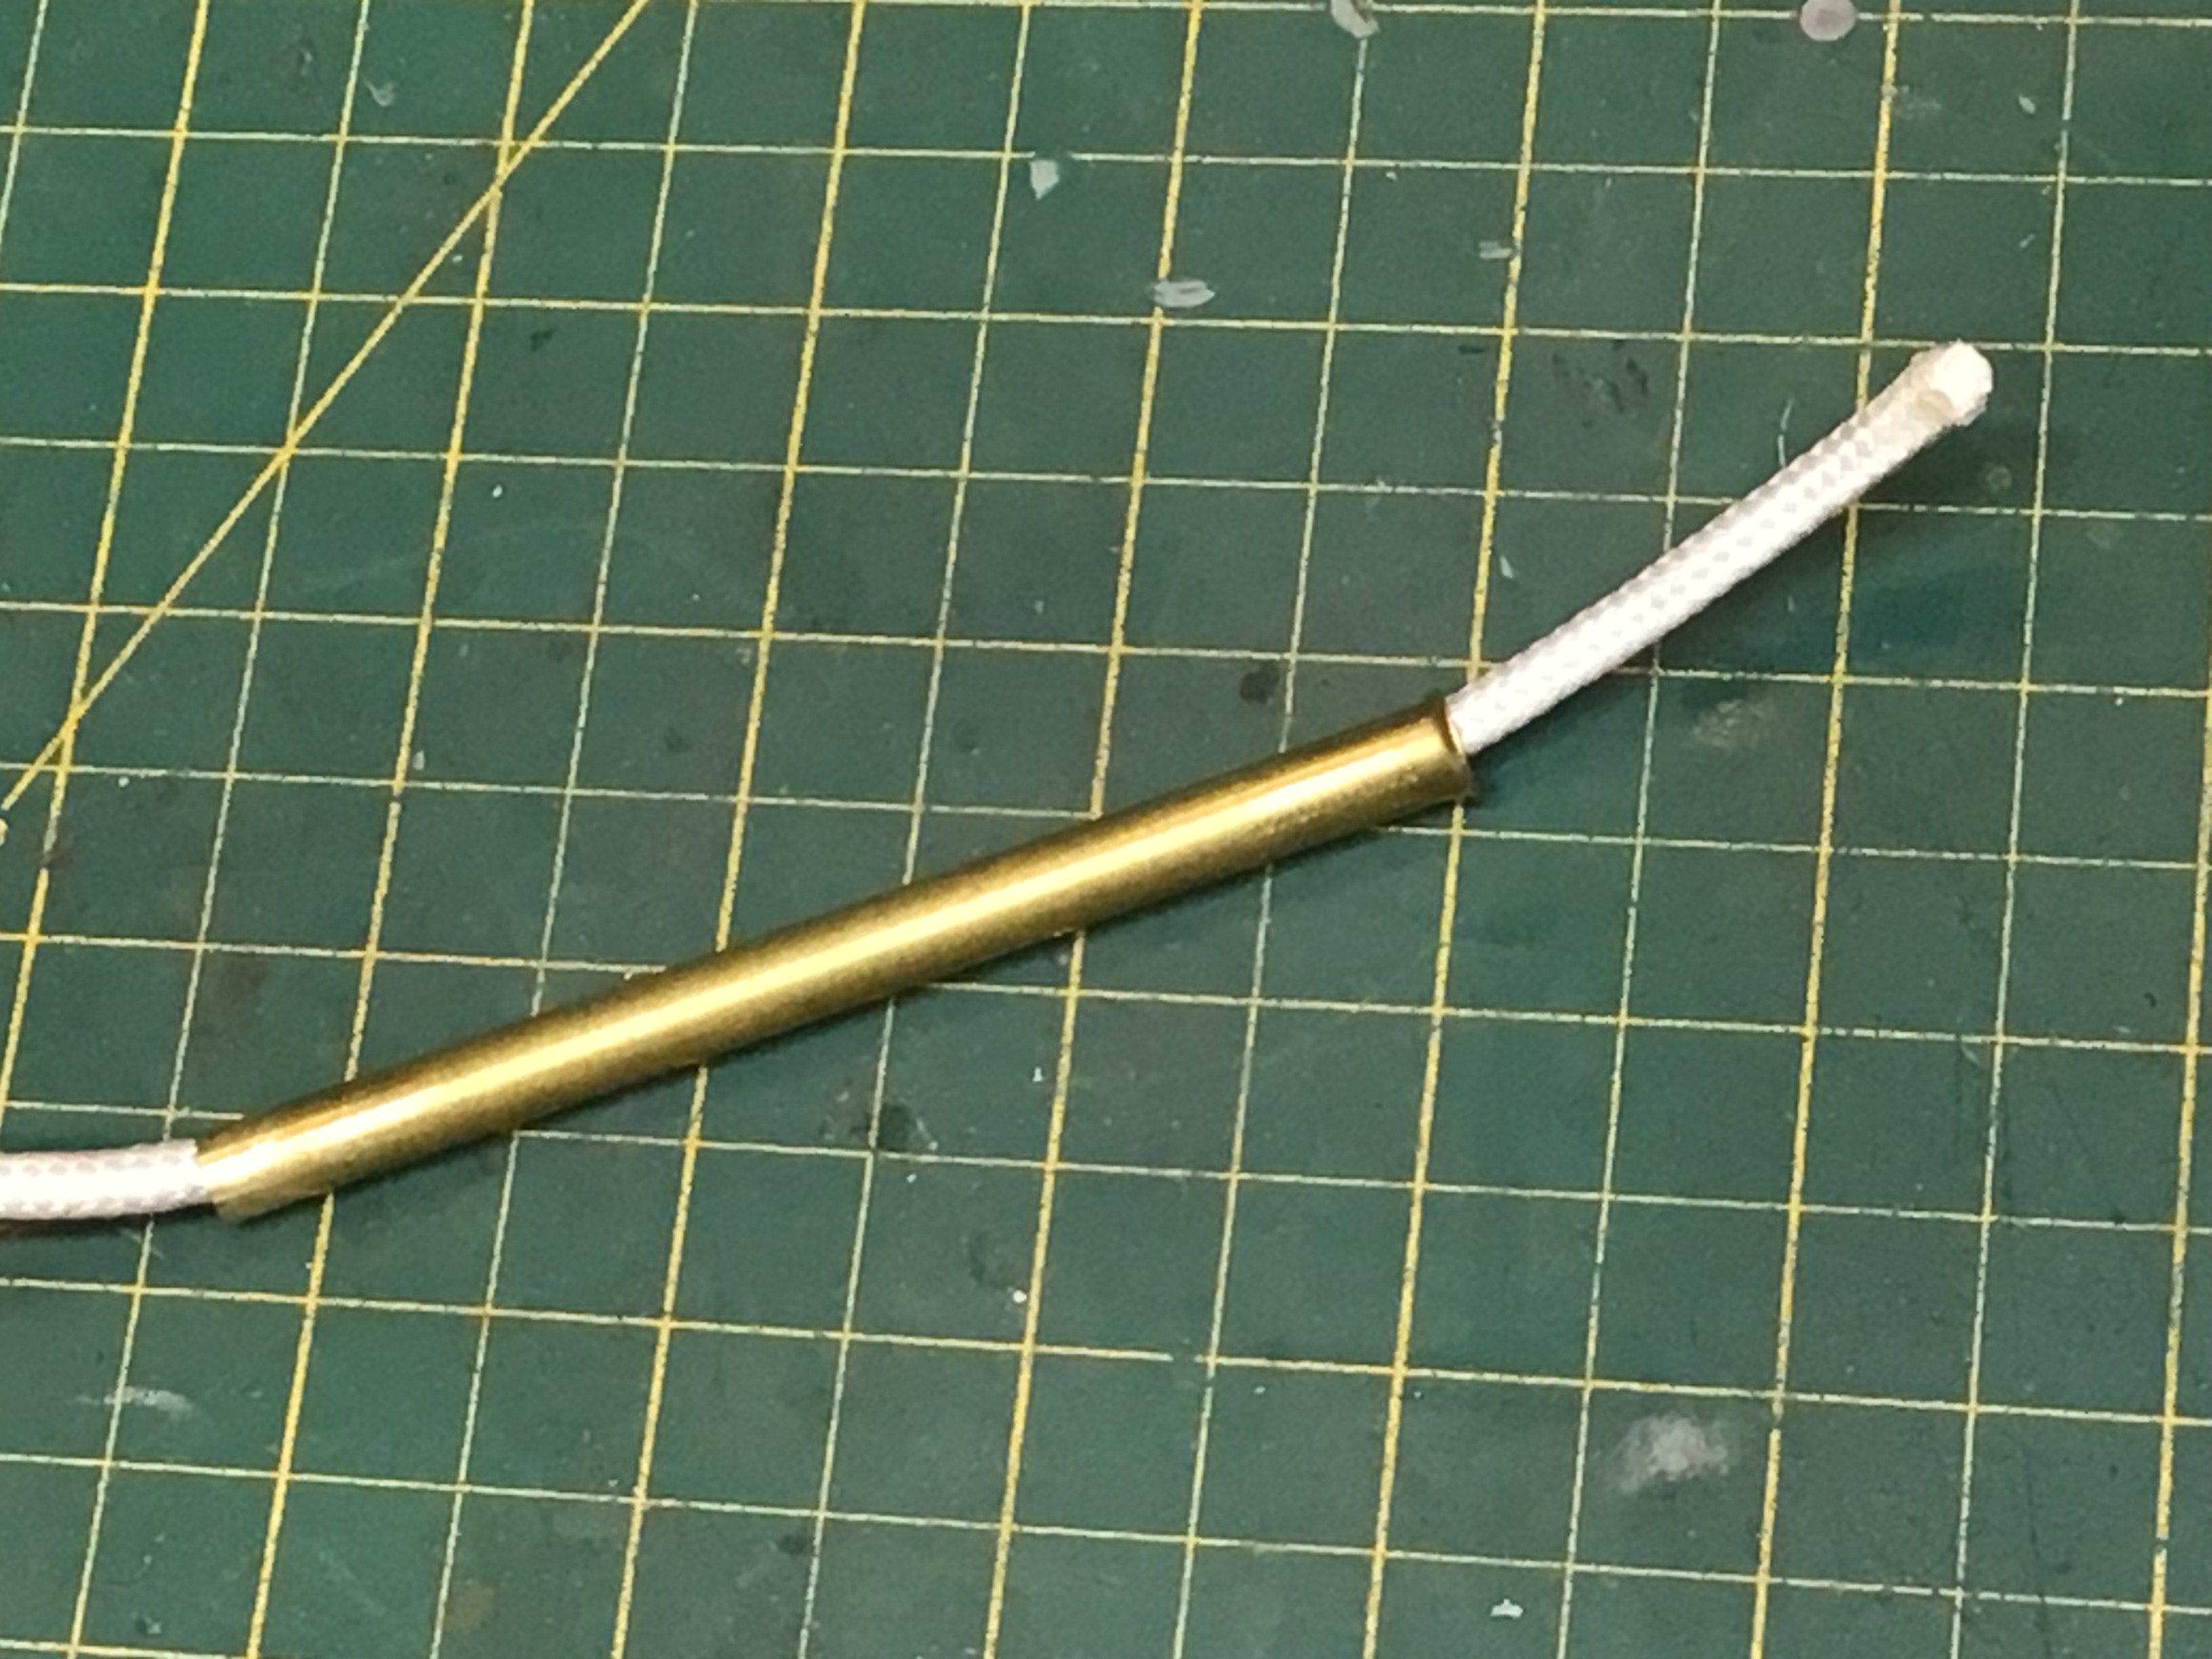
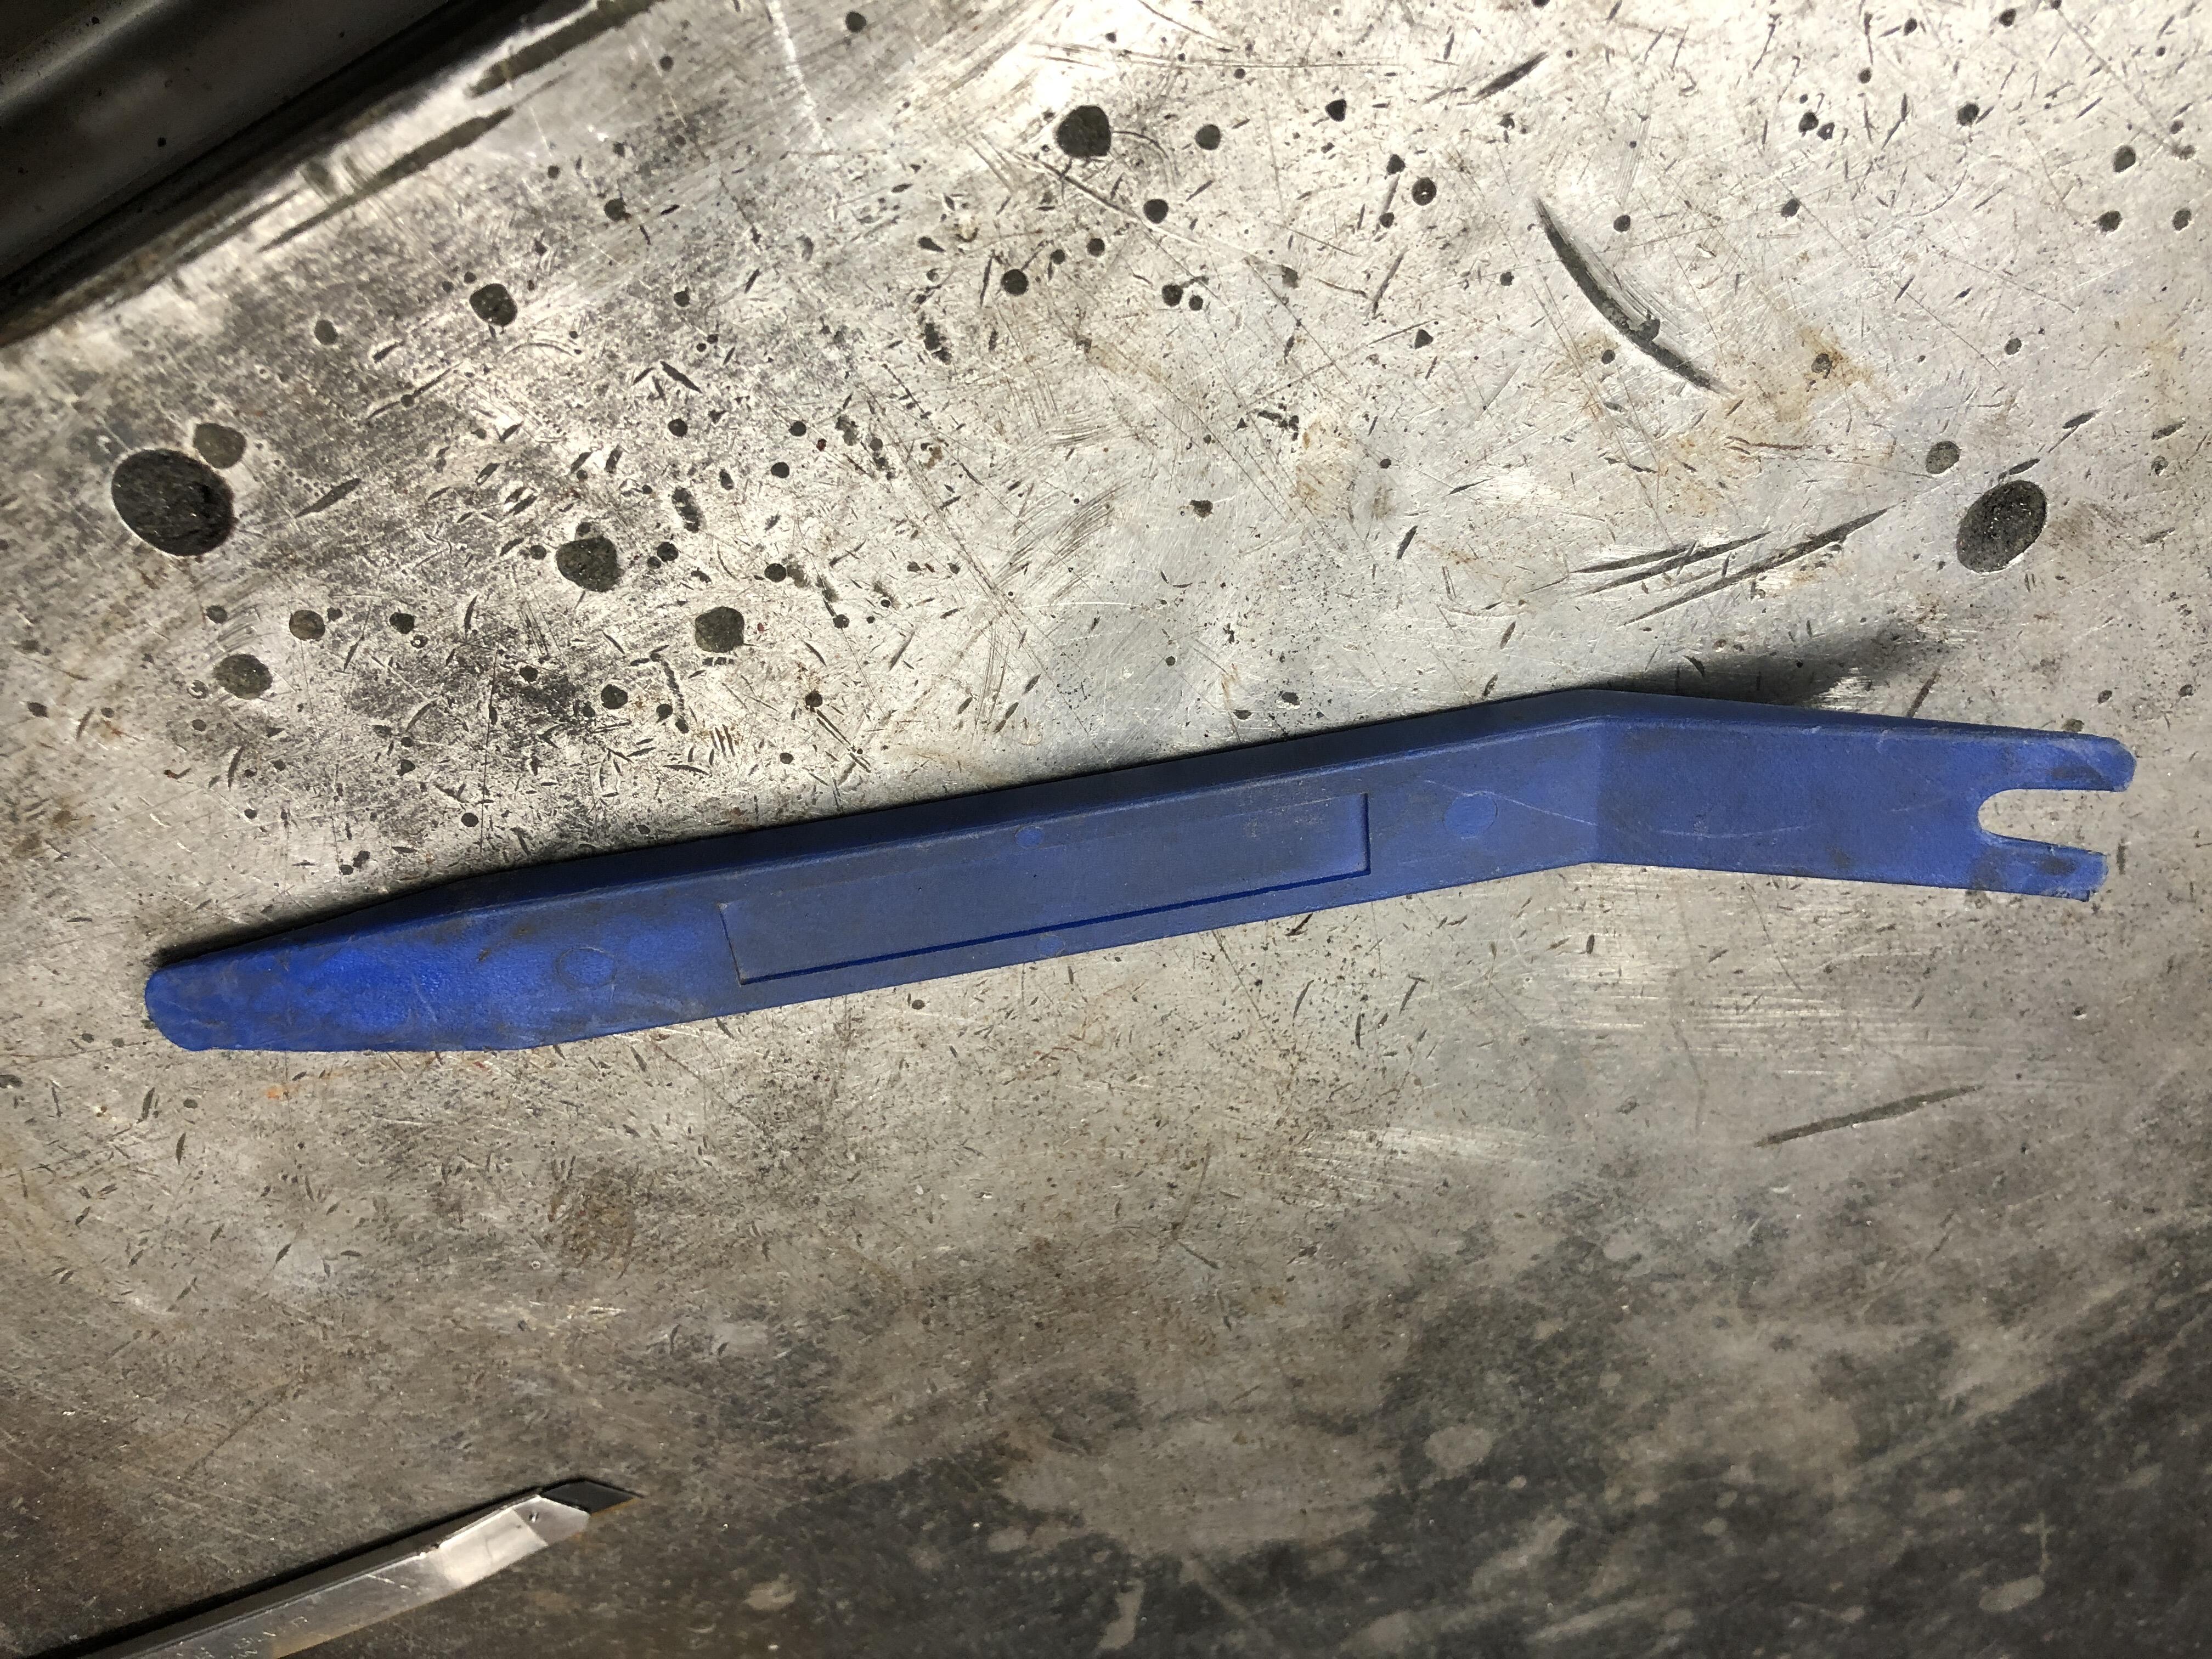

.jpeg.449e9859c01c4a6ae3e1bcdbb8b1e74d.jpeg)
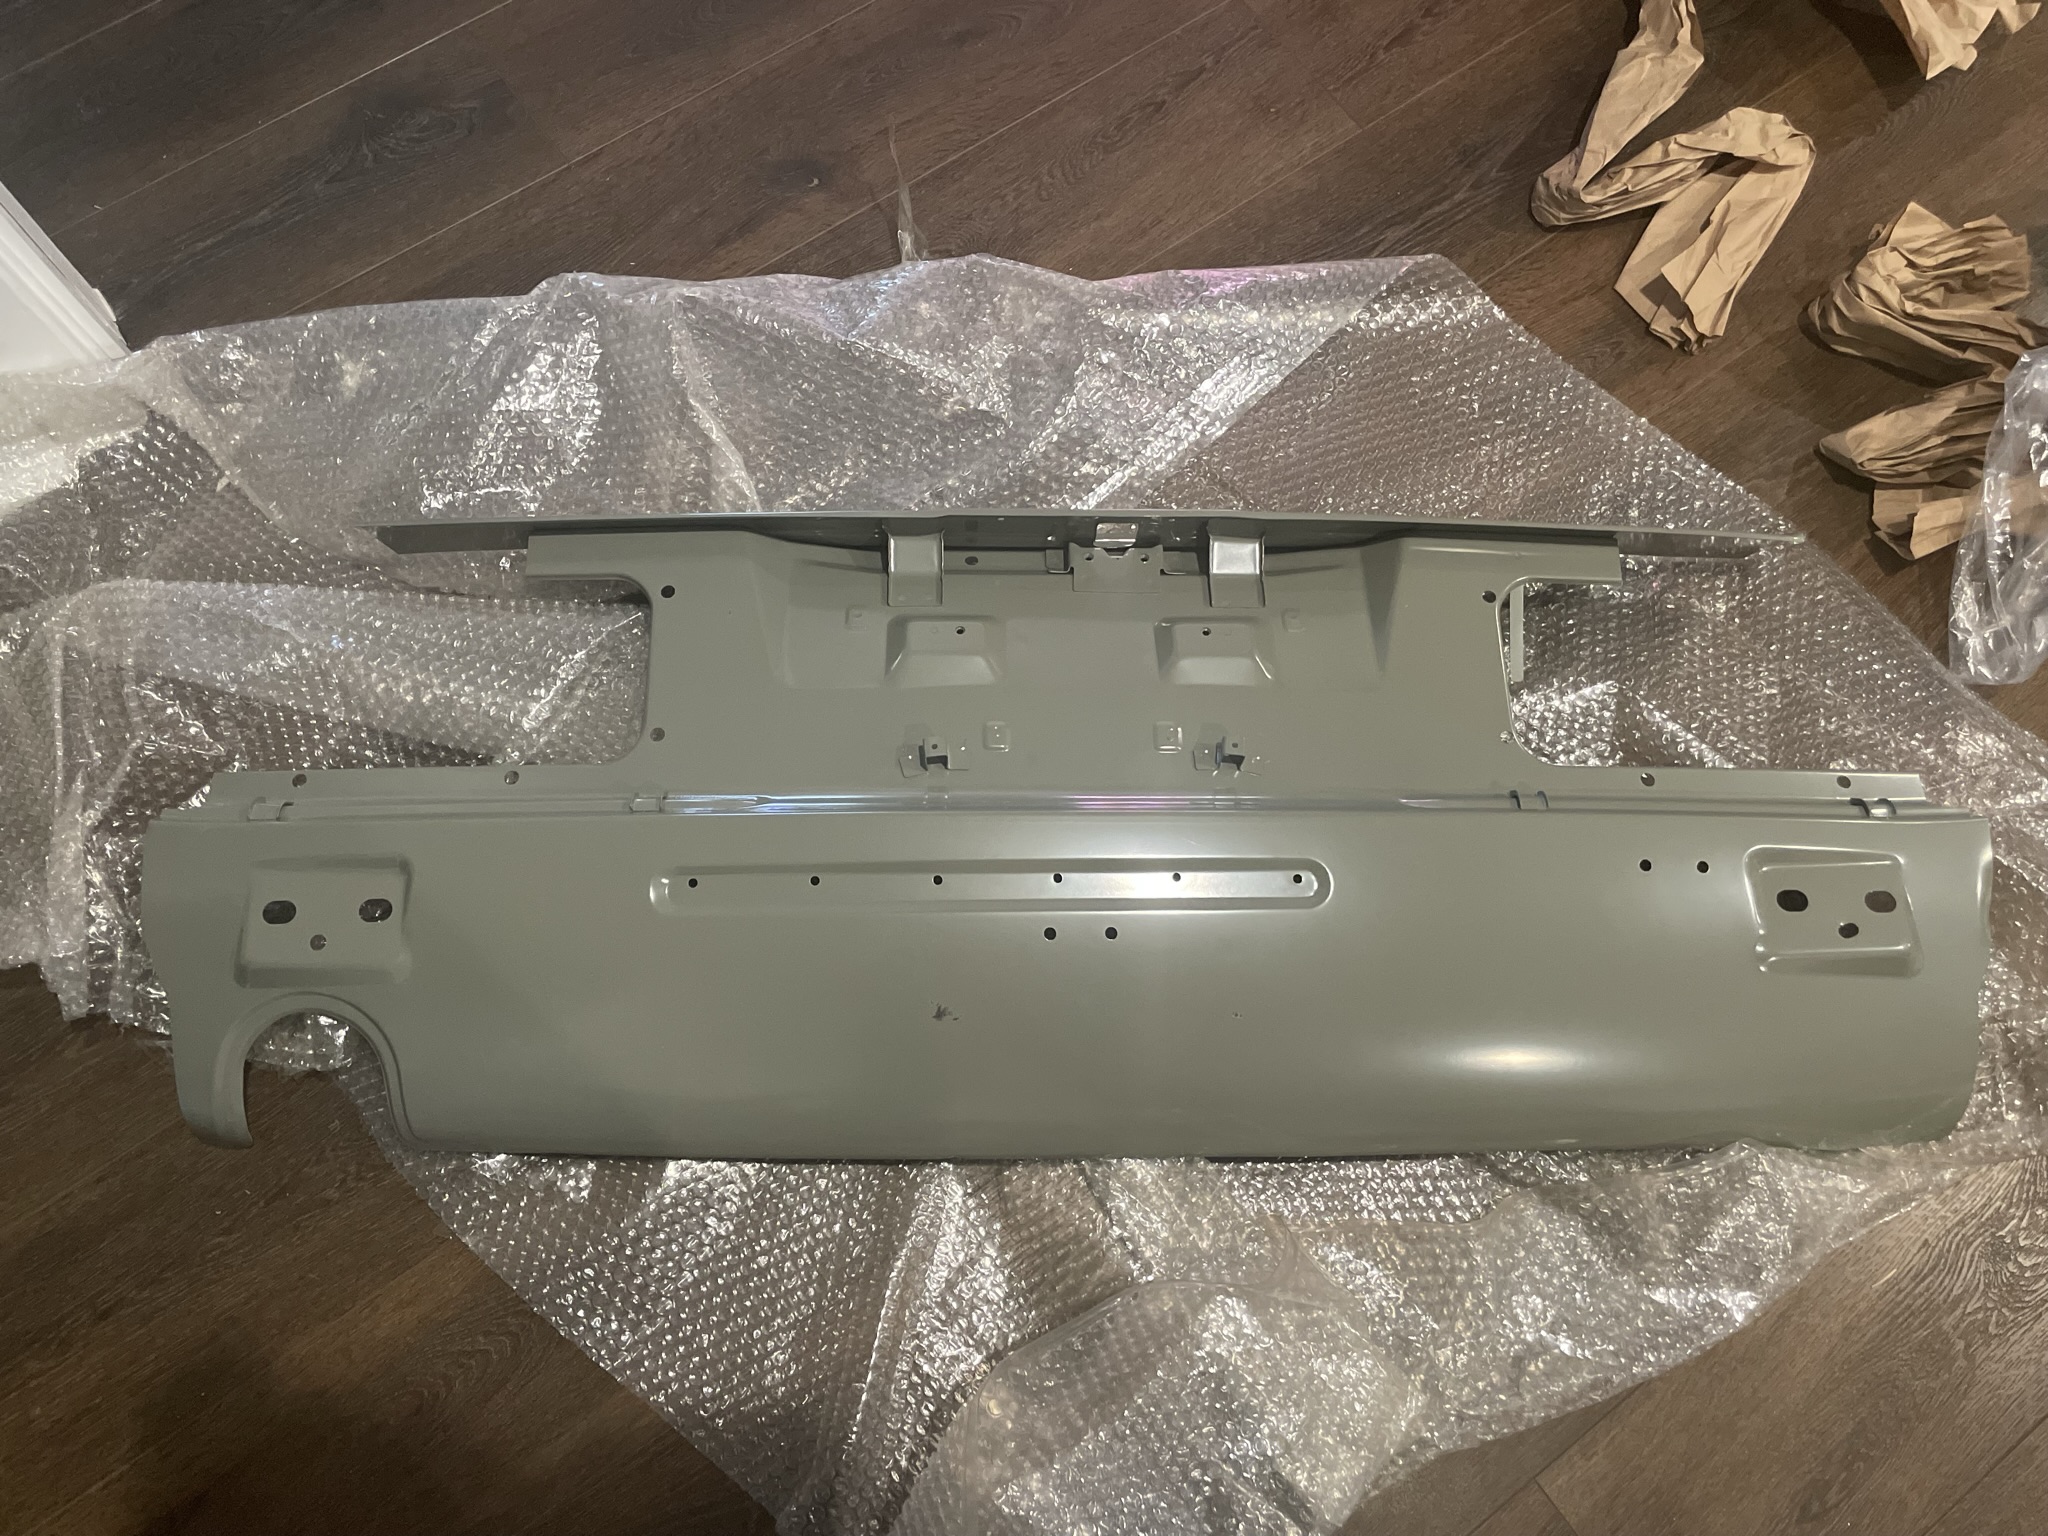
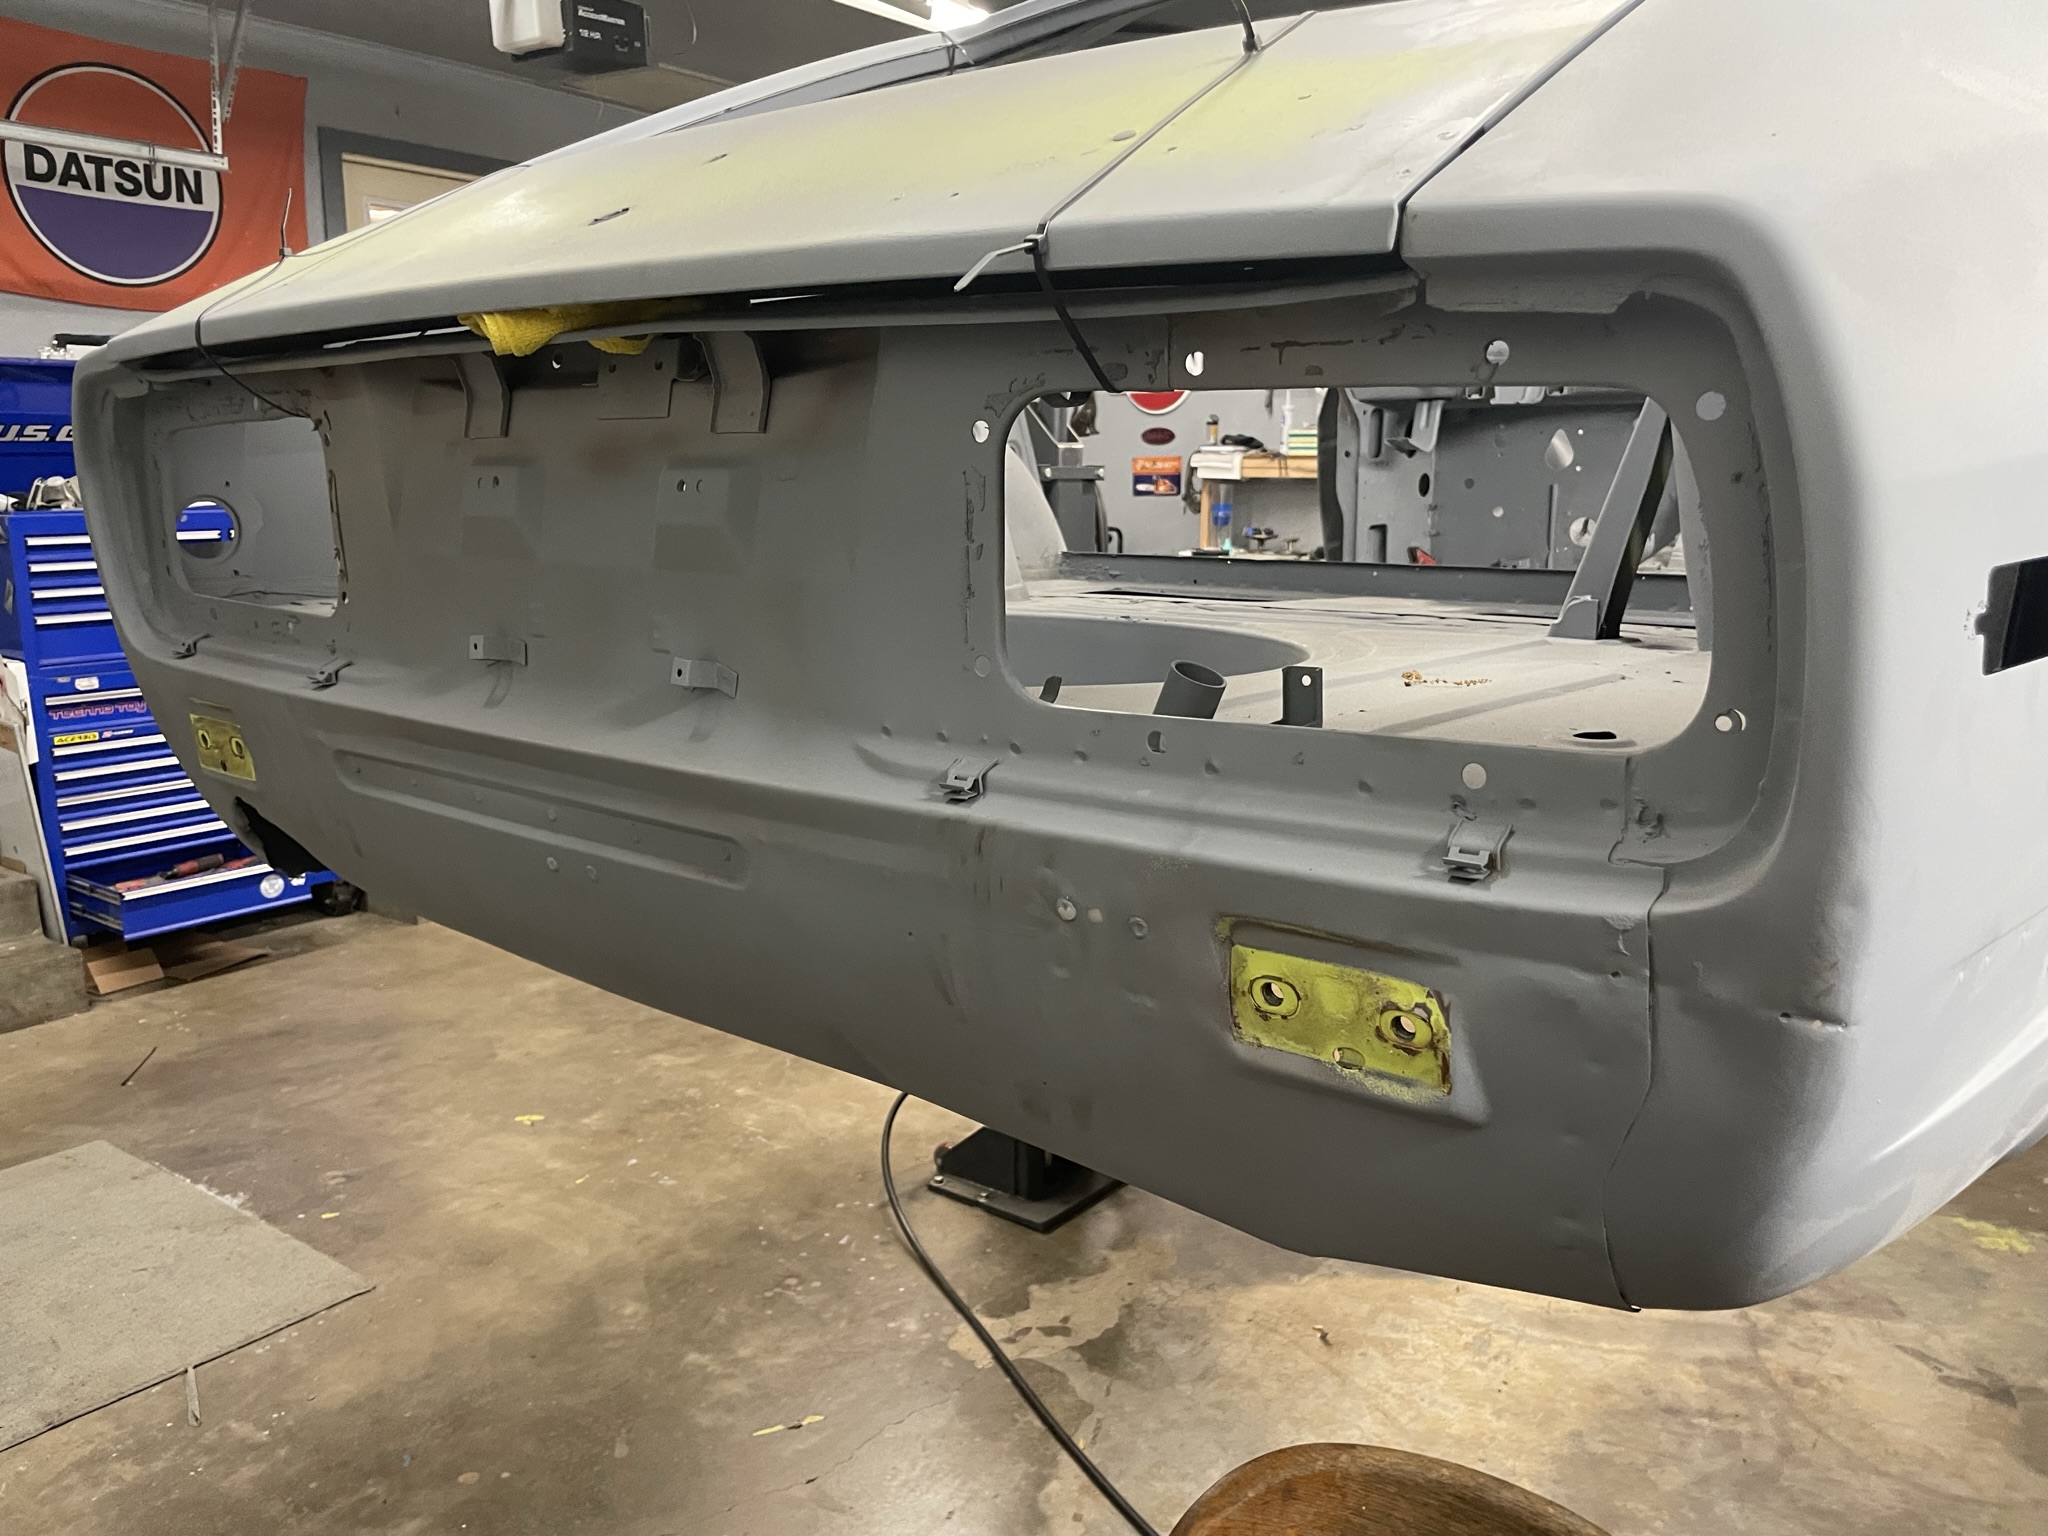
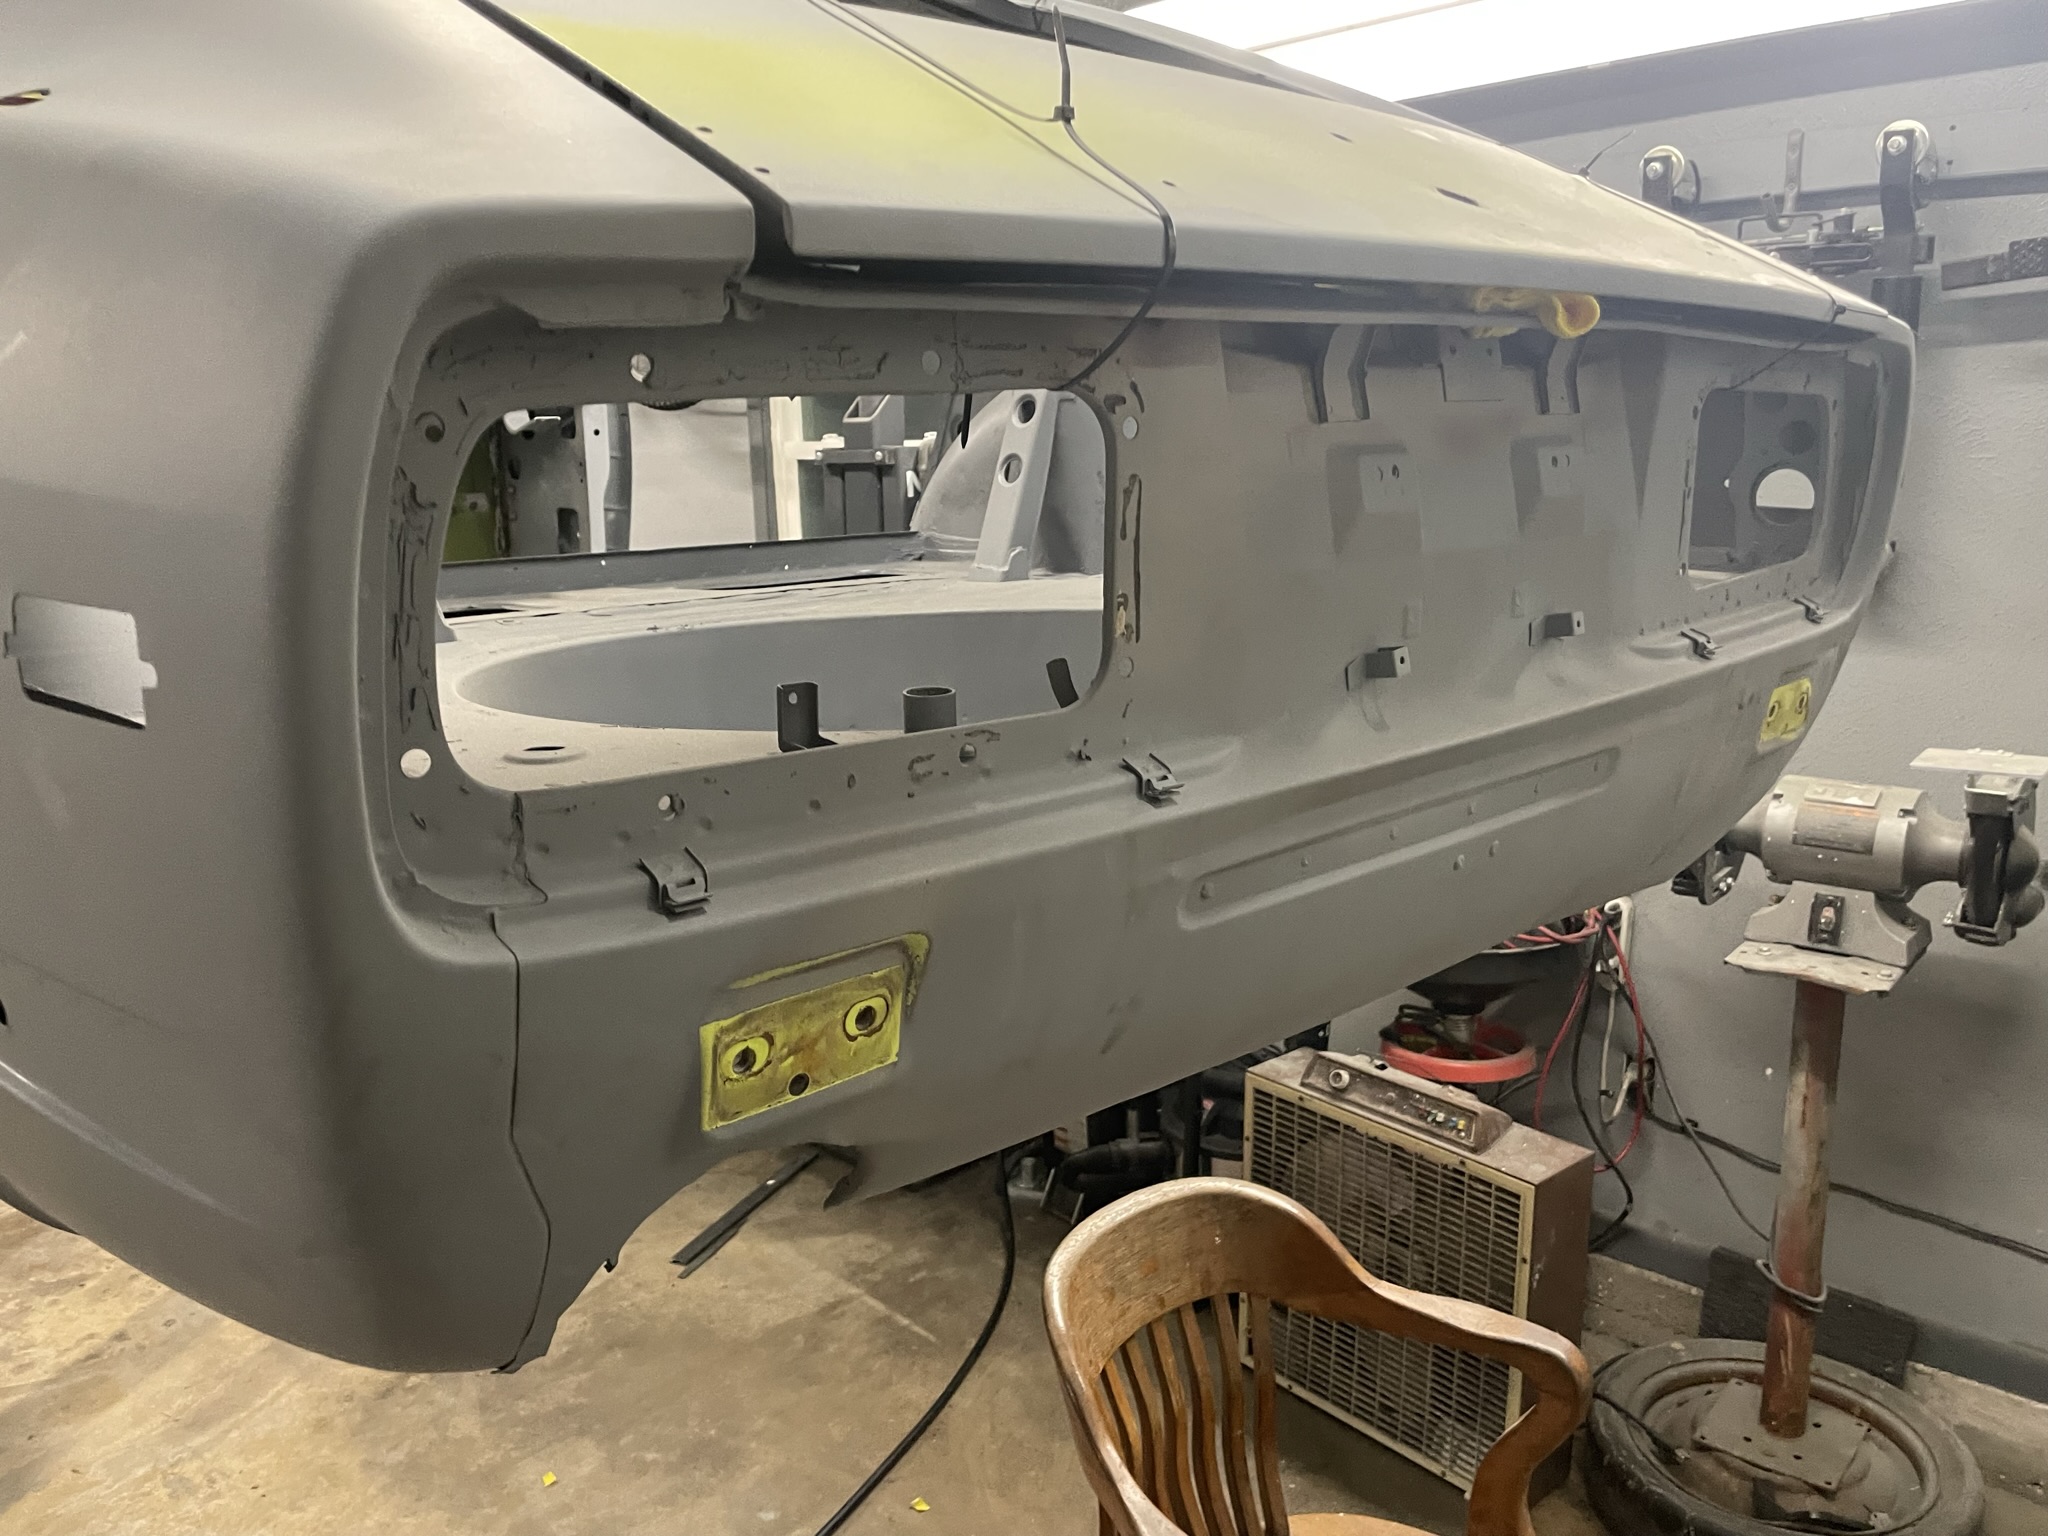

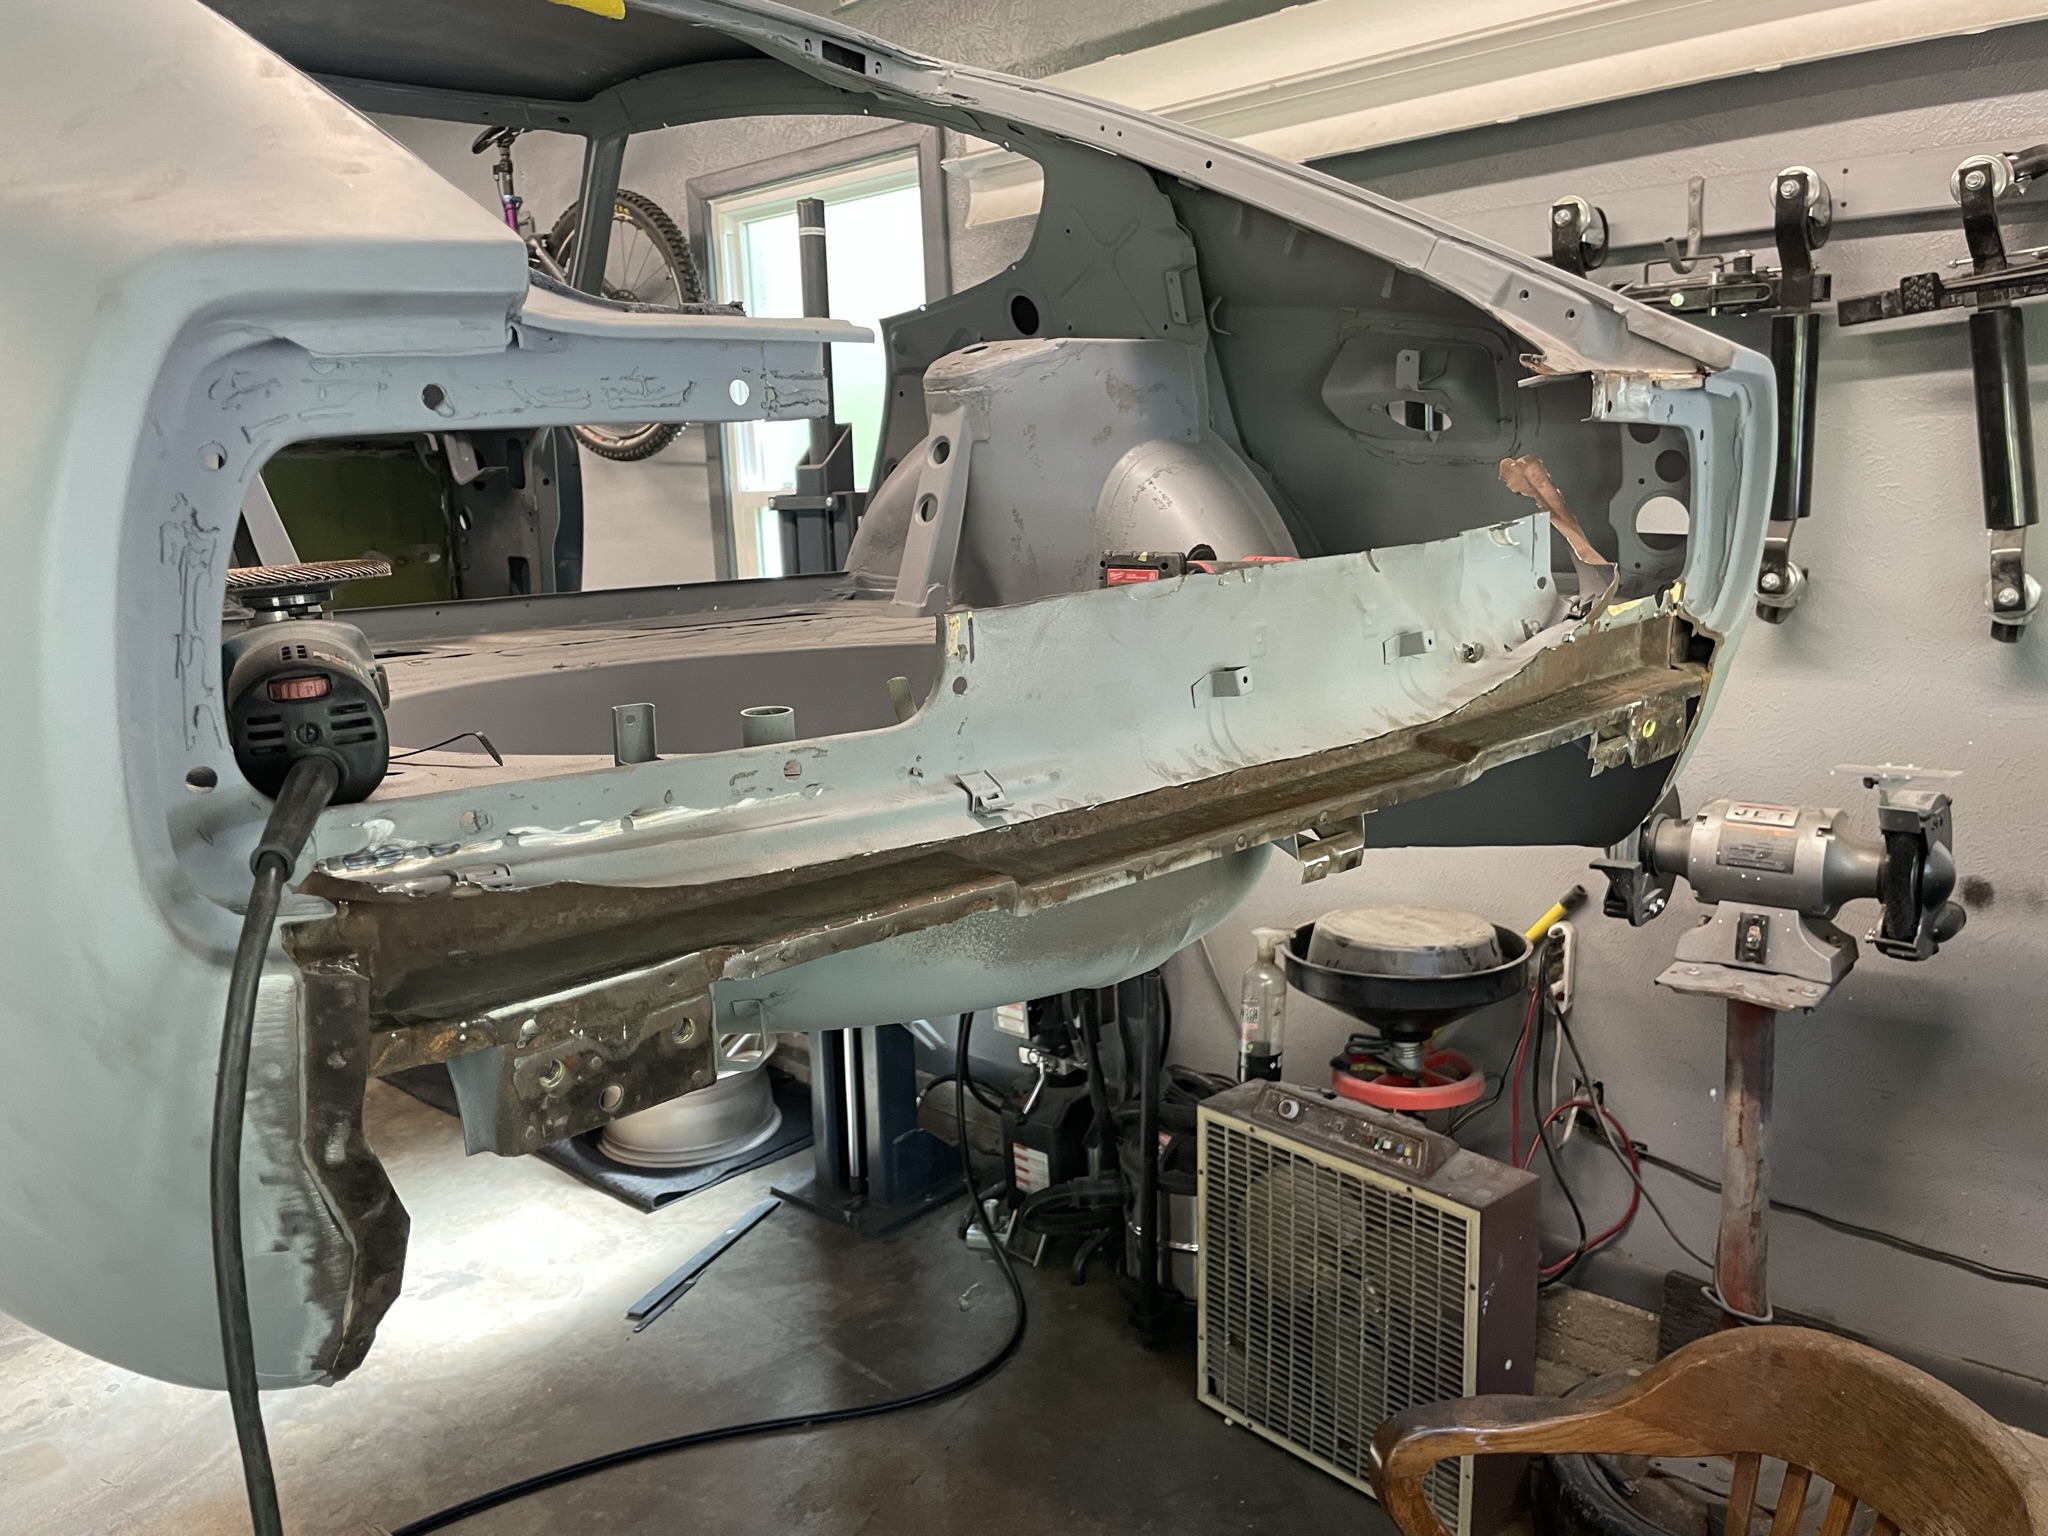
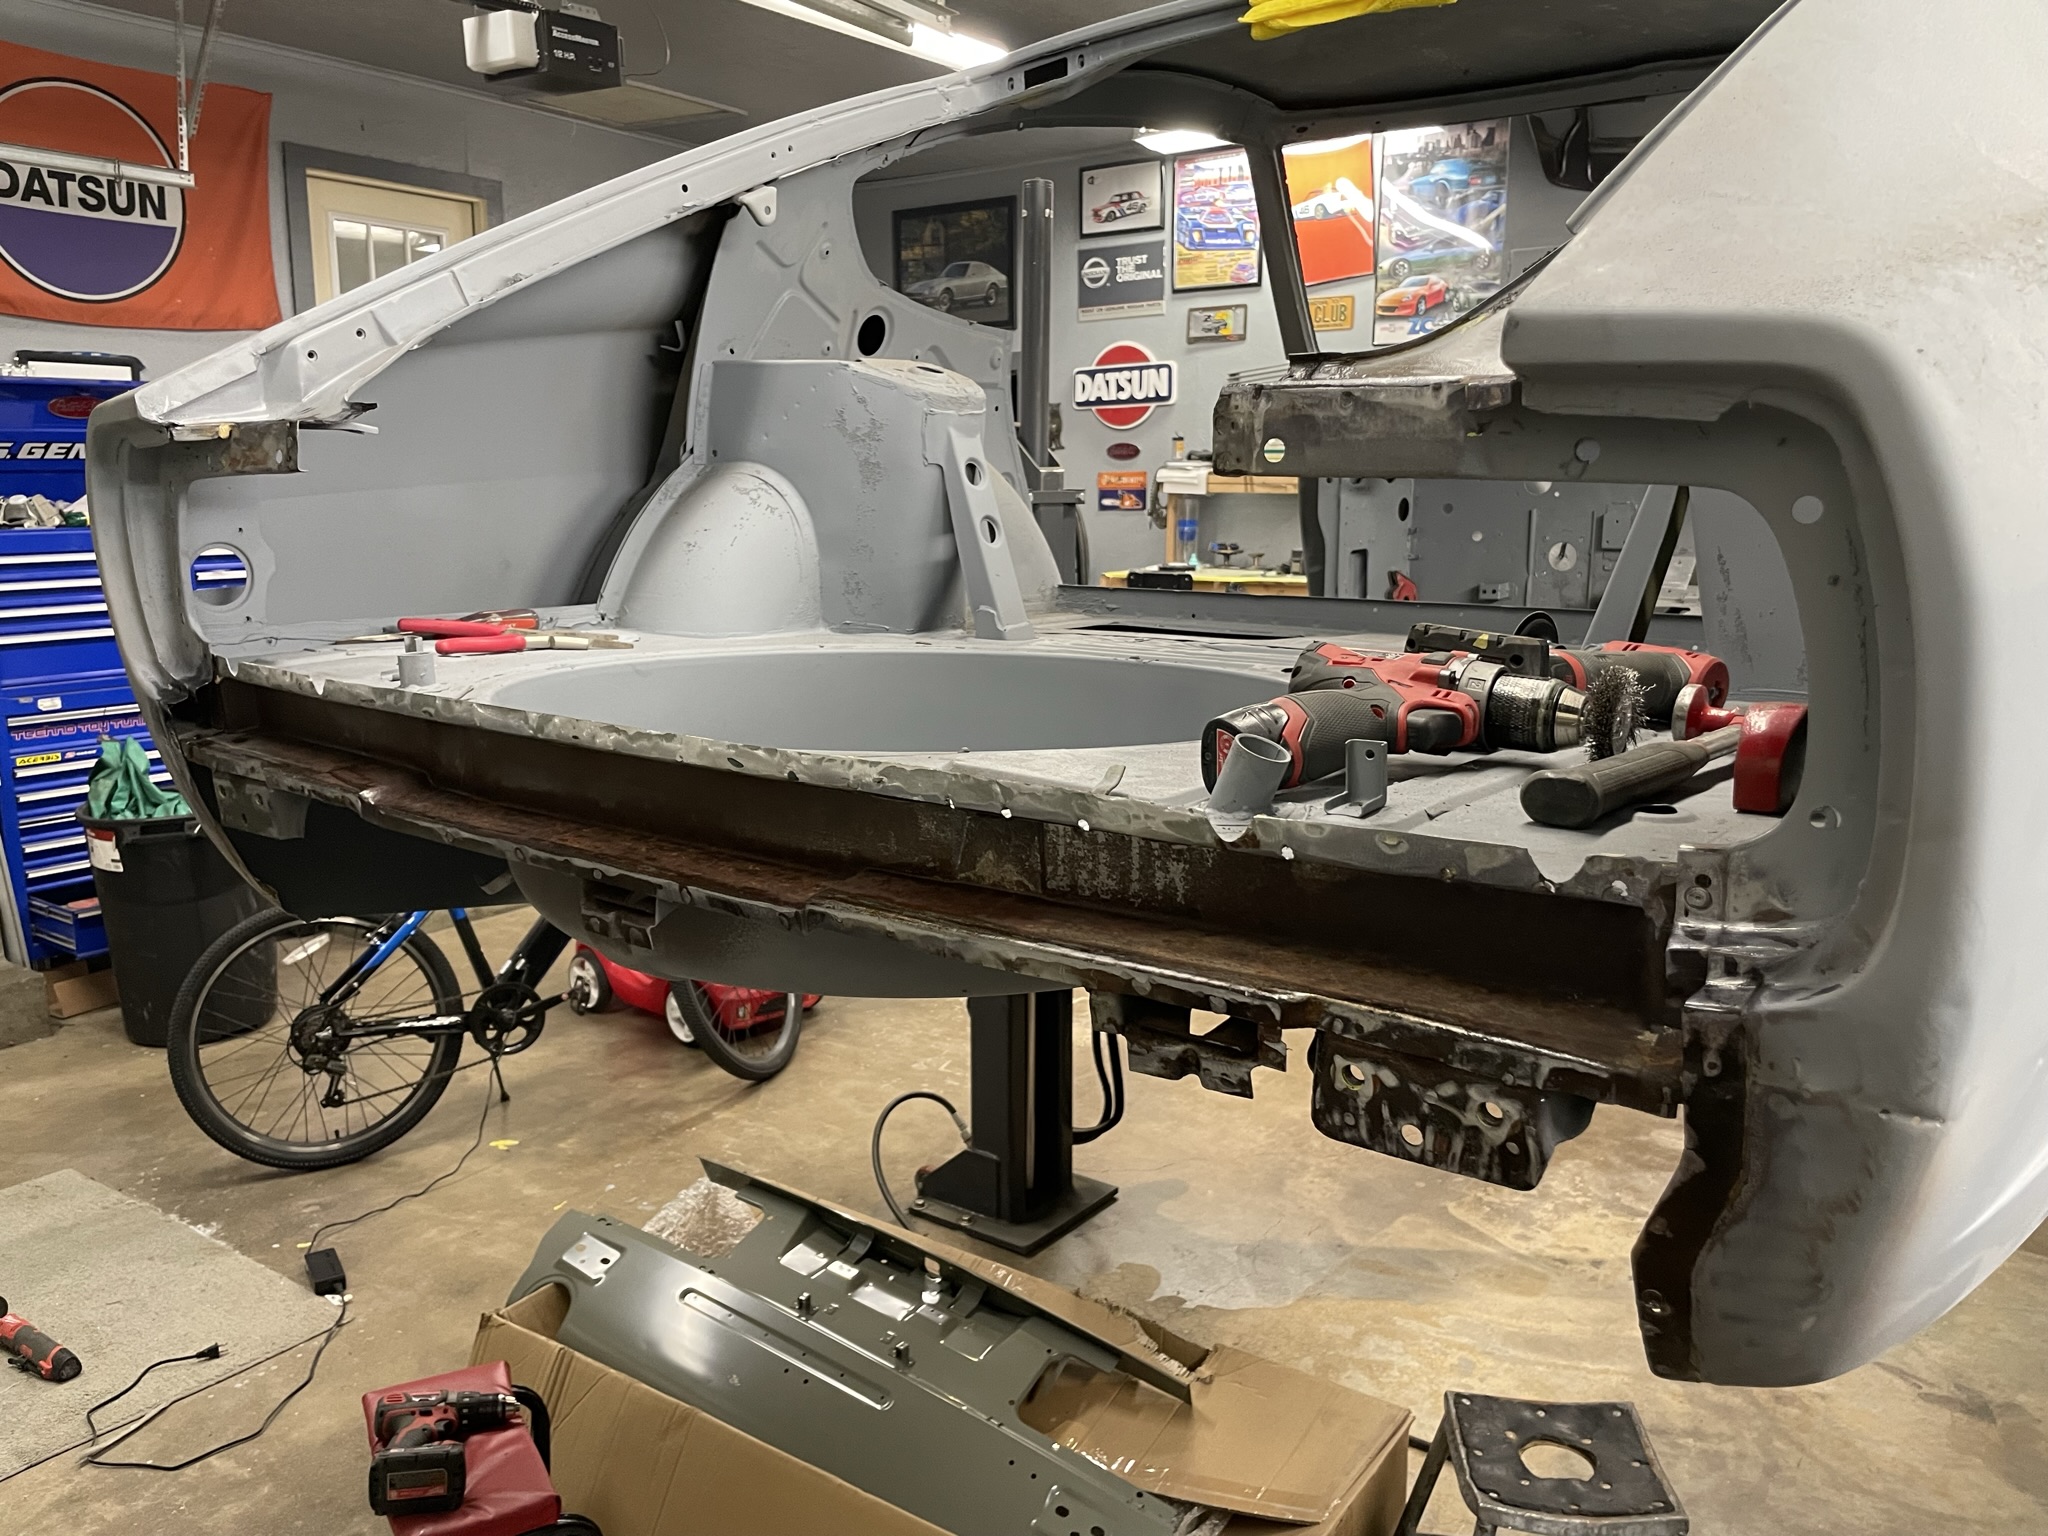

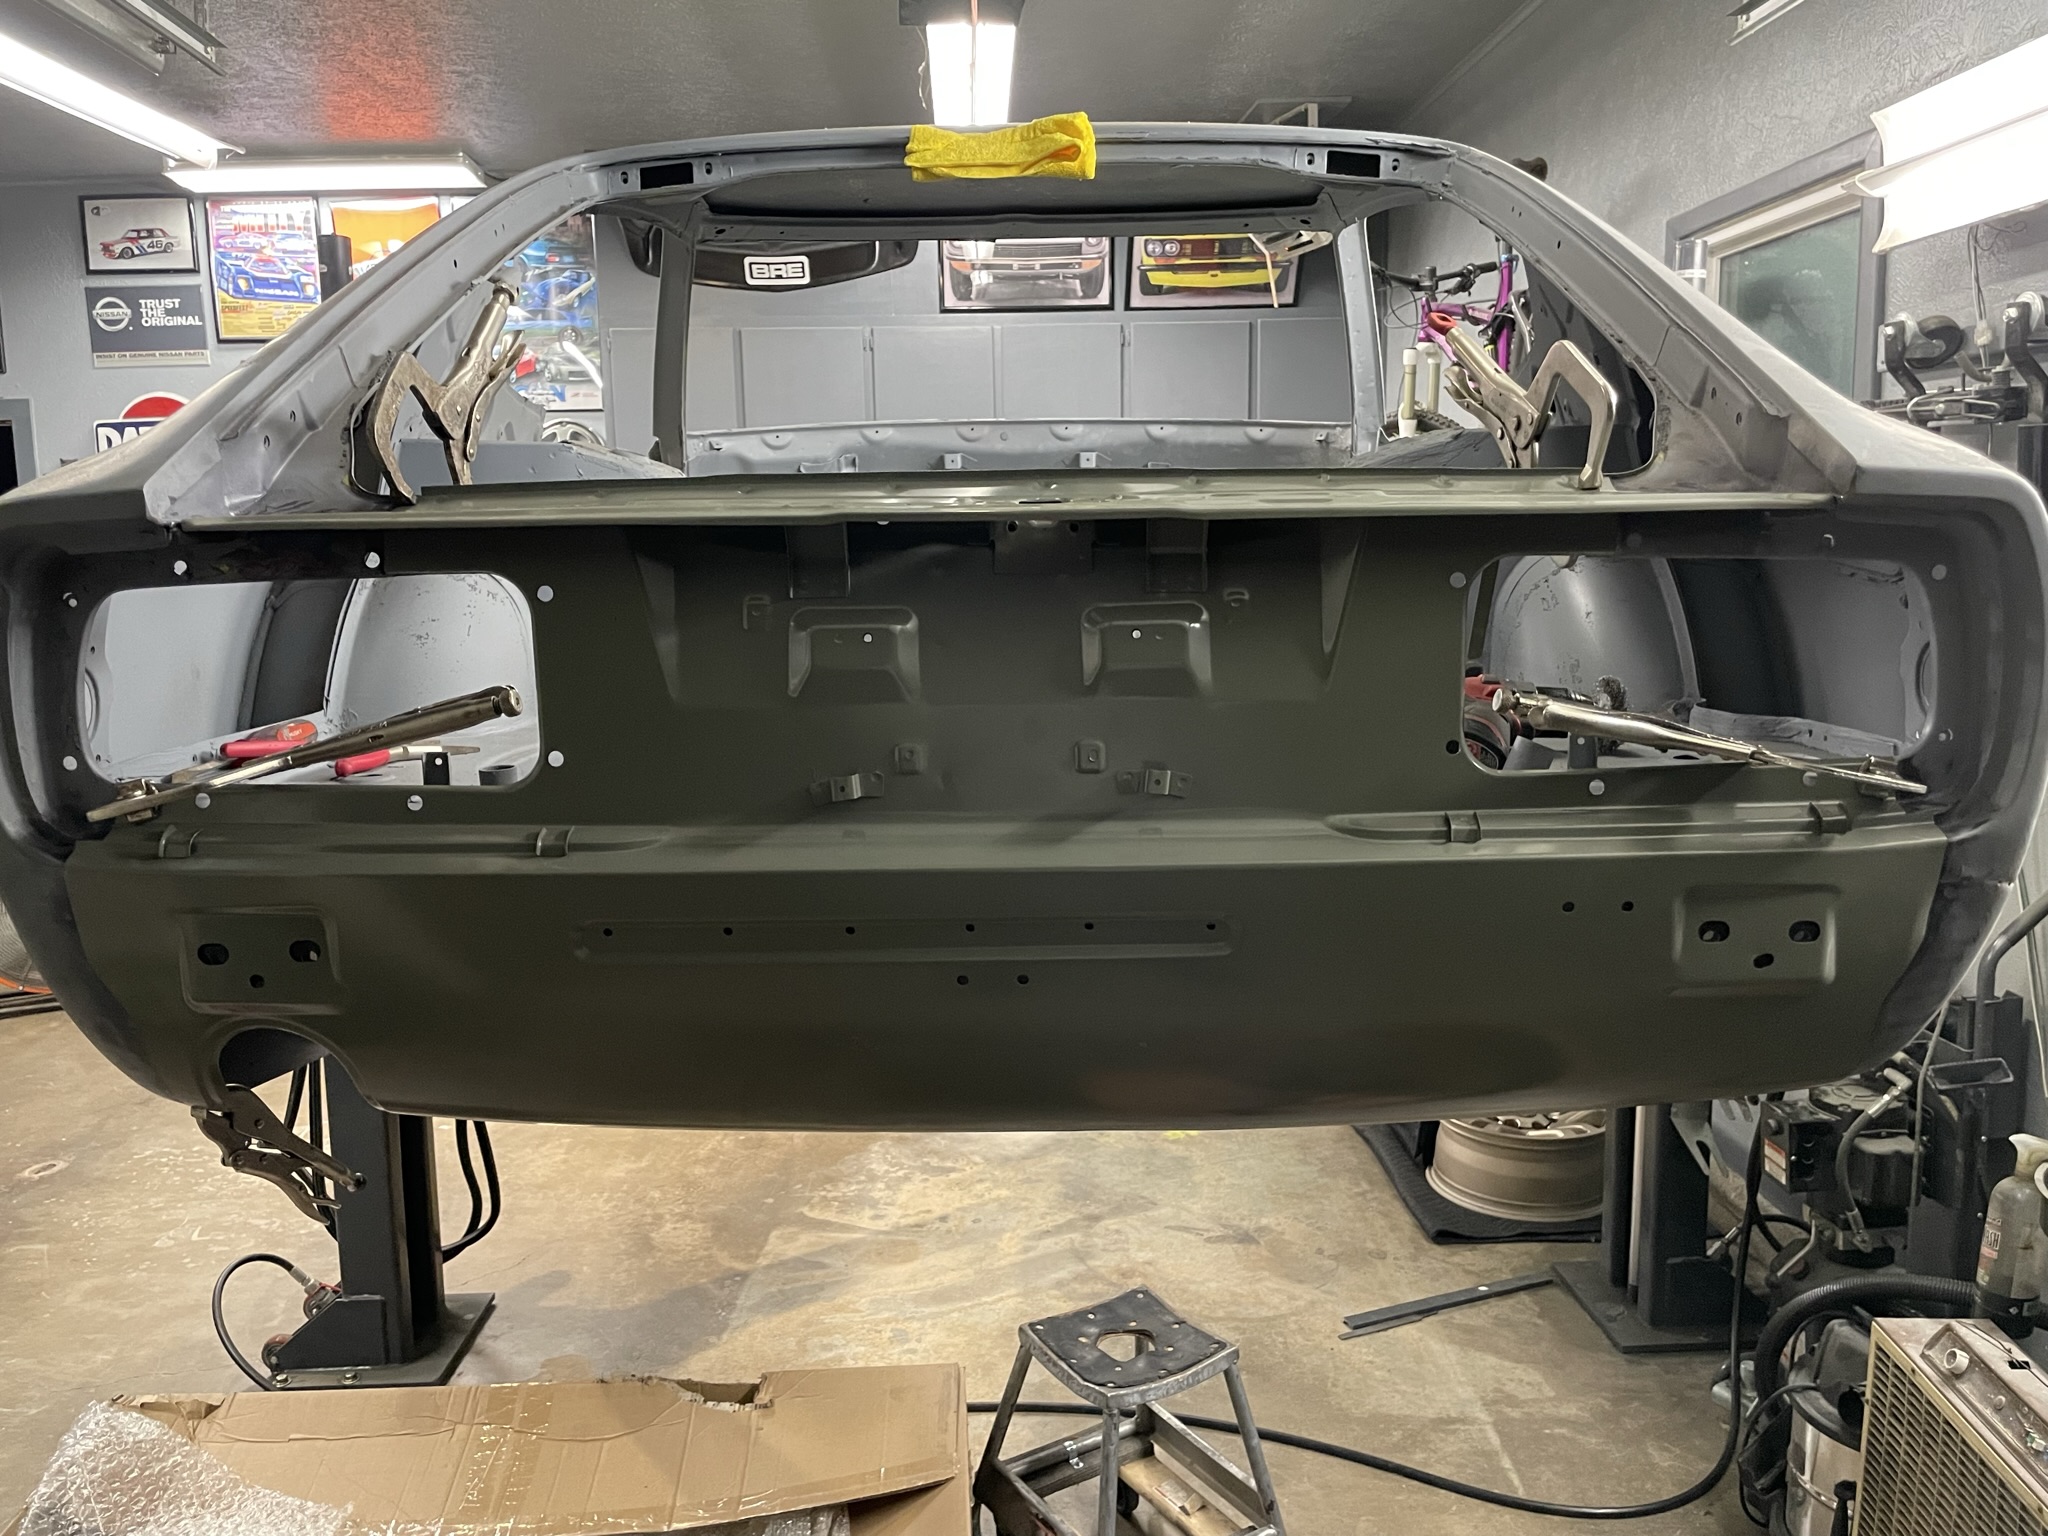

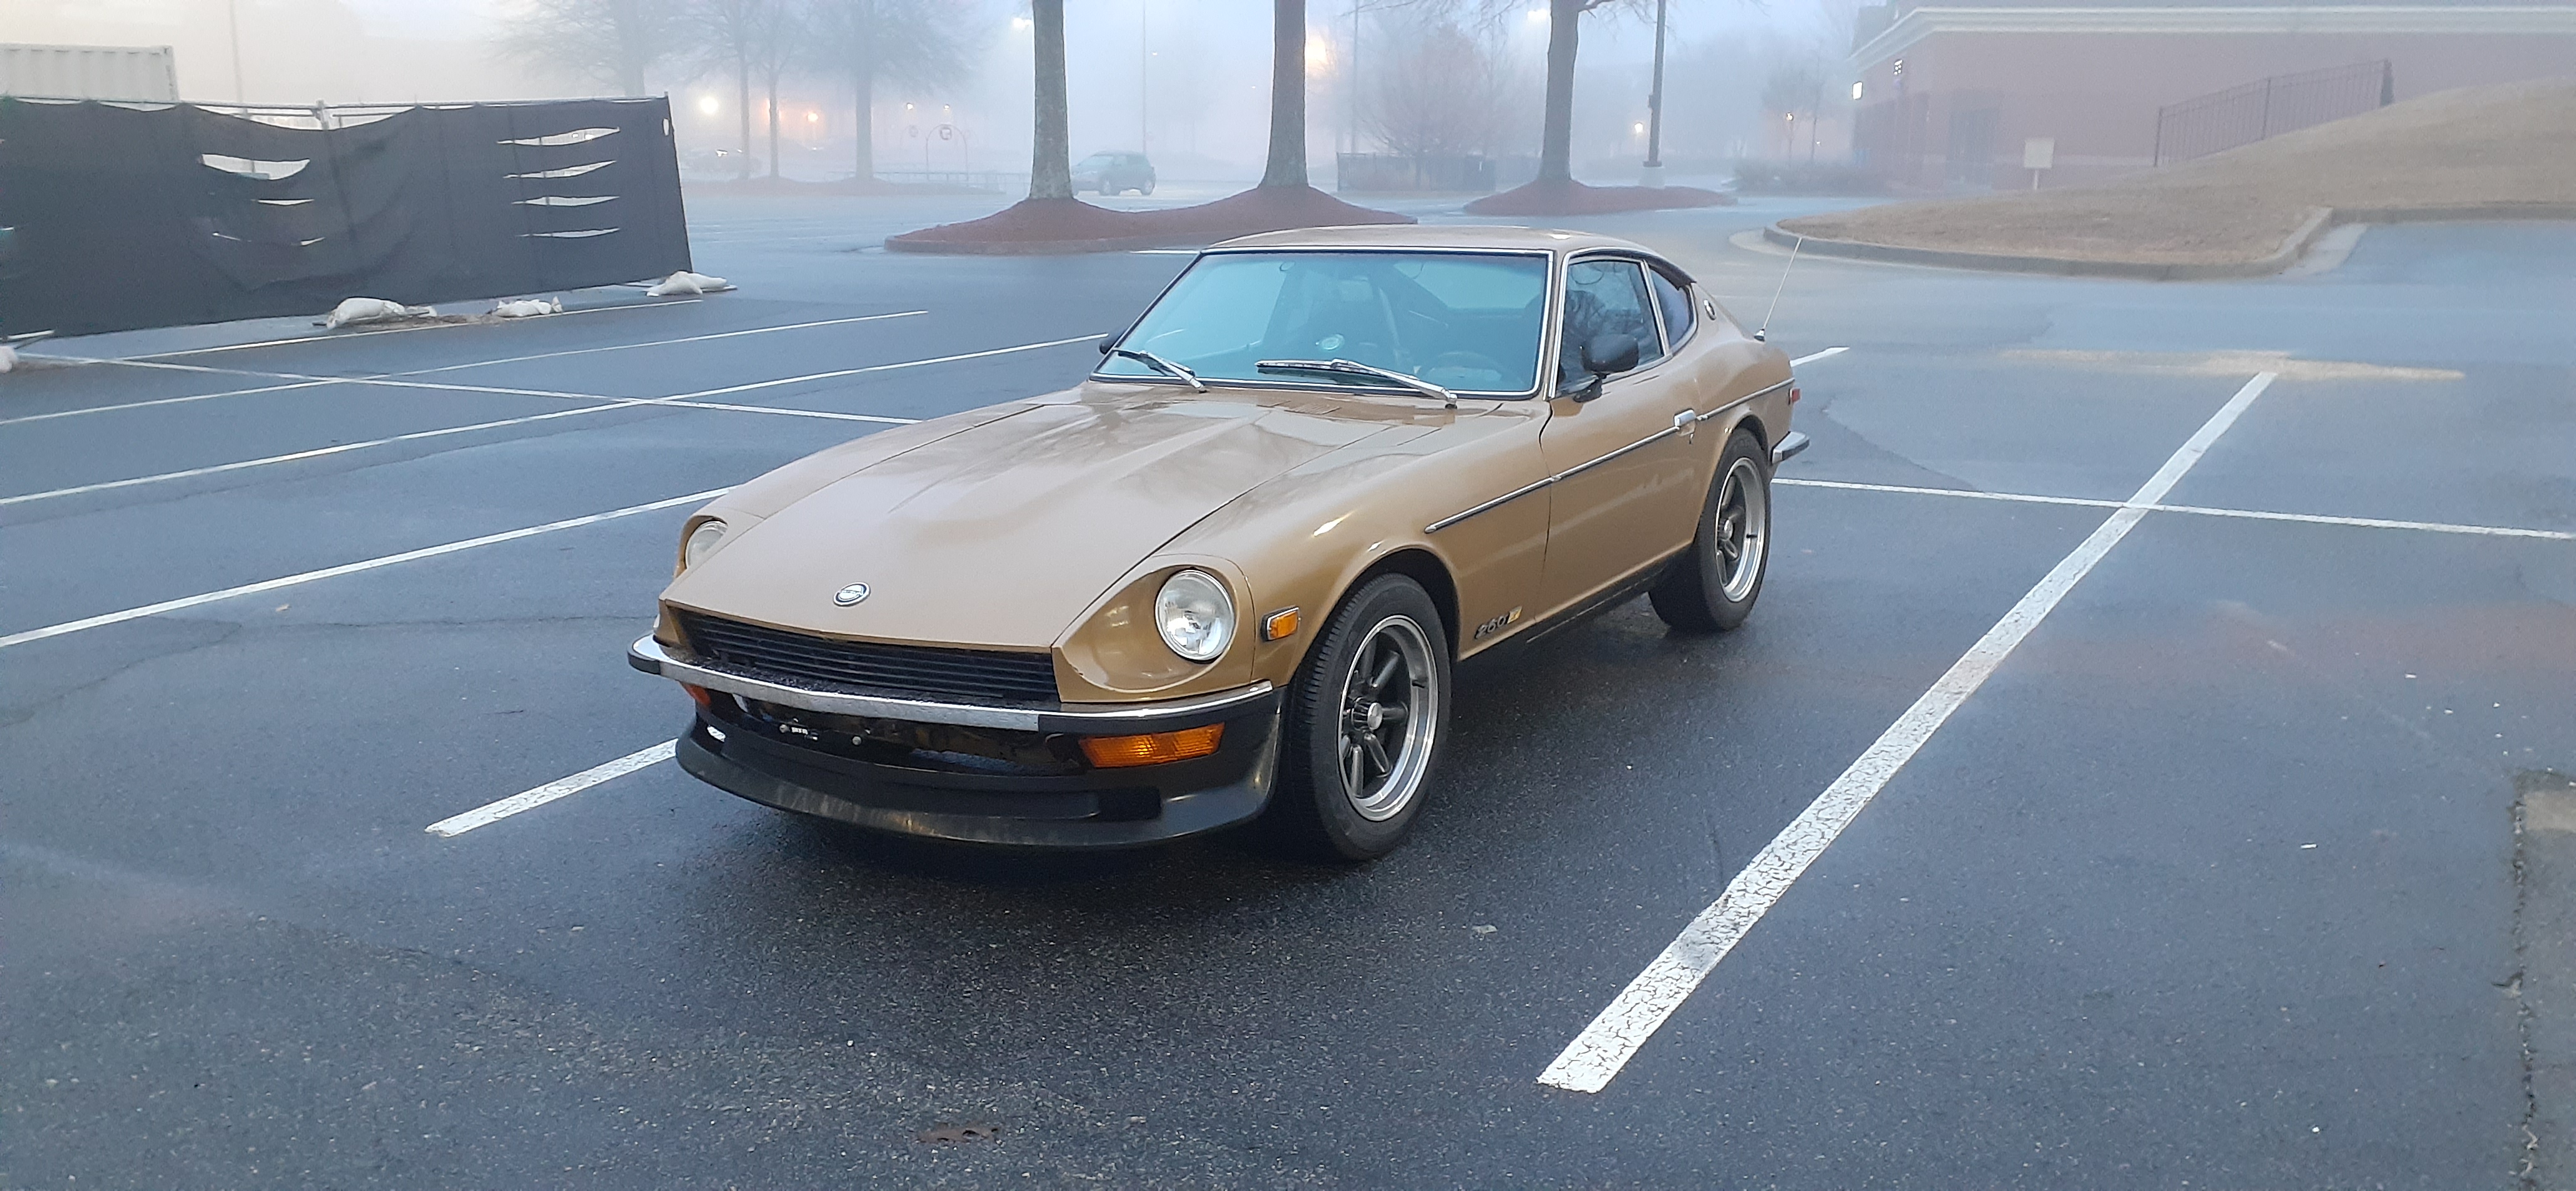

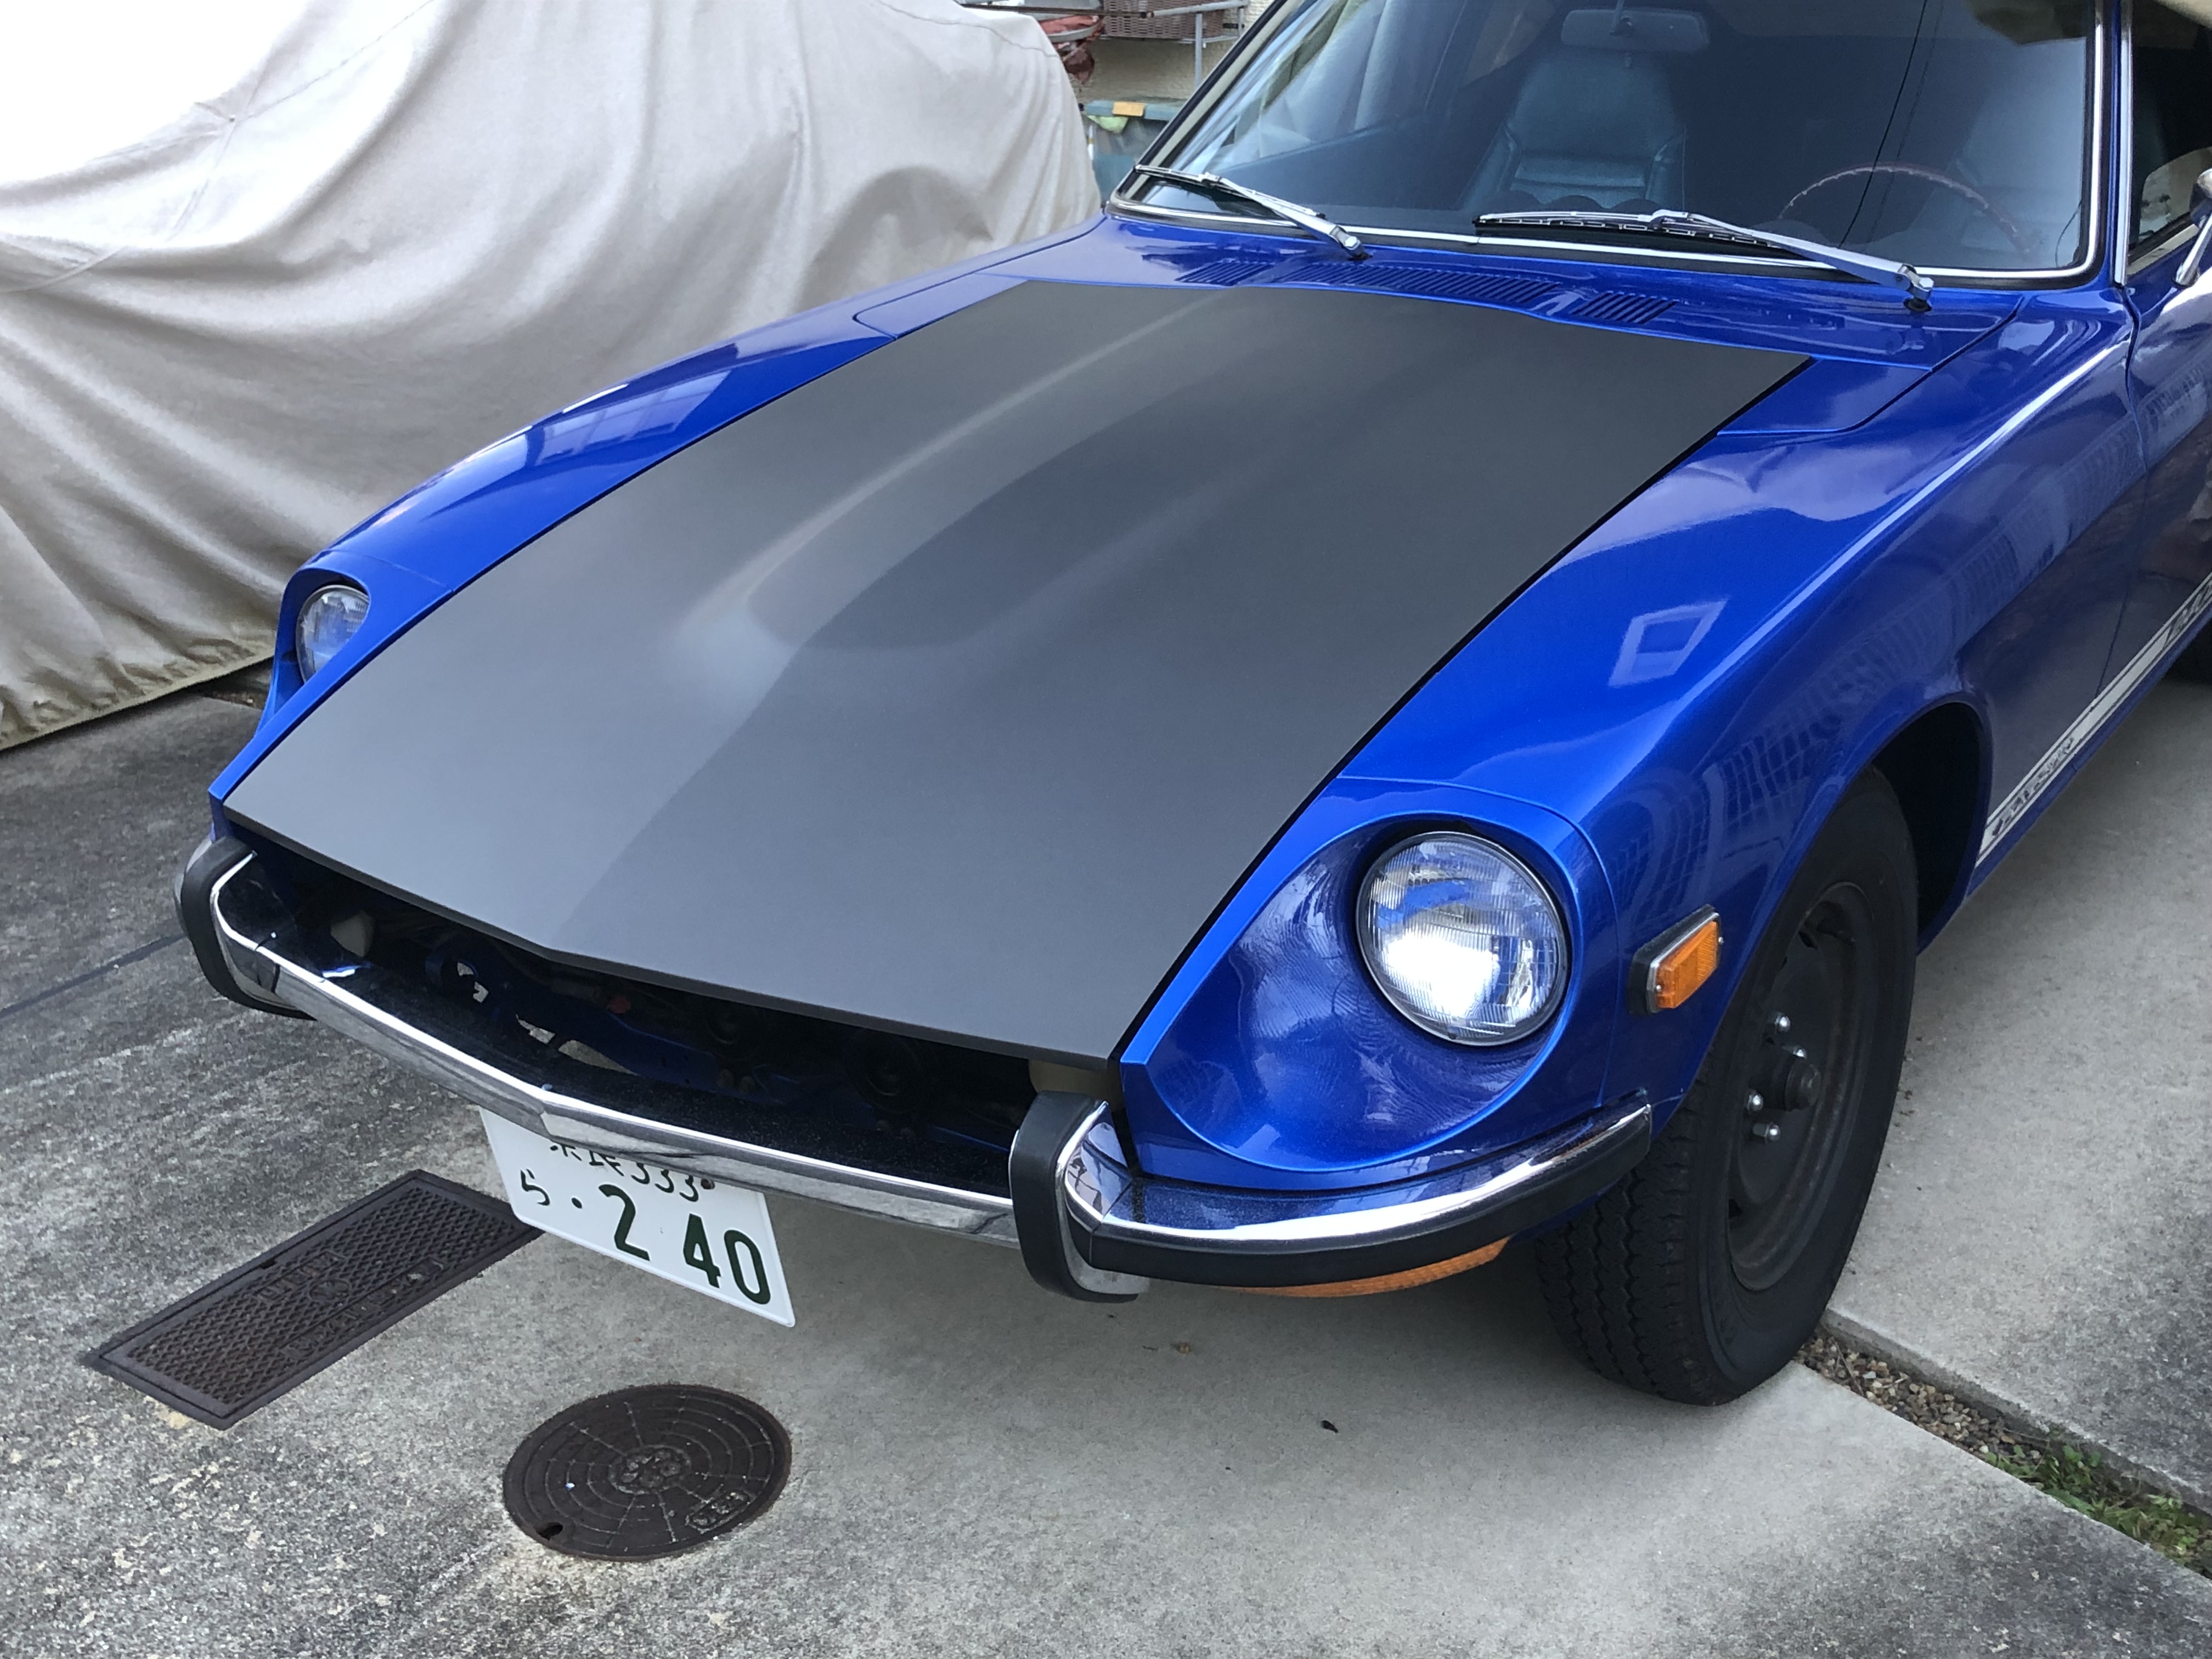
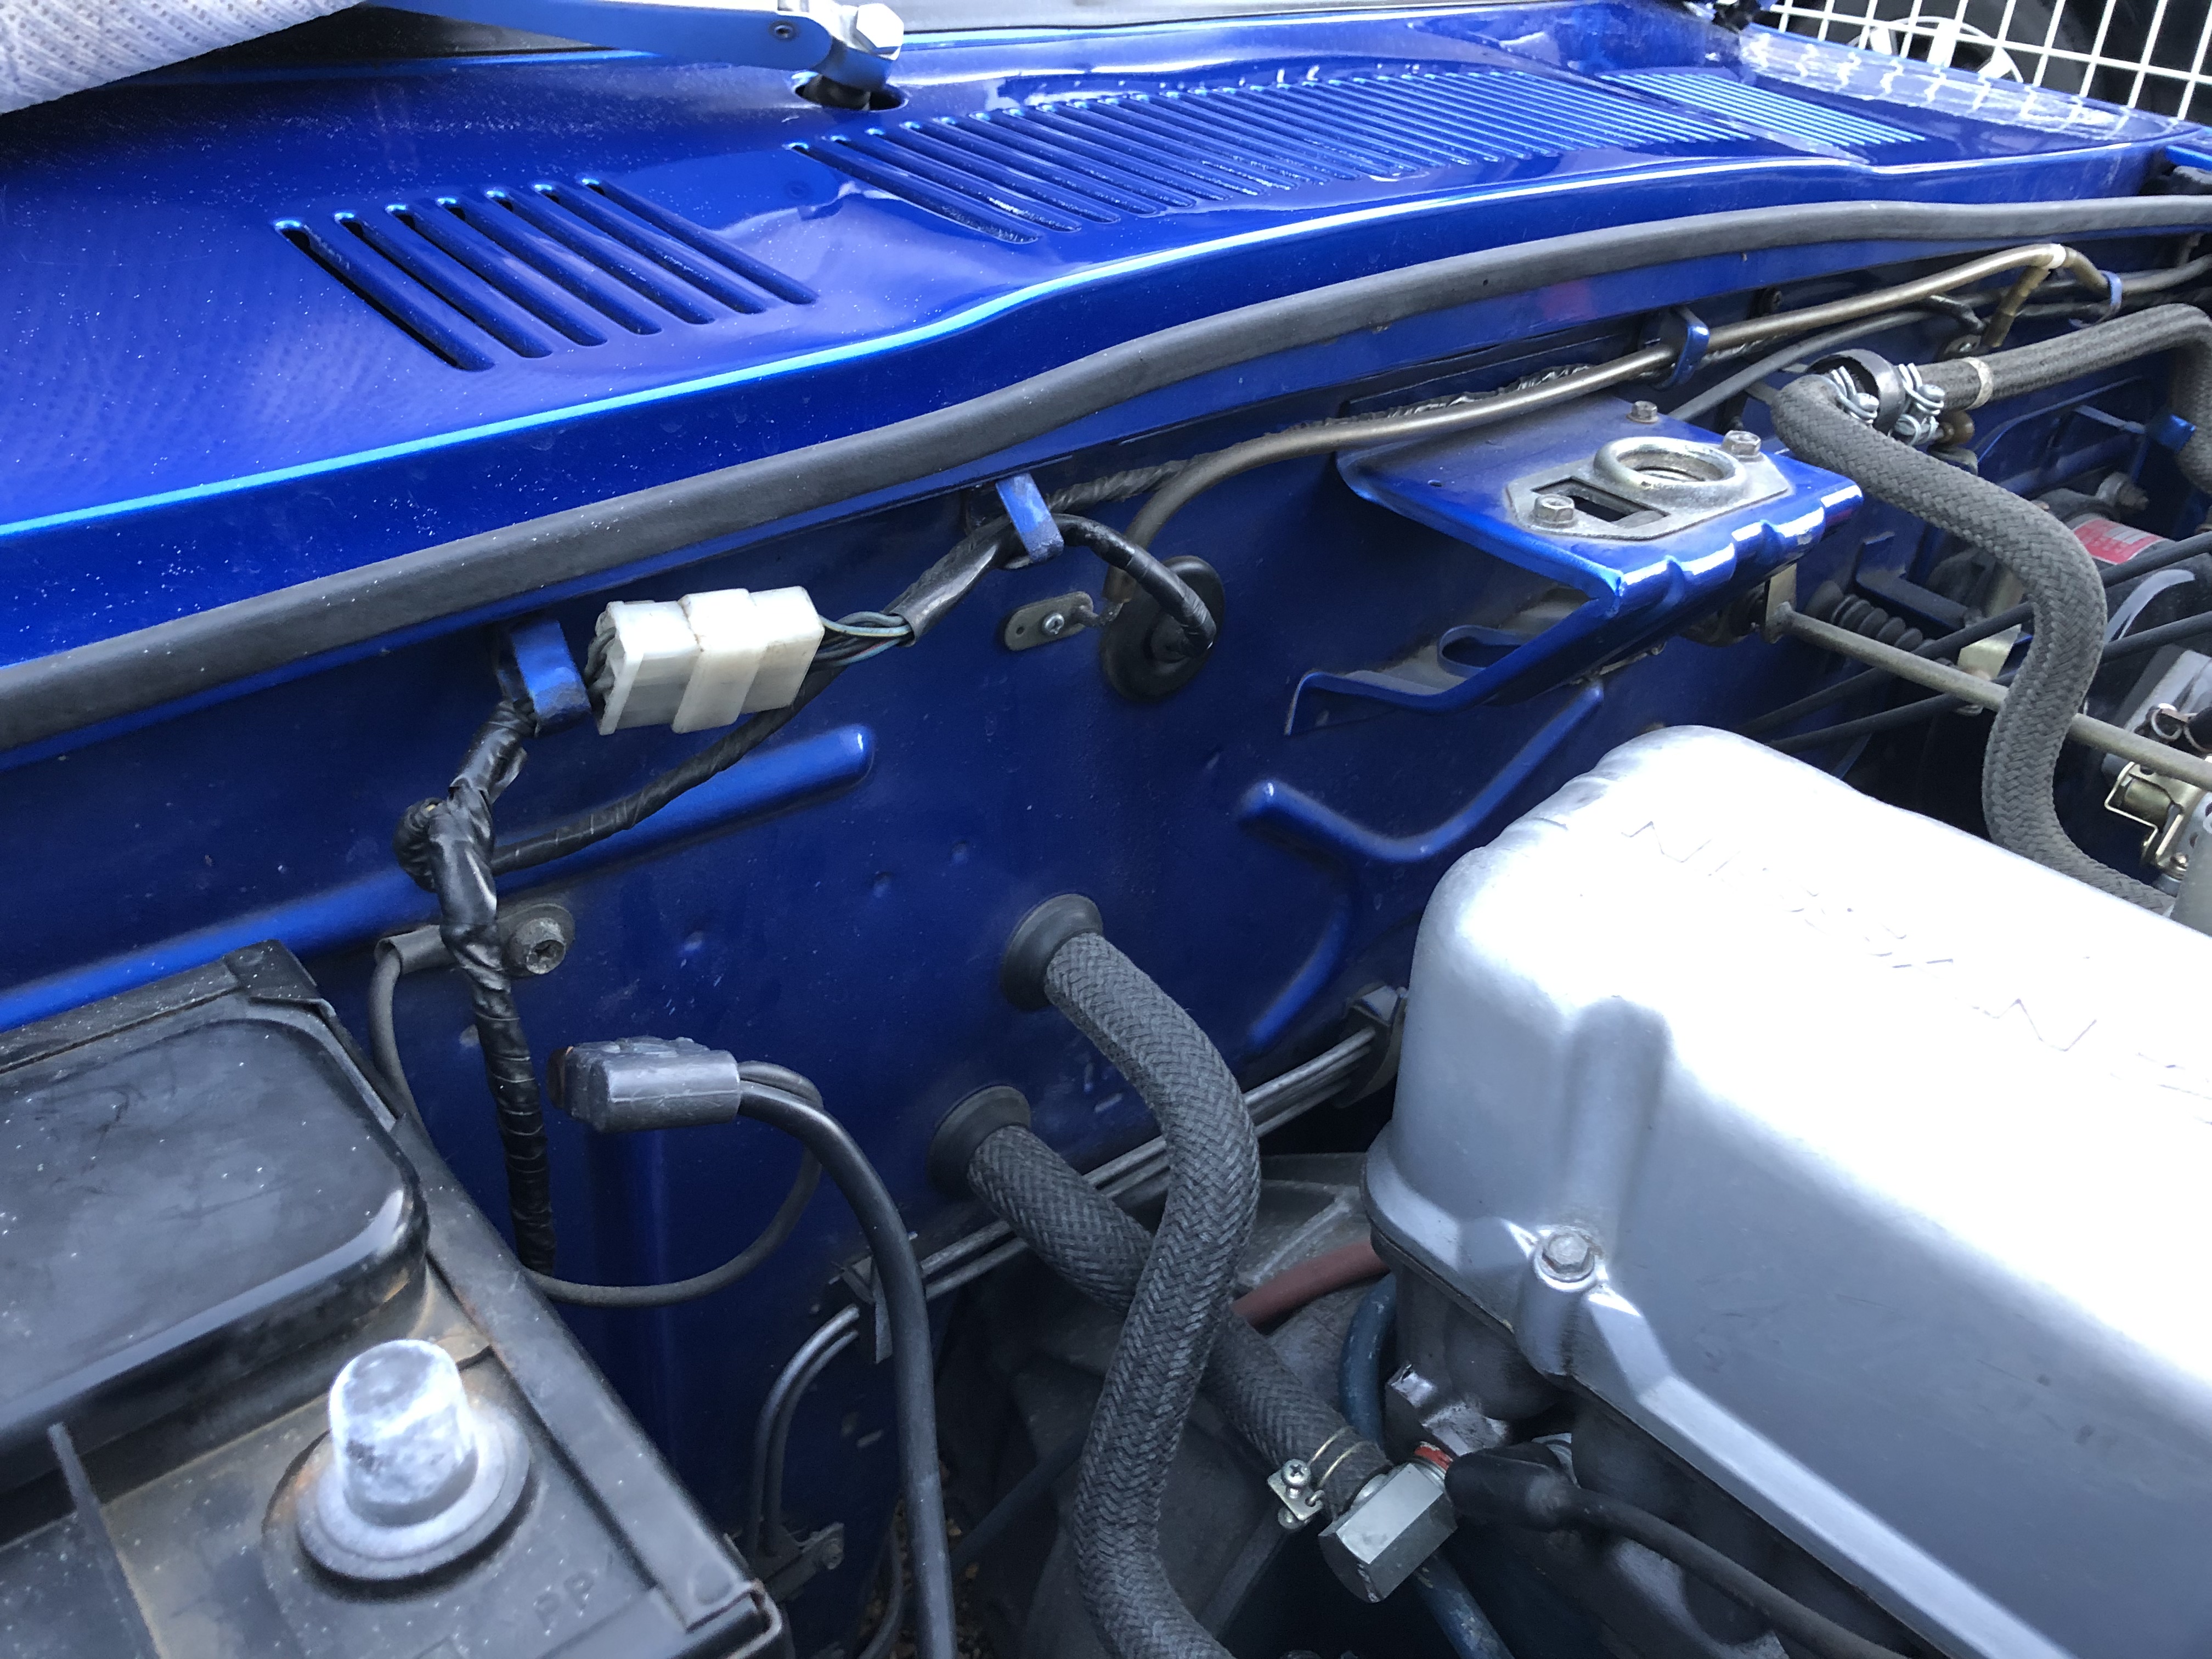


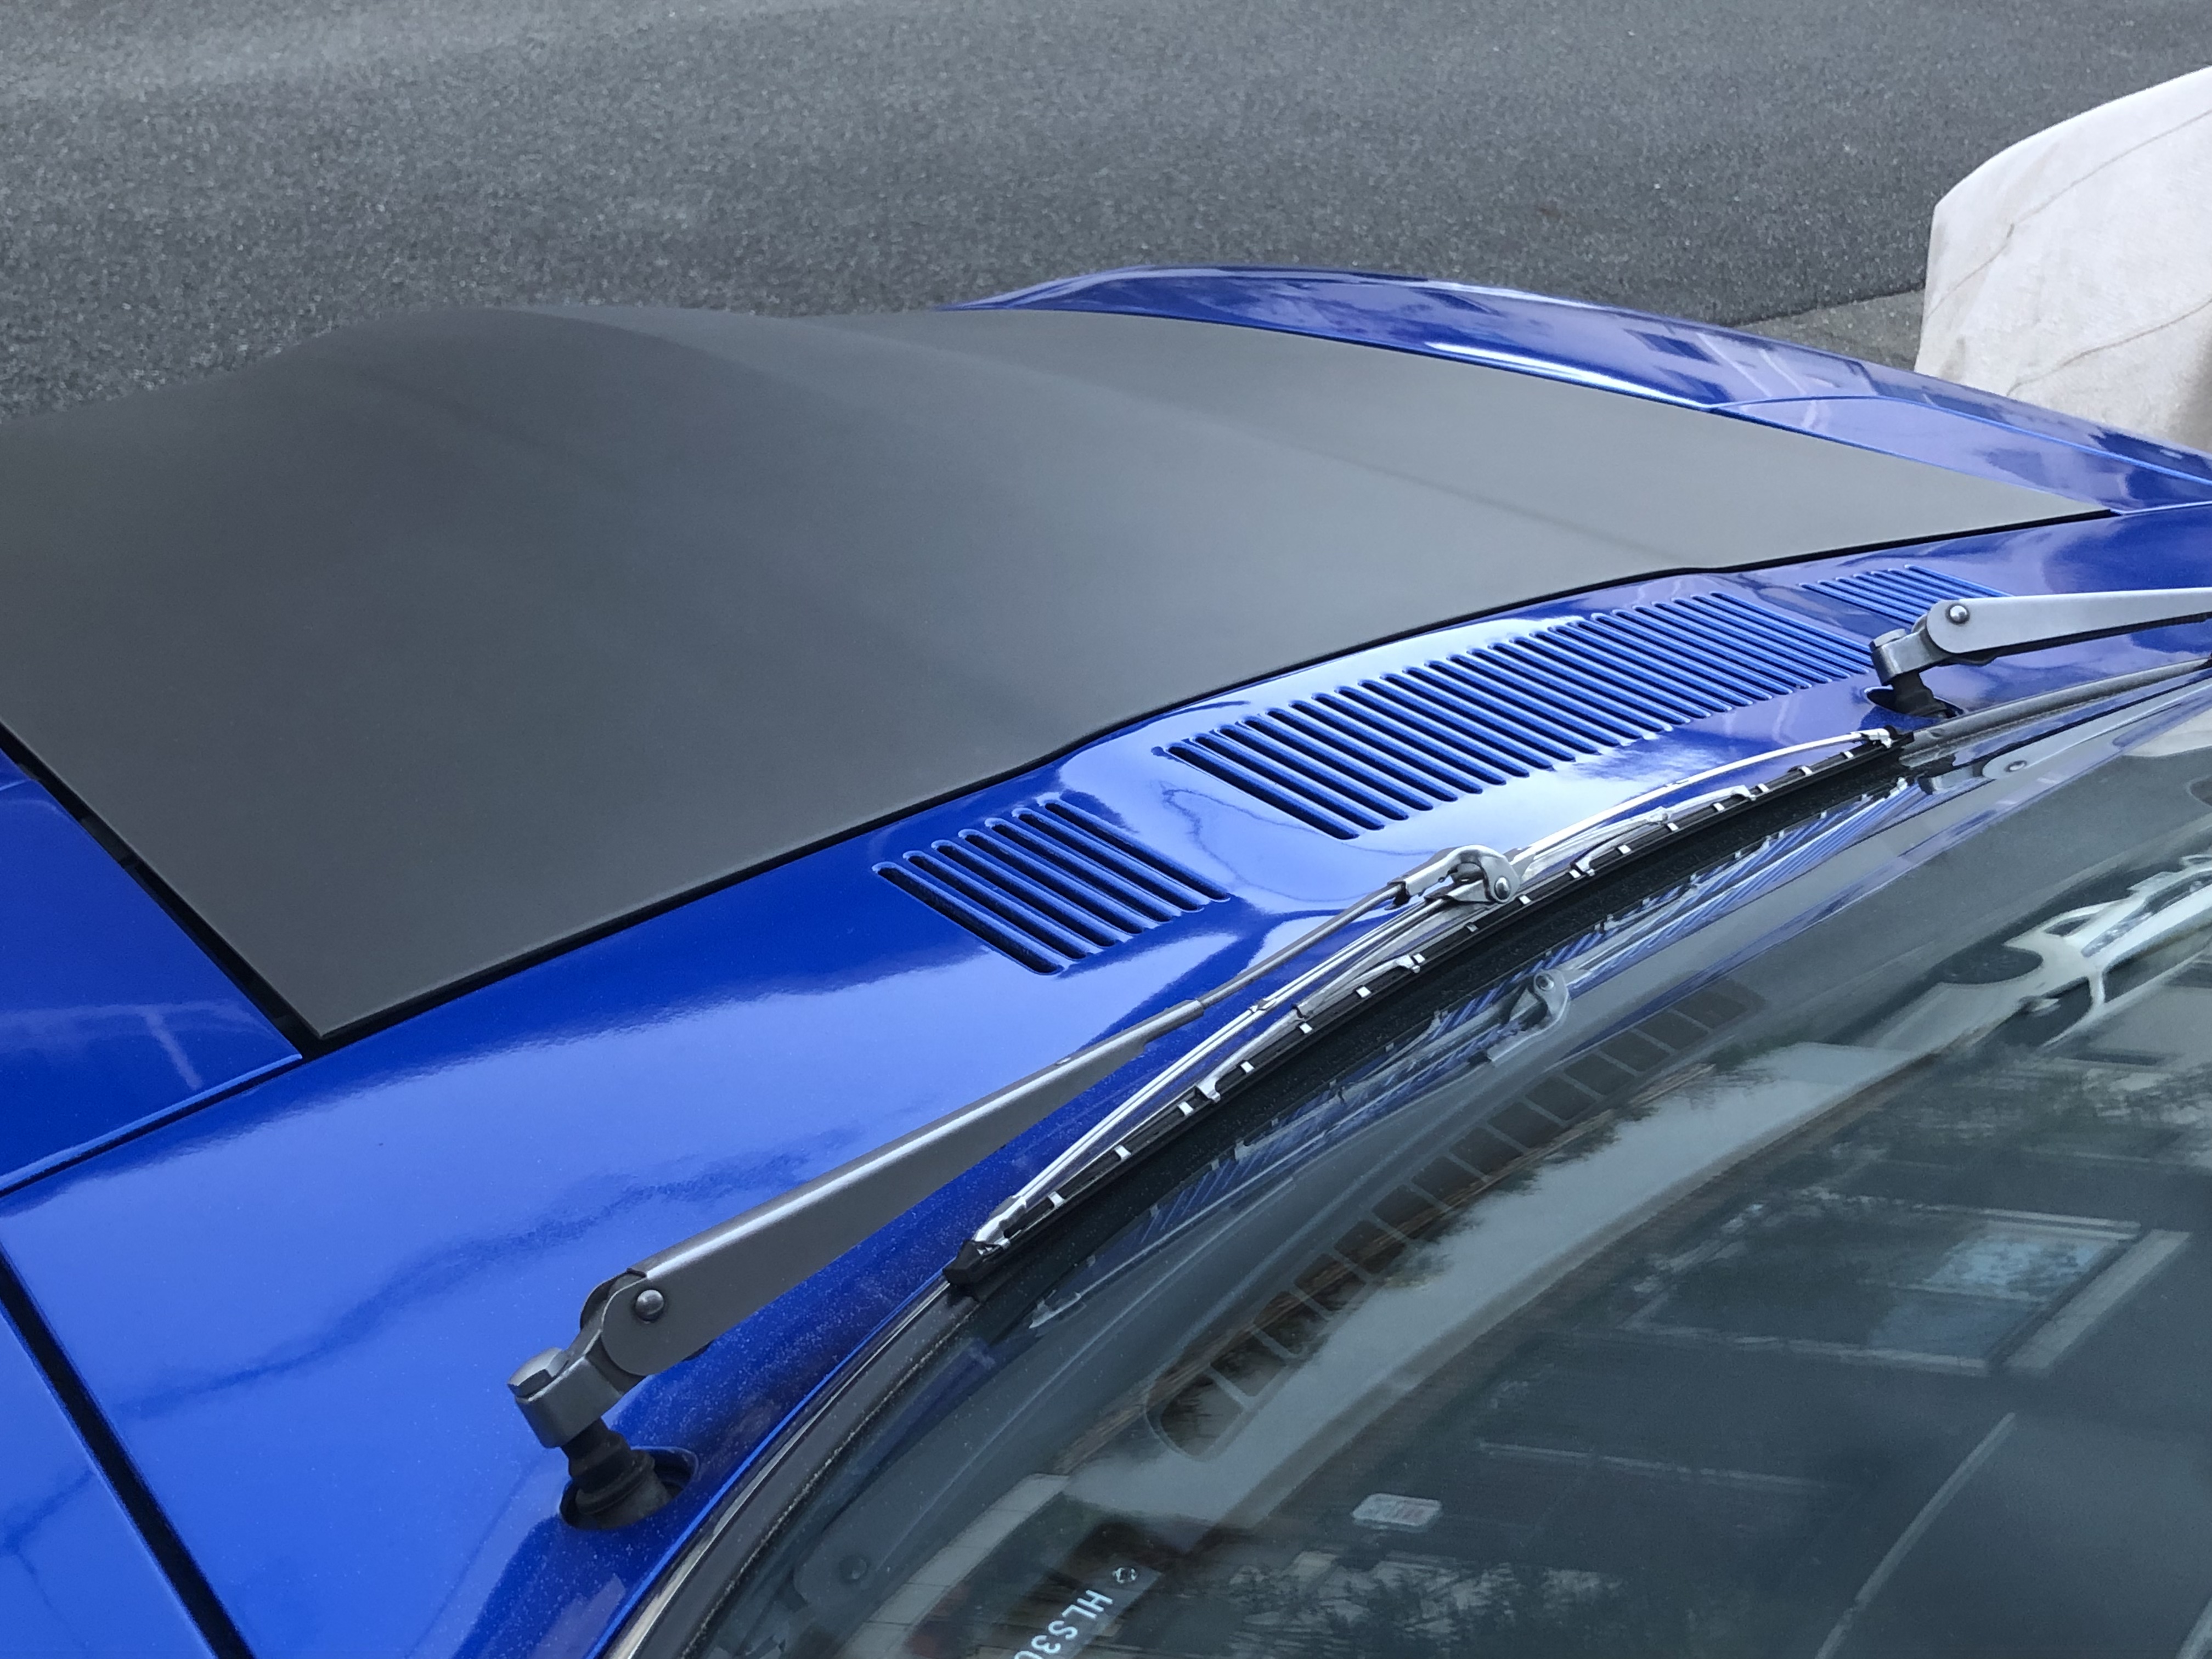
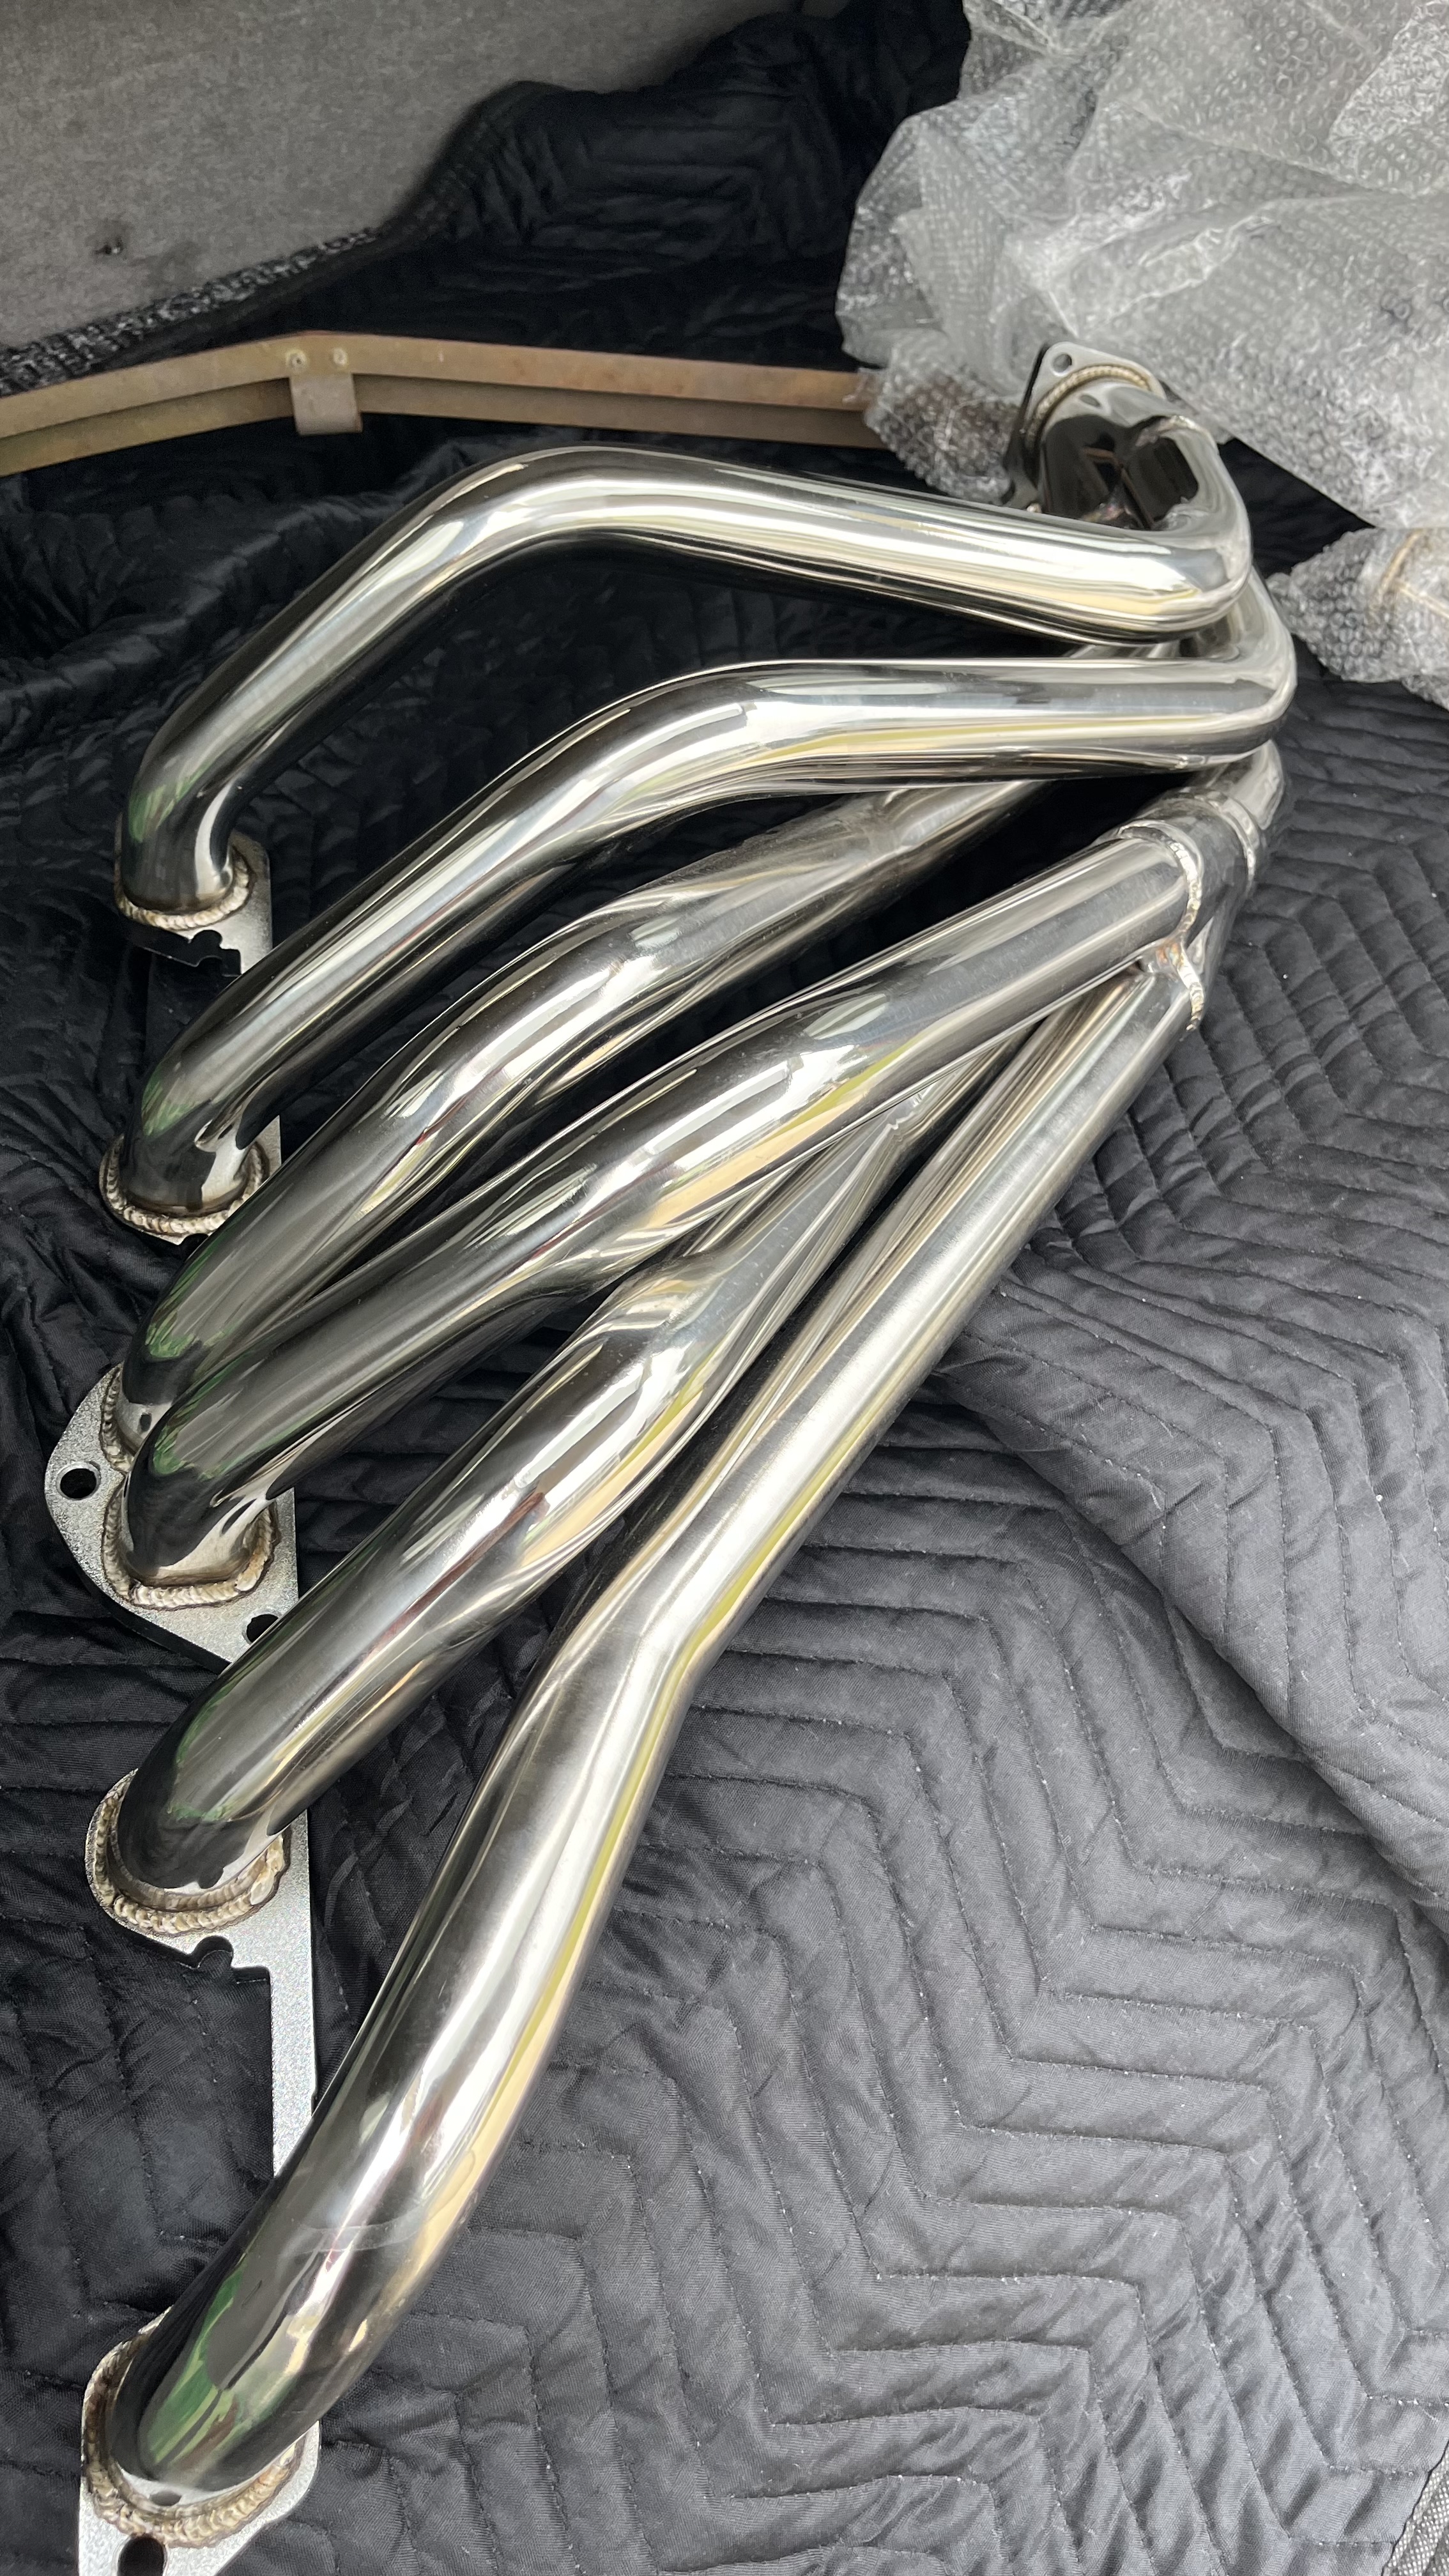


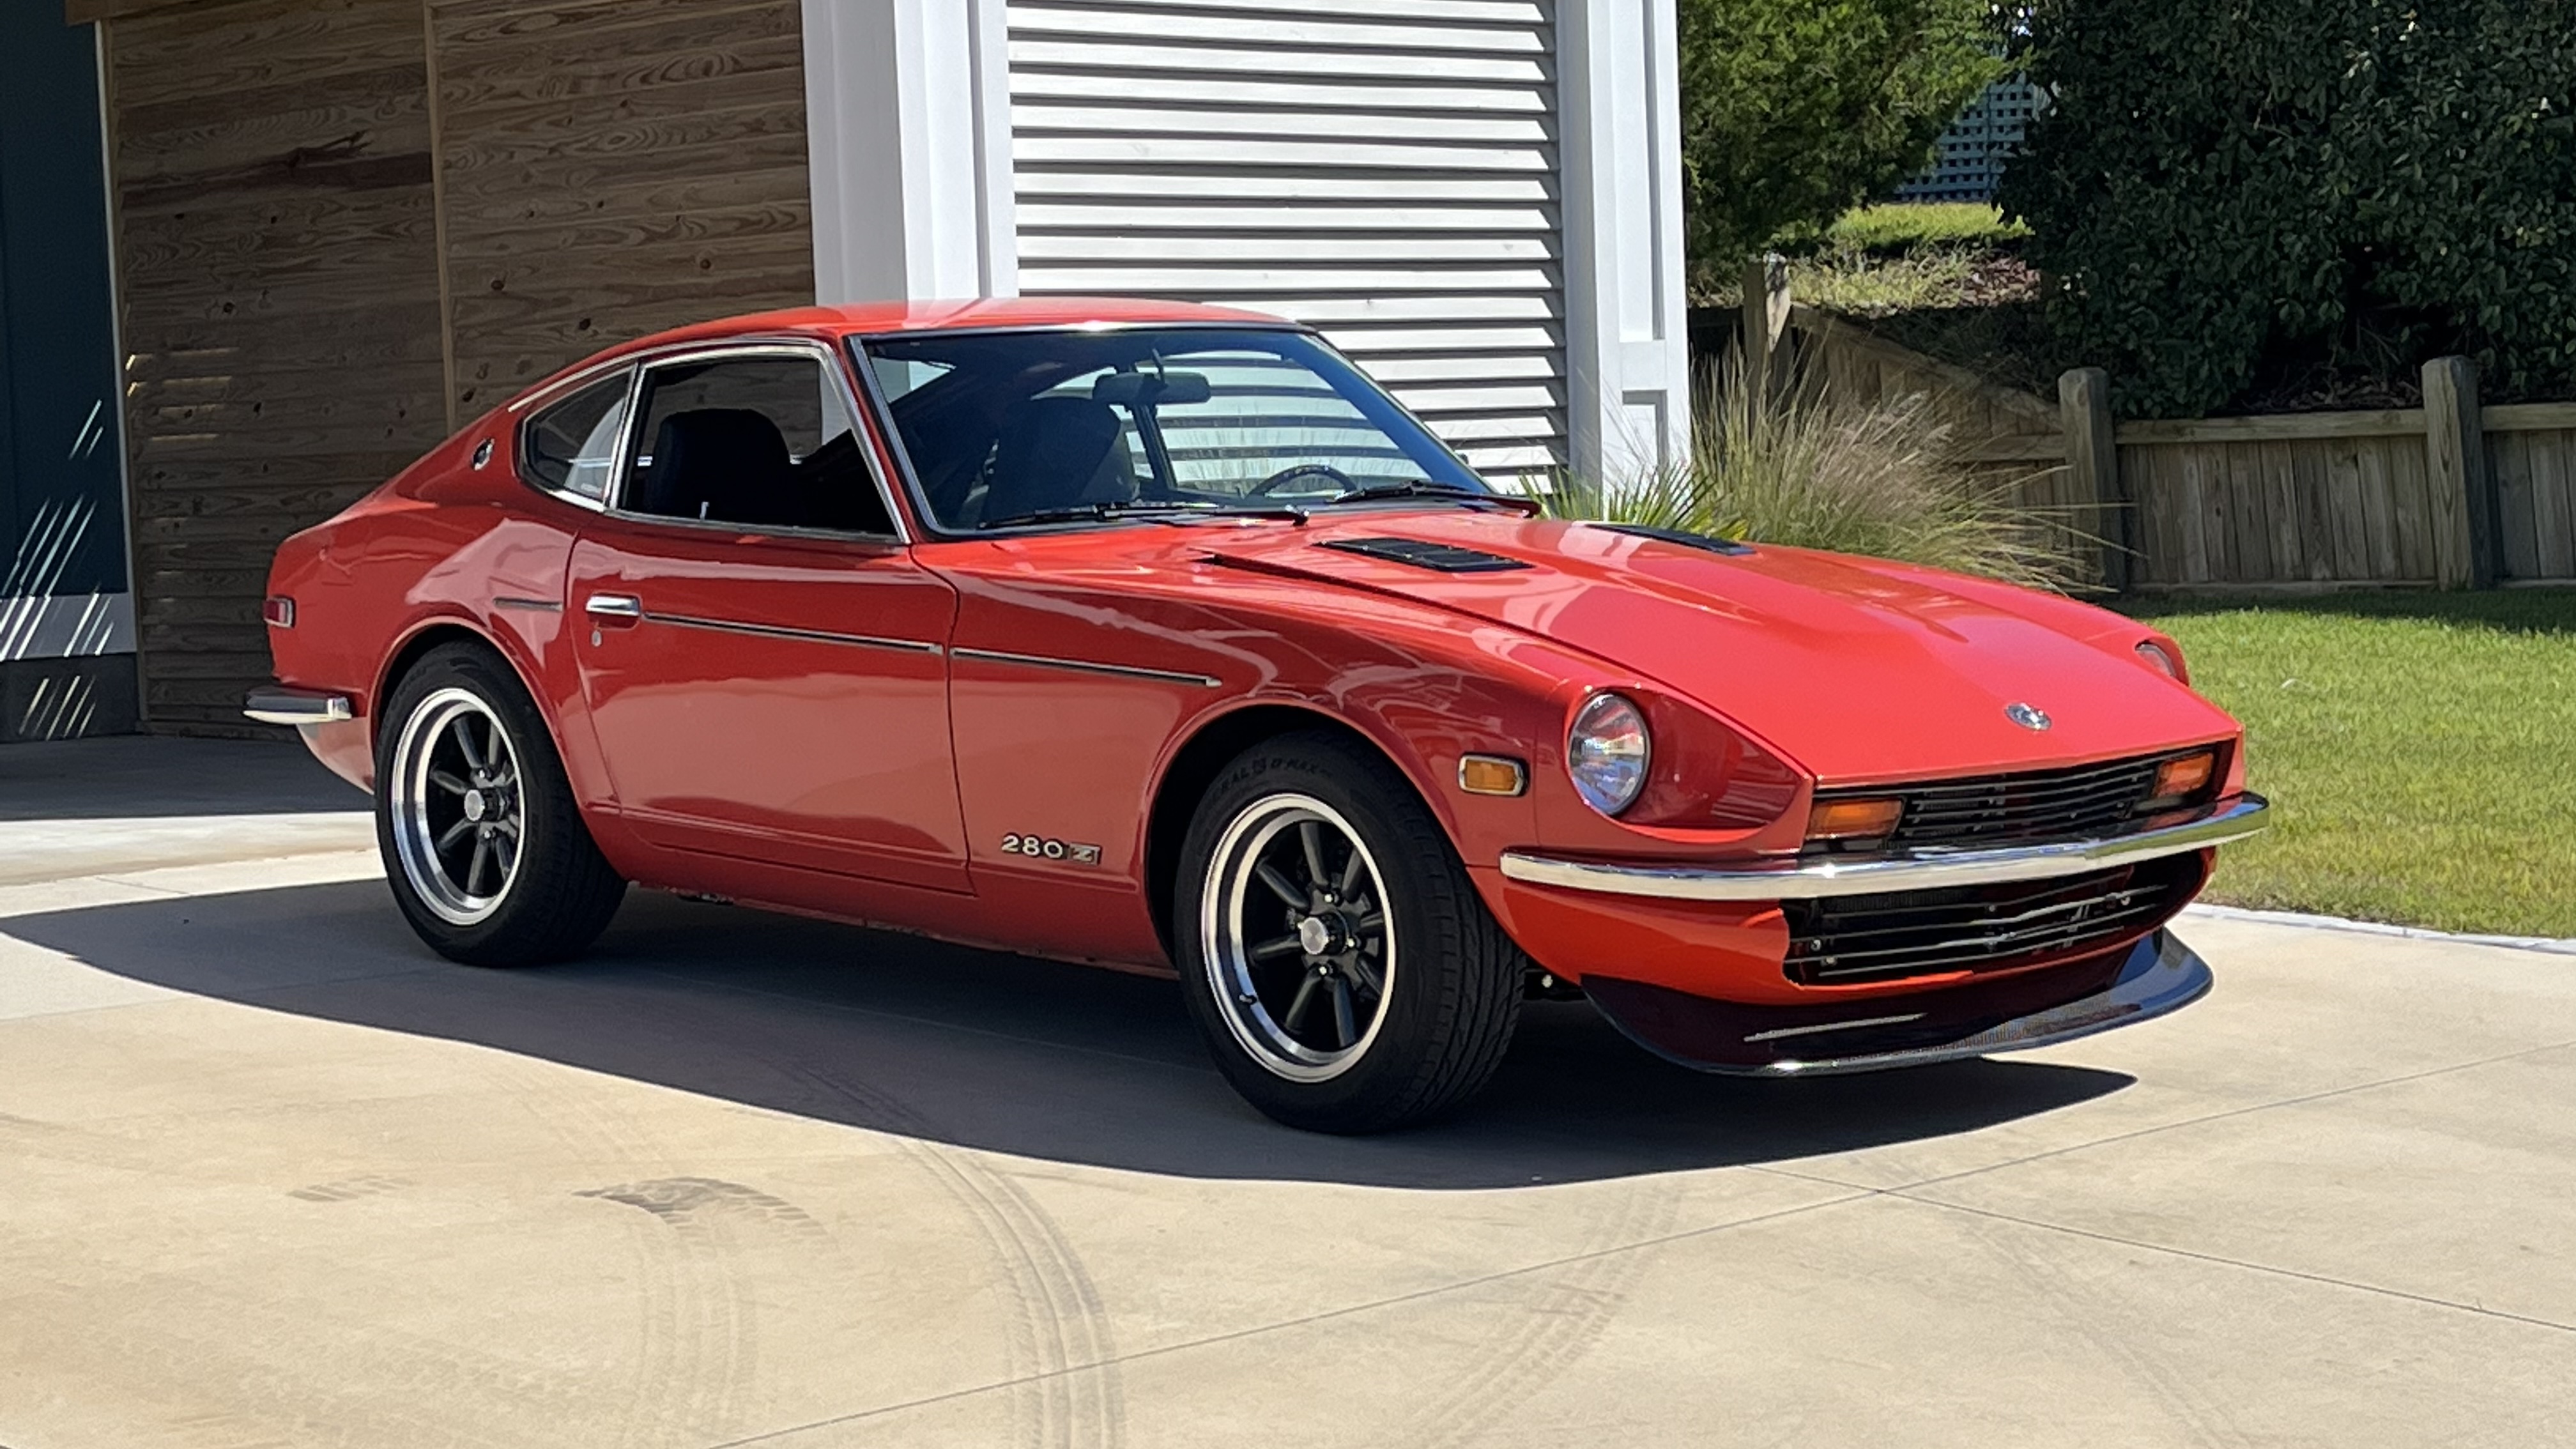
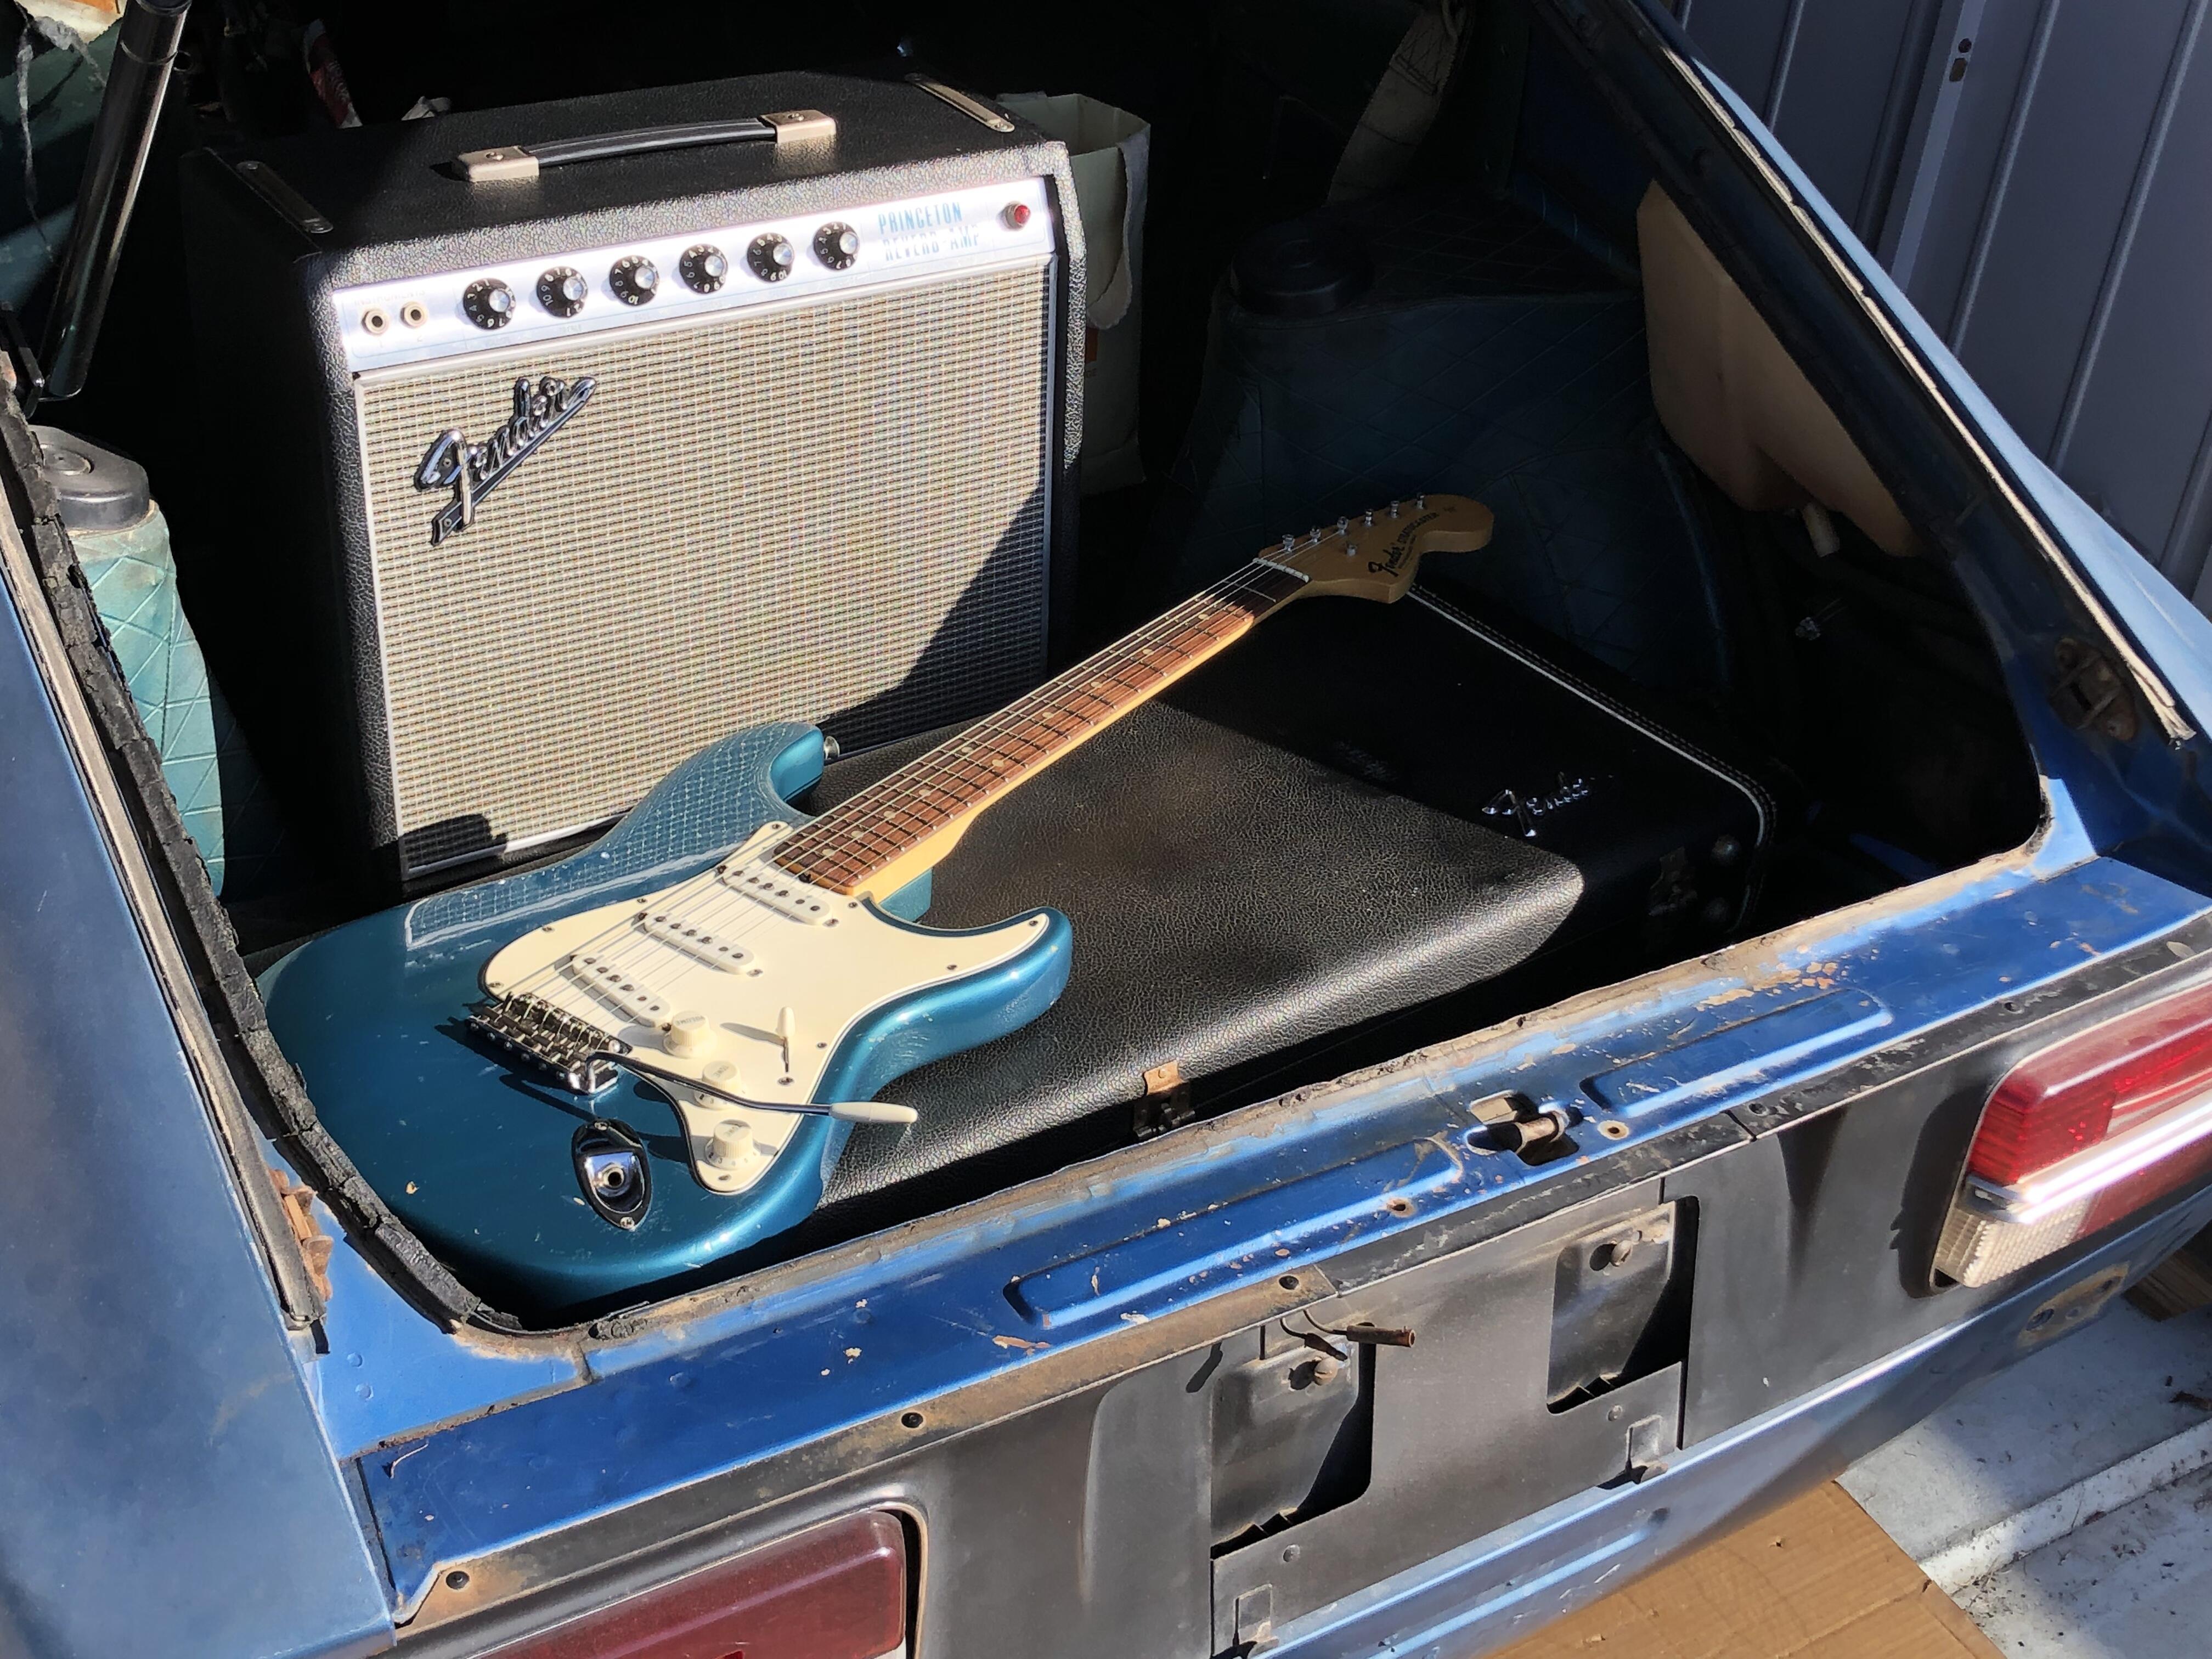

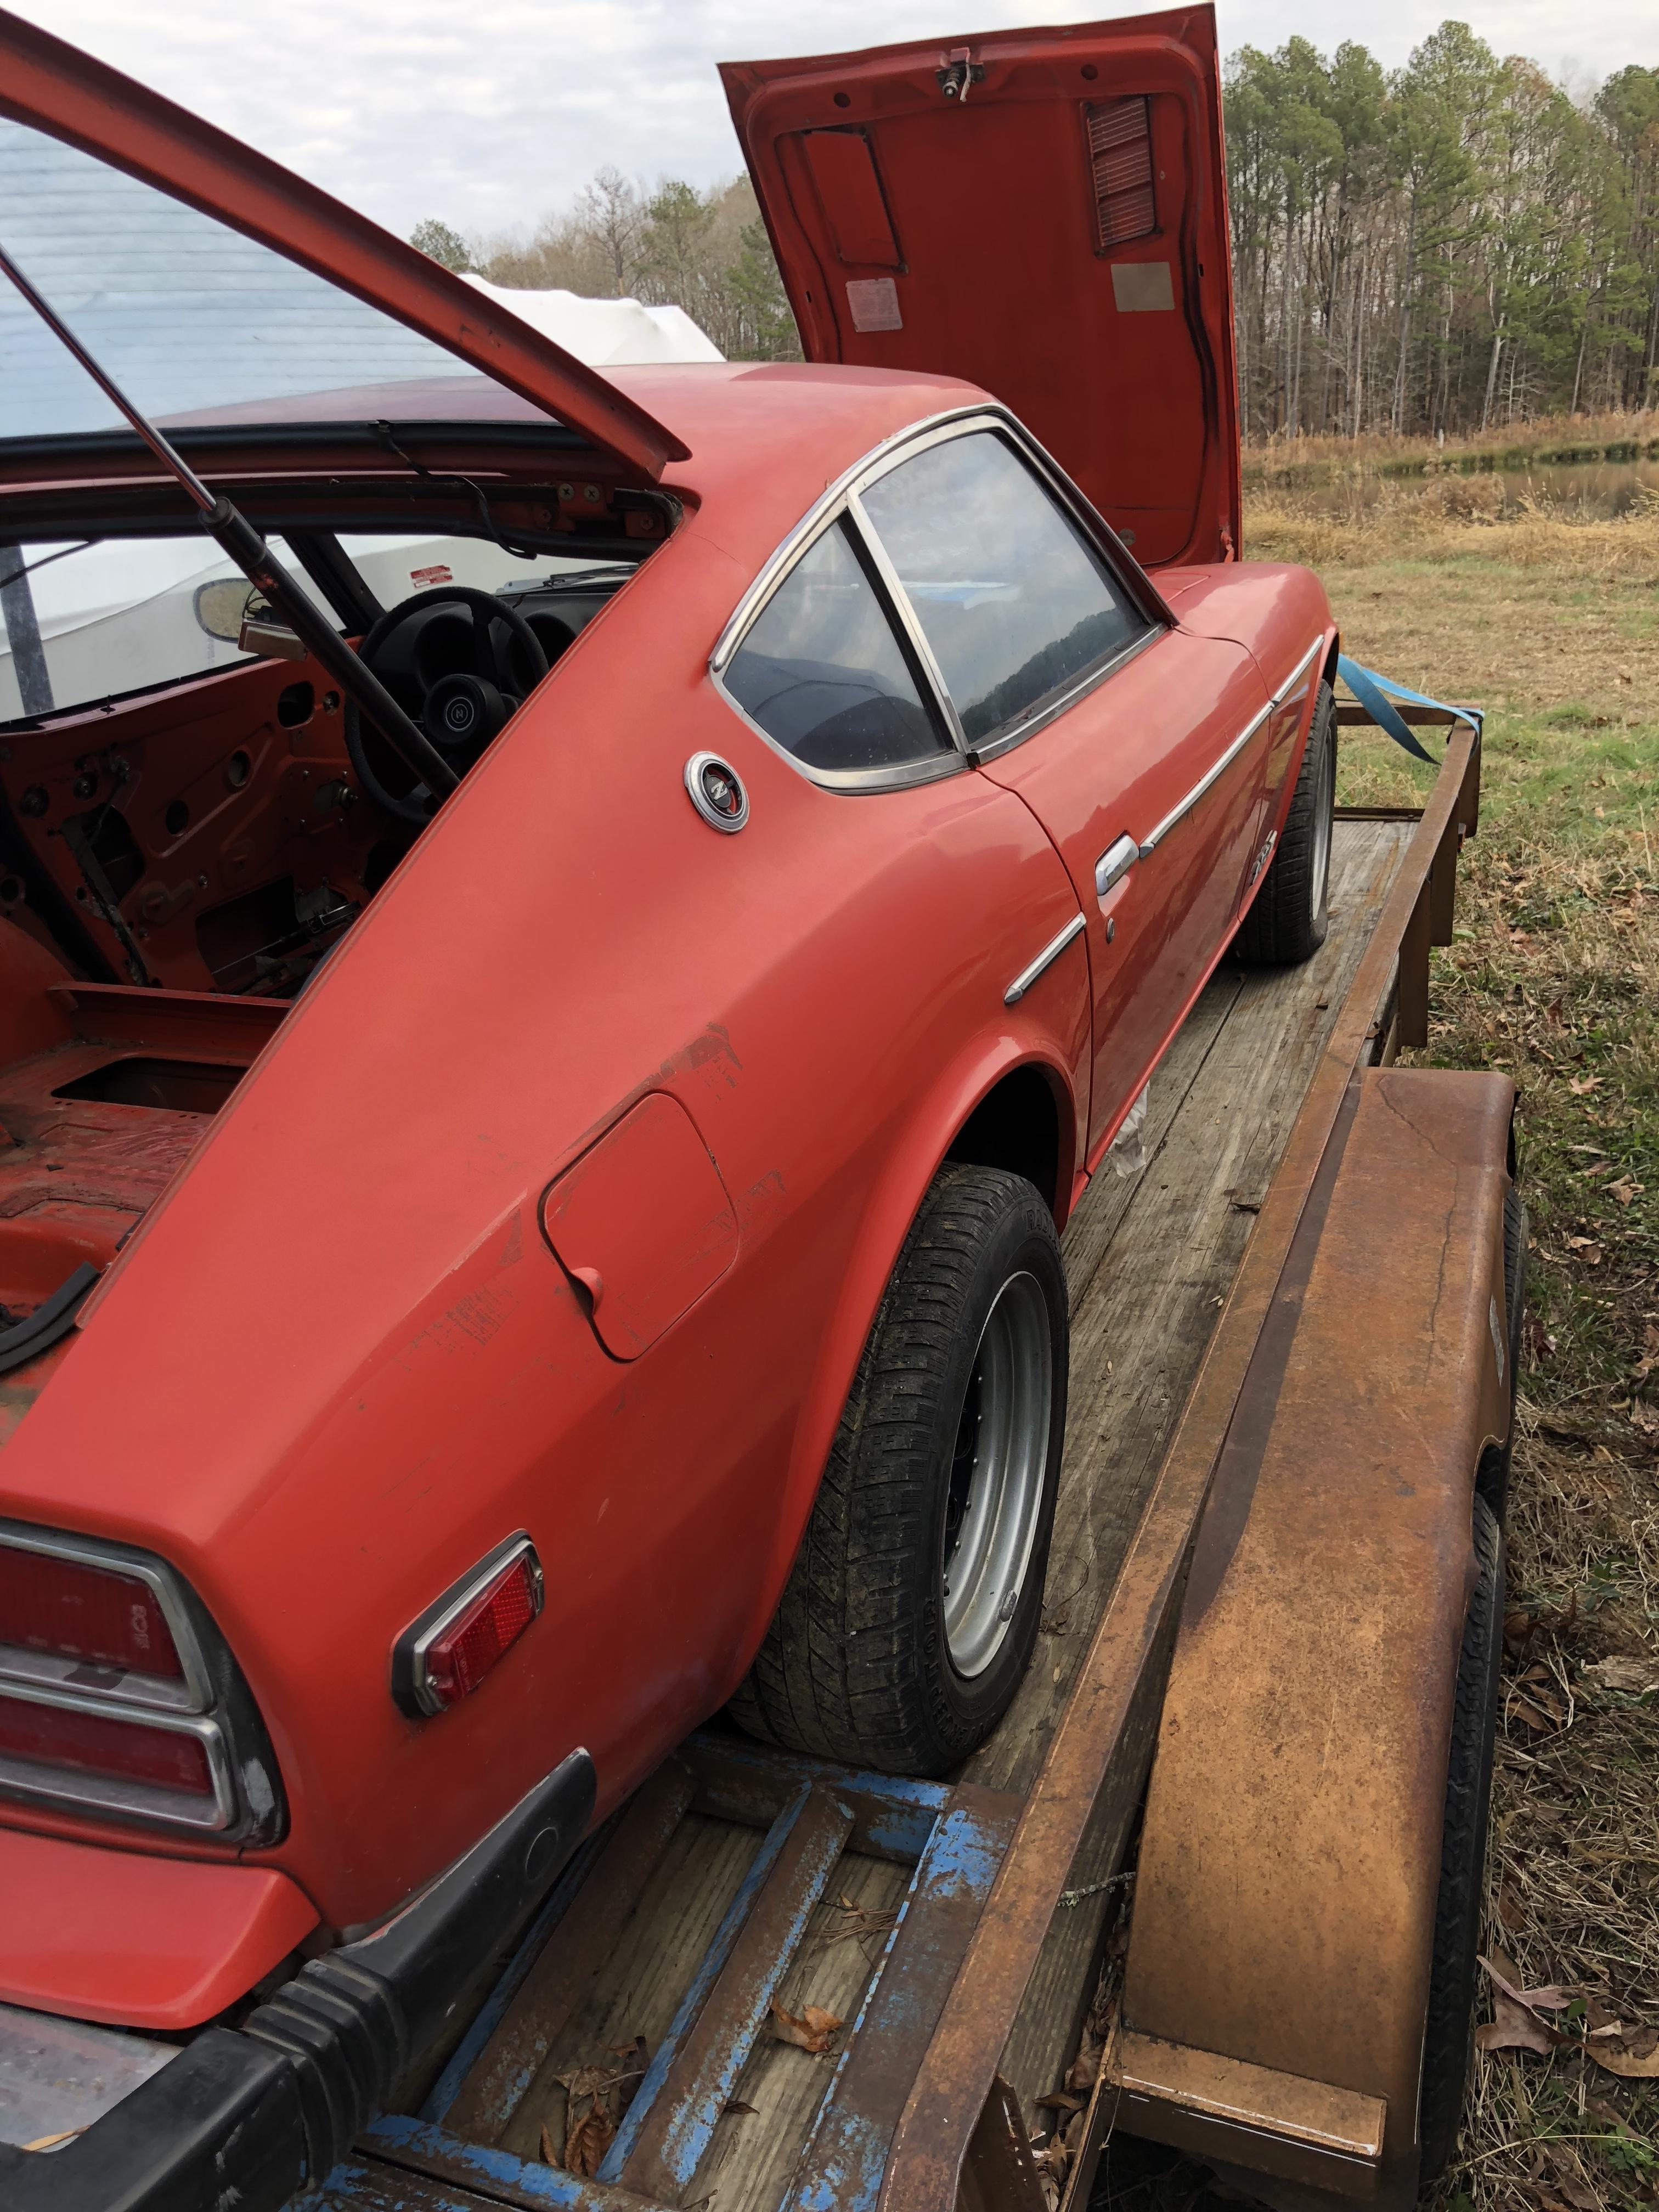
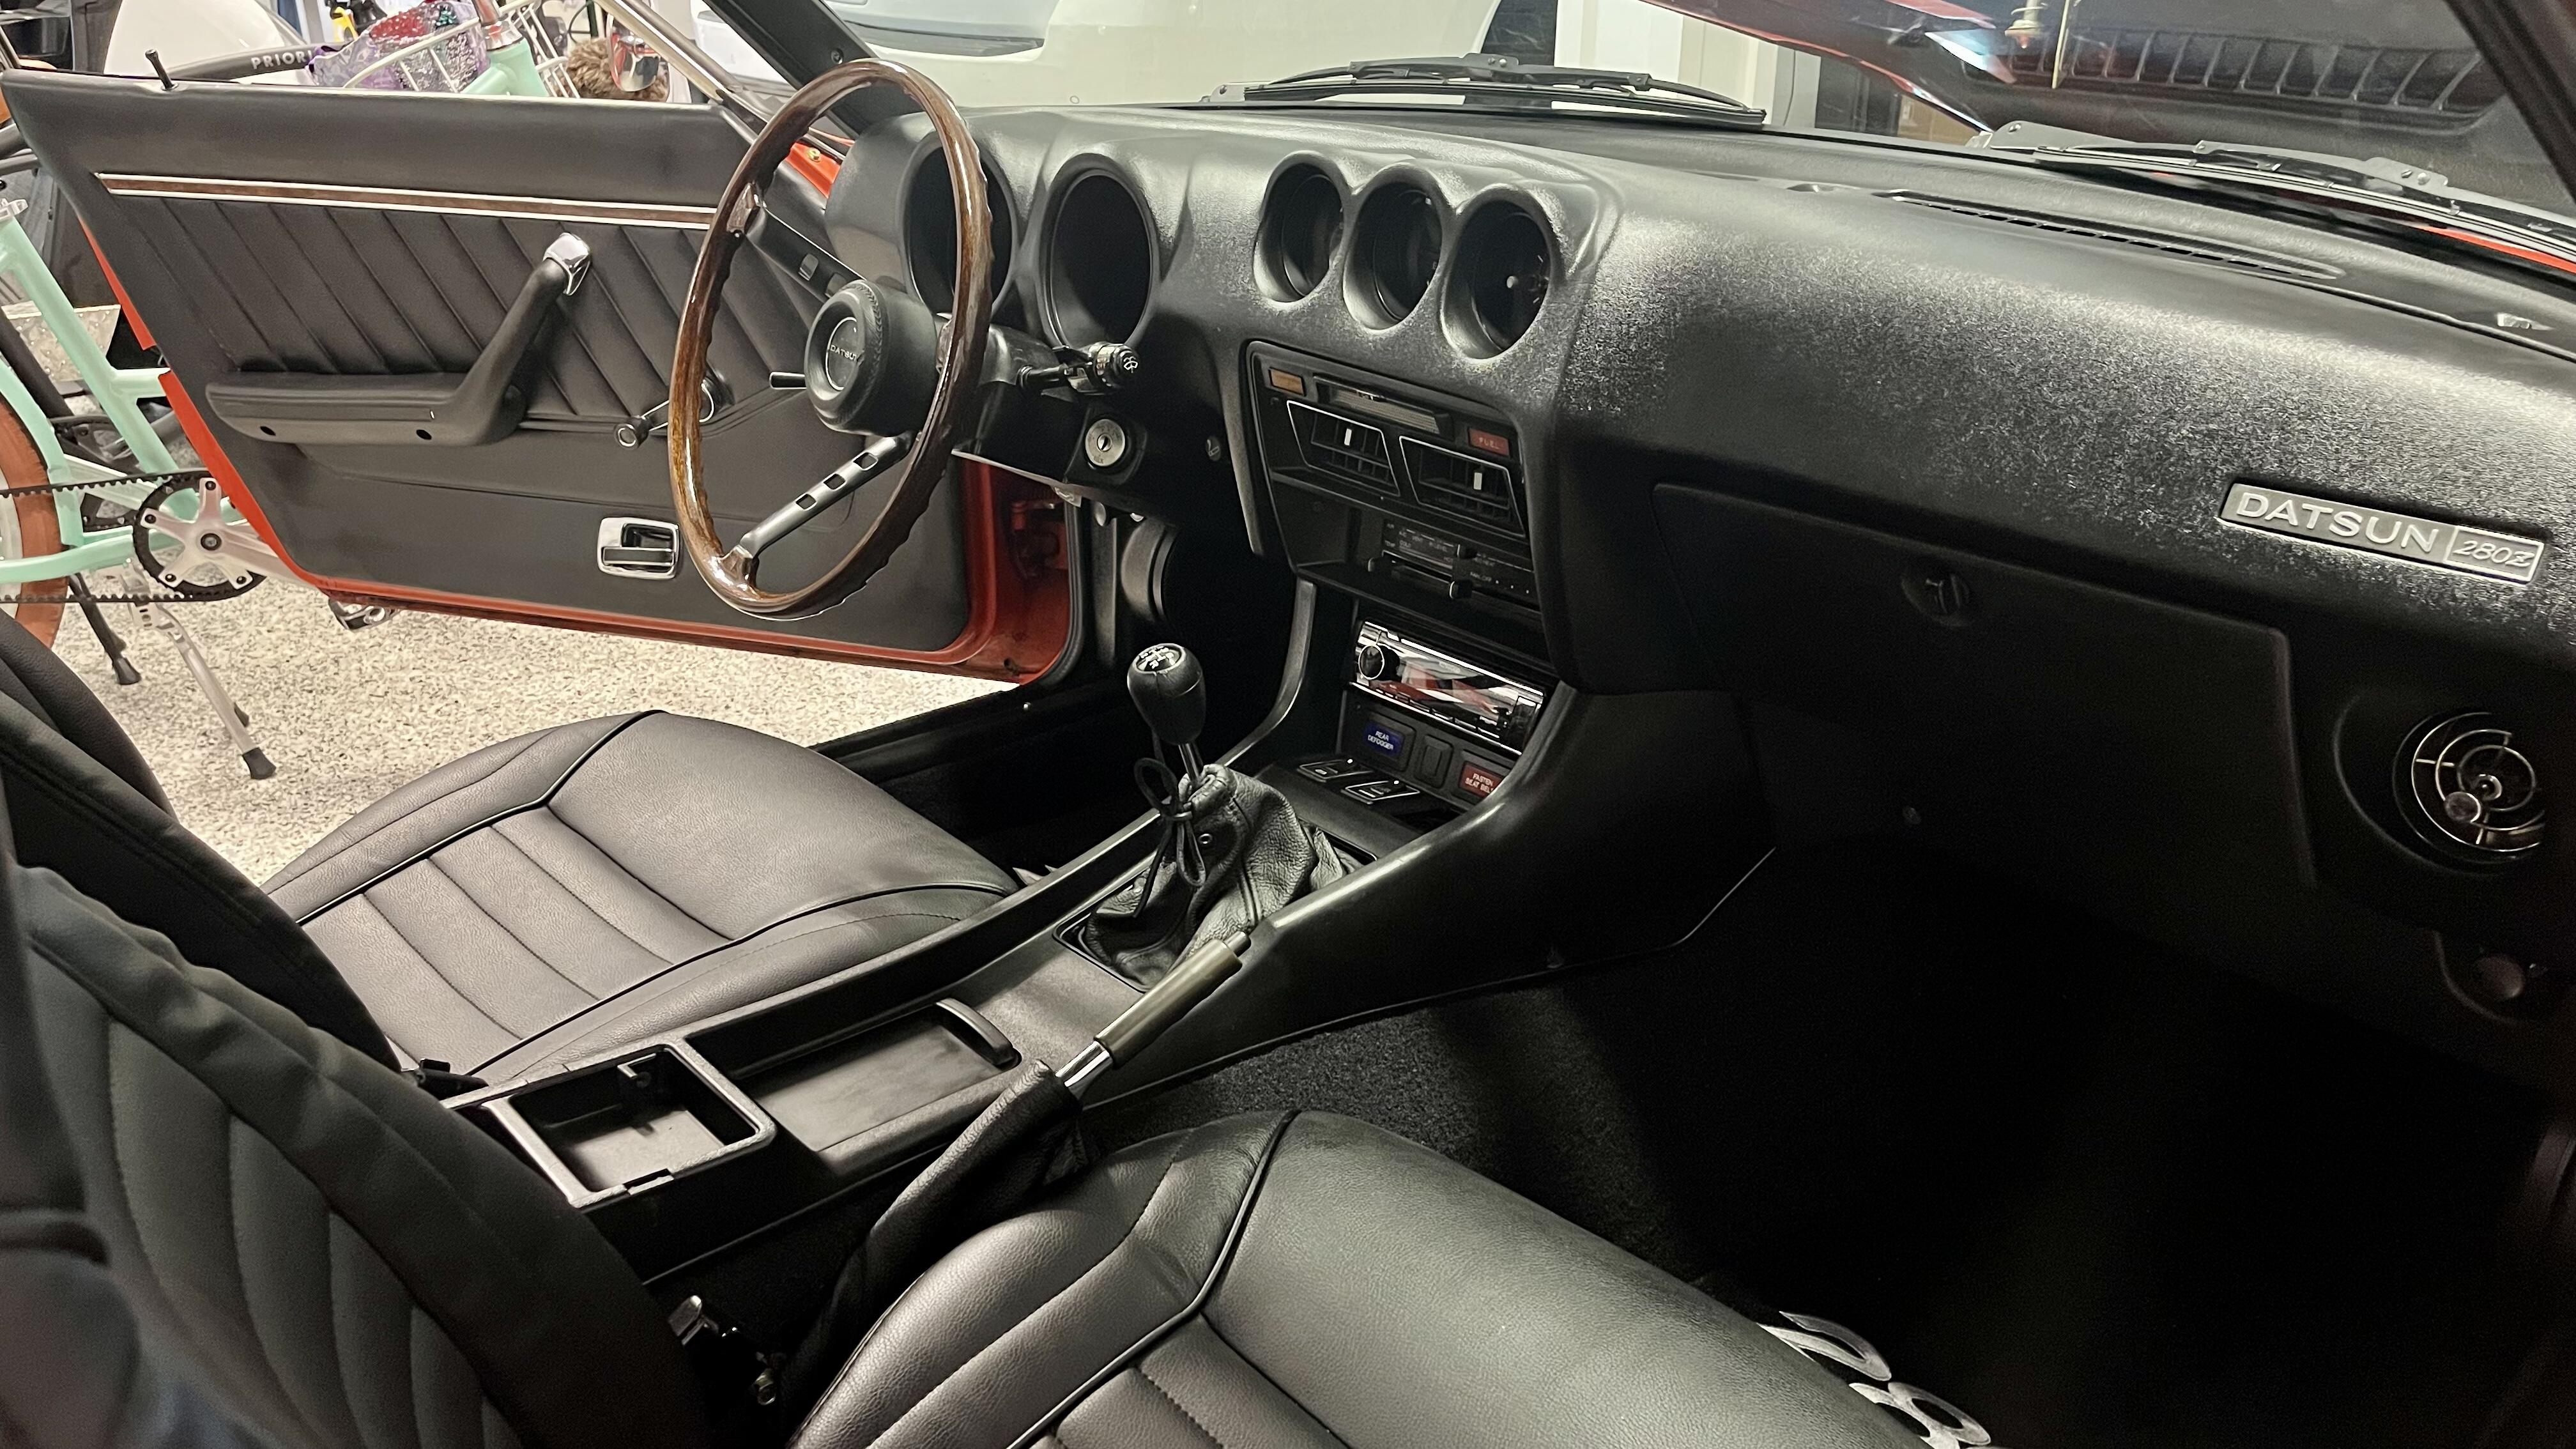
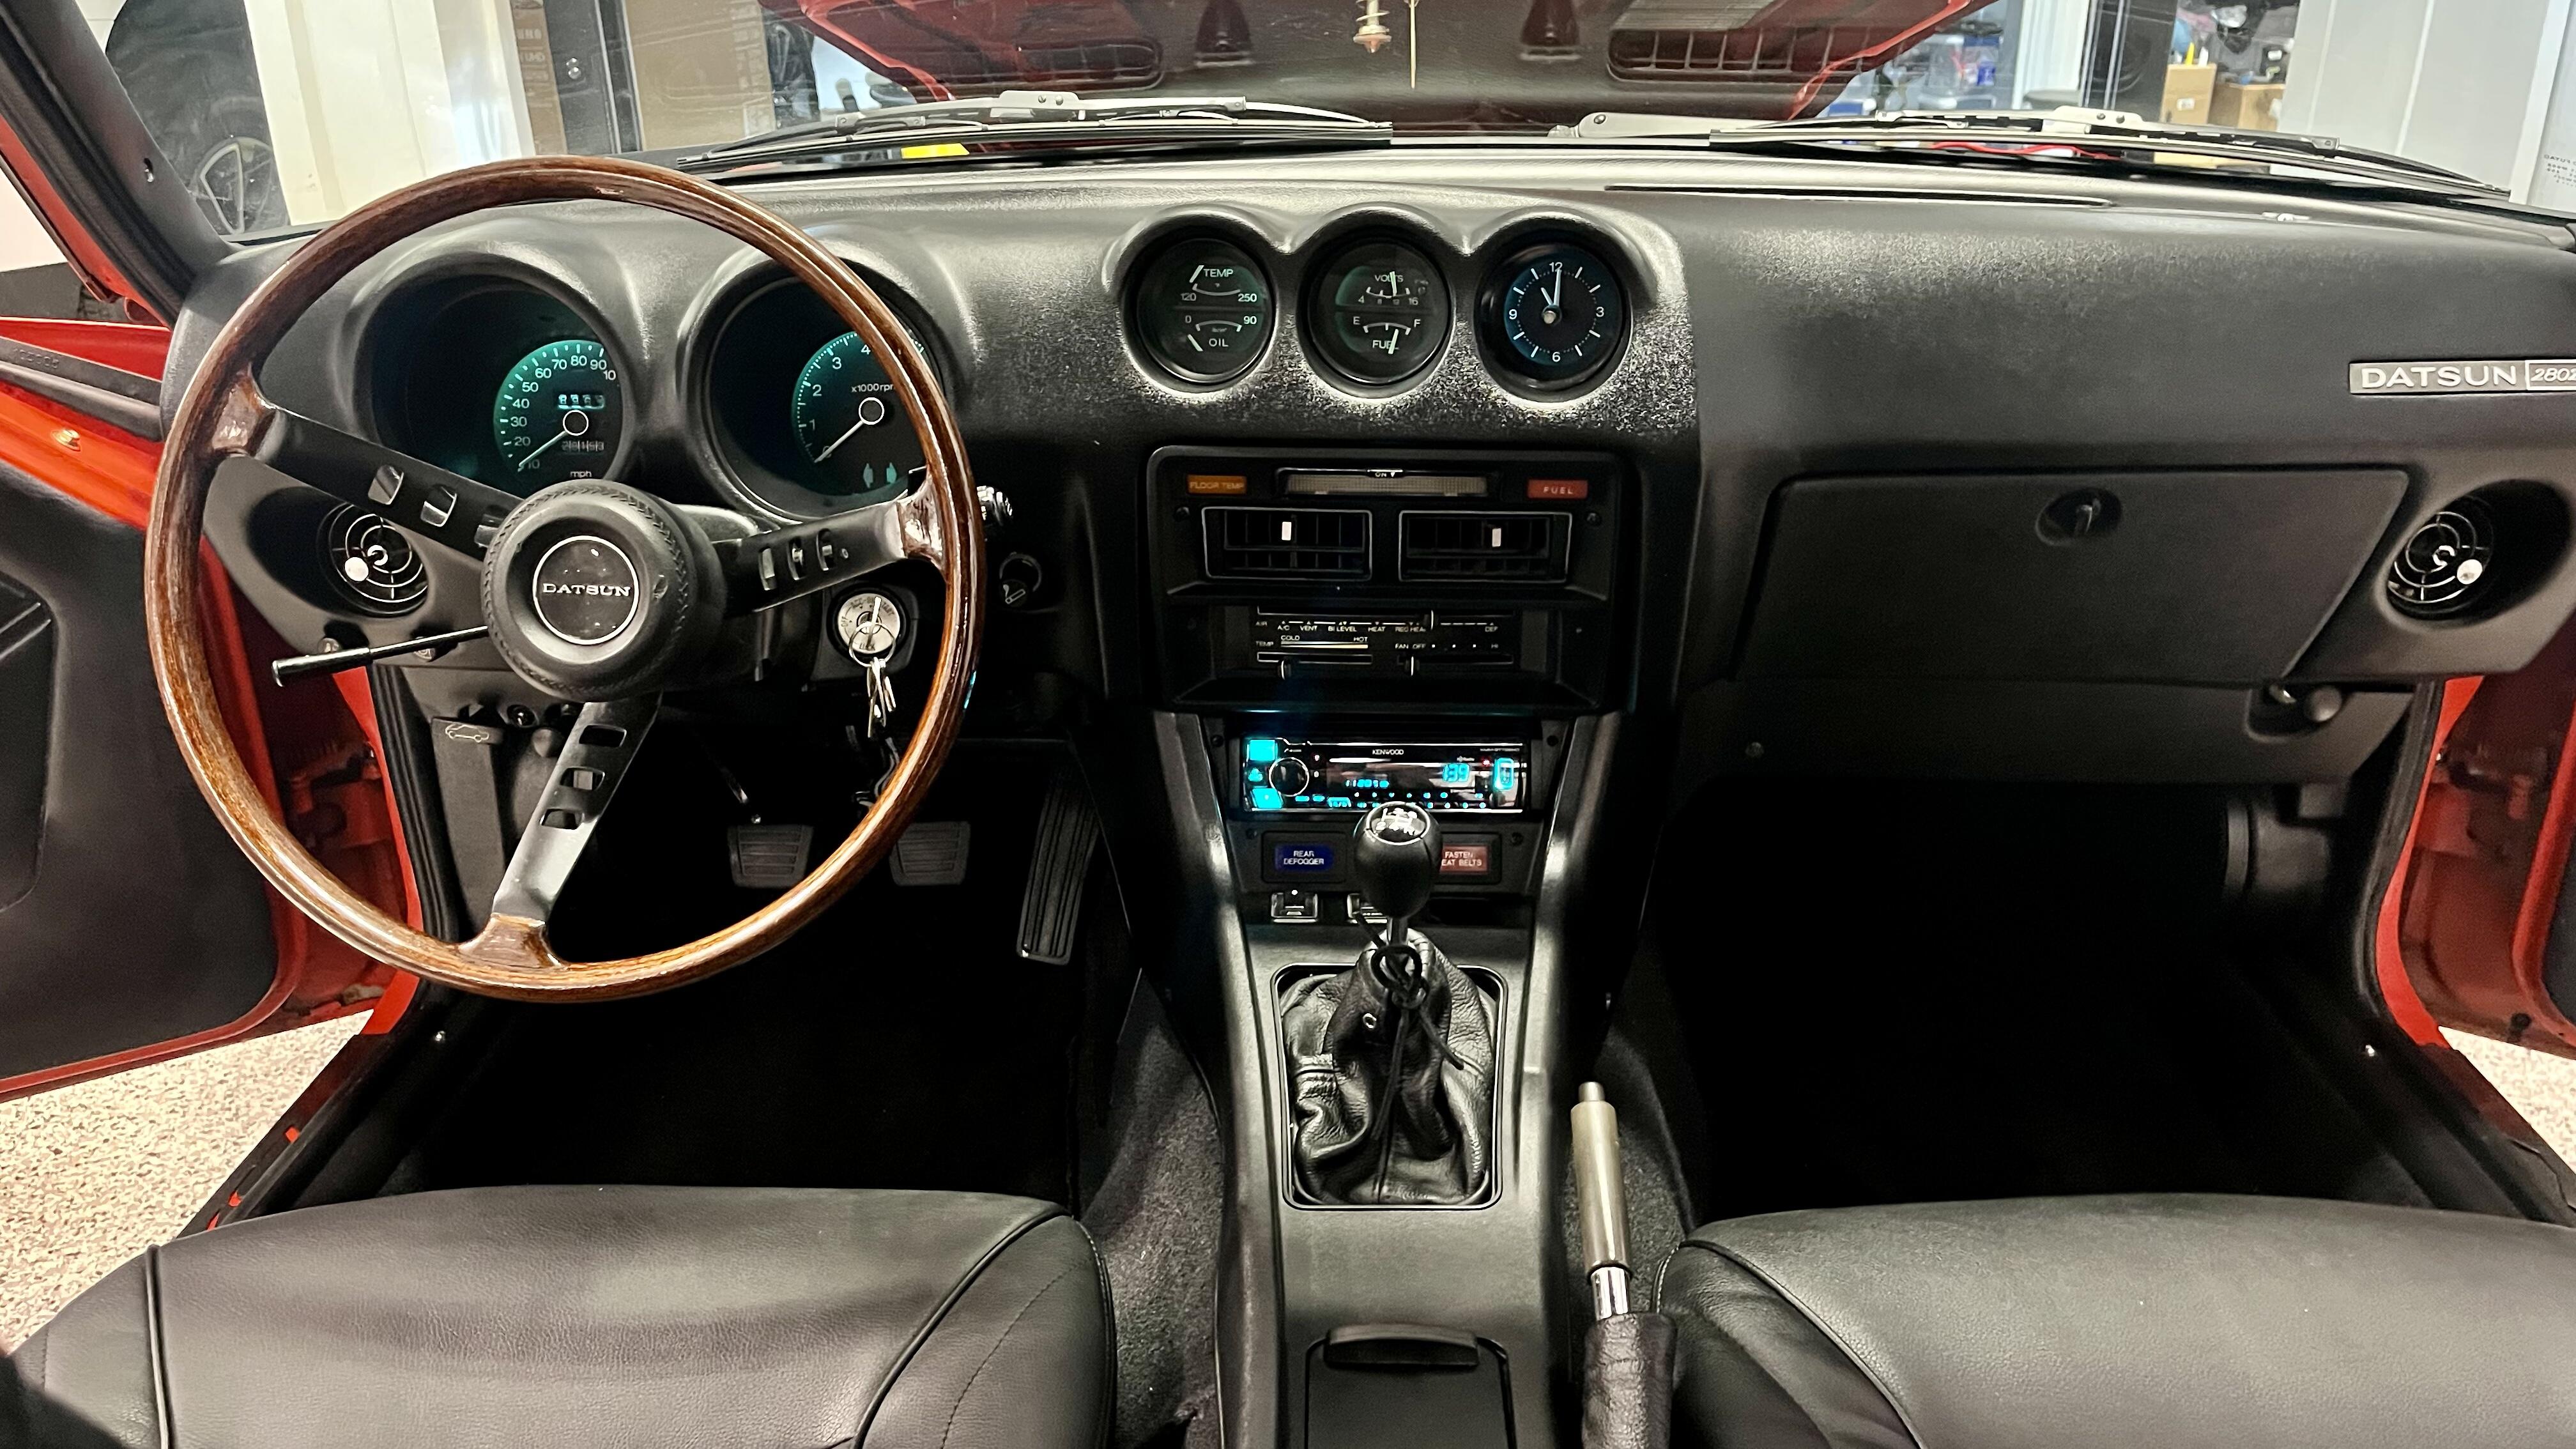
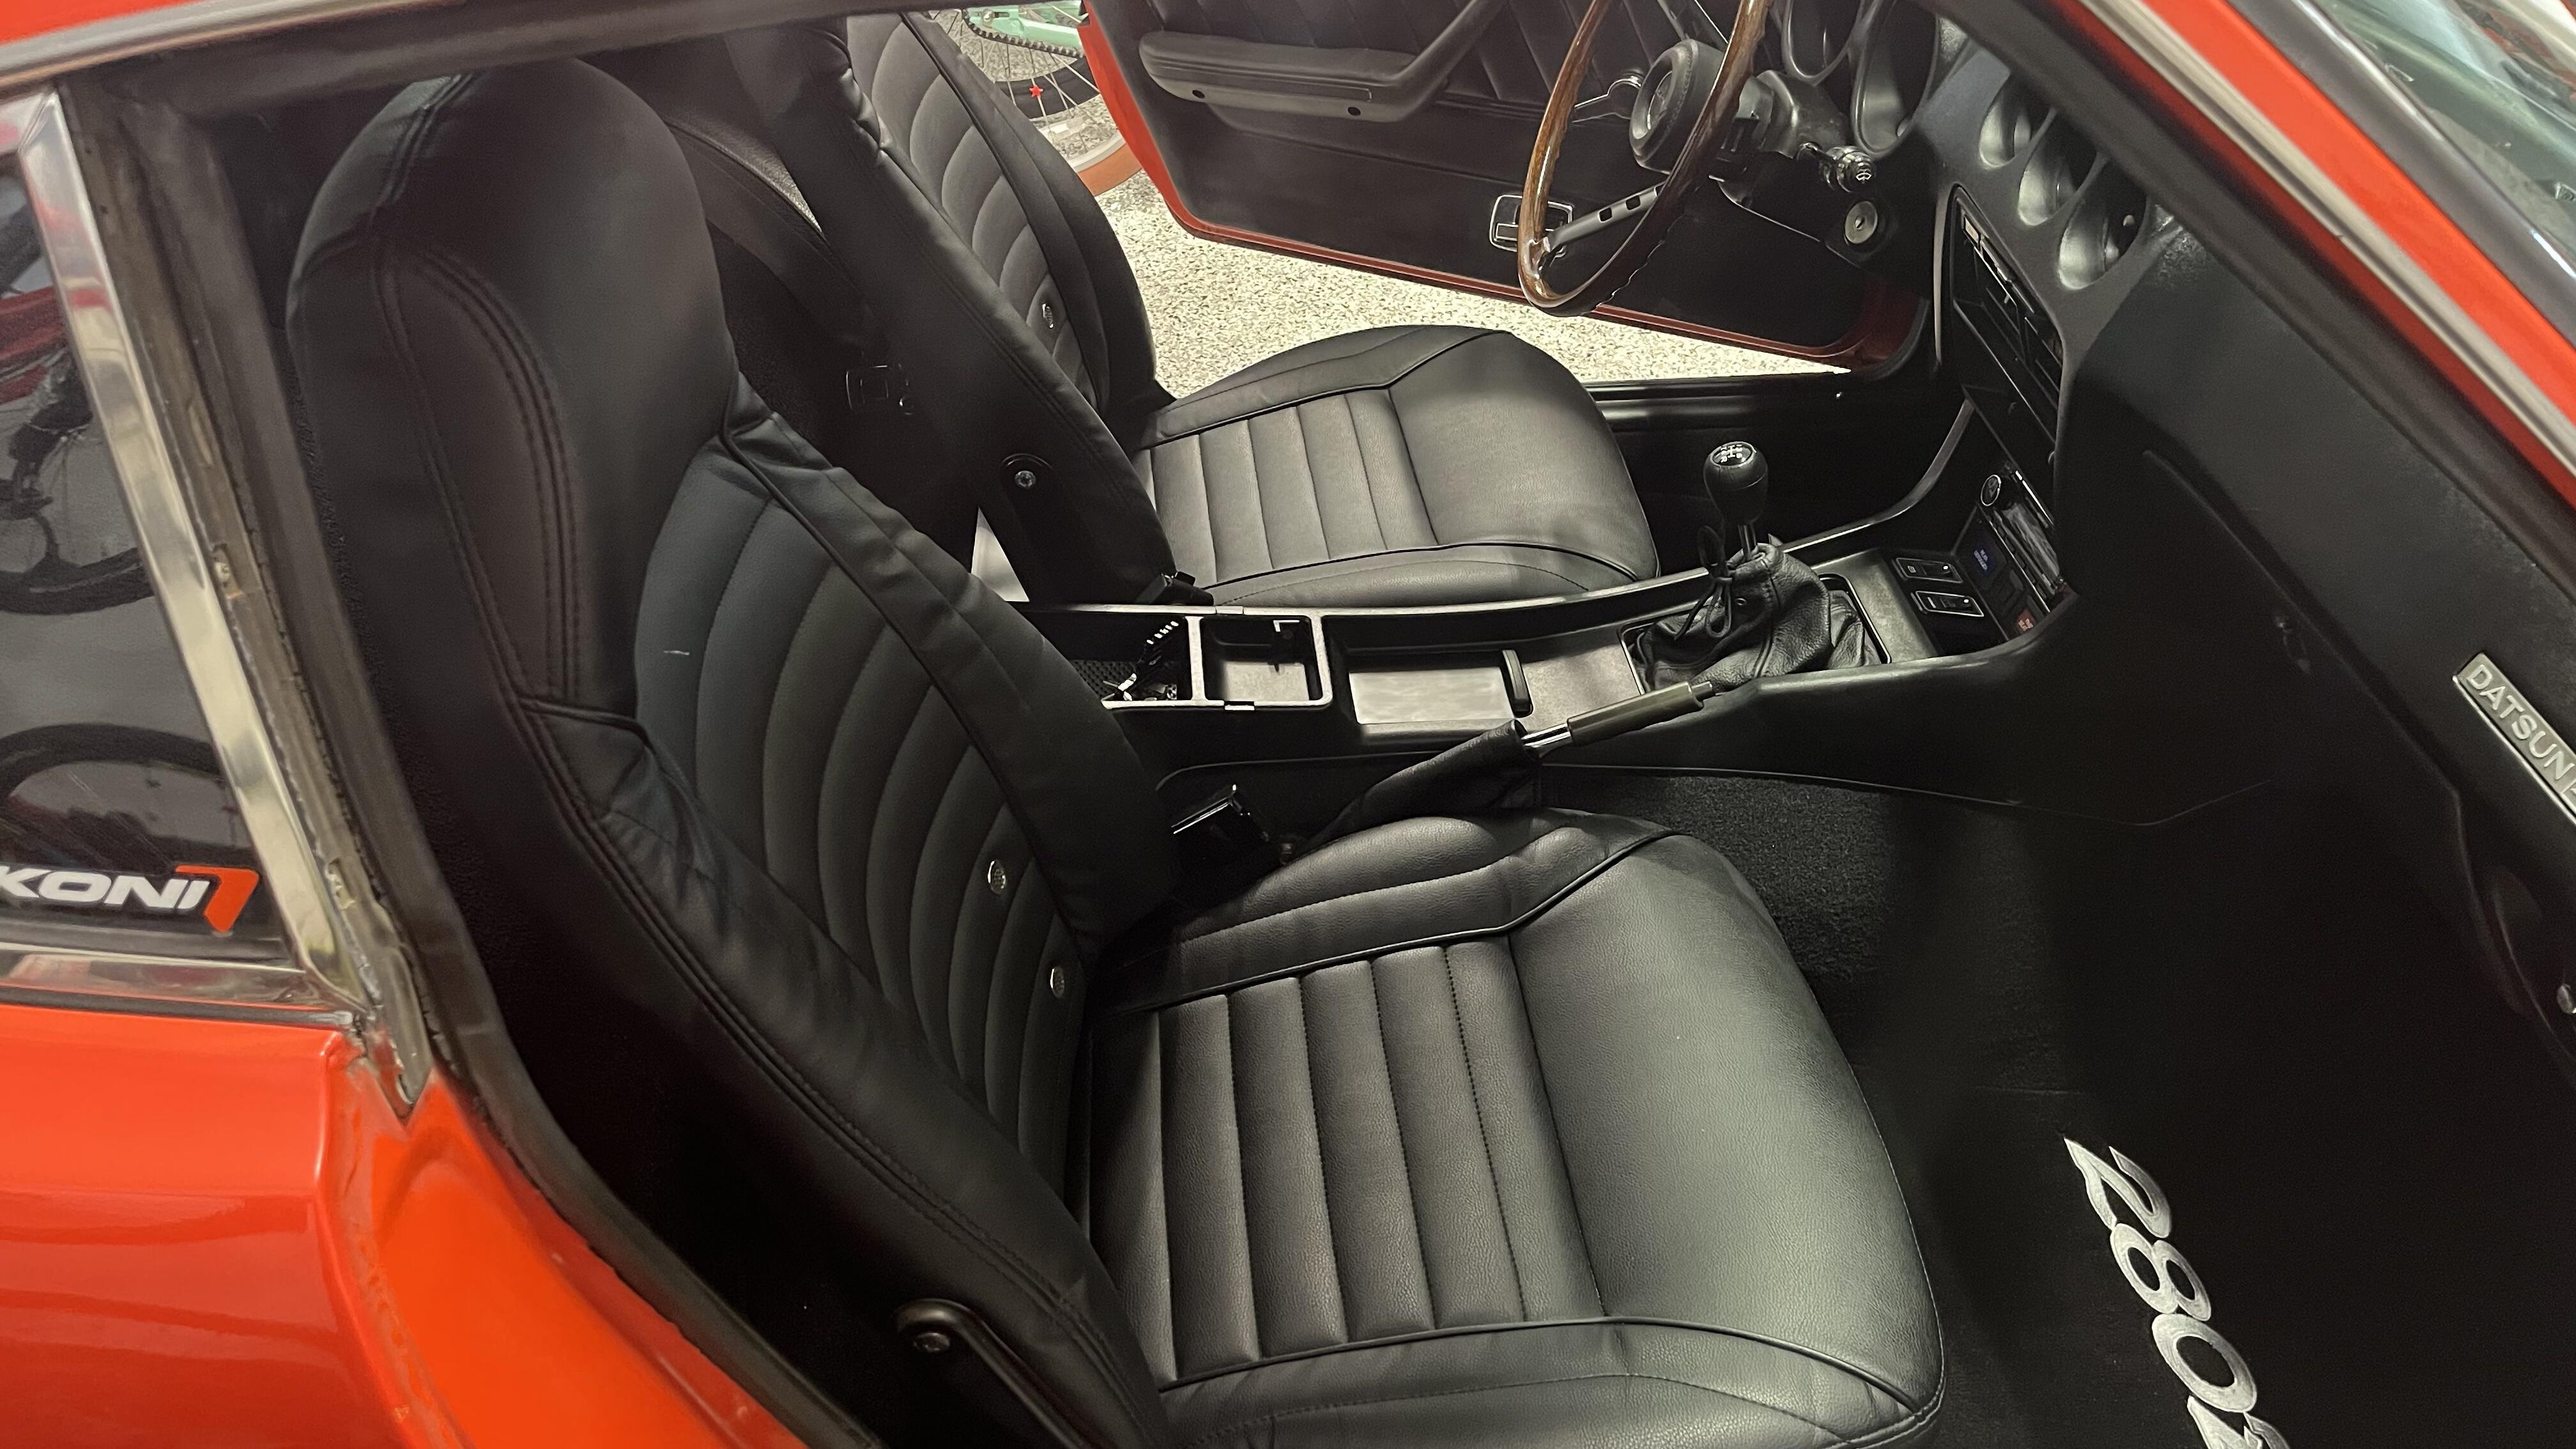
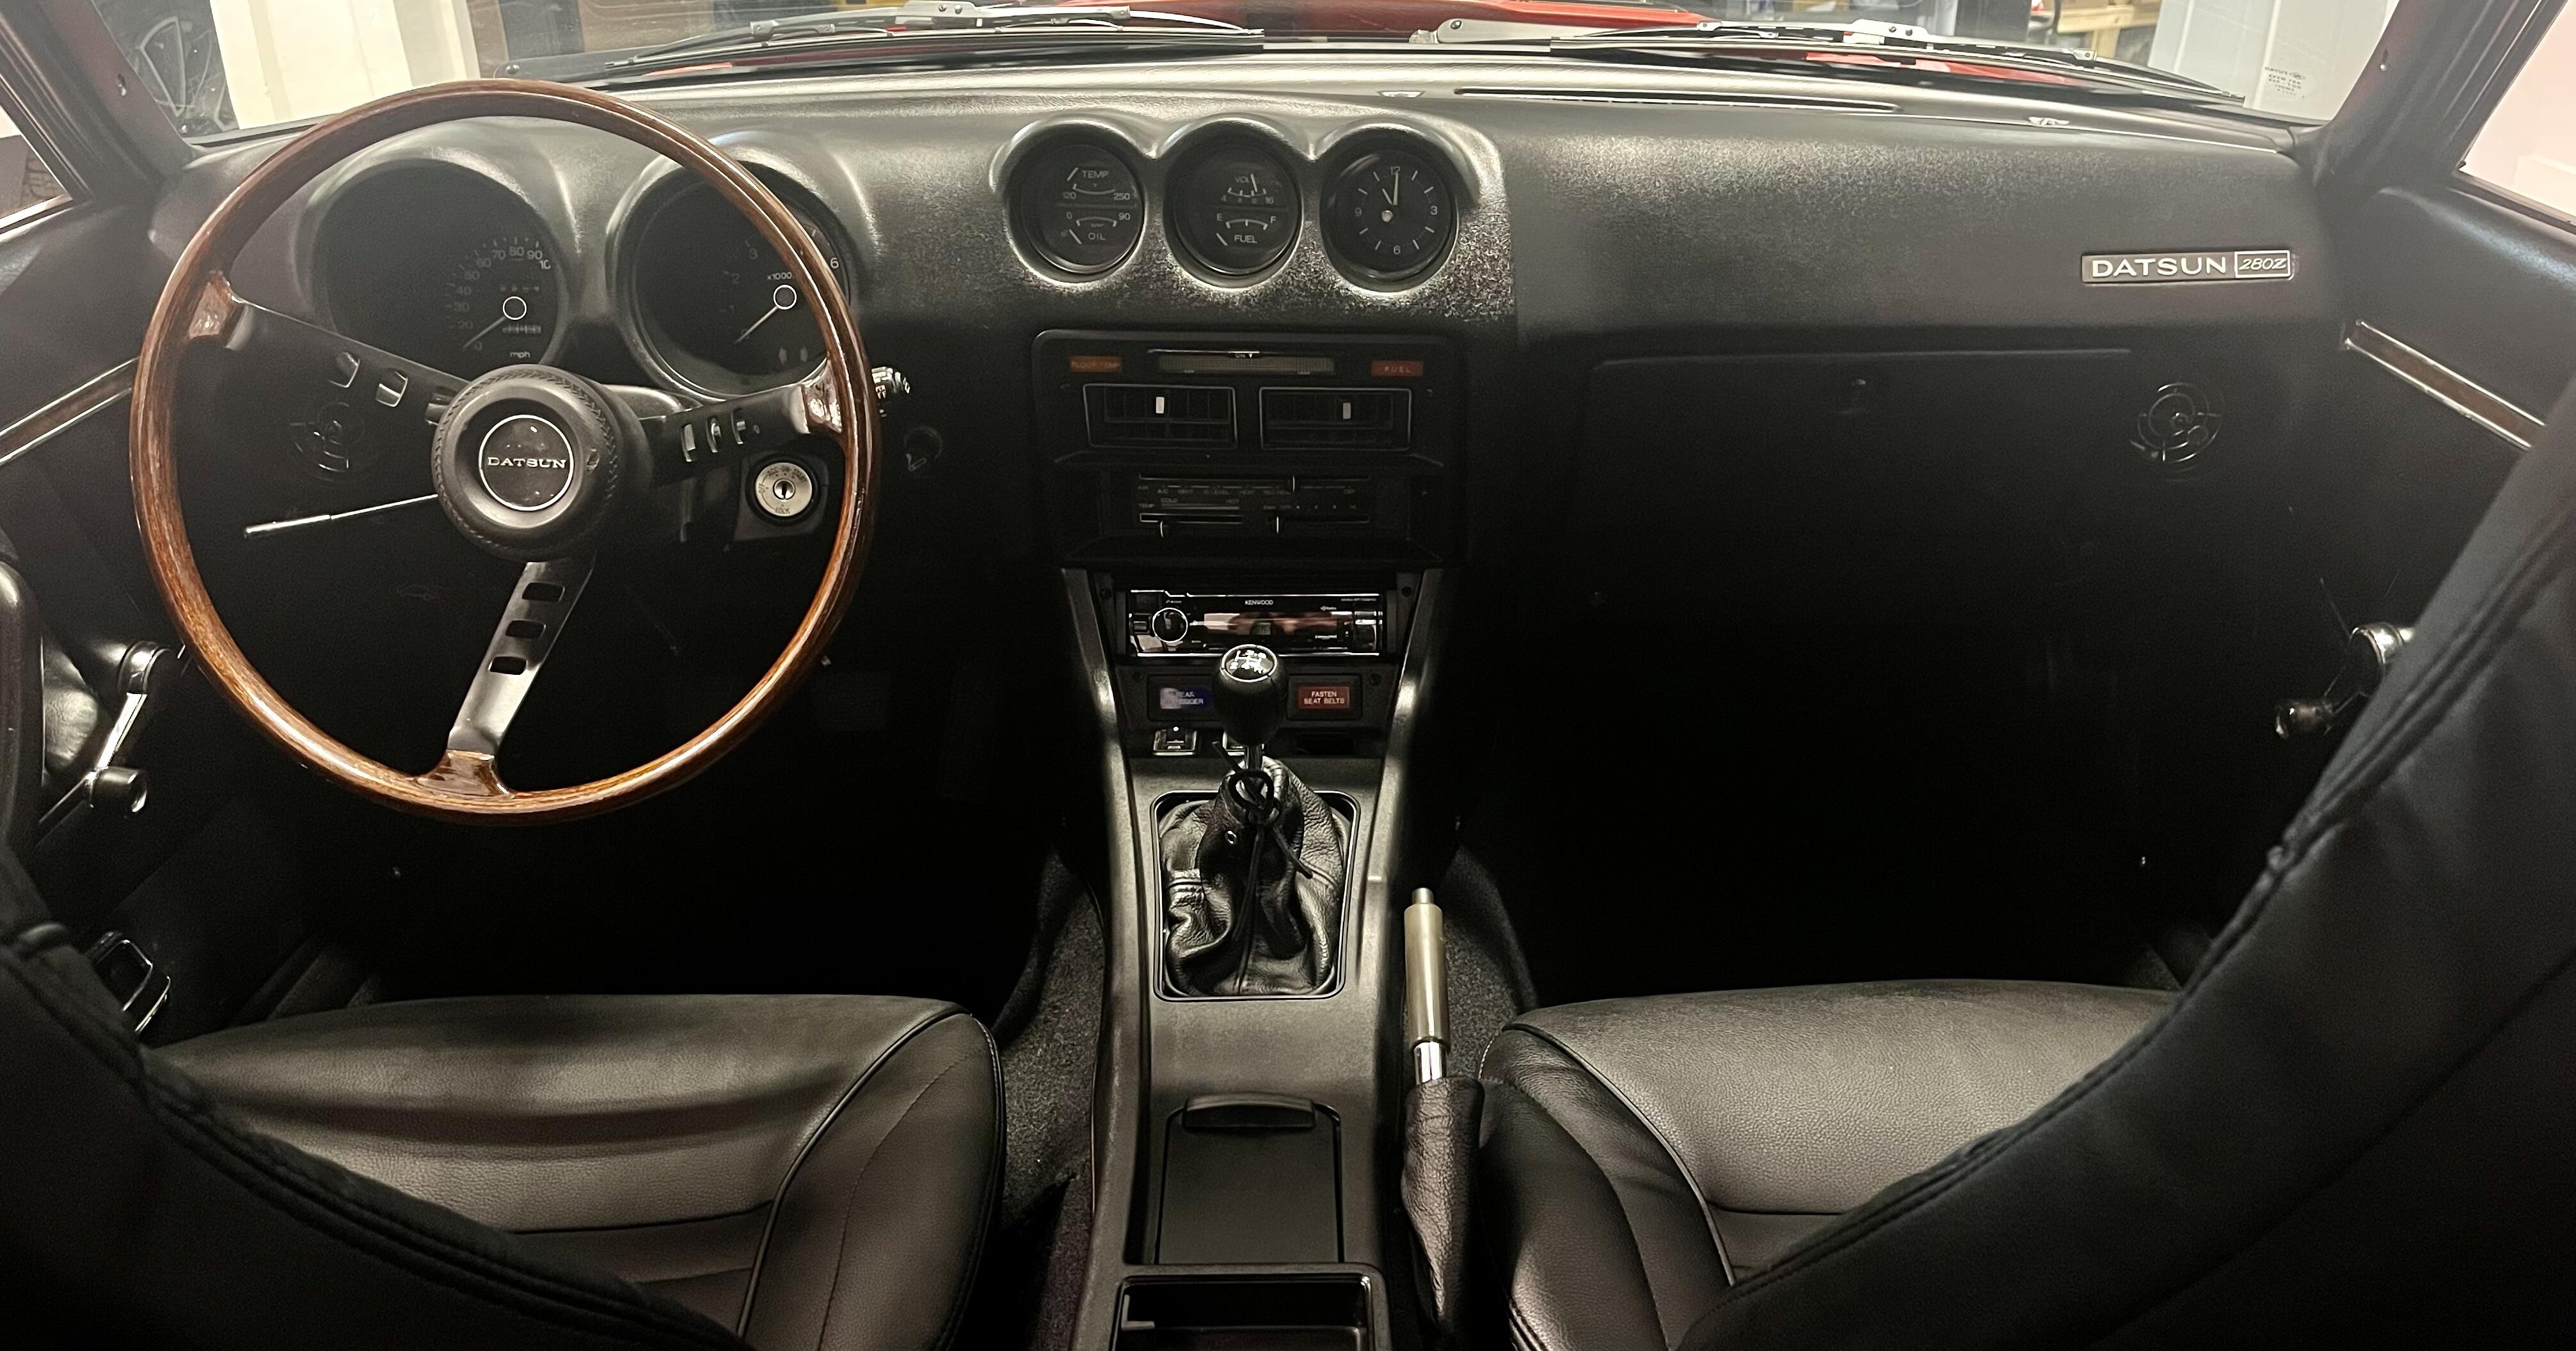
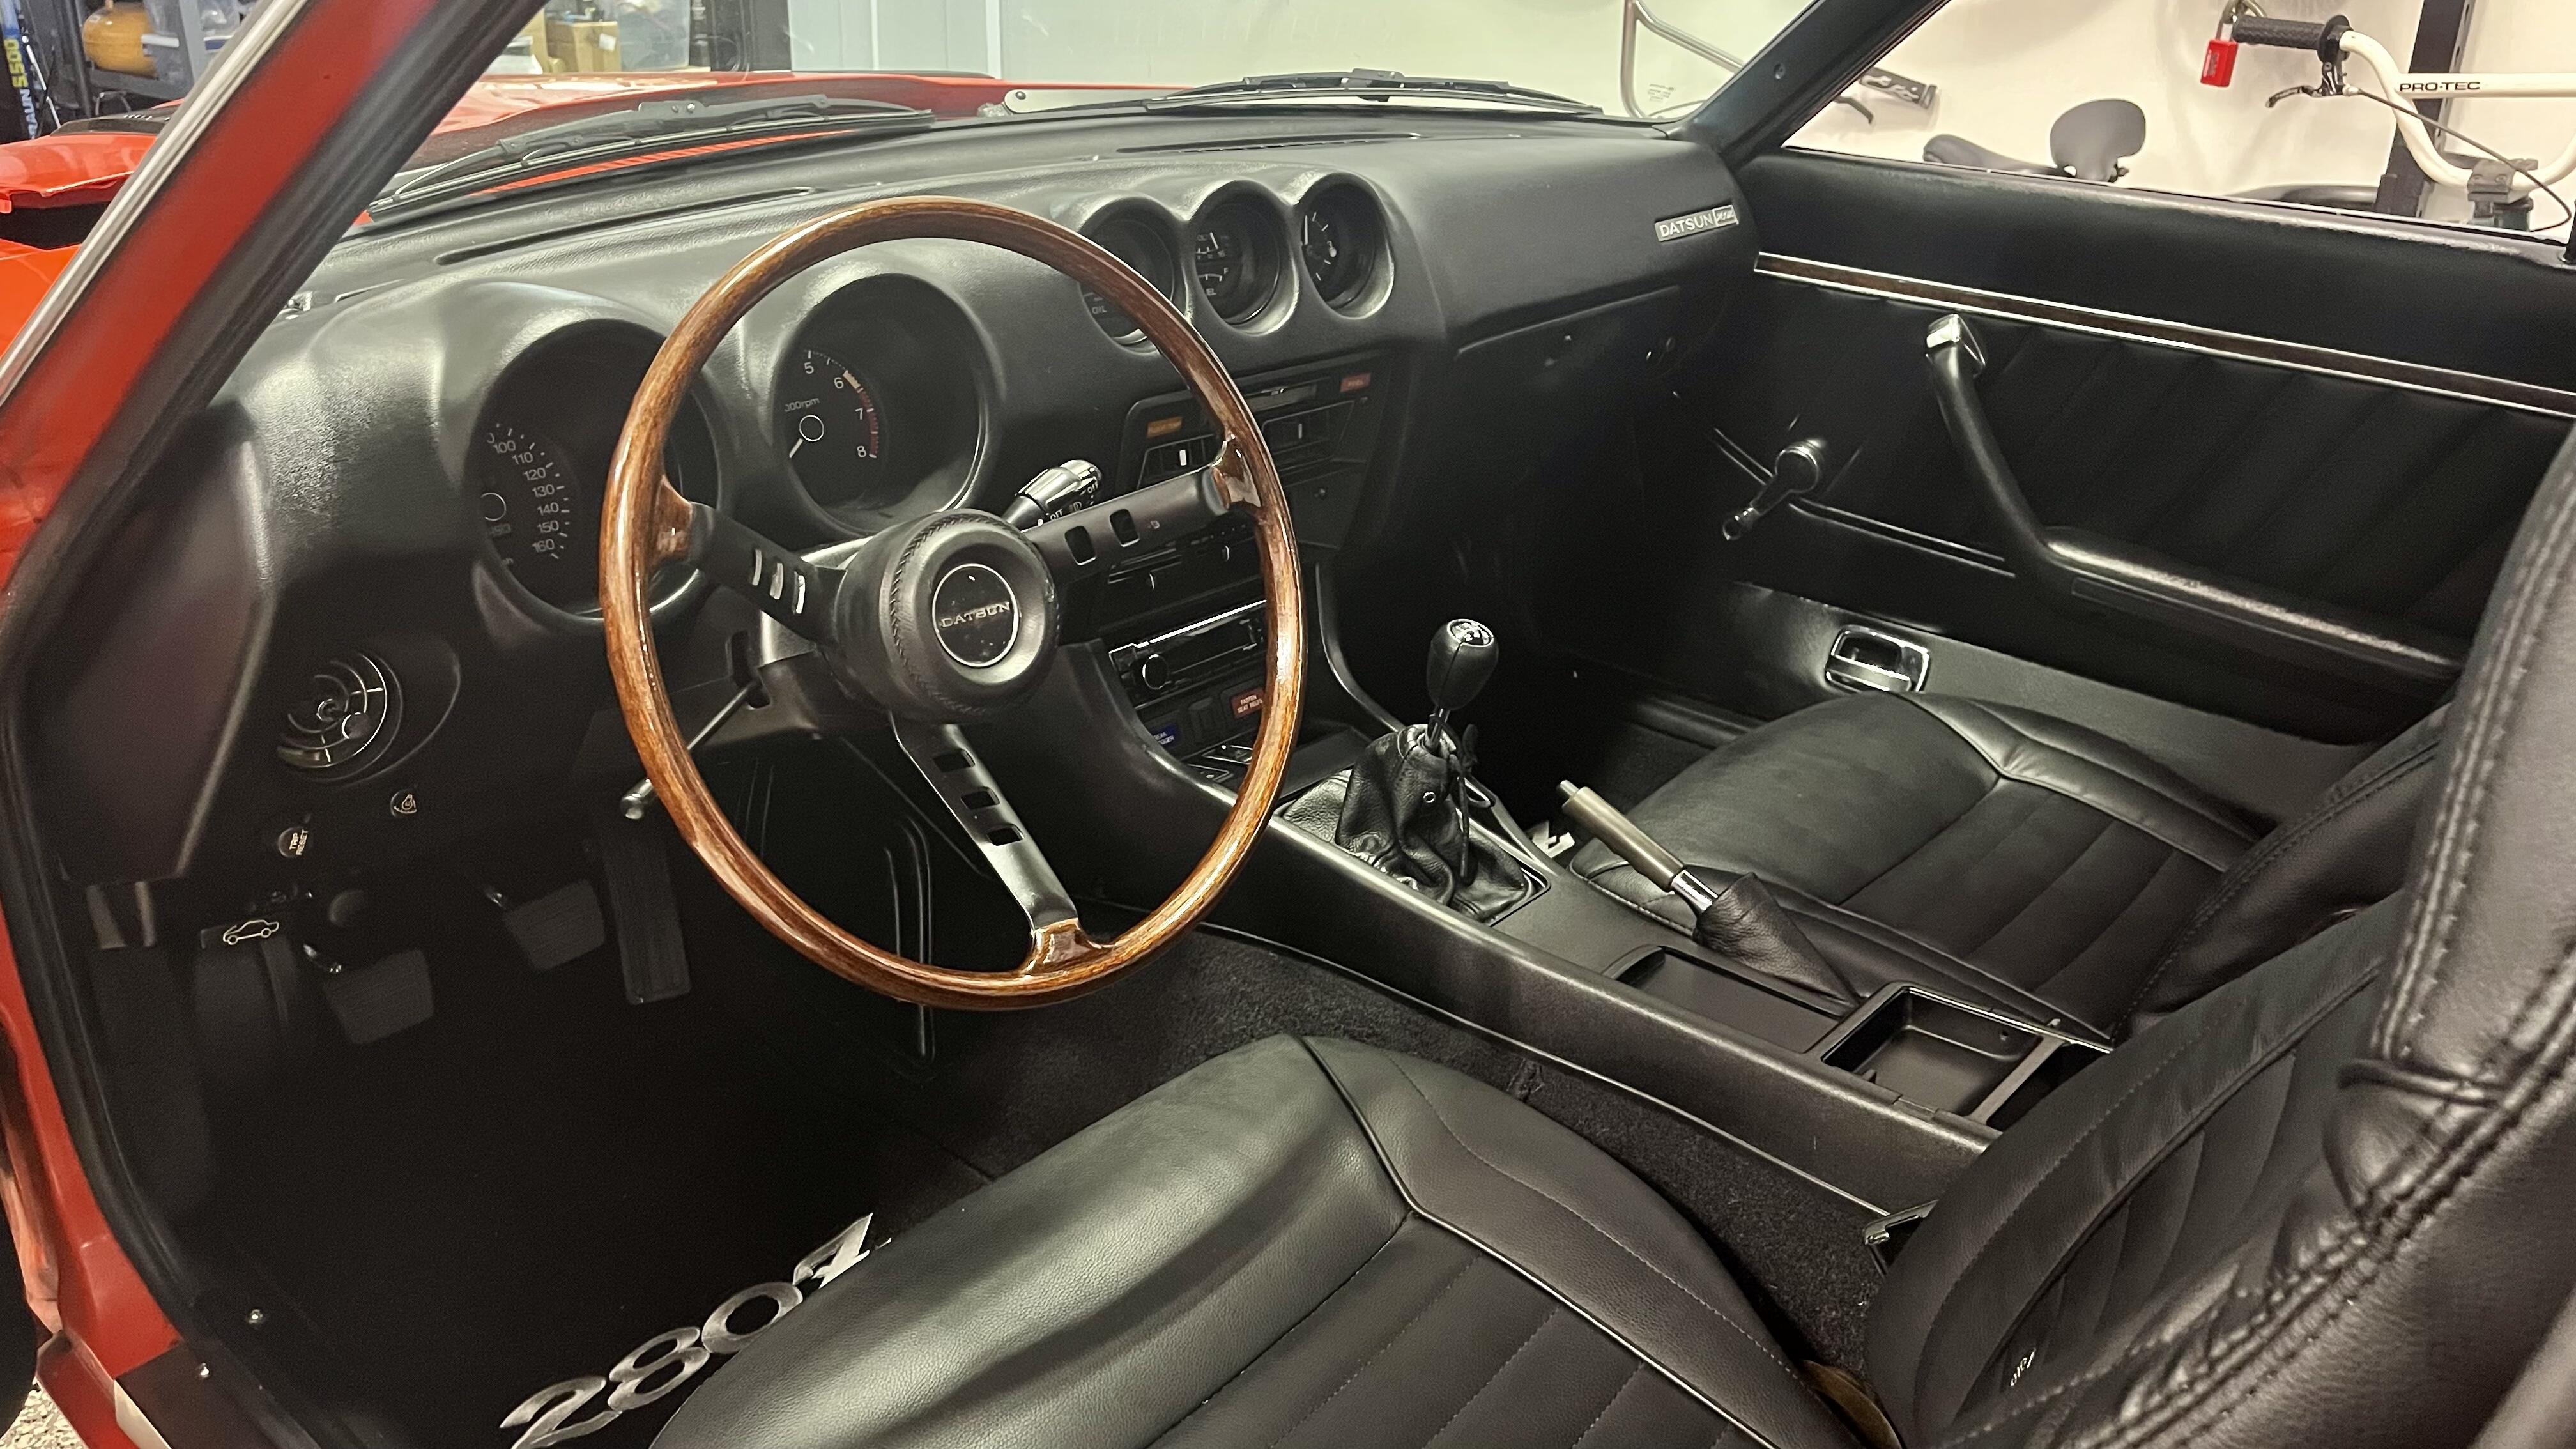


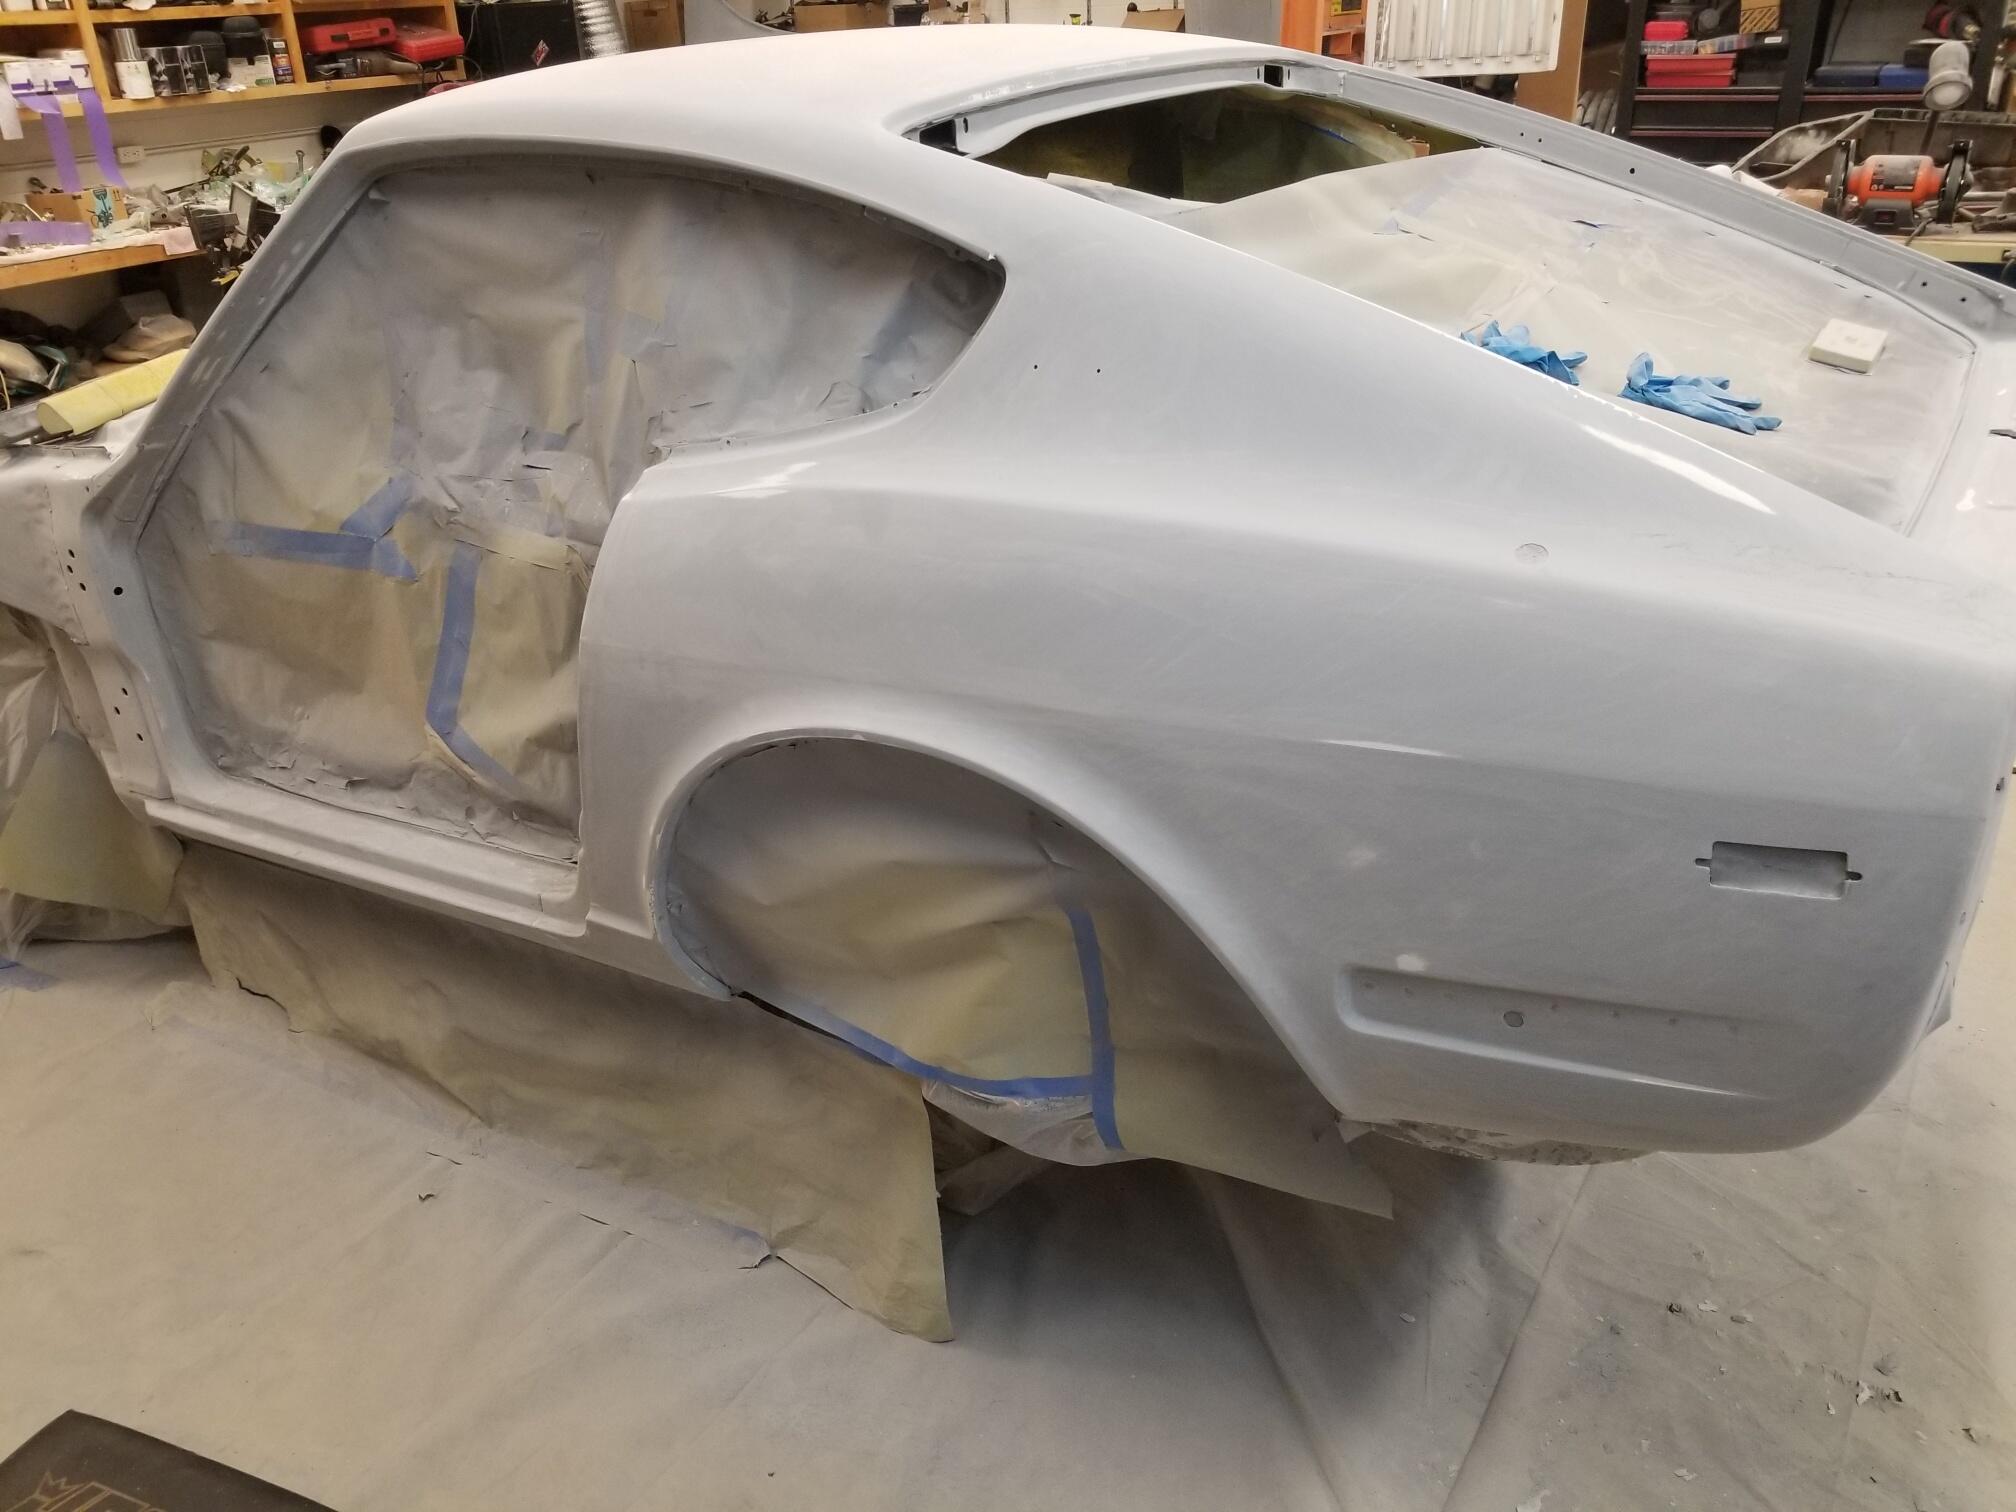


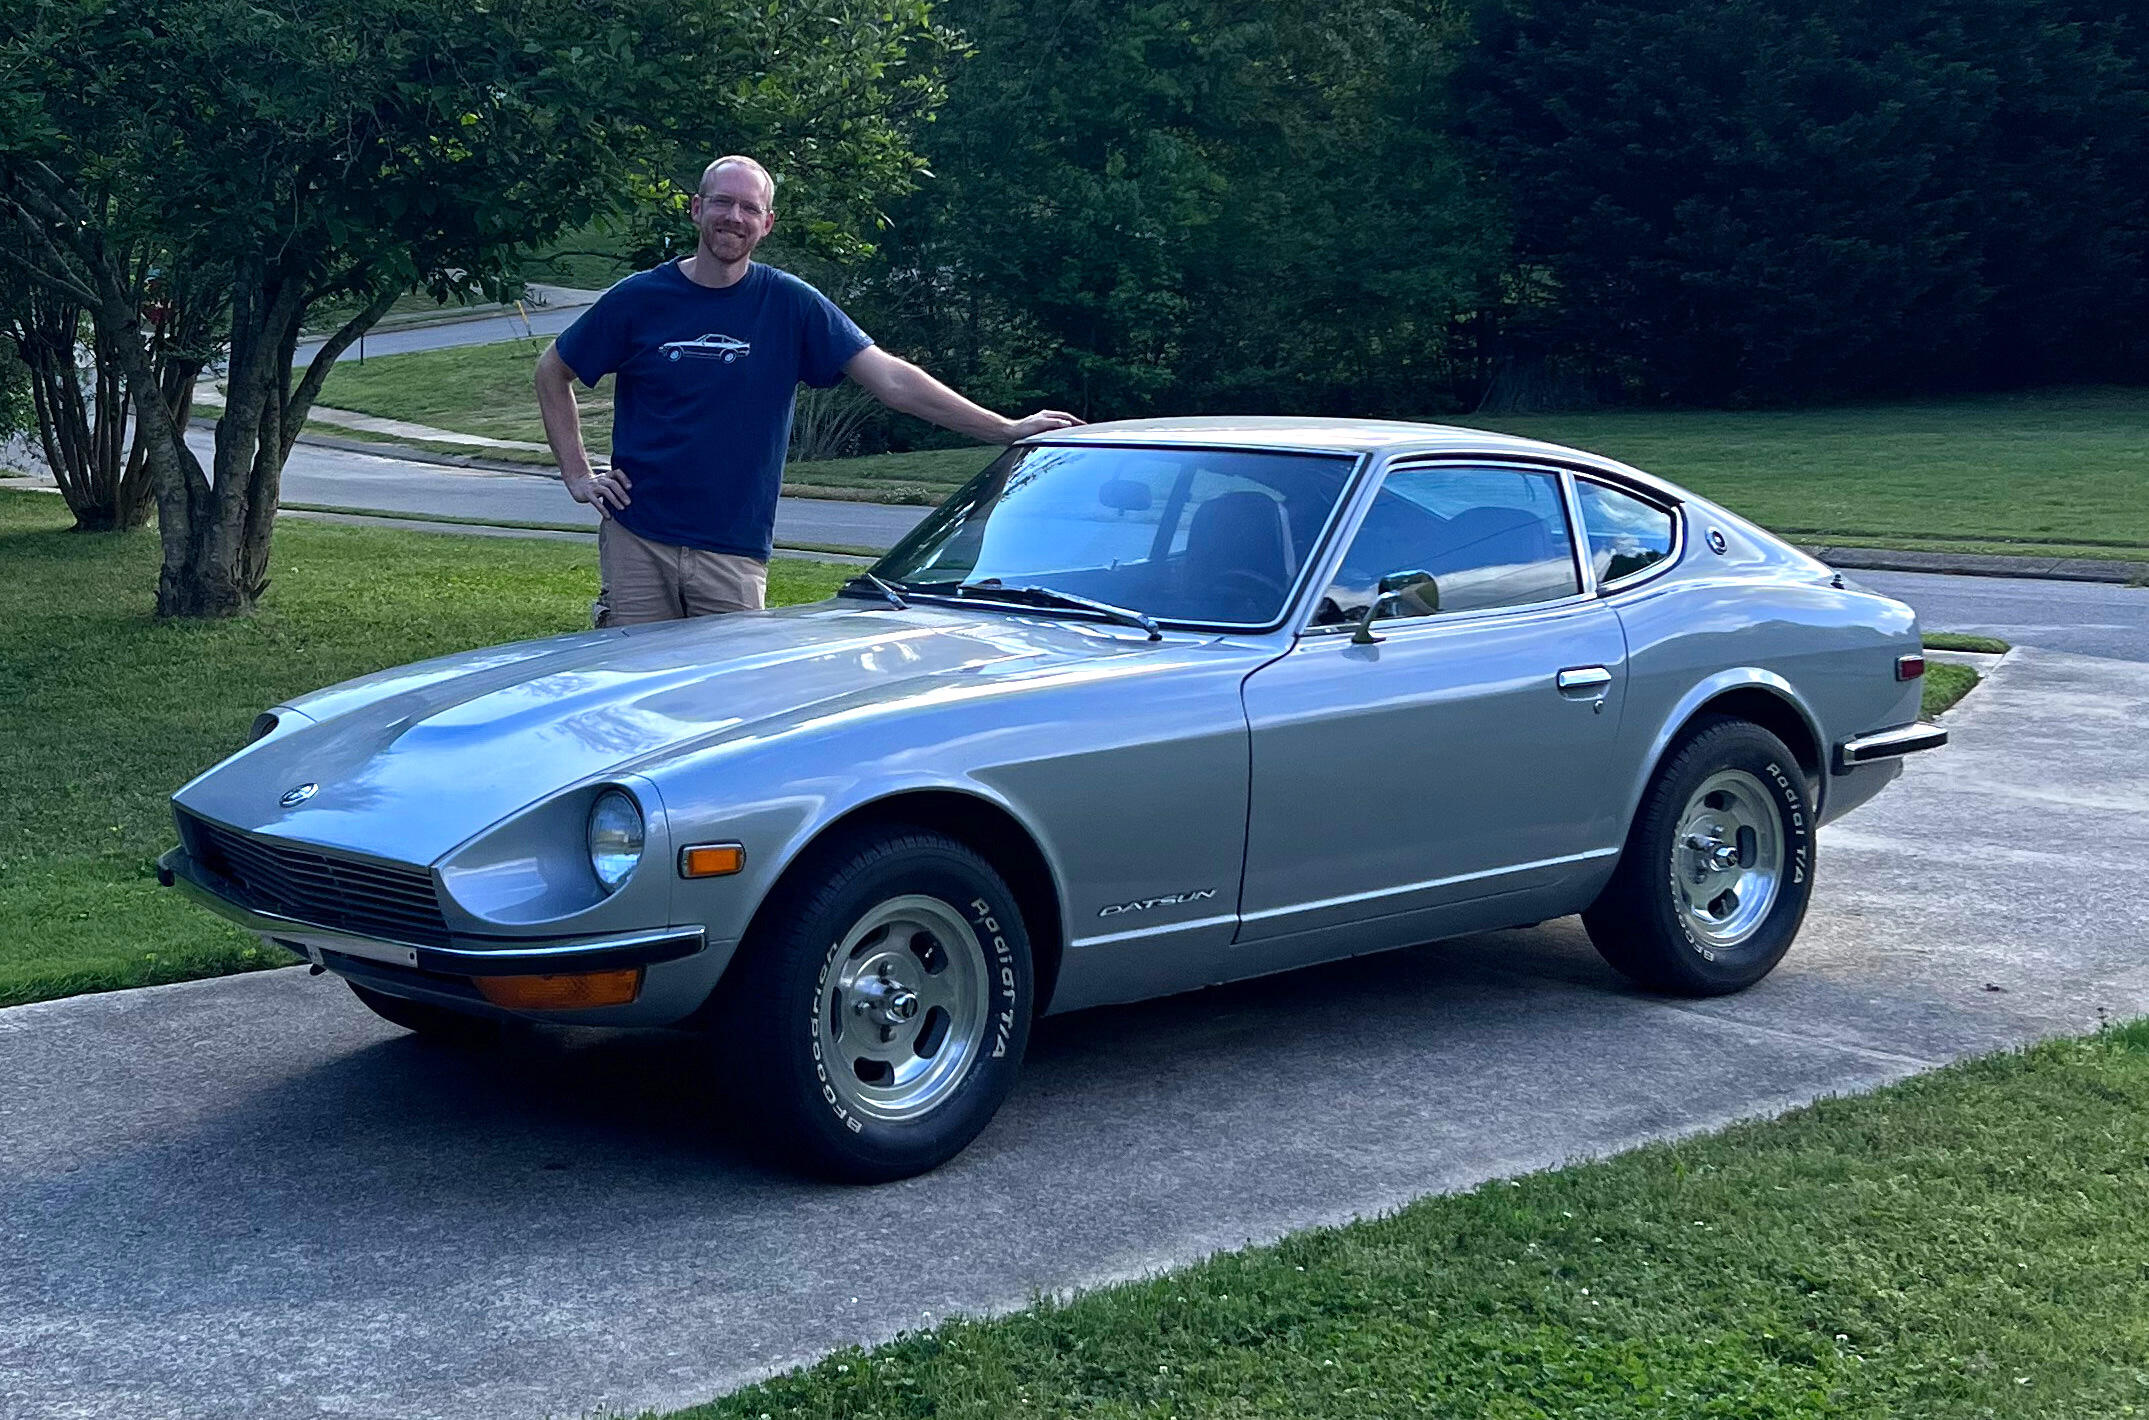
Important Information
By using this site, you agree to our Privacy Policy and Guidelines. We have placed cookies on your device to help make this website better. You can adjust your cookie settings, otherwise we'll assume you're okay to continue.