


Leaderboard

 Subscriber


Popular Content
Showing content with the highest reputation on 06/06/2021 in all areas
-
I have been working on documenting the fasteners on the car. When I finish all of the documentation of the hardware, I will upload a worksheet to the resources section. In the meantime, anyone with a google account can access what I have so far by going to the link: Datsun 240z hardware - 6/19714 points
-
There is no easy way to test the ignition module. SteveJ's diagram can be used to install a $25 GM HEI module. That's about as cheap and easy as you'll get. One of your main problems in your posts though is that you describe one issue then don't follow-up to show that you corrected it, then you come back with a completely separate problem. You started with plug wires that are obviously wrong by your picture. Then you started looking at your ignition module, Then you said that you had power to the ballast resistor but no power out of it. Maybe you meant no spark when you said no power. There are many small things that you can do to confirm that other parts are correct. Measure resistance through the distributor pickup coil. Confirm voltage at the coil itself with the key on. Measure resistance through the coil. You can even create a spark by disconnecting and connecting the positive wire to the coil with the key on to confirm that the coil itself will produce a spark and is wired correctly. You can take your meter and confirm that the ignition module is getting power. Confirm that it is properly grounded. Confirm that it is connected to the pickup coils in the distributor, There's a bunch that you can do and should do if you want to save money and have the best chance of getting it to work. Plug n Play is only really possible for things that are already working properly.3 points
-
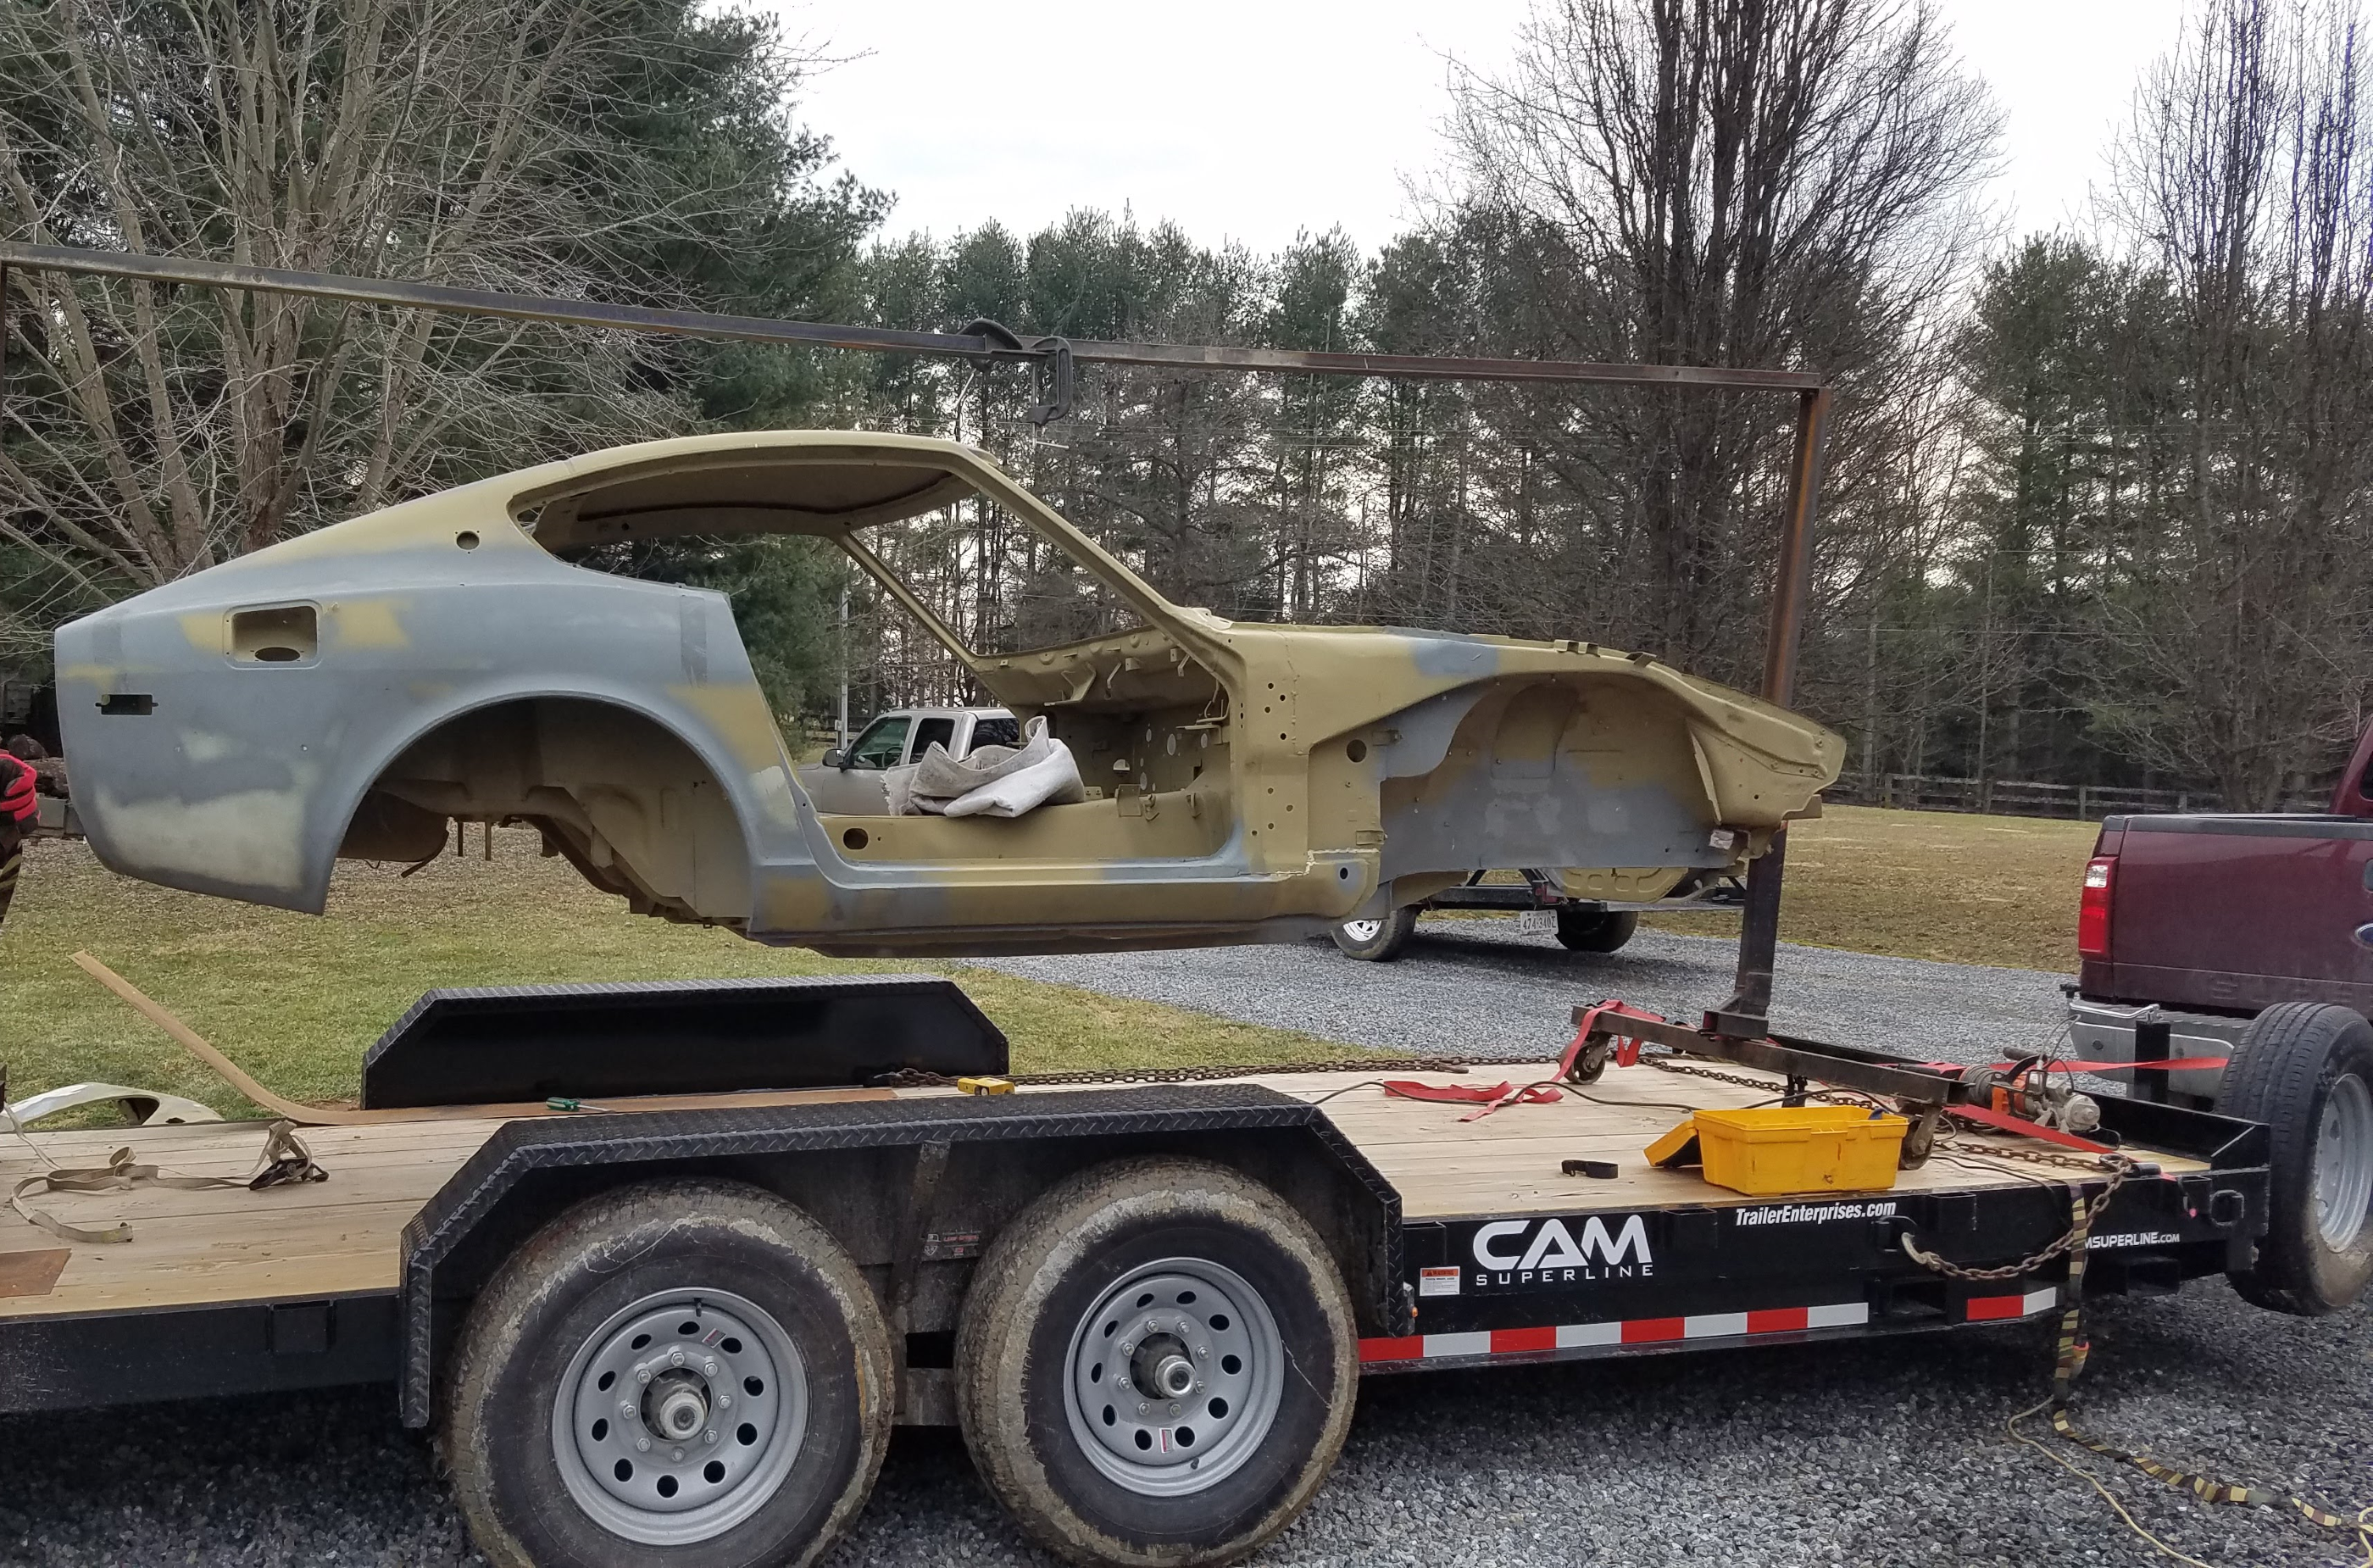
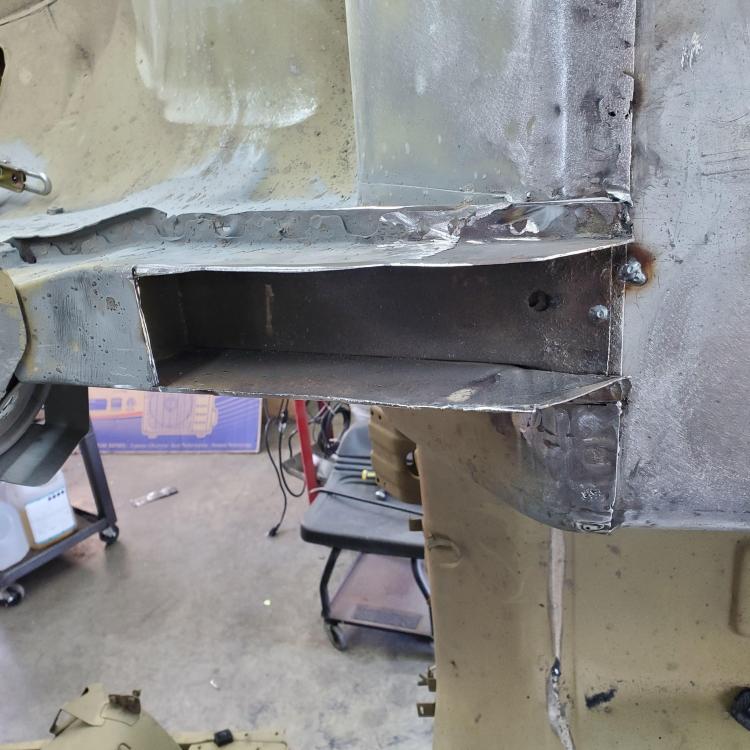
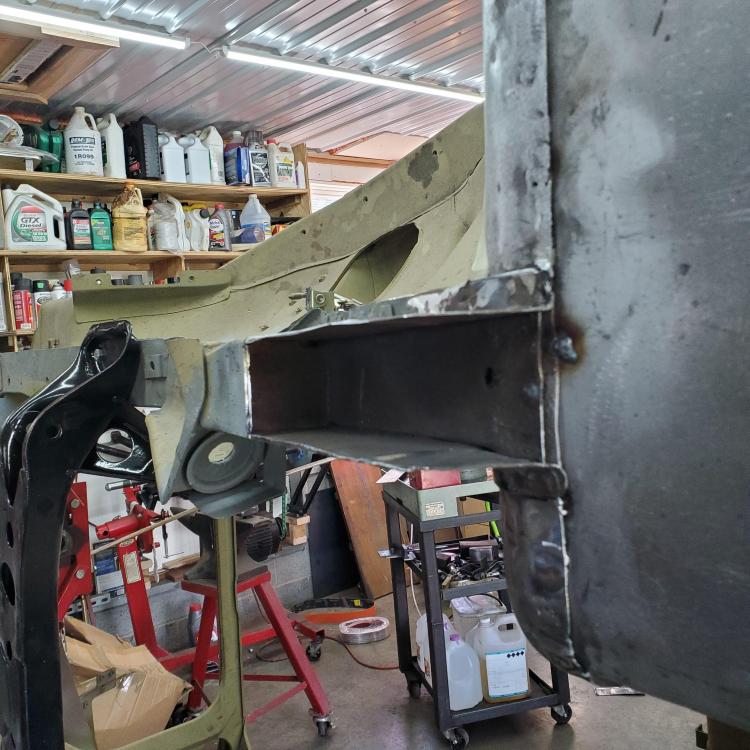
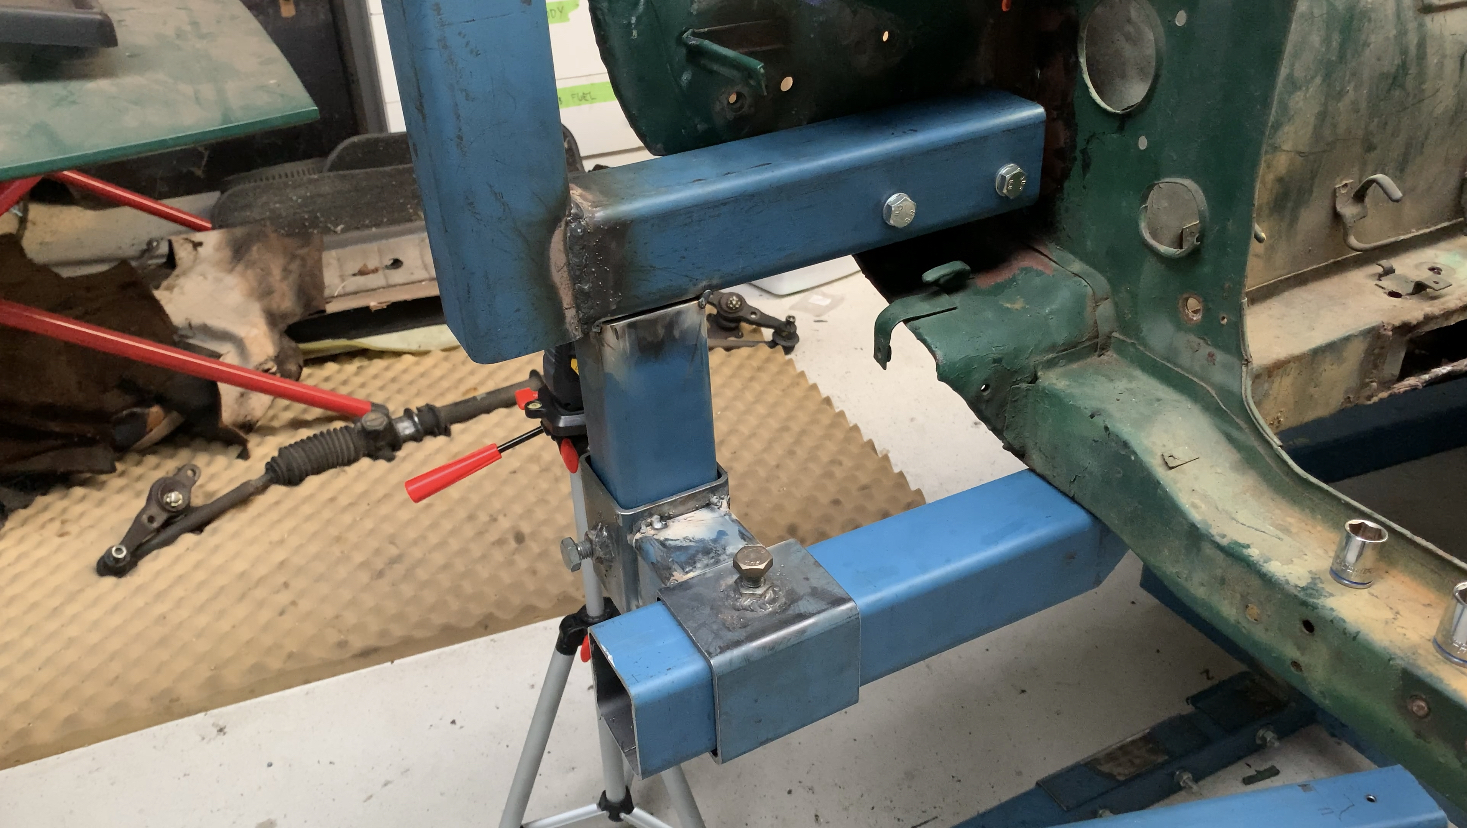
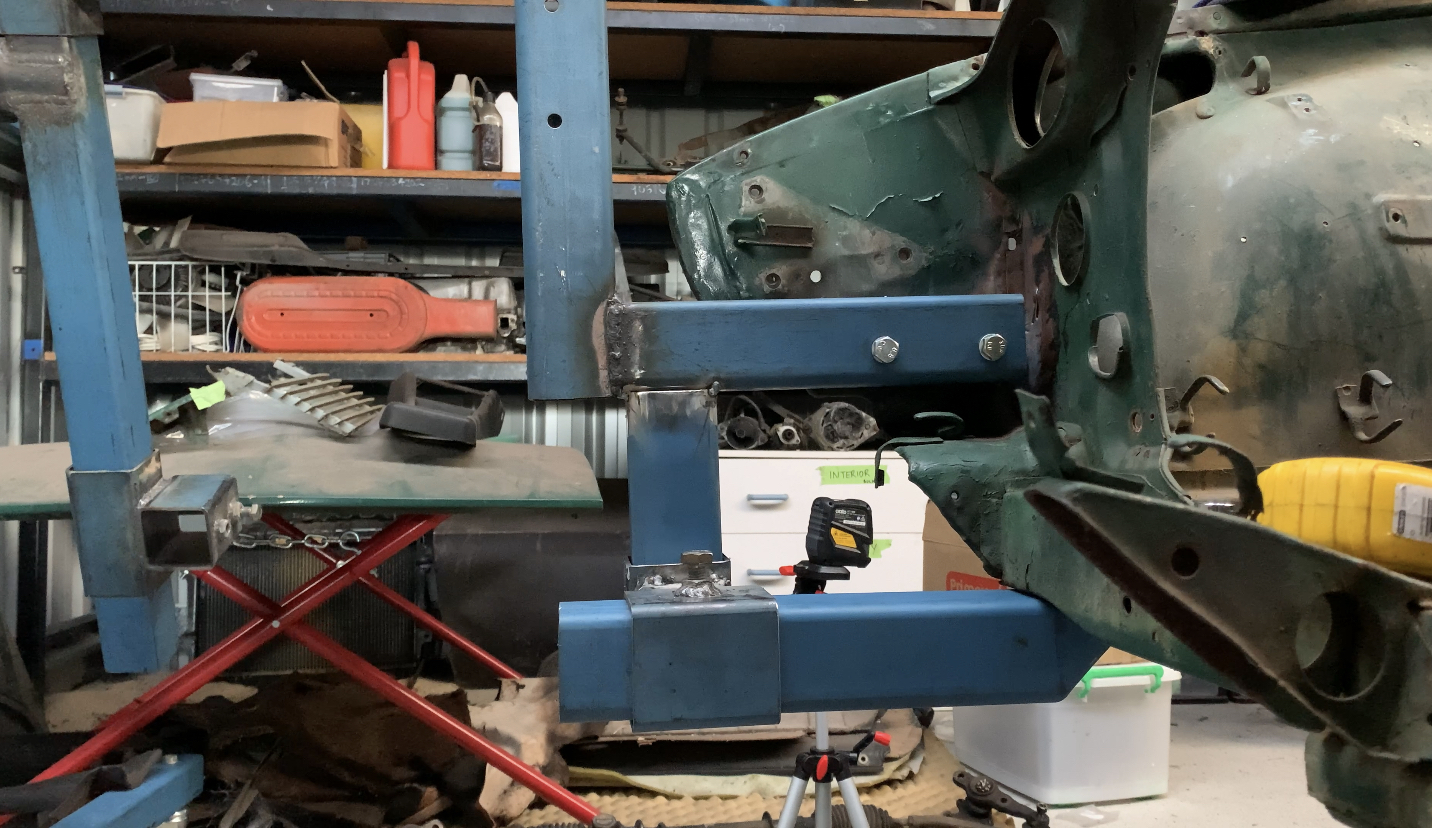
I only got in a half days work on my last RnR, but managed to get some important work done. if you have been following along my front nose was damaged in a past accident and has been some what weakened compared to a stock one. I decided to add an extra bolt in point on my rotisserie mounts to add some strength as I did not trust just bolting to the bumper mounts. This is what I came up with.... first I had to remove the snapped/rusted out bolts from the tow points. This proved difficult, used heat and penetrant along with easy out bits, but to no avail on the LHS, I snapped two easy out bits trying. I ended up just drilling a 10mm hole straight through and will use a M10 nut and bolt, (I’m replacing chassis rails anyway) and I have a conveniently placed rust hole which allows me access to place/tighten the nut. I managed to remove the rusted RHS tow point bolt with the easy outs! What a feeling of triumph! this additional mount point added a heap of strength to the mounts, vertically and laterally. And it was only tacked together. Once fully welded they will be plenty strong enough to support the car. Why did I make it adjustable and not just weld the front mount all together? Good question. I made it adjustable because after I carry out repairs on the front nose the bumper bolt hole locations may alter slightly meaning the rotisserie mounts won’t fit for the underbelly painting. Now they are adjustable, they will fit. Next up I hope to: - finish the front mounts - add supports where needed - start on the rear rotisserie mounts

 3 points
 -
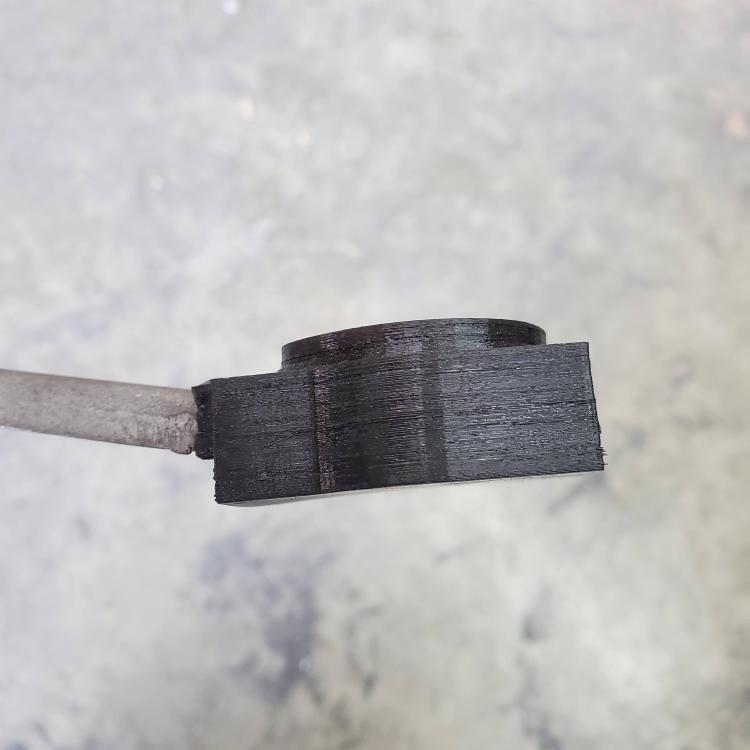
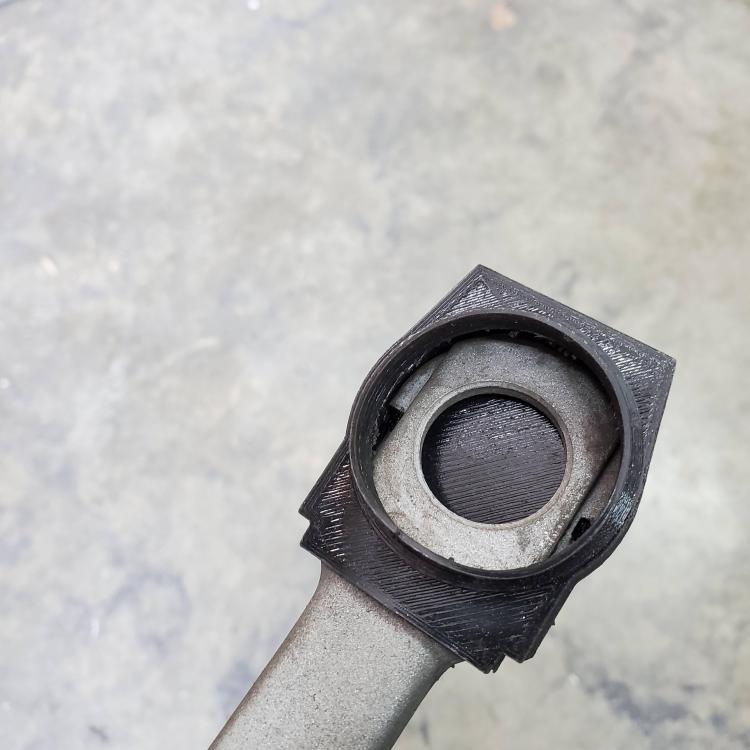
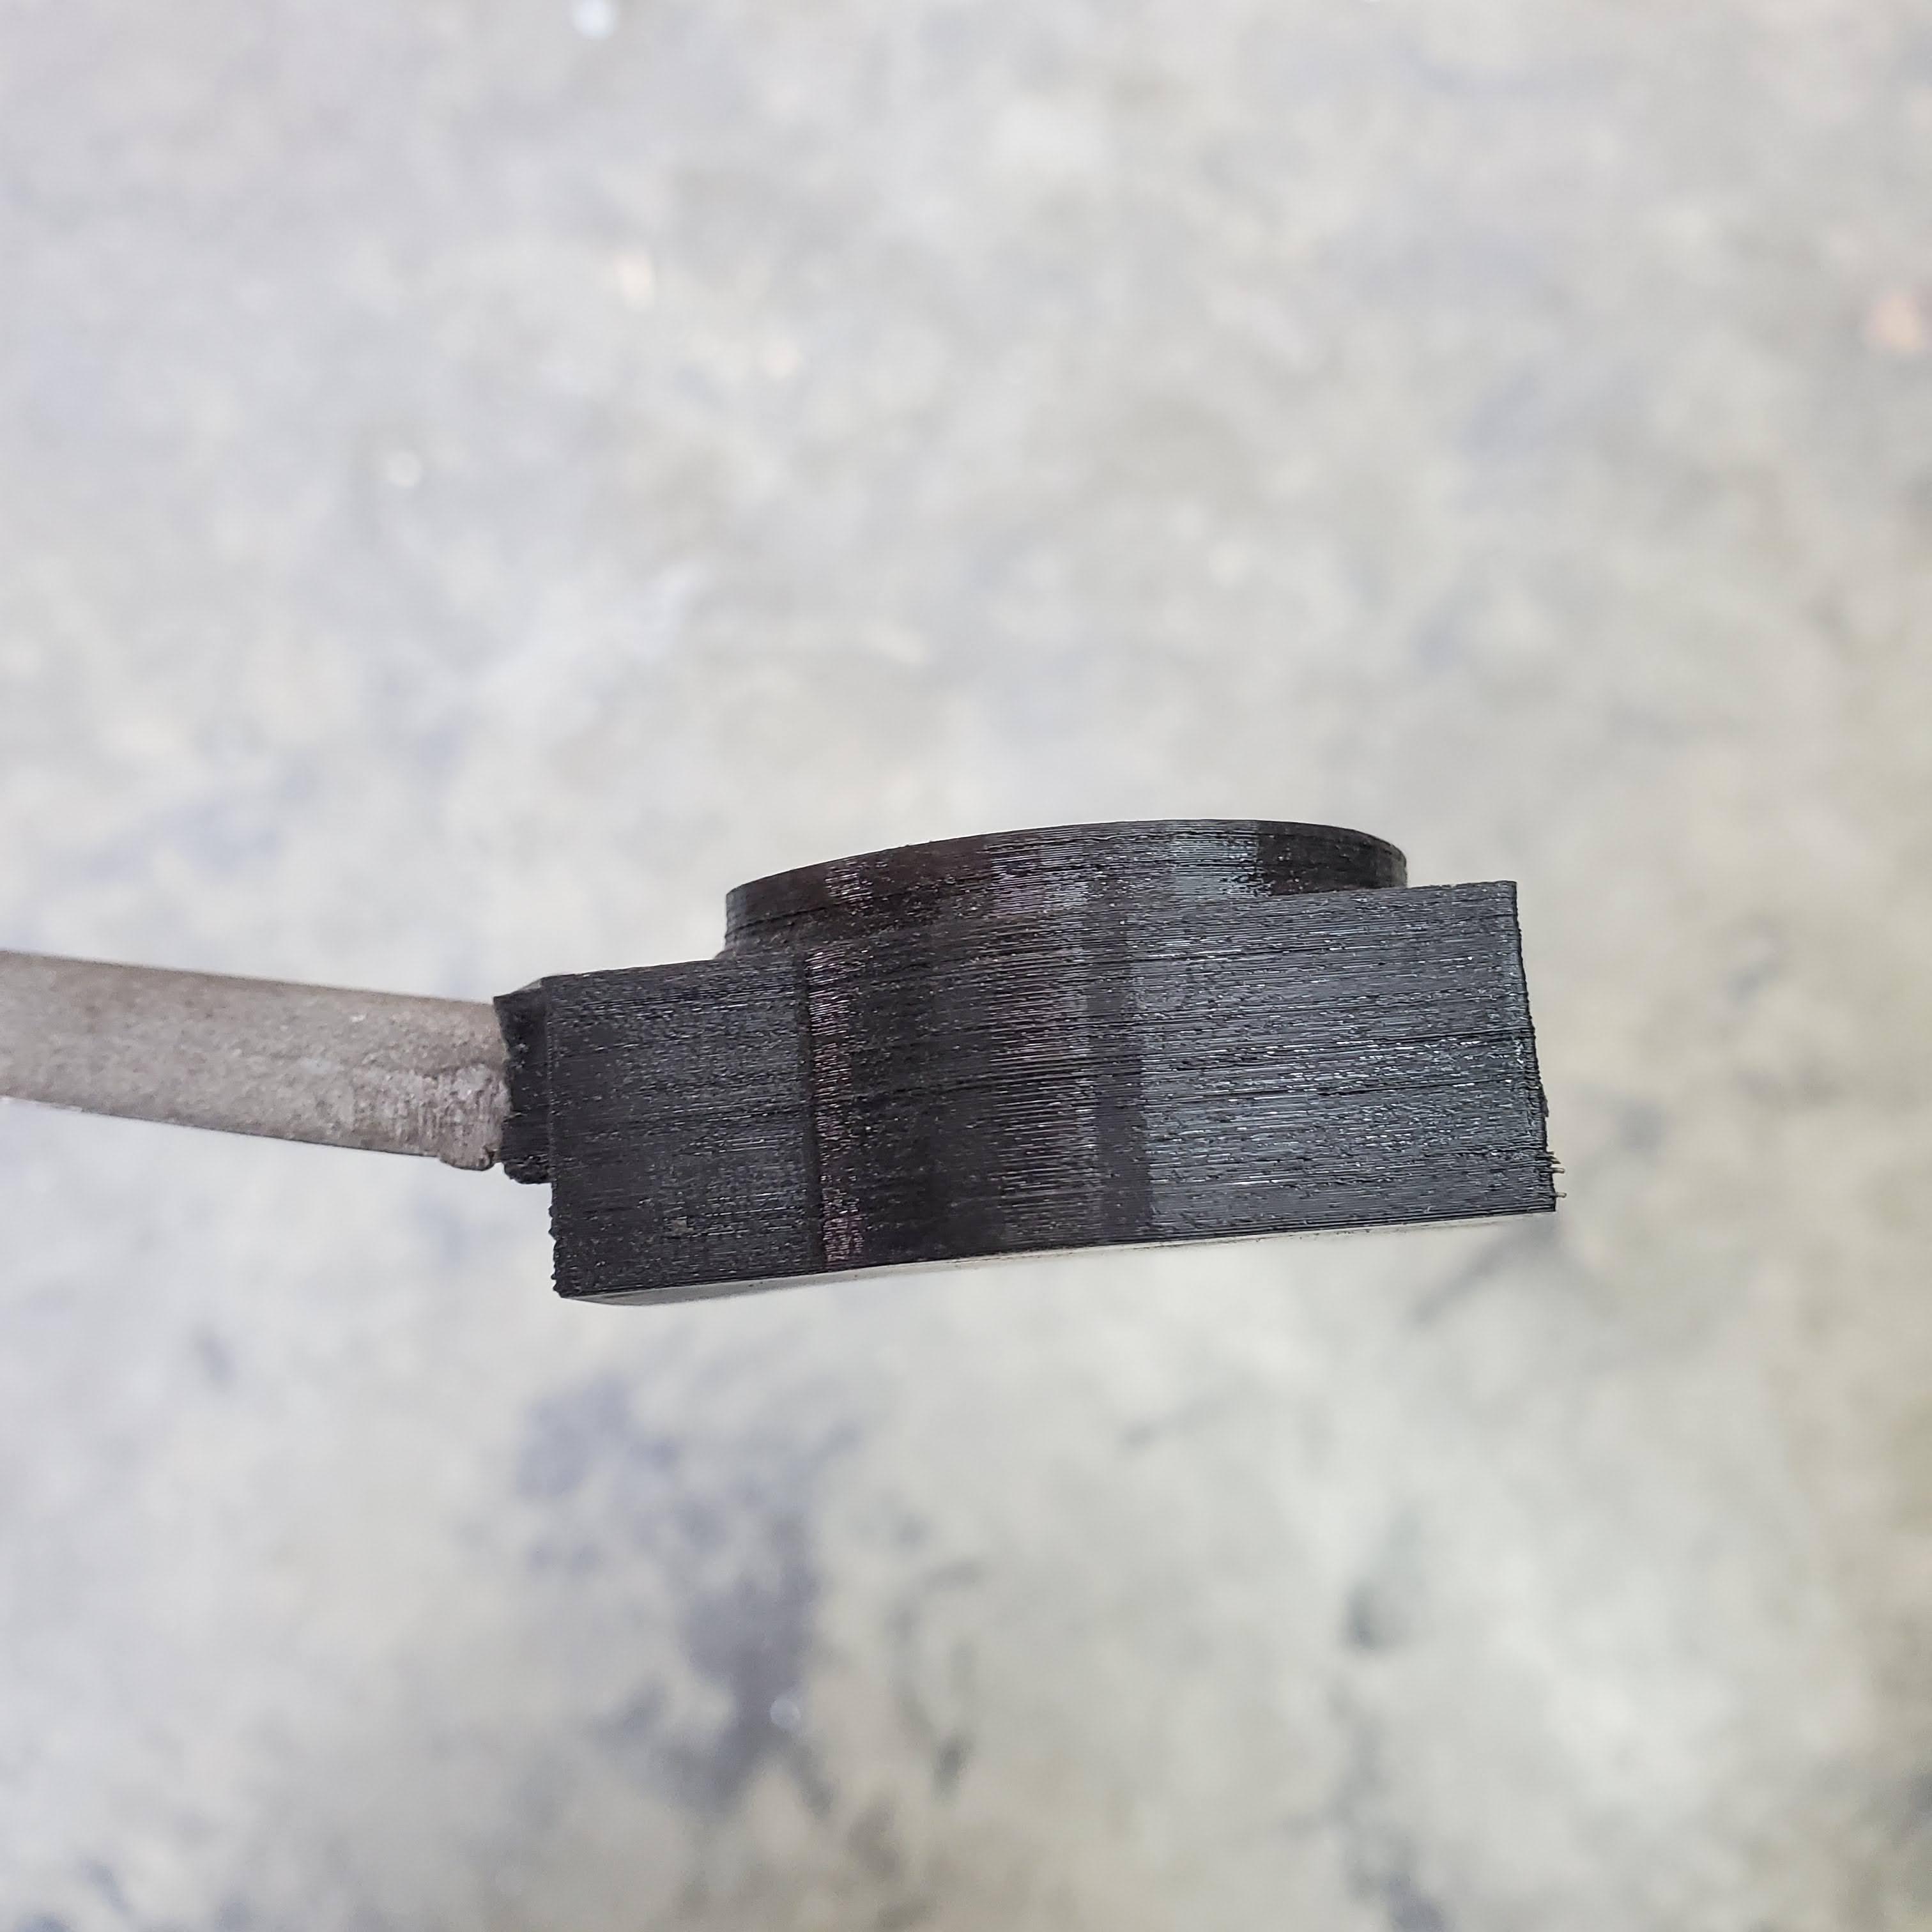
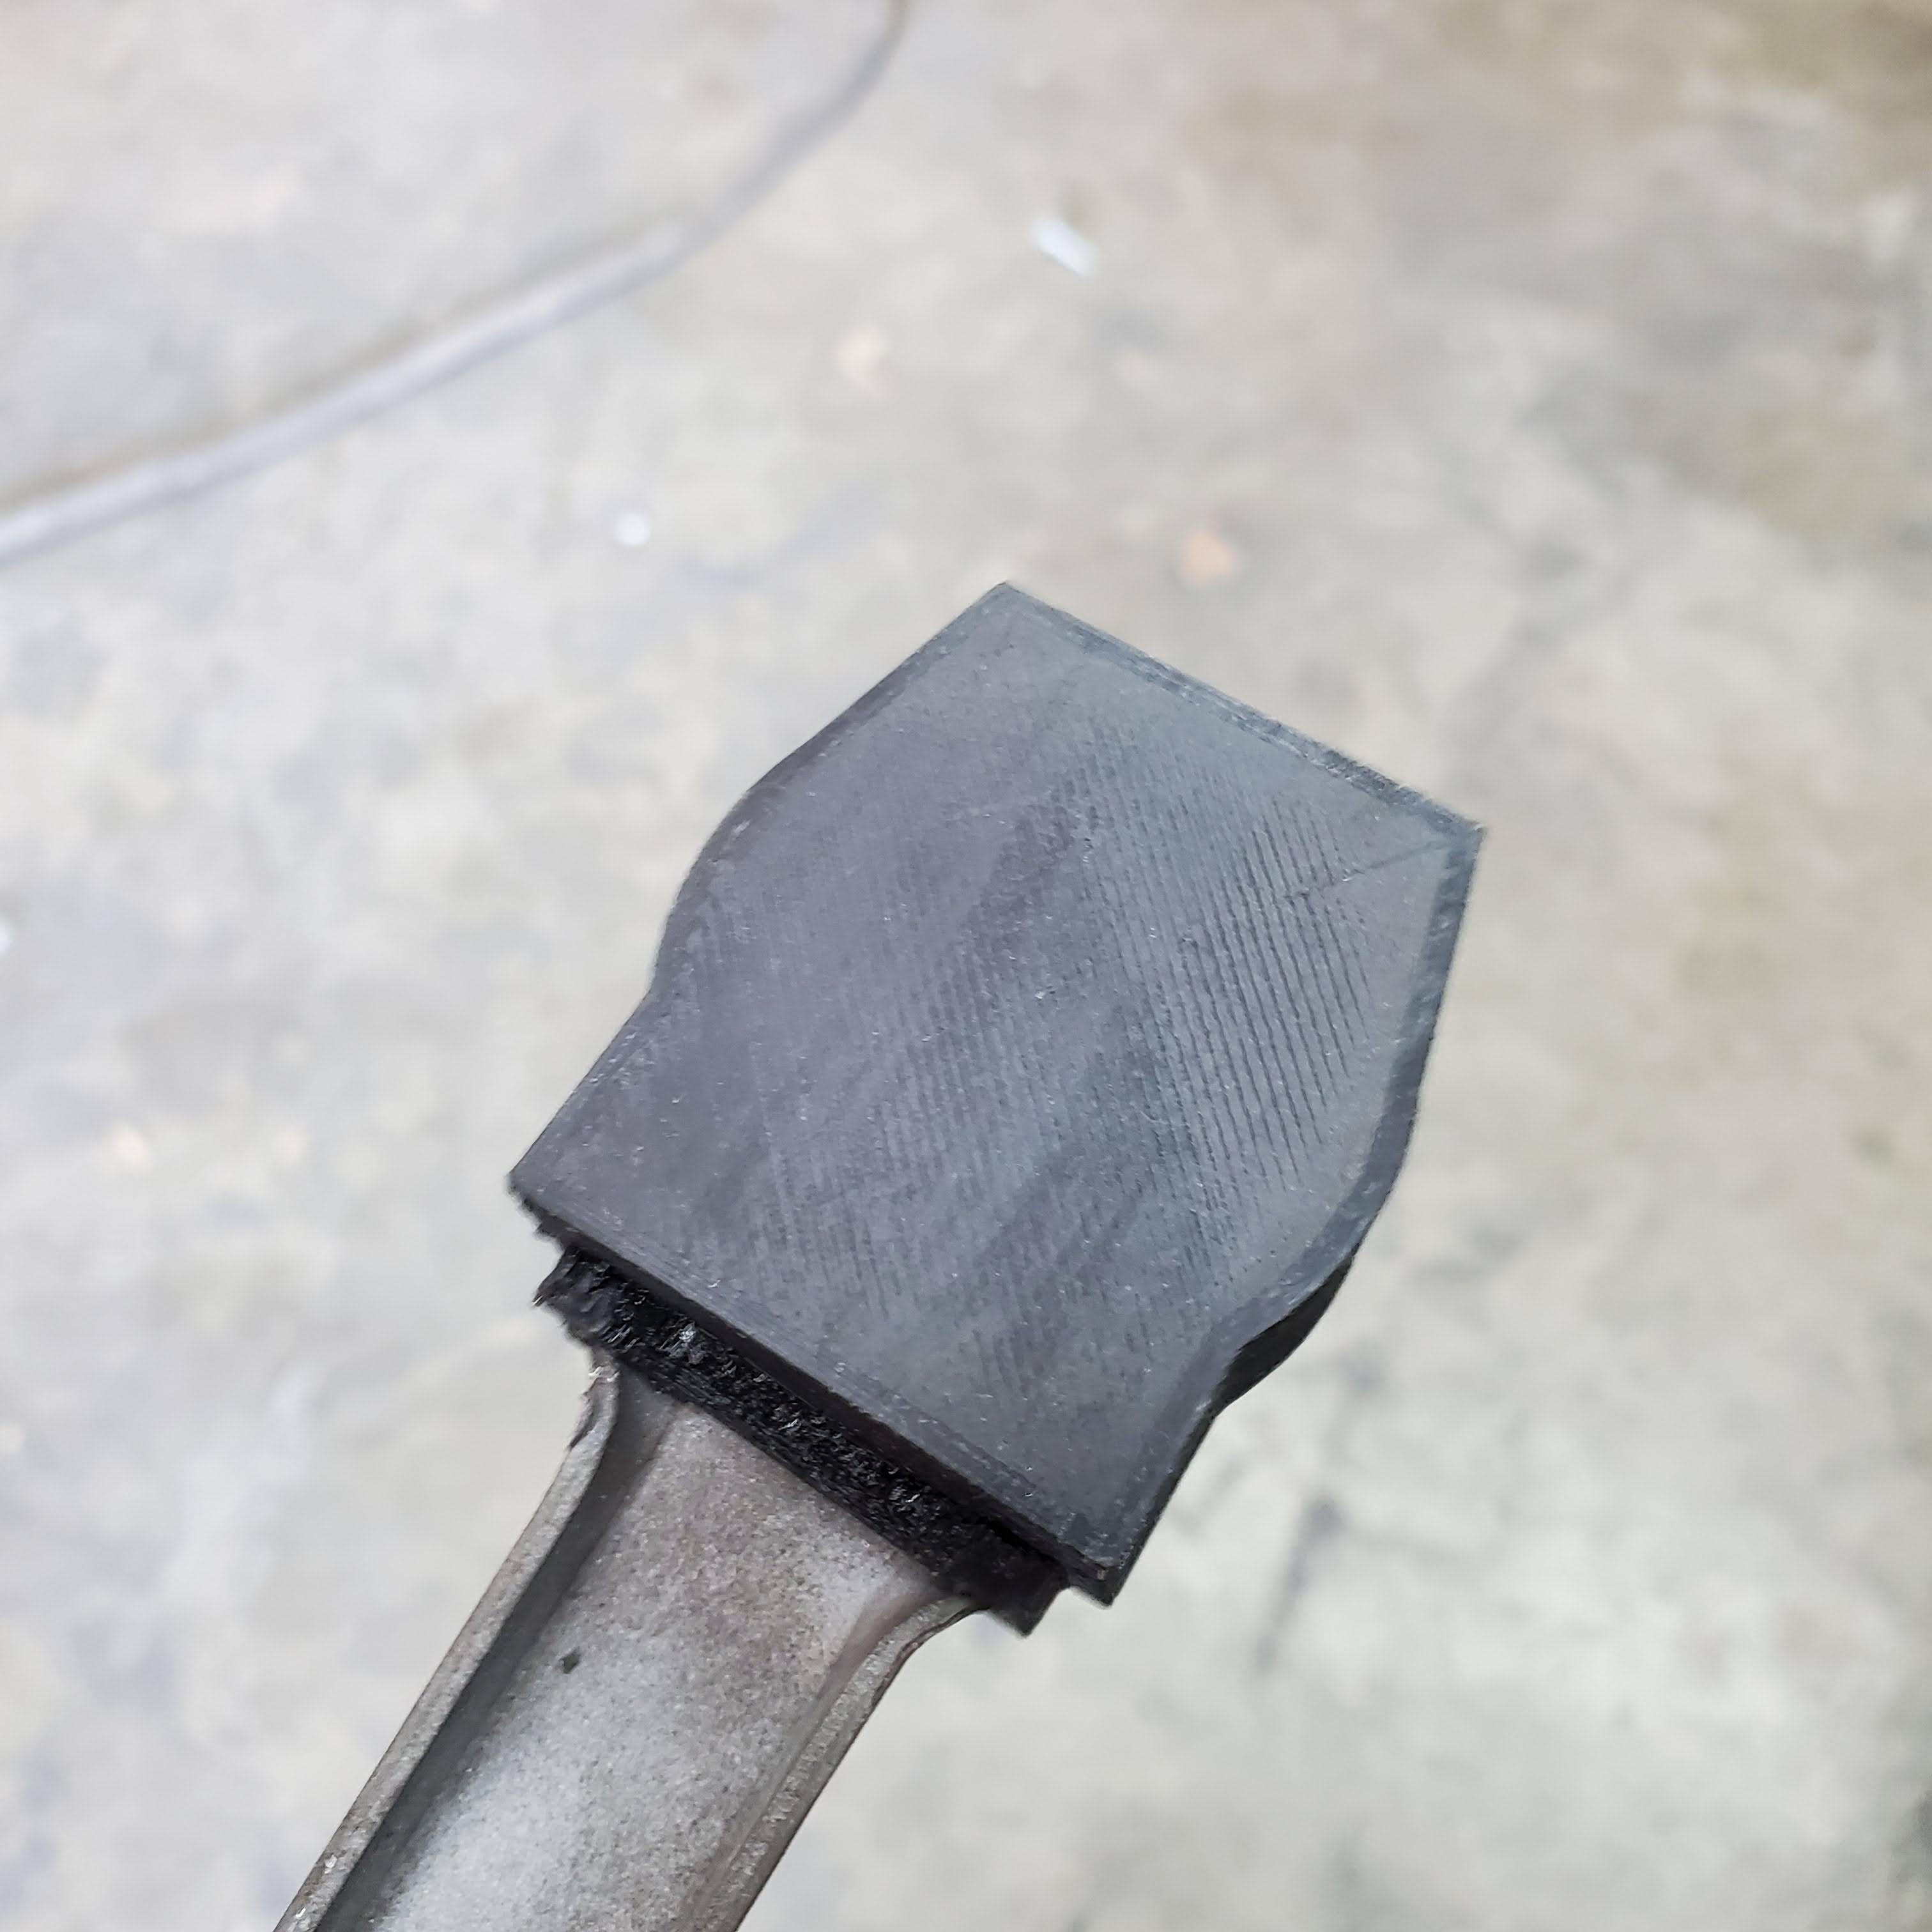
3 pointsAs a very cool aside, I recently acquired a 3D printer. This is a tool that I absolutely needed so I could make parts that are NLA. Seemed like a good story. Anyway, I needed a new boot for the wiper linkage. Used the one I had, with bits missing, extrapolated where I needed to, and printed it using TPU (first use of TPU). I tried it on for size last night; TPU is flexible, but it's not as flexible as the OEM part. I thought for sure the new boot would blow apart as I stretched it over the end of the linkage. Well, it held and the fit is nice and tight. I haven't checked its fit over the motor yet. I expect that one day I'll unearth it for the purpose of reinstalling it. That'd be a good time to check the fit, I think.


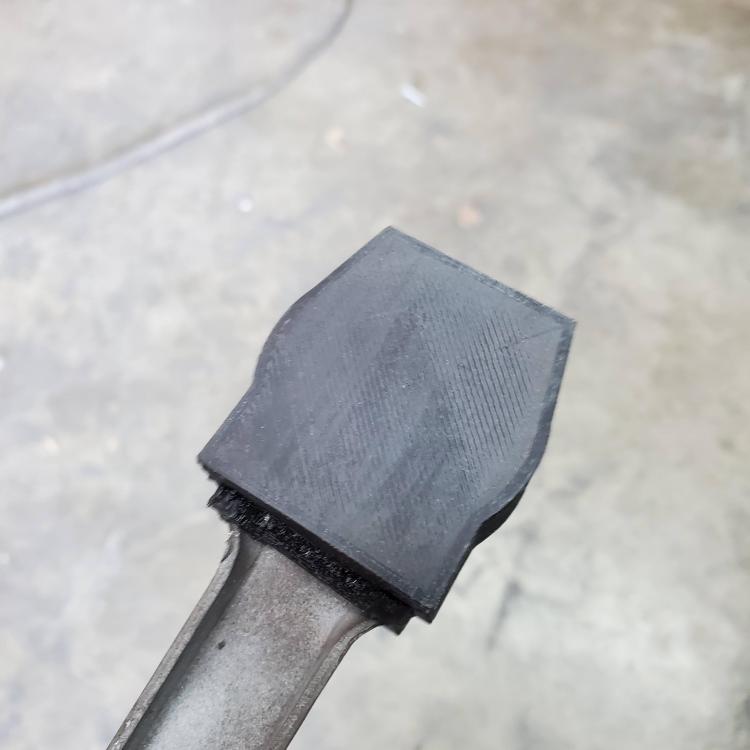 3 points
 -
When that happens I use a hammer and a pin punch to shatter the broken tool, and a dental pick to remove the broken bits. Fiddly, but effective.2 points
-
Been there, done that -- LHS tow point on one car, RHS on another. Needs an oxyacetylene torch. The flame temperature from a propane torch isn't high enough and the flame tip is too diffused. EZ-outs are the devil's tool (the cheap ones, anyway). Snap one off inside the stud and the degree-of-difficulty for the job instantly increases by a factor of 10.2 points
-
2 pointsInteresting.. i probably restored the right car? a increase of value of 86% in one year?? My idea to restore a 280zx was to have a car that drives very nice, is big enough for my 6 foot 6 and does not get stolen because they are not very valuable... i guess that last point i mentioned no longer applies.. pff..😕
.thumb.jpg.b670be784e31f4c420a47f82718596ef.jpg) 2 points
2 points -
They know their stuff there . I am truly impressed by their CV axles . That’s size should work . The +11 helps the tire clear in the rear wheel arch2 points
-
2 points
-
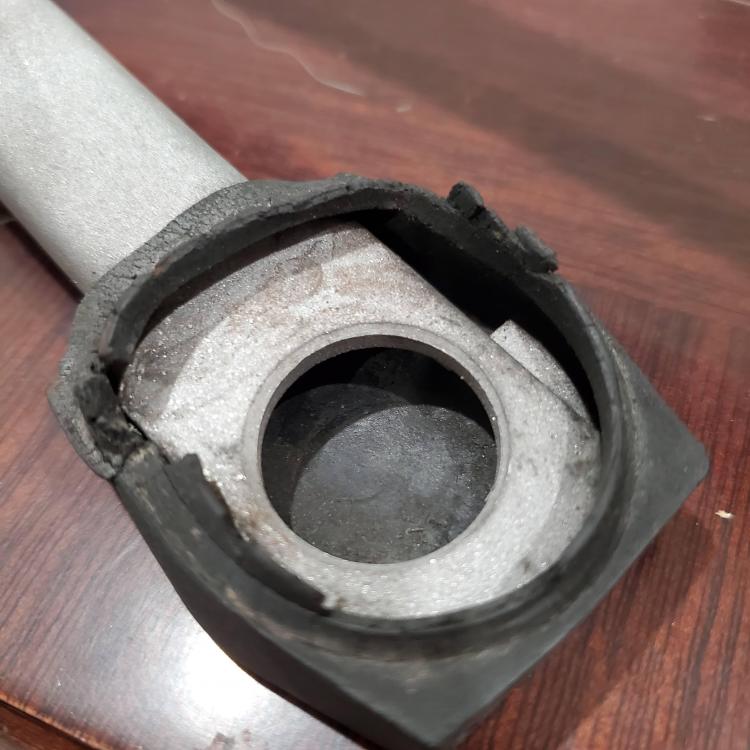
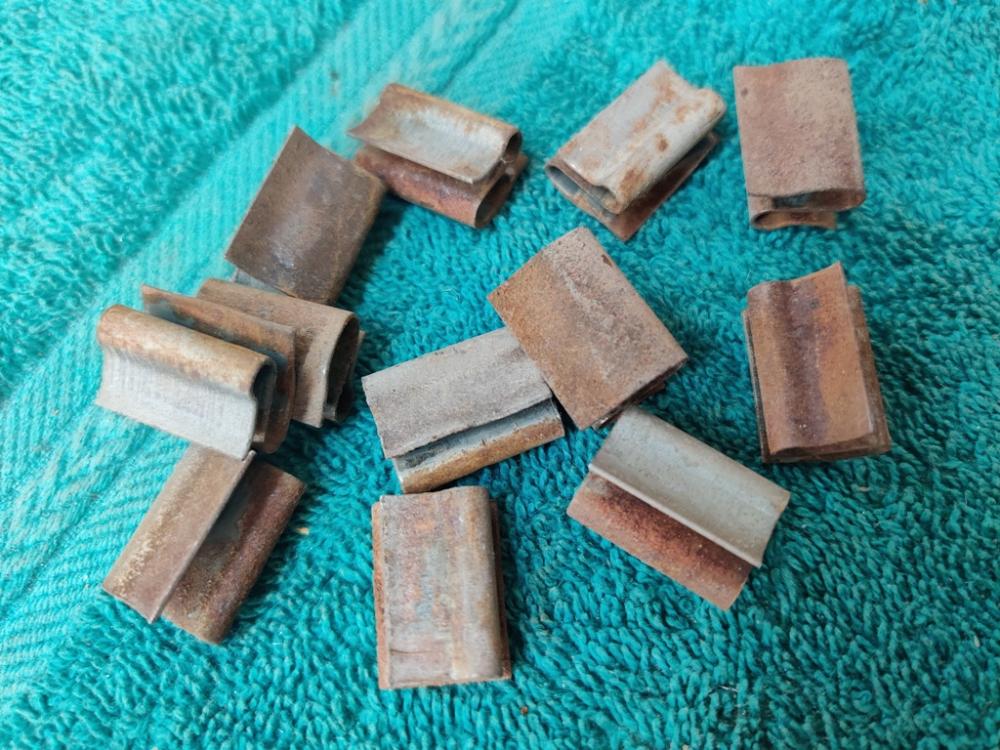
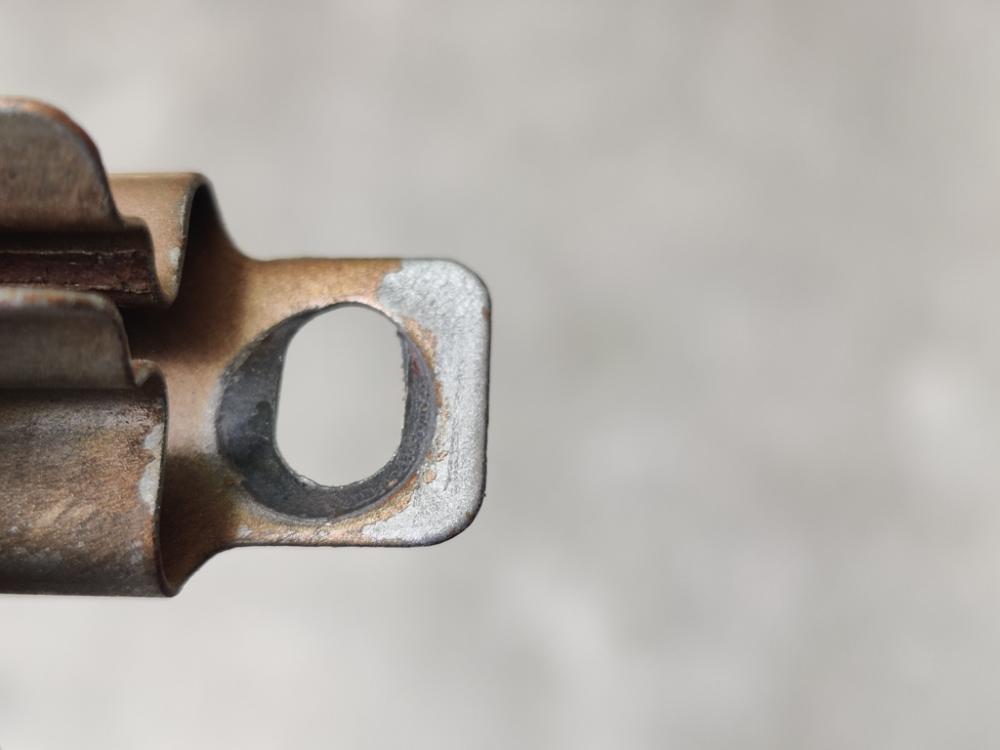
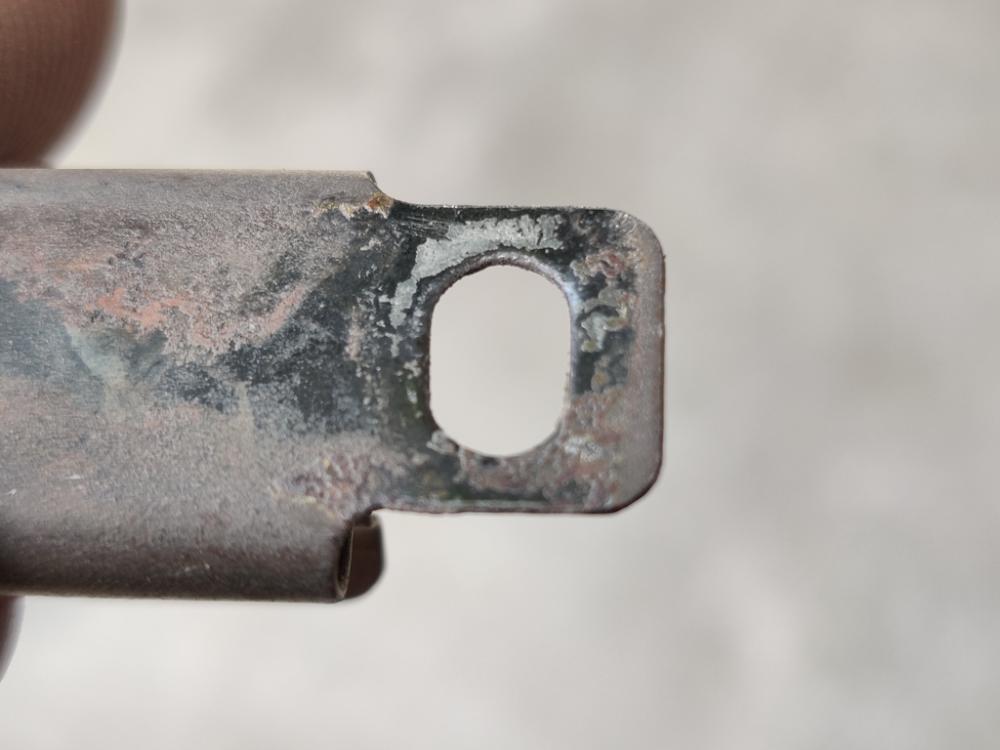
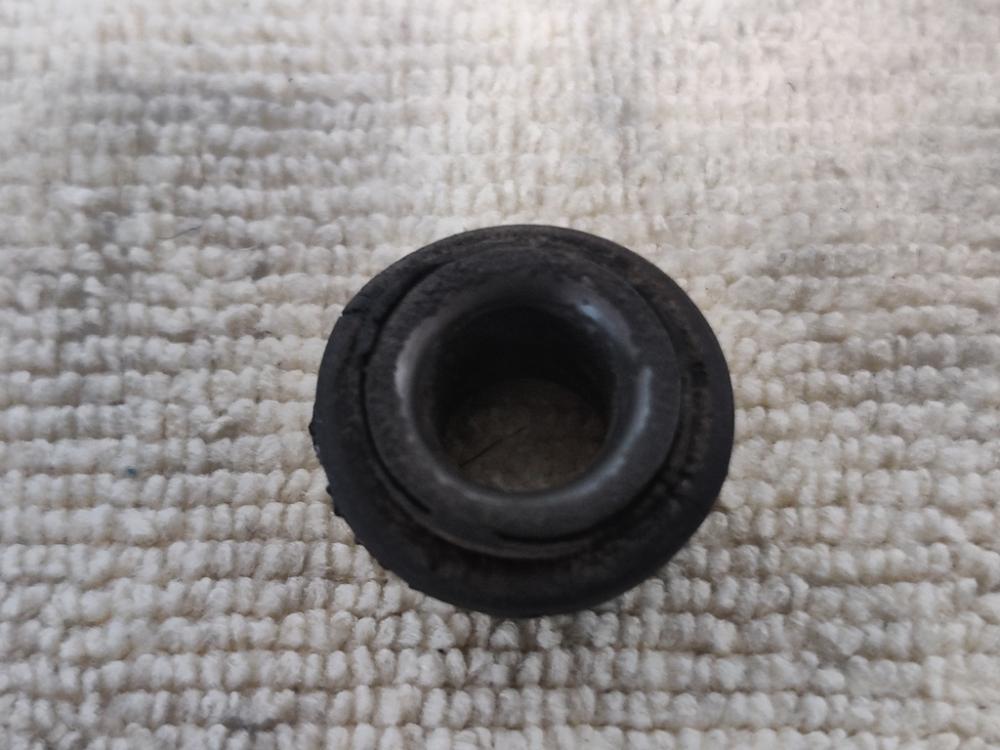
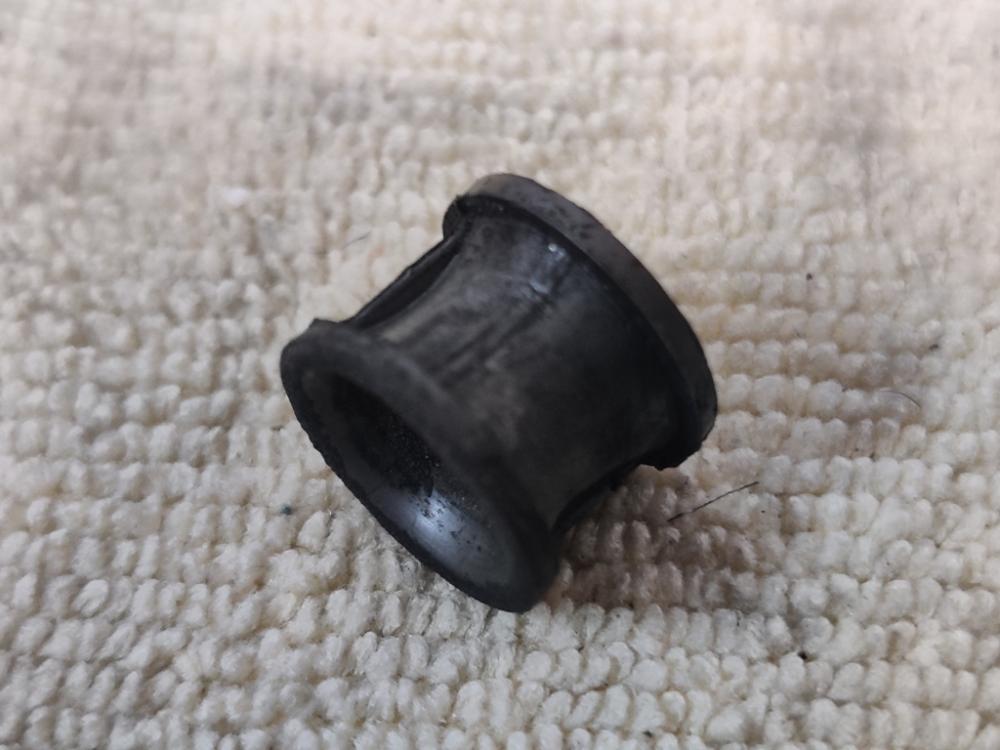
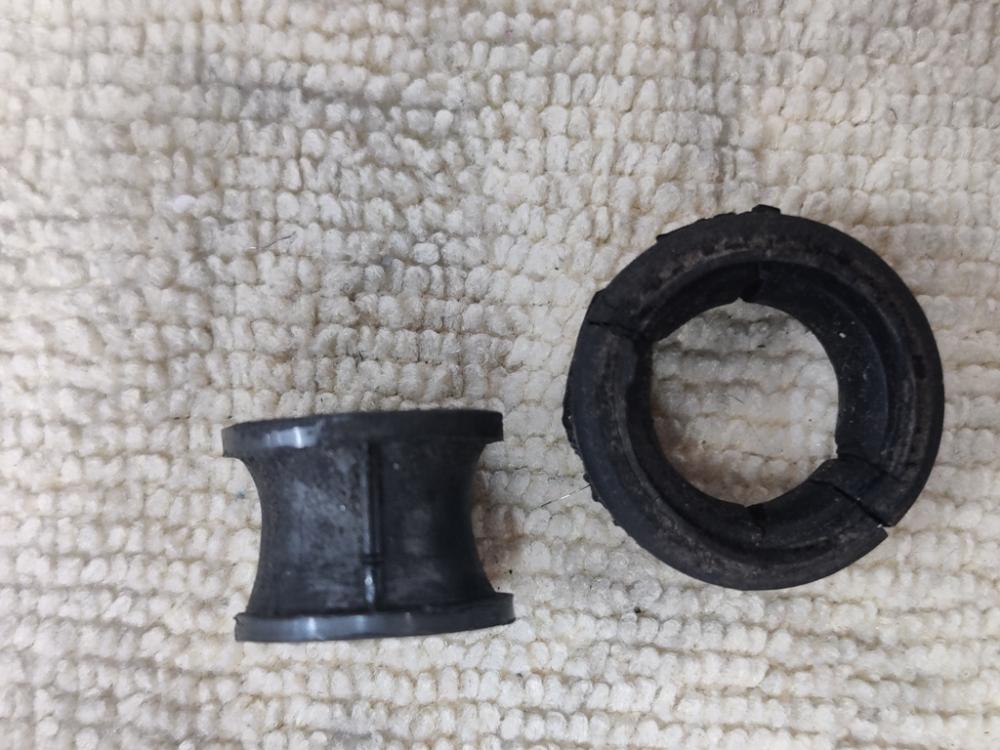
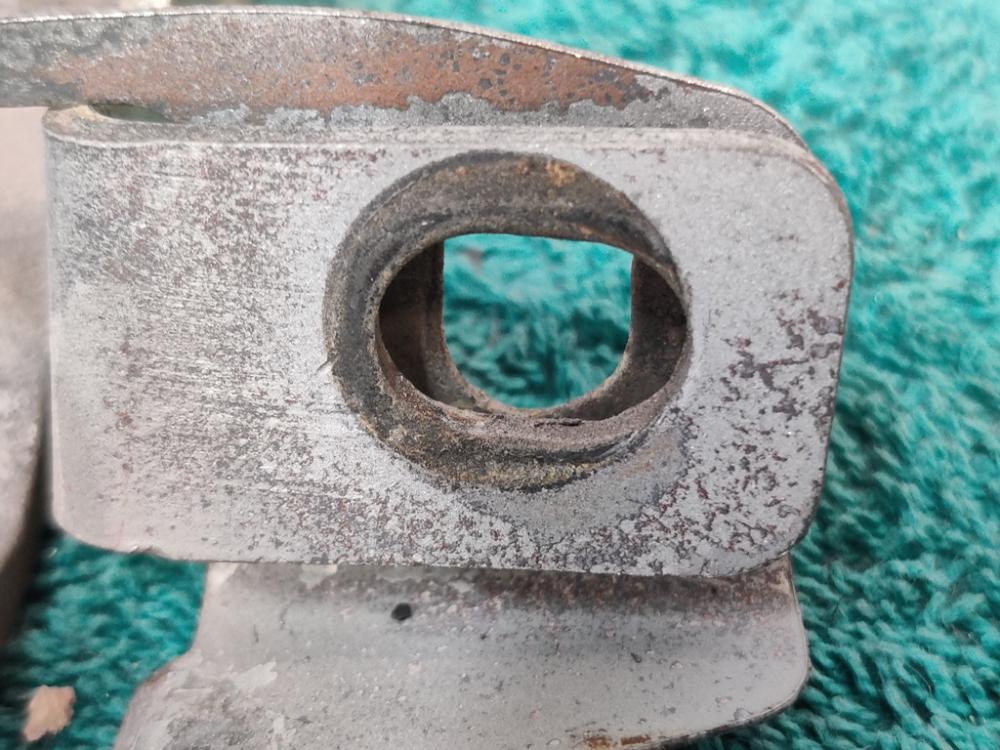
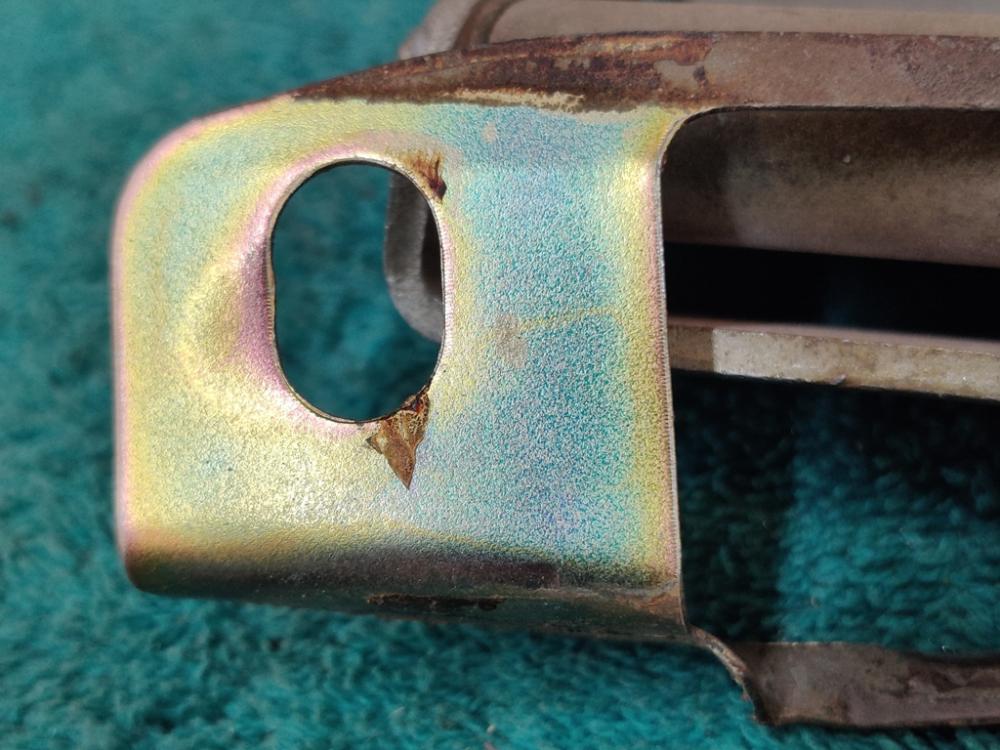
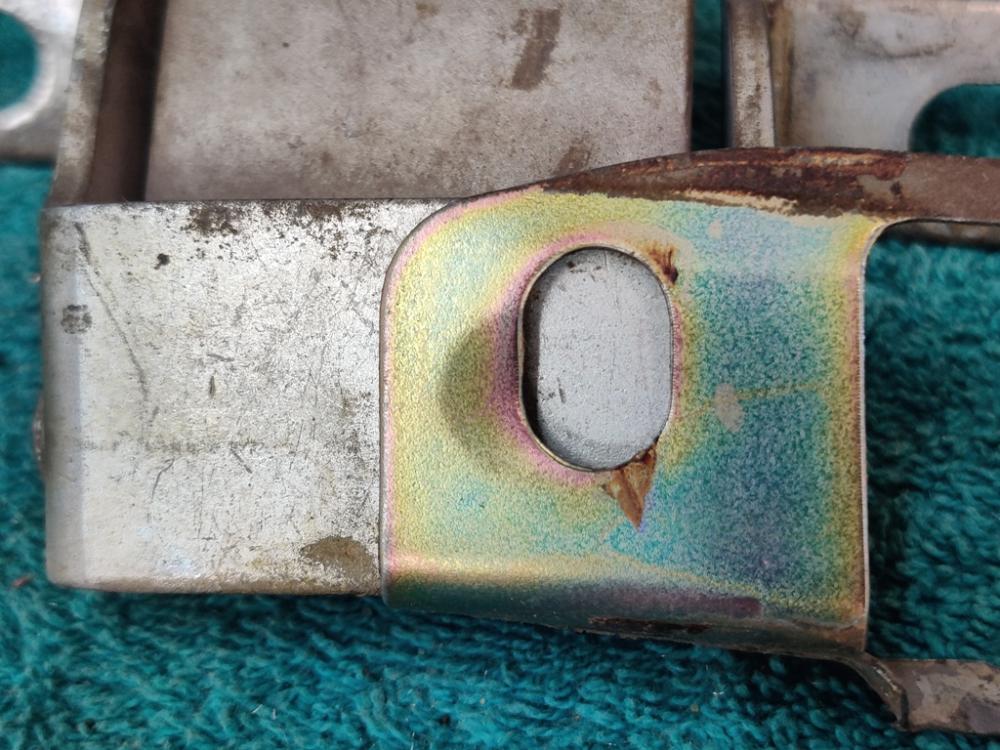
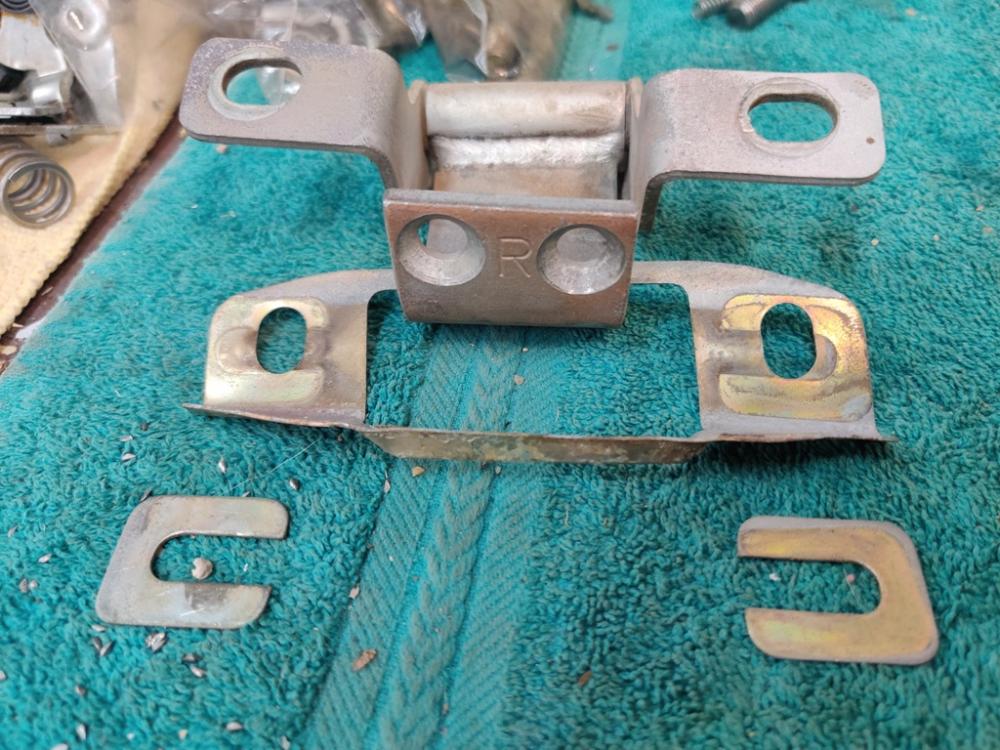
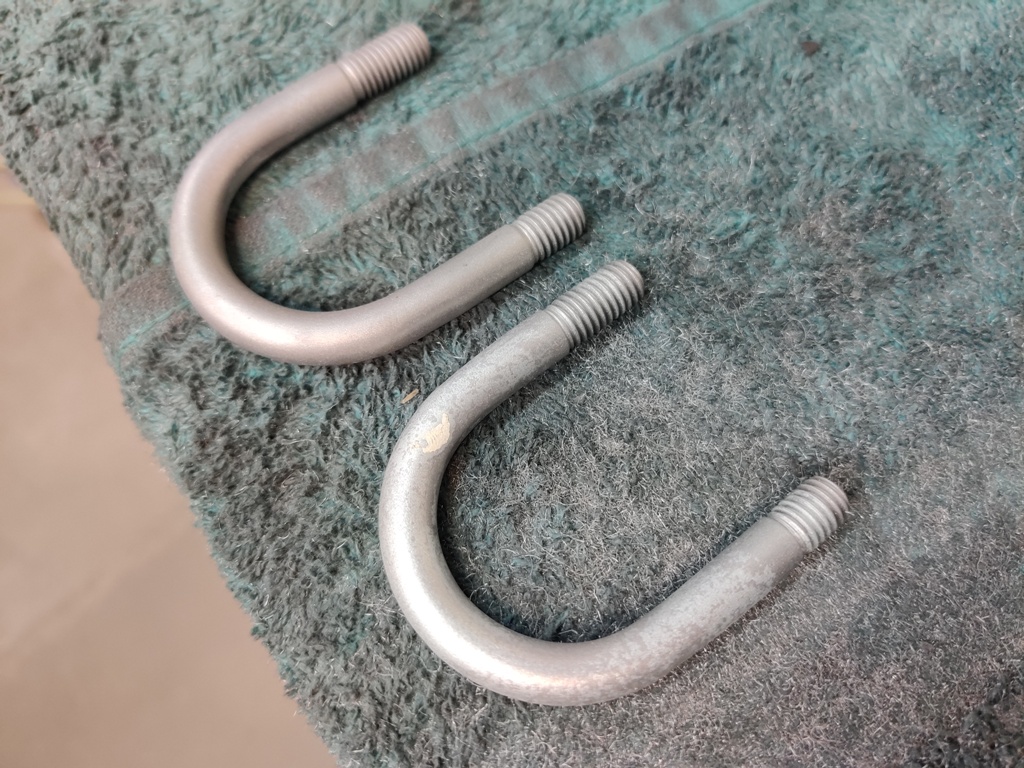
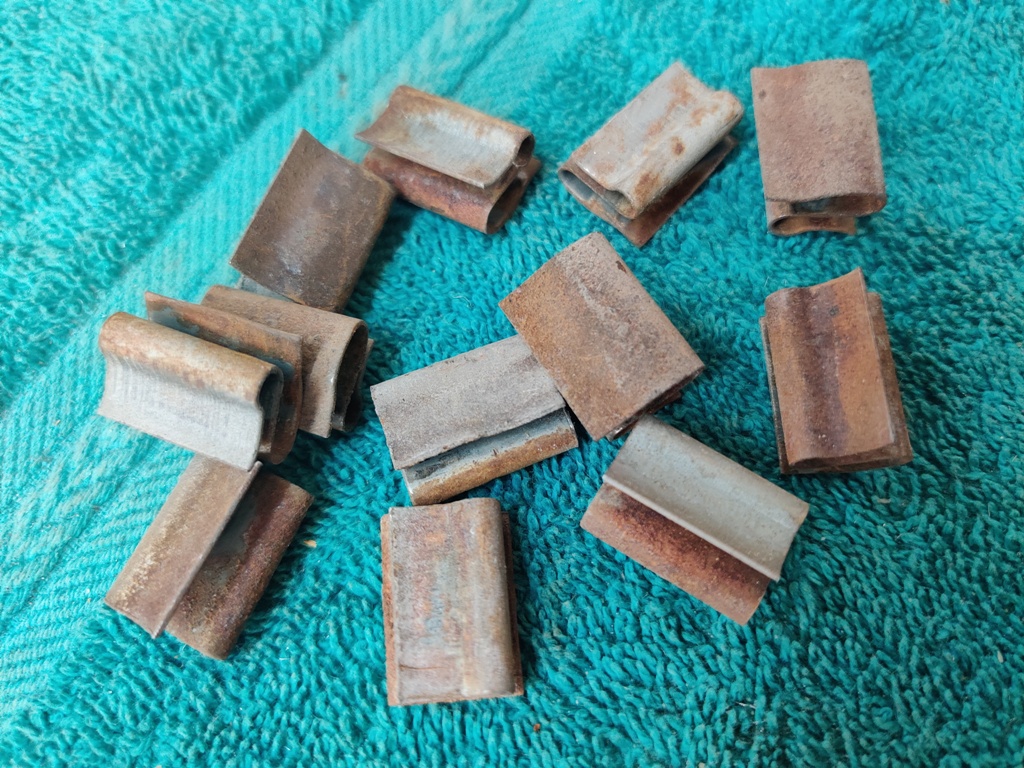
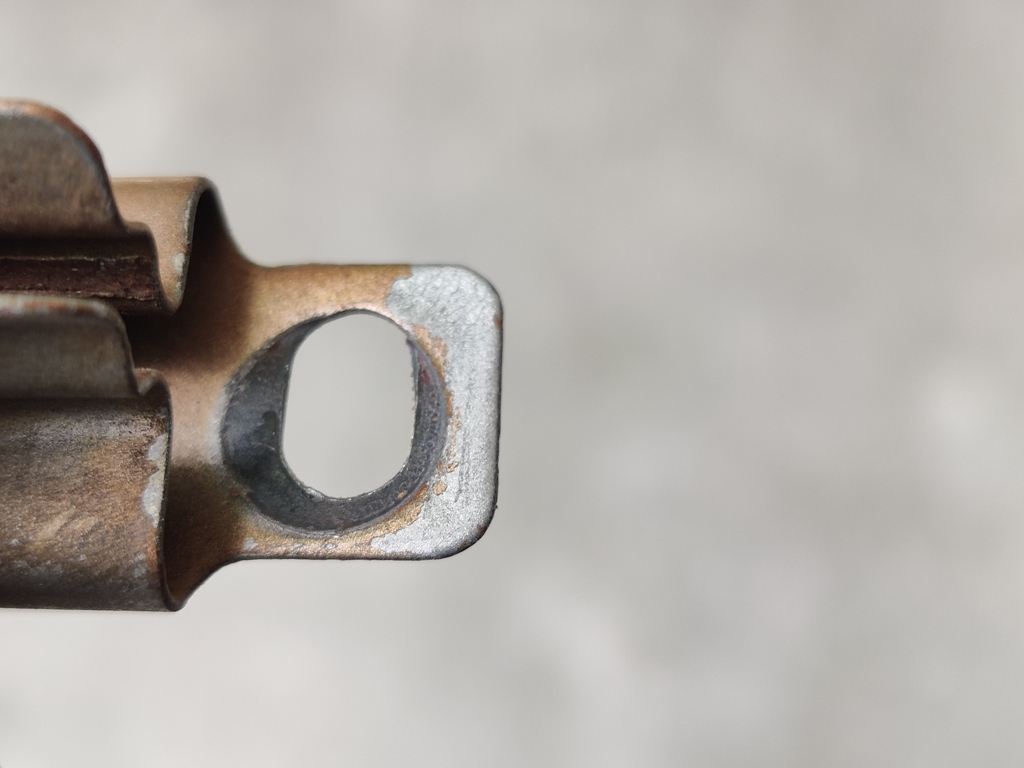
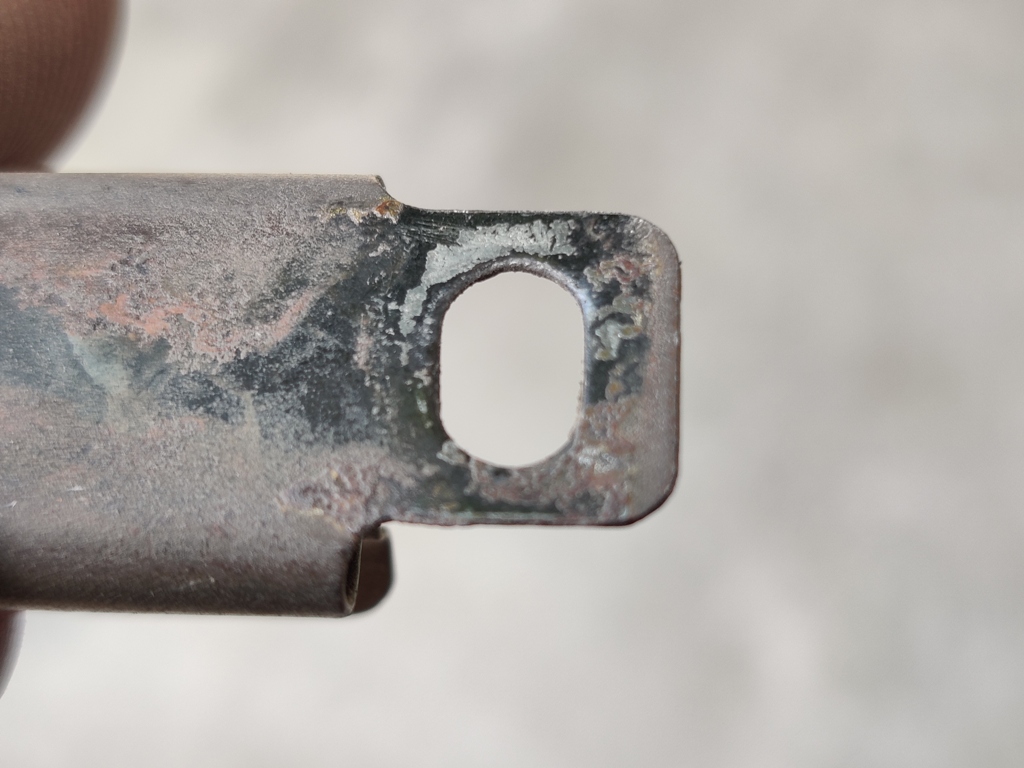
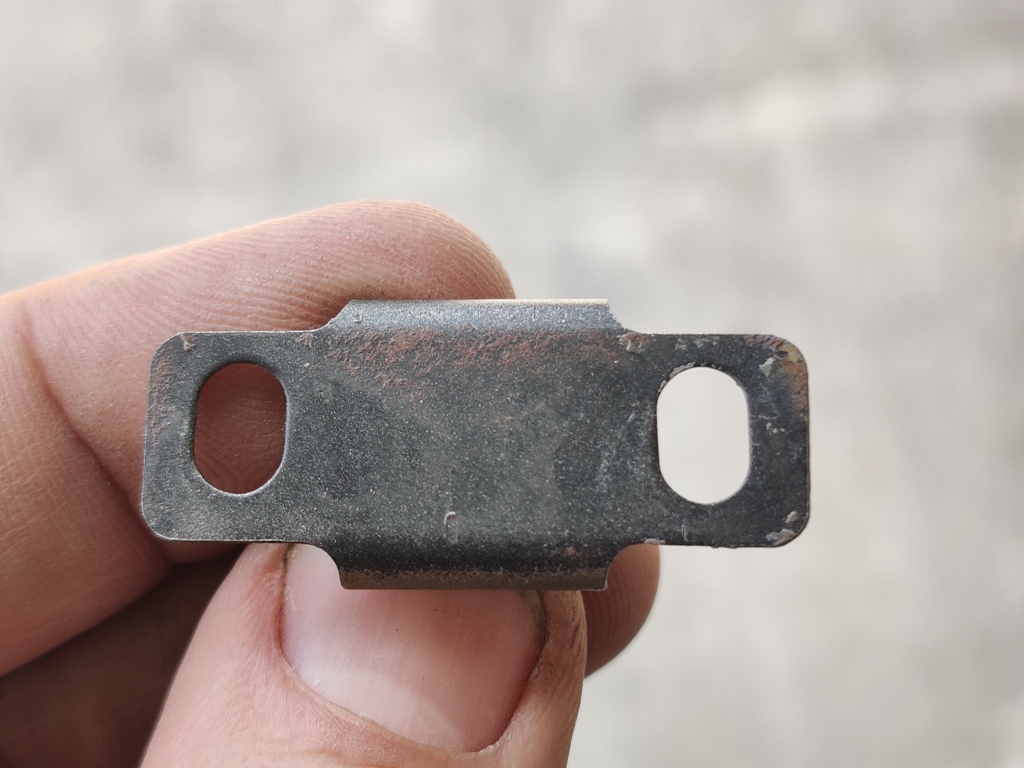
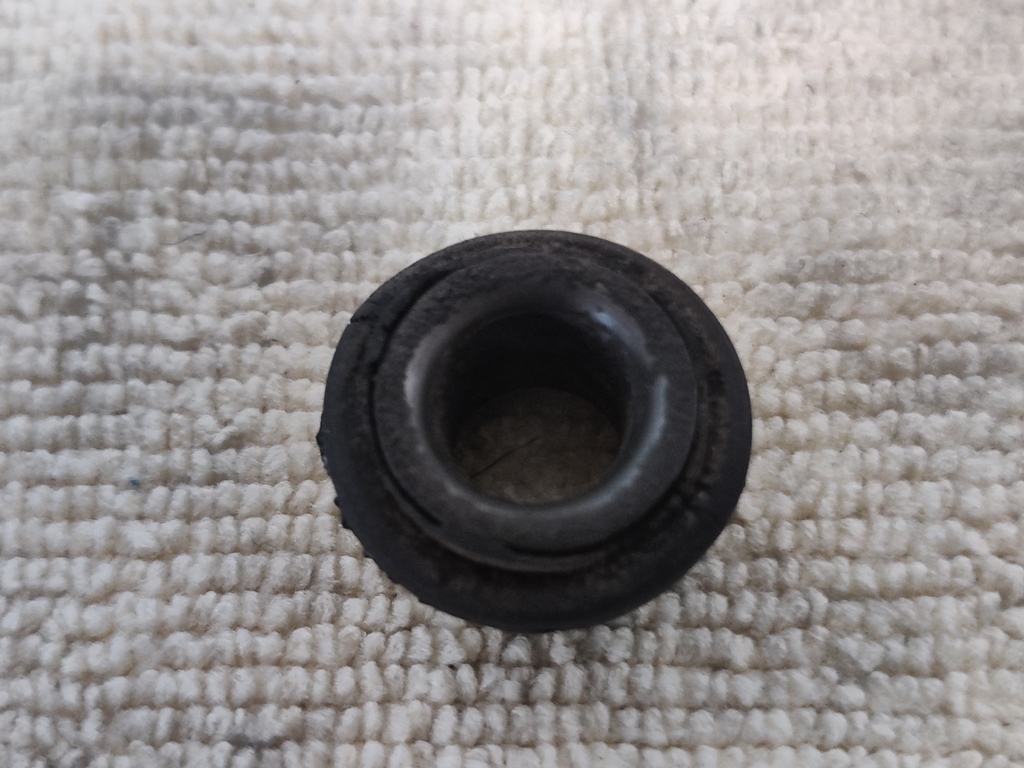
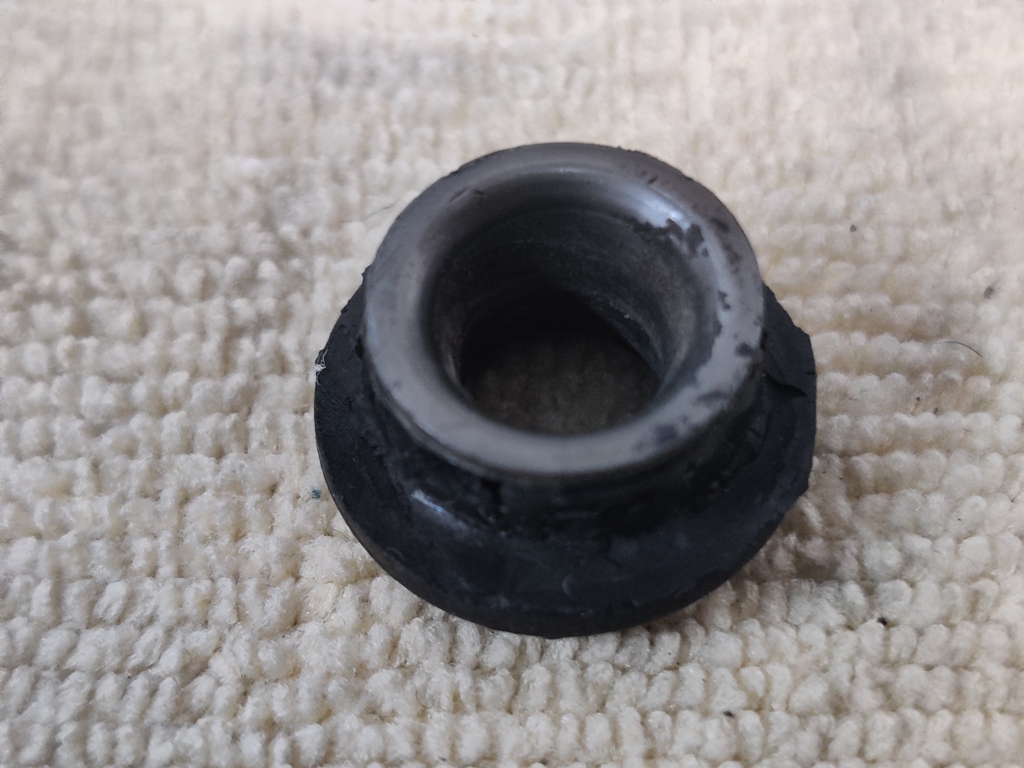
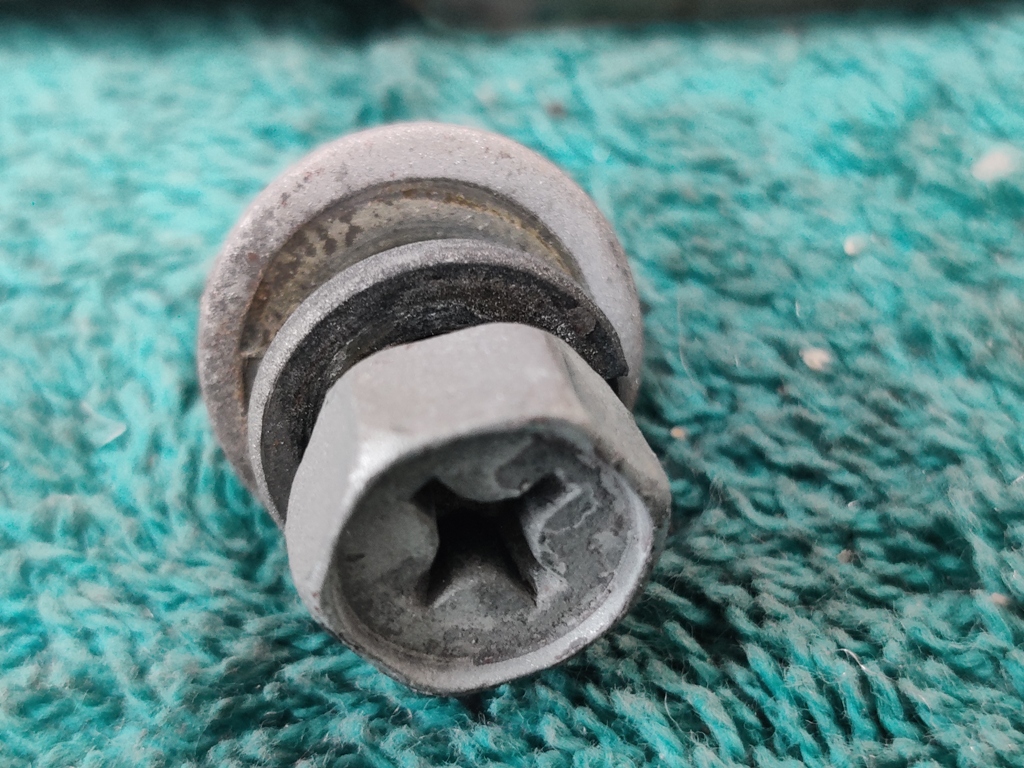
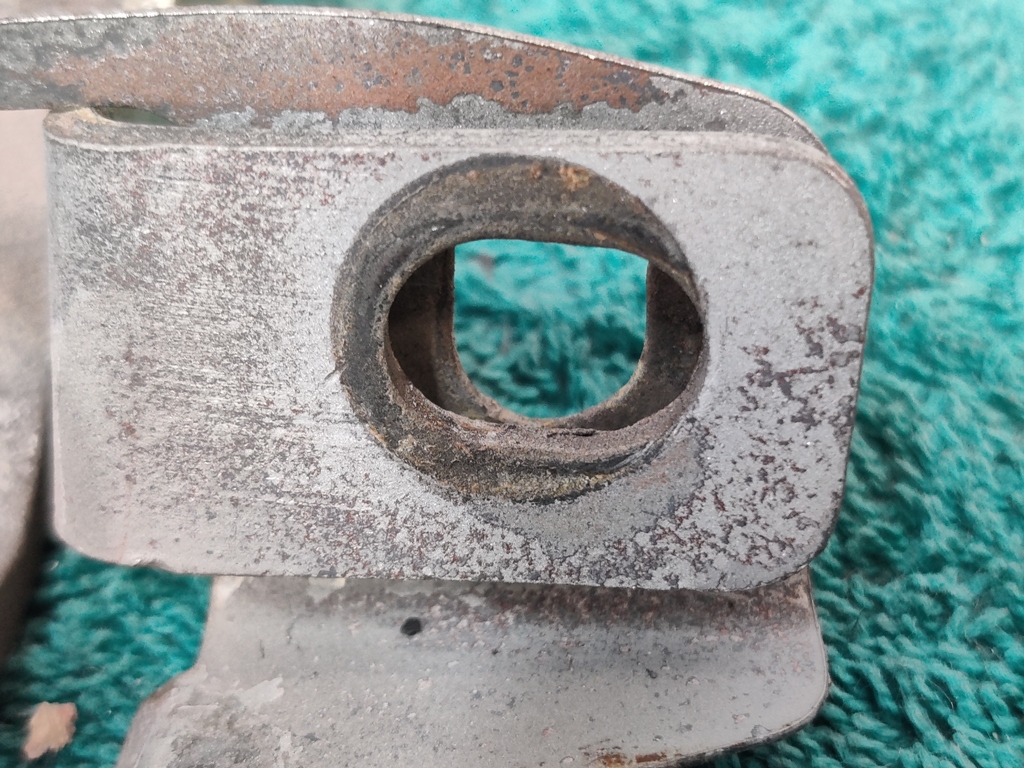
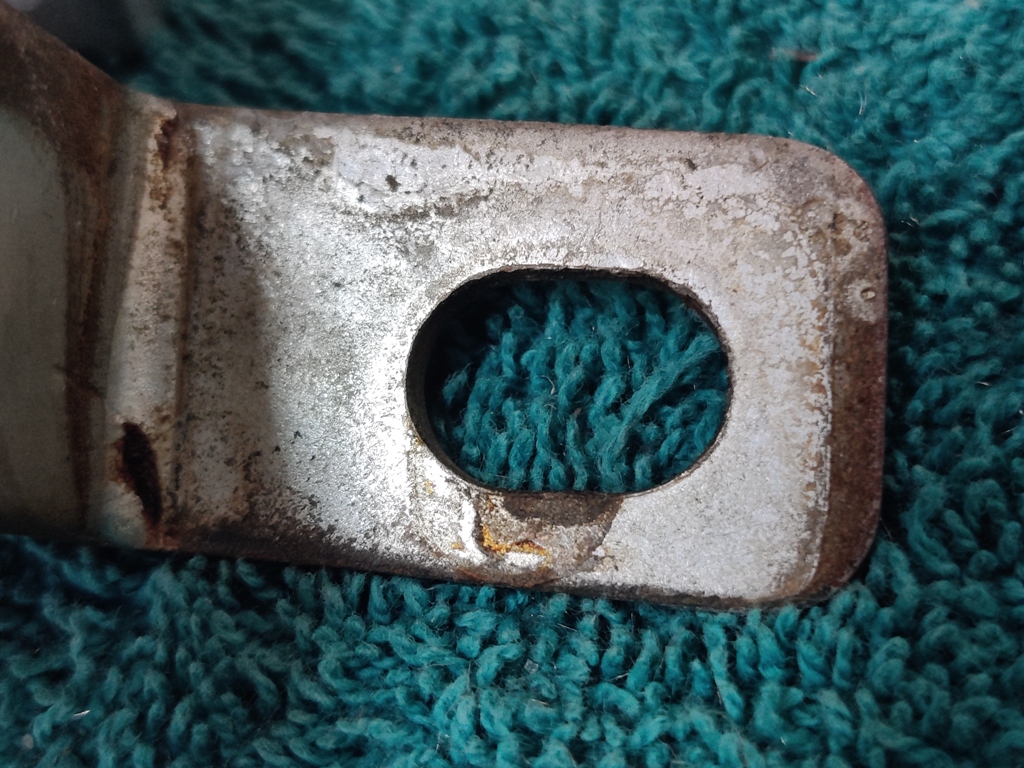
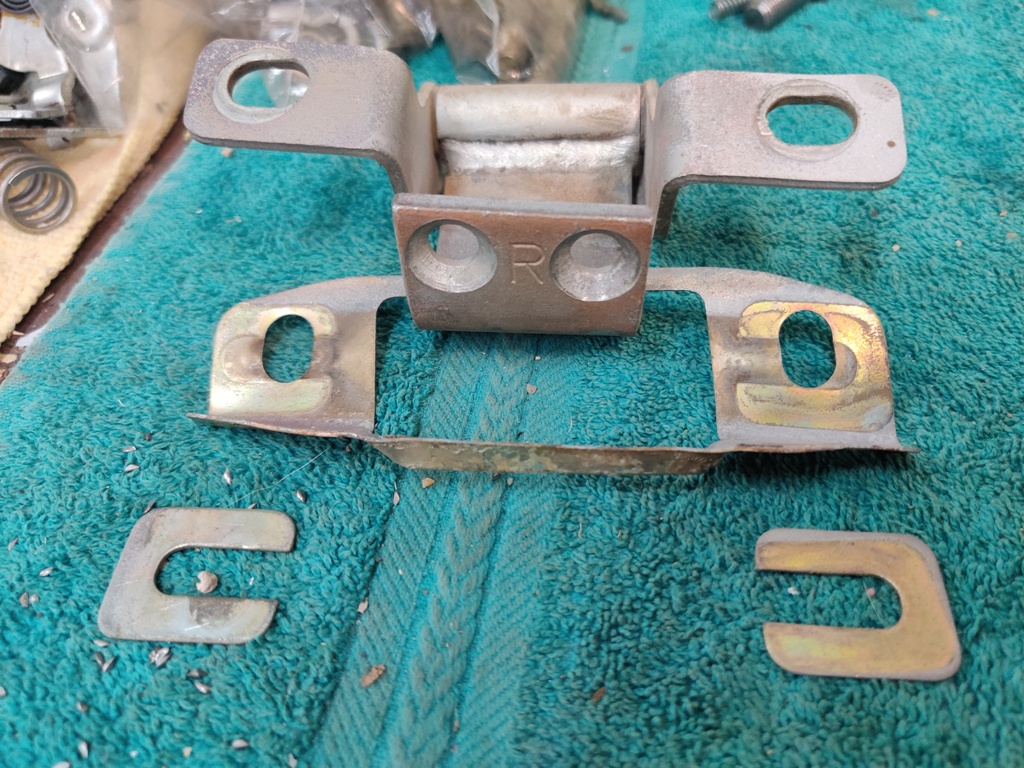
I see it has been a long time since I posted an update. I am still working on fasteners. I suspect that I am putting too much time into them, but I have no experience with getting hardware replated. So, I feel I can't leave it up to chance. I will probably send some "test" hardware along with it in various stages of prep or lack thereof. It will be interesting to see how the test hardware compares to my fully prepped hardware. I have a few observations to share, but not much of an update. First, the u bolt that holds the steering rack from twisting on the front crossmember - I happen to have two. There is a white blot of paint from the factory. I noted that under the white blot, the part was silver. So, this part seems to have received zinc plating (clear) from the factory. The clips that secure a rubber weather strip to the unibody under the top of the fender, here in their as removed condition. Amazing that they don't even have rust on their entire surface: The battery inspection panels have these metal clips. I find it interesting that they received a black coating originally that is not paint. This is actually consistent with other black plated parts I have found on the car. Black parts are, nearly without exception, springs or springy. The bushing in the bracket that bolts to the engine compartment firewall, which supports the back of the main throttle rod, is always rotten on any 240z. It is a two piece bushing, with a plastic inner barrel and a rubber outer grommet. The rubber part broke when I pried it out of the bracket. Here it is temporarily put back together: First pic has half of grommet removed. Middle pic is of the plastic barrel by itself. I will be trying to source a similar bushing from McMaster Carr. And lastly for today, I find it interesting that the hatch hinges were bolted into the car when it was painted at the factory. The odd part about that is that the rubber enclosure was in place also. My car had shims on the right side hinge only, and you can see by the original paint that they were in place when the car was painted. This, and the fact that the taper head bolts that hold the hatch to the hinges were not originally painted, tells me that the hinges and hatch were bolted to the car for fitment, and then the hatch was removed (the four taper head screws only were removed) for the original paint application at the factory. Also, hinge assemblies and shims were clear zinc, and backing plates were yellow chromate/cad. I think I am nearing the end of the great fastener round up and restoration of 2020/2021. I ordered some new ones a couple of days ago to fill in for the small number of originals that went missing at some point. I am digging through my boxes of old Datsun hardware to find suitable replacements also. I am having some success there, finding matching hardware with 4's and 7's and 9's on the heads of bolts - proper style and length. Yeah... I am more than a bit OCD I think.


 2 points
 -
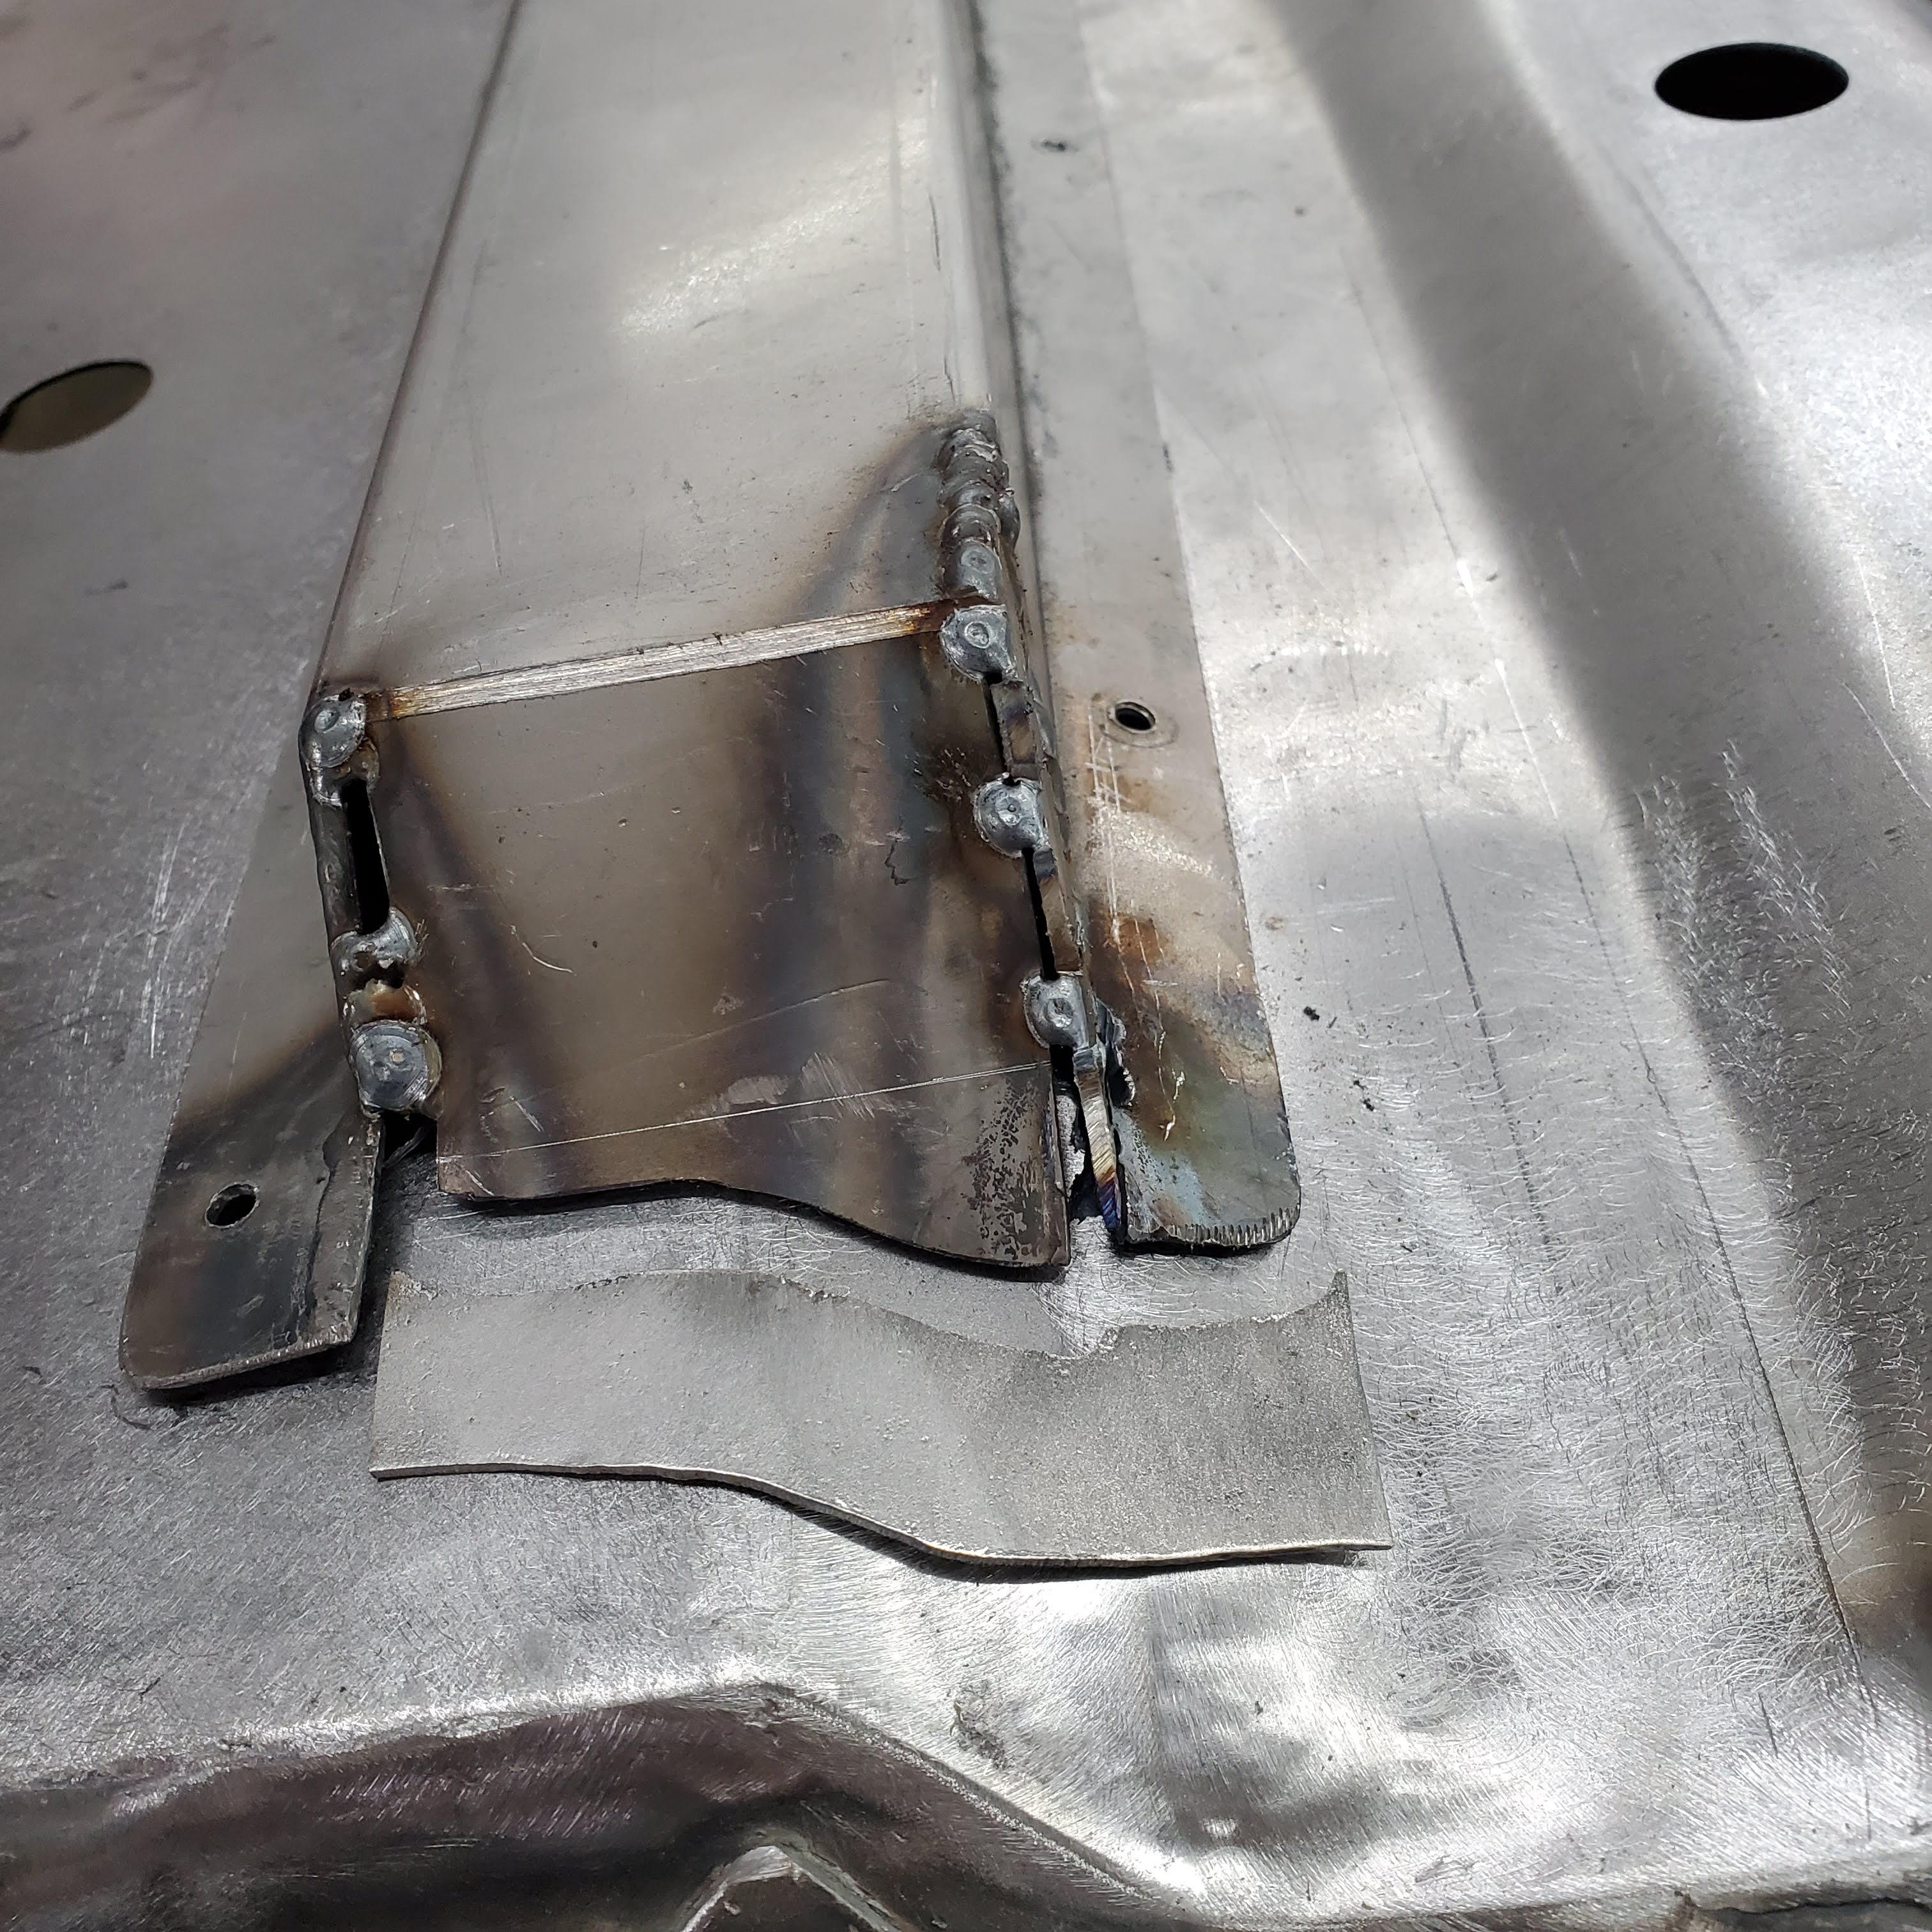
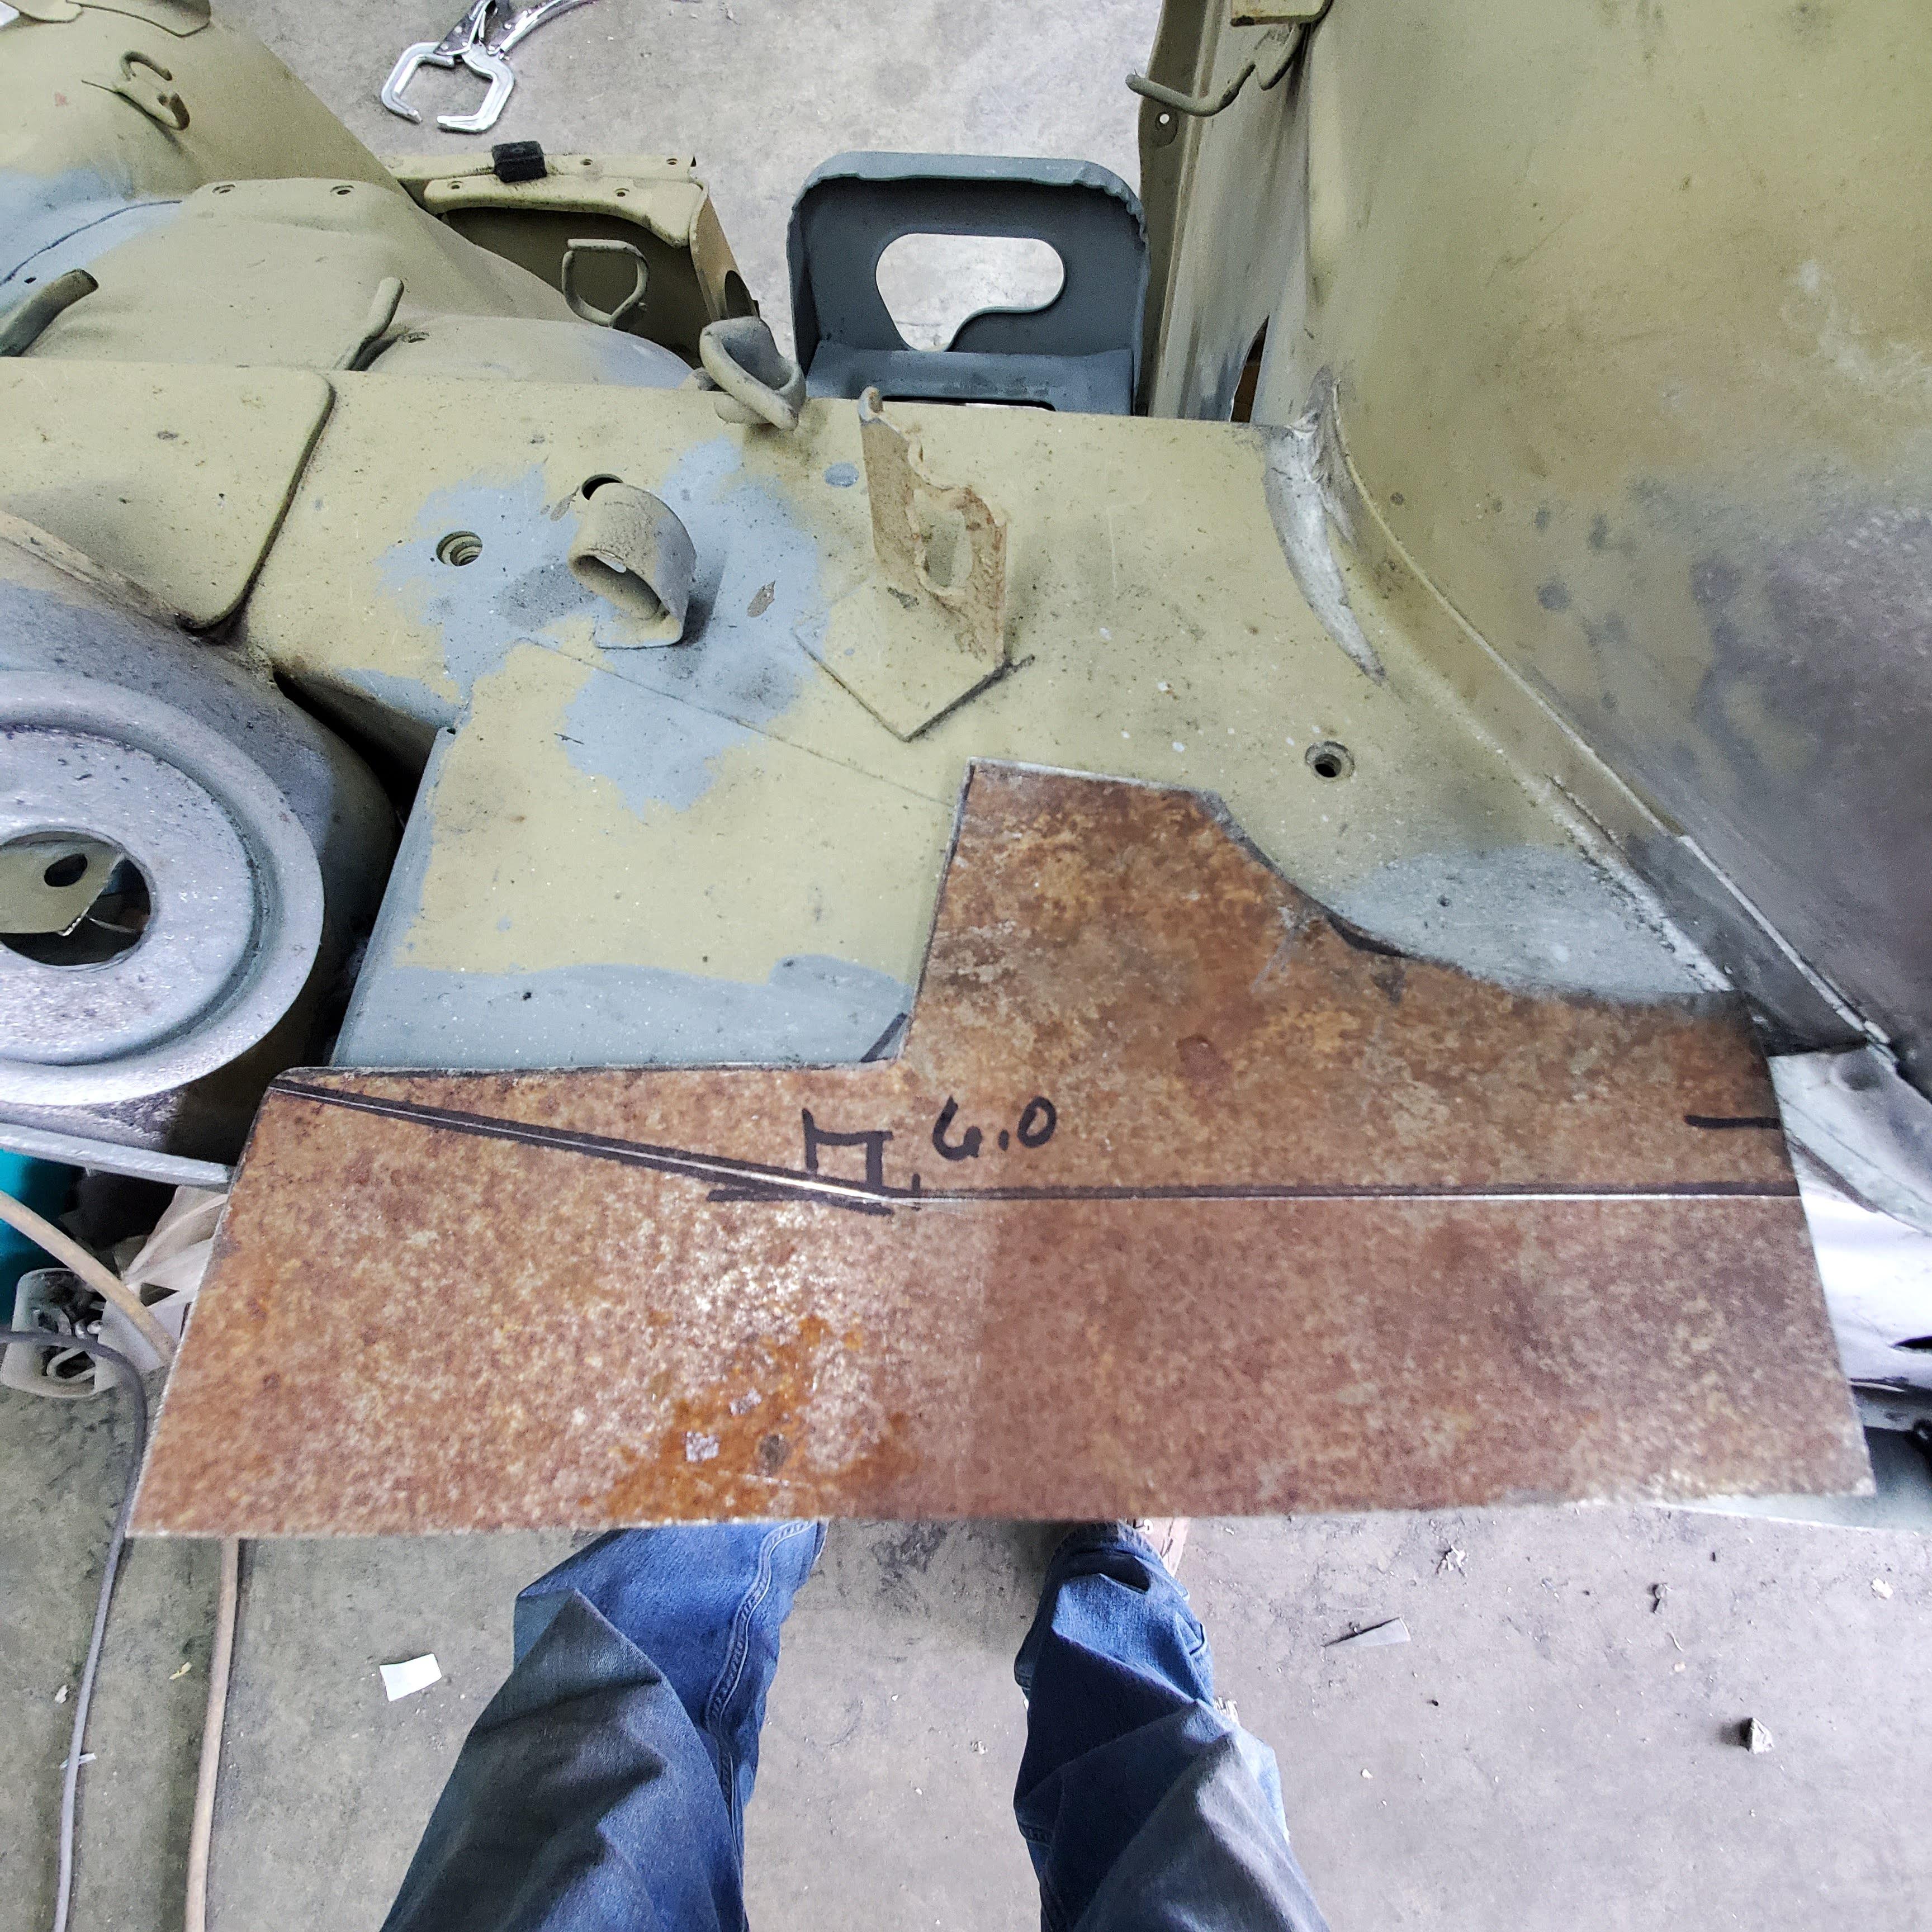
2 pointsI didn't really like the way the Zeddfinding's floor support terminated at the rear, especially since the vertical flanges (sides of the rail) were drawn together making the rear section narrower than the rest, so I modified it. Cut the welds with the thinnest cut-off wheel and tacked it back together where they should be. Then just made a new piece to look like a flange. Then just drilled some holes around the supports and plug welded them in place. The floor supports have flash rust because I used muriatic acid to clean the insides before treating for corrosion protection. I'm telling you, that stuff is amazing at removing rust...and oil...and anything else I guess that might keep metal reasonably well protected while you're working on it.

 2 points
 -
A little information I have gathered about these Bosch relays over the last ten years. I see 120 (11 pole) and 121 (13 pole) mentioned, but have not seen the 127 (also a 13 pole) mentioned yet. I don't know what they changed when they went from the 121 to 127, but it wil not work in a 280Z without altering things. The 120 was used from the end of the seventies through to 81/82 by many manufacturers such as BMW M30 2.8L and 3.2L engines with the L-Jetronic efi (5, 6 and 7 series). It was also used in cars like the Porsche 912/914, Opel, Vauxhaul, Renault R18i 1.6L, Alfa Romeo GTV6 etc, some Fiats, Triumph TR7, Rover 3000i, and a couple of Volvo models, VW and Mercedes. I'm sure I missed some manufactures in there somewhere. Basically a lot of European cars used this system with this relay. Bosch made system "improvements" and changed to the 121 somewhere in 1981/82 depending on car manufacturer and somewhere in 1984 the changed to the 127. The 120 will work on all our 280Z models without any issues. People have been using them for years, including myself for the last 9 years. There are a lot of Bosch parts that will fit the 280Z efi and work perfectly. I use them in my 280Z because they are easier for me to find here in Europe.2 points
-
1 point
-
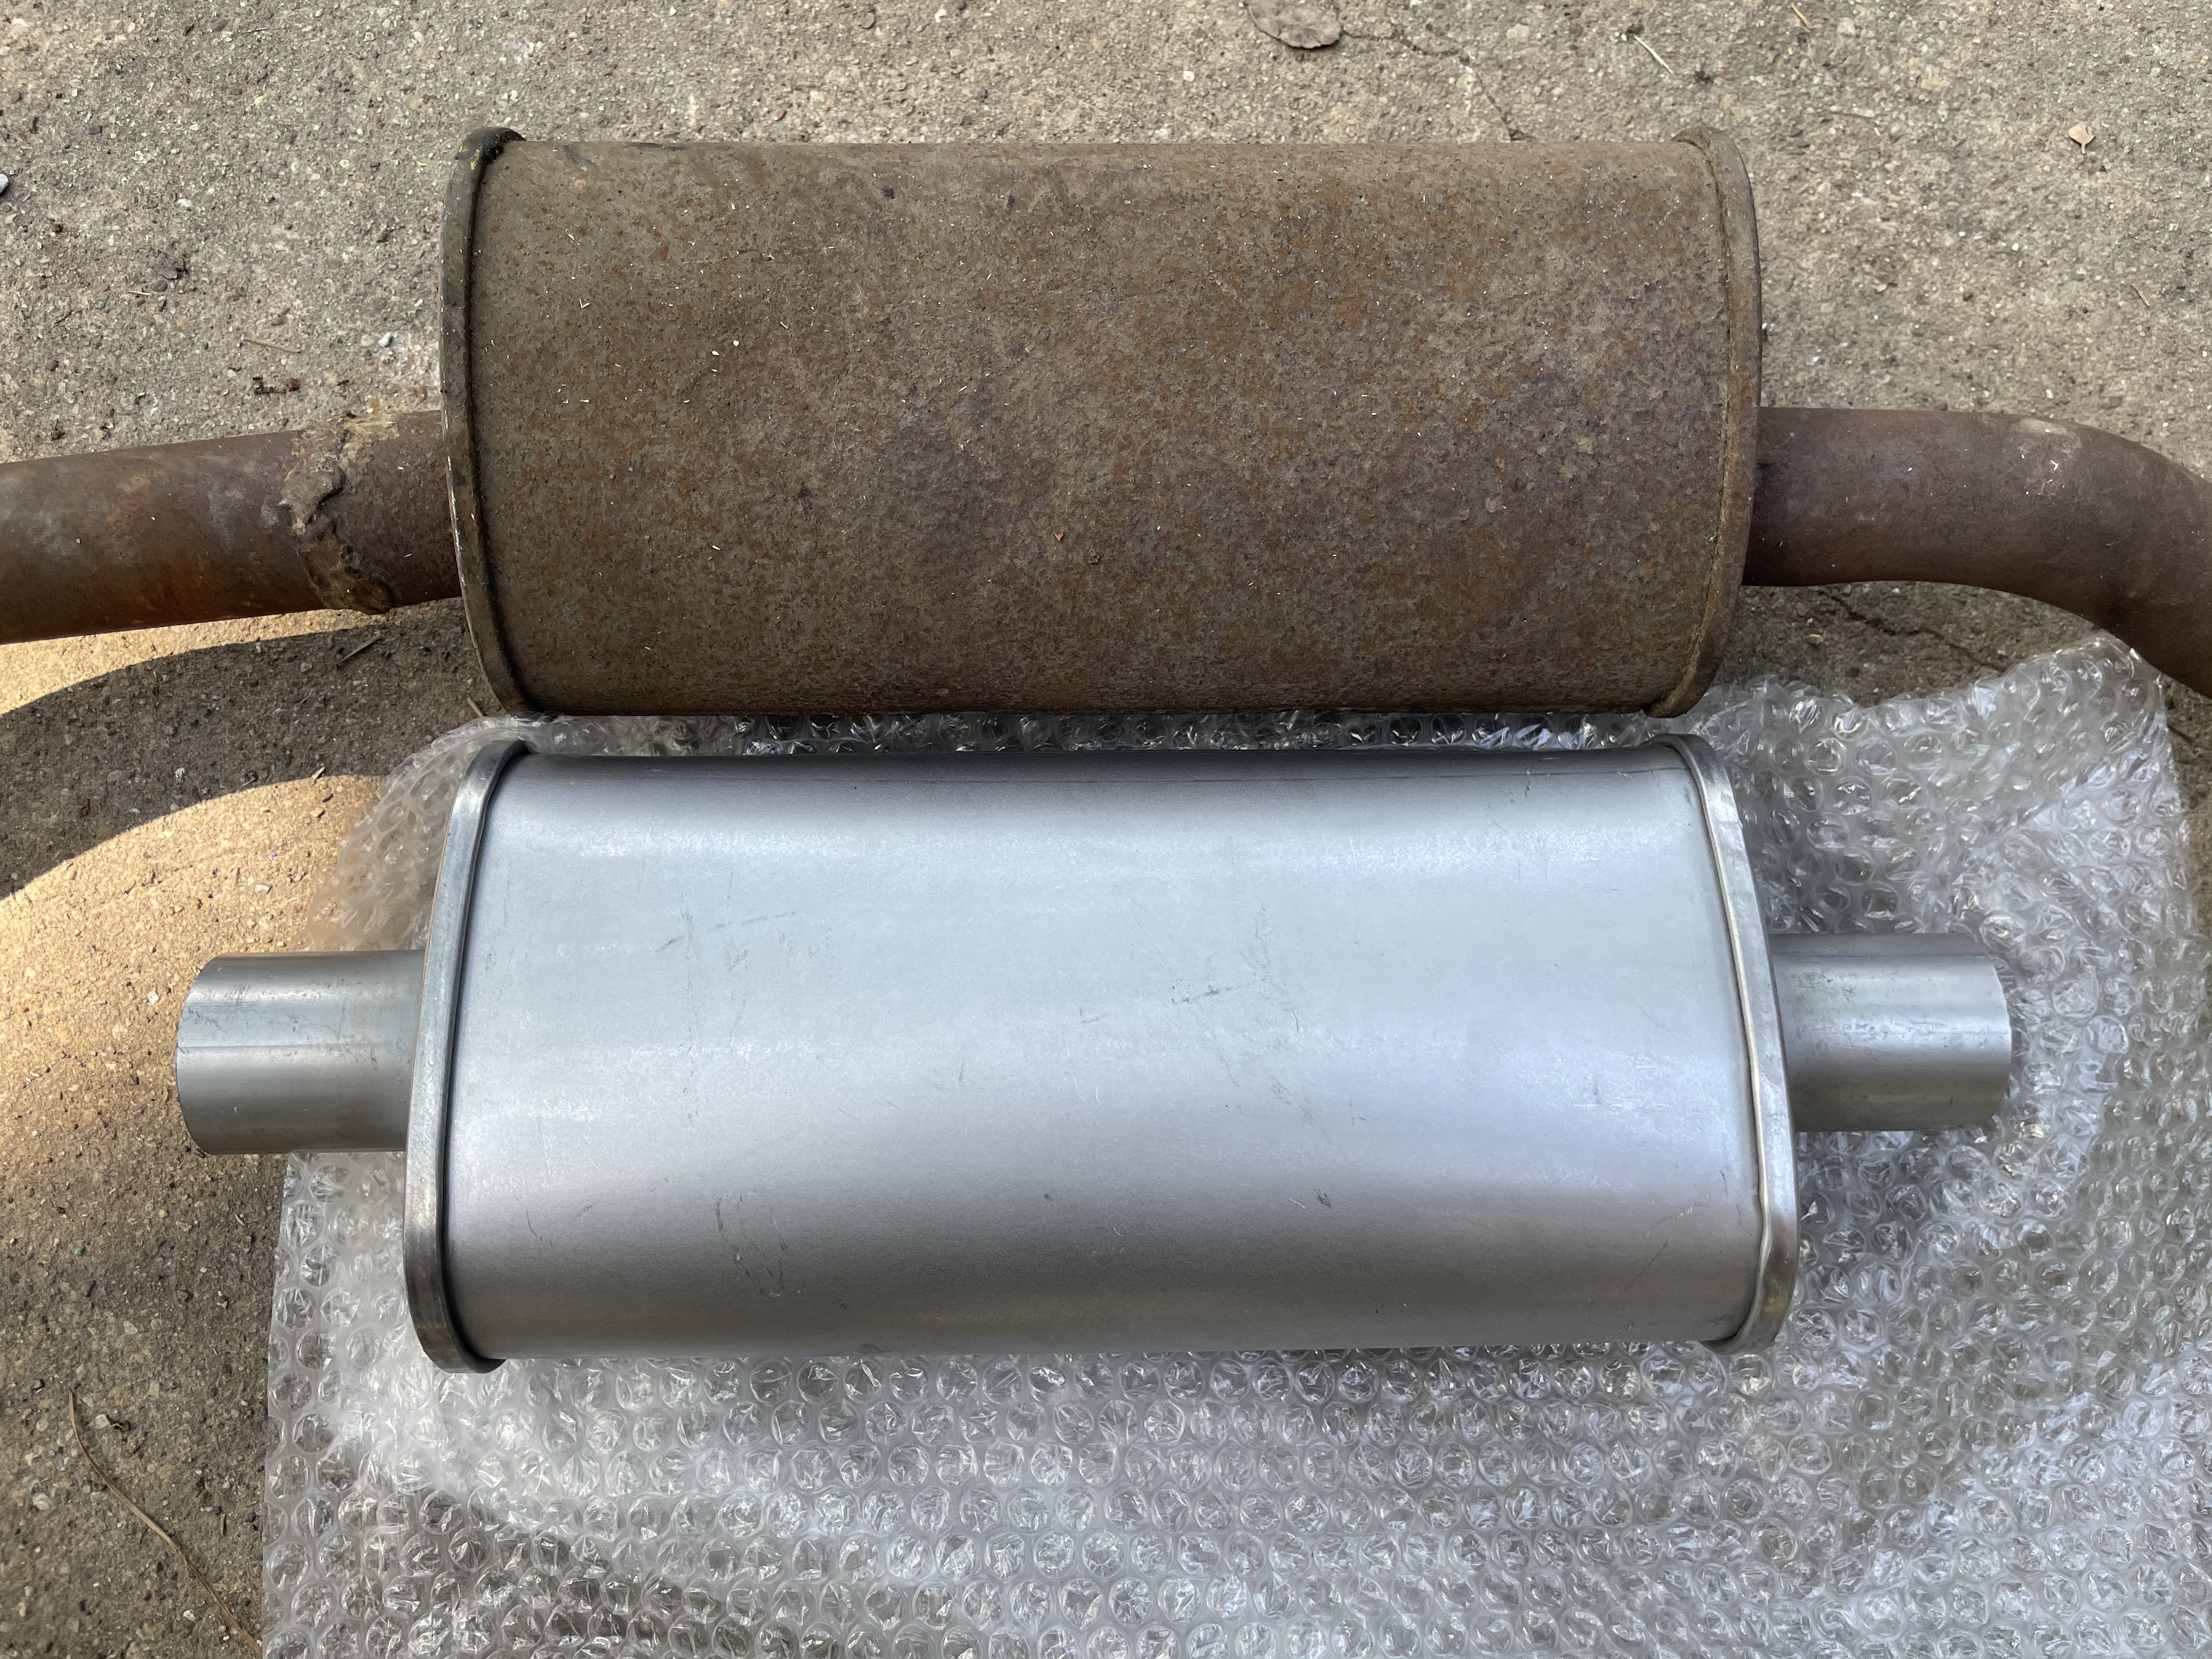
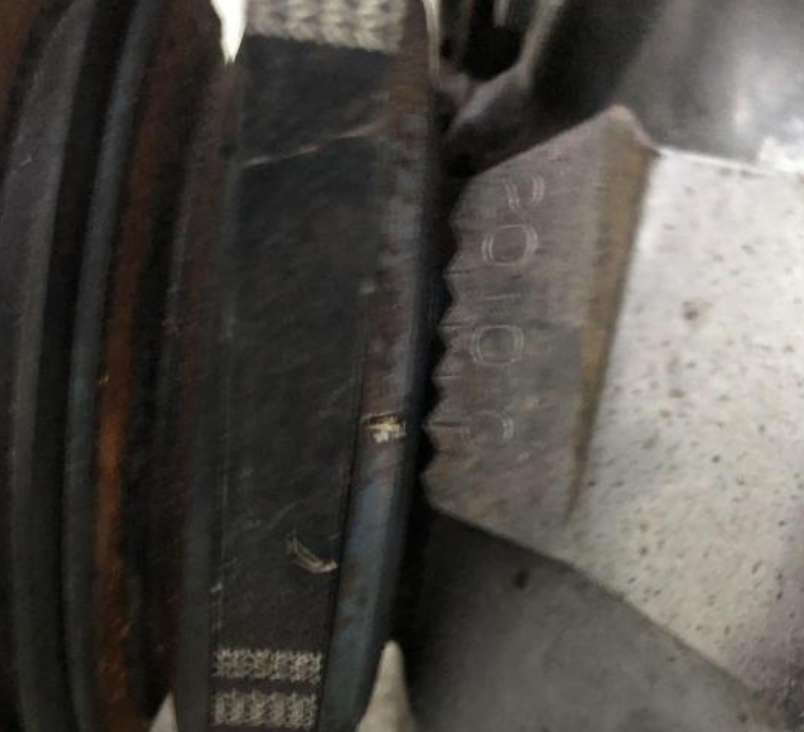
So I took a chance and bought the Australian based muffler. Turns out it’s a pretty close alternative to the “factory” style one. Side by side with the exhaust that came off this Z. I don’t think this was a true original piece, looks like someone spliced it in some time ago. Either way it’ll have the look I’m going for.
 1 point
 -
@Patcon Excellent idea! @Jeff G 78 Absolutely. Mine is a Prusa. The real "problem" is having to have the part in hand and it having to in fairly decent shape so it can be created in CAD. @dutchzcarguy Yes, a spool can be $75, based on material. The Prusa slicer software calculates the cost of each part. On a small per part basis, the cost is VERY reasonable.1 point
-
1 pointMy new current pcv plan. Slightly filtered, oil catched then back into my throttle bodies vac balance log. I will figure out a better filter later on.

 1 point
 -
1 pointI've had good luck with KF Vintage for my 240Z body parts. In the past, I used to purchase parts from Tabco for my earlier 240Z projects, but the new KF Vintage 240Z parts are superior to Tabco's and KF Vintage is also much more responsive. https://kfvintagejdm.com/product-category/datsun/1 point
-
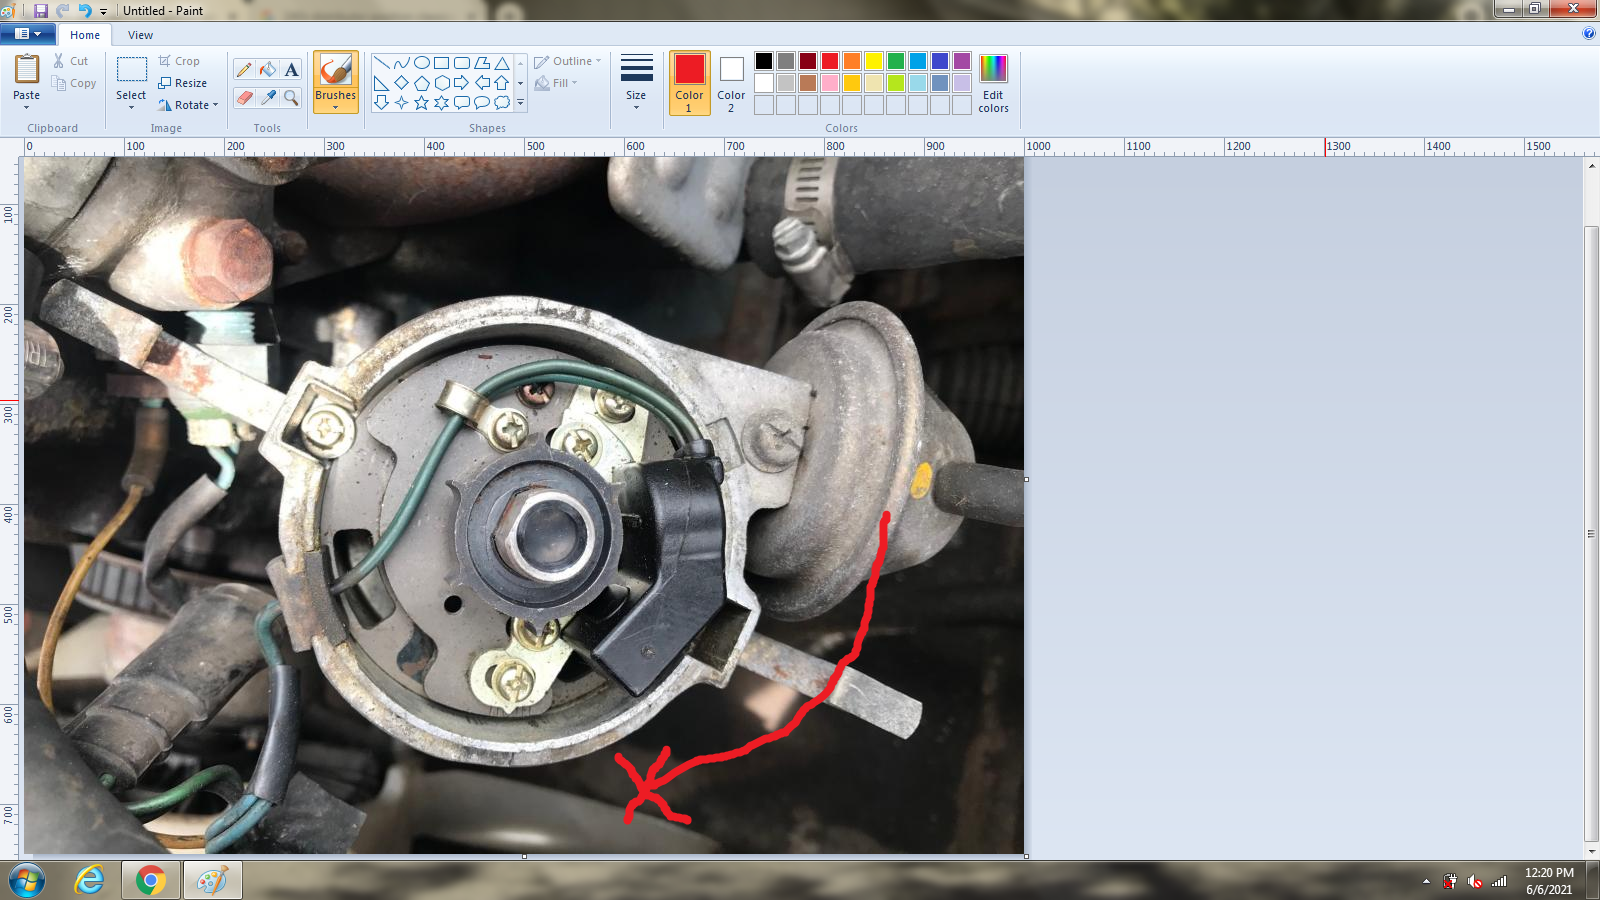
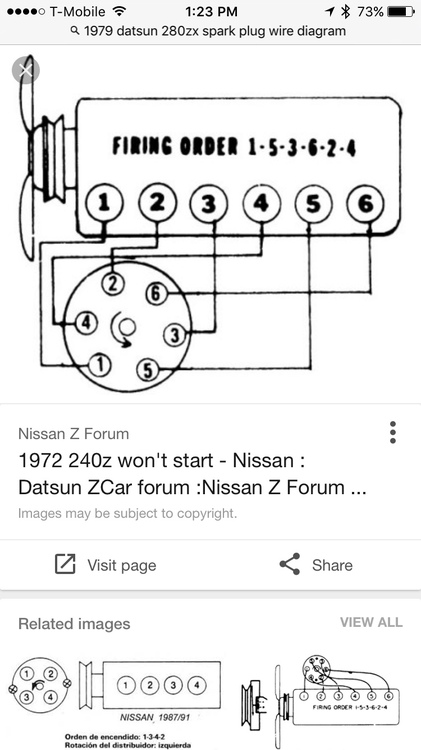
Your vacuum advance module is at 4:00 o'clock and every Z I've seen has their's at 6:00 o'clock. I think your distributor was installed wrong, maybe the reason for the wires being all fouled up? People move wires around to get one to run when the distributor is off. Could be what the previous owner was trying to do. http://www.atlanticz.ca/zclub/techtips/distributor/8.jpg

 1 point
 -
1 pointI worked as a civil engineer after college, but decided I didn’t like driving a desk, so when an opportunity to serve a 4 year state indentured apprenticeship as a truck and heavy equipment came along, I took it. 30 years later I “retired” , took a job driving semi trucks hauling oversized loads, then landed at The Big Shed a an aviation machinist. Now I’m about 13 weeks from permanent retirement.1 point
-
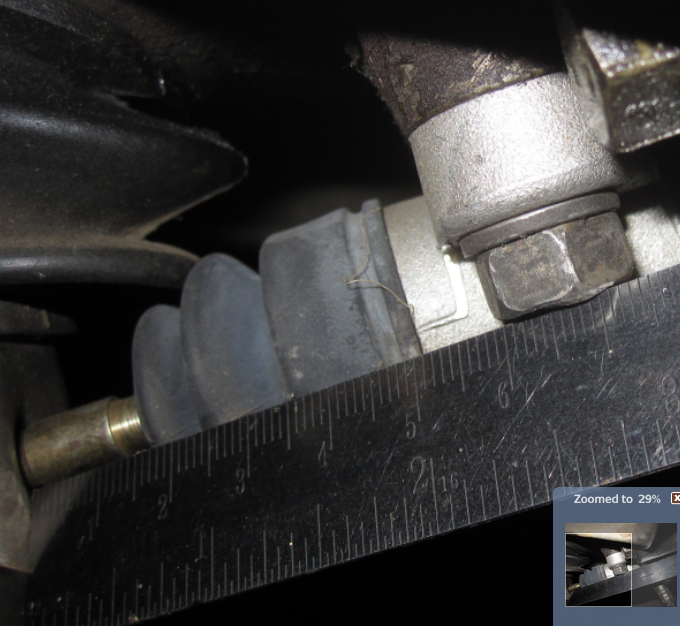
Looks like I got about 58 mm on my 76 with 5 speed and perfectly working clutch. To clarify - this is the measurement from the bolt head to the fork, at rest. Just to give an idea of how tall or short the TOB sleeve is
 1 point
 -
The old testing units are LONG gone from Nissan. Testing with the coil wire near the shock tower is one way. If you aren't ready to fix the issue with the ballast resistor, you can look for resistance to ground at the negative terminal of the coil. Holding the key in start, you should see the resistance fluctuate as the TIU closes the circuit to ground. As for plug and play? Nope. However, I did lay out most of what you would need to do to create an affordable alternative.1 point
-
Very cool! Might be a good idea to make a technical section for printer files and other pdf patterns and lists1 point
-
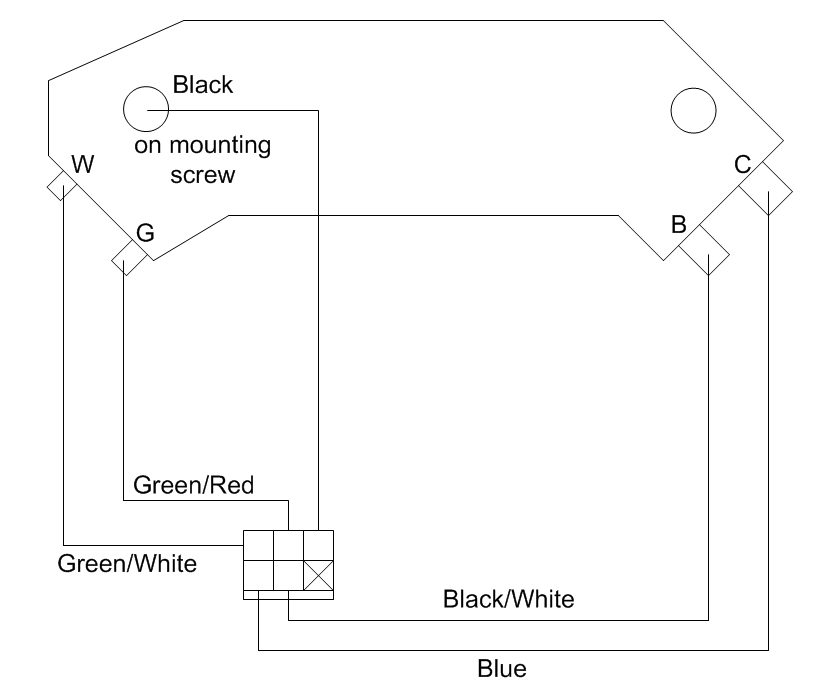
The problem with doing it in the engine bay is that the 260Z has a connector that does not match the 280Z distributor connections that you are thinking of. I didn't trace out all of the circuit paths for the B/Y vs B/W wires, so I included diodes to prevent backfeeding out of a sense of caution. However, from a more detailed look at the EE and EC section, I have determined that the B/Y wire would not be needed for the HEI conversion. Therefore the diodes aren't necessary. Here is the revised diagram.
 1 point
 -
New clutch collars are available from Courtesy Parts Nissan in Texas as well, I just ordered mine from there. Here was the thread.1 point
-
If he wires it in the engine bay then he can just use the red and green directly to the W and G pins, B from the coil's + terminal, and C to the coil's negative terminal. Then unplug the module in the cabin. That's the quick and easy test method if a person is not sure the module is bad. If it works, then it can be moved to the cabin. Or not. That's a nice diagram for in-cabin mounting. You could make a pdf and ask Mike to put it in the Downloads area for 260Z applications. @Mike P.s. are the diodes necessary or is that your engineer side saying that they couldn't hurt? Just curious. What happens if they're not used?1 point
-
The clutch master installed on the car when I got it was bad. The pile of parts the previous owner gave me had another master in it, but I have no idea if that one was also bad. It was at least better than the first one. I just ordered a new one. The seal kits look about the same price as a new cylinder. @cgsheen1 are you sure? I wouldn't be surprised. I haven't done anything to the clutch since buying this vehicle about a year ago, so it's not unlikely that the PO installed something wrong, b/c there was a lot installed wrong on this engine.. Yes I believe it's a 280Z trans. It's an L28 block and a 5-speed. Did they make 5-speeds for the 240? I recently installed this shifter: https://www.thezstore.com/page/TZS/PROD/classic22c01/20-10501 point
-
I'm not sure if the connector on the other TIU lines up. Do you feel adventurous enough to modify the ignition? With an HEI ignition module, a couple of diodes, a heat sink, heat sink paste, and a connector from Vintage connections, you could make a replacement ignition unit that would be pretty darn reliable for about half the price of that TIU you have in the last photo. (@Zed Head are saying the same thing.) Here is how you would wire the HEI for the TIU connector in the 260Z with the 6 pin rectangular connector. (Edit: Changed for the revised diagram in my later post.) Note: the connector as I have is drawn is a mirror image to the connector shown in the FSM wiring diagram per the Nissan drawing practices.
 1 point
 -
1 pointMaybe someone put your motor in the car backwards it happens all the time… 😆1 point
-
1 pointYou have confirmed spark and ignition timing with the starting fluid. Now you need to find out why the injectors aren't opening. Could be the power supply, could be the signal from the coil negative terminal, could be the ECU. Get a meter and start probing.1 point
-
1 point1 point1 pointThere's a few details missing. If you KNOW you have fuel and spark, then the most likely problem area would be whether they are occurring at the correct time - timing. Also, the fuel rail may show pressure, but that doesn't mean the injectors are supplying the cylinders with it. You need to confirm these things.1 pointWhile looking for something unrelated I found this Nissan Technical Service Bulletin that describes when and why the markings were changed on the plug and coil leads. Edit, Aug 6. I just noticed that "New" and "Former" are indicated wrong in the TSB. Yellow should be former and white should be new. In checking the register on @Carl Beck's site Zhome the engine number listed for the start of this change would have been in 3/71. The publish date of this TSB is December 1971 so it looks like 1972 models would have the white labeled Yazaki leads.
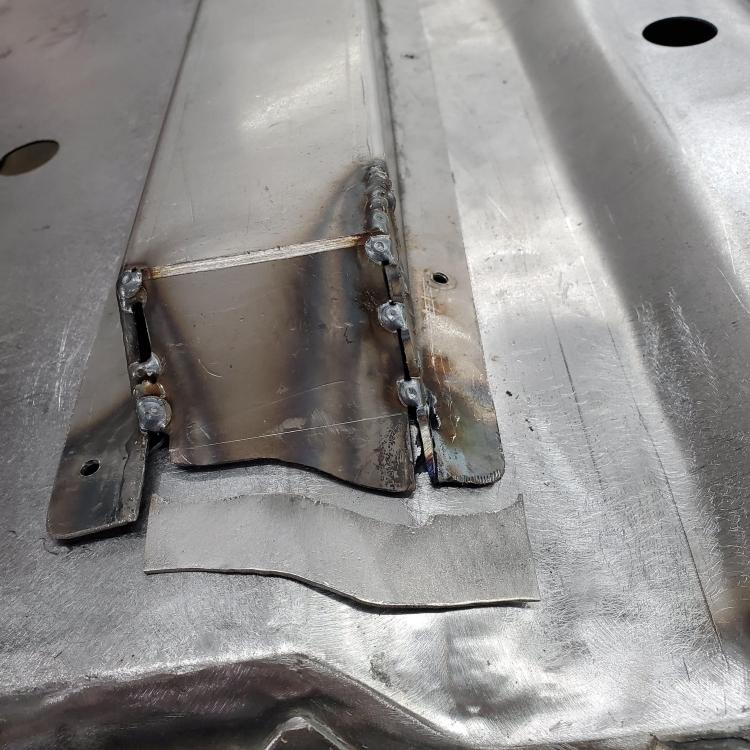
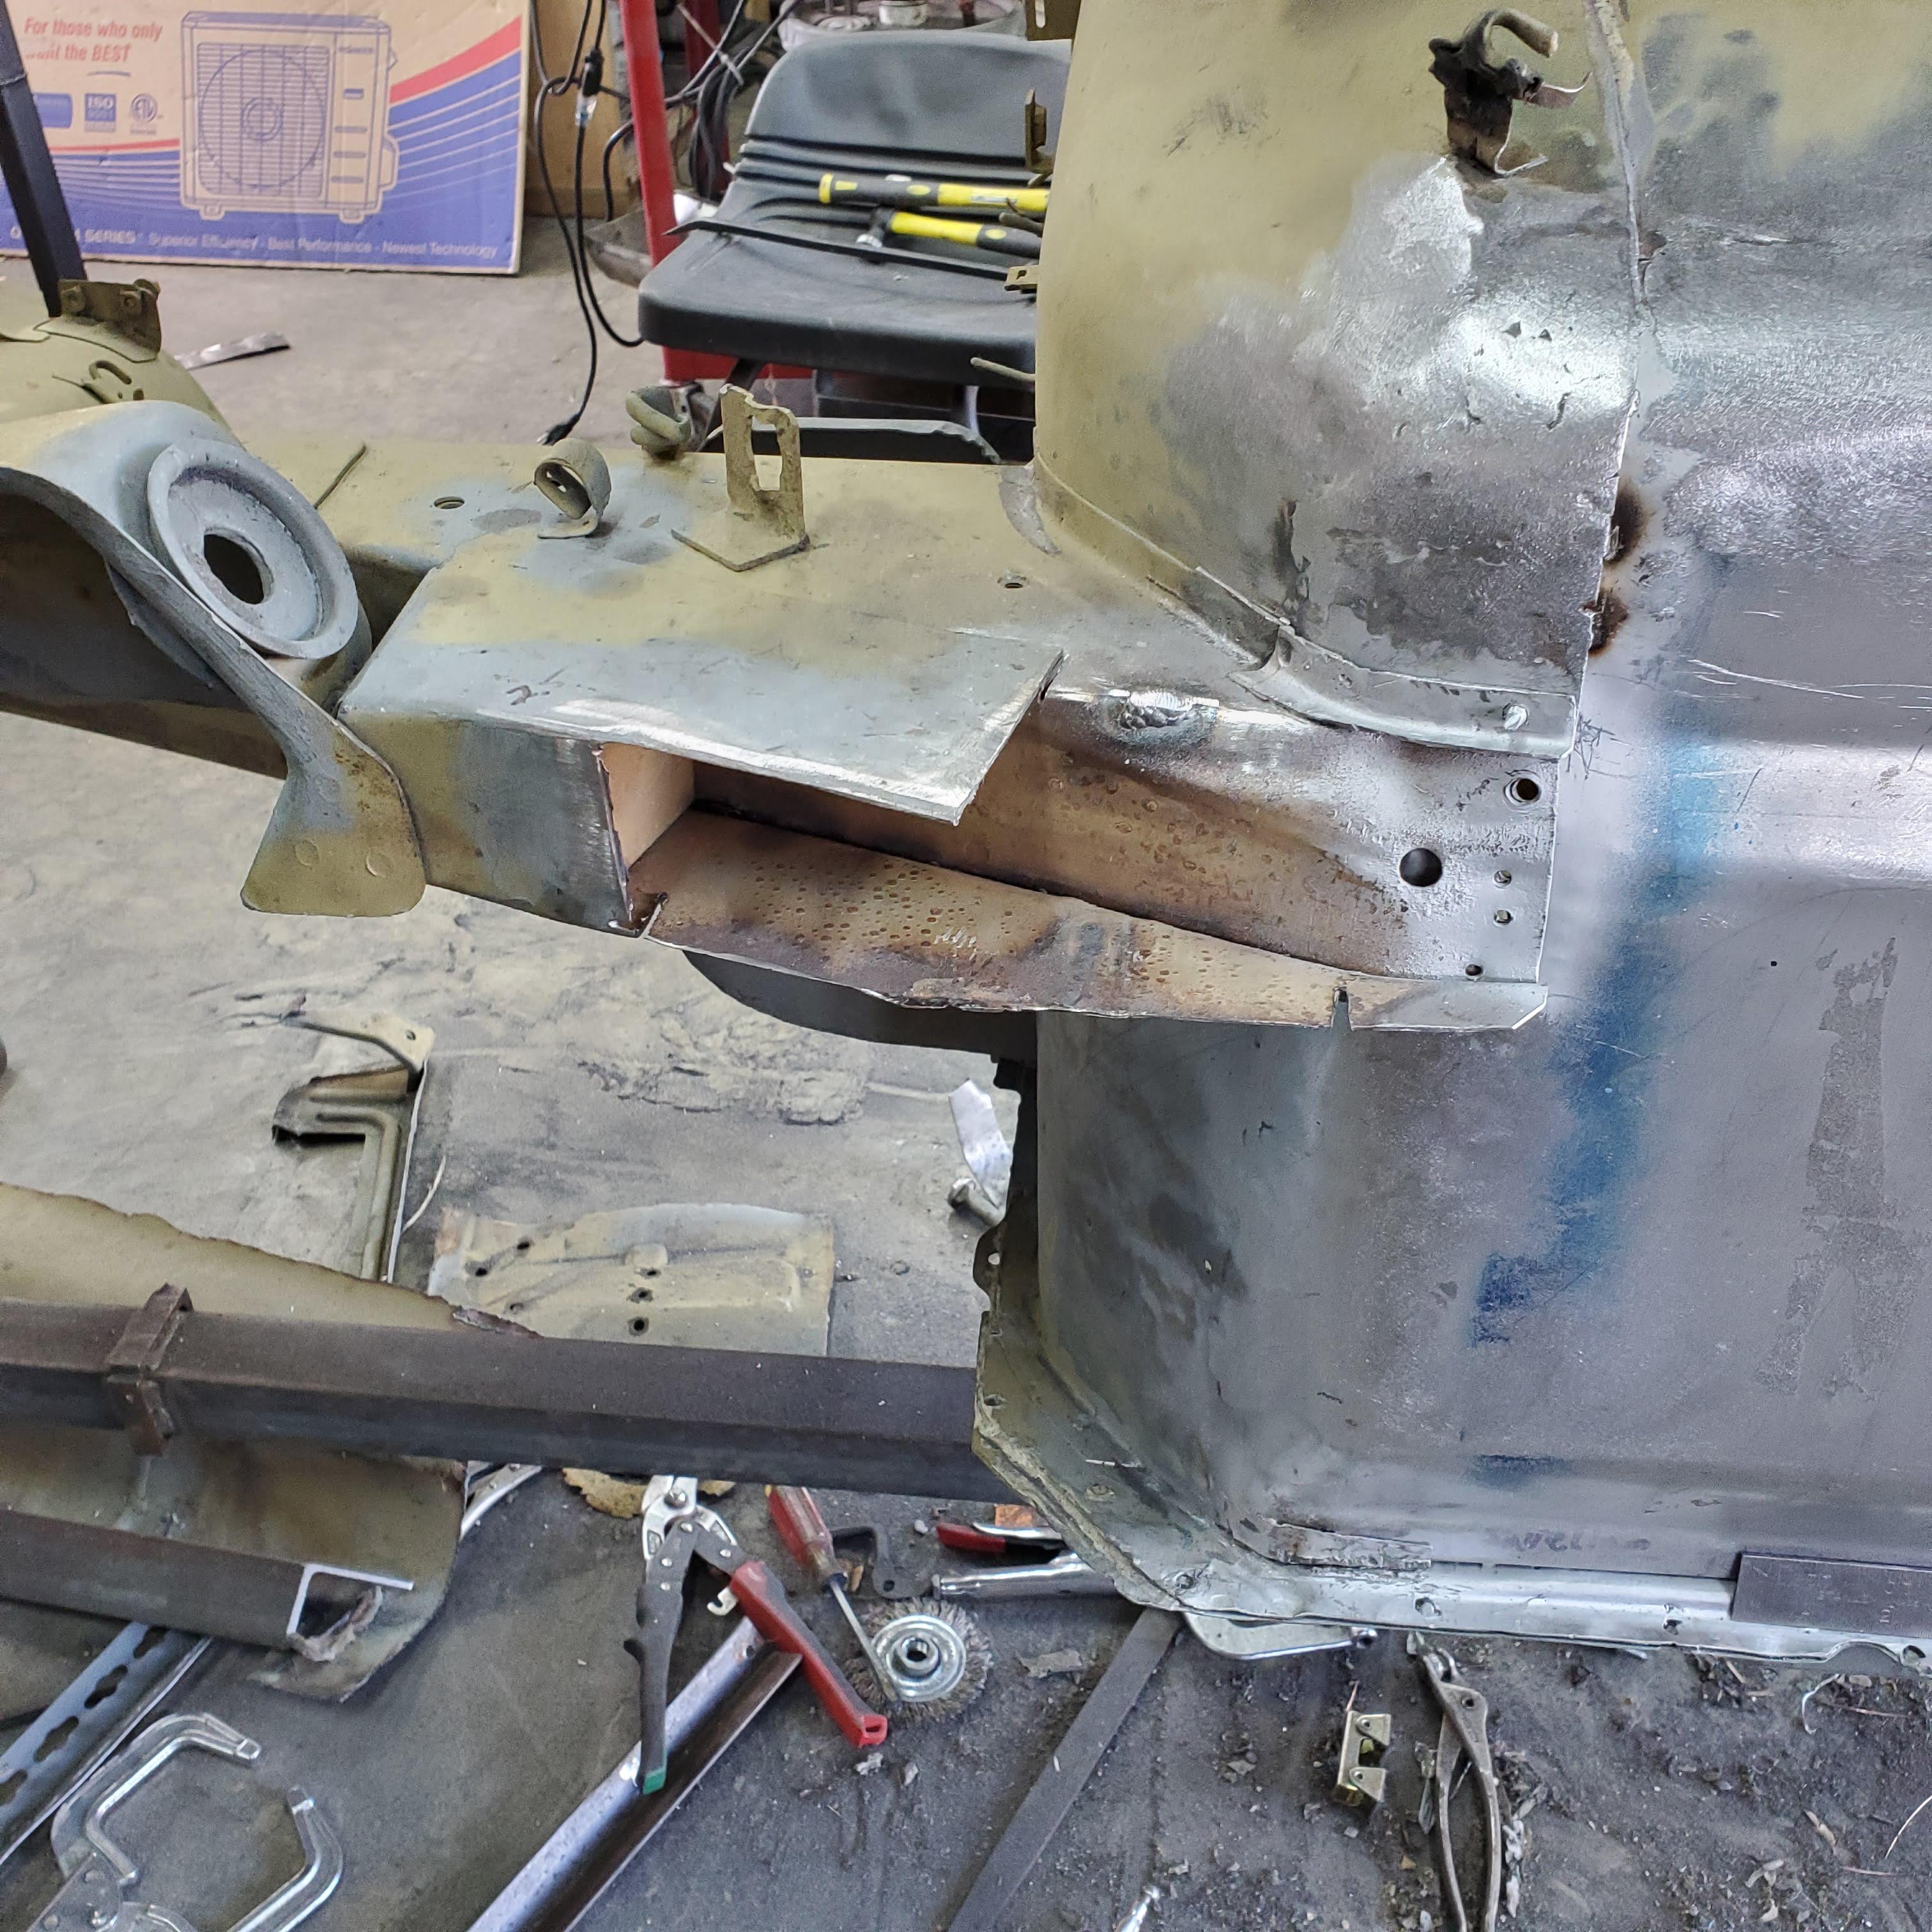
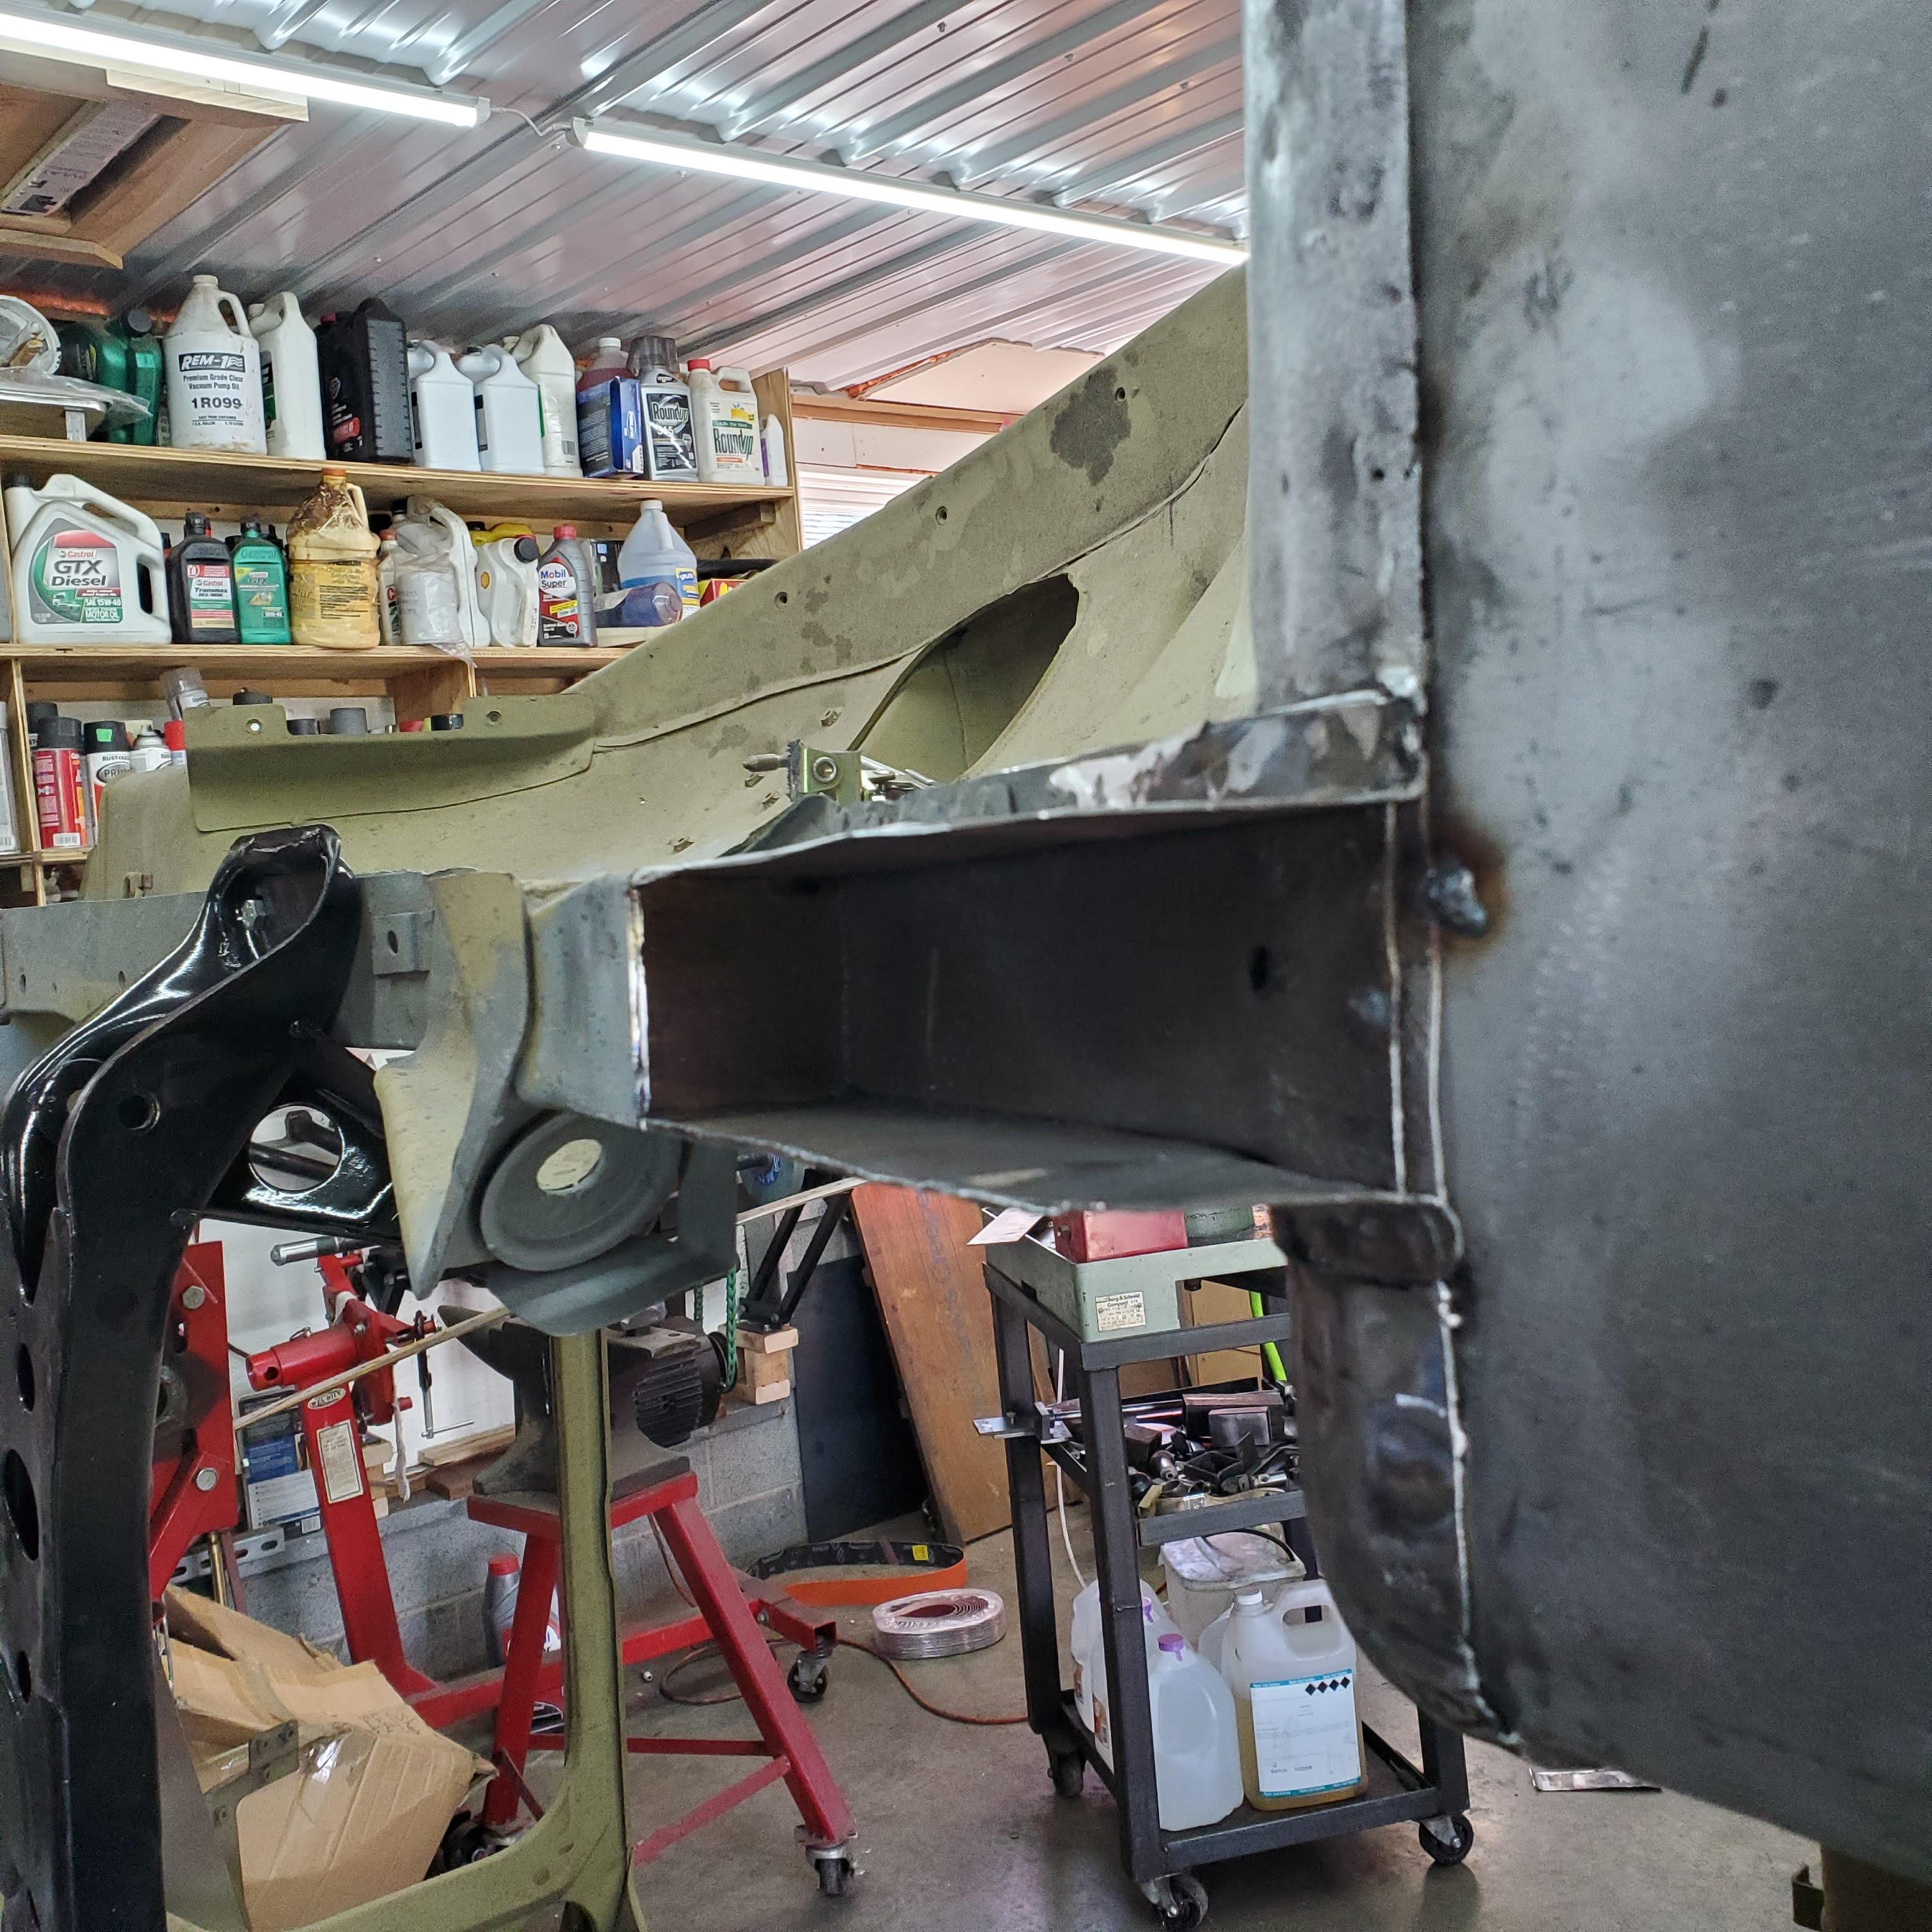
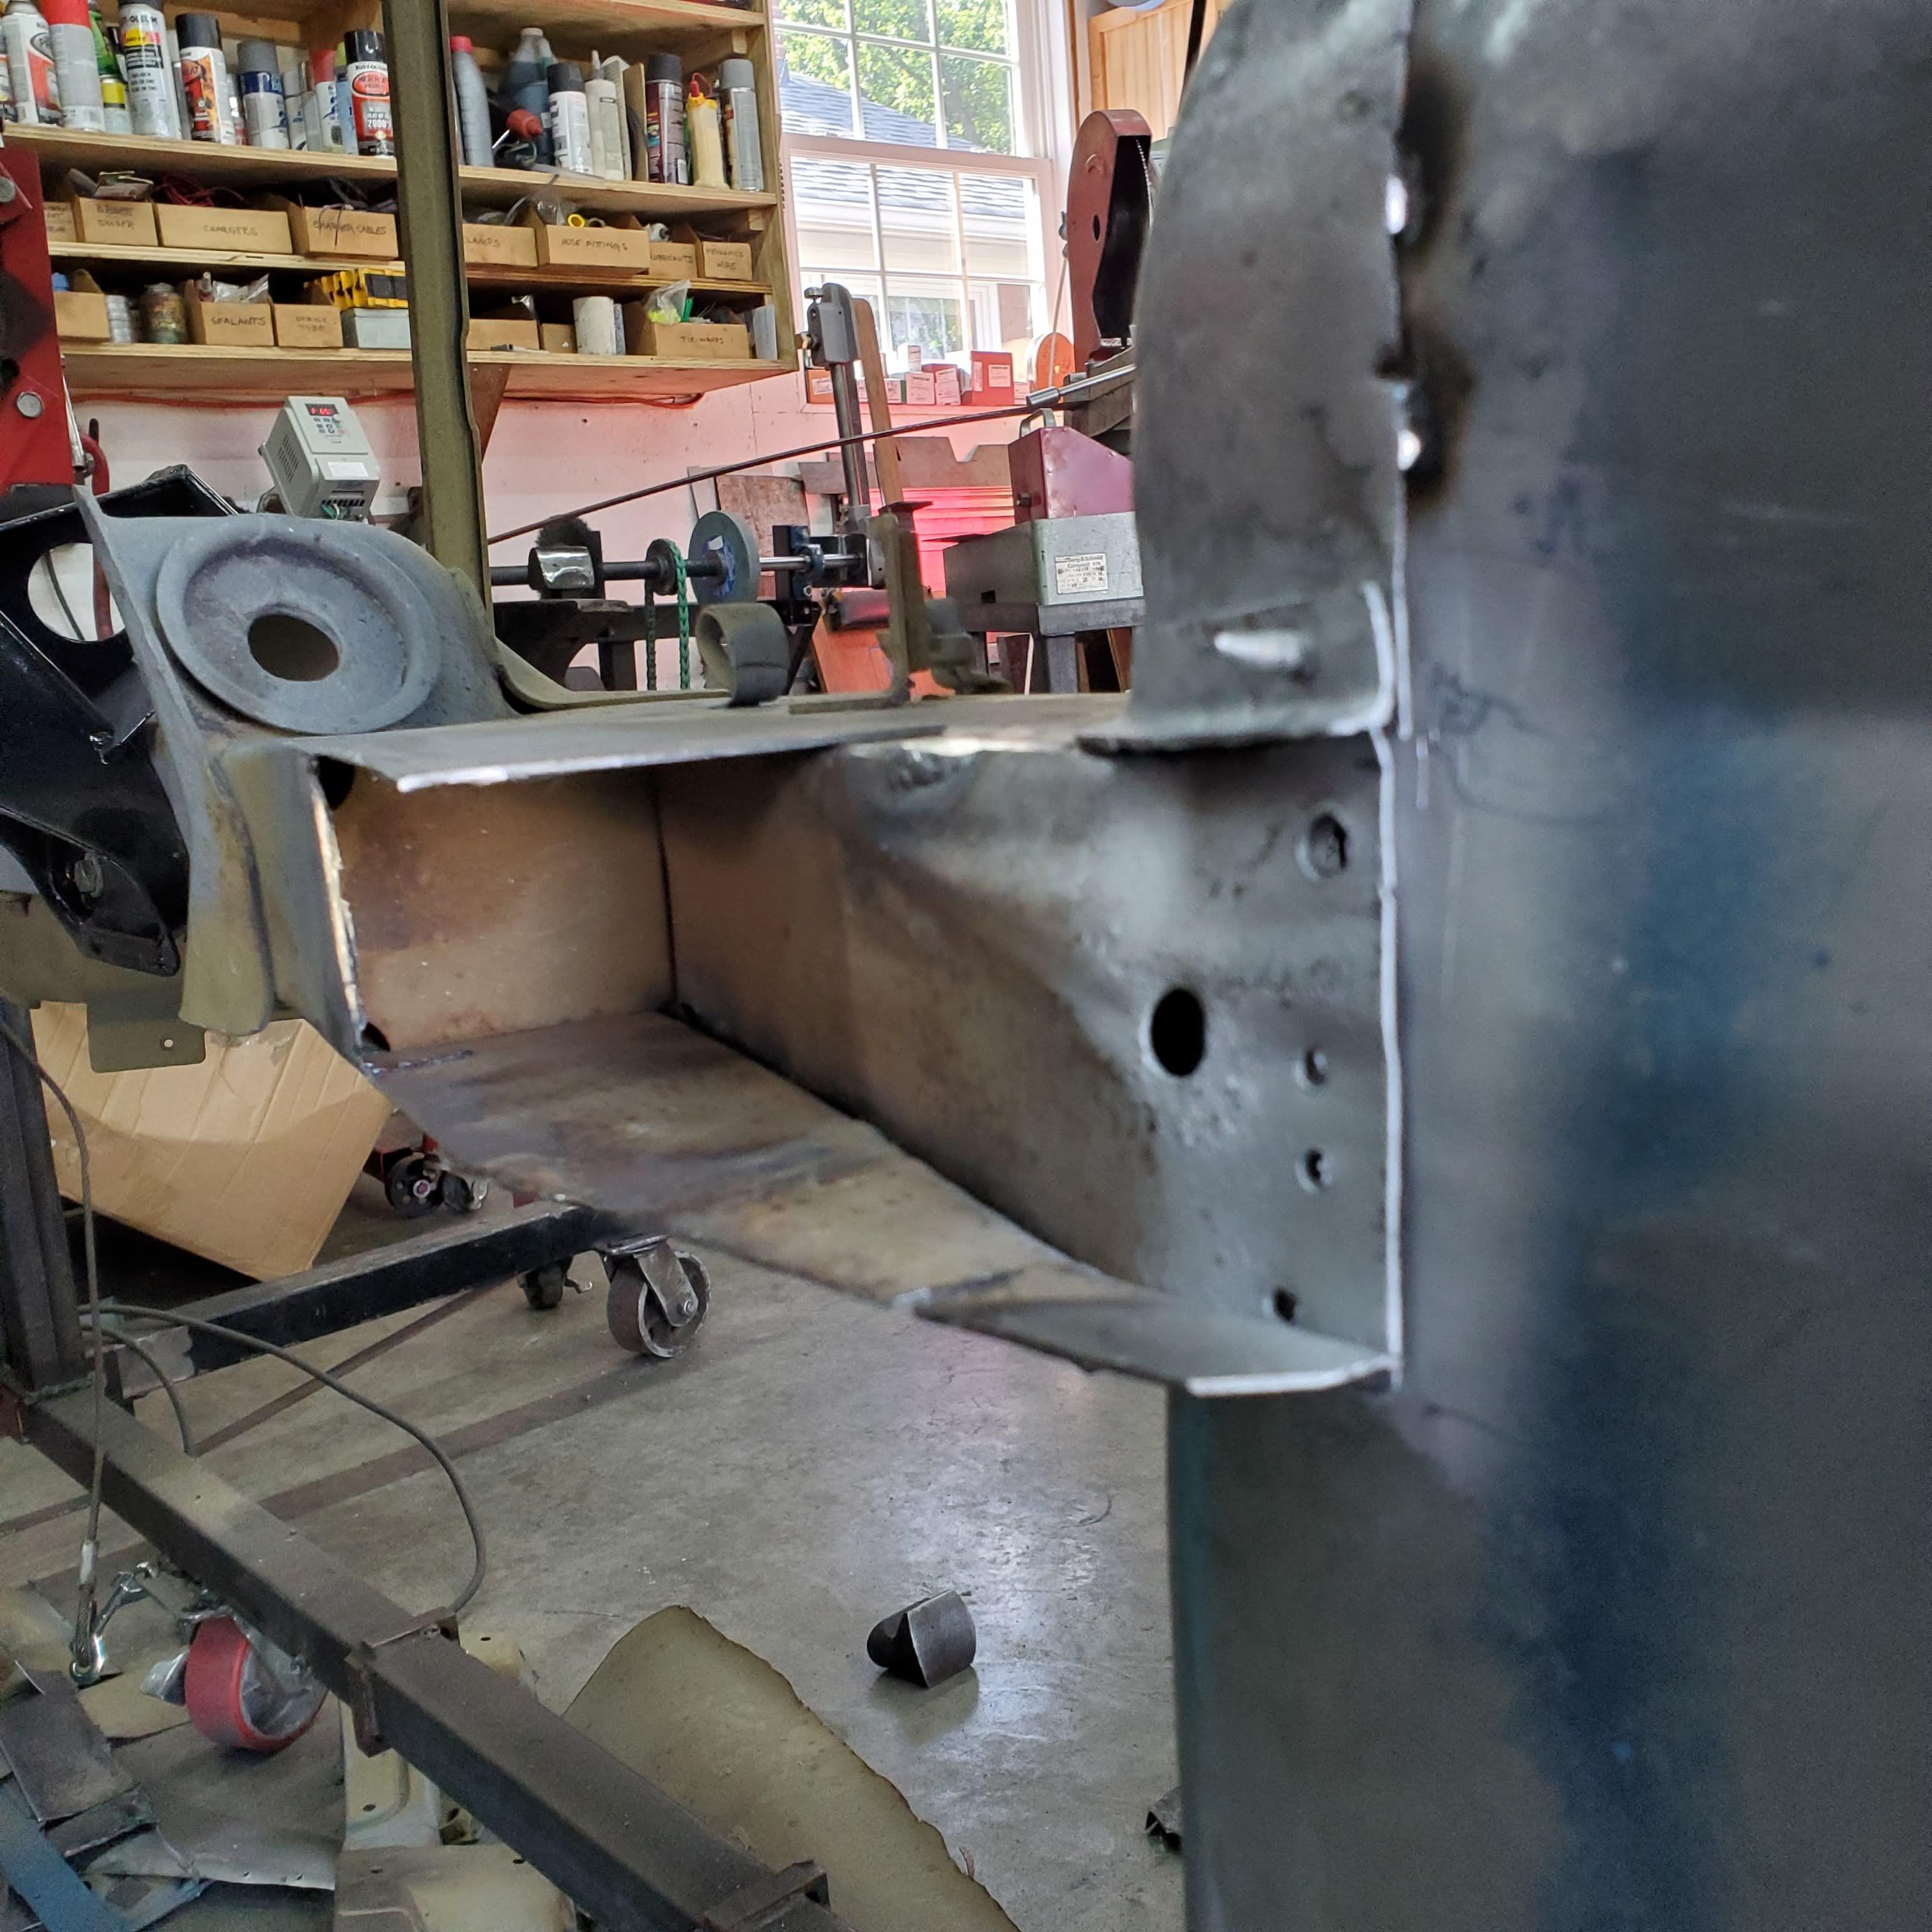
 1 point1 pointBut, but, but...they have been touched by the guys working at Gas Monkey Garage! 🙄1 pointThat is serious attention to detail, and not the least excessively so. One of the biggest problems with restoring anything is finding detailed information such as that you've provided. Good onya lad, I say. Now, we just need a database of all this good info. Anyone need a full-time job?1 point1 pointA little out of order here. Had to piece together the frame connectors before I made the frame internal supports. Nothing fancy - just cut and paste. Of course, all the weld penetrations had to be removed so as not to interfere with the internal supports I was adding. Since the original frame connectors were essentially gone (from previous work), I had to choose the slope of the forward portion. I extended a straight line from the floor support rails and then used the remaining inch or so of the sloped portion to figure out where the two planes should meet.


 1 point1 point1 point1 point1 point1 point1 pointSome people were fearful of Jenner and Pasture when they first "invented" vaccines. Some people were fearful of telephones spreading germs when they first were invented. It is normal for some people in society to be more cautious... a survival instinct.1 point


.jpg.a46302937c905bd7988fc7d853bf15e3.jpg)


Important Information
By using this site, you agree to our Privacy Policy and Guidelines. We have placed cookies on your device to help make this website better. You can adjust your cookie settings, otherwise we'll assume you're okay to continue.
Account
Search
Configure browser push notifications
Chrome (Android)
- Tap the lock icon next to the address bar.
- Tap Permissions → Notifications.
- Adjust your preference.
Chrome (Desktop)
- Click the padlock icon in the address bar.
- Select Site settings.
- Find Notifications and adjust your preference.
Safari (iOS 16.4+)
- Ensure the site is installed via Add to Home Screen.
- Open Settings App → Notifications.
- Find your app name and adjust your preference.
Safari (macOS)
- Go to Safari → Preferences.
- Click the Websites tab.
- Select Notifications in the sidebar.
- Find this website and adjust your preference.
Edge (Android)
- Tap the lock icon next to the address bar.
- Tap Permissions.
- Find Notifications and adjust your preference.
Edge (Desktop)
- Click the padlock icon in the address bar.
- Click Permissions for this site.
- Find Notifications and adjust your preference.
Firefox (Android)
- Go to Settings → Site permissions.
- Tap Notifications.
- Find this site in the list and adjust your preference.
Firefox (Desktop)
- Open Firefox Settings.
- Search for Notifications.
- Find this site in the list and adjust your preference.