Leaderboard
-

siteunseen
Free Member7Points15,115Posts -

heyitsrama
Free Member5Points1,185Posts -
grannyknot
Free Member4Points5,158Posts -
dylancorrea1
Free Member3Points143Posts


Popular Content
Showing content with the highest reputation on 03/23/2021 in Posts
-
3 pointsMight cause a fight in this thread but here it goes: I thought the motor would be broken-in within the 175 miles that you drove, that's a lot of movement for the engine components. > that new cam and the valve train needs to be covered with oil always while it sits. Why? It's not moving, is there something special about the finish of the material that requires oil? If the initial break in process is complete (first 50-100 miles?) then the oil should be replaced as the etching of the piston ring into the cylinder wall should be done, and we want all the metal out of the oil. Next service would be at ~1k... But it seems like it would be past the point where it matters... I'm probably wrong though, so I would like to be "educated" on the matter. PS: make a paint thread with lots of photos plz.3 points
-
Browsing the parts manual and came across these factory cylinder liners. Didn't realize they were a factory piece. And, even better, you can get them on Amazon. http://www.carpartsmanual.com/datsun/Z-1969-1978/engine-280z/cylinder-block/26 https://www.amazon.com/Nissan-11012-N4200-Liner-cylinder-11012N4200/dp/B01LX9V3ZK2 points
-
2 pointsYep, I forgot to say hello and welcome to a very helpful group of guys that bought these car brand new. They know them inside and out, up and down. Working on cars was the last thing on my mind at 18 so we're glad you are here, proves most of our theories wrong. The young and the restless do know how to drive a stick shift.2 points
-
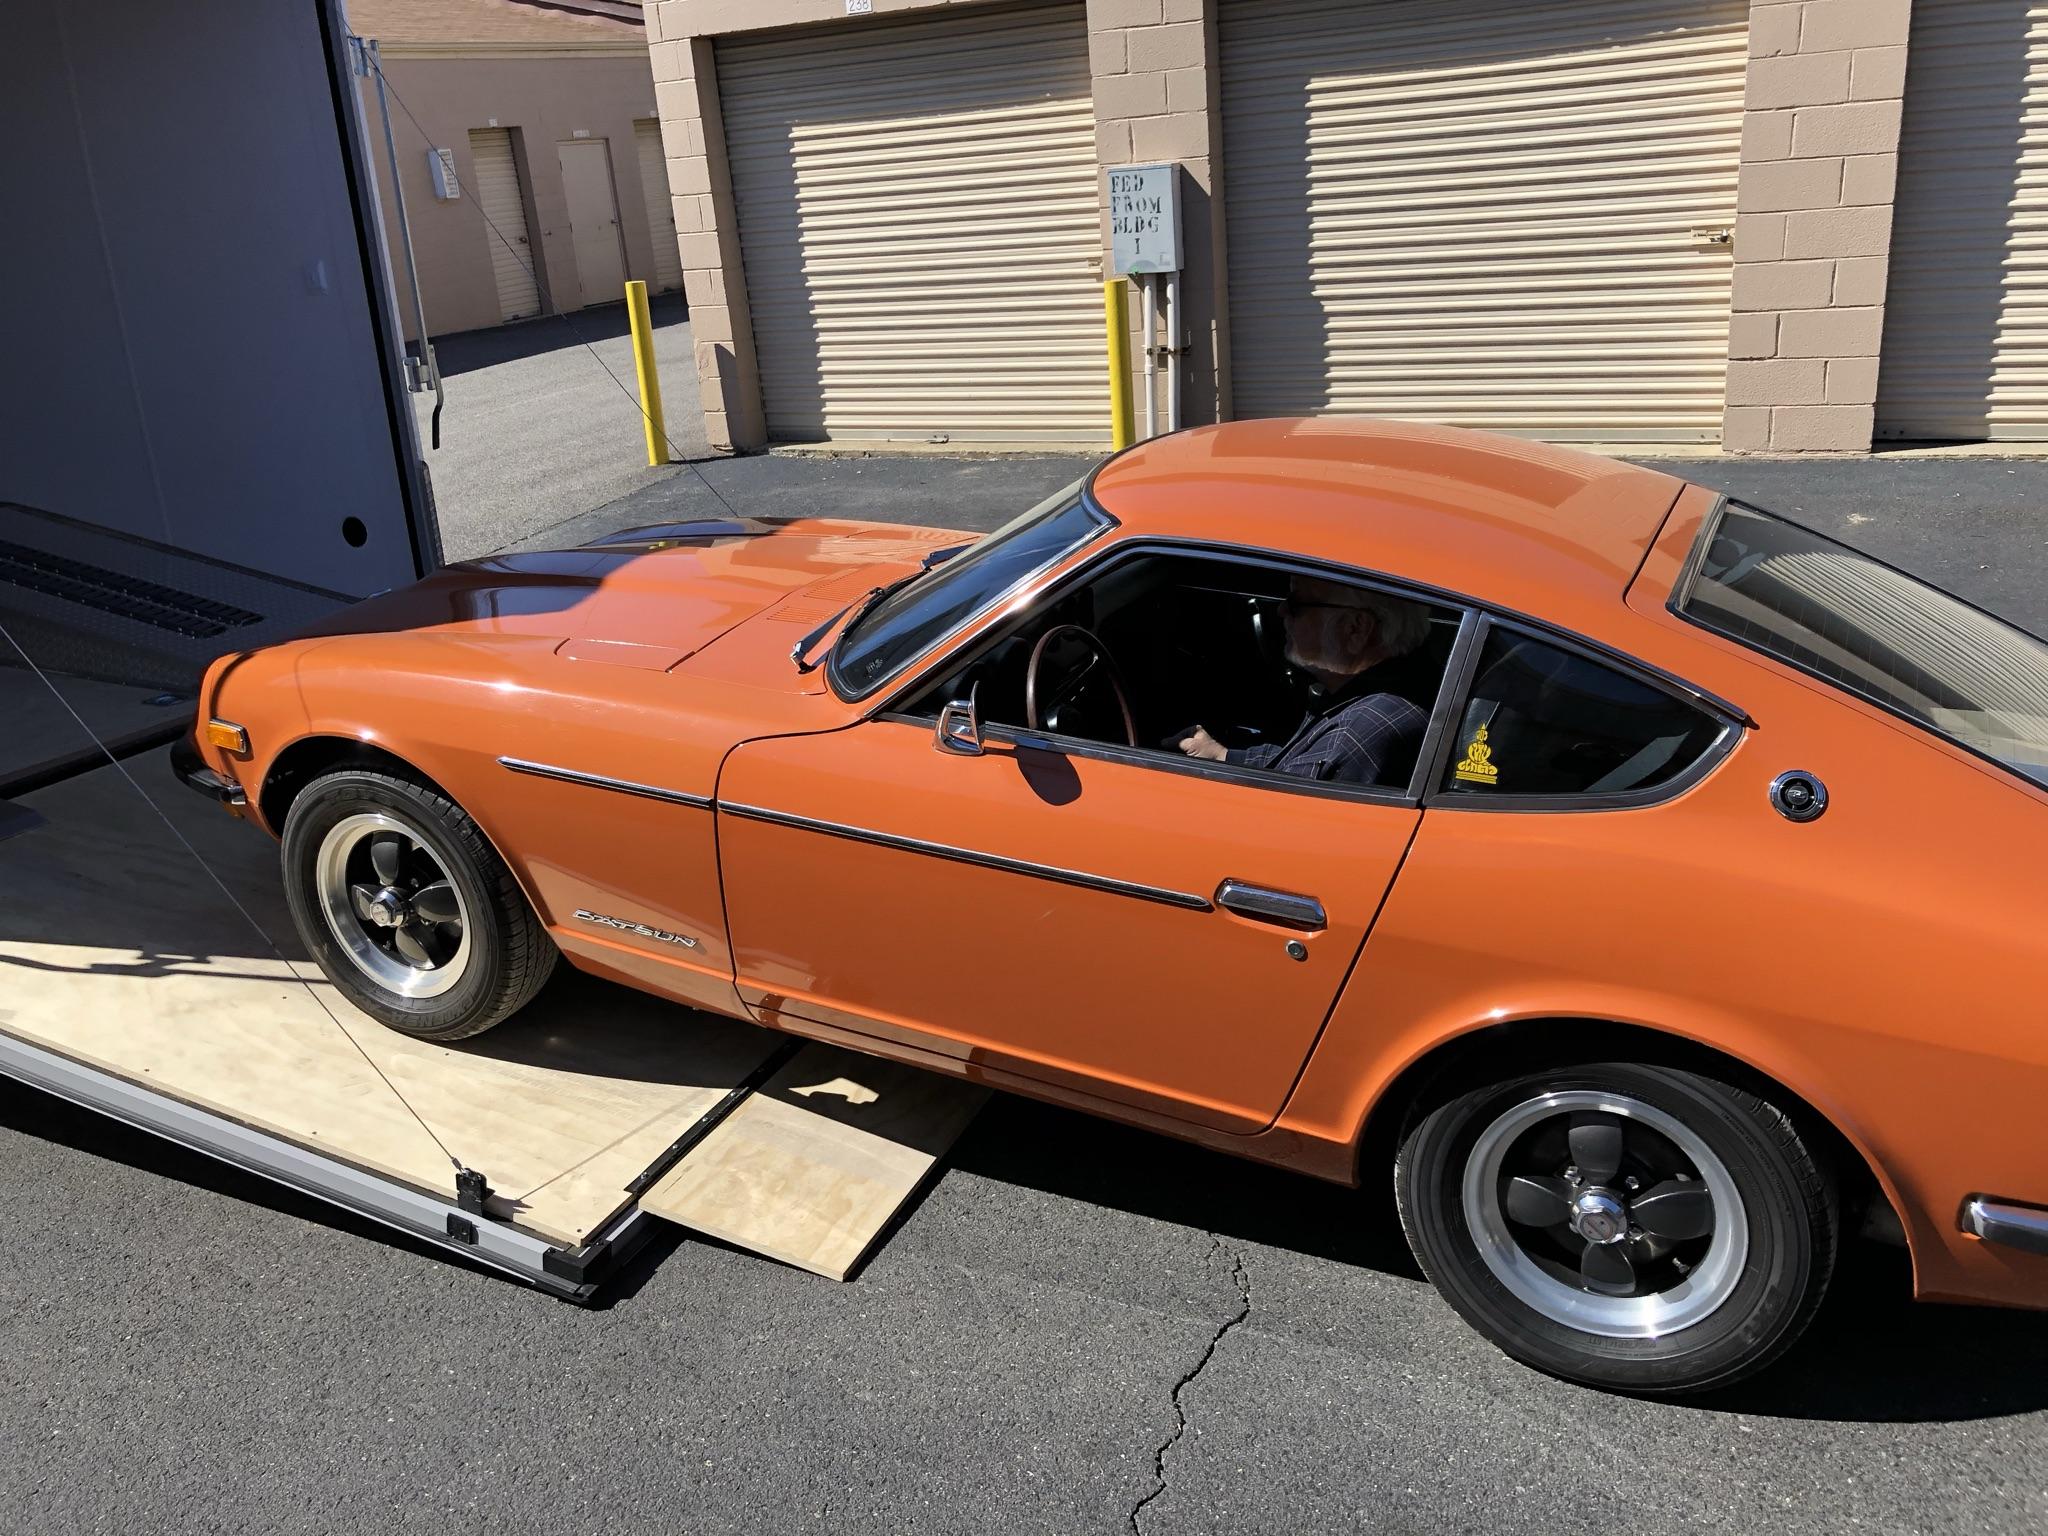
2 pointsHello I am a new 240z owner. I won an auction on BaT back on 2/9 and the car arrived here just a couple of weeks ago. The car was the orange 72...pretty much all original and it was as advertised by the former owner. Attached is a photo as it came off the trailer. In the first couple of shake down drives most things seem in order. I have already acquired a set of stock hub caps and I am looking for a set of stock wheels...a 2/72 date would be really nice. I am not totally new to Z’s but it has been a long time. I owned an orange 72 240 back in 72 and a 260 from 74-80. I had been looking for the right car for a few years now. Buying a car without looking at it was a bit scary but the community comments on BaT gave me some confidence. I look forward to enjoying my Z and meeting any owners from Northern VA. I also look forward of being a member of this forum. Thanks Jim
 2 points
 -
2 pointsHi Steve.....I just texted Eiji to answer your question......will let you know what I find out. Regards. Guy2 points
-
2 pointsThis is what I did. I cut it open with a metal saw and after blasting it there was no issue with welding it back together. I wore an correct mask for lead during the blasting and while welding.2 points
-
Well I haven't gotten the insulators off the intake manifolds yet, so I don't know which side the gaskets will end up on. I do, however, have the situation with gasket material petrified onto the manifolds where the balance tube goes. I've done some work with the paint scraper razor blade, but got skittish the second time I dug in. The first time you tell yourself "OK, I slipped once... Let's not do that again." And then you do it again. I believe the aluminum is softer than the gasket material. So I haven't caused any unmanageable damage yet, but just wondering if there's a silver bullet. Granny says "no", but I'm hoping he's just not hit on it yet. Maybe I'll try the shallow pan Mr. X suggested, and maybe put the whole thing in a bag just to see what happens. Thanks guys!! So before I crawl back to my hole... There ARE concoctions sold on the open market that are named "Gasket Removers". Is this just snake oil?2 points
-
2 pointsThere are no 100% answers to this question. Lots of anecdotal evidence, but no robust guidelines. Statistical populations of three. A classic example of 'YRMD' (your results may differ). All I can say is that if it all goes wrong for you, your last thought will be, 'F__'. Your wife may have a different comment .2 points
-
1 pointI'm far from an expert, but I've broken in two engines now, including one recently, so the info is fairly fresh in my mind, and my understanding is that the window of opportunity to set the rings is within maybe 50 to 100 miles. During the break in process you don't want to take it easy (except at first). Previously the thought was that you have to baby your engine for the first thousand miles, which from what I've read is the opposite of what you want to do. Cylinder pressure will force the rings out toward the cylinder walls, thus breaking them in and creating a good seal, so based on my research, what I ultimately ended up doing is starting off easy, going up to about 3000 rpm and about 1/2 throttle, and gradually working my way toward redline and full throttle, and engine braking/letting the car slow down on its own between acceleration runs. Then change oil. Lots of info out there supporting variations of this method.1 point
-
1 pointAs heyisrama says, most of your run in is already done so a few months of paint work isn't going to make any difference to your engine. I'm in your court when it come to engine break in, lots of short bursts of acceleration followed by engine breaking. The rings and cylinder walls are the only things that are breaking in so put them work. Nice to have friends with a paint booth😁1 point
-
1 pointThank you, I will look into it and hang in there with the car and keep everyone updated with changes and work I do on the car. Thank you for the advice and motivation! Sent from my iPhone using Tapatalk1 point
-
1 pointI added some pictures if anyone would like specific up close and better shots I can provide those, I bought the car from a mechanic who was getting to old to keep it. I have not messed with the timing yet, it scares but I have to get to it. The car had sad for maybe 1 to 2 month with out being on I try and turn it on frequently to prevent it from sitting to long. When I first got it I filled it up with some fresh supreme gas. Thank you for the welcoming and advice! Sent from my iPhone using Tapatalk1 point
-
1 pointI was previously using the blue NGK wires and had no complaints or problems. In getting my car ready for ZCON a few years ago several of my knowledgeable friends recommended I switch back to black wires for an improved appearance. I went with the Denso black wires from Rockauto, no ignition problems with this excellent product.1 point
-
1 pointWelcome to the forum. Great folks here that give solid advice. I've got a couple of cents worth of guesses, but I think a little more history of your car would help us more. Is the car new to you? or has it been in your family for a while? Has the car been "sitting" for a long time without running? Is the gas relatively fresh. I saw the new parts list, did you set the timing with a timing light? We understand all of this can be intimidating and full of rabbit holes, but just take it slow and figure it out as you go. Everything will make sense later. Pictures can really help us see what you are working with so add them when you can.1 point
-
1 pointIve replaced the fuel filter and did an oil change a few months ago, cleaned out the air filter as well. Im going to get a good battery to start since the car wont even turn on until jump starter and will run a fuel pressure test this week or next. The spark plugs are new like a month new I the old ones and will inspect for carbon build up. Thank you so much for all the advice ill begin cleaning the grounds and checking air leaks. Sent from my iPhone using Tapatalk1 point
-
1 pointIs this real? Song sounds good but I think the vocals maybe added?1 point
-
1 pointOnce the motor gets back to room temperature that's it until you crank it again. Just oil it up real good and keep it oiled. That new cam and the valve train needs to be covered with oil always while it sits. You could turn it over by hand occasionally too to prevent any sort of spots, like rolling a car to keep from getting flat spots on the tires.1 point
-
1 pointMarch 27th, 2021 Here's another teaser: Nissan 400Z Leaks in Production Form at Los Angeles Shipping Warehouse (msn.com) Look'n like sombody was listening!1 point
-
1 pointI've got the thought processes of an 18 year old so maybe I can help. Fuel, fire and air are the main 3 things needed to run a combustion engine. You need to get them all working but can do so one at time. Get a good battery, unhook the small solenoid wire on the starter. That should let the fuel pump run without cranking the car. Pull the hose off the top of the filter on the passenger's side up front in the engine bay. Put it in an empty gas can and see if you have a good flow of fuel. Pull a spark plug and turn the motor over to look and see if you have a good spark. Take the air filter out for testing. Clean any debris out of the air box. Not necessarily in that order but you'll have to do those basic things no matter what. I would put a new filter on and some new 10w30 oil. Get the cheap stuff at walmart if the car hasn't run in awhile. Clean the spark plugs before buying new ones. Clean all the grounds on the engine as described here... https://www.atlanticz.ca/zclub/techtips/electricalconnections/index.html Read this on vacuum leaks... https://www.atlanticz.ca/zclub/techtips/airleaks/index.html Let us know what you find out. I wouldn't fall into the trap I did buying up a bunch of parts you don't need.1 point
-
1 pointJust doing a favor for anyone else who tries to read your post. Sorry but the run on train of thought tapping on the phone texts are hard to read... (Edited - I was being an arse. Well done, Dylan.) How long have you had the car and has it ever run right?1 point
-
1 pointI think your assumption of the floats being out of tune was correct. Seeing that the fuel only filled a small portion of the chamber. I’ll go about adjusting it and see what I get. The more and more I open this carburetor the more I feel the need to rebuild it. I’ll let you know how it goes1 point
-
1 pointHas it ever run with those carbs, fuel tank and fuel pump? You can bypass the tank with a small gas can up front. Pull the suction hose off the fuel filter and put it in the jug. These cars are bad to get crudded up fuel tanks, mine was horrible when I first bought it. Wouldn't run for more than a few minutes so I used the jug trick and it ran fine. That's a whole other story... The main problem that I've seen is the floats are out of adjustment and don't allow enough fuel into the bowls, starving them of gas. When you pull the choke on it drops the nozzle letting in more fuel so your's are running or idling as you said above. Here's a very simple explanation @Jughead posted as few days ago to get the floats set at 9/16" down from the bowl's lid. I just reset the floats. Here's the procedure I used (which I got from Steve @ Z-Therapy): 1) Removed float chamber top and held with float on bottom. 2) Blew into fuel banjo fitting while slowly lifting float and holding 9/16" spacer between top of float and bottom of float chamber cover. 3) Adjusted (bent) the float adjustment tab so that airflow thru the banjo just stops at 9/16", and air flows with any downward movement of the float. After doing this, I checked the levels with Float Syncs. The levels are exactly the same in both carburetors: ~ 1/2" above the top of the metal bases of the Float Synchs. The base setting for 3 screw SUs is to have the adjustment nut on the bottom 2.5 turns down/out/counterclockwise what ever but anyway tighten them by turning them towards the passenger's fender, which is clockwise looking from the bottom up. Just snug them up not super tight. Then turn them backwards towards the driver's side, counterclockwise looking up from the bottom, 2 complete turns then a half way around turn. That's the ballpark and they should run like that. The nut I'm talking about is #19 in this diagram. When you loosen it the needles drop down and lets more fuel pass through the nozzles. Here's what I learned by and after doing it a few times it gets easy, you'll figure out what each step does and it'll all make sense. Thank You Mr @2402602801 point
-
Welcome enjoy the weather you got about a month until you need AC Sent from my iPhone using Tapatalk1 point
-
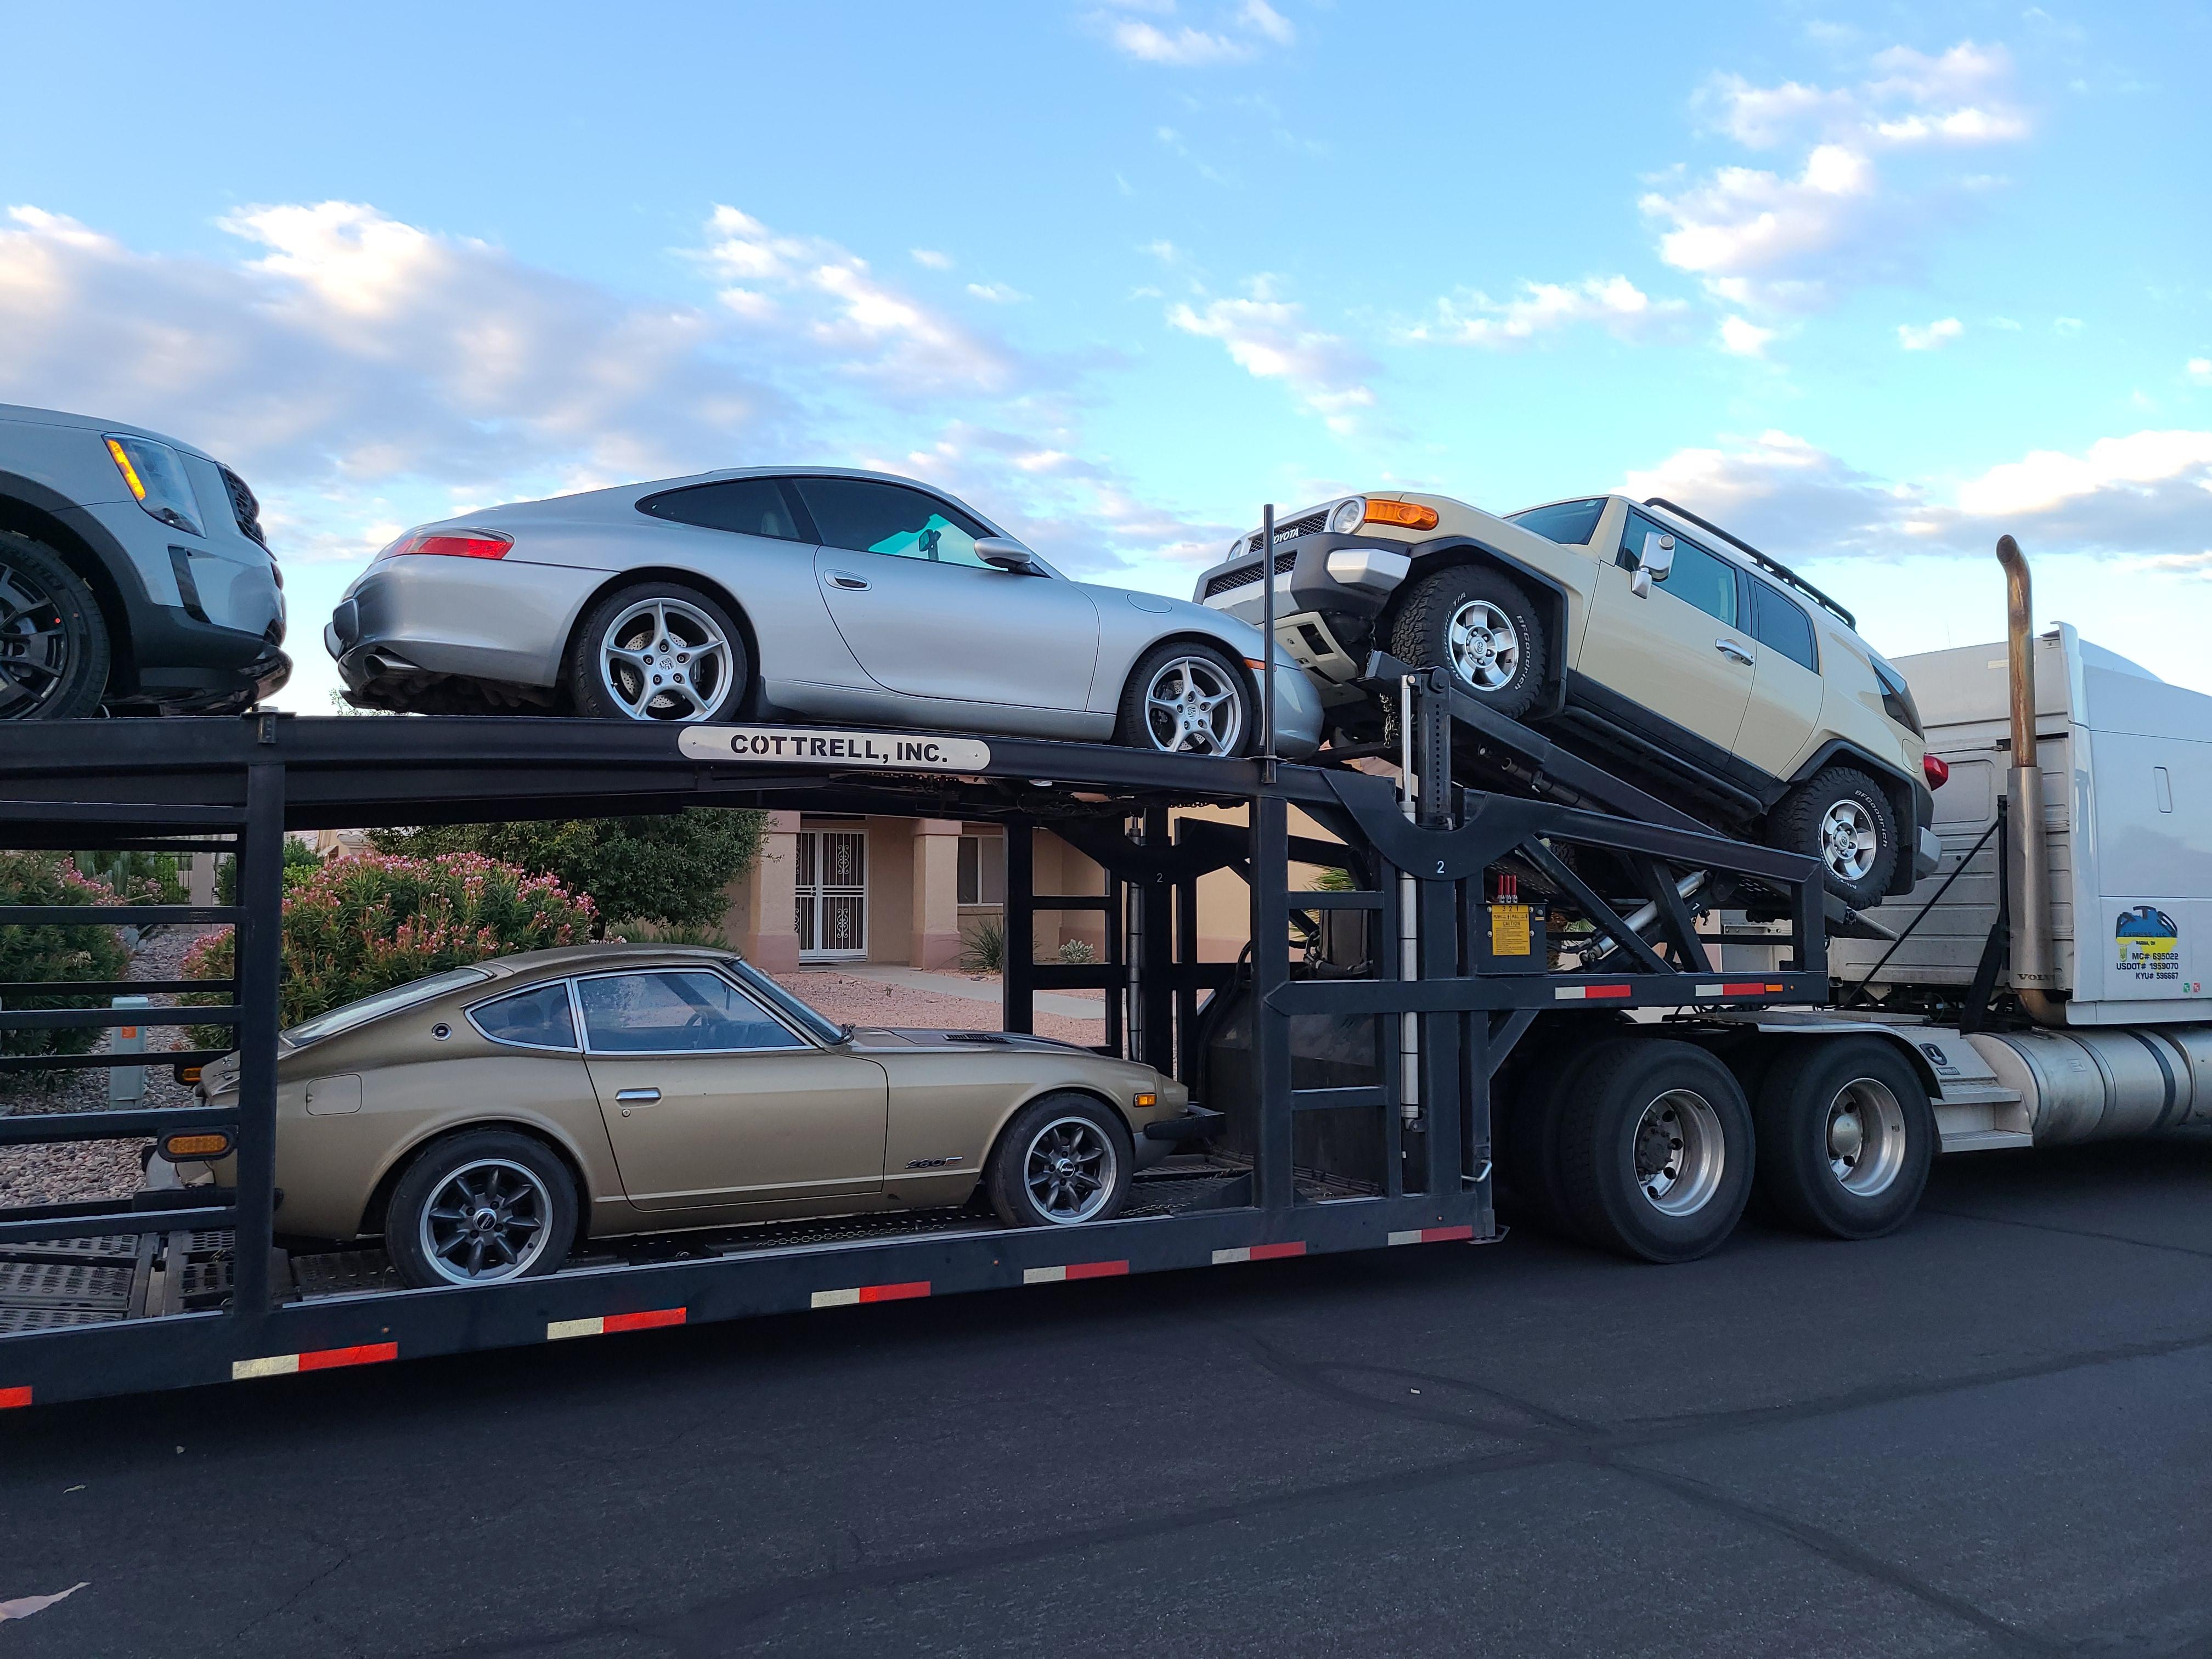
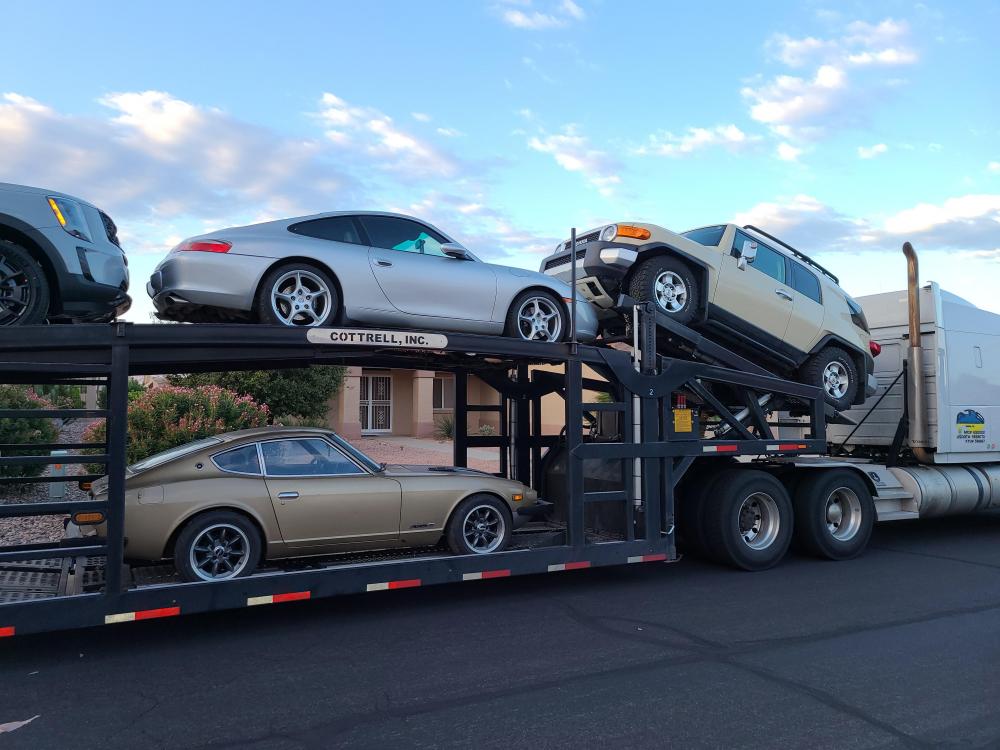
My cars made it to Phoenix. The FJ and 996 were unscathed, but something must have been kicked up and the driver's side mirror was broken off and the stainless steel trim that caps the door is dented from the mirror hitting it. Luckily, the mirror was already crap and there was no damage to the door itself. The cars were completely filthy and likely salty from a winter storm he drove through in New Mexico.
 1 point
 -
No no.. always smart to ask then not to ask.. you can always learn something.. For instans that i don't know how to write forinstans? and no i don't know how to get off those gaskets 🤣1 point
-
I've used my table saw table and emery cloth for truing flat surfaces.1 point
-
Leaked photos in gray and pearl white, I like both. Here's the gray. https://japanesenostalgiccar.com/production-z35-nissan-400z-photos-leaked/ https://www.400zclub.com/forum/threads/production-400z-spotted-in-gray-and-silver-–-pics-videos.143/1 point
-
1 pointNo, I completely took the carb canister out of the picture. It is still in the car/connected to the tank vent line but its vacuum hoses are disconnected. Yeah, there is indeed a change when the wot pin connects it feels kind of like when turbo boost comes in on a turbo car.1 point
-
1 pointWe're having an unusually early spring down here. Groundhogs be damned. I have a box of the baby blue mask from work and holy cow at the very obvious crud I'm getting with these cheap things while doing yard work. It's amazing to see. They will be absolutely necessary until the day I kick the bucket, full of papers proclaiming things I want to accomplish before said time of the bucket to be kicked.1 point
-
1 pointKeep working on that Bucket List and remember how long the Lone Ranger wore his mask 😎. Dennis1 point
-
Will do that! Will be the beeswax will hold up to the heat and fuel? Will do, I’ll have to buy a granite flat stone. there were minor Imperfections, I didn’t notice any significant warping I bought a set about a month ago X! Still waiting on them to arrive though...1 point
-
1 pointWhen I was in high school shop, we used to cut up old cars and then put them back together. Our shop teacher made us run water through fuel tanks before cutting or welding near them. So, a fuel tank exploded one day. I looked up to see the guy's expression as he stood there with a cutting torch in hand and staring at a suddenly very fat fuel tank. 🤯🤯🤯🤯. Kinda priceless. That said, I actually lit a torch and (without hesitation) inserted it into the fill pipe. No explosions, no flames, hence my comment: "Tried (the flame) and trusted (the results)" Thank you all for the good advice! I did lose a friend who was smoking a cigarette while he refilled the fuel tank on his lawnmower. It didn't end well for him, and I fully respect the significant danger of lighting off fuel vapors.1 point
-
Yep, I've read Bryan's entire site many times over the years. Great stuff!!1 point
-
$12k for that in Hawaii is a deal...for them to ship a Z from the mainland is not cheap. And that 240Z does not look that bad from the pictures provided (I'm sure it's worse that it looks, they usually are).1 point
-
1 pointWhoa, looks like a Mexican Pinata, lots of tank restoration businesses cut the tank in half to do the necessary work, I've done 2-3 tanks now with the POR15 kit and in every case there was more than enough left over to coat the entire outside of the tank as well. You may not want that look but it's an option if you like, with the POR15 kit you must follow the instructions to the letter, the steel has to be scrupulously clean, warm and dry.1 point
-
I haven't found any solvents that help on those original gaskets, I have an old Stanley paint scraper like in the pic, not much can resist it.
 1 point
 -
1 pointThere is some bracketry inside the tank so you will need to avoid those pieces. I think if I were going to cut on the top side. I would make a fairly big access hole. Doesn't matter to me if I weld a 6" patch back in or a 12' patch. It's about the same difference...1 point
-
1 pointI have welded three tanks in the past and never had any explosions etc. My advice. You plan to POR it afterwards and that is what I did on all three tanks with a similar treatment. The tanks needs to be cleaned before you coat it, if you do that first you will, 1. Clean and prep the inside of the tank, 2. Remove all fuel residue so you can cut it open without any danger to yourself. Just make sure the cleaning solution is water based. My second piece of advies is to cut a section out of the top of the tank directly above the damaged area. Make it big enough so you can get good access to the areas needing work. A weld repair on the top side will not be visable later and less likely to leak if you have a pin hole.1 point
-
I would try a shallow pan, i.e. a cookie sheet (I snag them at garage sales for work in the shop so Mrs. Racer doesn’t scalp me for stealing kitchen stuff). A paper shop towel laid down first should help keep the solvent where you want it, and reduce the minimal amount of evaporation that may occur.1 point
-
1 pointAlright well I guess it’s a mystery if @kats does not know. 😳 I 3D printed a plate yesterday, need to sort out the rest of the camera. Should be nice for track video.1 point
-
You can reuse those spacers just fine. As mentioned above, maybe hit them on a sanding surface a little to see if they're badly warped, but other than that, run 'em. If you think they're bad enough to risk not sealing, you could put a little gasket sealer on them as insurance. For those, I'd use a non-silicone type like Permatex Moto-seal. It's MEK based and (in theory) is resistant to gasoline. So I got a question for the collective... Has anyone come up with a good "solvent" to loosen the old petrified stock original gaskets? They're hard as rocks, stuck like the dickens, and probably harder than the aluminum they're stuck to. I've got the same job ahead of me (getting spacers off intake manifolds) and I've tried the typical methods with little success. I'm looking for a silver bullet without having to completely powderize what is probably asbestos laced old gasket material. All these years of experience and I'm asking how to get old gaskets off... Kinda embarrassing.1 point
-
Looks like it was done on a milling machine! 👍 As long as the head gasket didn't go through a heat cycle by starting the engine you should be fine to re-use the HG.1 point
-
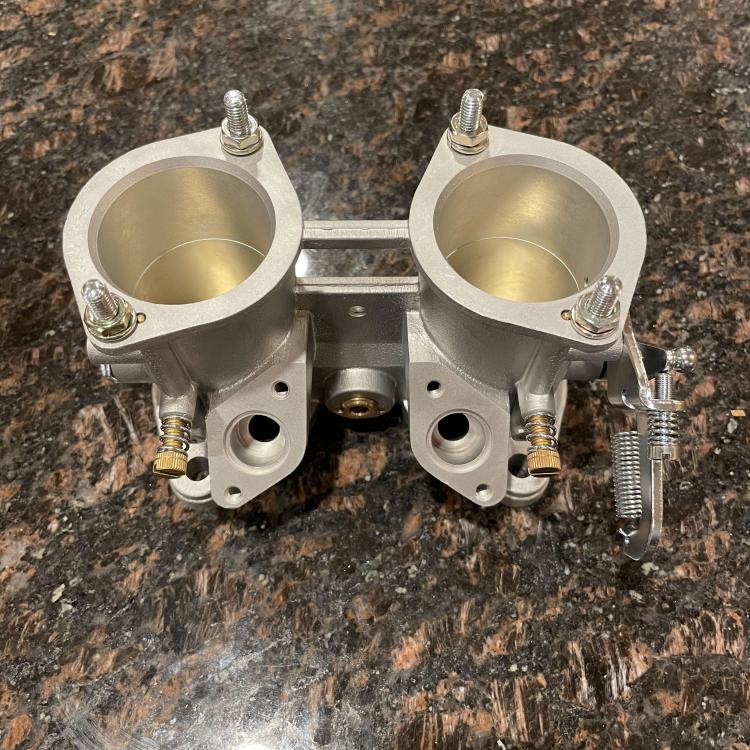
1 pointPretty proud of how these vintage SK throttle bodies came out. All new zinc, shafts and butterfly’s. I can’t wait for them to sing on my 3.1L


 1 point
 -
1 pointIll try to get a video of what I'm talking about after work today. I noticed that there are a lot of vibrations in the car, it was after i got into my buddies 92 e34 m5 last night, very smooth and stable ride.. Crap now i gotta show my messy car1 point