


Leaderboard
-
Careless
Community Member5Points446Posts -
jfa.series1
Supporting Member5Points2,760Posts -

wheee!
Community Member4Points4,607Posts -

240260280
Community Member4Points4,442Posts


Popular Content
Showing content with the highest reputation on 03/06/2019 in all areas
-
5 pointsThat's not likely a dealer warranty tag. Most likely "Big Eddie" was a mechanic with a strong sense of complete disclosure who went to a lot of trouble to document an engine swap for the then current and all subsequent owners. Note that he installed the tag on the firewall over the factory stamping of the VIN and made no attempt to replicate the OE tag. Good job "Big Eddie"!!!5 points
-
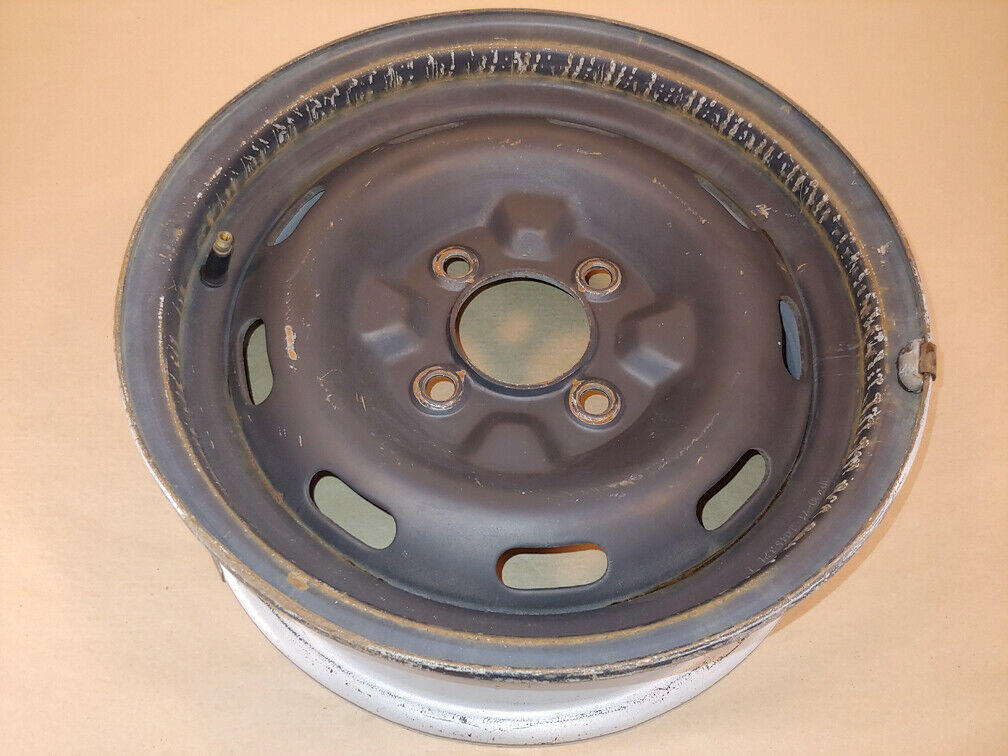
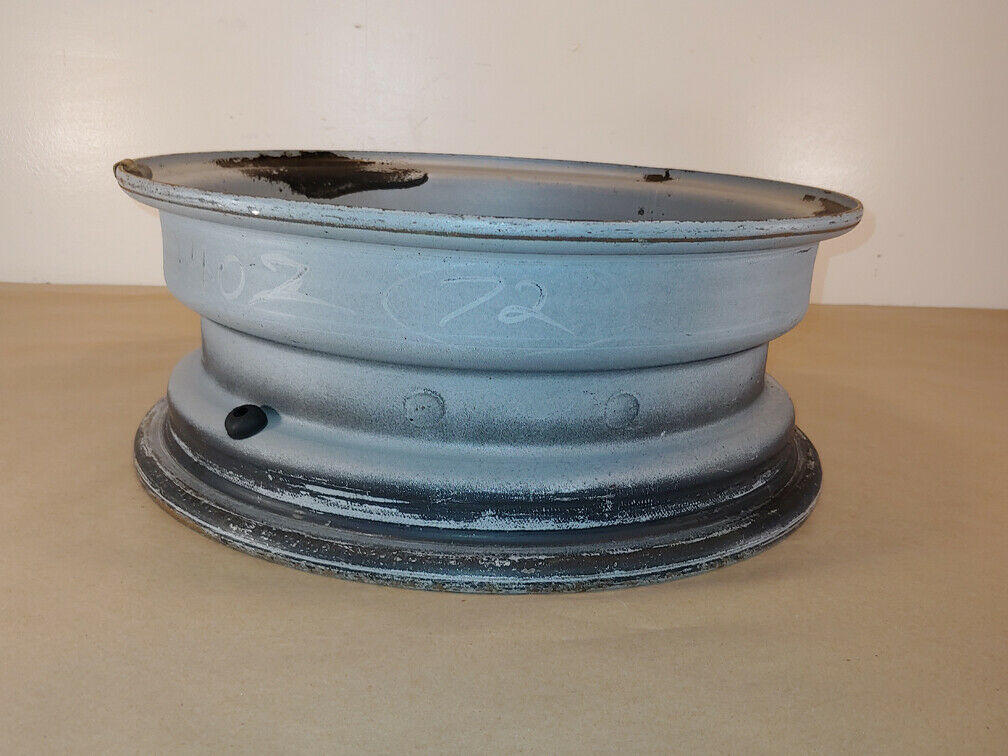
3 pointsTo add to this thread link, the colour that I found the closest to the INSIDE (or majority of the wheel body colour, I guess) gray colour was actually Alumiblast from Seymour Paints, which is a popular "rebuilders aluminum" coating. All of the powder coated options I had spec'd out were far too glossy or had a shine to them that was not similar to the dull faux aluminum on the inside of the spare wheels in inventory. The only issue with this Alumiblast paint is that it is very easy to rub off with solvents. The benefit to this is that it actually makes it easy to clean up if you are spraying the inside of the wheel after the tire is mounted to a fully powder coated wheel. Any overspray through the brake venting holes in the face of the wheel while spraying the inside can be easily cleaned off with brake parts cleaner. It can also be touched up with more paint, and it goes on wet and dries to the same shade as the base coat in about 30 seconds. All the top coats I tried to seal in the Alumiblast on some test pieces mixed with the Alumiblast or caused it to re-liquify and wash out or become runny, and I didn't have time to find a suitable matte powder coating formulation at the time, so Alumiblast is what I settled on using. It's probably not the most durable, but you could just buy some of that paint, coat a spare piece of metal, and then take it to a powder coater to attempt match the shade/finish with whatever they have in their inventory so you don't have to buy a 50lb box of custom powder. I'd like to add that I also spot tested some of the Alumiblast onto the inside of the untouched original spare wheel and you could not tell where the spray line was. So that's the best indication of how close Alumiblast comes in terms of paint accuracy.3 points
-
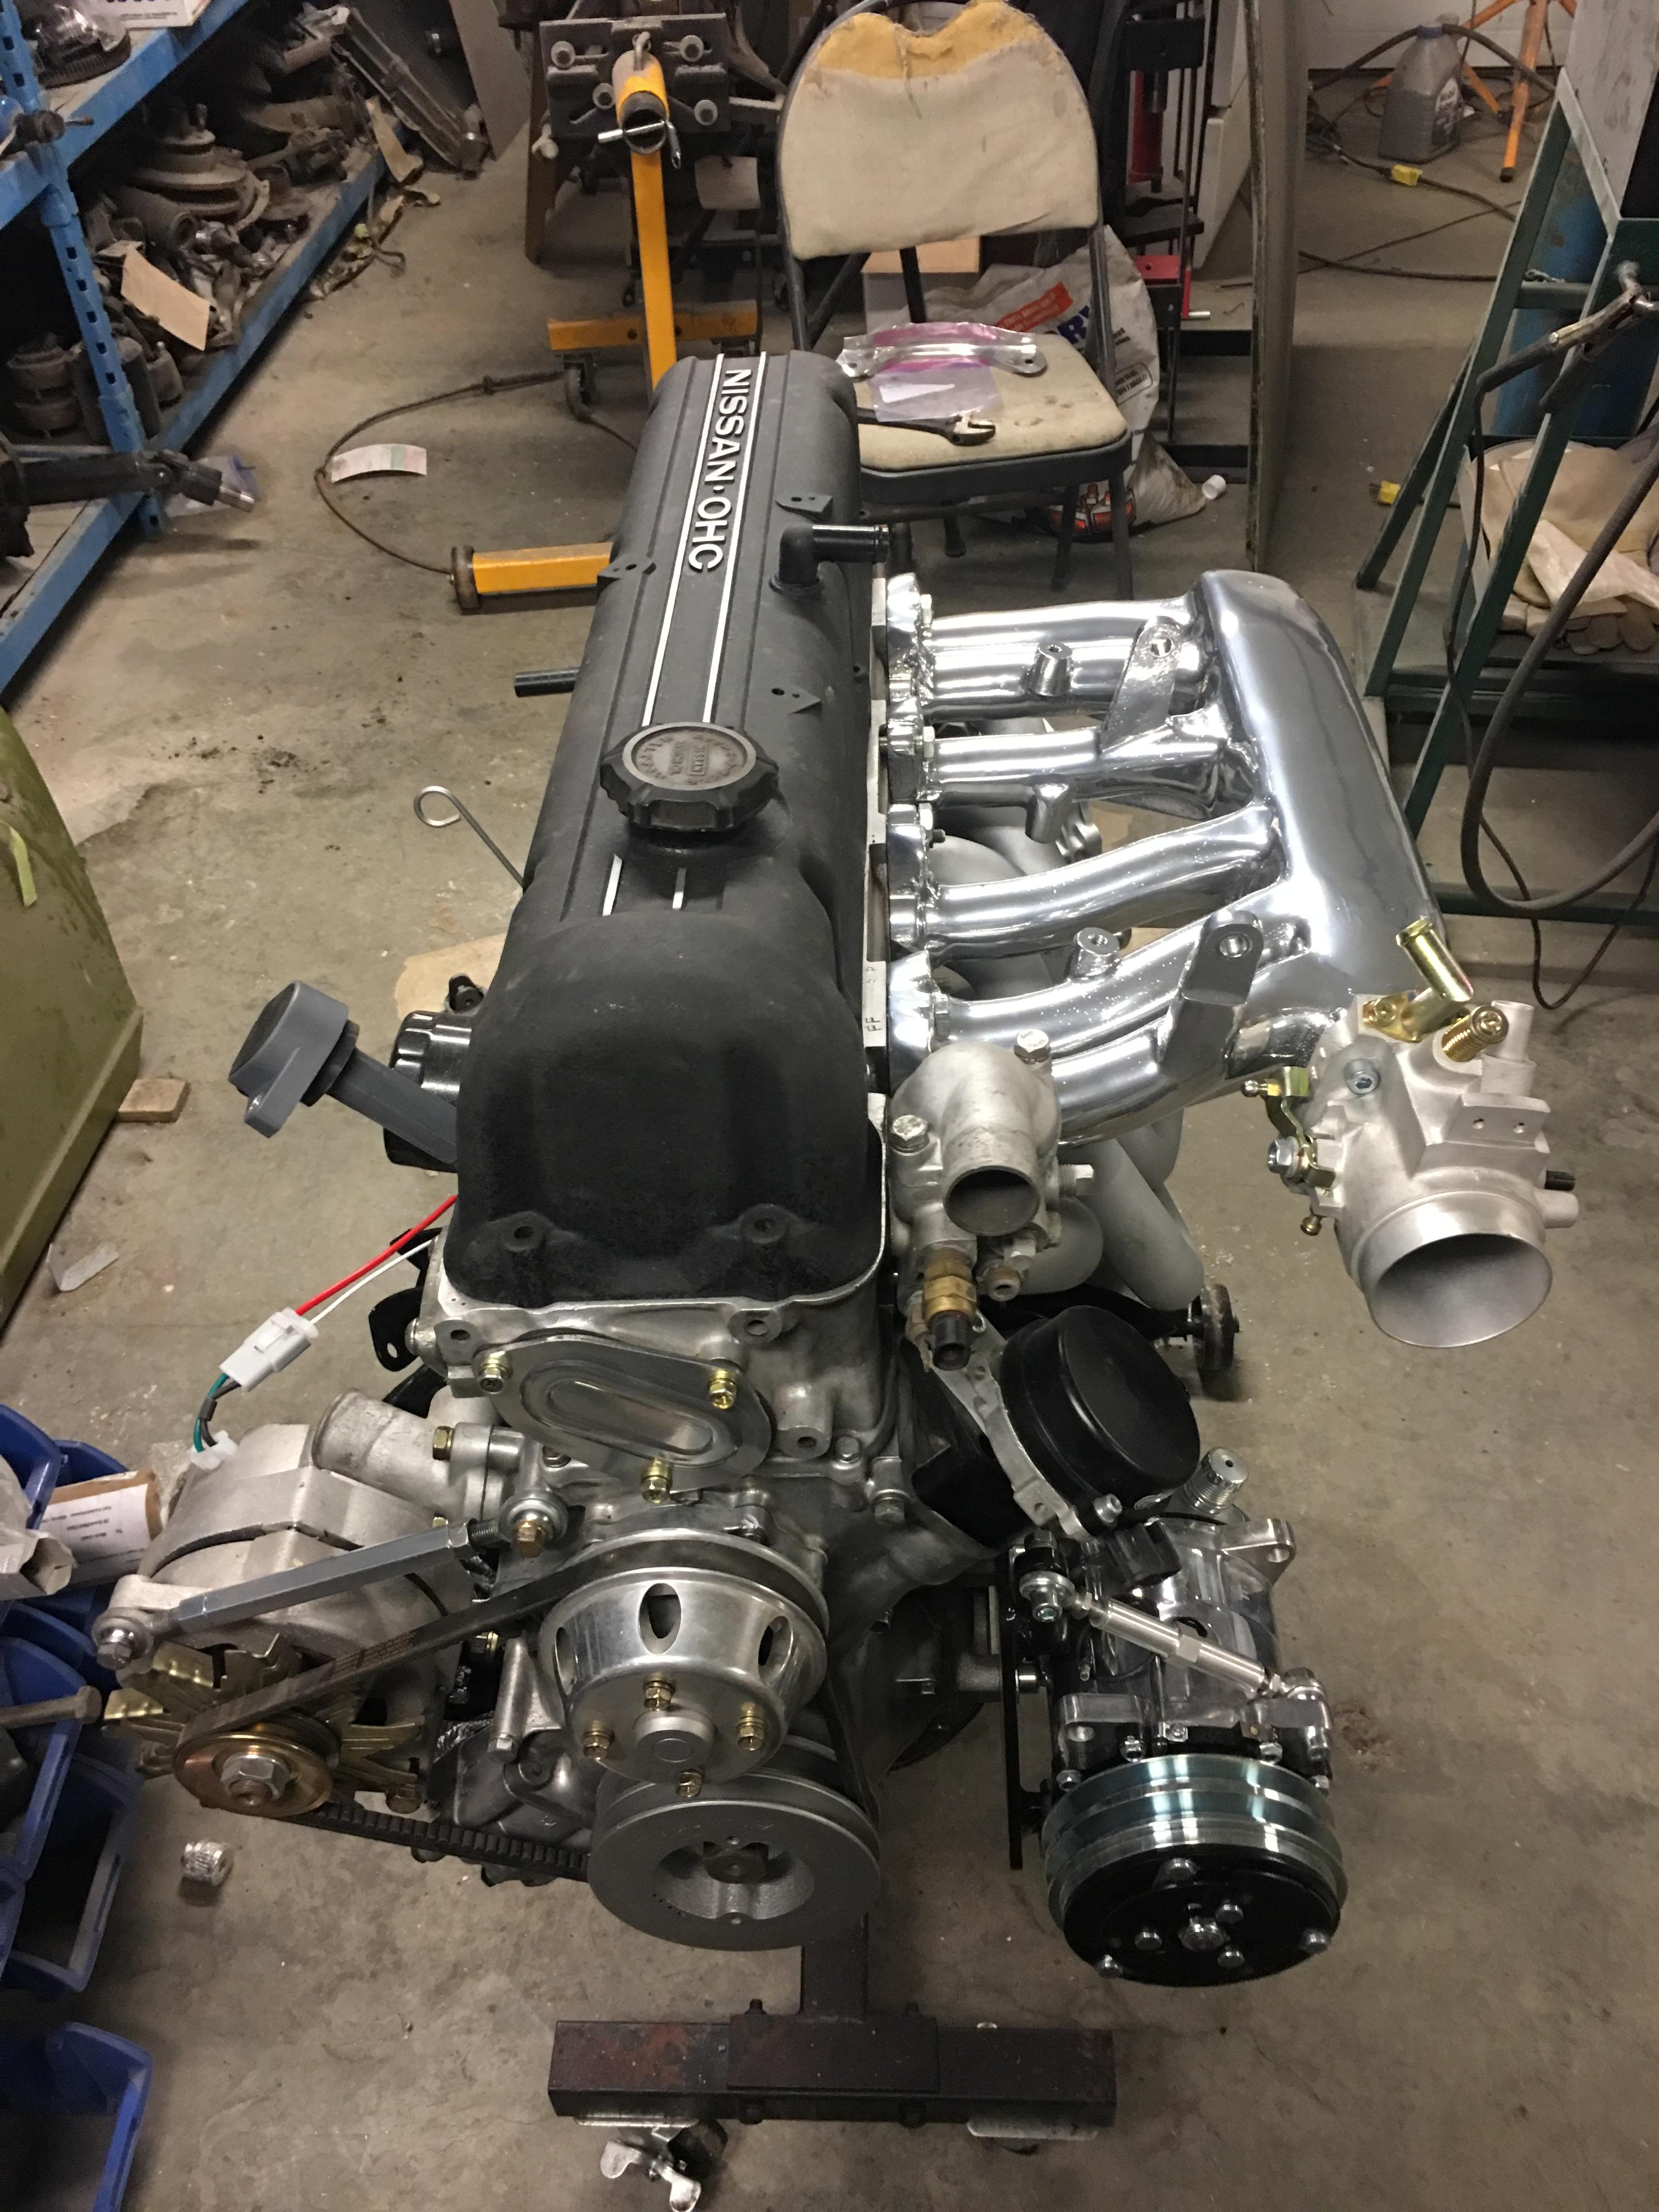
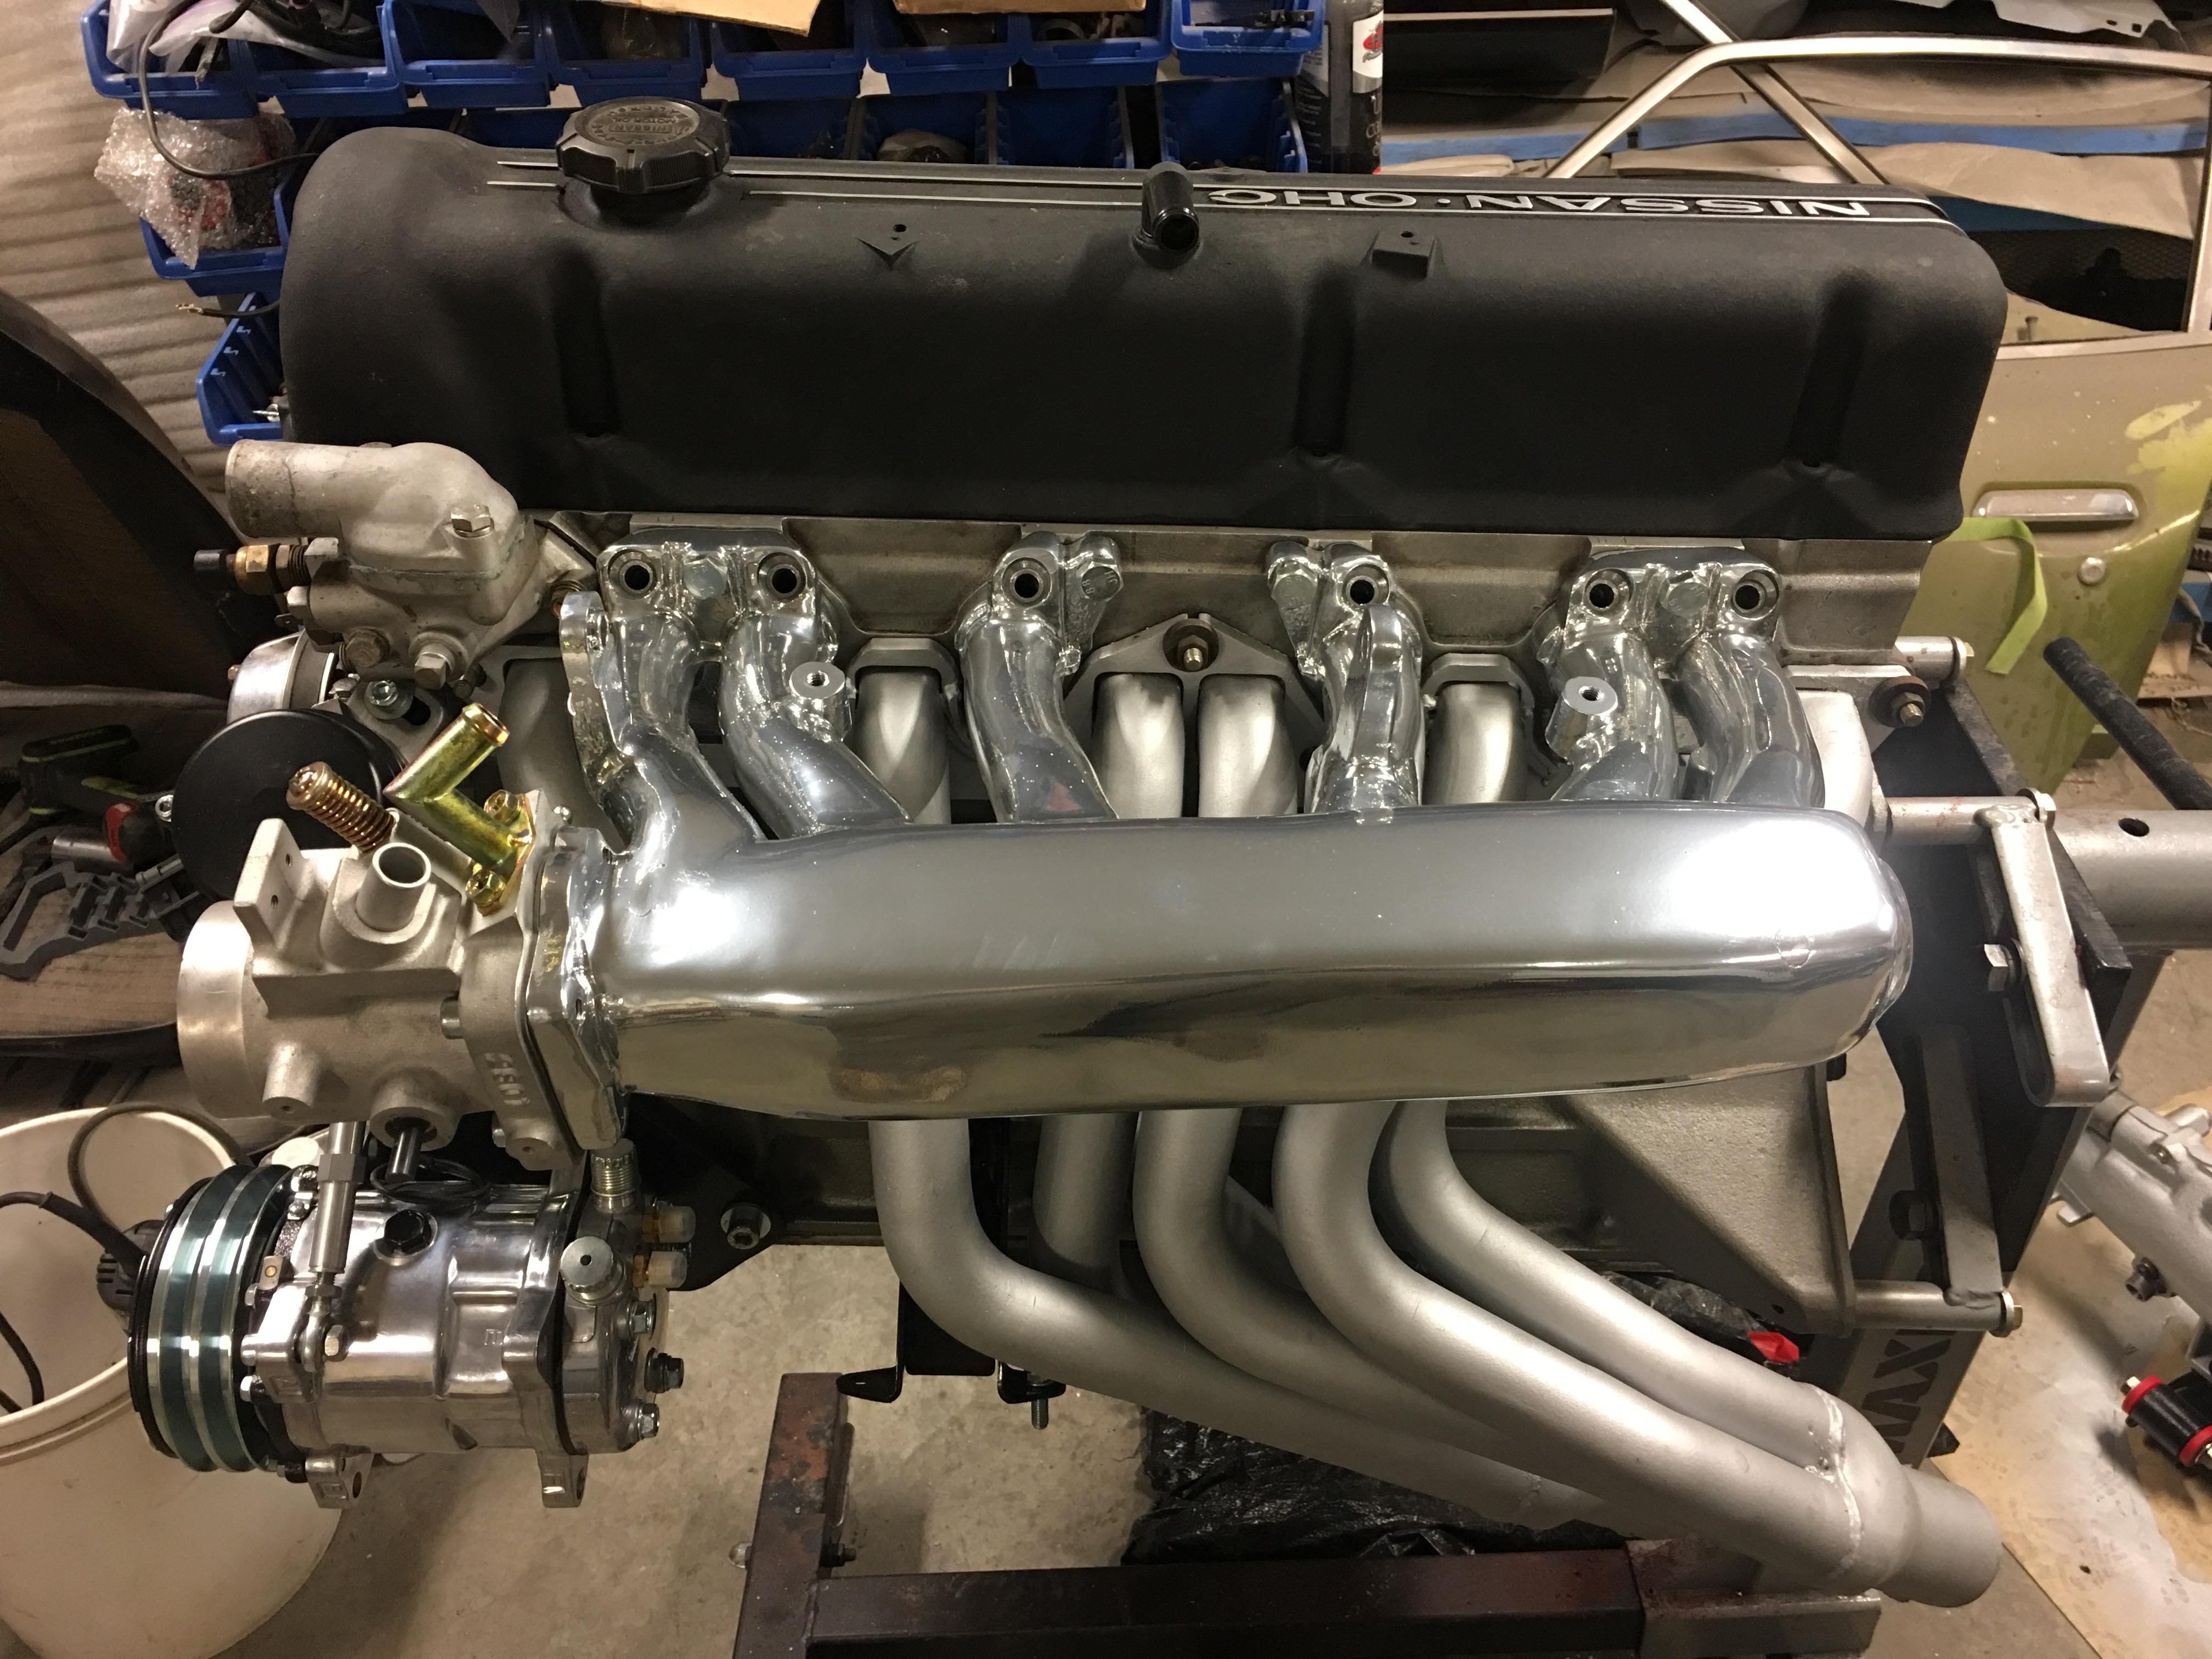
3 pointsPowder coated the intake too! Not perfect as there was a little off gassing in the oven causing some pitting. But overall I’m happy.

 3 points
 -
2 pointsI'm late to the party, but just to expand on the idea; I actually swiped some RTV over the holes with my finger, let it cure, then tumbled it for a short while to remove any fine residual RTV on the face where I smeared the holes. The servo housing thickness was enough for the RTV to grab hold of and stay in place. Once plated, I picked the RTV plugs out, and picked the RTV around the threaded plunger hole that I smeared there as well to prevent acid and plating solution ingress from that area too. You can buy silicon tapered plugs that might fit just as well, but the cone shape is not ideal for retaining grip for holding them in if they are being waved around during plating agitation, and you'd have to RTV the plunger shaft anyway.2 points
-
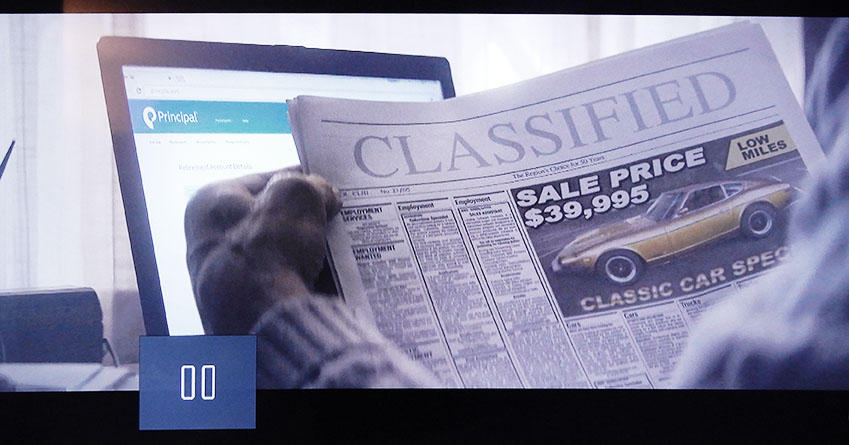
2 pointsI had to rewind because this went by so quickly, but it looks like the Z has earned its place in the investment world, in a manner of speaking. This showed up tonight in an ad for Principal Financial on CBS news, and it seems to show a good market ...
 2 points
 -
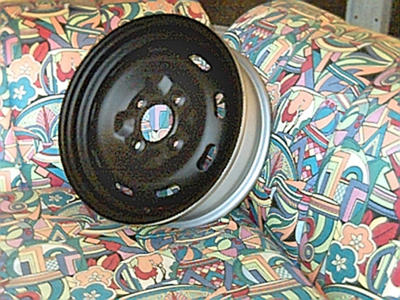
2 pointsDon't want to beat a dead horse, I can't find the thread. And I just got back to this computer. I've posted this picture before when I was talking with Kats about original wheels and tires. This is from 26th.
 2 points
 -
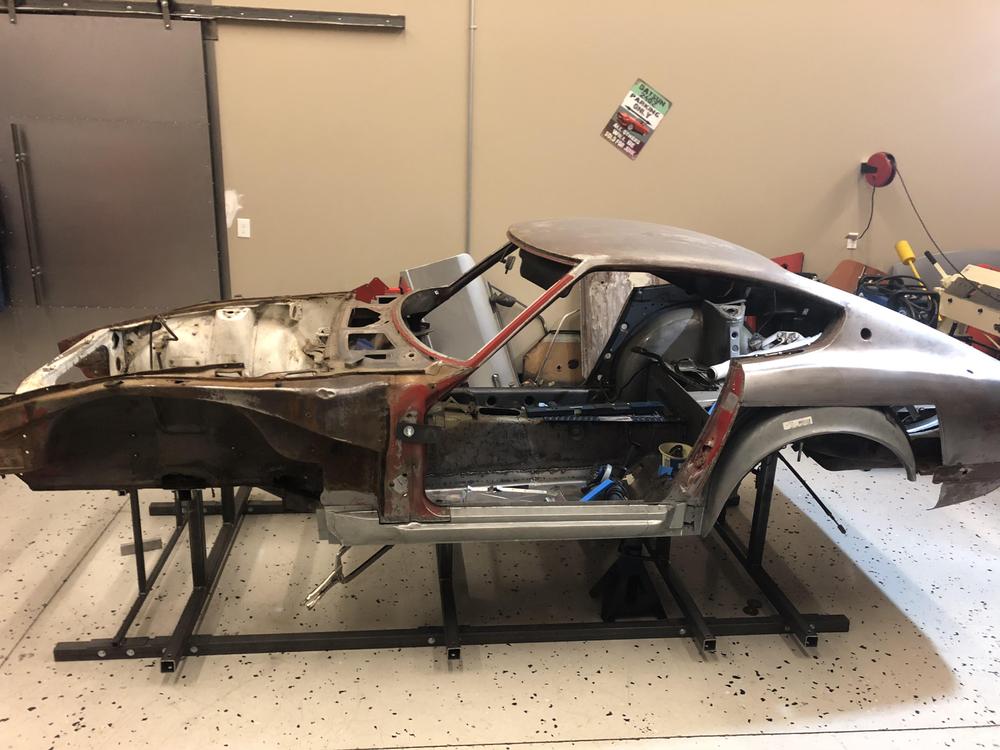
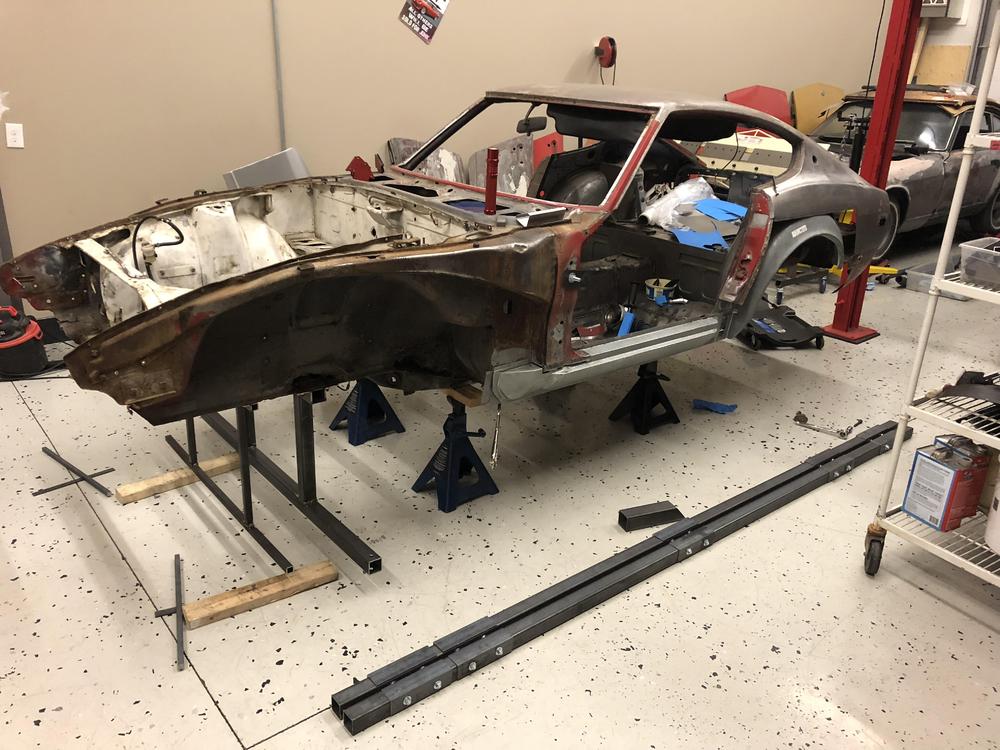
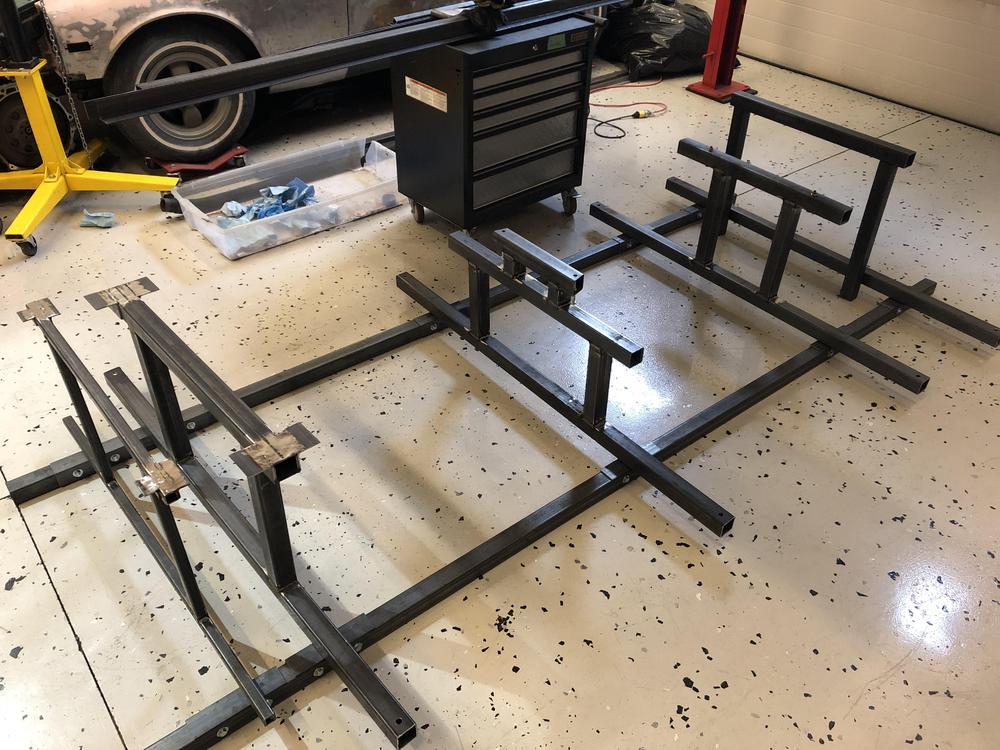
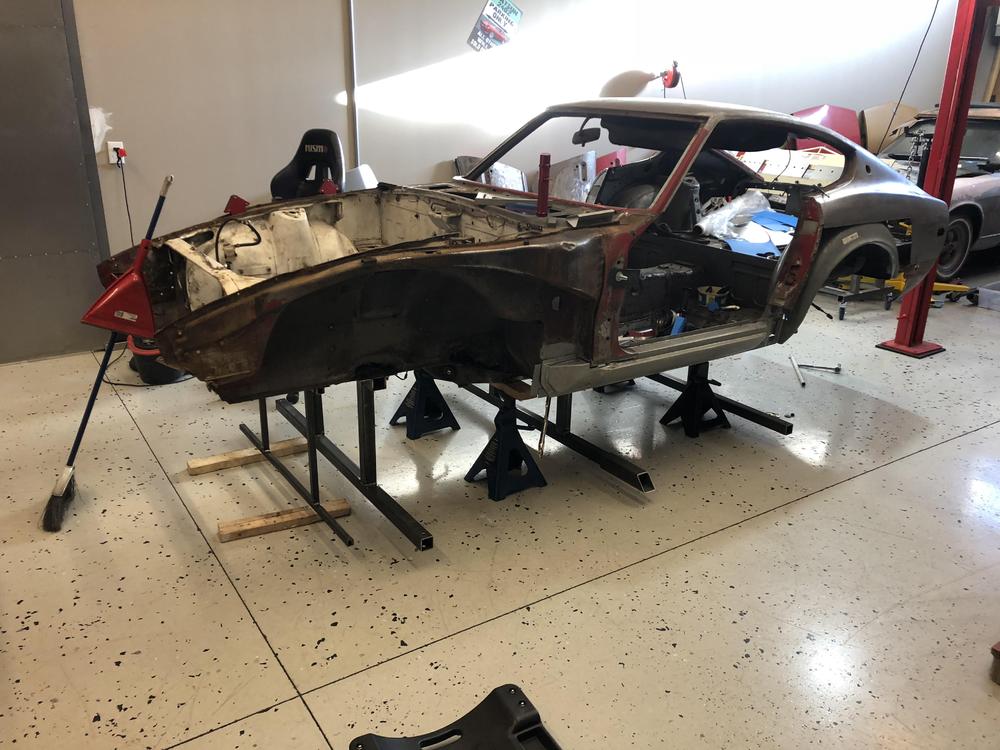
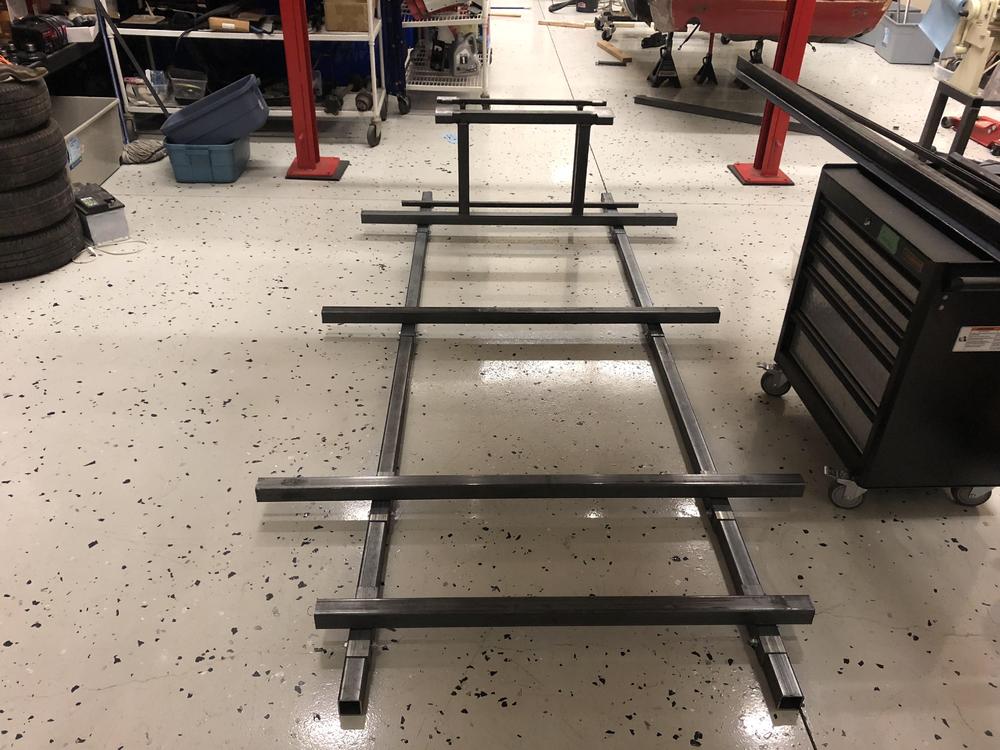
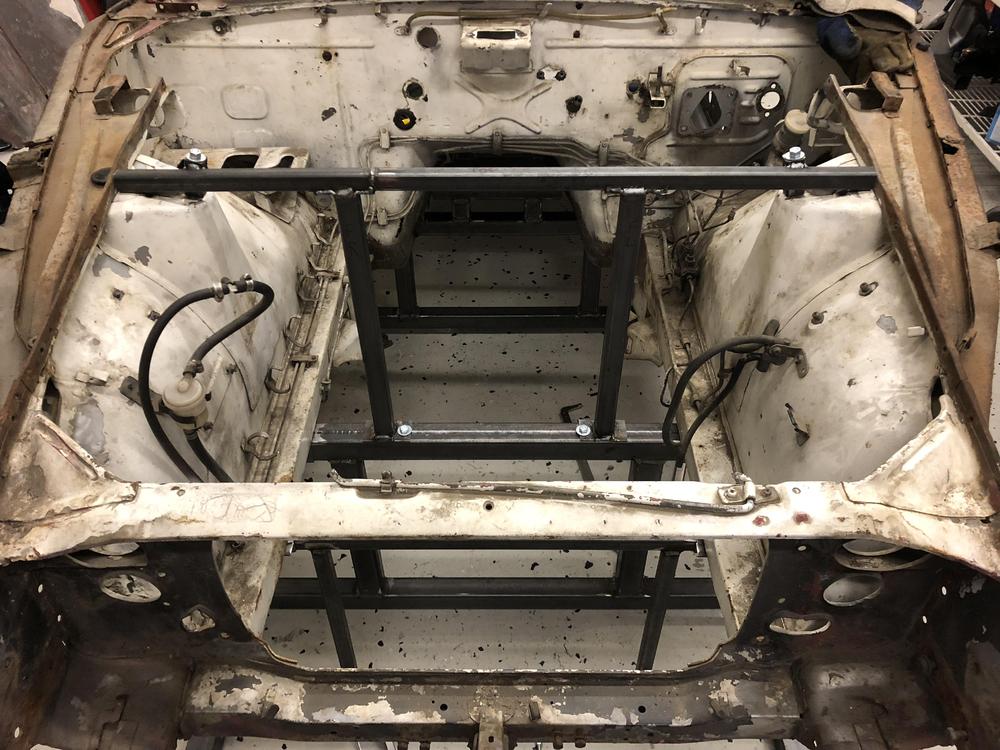
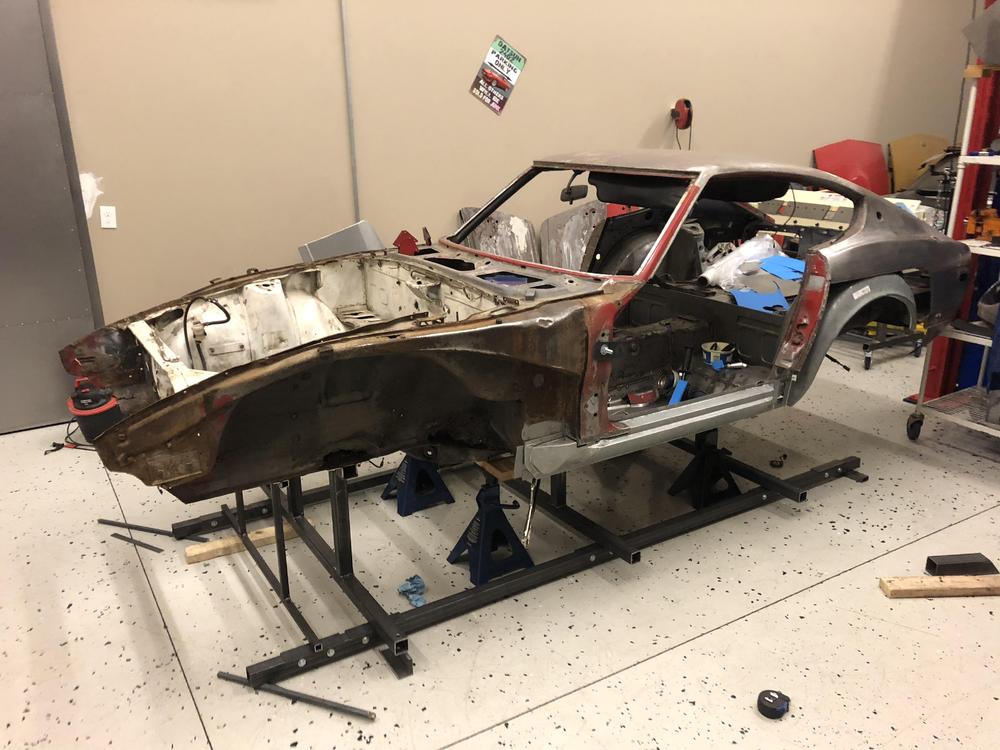
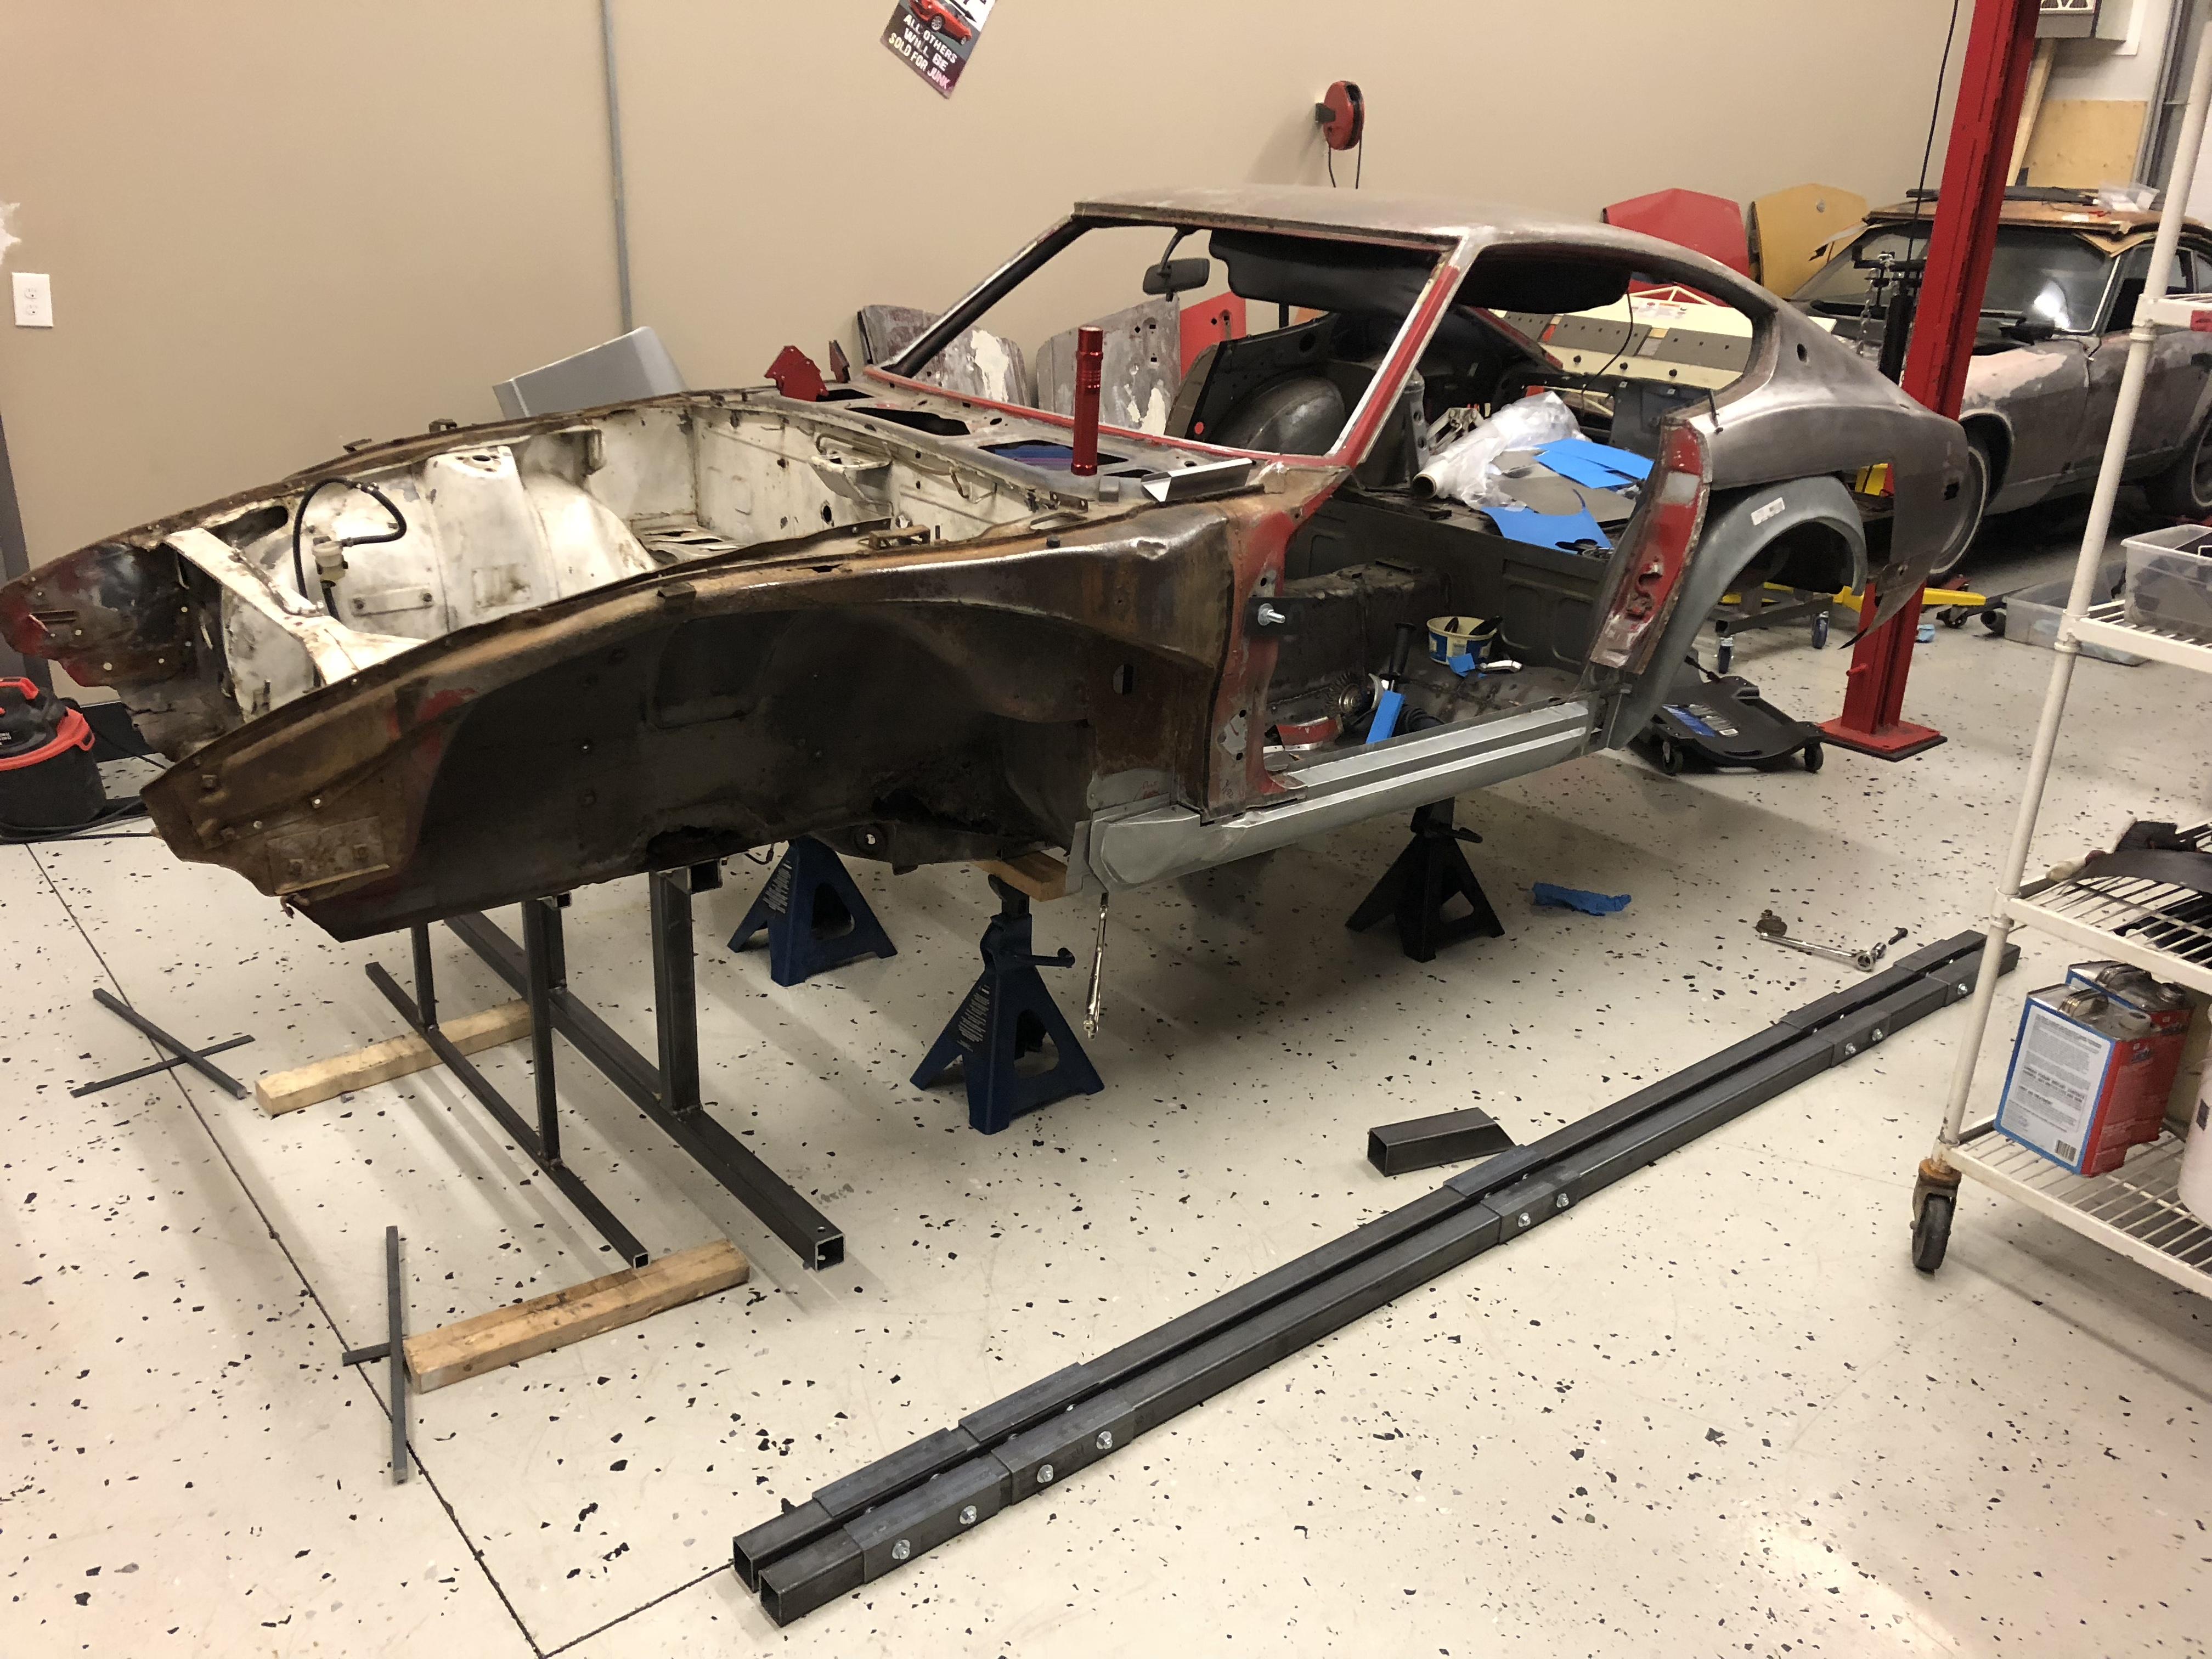
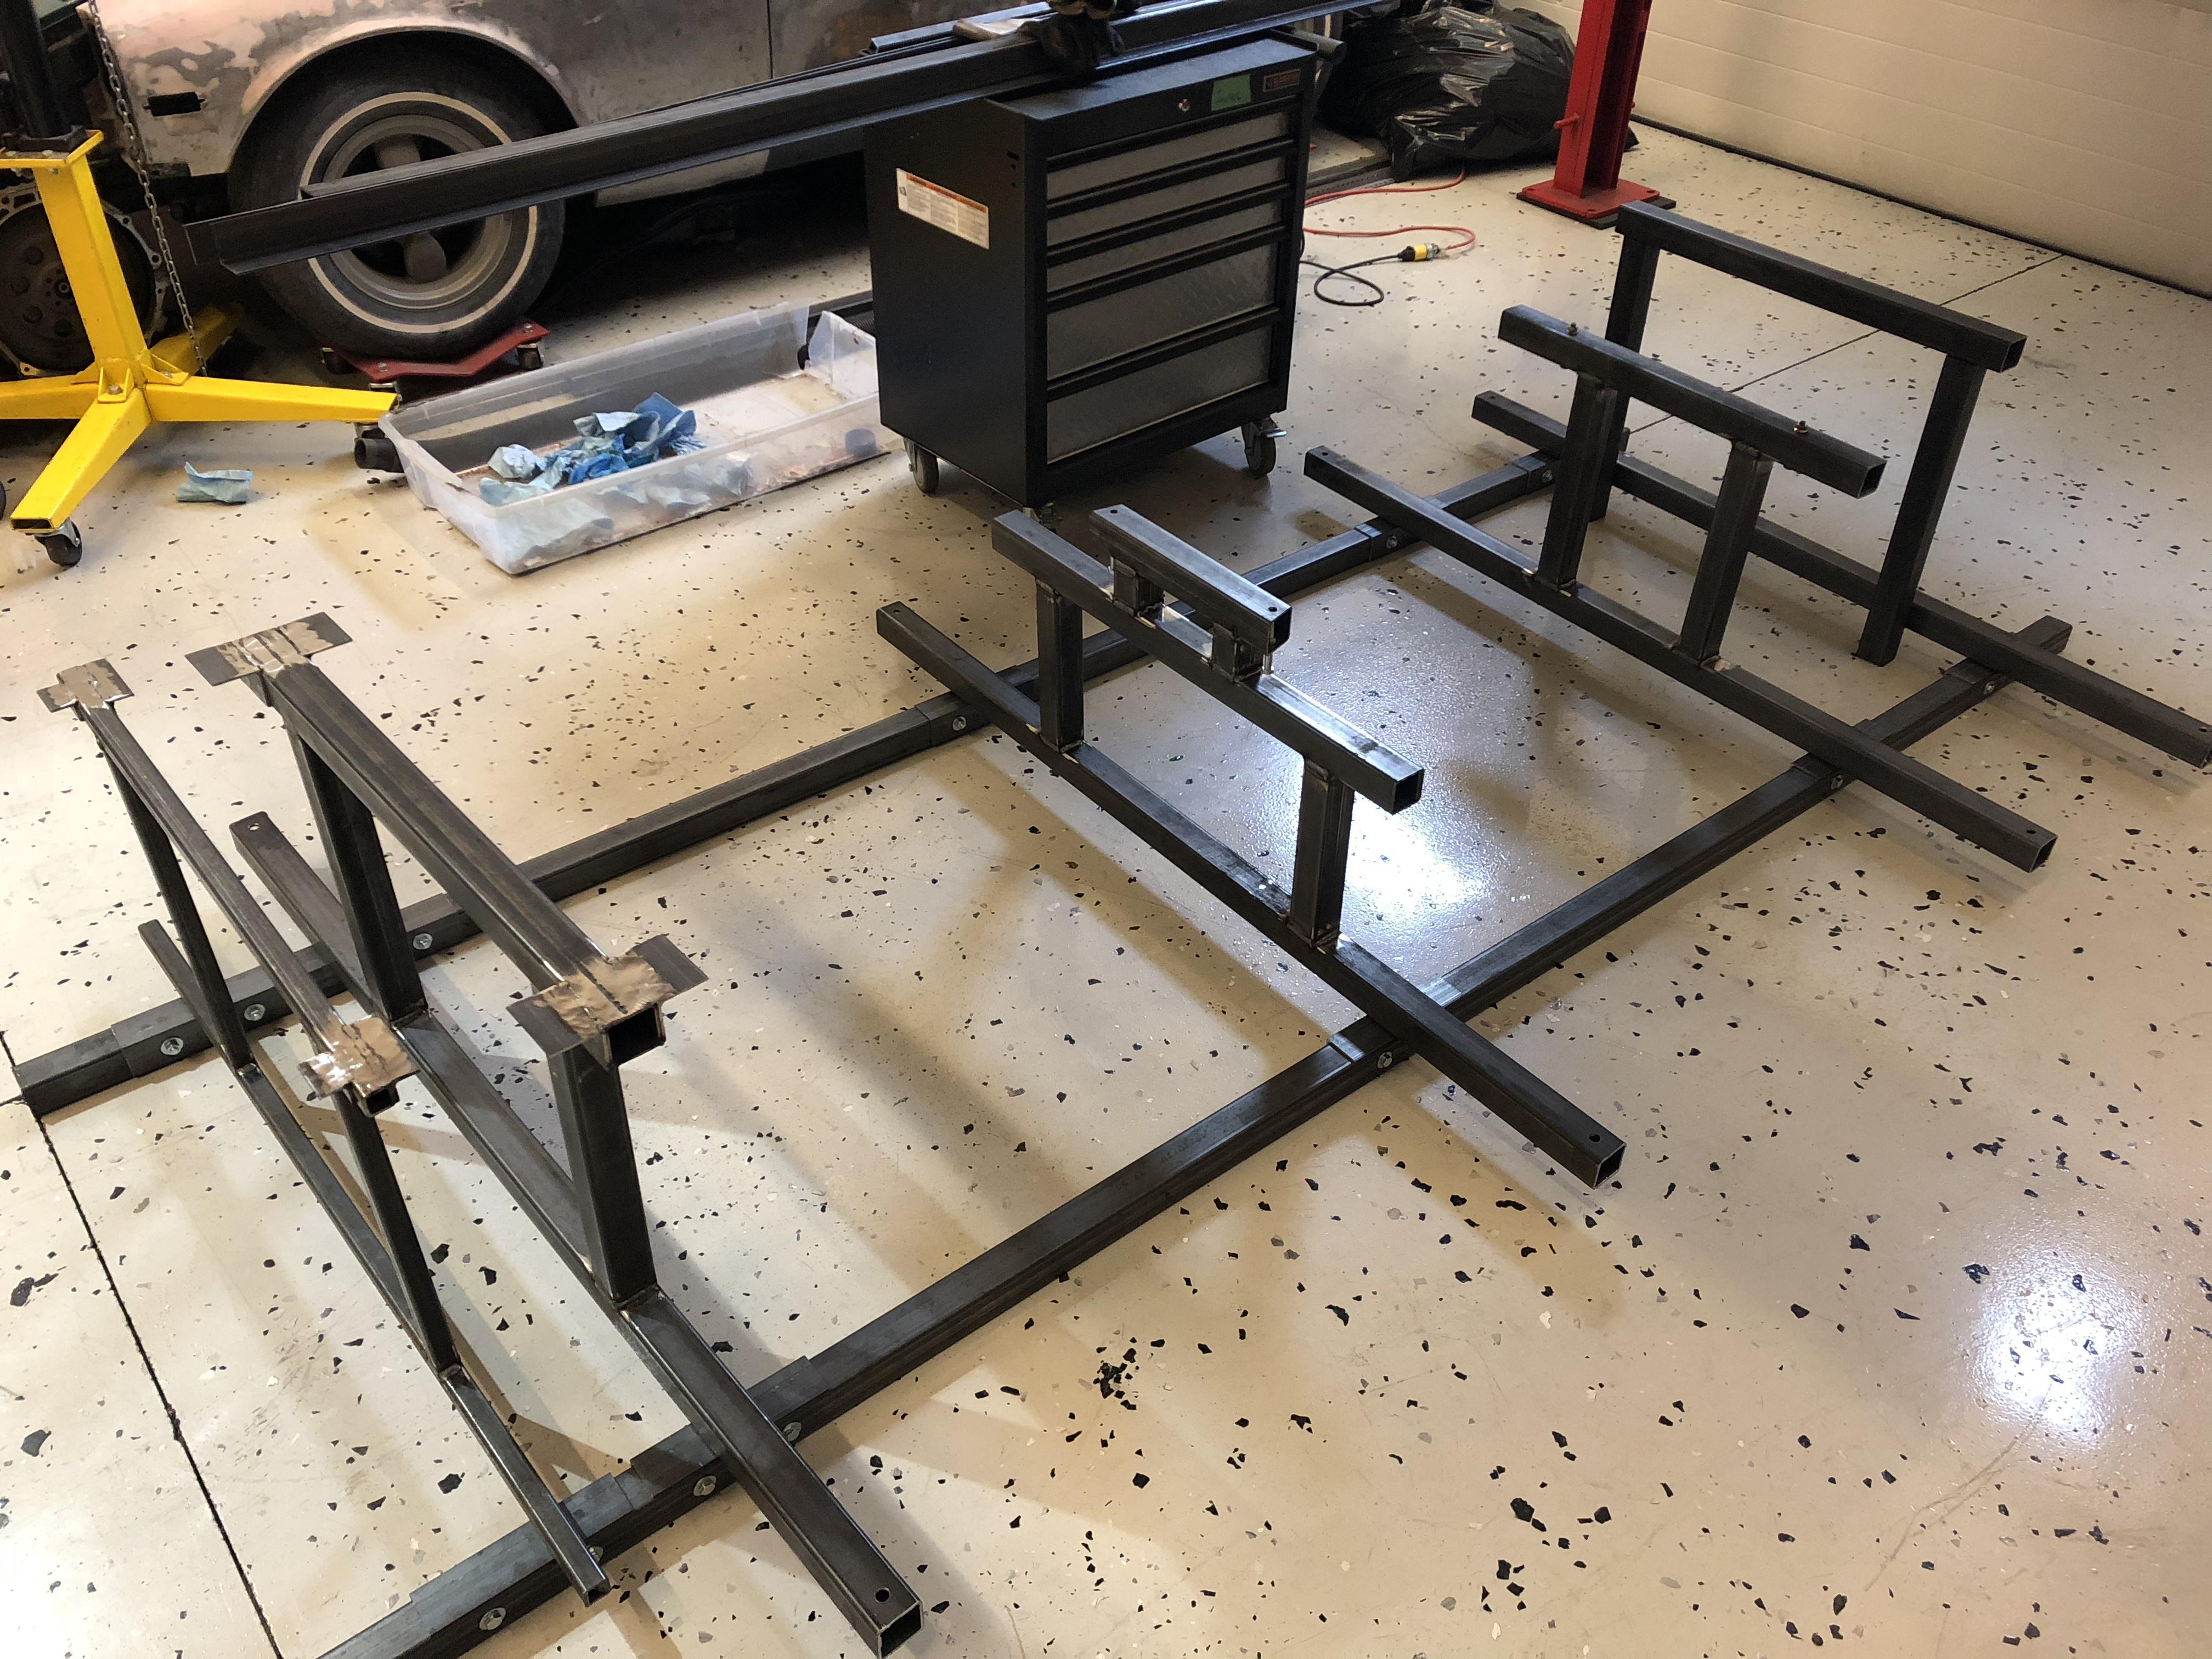
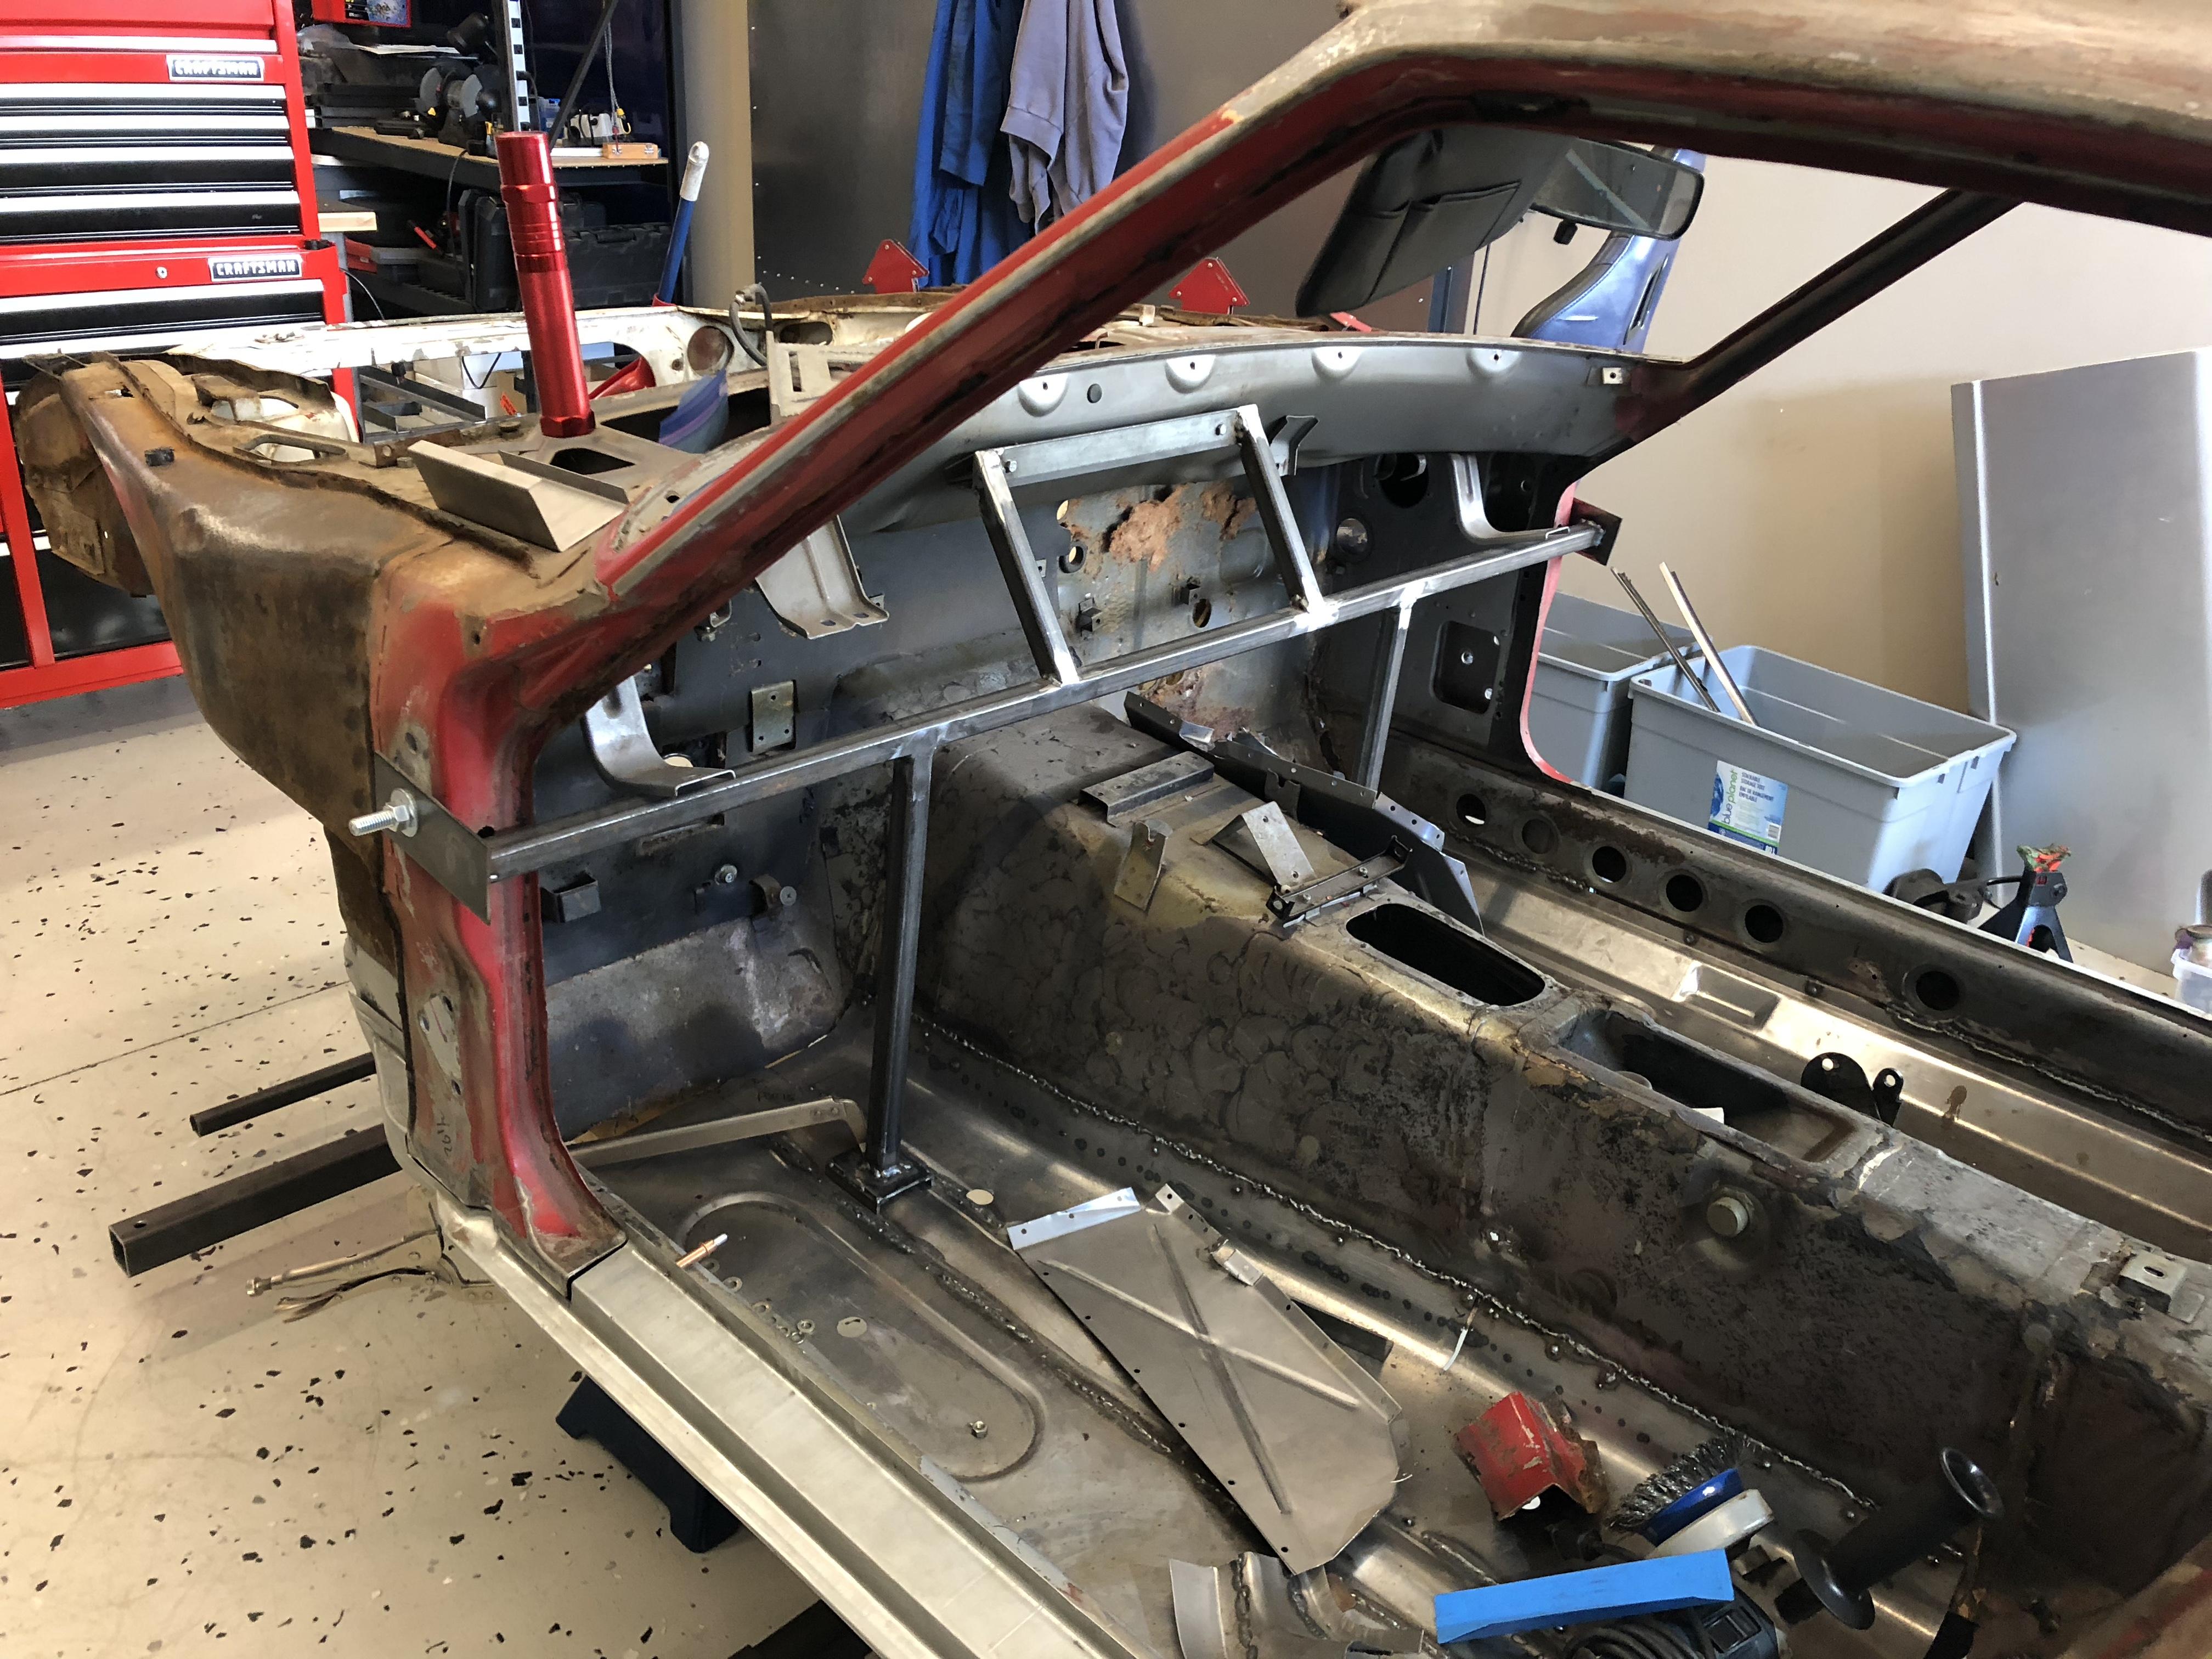
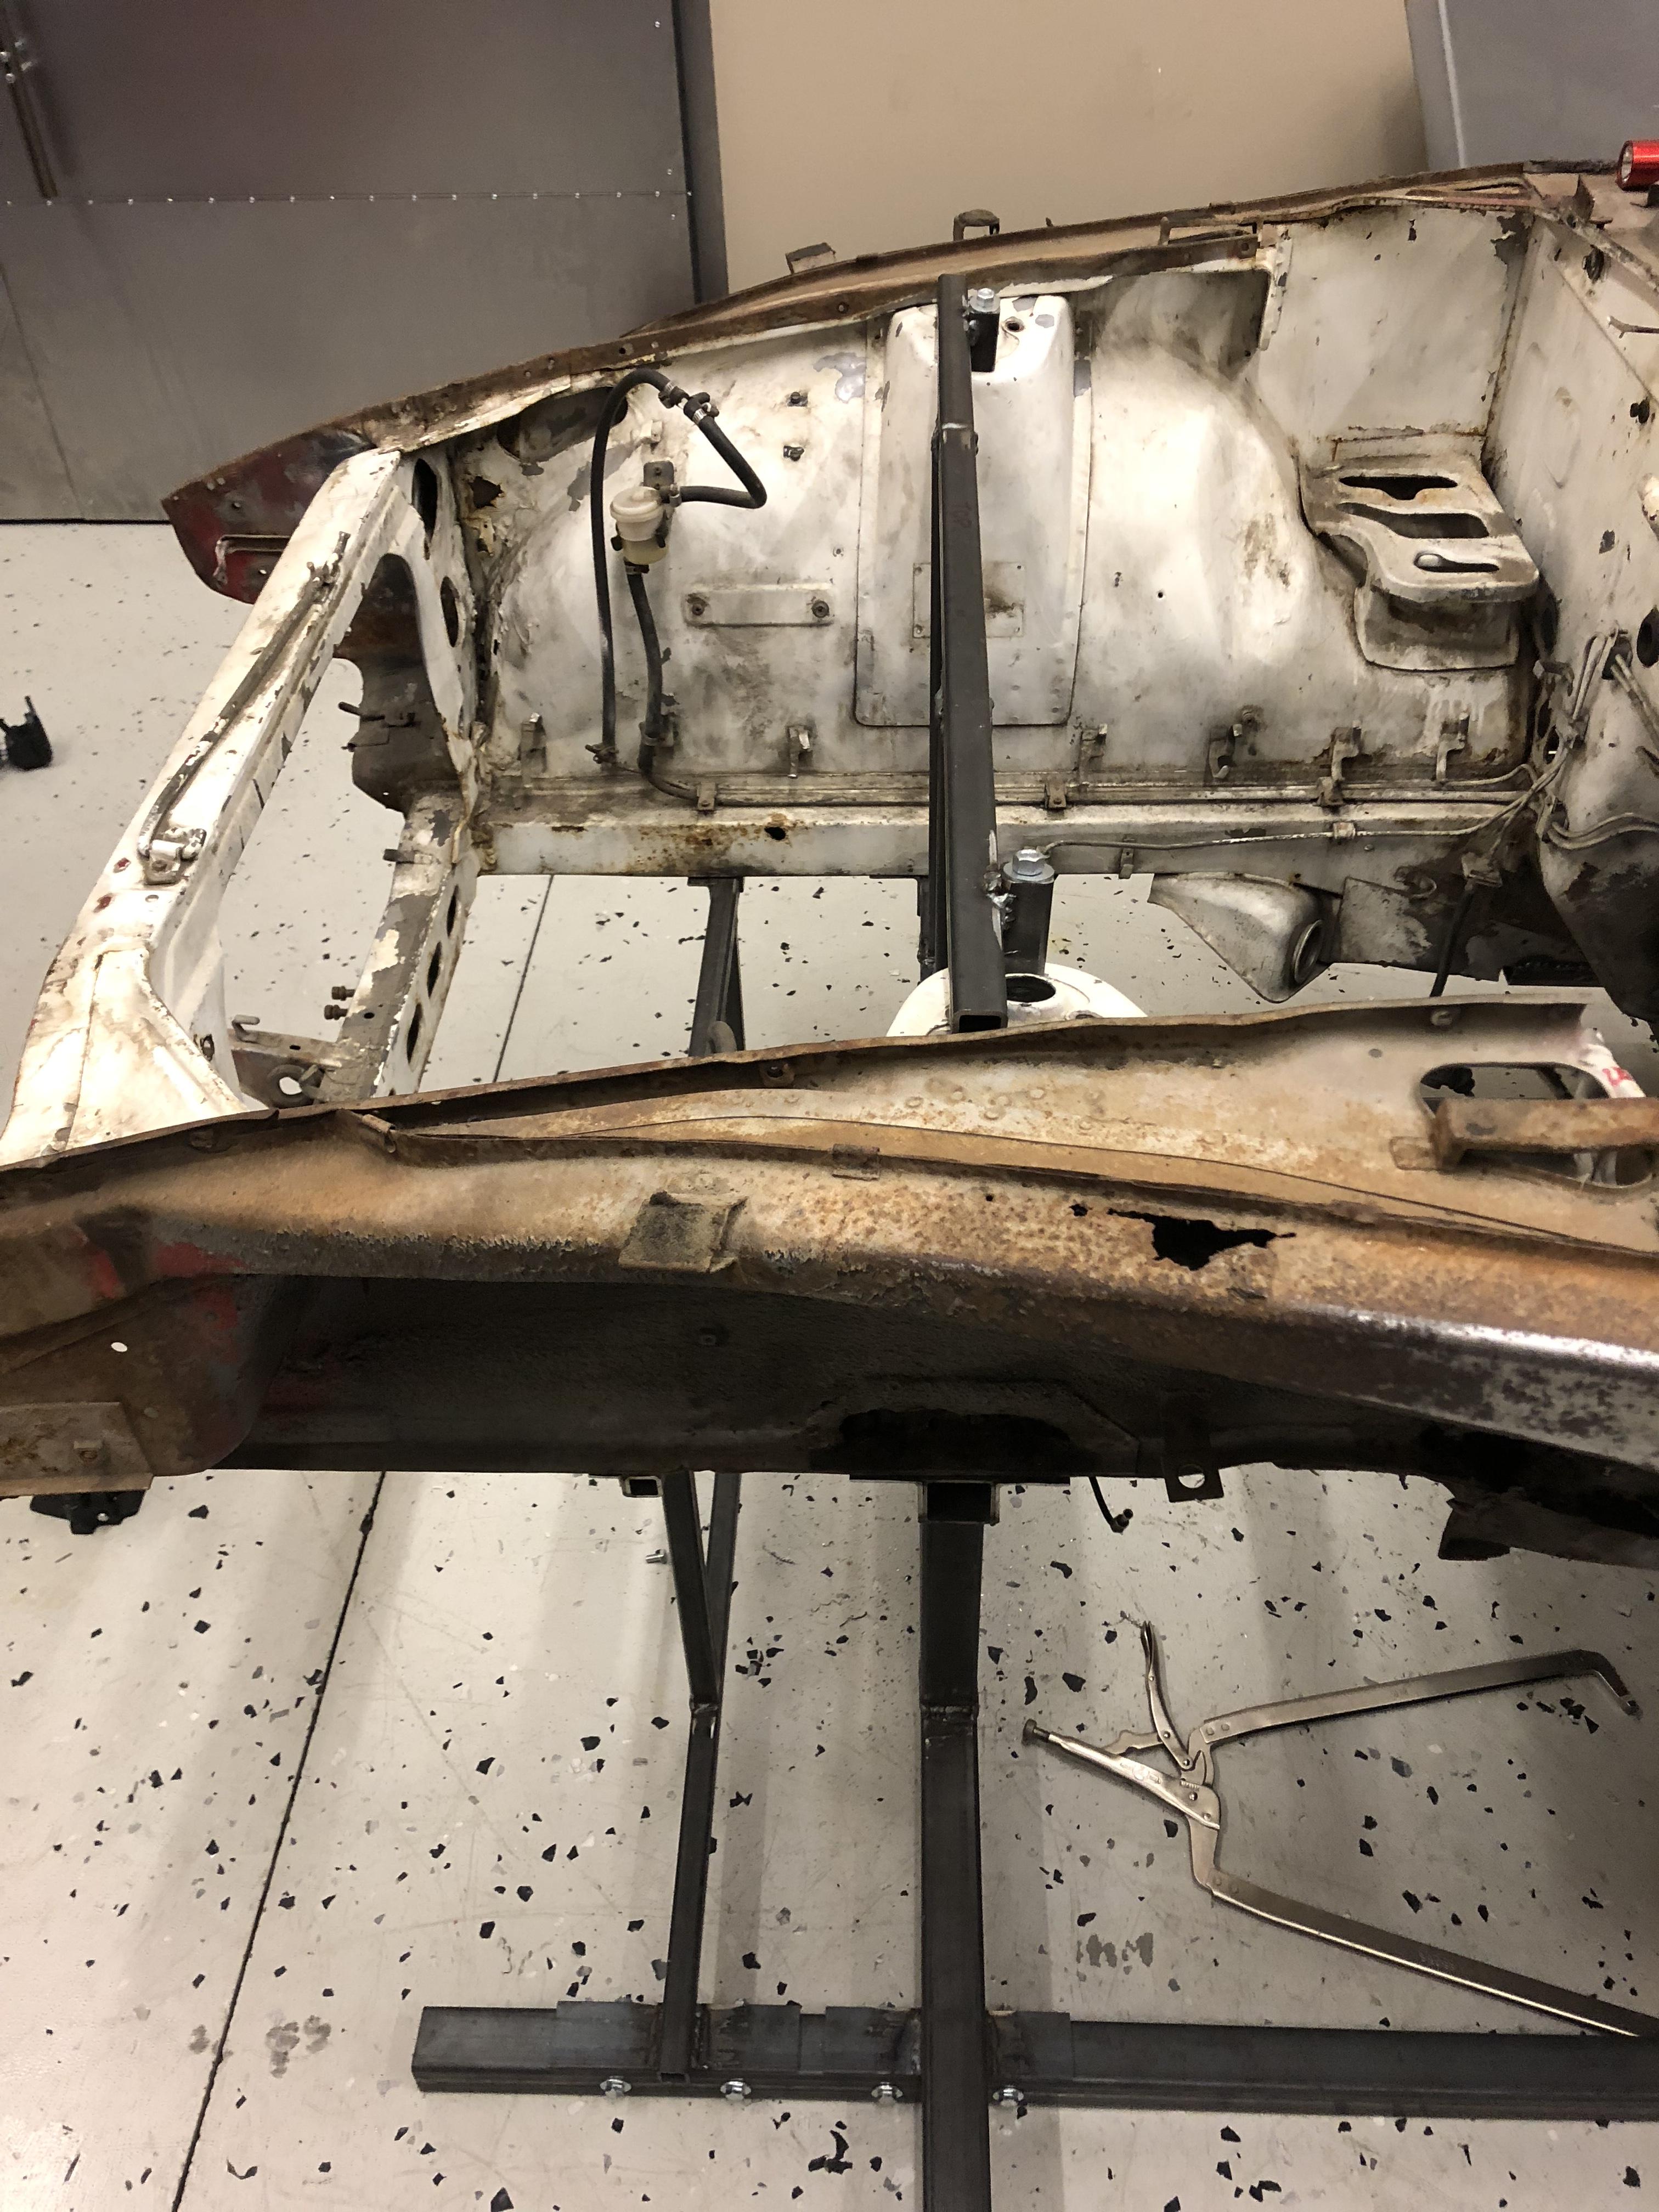
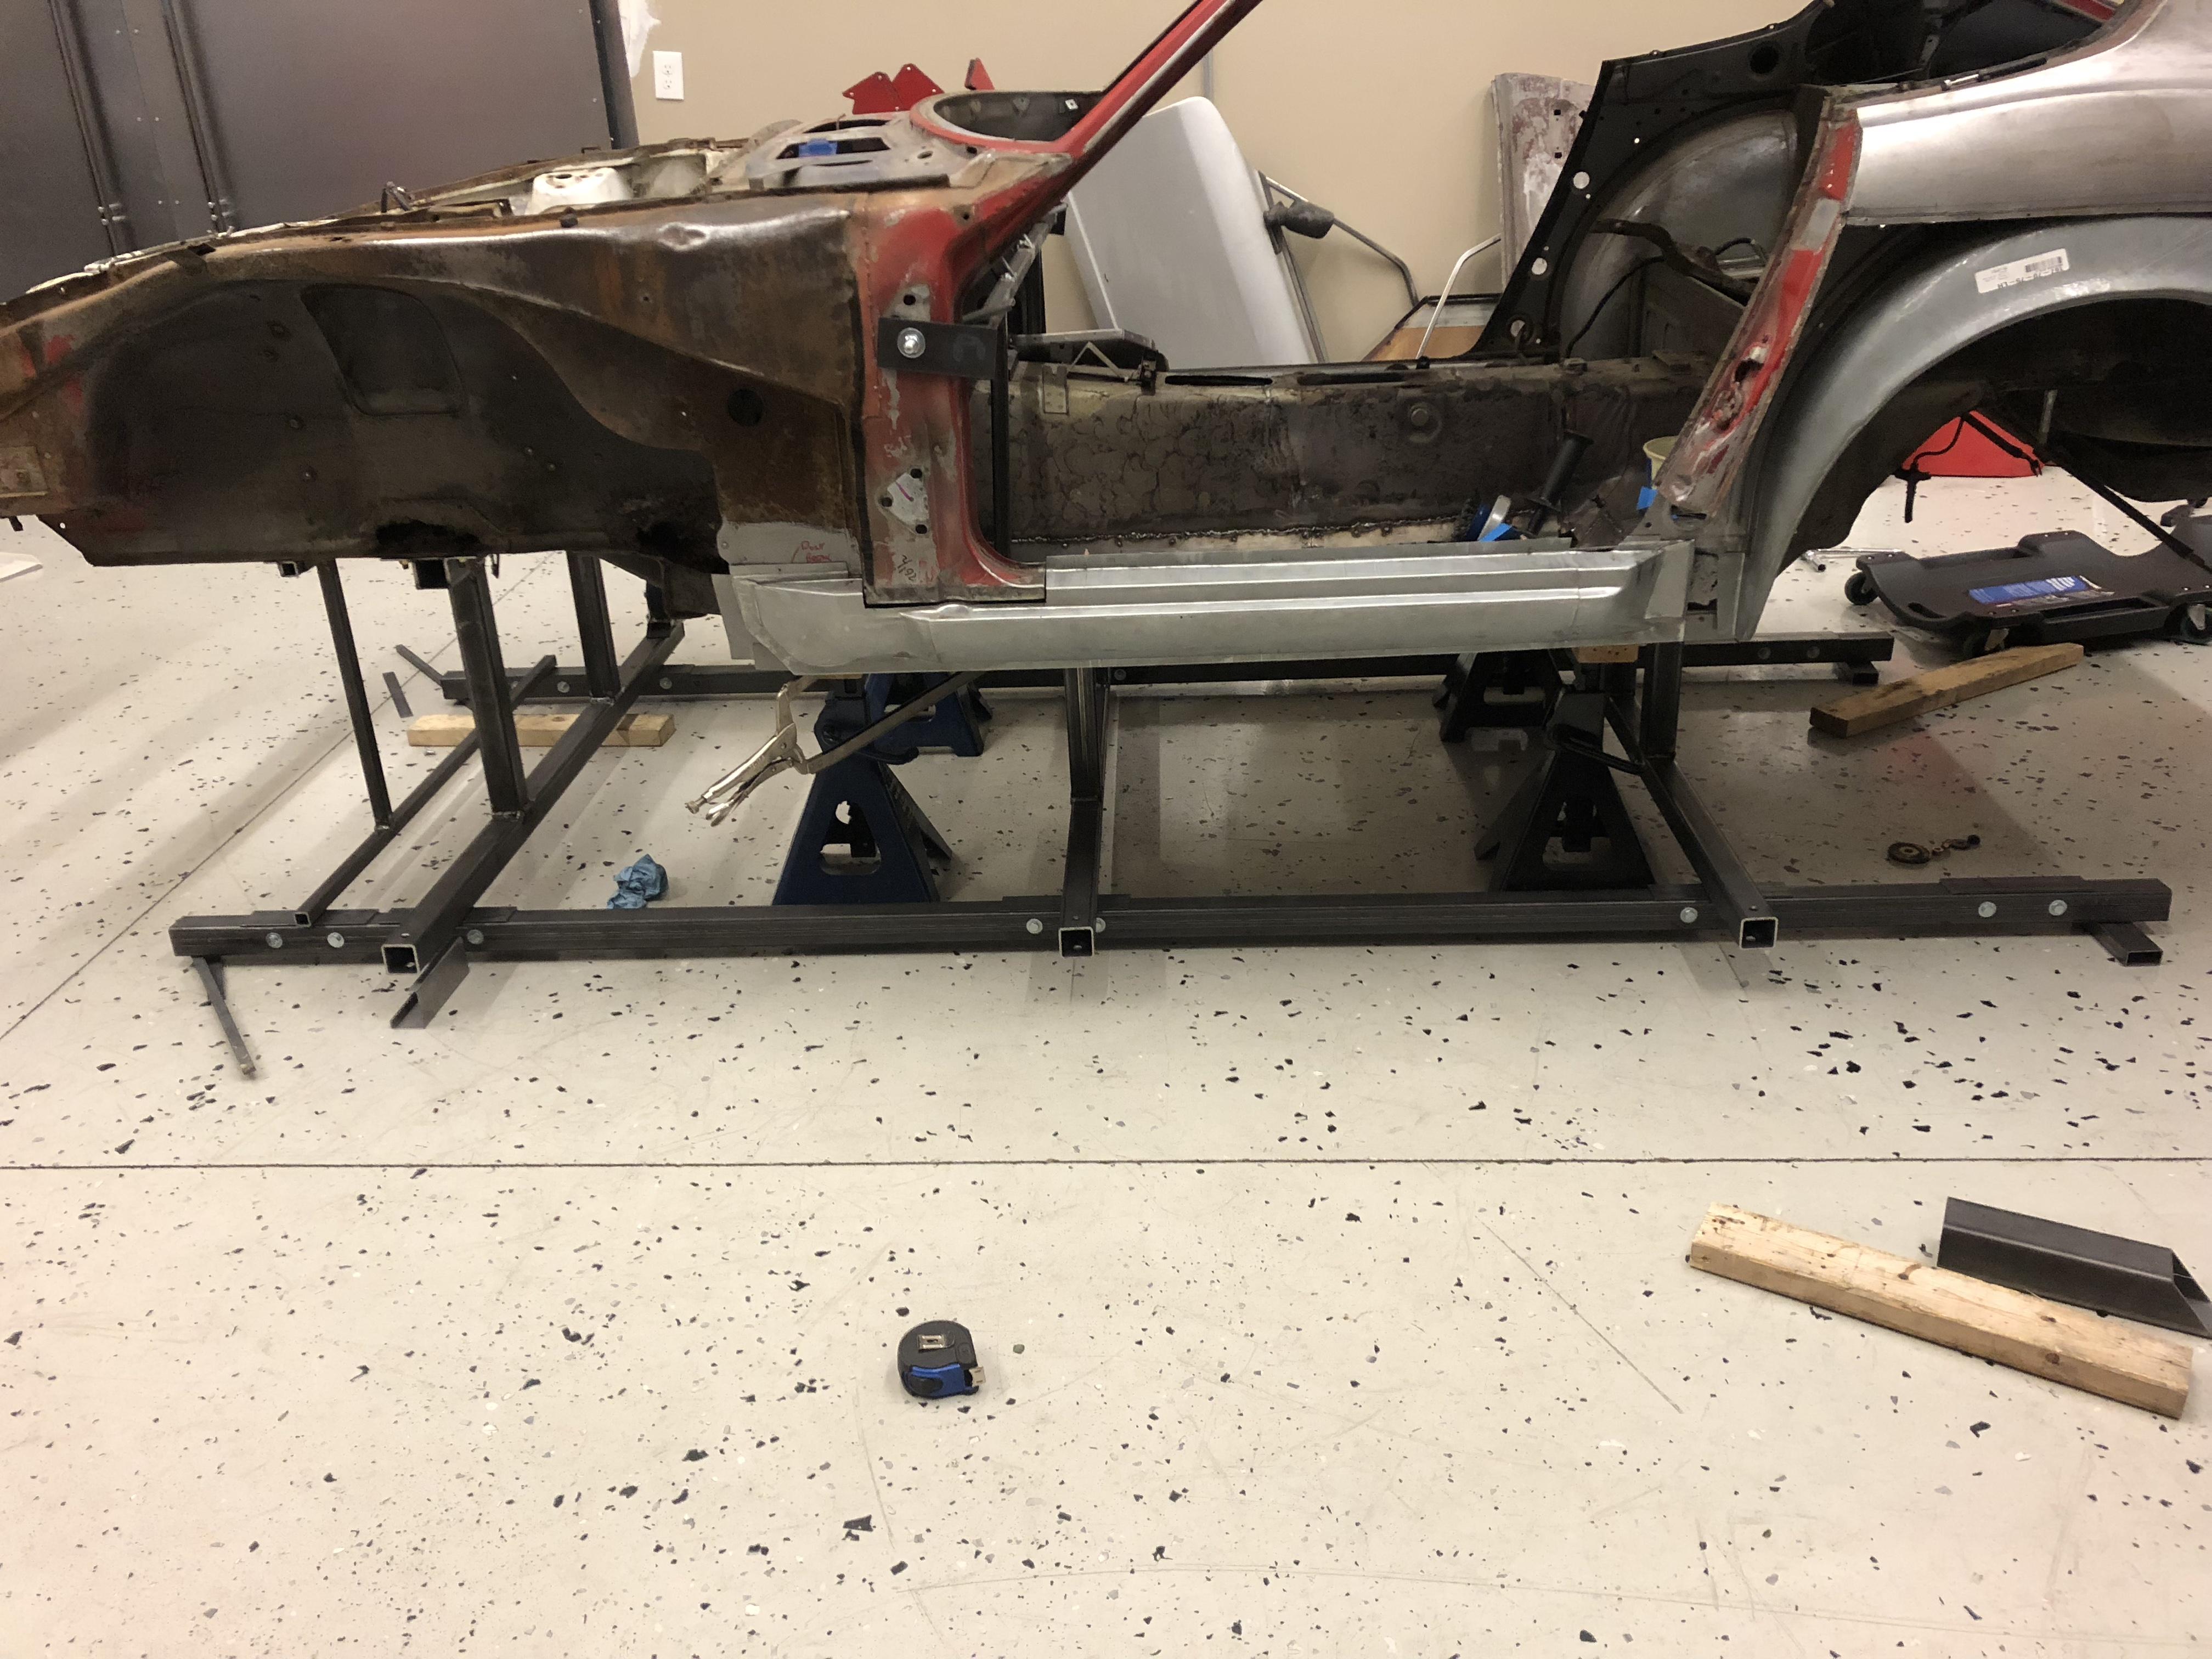
1 pointHi Guys. My name is Kent and I am a long time lurker here. I have several 240z project cars - none completed - but lots of ambition ....but that’s a story for a whole different thread probably. I started this car a few years back and, skipping to the point, I recently realized that I needed to take a step backwards in order to go forwards. I had replaced the floors and fabricated some new floor rails, but I realized that it would be nearly impossible to replace the front rails and firewall rust without stabilizing the entire chassis. Plus the rad support was repaired poorly by a previous owner at some point. Rotisserie was out of the question - way too much rust... Here she is on the completed jig .... a The jig was made from 2 x 2 x 1/8 tubing. It supports the chassis at stock suspension and drivetrain points - front swaybar, front crossmember, trans tunnel, and both side of the rear differential mounting point. I also added a support for the front strut tower, and across the door openings as I will be cutting out a lot of the firewall and the front rails. All the dimensions are available in the FSM. It is bolted (not welded) to the chassis. The whole structure is very rigid and I think that the firewall and frame rail replacement is going to zip right along. Here’s how she came together, in pictures .... hopefully this inspires someone else to get back on the horse. Cheers! e ;


 1 point
 -
1 pointWell, put THAT way, sure, I have his part...... but I haven't really investigated my options on a custom tail-light panel. @startt21 if you think their price is out of reach, my panel is $50K... it comes attached with a running drive train..... *Note* This is a today only special for any interested parties......1 point
-
1 pointIt's called supply and demand. They aren't making these cars anymore, so the prices will continue to rise..... If I had what you needed, I'd give it up. EDIT: I found another link for you - but it's not cheap either... http://www.car-part.com/1 point
-
1 pointIn MY experience, that doesn't work very well (for me). For this type of part - you need to be pro-active in the search. I would suggest contacting Z Car Source in AZ and show them what you need. ... https://zcarsource.com/ Good luck. Wayne1 point
-
1 point
-
1 pointthanks captain obvious for the follow-up on the old thread . from reading it I will leave my carbs alone as the brass plunger is submerged in the oil and that is where it all ways stays . Bruce made a good point there .1 point
-
1 point
-
1 point
-
1 pointWell, yes. Wow, does that picture look crappy on this monitor! What happened? The paint finishes are mat texture and although the silver may look like primer, primer is porous and not a sealing film. The paint coating seals the steel.1 point
-
1 point
-
1 pointyes I will give it a good cleaning and will let you know how I make out kind regards1 point
-
1 point1 point1 pointCurtis Salgado is still alive and well in Portland. One of my favorites to listen to live. He filled the void left when Paul Delay's passed on.1 pointThank you! I wouldn't have seen the t-shirts had I not seen your Hahaha. Those are funny.1 point1 pointIt makes a better repair to just drill out the spot welds and get the whole panel, my 2 cents1 pointI'm a Prototype Engineer and have access to some 3d printers and machining tools. Would be a pretty easy part to make with the 3d lettering on the shift map.1 pointAnd cut a sunroof hole in the top so your knuckles don't scrape the headliner.1 pointYou're probably too young for this, but the answer is shift it like Rat Fink: RIP Ed "Big Daddy" Roth: http://www.ratfink.com/1 point1 pointThey did have gaskets. I just cut my own and used aviation sealant. I never liked RTV on anything where a blob could come loose and block flow. The gasket is easy... just use you box of cornflakes and cut a rectangle to fit the area. Use a paper punch or hole punch (or drill) to make the two holes (one for oil and one for bolt). They can be same diameter. Trim any loose paper (xacto/file/sand paper). Coat with sealant and you are done.1 point1 pointSo far, so good, got everything in, took it for a joy ride and it lives. Need to get the fuel pump back to the relays from the switch, and put the skid plate back on, but first, the timing. I'm reading 10 degrees BTDC in the manual under tune up but, I can't tell what the numbers are on the piece mounted on the engine. Worn down. Now i'll have to jack the car up to get to the crank to turn it and line it up. This car is turning out to be fun. Thanks everyone, We are going to be driving it around tonight and tomorrow and see if we can flush out any problems, i'll report back. In summary it seems it was a combination of the fusible links, the fuel relay, the alternator, and the battery. All the joys of classic cars.1 pointGood stuff here! Interested to know, what were the charges were for the dry film coating of the throttle shafts? The EGR valve plating looks great! Did you have them plate the entire assembly or did you find a way to disassemble the diaphragm mounting portion from the cast iron base? Have any of the plated items with internal cavities (tubing, housings, etc.) exhibited bleed out from the plating process that discolored or degraded the surface plate finish? @Careless described this issue and his use of silicone and plugs to prevent it, as he had the plating done for a restoration he was doing.1 pointHere is an alternate approach. Not saying it is the best. Don't discount the fact that you have run hundreds or maybe thousands of hours on the track and haven't had a bolt come loose. Maybe you have your damper rebuilt, install it with a new factory bolt, torque it to spec, and re-torque after every race or so. Just another perspective. Wish you the best. Always enjoy reading your posts.1 point1 pointI agree 100%. Then again, if you are not worried about 100% authenticity, you can buy replacement side marker lights from a Thailand vendor (and reuse your lenses and SS trim pieces) to "upgrade" the old wiring and base housing. Doing this combined with the LED upgrade is quite nice.1 point1 pointAgree the Irwin/MSA harness is the best, but for those wanting to build their own.... http://jarvas240z.blogspot.com/2014/07/headlight-wiring-harness-with-relays.html1 point1 pointYep, can't say enough about the 2 harness upgrades. Dave made mine custom for my 77 280. Love them. BTW, I installed them about 4 years ago.1 point1 pointDavid Irwins plug and play harnesses are the best around. Make sure to get the parking light harness too, as that is the one that usually melts the fuse block. I dealt with David directly. I do have a funny story. After putting the headlight harness in, I didn't see a difference. I pulled up to a wall and switched from bright to dim and back again. One headlight was on brights, the other was on low beam. When Dave put it together he switched the wires on the left side. Simple fix by swapping the wires around and as good as new. Told Dave after I fixed it and he was really apologetic. Thanked me for not throwing a fit about it. I just thought it was funny. The thousands he has made up, I'm sure there might be a few that had the wires crossed. Headlight harness- all under the hood work Parking light harness-- one wire fished through the firewall and snaked though the dash to the steering column bolts.1 point1 pointTo give more details, Dave's (MSA's) kit is plug and play for the 240Z. It uses the same connectors. I've yet to see anybody complaining about it. I bought the Blackdragon Auto kit. It wasn't worth the money. Also, it used non-standard relays. If one goes bad, good luck finding a drop-in replacement.1 point1 pointDave's harness sold thru MSA is a very high quality upgrade, the other - not so much. This is one of those times, you get what you pay for.1 point1 pointZ Therapy sells SU oil. If you have a doubt, use it. However, I used 3 in 1 oil for years with absolutely no problem.....you're just looking for enough viscosity to keep the piston from rising too fast. Jiggy bits don't wear out :stupid: ....and there are no more "0"rings in the bottom of the SU reservoir than in the bottom of a beer mug!1 point1 pointI have found aftermarket senders to be pretty poor. If you haven't already, get a Nissan part. Marty1 point


Important Information
By using this site, you agree to our Privacy Policy and Guidelines. We have placed cookies on your device to help make this website better. You can adjust your cookie settings, otherwise we'll assume you're okay to continue.