Leaderboard
-

ConVerTT
Free Member9Points422Posts -

wheee!
Free Member6Points4,607Posts -

kats
Free Member3Points2,209Posts -

siteunseen
Free Member3Points15,015Posts


Popular Content
Showing content with the highest reputation on 02/14/2019 in all areas
-
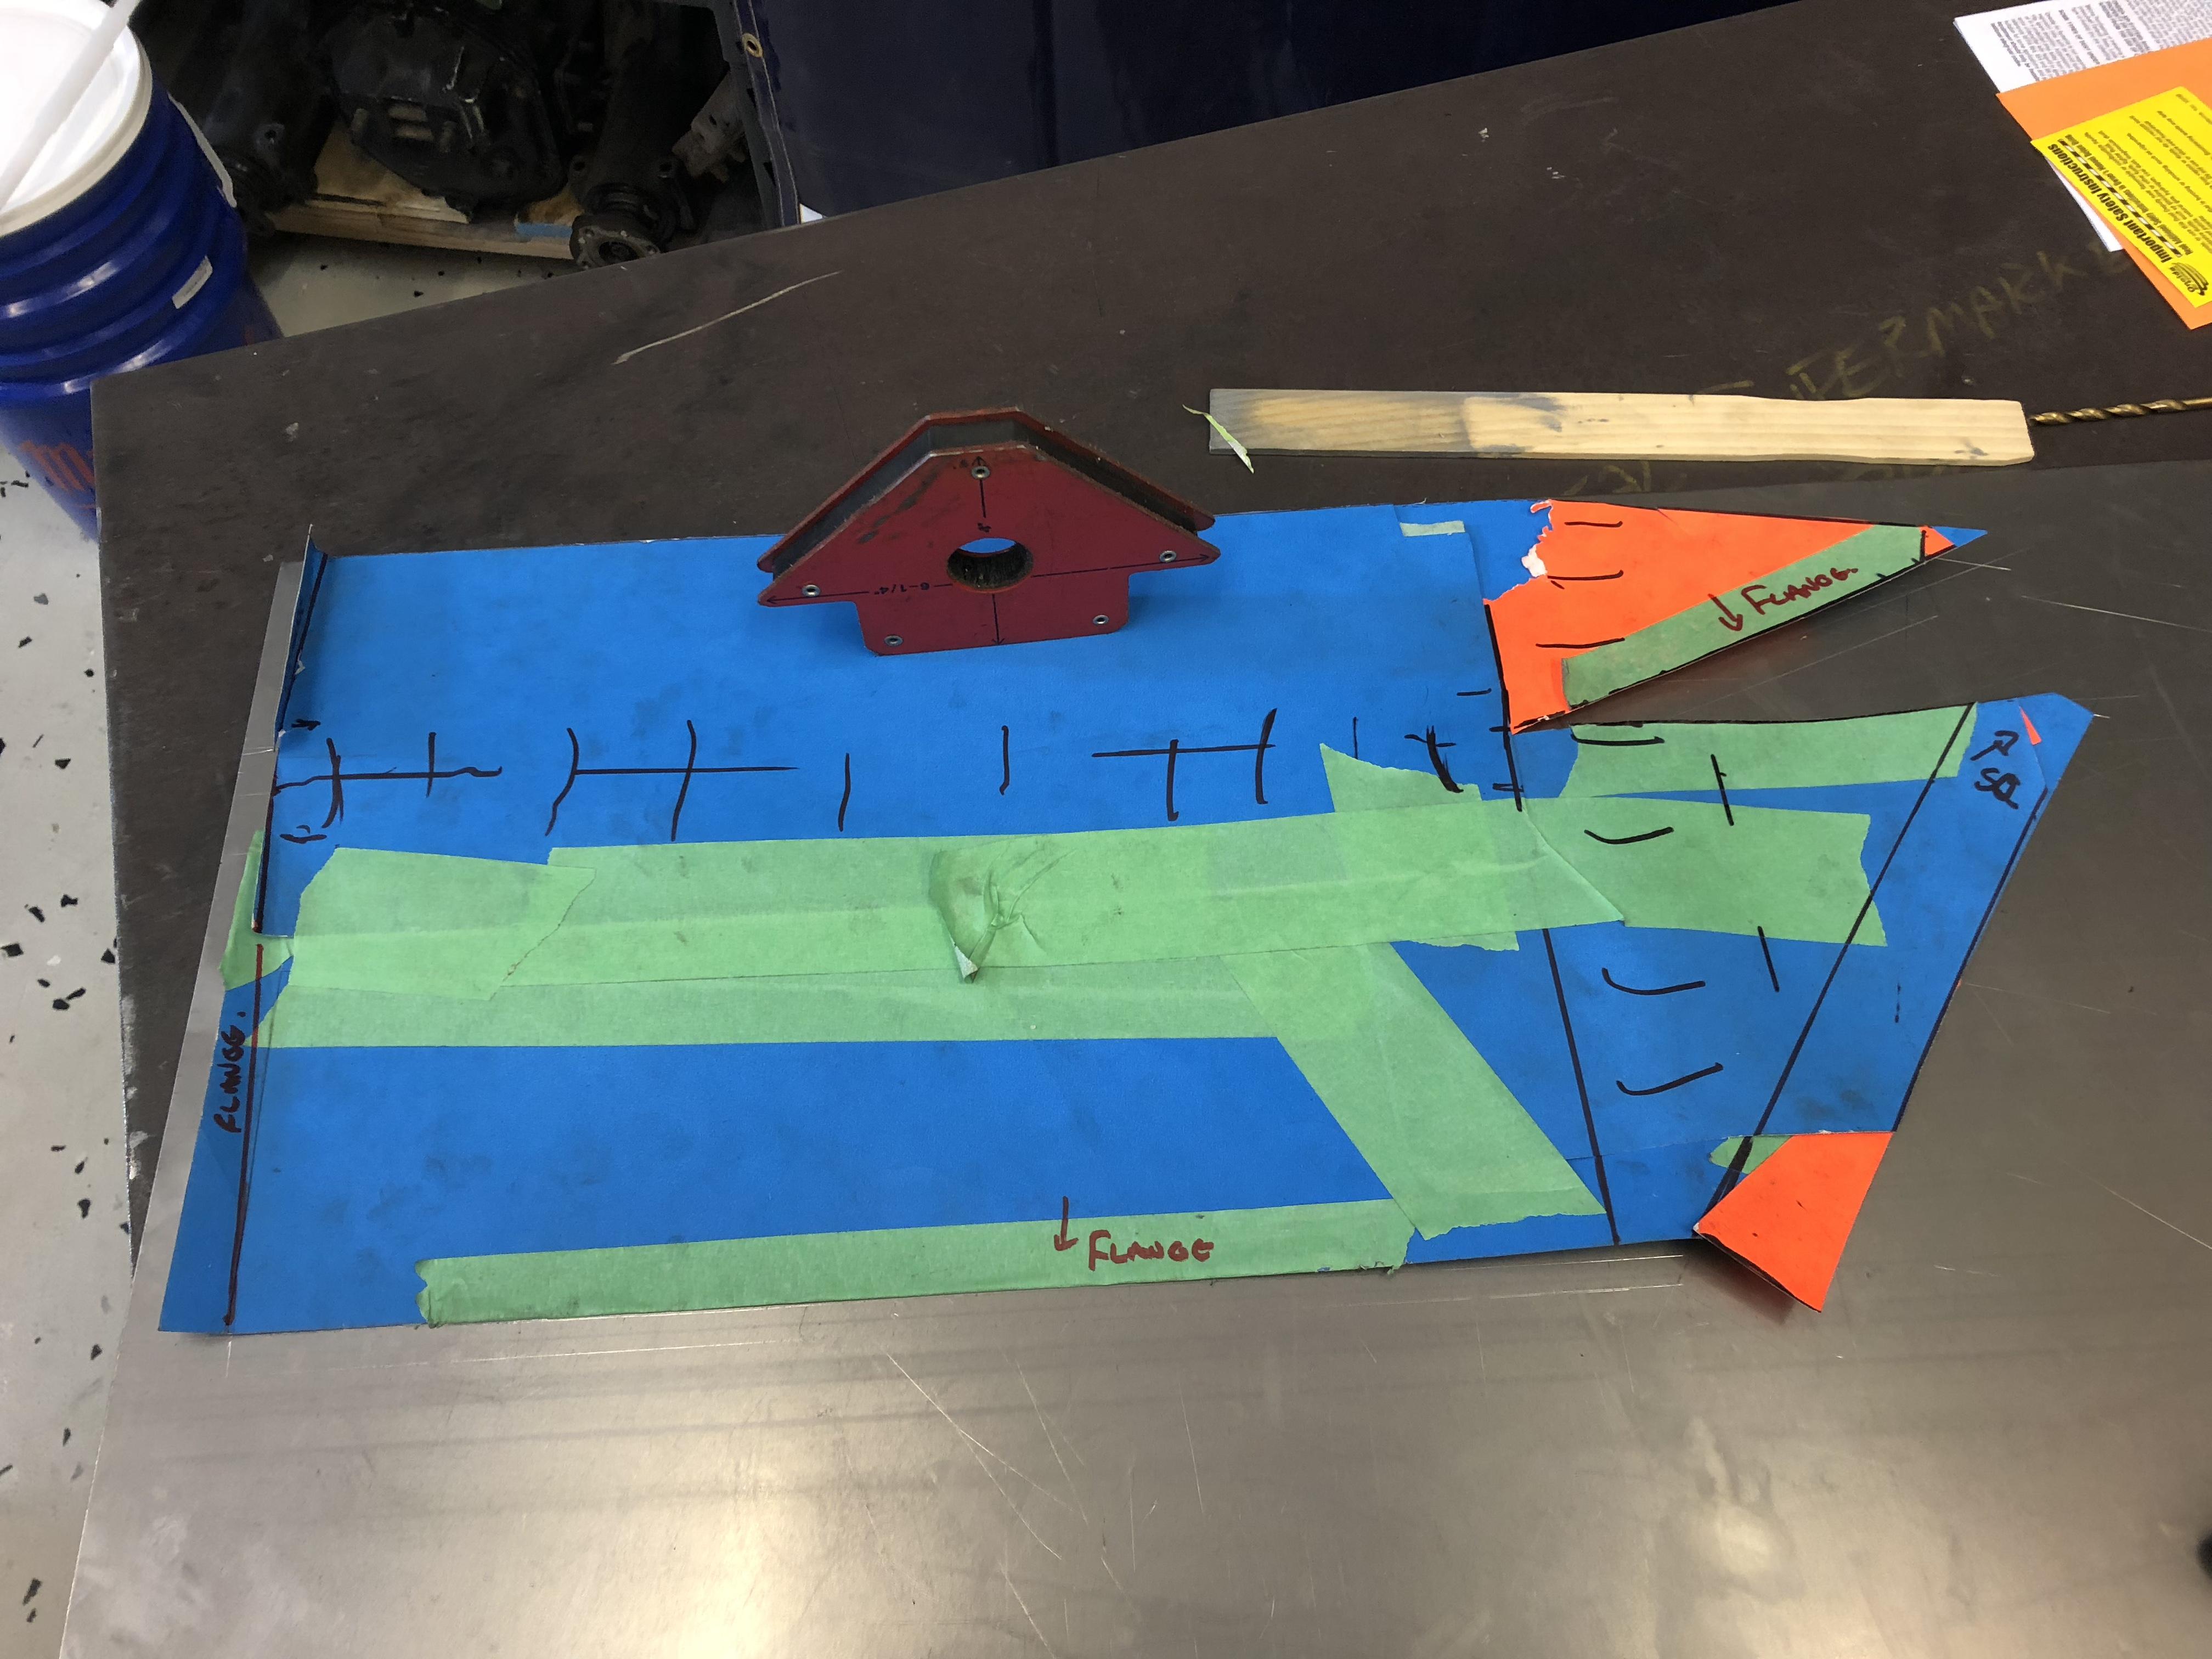
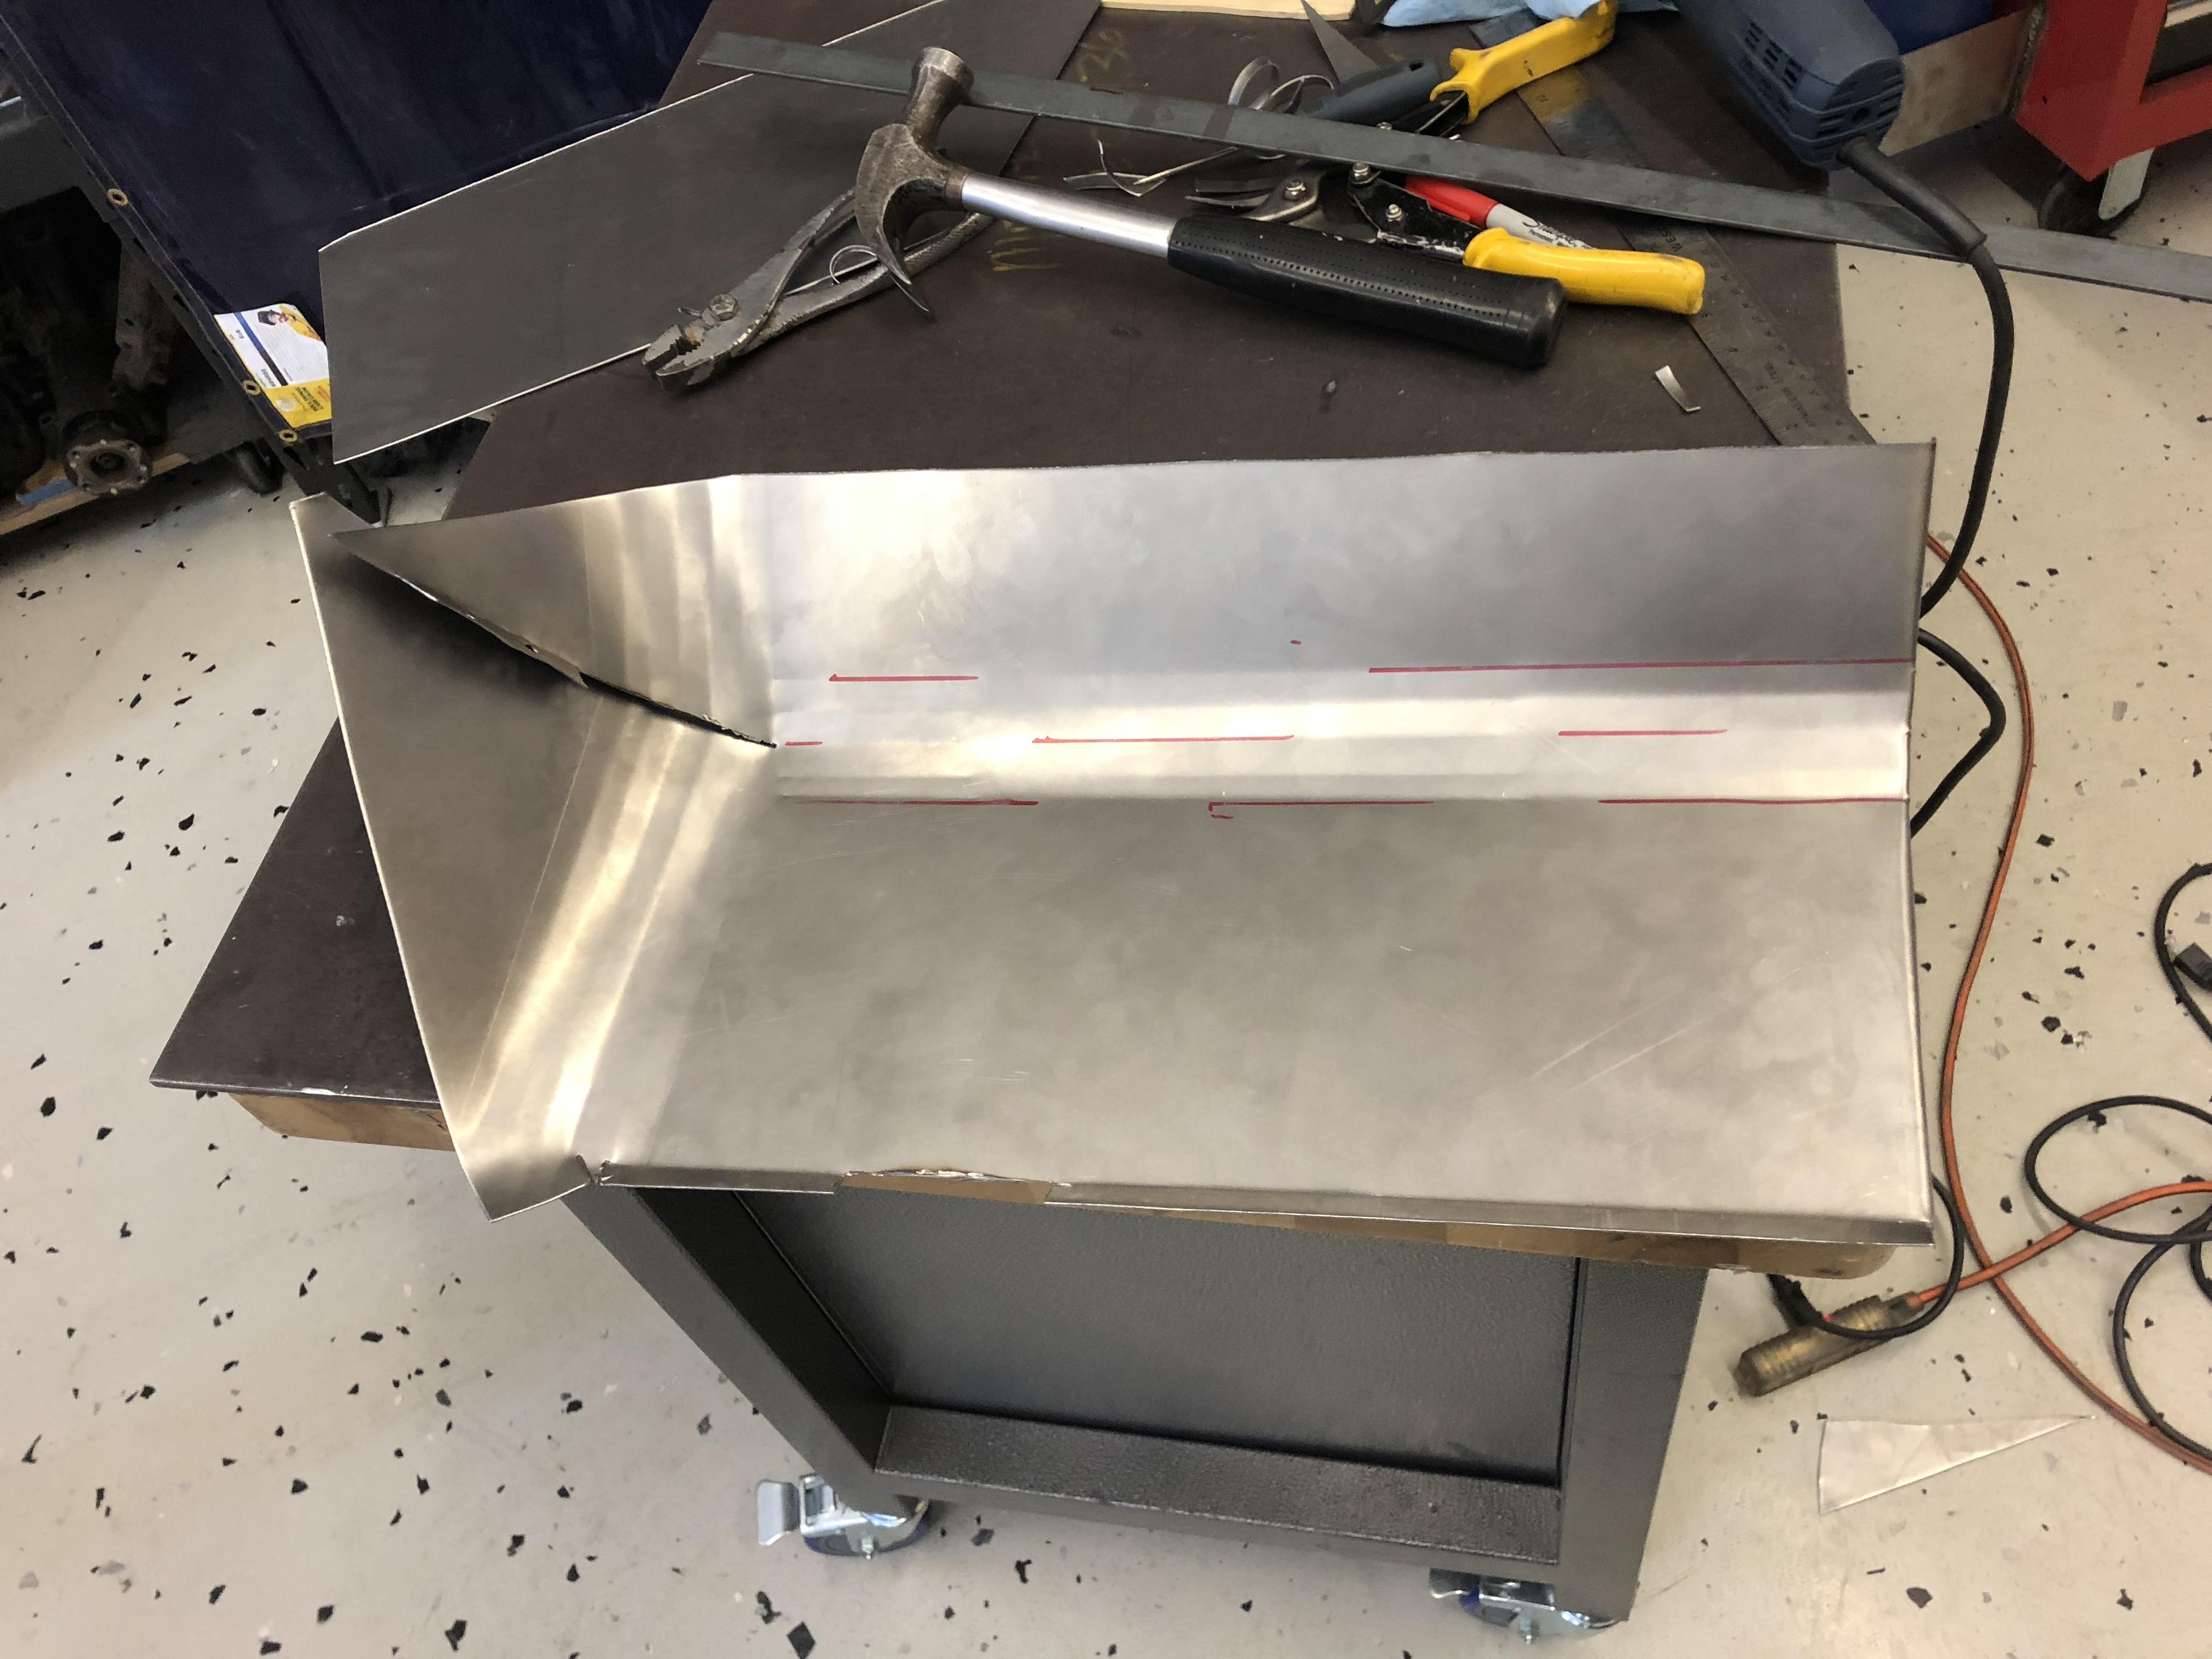
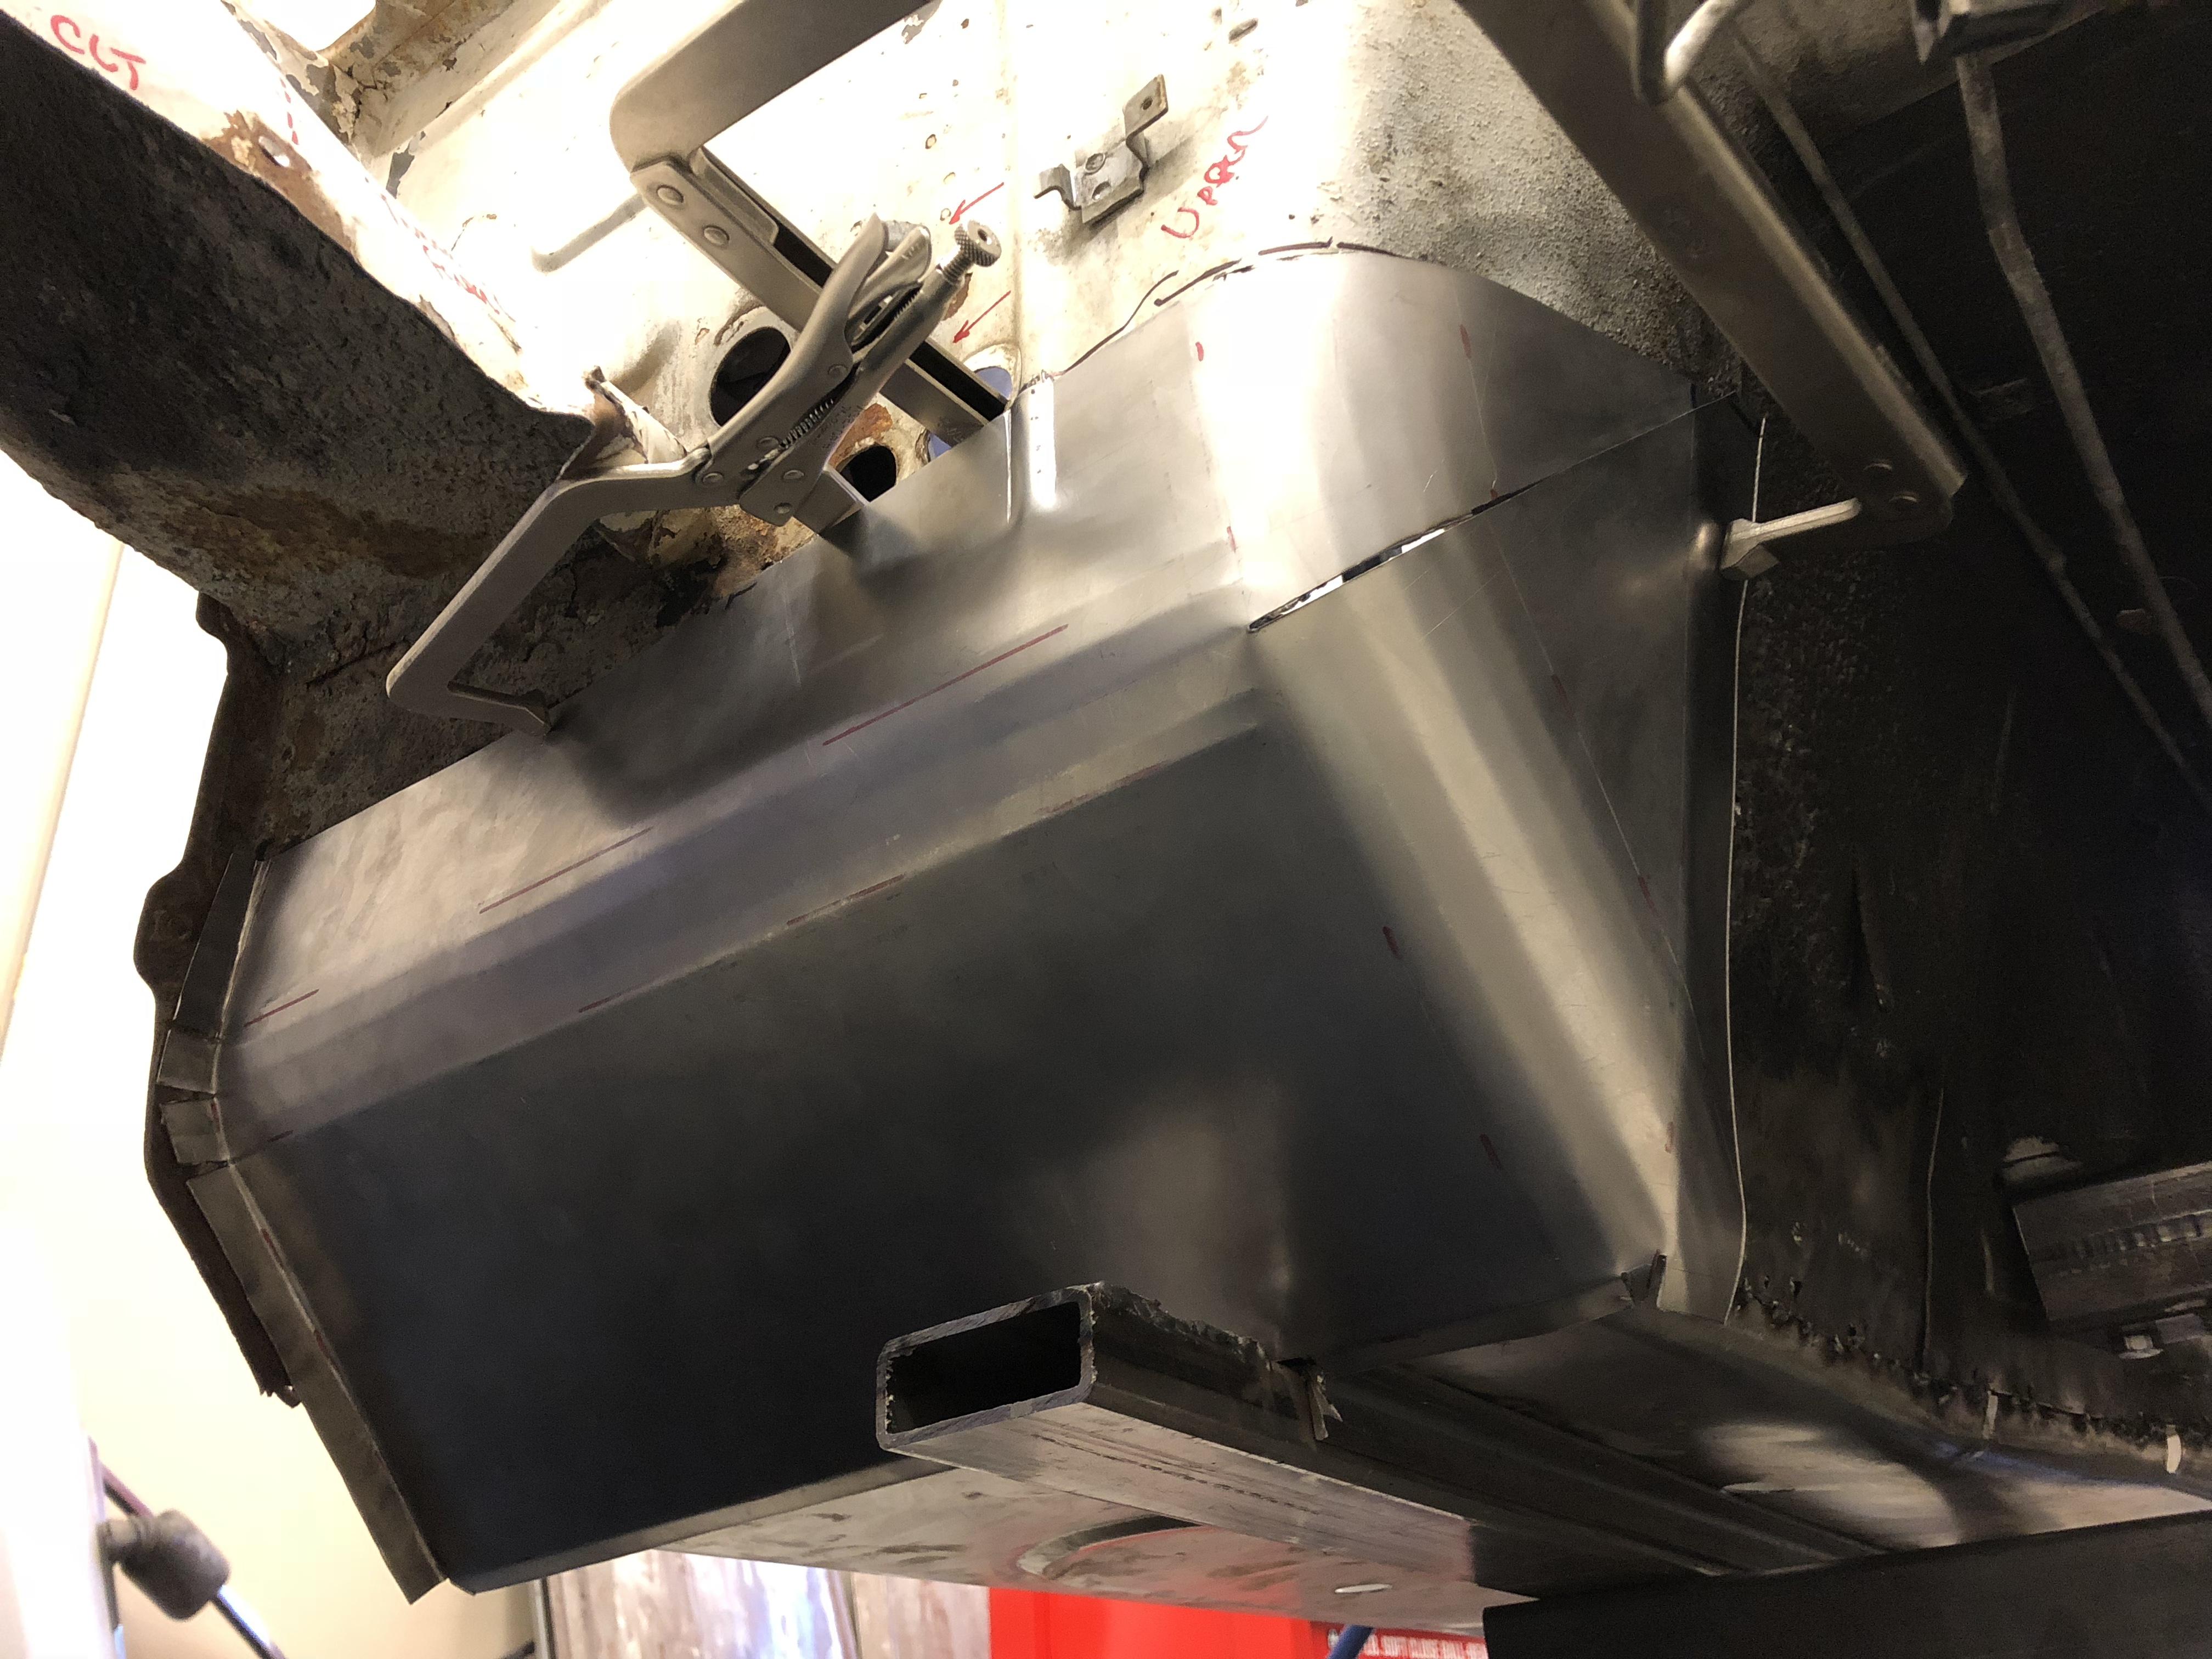
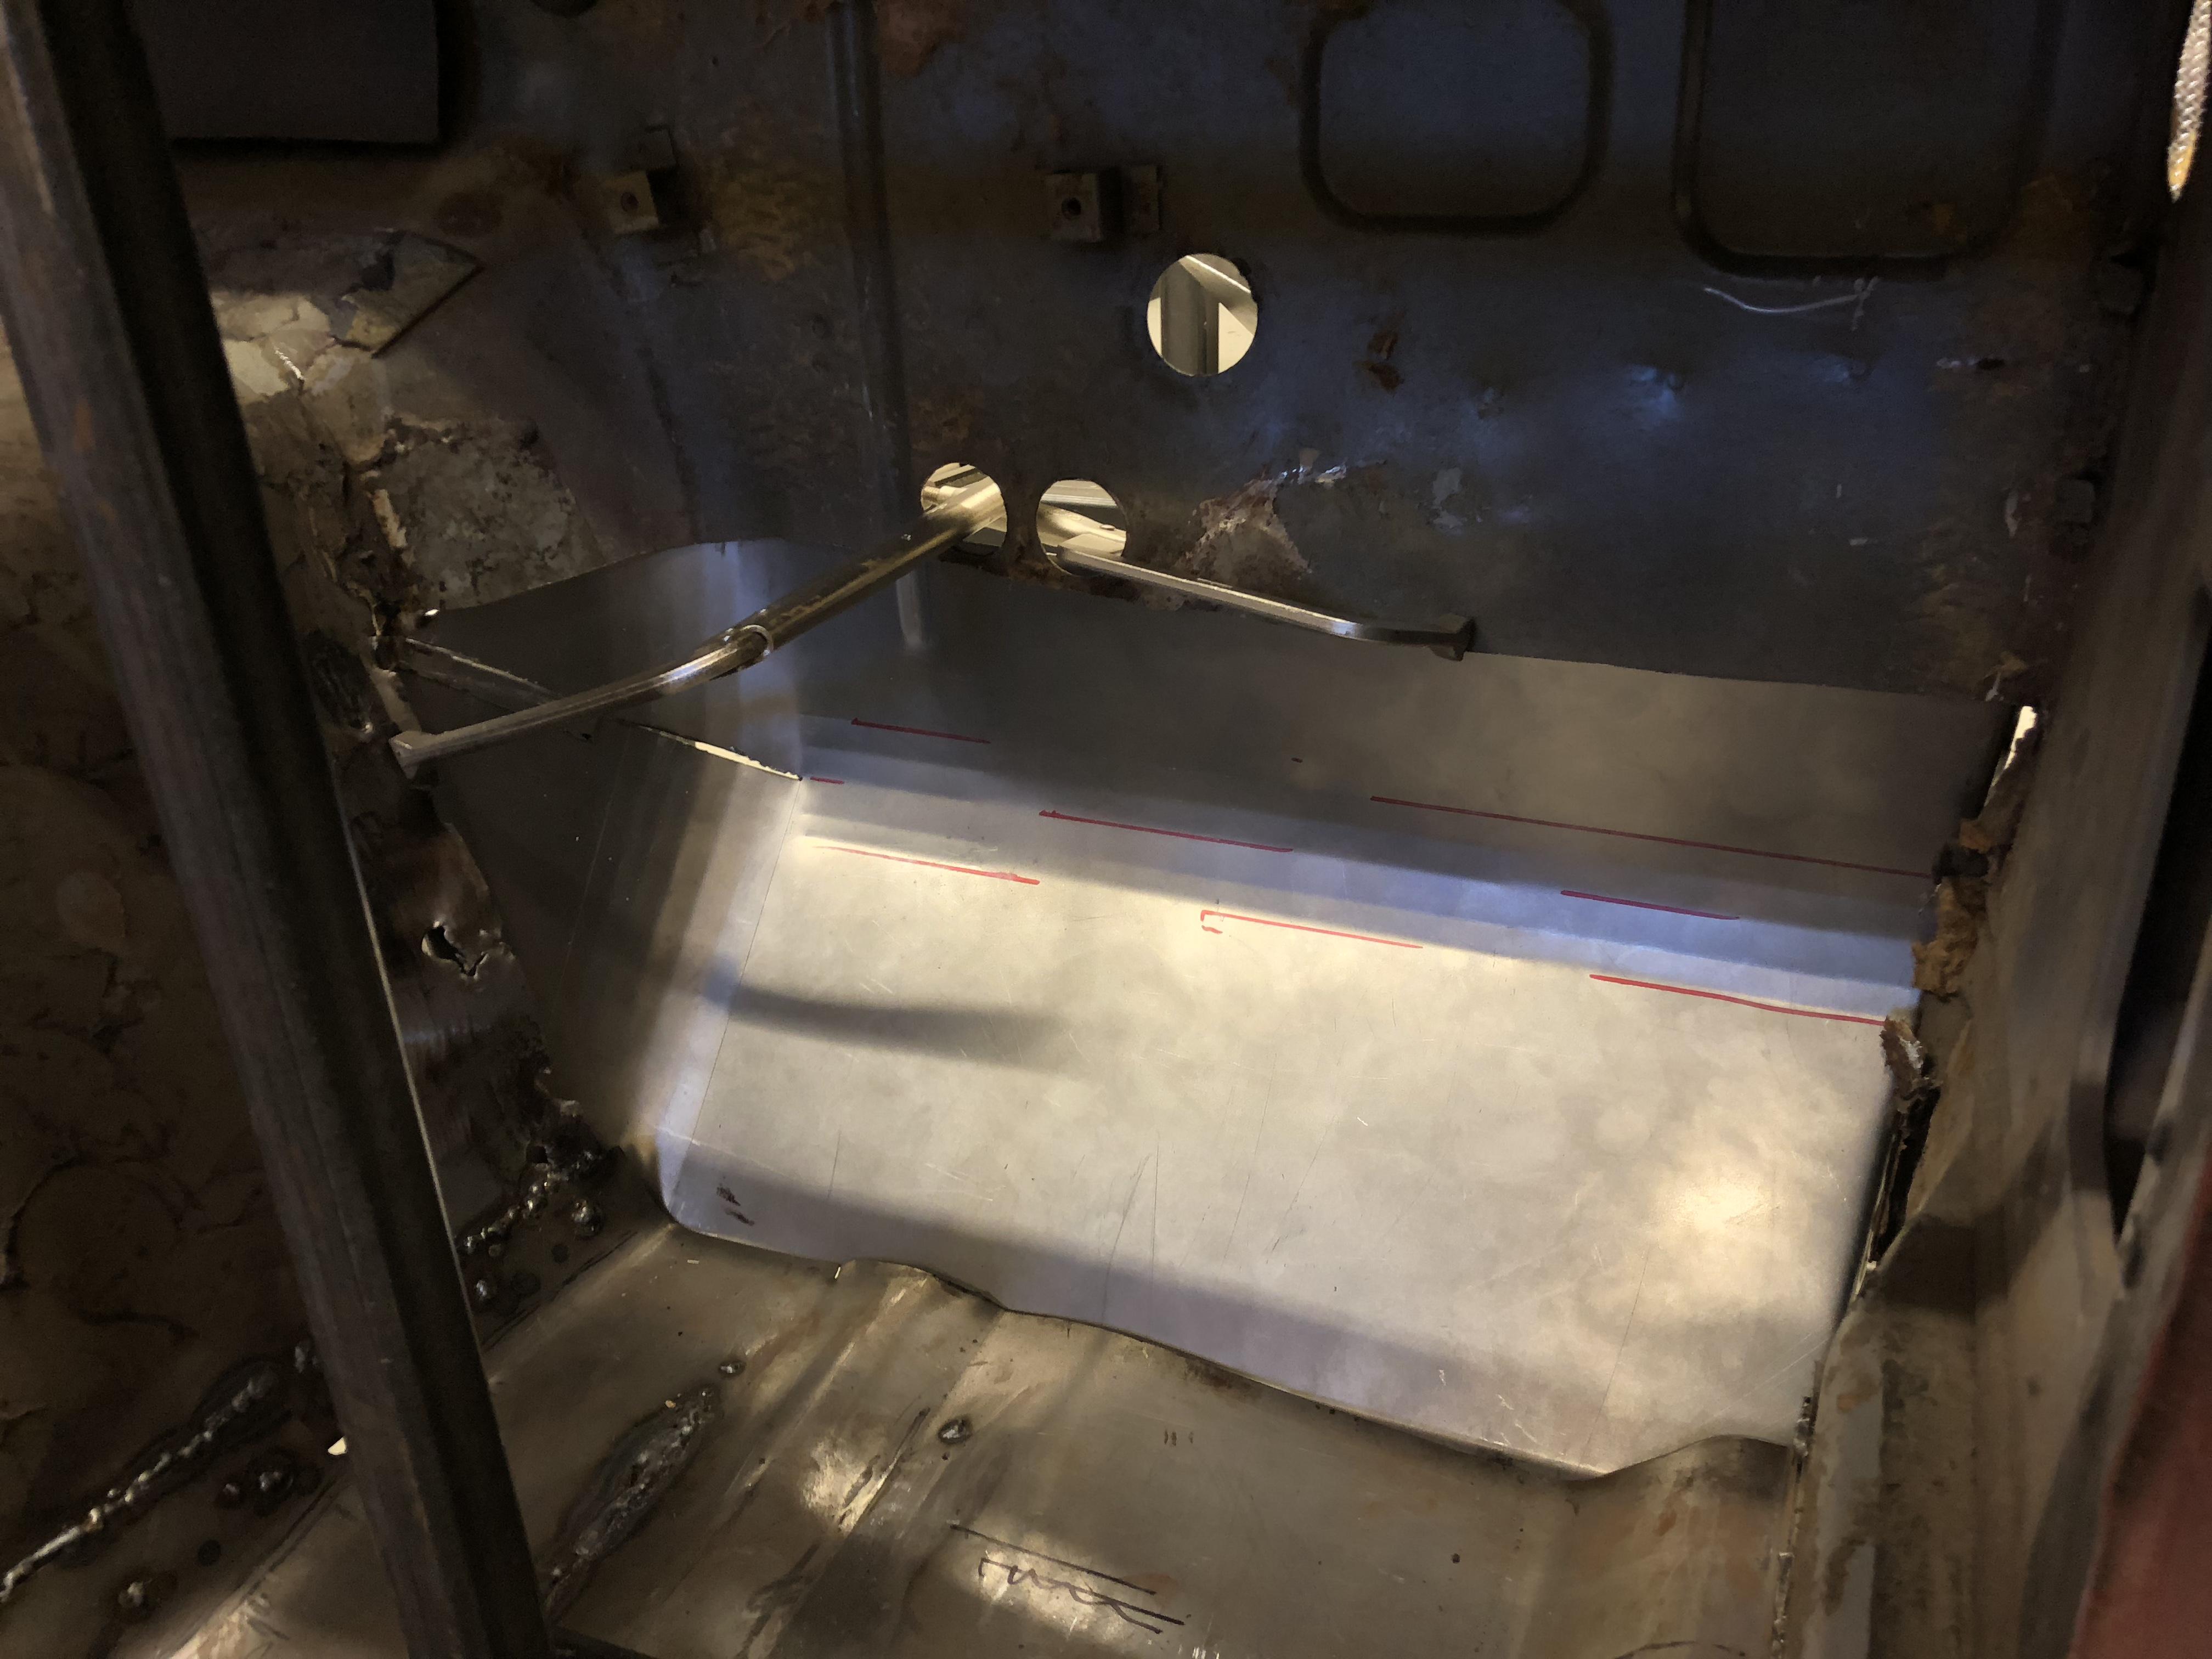
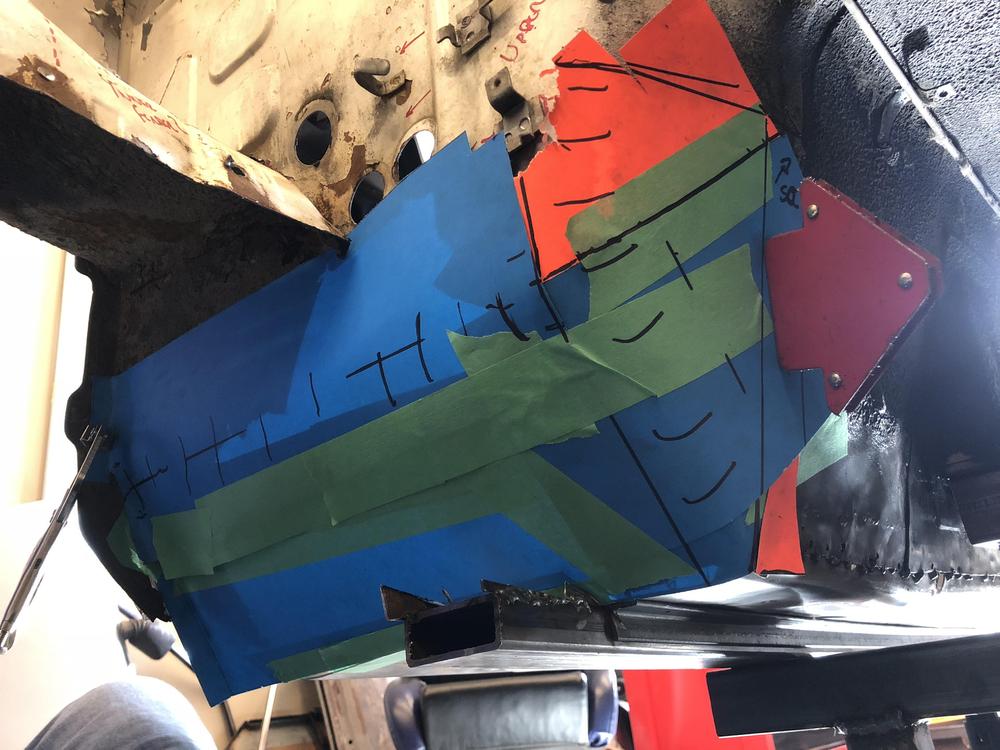
6 pointsDidn’t have too much time today but got the passenger firewall patch fabbed up .... Cardboard pattern .... Traced onto some 20 ga .... f Rough bends on the brake .... And clamped in place ...


 6 points
 -
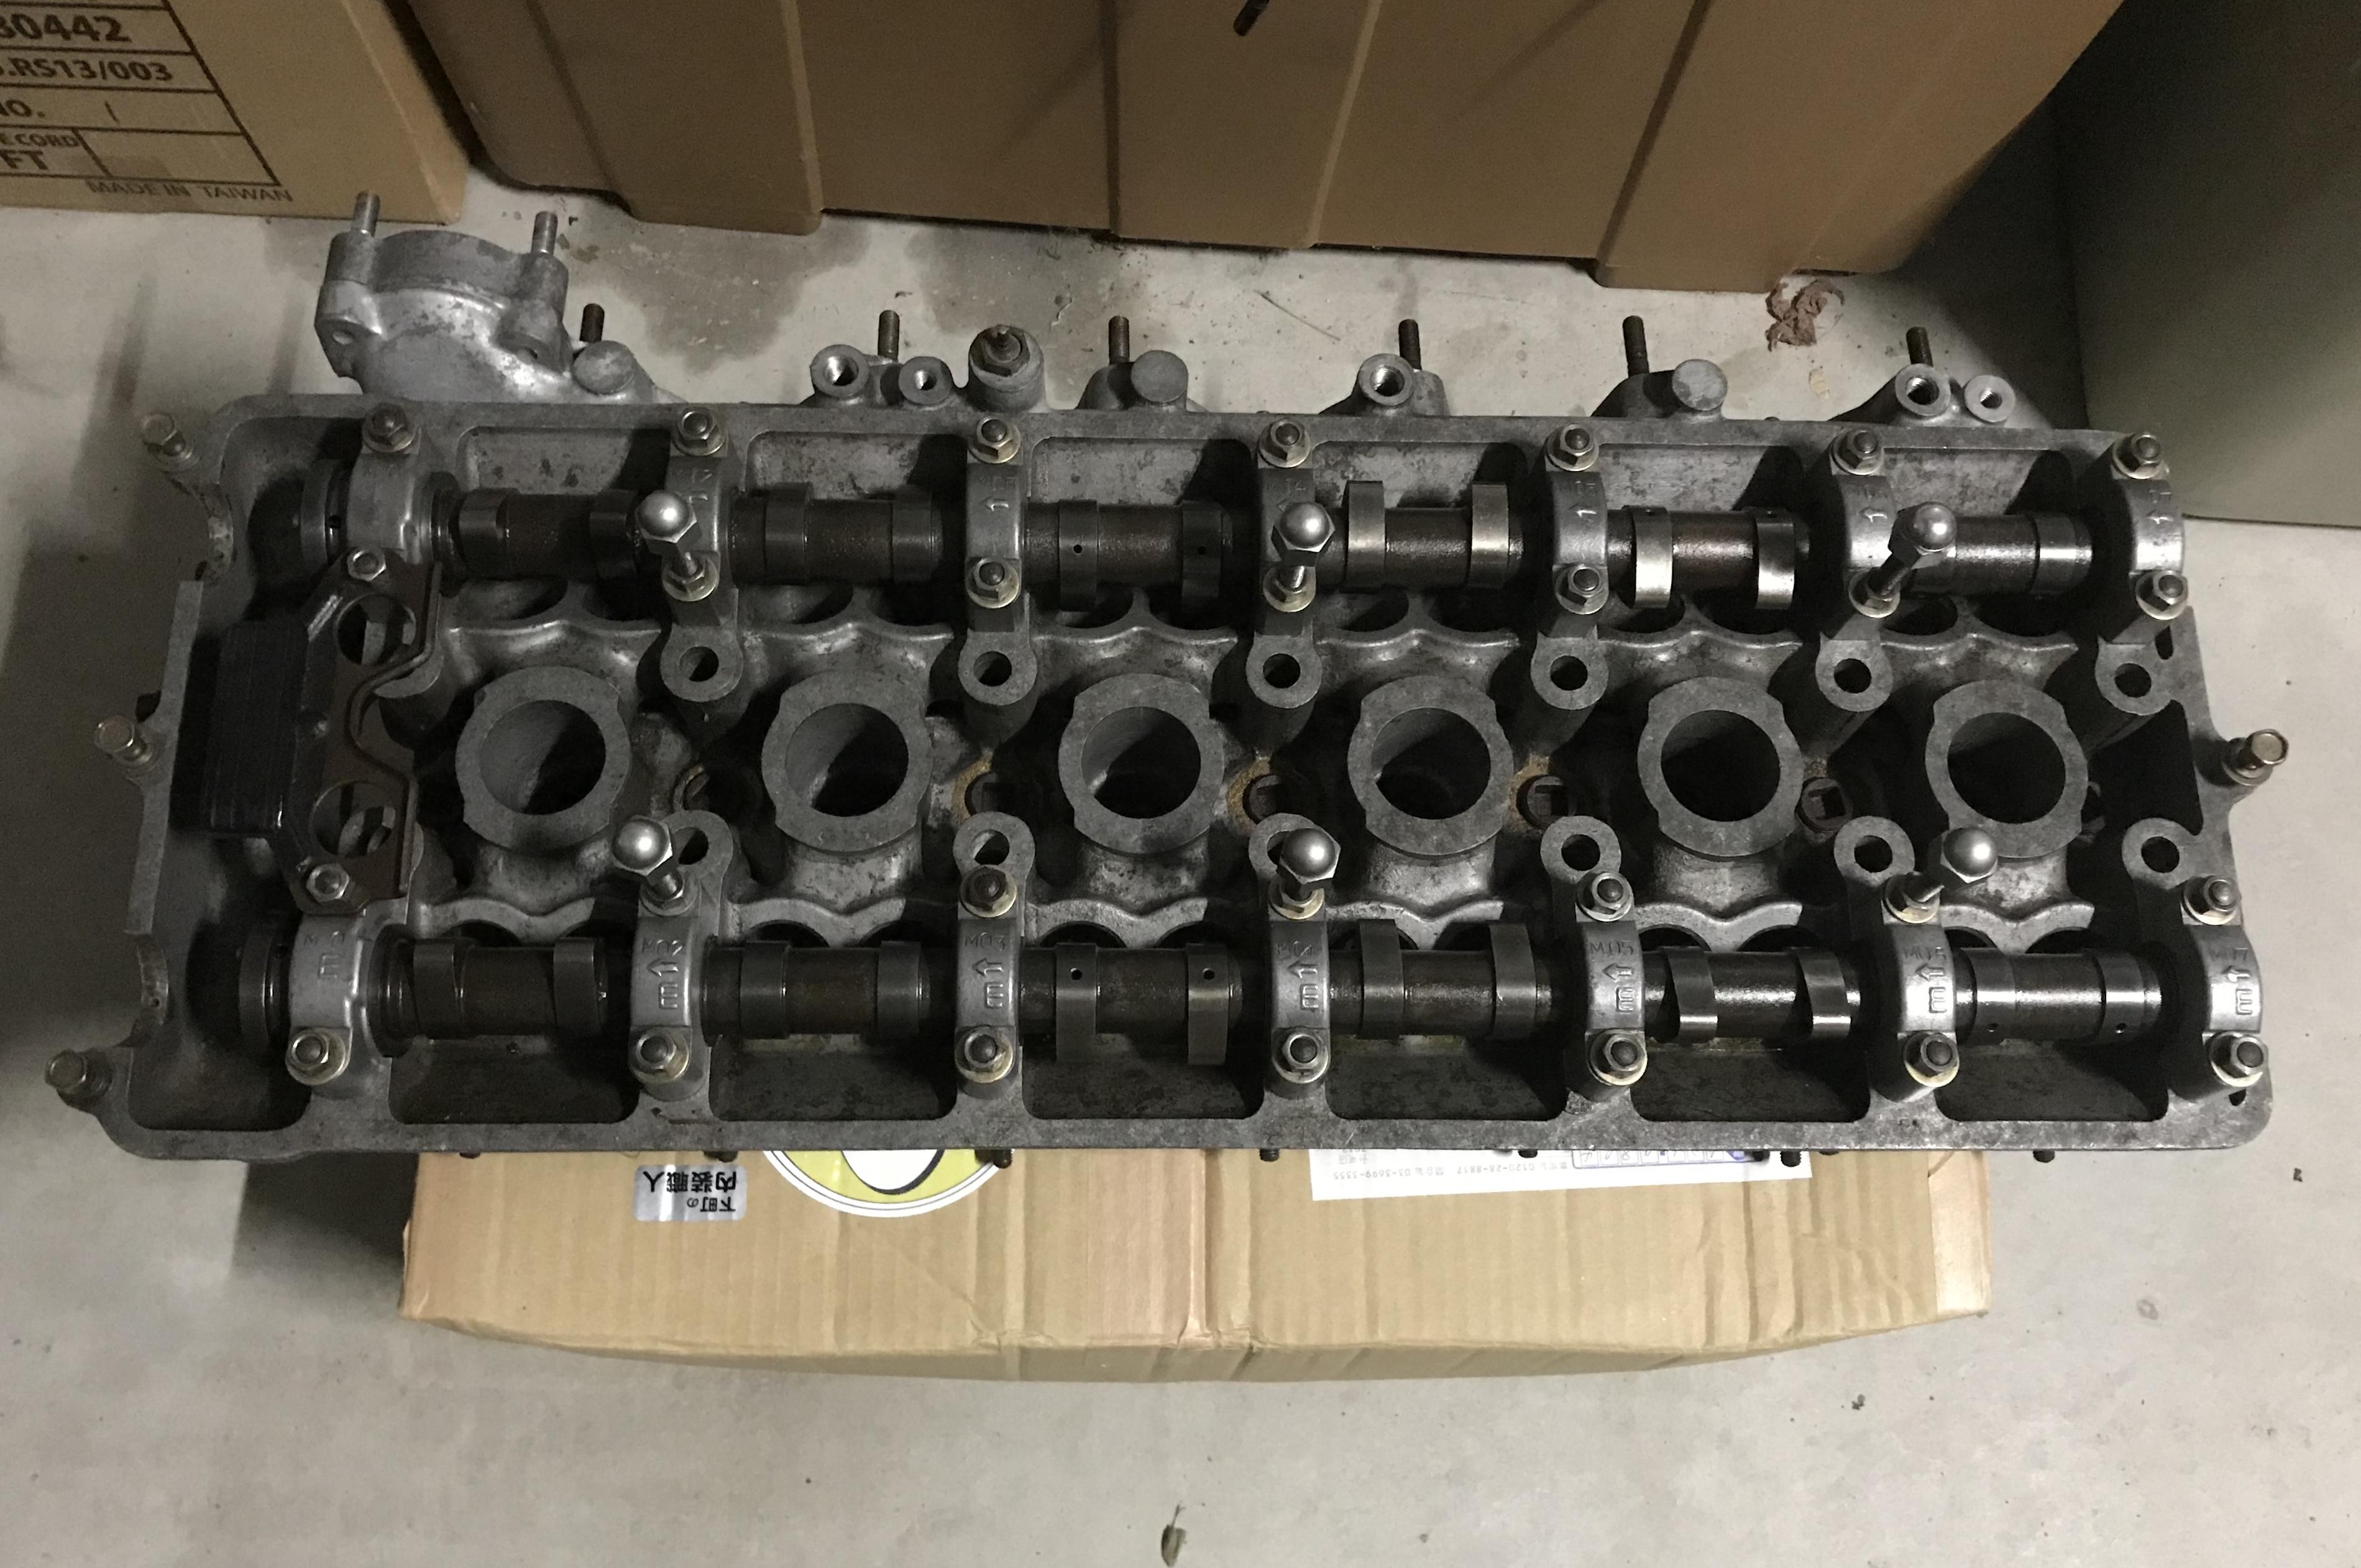
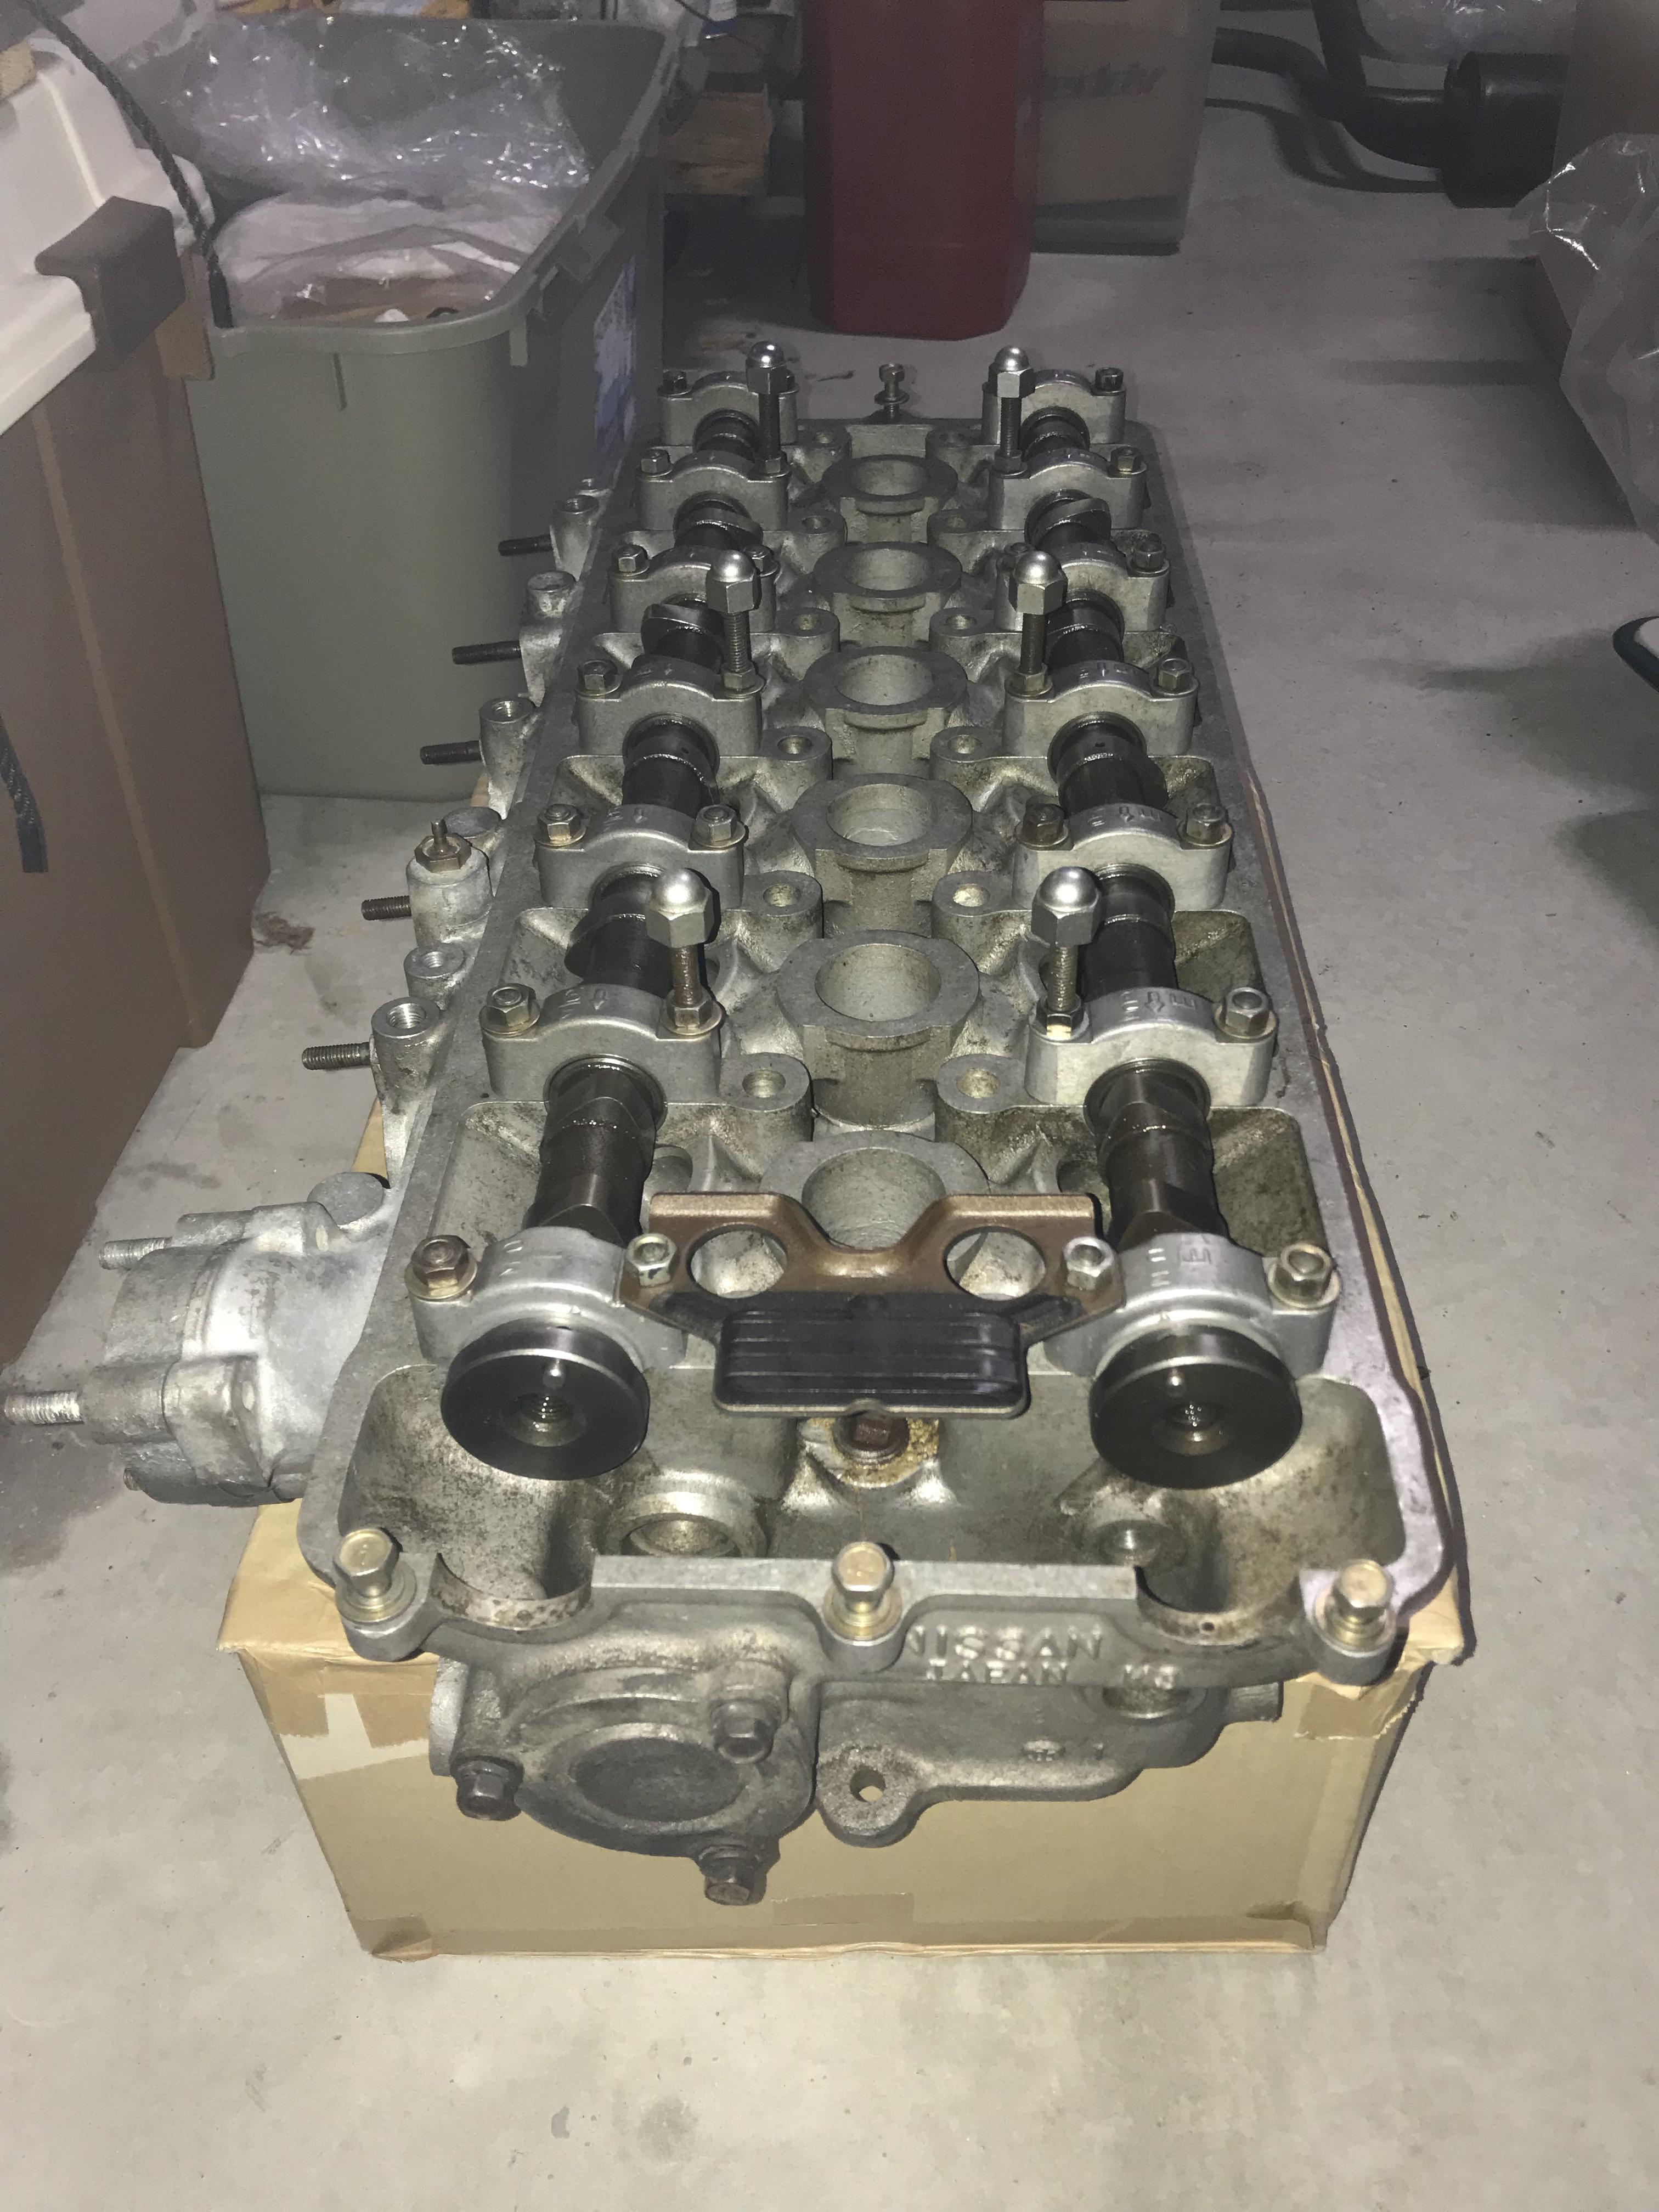
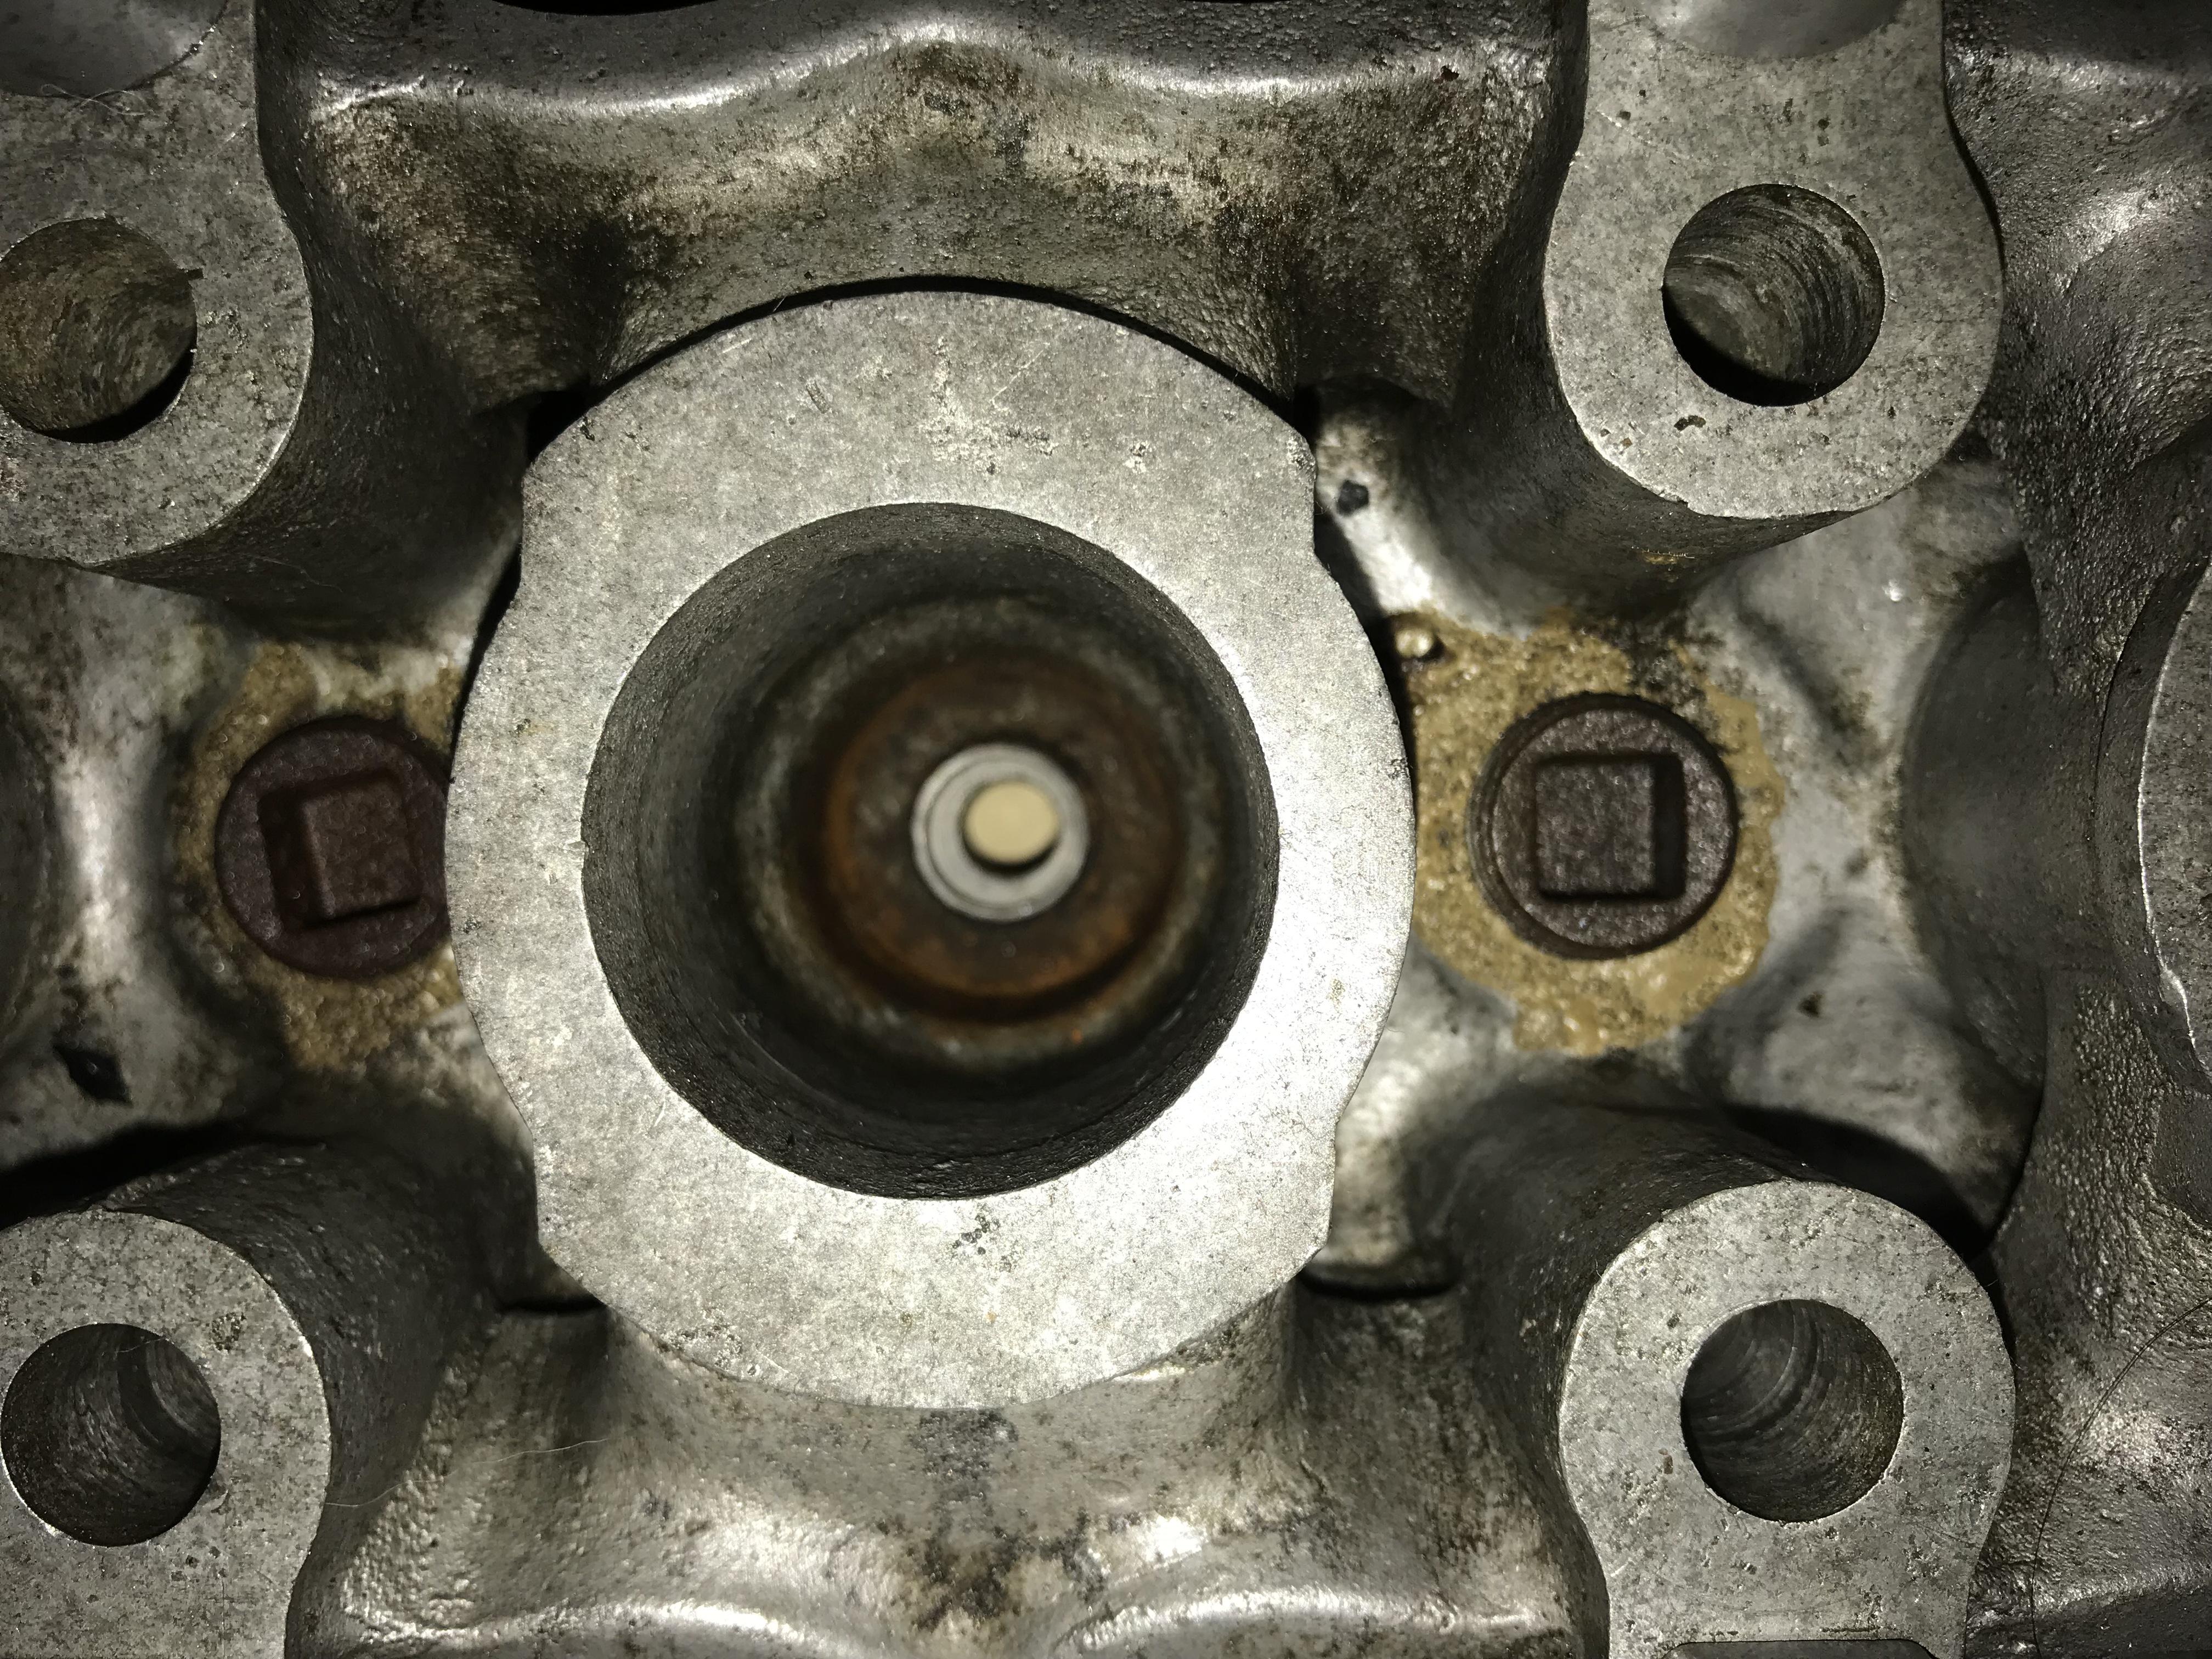
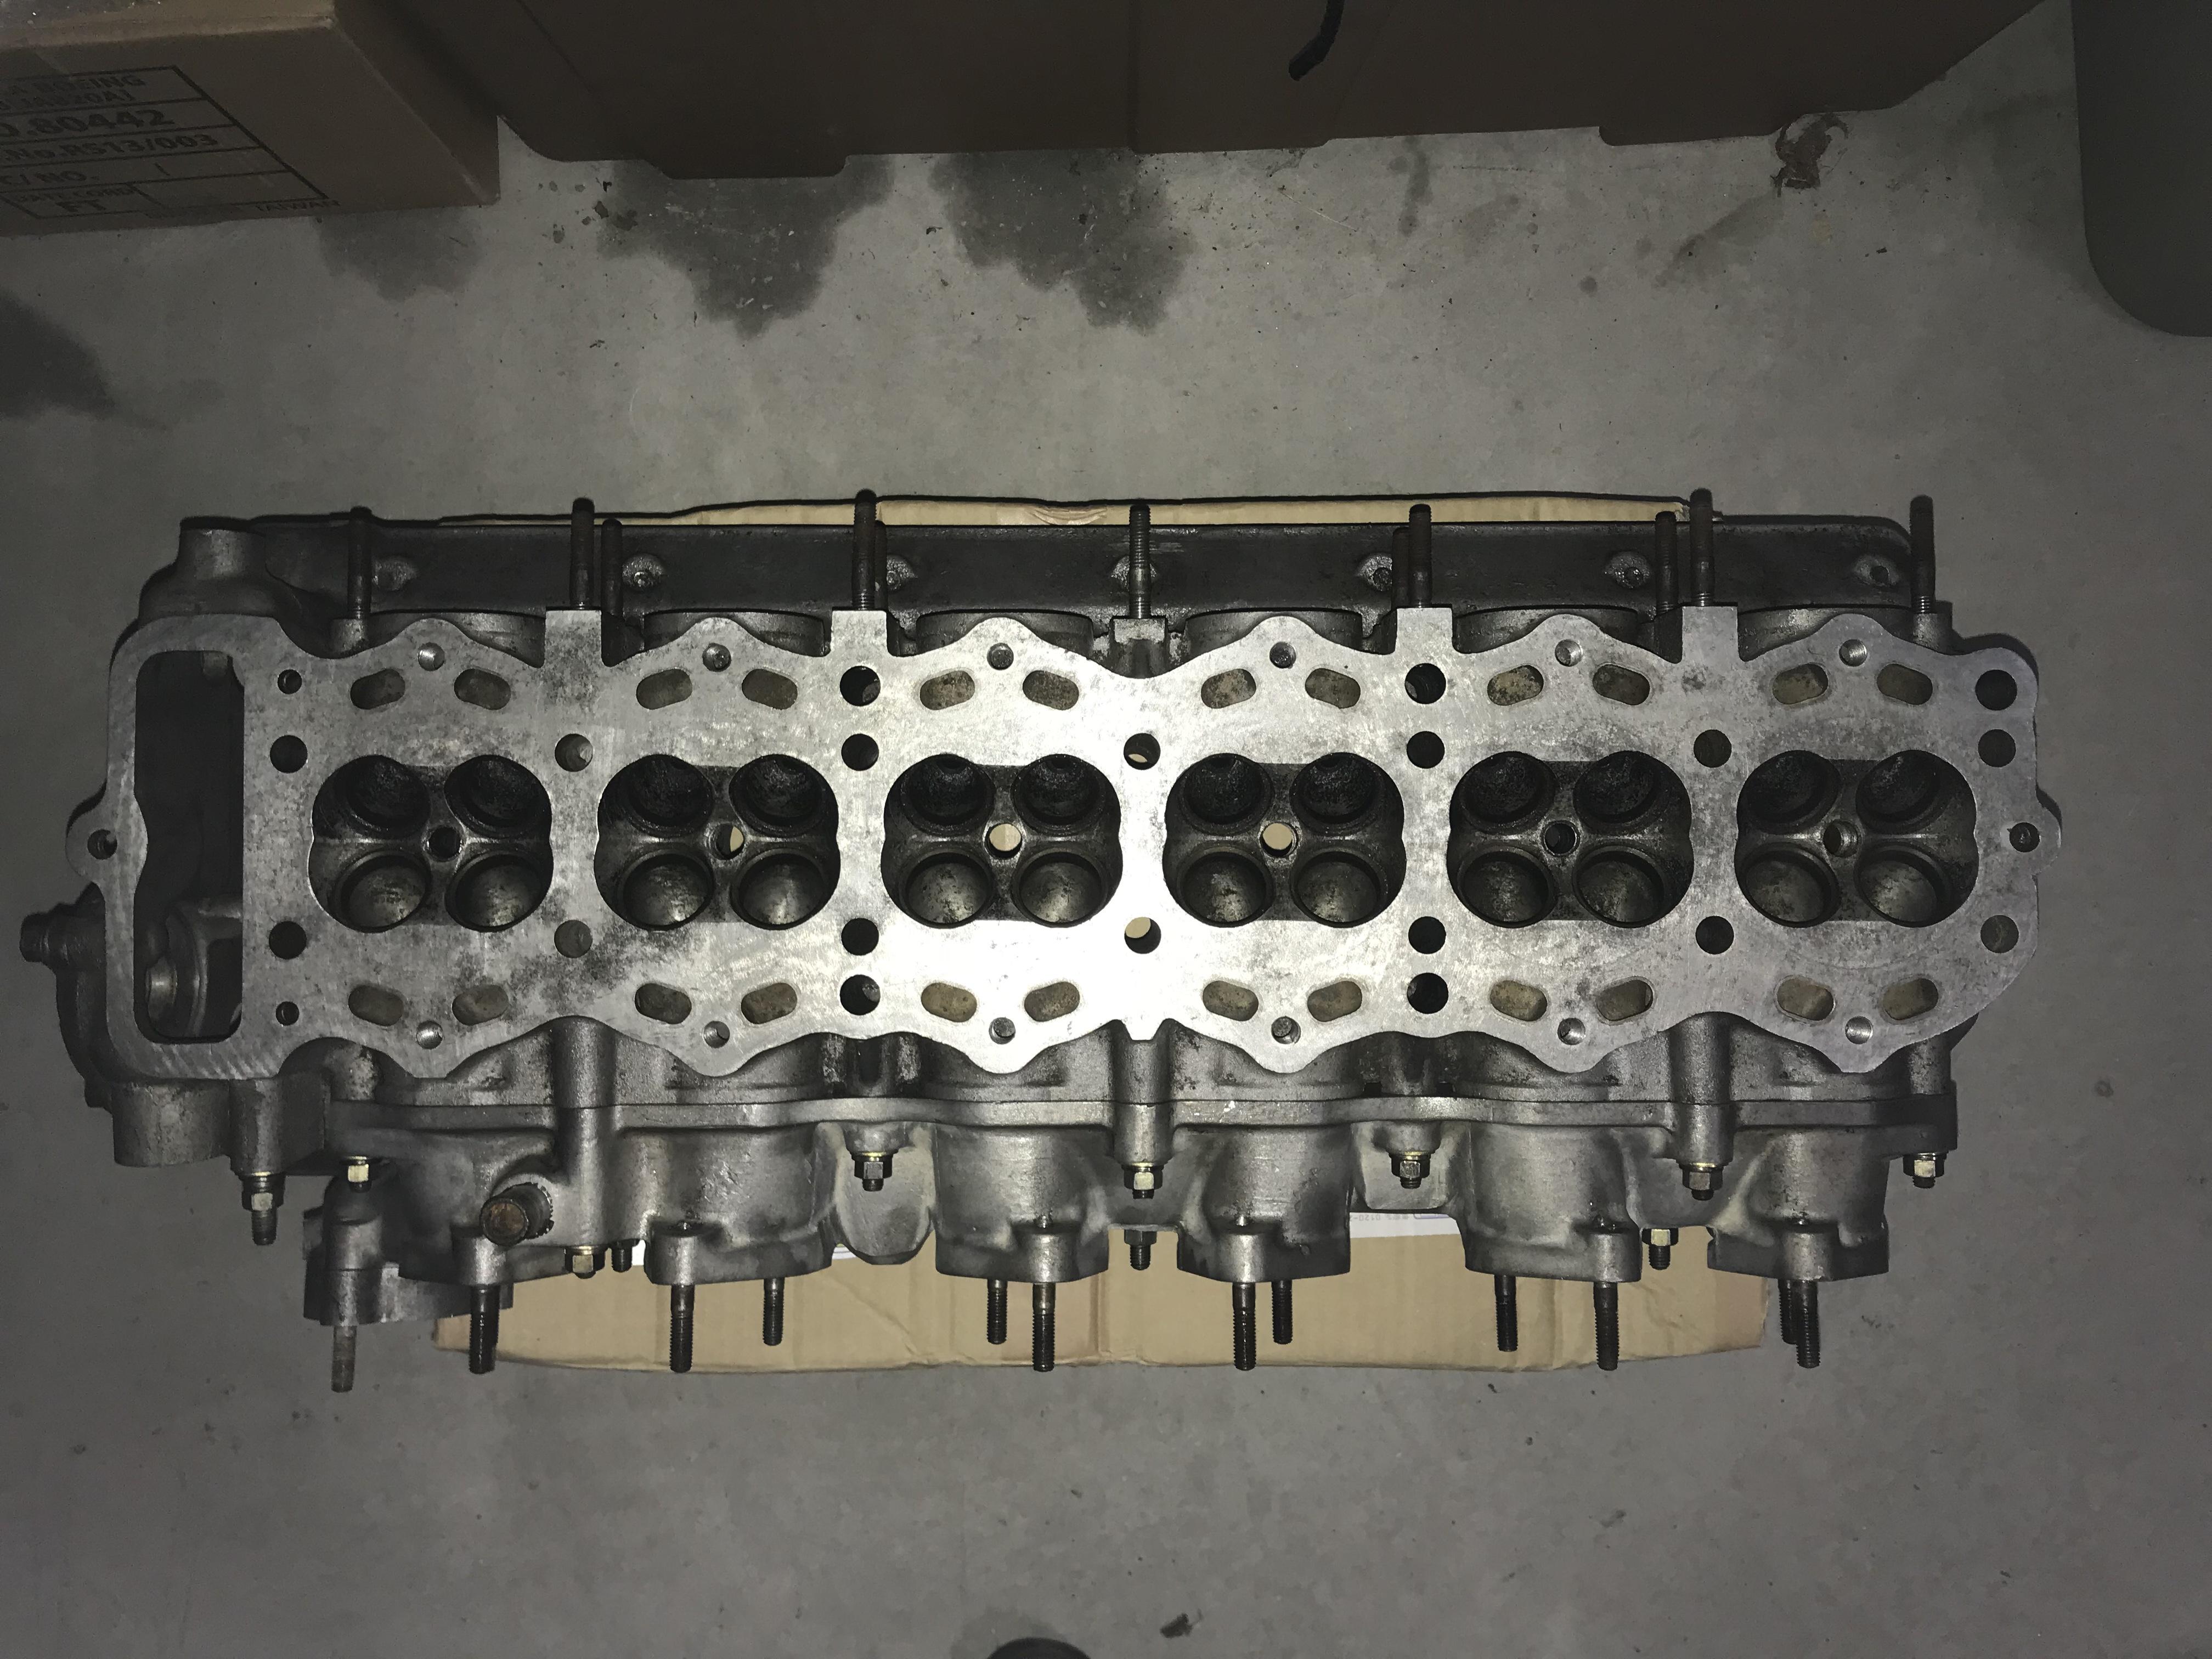
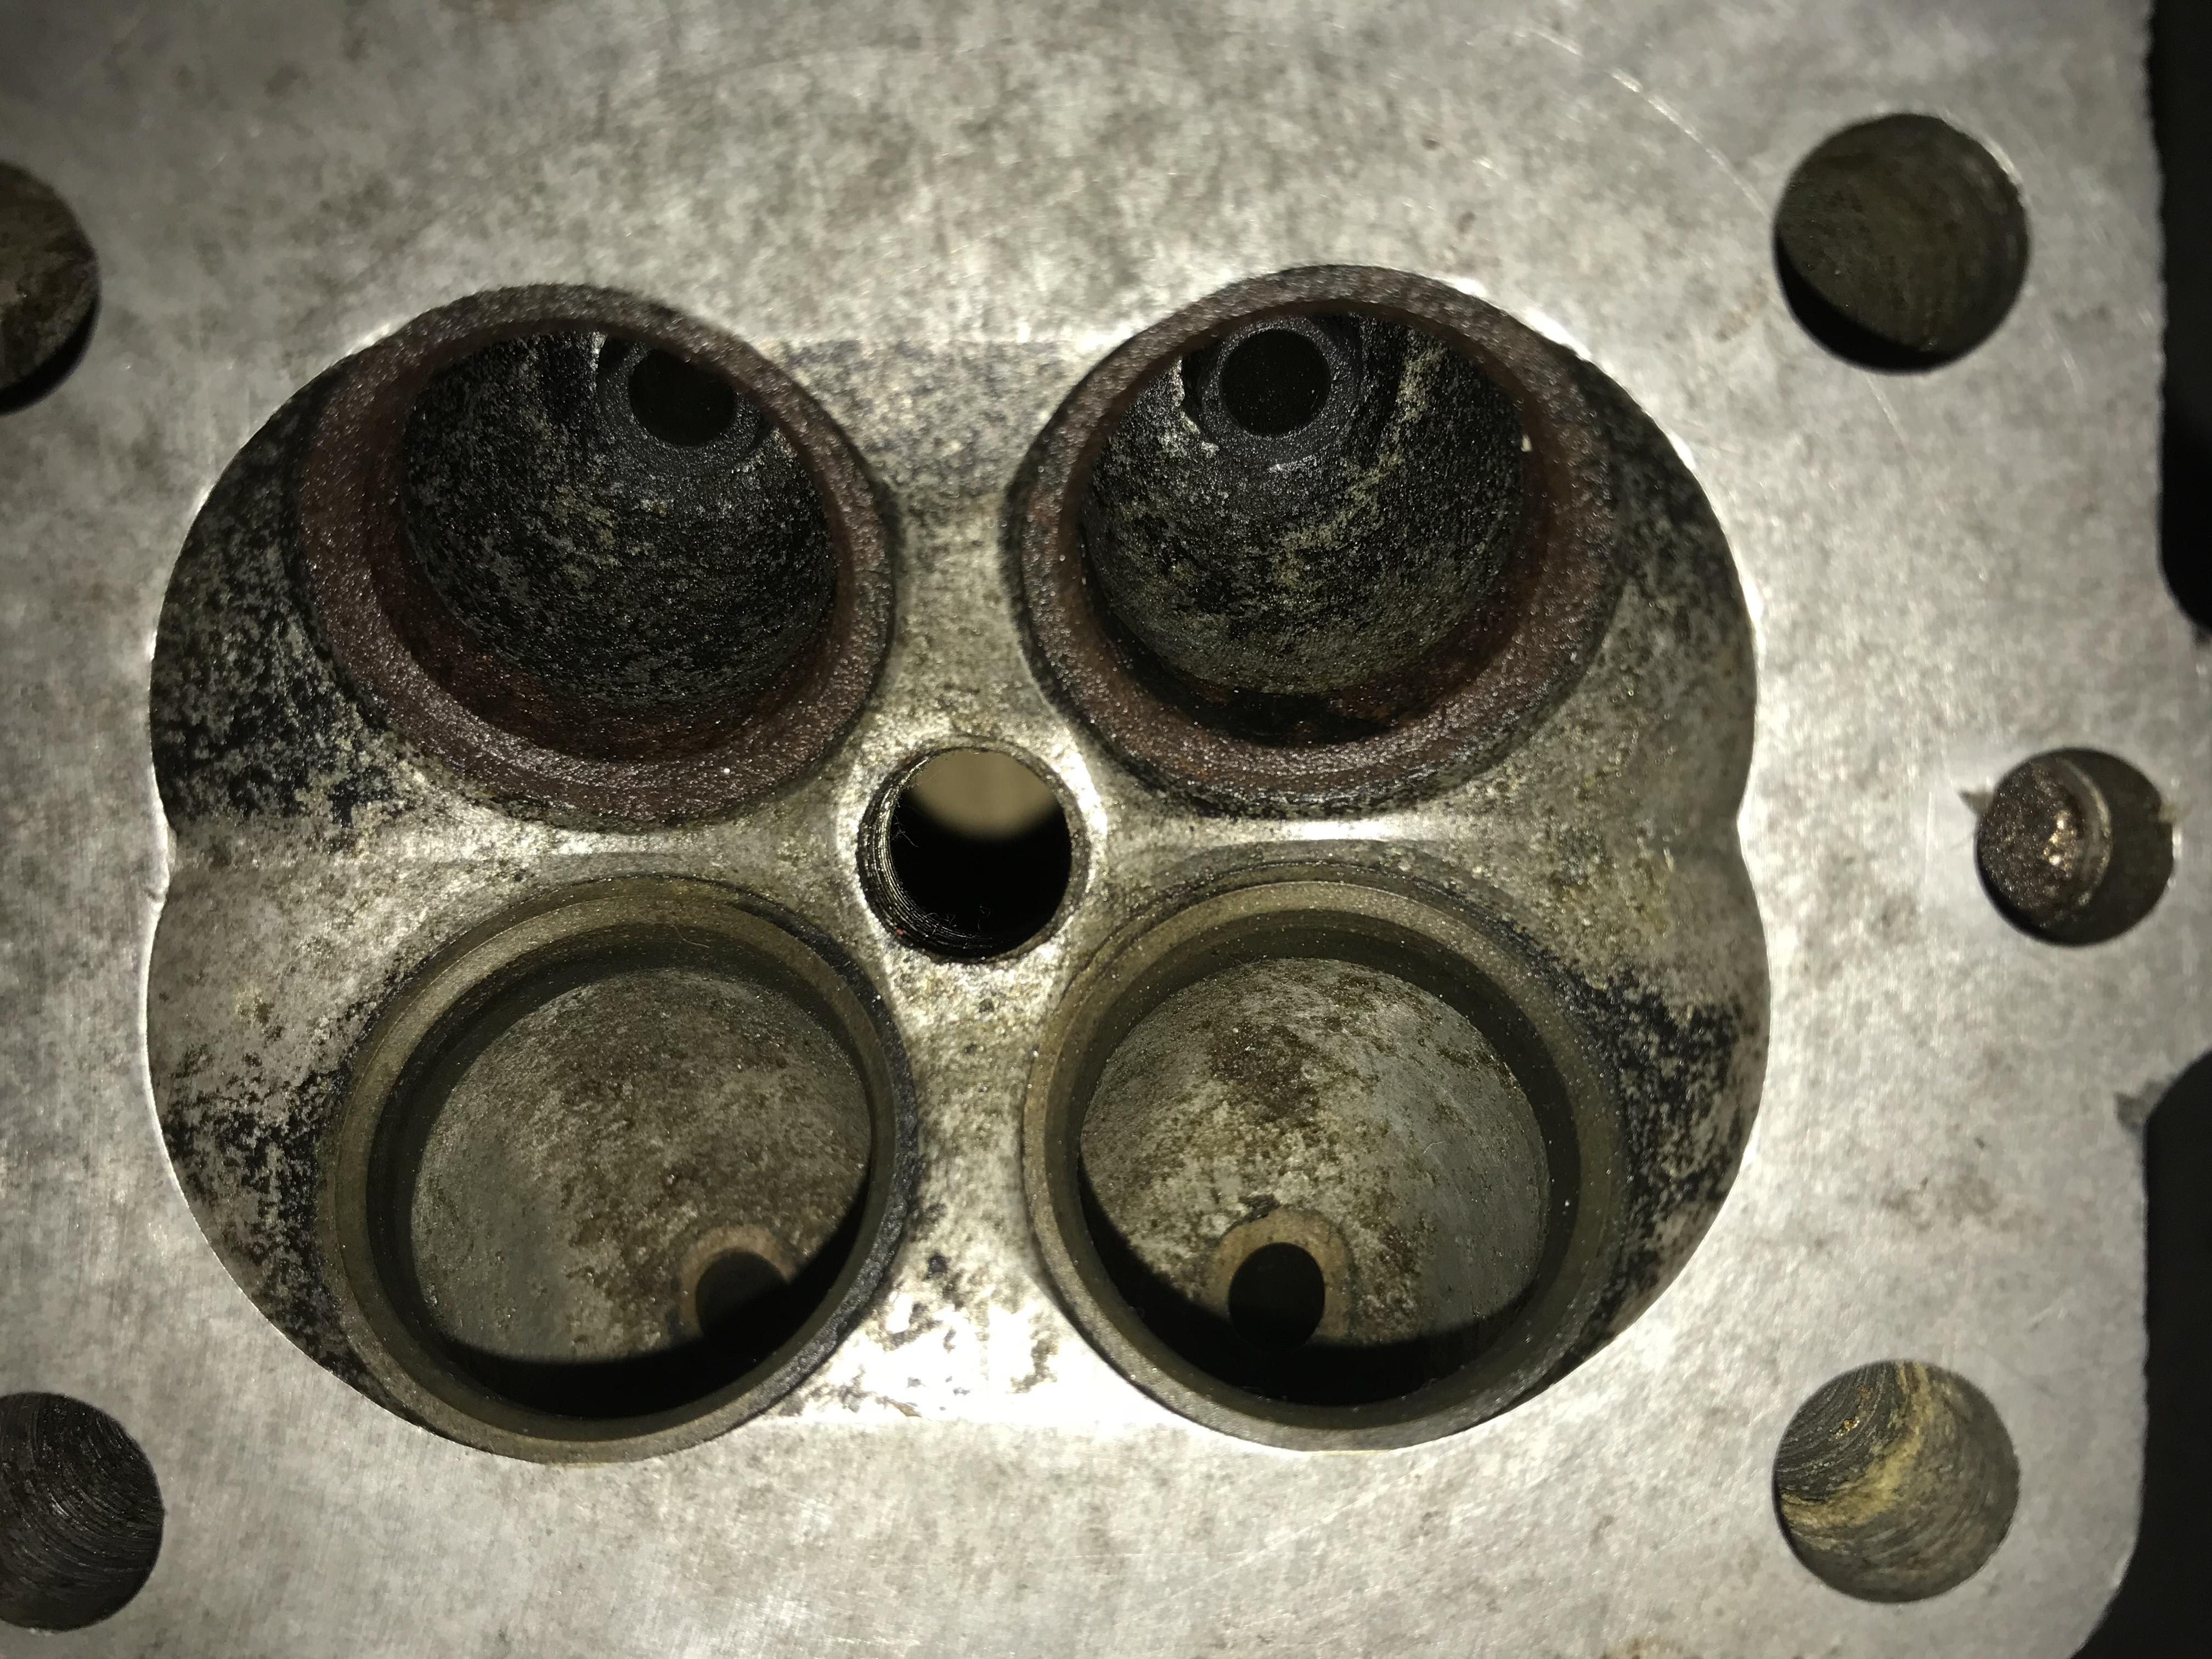
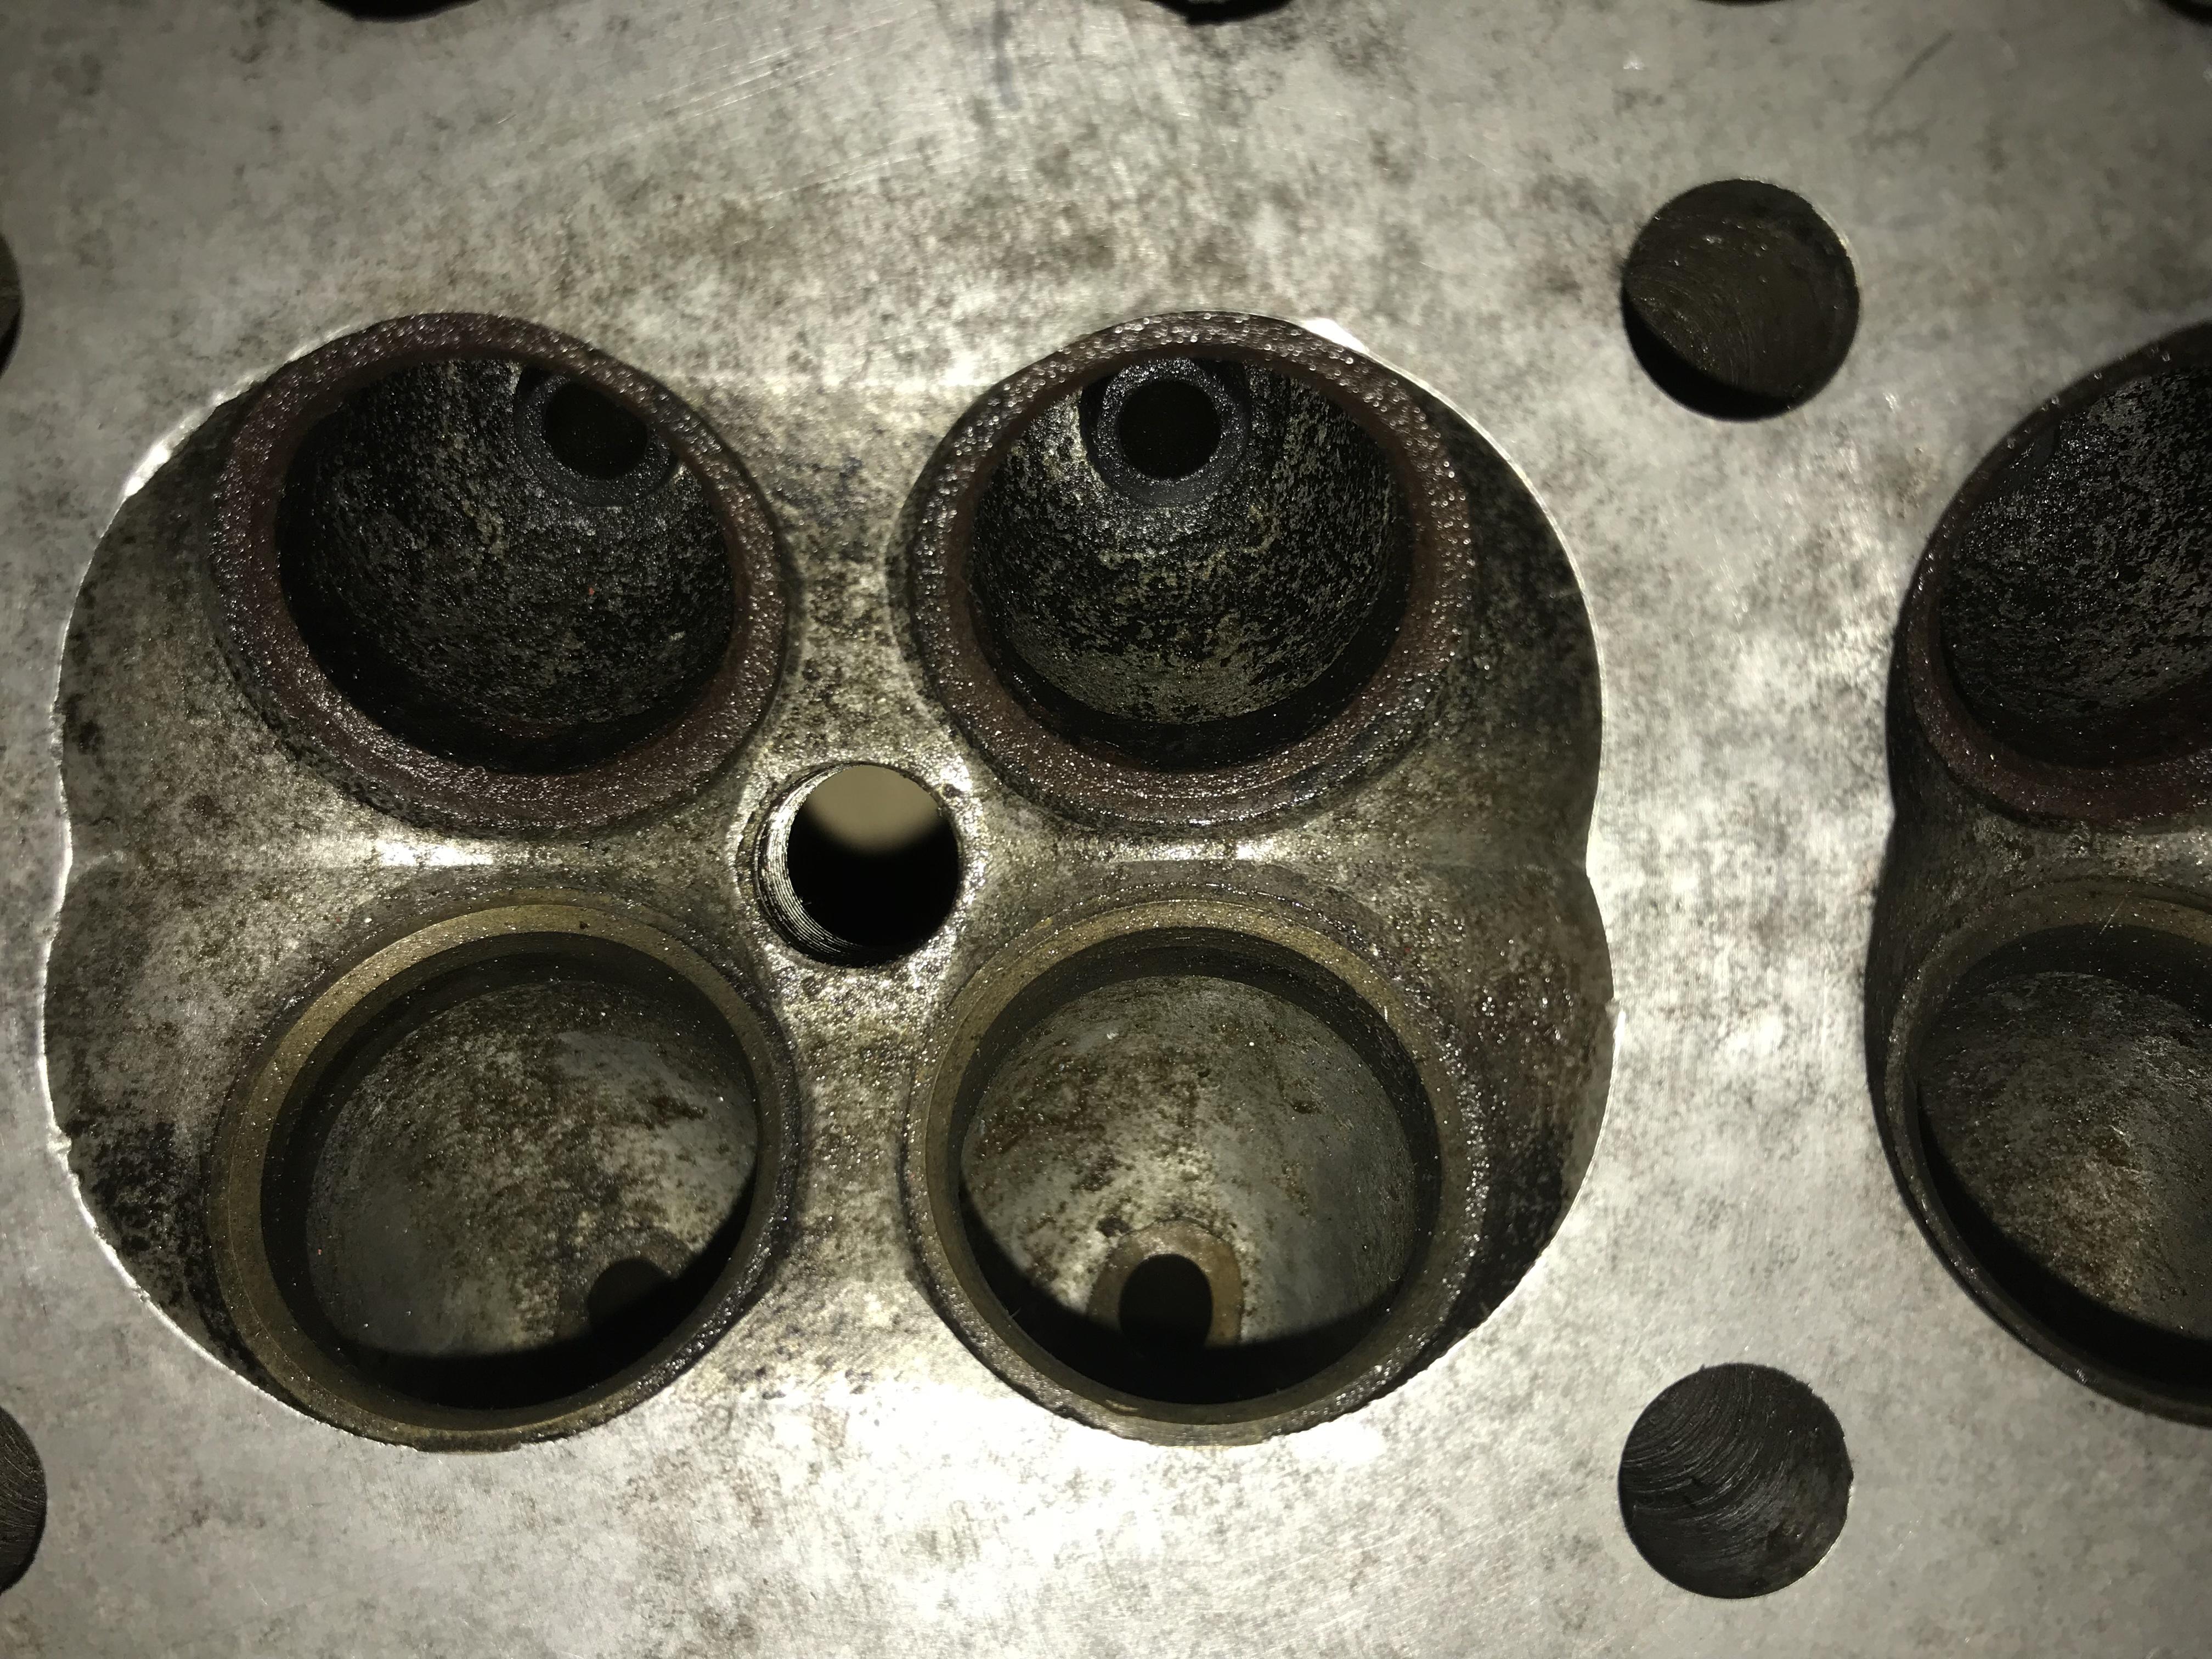
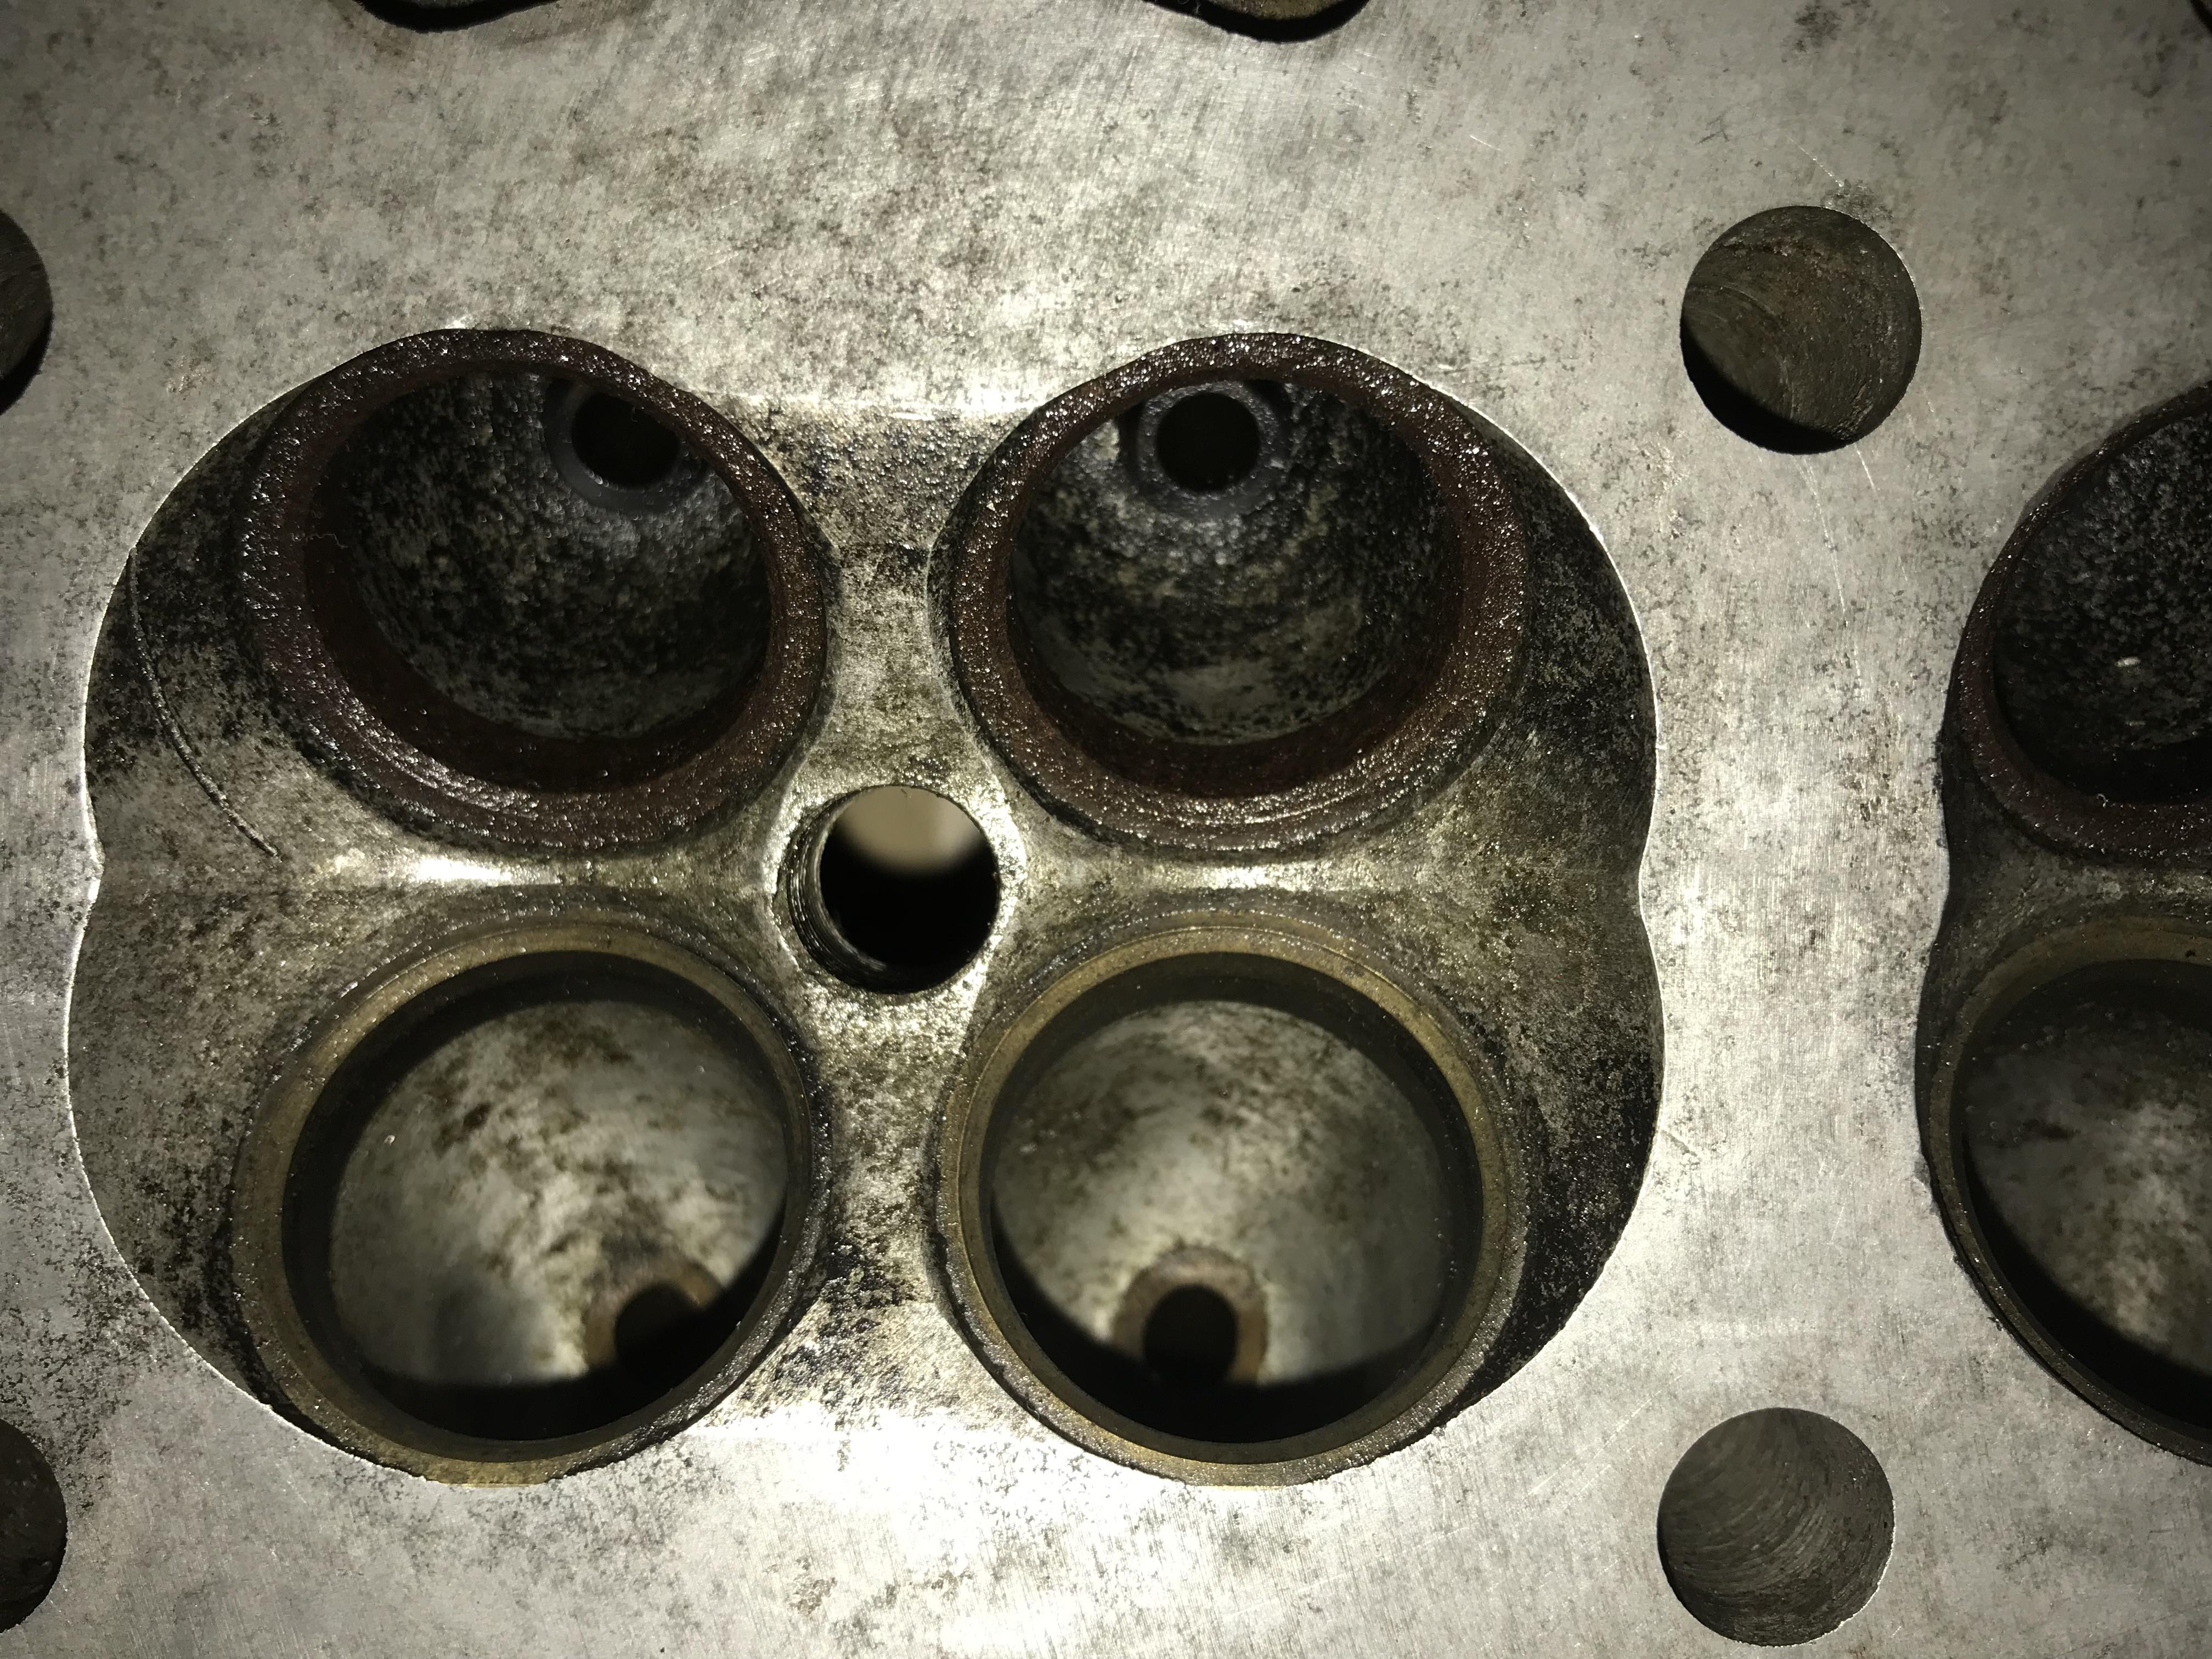
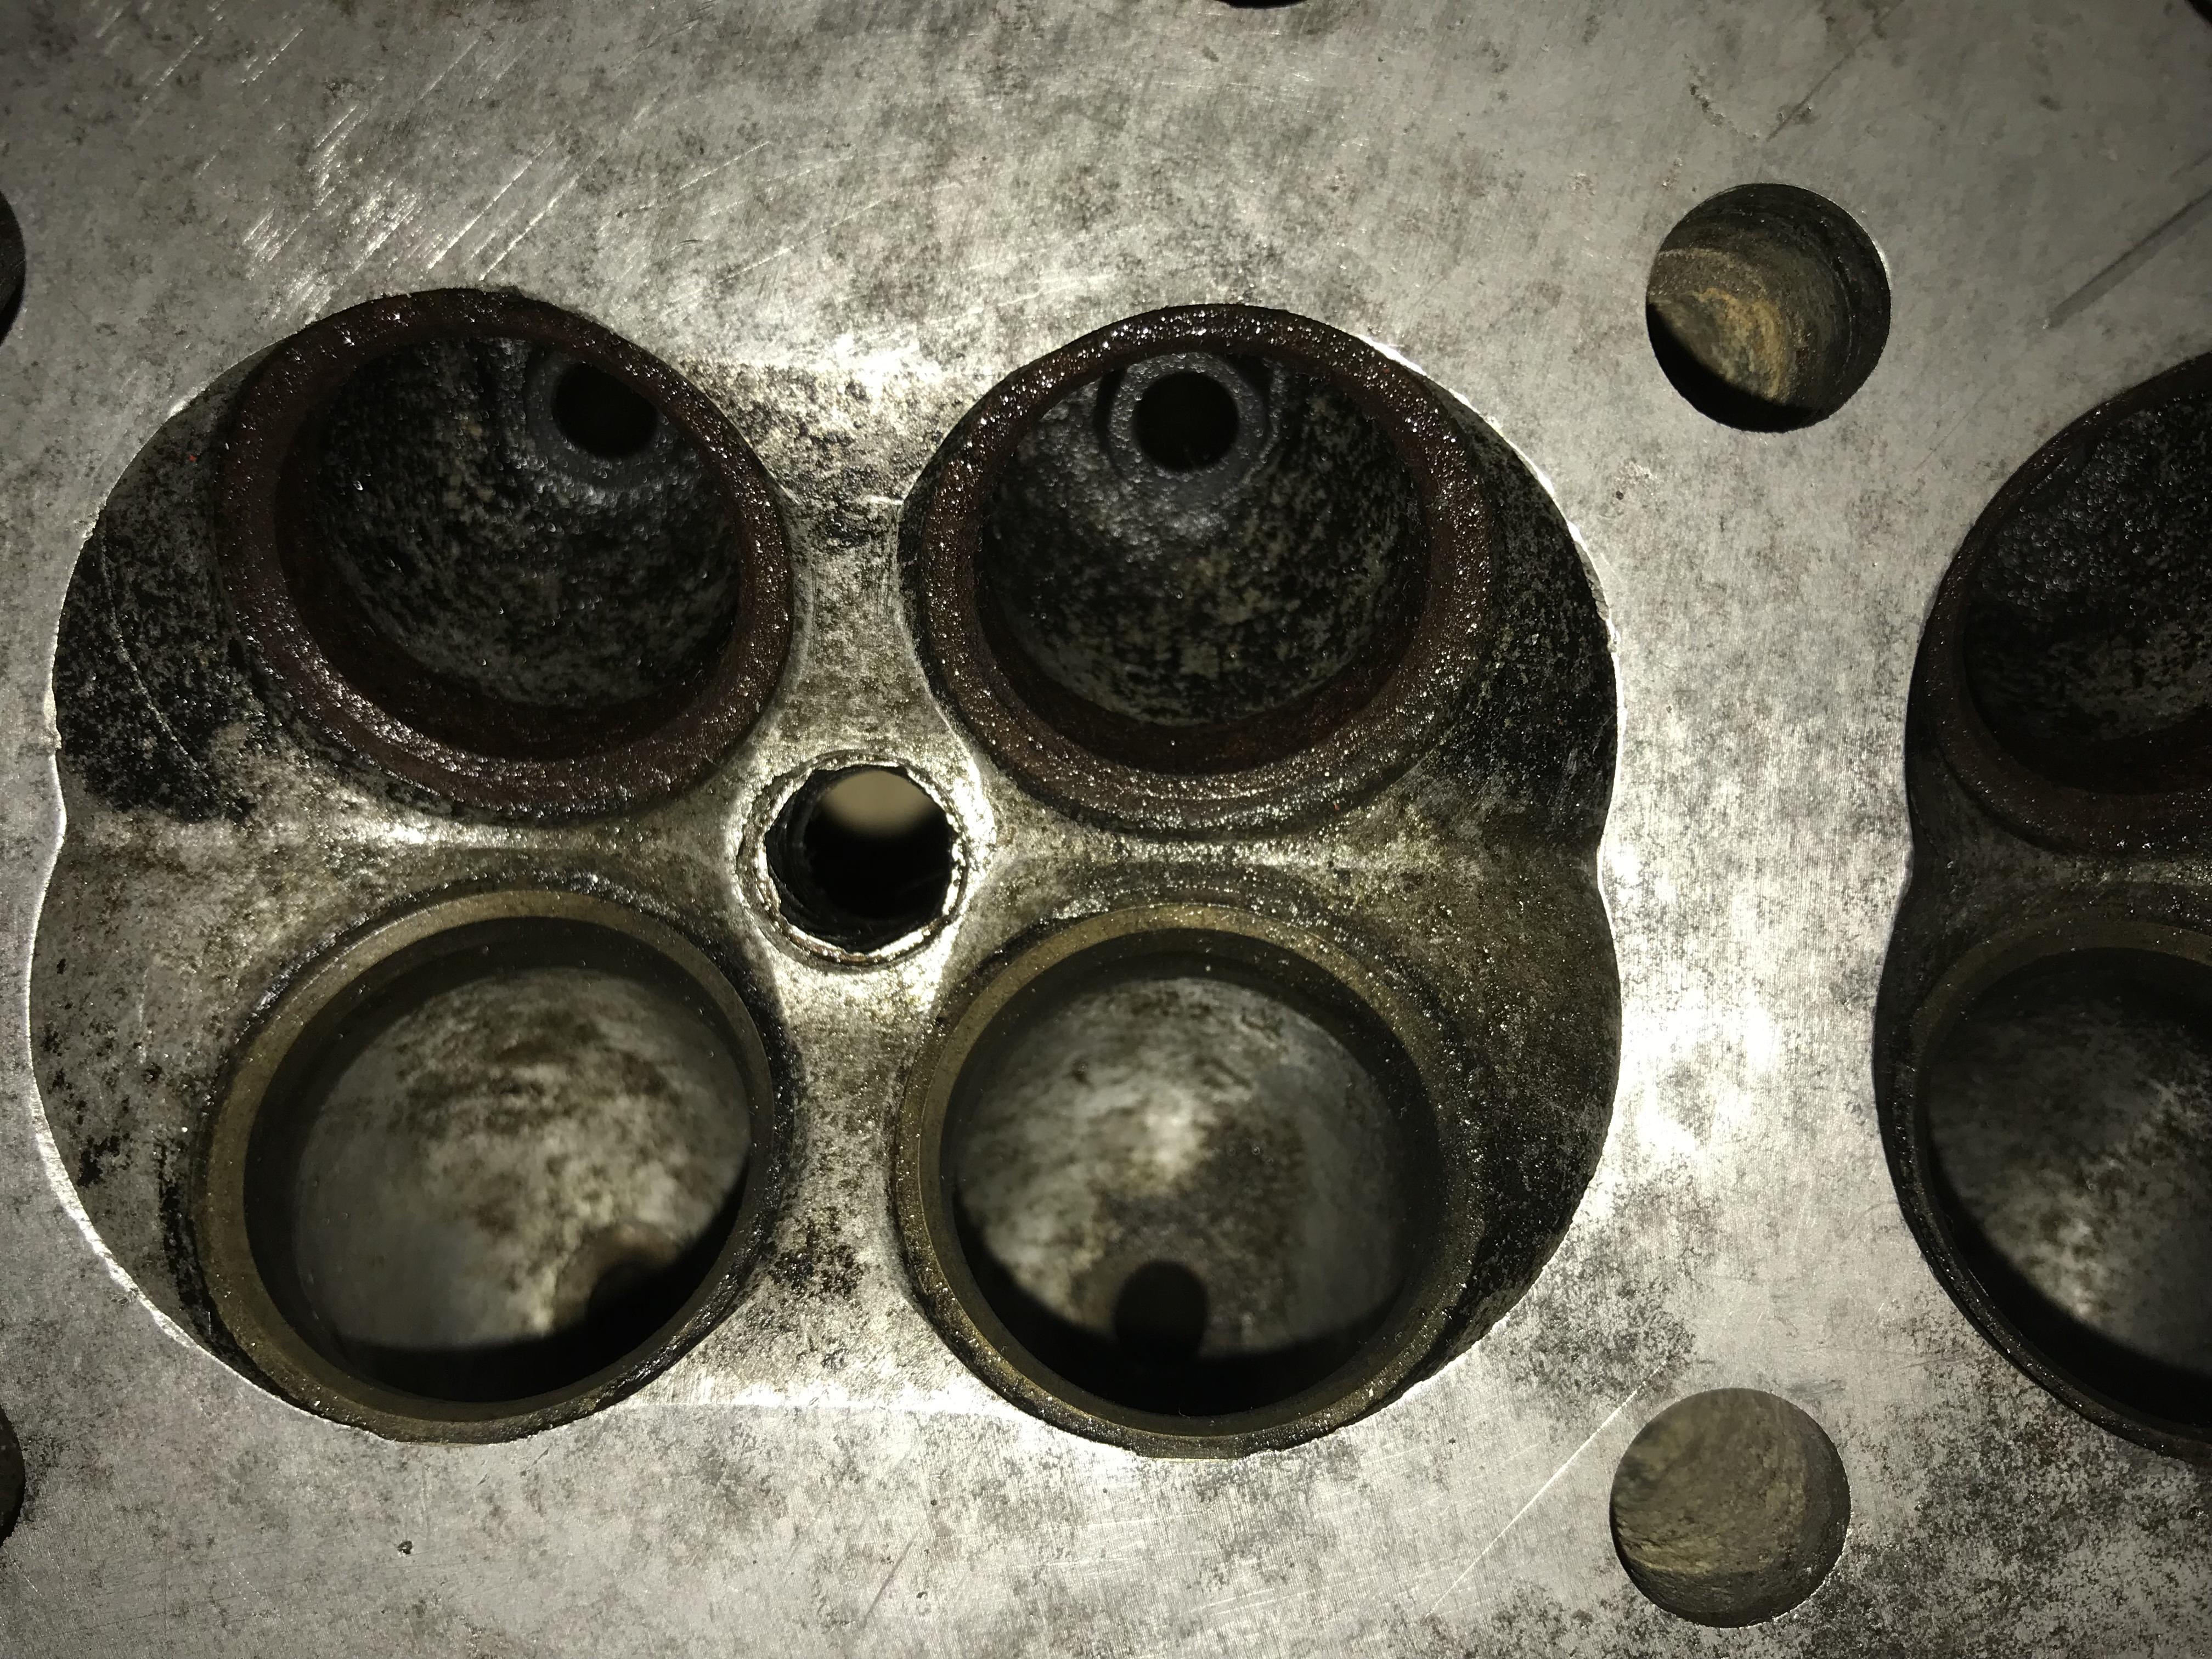
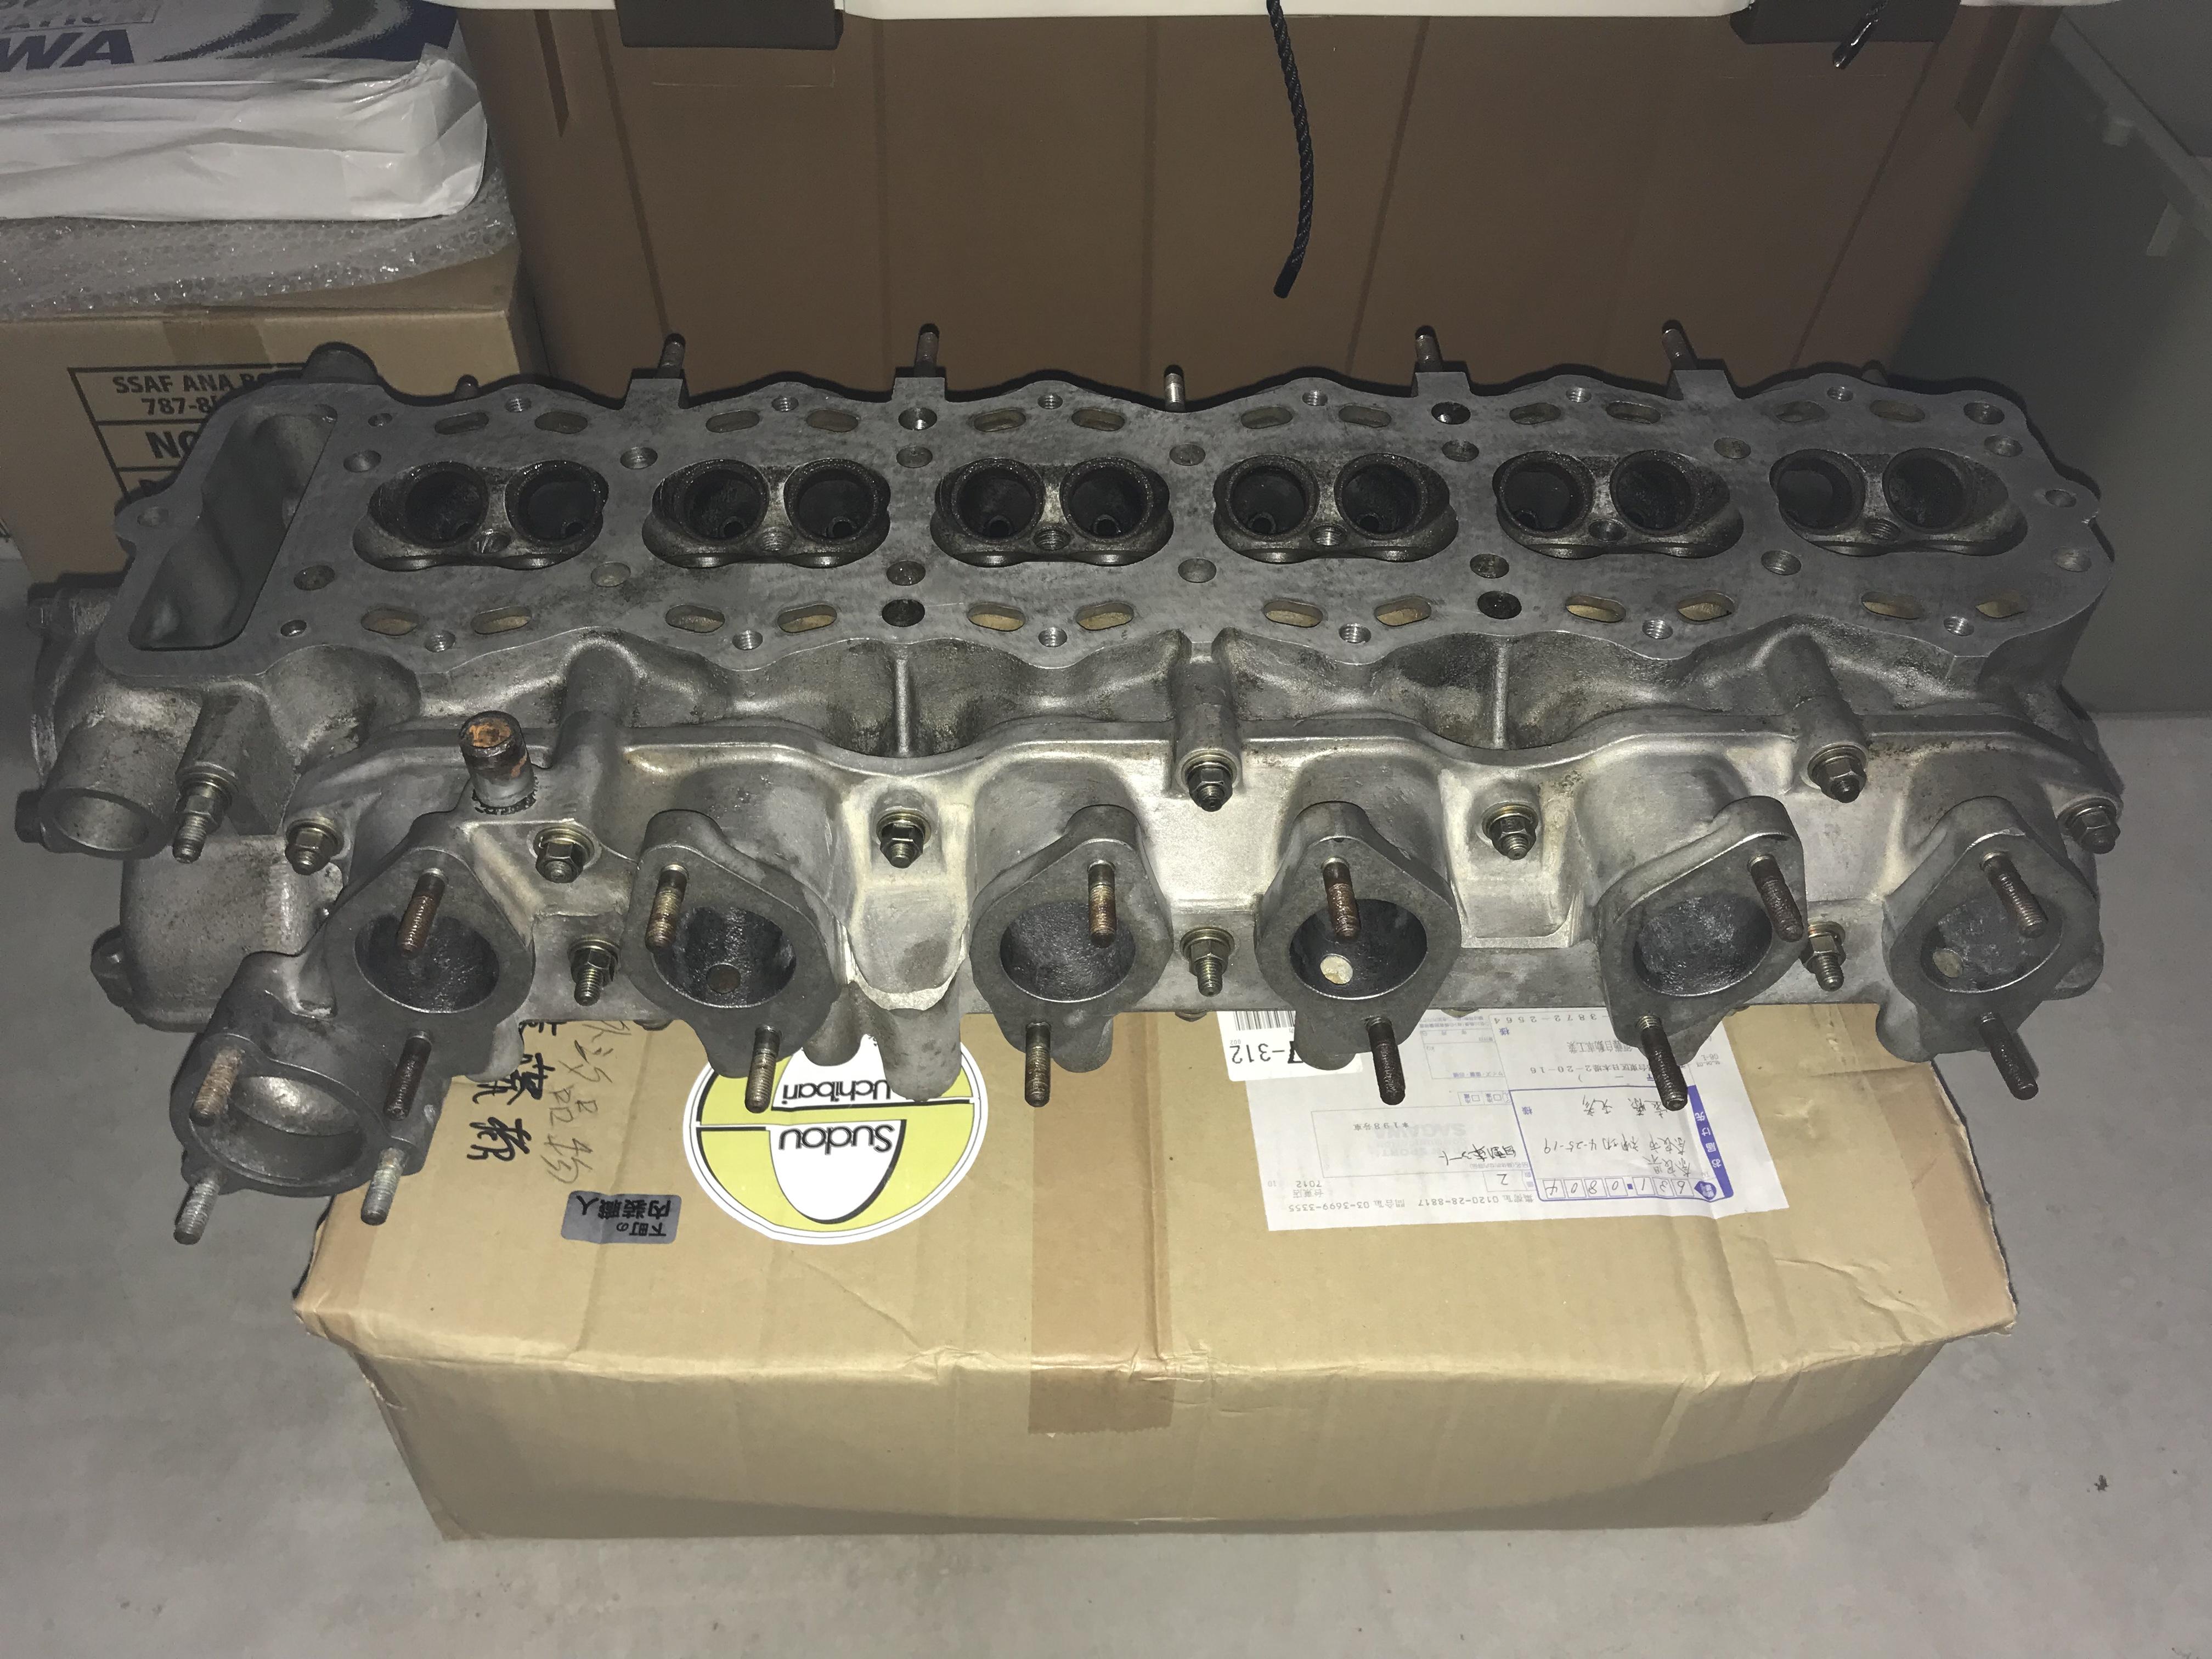
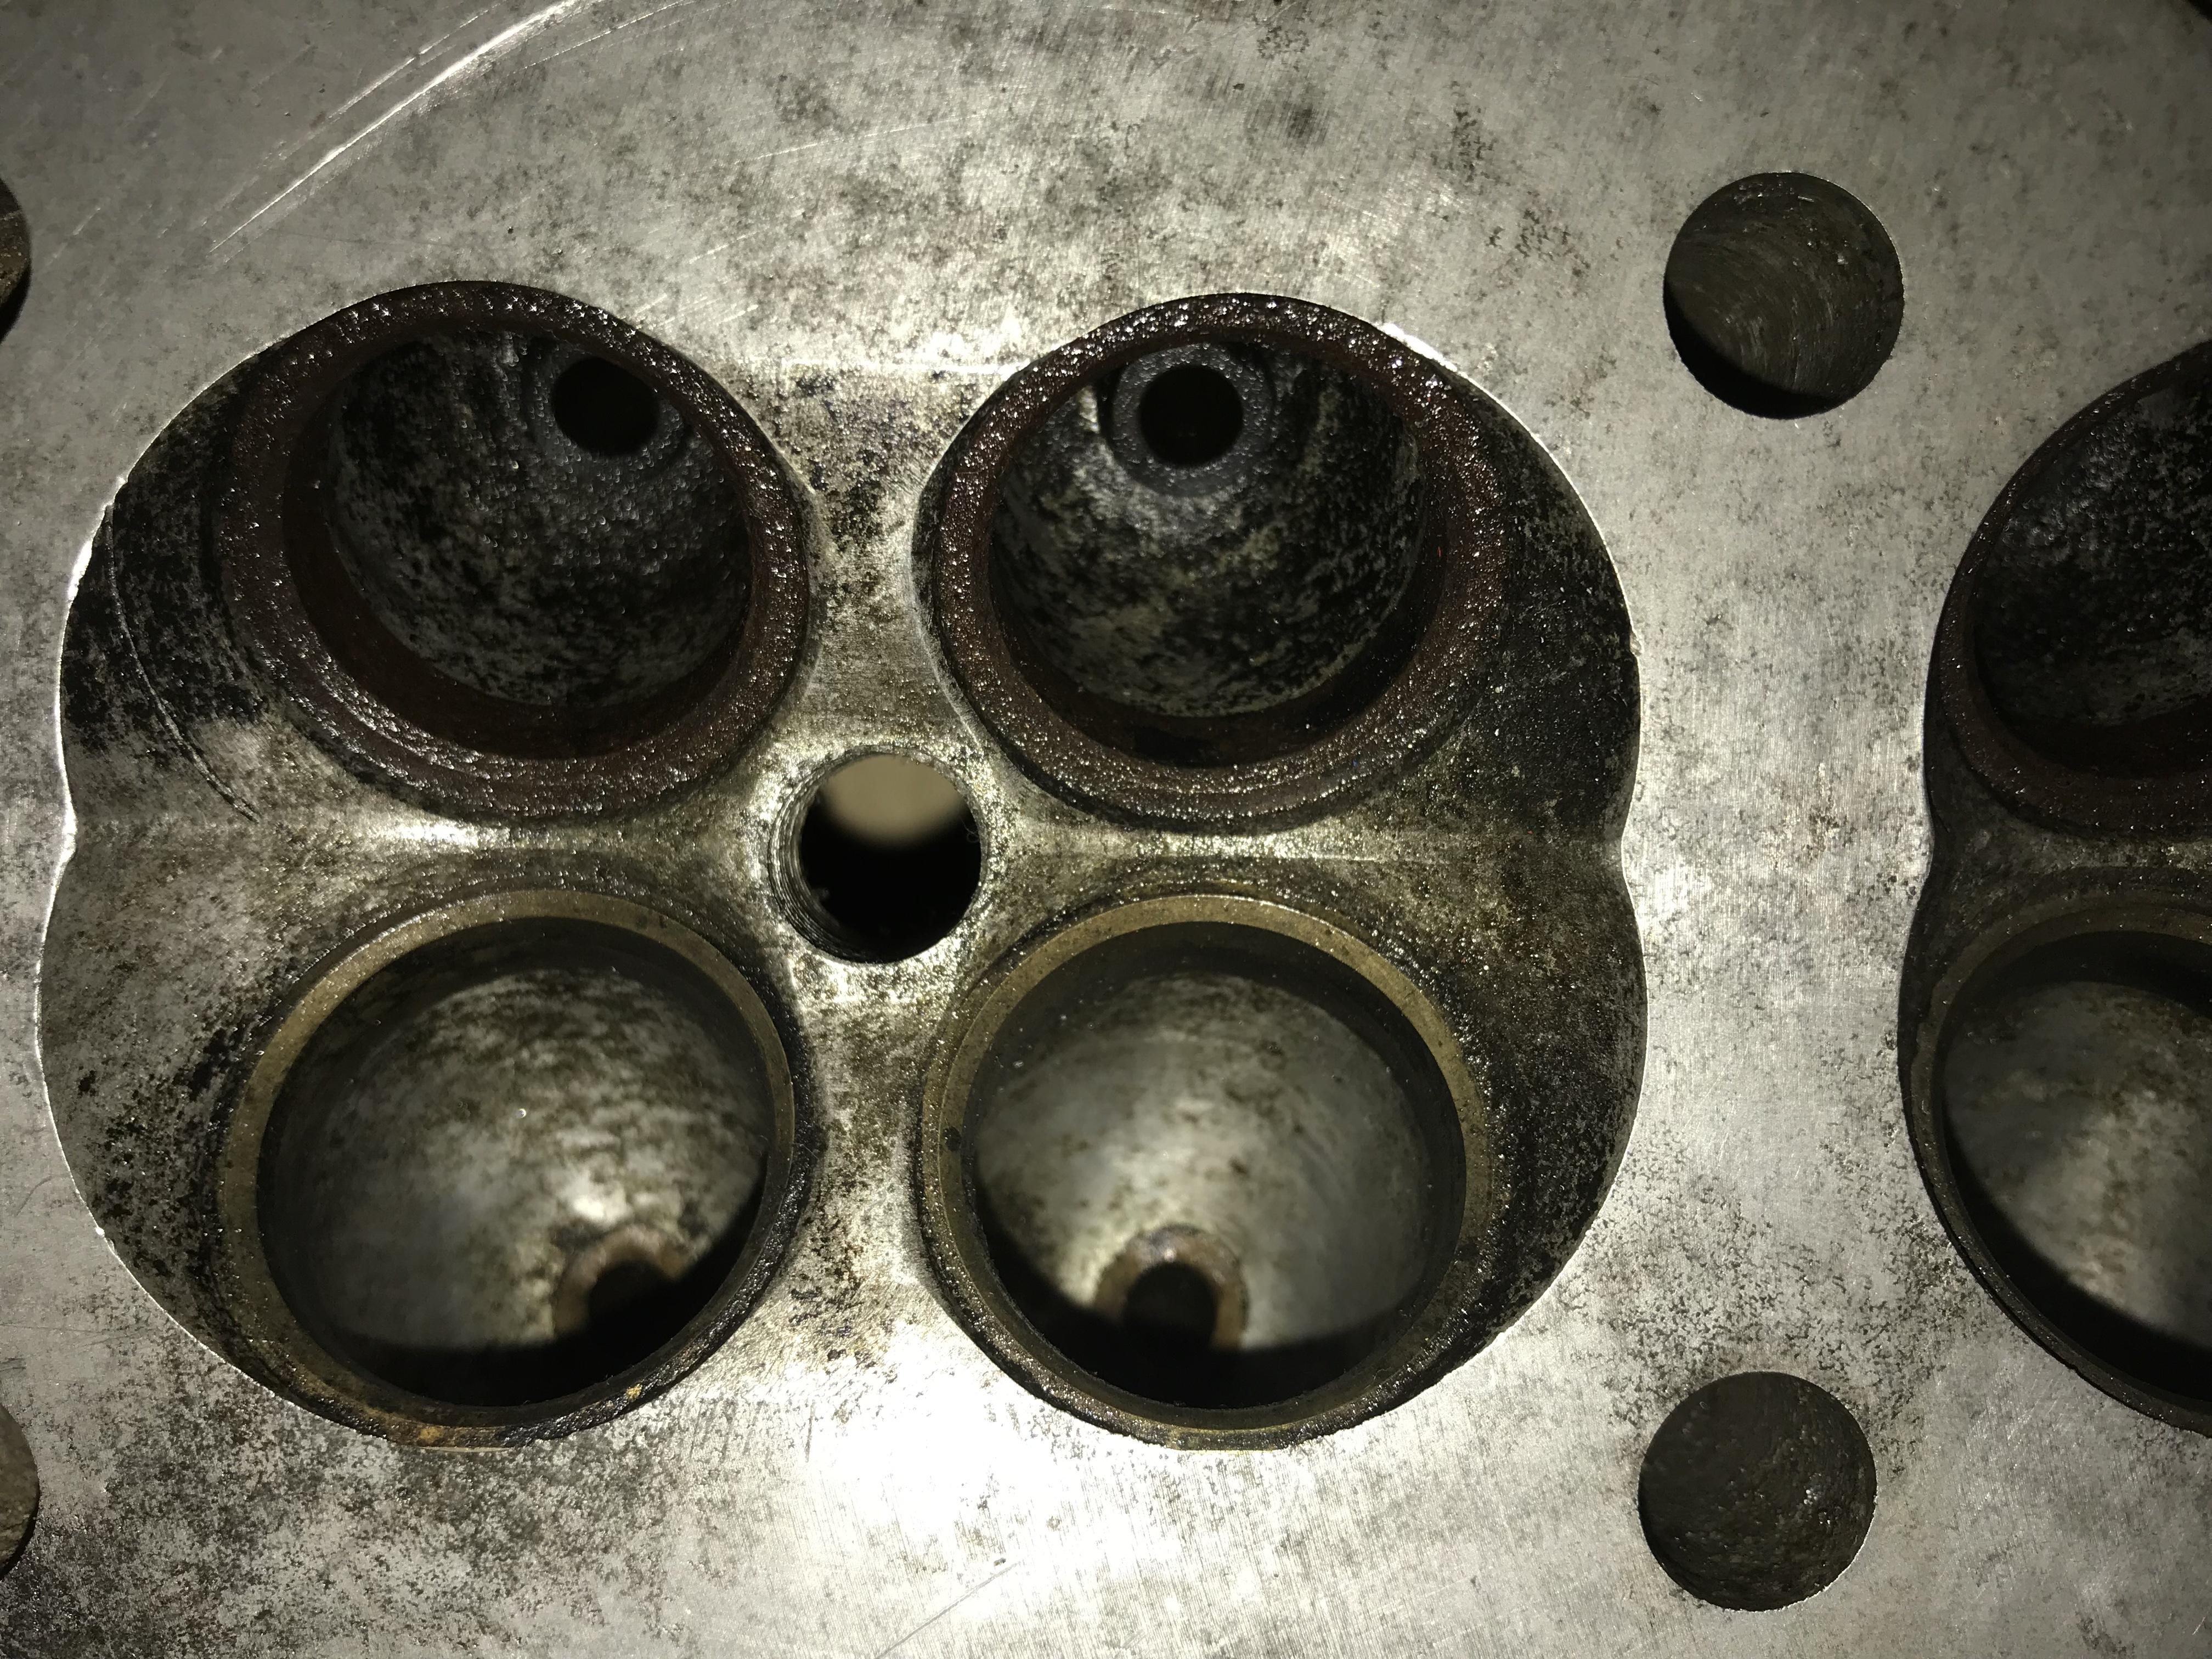
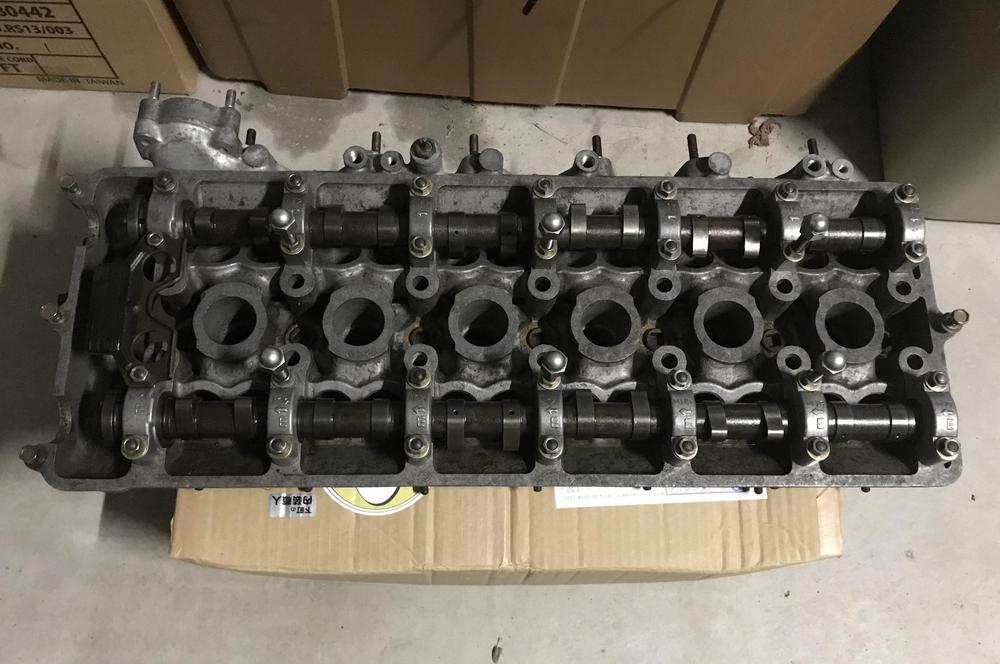
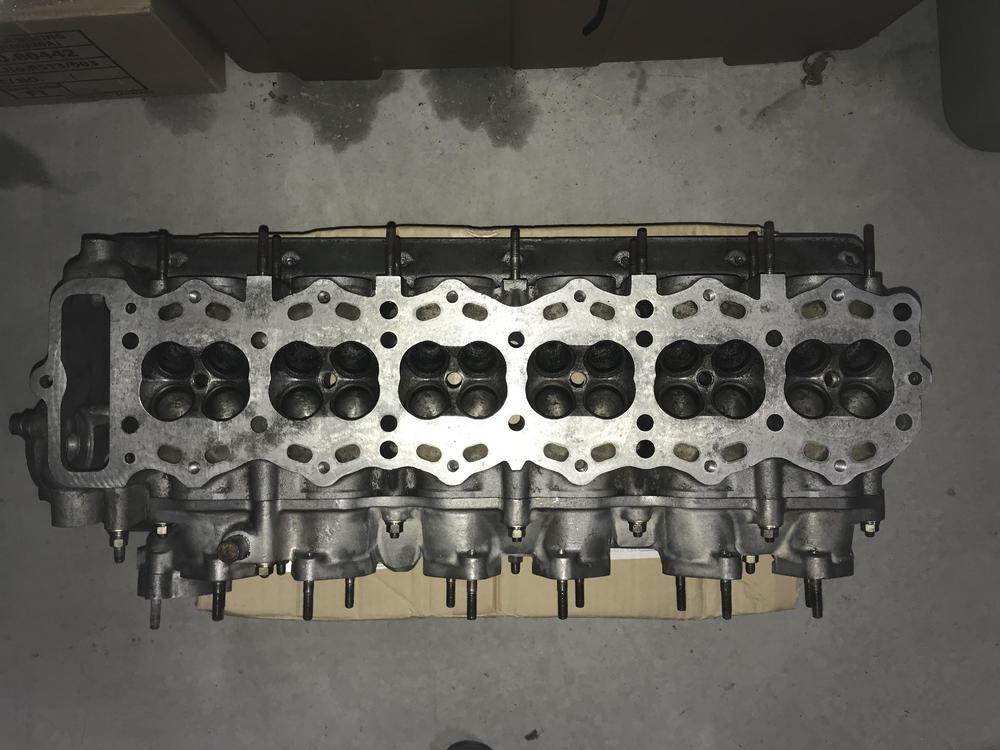
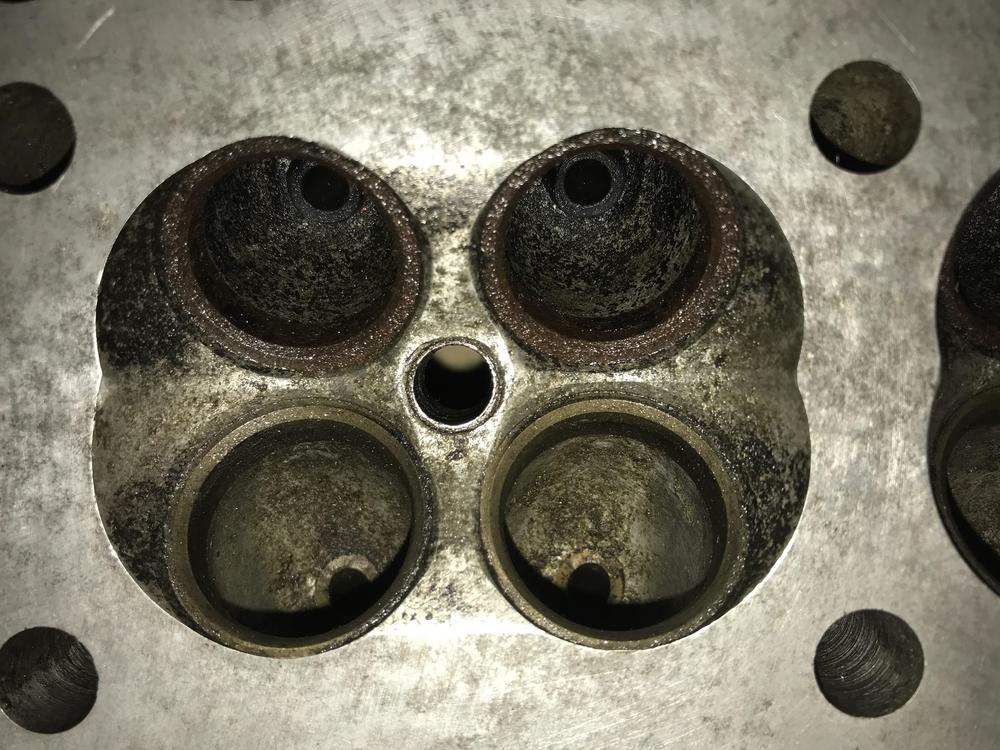
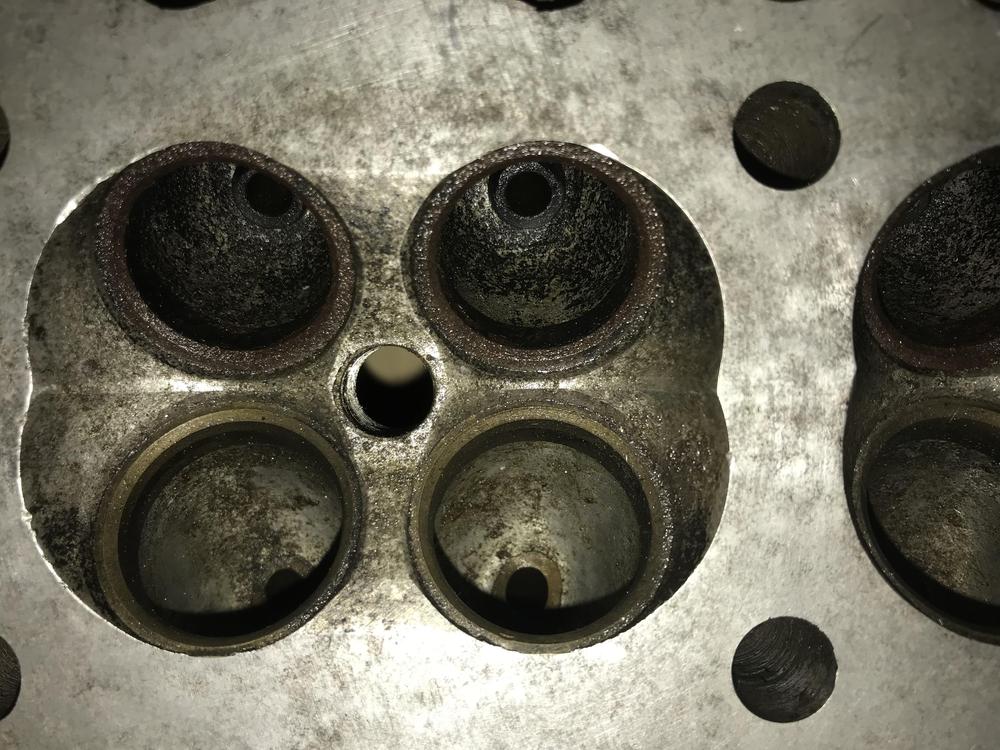
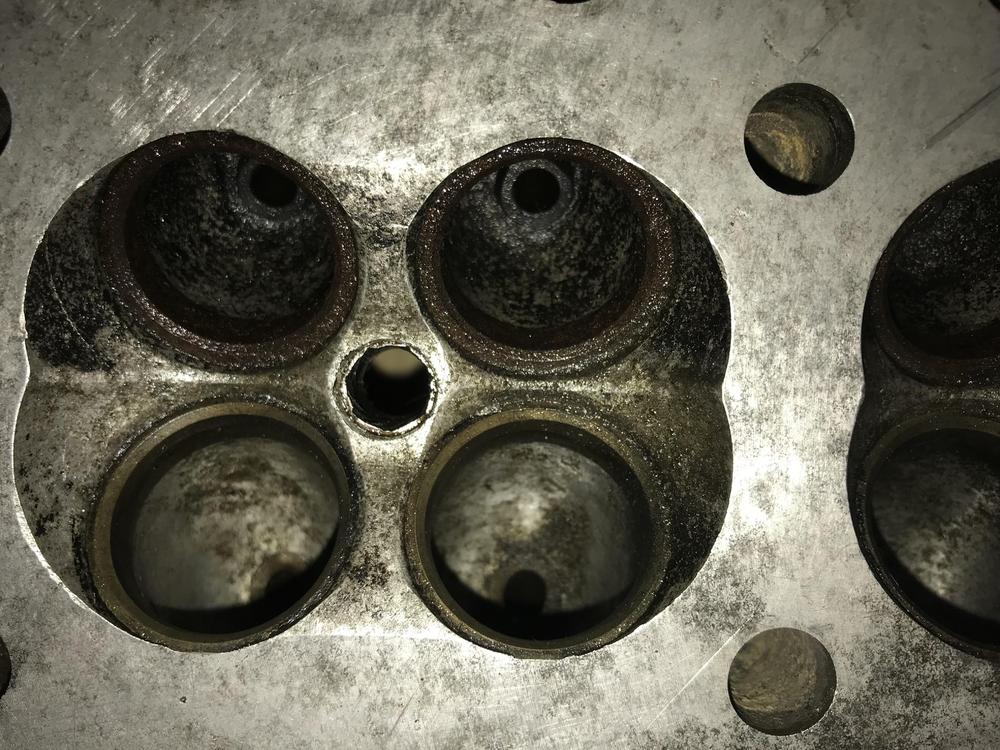
3 pointsHi , I picked up my spare S20 , I am so happy that now I can see it closely and I can list up what else I need for this engine . I see the head needs some fundamental work such as valve guide replacement, sheet ring replacement. And , the biggest problem is , No. 1 and No.5 Spark plug hole is something weired, someone drilled the sparg plug ,then plug’s metal is remaining in the hole’s groove. This makes me nervous, I have to find an engineer who can remove it and clean the hole . I don’t want a re-coil method if I can avoid. Other than that , parts are all in good shape , I don’t think I need to put my NOS parts into this engine.I will use this original component as much as possible. I will show you rest of parts when I am home . Kats


 3 points
 -
2 points
-
2 pointsPfffft... how are you gunna run your coolant lines with clamps in those holes! amateur....!2 points
-
2 points
-
2 pointsI had SS hose fittings in the heater in/out-lets. Both BSPT and NPT have 14 TPI for these 1/2 threads so it fits without drama. The 280's have the threaded heater hose fitting on the lower rad outlet, and the hole at the back of the head is always threaded, so it's an easy conversion. Makes it easy to put a simple brass plug in it.2 points
-
2 pointsWe have not so long winters but they suck if it's a week or two. So the results are a lot of new mothers. Instead of buying more kerosene they wind up eventually buying diapers. Trailer Queens and there little Honey Boo Boos.2 points
-
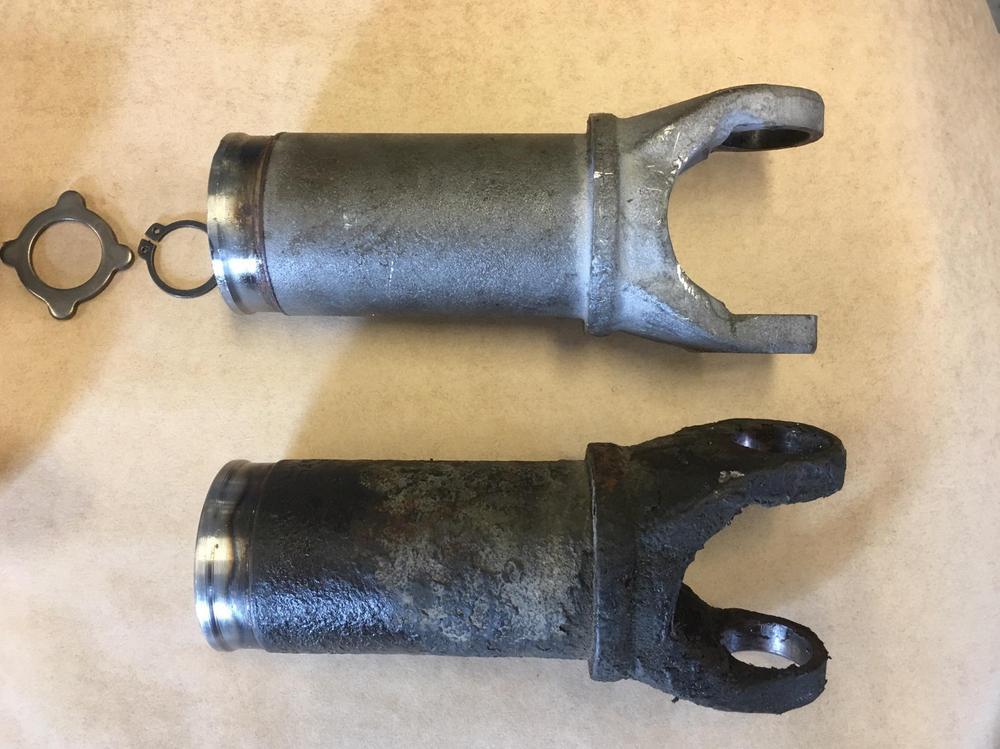
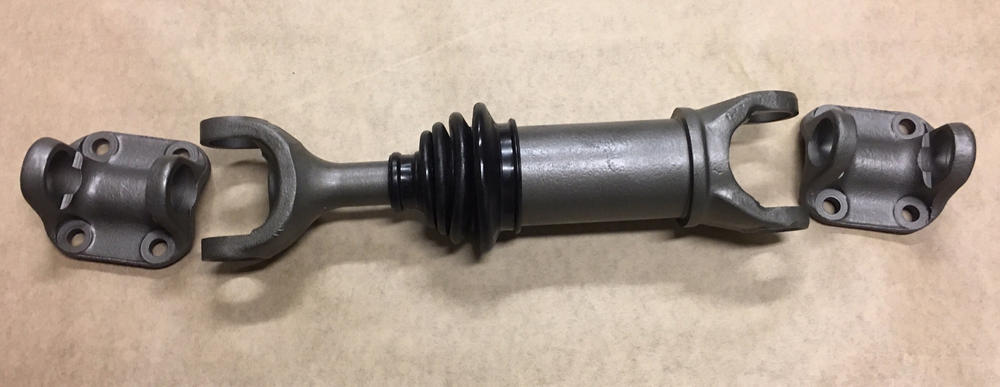
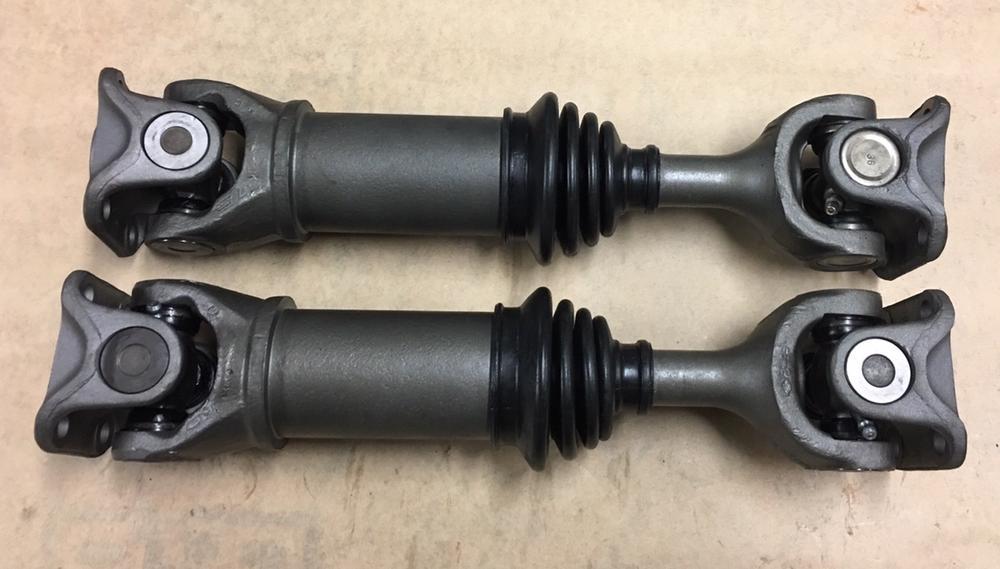
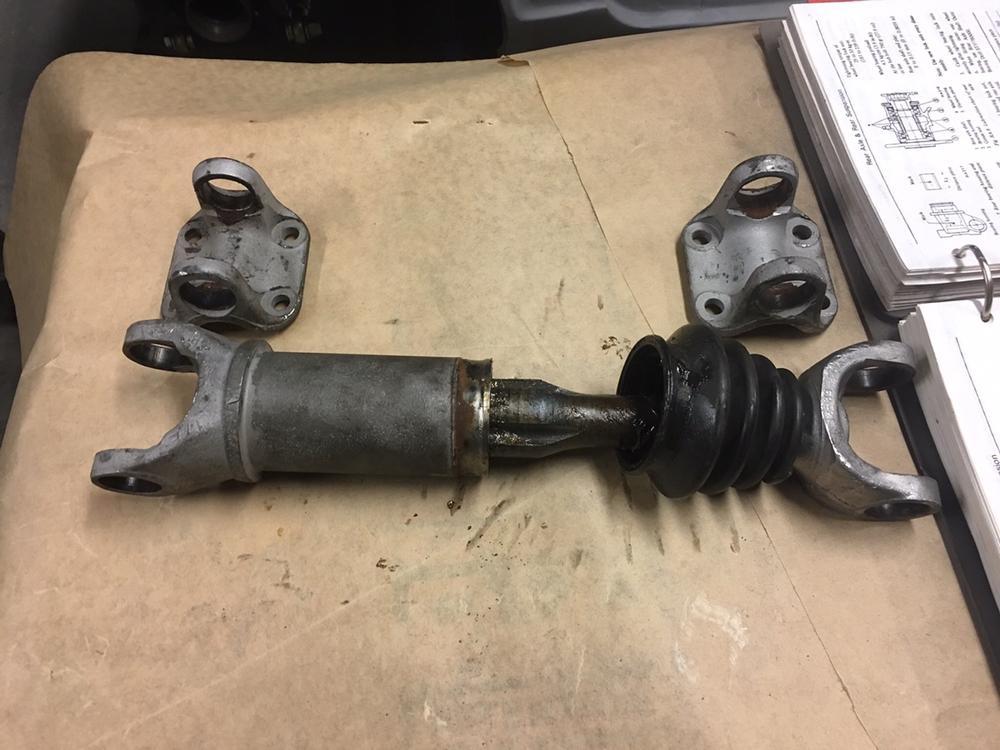
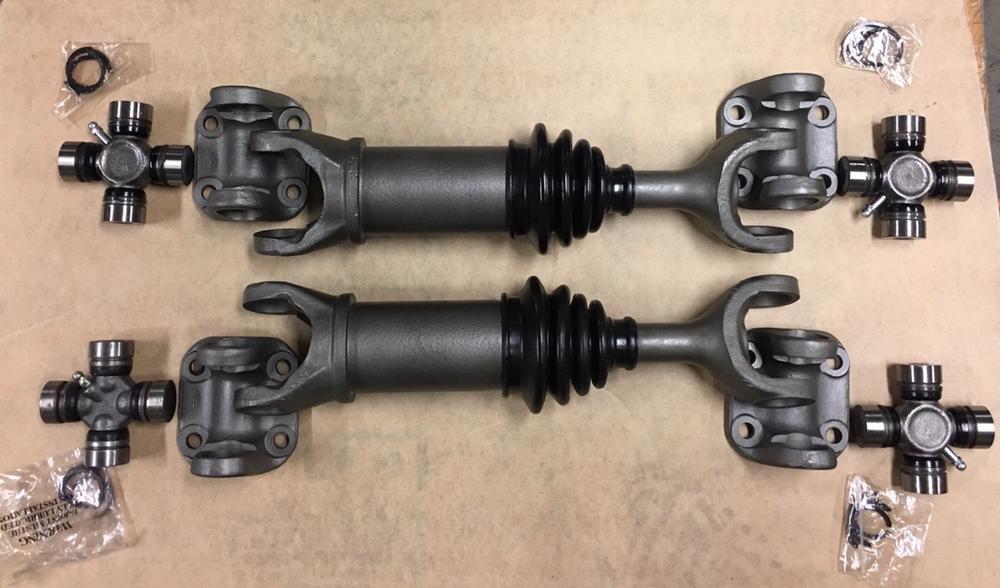
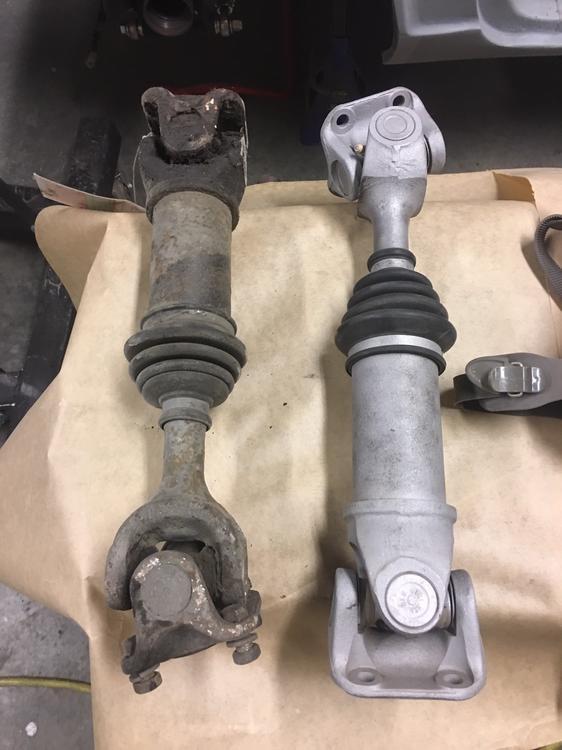
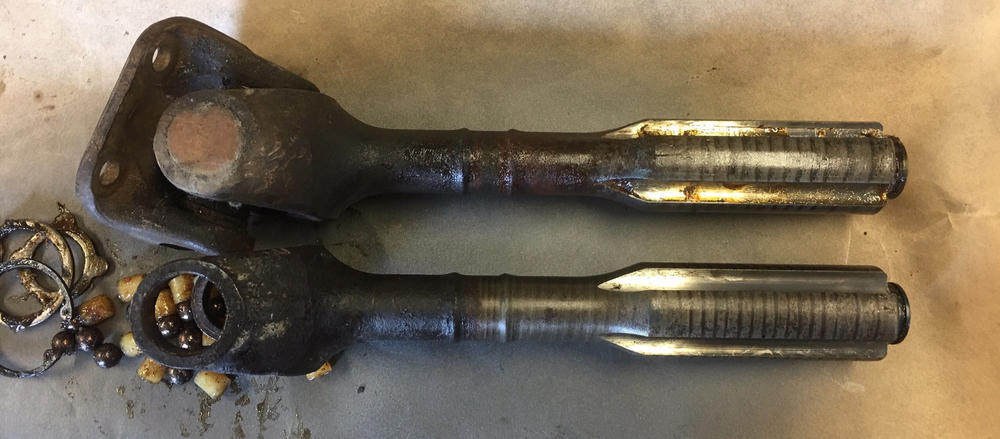
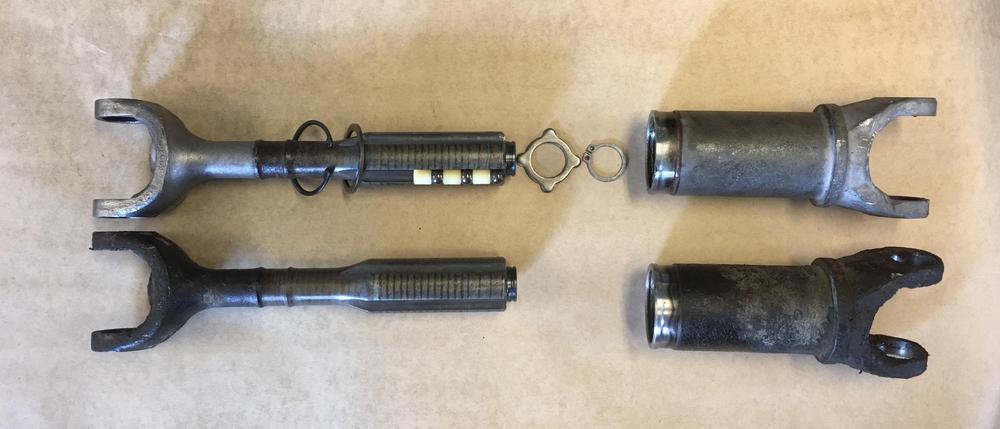
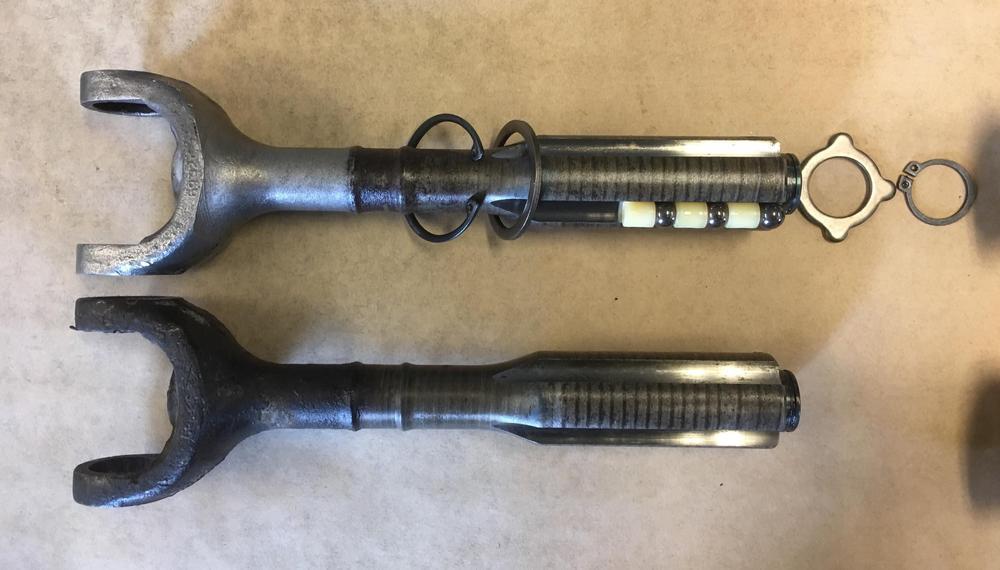
Let me start this thread by saying that I was not looking to solve a mystery or bust a myth when I started this procedure. I just wanted to rebuild my tired old 76 280Z half-shafts! I think there was a very common myth that the S30 half-shafts were different sizes. The driver side being shorter than the passenger side. Even though the distance from the wheel hub to the differential differs (more-so with the R200) from side to side, the half-shafts are IDENTICAL! The amazing amount of lateral play in the shaft allows it to expand or contract almost three inches. ...on to the pics! First a shot of the shafts after I ran one through the media cabinet next to the other. The removal of the u-joints is straight forward, several well documented methods on line if you need help there. Now the science! Here you can see that the axles are identical in each dimension. Also note the layout of the snap rings, retaining rings and the balls and spacers. And for those that were still disbelieving, a shot of a 240 half-shaft next to the 280 half-shaft. 240 shaft with the u-joint still attached. Then on to refurbishing! You will need 4 new u-joints. SKF UJ393, MOOG 393, or Precision 393 will all work or any variation thereof. I media blasted the shafts and protected the bearing surfaces while doing so. I then painted the exposed parts in Cast Iron engine paint from Duplicolor. Love the look! I re-used the old boots as they were in great shape. After blasting the shafts and painting them, I turned the boots inside out and fed the wide side over the bearing shaft. I used the cut-off top of a funnel to aid the narrow end going over the shaft and up into position. Worked excellent. Leave the boot inside out for now. Slide the upper retaining ring and snap ring on to hold the shafts together, tuck them up by the boot. Refer to the above pic for proper order. Attach the lower retaining ring and snap ring. Put the cleaned spacers and bearings into a zip lock bag full of a good quality bearing grease and ensure they are coated nicely all around. Place them in the channels in the correct order, ball bearing at the bottom, spacer at the top. The grease will keep them in place. Add about 10g of grease to the top of each channel. Carefully slide the shaft back into the axle while ensuring the ball bearing and spacers are supported by the retaining tabs. Make sure the shaft is orientated correctly, the same direction as the axle end! Try and keep the bearings at the bottom of the assembly as it goes together. Holding it vertical helps. When the shaft is in the axle, add another 30g of grease to the top of the shaft, concentrating on the open groves of the axle that did not receive the bearings. Use the retaining ring to push it all together and seat the bearings. I used a screwdriver and hammer to tap the retaining ring flat. Worked great, didn't need much pressure. Reattach the snap ring to the axle at the top. Wipe up the grease you got everywhere... and pull the boot back down outside-in , ensuring the top fully inverts and seats in the groove, same as the bottom. Attach your favourite brand of cv boot clamp over the boot ends and securely tightly. Mine had not arrived in time for the pictures. Proceed on to installing the u-joints, being careful not to damage the pretty paint! Grease the u-joints and you are done! Another 40 years of glorious torque! Thanks to Jim @zKars for his guidance and wisdom.
 1 point
 -
1 pointGood idea Cliff - as we know, even the newest L28's (other than those slated for other use, i.e. forklift, marine use) are now over 35 years - I know I've changed a bunch in my engine - it certainly isn't what came out of the factory, so who knows who did what to an engine that is sitting in the junkyard... especially if it is wrecked - at least you know it "ran when parked" John - I assume they will pull the engine for you? Whatever, if you need an open bed truck to transport it to the barn, let me know. Wayne1 point
-
1 point
-
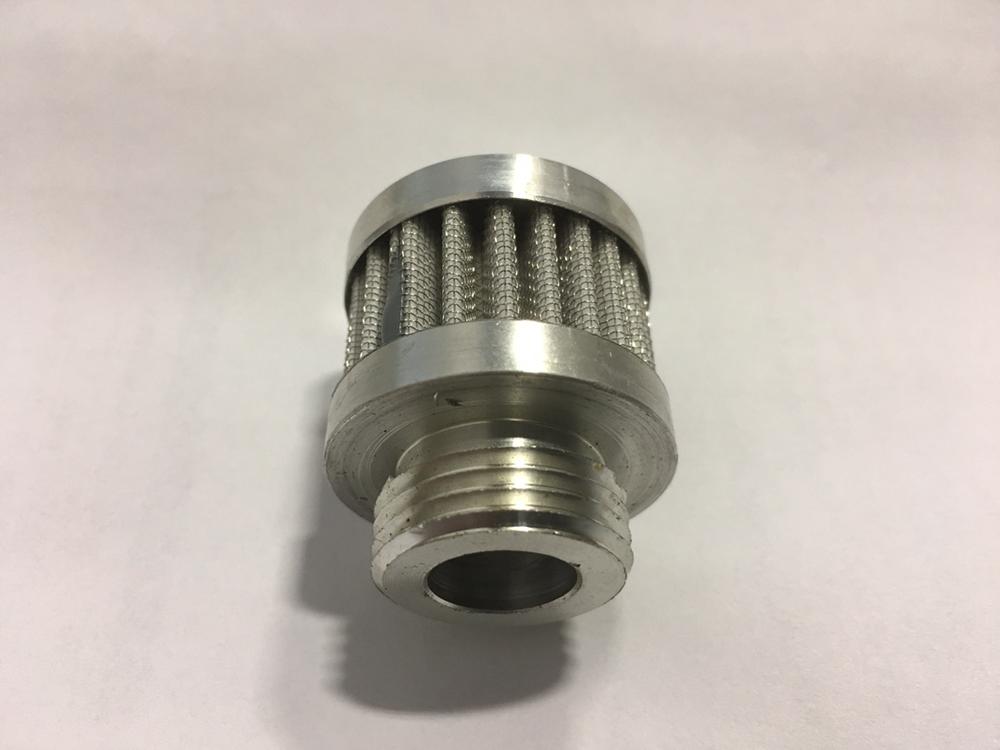
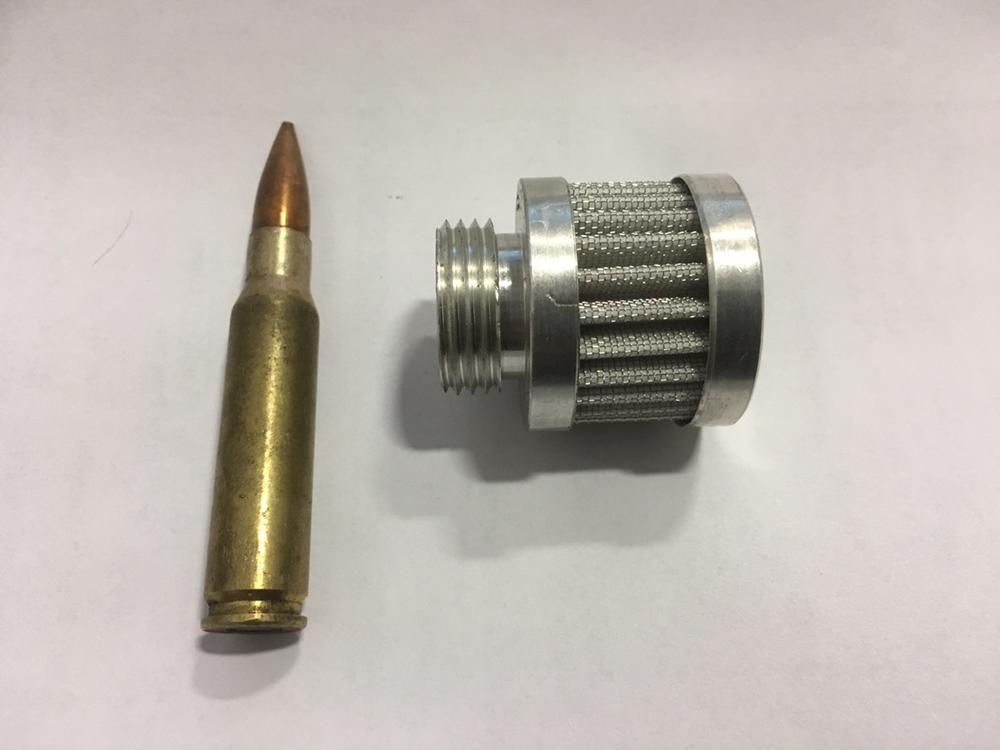
1 pointSo this is definitely going onto my car somewhere! Leopard 2 Main Battle Tank breather fitting! All Z cars should have tank parts... GPMG C6 Machine gun 7.62mm round for scale.... [emoji51]
 1 point
 -
1 point
-
1 pointThanks Cliff. I drove a turbo once in like 1989. It was a peppy little car and fun to drive. I know there was like 1 turbo for every non-turbo built so they’re harder to find for sure. I forgot about a new ECU and probably AFM and wire harness. Maybe the guy would throw those in....probably not? I’ll wait for ZedHead to chime in. He always has good comments. Starting to think a 240 not rusted out is becoming like a unicorn these days. Sent from my iPhone using Tapatalk1 point
-
1 point
-
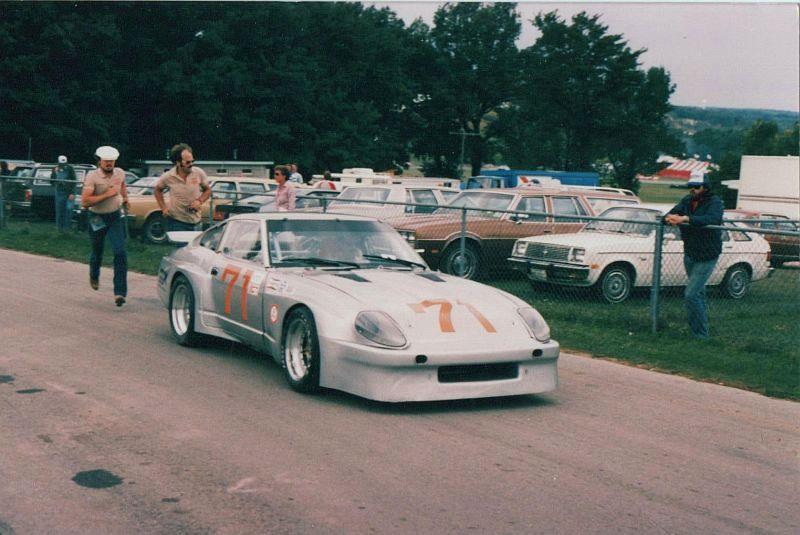
I took this around 30- 35 years ago and never saw it again, anywhere.
 1 point
 -
1 pointThere have been a couple of references to BRE/Interpart’s Mulholland shocks lately, which apparently were produced by Boge. The company is part of ZF Friedrichshafen AG, based in Germany and parent to other products like ZF gearboxes and Sachs clutches. Here’s some info that could be useful for reference or if anyone is hoping to nurse a set. https://www.thejunkmanadv.com/boge-mulholland-shocks-info.html https://aftermarket.zf.com/go/en/boge/products/car-shock-absorbers/1 point
-
1 pointSomeone probably stuffed the thread and tried to repair it. Worst case a tig welder would be able to apply some new material, redrill it then retap. It should be easy enough to fix. Did you win this head on Yahoo! Auctions recently? I saw a head for sale a day or 2 ago?1 point
-
1 pointI think the same guy who works on your valve seats would be able to repair your spark plug issue. Are those the exhaust valve seats that look so grunged? But then, how does one complain about a 4-valve, cross-flow head? Pretty cool, Kats.1 point
-
1 point
-
1 pointDepends on what you want it to look like and to what extent you are replacing them. (IE: if you are deleting emissions and coolant lines to the carbs) If you are after the original style braided hose look there is really only 1 source. Be advised that going this route will cost you some greenbacks. You'll have to scroll through the pages to see all the items, as they are not all in one kit----although supposedly you can save a few dollars by ordering this "value kit": "https://jdm-car-parts.com/collections/hoses-pipes-valves-nissan-datsun-fairlady-240z-260z-280z-280zx/products/original-style-engine-bay-hose-set-for-datsun-240z https://jdm-car-parts.com/collections/hoses-pipes-valves-nissan-datsun-fairlady-240z-260z-280z-280zx Smooth rubber can be had, but you will have to get what you need from multiple other sources---such as Zcardepot that Zed Head posted above. MSA (Motorsports) is another. I don't know of anyone who sells all the hoses needed in one place.1 point
-
1 pointRule #1, DON'T BEND THE BRASS NEEDLE that protrudes from the piston bottom. Start with a can of lacquer thinner, a soft brush, and some cotton rags. Clean every surface that you can reach. All those black surfaces in the pic are actually aluminum. When everything is clean reassemble the piston and dome onto the carb. The piston should slide up and down with no interference. Add 20 wt oil or ATF to the fill line on the small black stem. It might be a good idea to take a look in the float chambers to see if there's any flotsam or jetsom in there.1 point
-
1 pointI've always said, "Long cold winters are the Mother of invention.". Having spent my first 22 years in Northern Wisconsin, I know from experience. Dennis1 point
-
@wheee! Let me know if there is any way I can help you on your parts order. It isn't what I would call "fast" from the US to Canada but it might help.1 point
-
1 pointYeah I don't know why the first one came out big and the other ones are small. I'll get it fixed. I'm new to this posting thing so you guys will have to bear with me while I learn.1 point
-
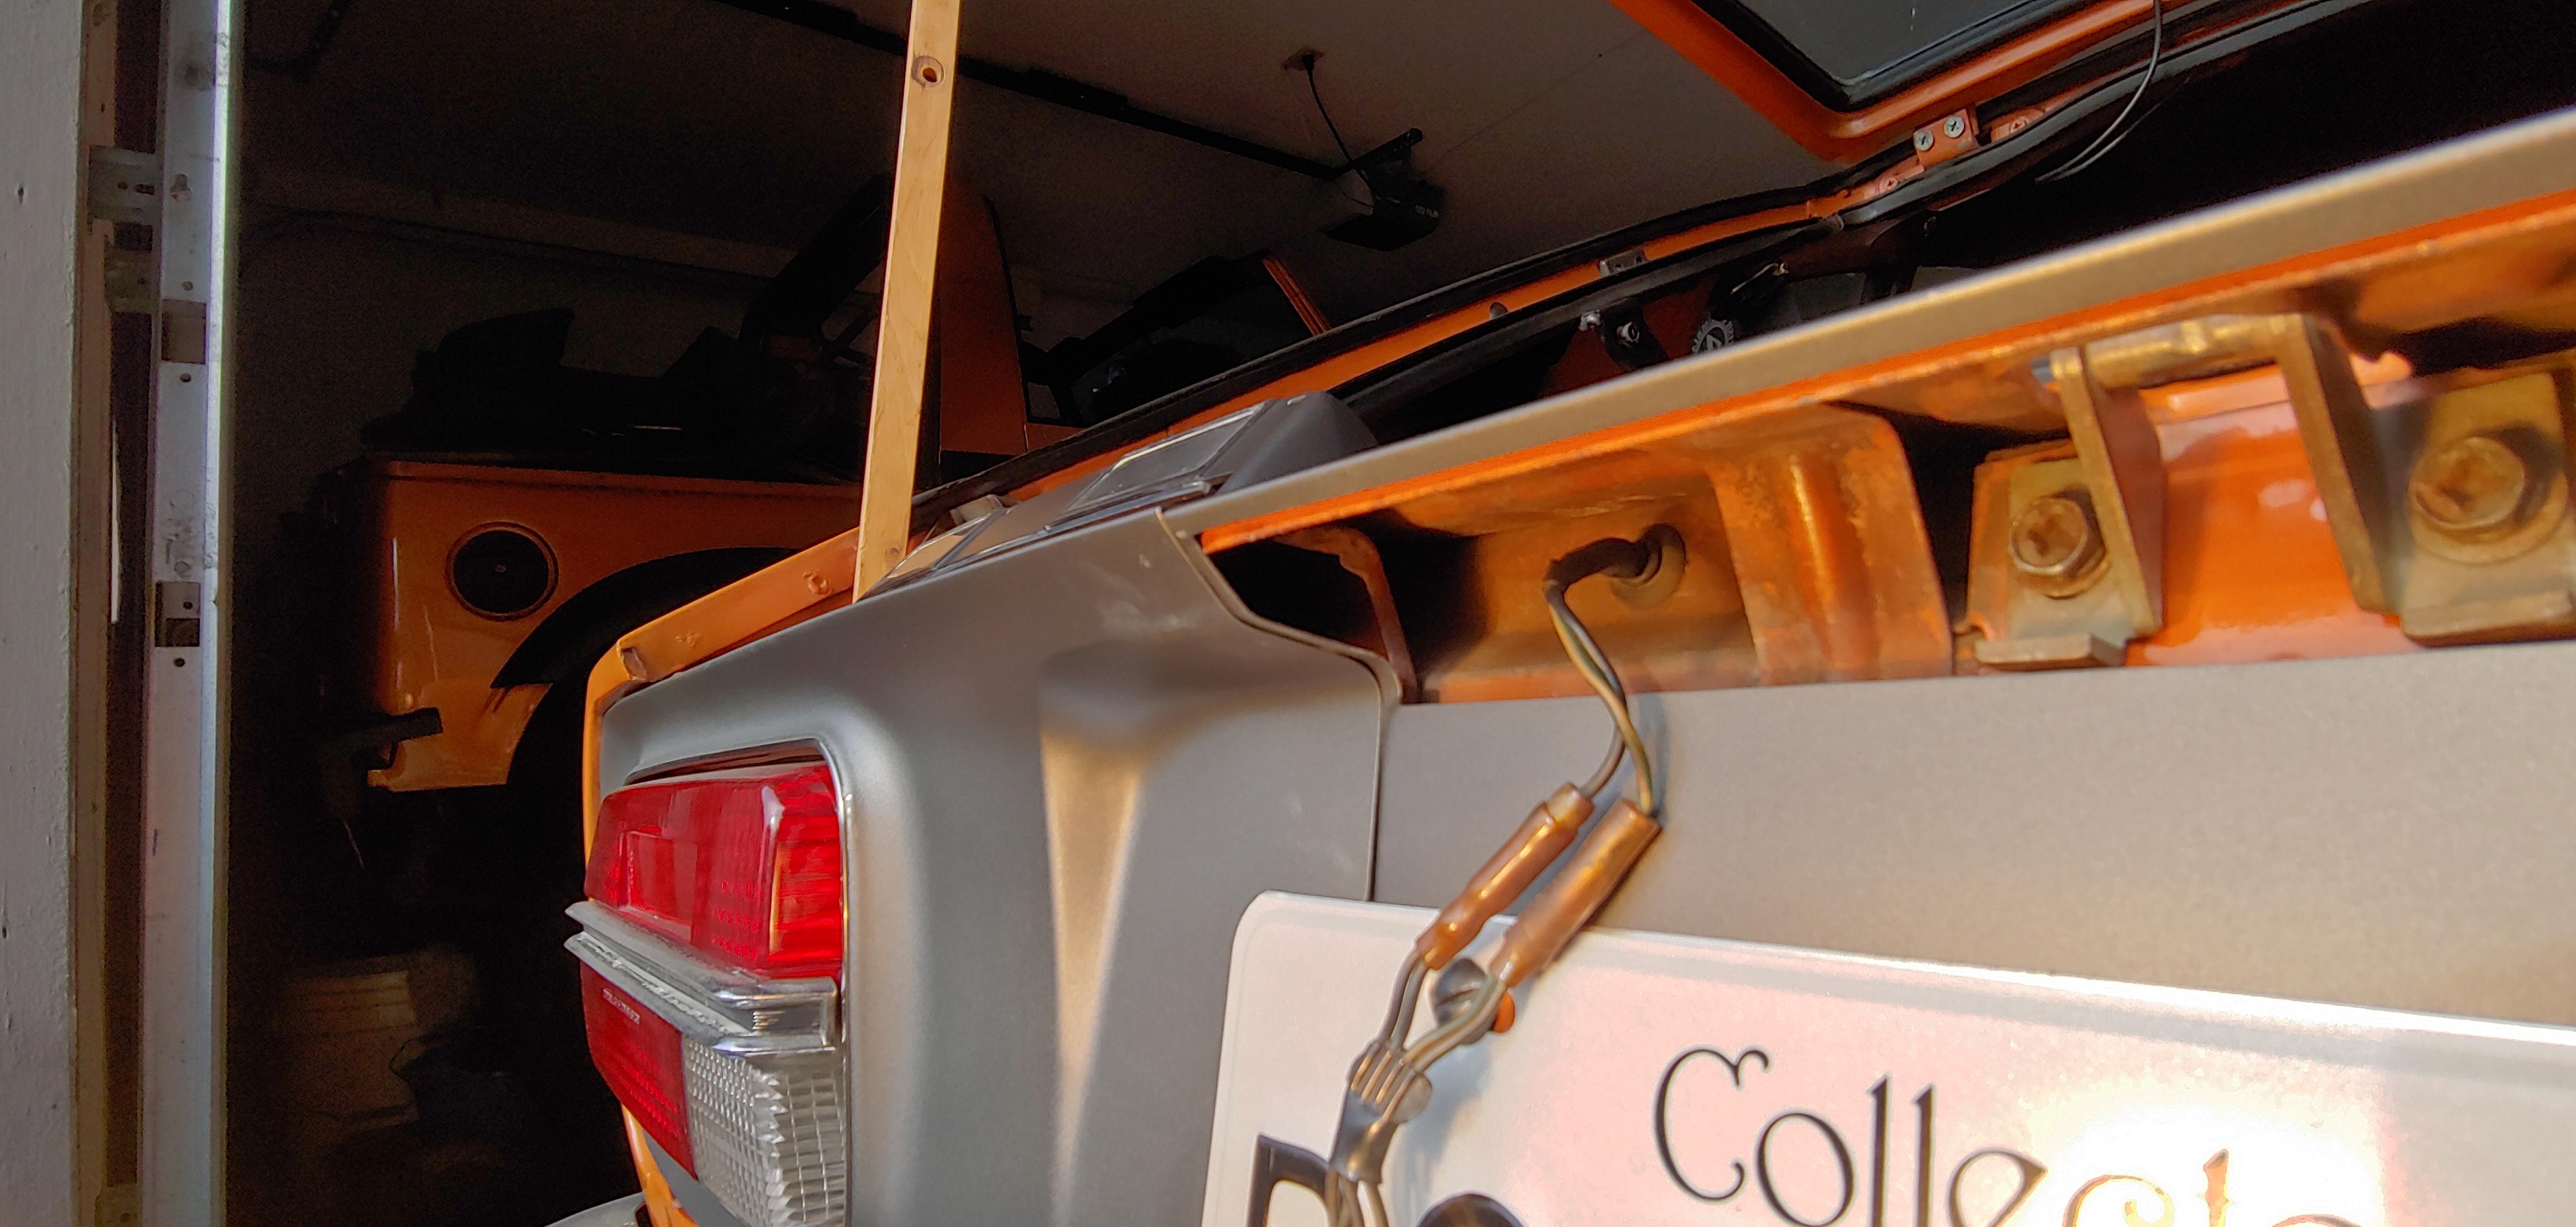
1 pointThose are transport plugs. The engine came to me in the back of a pickup truck and needed to have a couple plugs to prevent leaks from the residual coolant. I left them in to keep contaminants out for now. I took the hose plug off for the pictures. The stock lines will run as normal under the COP setup.1 point
-
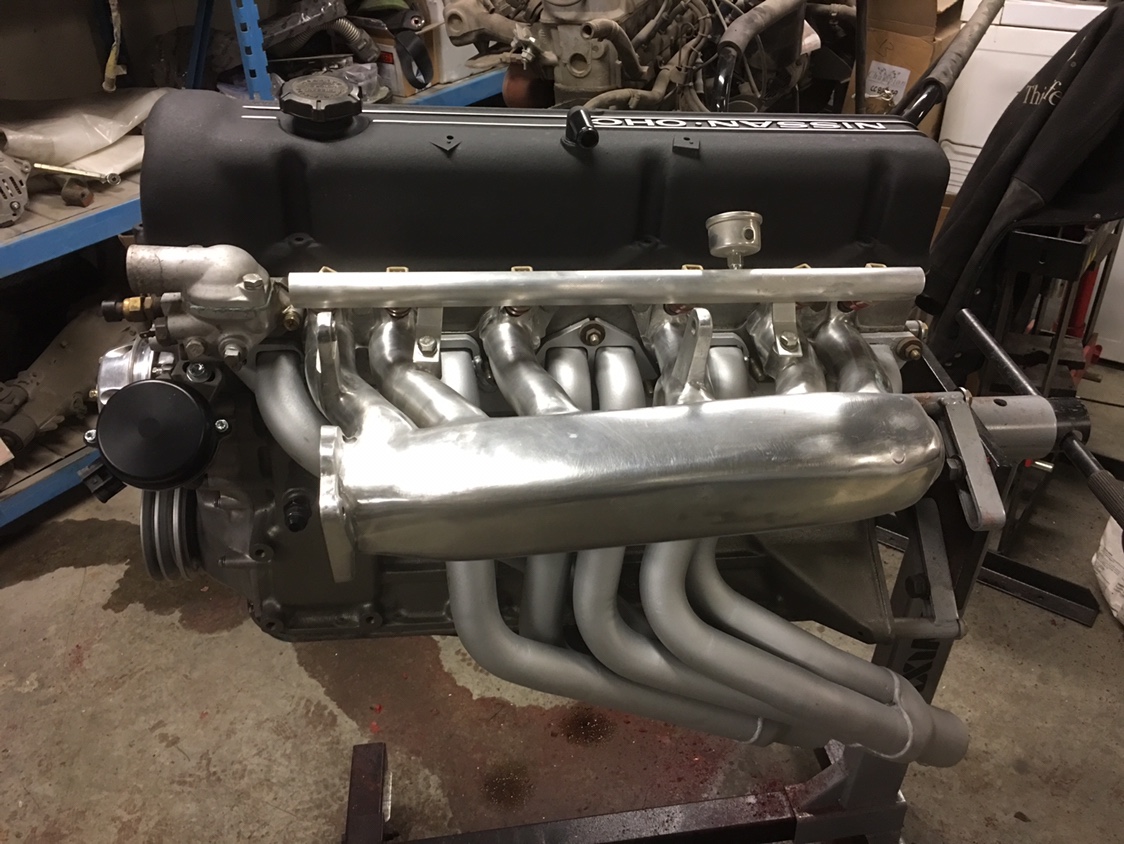
1 pointBack to the topic.... I got the block cleaned up and painted tonight. The oil pan needs to be done still and a few other things, but I thought it was as a good a time as any to slap it together for some motivation! As soon as the coil on plug units arrive, I can start mocking up the aluminum support for the spark plugs and coils. I think the cast iron paint will be a nice subtle touch in the engine bay along with the shiny black, chrome and red bits.


 1 point
 -
1 pointThe new Fusible links will be here tonight and I'll put them in. I'll get back to everyone when I get this in and test it and let you know what happens.1 point
-
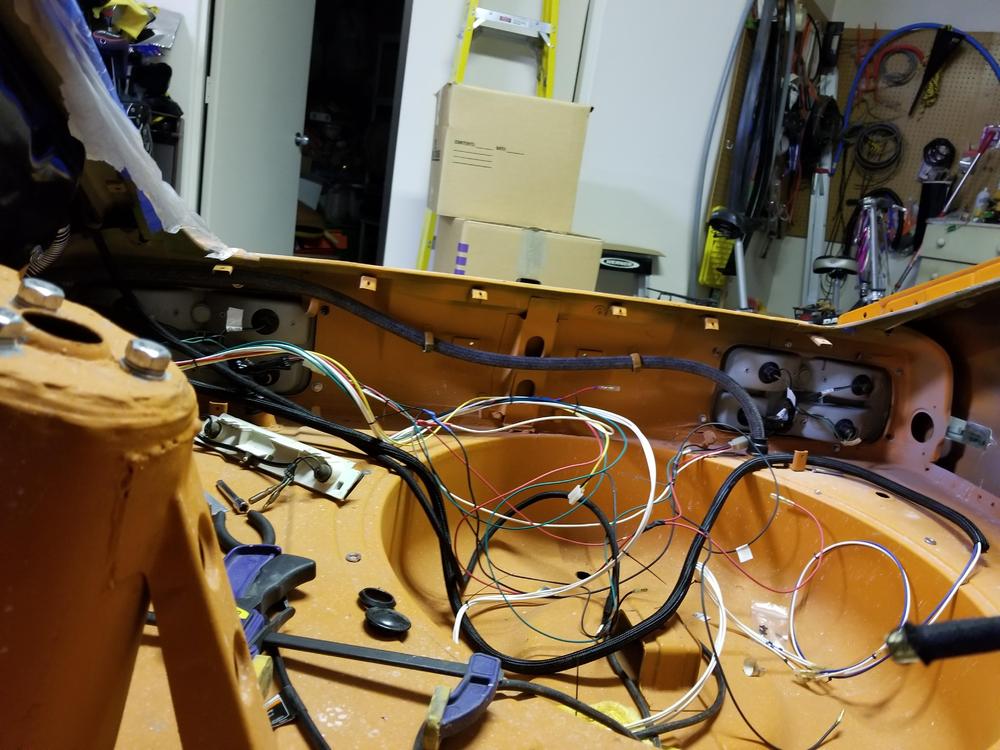
1 pointWhen the grommet is still black it's a lot easier to see. :) Who made that harness for you Q?1 point
-
1 point
-
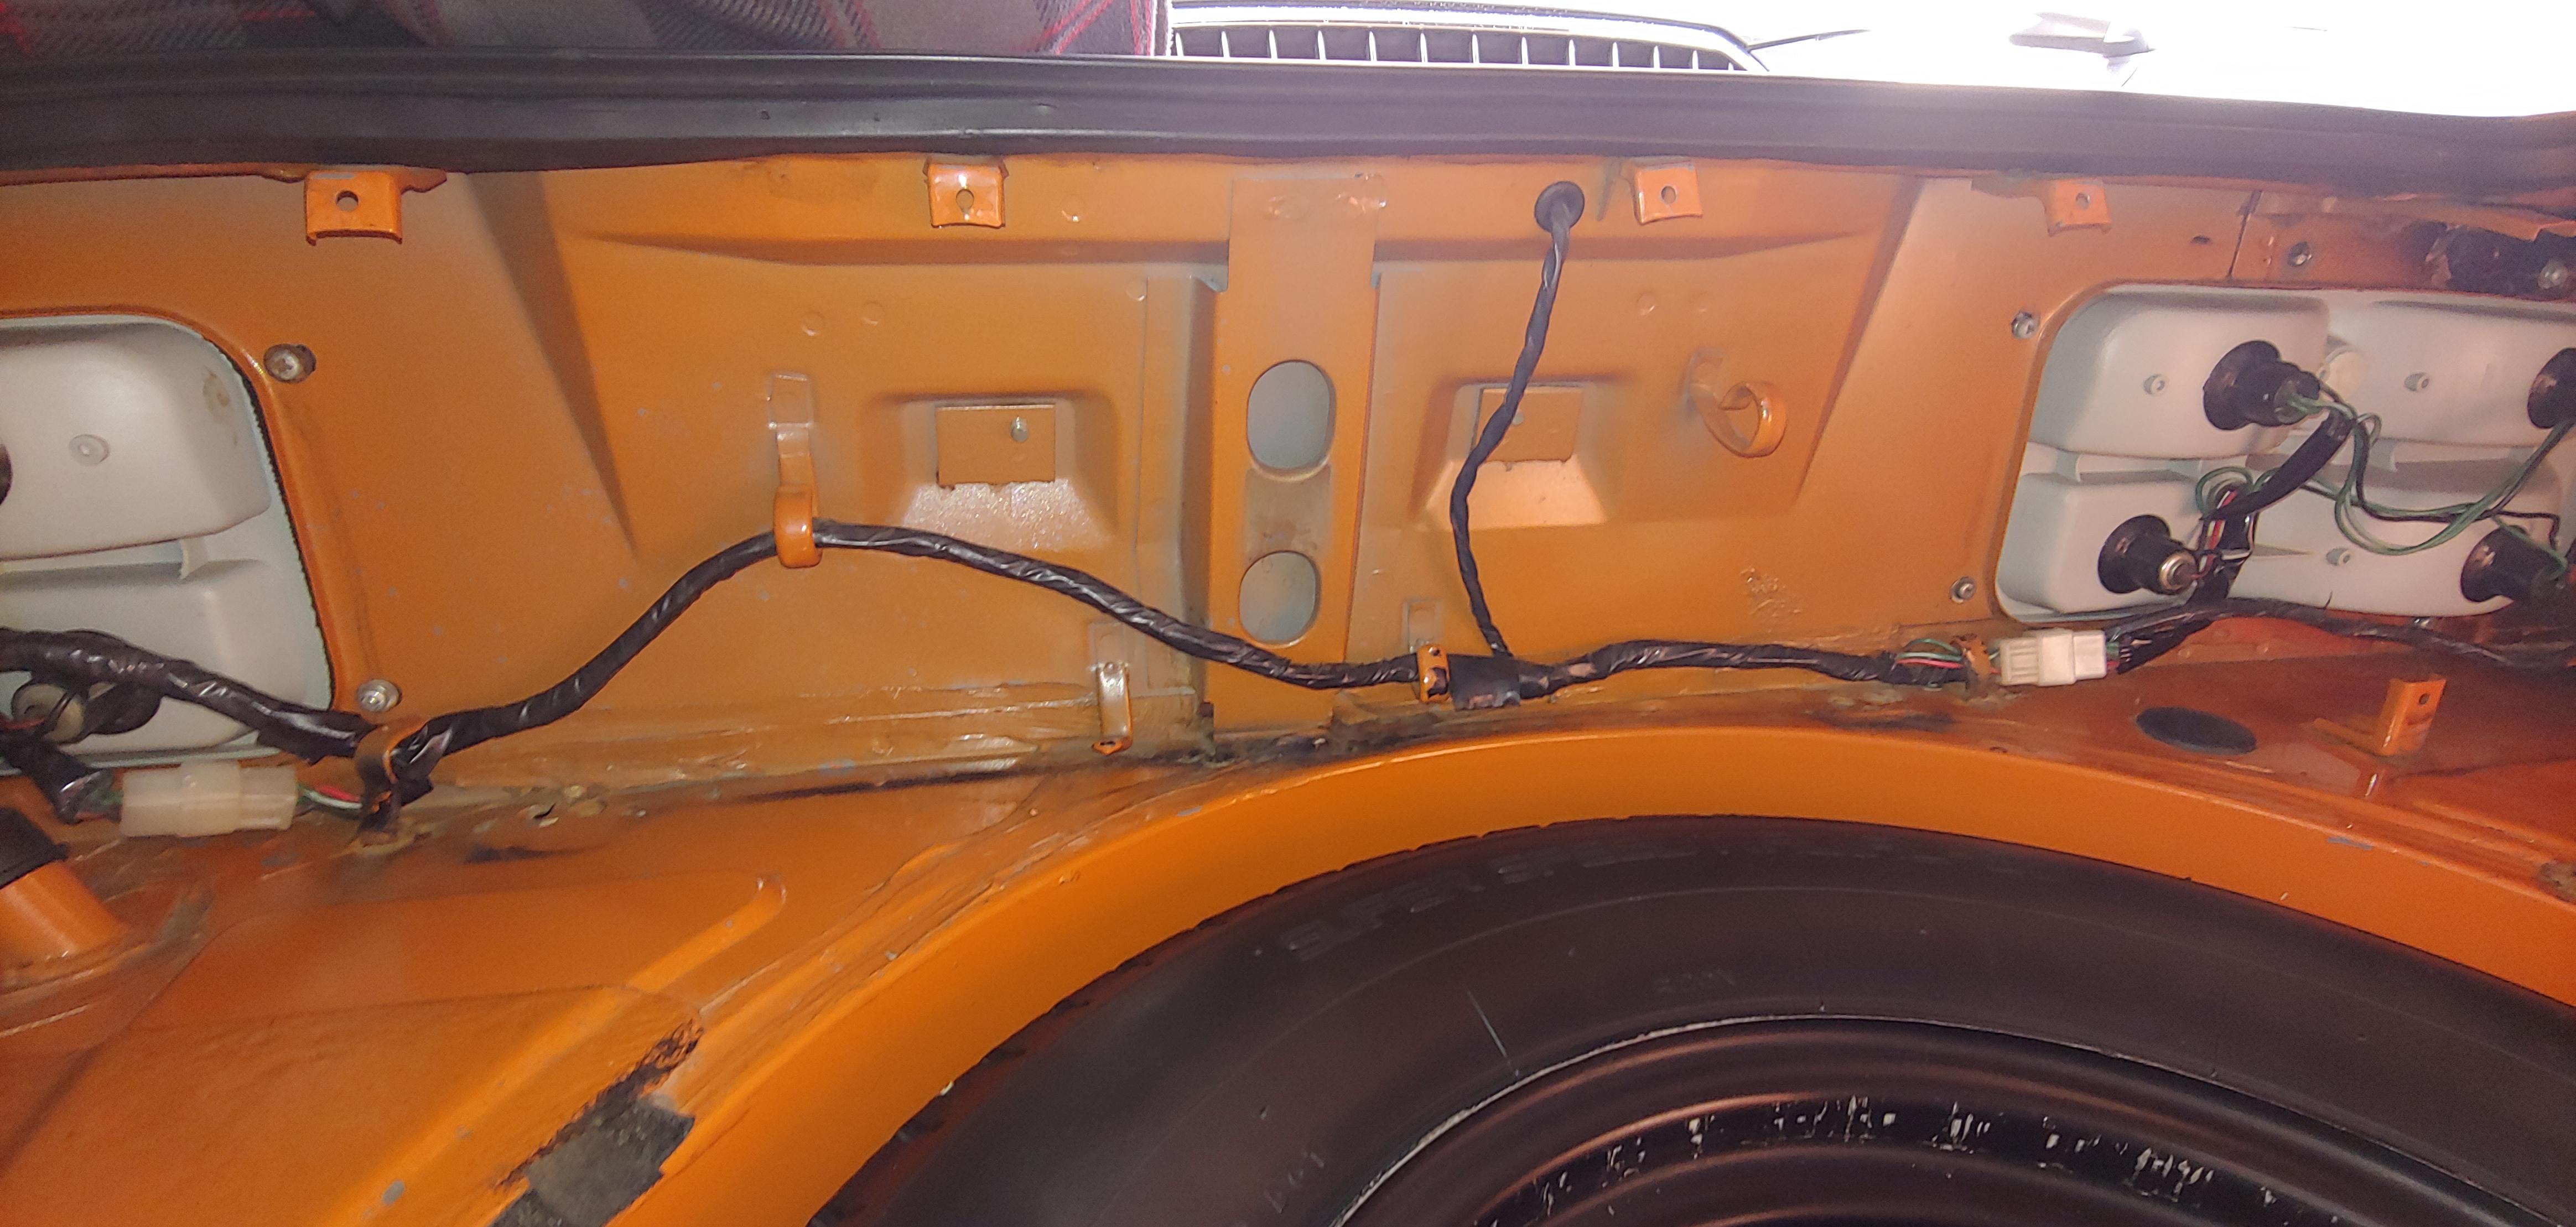
1 pointCanTechZ - The two pictures you sent are worth 1000 words. Thank you very much. I have a 1973 which in most regards is quite similar to your 70. Having said that I do not have the access hole in hatch area that appears in your picture.
 1 point
 -
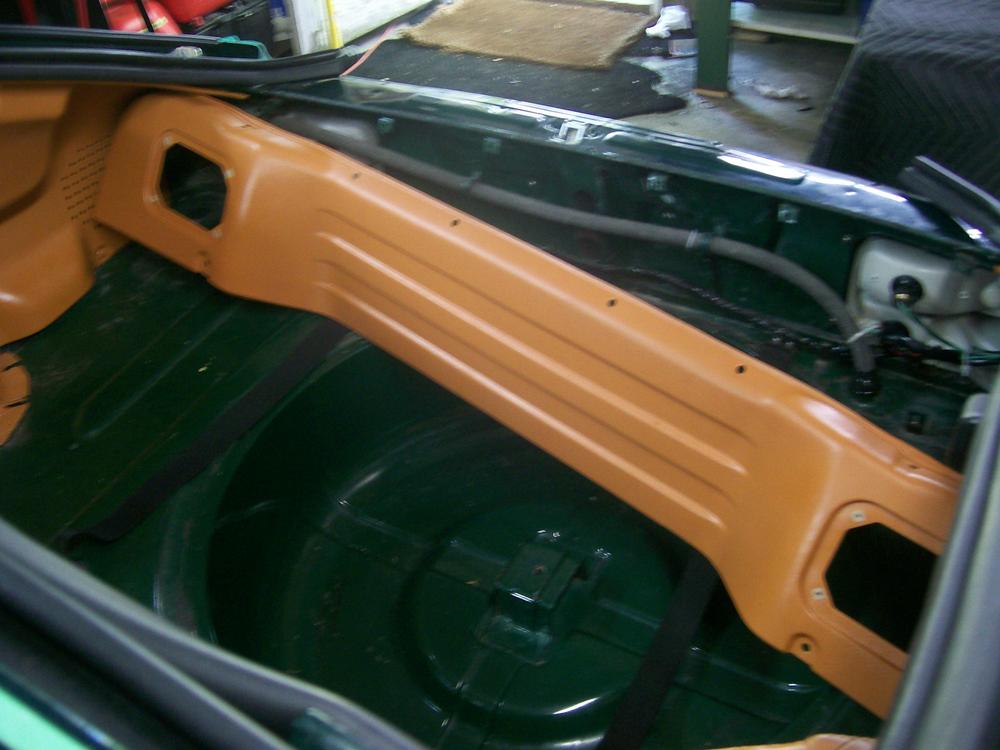
1 pointI know this question is answered, but I just wanted to mention that it would not be necessary to remove the outer center metal finisher to run the wiring harness and install the grommet. With the license plate light removed it should be no problem. Cheers Mike

 1 point
 -
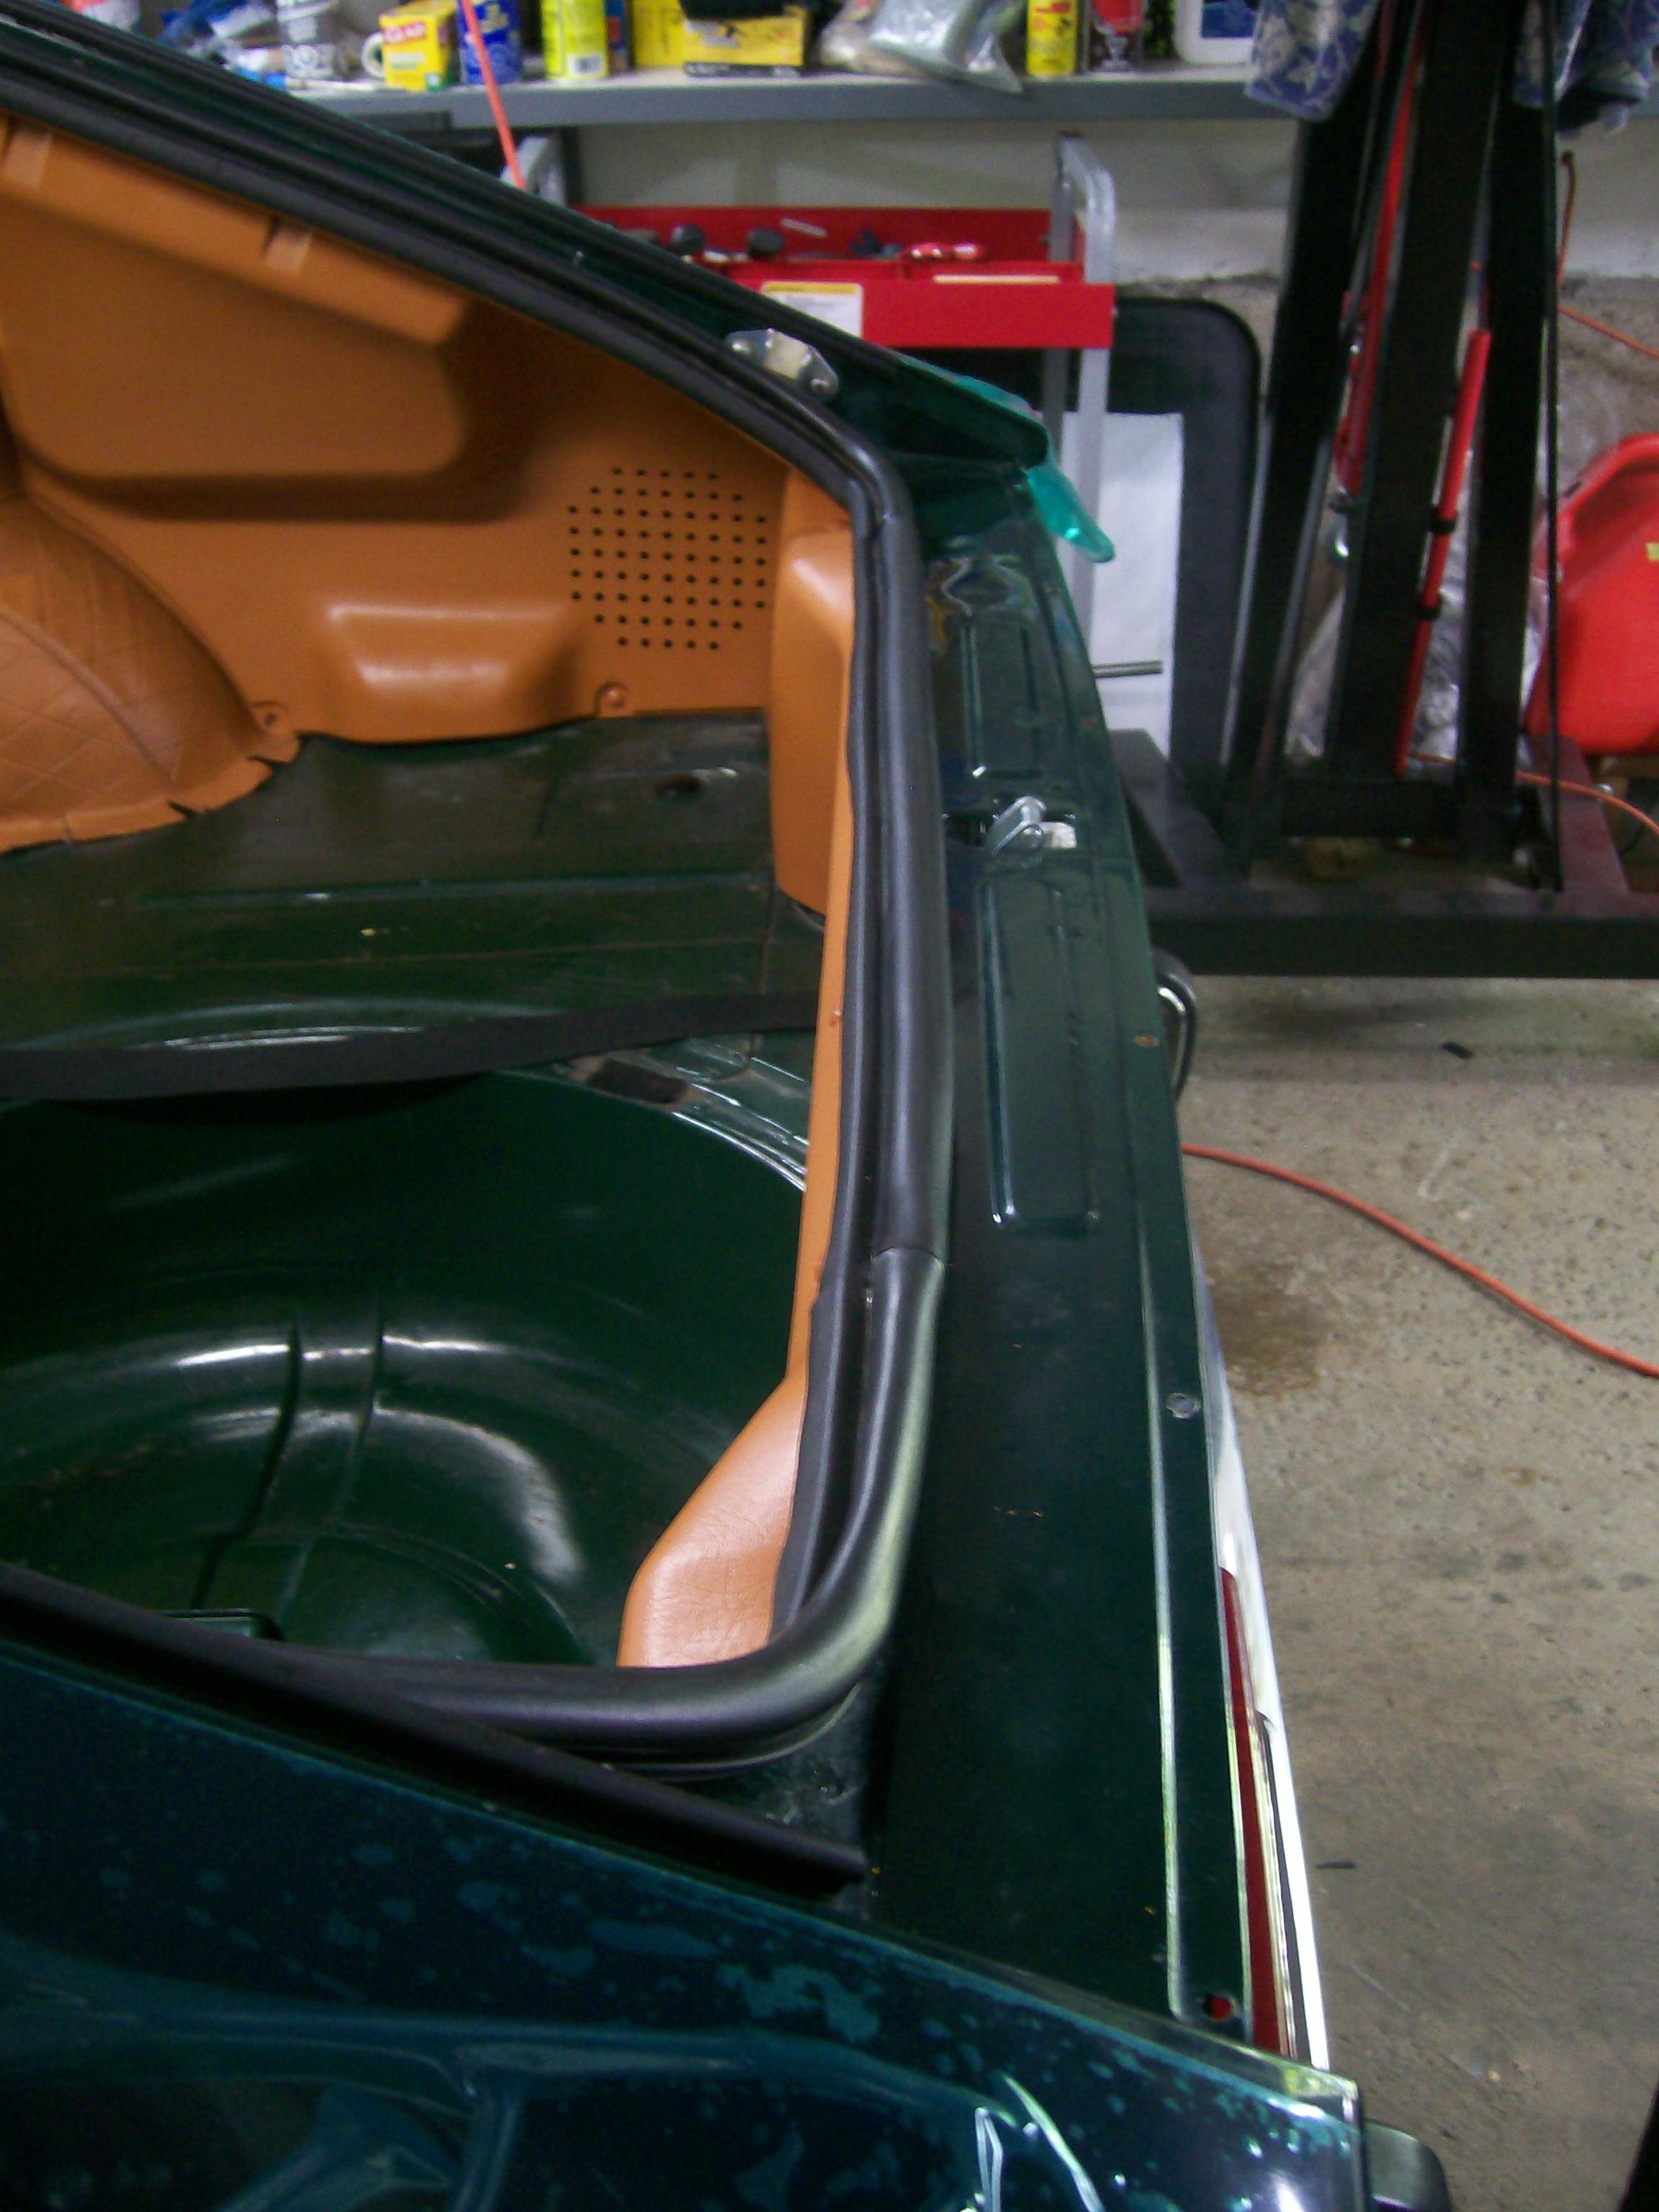
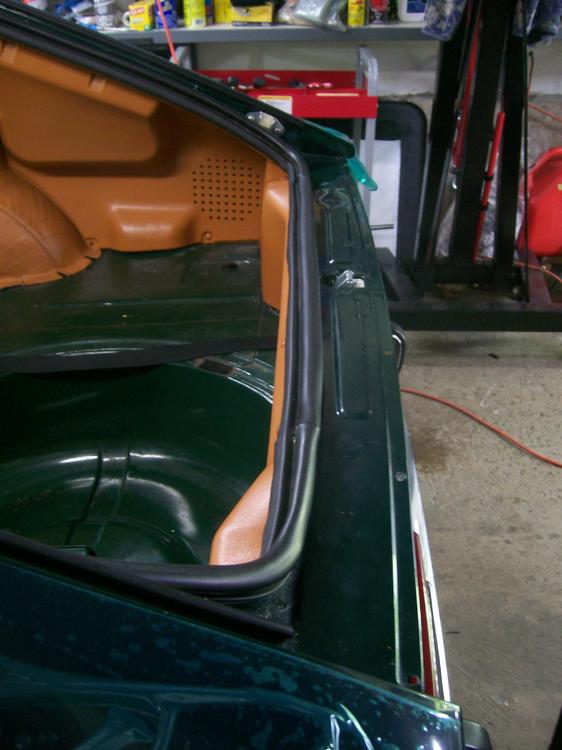
1 pointShort answer: Yes. It sounds like you haven't tried dismounting the light housing yet. When you do, things will be obvious. The wiring connectors are located on the outside of the body, behind the light housing. The wiring exits from the interior through a grommet-equipped hole (with grommet) just to the left of the body centreline. You'll need to remove both the metal centre finisher panel on the outside and the big plastic trim panel on the inside. You might also need to pull the weatherstripping free along the back sill. Be gentle and patient when you set about trying to remove the interior plastic trim panel. There are molded lips along the top and bottom edges that are typically brittle with age and really easy to break off if you don't finesse things. IIRC, you need to tug the top edge free first and tilt the top inward by an inch of so. Then you need to coax either the left or right end out the corner a bit so as to free things up. Then remove at a slight angle. The panel won't pull straight forward. It also doesn't like to bend very much. Picture below (a little fuzzy) shows the panel during installation rather than removal, but should give you the idea.
 1 point
 -
1 point
-
1 point
-
1 pointKathy and I will be there. Registered and flight is booked. Can't wait to meet all of you.1 point
-
1 pointWe could incorporate a real Georgia peach into each trophy. Unfortunately they are out of season by October, so they may be a little worse for wear.1 point