Leaderboard
-

siteunseen
Free Member7Points15,115Posts -

Av8ferg
Free Member4Points1,538Posts -
Captain Obvious
Free Member4Points10,081Posts -

Zed Head
Free Member4Points19,236Posts


Popular Content
Showing content with the highest reputation on 05/24/2023 in all areas
-
7 pointsHey all. The guy I worked for off and on, presently on at the time, past away in his sleep at the end of January. I've gone from a great 30 hour a week job to 55 hours a week by myself running a paint store. He had that and was a general contractor plus 88 two bedroom apartments plus another 10 or so commercial rentals. We lost our best employee when he didn't wake up one morning so I'm trying to help his family which he kept out of his businesses as best he could. I read the site every day but can't reply too much because of how busy day to day is. Making a lot of money is my get out of bed every morning motivation and his family is my family too. Saving up to do things in the future. That P90 head is my next project. I miss participating and chatting with the forum members but I must help the family get all his finances in order. He was a private guy that wouldn't worry us with the behind the scenes going ons. I'll be more active asap. Cliff7 points
-
3 pointsSorry to hear that Cliff. It just goes to show that life has no guarantees. Nobody knows when their time is up, so enjoy every day and never assume you can get to it later when it comes to personal stuff.3 points
-
3 pointsCliff, sorry to hear about your loss and the added stress it has brought into your life. Life is a roller coaster and it’s a ride you can’t get off until it stops. Don’t worry we got plenty of guys around here to keep the lights on in the library whale you navigate the waters of life. Take care and we’re all here waiting for your speedy return.3 points
-
Thanks for the props. I have a length of 3/4” heater hose I use, not only for carb setting, but to listen for exhaust leaks and other noises. Oh, and when tuning the carbs, I use a finger to lift the pistons.2 points
-
If you have not already done so, download the FSM for your car - it will have your wiring diagram: http://xenonzcar.com/s30/files/FSM/1974 260z FSM.zip It definitely sounds like you have a dead short somewhere, that is why the PO cut the wires. Interesting that it does not take out a fuse, perhaps wiring somewhere is heating up to the point of separating and killing the circuit. Since everything worked one time when you made repairs and hit the combo switch suggests the switch is not the culprit.1 point
-
1 pointDefinitely. One thing I did was stick a bright light under the car then sat it on the tank shining up towards the underside to see where light shone through then glopped some weatherstrip sealant on it to close under-car leaks1 point
-
1 pointThe two switches just complete the path to ground for the light. The wire that goes to the warning light switch is probably shorted to ground somewhere. You'll have to find it. It's not a distribution block, it's just a switch.
 1 point
 -
1 pointHere’s what happened in my situation. I was having the same issue’s similar to what you’re experiencing. Without getting into great detail. I changed out the booster check valve in the midst of going down the rabbit hole. Come to find out I had installed the new check valve backwards. There is an arrow on the valve. I had it pointing in the wrong direction where I was not getting any assist from the booster.1 point
-
1 pointBehind the passenger seat where the deck wall meets the floor board. The relay is mounted on the back of the seat rail support as well. Pull the carpet up you will see the harness.1 point
-
1 pointLife is like driving a new road, you don't know what's around the next corner.1 point
-
1 pointSorry to hear about your friend and coworker. Are you thinking this will end up being another change of jobs for you, or do you think you'll stay where you are? Kinda up to the family, right?1 point
-
1 pointSeems like you have your priorities right. Good luck. Don't press too hard. Slow and steady on the big jobs.1 point
-
1 point
-
1 pointI did raptor liner with body color over it. I am really happy with how it turned out. Maybe one day the other side will get paint!
 1 point
 -
1 pointCliff, I'm sure the family appreciates your help. Take care of yourself and jump back into the forum when you can.1 point
-
1 pointI really appreciate the feedback. Silly details like this really bother me. My 6/70 looks like the green car. To me, it looks more like 3 coats of heavy primer with some poor quality over spray. I have a 5/71 that received similar treatment. None of them are like traditional undercoating. So if a person were to go for accuracy, it seemed to me that base+clear would be more accurate to what they did at the factory than traditional undercoating. I have a later '71 model year car that has undercoating similar to what was done to the later cars (It's vin tag is gone so I dont know the mfg date). I assumed the texture would closely resemble bed liner but it looks like I may be wrong. I am always suspect of cars covered in bed liner because I assume they are using bed liner to hide poor work. I wanted to avoid that for sure. So I will take a look at a sample and go from there. Thanks1 point
-
1 pointMost Ford vehicles have inertia switches. If you want a high volume auto factory made piece. No offense to the Amazon parts but I'd rather have a used (by time only) Ford part than an untested part. Typically behind the kick panel on the passenger side. The red button is visible so that it can be reset. Salvage yards would have hundreds.1 point
-
1 pointAnother good point in favor of the Raptor finish. The Raptor finish on my car has a little more texture than what SpeedRoo showed but it's close.1 point
-
1 pointAre you sure your car did not have any undercoating? My 05/70 and 08/70 have some type of protection under the paint. Even the very original BAT $310k 240Z that was built in May 1970 has it.


 1 point
 -
1 pointUPDATE: I blew through the vent hose that goes to the carbon canister and got a thick gas smell in the cabin. I will investigate the vapor tank/hoses tonight. 5/23PM: Found/fixed cabin leak by replacing old style vapor canister hose clamps with belt clamps & confirmed leak under the car using a cigarette and hand pump through the vapor tank also sealed fuel sending unit access door with seal 'n peal. Waiting on a new jack to handle under-car1 point
-
1 pointI had my car painted last year with a color tinted Raptor finish underneath. I am very satisfied. Did it for the very reasons DatsunZGuy pointed out.1 point
-
1 pointIMHO you will reap more advantages undercoating than not. Better sound insulation and more of a protective layer from flying debris that may chip your paint exposing bare metal to possible rust. Ultimately it's your call. Franky, I rather side on longevity over vanity especially on a section of the vehicle that is prone to road damage and really won't see unless one is crawling underneath.1 point
-
1 pointThanks SteveJ! I’ll get to work on that. I know on my 77 that the fuel pump should only be running when the engine is running or on start but it would be nice to have an alternate means of cutting the fuel if for whatever reason is this system fails, and to stop potential thieves. You gotta remember what I do for a living. We have triple redundant safety and operational systems on most areas of aircraft. Short story: When the F-35 engineers came out to the ship while we’re were doing operational flying (Harriers). We had hours of conversation with them about the new F-35 design (this was 2003 timeframe so early in design stage). They had no plan to put a backup generator for emergency electrical power or an standby attitude gyro). The engineers comment when we quested those decisions was “you won’t need them because the primary generator, engine and Inertial Nav Sys will never fail.” The laughter in the room amongst the pilots was deafening. 20 years later the F-35 has all those redundant systems except it still has only one engine . The engine that was never going to fail has already led to several crashes of a $150 million aircraft. I love engineers but they aren’t the one that have to operate the machines they design. I already have the 78 fuel rail on my car because is used less hoses.1 point
-
I got everything cleared away from around the Z, so I could take it on a test drive. I have the trans filled with AC-Delco Friction Modified Synchromesh Transmission Fluid. It is pretty quiet, especially to the old one with worn out bearings. I need to drive the 240Z to compare the two since they both have 720 pick-up 5 speeds now. Anyway, there were no issues rowing through the gears. Happy camper status has resumed. Oh, and I also fixed the exhaust leak by using all three bolts and a gasket between the header and exhaust.1 point
-
I have spent most of my life involved with Triumph TR4's with twin SU's. Two things I'd like to add...When using either the "tool' (UniSyn) or the "hose" method to synch the carbs, the two carbs need to have their linkages separated from one another. There should be some clamping device that holds the two throttle shafts static as one. It must be loosened so that you are adjusting only one carb at the time. Another comment is that hose diameter used in the "hose" method must be big enough to hear through...more like a garden hose (3/4"). That has been my experience anyway. Best to just buy a UniSyn guage and be done with the guessing. With respect to raising the piston 1/16" with a screwdriver - Right on...! Exactly the way it is done. Fantastic thread entry, RacerX...!1 point
-
1 point
-
Nah, she’s too young for me. Oh, wait, I bet you’re talking about the car, aren’t you? Never mind.1 point
-
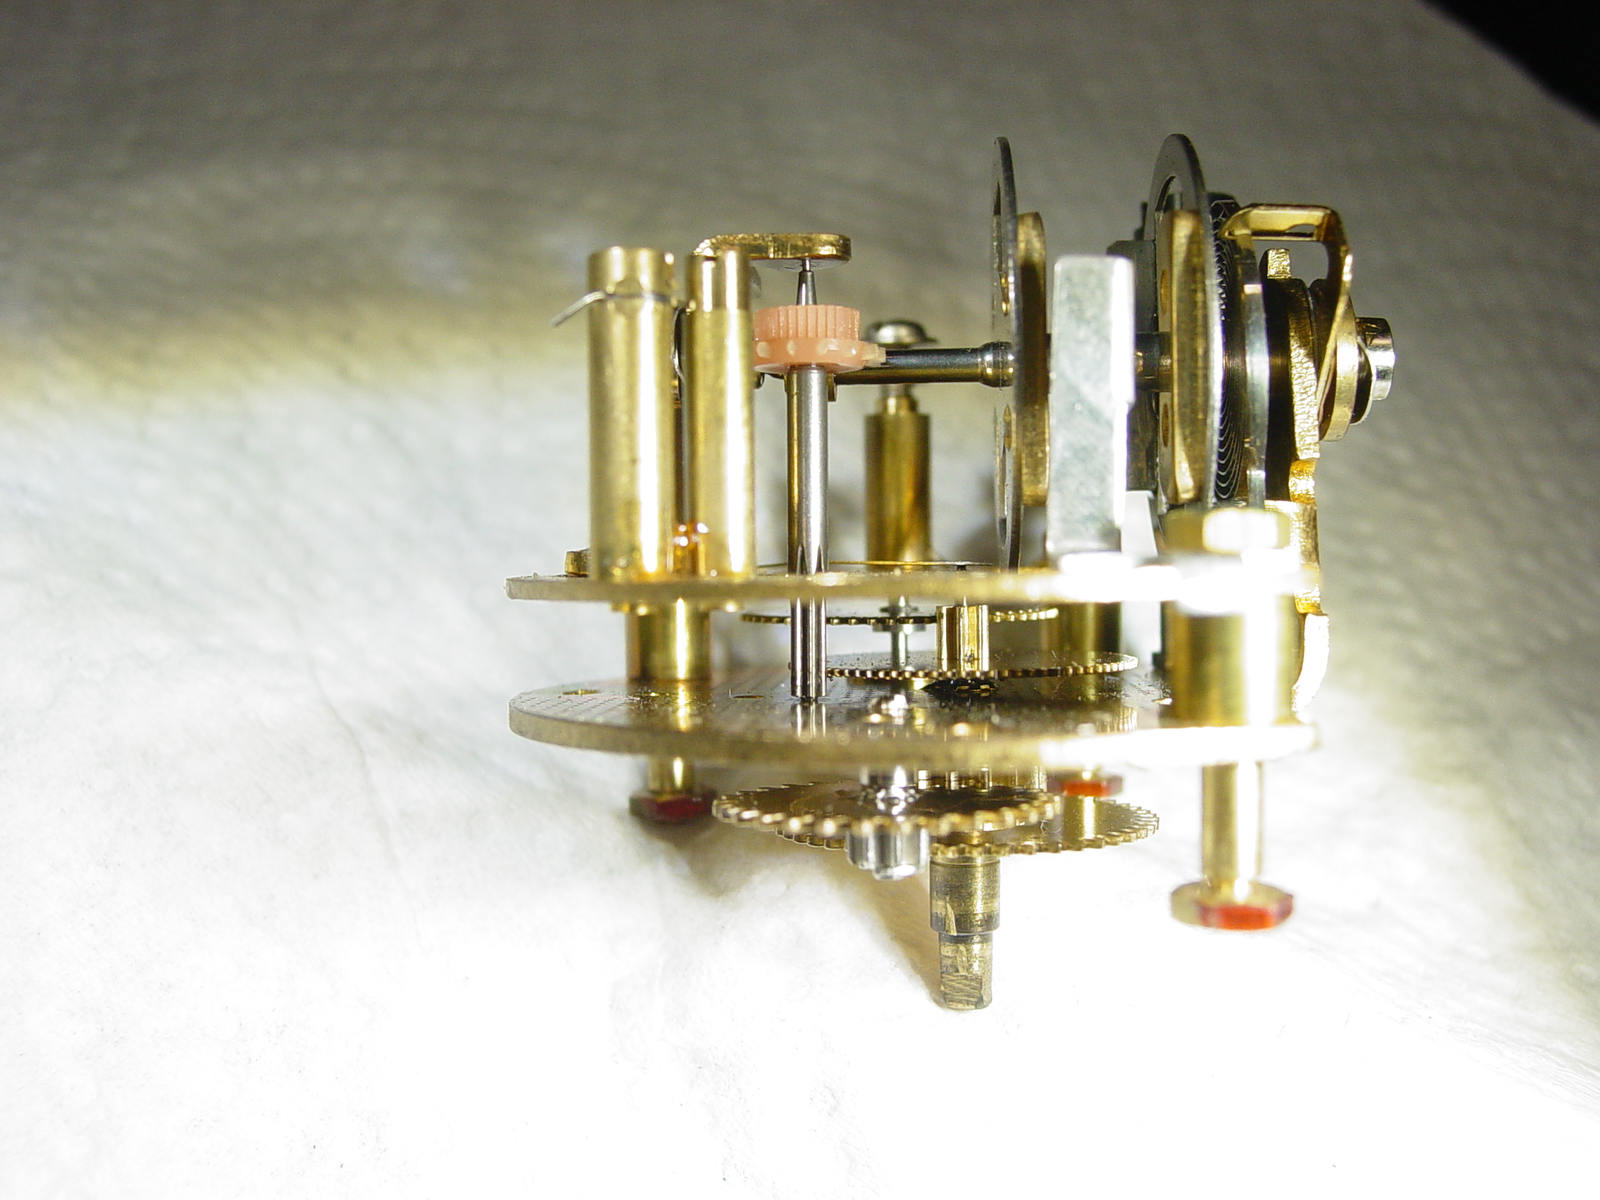
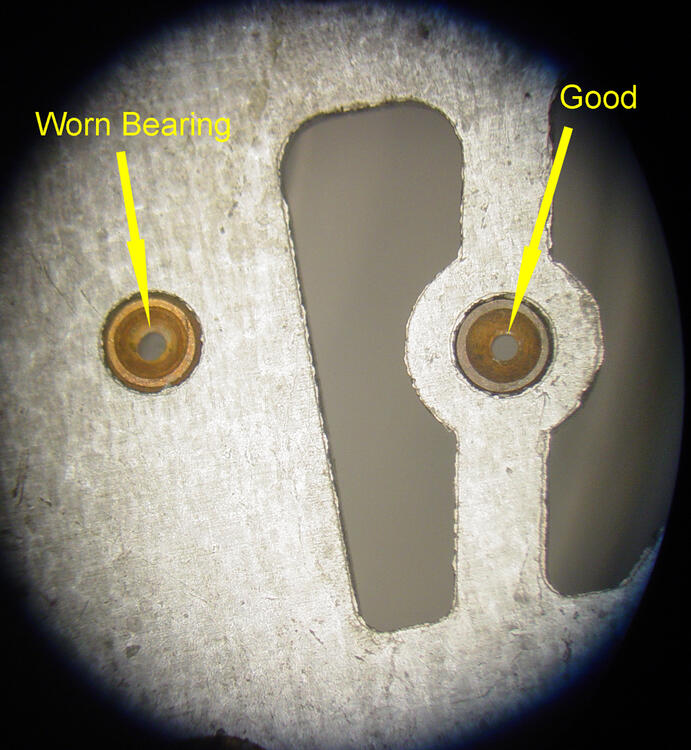
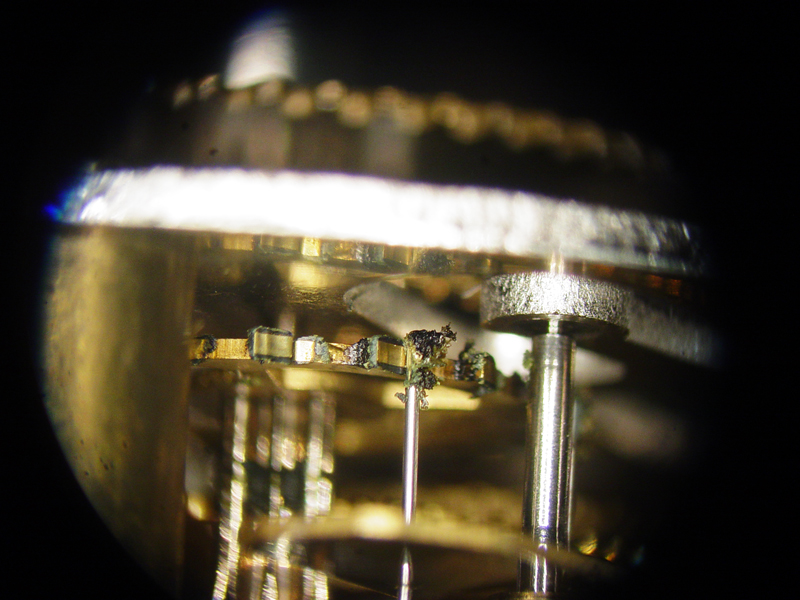
1 pointI noticed this tread and have a couple of comments. There are three clocks talked about here which are all different and have unique problems. The 74 260z was delivered with two clocks. Very early 74 the clock was the same as the 240zand the later clock was the 280 version. So we have the 240, 280 and what appears to be a VDO clock that are all different. As far as the 240z goes if you put 21volts on any of the clocks you will cook the parts. This clock is very sensitive to dirt, grease and oil. If you look at the enclosed you will see what oil does to the clock gears. Oil collects dirt like a magnet and turns into grease. This is what stops the 240 clocks. Disassembly and cleaning is the only way to put the clock back in service for many years. Also, inspection of the bearing points in necessary or you will be disassembling the clock within a short time. Again the enclosed shows a worn bearing and this part needs to be re-bushed. All the oil in the world won't help this condition. The 280z mechanism has very few bearing points and does not need any oil. The caps on the circuit board are the main problem and the spring is the second as well as the pink gear (missing teeth) on the enclosed. The other problem is the coils on the circuit board. Either of the two can be open,shorted, or incorrect resistance. As far as cleaning DO NOT use the cleaning solution as mentioned. This is an old clock makes formula and is VERY VERY caustic / dangerous. This is as dangerous to your lungs as using epoxy paint without a respirator. The cost to make such a formula is about $60--80 depending on where you can get the items. Also, the ammonia(20%) can only be purchased at a chemical supply house and runs about $35 / quart! Also, this formula will destroy and degrade the nylon and plastic of your clocks. DO NOT use it. Isopropyl alcohol is the best solvent and yes it takes a little elbow grease, but it works. I am not a clock maker, but I have repaired , cleaned and refurbished many grandfather clocks as well as hundreds of 240- 280 clocks. Oiling is something you should due for a grandfather clock as it has weights that drive the mechanisms that weight several pounds. With this kind of force on pivot points and bearings need to be oiled. Our Datsun clocks do not have this kind of force on the pivots. The 280z mechanical clock has several bearing that support pivots that are plastic and they do not need to be oiled. The correct way to oil something, if you must, is one drop of oil on the bearing/pivot and wipe off all visible oil. Clock oils today are synthetic and have a much higher load and degree of temperature resistant than organic based oils of the past. Hope this helps. Ron
 1 point
 -
1 point
-
1 pointYes, I did have issues with rusting after it came out of the citric acid solution, and no, the fact that it was chelated didn't do anything to prevent it. I started this whole process near the end of fall when it was still in the 80's in the afternoons and sunny. At that time, I would dump the hardware jars into a bucket, take them inside and rinse them off in the sink. Then take them back outside and dump them all on the hot black driveway to dry. It seemed that the faster they dried, the better the results (makes sense, right?). But I ran out of calendar time, and by the end of this process, it was in the sixties and there wasn't much direct sun to dry stuff on the driveway. So I set up a three stage rinse bath: 1) Pick out a part or two from the citric acid bath and shake it around in a bucket of clean water. 2) Move it from that bucket into another bucket with "cleaner" water and shake it around. 3) Move it from second water bucket into a small container of methyl alcohol (methanol). My thoughts were that a) it evaporated faster than water, and b) water is miscible with the alcohol so it would go into solution and help get H2O off the surface. Then after all that, lay it out on the semi-warm driveway to dry. That process got me through the end of the parts and the cooler fall days. Most of the larger parts got a quick wizz on the wire wheel after that just because I heard they looked better after plating if you did that. I didn't do the small hardware stuff because it was hard to hold. And yes, I zinnnnnngggged a couple parts across the yard. Only lost one piece in the end, and thankfully didn't put anything through any windows. Yes, it was a PITA, and yes it's done.1 point
-
1 pointMake sure and get the car up high enough so that you can get the transmission out. I have an small fairly low profile jack that I made a plate for, then rolled it out. Alternatively you could pick up one of the little trans jacks from Harbor Freight. You will need to support the engine so make sure you have something below or above to provide support. Other than that it's pretty straight forward. If you plan on pulling the flywheel I would recommend going back with something lighter. I installed a standard steel unit that had 4-5 pounds shaved from it. It makes the car seem so much more lively and does not really compromise low speed modulation.1 point
-
1 pointAs with most cars, reverse is not synchronized. That means in order to shift into reverse without grinding, all the guts inside the transmission must be dead still before the reverse teeth engage or they will clash. When the clutch is depressed, even if everything is adjusted correctly there is often still enough drag on the clutch disk to keep it spinning with the flywheel and pressure plate unless there is something that makes it stop. This is even more prevalent when the tranny oil is hot and thin. The friction from cold thick gear oil will stop the spinning quickly, but hot thin oil may not. Shifting into any forward gear will stop the internals, and then a quick shift into reverse should go in without any grind.1 point
-
1 pointI suggest buying the harbour freight 18lb one, and then buying an extra bowl from eastwood. it's the same one, but harbourfreight doesn't sell the bowl separately. then you'll have two different coloured bowls for each type of media you decide to use.1 point