


Leaderboard
-
conedodger
Community Member18Points13,001Posts -
Patcon
Supporting Member6Points11,279Posts -
The Unobtainium
Community Member5Points4Posts -
inline6
Supporting Member5Points1,345Posts


Popular Content
Showing content with the highest reputation since 03/17/2026 in all areas
-
5 pointsThank you so much for the kind words. We are happy to help anyway we can. Our crew are all car guys so they are very passionate and particular. We have been talking about doing some events for our customers. I will see what we come up with.5 points
-
5 points77 280z Combo headlight repair with new spring cap aka nibs. Shawn @The Unobtainium , I received the spring caps today. Installed them this evening, everything fit nicely and worked great! Now I have lights with the switch working perfectly. Thank you to Shawn and the folks at The Unobtainium for creating these. https://www.theunobtainium.net5 points
-
2 pointsWill try to upload a movie of it running. I tried twice but its 17MB. But it is running. Carbs are still not acting right. I have dead even flow through them, all the same across 6 carbs. Same jets, but my plugs are all over the place. I installed all new floats, float pins and needle and seats in all three carbs. Getting wildly different readings on float level using the Keith Franke clear acrylic tube method. I am 22mm, 25mm, 24mm from the top, which if I recall is to high on all of them. I have 29mm from the tip as the correct setting, but I have to go research it up again. IMG_8791.MOV2 points
-
2 pointsI don't like the really short brake pull. I prefer about halfway. That way I know the shoes are fully released and don't drag...2 points
-
I let a couple of friends in the area know about this in case they know of someone looking for a 5 speed.2 points
-
I have been updating an old engine build thread on HybridZ.org with content, but there is little interaction/engagement there. So, I figured I would like to post updates here as well. My efforts to get this other Z back running have expanded quite a bit beyond the rebuild of the 3.0 stroker motor. At the moment, I am working on repairing some rust in the floor panels. I have been watching a number of "Make It Kustom" videos on Youtube by Carl Fisher. In one of them, he creates some forms out of 3/8" plate to create a "hammer formed" part. Additionally, he uses a hydraulic press to "stamp" a recess into the battery tray he is making in the video. The rust in my floors on this car is not extensive. It is generally in the area of the large oval depression in the floor panel (on both sides of the car). Yesterday, I spent a few hours cutting out and grinding/filing on part of the form I plan to use to replicate the depression. On the right side floor, I only need a small portion of it. On the left side, I will attempt to make a full piece to replace the depression. I've never done anything with forms likes this, so we'll see how it goes. I will be using my 12 ton press because it is what I have to attempt to make the replacement part. But, I have been watching facebook for a suitable upgrade, perhaps a 30 to 45 ton press.
 2 points
 -
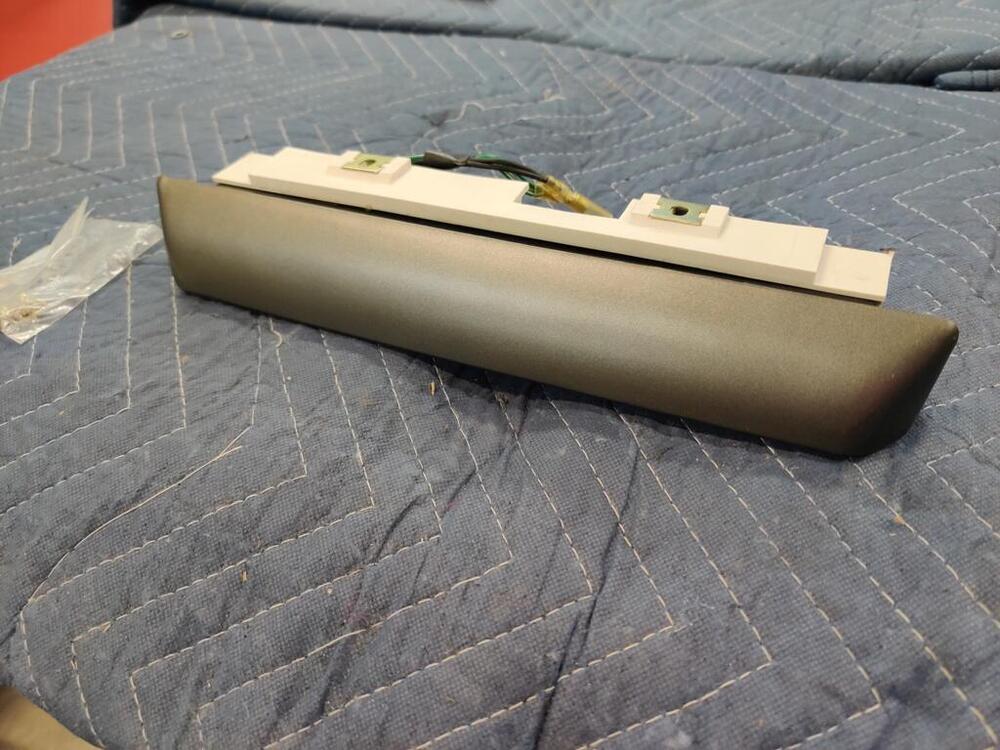
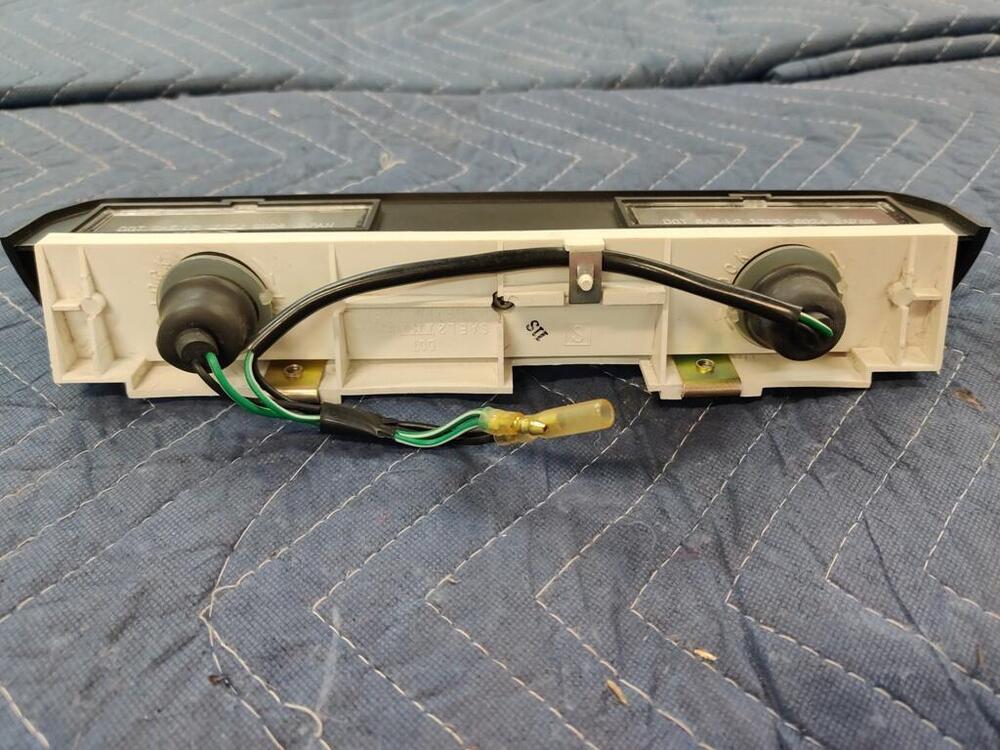
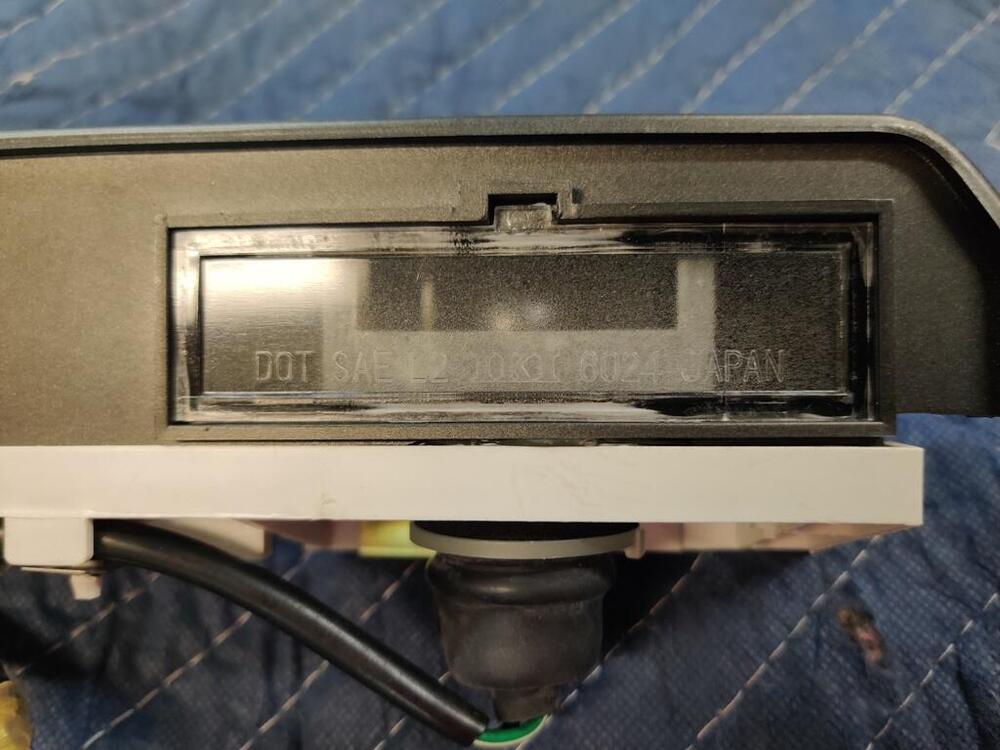
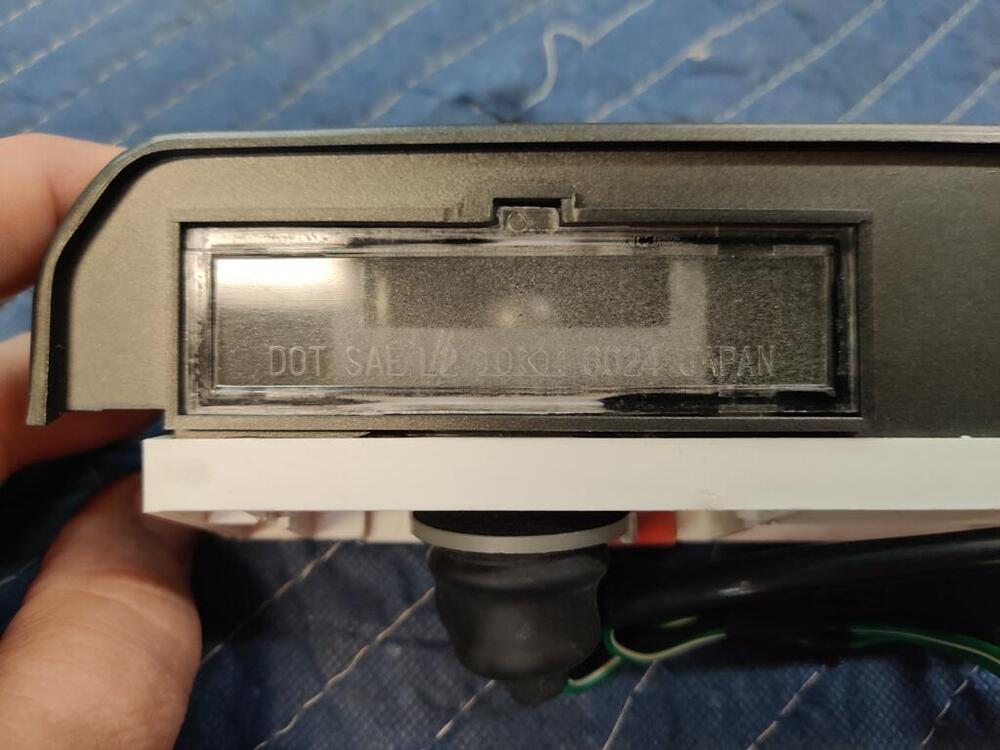
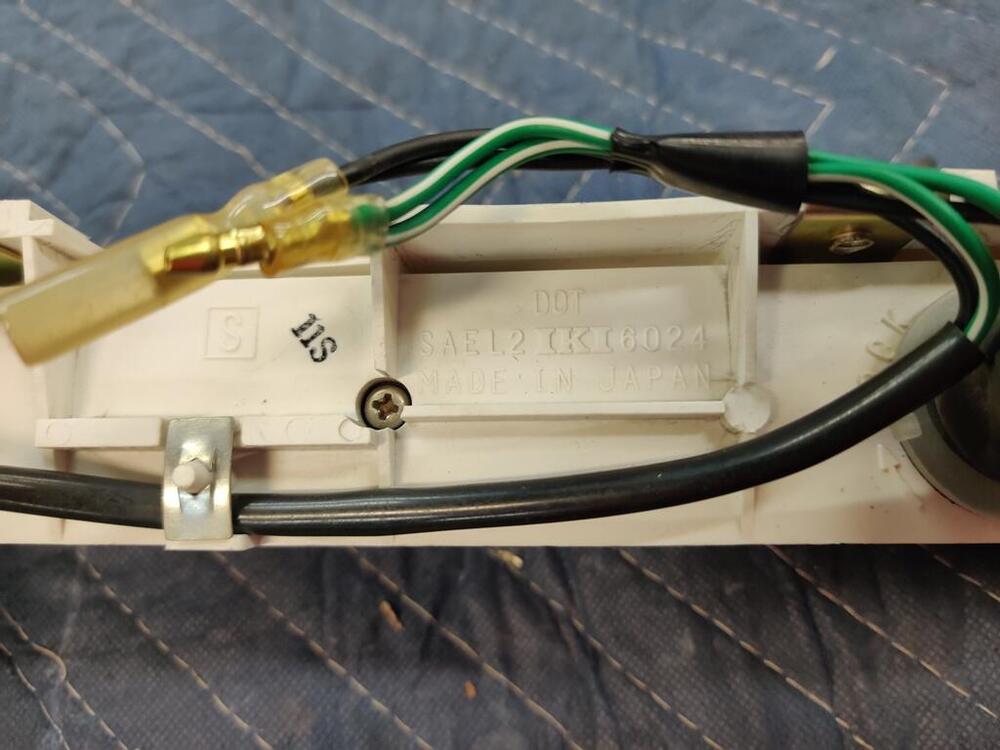
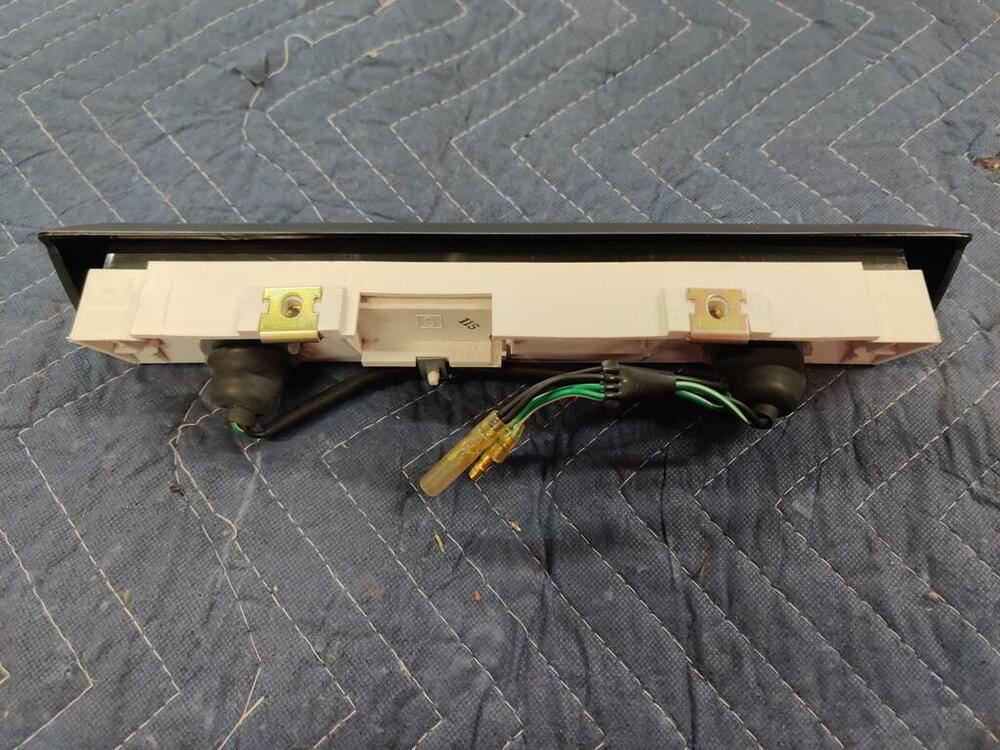
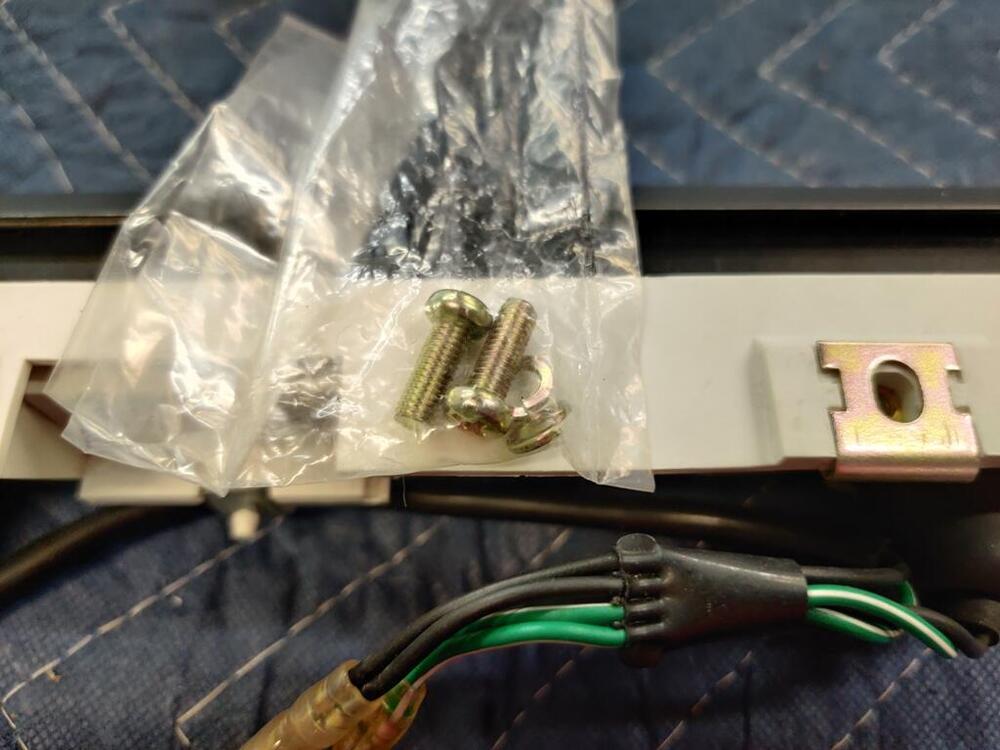
Unused (NOS) 26510-N3400 license lamp for 8/73 and later Datsun Z cars! Ready to bolt on - no repainting or cleaning your old/scratched one - saves you time! I am unsure of the upper date range cutoff for fitment. Please look at the pictures to determine applicability for your car. I didn't realize at the time I purchased it that it was not the correct lamp for my 71. As received, it had a slight discoloration (like a finger with thinner on it wiped it accidently) when I got it. I used the Ford color and matte paint (as detailed elsewhere in the forum) to touch up just the front face (not the whole grey area). The paint match looks very close to original. Hi resolution pics available. Price: $200 plus shipping cost to you.
 2 points
 -
2 points
-
2 points
-
Due to some stars aligning, I was able to collect loads of documents for my Datsun project from various sources. Some of those documents are quite rare and some which I've been trying to find for several years now. With this delivery I've been able to close a few big gaps in my archive, and this will definitely help me to write more complete knowledge posts in the future. Let's quickly go through what I got in the recent weeks: First, I was able to obtain a 1973 Press release folder from the Geneva Auto show, where also the 240Z was shown. So far, I only had the French version, but now, finally a German version, which came with this really cool cover page: I also got some missing Swiss price lists for my collection (free download of all of them here) and the "World of Datsun" brochure. I have quite a collection of this "World of Datsun" styled advertising material, but i've never seen this one before. So it's cool to have it :-) I got a few Datsun USA Service gauges / guides, which i think are quite cool: It also came with this "Datsun Saves" Gas per mileage saver calculator-gauge. Which goes nicely with the original can and Ad: I Also got an original Mikuni USA PHH Service manual And a Box for spare needles and Jets (empty): Found another full set of sports option catalogues. I didn't really plan on buying them, but I was the only bidder, so I got them for a good price. The seller also had some other ones for sale, which had an even better price. So I couldn't resist: Speaking of Sports options: I also got a bunch of Datsun / Nissan Motorsports / Competition parts catalogues from the USA: And a few very early ones. The one at the bottom is from 1974 and came including a price list: In regard to catalogues: I also got a bunch of Japanese market parts catalogues. Left the folder version and on the right the book version. I've never seen one with the "Nissan" marked protective plastic sleeve still on it. Very cool. I also came across an export market RHD (R-drive) Parts manual book for the 240Z / 260Z. So far, I only had the folder versions. Speaking of folders. I was very lucky to find these Datsun / Nissan Service journal binders Vol.3, Vol 3. and the empty one on the right side: Those folders on the left include loose early service bulletins of various cars and general information, but also the green Service bulletin booklets. This makes my collection of 240Z Related bulletins almost complete. There are still a few missing, unfortunately: I got also a later book version with the Technical bulletins in a book, and the Japanese Z-7, which is basically the same as the green ones, just for the Japanese market. Now I think only the Z-5 is missing in my collection (And some later ones, which I don't really care about): Also got these. The left is from a different car, but the right is a similar Service bullet in new design. I know this one was also available as a green booklet. Also got some S30 related service manuals, that were still missing in my collection: On the left you see the BW35 Borg Warner Service manual for different cars. And on the right side a Datsun USA Engine analysis book: Then got a bit of random items. From top left to bottom right: - A ZX Documents pouch (Came with some other stuff) - Datsun USA Parts Name numerical number index - 1972 Warranty and Service booklet - Tokyo Motor Show 1969 original admission ticket (Where the S30 was shown to the public the first time) - A service Technician record booklet - Hayashi racing brochure The Datsun Service technician was kind of cool: It was issued in September 1972 to this technician and has several certificates and stamps of completed trainings inside: And last but not least some random magazines. Like the Car Graphic one on the left. It was issued when the RZ34 prototype was shown and has a nice story about former racing driver and Central 20 owner inside. I still have some small items which haven't arrived here, and will do a proper archive overview once everything is here, since some followers requested this. And I also have some update on the actual car project.2 points
-
I just shipped a door glass for a 1983 280zx from the US to Switzerland. 22 pounds, mostly packing material. Box was 46x24x6. Shipping cost thru USPS was 188.00 International Priority 10 day. I was quoted 2500.00 by a UPS approved shipping store in my home town. I go on Shippo and Ship Pirate and Paypal shipping and came up with a shipping cost as low as 280.00 thru UPS. Someone is jacking up prices. I went with USPS International Priority. Hopping it gets to Switzerland without being broken. I filled out the forms online at Click-and-Ship US Postal. Super EZ. We will see....................2 points
-
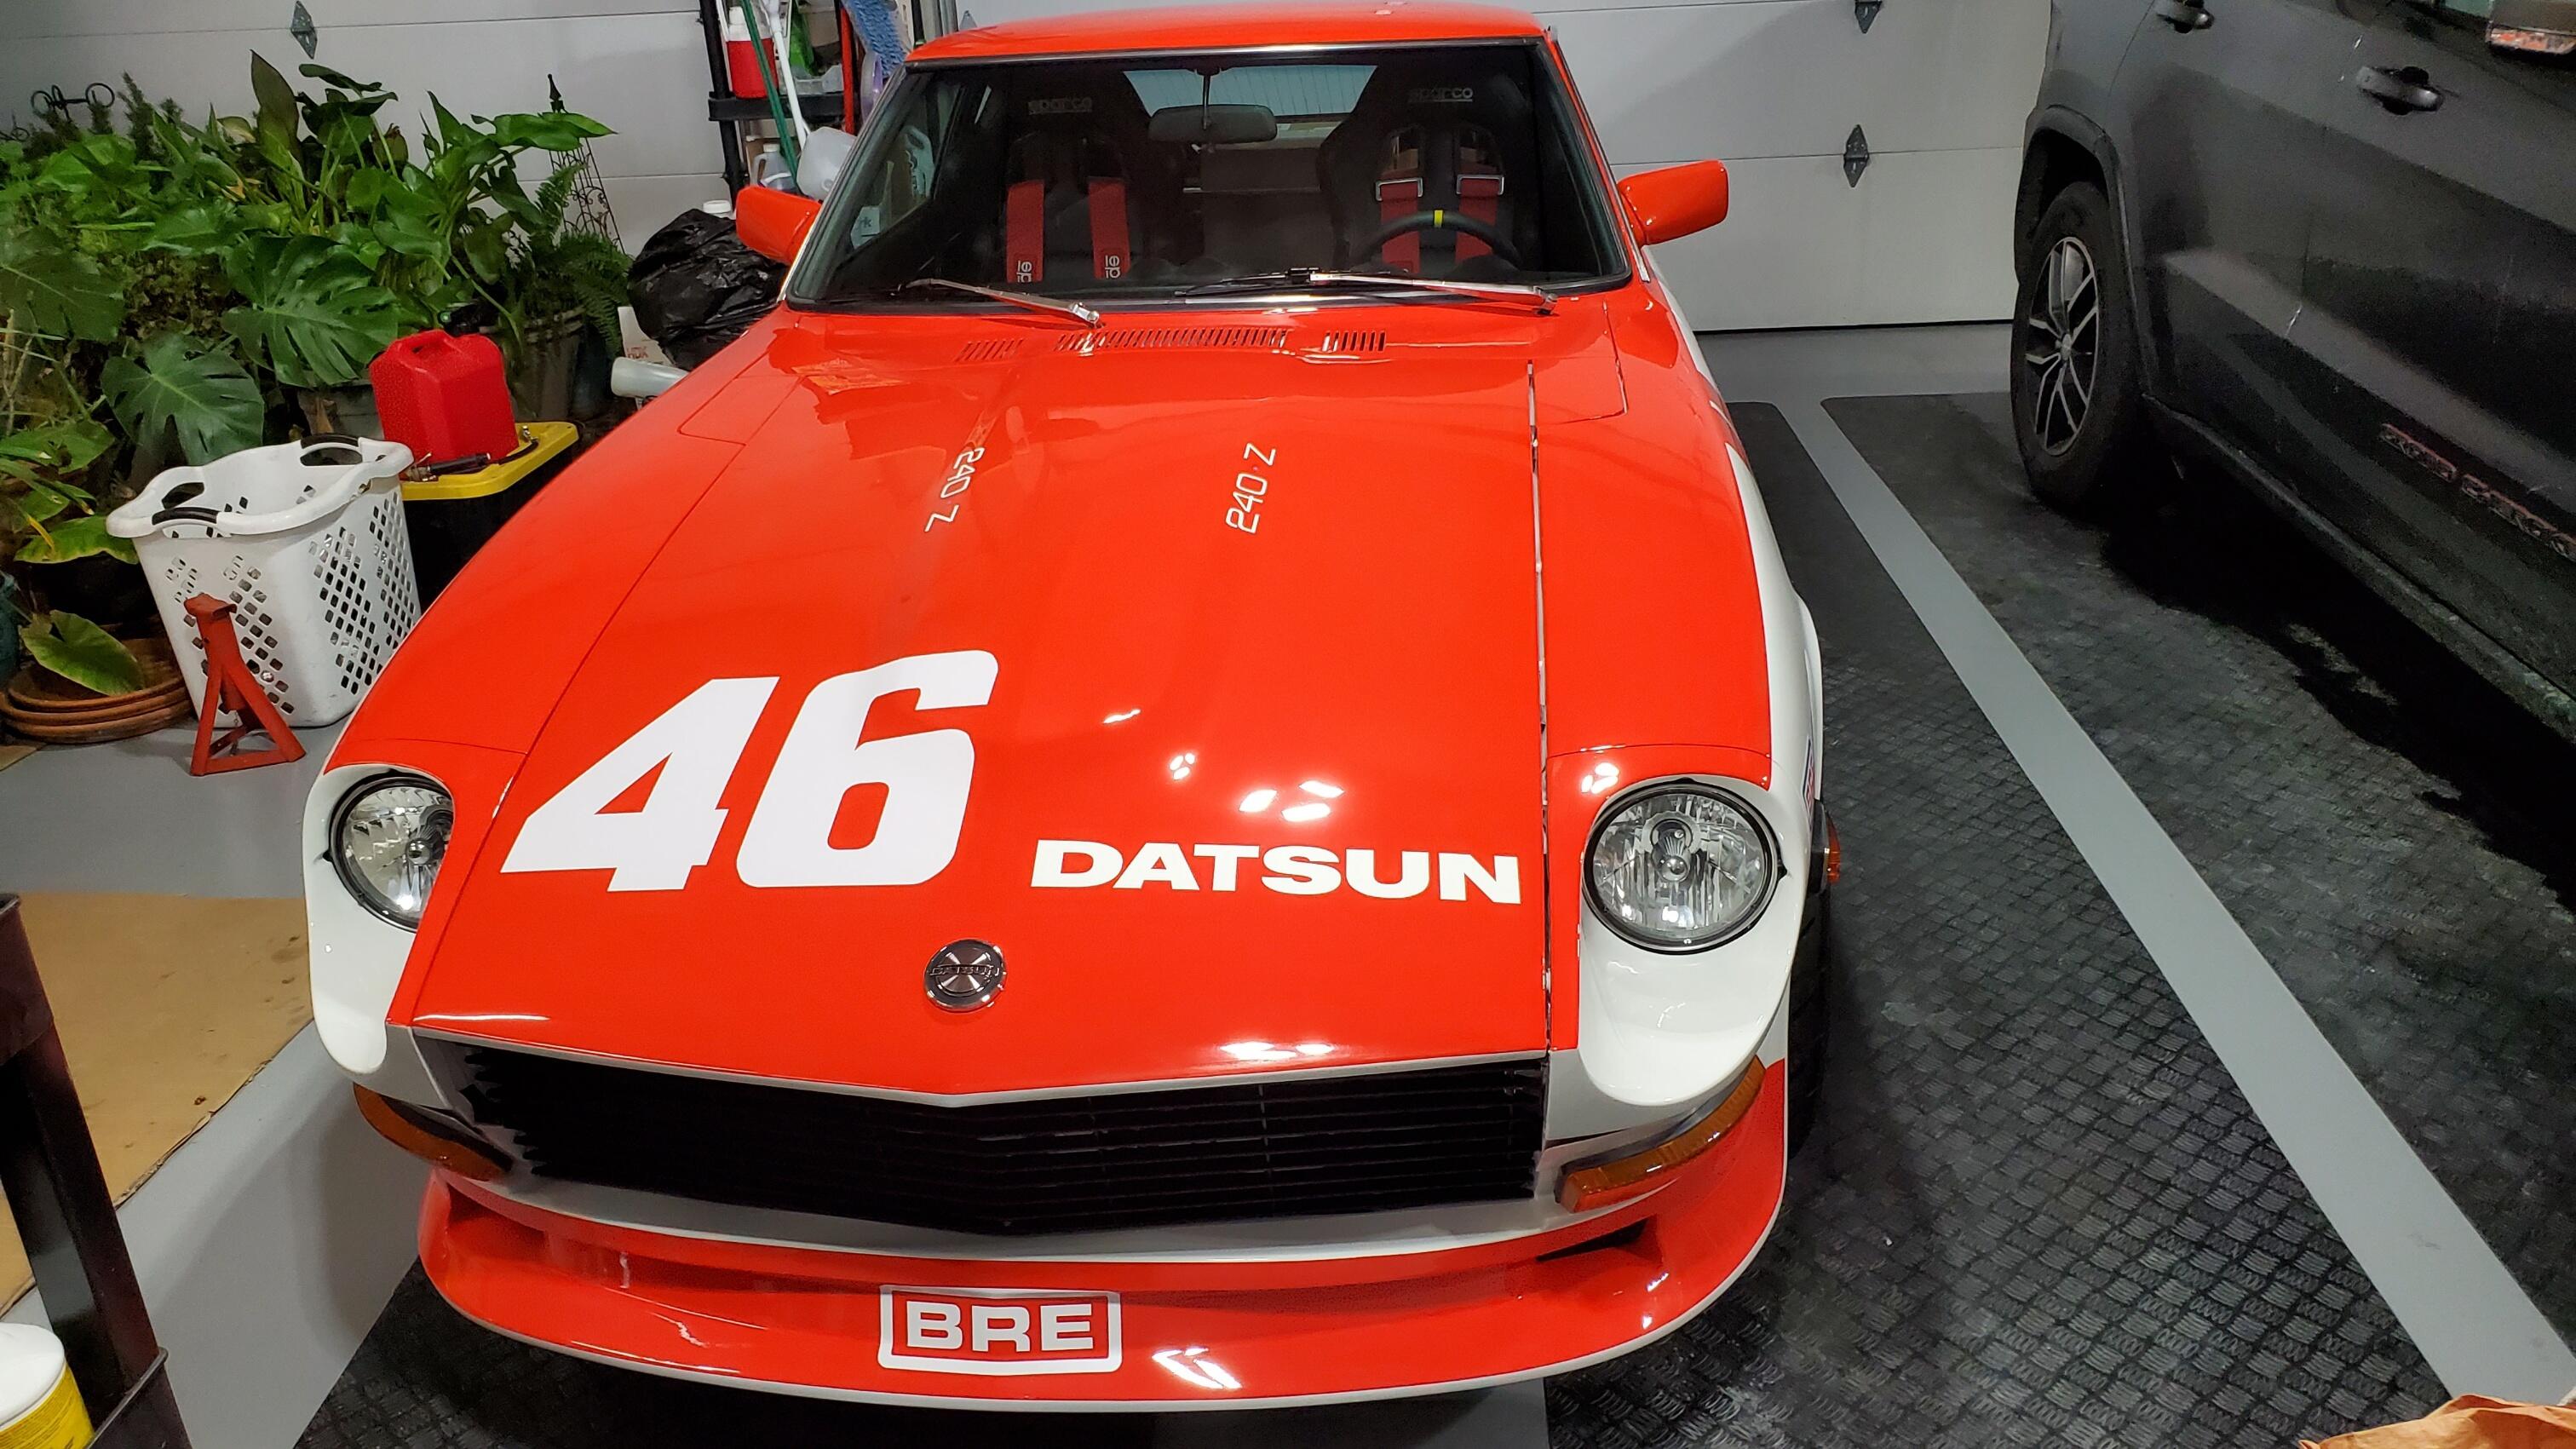
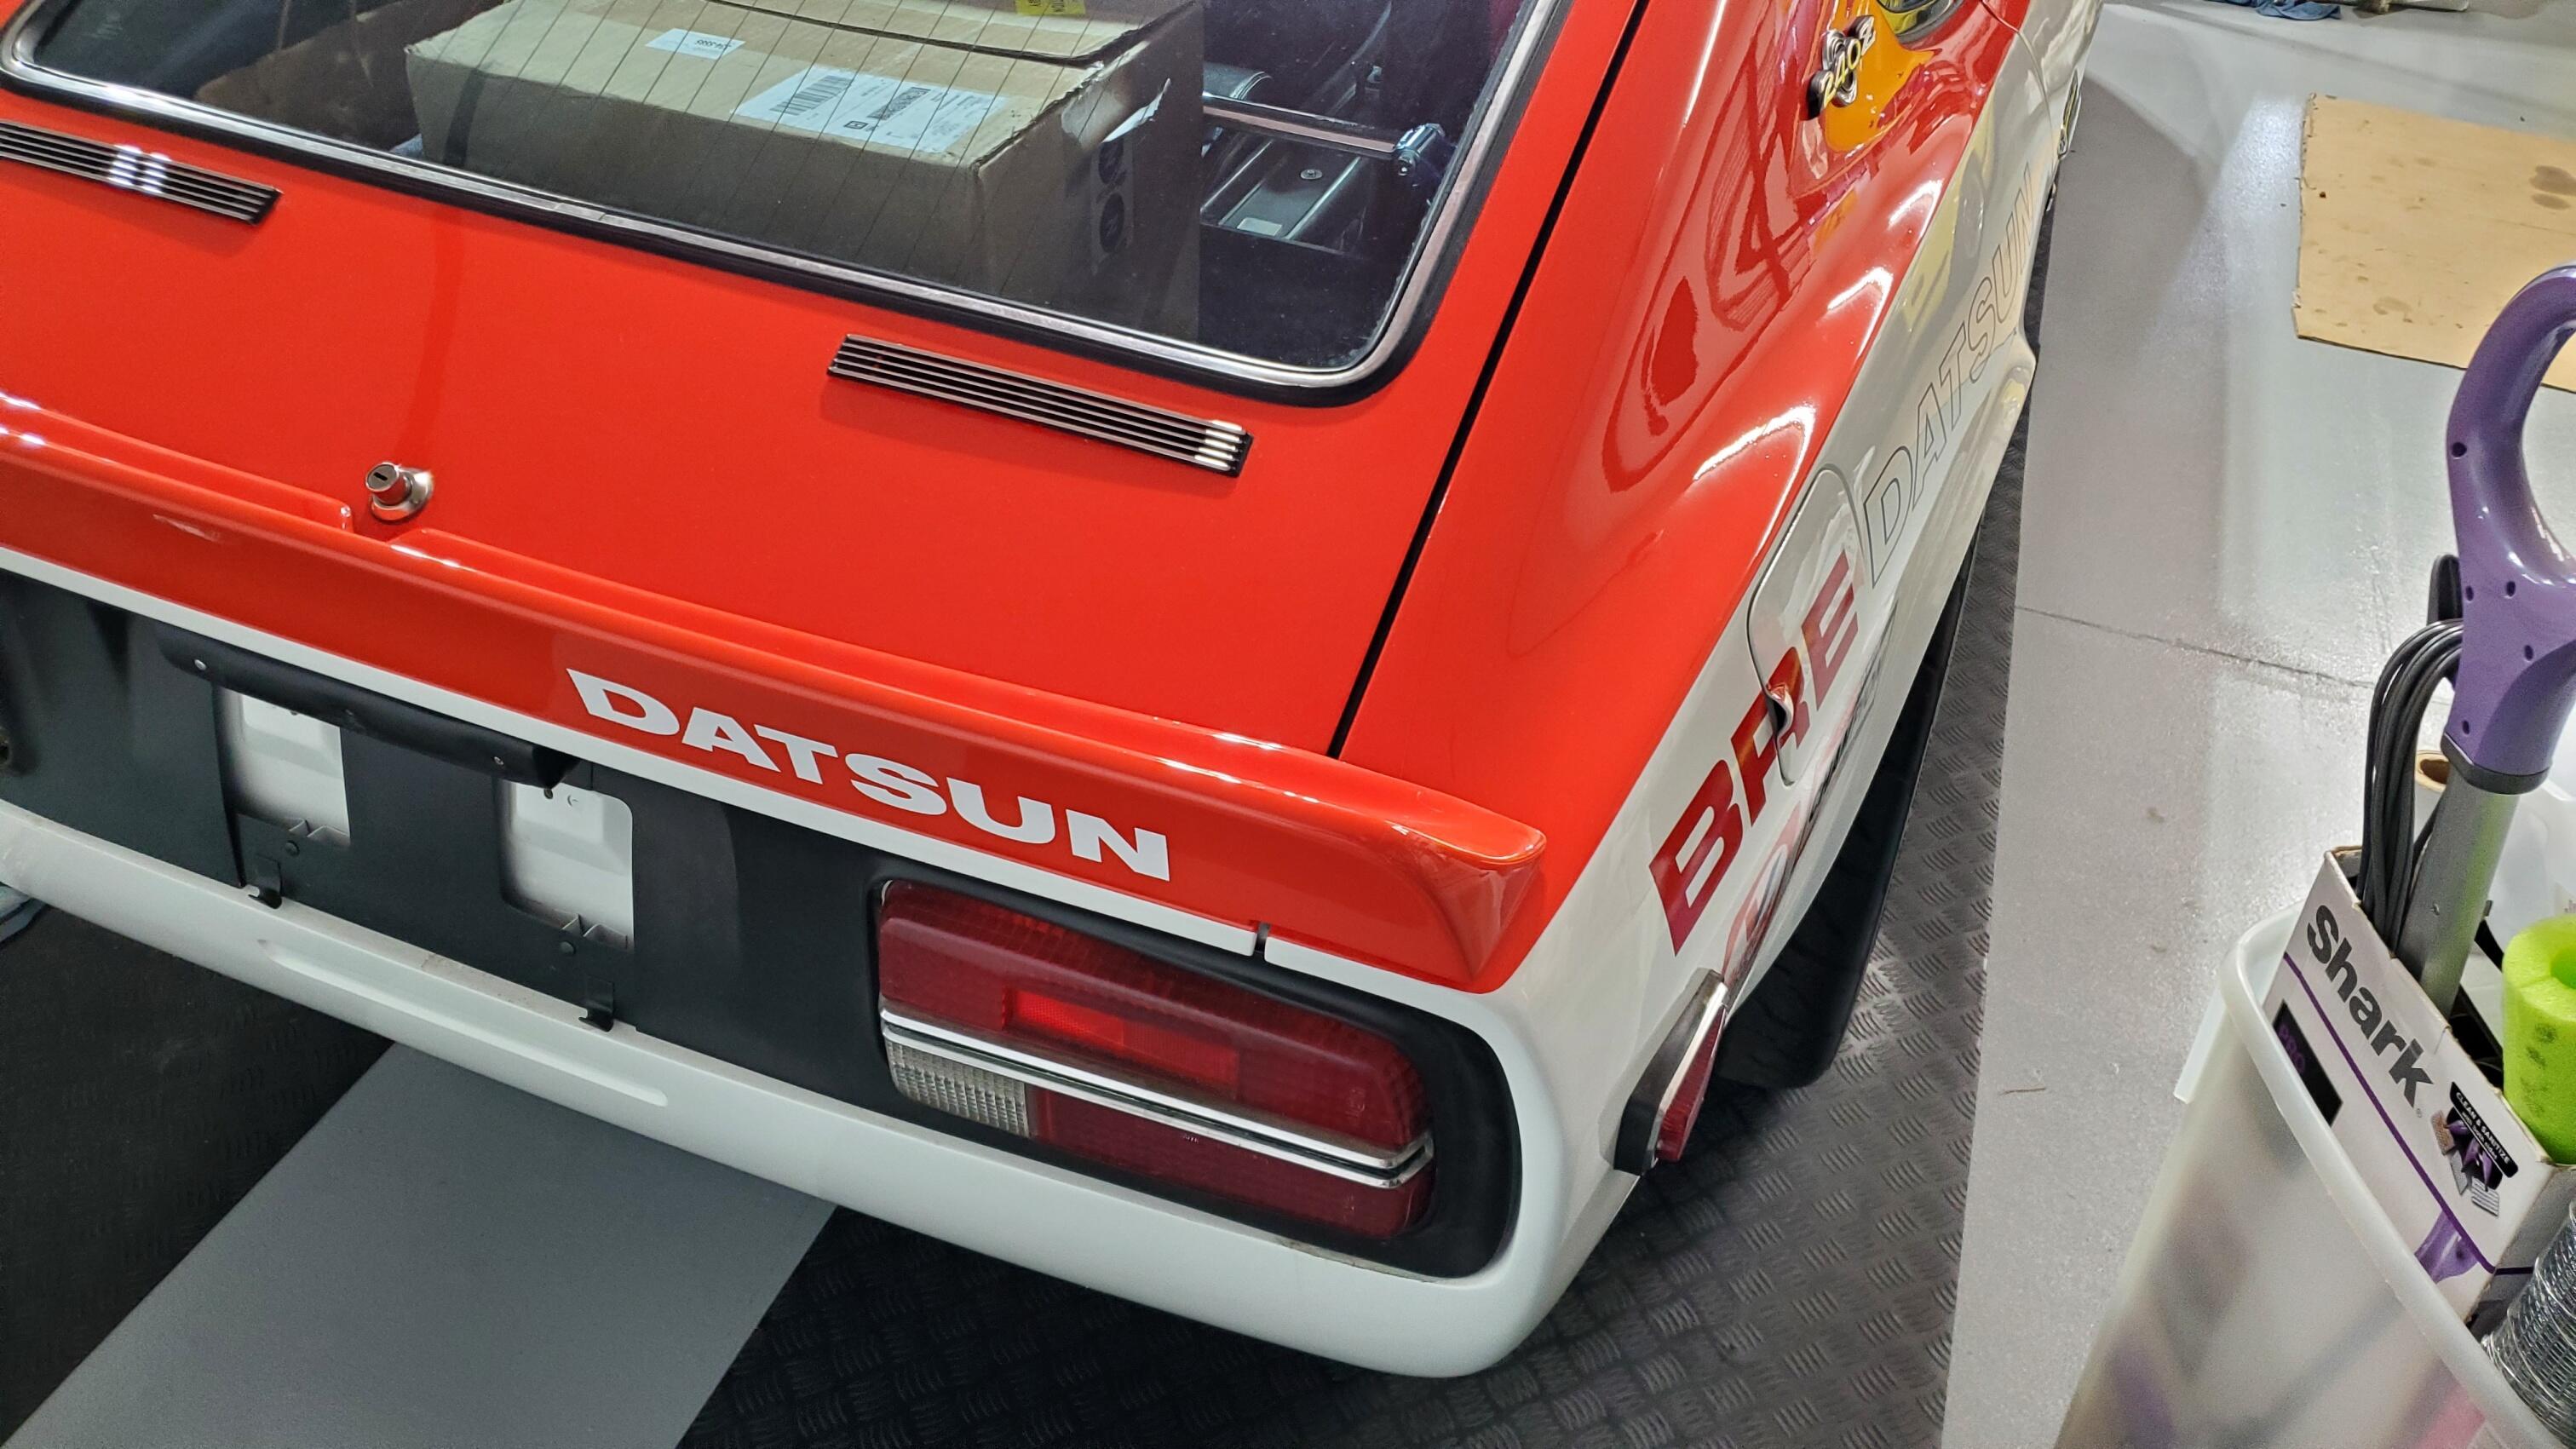
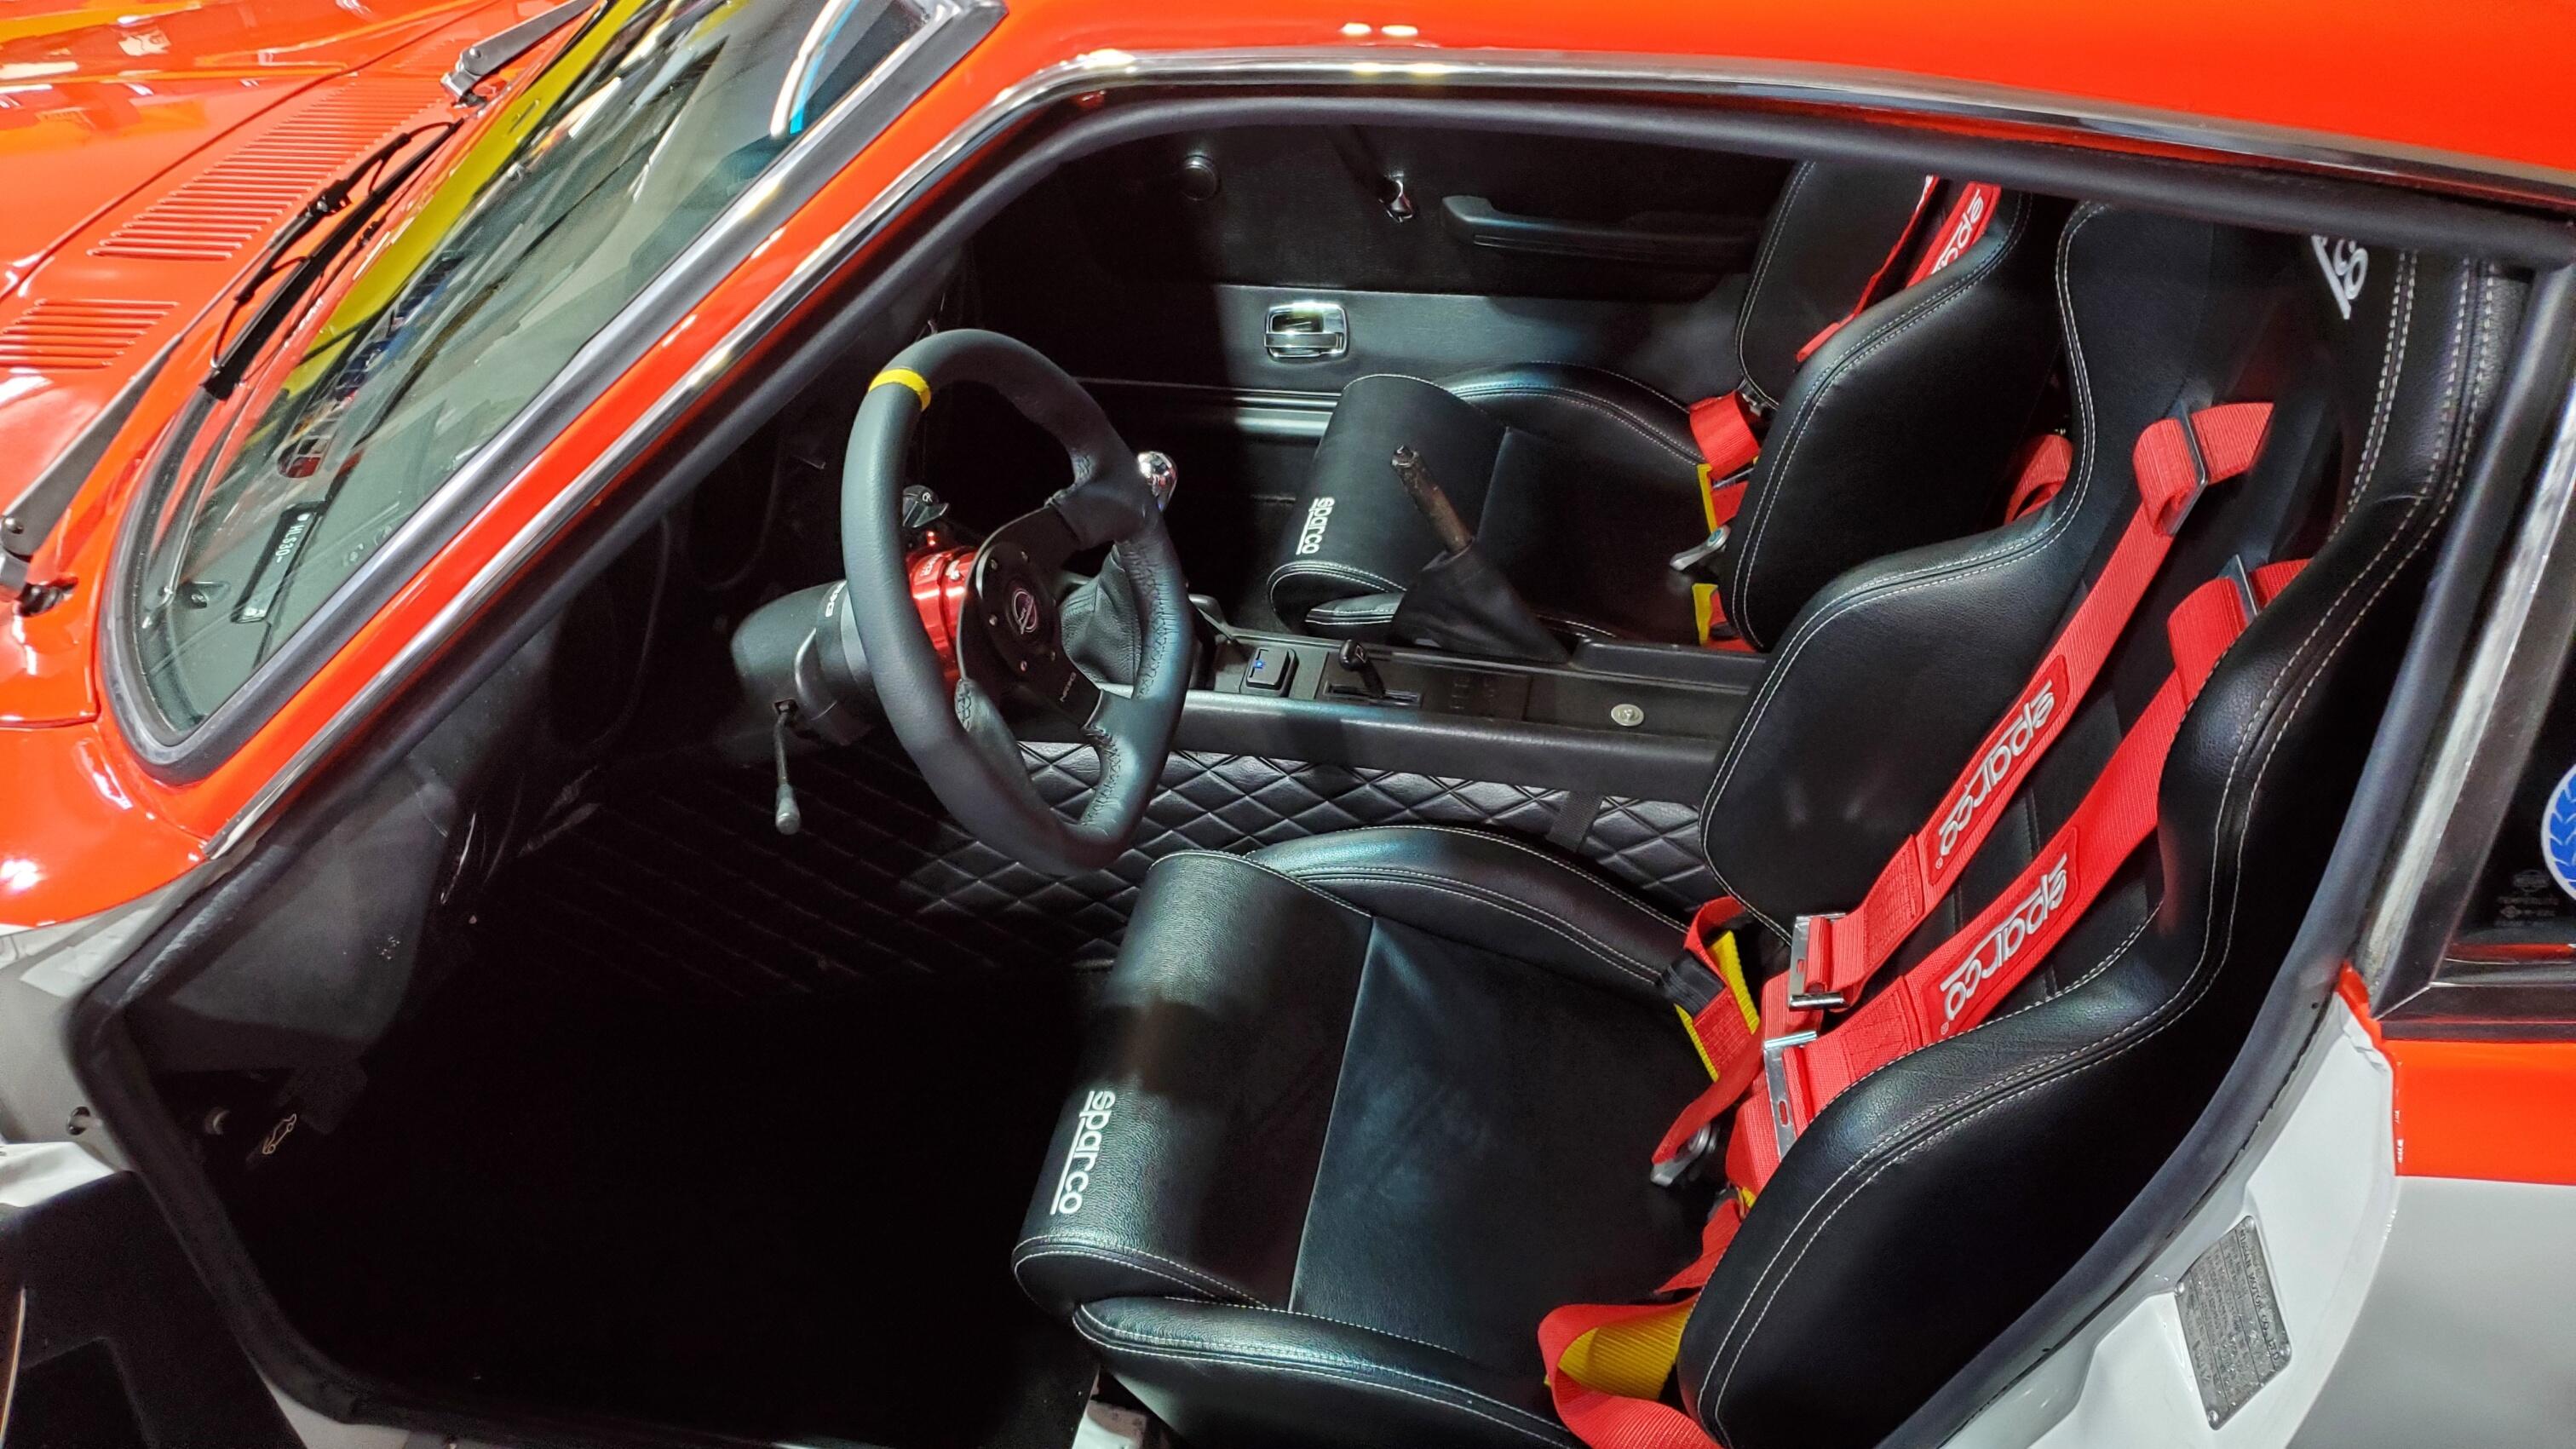
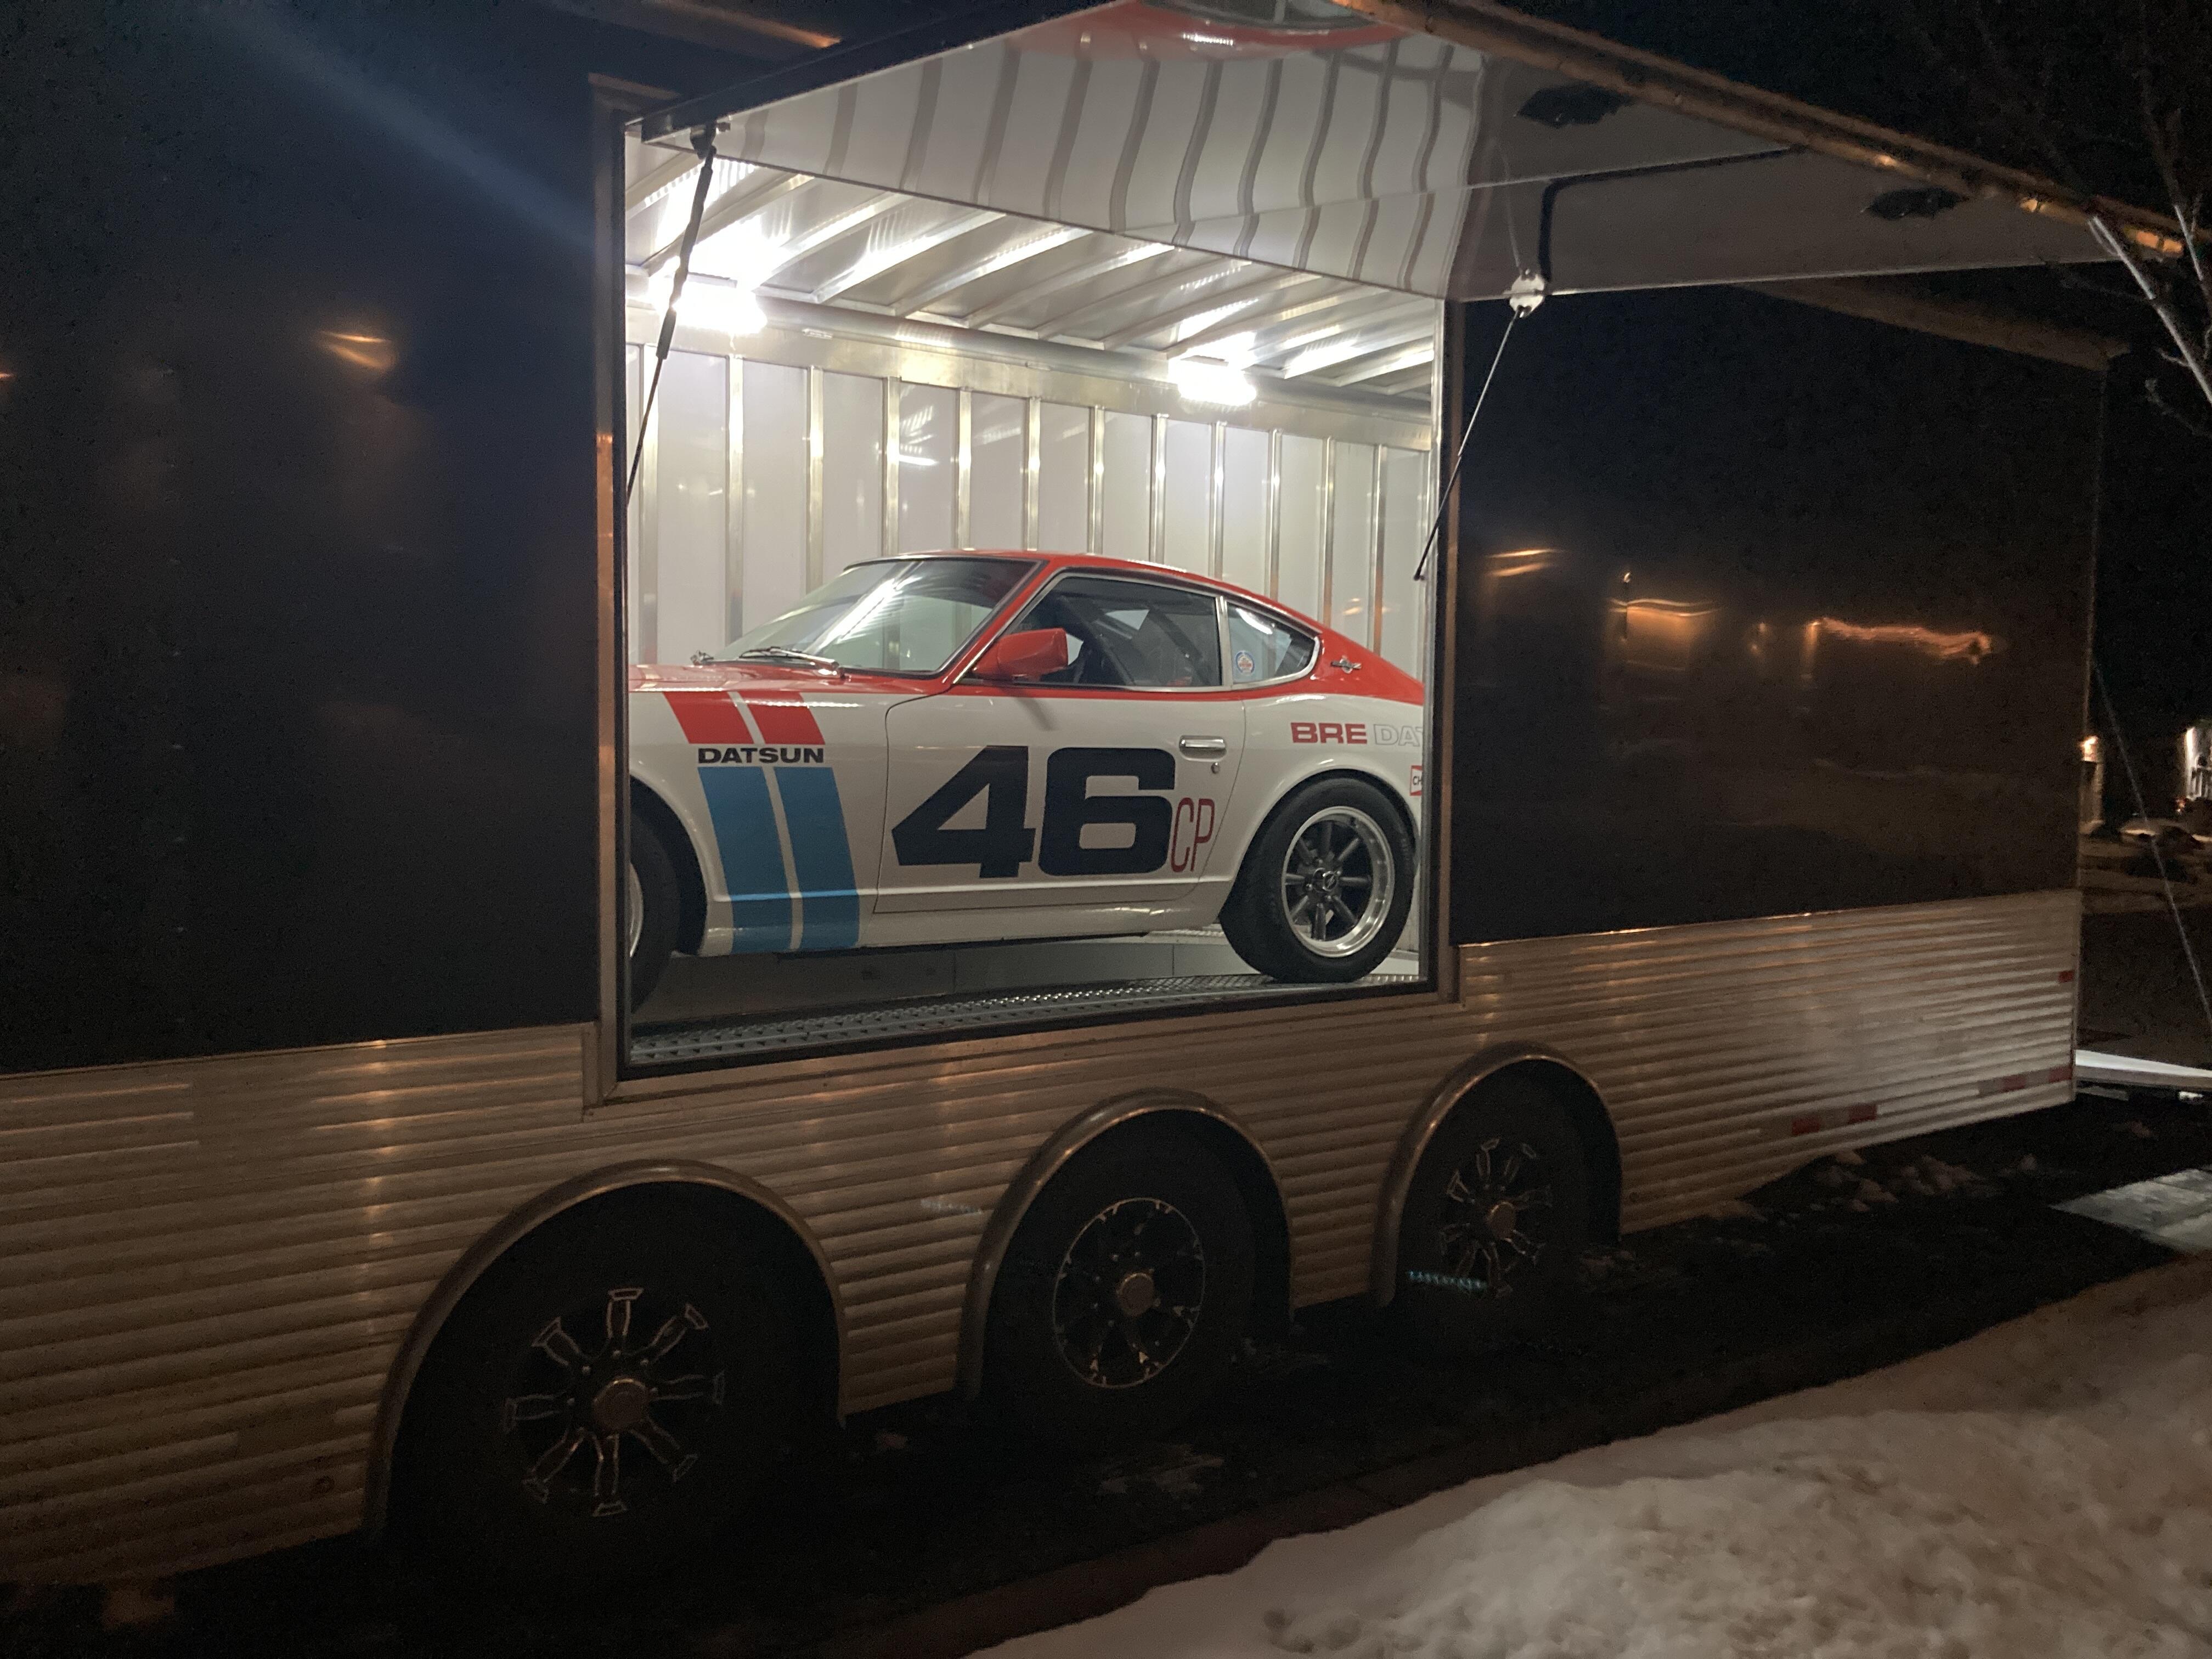
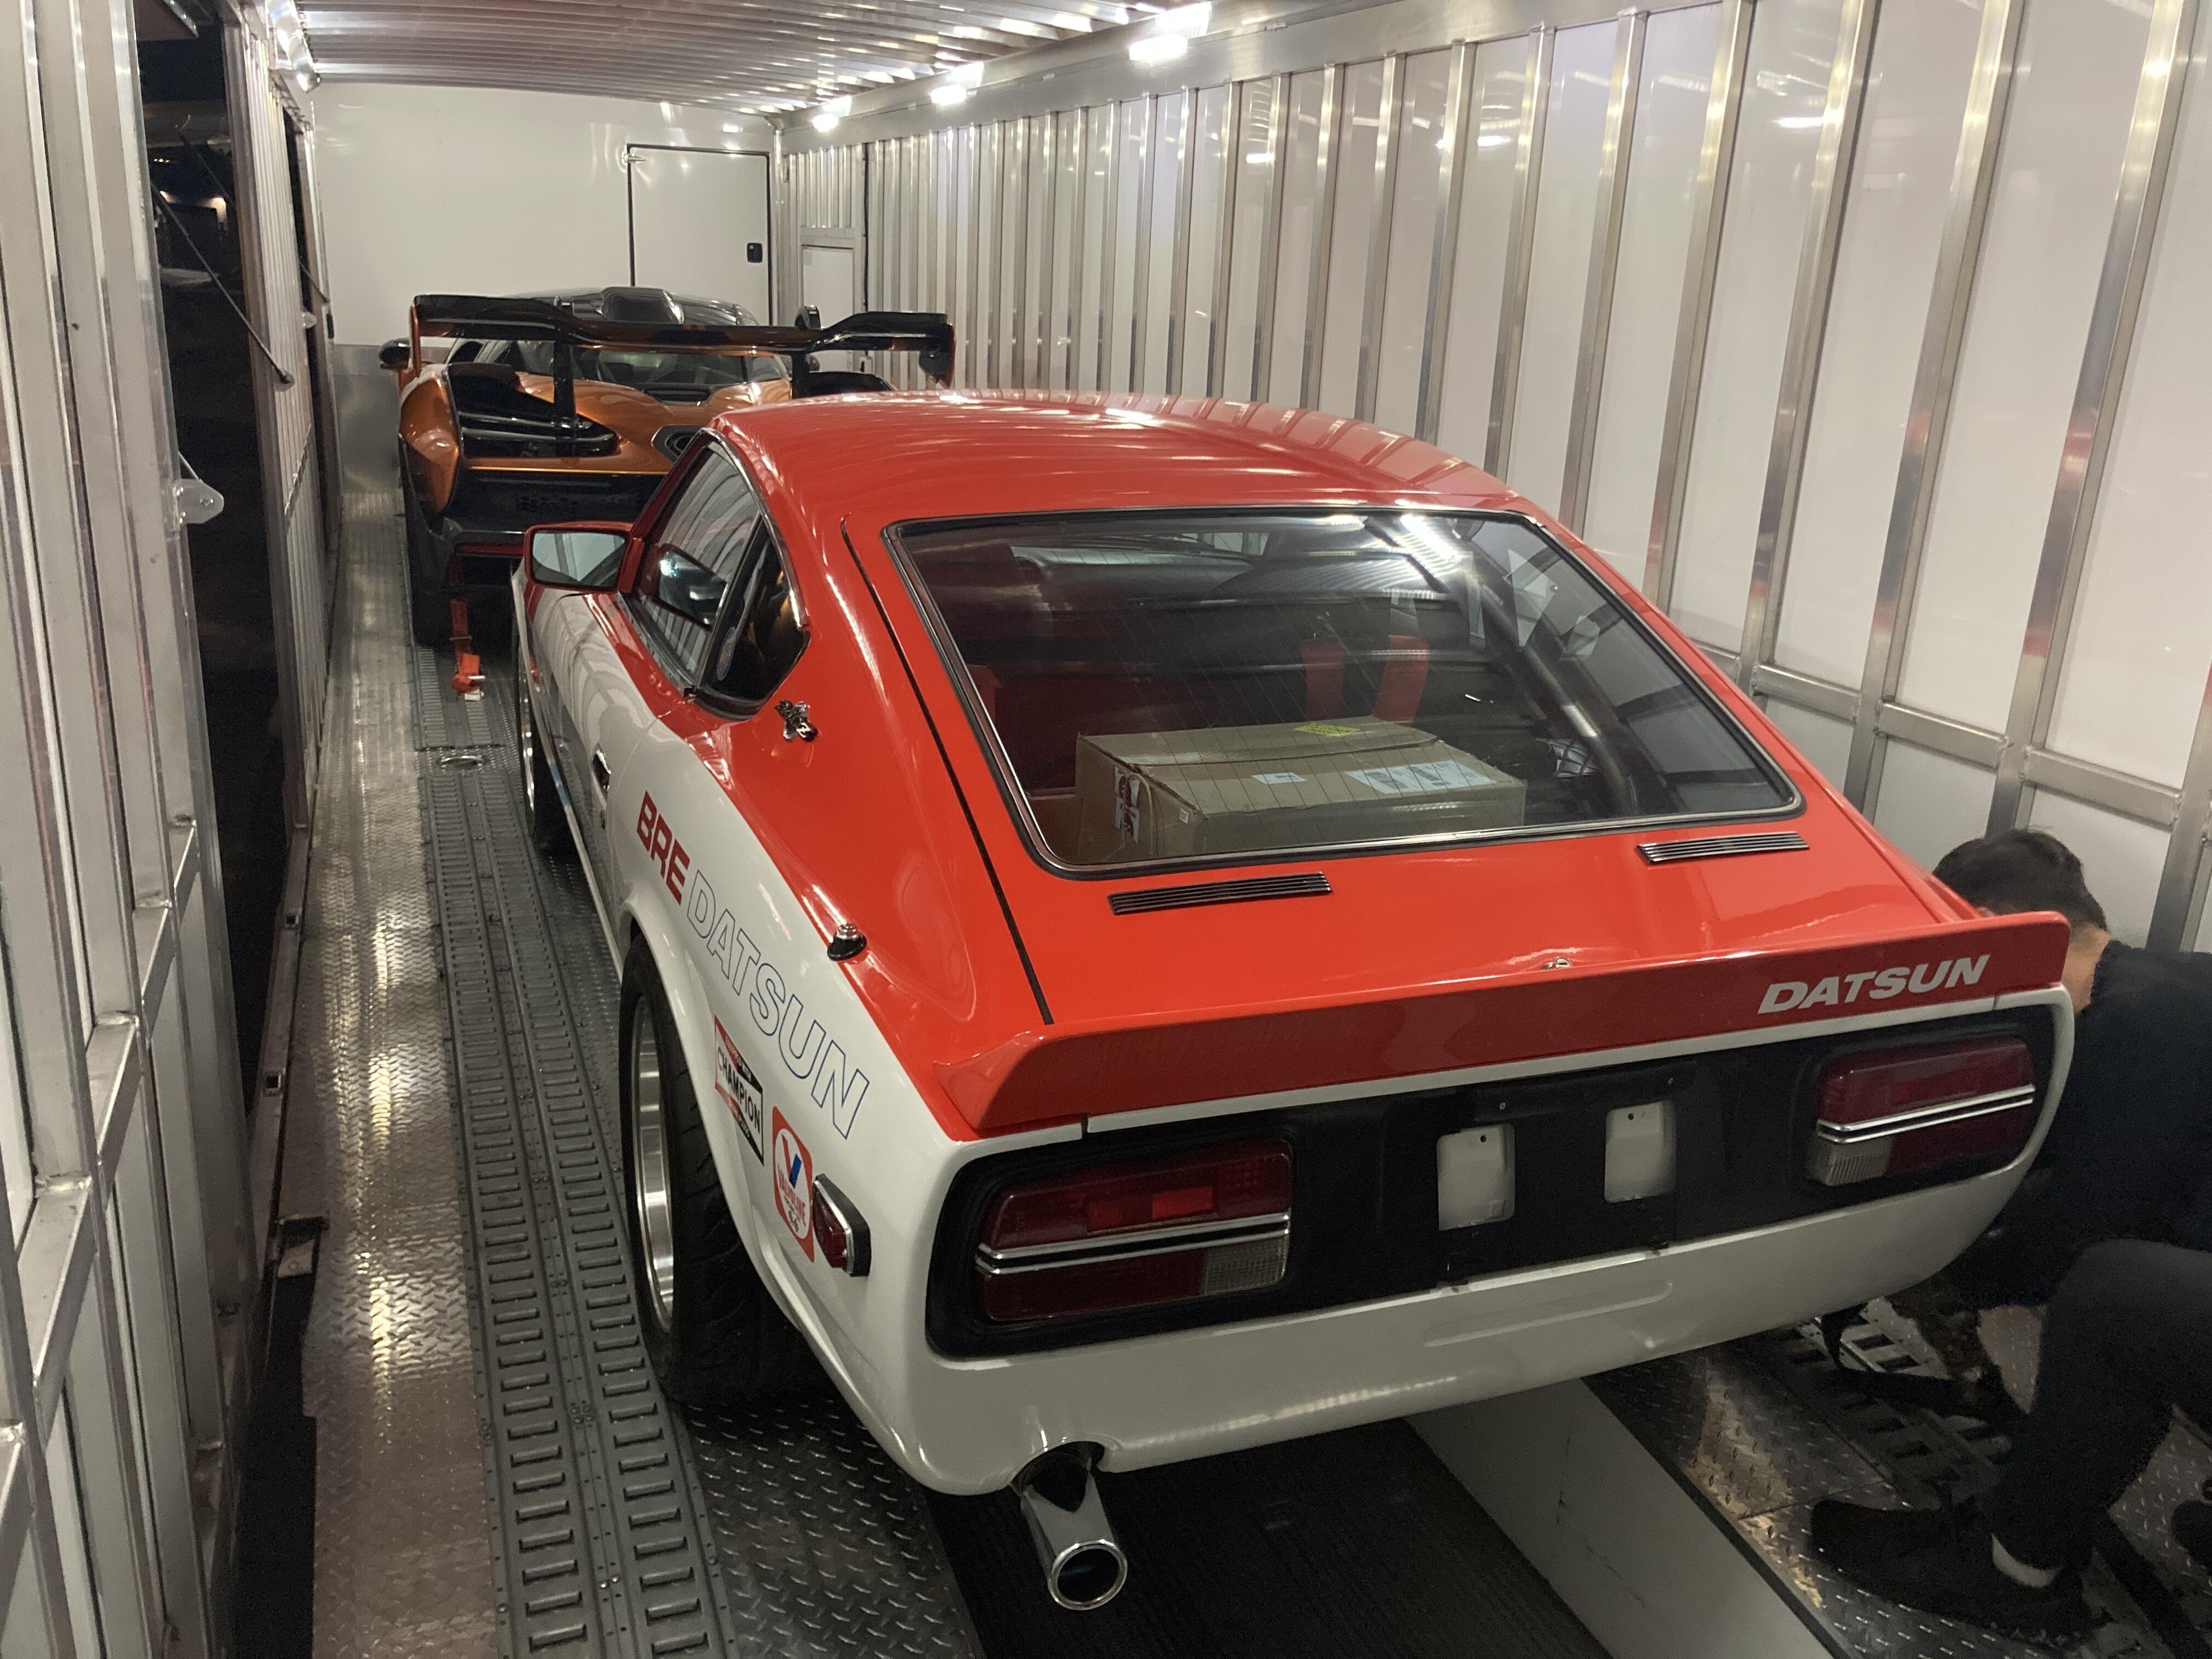
2 pointsSo I finally got the BRE replica Z finished up and sent off to the owner. Below are some of the final pictures of the car and photos of the car in the trailer. The Z and its' traveling companion, a SEMA McLaren, are headed on their way down to Texas.
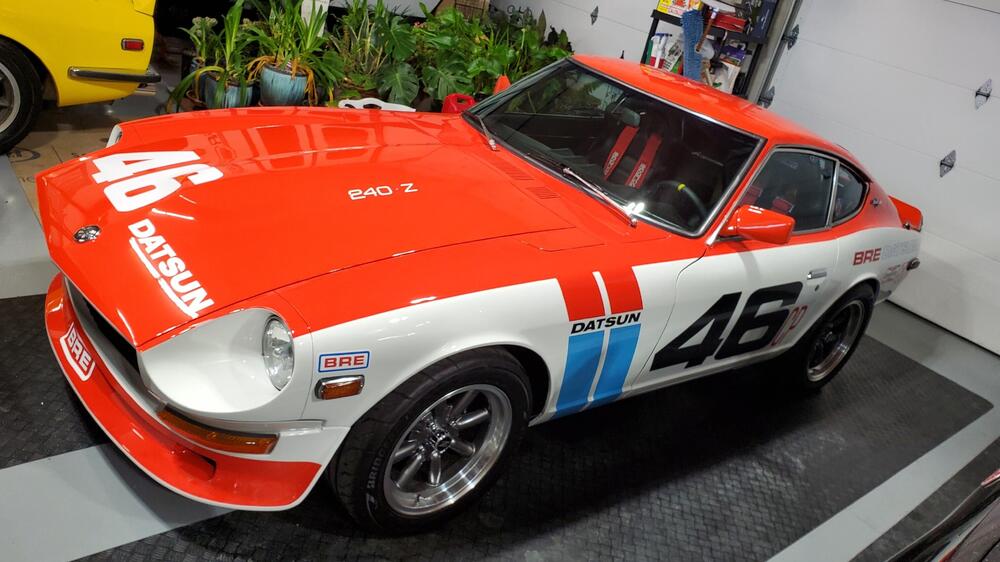

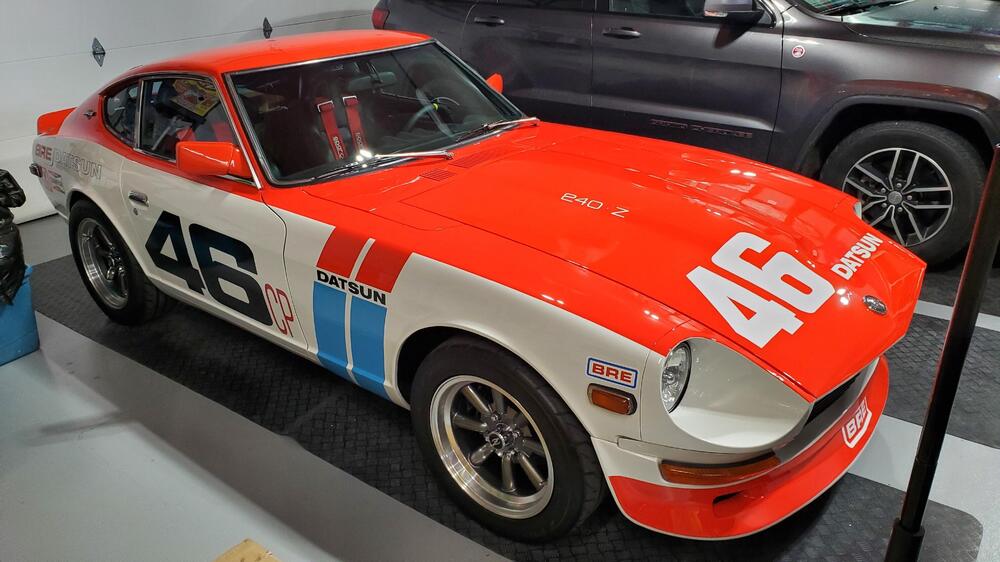

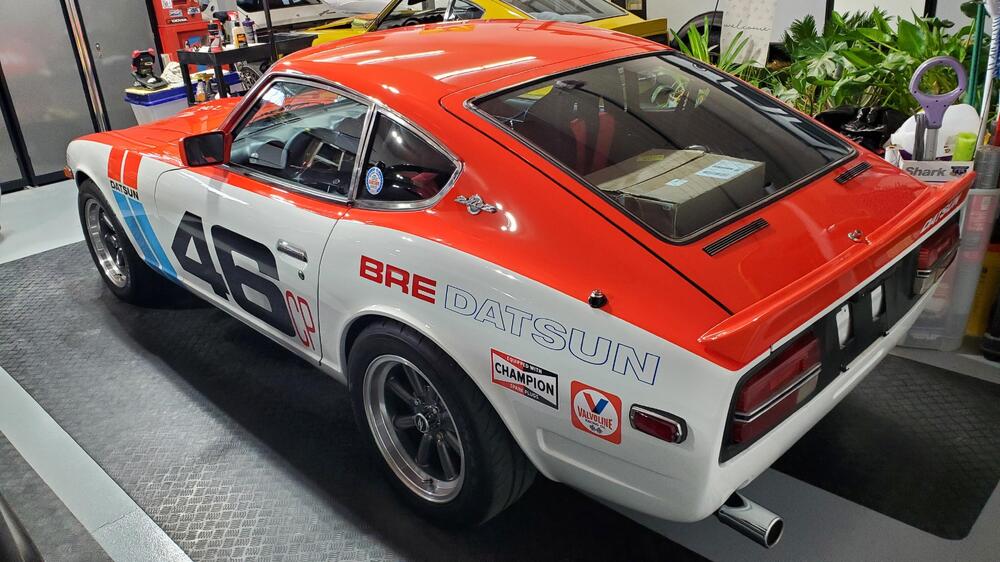


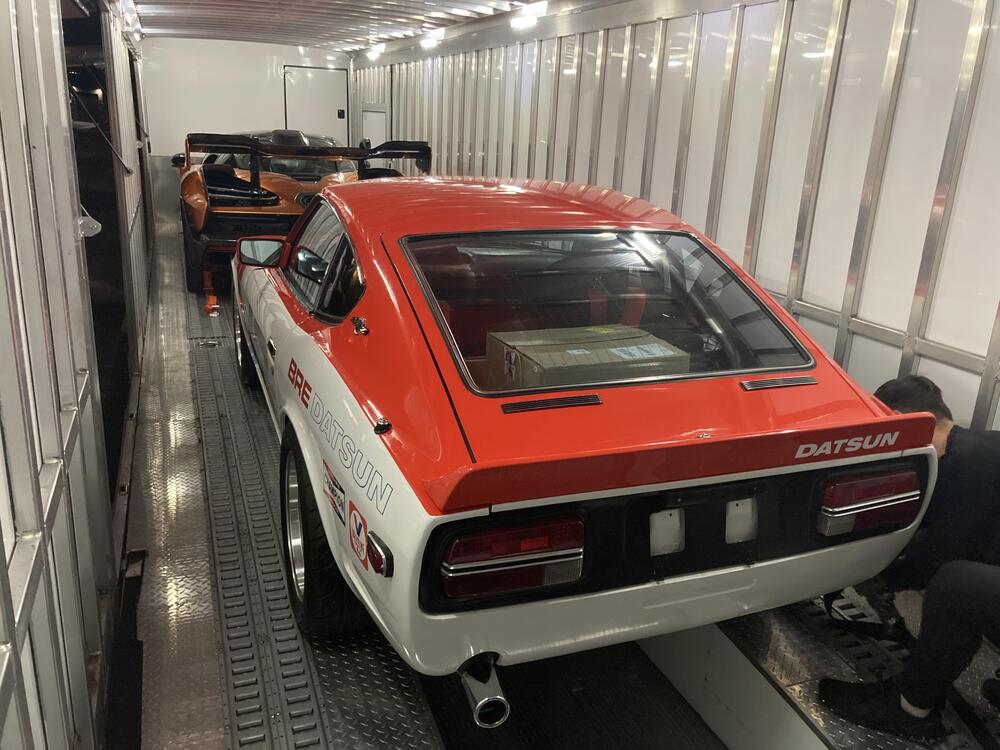
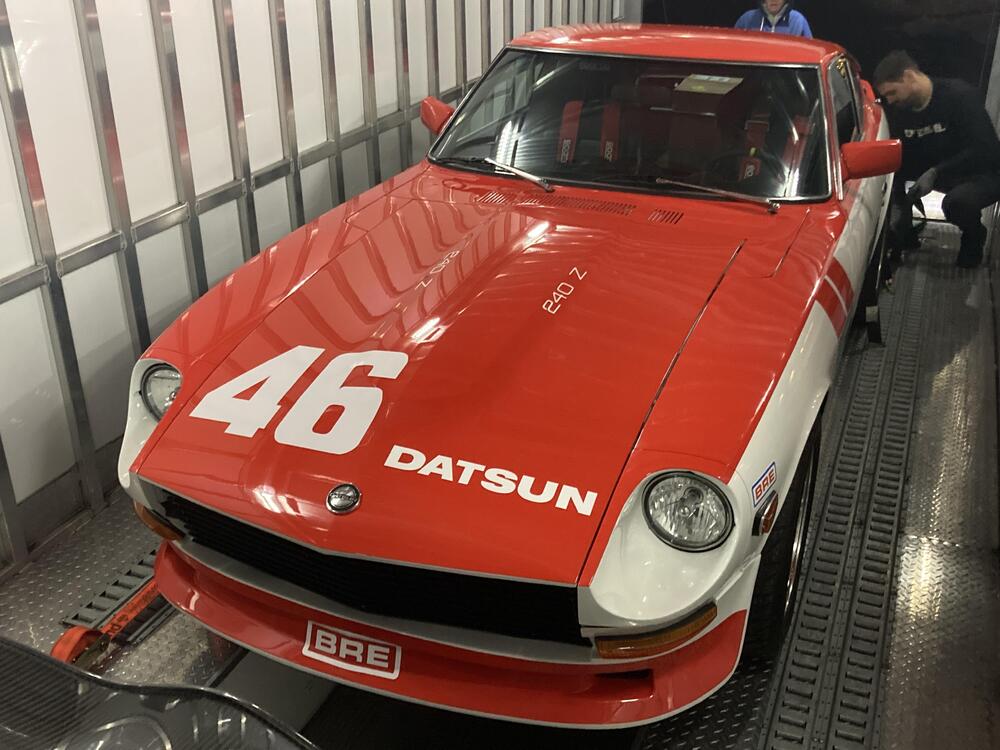
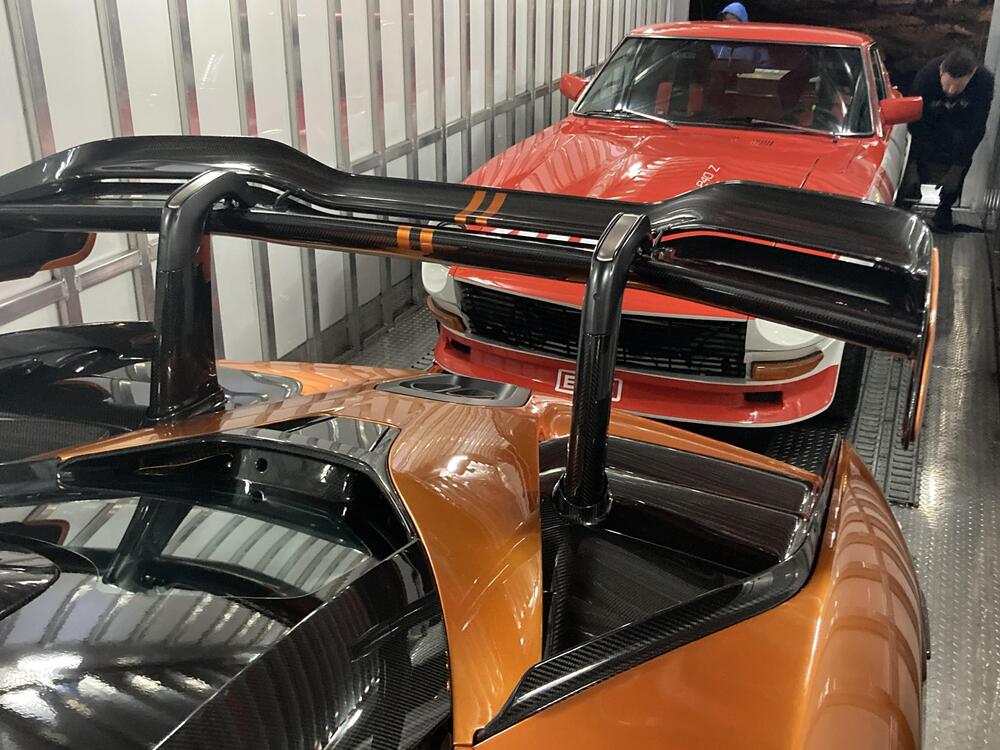
 2 points
 -
1 pointHave you put a vacuum gauge on the balance tube to see how the vacuum looks? I'd try it at both your more centralized PCV connection, and also at your brake booster connection on the end. Just to see if you can glean any useful info from the gauge?1 point
-
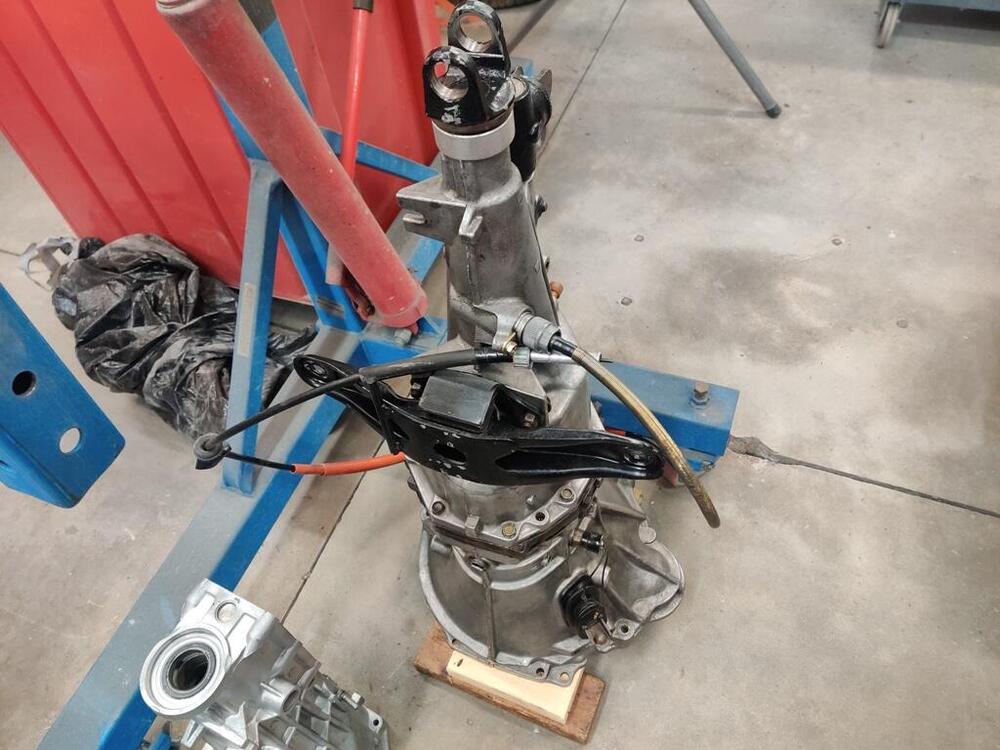
I have used this transmission in my Z for many years. After putting many miles on it over a number of years, I decided to rebuild it because it was grinding a bit when going into second. I rebuilt it myself using all new OEM bearings and synchronizers. I also replaced the seals/o-rings on the main selector rod. It has had little mileage added since the rebuild. It is in very good condition. I am switching to a 240SX transmission, so I no longer need this one. Price: $600 plus shipping or you can pick it up from Marietta, GA. Gear ratios: First 3.062 Second 1.858 Third 1.308 Fourth 1.000 Fifth 0.745 Not included are the speedometer cable and the series one transmission crossmember, though I will sell the crossmember separately.
 1 point
 -
1 point
-
Yep, especially when someone in Alpharetta (near @inline6 ) posted an 83 5-speed that wasn't even cleaned up for $700.1 point
-
1 pointUPDATE: I got her running!!! New 123 is installed and at this point I can say it performs as advertised. Could not start it up for the first 10 minutes and was about ready to cuss as I spent so much time going over the manuals and ensuring all was hooked up properly. Made sure my grounds were good. Then I realized I had not hooked up the last black wire on the dizzy. Yeah, it fired right up afterwards into a steady 500 rpm lope. LOL
 1 point
 -
1 point
-
1 pointA warped drum meaning it’s out of round. I’m not entirely sure how that would happen on these cars, as the drums are quite robust in design. It will be interesting to see if that turns out to be the issue, especially if it’s the same side with the seized adjuster. That seized adjuster doesn’t quite make sense either. In my experience, seized adjusters are usually caused by the car sitting for a long time, they rust up and stop adjusting, which typically results in a long brake pedal. But how would it over-adjust and then seize? One possibility is that it was installed incorrectly, they switched the adjusters, left adjuster in the right side and visa versa. I don't know if this is even possible, sinse I never tries it. If it over-adjusted, it could have caused the brakes to drag, leading to overheating. That heat could potentially warp the drum especially when the brakes shoes keep pressure when it is standing still and very hot. It could also cause the adjuster to seize. It’s just a theory, but it could explain the symptoms.1 point
-
1 point
-
1 pointWell, I’m not totally sure it’s going to be all sunshine and rainbows yet. I haven’t taken it on the road yet. The idle is definitely low compared to before I put it on. No verdict on how it effects the brakes.1 point
-
1 pointWell done dude! I never got PCV and ITB to play nicely. Caused almost a vac like leak. The issue was my idle ended up too high for my liking. So I ditched it. I am going to give the exhaust method a shot.1 point
-
1 pointI was being clever to draw out the bot. I actually meant is this a new bot method. I reported one of the posts. Lets see what happens.1 point
-
1 pointThe app does the calculation for you. "Degrees crankshaft". https://123ignition.com/wp-content/uploads/2023/03/Curve-Tabel.jpg
 1 point
 -
1 pointI agree with Yarb. My car was inop when I did the install. I set TDC and installed the dizzy. Rotated until I got the green light. Then locked down. Programmed in an initial curve Started right up. Verified actuall advance vesus the apps display with a timing light. IIRC there are multiple spots where the green light will light up as you rotate it...so you might have more than one orientation option1 point
-
1 point
-
http://www.zcarblog.com/wp-content/uploads/2026/03/IMG_0080.jpg John Morton was inducted into the Motorsports Hall of Fame on March 9-10, 2026 in Daytona Beach. The official induction ceremony was held during the 38th Annual Induction Celebration Presented by Toyota Gazoo Racing. Z Car Garage was honored to attend this milestone for our hero and inspiration to motorsport enthusiasts worldwide. http://www.zcarblog.com/wp-content/uploads/2023/02/312182441_483798780461966_6814874755748199404_n-1024x768.jpg From the Motorsports Hall of Fame of America: “The ageless Morton first made headlines in the early 1970s as lead driver for 2022 MSHFA [Motorsports Hall of Fame of America] inductee Peter Brock and his BRE Datsuns, winning consecutive SCCA C Production national championships (1970, 1971) in the outfit’s 240Zs and consecutive Trans-Am Under 2.5 titles (1971, 1972) in BRE 510s, winning 12 of 19 starts. Nevertheless, Morton didn’t attract many top professional rides until the late ’80s. He won twice in 11 starts in 1987 in underpowered Group 44, Inc. Jaguar XJR-7 GTPs owned by 2018 MSHFA inductee Bob Tullius and four times in eight starts in the top-rated Electramotive Nissan GTP cars in 1988. Other noteworthy results include a stunning second overall and first in IMSA GTO at the 1979 Rolex 24 at Daytona in a Ferrari 365 GTB/4, first in Group C2 at the 1984 24 Hours of Le Mans and first overall in the 1985 L.A. Times GP in a Porsche 962. He continued winning into the 2000s. At the 50th annual SCCA Runoffs in 2013, Morton, age 71, started 13th and finished 10th despite having only a few practice sessions in the car.” http://www.zcarblog.com/wp-content/uploads/2026/03/IMG_6949.jpg Highlights from the event included the unveiling of the John Morton display case, which will be showed for one year and the John Morton bronze portrait which will be permanently displayed in the MSHF. http://www.zcarblog.com/wp-content/uploads/2026/03/IMG_3205.jpg http://www.zcarblog.com/wp-content/uploads/2026/03/IMG_0068.jpg Video It was great to see John (currently 84 years of age) up on the stage giving his speech. Watch the induction ceremony with words from John and his peers in this video: Reception Highlights ROB: It was announced last year that John Morton would be joining the class of 2026 Motorsports Hall of Fame, alongside luminaries including Peter Brock (2022). Our client and friend Randy Jaffe also attended the event, bringing both the BRE Datsun 510 and 240Z race cars to the track and museum for display: http://www.zcarblog.com/wp-content/uploads/2026/03/IMG_0059-1-e1773470486877.jpg Highlights for me: Rusty Wallace was a one of the key speakers and I also recognized ESPN/NASCAR commentator Marty Smith. Lots of famous people were there like Nissan driver Elliot Forbes-Robinson, Kenny Roberts Sr. and Jr. both MotoJP champs when 2-strokes kind of ruled that series. It was really cool. http://www.zcarblog.com/wp-content/uploads/2026/03/IMG_3211.jpg http://www.zcarblog.com/wp-content/uploads/2026/03/IMG_0060.jpg Mike Debbie Rogers brought their narrow-bodied Cobra which is 1 of 32 ever made and it was a real spectacle. People were freaking out, taking photos with John since considering his connection to Shelby American. http://www.zcarblog.com/wp-content/uploads/2026/03/IMG_0061-e1773793127487.jpghttp://www.zcarblog.com/wp-content/uploads/2026/03/IMG_0066.jpg http://www.zcarblog.com/wp-content/uploads/2026/03/IMG_0096.jpg We also spotted a few Z cars at the event! http://www.zcarblog.com/wp-content/uploads/2026/03/IMG_0025-e1773791333374.jpg http://www.zcarblog.com/wp-content/uploads/2026/03/IMG_0029-e1773791311935.jpg It was a blast to have drinks with Randy, Joe Cavaglieri, Steve Johnson, Charlie from Honda R&D and a bunch of awesome people. We heard amazing stories of other inductees as the MSHF not only recognizes automotive motorsports: winningest driver in Unlimited Hydroplane history Dave Villwock (Powerboats) and NHRA competition director Steve Gibbs (Drag Racing). Incredible time and we loved seeing John Morton recognized for such an amazing career. http://www.zcarblog.com/wp-content/uploads/2026/03/ba14d3a0-1da5-45cd-b8d2-a65bfe88e651.jpg http://www.zcarblog.com/wp-content/uploads/2026/03/IMG_0095.jpg Please join us in congratulating John for this achievement! View the full article1 point
-
1 point
-
1 point
-
1 pointSimilar design, but my version has a metallic silver cover. Here's the page in question. Doesn't scan so nicely because I don't want to break the spine, sorry:
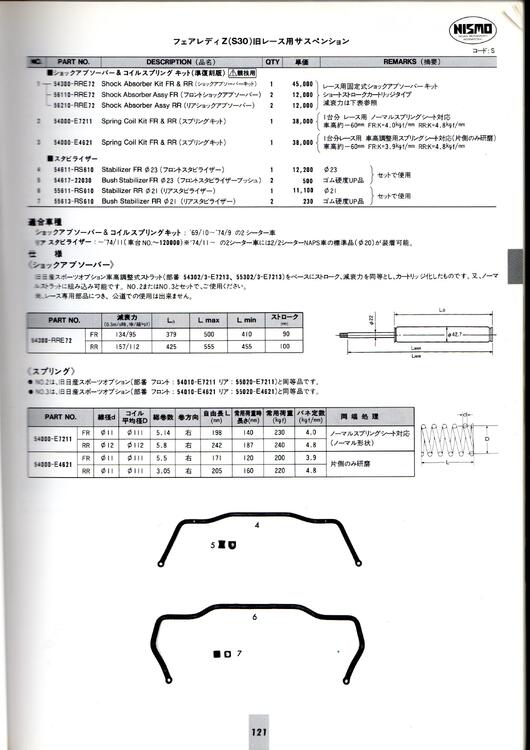 1 pointHi Nils, Nice stuff! I have an issue of the NISMO 1997 Japan catalogue that lists the 'RRE72' Kayaba blue NISMO cartridge inserts and their corresponding springs: *54000-E7211 SPRING COIL KIT FR & RR. The listings states that they are for use with standard strut platforms (ie, non-adjustable ride height), they lower the car by 60mm and the spring rates are FR: 4.0kg f/mm and RR: 4.8kg f/mm. There's a note that says the 54000-E7211 spring set is essentially the same as the older Sports Option 54010-E7211 (FR) and 55020-E7211 (RR) springs. So they just have new part numbers. Actually it might be easier for me to scan the relevant page and put it up here, because there is additional data for the springs and dampers which might be of useful reference for you. Stand by...1 point1 pointUpdate for you: After driving the car quite a bit, it now starts smoothly which is great but was running quite lean. I pulled the plugs and they were very white - you can see that plug #3 looks very burned which makes sense since that was the cylinder that had the injector that wasn't fully working at start-ups. I put a fuel pressure gauge on it today and here are the numbers: Idle: 32 psi w/15 on air fuel gauge (very lean) - Cruise: 36 psi w/15 on air fuel gauge (lean) - WOT: 40 psi w/13.2 on air fuel gauge (slightly lean for WOT but acceptable) I then noticed the TPS's idle enrichment arm contact was dirty, so I grabbed some sand paper and gave it a good cleaning - the sandpaper came out black to my surprise. After that, I opened the AFM that we went through in the "tuning with an air fuel gauge" thread and moved the gear back and forth. I noticed for the first time that when turning the gear there is a very quiet click with each tooth when turned - I believe the position I had it in was in between one of these clicks. I richened it one click and the air fuel numbers are perfect now: idle - 13.8, cruise 14.5, WOT 12.8 and the car drives awesome. Just for completions sake, I pulled out the fuel injection bible and went through all of the multimeter checks it provides, and everything came out normal. I'll post another update in the coming weeks as it continues to wake itself out of hibernation. I will be checking the plug gap on all of these in the coming days too.
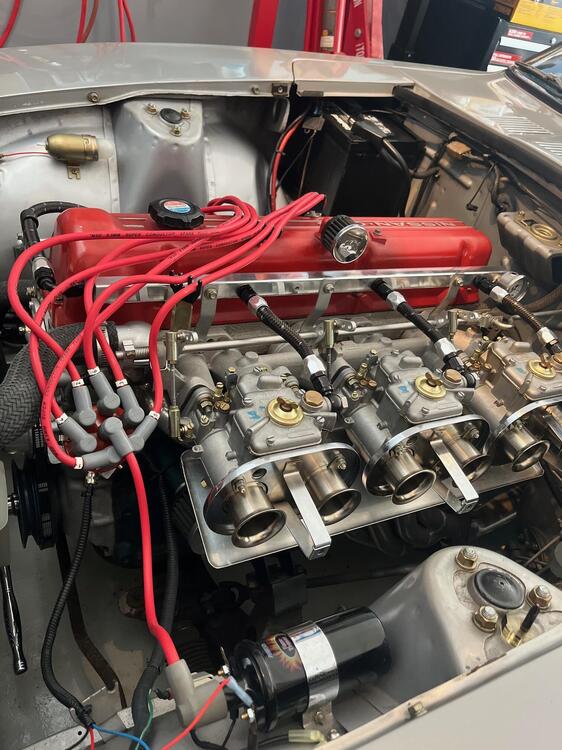
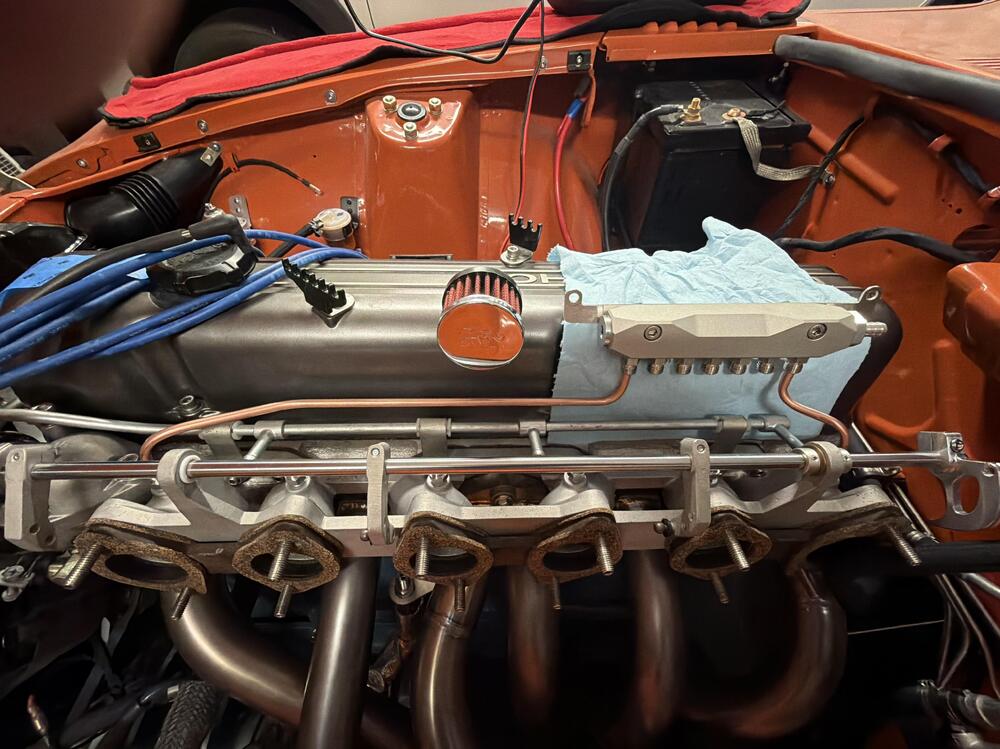
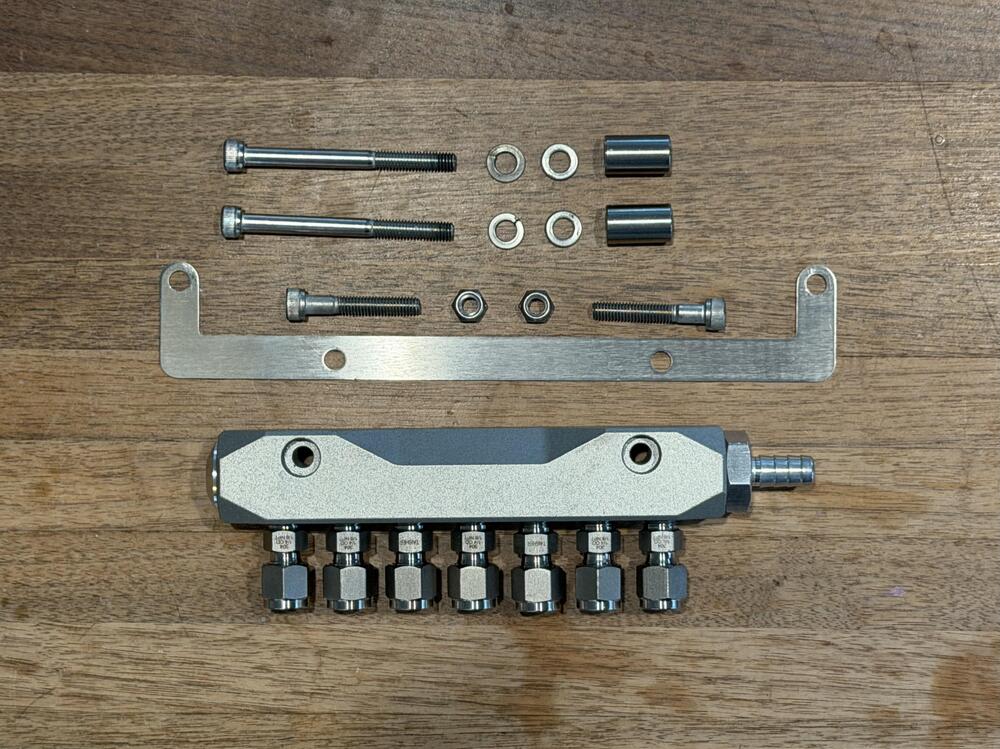
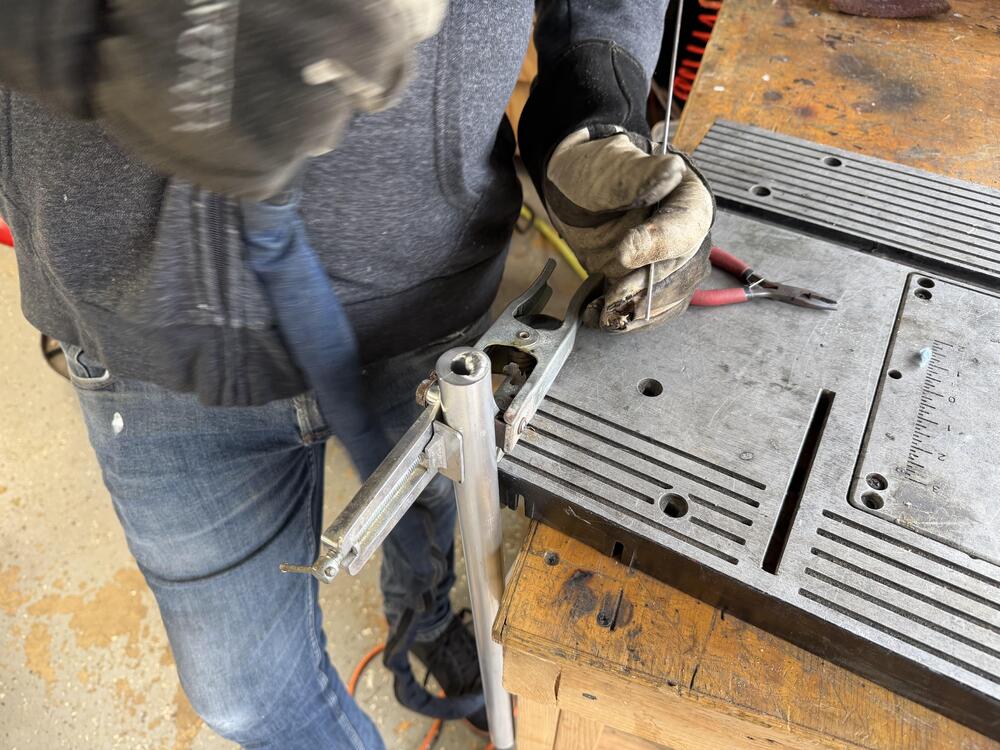
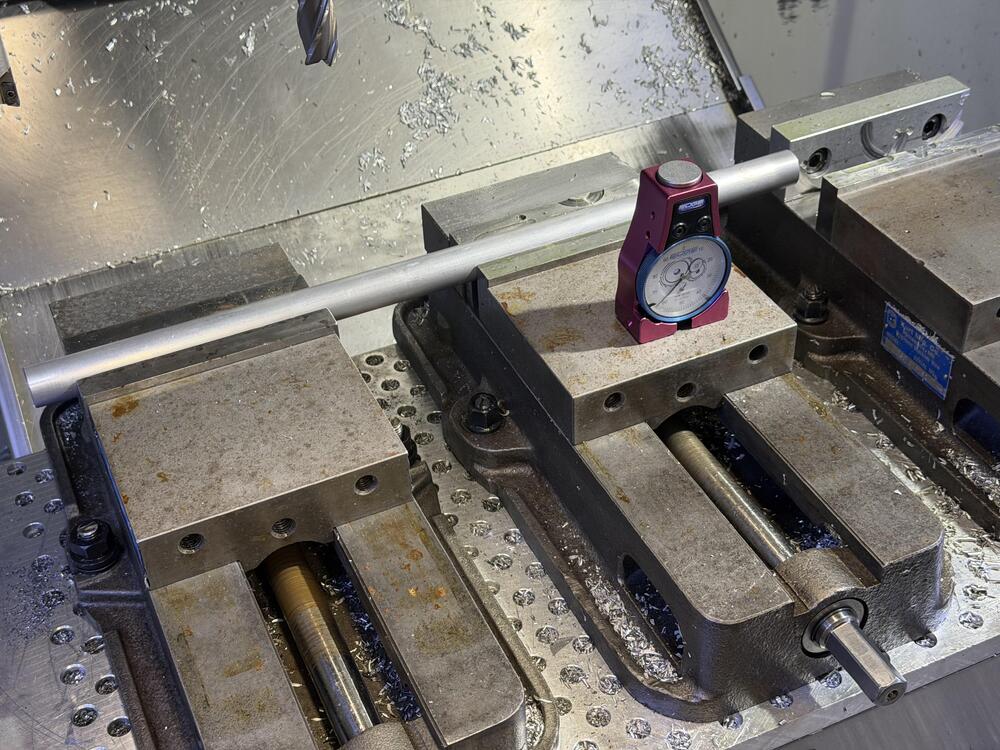
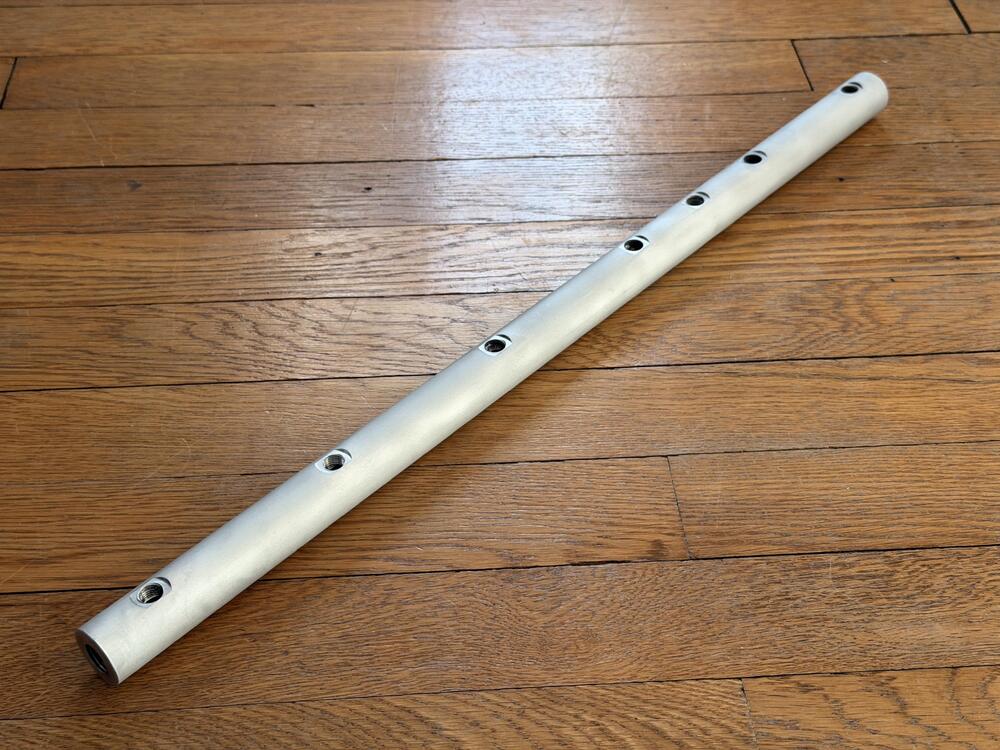
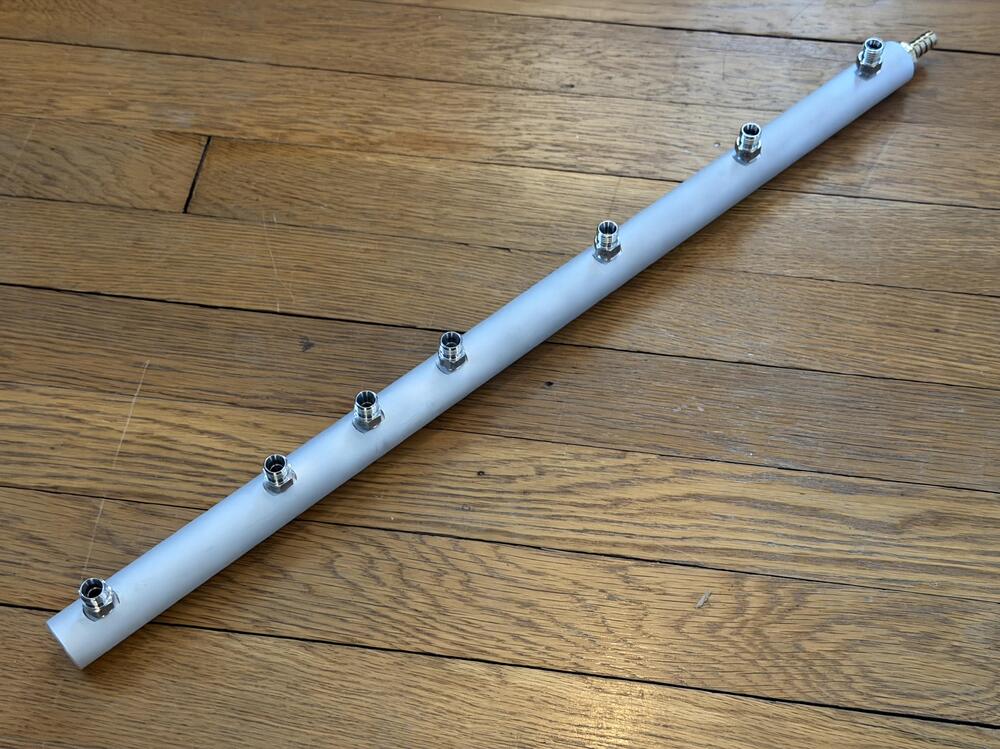
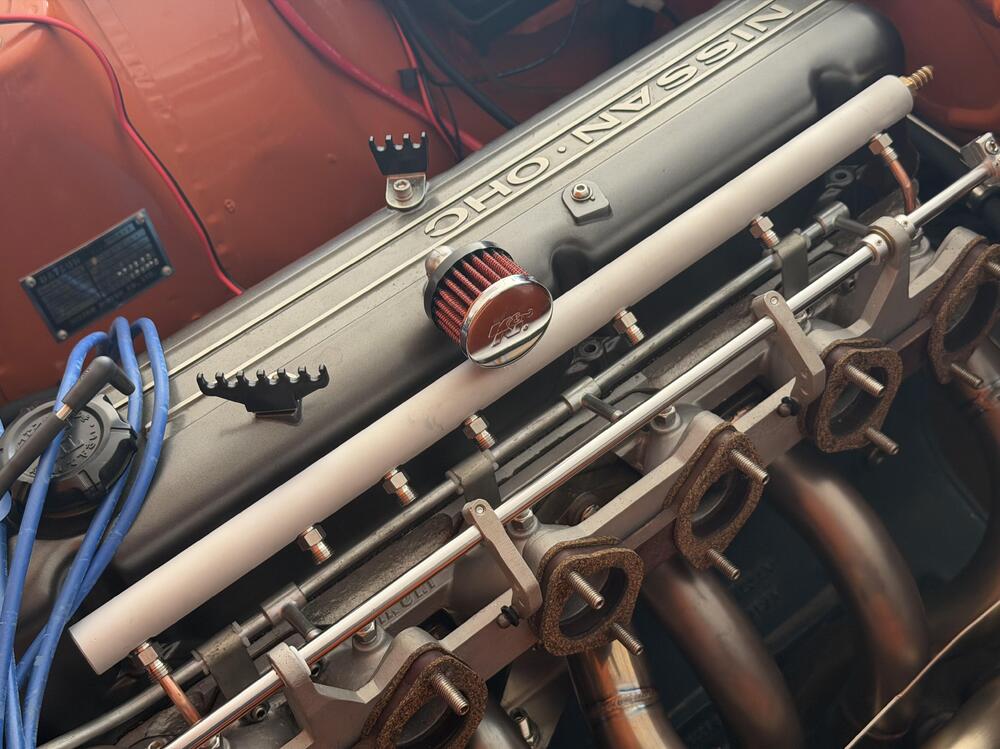
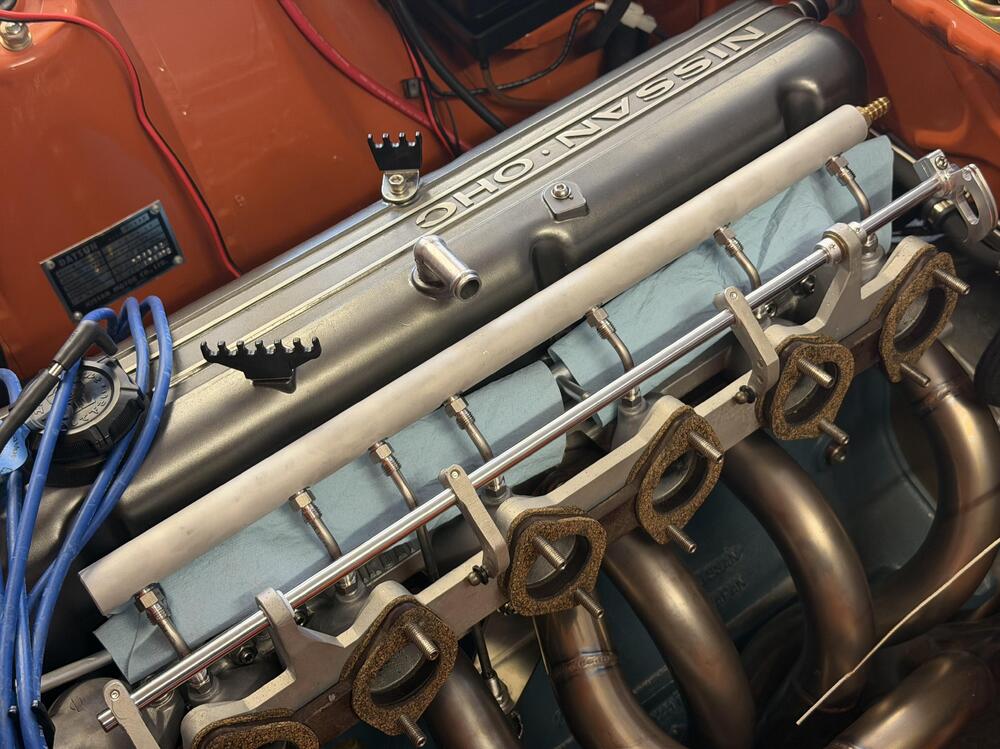
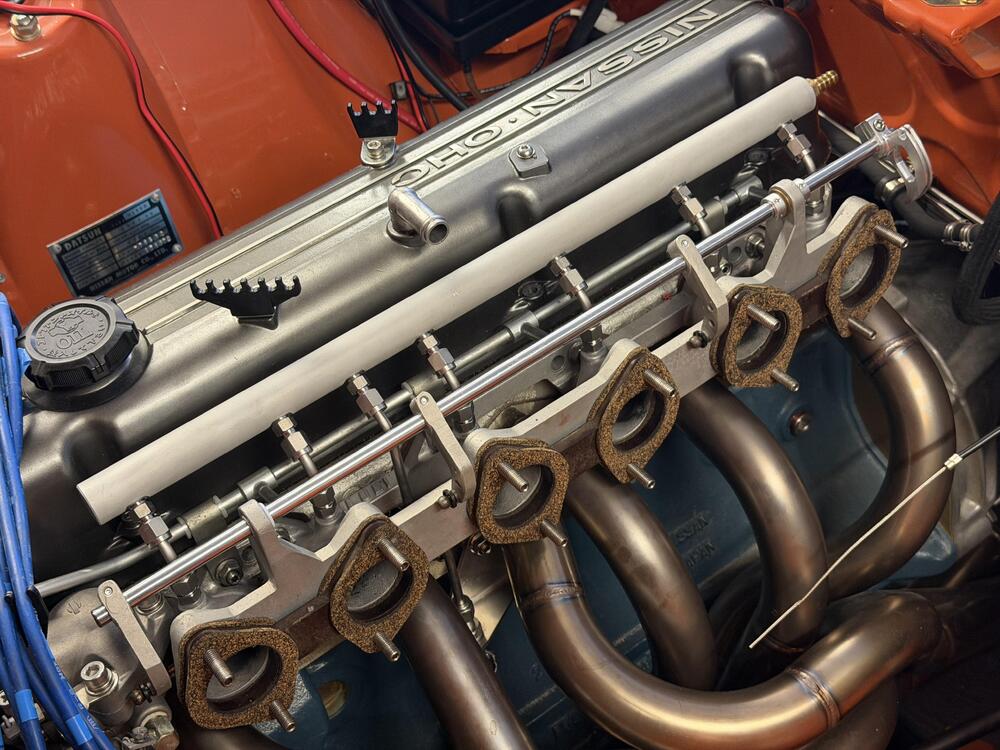
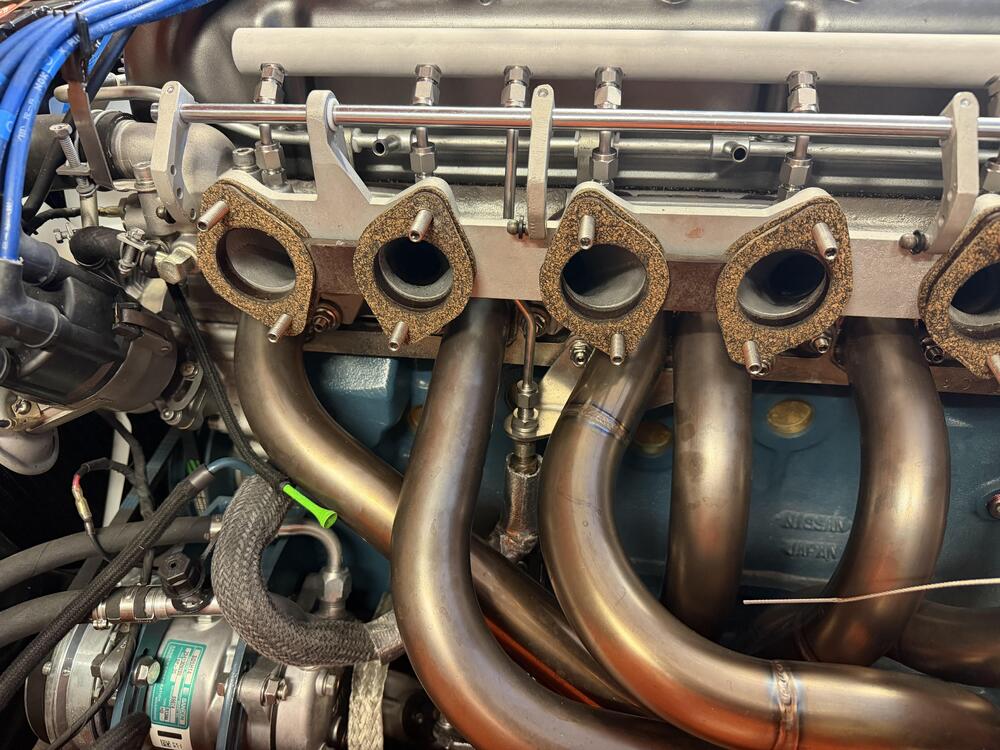
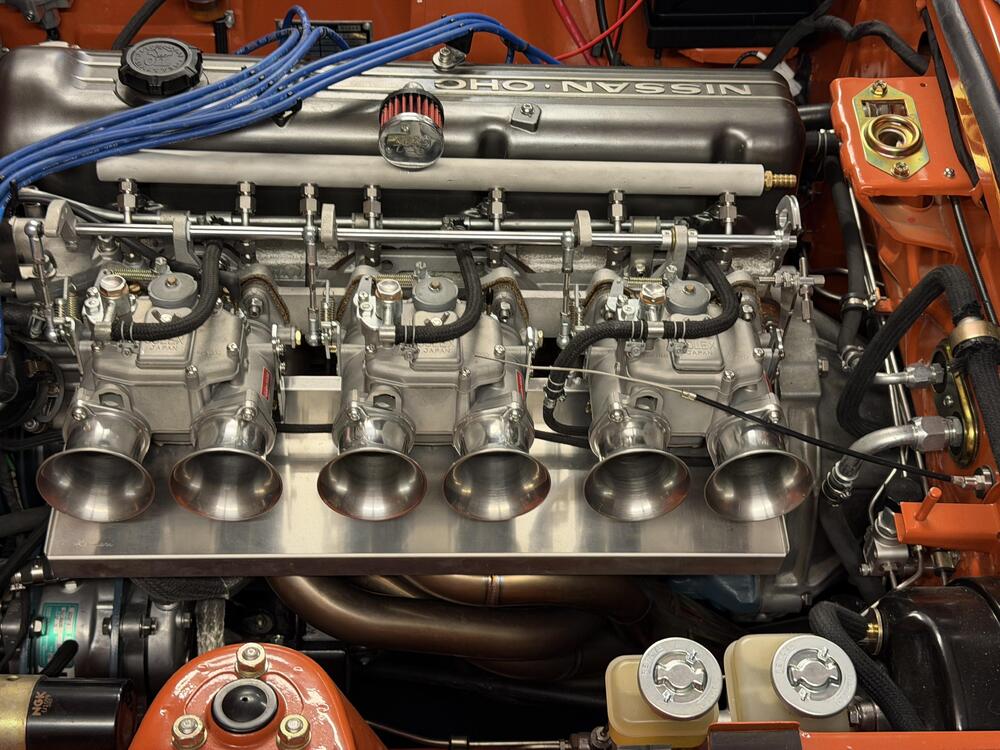
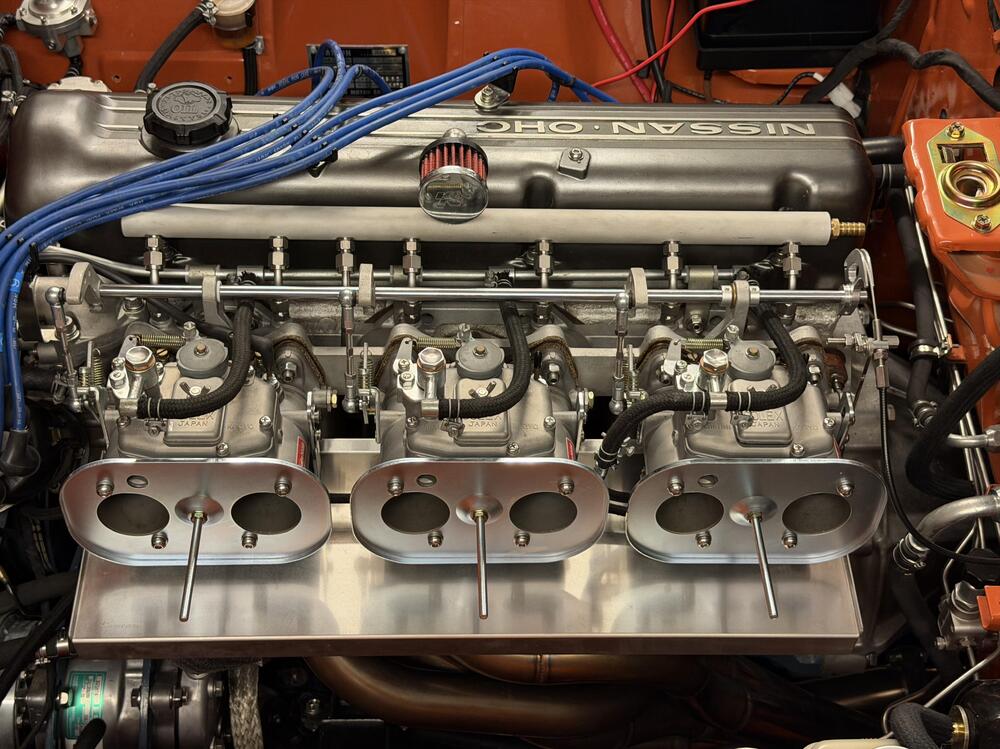
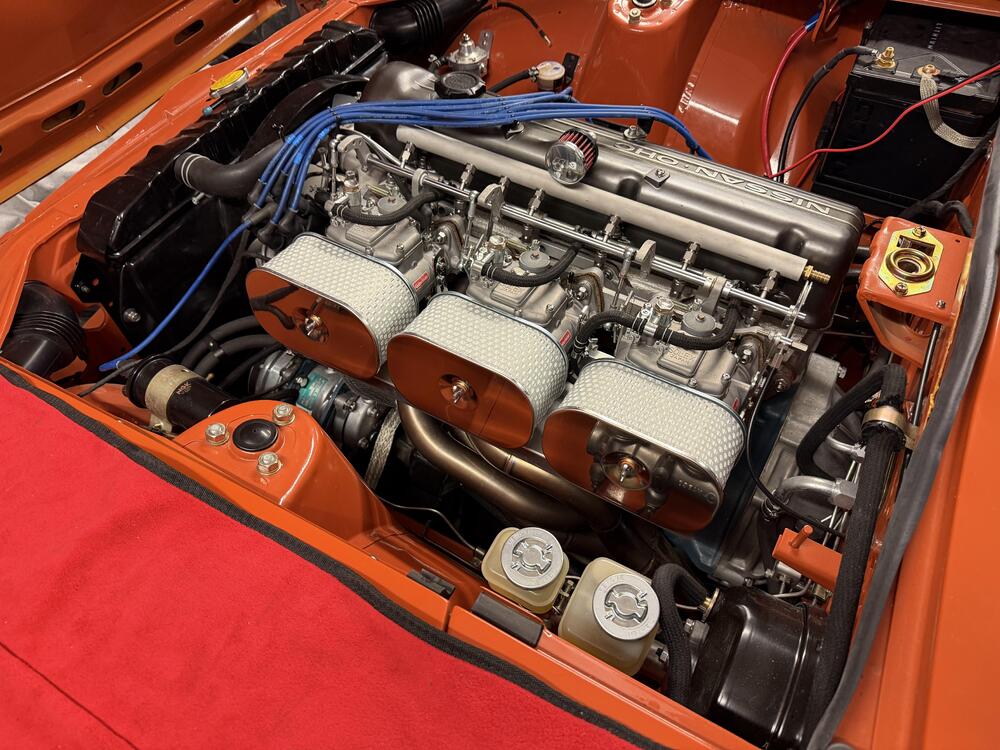
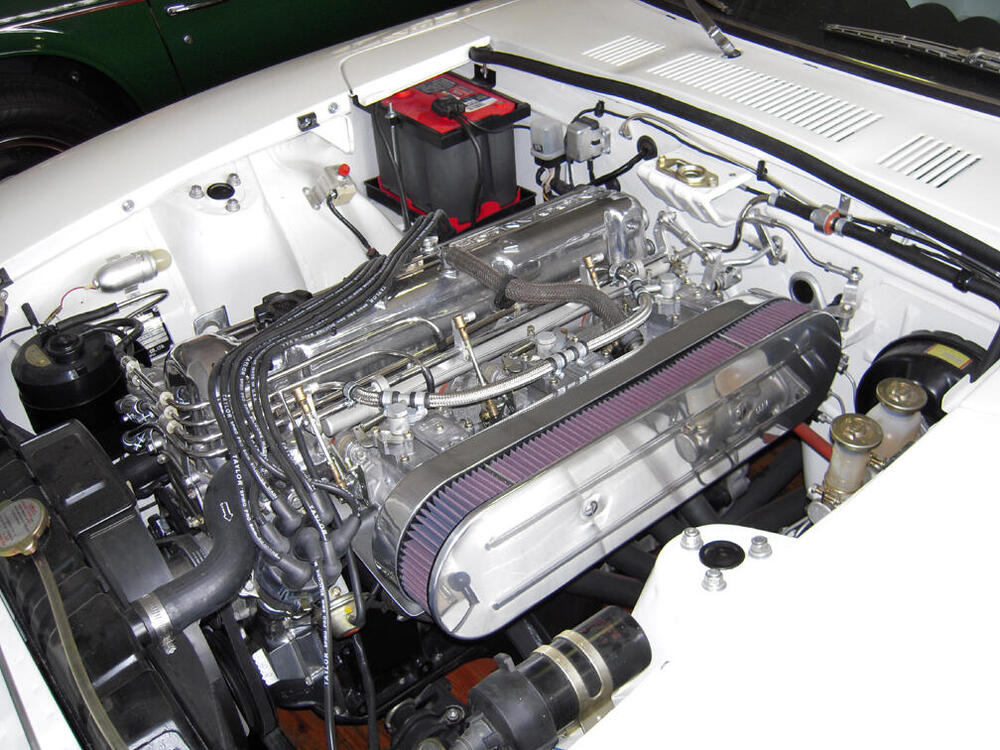
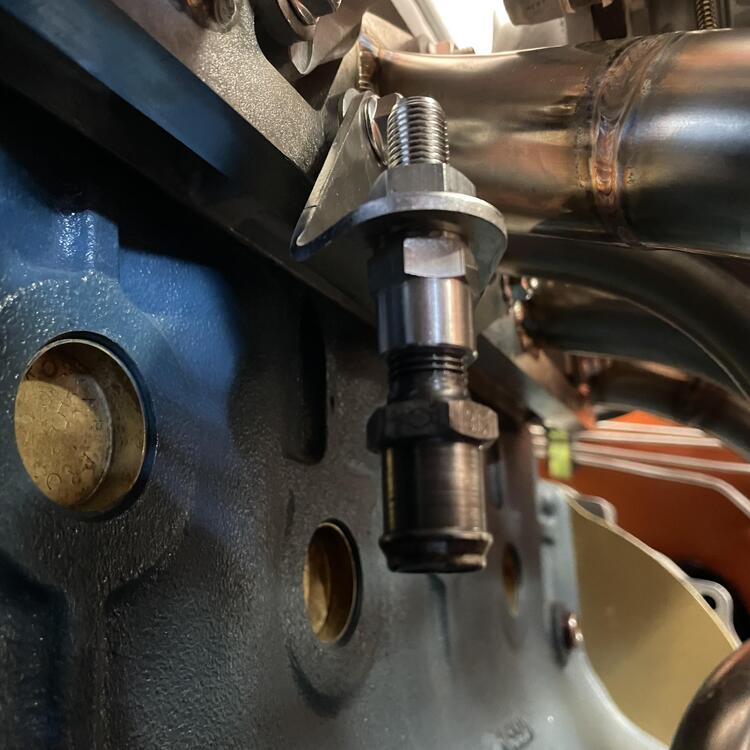
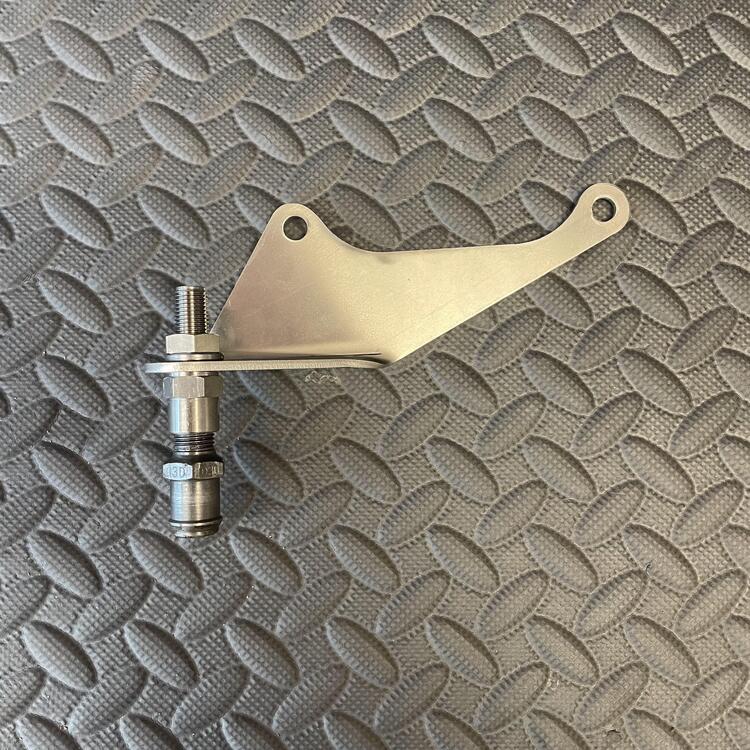
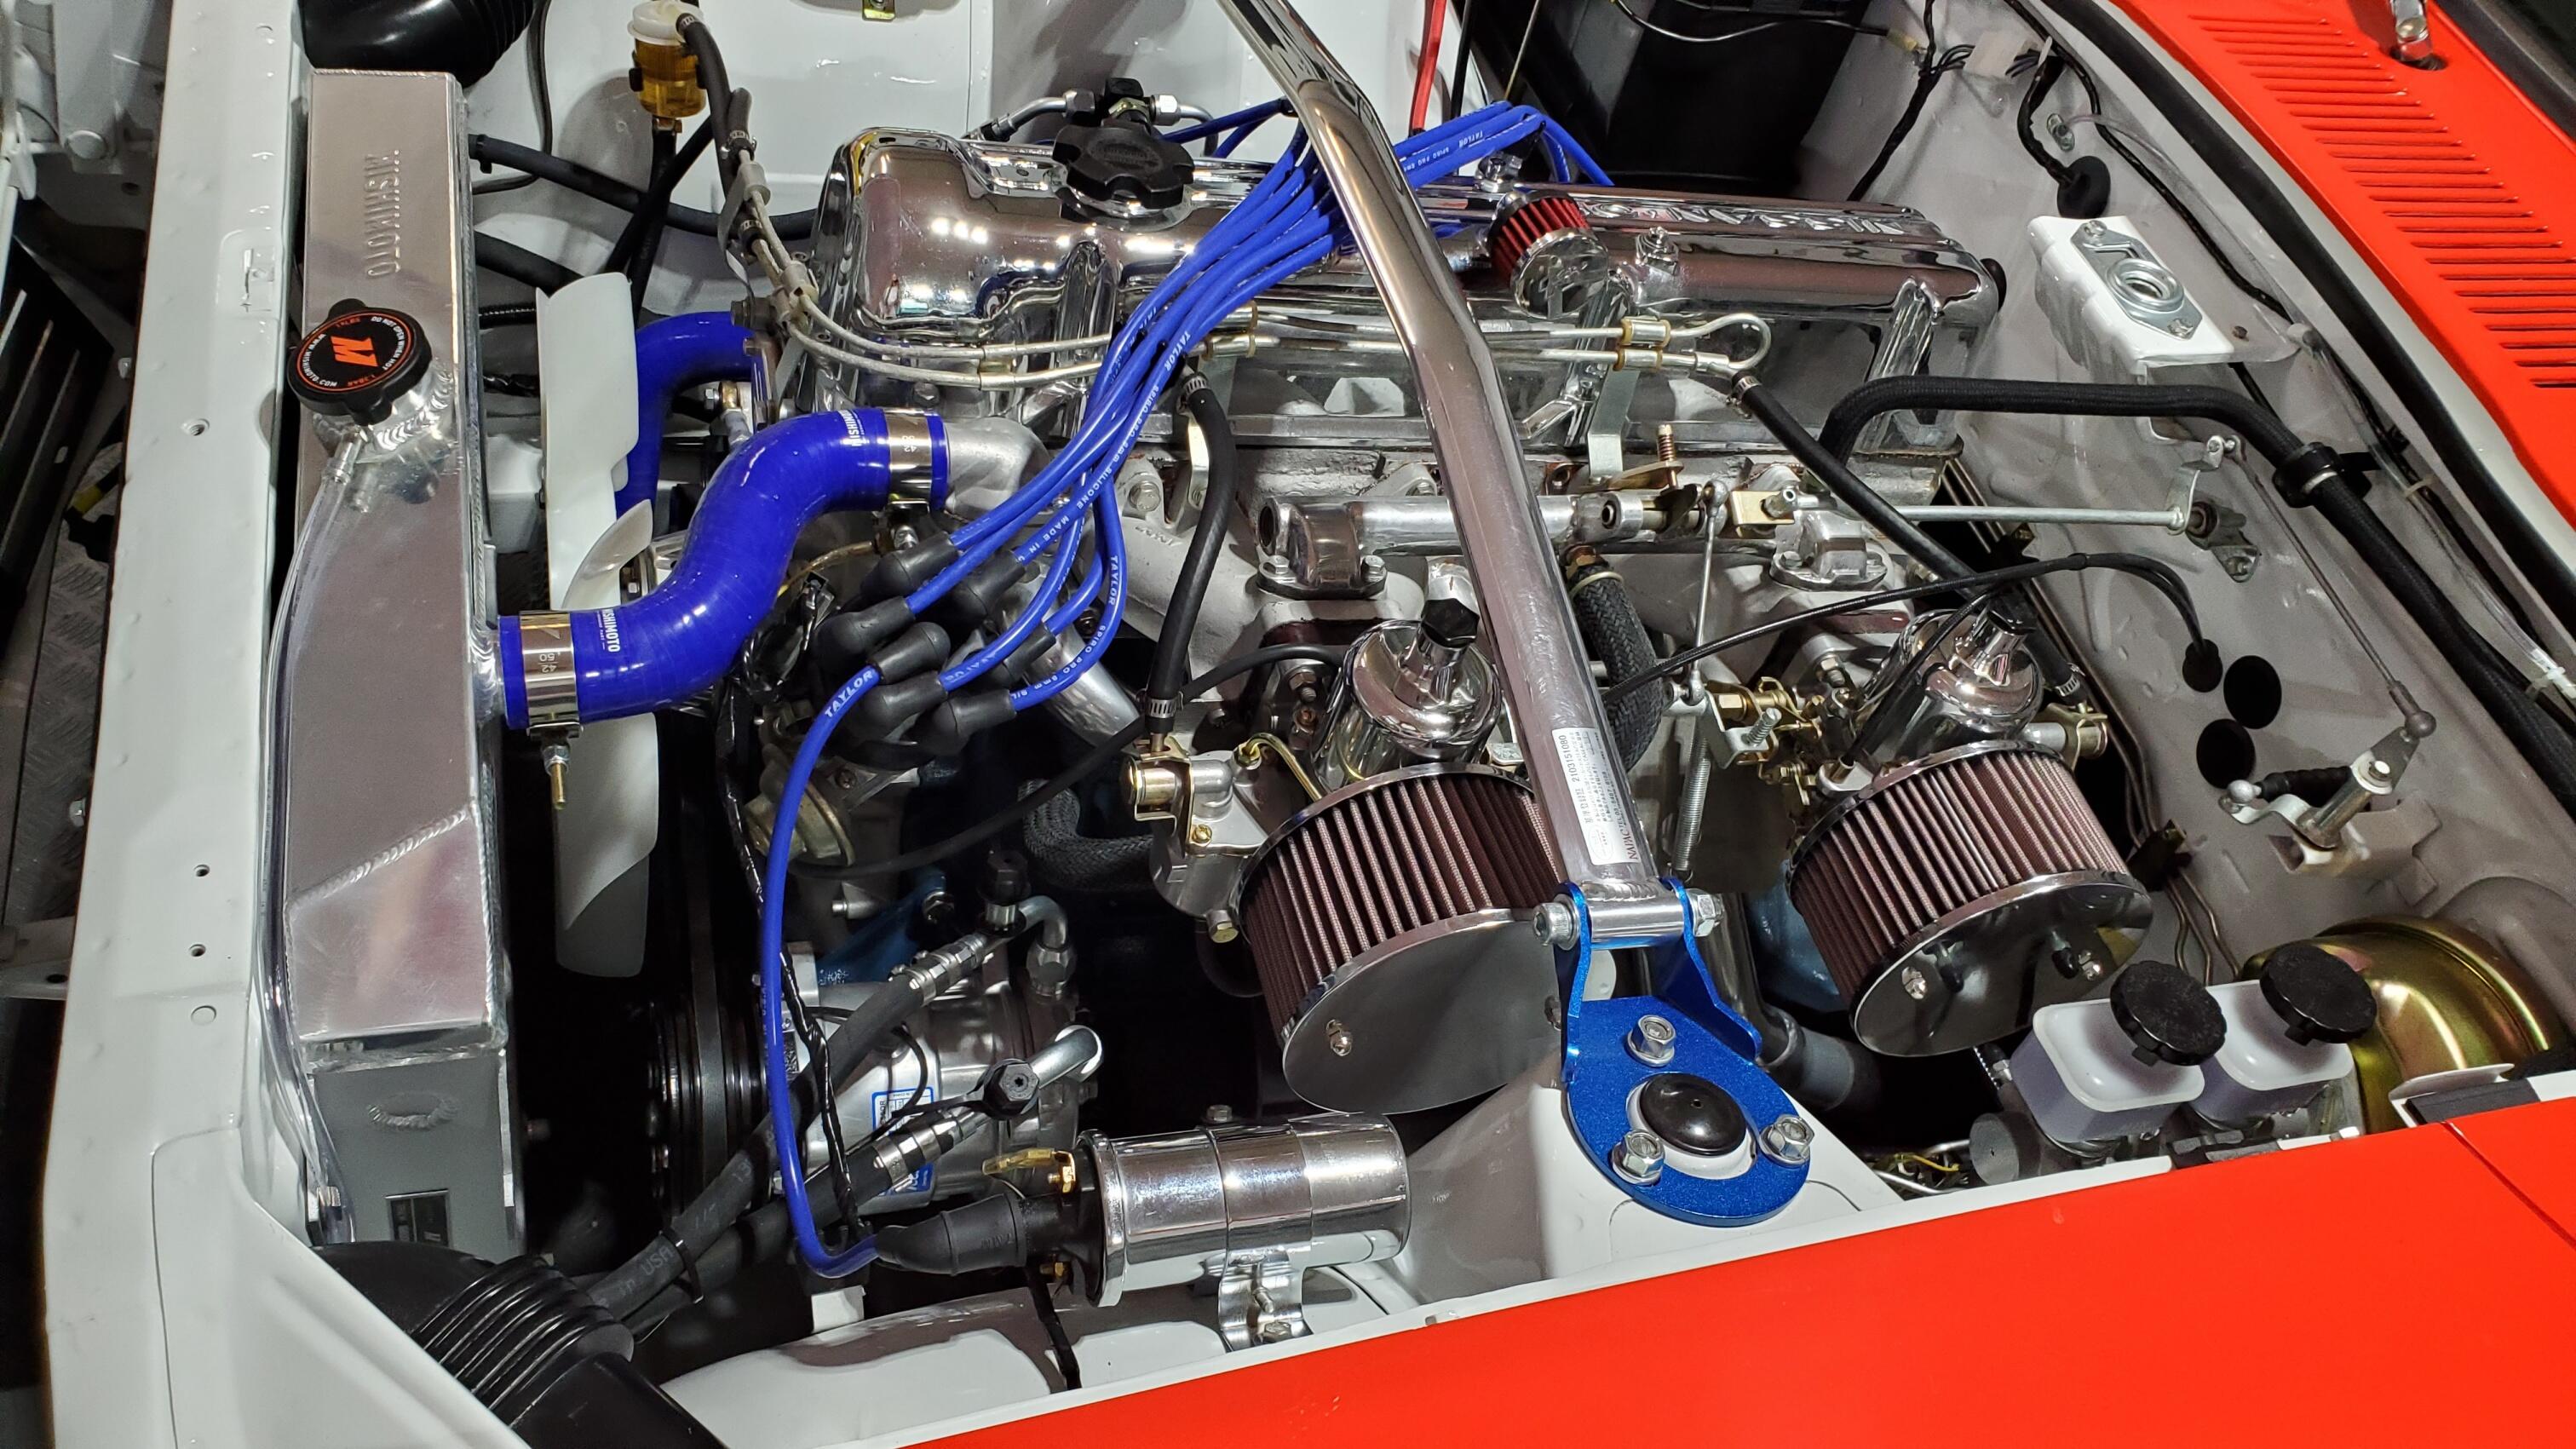
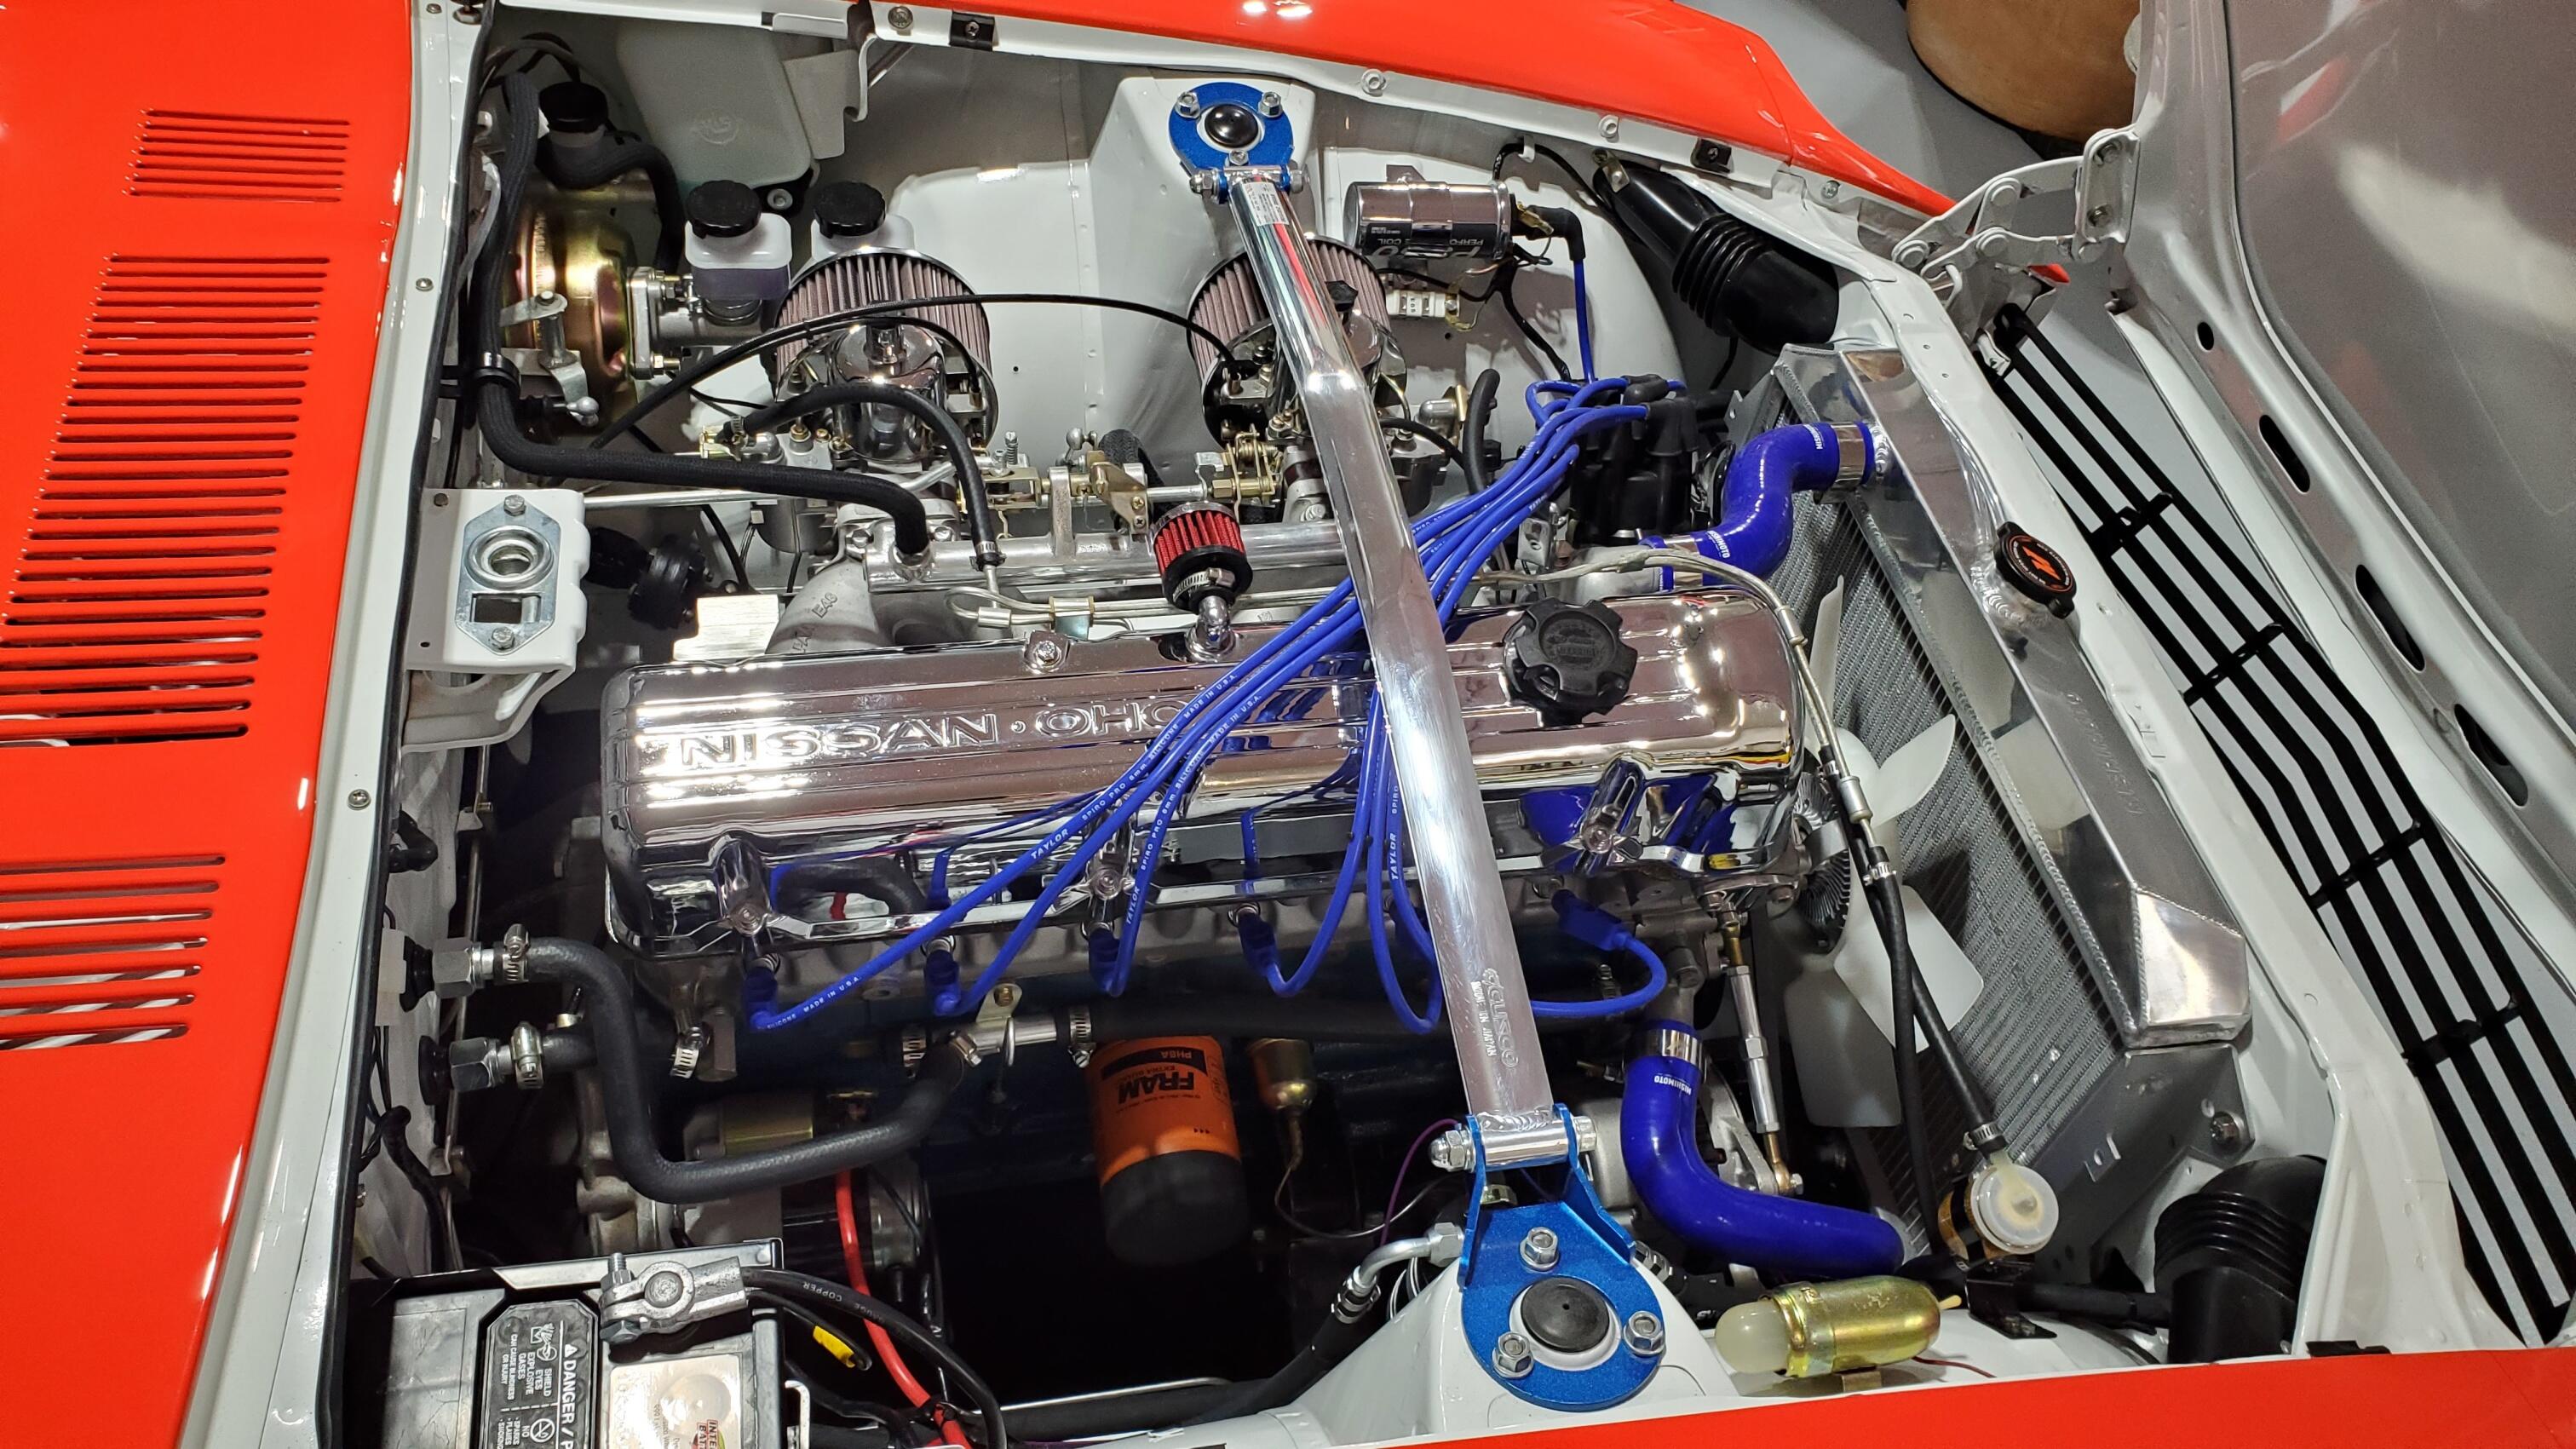
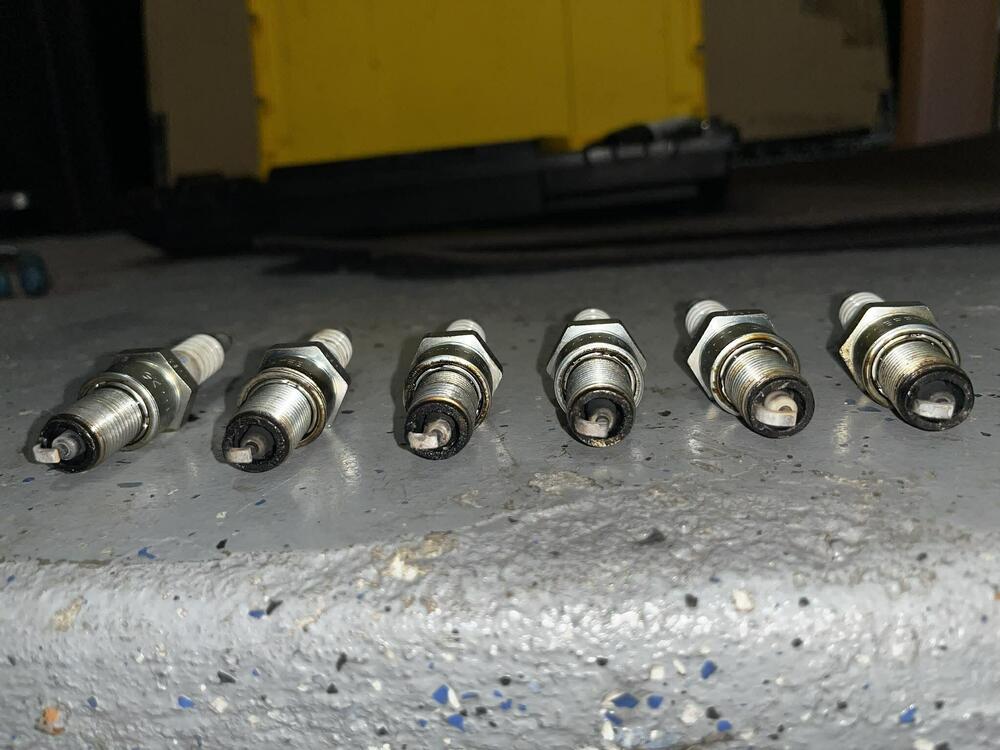 1 point1 point1 point1 pointCatch-Up Digest, Continued. After this I’m up to date. ••• March 9, 2026 They said it couldn’t be done.* If you have been following this project long enough (good job 👍🏻) you know this engine had SUs when I installed it. Lots of drama later I put triple Mikunis on it, and I’m glad I did. One thing my euro-spec SU balance tube has that my short Mikuni manifold is missing (other than clearance) is a PCV valve. Around the time I got the triples working I installed a bracket to hold one with a plan to figure out how to connect it later. Well, later is here. Several years ago I saw a Z at the east coast import show in PA sporting a custom air filter housing for a Lamborghini Countach air filter. The owners is here but I can’t find the name. We ALSO discussed its balance tube on the manifold. My plan was to do something like that, but add a port for the PCV valve. (Nismo put one with a PCV valve on the l型6気筒 TLX manifold, so please hold the snark). I would have liked to figure out a way to mount the valve right on mine, but routing the hose was getting too difficult. This cleans up the visible plumbing better. Hopefully it with function as intended. My vacuum manifold also uses the port on the #6 runner meant for the brake booster, so I move that fitting for to the back end, as well. Eight ports in all. It’s made from a 22.5 inch piece of aluminum pipe (1” OD, 0.25” wall for tapping, which is technically not enough but works). A buddy of mine was MVP on this for welding up the ends, getting my specs into his CNC machine to bore all the holes, and letting me use his lathe and mill to start the guide taps. A quick media blasting with aluminum oxide and it was pretty simple to install. The hardest part was getting 1/4” stainless tubes bent to the right angles to accommodate the irregular angles of the six manifold ports, which are so irregular they must have been drilled and tapped by hand. Lest I create the impression this was a complete breeze, know I finished a prototype meant to be final using a vacuum manifold, but bailed on it after the tubes started to look like a mess of spaghetti. Pro tip: if you’re doing something like this, get some copper tubing at a hardware store and mock it up with that before you start bending stainless. I’m pretty happy with this. The only thing I would change is to use thinner walled stainless capillary tubing. This stuff is unnecessarily robust, so it’s hard to bend and a smaller inner diameter than it could have been. *I don’t know how the balance tube will change how the engine runs. The assumption is slightly smoother, with the brake vacuum building faster at 6 times the frequency. ••• March 11, 2026 Nearly done in here. I picked up these Kameari stainless air filters on a whim from JDM Car Parts a while ago, and I’m glad I did. They look really nice paired with the heat shield (also from Kameari). I was nervous the shield wouldn’t fit with the cooling blocks installed, and it is tight, but it isn’t touching them or the header so I think I’m good there. The braided cooling block lines look nice over that shiny stainless steel. I’m still debating whether to get some short velocity stacks that will fit inside these filters. I do have a plenum for a cold air intake, and I think the old stacks are short enough to work in that, but I think it’s going to be a while before I get to that. Everything is back where it belongs now, except for the throttle cable and the booster hose. I remade the cable bracket out of thicker gauge stainless to get rid of the flexing problem with the previous version. As such I need to make some adjustments to the cam (and replace the barrel nut I lost). The hoses I need to reroute and trim to connect to the vacuum manifold I just installed. Otherwise I just have the windshield wipers and water tank to put in here and I’ll be pretty much done inside the engine bay.
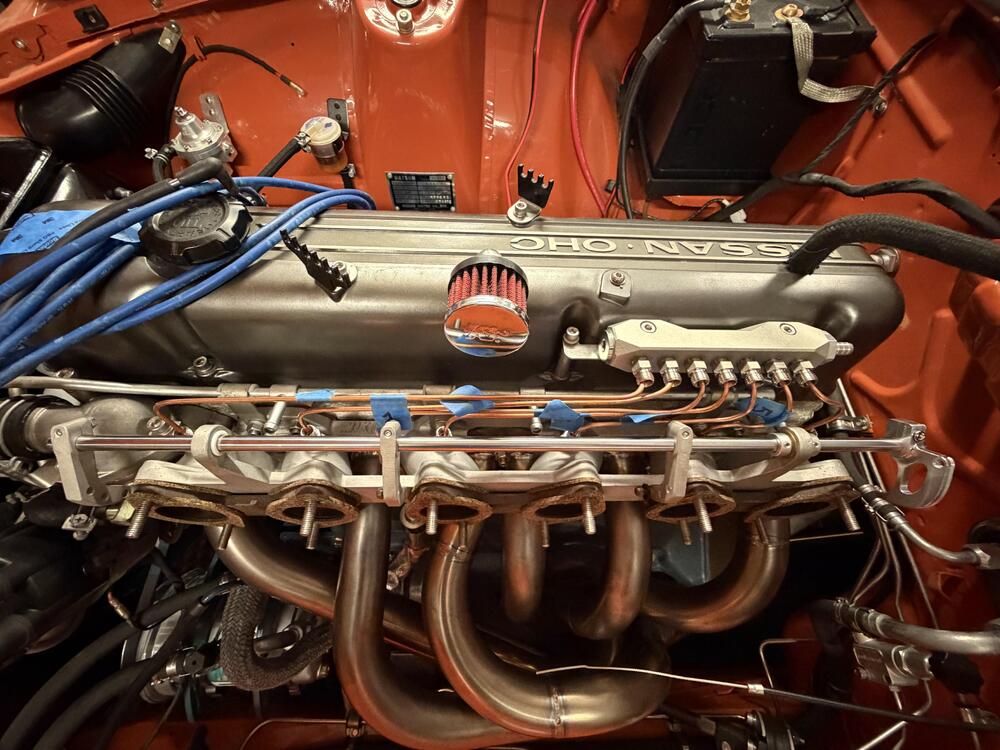


 1 point1 pointUpdate. I purchased a small roll of cunifer but the color was just too copper brassy for my liking. My journey continued and then about two or three weeks ago i stumbled on an ebay seller from China that made steel tubing in 25 ft rolls already yellow zinc plated. He referred to it as rainbow zinc but the pictures looked close enough to the traditional yellow zinc to give it a try. I got 50 ft of 3/16 for brake, clutch and return lines, 25 ft of 5/16 for fuel, and 25 ft of 1/4 for a vapor line plus about 40 fittings I'll probably never use. He was really nice and gave me a discount totaled 150.00 with tax and international shipping included. If you want 5/16 you'll have to ask as it wasnt a direct listing I could find. They just showed up today, about two weeks journey and would you know it, they look like the pics and are pretty damn close to what you would expect. Check it out if anyone wants to do similar. I picked up straightening, bending, and flaring tools to try and tackle this myself over the next month or so once I pull everything for the headers. eBay3/16” Car Brake Fuel Line Tubing Kit 25ft Coil Roll Zinc...Specification: Material: Steel Zinc Brake Line Tubing Diameter: 3/16 In. O.D. ( Note:3/16”≠1/4” ) Brake Line Tubing Wall Thickness: .028 In. Brake Line Length: 25 FT Coils ( 25ft=300inch=7.62M ) Type:1 point1 pointAnd she's off to a new owner - I hope. I know I know, I should just keep her and enjoy it. But I'm not a collector and I'm hankering for a new project. https://bringatrailer.com/listing/1973-datsun-510-6/1 point


Important Information
By using this site, you agree to our Privacy Policy and Guidelines. We have placed cookies on your device to help make this website better. You can adjust your cookie settings, otherwise we'll assume you're okay to continue.