Leaderboard
-
.JPG.cfcada9cf1c1b502df3f5f2f2ca3ff36.JPG)
SteveJ
Free Member6Points9,646Posts -
Barefootdan
Free Member5Points275Posts -

Zed Head
Free Member5Points19,238Posts -
grannyknot
Free Member4Points5,158Posts


Popular Content
Showing content with the highest reputation on 09/12/2021 in all areas
-
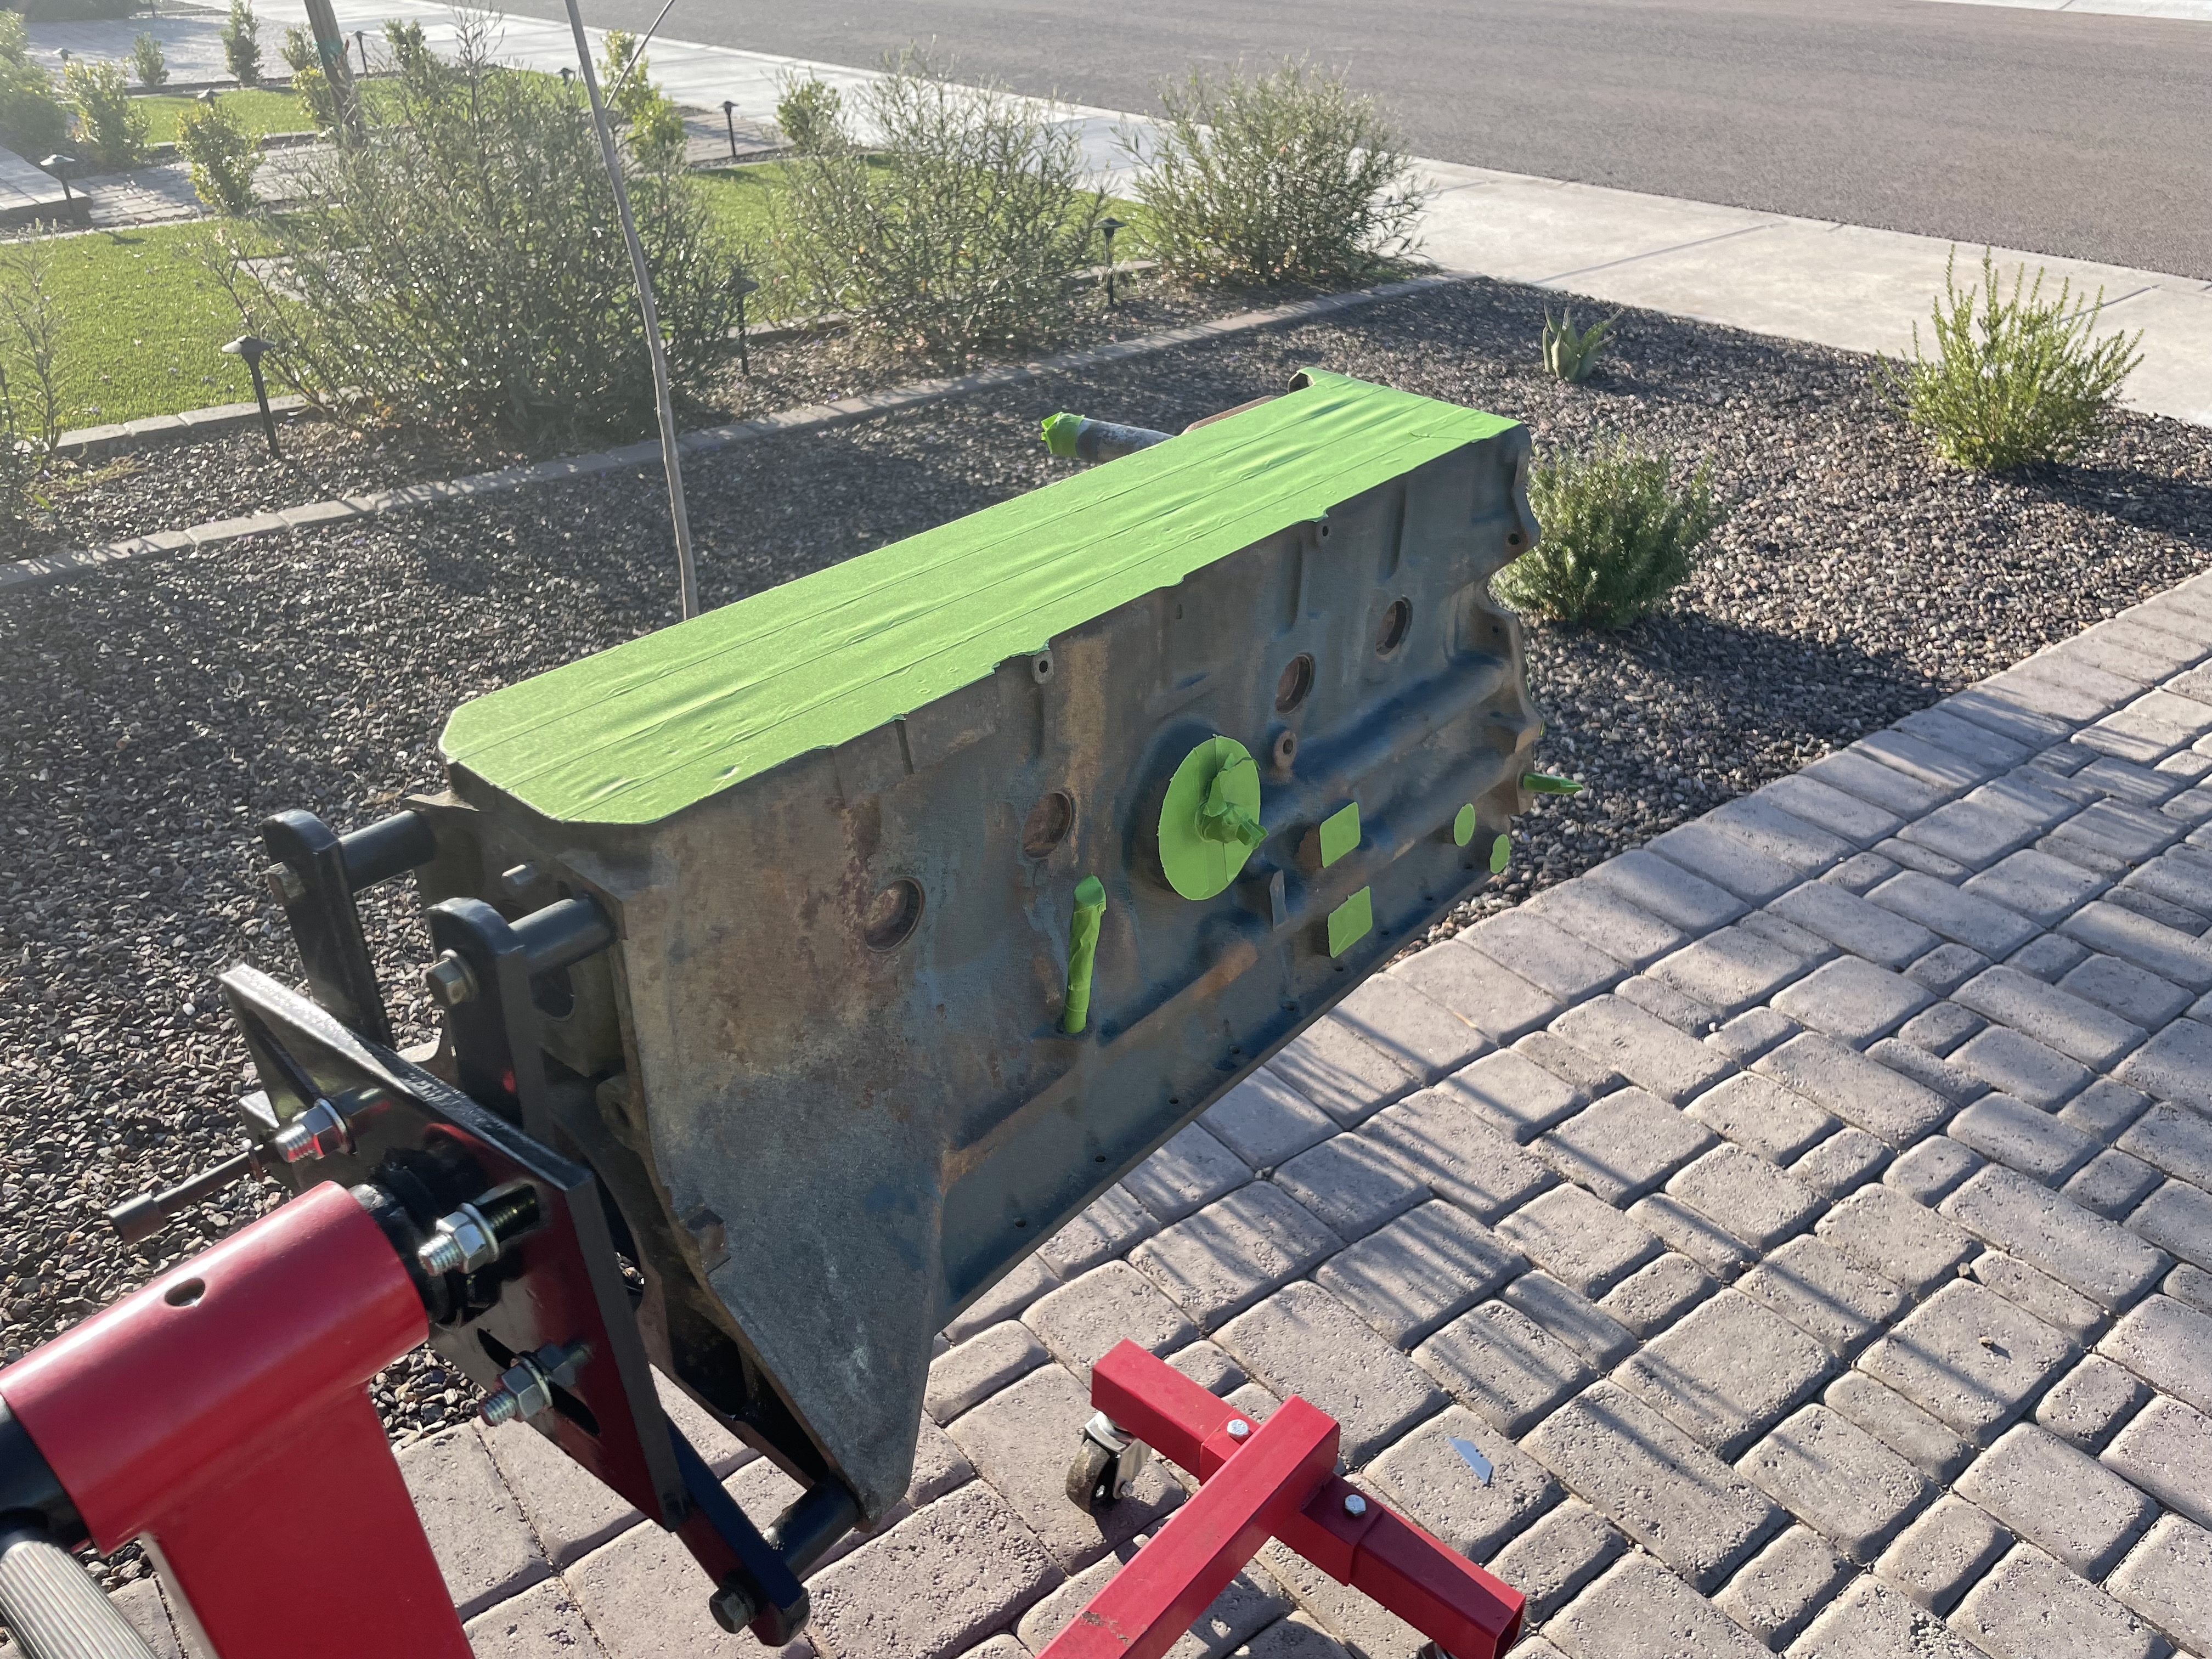
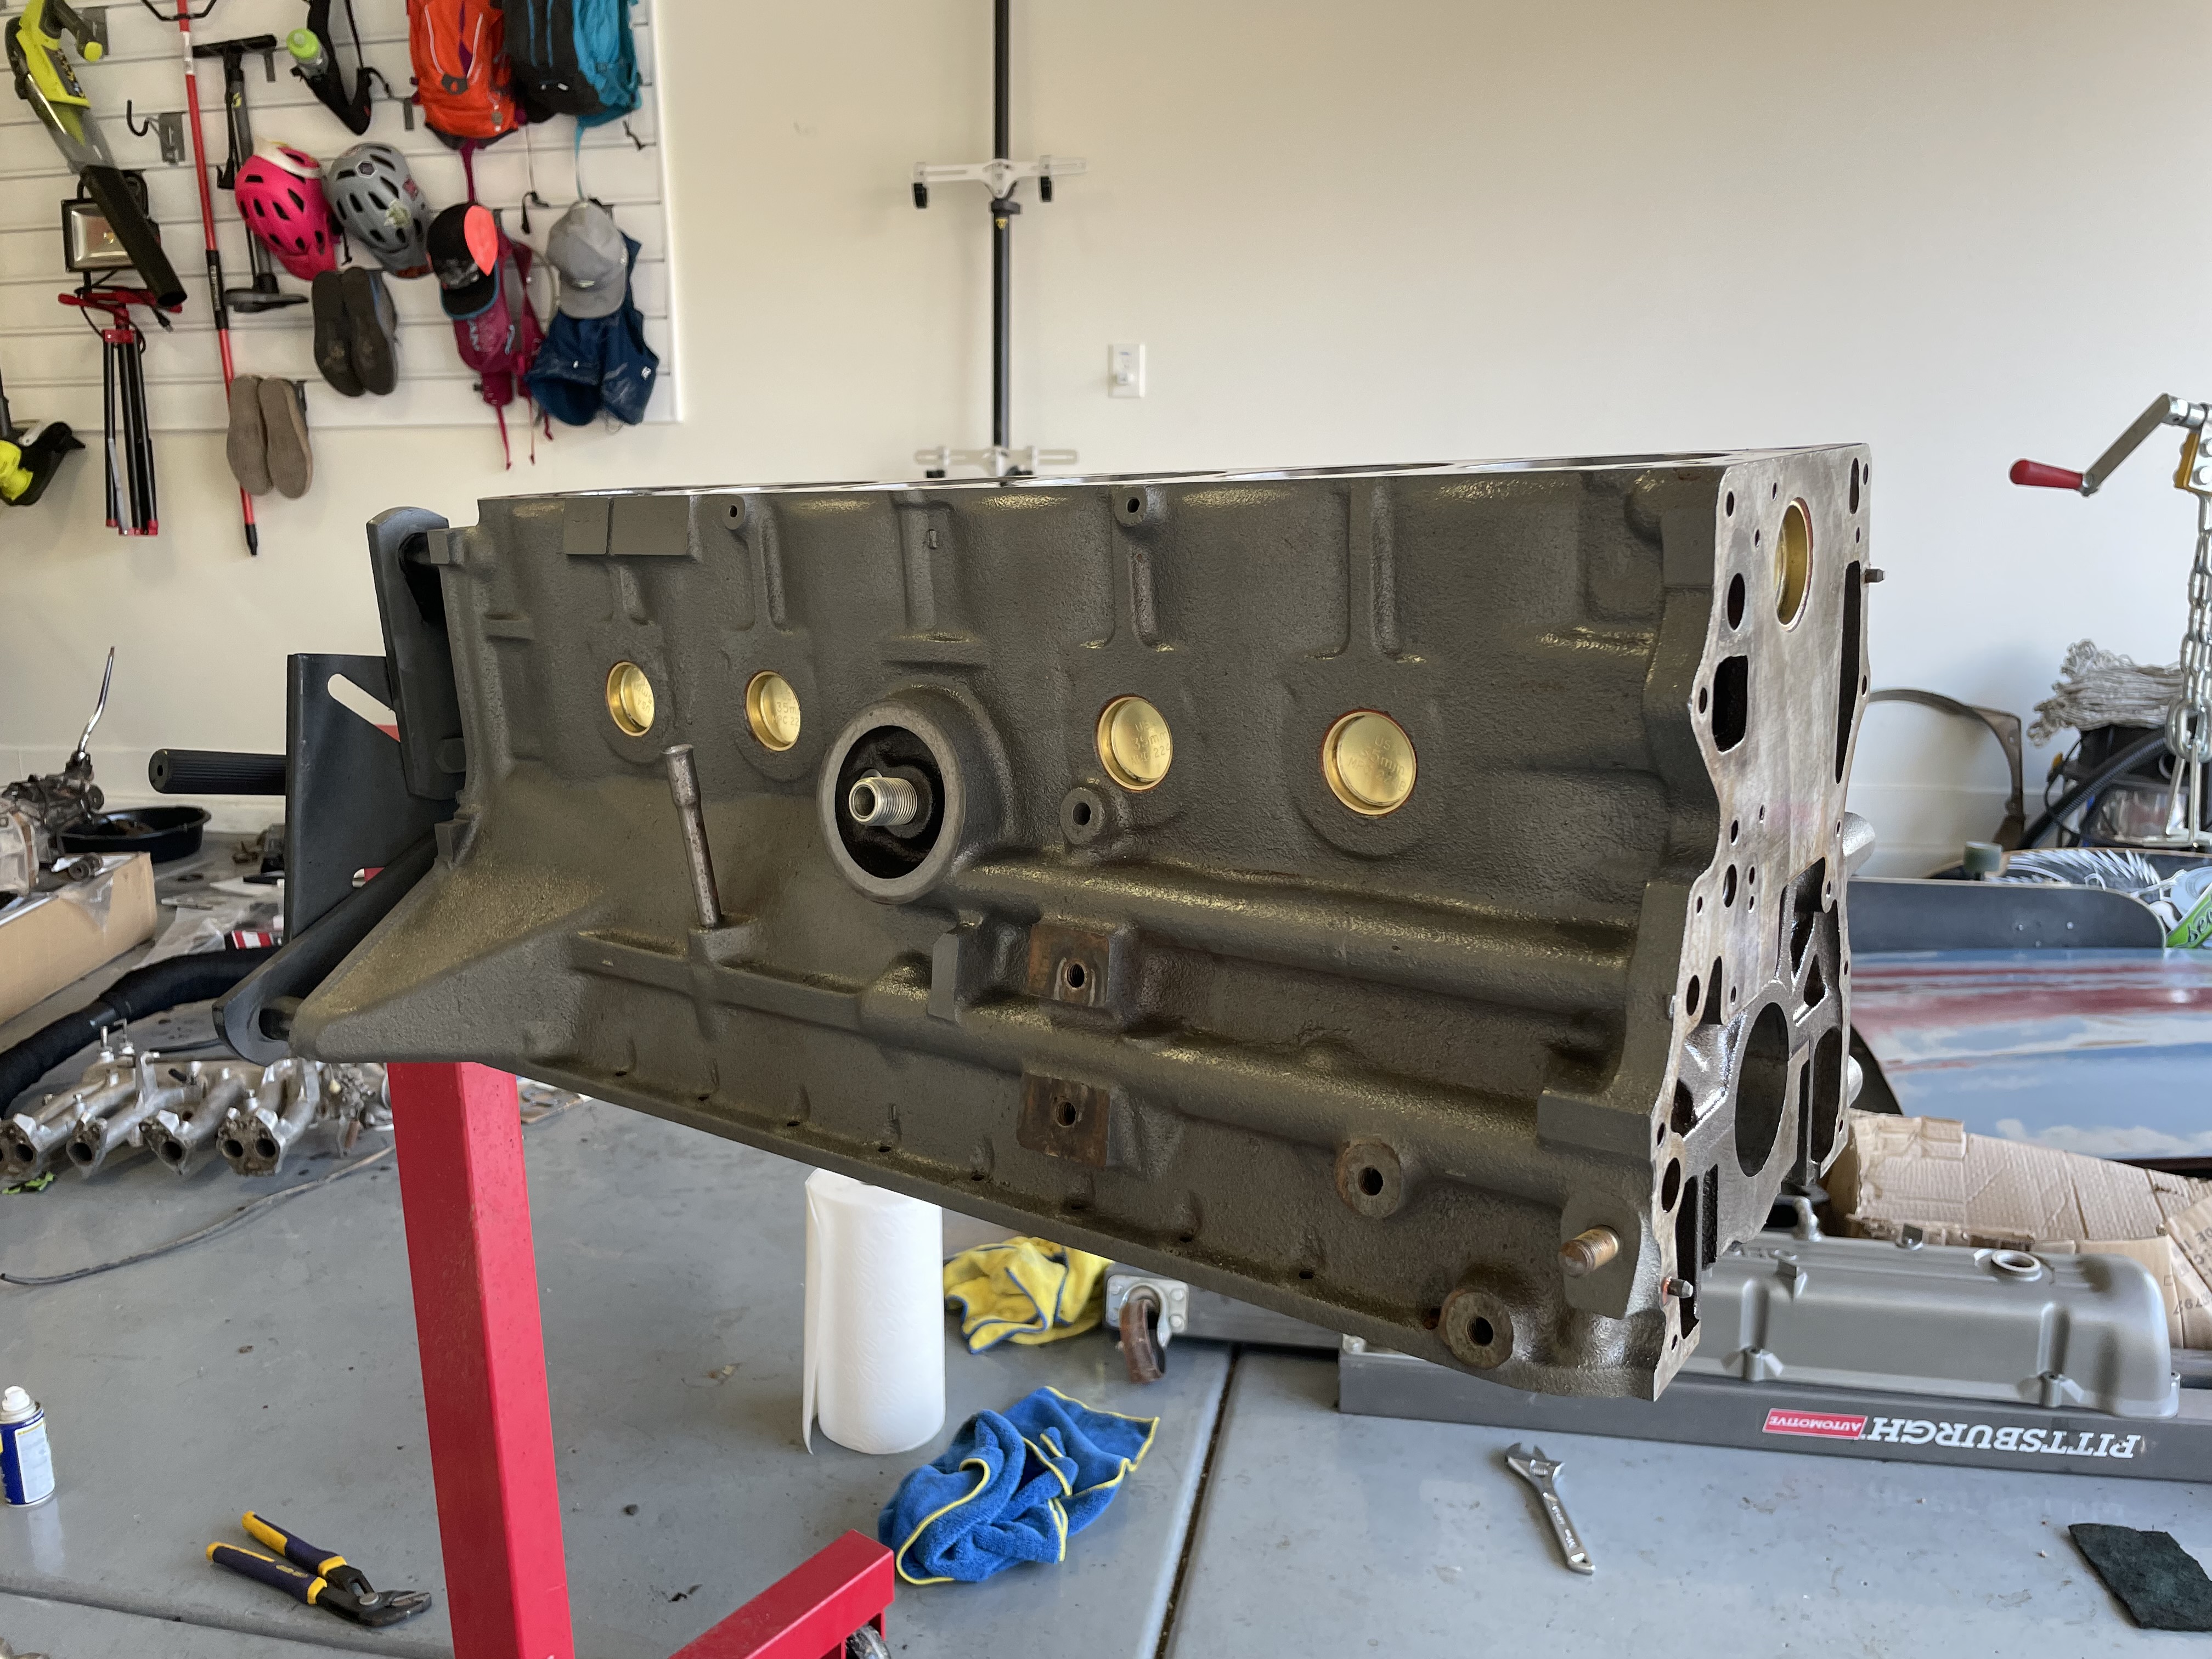
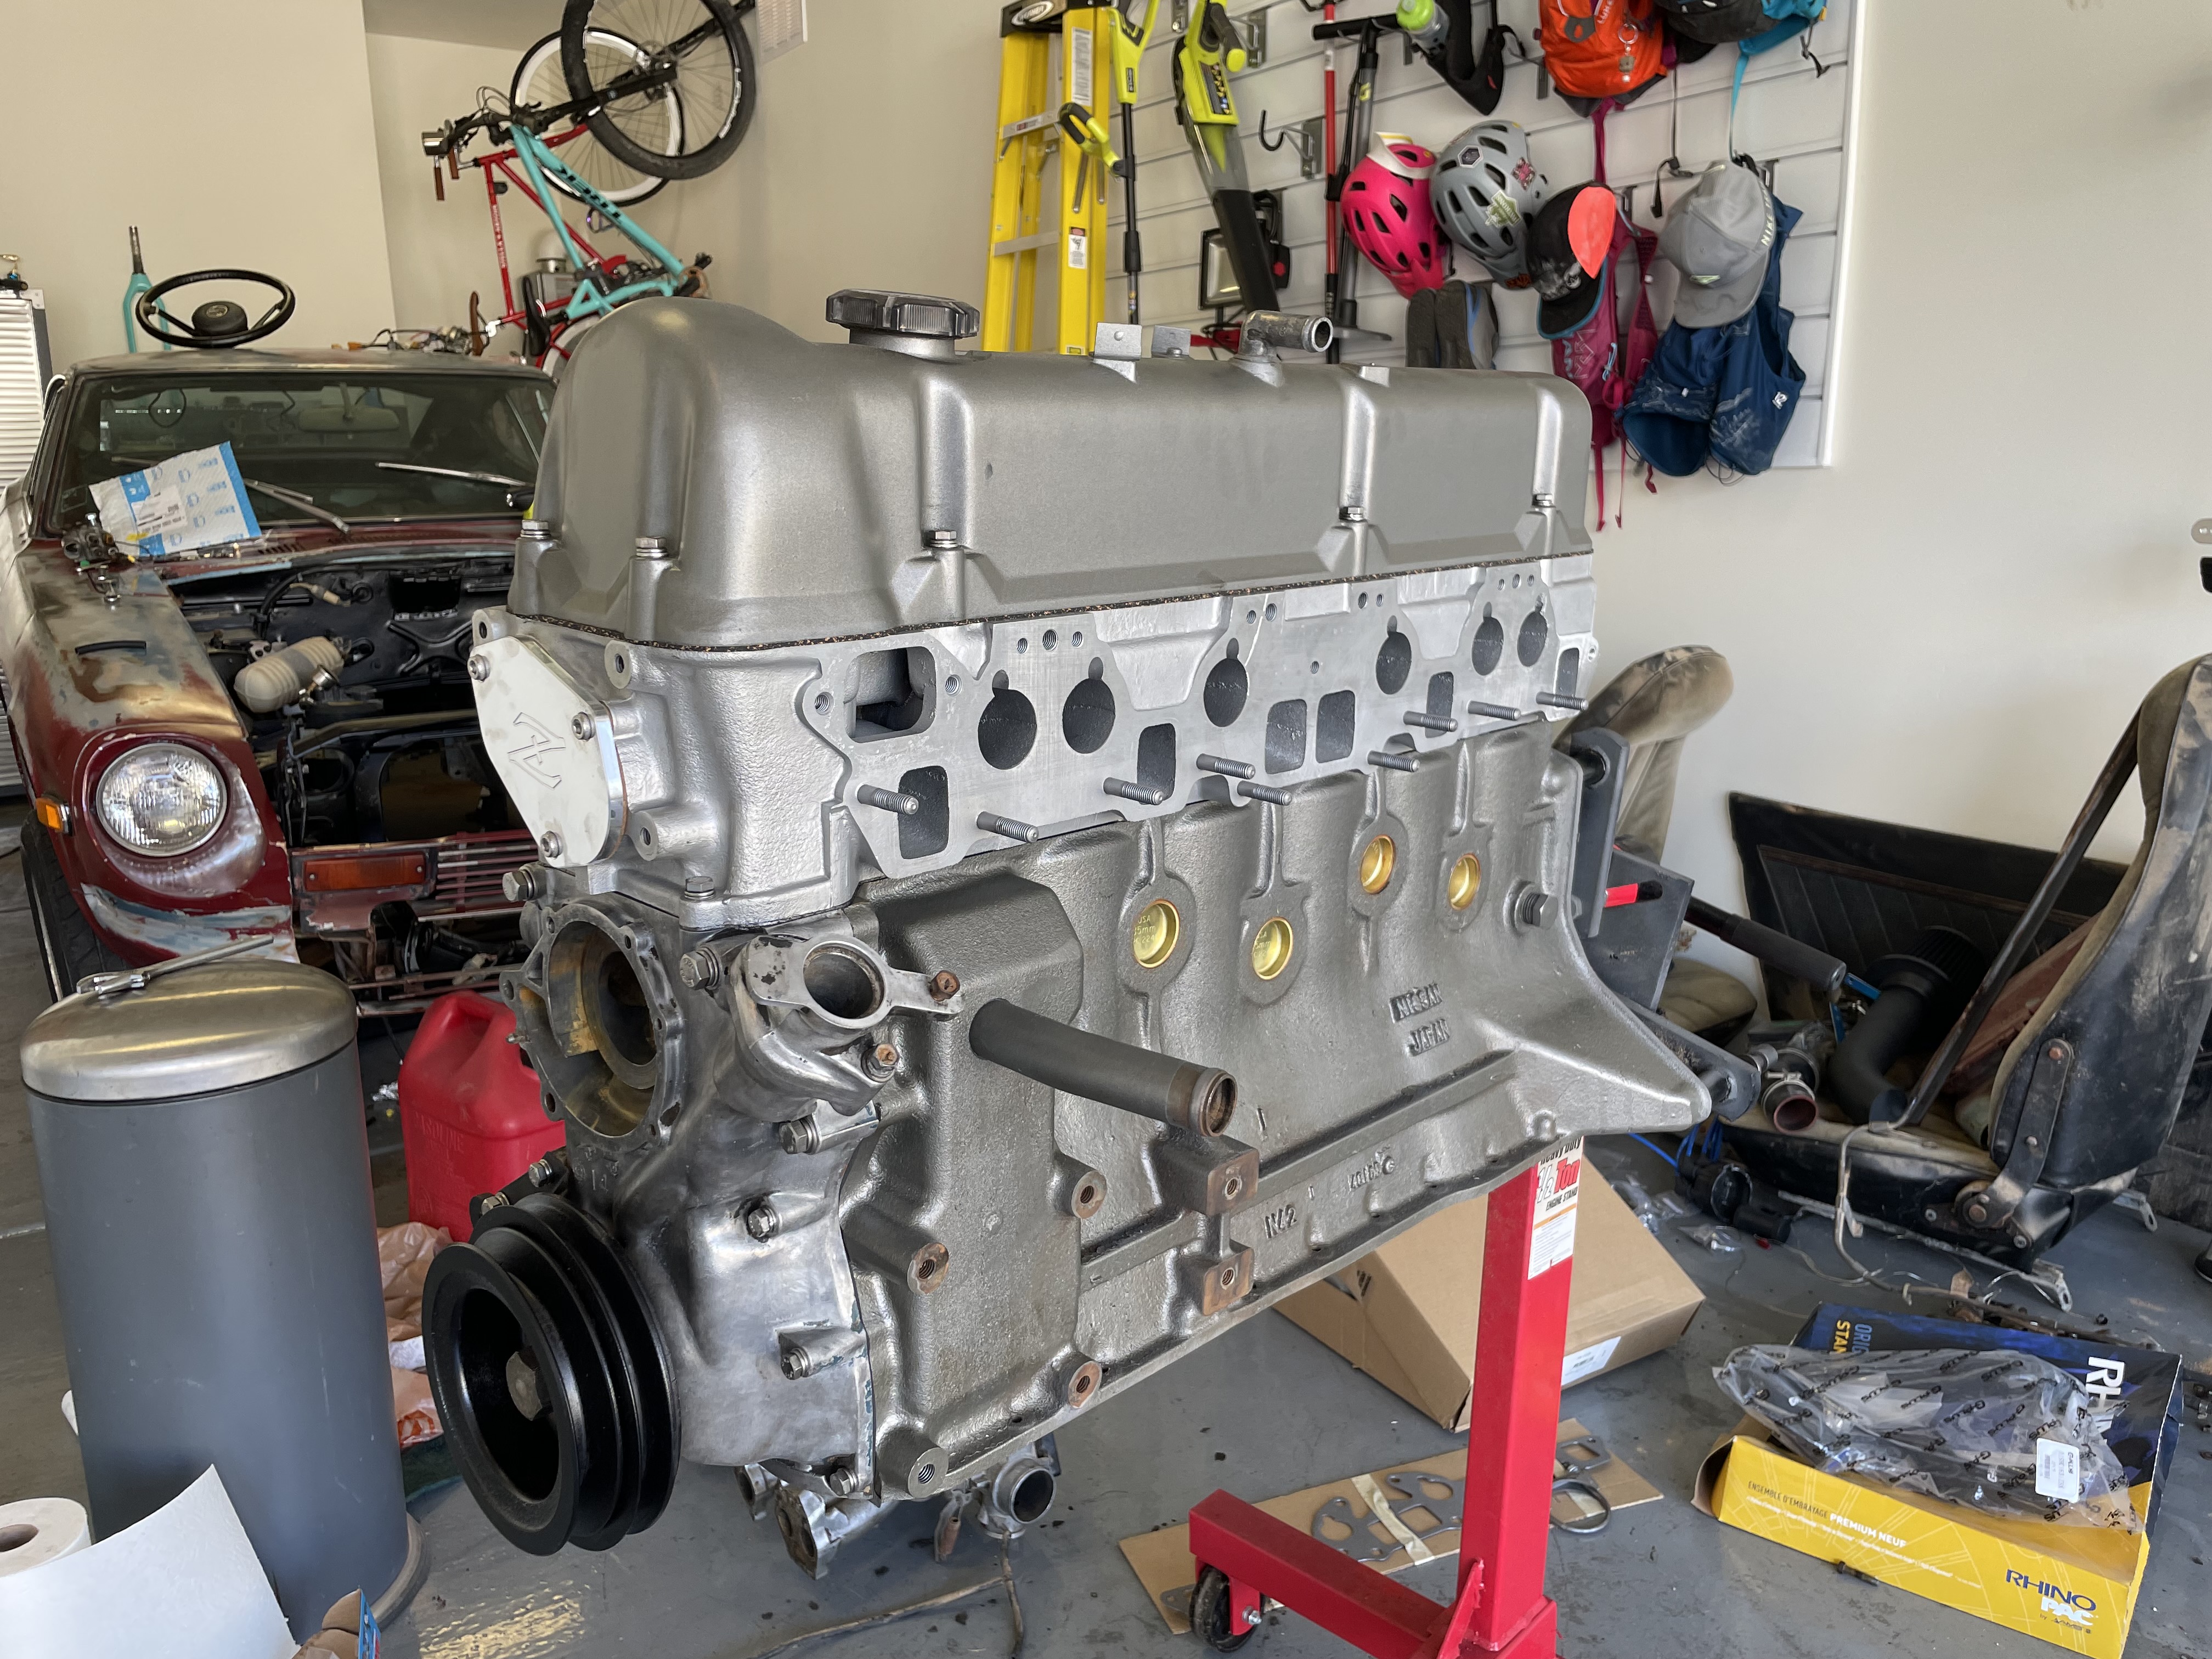
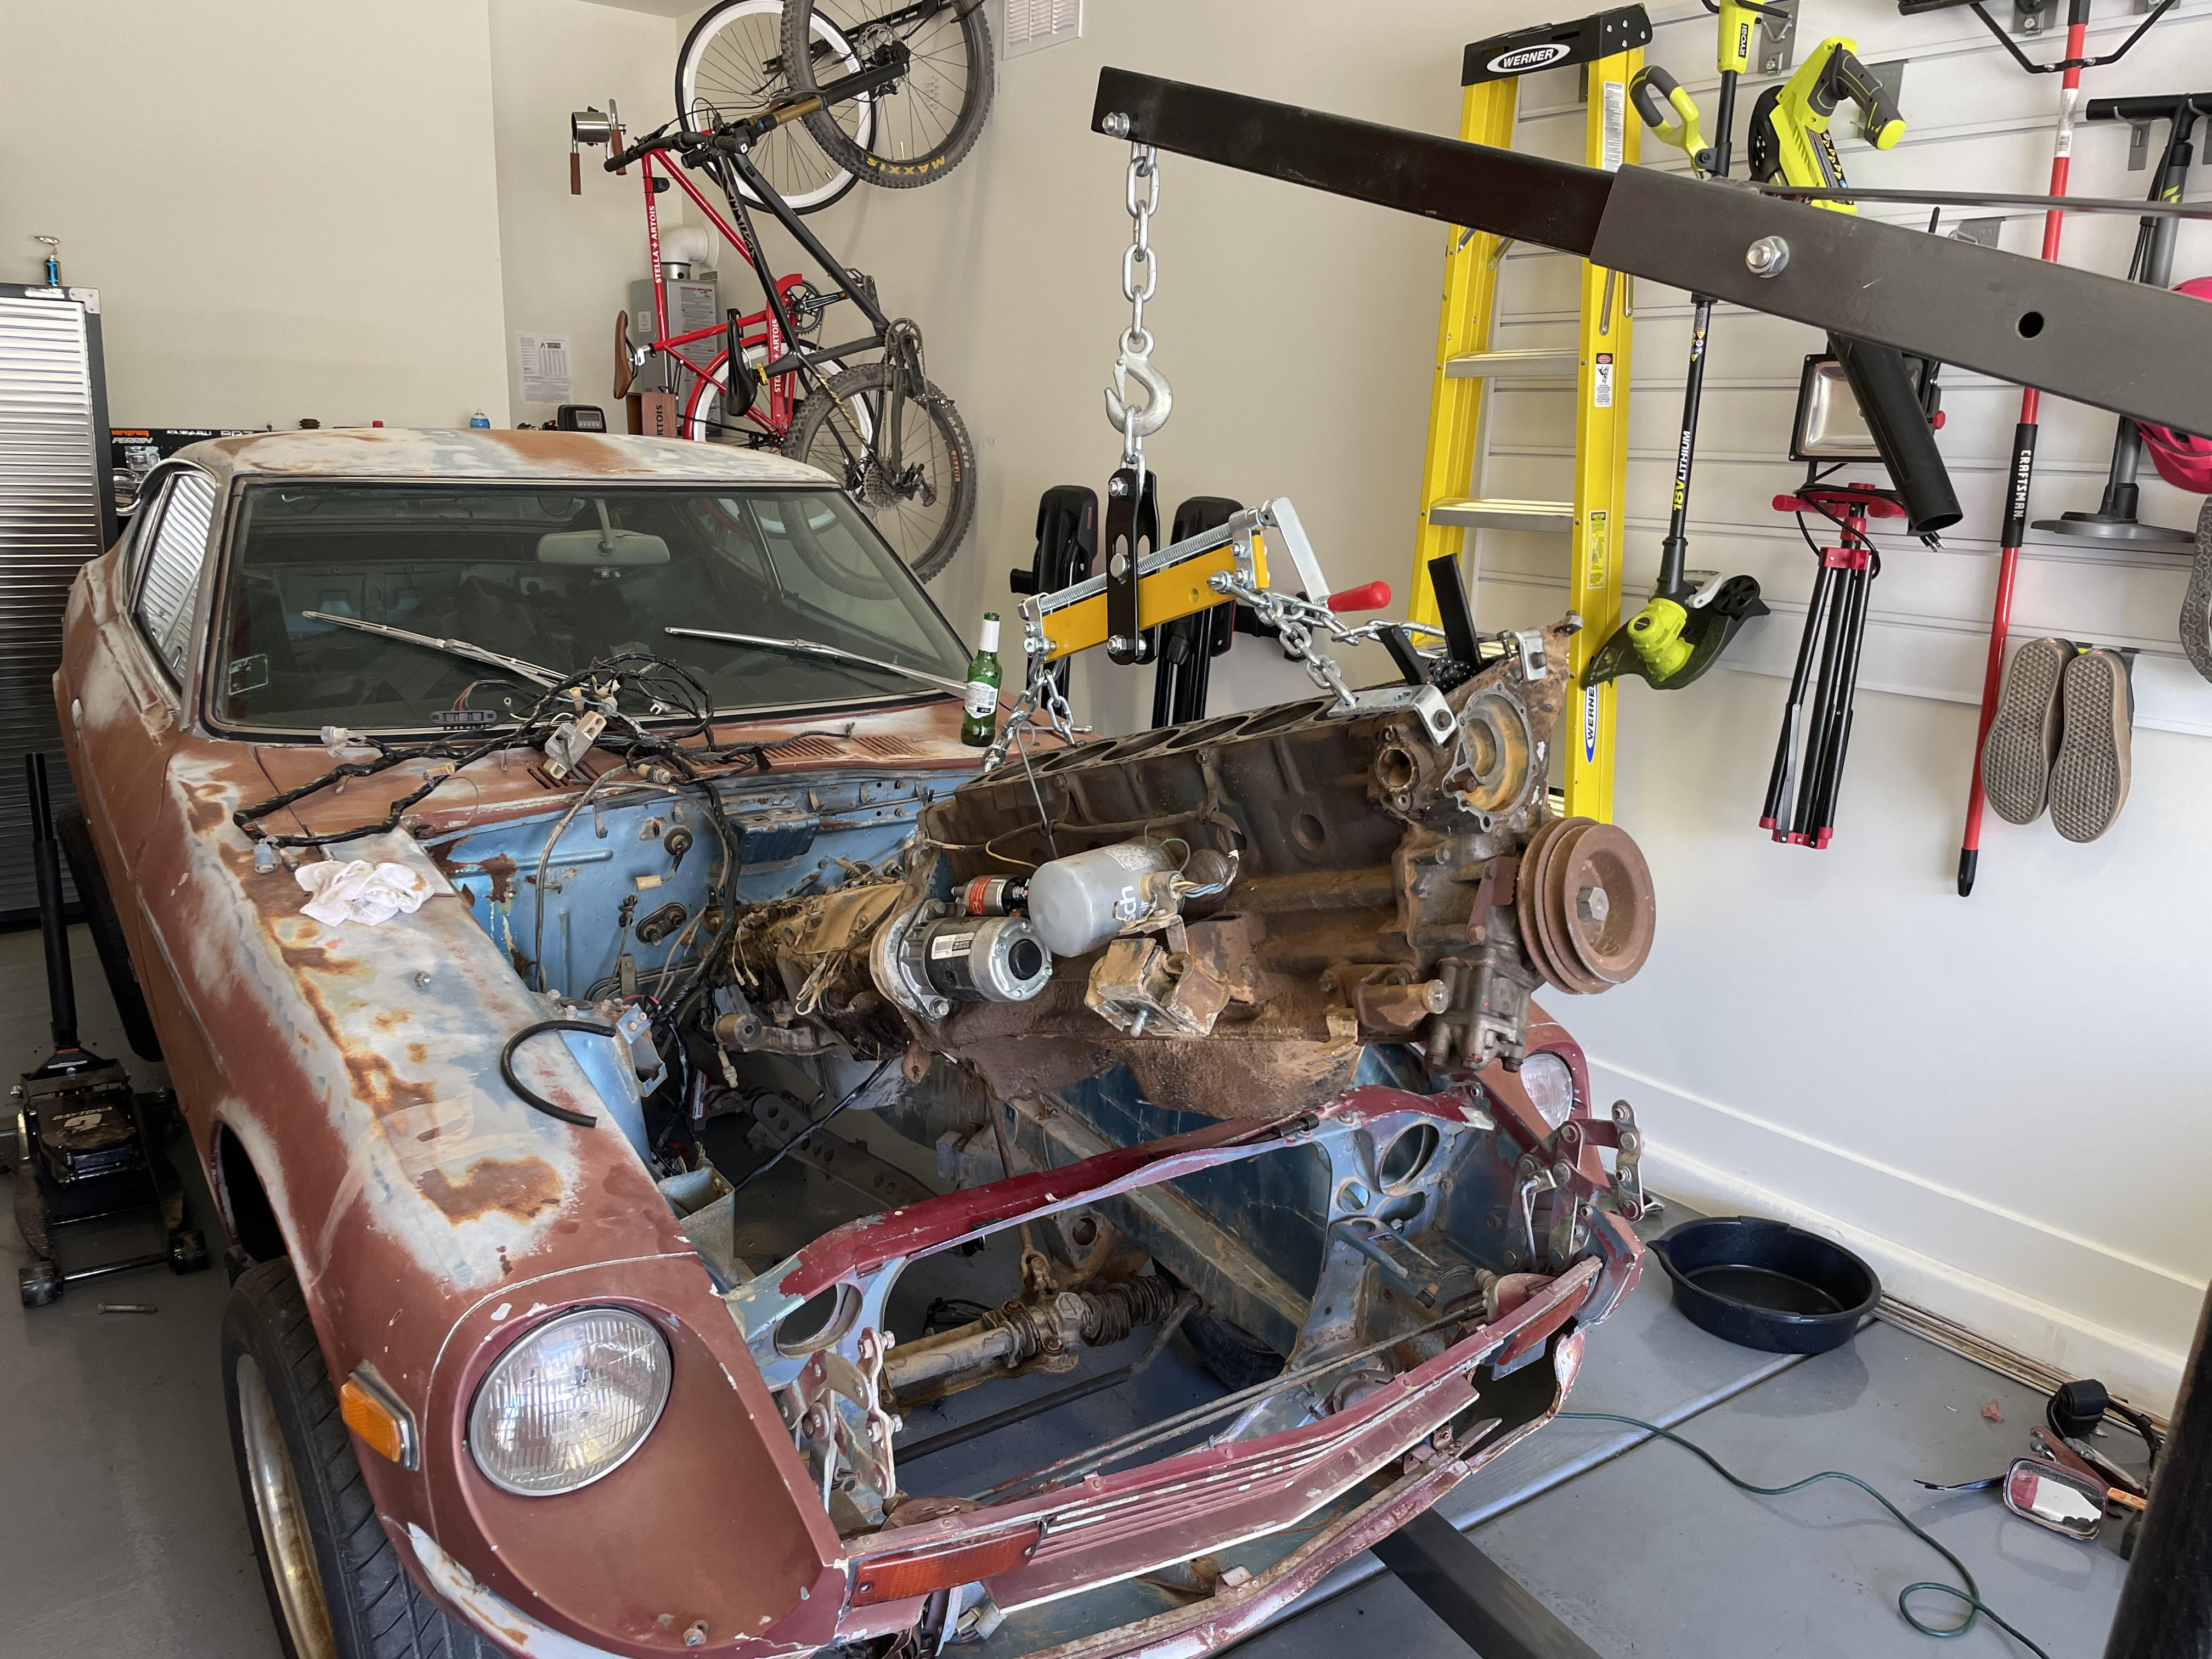
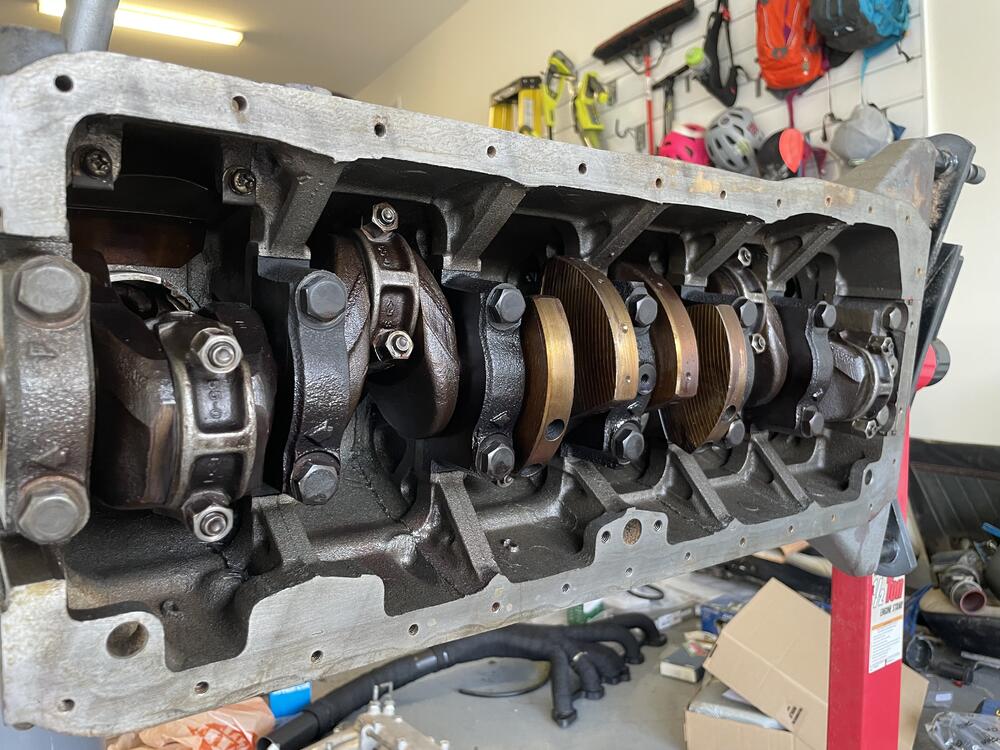
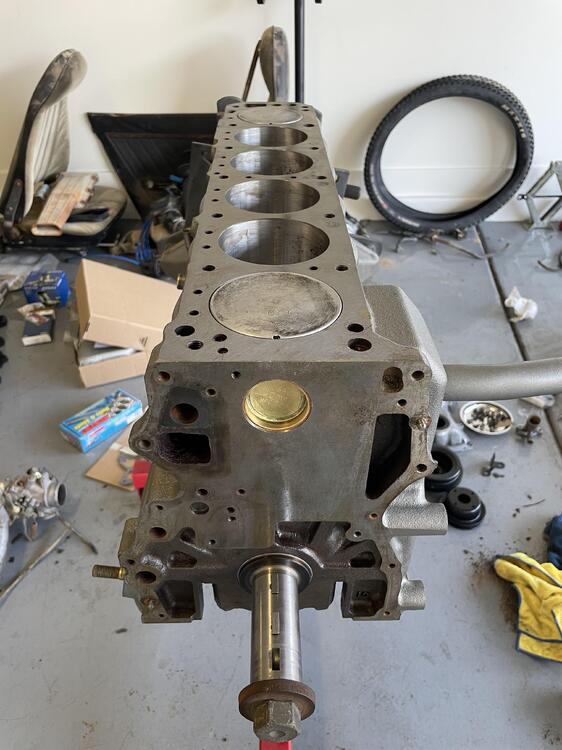
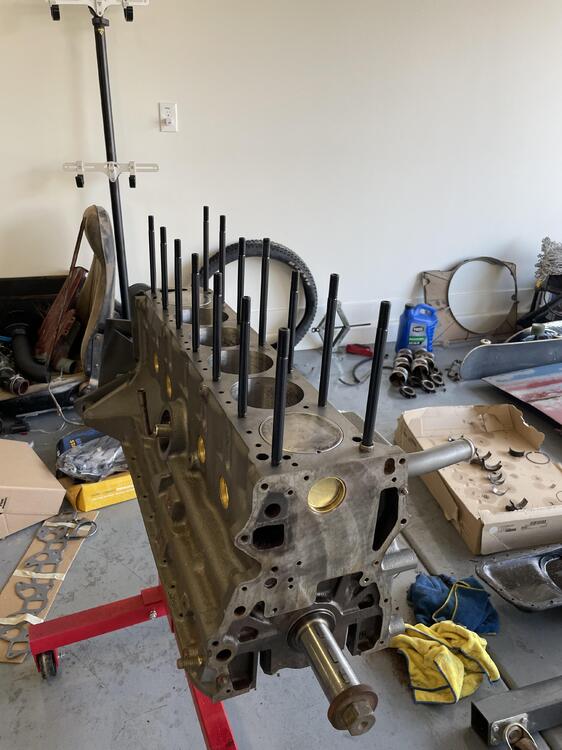
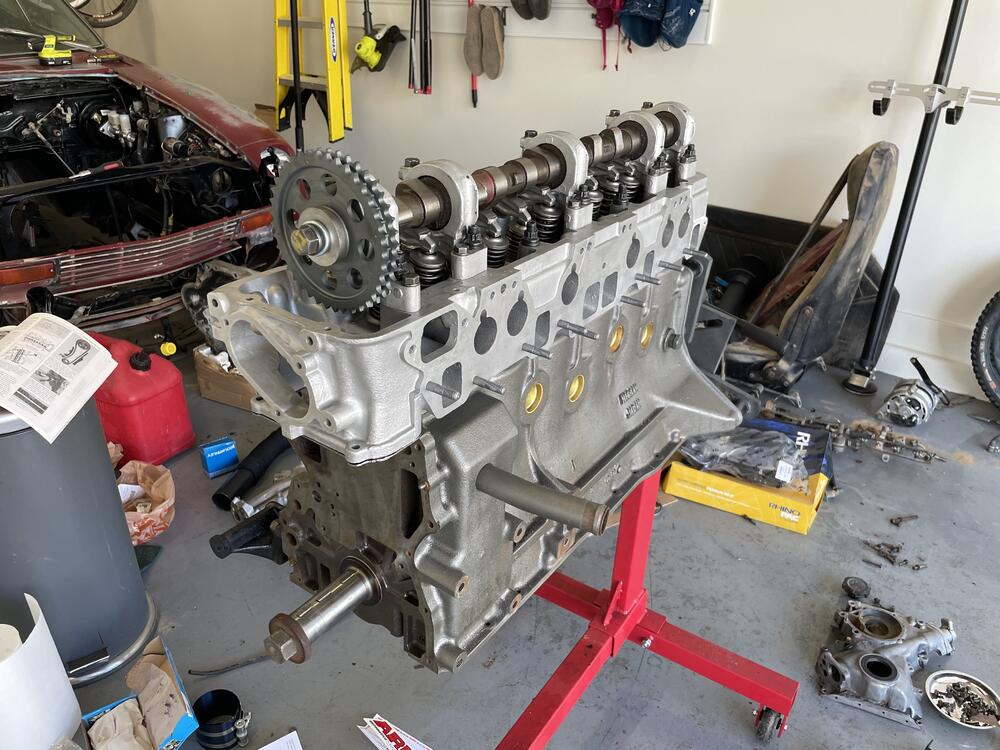
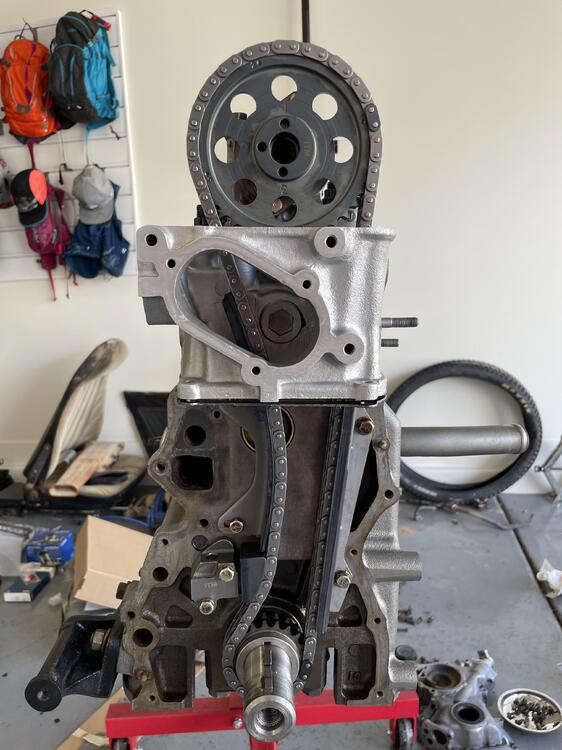
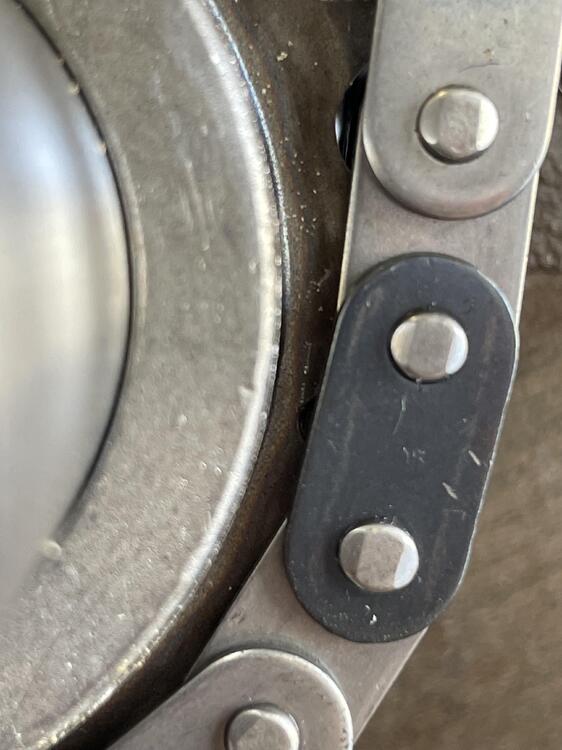
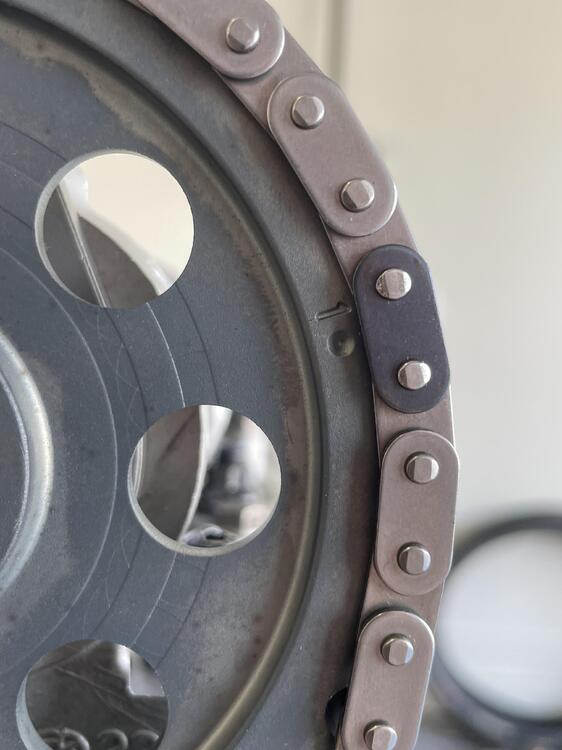
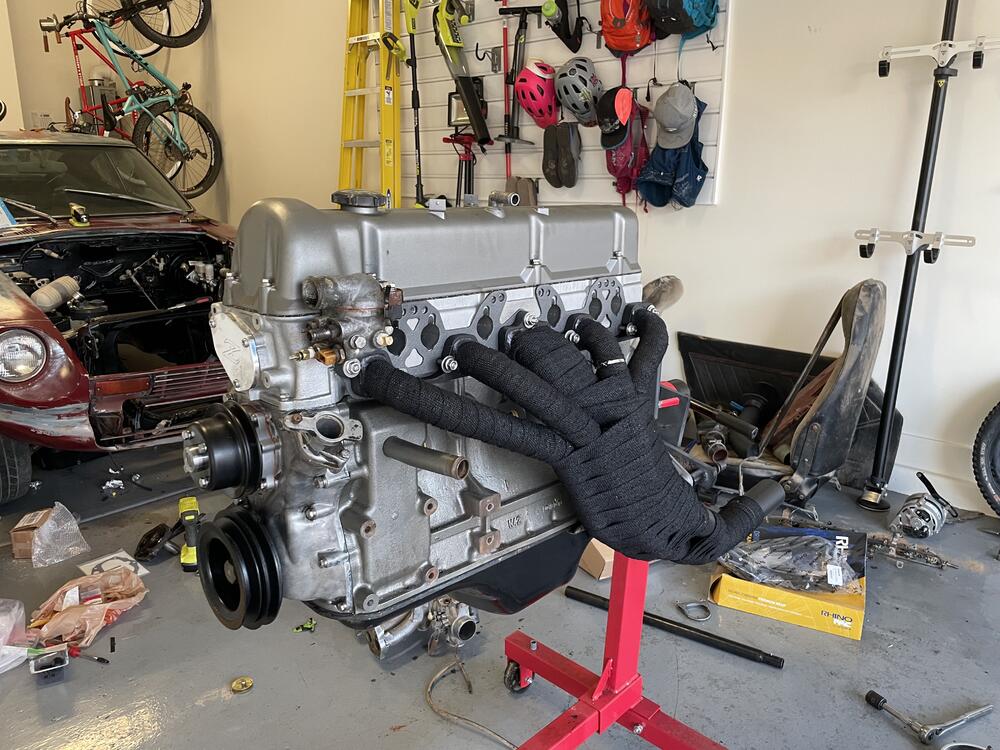
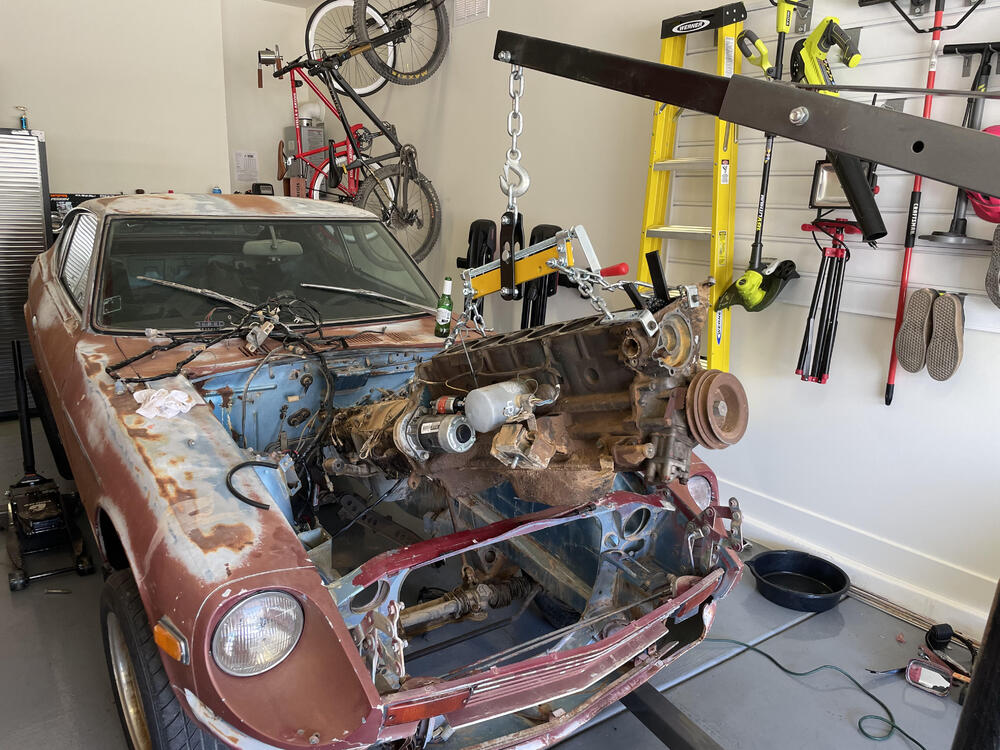
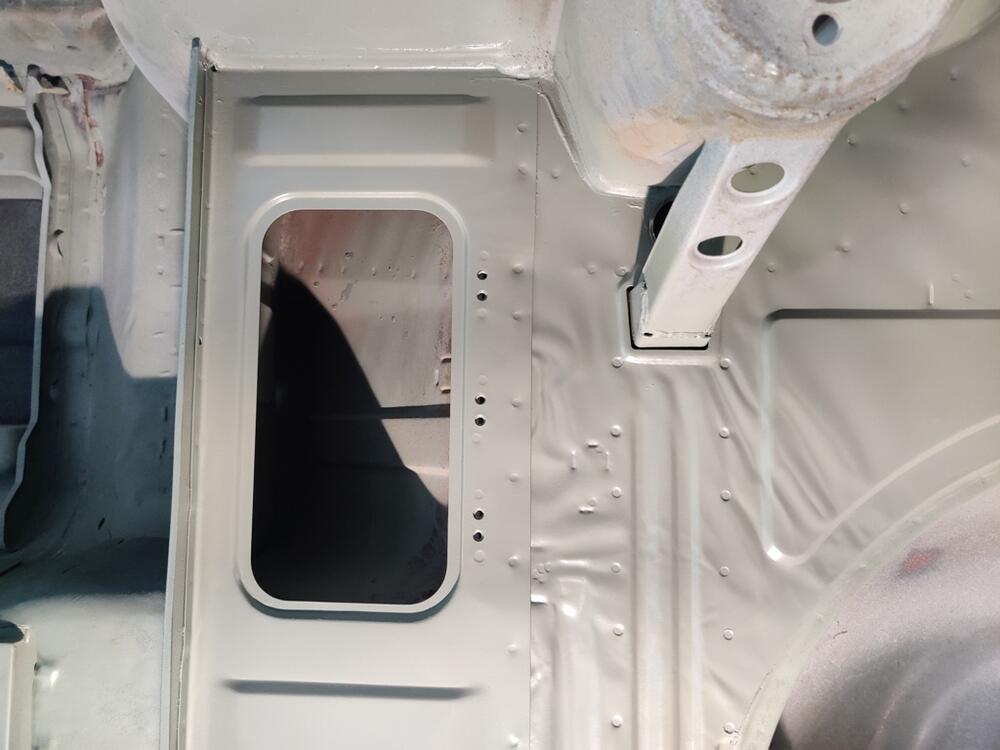
5 pointsAh, engine build day is finally here! All these months of preparation and cleaning all come down to this. The block was hot tanked, honed, and decked. I first started with a cleaning and removing the original expansion plugs. There was a heavy amount of rust within the coolant passages and some left over crud from their cleaning. I let the water run through these until no more particles were coming out. I ran a bristle brush back through to loosen anything up and another wash. I'm sure I missed the deepest corners and crevasses but I will just plan on an early coolant flush. All taped up and ready for paint! I had back and forth's on which color I wanted to go. Blue, black, silver, iron, or something wild like an orange. Ultimately I went with Iron to keep things simple. Sorry purists! After a few coats of primer and paint, things are looking much better. New expansion plugs really look good 😍 My kit from Rockauto was 2 plugs too short. So I had to swing by and get 2 extra 35mm plugs. Up next was bearings, crank, rings, and pistons. I did this late at night and realized I didnt even take photos until everything was in! Anyways, it went extremely smooth and the only hiccup was my dummy head rushing into it. I put the wrong sized main bearing onto the rear cap. Not until I got to the last two caps did I realize my mistake. Luckily I found this mistake and was able to correct it. Everything is turning smoothly and feels great. Ah, the sounds of fresh rings is the best. The friction of the fresh rings is perfect. Up next was the ARP head studs. Its so odd that they are hand tight for the studs themselves. I get how the clamping force works...but it feels so wrong! Slapped on the fresh head. So glad to get this thing off my workbench! I ran into my first roadblock here as I needed a deep 12mm 12 point socket. So that was all for day 2. Day 3 started with a quick trip to grab a new socket and get those head bolts torqued. Installed a new timing set. Seems almost too easy to time compared to DOHC cars Im used to! This photo was taken right after placing all the guides, but I didn't notice until placing my gaskets that my slack side was a bit off. So I repositioned it for a smoother transition. Covers were next on the agenda. Things are moving fast now! Lastly was the oil pan, oil pump, water pump and pulley, thermostat house (ITS SO GROSS 🤢) and the manifolds. I had to take a shot of just the exhaust as it looked so good! Installing the oil pan gasket was a a pain. Im not sure if the kit I ordered was wrong, but the gasket looked small. It was flexible so I thought that maybe it just need stretch to fit. I had 3 corners locked in place but could not get it stretch enough for the fourth. Not sure what the deal was but it ended up tearing. I picked up a Fel Pro gasket and it fit much better. I feel way better about it now. Not picture is that I also had the intake manifold installed. I am still needing a few misc plugs and I need to create a block off plate for my cold start valve. That thermostat housing...just needs replacing. I hate it. Tomorrow I will move my attention to the transmission. I am waiting on the input seal to arrive so I am at a standstill until then. The anticipation is growing!!! Let just take a moment to remember where we started with this crusty piece 🙂


 5 points
 -
4 pointsFun story! Thanks for sharing. Just imagine the finagling and posturing and likely shenanigans going on to own that Z with the VIN ending in “240” And dibs on calling those first 240 “Series 1” Z35’s. !!!!! Hahahahaha Going to get rich selling fake “hatch vent” pairs of stickers to put on the Z35 hatches…. “Limited Edition only 240 signed sets available. $2400.a set”.4 points
-
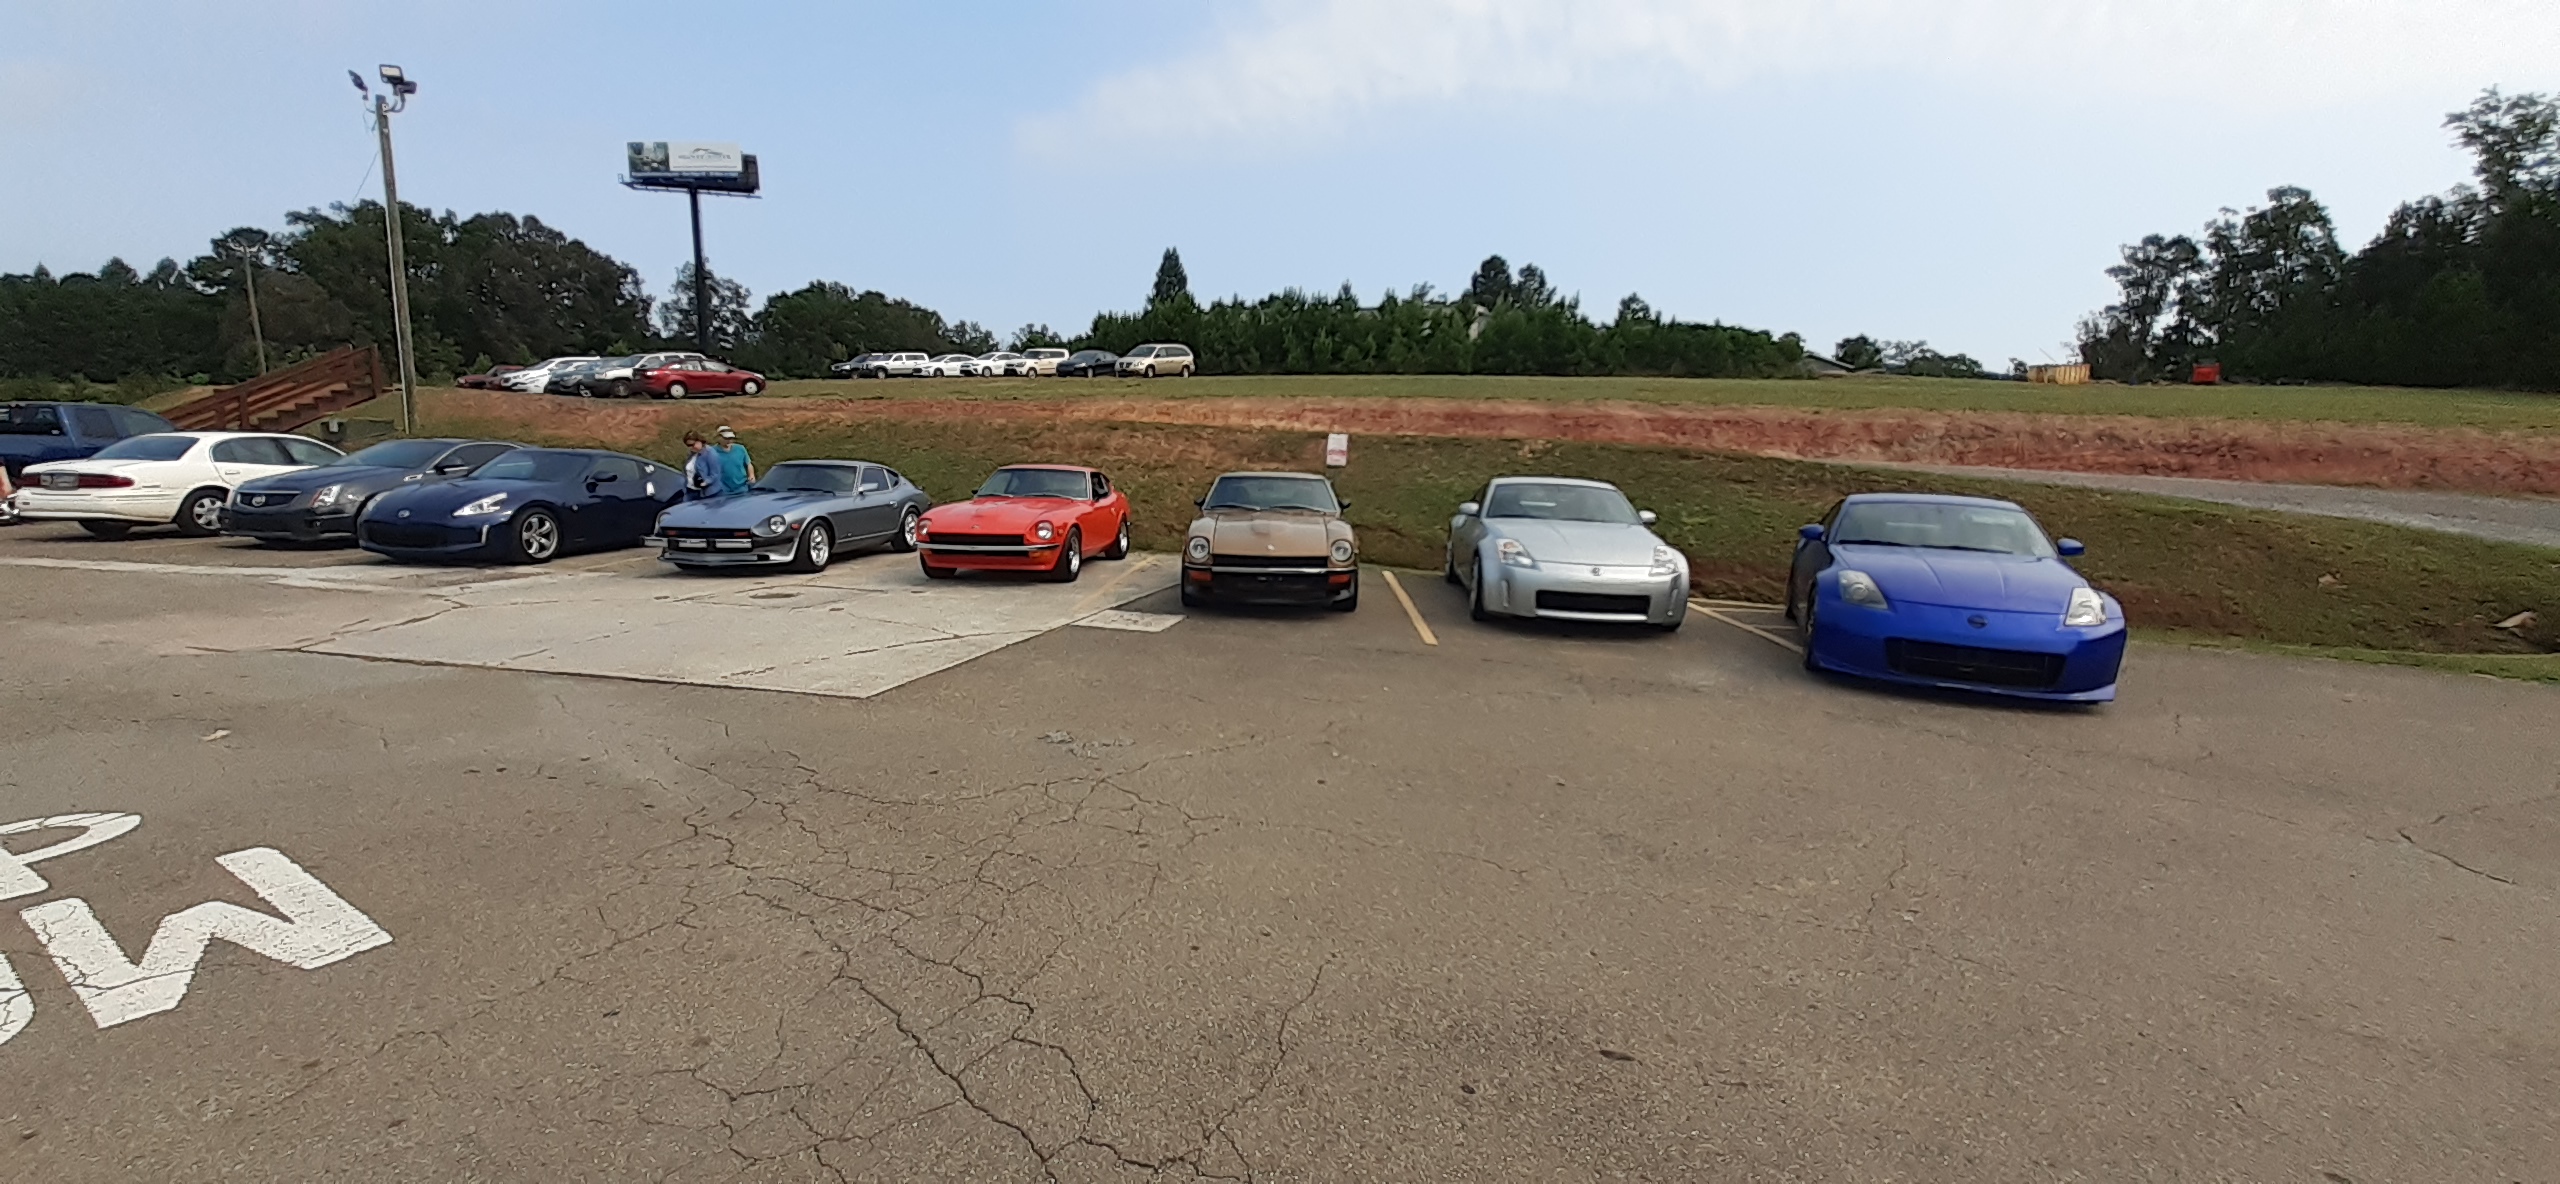
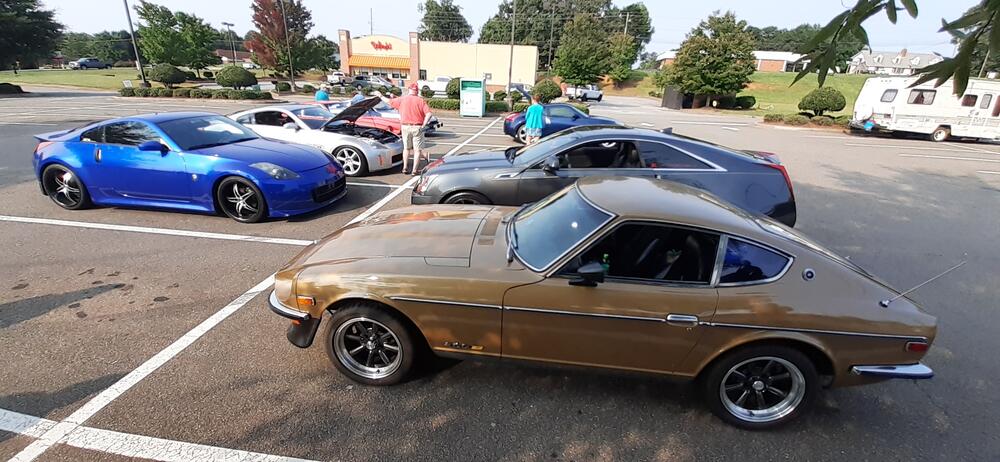
The Georgia Z Club did a swine & wine drive (BBQ for lunch followed by a winery trip). The wife and I went from the start to the BBQ portion. The club prezident always picks some great backroads for us to drive across North Georgia.

 3 points
 -
3 pointsYou get what you pay for, the KFV pans offer a much more correct looking pan if originality is important to you, and a somewhat easier install.3 points
-
2 pointsToday I wept. I wept for thousands of souls I never knew. 20 years. WTC towers 1 and 2. Shanksville, Pennsylvania. The Pentagon. Take a moment today to remember those who perished. Never forget. Weep for them with me.2 points
-
2 points
-
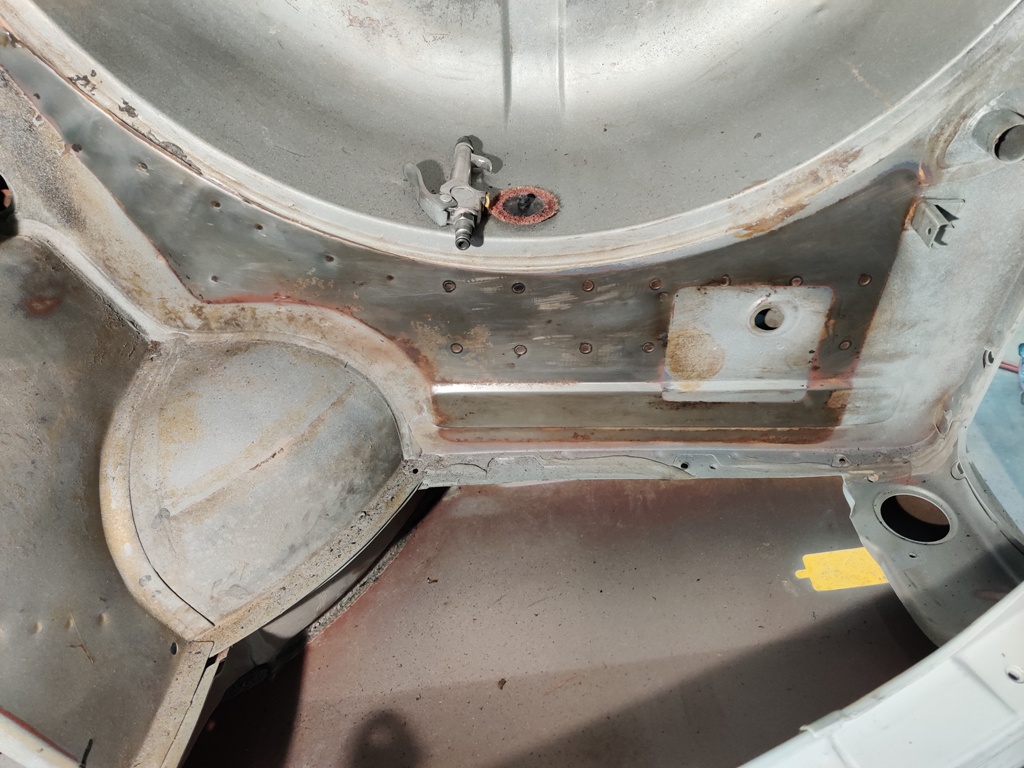
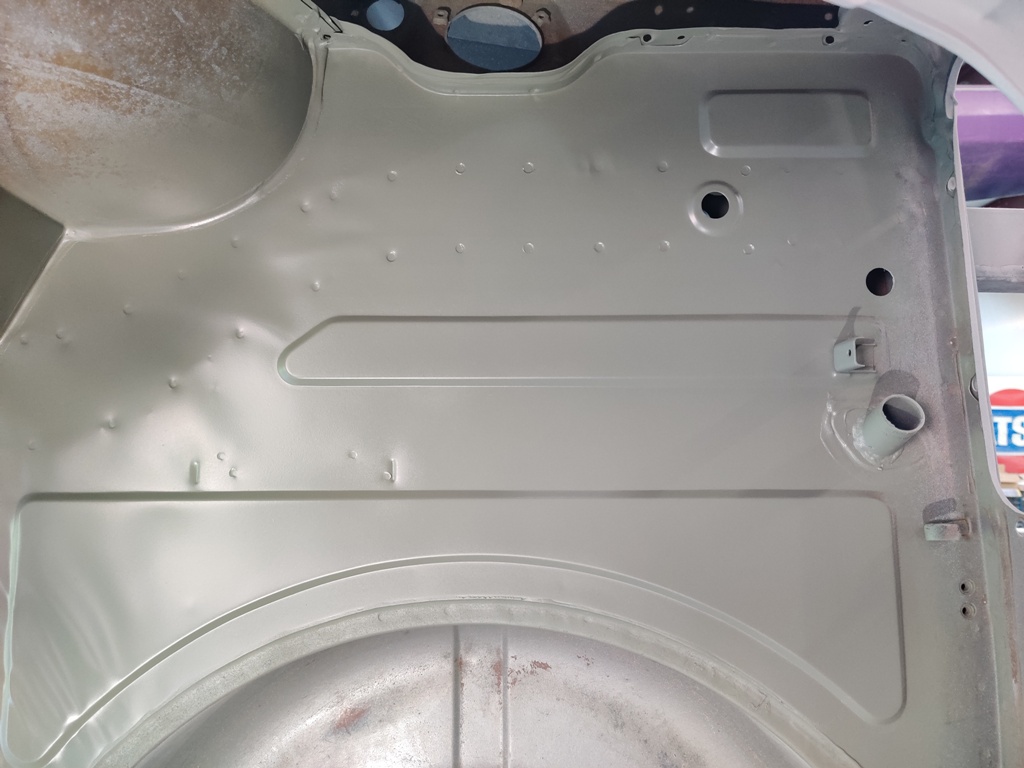
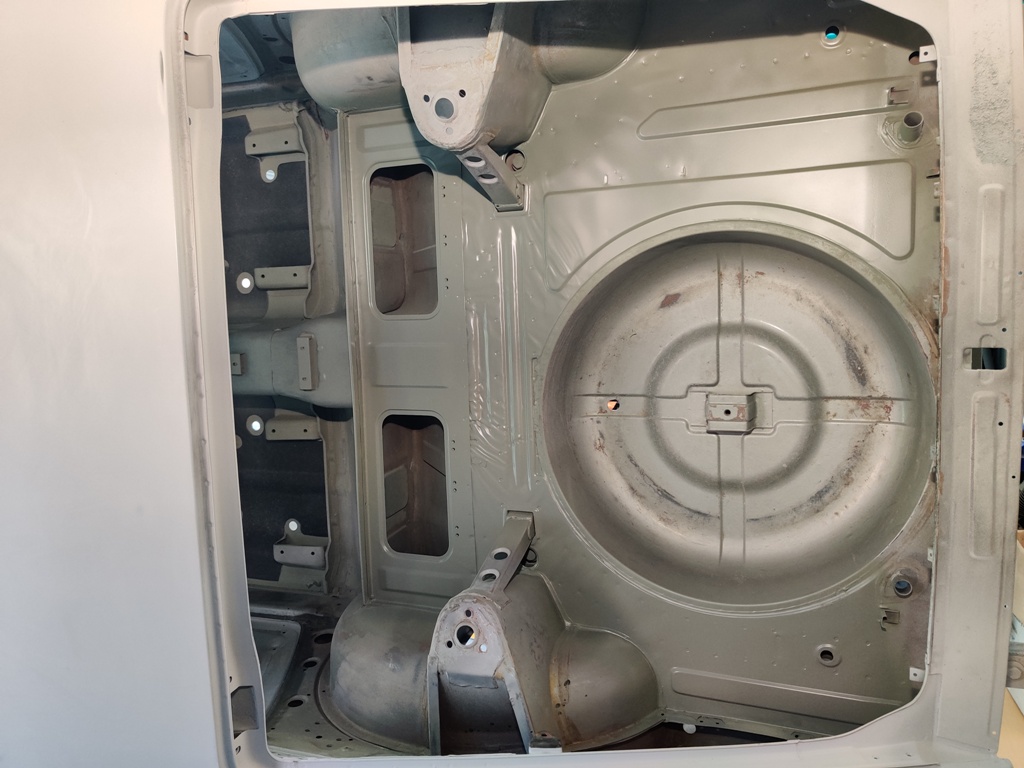
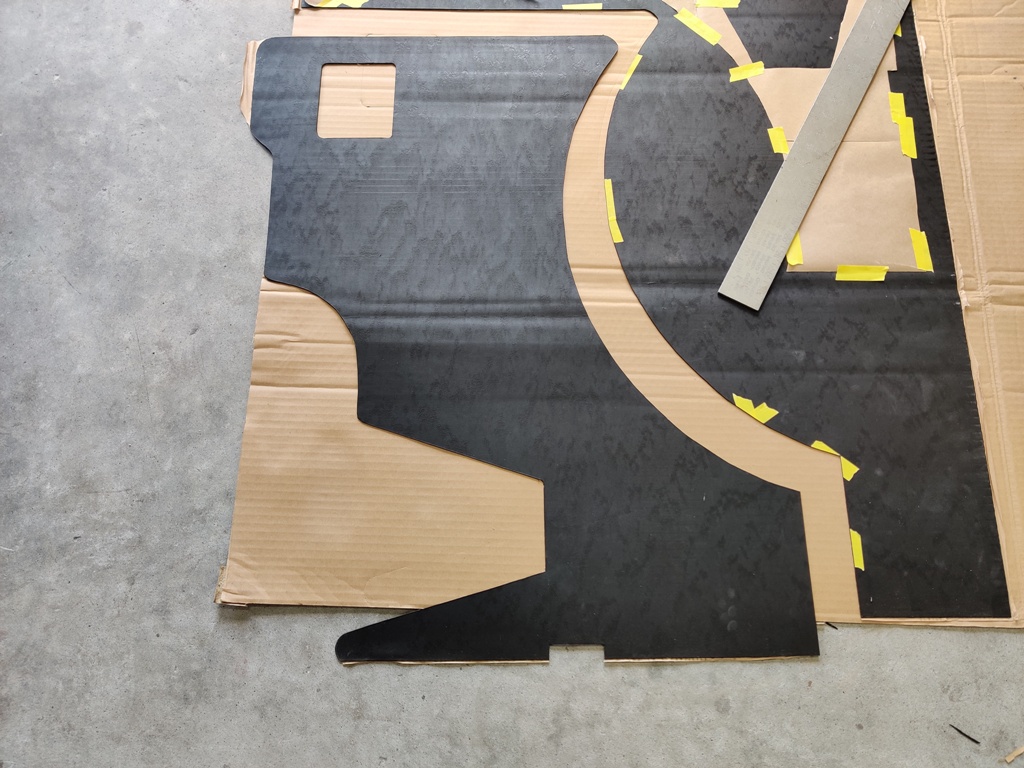
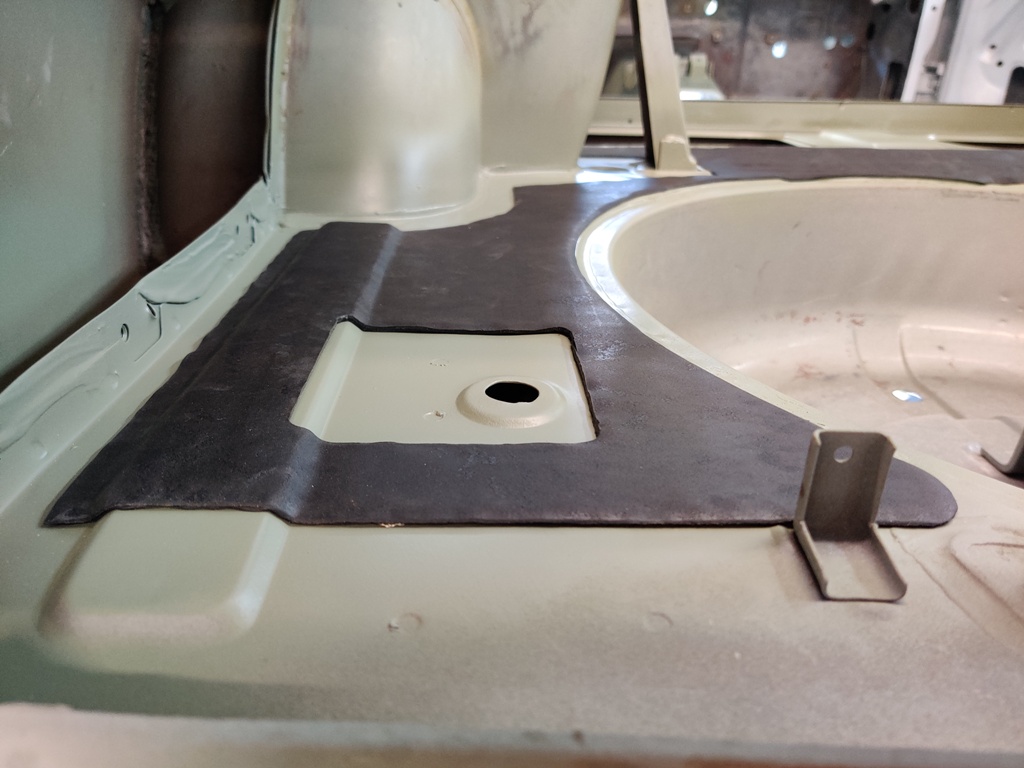
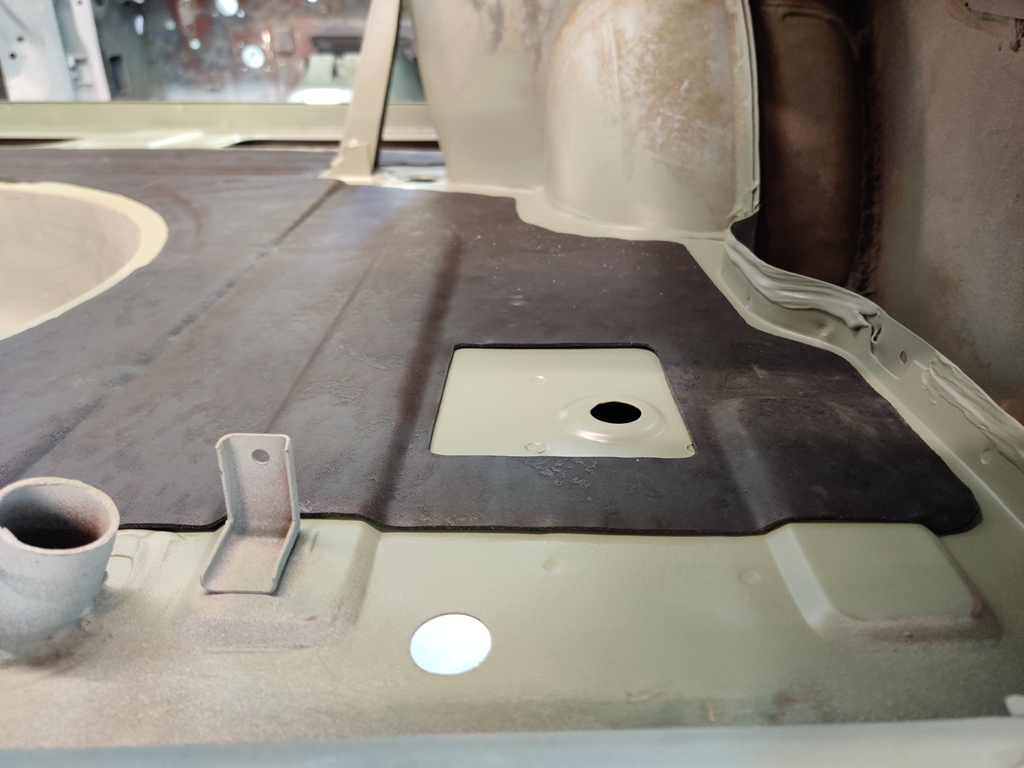
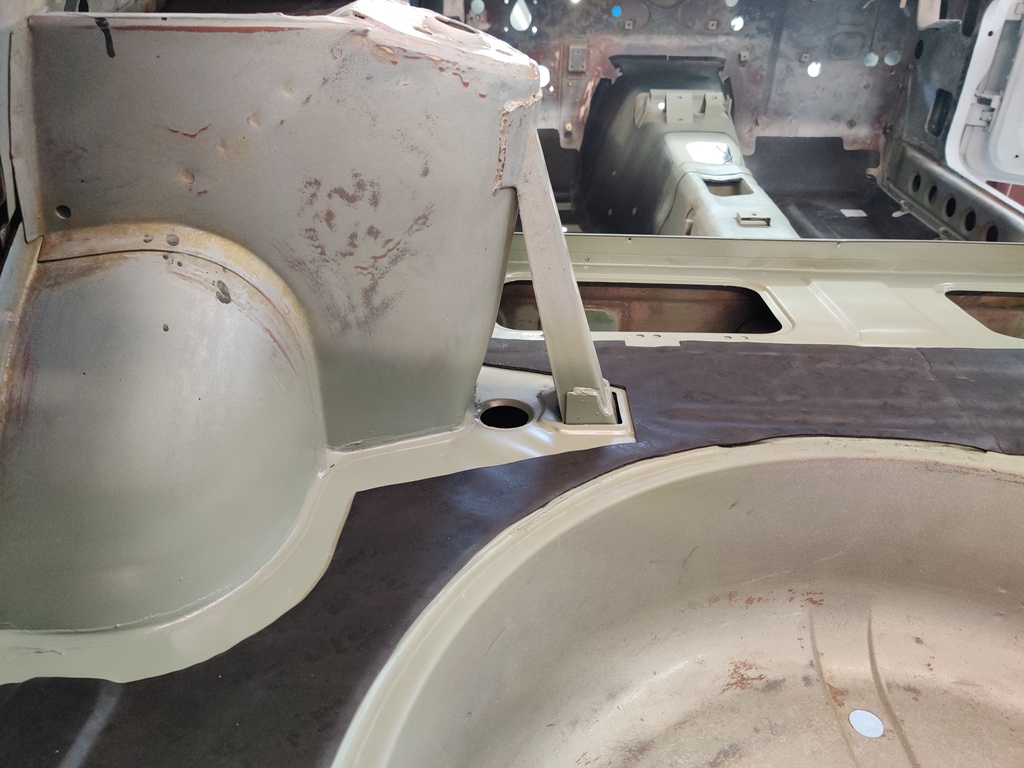
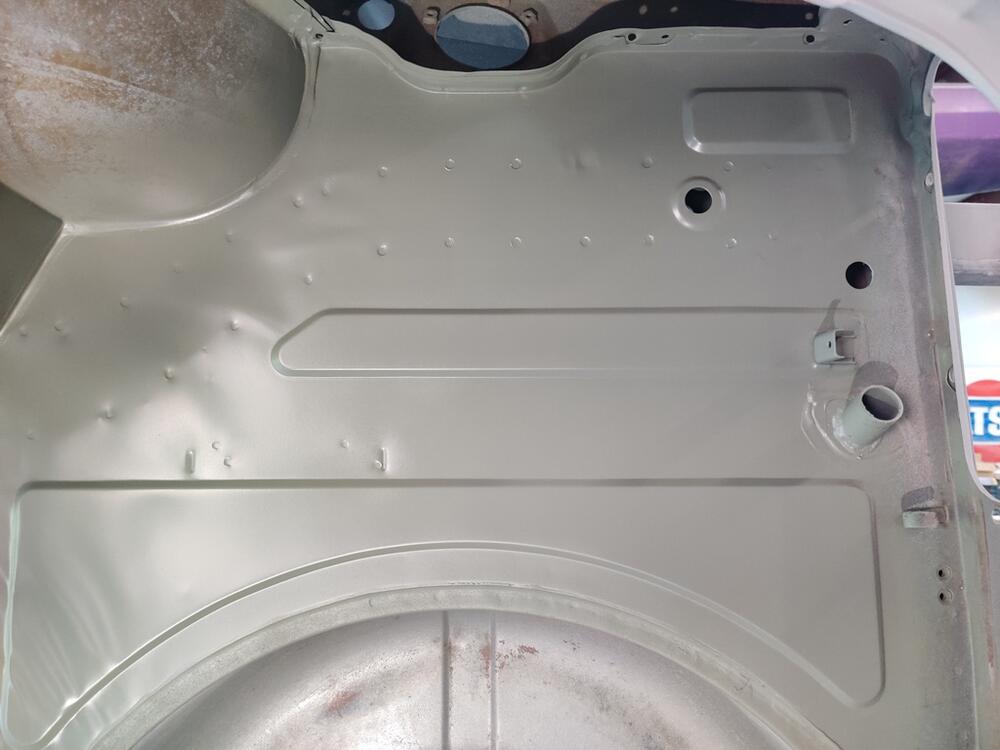
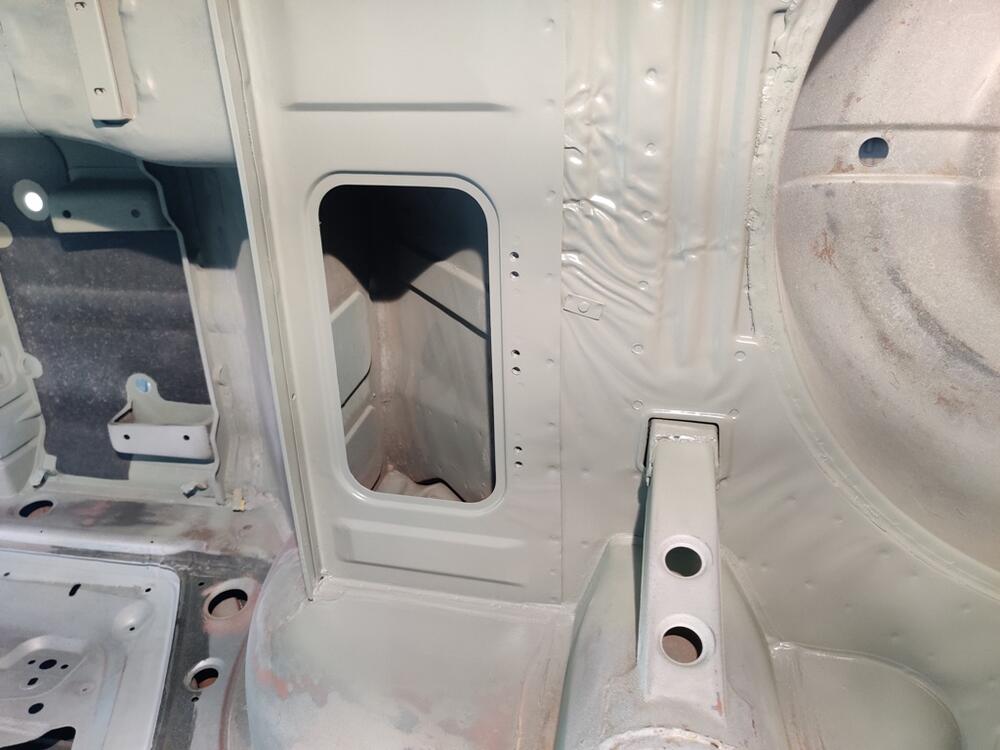
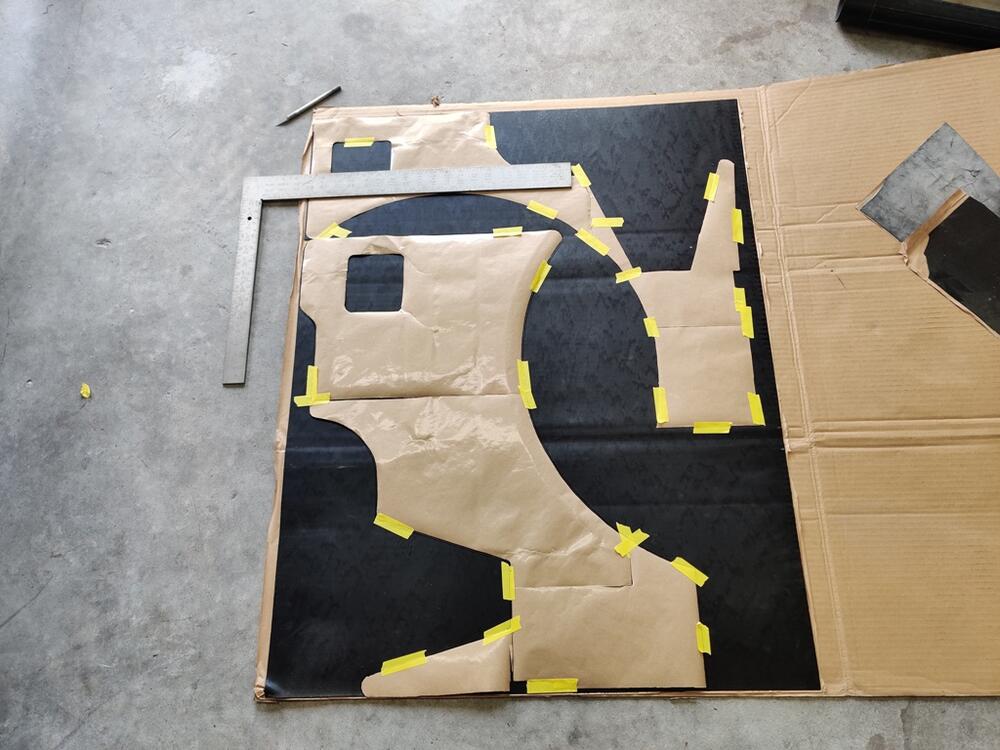
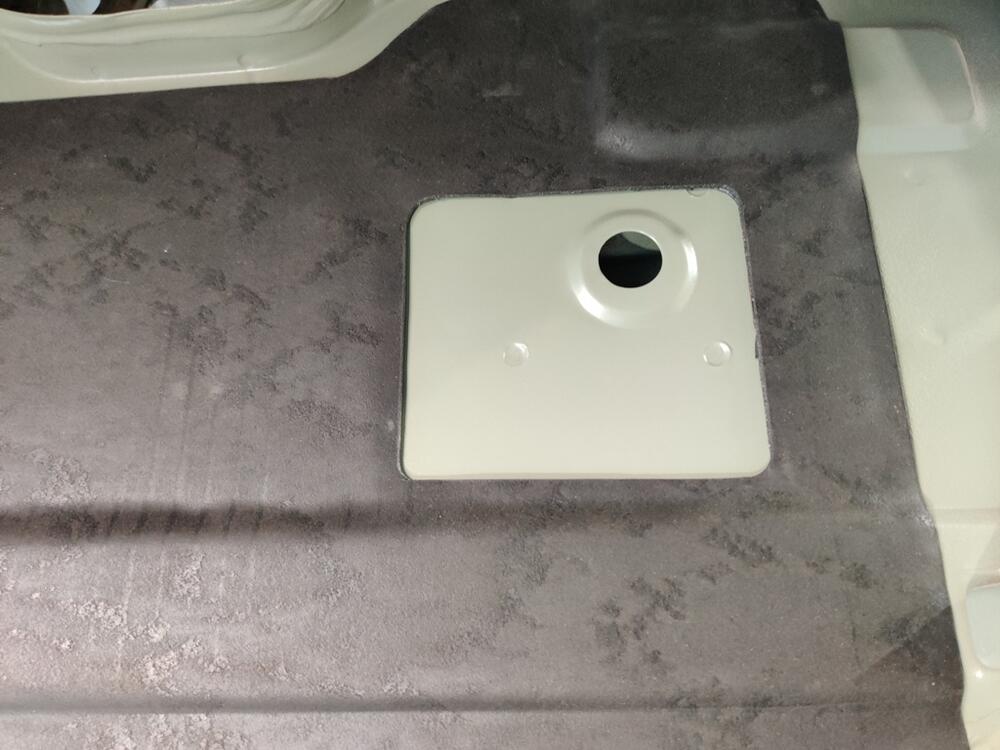
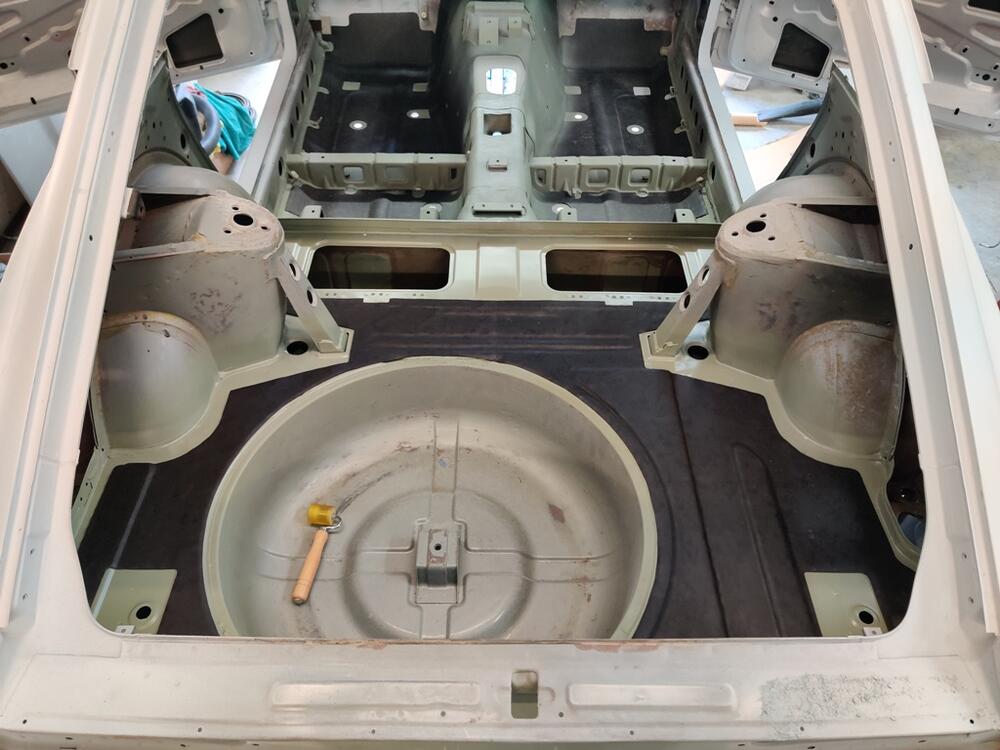
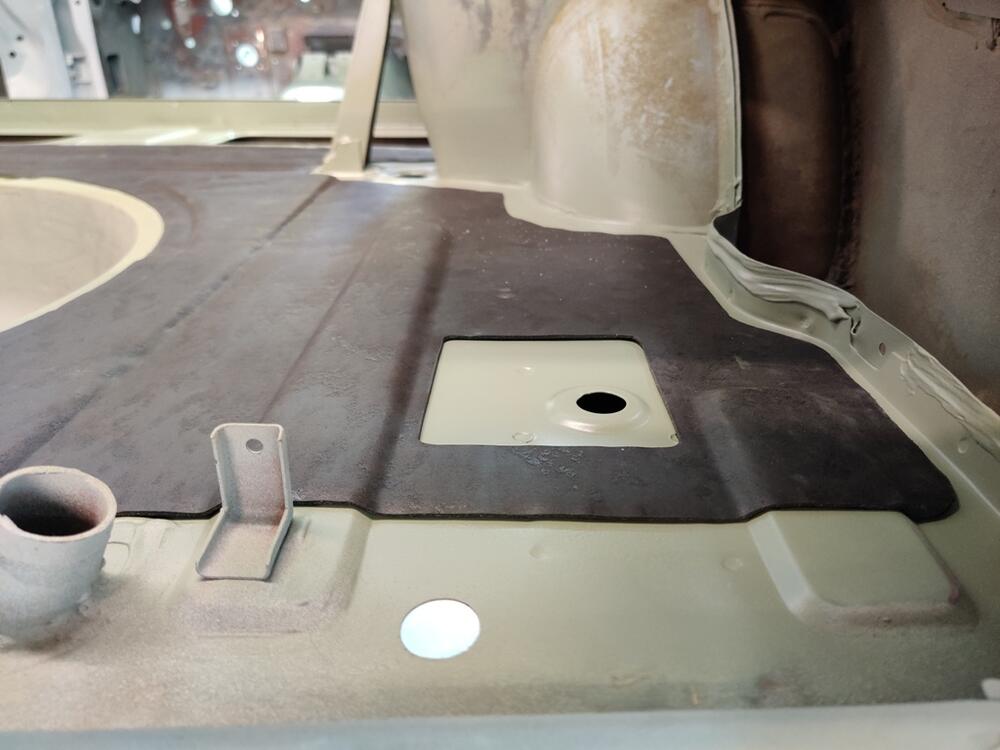
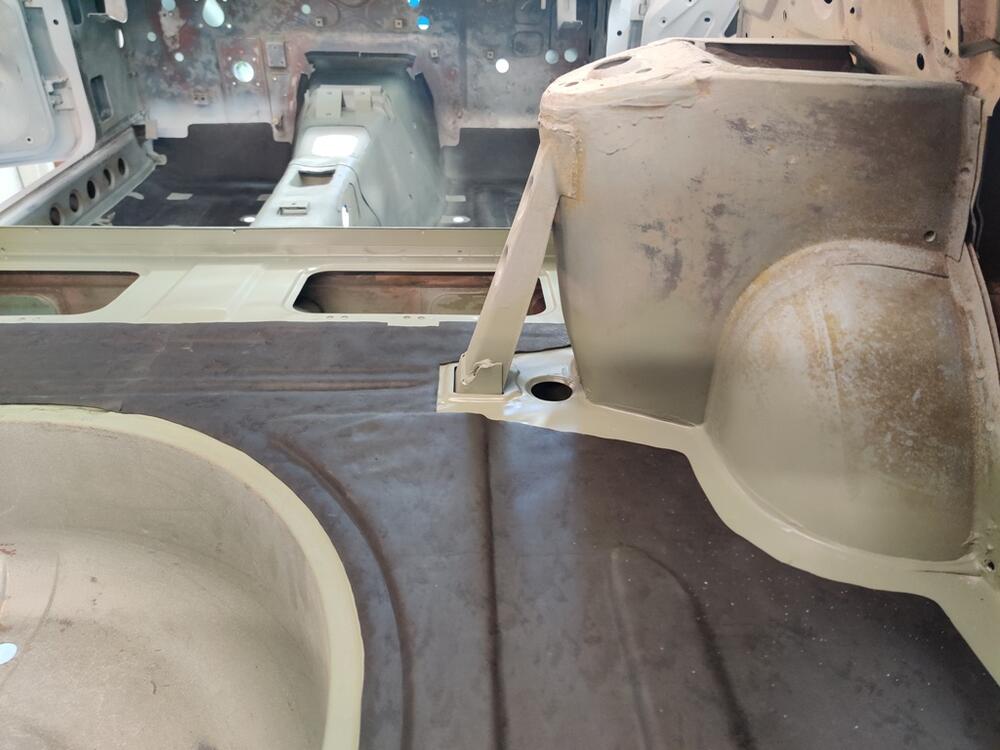
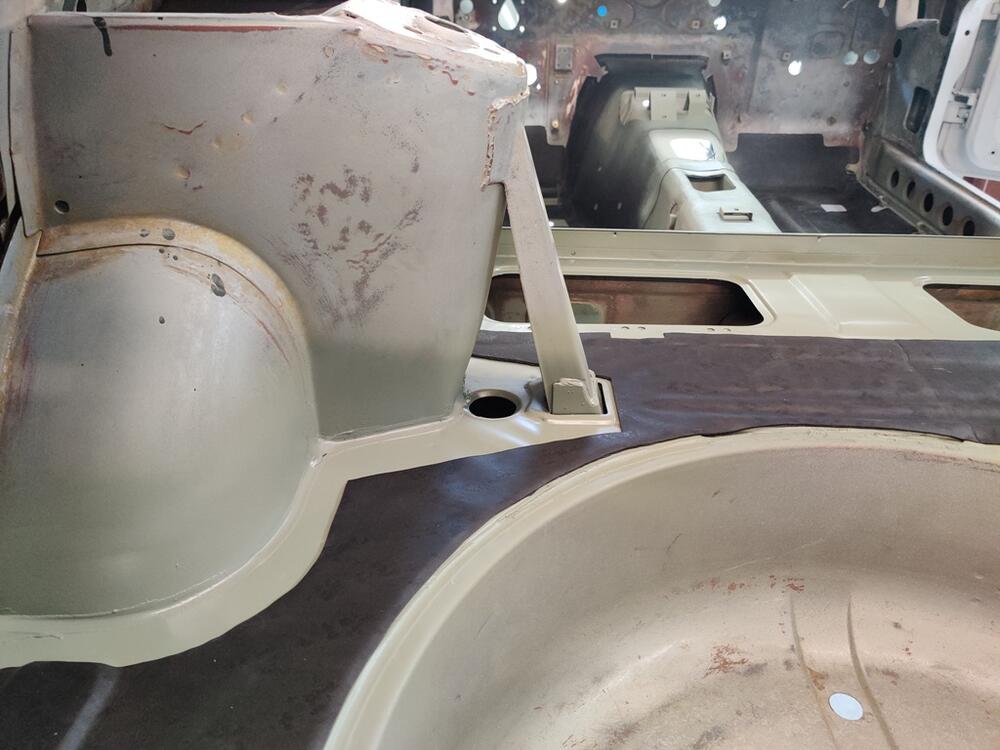
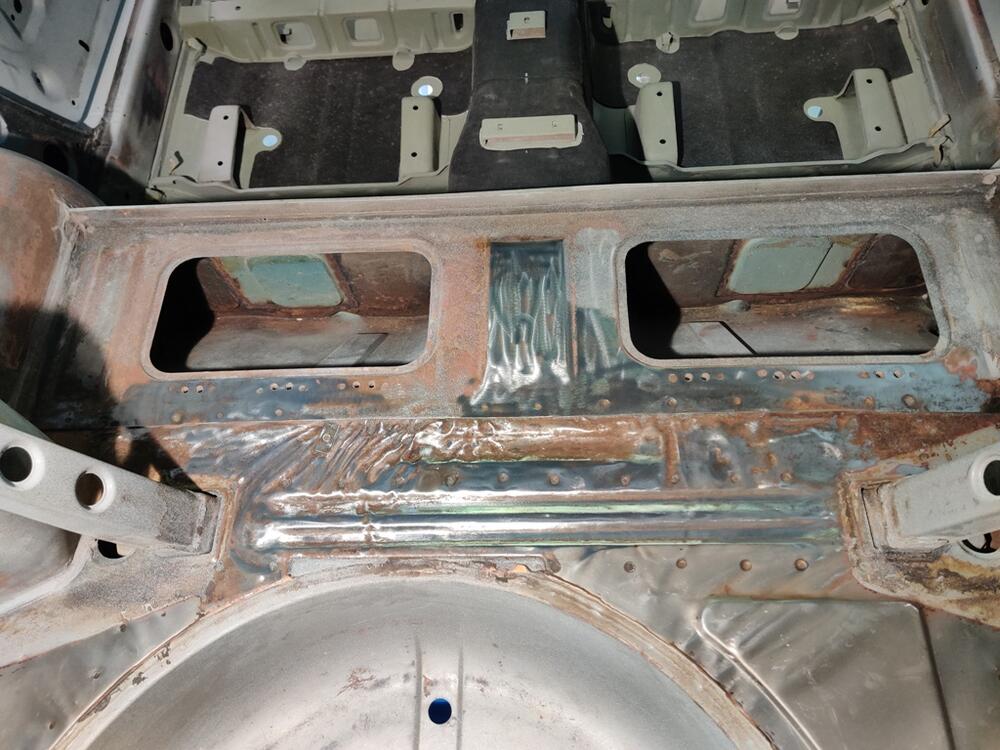
I picked back up on the work in the rear hatch area. I removed the remaining portion of the old sound deadening mat and found a bit of rust under it. I tried to remove it with a wire brush on a 4.5" grinder, and some hand sanding, but when you have the ability to strip with a "sand" blaster, everything else feels inferior when considering the result. Unfortunately, sand gets everywhere, so time for clean-up becomes a major factory. I should have stripped the rear hatch floor at the same time that I did the passenger compartment floor. I would have saved a lot of time in the long run. After sand blasting, I sprayed epoxy primer to the bare metal: I then applied the Second Skin pieces which I fabricated last weekend. The adhesive on this butyl rubber sound dampening is very strong. You have to be very careful when it first contacts the car to have it positioned correctly. After those were all in place, I used the backing paper from them as templates for the factory type of insulation. These templates are more accurate than my initial paper templates. When cutting the factory mat, I made the cutline about 3/32" outside the template edge. This makes the factory type mat a touch bigger and allows the edges to radius over/around the second skin mat for a slightly better look in my opinion. Finally, the effort to replicate the factory sound deadening mat is nearly complete, just a bit more to do at the firewall. I will be applying a 3M flexible seam sealer to all of the edges so that water can't get under it anywhere in the future. I am pleased with how it turned out. It is difficult, in my opinion, to distinguish it from the factory applied original, however it has the benefits of more modern technology - butyl rubber, strong adhesive, metal foil for heat shielding. The factory type stuff on top which looks nicer though and conforms to compound curves more easily. The resulting sound deadening is noticeably better.


 2 points
 -
2 points
-
2 pointsNot that I'm in any position to get a new DD right now, but I do like the new Z. I briefly considered selling the Porsche and maybe even my 280Z next year to help offset the cost of the new Z. But then I noticed that I see a heck of a lot of 370Z's in my area and every one of them is ratty with mismatched body panels, slammed ride height and stupid loud exhaust with a punk kid driving. It will take time, but I see the new Z getting the same treatment and that's not my vibe. After all the S13's and S14's were ruined, the same people started buying up the Z33's and Z34's. I think I'll keep my 996 and my S30.2 points
-
1 pointI had the car at an area car show yesterday and a couple of guys came up and started talking with me. They said they worked locally at a Nissan facility but were actually headquartered out of Franklin. During our discussion of the new Z35 they mentioned that the first 240 cars will have a special limited edition interior treatment. No details available. Grist for the rumor mill!1 point
-
1 pointThe adapter bypasses the stock external voltage REGULATOR as the "high output" alternators are internally regulated. If you have both an external and internal voltage regulator in the circuit, the internal VR won't see the battery voltage, so it jacks up the output voltage.1 point
-
1 point
-
1 point
-
1 pointThese pipes look rusty. I think if i hit them they would fall apart. For some reason, most of the new 280z headers start out for 1977 and new cars. Why is this?1 point
-
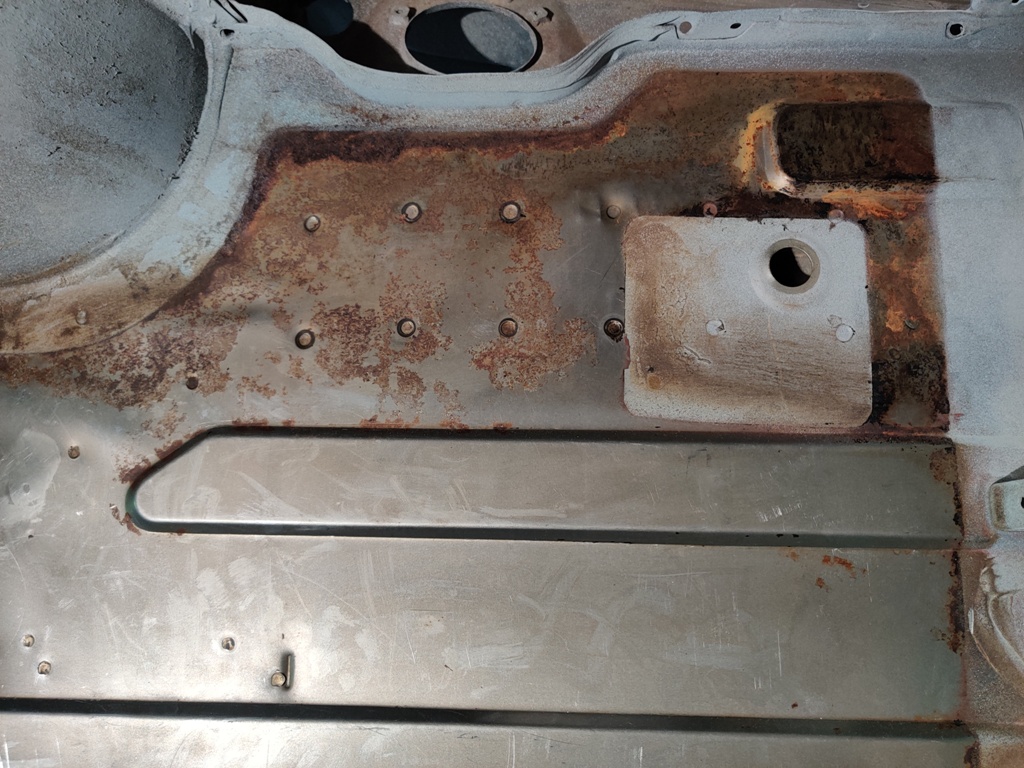
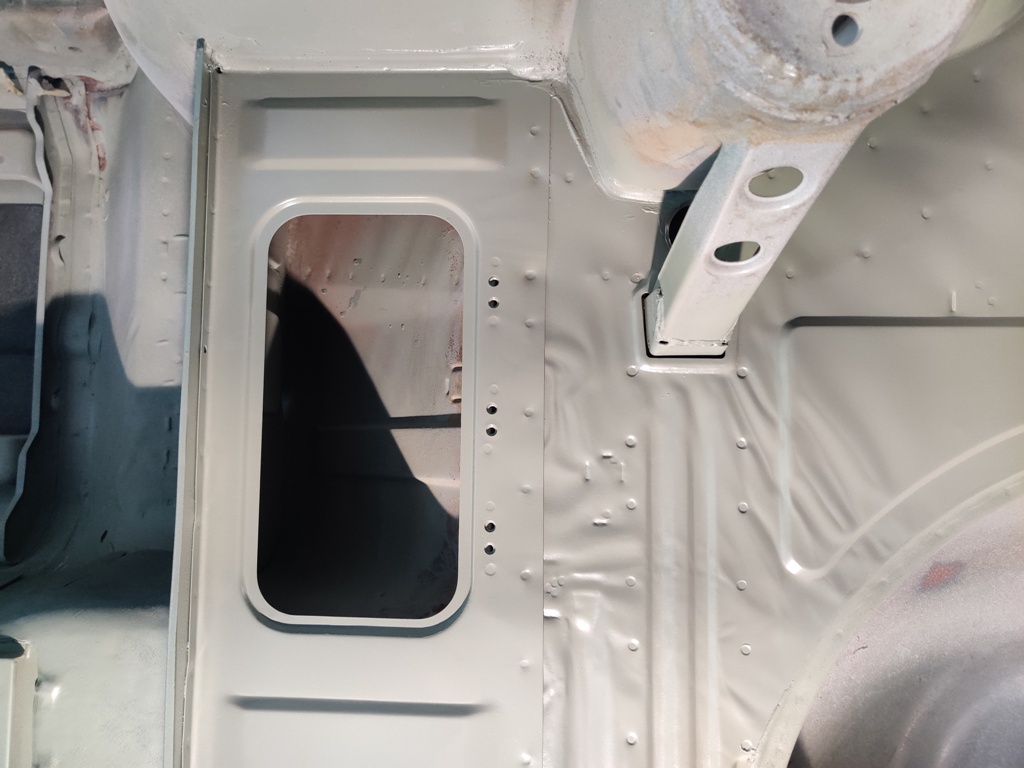
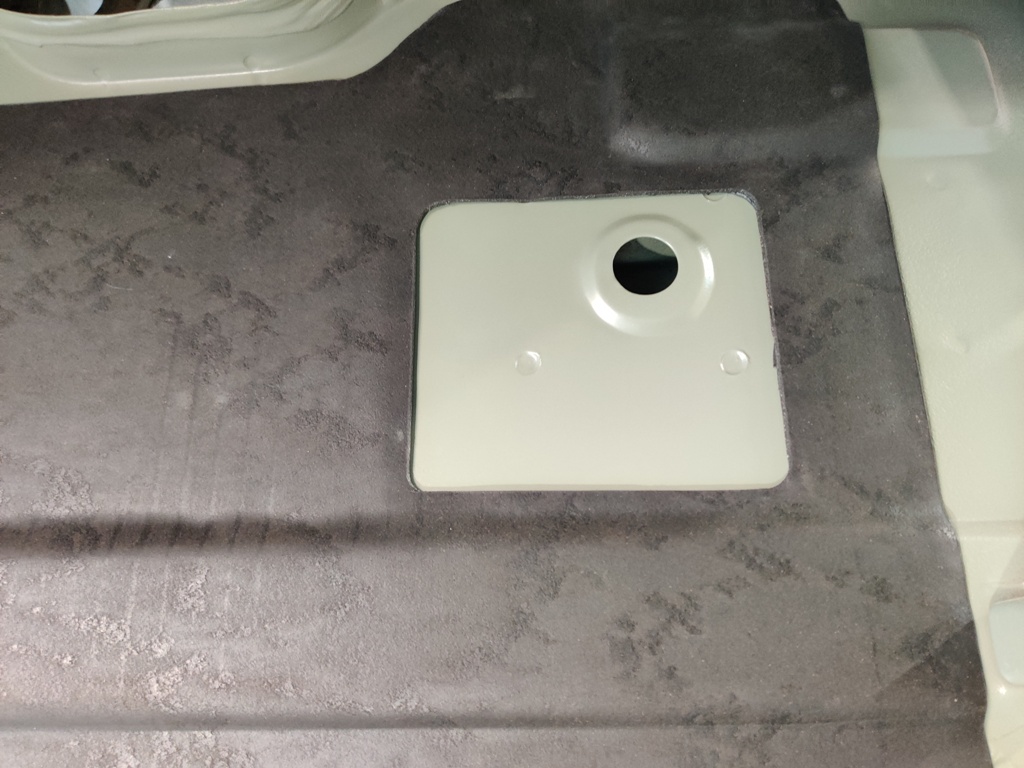
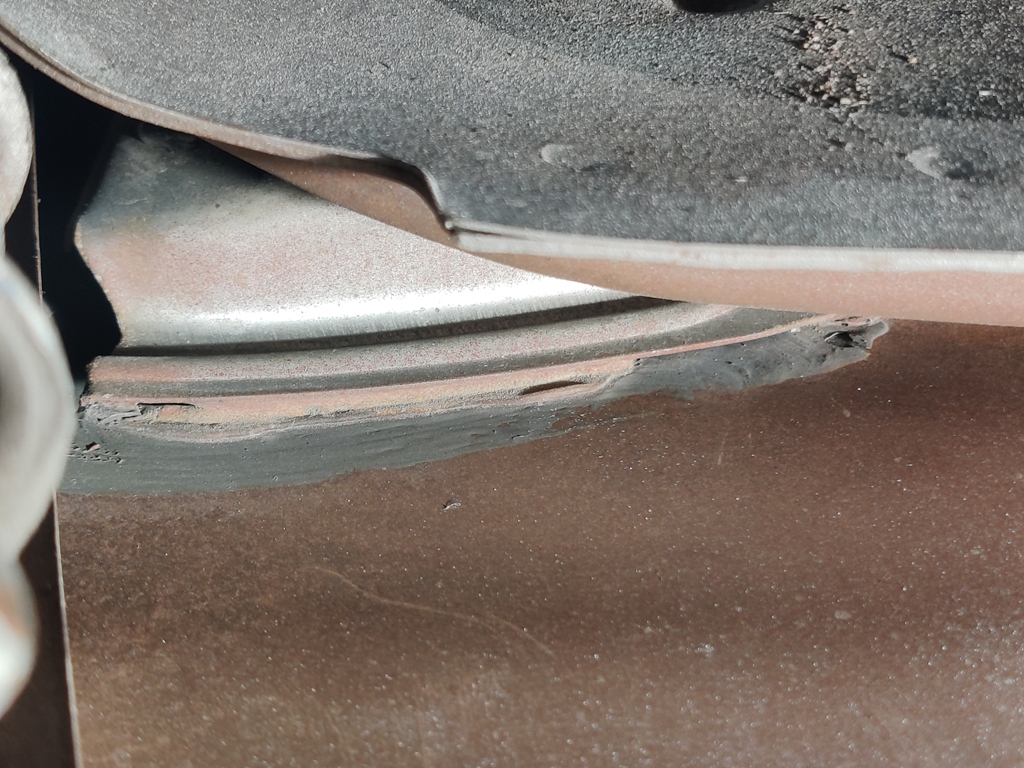
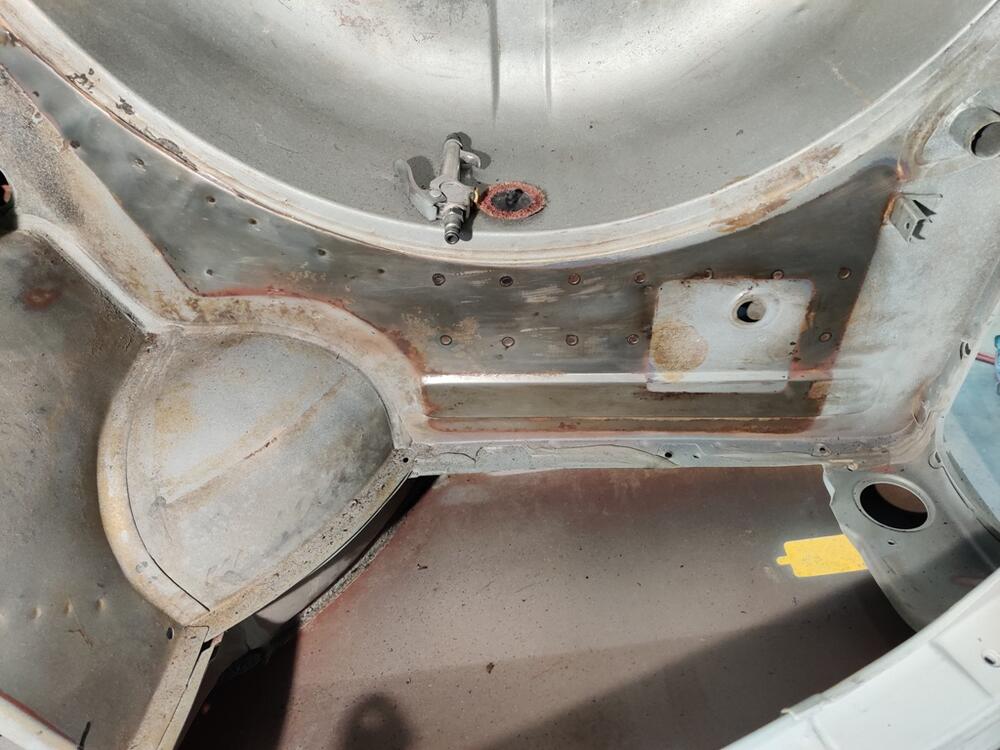
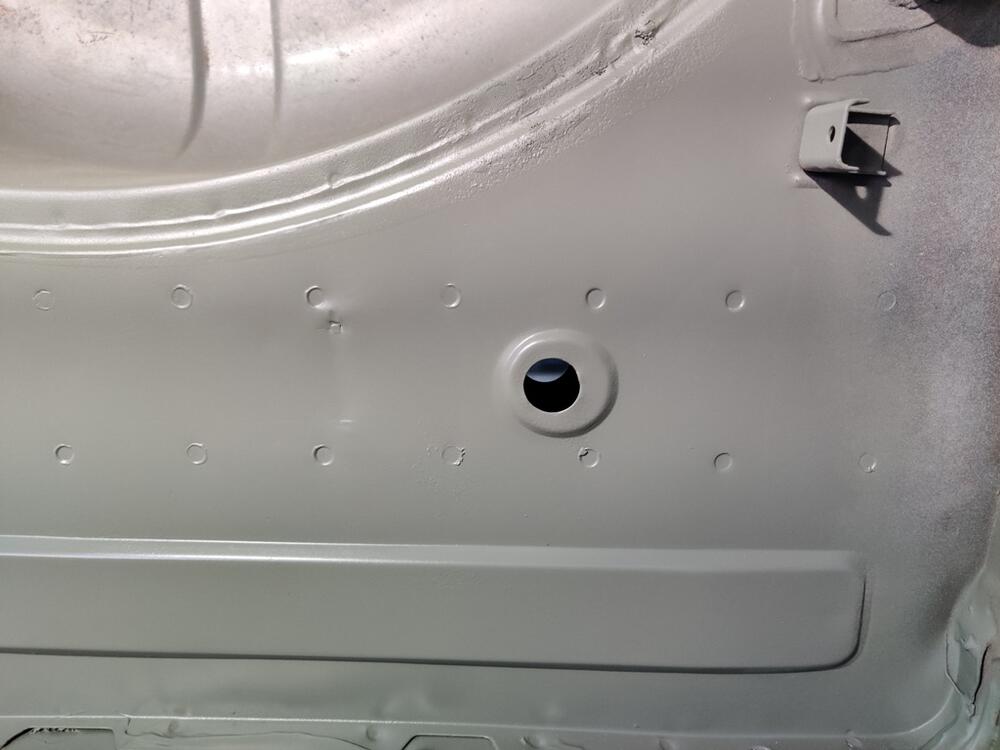
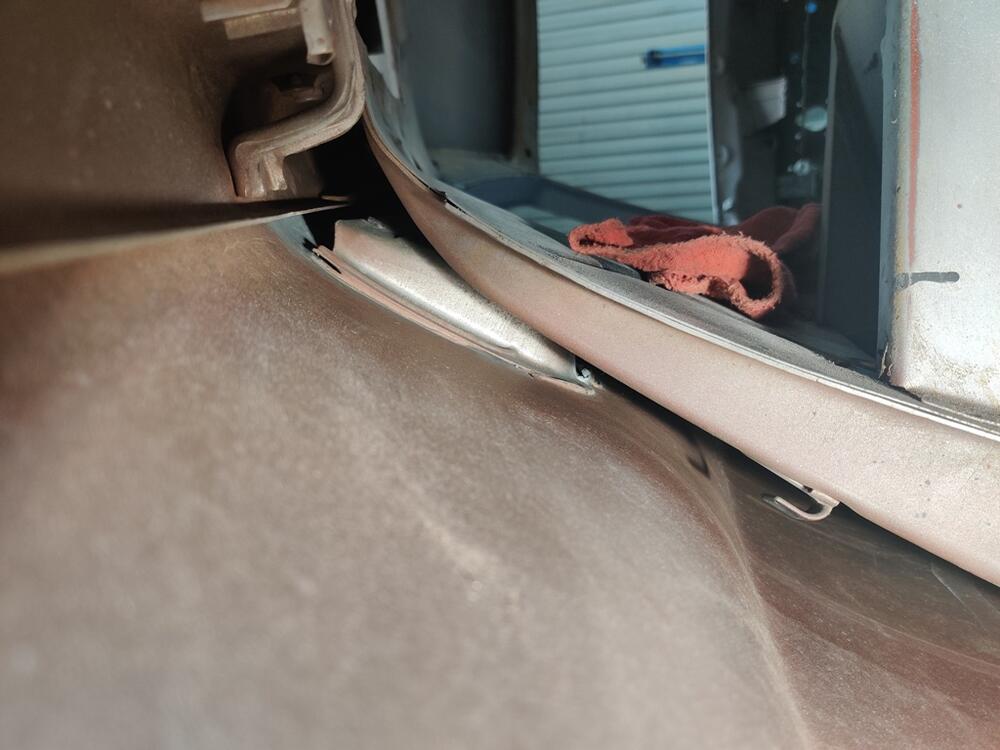
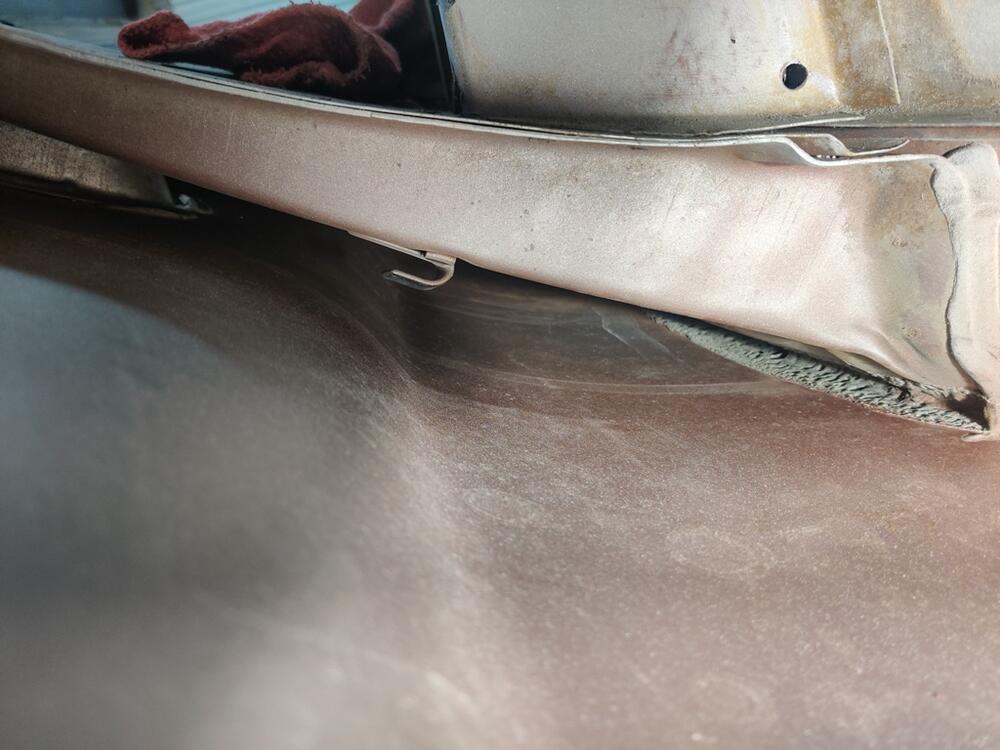
While I was doing the above work, I snapped these pictures which clearly show evidence of how water came into the car from the quarter panel vents. The hole in the quarter panel has this "U" shaped plate behind it which has some sealer not very well applied to the edges where it meets the inside surface of the quarter panel: In the bottom right hand portion of this photo, you can see where water ran down from the vent to the junction of the inner fender wheel well and the quarter panel. The car is at 90 degrees on the rotisserie with the left side of the car facing the floor: It seems wise to apply more seam sealer to the "U" shaped piece to make sure it doesn't let water in along its edges. That said, the top of it is open. So, it is not a good idea to hit that vent with a stream from a hose. 🙂 I will be be applying some spray on sound deadener to the inside surfaces of the quarter panel. However, before that, I will be prepping and addressing any suspicious areas of factory sealant to ensure no water can get in to cause trouble. *edit - I also noticed today that the bottom of the three holes that hold on the Z emblem is located below the bottom of the "U" plate, whereas the two others are contained within it. So, the bottom hole is more problematic for letting water in for what that is worth.

 1 point
 -
1 pointWhen I made mine (no longer own), I had machined a pair of flats and they came in handy. Taking bits of various designs, I had used acme all thread and thrust bearings instead of NC thread and a used throw-out bearing. One last thing, I drilled and tapped both ends of the all thread so if one end became damaged, I could use the other end. This is one of those tools that hopefully you only need once. It would be great if one could just borrow the tool from a tool library.1 point
-
1 pointWhere did you get the alternator? Post a link. There should be letters molded in to the case. A "B" and an "E", maybe a"P".1 point
-
1 pointMark the spot where it rubbs and take of the exhaust then make the pipe like a elips on the marked spot.. a few mm is enough maybe you can do it even when it's still installed, also you could take out the steering part that may be much more easy and make a small dent in the pipe! (Make the pipe elipse with a big pair of piers..)1 point
-
1 pointI would take it to a muffler shop that's been around awhile. They could move that over enough to get it off the rod somehow I think, my local shop would figure something out. Probably break the welds though.1 point
-
1 pointI got mine at Lowes. Seems like it's 3/16" maybe?, 1/8th"? Take something with you to compare it to like a golf tee or a nail. It's on a roll in plumbing and you buy it by the foot. 2ft would be plenty I think.1 point
-
1 pointhttps://www.ebay.com/itm/143414460942?chn=ps&norover=1&mkevt=1&mkrid=711-117182-37290-0&mkcid=2&itemid=143414460942&targetid=1262779892089&device=c&mktype=pla&googleloc=9011007&poi=&campaignid=10455978148&mkgroupid=122766957832&rlsatarget=pla-1262779892089&abcId=2146002&merchantid=101701585&gclid=CjwKCAjwyvaJBhBpEiwA8d38vLI1o55TkIgk81m3k9-kRSYCXclOoIrQjpnqURN9L0NlctLpZ1FVshoCxOYQAvD_BwE https://www.amazon.com/Feet-Octane-Clear-Sight-Gauge/dp/B00IICV0P6 https://www.google.com/search?q=clear+fuel+line+1%2F4&sxsrf=AOaemvIfbH79kK00ip_HrjWtdrIf_OGHww%3A1631447695426&ei=j-o9YbvFGfCRwbkPpN214A4&oq=clear+fuel+line+1%2F4&gs_lcp=Cgdnd3Mtd2l6EAMyBQgAEIAEMgYIABAWEB4yBggAEBYQHjIGCAAQFhAeOgcIABBHELADOgcIABCwAxBDOhMILhDHARCjAhDIAxCwAxBDEJMCOhAILhDHARCjAhDIAxCwAxBDOggIABCABBDJA0oFCDgSATFKBAhBGABQ8zdYuUVgykZoAXACeACAAVuIAdcCkgEBNJgBAKABAcgBC8ABAQ&sclient=gws-wiz&ved=0ahUKEwj7yOuisPnyAhXwSDABHaRuDewQ4dUDCA4&uact=51 point
-
1 pointThe company is Auto Panel Solutions, located in Thirsk, Yorkshire, UK. No website. They advertise only via Facebook. Prices seem reasonable and the CZCC members (not many) who have done business with APS seem happy with their purchases.1 point
-
1 pointNot all aftermarket headers fit perfectly, you might have to remove the header and make some clearance with a ball peen hammer otherwise the heat could travel up the steering shaft and might cause degradation of the the rubber rag joint.1 point
-
1 pointI already pulled one pin came out like butter! Thanks Jeff, tomorrow the other one will be coming out1 point
-
1 pointWonder why they keep using a part that must be destroying the product's quality credibility. How much could they be saving, if anything? @123ignitionusa1 point
-
1 pointThat's how it always works. When the first generation of Z-cars got a bit old and worn, kids got ahold of them and turned them into rusty, noisy hooptys. That happens to all cars that have any performance vibe about them. But many survived without that level of violation, and they're the ones we have today. I learned at ZCON that my '83 280ZXT is one of the cleanest and most original of its generation. That feels pretty nice!1 point
-
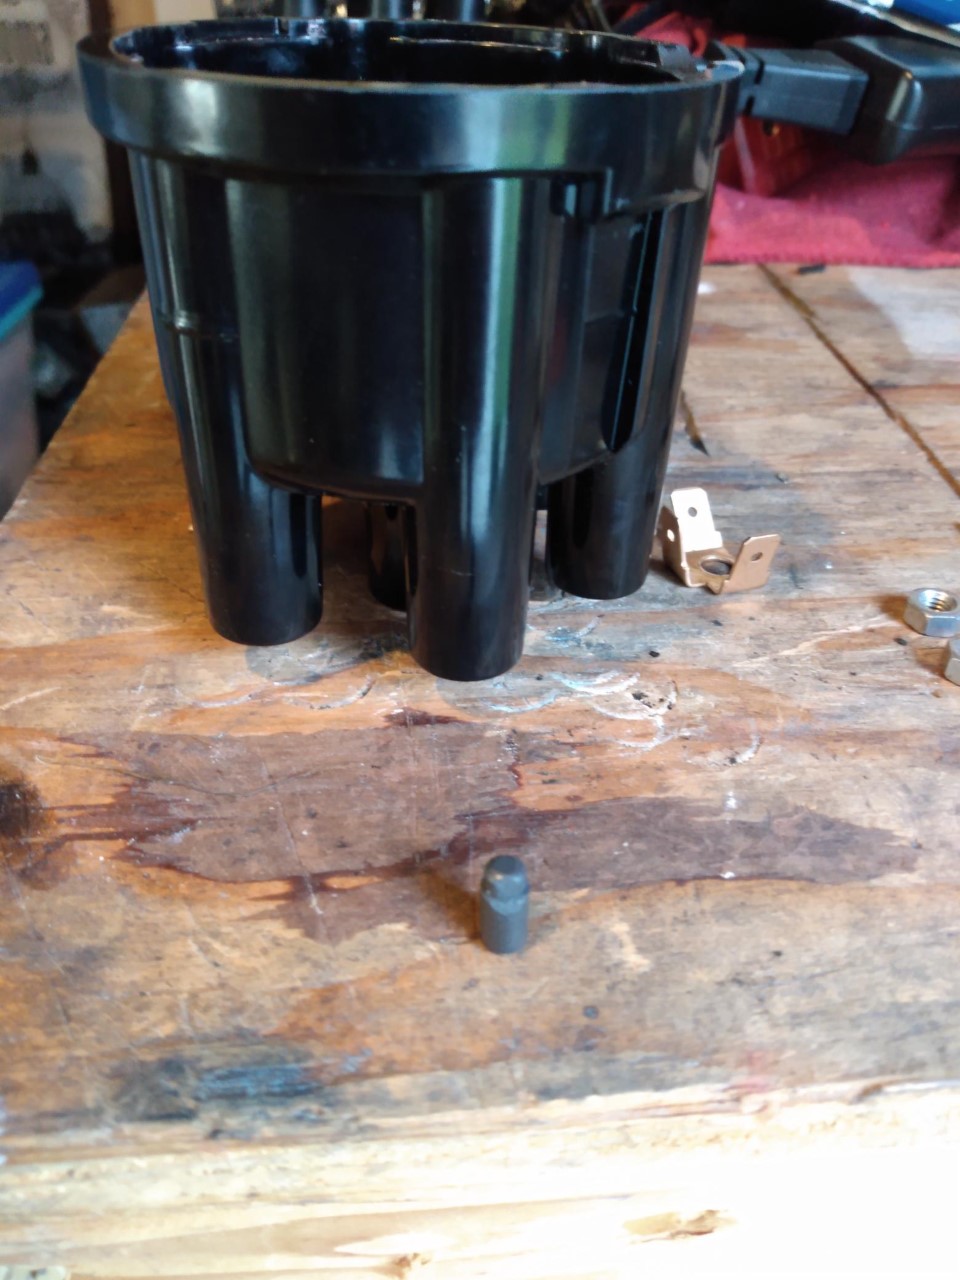
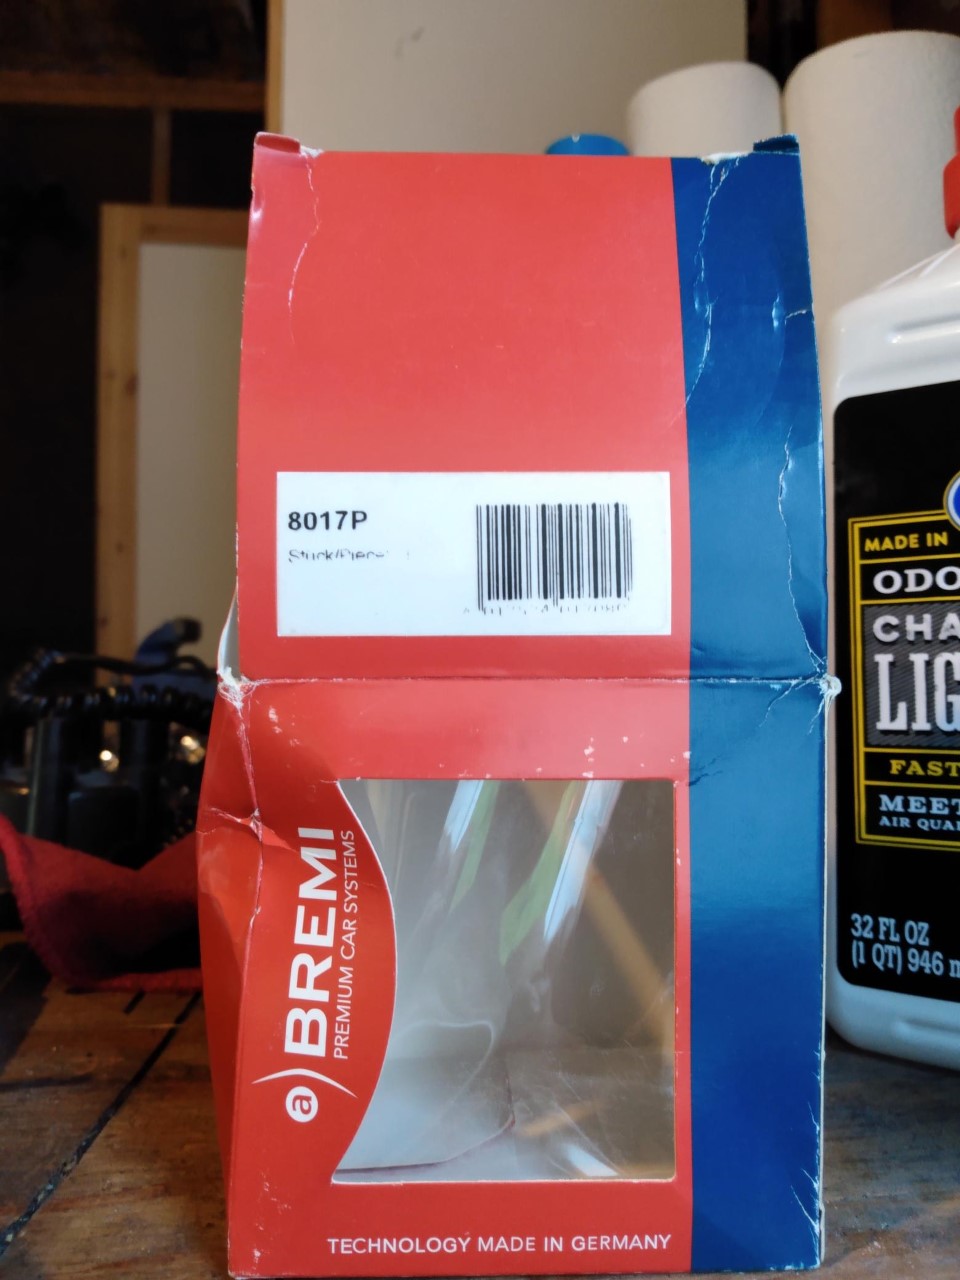
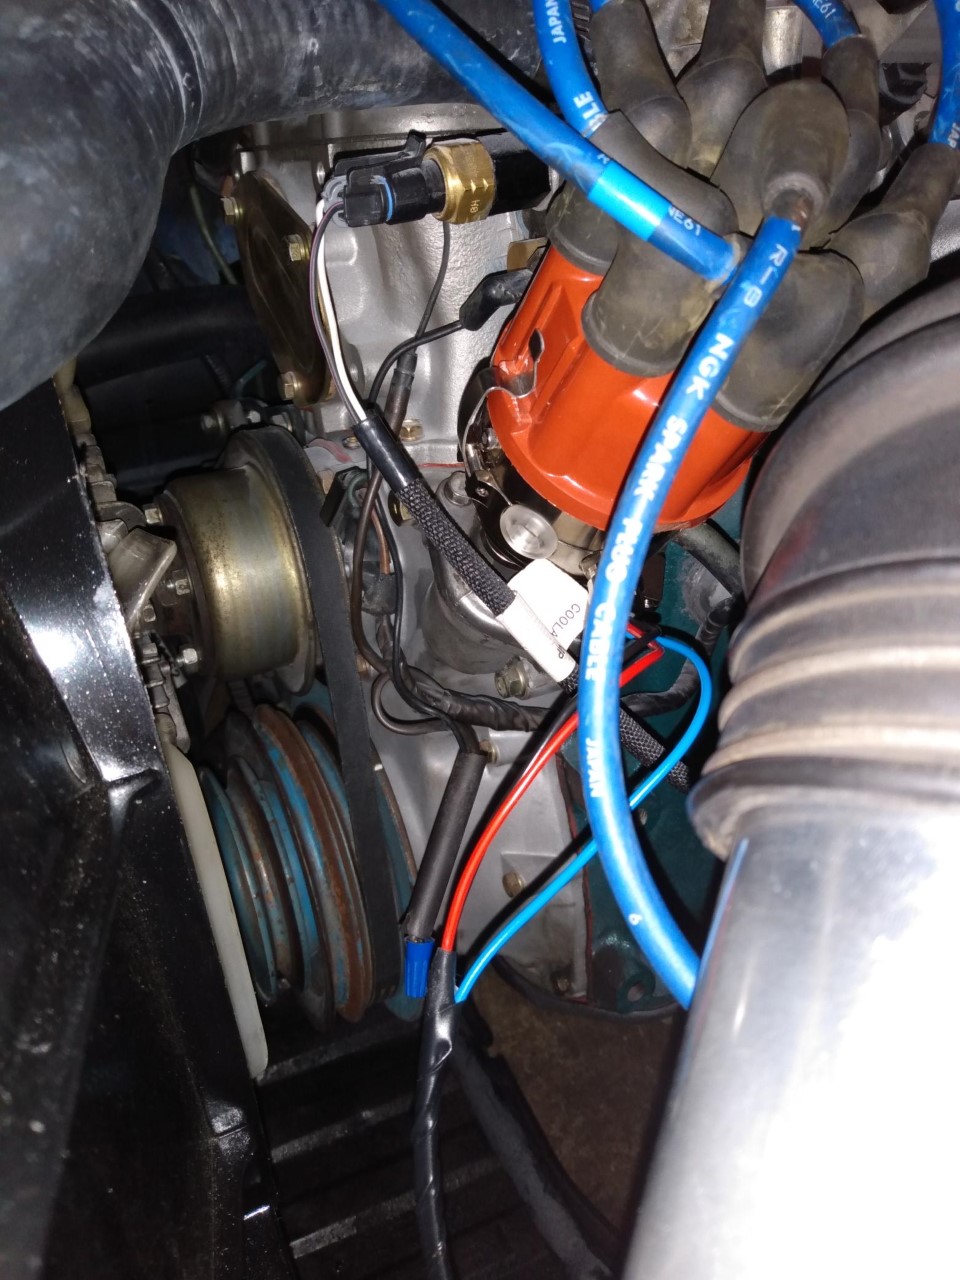
1 pointThe Beru cap that came with the distributor lasted almost 2 days without losing the center diode. Luckily for me, the car wasn't running when it happened. I was re-installing it after cleaning up the install when it popped out while attaching the coil lead. The Bremi cap arrived later in the day(a whole 2 days early). I installed it and went for a 30 mile drive. No problems. Smooth as butter. It's already been said, but I'll say it again..Don't trust the cap that comes with the 123 ignition distributor. The distributor works great tough. The BREMI cap # 8017p is readily available stateside and is $20.00 on amazon..and has at least put up with 30 miles haha.


 1 point
 -
1 point
-
I know right? Who judges the judges? I guess they do their best in the circumstances, but... Oh, and you downgraded me. I'm not an HS Standard, I'm an HS Deluxe Grande Nose... 😉
 1 point
 -
1 pointRichard I am pretty sure I have an extra correct cable and lever for a 71. Can you measure the length of yours. Sent from my iPhone using Classic Zcar Club mobile1 point