Leaderboard
-

Av8ferg
Free Member9Points1,538Posts -
Patcon
 Subscriber
 6Points11,142Posts
 -

siteunseen
Free Member6Points15,115Posts -
w3wilkes
Free Member5Points972Posts


Popular Content
Showing content with the highest reputation on 03/08/2020 in all areas
-
3 points
-
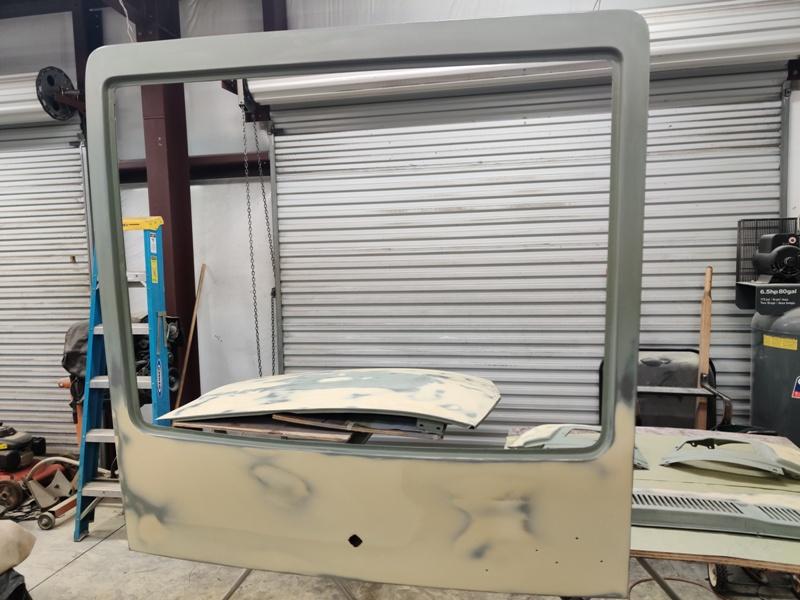
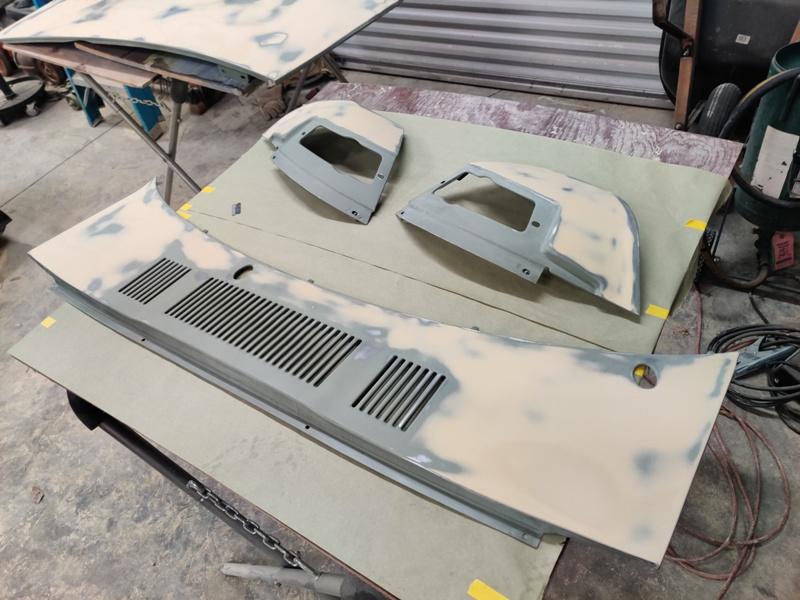
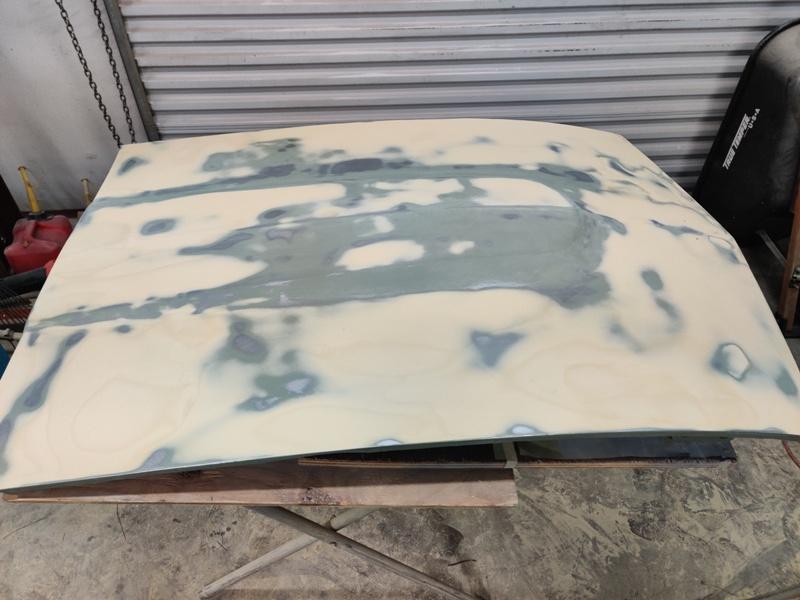
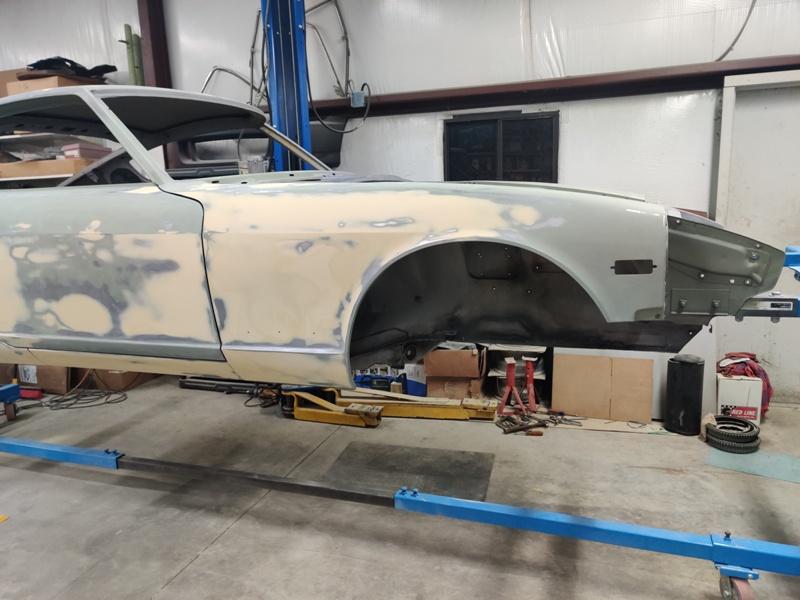
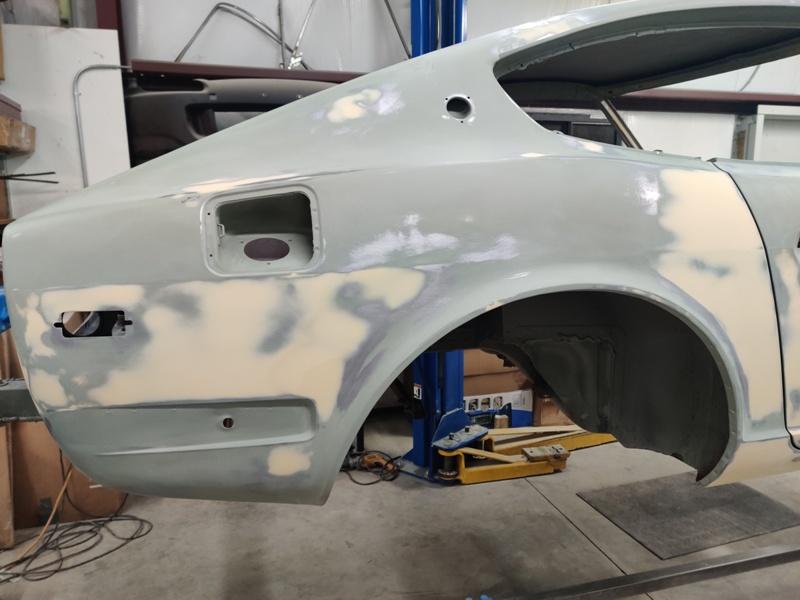
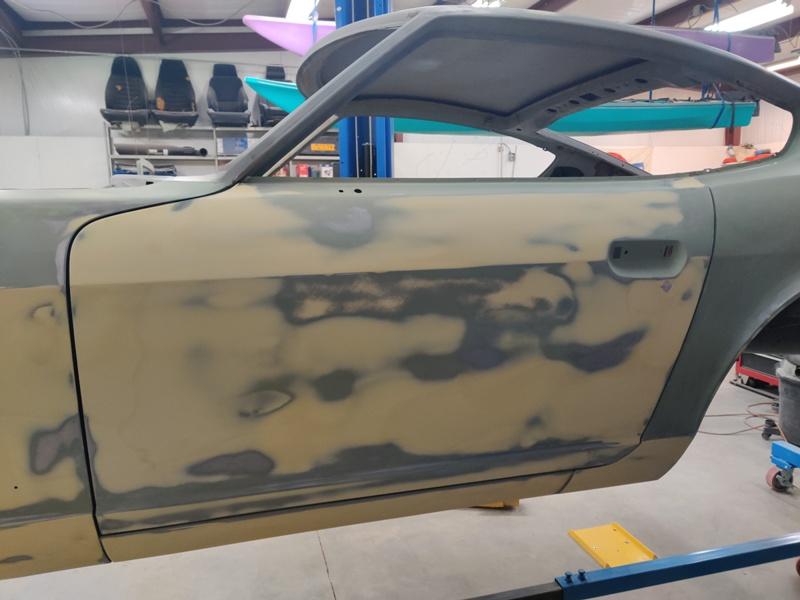
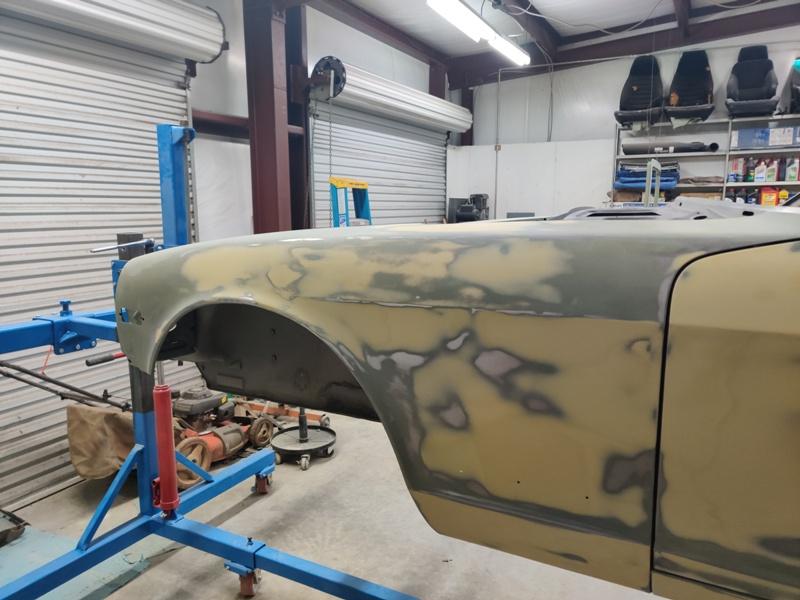
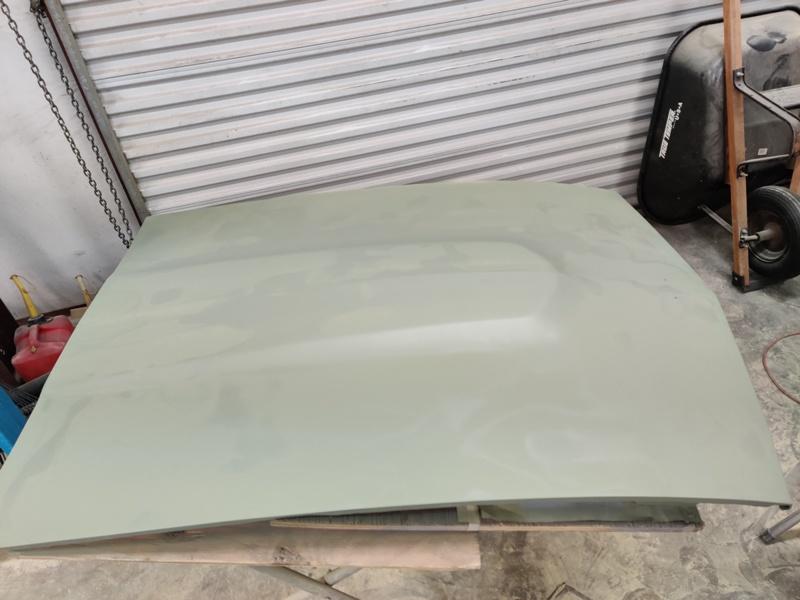
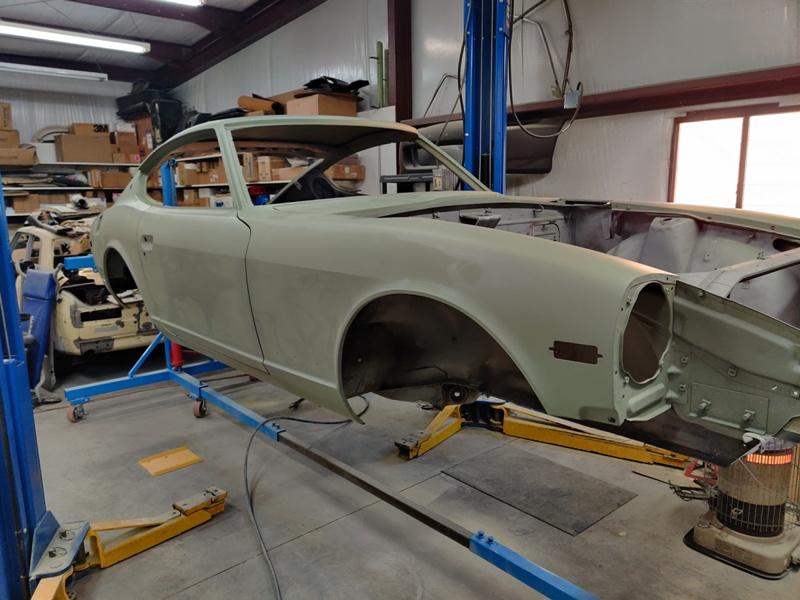
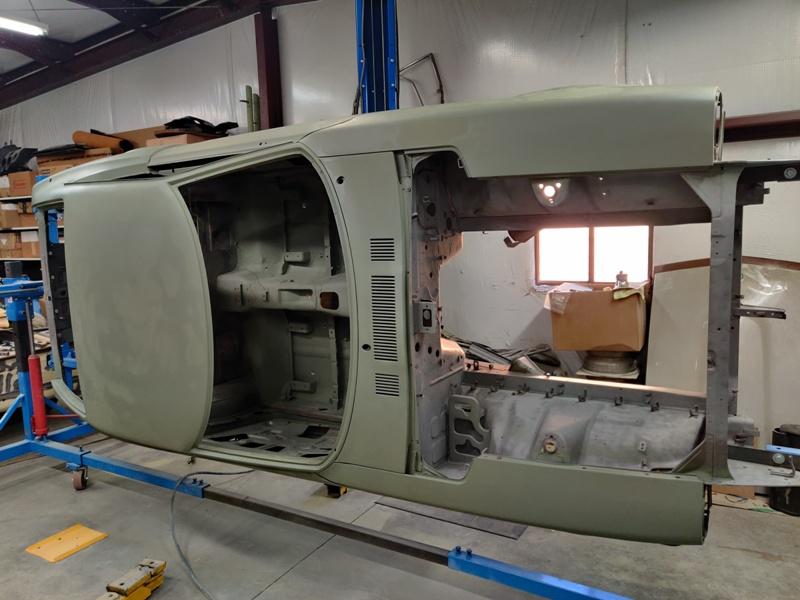
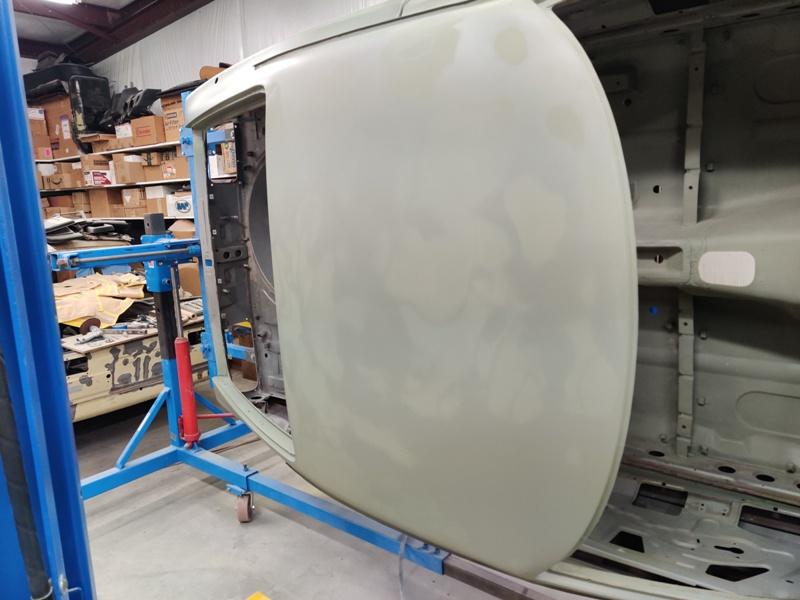
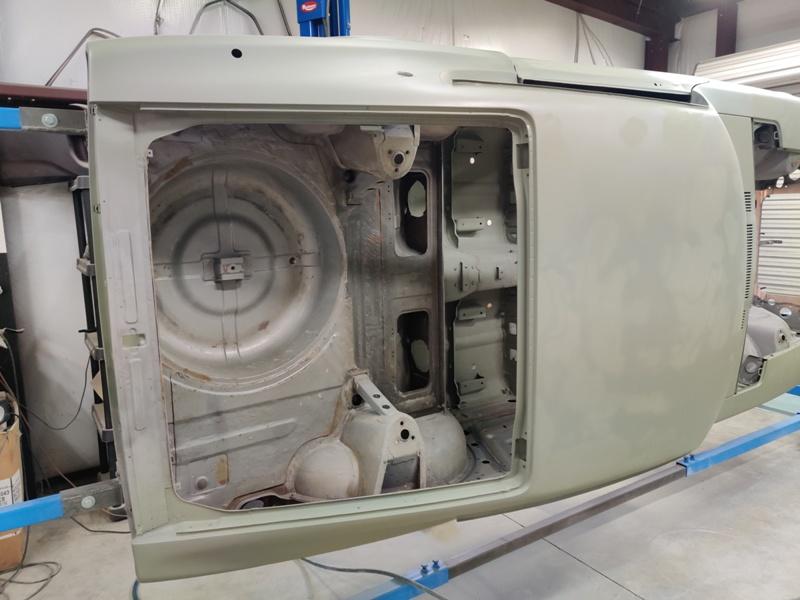
I got the body filler work to a point on the car where another coat of epoxy primer was warranted. I'm still not 100% on how it should be done, but I like putting down a coat on bare metal, then doing body filler, then another coat to seal everything. The plan is to shoot high build primer next, and then to block sand to perfection. We'll see how that goes. ? A lot of time was spent getting the panels "close" with filler. More than I hoped. You can spray silicone and tar remover on and let is sit while you look down the sides of the panel to see where you are with progress. Then wipe off and let stand a few minutes to dry before priming. A really important learning using body filler is to apply it to very large areas at a time. You don't want to apply thin amounts just in the low spots and then sand that down... Inevitably, when you do that, you will end up with more wavy-ness that you hoped for. Lows and highs of only maybe 5 thousands of an inch can be seen in a finished panel. So, instead, apply skim coats to the full panel (unless it is perfect, which can be checked via the silicone and tar remover method above). You'll save a bunch of time and get a better results by doing this. Another option, which I have not used yet, is to apply spray on polyester filler. That looks like a pretty awesome way to go, and I may try that next time around. How things look just before applying 801-703 Glasurit epoxy primer (which was also used on the bare metal): Left rear quarter panel was crazy straight. There is some filler in the area between the door and wheel well opening that has already been covered over with some epoxy primer though.

 3 points
 -
2 points
-
2 points
-
2 pointsThat is a STUNNING bit of kit!! You very lucky man. Have you explored the options for divorce!? You would have a very strong case. ;) Fortunately my wife married someone like her father so she’s used to classic cars, parts all over the house, lots of weekends of spannering and my bad jokes. The latter, only her father truly appreciates. I did cross the line though when she discovered the heat-shield and intake manifold had been in the dishwasher. It did smell of intake and had to be washed empty twice with dishwasher cleaner before normal service was resumed - so I guess she had a point. But the heat-shield did come out “gleaming” on the intensive wash setting; it was worth the beating and bruises. Back to dizzys - the 280z and Zx dizzy bushings can be replaced if you have a way to ream them to the correct size. New un-reamed bushes on the left .... You can see the wear on the shaft just before the advance mechanism. This is my brand new unused cardone item ... The shaft wear is tiny when measure by callipers but makes quite a difference to the movement. So if you go old dizzy, measure the shaft at different points. If you can lathe the whole thing down to the most worn diameter and ream the bushes to match, then you are onto a winner. At this point I decided my life was too short and went 123, it if I had more time and a stock engine then I may have gone down this road.2 points
-
Looking at the condition of battery tray and the floor section, I really don't understand how this isn't already gone. And someone asked him to cut the roof and tail section off.
 2 points
 -
2 pointsYes, that makes money....the other drains it! Sent from my iPhone using Tapatalk2 points
-
2 pointsGreat, thanks! I still need to make a few adjustments to my custom rail (copy of yours). The Rail came 24” which is too long. I need to cut it down to about 21” and retap the ends. Sent from my iPhone using Tapatalk2 points
-
2 pointsI’m pretty good. We have a $500 policy. No single expenditures exceeding $500 without consulting the other person. If I could buy the 123ignition in 2 parts I’d be good, but that’s not in the spirit of our policy. Sent from my iPhone using Tapatalk2 points
-
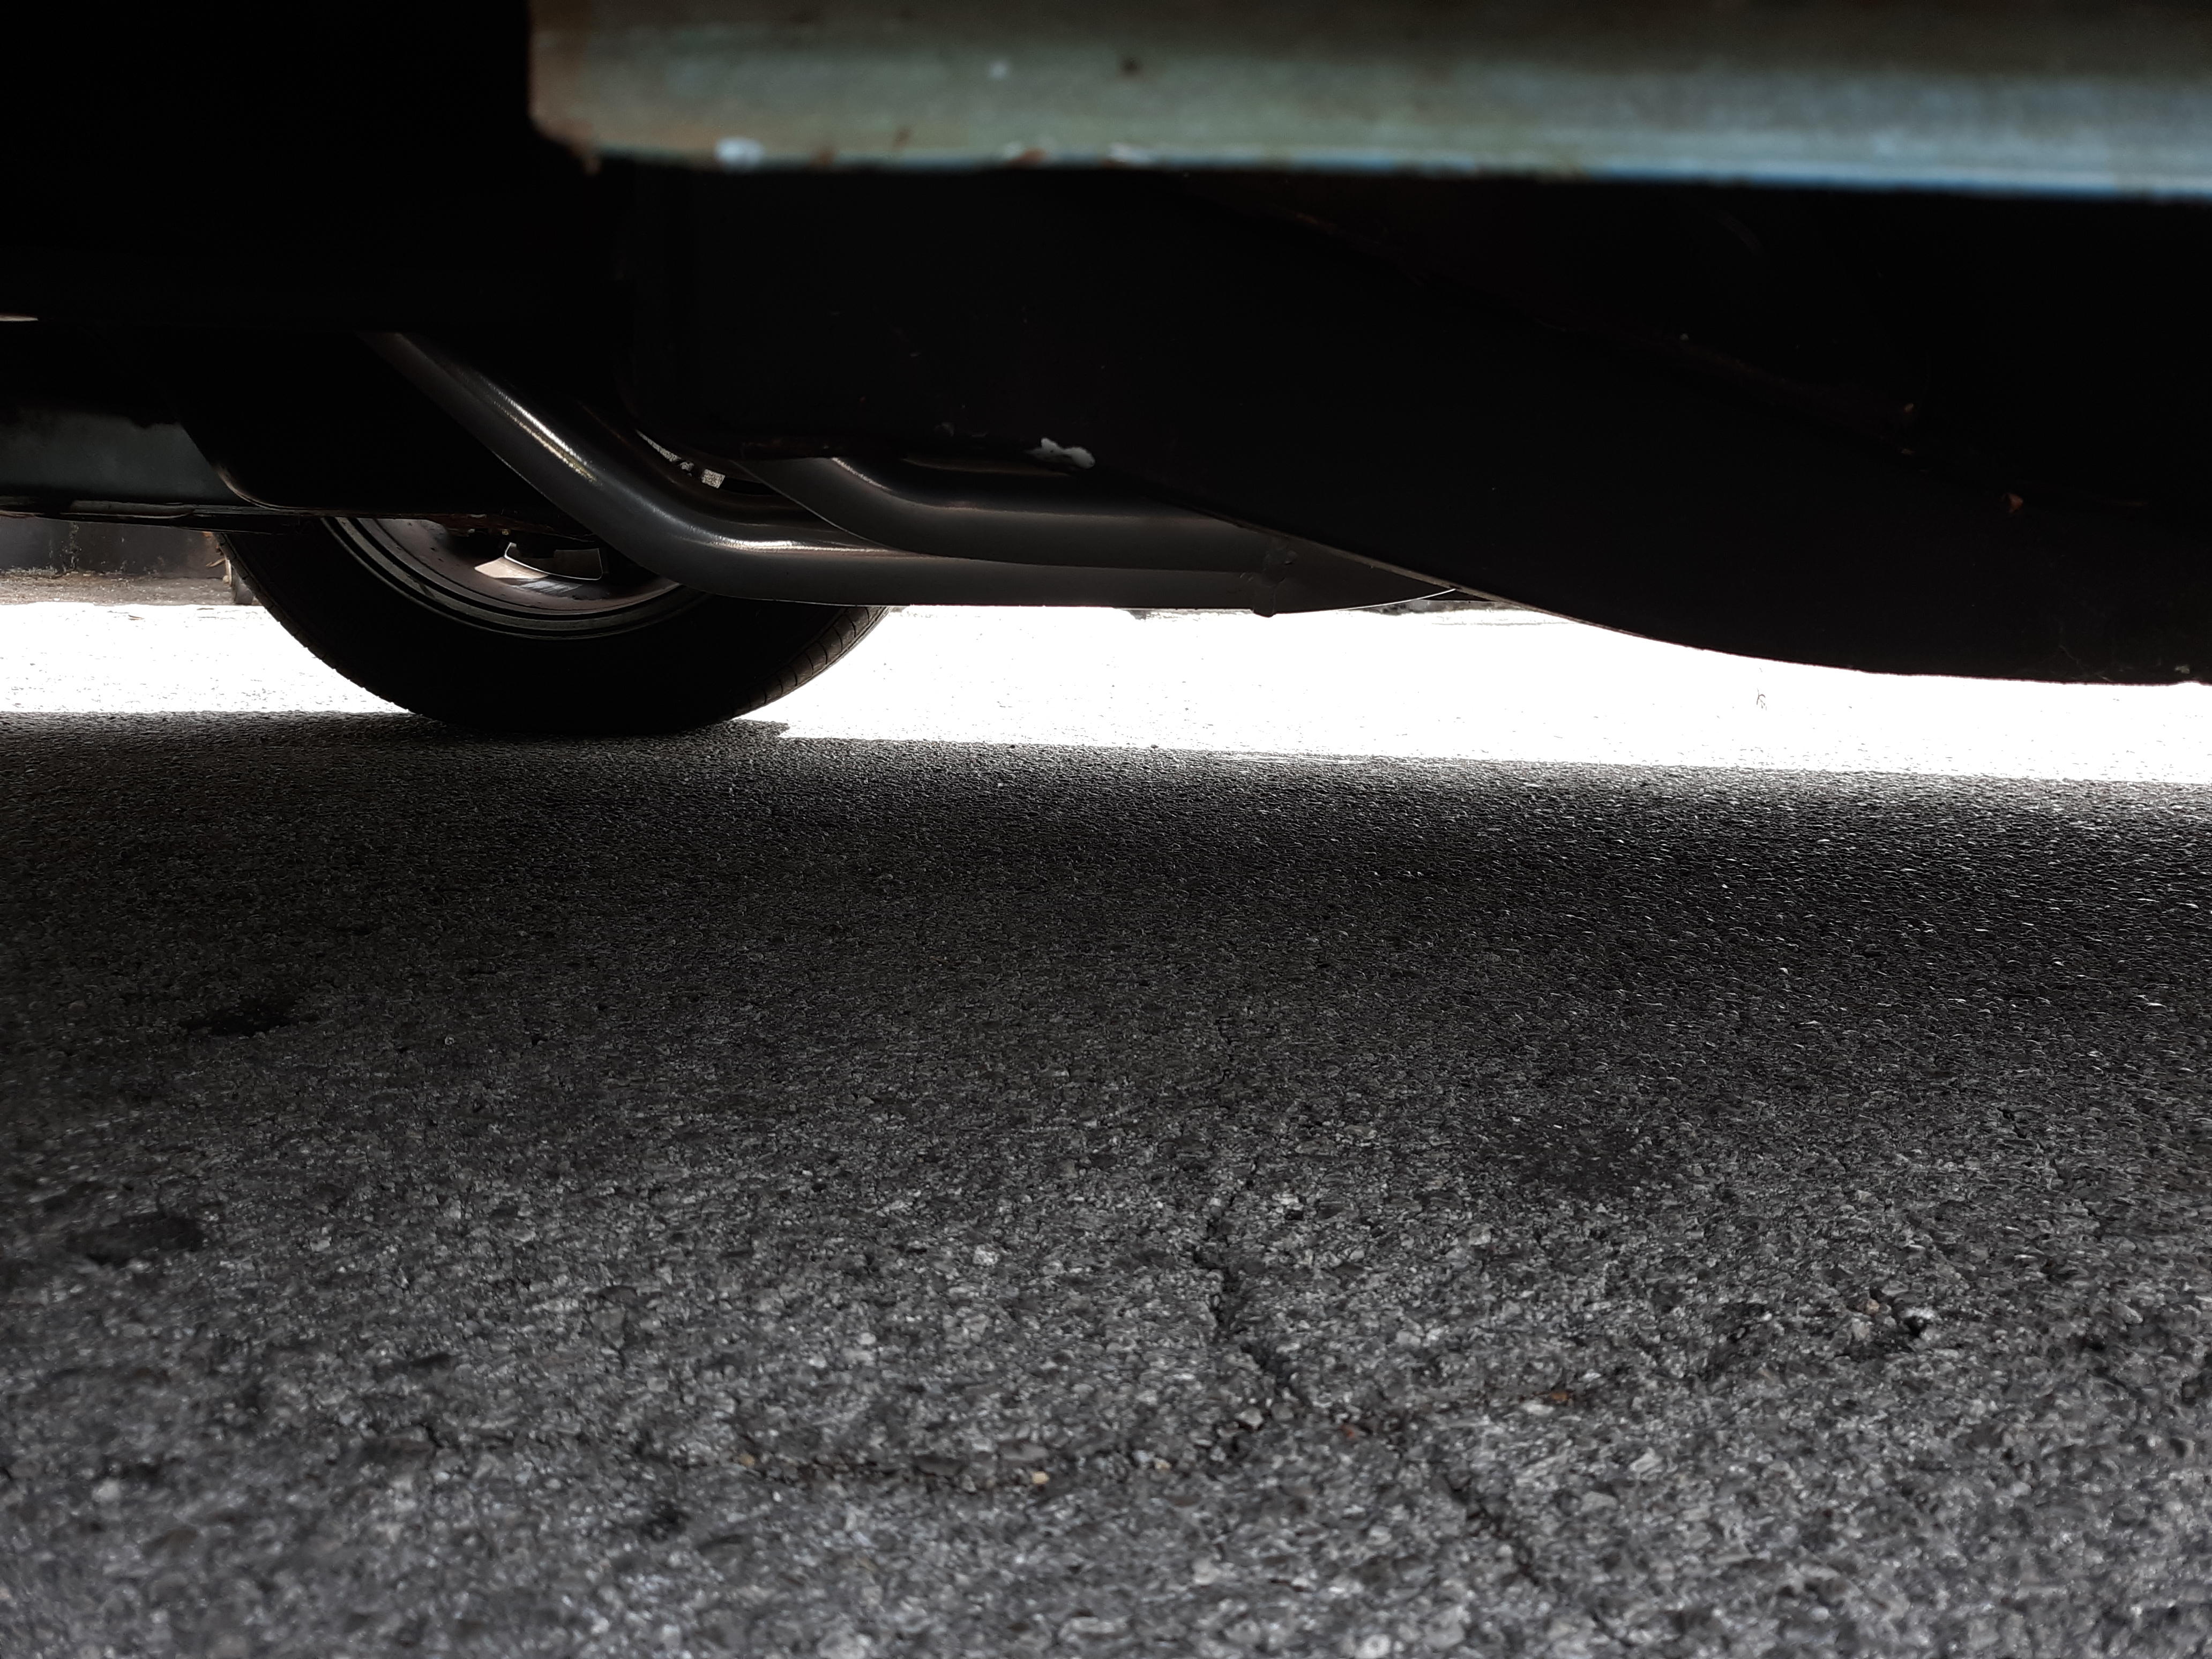
2 pointsFor prep, it was mostly wire wheel on the end fittings and any overspray that was on the tubes. I used 220 grit sandpaper on the tubes themselves till the tubes were mostly clean. It's best if you can use a 6 foot box so the tubes only have to bend in half. Bending into thirds because you only have a 4 foot box is tricky and not recommended. the bends end up being where the engine to trans area is and there are lots of bends there already , so gets confusing. Also, when you straighten the tubes, the plating will crack in the bend area when you straighten them. You can touch this are up with gold paint. With the bend in the tunnel, it is not super noticeable. These tubes will be 'Rack plated' so don't send your bulk parts (nuts and bolts) with the tubes, send bulk parts separately. There is a Lot charge for the Rack plating, so you can add a few extra tubes and it's essentially free. The tubes in the picture are for two cars. Also, very thrilled with how the plating turned out. Coloring, rainbow and brightness appear to be just perfect.2 points
-
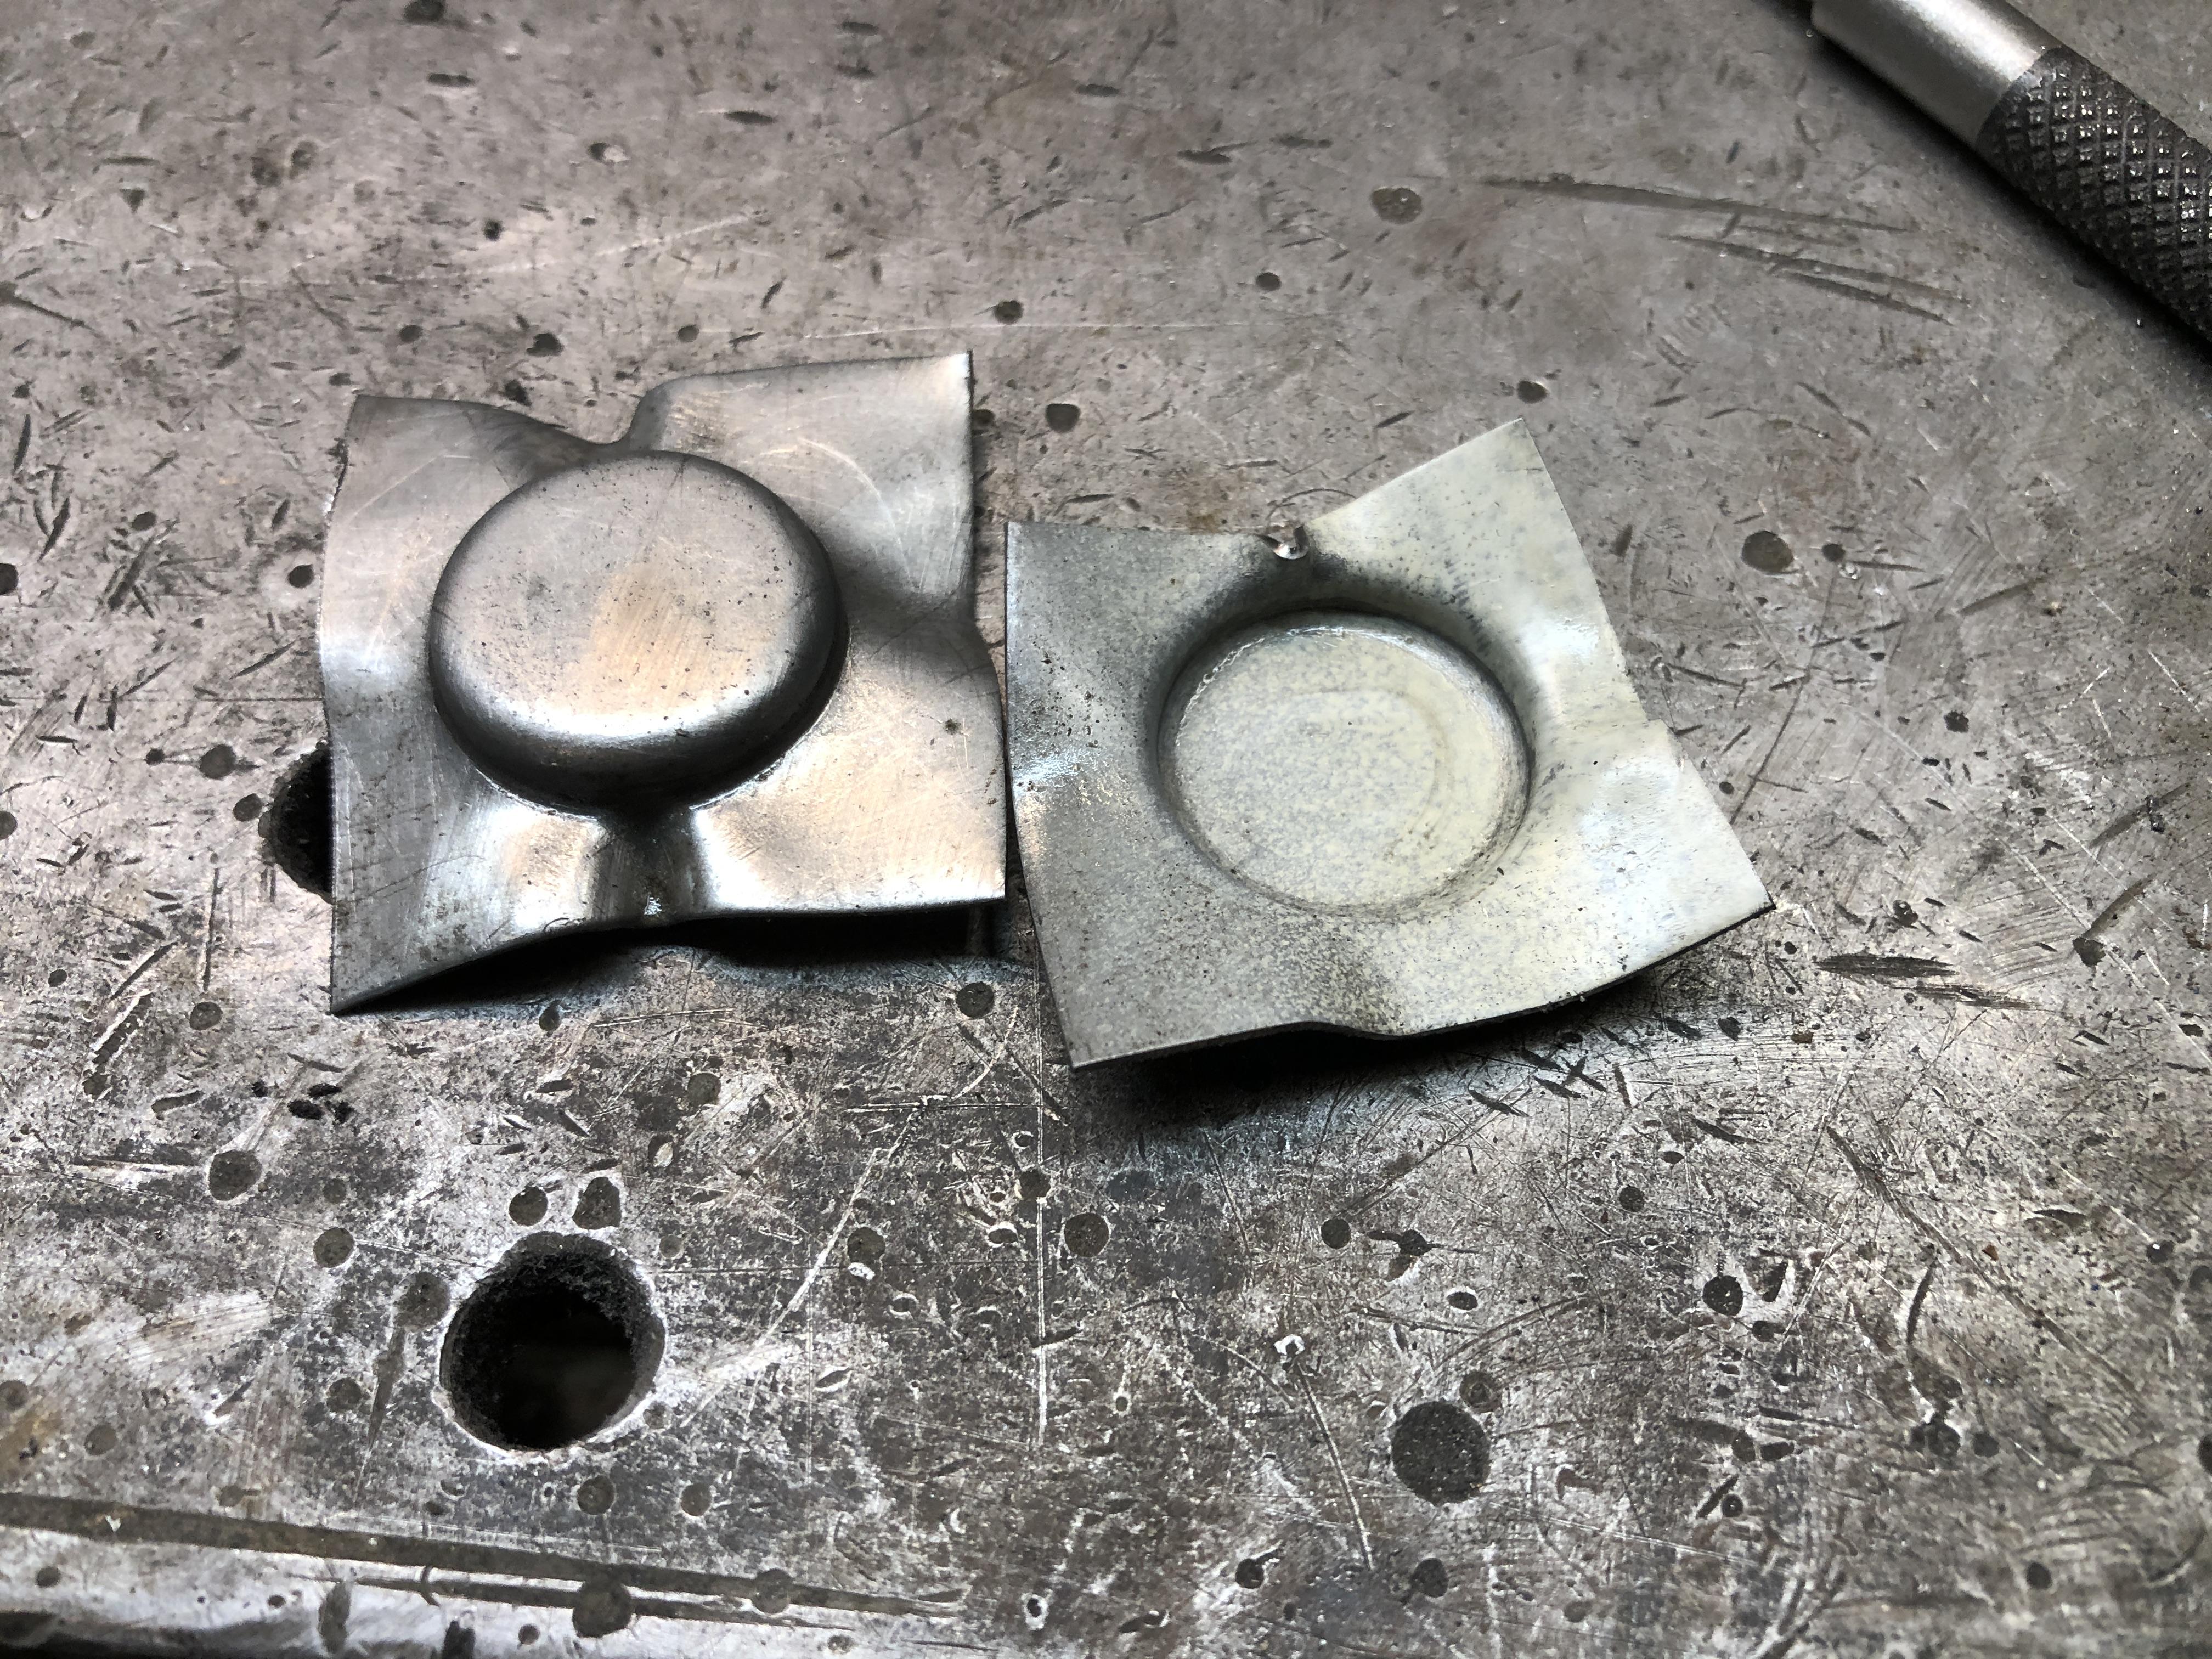
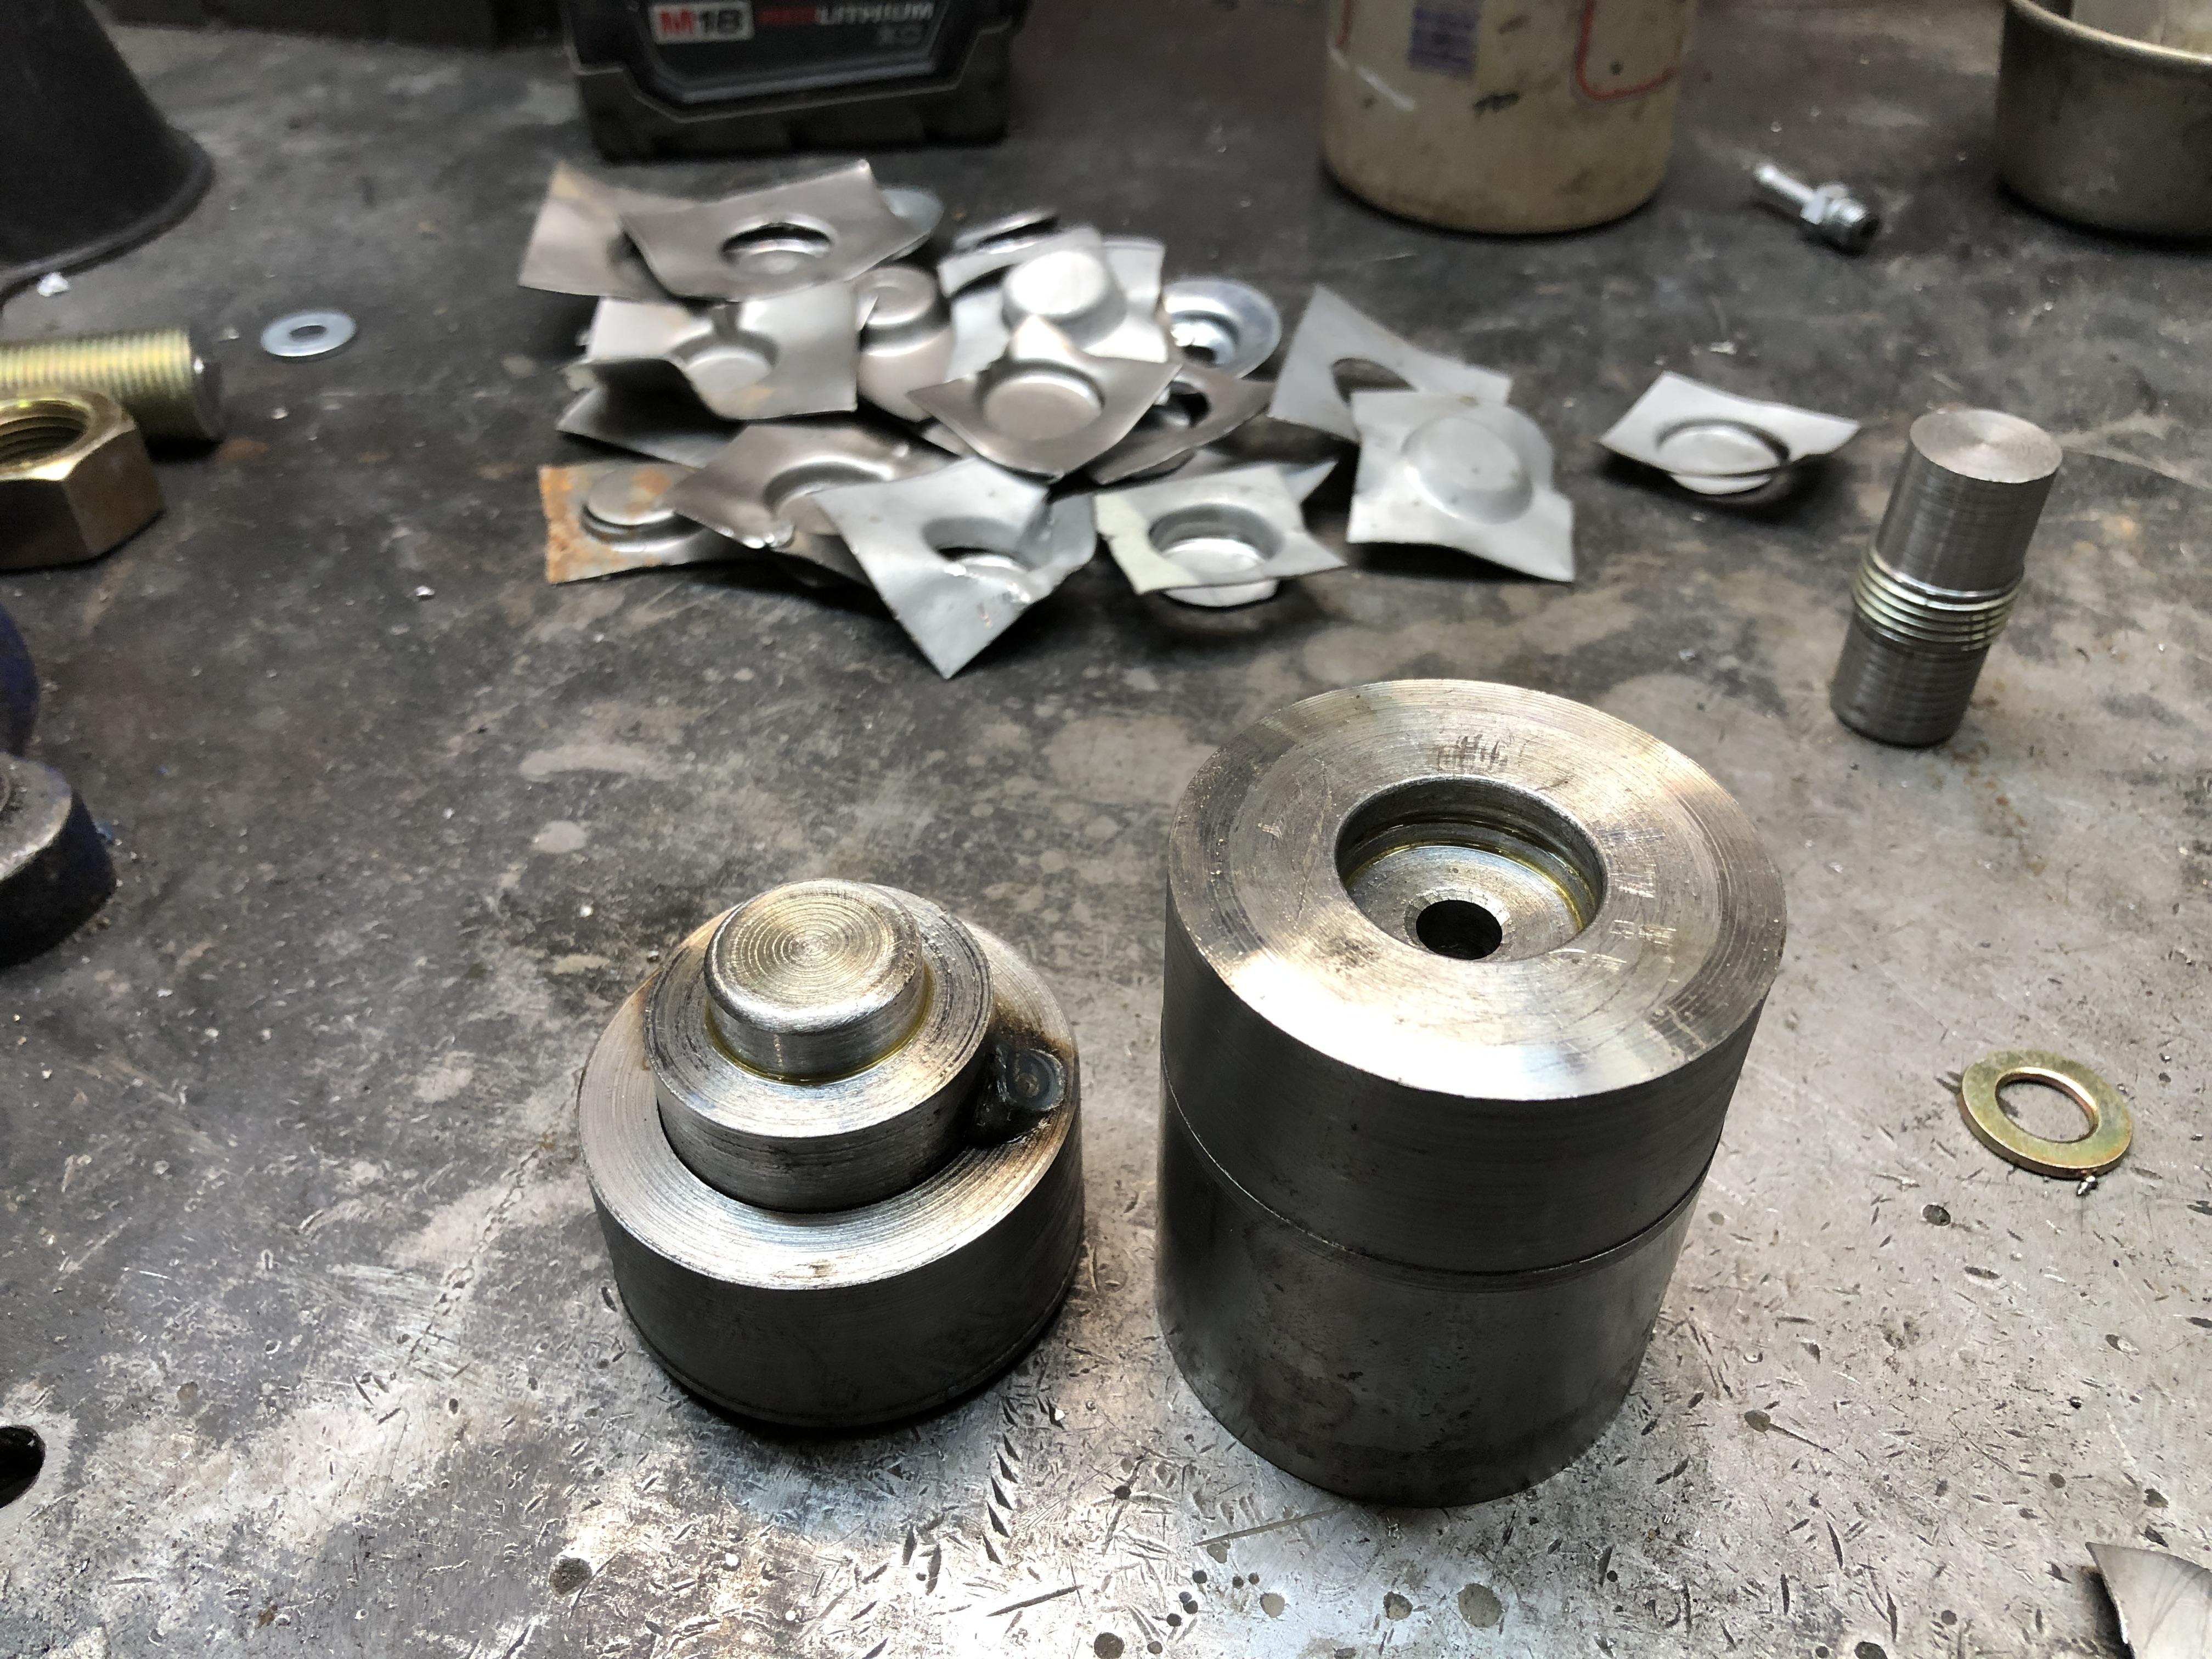
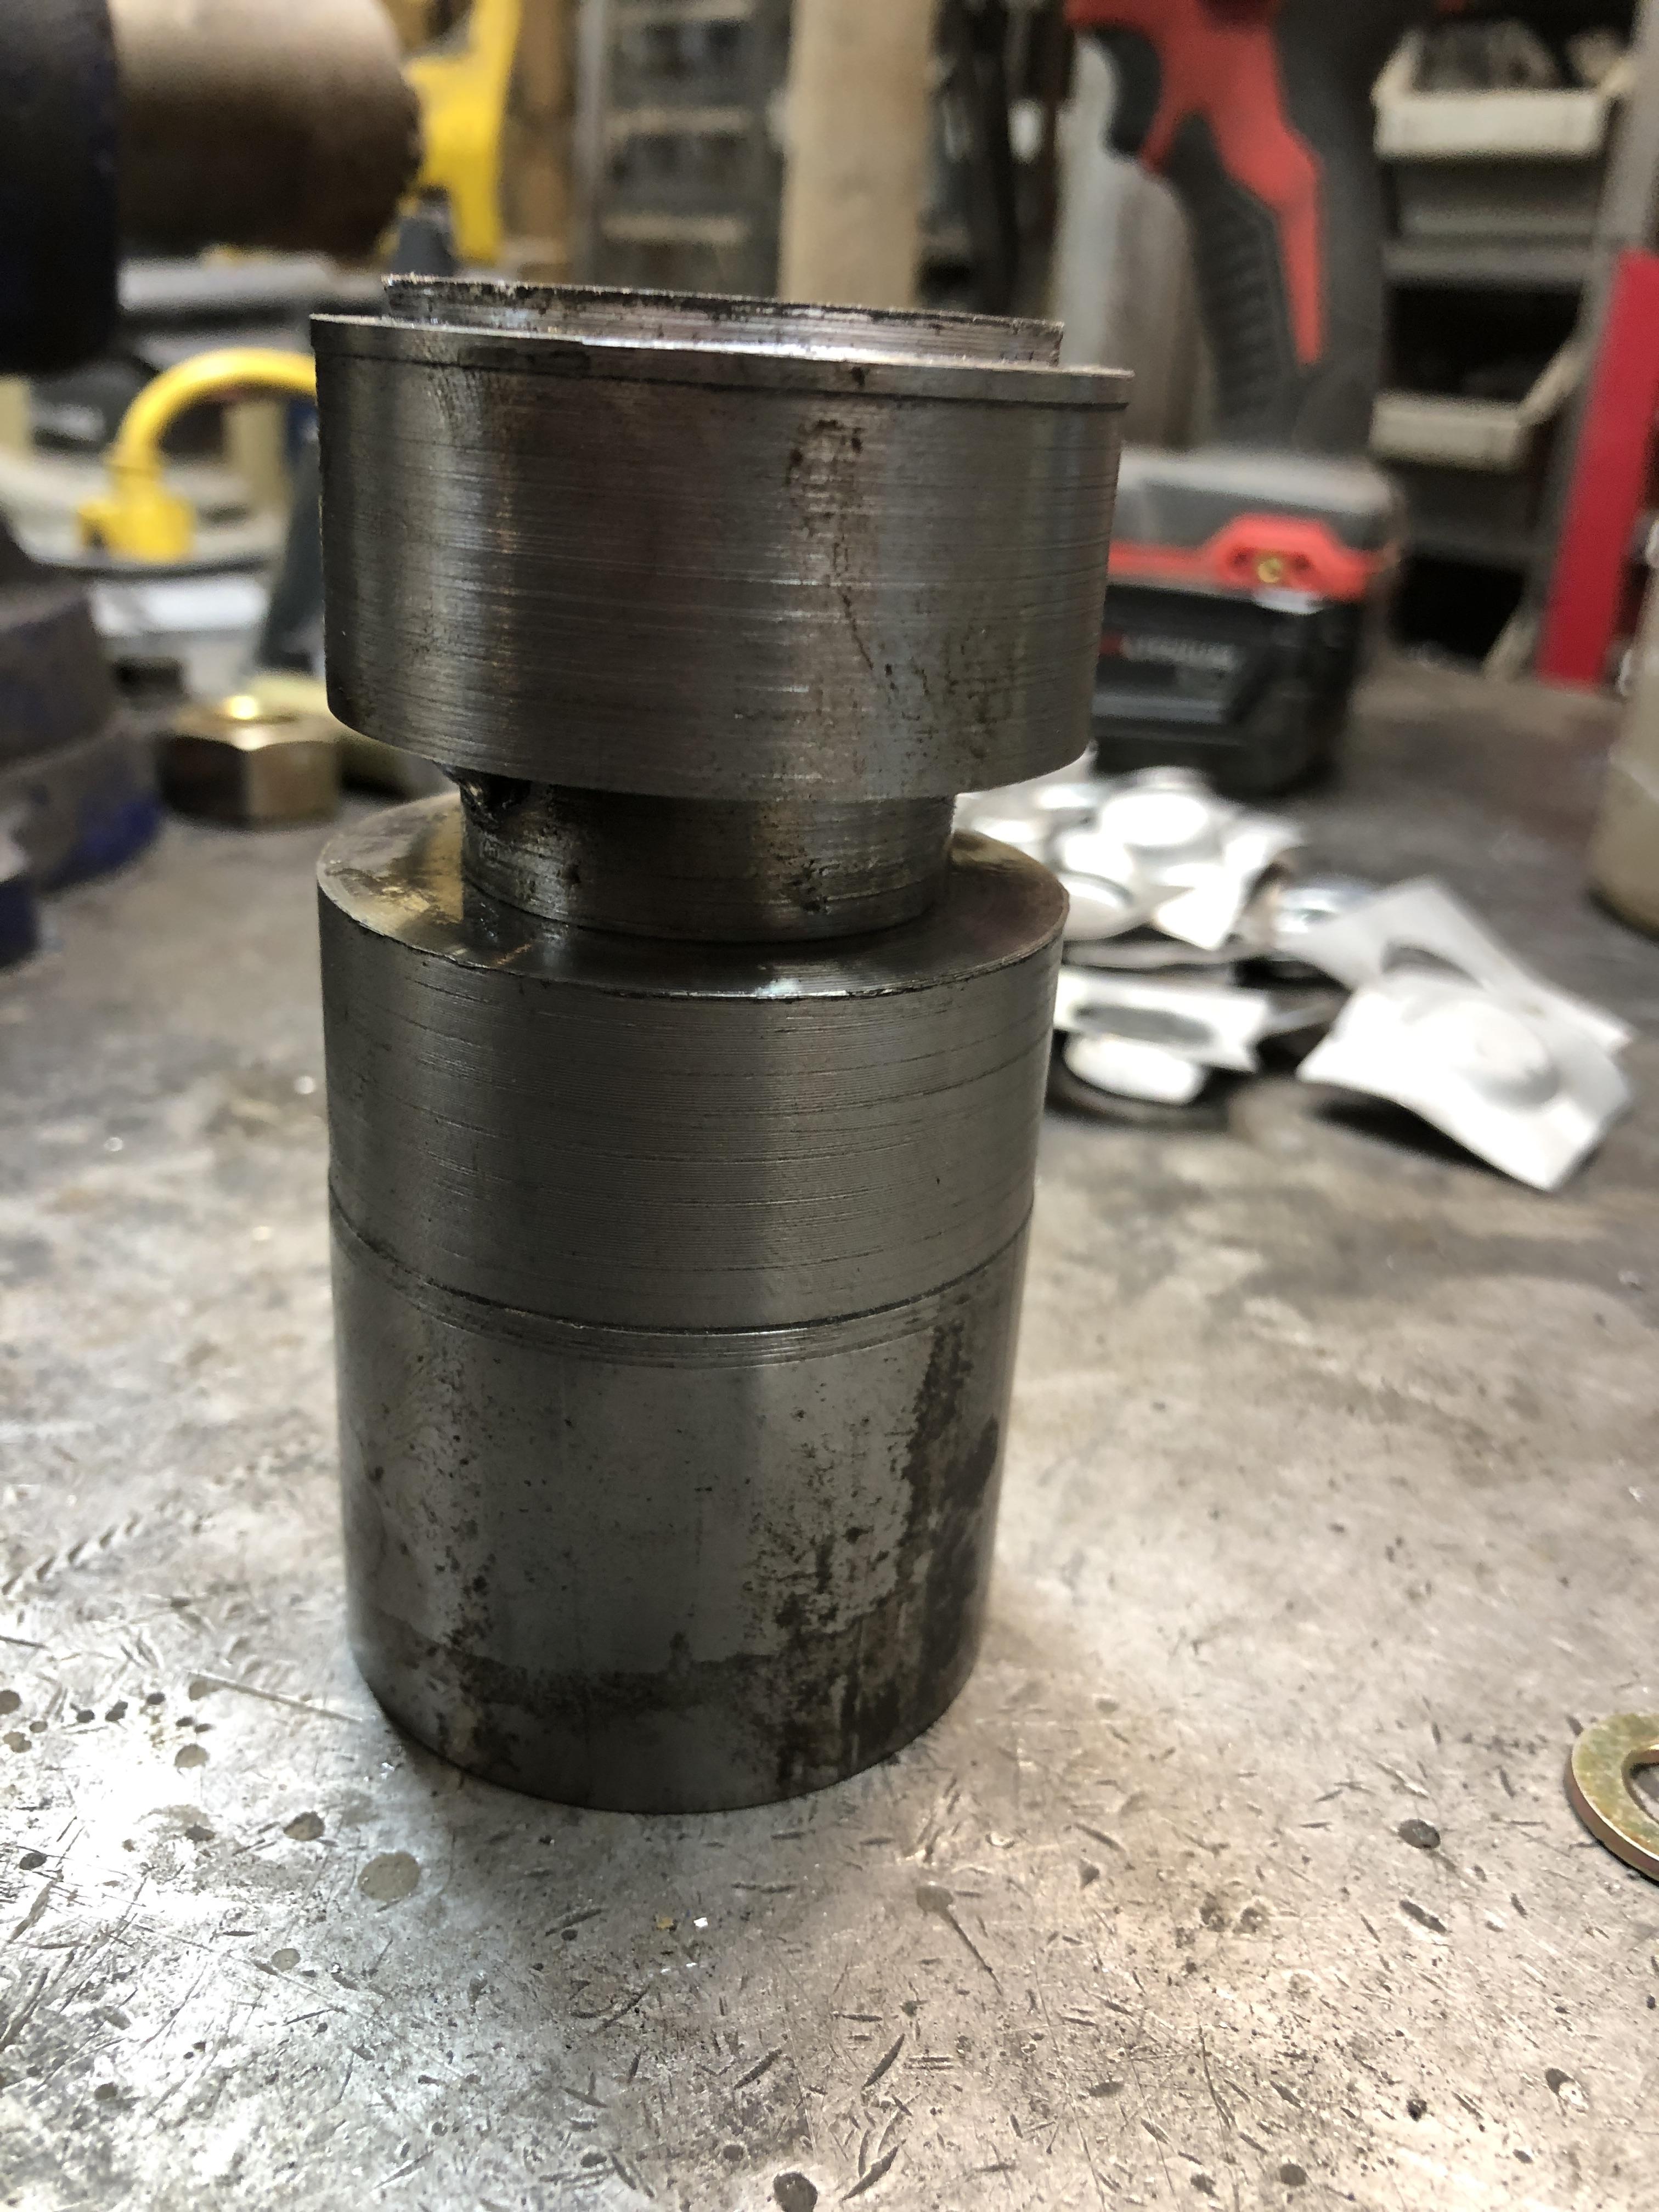
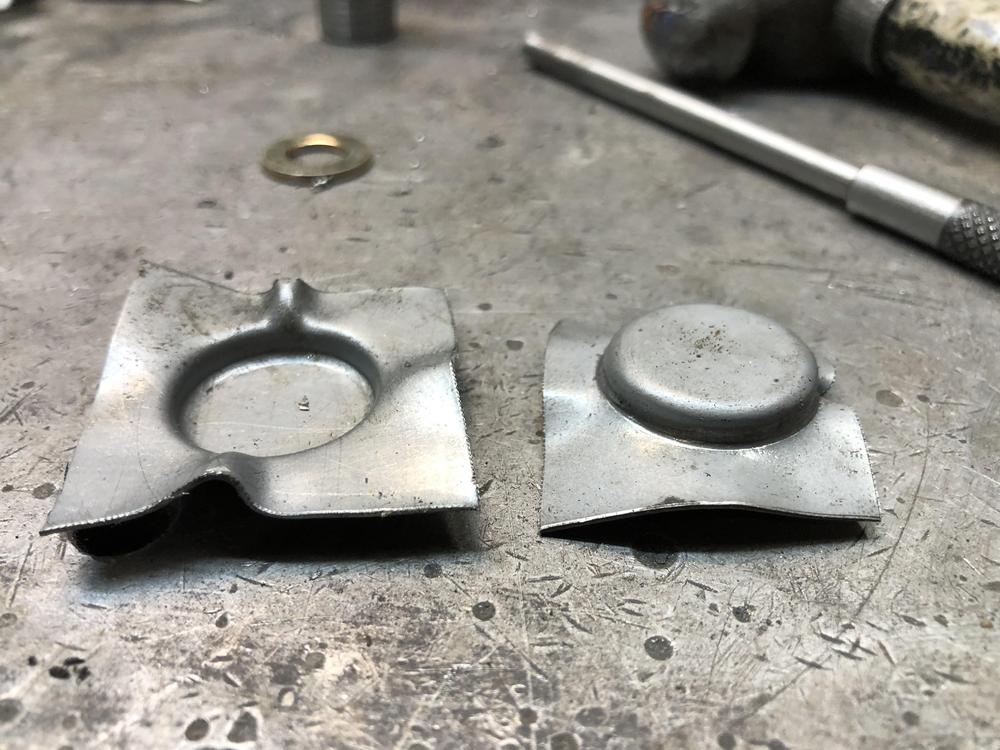
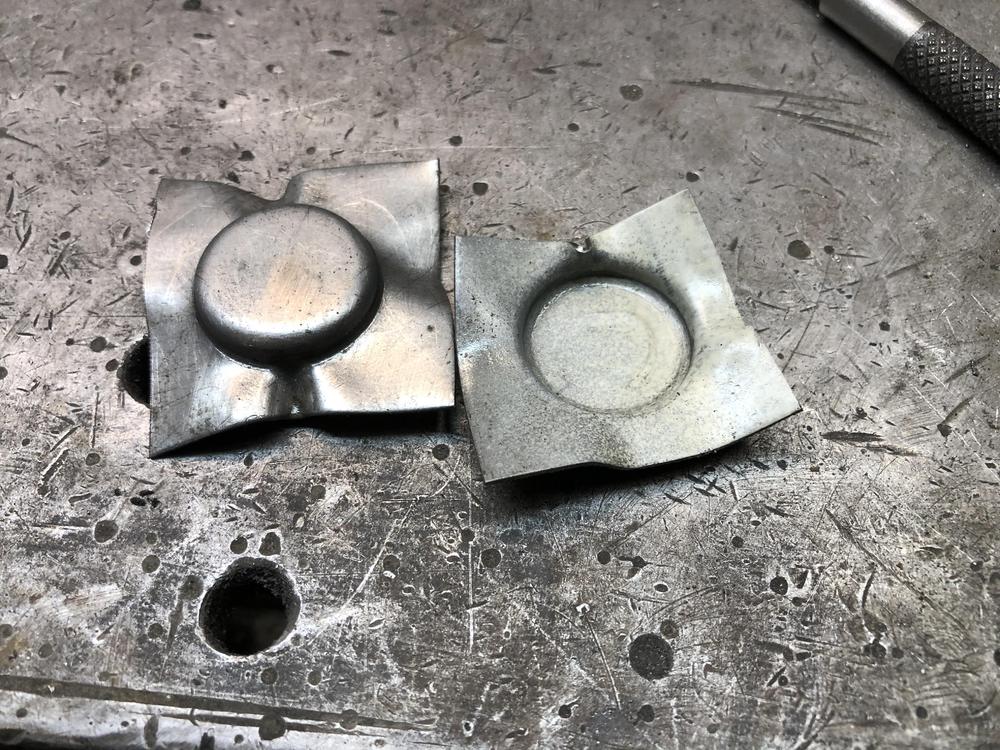
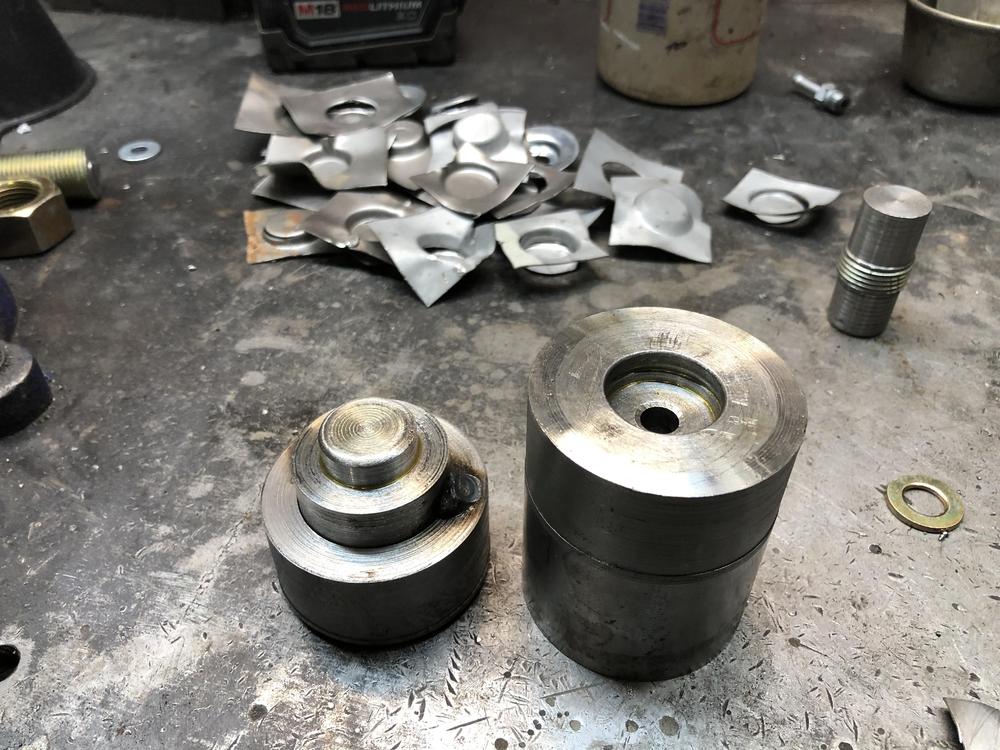
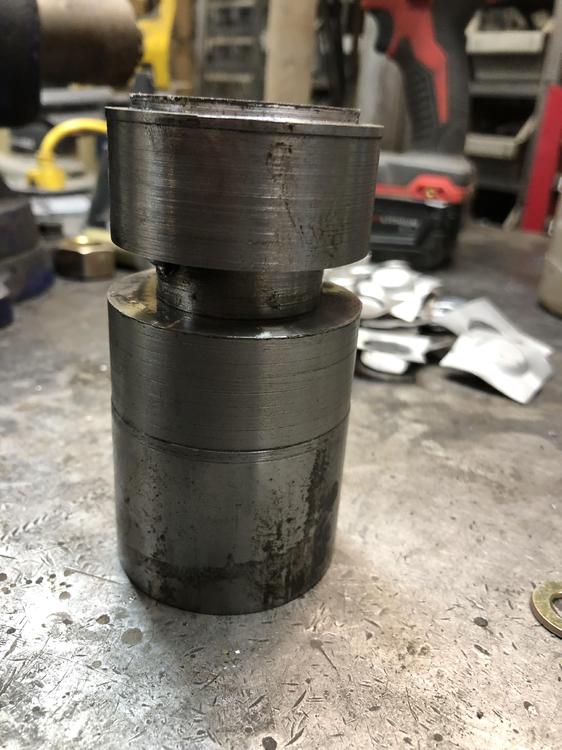
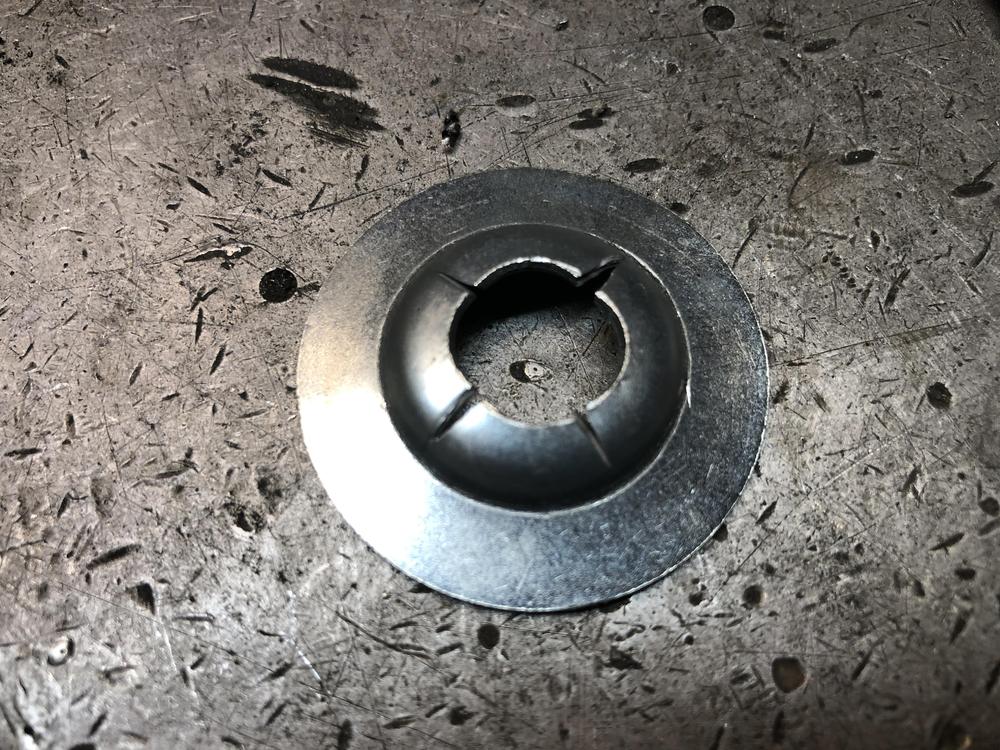
Three guesses what I did today. Dang process is very sensitive to several parameters. Centering of the dies turned out to be the biggest challenge. Lubrication was also a real helper. Corners are radiused. Once I got it right, I can duplicate . Twice anyway. I’d like to get the depth of the female die just right, so it stops and makes a nice flat bottom. It’s a bit deep at the moment Notice the pile of test pieces in the background. Next tricks are drilling the 5/16 hole (starting with 5/16 fender washers did NOT work) and cleaning up the excess. I plan on drilling the hole first, then using a 5/16 bolt and nut to make an arbor to mount it in the lathe, the clean up the flash there. No doubt there will learning moments along the way with that too. I currently only have 0.035 thick tin, the original washers have a .045 thickness at the turned up lip. Will have to go shopping Monday. I will have to reduce the diameter of male part of the die, to make room for the thicker material. I have .035 gap in the dies at the moment to match the material. They feel like they would be too thin and cheap feeling with 0.035 material. So making is possible it seems. More news on Monday.
 2 points
 -
Took the skyline over to my dad's (Diseazd) for a family photo. Missing from the photo is my Z31, his Z32 300zx and his NSX. Was definitely too bright out but it was the only time we had.1 point
-
1 point
-
1 pointI will say that I saw that coming. Wasn't sure from who because there's so many possibilities! ?1 point
-
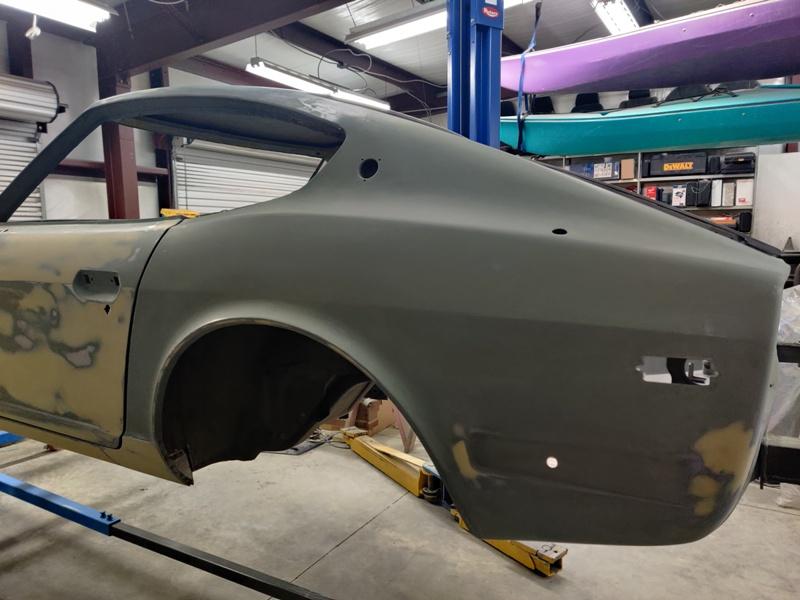
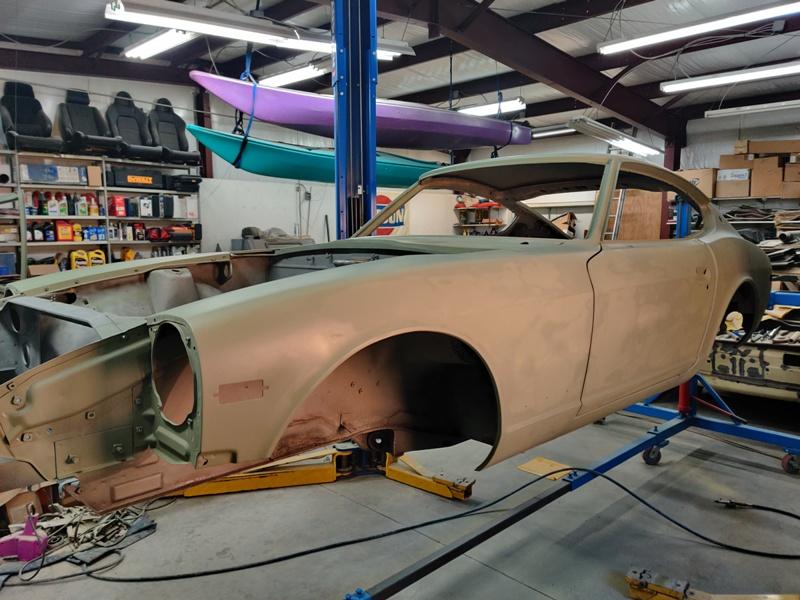
Epoxy primer applied. ? Has to be above 60 degrees for it to dry, so I'm using a kerosene heater to elevate the temperature in the garage.
 1 point
 -
I went thru this frustrating exercise years ago. With no one around to assist I found it impossible to both get the assembly pushed back into the body and get the screws in place to lock it down. My solution was to create "extra hands" with a ratcheting tie-down strap. I installed a large hook in the base plate of the garage wall and positioned the car with the rear towards the hook. A length of stout rope was attached to the hook. One end of the strap was attached to the rope, the strap passed into the car via the open hatch, around the front of the quarter window and back to the rope for a second attachment. The rope allowed for a shallow angle for the strap. Gentle ratcheting pulled the window into position and held it in place to get the screws installed. Loosen the strap, re-position the car, and repeat for the second window. Thankfully, no pictures exist of this particular McGyver moment. ?1 point
-
1 pointI am betting the valve was leaking. Let's diagnose before you go after the heater core1 point
-
1 pointThat's one of the many reasons I'm happily single. One of my early serious girlfriends came home to find all the frozen food, racks and ice bucket out of the freezer and my dented DRZ400's fuel tank in there filled with water freezing to pop the dent out. Edit: "happily single" at 50 is an oxymoron I'm learning.1 point
-
1 pointJust remembered an old problem with the MSD and EFI. Somebody just wrote about it. Might change your decision making process.1 point
-
Thanks guys. The seals are brand new and soft and supple already, so heat was of limited effect. I also didn't want to remove them since they're already bonded to the quarterlight frames with weatherstripping adhesive. This was the winning technique: I pivoted the rear corner up and in just enough to be able to insert a thick drift punch (my "awl") through the top rear holes and draw it toward the back. I was concerned I would crush the threads but it was OK. While holding it with one hand, the other hand secured the top front screw. After having lubed the bottom of the cavity, I was able to push the bottom of the window in enough to secure the bottom two screws. What a pain.1 point
-
1 point
-
1 pointYep, mine is 21" too. The header is a little lower than the oil pan but not as low as the bottom of the frame rails under the doors.
 1 point
 -
1 pointTo be honest, while the Viper screams like a rapped ape and is very reliable, in many ways I prefer the Z....or what the Z will finally be when completed. Sent from my iPhone using Tapatalk1 point
-
1 point
-
1 point
-
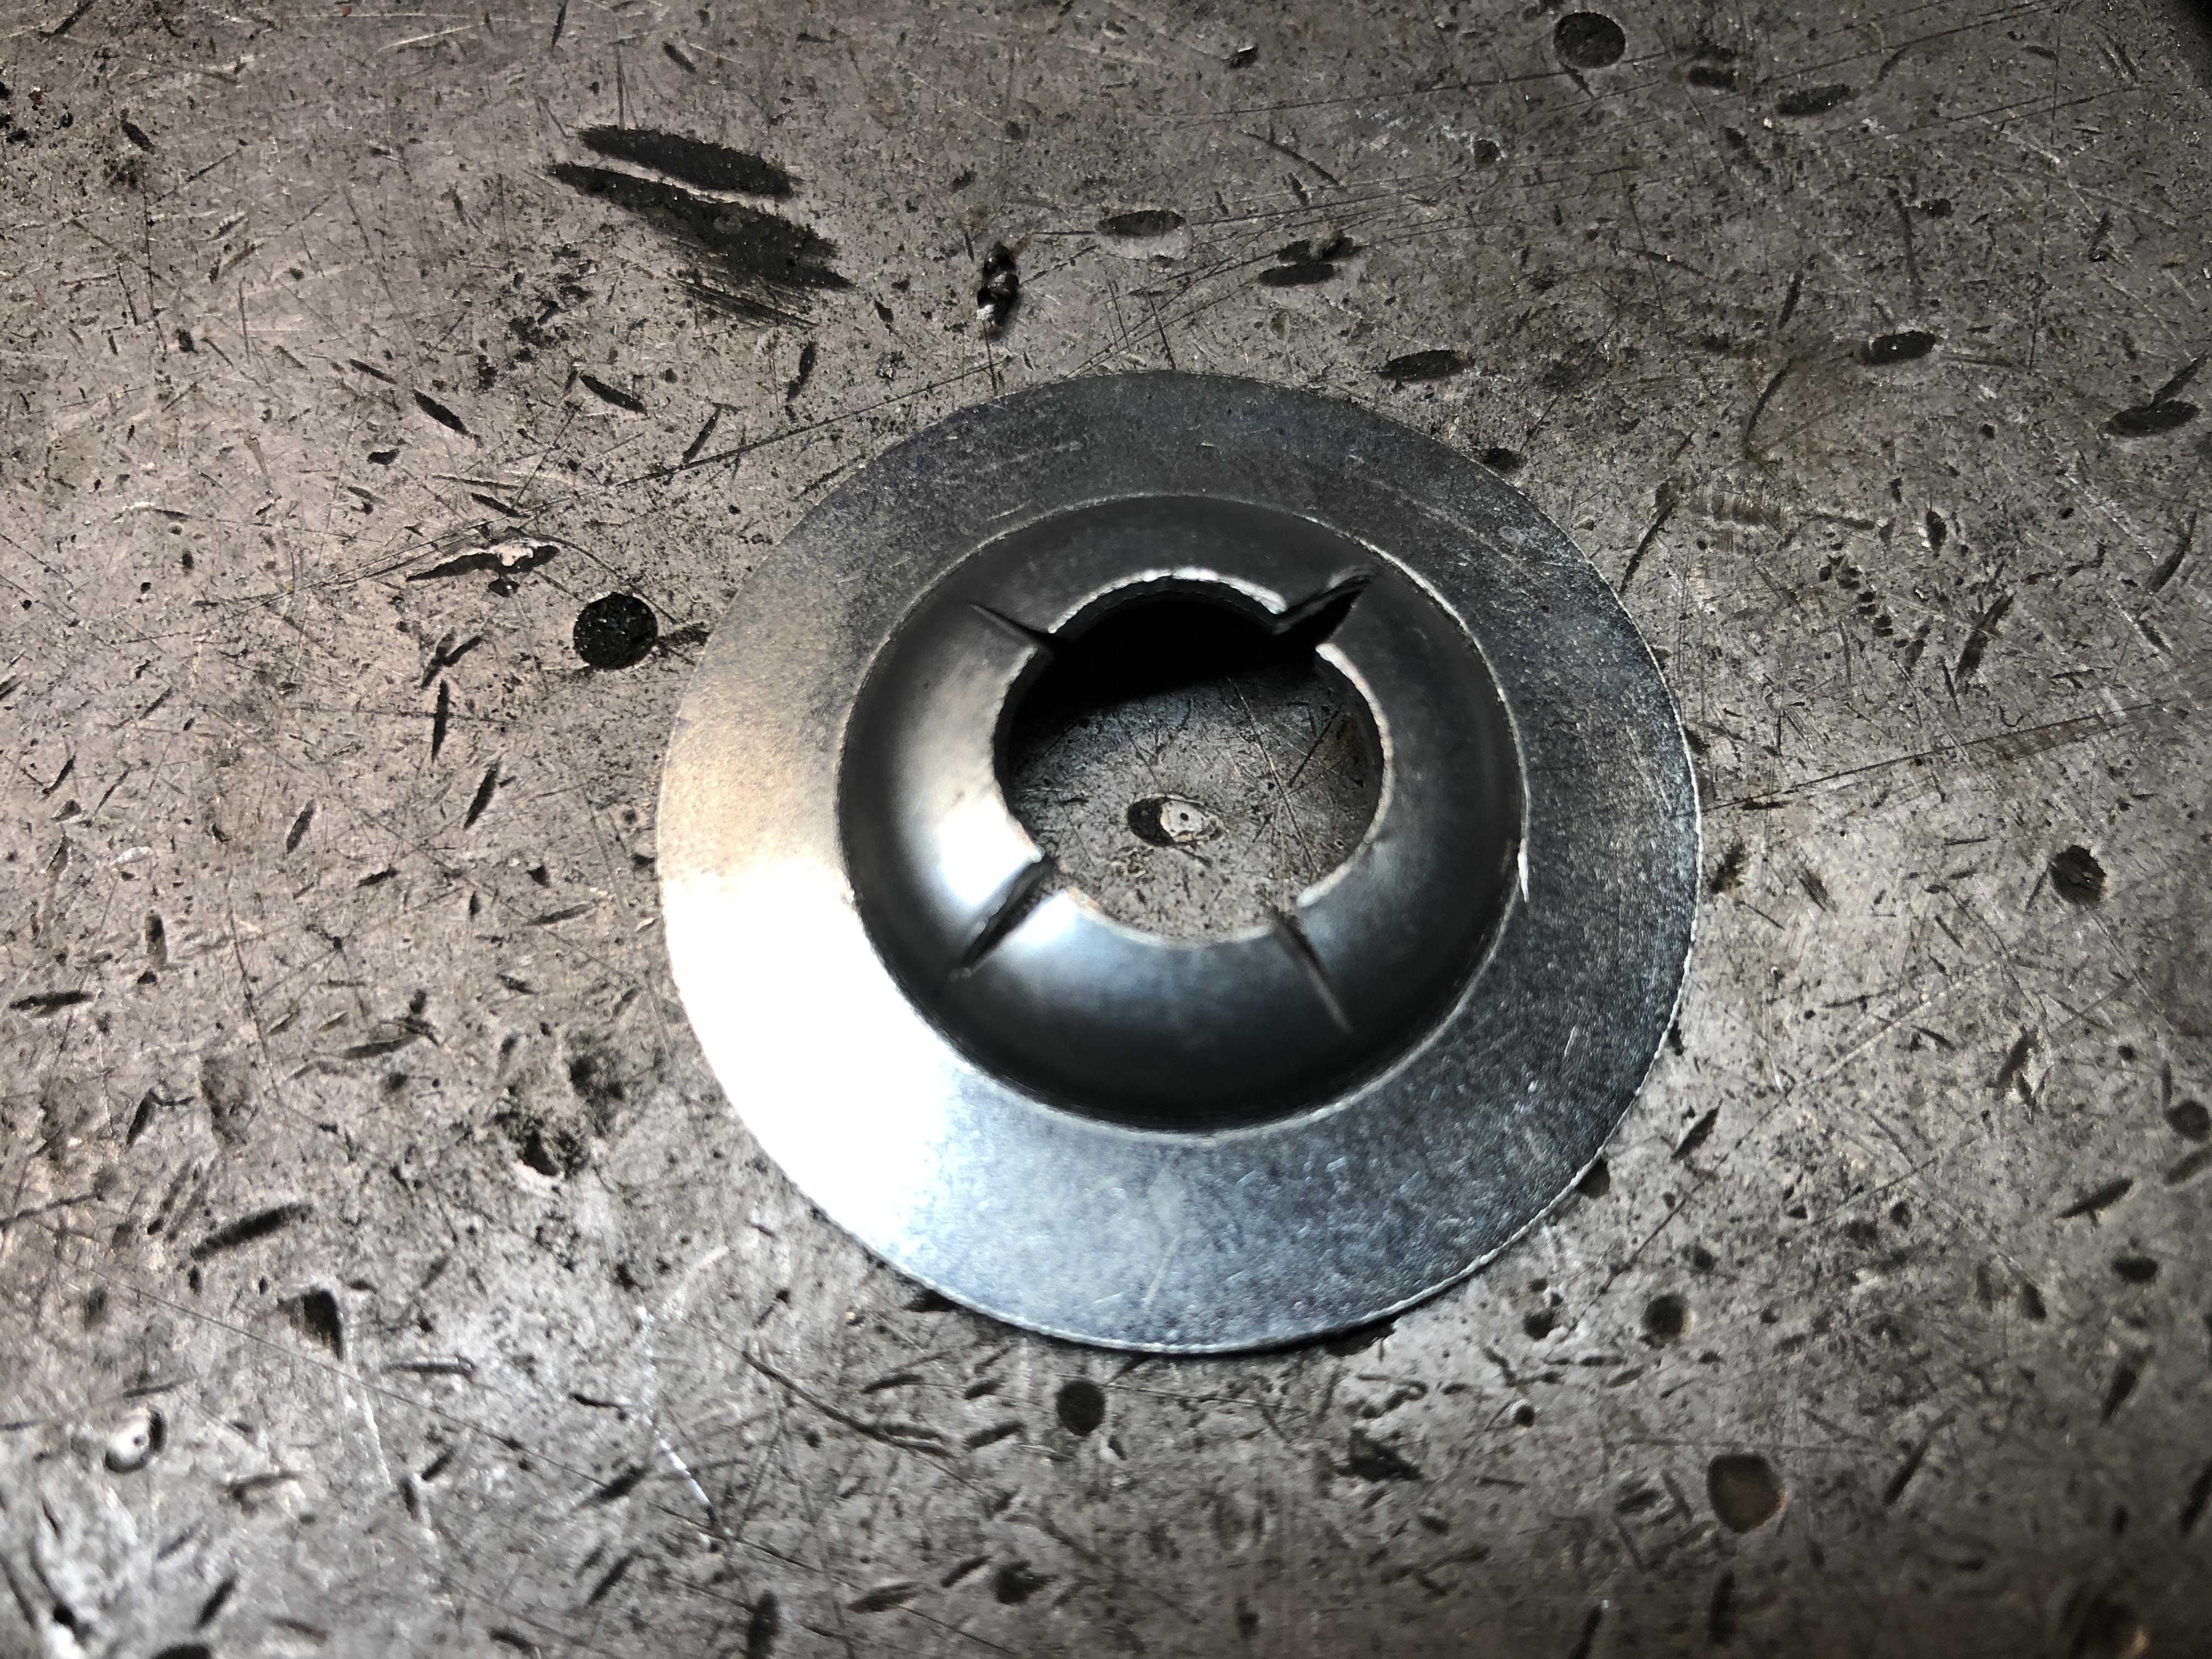
Yeah that fender washer trial didn't work out so good. It looks to me like all the stretch occurred at the center hole instead of the sides (as I believe it should). Looks to me like the clearance on the die set was too narrow. I didn't study the guidelines from that webpage I posted earlier, but my own testing indicated that if the gap is way too big, the material will fold and wrinkle and if the gap is too small, the part will stretch in the middle or shear along the edge like a punch. One other thing that we haven't talked about is the base material... The easiest thing to work with would be something dead soft annealed, and fender washer's aren't. They're heat treated to some spec and then plated. Anyway, your experimentation is keeping you safe. It's a cheap hobby, and you aren't out and about picking up anything unhealthy! I would really try to get some sort of hole in the part before you draw the cup. I put the hole in my test part after and it was a bit of a pain. Would have been much easier if the hole were there beforehand. At least some sort of a centered pilot. Looking forward to the pic of a handful of perfect parts!1 point
-
1 pointHa! My wife is way too smart to fall for that one. She get rid of all my cars if she could and put me in 99 Honda Accord. I have a 2000 Viper that my father gave me right before he passed away. She hates to even look at it. Wants me to sell it immediately but since it’s a rare car 1 of 34, I’ve convinced her the car will be highly valuable later. She would set it on fire if she could. The Z is at another location so she doesn’t have to look at daily it but thinks it’s a piece of crap. She wouldn’t be seen in either car for any reason. Sent from my iPhone using Tapatalk1 point
-
1 pointLooks good Cliff! So I noticed you made a custom cutout for one of the heat shields? With the coated headers has it mitigated the L28 hot start problems these cars have. My ZX engine came with that odd over the valve cover blower which I have no intention of putting back on. I was considering putting an adhesive heat shield tape under the metal stock heat shield to slow the heat transfer a bit but if these coated headers really reduce the heat maybe its not required. I’m going without the bung on the headers. Does everyone agree they should fit in the P79 just like the N47 head? Sent from my iPhone using Tapatalk1 point
-
1 pointBrilliant! My car is in my wife’s name (a 40th present to each other) - so when parts arrive all I have to say is: “but darling it’s for YOUR car, I just want it to be the best it can be”!1 point
-
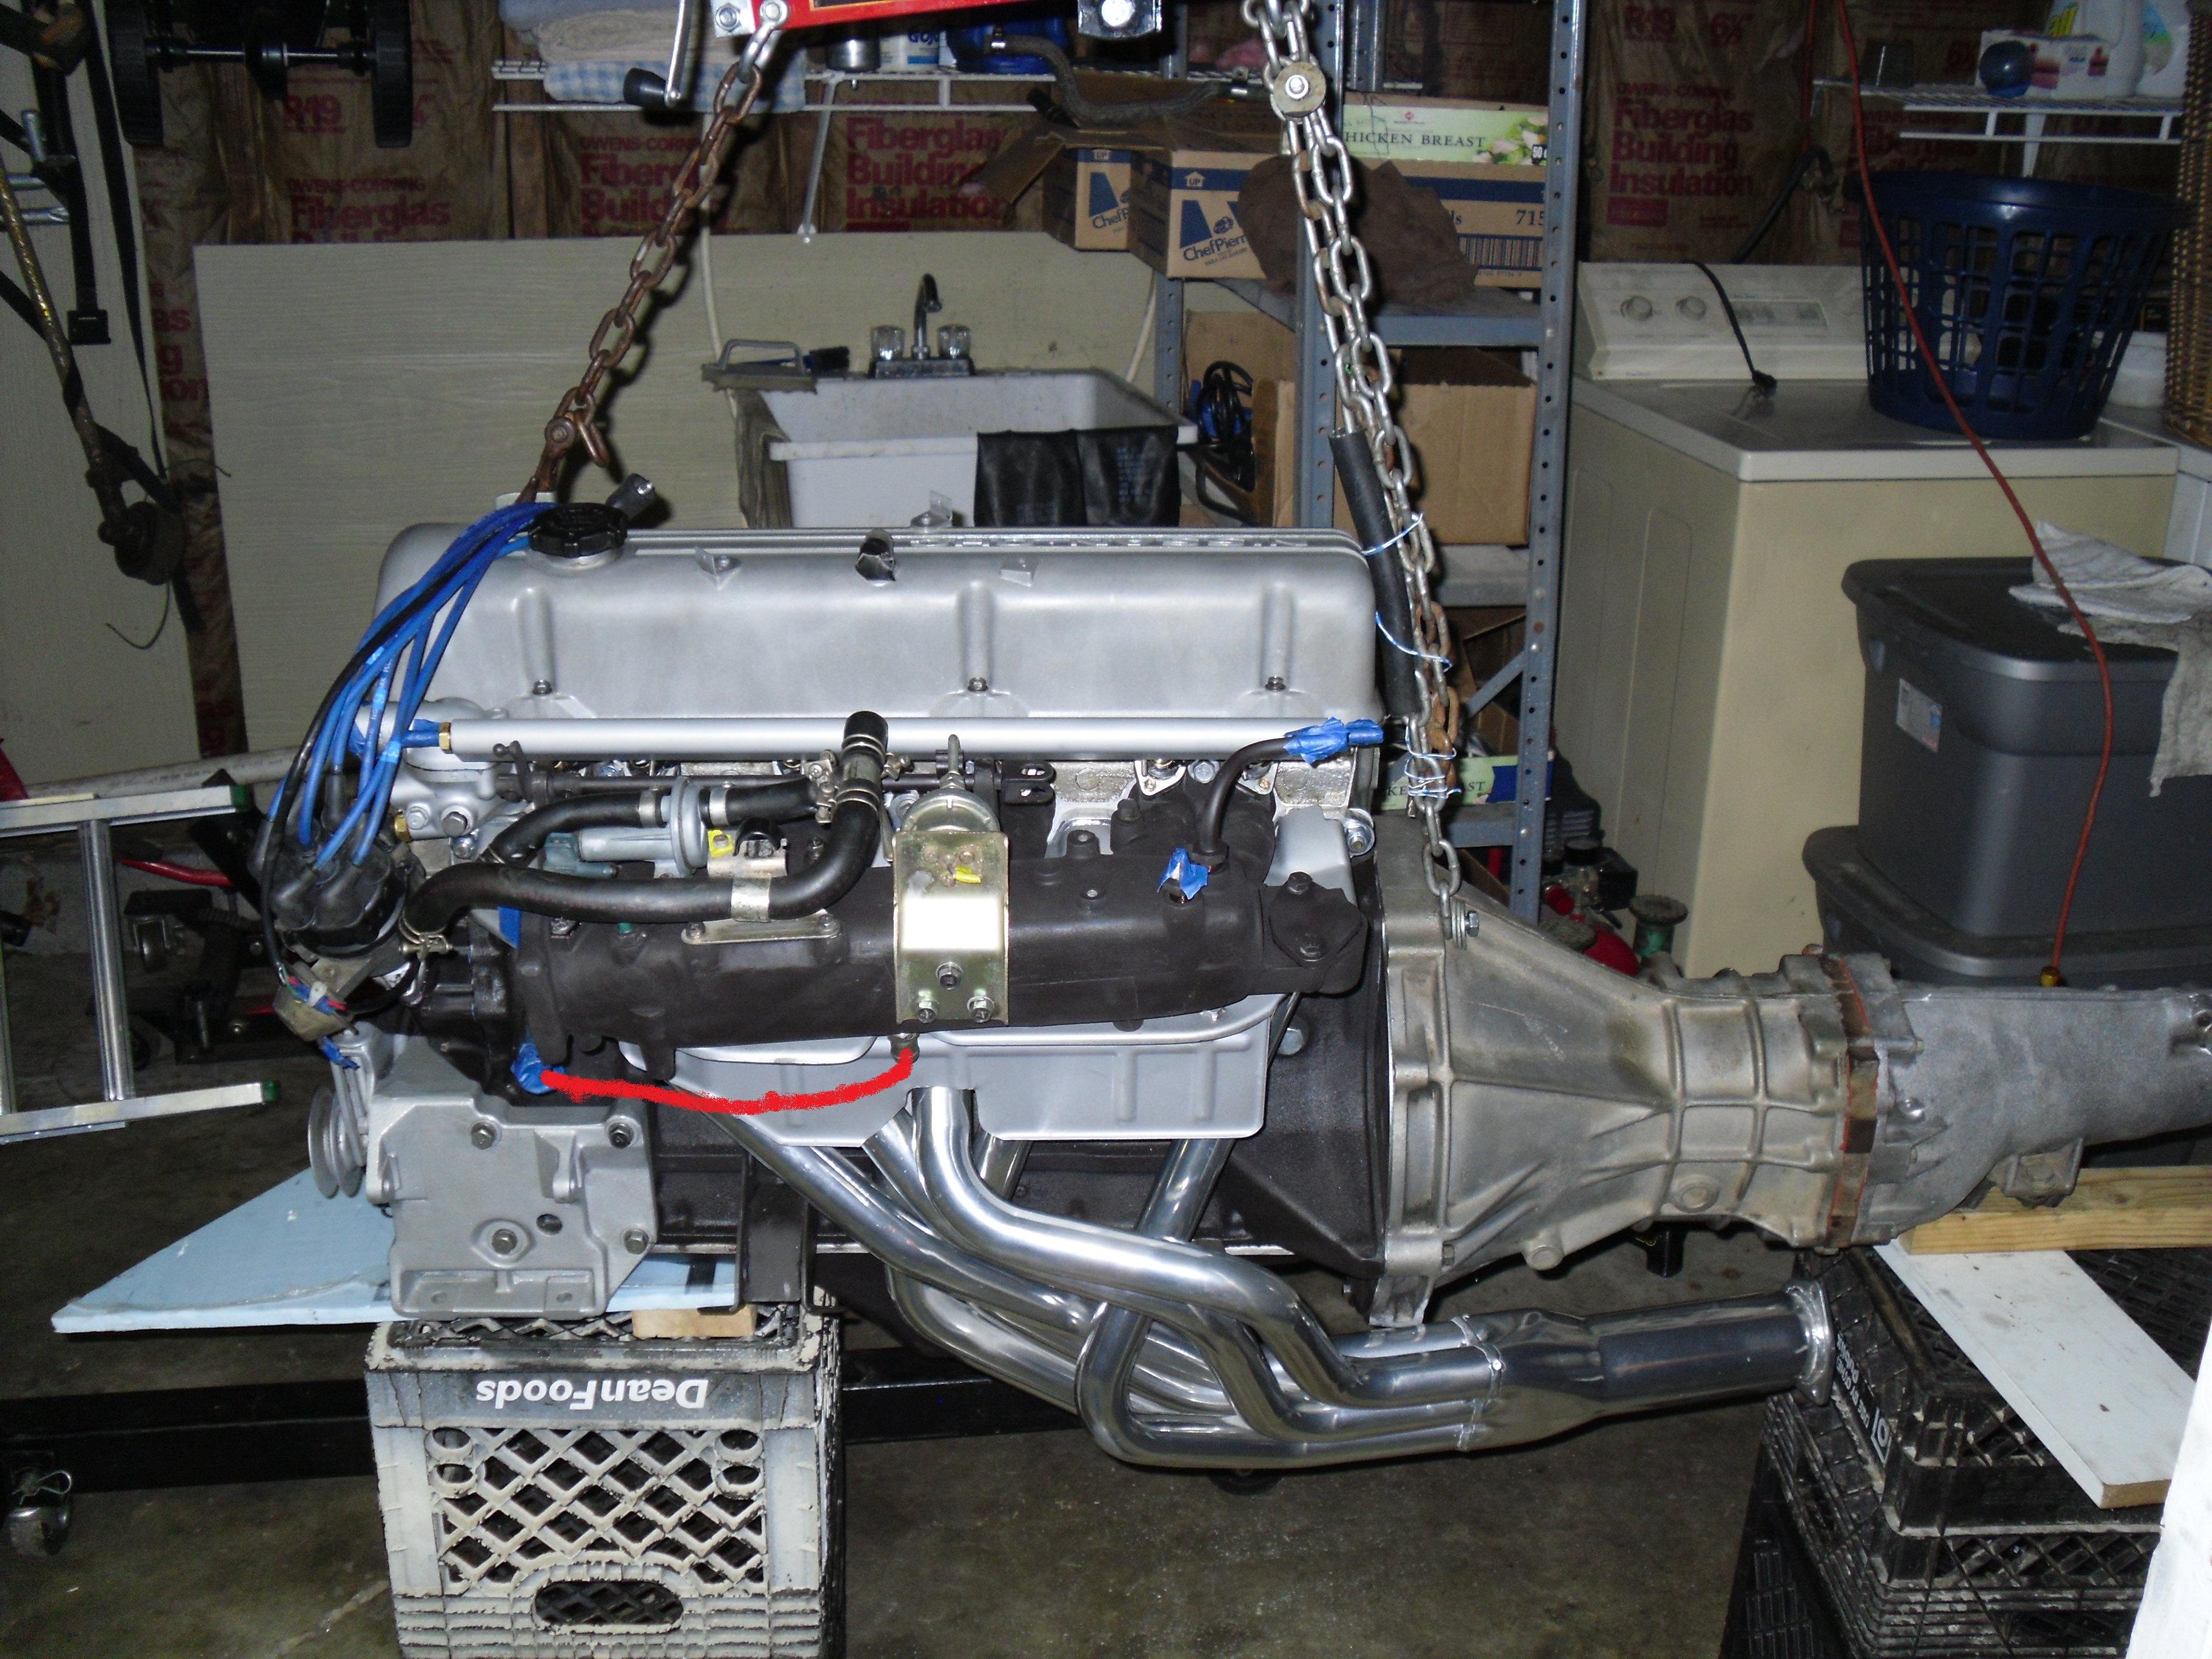
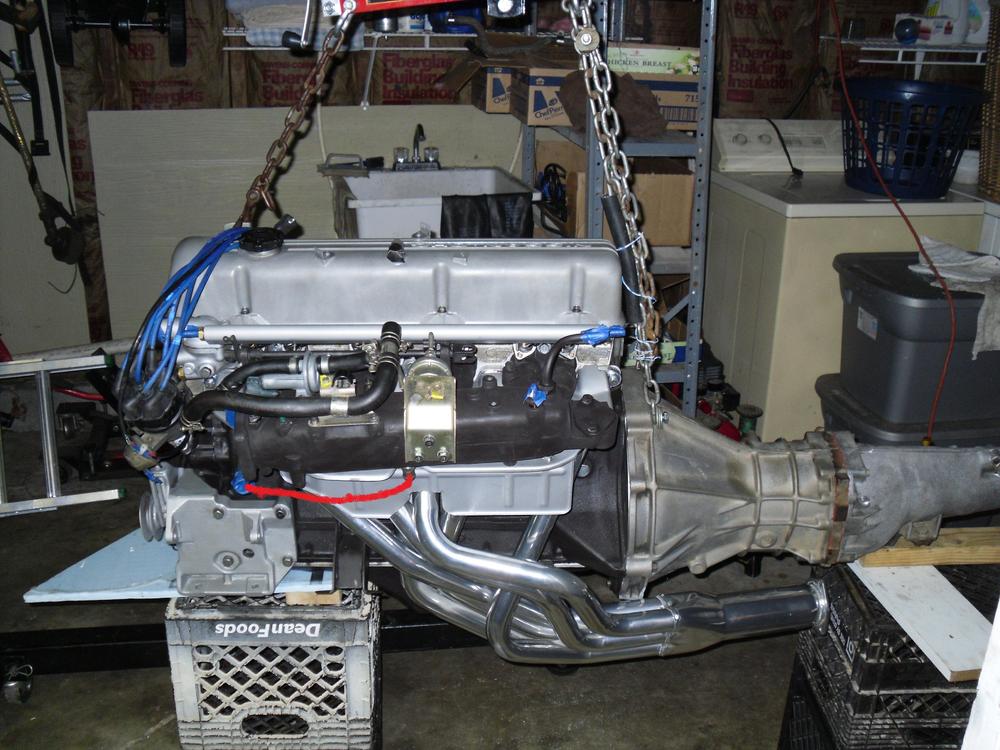
1 pointYou will really like the header at least I do. I put them on both my Zs and the heat reduction in the engine bay is incredible. With that header your fuel rail will feel cool to the touch after running the car. Here's my 280's motor before I put it in. Go to Harbor freight and get an load leveler. With one of those you can do it by yourself. I needed a little push to do it though, it's intimidating having that big of a thing hanging over your car. Thanks to Jeff G 78 and RossiZ again for the "push".
 1 point
 -
I initially tried using a fender washer that had a 5/16 hole, and die parts that pass through the hole. Seemed like the right thing to do. This didn’t pan out very well, as the distortion that happens caused the material to rip around the hole. I now have a 5/16” hole in the female side of the die, so I’ll use that as a drill guide to put a hole in the part after it’s formed. I measured the original washer base thickness. It is as suspected a bit thicker than the walls, at 0.050. 18 gauge sheet metal is 0.048, guess that will do.
 1 point
 -
If it was near me.. it was gone for sure.. then i build me another 240z.1 point
-
1 pointWhat Dave said ^ I'm thinking it's either the heater valve itself or the stiff wire that actuates it.1 point
-
Nice work. Love it! Nice pile of practice parts. Once you get the parameters right, you should be able to get very repeatable results. At least until the die is worn out. I see a lot of them torn out like my first attempt. I started with a gap that was the same as the material thickness and that was not enough of a gap. I took off about five thousandths and it made a huge difference. I could actually see the material getting pulled down into the die as the pressure was applied. And I found the same issue centering the die since I didn't have a center hole to use as a locating feature either. If I were to do it again, I would put a pin in the middle of the male die to locate the blank and center the male portion of the die in the middle of the other half. However, (in agreement with the suggestion above), I would make the pilot hole a little undersize because I'm not sure if the material will stretch in that area or not. Thicker material might be a little easier since there's more meat there to stretch until it gets so thin that it shears. If you want to know what they started with for the original parts, you should measure the thickness at the flat bottom. A micrometer would be the easiest way. My instincts tell me that the sides will be thinner than the base because the sides are what stretched in the original drawing process. Couple hundred more tweaks and you'll be in production!1 point
-
somebody, pull the trigger!!!1 point
-
1 pointYes, the ZX distributor body has a spot to attach the miniaturized module directly to the side. The 280Z distributors run a long set of wires to a remote module in the cabin, by the fusebox. Your 280Z module is probably still working. But, it's old. But, it can be replaced with a GM HEI module. EuroDat even wrote up a procedure to make it look stock.1 point
-
I would warm up the seal, lube it and the body, then when you insert the window try to get an awl in both top and bottom holes at the back and draw the window in, a second pairs of hands can set a screw in the top and bottom hole in the front and push the window in from the outside at the same time.1 point
-
1 point
-
1 point
-
1 point
-
1 pointPower brake exchange in San Jose California can rebuild them, I had mine done by them; if you end up using them have them power coat the booster, they run it through a bead blaster, it should be an additional $20. im not sure if DIY kits are available... I wonder where PBE gets theirs....1 point
-
1 pointKent, "A very nice gentleman." Would you mind if I shared this with my long suffering wife? Cheers, d*** McDonell1 point
-
1 pointThat's a classic bad booster sign. If the engine is running a bit rich the idle speed will go up. Sounds like your engine is tuned about right so the idle speed drops. The boosters usually go bad when the master cylinder leaks. So watch out for brake fluid in the booster. It will drip on to your paint and stain it. Boosters are getting harder to find also.1 point
-
That's sooo tempting. Most of us already have the parts to complete it or know where to get them.1 point
-
That one is as rust free as I've ever seen.1 point
-
1 point