


Leaderboard
-
Patcon
 Subscriber
 11Points11,175Posts
 -

siteunseen
Free Member11Points15,167Posts -
Yarb
Subscriber10Points1,967Posts -
conedodger
Free Member9Points12,619Posts


Popular Content
Showing content with the highest reputation since 12/01/2025 in all areas
-
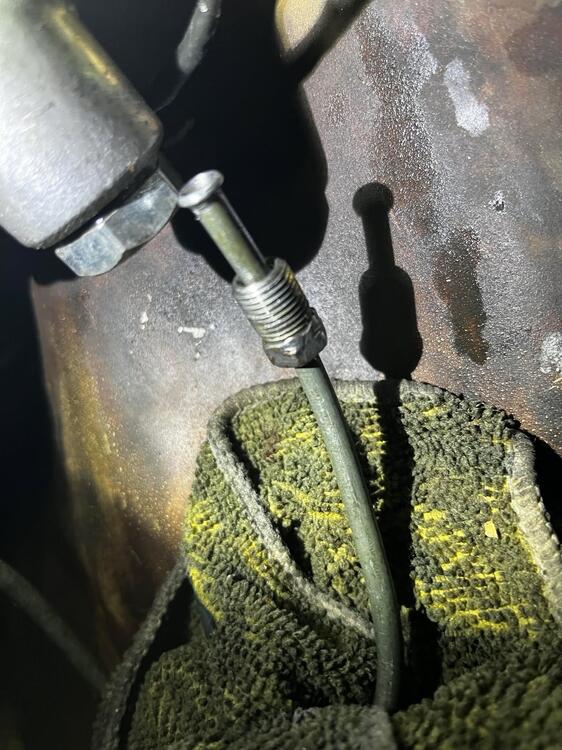
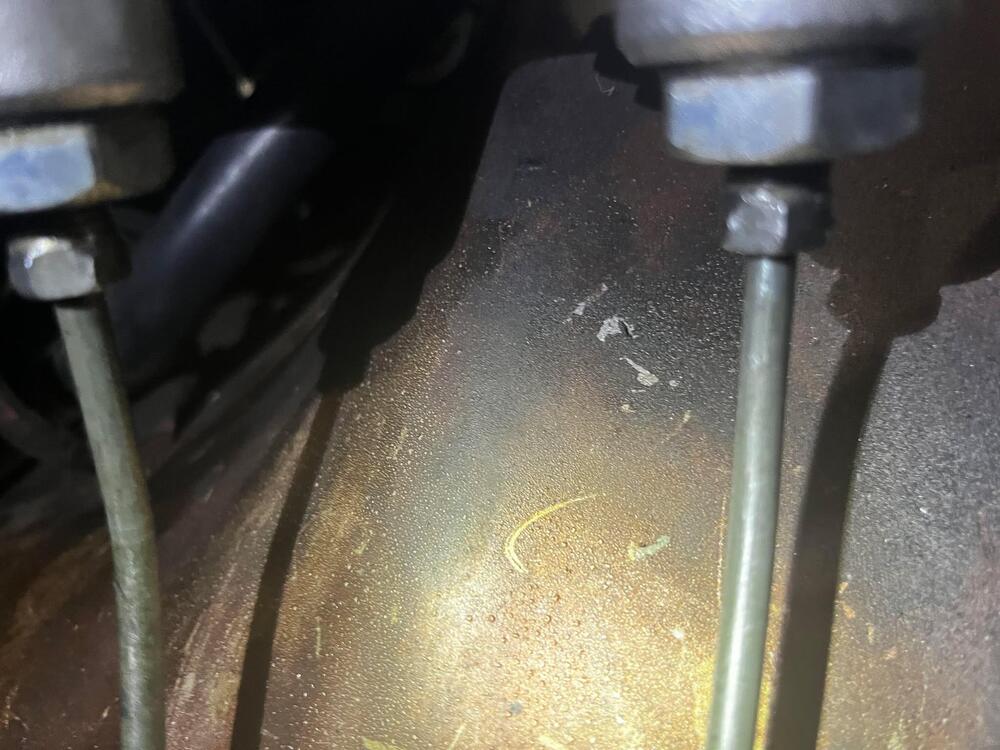
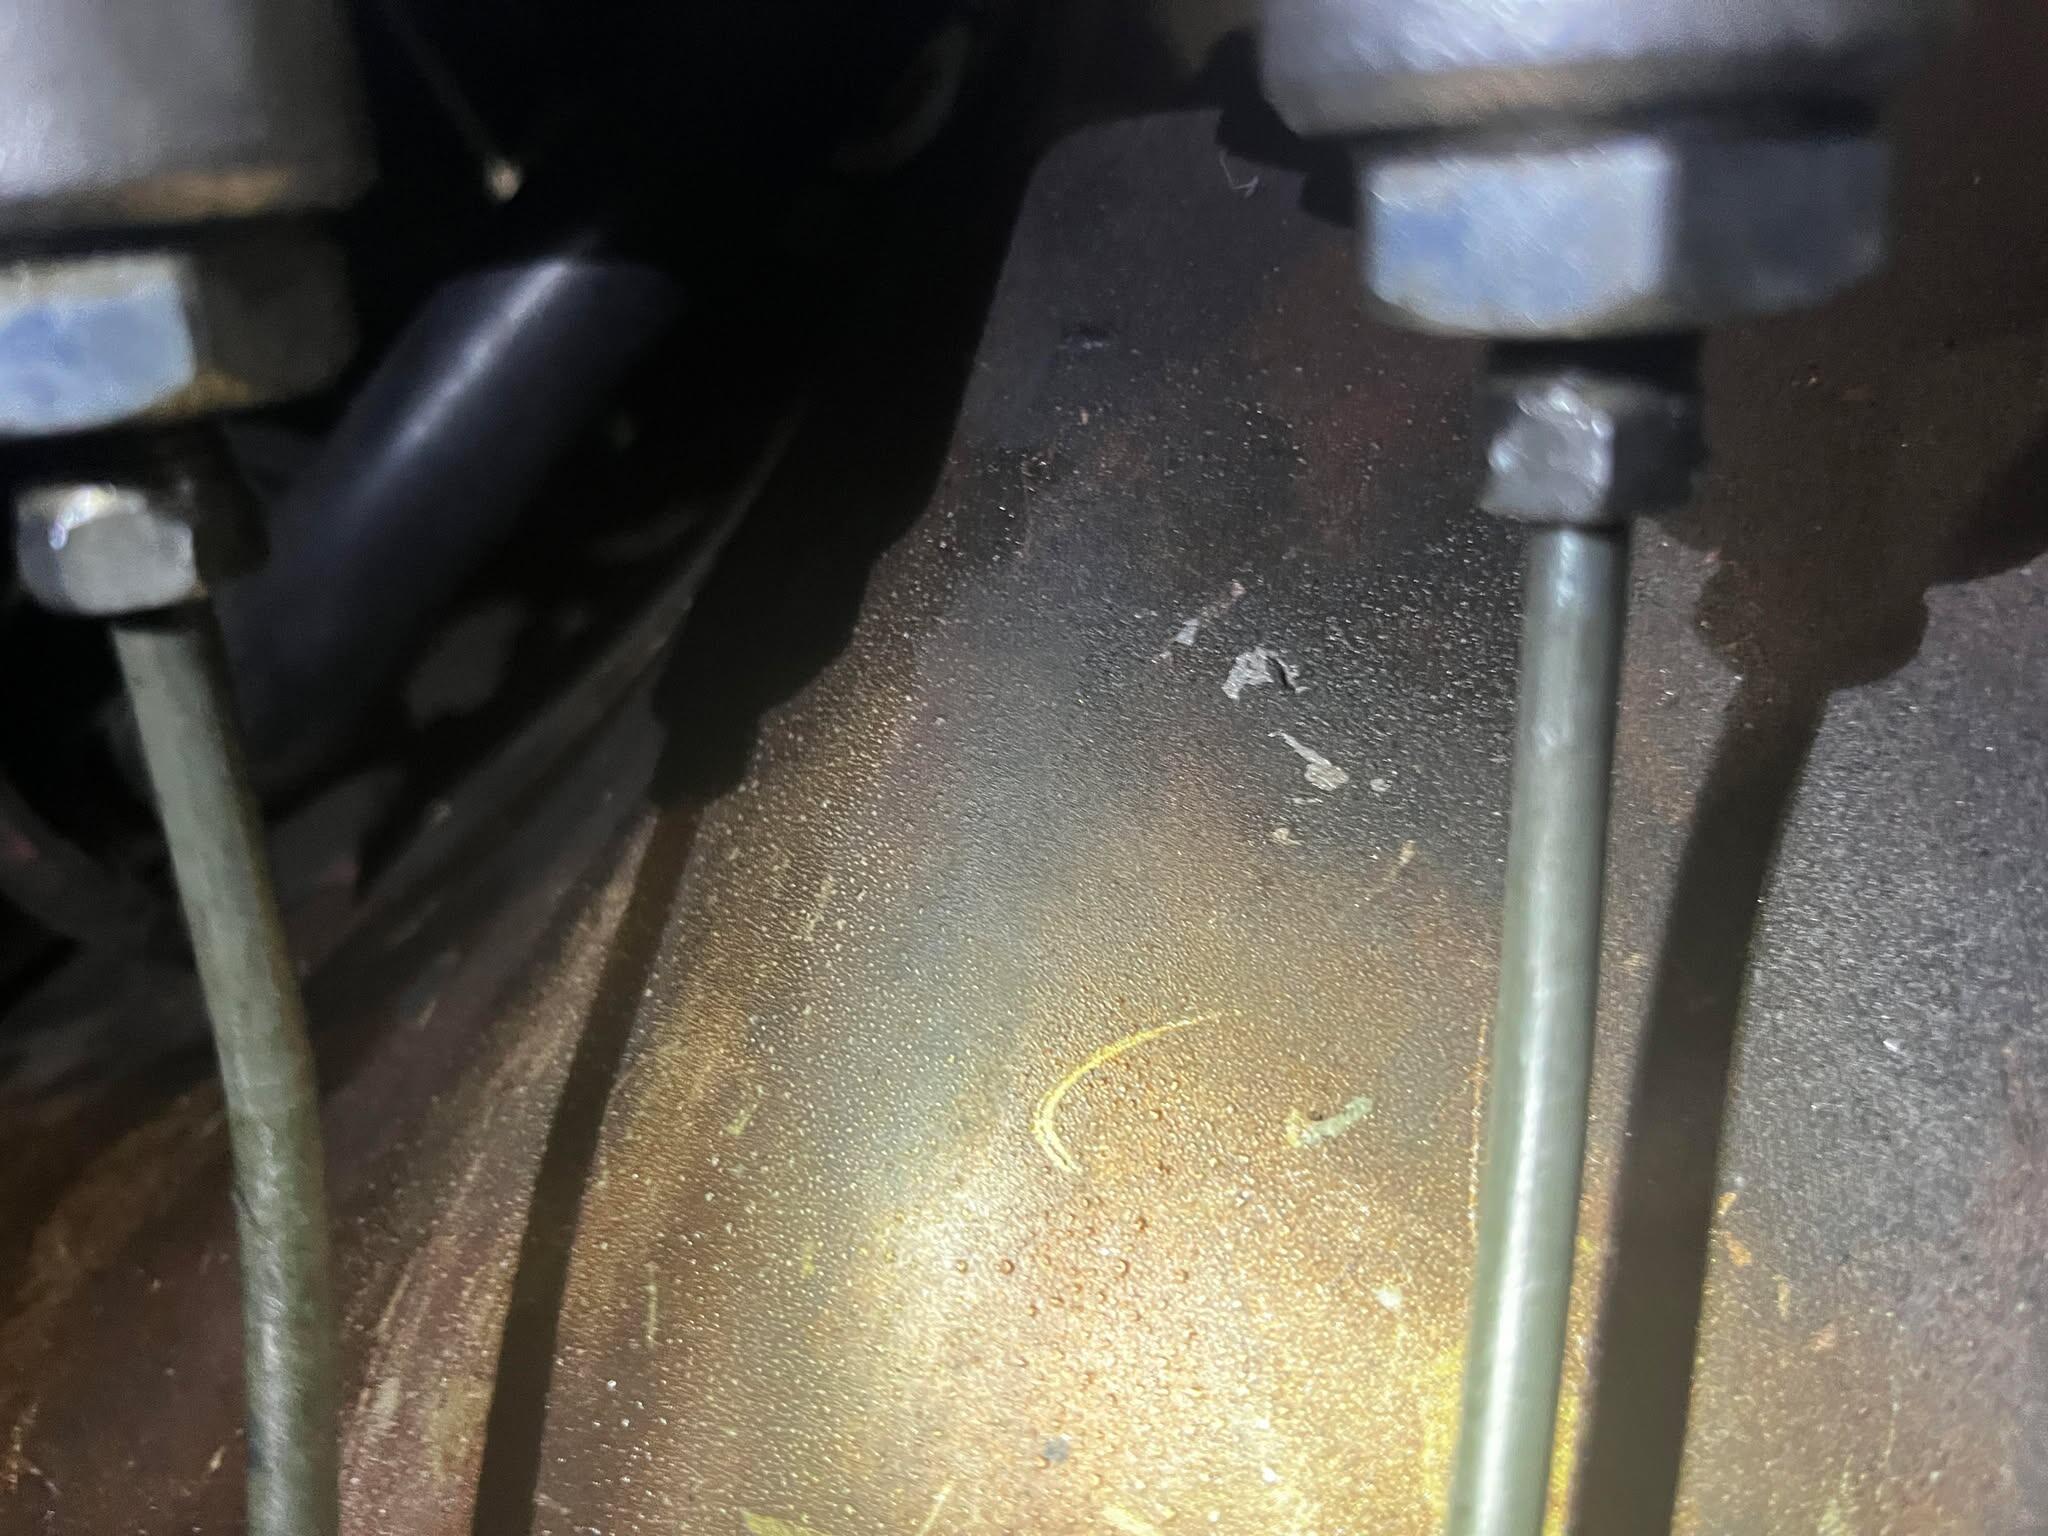
4 points4 points3 points3 points3 pointsUpdate for all of you. We very may be in business here and you were all right - the hydraulic line was crooked/not fully seated and once I took it out and reseated it, the leak was gone. Again, I still don't understand how it didn't leak over the course of 6 years and thousands of miles, but I guess that was a good thing. I am going to bleed the brakes tomorrow just to be safe but I did bleed the master after all of this and the pedal feels good. Here are pictures of the line screwed in before, the flange/nut's condition when I took it out this evening, and how the cylinder looks now with the line in straight.

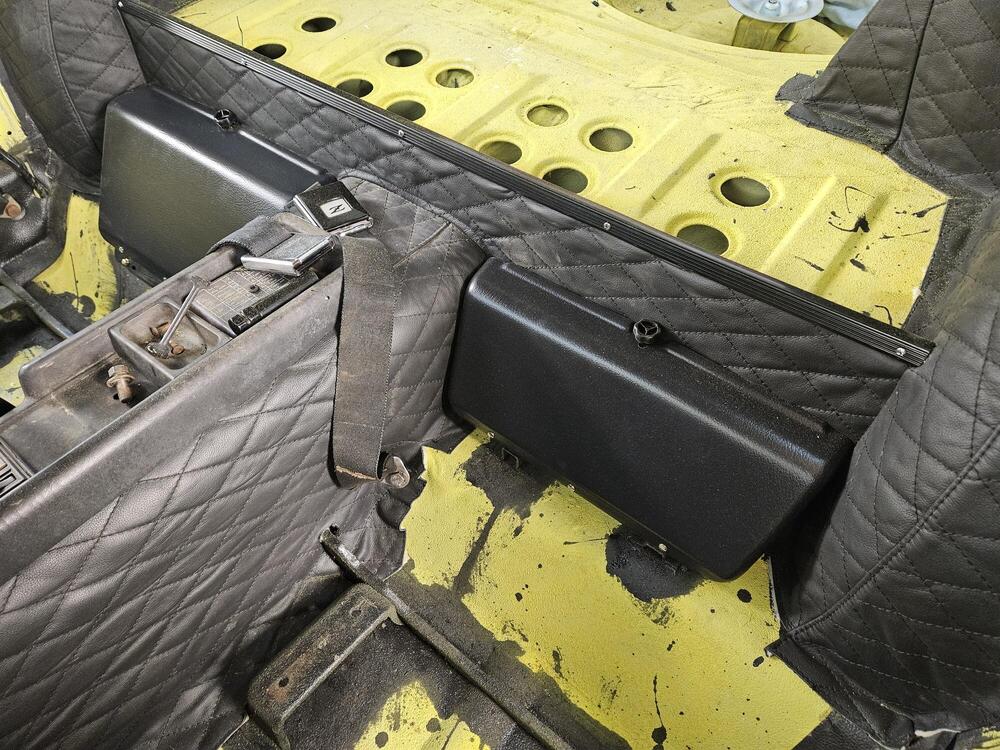
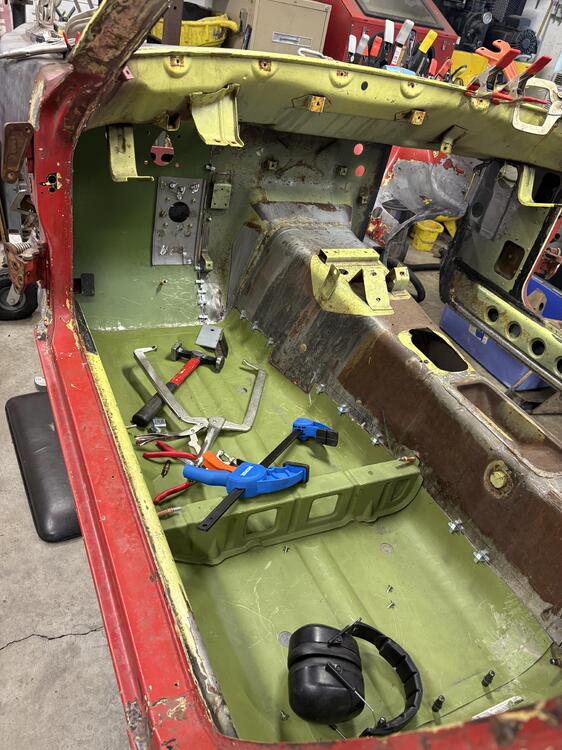
 3 points3 pointsI also got the tool covers from resurrected classics and got them installed A little nerve racking to bend the plastic hinges to mount them
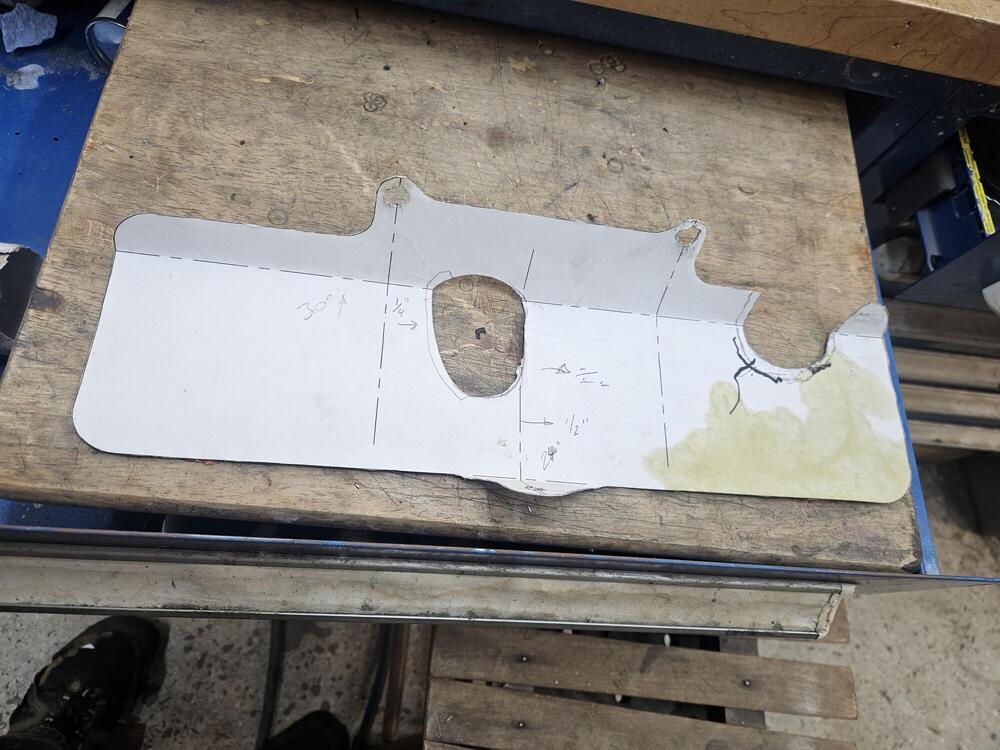
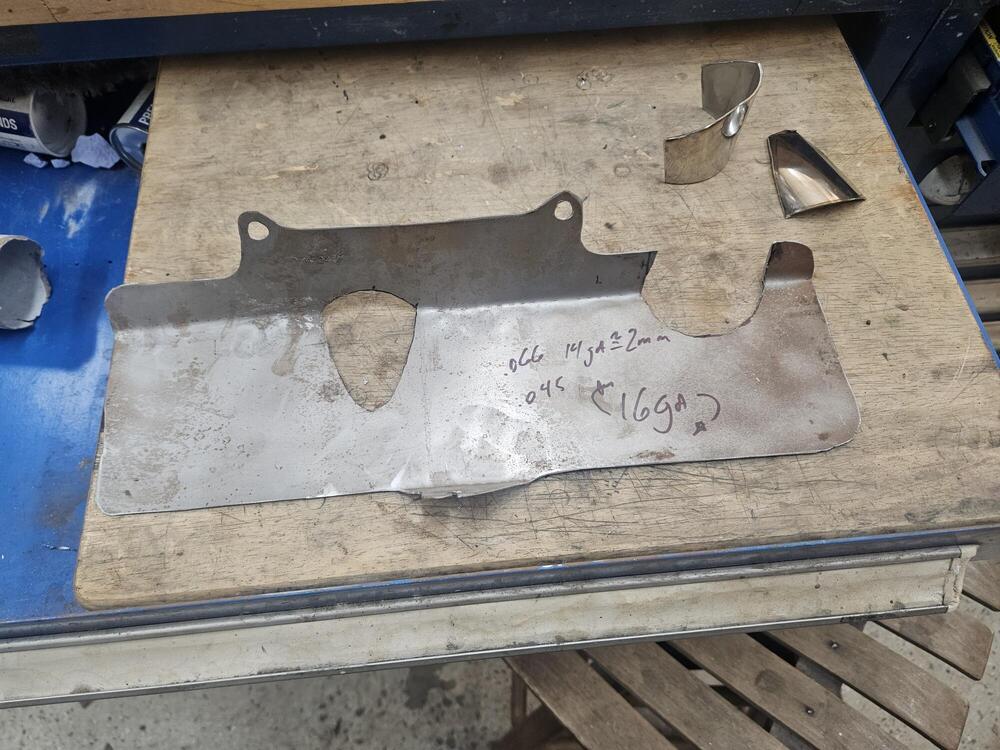
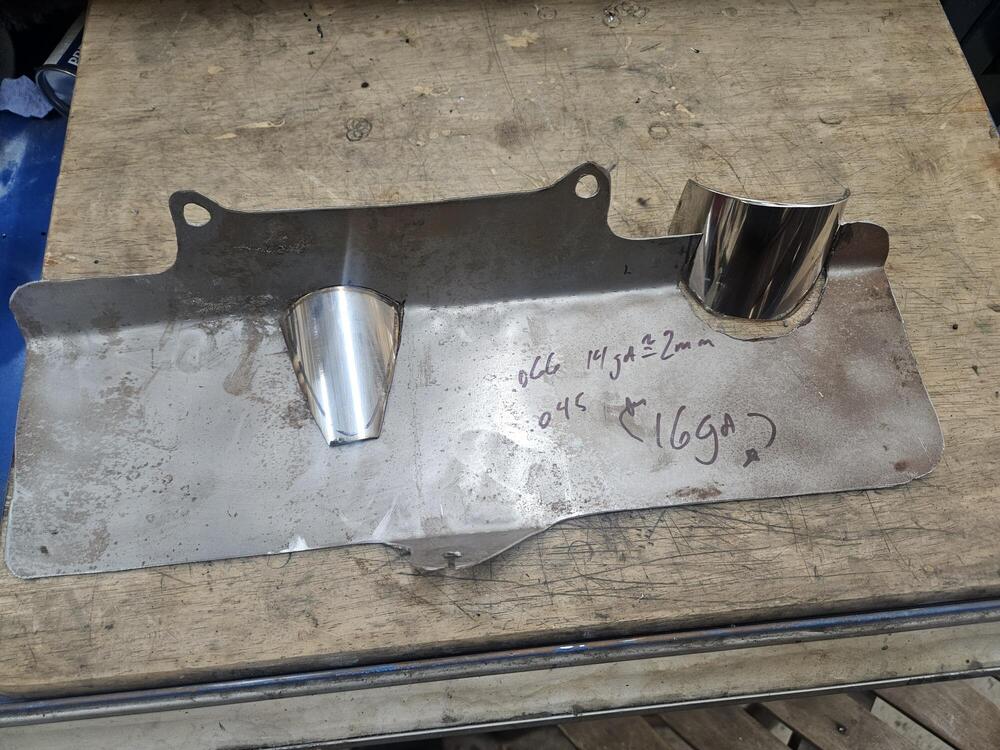
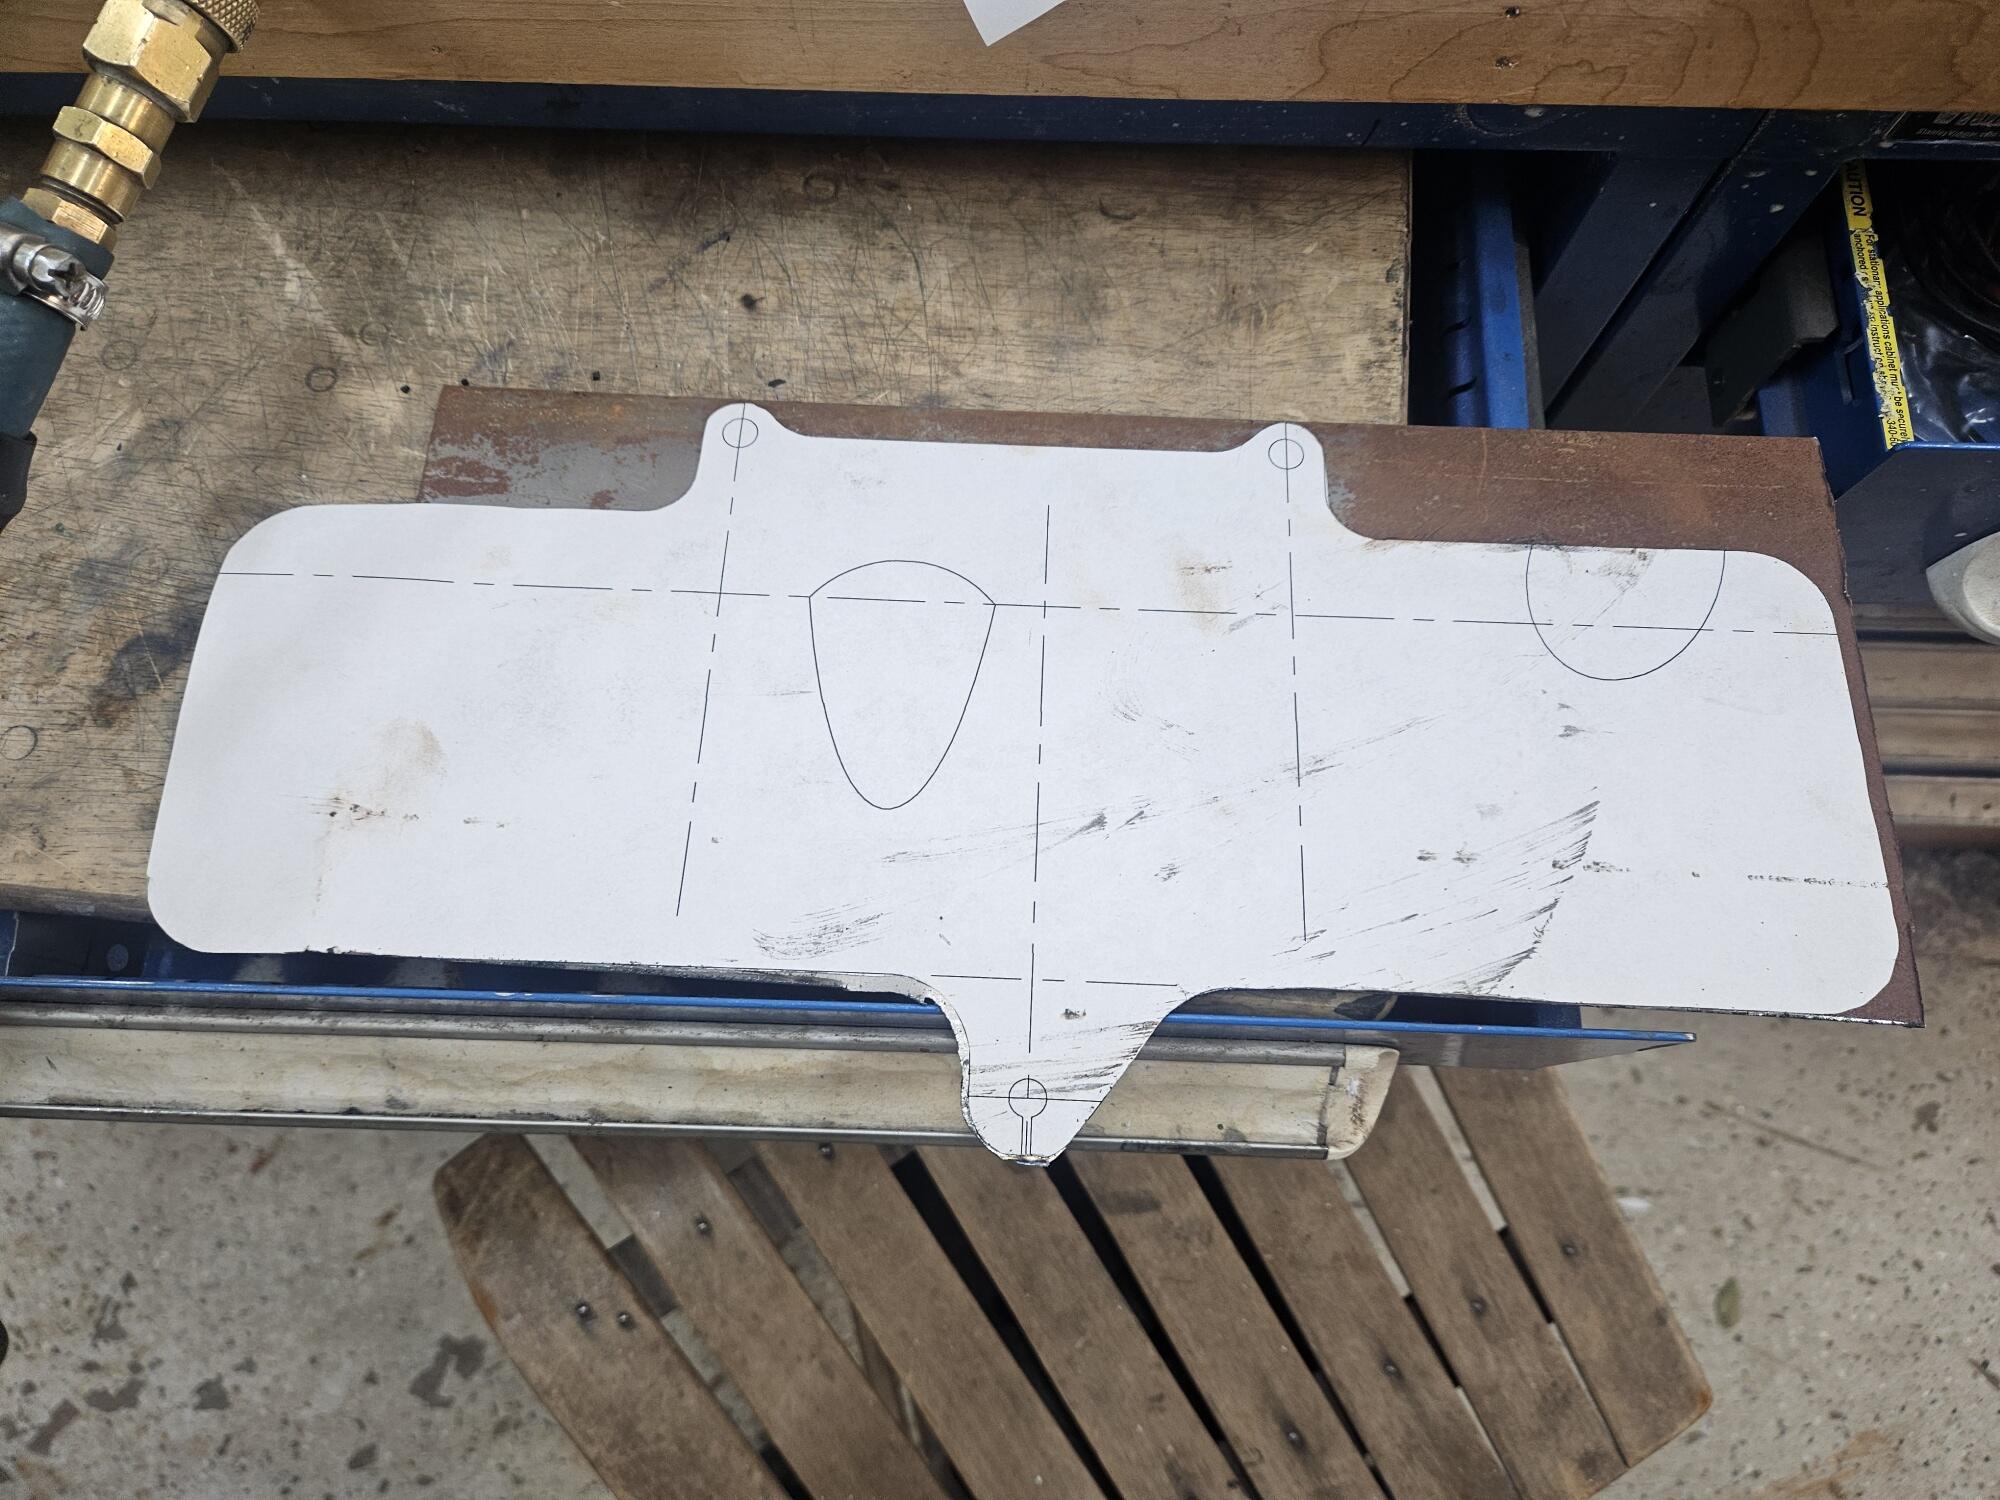
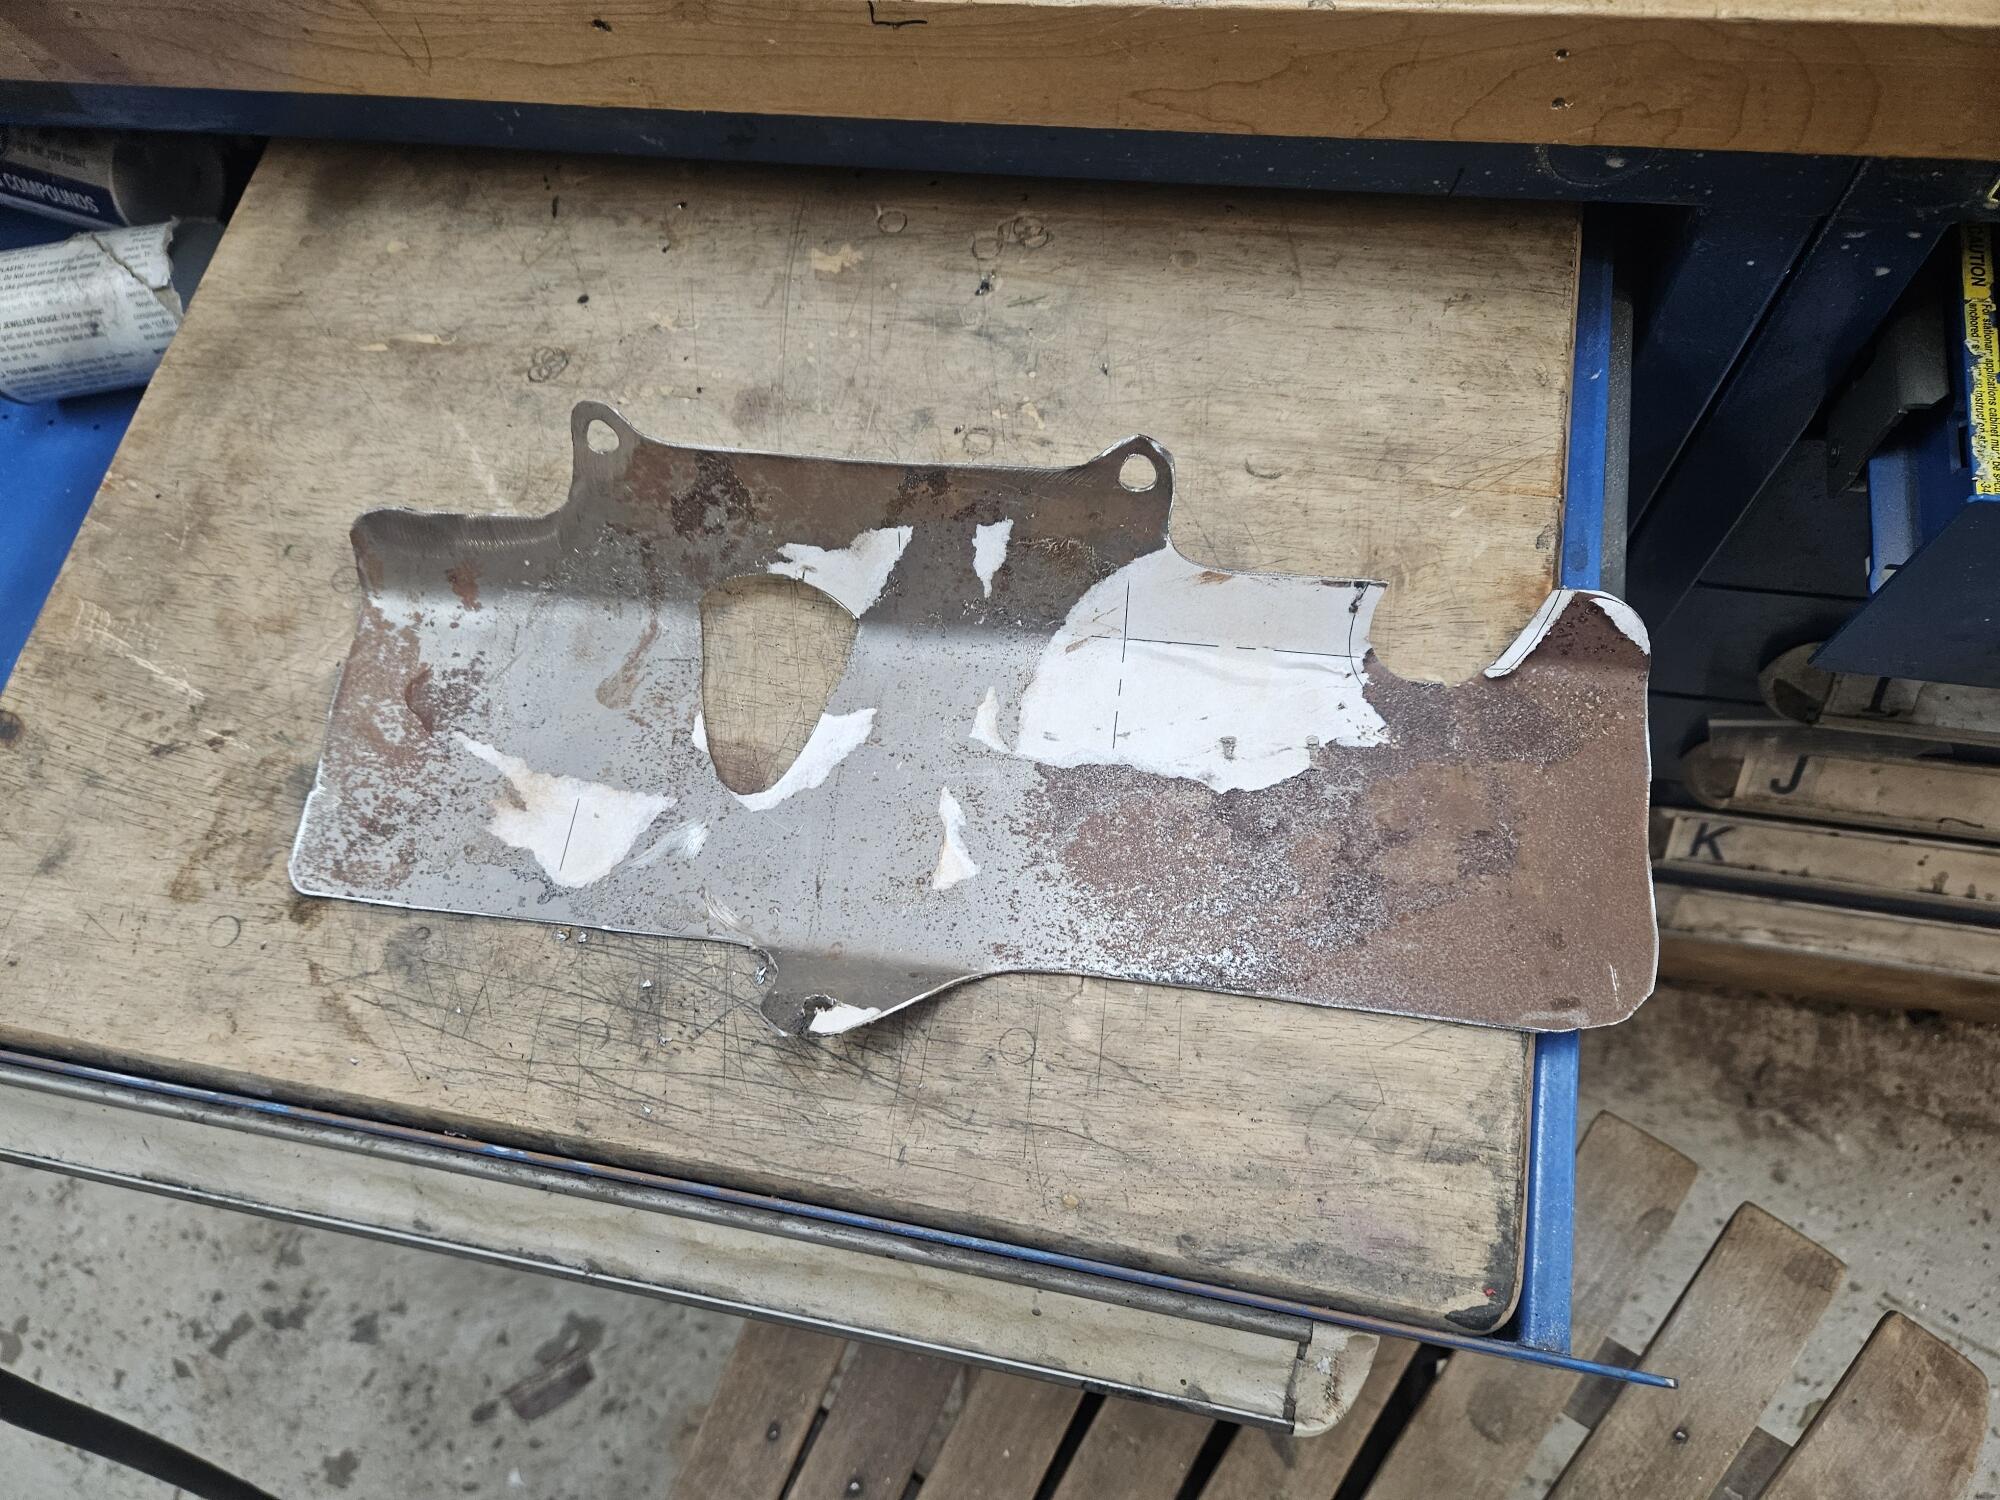
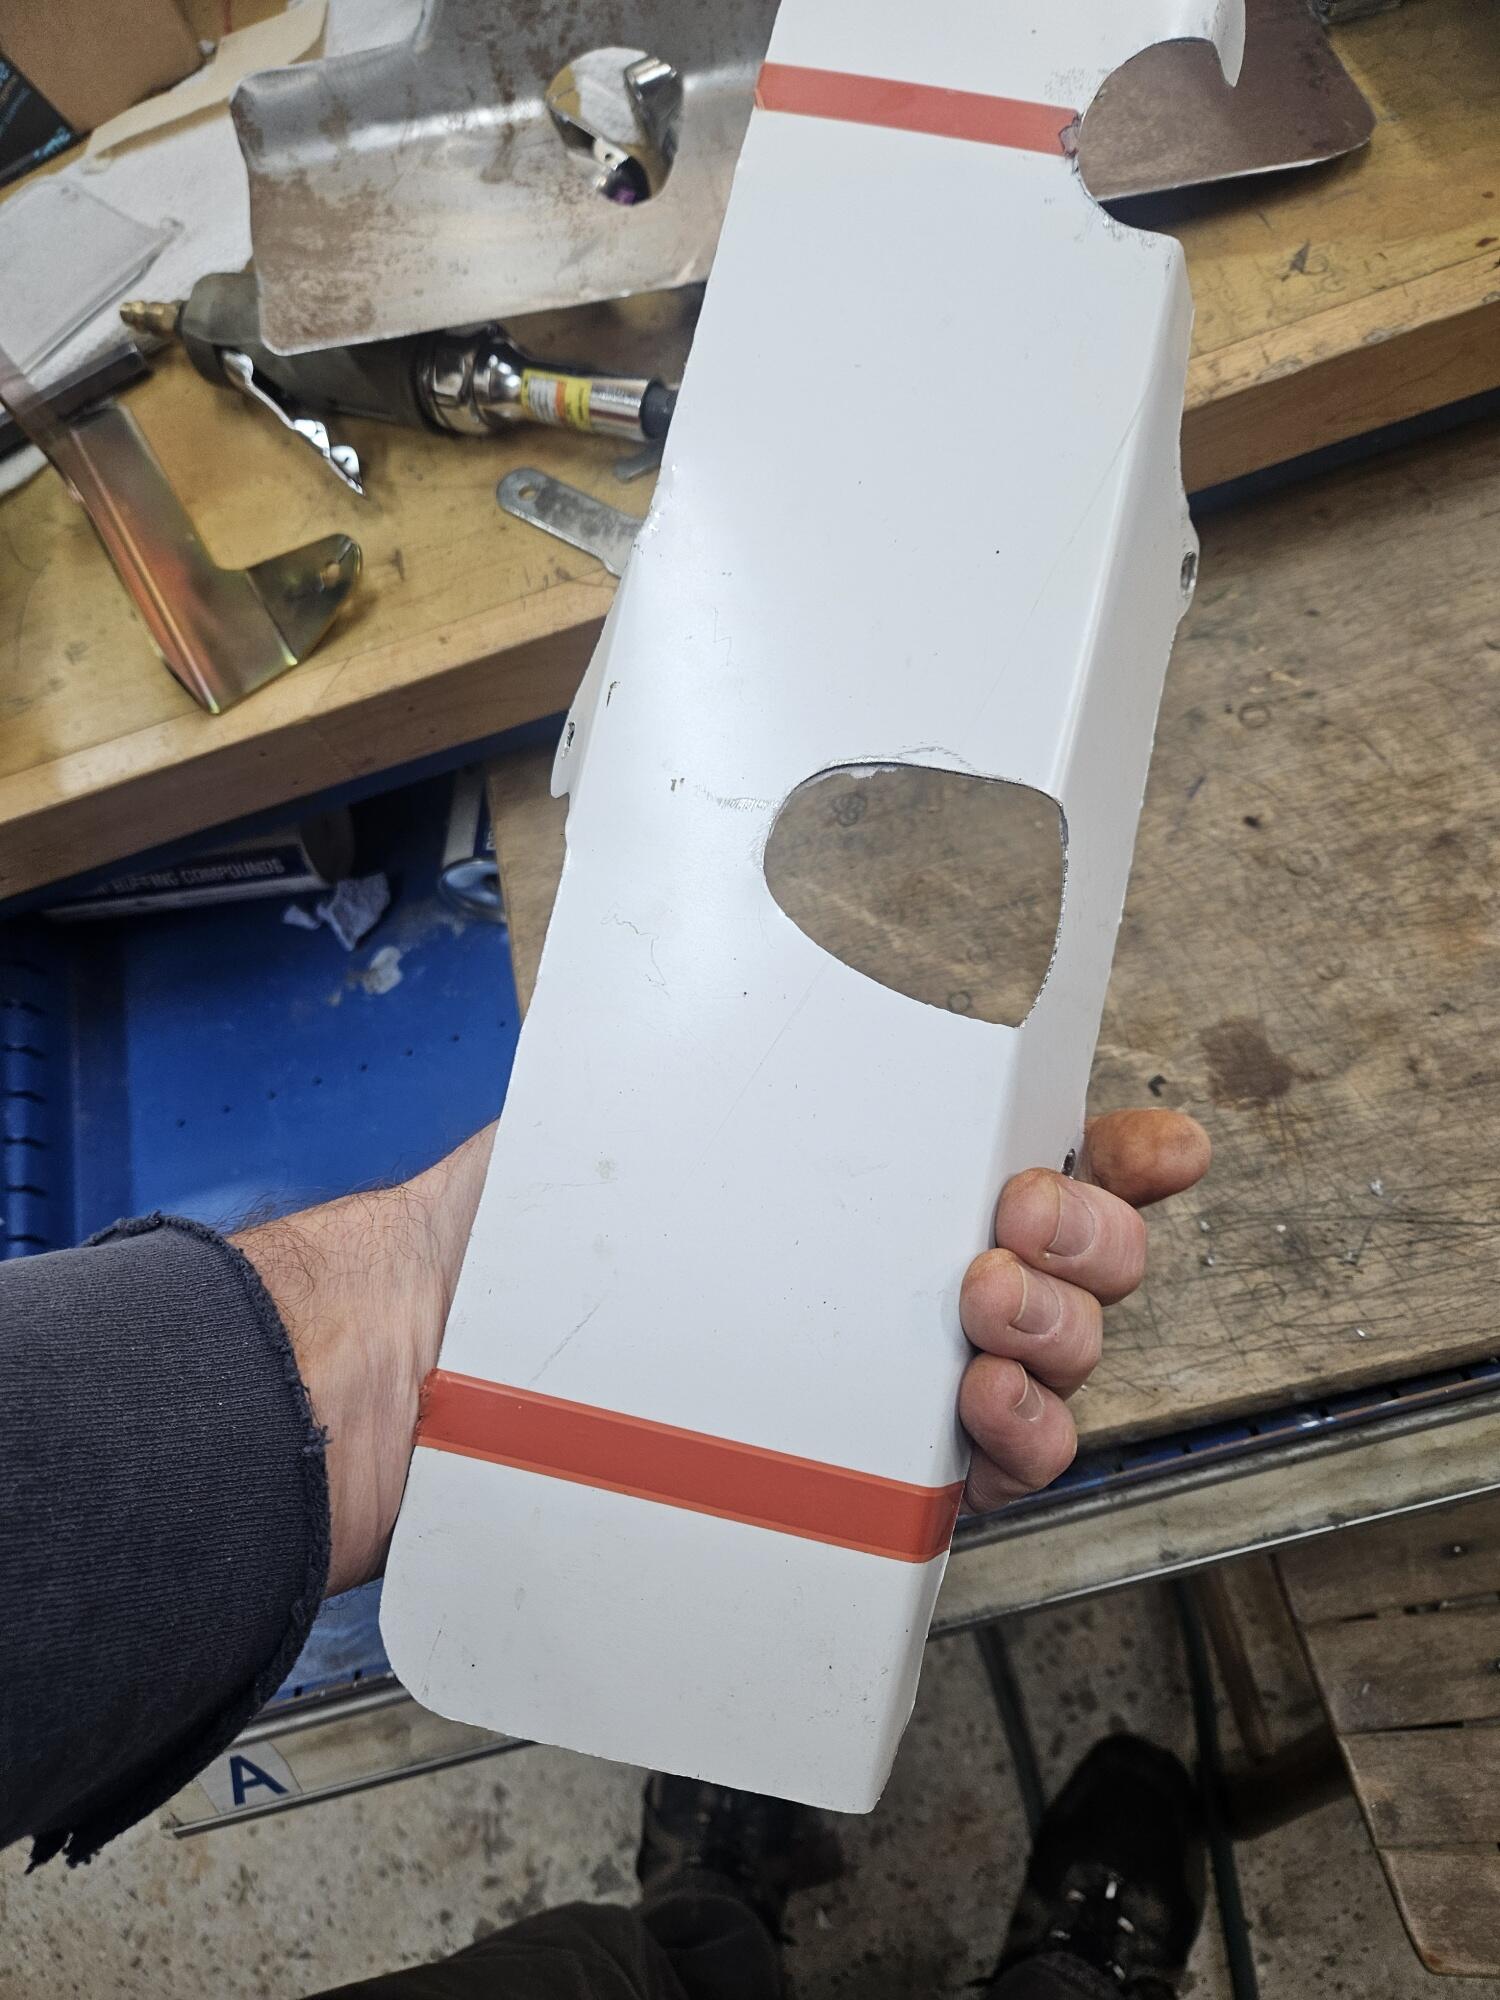
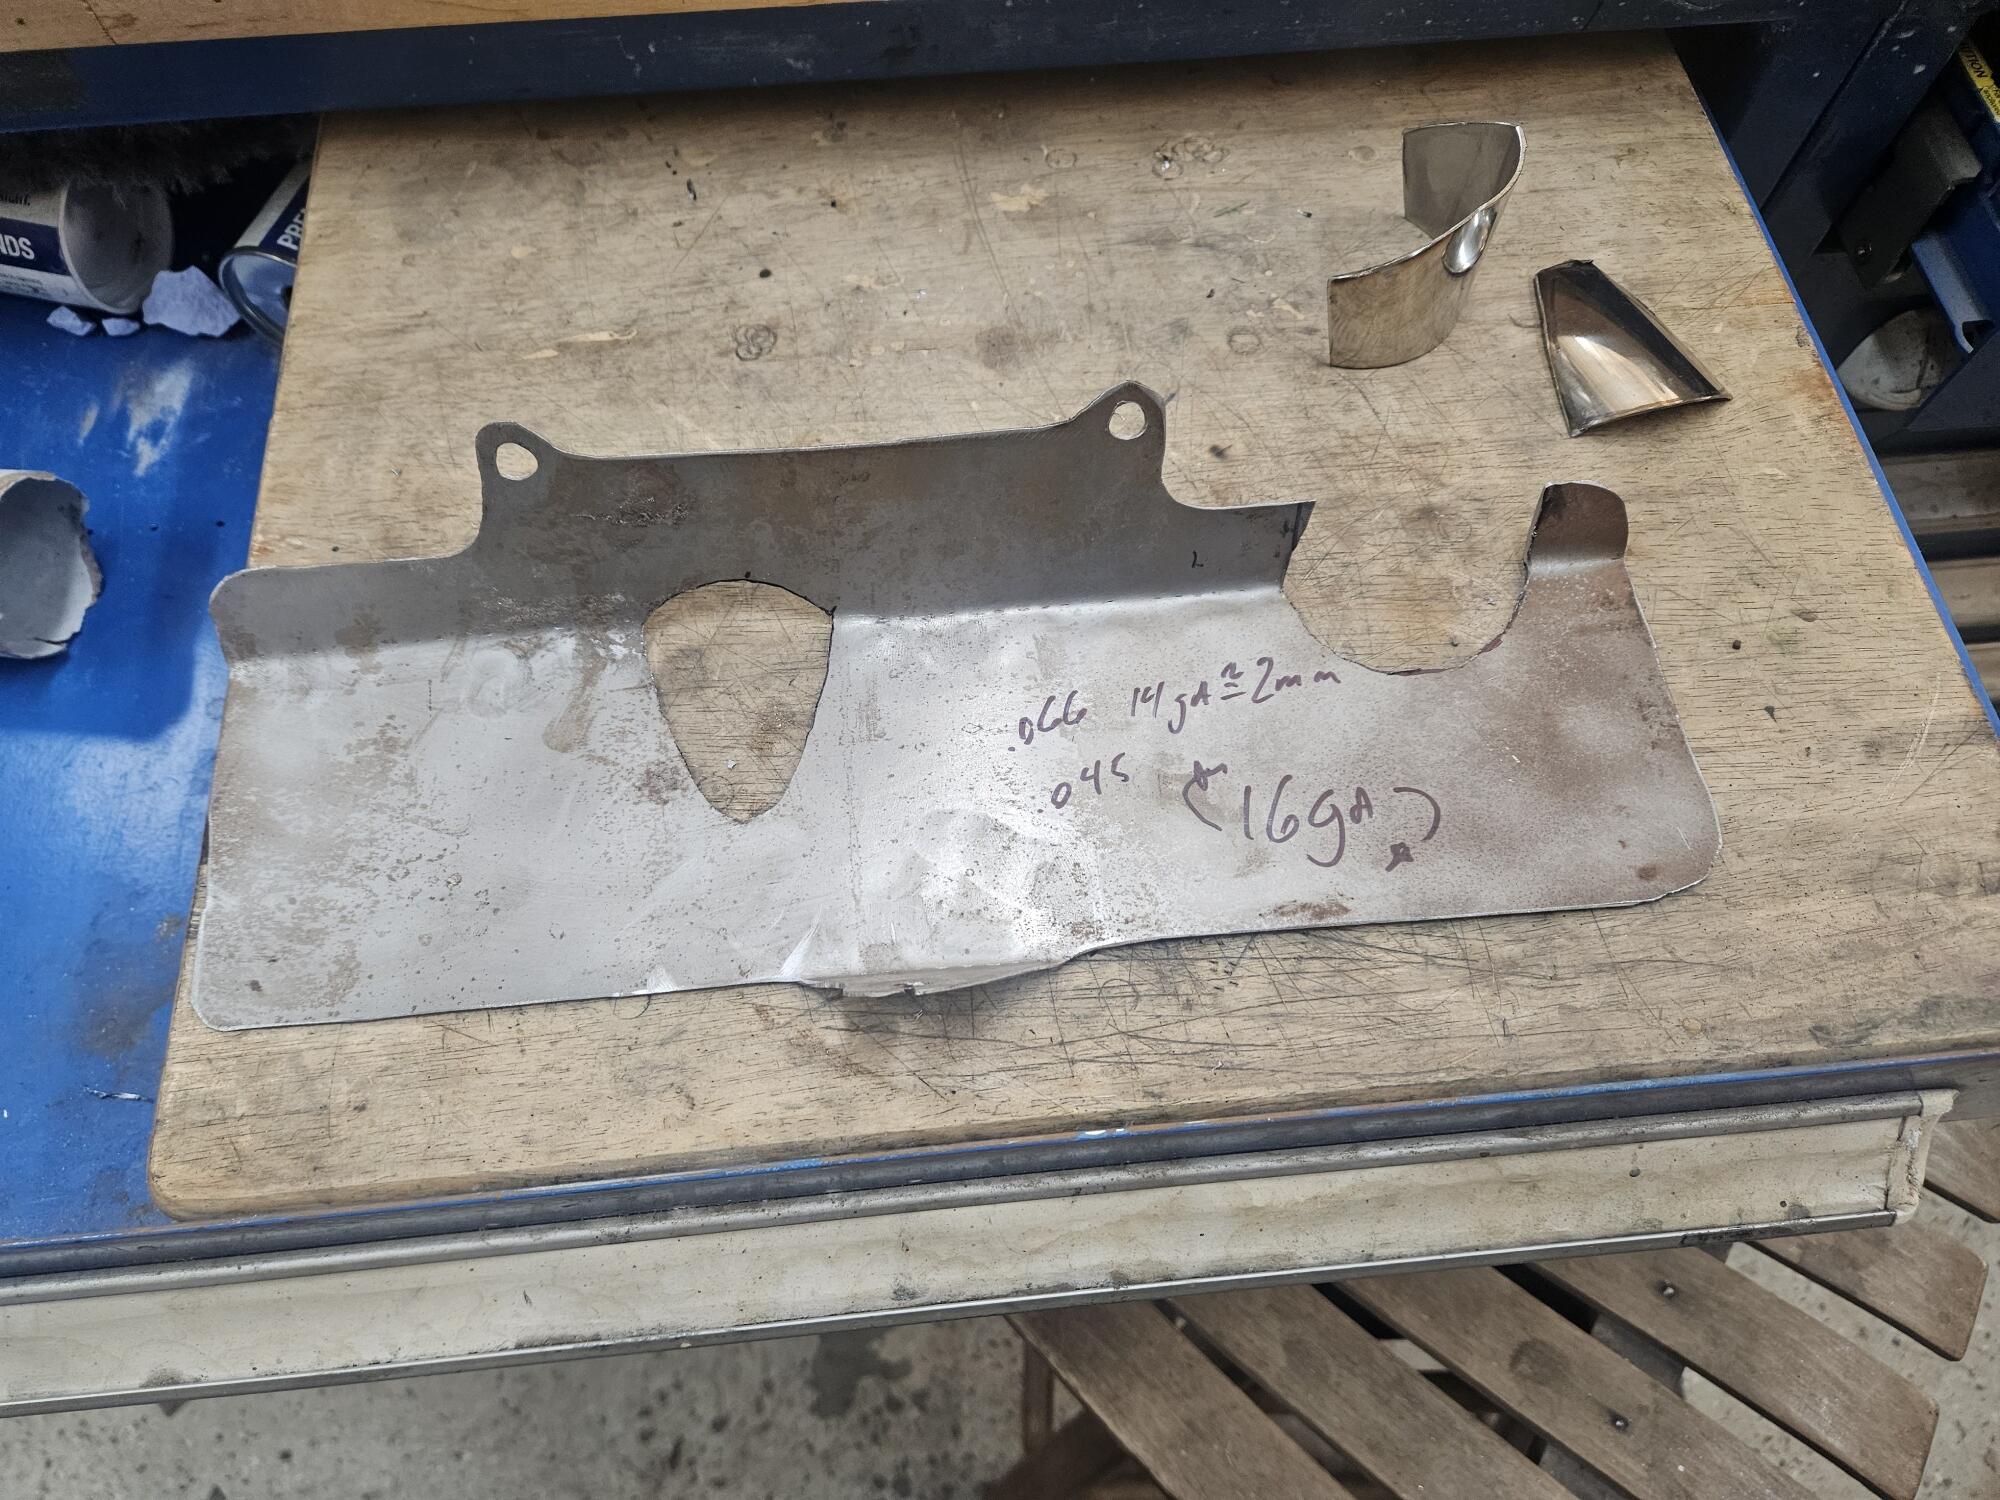
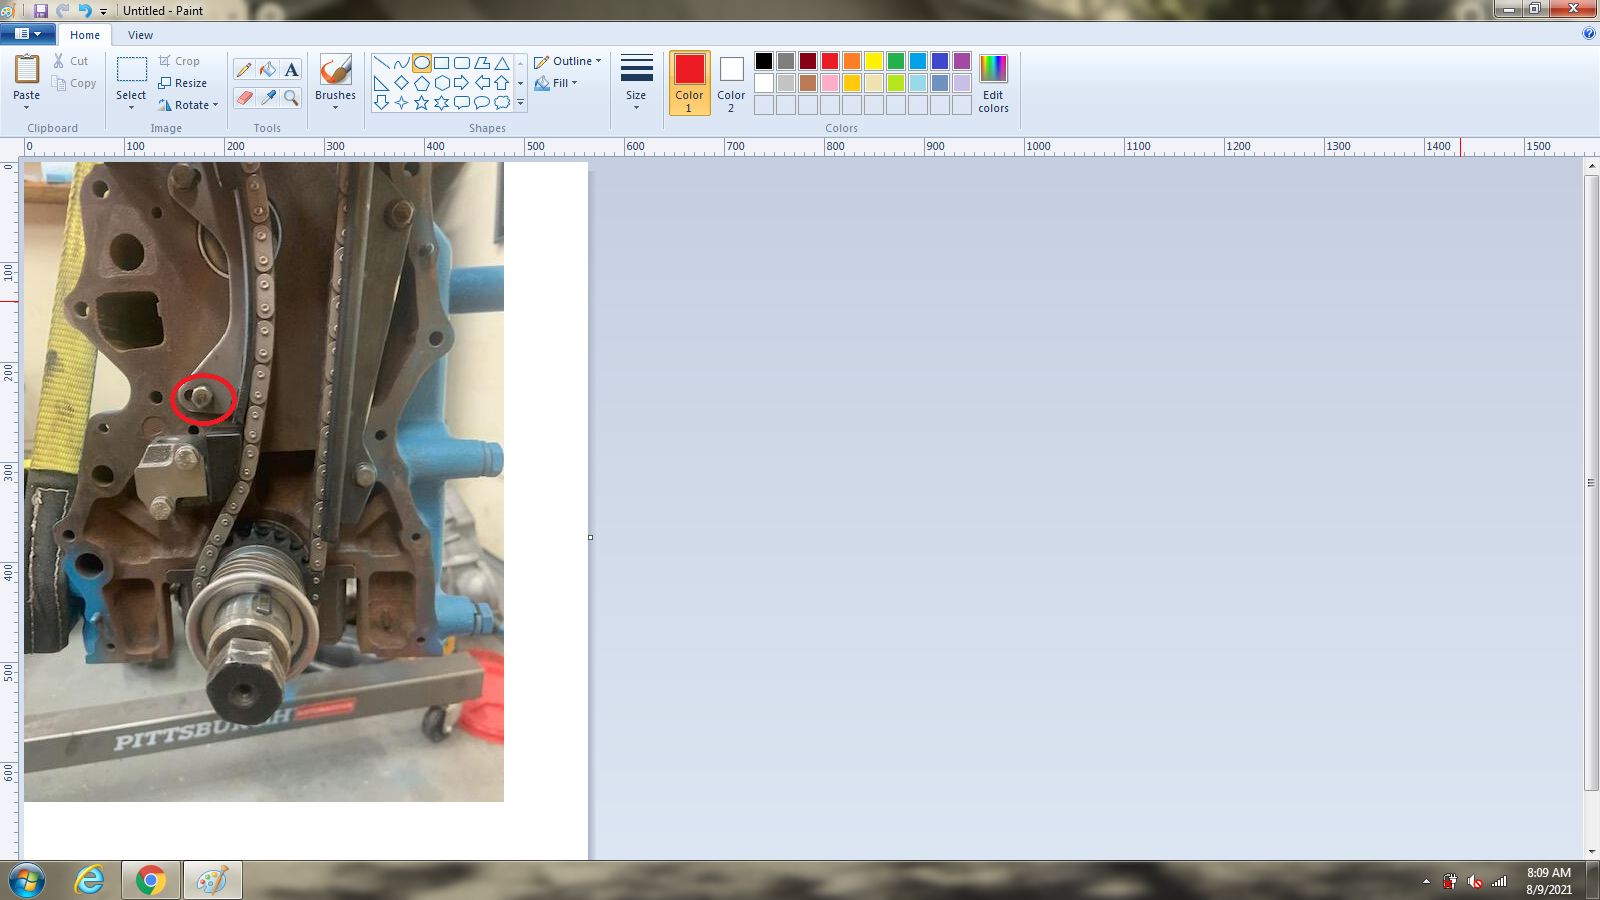
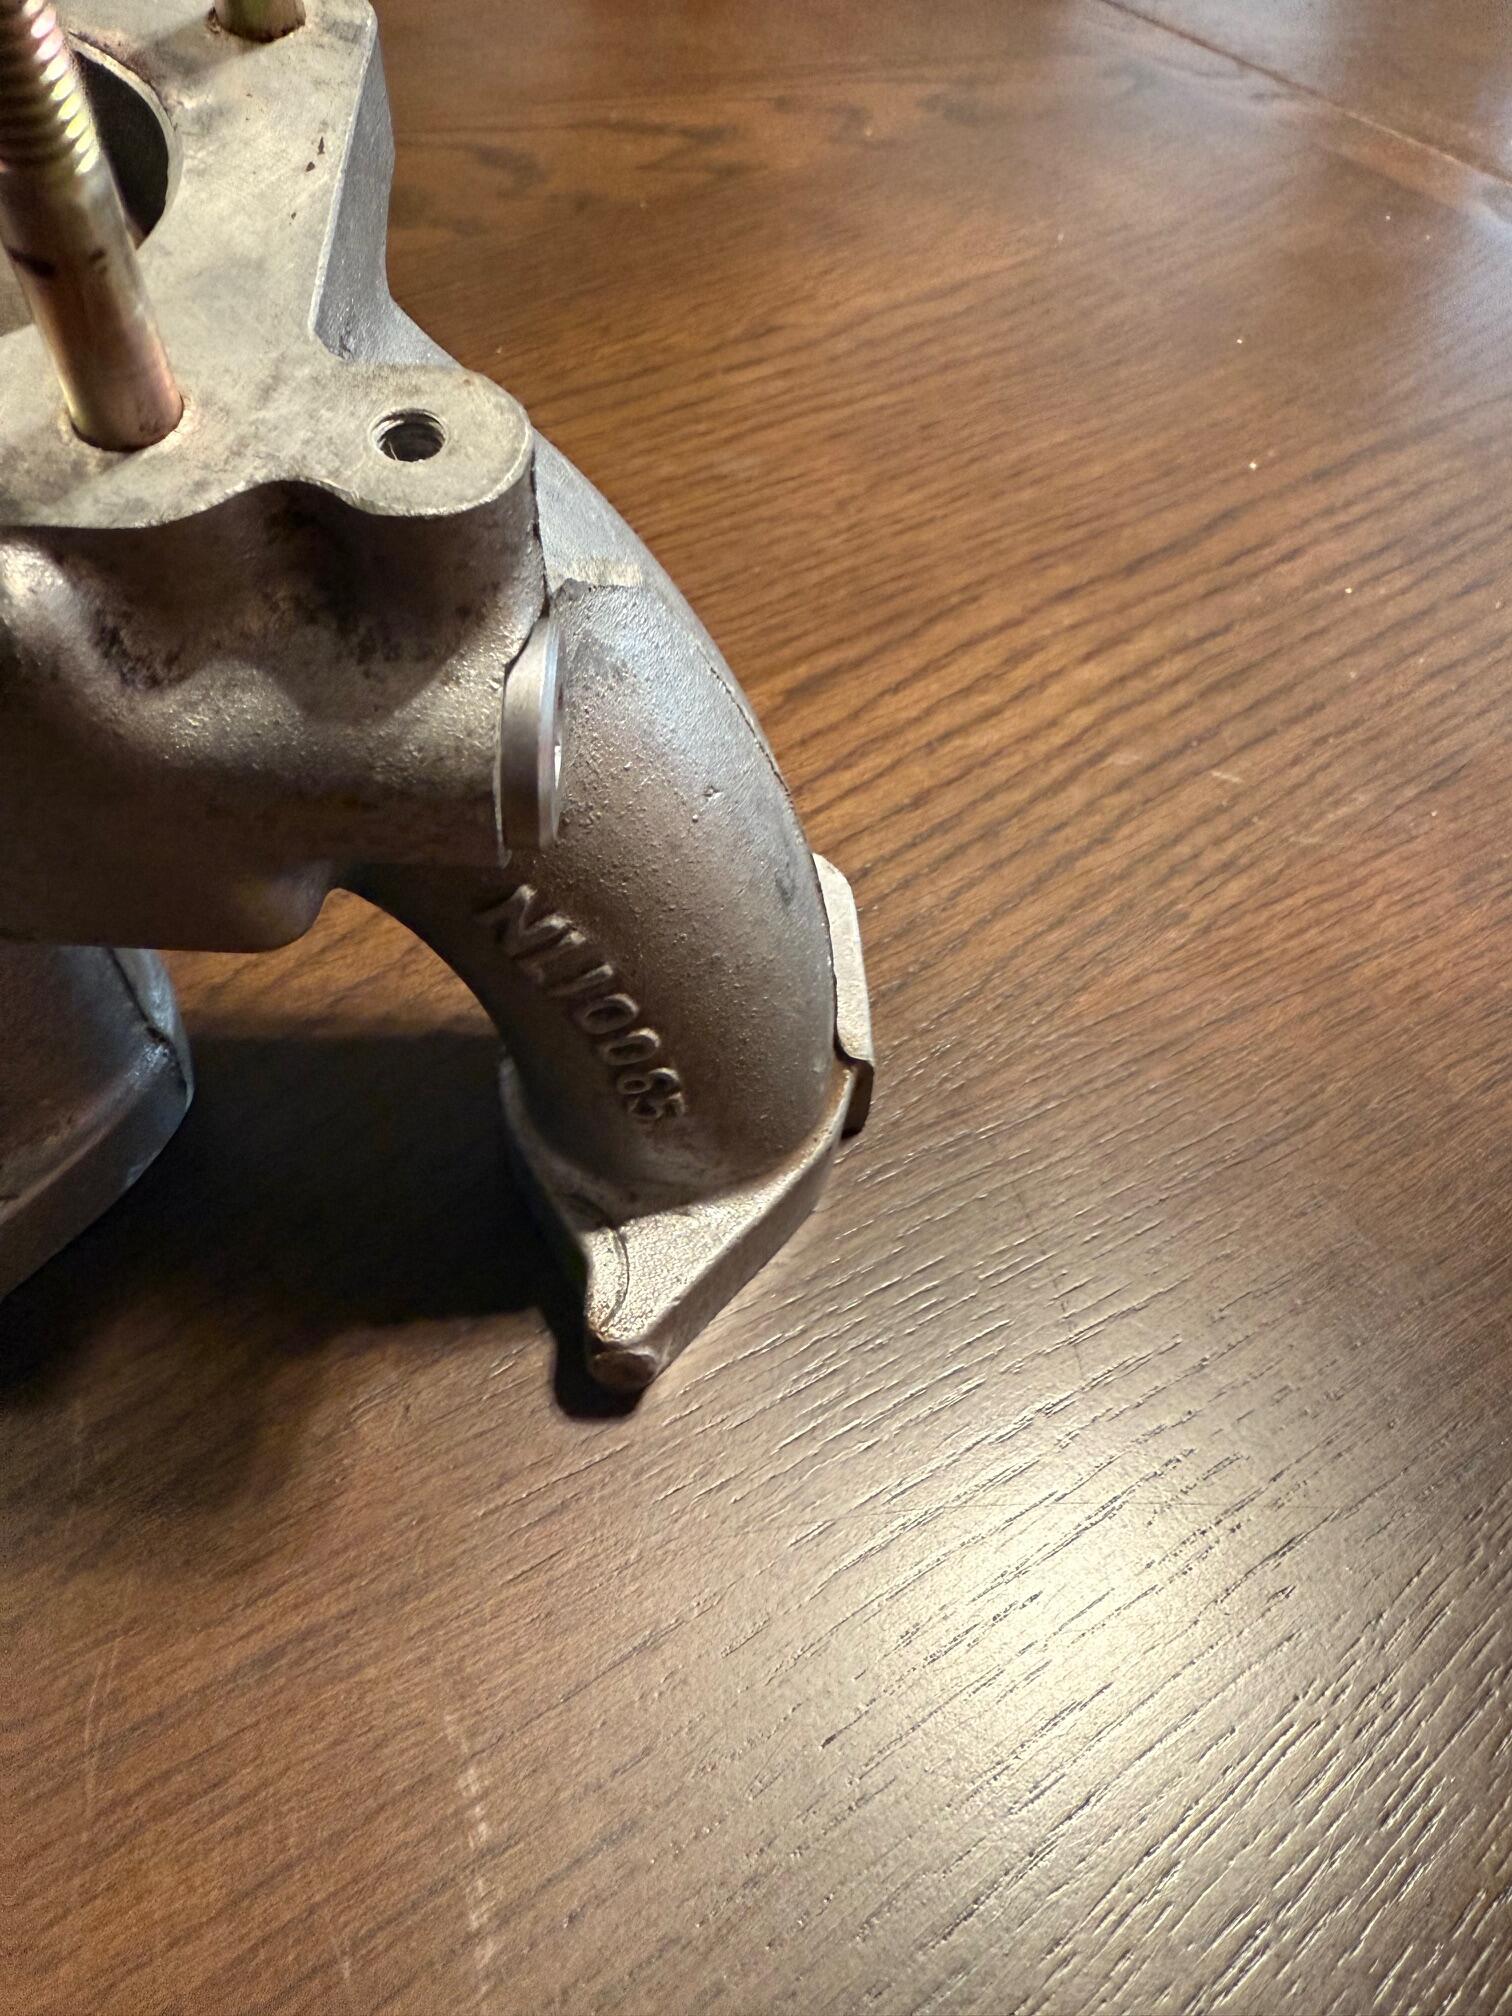
 3 points3 pointsS30 parts are rare and expensive. Not enough competition or volume of sales to keep the price down.3 points2 pointsMy '72 had the same type, it's a York a/c. You have to pull just about all of that off to replace the fuel pump. The smaller round thing above your circle is the fuel pump.2 points2 pointsNever seen the last type. Suspect it is a retro fit that someone did from some other car. The first one is 240, second is 280, though can’t nail down the change over date. Could be as early as the north american 260 in 74. The fiche might provide the date info2 points2 points2 pointsI worked on the heat shield/ cable bracket some more today. Here is the current pattern An earlier template on a piece of coil metal I glued it to piece of 16ga I had laying around A little cutting We will have to clearance it around some of the header pipes. Since it's an equal length header, they intrude on the carb area more than some We will use some stainless exhaust tube to deal with the clearanced areas. Once I finalize a design I will have sendcutsend fabricate it for me


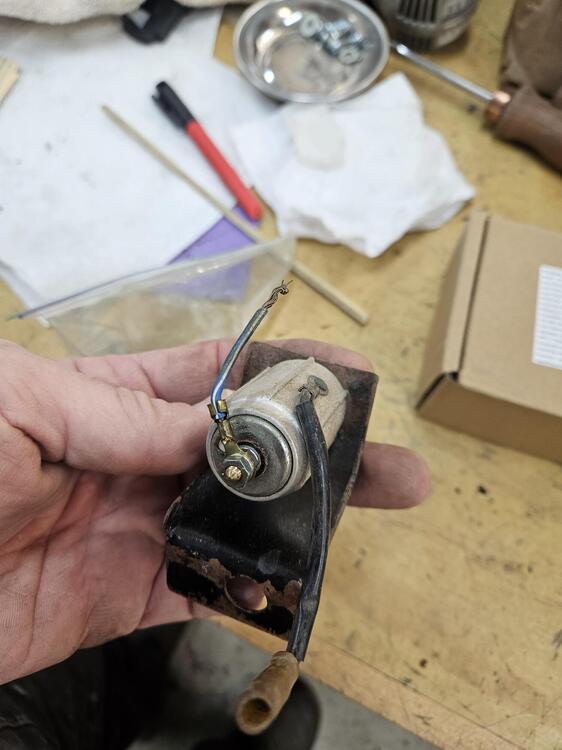
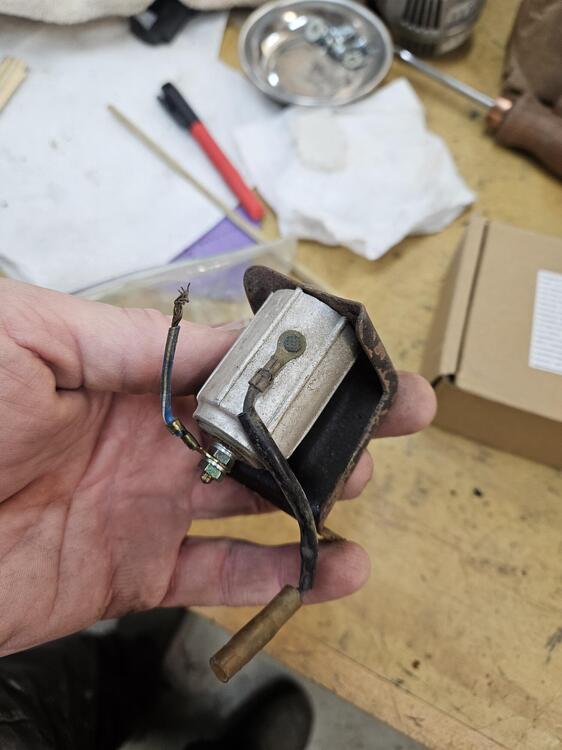
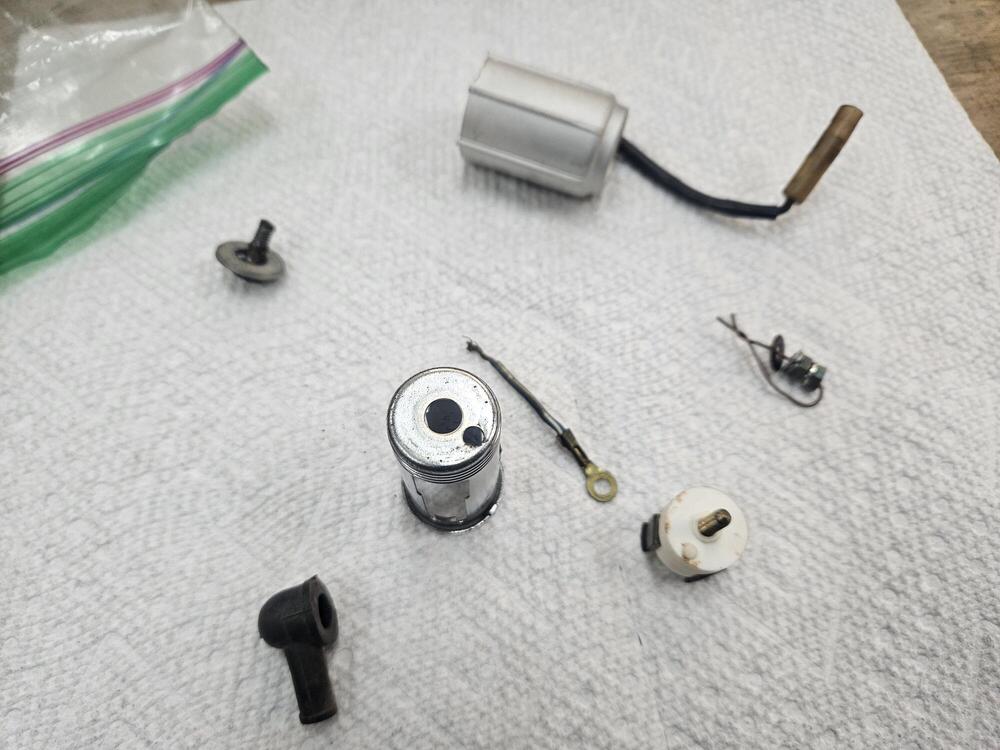
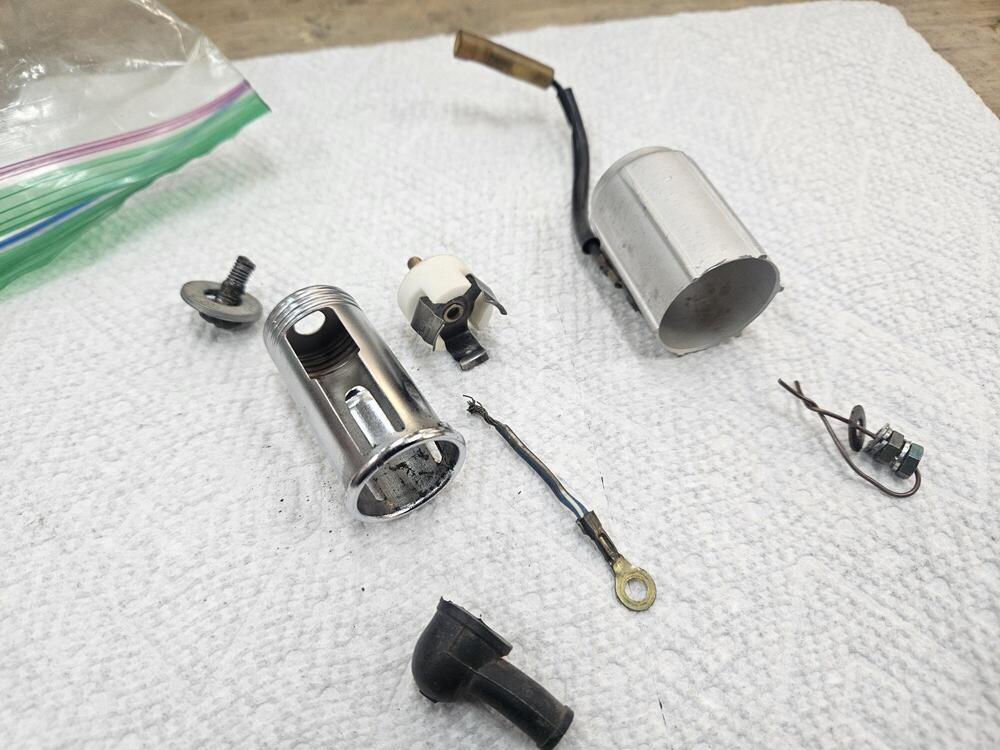
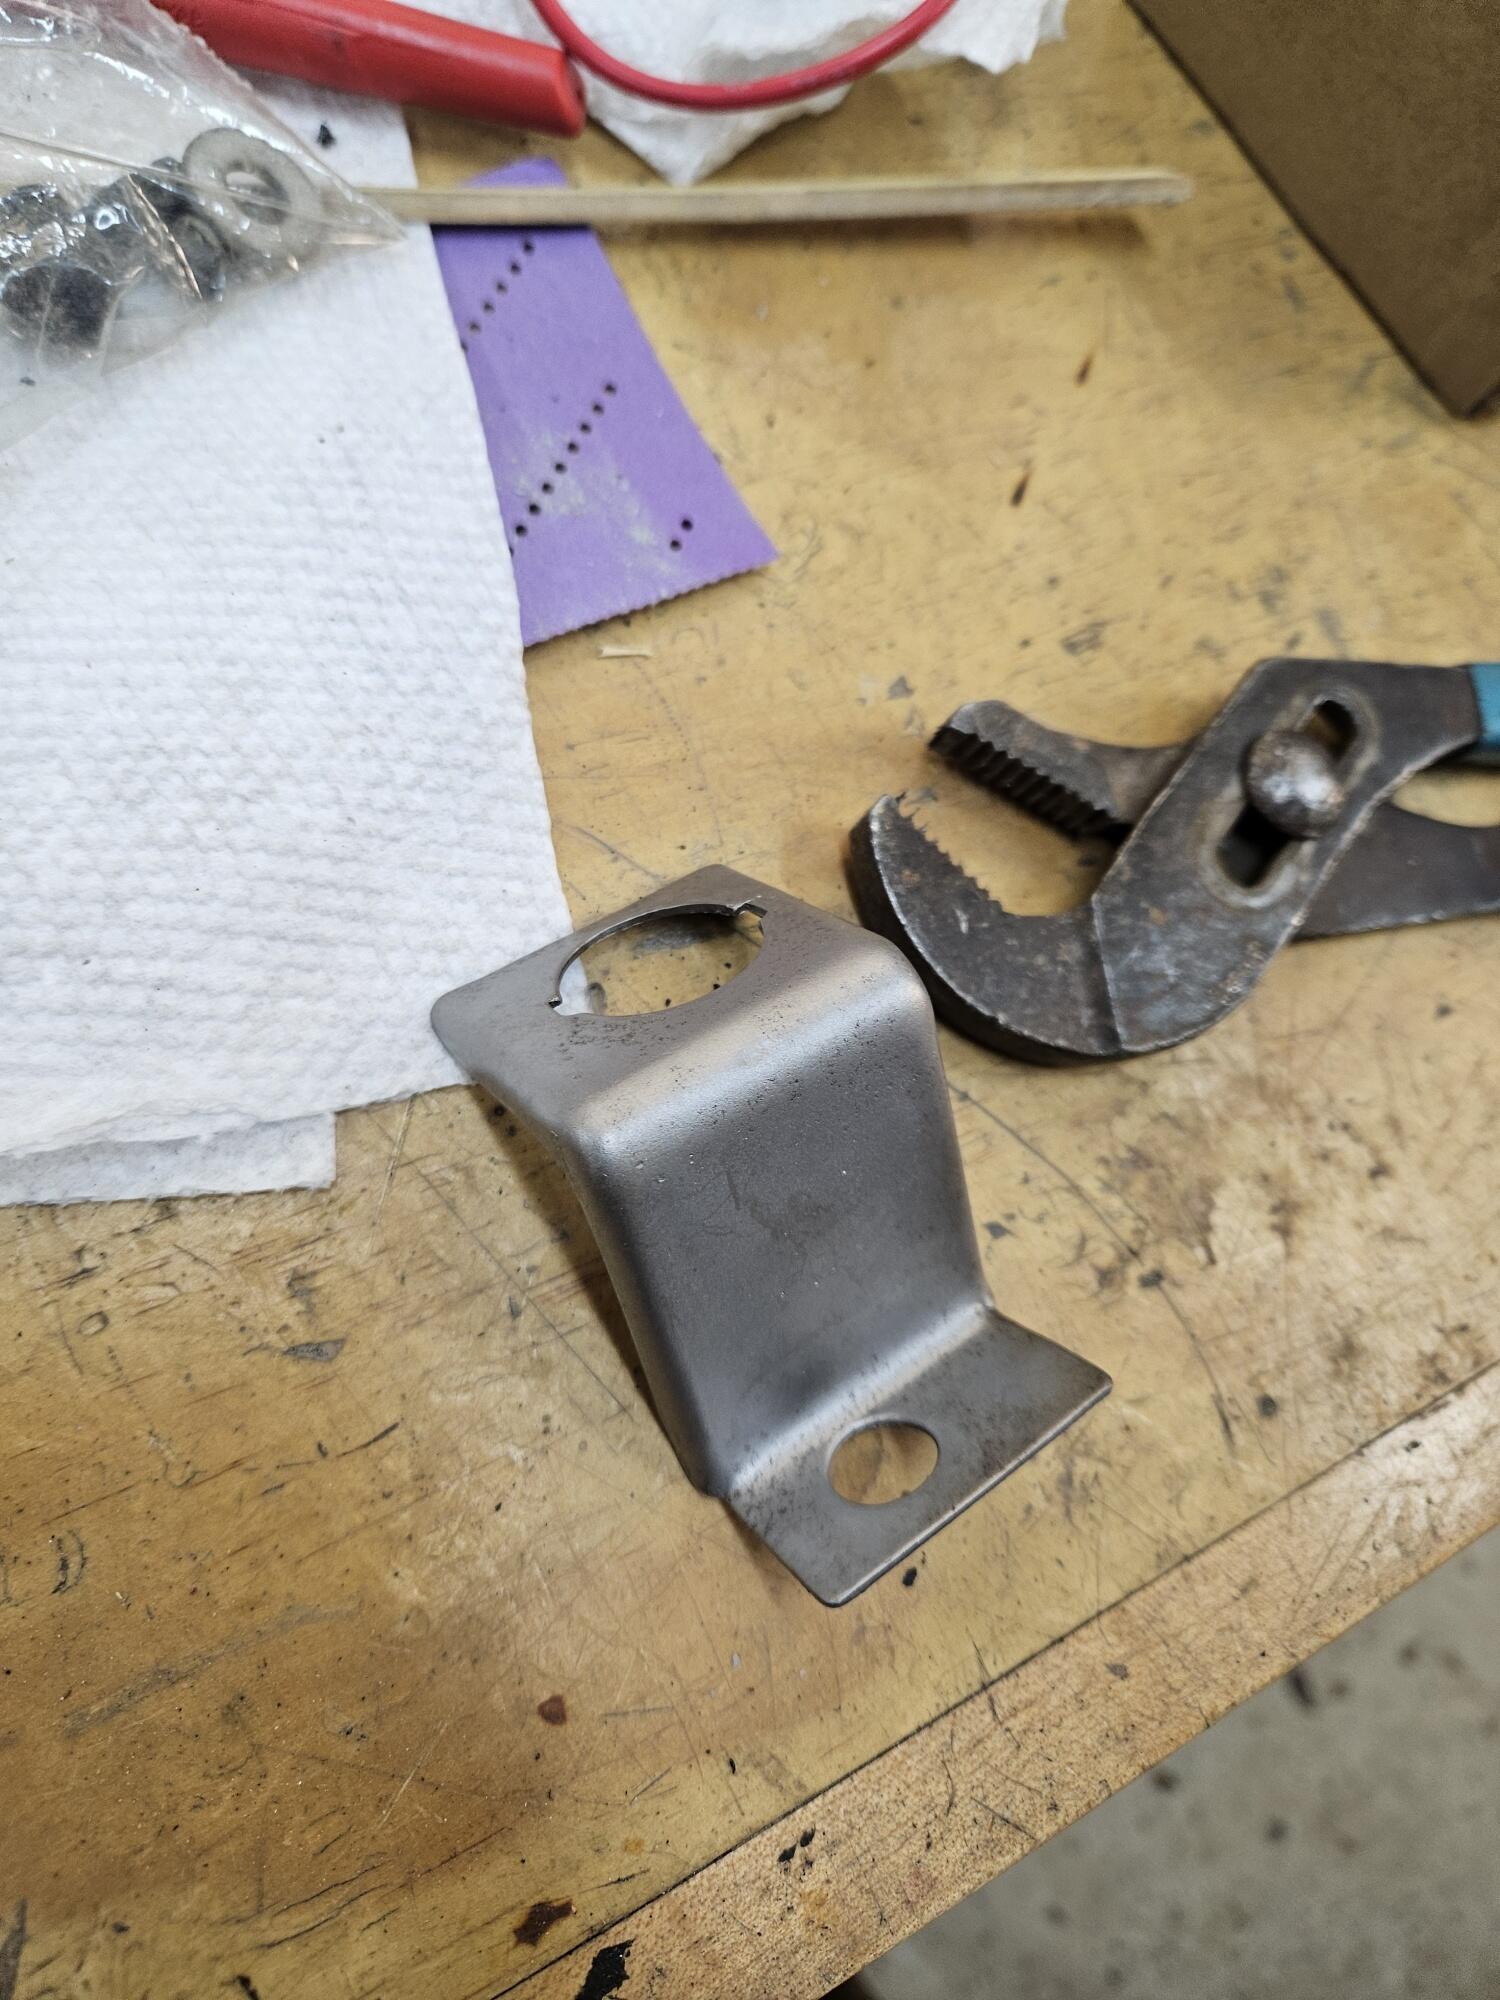
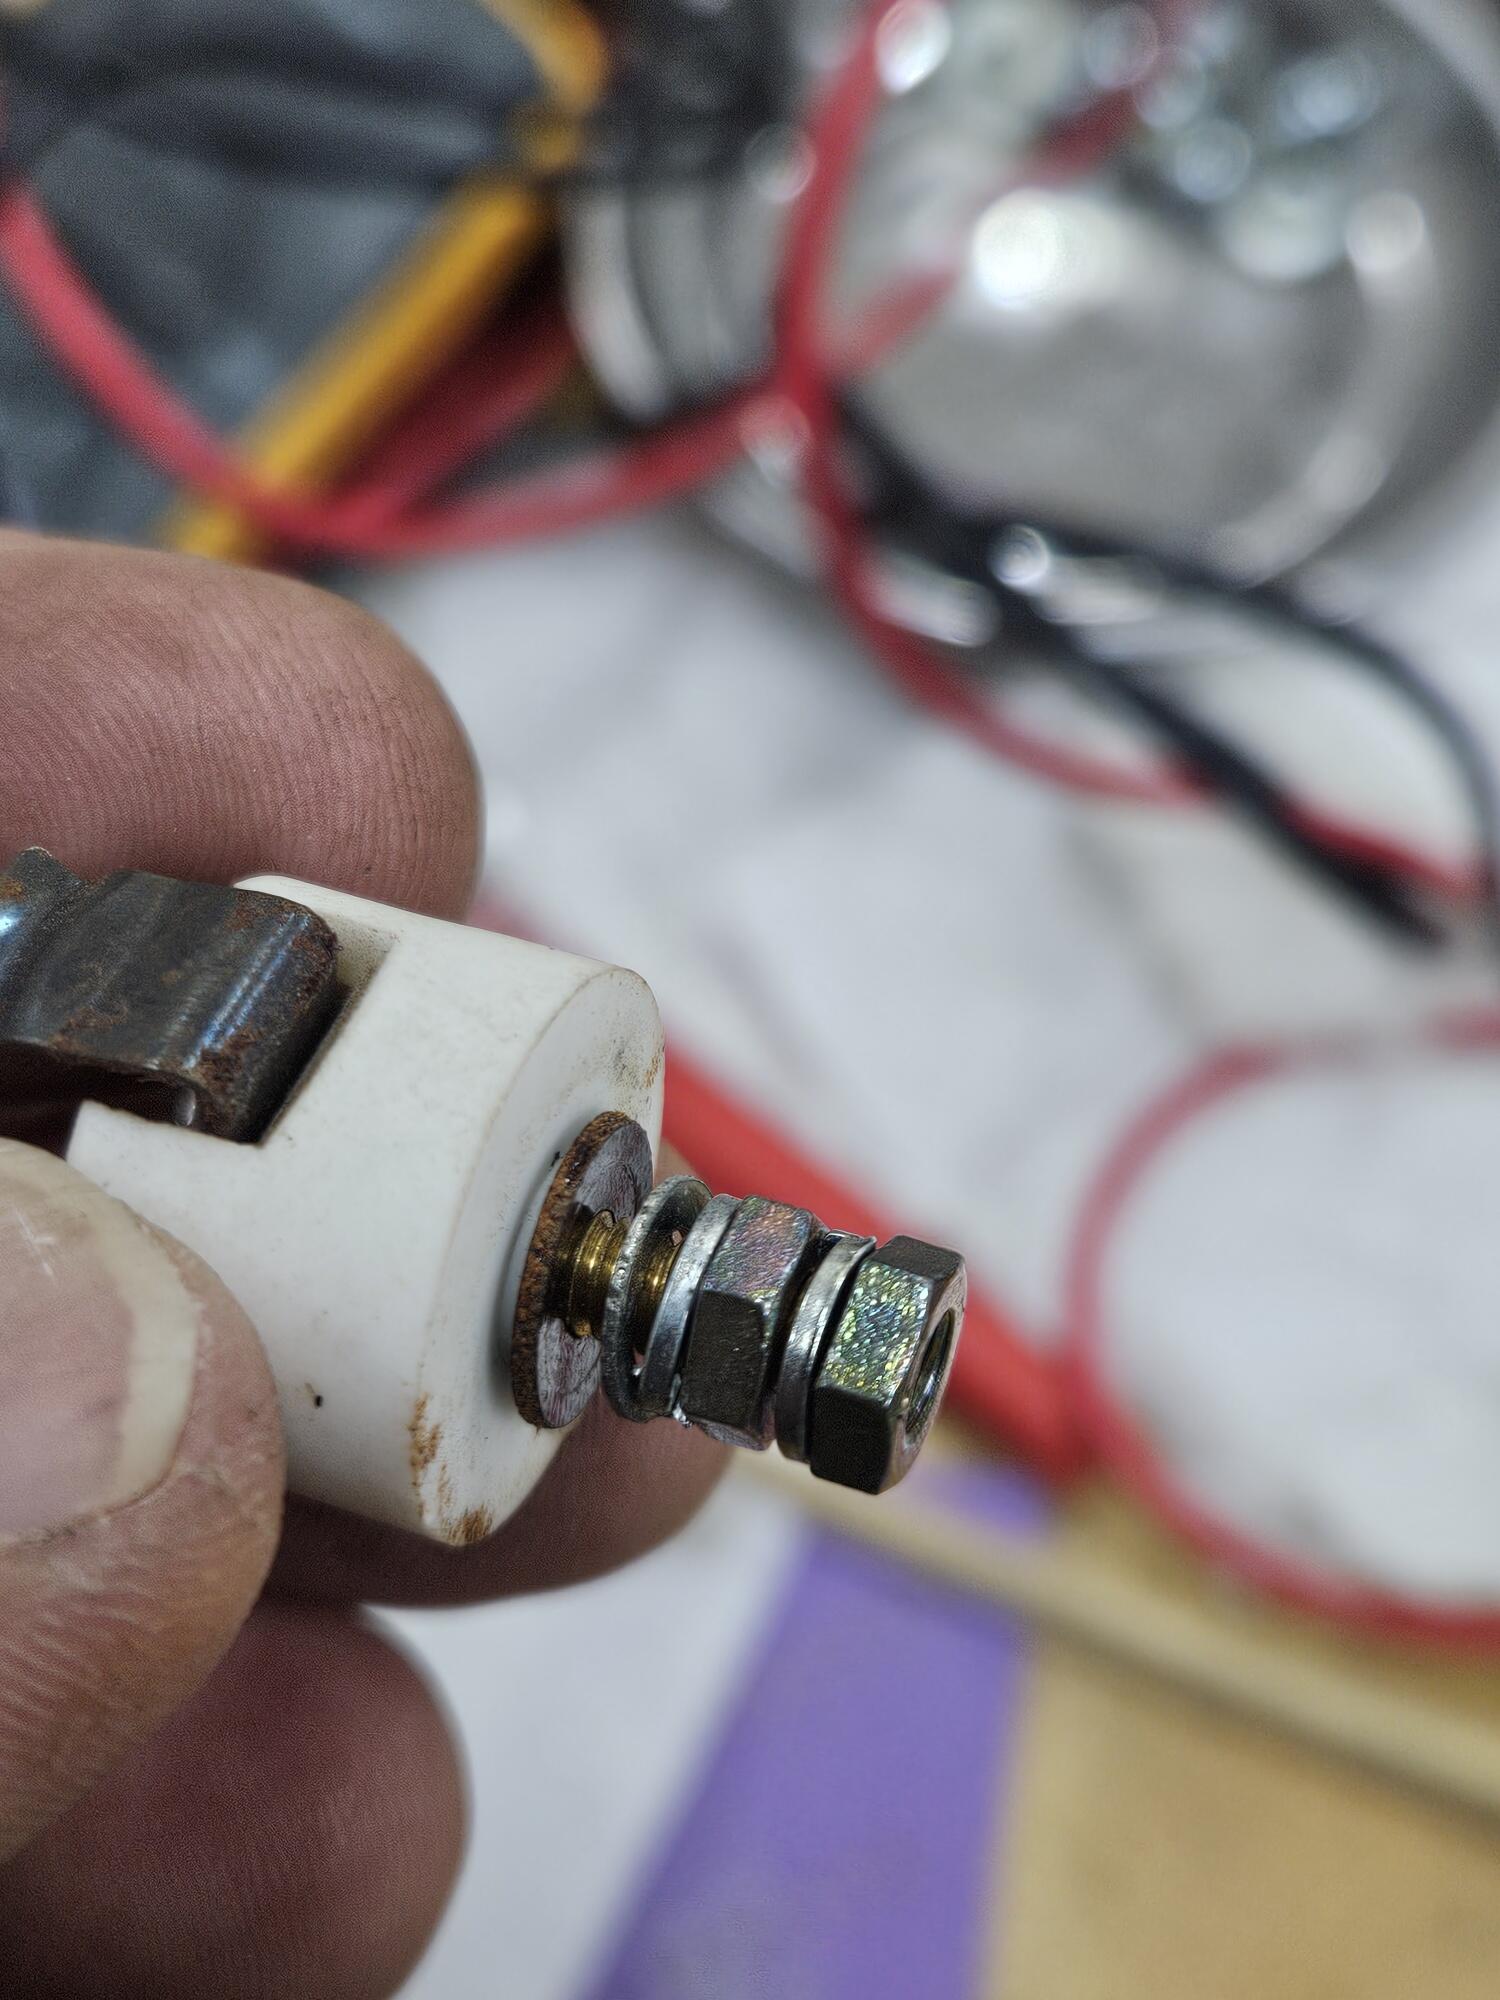
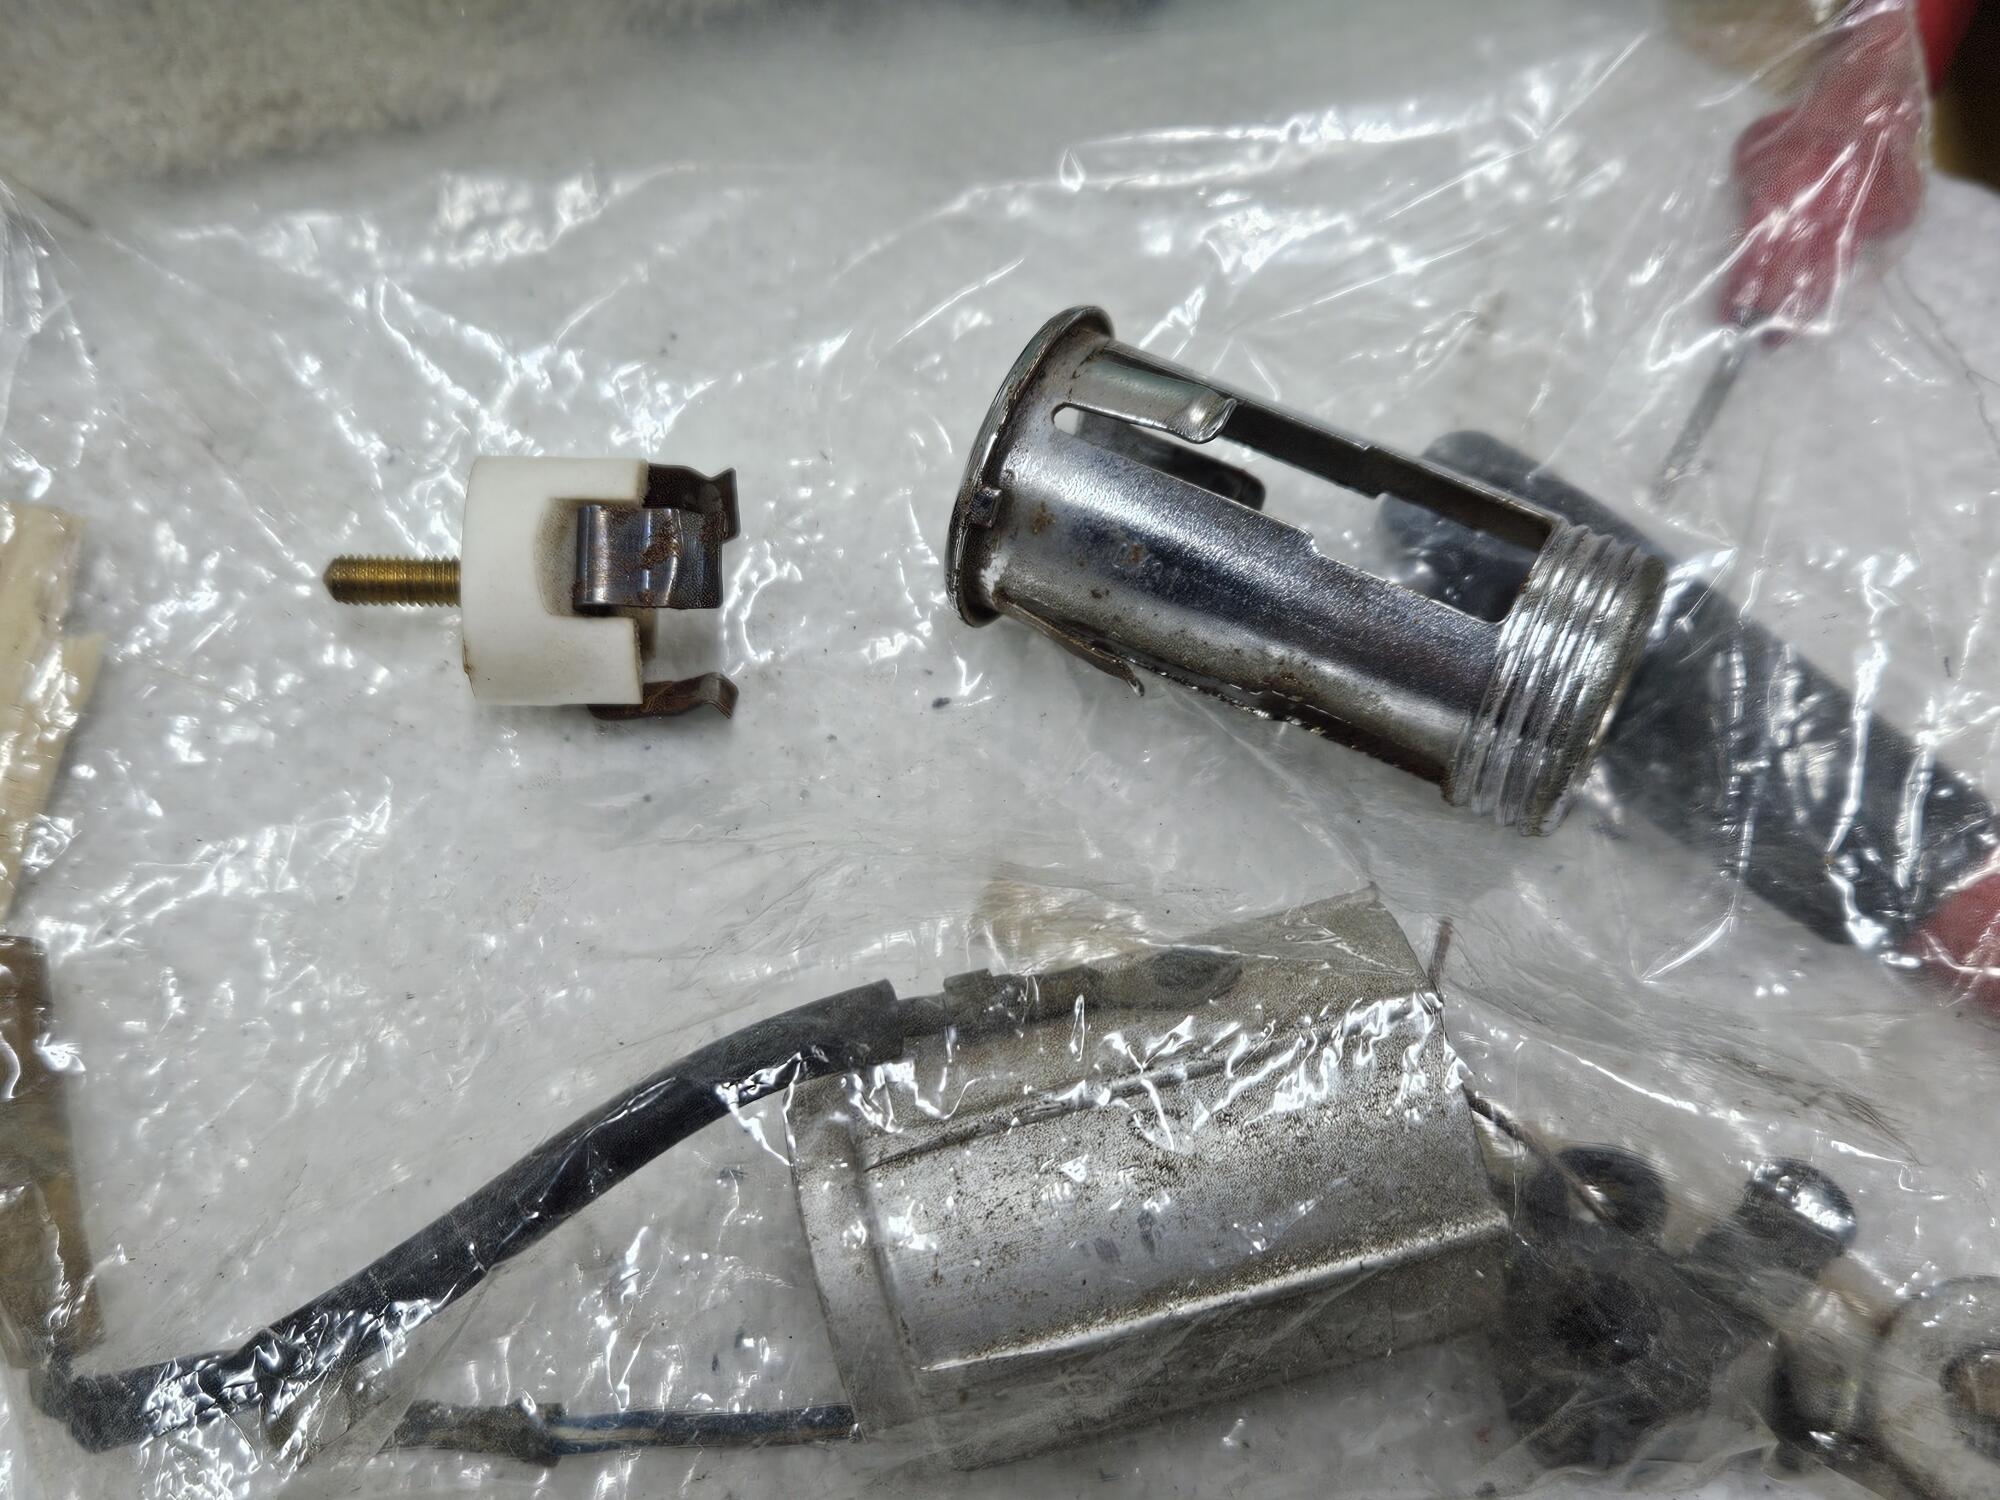
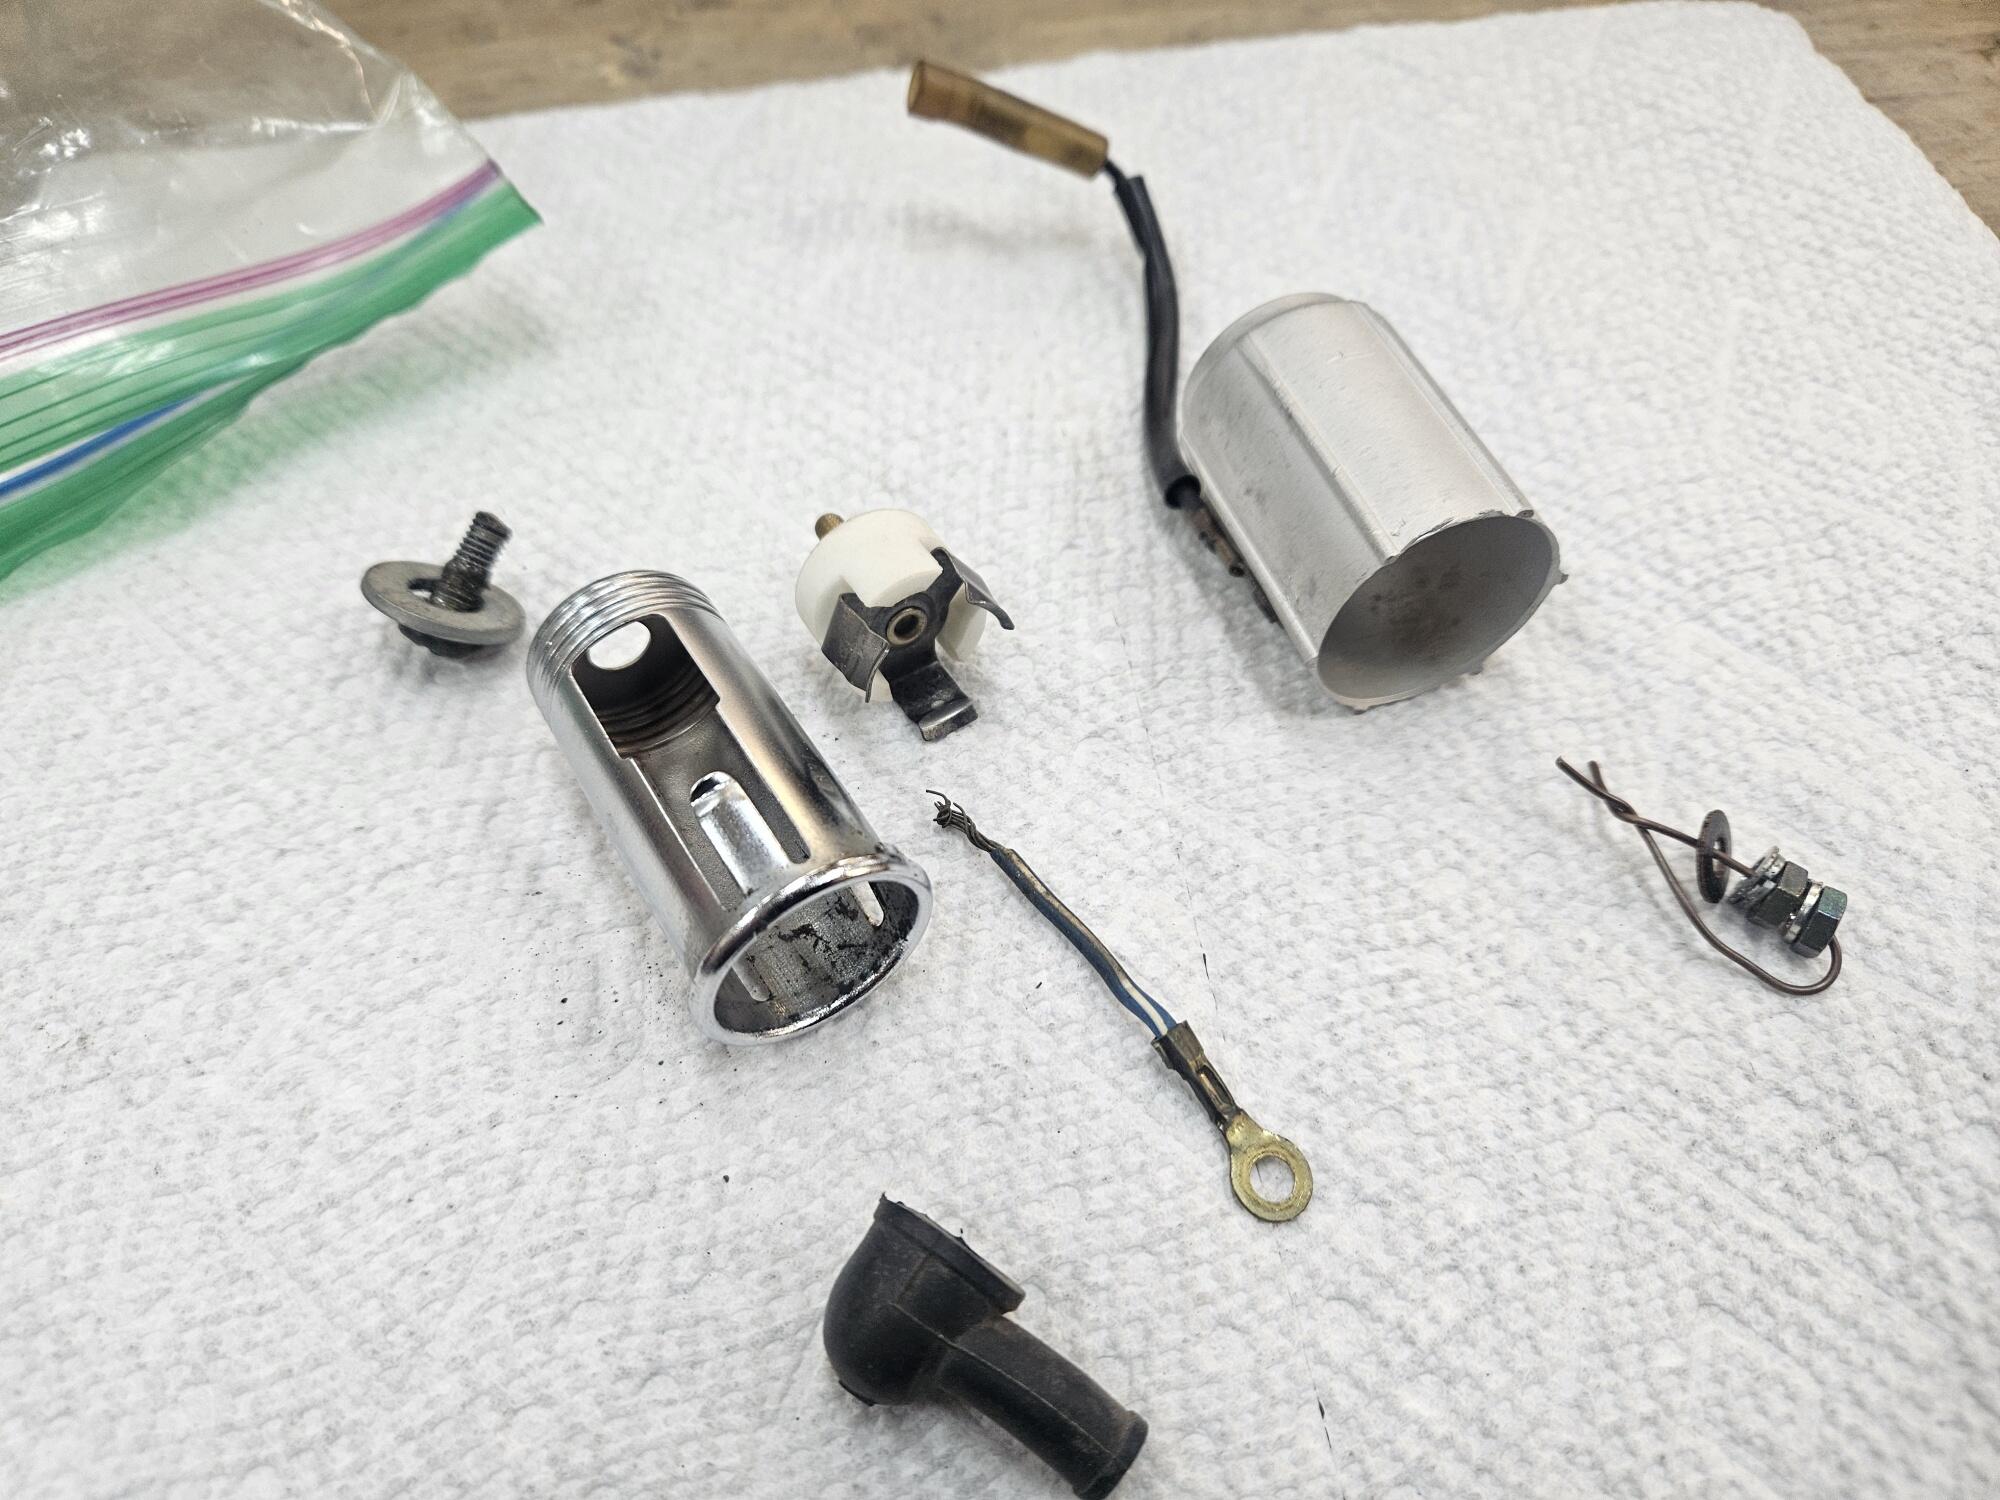
 2 points2 pointsI finished cleaning the cigarette lighter up today Straightened up the bracket and blasted it. Blasted the bottom ceramic with the prongs and polished the chrome rim


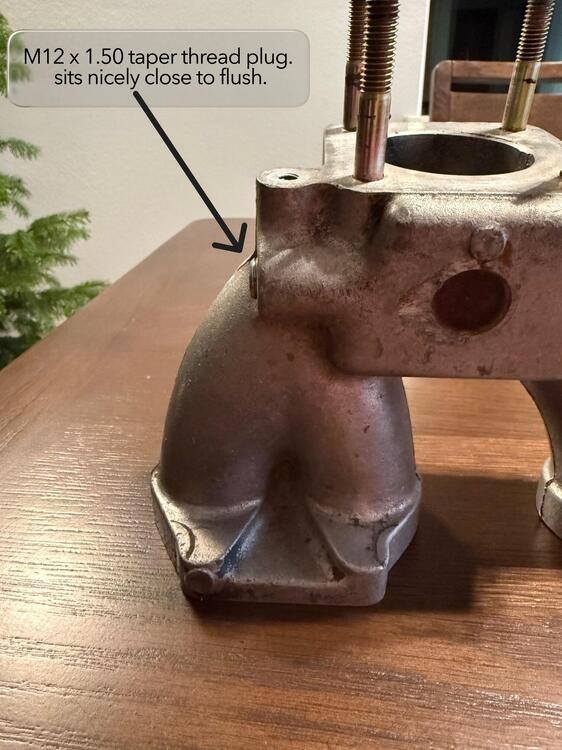
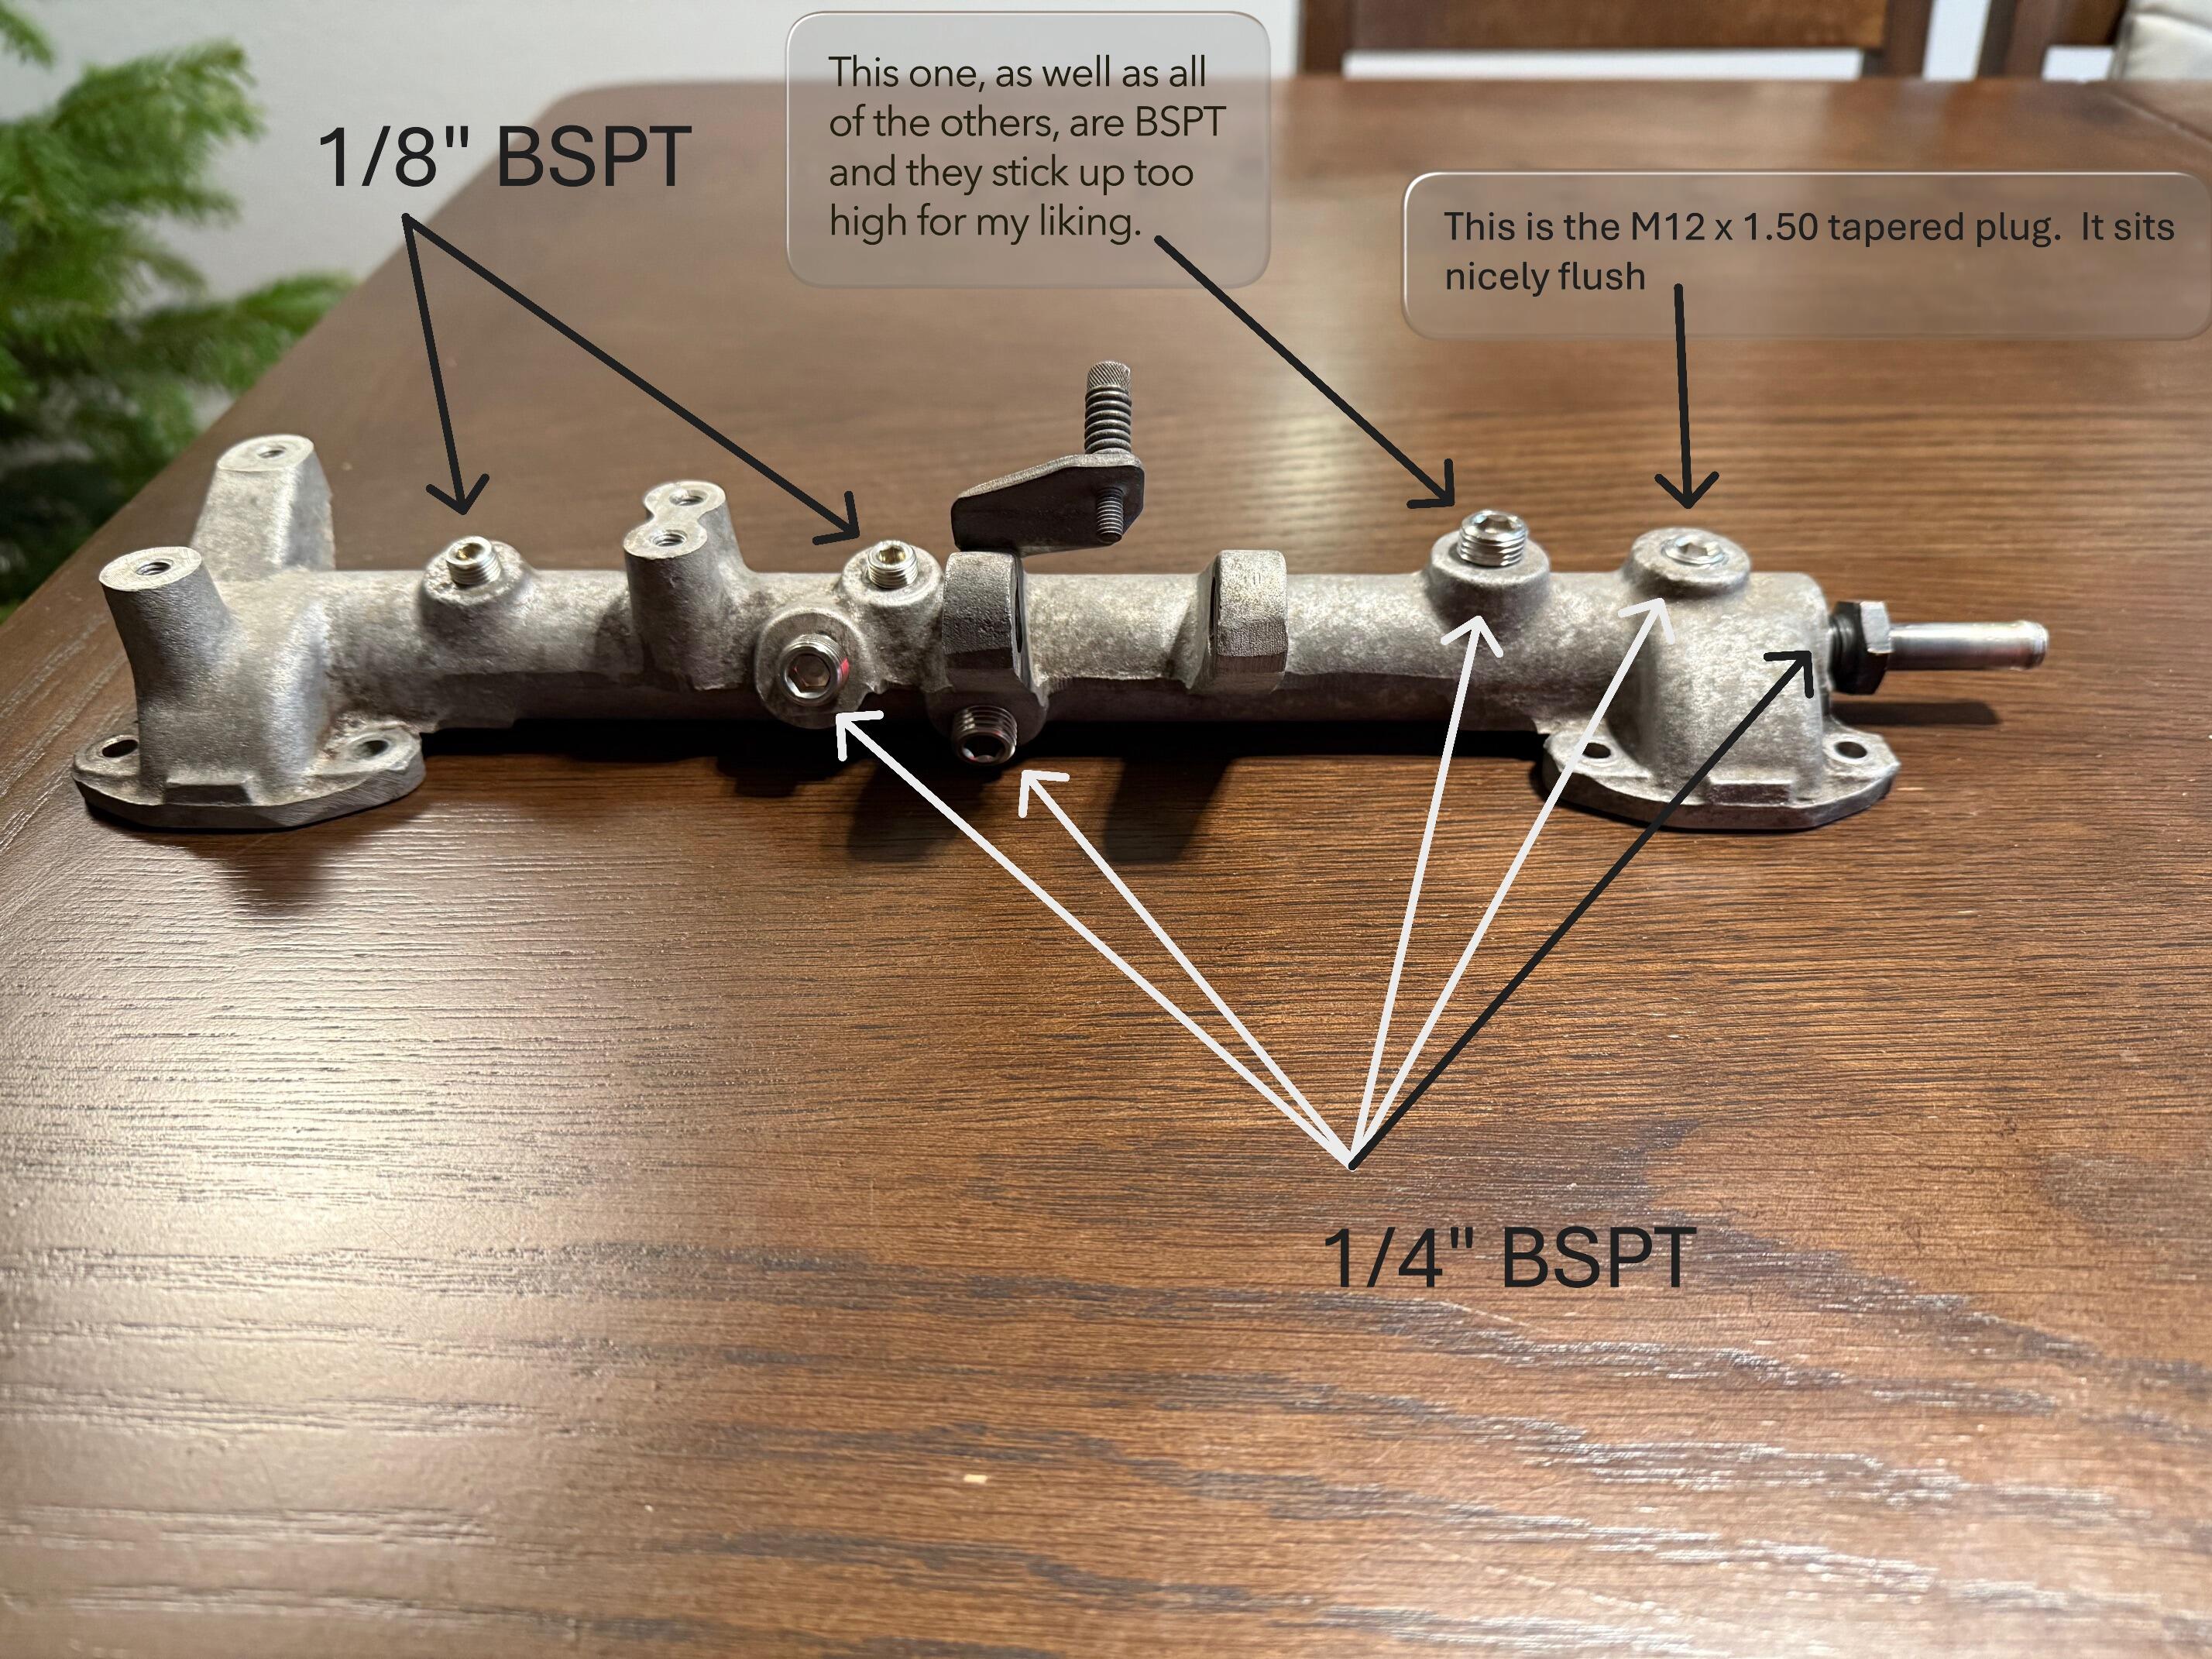
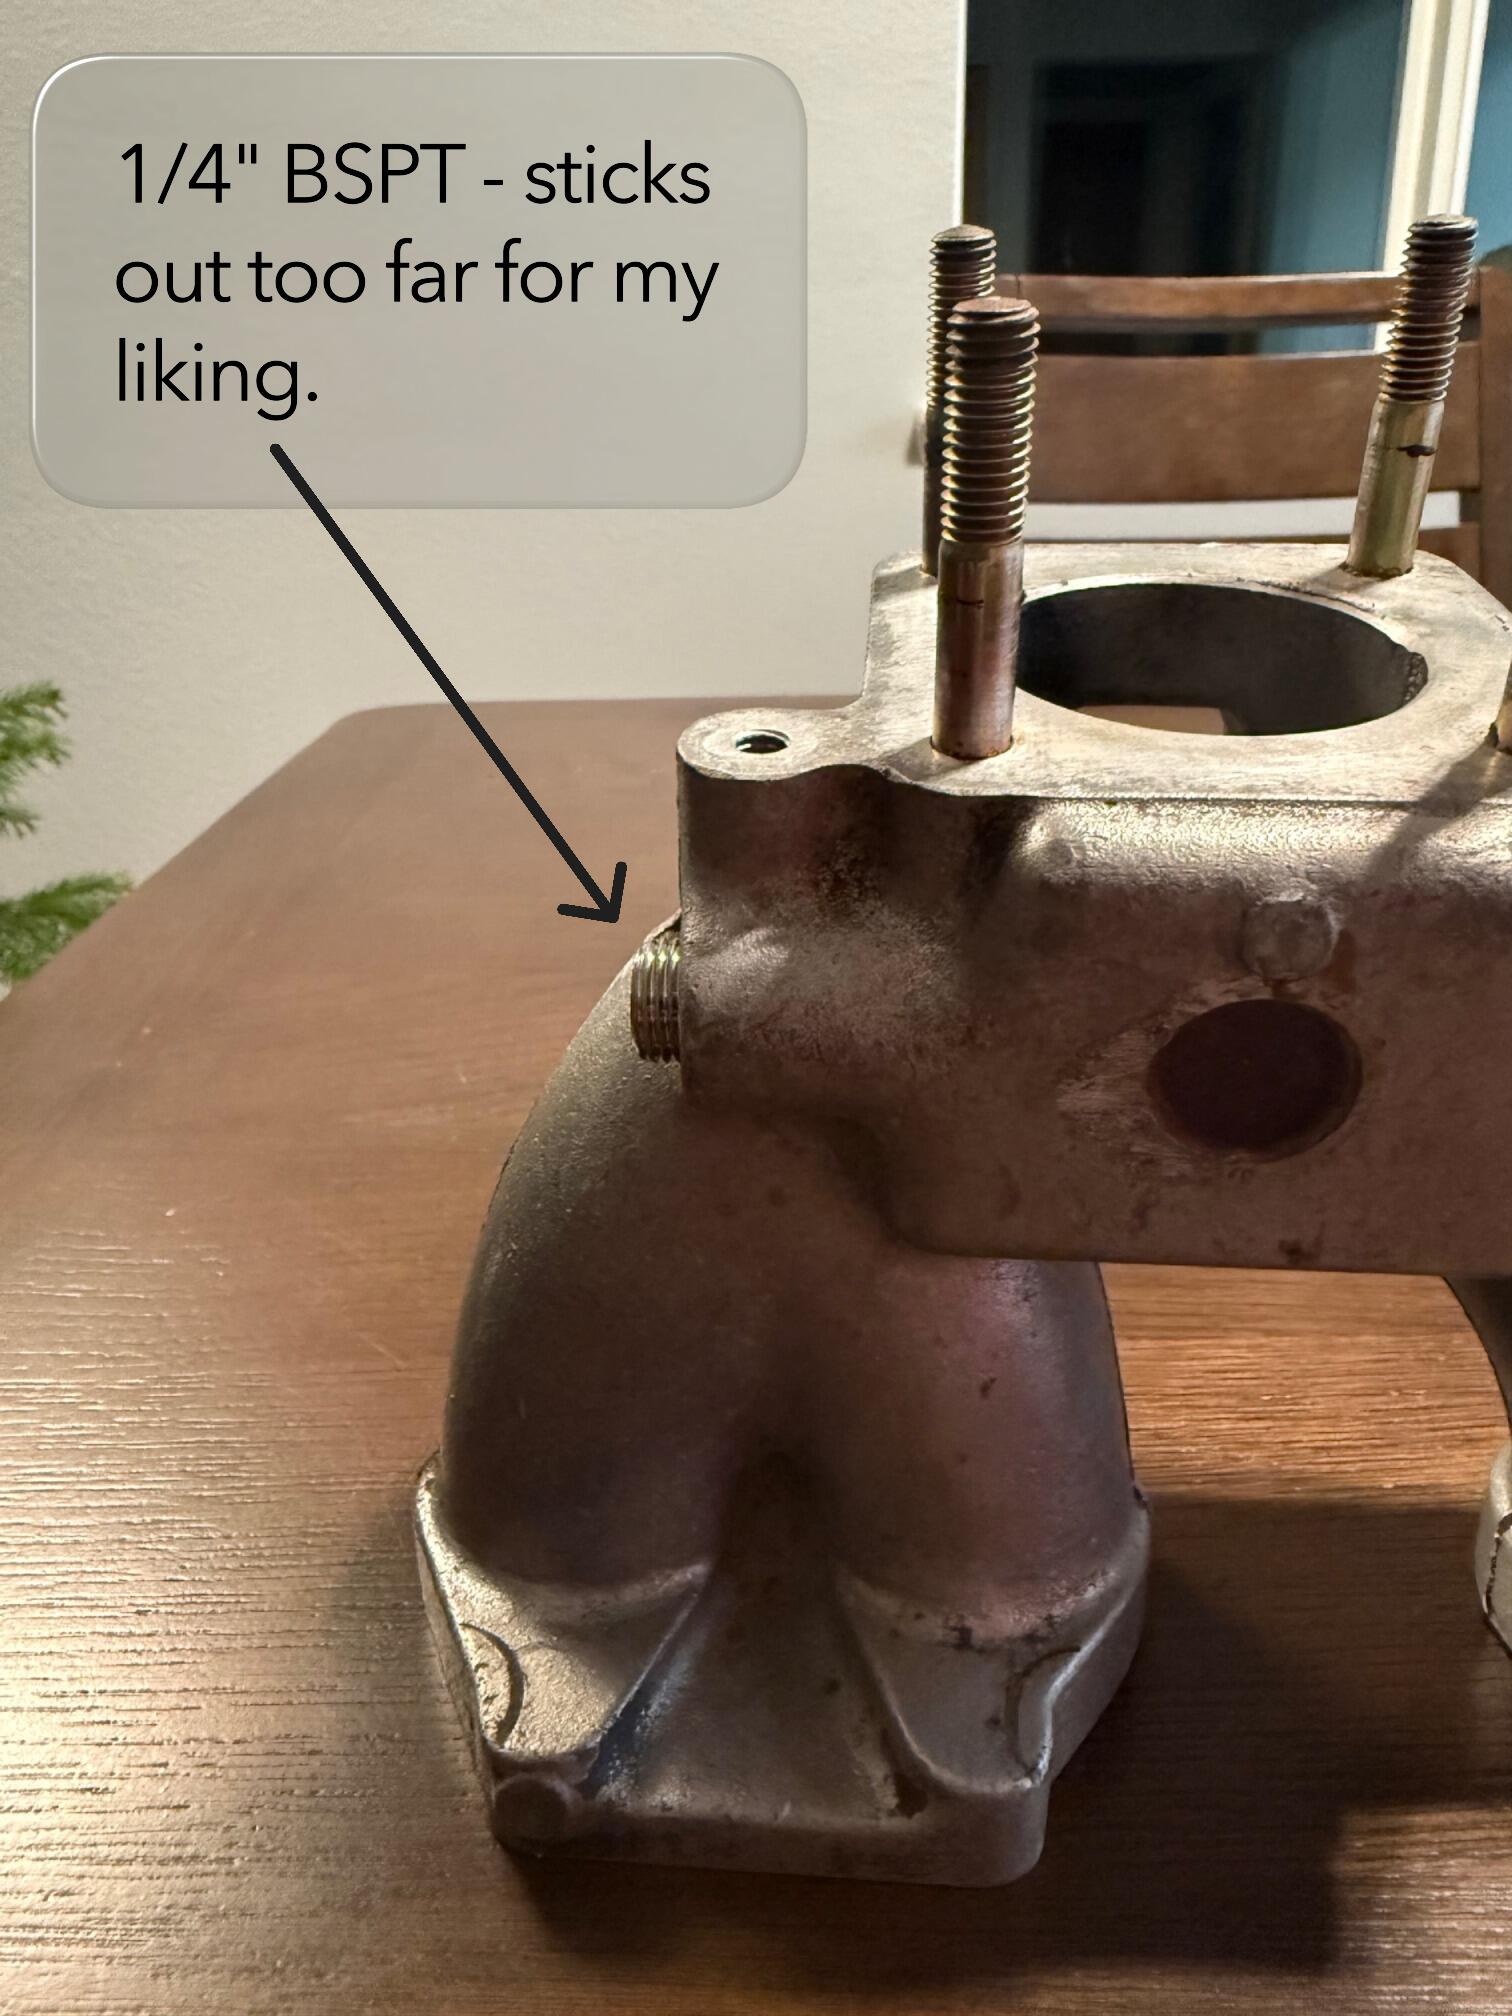
 2 pointsAgree with Yarb on rebuilt alternators. I make the store test them before I buy one. Been burnt before with a bad one, literally. Popped all my fuses as soon as I cranked the car. If you have a volt meter or can borrow one, check the fully charged battery without the trickle charger. Mine usually reads about 12.5 volts. Then crank the car and see what the alternator is adding, should go up to 13.5-ish. Check the alternator belt to make sure it's good and tight. I always use a broom stick or similar as a pry bar to get mine tight.2 pointsGood opportunity to learn how to use a multimeter. Check voltage at idle and while raising RPM. Some of the conversion plugs from MSA have been known to melt and fail. You can get a cheap meter for cheap at a place like Harbor Freight. https://www.harborfreight.com/7-Function-Digital-Multimeter-59434.html2 pointsEveryone on this forum I believe has had issues with rebuilt alternators and starters. Take it to the parts store and have it checked out.2 points2 pointsThe Kiwi girlfriend has lived with me for the last 10 years. She's great I'm lucky2 points2 pointsLooks cross threaded to me, and seems it should be threaded farther in if it weren't.2 points2 points2 pointsAnd the magic number is 11 rotations of the cam, or 22 rotations of the crank. https://www.classiczcars.com/forums/topic/62752-bright-links-on-timing-chain-line-up-every-11-rotations/2 points2 pointsOkay, so I've received various plugs and set screws from both McMaster and Bel-Metric. I ordered 1/8 and 1/4 NPT, 1/8 and 1/4 BSPT, M12 x 1.50 straight thread and M12 x 1.50 tapered thread, and I am still a bit confused! I won't hold you hostage until the end, I'll give you what I THINK the holes were from factory, and then I'll provide some pictures and notes from my "testing". I think the factory balance tube (US market 240Z) came with 2 ea. - 1/8" BSPT and 5 ea. - 1/4" BSPT holes BALANCE TUBE 1/4" BSPT HOLES it was clear to me that 1/4" NPT is too big, couldn't really even get a thread to start, so it makes sense that, 1) One COULD force 1/4" NPT into the holes in the soft aluminum and create some sort of "seal", and 2) a hole that had been "buggered by a previous (or current!) owner could likely be salvaged by tapping to 1/4" NPT. The 1/4" BSPT plugs I have encounter resistance at 1-1/2 turns and are fairly tight at 1-3/4 - 2 turns. This leaves them sticking out farther than I would like for a clean, plugged look as I would like them to be as close to flush as possible. The M12 x 1.50 straight thread, socket set screw I tried fit very loose initially, and threaded quite a ways in (farthest of the three options I tried) before finally hitting resistance. I feel like it MIGHT have finally created a "seal", but not ideal in my opinion. The M12 x 1.50 TAPERED plug encountered resistance at about 3-1/4 turns and was fairly tight at 3-1/2 turns in. This left it pretty close to flush to the surface and provided a good seal and I think this is what I will be using to plug 1/4" BSPT holes. (see pictures below) BALANCE TUBE 1/8" BSPT HOLES it was clear to me that 1/8" NPT is too big, couldn't really even get a thread to start, so it makes sense that, 1) One COULD force 1/8" NPT into the holes in the soft aluminum and create some sort of "seal", and, 2) a hole that had been "buggered" by a previous (or current!) owner could likely be salvaged by tapping to 1/8" NPT. The 1/8" BSPT plugs I have, encounter resistance at 1-1/2 turns and are fairly tight at 2 turns in. This leaves them sticking out more than I would like for a clean look (see pictures below) now I want to experiment with M10 fine thread (both straight and tapered) in the 1/8 BSPT holes INTAKE MANIFOLD WATER HEATING HOLES The outside (inlet and outlet) holes come from the factory with 1/4" BSPT holes Again, the 1/4" BSPT plugs don't thread in very far and sit proud. The M12 x 1.50 TAPER thread plugs thread in farther and sit pretty flush for a clean look. the inner holes (two holes on the inside of each part of the two-part manifold that connects the manifold halves with "bushings" and metal tubing) come from the factory with M16 x 1.50 STRAIGHT thread. I have some M16 x 1.50 straight AND taper plugs coming to try in those holes. I'm now thinking that a straight-threaded plug with a low head and Loctited, may be the ideal ticket for this hole since there is a machined spot to accommodate a bolt head. Heck, any old M16 x 1.50 bolt will work here! Keep in mind that these holes, if not being used (not connected to water lines), can stay open, they do not need to be sealed/plugged, as they will not affect anything other than keeping the intakes warm on initial start-up in cooler weather/climates. I just want to plug them for aesthetic purposes. Here's some pictures to clarify my rambling!
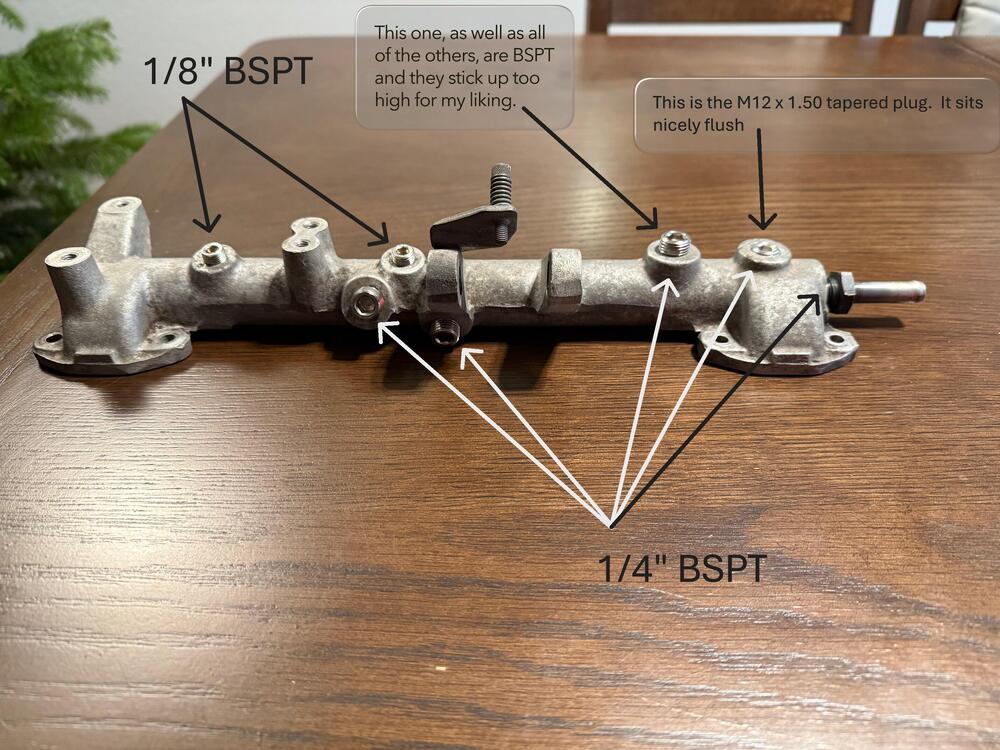

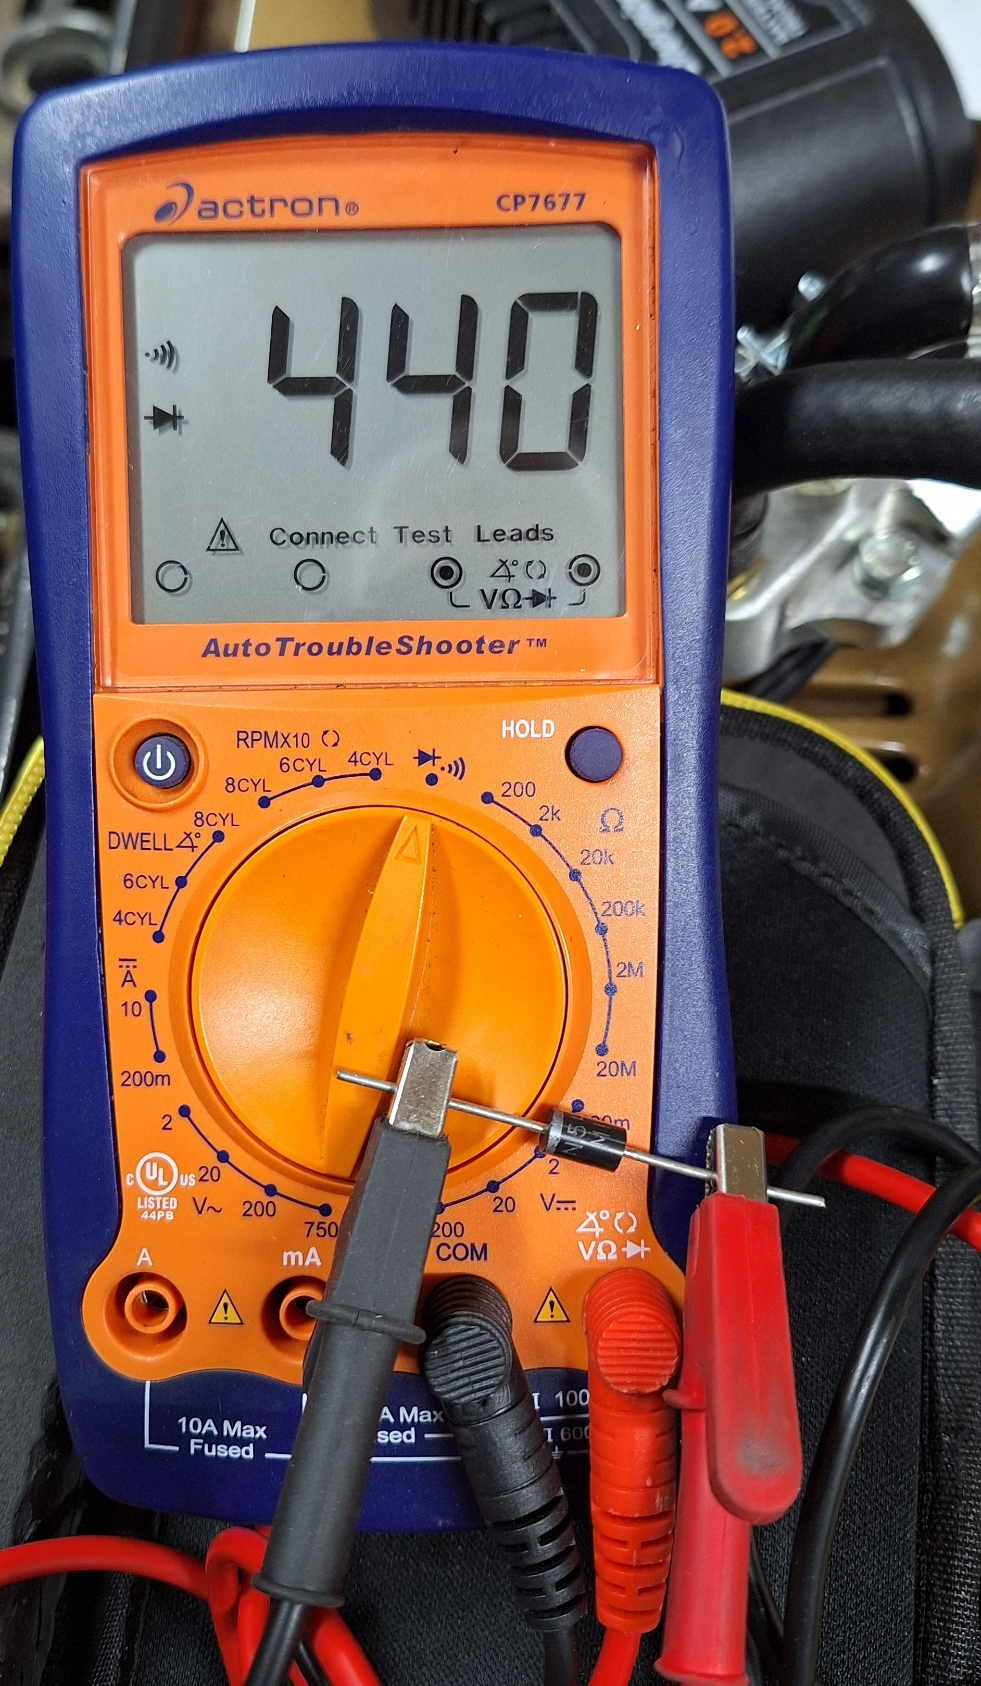
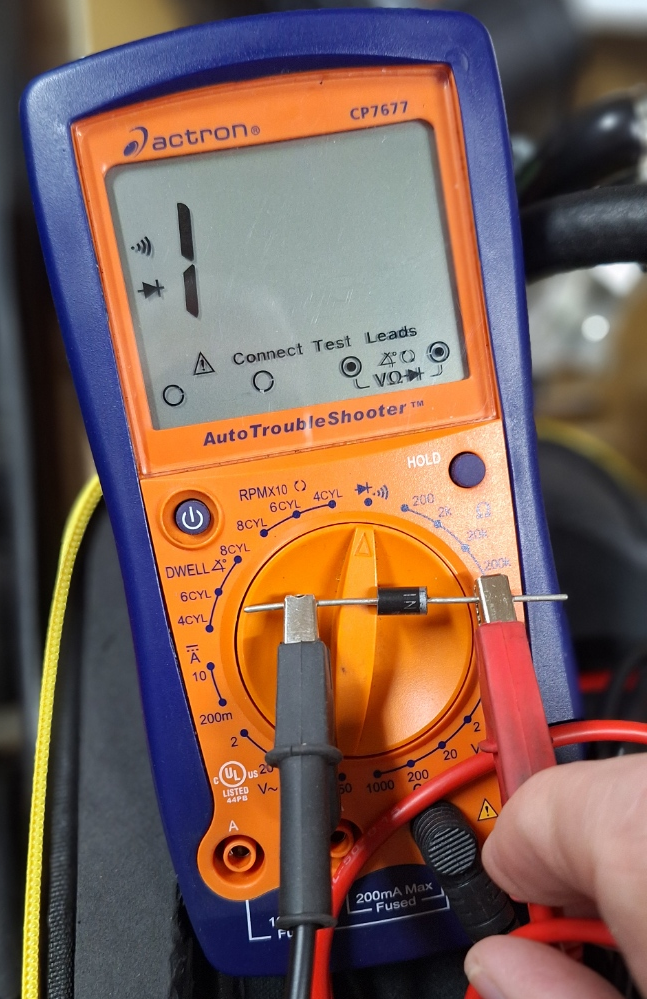
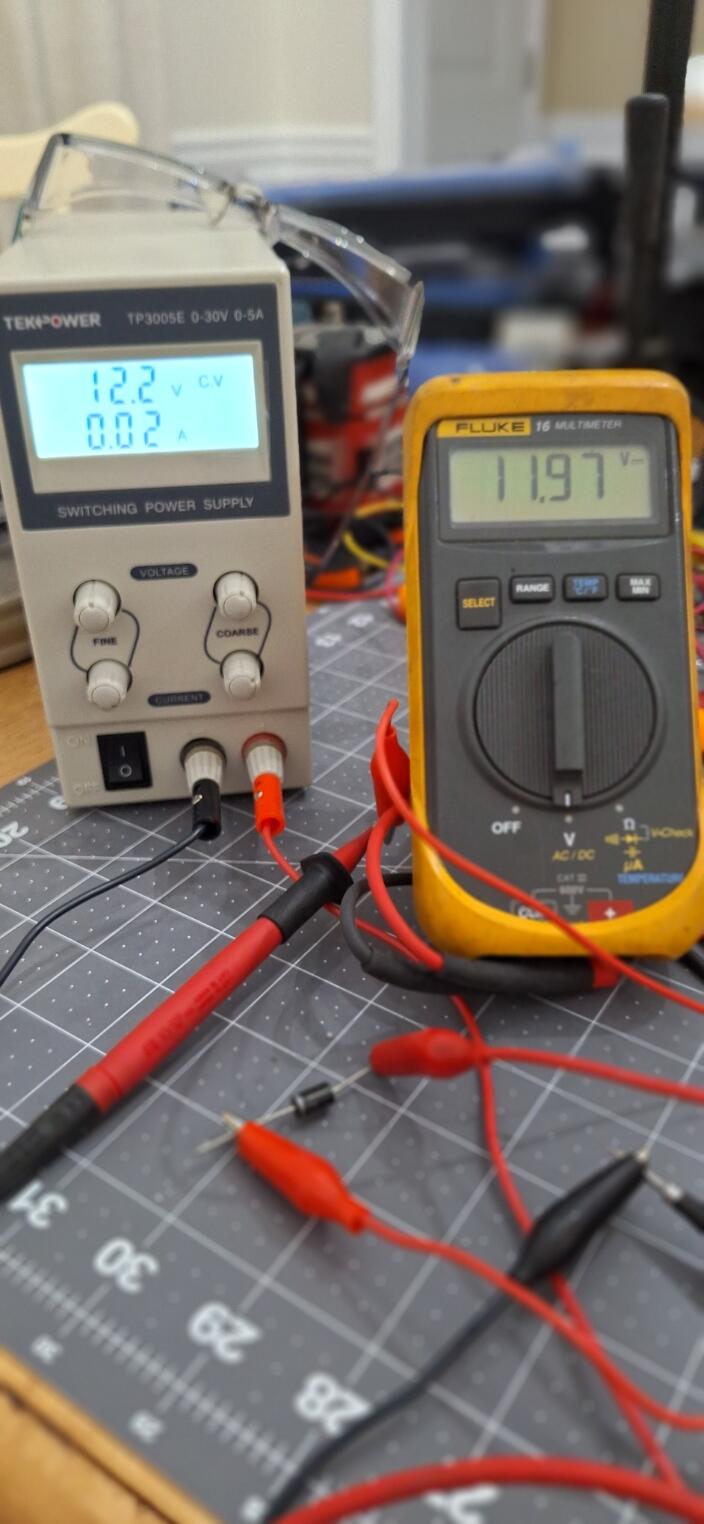
 2 points2 points2 points2 pointsGood question. Pull the parking light fuse and see if things change.2 points2 pointsI've been using a set of FIAMM air horns for about 50 years, very Euro and VERY loud!!! 😲2 points2 pointsAbsolutely! Will take me a little while, but the quality and sound were great on the test run!2 points1 pointThe York compressor is very heavy and as @siteunseen mentioned, the compressor mounting bracket makes it very difficult to change the fuel pump. I had the same set-up installed on my '71 a few months after buying it. But, year later, removed it all and replaced with a modern rotary compressor and mount. I still have my York installation instructions and compressor mounting bracket on a shelf.1 point1 pointI've looked at LED headlights off and on over the past few years. But honestly I don't really see a need for it. LED's are great for saving power in a house, boat, or RV. However, for a car that is NOT designed to run LED headlights, you really need to do it right. And, this won't be a $100 option. I've seen cars running around with cheap LED's and the flicker / light output is too annoying for my blood. A proper LED setup will need new drivers (circuit boards), relays, quality bulbs, and some nice wiring. The right setup also won't require cutting your existing harness and it will provide quality output. When I dug further into this venture, I found the Marimoto setup looks like a good one. But you're talking about $400-$600 for the bulbs plus another hundred or so for the wiring. Something to ponder anyway... FWIW1 pointOf course, there is one other possibility. I could have designed the test wrong. I dug out a diode that should be the same spec as the ones used in the plug and tested myself. I found my instructions were lacking. You should re-test with the meter in diode testing mode. You can leave the key in OFF, too. If you test from the ballast resistor to the white/black wire, you should get a result similar to this: With the leads swapped, you should see this: If you do the voltage test, you should see a little less than battery voltage as the diode causes a slight voltage drop.


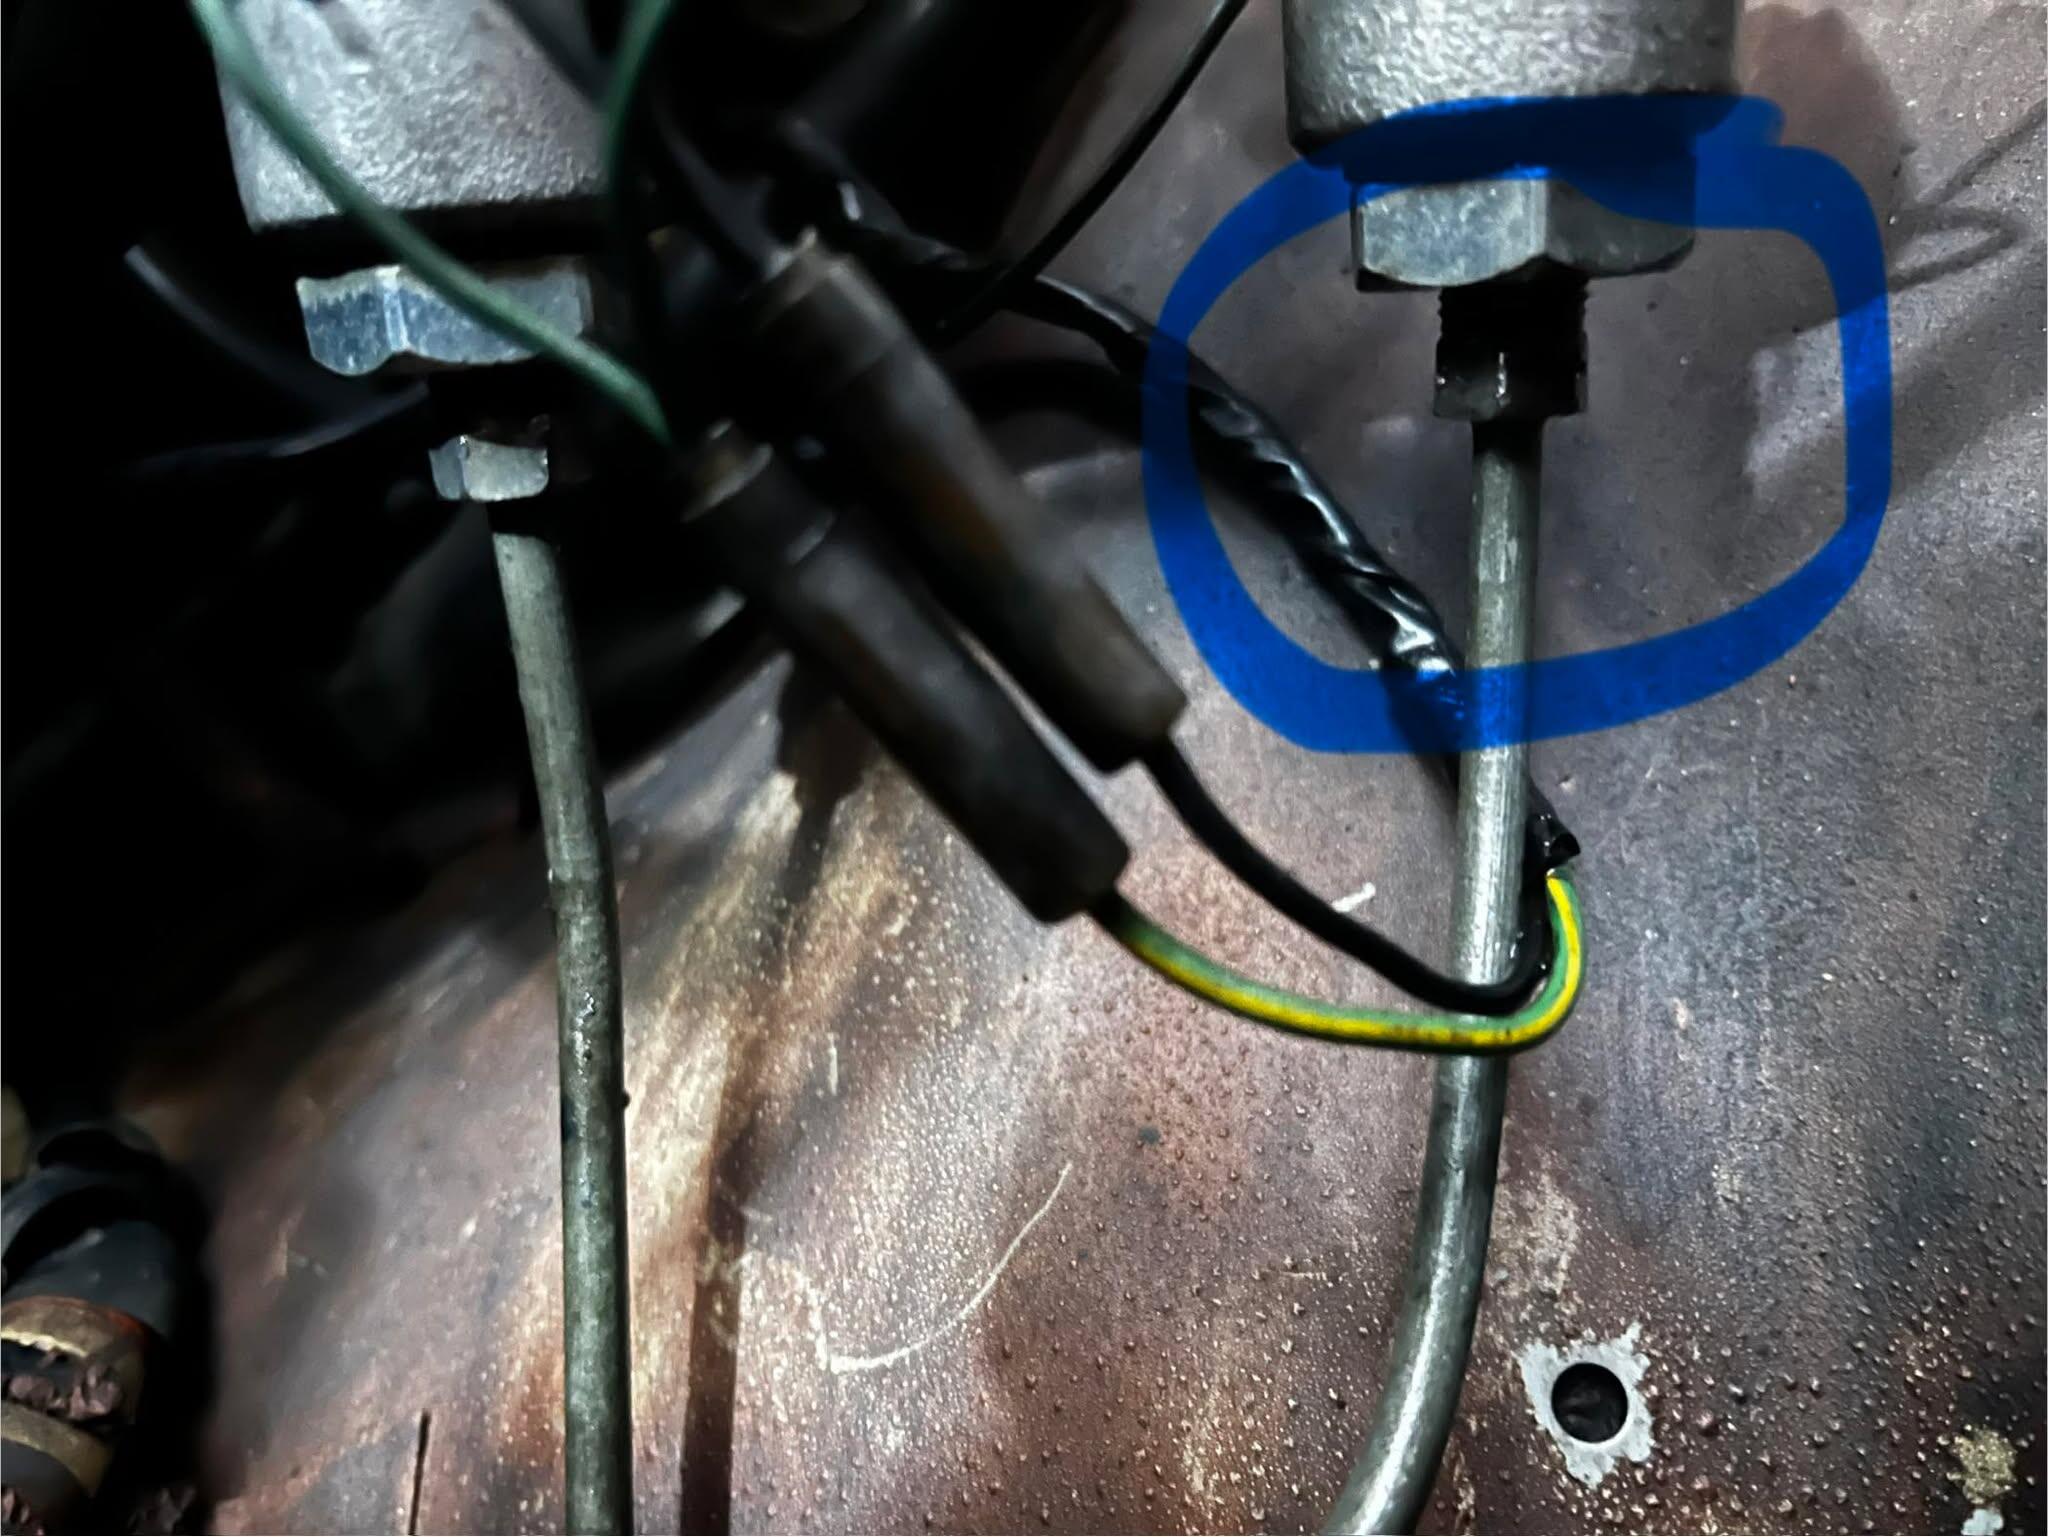
 1 pointSteve won’t get notified on the forum if you don’t use the “@“ before the user name. In this case it’s “@SteveJ”. Just a heads up when you are replying to a certain member with a message or response.1 point1 point@siteunseen Our Resident Librarian can dig this thread up for you. Have seen it many times here. Sorry Cliff, Figured you were bored on a Sunday afternoon! 🍻🌭1 pointOkay, I'm going to assume the battery is disconnected. Put the key in ON. Put your meter on resistance. If there is more than one setting, put it on the lowest setting. Put the positive lead on the black/white wire at the ballast resistor. Put the negative lead on the white/black wire at the T connector. (Yes, you'll probably need some help. Record the reading and report back. Swap the leads and remeasure. Record the reading and report back.1 pointHere's an old thread about a similar problem. (Edit - man, I wrote a lot of stuff back then.)1 point1 point1 pointOK so my girlfriend who has a New Zealand accent can get 50%. :) On another note, it's starting to look like there's a scammer in the community. bww 5325 who's only posted twice and joined November 15th Told me about Suly38B@gmail.com who claimed to have a gas tank and long story shorter I sent him $300 December 1st and he's gone radio silent on me.1 point1 pointIf you get 95% STT you're doing great. I struggle to get 50% with my Southern background ;)1 point1 pointYes, the front turn signals have gotten expensive and used ones can be rough because they're close to the ground1 point1 pointSounds like you don't agree 100%. We're just offering possibilities. It's actually more interesting to some of us that the fitting was 3/4 turn loose and did not leak sooner. If it was mine I'd pull that line and make sure I didn't need more parts before starting the MC replacement. Might find out that you don't need a new MC, you actually need a new hard line.1 point1 pointSure! It is leaking where the brake line bolt screws into the master cylinder on the forward reservoir (the one that manages the rear drum brakes)
 1 point1 pointThat’s going to be the market price you will find for new reproduction’s. Try Resurected Classic.’s. This time of year you might find a deal but you will probably stay in that range.1 point1 pointBoth the original tensioner and the new one have rubber type washers between the tensioner pad and it's housing.1 point1 pointI made mine as tight as I could on the slack side, the one that curves. I pushed the tensioner in all the way and put a zip-tye on it then pushed the curved guide as tight as I could and tightened it down. For some reason I'm thinking there's a white plastic washer that goes on the tensioner between the housing and the pad but it's not visible in my picture. Maybe you can confirm that and don't forget the oil slinger that goes on the crank nose.
 1 pointSeek and ye shall find! I was able to find it and jumper the connection. It was really burried at the back. For others coming to this thread, when looking at the two wire bundles from the passenger side it's connected to the one on the right. It splits off from that. (see pic with finger pointing to it) Just grab the smaller taped up bit coming off it and start pulling. The Nismo pump is a bit noisier than I'd like but I'm really happy none the less. Initial pressure on start up is around 6psi and then once it warmed up it dropped to 4 to 4.5psi. I've moved the red wire from the + side of the coil to the ballast and it runs. But, I've currently got a intermittent misfire on two cylinders. Number 2 and 5. I found them by attaching the timing light plug wire connector to them and the light flash wasn't consistent. I've ordered new NGK plug wires, plugs, cap and rotor. I'm not sure of the cap and rotor though. I went ahead and assumed they're for an L28 though I could be wrong. How can I identify the difference between a L24 distributor and one for an L28? I'm guessing they're not identical. I know the 240Z had points and the 280Z didn't. As the car has a L28 from 2000 I'm assuming they also threw in a later distributor with the Pertronix. I pulled the plugs and they were really sooty. I cleaned them with a wire brush and that didn't really help. I'm wondering if it's my ignition or if I'm just running super rich. Both of those are on the most direct line from the carbs and I'm assuming would be getting a more fuel than the other cylinders to their sides. Brakes also need to be fully bled as I've installed the 8.5" booster upgrade from JDM-Car-Parts and new master cylinder as well. So it drives and stops and can be driven around a parking lot or paint shop if need be.

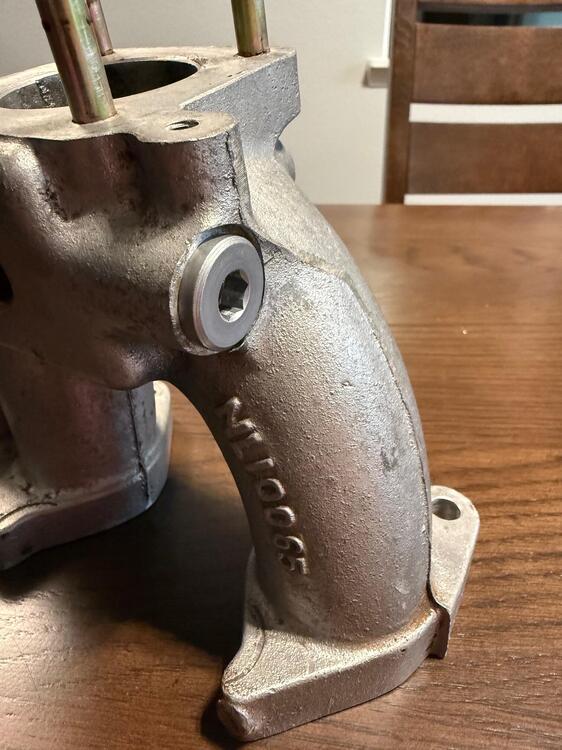
 1 point1 pointOK. Just got the last of the plugs in. I like the M16 x 1.5 low headed plugs to fill the inside ports of the intake when one has removed the water heating. Purchased them from Belmetric.
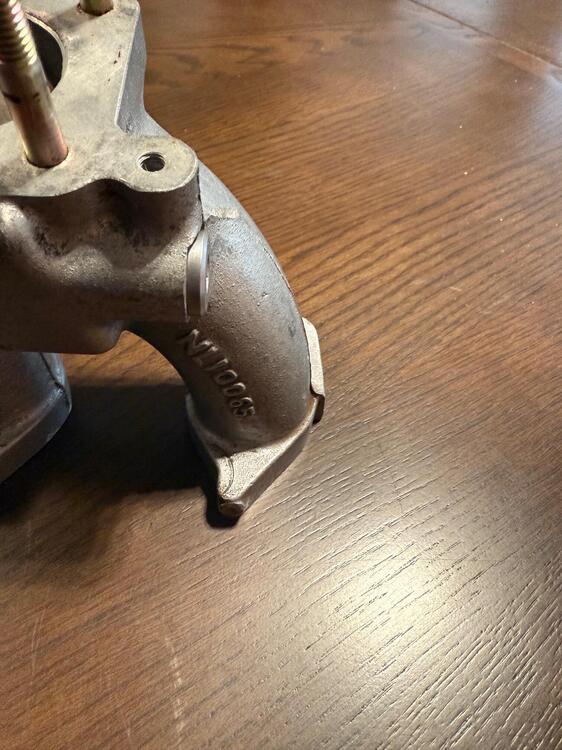

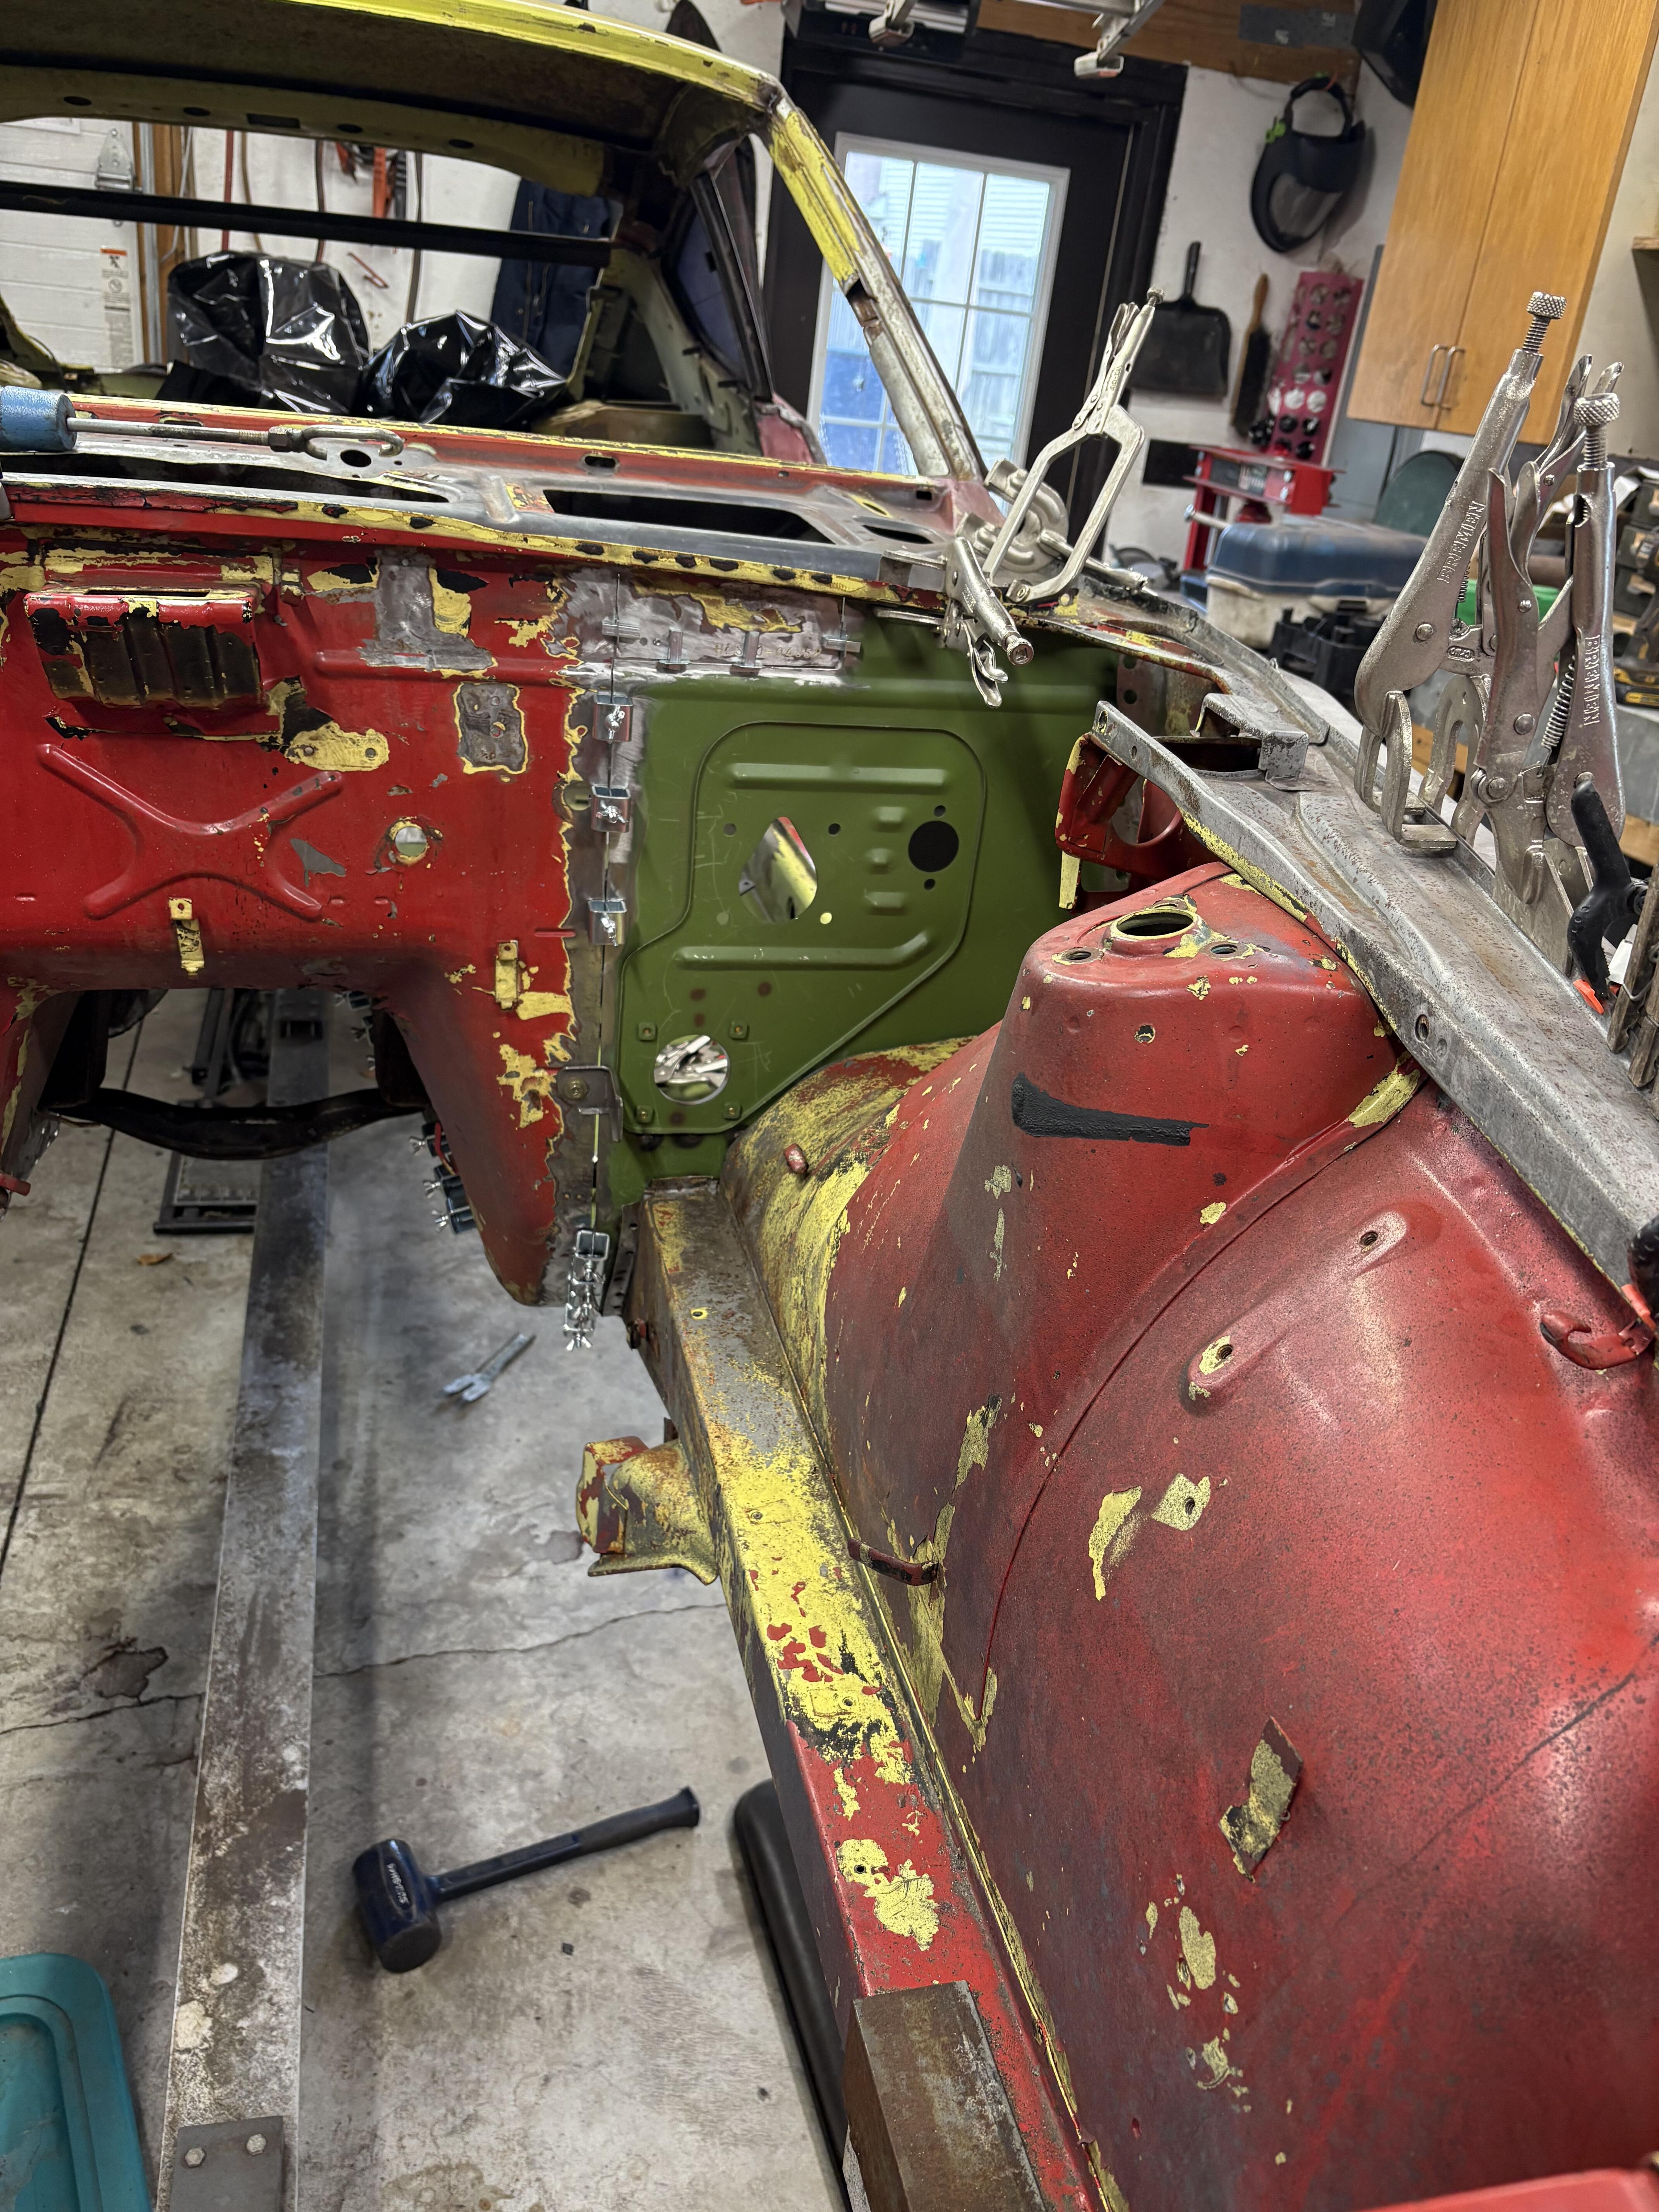
 1 point1 pointI really appreciate that thank you. I was certain I did everything right I just didn't get to number (11) eleven. I saw your 2019 post and your mathematical computations Cheers1 pointNECROPOST ALERT!!!!!!!!! A broken hi- lo beam switch housing circuit board CAN be repaired so it will work correctly without the switch butterfly moving out of position between switch plunger detents. One just needs a steady hand and more importantly, a command of various epoxies and repairing compounds available retail to ascertain what is most apropos for your situation. Also, depending on the severity of the circuit board damage, the repair may necessitate making the circuit board unremovable from the housing. It's a Datsun. there is always a way...1 point1 point1 pointI thought it would be prudent to assemble what I have so when I do the other side floors and such I have my gaps set on the drivers side already . The tunnel is pretty flimsy at this point . The passenger side just scares me as far apart as I have it .
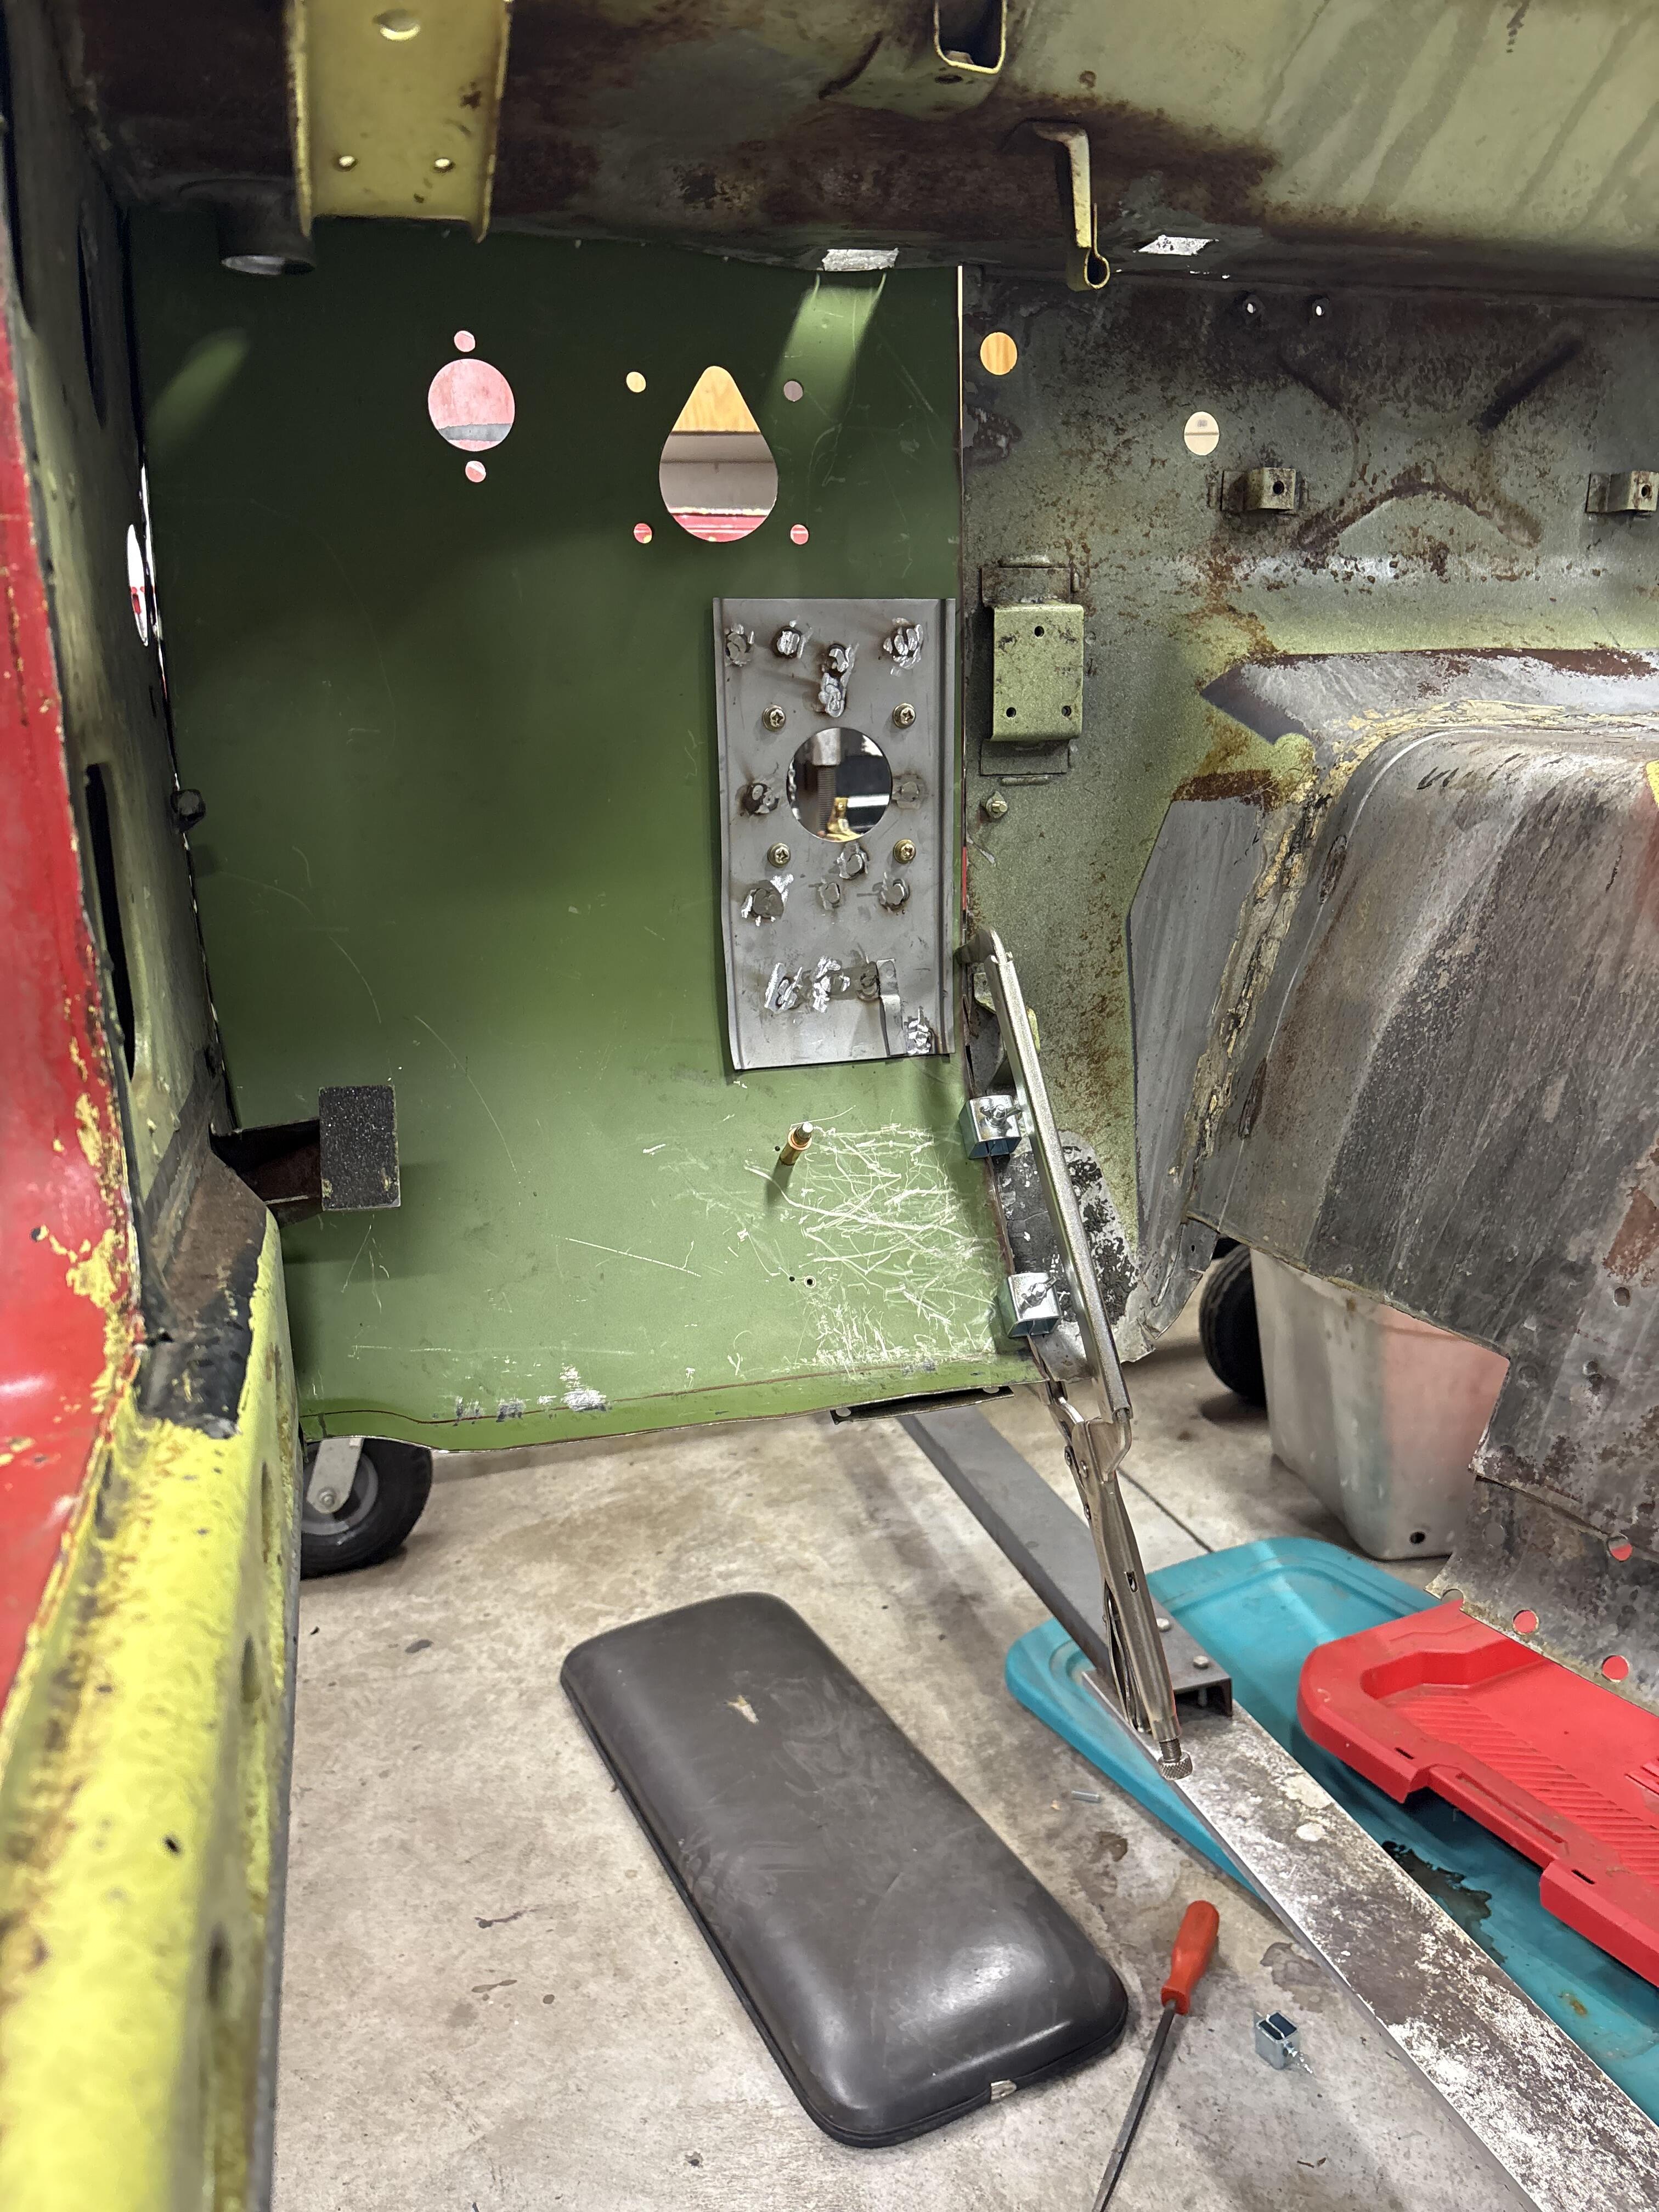
 1 point1 pointTo recap...I was looking for suggestions on replacement horns for now until I get around to rebuilding the original ones. I ended up buying and installing these from Z Car Depot: https://zcardepot.com/products/horn-set-hi-lo-240z-260z-280z-510?variant=50610208964920¤cy=USD&utm_source=google&utm_medium=cpc&utm_campaign=google%2Bshopping&gad_source=1&gad_campaignid=17820837536&gbraid=0AAAAADgHqXssZ64ffuRLMdHFQA1WVqNee&gclid=CjwKCAiA86_JBhAIEiwA4i9Ju_aM-ViE06tUtzcGp1fUrYiM7OyJd_3WeMCCfgkuDa7cRHrPUPNNsBoCRM4QAvD_BwE They do the trick. Not sure when I'll get around to diving into rebuilding the original ones, though for now I can still drive around and let people know I there. :)1 point1 pointI have heard it said that the bright links of the timing chain will "line up with the timing marks ever now and then" when you spin the engine over. Well... I'm here to put a number on it and that number is eleven. I lined up my timing marks and then rotated the crank to see how long it would be until the marks lined up again, and the answer is that they line up every eleven rotations of the cam (twenty-two rotations of the crank). Not being satisfied with only experimental results, I counted teeth and links and stuff. There are 20 teeth on the crank gear. There are 40 teeth on the cam gear (makes sense since the cam spins at half the crank speed). There are 110 "teeth accepting holes" in the chain. The common multiple (modulus maybe?) of all of those numbers is 440 and it takes eleven cam rotations or twenty-two crank rotations to move 440 link holes. The links of the chain will line up in the same position every eleven rotations of the cam. And because everyone likes pics... Timing chain and pulleys:
 1 pointBright ideas come from bright people! Thanks!1 point


Important Information
By using this site, you agree to our Privacy Policy and Guidelines. We have placed cookies on your device to help make this website better. You can adjust your cookie settings, otherwise we'll assume you're okay to continue.