Leaderboard
-
.JPG.cfcada9cf1c1b502df3f5f2f2ca3ff36.JPG)
SteveJ
Free Member10Points9,646Posts -
grannyknot
Free Member8Points5,158Posts -

CW240Z72
Free Member5Points229Posts -
BoldUlysses
Free Member5Points344Posts


Popular Content
Showing content with the highest reputation on 08/15/2021 in all areas
-
5 pointsI can't get the pics to open but if you want the most for your car you should get it running well, fix the minor repairs you mentioned, clean it up, replace the Recaro seat with the original and take extensive photos of the car showing every area of the car especially the bottom. Have a look through these previous auctions for ideas on how to present the car, https://bringatrailer.com/datsun/240z/?q=datsun 240z Oh, no danger of the wolves eating the sheep, everyone here owns at least one Z.5 points
-
4 pointsQuick update: FINALLY finished the car's exterior. 100% done. Need a bath, but it's all there. Feels good. Couldn't have done it without all the great resources here and elsewhere.

 4 points
 -
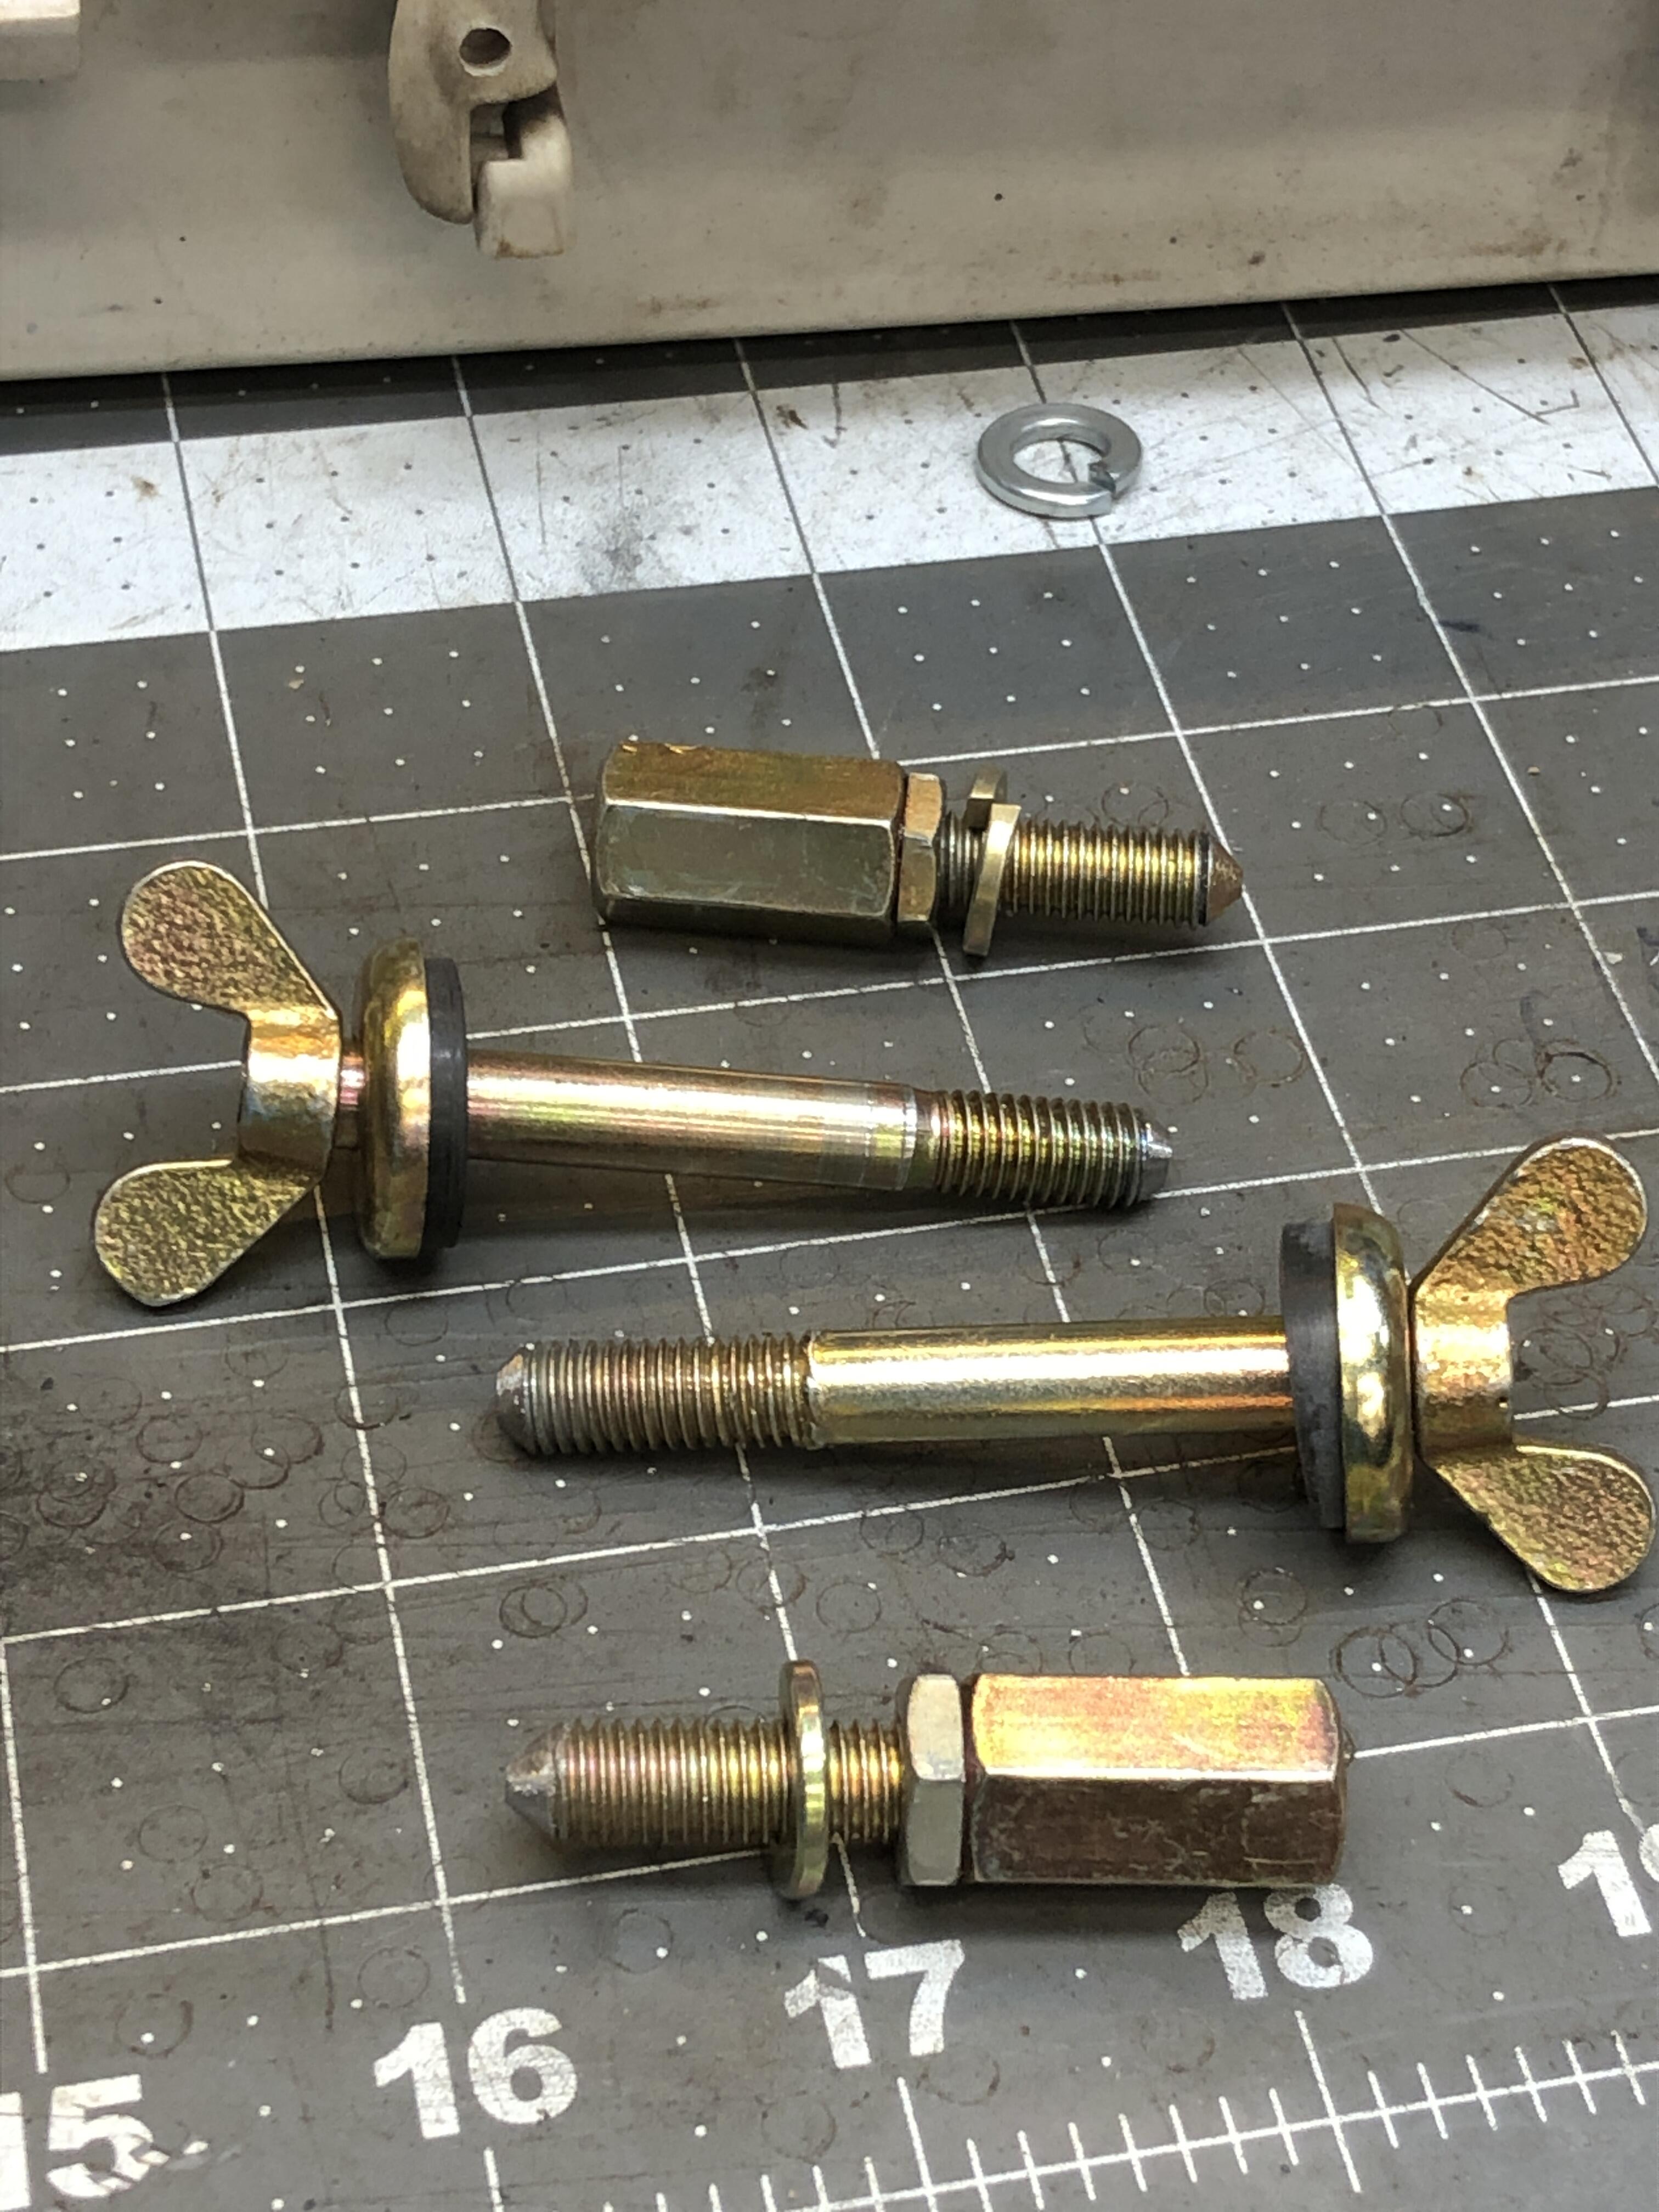
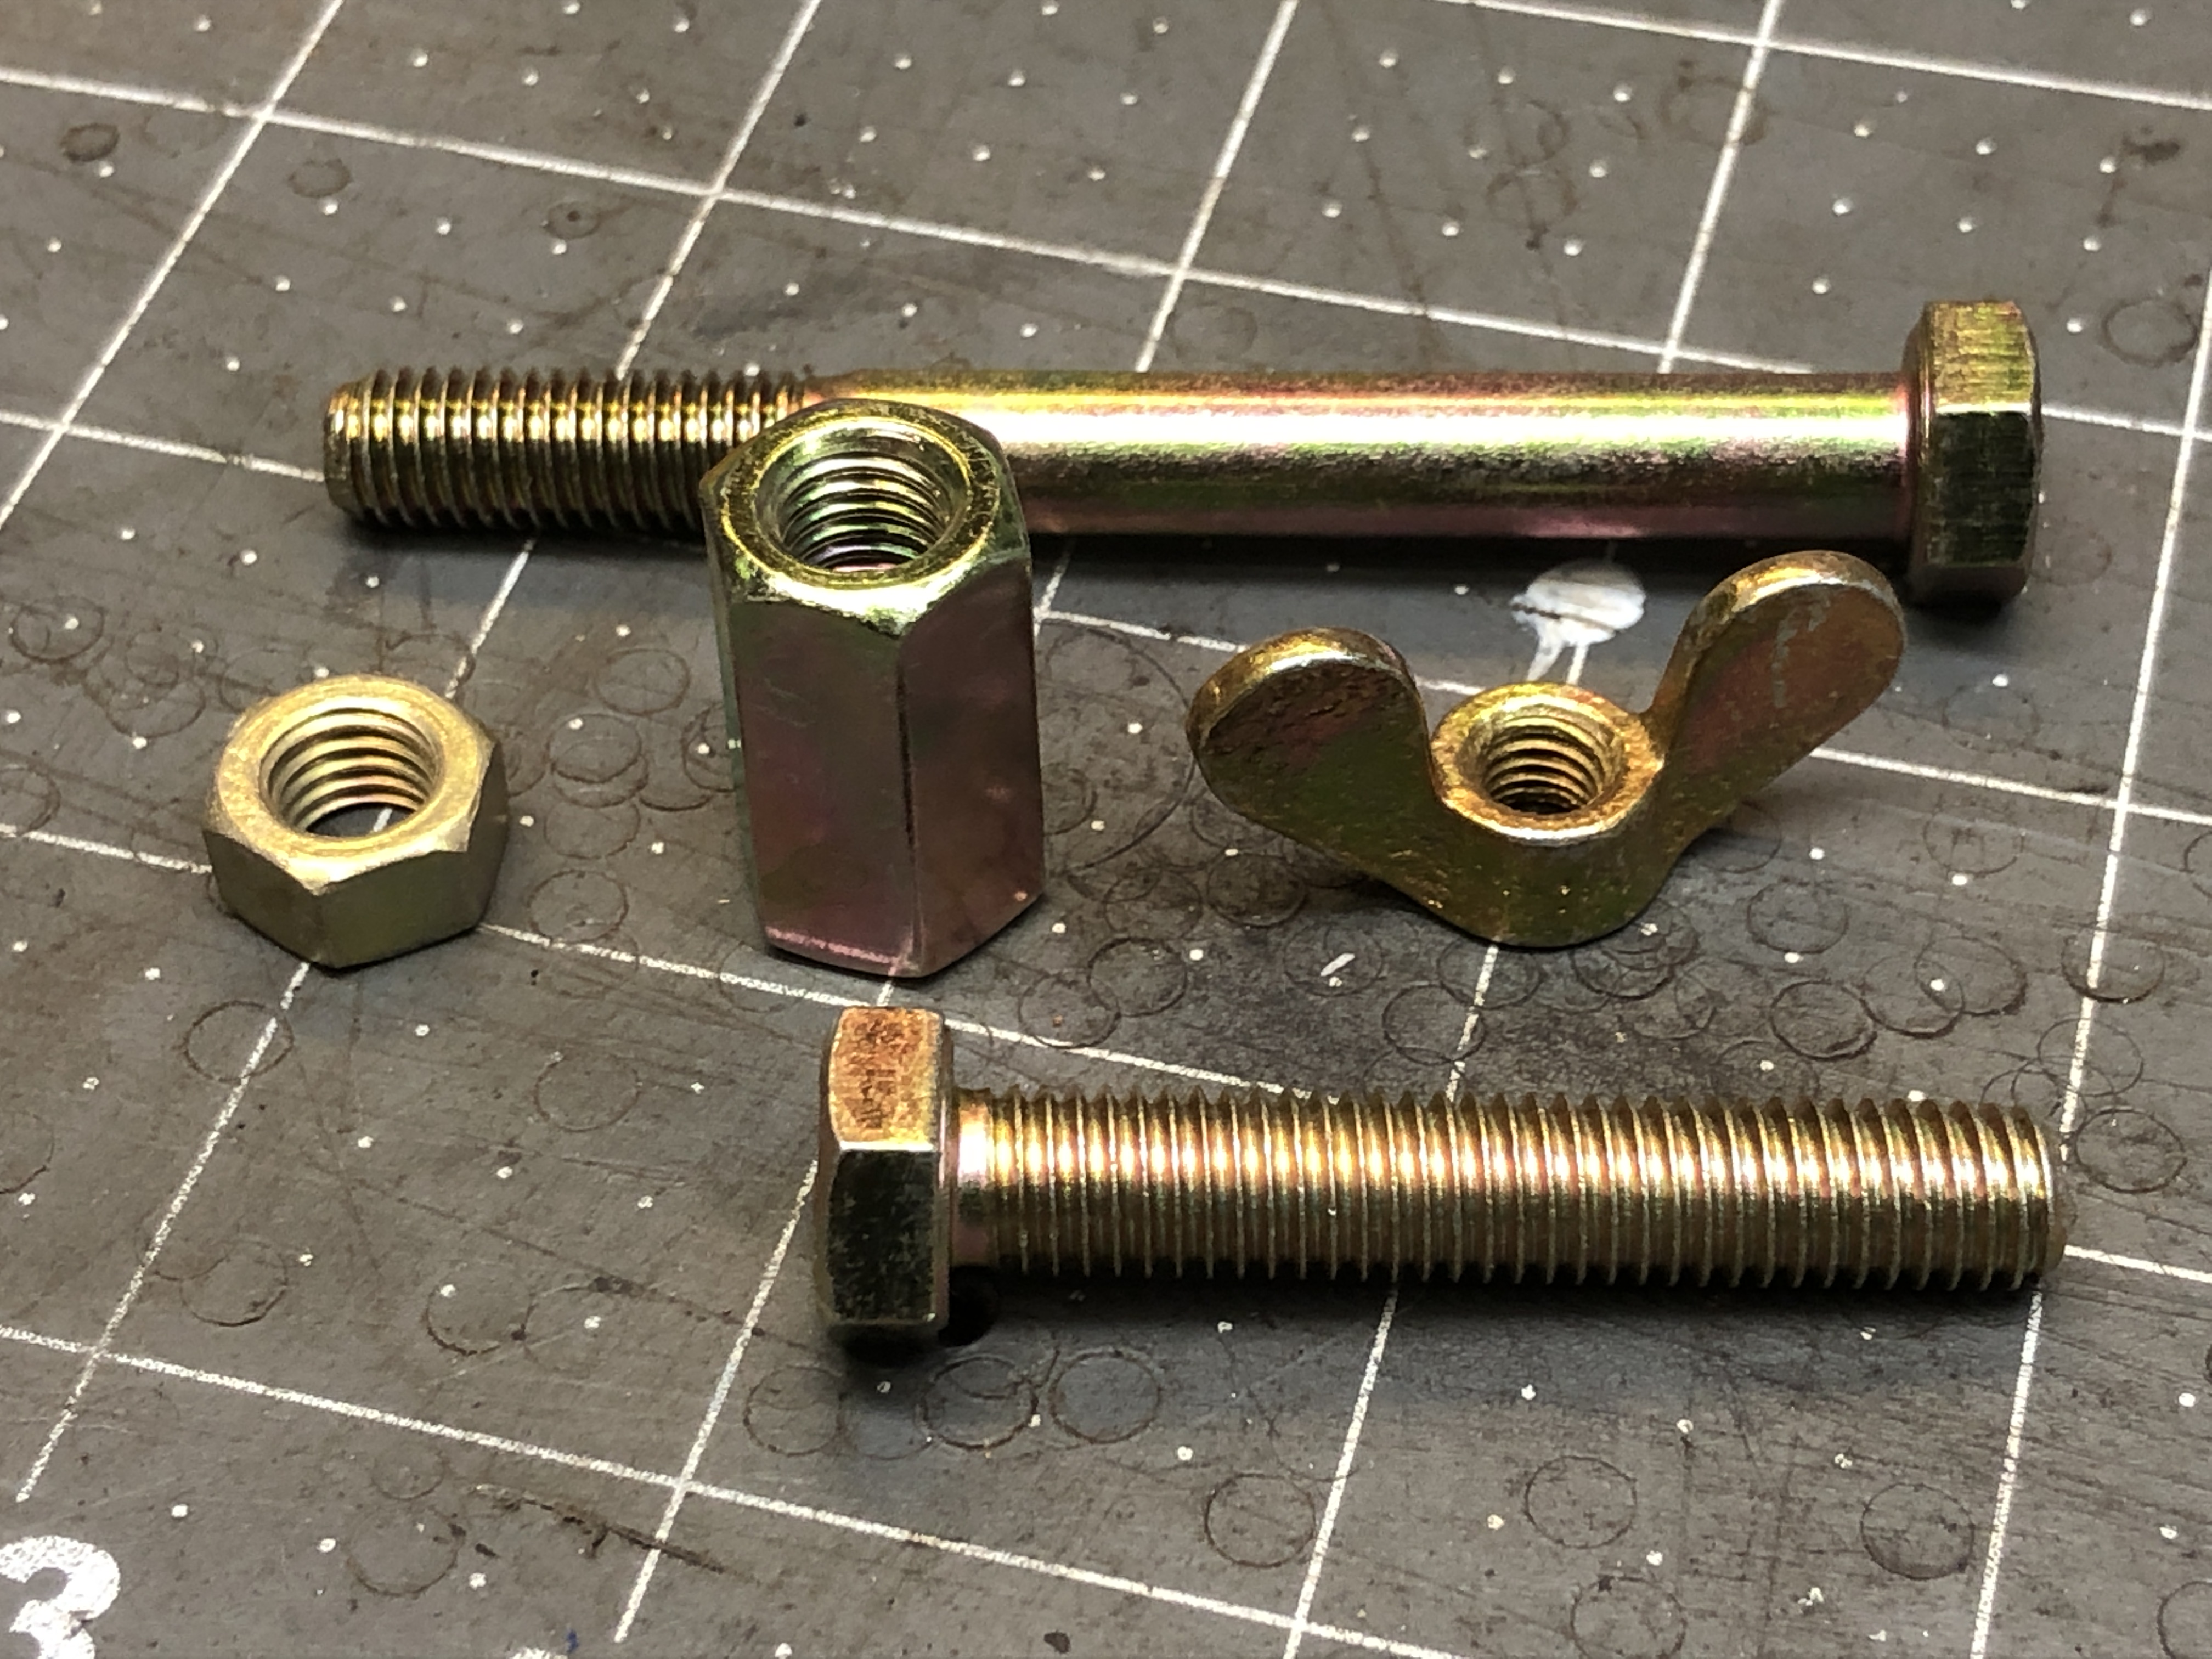
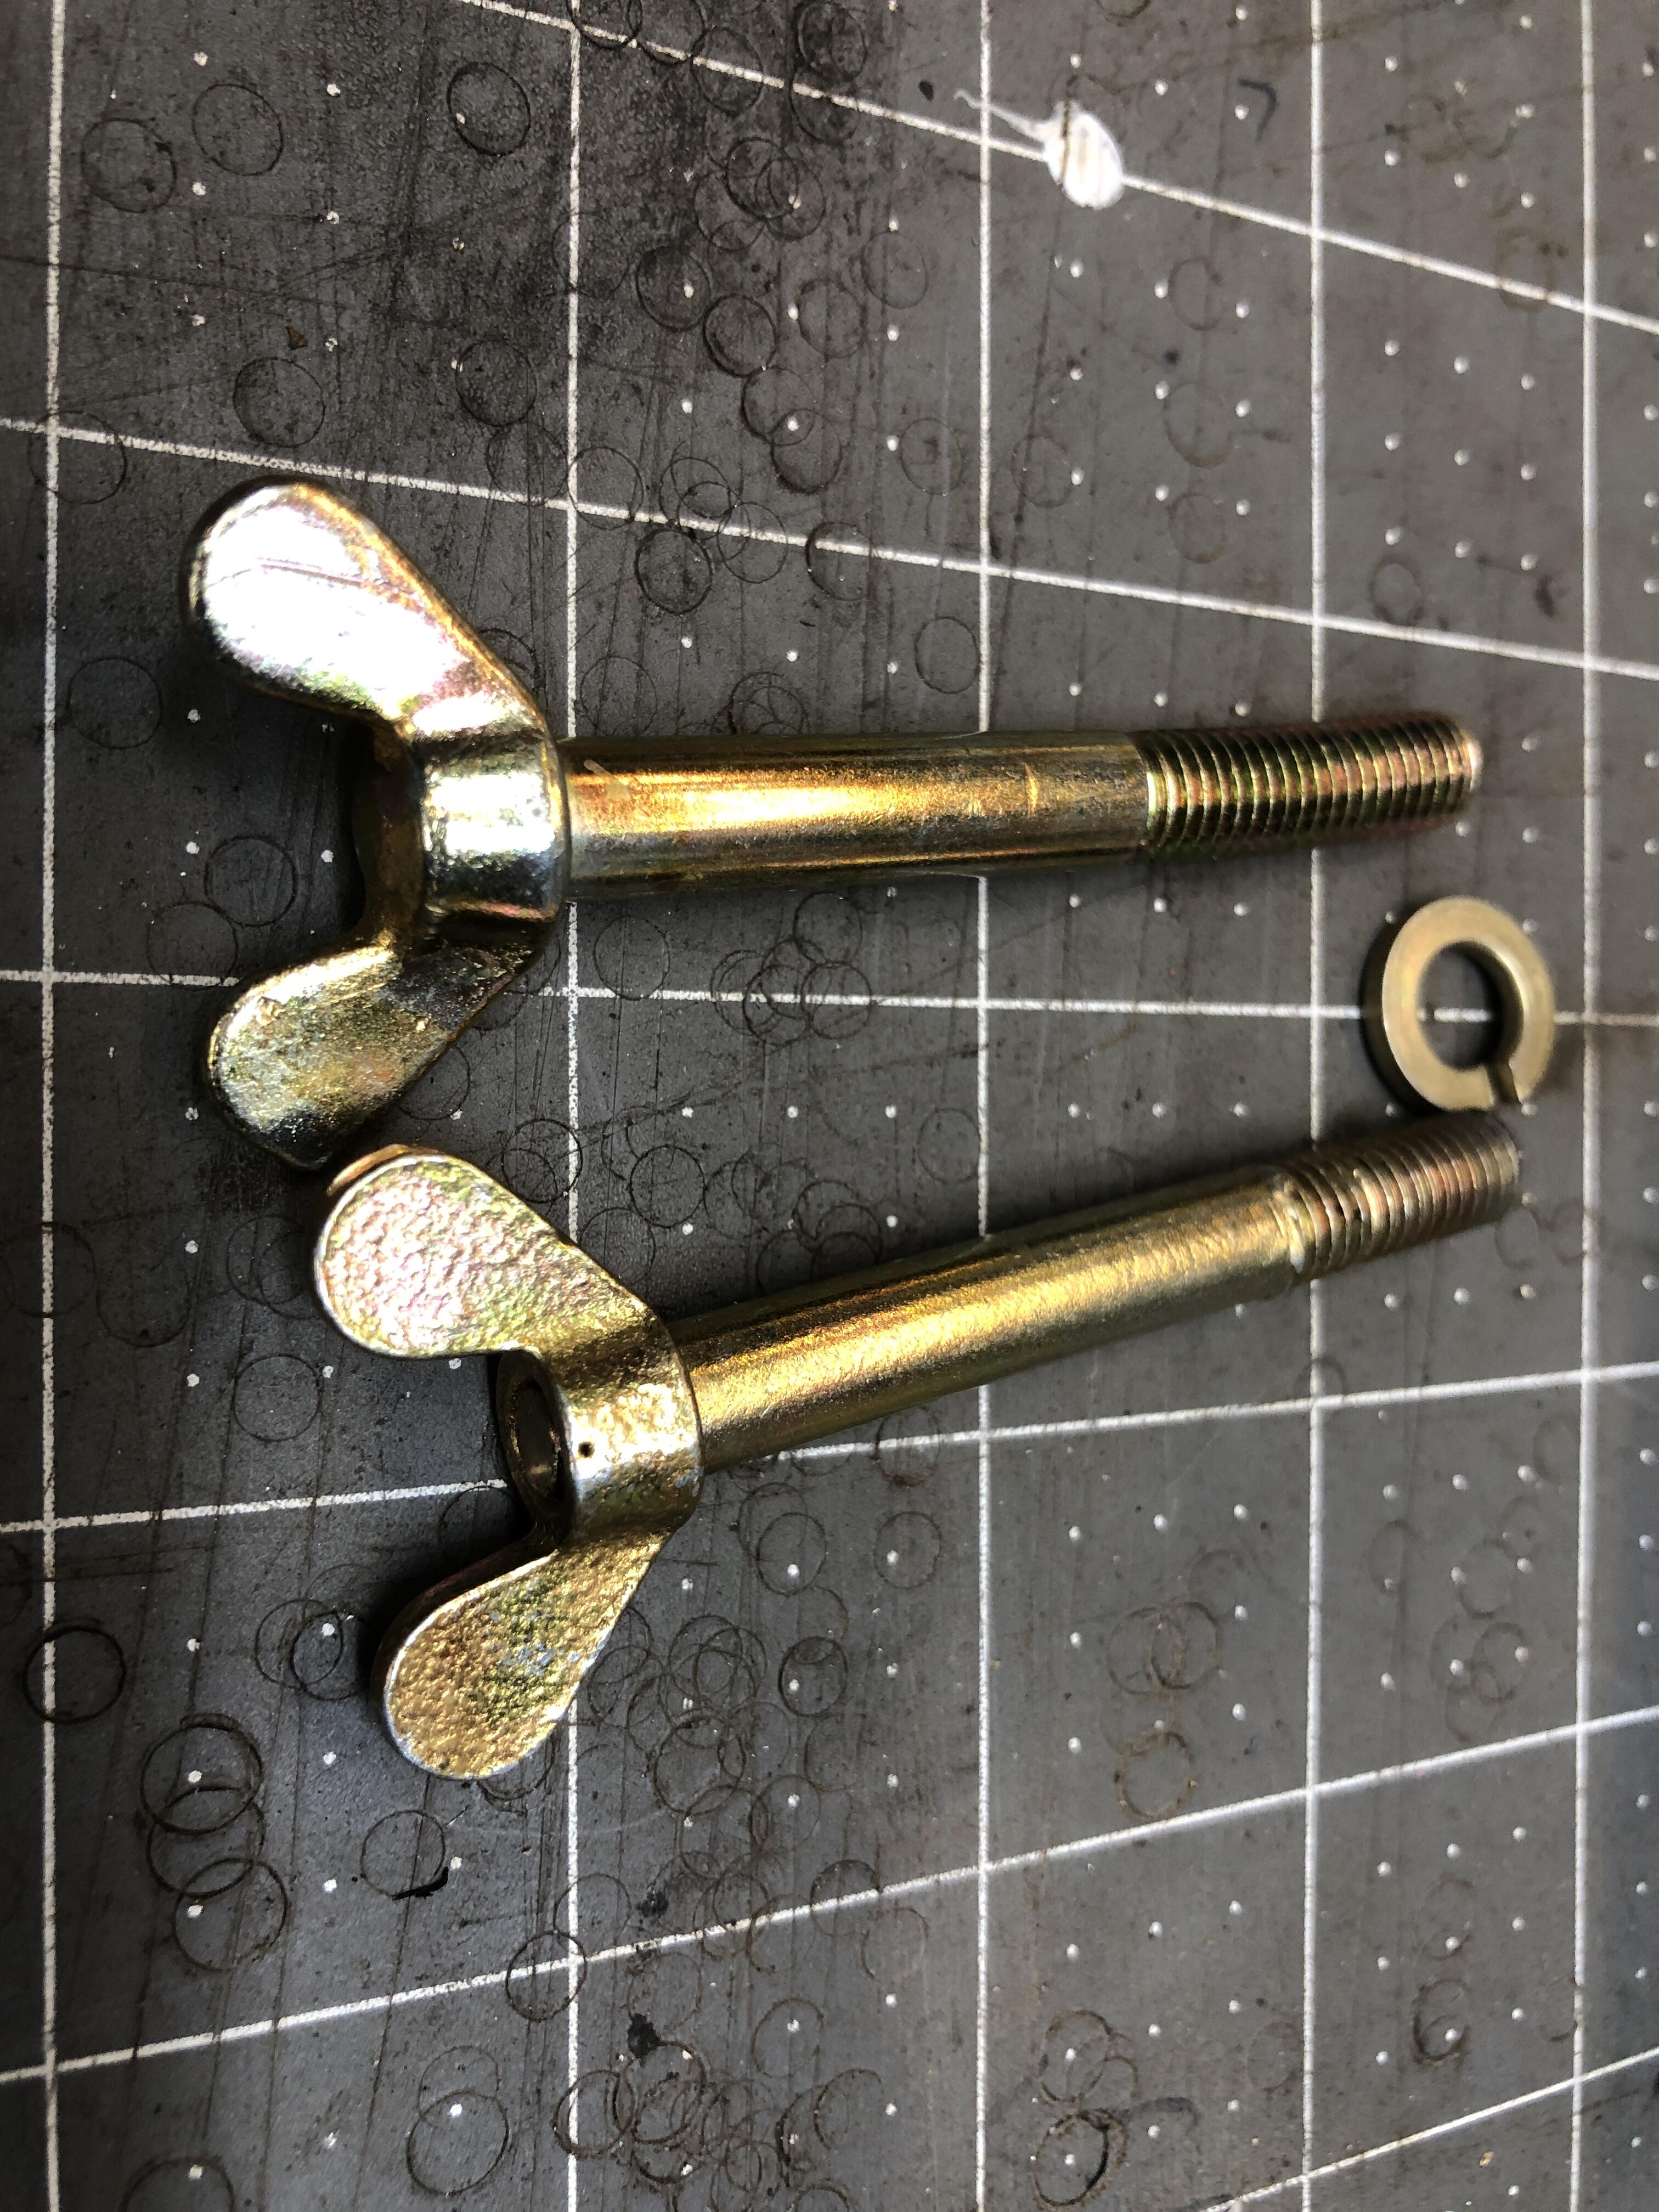
4 pointsI’ve made Wally a set of my “new” reproduction air cleaner hardware. We he gets them, he can report on appearance and functionality. The hex coupling nuts I used are 13mm wrench rather than the stock 14mm, and I make them by threading in an M8 bolt and locking it in place with a thin jam nut and red lock tight. The wing bolts are made from a M6 wing nut and an M8 bolt that has the end removed and turned down and threaded for M6 to attach the wing bolt. Red locktite and torque lock it in place. My reproduction cup washer are included. These are the raw materials. Comparison of an OEM wing bolt (top) and mine. Ears are dang close to the same size and shape wize. Slightly different surface finish.

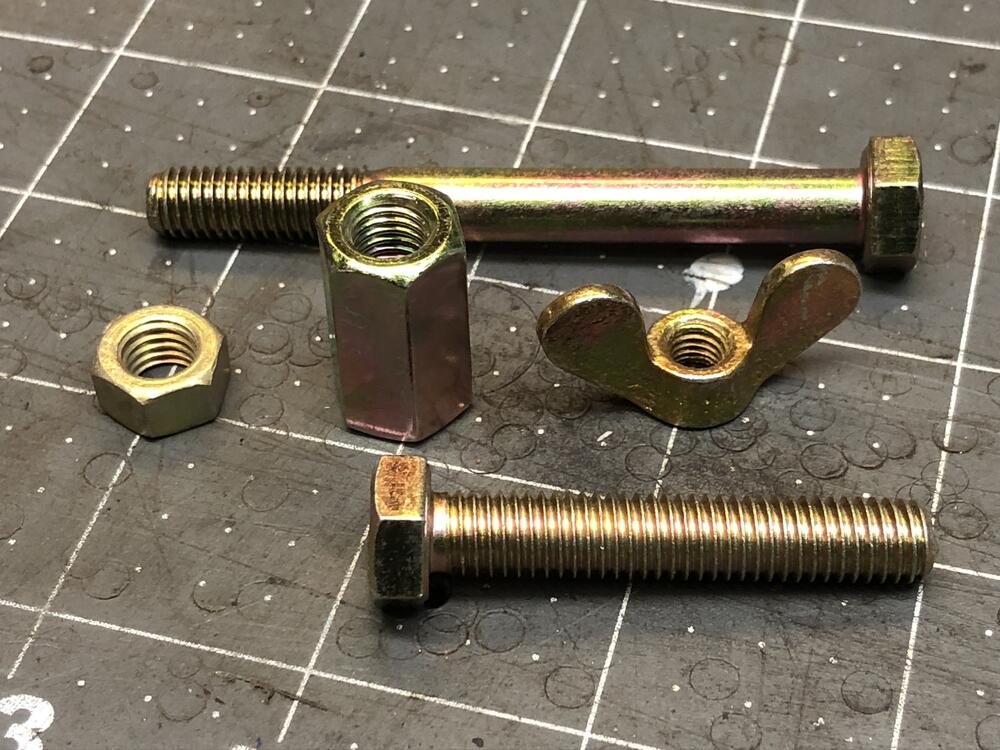
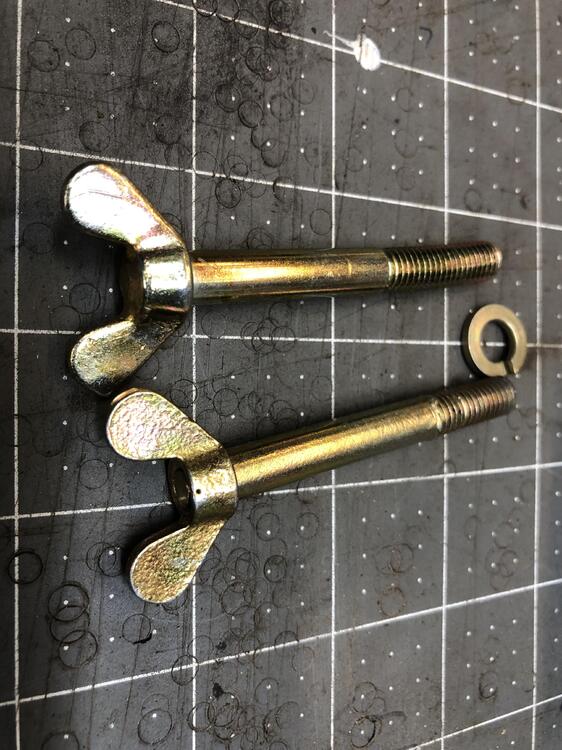 4 points
 -
3 points
-
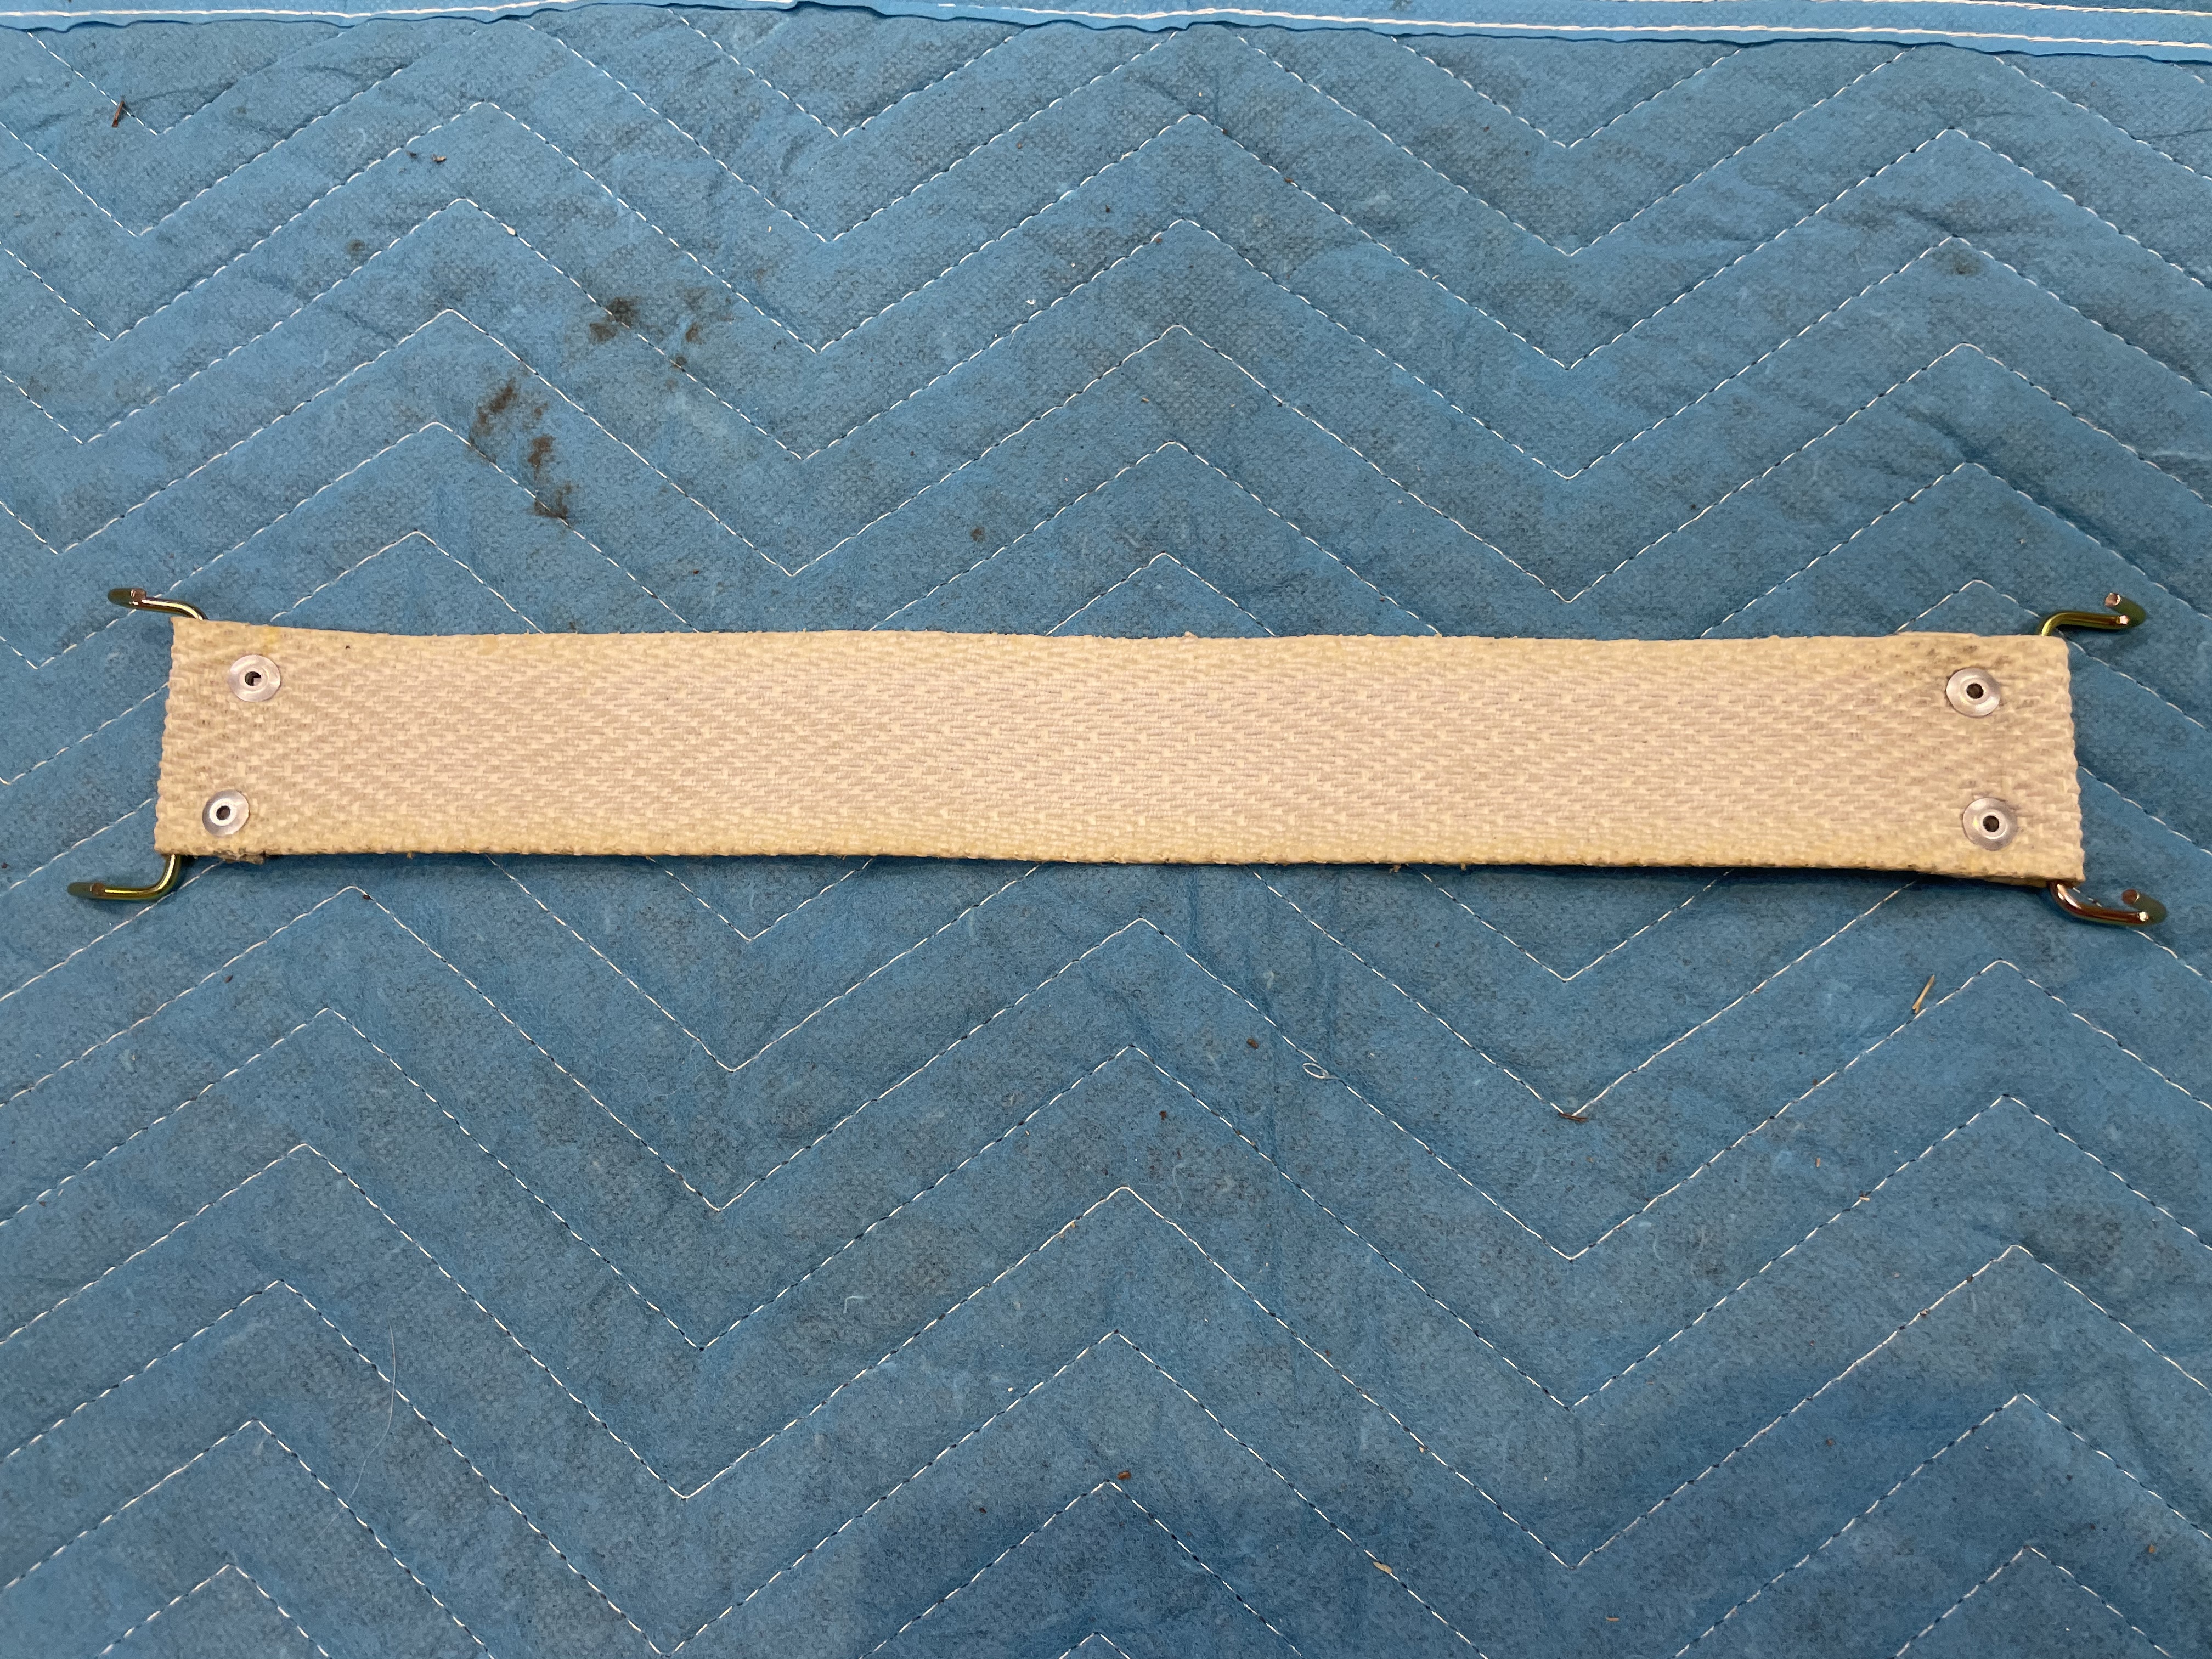
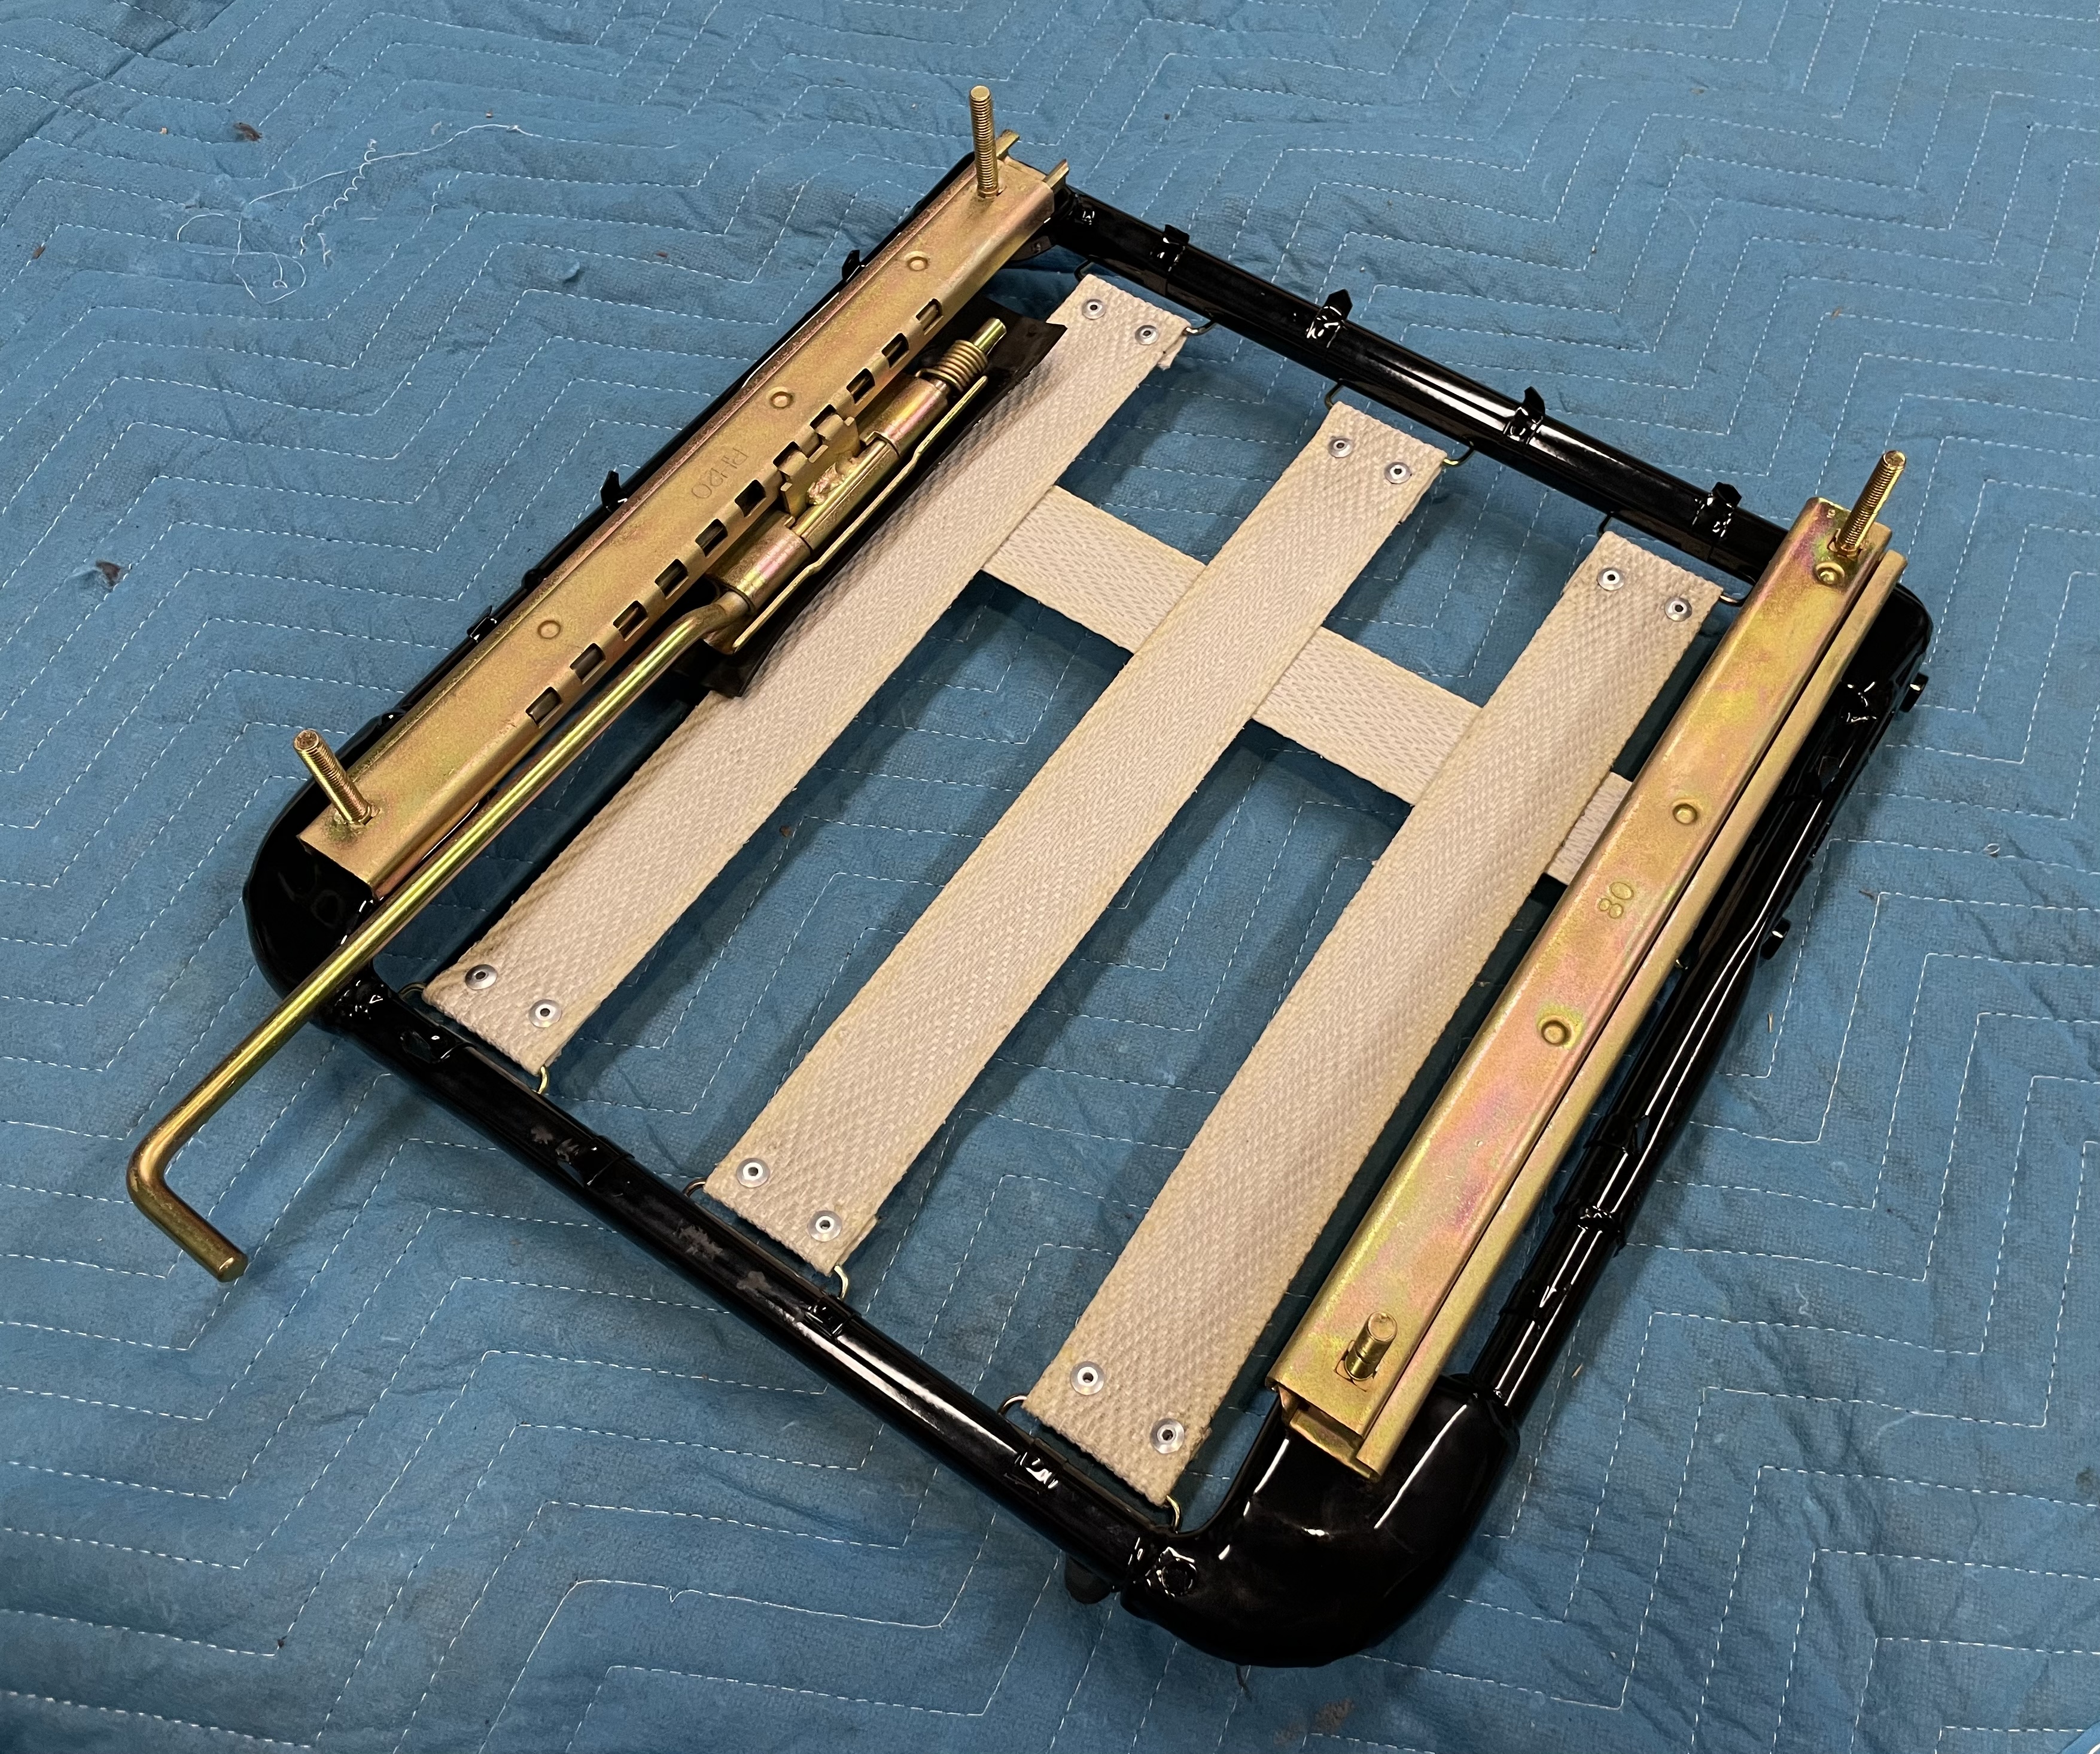
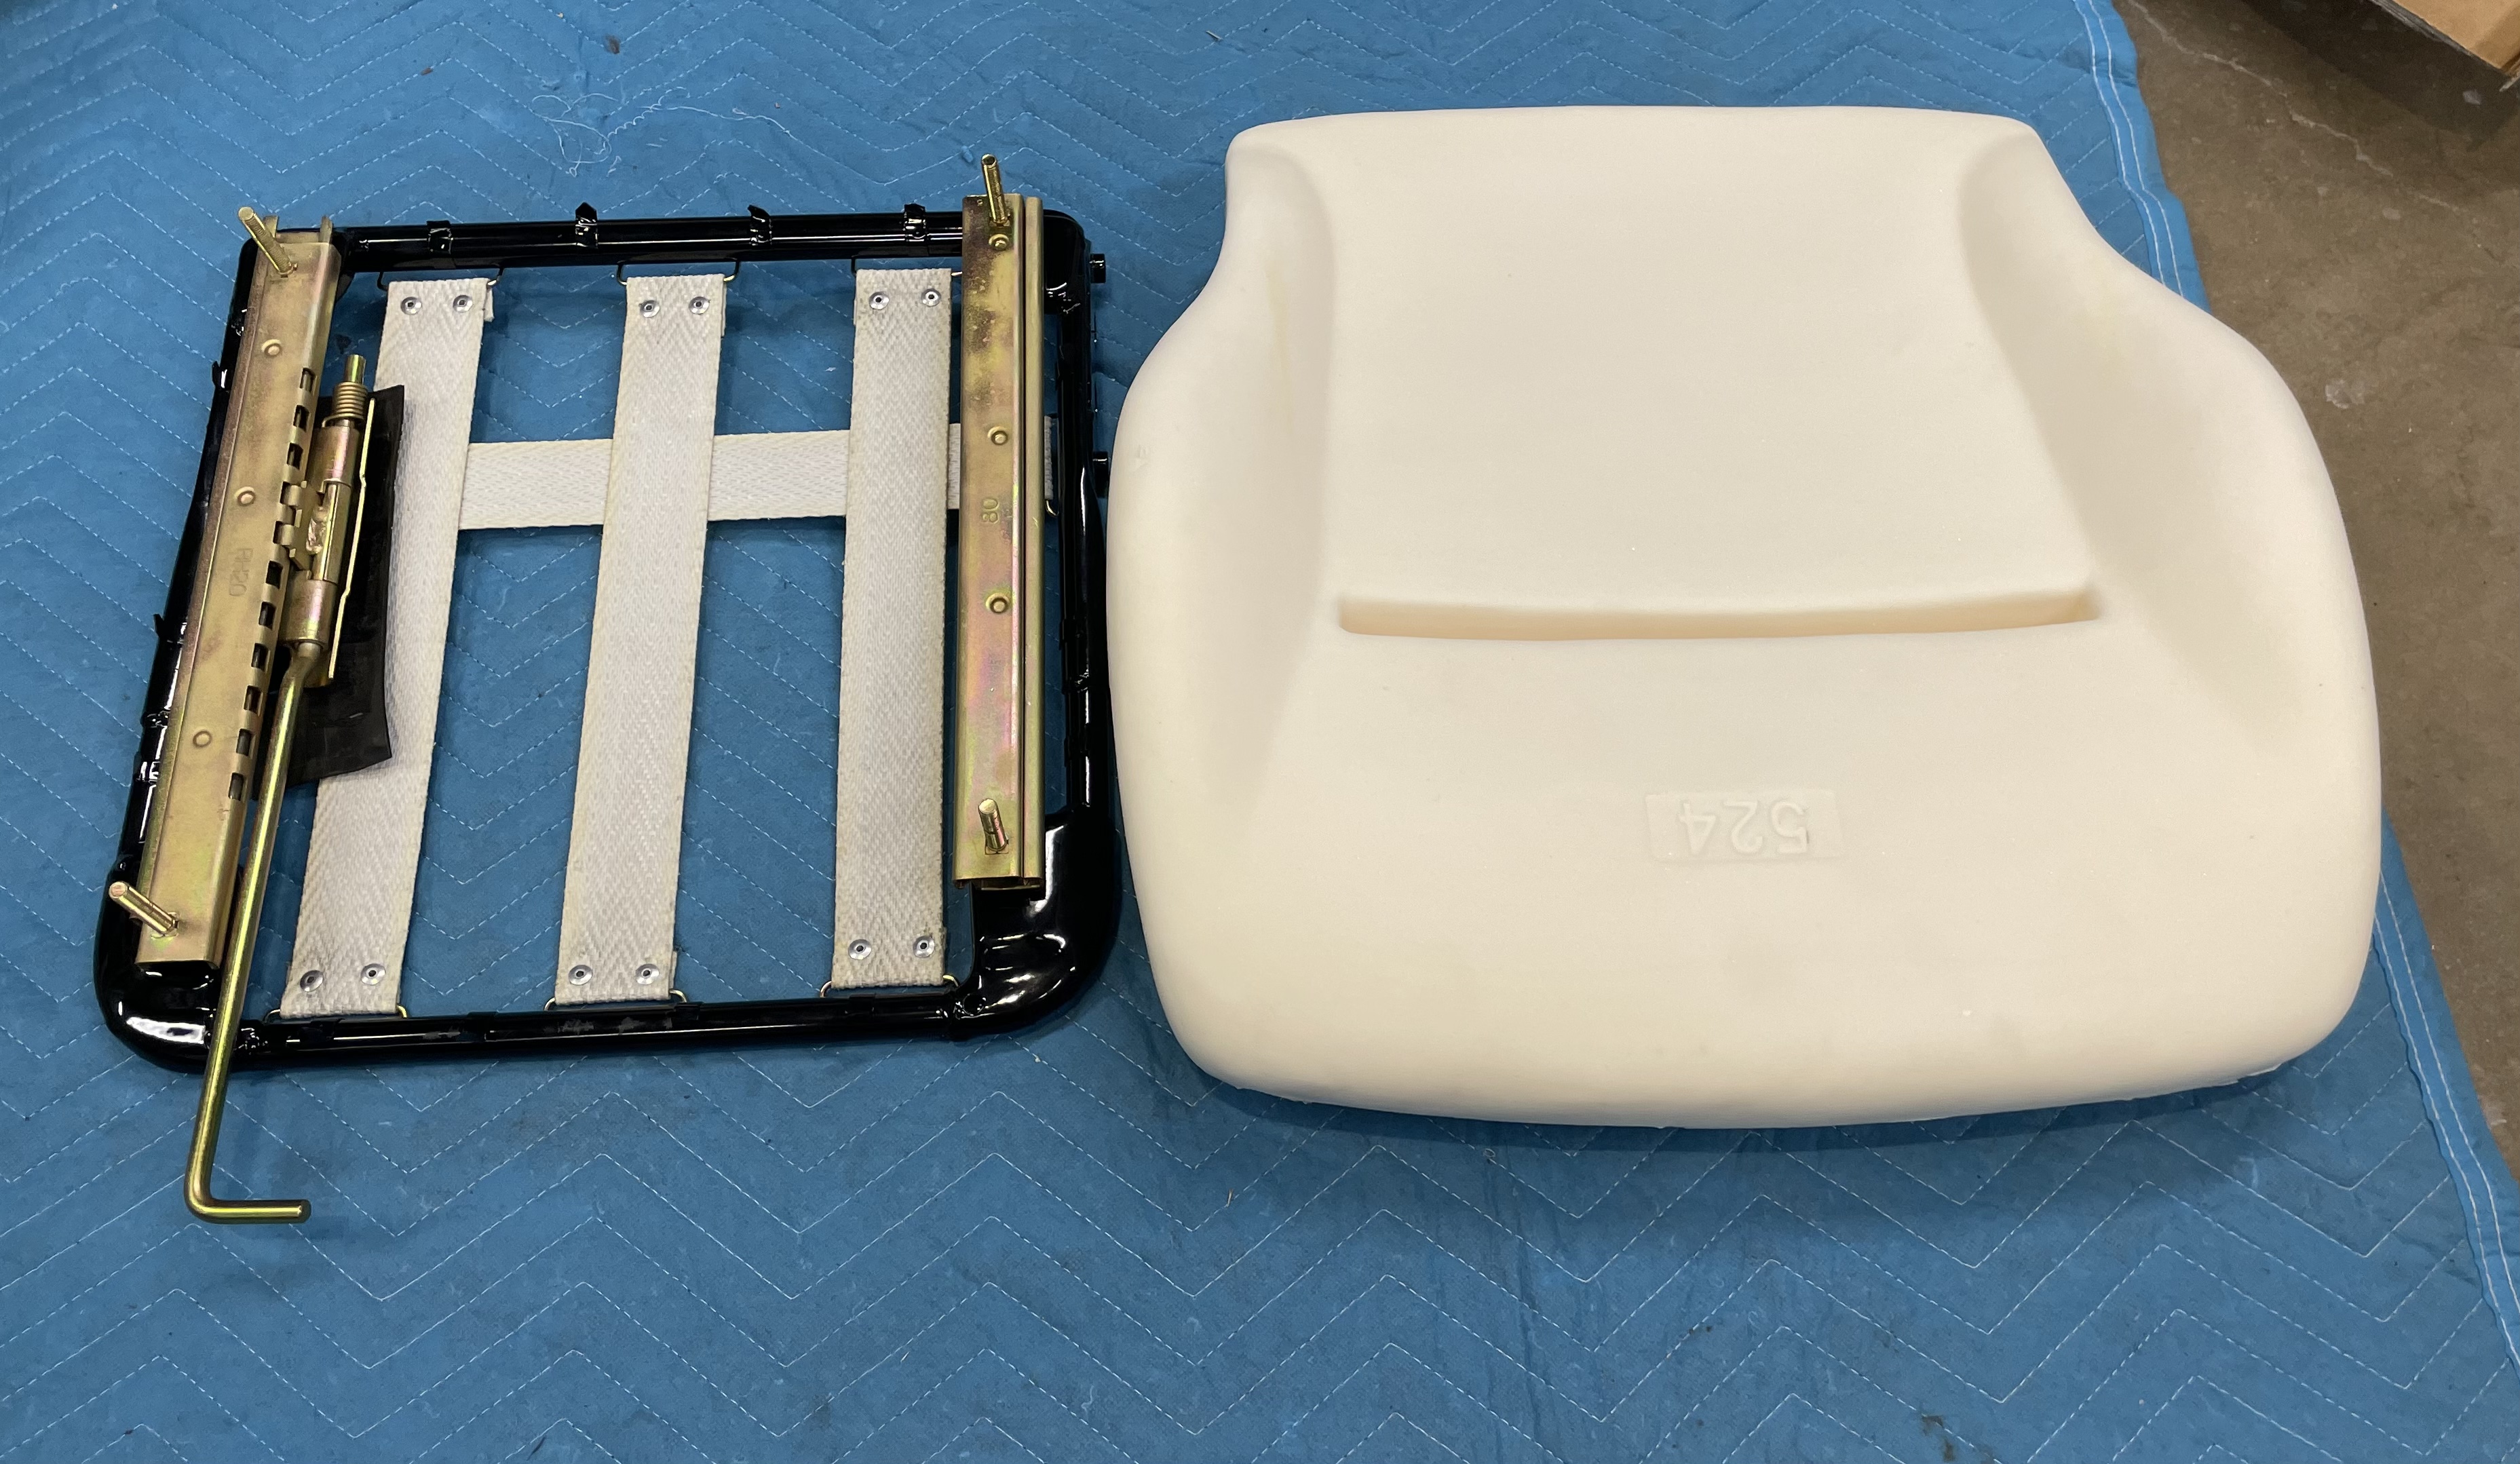
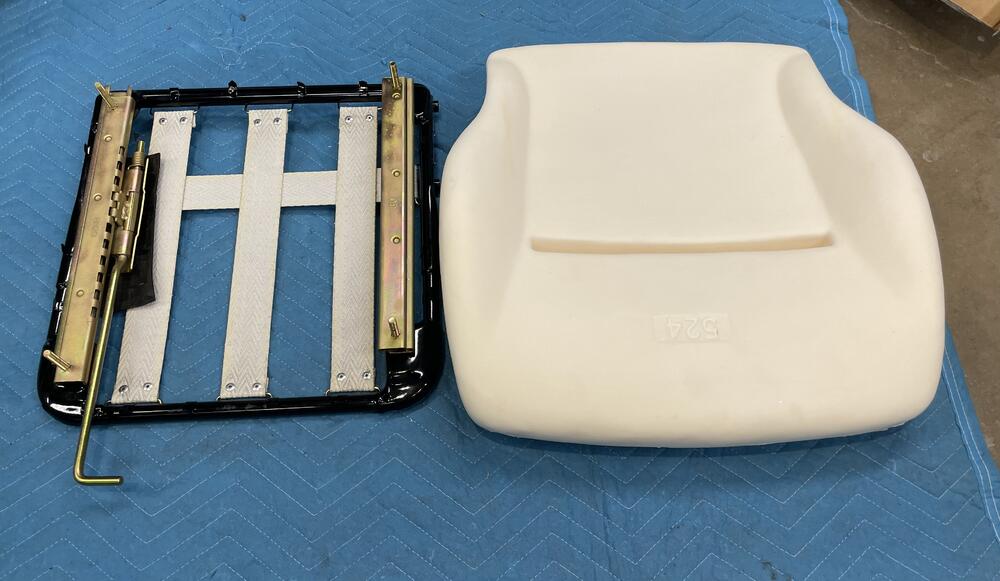
3 pointsMaking progress on the seat rebuild. Remade the lower seat straps, assembled to the powder coated base with all replated hardware, and covered it up with new foam and cover.


 3 points
 -
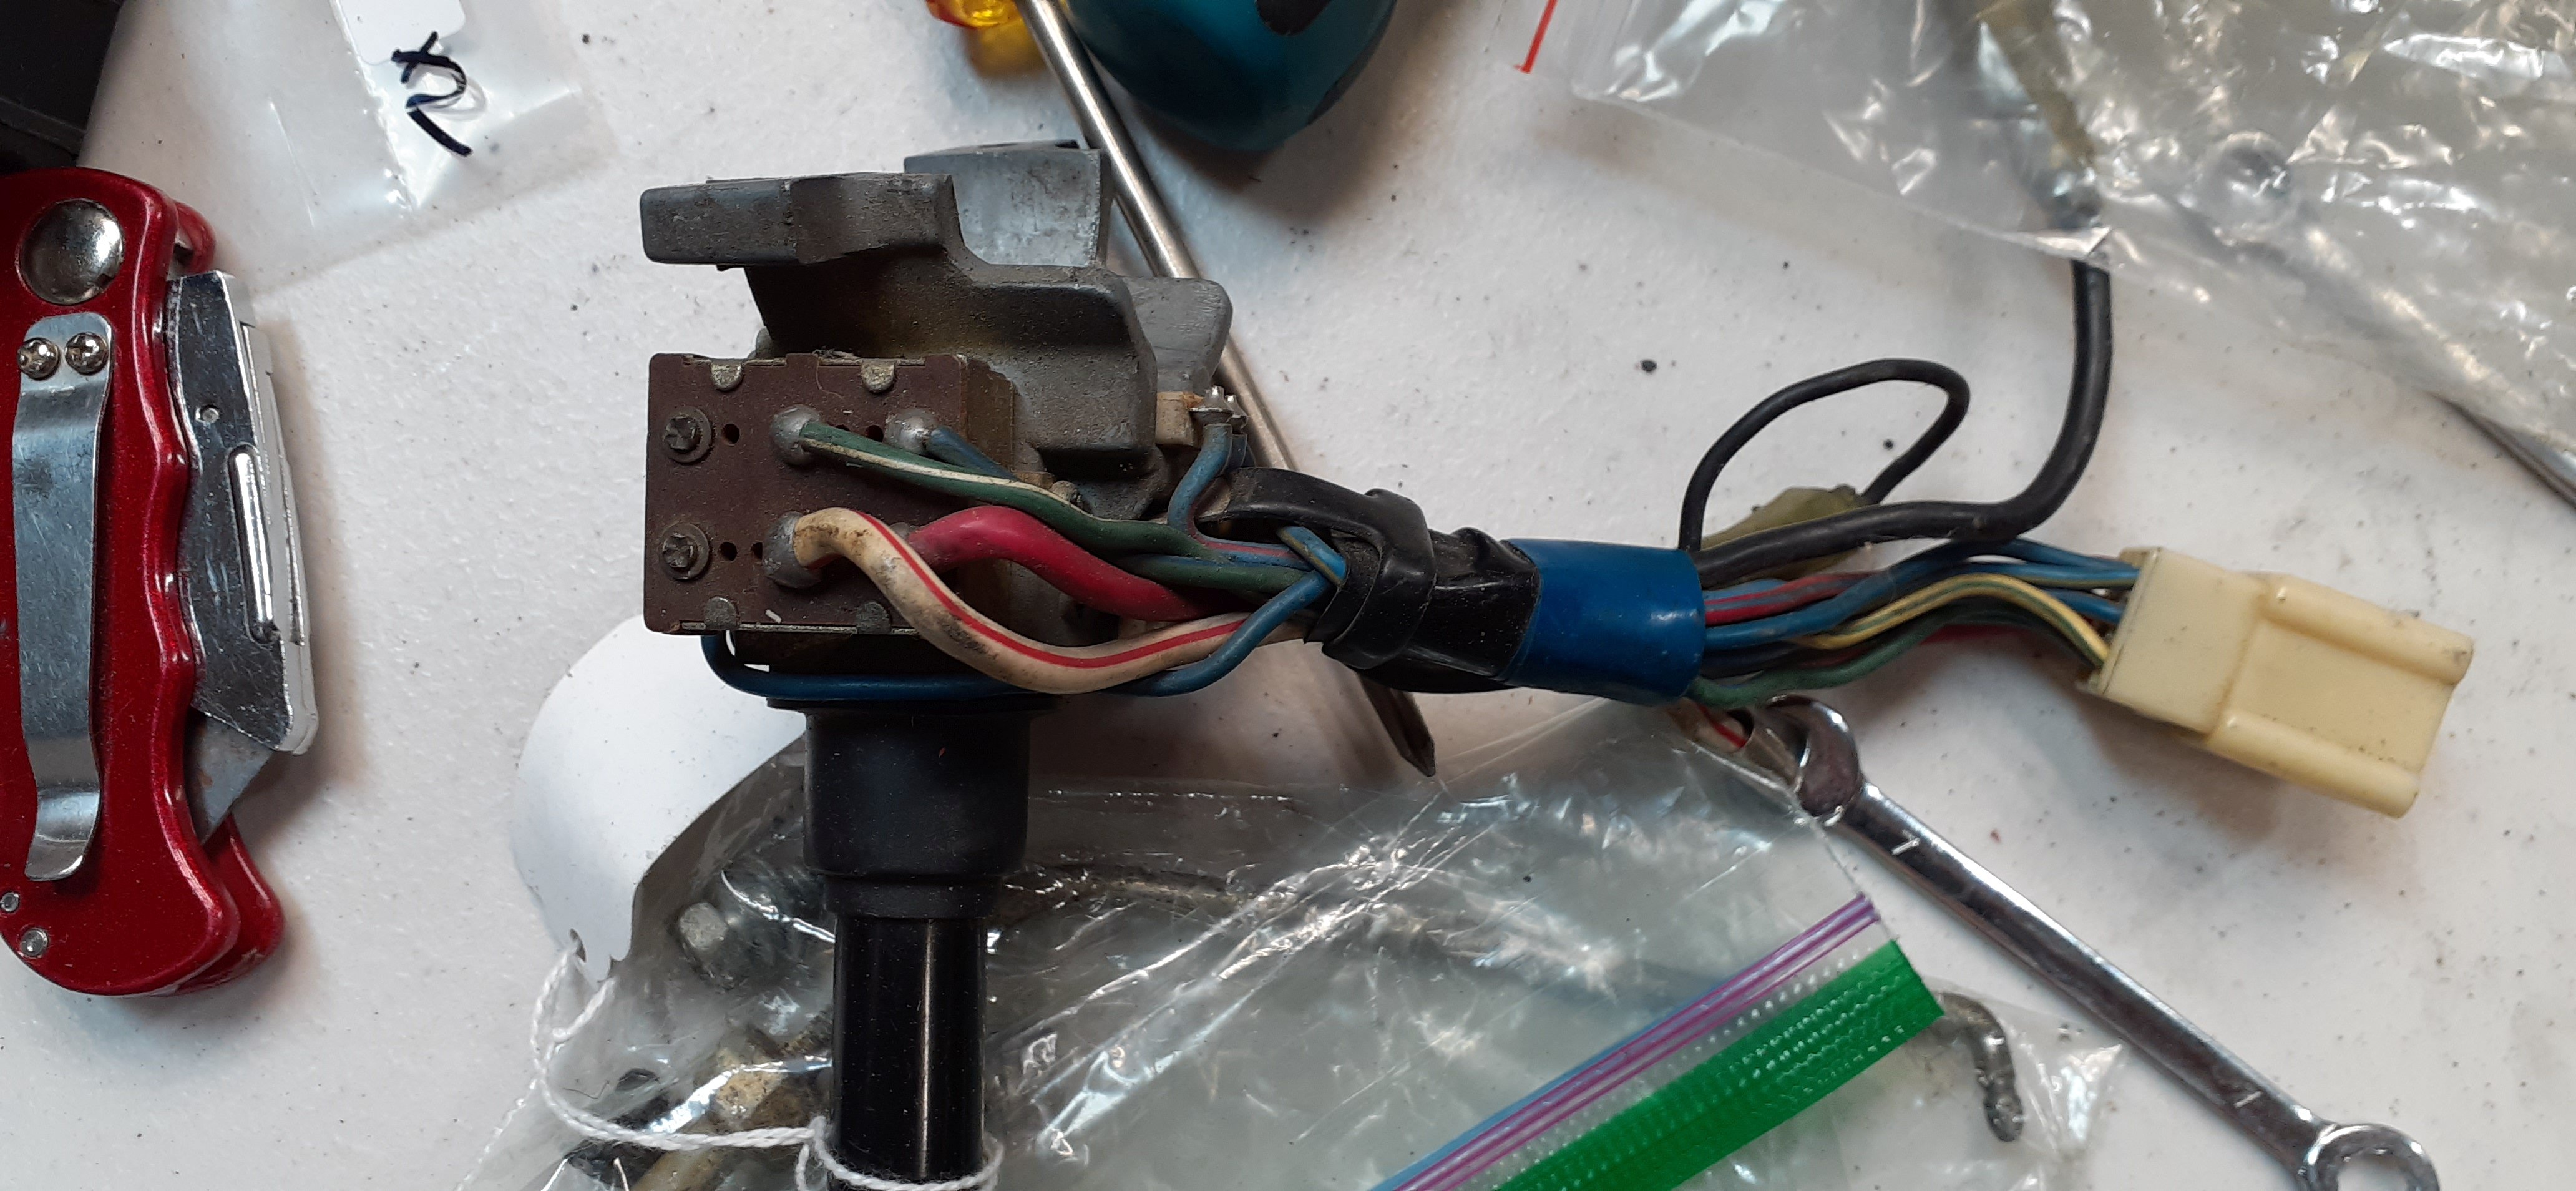
3 pointsOkay, here's a photo of an intact switch. You can see that in addition to the missing wires for the headlight, the green/white wire on your switch is in the wrong location. The green/blue wire should be on the terminal closest to the wire bundle. The 9-pin wire connector needs to be replaced. You can get a replacement connector from Vintage Connections: http://vintageconnections.com/Products/Connectors. I would suggest getting some spare 2.8mm terminals if you don't have experience with crimping wires: http://vintageconnections.com/Products/Terminals. Get the 2.8mm male spade and 2.8 female non-latching. For a crimping tool, I like to use one like this: https://www.amazon.com/Pc-Accessories-Terminals-Crimping-D-Sub/dp/B007R2JLJK The biggest hurdle is to find what else the IPO chopped up. If the high low beam switch is on the floor, that means those wires have been diverted from the turn signal switch. Be sure to download the FSM for your car so you have a good wiring diagram. Also, go to Account Settings. It's in the drop-down at the top of the page by your username. After you get to account settings, choose Signature and put in the year of your car. It helps us tailor answers to your specific model.

 3 points
 -
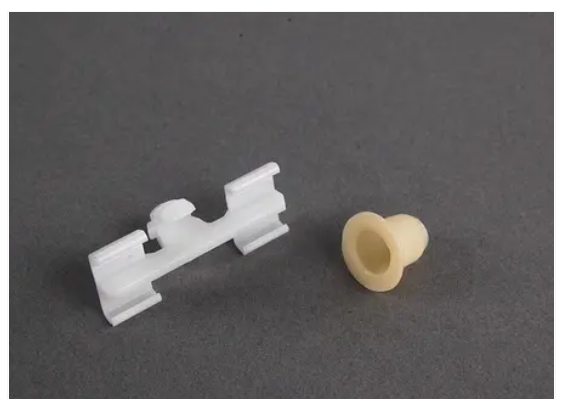
Ha! Some of it is obsessive - no doubt. I appreciate your input. My first car was a 4-door 510. Being just 16, it was a prized possession, and I used to wash it about every week. Water got into that car and under the floor mats something fierce. One day, to trace the sources of the leaks, I set up a hose so that water showered down heavily on the car. After about 20 minutes, I got inside and looked to see how water was getting in (I had removed the kick panels and floor mats, etc.). I was quite surprised to see that a main point of ingress was one of the bolts clamping the LF door hinge to the car. A steady stream of water was wicking along the bolt threads from outside to inside the car and running downward from there, collecting into a pool on the floor. Interestingly, though I thought the windshield seal might be leaking, it was not. I also recall finding that if I pointed a spray of water from the hose at the c-pillar vents, water would fly in... it would get directed upwards by the internal part of the vent, and then drop down onto the trunk floor, where gravity would direct it to the lowest area under the rear seat bottom. When I restored my first 240z in 1993, I had to reconstruct the dog leg areas of the car with new metal. A few weeks after I got the car painted I was shocked, and upset to find standing water in the dog legs of that car. I couldn't figure out how it was getting in and just drilled a hole in the bottom of the dog leg area so the water that was collecting there would drain out. For this car, I'd like to know that when I wash it, or if I get caught in a thunderstorm with it, no water will enter through the emblem holes and dribble down into the dog legs, or down into the back edge of the rear hatch. Newer cars tend to utilize water proof solutions like this BMW clip, which utilizes a rubber plug, of sorts: Given my previous experiences, I figure I might as well address these known water entry points.
 3 points
 -
2 points
-
2 pointsHere's your cowl drain - it exits between the splash shield and A-pillar. Not visible without removing the fenders. One on each side. If a car is parked under trees, the cowl and drains can fill with leaves and trash.
 2 points
 -
2 pointsWhile going thru all these wiring repairs, give some thought as to why the PO made the changes: in all likelihood the internal contacts are burnt or worse. When you finish the external repairs, you'll still be faced with fixing the original problems. If you get discouraged and look for replacement switches, be cautious about anything sold on ebay that is represented as suitable for any S30. That is not the case as Nissan made a lot of changes throughout the S30 run. While refurbing units across all of the S30 line I made a chart that shows the variations in the switches and note they are not interchangeable due to feature and/or wiring and connector differences. You can see there are 4 variations of light switch for the 240Z and 3 variations of turn signal switch. This information came from the online parts catalog. Lights 240Z Applied Date Qty Interchange From To Newer Former Superceded 25160-E4600 7012 1 25160-E4601 7101 1 No No 25160-E4600 25160-E4602 7101 7108 1 Yes Yes 25160-E4601 25160-E8800 7109 7206 1 No No 25160-E4602 25160-N3300 7207 7307 1 Yes Yes 25160-E8800 260Z 25160-N3605 7308 7411 280Z 25160-N3605 7412 7607 1 25160-N4700 7608 1 Turn signal 240Z 25540-E4600 7108 1 25540-E8300 7109 7206 1 No No 25540-E4600 25540-N3300 7207 7307 1 Yes Yes 25540-E8300 260Z 25540-N3605 7308 7411 280Z 25540-N3605 7412 7607 1 25540-N4701 7608 12 points
-
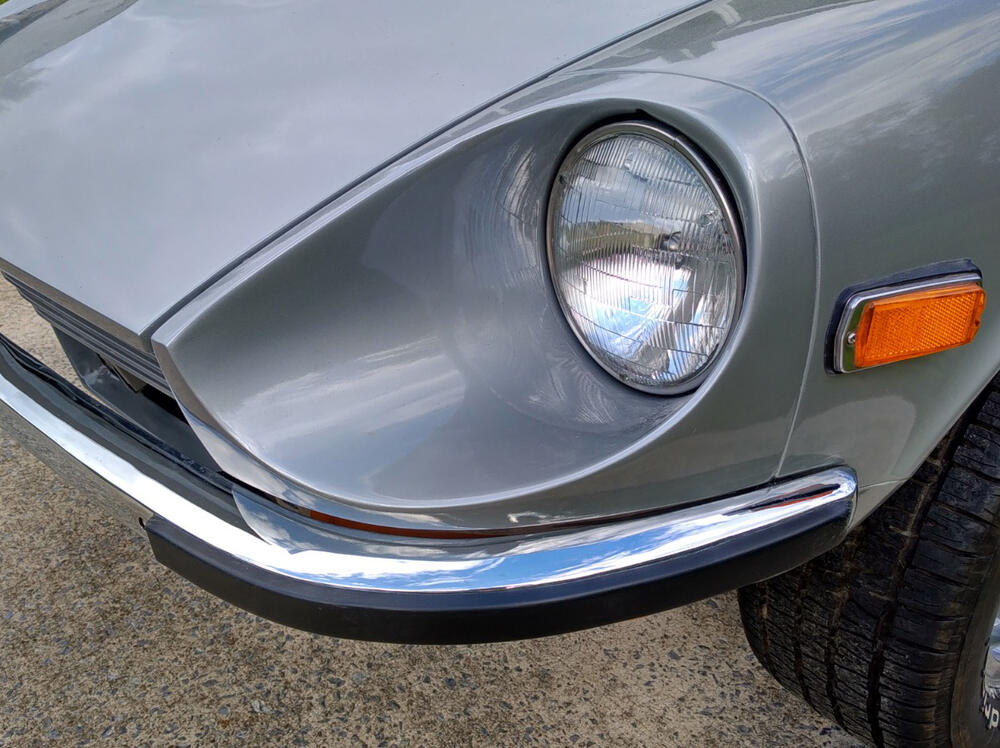
2 pointsThe plan for today was to start early with bleeding the clutch...yeah, here's how that went. No fluid moving through the hydraulic circuit. Lots of time spent removing the hose between the slave and hard line. Got lots of gunk out of the hard line and clutch hose. I used air on the hard line and 14 gauge solid wire on the hose. Wrestled to get the hard line and hose reconnected. Bleed the system only to find a leak between the hose and slave cylinder. Researched the problem and found this thread: https://www.classiczcars.com/forums/topic/46057-slave-cylinder-hose-gasket/ Found my sealing washers and got everything reassembled. Got the clutch bled with no leaks. Don't you love it when a simple task takes several hours? I also replaced the old battery cables and installed the H4 housings with LED bulbs for the headlights. It doesn't seem like much, but it ended up being a long day. I decided to put off the startup until next weekend.2 points
-
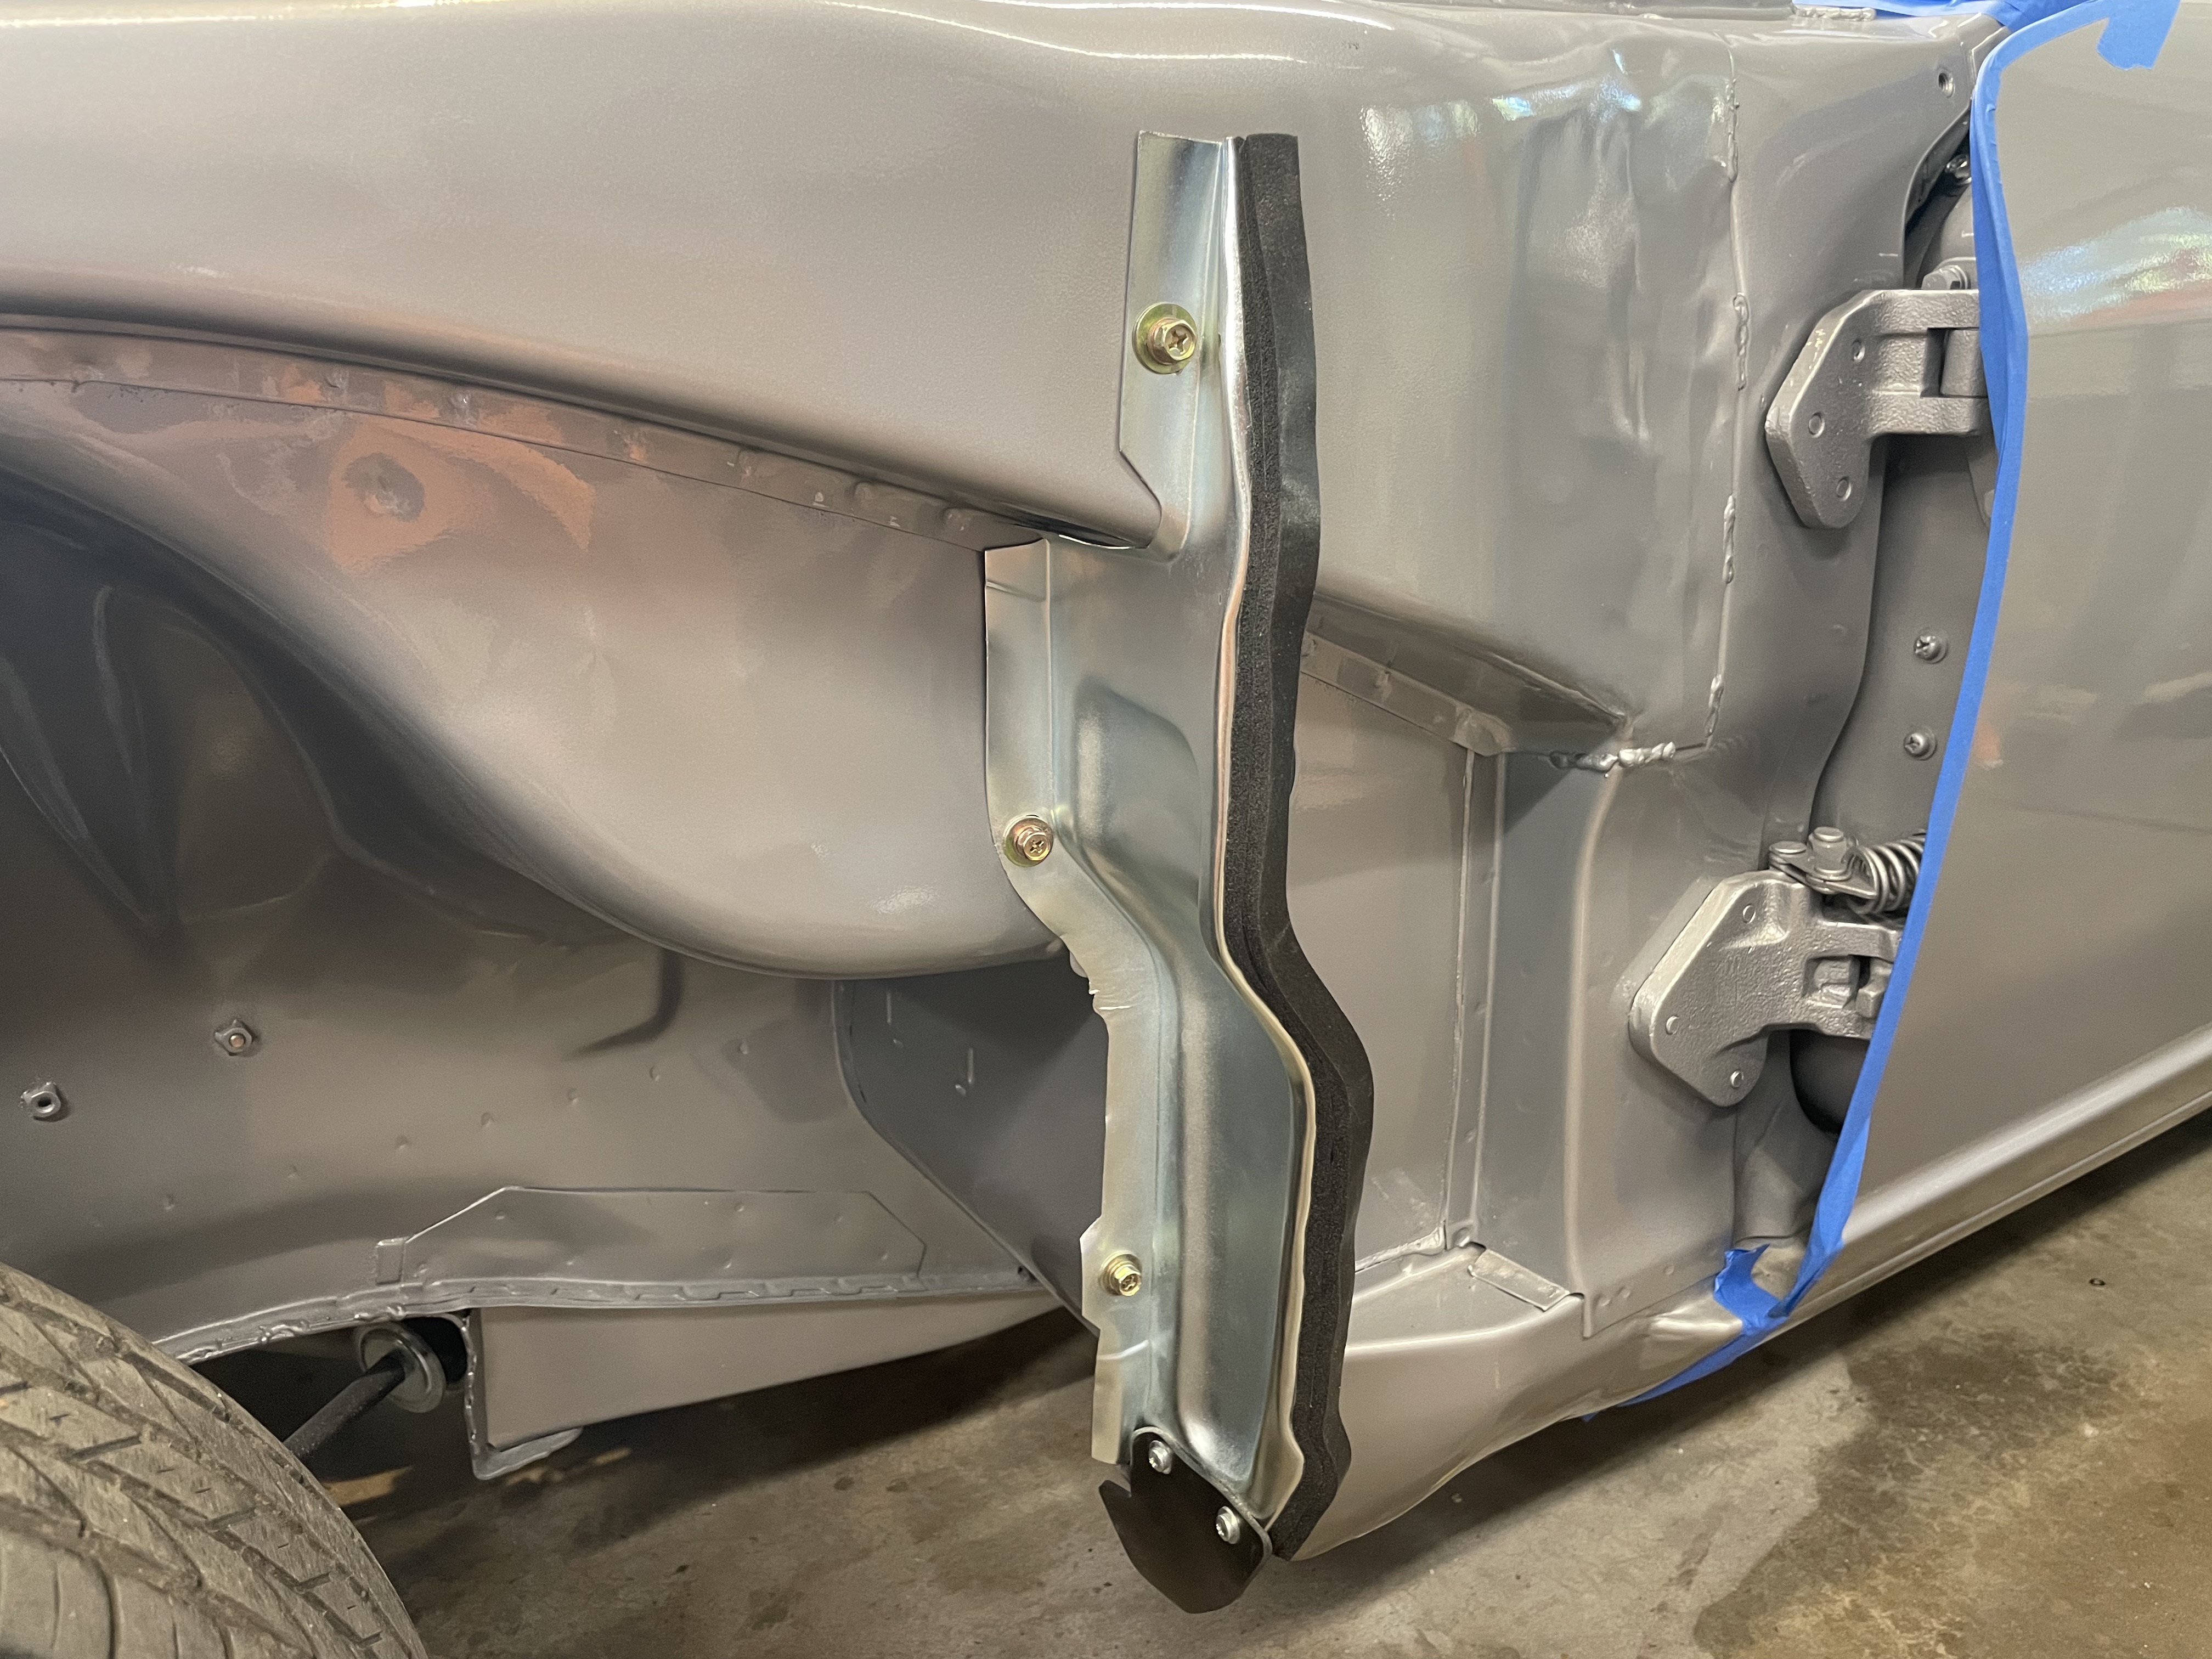
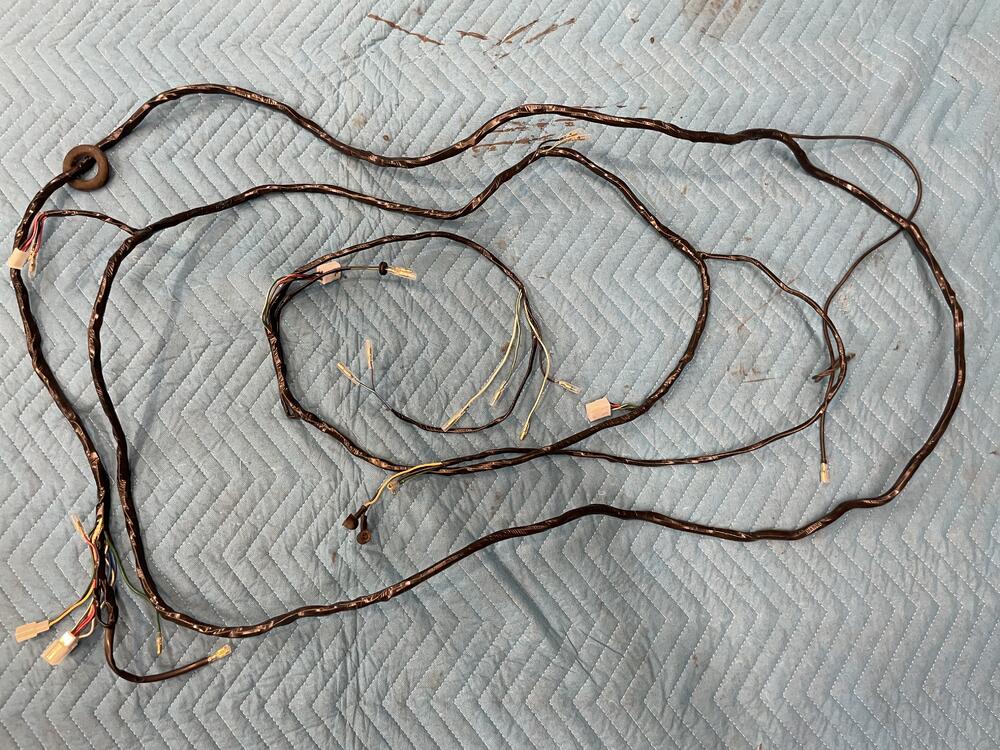
2 pointsFew smaller details completed tonight. Finished up the interior harness rebuild and installed the inner fender splash shields. Replated in clear zinc (I know, they should be body color but couldn’t bring myself to paint them) new hardware, foam, and lower mud flap.
 2 points
 -
1 point
-
1 pointI added some gas to the tank and some oil to the dampers and ran the car again. She starts up and idles, but she needs plenty of tuning. At least she is pulling gas from the tank. The tachometer isn't registering, but that is because of how I wired the Pertronix. I just need to re-wire it a little to stop bypassing the tach. (I figured that out by reading a Hybridz response from @beermanpete. I miss that guy posting here.) The rear carburetor is leaking fuel at the banjo fitting. I'll take that apart and put in some new sealing washers.1 point
-
1 pointYou don't know the half of it. When I took the car off the road 11 years ago, I had a lot to learn. I have gained a TON of knowledge reading posts from all of my friends on this site and around where I live. It also took a lot of effort to change my priorities to put the car up high enough to get it done.1 point
-
1 pointSo I got bored today. I got the new battery and decided that I didn't like how the new cables fit on it with the Nissan battery frame, so I got different cables. With the new cables installed, I pulled the plugs and removed the valve cover. I put a squirt of oil in each cylinder and bathed the cam lobes with oil. I then used the starter to turn the engine. It did not hesitate. Next I put some gas in each carburetor via the float vent using a 1 ounce syringe. I put a short spray of starting fluid into each carb and climbed behind the driver's seat.1 point
-
1 pointFinally nailed down the last detail. We are getting in Friday afternoon (hopefully in time for cocktails 🍸). Looking forward to meeting folks and seeing a lot of great cars.1 point
-
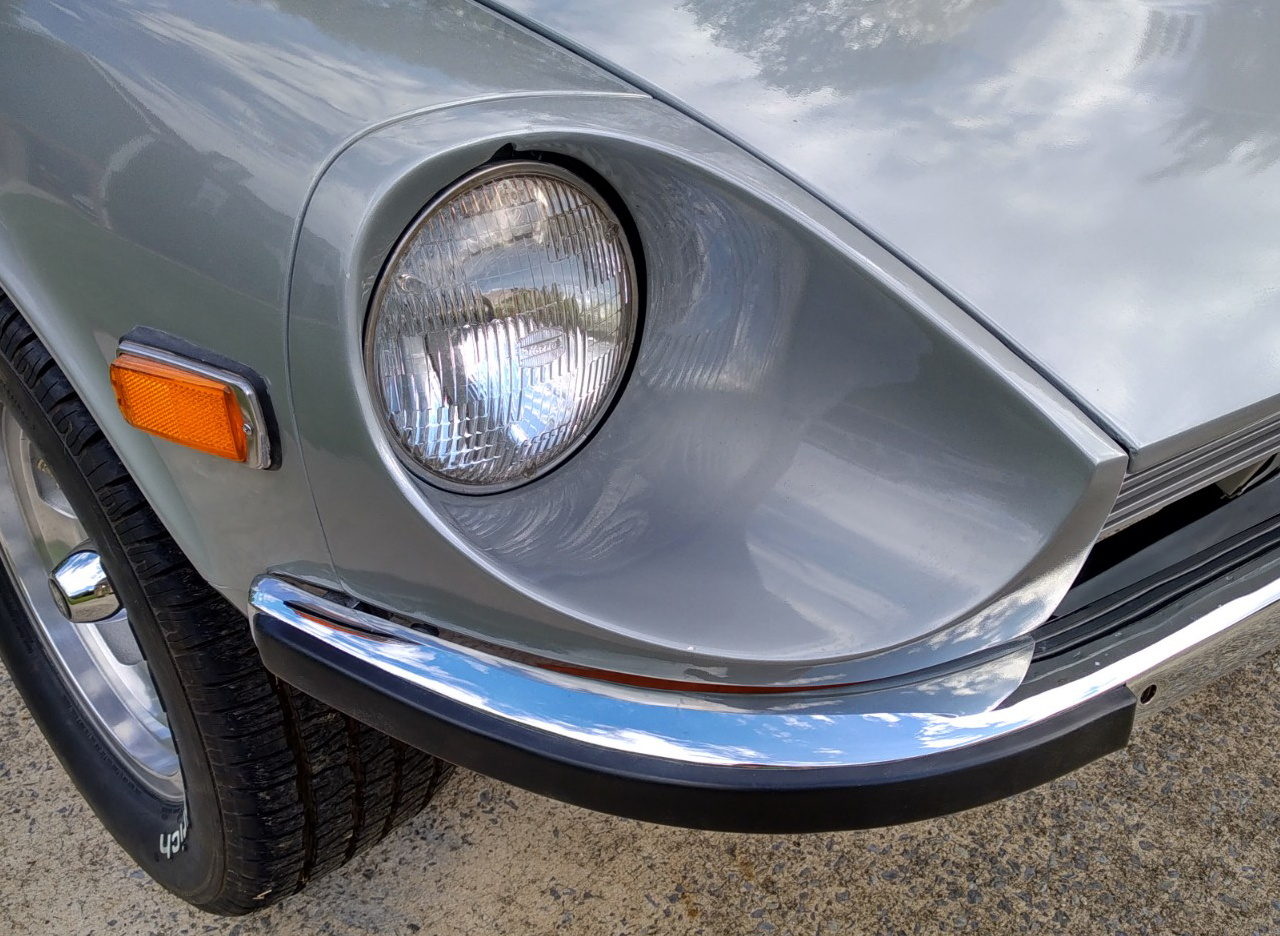
1 pointQuick update here: I managed to get the left corner of the hood to align by removing one of the torsion springs. The hood doesn't stay up with just the one spring, but the hood prop keeps it in place when opened.

 1 point
 -
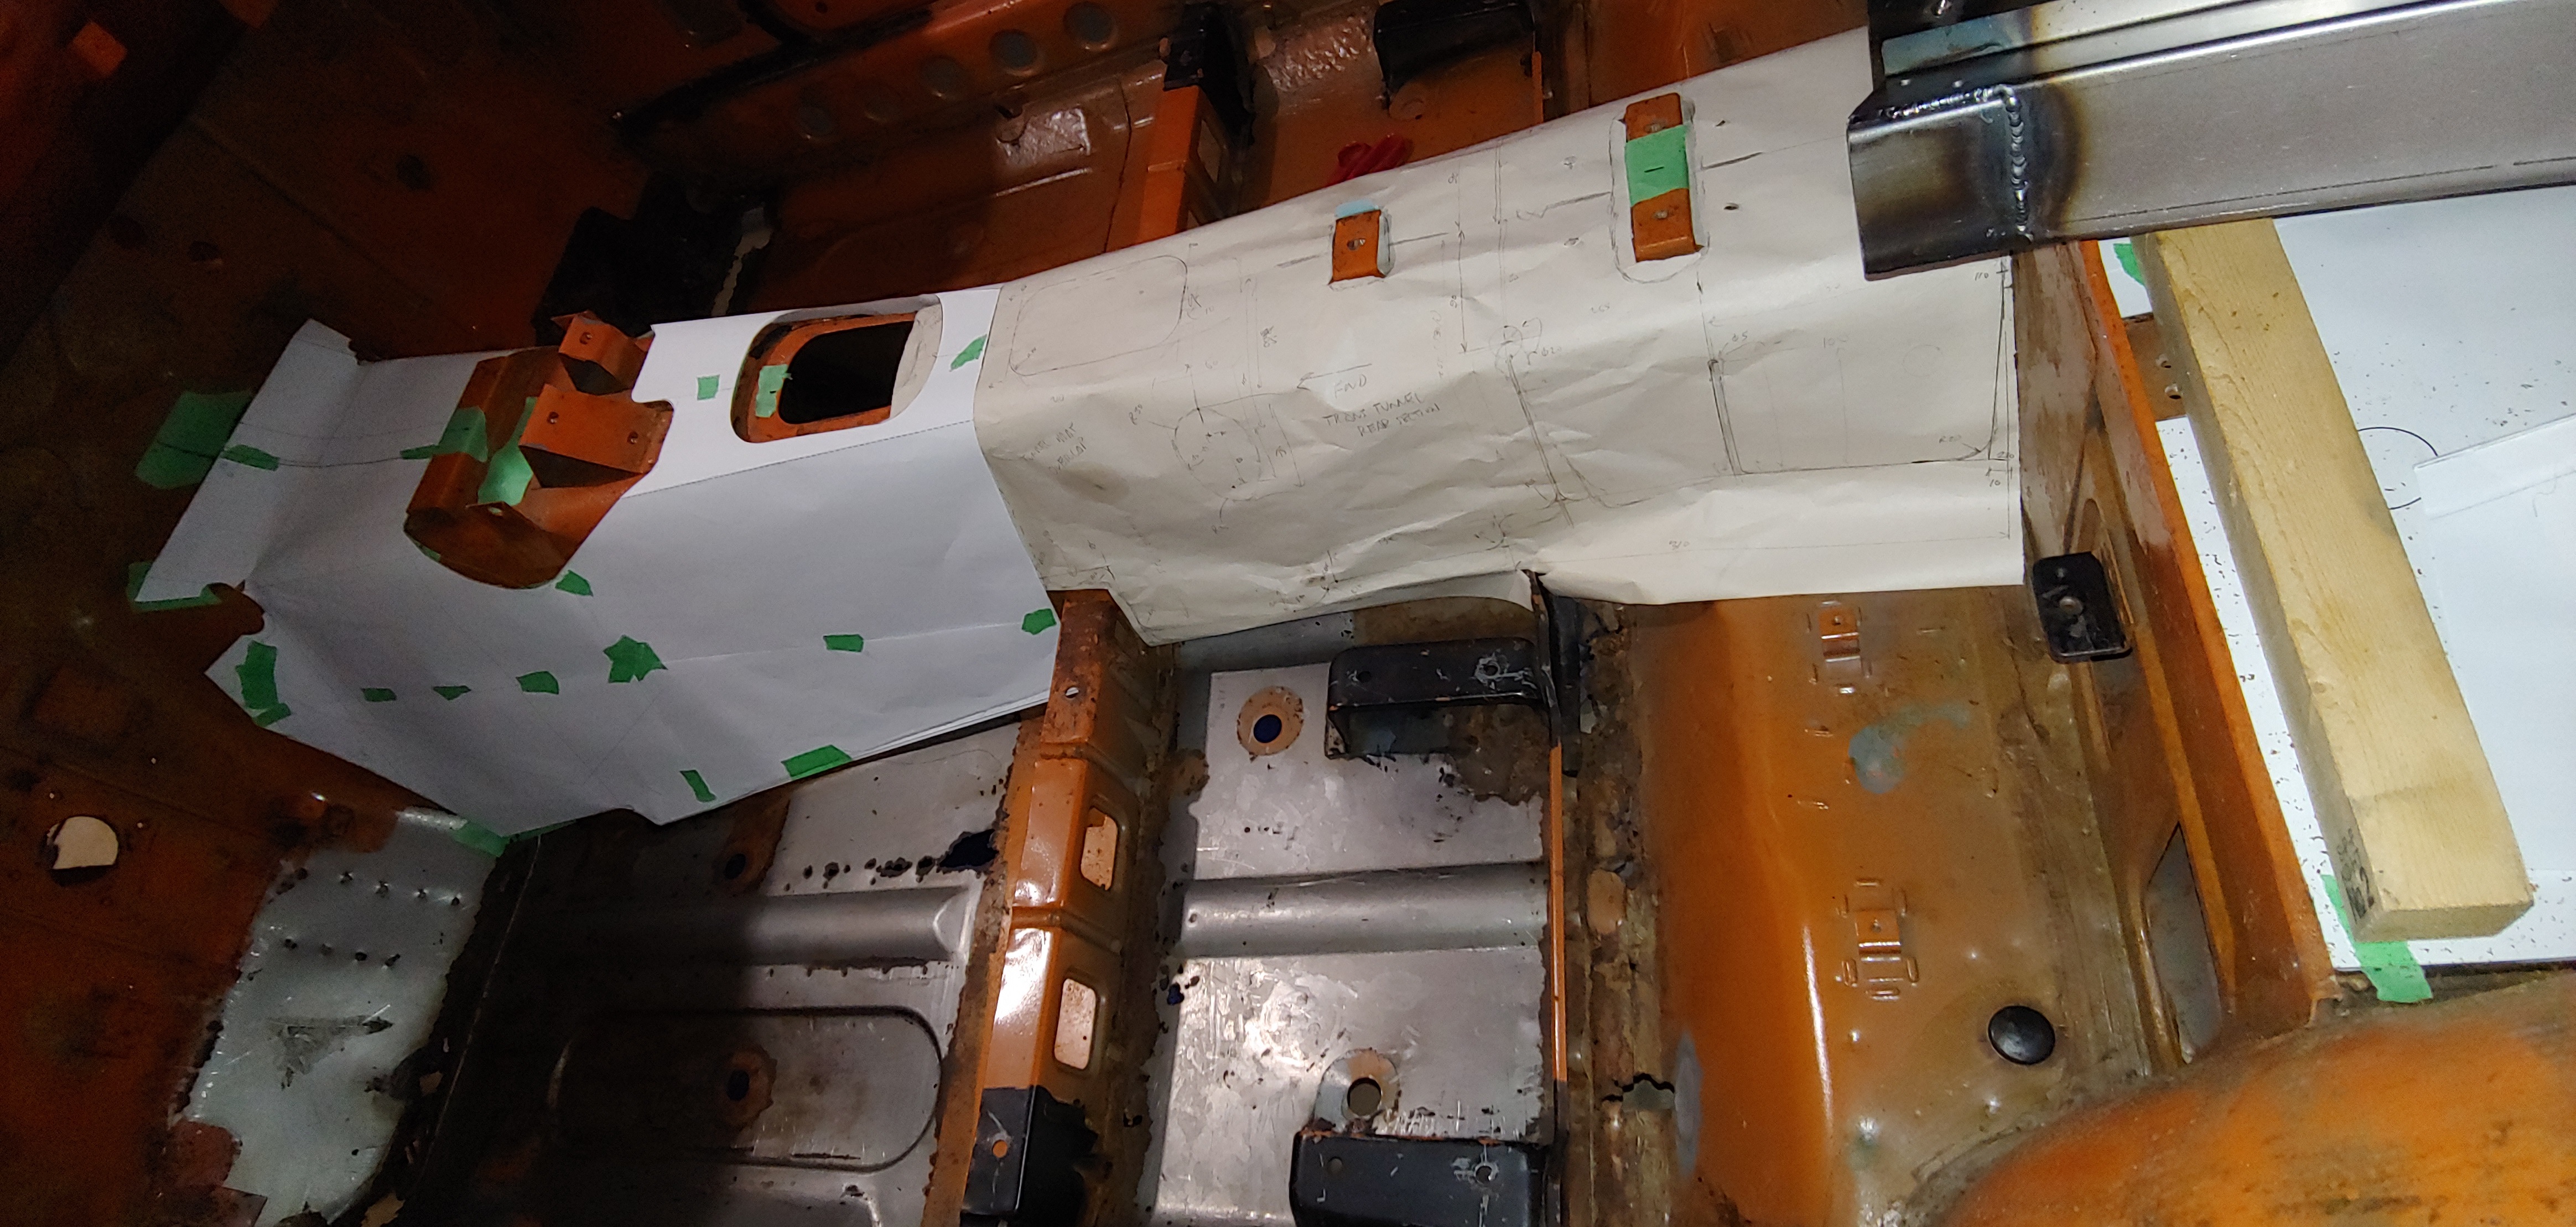
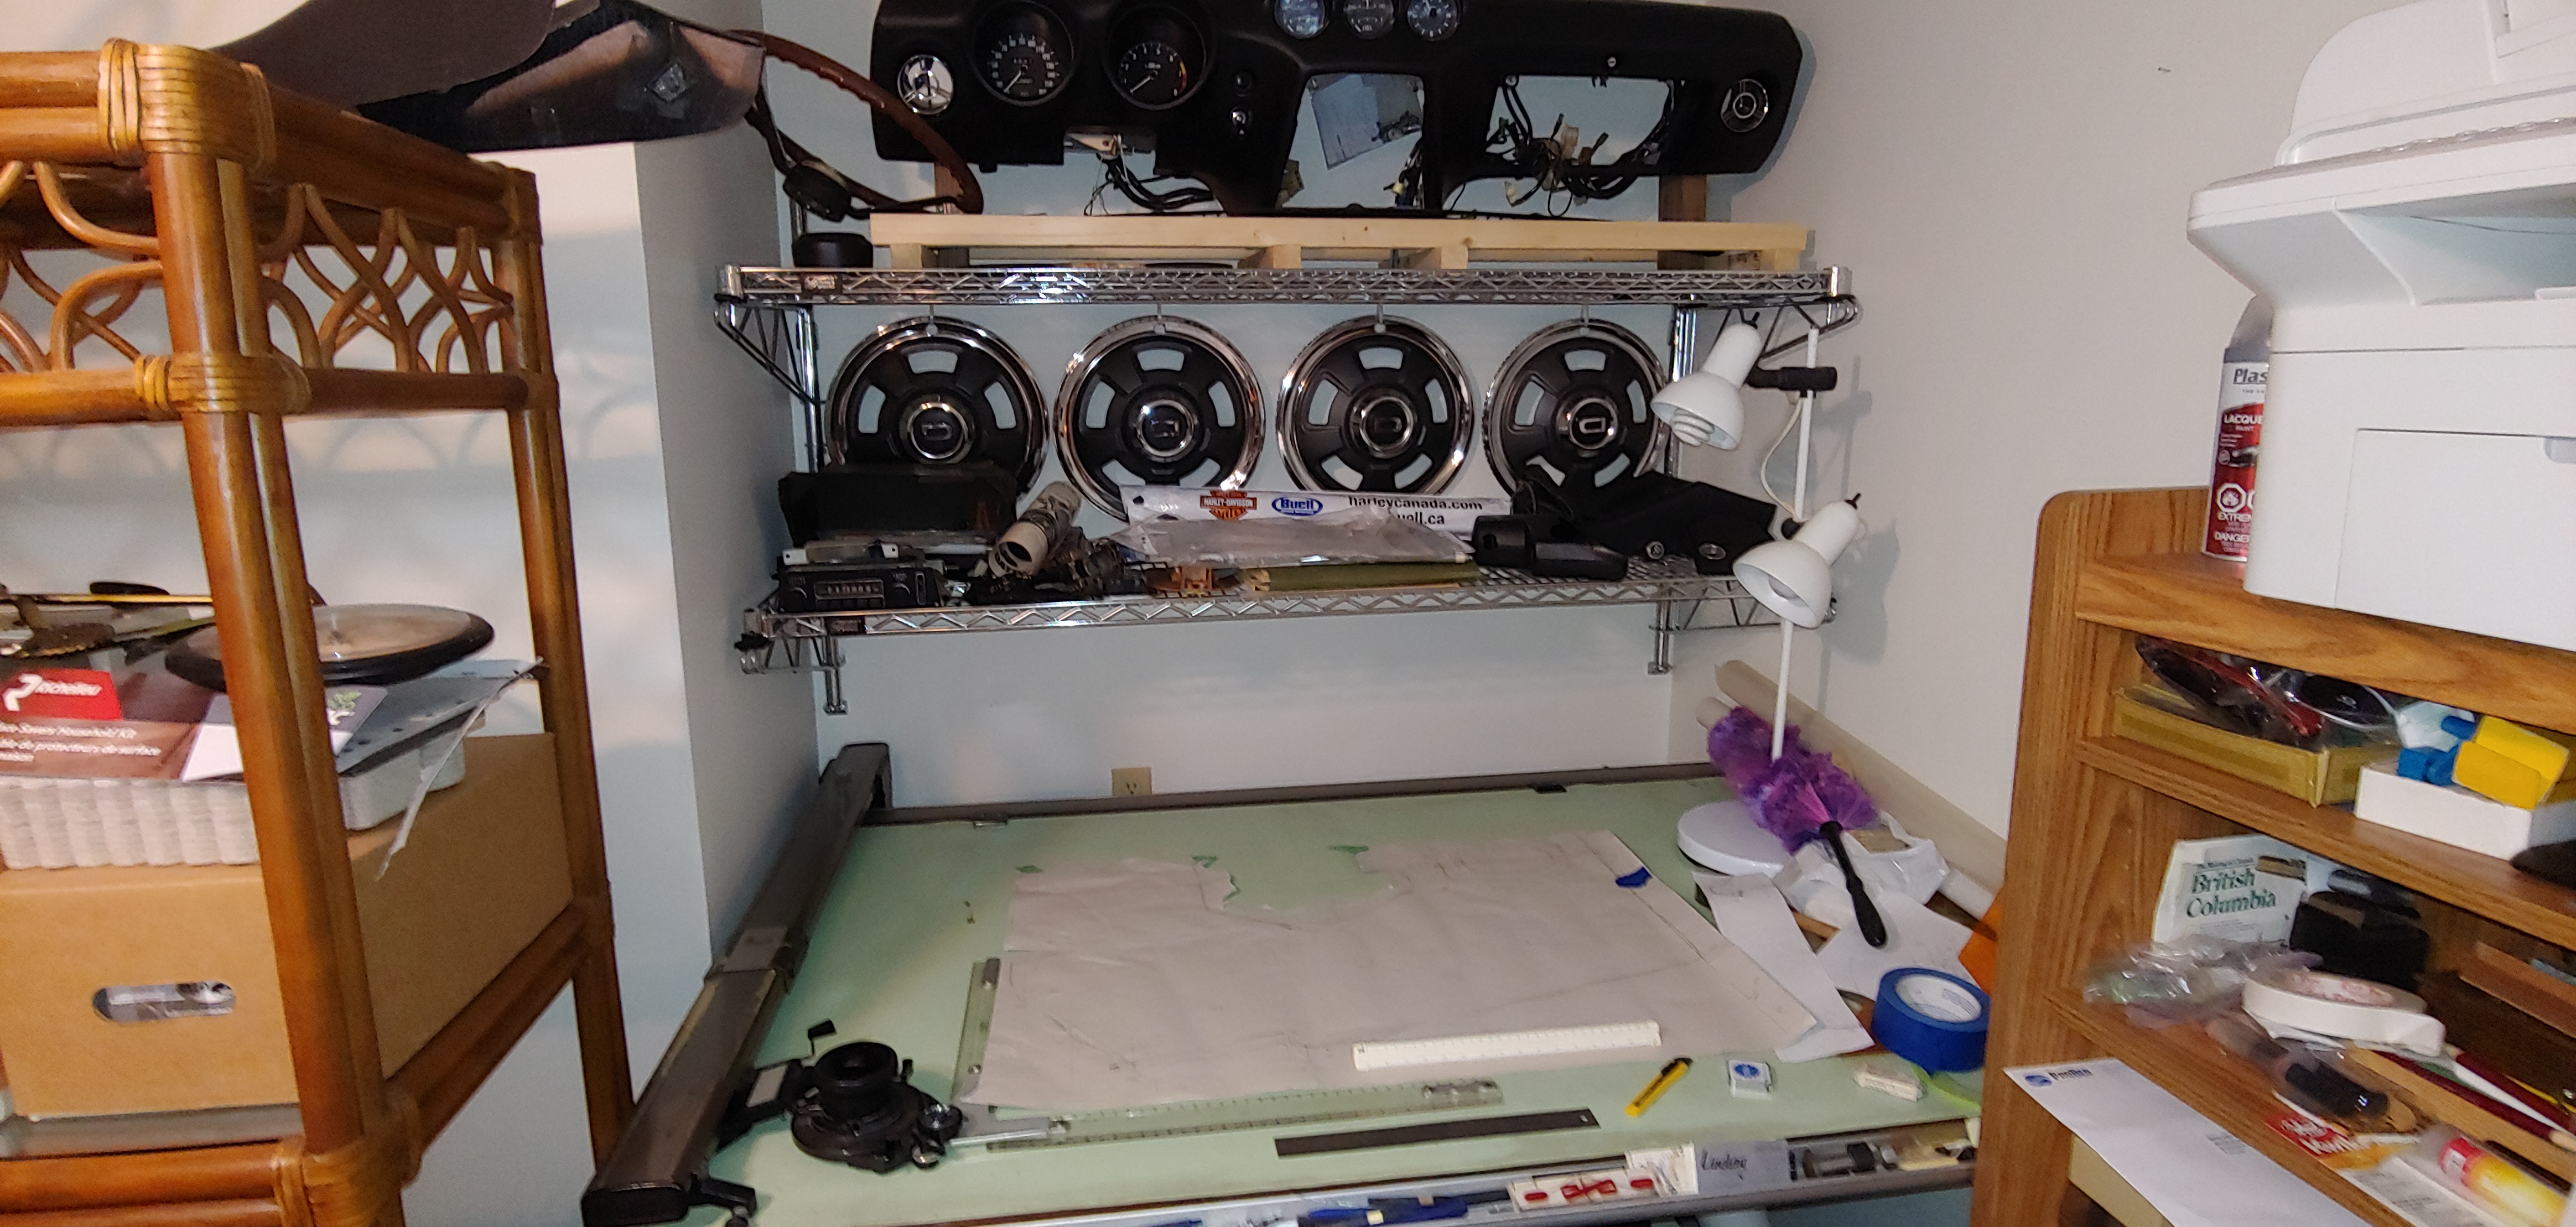
1 pointSpend much of the weekend continuing with my tar mat template project. Almost finished with the preliminary test fitting of the transmission tunnel templates. Hopefully just have to do one more round of adjustments to my cad file and then plot full size in one piece to do a final test fit. Actually two pieces, there is a front section and rear section that overlap. This has definitely proven to be the most time consuming part of the job. Luckily my drafting table and computer are in my office that is directly connected to the garage. As you can see I'm using all available space for parts.

 1 point
 -
1 pointSo i had the rear and front rubbers on wrong ends. It was easy to do. Anyway when i changed them and realized they cover up one of the chrome bolt holes it looked much much better. almost no gap
 1 point
 -
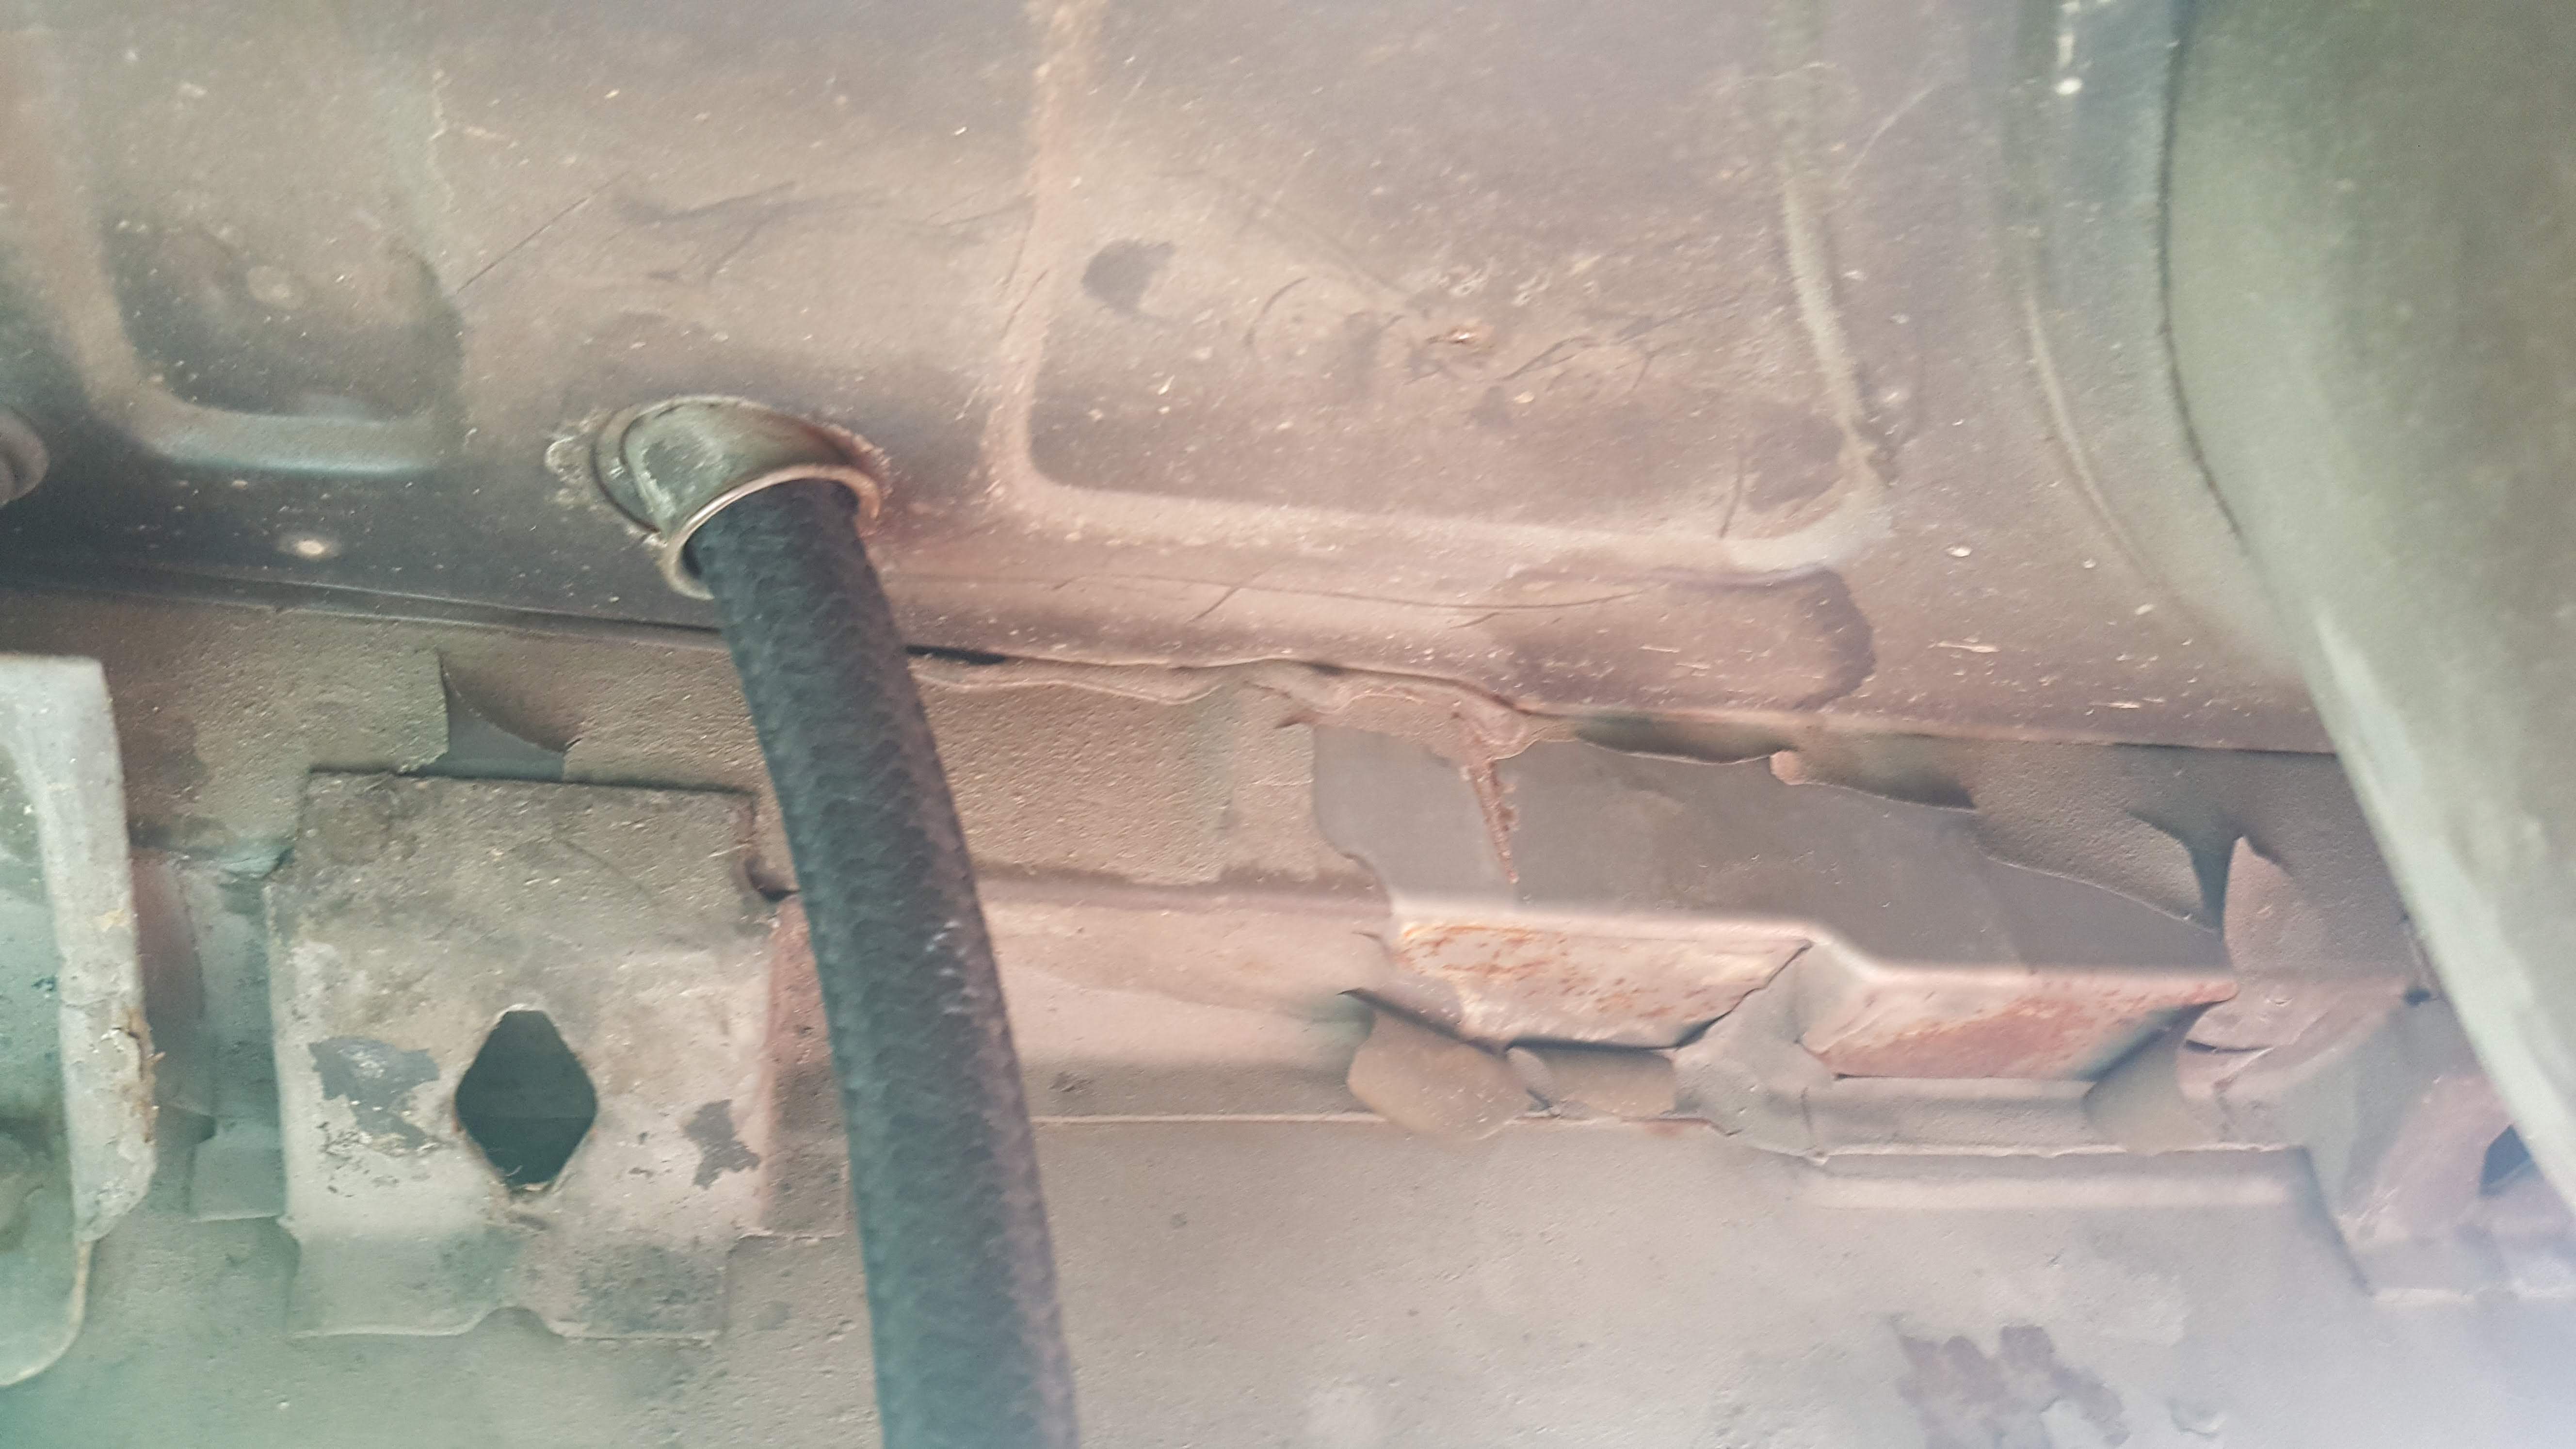
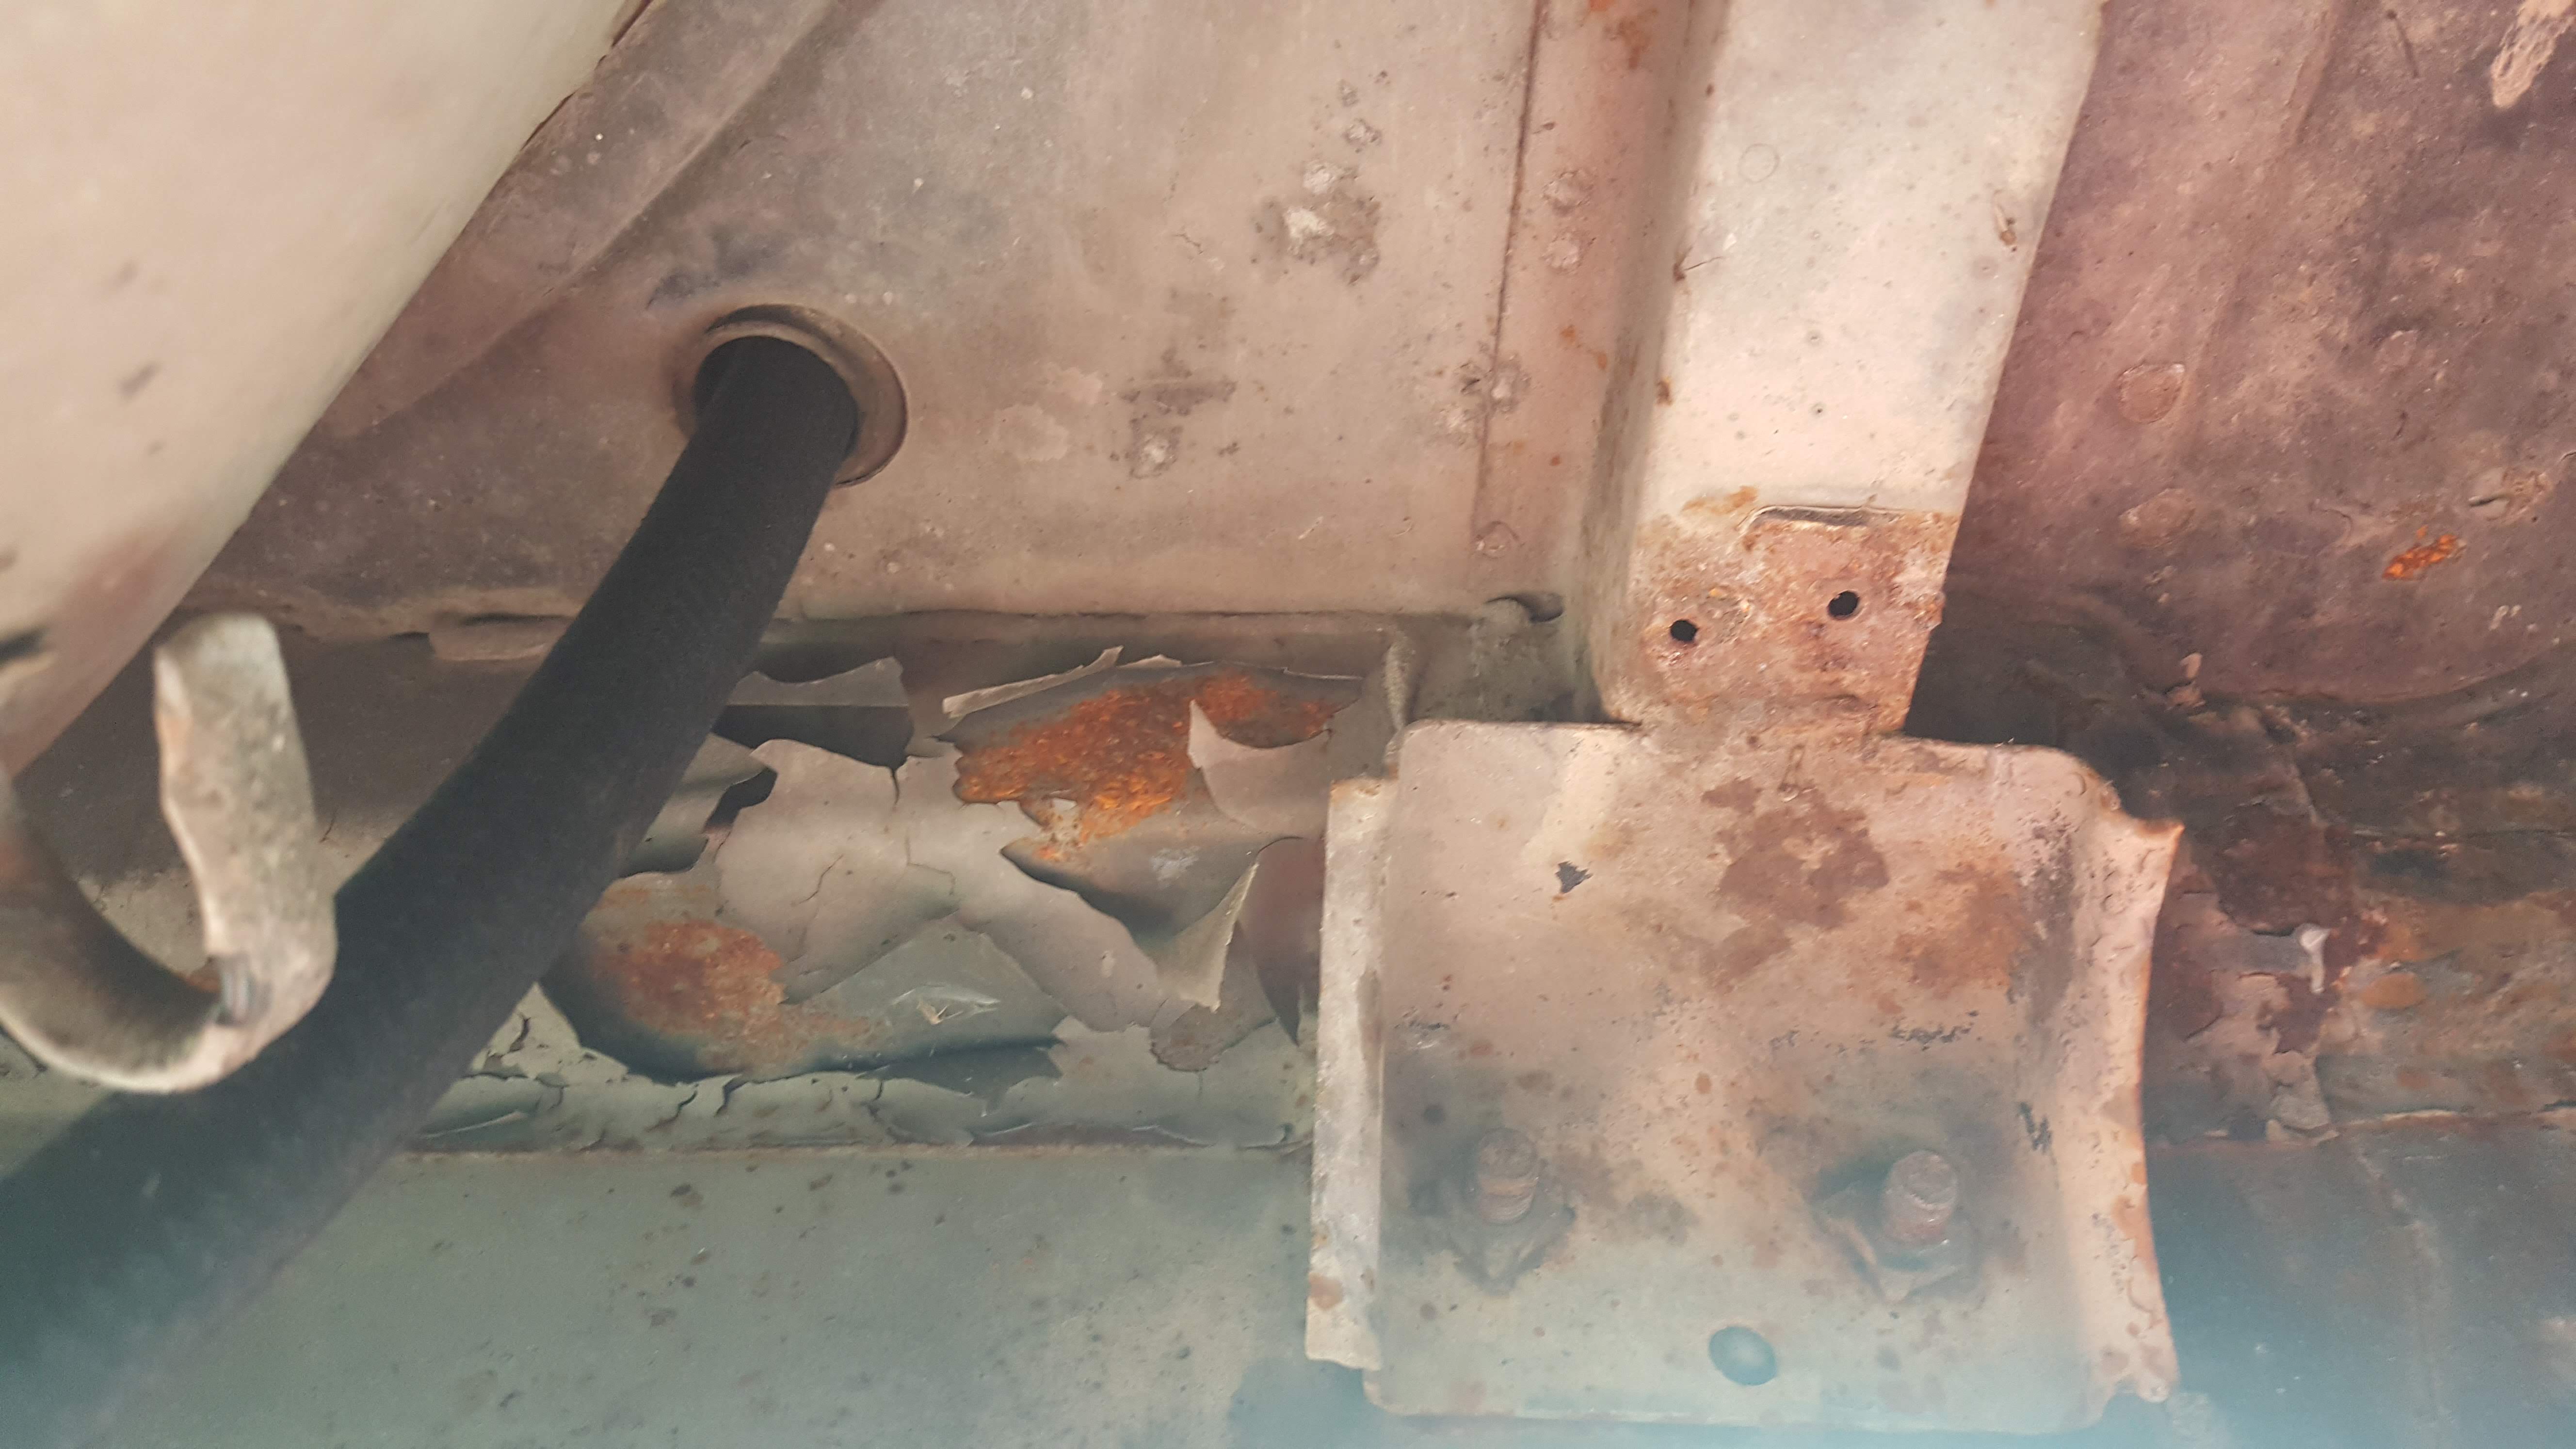
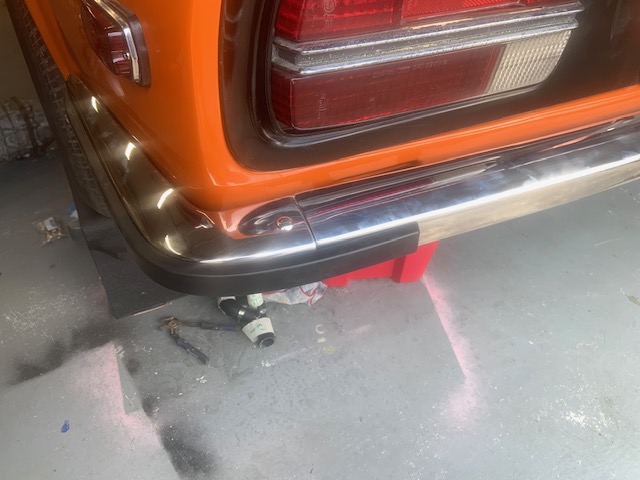
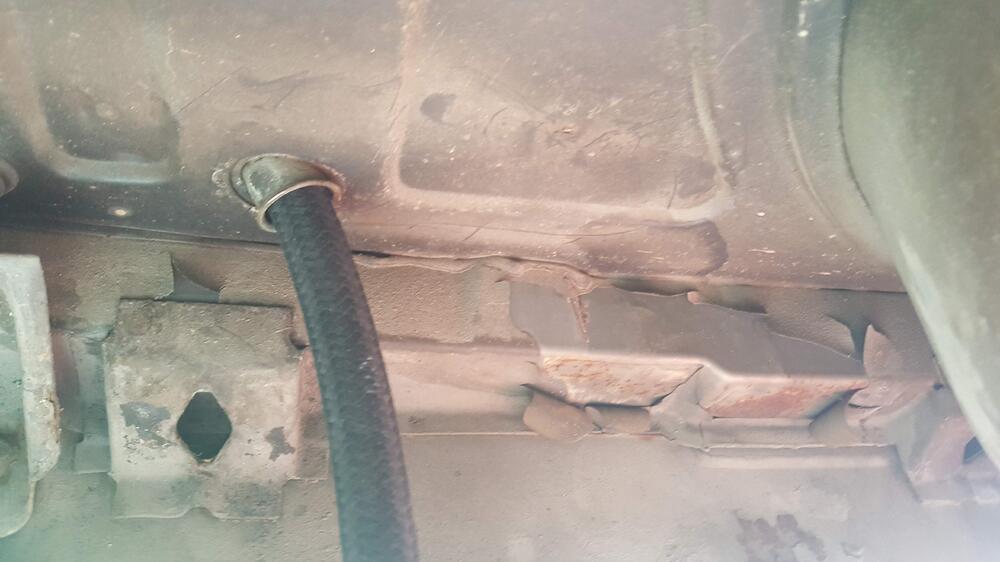
1 pointWe were installing the fuel tank this morning and I noticed some stuff peeling off of the under side of the car in the VERY rear. While most of the under side does have body paint this area seems to have some kind of coating over the orange paint and that is what is flaking off. See pix. The fuel tank is back in the car now so I no longer have access to this area, hope these pix help.
 1 point
 -
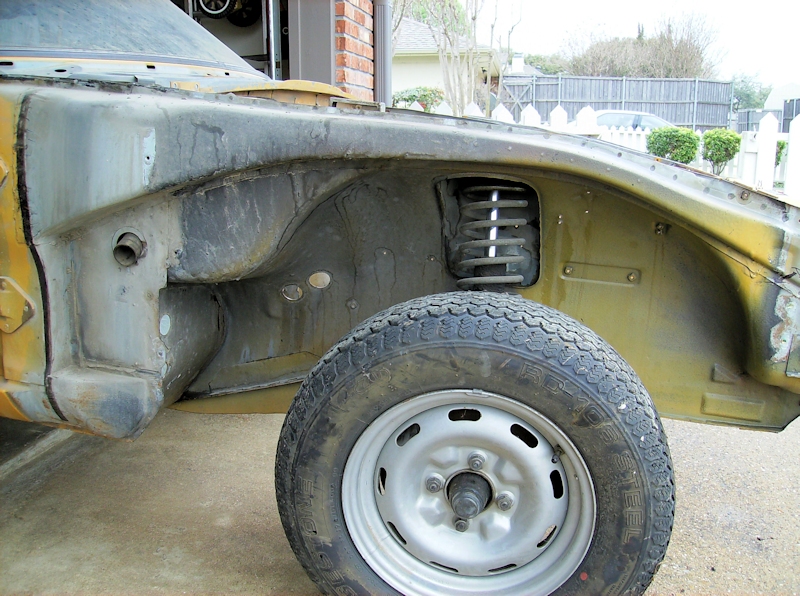
1 pointThe rear struts are different on the 240 and 280, the 280 struts are taller, by (if I recall correctly) about 40mm. So the rear springs are shorter on a 240, taller on a 280. The fronts are the same height.1 point
-
1 point
-
 1 pointMany thanks to zKars! Parts received and installed and the car is one step closer to having a new home! 😊1 point
 -
1 pointThe headlight swap and battery cable change actually went as expected. Sometimes the breaks go your way.1 point
-
1 point
-
1 pointFirst you could change the title.. what about is this thread?.. about a sale of a 1971 240z !!! If you had put that in the title, it got MUCH !!! more attention.. i think. and the foto's ... put some in the thread.. not download-stuff.. remember, people are lazy haha.. oeps.. 🙊 And how can i tell you what's it worth.. i need not 3 pics i need 50-200! pics and maybe i can tell what a right prize could be..1 point
-
1 pointThanks for putting some quantitative numbers on my "they look different to me". So are you sure the clamps were in the right way before you took them off? In other words... Are you sure about that "56 degree end goes in front and the 50 degree end goes towards the rear"? Has your rack ever been off the cross member before? The rack I was messing with here when I noticed the difference had poly bushings in it, so I know some PO had been in there in the past. In other words... I have very little confidence that the straps were in the same position as when they first left the factory.1 point
-
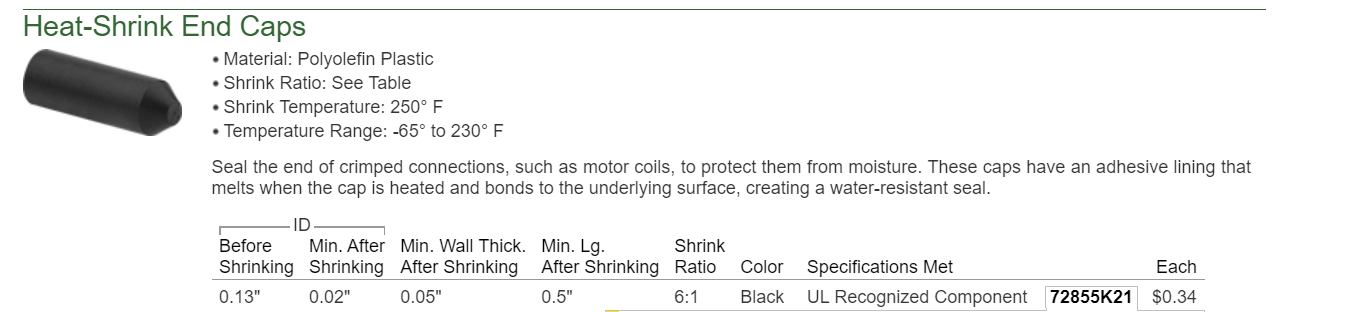
One of my goals for the car I am restoring is to address points of entry for water into the body of the car. If you look at the design that was originally used for the emblems on the car, (hatch panel and quarter panel in particular), it is obvious that water enters through the holes in the panel. I've been thinking of a way to seal them. These may be a good option. I am thinking of continuing to use the factory metal clips on the posts of the emblems, but to put these on and heat shrink them around the clips. I think I will give it a try on a test panel. I need to come up with a few other things for my order with McMaster-Carr.
 1 point
 -
I don't see when this ad was posted. I know I've seen this one listed for sale before though.1 point
-
Since the door with the 260 badge is the same color as rest of the car, I'm guessing this was done several decades ago when they probably "all looked alike" after some kind or respray or repair.1 point
-
@Tweeds never said more than one person was involved...1 point
-
Maybe he was real small. Even as a tall guy, I can ball up and get in the trunk, and that's already pretty close to some positions. Maybe it was owned by a contortionist couple with a kink for claustrophobic sex. Ha! What an image!1 point
-
This 240Z is proof that there is a "witness protection" program for old rusty cars that enables them to assume new identities in a new location and with a whole new back story. As Fox Mulder used to say on the X-Files, "Trust no one".1 point
-
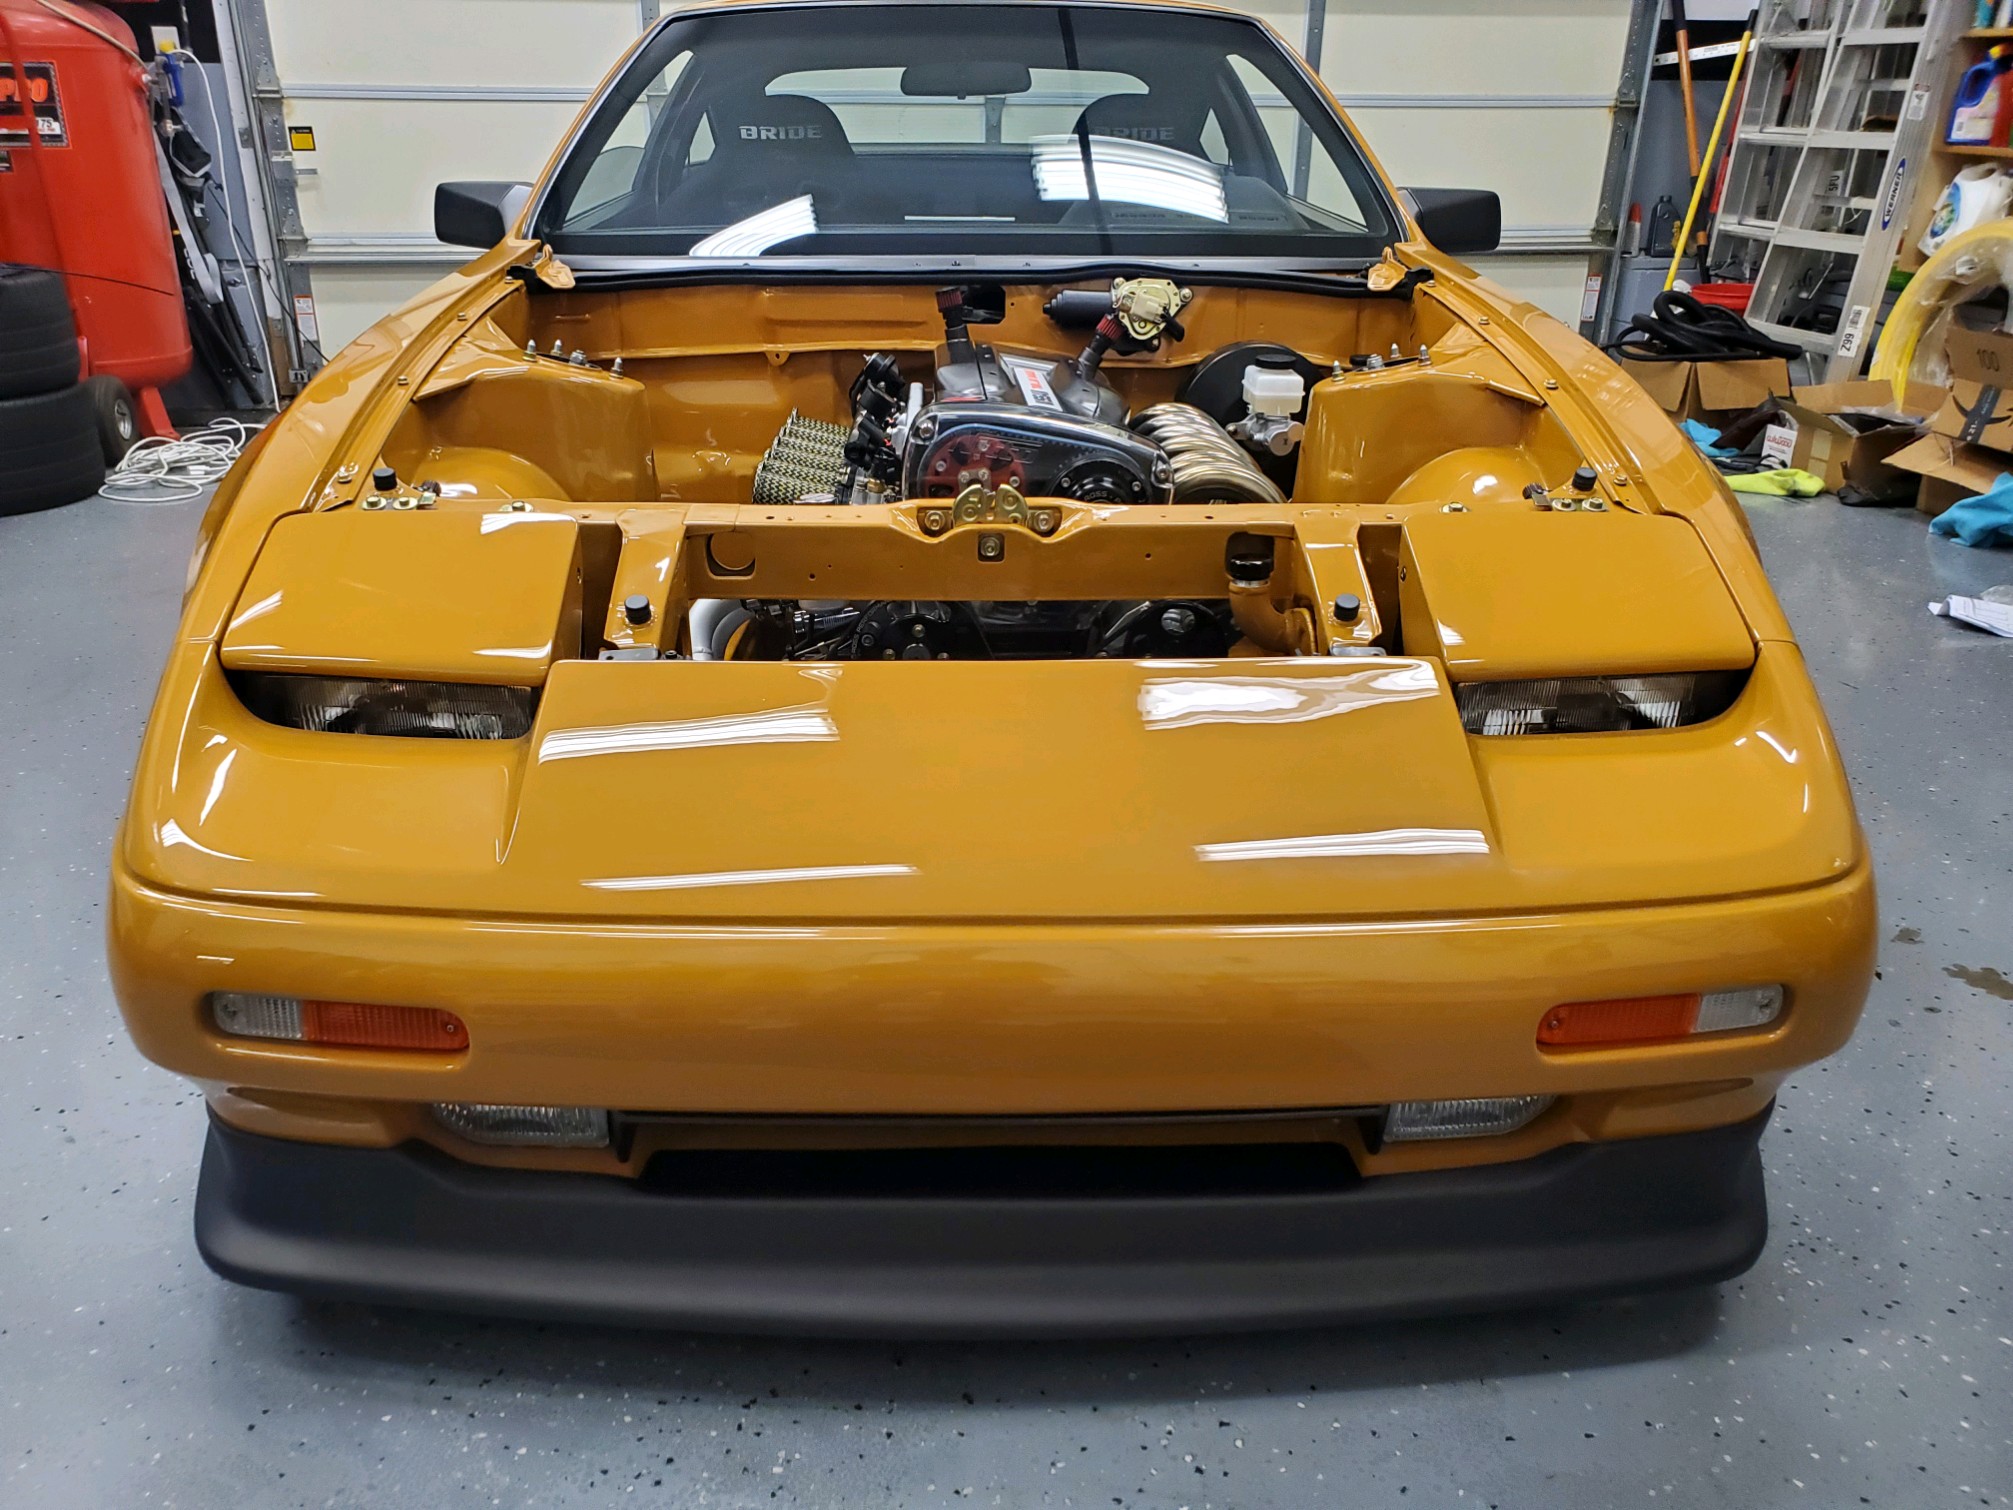
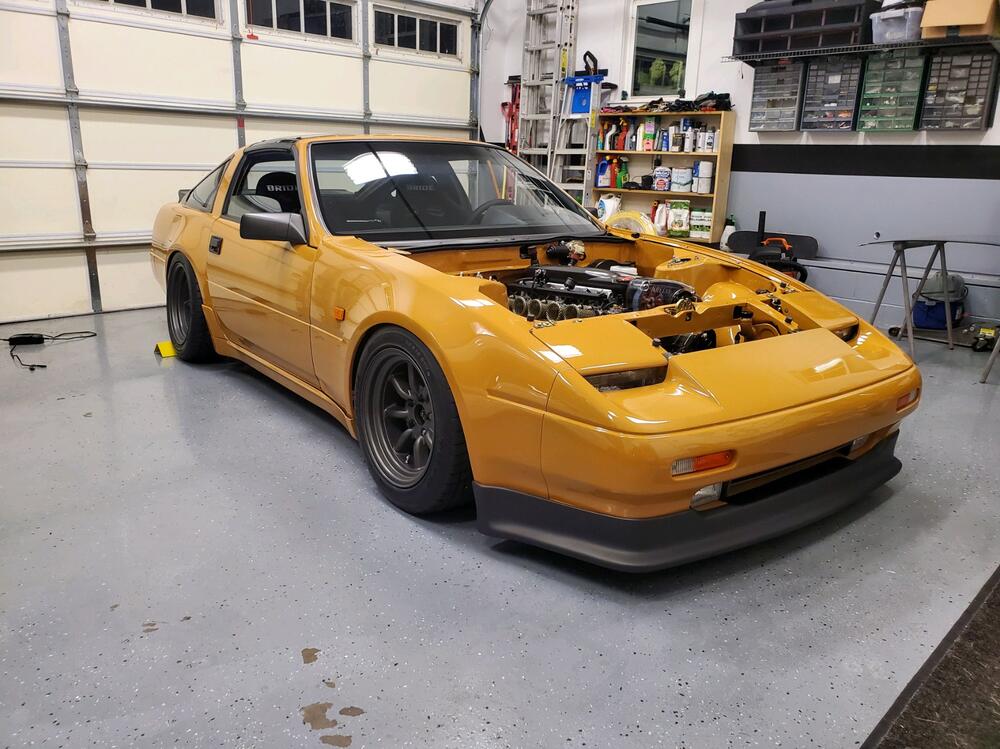
1 pointSorry Brandon….had to post this. Incredible sound…..great job on a cool project!!!! Undoubtably the best Z31 in the world!!!!


 1 point
 -
Two years ago I removed the transmission tunnel vinyl, and then used adhesive remover to get rid of the tar. Next was Dynamat which I covered with 1/4" Dynaliner. Both are stick-on and the Dynaliner provides cushioning and a perfect surface for the vinyl. A tremendous amount of heat and noise comes from the tunnel and this mod dramatically reduced both. Undetectable too if you take your time and do it right. While you're at it, do the floors too. Peter1 point
-
0 pointsJDM Car Parts has the foam. Fit was great. I’d give them more props for all the parts I’ve purchased, but the owner was extremely rude to me and I no longer do business with them.0 points