Leaderboard
-

Av8ferg
Free Member11Points1,538Posts -
Jeff G 78
Free Member10Points3,007Posts -

siteunseen
Free Member8Points15,115Posts -
.JPG.cfcada9cf1c1b502df3f5f2f2ca3ff36.JPG)
SteveJ
Free Member5Points9,646Posts


Popular Content
Showing content with the highest reputation on 08/04/2021 in all areas
-
5 pointsThanks for the mention Cliff @siteunseen. I would not recommend removing the intake and exhaust manifolds. I have done it that way, but getting to all the studs without breaking them is hard enough on a stand, let alone in an awkward position while in the car. Pulling the engine/trans is easy. Just make sure you plug the trans output as Cliff instructed. I use an old driveshaft yoke which seals perfectly, but a pain cap or a sandwich bag and rubber bands will work as well. The higher you get the rear of the car, the easier it is and the less height you need for the pull. You said you bought a hoist. Is it folding or fixed leg? I found that the folding hoists don't quite have enough reach for a Z and you will need to remove the front bumper. It will work to get the engine out, but the reach is a few inches short to get it back in and aligned over the mounts. I struggled and finally bought a non-folding hoist which you see in the pic Cliff posted. You might want to tape a rag over the sloped side of the hood latch bracket, The valve cover will be very close to it and can easily scrape the paint off. My crusty race car doesn't matter, so I let it drag if needed. I do swap valve covers if I have a nice one on the engine. I usually always use two tie-down straps on each lift eye. That way, I can release pressure on one while the other holds the load. It's great for getting the angle right.5 points
-
4 pointsAll I have left is the exhaust and drive shaft those exhaust puppies are on there tight! Breaking out the 3/4” impact wrench. Sent from my iPhone using Tapatalk4 points
-
4 pointsHave not posted much over the years but I am scrambling to make it. Trailering the car from Ohio. Spent 5 years working on the car with no finishi line in sight so Imma just slap it together and get her to pikes peak on her 50th birthday. Still got paint and final assembly to go. I'll not be sleeping for the next few...4 points
-
4 pointsOn the radiator support, you will see a spring clip that holds the hood prop. Remove the prop rod and then tape the little red cap off of a WD40 can over the clip. The oil pan will easily snap the clip off if you don't protect it with the WD40 cap.4 points
-
4 pointsI’ve lived an hour and a half drive from Canada since 1970. Going to Canada is like driving across town. Been there so many times I lost count. When I turned 18 the drinking age up there was 18 so we would drive up Friday after work and spend the weekend bar hopping and sleeping in my friend’s van. Always came home speaking “Canadian”. That’s what its all aboot, eh? Spent lots of dolers on beer. When I was in Roanoke, Virginia a guy there accused me of being Canadian, said I had an accent. So, yeah, I speak Canadian, eh?4 points
-
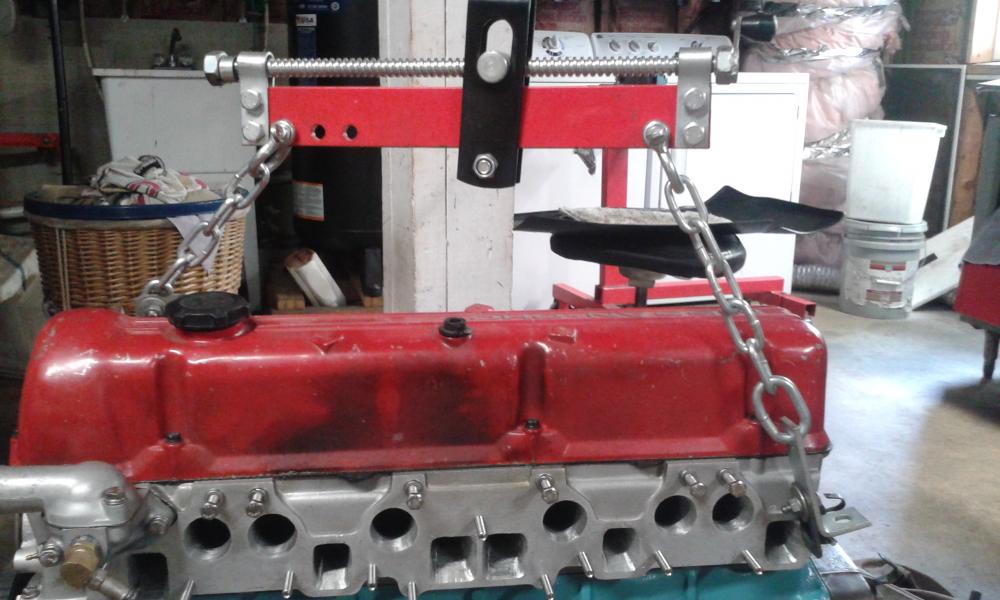
3 pointsI didn't use straps but I did read that. here's my setup before install. I used an old valve cover so not to scratch up my nice pretty one. Here's one of my favorite " calm down it'll be fine" pictutres from @Jeff G 78. He really helped me from jumping off the roof. He's like a big 'ol walking talking Valium. He's the one that told me to jack the rear up and I made the decision to let the air out of the front tires as much as I could while still getting the hoist under there. My ceiling is low too but it's exsposed rafters so I lined the hoist up in between the rafters. That bought me another 10 or 12 inches. When it was all over with I'd say I overthought the whole deal, it's easy and I did it all by myself. You got this Ferg.
 3 points
 -
3 pointsCliff, thanks for that. I think it gave me more to think about. I’m a bit concerned that my garage might not be tall enough using the load leveler with its standard set up. My garage is 9’9” tall and I don’t know what I’ll need but I don’t want to be in the middle of the pull out to figure it out, One response on the thread you sent the guy was worried about his 10’ garage not being enough, So, you mentioned that using ratchet straps should mitigate the height concern. Did you strap one to each end of the leveler or did you just attach them to the main hook on the hoist? Does anyone have any pics of that set up. I have two helpers on call to help me get though this, both with the same level of auto skills as me…aka amateurs. Side bar Cliff……my kid is burning though his vans (3 this year) because he thinks they’re perfect brakes. Things haven’t changed. We didn't have a lot of money when I was a young kid, my mom just said well it looks like you’re going to school with holes in your shoes. All my shoes were hand-me-downs from my brother until I was probably in 7th grade.3 points
-
3 pointsYes, I'll be holding on to and reusing those. Satin black, thank you for that tid bit! I replaced nearly all the fuel hoses in the rear of the car this past weekend and found several of the OE hose clamps missing and in their place the typical style you would buy at any auto parts store (worm screw style). Time to keep an eye out for any OE ones I can get a hold of on the cheap to have refinished when I do a full restoration later down the road.3 points
-
If they turn out correctly would be happy to do some for others.2 points
-
2 points
-
2 pointsYes, I have some spares…. At least they are shiny, most have rust pitting but not enough to affect strength. The threads at the bottom end of those pins are just M12x1.25. Easy to find a washer and nylock or Stover lock nuts. Send me a PM, we’ll get what you need on the way.
 2 points
 -
2 pointsI changed the topic.. haha @siteunseen so a 260z has a diff. stick then a 240z or are there diff 240z sticks? never had that.. i remember that i had 3 the same in my stash once but were exactly the same length and looked also the same. Where from 240z cars.. My valuable lesson on Z cars is that... there are very few cars as reliable as a (good serviced) z car!! 😉 (Sometimes i think that there is no longer a firm that makes a GOOD CAR!! All that electronic sh*t is going to make them all unreliable! (I'm an (old) electronics guy myself i know what can and will !!! go wrong haha) Stuffed with computers.. bah!! I always say: a pig's rear is smarter than a computer, it knows when it has to go to the "bathroom" haha.. it takes just one (!!) "0"or "1" to mess up the whole program in a computer and that will stop your car...again! 😡2 points
-
2 pointsToday's episode is "While I'm at it..." Since the seats are still out of the car, I figured it would be a good time to replace the center console with one I've had lying about for 8 years or so. I removed the console and removed the ash tray cover. The cover was pretty dirty, so while I'm at it, it would be good to clean it. I transferred the clean cover to the replacement console, and then I proceeded to remove the outer shift boot. Well, it was pretty old, and some of the threads broke. Then I looked at the rubber shift boot. It was torn. While I'm at it, I might as well find the replacement boot I bought many years ago. (Okay, so the wife found it for me. She knows the spare parts room better than I do.) I also found another outer boot during the search. The shifter was pretty sloppy. The bushings were MIA when I bought the car in 93. While I'm at it, I'll find the brass bushings I bought 4 years ago and install them. It only took searching the same places twice to find those. I followed the tech tip on Blue's ( @240260280) page (link below) and used my vice to press in the bushings. I even had Wendy shoot a video of me pressing in the second bushing. Well, I couldn't crank down hard enough with the vice to get the bushings flat enough to fit inside the fork. So I took the shifter to the 20 ton press. THAT got the bushings flat enough. The shifter slop is gone. During all this, I got the drawstring out of the old outer shifter boot and threaded it into the new boot. Tomorrow I will attach the rubber boot to the transmission tunnel, attach the outer shift boot to the center console, and get the center console back in place. If it all goes quickly enough, I might start getting the seats back into the car.2 points
-
2 pointsI run Evans. I run it for the corrosion issue's. Lots of info on-line with people strongly on both sides. I march to the beat of my own drum, so I am not afraid to dive in and find out for myself. The following are some things I have experienced. - You shouldn't run a copper/brass rad with multiple small rows. The evans coolant is thicker and really needs a rad with larger tubes. I now run an aluminum two row with larger tubes. It was overheating on a brand new brass/copper 3 row and the swap to aluminum fixed that. Long story short, you need a better rad than stock. Evan's will explain that on their site. - Does not boil in the cylinder head, possibly reducing hot spot's and improving detonation resistance. - You will notice very little building up of pressure in the system so it's easier on the hoses. - No water in it so no electrolysis causing corrosion.2 points
-
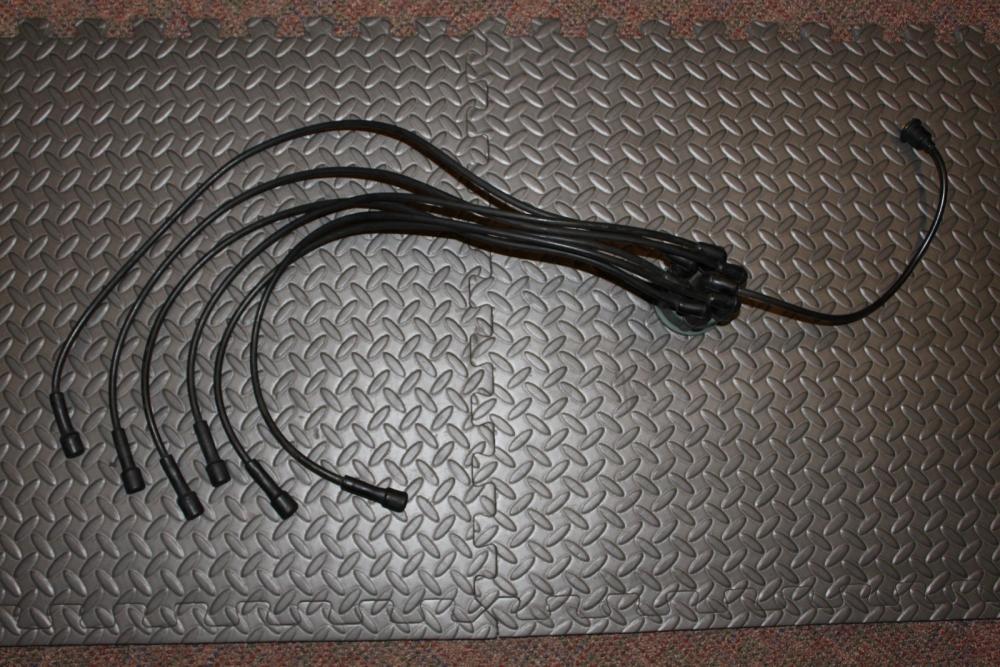
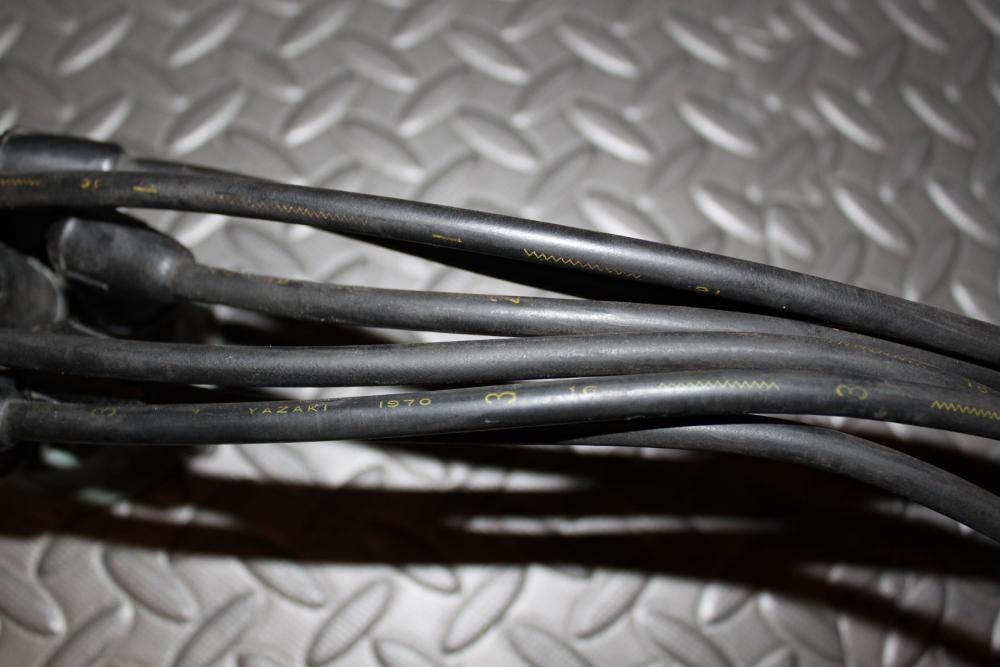
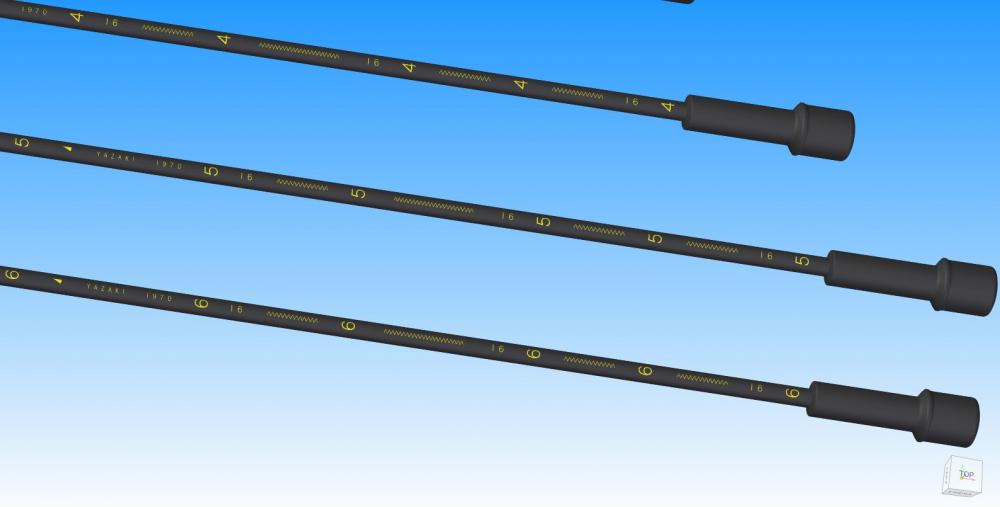
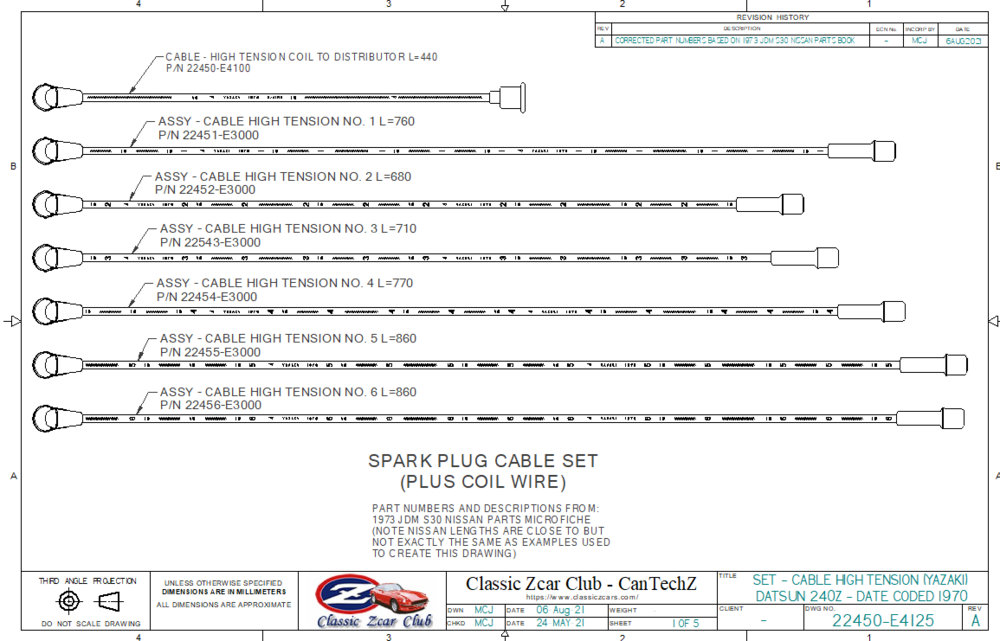
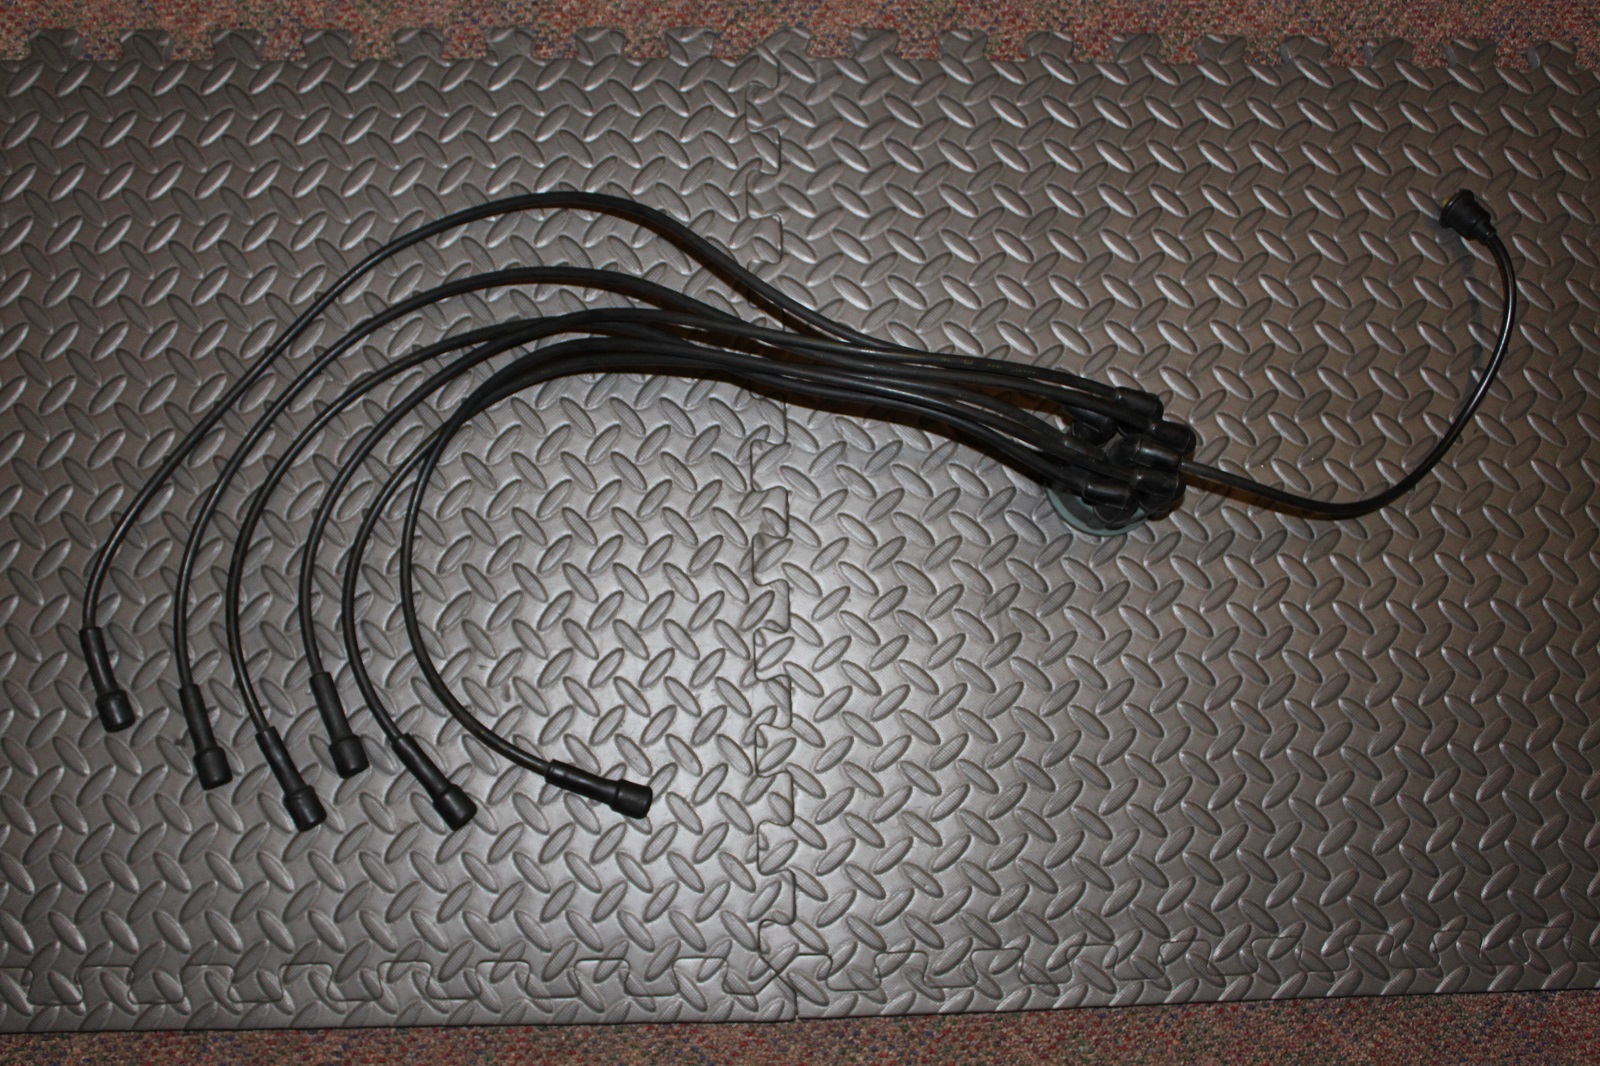
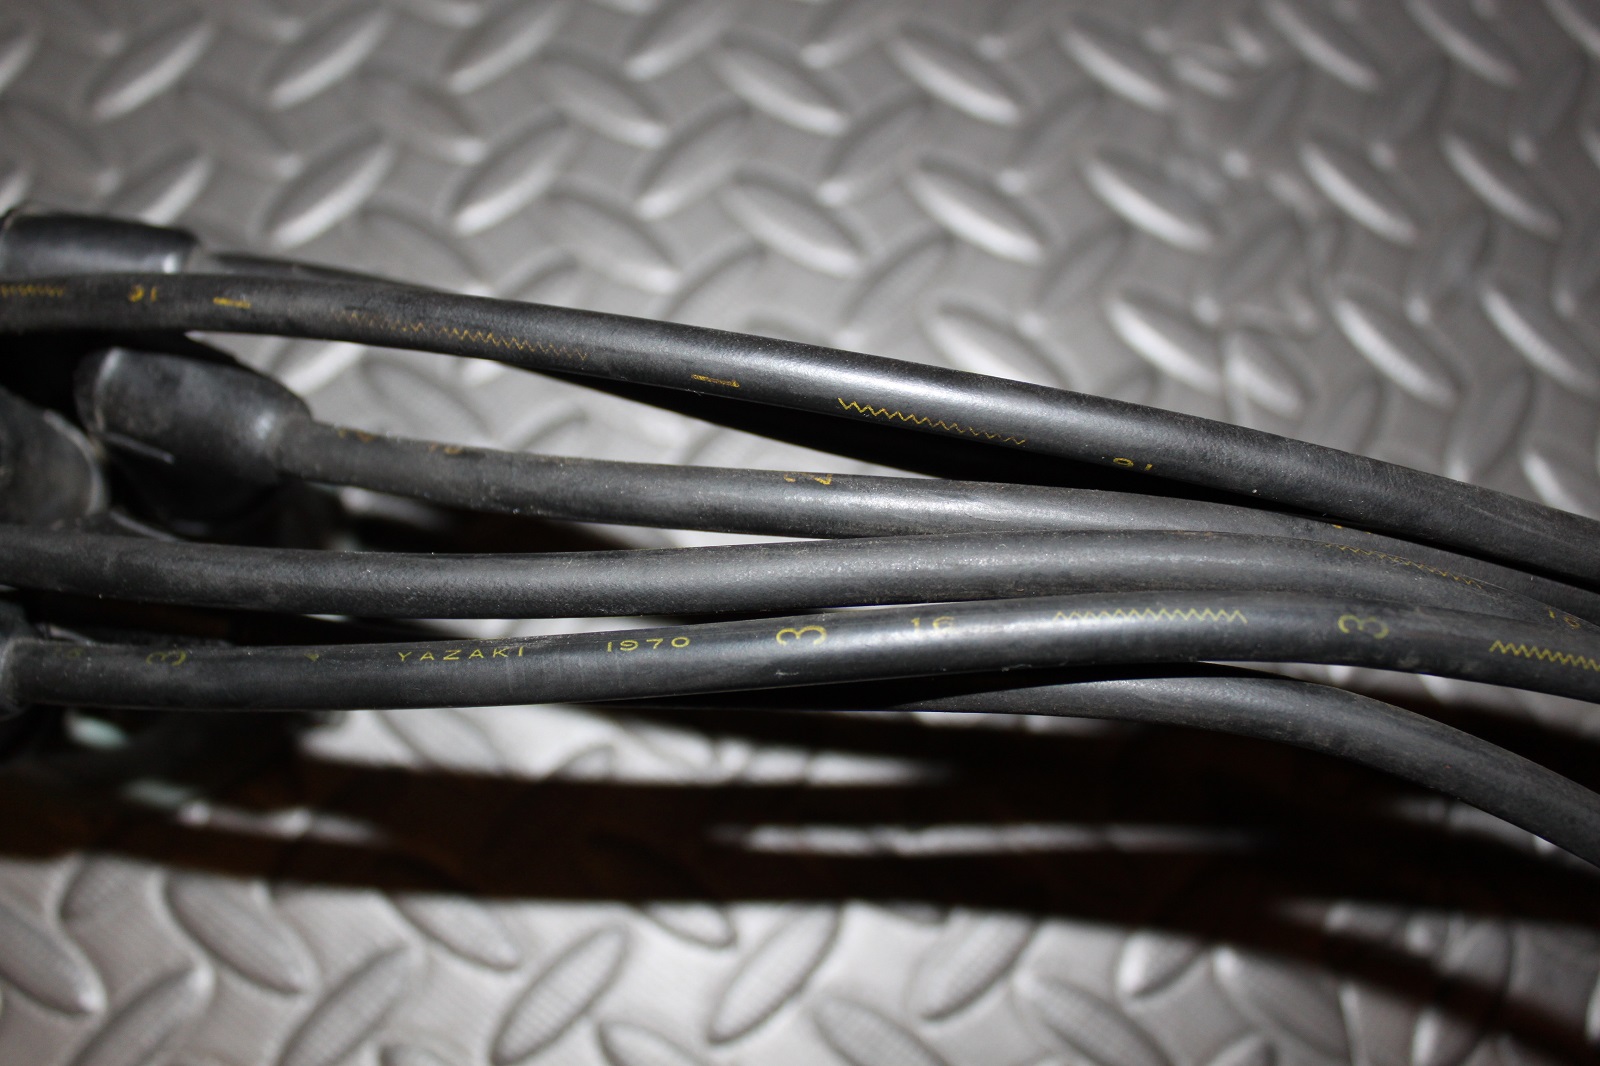
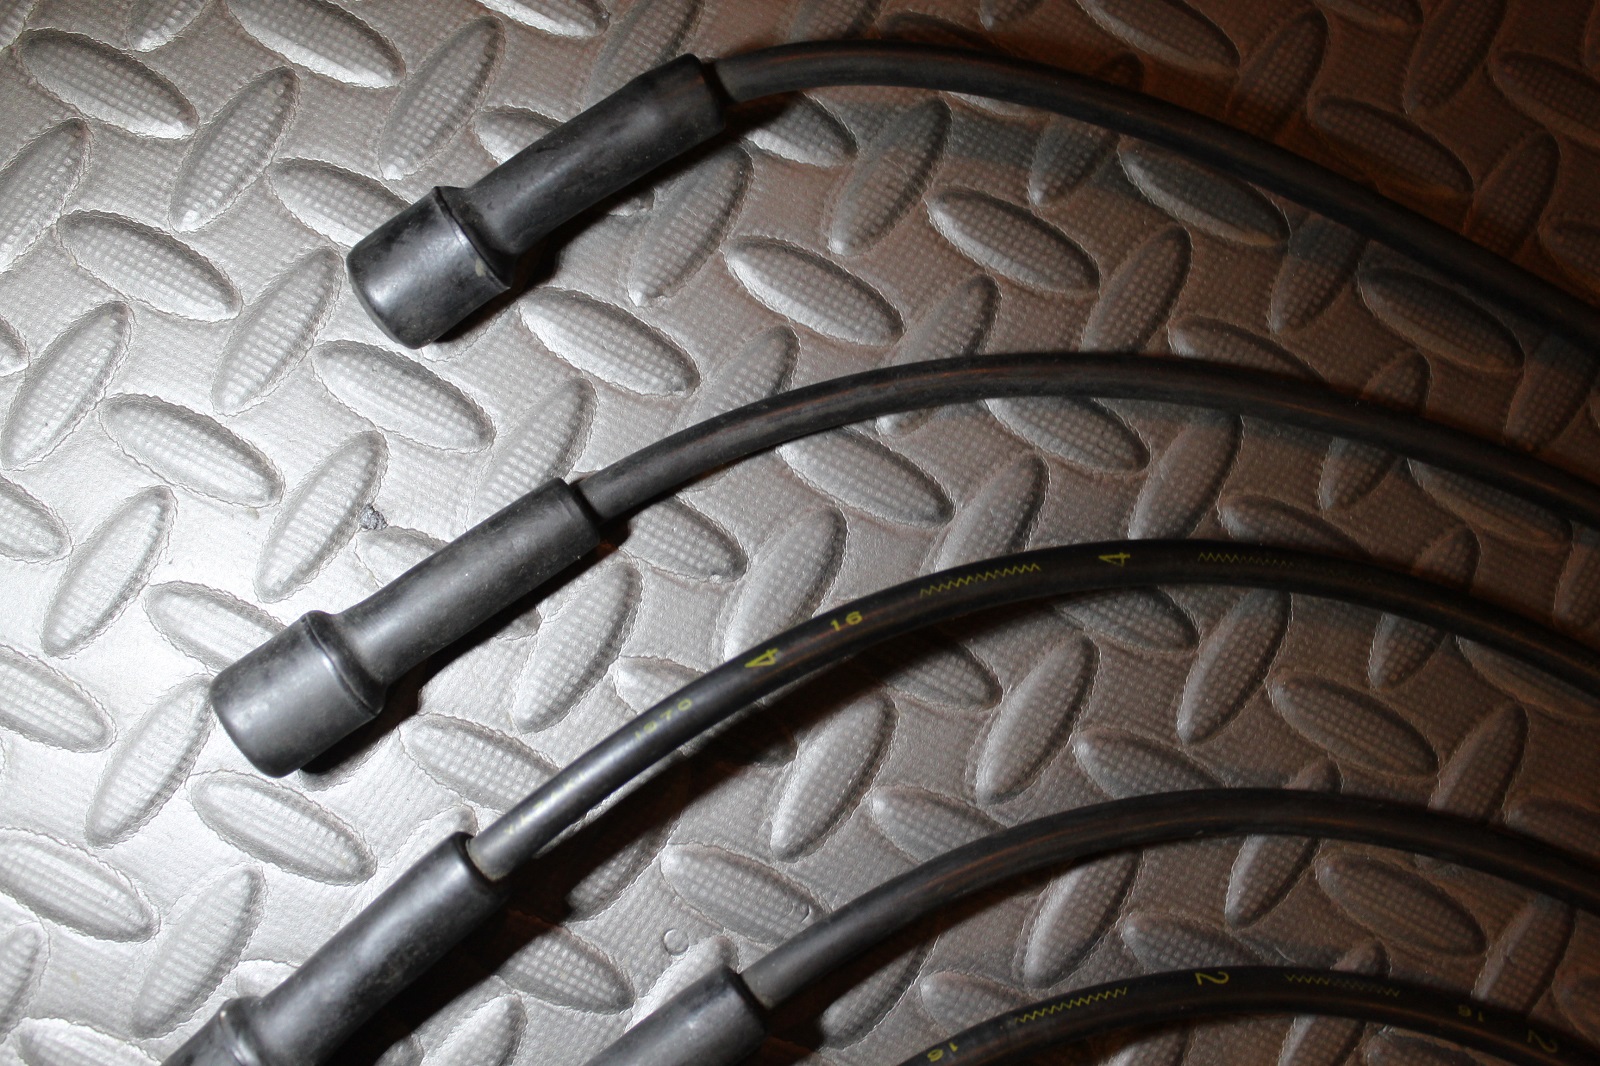
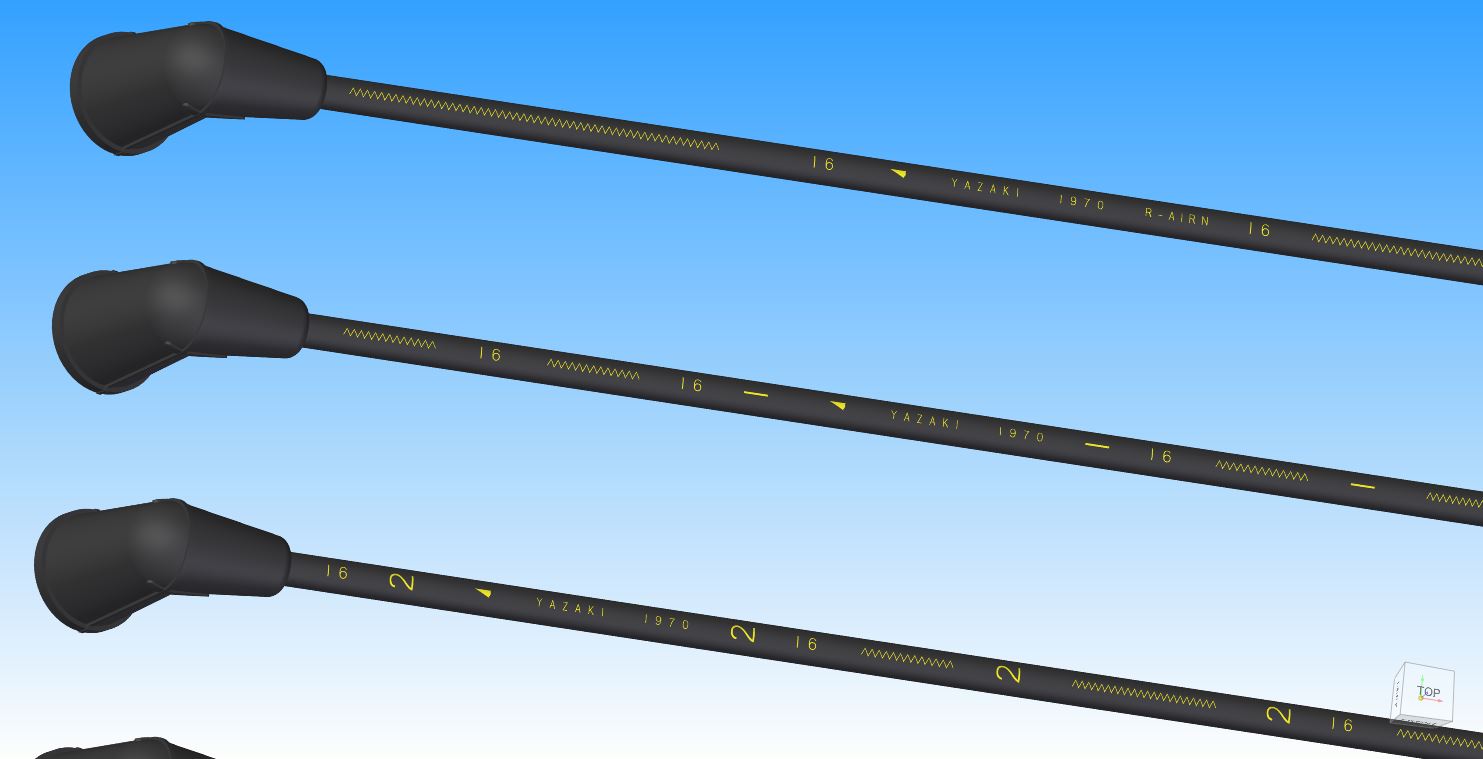
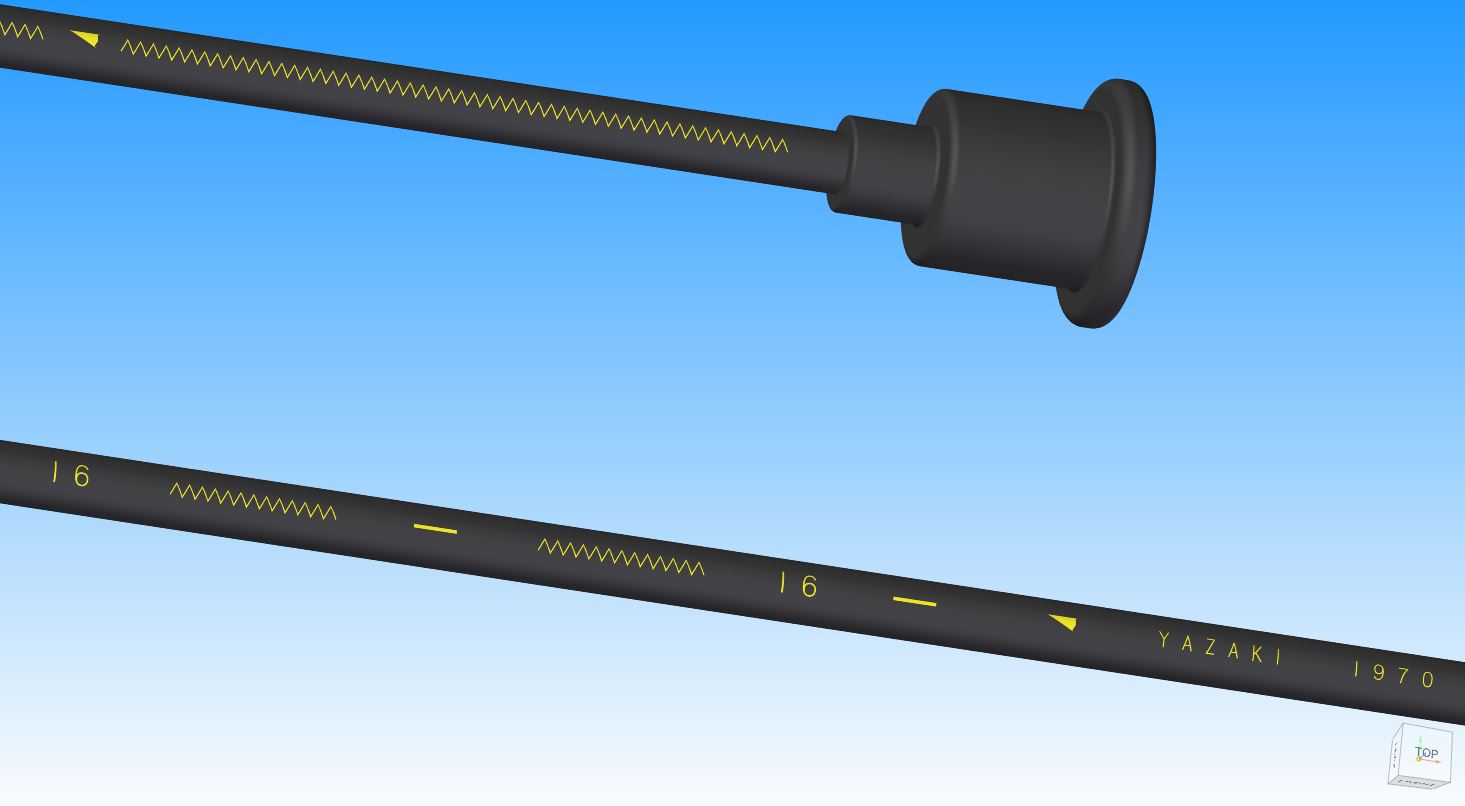
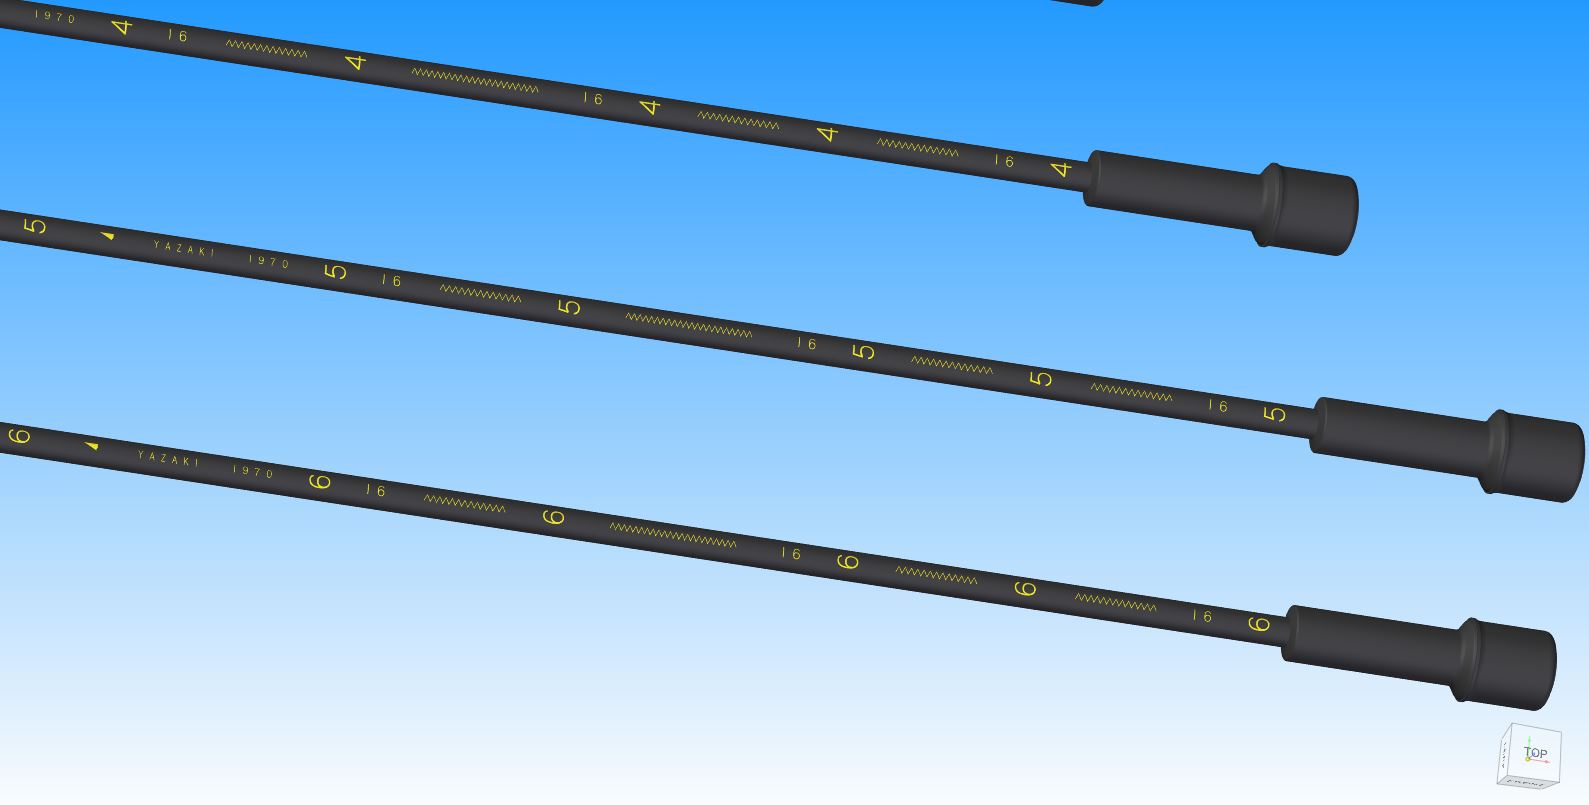
I am lucky to have the original date coded Yazaki plug and coil leads on my 1970 240Z. So I've started this topic to discuss the details of these on S30 cars, I don't want to limit this to only early cars, as I'm interested in hearing about their evolution over the years. Edit, 6AUG2021, Replaced image and pdf drawing to reflect correct part numbers I have taken detailed measurements to create 3D cad models and a drawing complete with markings. To start here are a few pictures of mine, they are not pristine but the date code and markings can be seen. Here are a few images of the 3D cad model, created with Solid Edge version 2020: The descriptions and part numbers are from the 1973 JDM S30 Nissan parts microfiche. Interestingly the lengths quoted in the parts book are close but not exactly the same as my examples. The small triangle ahead of Yazaki, is actually their corporate symbol, I did my best to represent it as close to the original as I could. The text font I used was the closet I could find on my cad program, again close but not exact. https://www.yazaki-group.com/75th_en/history/mark/ I'm also attaching a drawing of these in pdf format. @Mike, I hope you don't mind that I poached the club logo and used it. Any comments are welcome and appreciated. Here's a preview of sheet 1 of the drawing: 22450-E4125(A) Yazaki Ignition Lead Set 1970 240Z.pdf


.thumb.JPG.2b7fd3a8c06f5fbca4900c35d1d84246.JPG)
 1 point
 -
1 point
-
1 pointThat's too funny Wayne! We are very skeptical of the "odd accent" types. They want SOMETHING.1 point
-
1 pointI always get the phrase "You ain't from around here, are ya boy? Cliff knows the interpretation - ya better state your business before I introduce you to my Winchester.1 point
-
1 pointSounds like you have quite a bit to get done. Just set up a cot in the shop and order in food. You only really need 4 hours of sleep and since there's 24 hours in every day, you'll have plenty of time. 😁1 point
-
1 pointComing in late to the thread, HF has different length hoist straps that you can wrap around a intake/exhaust or other points that lets you shorten the length of the chains.1 point
-
Thanks @CanTechZ!!! Now I'm gonna have to dig through my storage shed and find my OEs. I have a '72 so I'd like to know.1 point
-
1 pointI used a place in Ft. Wayne Indiana called Reckon Plating. I liked the fact they were local and within driving distance to me (I live in Valparaiso). They did a great job and they answer the phone when you call with a real live person. I'm working on a 73 240Z, I had them do the front and rear bumpers, the rear over bar and the bolts. It cost me about $1200. They'll do and estimate if you send them pictures and descriptions (length, width, height, etc.). Just be aware the the actual cost once they actually see the parts will likely be more than the estimate. A lady that worked there, Shane is very friendly and helpful. Don't know if she still works there or not. Here's the info: Reckon Plating 5300 Hanna St Ft Wayne, IN 46806 800-5924766 or 260-744-43391 point
-
1 pointAfter causing a race DNF and a lot of money, I learned that the crank damper bolt needs Loctite. It can and sometimes will come loose and destroy the engine. I also learned that stock L-Jetronic EFI does not play well with an aftermarket cam. If you want stock EFI, stick with the stock cam. If you want a performance cam, go with carbs or a modern EFI.1 point
-
1 point
-
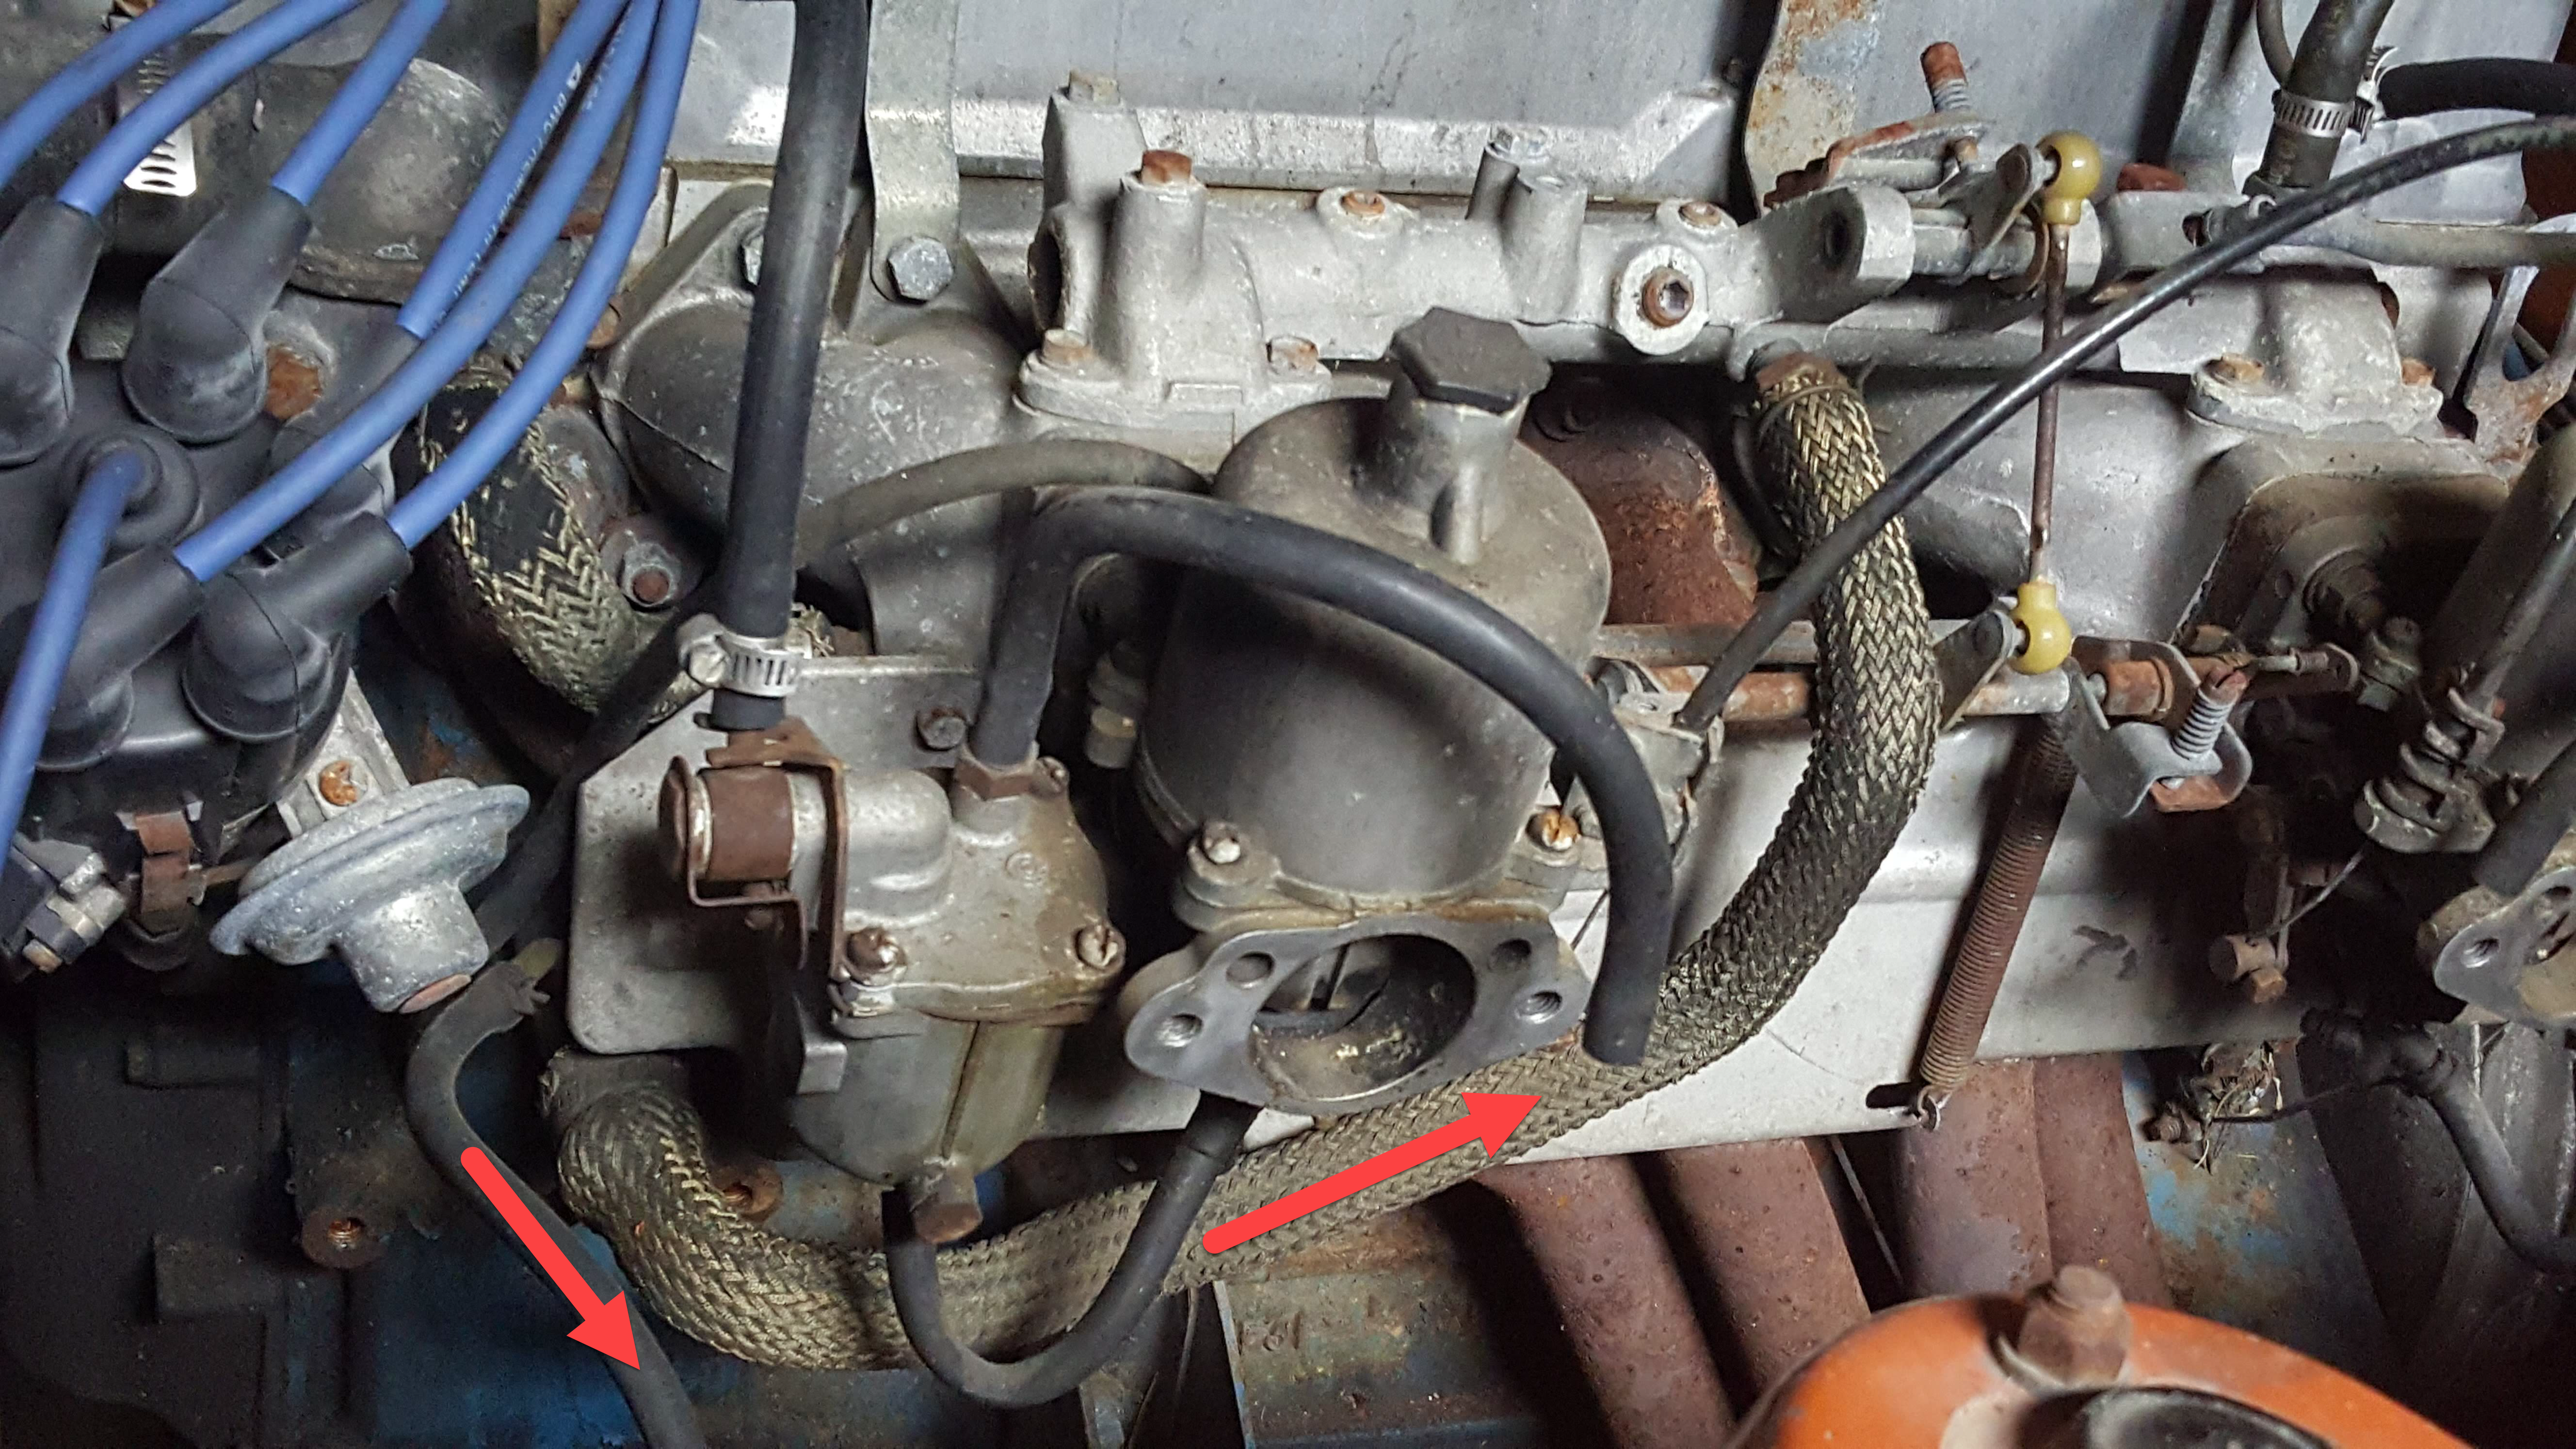
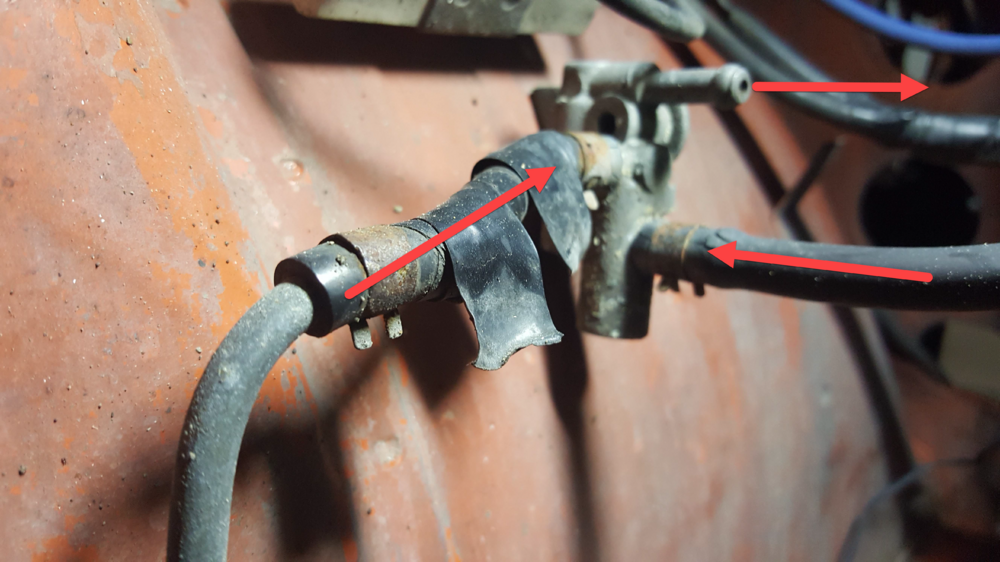
1 pointPerfect although now I have another question... The small hose coming from the block breather tube flows TO this check valve which the directs flow to the air cleaner. The large hose that comes off of the block breather tube flows to the balance tube between the carbs (see pic for both). This seems redundant to me. What am I missing or not understanding? For anyone wanting to use these pictures in the future I've corrected the flow arrows through the check valve (see pic below).

 1 point
 -
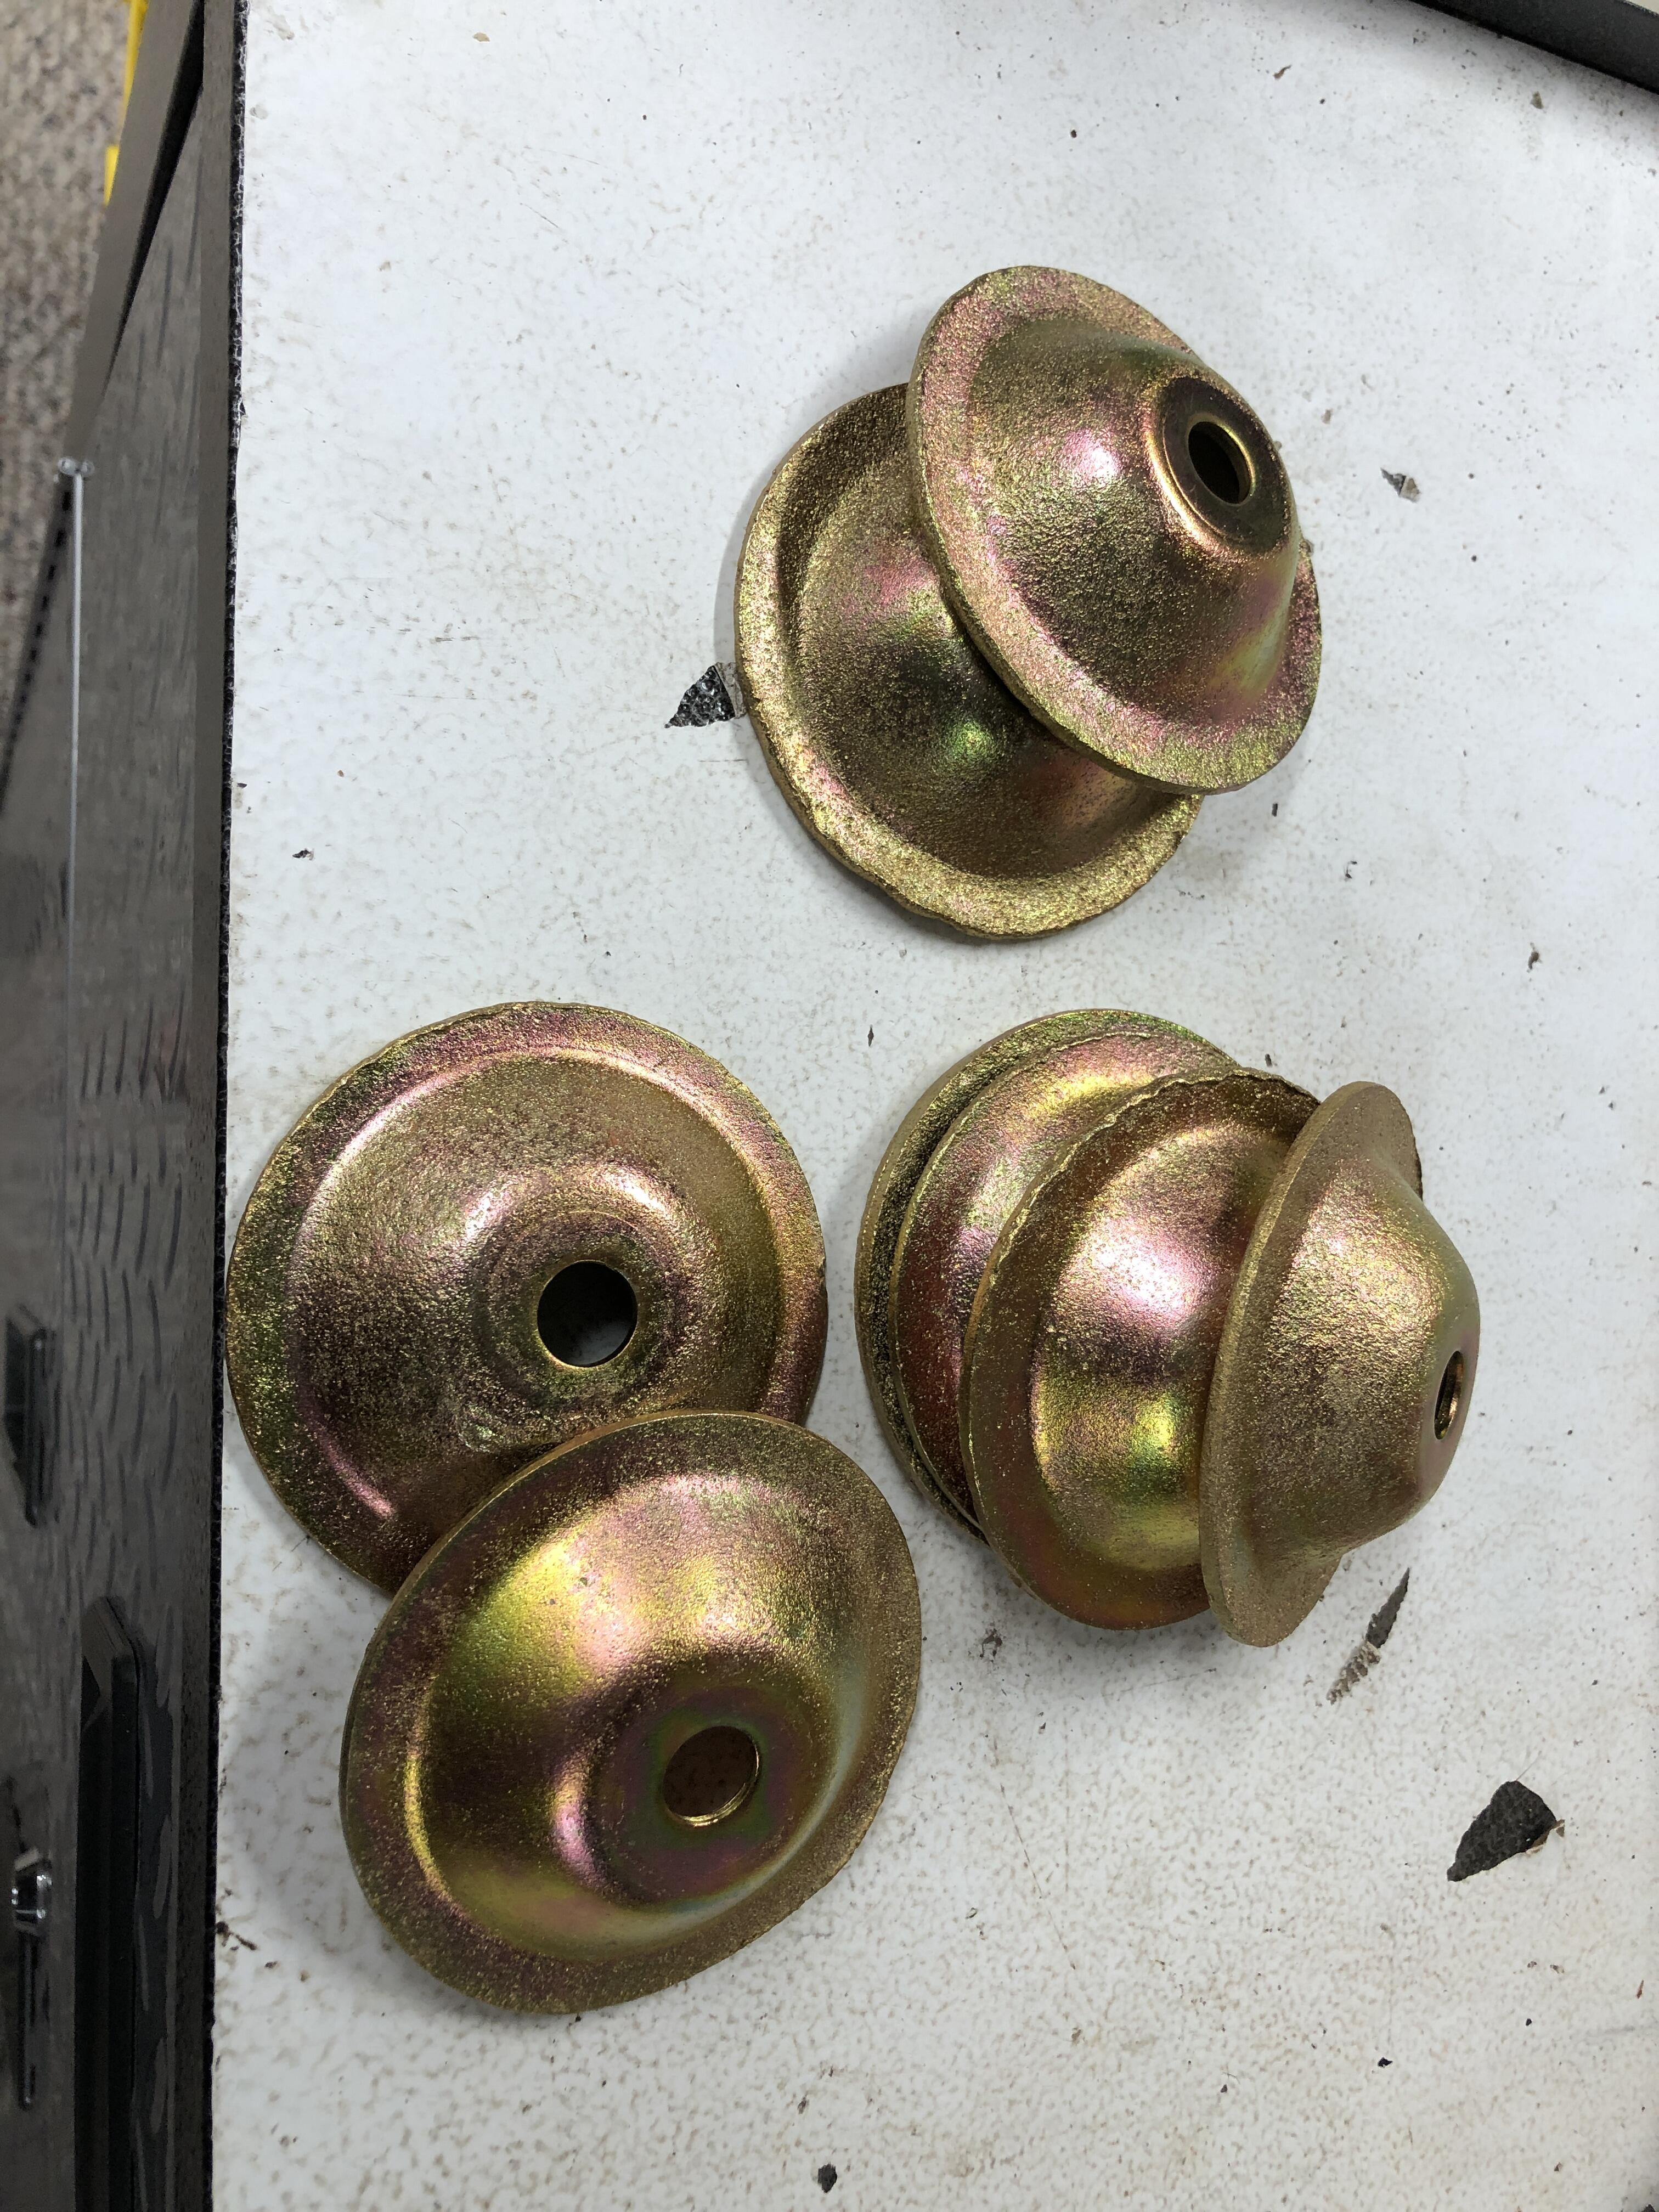
1 pointJeff, Thanks for the advice. I have a folding lift. I can easily get the bumper off since it’s a new 240 style and not the railroad tie. Good advice all around. Got the radiator out today(what a mess) had to kick my dogs out of the garage before they tried to drink it. Wiring all labeled and disconnected. Working on the AC lines and compressor. Didn’t think the system was charged having sat so long. Got a nice blast of refrigerant on one line. Throttle links off, starter and heater hoses done. Going to drain the oil and trans fluid next. Headed to Lowe’s to get some rubber plumbing caps. Friend headed over to help with hood this afternoon. (Thanks Cliff for reminding me to mark the hinges). Cliff what’s are you talking about when you mention the WD-40 cap on the hood rod? Sent from my iPhone using Tapatalk1 point
-
1 pointThanks Cliff, I like to think things through before jumping in head first. I’ve leaned that lesson the hard way in life. Do you think I need to remove the intake and exhaust manifolds first. Would prefer not to and just remove the exhaust pipe from the manifold. I have an old valve cover…good idea!1 point
-
1 pointFrom what I've learned the 240's stick number starts with an E, 280's with a P. Good thread I found below with the different numbers and possible receiver tube lengths. And I agree on newer cars. They suck for us DIY mechanics. The newest car I've ever owned is my 2000 or 2001 Camry, can't remember what the title says but I list it as a 2000 on my insurance. I did buy a brand new 2009 lawnmower that cost as much as a car.1 point
-
1 pointMy township does something similar so I take my used coolant into town where I know the guys at the local garage, they have a 300 gal tank where they store theirs between pick ups. I bring them coffees they let me dump.1 point
-
1 pointInteresting diving down these rabbit holes. One of my main reasons for wanting to avoid normal coolant is the disposal part. My county has 1 day out of the year (10 April) you can dispose of it and they charge you $10. Total BS, one of the many things I learned leading people is if you don’t provide an easy solution for people with a problem they very often do the wrong thing. Example, Billy-Bobs changes his coolant and discovers there is no place to dispose of it but that one day a year. You’ve made it too hard for Billy-Bob to comply so he goes and dumps it in the woods or sewer. Now I won’t do that but some people will. If you make it easy to follow the rules you get more compliance. I don’t want to store gallons of coolant in my garage for a year, which I’m going to have to do when I drain my rad tomorrow. I think I’ll probably go the traditional coolant route. Biggest reason is what Dave WM said. If a hose is damaged or I have a leak and I’m running Evans…I’m kind of stuck, especially when I’m driving to the next ZCON (East coast please). Not the case with traditional coolant. That’s the biggest driver to me. Good discussion and we have successfully thrown Jay Leno under the bus.1 point
-
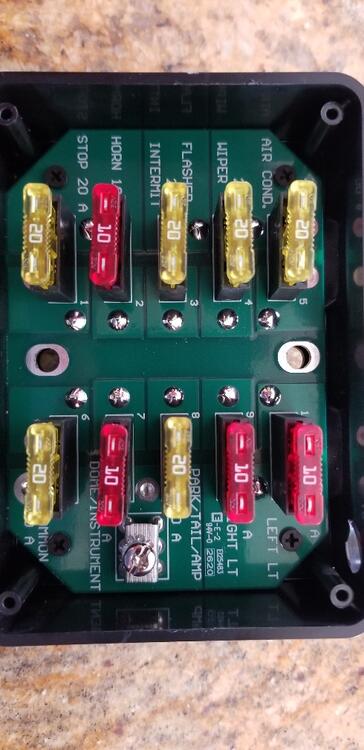
Hi Patcon, Will do as soon as the fuse box is reinstalled in the car. As with most hunt for the unicorn it requires access to the harness. Assume this fuse box will carrier the same fuse location to check for continuity and same side of the fuse?
 1 point
 -
1 pointGreat pics of what you found. I suspect the oil breather pipe from your L24 would fit the new L28 and allow you to retain the flow guide valve piping. If not, you could cap the one inlet nozzle on the flow guide valve to retain the one from the fuel tank. BTW - hold on to all those little OE spring clamps and refinish them in satin black for originality.1 point
-
1 pointSub category. What's the most valuable lesson I've learned for my Z. There's at least 3 different length oil dipsticks for our cars. Make darn sure you have the right one for your motor or you'll overfill it and have a drip after running the car. I did this and had a drip or two off my oil pump until I figured out I had a 2.8 stick in a 2.4 motor. Drained about half a quart and my garage floor is a dry as my dogs food.1 point
-
1 pointGood luck with it! Don't scratch that nice paint job. Those HF levelers are nice but scary when you're working by yourself. They pop and are jerky when using them while loaded down with the motor. That little handle is useless, put a socket on the other end. Grease the bottom rail the roller rides on, makes it a little smoother. I found an old post of mine showing what I did. Might help you too. Here's some reading for ya. Below the videos it's stuff from classiczcars.com. https://www.google.com/search?q=engine+leveler+classiczcars.com&client=ms-android-americamovil-us-revc&ei=_6wJYZWmJtScwbkPxba40AY&oq=engine+leveler+classiczcars.com&gs_lcp=ChNtb2JpbGUtZ3dzLXdpei1zZXJwEAMyBQgAEM0COgQIHhAKUJuaAVjkrAFgxrkBaABwAHgAgAHIAYgB5g2SAQYwLjExLjGYAQCgAQHAAQE&sclient=mobile-gws-wiz-serp Skateboarding comment. I always put my right foot down on the toe box of my tennis shoes and used that as a brake. Pissed my Mom off but what didn't eh? I had to google "eh" to figure out what @Racer X meant.1 point
-
1 pointGetting all the stars aligned for the big pull. Picked up a unused 1 ton engine hoist on CL for $100. Cheaper than renting one for a week. I’m sure there will be work stoppages and challenges I run into that could push my timeline out 30 days. Shooting for a week? Also got a leveler for $34 at Harbor Freight. I primed and painted my transmission to match the engine block yesterday. It’s looking good. I’ll start disconnects tomorrow. -Cooling System - Wiring - Exhaust - drive shaft from transmission - slave cylinder . Starter -multiple misc items. Sent from my iPhone using Tapatalk1 point
-
1 pointI think you are being a little hard on Mr. Leno. He is a true enthusiast. His only interest in putting up a video on the Evans product is because he looks for interesting products that can be of benefit the classic car world. I would imagine he received no compensation from Evans other than probably some product to test and possibly endorse it. As far as being a "car expert", his record on marques he cares about speaks for itself. My 2 cents ....1 point
-
While looking for something unrelated I found this Nissan Technical Service Bulletin that describes when and why the markings were changed on the plug and coil leads. Edit, Aug 6. I just noticed that "New" and "Former" are indicated wrong in the TSB. Yellow should be former and white should be new. In checking the register on @Carl Beck's site Zhome the engine number listed for the start of this change would have been in 3/71. The publish date of this TSB is December 1971 so it looks like 1972 models would have the white labeled Yazaki leads.
 1 point


.JPG.6654356d42e0cf66fb1a33e18c19adf1.JPG)