Leaderboard
-

Zed Head
Free Member5Points19,236Posts -
zKars
 Subscriber
 4Points3,770Posts
 -
Patcon
Subscriber4Points11,142Posts -

siteunseen
Free Member3Points15,115Posts


Popular Content
Showing content with the highest reputation on 03/05/2020 in all areas
-
As a business owner, if I was being endorsed or using the endorsement of somebody convicted of fraud, I would want to be told. If I continue to use them, then that is my prerogative but I would at least like to be made aware of something that might not be readily known.4 points
-
2 points
-
2 pointsPut your finger on the top of the shaft and see how much play there is. Wiggle it and see if it moves far enough to touch anything. Or just take the distributor out and see if there are any obvious problems. While it's out see if the drive quill (down in the hole) has problems. Your problem doesn't sound complicated but you're going have to go farther to solve it. It's an uncommon issue, nobody out here will have the easy fix. Time to take things apart. Removing the distributor is super easy. One screw, and disconnect the red and green wires, and it pulls right out. It only goes in one way, so you can't really mess things up. That distributor is so rusty inside that it's almost guaranteed that your vacuum advance doesn't work anyway.2 points
-
2 points
-
I never said it did. Just that this guy is running around with his merry men claiming to be the greatest thing to happen to the s30 range in the past 50 years. Its wrong on so many levels.2 points
-
2 points
-
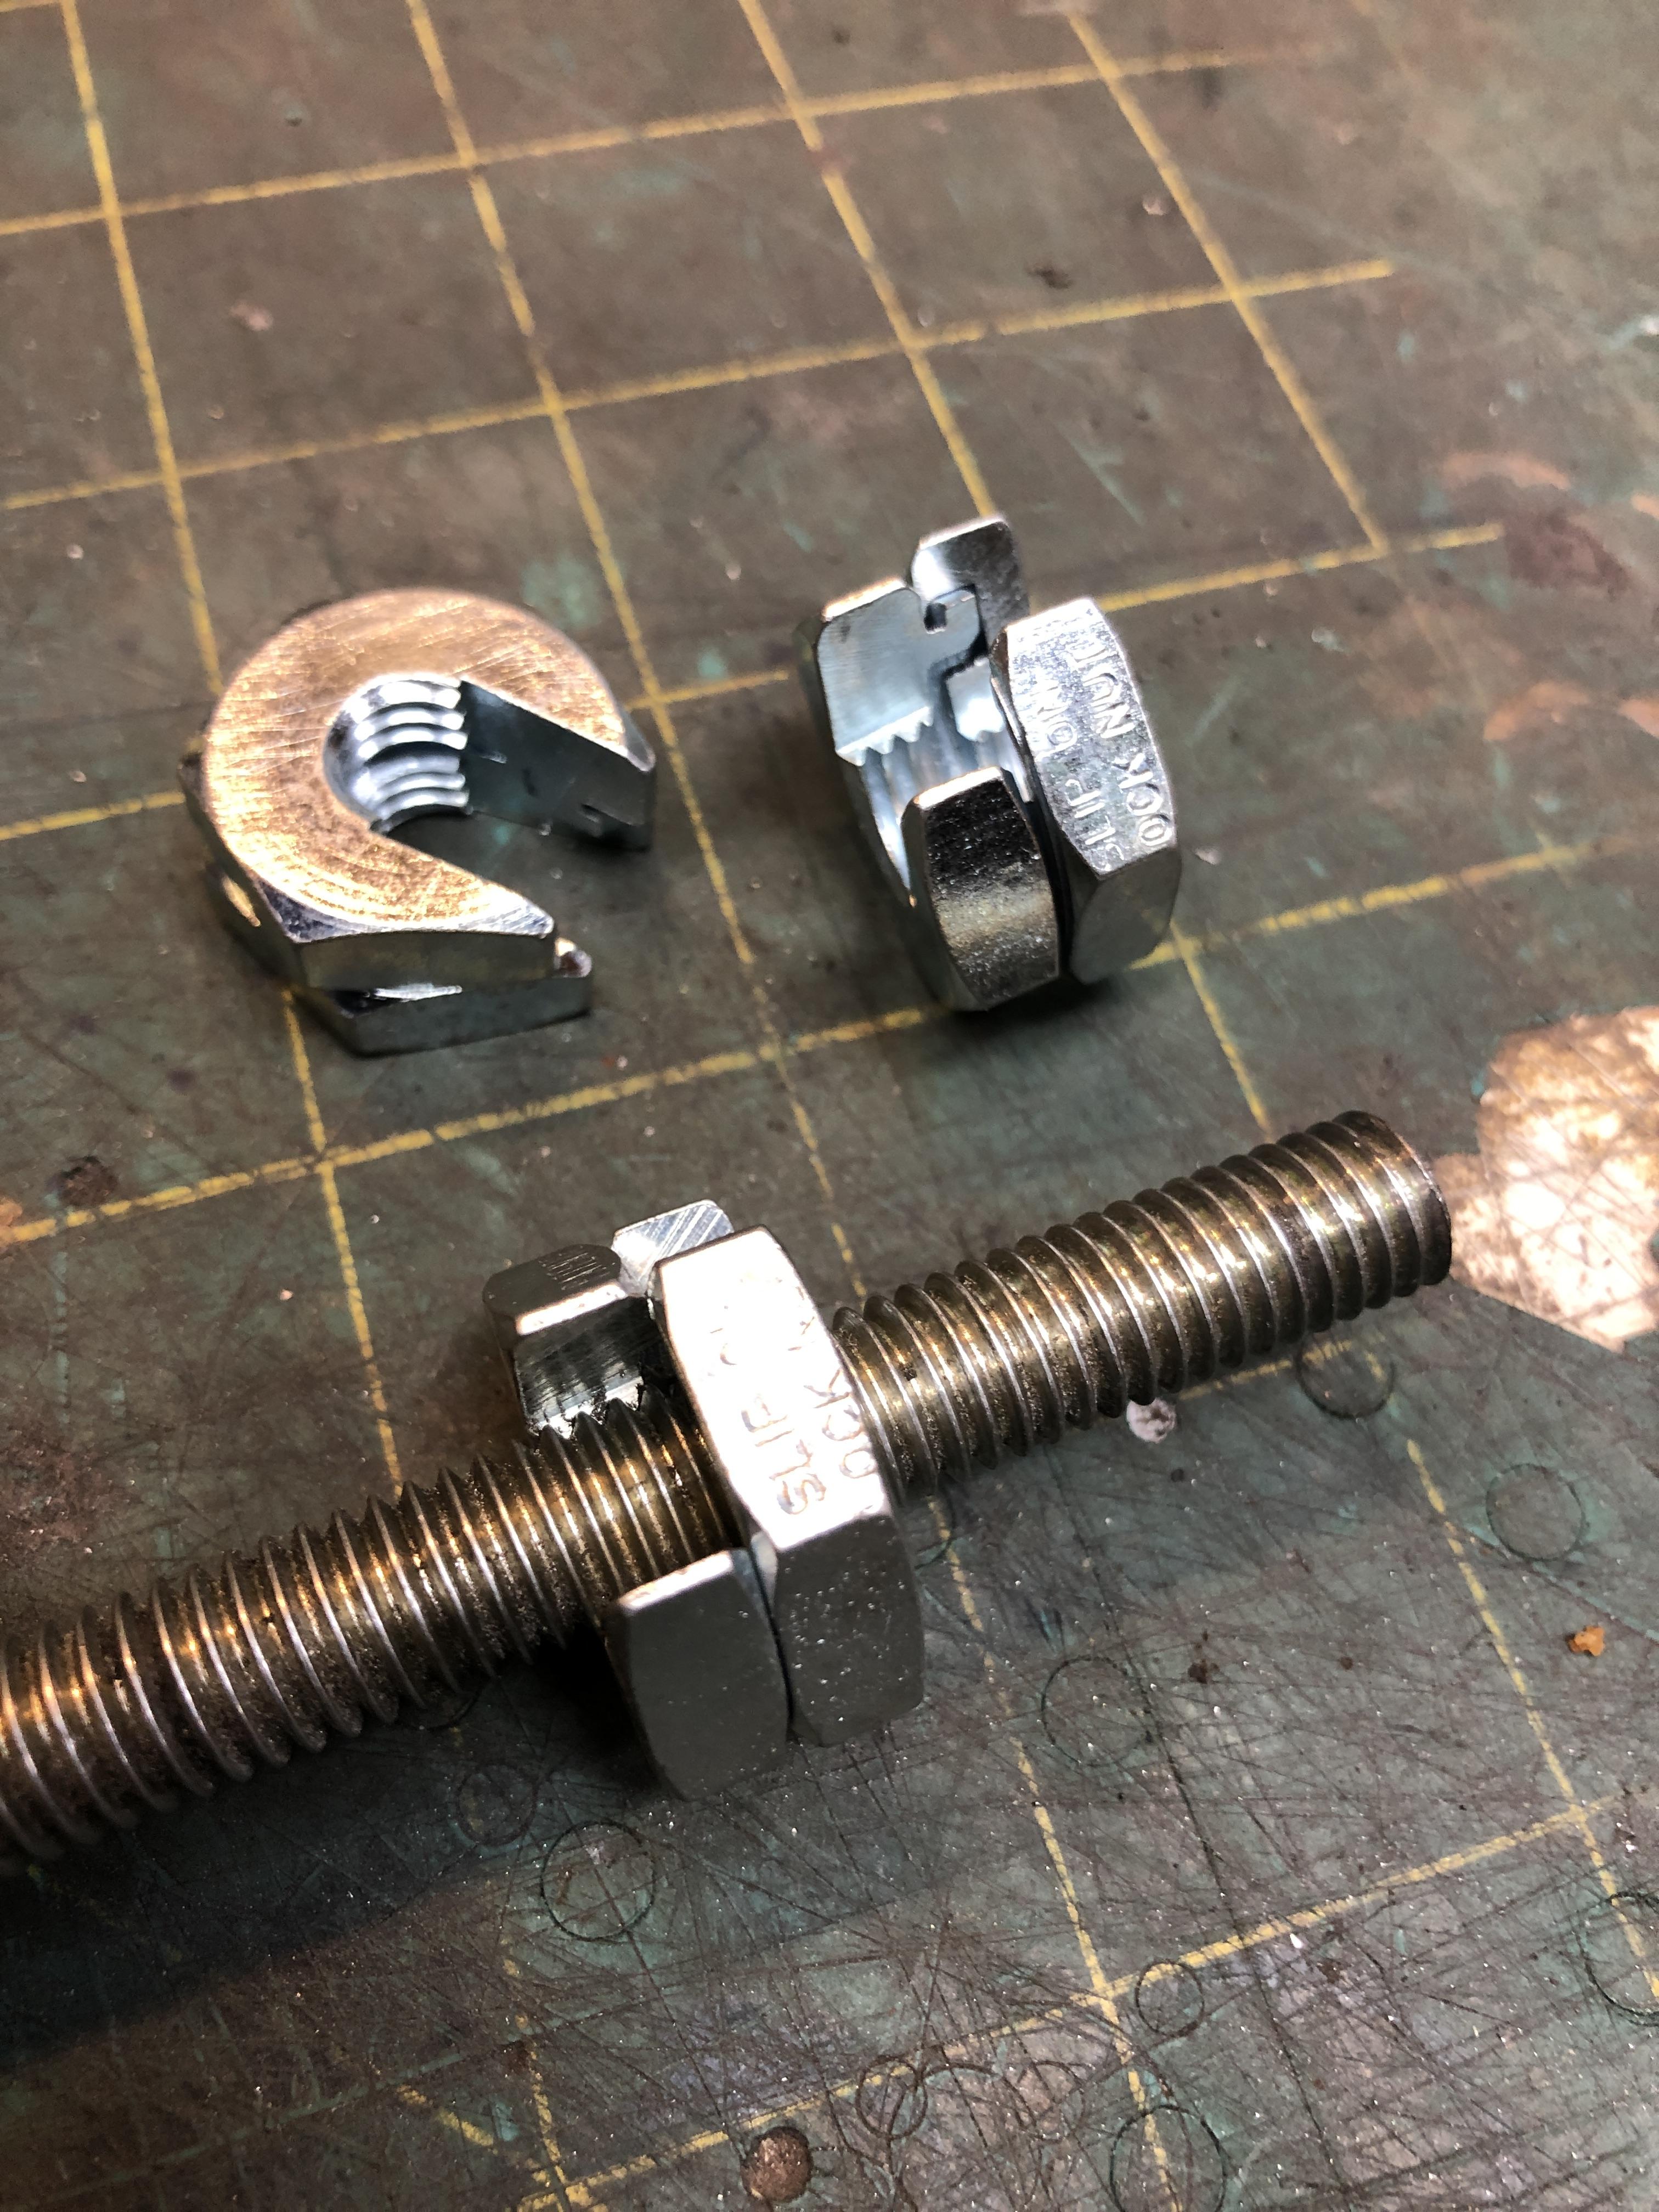
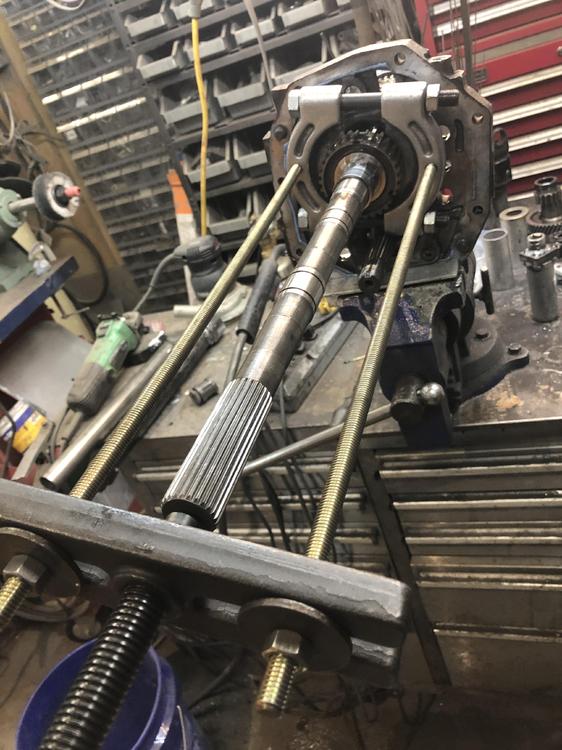
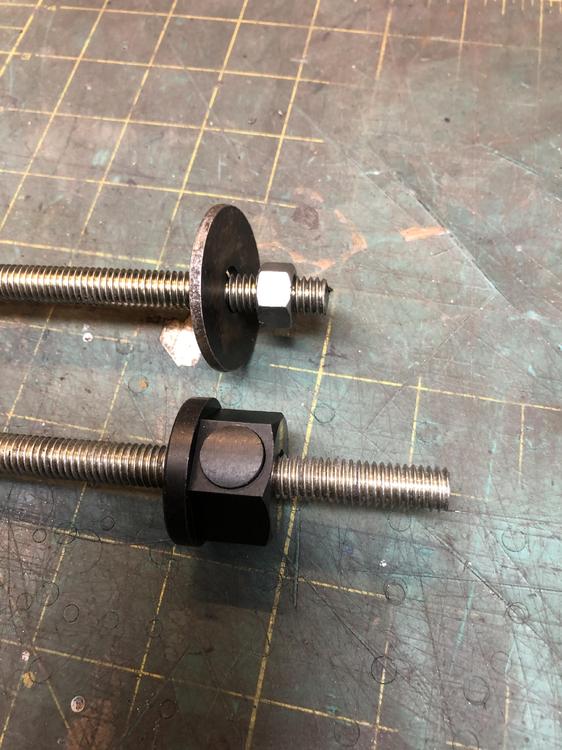
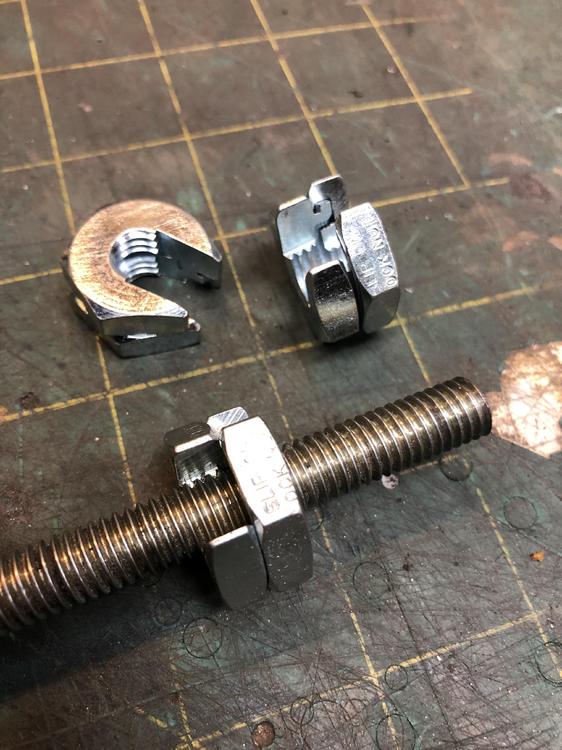
So this thread is titled "tips and tricks" so here is one tip and trick. This is related to using the bearing splitter and puller. I use the puller with long extensions to get the rear main shaft extension housing bearing off, then to pull the very snug bearing sleeve under the 5th gear needle bearing. It requires 16" extensions for one and 18" for the other. Being inherently lazy, and efficiency driven, the ordeal of spinning those 3/8 nuts back and forth on the long rods, or changing from 16 to 18 in rods and having two sets of nuts and washers, I find just too tedious and time consuming. What to do, what to do.... Let's see... Surely there is a nifty "something" out there that allows you release a threaded nut and slide up and down, then quickly re-connect it with the threads. Didn't take much googling to find the concept of a "slip on nut" to be a real thing. Here is the first thing I found. Two interlocked nuts that rotate to expose an opening, then rotate to lock back on the threads. Found it on Fastenal's website, and low and behold, they actually had some at the store near me. I zoom over, and yes, she pulls out four of them in a baggy, goes to the computer and says "That will $60 bucks please"! I let out the loudest laugh i have ever produced. She looked at me with very worried and surprised eyes, wondering what I'd say or do next. She managed to say with a straight face, "well, we do have minimum charges....". I apologized for possibly offensive behavior, thanked her for her time, declined the purchase and left.. Home I went to the internet. Found them on McMasterCarr for $5.75 each. BTW these are 3/8-16 thread. (PN 90125A031) Even better, I also found on McMasterCarr a much slicker sliding nut system, the "Push Button Slide Adjust Nut (PN 98150A360) for a mere $10.83 each. Of course I bought both items to compare. I had other important things to buy from them as well, so I justified it easily. Like a bag of 25 orings that fit the speedo cog body and striker rod for $8 bucks (9262k892)rather than the $8 each that Nissan charges you. Same for snap rings (97633A290), and various individual ball bearings that match the ones you always lose when you take the trans apart)..... They are surprisingly all perfect SAE sizes. 0.25 (shifter rod detents), 3/32, etc. (Yes, it all was more than $60 Canadian, I knew you'd ask....) Anyway, the push button slider nuts are the best thing out there. Push, slide, release, thread to lock. The nut OD is quite large (over an inch for a 3/8 nut), but for this usage its perfect, as the base is flanged and fit the fingers on the puller head without additional washers. The two piece slip on nuts work too, but are finicky. BTW the trick to getting McMaster Carr to sell to Canadians is to register your account with a business name. Don't have to provide proof, just have a name in the box when you fill out their on-line form. I use my zKars handle. Occasionally the courier driver will ask my name on delivery, I will blurt out my actual name and he will say "but the name on the waybill is ZKars". I show him a business card I had made up, he's happy.
 2 points
 -
https://www.rockauto.com/en/parts/dorman,602885,wiper+linkage+/+transmission,8856 Harold Burroughs posted on FB yesterday about the availability of new aftermarket S30 wiper linkage from Dorman, PN 602-885. Just thought I’d spread the word. He reported the find from Advance Auto’s website, but Rock Auto has access to it also. Anyone with access to Dorman can get it. The price is impressive, $69 CAD. That’s about a $1.98 in USD, so who can resist? Yes as we know you can rebuild and re-lube the stock stuff, but if your shafts are all rusty (as all us old guys know), no amount of lubrication will make things go smoothly or last that much longer.1 point
-
1 pointThe parts look like 280Z parts if you compare to Rockauto pictures. If moozieman is 100% sure that it's the distributor then there's only one thing to do. Remove the distributor and check it out. The overall description doesn't really make sense anyway. Why would the rotor grinding on the cap cause the engine to die? The engine would happily just grind that cap and rotor in to dust.1 point
-
When all you have is a three jaw puller, the whole mother of invention thing kicks right in. I'd be proud to have built that.1 point
-
1 pointDon't try to crank it yet with that 10 year old gas. Drain that crap then put a filter straight out of the tank. This is a 280's but you'll get the idea. For my 240 a Fram G2 works best. http://atlanticz.ca/zclub/techtips/fuel/g3filter/index.htm Oh yeah, welcome to the forum. A lot of information here plus some laughs, mostly tongue in cheek stuff though. I/we kid around a lot. Post some pics of that 260! We enjoy looking at other peoples stuff.1 point
-
1 pointIt could be a ZX rotor button under a Z cap? I have know idea about the compatibility of those two but I do know a ZX has bigger cap and rotor. It looks like your rotor button is too big to me. If the shaft won't wobble I would do what Mark suggested and get the right combo from Bosch. $10 maybe???1 point
-
1 pointCan you highlight where in the pics it shows the grinding? I can't see it. Also a sound recording might be good. One man's grinding is another man's whirring!1 point
-
1 point
-
Bravo on the install video. ? Great Job! Just a follow up regarding this particular 123ignition distributor. Upon receipt of the unit, I installed it in my 1969 MGC where it has been working flawlessly since. New price on rotor after review. Plus free shipping in Continental USA. Thanks for the support from the Classiczcars. Hope this helps Ed1 point
-
Yes, install dizzy=use timing light. No question. Although a year old thread, I do want to chime in here. Since about the time this thread began, I have been running the (Bluetooth) 123ignition /Tune+ On a 260Z block / heads with twin SUs and SM needles. I also run a hotter coil (oil damped) Bosch Red is also ok. And I’ve bypassed my ballast resistor and rotor resistor myself. Why have extra resistance in your circuits, unless you still use AM radio? Heh, heh. No problems with the engine / timing in over a year of spirited driving. I love to tune it as I choose each day, depending on how I plan to be driving. I have several Curves, like 10 including the ‘Default.123’. I use an ipad and also my iphone. You can tune ‘one the fly’ (just +/- advance, you can’t change or save the curve-yet...). SO City it’s start & stop, so use a good idle maybe 10-12d BTDC at 750rpm -not my default map which as lower idle advance. Cruising the freeway or touring (I want better milage), twisty mountain canyons (lots of advance at high rpm). It’s cool to have variable Timing / vacuum advance curves, without playing with advance weights, or adjusting the position of the dizzy manually to change static advance. Some comments: The setup procedure with the LED light is only good for getting the engine running with the new dizzy. Then run the 123ign centrifugal map with 0 degrees up to 1500rpm in the app and set the engine (with the timing light) to match. I read somewhere that using the LED procedure can actually set 5d TDC static to ‘get the engine started’ easily. I didn’t see this myself, but it brings up the next point. Personally I wouldn’t run the default map and LED timing except to test, and certainly not on the road and under load. Do NOT set up static timing, it screws everything up, and you would have to ADD that to all the values 123ign “sees” in real time and when you add vacuum retard “maps” (which *will* kick in at 1500rpm by default) it gets way too confusing. That is IF you run a vacuum advance line / dizzy (I do)- most with triple DCOEs won’t (or can’t as there isn’t a common plenum). You confuse the123ign and more importantly yourself as to the advance you are running. I did write to Ed Madak, before install and he was very helpful The instructions are incomplete and they expect you have some knowledge. He said: “Hi Richard Setting the app to 0 and the number one cylinder to TDC is preferred as it will show exactly what you have set your timing to. Always confirm using a timing light and synchronize the app with the motor. Hope this helps“ It did help. So you don’t think I’m a fanboy, here are some issues I have experienced and tried to solve: 1. The install instructions are terrible. Read the above and take note, hard lessons learned, you must confirm you have TDC marked correctly on your harmonic balancer. Then use a good timing light, one with dialback if you can. I even made an ‘newbie’s guide’ (ymmv) of my 123ign install & posted it on YouTube: 2. These engines love advance, but personally I don’t exceed 35d advance even at 8000rpm (it’s never driven as a race-car). I also usually RPM limit at 7500, 123ign does random spark cut to keep to that limit. My tach is very accurate and the function works as advertised. I have a ‘hotter cam grind’ and don’t want to bend valves or blow a head gasket. 2. Problems I have had are mostly with the app: i) Sometimes it doesn’t load any curve, and seems to run whatever you save as Default.123 - so make that a gentle map with good idle but one where you will notice a big difference under acceleration (and can’t trash your engine). Butt dyno to the rescue. ii) The ‘map curve’ which does ignition adv/retard from vacuum is difficult to understand at first, I wish it had an option to change it to Hg (mercury), rather than Abs pressure (kP) which the dizzy uses. Yes, you can look up conversion. My default is very gentle, but I have more aggressive maps to run: Default MAP No. Abs Pressure (kP). Degrees Crank 1 0 0 2 29 0 3 30 5 4 45 7 5 85 0 6 100 0 7 200 0 Note: If the Map you’re reading is shown in Degrees camshaft, you need to convert to crank by using a x2 factor. That’s buried in the crap instructions. Crank rotates twice for every single cam rotation. Look at the gear sizes on the timing chain! So you multiply cam x2 to get crank degrees. ii) You can ‘immobilize’ your car in the app, which is a feature I like (I used to run a manual kill switch). It used to work correctly, but now when I go back to settings after disconnecting, the app looks like it’s ready to go. But it isn’t, the engine will die right away. You have to enable, then disable the function. On my New iphone anyway. Not ideal. Iii) The GPS speedo is rubbish compared to other iPhone GPS apps and Speedos on the market. Sometimes it says I’m doing 153 mph (yeah, right) sometimes 25mph and I’m doing a steady 65mph on the freeway. Mostly. But it’s okay as a check, my analog speedo isn’t accurate at some speeds (very low and above 60mph). So it can help ‘fill in the gaps’. iv) As discussed, the cap and rotor aren’t great, and way too expensive. Replace the cap and rotor with a Bosch one. The ‘71 280SL Mercedes and the ‘65 Porsche 911 2.0L base used the same cap, but that’s from memory. Buy products made in Europe, so Germany or Italy. Go to a Porsche site or Imports parts supply. Dizzy cap for 123ignition 123 Tune+ Bosch 1 235 522 060 or Beru VK102 Part Number for the rotor is: Bosch 1 234 332 024 or 1234 332 088 which supersedes the 024 WVE 4R1209 For example, a good quality rotor (Italian made) is also available here for $25 shipped: https://rover.ebay.com/rover/0/0/0?mpre=https%3A%2F%2Fwww.ebay.com%2Fulk%2Fitm%2F333529359496 I bought a Bosch cap NOS (in original box) on eBay for around $16, in fact I got two- and was happy. If I wasn’t (cracked or used) I would have sent it back for a refund under eBay/PayPal policy. Finally, the rotor should not come with a resistor, I’ve modified mine by soldering in a piece of ‘house wiring’ gauge copper wire No problems at all, but you may need to file the top of the wire flatter to have good clearance. Good practice would be to encase the copper wire run in epoxy, so you don’t get unwanted spark jumps. Especially if you run MSD 6AL and a hotter coil. v) No data logging. A huge disappointment, or has to track the data, why not be able to save a ‘pull’ to look back at what the dizzy (and the car) did. Fix this! That’s it. My experience has been quite good. These are machines. Cars and engines go wrong. You all know that. There’s probably more I could say, but I hadn’t intended to write a book when I started. If you’re reading this far, you have the benefit of what I’ve discovered. I like the 123i Tune+ dizzy and plan to use another one soon- maybe just the USB one as it could have a single standard tune. This is on a built stroker 3.xL with triple webber DCOEs, hot cam, etc. I’m not scared that if set up correctly, it won’t detonate your engine. It should default to a map that ‘still makes sense’ if it goes out. BTW the holes 4&5 on the L6 are more prone to failure than the others. Don’t ask me how I know...1 point
-
1 point
-
1 pointI'm refurbishing my tank in a 1974 early 260Z. I took some pictures to be sure it goes back together correctly.......and have one that should help. Your hose in question goes under the frame and back up into a bendable clip. Hope this helps!
 1 point
 -
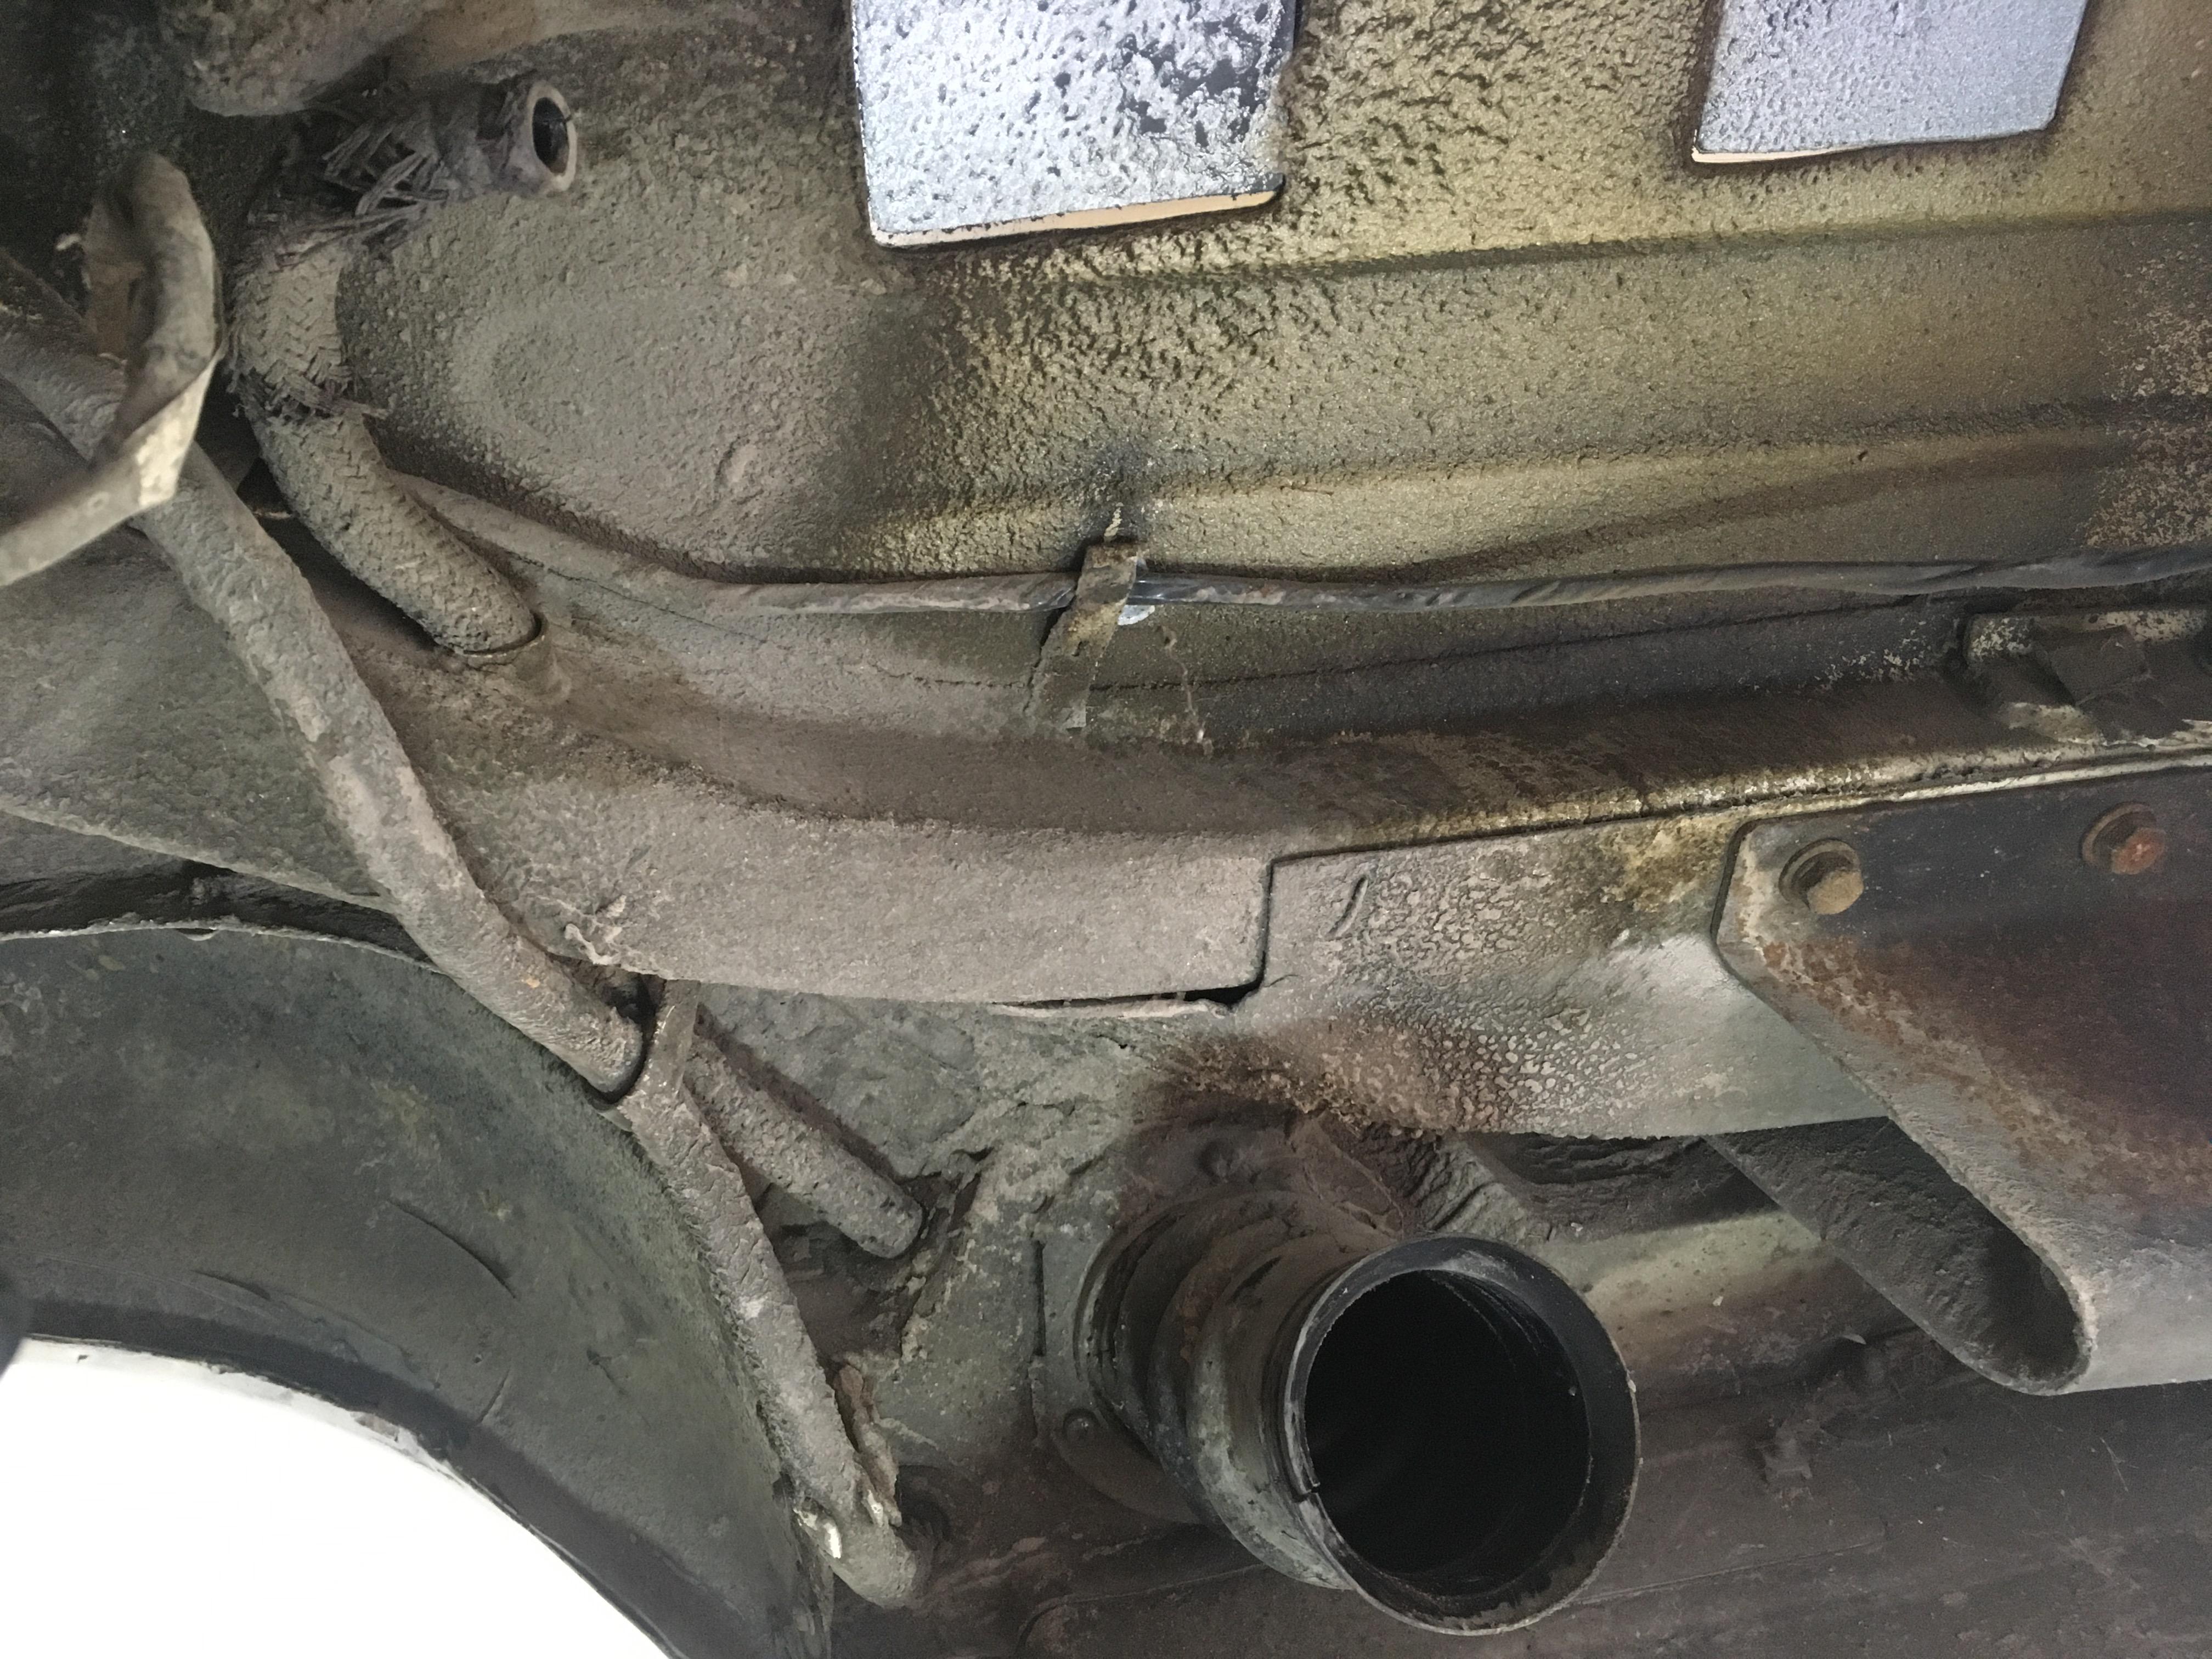
1 pointIt is 100% the distributor. I have put my hand on it while running and can feel the shaking before it dies off. The grinding sound is quite obviously coming from the distributor. There is also visible grinding under the distributor cap in the above photos.1 point
-
1 pointHere's the rings I used: Checking ring gaps: My ring gaps (like @Av8ferg) came out within spec so I did not need to do any gap grinding. Top ring gap - Spec is .009 - .015 and I get .014 on mine. (Note that I measured .020 to .024 with old worn top rings) Middle ring gap - Spec is .006 - .011 and I get .009 with mine. (Note that I measured .014 to .015 with old worn middle rings) Oil scraper rings - Spec is .012 - .035 and I get .014 with mine. I did not measure old oil rings.

 1 point
 -
1 pointI'm using stock iron Nissan rings and "I read on the internet" that 240 grit is a good choice for standard OEM iron rings. For example, here's a snippet from the ball hone company's website. From https://www.enginehones.com/technical.html ~~~~~~~~~~~~~~~~~~~~~~~~~~~~~~~~~~~~~~~~~~~~~~ What GRIT should I order? Hone grit is one of those topics that will vary vastly from OEM manufacturer, ring designer to professional engine builder and will depend on how bad the cylinder wear is and whether a deglaze will do the job . If you have a poor condition bore with rust or deep grooves you will need to use a 120 grit hone to remove the rust and remove the deep grooves. Then follow up with the appropriate grit depending on ring application. For a basic deglaze to refresh the engine just use the grit depending on ring type. EngineHones.com has built several engine mules (our guys race too!) to investigate the grit question with on-track results. The table below which was derived from our engines, ring manufactures and technical literature. Our best seller to commercial engine rebuilders and power-sports shops is the 240 grit hone. Our guidelines are as follows: Iron Cylinder Ring Type: OEM Iron rings: 180 or 240 grit Chrome rings: 240 or 320 grit Moly Rings: 320 or 400 grit Plasma Rings: 320 or 400 grit not sure ring type: 240 grit ~~~~~~~~~~~~~~~~~~~~~~~~~~~~~~~~~~~~~~~~~~~~~~~ And there are a bunch of other enthusiasts sites on-line that echoed the same recommendation, so that's what I went with. Granted, I did not call Nissan and ask, so I could have made a grave mistake, but I hope not. I'm no engine building expert and I would be interested in hearing from anyone who has expertise in such areas and would like to throw themselves in front of my build train though. I don't have pistons in yet.1 point
-
1 pointIt’s unfriendly if you are in the room with out a mask I guess. Silly Sent from my iPhone using Tapatalk1 point
-
1 pointThe switches arrived today and are not a good fit for the housing. The 29.5mm dimension is too big to fit flush against the end of the tube. The OE switch is 23mm (0.9"). Now its off to the site recommended by @SteveJ to shop for a better fit.1 point
-
1 point
-
1 pointCould you get a helper to make it do the grinding thing and then you listen around and see where it is coming from? That's what I would try and you may already have. It could be the water pump impeller rubbing against the front cover. That's pretty common. What about the sound with the clutch engaged/disengaged? Listen around the alternator too. They can make a grinding noise when you rev the motor. It would have that black dust all over it also.1 point
-
" Klassic Fab has been manufacturing quality VW Bus floor replacements for years " I would expect their web site to be mature and functional based on their VW history... very odd. FYI Parent site: https://www.klassicfab.com/1 point
-
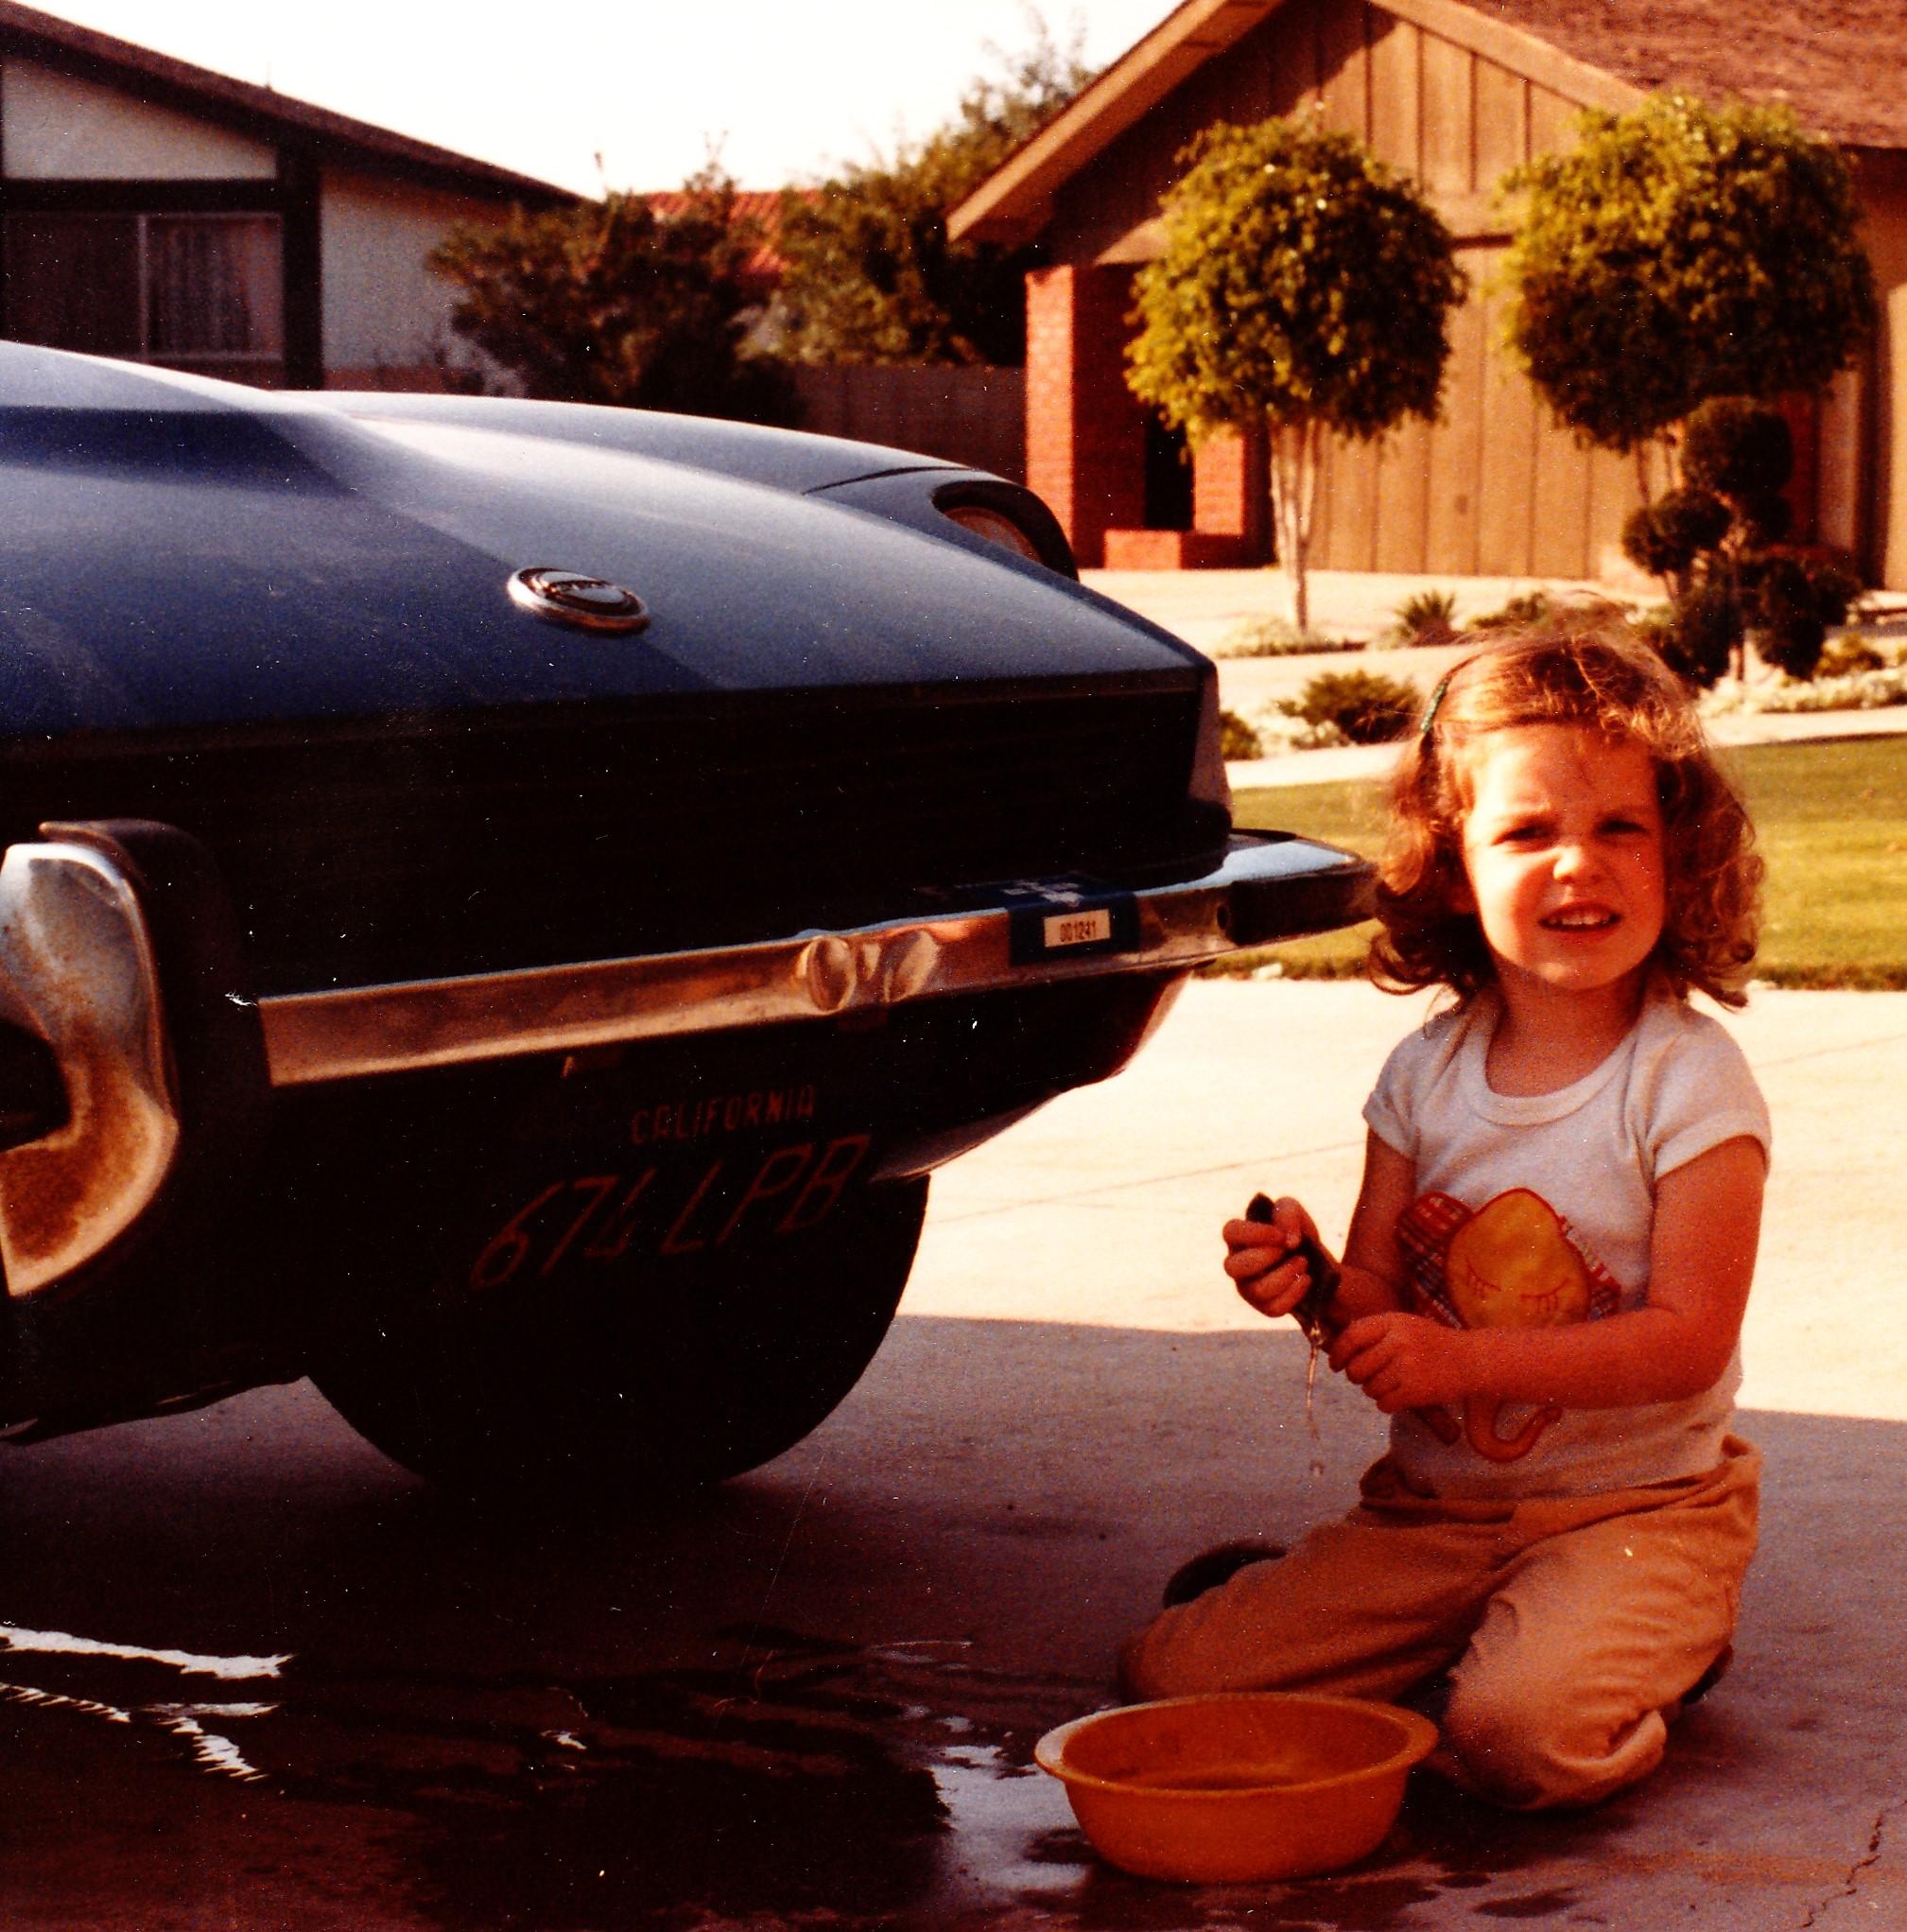
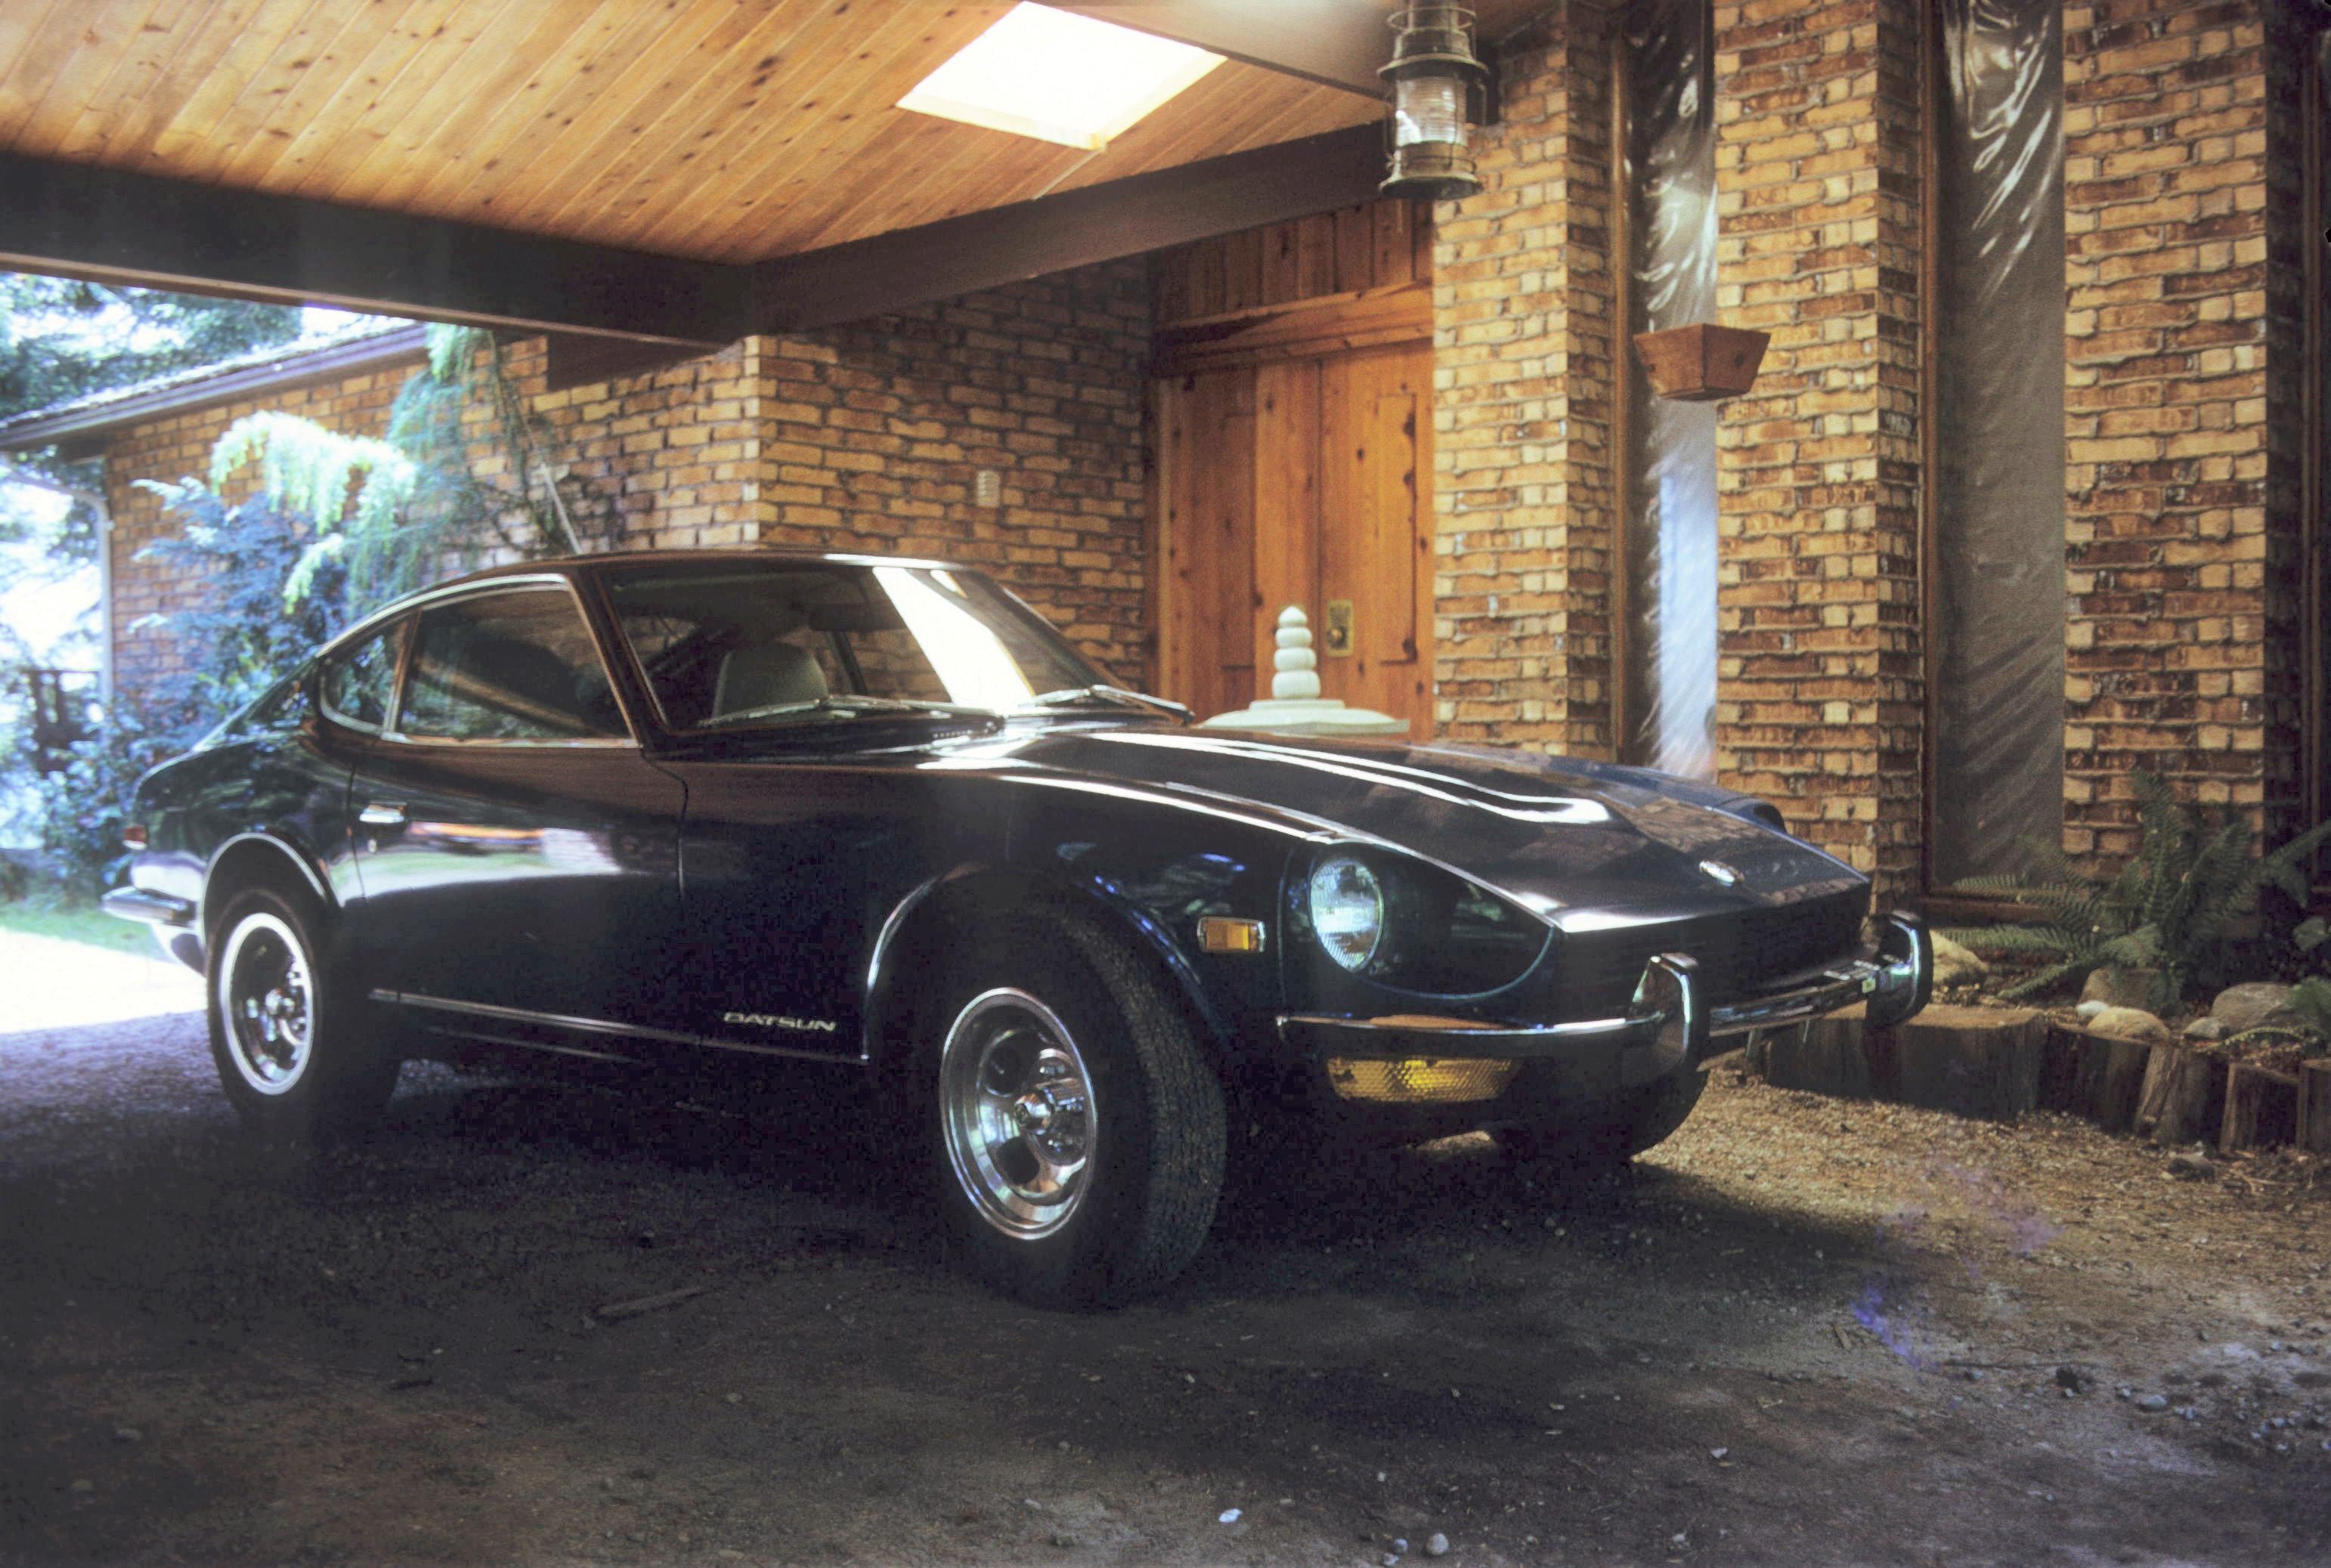
Some old and new photos of my '73 240Z. (I am the original owner) My 240Z in 1973 1982, Daily Driver loved by our daughter . 2019: after restoration - loved by the next generation


 1 point
 -
1 point
-
Seems to me you should get social security after paying in for the lifetime of your career, but we all know how that's going to end up.1 point
-
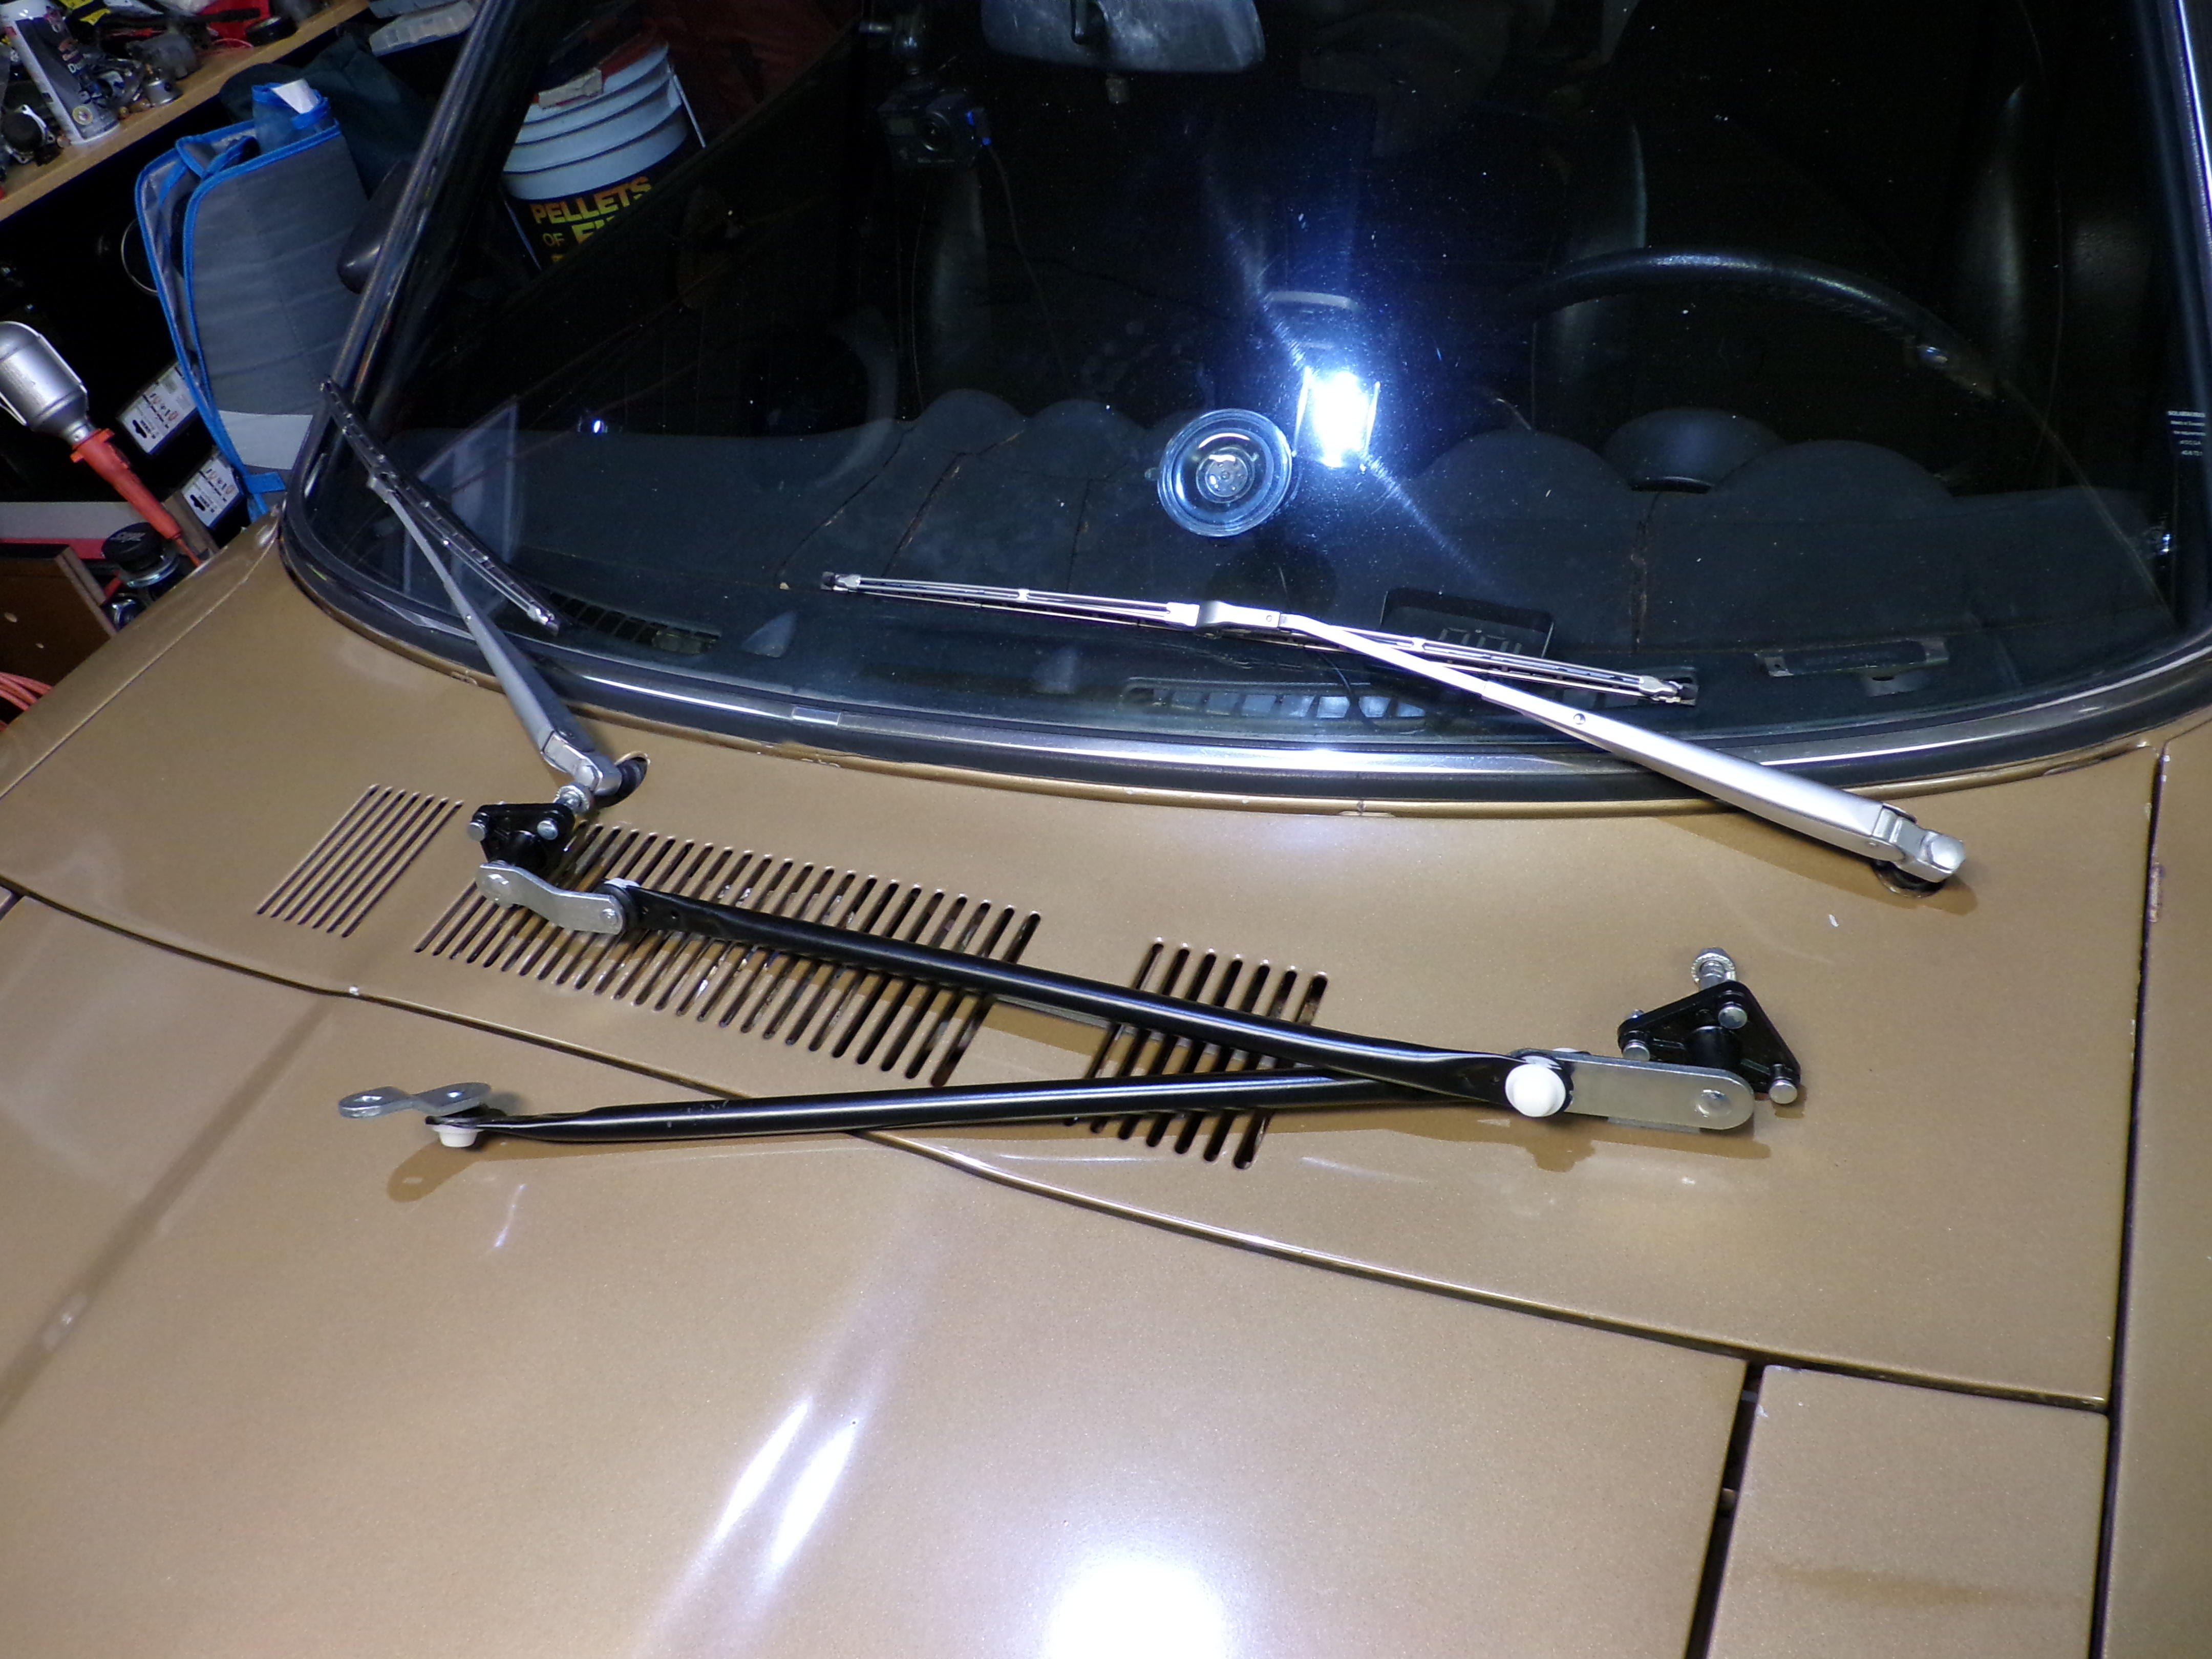
I received the wiper linkage today. I lined it up against my 260Z. The Suzuki linkage is not nearly as wide as the Z car linkage. At best, it could MAYBE be a source for parts, but I'm not even sure about that. I didn't test fit a blade on it. I'm just going to see if I can return it.
 0 points
 -
0 points