Leaderboard
-

siteunseen
Free Member3Points15,115Posts -
26th-Z
Free Member3Points5,264Posts -

wheee!
Free Member3Points4,607Posts -
Carl Beck
Free Member3Points5,043Posts


Popular Content
Showing content with the highest reputation on 06/12/2016 in all areas
-
3 pointsBack from training! Lot's of packages awaiting me on my return.... I received the spade style LED's for the dash mod, Chas's absolutely awesome bumper mod kit arrived looking like artwork, several packages from Eastwood with powder coating supplies including their new "chrome" powder that looks amazing in the pictures. I will try that out on one of the spare valve covers. Still trying to finish the major yard work project that I started before the last exercise.... almost done! Soon I can return to the 280... Sad new is I might be losing my MIG welder. My son-in-law needs it on a job site out of town. Guess I will need to pony up and buy my own3 points
-
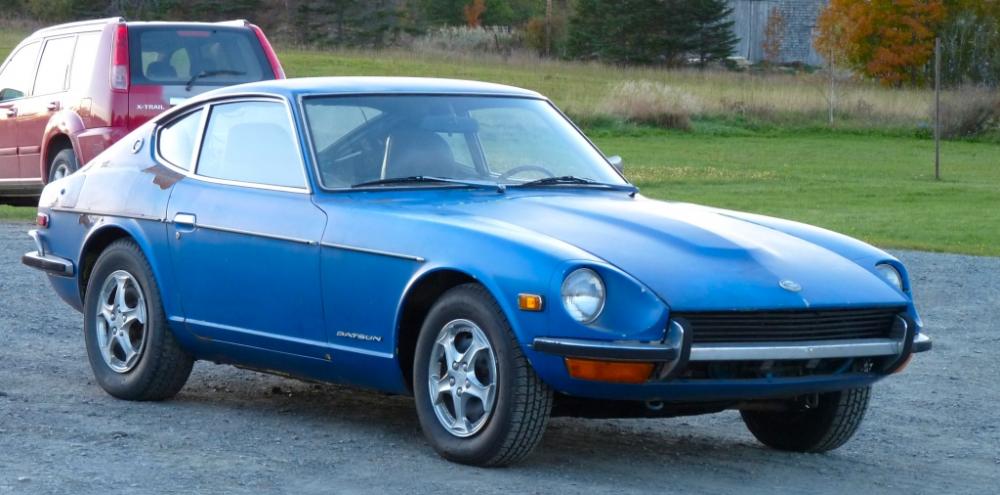
1 pointTook on a client for some Z work- didn't have enough to do- 1972 Auto from out west- very rust free and original. Going to try and bring her back to glory
 1 point
 -
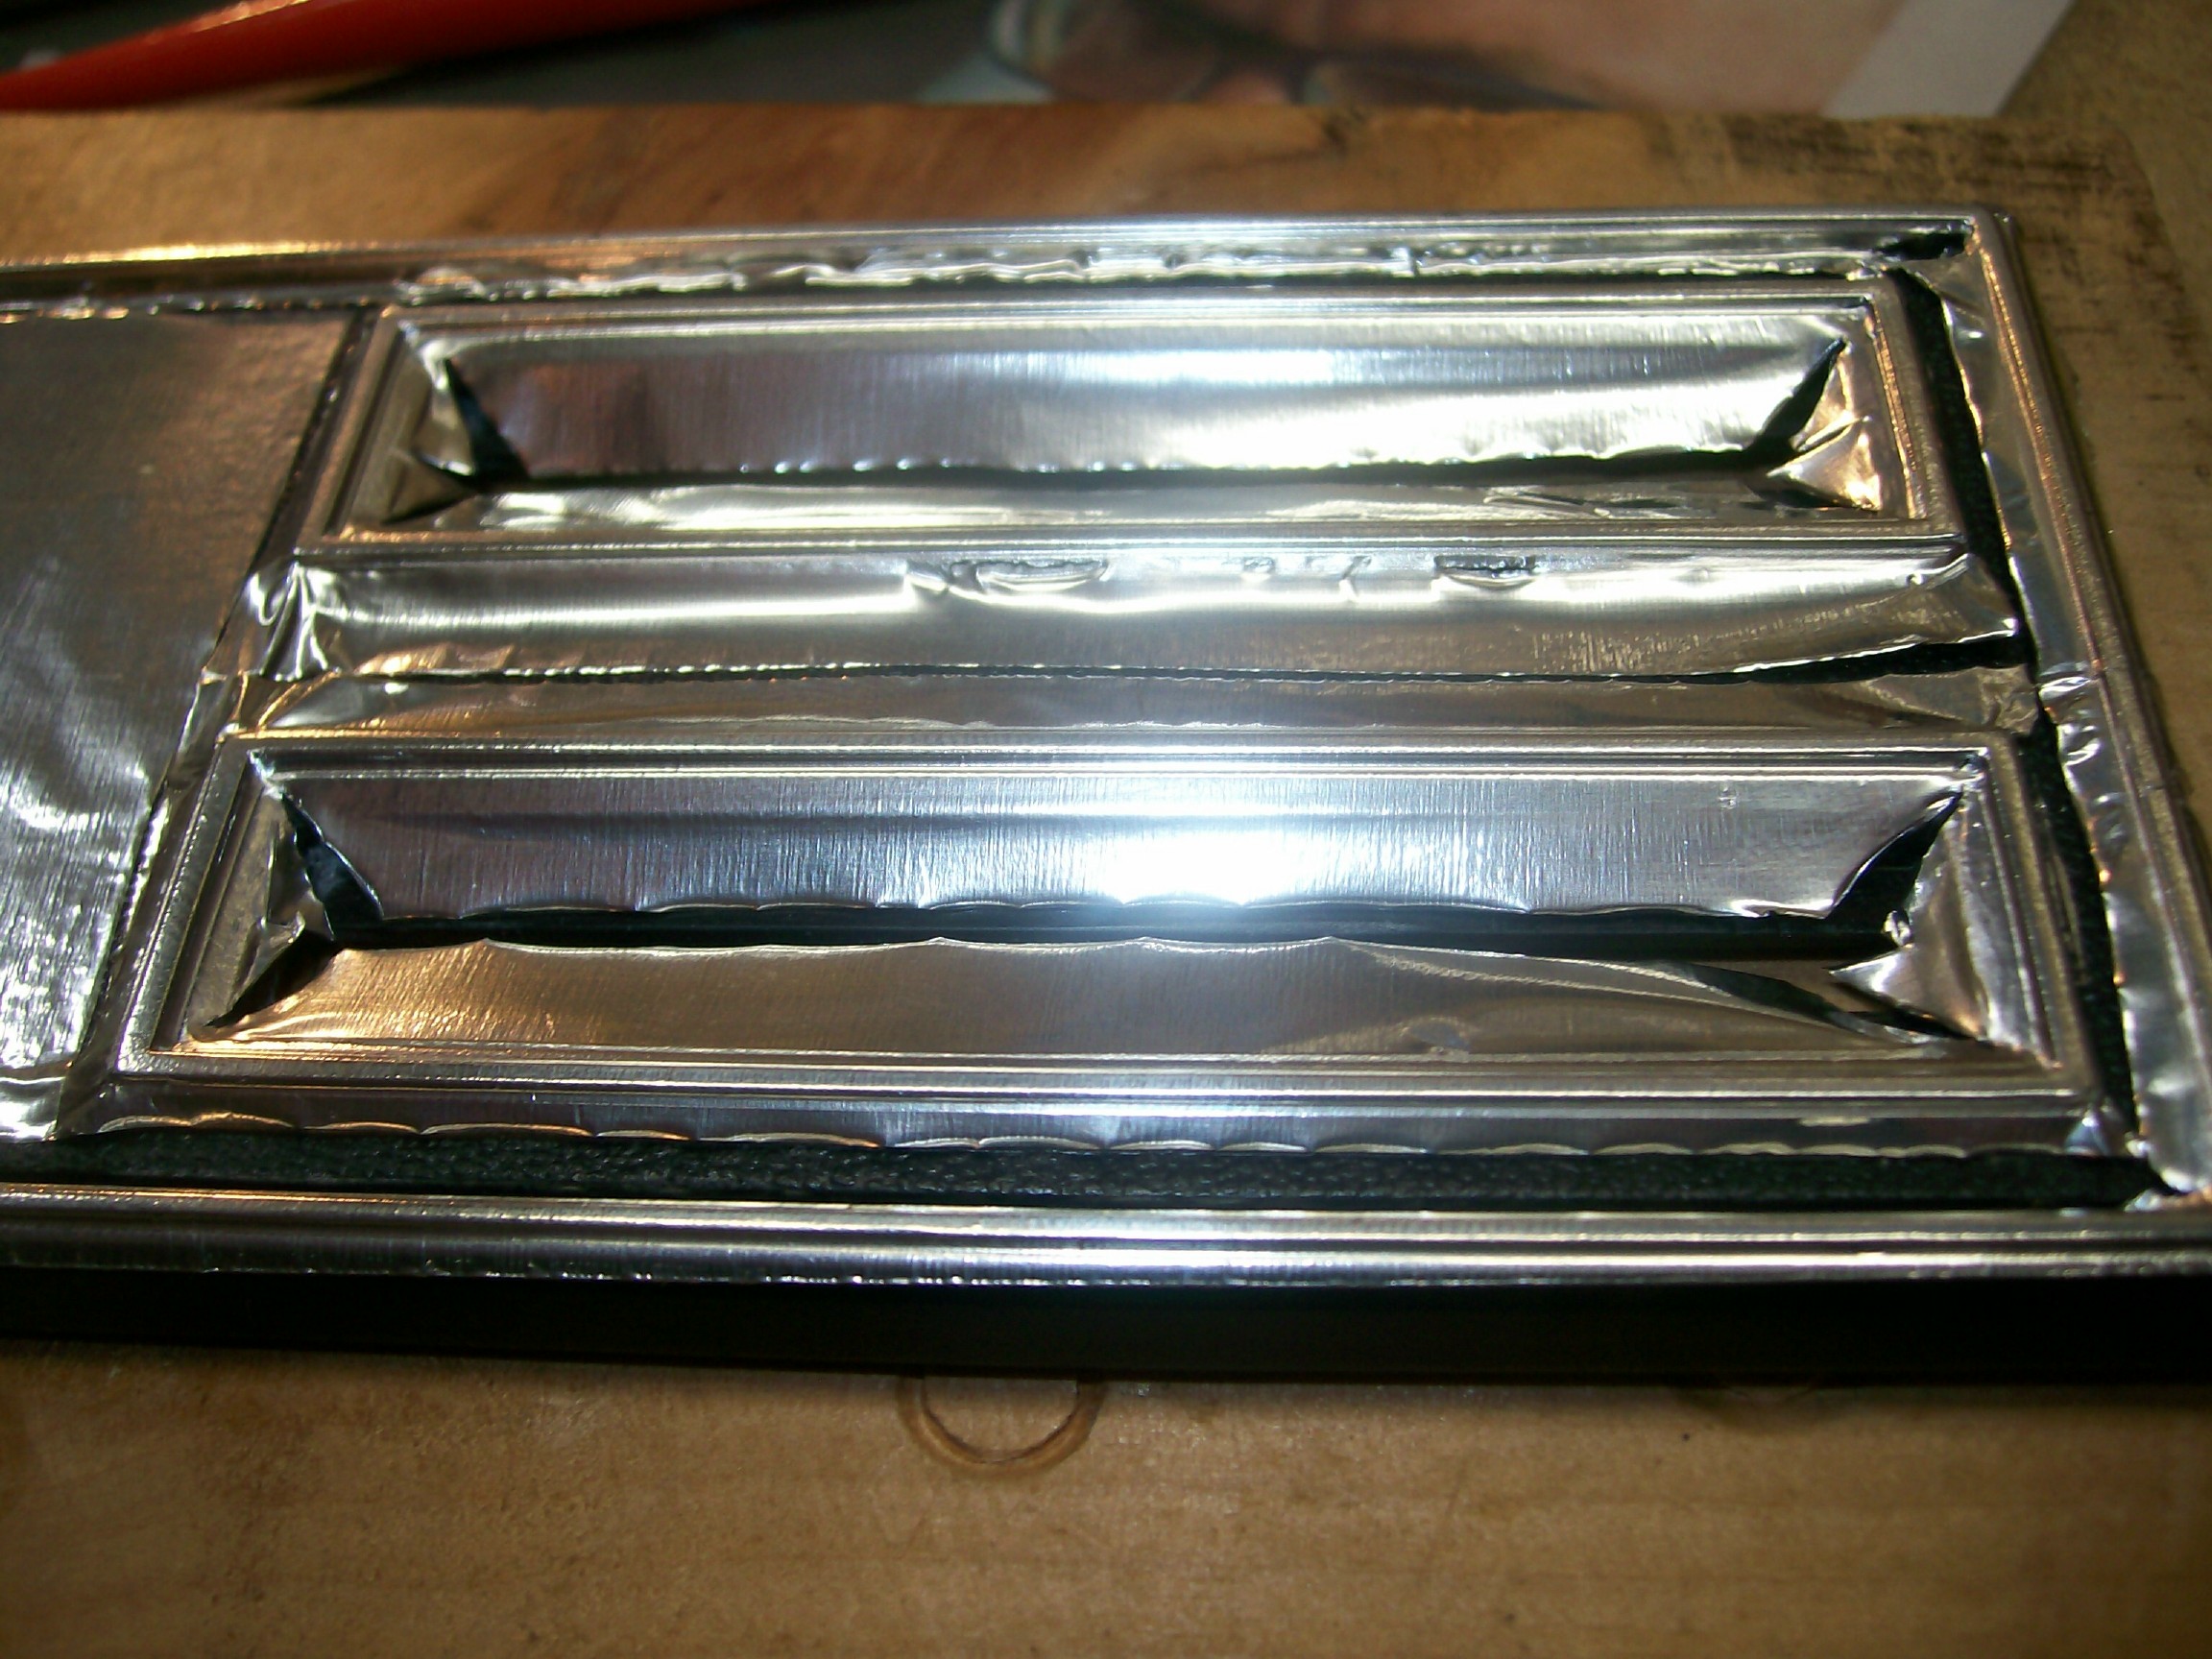
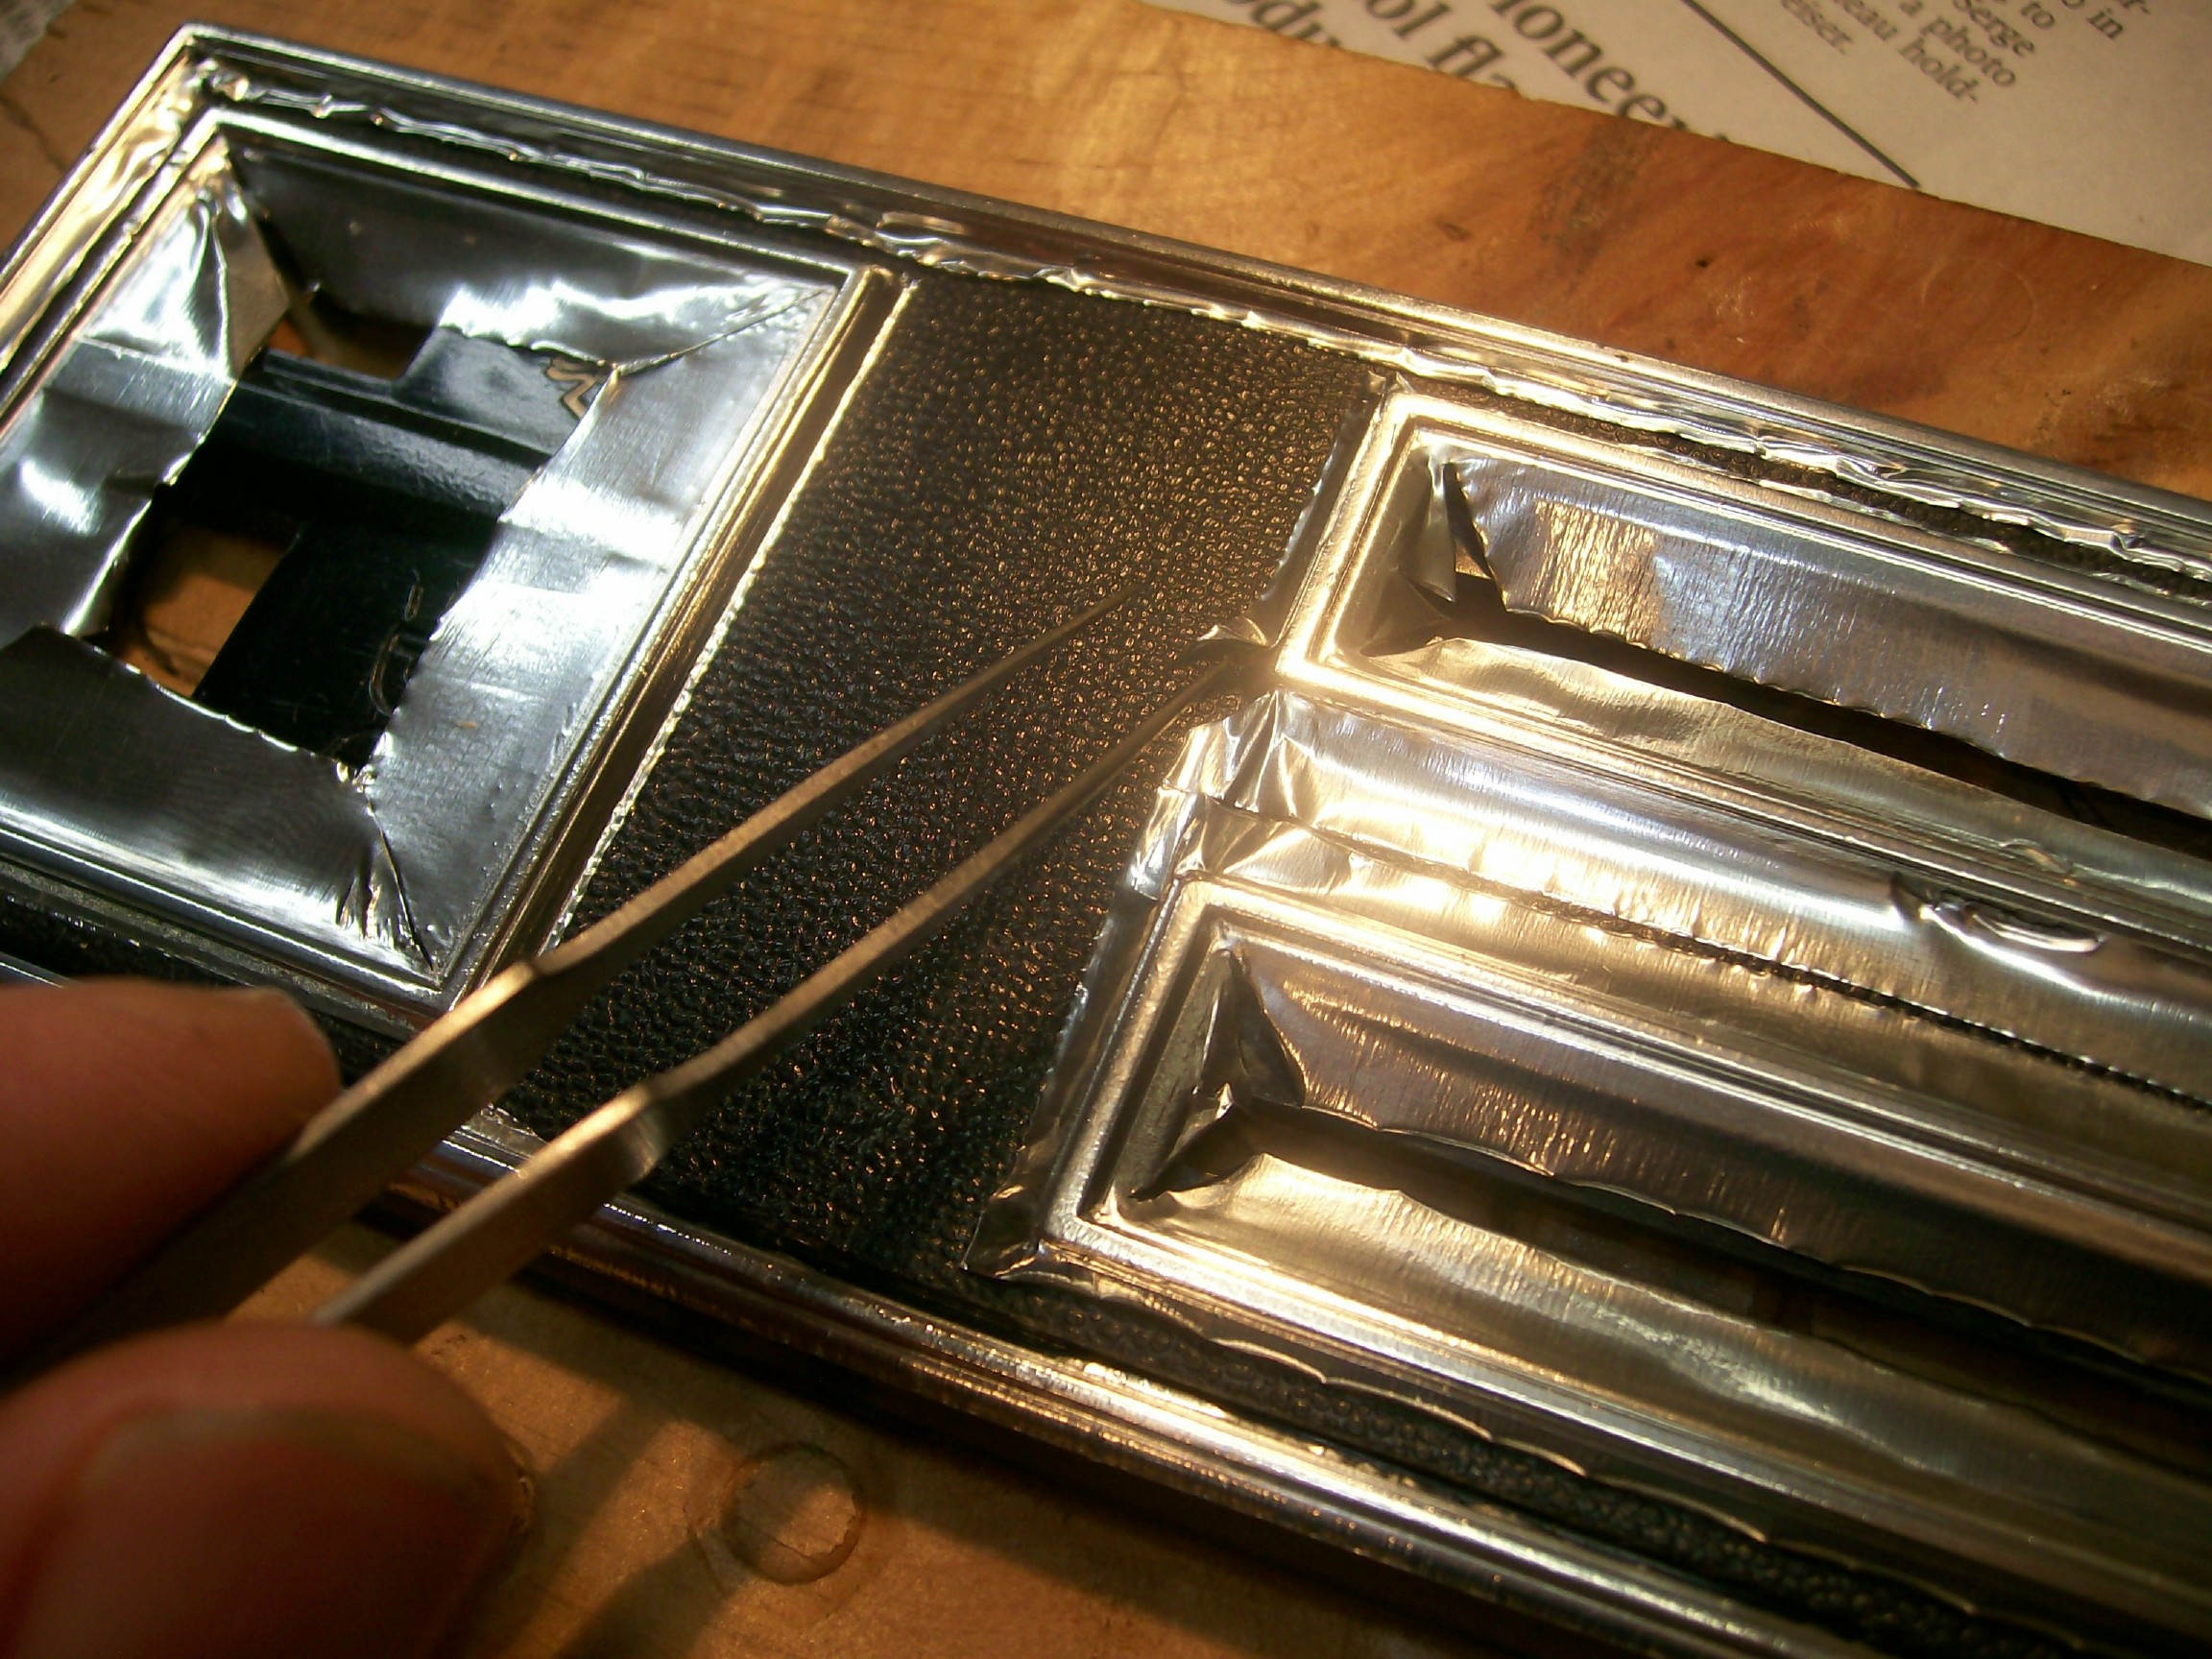
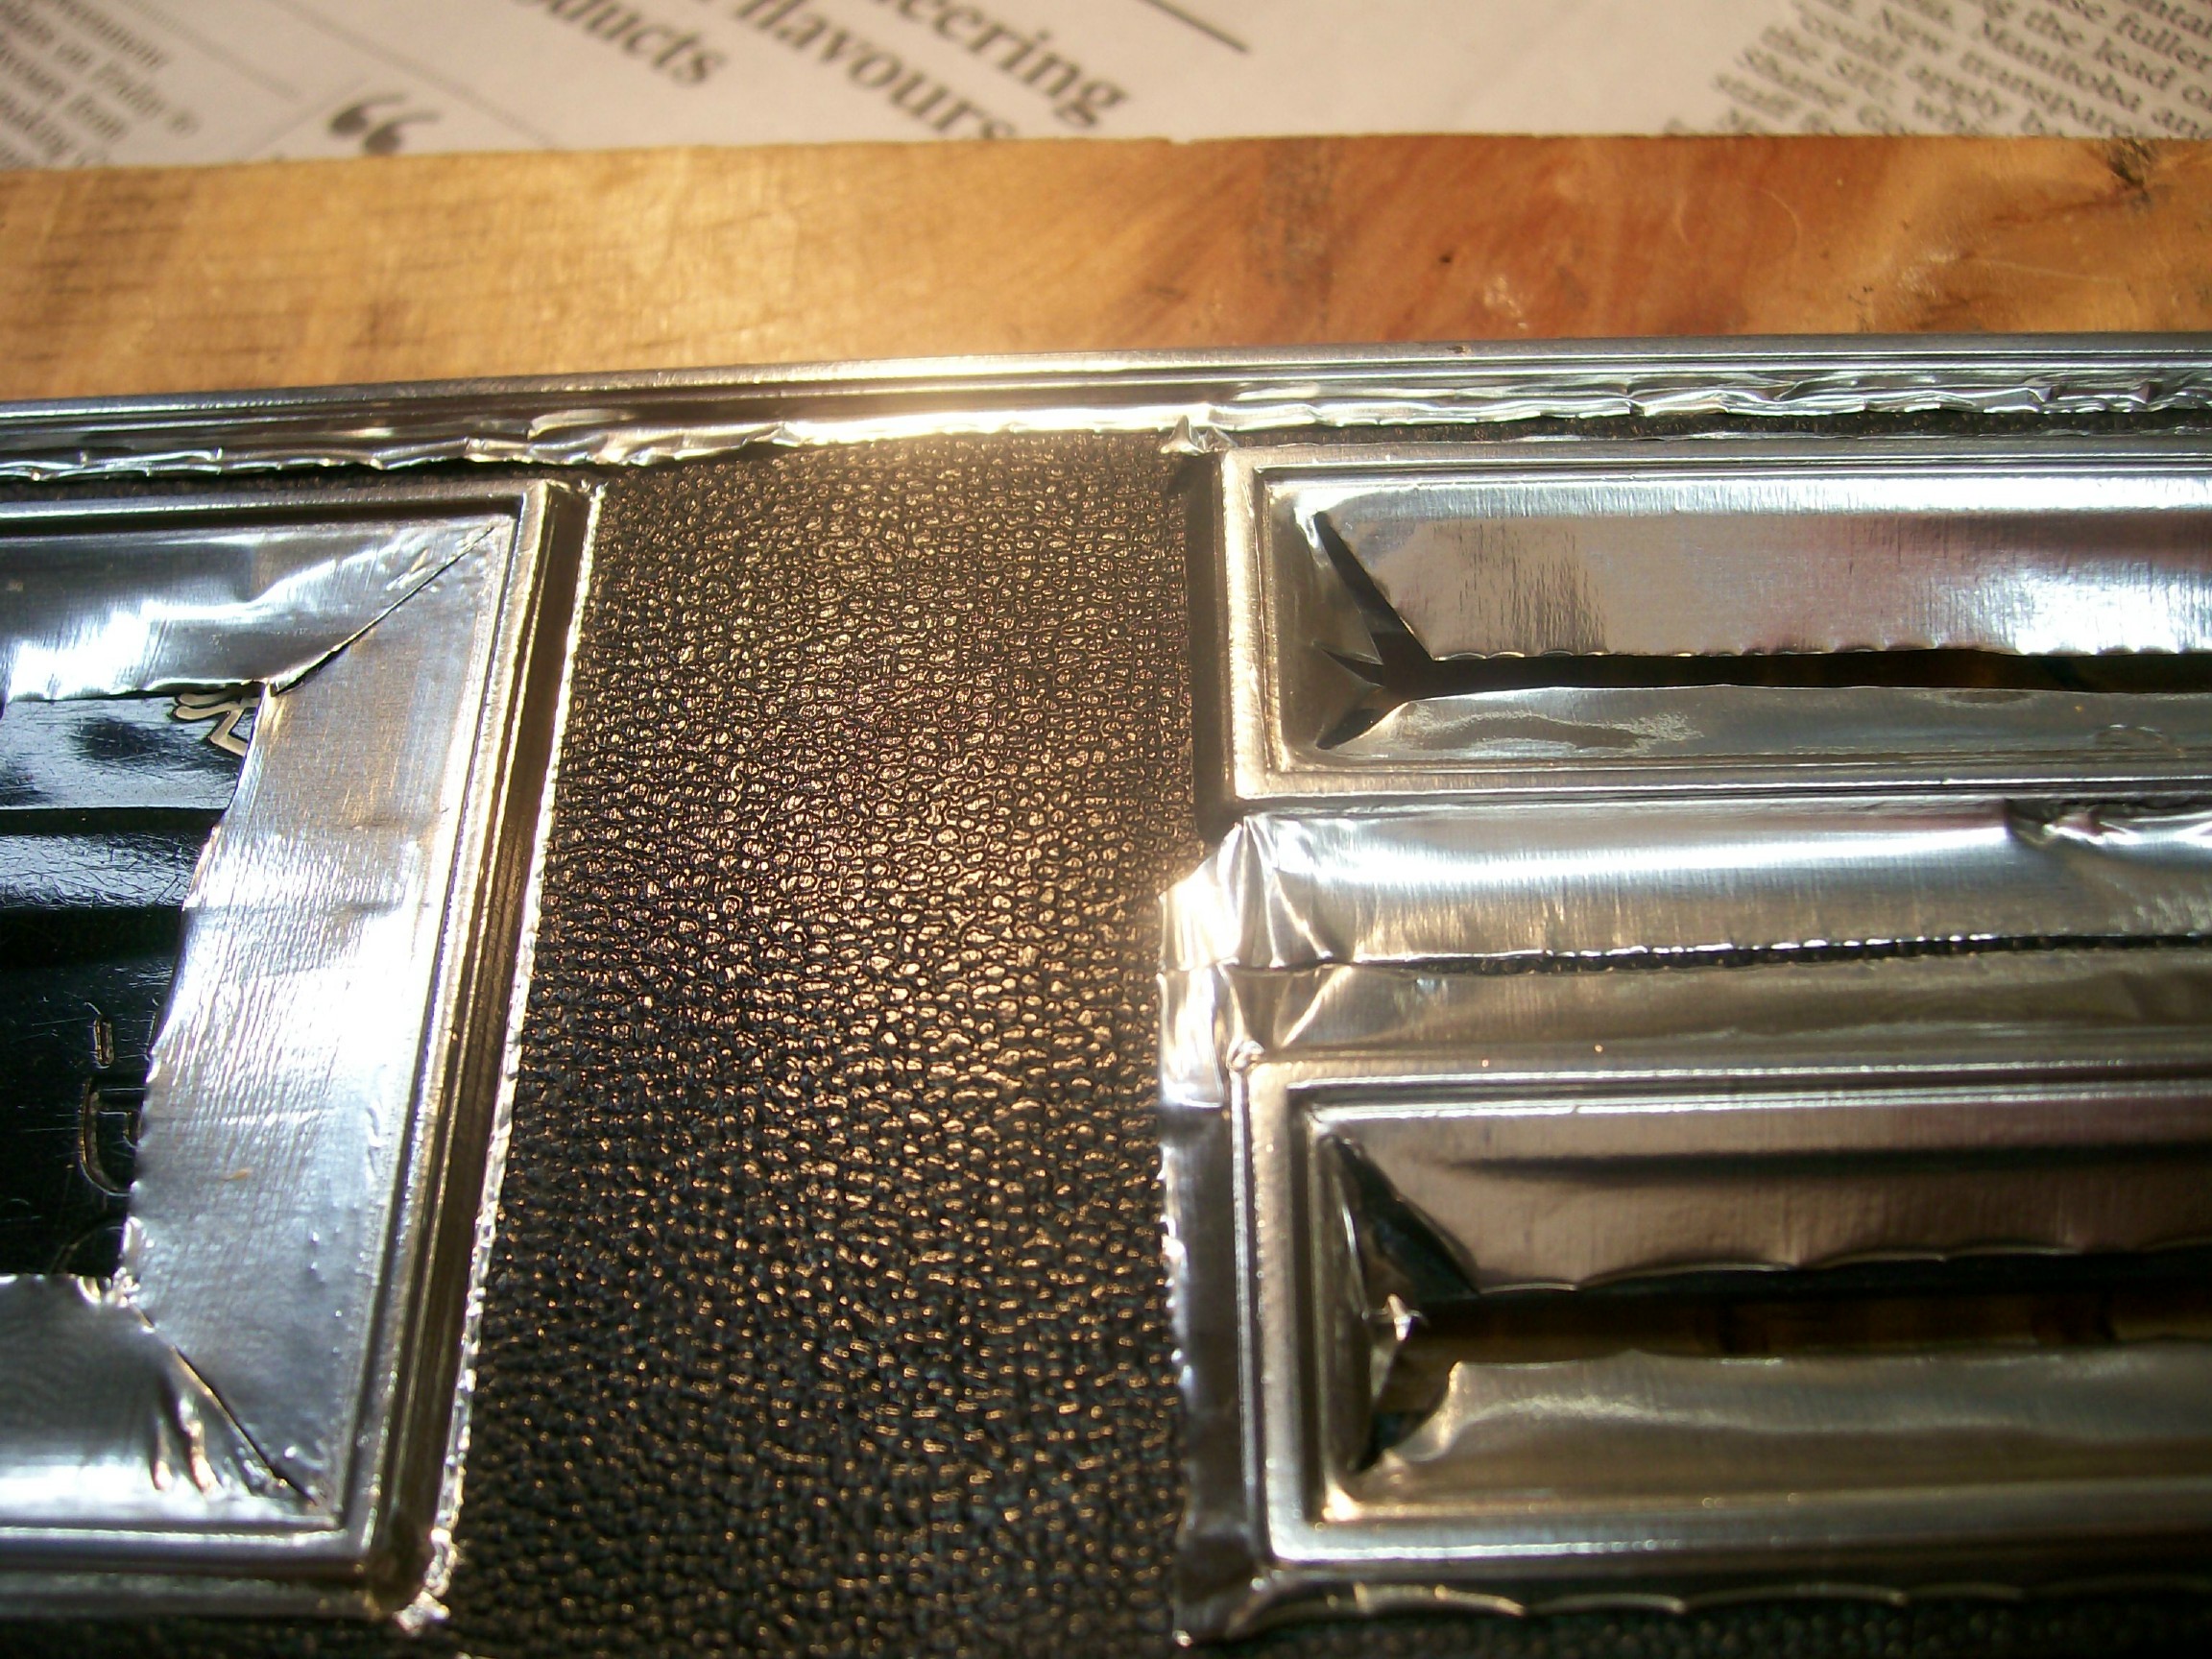
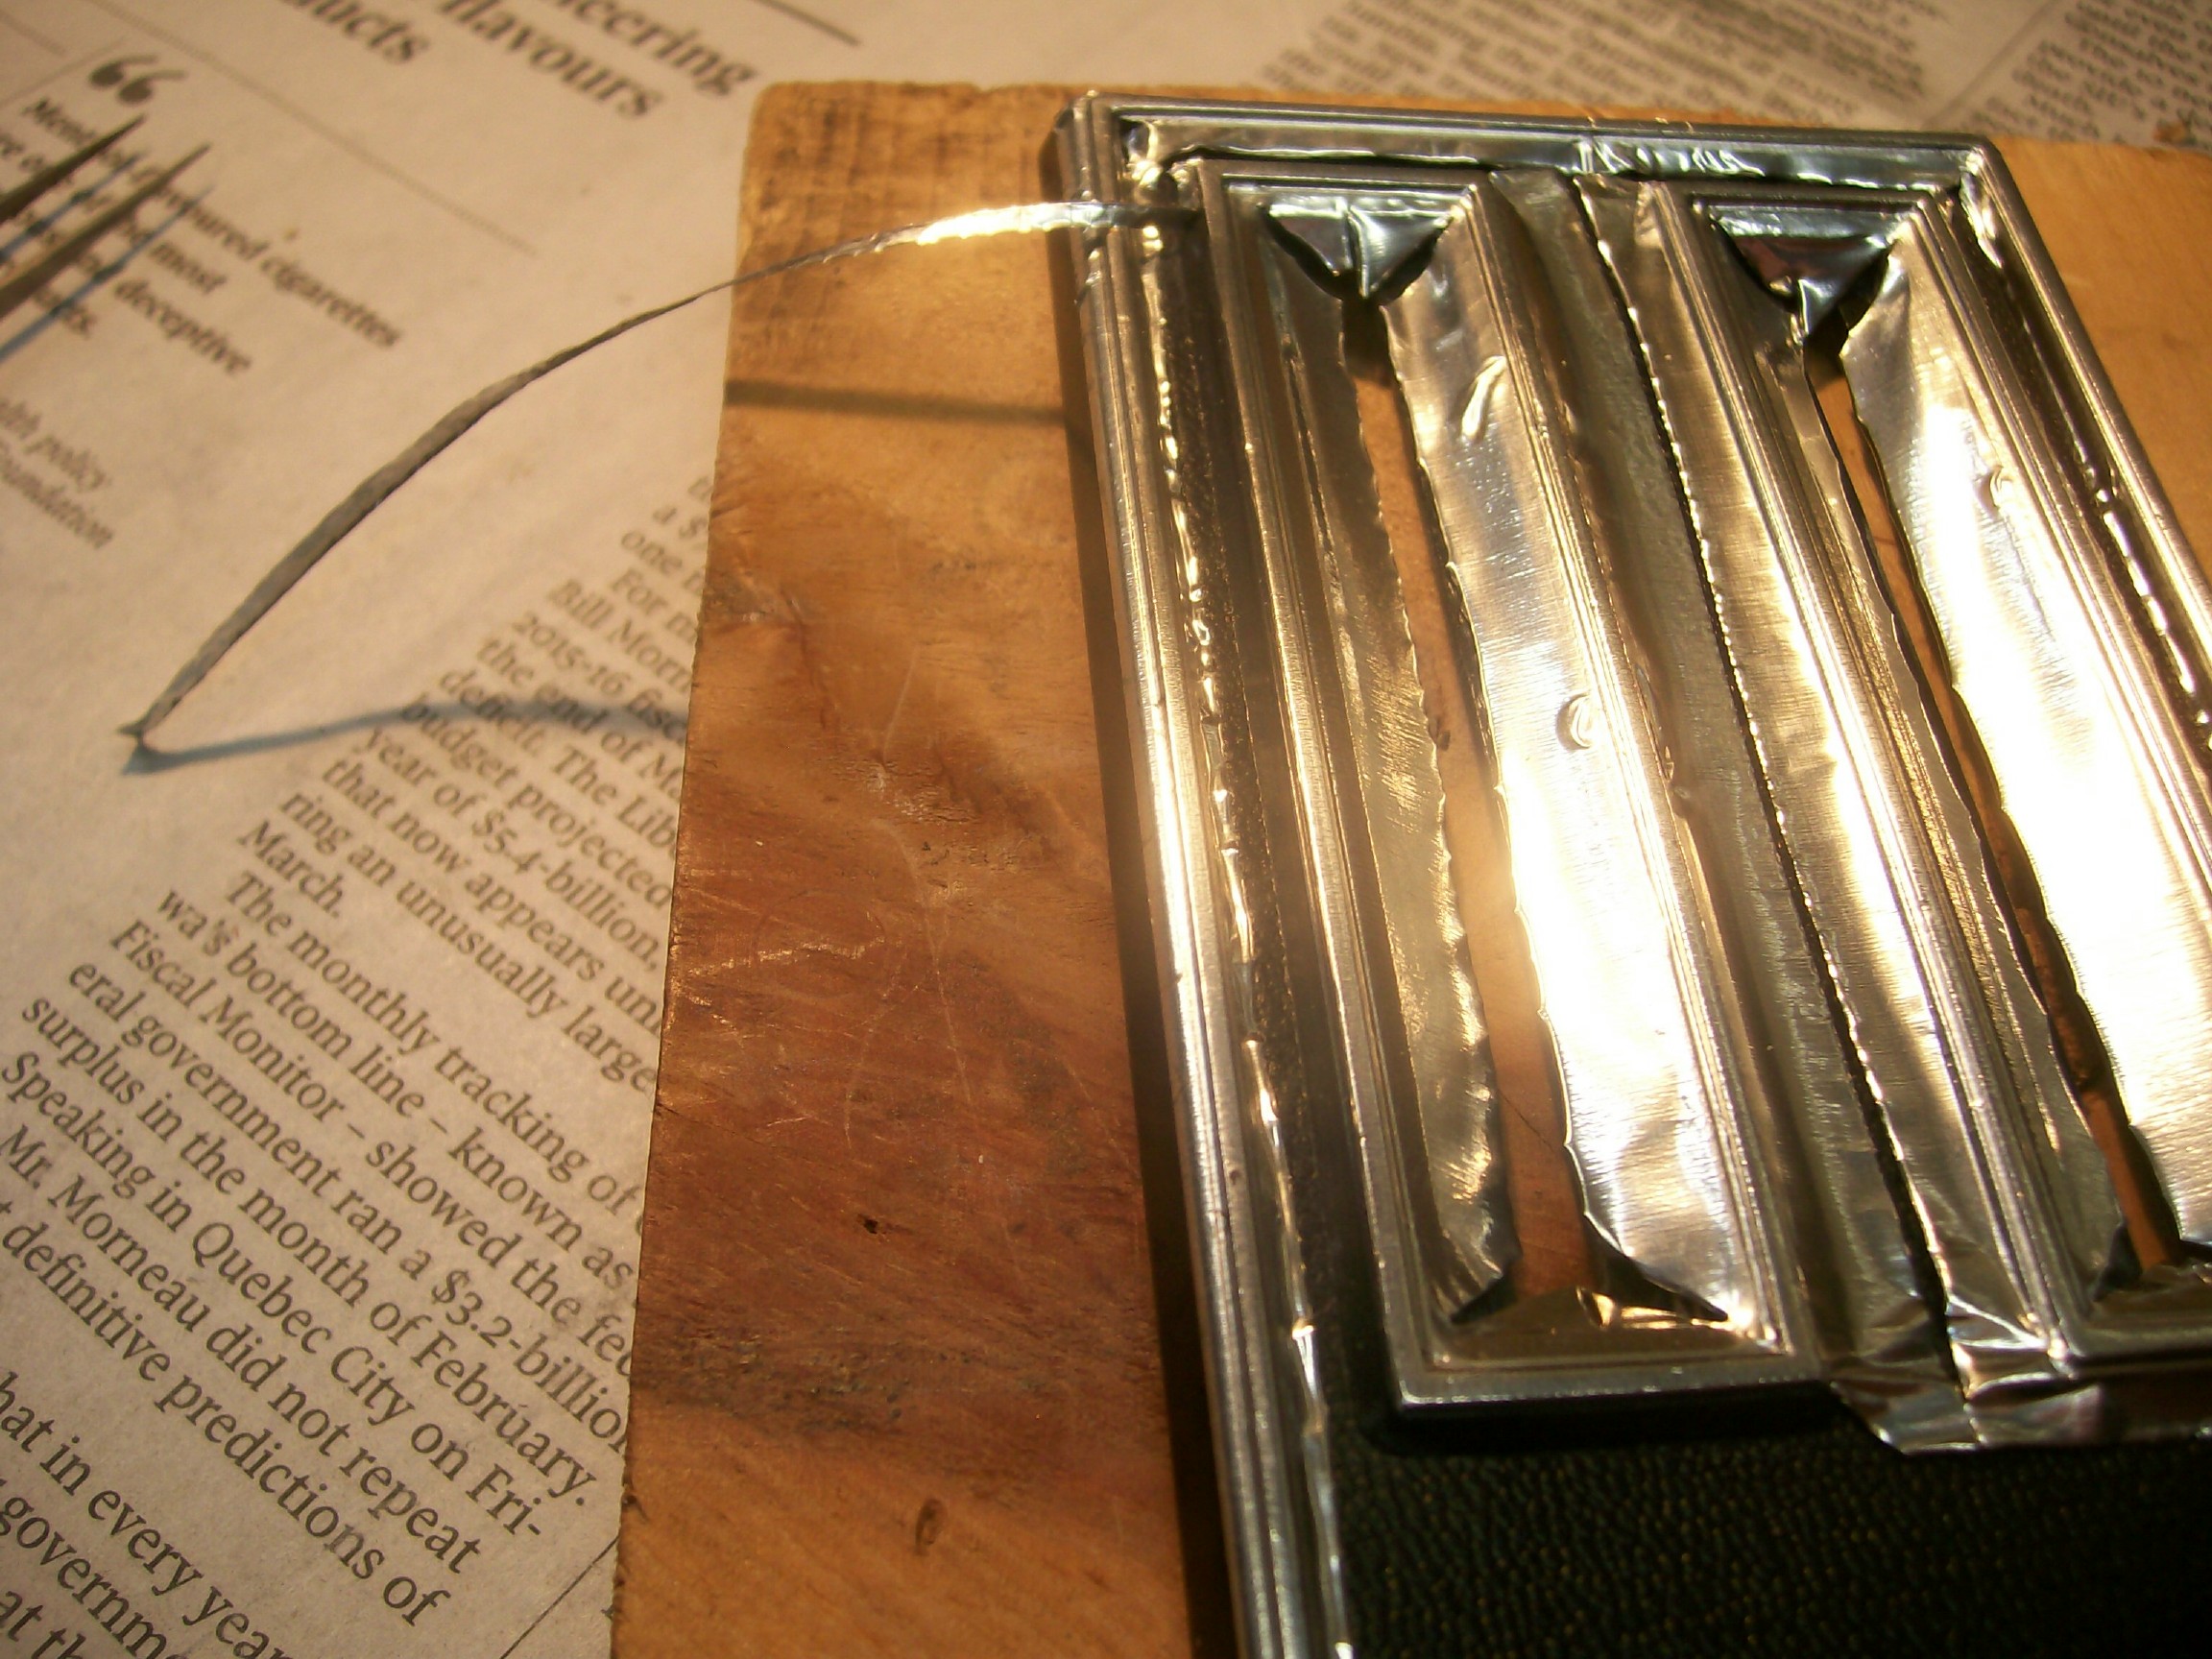
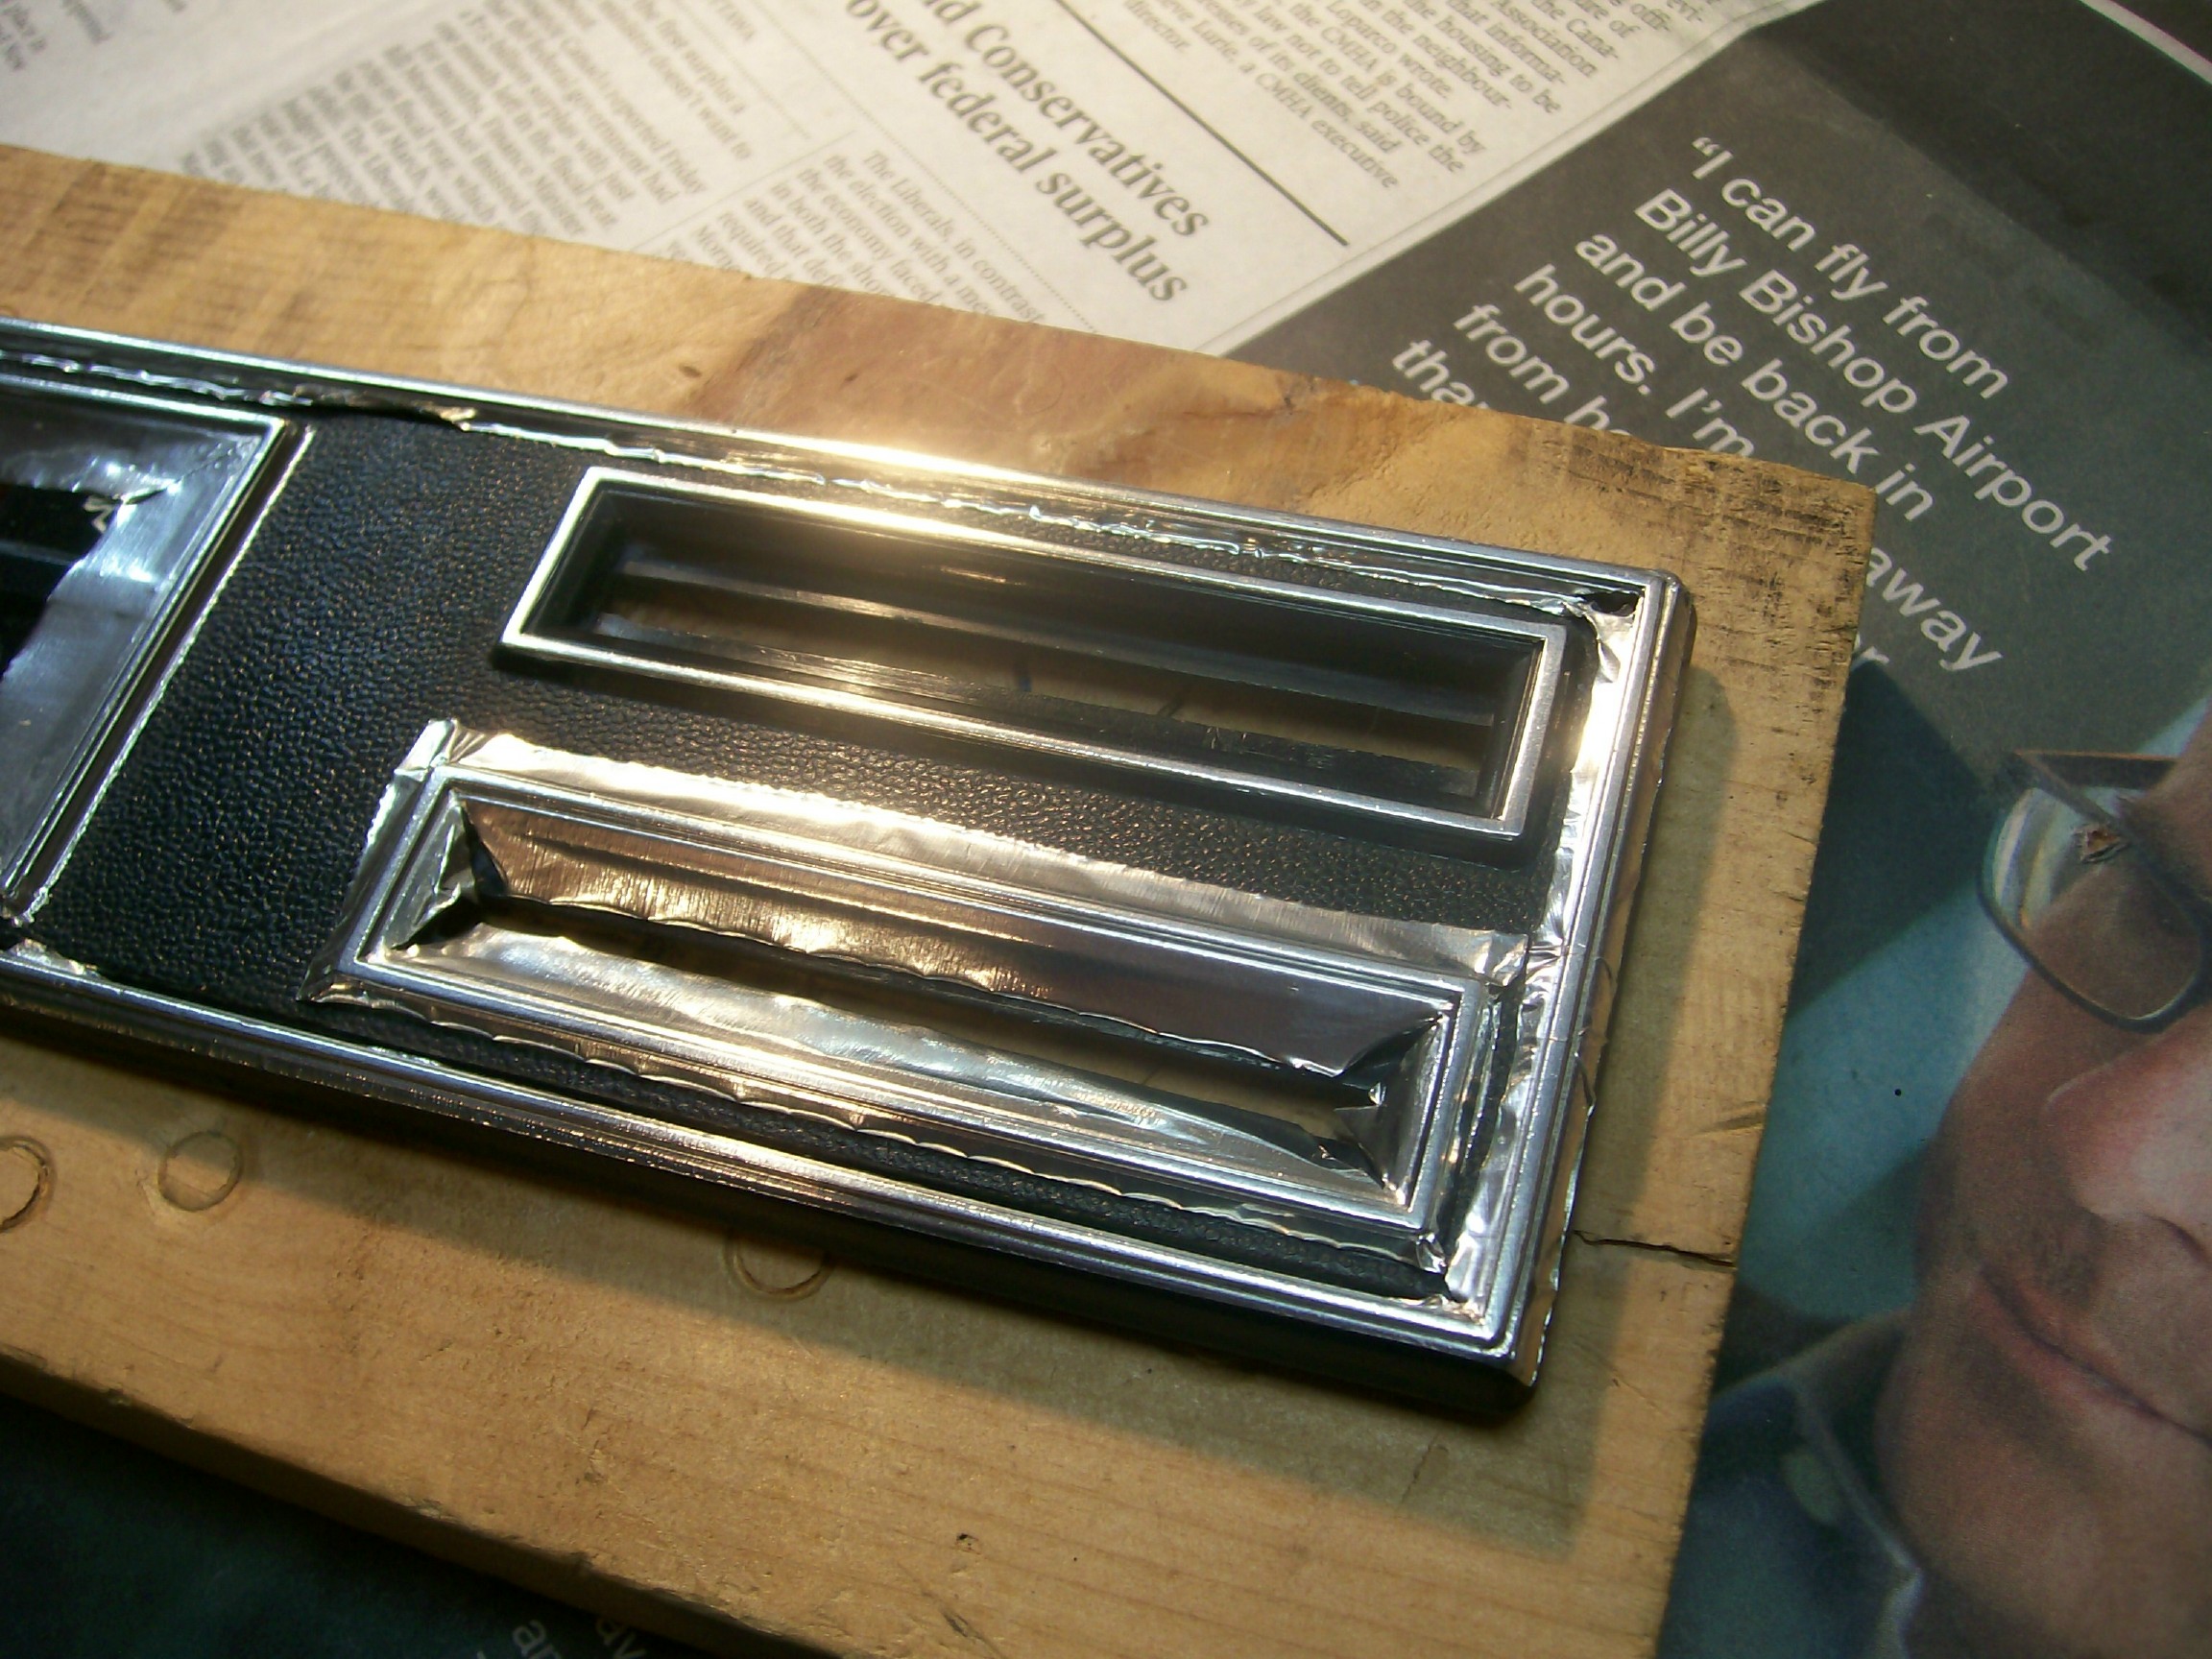
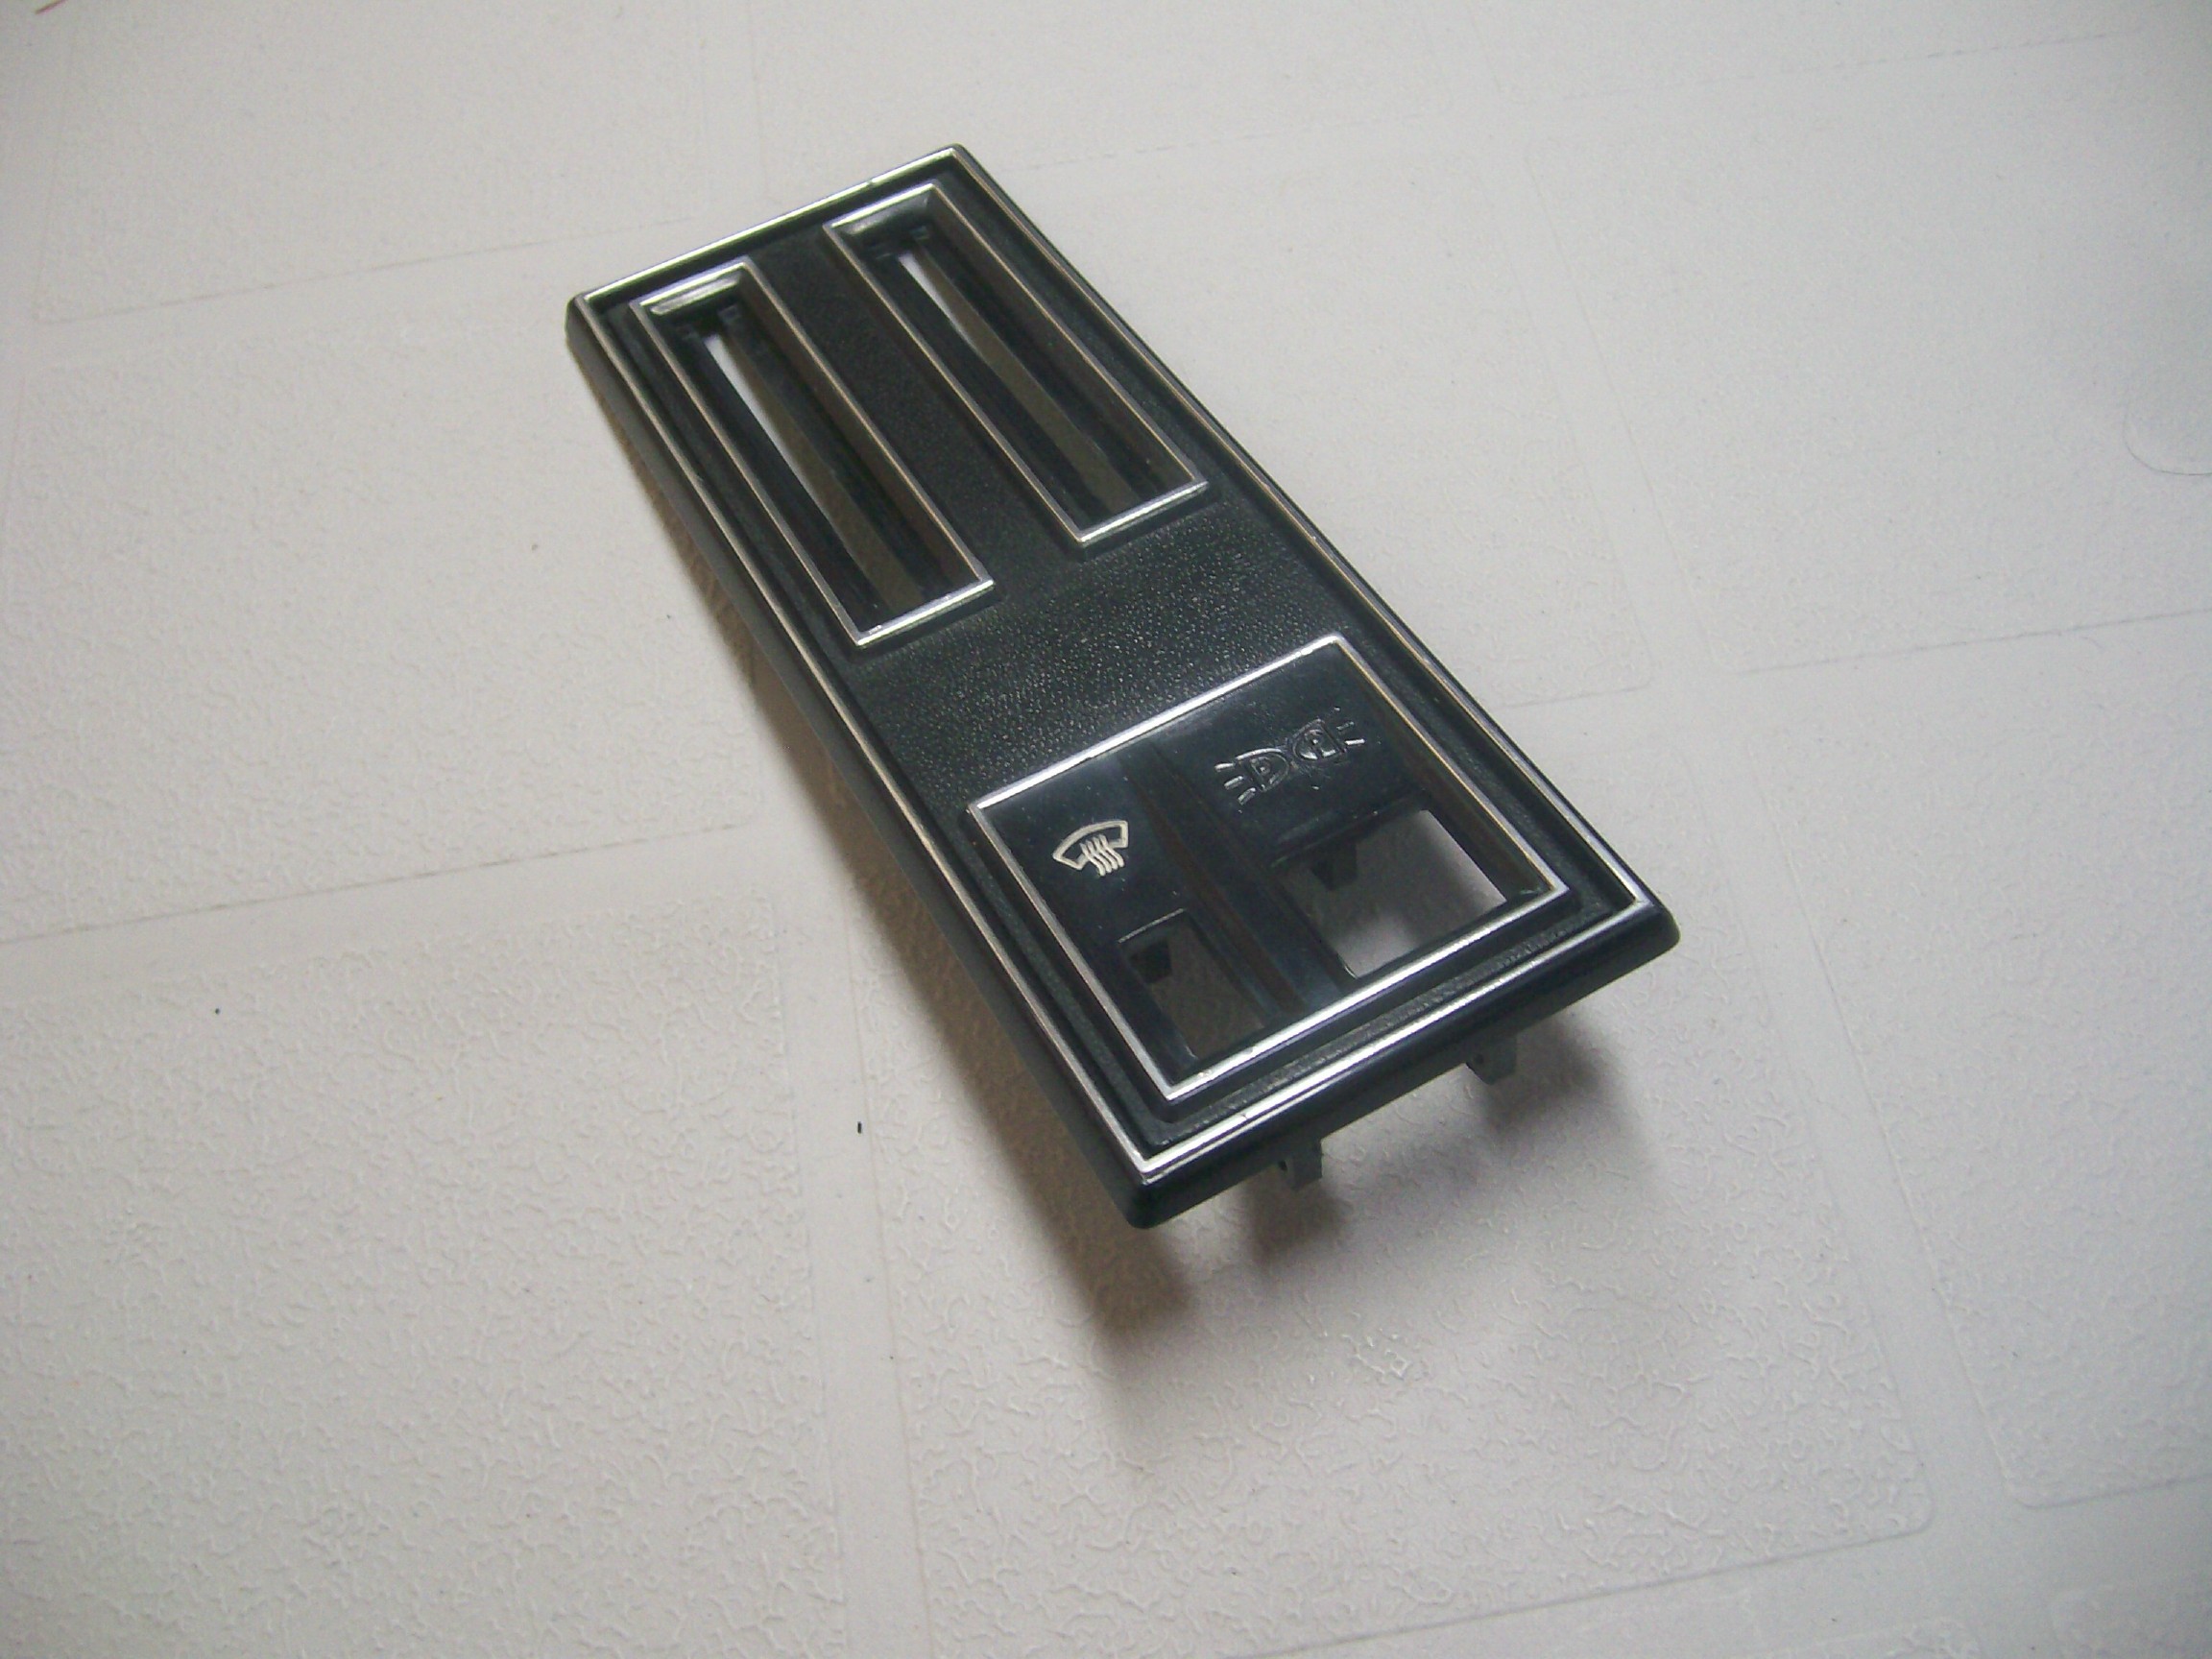
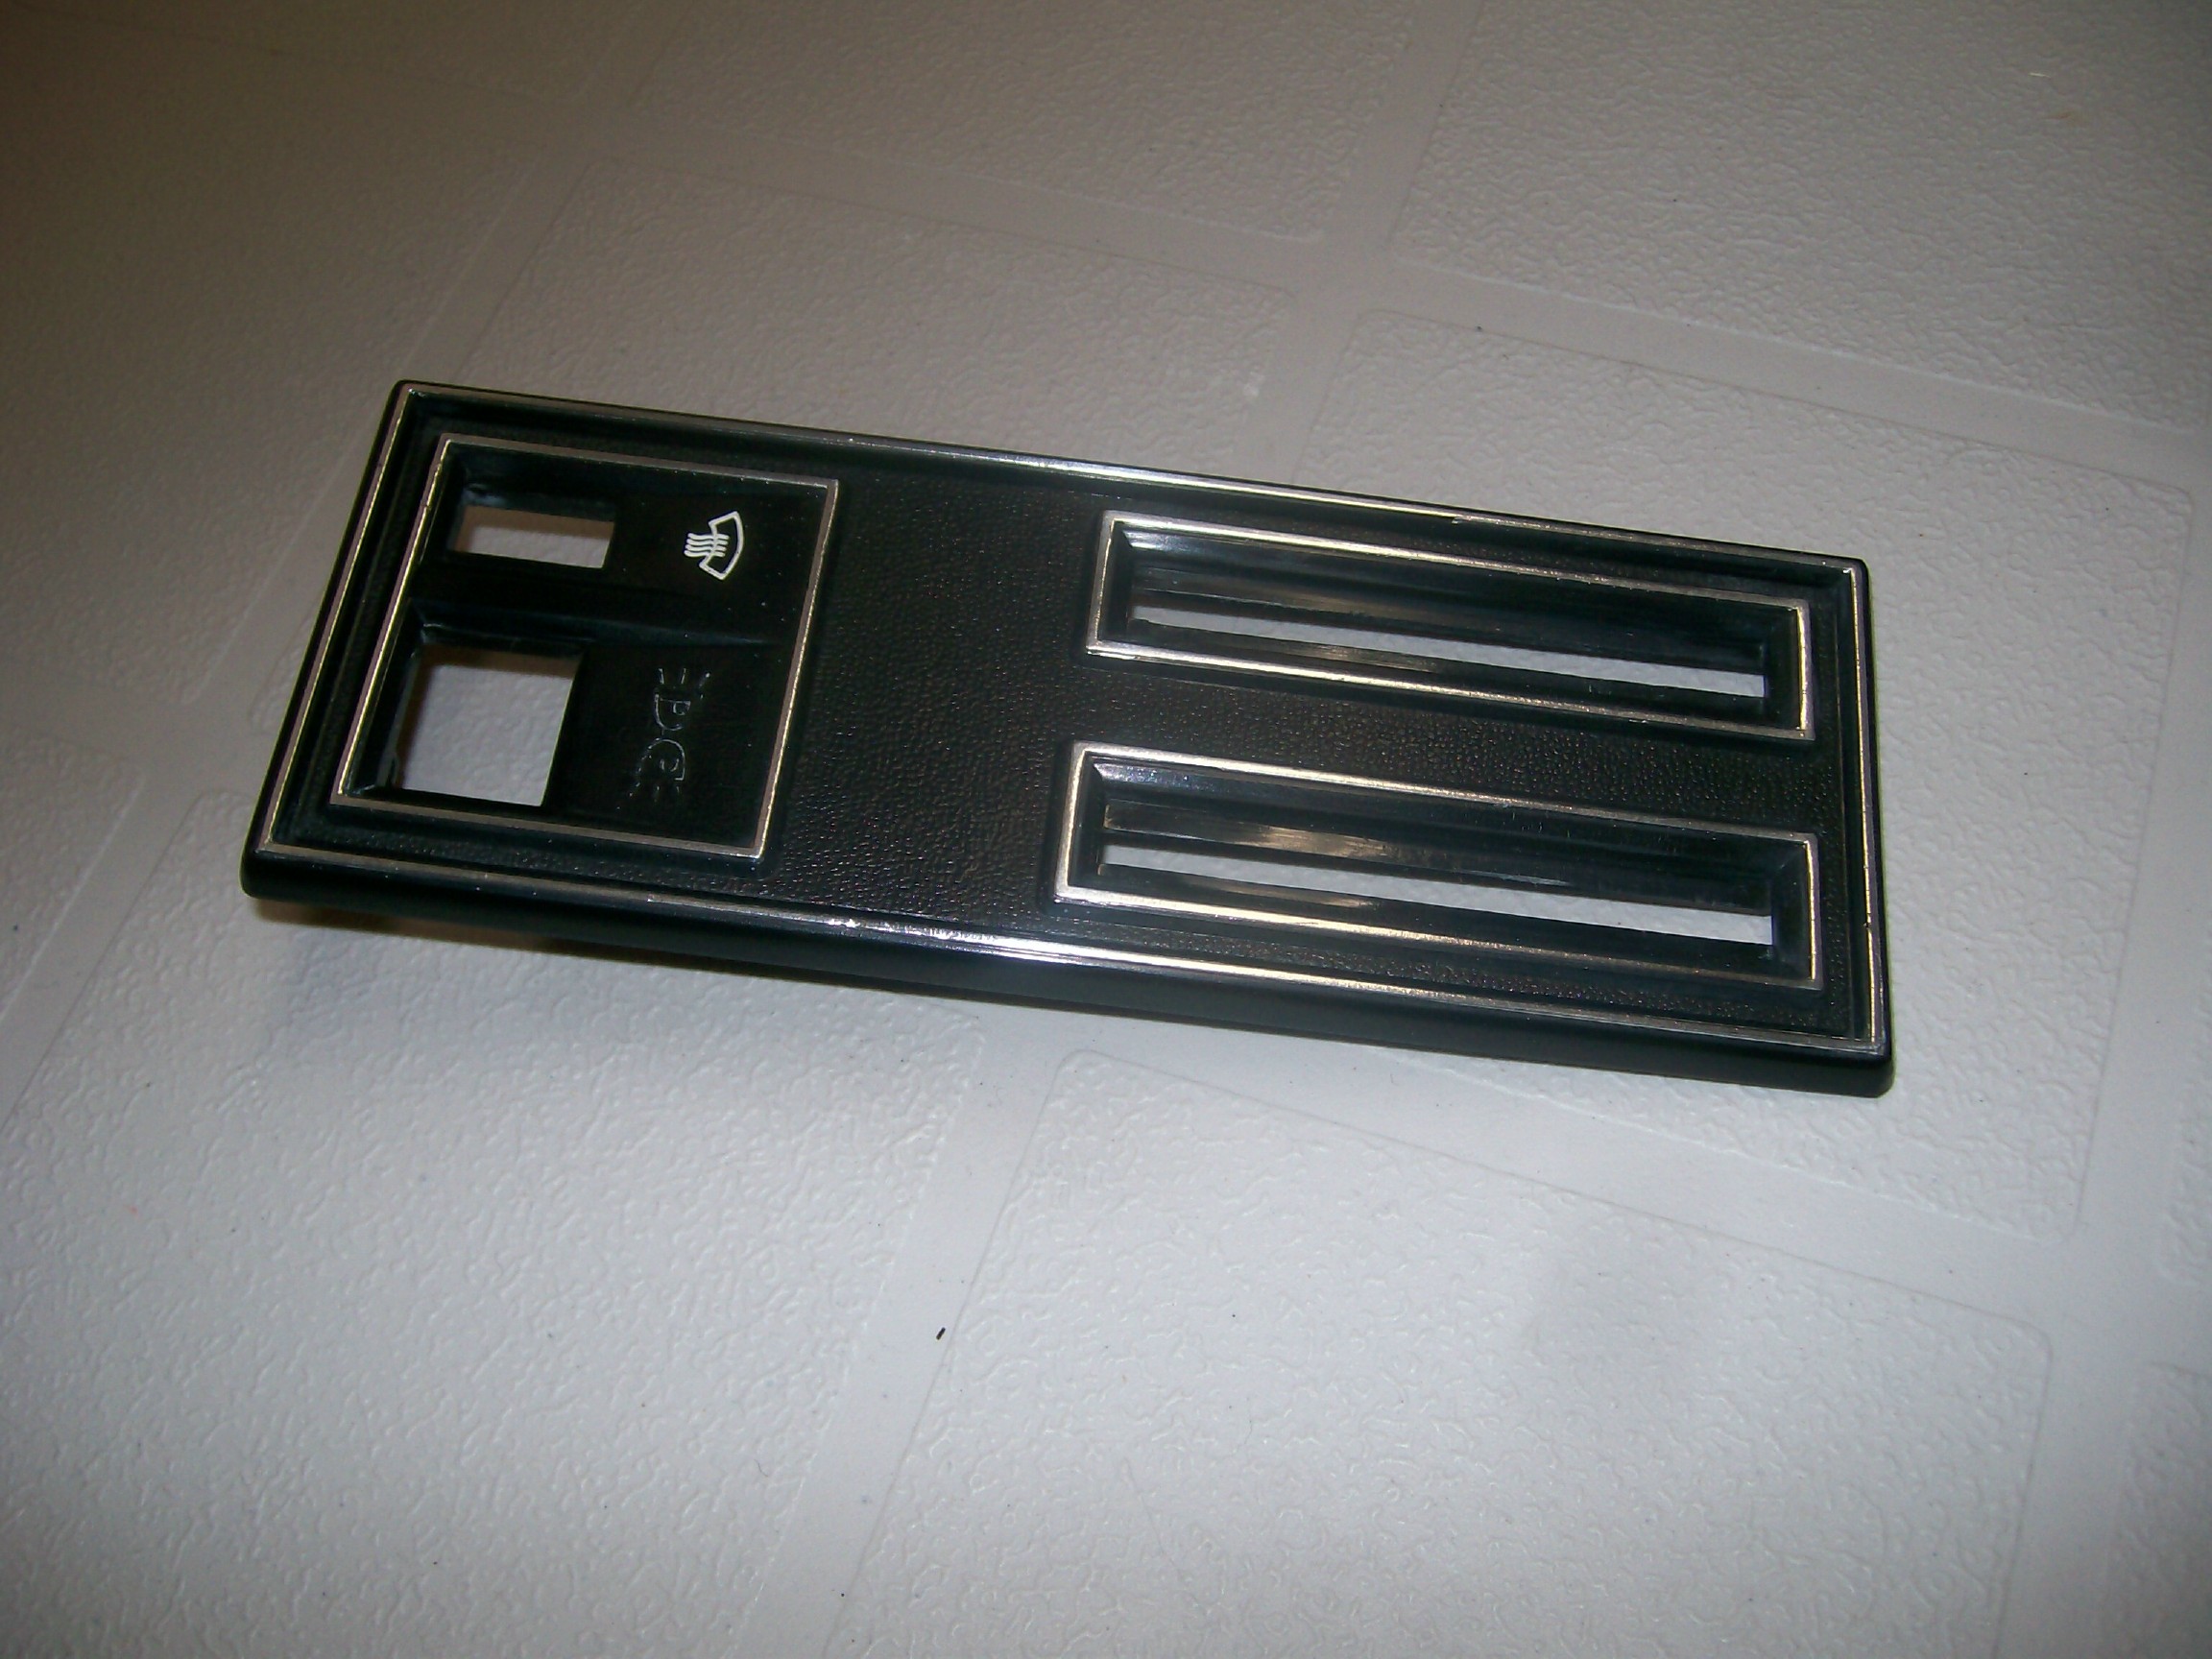
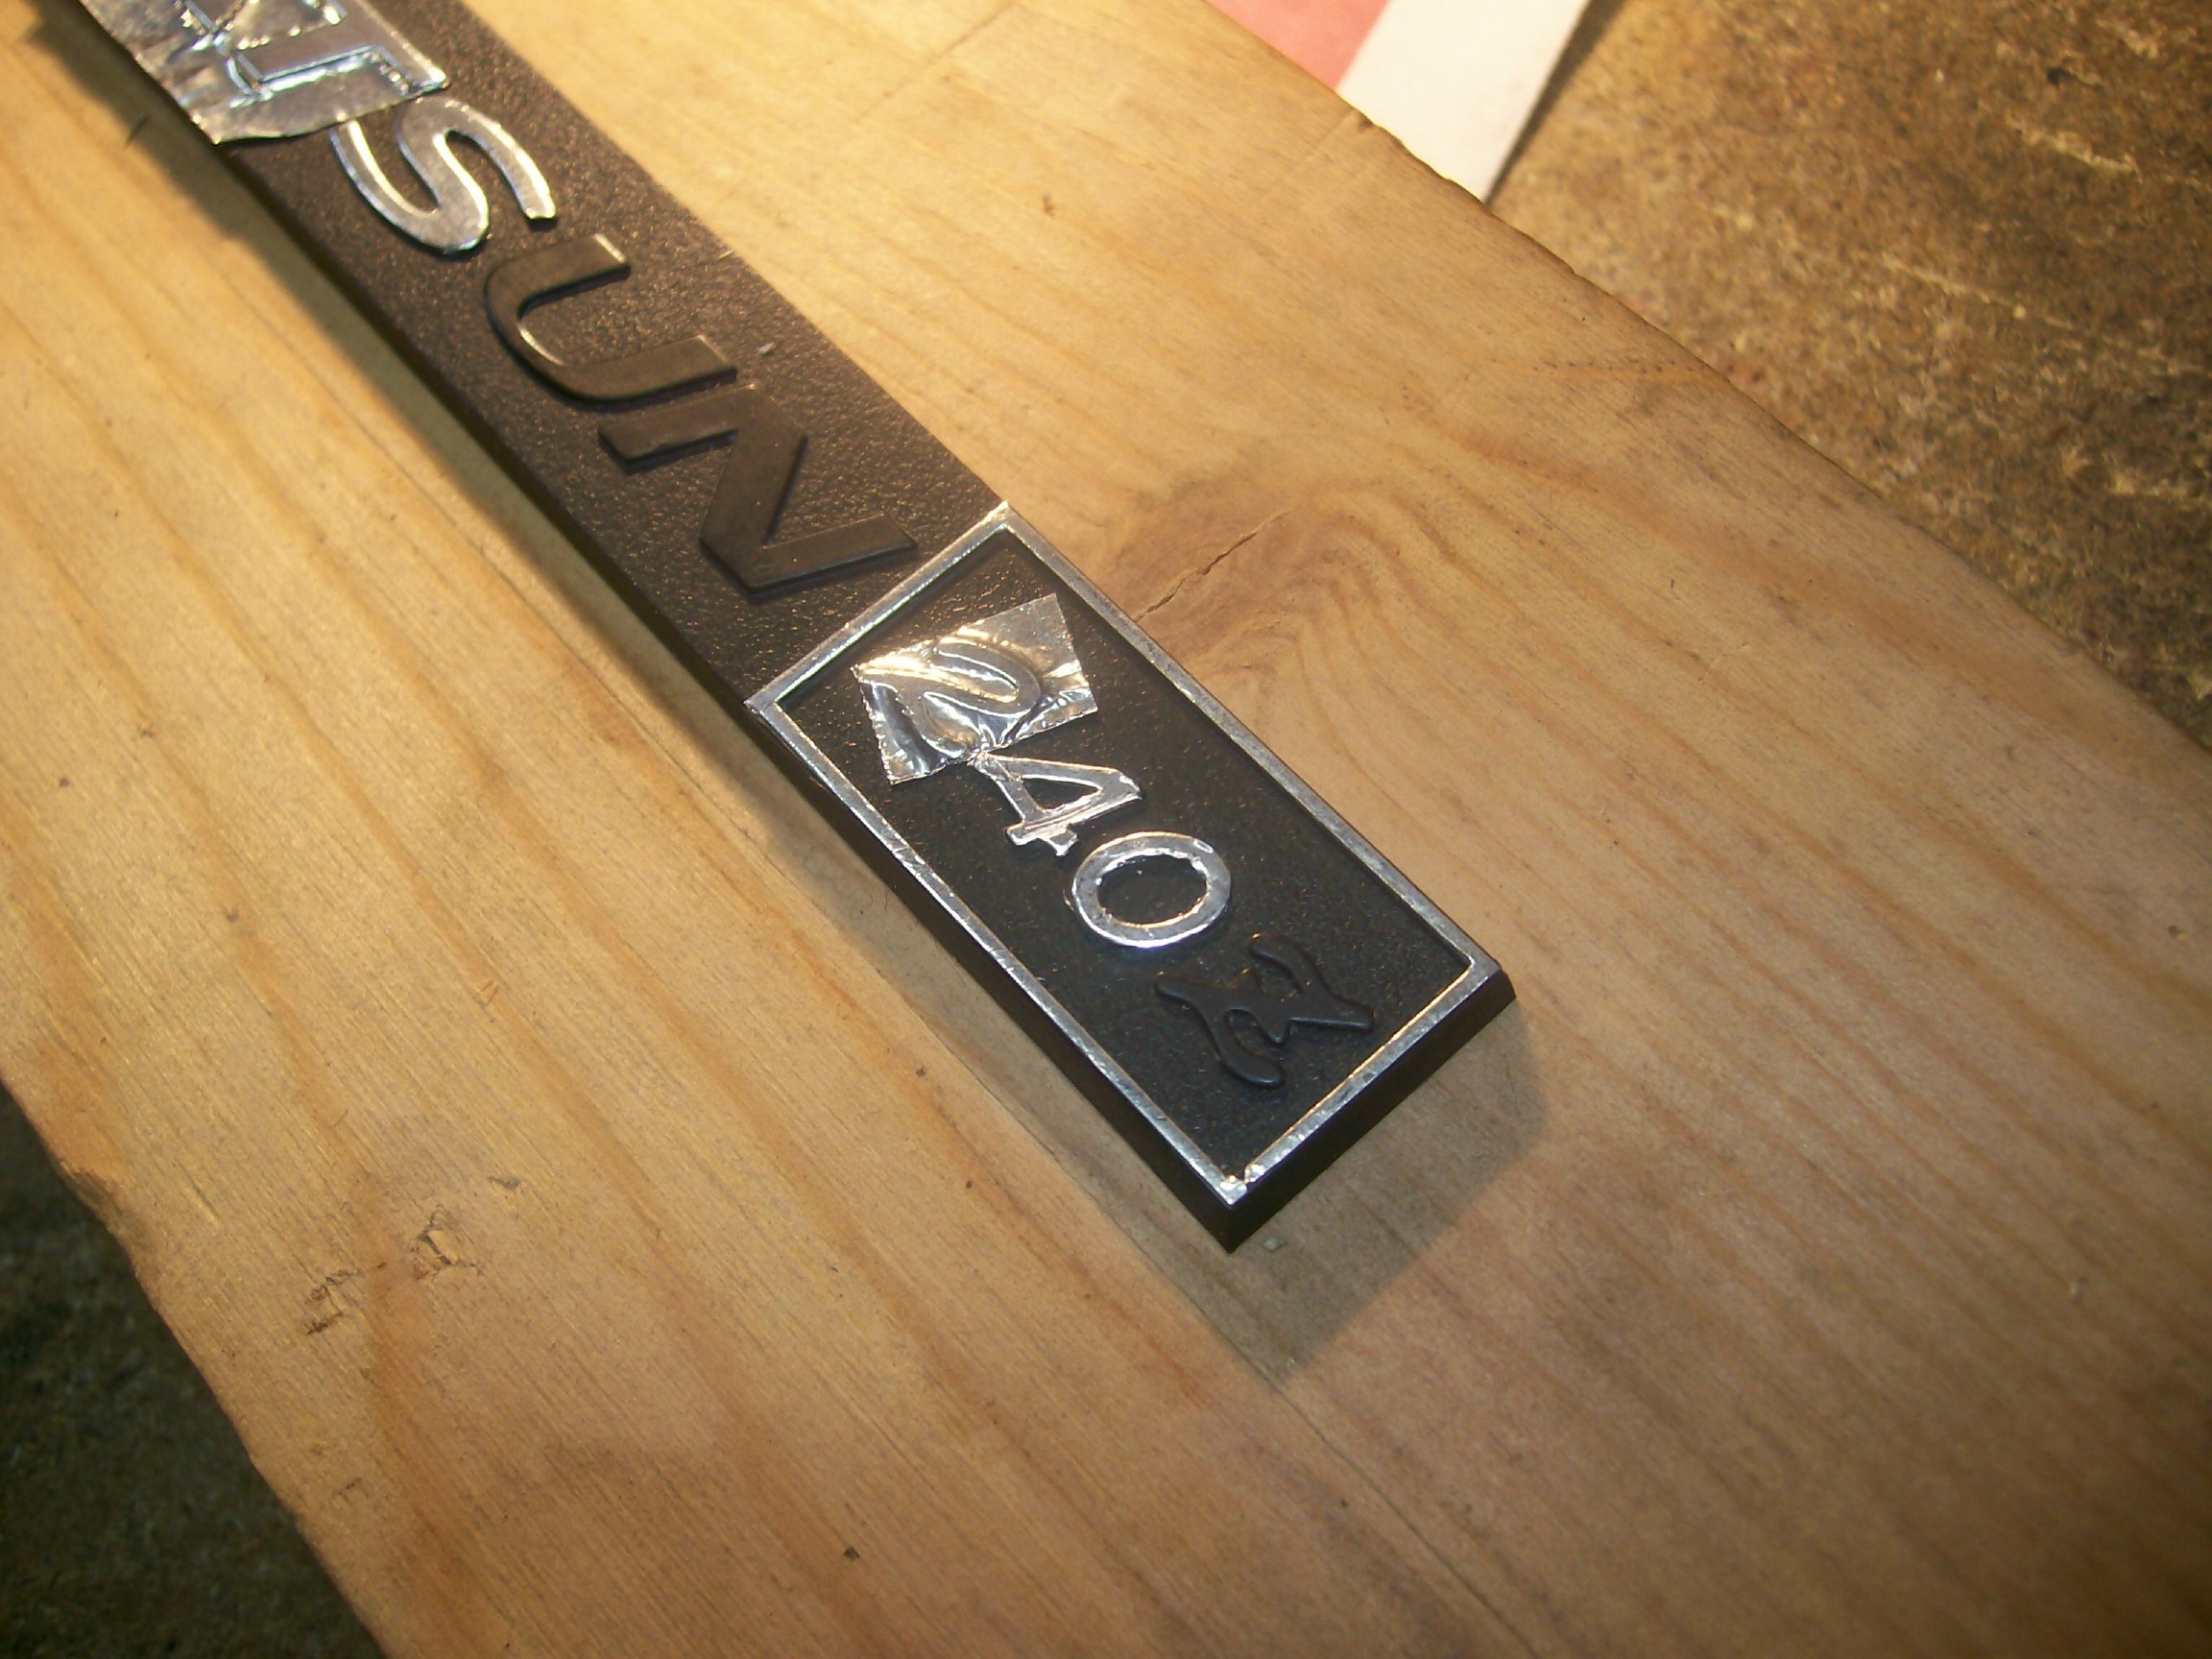
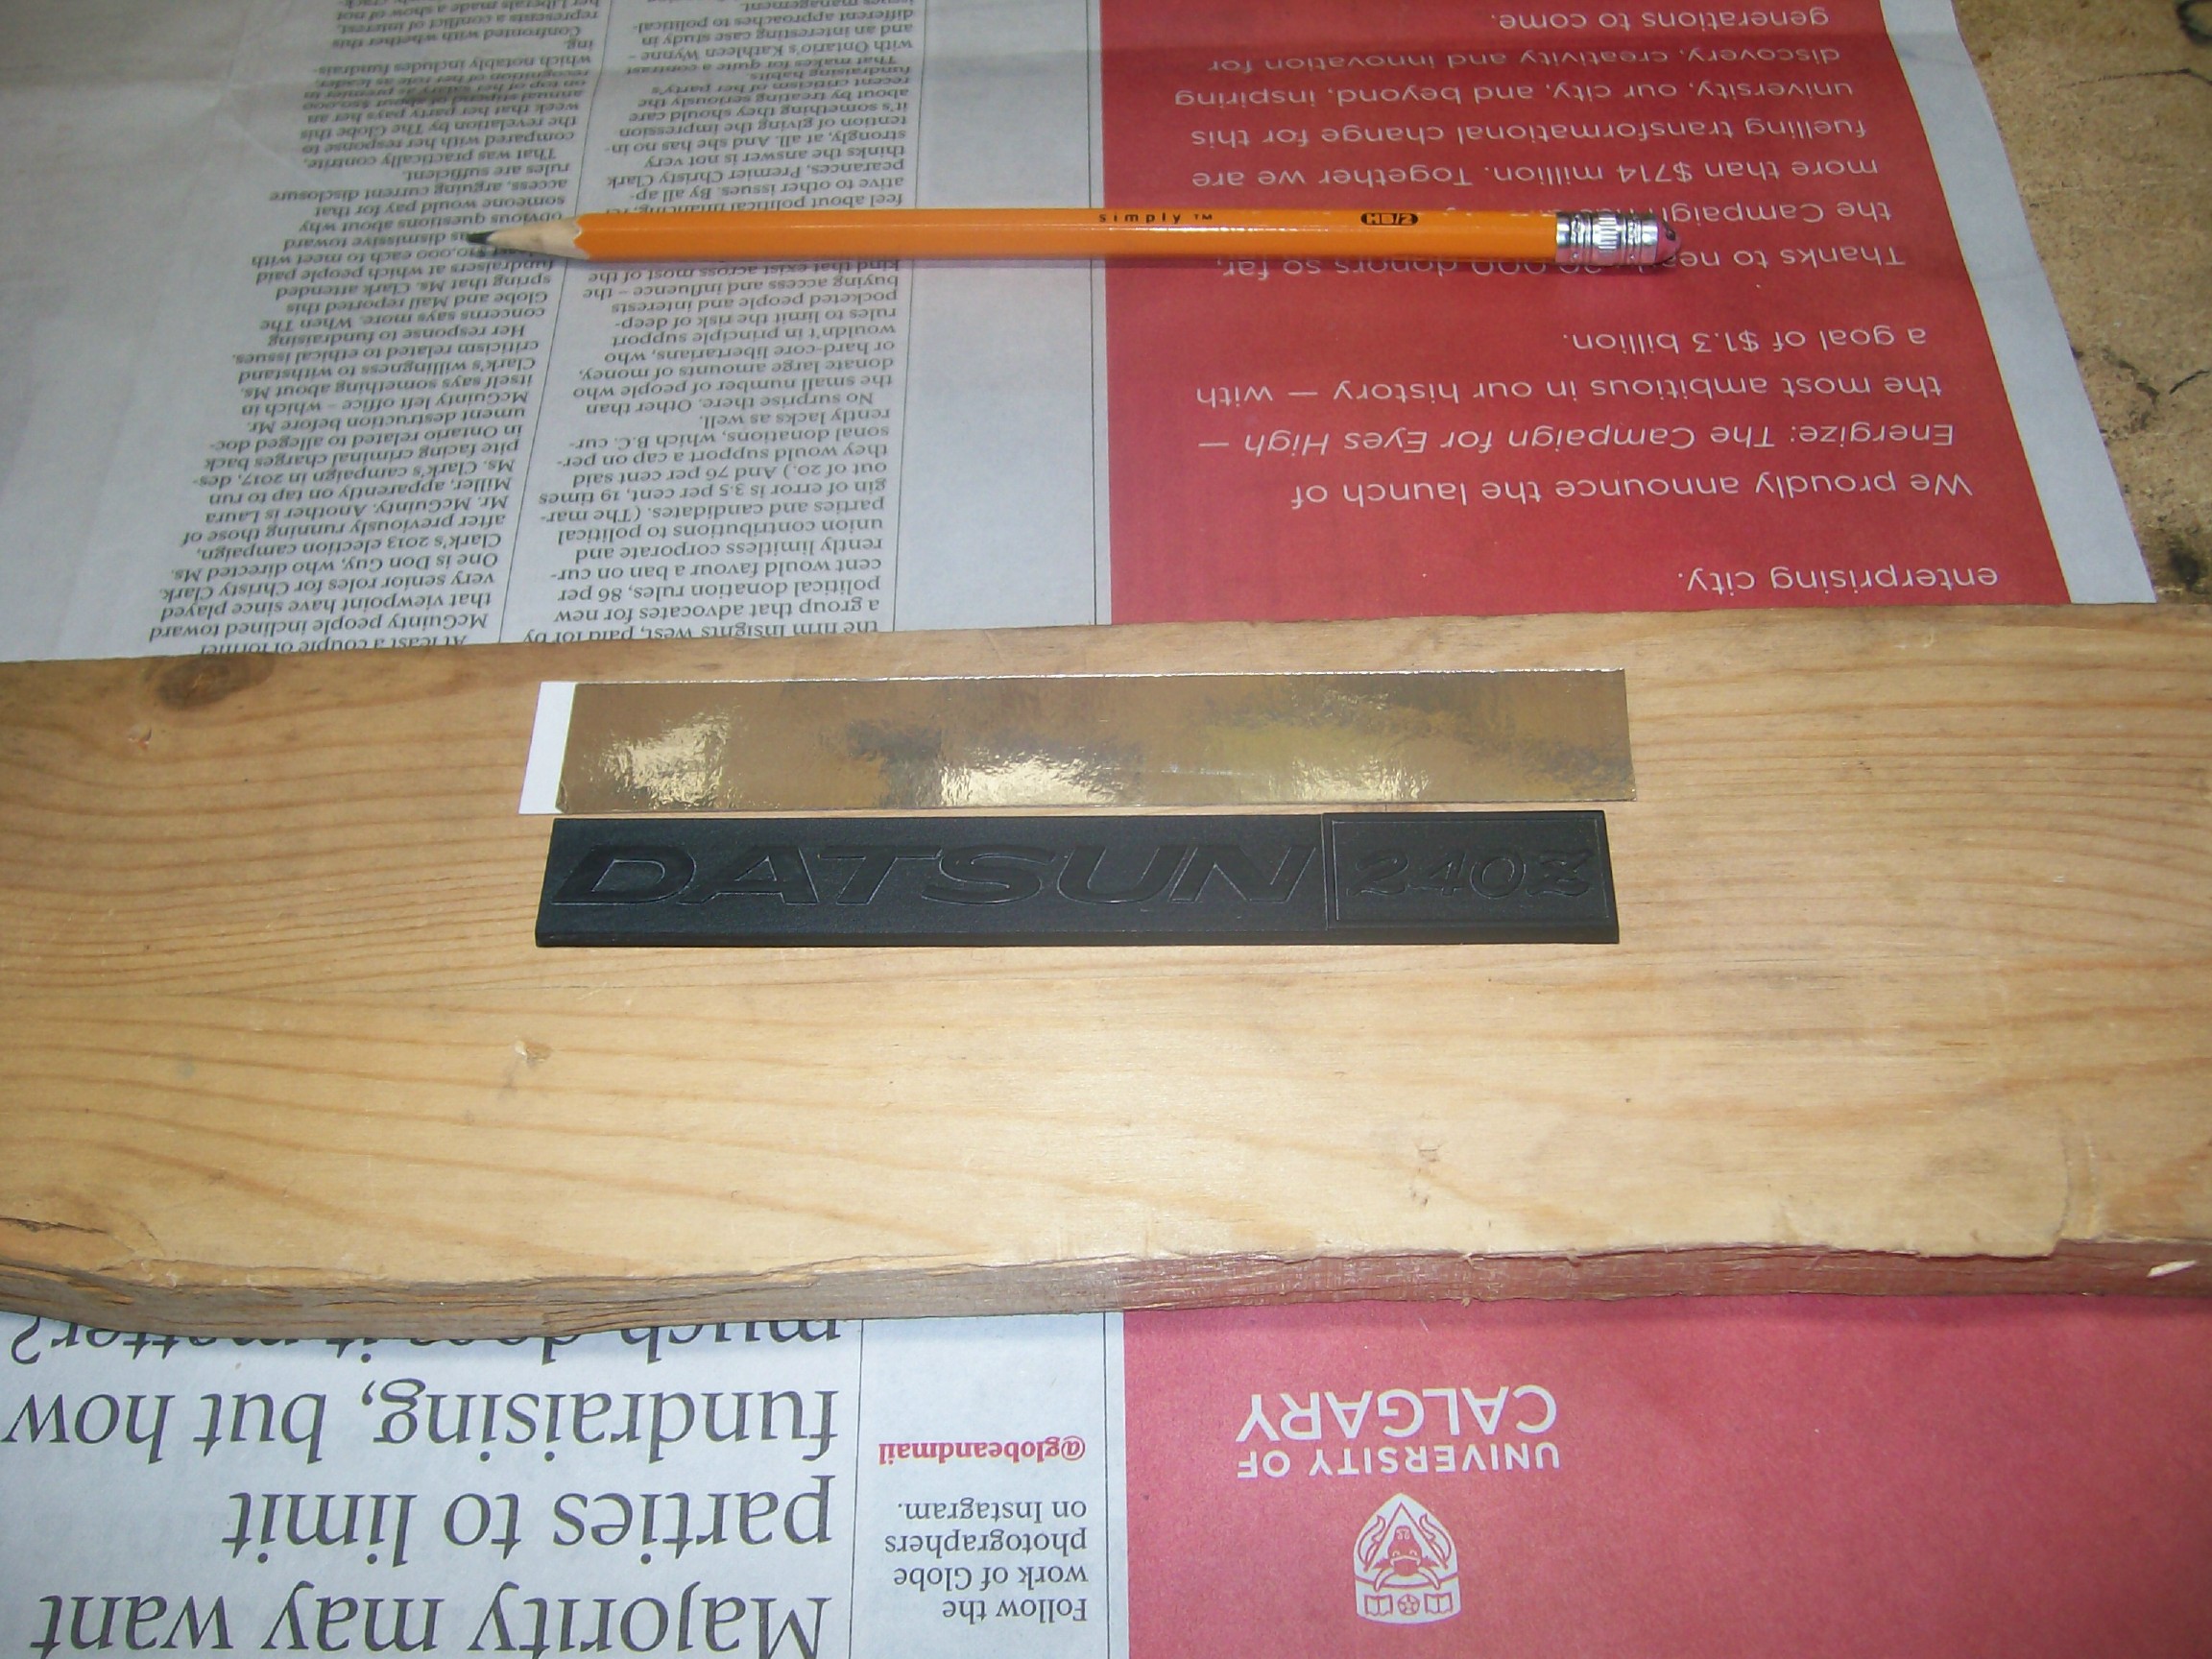
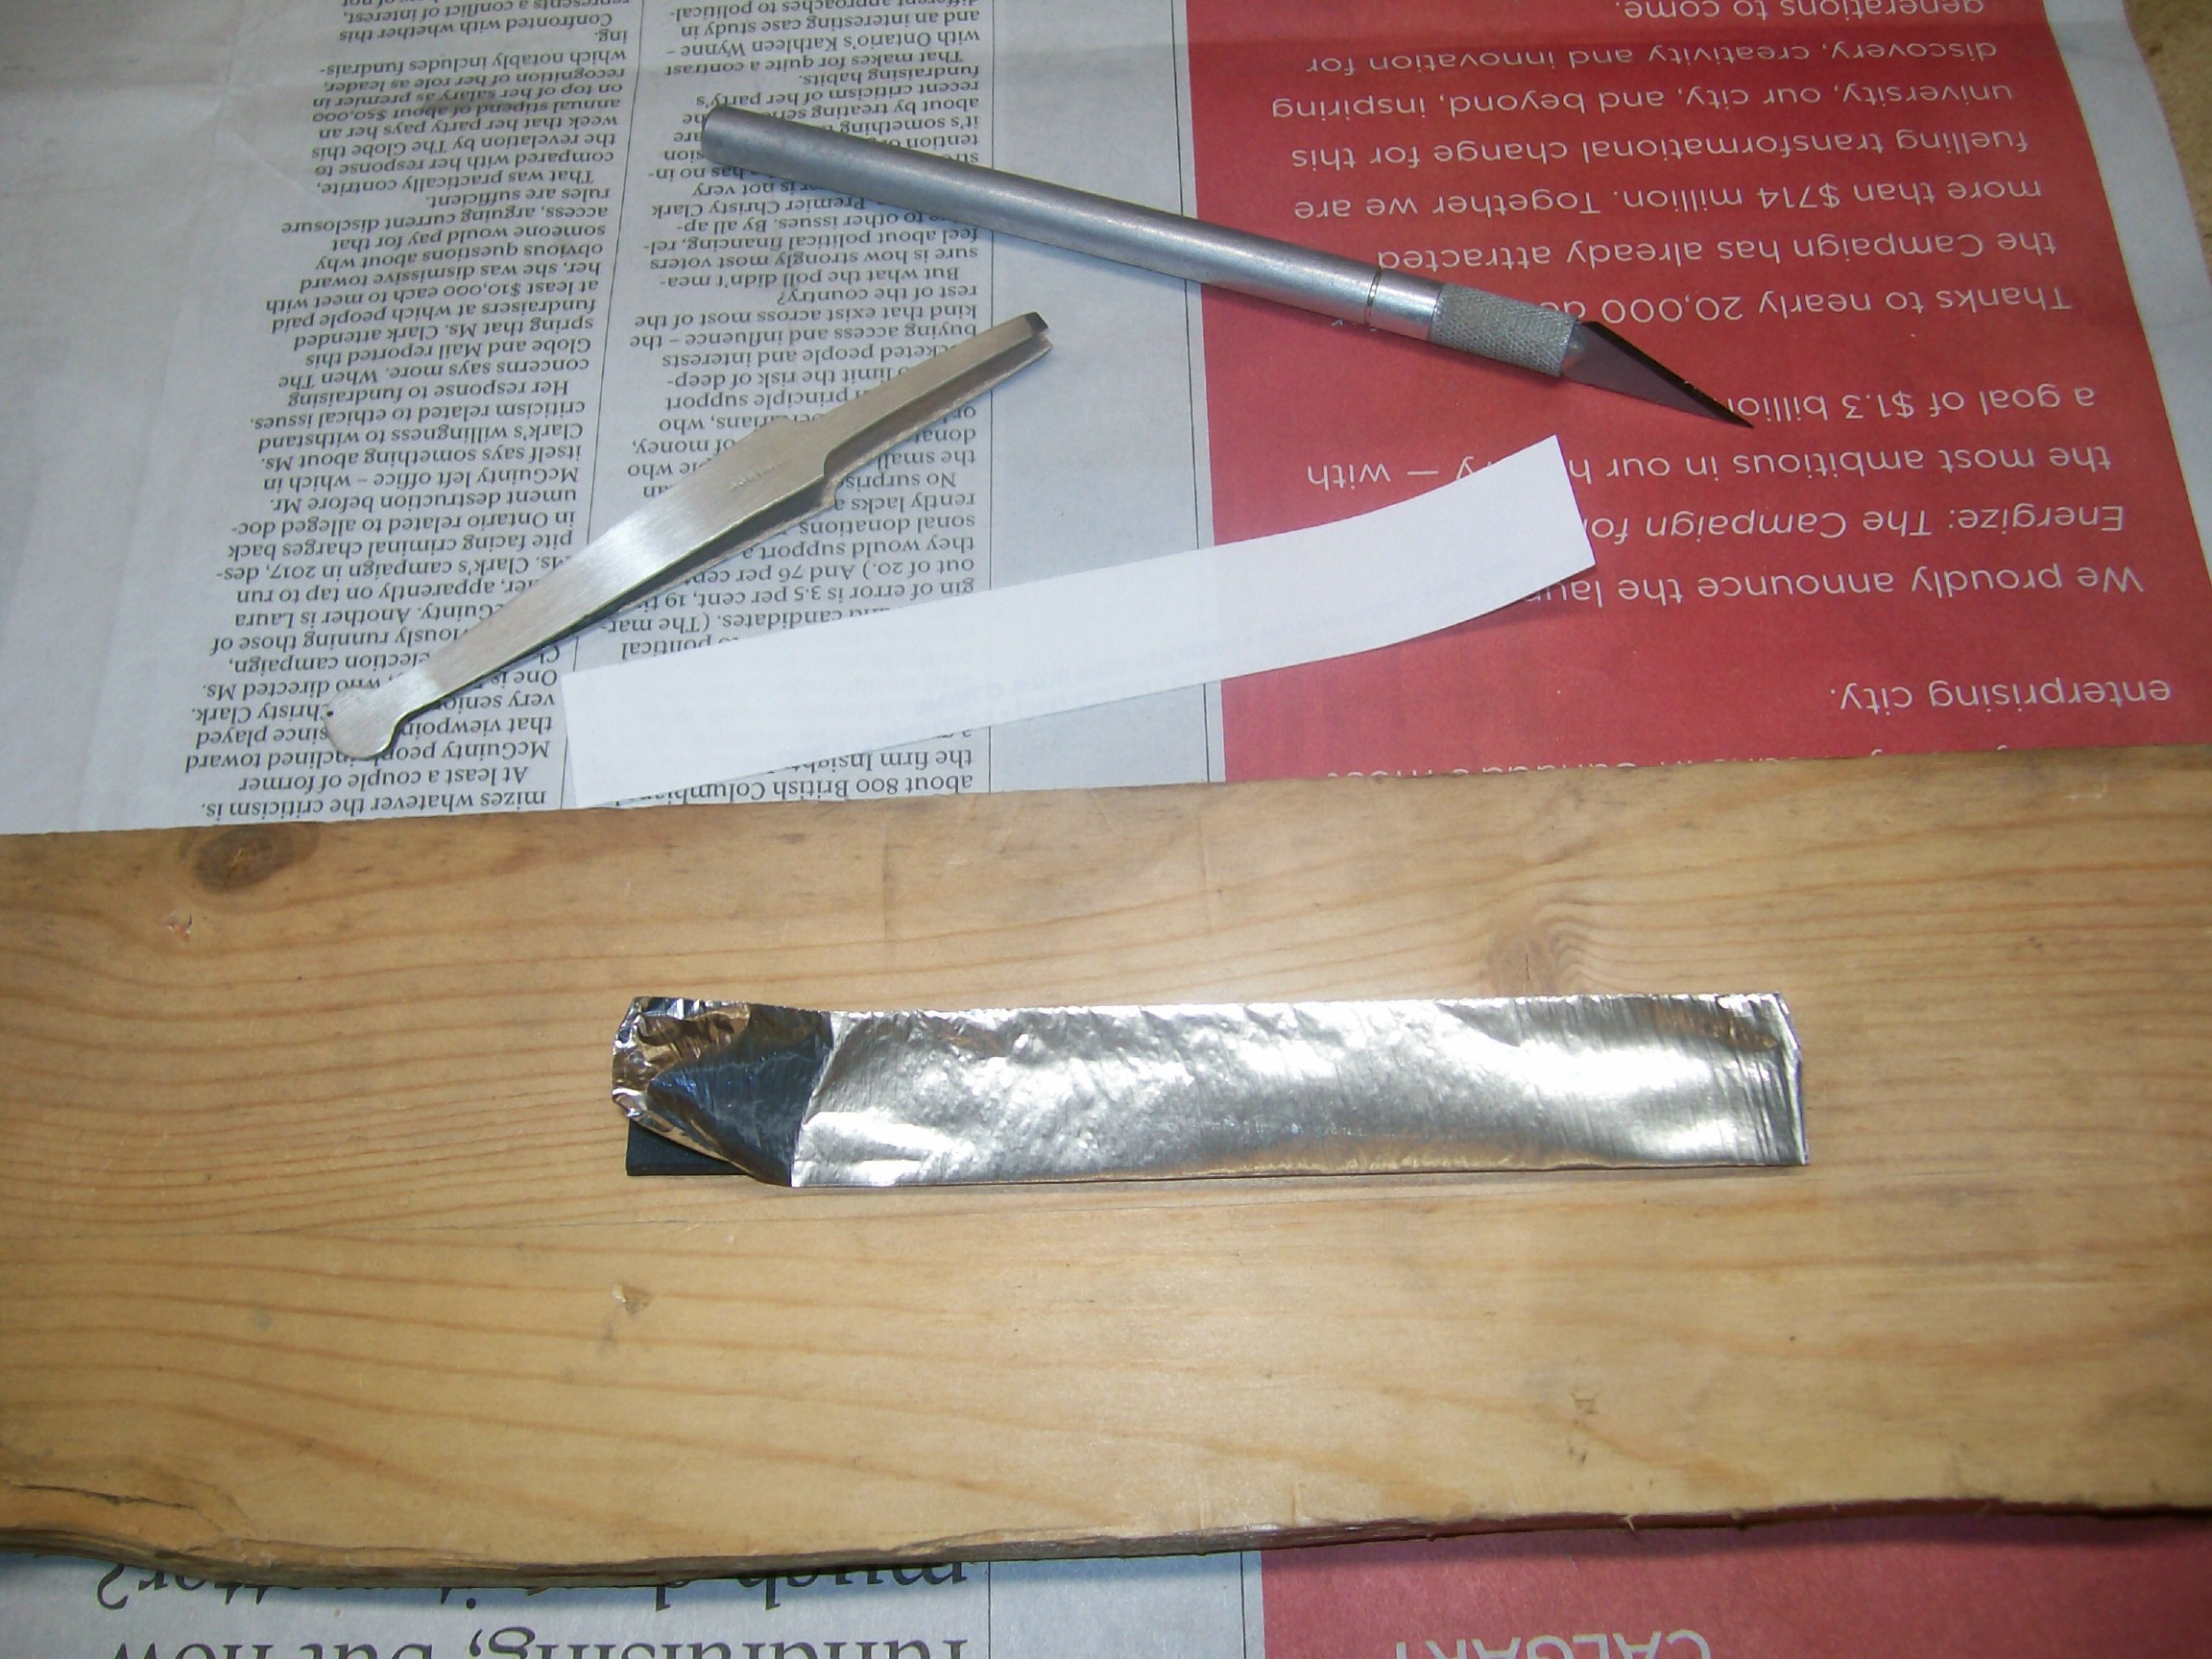
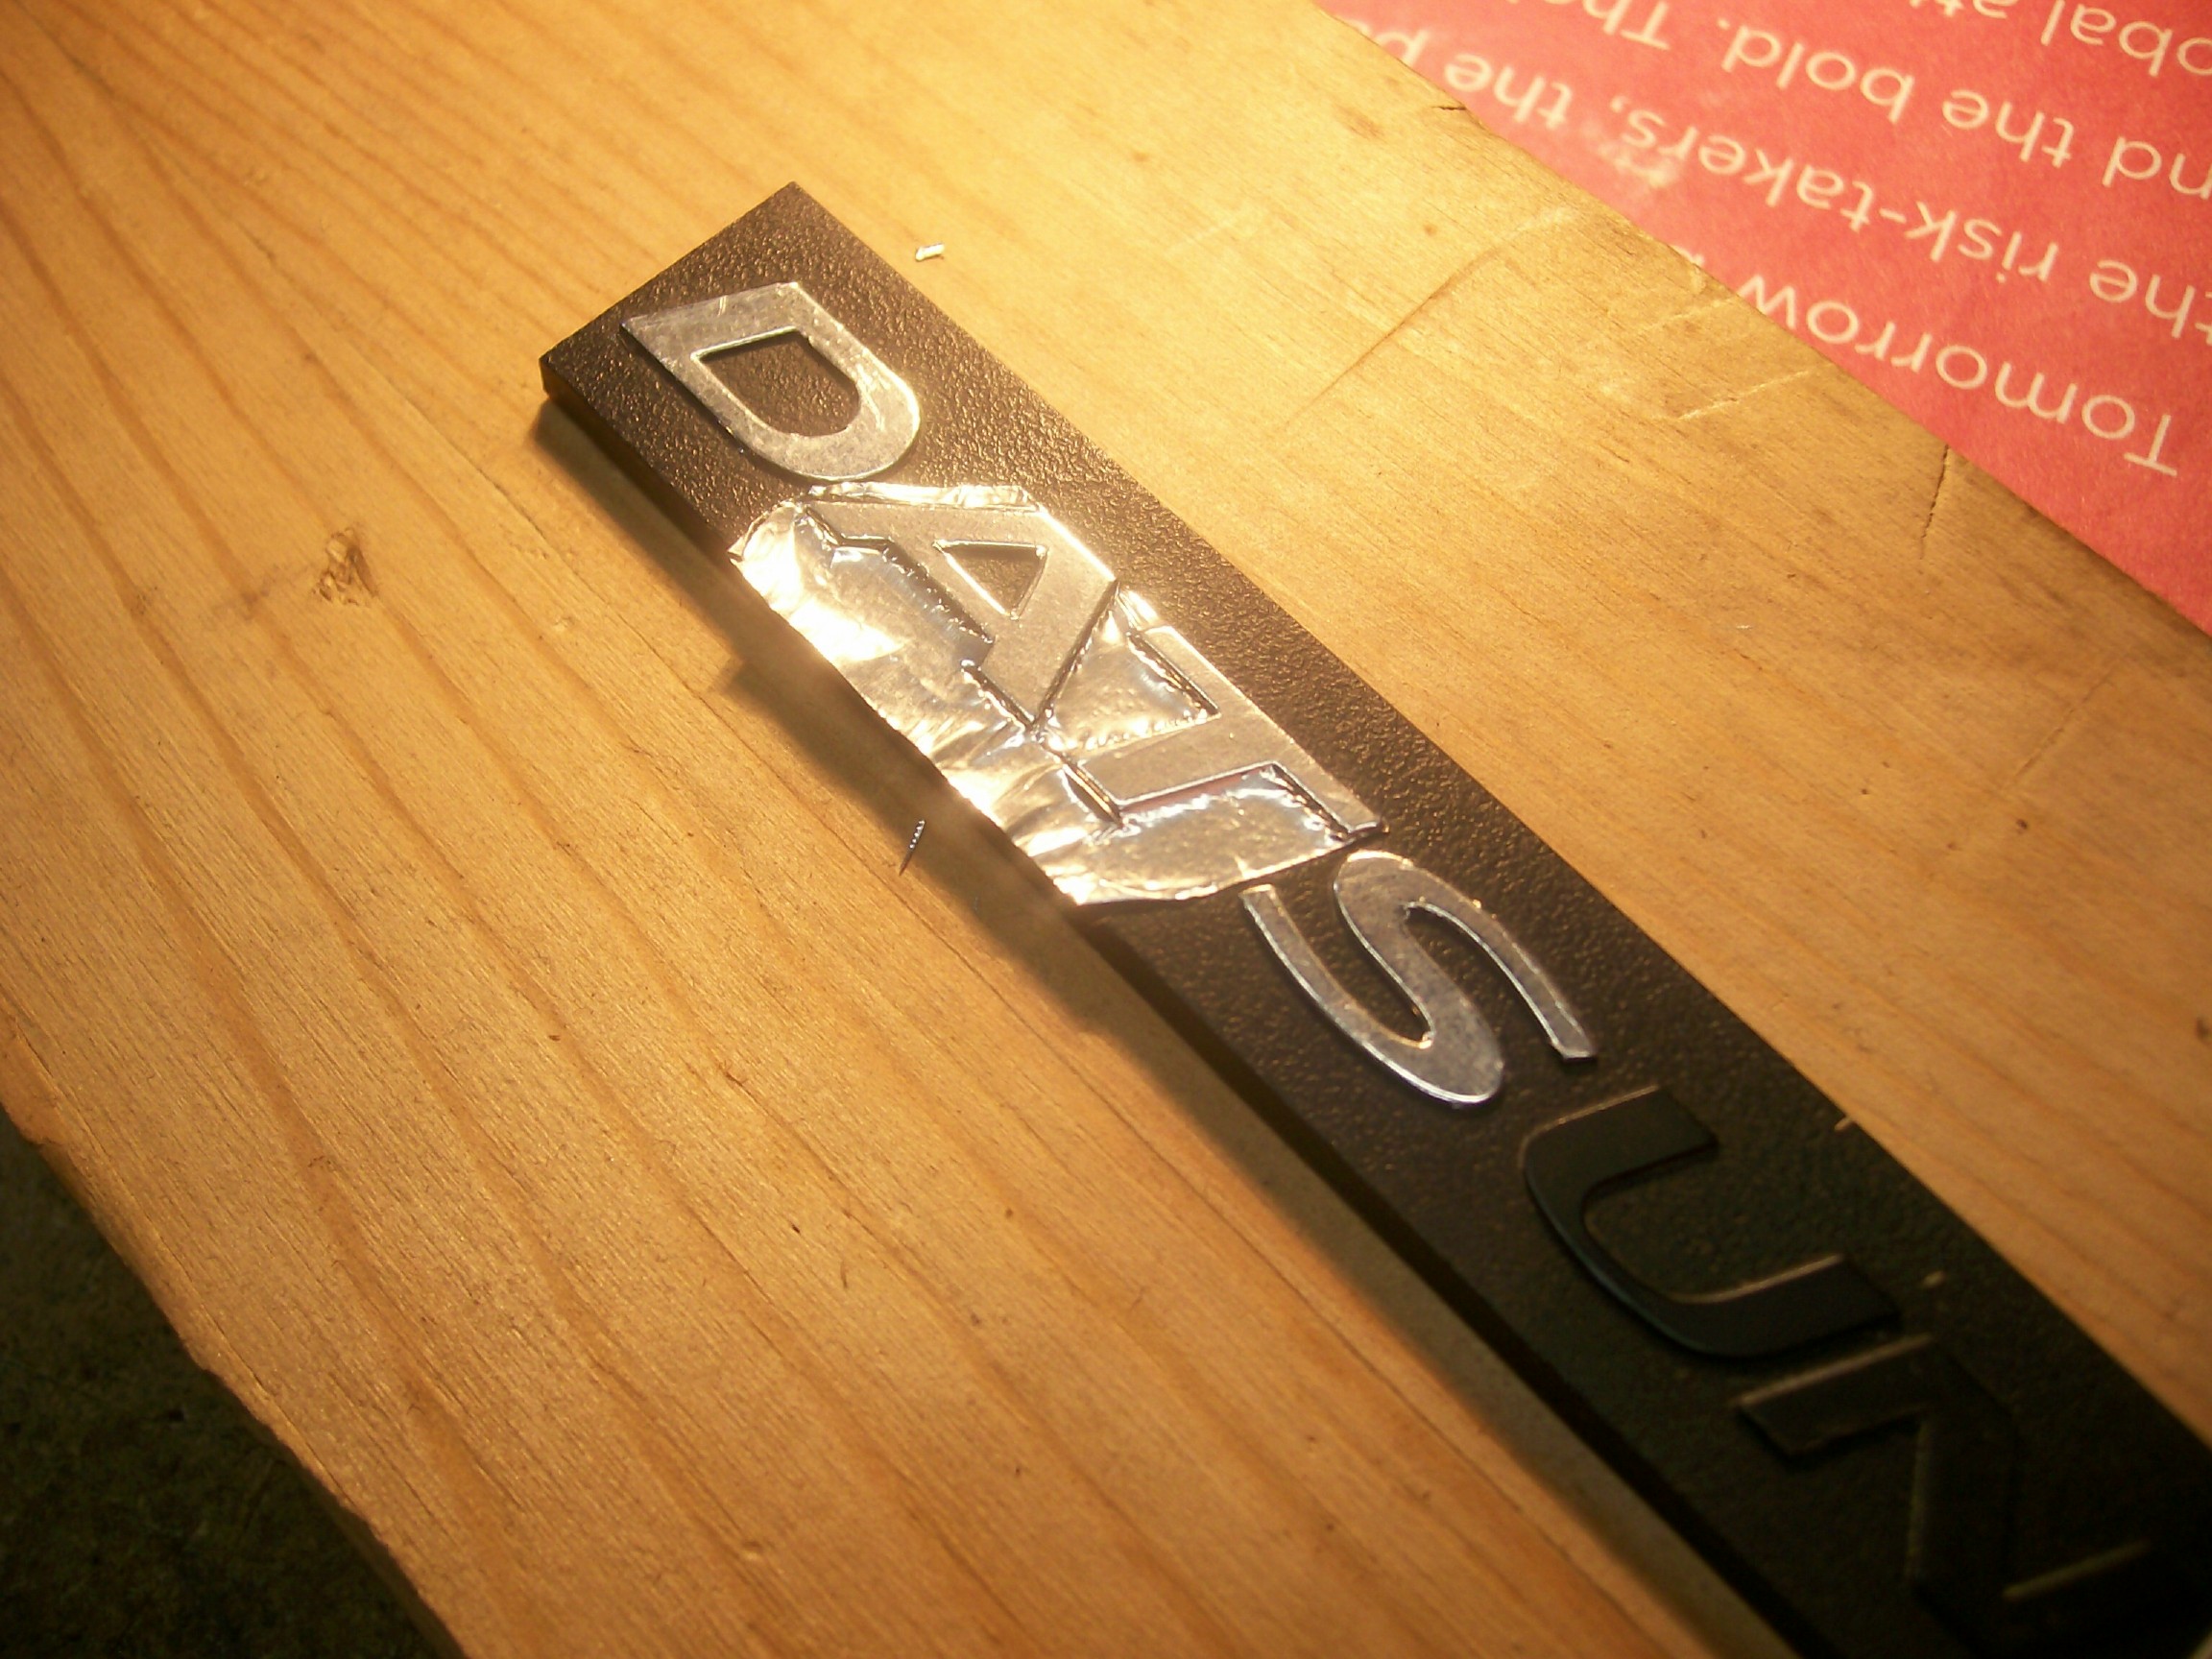
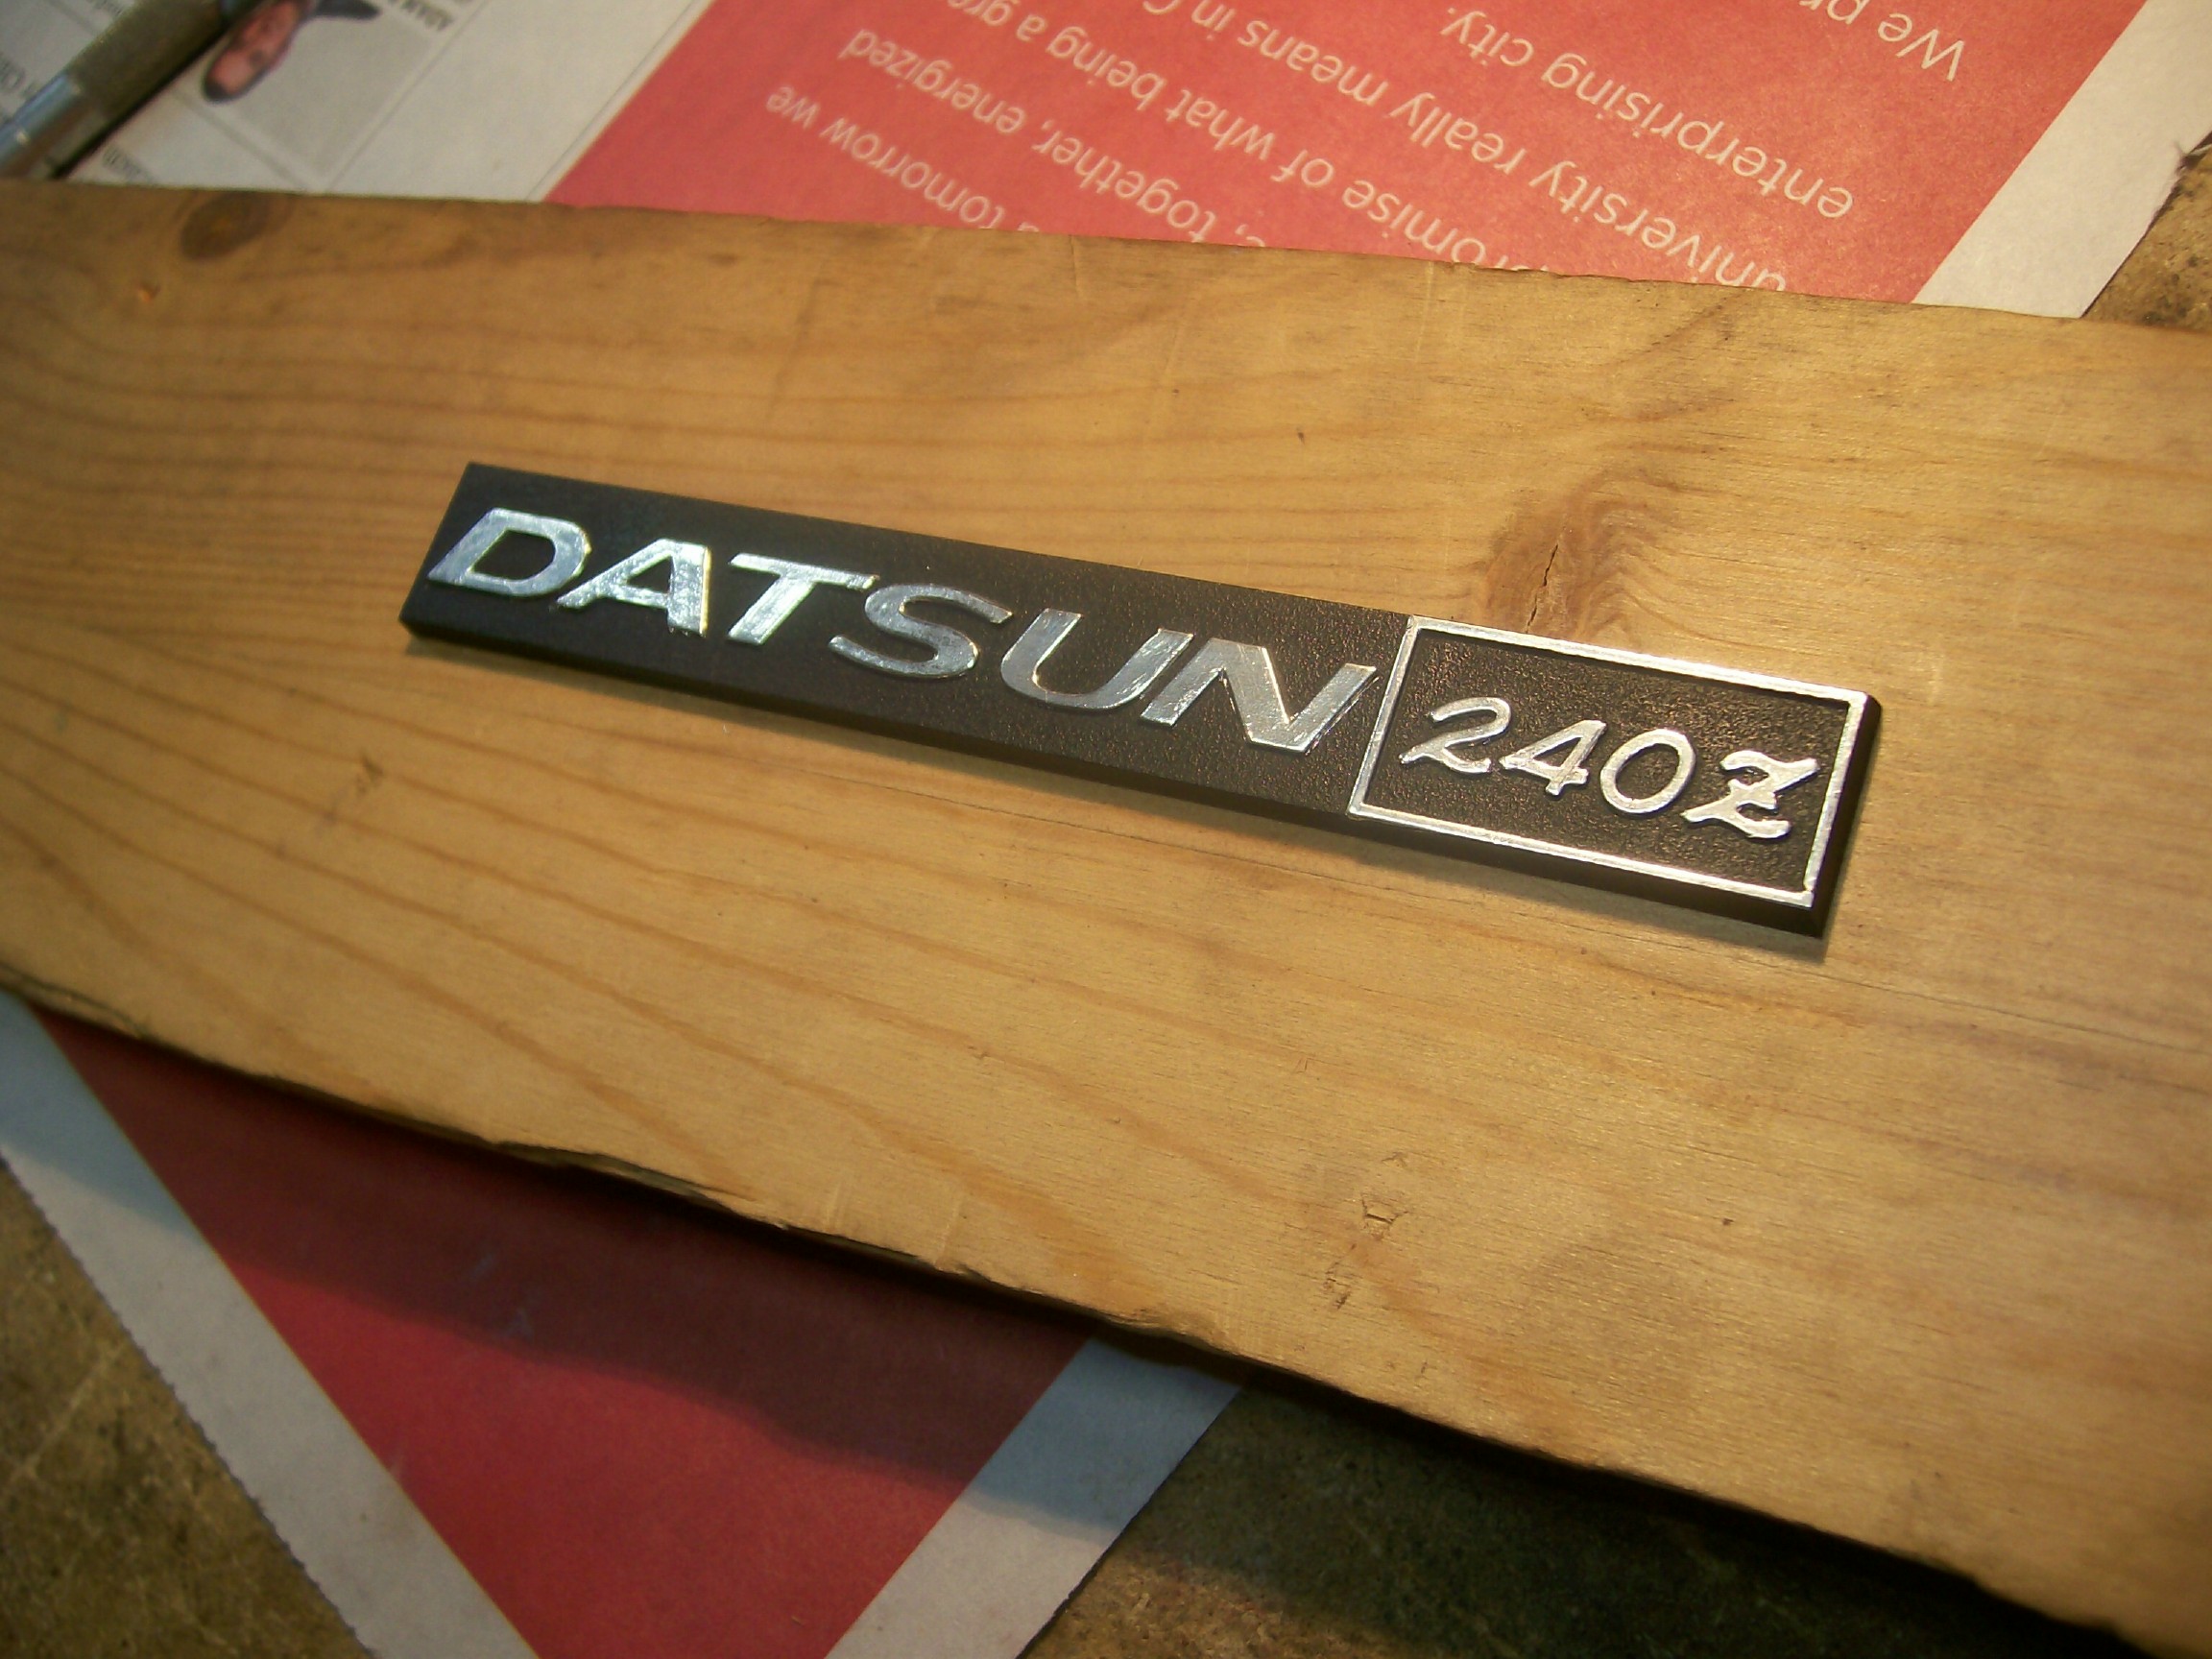
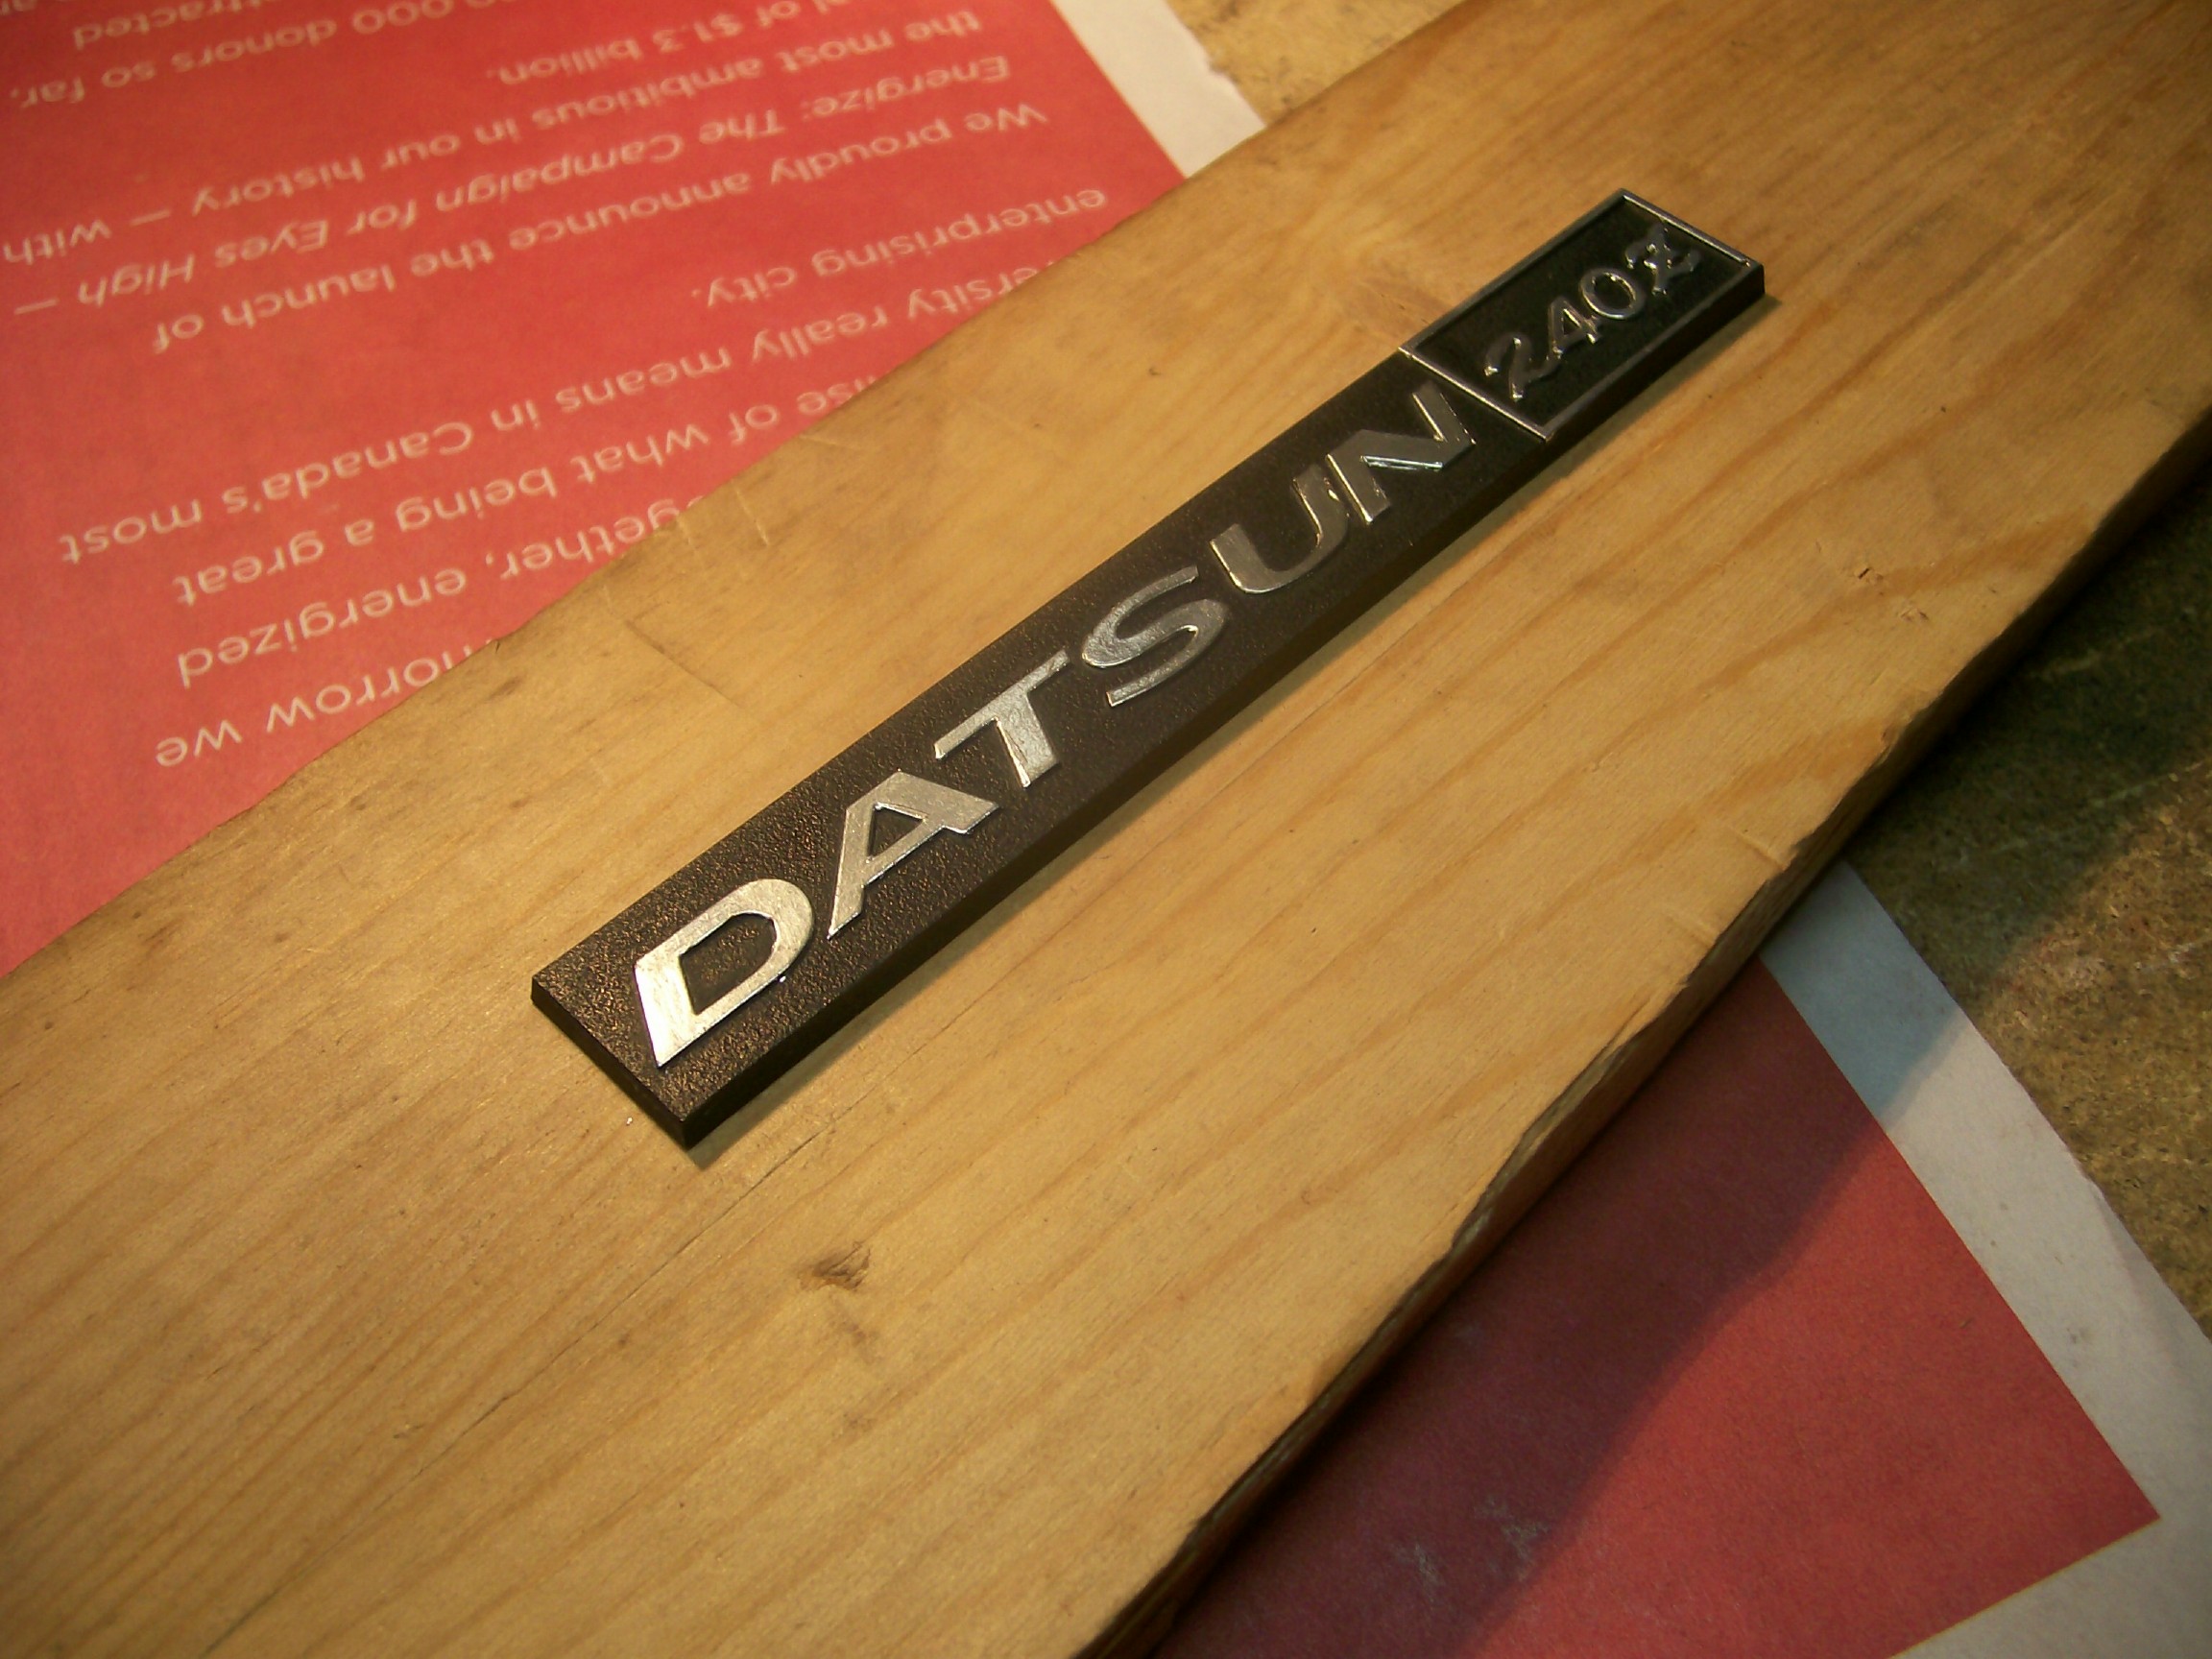
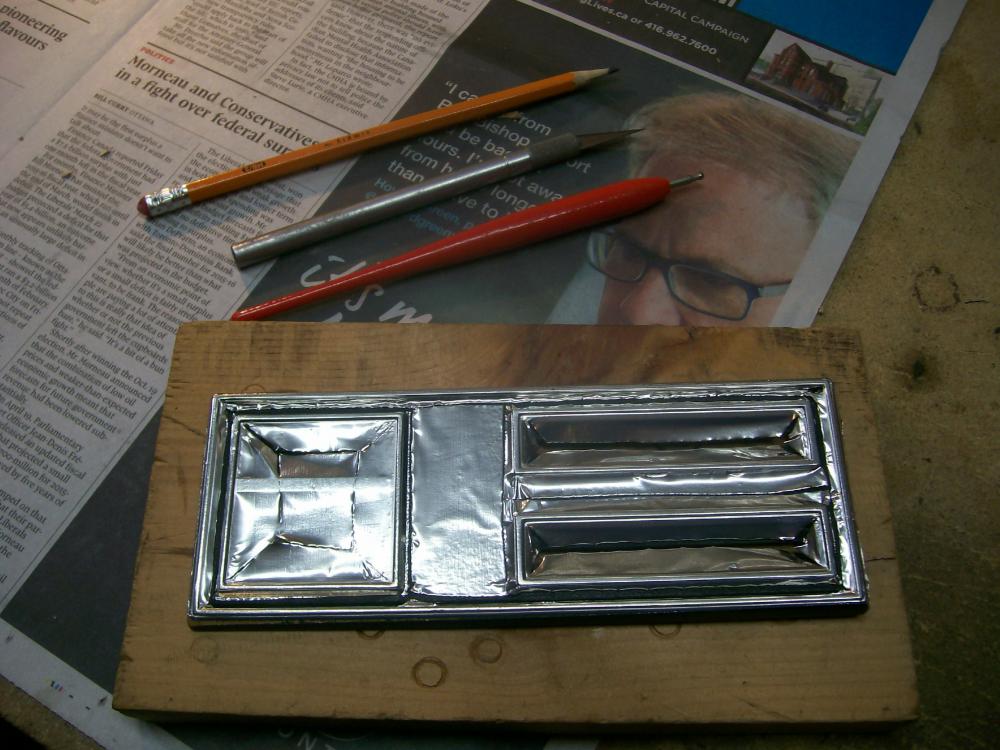
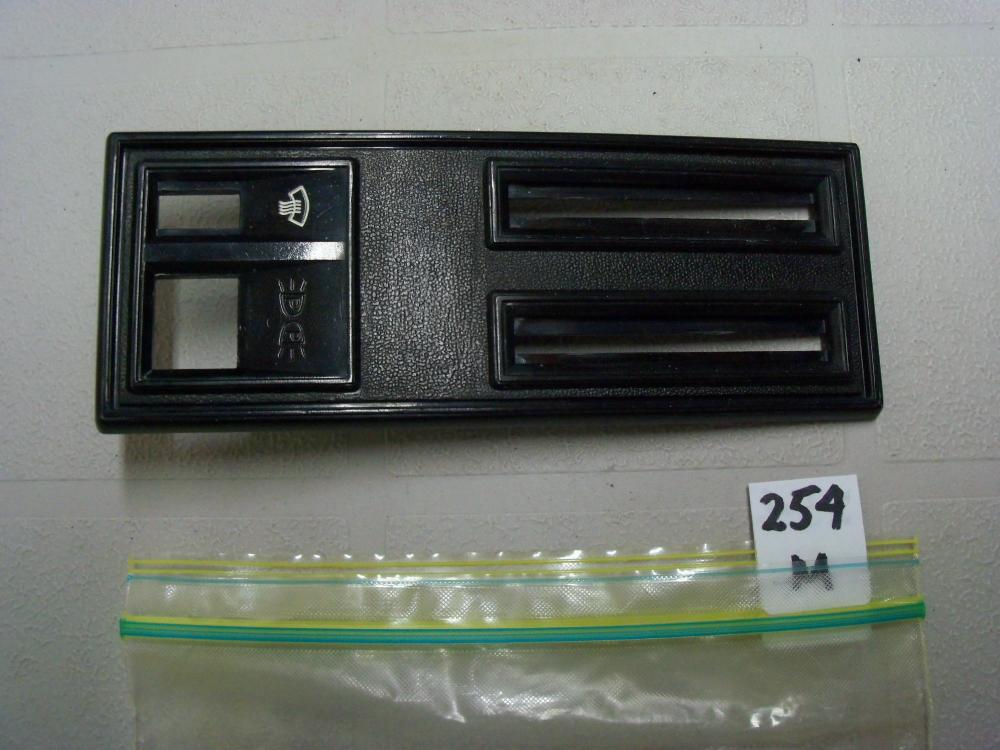
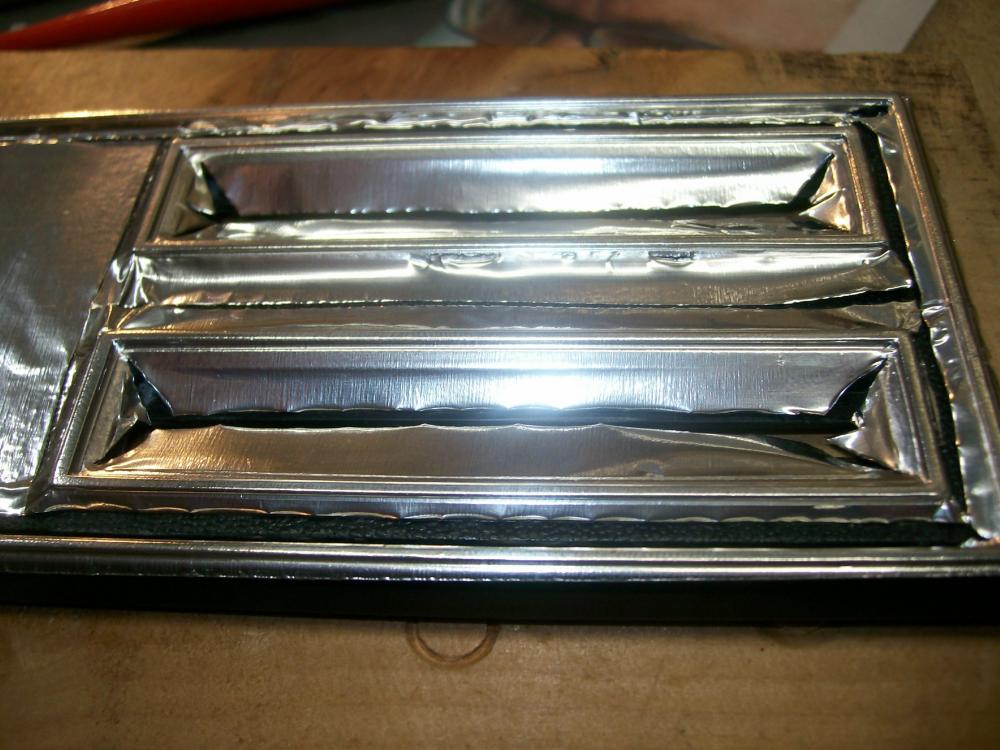
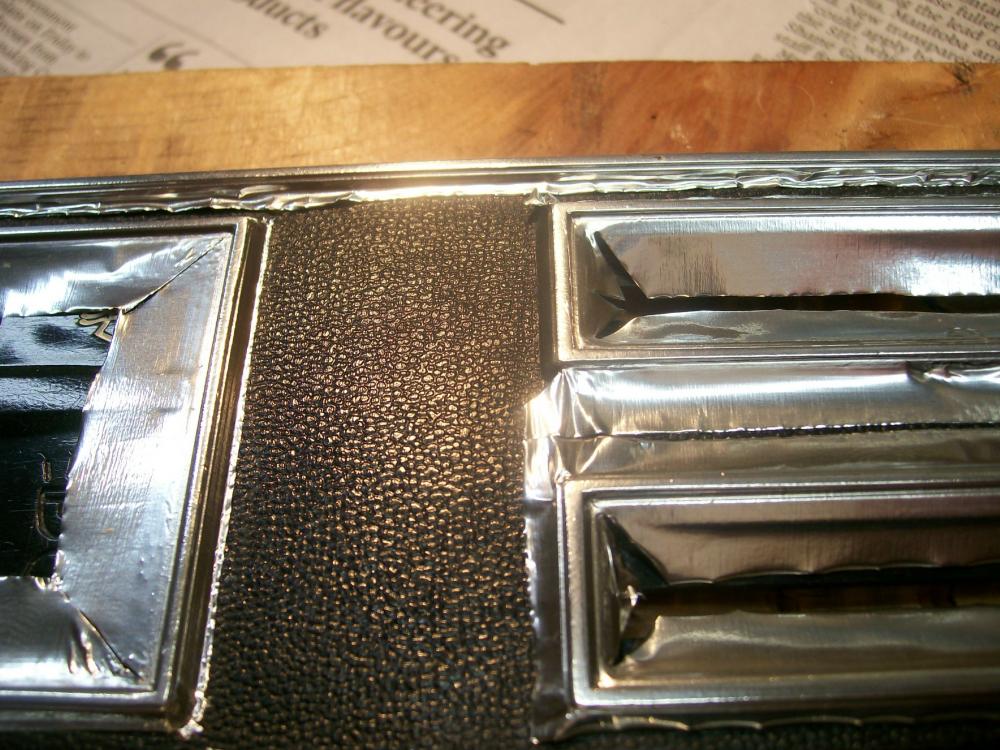
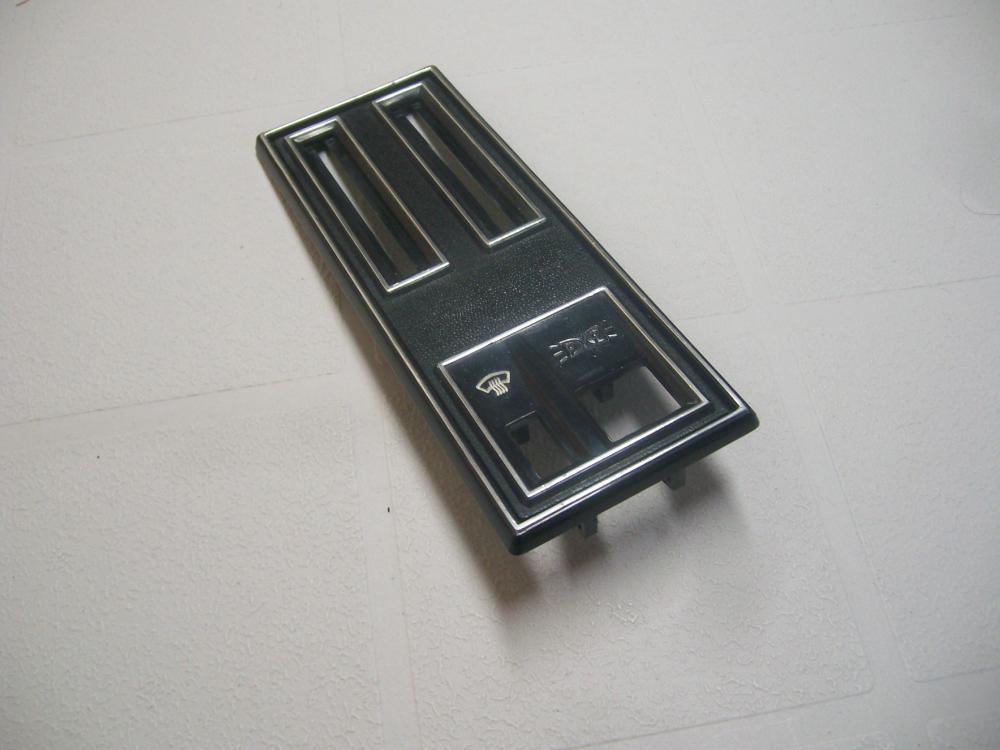
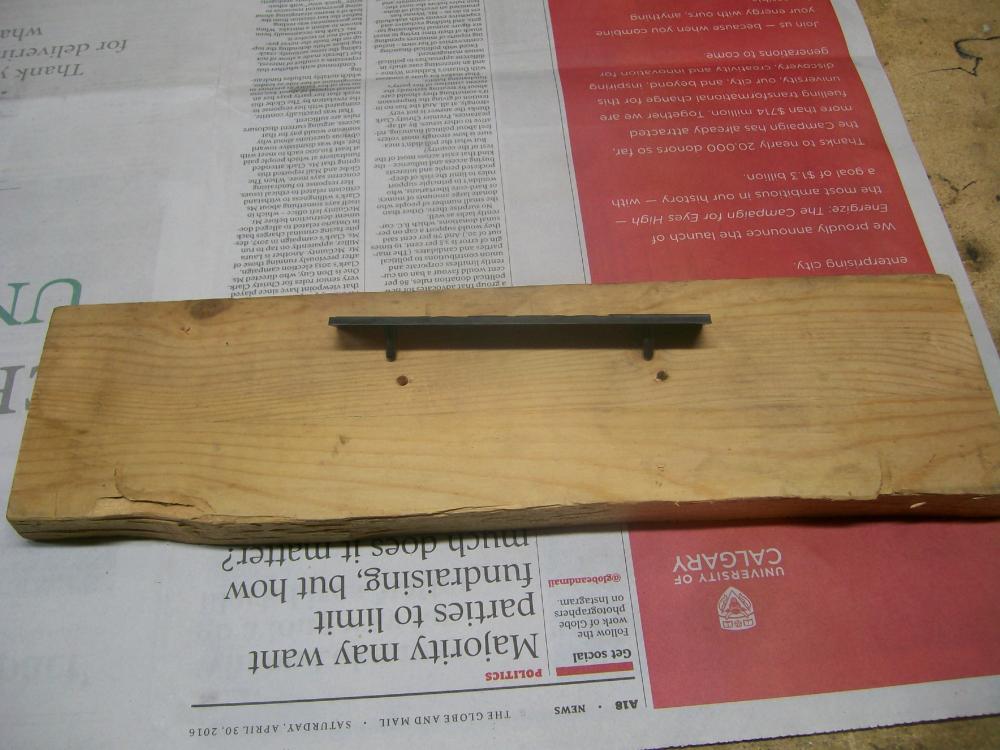
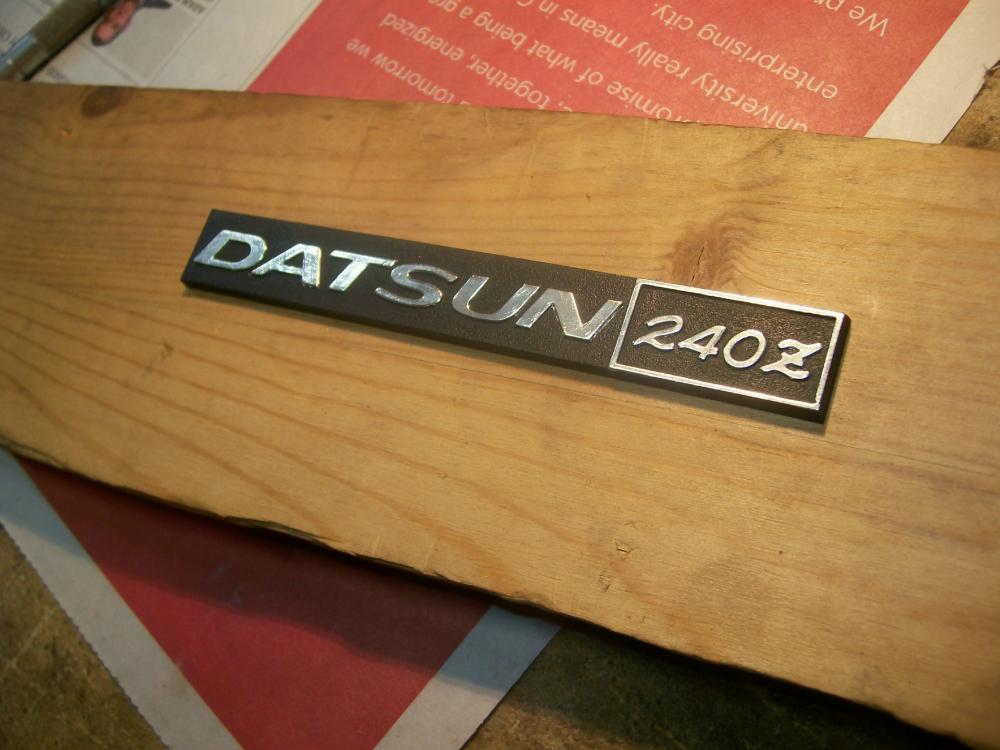
The topic of refurbishing the chrome lettering on the Z's dash features came up again today. I'd read several past posts by members, including those the recommended the use of the silver Sharpie pen. I tried this on the 'Datsun 240Z' logo plate for my glovebox door. While the results looked ok, it proved not to be very durable. As a matter of fact, the ink came off on the kleenex tissue that I'd wrapped the piece with for protection during storage. Maybe some clear acrylic would have helped. Just the same, I now had to start over. This time, I decided to try something different. I'd read about the chrome foil that scale modelers use for simulating chrome trim on plastic kits. Pictures of their results looked really promising, so I decided to give it a try. A page-sized sheet of adhesive-backed foil cost about $10 at the local hobby shop, so I figured I didn't have much to lose. The results were better than I'd ever cared to hope for. Here are some pix of the work I've completed so far -- two pieces: the glovebox logo and the centre console insert plate. The foil itself has about the same feel as the foil wrap used in a package of cigarettes. It's very thin and you need to be very careful peeling it off the backing sheet. Also, the adhesive on the back is very, well, adhesive, so you need to plan ahead as to what your next move will be after you've peeled your piece off the backing sheet. One wrong move and it'll be stuck to something you hadn't planned on sticking it to. It does not un-peel easily, so you'll probably have to toss that piece and cut out a new one. You'll need a sharp hobby knife to make this work. As the instructions that come with the foil mention, 'sharp' means 'really sharp'. Use only a brand-new blade. In fact, the foil manufacturer recommends that you hone the brand-new blade to make it even sharper. I didn't do this and I didn't find it necessary. However, you're going to be cutting through actual metal and that means that you may need to replace your blade with a new one from time to time during the job. The tip-off will be when the blade starts to tear the foil. Unfortunately, that will be too late (i.e. your job will be ruined), so the moral is, don't cheap out on blades. This job takes a very steady hand and a lot of patience. It's also really important that you set up your work piece so that it well anchored, movable, and placed so that your arm and hand will be well supported and at the right height for both comfort and position relative to the work piece. Let's start with the console insert plate. This has mounting bosses and brackets that extend off the bottom, so I found a piece of scrap wood and drilled holes in the appropriate places so that the plate would sit flat on the board. I also made sure that the plate wouldn't jiggle or move around on the board (really important). The console insert plate has a number of full-perimeter chrome accent stripes. As you can see, the chrome was completely MIA on my plate... Although it would have been less risky to do each 'box' as four separate chrome strips, I didn't want to have cut-lines at the corners. Too easy to catch on and lift and edge when driving, and also not a clean appearance. So, after taking a deep breath, I cut a big sheet of foil and dropped it in place... The picture shows the foil in place and I've already 'burnished' it along the raised accent ribs. I found this best accomplished with a piece of high-acrylic cloth from an old shirt. Whatever you use, make sure it's smooth, soft and thin. Be really careful when you do your burnishing. It's all to easy to catch a bit of raised foil by accident and create a rip (and that means you start all over again). Do not burnish in the areas that won't be chromed (it's going to be enough of a chore lifting the excess foil away, without having it stuck to the work piece). You want to burnish only on the 'flats' of the raised ribs but not along the sides of the raised ribs. In the picture above, I've also started to do some initial trimming. Again, you need to be careful at every step along the way. Little rips turn into tears, and a tear can suddenly grows by a half-inch and ruin your work. (BTW, one of the photos shows an actual 'burnishing tool' that I had left over in my tool kit from the days of 'letraset' - it proved to be poorly suited for use with the thin modeler's foil I put it away immediately). The knife work requires practice to develop the right 'touch'. You need to find the right weight, the right 'steering' angle, and the right tracking edge (it's not a freehand cut). You'll learn how to find a ledge that you can run the point along. Once you get the knack of it, you can run a 4" straight cut in one move. In point of fact, you really need to strive for making these cuts in one move, because it's difficult to resume a cut without creating a little ragged edge. Also, the foil doesn't lend itself to 'clean-up' work afterwards. You really need to try to get it right the first time. The photo above gives a little closer look at the burnishing and the start-off cuts. Below, you can see me about to use my tweezers to pull the excess foil away after the first of my detail cuts... Here's the 'After' shot, with the excess foil completely removed... Below, you'll see the same process carried out for the first of the longer cuts... And, finally, the first rectangle completed (at this point I am feeling both happy and relieved)... It perhaps goes without saying that the raised strips around the outer perimeter of the plate were the most challenging to get right. Nevertheless, I was 'in the zone' by this time and managed to get everything done without any major incidents (just a couple of small ones ). Here's a photo of the end result: and... (The second photo won't load full-size for some reason) I was pretty happy with the results, given that this was the first time I'd ever tried using this foil. I was particularly relieved to find that I could cut dead-straight edges just by finding the right little ledge to let the knife tip run in (it's easier to feel these ledges than it is to see them, but they're there). Once you find the ledge, the challenge is to keep the knife tip moving steadily forward in the right direction. It's pretty easy to have the knife tip wander out of the ledge if you have the blade's 'steering angle' a few degrees off. When that happens, you've got trouble. Now for the glove box emblem. Different challenges here, given the many curves and inside corners. Same technique though. First, the backing board... Then mount the work-piece and cut a piece of foil... Lay the foil in place and burnish with your cloth... Look for the 'ledge' around each character and start to make your cuts. Curved edges are the most challenging, obviously. You may have to re-do many of the characters before you get everything to the point where your happy with your results. If you need to do a fix-up (like I'm doing with the '2' in the shot below), make sure you cut you new piece of foil to exactly the right overall size, so that it doesn't accidentally touch the foil on one of the adjoining characters... which will mean you'll now need to re-do both characters). Of all the characters in this logo, the 'Z' was the hardest to do. Save it for the last. Here's the final result (not the greatest of pix as I found it hard to get the lighting angle right)... All told, I think it took me about 3 or 4 hours to complete these two pieces. I found it useful to walk away from time to time, as it's pretty demanding of concentration and coordination. Nevertheless, it's real (metal) shiny chrome and it won't fade. I'm pretty confident about the adhesive, but I guess there's going to be a test of that sometime in the future when the car gets parked in hot sun for a few hours. The durability looks like it will be just fine, provided I never accidentally catch an edge while cleaning.


 1 point
 -
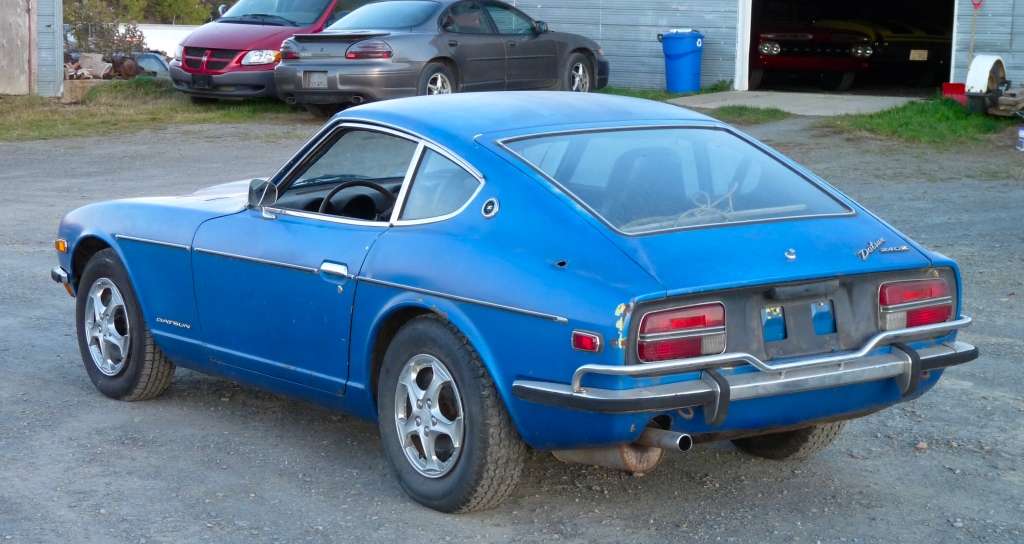
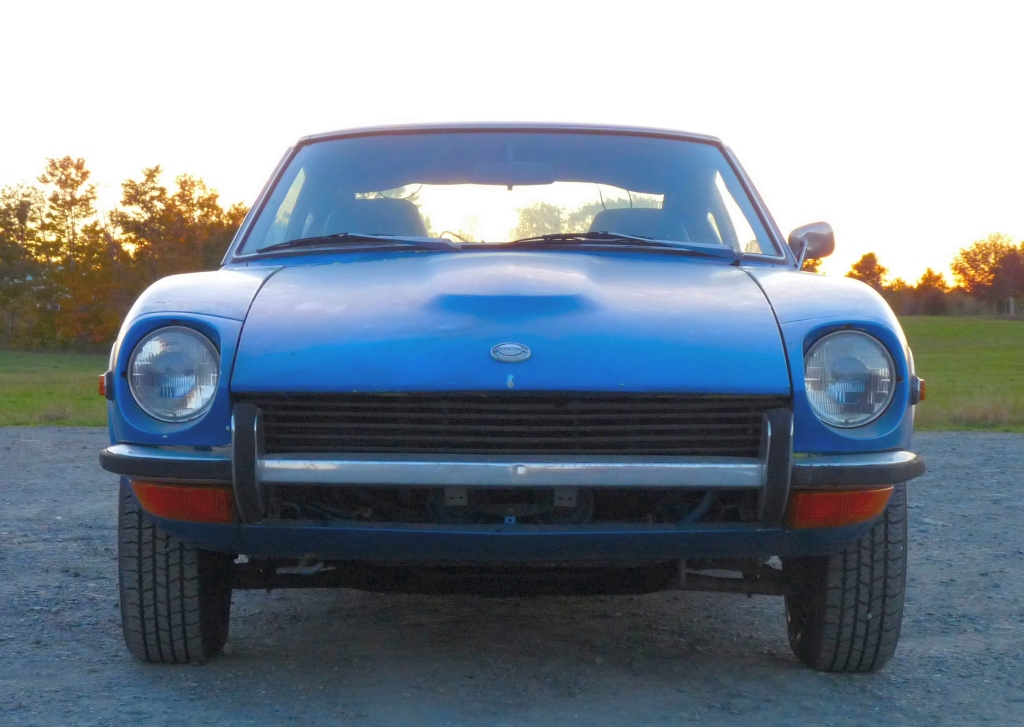
I also have a neon yellow (blue overspray 72). Just 4,000km away: https://www.google.ca/maps/dir/Nova+Scotia/United+Kingdom/@50.0300188,-33.590142,4z/data=!4m7!4m6!1m2!1m1!1s0x4b591298de18cf45:0x102581ef8cf0940!1m2!1m1!1s0x25a3b1142c791a9:0xc4f8a0433288257a


 1 point
 -
1 pointThe third photo gives a good comparison of what it looked like (top, old rail) and what it will become. Nice work. Good to see you back home safe. Enjoy.1 point
-
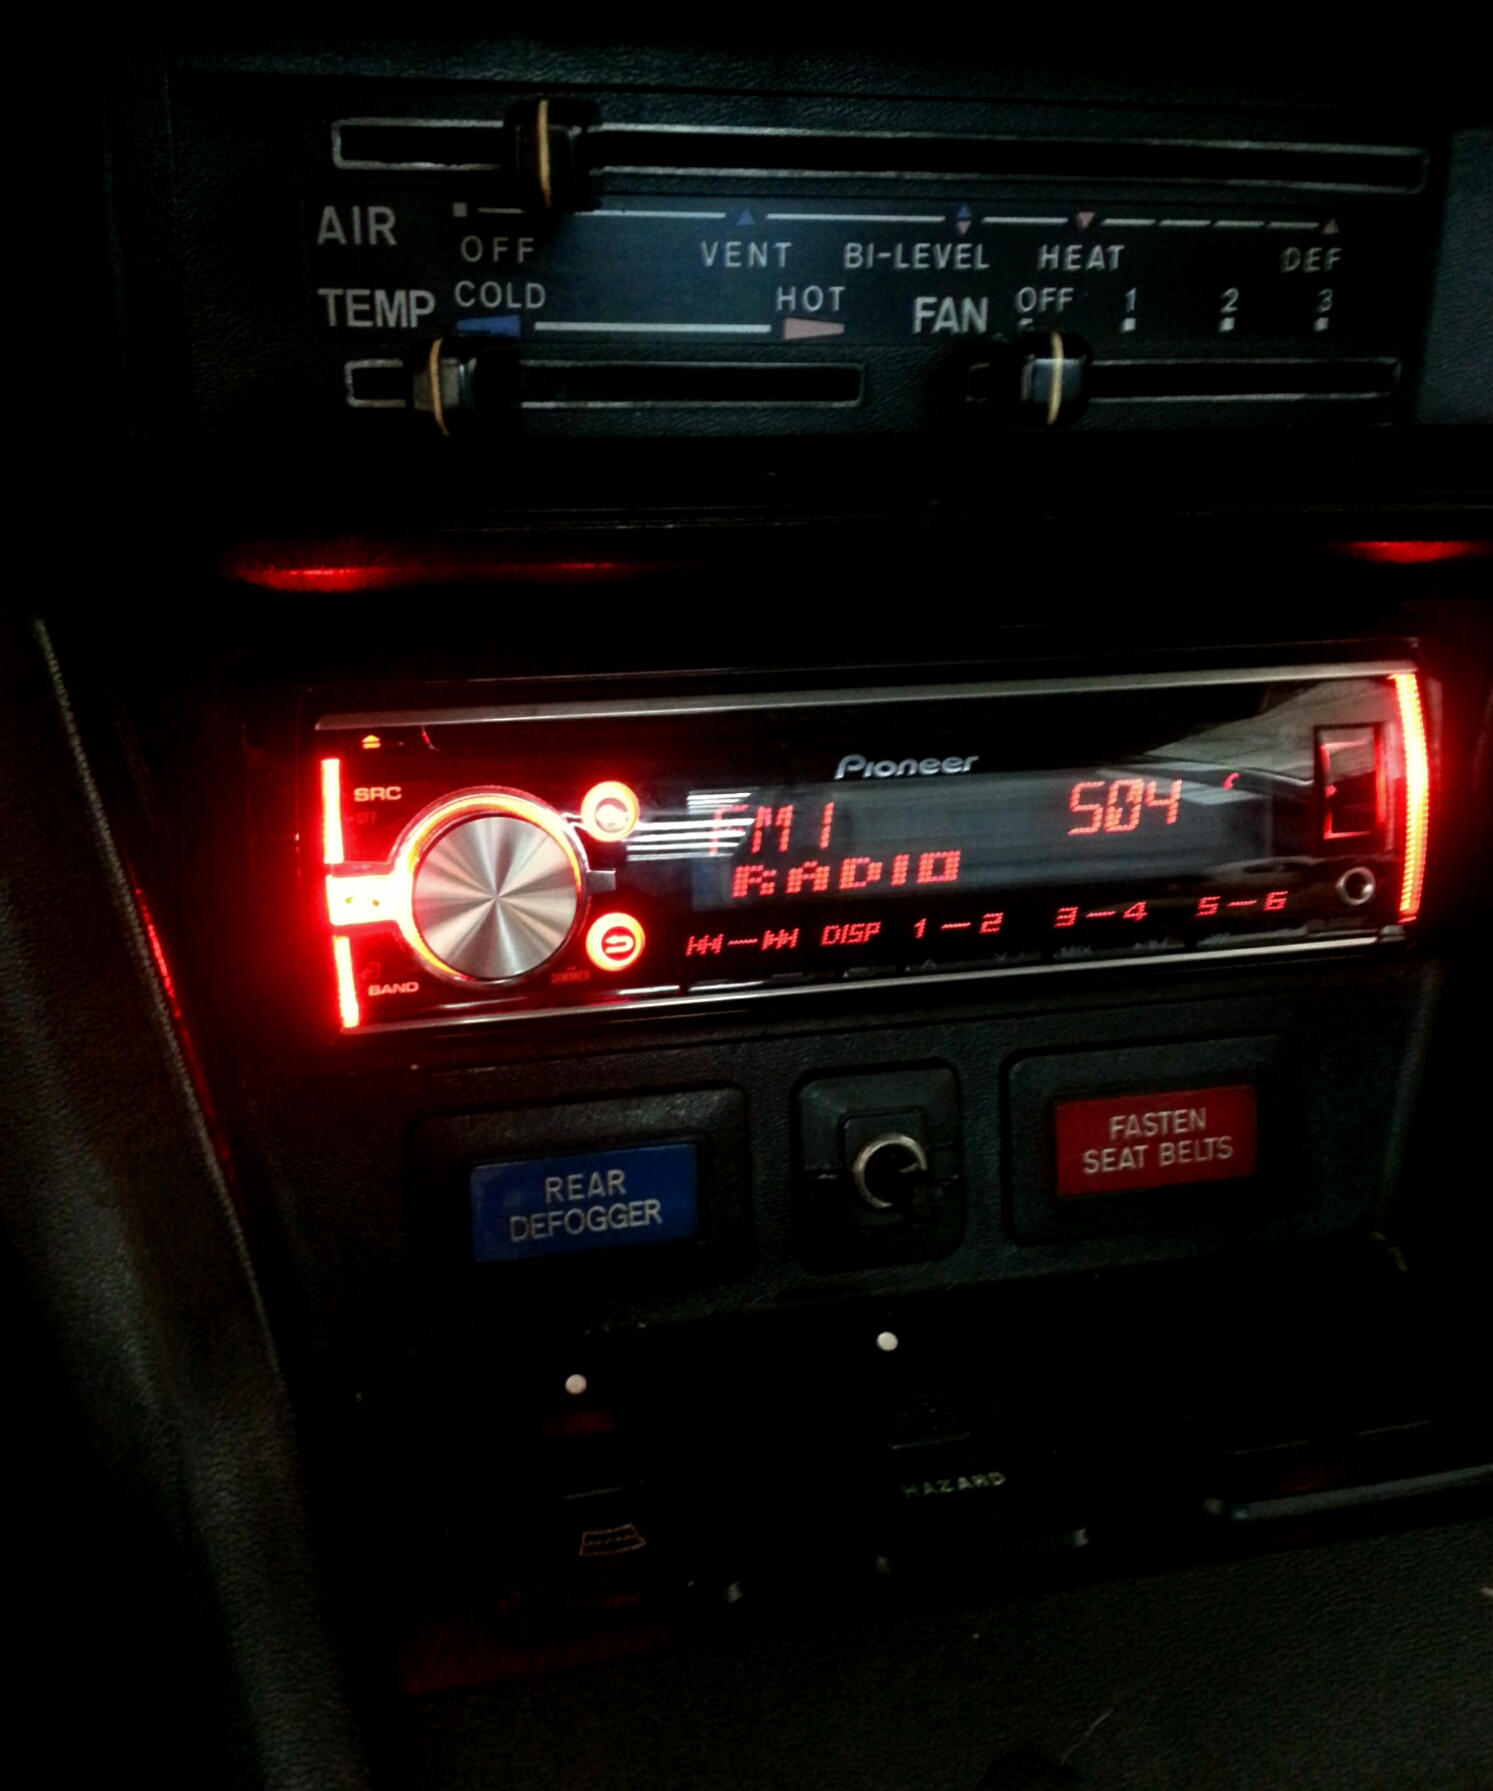
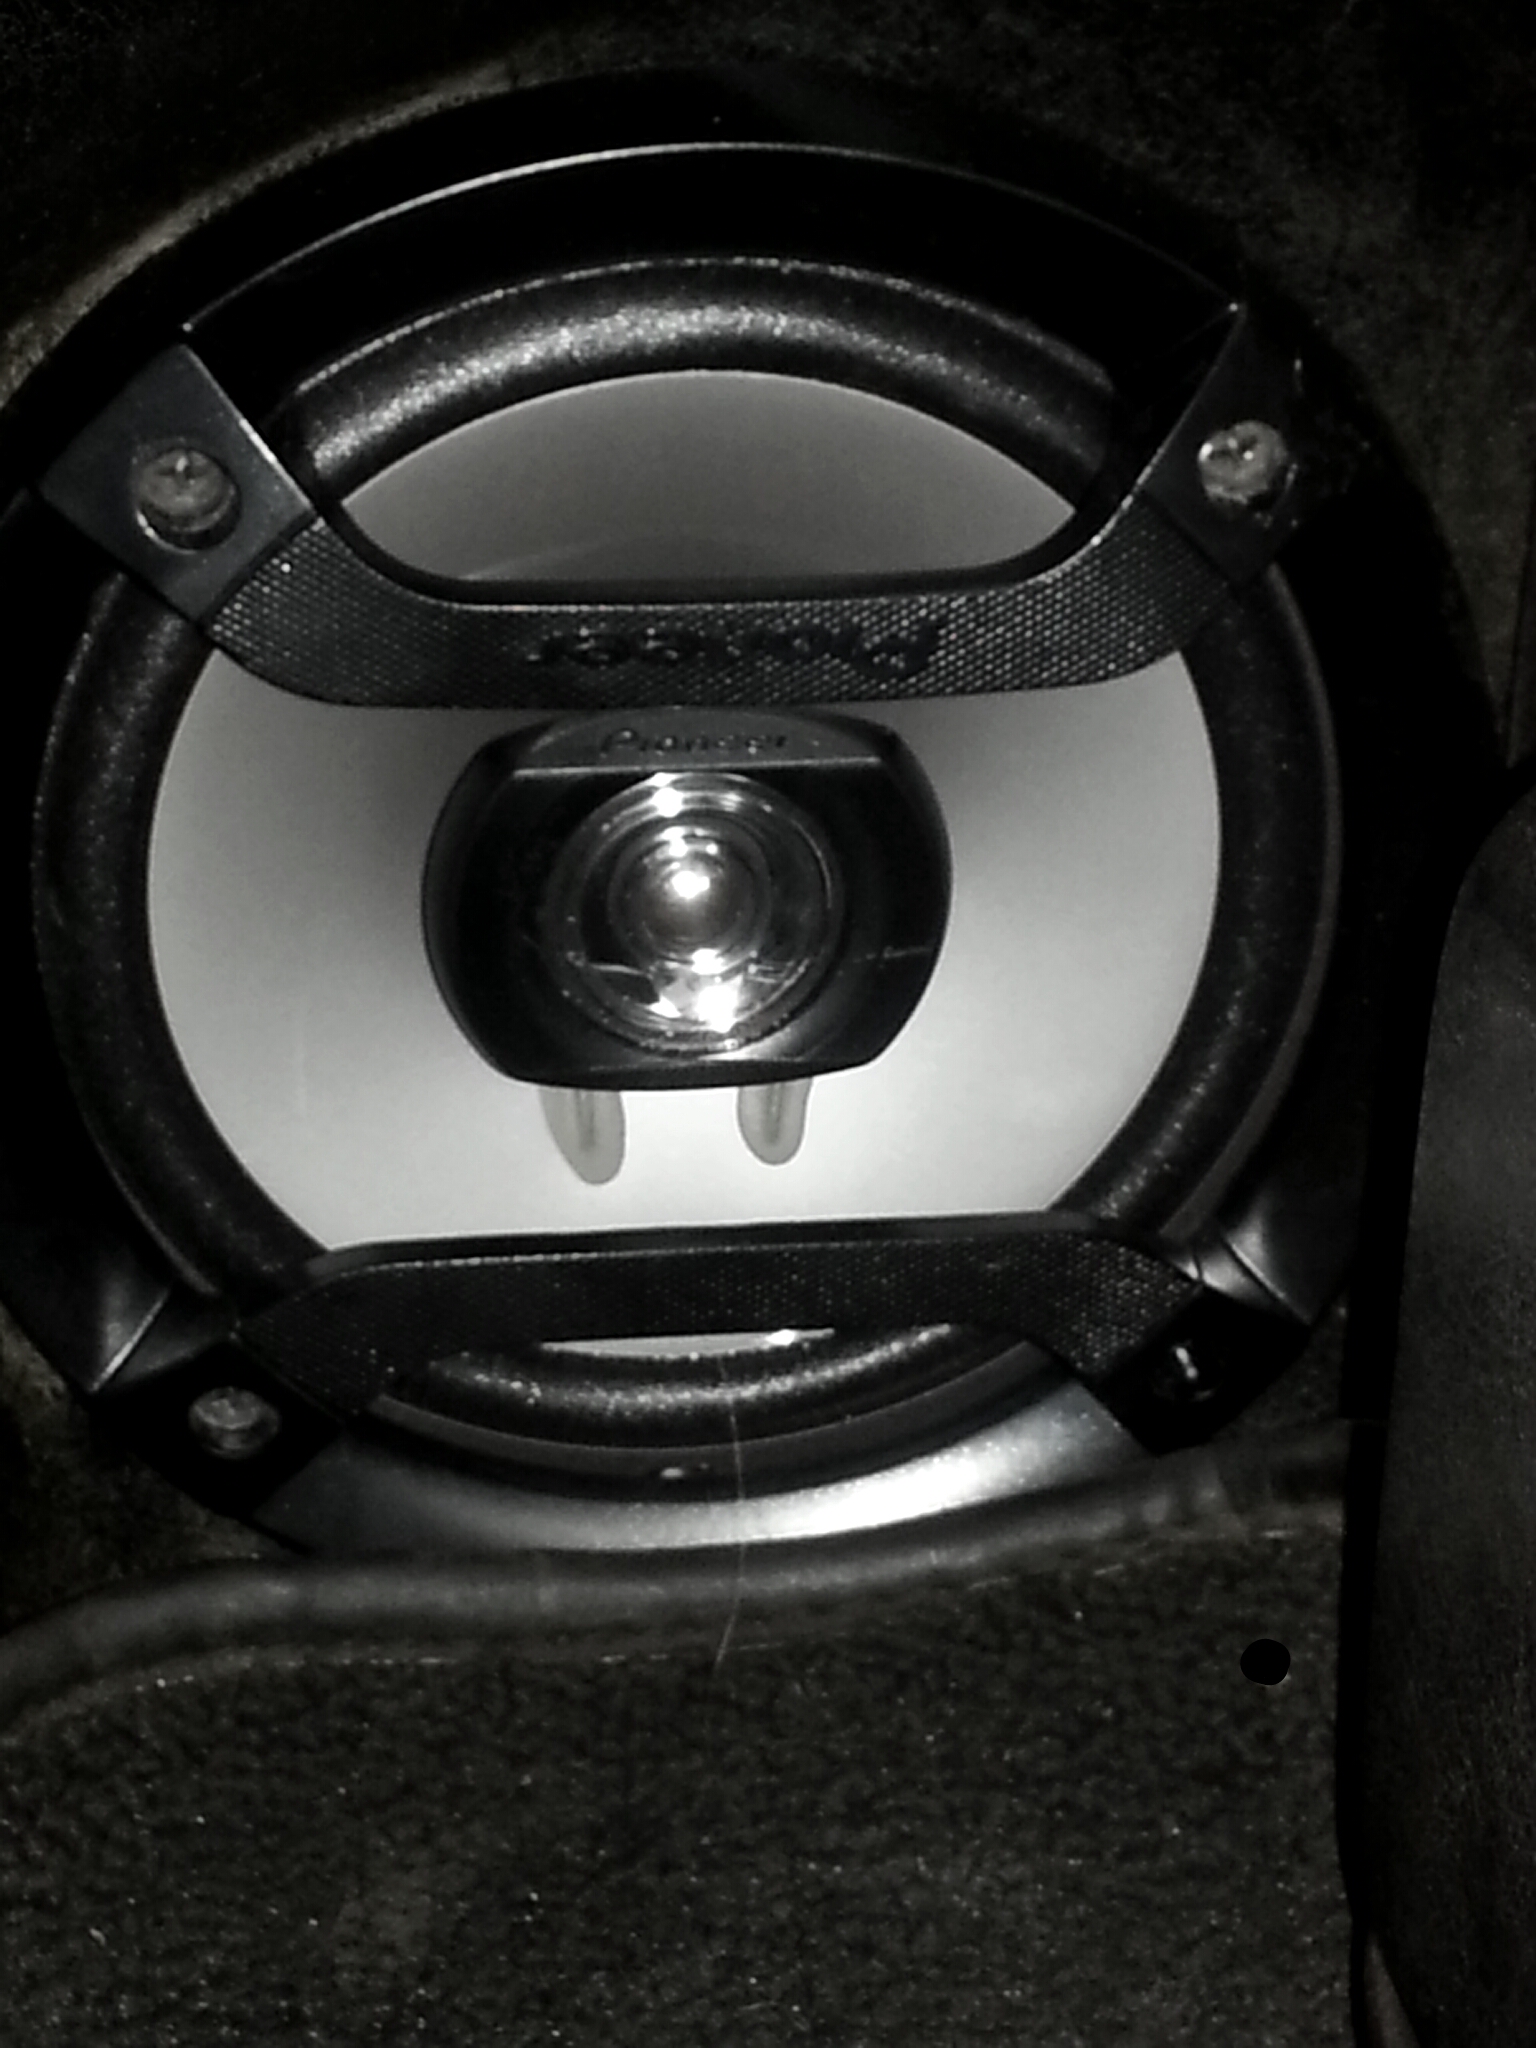
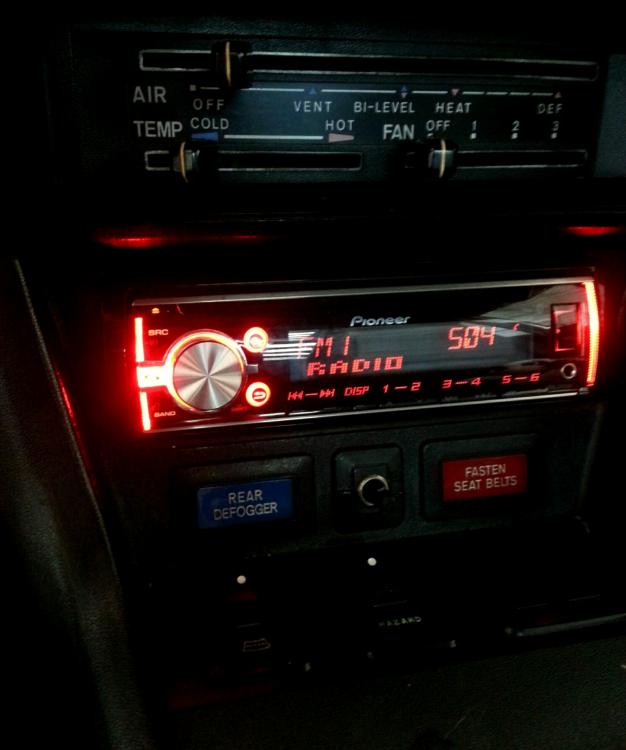
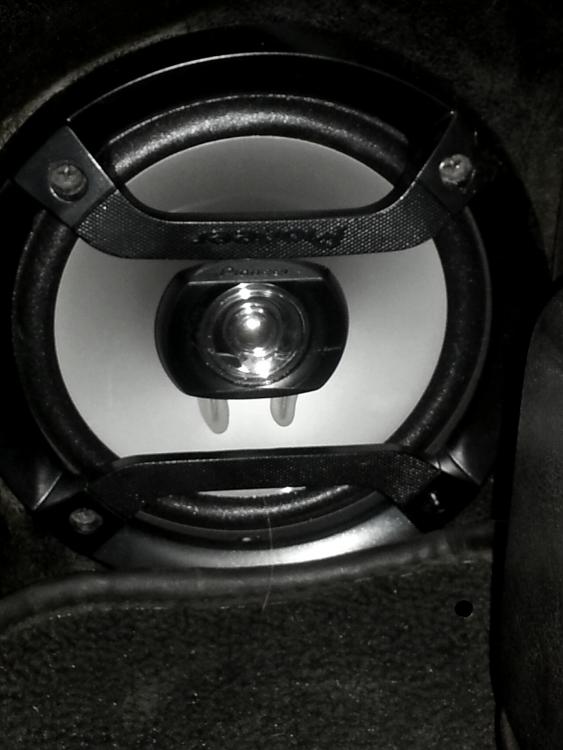
I was able recently to gift my RedBird with a new radio/cd player and speakers. They are Pioneer, and sound GREAT!!! One of my "want to do asap" has been done for the both of us. I'm sure she is happier, that old radio really was on it's last leg. And with only one working speaker, the sound was frightful. I am absolutely thrilled, now I can listen to the Old Classical Rock and Roll and blast my ears out if I choose! HA! I won't, but it is nice to have an option for it.
 1 point
 -
I have the Wilwood's on my street/track 240 and the 240 race car has the Z31 with Porterfield pads. Since the race car is run in vintage events, I'd get kicked up into "A" production (big block V8s), if I installed the Wilwood brakes but I only get pushed into "B" production with the Z31s. While I really like the stopping power of the Wilwoods, the Z is more a momentum car and I can get a years worth of track time (10-15 days) on a set of pads (car weighs in at 2368 with me and 8 gallons of 110). Learning to let the car hang out a bit takes time. Being able to hit the brakes and have them do all the work is easier, but as my hippie, 1970s California SCCA instructor said - "Braking is negative acceleration and we don't do negative". So if this is just a track day car, the Wilwoods make a good case for themselves based on cost and performance.1 point
-
1 pointBack from Orlando and am catching up. Had a great time. Didn't get the chance to do everything I wanted to do, but I did a bunch. Spent a fun rainy afternoon with @Dave WM . Survived the season's first tropical storm. Ate at the Sloppy Taco Palace. Shopped at SkyCraft. Sampled fine beer flights at a number of the brew-pubs (1010, Ocean Sun, Crooked Can, Hourglass, and Cask and Larder). 1010 was a real treat. I got there too early in the day and they weren't even officially open for business when I got there. They took me in anyway and we spent the afternoon chatting. Just me and the guys from the brewery and a couple of their local friends. It was fantastic. I learned a lot about the Florida microbrew scene. Everyone in the business knows everyone else and they're all friends. Not even considered "competitors", just friends. Had an upscale dinner at Cask and Larder. Took a stroll around Lake Eola. Saw what was left of "Old" Orlando (Robert's Building, Church St Station, Bumby's). Biggest regret was not being able to get an opportunity to meet with @tunesnxs. Next trip hopefully. Thanks to all for the suggestions and hospitality, and hopefully there will be another trip in the future!1 point
-
paging @Chickenman's brain for distributor wisdom. So since I don't have a distributor machine, and my attempts to find someone with one locally didn't fare too well (found someone on Kijiji who was looking for them doohickeys, which was the closest i got... must look further)... I decided to take apart the distributor taking care to not damage the finishes. I will attempt to contact some other people to see if they know anyone with a distributor machine. Would love to buy one myself- been purchasing inexpensive vintage tools- but the Sun machines are a good 2500 for a properly functioning unit from some guy in Detroit who specializes in restoration of said machines with various "future-proofing" and accuracy upgrades- so that's off the "must buy" list for now. And below are my findings & photos of the internal parts. Coles notes conclusion as of this post: both governor weights are equally heavy: both read @ 25-26g (52g combined) [see photo Fig. 1.1 + 1.2, & 1.3] both springs have the same tension: rudimentary test [see photo Fig 2.1] spring/weight cam unit has different upper and lower slots [see photo Fig 3.1] spring/weight cam unit has "12" marking: D612 = 12* Max Centrifugal Advance, D606 & D609 have 6* and 9* respectively [see photo Fig 3.1 as well as full assembly in Fig 3.2] Fig 1.1 Fig 1.2 Fig 1.3 Fig 2.1 Fig 3.1 Fig 3.2 Not sure if I should just slap it together with the points and just get on with it. On pace to get the motor started by end of next month. Just gotta get some items i've been putting off the ordering of so I can save on shipping mulitple items with those ones that are needed for engine stuffs (though there's not much!) I'm still new at this points stuff. But I value the learning experience- even though I probably won't be doing this to too many distributors. Still fun, though!1 point
-
1 pointSharpie makes an oil base paint pen that comes in lots of colours, their silver one is a very good match for the fine trim on our radios and glove box doors and besides, Mr. K used to use them to sign things.1 point
-
1 pointThat looks like a lot of work, but there is nothing like doing it yourself! Great job.1 point
-
I uploaded a bunch to the files section a couple weeks ago. Sent from my iPhone using Classic Zcar Club1 point
-
I had my '78 280Z front and rear bumpers chrome plated at a small local shop here in Miami. I shopped around and the estimates went form $1000 each () to $300 each. I took the latter and I would say the job was a 9/10. The inside surfaces were prepped and plated as well but I sealed them with 2 part anti-corrosion black paint before putting them back on the car.

 1 point
 -
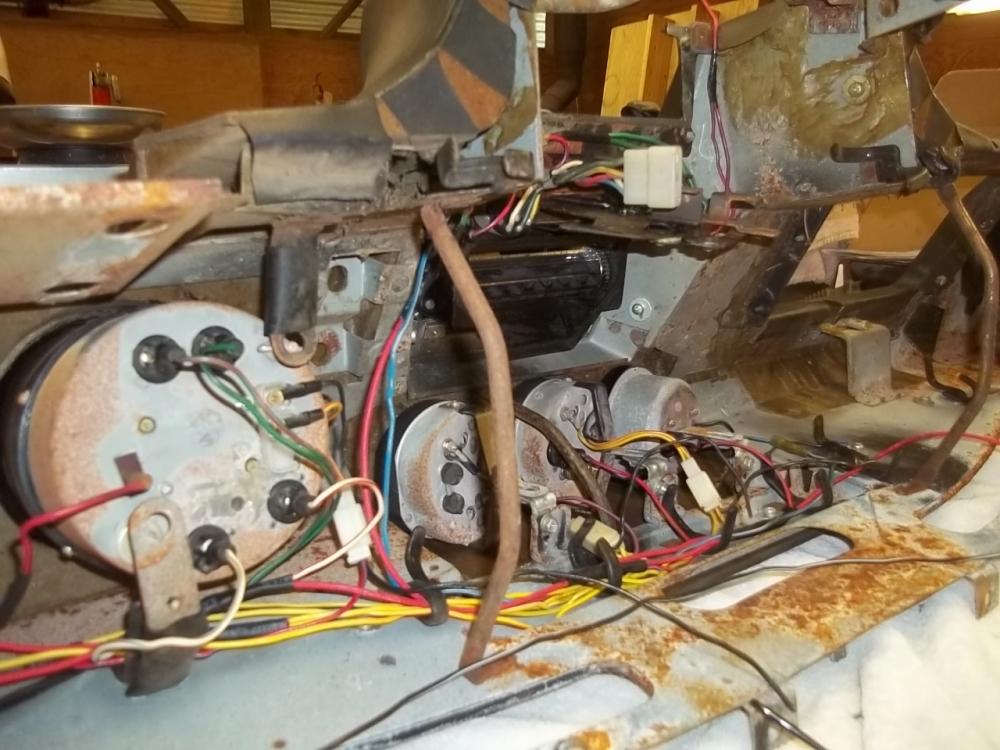
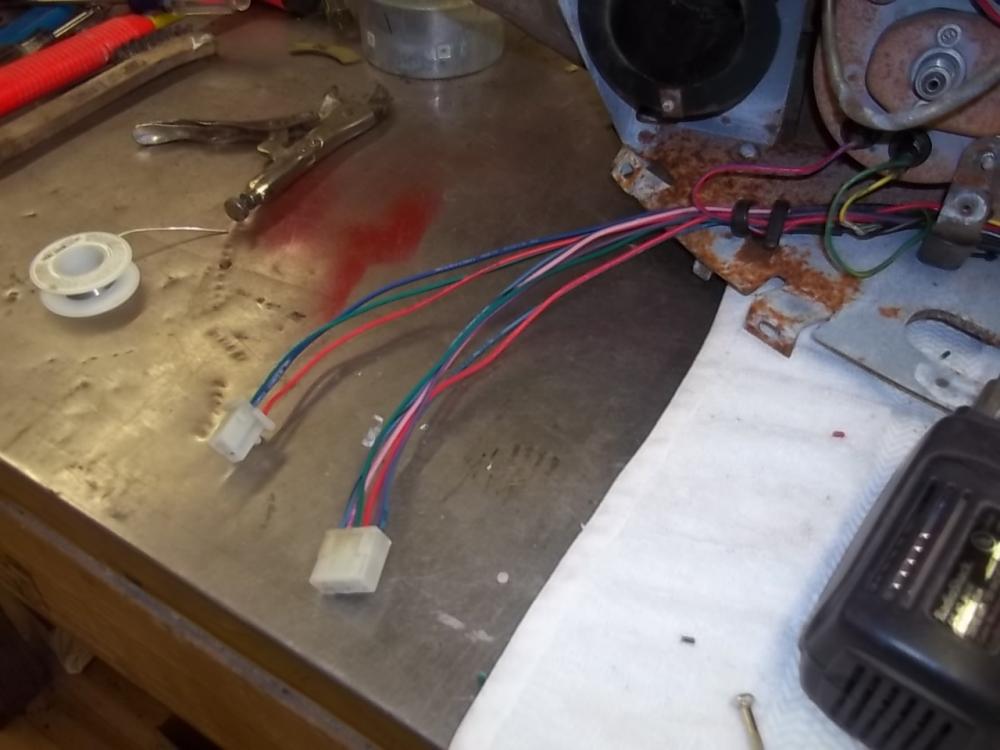
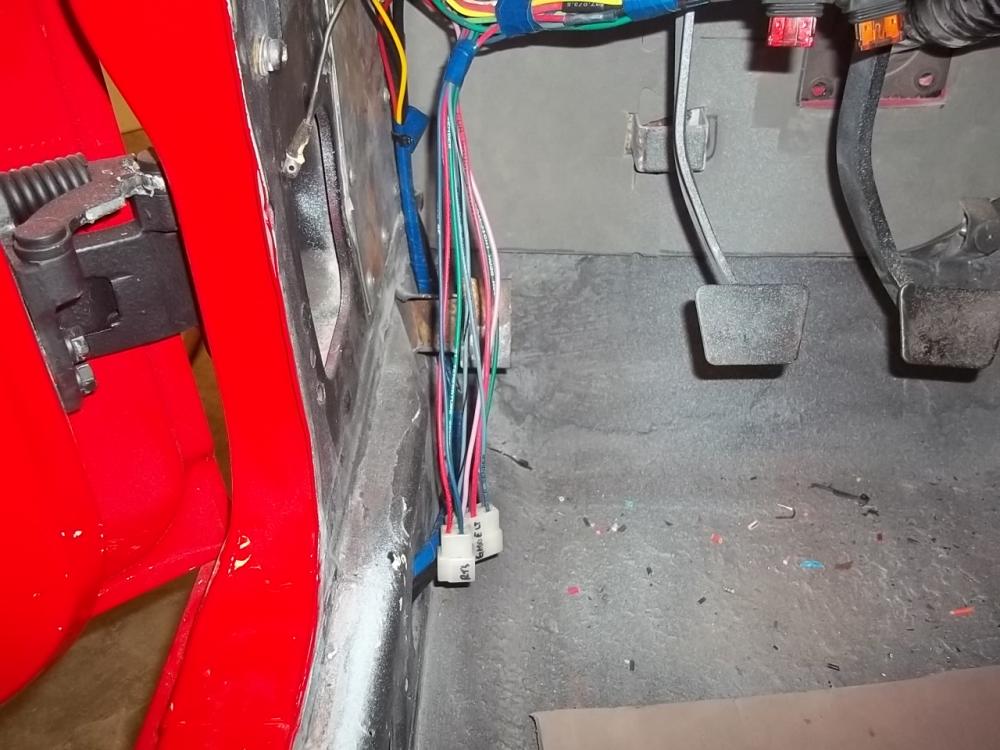
1 pointi finally found a dash, so i now have all the dash wiring done. i ended up with 2 connectors near the left fresh air vent with a total of 9 wires feeding the gauges and lights. the only other connector is for the heater.
 1 point
 -
When you're trying to crank it next time, have someone pinch the fuel line after the fuel filter. If it's soft you have a weak fuel supply, it should be almost solid feeling when under pressure. Here's some good information on just about everything pertaining to a 280. http://atlanticz.ca/index.php/tech-tips.html1 point
-
Your patience will be rewarded. Just to be clear, when you say series one, what do you mean? I only ask as I have seen different meanings to that term, and it is a term that Datsun never used itself. It is an owner invented term. When I hear series 1 Z I think 1970-1972 (maybe 1973). I don't really think of a series II car but if I did I would say a 260Z is a series II car and a 280Z is a series III car should you be so inclined. But again, that series XX is not something Datsun ever used to denote models. So bud, when you say series one, do you mean a 1970 only?1 point
-
1 pointWinter Garden is a nice walk old town, somehow managed to not get bull dozed. Rent a bike and ride the west orange trail (old train tracks converted to bike paths, DO NOT drive bike on the road with cars). Canoe ride is fun used to be a place called Katies Landing, they take you up stream, so you can just drift back. Lots of wild life to see, but its HOT so beware. the Wekiva river is the run to make, very slow pace takes 4-5 hours. Sky Craft is the local surplus store, all kinds of junk to roam around in right of I-4 and Fairbanks. Florida really sucks unless you like water sports (ski/fish) esp central florida, hot and humid. Beaches ok if that is your thing but red tide and jellys can be issues. West coast beaches are nice sand and calm waters, but learn to do the sting ray shuffle. East coast is often stormy and over crowded with folks that really should cover up more than they do (not a pretty scene, if you want that go to Miami), surf can be ruff and dangerous at times. If you want to see some old cars go to Don Garletts up near Ocala, really cool stuff, but no imports. Call me when you get into town, stop by and check out my Z. I am right near Universal (don't go to the theme parks, complete waste of money and time). oh and you could visit the Z junkyard up in Sanford.1 point
-
I'm following your footsteps, only behind your's by 7 months and a day. I washed and put some moisturizer on mine today after being down for over a year. After the Bellagio squirter, Wiped off
 1 point
 -
1 pointI'm looking into what it would take to create an arm for the right side to match the OEM mirror. If anyone has a beat up original that they could donate to the cause I have an engineer waiting in the wings to give me an assessment on getting the parts manufactured. Sent from my iPhone using Tapatalk1 point
-
100 miles this morning without a hiccup. 8^) I believes I got it!1 point
-
1 pointMany thanks for you reflective comments, Carl. The non-metallic paint location comment is a typical automotive manufacturing technique. You probably noticed that the 901 silver cars are that way. Part of the problem I have here is that I have achieved a college education and "we may never know" is not necessarily in my vocabulary. As I have previously indicated, through research, they were NOT repainted in California. I still have a couple of other sources to confirm and I'll let you know if that conclusion changes.1 point
-
1 pointThe first time I heard that story - the 280Z's had been painted Black at the factory, but it was a non-Metallic paint. The Metallic Black Pearl paint to the exterior surfaces was said to have been applied after they arrived in America. DAS was the facility that was supposed to have done it.. Given that DAS at L.A. handled some 83,000 Datsuns in 78 -I guess believing that they painted the exterior of one or two out of a hundred cars - wouldn't be too far fetched. They installed 12,000 AC units in the 79 280ZX's.. On 22 acres it was a huge opperation.. But who knowns... As far as I know, any manufacturer could repaint a car before they sold it to the Dealers. There was no liability associated with paint - no Lemon Laws on the books in 78. None of the transport damage that was repaired had to be disclosed to the end customer... It is interesting that the Black Pearl's had non-metallic paint in the engine bay, as well as inside the car. That is usually one way you can tell if the car has been restored rather than original - the engine compartments in the restored cars are usually sprayed with the metallic paint.. Unless we find one of the Painters, that worked at DAS in 78.. we may never know for sure.. FWIW, Carl B.1 point
-
1 pointHumm..... Very Interesting... the S211's must have been repainted in Japan, did Nissan actually export any of them? According to Long only 20 of them were built. Would the "SP213" also be Right Hand Dive Models? Again according to Long the SPL212's and SPL213's were sold in America. The SP310 being the first Fairlady sold in Japan.. Long seems to indicate that the SP310 was the first Right Hand Drive Fairlady... But speaking of Nissan repainting Fairladys... According to Brian Long: "Bruce Morikubo bought the first of 123 SPL212's destined for America, eventually taking delivery from Speedway Motors in Tucson, AZ, in the middle of Aug. 1960. Being the first car, Datsun offered to paint it free of charge, any color Morikubo wished, so it was finished in Cherry Blossom Pink. Katayama also give the owner honorary life membership in the Sports Car Club of Japan." FWIW, Carl B.1 point
-
1 pointYes, the optional wheels do not appear to be part of the appearance / decor package. I wrote to a couple of sources that would know about the respray issue and one has replied that the S211 and SP213 Fairladys were repainted as required because of the color combination of interior / exterior. So far, to the best of my knowledge, only shipment repair painting was made in California for this conversation.1 point
-
1 pointThe first one has the factory option alloys and the second one has aftermarket wheels. My point was that neither the Zzzap nor the BPE came with anything other than hubcaps unless they were ordered. Wheels were not part of either appearance package.1 point
-
1 pointThis might help, I started an Original Owner 280Z site and there are two 1978 Black Pearl cars on the site listed. One is with the Black Pearl stripes and one is without and they both have different wheels. Here is the link -http://michaelgoodweddings.com/datsun/index.html Both were at the convention is Cleveland last year. Hope this is some help.1 point
-
1 pointI'm not here to knock the rules but rather tip my hat to the people who put in the hard work to write them in the first place. I first judged a ZCCA natonal convention in Long Beach five or so years ago and have judged or chaired the judging every year since. I have judged three major regional events - chairing one of them - and conducted three judging schools. In my yonger days, I was a nationally licensed SCCA scrutineer. I am now part of the ZCCA car show committee as co-chair with Fred Buoni of the stock classes. Some months ago, our committee chair Paul Hollander asked to review the rules in an effort to clear up the definitions of the various categories - stock, street modified, Nissan modifed, ultra modified, and daily driver. He also asked to add the 370Z model. So, I found the original WORD file and started editing. I hope to make a presentation at the Board meeting in San Antonio and ask for adoption of the revisions. That's the reasoning behind my quieries as well as my direction. All this conversation for that one paragraph! Here's where I'm at; "The guidelines by which an object is evaluated validate the significance of the award and I would like to see the ZCCA awards ranked amongst the highest of automotive recognition". How's that?1 point
-
1 pointWhere did the ZCCA get that from? The wheels were optional and not part of either 'package'. Never heard anything about them being done in Long Beach. Were there more BPE's than Zzzap's?1 point
-
1 pointI don't think anyone knows much about them and there's a lot of personal opinion and heresay floating around. I don't think there are any definitive answers about these cars since they really weren't that big a deal back in the day. (my opinion) Carl used to sell them and I worked at a dealer where they were sold at the time. I don't think that makes either of us an 'authority' on the subject since all we knew was what Nissan told us at the time. (I know that's true for myself and I'm assuming it would have been the same for Carl). We may never know the 'truth' about them. I don't reacall ever reading, hearing, or seeing anything that would indicate that they were available anywhere other than in the U.S.1 point
-
1 pointHi Stephen: I think - and who knows for sure what the people at Nissan were thinking at the time - that the logic has to do with the primary focus of the different vehicles. It seems the logic associated with the name of the Black Pearl Edition 280Z - was that it was logical to use the name of the Black Pearl Paint to identify the car, because the paint color was the primary focus of the car. The 78 Black Pearl was a limited edition because it was actually a test market vehicle. Nissan wasn't sure that the American public would buy a black sports car at that point. So they built enough to scatter around America and observe the reaction. They were an immediate sell-out and Dealers requested more - but of course being a Limited Edition, Nissan hadn't actually set up to produce more.. There is a very nice man that worked for Nissan/Bob Sharp racing doing video work during that period. He owns the 1979 280ZX 2+2 that was the first prototype for the "Black Gold 280ZX" advertising/marketing campaign. Because of his association with Nissan/Sharp he was allowed to buy the car directly from Nissan Motors USA, and Bob Sharp put a set of Gold Gotti Wheels on it for him as a gift. The ZX has just under 7K miles now, and can be yours for $20K. I think the logic associated with the ZZZap Z on the other hand, had more to do with the Special Decor Package itself adding some Zap! to the Sunburst Yellow 280Z. There had been many yellow Z's before ... so the color itself was not the primary focus in that case. FWIW, Carl B.
 1 point