Leaderboard
-
zKars
 Subscriber
 8Points3,770Posts
 -
HS30-H
Free Member7Points5,509Posts -
.JPG.cfcada9cf1c1b502df3f5f2f2ca3ff36.JPG)
SteveJ
Free Member6Points9,646Posts -
grannyknot
Free Member5Points5,158Posts


Popular Content
Showing content with the highest reputation on 07/21/2023 in all areas
-
There. See? It was the loose dizzy cap. Guess it went wonky (sorry for the technical term) above 4k. I knew if I asked you guys would help me solve it! Even if only in spirit..... So what did we learn today? -Misfires can cause a lean condition as read on the AFR gauge, just like the reverse. -Change a bunch of stuff and get the same result? You are changing the wrong stuff. -Tunnel vision is blinding.6 points
-
Well, that's what I get for not suggesting looking at your ignition after I read your post. I could have looked like a stud...well, yeah, that is going too far. 😞 Of course for a sparky type, we usually suspect electrical first.4 points
-
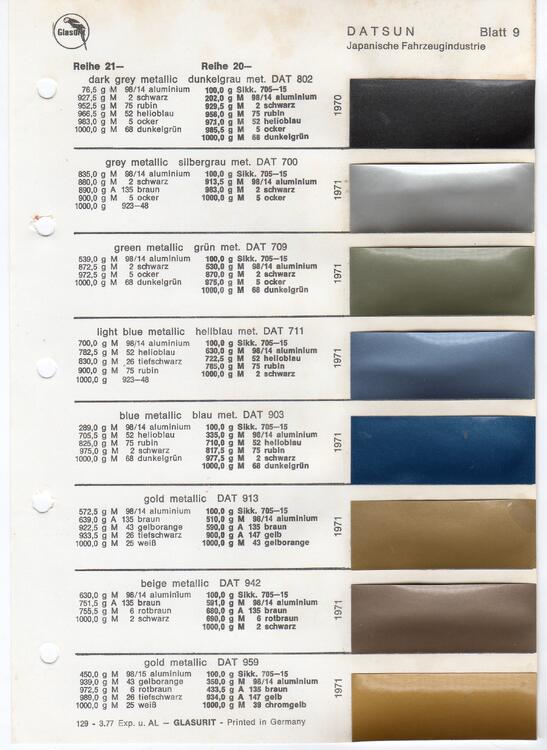
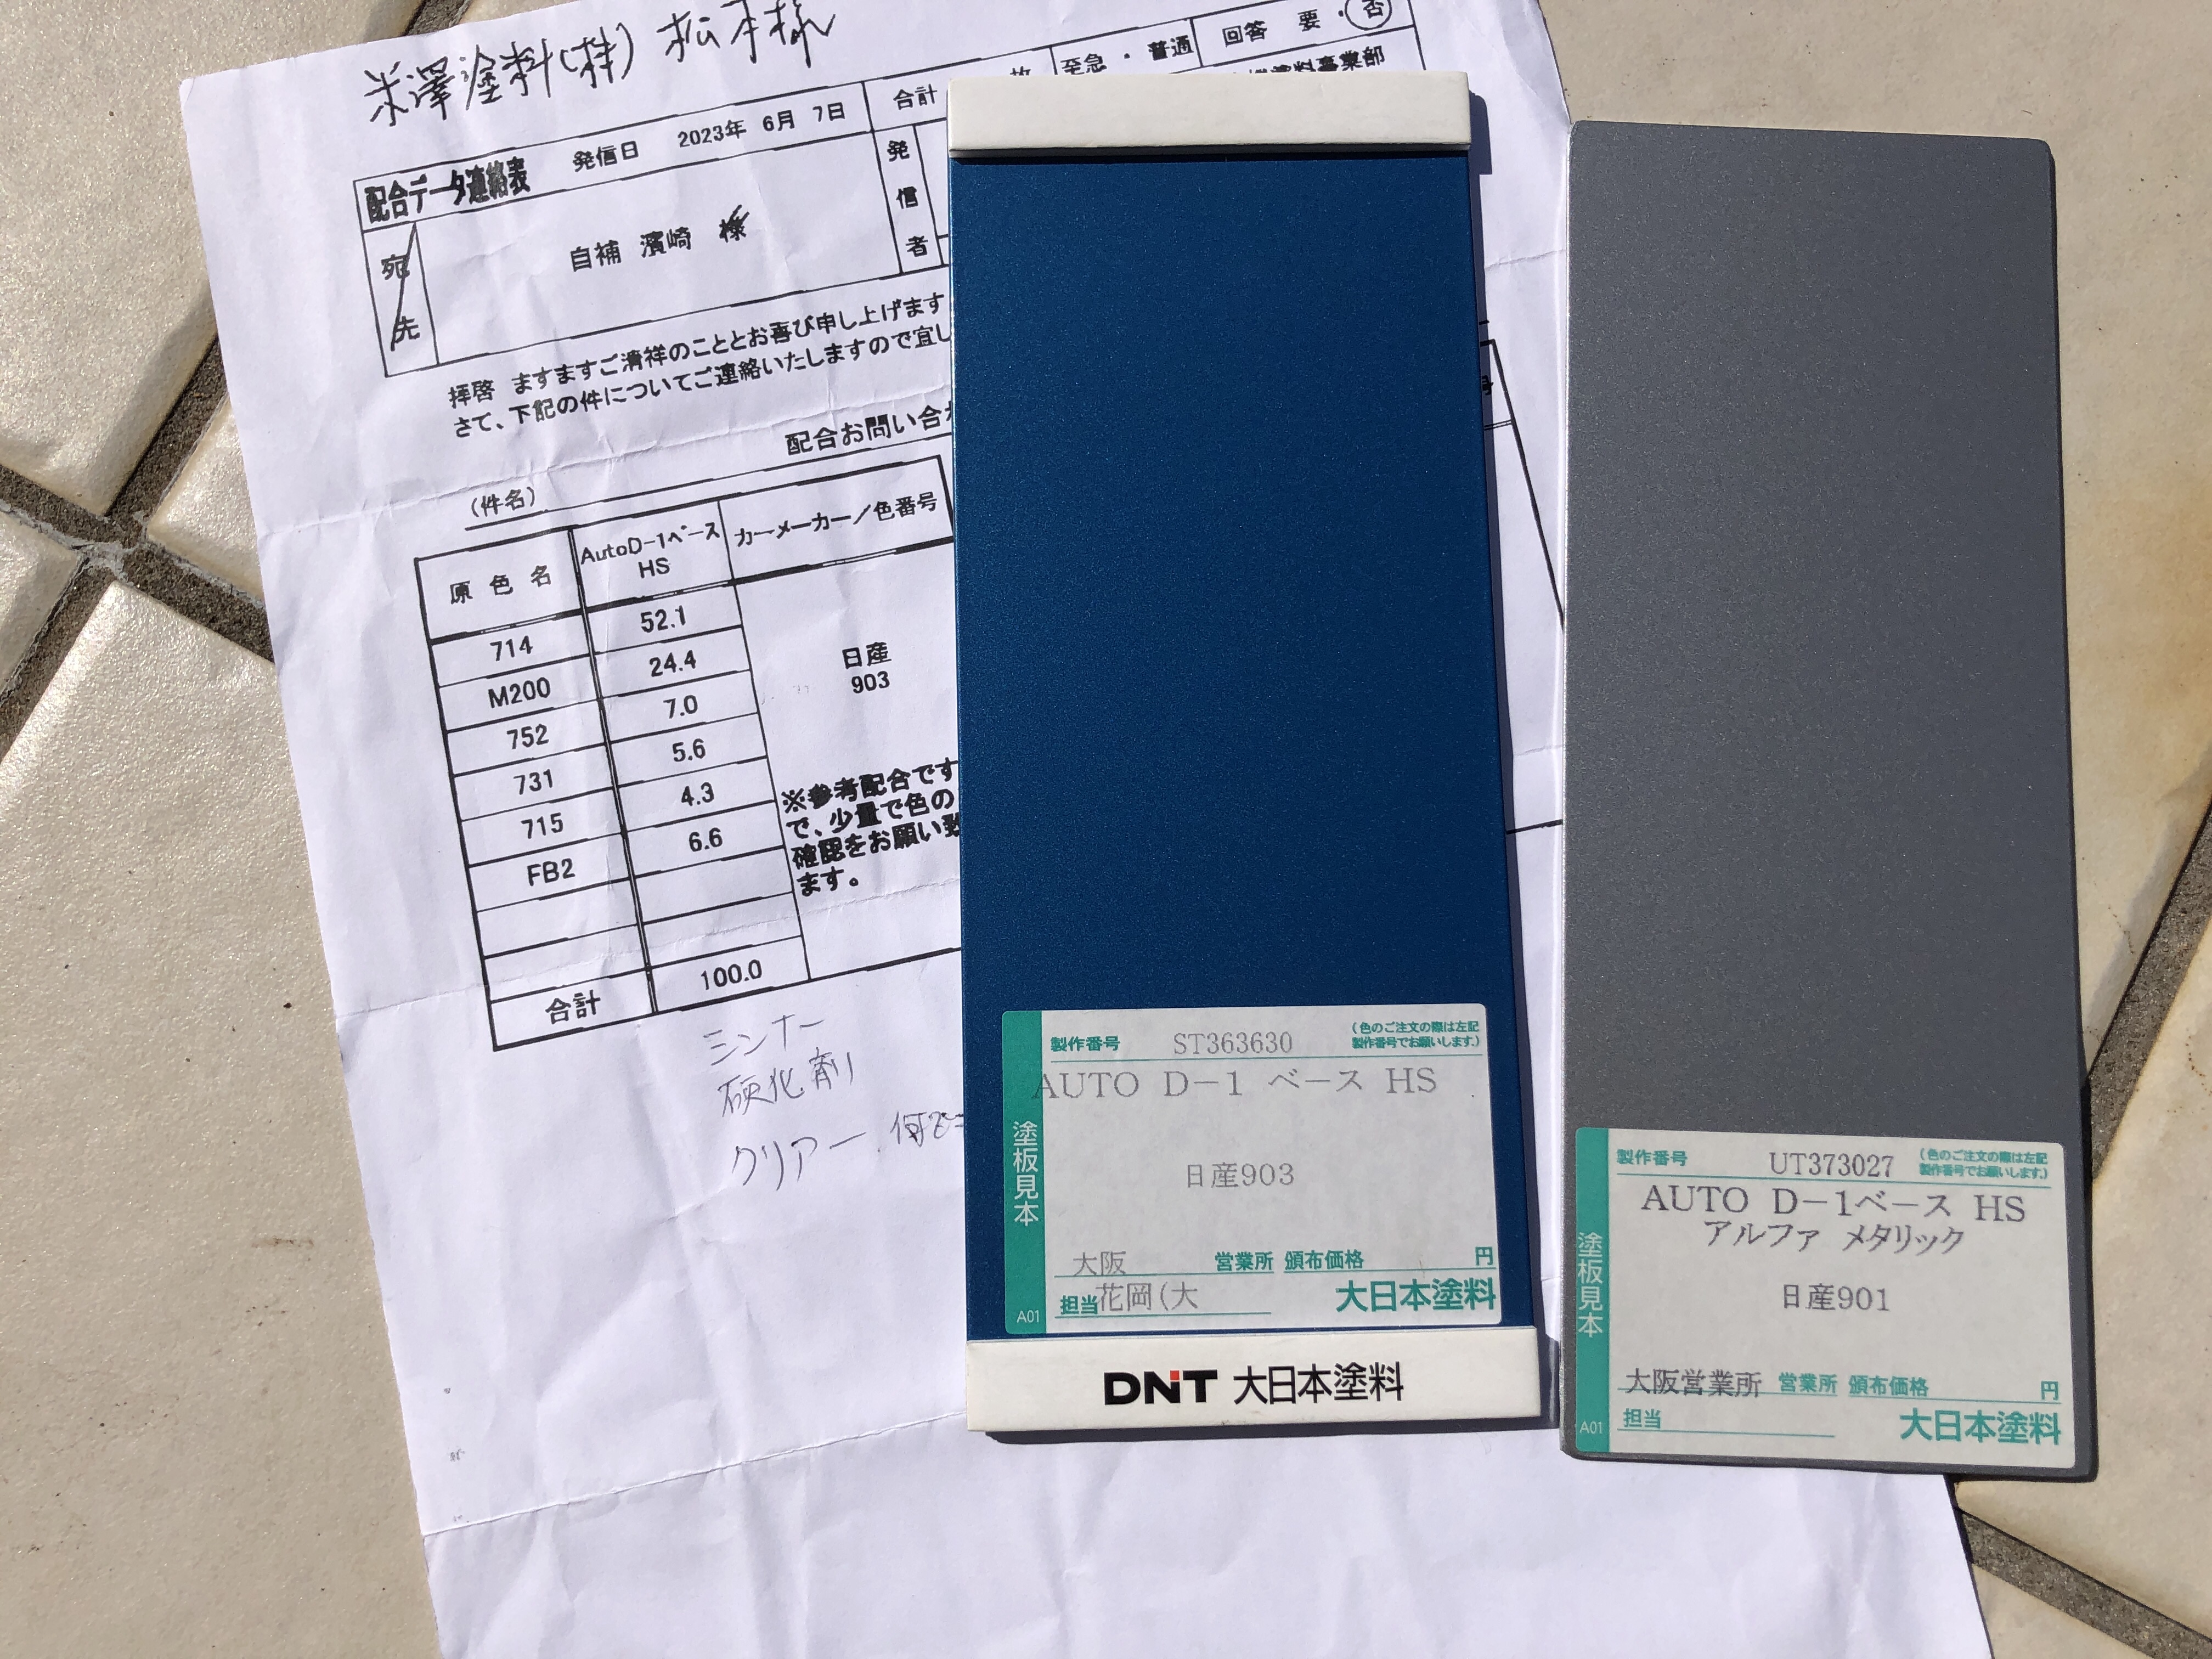
4 pointsI have been looking for original color for my blue 240Z, color “Universal Blue 903”. I finally got to know the manufacturer DAI NIPPON TORYO (DNT) and they made a sample for me for free of charge. We know Nissan used TANABE KAGAKU for the metallic paint, and there are mixing ratio of colors, this information can be seen only in Fairlady Z service manual. I have never came up to see those instructions in any other manuals. That means there is no information for Universal Blue 903 because it wasn’t available for Fairlady Z series. And seemed no Nissan domestic cars were sold in blue 903.(maybe I might be wrong). But I tried to ask a local paint shop which is very helpful for me and they found TANABE KAGAKU was merged into DNT. DNT replied they still have data of Nissan metallic 903 and 901 which they were originally provided by TANABE KAGAKU. Unfortunately, today’s paint isn’t the same like 1969 acrylic enamel paint. But I am happy that I think the paint has DNA of original 903/901. Please see the samples, I think it looks little bit lighter than my original 903 around the spare tire area, I have to decide to go with 903 or put a little bit arrange with this 903. Also, I really love 901 silver. I realized that my Z432 has much brighter silver, so back to 901 will be on my to-do list too. Kats
 4 points
 -
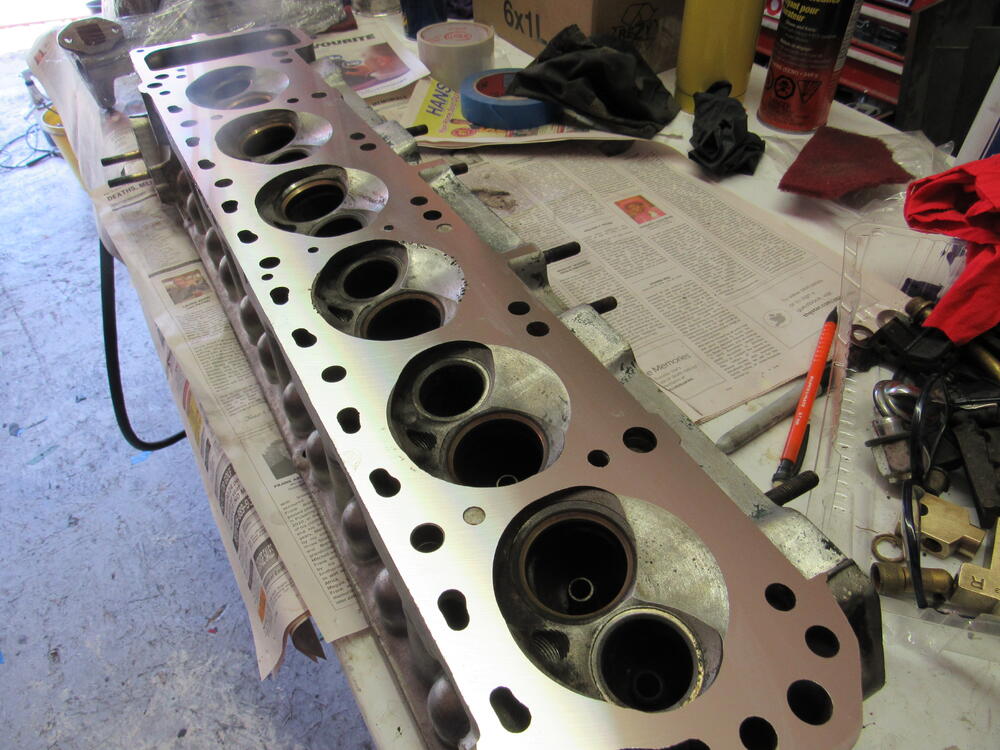
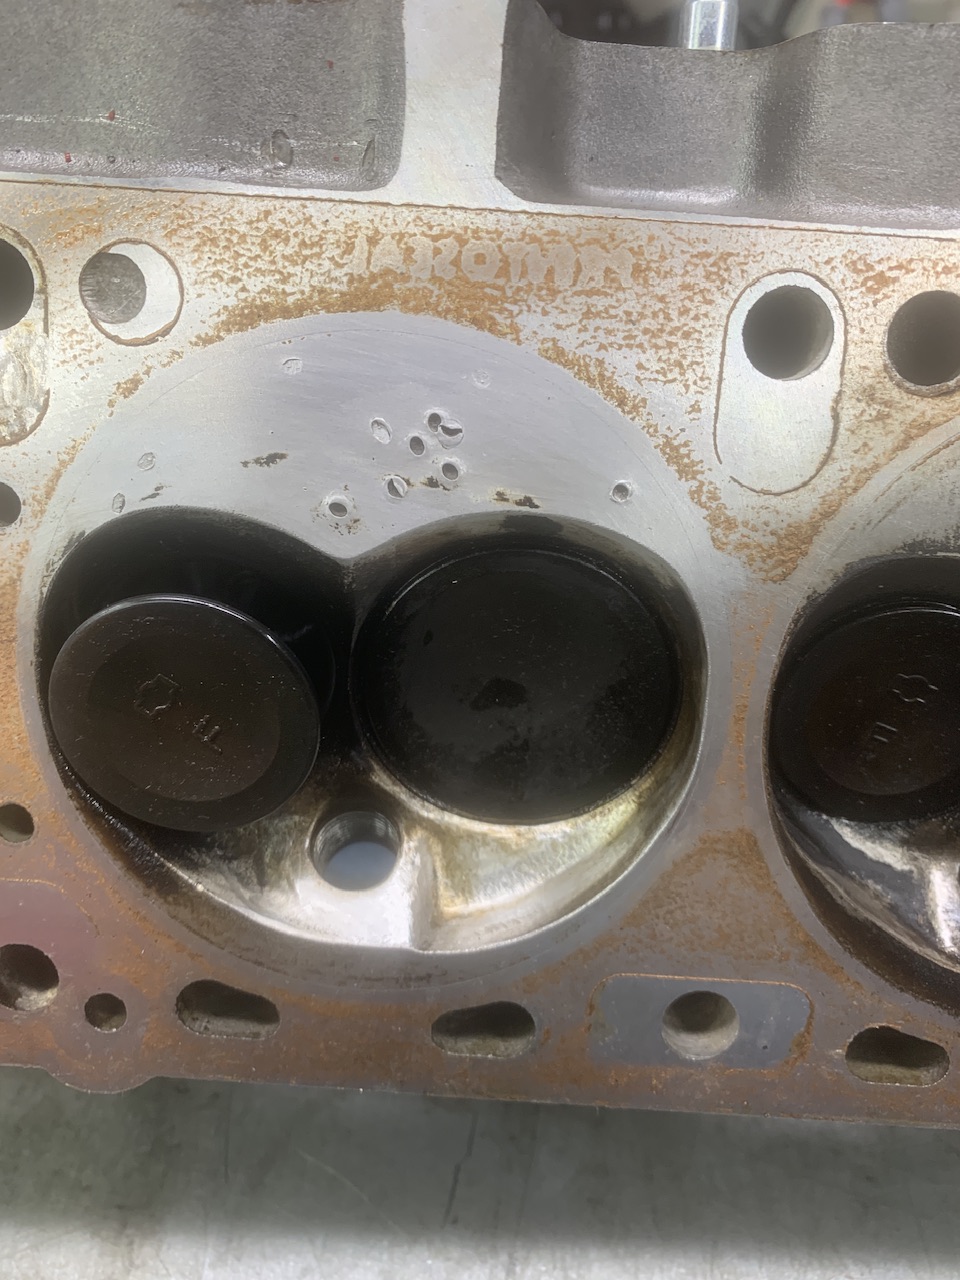
3 pointsThe reliefs are going to be different depending on the orientation of the intake and exhaust valves in each cylinder. Half are I-E and the others are E-I.3 points
-
3 pointsThere's a nice - circular, historical - link between the Castrol brand and 'our' cars too, as they were big sponsors on some of the Works rally team cars in period:
 3 points
 -
2 pointsJust saw this. Maybe I’m late to the game here but this is the first I’ve seen in High Zinc additive. https://www.amazon.com/Castrol-Classic-20W-50-Conventional-Motor/dp/B09QXWLY2Y/ref=pd_rhf_d_cr_s_bmx_gp_la4mehqn_sccl_1_3/139-8531450-3914603?pd_rd_w=kiQ7z&content-id=amzn1.sym.9a6f1177-7e55-462d-bd77-cfaee186750a&pf_rd_p=9a6f1177-7e55-462d-bd77-cfaee186750a&pf_rd_r=XNJ1S7EH8MEJY42D1DAN&pd_rd_wg=0ExCb&pd_rd_r=7f457931-43eb-49a8-9f77-ee3270dc1cf9&pd_rd_i=B09QXWLY2Y&psc=12 points
-
2 pointsThere is lots of stuff I'd like to do.😀 The valves are in good shape and so are the guides, also Dave would like to avoid mission creep, he is looking for a weekend driver that is as close to stock as is cost effective, gotta stay in budget.2 points
-
2 points
-
2 points
-
2 pointsHere’s a pic of known FOD . This was done by a small bee bee of weld that found its way in the intake and got sucked in the engine - it’s a long story . That head is still in use on my 3.2 stroker Are you going to do anything to the head ? New seats , bigger exhaust valve, unshroud the valve areas.

 2 points
 -
2 pointsIndeed! Great detective work, Kats. I don't know if it is of interest, but the old UK concessionaires 'Datsun UK' recommended Glasurit (German) brand paints for repairs back in the early 1970s. They quoted mix formulas for #903 Blue Metallic in both their 20 and 21 Line paint systems. I would imagine that they must have been quite a close match to the original Nissan paints at the time?
 2 points
 -
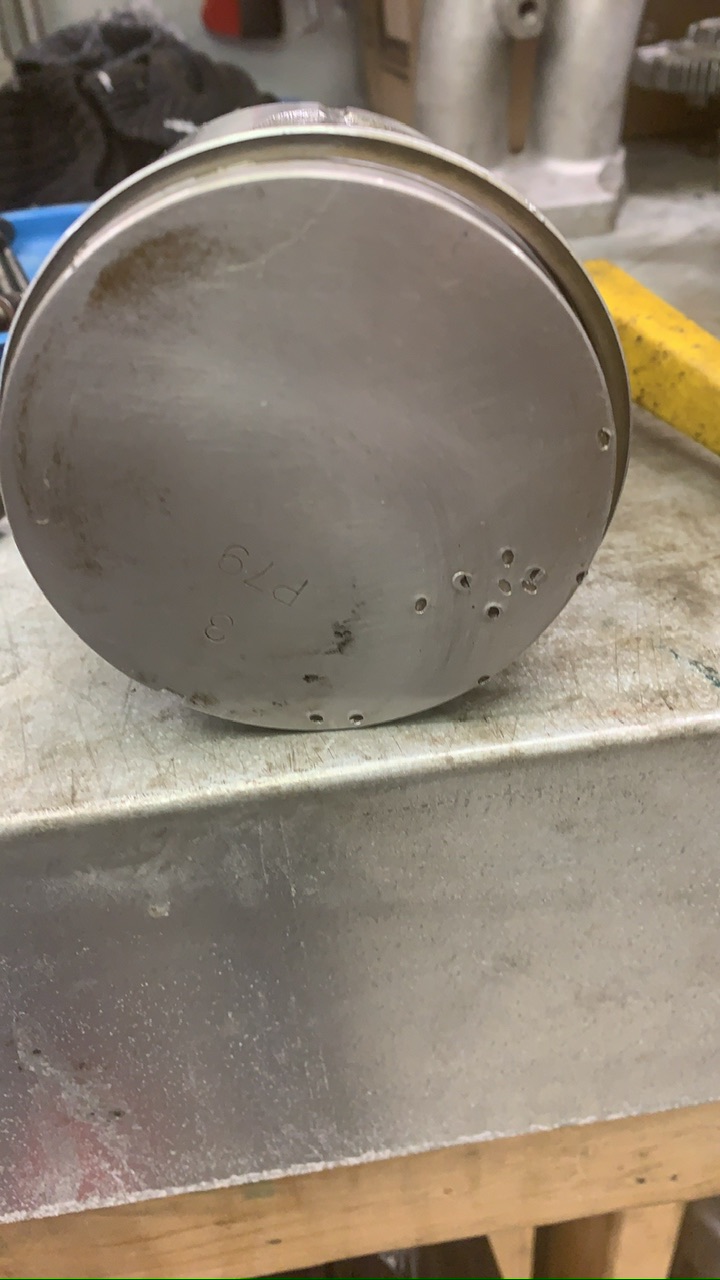
2 pointsI got the head back from the machinist today so I can start putting that back together.
 2 points
 -
2 pointsVery cool! Where I’ve netted out on this is as follows: I am going to punt on the decision to go electric or not until I am closer to starting the car. In the mean time I will build the provisions for an electric fan into my engine harness and if I don’t use it I’ll tuck it away.2 points
-
1 pointWell, that was fast. The connecters arrived a little while ago, and I have put them in a divided storage container so they will be ready to use. If you need YPC connectors, hi-1000ec.com is legitimate. I purchased extra male 3-pin and 6-pin waterproof connectors. The 3-pin is for wiring a conventional Bosch relay for the AC relay. The 6-pin is for jumpering out the voltage regulator connectors in 75-77 280Zs when converting them to internally regulated alternators. I bought connectors that could be used for the center gauges, too. It could also come in handy for a conversion to Speedhut gauges.1 point
-
1 point
-
1 pointThat would be good info for the technical resource area. Glasurit paints are still available, as far as i know. Maybe people could add there paint formulas for factory color match and provide the specs for the paint they used1 point
-
I spotted a FB post the other day where someone was asking about the best oil and filer for their L-series engine. So. I did a search on any available reports or charts on zinc / ZDDP content and came across this one. The new Castrol product is certainly better than the one listed in the chart but the Lucas oils still seems to be the top conventional oil products. ZDDP Chart.pdf1 point
-
1 pointThanks for the suggestions I'll be trying those out today. I'll post any results.1 point
-
Somehow I missed the reply - thank you SteveJ. It's interesting that the Male pin tool is listed as being for molex - the old (late 70's) VAG crimp & release tool kit I have includes an array of interchangeable Molex removal sleeves, but not ones that fit the male/female Yazaki sizing. Perhaps I lost some sleeves over the years. The nice thing about that tool is that it is spring loaded, so it pushes the terminals out after relieving the spring tab. I'll get the variants you've listed, since they work for this application. Thanks again!1 point
-
1 point
-
Update: so after some late night reading of the FSM, I found on p.BE-95 that the yellow wire is indeed supposed to be connected to the BCDD. The black wire is supposed to be connected to the ignition coil external resistor positive terminal. I will connect these soon and report back. I doubt this could be the root cause of my problem, but I do not think thses should be disconnected and hanging free and dangling in the engine compartment.1 point
-
1 point
-
I do like this stuff. Getting pricey and harder to find, at least in my kneck-of-the-woods.
 1 point
 -
1 pointA core is the galley by which the oil flows through. At first, I noticed a difference between the top brackets. One side mount and another top mount, as you show, Alan. But I see both side and top on the 18 core cooler, so...1 point
-
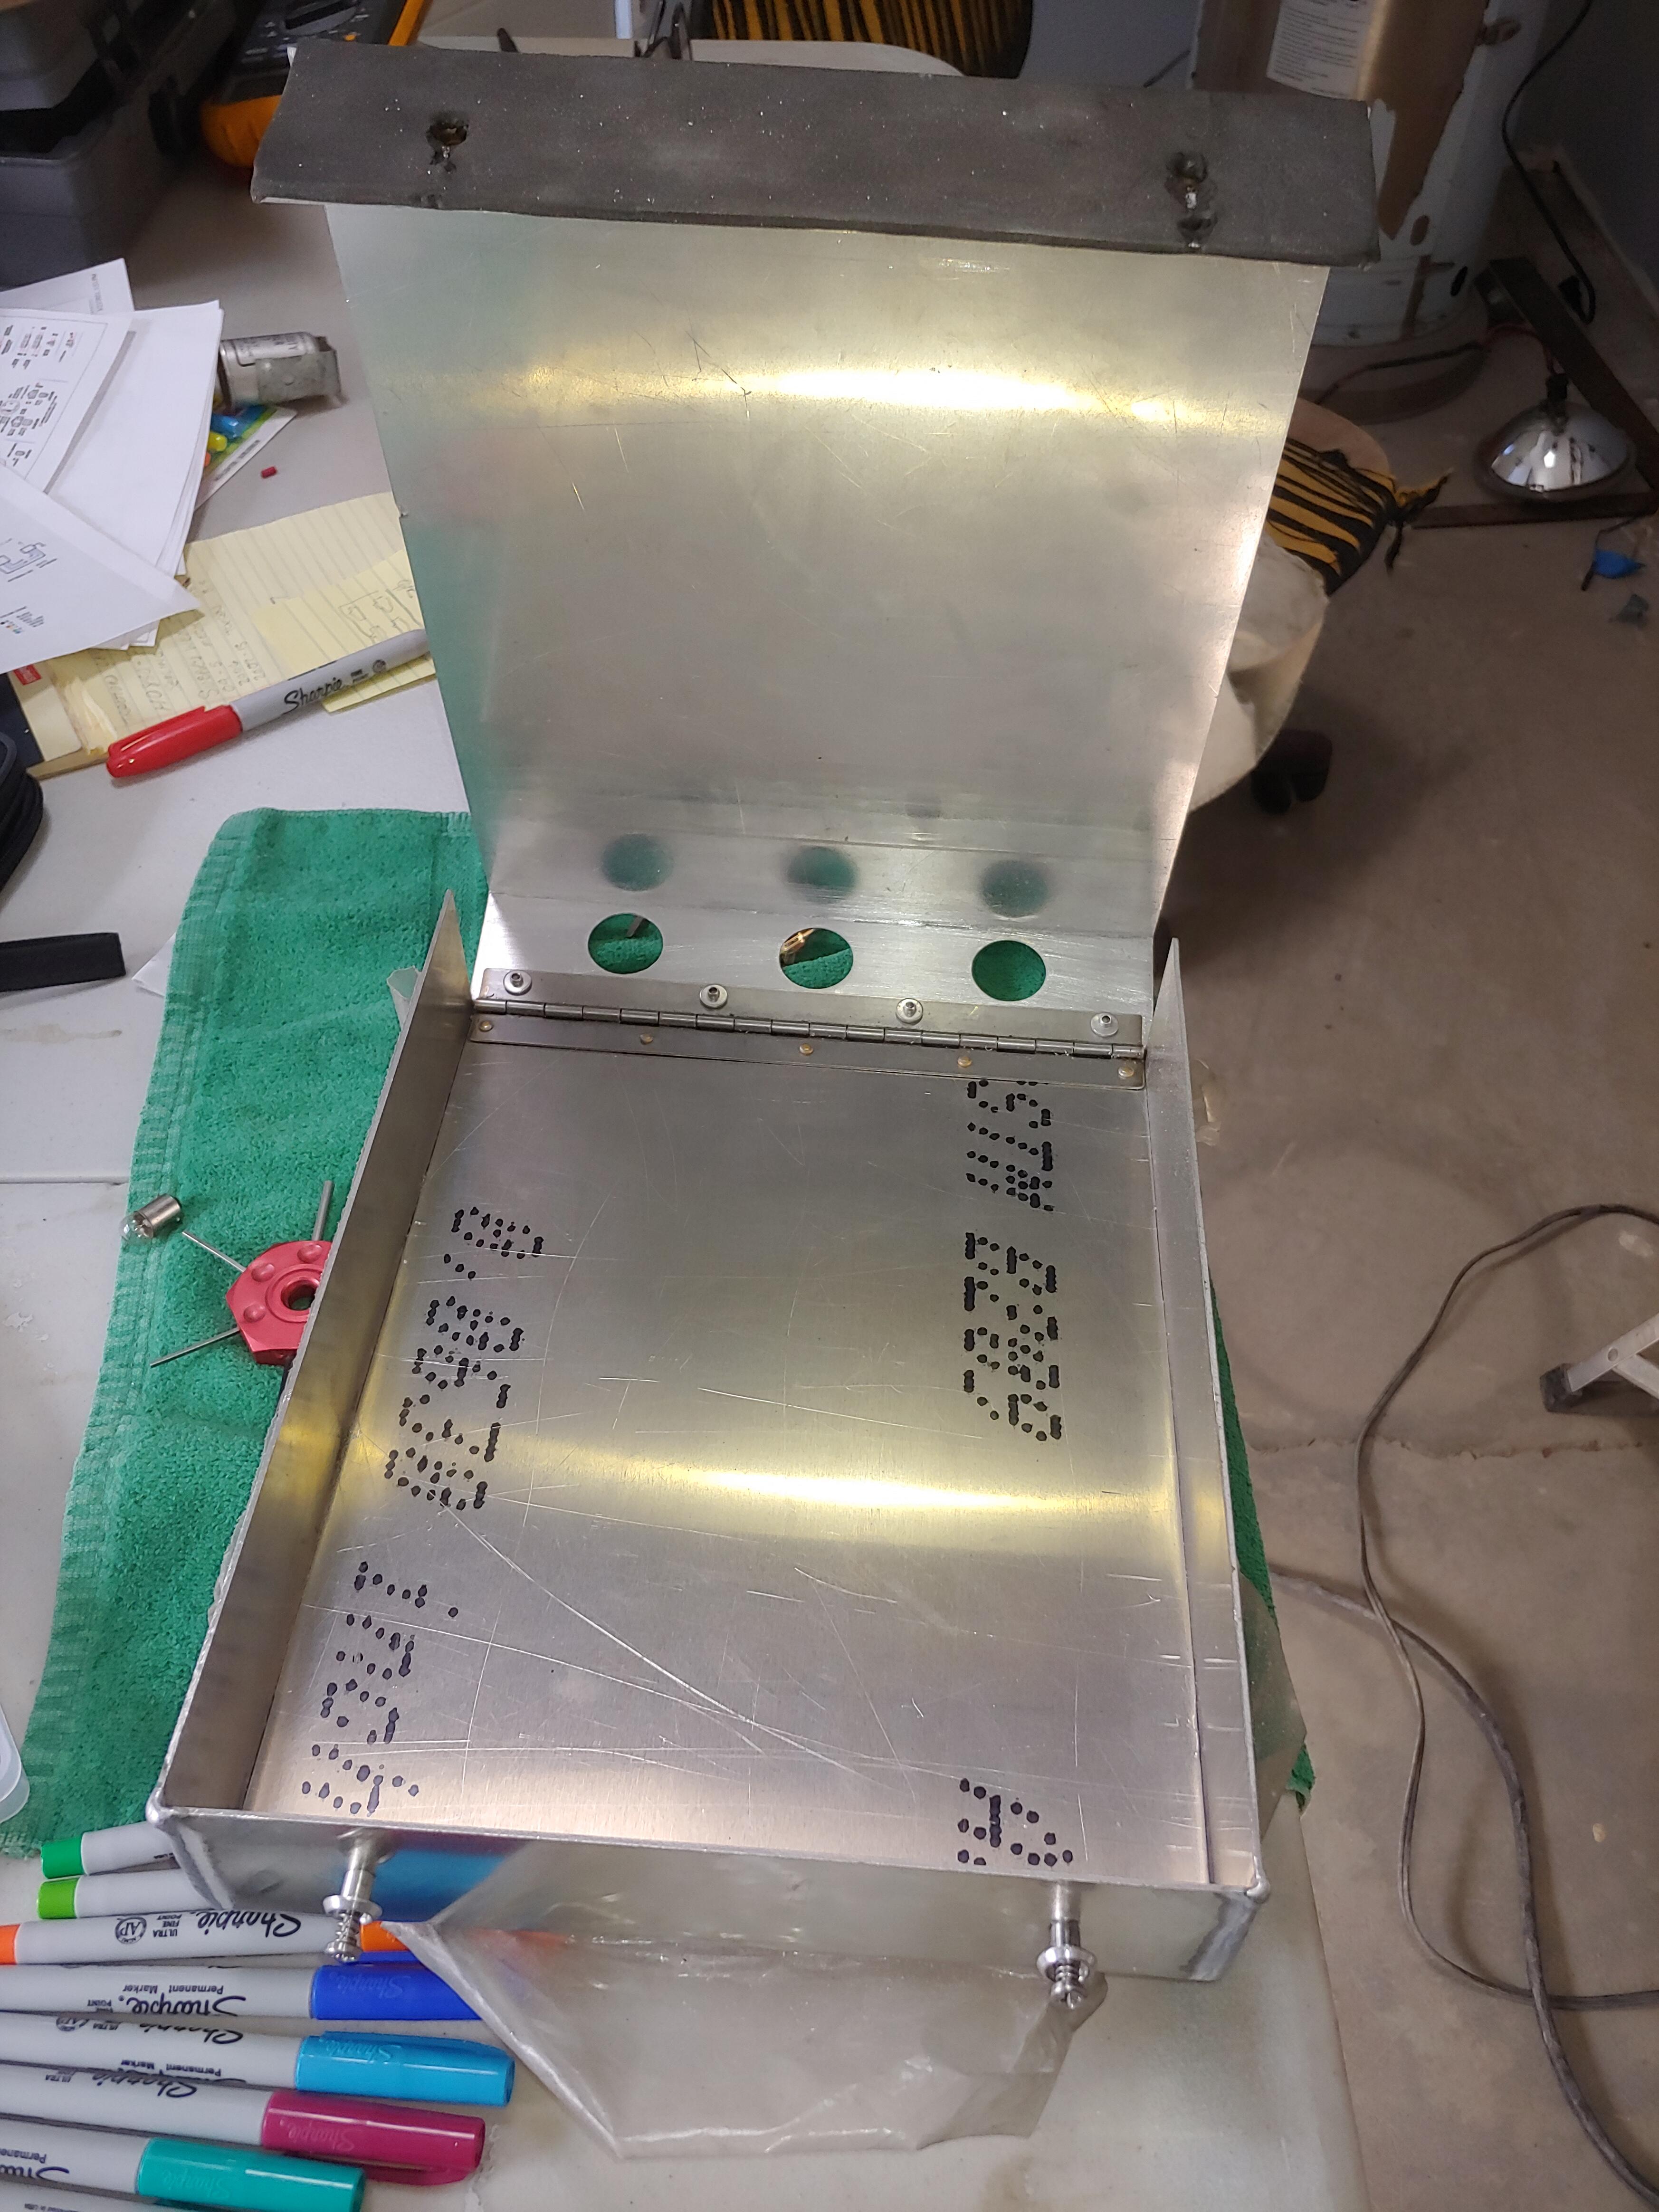
Won"t get into the pros and cons with electric fans. But for me its the only why to go. Did it on my 32 ford that I built. Matt on your relays I went though the same problem Spend all kinds of time at junk yards on the net looking for a relay box. Ended up having one made for me. You can go to any Hot Rod or custom car shop that does real fabrication work and they will build a box for you. Mine cost me $50 plus materials. I mounted it in front of the battery mount. Now my car had been hacked by POS where I even had to replace the right side if the firewall. First pic is relay box the lid has rubber seals on it to keep moisture out. It has a power relay to supply the relays above it. A ford enertia switch controls ground to fuel pump relay
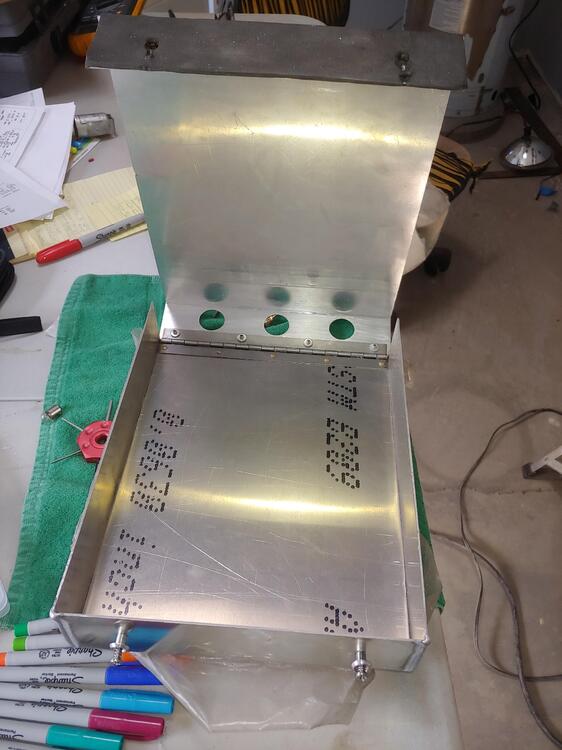
.thumb.JPG.b181eccfe801ca4cebf93bcd1e7e6d87.JPG) 1 point
1 point -
1 pointDing DIng! We have a winner! I don't think we needed the entire song lyrics quoted, but we have a winner! Wango Zee Tango!!! Hahahahaha!! Now go pretend your face is a Maserati and sorry for the diversion!!1 point
-
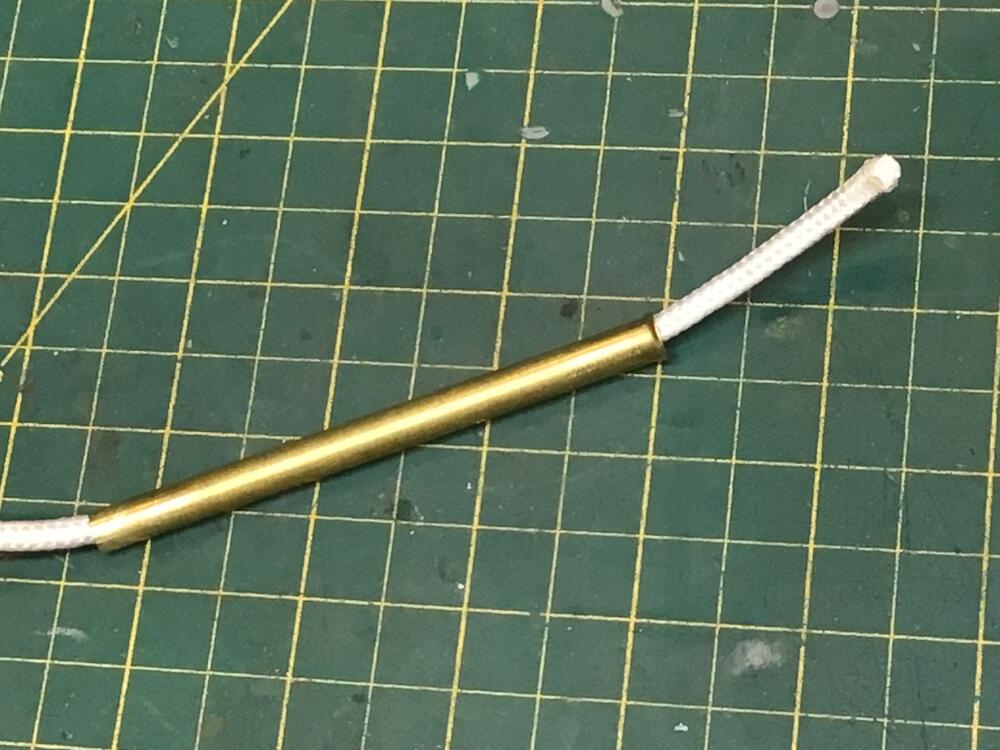
1 pointJim, you clever bugger, I love that cord in the tube idea and the corn starch, I'm going to try both next time.1 point
-
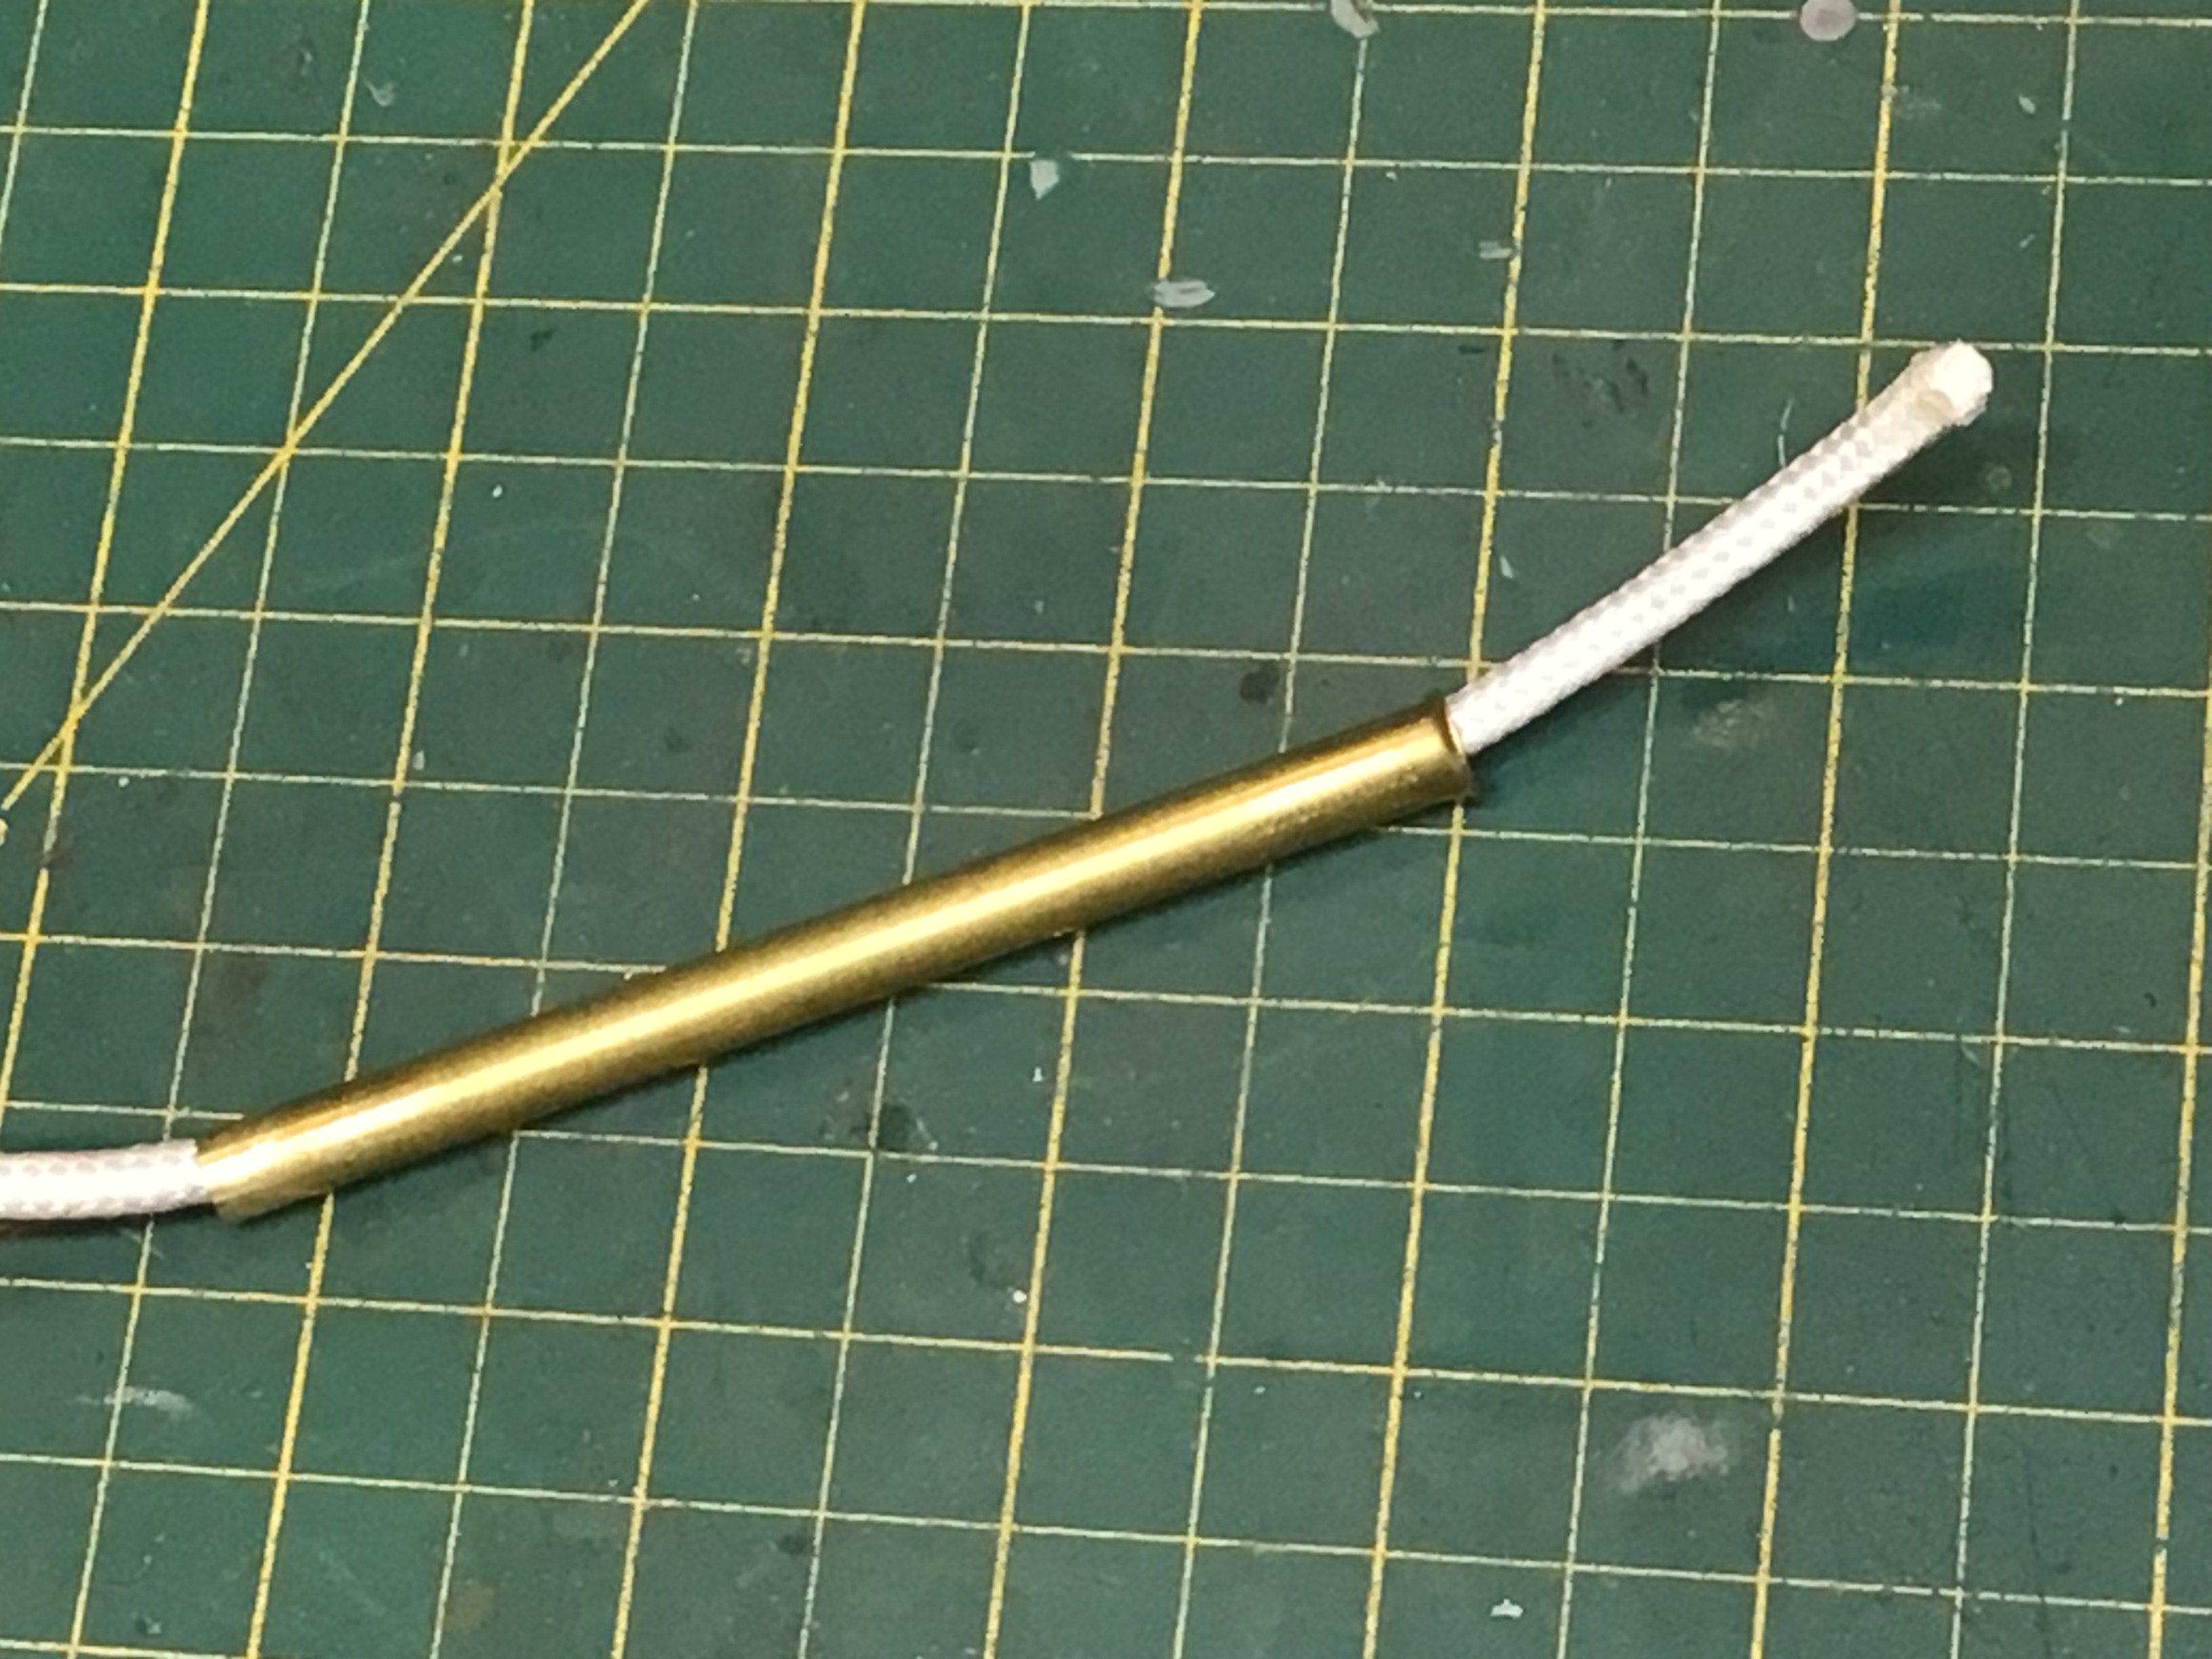
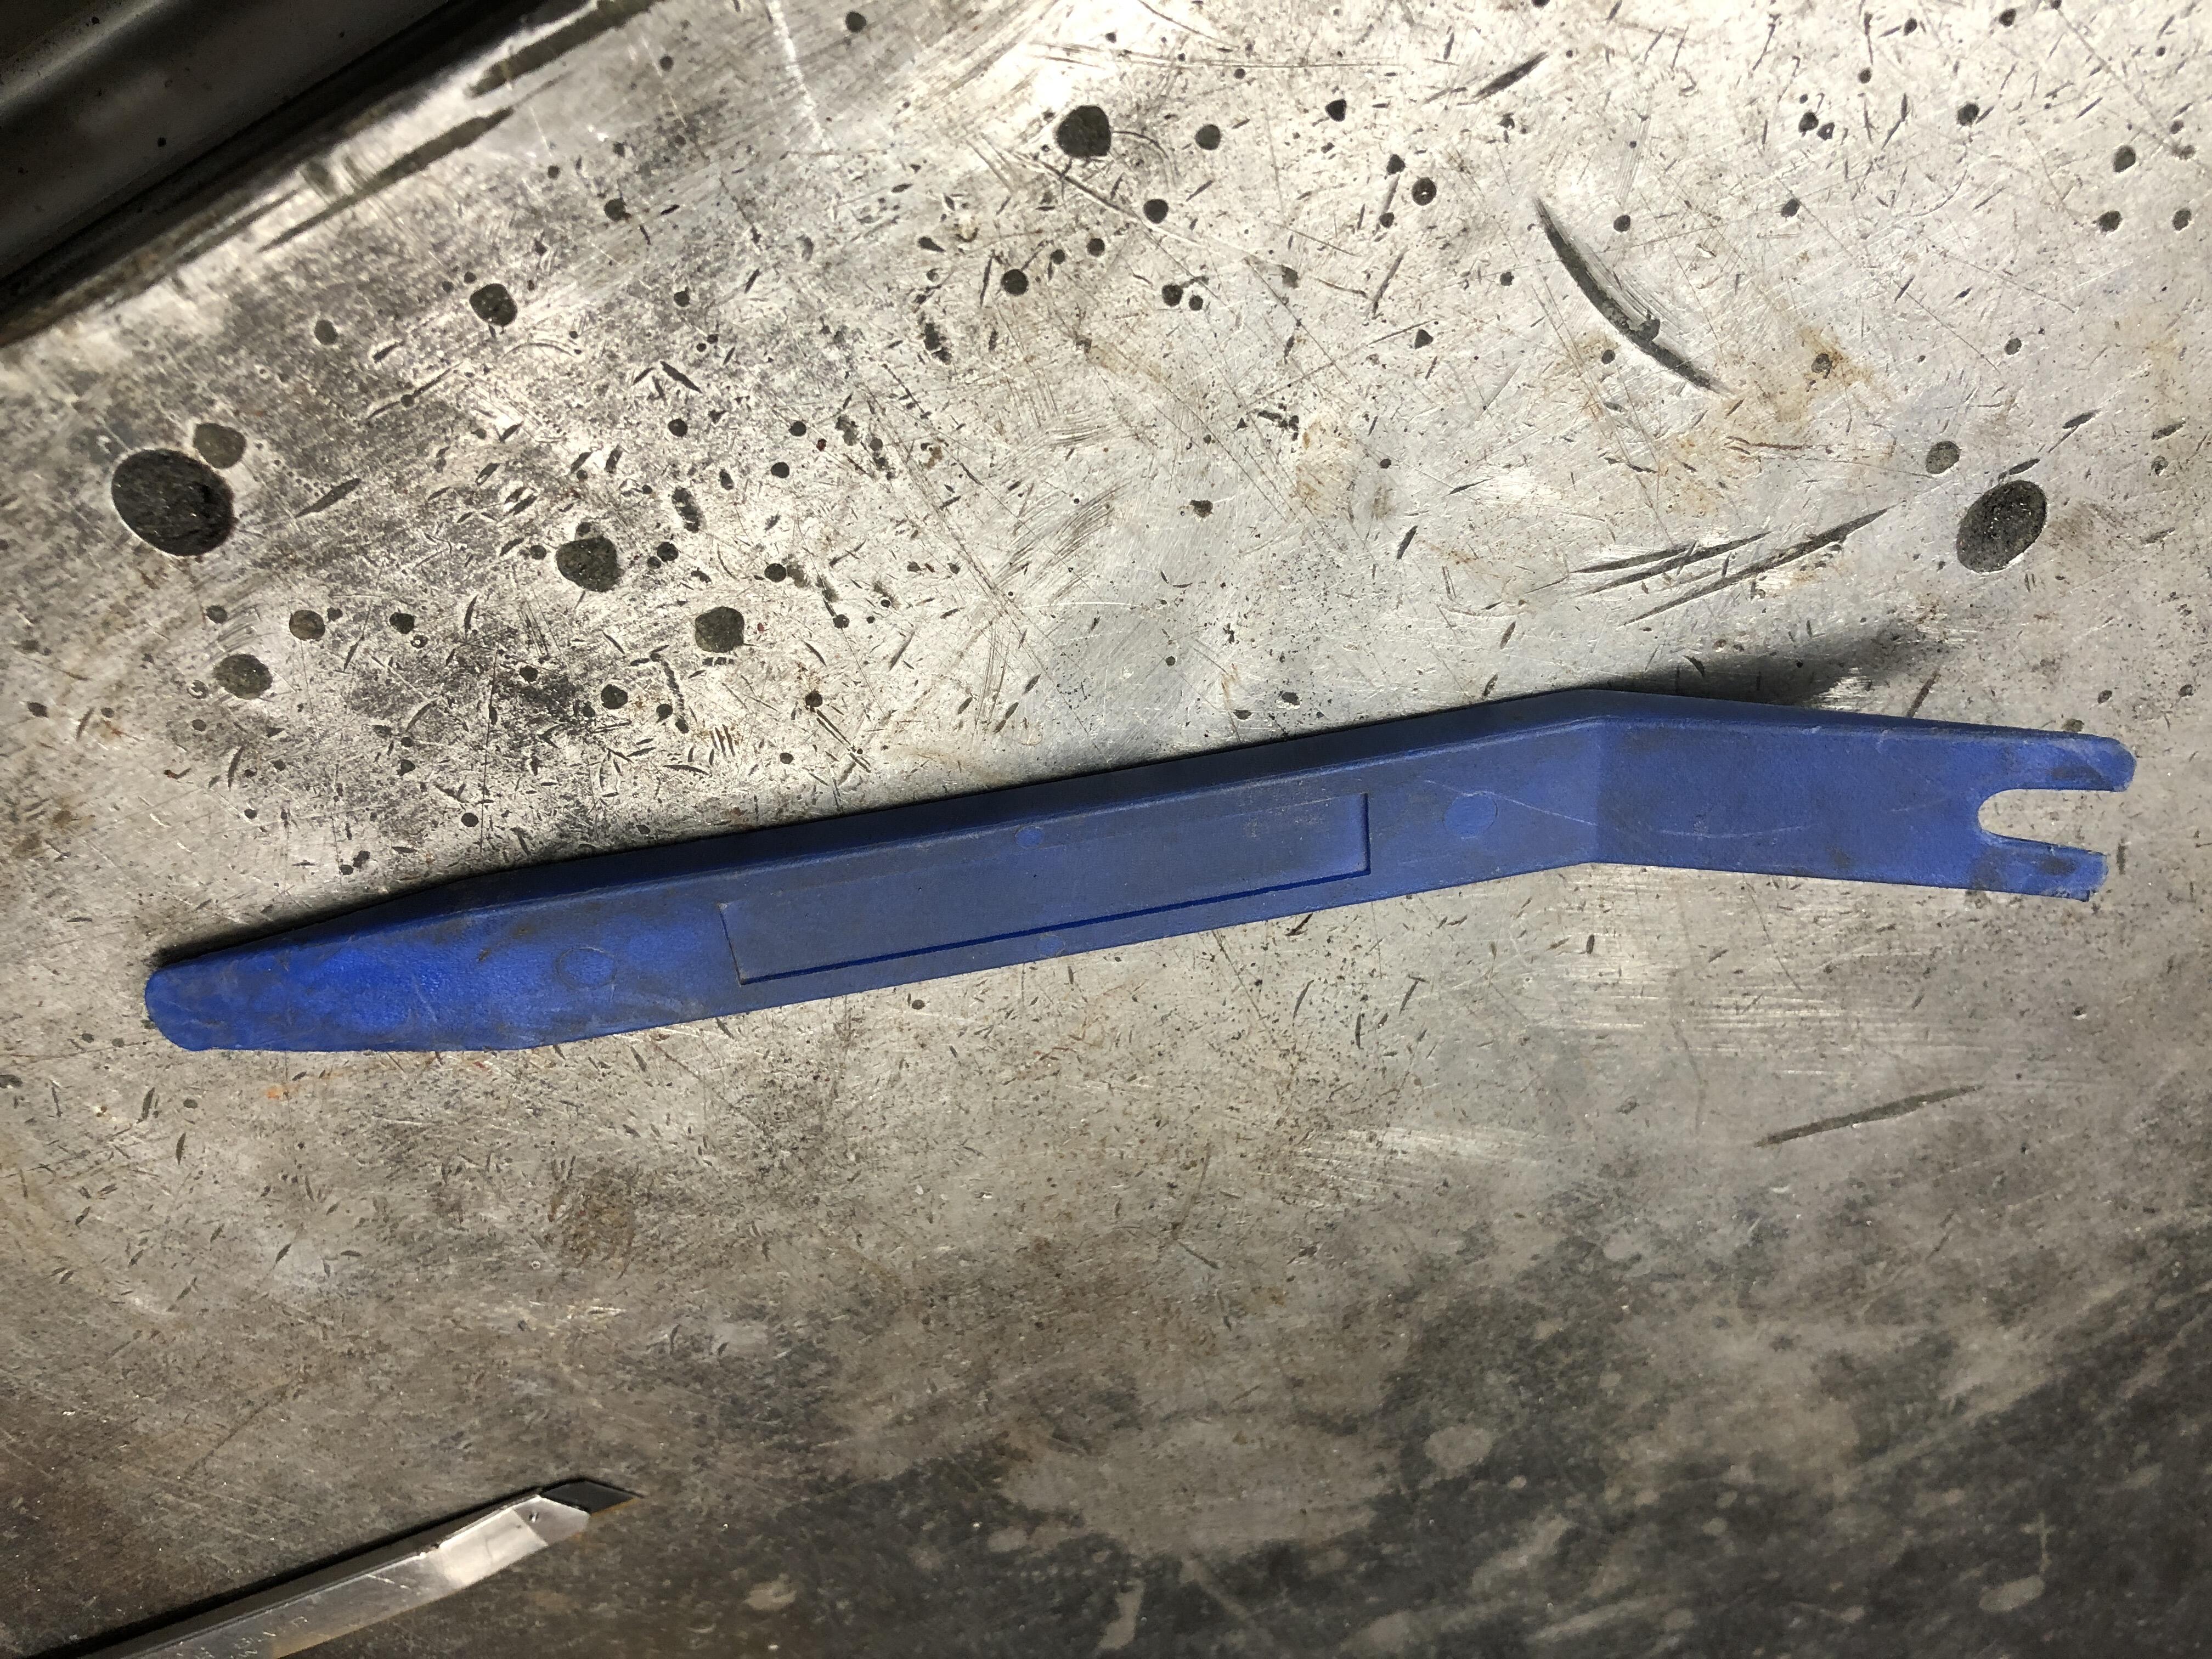
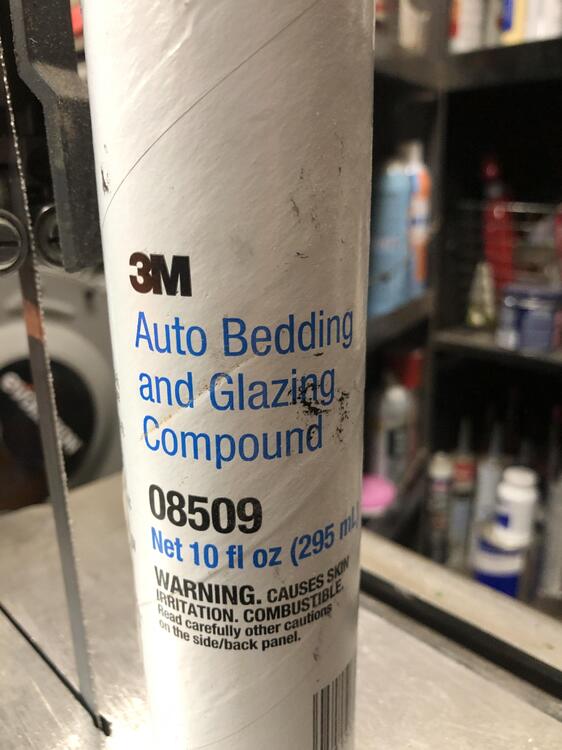
1 pointExcellent write up. If I may add a couple of personal experience notes. 1. Putting the cord in the groove. I use a short piece of brass tubing, 1/4 OD or something, 4 inches longish, whatever will let your cord of choice pass through easily. Poke the end of the tube into the groove and drag it along, it will deposit the cord in the groove like magic. Should take you literally 30 seconds to do the entire circumference. 2. Lube. Tried all kinds of wet lubes, none were all that useful. If you feel compelled to use lube, try corn starch. Dry, stays put, cheap, easy clean up (blows away without doing anything actually) and makes rubber slippery without being greasy or drys out like soap. 4. Spend more time than you think you should getting the gasket/glass sitting as low and close into the window channel as you can, flush with the body all around, and centered left right. This will ensure an easy cord pull as the rubber lip is nice and close to the pinch weld. 3. Biggest trick of all is to use two cords instead of one. Start one top center and go around left, end at bottom center. Same for the right. Leave a foot at each end top and bottom. Pull a bit of the bottom, left and right six inches, then repeat on the top, left and right, continue left and right, balancing your pull top and bottom. Go around bottom corners first, then the top, though it really doesn’t matter. Why is this such a great deal? Balance. All the problem I had during the first dozen installs revolved around gravity. I always started at the pull at the bottom and ended at the top, if I went the other way, gravity would pull down and make the bottom sit far too far away from the pinch weld. At least if you set the bottom first, then the top is likely to stay closer. Still by the time you get around the top corners 3 of the 4 sides are in, and the top “tends” to be farther away from the pinch weld than is ideal and you end up fighting to get that rubber lip over the pinch weld. If you do the top and bottom at the same time, you have balanced gravity and trap the glass top and bottom, which are also the longer edges, so by the time you get to the sides, it’s all over but the beer drinking. You can also see if you’re slightly off center left/right before you do the sides, and have a chance of easily pushing it back out to start over. You do NOT want it off center of course. Leads to leaks. Bad enough that most seals I see don’t have molded bottom corners. Rubber never seems to sit right often exposing those bottom corners. Sealant time. See the picture below of what I use. Doing this balanced technique, I often don’t need a second person pushing on the glass from the outside. As long as ensure you get the glass/gasket down as tight to the body as possible before you start and maybe get out a couple of times to push it down as you get going around the top, or just before you start going around the corners. If you’re a social person, then get four buddies, one on each corner and you’ll be done in 5 minutes. 4. Setting the lip over the pinch weld. As you pull cord and the rubber lips slips over the pinch weld, I spend a few moments pushing the lip firmly down onto the pinch weld, seating it more completely than just where ever it sits after the rope passes that point. Makes double sure the glass is pulled down into place. I use a flat plastic tool to get between the glass and lip and press the lip away from then down over the pinch weld. I use a 5/32 white nylon cord, but I like the idea of thick string trimmer cord. Should have less friction. Whatever you use, wear thick leather gloves so you can pull without pain. Too old for that grin and bear it crap.

 1 point
 -
1 pointWe have never broken one during removal or install. We were very nervous about removing and reinstalling the windshield with the crack so we were super careful (and had a fair amount of experience on our side at that point.) In the beginning, we were super careful because we weren't sure we could find a replacement. Then we had some solid experience, and had developed a removal method once we found that we could source replacements. I have broken a windshield out of the car... On our shop move a few years ago, I didn't pack one well enough... And, who says it doesn't get cold in Arizona? Why I've seen temps in the mid-to-upper 30's!! - well, until the sun comes up... (and I'm wearing a light jacket while these Arizonan's are bundled up in ski parkas - I grew up in Idaho and waited for the school bus in -30 temps.) Okay, I'll admit that we don't trust any modern windshield installers. They glue windshields in. That's pretty much all they know. A gasketed windshield installed over a flange is foreign to them. So, here's how we don't crack windshields: A. Use a utility knife (Xacto knife, single edge razor blade) to slice away the thin rubber that holds the trim on. Remove the stainless steel trim. 2. Utility knife - slice the exterior gasket carefully in the flat that was covered by the trim. You're looking for the edge of the glass. Once you find it, cut around it - all the way - enough that you can remove all the rubber from the outside face of the glass. 2b. You can do the above by yourself, but what follows really needs an assistant. Or two. c. Carefully push the glass out from inside the car. Lift just a little bit all along the perimeter until you're sure that all edges of the glass are unattached and it can be removed without interference. D. Remove the rest of the original gasket from the flange and clean the flange completely. REMOVE the dash finisher (the black crescent moon shape metal piece). 5. Get the new or exisiting windshield on a stand and install the new gasket on the glass. Be sure the glass is fully in the channel all around. Lube helps - very soapy water. 6. Install the stainless steel trim - not the corners, just the long pieces. Ya, do it now - it's MUCH easier than after the windshield is in place. The back side of the trim IS SHARP. It'll slice the rubber if you're not careful. You can file or sand the sharp edges if you're OCD (or even if you're not...) You have to raise the rubber flap up and over the edge of the trim. Lube helps - we use Meguiar's Hyper Dressing - and a smooth skinny tool: Awl, pick, screwdriver, smooth without sharp anything that will cut the thin flaps that hold the trim. g. Install a long cord in the gasket groove - thicker is better - like the olde tyme clothes line cord, cotton is better, but I have 3/8" polyester that works. WET the cord FIRST - yup, soak it in water. Add a little dish soap if you want, we need lubrication. The cord needs to pass each other at the meeting point by 10-12 inches. We like the meeting point at the top of the glass in the middle and the ends need to hang out fairly far - you need to get a good grip on either one - perhaps wrapping it around your hand. H. Lube up the windshield flange metal with some dish soap and water or Hyper Dressing. i. Two people - set the windshield - with the gasket snug all around - into the flange. Cord ends should be inside the car. Make sure it's centered all around. ii. One person is going to pull the cords inside to pull the rubber gasket into the interior of the car, sealing it to the interior side of the flange. At the top and on the pillars it'll be set over the vinyl. The other person is going to be on the outside holding the glass in place while the cord is being pulled. That person will use both hands as often as possible, palms down, fingers splayed on the glass. Their job is two-fold: 1. As the cord is pulled, the glass will want to move opposite of the pull (starts at the top, it'll want to move down, when the pull is on a side, it'll want to push to the other side. Exterior person needs to keep the edges of the glass/gasket from moving out of the hole the windshield sits in. 2. When the cord is pulled the glass needs to sink into the frame when the rubber is pulled into the interior. So, a certain amount of exterior pressure can be needed to keep the glass settling inward as the cord pull progresses. J. With the person with hands on the glass externally, the person inside starts to pull the cord. The cord hanging on the right side will be pulled to the left, and vice versa. Pull one cord only. Pull it at a 90 degree angle to the glass. Pull carefully and slowly if necessary. Don't pull so fast that the person on the exterior can't manage keeping the glass in place or help you get the glass to sink into the hole. I'll be easy until you get to the top corner(s). Stop at the corner and pull the gasket up on the inside and get it set into the flange as much as possible. The gasket needs to be pulled outward (like lifting it the same direction as the outside edge of the glass) getting it to set firmly in the flange. That helps the glass pull inward as well. At the corner, go very slowly and swing the cord in a circle as you're carefully pulling corner gasket rubber. Sounds stupid, but it works and doesn't cut the gasket. Once past, make sure your helper keeps the glass from moving out of the hole on the opposite side. Before getting to the bottom corner, pull the gasket into the flange - do it as you go and it'll help. Now pull across the bottom - it'll want to make the glass pop out of the side that's not pulled yet. All this time your helper needs to be getting the windshield to push inward as you're pulling cord and setting gasket into flange. If you have two helpers, it makes it very easy. Keep going around the entire windshield and do the second top corner same as the first. Pressure on the outside. Finish up by pressing firmly down on the outside, and pulling the gasket firmly into the flange on the inside. k. if it doesn't set right - have no fear - just remove it and start again. Pull the gasket rubber on the inside down on one corner and push that corner out carefully - continue around the whole windshield, take a deep breath, lube it up, try again. (But... It's a LOT easier if you're patient and get it right the first time...) L. Push the gasket out as far as you can - especially at the top corners. Install the trim corners and gap cover pieces. The stainless steel trim is not just for looks - it helps maintain the gasket in it's proper place and will help stop the gasket from pulling away from the top corners. Don't use it at you own peril... Note: I do not use any adhesive or gasket seal. These gaskets were designed to seal around the glass and flange without it. Now, I'm fully aware that that isn't always true. BUT, Arizona (no rain) and Z owners here wouldn't (don't) drive their Z's in the rain even if there was. Okay, they still wash their cars, but heat and NO humidity dries things FAST here. YOU can decide for yourself if you want to use such a thing - Nissan did - in spots - on the later models. I still don't. And: Patience is the key to Joy... Fortune cookie...1 point
-
1 pointYou work in Arizona where it never gets cold. Did you or your son ever break a windshield? You said you replaced dozens but didn't say that you never broke one. My first experience removing a windshield was in a wrecking yard. The owner was gone and his wife told me and my friend that we should wait but I told her that we could do it. It was about 35 F. A small tendril of adhesive was still attached (GM used a rope of sticky tar-like adhesive for windshield installs. Nasty stuff) as we tried to lift it out and it cracked. We left, I didn't pay for it (cause I was a punk kid), and the owner started calling me "Easy Money" after that. In the long run I paid him back by giving him a 66 GTO (the same one that I was getting the windshield for) after I wrecked it, and his son a 55 Chevy pickup truck after the axle bearing went bad. The statement was, basically, that old windshields, especially those with chips, are more prone to cracking than new ones. Just because you guys were careful enough to get it done doesn't mean the statement is not true. Anybody who's watched a chip grow in to a crack and spread across the windshield should know. Tell some stories about how to get it done. Heating the adhesive helps, a warm day helps, make sure that every scrap of adhesive is cut free (a PO might have tried to seal a windshield leak in the past). Stuff like that. Interesting though that by the statement it broke during installation. So the BS calling ia about the wrong part as are my suggestions above.1 point
-
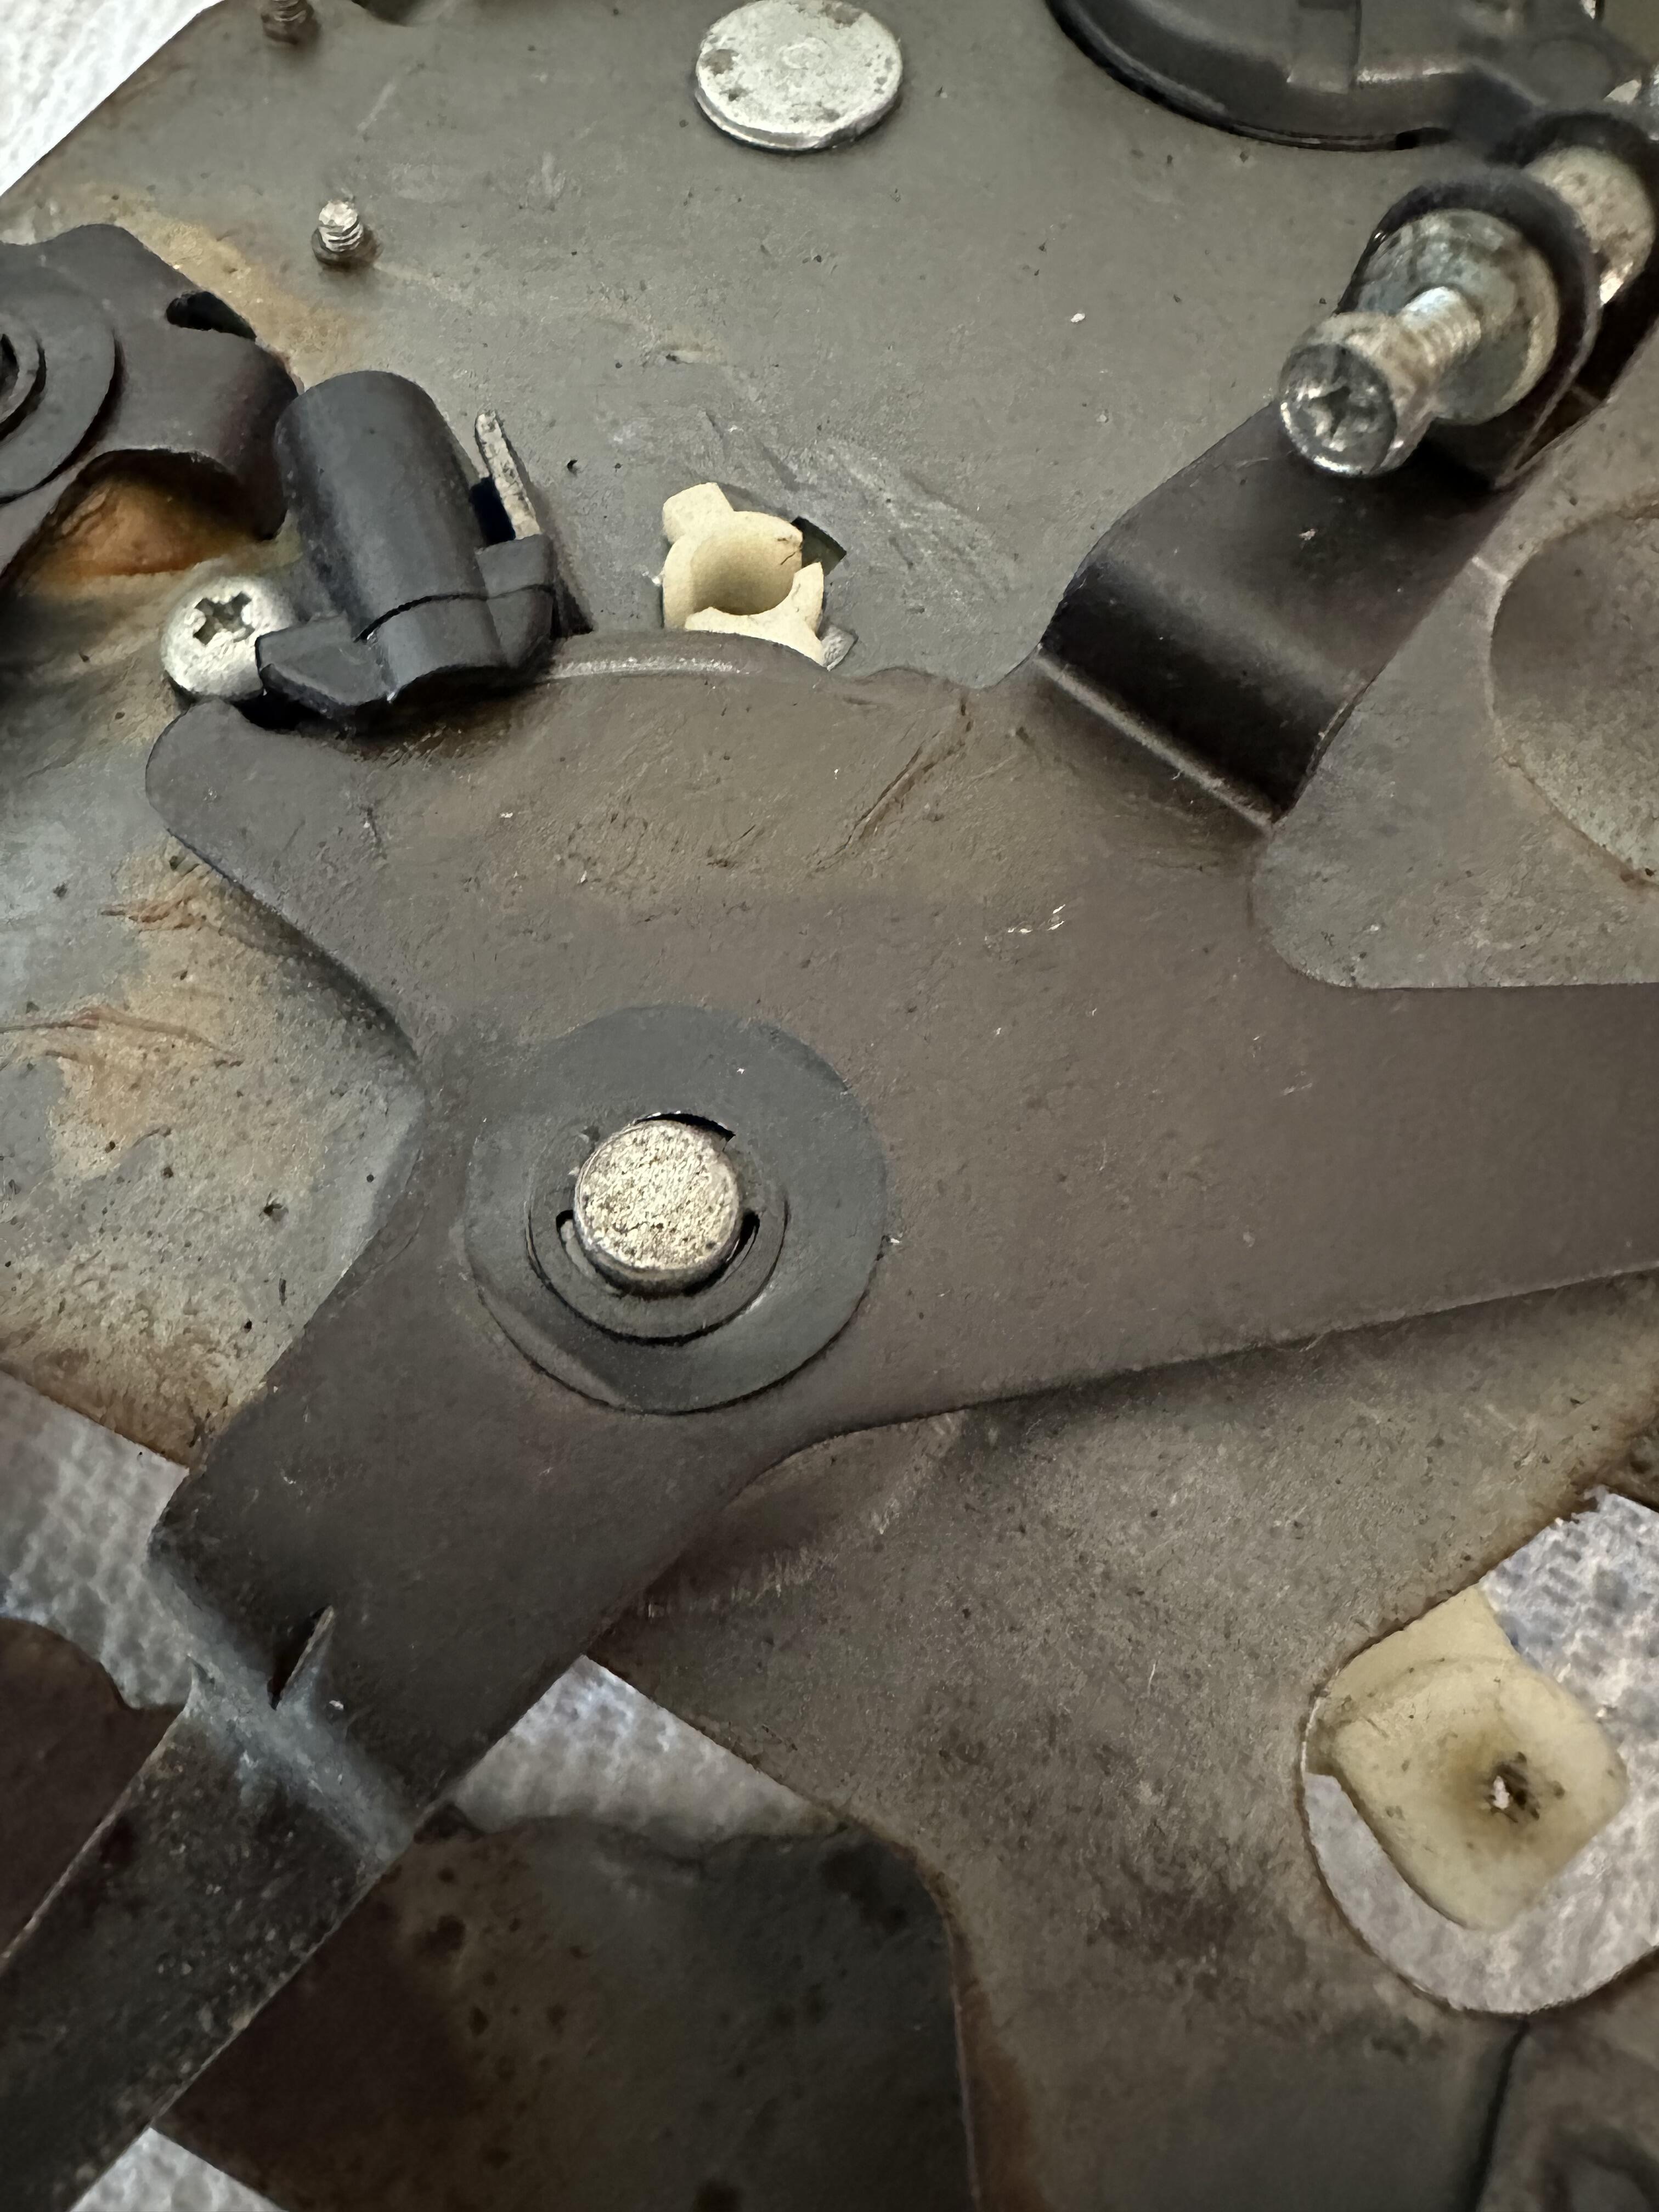
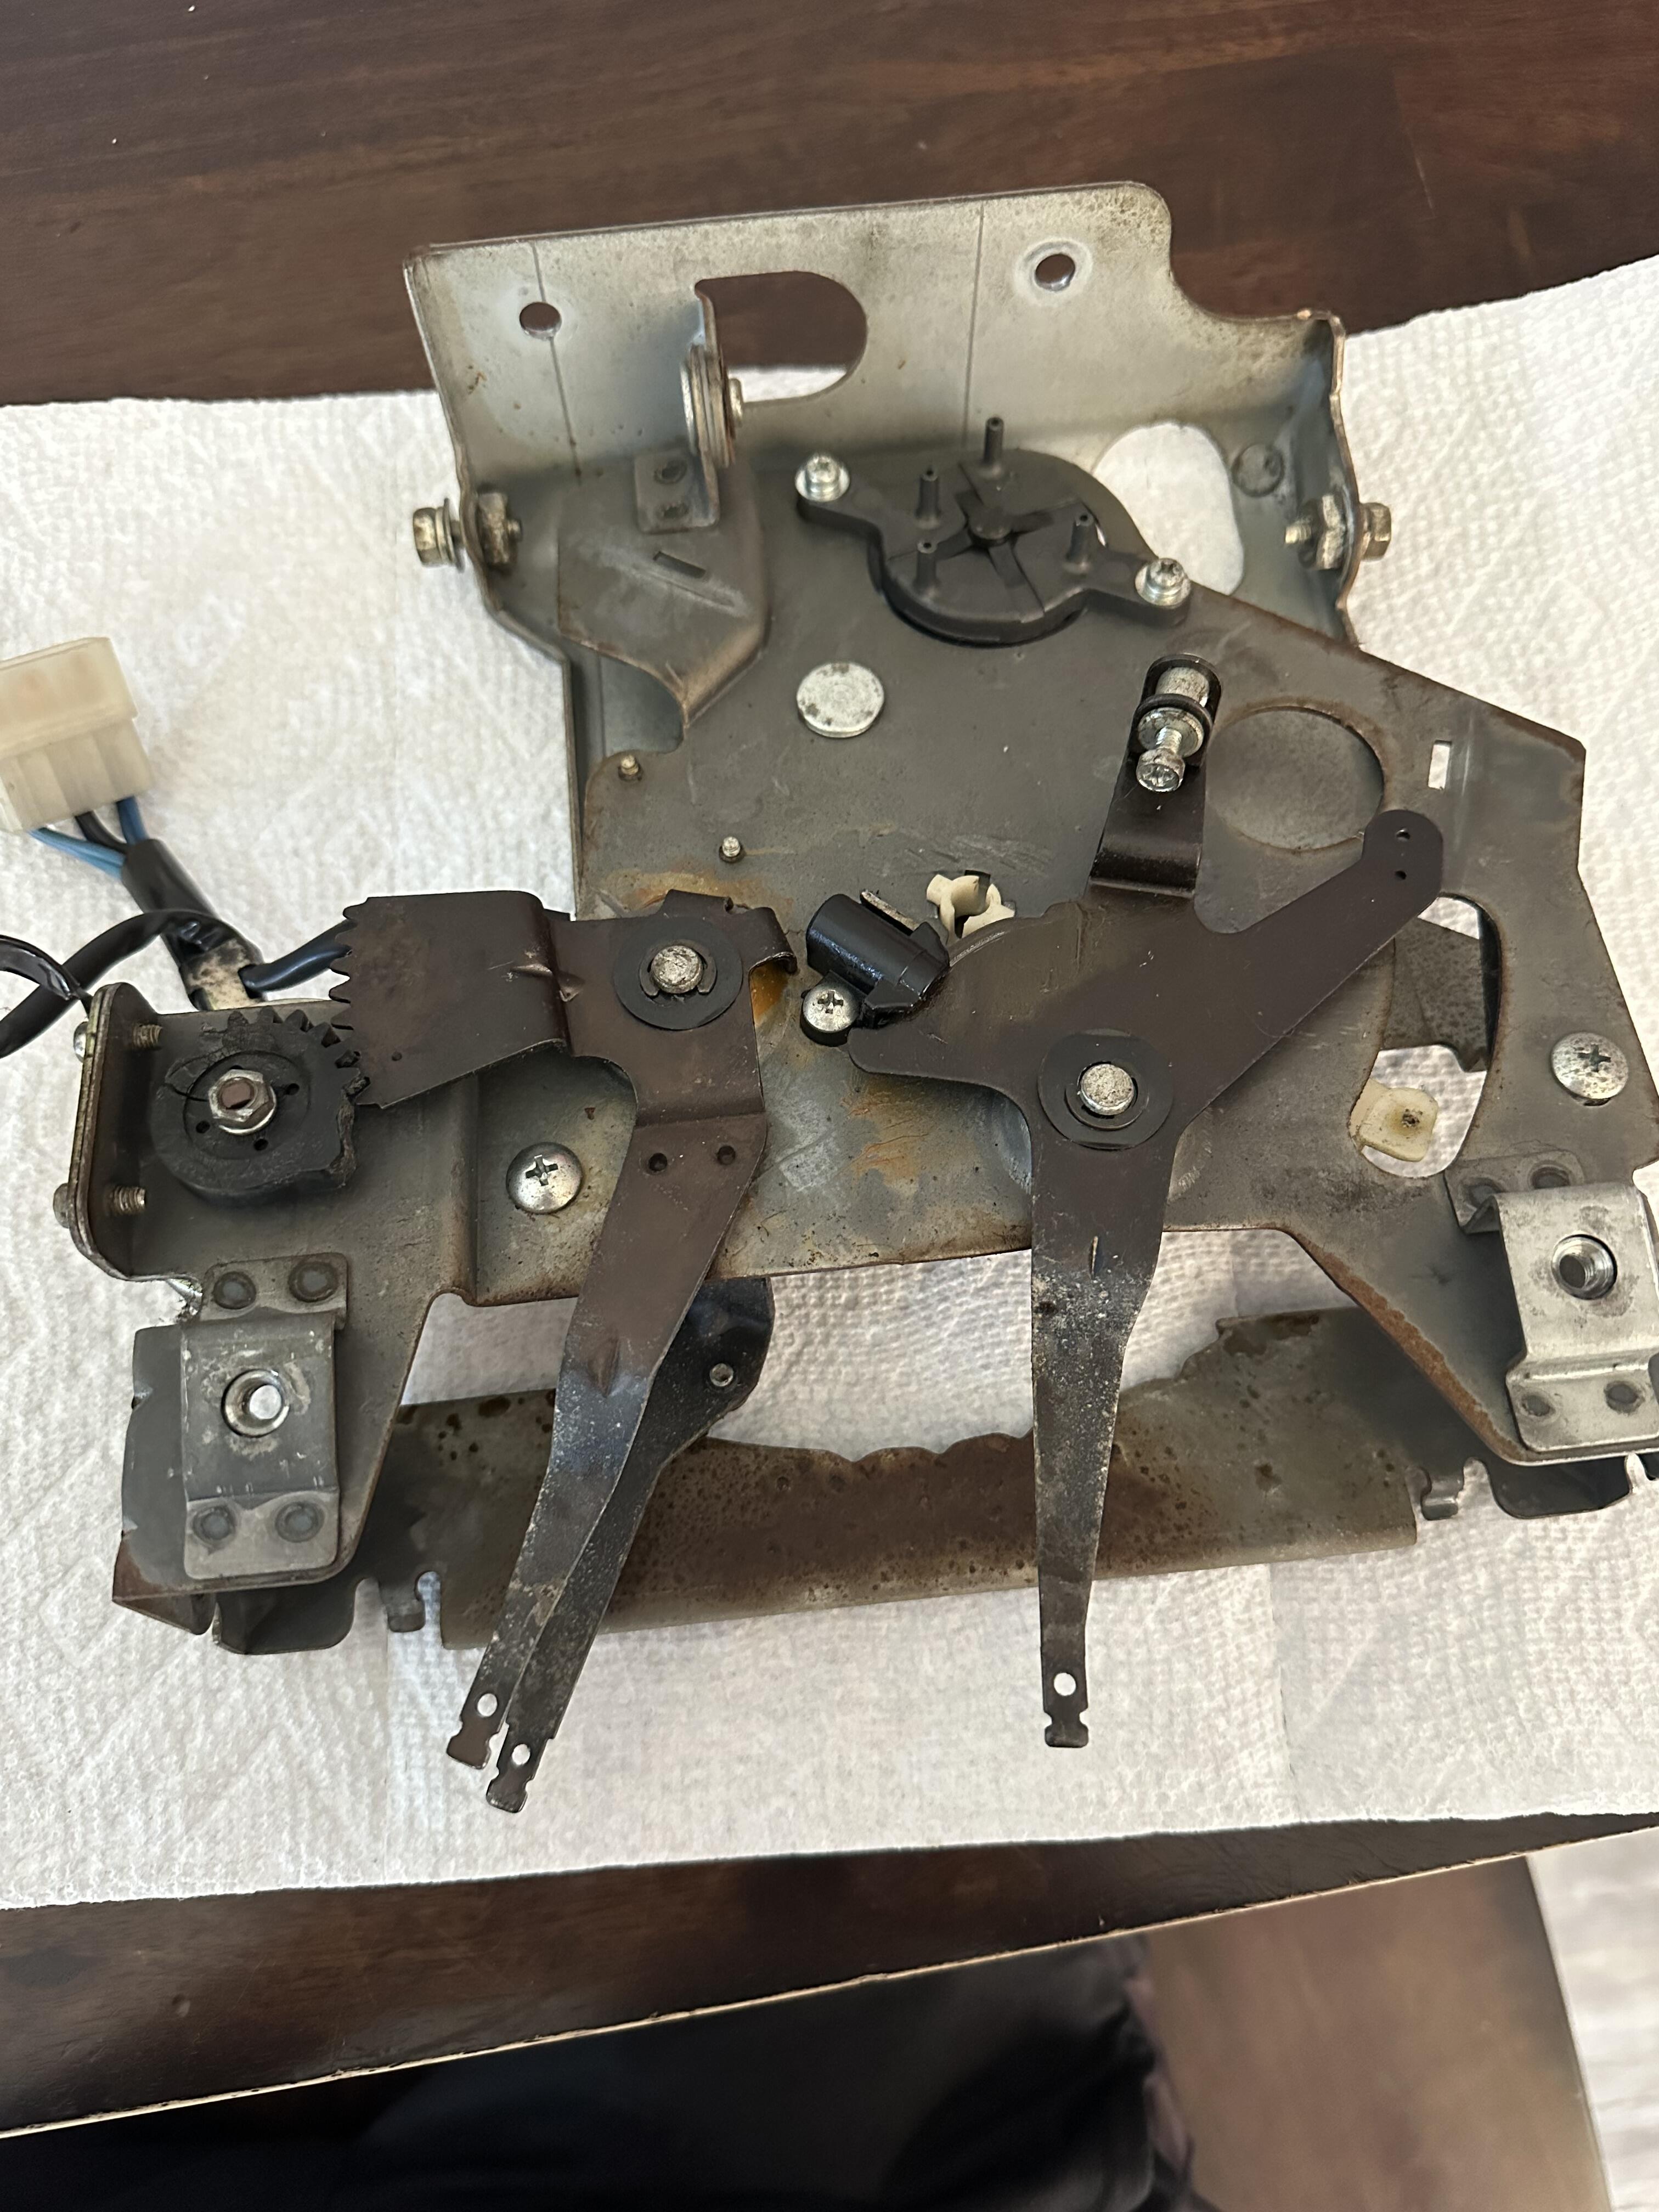
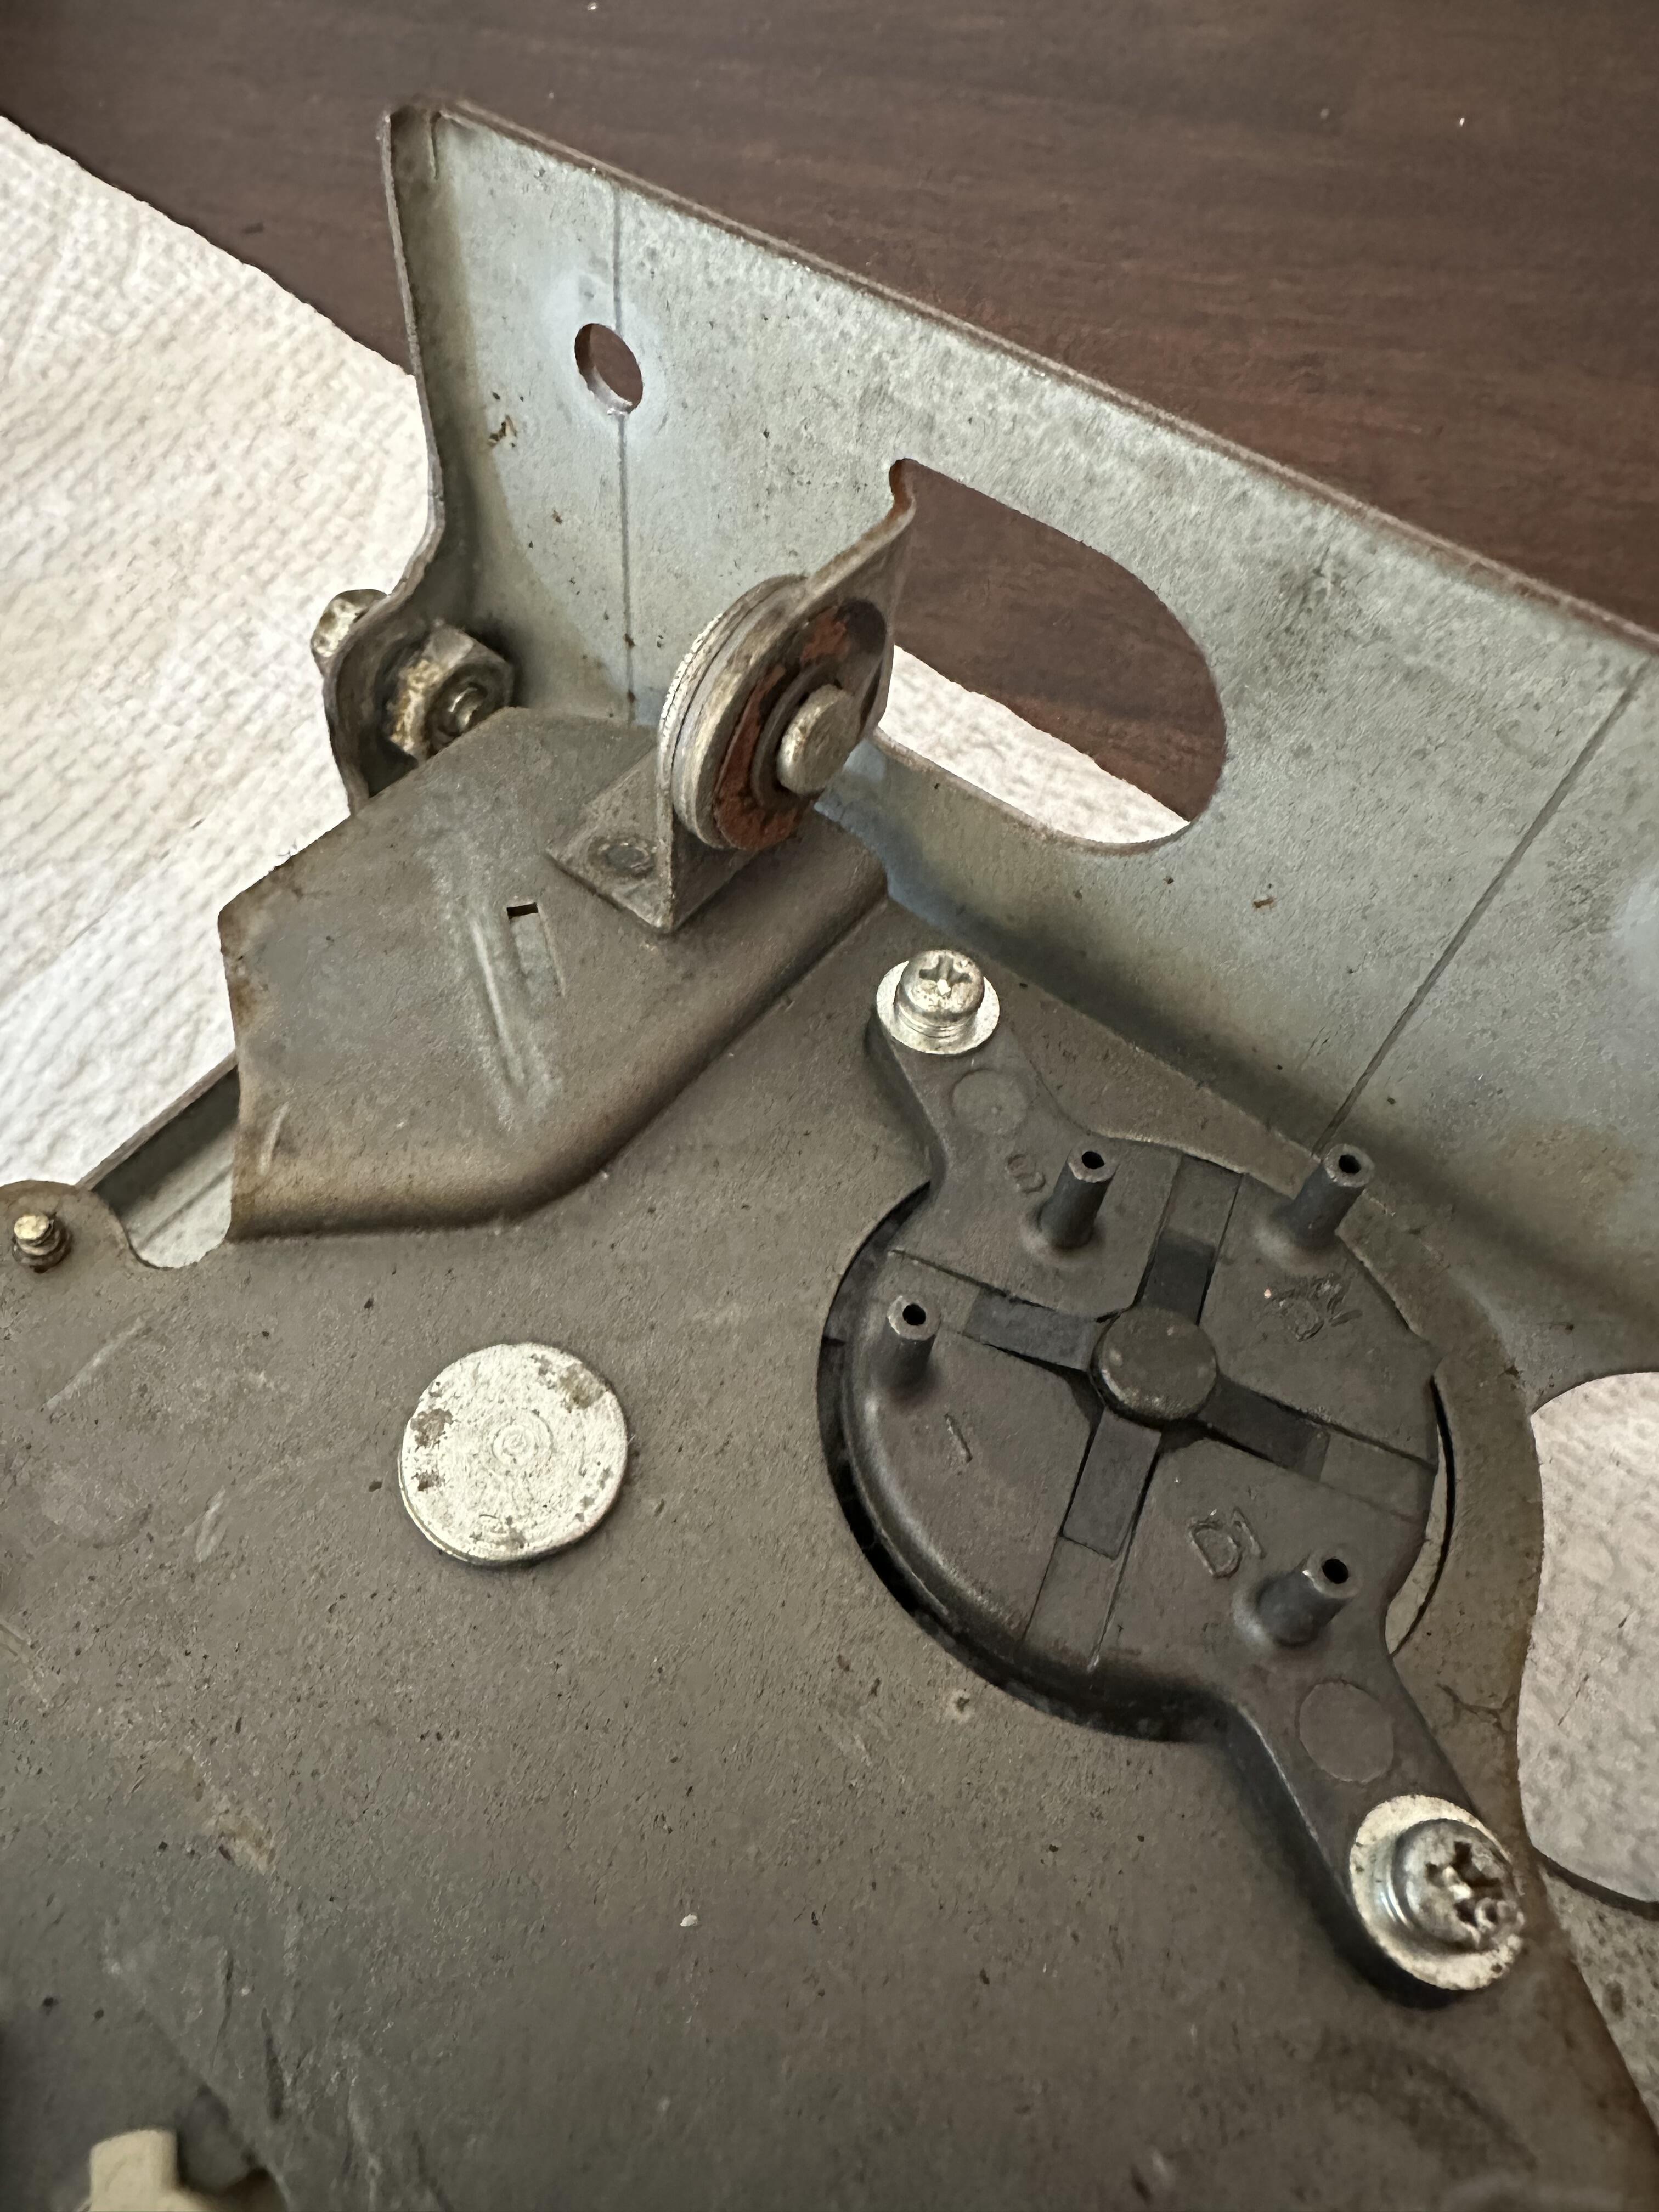
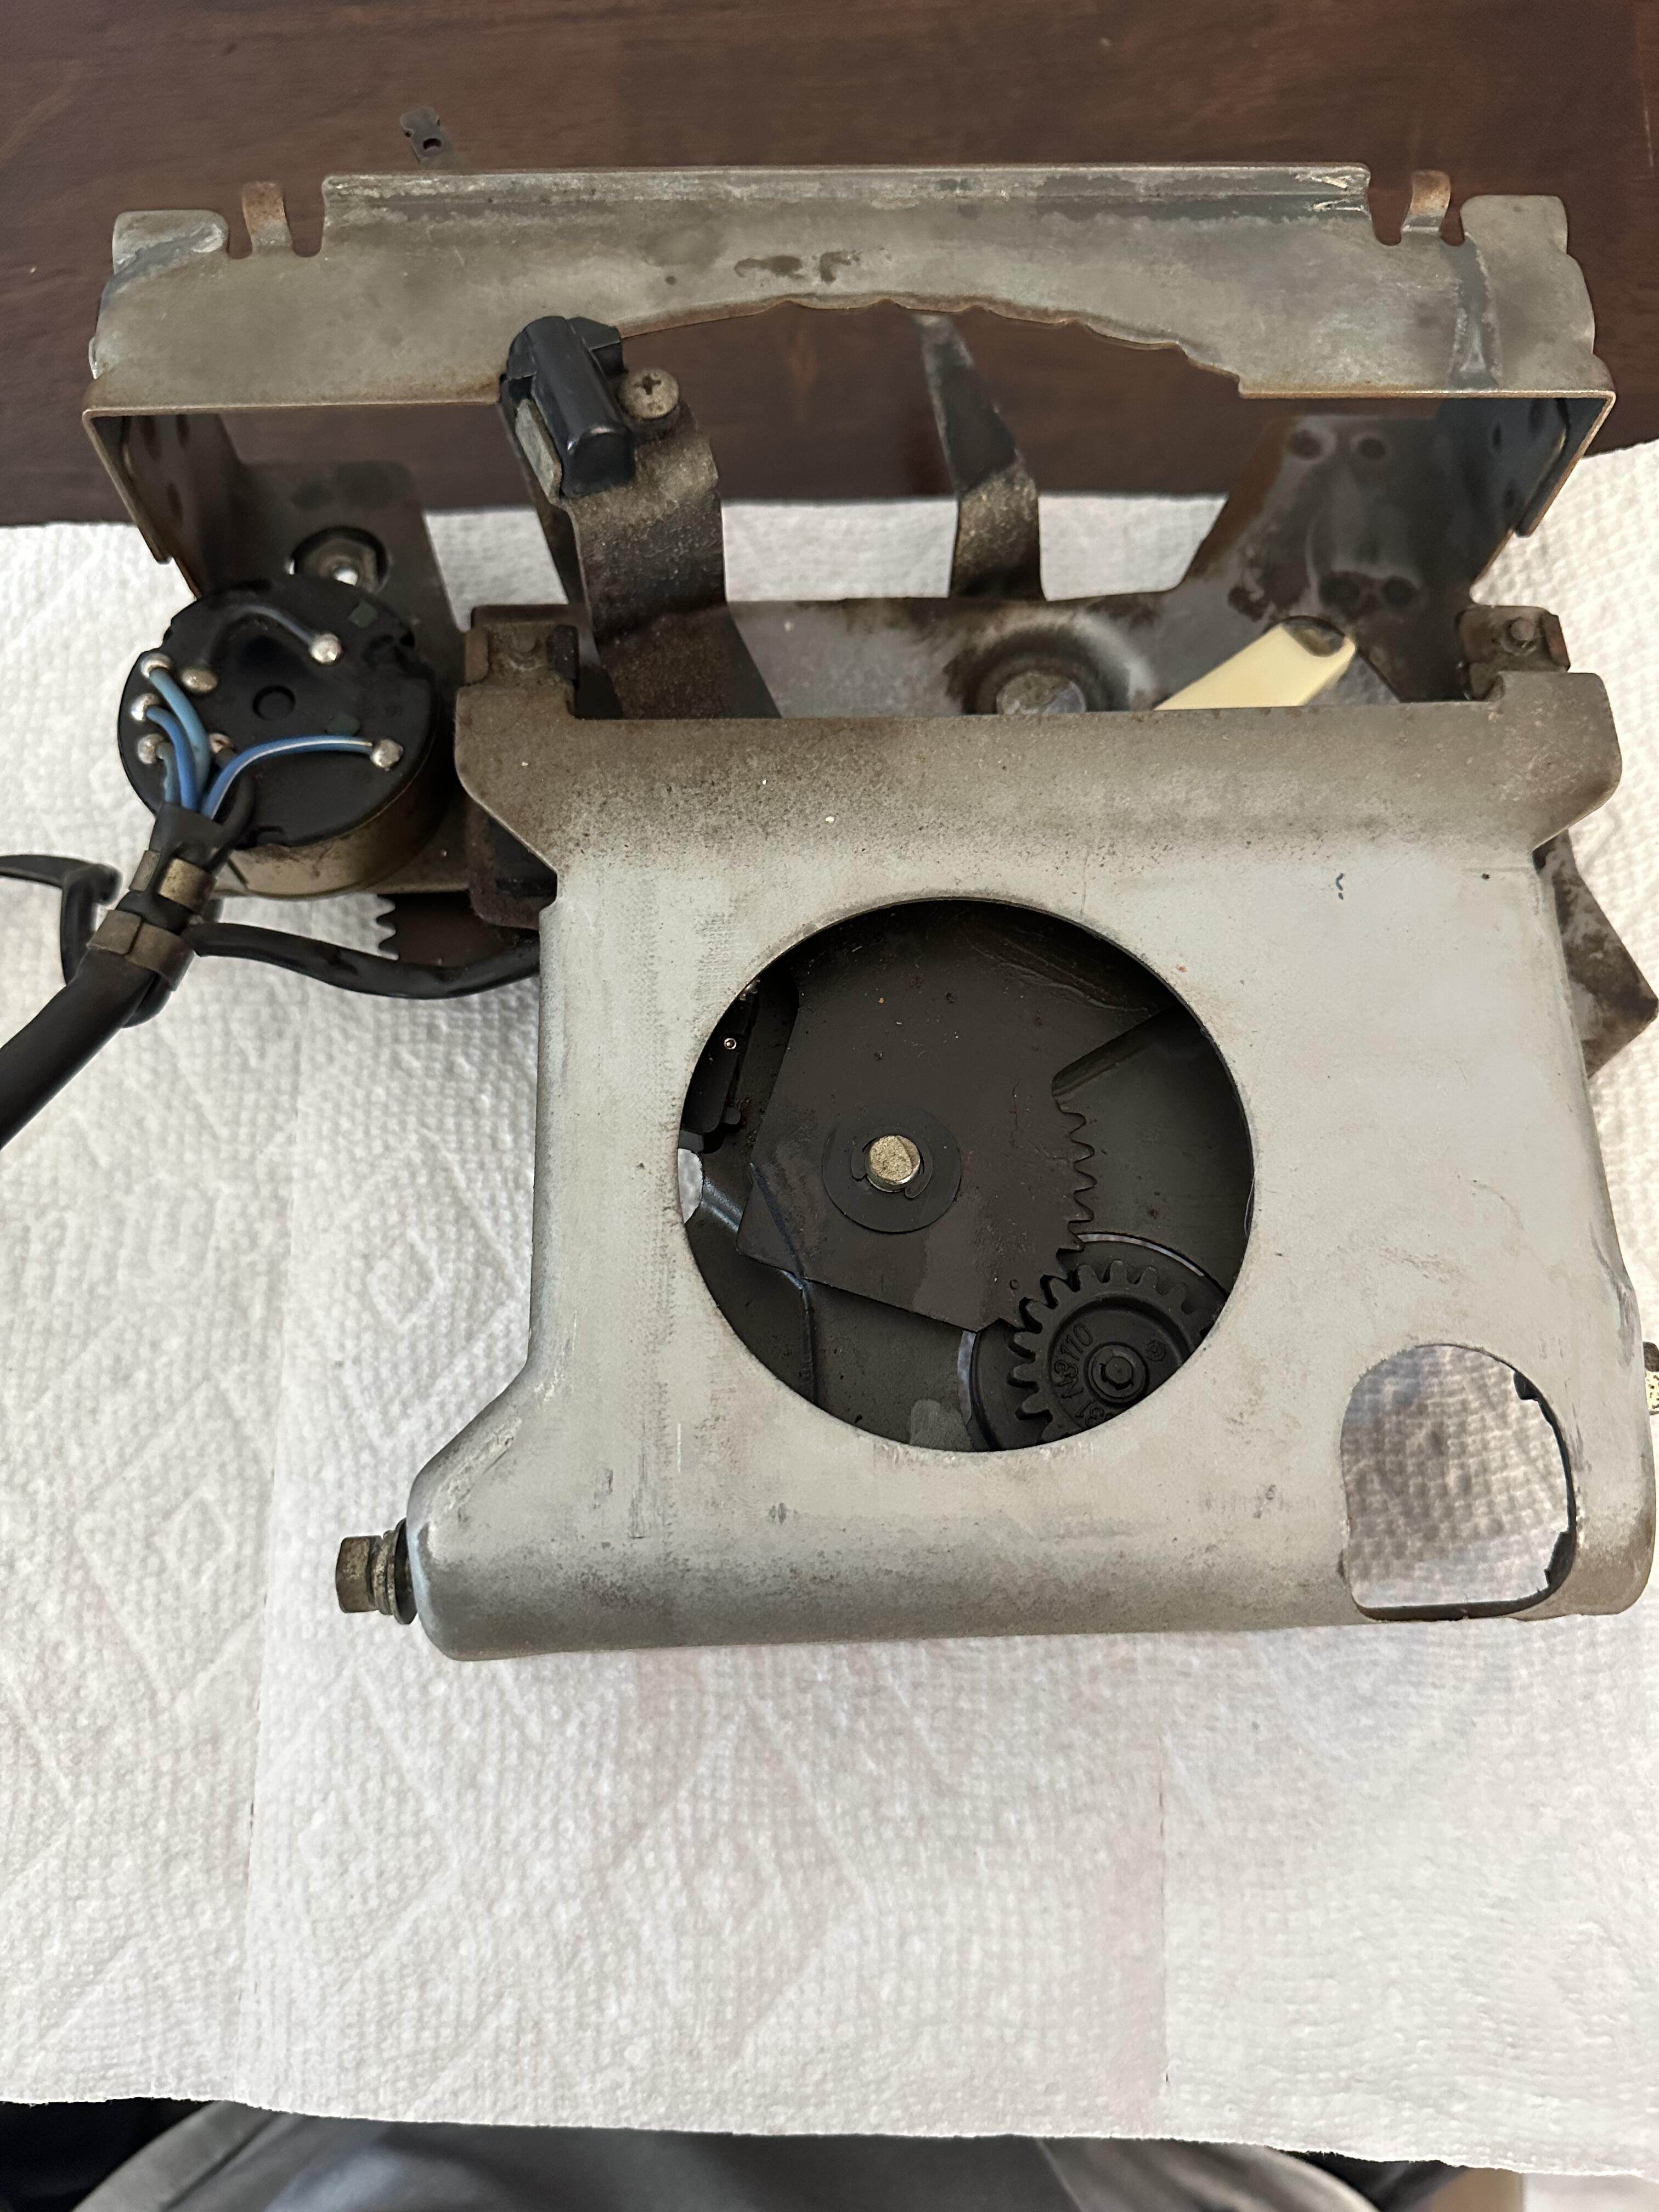
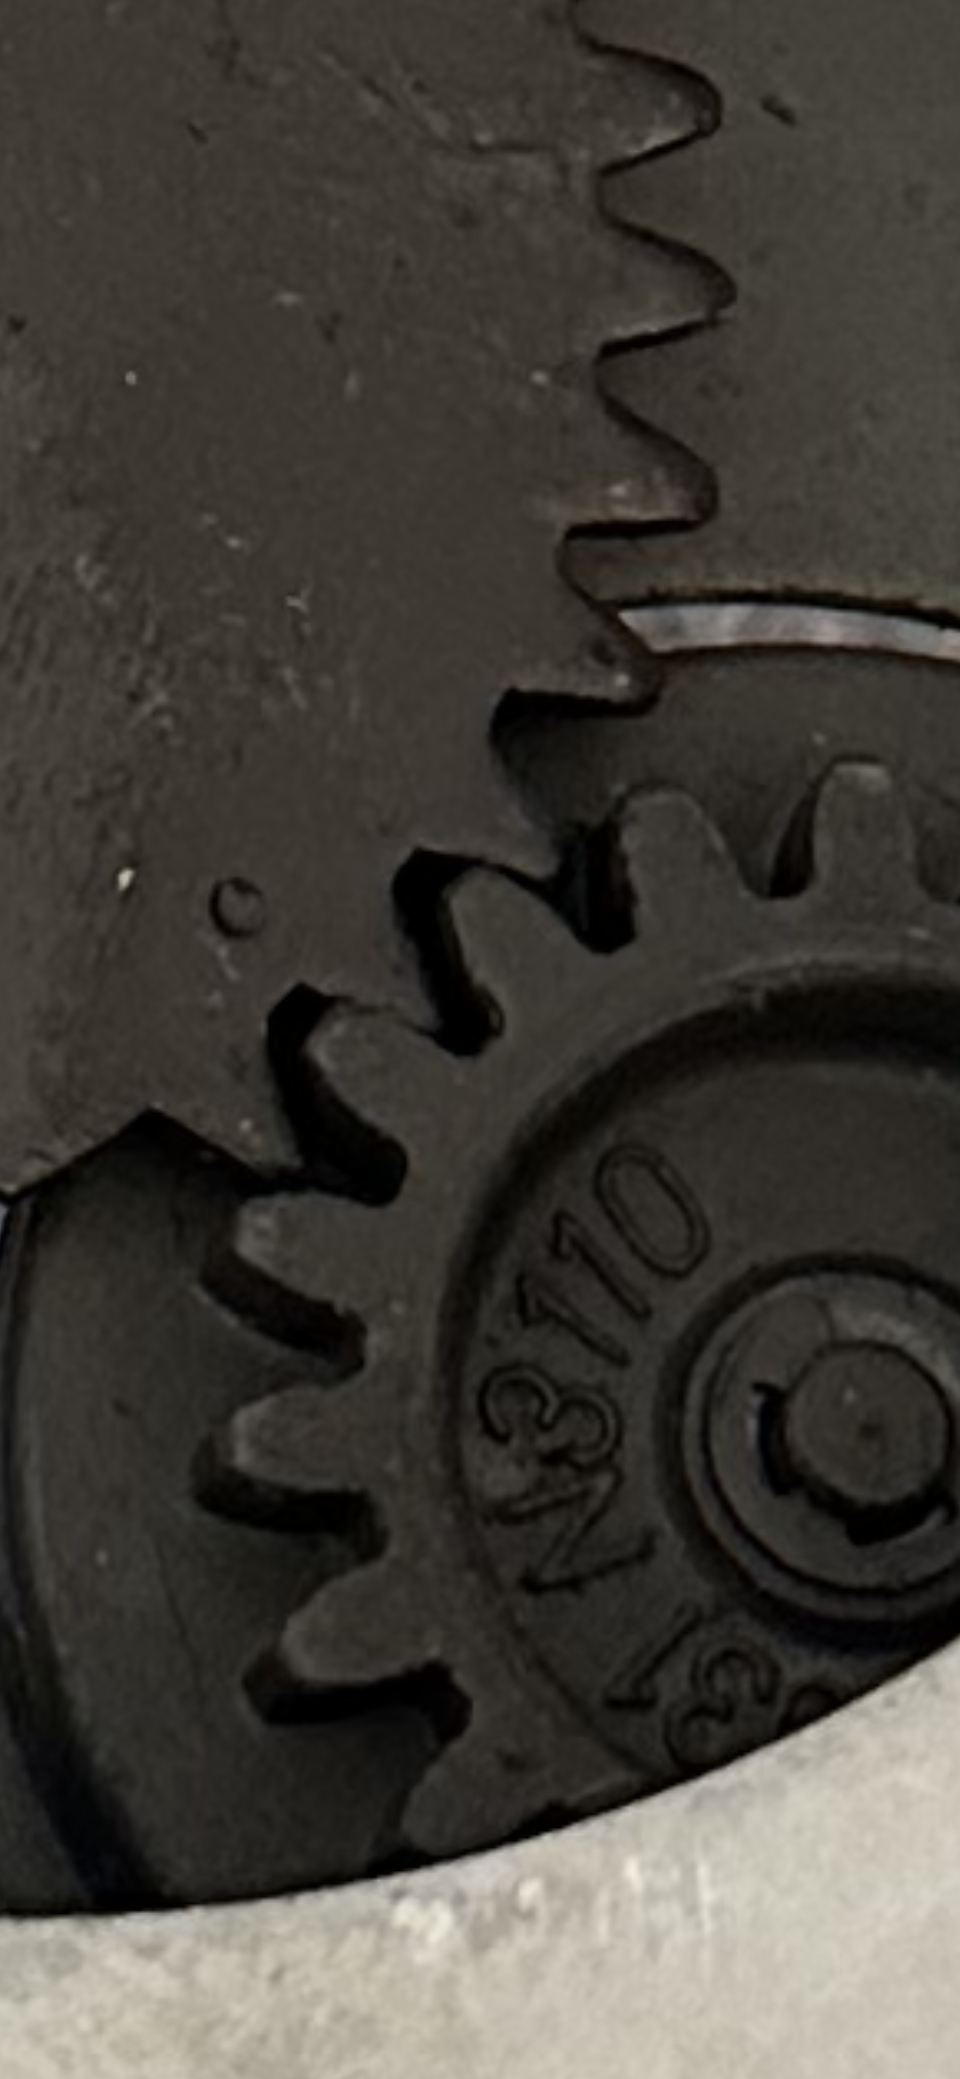
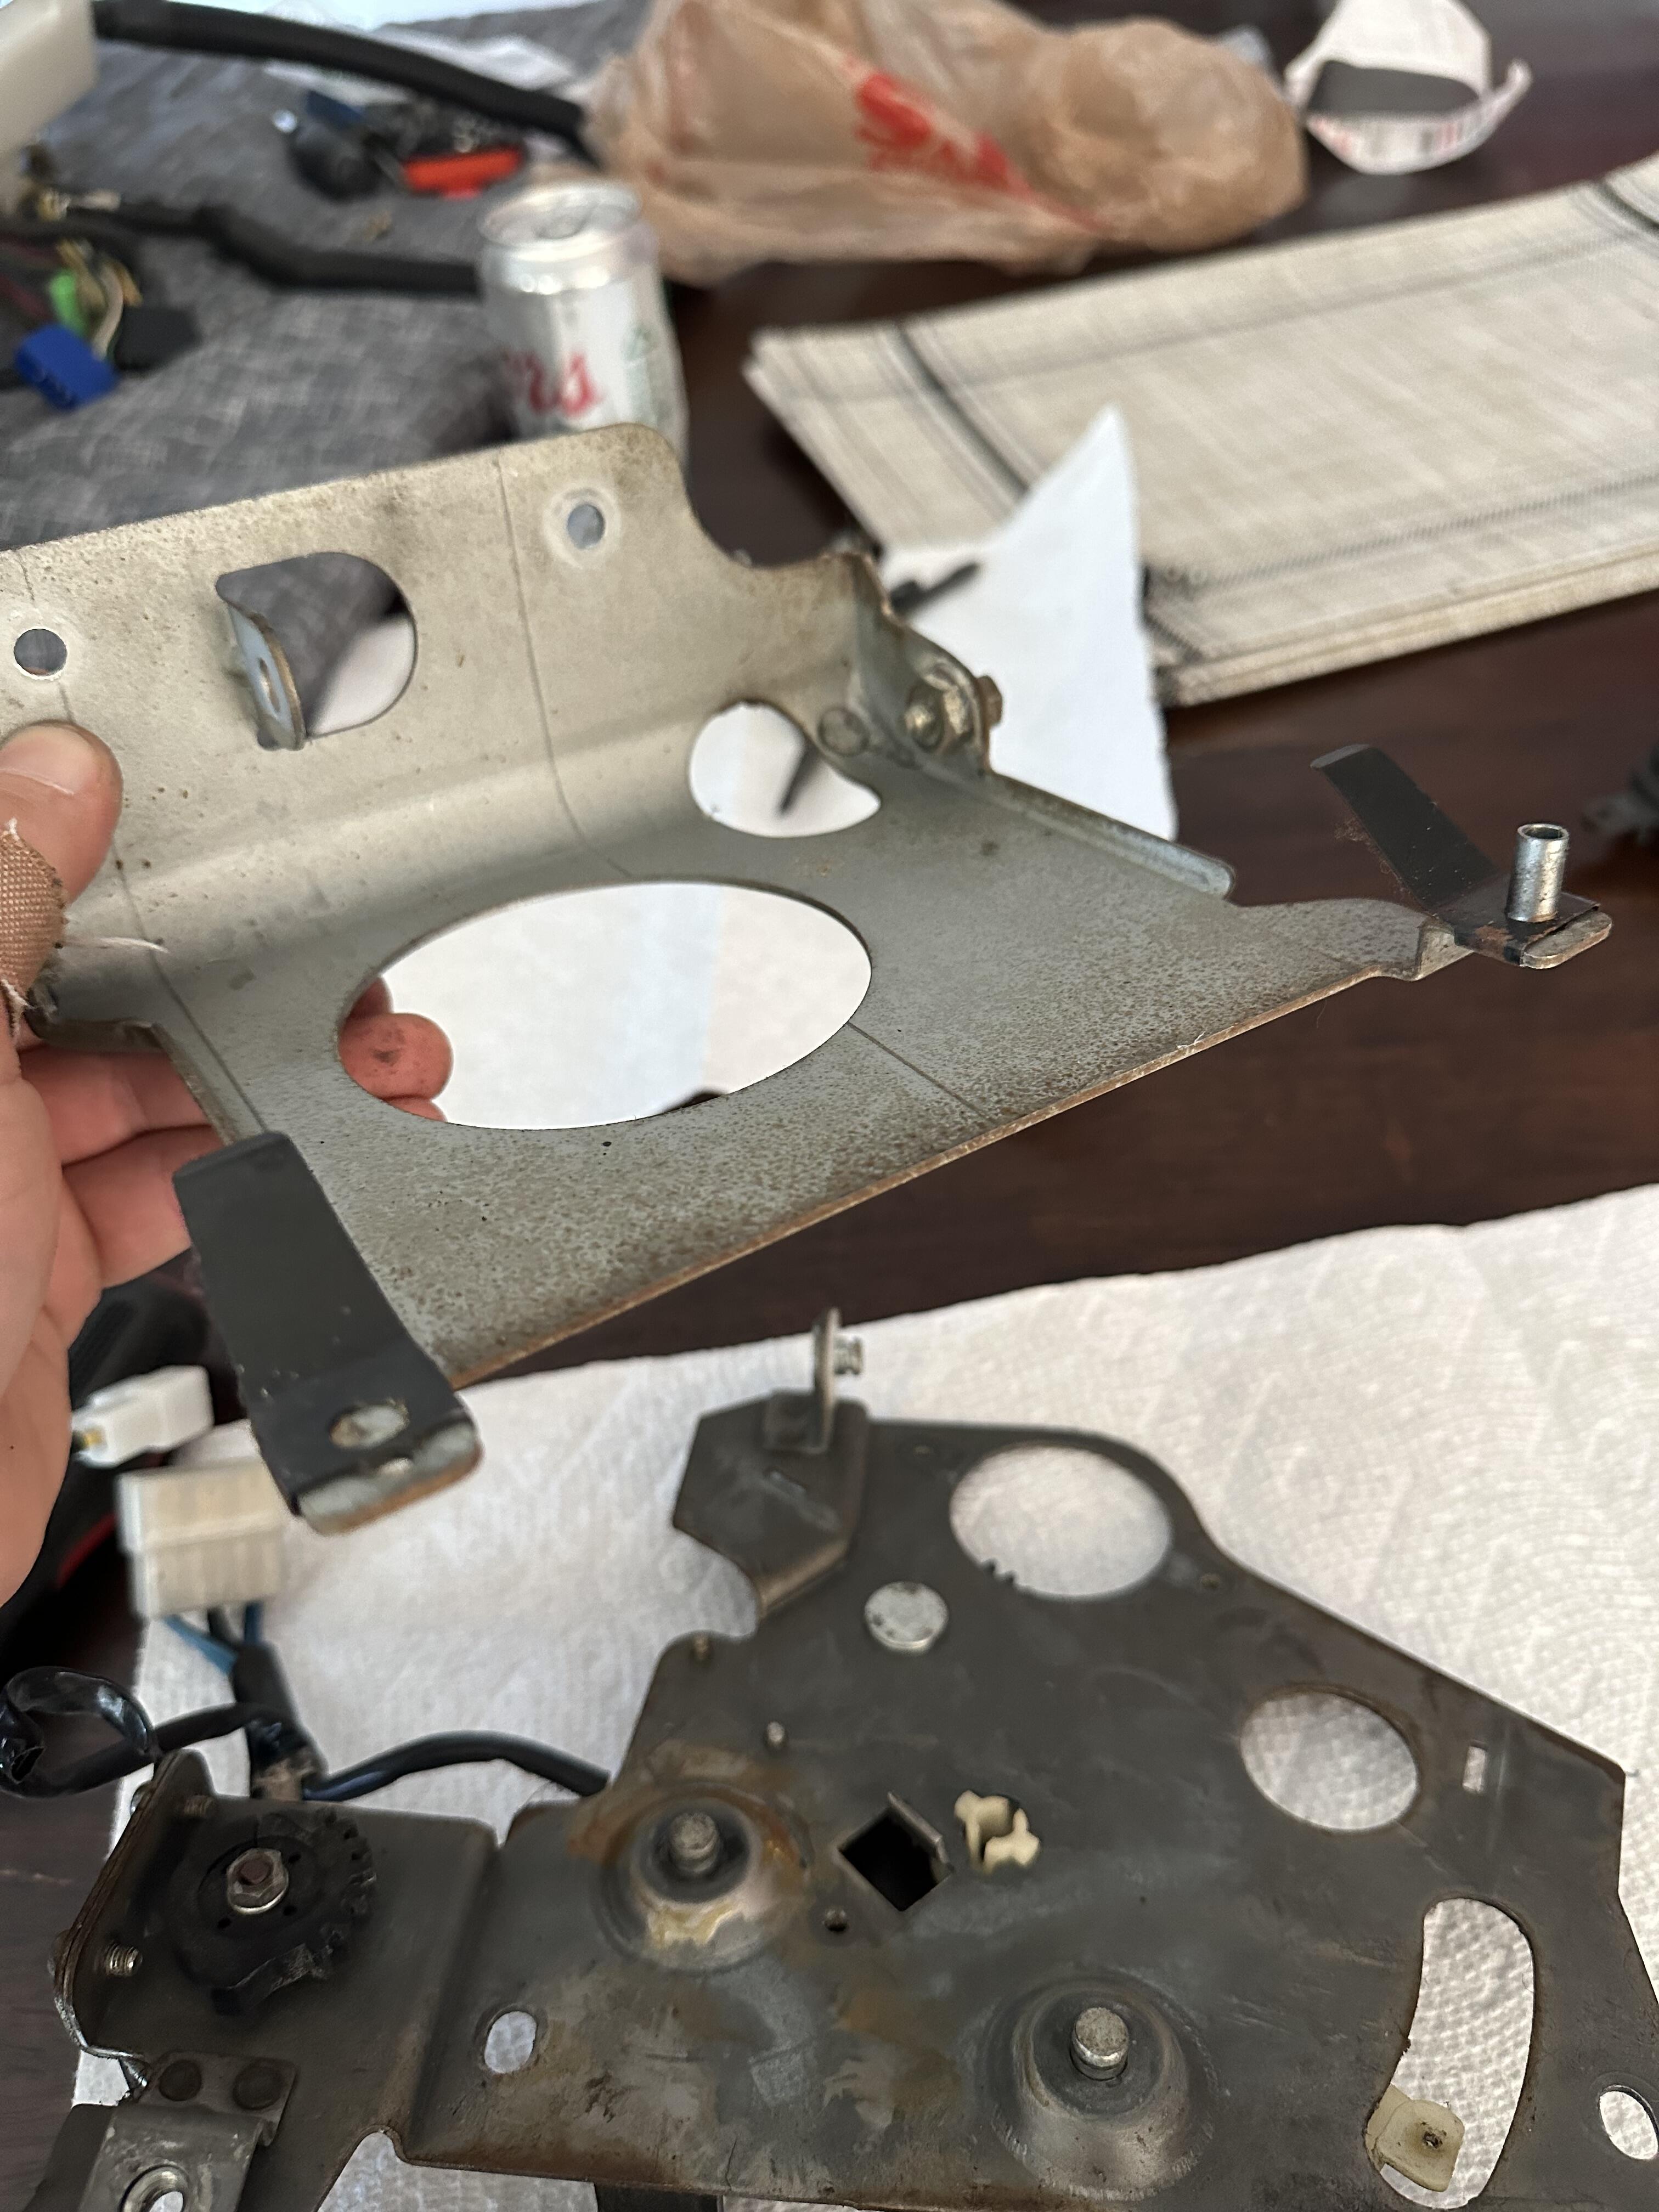
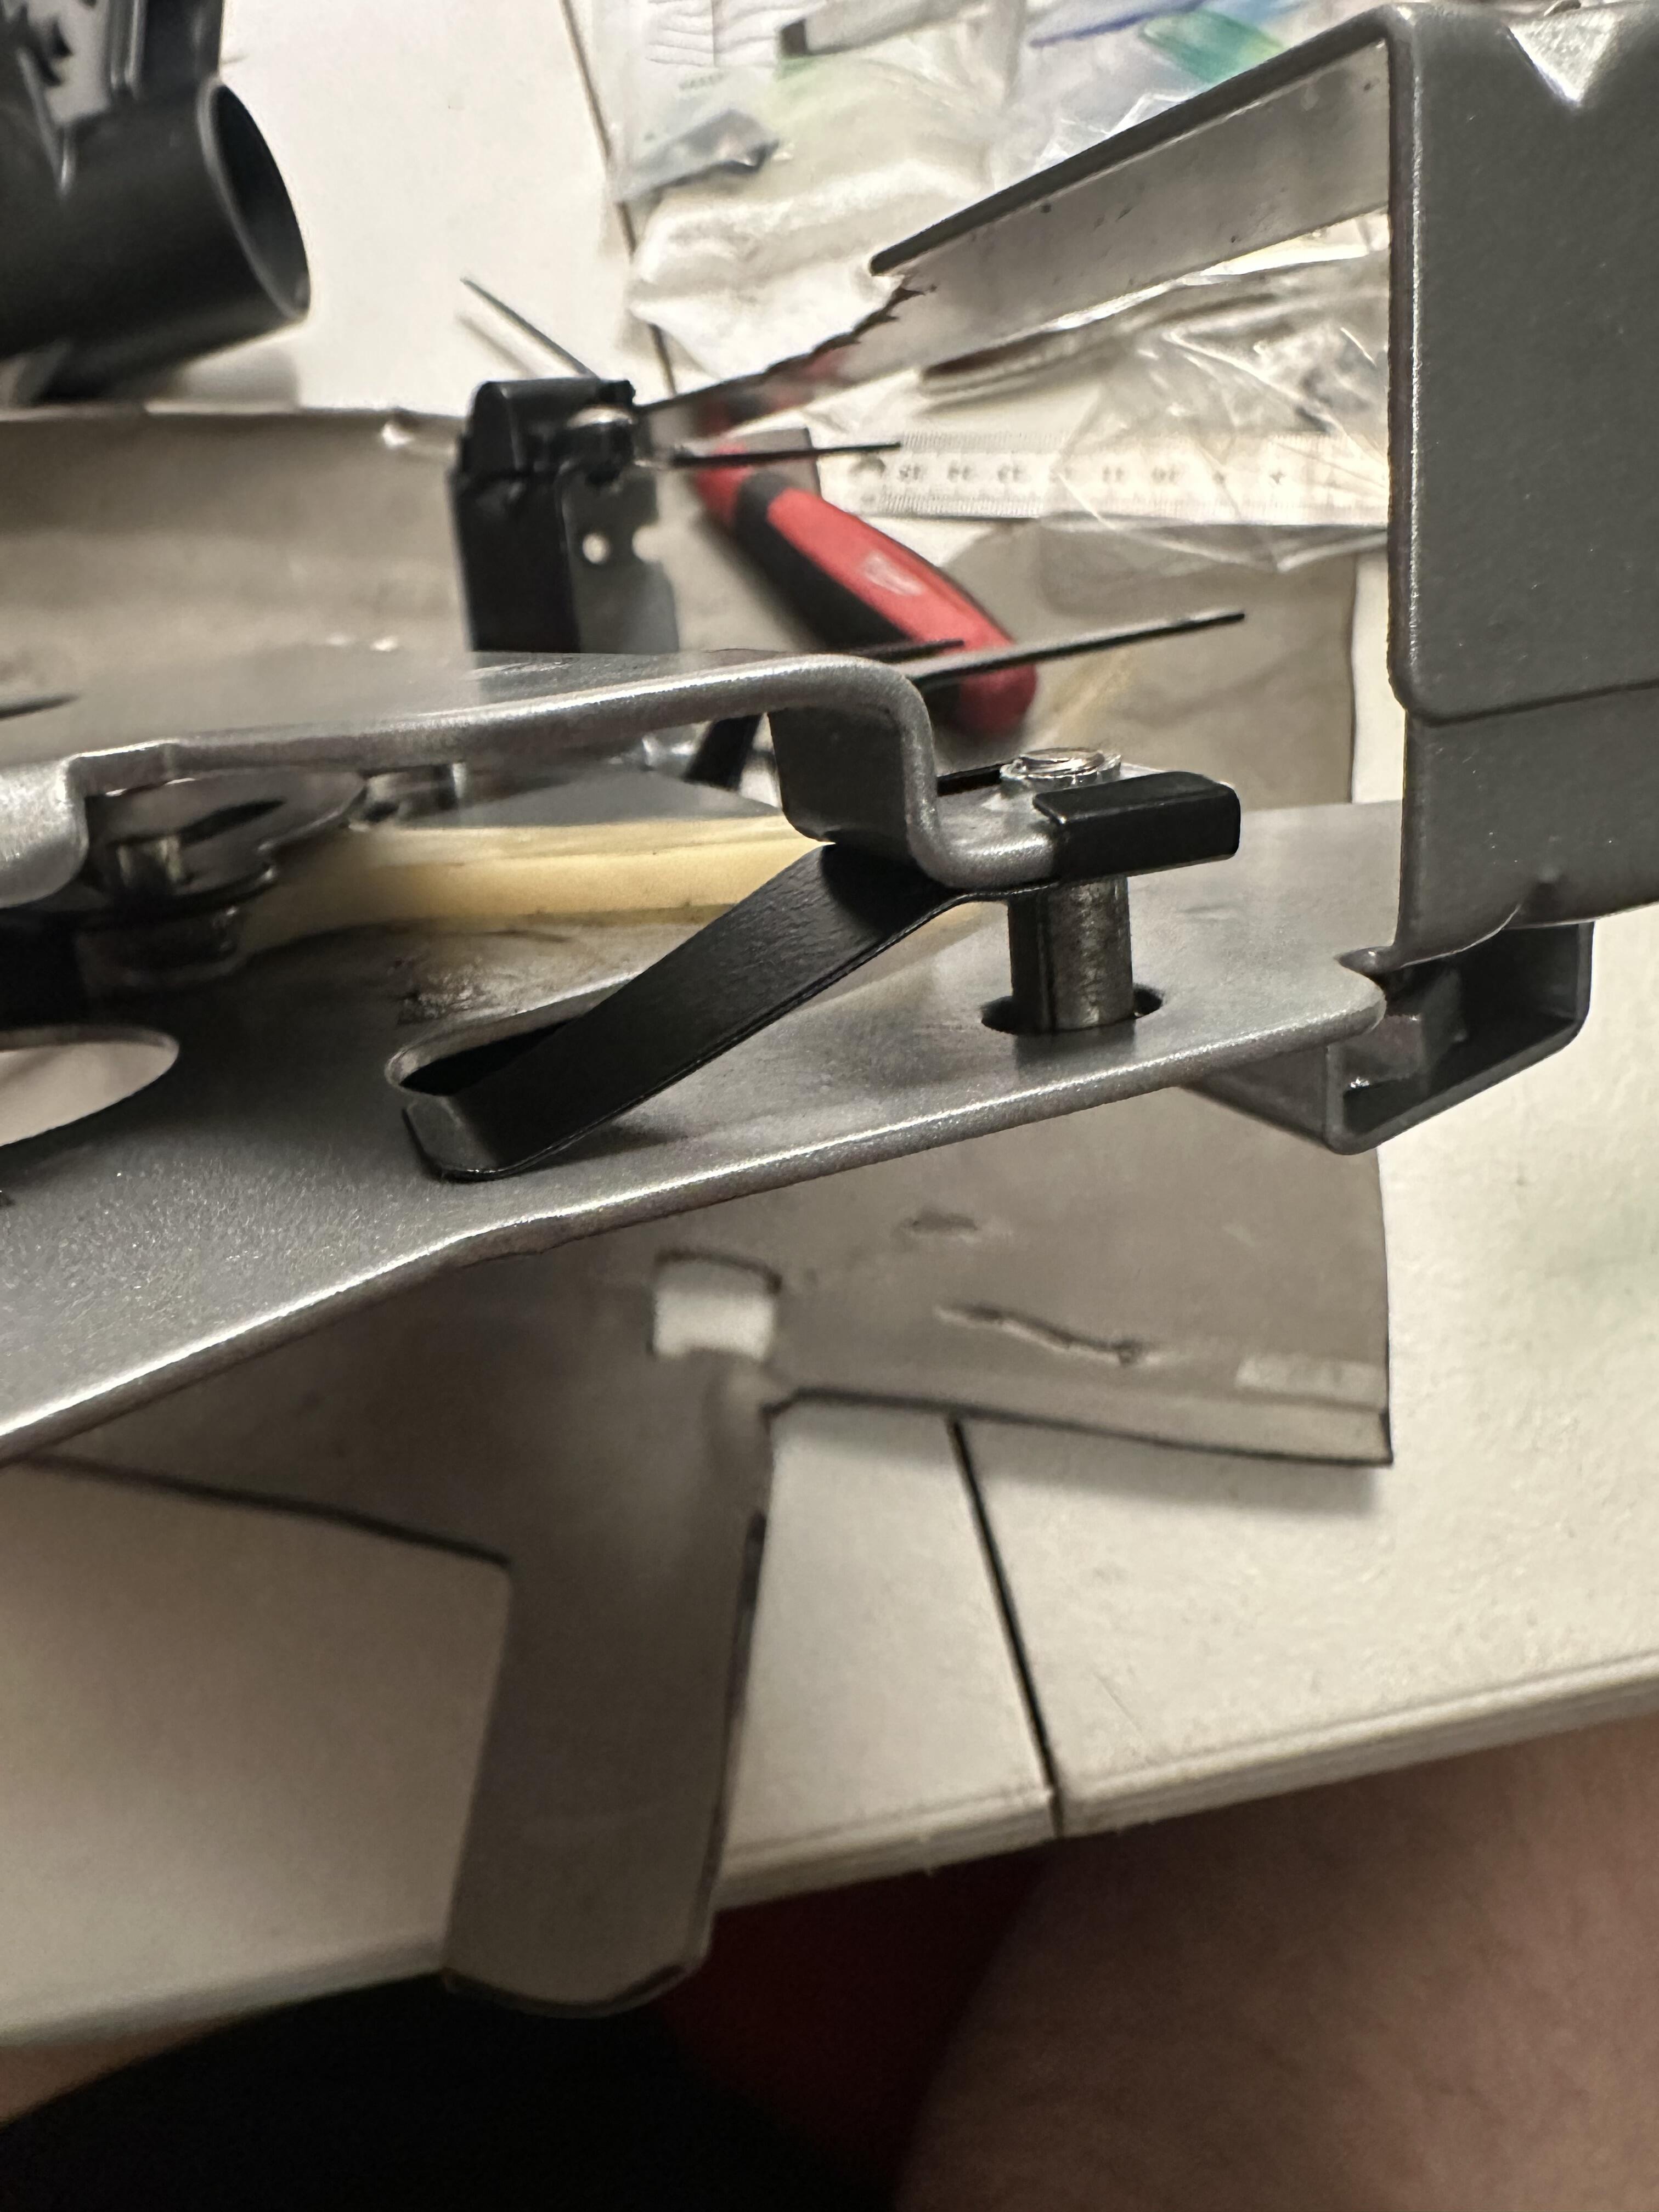
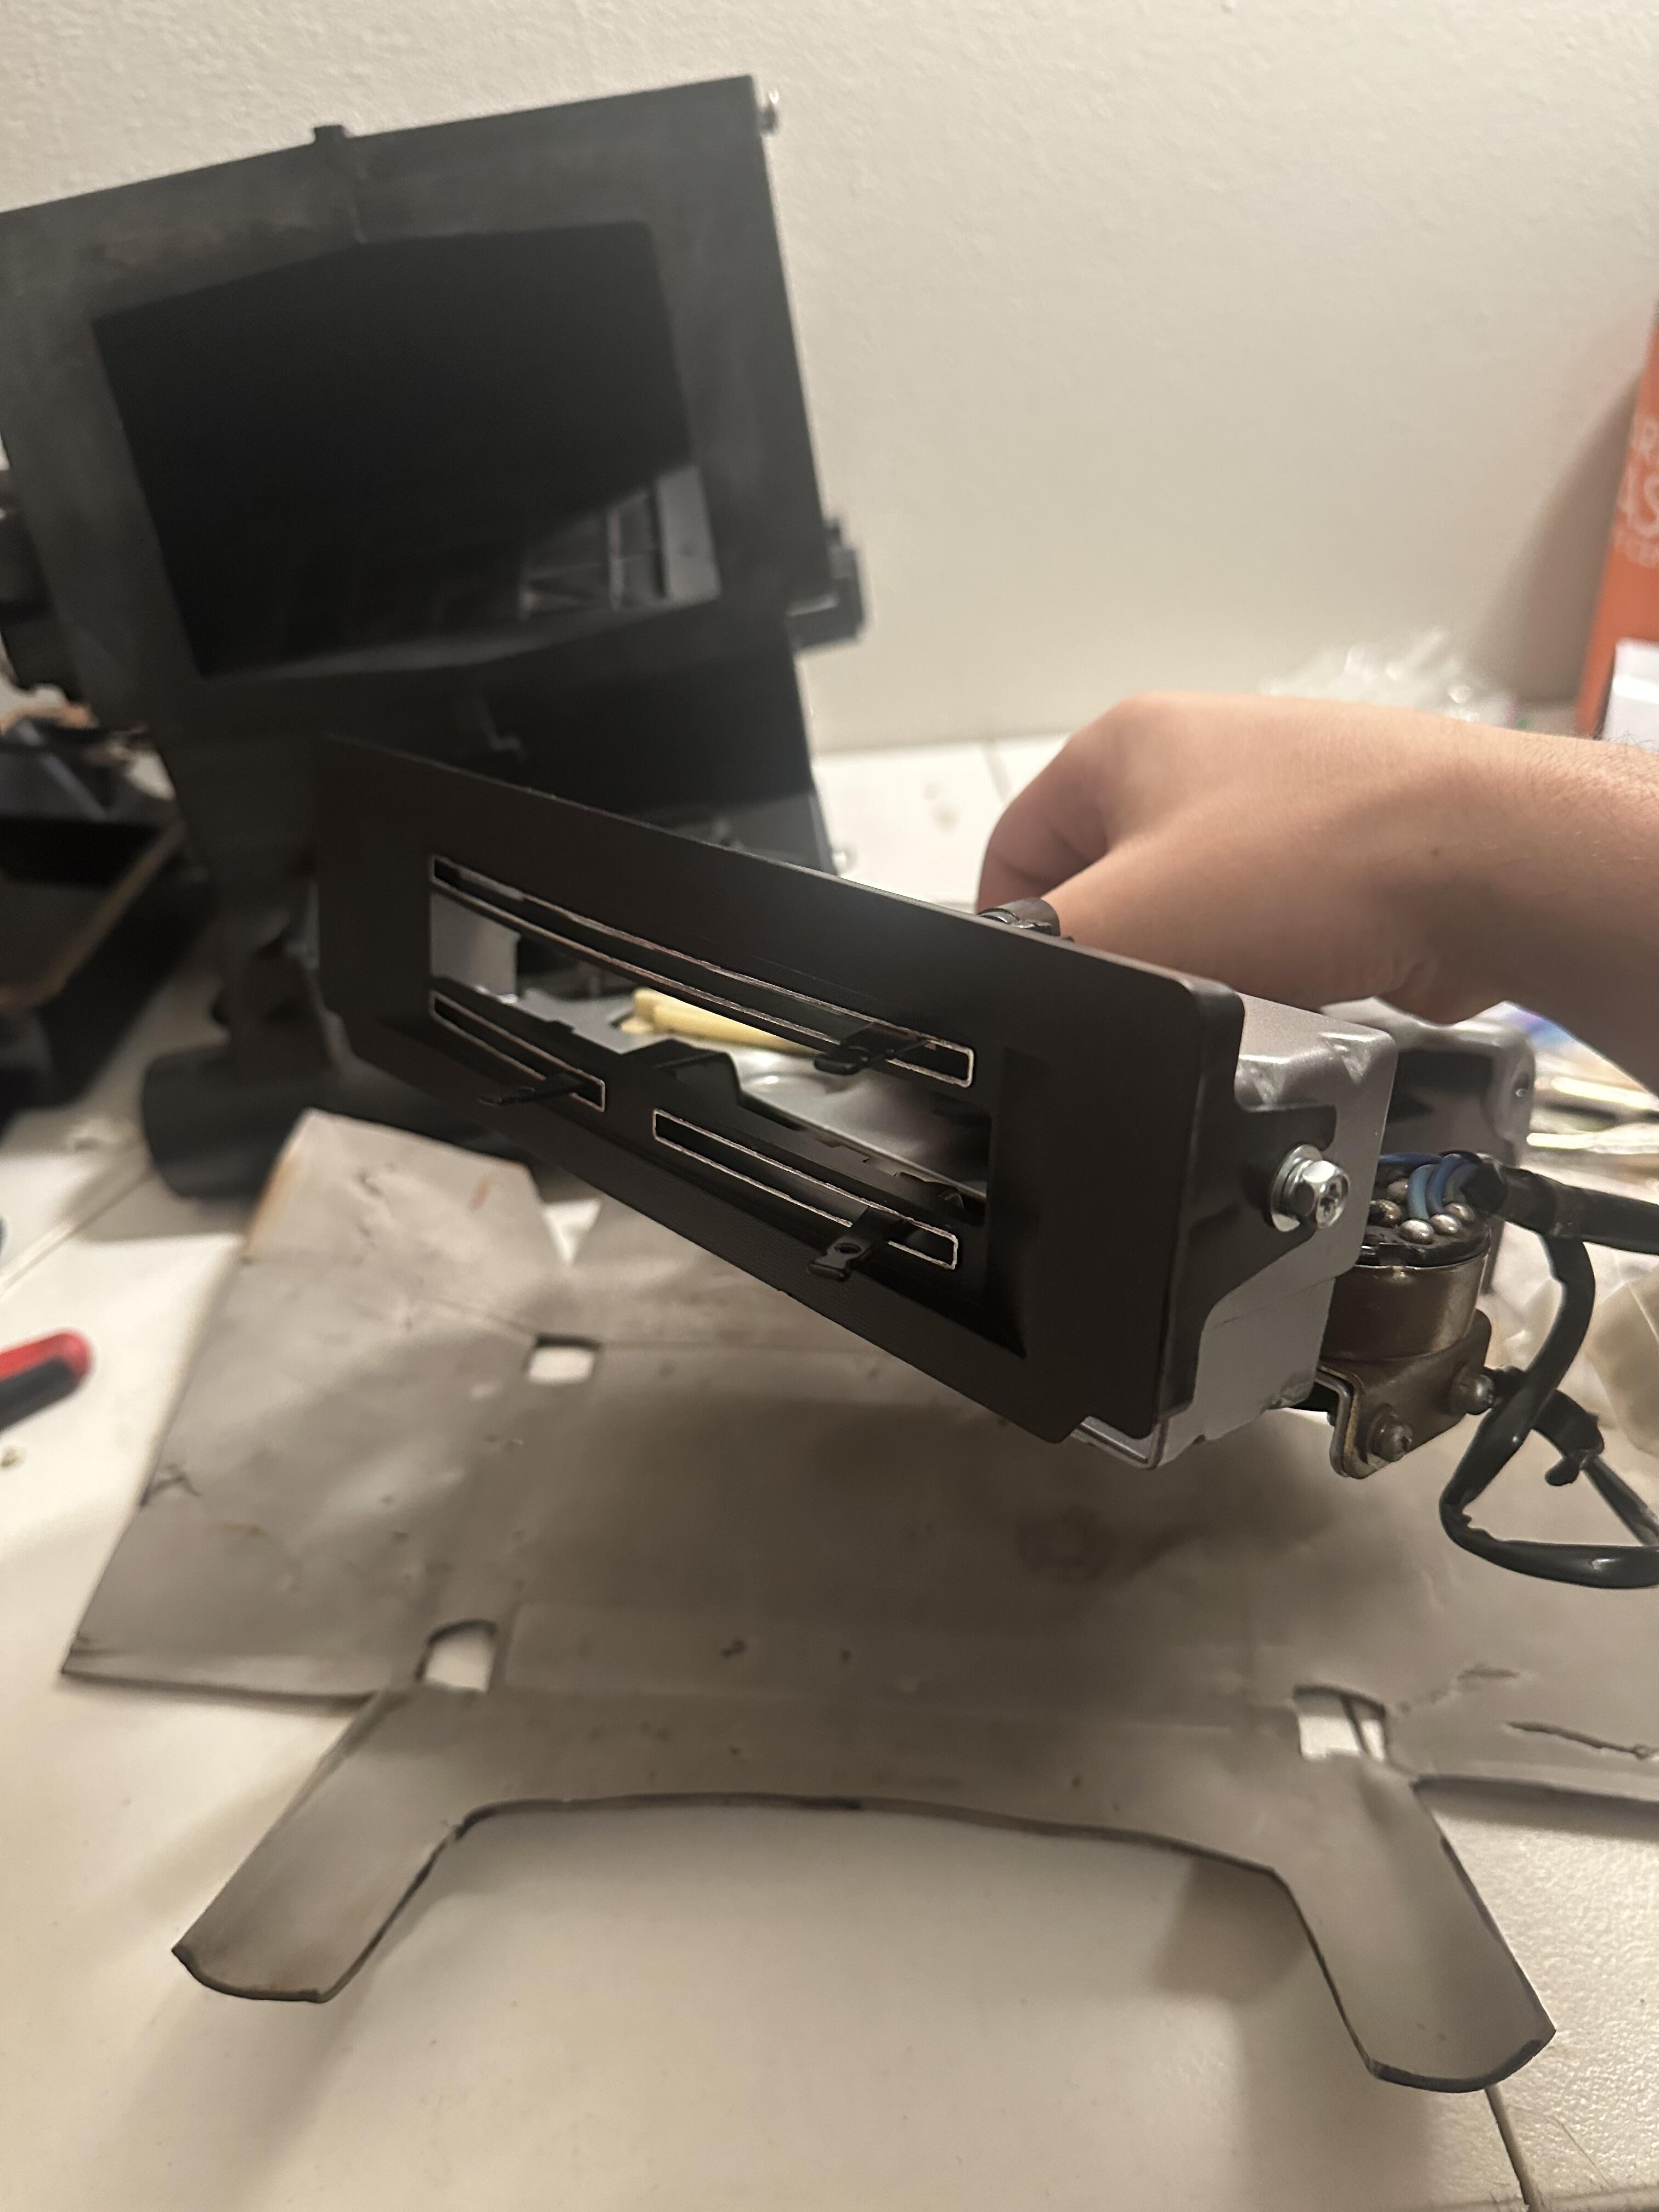
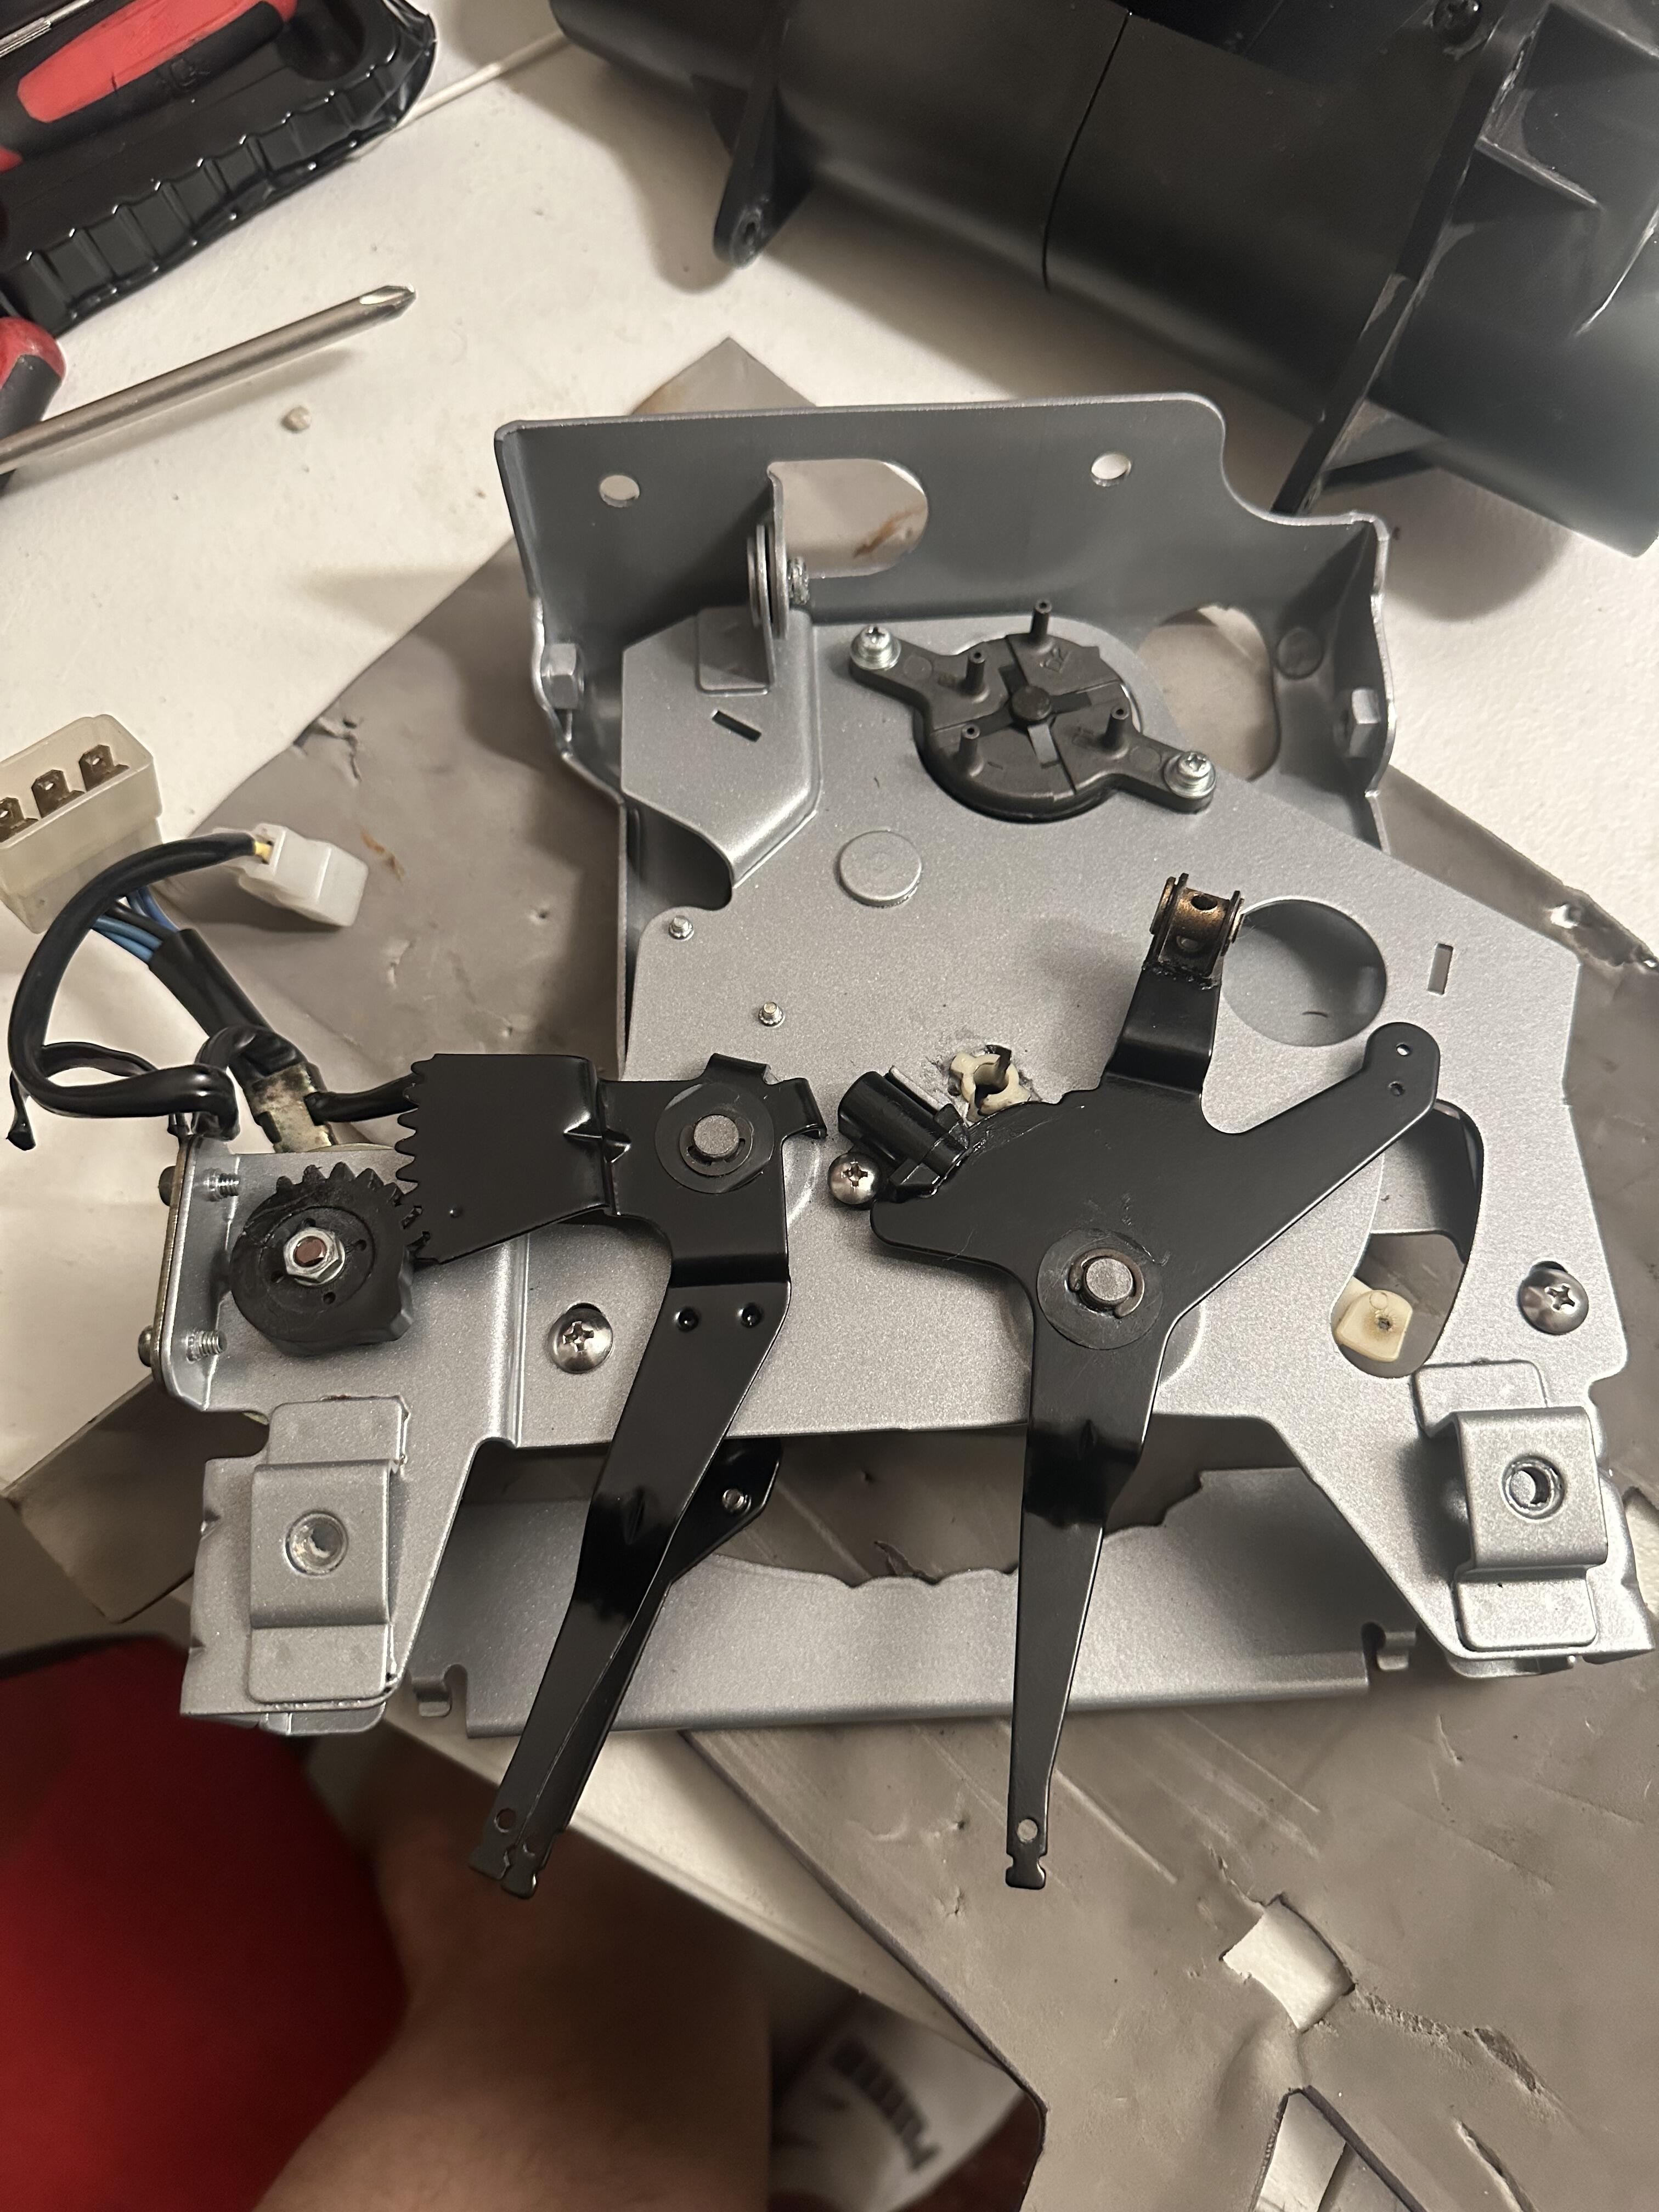
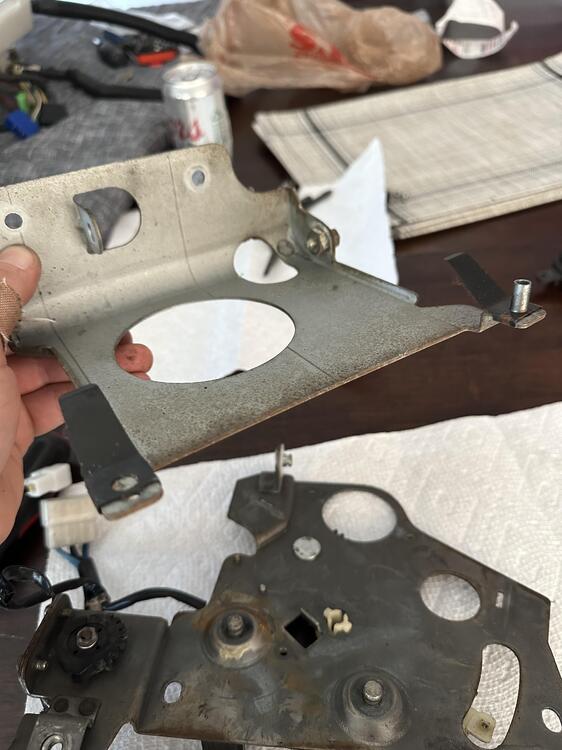
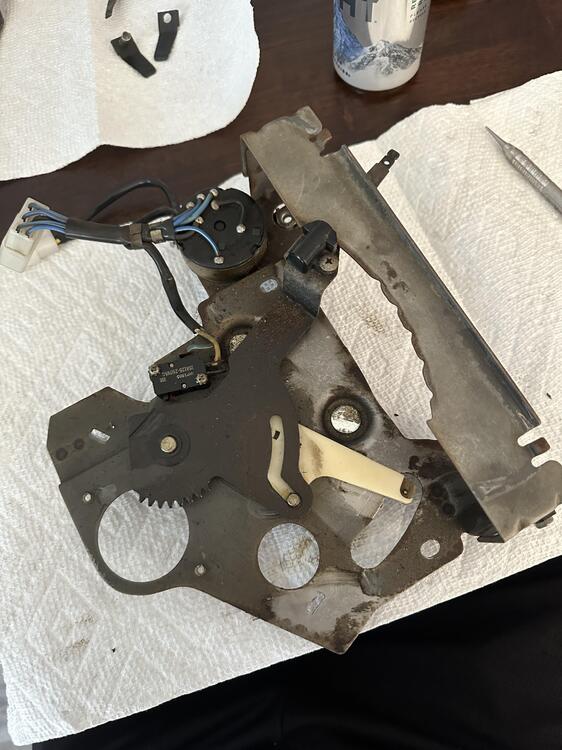
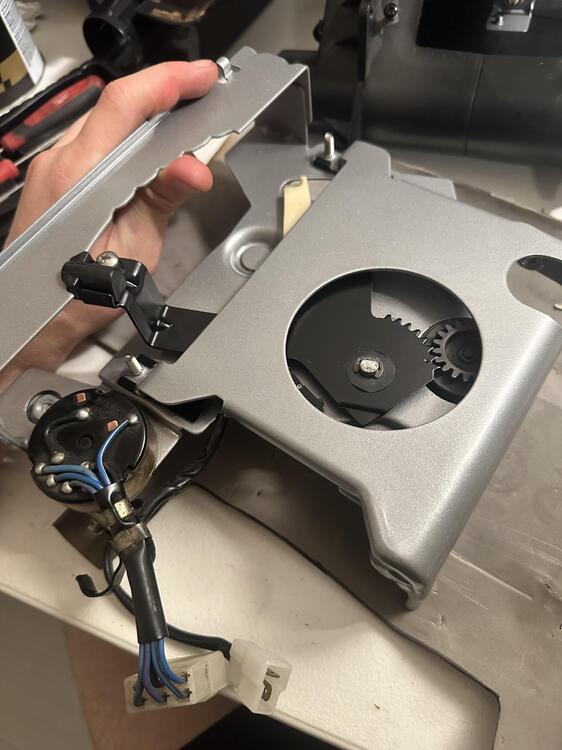
Hey guys, this was my take at restoring my old climate control box. Hopefully it helps someone in the future in case they didn't take good photos:) This is on a 77 280z. I am not sure if all years are the same. My module was really sticky, which was presumably caused by rust and lack of lubrication, so I went the extra mile and redid everything so as to never have to touch this box again. Here is the start take note that I swept every lever to the left so that everything is in sync. The module is upside down. Next is a close up photo of the Hot/Cold switch. It is held on by a pressure washer and snap ring. There is a black mechanism with a spring and ball bearing inside pressed against it. MAKE SURE NOT TO LOOSE THESE! The spring can cause the ball bearing to fly out and dissapear when removing, be careful. Although not in this photo, the Hot/Cold switch is connected to a mechanical wire that travels to the heater valve. The fan switch is removed by removing the nut that holds the black gear on, and two screws on the side of the module. You can then remove the arm by removing the pressure washer and ring. Torwards the rear on this side another pressure washer and snap ring are clipped (holds two halves of the module in place) you can also see the two screws to remove the vacuum selector valve. I will not cover how to rebuild this valve, however to do it you just need to pop it apart and put vacuum grease on the inside so it seals. Very simple mechanism. Here is the top side of the module. Take note of the relationship between the throm arm gear and the vacuum selection switch. This is its relationship with the throw arm pushed all the way left. Unscrew the two screws that hold the control module halves together. You can see them in my first photo. It pops off and you can see the two black spring tabs that hold it together with the metal spacers (0ne is missing from this photo). Take note of the coors in the background and follow suite. Here is a good view of the throw arm mechanism for the selector switch once the half is removed. The arm is attached by a snap ring and pressure washer. Although not in this photo, below the arm is also a plastic circular spacer. It is easy to forget during reassembly, but don't. The black arm also has a tab that controls the plastic throw arm. This plastic arm can crack, so if it is just fill it with epoxy or other strong glue. remove this arm, the plastic peice, and then unscrew the spring loaded pressurre tab from the arm making sure not to loose the spring and ball bearing. Next, Just remove the fan switch and its correlating electrical thing if you haven't already (sorry mine worked perfect before removal so I did not research its proper name. Simple as that. I then proceeded to powder coat all my parts and get new matching hardware. I found Misumi to be a good source for hard to find hardware that matches the original. Ace hardware didn't make the cut, haha. If you wan't you can also go more OEM and plate the parts, but I wanted a more permanent solution.... hopefully. Reassembly is just the reverse of this! Here are some helpful photos. Make sure to grease any areas the control arms pivot on. If you want a guide on how to restore the HVAC plastic faceplate a guide to do that is here (done on the radio bezel). Same principles apply. At some point in the future I will post heater and AC box restorations, and I will cover how this module connects to everything else then:)


 1 point
 -
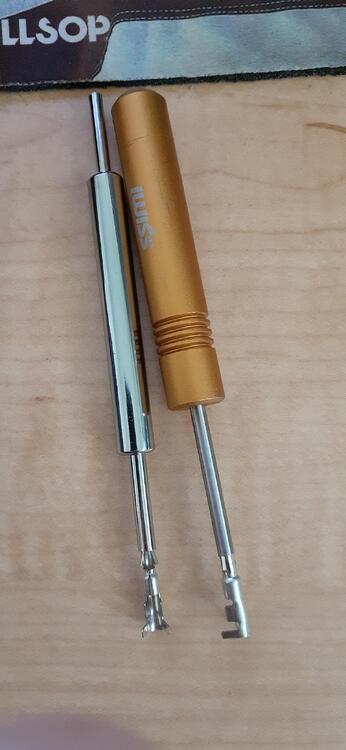
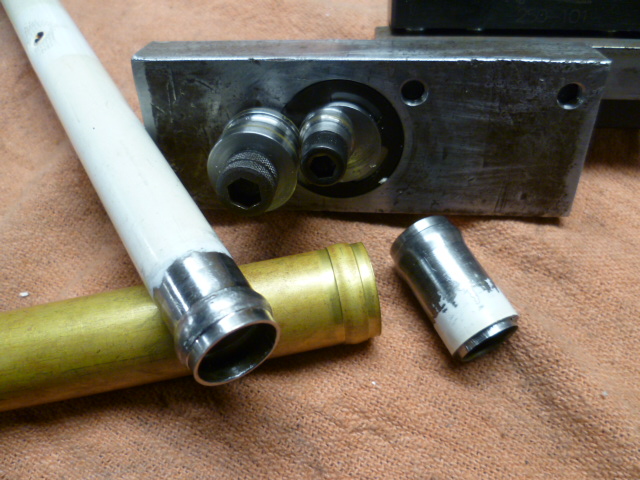
Okay, I made sure I found the right part numbers. For the male pins, this extractor works: https://www.amazon.com/gp/product/B01G46DJVU The larger side is the one that fits over the male pins. For the female pins, the Iwiss (also known as Icrimp) WR01 works. I bought it with a weather pack crimping tool: https://www.amazon.com/gp/product/B07GB698KV/, but you can also get it with a couple of other pin extractors: https://www.amazon.com/IWISS-Extractor-Removal-Metri-Pack-Connectors-3/dp/B08PKLZXCX Here's a photo of the extractors:
 1 point
 -
Wonder if my picture posting problems persist. Let's find out. Here's my cobbled together bead roller for when I was messing with the tubing: OK, so I can post pics again.
 1 point
 -
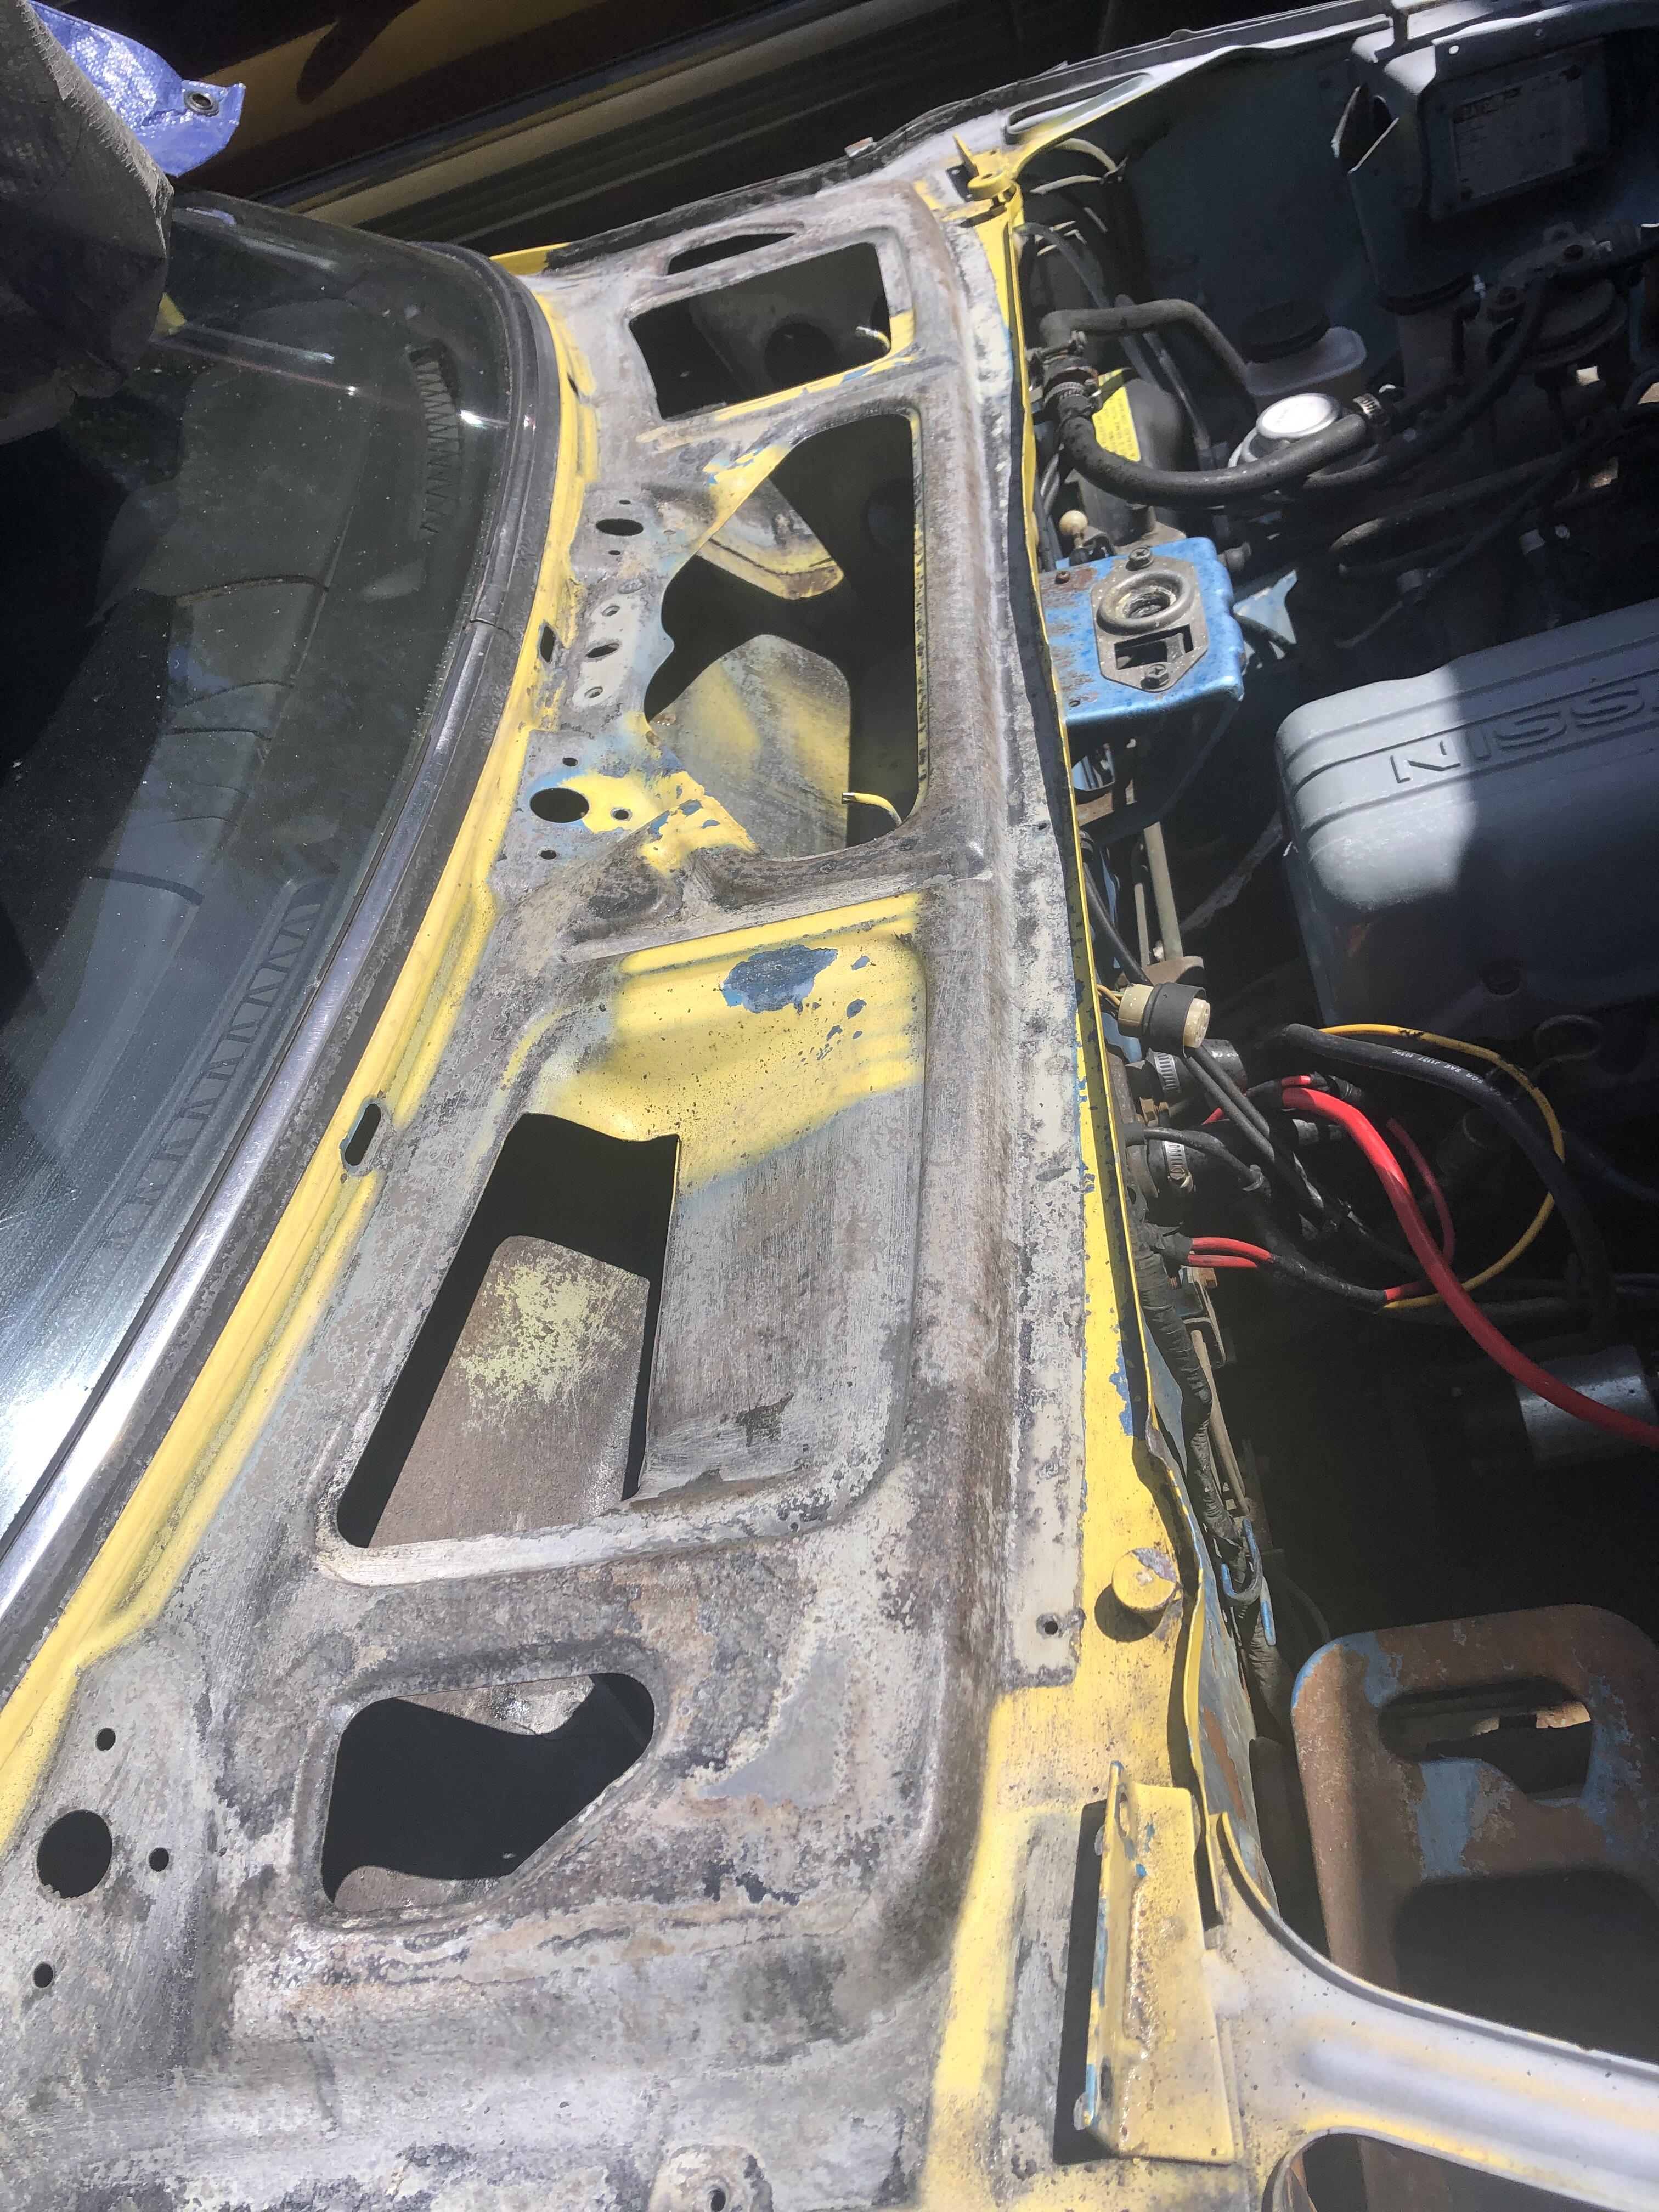
1 pointLooked a lot of reviews and this product Rust Kutter came up on top above OSPHO. Both are Phorphoric Acid based. https://www.amazon.com/dp/B001U1GW82?psc=1&ref=ppx_yo2ov_dt_b_product_details This thing works!!! my rust was pretty serious. Scrapped with a big wire brush and this is after first pass sitting for about 30 hours. Good thing is it creates a flaky black surface which I believe is the reaction residue which can be scrapped off with a wire brush. I think results are pretty good so far. I am planning to give it 3 rounds. Using the same treatment in the battery area which luckily dont have any pitting. Wanted to share the results and the product I used. Probably will also use that wet rag combination as well in harder areas. Slow and steady!!!

 1 point
 -
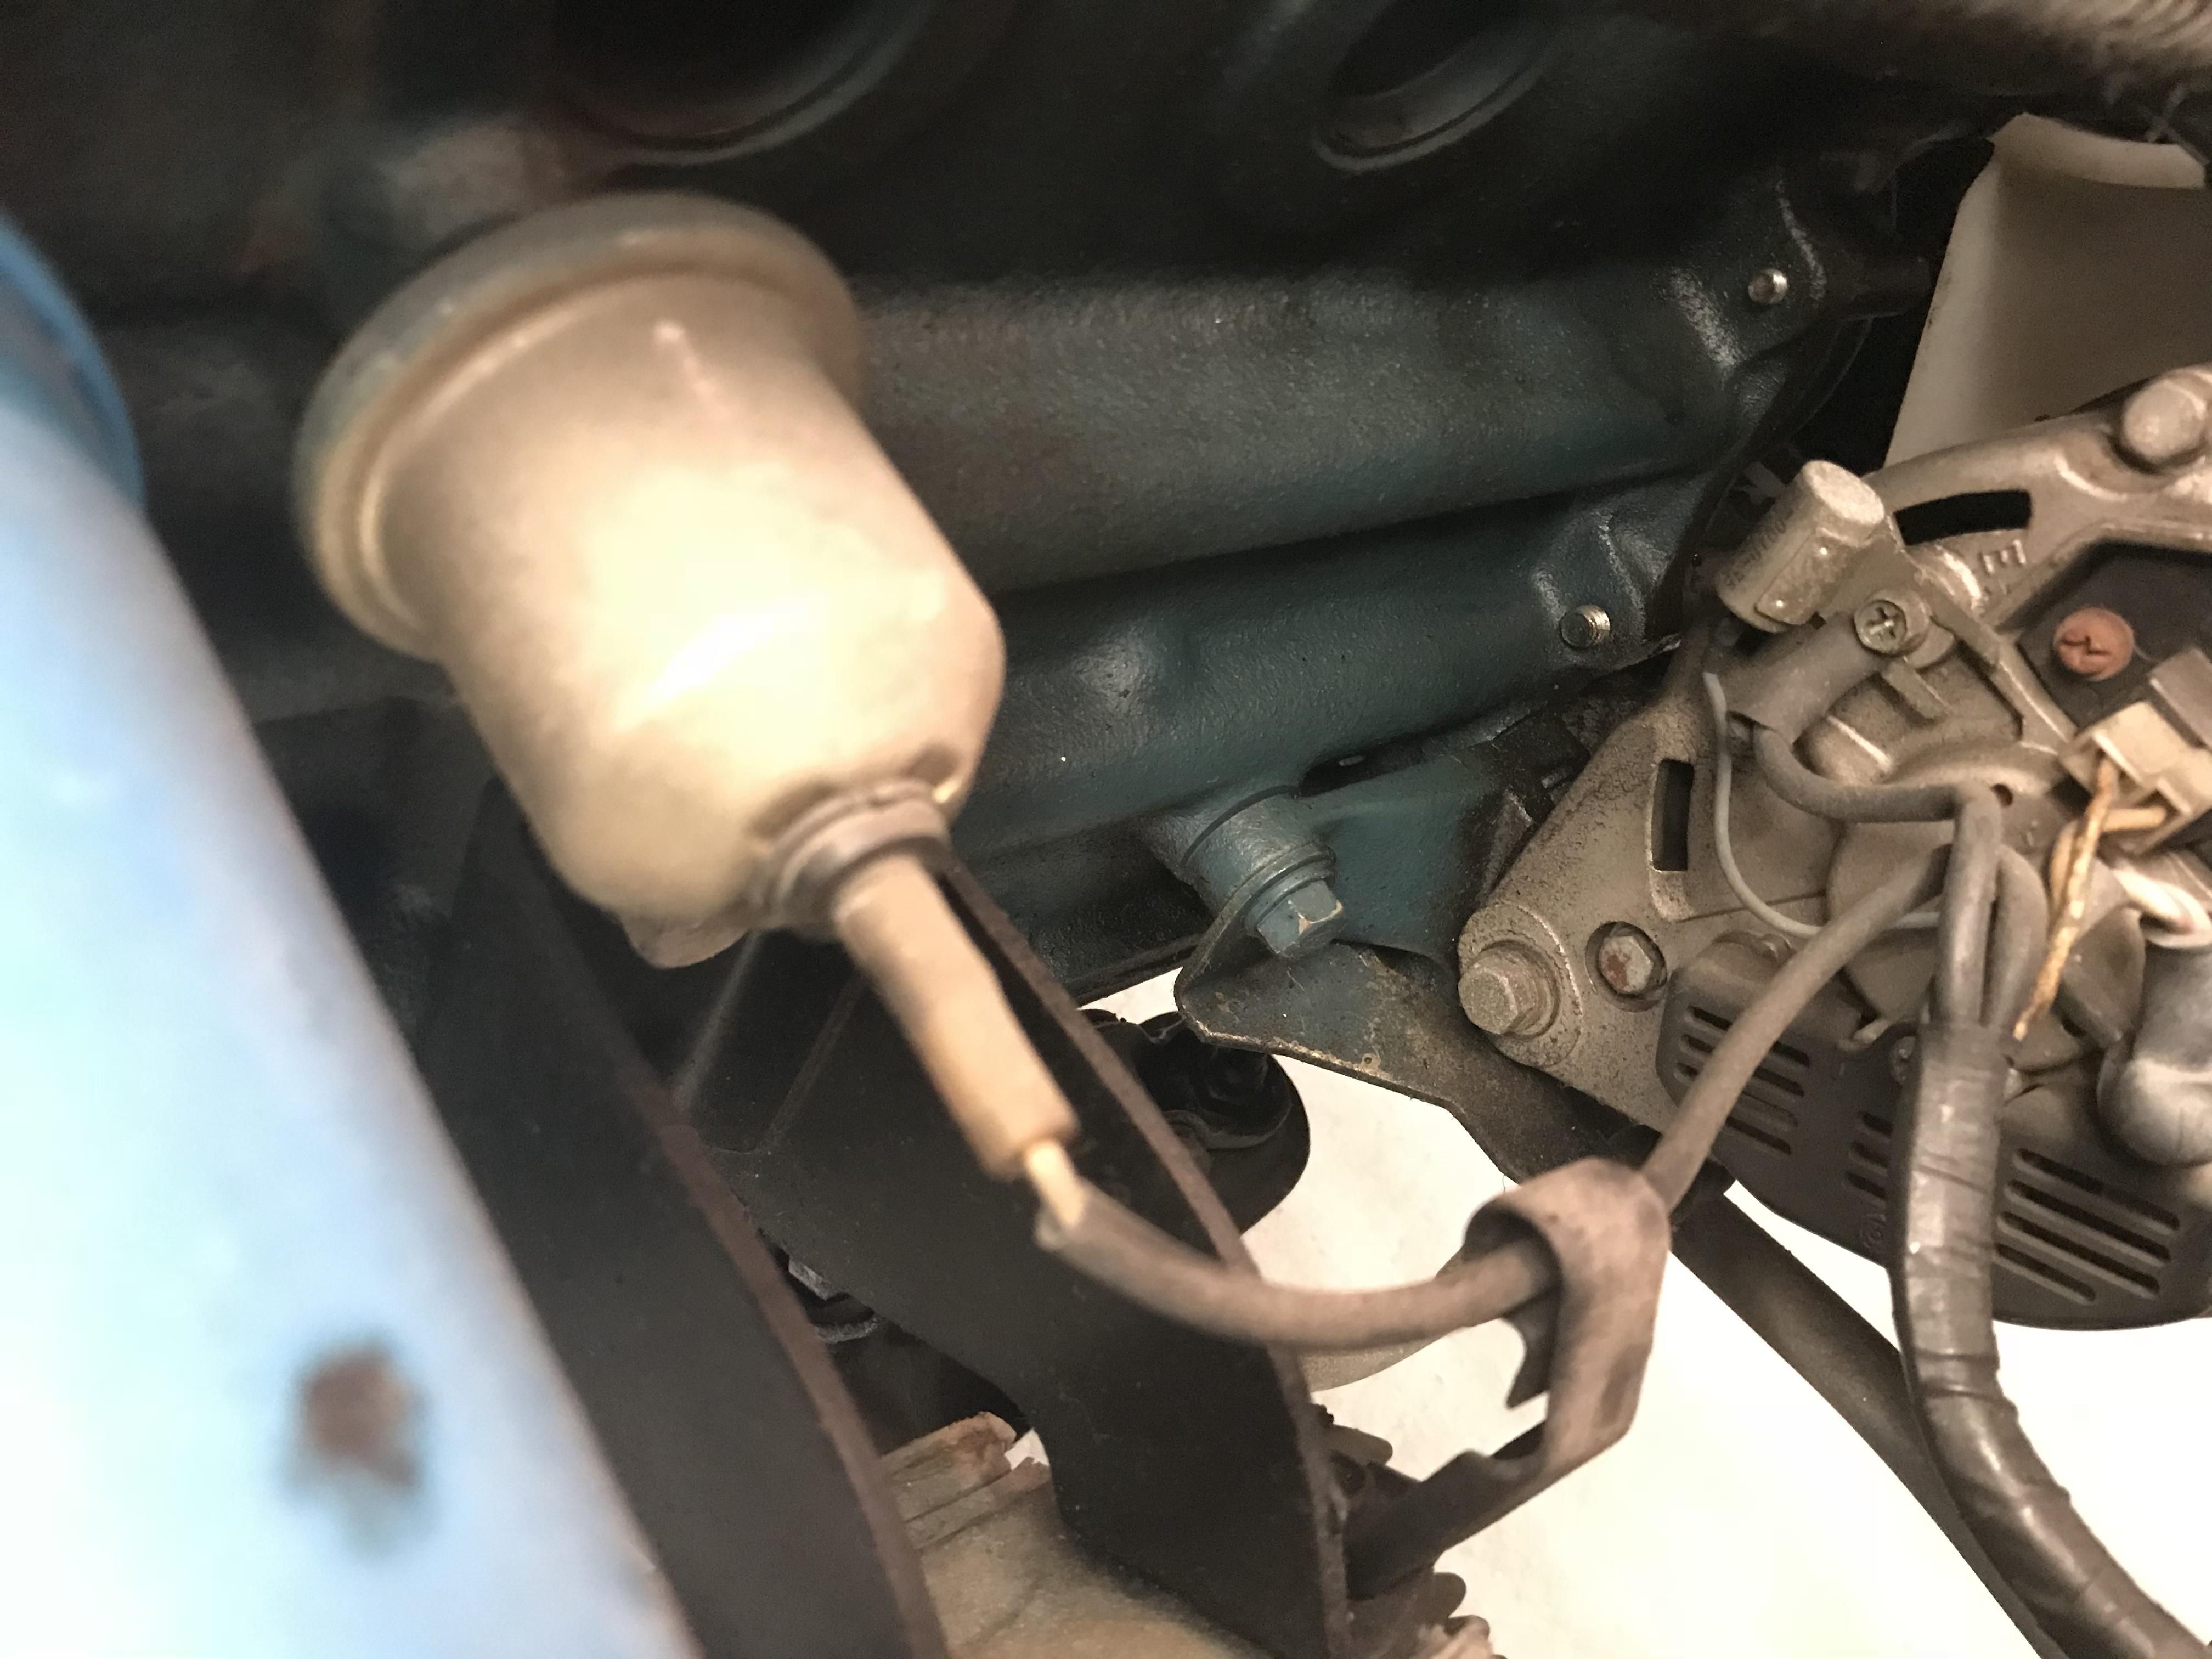
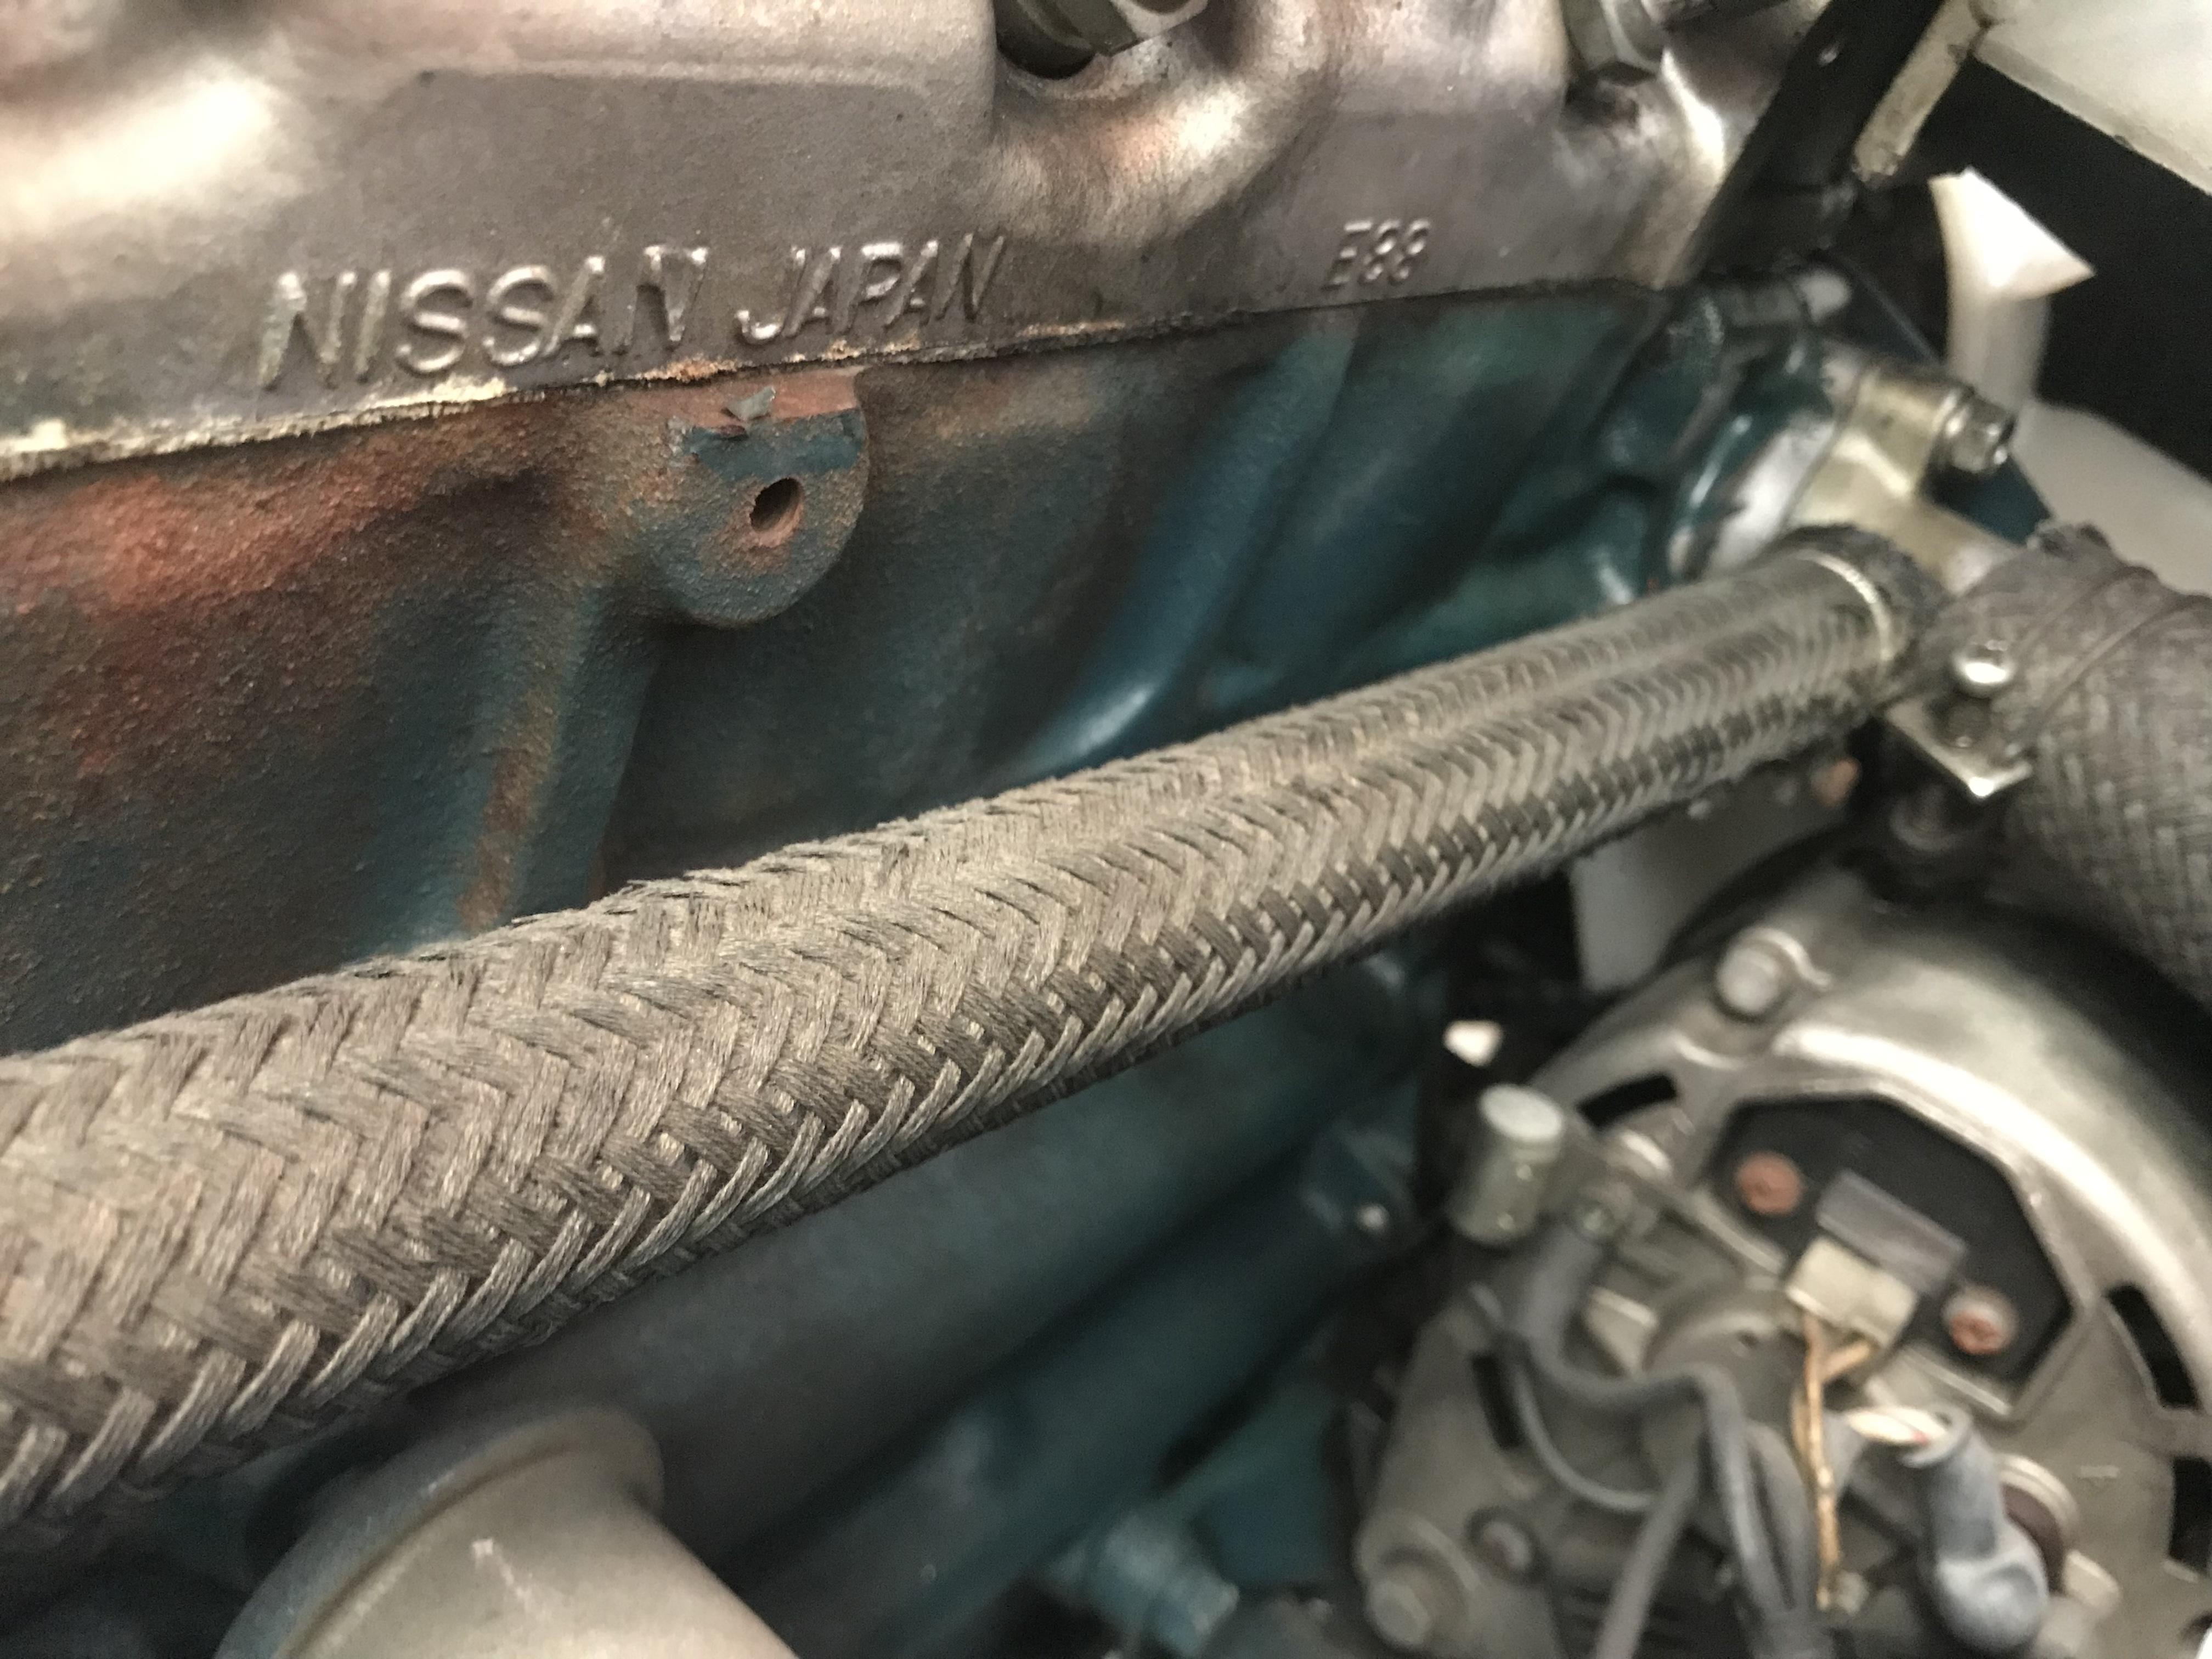
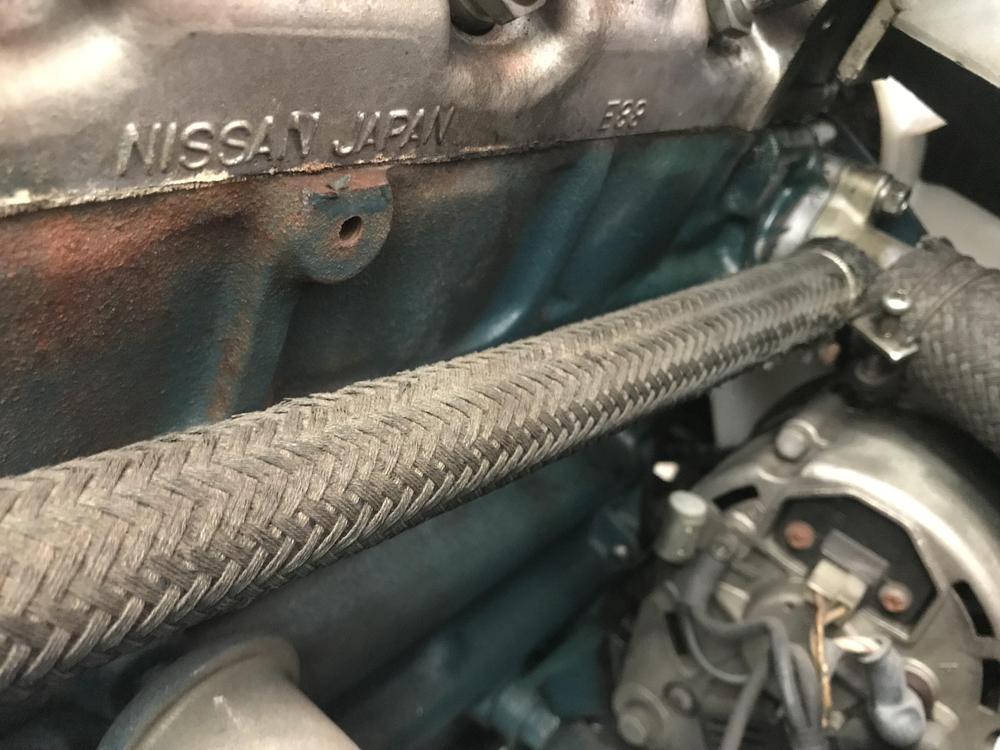
This is the engine which has never repainted. I can see the paint can color matches this non repainted engine block . I found hose clamps at a water pipe has over sprayed, this is interesting. Anyway only Japanese owners can have this paint can , we don’t have a judged show in Japan like ZCON , but I am sure this paint can deserves for a gold medallion car if we had a ZCON in Japan . Kats


 1 point
 -
We came upon a well preserved part that we took to a local paint supplier and had them match the color. We ended up with a quart can (from which we've done probably 5 blocks over the years and still have more than half) and eventually a couple of spray cans they made using that formula. We discovered that it's much easier to brush on than spray the block itself... Easier to spray the brackets and pulleys. We also learned from the 1975 Museum car we had in the shop that if you're going for authentic factory look when spraying, you have to overspray the bottom of the head about an inch or so...1 point


.JPG.323874a4ee3976a5996958fc1b016252.JPG)