


Leaderboard
-

siteunseen
Free Member9Points15,115Posts -
HS30-H
Free Member8Points5,509Posts -

Zed Head
Free Member5Points19,238Posts -
zKars
 Subscriber
 4Points3,770Posts


Popular Content
Showing content with the highest reputation on 08/12/2021 in all areas
-
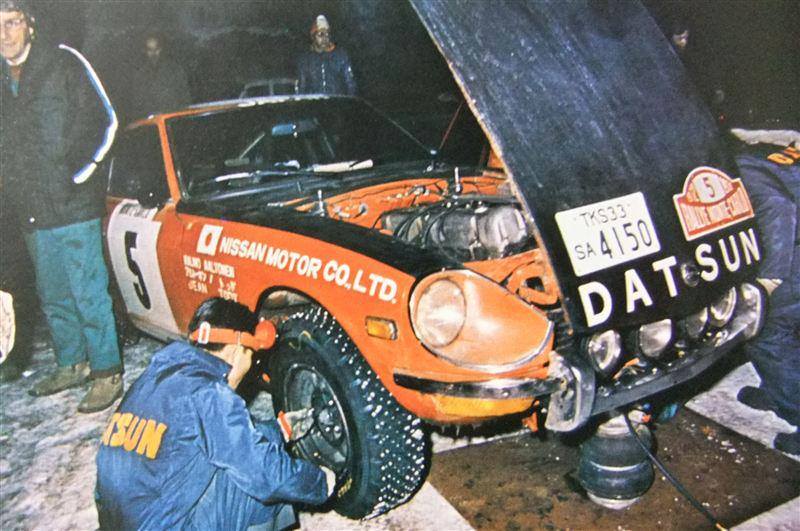
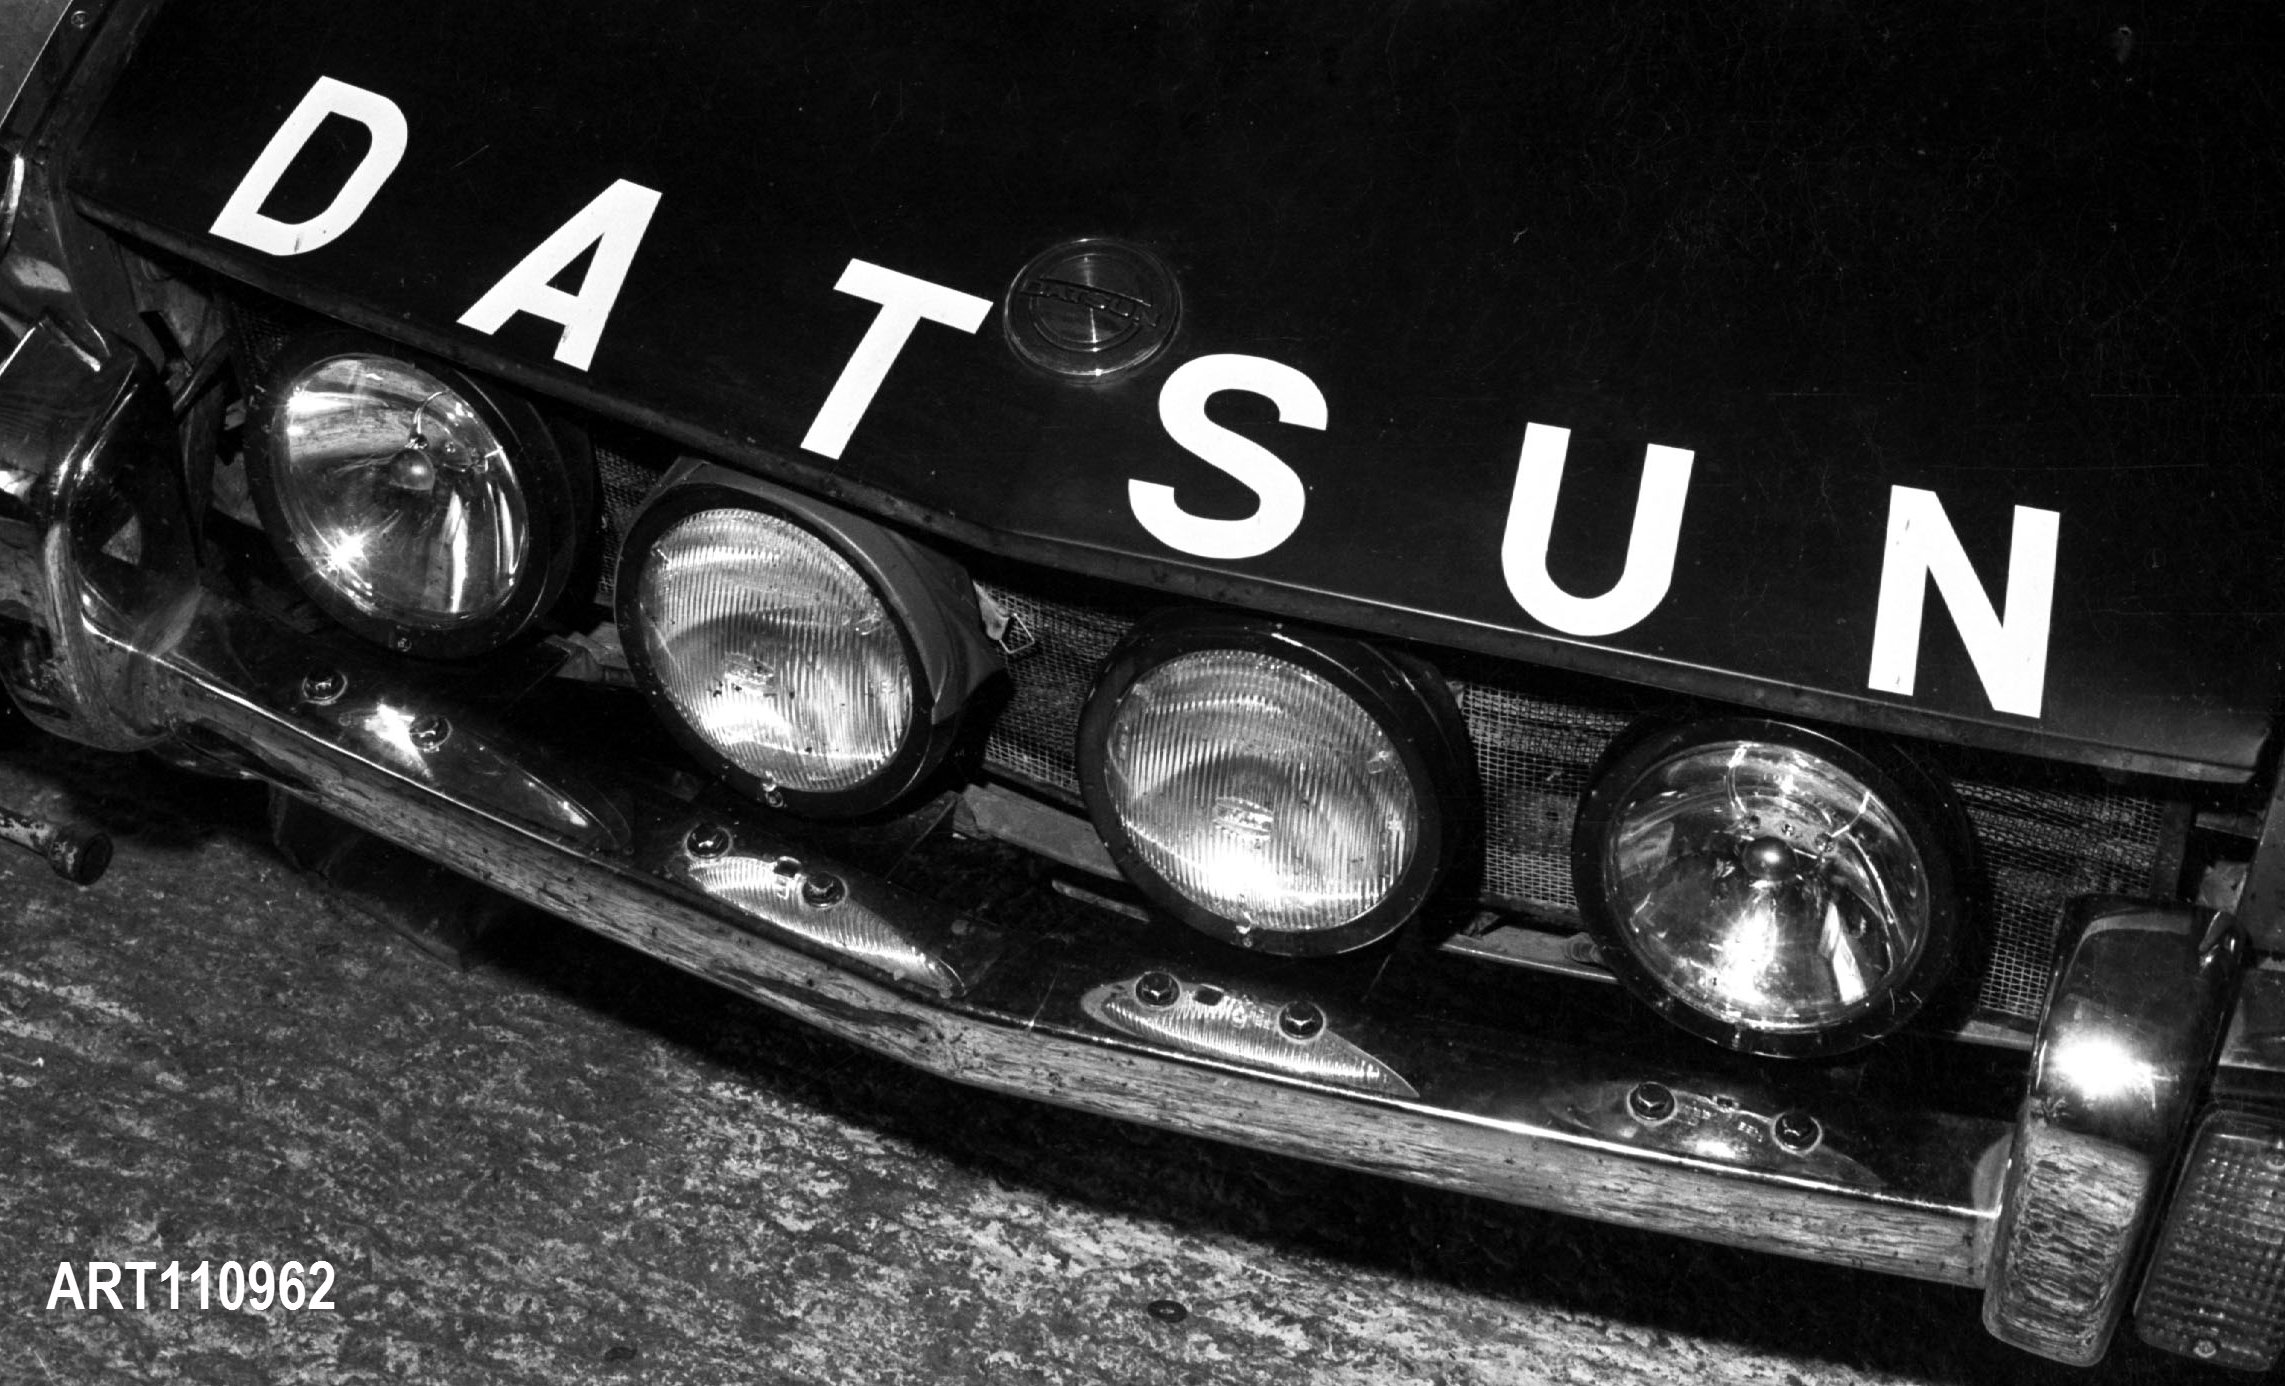
4 pointsHere's an example of a self-built replica 'Drop Bumper' and lights, on one of the VZ Program cars which went to Japan. I've seen the car in person and it is very well done:
 4 points
 -
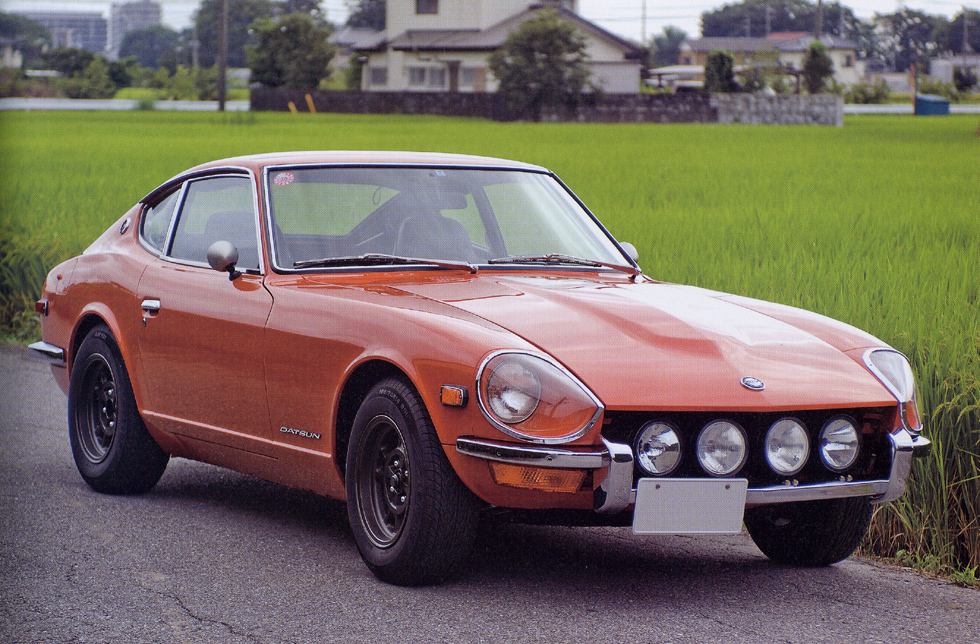
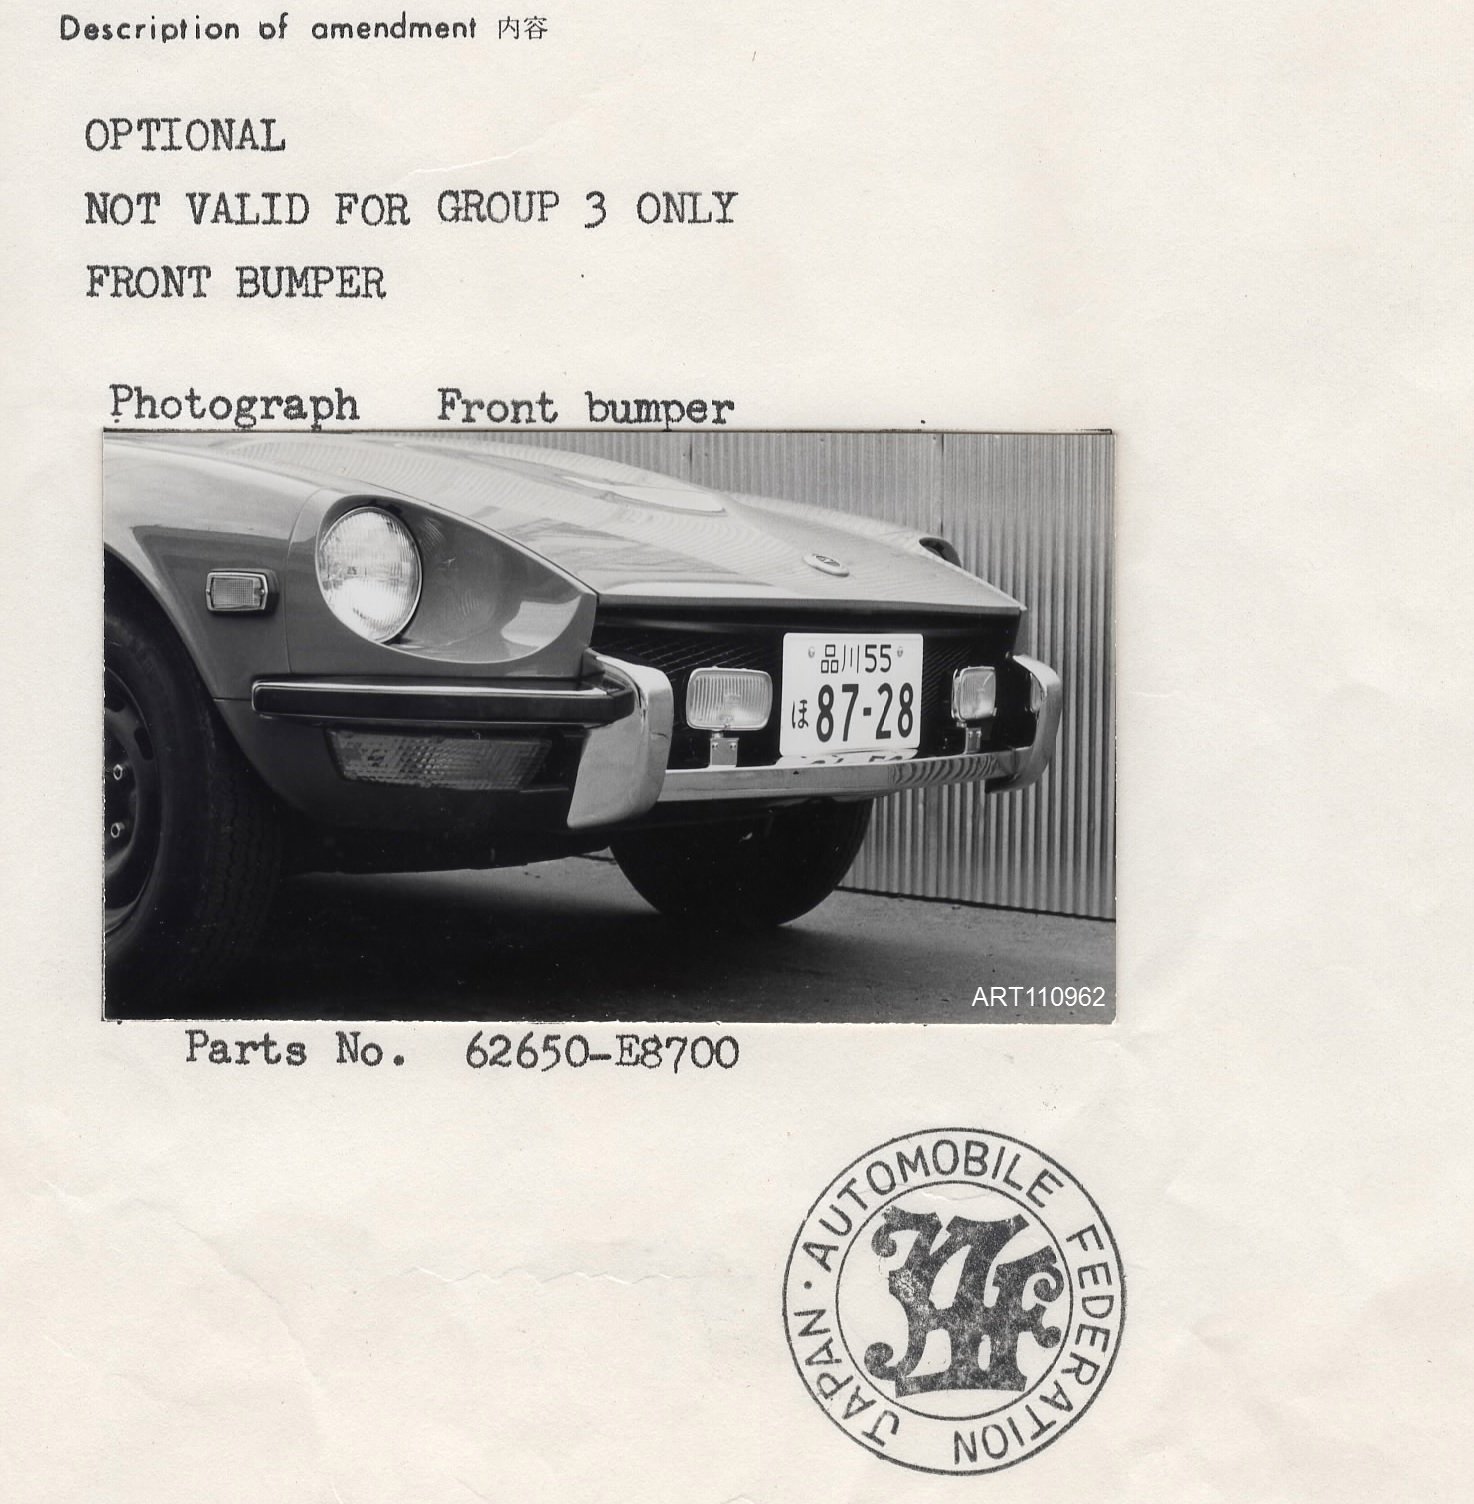
3 pointsAs part of the homologation process, the 'Drop Bumper' was in fact given a factory part number and made available to the general public. Part number was 62650-E8700. In Works rally team use there was a fairly complex arrangement of braces and supports for the lamp units themselves; the lamp mounting brackets were braced to the front valance as well as the centre part of the bumper, and the whole affair was linked to the sump guard and the sump guard mounts. Little of that would be relevant to, or necessary on, a road car but care in bracing the lamps is quite important in order to avoid 'beam shake'/flicker, as well as stress fractures. You'd struggle (to put it mildly) to find an original E8700 bumper in live captivity, but you could make your own version and this has been done quite successfully by others. Photos save a thousand words:
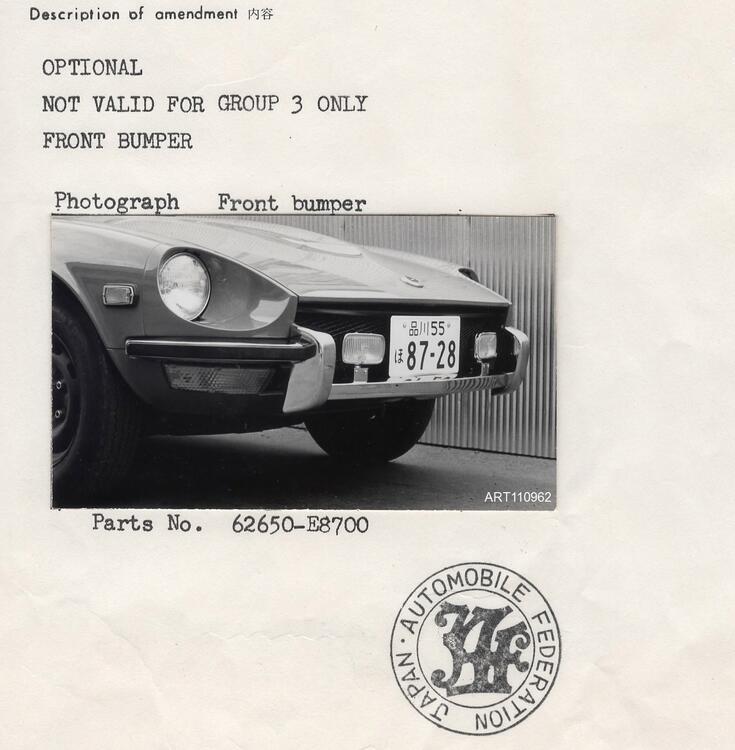

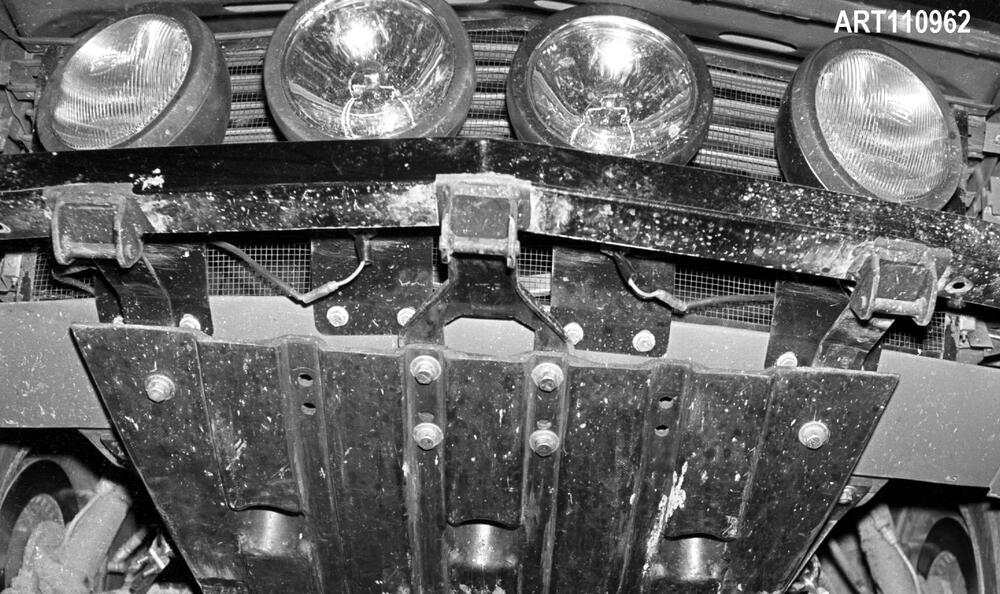 3 points
 -
2 pointsI think its most important to ensure the compressor drive axis is parallel to the crank shaft to make sure the pulleys run true, I was un-aware that the sanden compressor cared much about being level in any plane. Did I miss something in the past Vintage installs I’ve done? I can think of some comment about the ports needing to be vertical ish, or within some degree swing either way of vertical, but it wasn’t all the critical. Depending on how you plan to tighten the belt ,ie are you swinging the compressor in slots in the mounting brackets or using an idler pulley, the compressor will rotate anyway. And yes, as if Derek needs any confirmation, the engine leans 12deg east if you’re driving north.2 points
-
Assuming the wipers were properly parked when the motor was last turned off, then the first picture shows the correct orientation. The stub arm is in line with the long arm, not doubled back as the seen in the last two pictures. To check after assembly, don’t put the wiper arms on the splines, just turn the motor on and watch it run. Turn it off and let it park. Then put a little masking tape flag on one spline in place of a wiper arm and turn on the motor, and watch the tape flag to see if its doing the right thing when running and when parked. THEN you can feel confident putting the real arms on and letting it run. I have in the past done this wrong, put the wiper arms on and had them crash into the wiper cowl spoiling a nice fresh paint job, so I always use the flag method after re-assembling this mechanism.2 points
-
2 points
-
2 pointsI've been a 240z owner for 47 years, kids, grandkids most of that time and I've actually had to use the starter in 1st gear to get going and once going it's easy enough to shift without grinding gears. This was due to a clutch slave failure on each of my 73 and 71 cars (and before that in my 61 Belaire wagon, clutch linkage broke). I also never leave the keys in the car so kids can't "hit" the start button. I guess they could push in the clutch and get it rolling, but isn't that true on current manual shifts?2 points
-
2 pointsAll my modern clutch cars are like that so it is a good “safety” feature for when the wife drives/starts the car. Plus it is part of the wiring of the push button and I have no issues keeping a safety feature installed. I have five grandkids climbing around in there at times and one of them is bound to push the start button eventually….2 points
-
2 pointsIf it were me, have it ground. Those hot spots look to be enough to cause premature failure. I've learned the hard way.2 points
-
2 pointsThe only machined surfaces on the block that are parallel to the cylinder bores are the front where the timing cover attaches, and rear where the transmission attaches. The deck where the cylinder head mounts and the pan rails where the oil pan attaches are perpendicular to the cylinder bores, and parallel to the crankshaft and camshaft center lines. I mounted a cylinder block to my engine stand, rotated it so the pan rail was perfectly level, using a smartlevel (a digital level). Next I mounted an oil pan, and measured the angle of the bottom of the pan using the smart level. I got 12 degrees.2 points
-
2 points
-
1 pointI would do poly for the steering rack as those take a beating. The new poly ones are kind of a pain to seat, but once in, they hold the rack tighter. I don't see any tears on the crossmember bushings, so I'd leave the stock rubber in place. It's easy to do that one later if needed.1 point
-
1 pointYes, the way to do it is to cut an original bumper into three pieces and 'drop' the centre section by welding on some flat stock and/or (preferably) finding some nice period over-riders from a suitable sedan and using them as the vertical elements. Yes again. The design allowed the bonnet to pivot open normally on stock hinges, with the front edge swinging over the lamp units. Again, easier to illustrate than to describe:
 1 point
 -
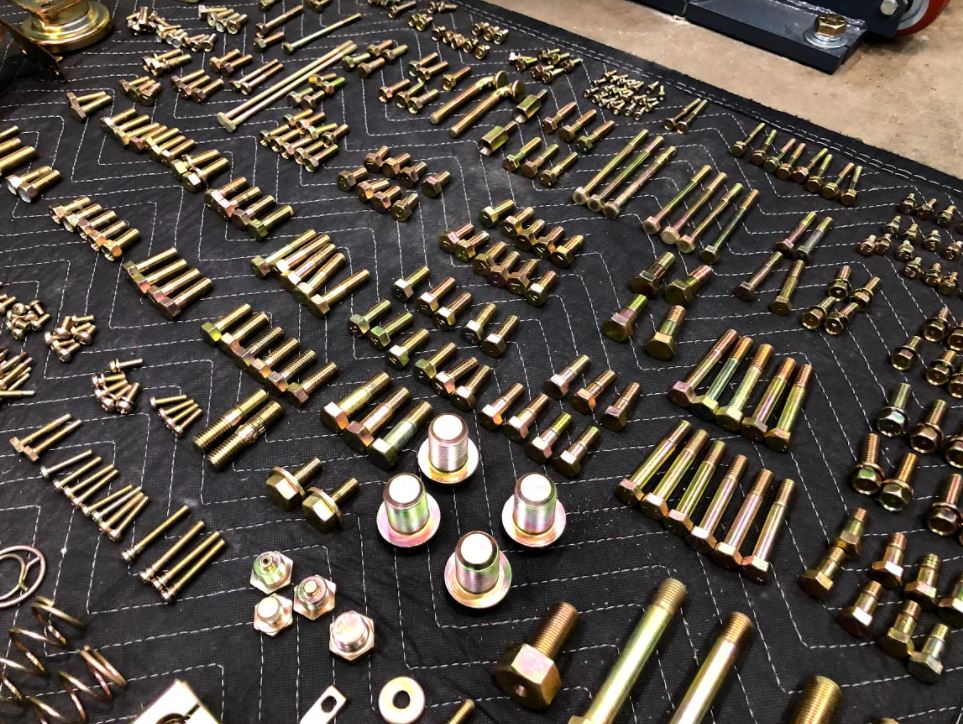
I know you were asking CW240Z72, but I will post my Excel spreadsheet for sure. It just isn't "finished" yet. So, I made that Google version which anyone should be able to access in the link I provided if they have Google account. The link can be shared with anyone. If it helps, I can upload an Excel sheet, but again, it is not complete and will need to be updated and then reuploaded with each round of changes/updates. The Google version at that link will update whenever I make changes to it. When it is "done" I will certainly upload an Excel version for those who want to consume it that way. I have all my zip lock bags which are labeled with where they belong (they are currently empty 🙂). When I get the hardware back from the plater, I will fill the bags with the correct hardware, and during that process, I will take photos. I'll attempt to find a way to associate those photos to the entries in the Google sheet, so it is easy to find the hardware info, and easy to click to see picture(s) of those as well.1 point
-
1 point
-
1 pointI have heard good things about the Falken Azenis for many years.1 point
-
1 pointI like this one! I just used it to compare the OE tire size to the new tire size on our Tundra and got the info I wanted. Thank you for the link!!1 point
-
1 pointI would absolutely try sanding it. Always in favor of a $5 solution that works. Not sure why I wrote that last post to sound like not to - probably foggy headed and way past my bedtime.1 point
-
@psdenno Probably garage kept, climate controlled its whole life, too.1 point
-
Seems to have undergone quite a metamorphosis since 2014. Even the sunroof appears to have self healed. As described on Craigslist 2014 and EBAY 2021: 2014: Body/Underside heavily rusted. Would need Floor Pans, Left Rocker, Engine Frame Rails, etc, etc. 2021: RUST FREE Classic Z car has been been well preserved and maintained.1 point
-
1 pointI think you're talking about the splined hub. That's just a design feature of the disc. No parts to swap there. You do want to clean the splines on your transmission shaft though and test fit the disc to make sure it slides smoothly on the shaft. It doesn't move far but it does need to be free. Use a wire brush. Check the nose/snout of the transmission front cover also for grooves and wear. The throwout bearing sleeve rides on it and needs a smooth path too. If anybody let a bearing seize up in the past the spinning sleeve can do damage. Some time's the snout/nose breaks off completely.1 point
-
1 pointJust read a story about a young guy who got killed when he was ejected from his car while doing doughnuts. It rolled, he got thrown, the truck landed on him. It only takes one mistake. Forgot to say - he didn't have his seat belt fastened. The primary safety feature for car crash safety.1 point
-
1 point
-
1 pointI bought a 1977 Chevy Monza Spyder with the 305 V8. It was the first car I ran into which required the clutch pedal to be depressed to engage the starter. Probably the first week I owned it, I pulled the switch out of place from the clutch pedal assembly and wired it closed so that the starter could be used any time. When I'm working on a car, I really don't want to have to climb into it to use the starter. I and my family owned that car for 30 years, and not once did defeating that safety device result in damage or problems for anyone.1 point
-
Part Number: 30610-U750A You can still get them from Nissan. https://parts.courtesynissanoftampa.com/p/Datsun__280Z/Cylinder-Master/89597235/30610-U750A.html?partner=googlebase Sent from my iPhone using Tapatalk1 point
-
556 for sale again... up from the $1,800 above. https://www.ebay.com/itm/165013655212?hash=item266b948eac%3Ag%3A-GIAAOSwz1NgndTv&LH_ItemCondition=41 point
-
Read through this. It'll help get prepared for the job. https://www.atlanticz.ca/zclub/techtips/clutchbleed/index.html1 point
-
I use Red-Kote with no issues so far, about 10 years on my 280 and 5 on the 240. After all the research, reading I did it was apparent how long I let it cure makes the successfulness of the process what it is or is not. @Bonzi Lon thank you for the advice. I ran those glass fuel filters for the first month looking for pinkish colored fuel. After getting scolded by many folks I took them off fearing a leak and engine fire. Thanks @madkaw for scaring the bejesus out of me but they never leaked and served their purpose, no pink gas right before the fuel rail. The low pressure on the carbed 240 was a no brainer but the 32'ish psi on the 280 was worrisome and I wound up with quality fuel extinguishers in both cars. Long road but it circled back around complete and everything is fine. And I have the plastic filters right out of the tank on both cars. G2 on the 240, G3 on the 280.1 point
-
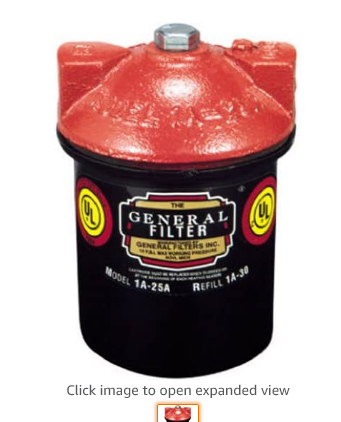
These are made for vacuum, pull-through, applications. Furnace oil. Kind of kidding but if you needed something to get you by until you could fix the tank, they'll hold a lot of crud and don't hinder flow. Put a ball valve in front and it's easy maintenance. https://www.amazon.com/General-Filter-1A-25B-Standard-8-Inch/
 1 point
 -
1 point1 point1 pointYou need makeup on them hands, those life long working hands. Maybe some googly eyes to look back at you in shame. You'd get them eyeballs moving so fast they'd look like a hockey puck getting slapped around.
 1 point1 pointI would have stuck it in a baggie with a bit of orange peel. That would rehydrate the dried out weed, giving it that “just right cured and ready to smoke” texture.1 point1 pointPlastic cover is 100% original to the car. Second Z I’ve had with one, as it was for both CanTechZ and jfa.series1 above.1 pointEvapo-Rust or CLR do wonders for removing rust when prepping hardware. I tried the media blasting but its very difficult with the smaller parts. I soaked everything in CLR overnight, and wire-wheeled every part. Doing so gives the metal a nice luster that shines through the plating. Don't bother with itemizing everything in zip locks, as you'll get everything back in one big box. I wrote every fastener down by size/length/thread pitch/qty and transferred that over to an Excel sheet for easy tracking.
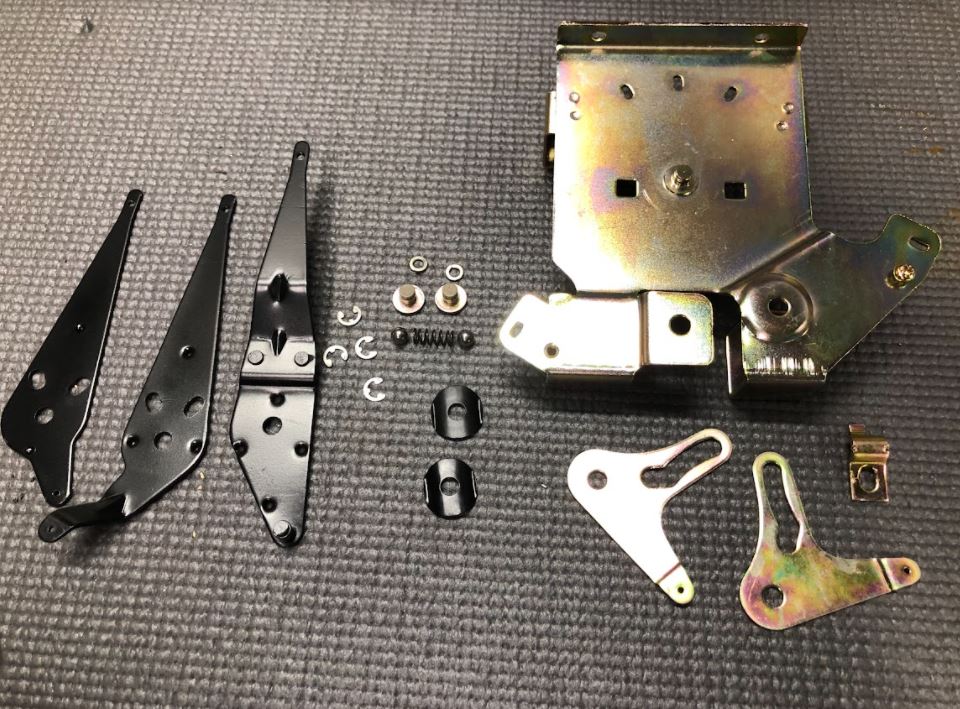

 1 point1 pointIf you're a visual type maybe you'll see what I'm saying. "Unload" is what my Dad said???
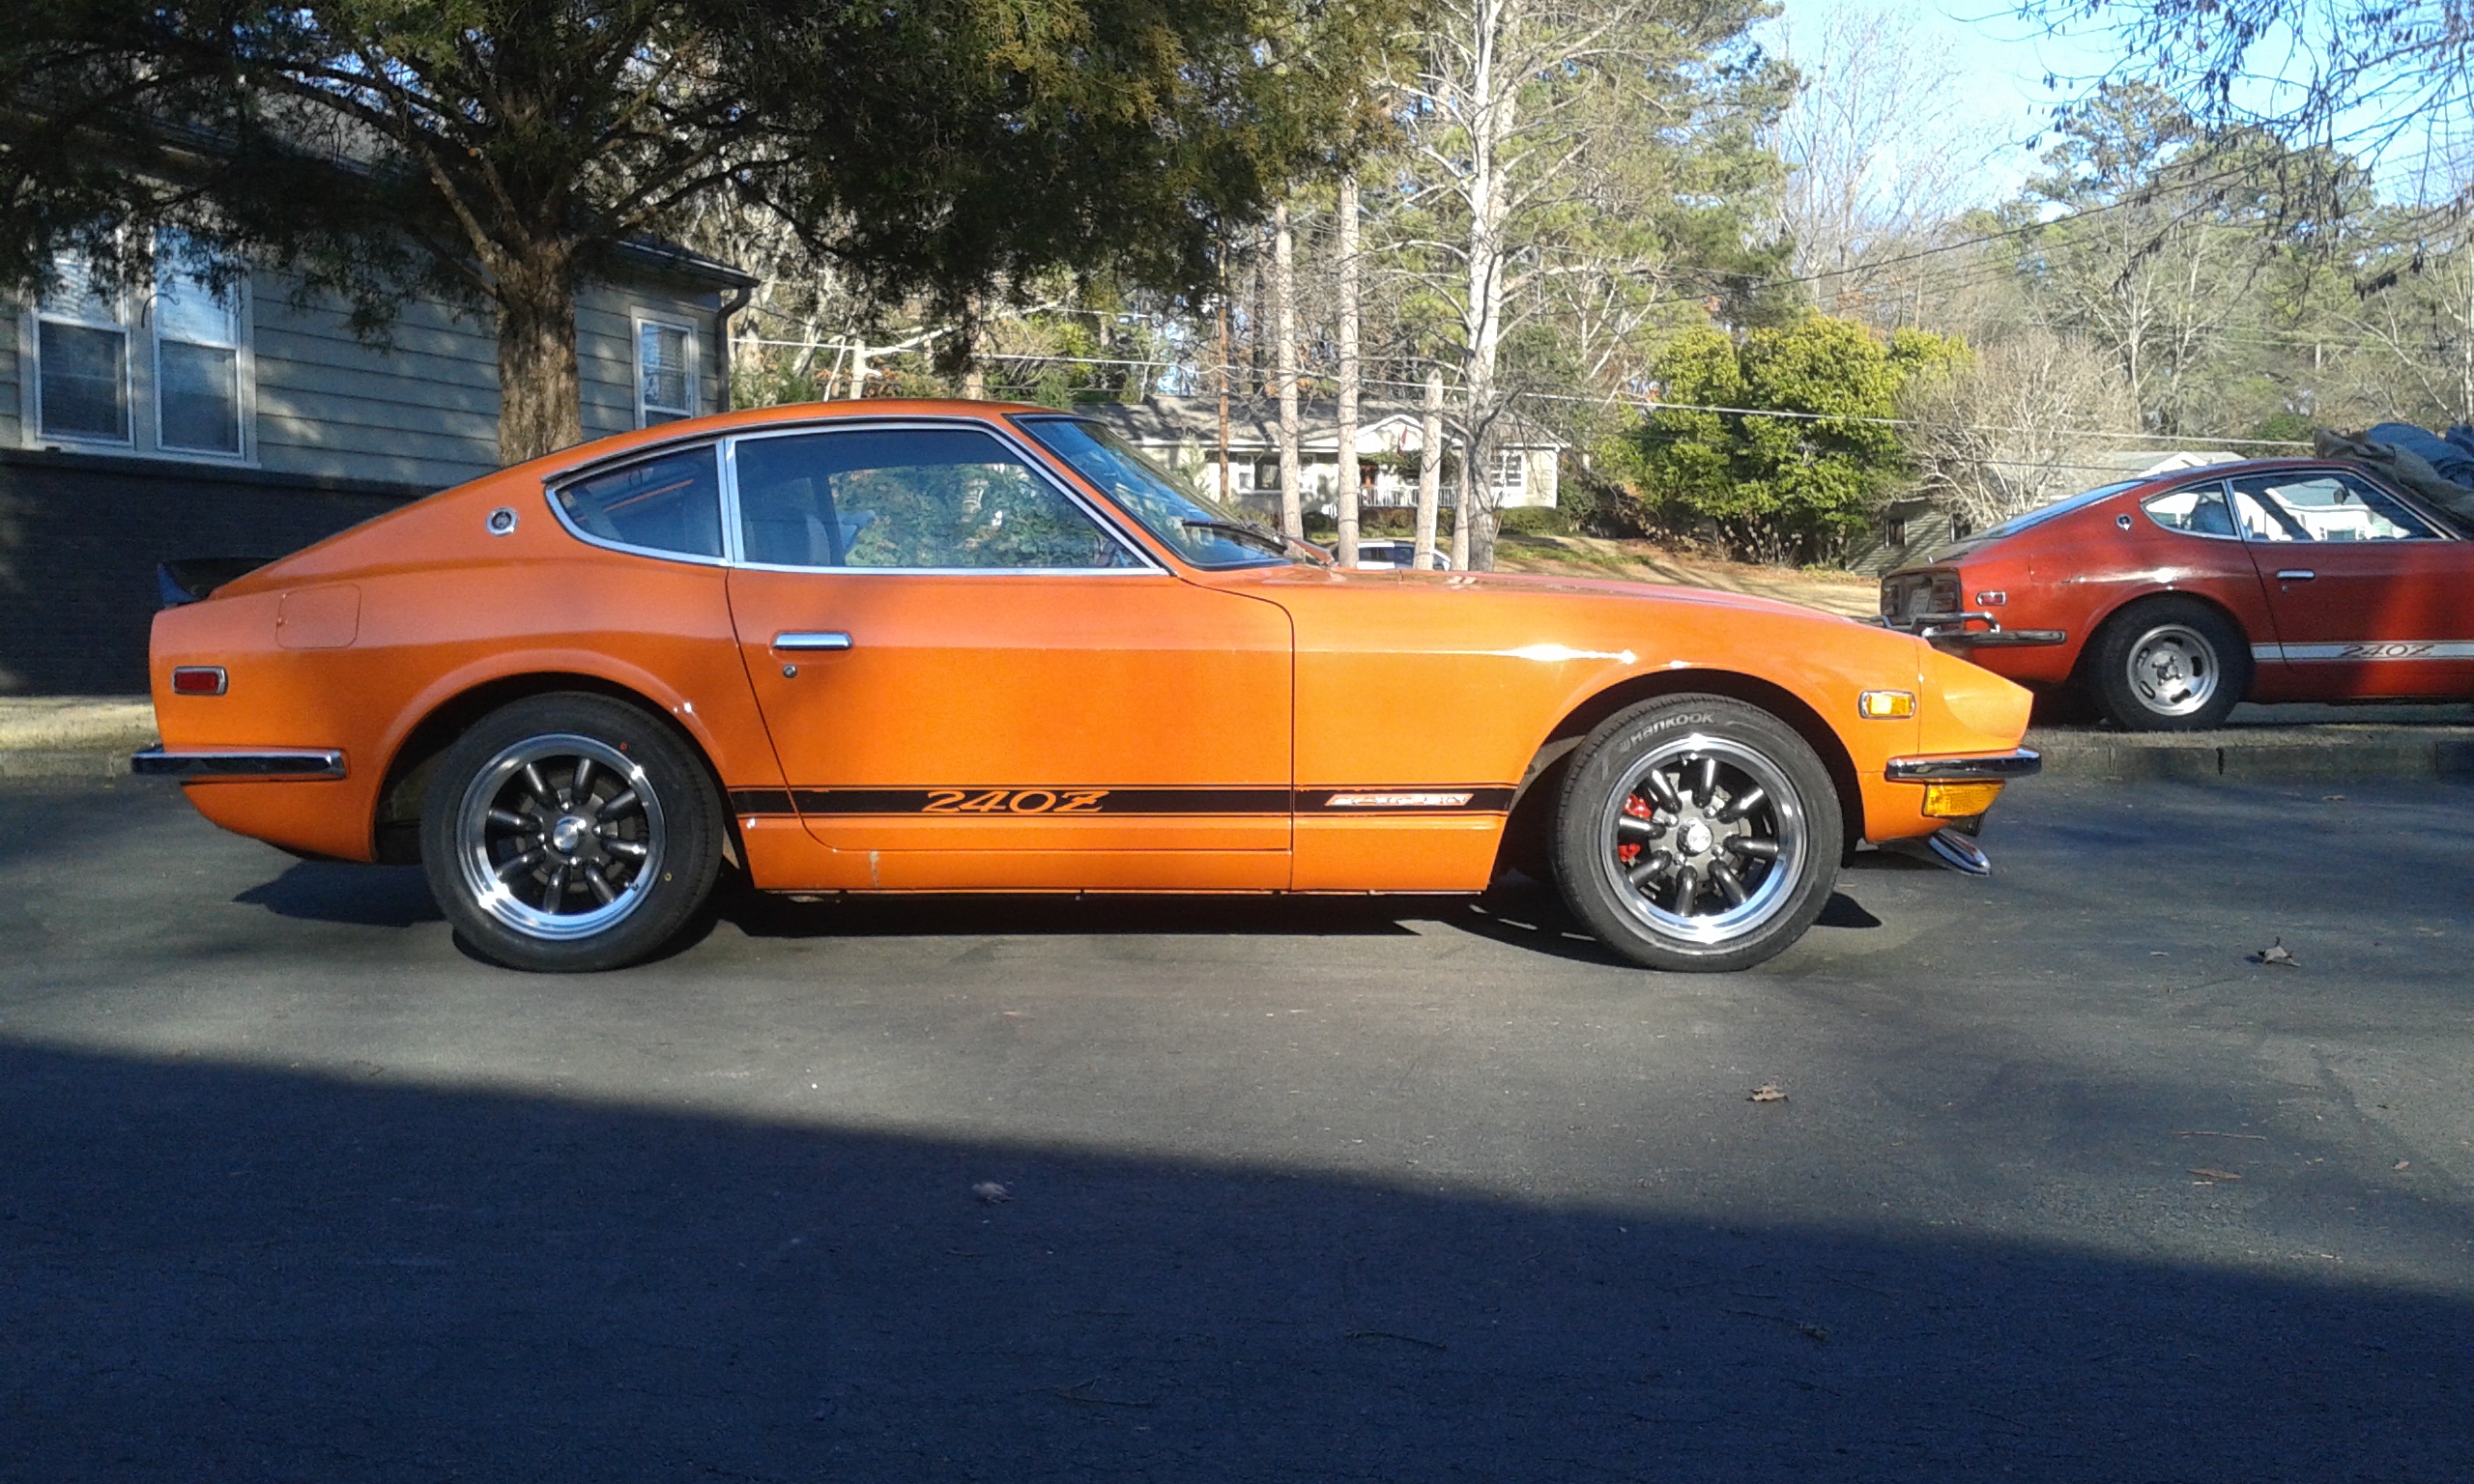
 1 point1 pointI haven’t done a whole lot other than pull and clean things as they come off. The first thing that started it all was a rotten coolant hose going to the air control valve. Oh I’ll just fix this and put it back together, Cleaned it up a little and replaced the nipples with ones from my donor 280zxt parts stash. Then from that to now Of course I had to keep cleaning things up and pulling them. One of my main goals is to paint the engine bay the body color. Never liked being able to see the red and someone else decided to rattle can black what they could while apparently removing nothing. At least it cleans off relatively easy. I’m currently cleaning up and undoing the wiring harnesses. Sent from my iPhone using Tapatalk1 pointDon’t know yet, I still need to mount and balance them. Oh, then there is all the other pesky stuff. Like a fresh engine. New Stainless brake and fuel lines. Refurb the fuel tank, and replace all the fuel hoses with ethanol compatible hose. And a few other minute details. OK, a lot of other minute details.1 point1 point1 point1 pointI love my 15" rewinds. 205/50 Falkens is what I run. They fill the space perfectly in my opinion. 16" are too much for a 240 so I put them on my 280. Still a little too much for me but way better on the 280. Go to motorsportsauto.com I think and they have suggestions on tire sizes for our cars. Rewinds are super light, you can't go wrong money wise vs. wheel combo.
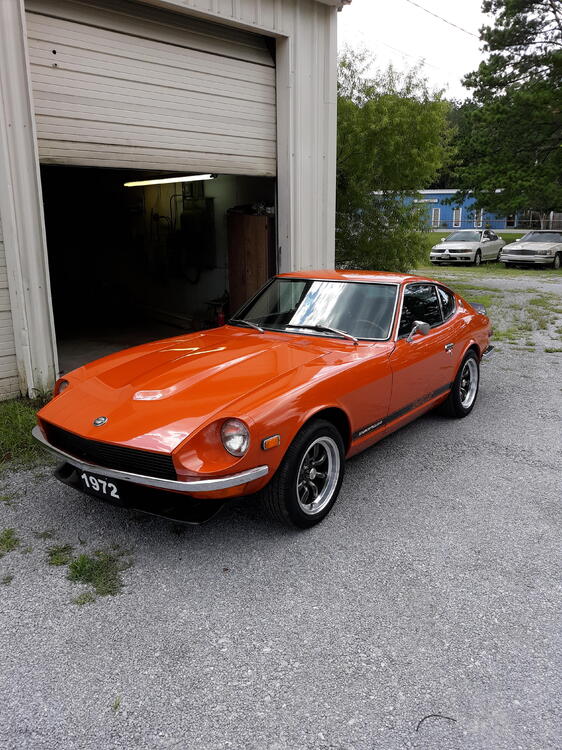 1 point


Important Information
By using this site, you agree to our Privacy Policy and Guidelines. We have placed cookies on your device to help make this website better. You can adjust your cookie settings, otherwise we'll assume you're okay to continue.