


Leaderboard
-
davewormald
Free Member5Points128Posts -

siteunseen
Free Member4Points15,115Posts -

Racer X
Free Member3Points1,877Posts -
Captain Obvious
Free Member2Points10,081Posts


Popular Content
Showing content with the highest reputation on 03/28/2021 in all areas
-
3 pointsI know you'll all be shocked to hear that saving money on the KYB's just cost me a small fortune in parts I wasn't there to buy ...3 points
-
2 pointsI believe the hose from your valve cover needs to be behind the throttle body vane.. Also, i cant see the ground connections from the EFI wiring harness. They should have just enough length coming out of the harness to be connected to the intake manifold.2 points
-
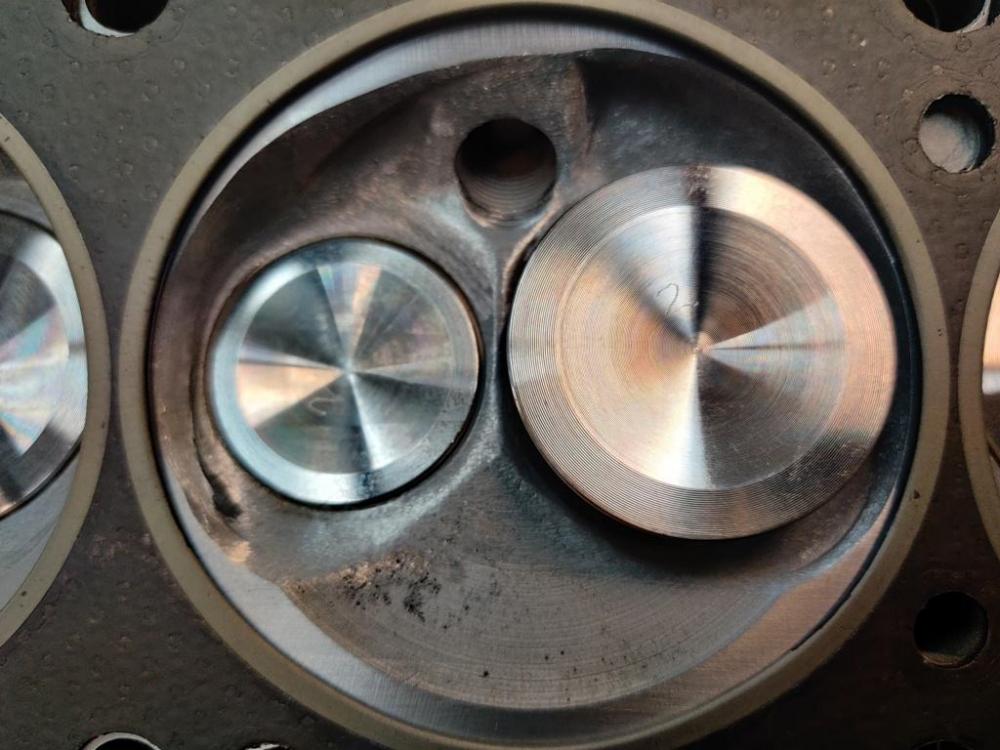
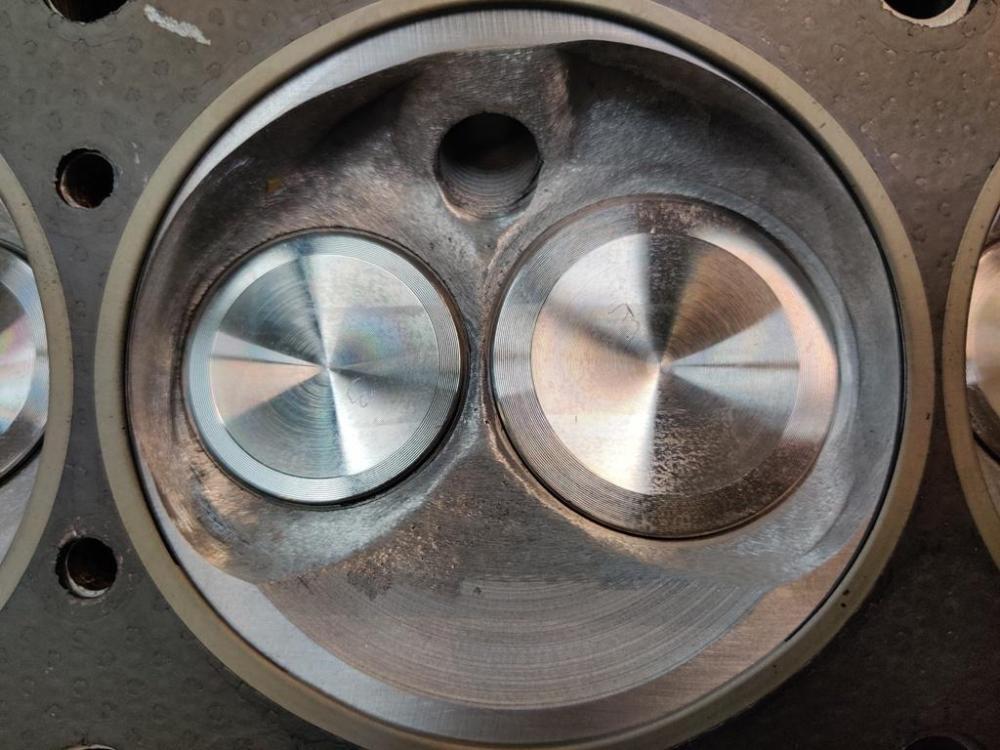
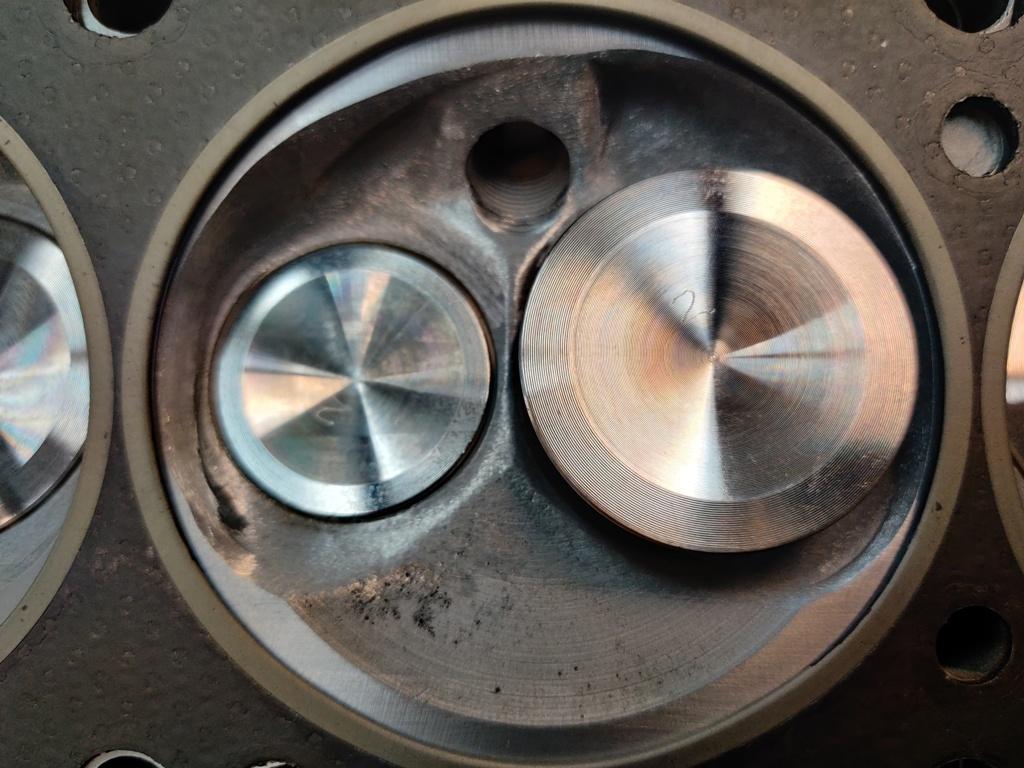
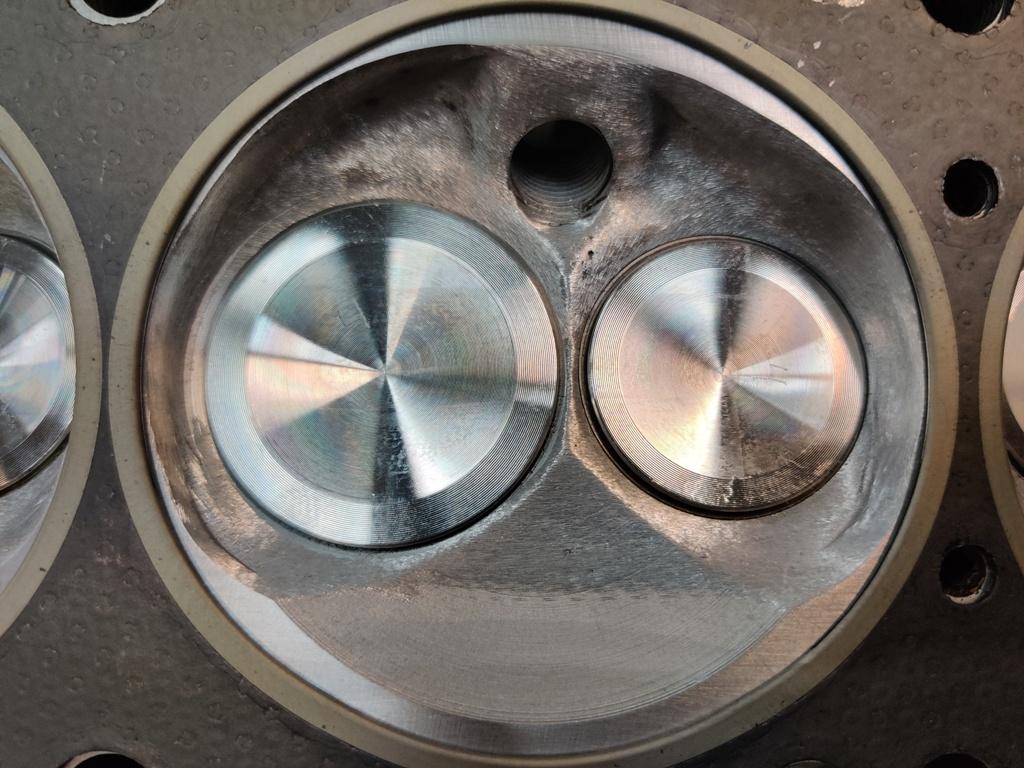
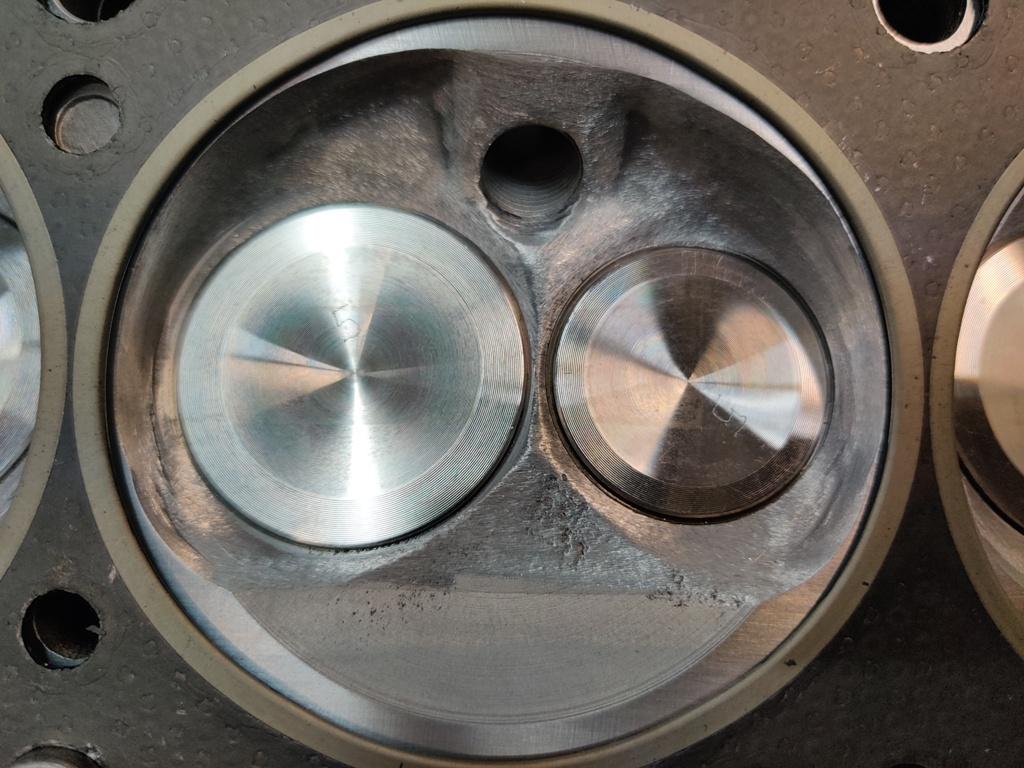
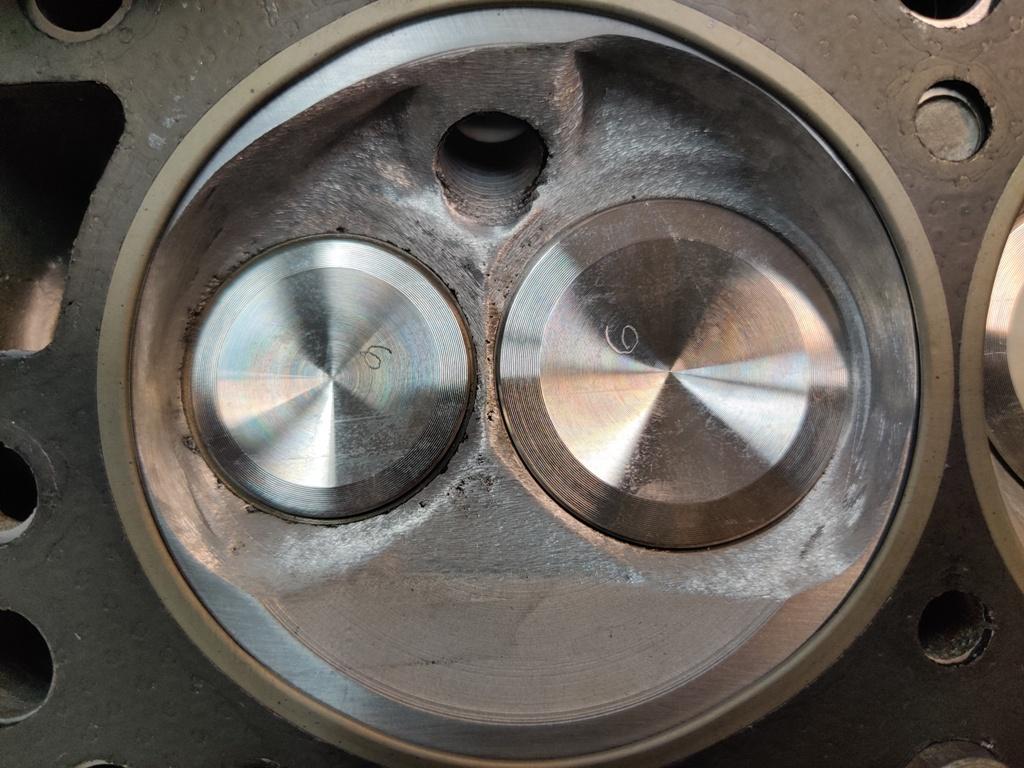
Chambers 1 to 6 in order from left to right after very little ground away, only nearest the valve and to the fire ring: I put the entire head inside a plastic bag and taped off everything so I didn't get any grinding dust anywhere in the head or valves, etc. I will check valve to block clearances next. Before the head goes back on for good, I will address any sharp edges that remain.


 2 points
 -
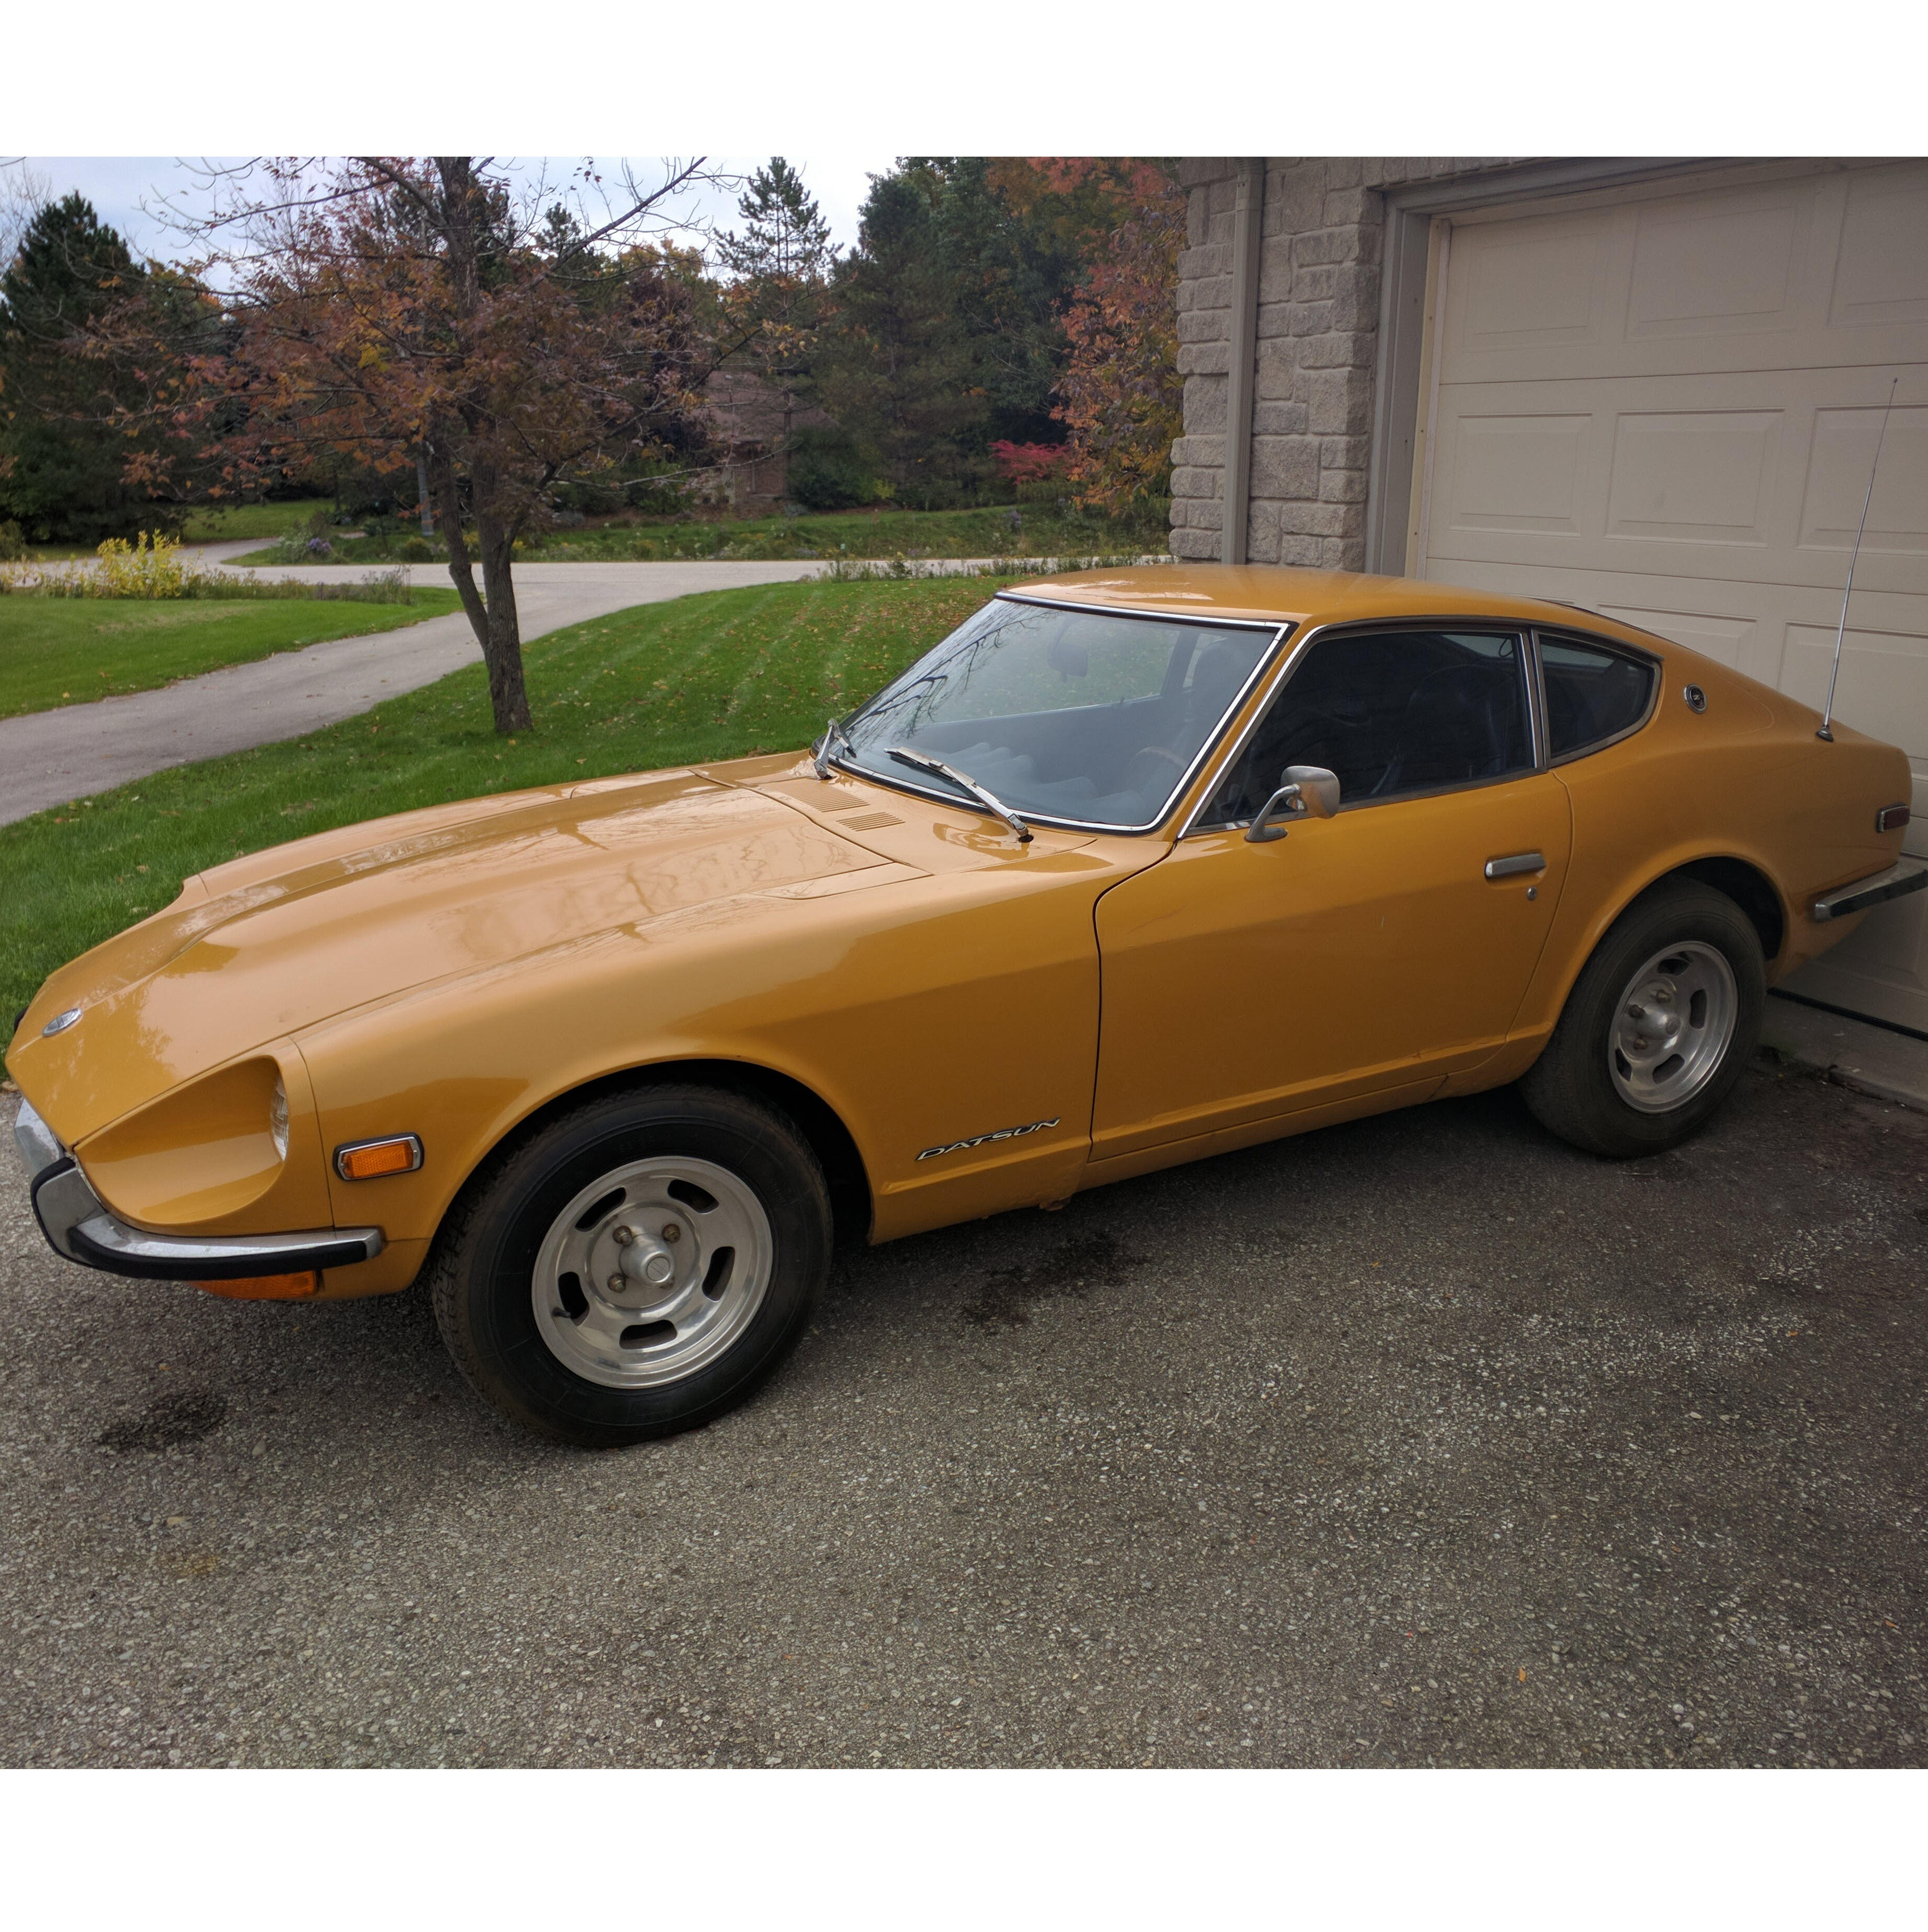
2 points2 points2 pointsAll three of his cars had the Hitachi SU-HIF "Flattops". And notice all the trophy's! That was one of the reasons I went to see him as I was contemplating the restoration of my '73. (which I finally accomplished by finding Motorman7 in 2018. See the thread "We're bringin; back the Flat Tops! https://www.classiczcars.com/forums/topic/60309-were-bringin-back-the-flat-tops/ ) Now thanks to Motorman7, my '73 looks as good or better than his.2 points1 pointWho rebuilt and installed the head? Is it the one the car came with? Your PCV hoses look right, I couldn't see that the one in front of the AFM was an elbow. I'm afraid you have the typical internet dilemma of assuring everyone out here that things like cam and ignition timing are "right" and don't need to be verified, yet you can't get the engine to run right. It's hard to get too involved when you don't have verification of those important things. No offense, but the thought that runs through your mind is "why should we believe this guy"? Anyway, two things that come to mind are: 1. a rotten EGR passage, where the blockoff plate doesn't work because the passages themselves are rotten. Somebody had that problem a few years ago and he had all kinds of odd problems with the way the engine ran. I think that he might have found it by measuring intake vacuum. It was much lower than it should have been. You might take an intake vacuum measurement since it is a measure of how the engine is pulling iar through the manifold. It's a clue. 2.1 point1 pointAll silver and body colour matching front air dam and rear spoiler will give the car a more refined even sedate look, front air dam and rear spoiler being black or charcoal will give it a sportier and more casual look (just my opinion). Two tone wheels to me always look "better", but nothing at all bad about a solid silver wheel. What a wonderful stage to be at, planning the final look of the car. I mixed it up a bit on my 72 with body colour on the front air dam and black rear spoiler, black mirrors, bronze wheels.

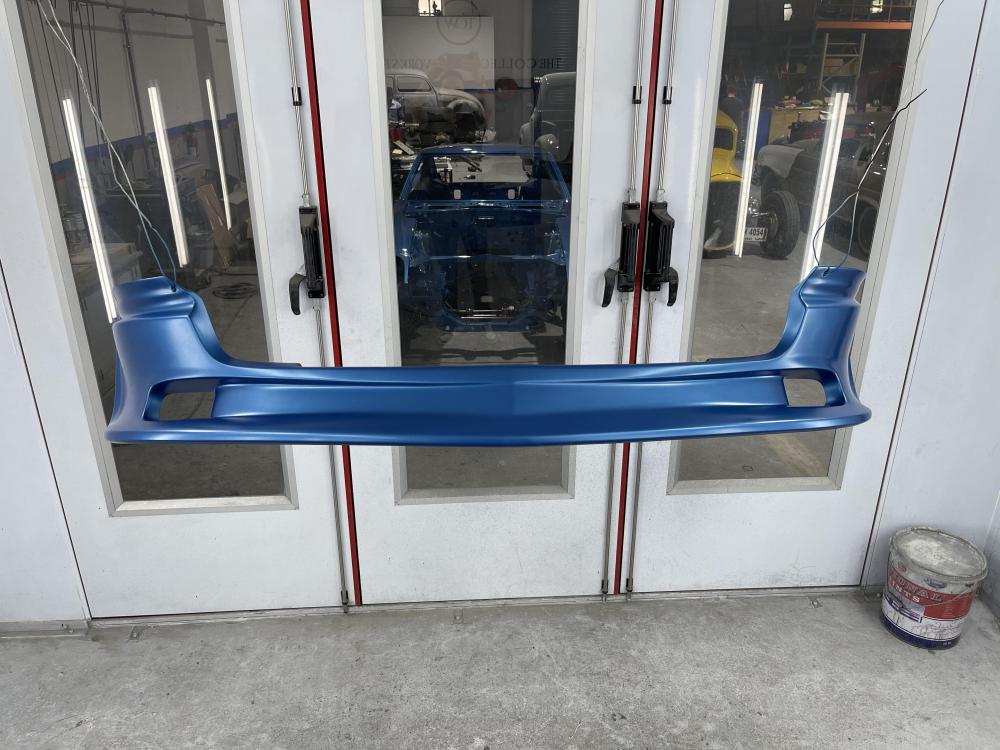
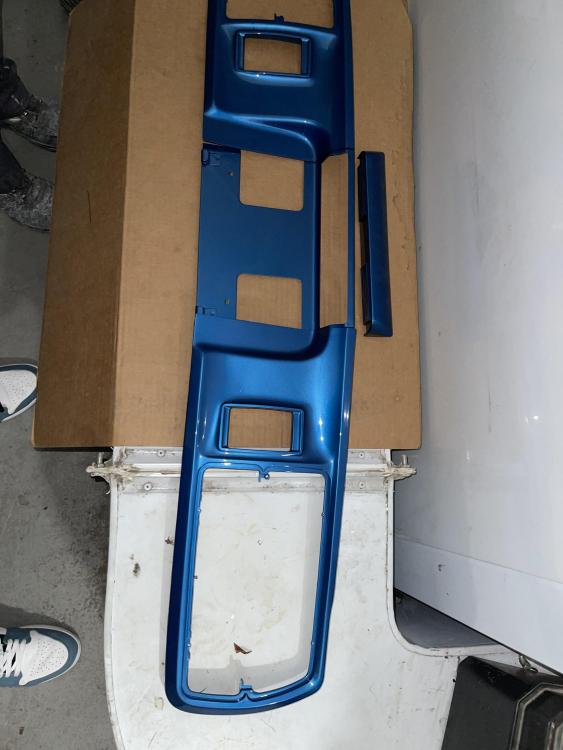
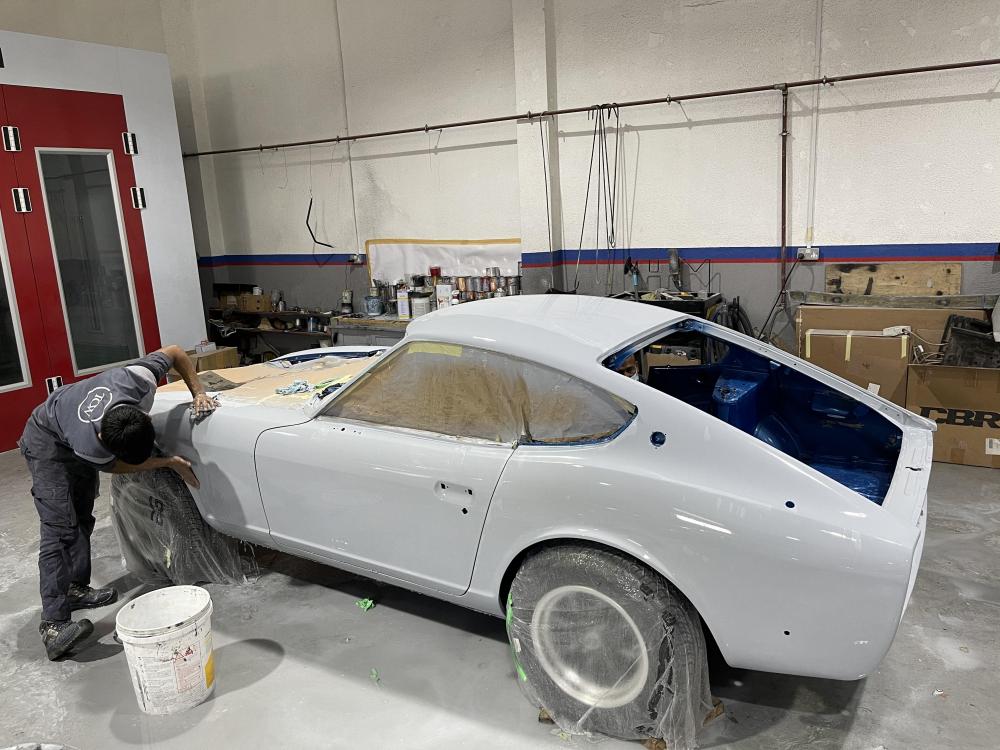
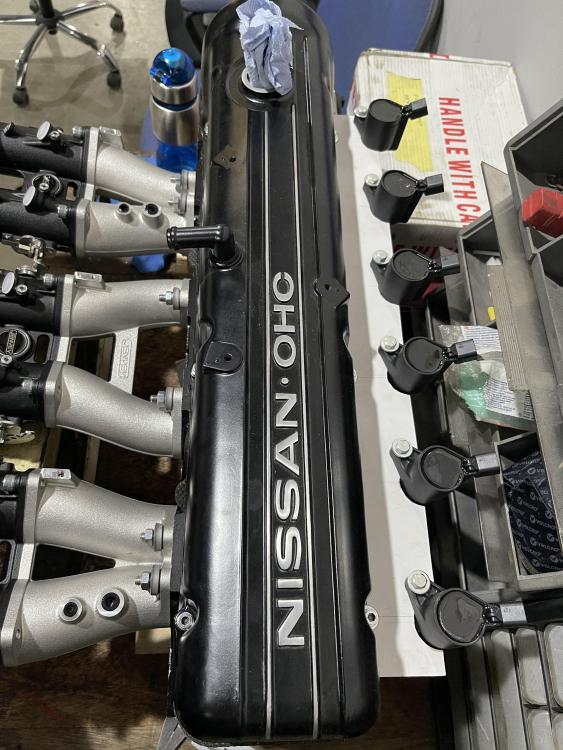
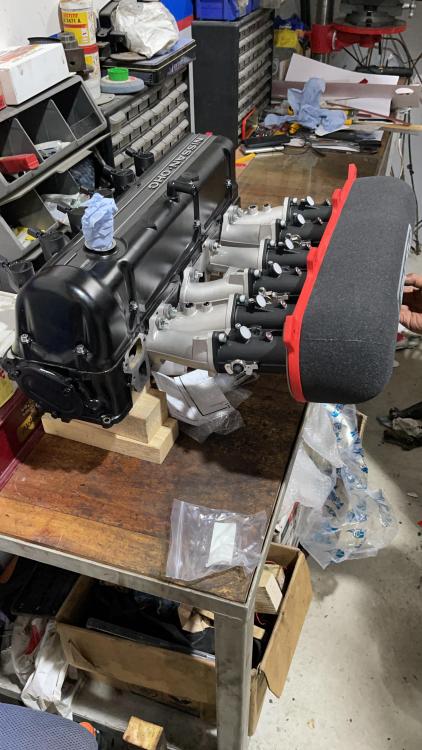
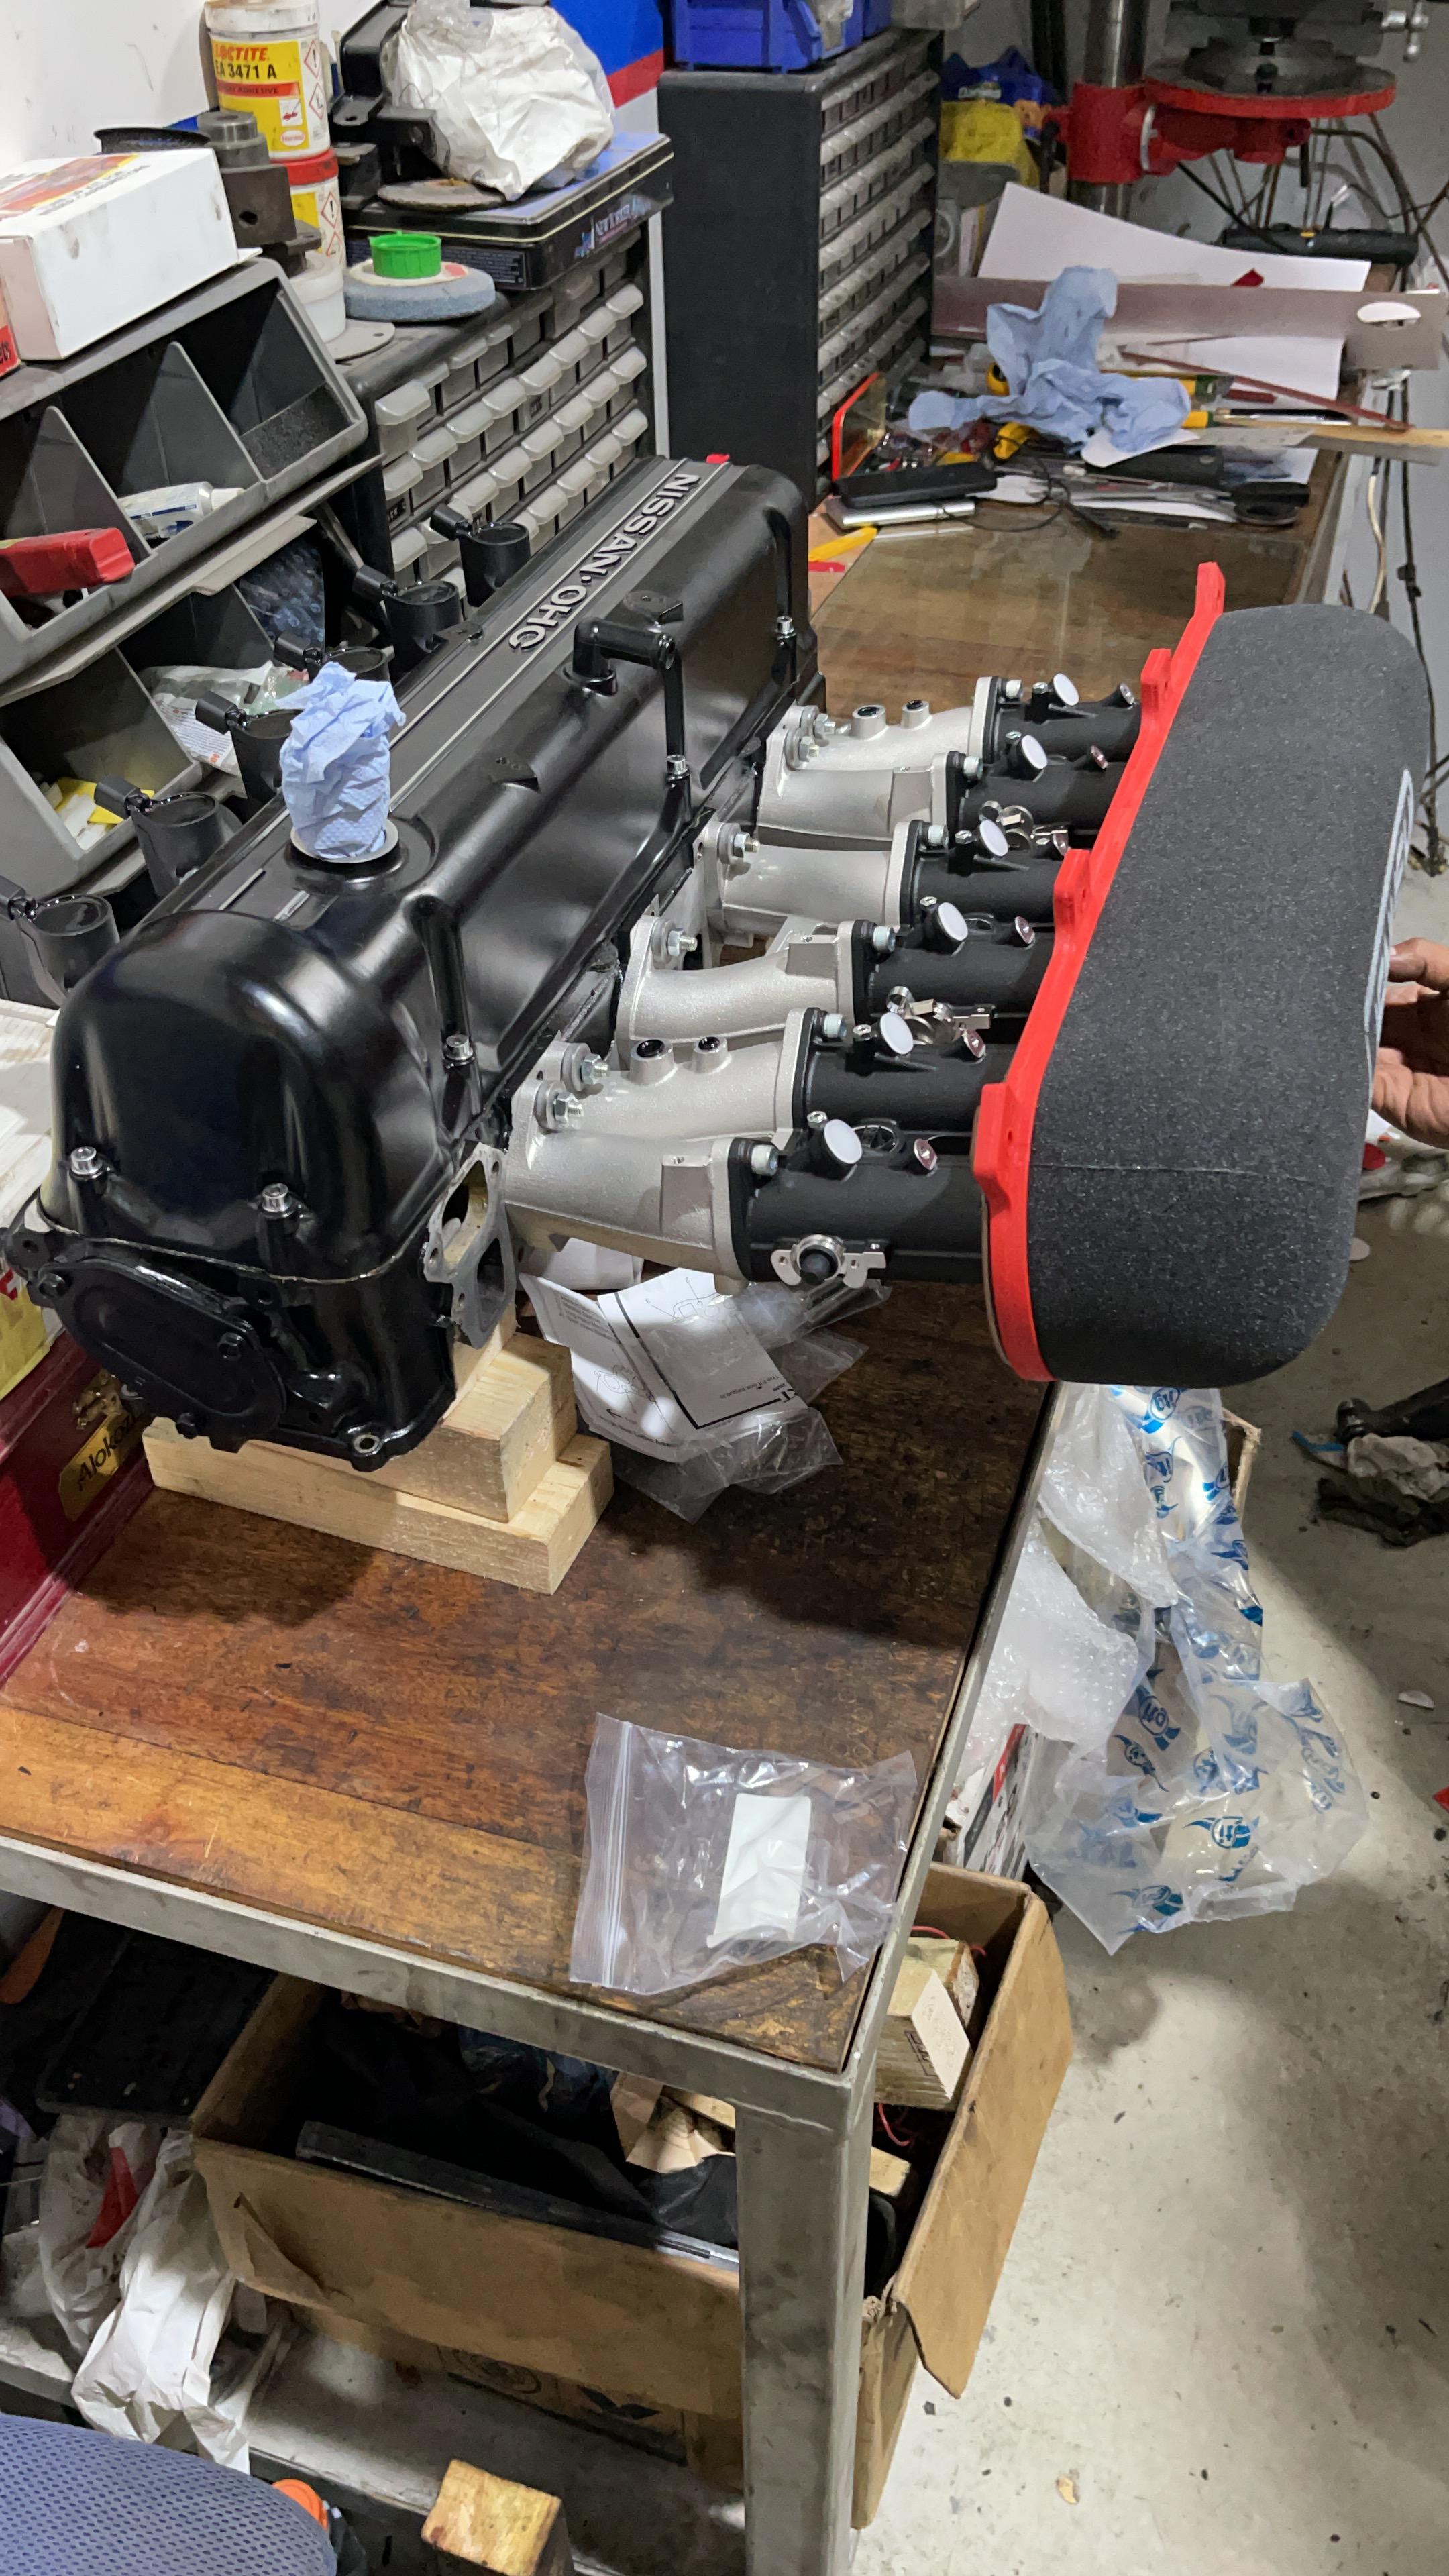
 1 point1 pointWow, haven't heard Golden Earring in a long time. My favorite time was back in 94. Three years earlier I had leased a VW Corrado and my wife was driving a 300ZX Turbo. We had lots of fun racing each other over those years, er, I meant to say touring together. I actually call that spirited driving Bumper Tag. Anyway, I was returning the Corrado at the end of the lease, and my wife was in her car to bring me home. The inevitable who can get there first started. Shortly after the START, Radar Love came on the radio - my all-time favorite driving song. As I pulled into the dealership and stopped, the song ended and I turned off the engine. It was an absolutely perfect moment. I got out and walked away, smelling hot brakes, listening to the engine crackling as it cooled, and smiled at my wife - because I beat her! 🥳1 pointExaclty, a big confusing onion, that makes your eyes water the further you peel away at it.😁 These are all great things, I'm definitely going to check into. I am going to make a dedicated post about this problem, and maybe you could help me out there!1 pointMy general thoughts on the big picture is that it's your typical fuel injected Z that has been sitting for 30 years. Vacuum leaks (small ones all over the place) Dry-rotted leaky intake air ducting Corroded dirty connectors Questionable previous repair workmanship Fuel pressure problems TPS adjustment issues Ignition timing issues AFM that has been adjusted by a PO Maybe even some common issues like having the temp sensor and thermotime swapped Add to that, a list of aftermarket things that have been put into the car over the course of it's history: Injectors of unknown flow rate probably replaced at some point Aftermarket coil that may or may not need a ballast resistor Aftermarket ignition box that may or may not be wired correctly You know... The typical Z. Work on one layer at a time. Like an onion.1 pointQuick look at the internets: Moog Parts defines "steering ratio" as the ratio of how far the steering wheel turns to how much the wheels turn. For example, if a 360-degree turn of the steering wheel causes a car's wheels to turn 20 degrees, then that car's steering ratio is 18:1 (360 divided by 20). So you cannot determine steering ratio simply by measuring the distance the rack moves for one revolution of the wheel. However, If everything else in the system is the same (like the lengths of all the other steering members), then the rack that moves more per wheel rev will have a higher ratio, but I'm not sure (in the Z car realm) that we have nailed all that down for sure.1 pointWhen I get a free day (2025 at the rate I’m going) I’ll measure my vast array of steering racks and let you know! At the very least, I have a known 75 rack that I can measure and tell you about. I don’t understand rack and pinion ratio’s anyway. One turn of the wheel produces a certain amount of rack movement. No ratio of nothing.1 point@zKars, this where you step in, drawing from your vast collection and layout a steering rack from each series with definitive measurements, what say you? 😄1 pointHey Ryan, Nice to see you do things in mm it's more accurate (Only my opinion!! Haha before i get half of the people here all over me! ;-)) But.... Take a look at vid on 7:54 min. you made yourself a lot of work.. Take out just the small part that is bad.. you also cut into the corners to far and also in the plate that is behind the piece you tried to take out.. You should also stay away from the door opening, if not very necessary! (Later on it will get you into trouble with the heat of welding.. all unnecessery!) Also if you take out a rotten piece, make the corners round you'll see that it's much easyer to weld a round corner than a 90 degree corner! (Use a big drill in corners) I did not see the whole video as i can't concentrate for a long time.. First blast the car to work on clean steal, then weld all corners and edges and stuff and then you can repair the bigger flat (read floor) pieces.. Maybe read a book on how to restore a car.. And the last thing i wanted to say.. you have to work much more precisely, again that part you took out of the dogleg, it's a biggy.. As the standing steel plate inside is completely rusted away you might think about it to take it completely out.. the dogleg.. But get it blasted clean first... i see a lot..lot...lot of work here.. (Ive done that myself once.. my car you can lift it on the doglegs (as it supposed to) it's strong inthere..)1 point1 pointThanks, that's probably a good idea. I plan to install the 5-speed when I get back from deployment. I'm really not too excited about messing with that dash again. I'm still a little traumatized about pulling and reinstalling it for the heater core. Who would have guessed an engine swap would be easier than the dashboard😧 Thanks again everyone for the thoughts/advice. Cheers, Scot1 point1 pointThree drummers. WTF. Look at those guys...Shaver's Live Forever.1 point1 pointIn the past I’ve gotten a wrench on, then shoved a screw driver between the flange that the ujoint connects to in order to apply torque to remove the nut. Might help you out.1 point1 point1 point1 pointI've always heard and seen it should be to the left just a hair, and found that to be true over the years. As for the the valve gap I'm saying true TDC is equal for the front two. I don't remember the numbers but once they were the same it was at tdc on my car. So for instance and I mean JUST for instance they would measure .10 exhaust and .10 intake with feeler gauges. That's one of the few ways I was of "measure 3 times, cut once" mindset. It was winter and I was overthinking big time but it worked. My motor is nice and tight, dead on all the marks. I'm sorry if I may have caused any confusion but it all worked for me in the end. I was overthinking the whole thing and got a lot of laughs but it was fun and I entertained a few of the engineers on here. That meant a lot to me at the time. Maybe gained some respect? Actually they are too nice to call me a doo-mass so we all got a laugh. Good guys, they are, no matter what I say.1 point1 point1 point1 pointI'm constantly distorted whether I like it or not. Somedays are cheaper than others though.1 point1 point1 point1 point1 point1 point1 pointWell, it's difficult to say what year my transmission is at this point. The 5th gear part is off a '82 worn out trany, most of the rest of the innards are out of a '78(?) 4 speed, and the shafts (except the input) are out of my 70 something transmission that a PO installed in the early 80's. Not sure how it's going to work once I get it together... kind of sounds like that old Johnny Cash song.1 point1 point1 pointGood morning everyone, Zinta was finally painted over the weekend (mostly on Thursday) and... She is stunning ! Last wet sanding before entering the booth for cleaning and prep. Below picture is before the clear coat, I hesitated to ask them for the mat/frozen look with a specific clear coat, but I still wanted to have the same original DAT307 from when she left the factory in 1976, so I went with the regular shiny clear coat (pictures soon as there is a surprise coming with it). Air Dam before clear coat and bumpers with primer only (all the holes from the bumpers were welded and the brackets adjusted to reduce the gap, so they sit closer to the body): Hood, Trunk, inspection hatches and tail light/license bracket after clear coat: I finally receive my head bolt for the engine today (ordered 3 weeks back from Zcardepot, through eBay), so the engine rebuilt can start ! In the meantime, been working on the individual coils support and the ITBs air filter support, will only do an intake ports matching but no polishing. The 81 280ZX 5 speed gearbox also got cleaned and made ready for the final assembly !
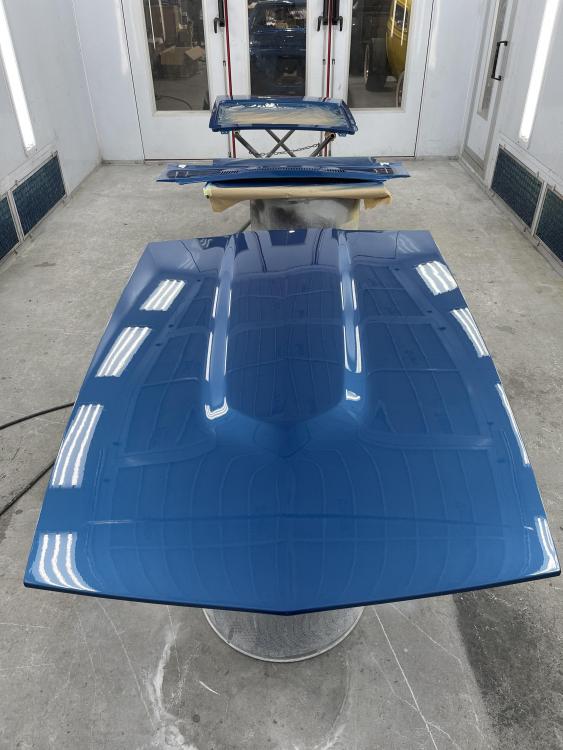


 1 point


Important Information
By using this site, you agree to our Privacy Policy and Guidelines. We have placed cookies on your device to help make this website better. You can adjust your cookie settings, otherwise we'll assume you're okay to continue.
Account
Search
Configure browser push notifications
Chrome (Android)
- Tap the lock icon next to the address bar.
- Tap Permissions → Notifications.
- Adjust your preference.
Chrome (Desktop)
- Click the padlock icon in the address bar.
- Select Site settings.
- Find Notifications and adjust your preference.
Safari (iOS 16.4+)
- Ensure the site is installed via Add to Home Screen.
- Open Settings App → Notifications.
- Find your app name and adjust your preference.
Safari (macOS)
- Go to Safari → Preferences.
- Click the Websites tab.
- Select Notifications in the sidebar.
- Find this website and adjust your preference.
Edge (Android)
- Tap the lock icon next to the address bar.
- Tap Permissions.
- Find Notifications and adjust your preference.
Edge (Desktop)
- Click the padlock icon in the address bar.
- Click Permissions for this site.
- Find Notifications and adjust your preference.
Firefox (Android)
- Go to Settings → Site permissions.
- Tap Notifications.
- Find this site in the list and adjust your preference.
Firefox (Desktop)
- Open Firefox Settings.
- Search for Notifications.
- Find this site in the list and adjust your preference.