


Leaderboard


Popular Content
Showing content with the highest reputation on 11/26/2019 in all areas
-
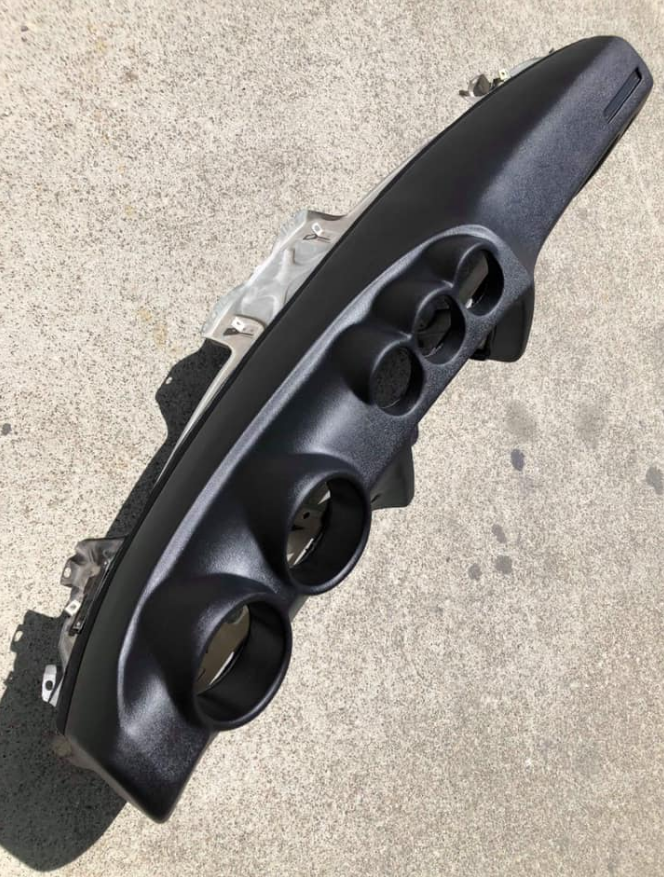
3 pointsA little Vintage goodness from @theguppies ! And a good shot of the horrible blemish that reduced the value of this dash. However will I live with such atrocious quality? Thanks to Vintage Dashes for this awesome product at an unbelievable price.3 points
-
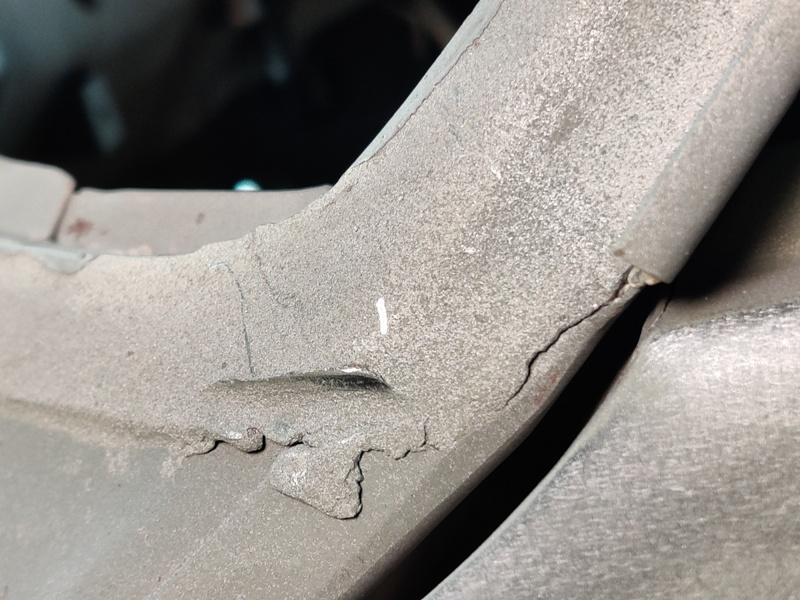
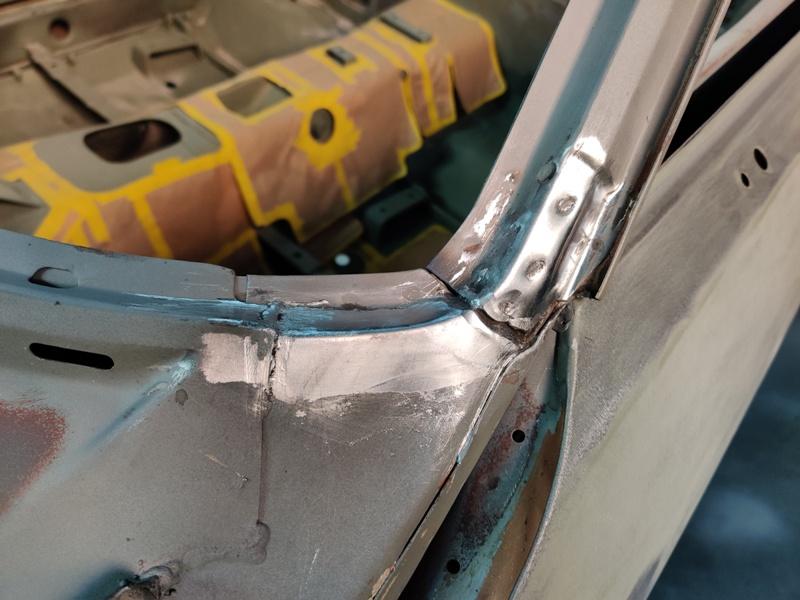
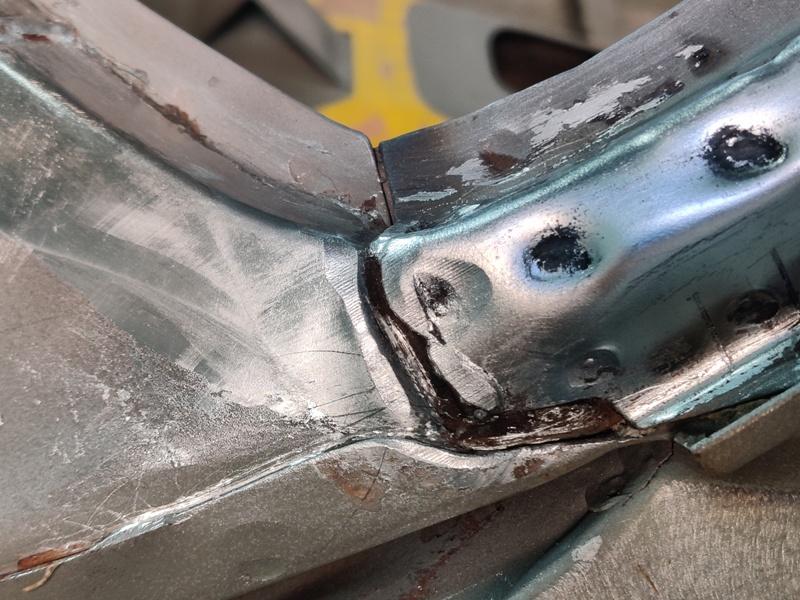
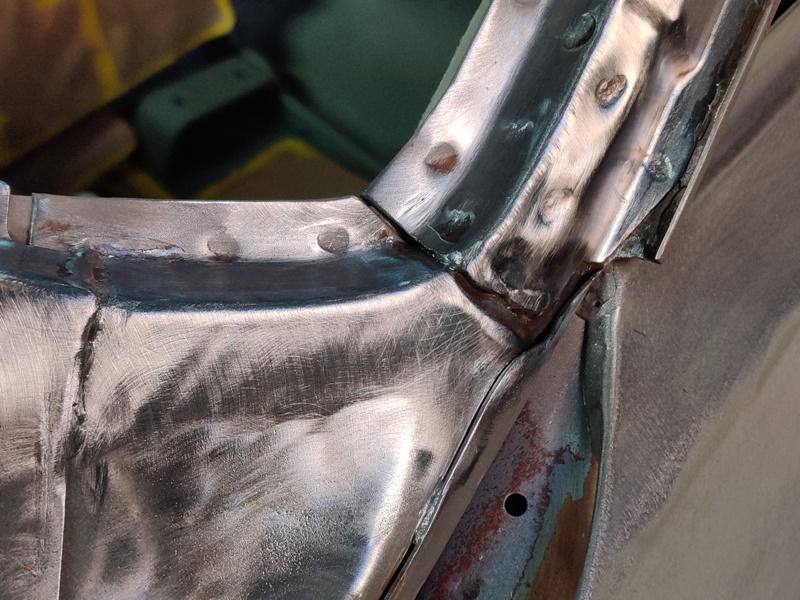
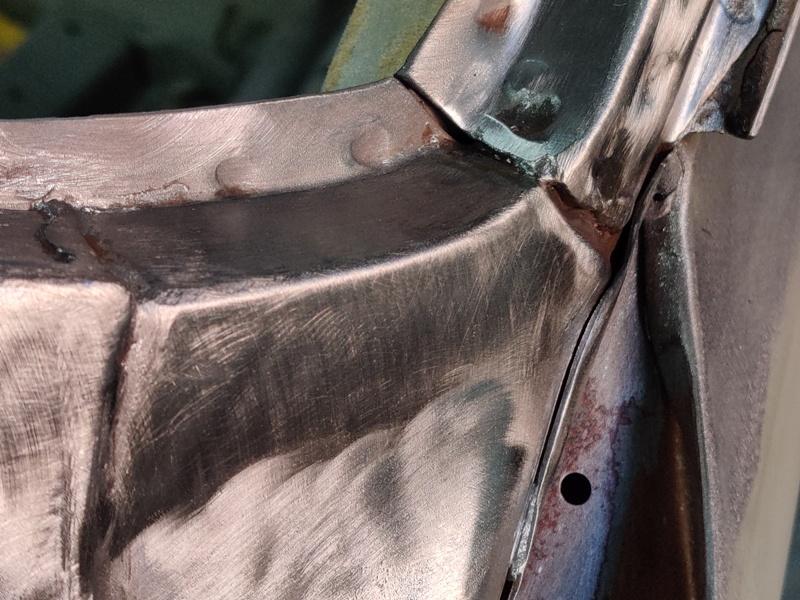
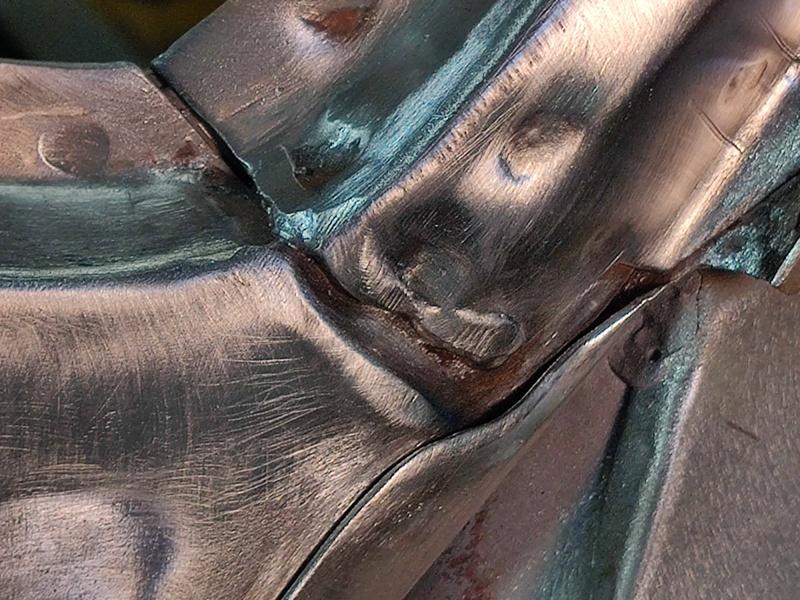
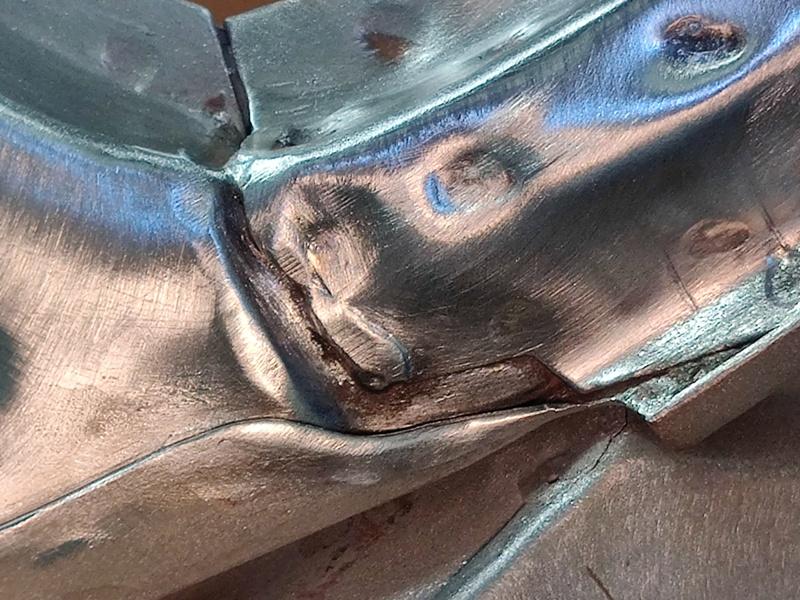
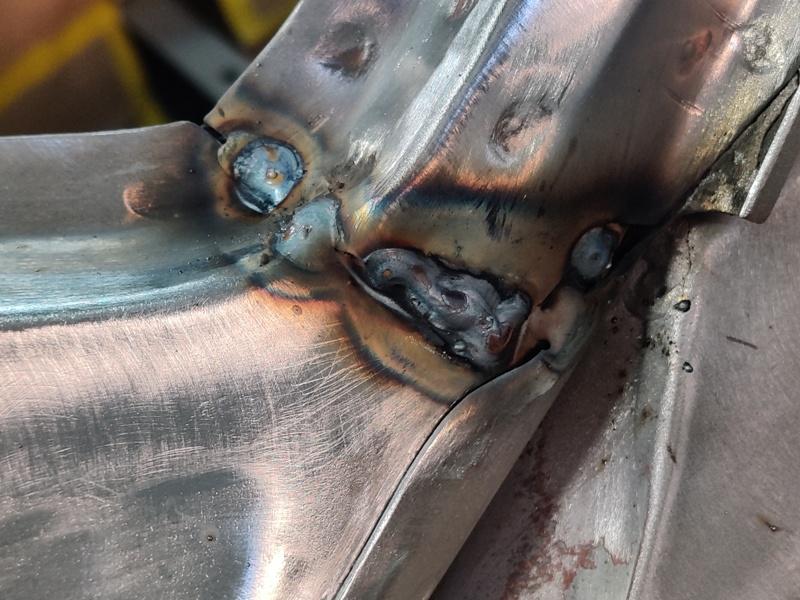
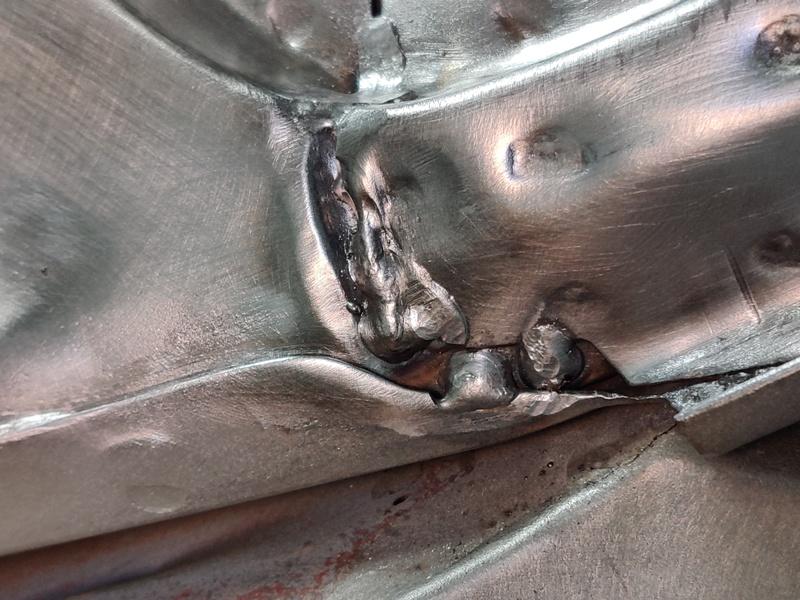
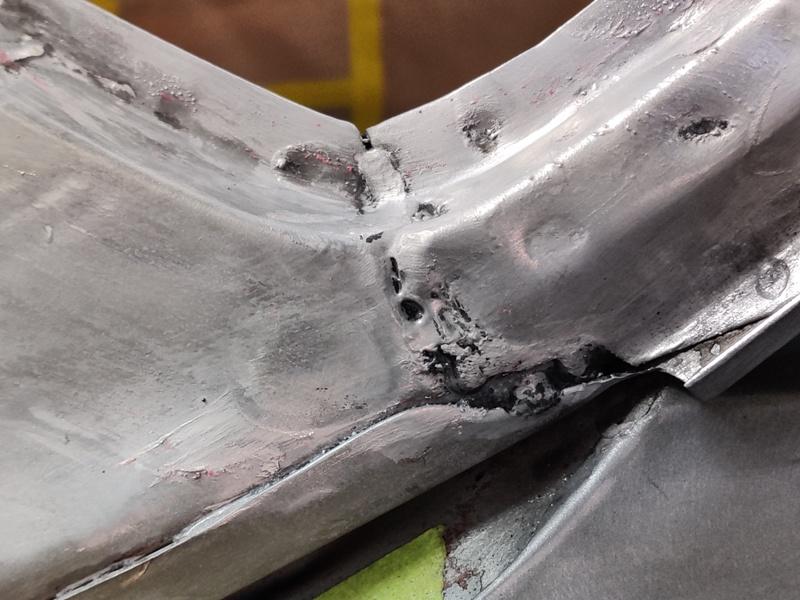
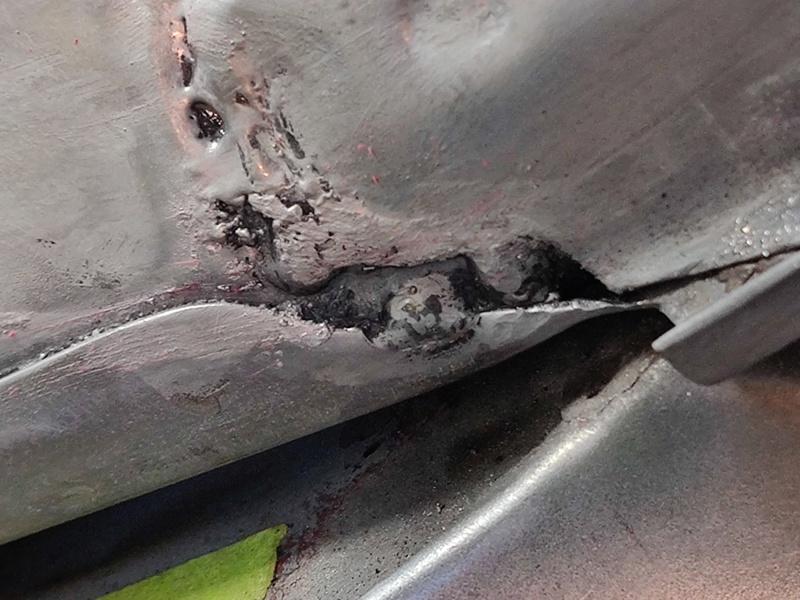
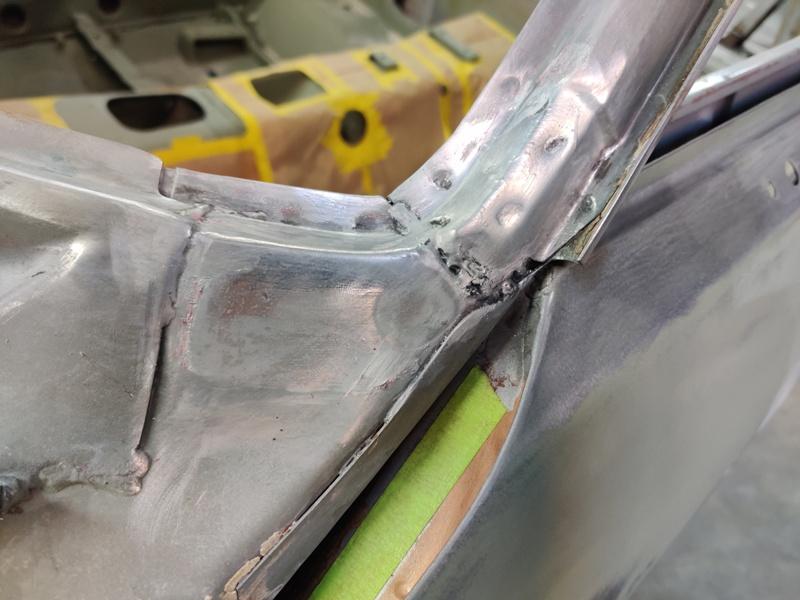
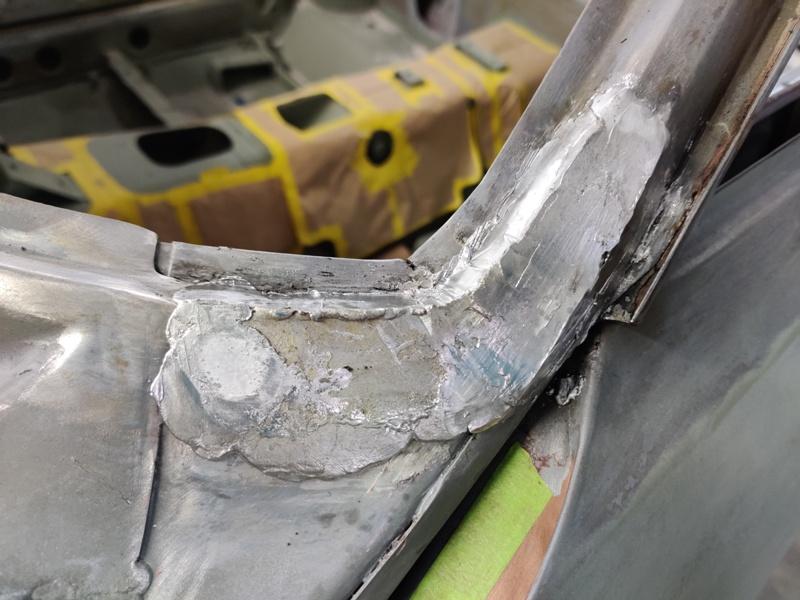
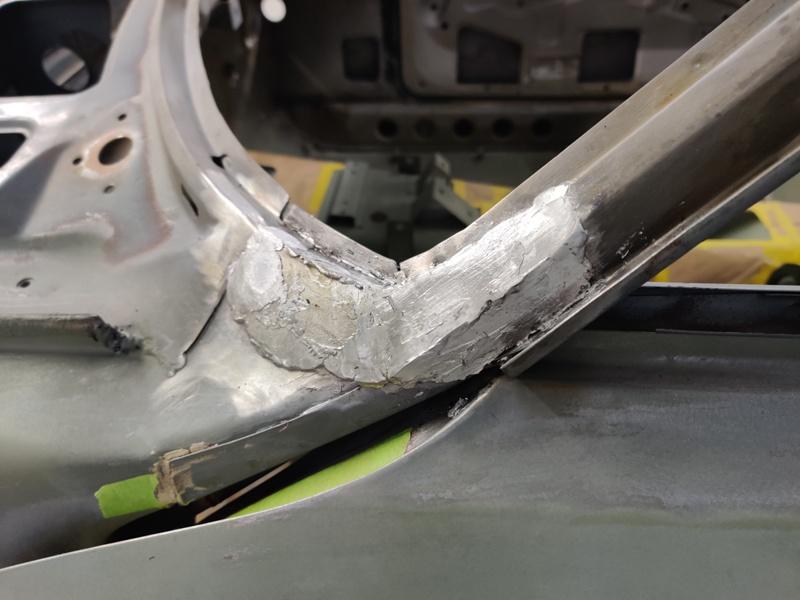
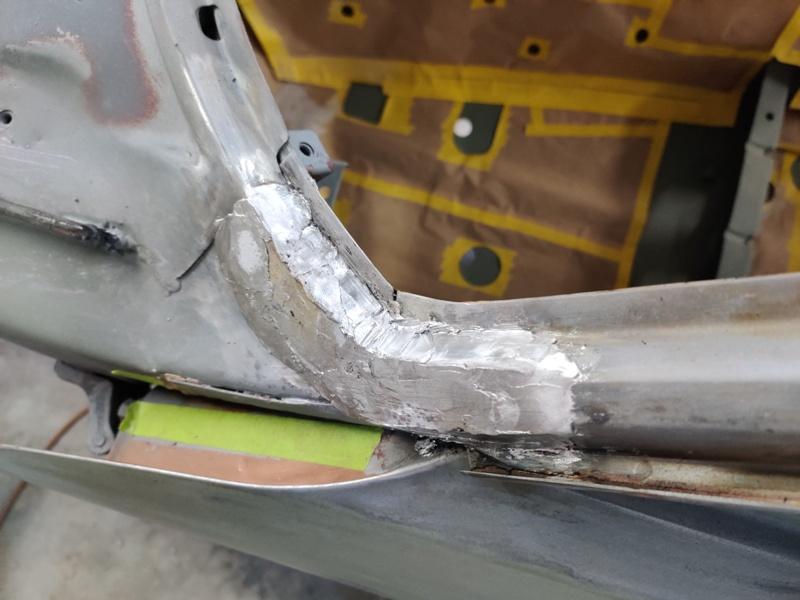
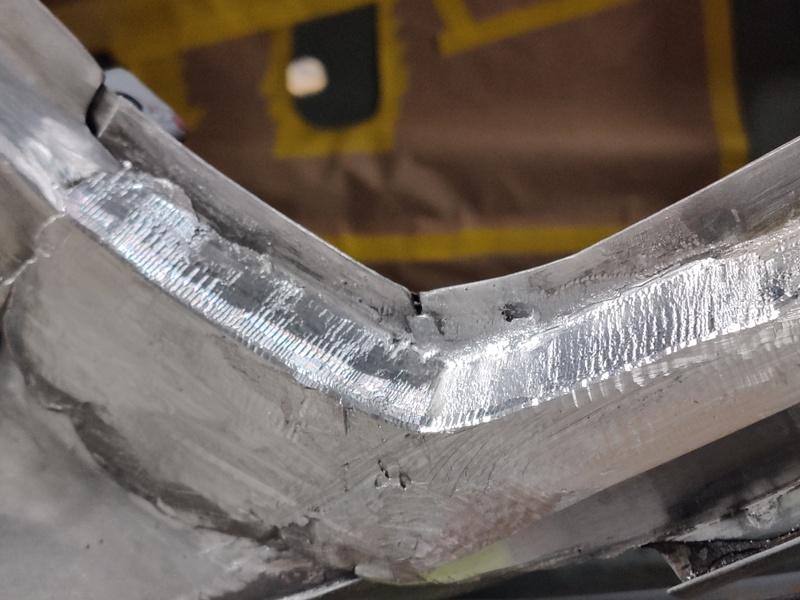
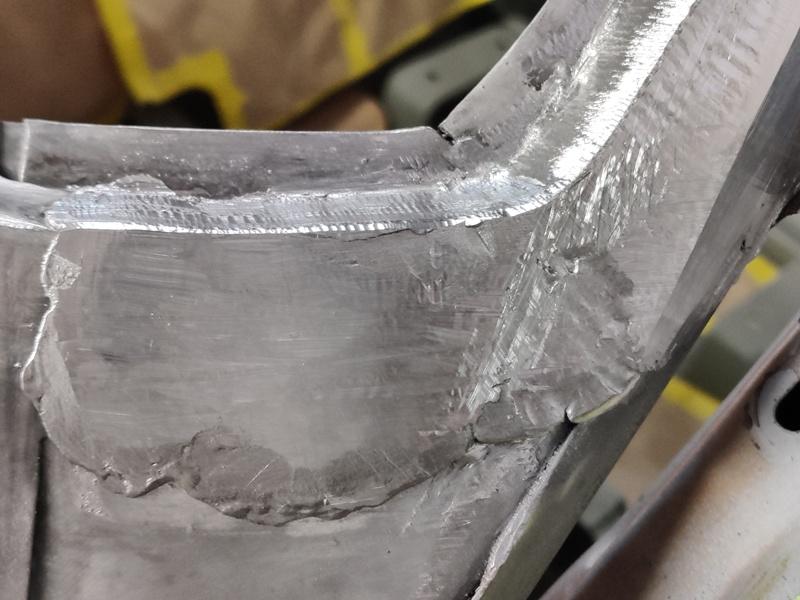
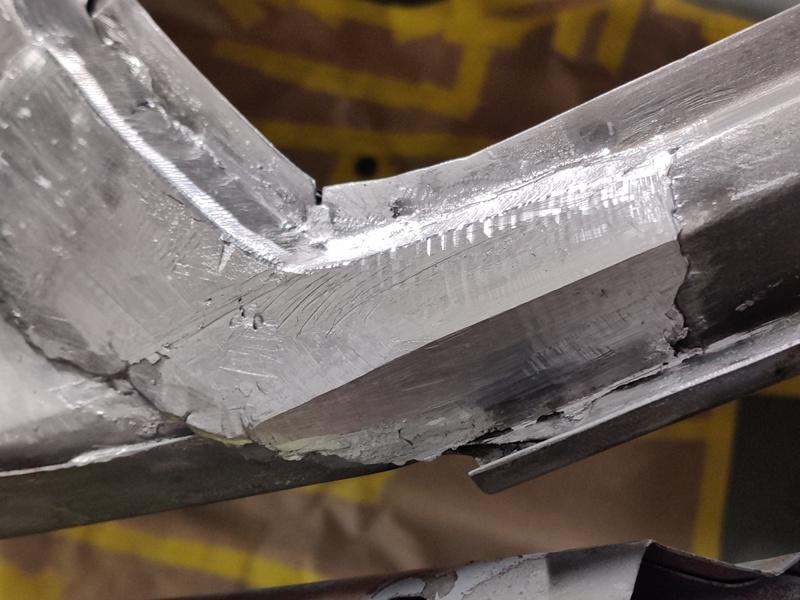
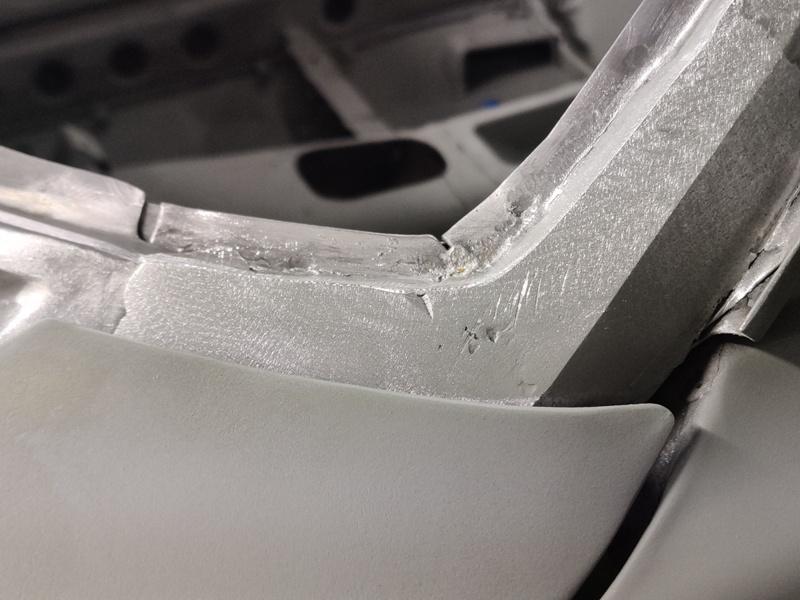
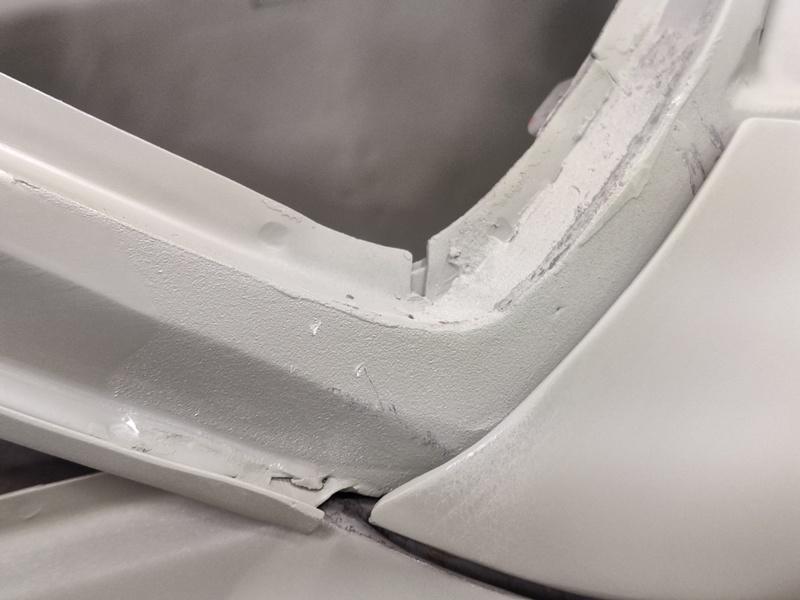
Next up to share is a repair to the A pillar where it attaches to the unibody. Evidently there was some flexing going on here at some point. Looking at the unwelded seam (inside edge of the corner), it seems obvious why this happened. Pics show that aligns with the crack in the lead body filler: Also, note the indentation/impression made by the back edge of the fender. Is that how it came from the factory, or is that unusual. The driver side fender did have slight accident damage just behind the wheel well opening, above the body line. Maybe a slight side impact there caused the back edge of the fender to bump the lead? I used a propane torch to heat the old lead and watch it run off onto the floor. Then I used a blue stripping wheel to clean up the surface of the metal, followed by liberal use of the torch and compressed air to blow the old lead out of the crevices... followed by use of a stainless wire brush. Given the lack of welds here, I strategically set a couple of tacks and a bead with my MIG welder for good measure and ground the ones in the inside corner down flush: Next came the tinning. I watched a Youtube video to get a reminder of how to tin. An Eastwood lead kit from my restoration of my other Z back in 1993 was put back into action. The tinning "butter" did pretty well considering it was 26 years old. At least, I think it did... I neutralized the acid with some water and baking soda mixed together. Then went over the area with a wire brush. Next came the lead filler. Again, I used a standard propane torch: I think it came out pretty well. Next, I started shaping with a file as well as a die grinder: More filing and some sanding with a DA and 80 grit. Looking closely at the passenger side (3rd pic), I see that the body line is altered before it meets the back edge of the fender. I will replicate for the driver's side.


 3 points
 -
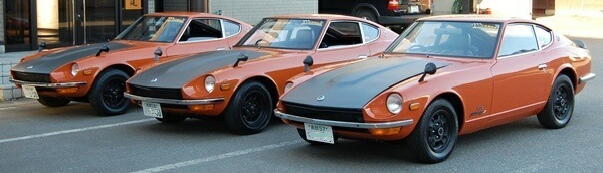
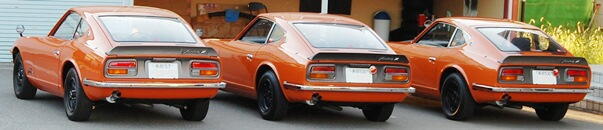
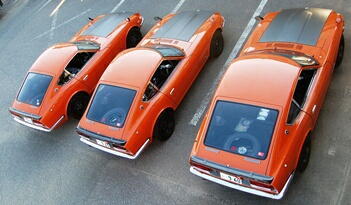
3 pointsImagine how much this collection of 3 would go for, all in the same family! http://www.tarumi.or.jp/page053.html

 3 points
 -
3 pointsMy son just doesn’t want to get greasy dirty - clean freak, but at least his room was clean. My daughter probably understands cars more then most men her age (30). At least my son will have a degree and already has made his fame and the daughter will always be employed - SO - dad won’t be supporting anyone but the Z -lol3 points
-
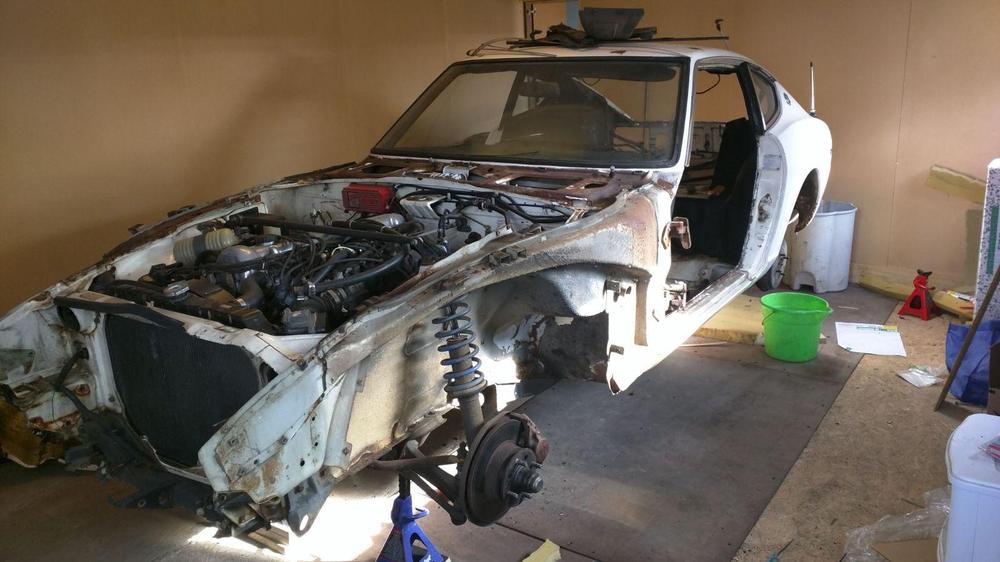
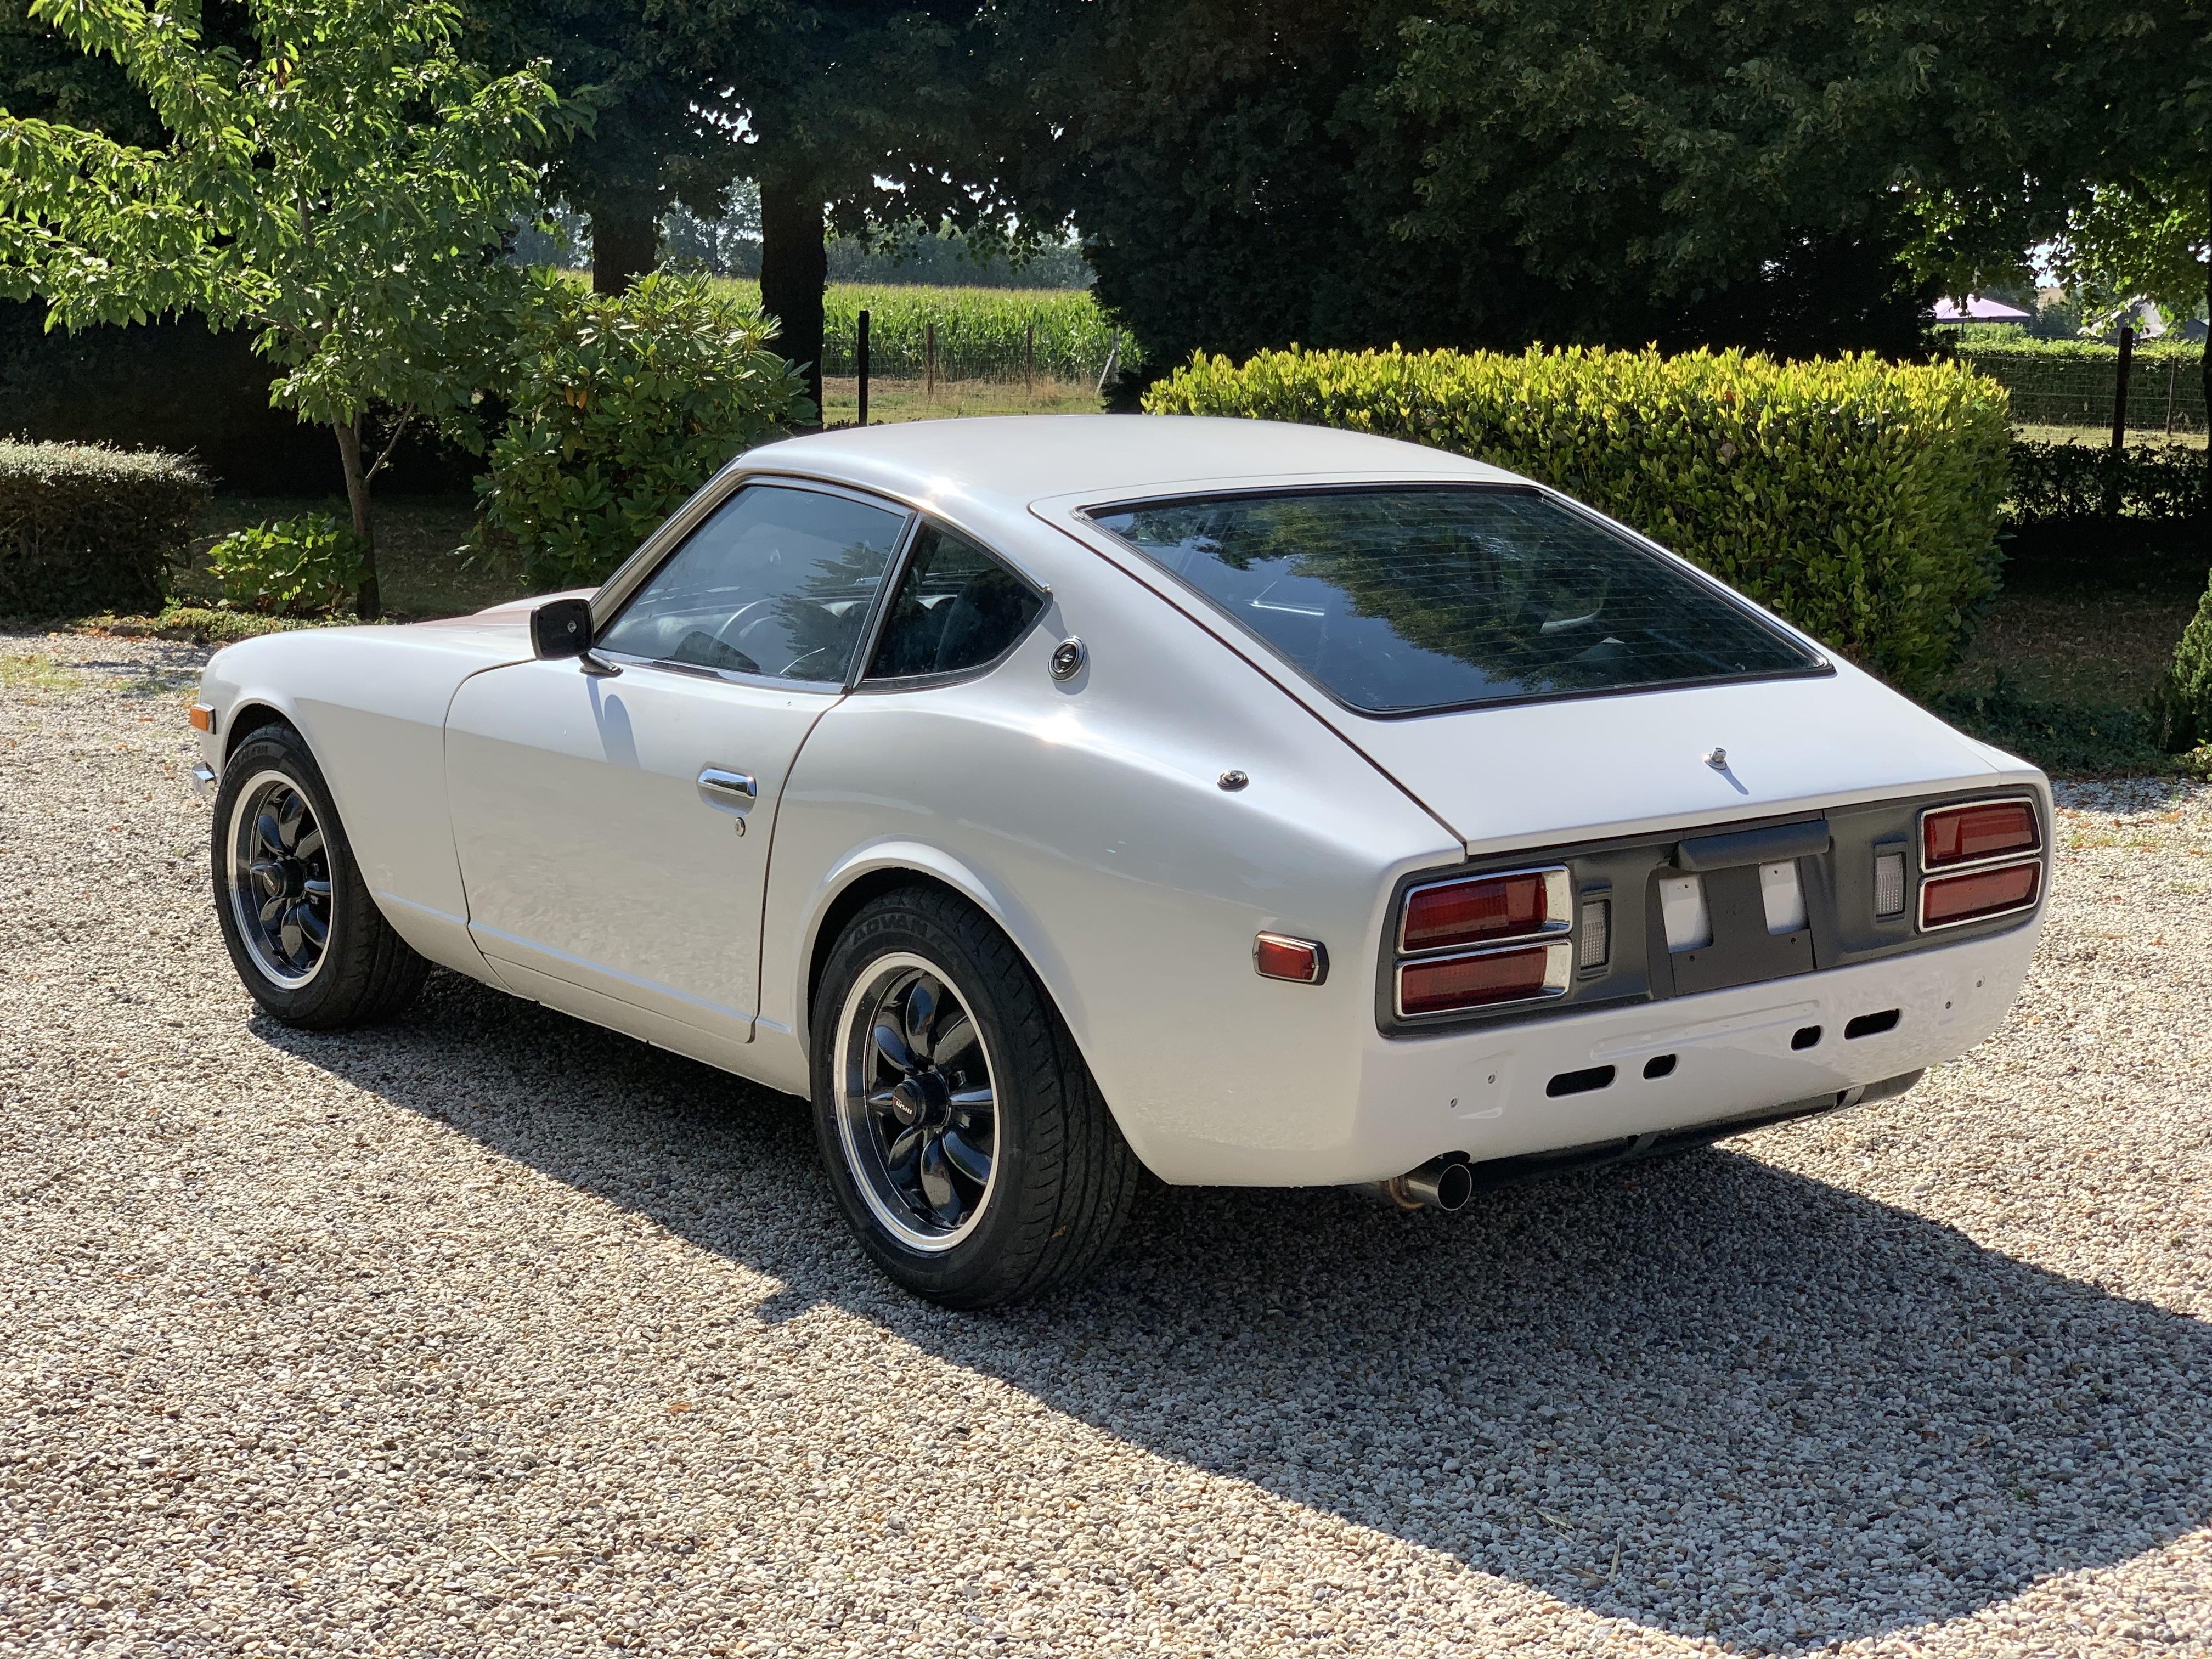
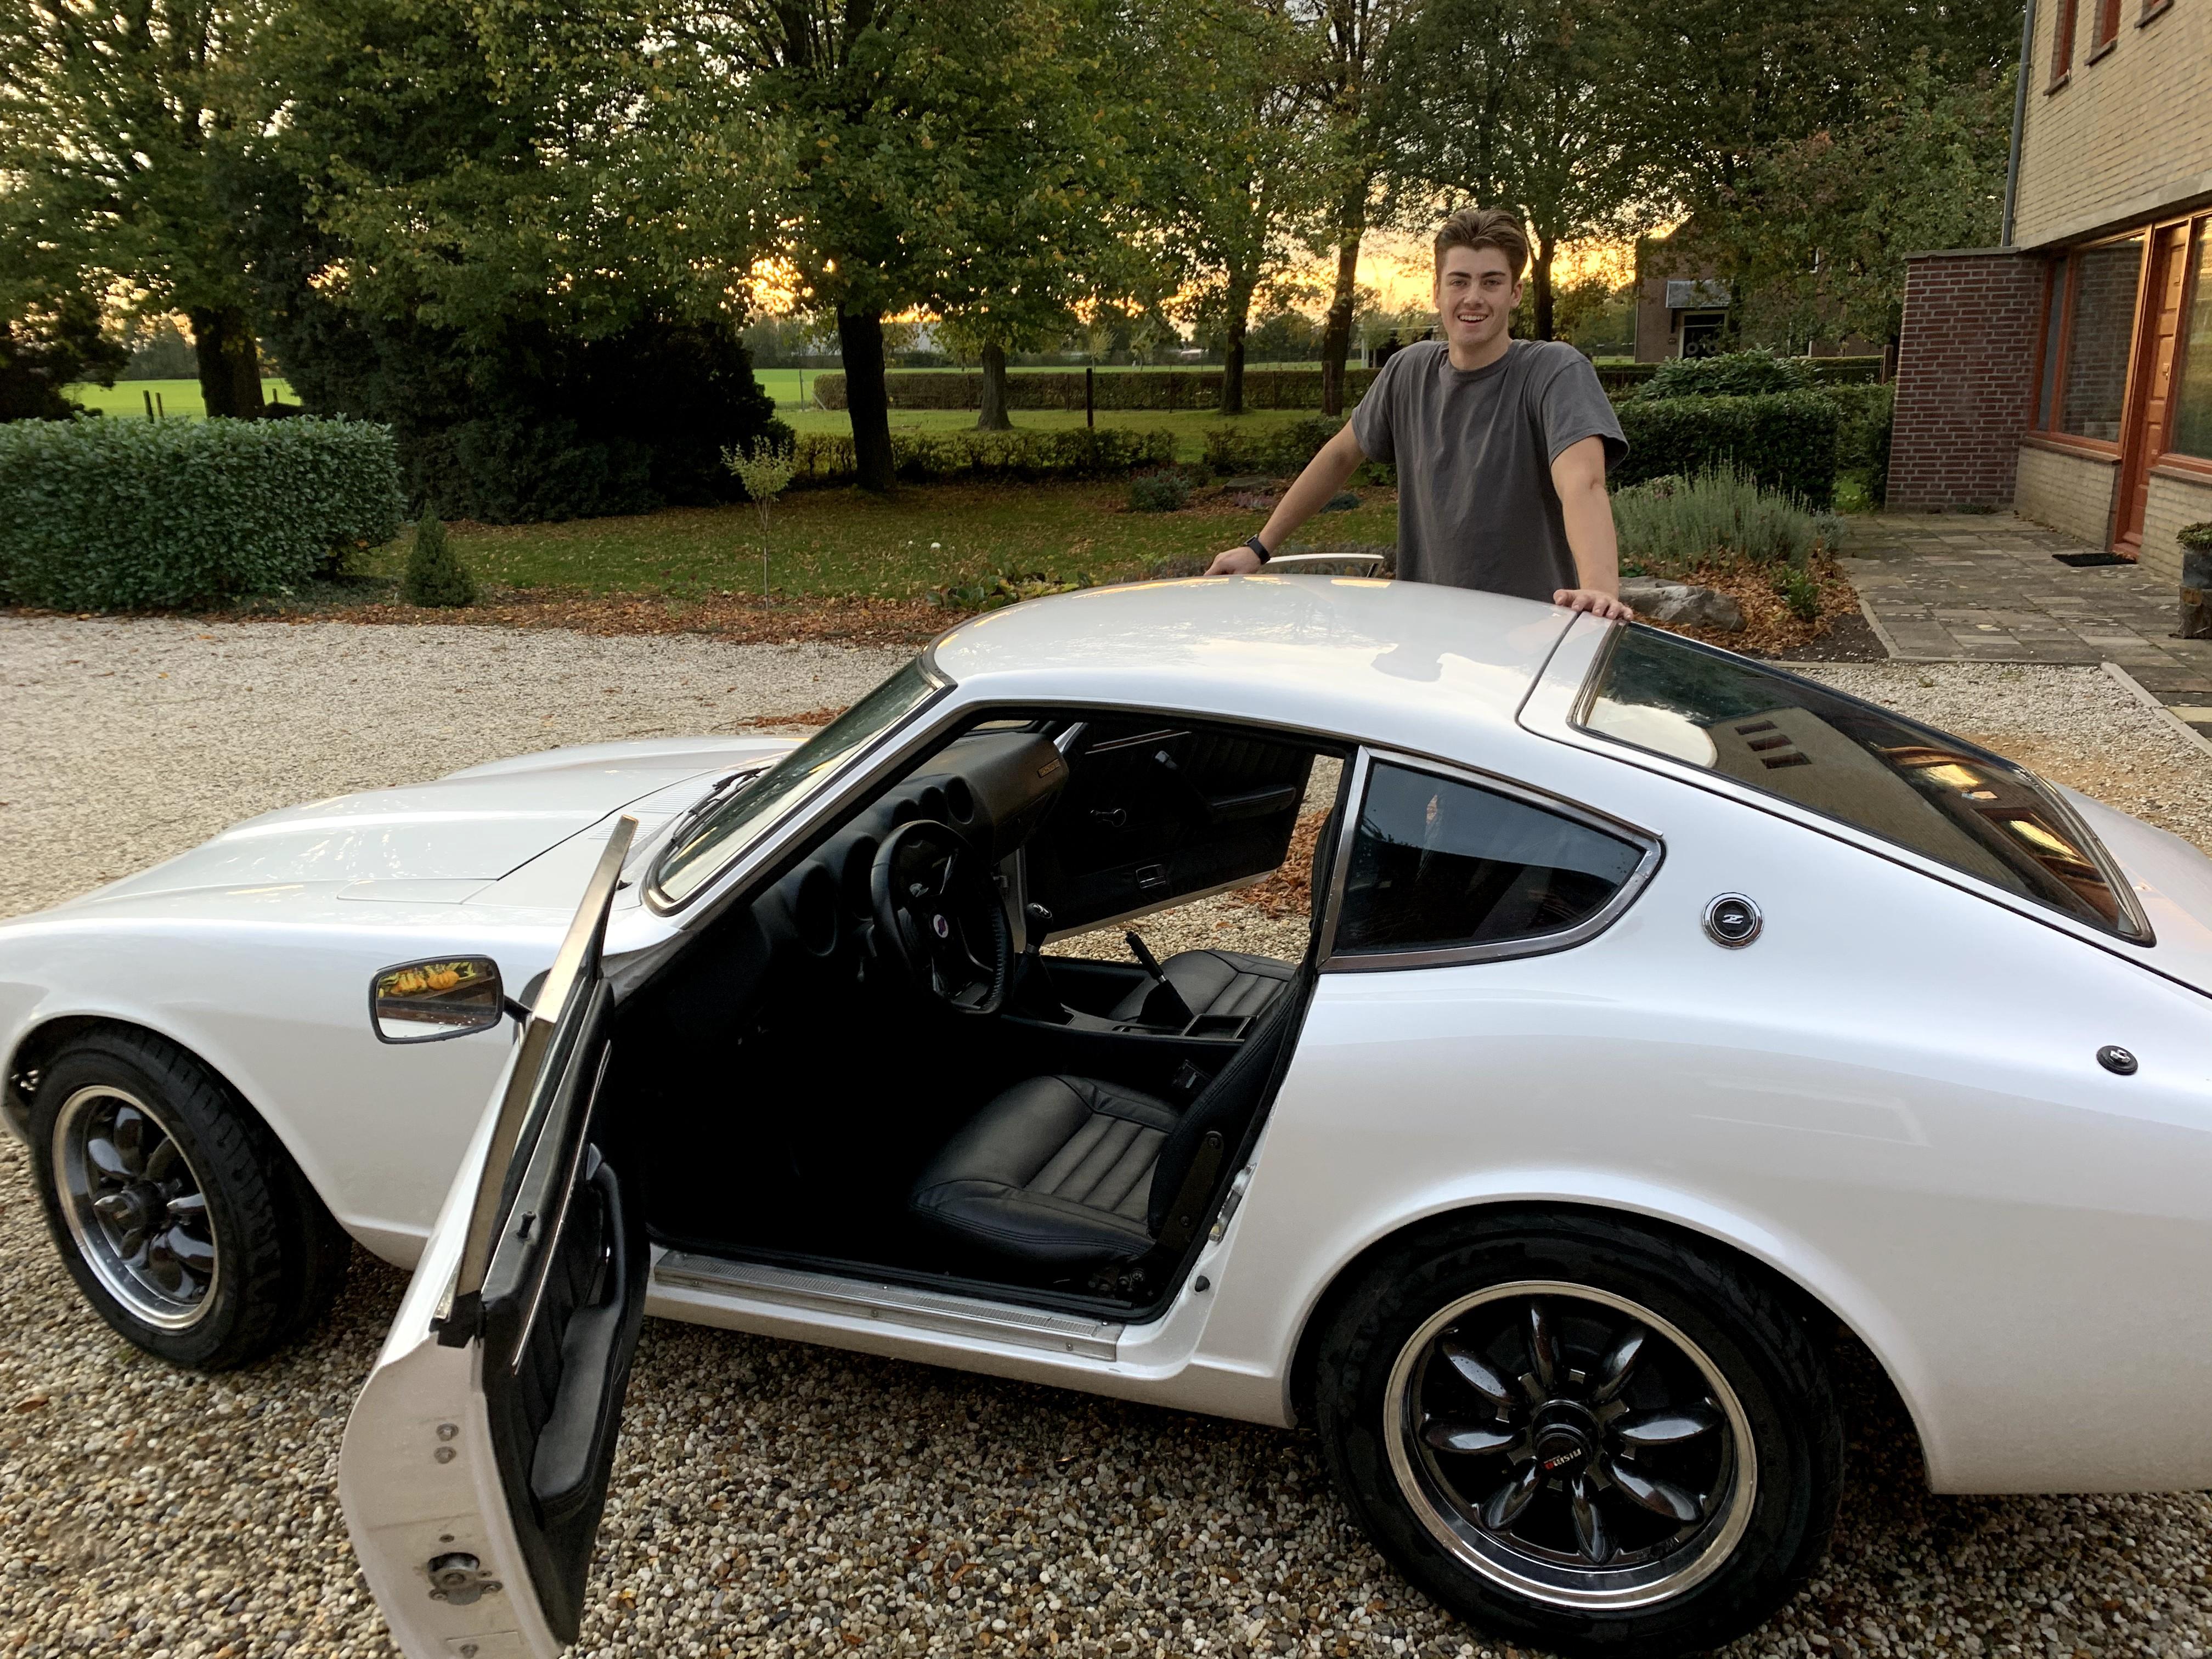
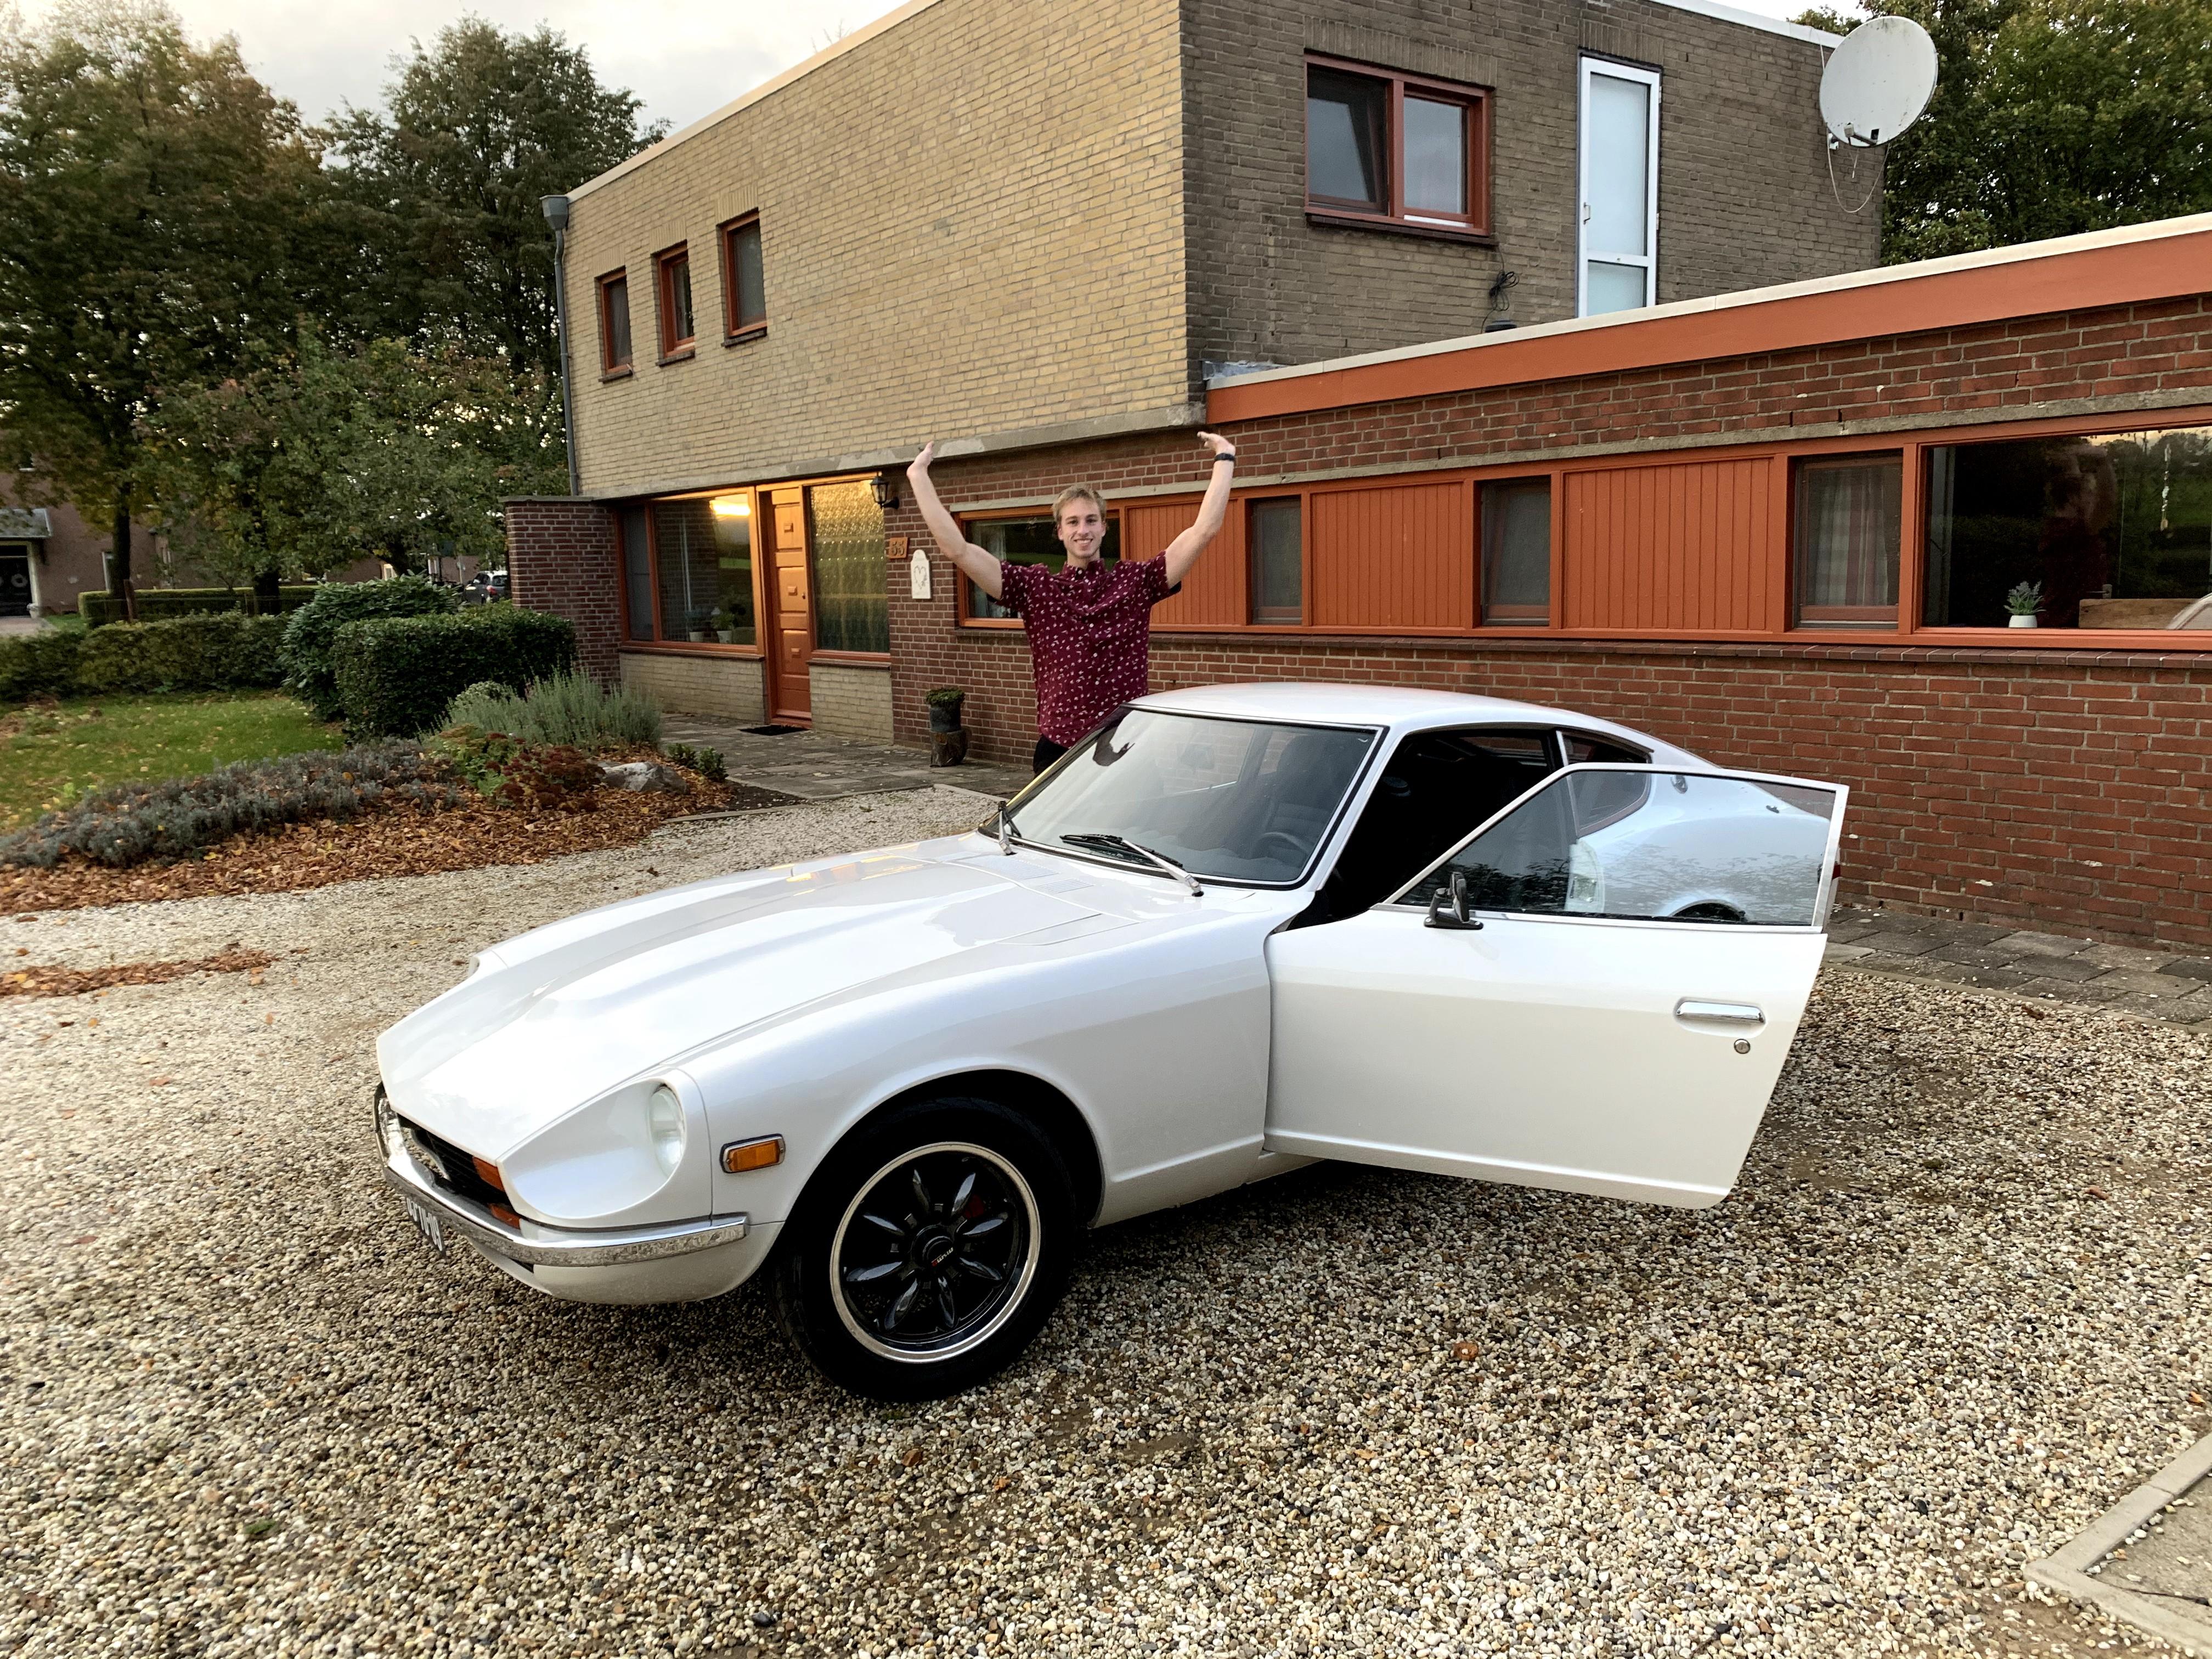
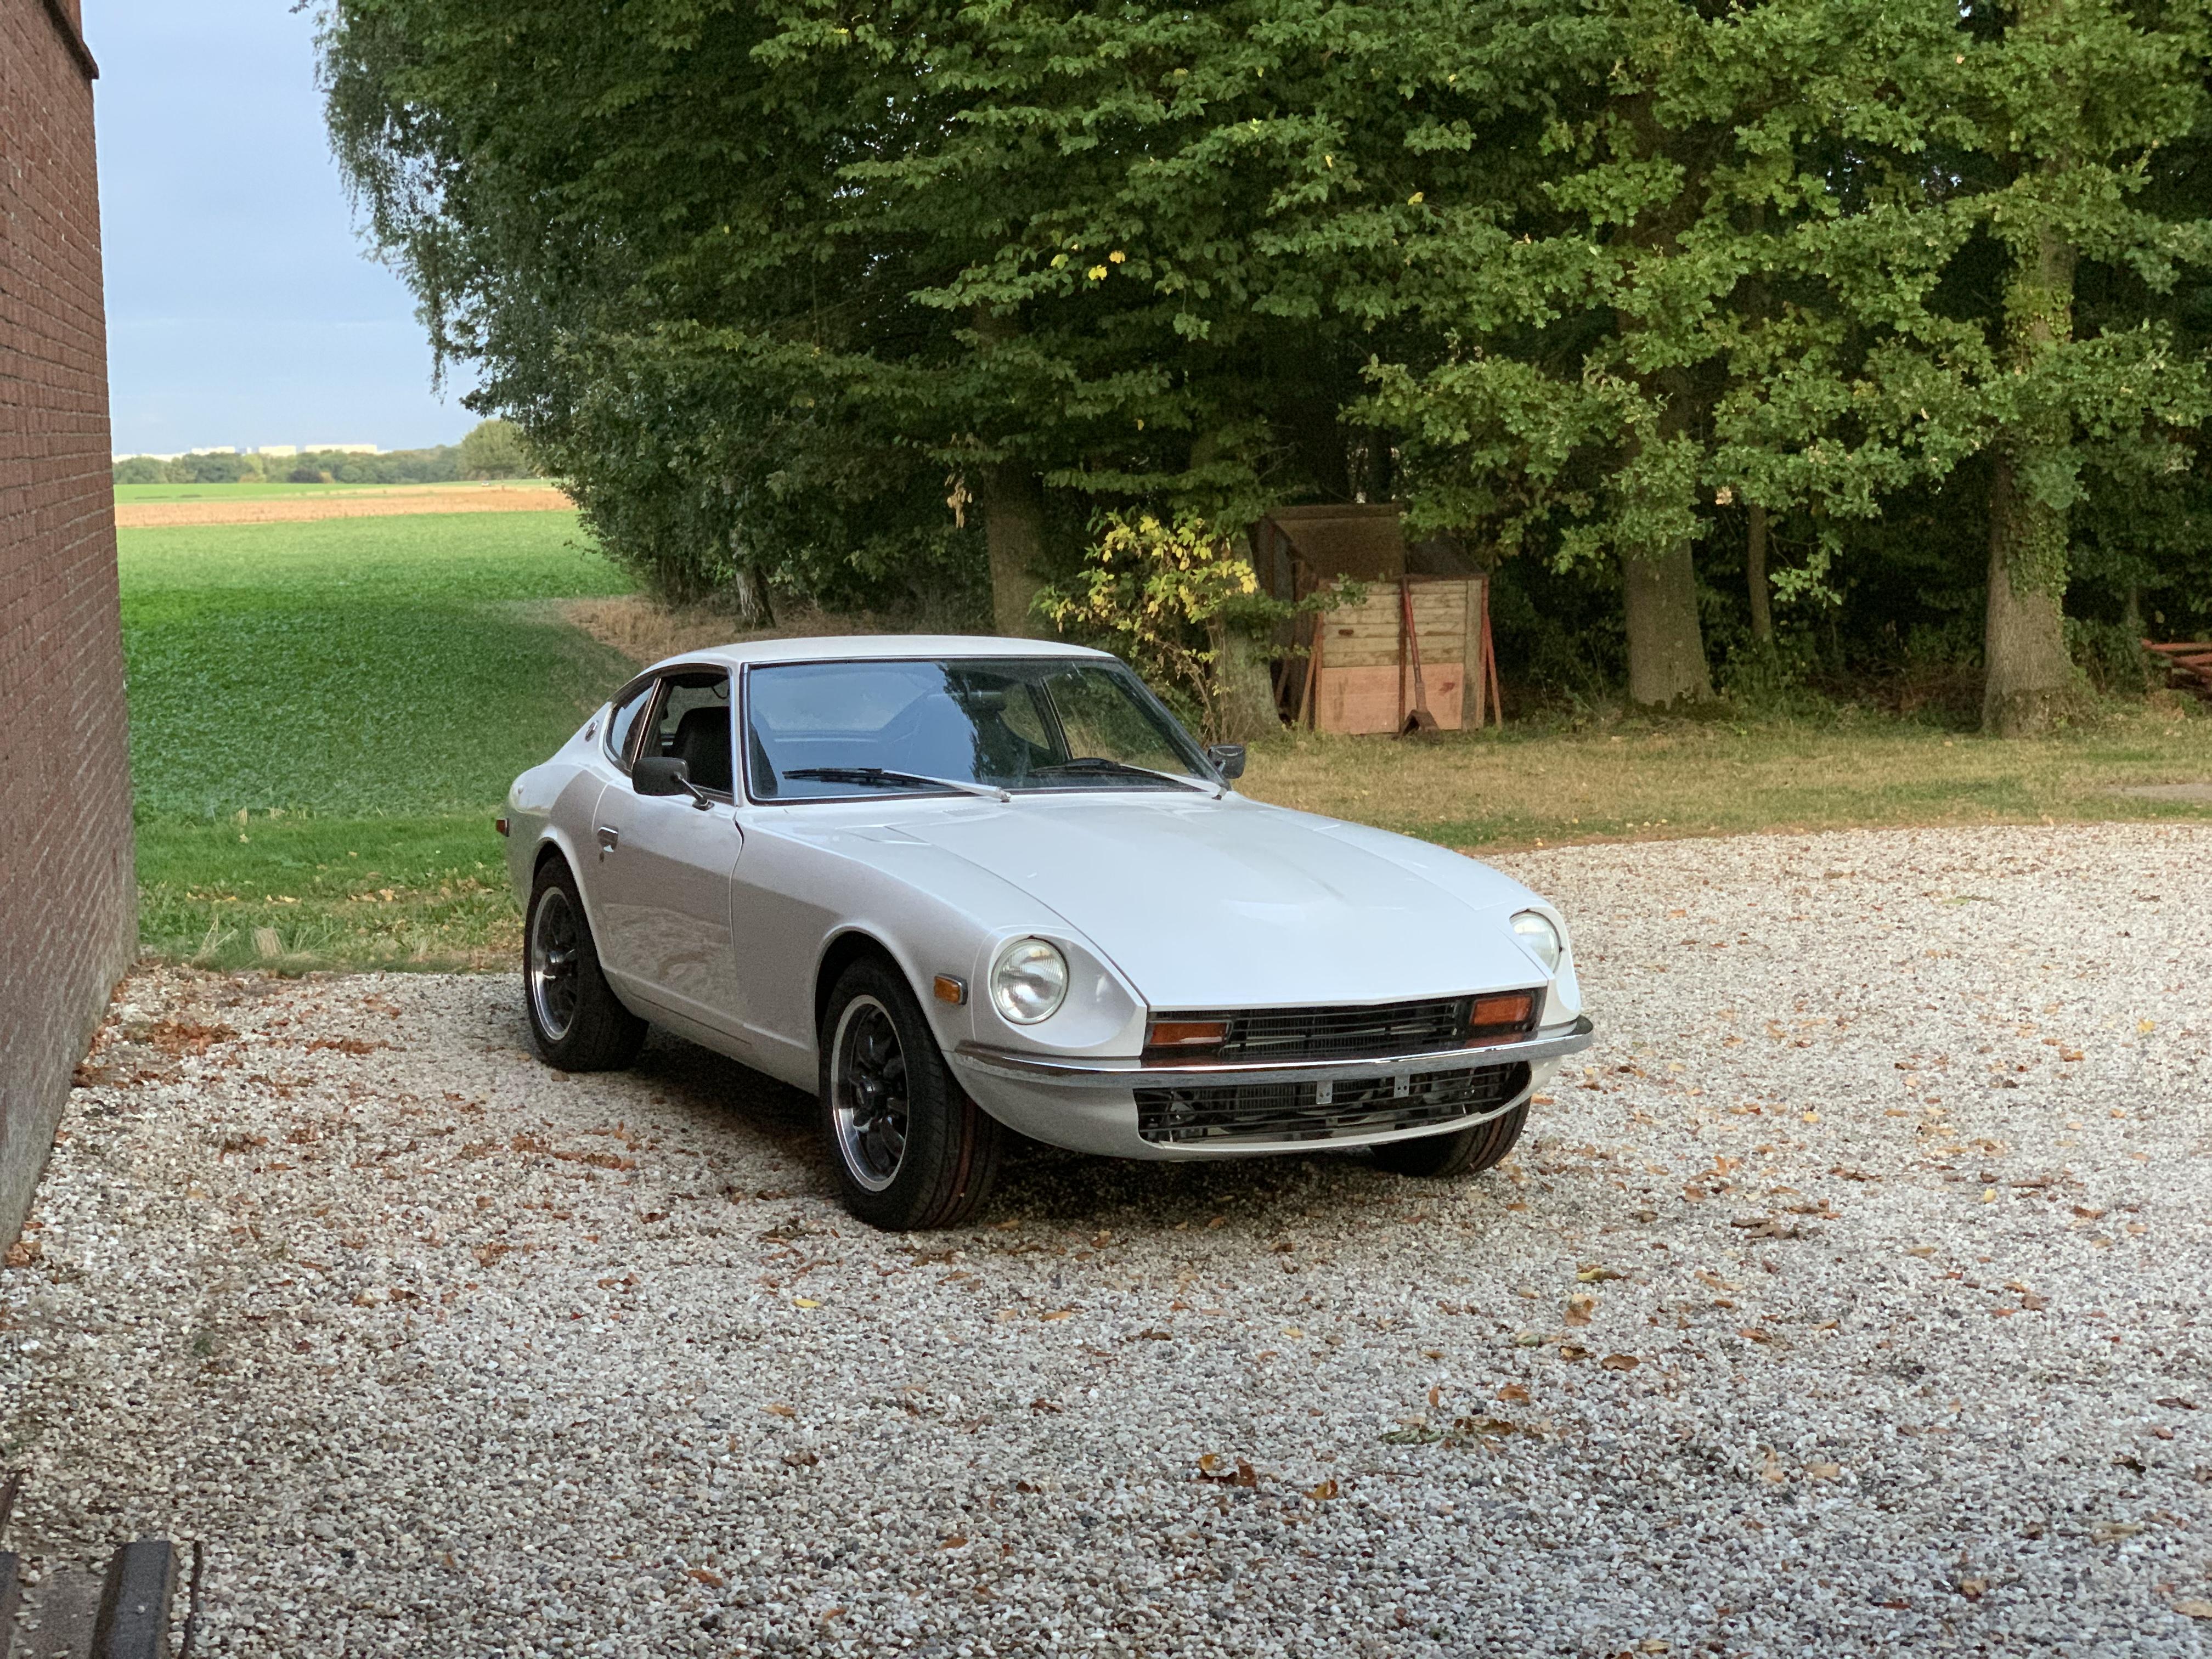
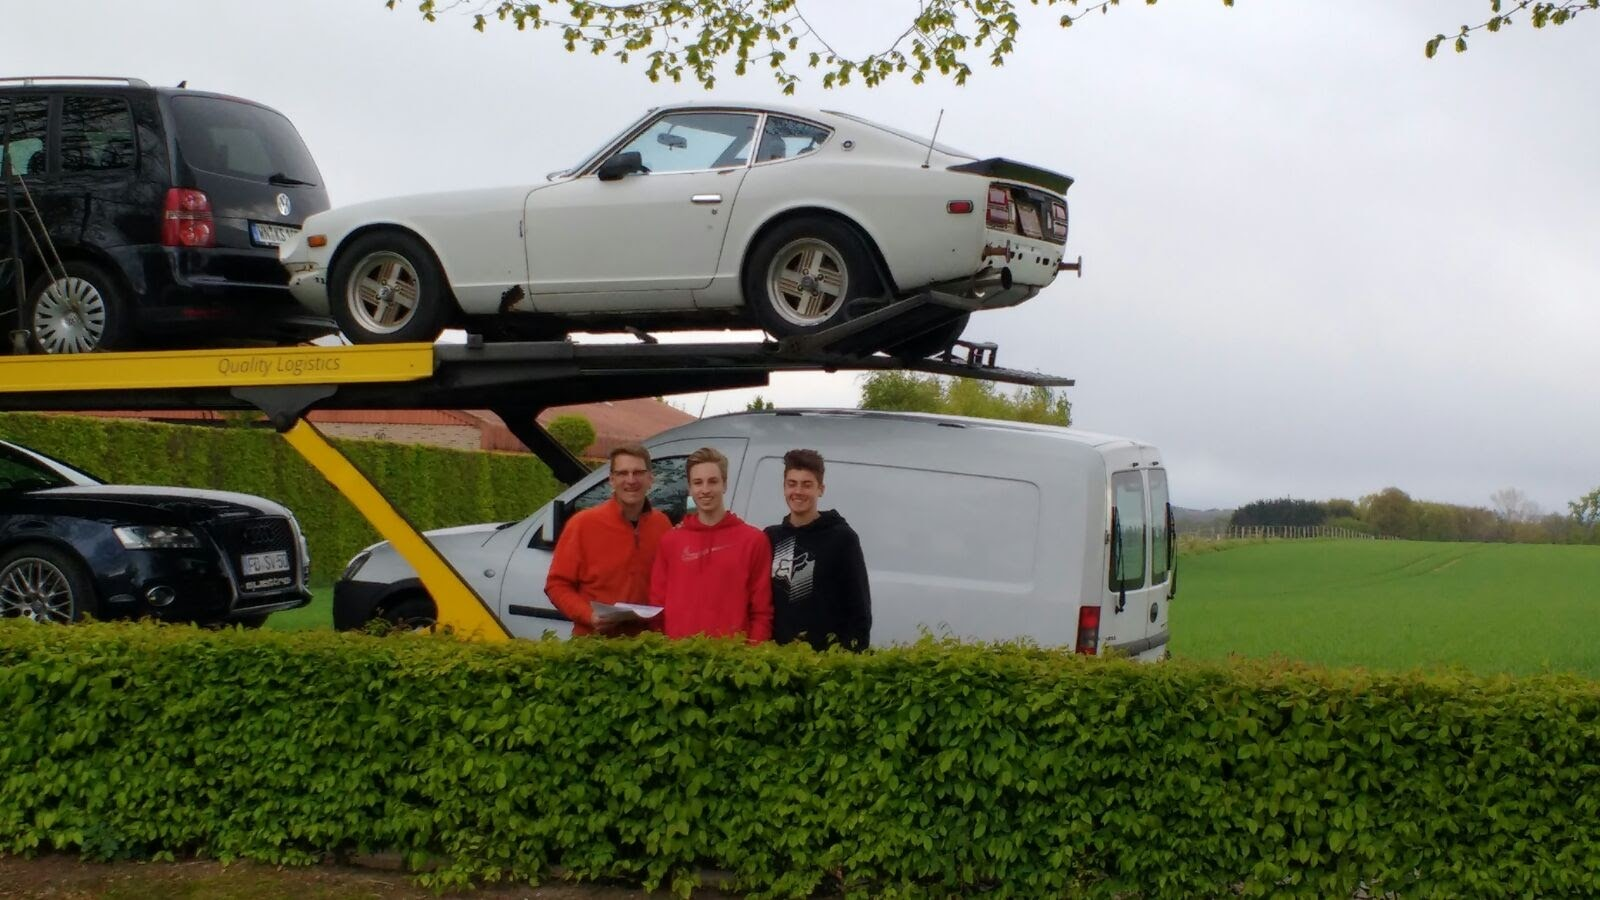
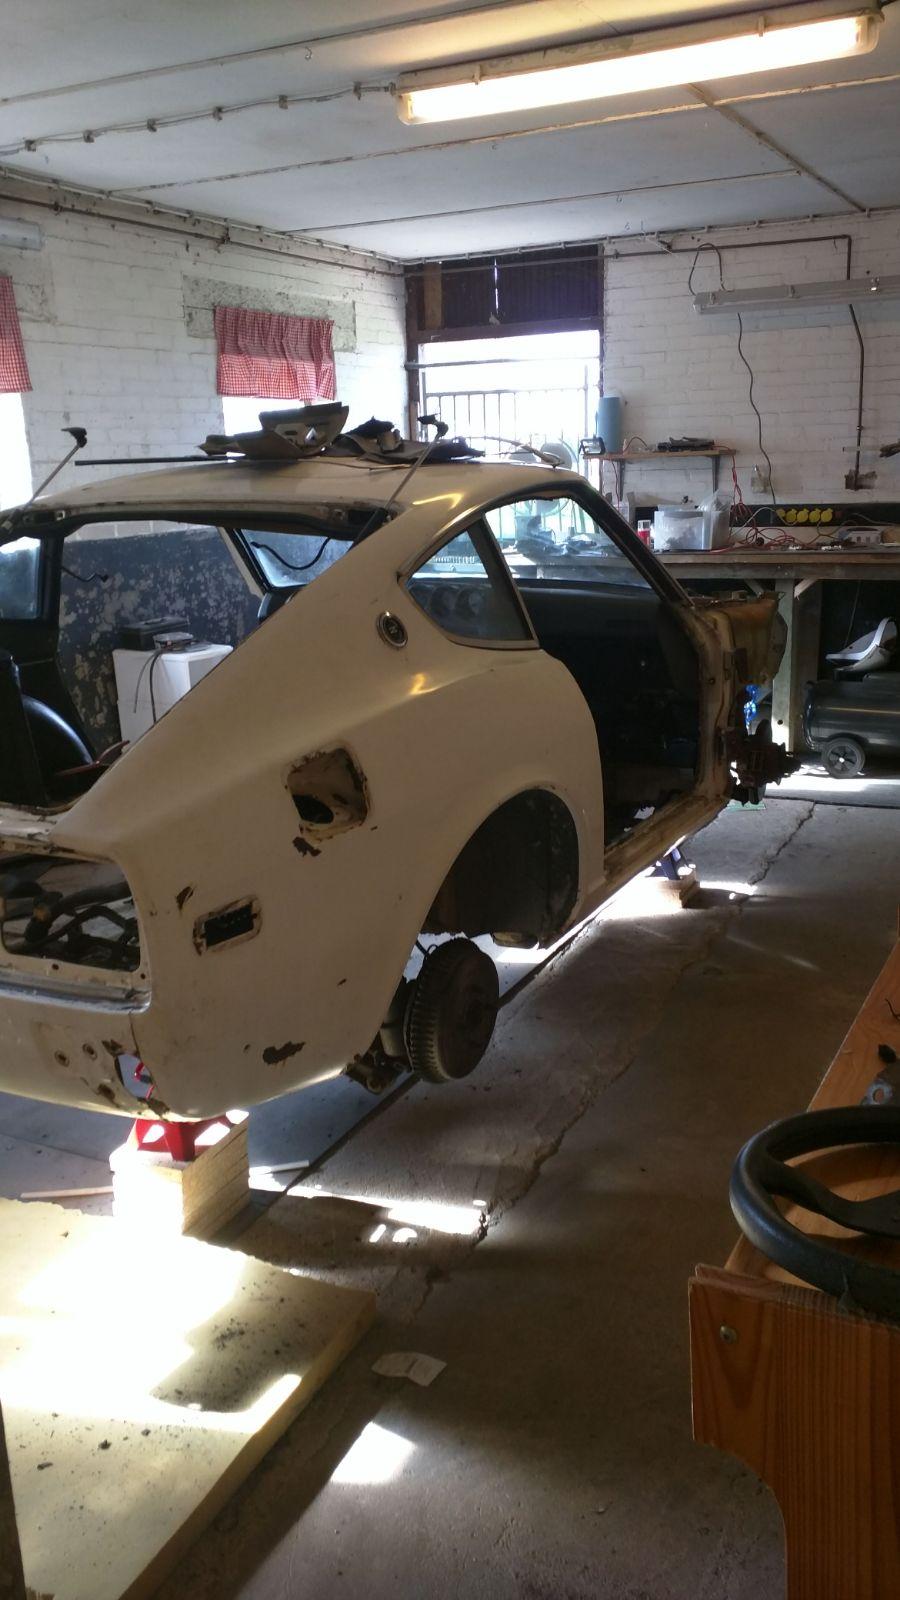
2 pointsSo now that our Z is almost finished, I thought I would finally join! My 19 year old son bought the car as a learning project that we could work on together with his 17 year old brother and their friends. The project has taken almost 3 years now and we are always just one repair away from having it completed. We bought the '75 280Z in Charlotte NC and it came with the original engine and a 5 speed. We imported it to the Netherlands where we live and started the restoration project. Now we almost have it on the road and are just working the kinks out of it. Latest problem has been a stumbling and missing when it starts warming up which has almost left me stranded. Still need to finish wet sanding and buffing the paint, then we can start enjoying the car. Oh wait, winter is almost here, so we will finish it just in time to park it for a few months!2 points
-
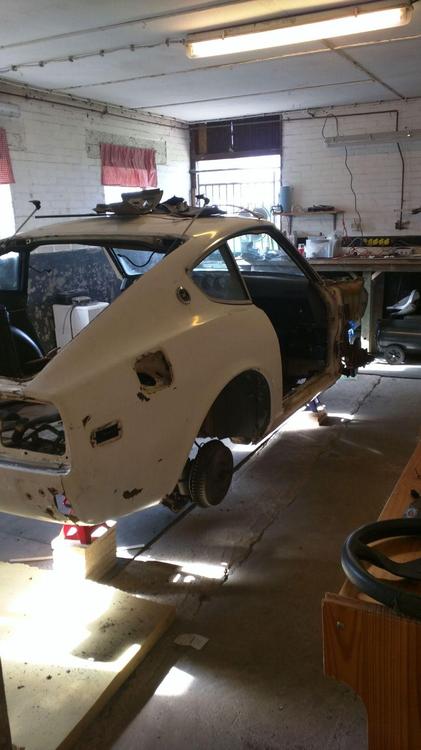
2 pointsHi everyone, Decided to post my current build . I started this project back in July of 2017, my initial expectation was to build a nice somewhat daily driver and possibly do a few track days. This is my first attempt to restoring a vehicle, prior to this I've never attempted anything remotely as complex as this. As always what I thought would be a simple project ended up being a much bigger task. I started with a $200 flux core welder and ended up borrowing @grannyknot Miller welder, that alone made a massive difference and cannot thank him enough for all the help and guidance through out this build. Details of what came with the vehicle when purchased. -L28 fully rebuild (according to the seller) -5 speed transmission out of 86 300zx -R200 rear differential 3.54 ratio My current plan is to build a period looking 240z with a few mods here and there such as, z432 rear spoiler, xenon front air dam and recently purchased used rs watanabe's 15x7. I will be posting pictures as this build continues to evolve.2 points
-
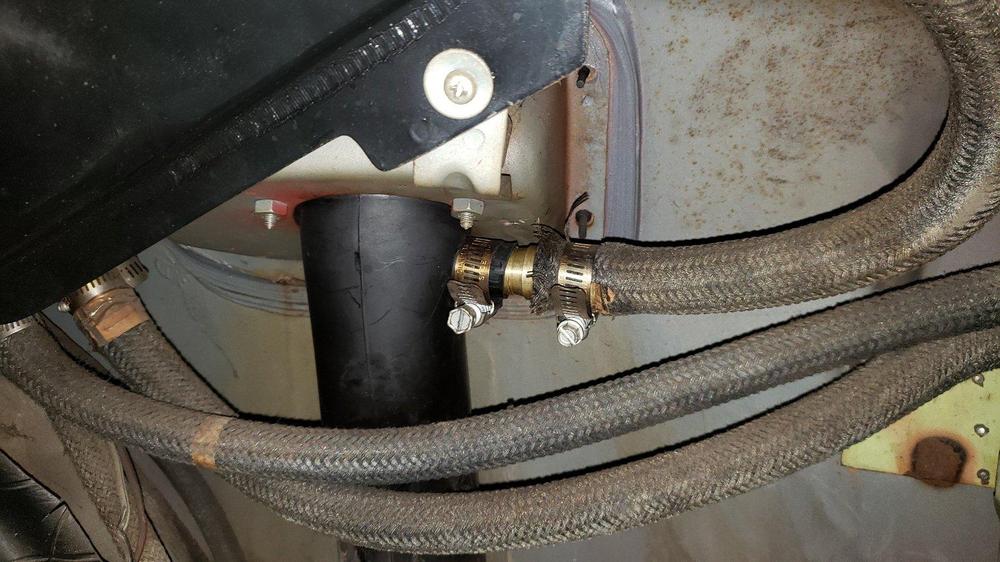
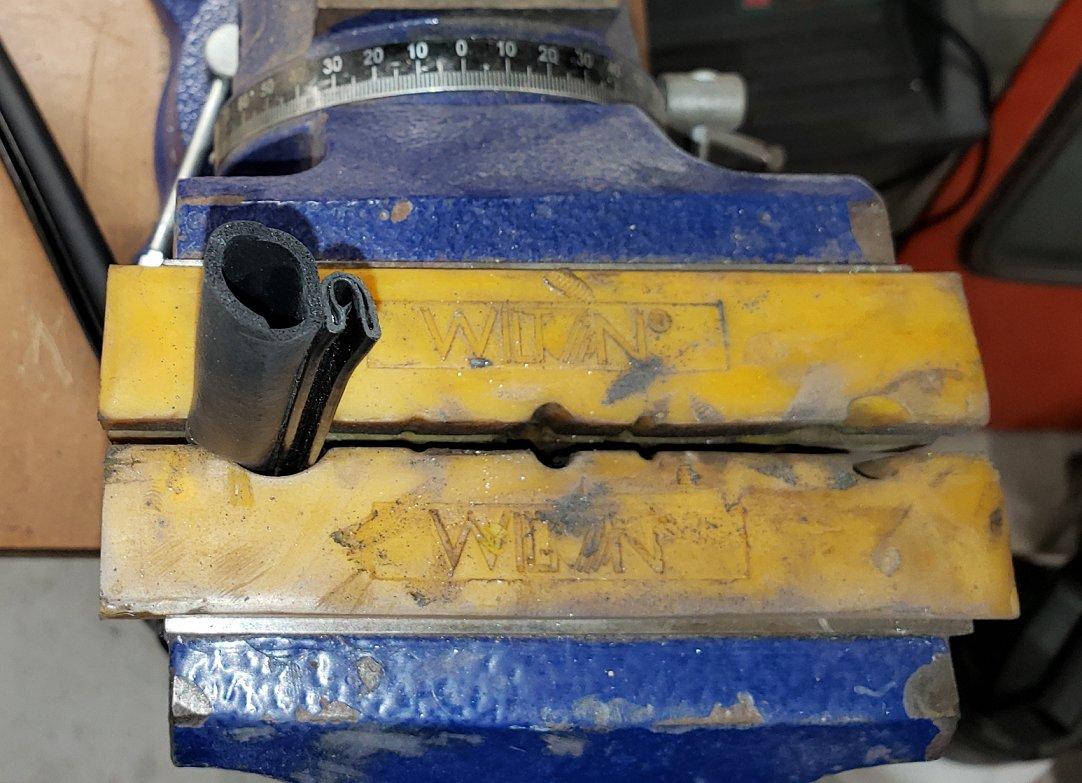
2 pointsNo need to go any farther than your local auto parts store. Measure each flexible hose you want to replace. Add the lengths and round up to the next foot. Cut the new hose to fit and replace any suspect clamps with new ones.2 points
-
2 pointsI'll skip to the most recent photos to show that we are very close...


 2 points
 -
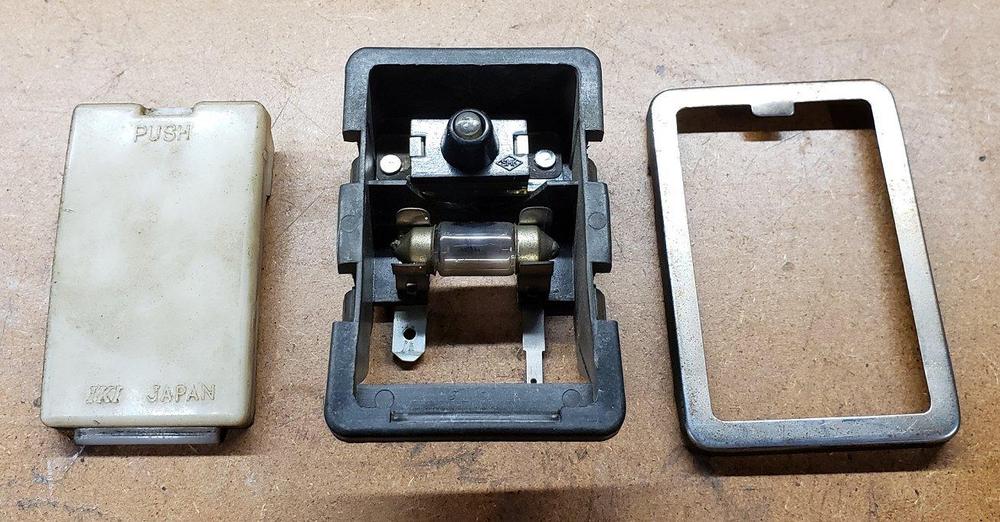
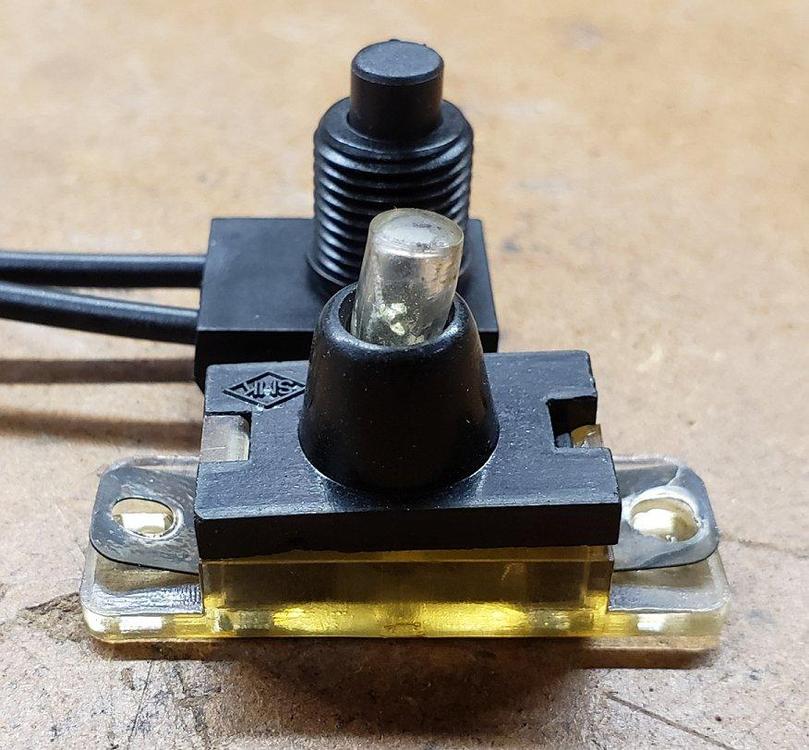
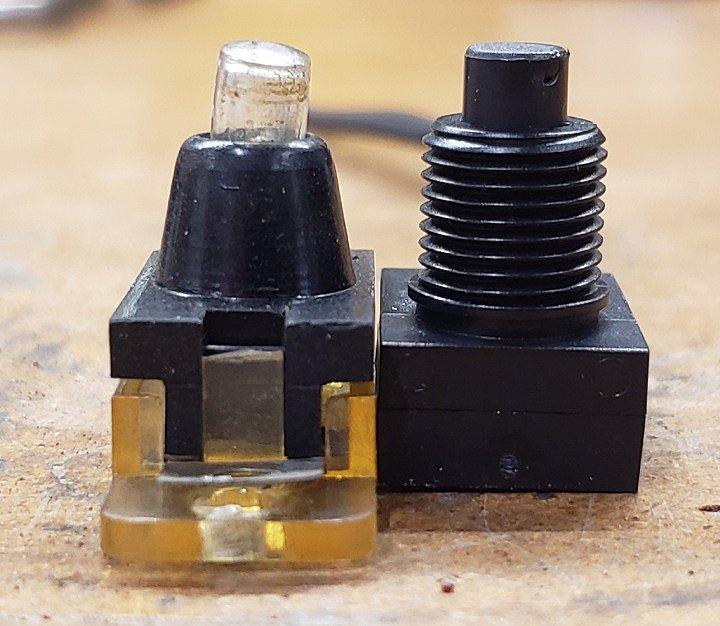
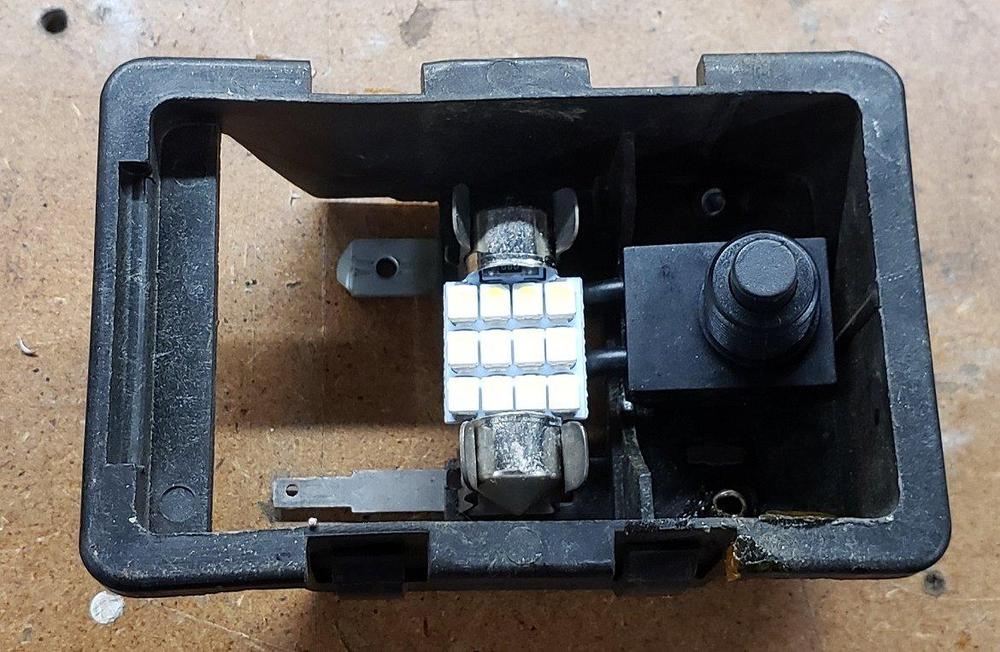
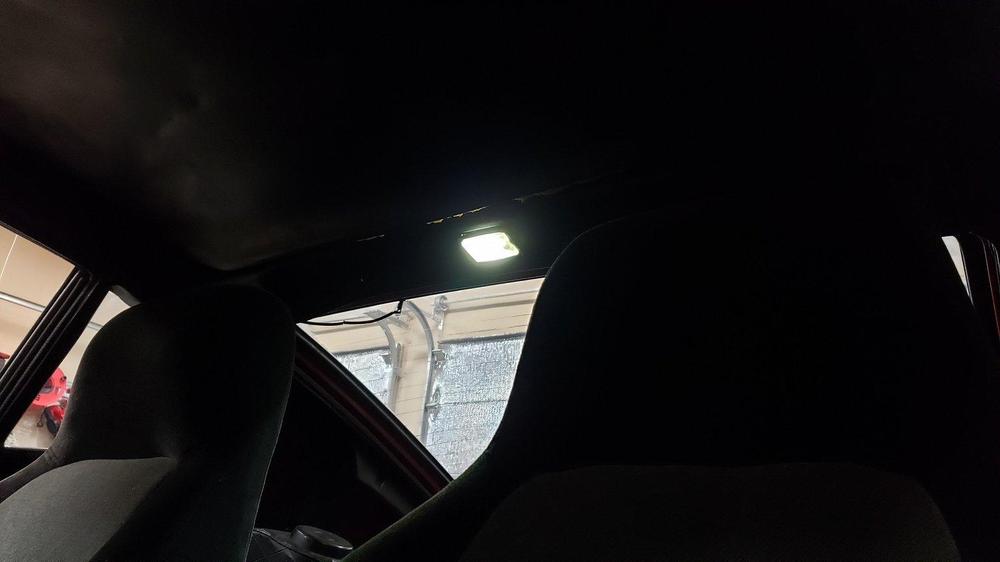
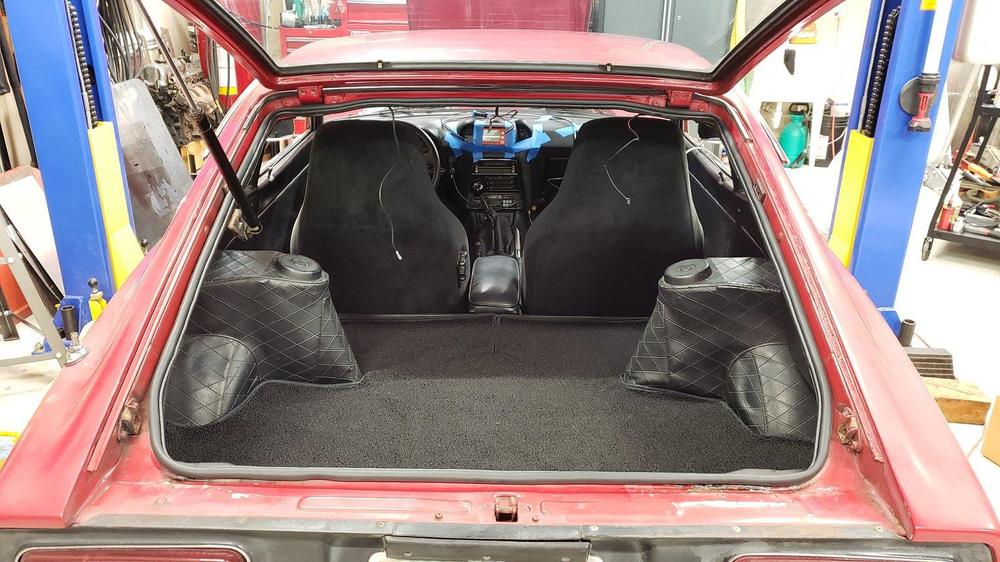
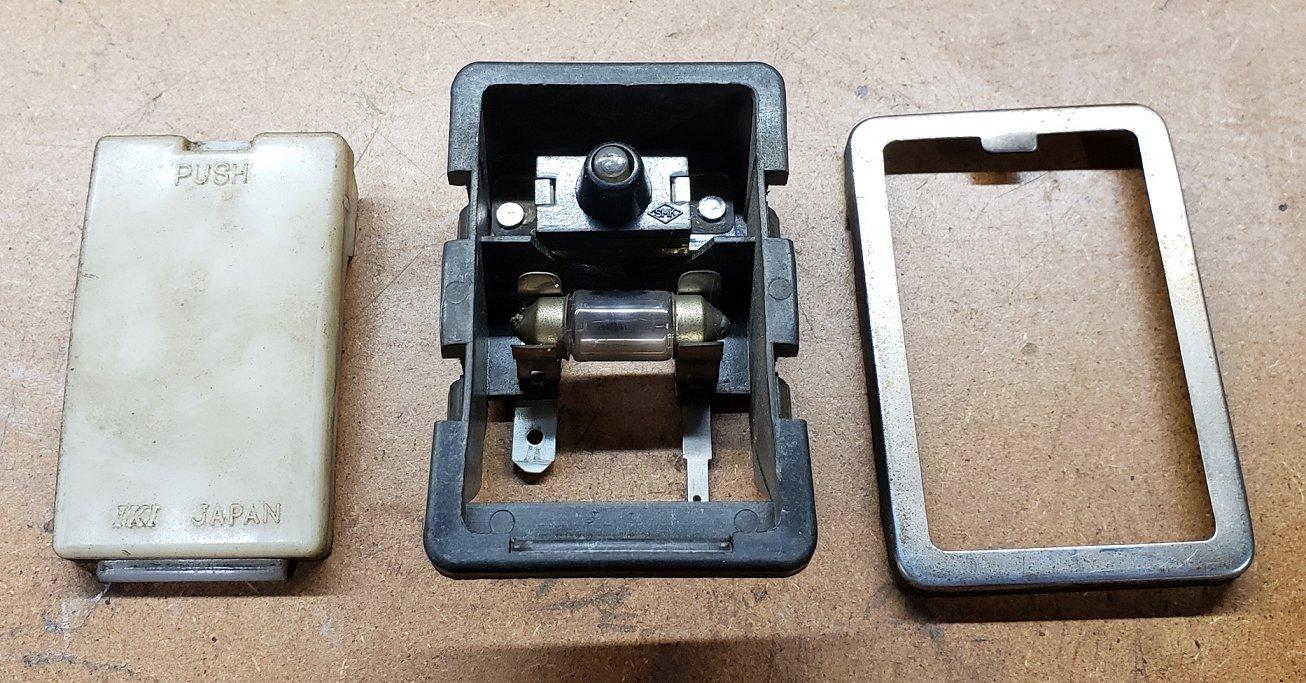
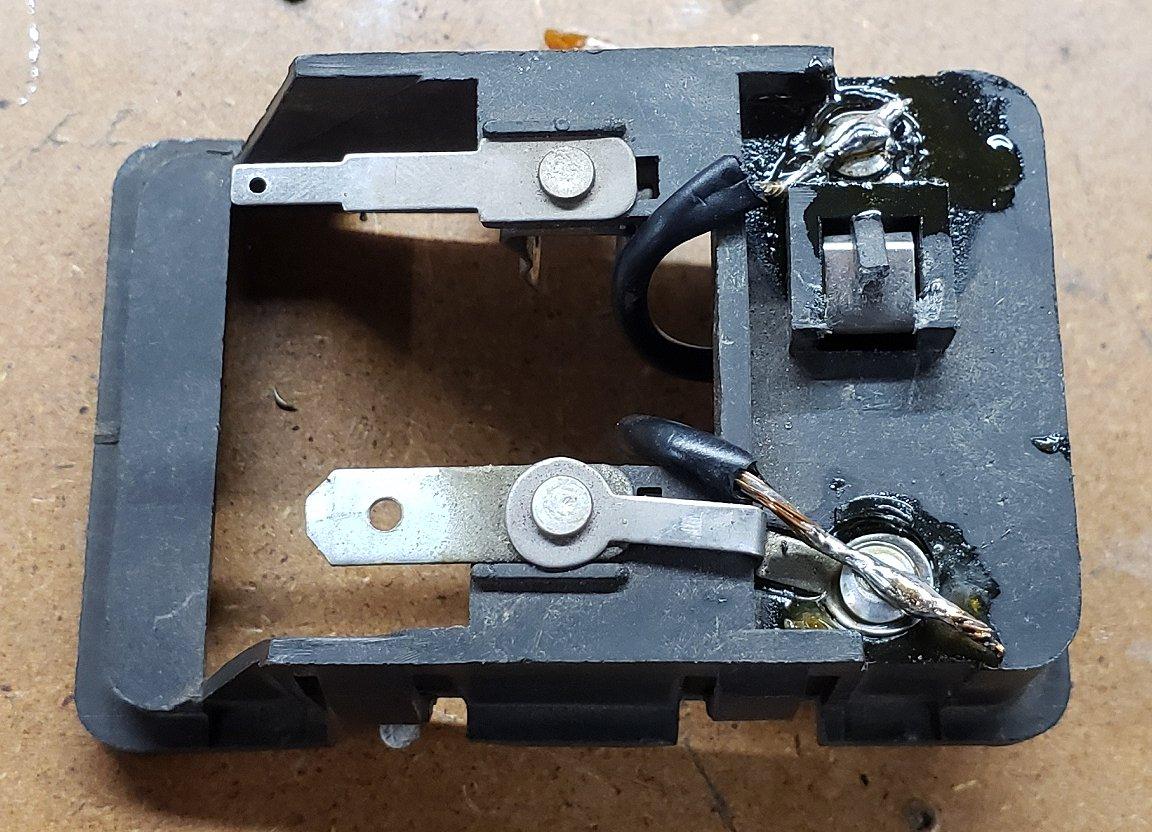
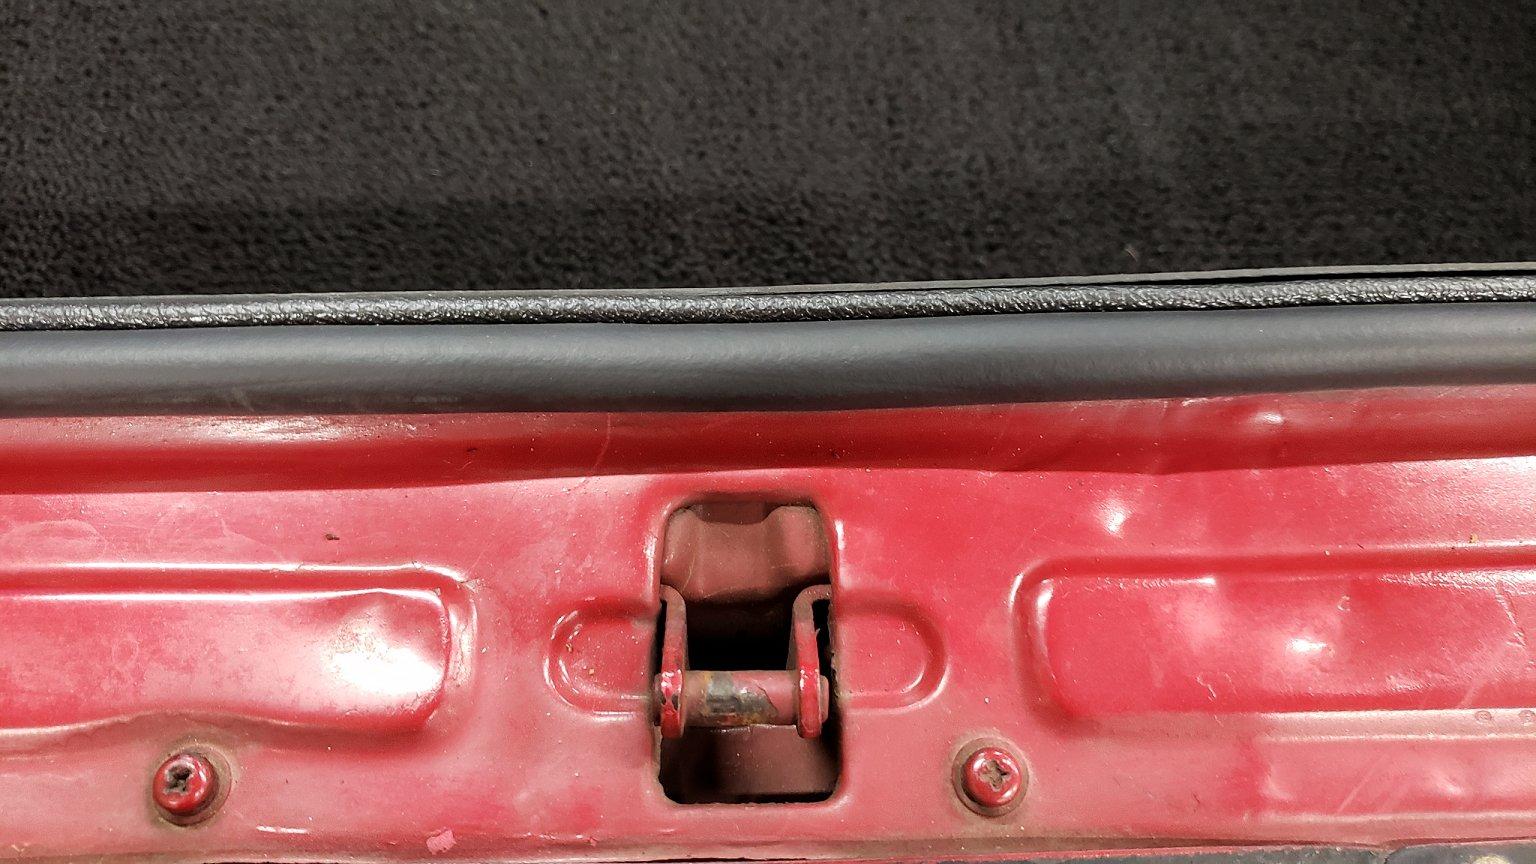
When I removed the rear interior panels for the hatch seal replacement I also had to remove the dome light and trim piece. The dome light has never worked in the car so I wanted to figure out why. A few depressions on the lens told me the switch was not popping back up as it should. After carefully removing the trim piece and lens this was easily confirmed. SMK is still in business and they make of all things, keyboard letter switches. Makes sense but in all my research I could not find this switch or anything close to it by SMK. I would love to know who makes the switch for the NOS units Nissan is selling for $100. There was no way I was giving a c-note for a new dome light so I found these switches on Amazon, 5 of them for $8.68. As always, they arrived in a few days and after some side by side comparisons I decided to move forward. https://www.amazon.com/gp/product/B07LCH1N3B/ref=ppx_yo_dt_b_asin_title_o05_s00?ie=UTF8&psc=1 First I riveted the contacts back to the housing as I had to drill out the spot/swag welds from the old switch. This would give me something to solder to. Looking back on it I wish I had just used some small machine screws and and nuts as I could wrapped the wire around the screw and filled it with solder. Oh well, next time! Then it was just a matter of soldering the wires from the switch to the riveted posts. I had thought about using some double sided tape on the bottom of the switch but I could tell it was not going anywhere, especially once the lens was on. I replaced the old bulb with an LED, again from Amazon and with a quick test I confirmed I had the polarity correct on the bulb and the switch worked. I cleaned up the lens and polished the trim. Upon testing with the lens on I determined I needed to bend the rivets out of the way a little. With the action feeling good I installed with and basked in the glory of my handy work. The light works when either door is opened and works via the switch. Job done!


 2 points
 -
2 pointsThat's where the ignition key has been relocated to. You can see the steering has no lock, just an empty hole in the plastic housing to the right of the column..2 points
-
2 pointsWe have created a generation of kids that are addicted to social media, have no real skills and expect everything to be both easy and free. We will pay as a society for this. My kids don’t have phones but all their friends do. I don’t know who said this but I like it. “Hard times create strong men. Strong men create good times. Good times create weak men. And, weak men create hard times.” We are creating weak men in my opinion. When I was a kid both my Grandfather and Father could fix and build anything and worked their tails off to provide for their families. People today are generally helpless, lazy and at the same time arrogant. Sorry for the rant! Sent from my iPhone using Tapatalk2 points
-
1 pointNo “extra” tax, just the assessed GST (under $25) from border services. More than fair! Thanks again for selling me your distressed and severely damaged dash that no one will ever believe is a blem... [emoji38]1 point
-
View Advert Wanted. A Decent Nissan Z 5 speed Well my stash of 5 speeds has dwidles to two. One that is locked up, and one that you can't get into 5th gear with power applied. Before I go off and source a C type and go through that process, doesn't anyone "close by" have a decent late 280 or 280ZX 5 speed they KNOW is in good condition? Would pay decent money for it. Let me know. Short ears, two muffler hangers, short ears one muffler hanger or long ears one muffler hanger is ascending order of preference, but WORKING and not in major need of bearings is much more important. BW turbo 5 speeds need not apply, not that desparate yet.... ? Thanks Advertiser zKars Date 11/26/2019 Price $400.00 Category Parts Wanted Year 1983 Model Z or ZX1 point
-
1 pointAs I said earlier in this thread... "If this is the return line from the fuel rail I used 3/16 as I stated in the prior post. The supply side (where the stock fuel filter is) is 5/16" It's 5/16 supply and 3/16 return back at the tank also.1 point
-
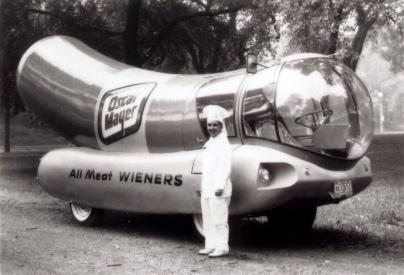
1 point1 point1 pointIsn't it? Lord save us from the advertising jingles. Pretty please. Maybe you could make that offer to your chum 'SpeedRoo' over here, as he seems enthusiastic? Look, this thread is titled 'Fairlady 432 at auction'. A little digression is inevitable - and usually no bad thing - but if you're going to be scouring the web for random photos to dump here then may I suggest they either have a question or explanation attached to them, that they are not divorced from their original context, and that they might be neatly woven into the subject of the thread? I don't see how a replica FRP dash is 'on topic' in this thread. I think it's a reasonable observation. And I do plenty of 'sharing', thanks. My personal preference is to use my ammunition sparingly, and where it will - hopefully - be on target and with good grouping. Your spray and pray approach might please the crowd (hey, who doesn't like a bit of instant gratification?) but in the long term it will tend to throw up more questions than answers because you're often not bringing the data with the photos. A good example is the tranche of photos you dumped on the choke & throttle control thread yesterday. Who knows what's what anymore? Here, have a WienerMobile on me. You can colour it in at your leisure...
 1 point1 pointSo be it... this site is not reference site, it is the spirit of 片山豊 that lives here: "Love Z cars. Love Z people. Love Z life." . If you want to set up a more accurate and orderly site, I will pay for the domain and web space and get you or a friend of yours set up to start rolling it out. It is a shame that your knowledge, experience, and reference materials are not shared to the masses.... the Z world would be a better place!1 point1 point"HS30"...? Not used on HS30 production cars. It was actually an S30-S 'Z-Std' part.1 point1 point1 pointGood catch everyone ! This R has an original Dash which doesn’t have cut away for the blower vent for each side . You can see the hole is just covered ( un - cut ) by vinyl . Usually this vinyl had cut for the vent .This is the true dash for the 432-R . However , each car has each customized style . This car has center vent with control levers , I can’t tell from the picture whether this car has a heater box or not but , there might be a heater box . Attached picture is the good example of a plain Z432-R which has close configurations to the press car . No map light , no blower fan switch , no slide levers , no glove box lid , etc . Blue , you may have some pictures of the press car’s cockpit in your Hoover bag . Kats
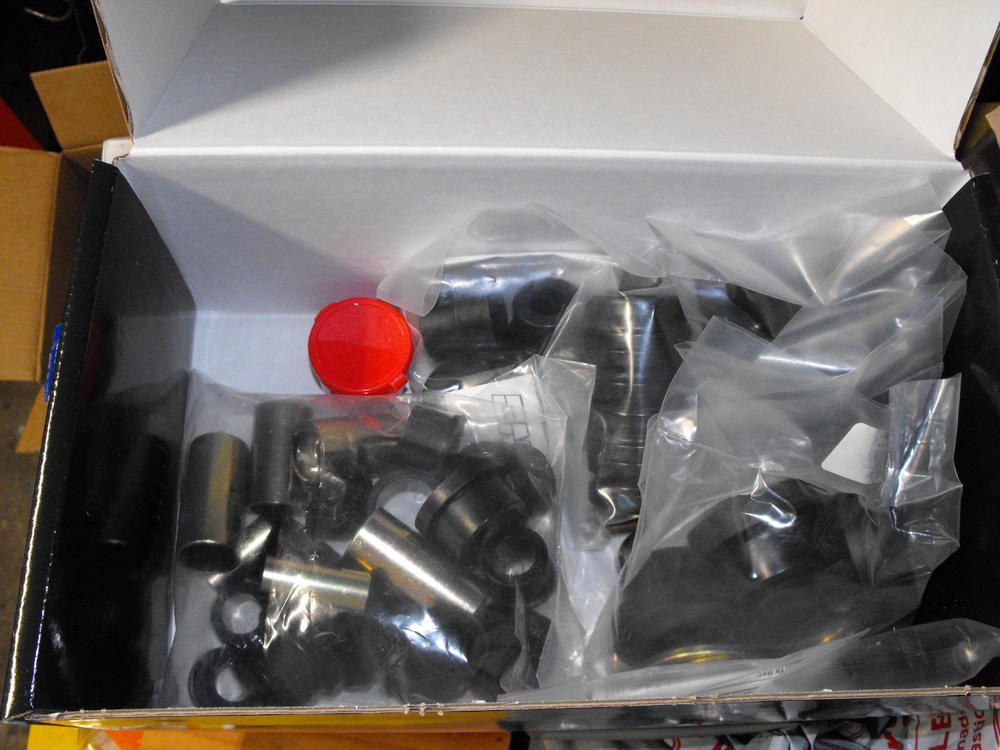
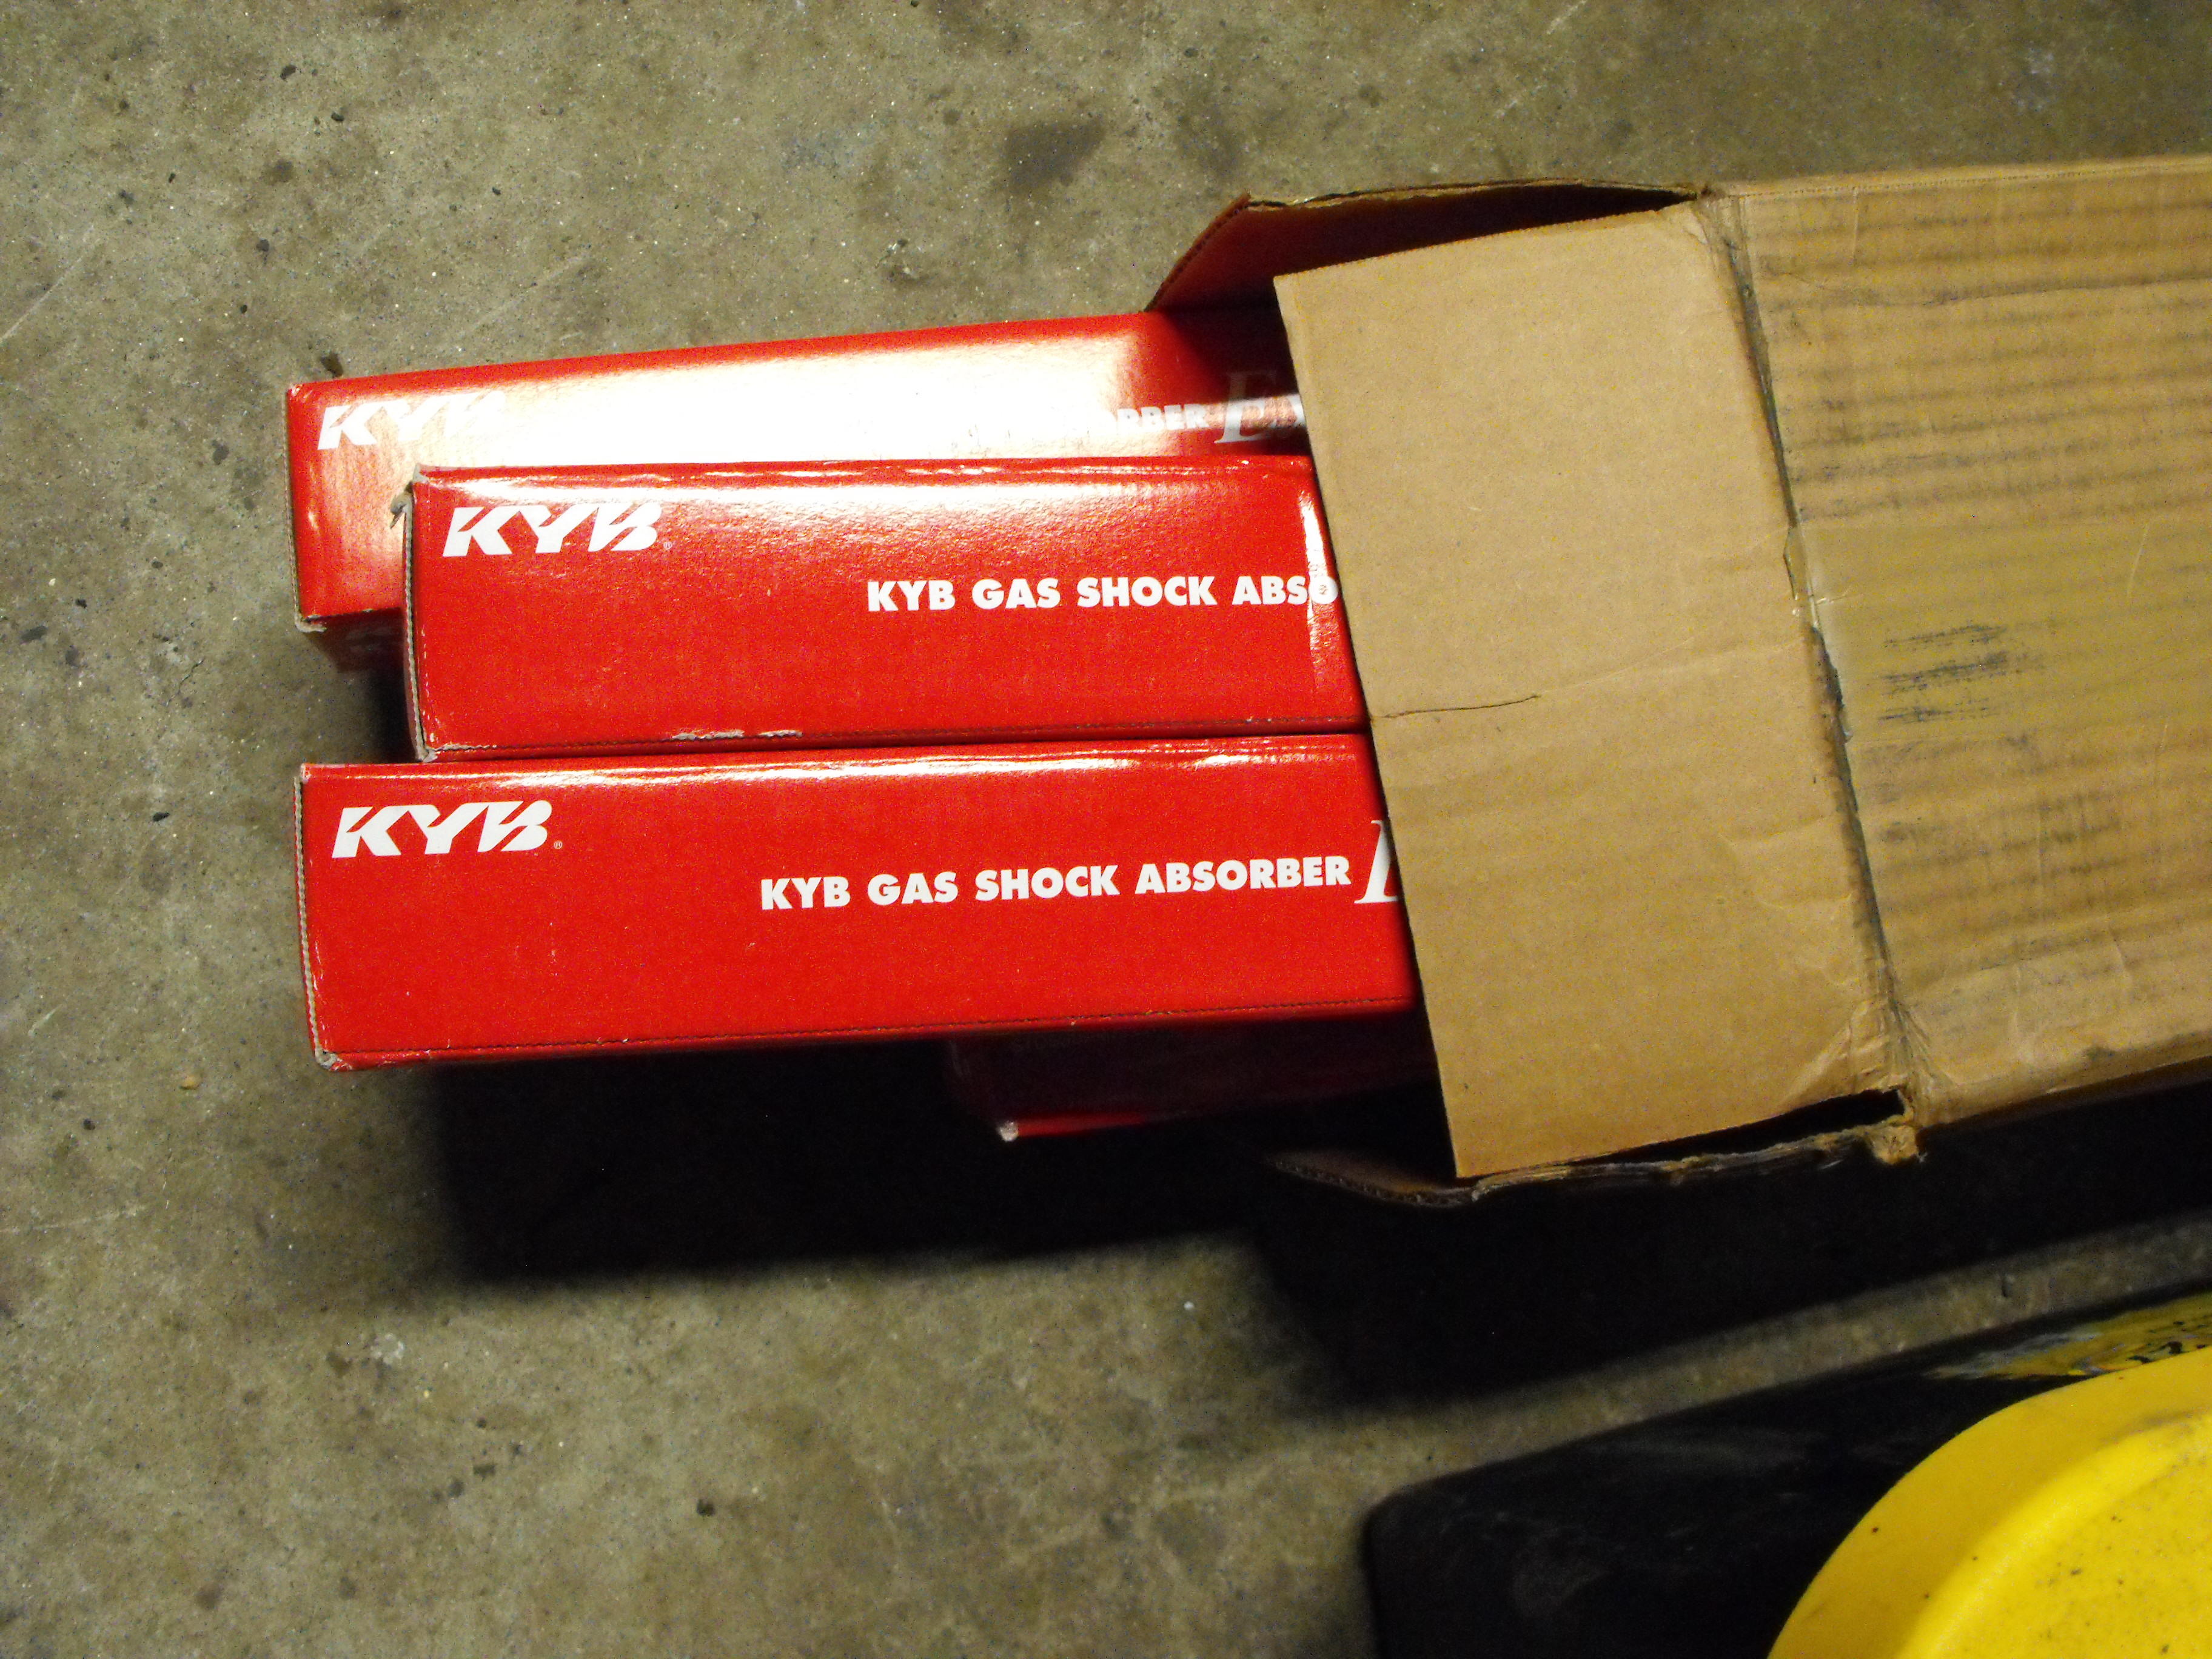
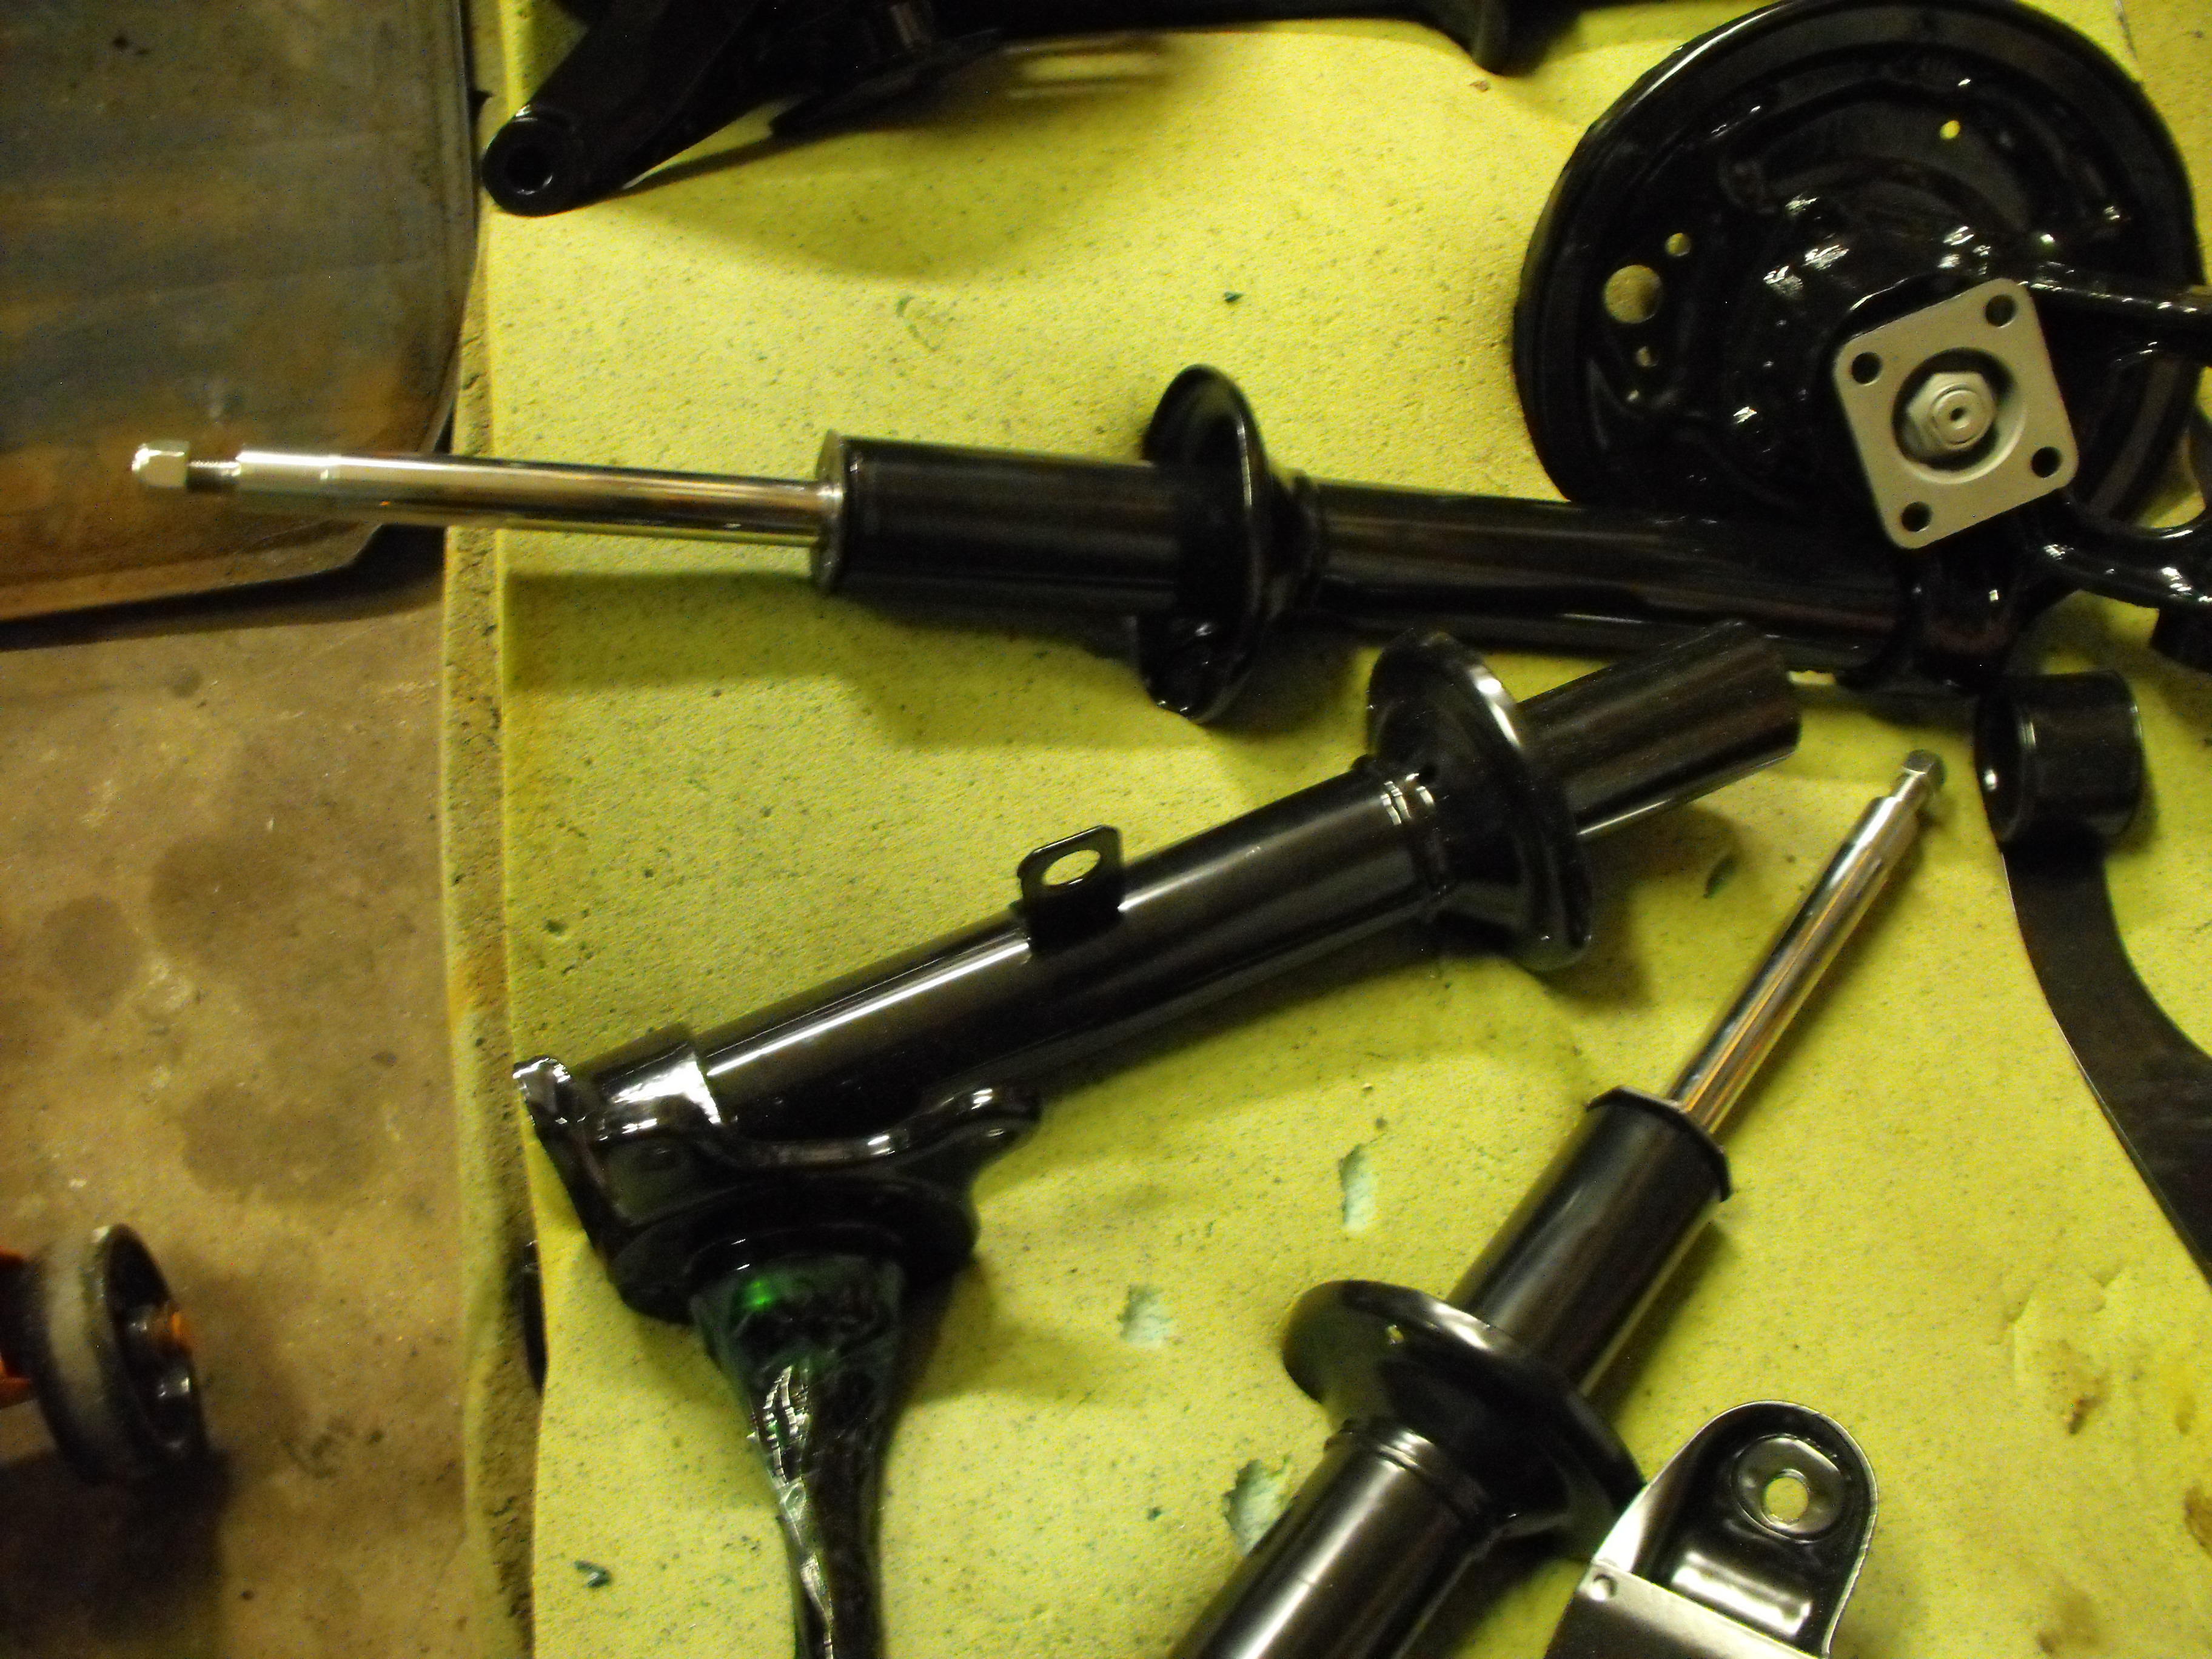
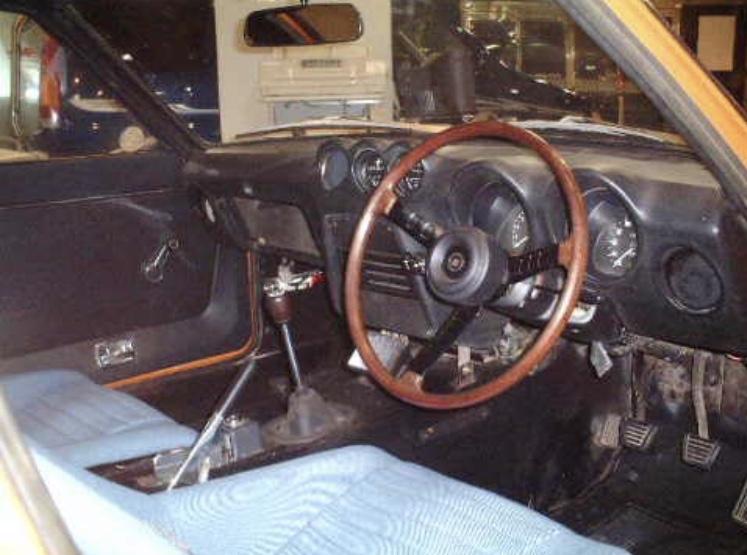 1 point1 pointIt's like Christmas here....lots of parts coming in. Got the 'clear' zinc back from the plating shop. Also received more engine parts and suspension parts. Started installing shocks and will finish up the struts over the next couple days.

 1 point1 pointLooks like a Nissan reman. Rebuilt to Nissan specs. Should get 200,000 + miles from it. Do you know where it's been stored, and how? Does it have oil in it or is it empty? I would assume that Nissan coats the internals for rust prevention in preparation for shipping and storage, but who knows how long that lasts. Might be worthwhile to inspect rust prone surfaces before starting it. I don't know when Nissan stopped supplying reman engines but I'll bet it was over 20 years ago, at least. That engine has been floating around for that long. Fixed your picture -
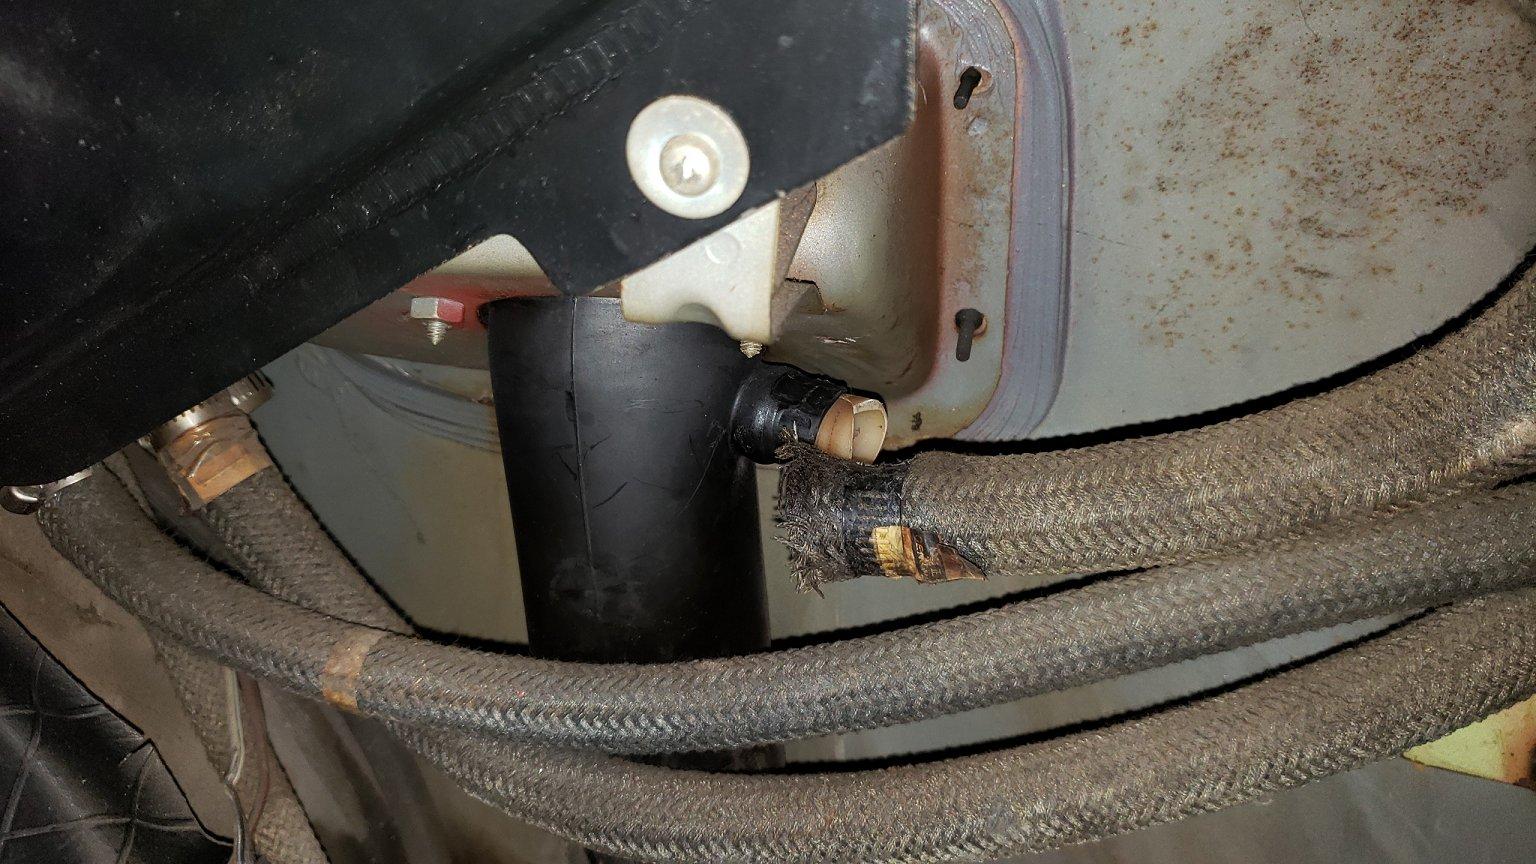
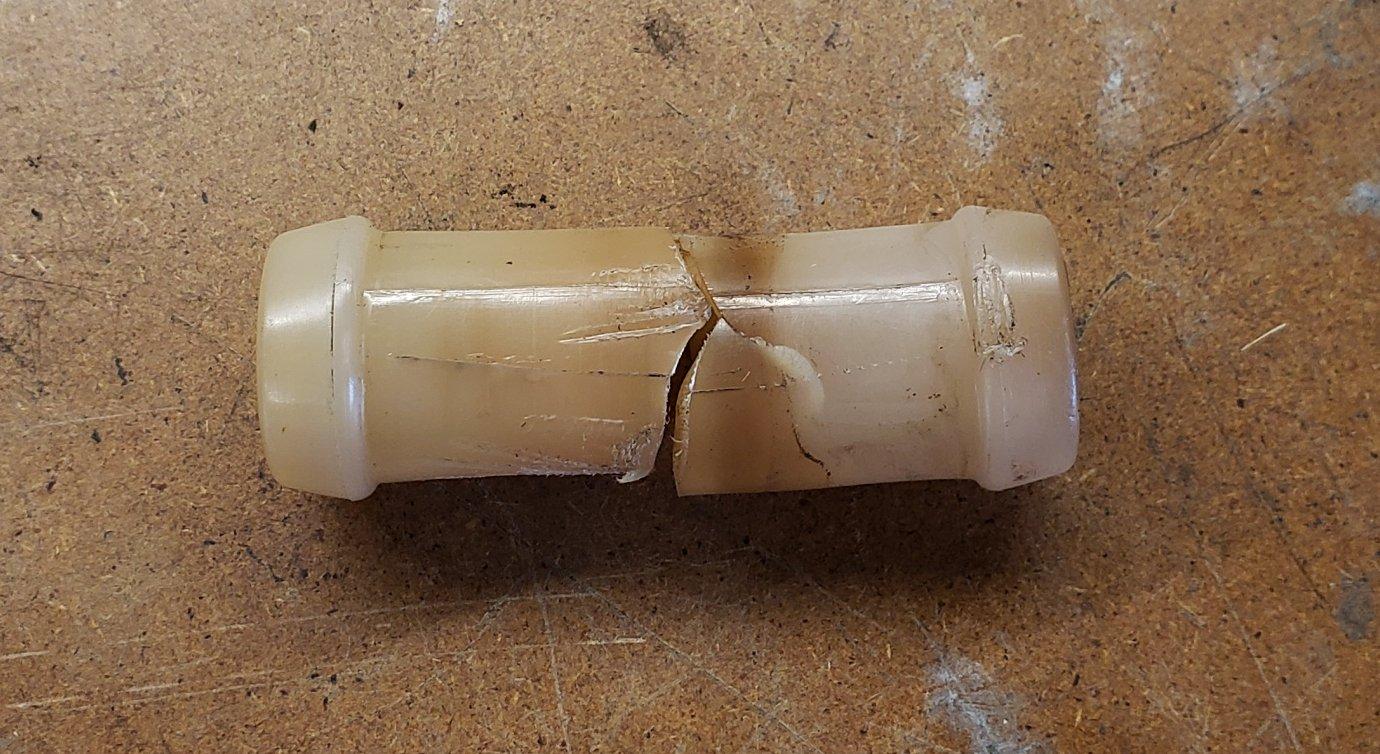
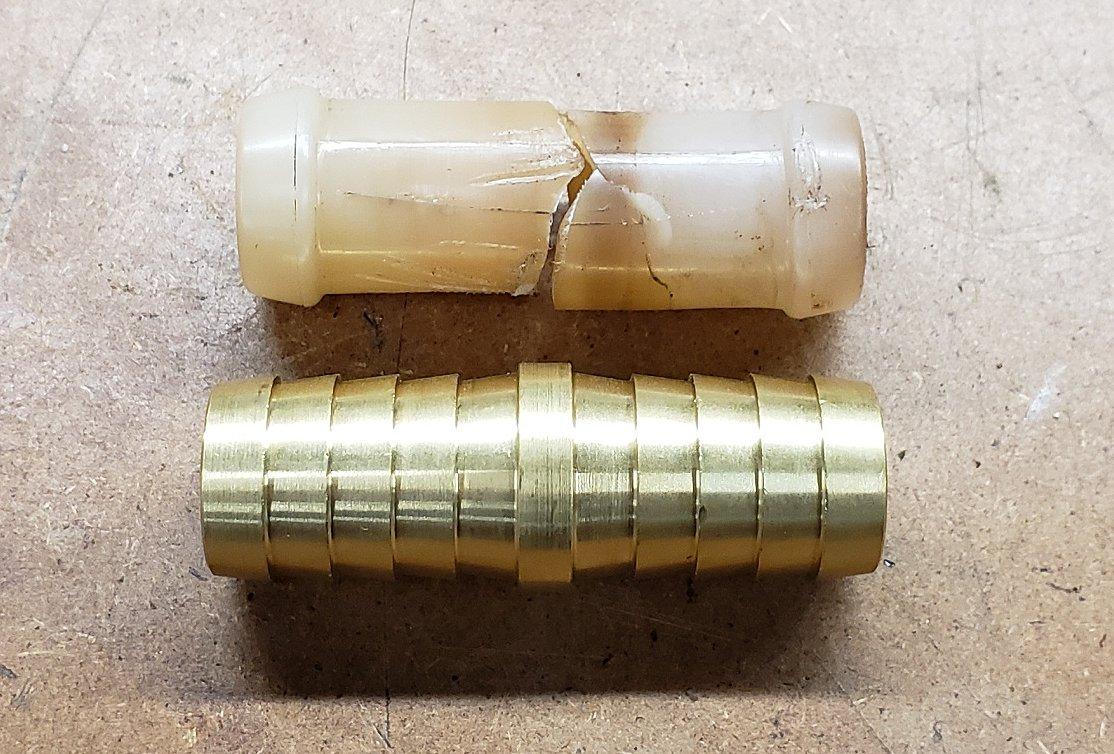
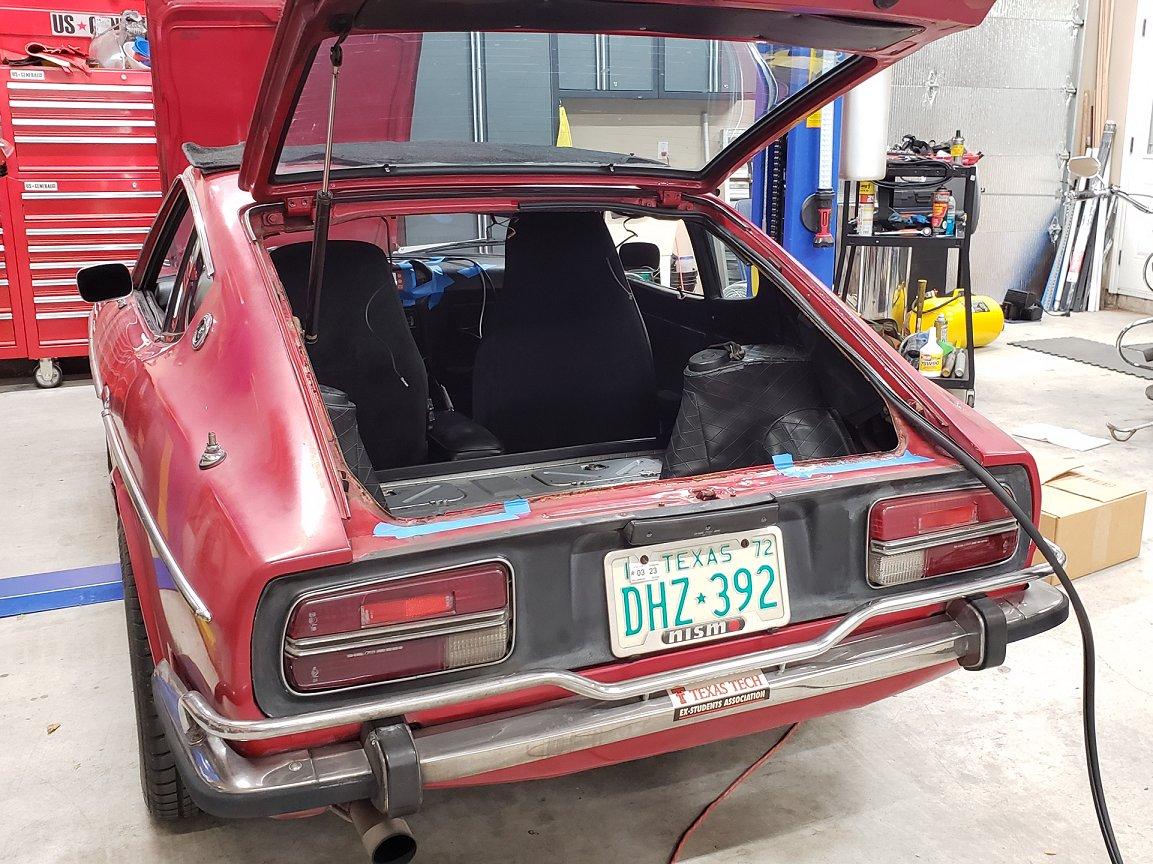
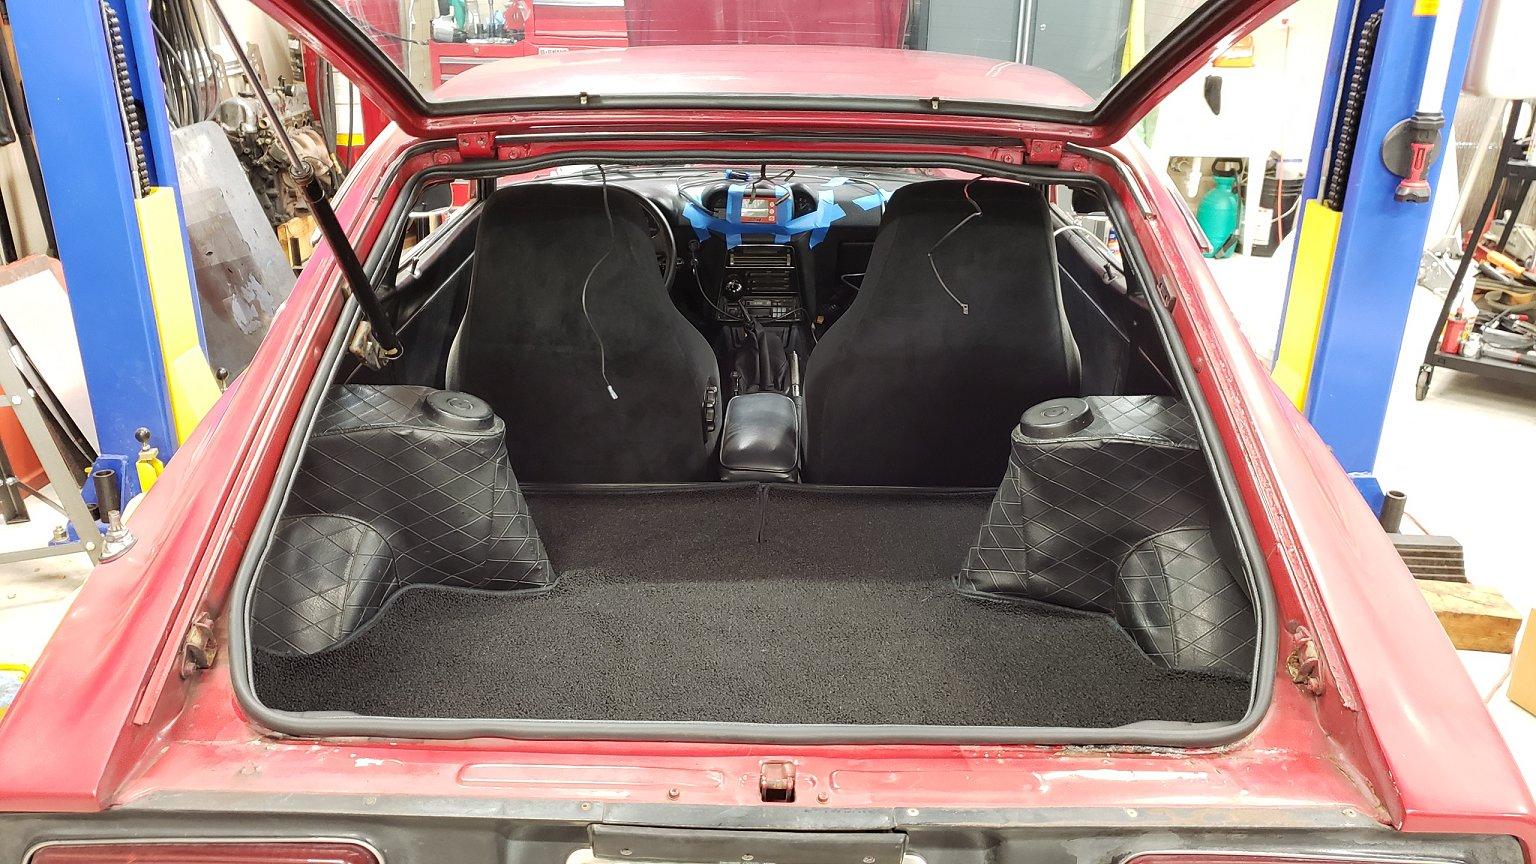
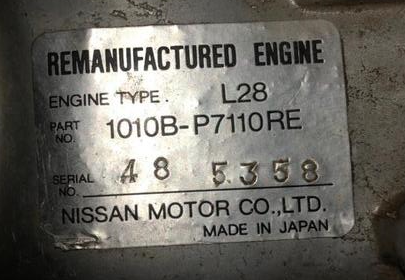 1 pointAs I have been driving the car more in effort to tune the carbs, the exhaust smell was becoming too much so I decided to start with the hatch seal. The seal on the car was well past its prime. Before starting to remove the old seal I removed the rear interior panels and quickly discovered the highly probable cause for the occasional raw gas smell I would get, a broken plastic vent hose coupler. A quick search on Amazon got me a new brass piece to my door in a couple days and was quickly installed. With the old seal removed along with all the residue I could scrape off I took some measurements and ordered 25ft of seal number 1120A832 from McMaster Carr. Knowing I or someone else would paint the car in the future I wanted something that could easily be removed but still seal up in the mean time. While I waited for the seal to arrive I successfully re-glued the outer seal at the top of the hatch opening. I also wire brushed and sprayed some rust encapsulator on spot that were under the seal. Once the seal arrived I spent about an hour installing it as it requires strength and finesse. The seal seems to work very well as it has some real cushion but still allows the hatch to close with ease and is not pushing it up.


 1 point1 pointWhat webers did you get? You might read some and get the easier SU carbs. I had some triples and sold them. Too much tuning for me, never installed them. The SUs are so much simpler and pull good enough for me. Everybody says the webers sound good. What the hell does that add?1 pointI've read lower psi hydraulic hose will work with fuel but not recommended for long term. 250 psi has a different rubber compund than 1400 psi. After seeing Jalex's photos I believe that. Why take the chance...1 point1 pointI made a spacer that straddles the guide . I also invested in some guide seal pliers. With pliers I didn’t have to tap the seals on . I had enough control with the pliers to ease them on and avoid the bulge .1 pointThe clamps you're using will work fine although they're not as good as the F.I. rated clamps. Looking at the pics, I don't think the problem was the clamps it likely the hose. Cliff (Siteunseen) mentioned in another thread, (on the same subject) that the line you're using isn't rated for gasoline, although I haven't verified that. I trust Cliff. Replace all the flexible fuel lines with the proper hose and reroute the new hose so it doesn't touch or rub on any bodywork. Pics when you get it done.1 point1 point1 pointThe damper and pulleys should swap easily. No need to do so though. Since you're using carbs you don't need EFI hose. Just get some quality fuel line. You will probably need to do some exhaust system work, depending on where the L28 came from and how complete it is. The L24 manifold and down pipes might be smaller than L28 parts. 280ZX manifolds are different from 280Z manifolds. Basically though, the L28 and L24 engines are almost identical on the outside. Everything should swap over.1 point1 pointI talked to engineers, surgeons, librarians, and other professionals. Kid's hand-motor-skills are gone as well as drawing abilities. No writing and limited printing... hands are becoming useless.... can't hold a wrench or a screw.... lame arse generations ahead.1 point1 point1 point@SteveJ Not the same car, this is a 432R. This is an upcoming Auction. @Wheee! Try this link. https://www.thedrive.com/news/31176/this-1970-nissan-fairlady-z432r-could-become-the-most-expensive-z-car-ever-sold1 point1 pointHere are a few pics of it as it arrived from the port and as we started the tear down.Photos (2).zip

 1 point1 point1 pointThe Series I choke/throttle mechanism with cables on eBay sold for $1,588.89!1 point


Important Information
By using this site, you agree to our Privacy Policy and Guidelines. We have placed cookies on your device to help make this website better. You can adjust your cookie settings, otherwise we'll assume you're okay to continue.