


Leaderboard
-
Captain Obvious
Free Member9Points10,081Posts -

siteunseen
Free Member9Points15,115Posts -

Zed Head
Free Member7Points19,236Posts -
.JPG.cfcada9cf1c1b502df3f5f2f2ca3ff36.JPG)
SteveJ
Free Member4Points9,646Posts


Popular Content
Showing content with the highest reputation on 09/16/2023 in all areas
-
7 pointsWhoa, whoa, whoa... naked hostility? That's my first tattoo.7 points
-
5 points
-
3 pointsIt's in that thread I linked above. I made somebody angry with my naked hostility.3 points
-
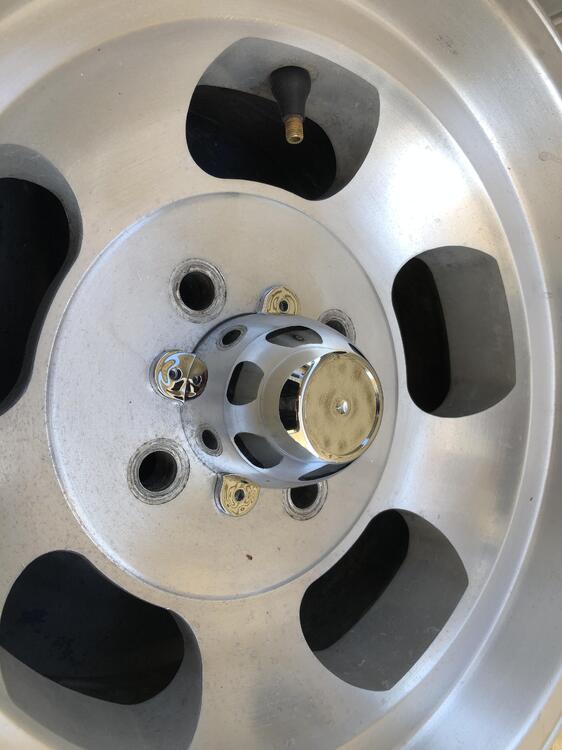
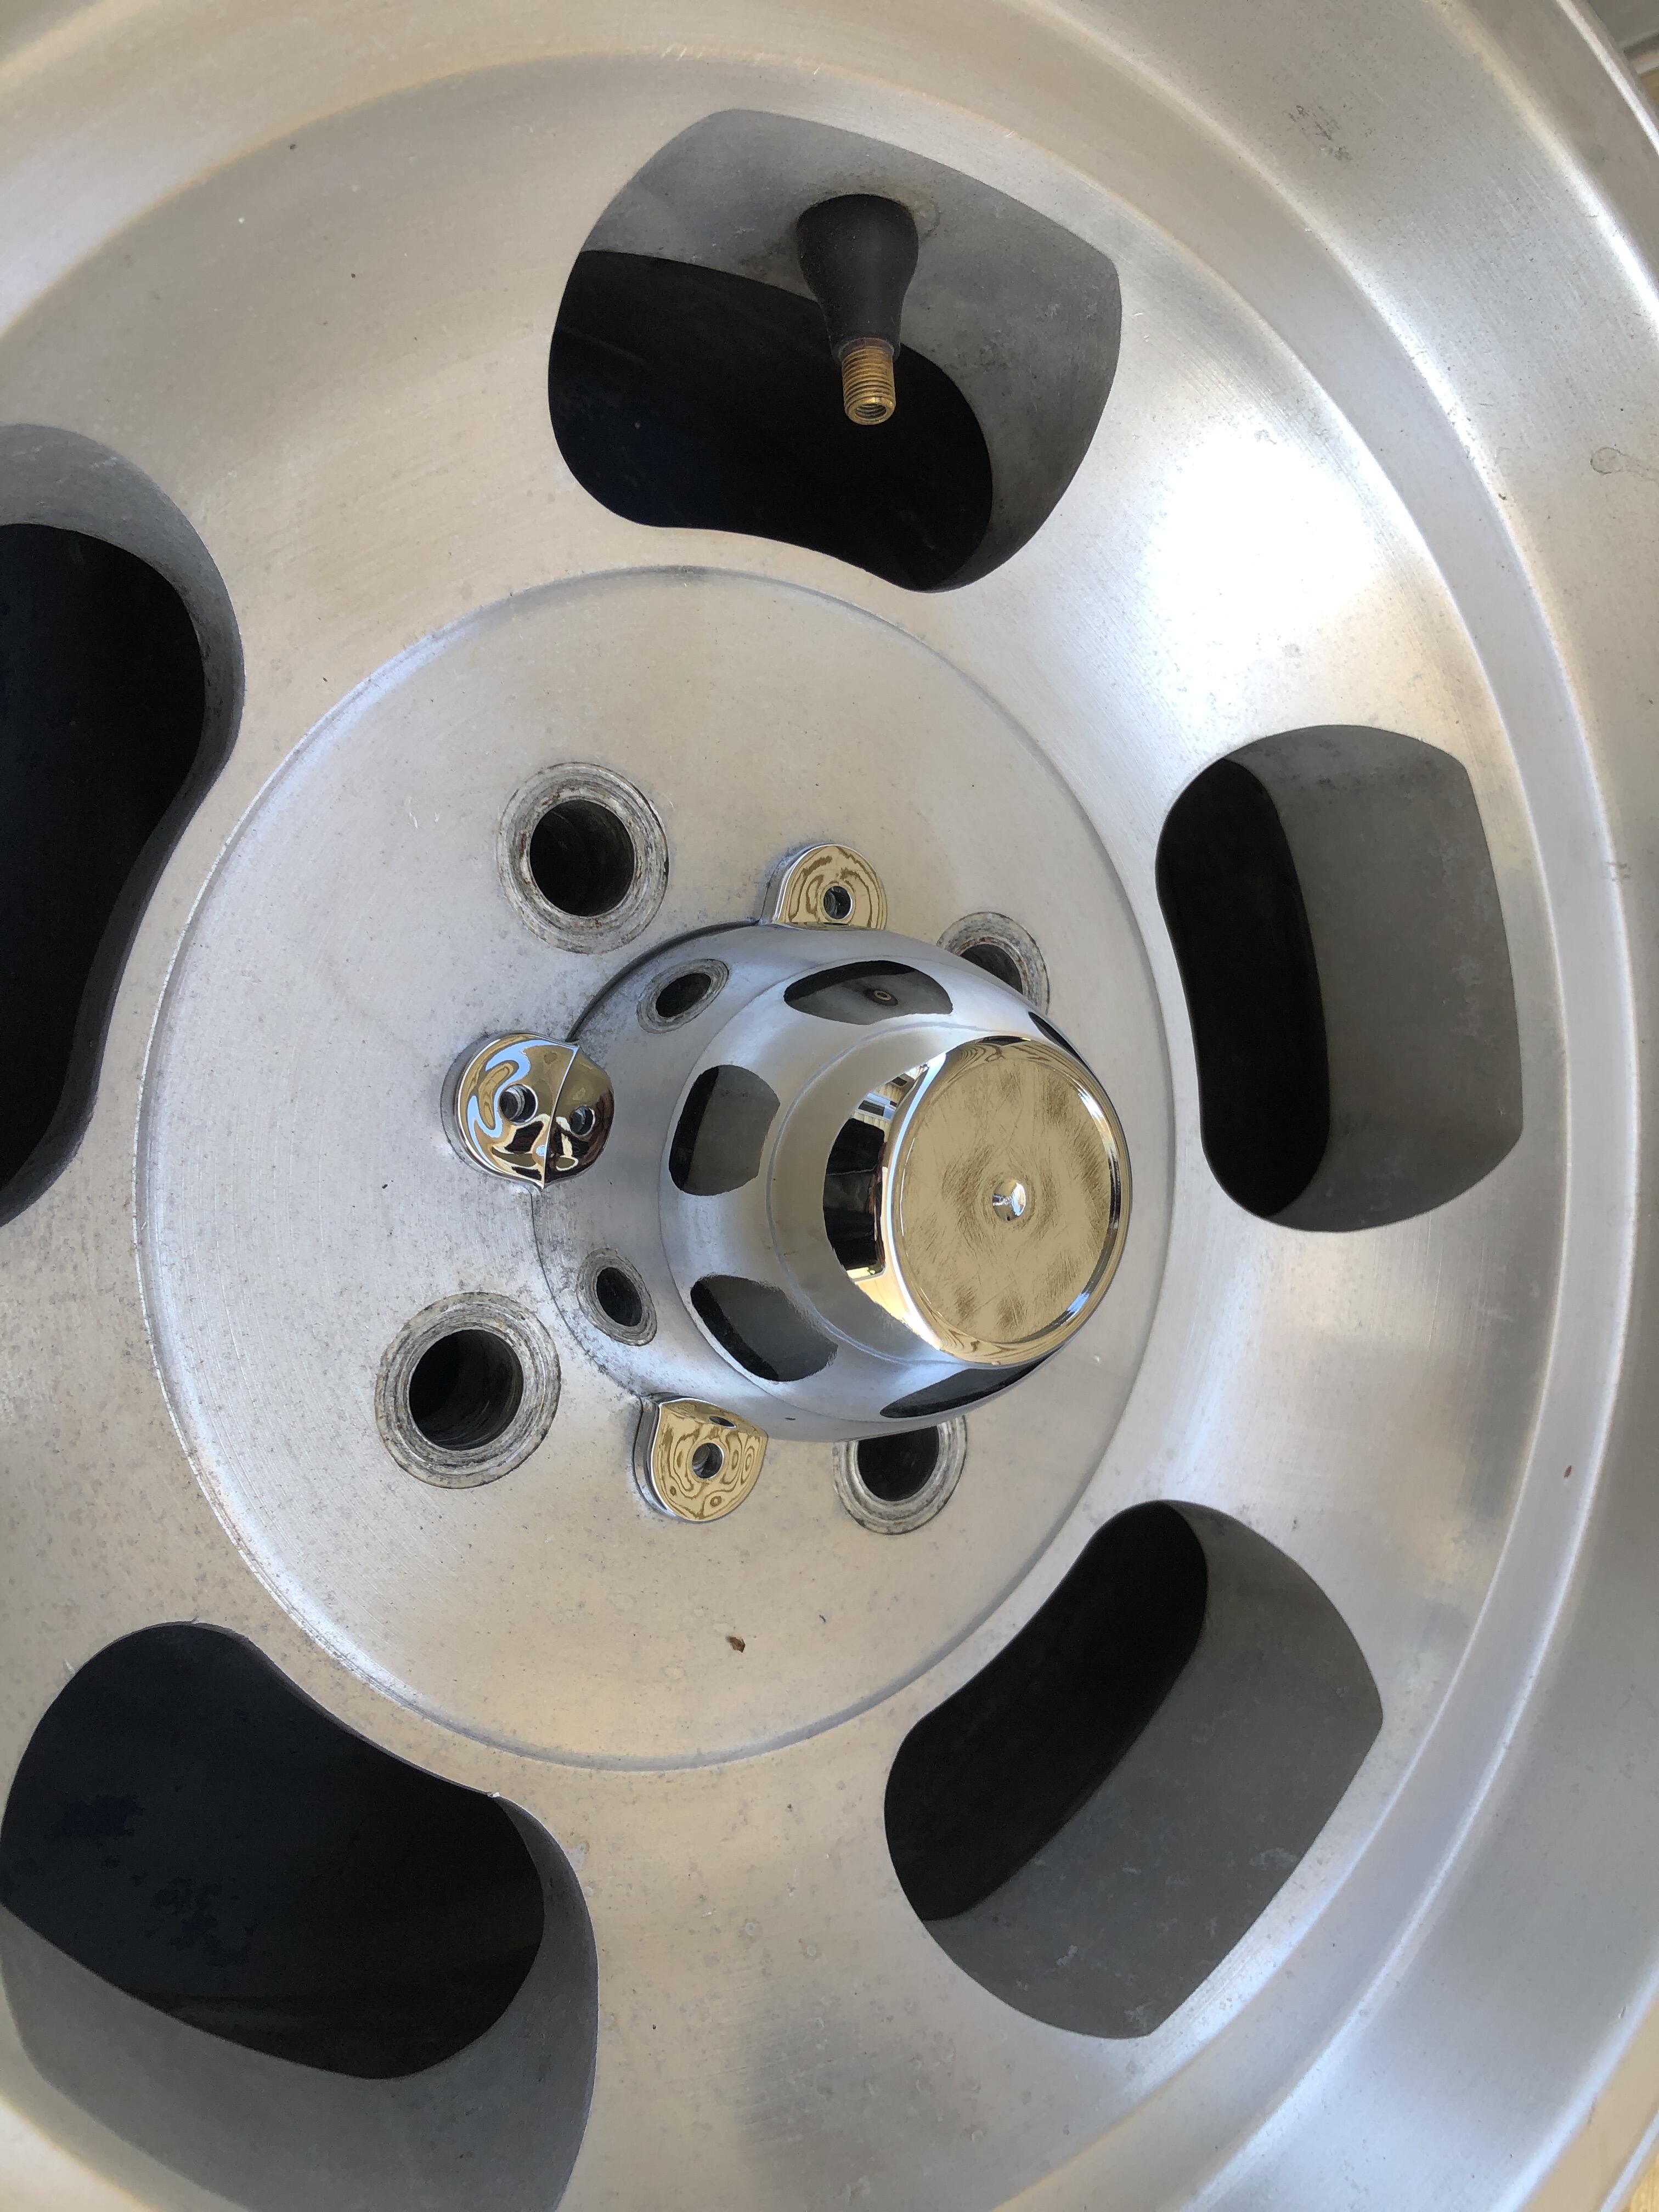
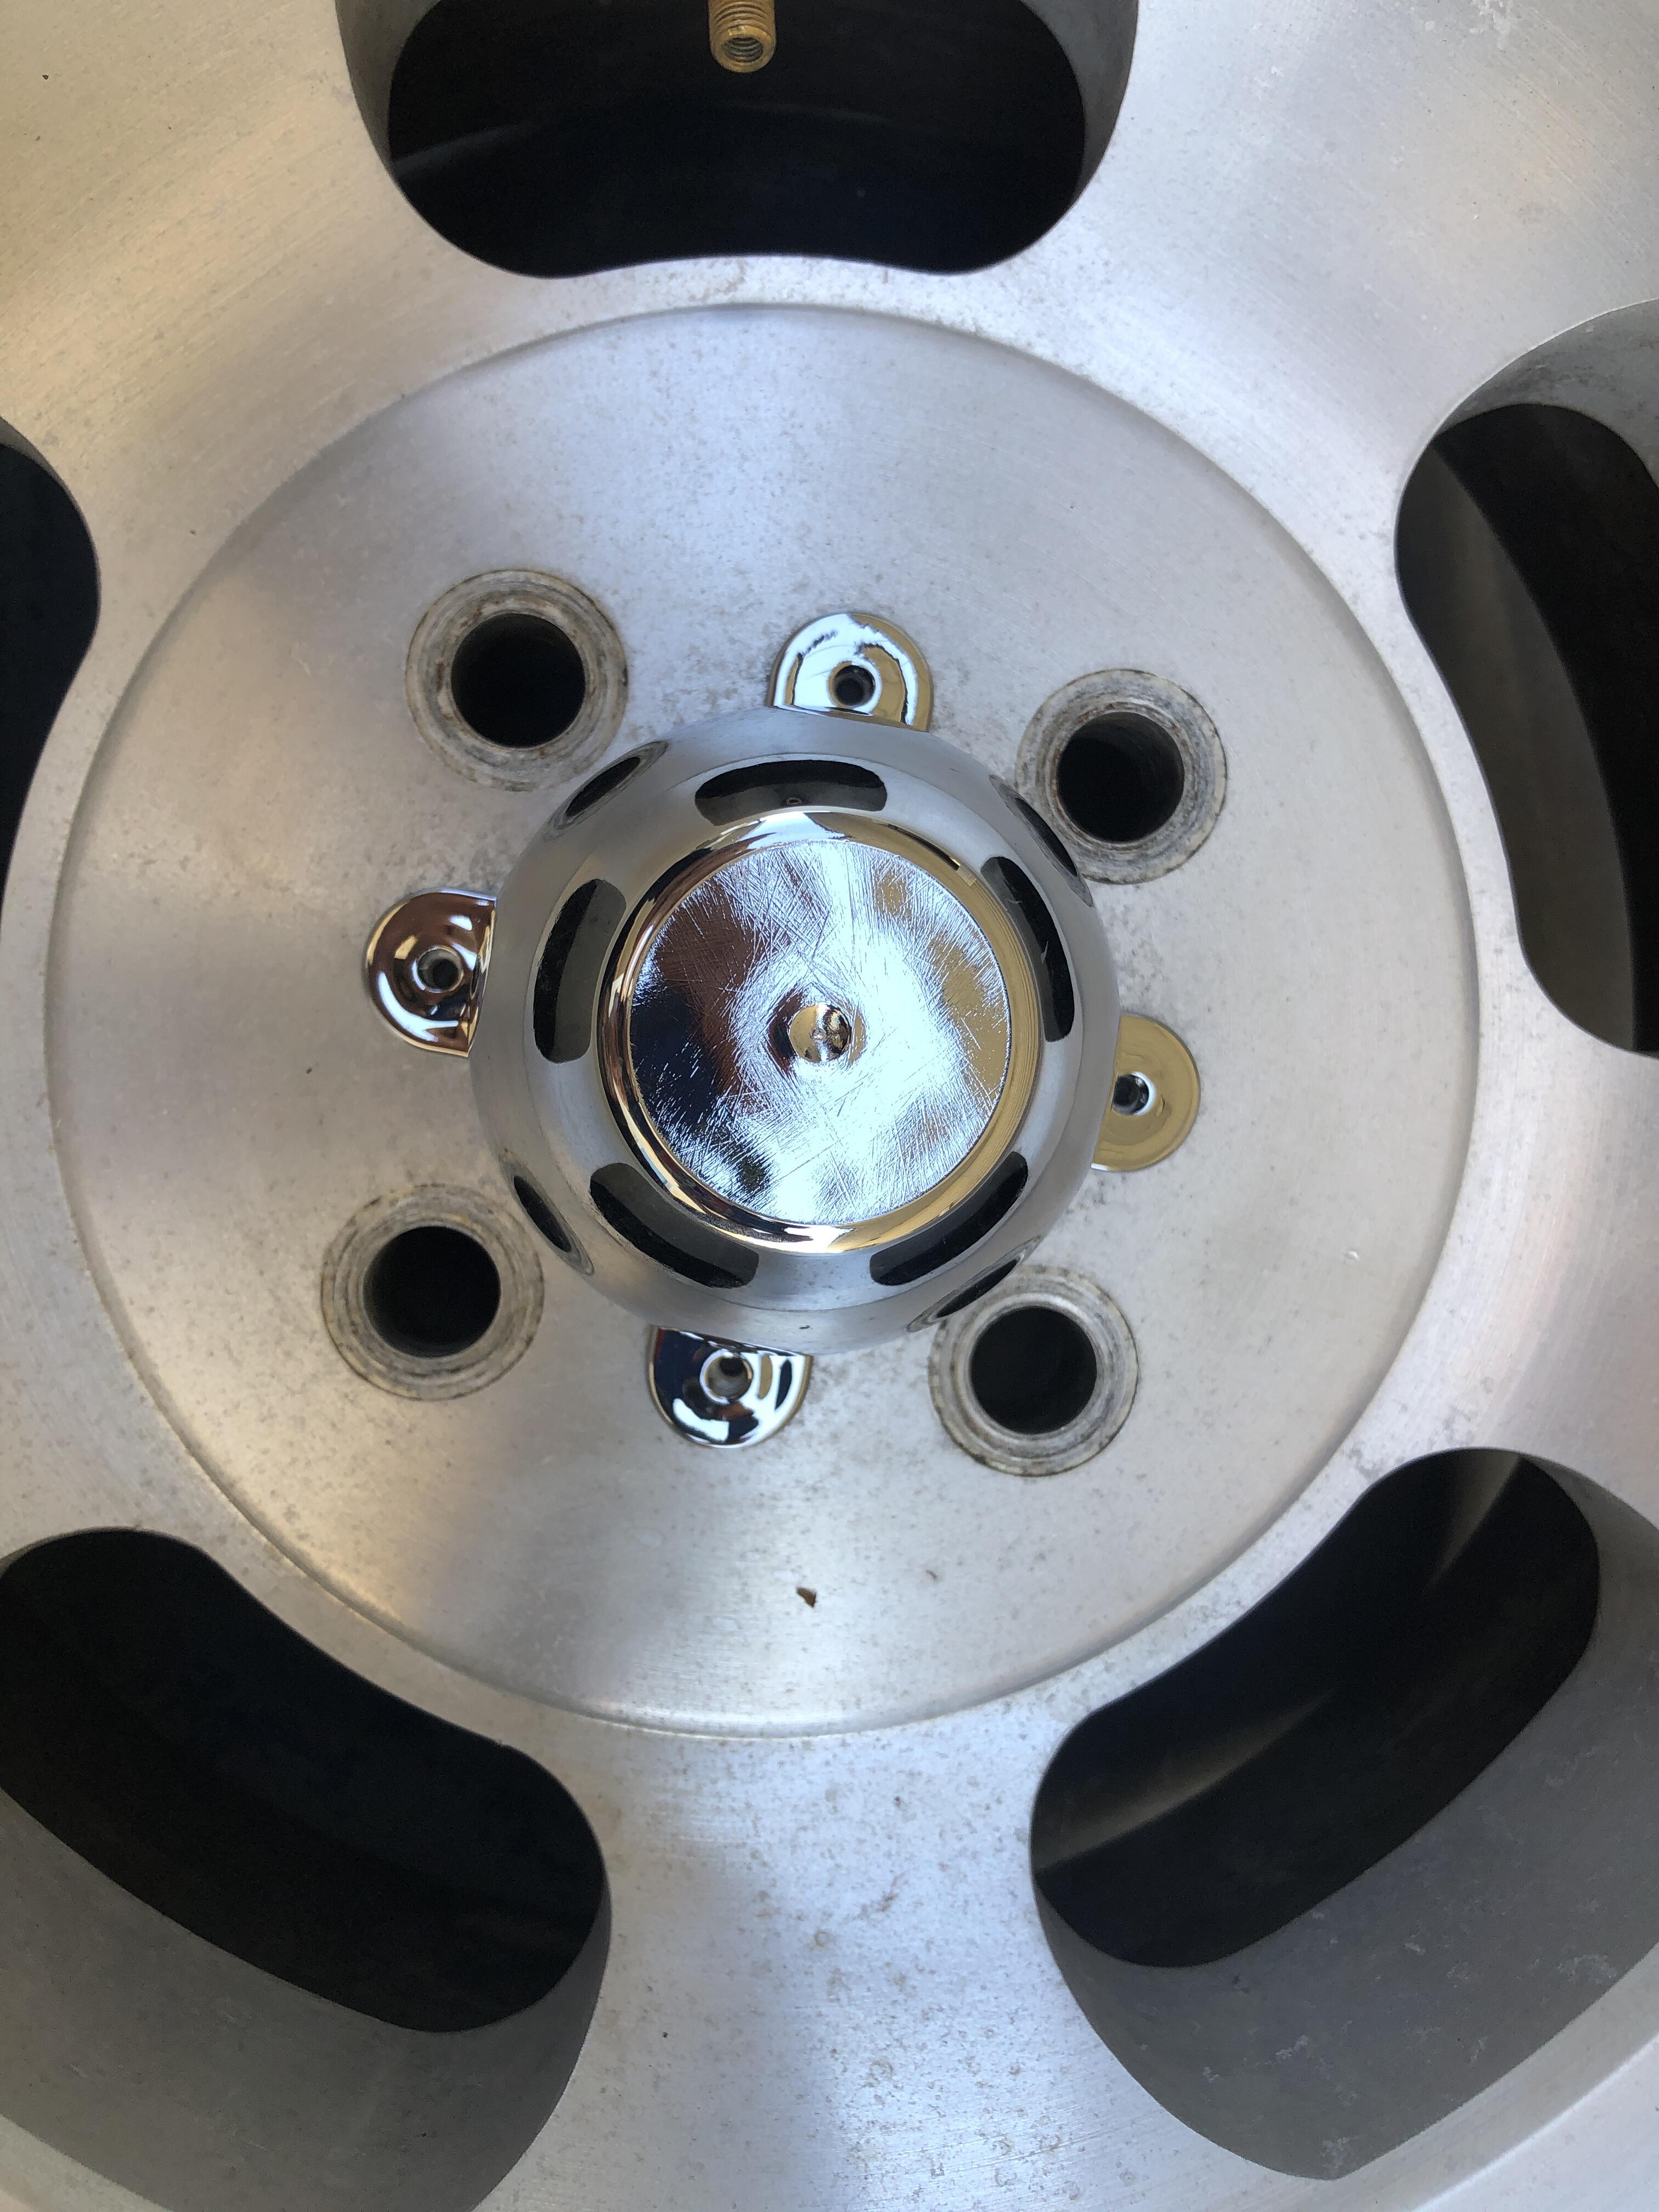
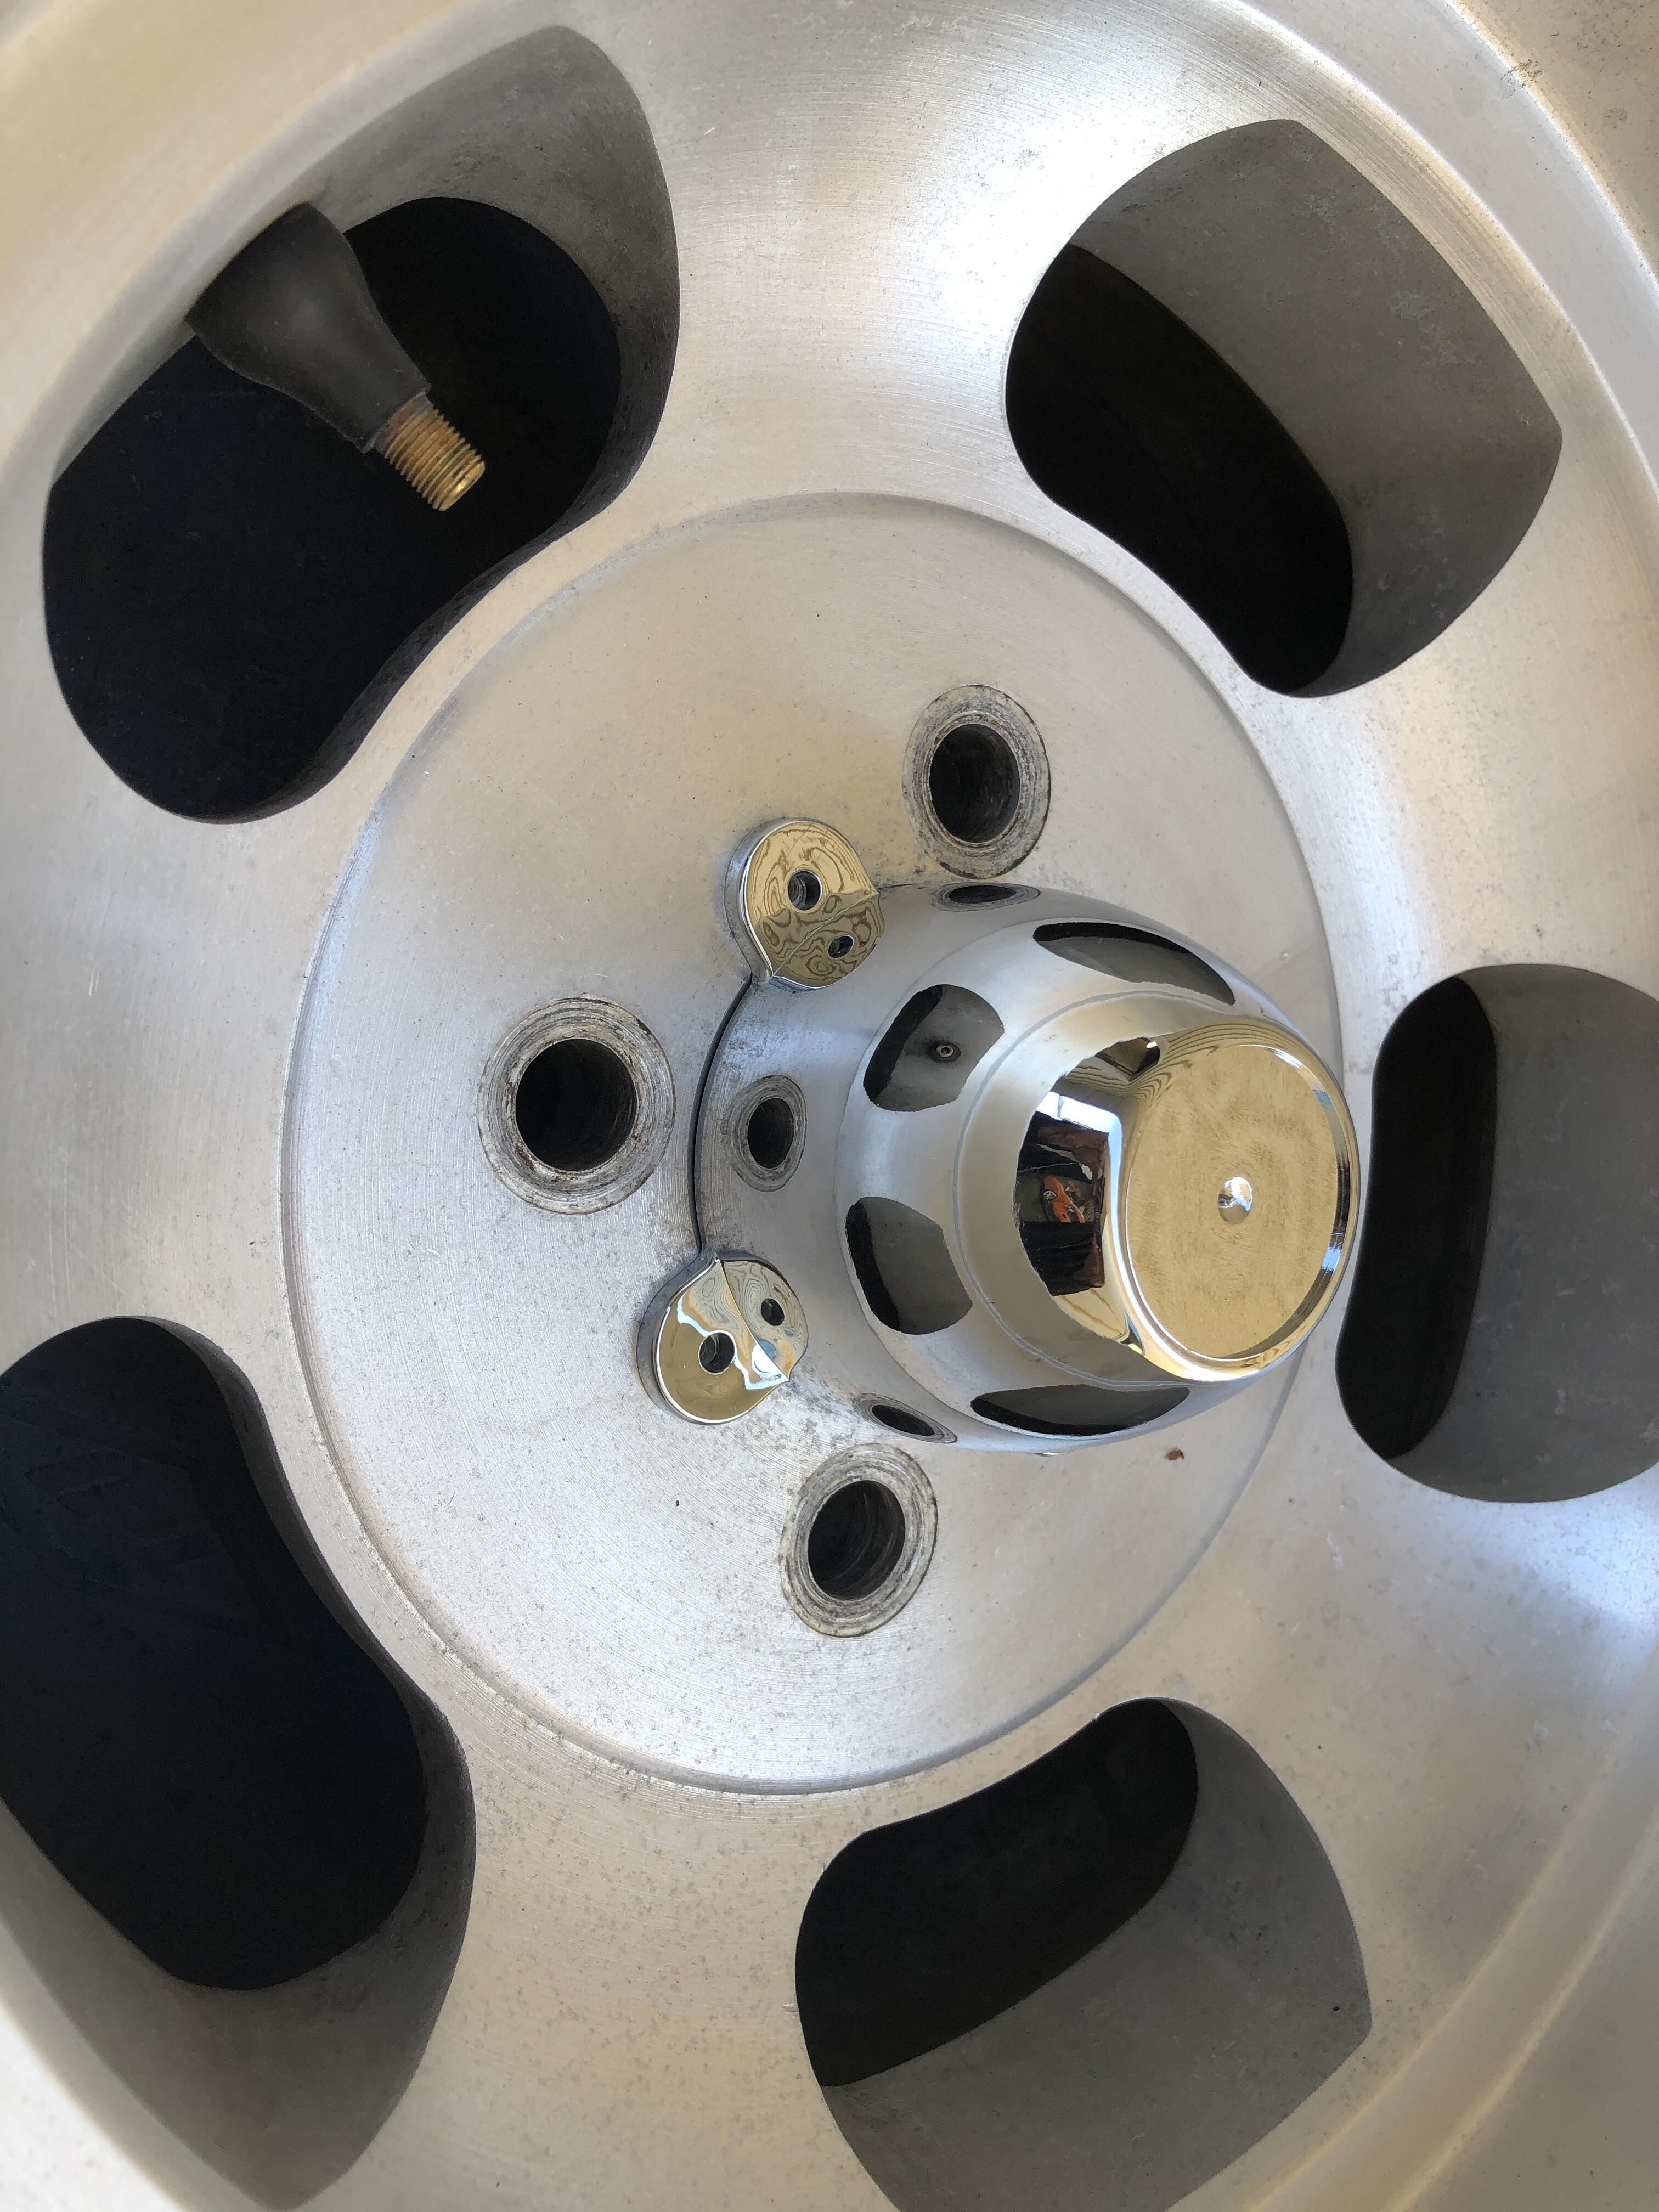
2 pointsTo finish up this topic, the caps suggested above have arrived, and they are a perfect fit. The chrome is perfect, they even come with the four little screws! Now to transplant the old stickers. Or get new ones. Now the decision has to be made about how to protect the amazing bare metal finish on these wheels. Polish, clear powder coat, clear acrylic paint?

 2 points
 -
2 points2 points2 points2 pointsGood stuff! I haven't had a horn since 2017. I've been yelling like a crazy person out the window in lieu of a working horn.
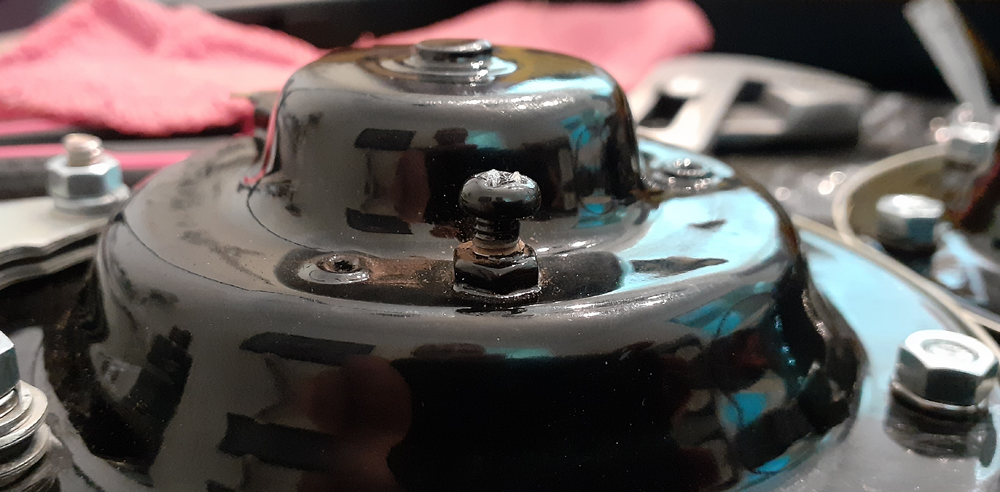
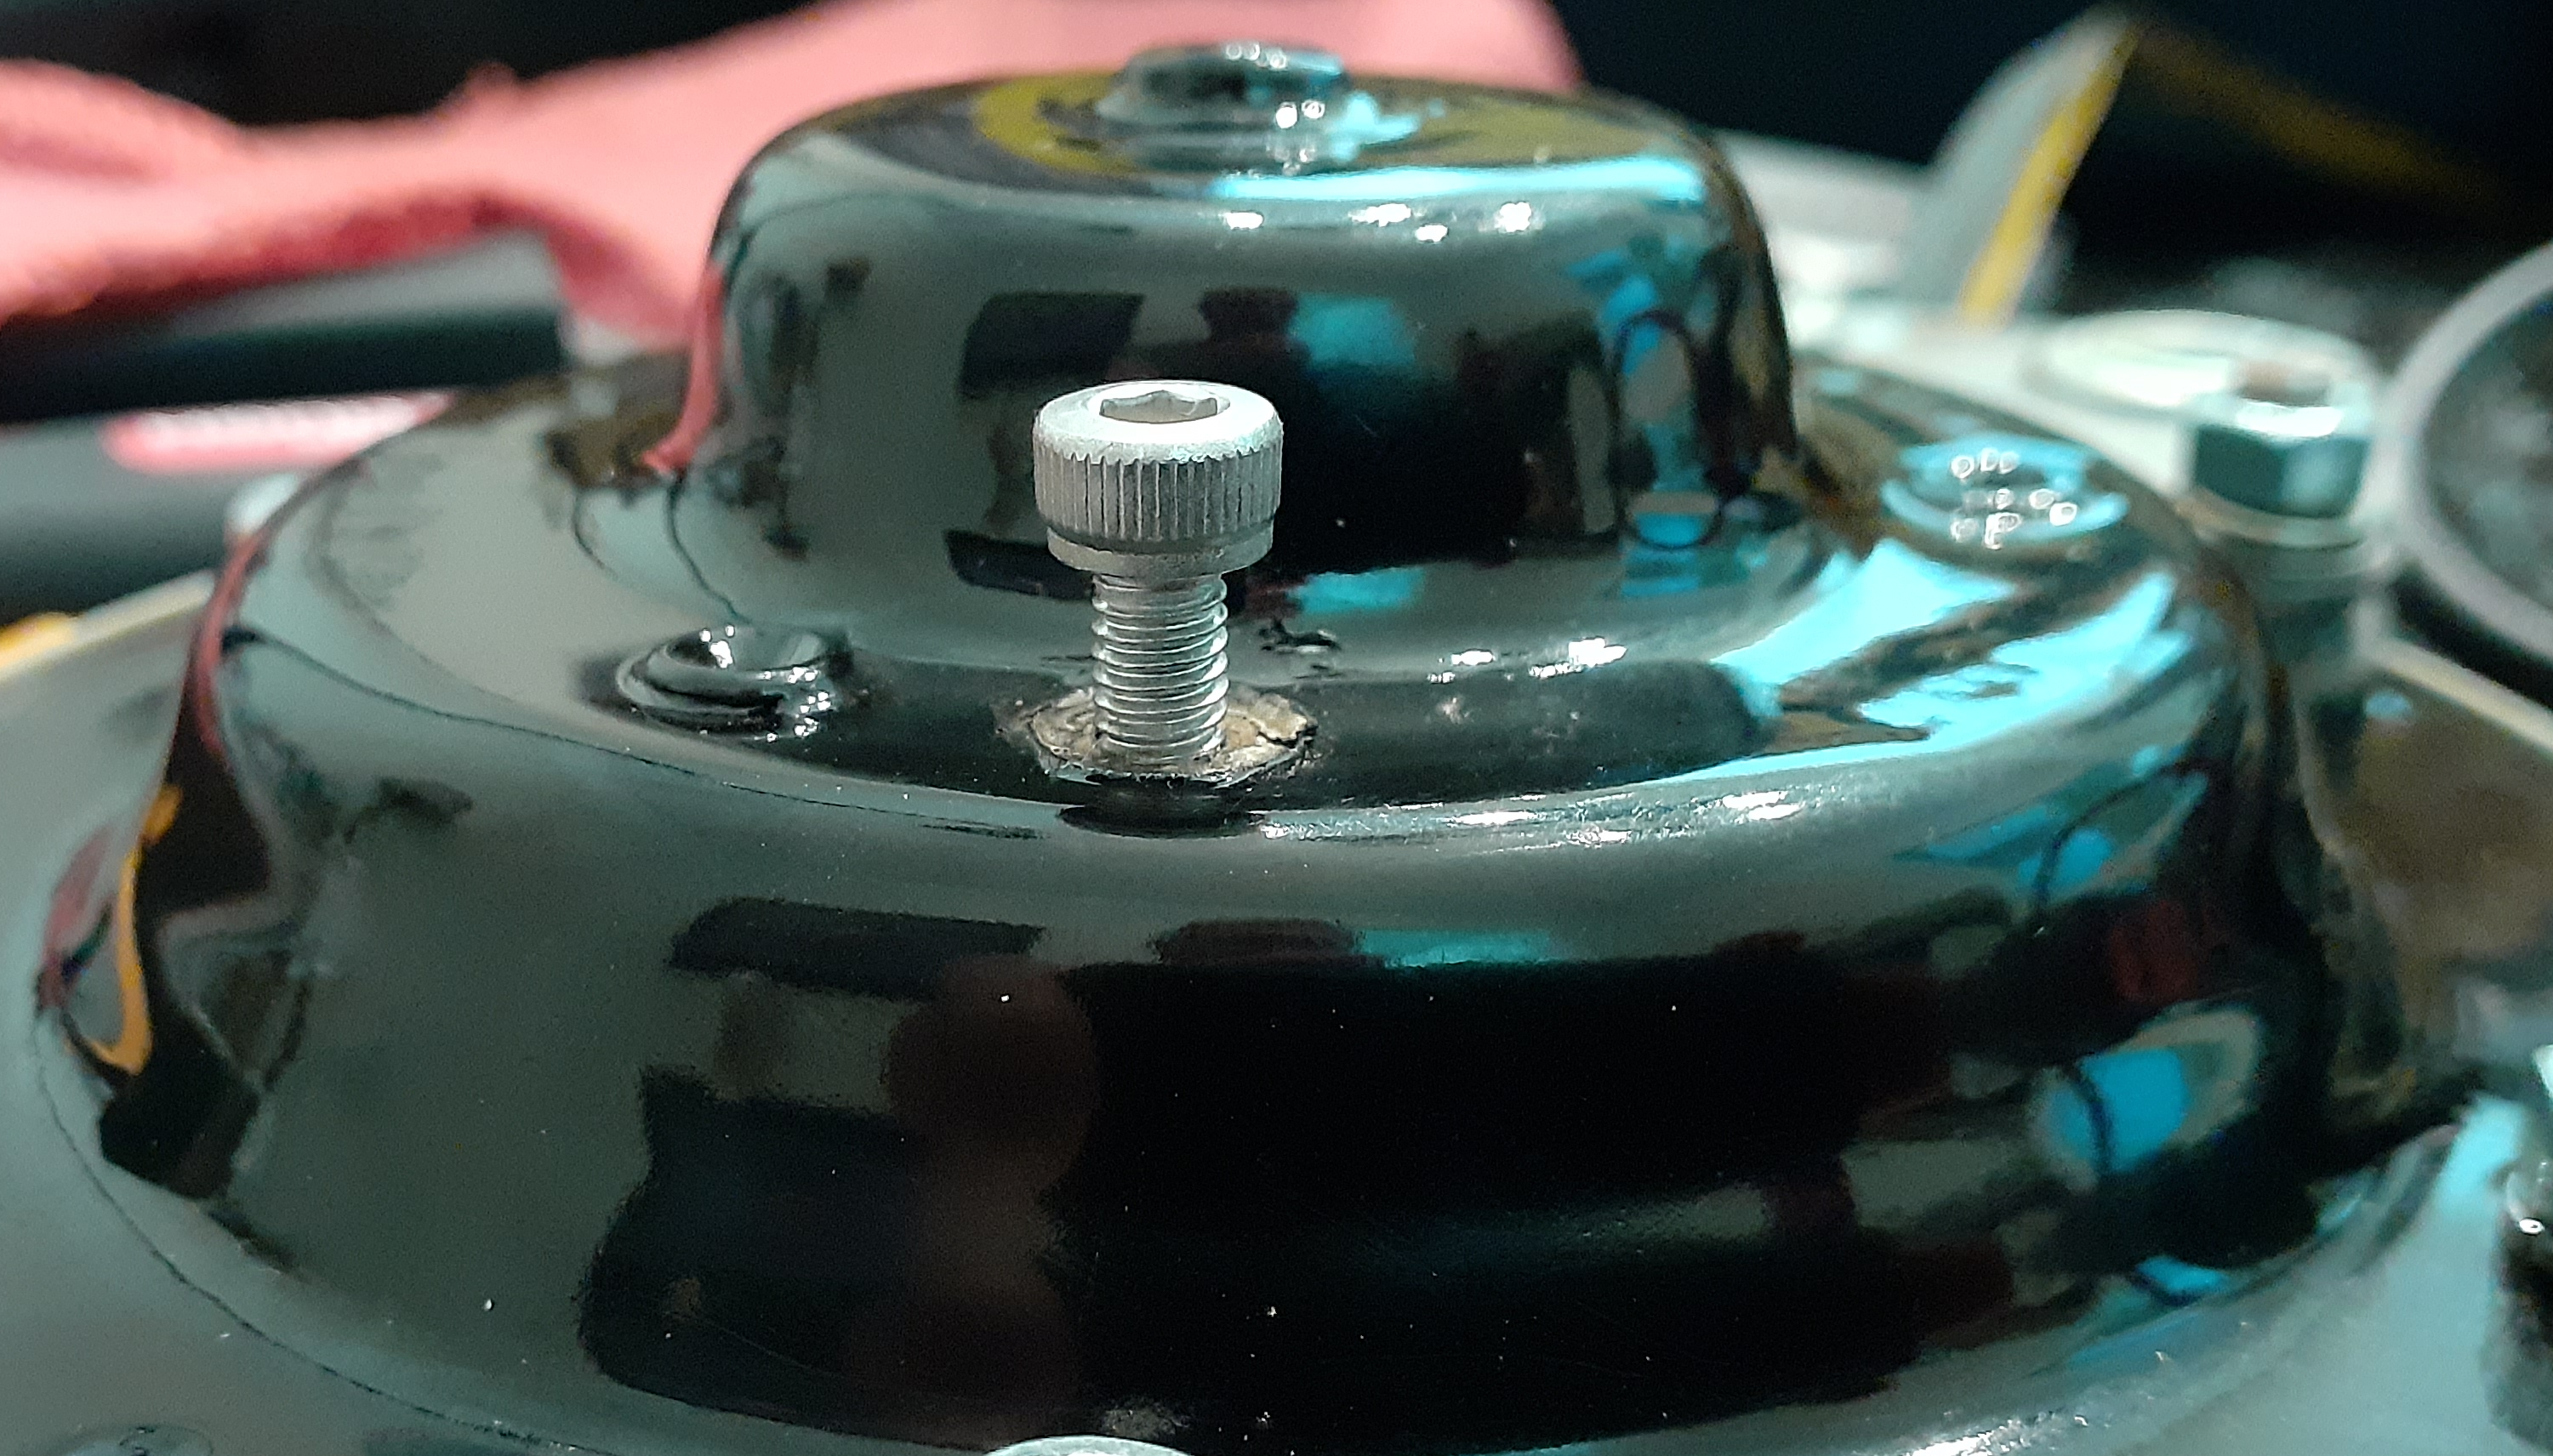
 2 points2 pointsActually I think it was SteveJ that exhibited naked hostility. Zed, You were properly chastised for not knowing enough ways to skin a cat.2 points1 pointI cracked the code on the horns. I was working on getting @Tirnipgreen's re-plated horns working. I tinkered with them some a while back, but I needed some time to focus on them to get the bugs out. Fortunately I had one of my old 260Z horns that was unmolested to use as a template. Before I go into detail, let's talk about the theory of operation. When you press the horn button, the relay sends voltage to the horn. The coil in the horn is energized, pulling the diaphragm in. The bar on the back side of the diaphragm hits a tab on a set of contacts on the negative side of the coil, de-energizing the coil. The diaphragm snaps back into place, allowing the contacts to close. Repeat steps 2 through 4 as long at the horn button is depressed. The vibration of the diaphragm is what makes the sound. So what appear to be the potential failure points? The tab for the positive wire on the outside of the horn loses electrical contact with the coil inside the horn. The contacts get carboned up. The bar on the diaphragm is not aligned properly. The tone screw is not adjusted properly. I don't have a documented fix for #1. You see it by measuring resistance between the outside tab and the inside of the horn where the coil wire is mounted. Ideally, you should have continuity. For #2, test by measuring resistance from the positive side of the coil to the body of the horn. It should be less than 2 ohms. To lower resistance, I cut a 3/4 inch wide strip of 1000 grit sandpaper and folded it in half. I worked it between the contacts and pulled it through a couple of times, using the tab on the contacts to moderate the pressure. I measured resistance from the positive to body of the horn until it dropped to less than 2 ohms. For #3, I took a straight edge and held it against the side of the bar. There are two alignment holes on the diaphragm, and I noted the distance between the straight edge and the hole. It's between 1 and 2 mm. If the bar on the horn you're working on doesn't line up that close, loosen the M6 nut and rotate the bar. Hold it in place carefully while locking now the nut. After adjusting the internals, put the horn back together. Measure resistance from the positive tab to the mounting bracket of the horn. If it's more than 20 Ohms, the tone screw is turned in too much. The tone screw is an M4 screw on the back of the horn. The screw in the photo below was powder coated onto the horn, and I had to break it loose. I got the resistance from being over 1 MOhm to around 2 ohms. After that I used a car battery to test the horn and get a better tone. I had to work the screw in and out a few times until I was happy with the results. 20230910_153848.mp4 The other horn was a little more challenging. When I tried to break the screw loose, the screwdriver chewed up the head. I had to replace it with the only screws I had available, allen head screws. After playing around with the height of the screw, I finally got a decent volume out of it. 20230910_160521.mp4
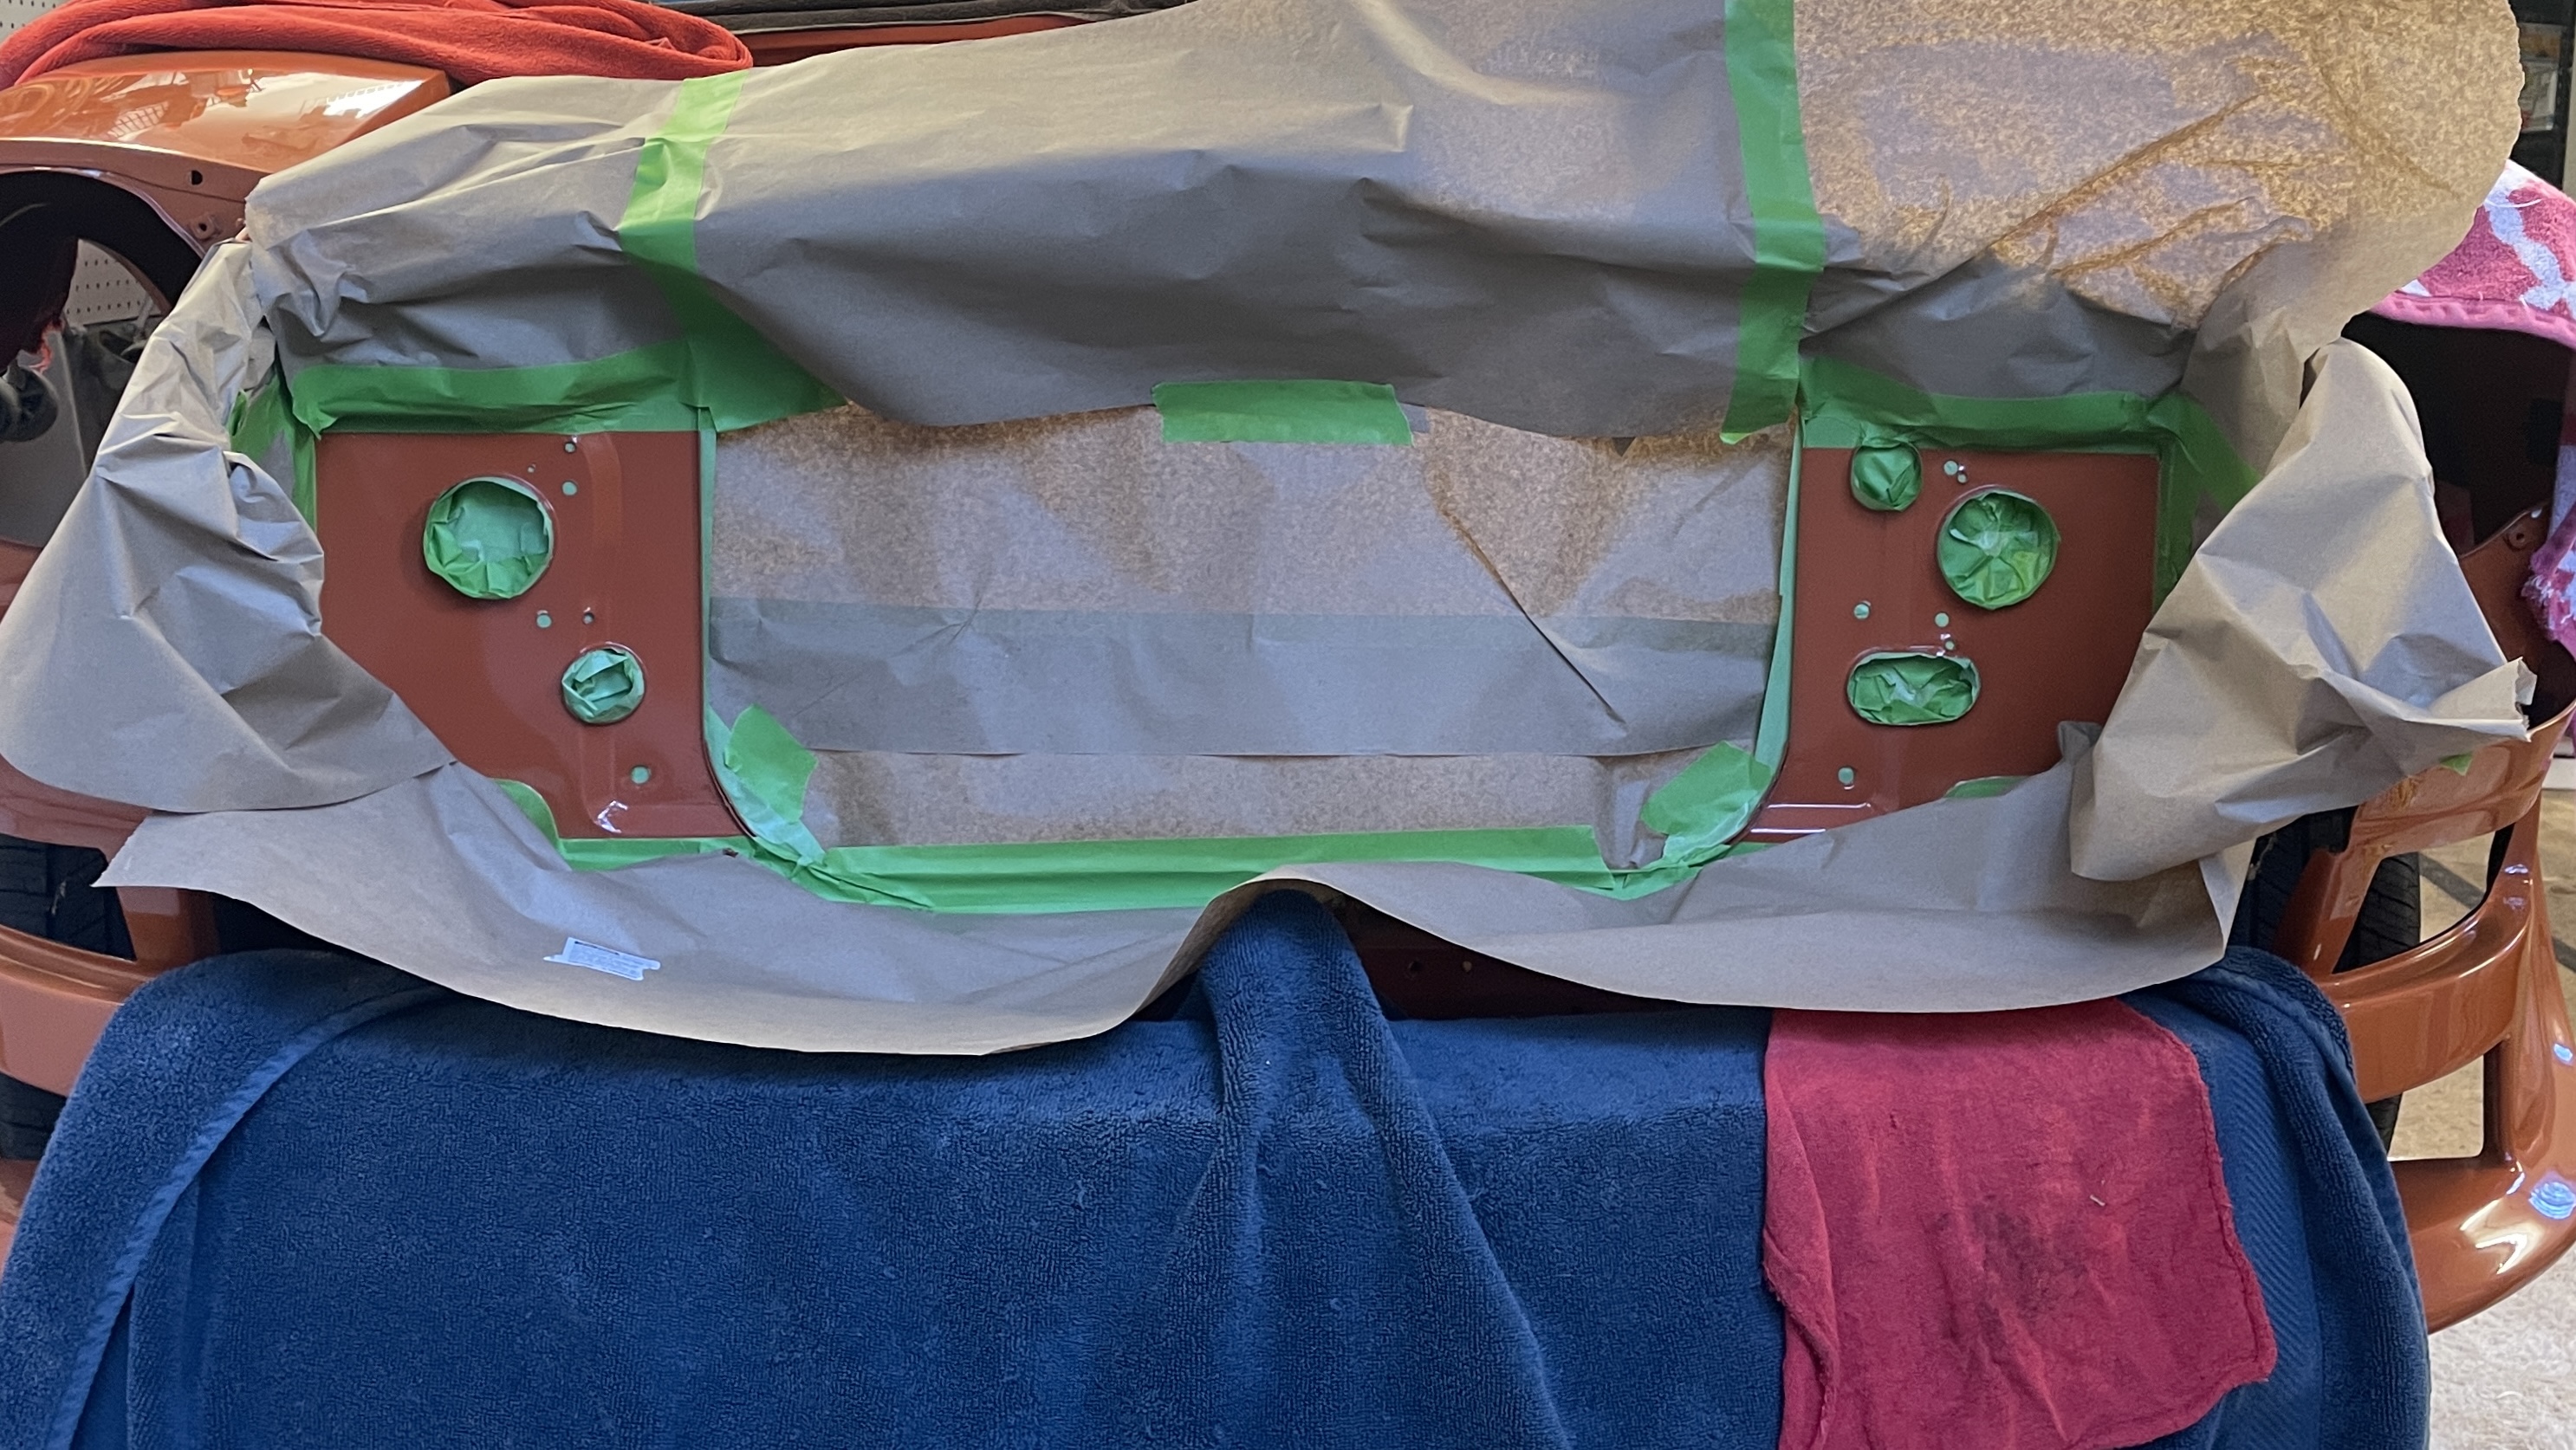
 1 point1 pointI measured the hole that the spring slides into and thats 3mm so I'm probably going to try and find one that size, under the assumption that the ball gets recessed in it a bit1 point1 pointYes. Good if you have parts to sell, bad if you want them. I slightly blame MZR and other customizers. There are only so many of the NLA parts that aren’t being reproduced, and I will bet they hoarded stocked up on them.1 point1 pointAll of mine have come from rotted out / damaged lights that I parted out. I have a small supply of the shorter ones.1 point1 pointI blacked out the radiator bulkhead and grill tabs (thanks @Patcon for the thread showing how that’s done). Now I just need a 280z harness boot and I can put the engine harness in.

 1 pointEverything is discussed in that first link I posted in #3. The turn signal contacts get gummed up too. Pictures of the switch internals would be much much better than dirty q-tips. What's up with that? I sure hope I don't start getting those e *a^ %r$ w#a&x ads again.1 point1 pointThanks for all the good suggestions. I don't have much experience with body work. I've paid the price to others over my many years. I agree with comments about the rusted area probably being larger that I can see now. I've used POR 15 products for years and I know it's good stuff. Too bad I don't weld so I plan on using the short hair fiber route. Hopefully the so called "matching" aero paint I ordered will make it all look good.1 point1 pointMaybe like the boobs one there’s another X-rated thread to be had here? “Original Naked Hostility Thread”!! Mr Sitester can start the ball rolling - if it offends, then don’t open the thread! :p On topic - I’m with Mr Jfa - when I took my switch apart in the kitchen, it shot lots of small things across the room and I spent an hour on a search and rescue mission!! I never got it back together in a working state again as the tabs i bent back broke off the second time I tried to reassemble it. You have one shot at this from what I experienced. Have you measured the resistance when you turn it on? Check and let us know. You may find that it’s high enough to heat it when 10A+ is going through it with the lights connected “naked” to it. But when attired with a relay drawing 0.1-0.2A it would be like the Fonz - cool and happy! (Showing my age, I know). Why not test it with a relay and potentially save yourself the hassle of having to open it up? I don’t like electrical contact resistance ANYWHERE, but IMHO at 200mA, you’re highly unlikely to see a problem there again.1 pointMight be why he decided to switch to a GM HEI. Looks like his was wired backward somewhere along its journeys. The FSM's all show Green on the outside. Here's EuroDat's - Here's 75 and 77 -
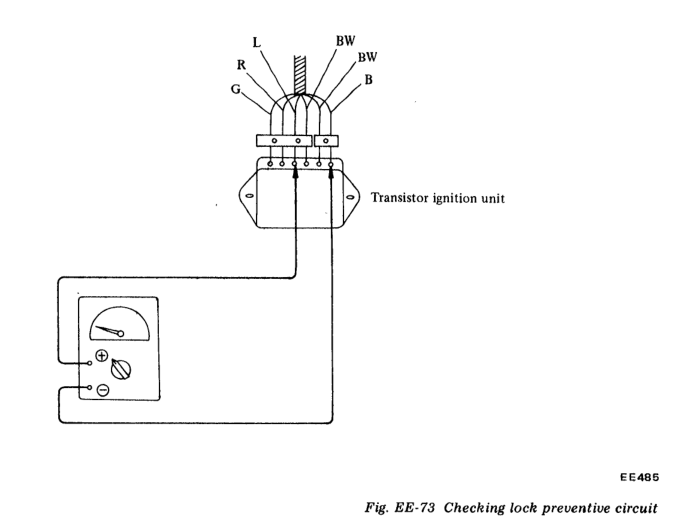
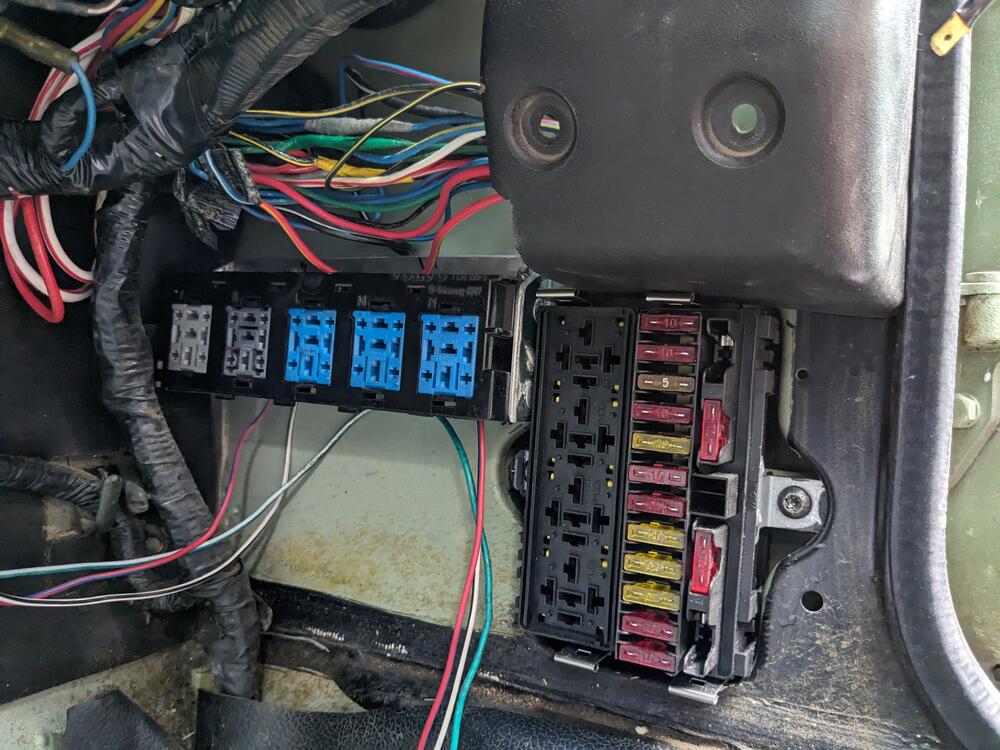
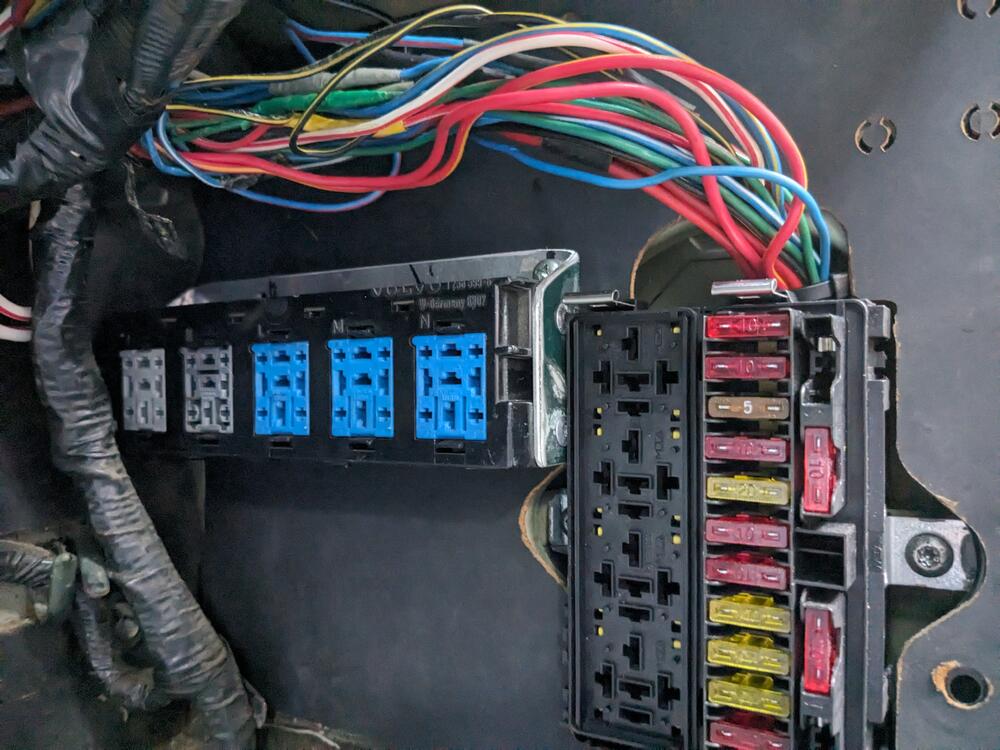
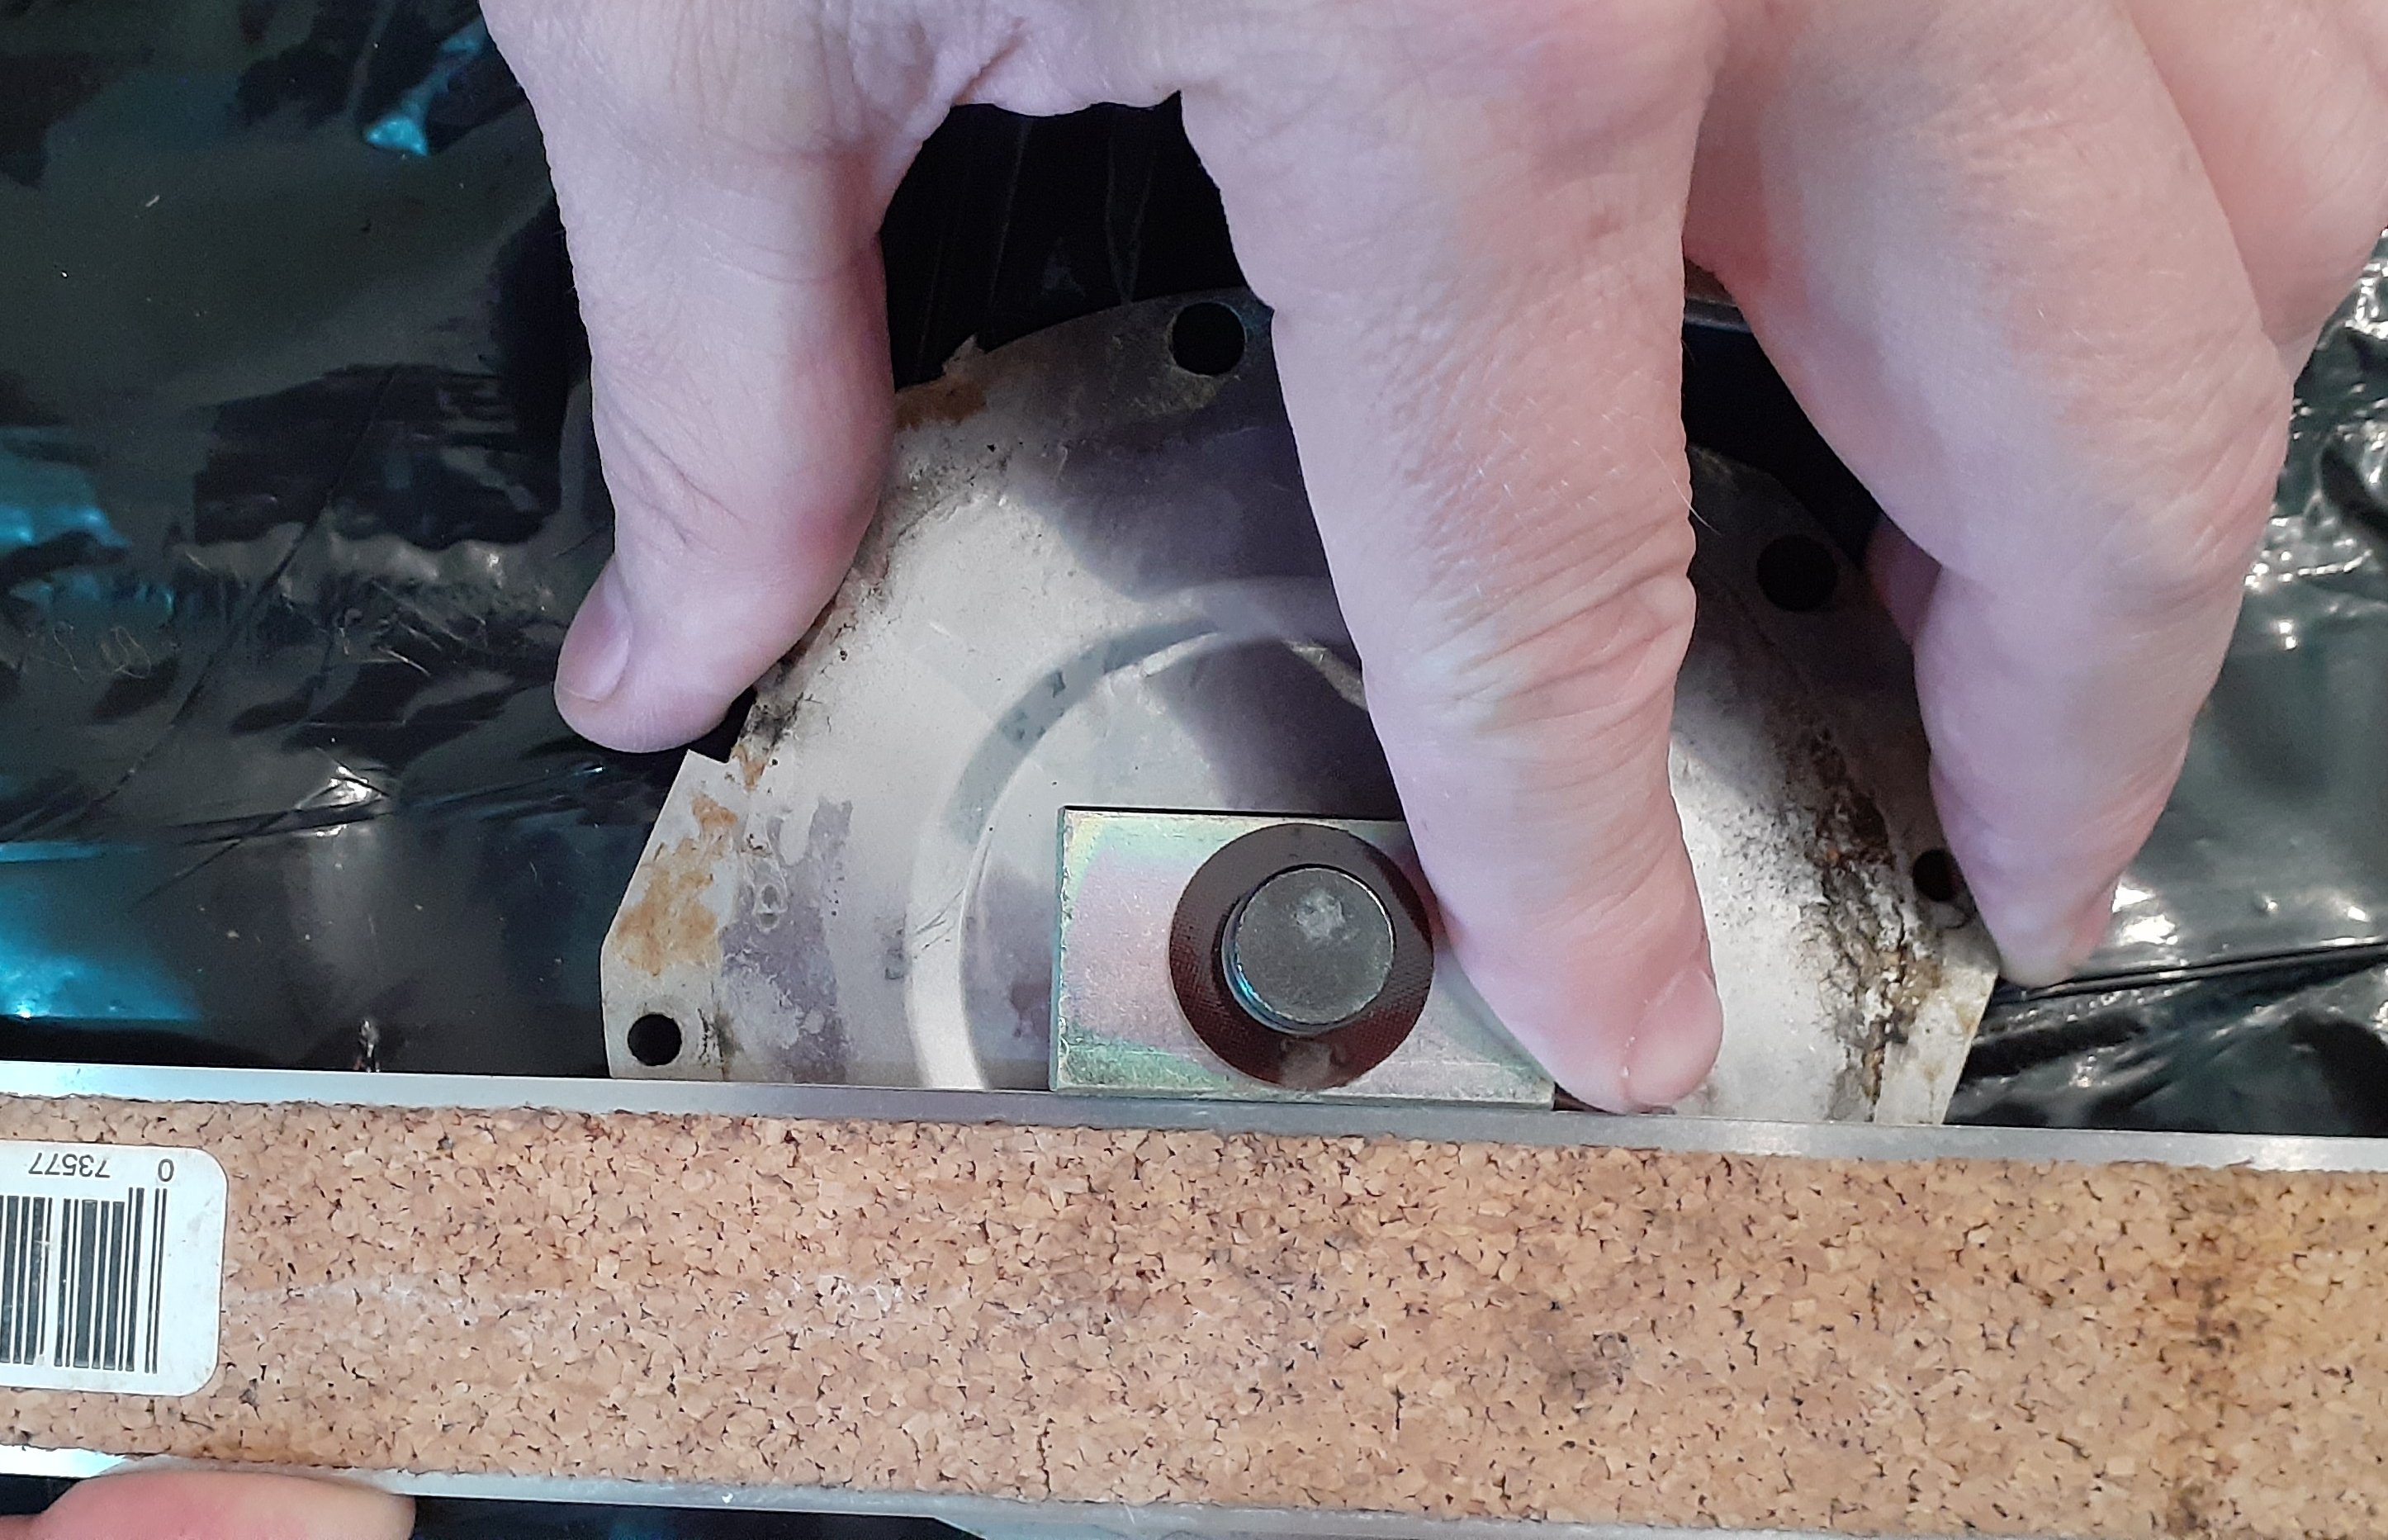
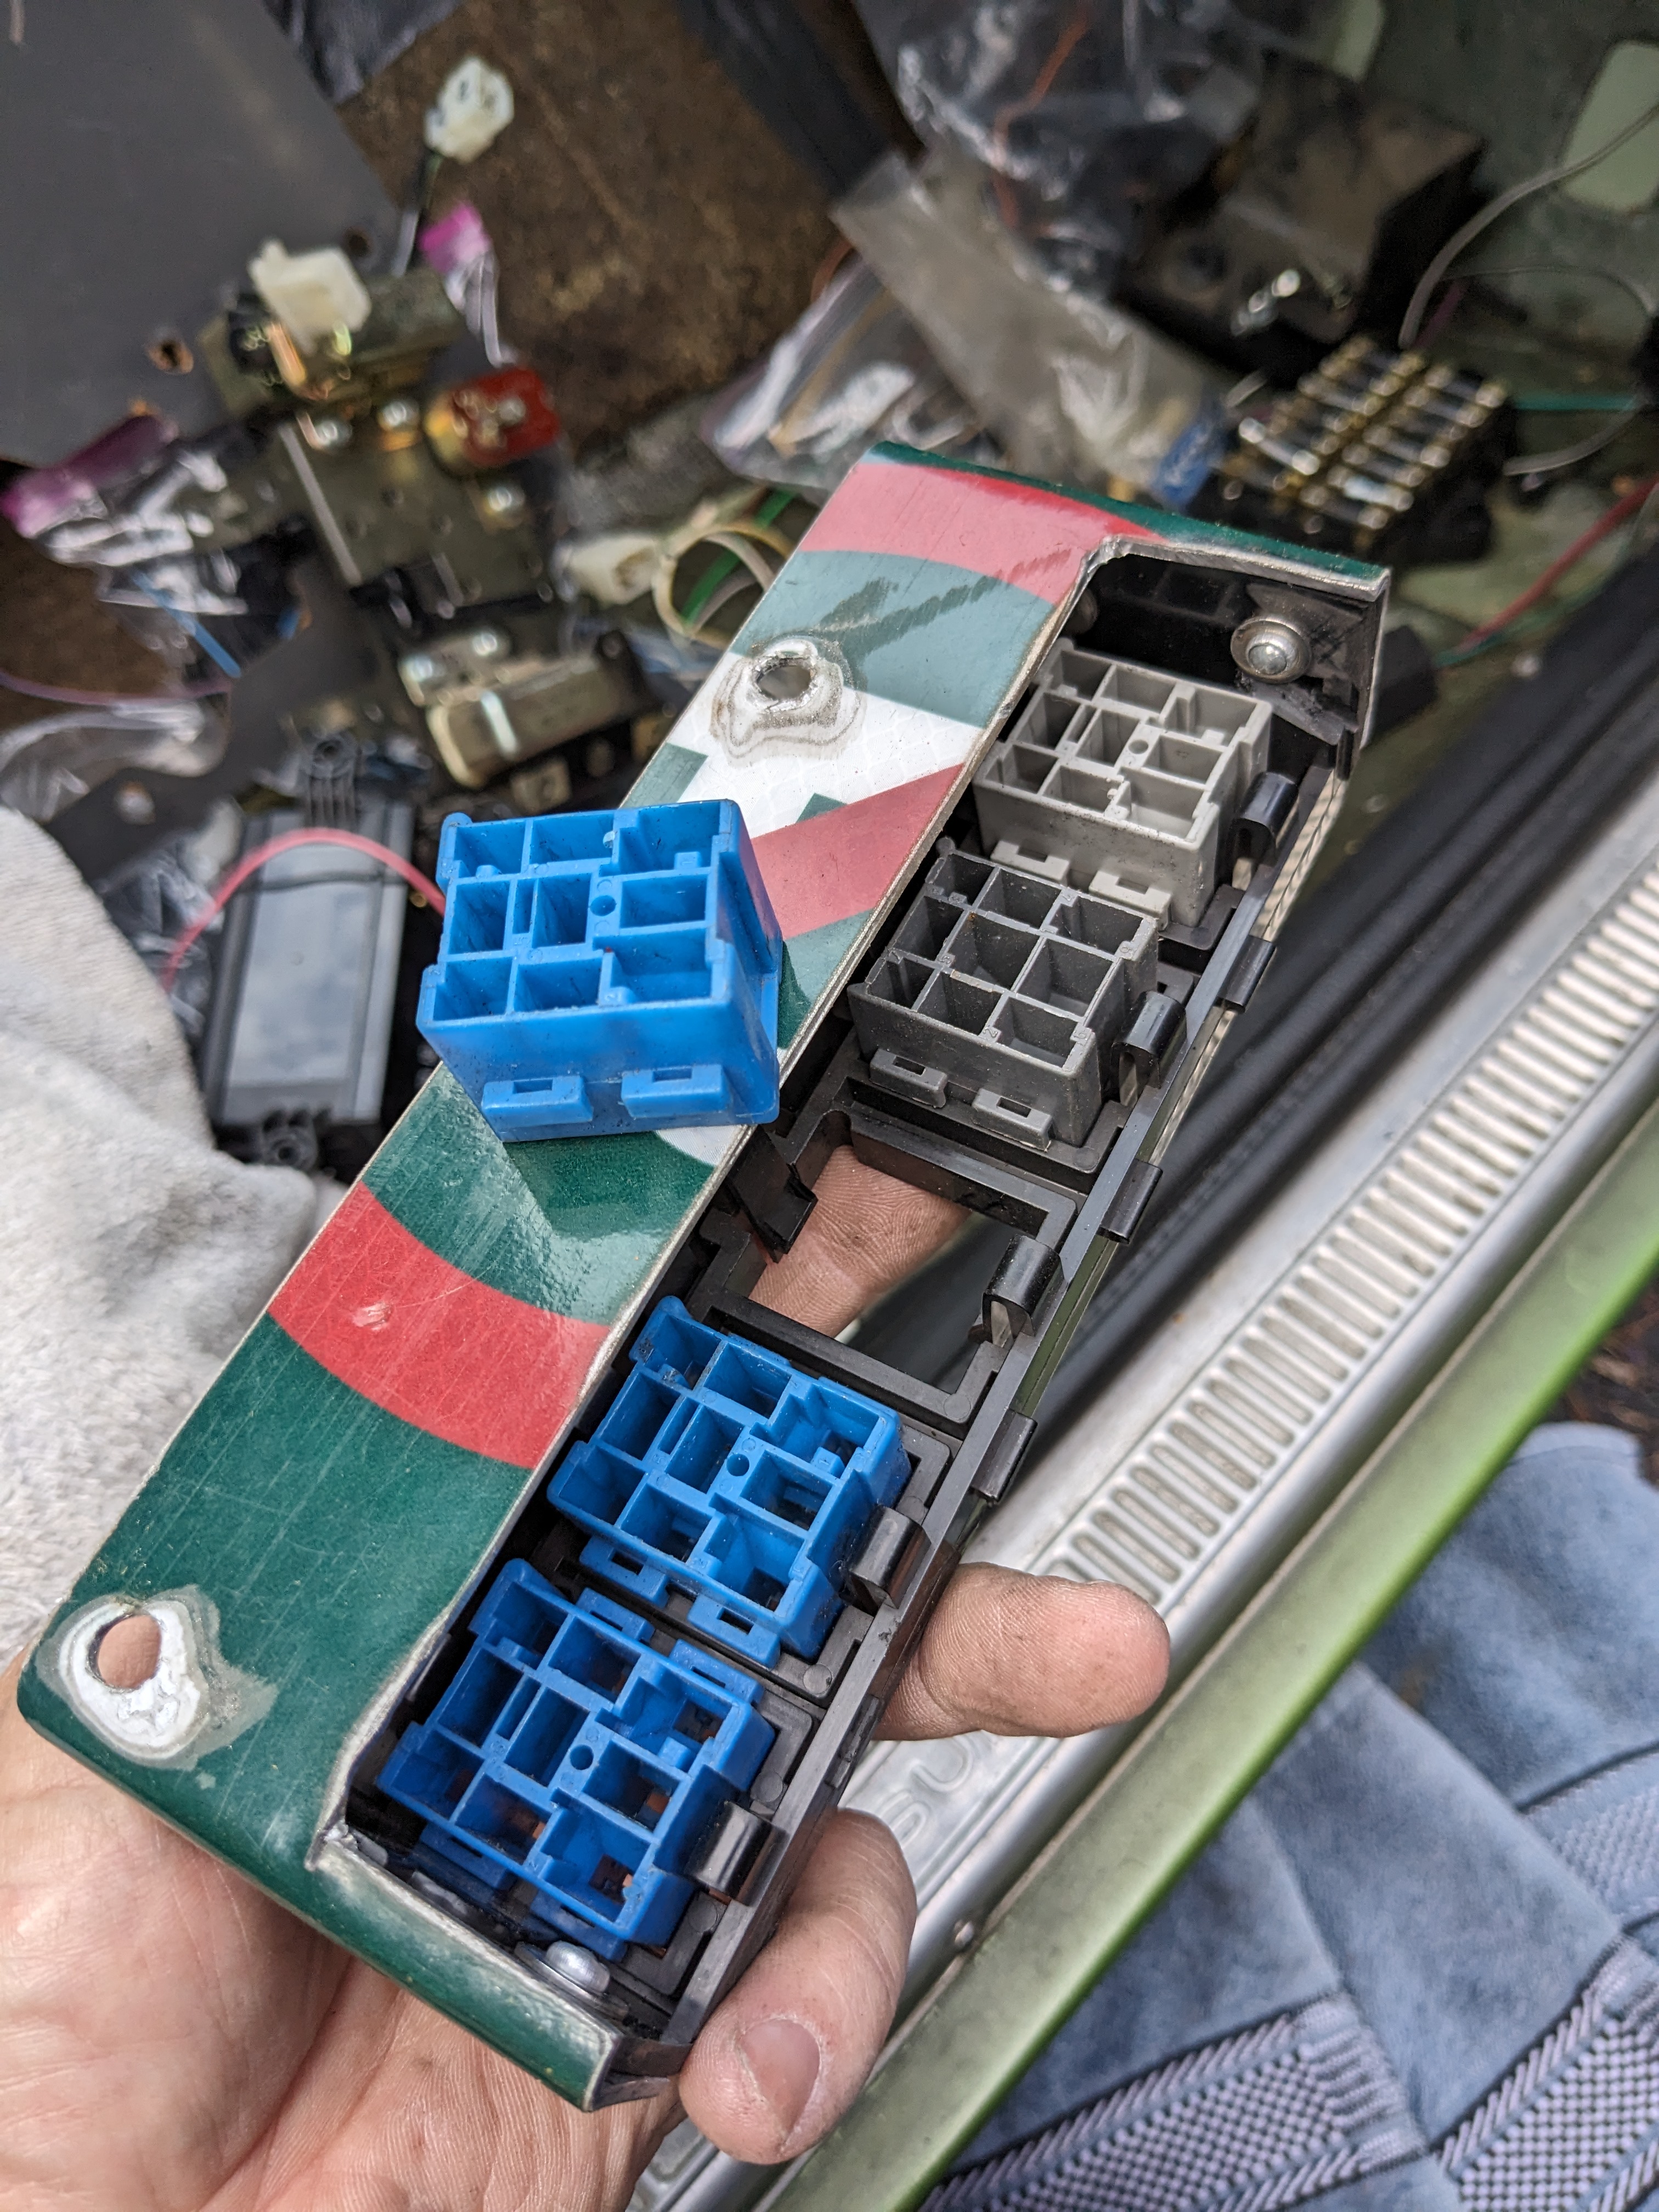
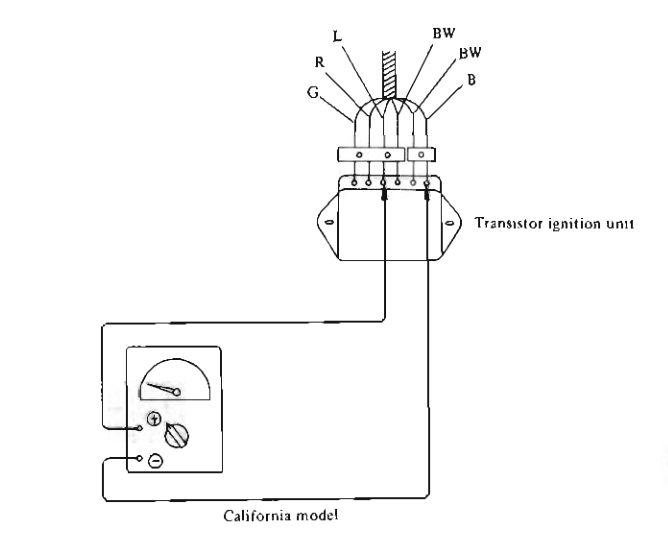 1 point1 pointGlad you got the busted off remnants of the old sender unit out of the block. As for cleaning out the threads... The correct tapered tap would work fine. Two things I would keep in mind though: 1) Any metal you take off runs the risk of ending up in your oil galley. Take appropriate precautions. 2) Since this is a taper thread, any metal you take off will end up in the male stub threading in further before sealing. Don't go any deeper than you really need to. Clean it out... Don't make it bigger.1 pointFigured out how I will address the relay installation issue. I made a bracket to support a row of relay sockets cut from an '80's Volvo 700 series fuse/relay box backside - have to be able to remove the relay socket inserts as needed mounts using factory location of the ignition transistor module factory trim panel works fine
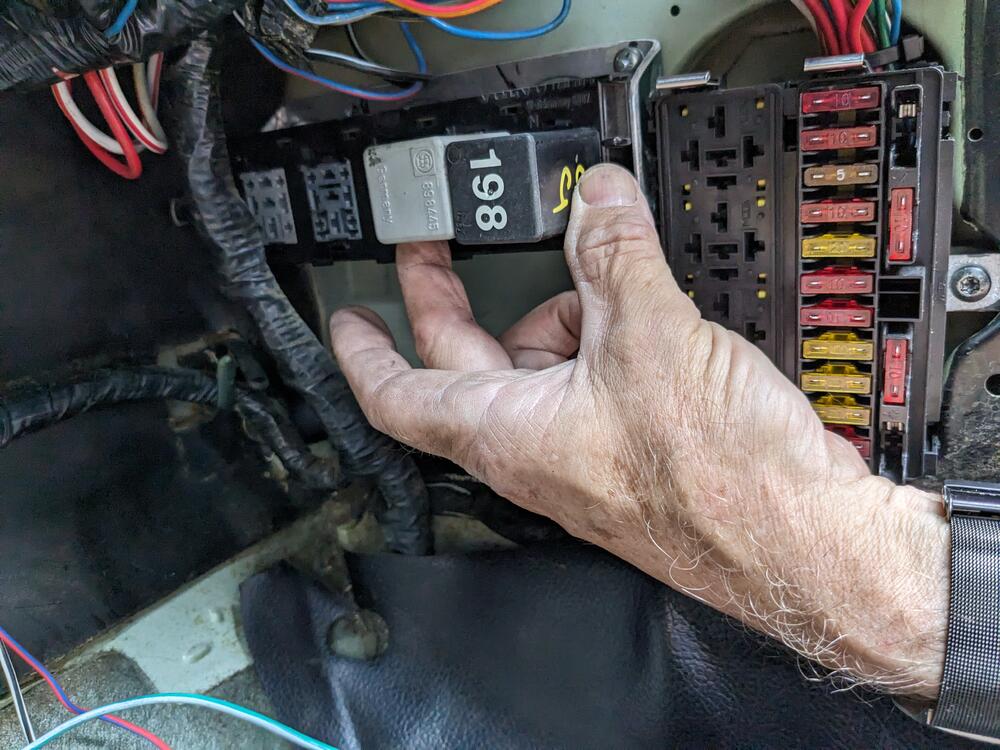

 1 point1 pointNLA at Nissan. Not for the headlight, a thin gasket where the sugar scoop fits against the fender. They had completely disappeared from my car by the time I took it apart. I made no attempt to replicate for my build.1 pointAfter you get things put back together you should get the "Smoke replacement kit". These were initially created for Lucas wiring in British cars, but I think they'll work in ours too. 🤣🤣
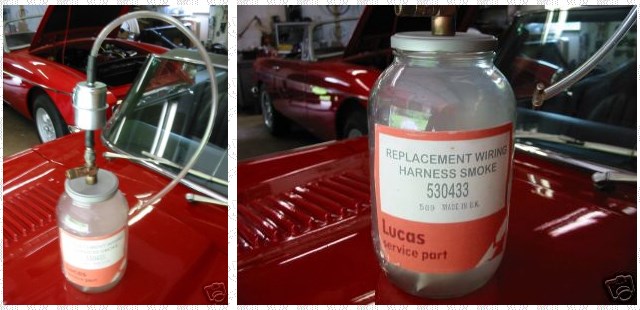 1 pointThe large gauge black wire on the center post is the high amperage power coming into the light switch from the fuse block, the small gauge black wire on that post is a jumper carrying power to the other side for the wiper switch. Smoke in this area says you have very high resistance either inside the switch or downstream in the wiring or at the lights. If you decide to open up the switch, I recommend you do so on a work bench topped with a soft towel. Tiny bits tend to bounce and run away on a hard surface - ask me how I know. Here's a pic of the small bits inside the switch box - rockers, tiny springs, and nylon "nubbins". You can see heavy carbon buildup on the rockers where they contact the posts on the circuit board. In the pic, one nubbin at the far right is actually melted from heat - it had to be replaced with one from a cannibalized switch.
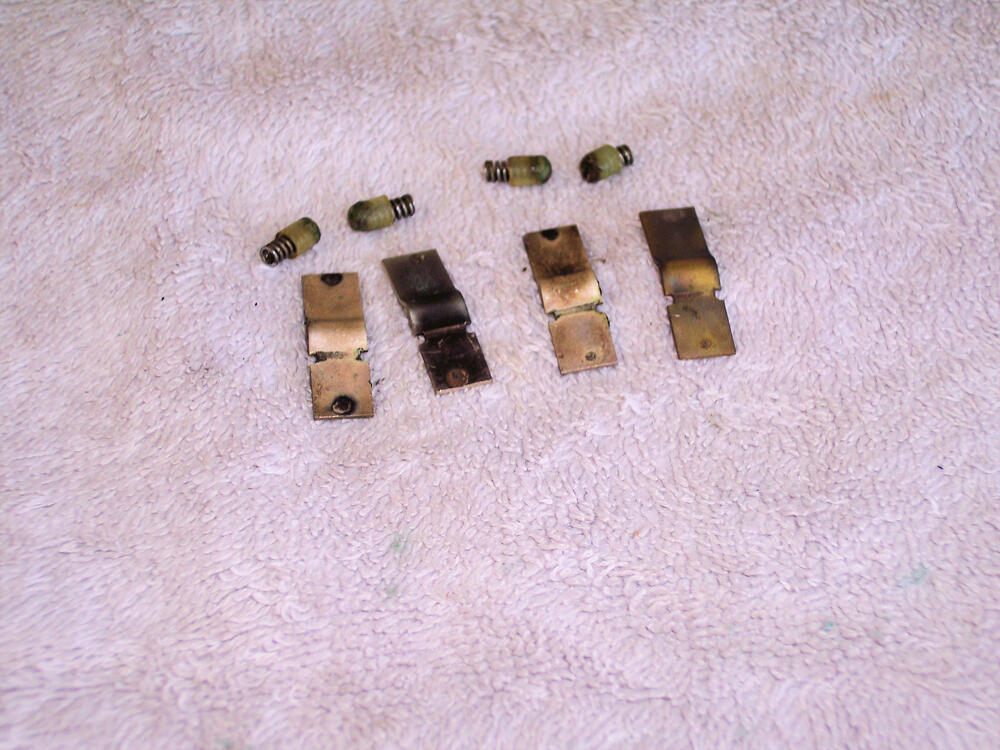 1 pointI’m not on FaceBook so it won’t open for me I presume.1 pointCarefully bend the four metal tabs back and the contact board will lift out of the case. Be very careful, there are small springs and things inside. You'll probably find pitting and maybe something melted. If you can get things cleaned up and use relays it should be fine, with the lower current. Be careful with the wires and solder joints. After many heat cycles they get brittle and often crack and break off. It's a pain resoldering them. Looks like somebody might have been in there already. There a threads about working on the combination switch I'll post one up if I find it.
 1 point1 pointI we are about the same vintage. I have so tube testers that go back even further. 🙂1 point1 point1 pointSo last night I wanted to see if I could improve the sound from the horns @Tirnipgreen asked me to work on. One was nice and strong. I wasn't going to mess with success. The other wasn't working, though it worked before. I could tell it was pulling in the diaphragm, but the contacts weren't opening. This was verified by taking current measurements on that horn and one that worked. The non-working horn was pulling a lot more current. I tweaked on the parts repeatedly, but I couldn't figure out why that one horn would not work. Finally out of frustration, I took the other horn apart to compare the diaphragms. The problem then stuck out like a sore thumb. Whoever reassembled the diaphragm on the horns didn't put the parts back together in the right order on the non-working horn. The fiber washer was on the wrong side of the bar between the diaphragm and the bar. This is how is should be. So when the diaphragm tried to open the contacts, it was still providing a path to ground for the coil. With the coil still energized, the diaphragm wasn't moving. Once the diaphragm was assembled properly, the horn worked just fine. With the new knowledge, I decided to re-shoot the video to go over the details of the horn. I just have to edit the new video.
 1 pointOverall, the whole thing was kind of odd. He said that he's been visiting the Guild showroom for years. Wouldn't give the name of the builder on the open forum but said he knew who it was and would supply it to serious bidders. But then later in the posts said he had a vague memory, like he wasn't sure, that the guy's name was Larry. But then said he had contacted the builder about the parts on the car, so he must have known him pretty well. Almost like the three of them were teaming up to sell the car. Very strange. I saw some odd stuff on the bottom of the car. It was painted black up to about the ends of the floor pans. The welds there look odd compared to other unmolested cars. The door jamb tag is a reproduction. There are two different firewall VIN stamp pictures in the listing. Edit again. I'm spending too much time on the internet. Anyway, I had wondered about this. Why stop painting there and why do the welds look so chunky. Here's a comparison. https://bringatrailer.com/listing/1972-datsun-240z-289/
 1 point1 pointHe mentioned he would move it on to another venue. It will be hard to find a venue that has the traffic BaT has. It would have been very helpful it the underside was all removed cleaned and painted. All those bits looked pretty bad. And what can you say about the sunroof other than being a dealbreaker. Why did he even buy that car if he was just going to sell it? He must have had some wild idea he was going to flip it for a tidy profit. Big mistake.1 point1 pointNice, looks clean[emoji1360] As is typical with my car, nothing ever seems to be plug and play. Do you know if the seal you received from Z store was a Precision brand seal? I’m assuming it was, but just curious. Sent from my iPhone using Tapatalk1 pointhttps://www.classiczcars.com/forums/topic/34633-kia-sportage-weatherstip-rocks/#comments1 pointYeah, let mine sit compressed for a good while. Still too high🫤 Any idea what years of Kia sportage? Sent from my iPhone using Tapatalk1 point


Important Information
By using this site, you agree to our Privacy Policy and Guidelines. We have placed cookies on your device to help make this website better. You can adjust your cookie settings, otherwise we'll assume you're okay to continue.