Leaderboard


 Subscriber
Popular Content
Showing content with the highest reputation on 07/14/2022 in all areas
-
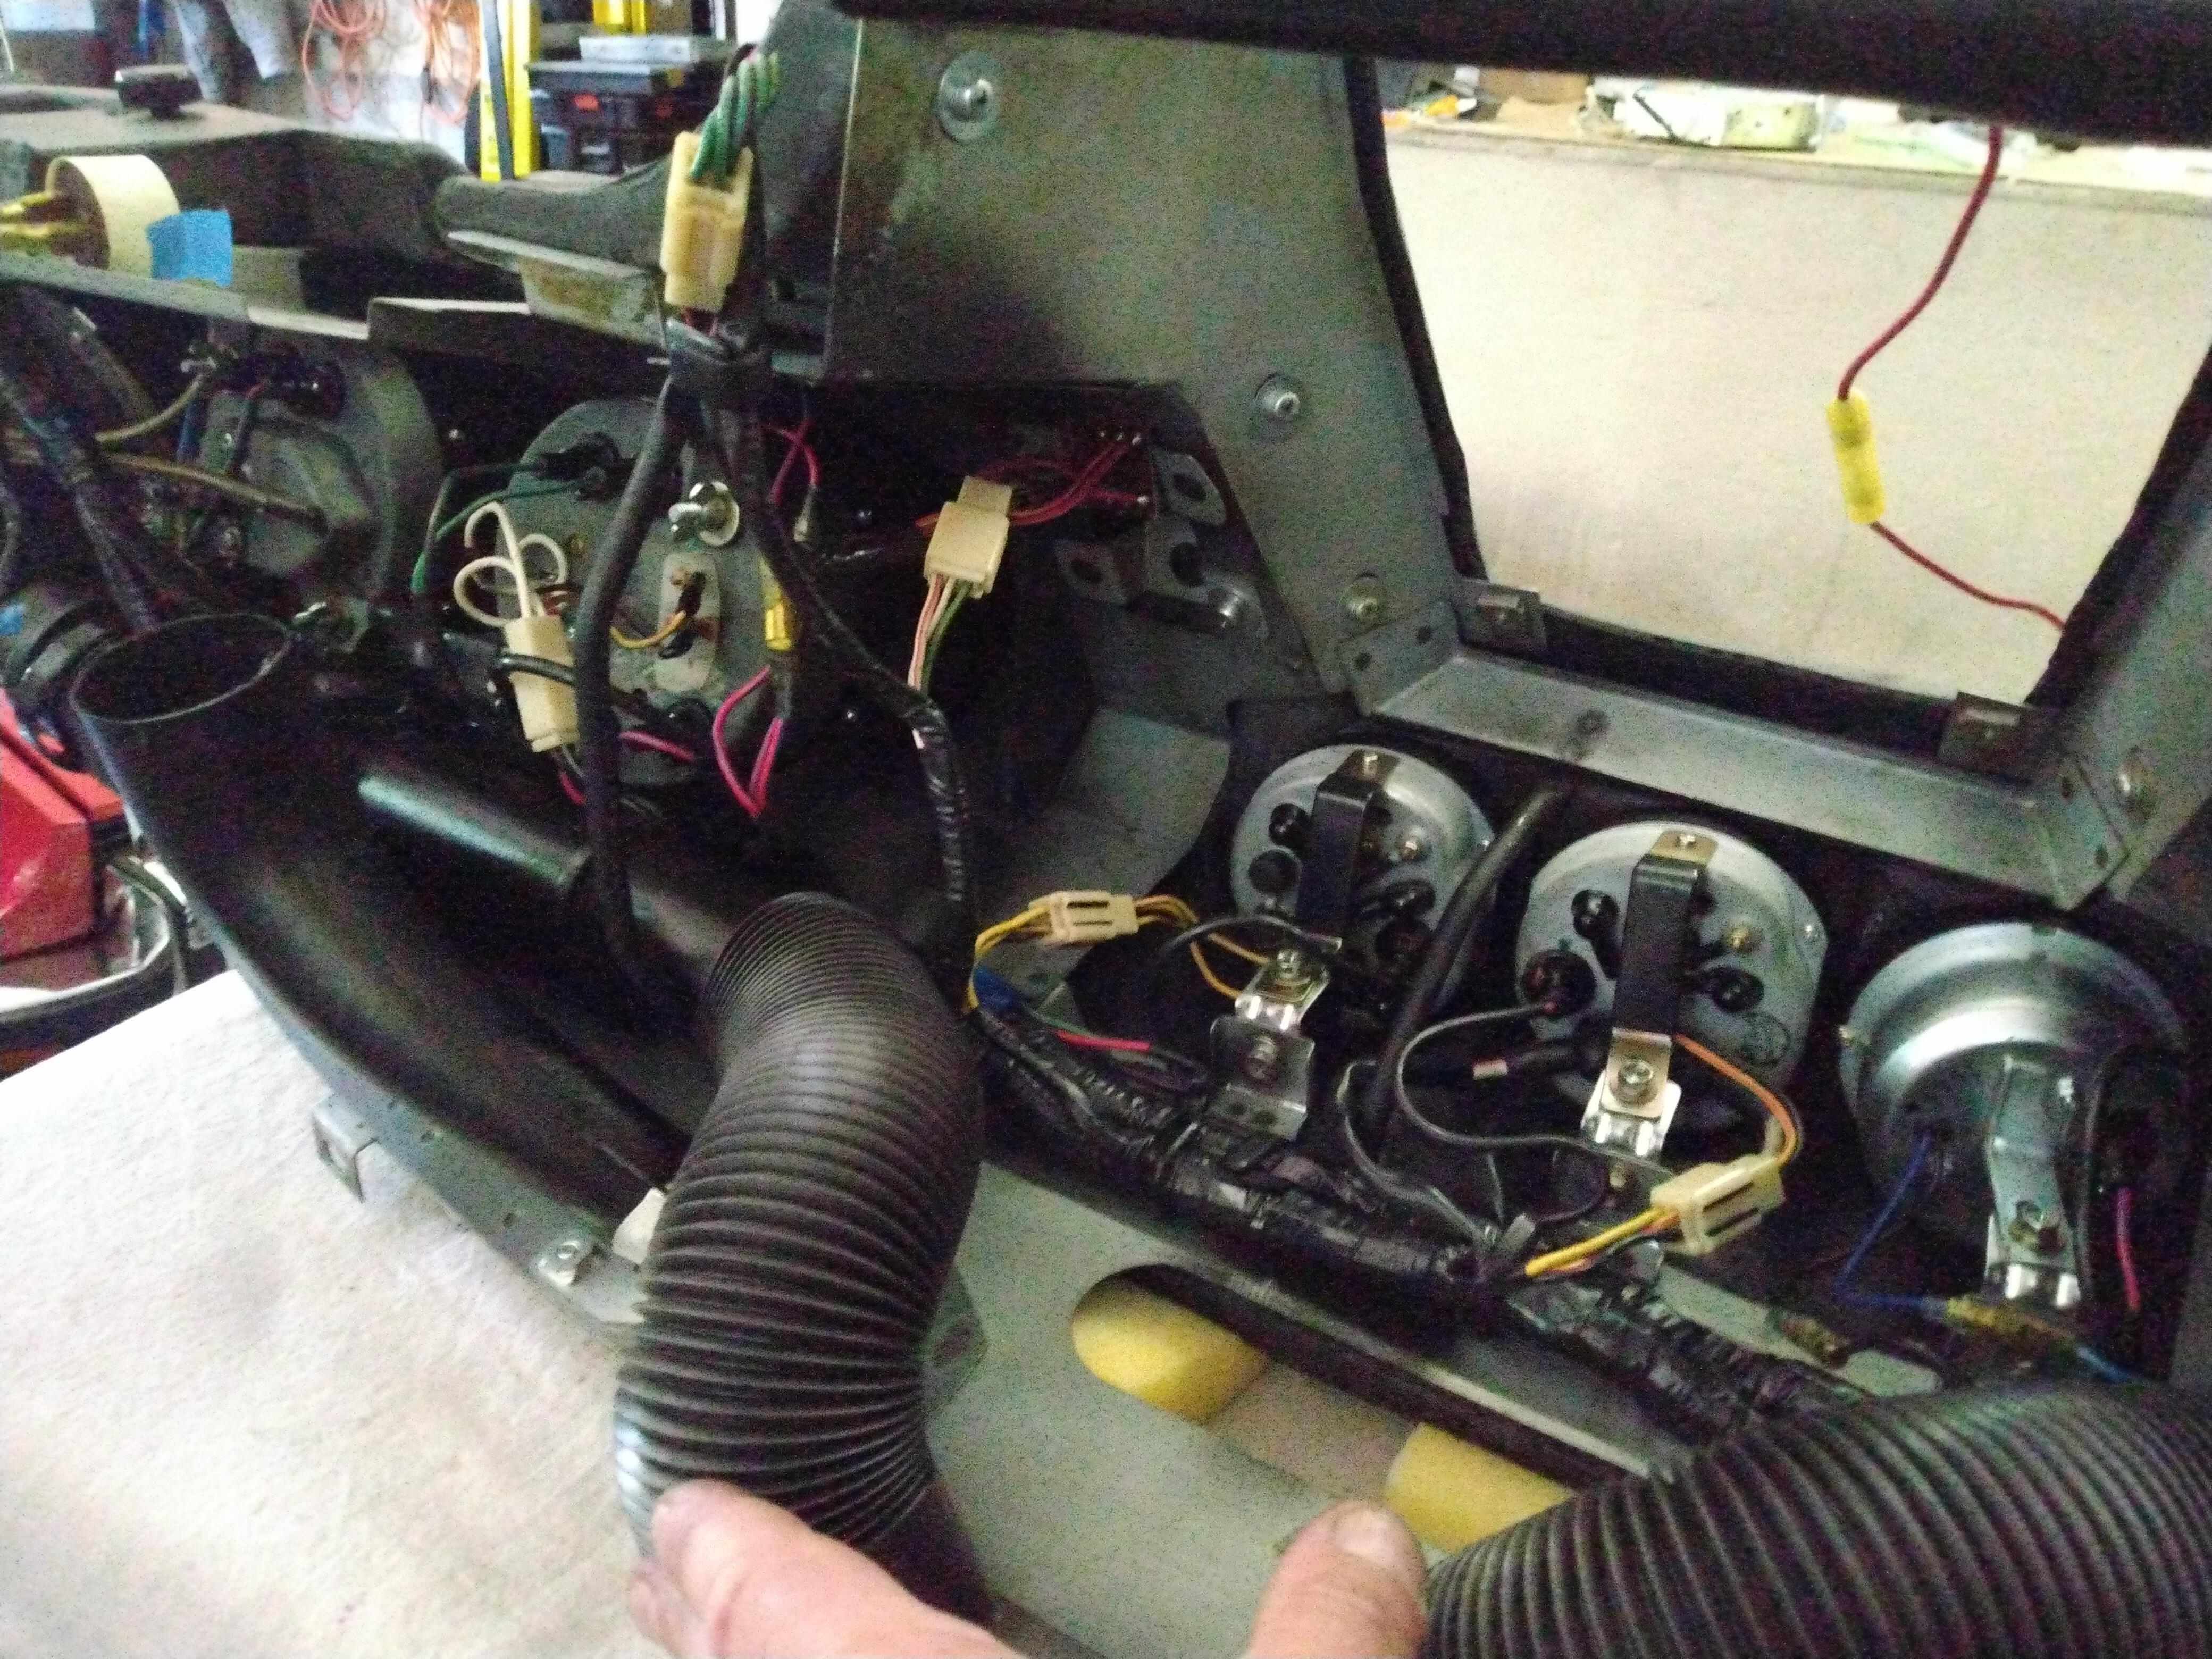
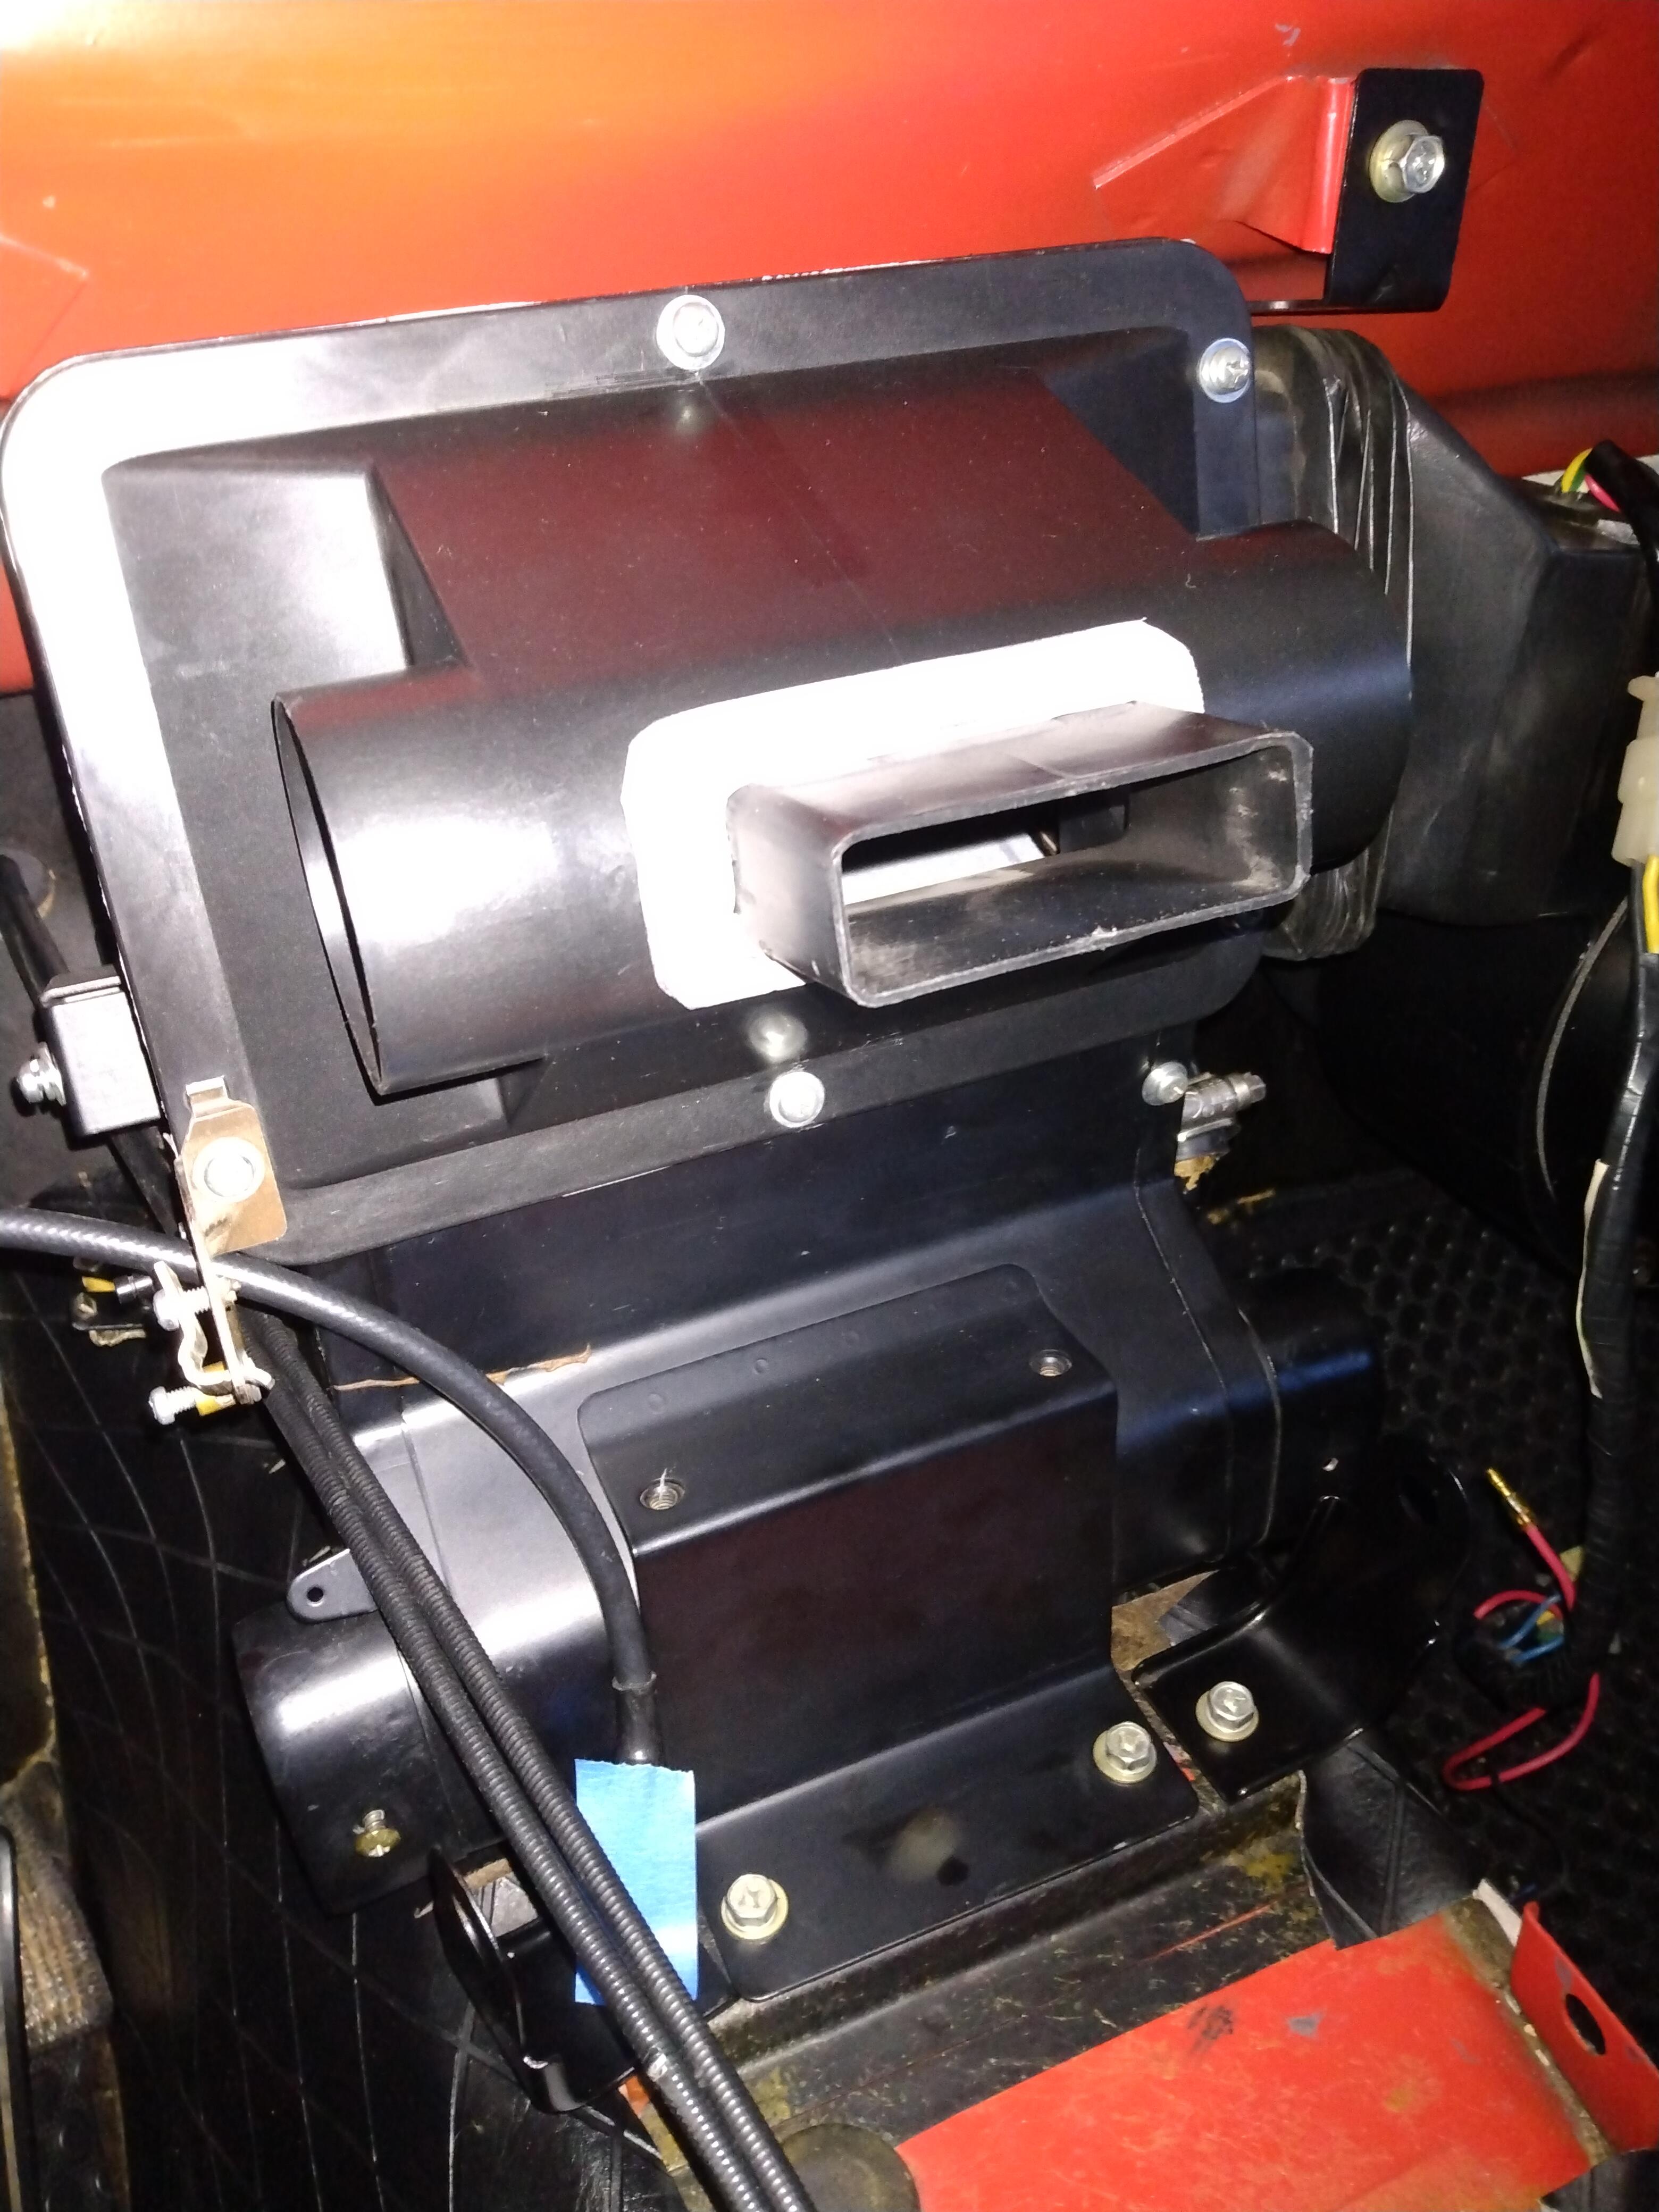
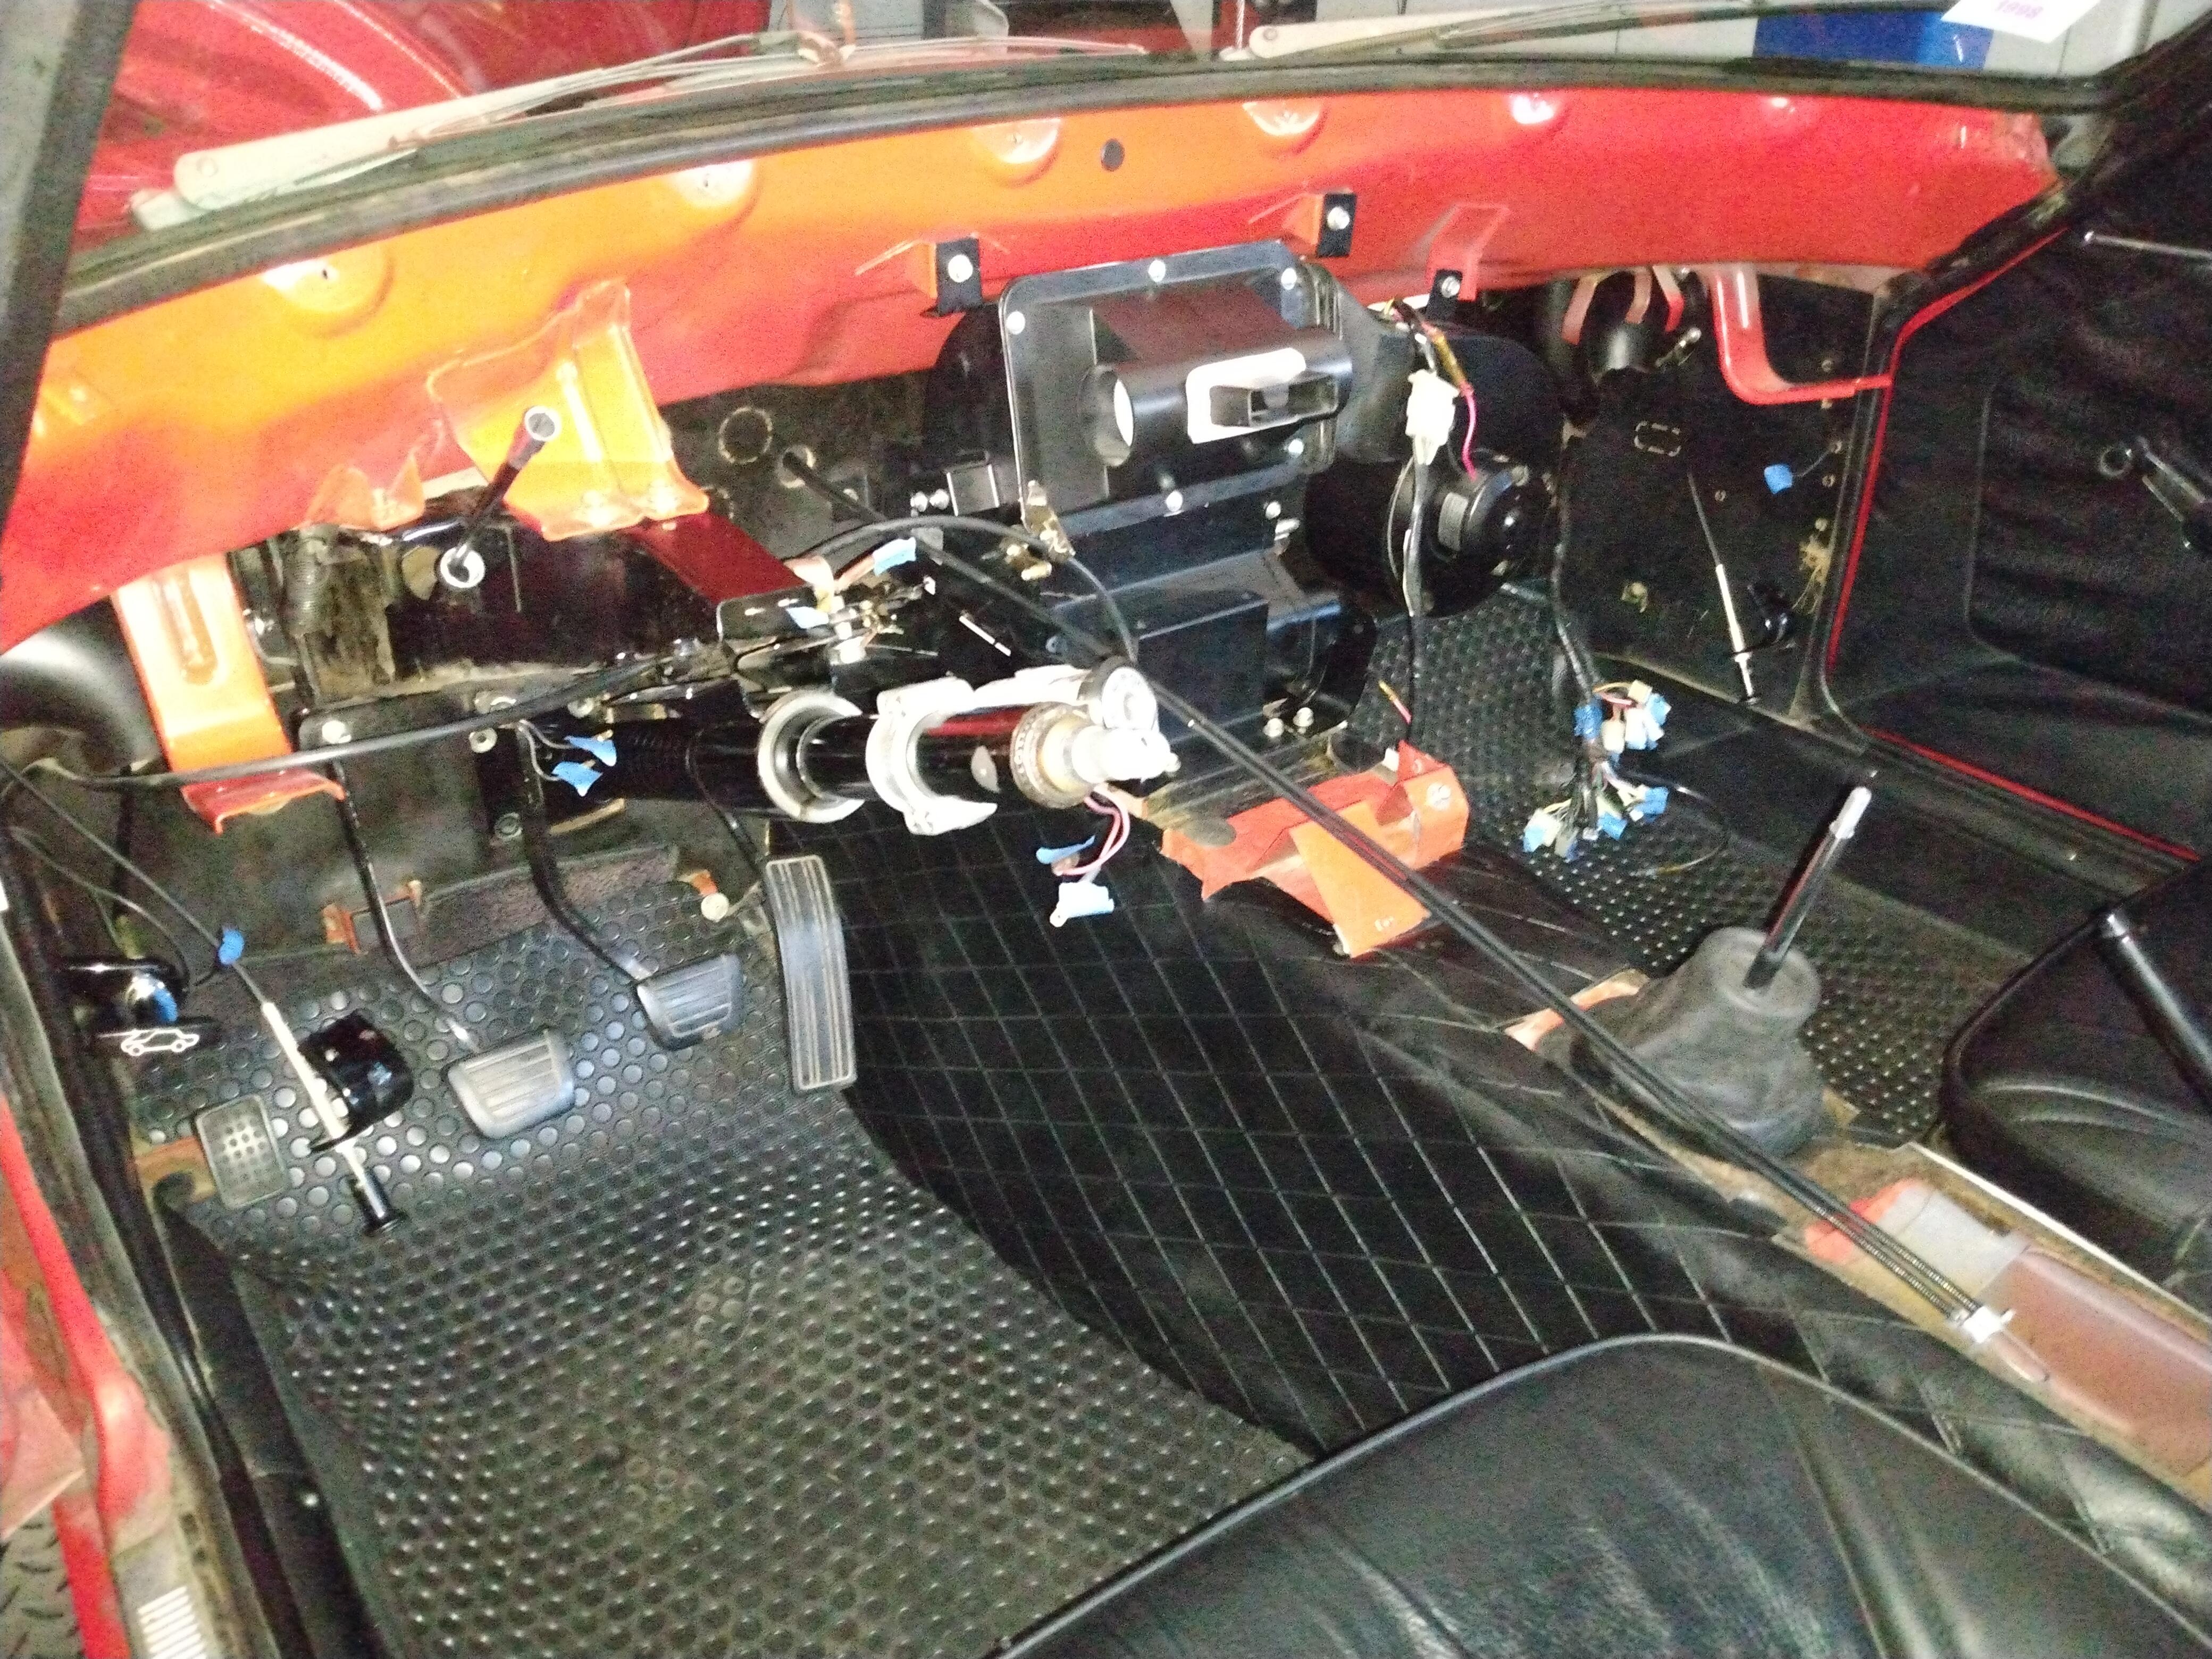
3 pointsRight on, thank you. I am headed out to start buttoning things up. Things are pretty clean under the dash now. Heater box is rebuilt, heater core is flushed, new hoses, new coolant valve, upgraded relay harnesses, new Zclock, new dash. Here is a little car porn.


 3 points
 -
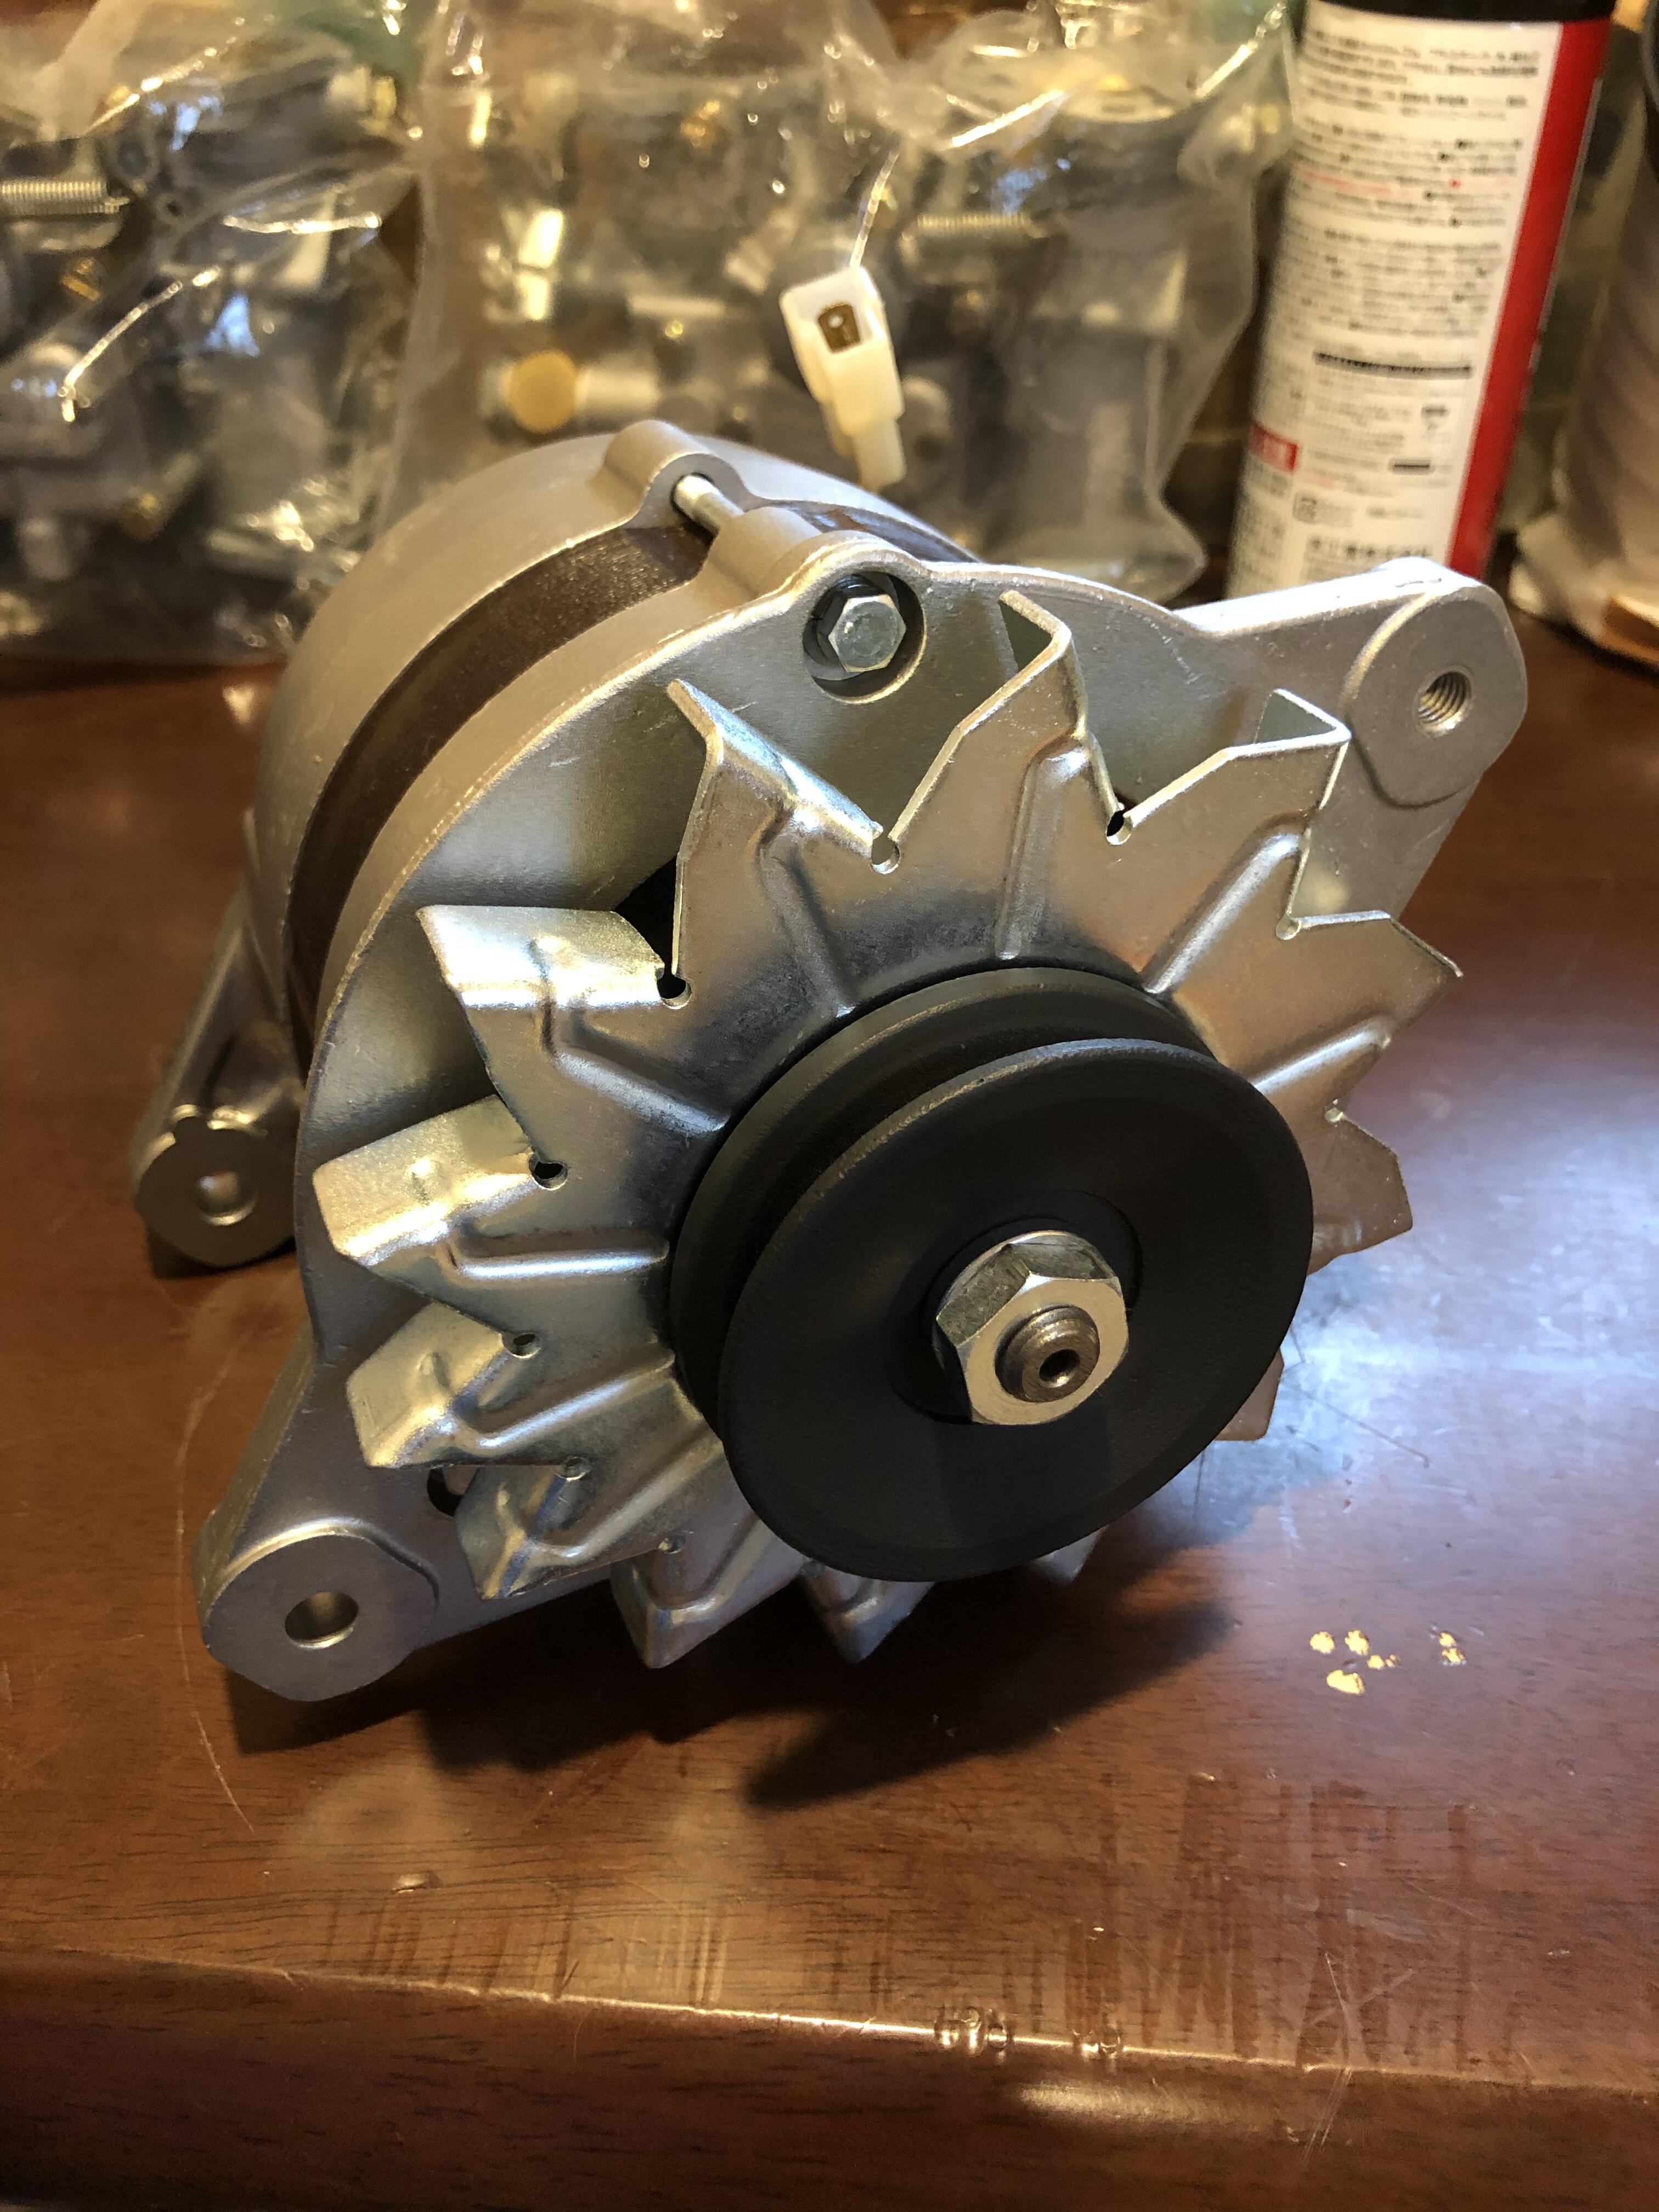
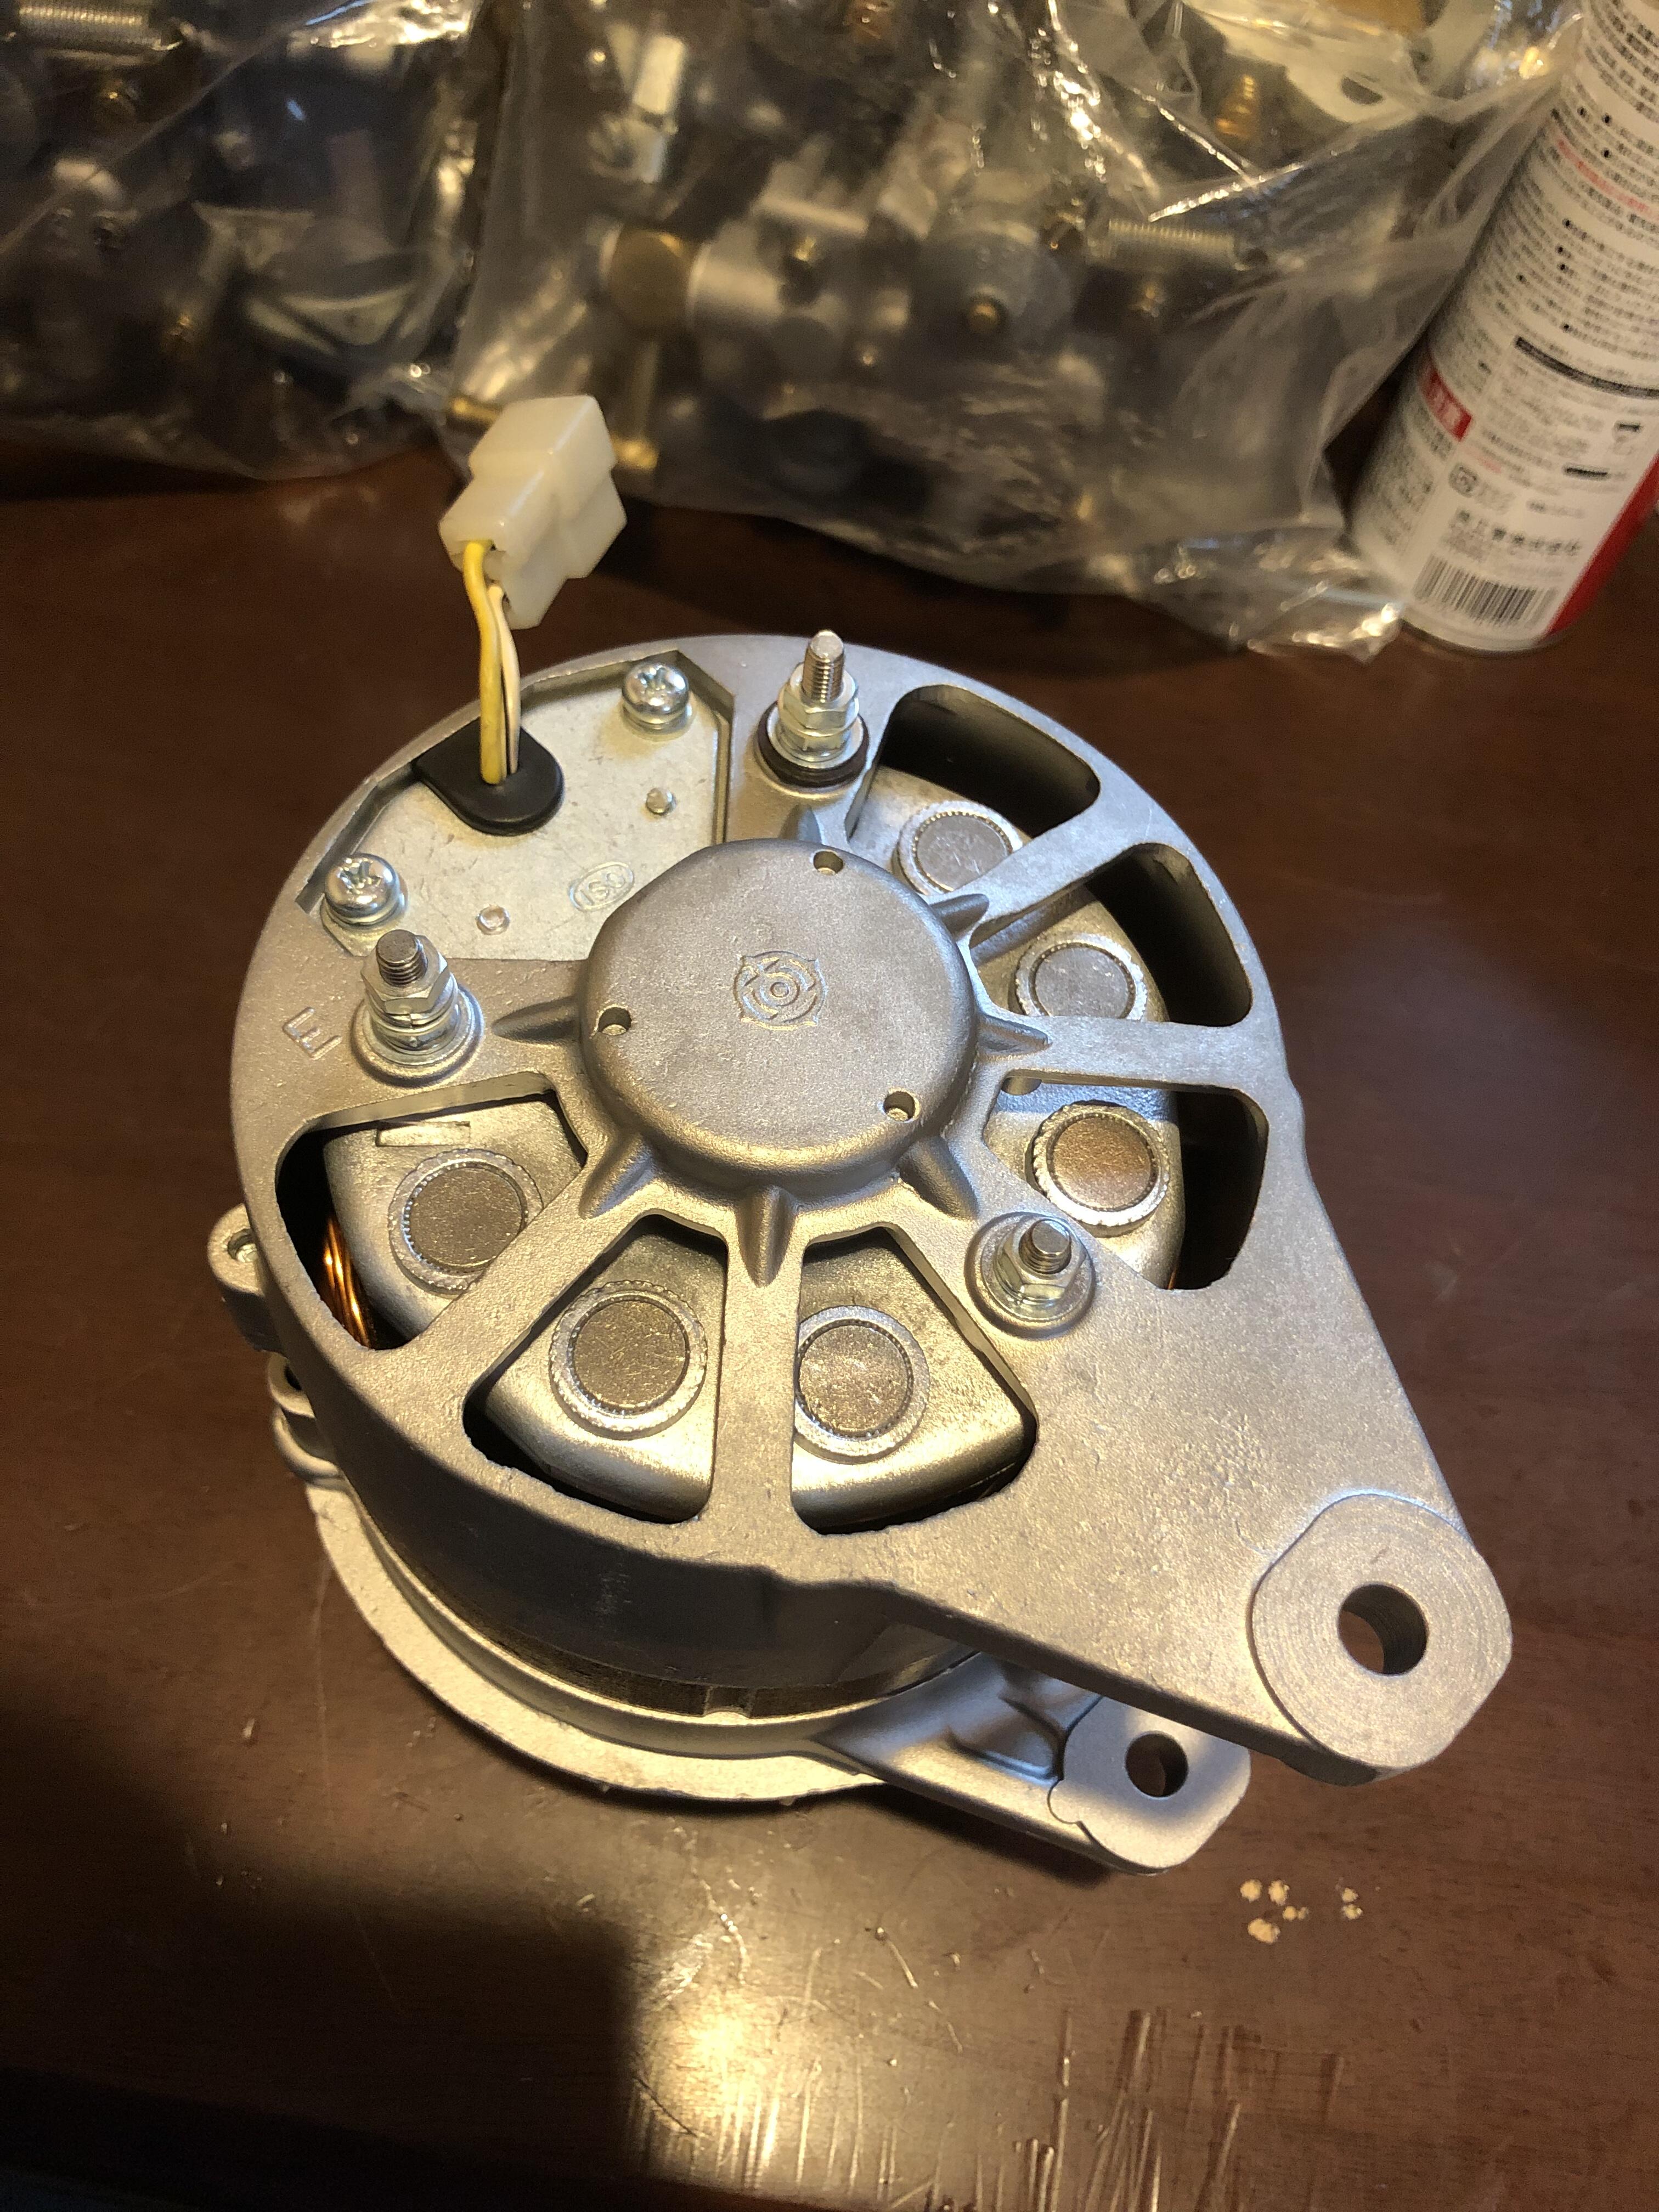
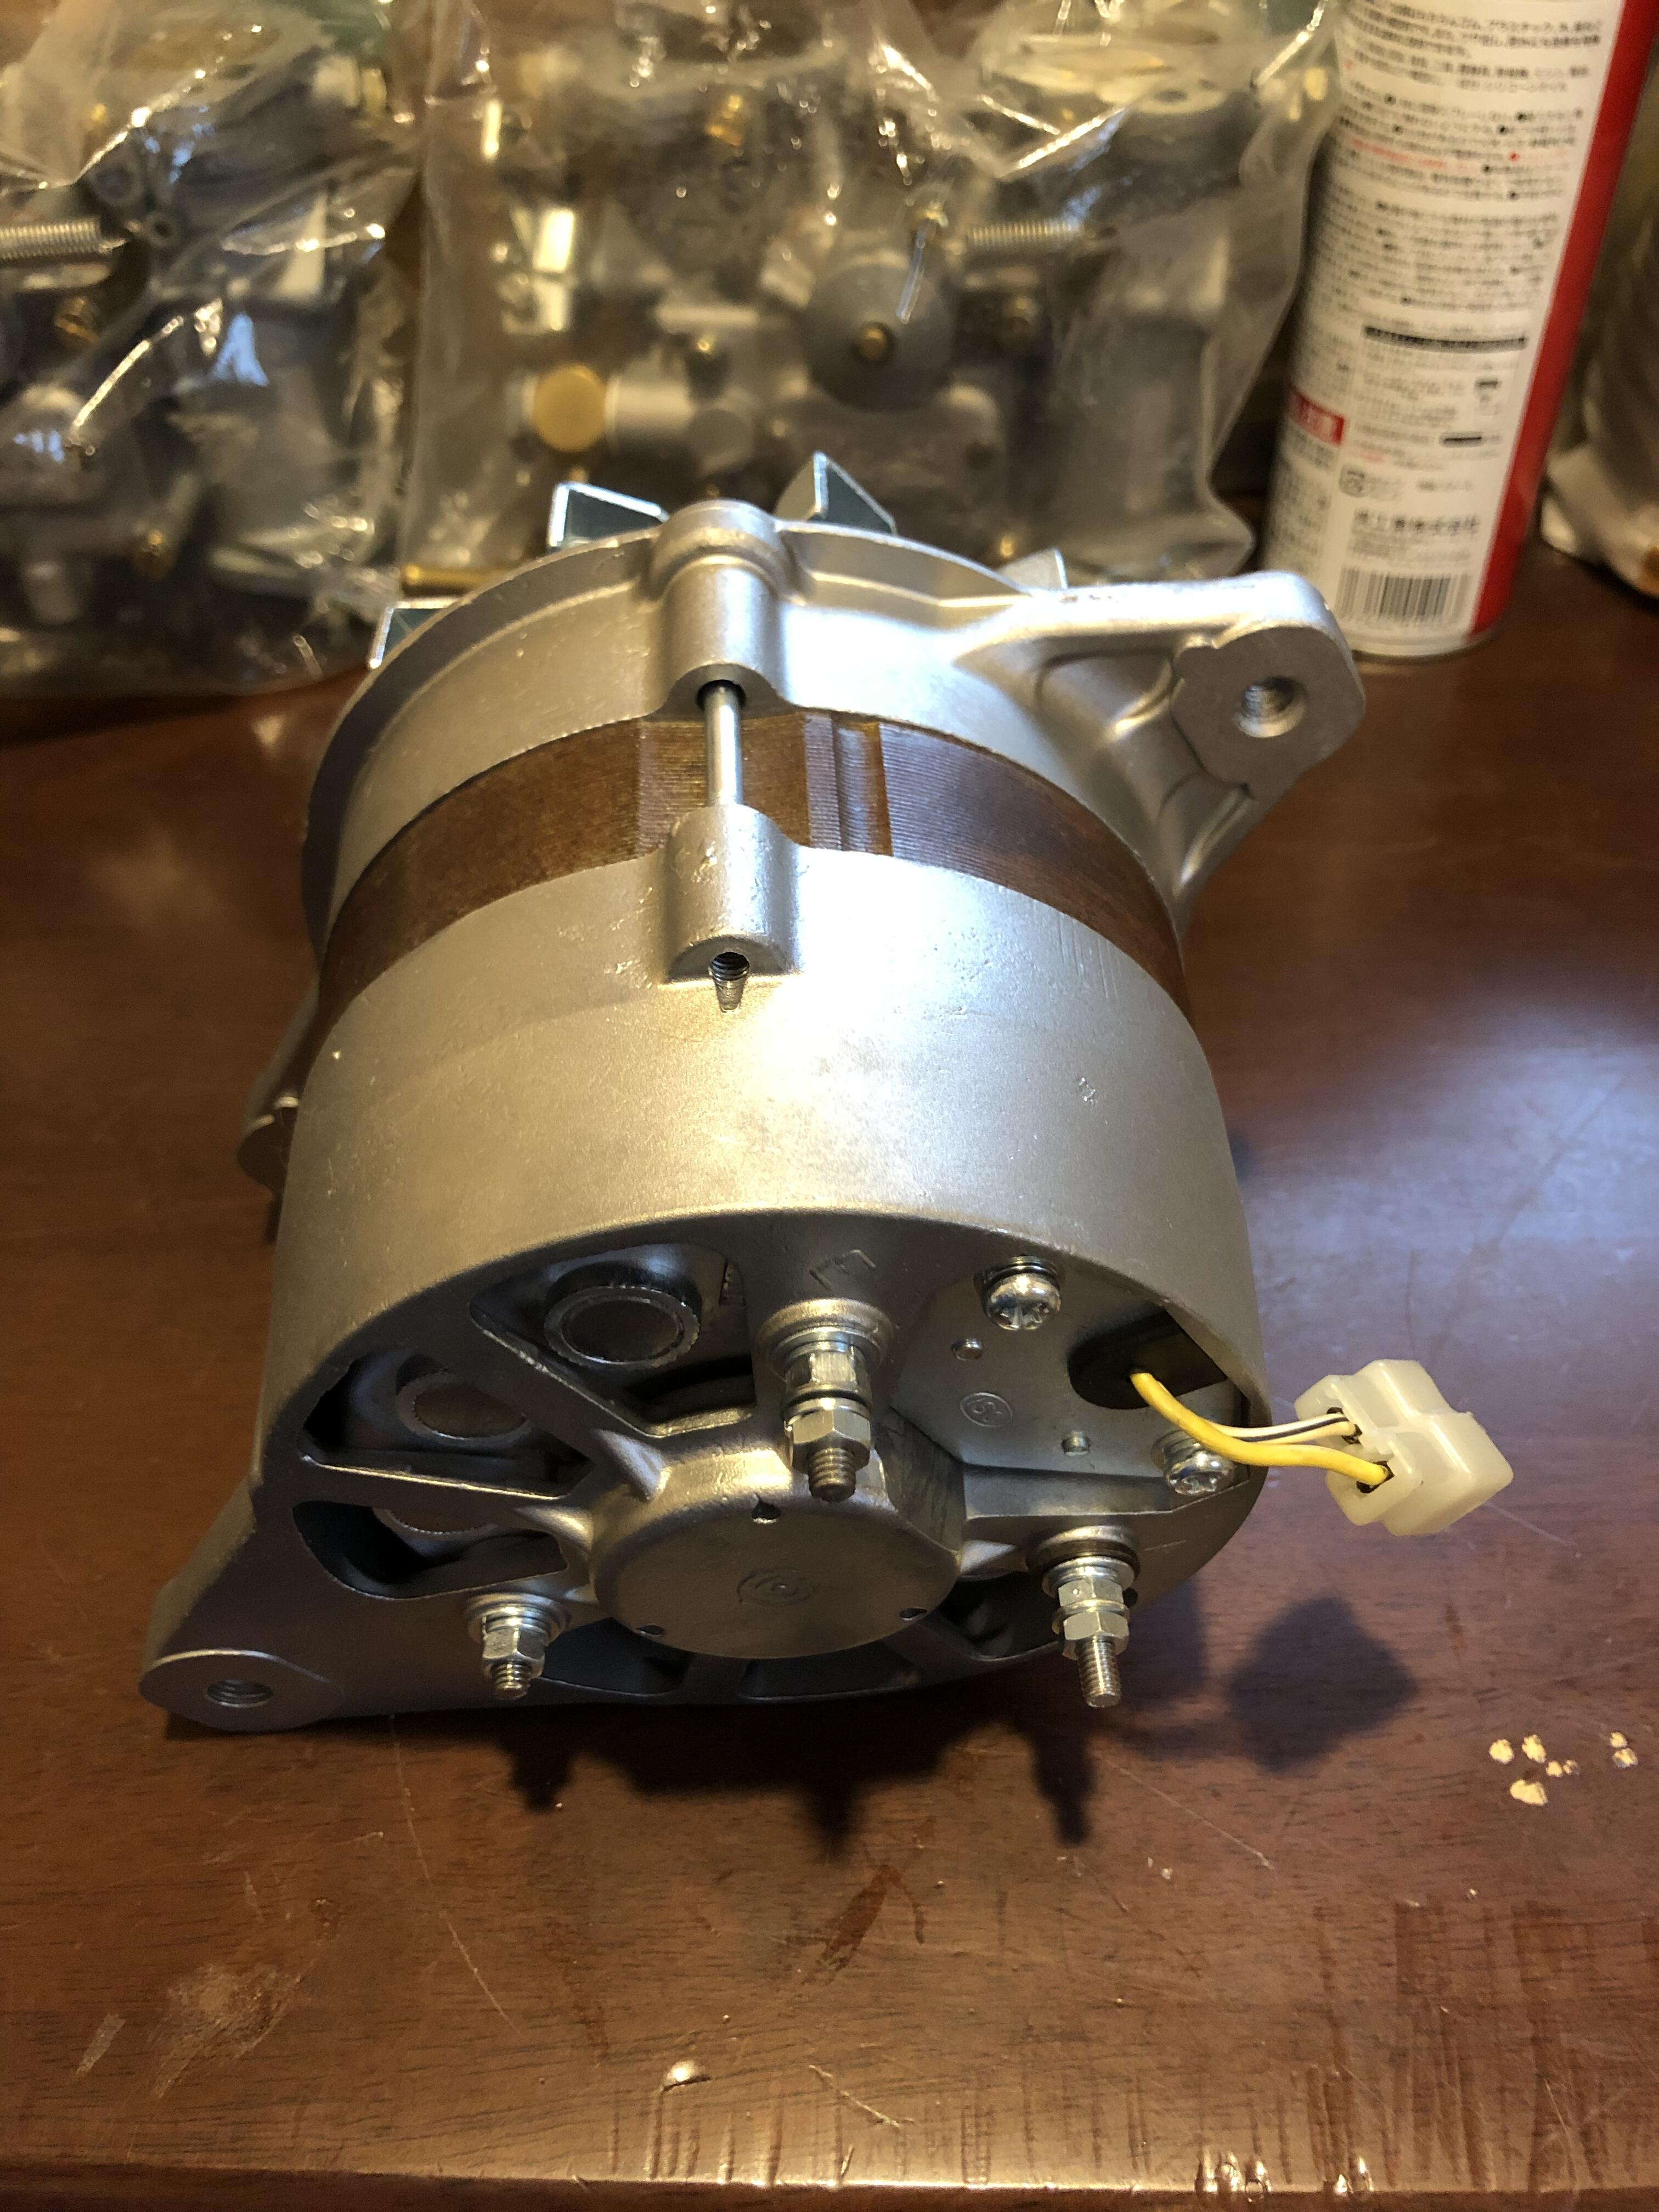
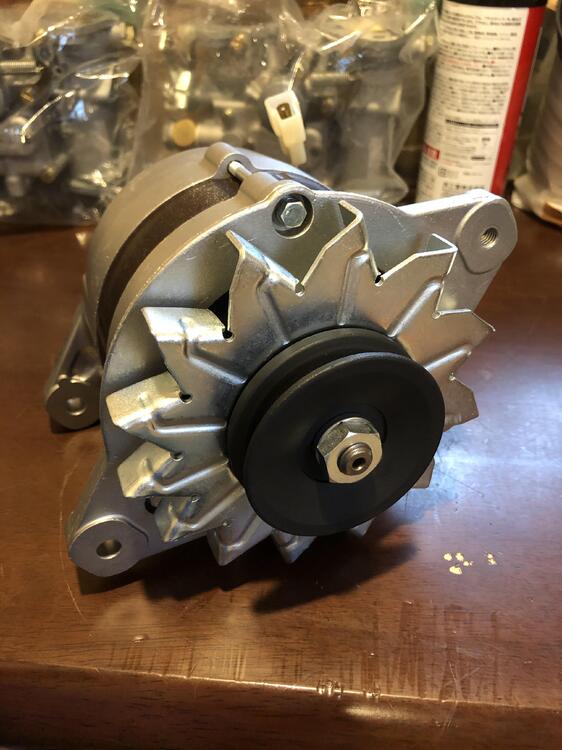
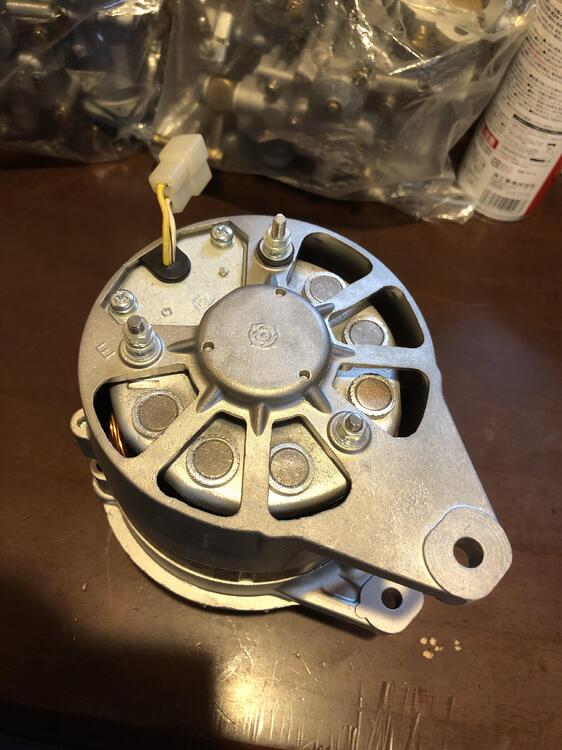
2 pointsNothing to tell recently except this alternator, I had my old spare one rebuilt at a local shop. I am so happy with the result , they did what I wanted to have . I said don’t paint green on the center portion, leave it as it is . They said it needs to be painted for some reasons , then we agreed paint clear coat on it . Unfortunately model number and Nissan part number have gone , actually they have already gone when I got it a long time ago . I will put this in my first 240Z , then previous one on my first 240Z will go to my second 240Z . Kats

 2 points
 -
Check out American Modern. Mine is in the restoration stages and I insured it for 30k. $258 year. You can raise or lower it at any time. $100 deductible2 points
-
It should be OK. Every evap tank I have ever had out of a Z has been clean and shiny. Wouldn’t hurt to have a look at it, do you have the inner trim panel removed?1 point
-
We have come a long way since 1997 - when we had to plead with Classic Car insurance speciality carriers for coverage, when the Hagerty was the only one to respond. To now, with them suggesting we increase the agreed values of our Z’s. I think you want to insure against whatever loss you can’t afford to take. You want the coverage limit high enough that your Z would be replaced or repaired rather than Totaled. Much of that depends on the current condition of the Z’s. It would seem that $35K would a minimum number.1 point
-
1 pointDown in Arizona I have had several transmissions for different vehicles over the years rebuilt by a specialty shop called Hayes Transmission. Funny enough the only manual transmission fluid he swore by was an OEM KIA fluid. UM090-CH036. It is 75w-85. I run it in both my 4runner and 280z, and both transmissions work like butter. I would like to mention that the 4runners transmission was rebuilt and I put in MT90. The shifting was very choppy and drove this for about 6k miles. Finally listened to the tranny mechanic and the KIA fluid turned it to butter. Honestly though, most all GL4 manual transmission fluids should be fine in the proper weight.1 point
-
1 pointBuy a Nissan valve cover gasket. They hold up a lot better than the aftermarket ones. Here is the current part number: 13270-Y7010. You can order at your local dealer or an online dealer like https://www.nissanparts.cc/1 point
-
6 speed quick shift? We don't need no clutches.1 point
-
Once the wheels lock up there is no "faster". Unless you go with wider tires. Then you might not be able to lock them up without more force. A bigger booster will give more force, it's a multiplier. A bigger MC will create less force it's done for volume, to get rid of the travel in the pedal. I'm just teasing out the details. cgsheen's story is a good one showing both feel and fade as concerns. But also in a competition setting. He chose pad and shoe material to achieve his goals. He also probably adjusts the system to remove all play in the linkage and air in the lines, so pedal feel is high and tight. I'd guess. I just saw a brake question on another forum and the guy was asking opinions about "caliper covers" and slotted drilled rotors. That's a whole different angle, the look.1 point
-
Due to a NASA (supposed to be) weekend on stock brakes (which lasted about 2 track sessions with the instructor) I started out with the 4-piston non-vented mounted on stock disc. (just the caliper change and I can't remember the friction material - probably semi-metallic back then) The "butt dyno" couldn't really tell the difference between this and stock. Disappointed, I installed the Z31 vented rotors with the 4-Runner wide calipers (stock master and booster) - friction was either semi-metallic or ceramic, can't remember. I noticed a good improvement in braking and a large improvement in fade and heat dissipation. A short time later, I installed Porterfield friction material on all four wheels (stock drums in back). These pads grip about the same as an OEM with normal street traffic, when they warm up they get VERY grippy and do not fade. Goldie likes to hill climb (L28ET builds a lot of torque) and coming back down the hill is much less dicey with this particular friction. At the bottom I still have full confidence as these grab better at the bottom than they did at the top and I've yet to experience fade. I've been on this setup for 7-8 years and I daily drive my 260Z. I still use the stock master. My youngest son did the same brake swap on his 1975 280Z but replaced the master with a 15/16 280ZX master cylinder. I'm sure there's some difference, but I've never really been able to tell when I drive his car.1 point
-
I just did some math; the average bidding / selling price for a Datsun 240Z in the last six months according to BaT is $36,118.1 point
-
The site has a For Sale sub-forum. Always good to just put your price out there. The scammers just want to make contact then persuade people. Put it out in public and you'll get a better response. https://www.classiczcars.com/forums/forum/11-for-sale/1 point
-
Well it looks like the day of doom is here, The Z was at the shop for another reason, but while it was idling in the driveway of their shop the pump blew a hose again and gas went every where. But they shut it off and pushed it into the shop and up on a lift, there si some reason the hoses keep blowing apart and it's from very weak hoses somebody used in the past, BUT they drained the tank and then looked inside and guess what . . . . It's VERY RUSTY in there. So I said I need to take the tank and get it restored, but how was I going to do that with it sitting in their shop ???? to which the owner said No Problem, we'll push in the last bay and it can sit there until I get the tank finished and back to them. So there's a old shop about 120 miles from here and I'll pick up the tank and drive it out to them to be restored. There isn't a lot of alternatives right now, I really don't have much of a choice, I could hunt around for another tank, but I'm not going to find a 47 year old tank that's not as bad as the one I got so I'm restricted in what I can do ????1 point
-
Here's the link again, below, so people don't have to go back a page to see it. If the guy is in to the weeds of Series 1, 2, etc. then he probably knows if has an L24 or L28. Besides the engine serial number, the symbols L24 or L28 are stamped on the block ID plate. It looks like a pretty nice old yellow 240Z. Don't get too caught up in originality if you're looking for a car to drive and enjoy. Many people buy these cars for their collections and never drive them. Browse the BAT 240Z listings if you want to see what people are paying and what they're getting. The market decides the price, you just have to decide what it is you want to pay for. Originality, drivability, cool factor, whatever. They're all out there. https://losangeles.craigslist.org/sfv/cto/d/la-crescenta-1971-datsun-240z-series-15/7506539433.html1 point
-
1 pointWell then you haven't read many of the things I've written. Haha!! But regardless, it's clearly an experience issue here, not ability. You'll get it!1 point
-
1 point
-
1 pointgot head on last nite, TC too, hand spun it all were about 75 psi. Spent a ton of time cleaning the gasket off the engine for the front cover. Will work on the front cover side next. Will prob pop for a dizzy drive just so i dont have to keep swapping them out to run my test stand dizzy. Got some OE core plugs on the way (thanks Jeff, I needed that, anyone remember the old aftershave comercial?).1 point
-
1 pointI have some yellow zinc parts on my 240 restoration, notably both halves of the hood latch, throttle bell crank, and some nuts and bolts. I would like to get the car as close to original as practical and understand that there are other bits and pieces that should be done, notably the under-hood trouble light, but there are others I'm unsure of. Any advice would be appreciated respecting: Coil holder, fuel filter clamp, door latches, hood support strut, hose clamps, brake line clamps, under-hood fuel lines, fuel rail, engine hoist attachments, and the tube that runs around the back of the head to provide heated water to the intake manifold. And any I might have missed. Many thanks1 point
-
1 pointCARELESS MEDIA TUMBLING GUIDE (skip this post if you're not interested in reading my process!) You can tumble copper, steel, iron, brass, aluminum, magnesium, and even opaque or clear plastics. The tumbling process does a great job of bringing fogged plastic back to life too. It does a good job of cleaning aluminum to a "clear anodized" look, and it does a great job of bringing brass to an almost "as manufactured" look. parts that should not get media inside, like oil pressure senders or short brake lines should be capped off, unless they can be blown out with brake clean and air pressure- or with a suitable solvent. - 11lbs of media - start with 5 - 6 lbs of m6 to m12 nuts, bolts, washers. - green pyramid media - 3 cups of water - 3 or 4 squirts of dish detergent or - 1tsp of Potassium Hydroxide flakes (speed clean active ingredient, can be bought at soap making supply or online. very inexpensive) occassionally you will get a large soapy/sudsy foam filling the entire bowl. That can be whisked off the top and put into a bucket. To combat this, I might try the new Tide HE Turbo laundry detergent as an additive. It has a high cleaning power but low suds. If you use just the Potash flakes, it is a very slick solution with very little soapiness to it. It will also coat the parts for upto 10 days to prevent flash rusting. I prefer having some sort of mild grease cutting fluid in there, like dish detergent. It keeps the media somewhat clean as well. I keep a large bath towel handy to keep wiping my hands. I found a lint-type (not lint-free) towel is best for cleaning hands periodically and also wiping the parts down. The wet media water dries on the towel quickly, and you can just bat the towel outside to get it to dust off if it gets a little crusty. painted items or small items with crevices or places for the media to get stuck will not have action in those zones. recessed drive screws will not have the screw drive cleaned extremely well, and might have paint left over (phillips, slot, allen, torx, etc.) You will have to pick at these items with a small pick-tool to get the media out after tumbling, or grease out before tumbling. Sometimes the media water-slurry that is generated from tumbling will get in there and clean it out for you, but it also needs to be picked out as well. Twisting the screw head into a stiff bristle brush can do quick work of this if you don't let the media harden up (i.e- clean while still soapy/wet). Any items that have small casting imperfections, small pits with rust, or small tool-path marks or machine grooves (like the alternator pulley from the grapefruit style early series 1 alternators), will need to be either wire wheeled or sprayed with some sort of paint/rust remover like Eazy-Off Oven cleaner, and brushed and washed briefly before being tossed into the tumbler bowl. The good thing about buying an extra bowl is that you get a second tightening knob for the lid. With this second knob, you can screw it down on the all-thread and have one knob/washer/rubber washer combo that threads all the way into the tumbler and holds the bowl down. Then you can put the lid on and thread the second knob as you would normally. This prevents the bowl from warping due to parts being off balance or the solution going cement-like over the course of a couple of hours. This warped one of my bowls and now I have to get creative on how to fasten it down. It widened the all-thread hold on the bowl to where it moves around too much, so i put a plastic bushing there to take up the slack. I found that holding down the bowl with the knob inside before the lid goes on gets maximum centrifugal action on the small parts that float around the perimeter of the inside of the bowl, and knocks them into the center. To fish items out, I first experimented with a magnetic wand with an LED at the end, but the magnet was not strong. A regular magnetic wand with no LED works a lot better... But then I found an old magnetic bolt tray that the magnet separated from, and it worked amazing. An old mechanical platter hard drive magnet would be even better. For the extra small items like the 2-wire clamp washers and screw plates, I just ran the tumbler with the magnet in there for 2 or 3 minutes and took it all out, covered in metal-water and small parts. Did that a couple of times. The trick here is to have two buckets. One with soapy water that you immediately dunk the items into and swish them around to get any metal dust off them (do this without the magnet attached to them). Then another clean water bucket to dump them in, temporarily while you do the rest. At the end, I use a 1lb dollar store scooper and drop 1lbs of media into a stainless strainer and run water over it to clean it. When I go to dump it into a small clear container, I keep a magnet at the end of the scooper to catch and left-over items. In total, I may have left about 20 items in the bowl throughout the multiple (maybe 15-20) washes. That's not a bad percentage for my method, consider the vast amount of items, especially miniscule ones. Once the media is clean and the parts are all collected, I take them out of the clean water bucket, and put them in the strainer. Wash them really quick (they're wet already, anyways), and then wipe them with a thick towel by dropping a handful on there, and folding it over and rubbing briefly. I then put them in the strainer and spray WD40 on them, and put them in a clear bin for sorting later. I later learned that some of the plastic media residue from my experimenting with various compounds like paint polishing paste, simple green, powdered/bleach type dish cleaner CAN leave a fine plastic residue on the threads of certain items. I used a stiff brush and held each and every bolt or item in my hand and just rubbed them across the brush 5 - 10 times. Each item takes about 2 seconds to do. For nuts, I did not bother to wire brush the inside, as I did not have a small bristle brass pipe cleaner to fit in most of them. The only issue is that under the plastic is some moisture, so it will flash rust under the threads or not get plated. But I use Marine Grade Synthetic anti-seize on virtually everything I put together, so it's not a big issue. It works better than plating does to begin with, IMHO. As far as time goes, on a per-batch basis... - setup (5-10 minutes) - magnetic fishing (10-15 minutes) - cleaning media (30-40 minutes) - cleaning items (30-40 minutes) - WD40 spray wipe and spray (5 minutes) Keep in mind that you don't need to wash the media or fish out every item every time. You'll know when the media gets grimy. Some people have said to keep running it, it doesn't matter. But there were times when I needed to know that the only things in there were alternator parts, or an assembly of something or other, so I was forced to clean out the media. If you're not cleaning the media you can just take out what you can with a magnet, and put the next batch in. You don't need to take everything out. I found that the green plastic media is very forgiving in that it BARELY takes off much metal. It's so fine that it turns into a dust at the bottom of the bowl. It would probably not register on most vernier calipers- it's so fine. The largest item I've put in the bowl is the entire e-brake linkage assembly, except for the long rod that fastens to the cables. The entire pivoting lever assembly that is two welded washers to a tube with a long arm with the clevis pin at the end fit in there, and with the exception of a couple of areas not being scrubbed because they get no media passing across- it came out reasonably well. I'm going to bead blast those areas and run it back in the tumbler for 2 hours and it should be ready to go. With all that said, it usually takes about 2.5 to 3 hours when doing a full media swap. I bought the extra media so I can cross-mix from separate batches to prolong the use of the media. But I will not be doing that from now on. I will keep the media separate so that I have some finer medias and some 'slightly used' medias. They still work just as good as they get smaller, sometimes even better. So I will use that for getting into smaller parts. I might experiment with a ferrous media that is not as aggressive as metal shot at some point. I would like to try something smaller with sharper edges that retain their edge for a longer time to get into smaller threads, but so far plastic media is good! I know it's not exactly healthy, but I quite enjoy the "not burnt, but kinda warm" plastic media smell too wheeeeeeee! For last batch of stuff, I tried to etch the little pieces of rust off by leaving them overnight in Apple Cider Vinegar, brushing them briefly, and then putting them in water + baking soda to neutralize the rusting action before dousing them with WD40 as well to prevent rusting. I would say it made the items appear a good bit lighter, and did in fact take some rust from small machine marks and threads that were too far gone to some degree... However, I'm sure if I left the items in the vinegar for say... 3 or 4 days, the results would have been way better. It does have a slight "etch" to them, and they are slightly lighter than before they were tumbled.1 point
-
1 pointHo boy, lots to do here. Remember that the soi-disant "Series 1" designation here in the USA generally indicates a car built through early Jan. 71, the change coming at around VIN #20000. The late-71s (sometimes aka "Series 2") ran from the end of Series 1 production through 8/71. ash tray - Same basic style used through 8/71, several small variations during the run. E31 head - Many late-71s had the E31 head, through 5/71 at least, maybe longer. By 7/71 (my current car) had gone to the first of four E88 variations. "Nissan 2400 OHC" valve cover - Not all Series 1 had these. Apparently none of the automatic-equipped cars (from 9/70-12/70) had them, and even the manual transmission cars seemed to lose these sometime in 10/70. metal fan (behind radiator) - All '70 and '71 cars, through 8/71. tail light wire harness (has aprox. 1" white molex plug) - There were many wiring harness differences, even within the Series 1 cars. The tail light harness plug size difference is a minor thing, but is actually related to a complete change in the brake light function on USA cars. The Series 1 cars use all three red bulbs per side as brake lights, the Series 2 and later only use the upper and lower outside pair. coin holder - I could be wrong here if you are talking about some small variation I'm not aware of, but if not all '70-71 cars had this, again through 8/71. seats (non-reclyning) - Same again, they didn't change to the ratcheting recliner mechanism until the '72 model year. Standard on all '70-71. steering knuckles (shorter than later models and smaller ball joints) - Only early Series 1. The knuckles that take the smaller ball joints were phased out during the middle of Series 1 production. From personal experience, after 6/70 but before 10/70. tranny (has straight shift stick) - All '70-71 again, through 8/71. inner rubber shifter boot - All '70-71 again, through 8/71. center console - All '70-71 again, through 8/71. choke assembly in passenger compartment - All '70-71 again, through 8/71. choke plate on center console - All '70-71 again, through 8/71. dash (depression above hazzard switch is unused and thus not cut open) - All '70-71 again, through 8/71. gas door - All '70-71 again, through 8/71. gas cap - All '70-71 again, through 8/71. expansion tank (it's metal, they changed to plastic) - Other way around, and not strictly a Series 1 change. Early cars (like my former 10/70 and 4/71 cars) used a plastic tank, through 6/71 according to the parts list. After 6/71 they had metal tanks (like my 7/71 has). carbs (4-screw style) - 4 screw carbs were used for all '70-71 cars. The very early cars had some differences (lack of float drains, different shape float covers), but those were phased out long before the end of Series 1 production. front bumper mounts - I'm not aware of any differences here until the '73 model year. rear bumper mounts - Same as above. combo switch - Many electrical parts are slightly different, but again, they even vary within the Series 1 run. The obvious miss in your list is the defroster switch (added around VIN #1400 or so). The Series 1 defroster switch is black and unlighted. For late-71 it is orane and lights up when switched on.1 point