Leaderboard
-

Av8ferg
Free Member10Points1,538Posts -

DC871F
Free Member3Points676Posts -
DatsunZGuy
Free Member3Points930Posts -
Patcon
 Subscriber
 3Points11,142Posts


Popular Content
Showing content with the highest reputation on 11/17/2021 in Posts
-
5 pointsWell, I had some challenges today getting the engine started but phoned a friend “Captain Obvious” and he steered a mere mortal like me to success. First we had no spark, we narrowed that down to a bad ignition unit on my ZX distributor, put in a backup then we had spark but no ignition. Fuel pressure was 35psi. I couldn’t smell fuel so we guessed that the injectors were not getting power. Had a old fuse link on the injector power that goes to + side of battery. Put the link on a multi-meter and it had higher resistance that expected. I had just bought a new one from Banzi Motorworks (didn’t want to install earlier incase if I had a bad connection I didn’t want to burn it up. ($38 part). Put that one one and it fired up. Here’s a link to a video of it starting and running after I got the timing set and idle adjustment close. Thanks for all the help! You guys are awesome! I owe Bruce more beer!!! Sent from my iPhone using Tapatalk5 points
-
5 pointsFinally finished all the hook ups, re-wiring, hoses and cooling system. It took way more time than I expected. She’s was done at 3pm today but kids got off school bus so I need to wait until tomorrow. Like I said I hope it doesn’t blow up [emoji1787] Sent from my iPhone using Tapatalk5 points
-
3 points@HS30-H Thank you for setting the record straight and pointing out the inaccuracies of the video. I take anything posted on YouTube with a grain of salt when it comes to historical accuracy. It is often more about generating Likes 👍 and ad revenue 💰 than integrity of the subject matter presented.3 points
-
If a car was ruined by a flood but stayed in the garage the whole time - could it still technically be called garage kept? Ha!3 points
-
Some years ago one could clean up a branded Oregon title by registering the car in Washington, then back to Oregon. I believe they caught on to this some years back though.2 points
-
2 pointsDon't they use the same calendar in Neuvecelle as the rest of the world? This thread is 13 years old. mikewags hasn't visited the site since 2010. Welcome to the forum.
 2 points
 -
2 pointsSome of the last details getting wrapped up. AC system charged up and working nicely. Also working on getting the rest of the stickers installed and a window sticker made up for the car.


 2 points
 -
$21k for a car that needs some serious work. I'm astonished.2 points
-
Did this many times in Georgia living in Florida to get clean titles.1 point
-
Or...I could title it in Alabama with a bill of sale written on a Burger King bag, pre 1975 no title required just a bill of sale. There's a lot of stolen Northern cars down here still. My Dad said it was rampant in the '70s thru early '80s. My '72 was tiltled with a hand written bill of sale on back of a packing slip. Carried that to the Courthouse and paid $20? then got an Alabama title in my name in a couple of weeks.1 point
-
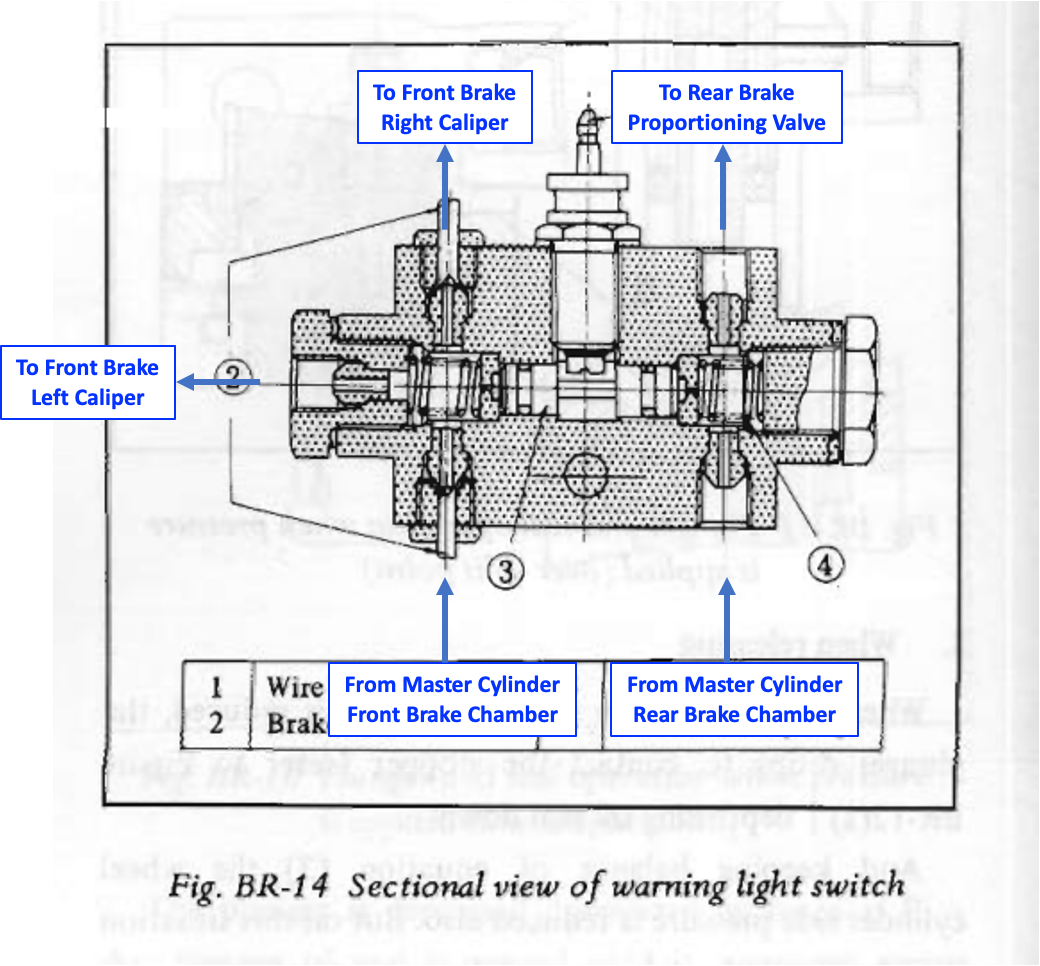
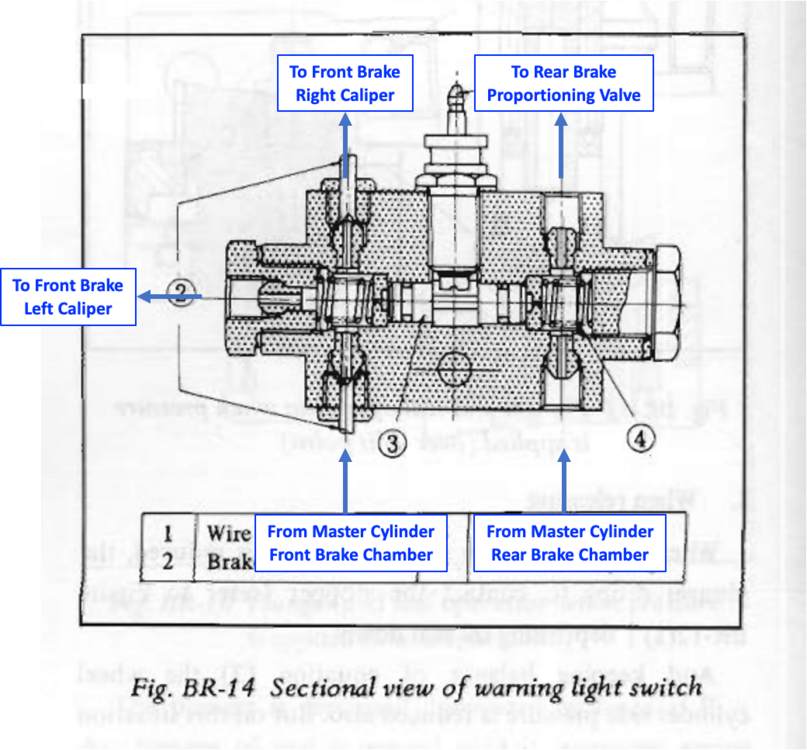
It appears to me that the front brake circuit is essentially common from the point where the brake fluid enters the warning switch. Below is a marked up image showing what I think to be true. If true, it seems the only possible cause for what I'm seeing is an obstruction in the left front circuit. I think I'll look at the warning switch next.
 1 point
 -
1 point
-
Currently $4250 Crosses the block in about 40 minutes. Cant watch it live, in the deer stand1 point
-
1 pointYes. 1970 'Deluxe' model S30-D Fairlady Z-L would have had loop carpet sill trim pieces, matching the floor and deck area carpet. In contrast, the 'Standard' model S30-S Fairlady Z would have had 'leather' textured vinyl trim to match the floor and deck mat material.1 point
-
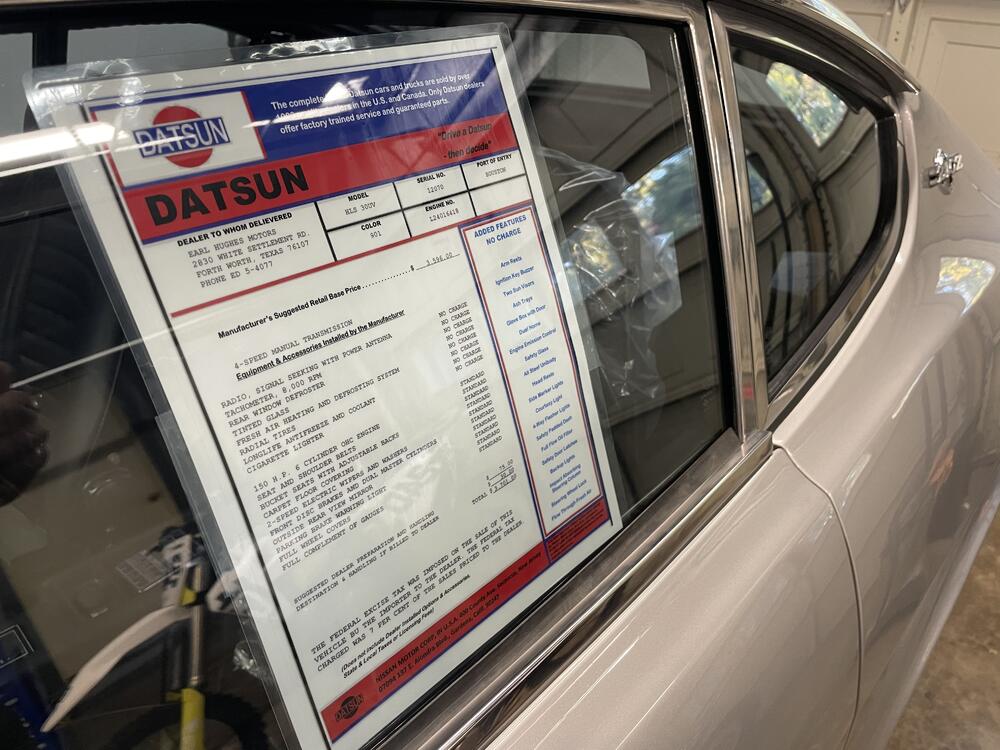
1 pointOne of the reasons that i'm here is i learn some english... (I hope!!) do i see that right/correct? It says: "Dealer to whom delievered" ? ... that must be wrong hey? (Just under the black DATSUN on red..) But don't worry i find your work fantastic! Very nice, AND you know it.. it's in the details!! Again, it's a beauty! 👍 👏1 point
-
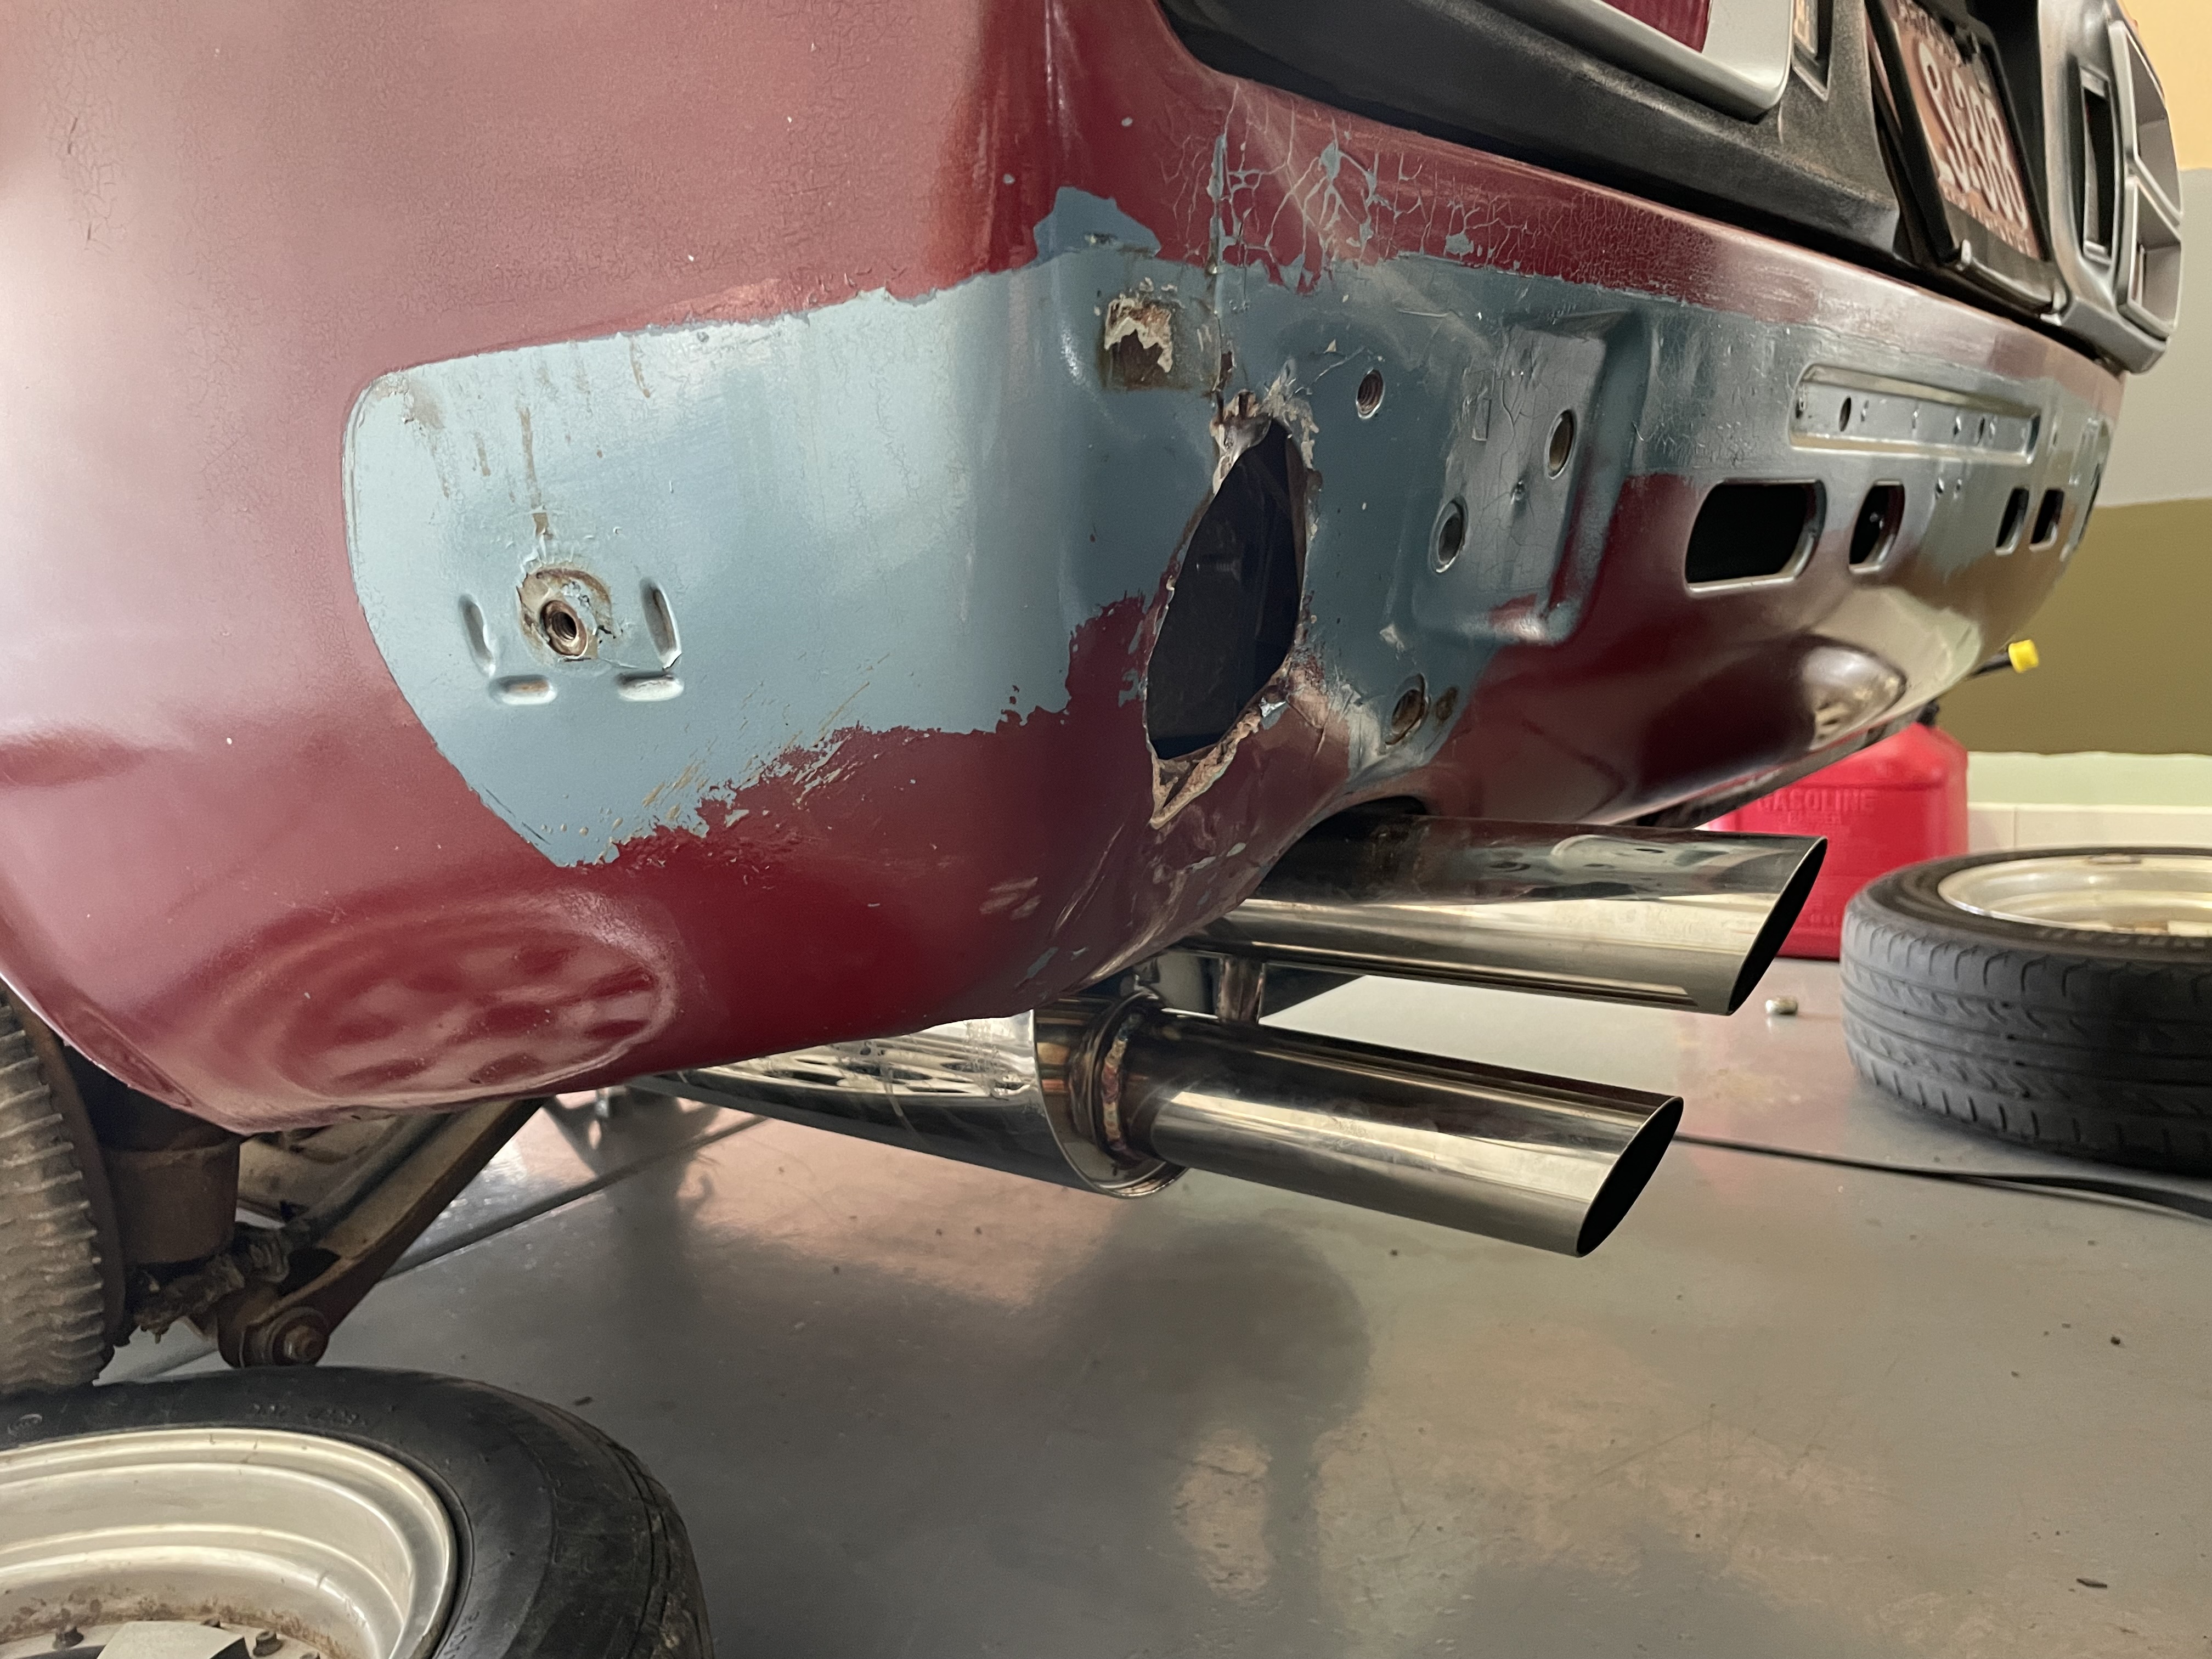
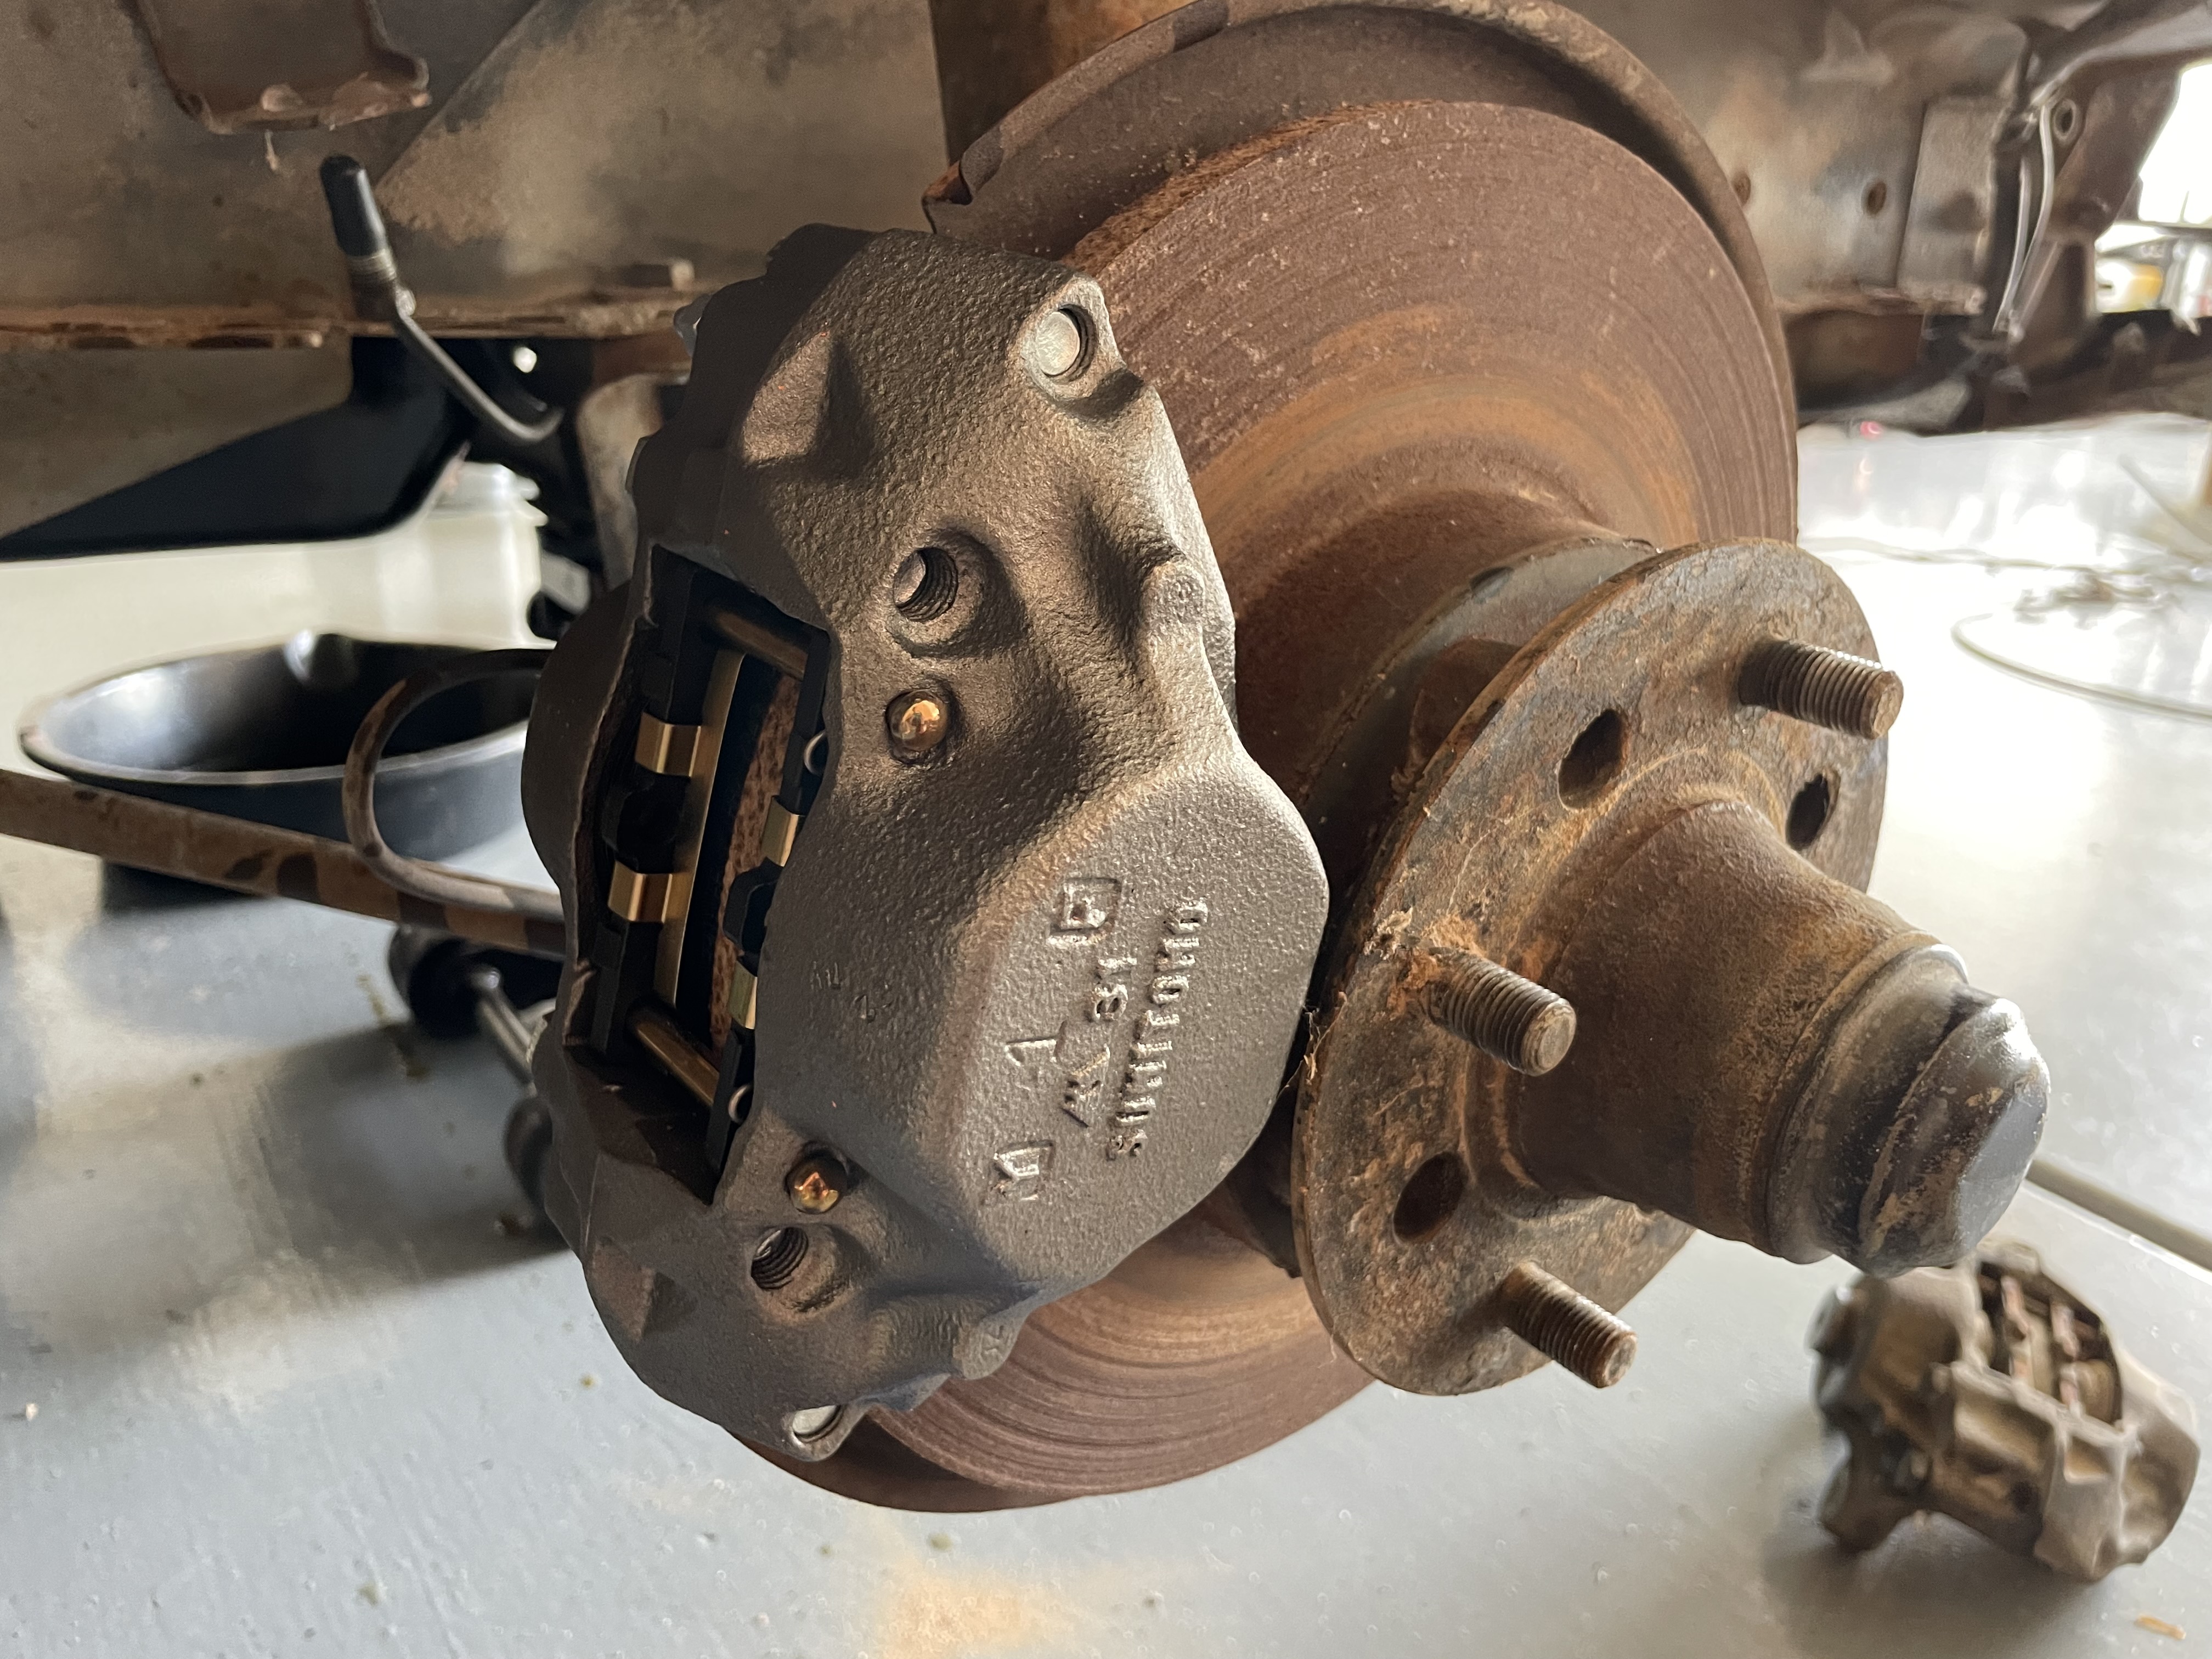
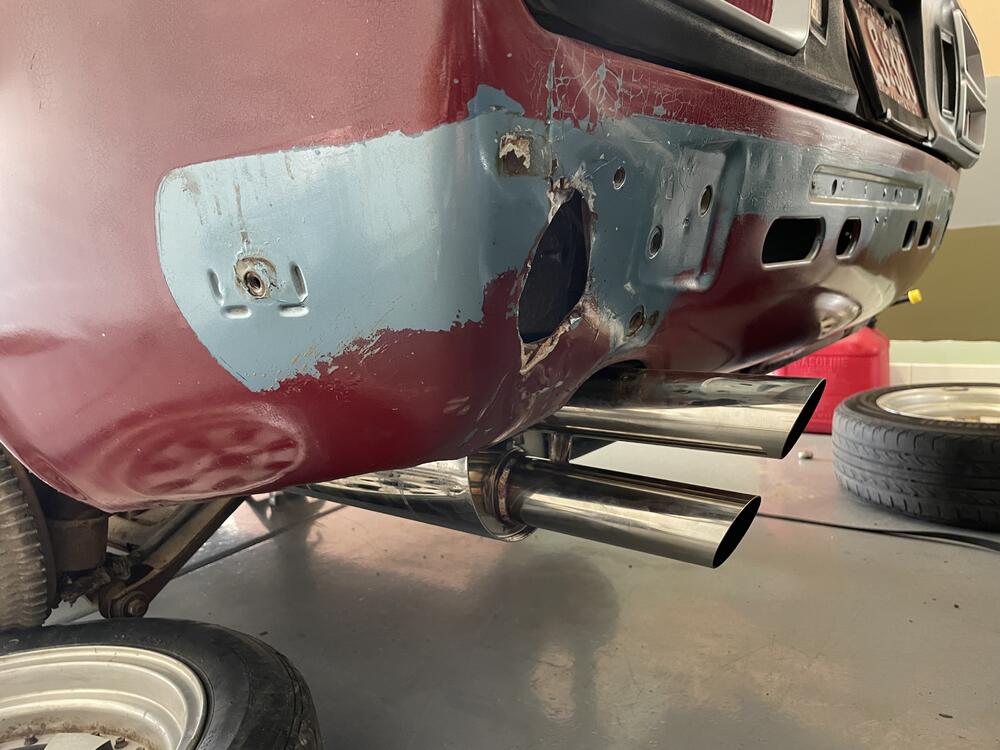
1 pointI realized I never posted my exhaust photo! Its too good looking for the rest of the car! I will dial in the fitment once I take it to the shop for a proper flange to be installed. Currently it sticks out a couple inches too far for my liking. But I can start the car in the garage without my ears bleeding so its a win 🙂 I finally moved my attention to the brakes as its the last thing needed for a test drive. I finally got the front bleed screw unclogged but it was sticking. So rather than spend time and money on a rebuild build...a remanufactured unit is only $37! Got one for each side with new pads. New rotors are in the mail so dont mind those rusty discs too much. You might also notice the soft lines are disconnected. After replacing the calipers, I thought its better to be safe than sorry, especially for brakes! So those are on order too. Once brakes are done I will be ready for the maiden voyage! Maybe just to the neighborhood park and back for now 😉 I want the satisfaction of driving her before tearing into the interior and wiring harness.
 1 point
 -
1 pointA pretty good new timeline of the Z car. Some interesting footage & pictures.1 point
-
1 pointI have three - used - so I guess you can count me as hoarder... (no blacks, one white, no reds, but three yellows...)1 point
-
I agree it's somewhat of a struggle to convey all the variables that I've tweaked during this troubleshooting activity. Your assessment of the current state is accurate except the problem child is the left front and not the right front. I get what you're saying about whether I can spin a rotor by hand. I really won't know about true braking performance until I back it out of the garage - I've done that before and then pulled right back in because the brake performance was so poor. What I can say is that on the right front, I have gone from being able to freely spin the wheel by hand to now not being able to move it at all by hand, so that is at least progress in the right direction. At this point, I'm mentally preparing to start the entire brake bleeding process over from scratch. Something I'm not excited about, but may be necessary. What I've done to date: Checked protrusion of brake booster rod vs depth to engagement with MC piston. Based on my measurements with a caliper, they should be within a few 1/100s of an inch when the MC is mounted. Adjusted the brake pedal range of motion to maximum travel to ensure the MC piston is able to fully recede to its original position after the brake pedal is released Bench bled the MC (literally on a bench). I think this action helped "prime" the entire system and seemed to have a positive impact. I remounted the MC while still full of brake fluid - a difficult job while simultaneously ensuring no fluid gets onto the paint. Corrected a brake fluid leak at the inlet to the brake warning switch that mounts just below the MC. I ended up building a new line from the MC front brake circuit to the warning switch. No leak at that point sense. At this point in the process, I was successful getting the right front brake to fully bleed and I now get brake performance (when tested by turning the wheel by hand). I still did not have any brake engagement on the left front. When bleeding the left circuit, there is limited fluid flow out of the bleed valve. Note that the rear brakes have consistently worked and I get really solid flow each time I bleed them. I then worked exclusively on the left front brake circuit. I confirmed that fluid exits the brake warning switch when the pedal is depressed, although I don't have a good means to measure the flow or force as it just sprays out of the port (into a small bucket I was holding) I checked that I could "blow through" the hard lines in the left front circuit and I replaced the flexible hose with a new hose. I was not able to blow through the entire left side circuit (from the line at the warning switch to the caliper bleed valve. This made me suspicious of the (brand new rebuilt) brake caliper and I removed it from the car and took it to the bench. I set it next to the original (also rebuilt but by me) brake caliper and compared my ability to blow through each from the fluid inlet to the bleed valve. The original was easier to blow through. I suspected a blockage in the newer caliper and used my brake bleeding vacuum kit to pull on each at the bleed valve and compare the vacuum. After a few tries, the newer caliper started to behave in line with the original possibly indicating an obstruction had moved but I didn't see anything. Still suspicious of the caliper, I installed the original, hooked it up, and proceeded to bleed the lines again. No change. Still very low flow of fluid out of the bleed valve. I removed the original and reinstalled the newer caliper (my preferred if I can get it to work). That's where I am as of today. Parts that have been changed during this process: Master cylinder Brake warning switch Proportioning valve (mounted under the rear of the car on this 1972) Both front calipers Brake line from MC to warning switch for the front circuit Brake hard line from the warning switch to the flexible hose on the left side I'm glad you got me thinking through this as I knew I needed to get all this documented for posterity!1 point
-
Of course us on-line are limited to the descriptions of the behavior, and because of this things can get murky. At this point, you're saying you've bled all four corners and they all look great except for the right front. And at that right front, you've got a very weak stream of fluid and a pedal that still goes to the floor. Other than that, everything seems to be OK. Is that correct? One thing to keep in mind is that it really doesn't take a lot of pressure in the lines to lock up a corner (any corner) to the point where you can't turn it by hand. In other words... Just because you can't spin a rotor or a drum by hand doesn't really mean you've got normal pressure in that corner of the system. Even a small amount of hydraulic pressure in the lines is enough to prevent the corner from being able to be turned by hand. Hope your brain clearing walk-away provides some ideas and you come back shortly with the answer.1 point
-
I have a tool that you use for finding tdc compression that you stick into cylinder 1. But I also took off my valve cover and checked the lobes and timing marks and checked timing marks on my pulley. Also used the the oil pump spindle at the top at one point to make sure that was tdc1 point
-
It looks to me like the valve cover says Nissan OHC, which might mean the engine is not original to the car. I'm sure it will go up more towards the end of the auction. People are paying higher and higher prices for these cars in this condition, and a lot of times selling the unfinished project a few years later.1 point
-
1 pointHaha.. hoarding.. 😂 Some z-people called me a hoarder... @bartsscooterservice I did not know that the yellow one was the original for the 240z! Thanks! I got one brand new so i cherish that one!1 point
-
It's at 1450 dollars now... (that pile of z junk..) but i saw something else a Datsun/nissan 720 1984 that would be a nice winter car.. (And a good car to get my firewood haha.) Copart USA - Online Live Vehicle Auctions - Bid & Win1 point
-
1 pointBut packed full of mistakes, misconceptions and misapprehensions. As usual.1 point
-
In many states that sticker could be removed, but the title would be branded salvage. Somebody aught to watch the live auction. I suspect the final price will surprise you1 point
-
The car had been totaled and/or reconstructed, it then has to go the the Oregon state inspection and get the vin re-certified. You will notice the new state sticker had the same vin as the original. This will also mean the car will always be branded as totaled or reconstructed.1 point
-
1 pointHe came up to Road America a lot for the vintage races over the years. He raced my friends original 1964 289 Cobra several times. Before he was married he always brought a girlfriend with him. He loved the ladies. 😃1 point
-
We were in North Italy around Lucca, Siena Pisa etc in October for two weeks. We decided to jump in the car drive down and book B&B's or agriturismo's. Great time.


 1 point
 -
Looking at the BASF Glasurit 801-703 chromated epoxy primer's safety data sheet (SDS), it is a "horror show" from the perspective of having cancer causing ingredients which include both the solvent xylene as well as the "active ingredients" strontium and barium chromate. Chromate is what we chemists call "chromium six", abbreviated as Cr(VI), and it is exceeding dangerous in long-term occupational exposure. If you work with such a product, it is probably not too bad when you are applying the wet mixture - but do that with proper ventilation and other PPE, please. But, if you EVER have to sand, media blast or otherwise disturb the dry film - even years later - you absolutely need to do so outdoors, fully protected and well away from any area where people or animals would be likely to roam afterwards. Literally, that dust could end up killing you. I once worked on a contract for the USAF to clean up the waste streams from a parts reconditioning facility in Utah that did a lot of electroplating with, among other things, cadmium and Cr(VI) solutions. By the time the waste streams got to the treatment facility, the Cr(VI) and mostly been reduced to chromium four, Cr(IV), which is still every bit as dangerous as Cr(VI) but not as reactive. I always wondered about the folks who had to haul the sludge away to a HAZMAT landfill.1 point
-
1 pointI met Bob Bondurant when I attended his driving school in 1992. I wore his driving suit during some track days. At the end of the school session, he spent time with the "students" telling stories and shaking hands. It was a rush and a lasting memory to shake the hand that worked the Cobra gears at Le Mans. Rest in Peace.1 point
-
1 point
-
All the way through reading the above I'm thinking "this is a flood car" and then your last paragraph confirmed it, the only way I can think of possibly solving this problem is to pull the entire wiring harness from stem to stern, lay it out on the shop floor, cut off all the tape and start cleaning, testing for continuity and resistance on every wire. There is also the possibility the water has wicked up the copper wire under the sheath, has corroded the wire but is completely hidden. It might be a better all round decision the buy one of the many aftermarket wiring harnesses kits and start fresh.1 point