


Leaderboard
-
AK260
Free Member7Points999Posts -

Diseazd
Free Member6Points3,362Posts -

siteunseen
Free Member6Points15,115Posts -
Carl Beck
Free Member4Points5,043Posts


Popular Content
Showing content with the highest reputation on 04/10/2021 in all areas
-
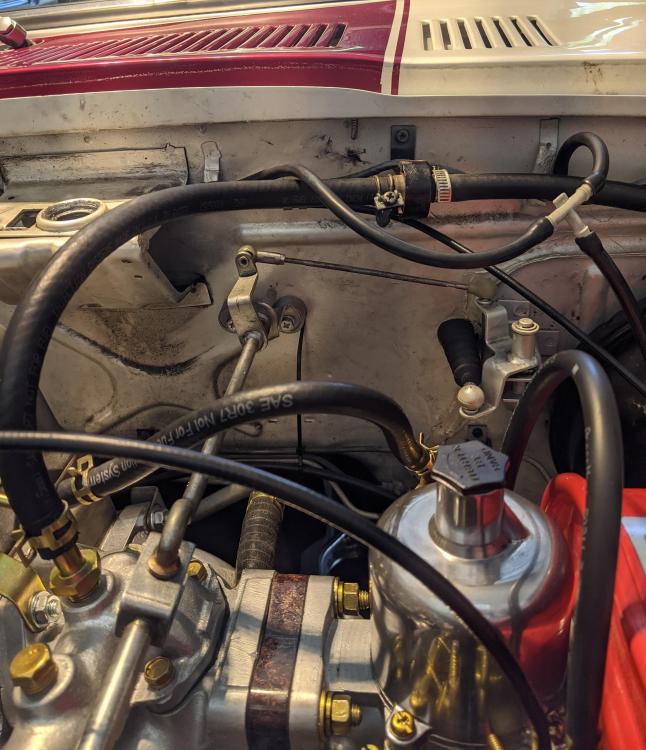
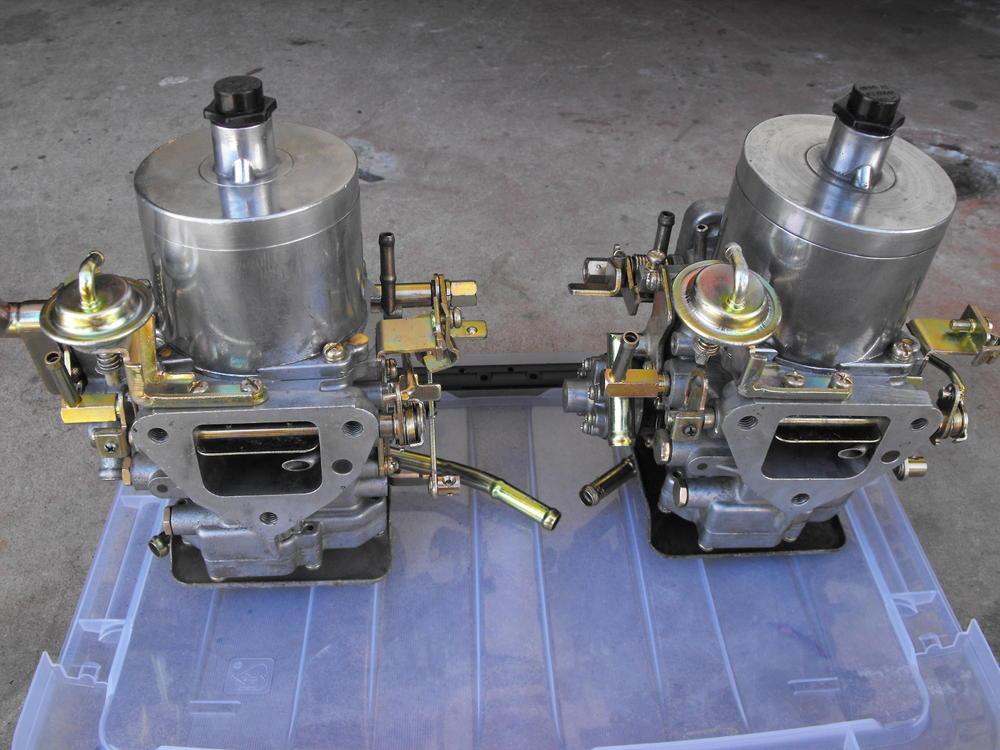
My experience was quite the opposite when it came to the Flat Tops While some like to debate the technical merits of the Flat Tops - one thing is not debatable. From the introduction of the 1973 240Z’s with the Flat Top Carb’s needed to met the EPA Exhaust Emissions Standards - Dealers were plagued with Customer Complaints accompanied by Datsun 240Z’s being returned to the Dealerships on a Tow Hook. Something never before experienced and most certainly never expected. The 240Z and indeed DATSUN had established a well deserved reputation for Reliability second to none. I was there at one Dealership and it was NOT PLEASANT for anyone, most certainly not the New Owners, nor the Service Managers that had to tell the Customers their car might be in the Service Bay for several days. Of course the Customer Complaints came back on the Sales Staff as well. Several Customers demanded that we refund their money and take the car back. The Flat Tops were so good - that Nissan Motors spent thousands of hours of Technical Service & Engineering time trying to identify and solve the problems with the Flat Tops both here in the USA and in Japan. We had Nissan Personnel in our Service Dept., working with our mechanics, several days per week, for several months. This was happening at 2 or 3 other Datsun Dealerships that I was aware of on the West Coast as well. Indeed we saw an ongoing series of modifications attempted while looking for an actual solution to the problems. A lot of Trial and Error went on for months. The problems according to Nissan were Vapor Lock in the fuel lines and Percolation of fuel in the float bowls (now hanging directly over the larger and hotter exhaust manifold). The attempted solutions were many and varied for months and months. The result were Z’s dying on the street or highway and/or refusing to restart when hot. It was not unusual for a Customer’s Z to be returned to the dealership 3, 4 or 5 times before the Customer gave up. (then went to Private Repair Shop and had 70/72 SU’s put on - problem solved). By the end of the 1973 Model Year, Nissan had greatly reduced the occurrences of the “problems” - but far too many Customers in several area’s of the Country were still being effected and/or were disappointed. Nissan’s real solution to the wonderful Flat Tops was to replace them with Fuel Injection as soon as possible. For most customers, and secondary owners - the Z’s were out of Warranty after 12 months/12,000 miles - so any/all labor spent attempting to “correct” of “fix” them held the potential of significant Labor Costs for subsequent owners - their least expensive solution was to replace them with the 70-72 SU’s. By the time the 74 260Z’s came out - Nissan had made several changes to the Flat Tops and they did perform far more reliably - however outside of the Datsun Dealers, the privately run shops did not have the benefit of Nissan’s Extensive Technical Training offered to the Dealer Service personal, nor did they have all the Technical Service Bulletins the Dealerships had. So private shops just refused to spend the time with the Flat Tops - because their Customers weren’t willing to spend the money on the labor hours needed to overcome the learning curve. The “learning curve” consisted mostly of trying to get the technical information from the Dealer Service Departments (who really weren’t in the business of training their own competition). This was not a situation where untrained Service Tech’s did not know how to deal with a new Carb. - it was a situation where the new carb. properly tuned to meet the EPA Spec.’s at the time - would not perform on the car. A year or year and half later, with the new Carbs redesigned / modified yes, the Nissan and Dealer Trained mechanics could set them up and yes they would run (most of the time). Mr. Umera tells the story in his Book: Section: Post Sales Responses - Vapor Lock -Quote:- Executive Director Ryoichi Nakagawa, the chief of the engine departments, gave us a pep talk, saying, “In a car, the worst case that can happen with this defect is the engine stalling, but if this happens on a plane, it crashes.” Although the engine design departments also tackled countermeasures, satisfactory results were not obtained, and the manager Harada of the Third Design Department asked us to cooperate in coming up with countermeasures for the vehicle itself. As a temporary measure, a heat shield plate was placed between the exhaust system and the carburetor, glass fiber was wrapped around the fuel system pipe, and louvers were cut in the engine hood to vent heat. But this was not enough. Then, as the last resort, a powerful sirocco fan, which began to turn when the temperature in the engine room rose above a given temperature, was installed in the engine room to pump out the heat. This almost solved the problem, but it was never perfect, because the fan would turn for a while or sometimes started turning suddenly even after the engine was turned off, surprising drivers. Assistant Department Manager Shidei, who was the chief engineer at this time, visited America to persuade Nissan Motor Corporation U.S.A., to deal with the problem using this tentative measure for a while until a proper countermeasure could be taken. I can’t imagine that would have been an easy task for him. One year later, we solved the problem properly by abolishing the carburetor and adopting the L28 engine with electronic fuel injection. -End Quote- FWIW, Carl B.4 points
-
4 points
-
@jfa.series1, your suggestion to shorten that rod helped a lot. Thanks! See pic of new angle. I also swapped back to my original "pirate's hook" assembly since the one I recently acquired was at a more dramatic angle. Also put a little white lithium grease in some spots.

 2 points
 -
Too bad they didn't solve it by installing a cross-flow head. SUs on one side, exhaust on the other.2 points
-
The plates look too open to me two. You removed these from the shafts didn't you? They only go in one way. Are you sure they're installed correctly?2 points
-
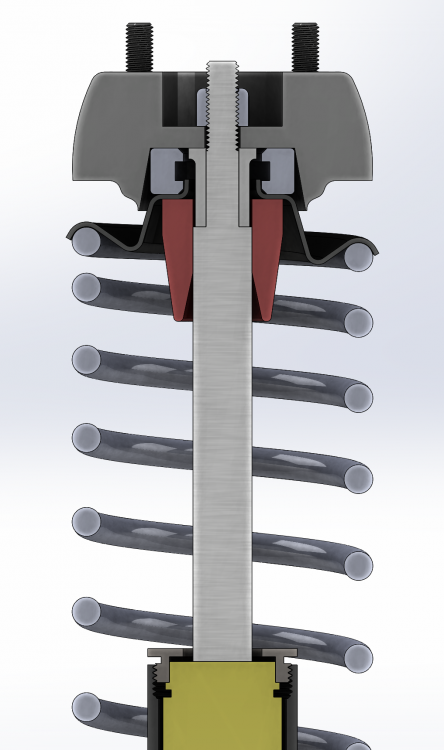
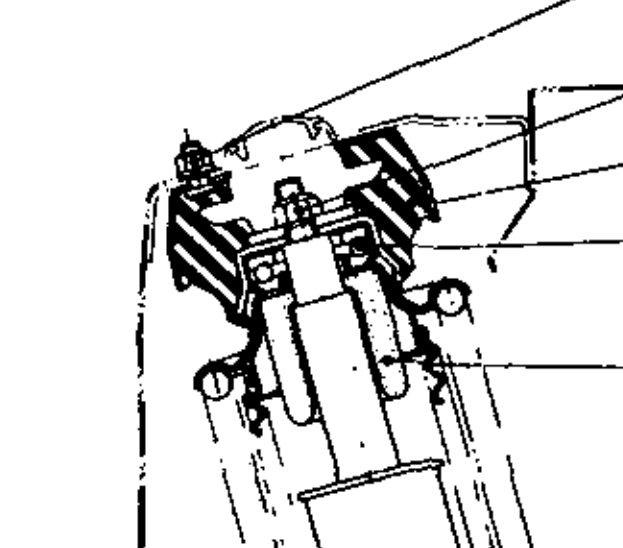
2 pointsIf these are the fronts.. why is there not a bearing in the top that can let the top rotate? (these bearings are bearings that are not like the wheelbearings but rotate top and lower part .. (i don't know how to say this on an other way..) Nice picture drawn but the topbearing shoud be drawn in an other way.. there should be a top and lower half with ballbearings in between. Again, nice drawn.. you'll figure it out i'm sure! 😉2 points
-
Well, I’m forever stunned at how little air / fuel a healthy engine needs to rev up without load. So not too sure chap. I will get you a photo of mine shortly. The good news is, you can see one piston shooting up more than the other, so now you have something to work from. Forgive me if I’m going over things already discussed / suggested, I’m just trying to go back to basics and eliminate possibilities in my head. The simple fact is, at the most basic level an engine only needs timing, fuel and air to rev up. So, we’ve determined your timing is OK, let’s park that. As for fuel, I know you’ve checked fuel bowl levels and I’m assuming your jets aren’t set overly rich and are equal. So for now let’s also ignore them. I am also assuming you don’t have a sticking piston and have done the “drop test”, so I’m making an assumption that your pistons move freely. The only reason a piston rises is, sufficient airflow across the bridge that with a pressure differential overcomes the effects of gravity and the carb spring. So either you have one carb with little vacuum on the inlet side compared the other or not enough resistance against the piston. You have a balance tube - so at idle, theoretically, you have equal vacuum across the manifold side of both carbs which should raise both pistons equally. An inlet manifold vac leak would be shared across the carbs - do we agree so far? Would you please do me 2 favours: 1. Test your spring rates - I did mine very simply using books and kitchen scales to prove they were pushing equally at the same height (67mm). Let’s prove you have equal resistance between your carbs so as to eliminate that. 2. While you have the domes off, check that the hole(s) in one of the pistons isn’t blocked (red markup). The one that “communicates” manifold vac to the piston. Also check the small carb inlet holes that “communicate” atmospheric pressure (yellow markup). These are the only mechanisms by which the piston is lifted. If blocked, or restricted, the rise will be affected. Give them a good squirt of carb / throttle body cleaner and a small brush / wire through the holes. Also ensure that the washer at the bottom of the spring isn’t blocking the piston holes when reassembled. Once we prove the above: Let’s try something a little different to prove you have or haven’t an air leak. I want to separate your carbs from each other. I want you to block the balance tube with a home made rubber gasket at both ends such that we eliminate any possibility of any leaks through it and prevent the equalisation of any manifold side vac leaks between the carbs. After that, you can disconnect the balance “bar” such that both carbs work independently of each other. Now you can measure air flow with an airflow meter through each carb and adjust idle screws until the airflow is equal. This will very quickly show you a difference between the two. The one with a vac leak would have the larger opening. Then we can start to work on that side of the manifold and investigate any false air sources.2 points
-
2 pointsSomewhere in southeast Idaho tonight, headed for Fort Bragg. Mrs. Racer and I are taking the oldest grandsons car to him. Driving straight through. A little Johnny Winter for the night time drive.2 points
-
OK, MEGA dumb question - are you certain both carbs have the depression springs installed on top of their pistons? Also that gap looks a little wide to me - could be just a trick of the camera. I will take a photo of mine later today for comparison. If memory serves, mine look almost completely shut. A vac leak between carb and intake does not make the piston rise - in fact quite the opposite. Air flow THROUGH the carb does. [mention=23570]siteunseen[/mention] - no tricks just the iPhone camera. The CCD being infrared sensitive picks up the hot manifold and makes it look way hotter. To the naked eye it was just a very slight dark red glow / barely visible but enough to make me want to take a photo!2 points
-
Hi Dadsun, welcome to the '73 club! The best year of all 240Zs! 😁 But the "worst of the flat top carb iterations.." was still a great carb, despite Z therapy and numerous mechanics who couldn't be bothered to learn about the SU HIF "Flat Top" carb design licensed by Hitachi that powered many sport cars for more than two decades. My 10/72 1973 240Z (S/N 125678) ran great in inland Los Angeles county heat for 117,000 miles before I fell for a mechanics spiel about how wonderful and superior the round tops were and I replaced them with round tops to "improve" my car. They did not. Thanks to Motorman7, my Z is now running again with the Flat tops and winning awards. See the thread "We're Bringin' back the Flat Tops" here at classiczcars. Good Luck on BAT. I'll be watching. (although I'm never selling my '73. it is Too Much Fun!) My Z shortly after I bought it in 1973 Inspected by Yoshihiko Matsuo at 2019 ZCON in Branson. Came in 2nd to Zup's '73 (also with Flattops!) Hitachi SU-HIF "Flat Tops"

 2 points
 -
2 points
-
2 points
-
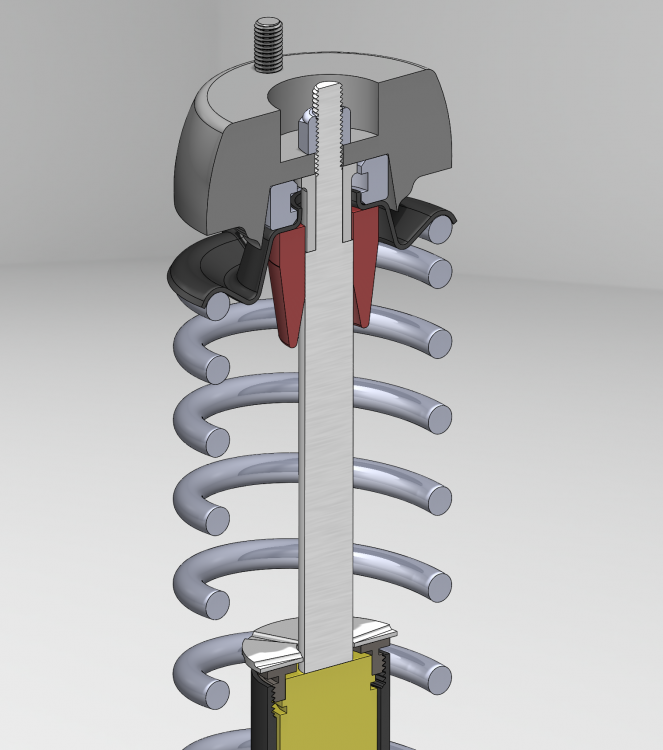
2 pointsActually Joseph and I have been talking on the phone about this during recent posts. Lapriser had as also reached out to our KONI tech staff at info@koni-na.com, which is what we would prefer that you do if you have a technical issue such as this. I also saw the post notification when it popped up on the forum. First off, clearly I am sorry to see of the issue that had occurred with the stripping of the threads during installation. We (KONI and Motorsport Ind.) have already made a plan to get a new replacement unit sent out to lapriser at no charge listed officially as a "customer courtesy" replacement due to an installation error that hopefully we can all use a teaching/ learning example and not actually as a warranty situation caused by a product manufacturing issue. Looking at the photo, it is pretty clear that the nut was not cross threaded from the beginning as the threads are only truly destroyed down in the area where the nut sits in the tightened position. The instructions state that the nut should only be tightened to 37 ft./lbs. which is where we feel that things went wrong here. Normally we only see issues of mounting threads being stripped in place (it is quite uncommon though) when someone uses an air or electric impact tool and bangs away to a much higher torque and also gets the very common side effect that the damping adjuster tab and mechanism also gets jammed from the hammering effect of the impact tool. Although the adjuster did get stuck in this case, lapriser did state that he had only used hand tools so must have been solely from manually tightening to much greater number than recommended. Of particular note, the top mounting threads used by the Z cars are use D -shape on the quite small in diameter (12mm vs most strut mount threads at 14mm) with a pretty fine thread 1.25 pitch. The flat area of the D means that about 25% of the circumference has no threading which will also mean that there a not a lot of threads available to hold excess torque without damaging the threads. The D -shape is required by Datsun's upper mount shape which was not uncommon in the 1960s and 1970s but went away for the vast majority of cars after that and now 360 degree threads are the norm for several decades. Extra care should be used if you are installing the D - shaped mounting pins in a spherical bearing camber plate as well that doesn't have the D -shaped mounting hole. Laprise did make the comment that the insert appears to no longer be damping now which is probably evidence that difficult and escalating process of getting the thread damaged nut and mount separated had also cause the strut's piston to become untorqued and open up or bypass the valving flow paths. Normally we only see this when someone uses and impact tool and it aggressively spins the piston rod inside the body or it the car has experienced very high side loading force or top mount bearing failure under use. So we will make sure that we get a fresh units to laprise for his car but would very much like to caution people during installation to be careful and be aware of the following: Use only hand tools and not impact tools as you can overtighten and cause internal issues that you may not notice at that time Use only 37 ft/lbs when tightening the top nuts . If you don't have a torque wrench available, better to be ion the conservative side than the too aggressive side The Z car's 50 year old top mounts require a small diameter, fine thread and a D shape top mounting area with about 25% of the circumference having no threads so again, please do not overtorque it or you can damage the threads and have a tough time getting it back apart. The provided nyloc nut is there to hold the mount properly tighten and not loosen so there is no need to tighten beyond the recommended amount. Earlier in this thread someone projected that the KONI nyloc nuts were made of stainless steel and the cause for galling but that is incorrect. The KONI nuts are actually chrome plated mild steel and not stainless (much more expensive and not used in damper hardware) so dissimilar metals of different hardness is not an issue here. Sorry for this being long but I am trying to be thorough with the explanation.2 points
-
1 point
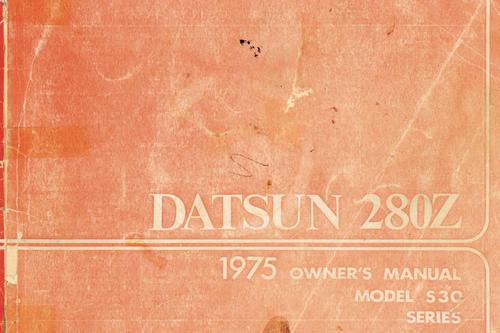 I scanned in my 1975 280z Owner's Manual. The binding was falling apart so I pulled the pages apart from each other, made the scans, and assembled in InDesign. Pages 67-70 are missing though from the emissions section. This is a better quality scan the the other '75 manual I found on the net.Free1 point
 -
1 pointThe Z Proto wrapped up a three-day visit in Dallas today. I had recently posted on the Nissan USA Facebook page about our 50th anniversary and they reached out to me with an invite to see the Z Proto. What followed was an unexpected photo and interview session where they posed my car next to the new Z. The new Z is a sleek and stylish car with none of the faux vents, overwrought bulges and creases, or chrome embellishments; the interior is exceptionally comfortable and well done. The Nissan team was very welcoming and showed a genuine interest in my car. I expect to get copies of the photos taken by the pros in the coming weeks.


 1 point
 -
1 pointThat's like a pic of Bigfoot, I don't exist except in the wild. We also have half of riffraff, I guess riff, in that photo. @gwri8 what a fun day! @Mark Maras and his wife were my instant family as soon as they walked up to my never been seen country arse in the airport's luggage carousel and said "Cliff?".1 point
-
Yeah, I can see visually that there is WAY WAY too much airflow for idle right there. I think we’re starting to get somewhere. You definitely need to back off those idle screws a lot and or figure out why your butterfly is being held open.1 point
-
1 point
-
1 pointWhat is your tire and wheel combo? My front fender gap is much greater than what your picture shows with the same springs and konis. I have 205 55 15 on 15s. I have not driven the car so maybe it will settle once it hits the road?1 point
-
1 point
-
1 point1 pointIt took a while but I got to finally say hello to the car today, so here is mine for comparison Bear in mind with my cam it has a high idle at 1k revs and 16 degrees timing.1 point1 pointExample of a top bearing that's on top of the strut (lower and top half can turn independently. This is the other side..1 pointLove Mel Brooks! I watched Space Balls just the other night. Mr Brook's played President Skroob which is a backwards play on Brooks spelling. I've watched that several times and just realized this.1 pointI'll get a picture of my ceramic coated ones maybe tomorrow night if it doesn't rain here. I'm going to get both cars out, weather permitting. New oil and valves adjusted. Now to wear the brake pads down and heat the tires up. Big plans for Saturday, if no rain comes around.1 point1 pointPaint was no charge. They would plate if you needed at extra cost. Nice people, too1 point1 pointVery nice work, lapriser! As mentioned above, the only thing that I saw was that the upper image didn't have the white plastic "bump plate" but I see it on the angleD view. As Joseph mentioned, it is a surface for the bump rubber to impact into and allow any road grit or puffs of air from the fast moving bump stop to be blown out to the side and not into and possibly passed the piston rod seal. It is simply an extra layer of protection for the rod seal to have a nice long life in the sometimes harsh and dirty environment of a roadgoing fender well. Also if your car is lowered and has oversized wheels and tires such that the tire may hit a fender lip occasionally during deep suspension compression, you can stack a few extra bump plates on each other (called "packers" by the racing community) as a fine tuning to make the bump rubber impact happen a little sooner and keep the fender off your tires. Just for fine tuning though, if you need a lot of added strut length to keep the fender off the tire, you really should consider a higher spring rate, a higher ride height, or less wheel or tire width to keep the fender away.1 point1 point1 point1 point1 point1 point1 pointUtterly brilliant chap - massively applauded!! Yes it is but don’t forget the white washer that goes at the bottom to stop air locking if bottomed out.1 point1 pointHey guys, I was thinking about drawing up some Datsun Specific instructions for these. Is that something anyone would be interested in? I started modeling some reference 3D files for my own sake. Can anyone confirm this is the stack up for the fronts?
 1 point1 pointWell, I can FINALLY update on this topic! I had the Datsun booster (thanks, terrapin) rebuilt by boostersteve in Oregon. Problem solved! Brakes are now behaving properly. My takeaways from this are: . Cardone boosters are not a compatible swap into a 240Z (at least for 1973). don’t know why. . Datsun boosters, even the crusty ones, can be saved. cheers!1 pointI got my Kia motor from RockAuto and installed it last fall. Used a metal nibler to make it fit. Got it all hooked up with the factory connector and turned it on. The new motor made some noise but didn't make much difference in air flow. Did some testing and determined it was spinning the wrong direction. Swapped the pins in the connector and tried it again. Tons of air blowing after that. If anyone does the upgrade and doesn't notice a difference try swapping the pos / neg that feed the motor.1 point


Important Information
By using this site, you agree to our Privacy Policy and Guidelines. We have placed cookies on your device to help make this website better. You can adjust your cookie settings, otherwise we'll assume you're okay to continue.
Account
Search
Configure browser push notifications
Chrome (Android)
- Tap the lock icon next to the address bar.
- Tap Permissions → Notifications.
- Adjust your preference.
Chrome (Desktop)
- Click the padlock icon in the address bar.
- Select Site settings.
- Find Notifications and adjust your preference.
Safari (iOS 16.4+)
- Ensure the site is installed via Add to Home Screen.
- Open Settings App → Notifications.
- Find your app name and adjust your preference.
Safari (macOS)
- Go to Safari → Preferences.
- Click the Websites tab.
- Select Notifications in the sidebar.
- Find this website and adjust your preference.
Edge (Android)
- Tap the lock icon next to the address bar.
- Tap Permissions.
- Find Notifications and adjust your preference.
Edge (Desktop)
- Click the padlock icon in the address bar.
- Click Permissions for this site.
- Find Notifications and adjust your preference.
Firefox (Android)
- Go to Settings → Site permissions.
- Tap Notifications.
- Find this site in the list and adjust your preference.
Firefox (Desktop)
- Open Firefox Settings.
- Search for Notifications.
- Find this site in the list and adjust your preference.