


Leaderboard
-

ConVerTT
Free Member7Points422Posts -
Patcon
 Subscriber
 3Points11,142Posts
 -
w3wilkes
Free Member3Points972Posts -
Rod's Garage
Free Member3Points29Posts


Popular Content
Showing content with the highest reputation on 02/23/2019 in all areas
-
4 points
-
3 pointsok guys, I figured out how to enlarge the pictures. Was away last week racing my 260z in Sonoma. Am starting on the engine and transmission this weekend and will be posting pics of that soon.3 points
-
I mentioned this recently in another thread, but no one came through to confirm/deny or expand on it: There were reports some years ago that a section of a Z front fender has a contour that replicates the under-battery section of the inner fender. Unfortunately, I don't recall that suggestion being accompanied by pictures to show how it was done (or whether it was done). Even if true, Z front fenders don't grow on trees these days, so it would probably amount to a difficult or expensive solution (or both). However... The general concept is interesting. Perhaps a re-pop or scrap front fender from a more pedestrian donor vehicle would serve equally well? It would need to be a vehicle (car or pickup truck) with a similar, rounded styling. However, I think you'd only be able to size up the feasibility of this approach by cutting out the Z inner fender repair area and then eye-balling the shape, hoping that it would ring a bell: 'You know, that looks a lot like the crown of the front fender from a 1986 Ford Taurus'. A DIY alternative would be to take a fibreglass cast from the repair area and then do some tree-stump/sandbag tin bashing, using the cast as a shape reference.2 points
-
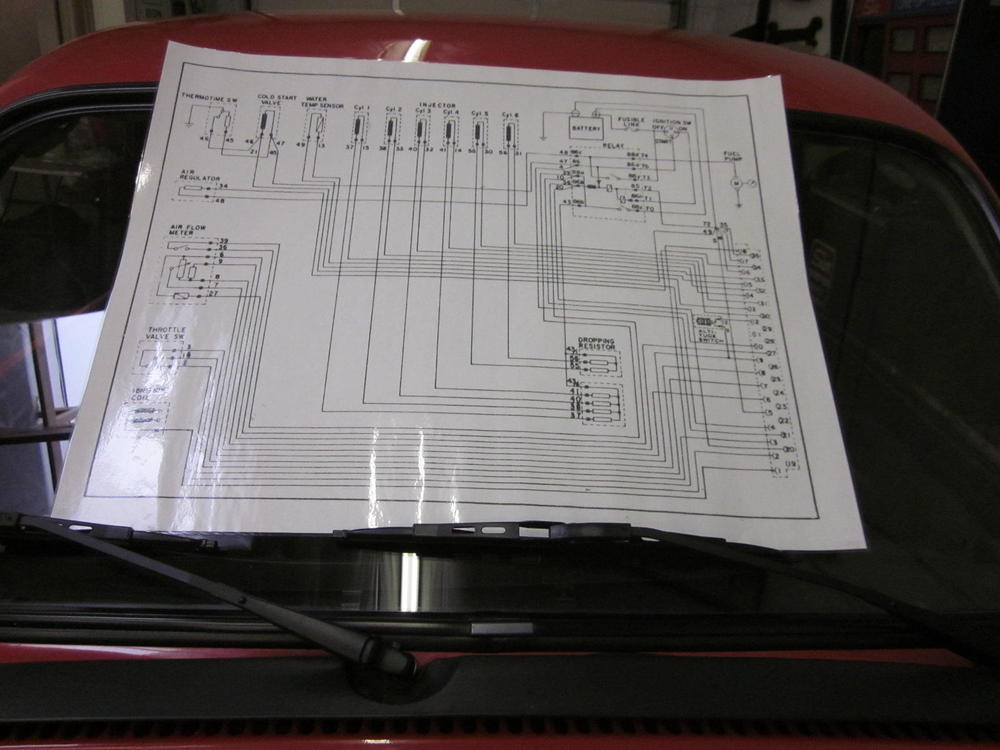
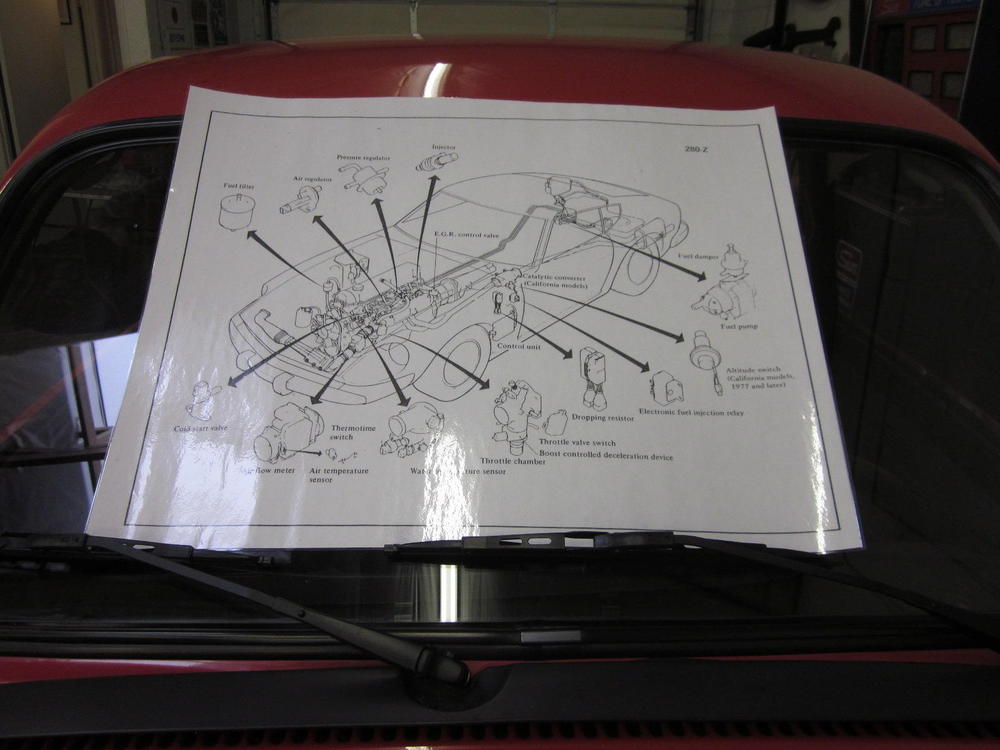
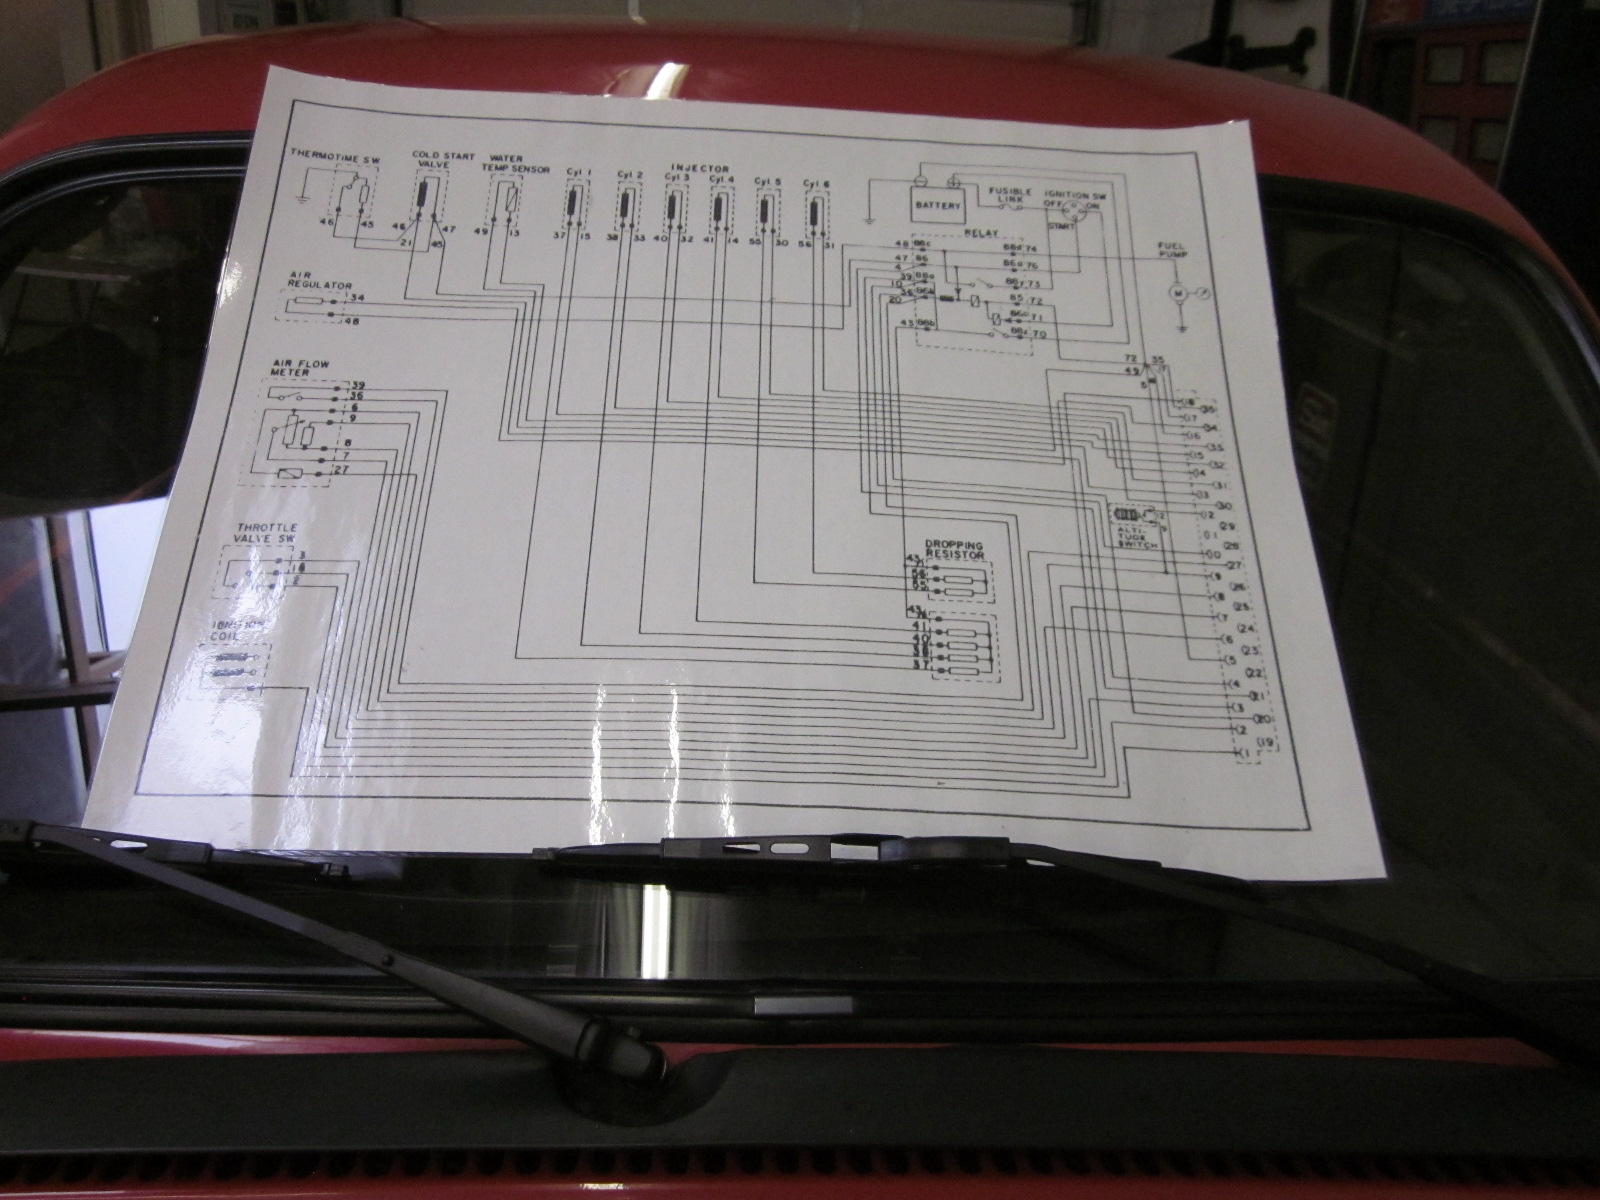
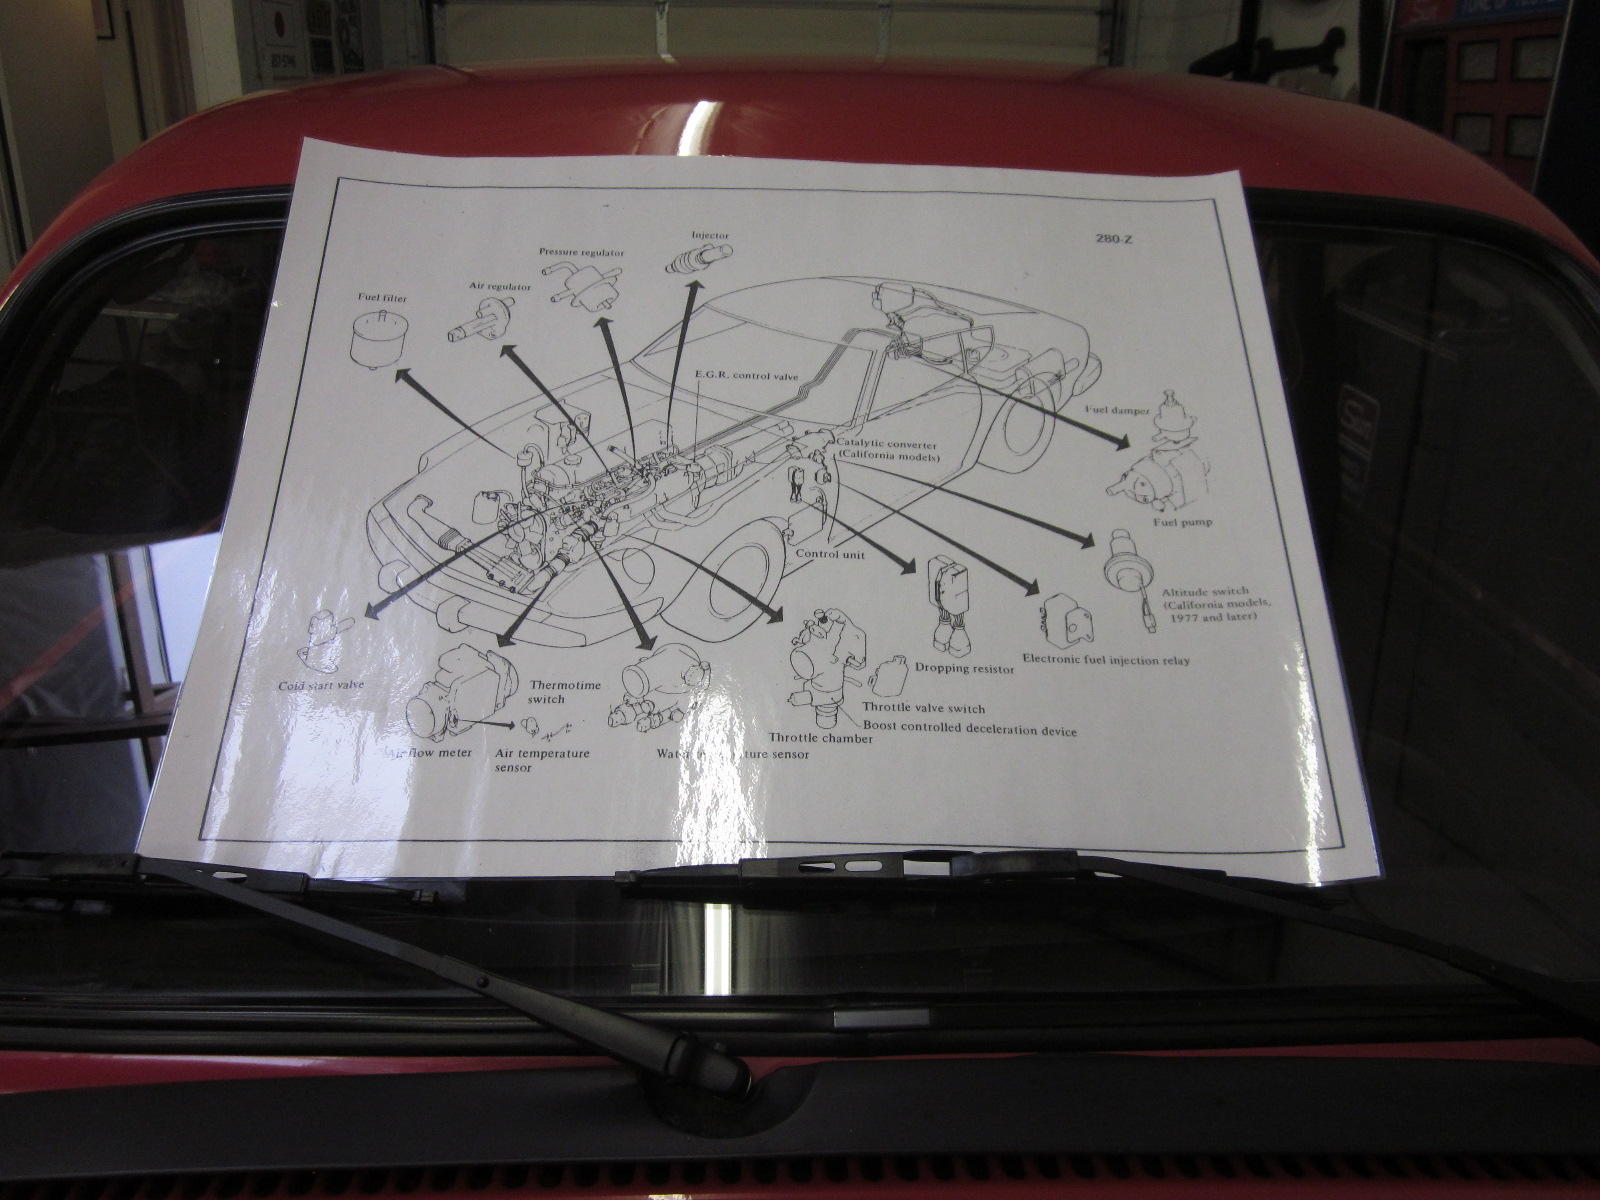
Very soon Banzai Motorworks will be offering 280 EFI charts in large 18 x 24 format. They will be laminated and make excellent Man Cave decorations. Stay tuned to their site at www.zzxdatsun.com. In the meantime they offer the same size laminated 240 wiring schematics for $13.50 plus shipping
 2 points
 -
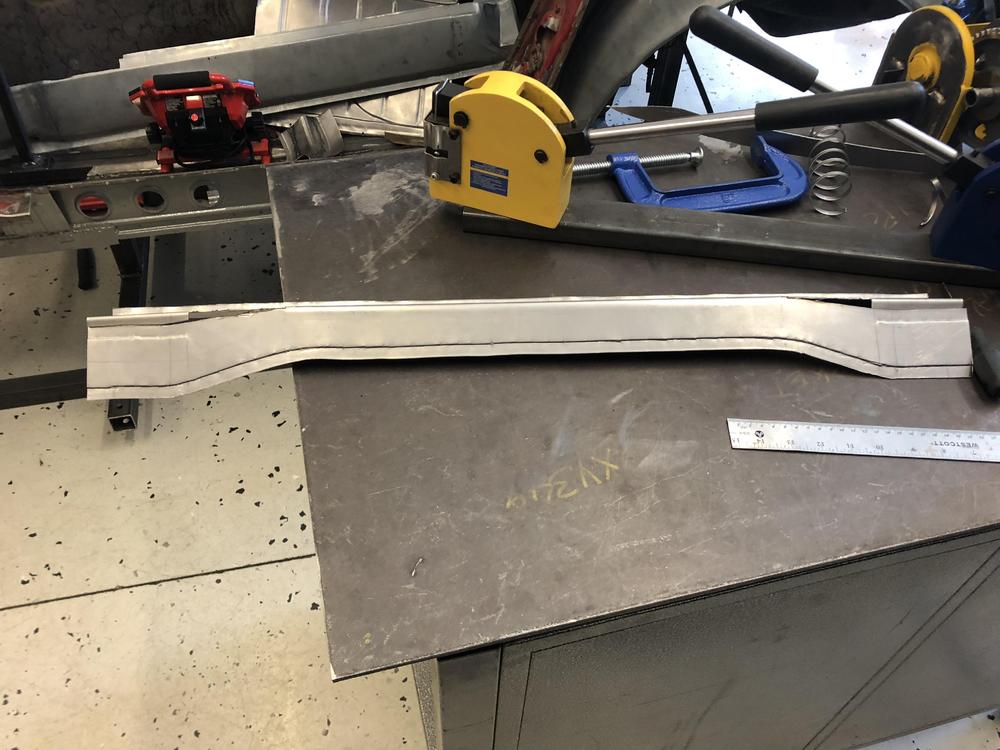
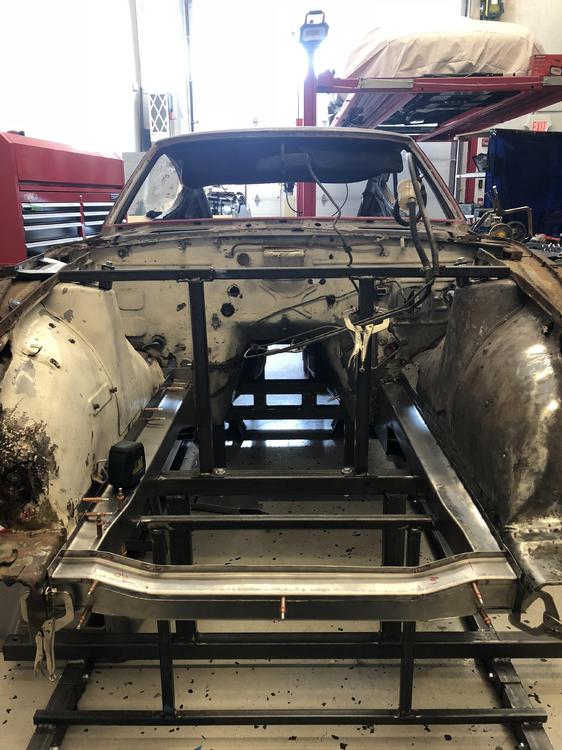
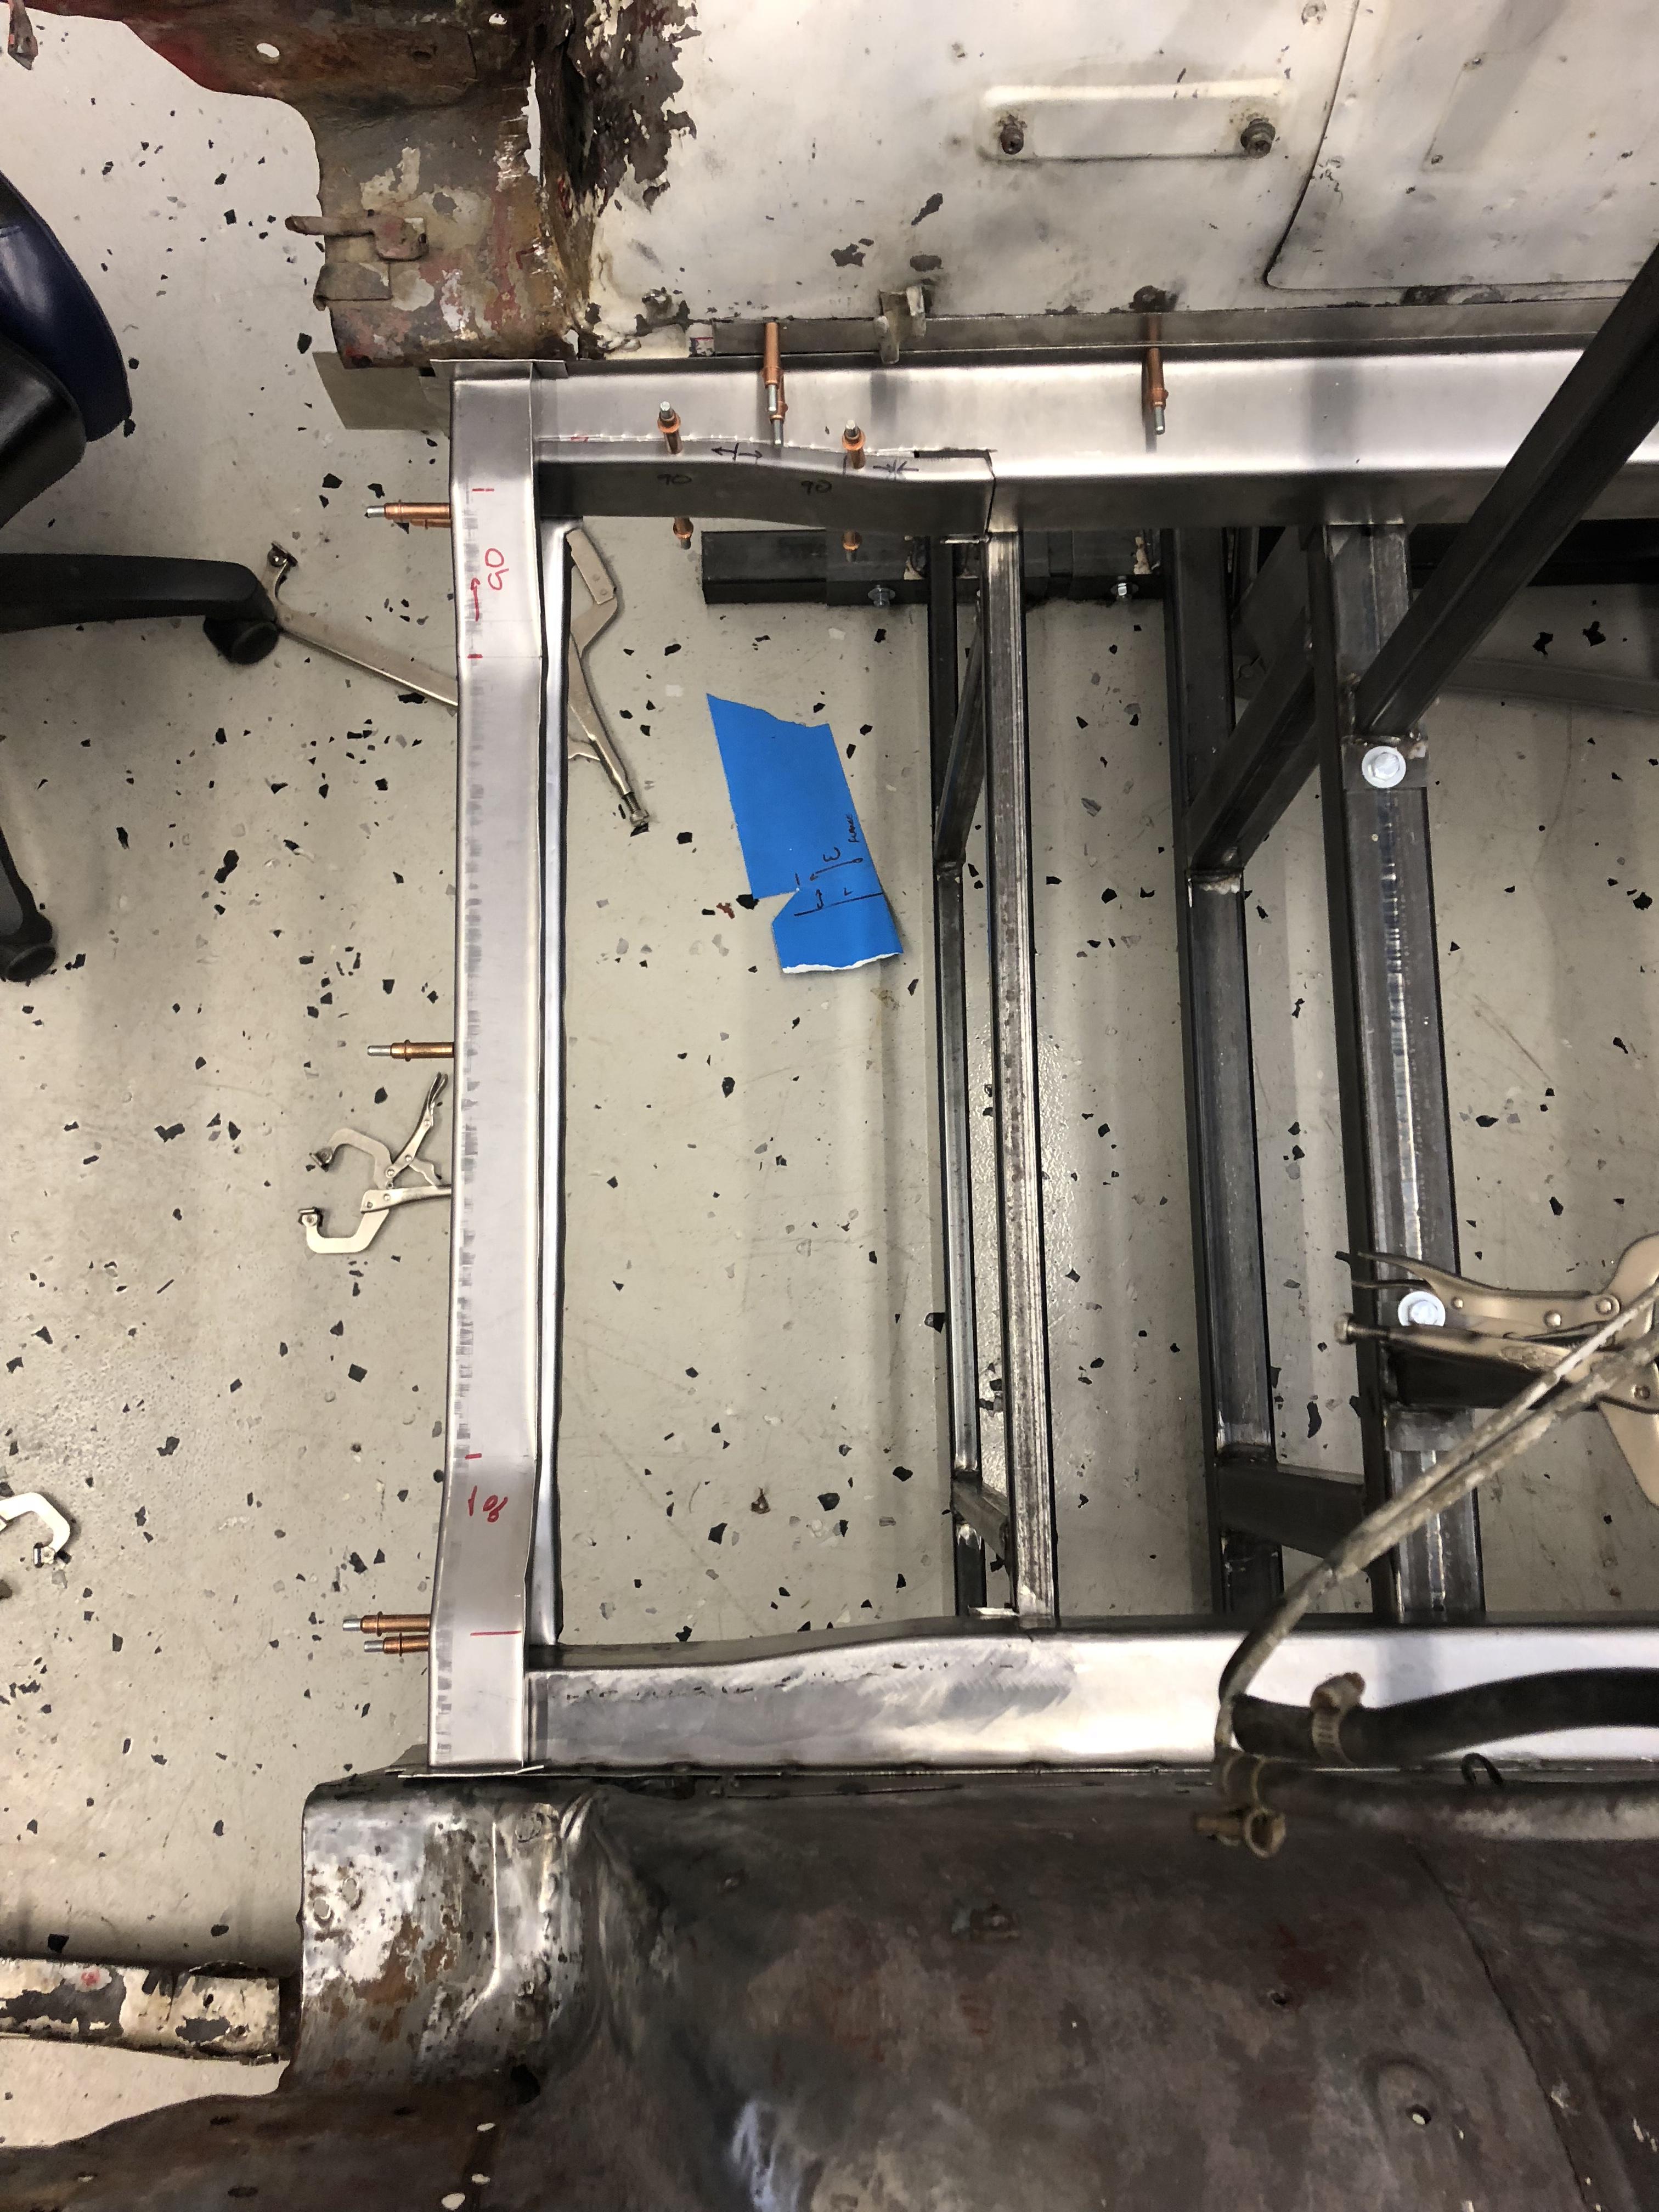
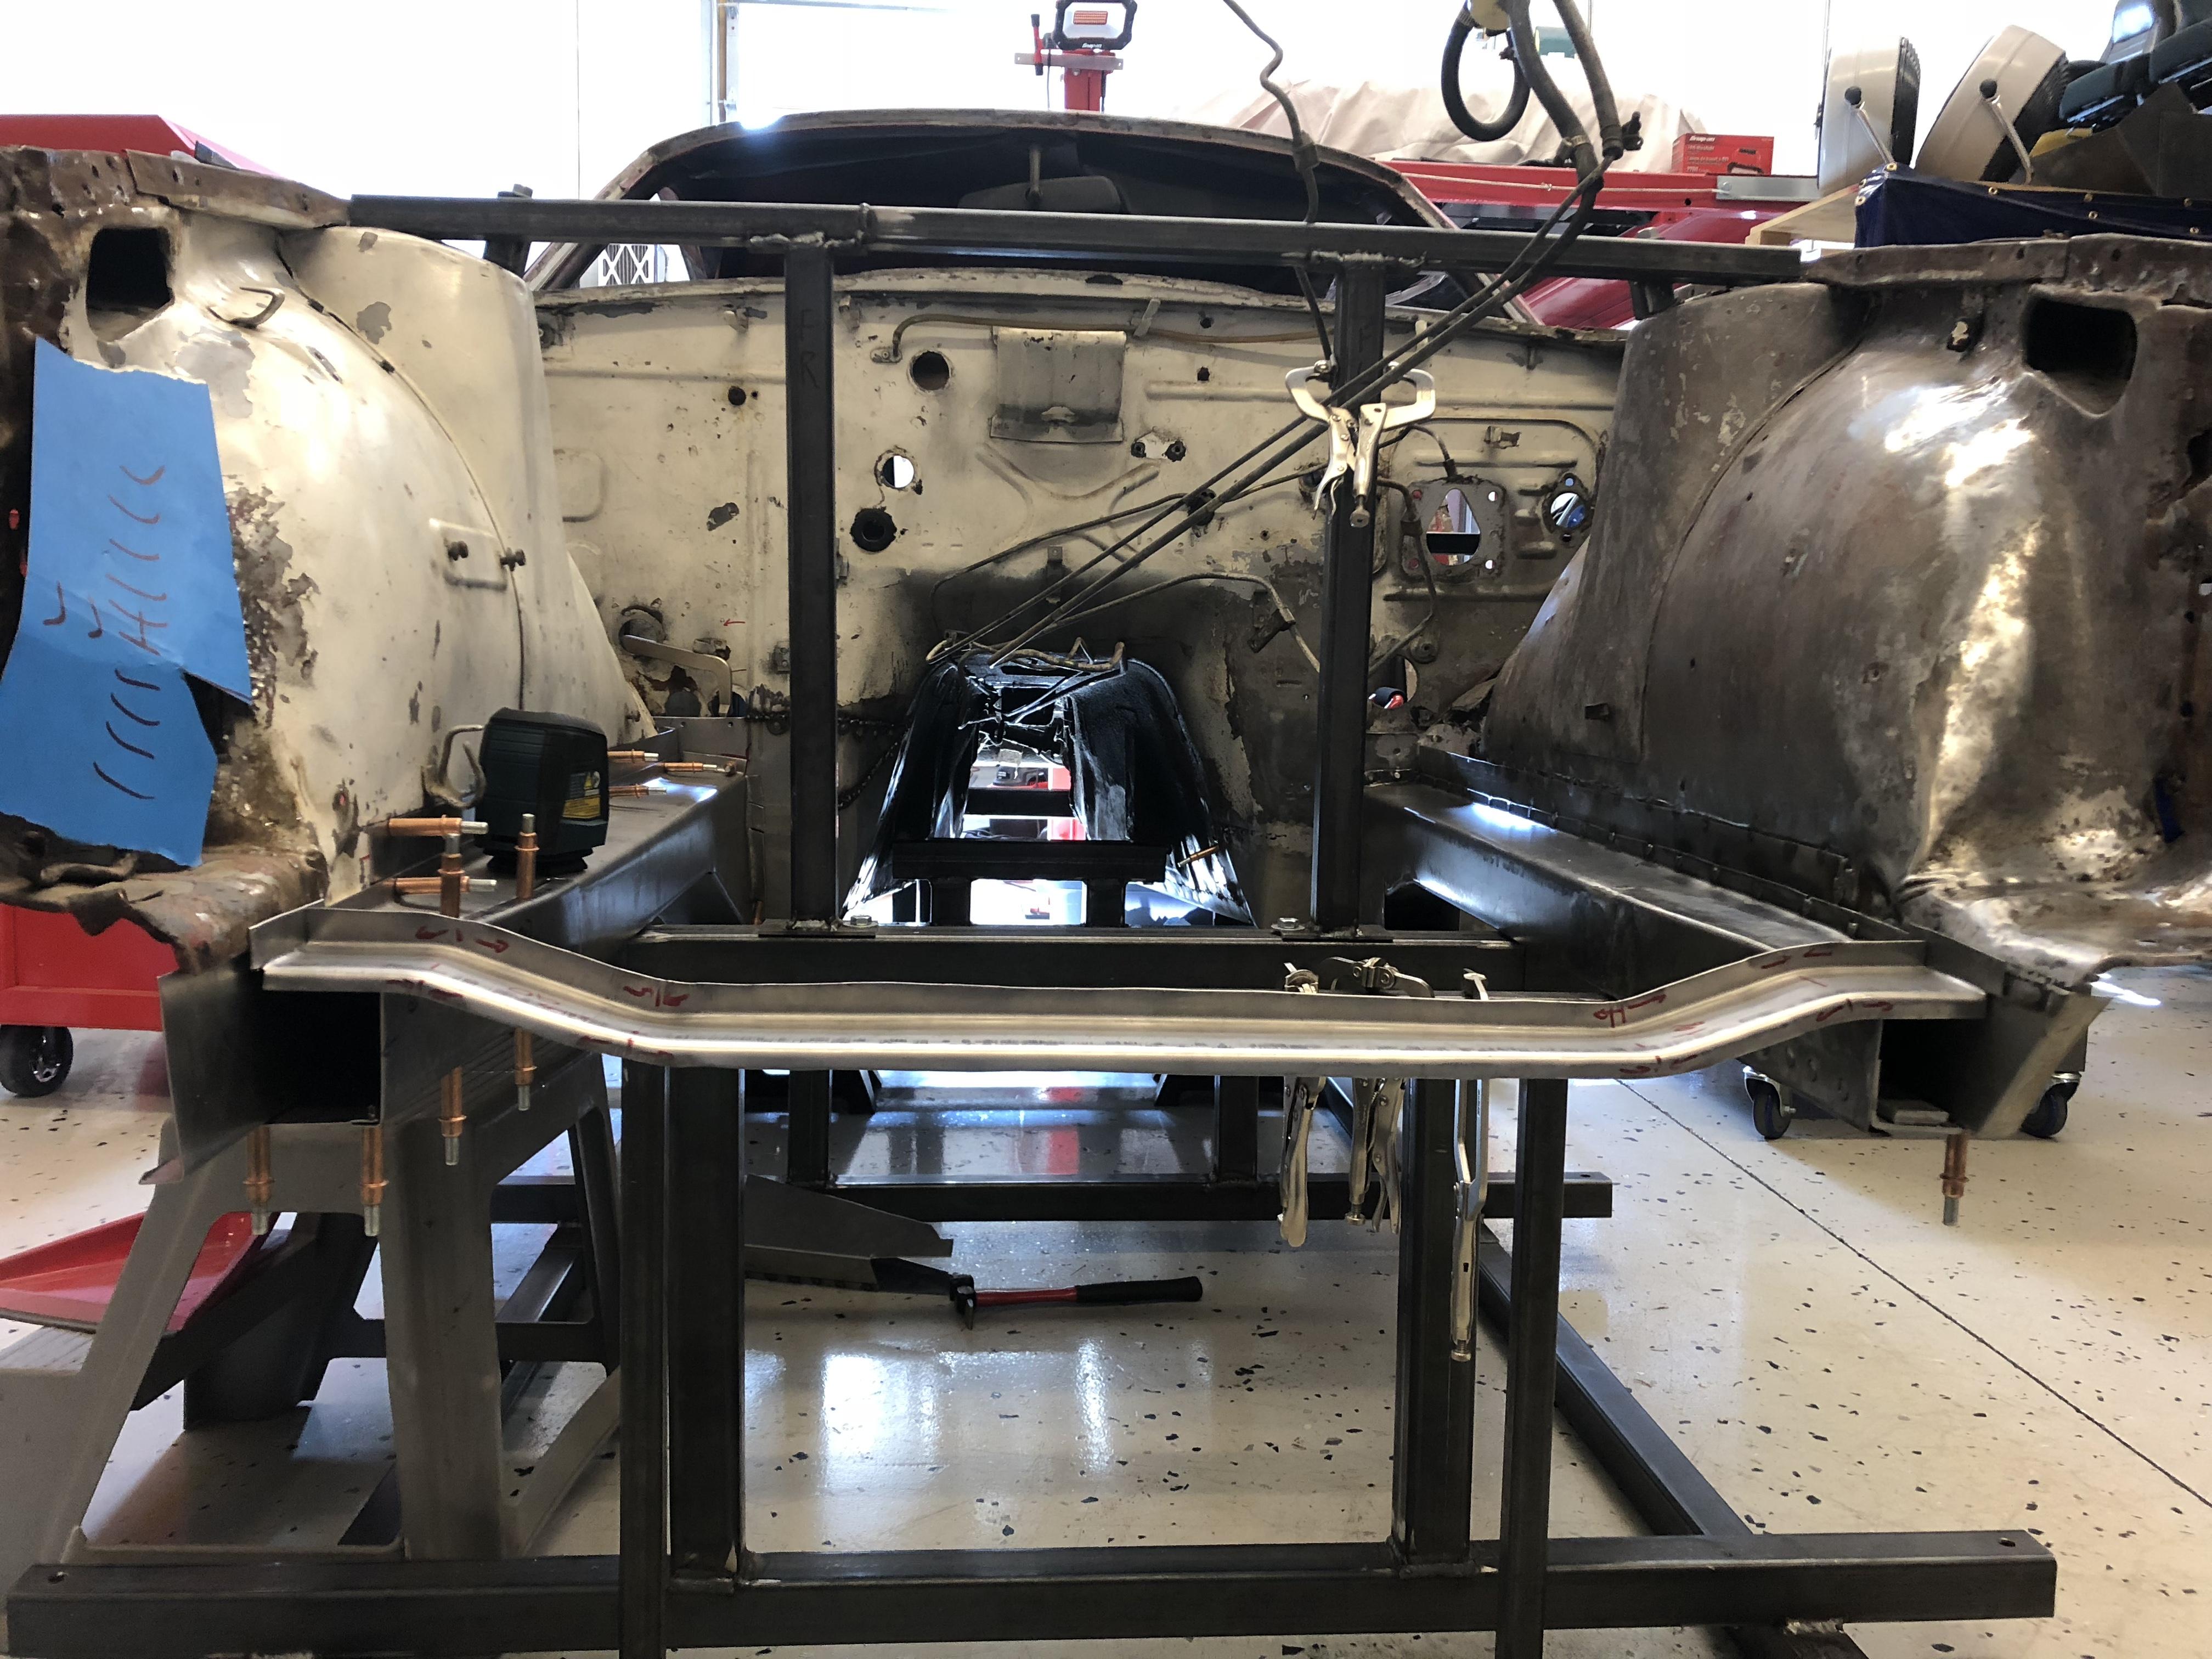
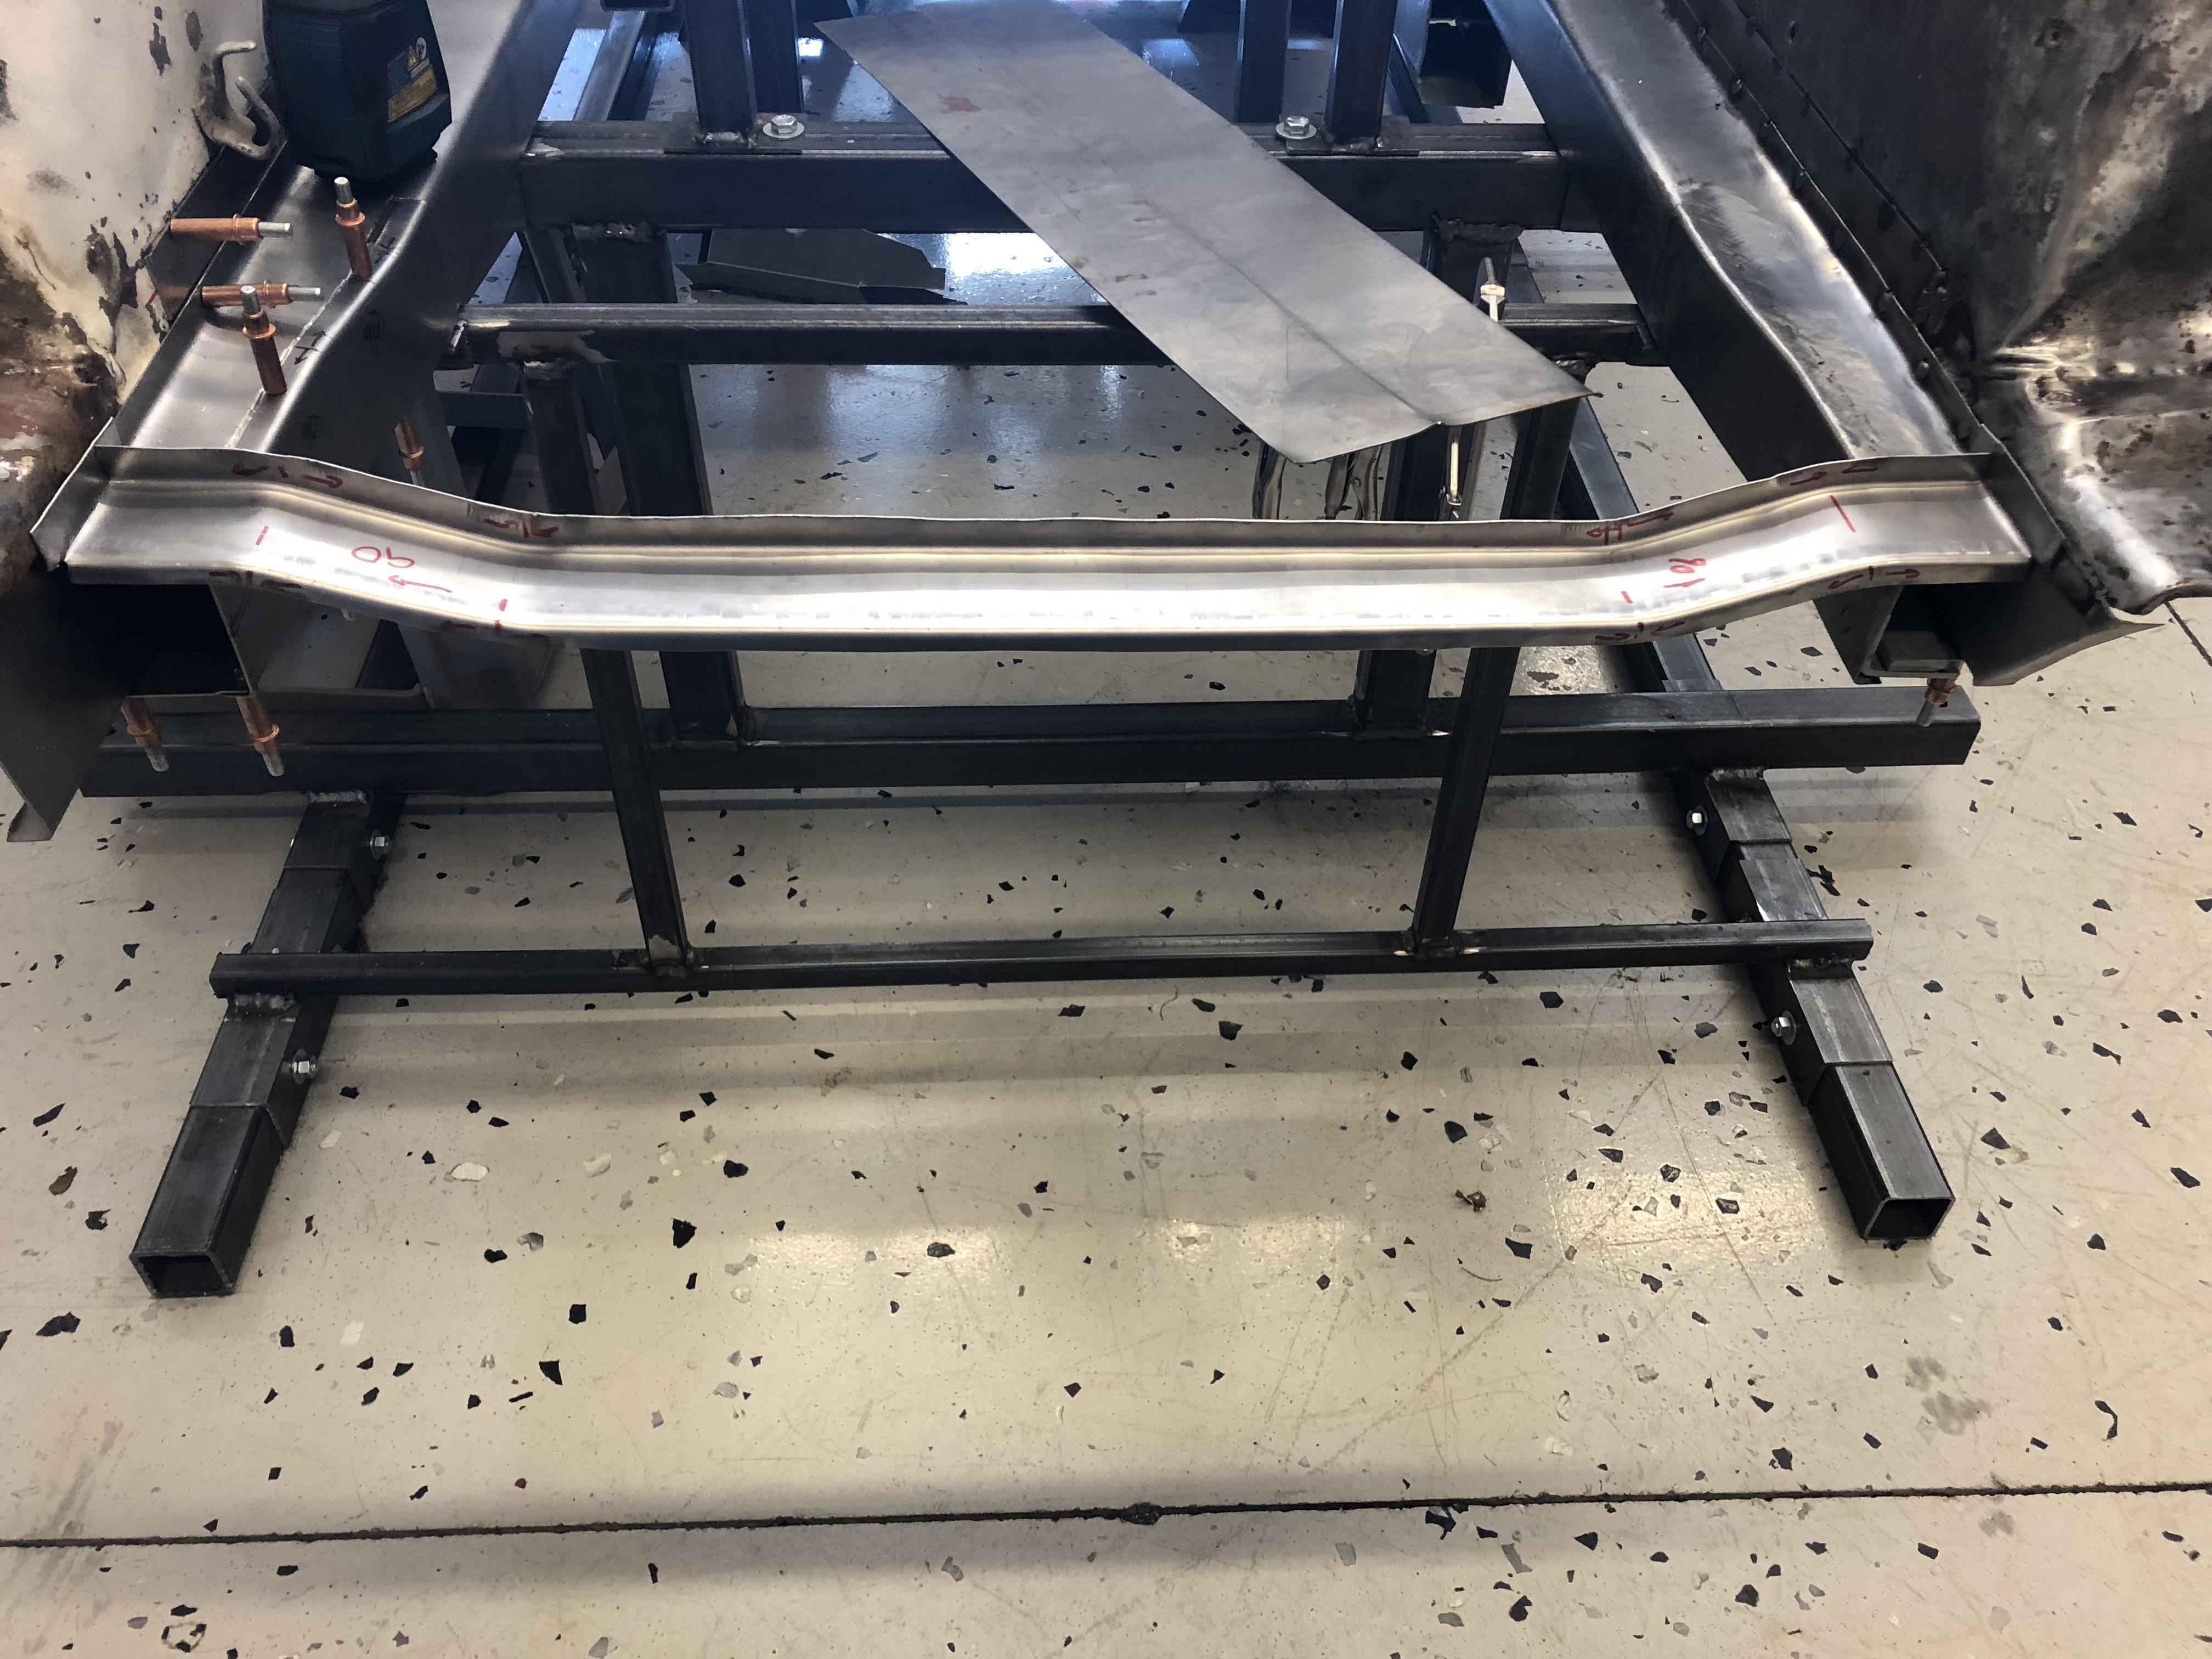
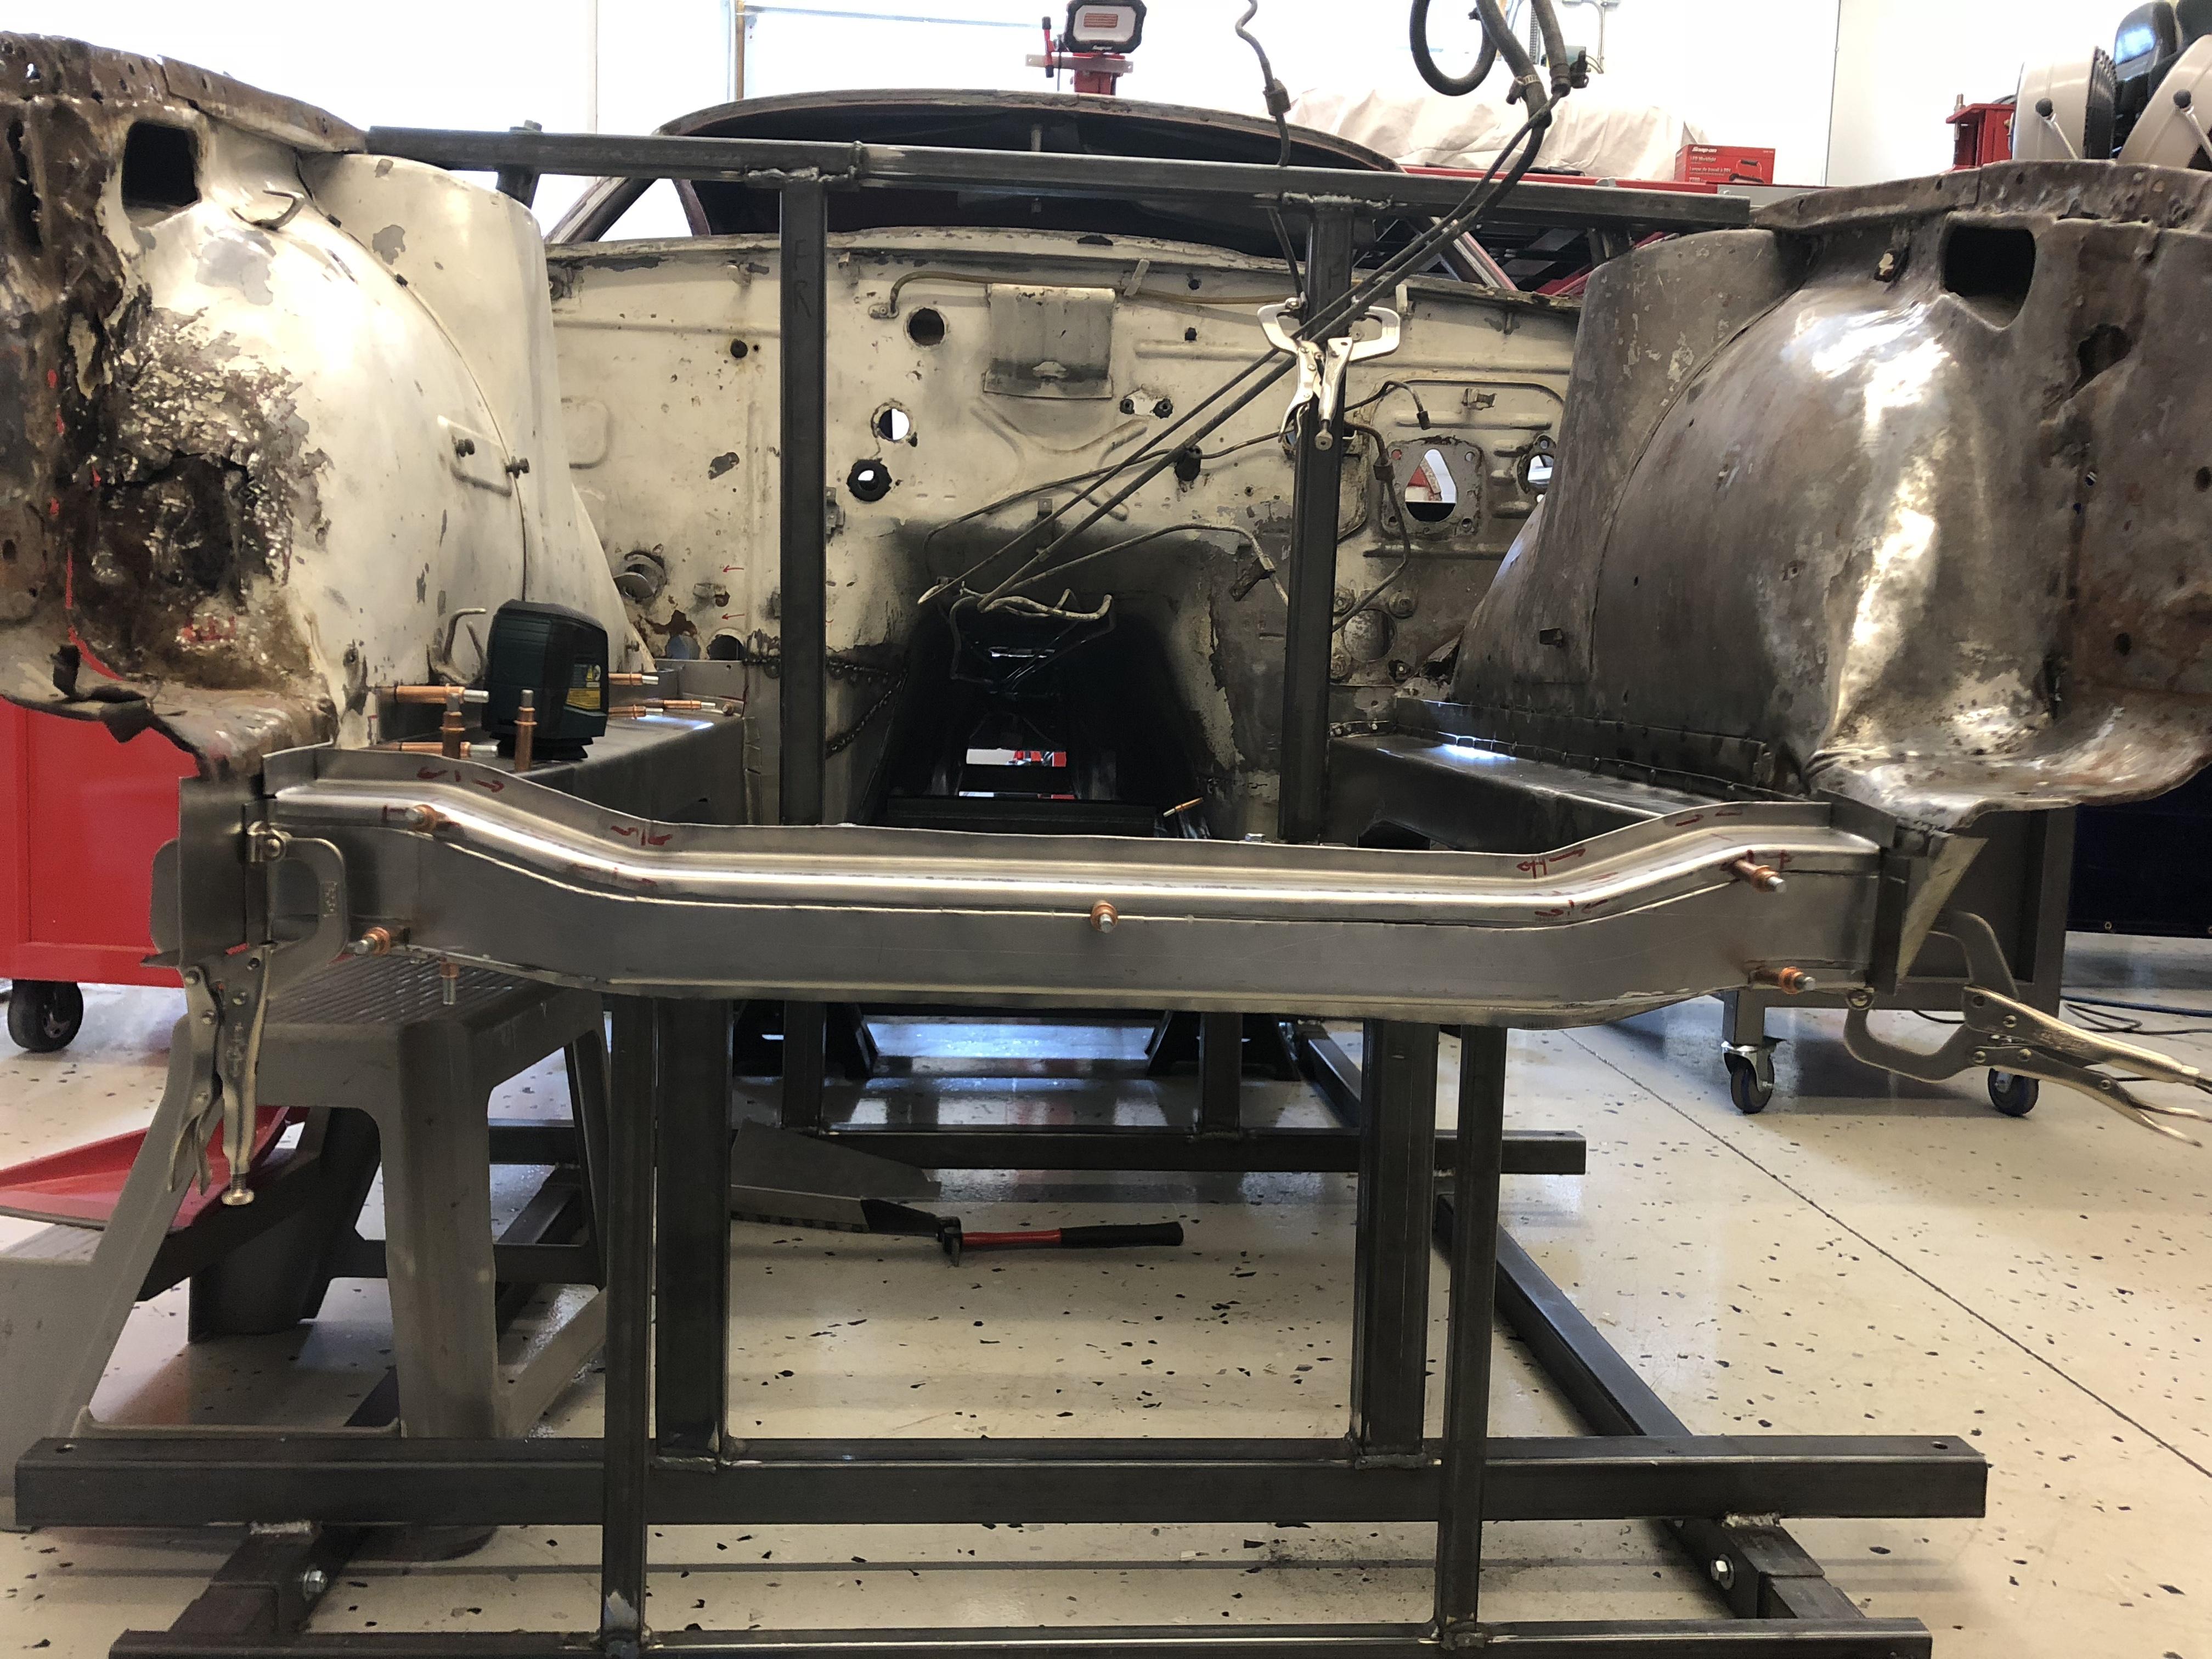
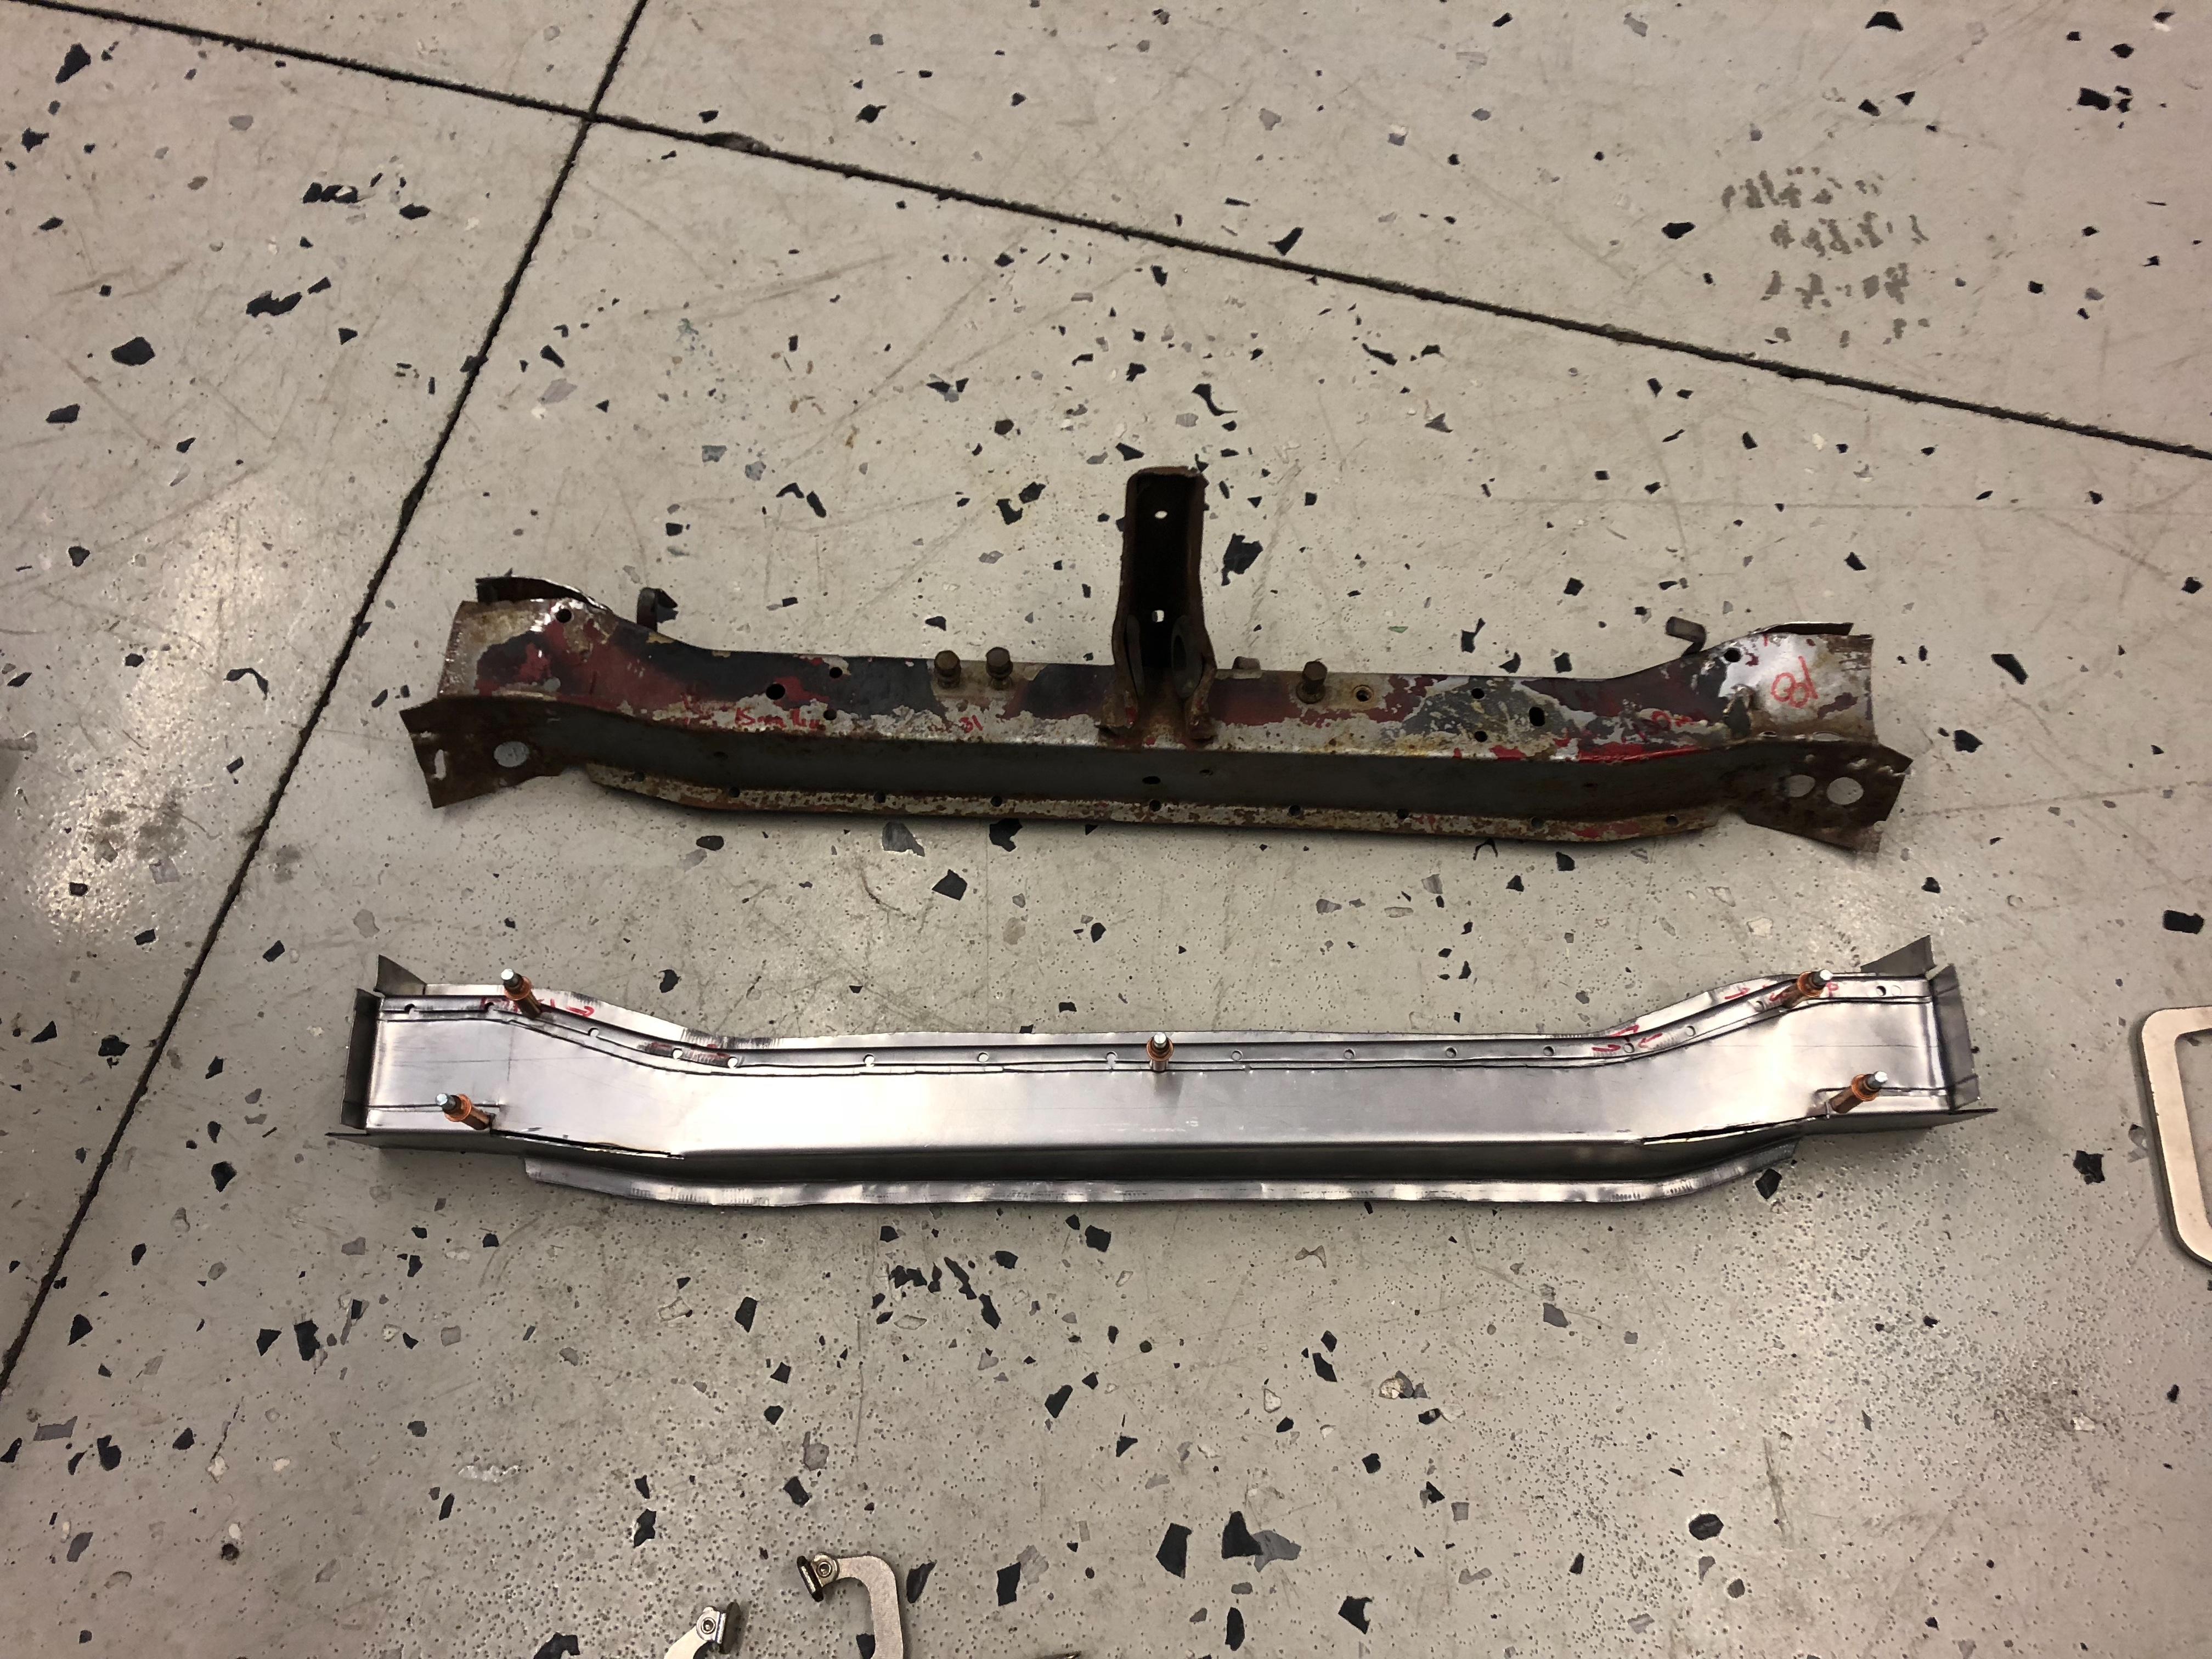
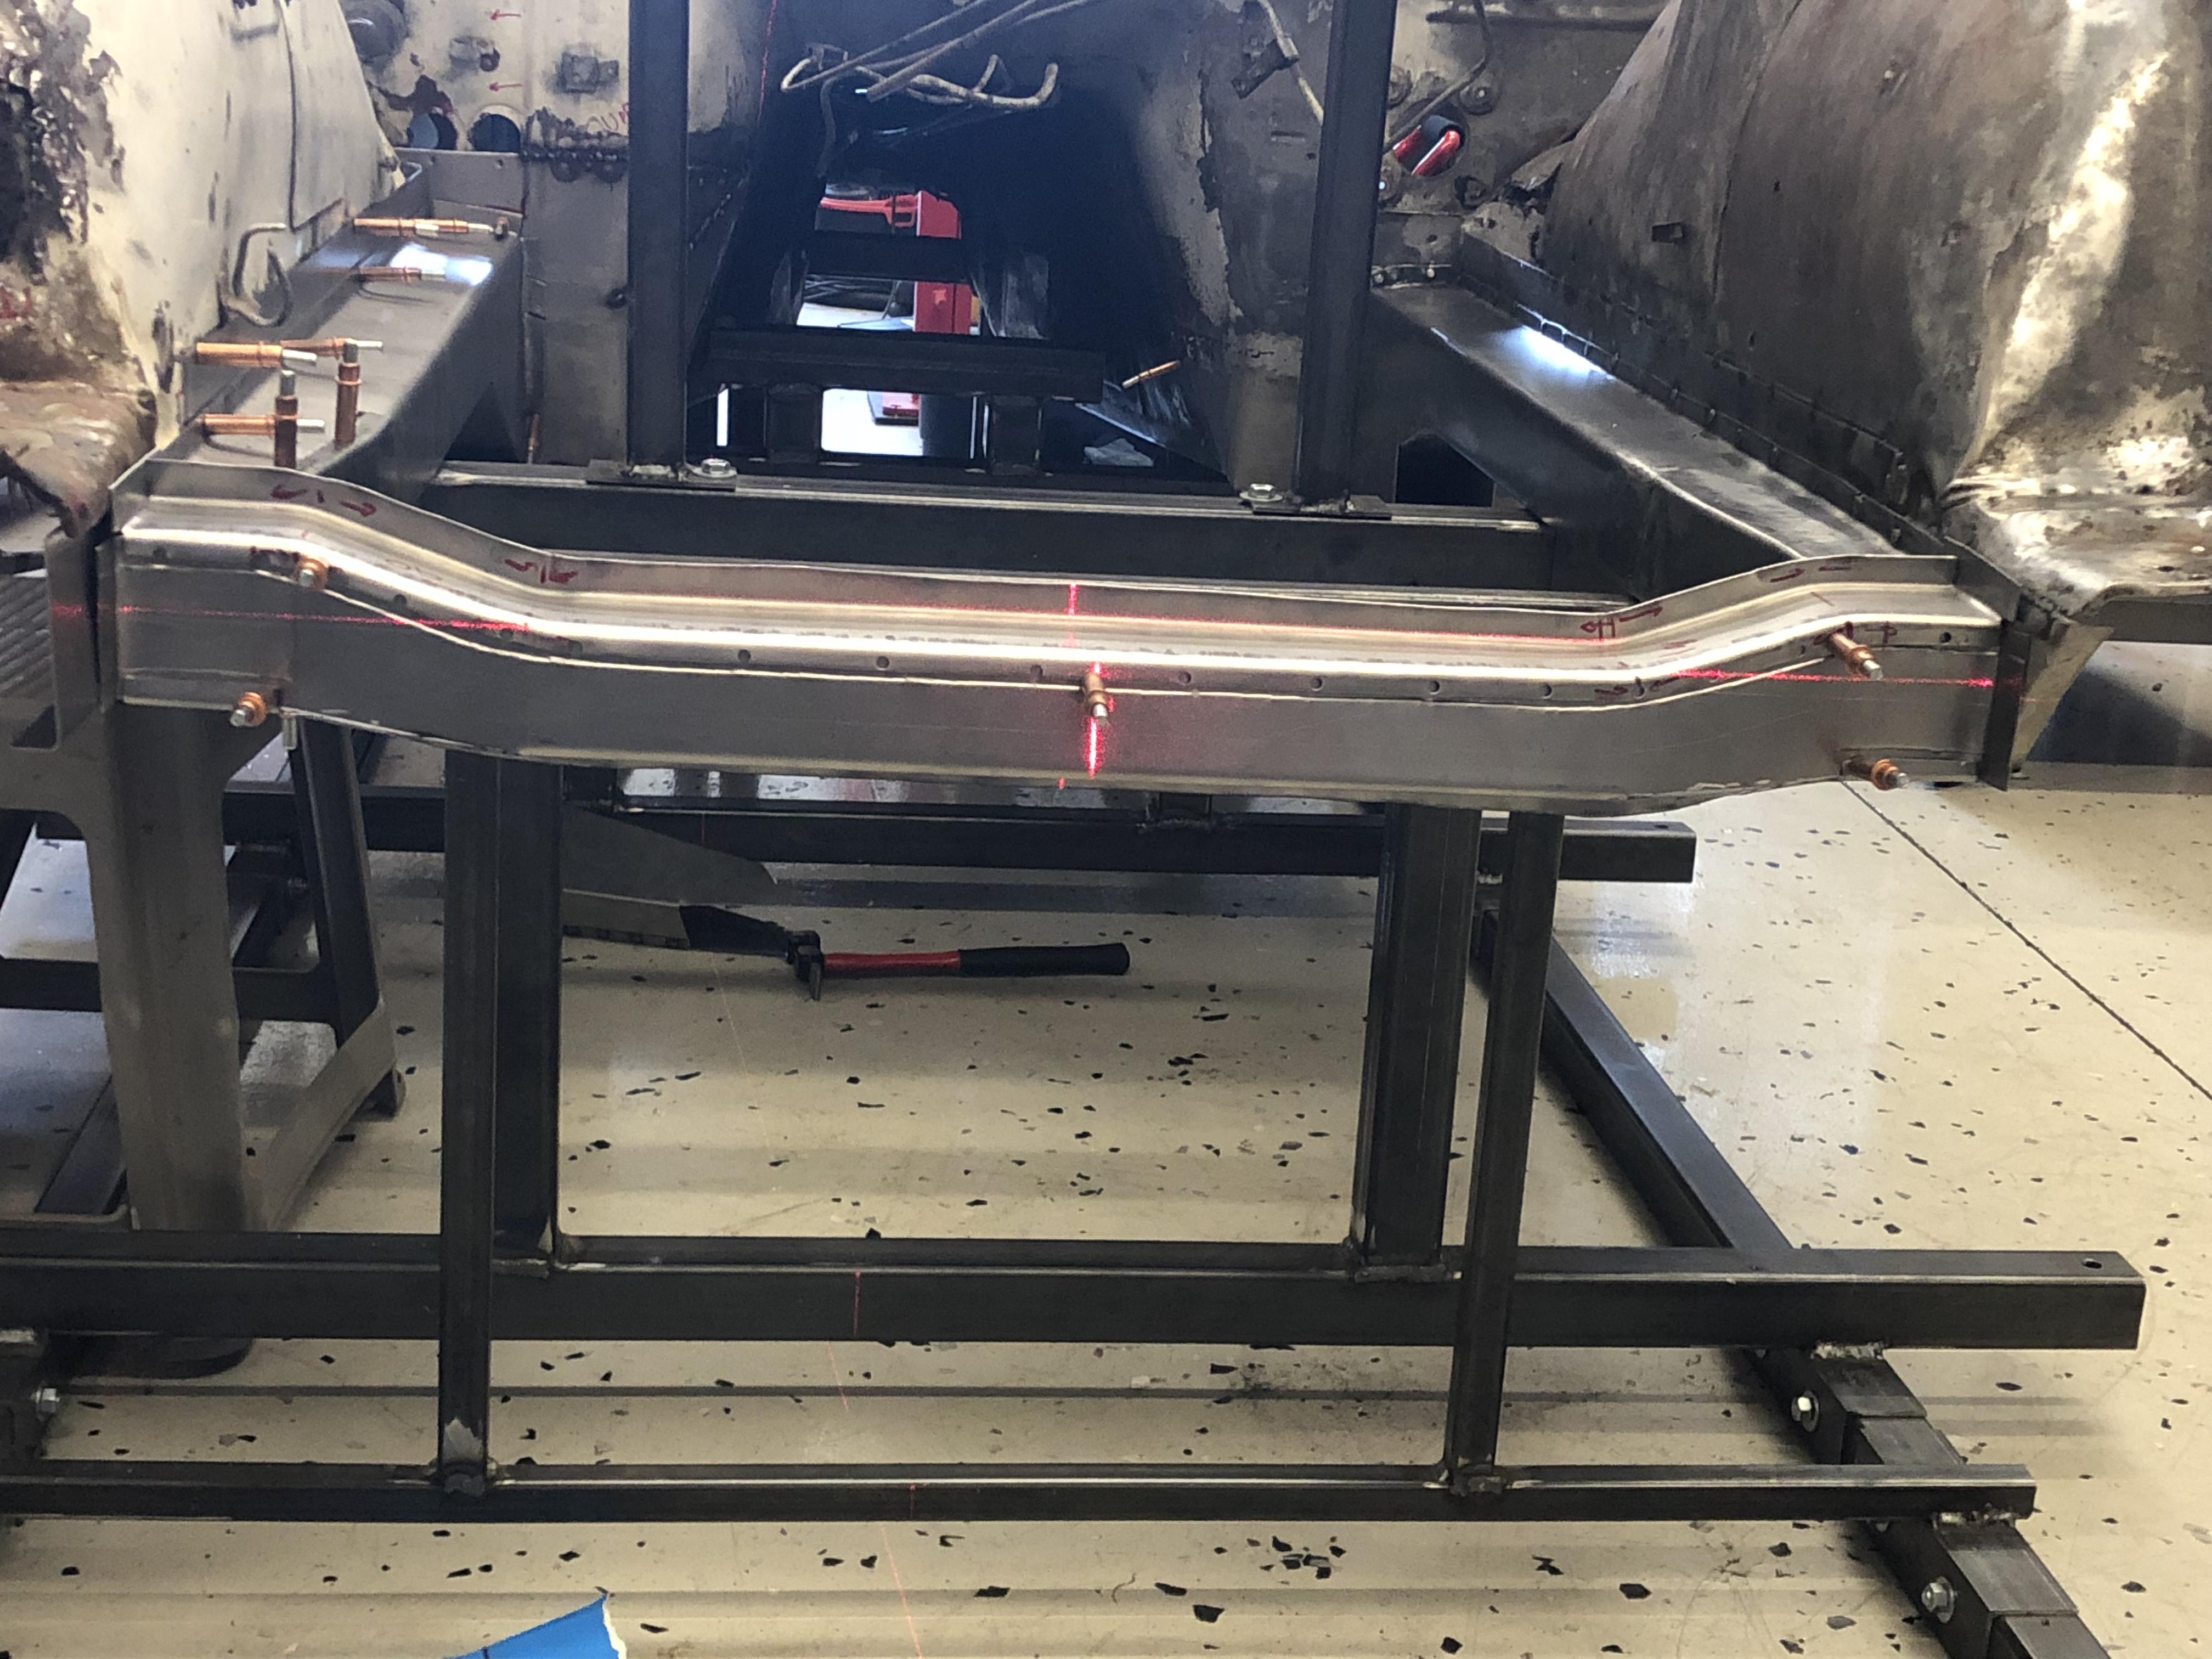
2 pointsHey guys! So I didn’t feel like welding today so I started bending a new lower rad support... I started by forming the upper section from 18 Ga on the brake and by hand with the shrinker / stretcher ... ‘ Next I cut and formed the lower section to match. More bending, more shrinker/stretcher .... More Clecos ... i


 2 points
 -
2 points
-
1 pointFor balancing the carbs here are a few quick and dirty methods I use when I don't have a flow meter or WB A/F meter: Setting Idle 0 Assume good plugs, valve adjustment, no vacuum leaks, good fuel pressure and float levels set correctly. 1. Remove air box 2. Warm up car and remove all linkage connections so that the carb's throttle plates are resting on their set screws. 3. Adjust each set screw so that the suction felt when you put your knuckles against the throat of each carb and feel the air flowing between your fingers is the same on both carbs. 4. Stick you head down between both carbs and listen to the intensity of air whistling sound from each carb. It should be the same amplitude 5. Repeat 3&4 until happy and your rpms are 600-800rpm (exact rpm should be suited to your taste and performance when moving from stop or what the FSM states... your call baby) Setting Off Idle 6. Reconnect linkage 7. Make sure the screw from the fast idle servo is not pushing on the throttle rods (that screw is the one next to the front carb). 8. Turn the fast idle screw at the center of the linkage (way up high) so that the car is idling ~ 3000 rpm 9. Adjust the balance screw on the linkage (next to the back carb) so that the air flow is the same in both carbs (as you did in 3&4 above) You can also observe the point at which both throttles open when you push the main linkage. The balance screw should be set so that both throttle plates open at the same time. Setting Mixture 0. Warm up car 1. Screw both jets all the way up to the top 2. Screw the jets down 2.5 turns (default starting point) 3. Take the car for a run and listen closely for popping in the exhaust (rich), popping in the intake (lean) and note power 4. Screw both jets up or down 1/2 turn and take another run to see impact. 5. Repeat 3&4 and do 1/4 adjustments until you are happy 6. Take the car for a spirited 30min drive with plug wrench then while driving fast on a long stretch, hit clutch, kill motor then pull over to side of road, look at all plugs and compare colour. If there is a difference between the front 3 and rear 3 then the fuel jets need tweaking. Adjust the darker 3's carb by turning up the jet to lean the mixture a 1/4 turn If all plugs are too dark then turn both jets up 1/2 a turn. 7. Repeat 6 until you are happy. All plugs should be the same colour and very light brown. Listen for popping out the front to tell if you go too lean. Don't worry, you can take your time and do this leisurely over a couple of days to fine tune and colour match your plugs. Power and Timing 1. Fill up with premium gasoline 2. Advance timing to 10° BTDC 3. Grab a 10mm wrench 4. Take car for a run and note power 5. Pull over and use 10mm wrench to advance timing a bit (turn distributor clock wise) Don't worry about a timing light 6. Take it for a run and note power increase and listen for pinging under load (try acceleration on a hill to force a load) 7. Repeat 5&6 until you are happy with balance of power vs. pinging 8. Check plugs again. You may need to add more fuel to get the last bit of power 9. Make note of timing at idle using a timing light. Follow Up 1. Turn each jet up and count turns. Record these numbers for future reference then turn the jets back down. 2. Measure timing with a timing light at idle with no vacuum advance and at 3000 rpm Record these numbers. Aim for 36 to 38 maximum degrees at 3000rpm. 3. Measure engine vacuum and record number. 4. Measure air flow (with proper device) and record numbers 5. Measure O2 with WB at idle and at various RPM's underload and record numbers. 6. Re-balance carbs at idle and 3000 rpm's with airflow meter. 7. Adjust jet height using WB O2 sensor. 8. Close mouth of each carb (one at a time) set rpm to 3000 and run rough on one carb and measure with WB. Compare both carbs and strike balance. (AF ratios should be the same and rpm's the same when running on one carb) 9. Do the "lift each piston 1/16" and compare how engine behaves as well as "Norm's lift each piston fully to disable" trick to also compare each side to the other's behaviour. 9. Measure 02 with WB at various rpms' under load and select or augment needle to taste. Repeat 9 until happy with WB and butt dyno performance. 10. If you have the luxury of a dyno then use it. 11. Once jets and needles are set Blueprint (measure evertyhing) including depth of jet from bridge of carb with vernier caliper's depth gauge.1 point
-
No offense to anyone, but if I'm going to pay for a panel, it needs to match the original closer than that. I can make that on my own...1 point
-
1 pointI thought mine was the original, but one of my viewers identified it as a 240K wheel. Either way, I like it so it can stay.1 point
-
1 point
-
1 pointIt is now. I just had it on the floor like that to paint for a short while. Thanks!1 point
-
You can also tell that that's not his first rodeo. He obviously knew the track and ran most of the lines pretty good except for slower traffic1 point
-
1 pointI used a Big Maxx vented propane unit. They work good and can be run on natural gas if it's available. They make a several sizes1 point
-
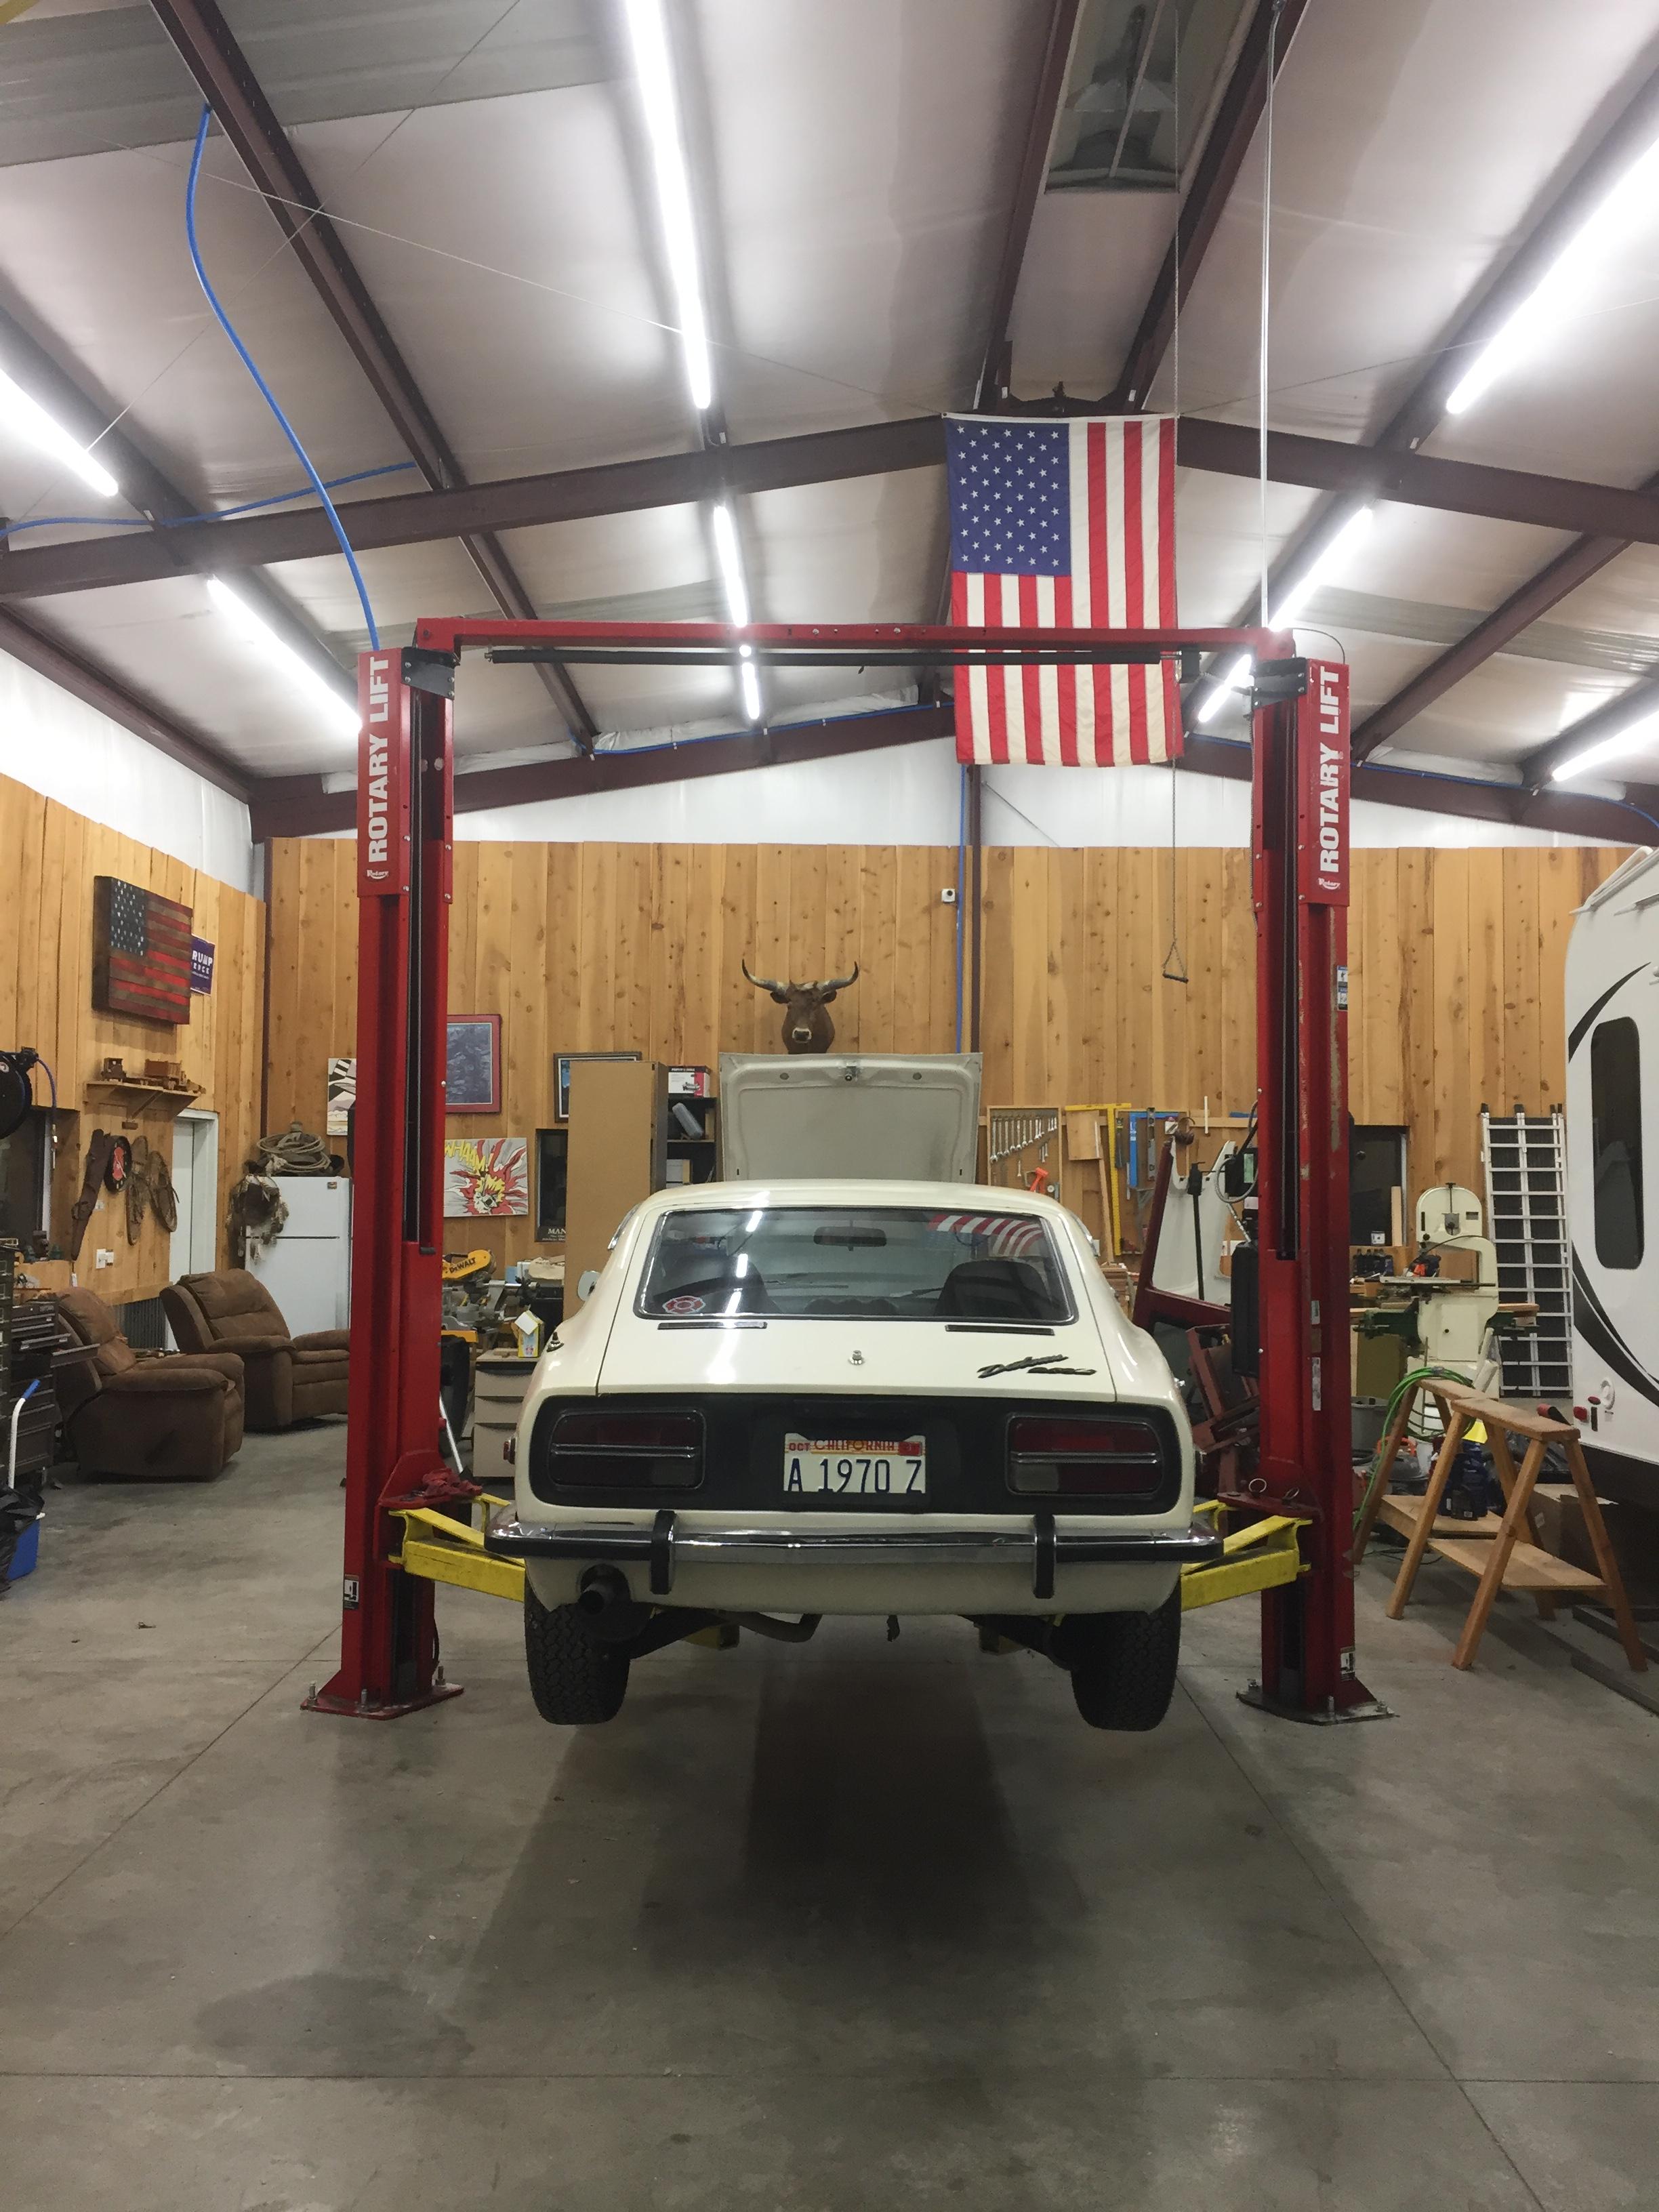
1 pointGreat pictures. That's exactly where my lift is. Thank you. I want nothing more than to do it right. So far this site has been nothing but great. What an awesome resource.1 point
-
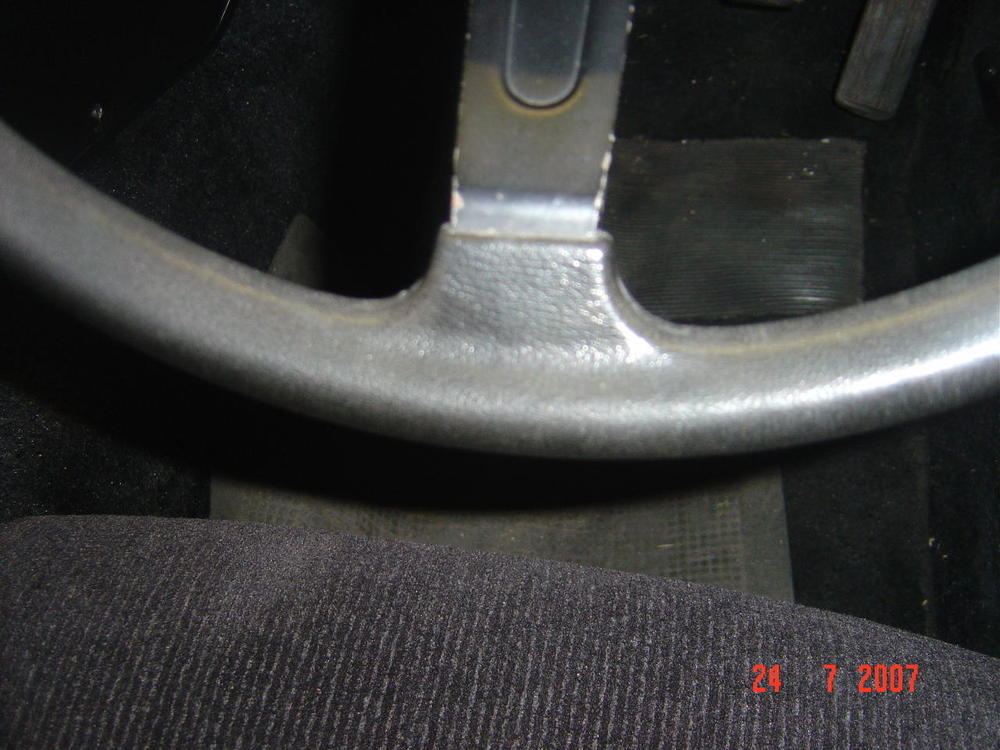
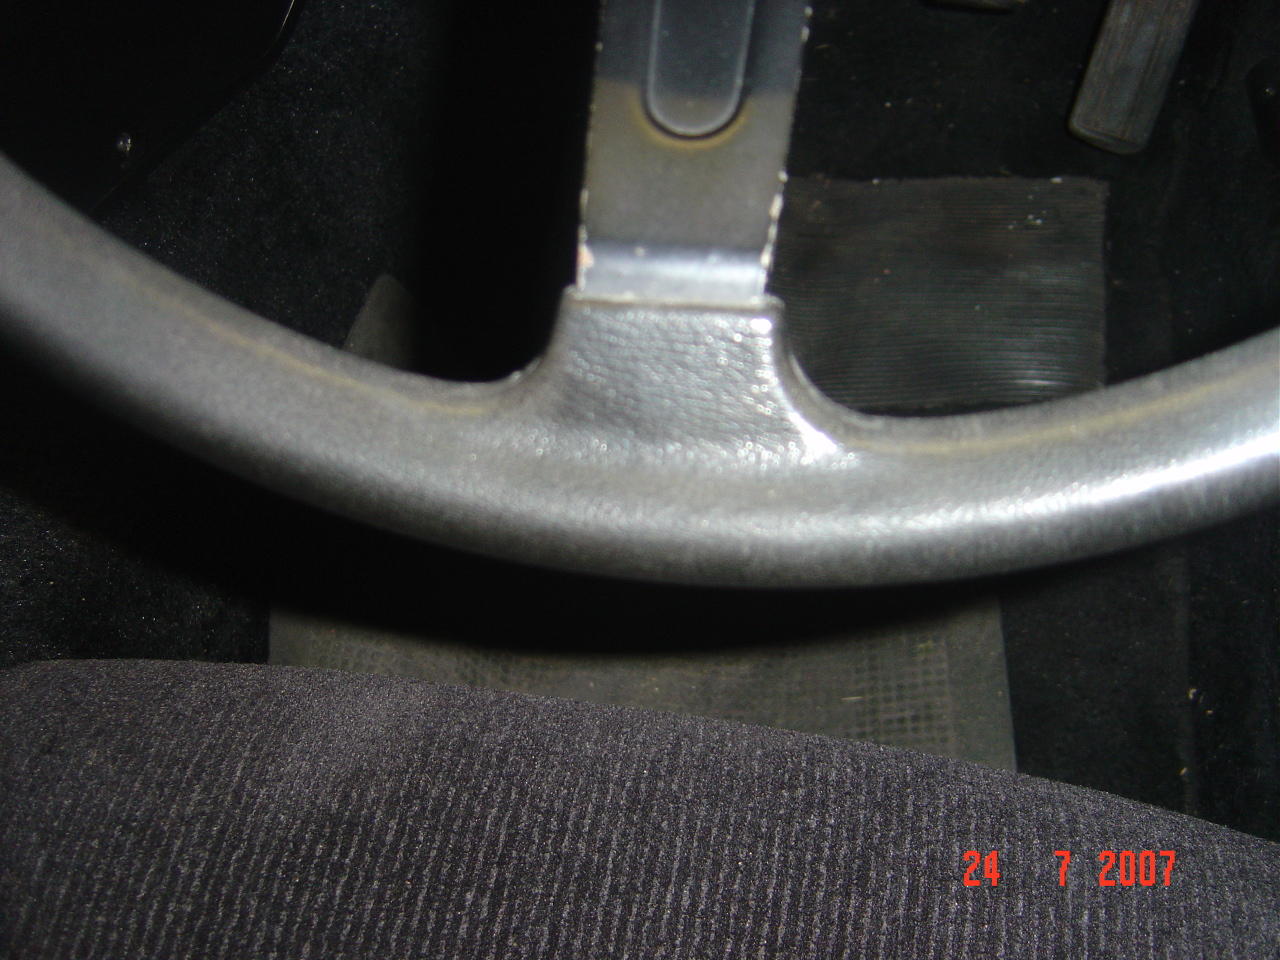
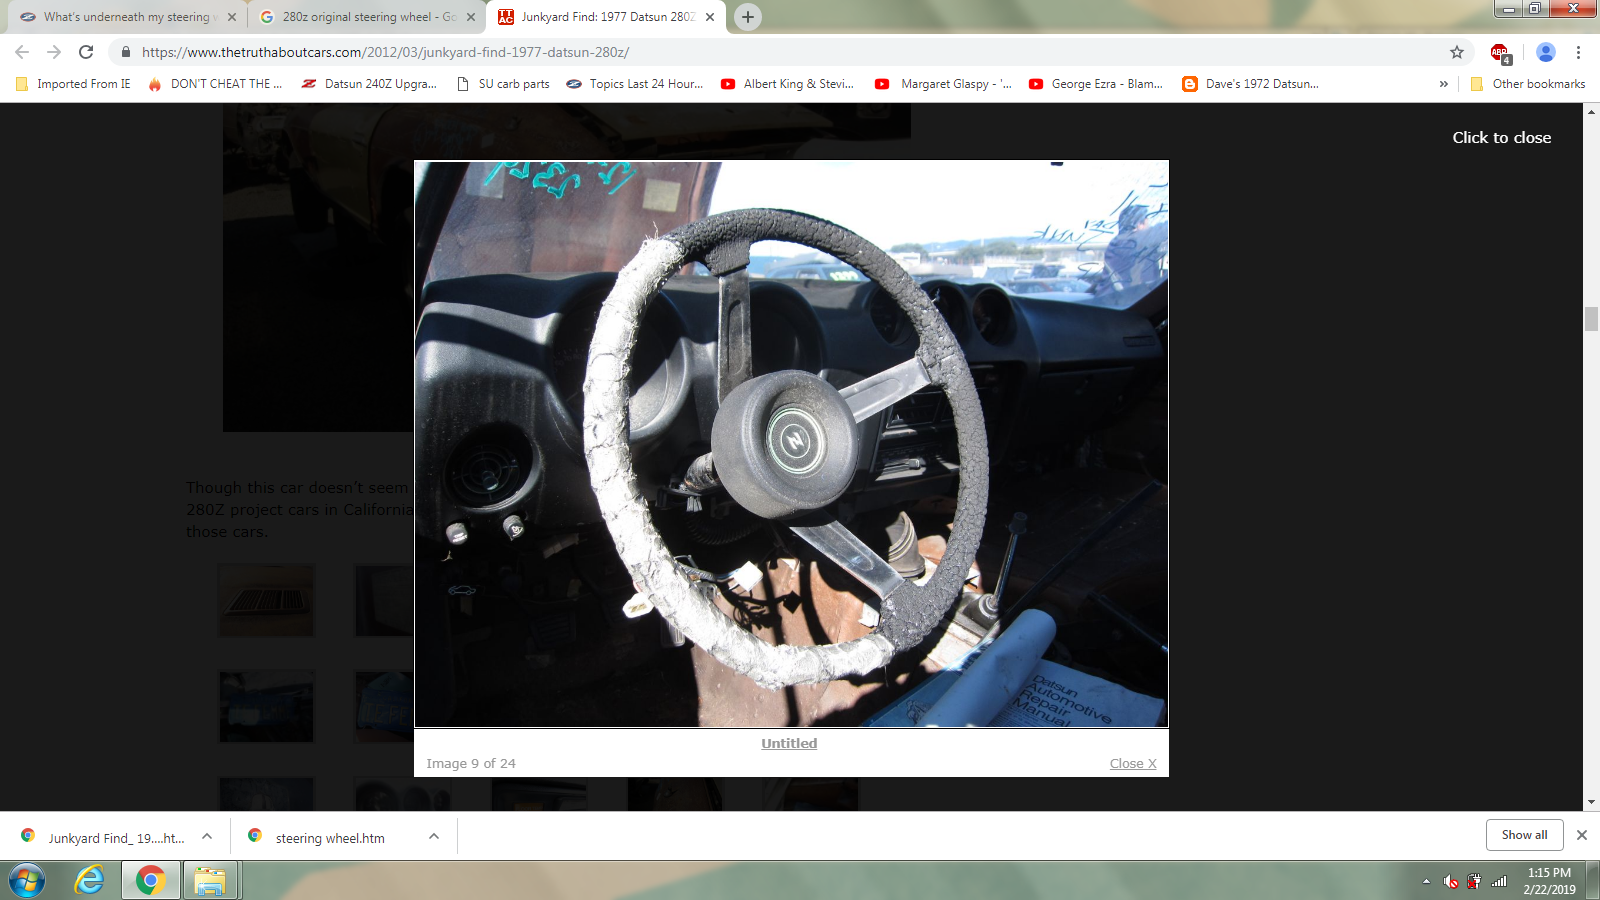
1 pointI like that steering wheel. All the 240Z wheels I've seen before have different spokes than what you have. The series 1 cars don't have the holes punched out, they're just indented where the holes on this wheel are.1 point
-
1 pointI really like what you did with the graphics! Subtle, not too flashy, nice touch.1 point
-
1 point
-
Steering wheel rims on later models are finished in hard rubber, like the later model shift knobs. There is a slight difference in the 1977/78 model steering wheel hard rubber rim than earlier type hard rubber rims, in that the former type hard rubber rim has faux "stitching" at the 6 o'clock position, whereas the 1977/78 model does not, I believe (same as on my 1977 UK 260Z, i.e., no faux stitching ).
 1 point
 -
1 pointDepends on what you call original. The wiring harness is prewired for an electric fuel pump. You've removed the evap tank and removed venting from the fuel tank, turned the remaining top vent in the tank 180 degrees. If you're an original purist you should probably stay with the mechanical pump. Here's a thread on rebuilding the original pump.1 point
-
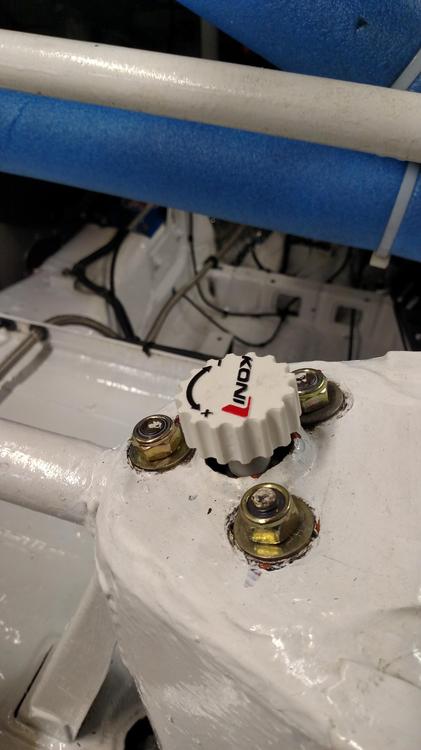
1 pointI am in the process of switching out my Tokico HTS shocks for a set of Koni 8610-Race because I am increasing the front springs from 375# to 450# which many folks believe is too much for the HTS's to handle before blowing. While this might not be true, having to replace a shock or shocks at the track would be a PIA not to mention that HTSs are NLA. Like the Koni the HTS had a wider range of adjustment with no numbers to go by just the requirement to remember how many turns you made. Unlike the Koni the HTS could not be rebuilt. These Koni "Sport" shocks look to be a perfect solution for every type of driving one might do. That Koni and MSA are now producing a Better replacement shock for our Zs is wonderful news and I salute their efforts to ensure we can continue to enjoy these great cars for many more years. I've attached a picture of the Race shock adjuster which I assume is similar to the one used for the Sport version (once it's set you would remove it from the shock and Koni suggests that you put it in the glove box).
 1 point
 -
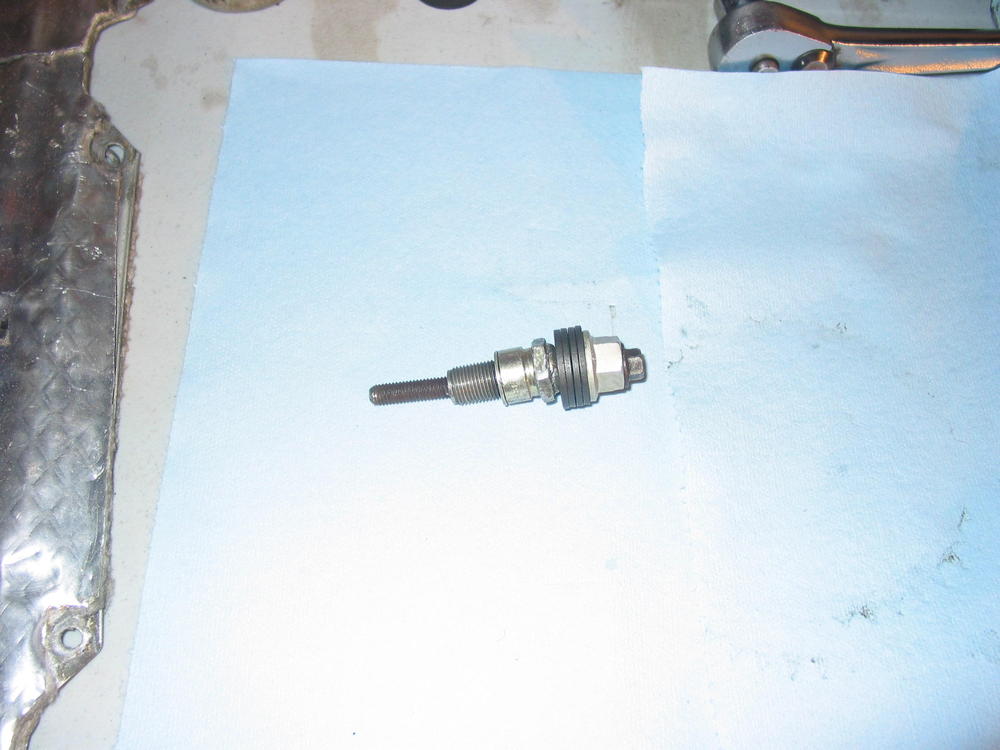
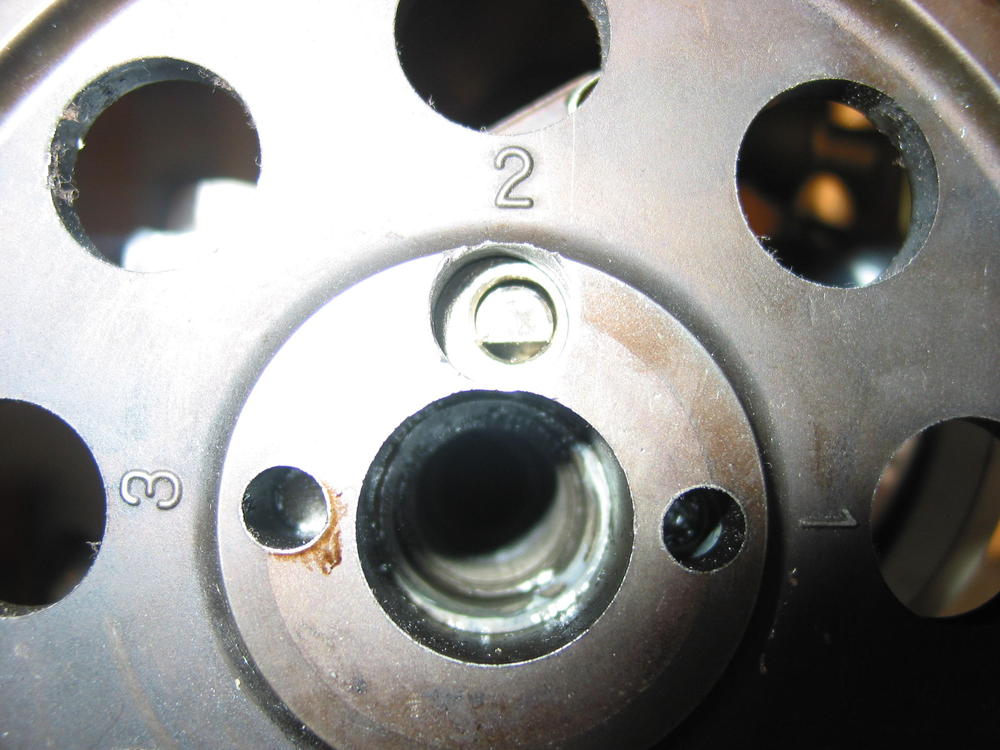
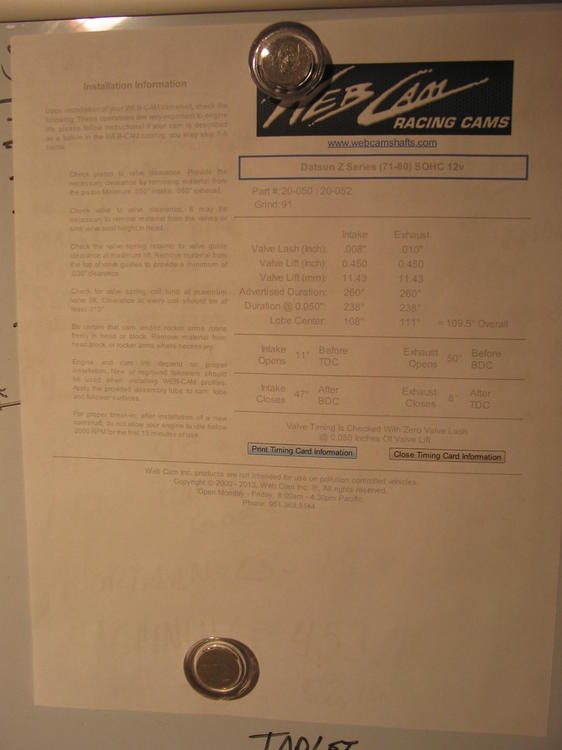
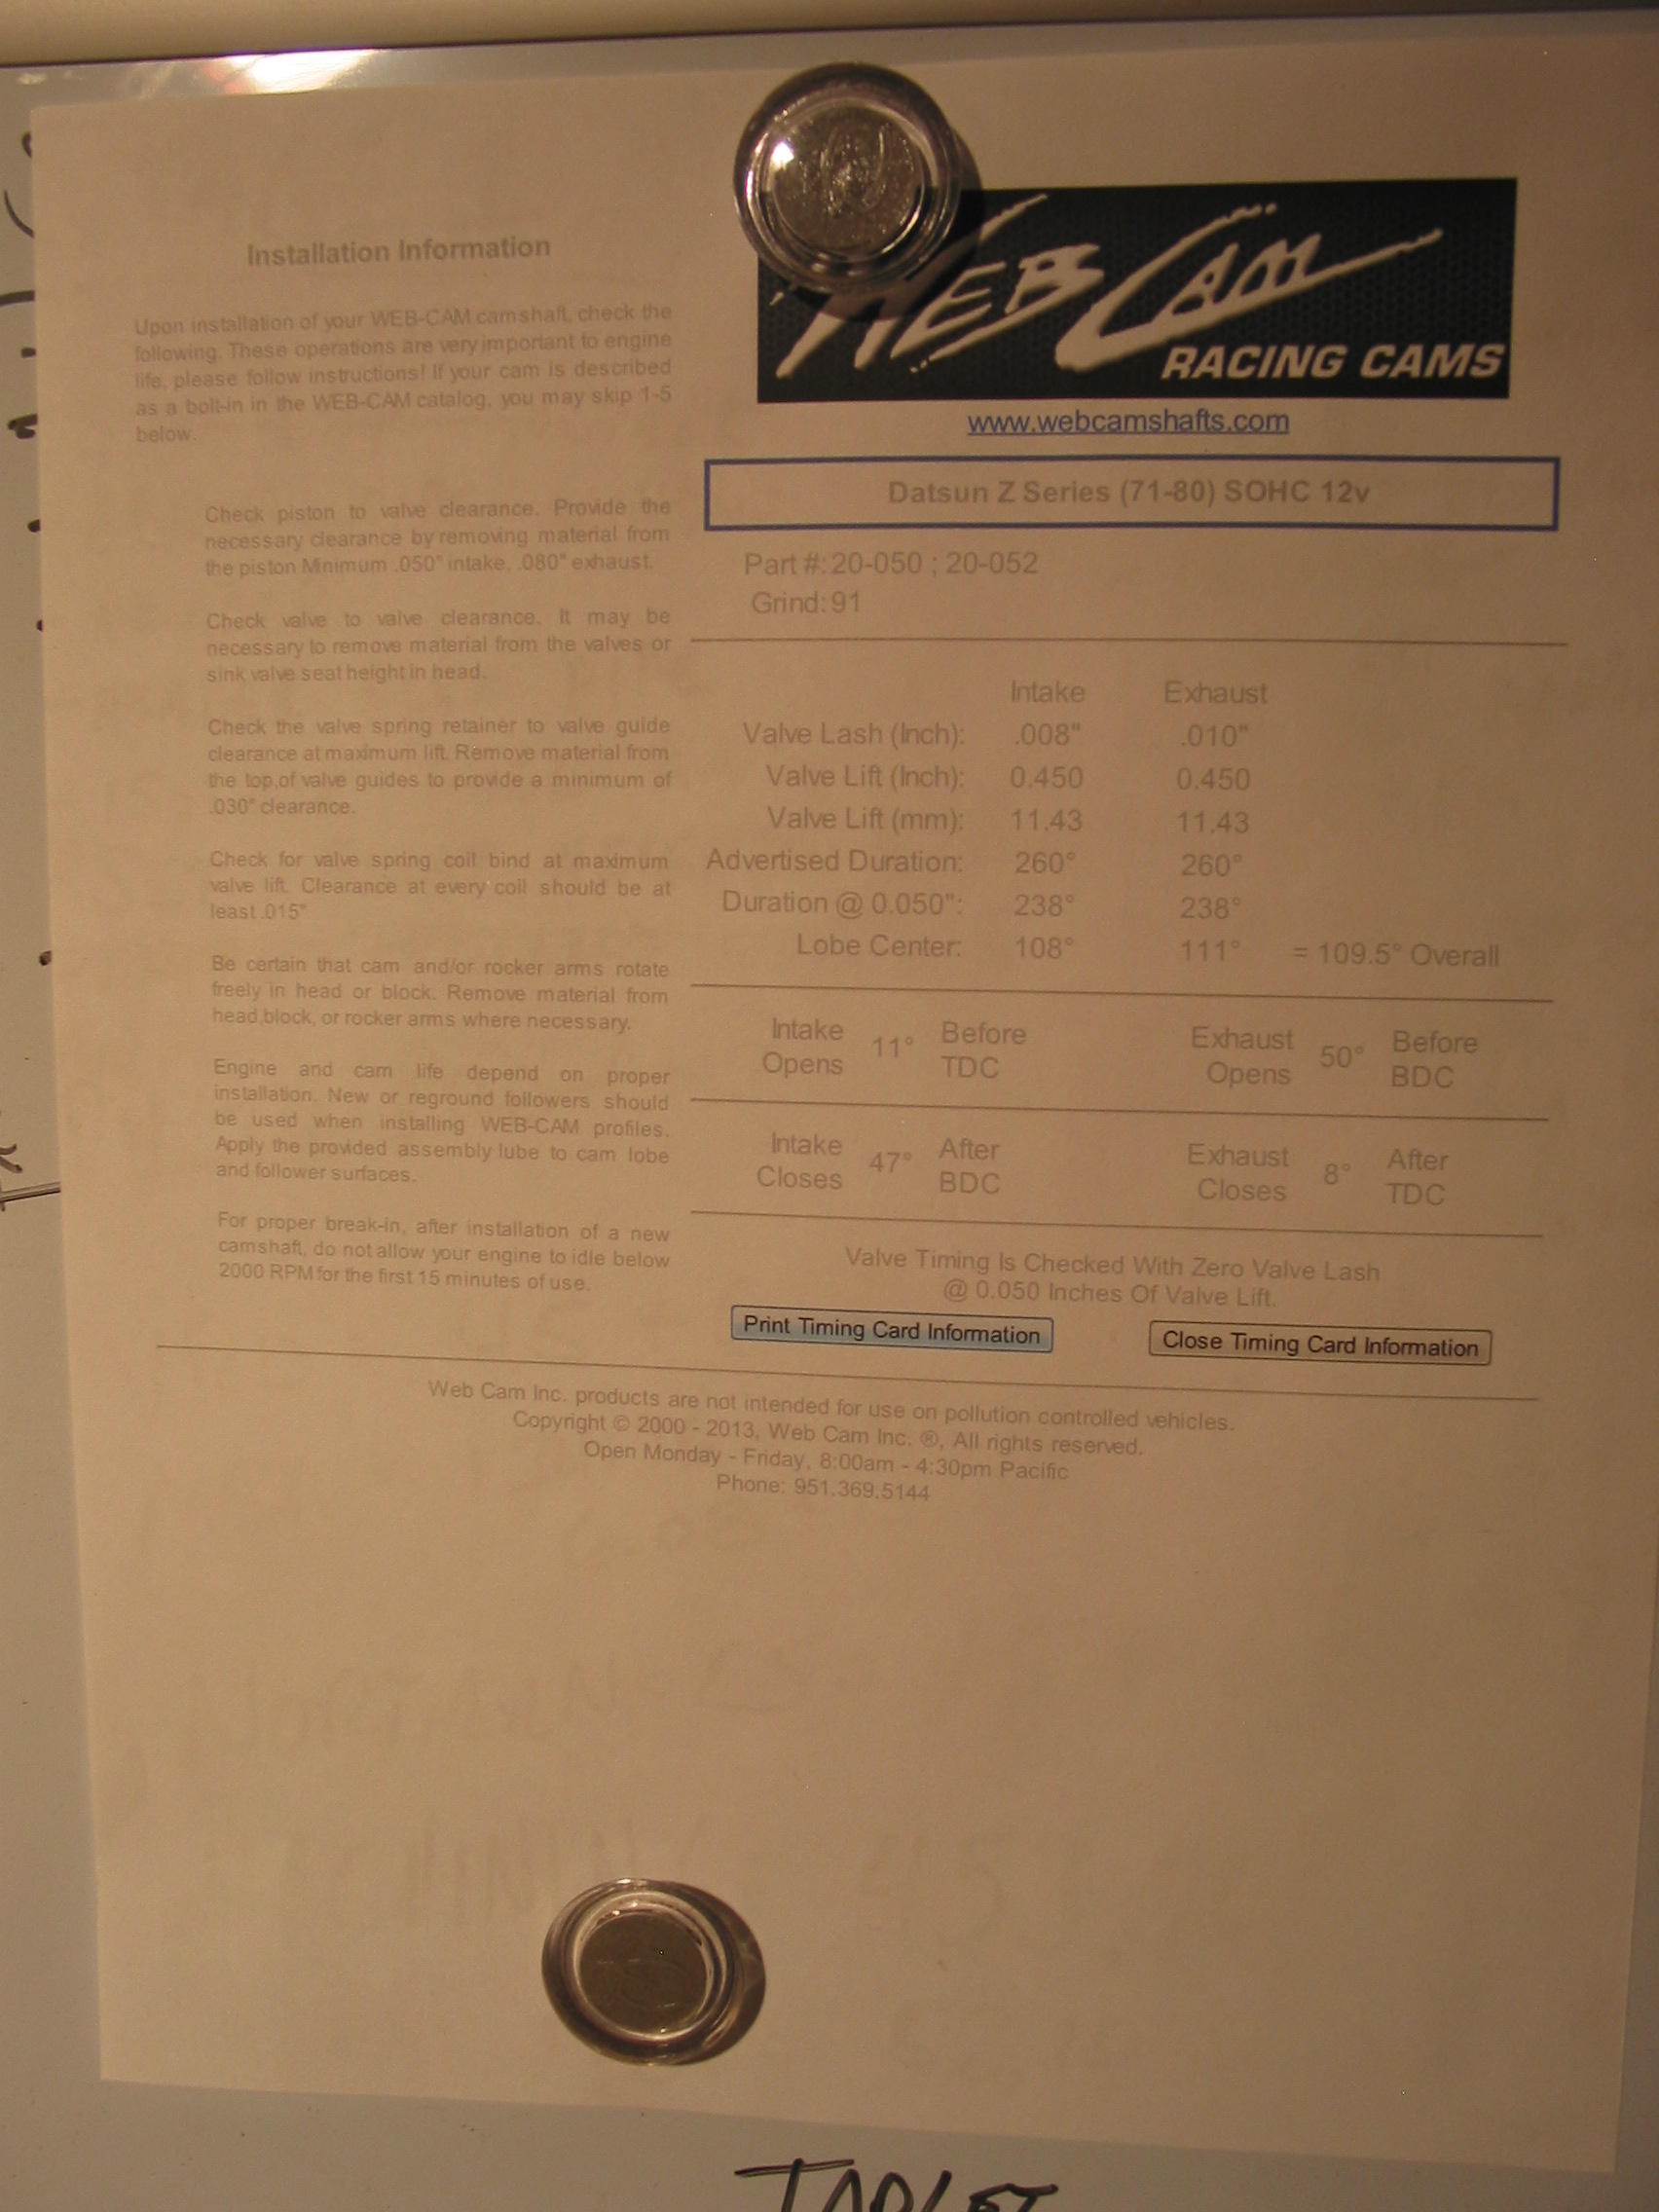
1 pointi gutted a spark plug and installed a bolt through the center with the end ground smooth. I then turn the crank slowly until the piston stops from the stopper. The length of the stopper bolt should cause the piston to stop 5° - 10° from TDC. I note the number on the degree wheel and then rotate the crank backwards until it stops again. Again, I note the number on the degree wheel. I rotate the degree wheel on the crank the number of degrees it takes to make the CW and CCW numbers match. I then do it all again to double check that the degree wheel is exactly zeroed at TDC. From there, I can start checking timing per the cam timing card. I use the eccentric sleeves from a SBC as described in the How To Modify Your L Series book.
 1 point
 -
They're right here. The tachs seem sensitive to the voltage pulse. People often have problems with the MSD ignition systems too. I had problems with a GM HEI module. The XR700 is about exactly like what you replaced. No real benefit. You could put the old stuff back and keep the Crane as an emergency spare.1 point
-
1 point
-
1 pointExcellent. When diagnosing an electrical issue, you can start at the battery positive and work your way to ground, start at the ground and work your way to battery positive, or start in the middle and work in one direction or another. Since we know the car runs, make sure you set the engine to top dead center before swapping the distributor. Take a photo of the rotor so you are sure how it is oriented. Make sure you have a good ground for the new distributor, too.1 point
-
1 point
-
It's foamy feeling thing, sticky kind of. I don't like mine so I covered it. This picture shows what it turns into. It will give you an idea of what they feel like after 40 plus years in the sun.
 1 point
 -
1 point
-
1 point
-
1 pointNever tell her you can sell it in a heartbeat! Tell her, “If I just fix it up a little more, I can get our money back” That at least buys you time and more mods...[emoji6]1 point
-
1 pointAbsolutely. I took all of my lock cylinders to an automotive locksmith and he keyed them all the same.1 point
-


Important Information
By using this site, you agree to our Privacy Policy and Guidelines. We have placed cookies on your device to help make this website better. You can adjust your cookie settings, otherwise we'll assume you're okay to continue.