Leaderboard


 Subscriber


Popular Content
Showing content with the highest reputation on 02/22/2019 in all areas
-
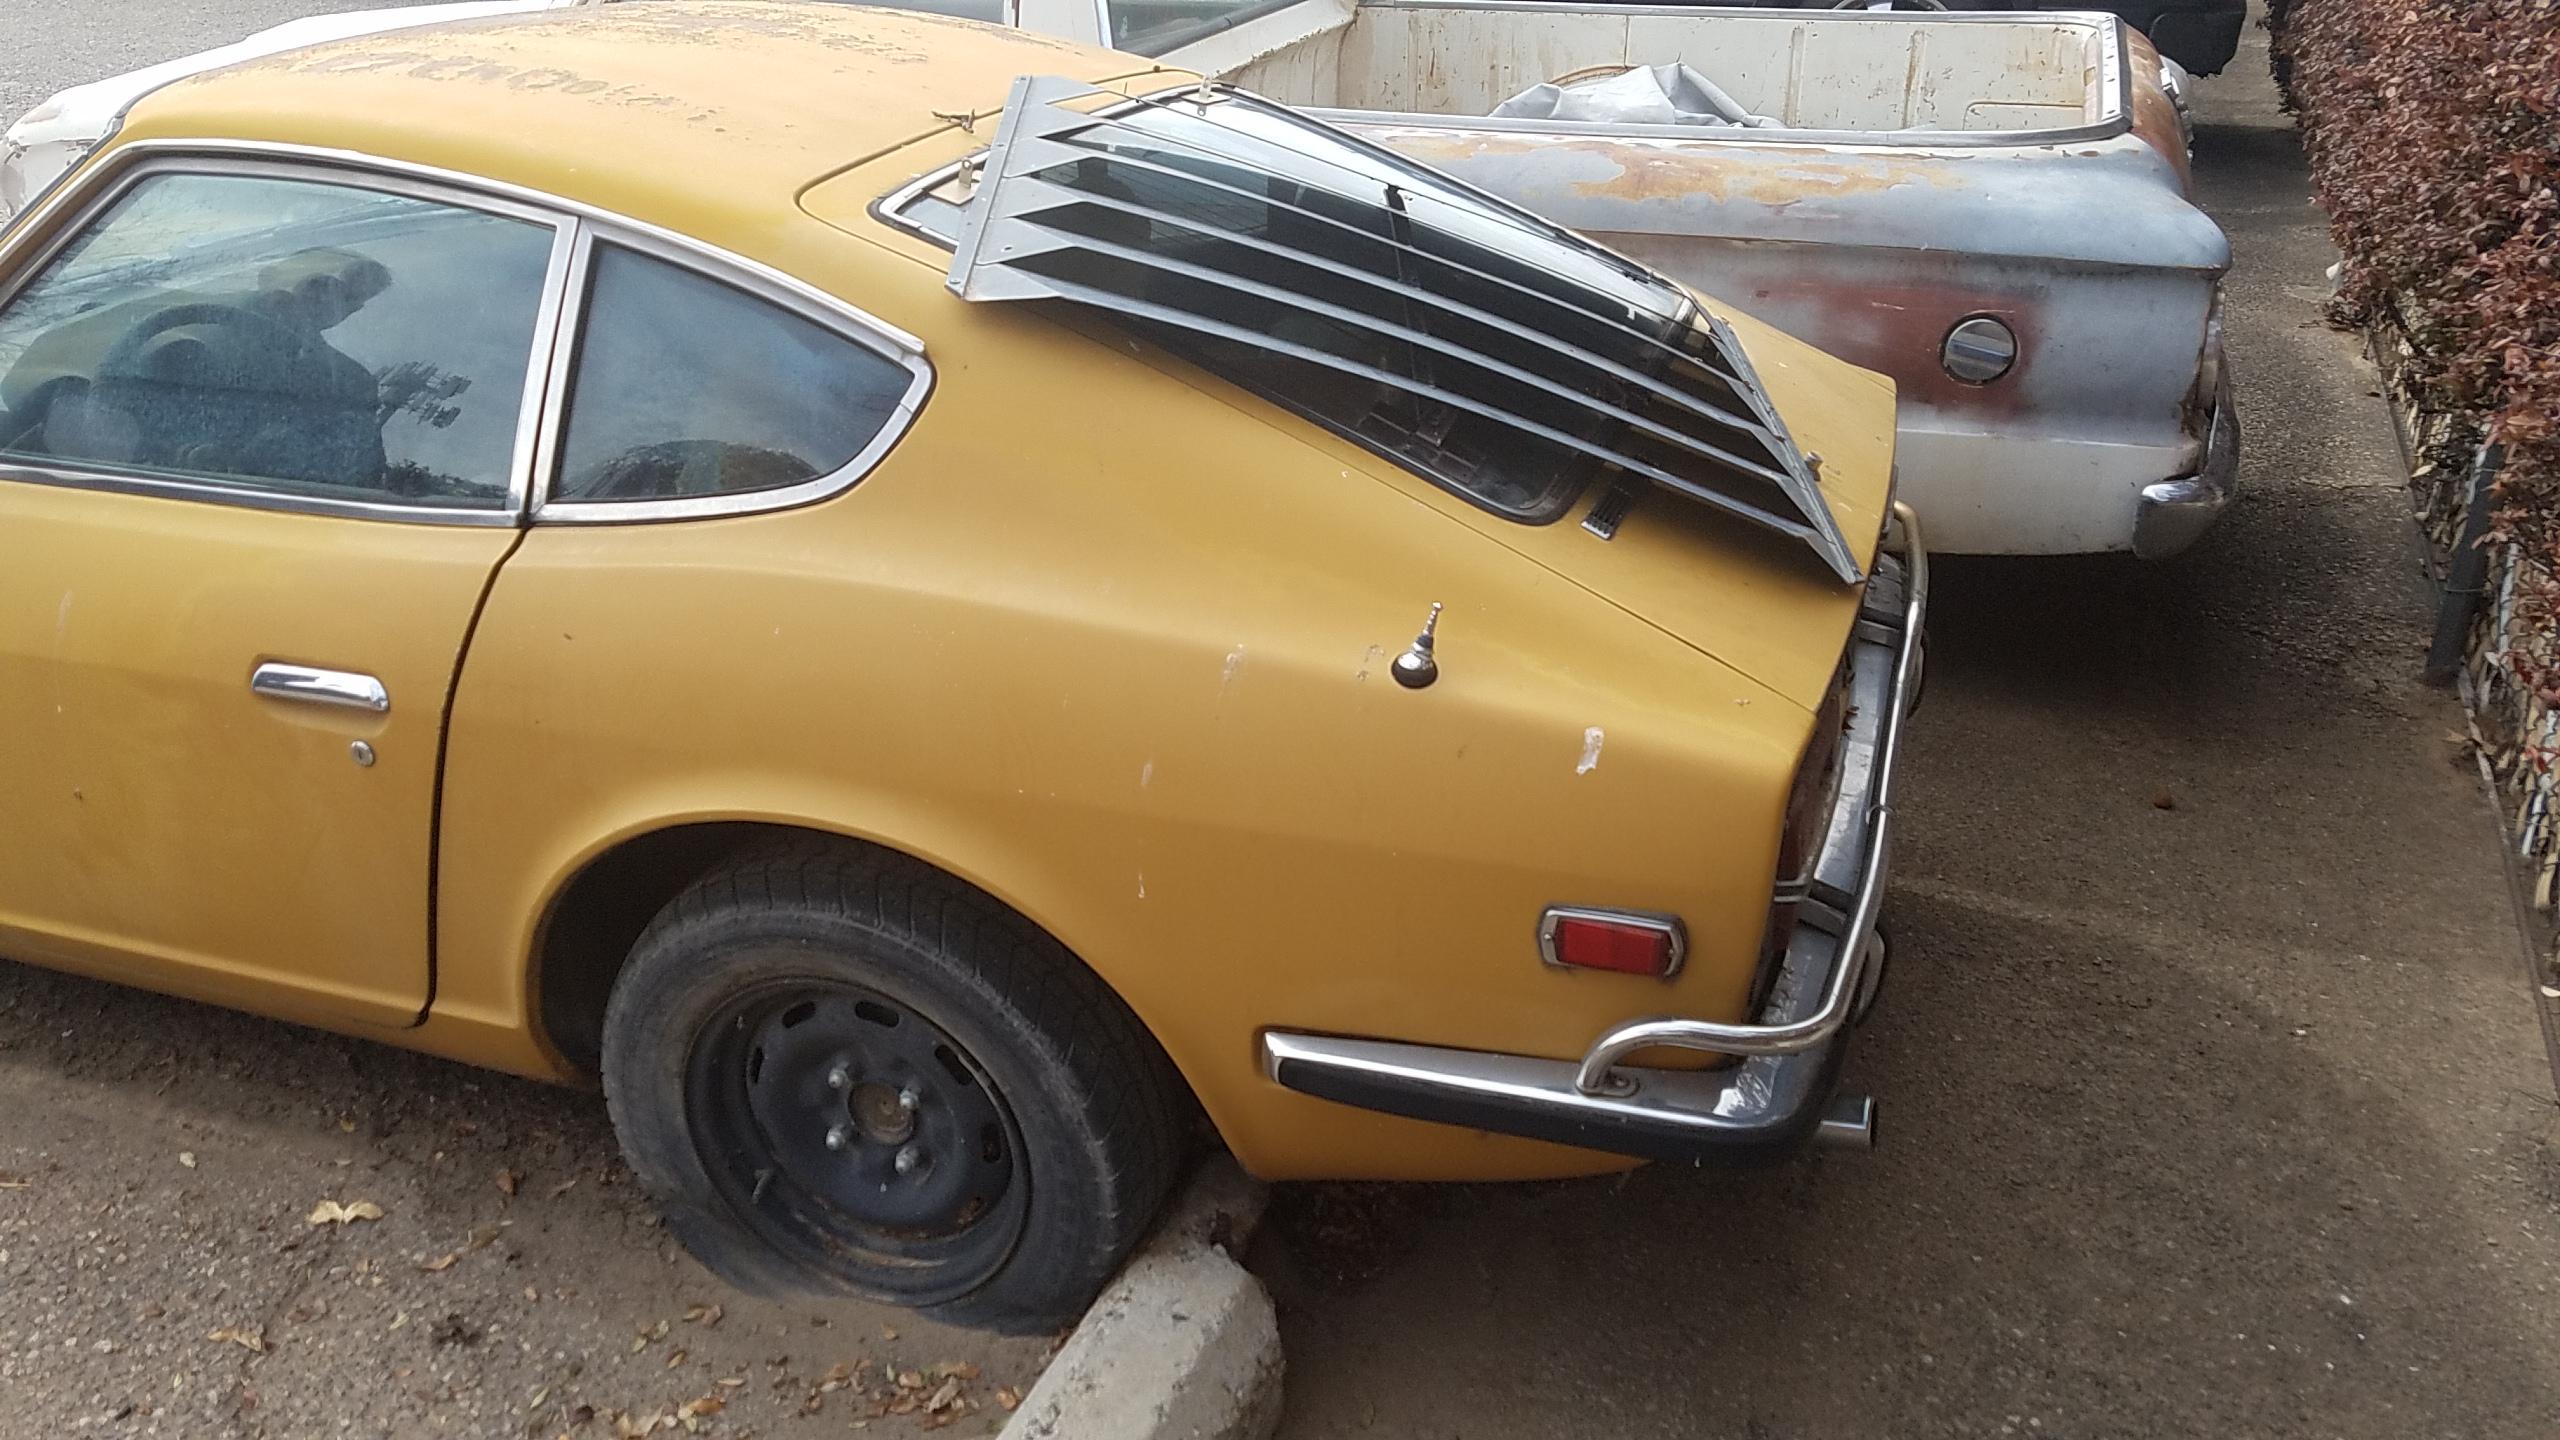
3 pointsGood shape, body is straight. Seats in good shape. Original sound deadening on floors. Looks early generation. No cancer.

 3 points
 -
2 points
-
2 pointsAs a follow up, this morning I contacted Ryan at www.zcardepot.com and he confirmed to me that the wipers he is offering on the website are not OEM Nissan. He specifically mentions that in the listing by referring to them as "original style".They are a very close copy that he has sourced when the original wiper supply dried up. As of now these are the closest you can get to the visual appearance of the OEM wipers. He does have them in stock.2 points
-
2 points
-
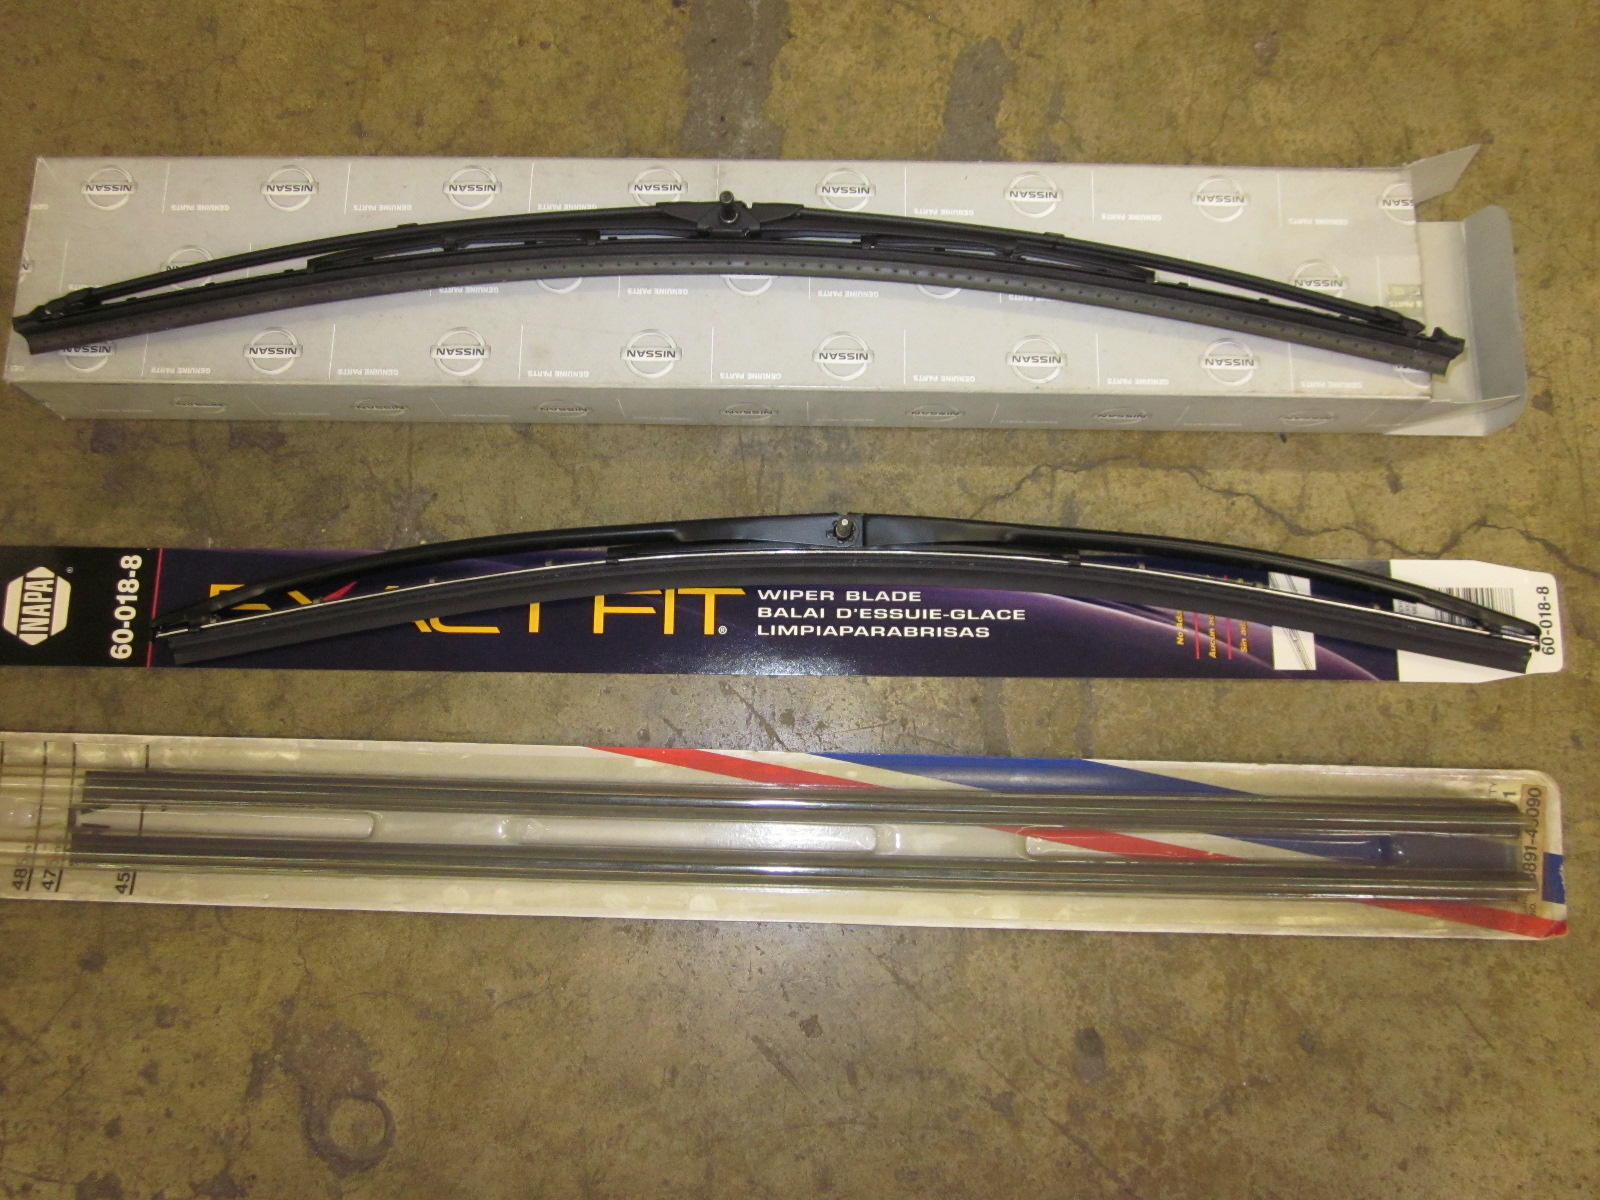
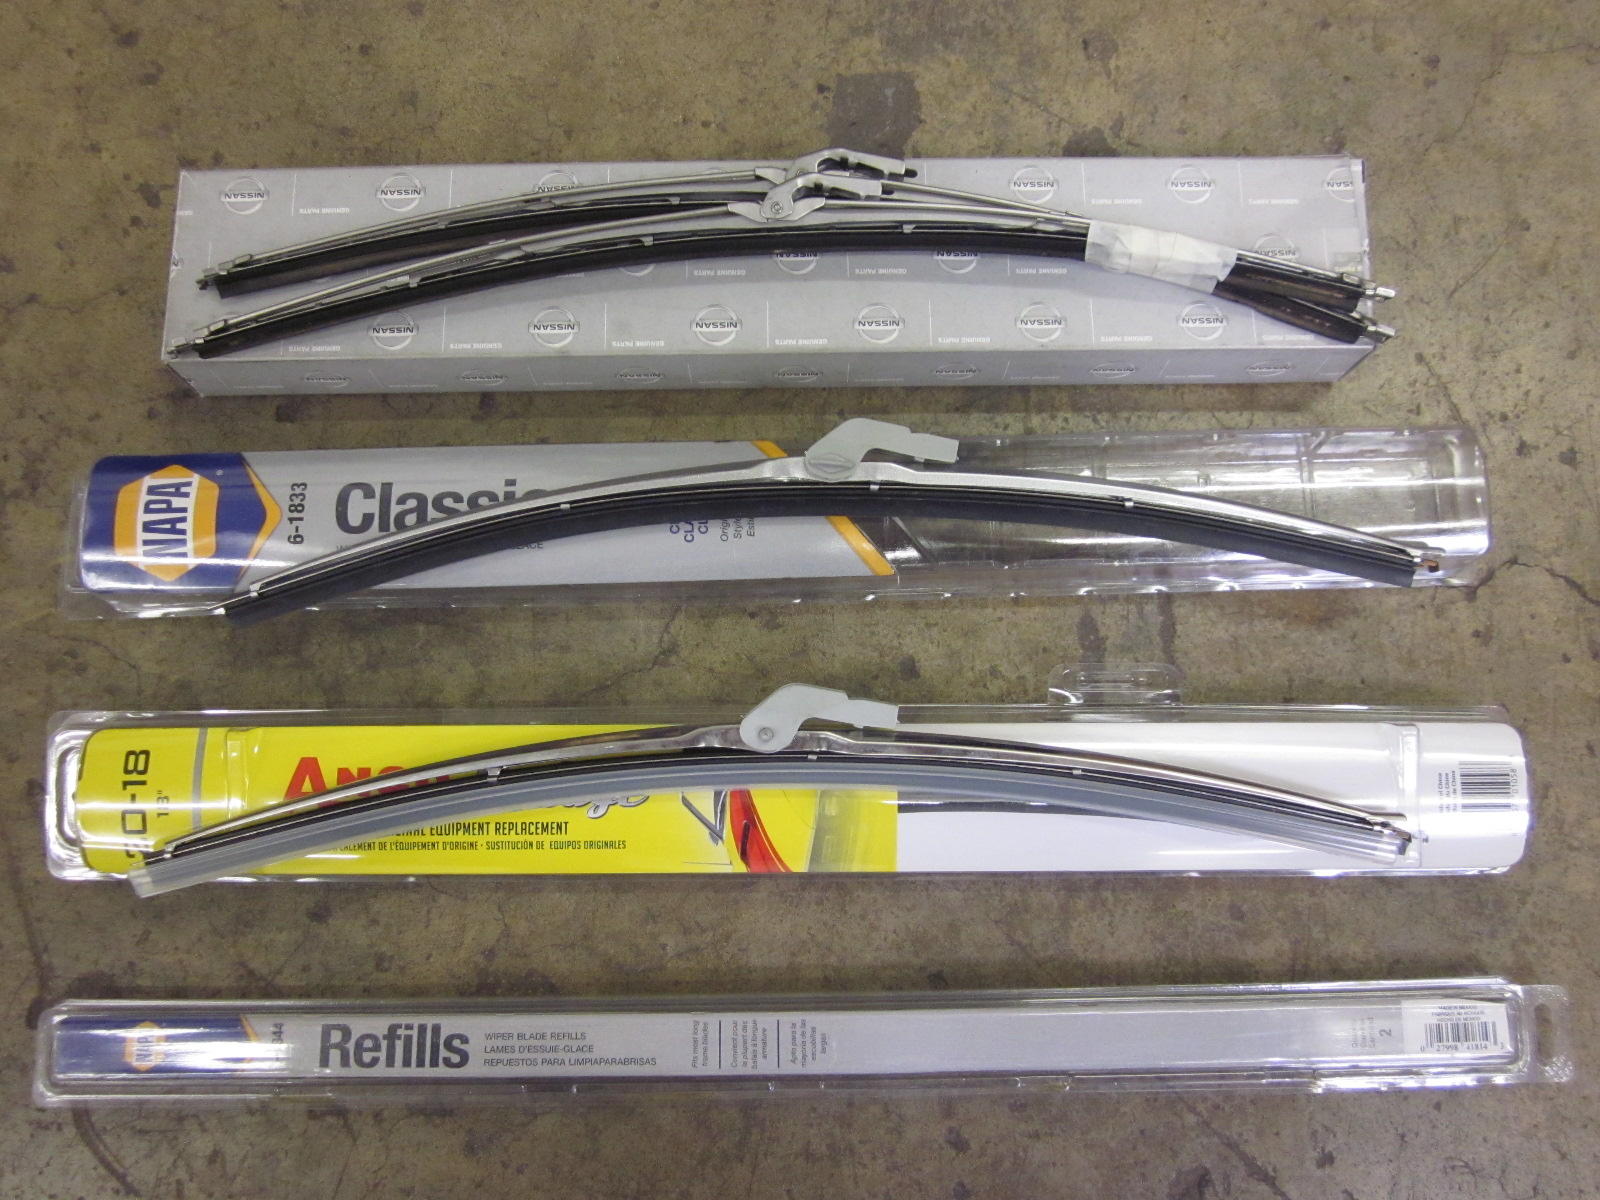
2 pointsAfter finding out that 240 and late 280 wiper blades are NLA from Nissan I decided to go on a bit of an adventure checking out what's available on the aftermarket. At least something that might be period looking. On top is a new Nissan factory 77/78 280 black pin drive type blade, B8891-N3500. Below that is an excellent substitute from NAPA, 60-018-8 for about $12.00 each. I like these because they look good and the pin drive is solidly mounted to the superstructure and not part of a universal mounting kit. At the bottom are a set of NLA Datsun refills B8891-45090. The last set Nissan had. At the top of the second picture is a set of Datsun factory blades that I liberated from a 240 with only 9k miles. On the superstructure is printed "under license from TRICO". Below that is a set of NAPA /TRICO Classic blades (6-1833). Although they are sold by NAPA and TRICO for about the same money, $9.00 each, and are almost identical, they are manufactured in China. The mounting arm is part of a kit and made from gray plastic. The design of the metal superstructure is nothing like the factory blades but the color is pretty close. Below that is a set of ANCO Vintage Specialty Blades, ANC-20-18. I had a hell of a time locating a set as those dealers indicated on the ANCO site as being near me didn't have a clue. I finally ordered from Summit for more than $25.00 each. Upon opening the packaging I discovered that THEY ARE THE SAME MADE IN CHINA BLADE AS SOLD BY NAPA and TRICO! Only difference-the superstructure is more shiny. At the bottom are a set of NAPA/TRICO refills and yes, they do indeed fit original Datsun factory blades. However, the stiffening piece is black. The NAPA part # is 6-1844 and are/were about $7.00 for a set. Given the relationship between NAPA and TRICO I'm confident that they are the same TRICO 44-180 mentioned by siteunseen. Cheers

 2 points
 -
2 pointsI couldn't agree more grannyknot! I'm not deriding this excellent survivor, what a wonderfully preserved car, but there are a couple of things that I saw, so I will mention them. When I say "original" it is in the context of "correct" for a 240z car with this build date of 1971, not necessarily original TO THIS CAR. The positive cable to the battery does not appear original to me. I could be wrong but I've never seen an original red one---only black. The uniquely shaped and formed terminal end is hidden by the inspection lid in the photos, as a result it is unknown by observation whether it is truly an original red one. The battery hold down is new (you can see the tag) and the battery does not have it's proper cover and cap. Certainly not a big thing, but for $72 grand it would have been nice to see Steve Nixon's reproduction on it with proper disclosure that it is a faithfully correct reproduction. (Steve reproduces the battery terminals also I might add.) Madill, Oklahoma is not too terribly far from where I live in NW Arkansas. Sounds like a road trip in Zilver might be in the offing to see The240zGuild operation first hand. He has offered many nice cars through BringaTrailer and obviously knows his stuff. Possibly he could give me his professional appraisal of Zilver while I am there!2 points
-
1 pointOn Facebook, The 240Z Guild just posted of the sale of an original paint '71 for $72,500. The car is HLS30-19769, lots of photos on their page. https://www.facebook.com/The-240z-Guild-463701714192371/?__tn__=kC-R&eid=ARCljoUeqeBGQ1K7uZ2neg6DB9HjORaaR-Weabm097EOpZhh3sZrXmEAinbxzem4dFcBi6-9BvXpWkCK&hc_ref=ARQUvILE-92Kvd7_rXuN5FmPOUnue4r5_18ic1vZnANzNEbGc6qt-yKtKty5G26gFPA&fref=nf&__xts__[0]=68.ARCppRC-PW94KvzFkLnkWuhc6LbmxrucBakPHCxdLEfKurNJbsKCREFrXOYlltOLVrvkIhPkAYXZ8bJQI46i19c4mgsz1OQ27GgFIYK0ilxl_4npswRT8W-yunyXNbp1wntDwKTKaA_rM24WOCotSBxdX5EWbmIvtAcavkq-fOCUb6uq0l4e-IDhDlukomaezHMgtWXAYIwTmA4S-ye-vaWVEfFxuD7OLAxnEzCqCJ40NKj7RT5EAPRxMDEHIdvNJga8MuFl5wkokLIIHmaiVAaQZRY2nob2wKeJs5DvS9aYiyV1GIV0AMspbKhkErtm4Zmdi1hKRFXgjn6kgjiah9BPLJP8MX_SPhR8d63nR9f4jcEjxYuvv7I1 point
-
1 point
-
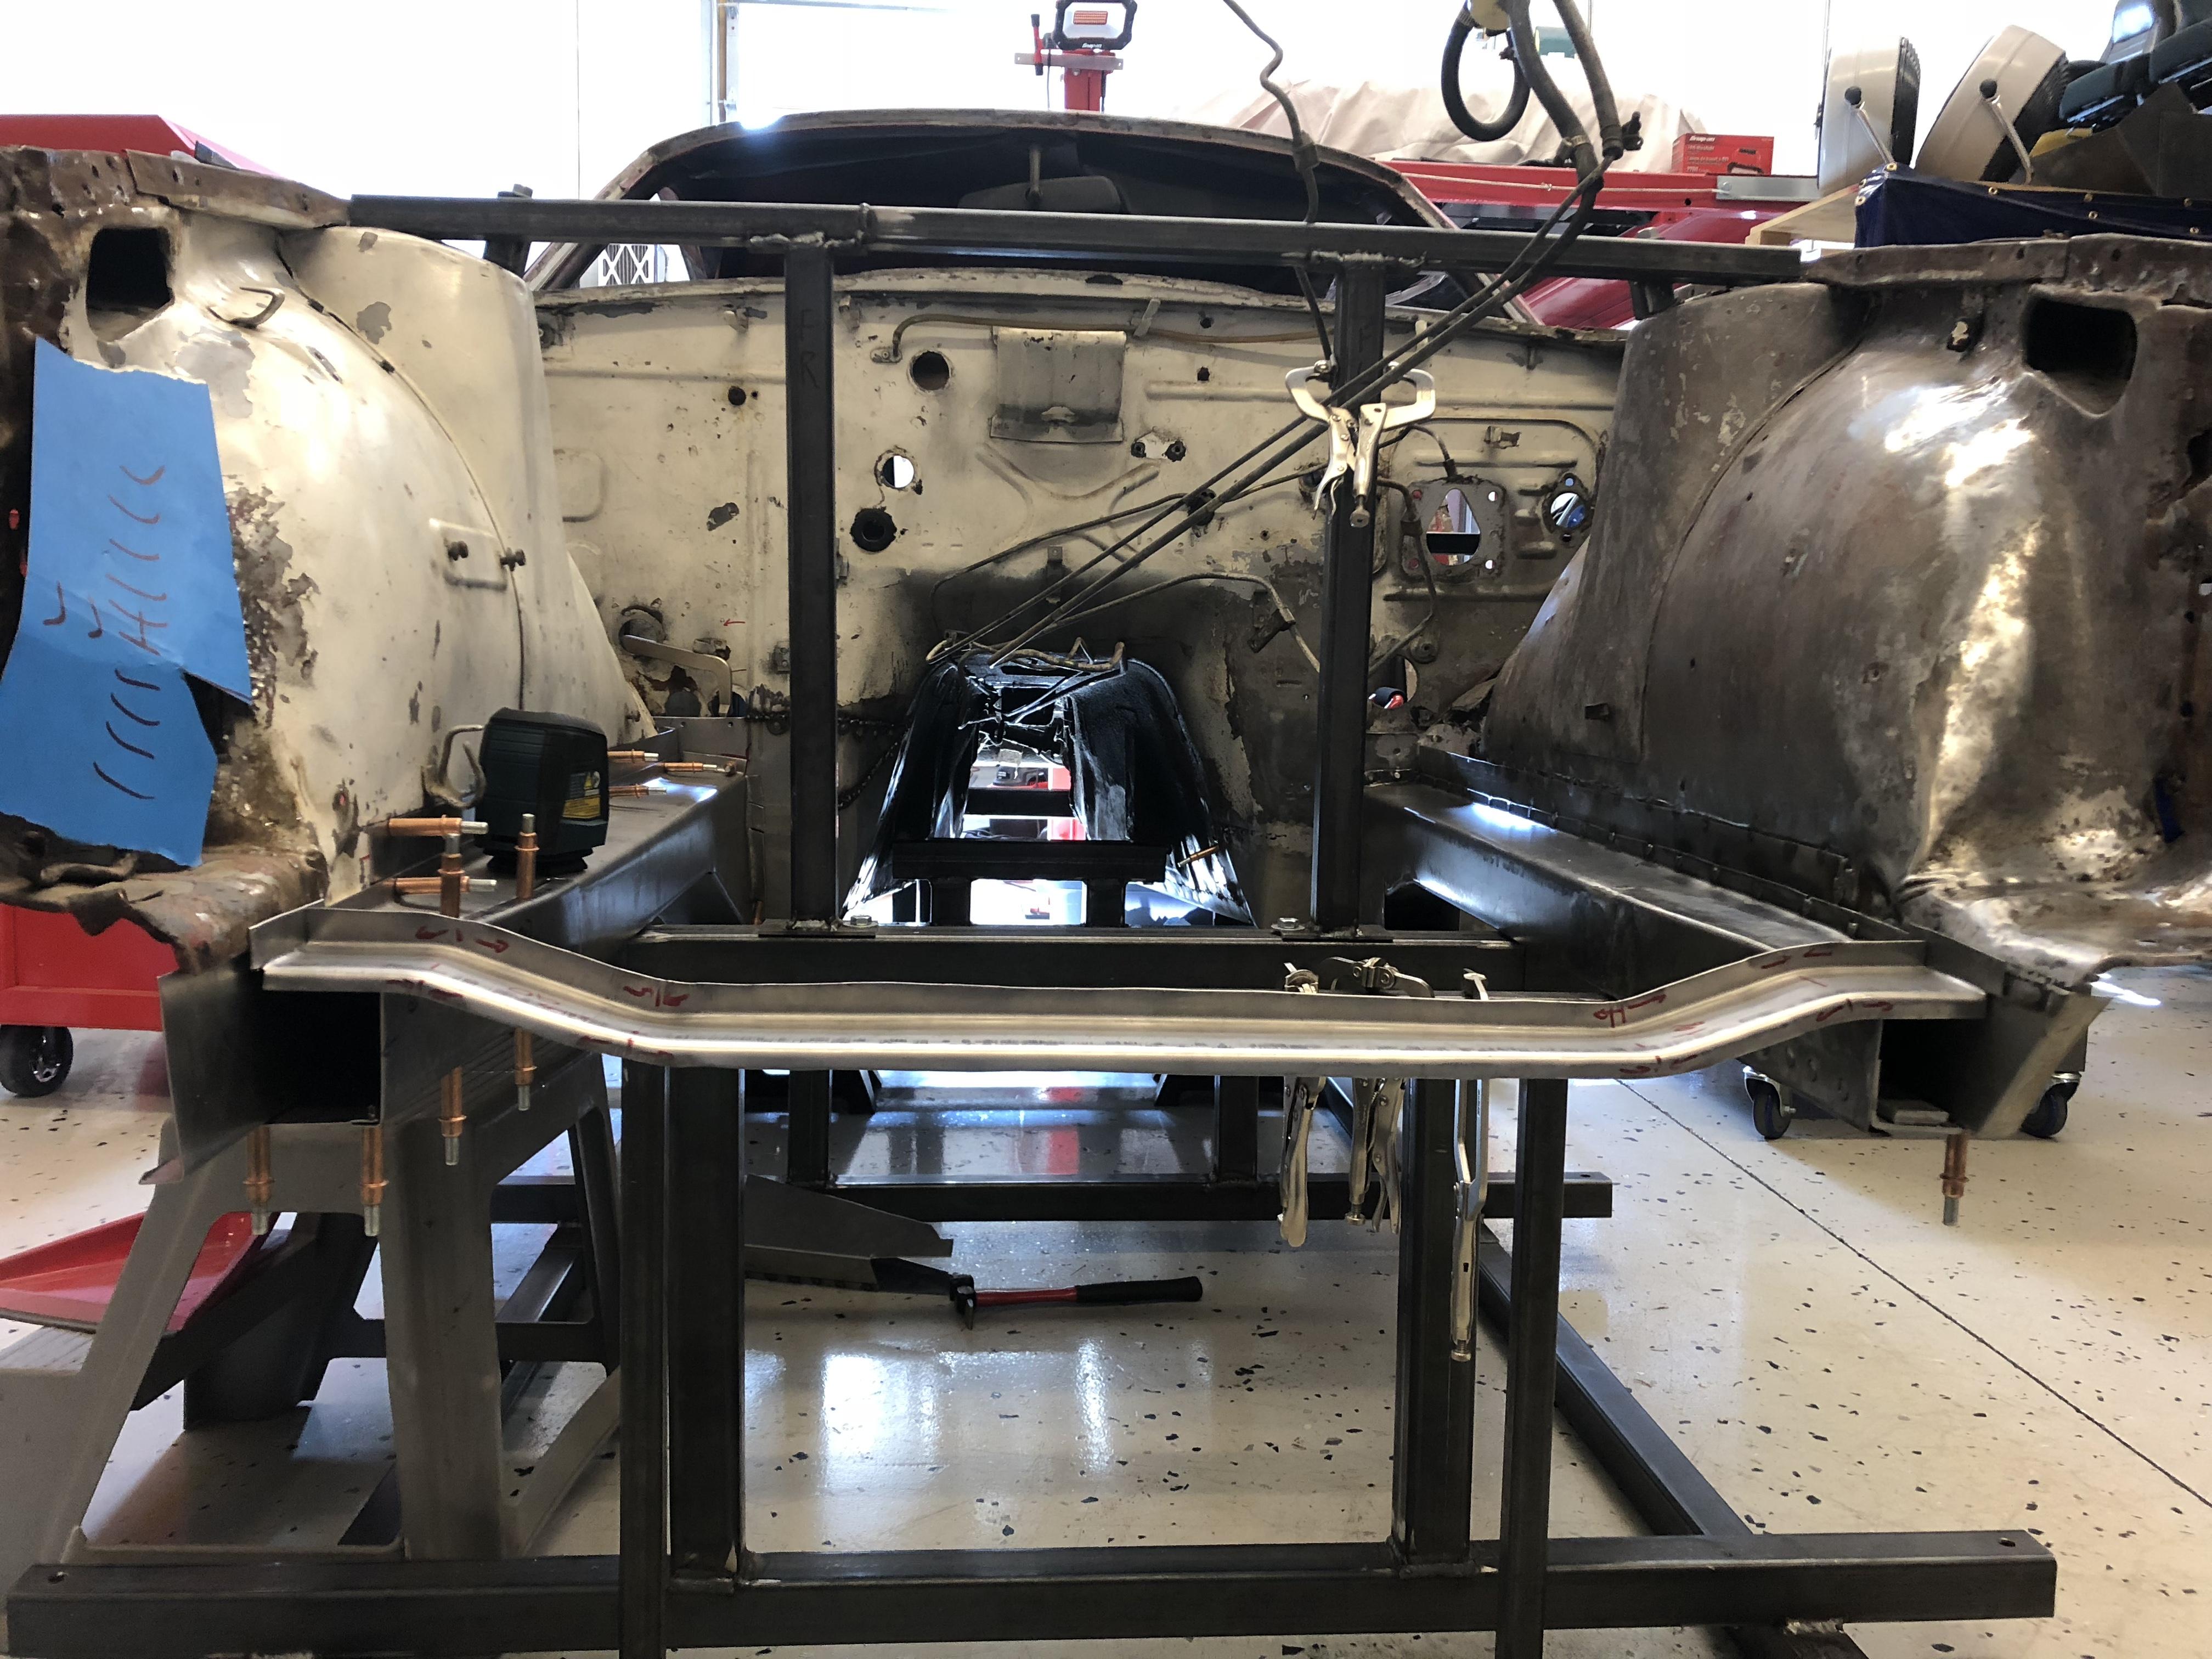
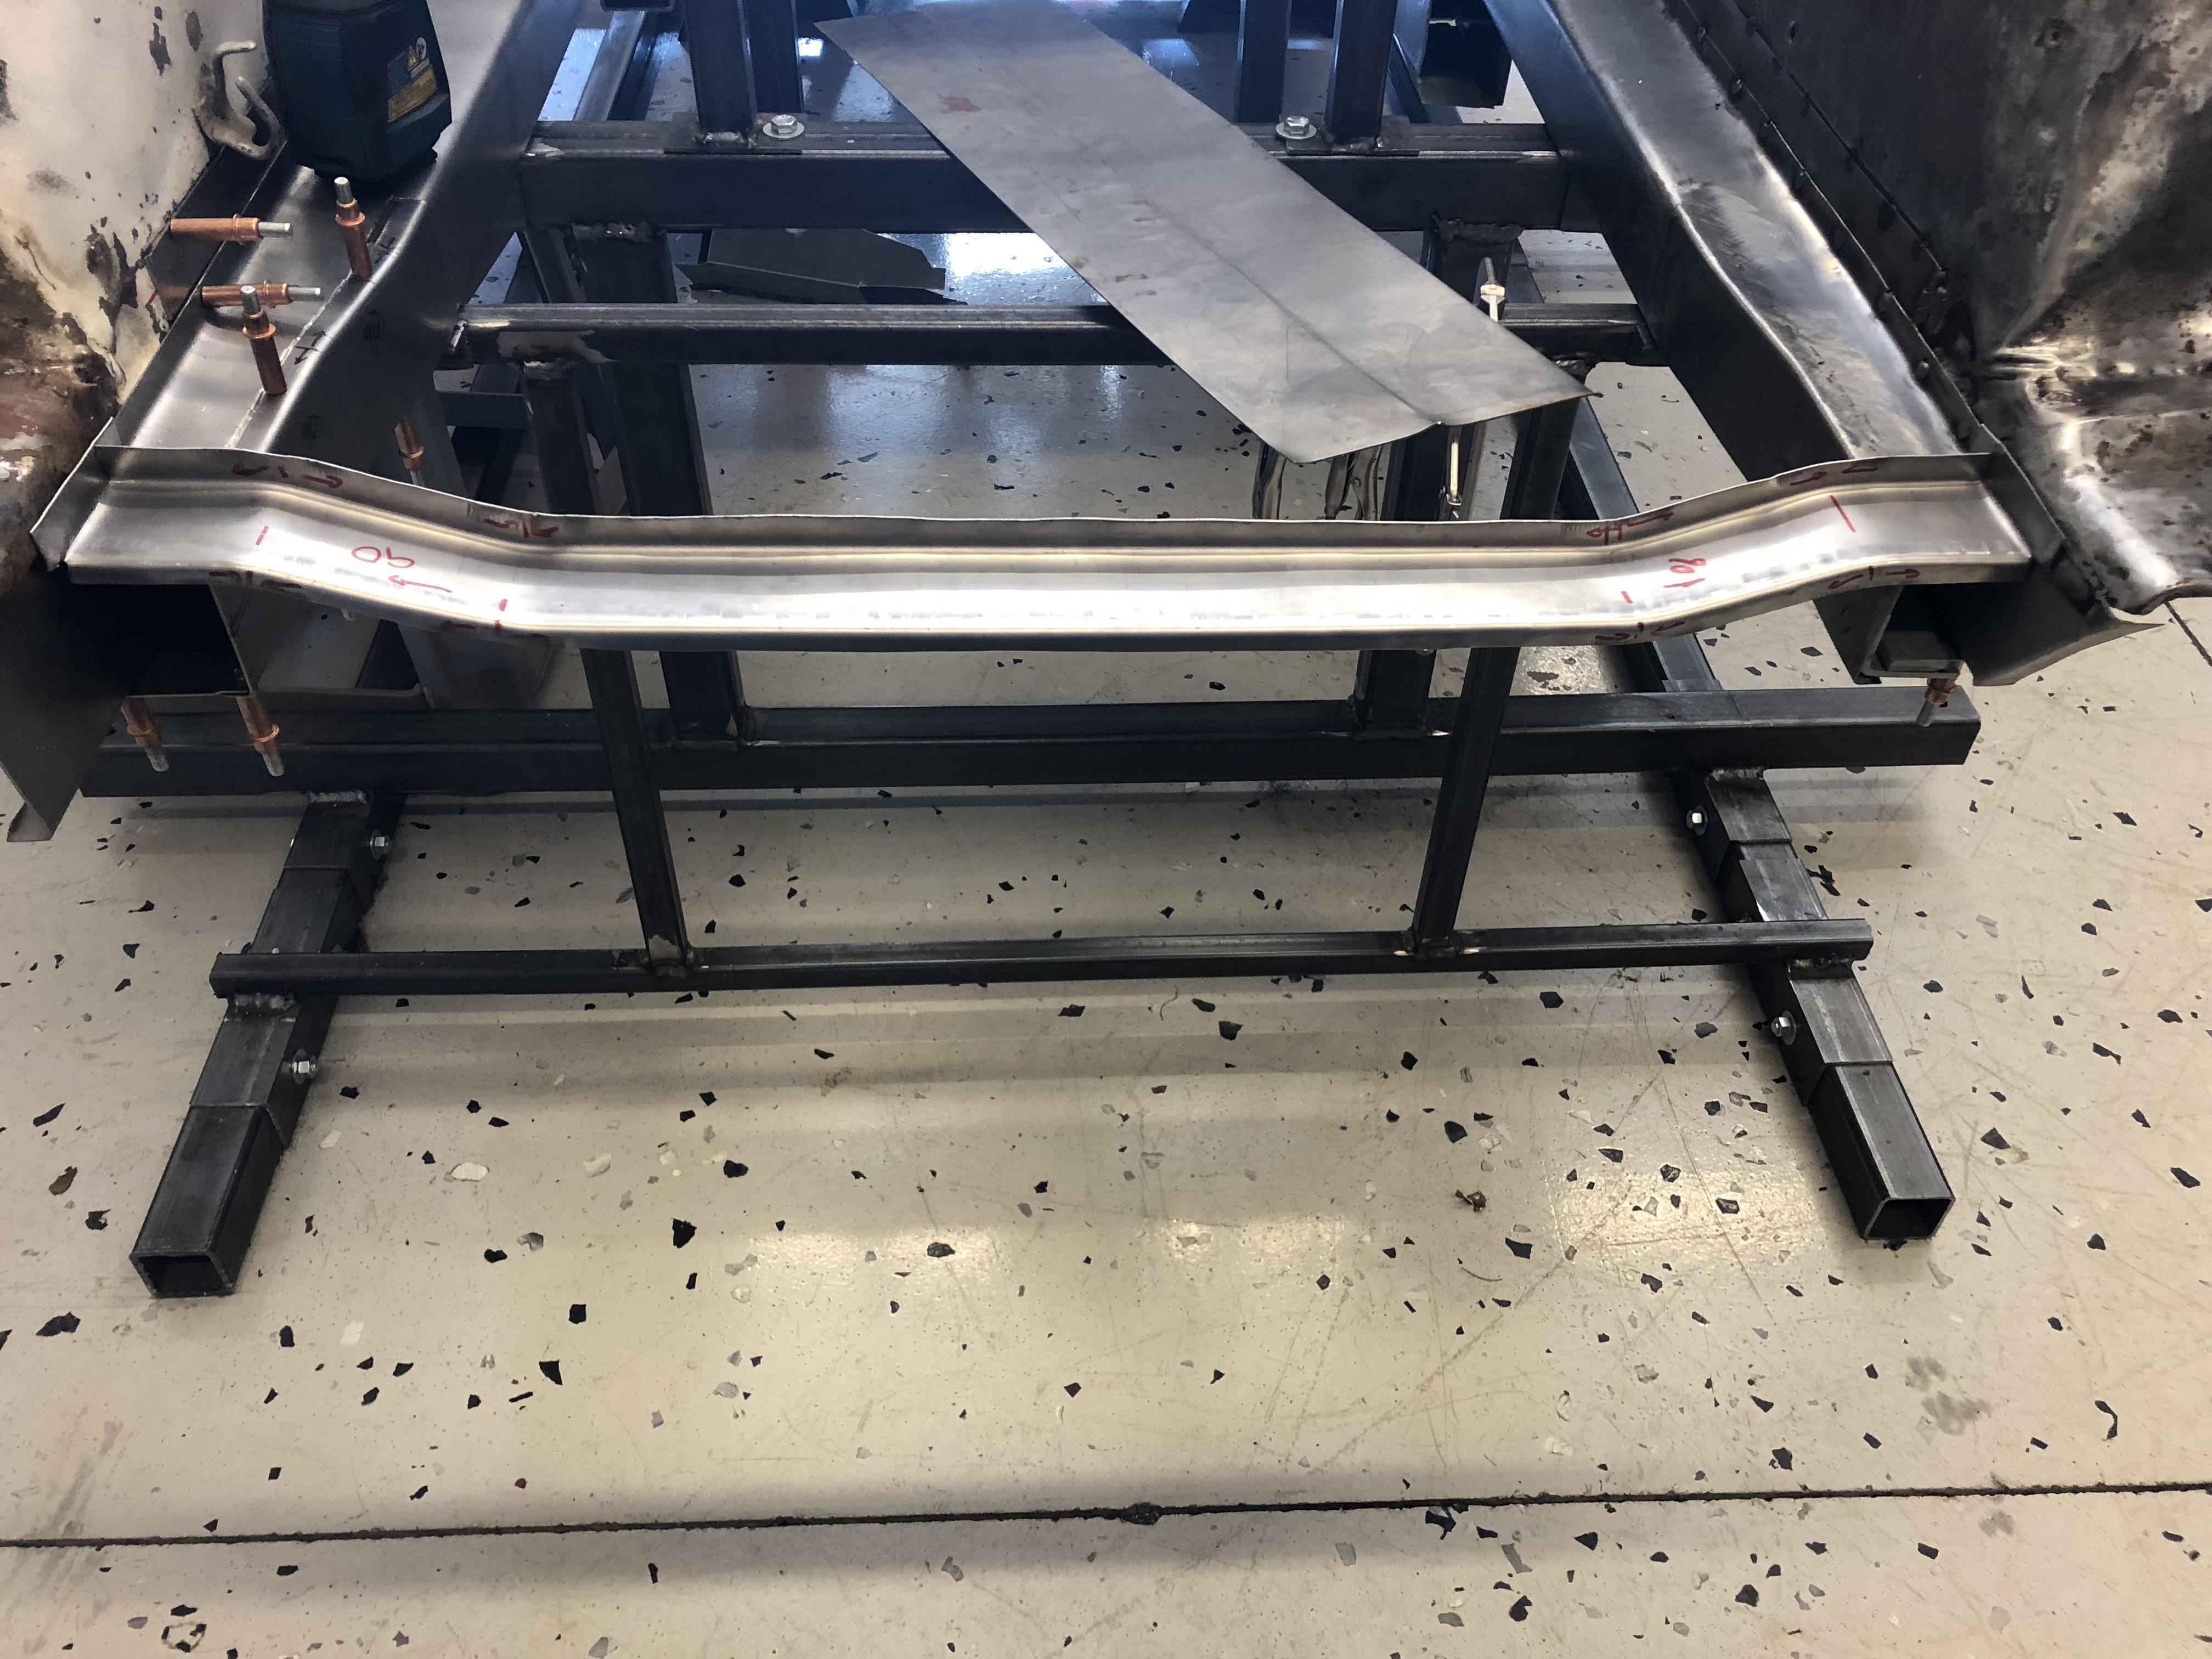
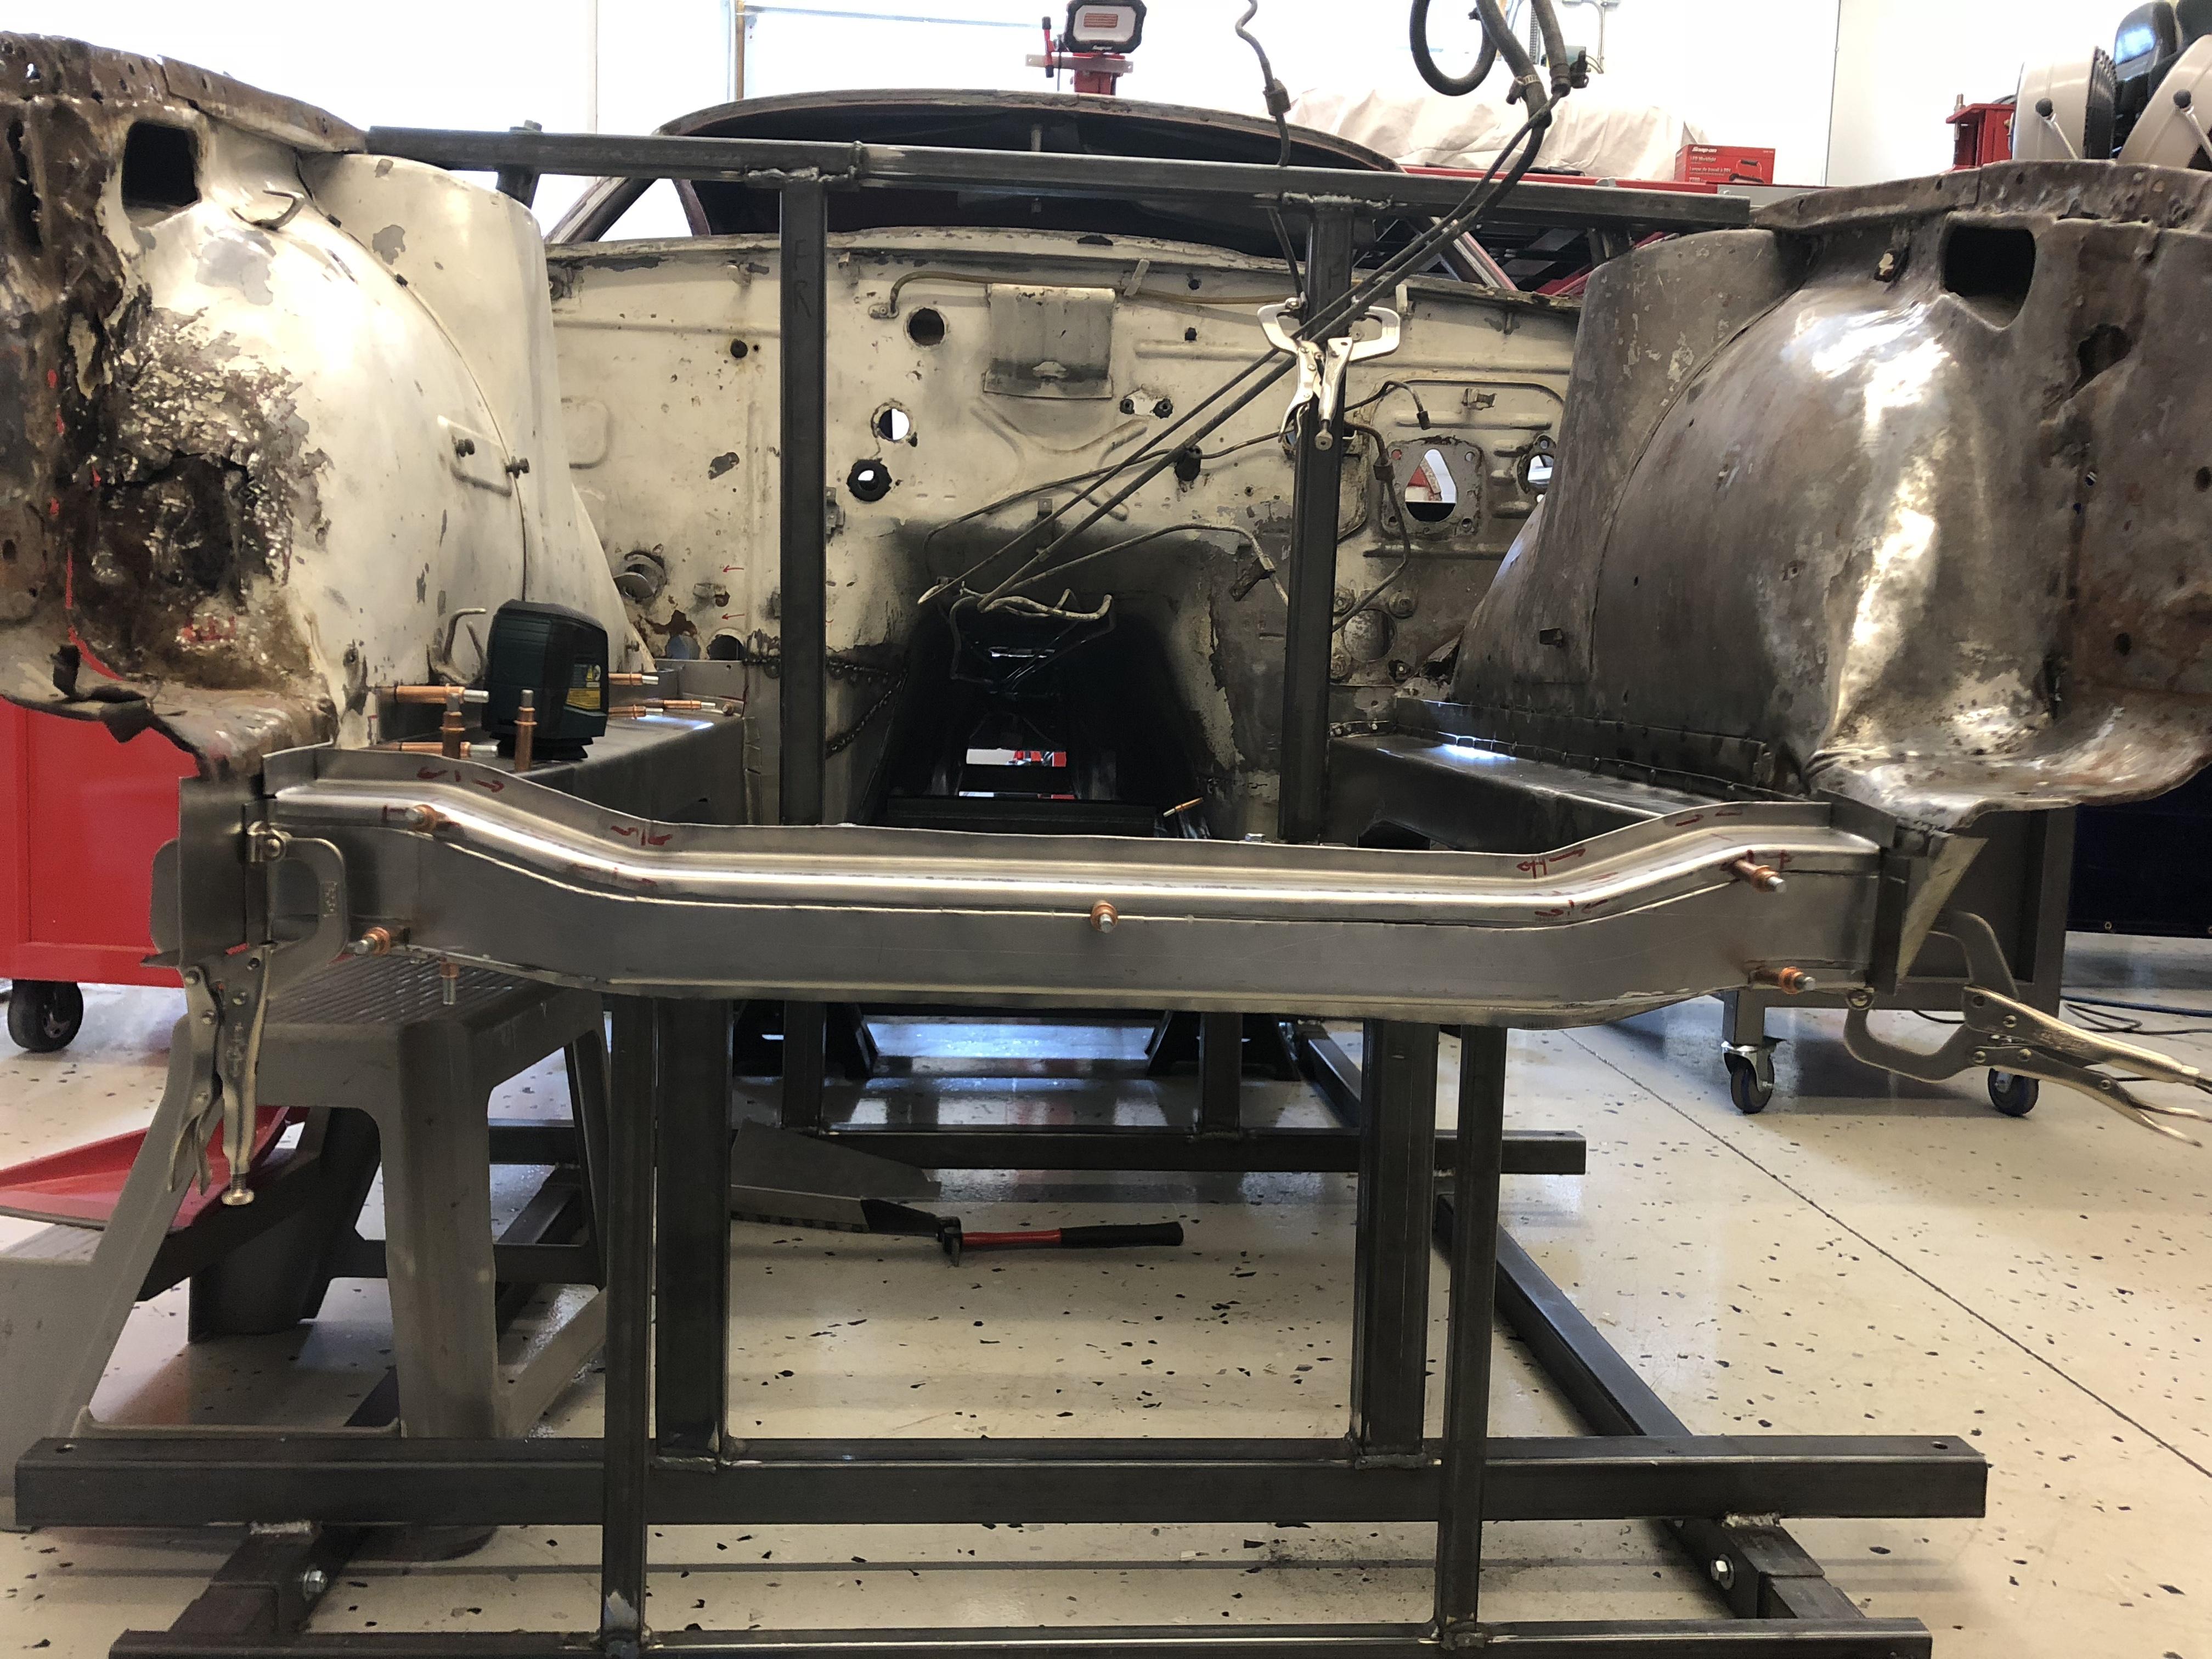
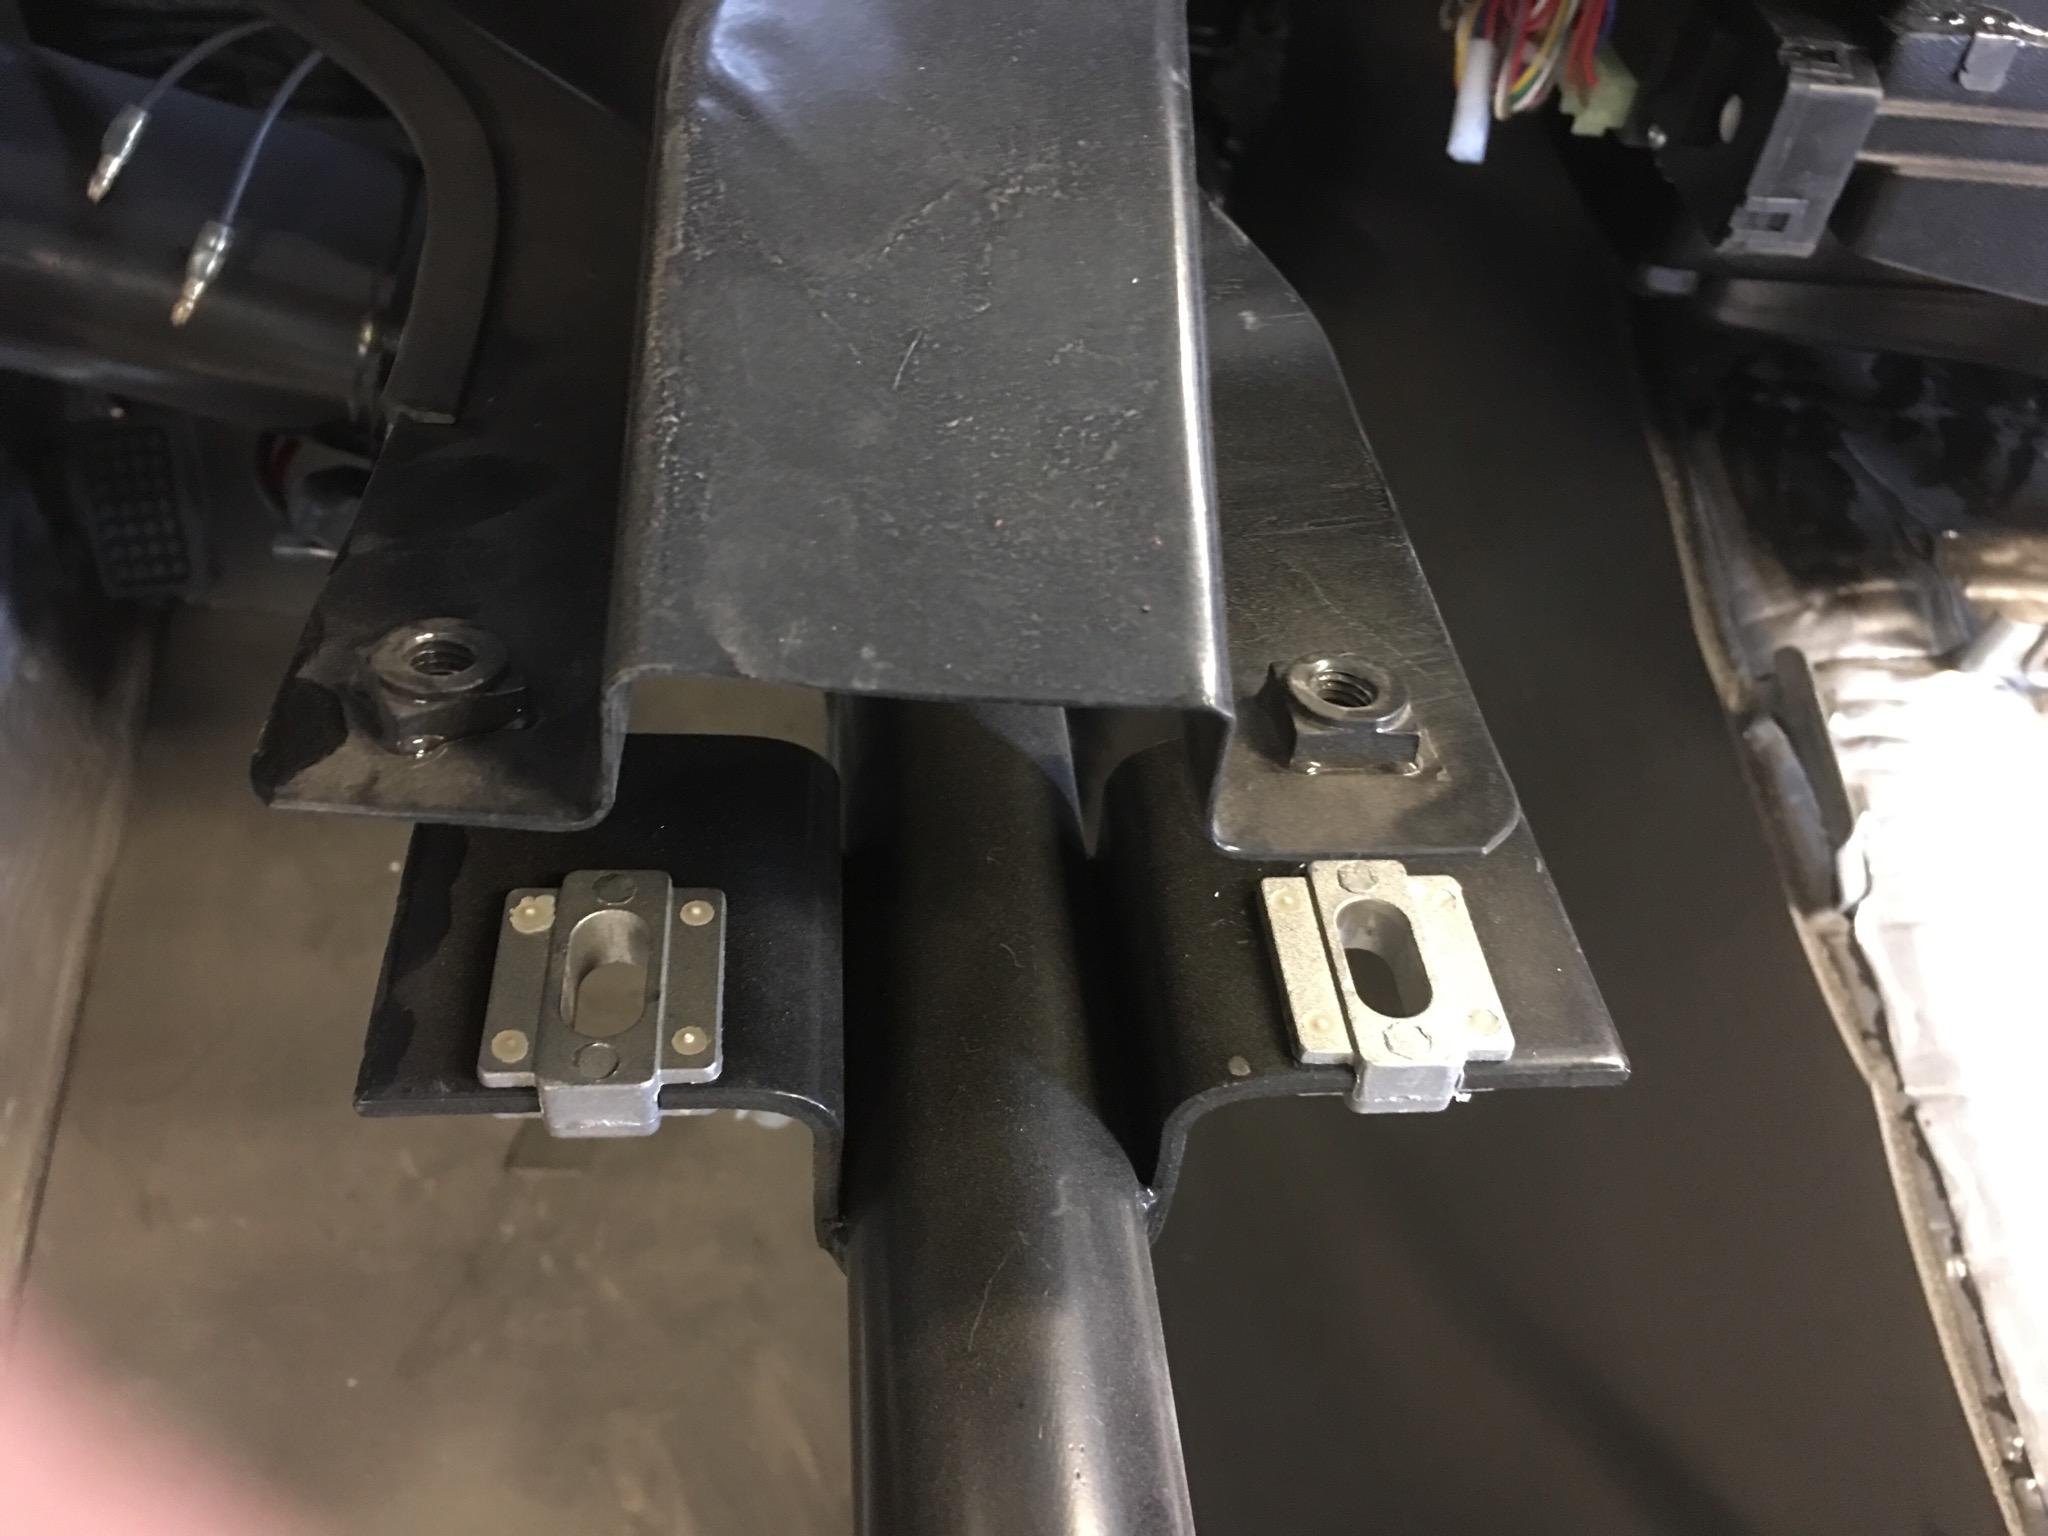
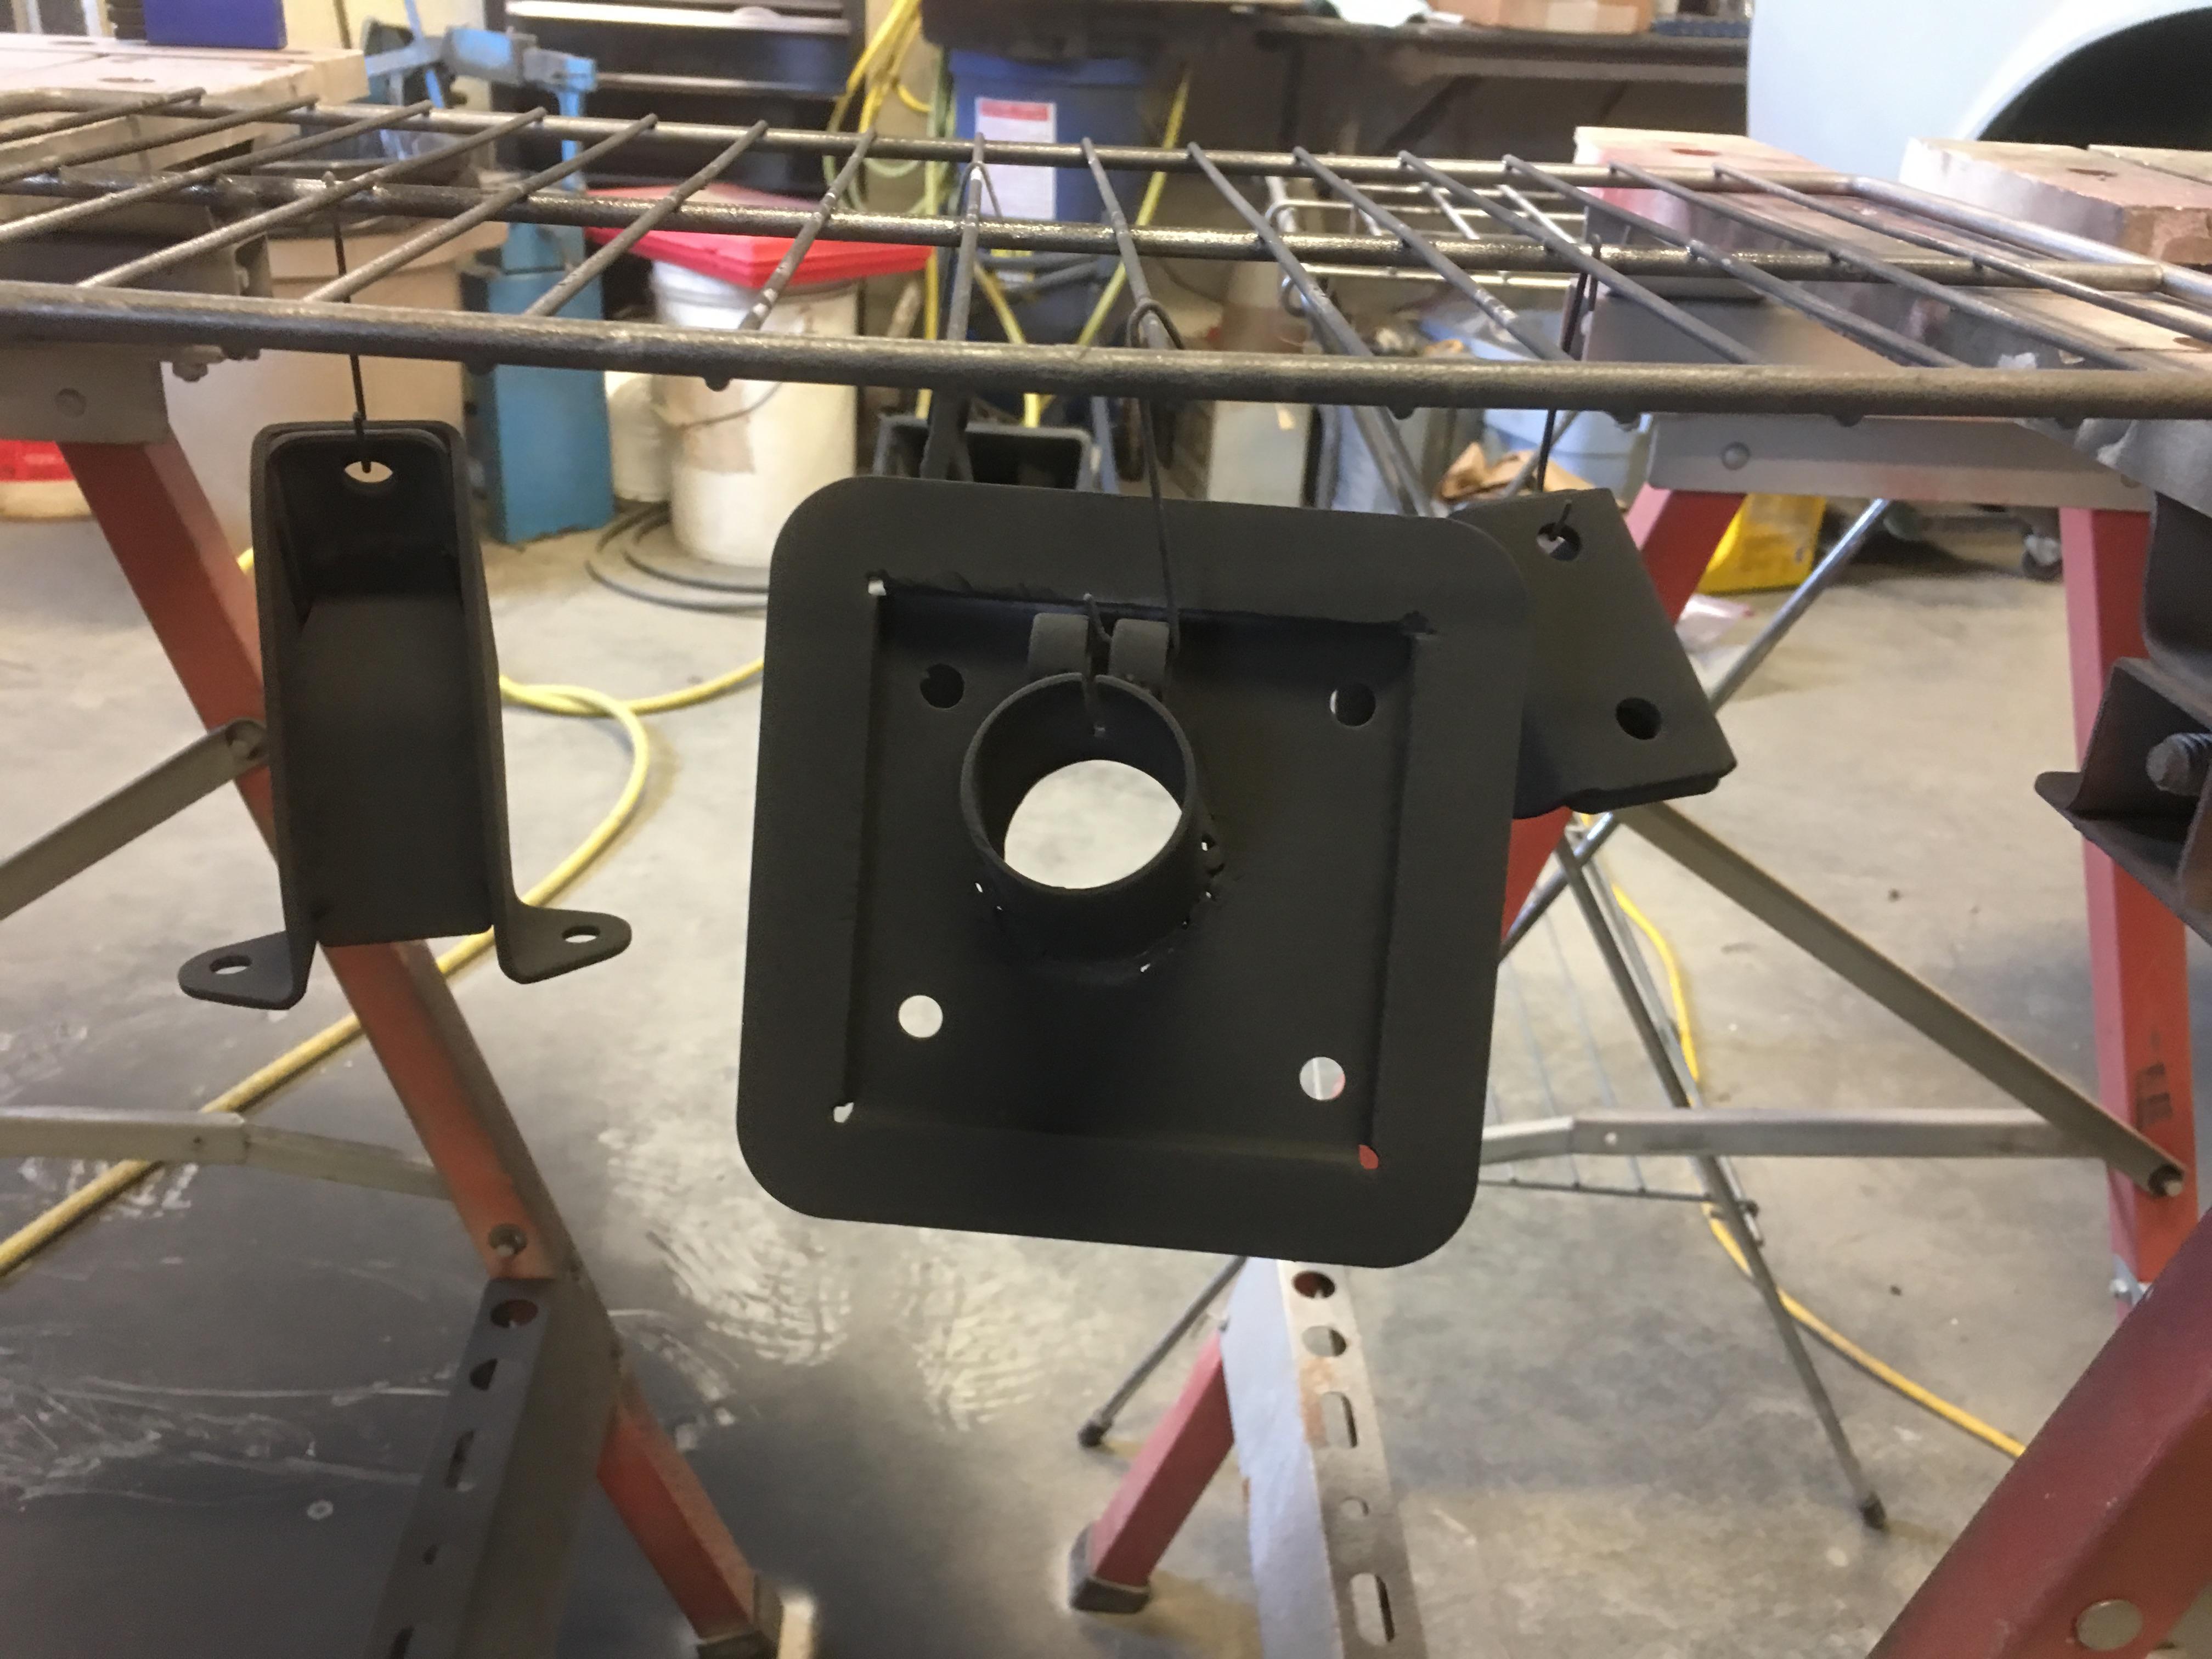
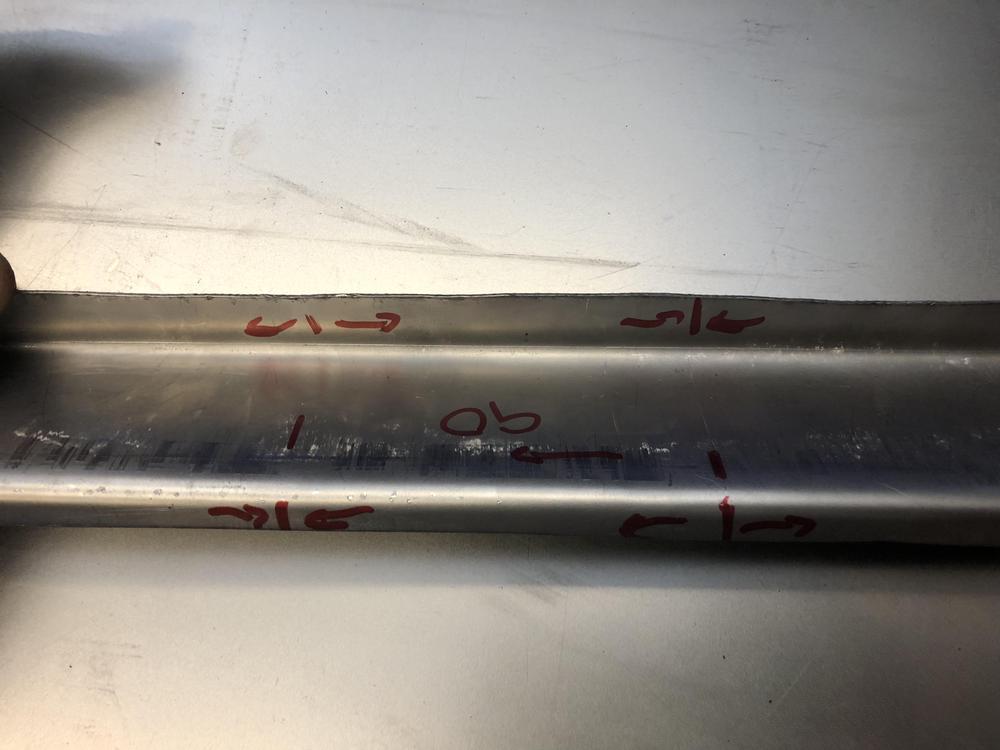
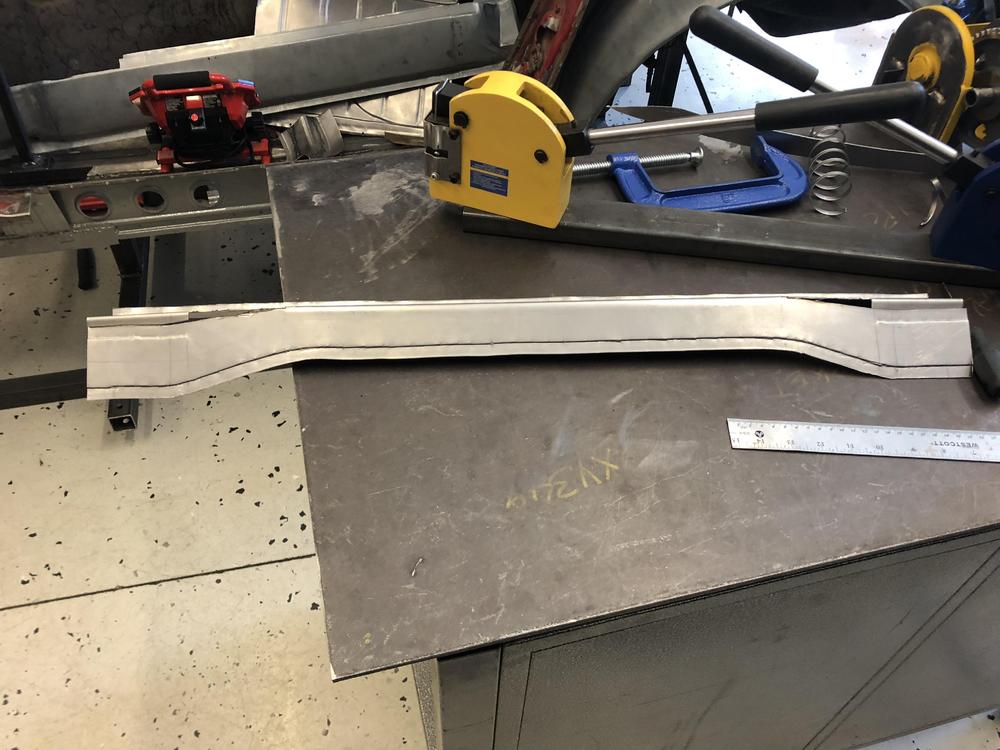
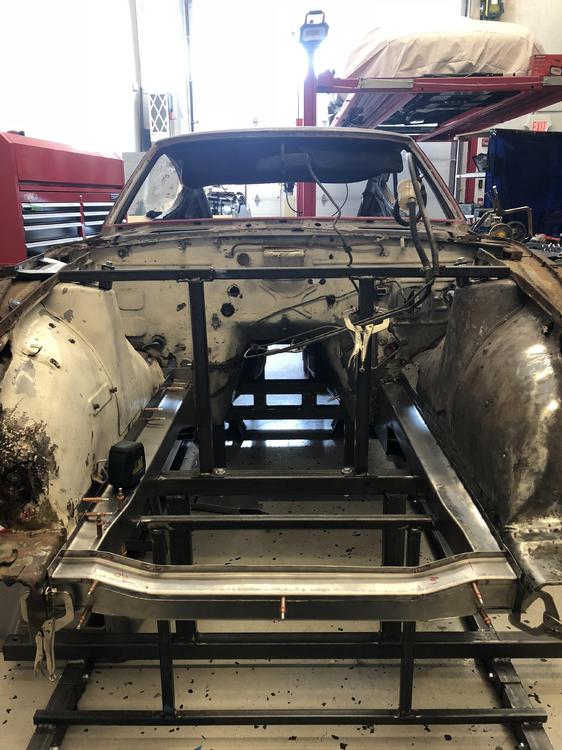
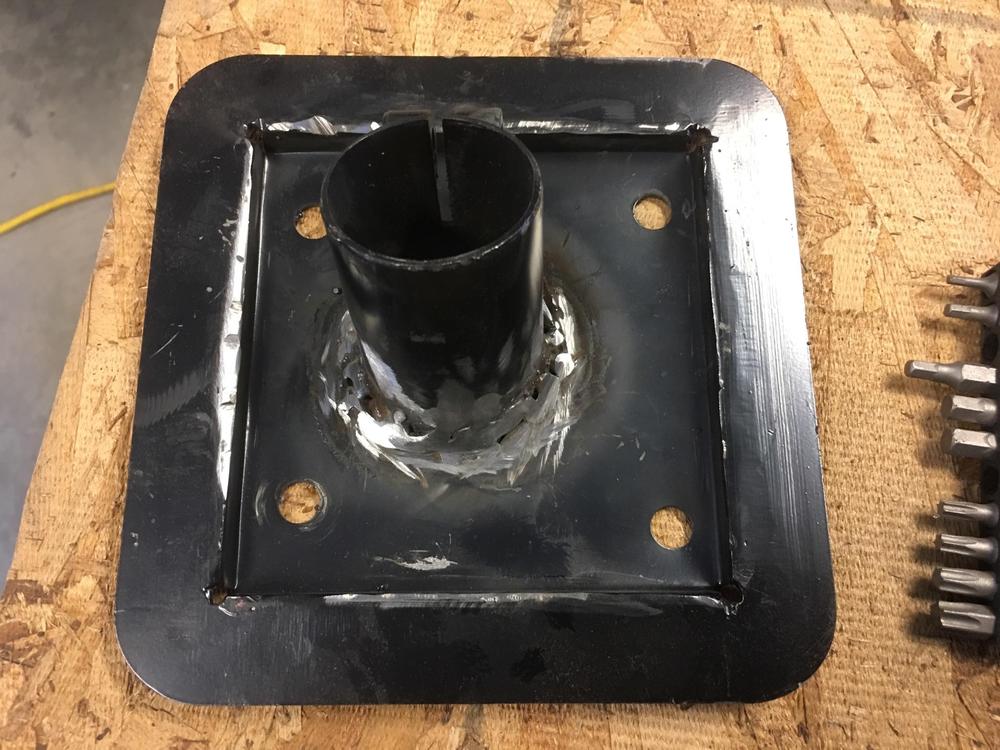
1 pointHey guys! So I didn’t feel like welding today so I started bending a new lower rad support... I started by forming the upper section from 18 Ga on the brake and by hand with the shrinker / stretcher ... ‘ Next I cut and formed the lower section to match. More bending, more shrinker/stretcher .... More Clecos ... i


 1 point
 -
1 point
-
I am referring to the section of the inner fender that is always toast and is a compound shape1 point
-
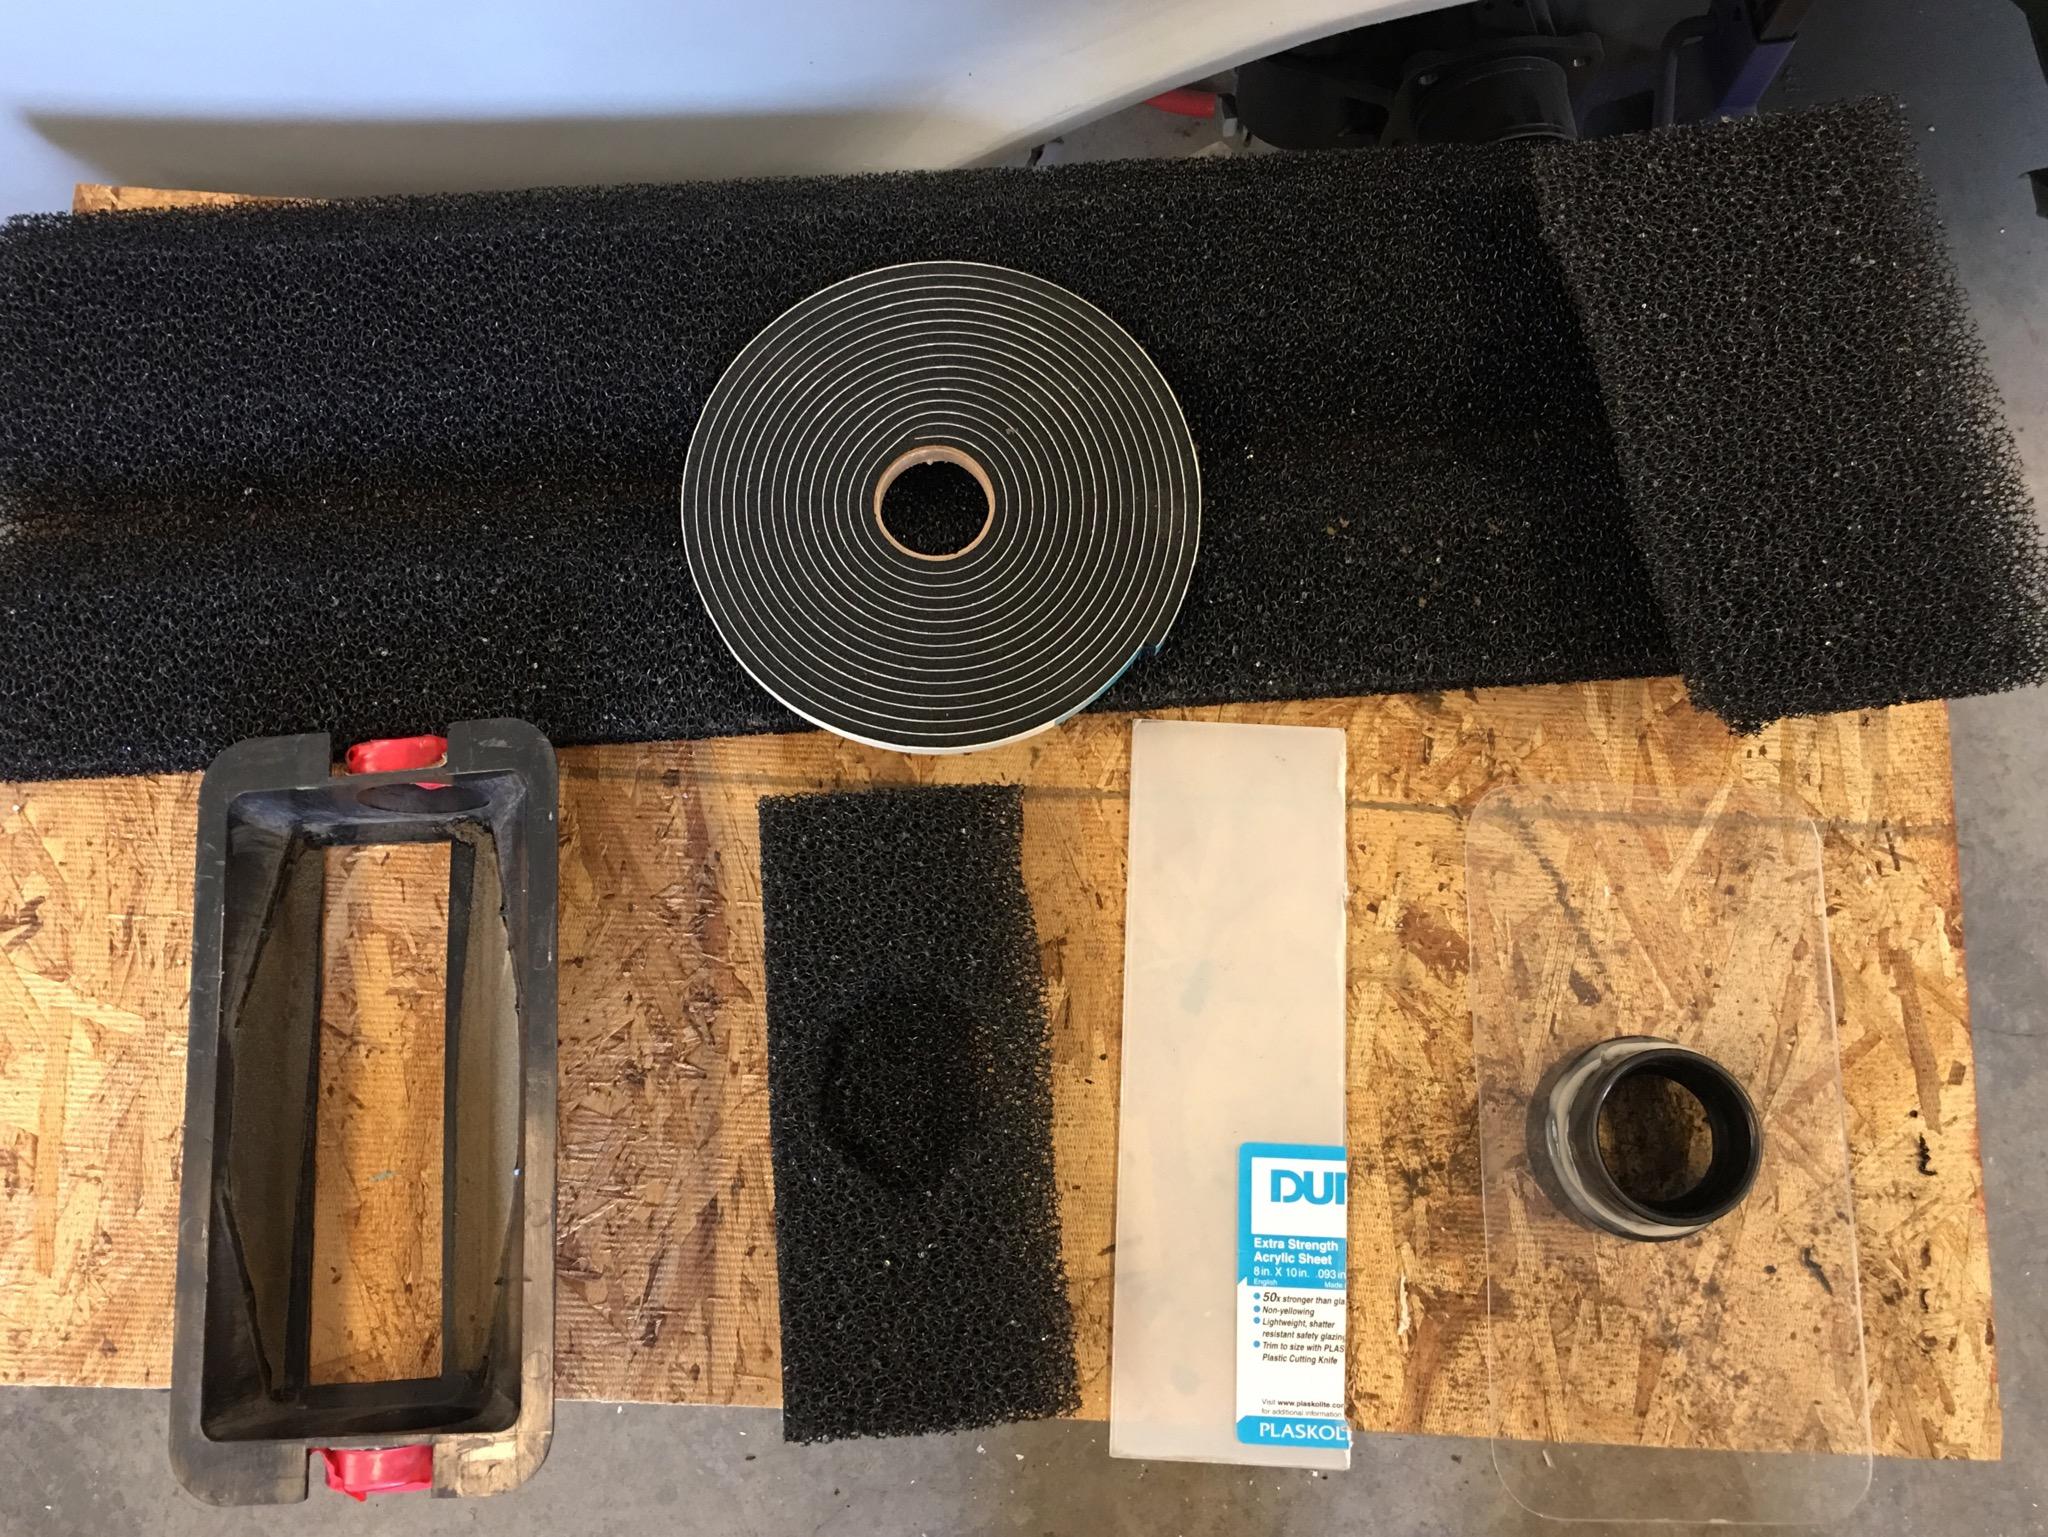
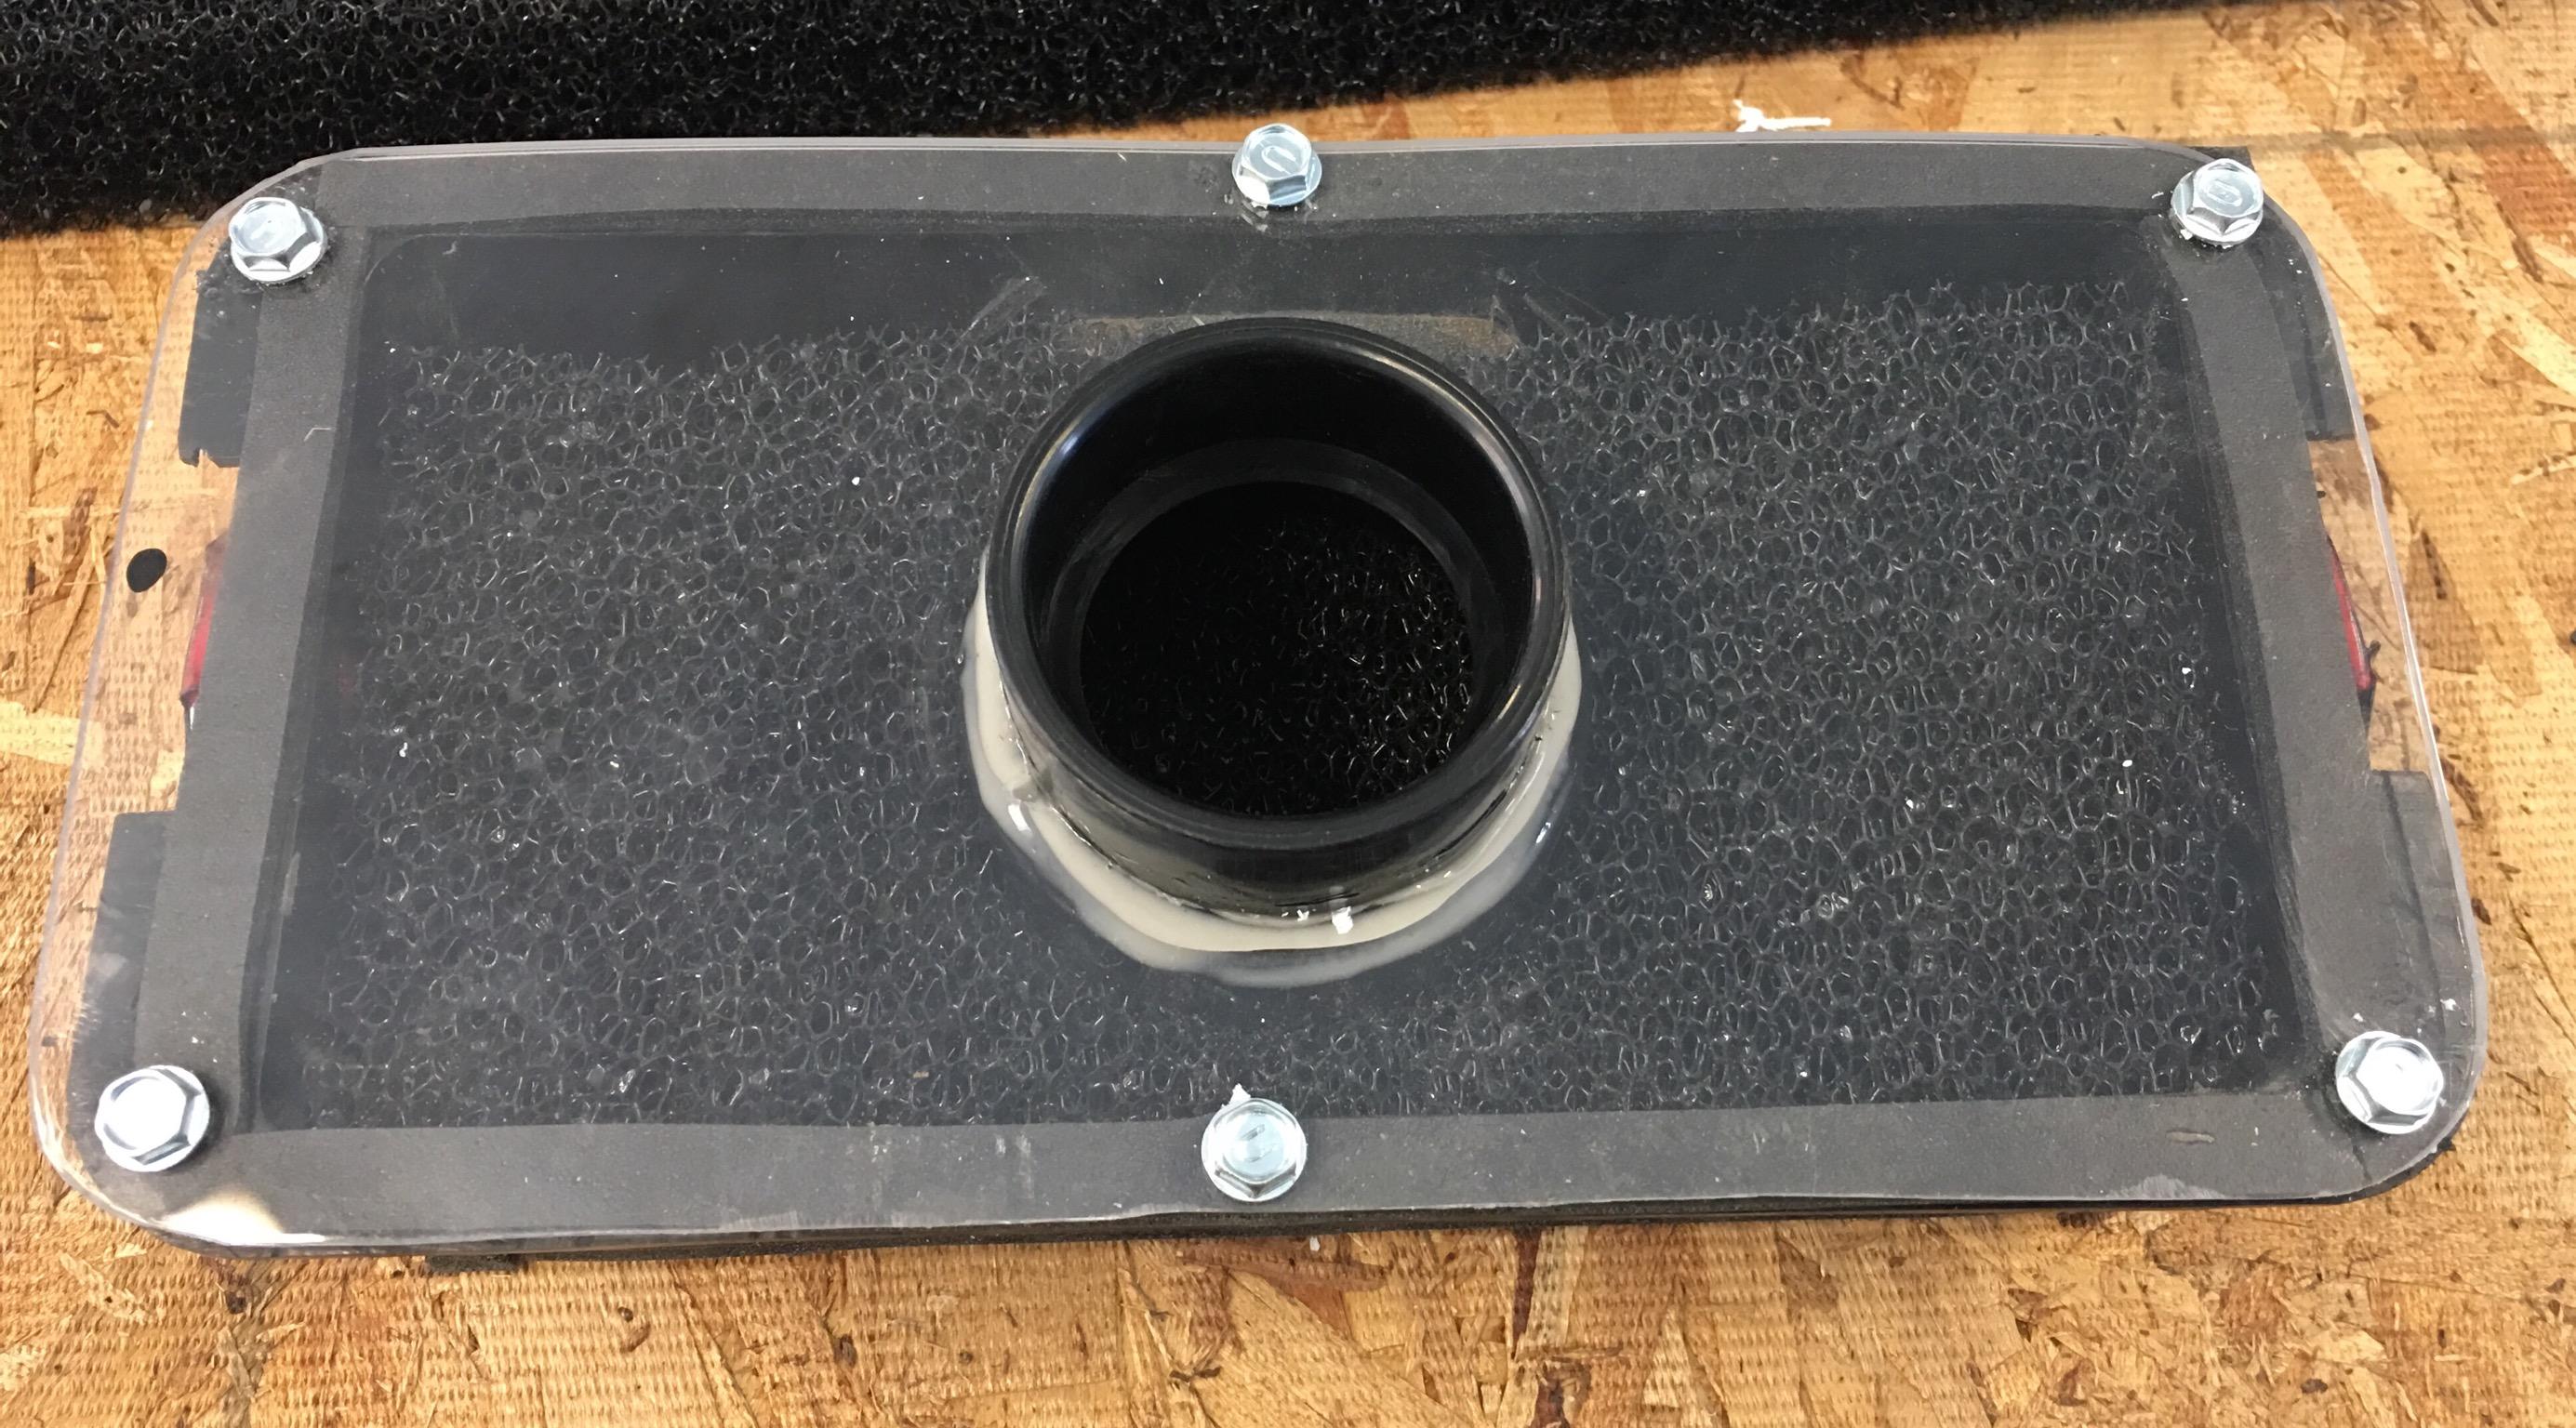
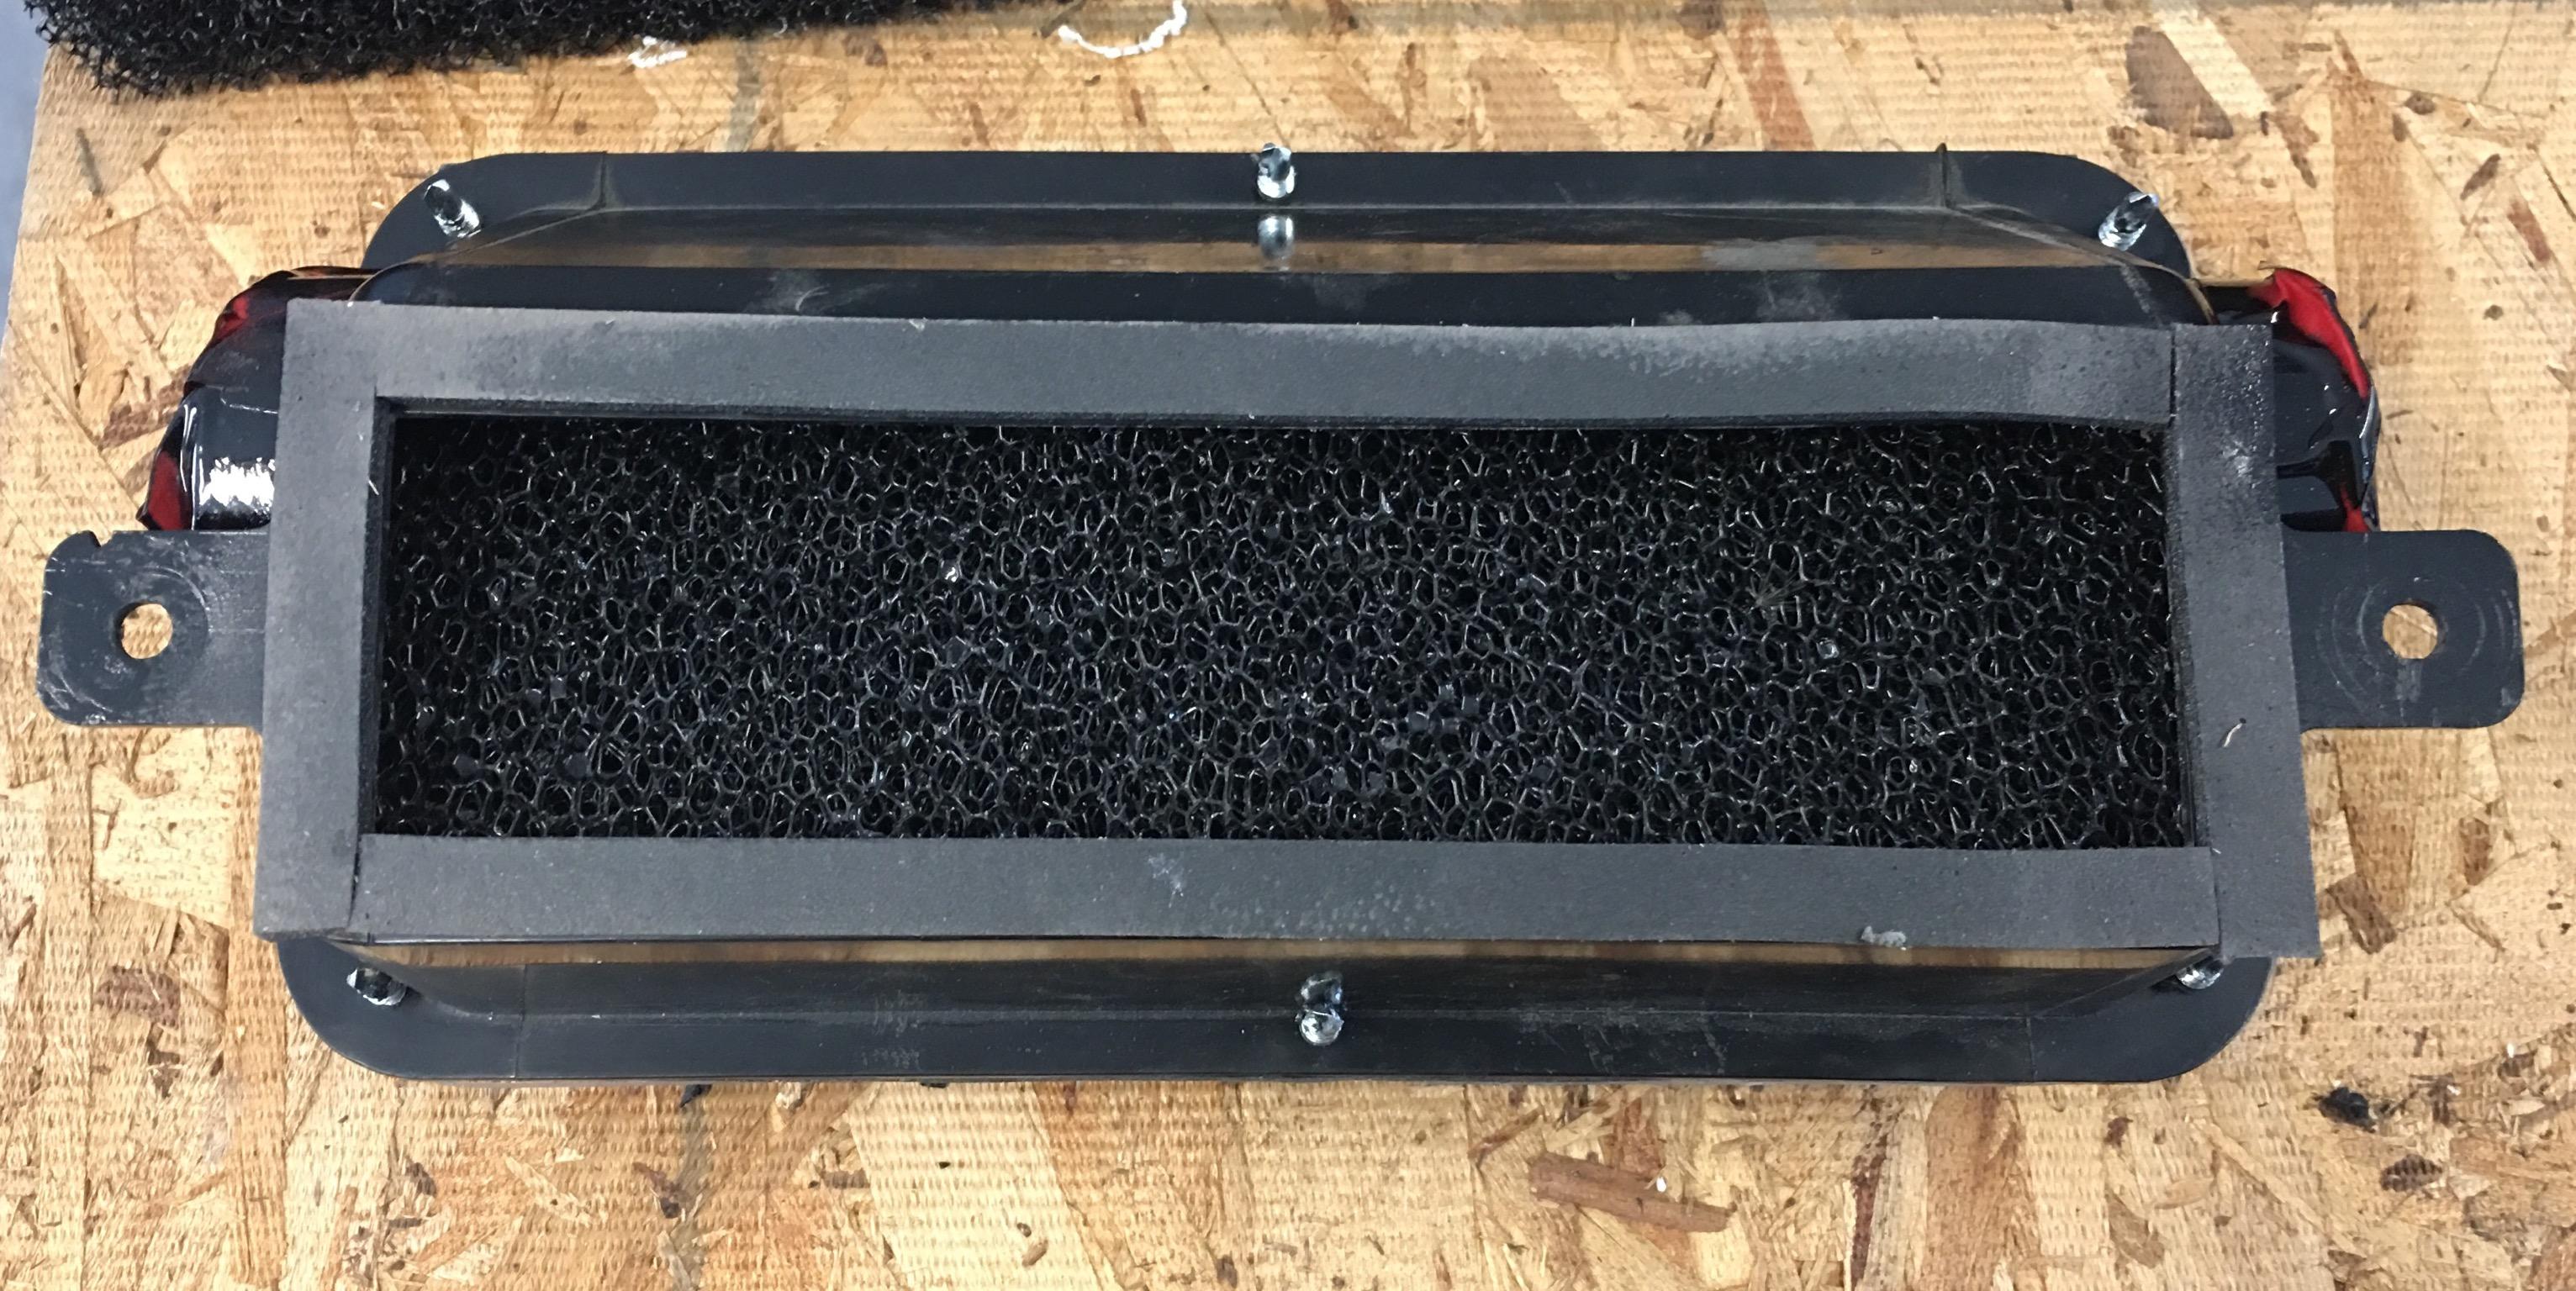
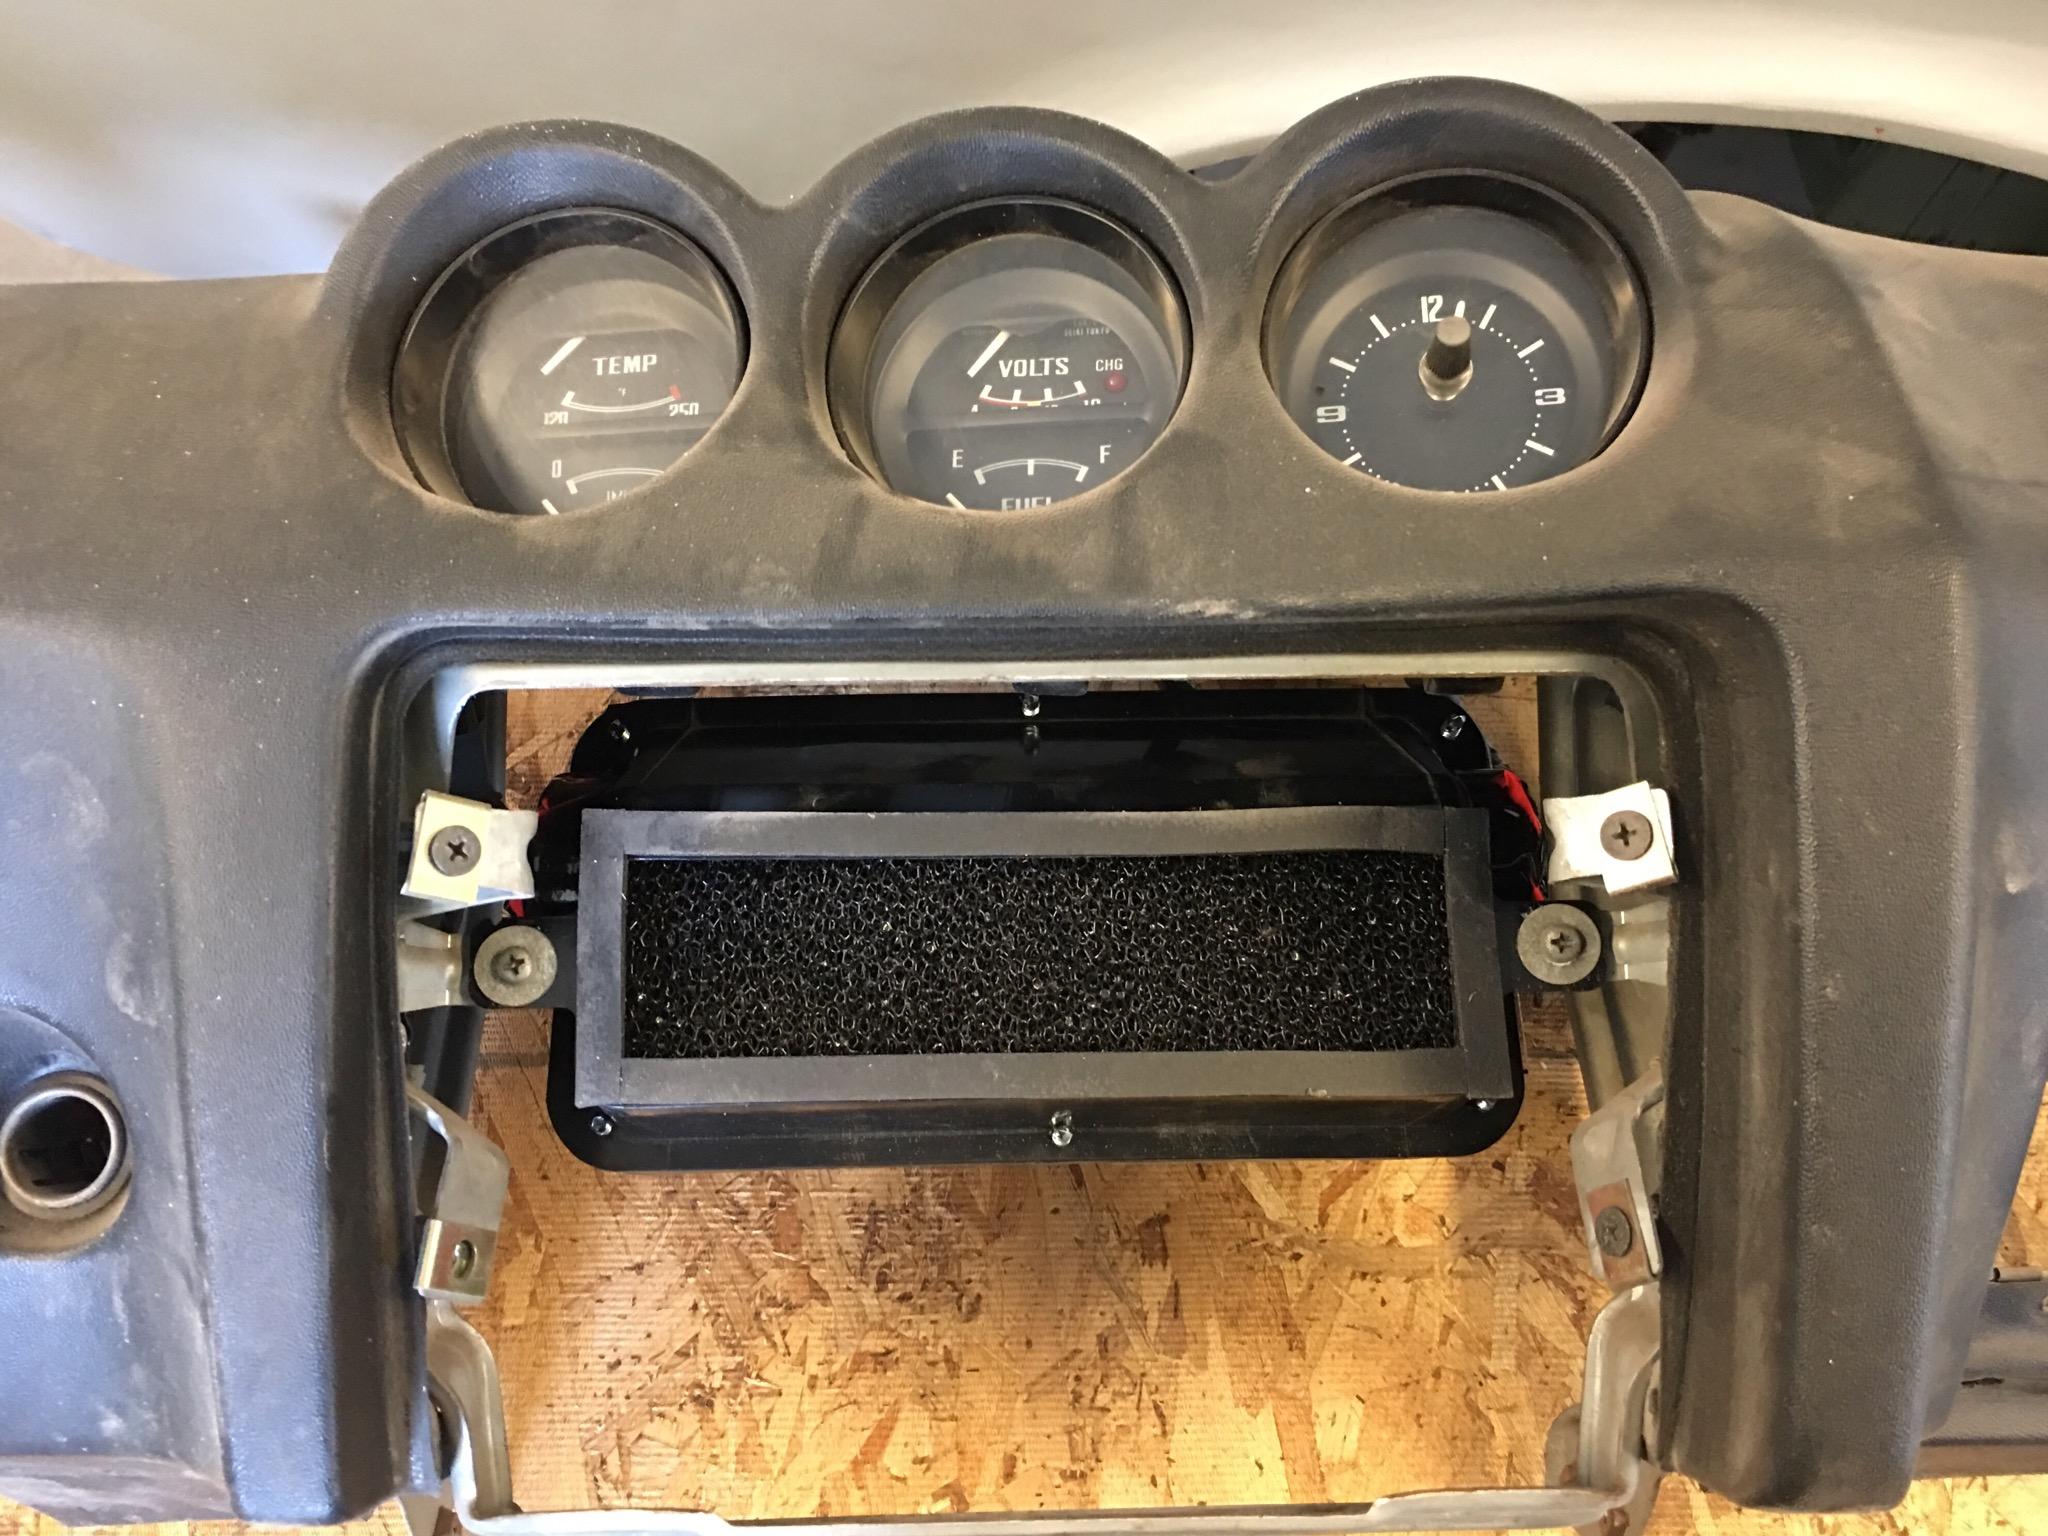
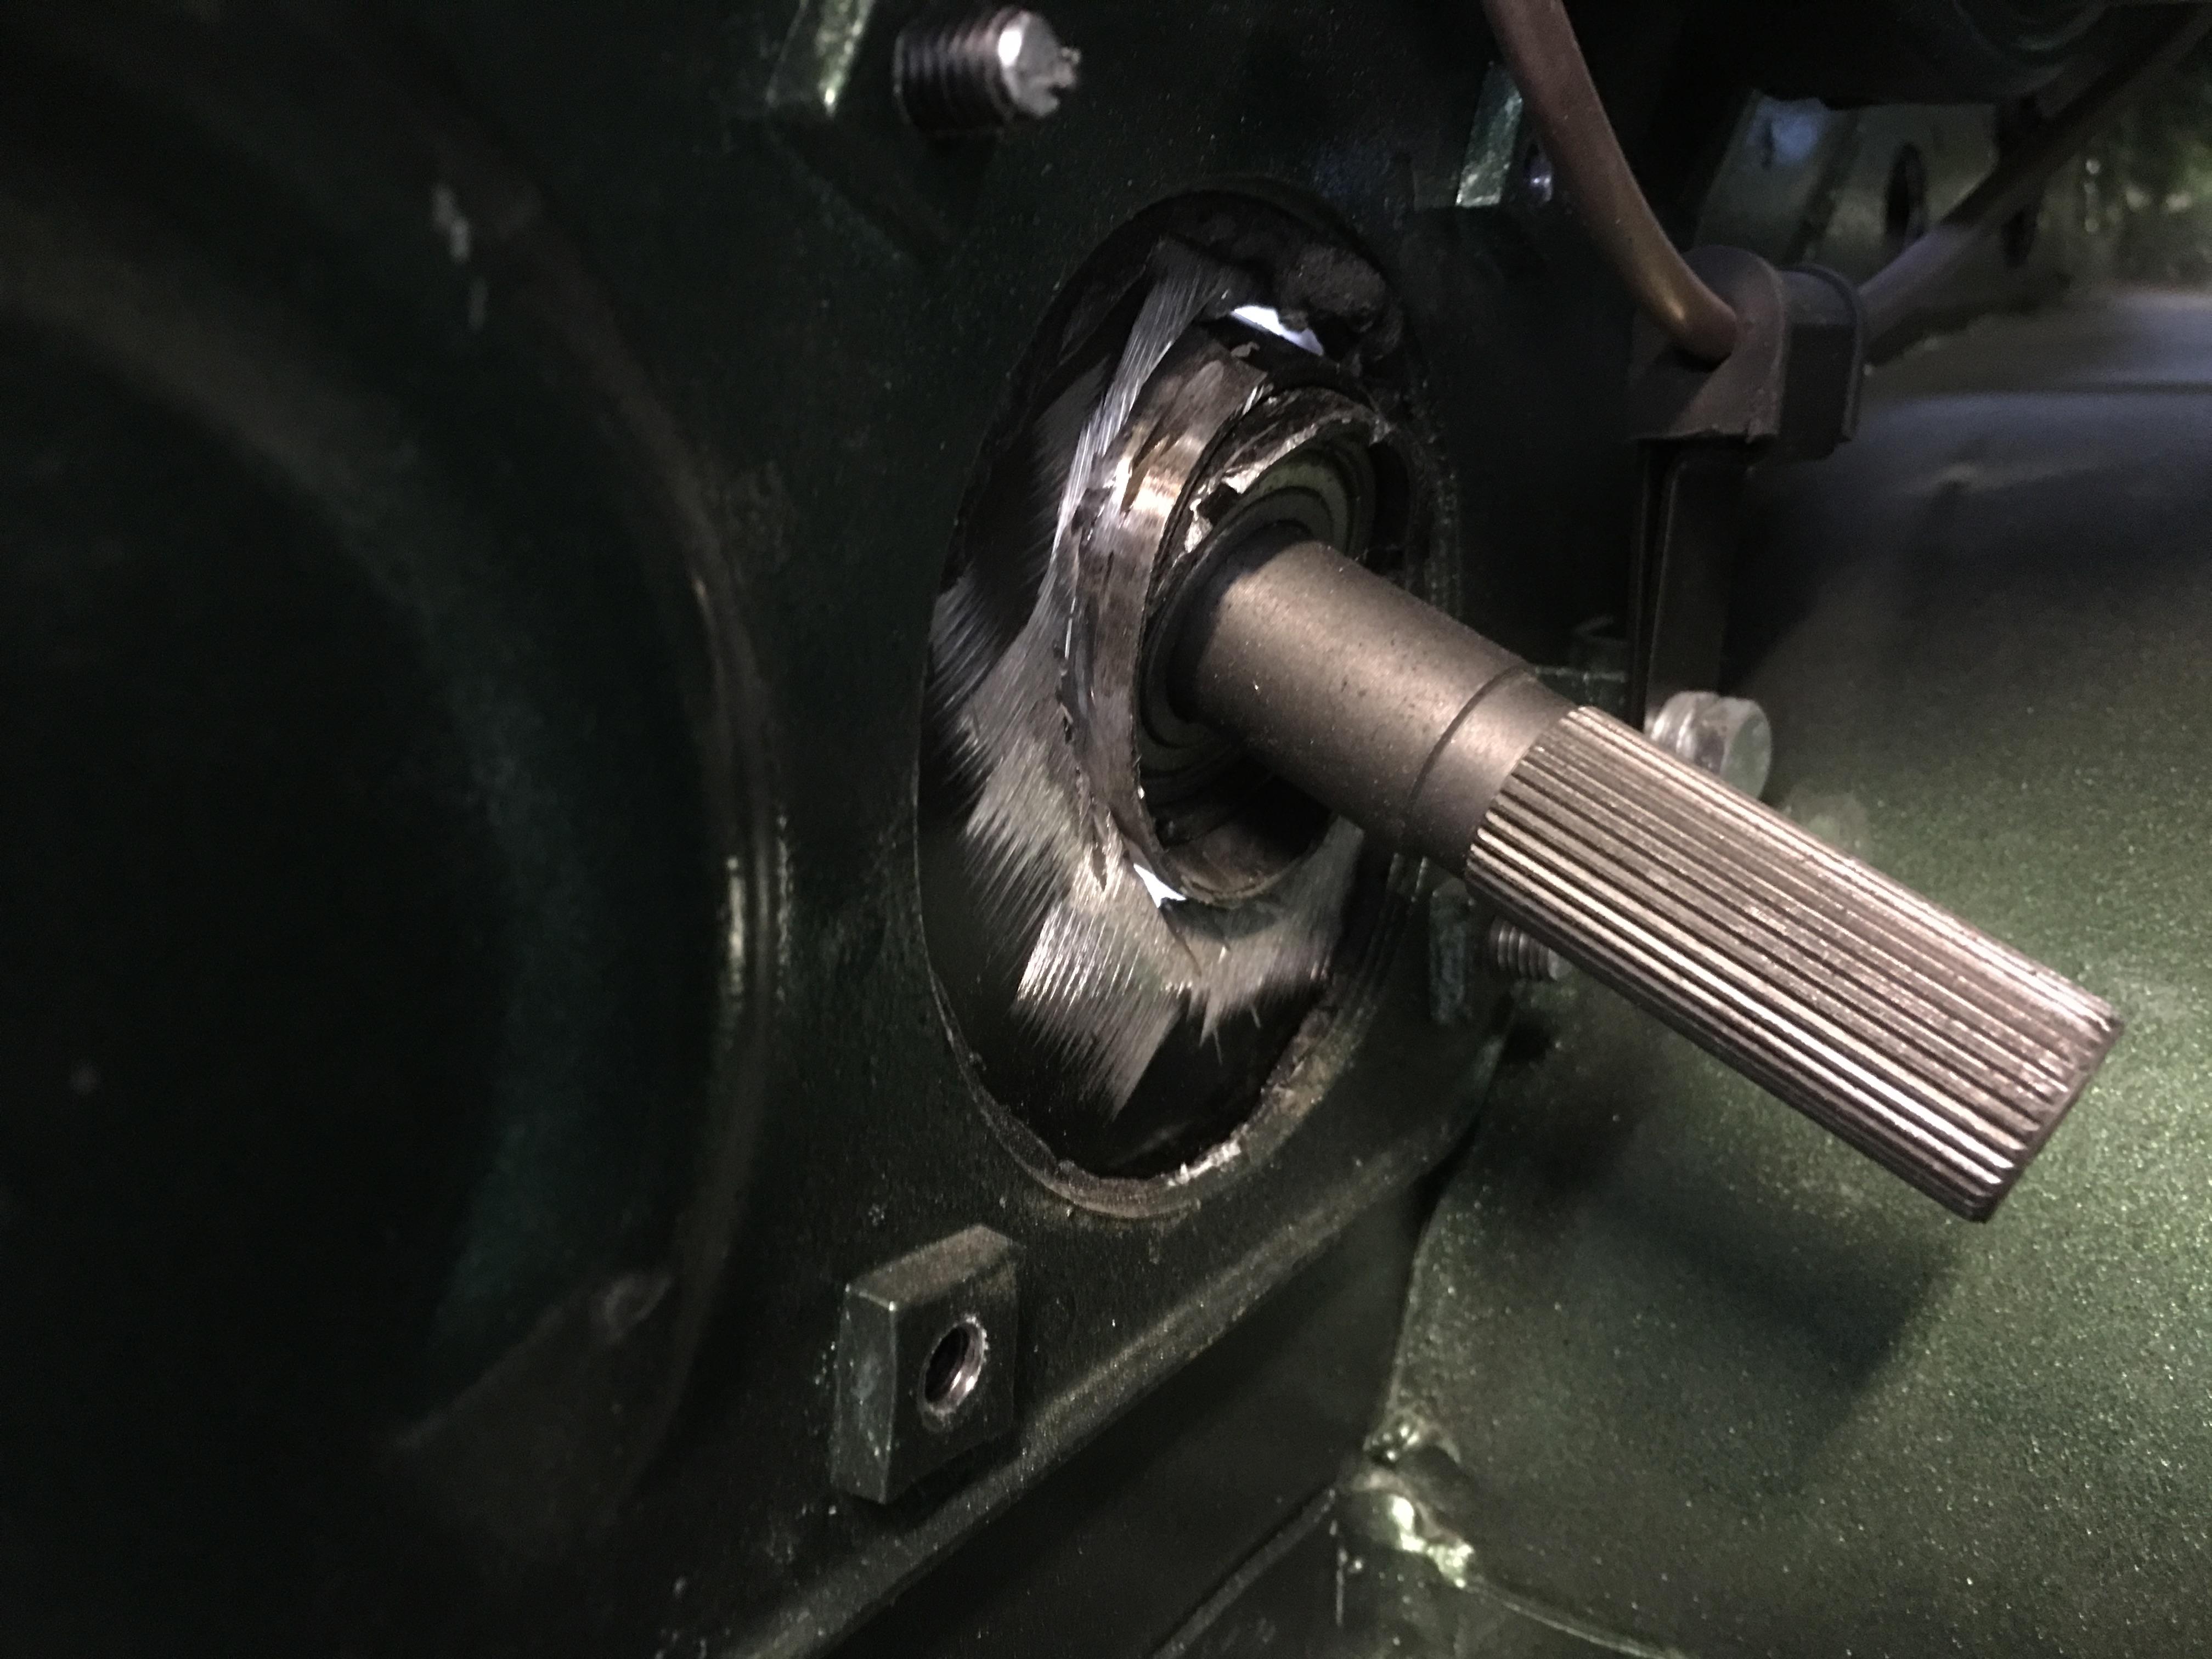
1 pointSo, on to the centre vent stack. I picked up some supplies. A section of eaves trough foam, some acrylic plastic sheet, a plumbing pipe reducer and one foam gasket. First thing was to remove the transfer section in the dash. Then I cut out the side diffuser panels and trimmed off the side vent outlet tubes. The foam eaves trough material was the perfect shape to fill the void and great non-turbulent air flow. Then I trimmed the acrylic sheet to fit and opened a hole for the plumbing adapter to connect to the 2” vent hose. I then trimmed front and back with foam gasket and then bolted the acrylic sheet onto the transfer panel. Looks pretty good!


 1 point
 -
I installed the Crane XR 700 and coil when I first got my Z in 2005 to replace the point system. It worked OK, but there was no difference in performance. Later on I replaced that distributor with one from a ZX, also no performance gain, but reliable spark. No tach problems with either one. As has been said many times here the best bang for the buck performance-wise is cylinder head /cam work. I have been very happy with my F54 block and N42 head with a stage 2 Delta cam, Z Therapy carbs, and MSA header/exhaust system. Cheers, Mike1 point
-
1 point
-
1 pointY'all gotta use the power of the @. @wrecked2001 We can see you man! Or your friend.
 1 point
 -
1 pointKoni Test Drive Z Owner Ian Stewart’s Impressions "Hello everyone, my 260Z was used as the test vehicle for the new Koni struts. The car was the perfect candidate as I had already rebuilt the suspension with new ball joints, Urethane bushings throughout (both front and rear), stiffer springs and Illumina struts. The only change that was made for the testing was replacing the Illumina’s with the Koni’s. The Koni’s are an improvement over the Illumina’s in my opinion. You need to get used to not having a way to tell where you are at as the Koni does not have an indicator, but the adjustment range is much wider and you can really feel the difference when you make a change. I never really noticed differences when I adjusted the Tokico’s, whereas I can definitely feel the difference when I adjust the Koni’s. My car is fitted with 160in-lb front and 180in-lb rear springs that lower it about 1.5 inches from stock. Note that these spring rates are similar to most aftermarket spring sets for Z-Cars, at roughly 2X stiffer than stock springs. At full stiff on the Koni adjustment the car is too harsh, but at full soft, it is comfortable (to me) for street use, I like the ride. I have not auto-crossed the car yet, but expect the full stiff setting will work very well." Ian Stewart.1 point
-
1 pointThere is a guy in the Tampa area who has an astounding collection of S30 Z-cars. When I first met him, he had several early, series one examples with low miles and in nearly pristine original condition. I recall one of the cars had some of the original plastic interior wrapping that the dealer was supposed to remove. Eventually, he sold those cars and replaced them with a number of Vintage Z cars from a collector in Georgia. We probably know of whom I speak. Point being, survivors like the one we are discussing are out there and I would guess that the $72 grand is about what they are worth. What's a Vintage Z worth these days?1 point
-
1 pointI am pretty sure I have enough parts (drive line and steering rack) then I could made a all wood vehicle, that would get the HOA to quacking :) I was thinking the same about a radiator. I see a lot of videos of folks starting up diesels the same way, no radiator. when I do my test stand I think I may just hook up a garden hose to it and let the water flow thru the engine and dump out on the ground.1 point
-
1 pointI don’t have enough pages for Kent’s list of cars... But yes, I bought the roadster today. Couldn’t resist.1 point
-
1 pointI like this guys setup. I did not realize the adapter plate would be strong enough to hold the starter.1 point
-
Good work! I am betting on that battery terminal. When you have time disconnect, inspect, and clean every electrical connection in your engine bay, in the passenger footwell, on your ECU, at the fuse panel (including fuse holder tabs), and ignition box.1 point
-
1 pointThere appears to be a significant disconnect between what I described and what you did. For resistance, you should start with the lowest setting. That would be 200Ω and not 2MΩ. This is important. In my previous post, I said I measured 78.7Ω across the coil. That would be 0.0000787MΩ, or on your display, 0.00MΩ. This is important. If the coil was shorted out, the resistance would be much less than 78.7Ω, but your meter would still give you the same reading as a good coil if you use the 2MΩ scale. As for the test that you said failed, what were you using for your 12VDC source? Did you hear a click in the relay (possibly 2 clicks)? Try this test: Put the positive from the 12VDC source on pin 95. Connect the negative to pins 94 and 96. Put your meter on the 200Ω setting and measure resistance across 91 and 97. Here is the theory of operation for that relay: If there is voltage across pins 95 and 94, the coil is energized, and the the contact near pin 96 closes. Now there should be voltage across pins 95 and 96, and the second coil is energized. That causes the relay to move the switch that connects 91 and 95 so that it now connects 91 and 97. This is all relatively binary. Either the circuit is open or closed. Either the coil is energized, or it is not. If there is a voltage drop, it could be from the contact between 91 and 97 getting pitted or dirty so that there is not good contact. This would act like a resistor in the circuit. If the car runs, the relay works. However, the fuel pressure should not be at 48 PSI. I think you're barking up the wrong tree.1 point
-
1 pointGood news, I was able to get the bolt in. We're all set, thanks so much everyone!!1 point
-
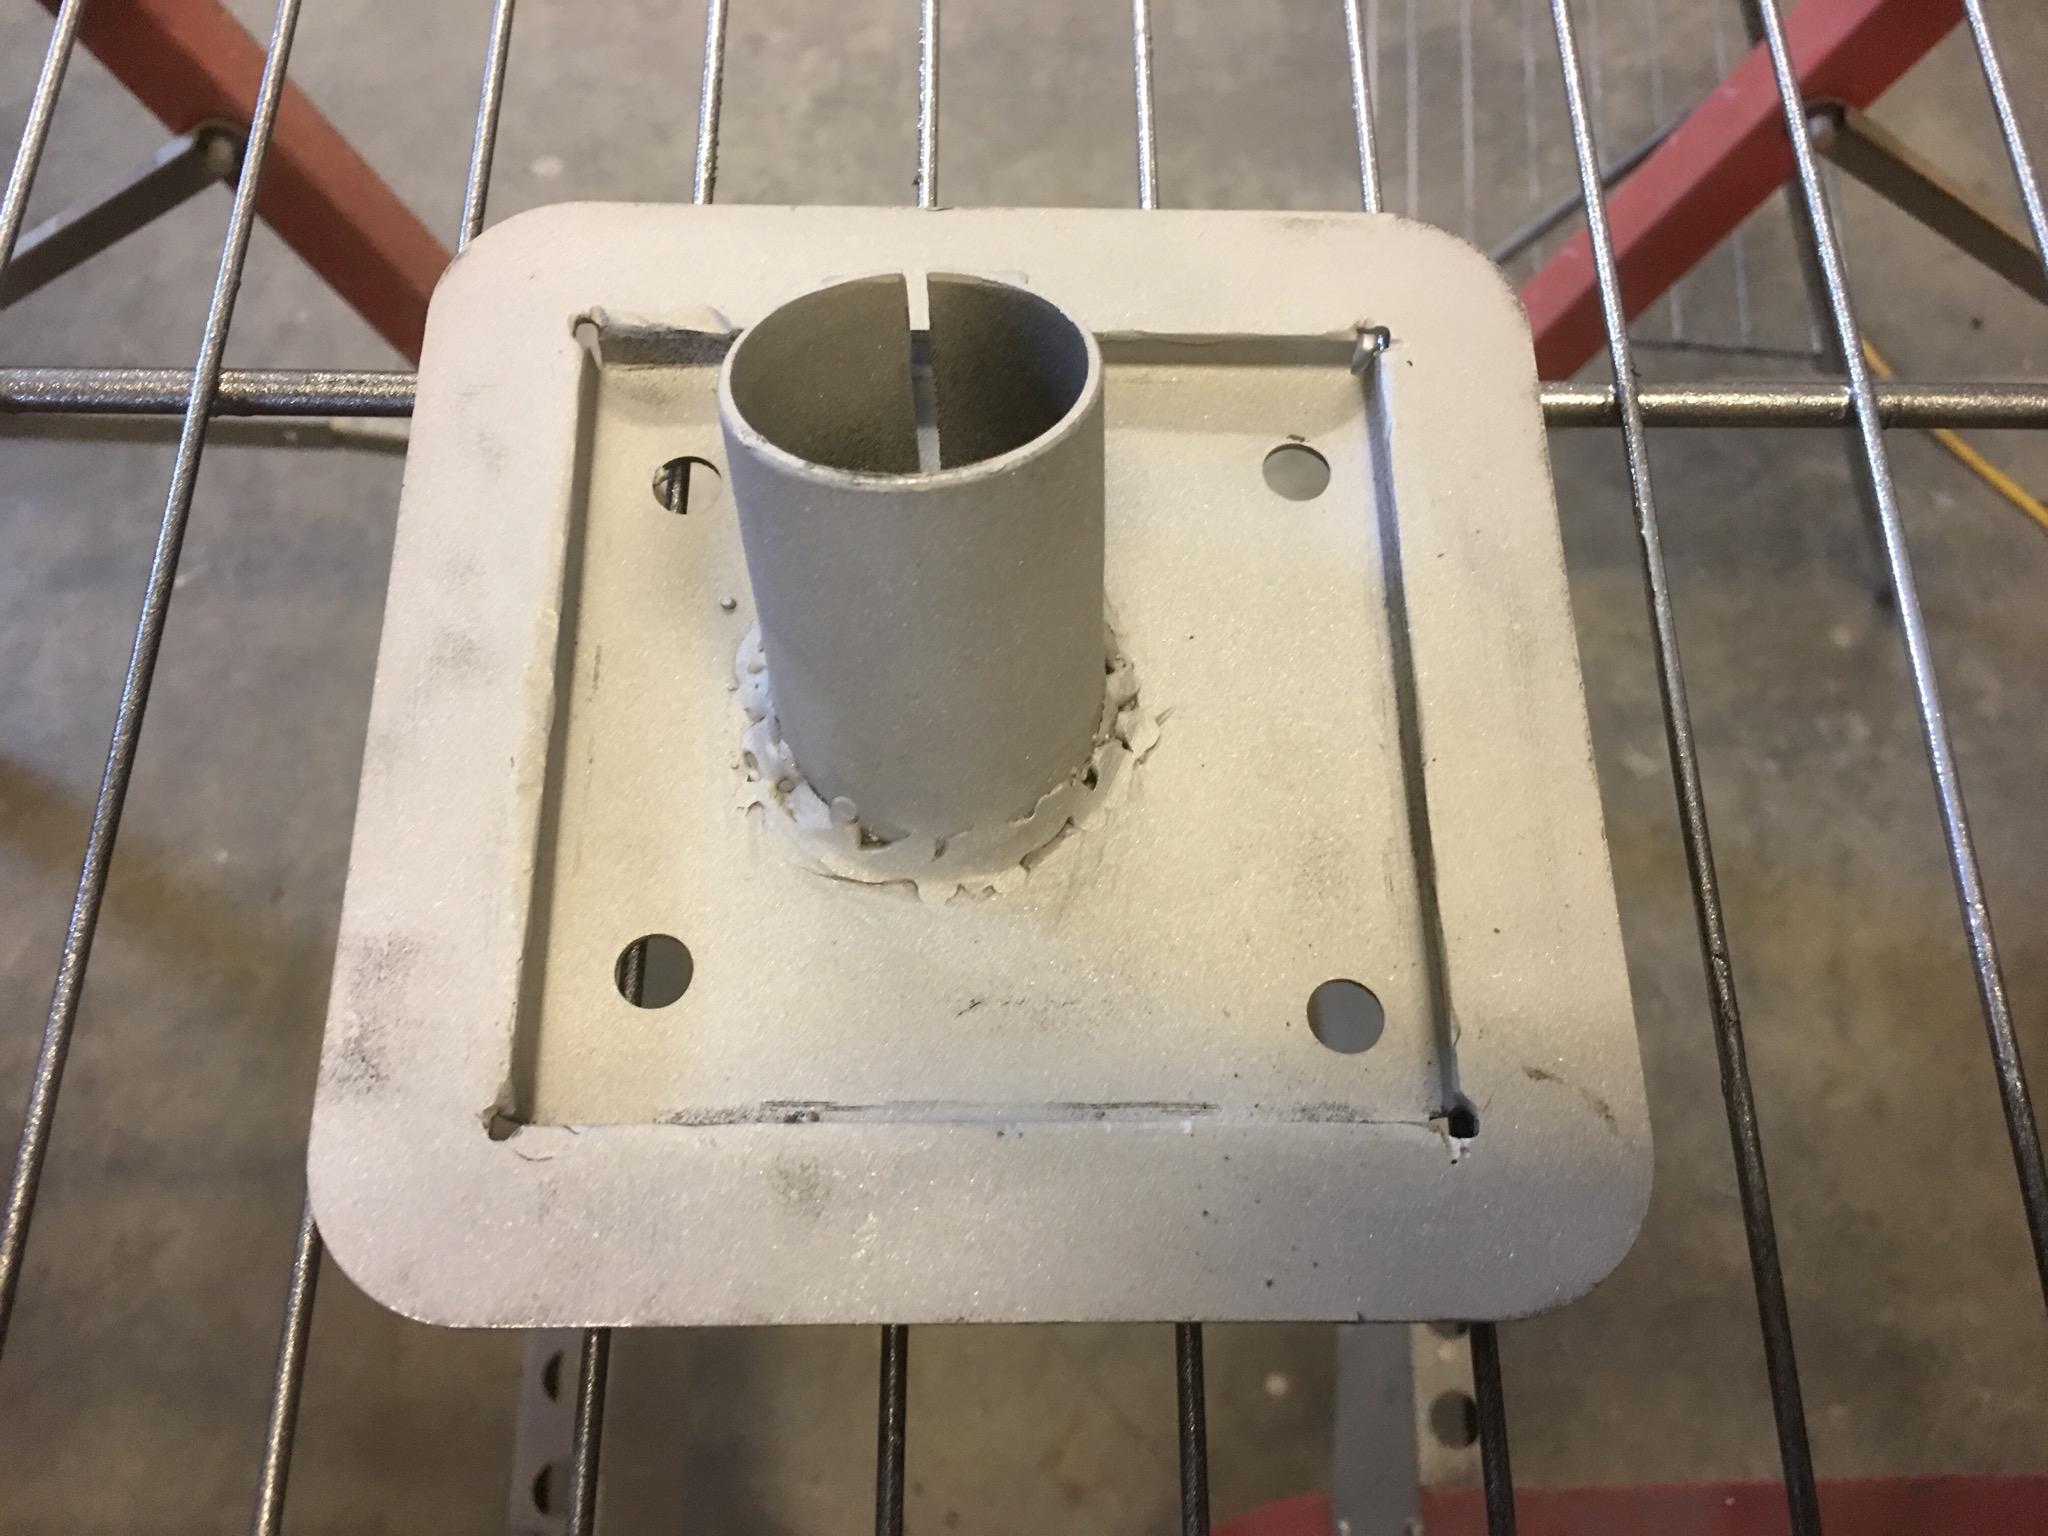
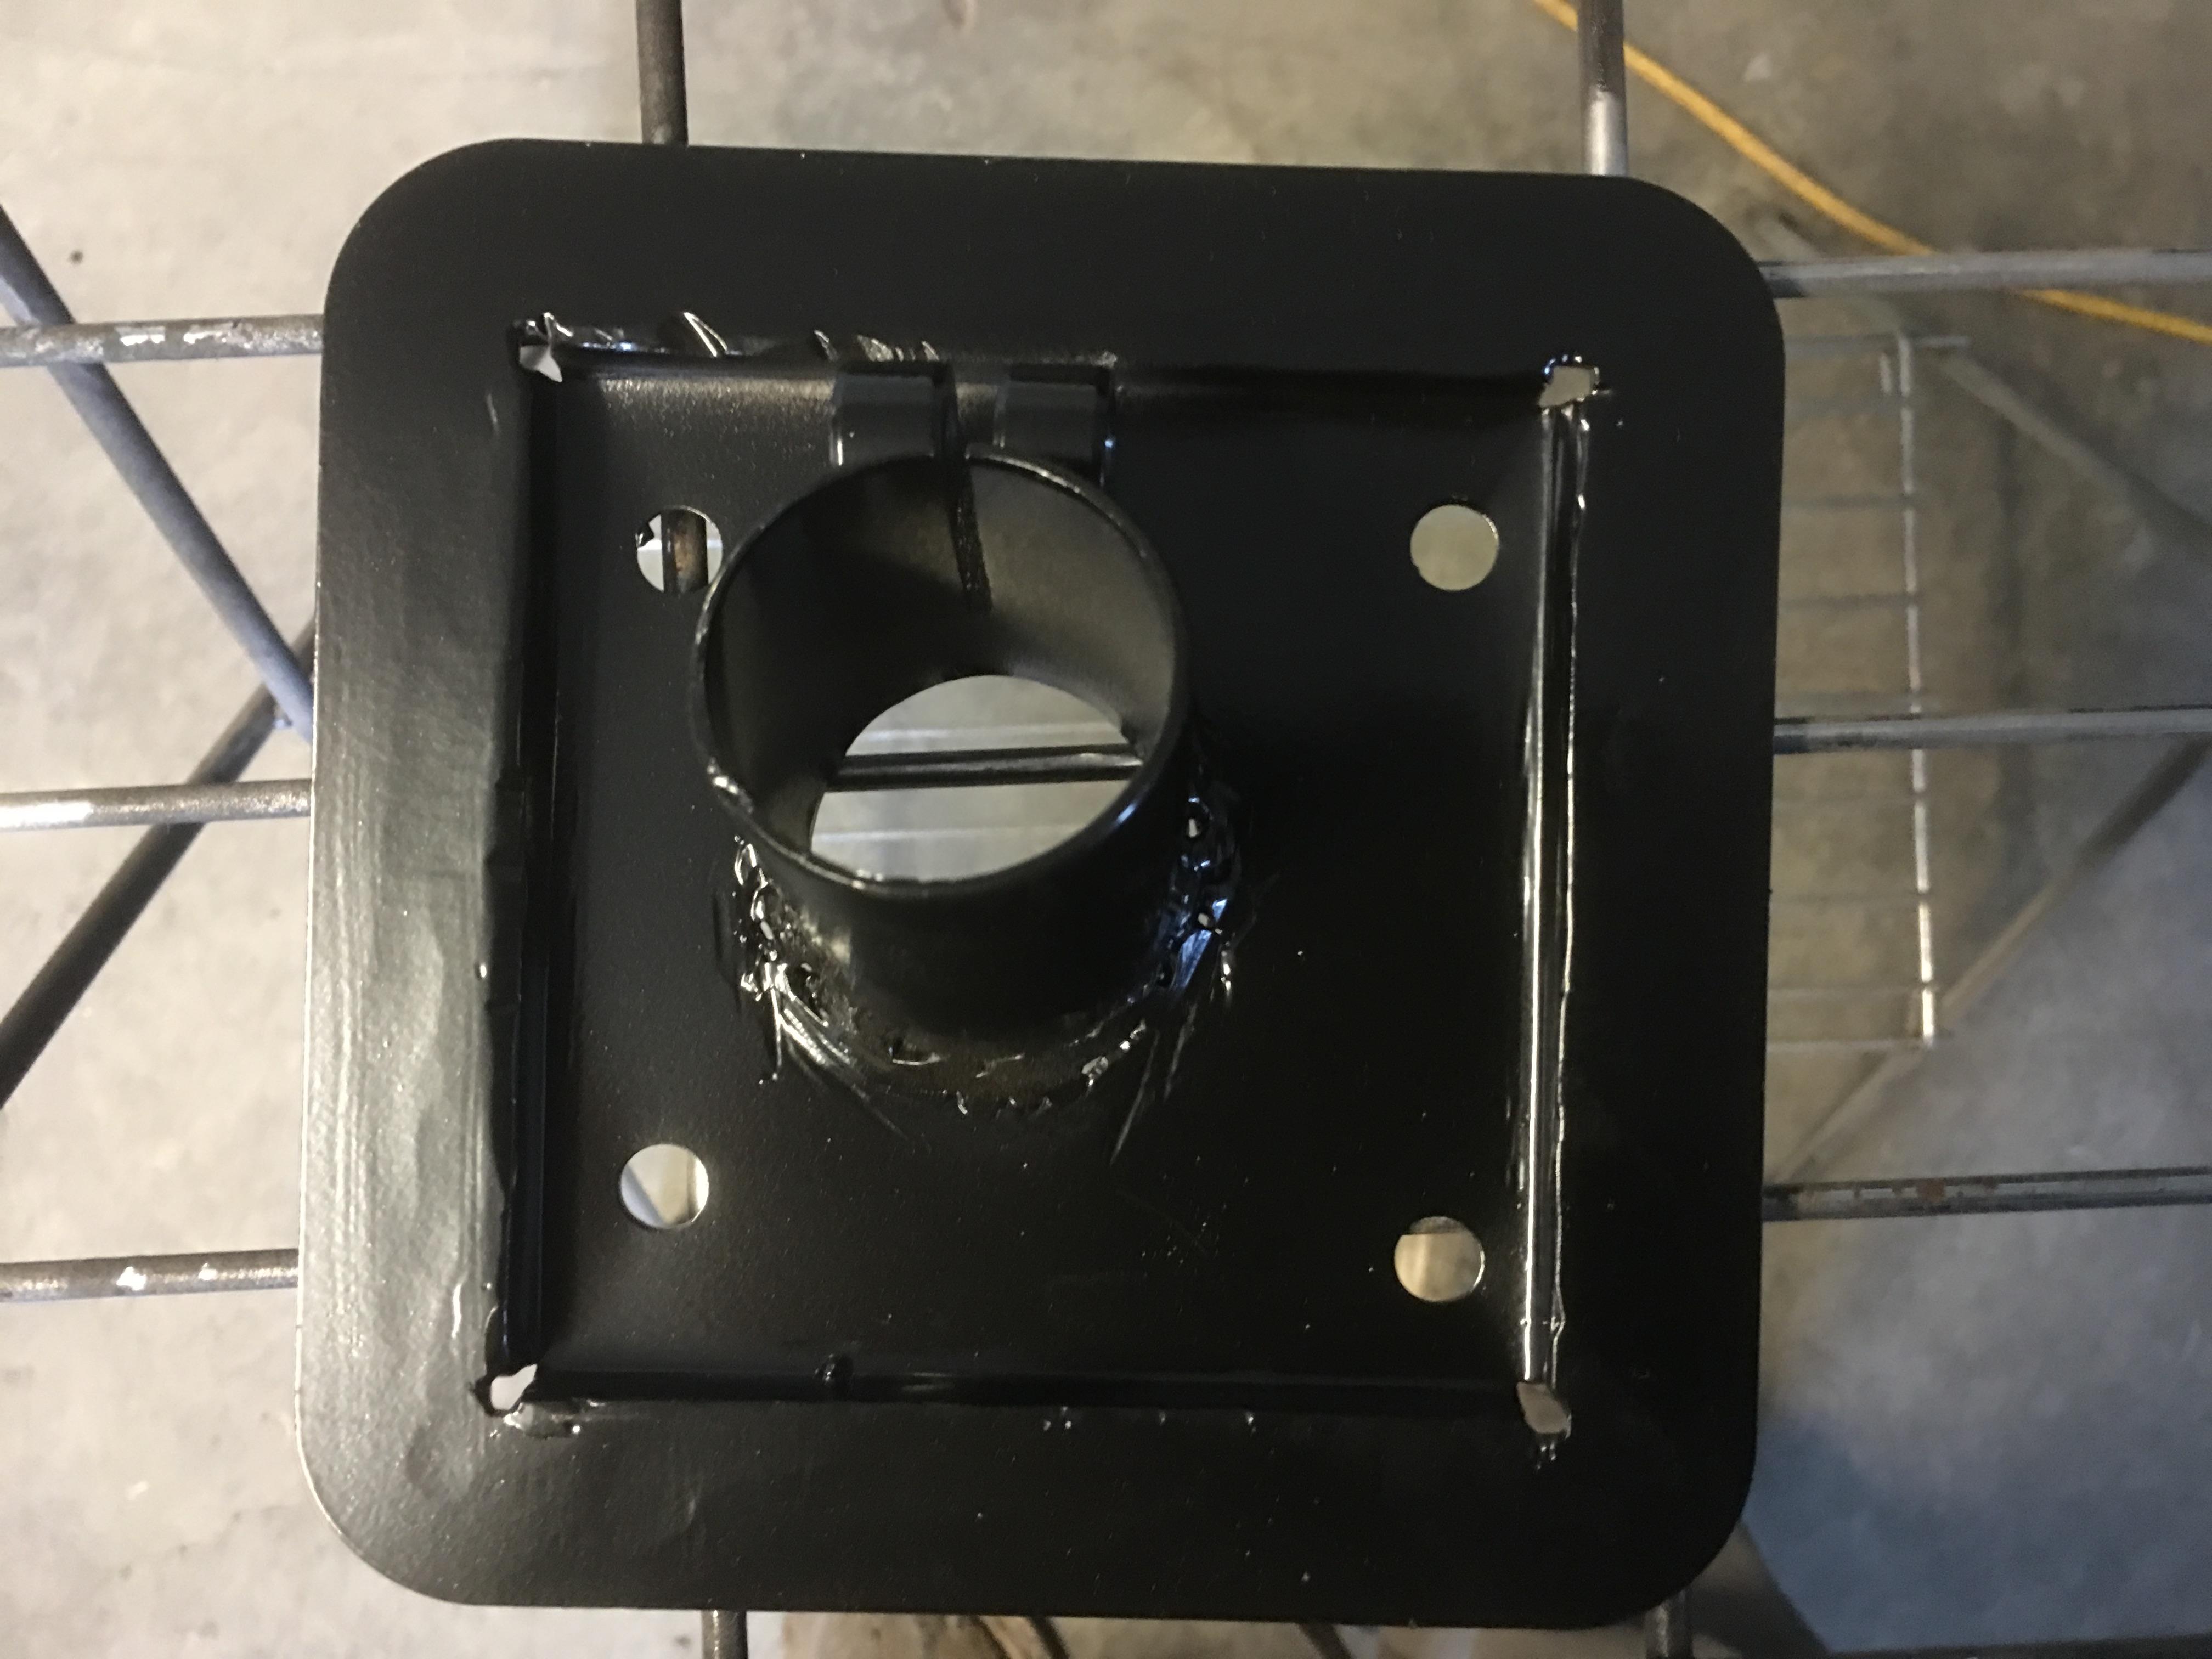
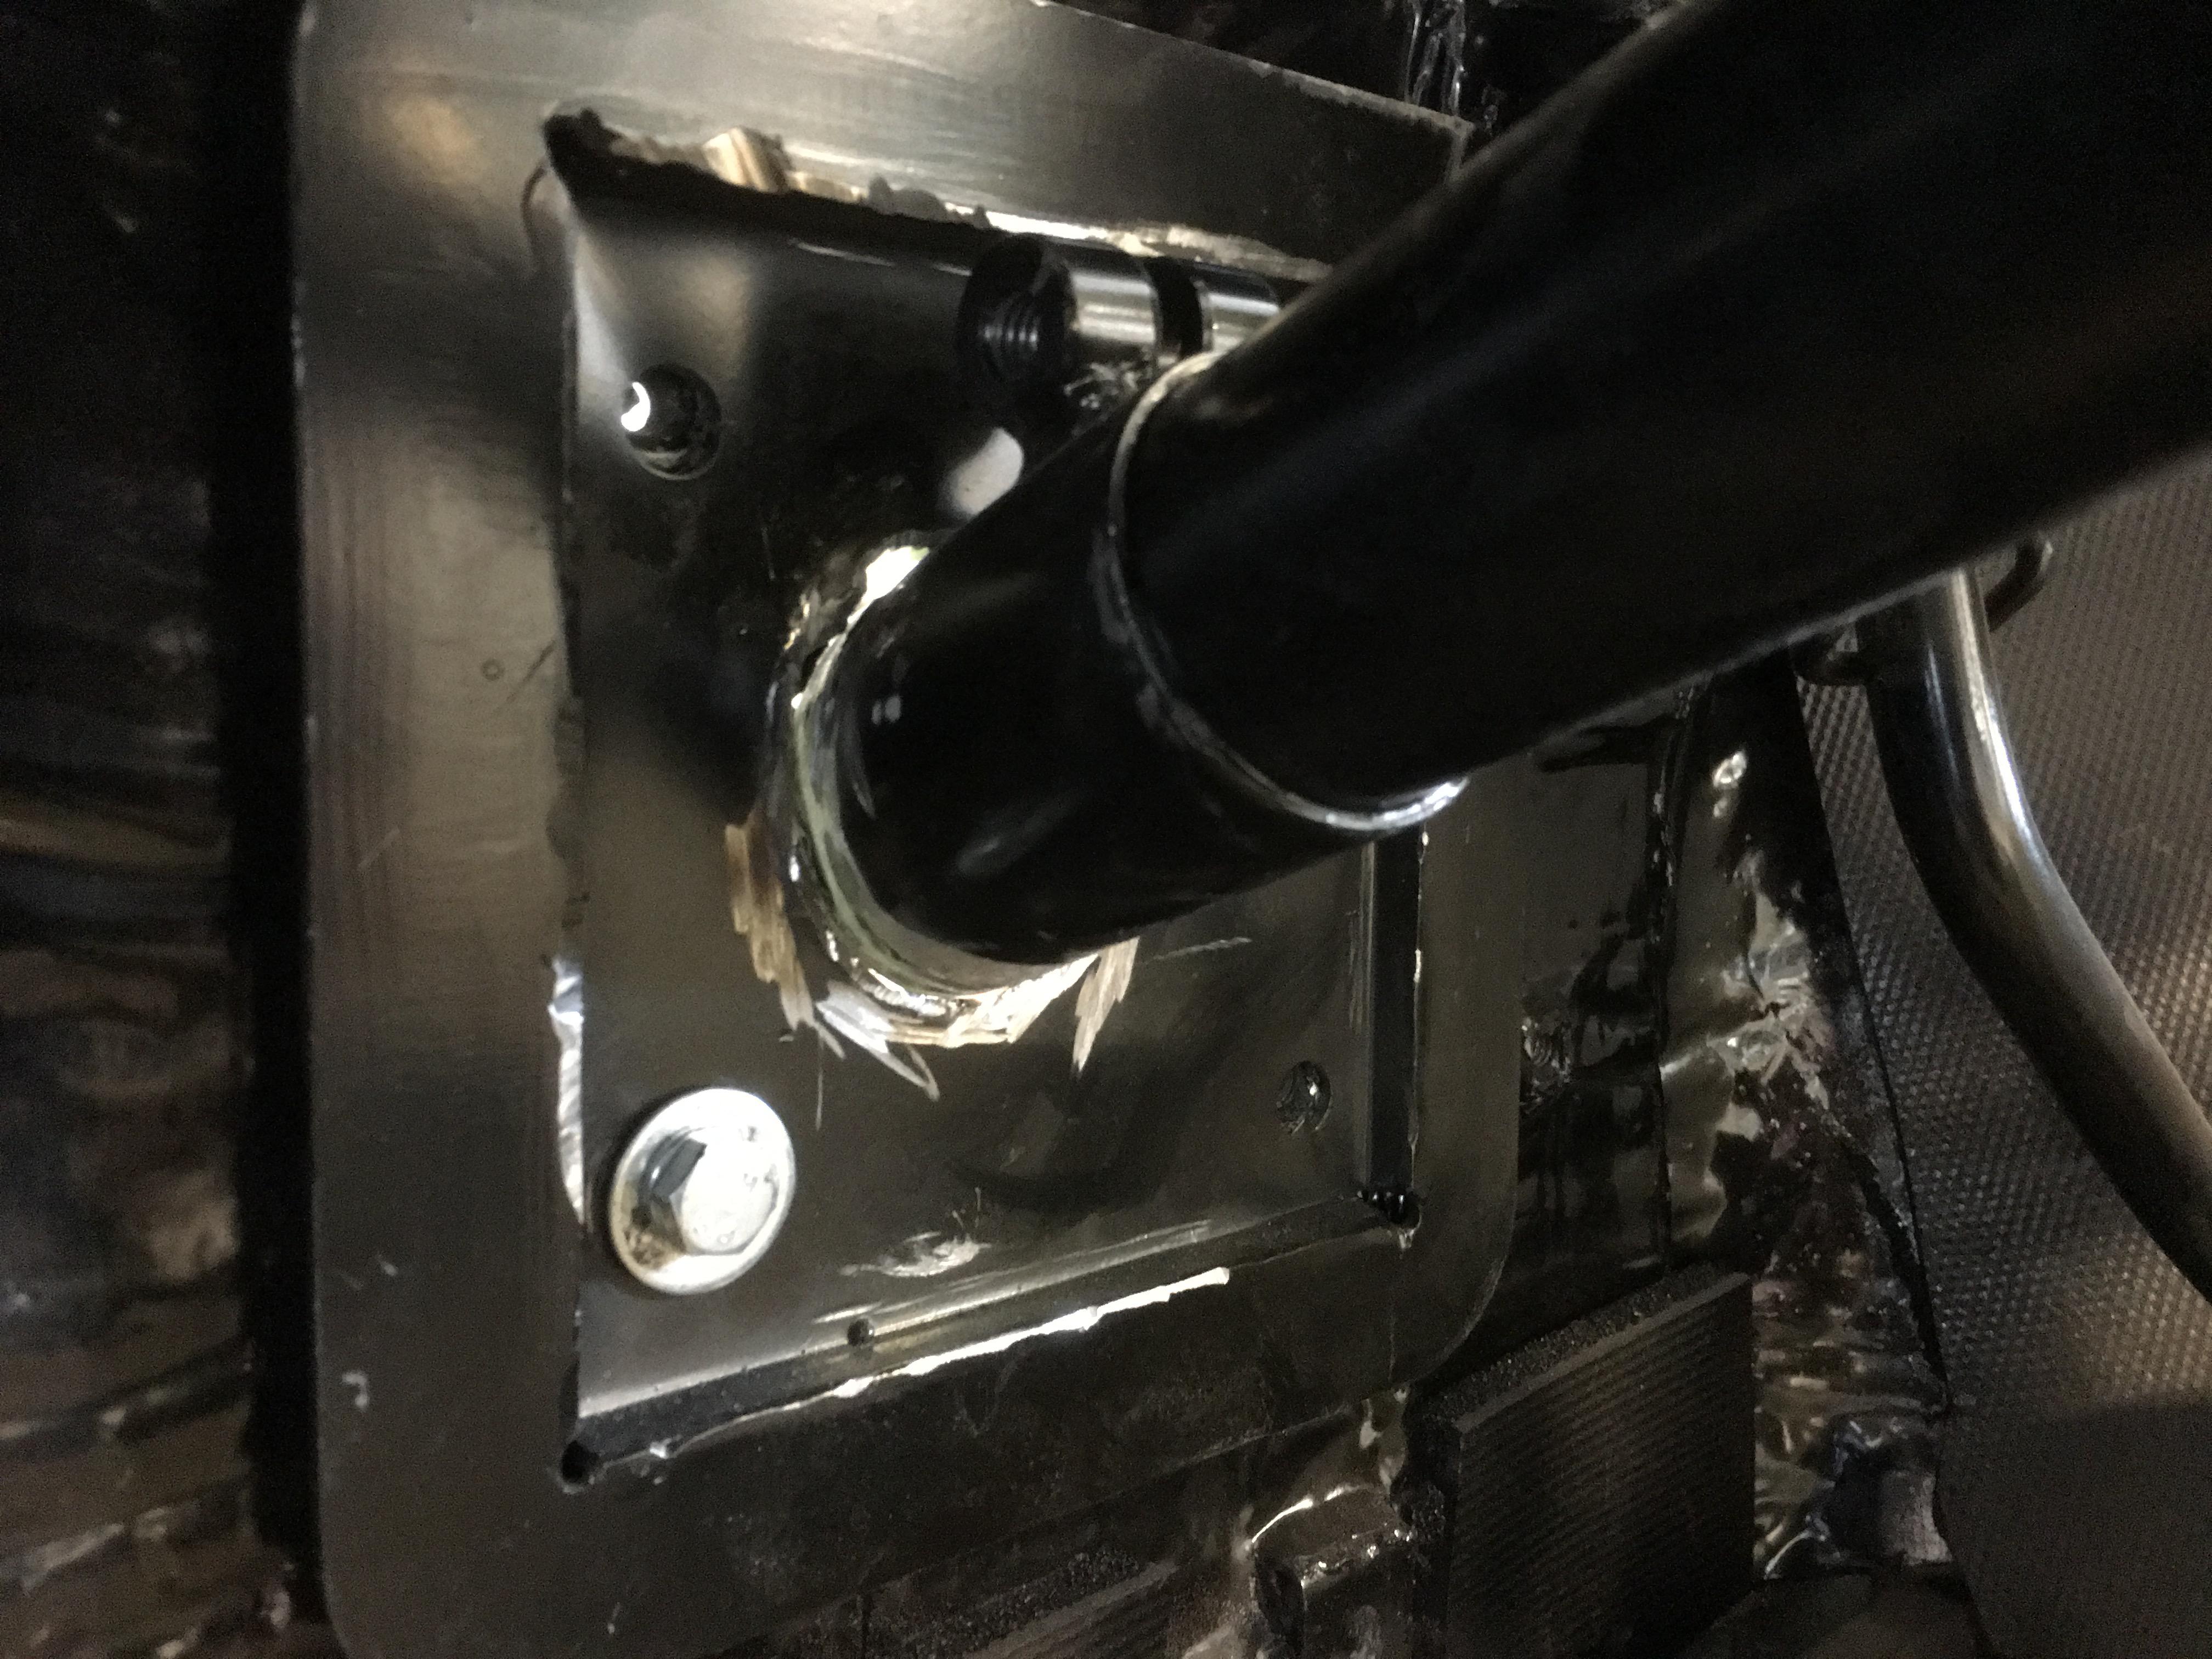
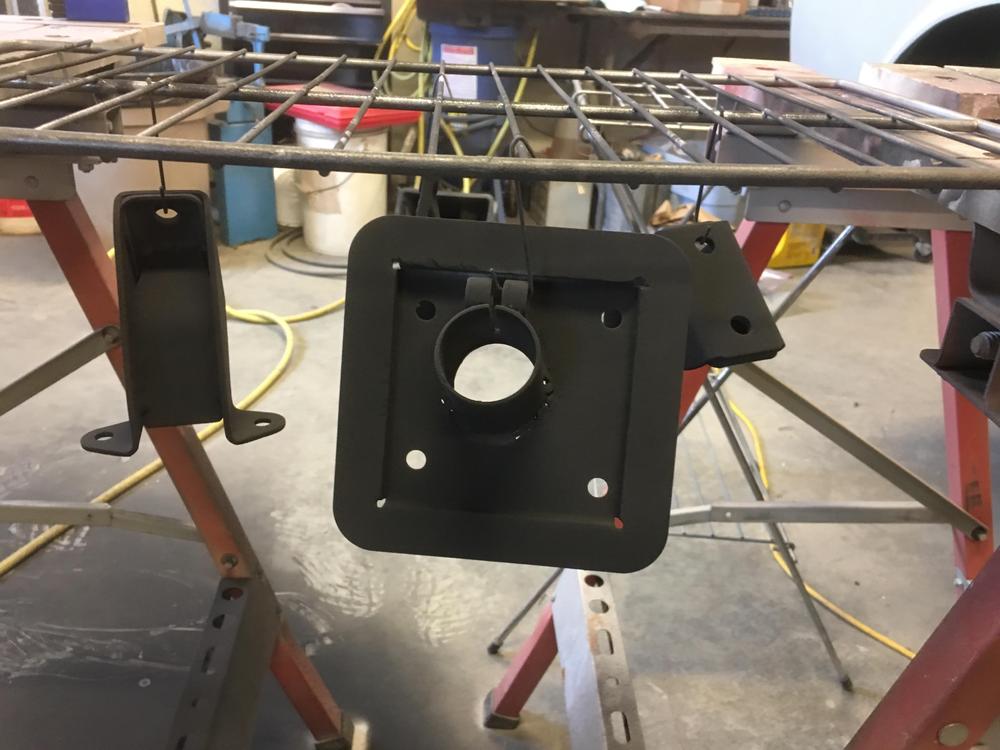
Wow thank you so much Mark!! We will take your sample and use it to make a new Jig to make our firewall plates. All our future customers will get the perfect angled firewall plate.1 point
-
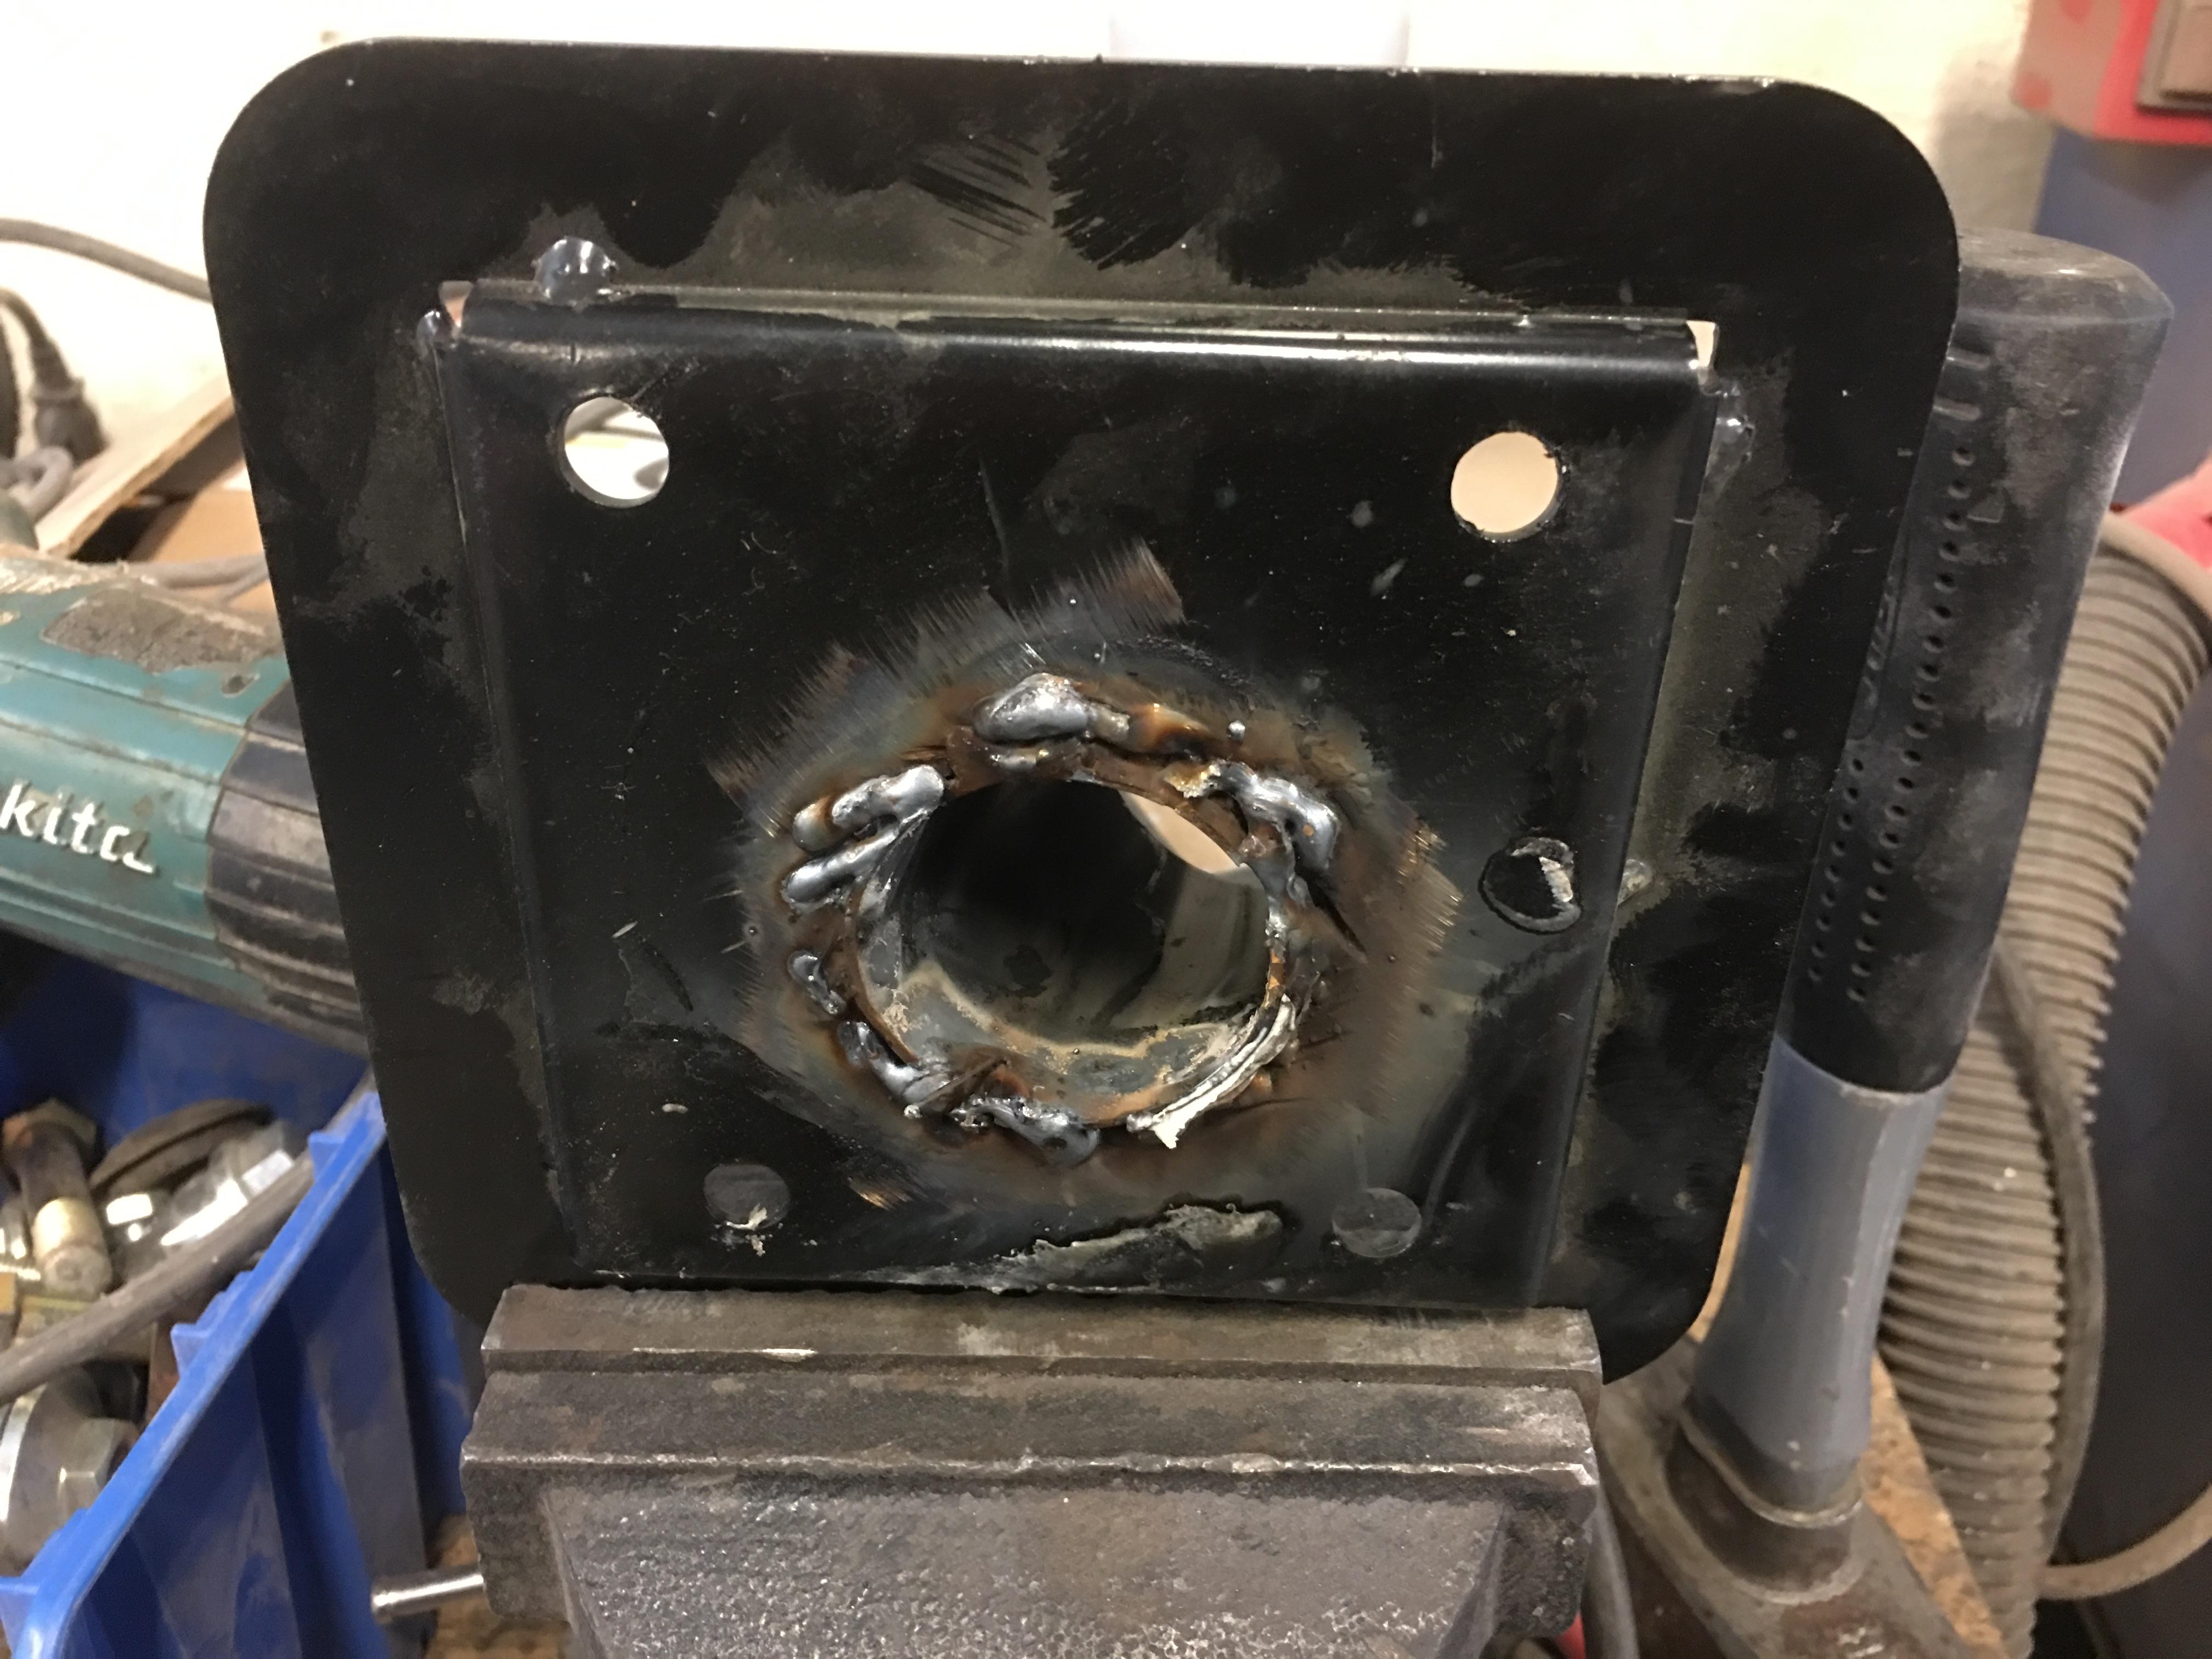
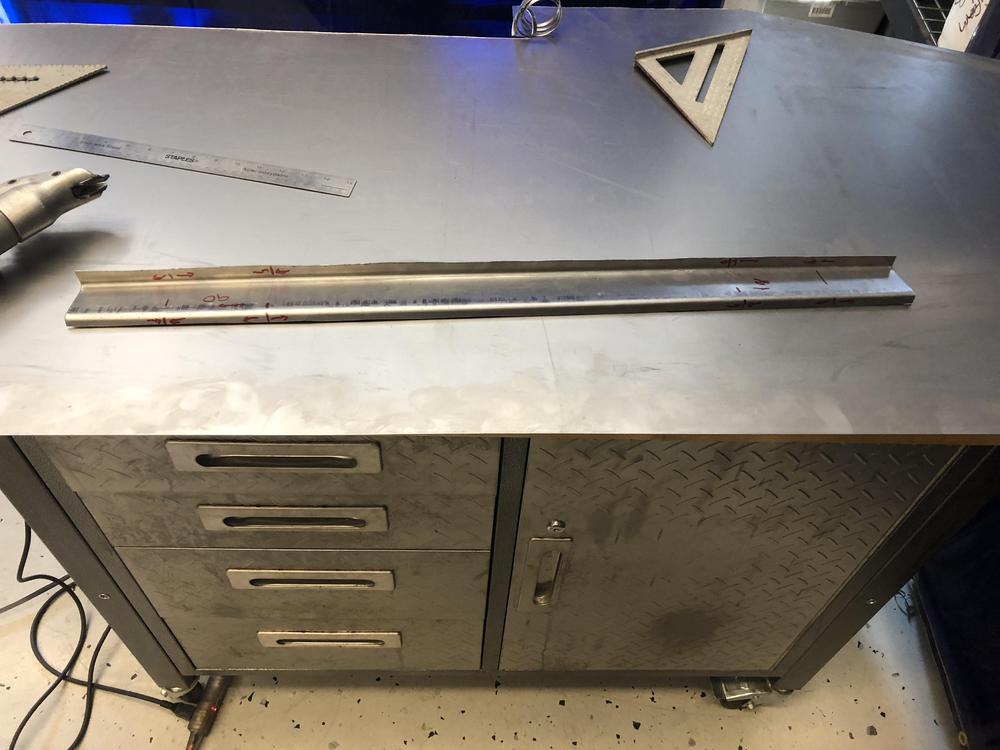
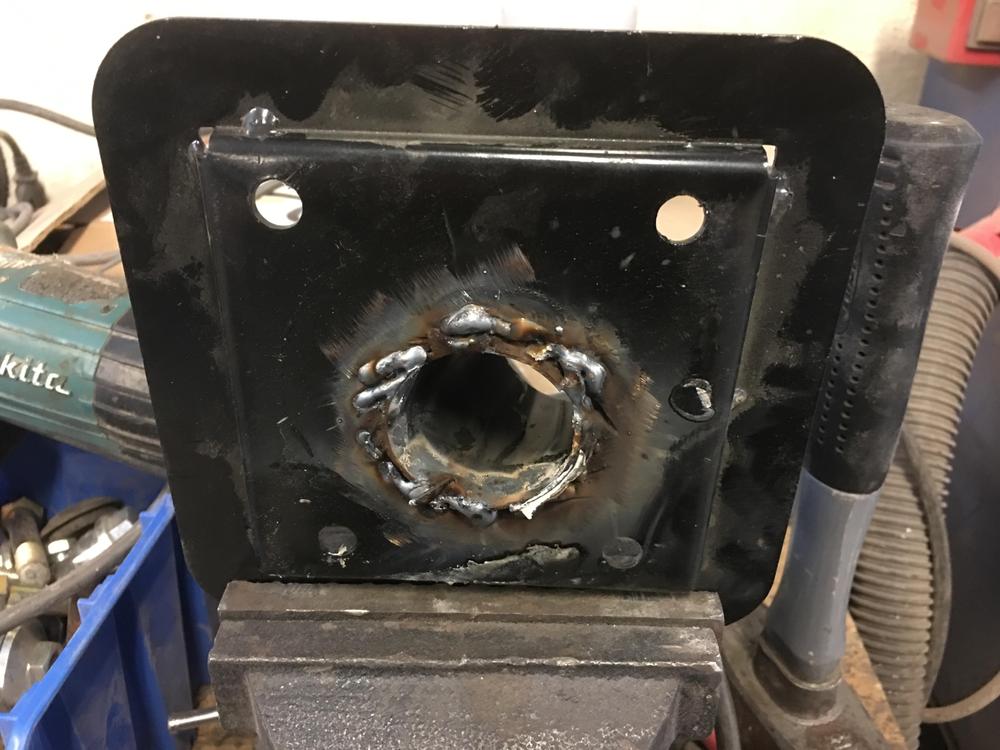
Well the spare firewall plates arrived today so I got to work! First a picture of the problem. The current jig puts the column down and to the right. Next step was to carefully grind off the welds and free the collar from the plate. Then I bolted the firewall plate in, then slid the collar over the steering column. I then bolted the column into the proper position with no strain. I then slid the collar thru the firewall plate and tacked it into place with my welder. I then pulled it all out again and ground down the ugly welding and media blasted it clean. and because I can, I decided to powder coat the finished amended firewall plate. Now to get this back off to @silverminemotors for making the next set of power steering firewall plates!


 1 point
 -
1 pointFirst, let's go over terminology. This is important for clear communications. Voltmeter - Measures voltage (difference in potential) across a source or a load, such as across the terminals of a battery. Ammeter - Measures current flow through wires. Ohmmeter - Measures the resistance (opposition to current flow) of a load. VOM - Volt Ohm Meter: This is a meter designed to measure voltage or resistance Multimeter - A meter that at a minimum measures voltage, resistance, and current. Some multimeters can measure frequency or inductance, and others have functionality to test transistors. Autoranging - A VOM or multimeter that will automatically select the range for the display, going up or down orders of magnitude. Continuity - Continuous, as in a continuous piece of wire. Now let's talk about resistance. Wire has resistance. Connections have resistance. Both should be low enough that we can ignore it if things are in good working order. Even a VOM or multimeter has resistance. An air gap has very high resistance. If you are using a digital VOM/multimeter with autoranging, the first thing you do is set the meter to measure resistance. The display will typically show OL (open line), and there will probably be a capital M near the reading to show megaohms. Touch your leads together. The display should go down to less than 1, and the M should disappear. If the meter has a continuity buzzer, it should be buzzing at this time. Please note that the threshold for a continuity buzzer may be several ohms. The autoranging feature will change the display, possibly without you realizing it. It can go from megaohms, to kiloohms, and to ohms virtually instantly, so you have to watch for the M or K on the display. If you have to set the range manually on your VOM, start with the LOWEST range when you are checking for continuity. Touch the leads together and make sure the reading goes down to less than 1. If you are using a higher range, the display may read less than 1, but you could have a lot of resistance. My philosophy when checking continuity is to IGNORE THE CONTINUITY BUZZER. The value on the display is important. So go back and start over. Have a notepad with you to record readings. Also, where exactly are you placing the probes for the meter? Be specific so we can tell whether or not your technique is correct. Finally, what year Z do you have? There are differences, and if you need help, we need to know which FSM to refer to. Feel free to post a photo of your meter so we can verify what setting to use on the dial.1 point
-
1 pointHalfway between the start of piston movement either direction. TDC should line up with the largest mark on your vibration dampener or timing tab depending on the year. To get it exact, "back in the day" we used a piston stop and a degree wheel. There's probably something electronic that will find it by now.1 point
-
1 pointTrico 44-180 refills fit both my cars very good. $8 at O'reilly's. https://www.oreillyauto.com/detail/b/trico-5077/wiper-blade-motor-16494/wiper-blades-25089/wiper-refill-12826/83ee6f490634/trico-18-inch-natural-rubber-wiper-refill/44180/4748890/1977/nissan/280z1 point
-
1 pointYes, even Banzai no longer has them. It's important to remember that Nissan doesn't discontinue an item out of meanness. If an item doesn't sell - those are too expensive, I can get a set of blades from Advanced Auto Parts for half of what Nissan charges - then why should Nissan reorder 10,000 from their supplier? Pure supply and demand.1 point