Leaderboard


Popular Content
Showing content with the highest reputation on 08/20/2017 in all areas
-
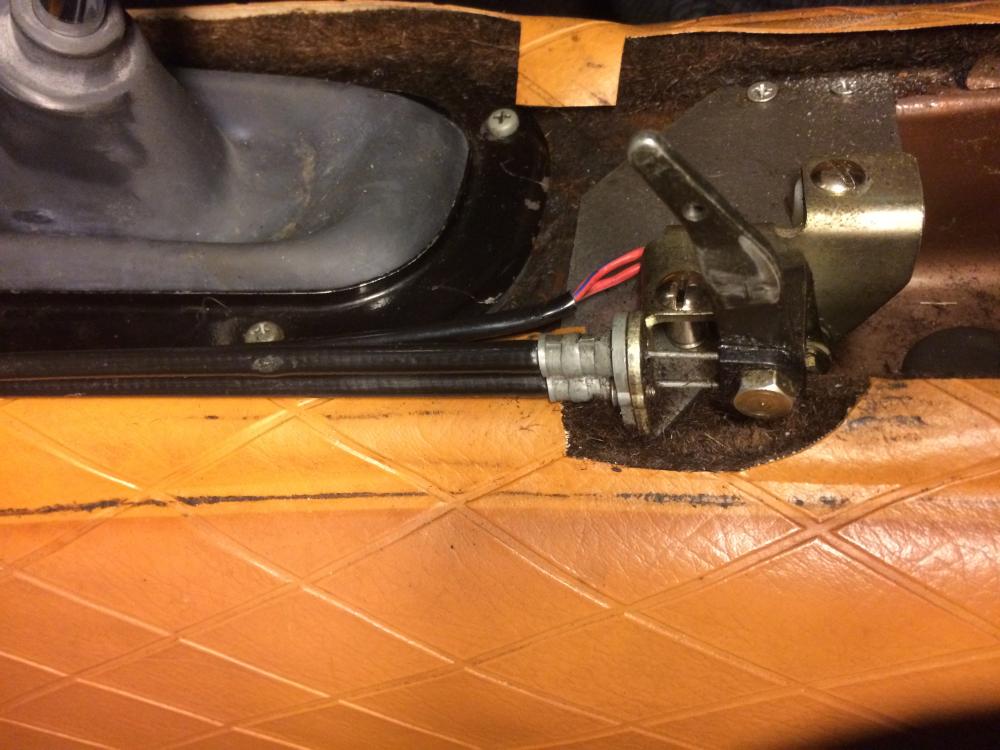
1 pointLast night I replaced the choke (cold start) cables for the carburetors. They need to slide freely and after 44 years of usage and most likely never being lubricated since new, it was time. After doing some research I found that 0.055" Piano wire is the best option for replacement as its affordable and able to push and pull, which is required. I also have more than enough left over and only paid $4.60.After disconnecting the cables from the carbs and pulling the center console apart, I removed the cables from inside the cabin, then measured the length needed. I left myself an extra foot before I cut the Piano wire. I bent it around the mounting plate and then lubed it very very very good before fishing it back into the housing and reconnecting. I'm very pleased with the results!Link to Piano Wire used:http://smile.amazon.com/gp/product/B002M3JQGC?psc=1&redirect=true&ref_=oh_aui_detailpage_o02_s00


 1 point
 -
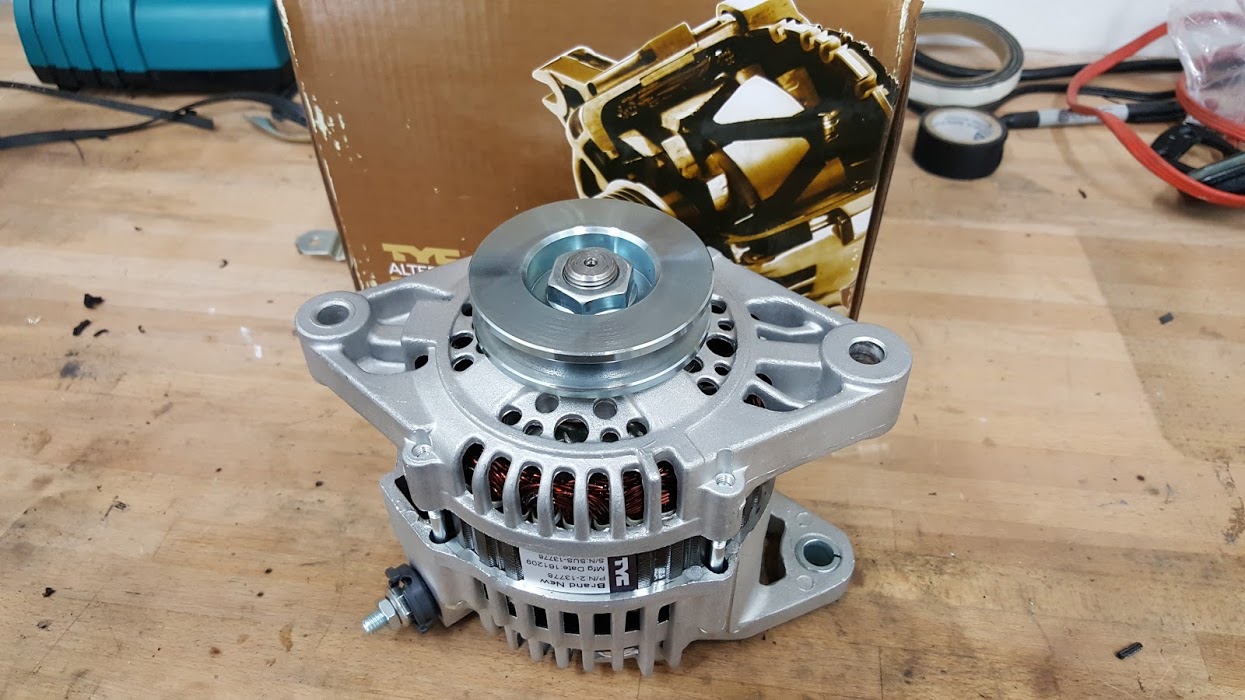
1 pointDid an alternator upgrade this weekend. Got the 90amp TYC unit with an internal voltage regulator from Z Car depot. Straight forward install but bypassing the VR wiring threw my for a loop. All the diagrams I found online had different color wires than what I had. Apparently some 75' models are different than others. But after some research I found a thread by Tamo3 that helped me. Soooo thanks to you my friend! Installed

.png.c9135de0d8d203c2de451193e7b6401f.png)
 1 point
 -
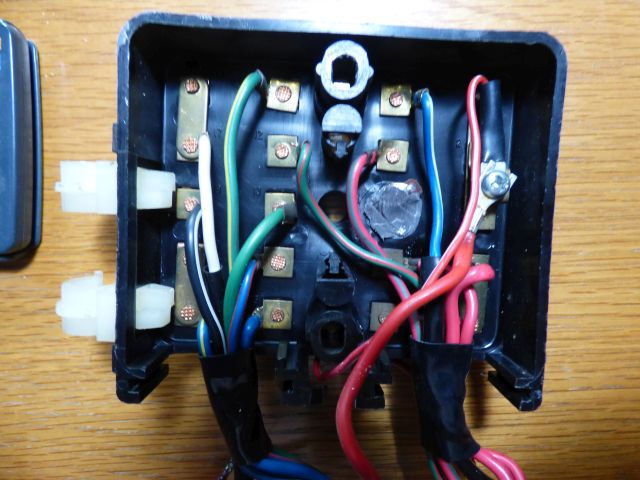
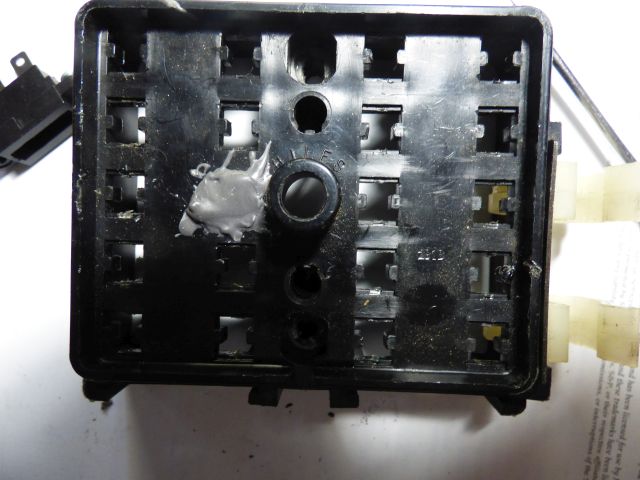
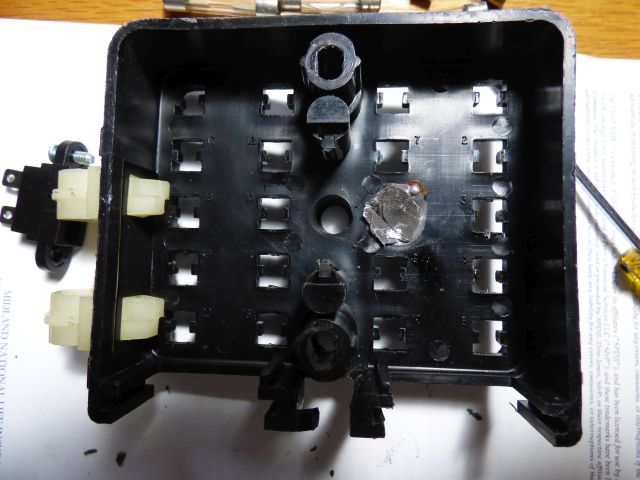
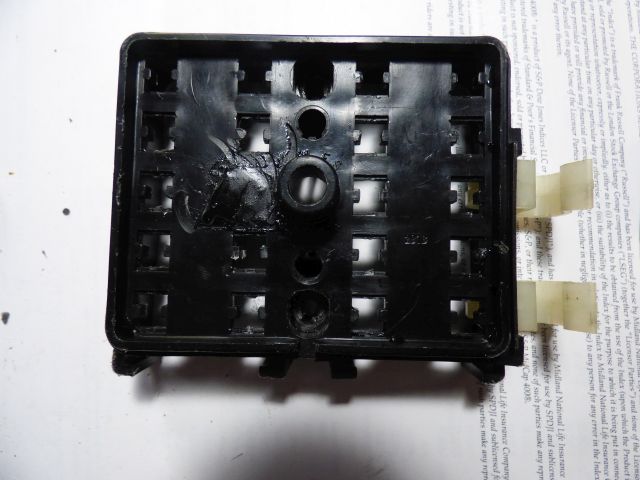
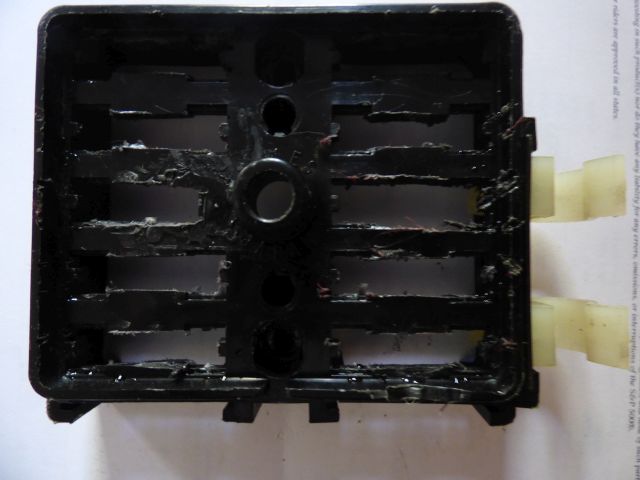
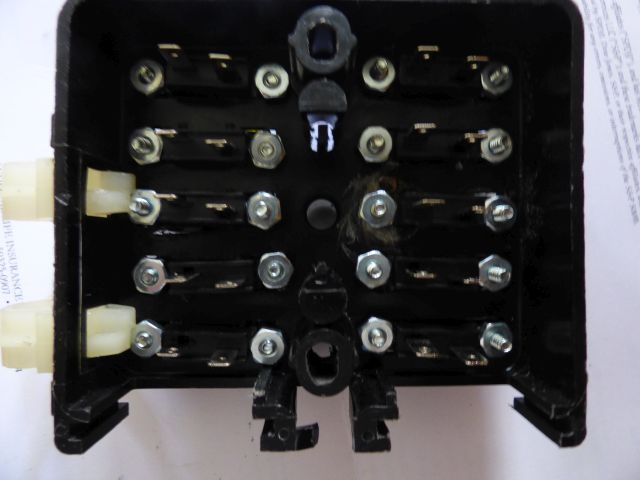
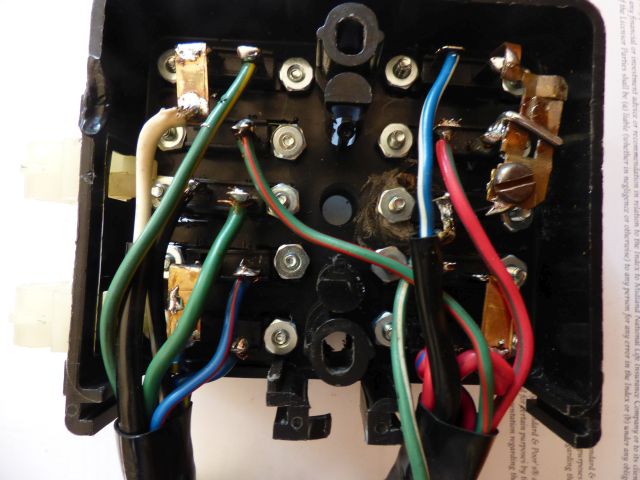
I undertook this fuse box upgrade this weekend. I had ordered the fuse holders back when @Phil Z first posted this. Just now was motivated to do it. My fuse box had the typical melting of the parking light fuse. I installed an inline fuse pre-1980, and installed LEDs a few years ago to lower the current draw. My first step was to take photos of the existing wiring and also make a key to where each wire goes. Next I removed the fuse clips leaving a bare box, then repaired the hole from the melted fuse with JB Weld. Semi-ground down the JB Weld and coated it with black satin paint. Like Phil I used a dremel to cut slots for the fuse holders. I cut the first one too wide, so after that cut them slightly smaller than needed and filed them to the right width. I had some 6/32-inch machine screws in my stash, some 3/8" long and some 1/2" long, and they were the correct diameter. Drilled out the holes as needed and installed the fuse holders and screws. Nissan didn't leave any spare wire length, so I pried open the clamp holding the insulated part of the wire and cut off the old fuse holders to give me all the length I could get. To connect the source side of the fuse block where two wires were common, I tore apart an old plug and soldered those across the terminals. At the three common connectors the stock box has a screw terminal. To duplicate that I smashed an old duplex outlet and soldered the parts across the three terminals. Ugly but effective. I soldered the wires on, checked for continuity, and re-installed it in the car. So far everything works like it did before. As Phil said, the fuse box cover still fits. Thanks to Phil for coming up with this upgrade.
 1 point
 -
1 pointYou should be able to blow one way, but not the other. If not carb cleaner may clean it up. Skip all this for now in my mind. Get the lines cleaned out.1 point
-
1 point
-
1 pointSo in case anybody is curious... I went over to @lefty7126's house today. We tested for continuity between the fusible links holder and the negative cable of the battery. Unfortunately, as I suspected, we found continuity. I moved down to the shunt, unplugged it, and found continuity between the downstream side (away from the fusible link) of the wiring harness and ground. I traced through the wiring diagram for the white/red wire, and we continued to diagnose. First we removed the connection to the alternator. No change. Then we removed the C-6 connector on the engine to dash harness. Still no change. Next we disconnected the C-5 connection. That broke the short. There are two white/red wires on C-5. One goes to the ignition switch, and the other goes to the headlight switch. I disconnect both switches. Each end of both wires had continuity to ground. That was our stopping point for the day. Lefty's dad is going to pull the dash, and I'm going to return over Labor Day weekend. I believe the dash was out before, and maybe some wires got pinched on the re-installation. It's always good to meet a fellow enthusiast who is willing to get his hands dirty. @Jeff Berk, I looked at the build date of the car. It's 10/74, making it a "late" 260Z. Some components were rearranged from the early 260Z. The split-loom in the photo actually covers AC lines. There are some other wiring issues to sort out in the car, and those will be easier to deal with once the dash is out. The car looks to have good bones, too, so it should be a good starting point for Lefty's projects. @Pat Carr, we ended up going to a great no-name restaurant co-located with a Mexican grocery store.1 point
-
1 pointHe said "two days ago" in the post you referenced. SeK needs to keep us informed. He didn't tell us that he tried driving it with the cap off until an hour ago, but he tried it two days ago. Doesn't sound like a clogged vent issue. The slightly clogged inlet and outlet lines are your biggest clue I think. You should be able to blow through them like blowing air through a straw. Although you followed the RedKote instructions correctly, it's looking like you partially blocked those ports, probably got some on the metal "sock". Since the tank is out why not poke some wire through there and see if you can free them up.1 point
-
1 point
-
1 pointI maybe wrong here but that line with the dry filter looks like it goes to the carbon canister from the vapor tank by the filler nozzle. not sure why anyone would filter that. oops JSM beat me too it.1 point
-
1 pointI'm pretty sure that line is for the evap fume line to charcoal canister. I honestly don't think it has anything to do with you issues. You probably need to check the service manual to see if that is supposed to be there or not. Honestly, since the tank is out, take a 5 gallon plastic tank fill 5 Gallons of gas in your tank now that it is out of the car. Use your old fuel pump with a battery hardwired to the pump to pump it back into the empty 5 gallon plastic jug. Slosh the tank a little to simulate driving. Listen for any pump noise change or slowing flow. Have a fire extinguisher close by just in case. Do this outside not in the garage.1 point
-
1 pointYes you can. That would be one side of the break-it-down equation. Put a can of fuel back there with both the return and supply hoses in it. Use a longer piece of hose.1 point
-
1 pointI did see your post and plagiarized! I spent about $60 on mine, minus the AN fittings, hose & FPR of course. Sent from my iPhone using Classic Zcar Club mobile1 point
-
1 pointHaha!! Yeah, I stumbled across that video a couple days ago looking for something else. Don't even remember what I was looking for, but that one came up for some reason. Yes, Paul is the Seth Rogan one. I know everyone's tastes are different, but that one really had some laugh out loud moments for me. I hope it does for you too. Rotten tomatoes says "Paul is arguably the best science fiction comedy since Galaxy Quest." (Have you seen Galaxy Quest?) So you really want some difficulties putting your top list together? Here's some more of my favorites: Aliens Airplane Escape From New York Spaceballs And honorable mentions... Top Secret, Life Of Brian, Real Genius, Princess Bride, and the first Matrix. Seems l like stupid humor and science fiction..... Not much of a surprise there.1 point
-
1 pointand for gosh sake get fuel injector style hose clamps, I hope you are using fuel injector rated hose. Make sure you look closely for fuel leaks, there are a lot of places for that to happen. I see you have hose clamps on the vacuum line to the fuel regulator, that should not be required if you are using the correct vacuum line. You need to stop with the descriptions and start with all the test that have been described. One real quick test would be to dead head the pump. Disconnect the starter solenoid wire, clamp of the return line, turn the key to start, only do this for a couple seconds as the pressure will build very fast, if you have an after market pump you may see upwards of 90psi. this will quickly determine if the pump and tank are able to supply high pressures. The reason you want to only do this for a couple seconds is its very hard on the fuel hoses and connections (clamps). If you did NOT use fuel injector rated hose you will likely burst something from the pressure (non FI rated is about 50psi). those worm gear clamps have a way of eating into the hose. I good supply of FI clamps is at the local junkyard, just go to the import section and look around, tons of them and top quality, not the junk sold in the auto parts stores.1 point
-
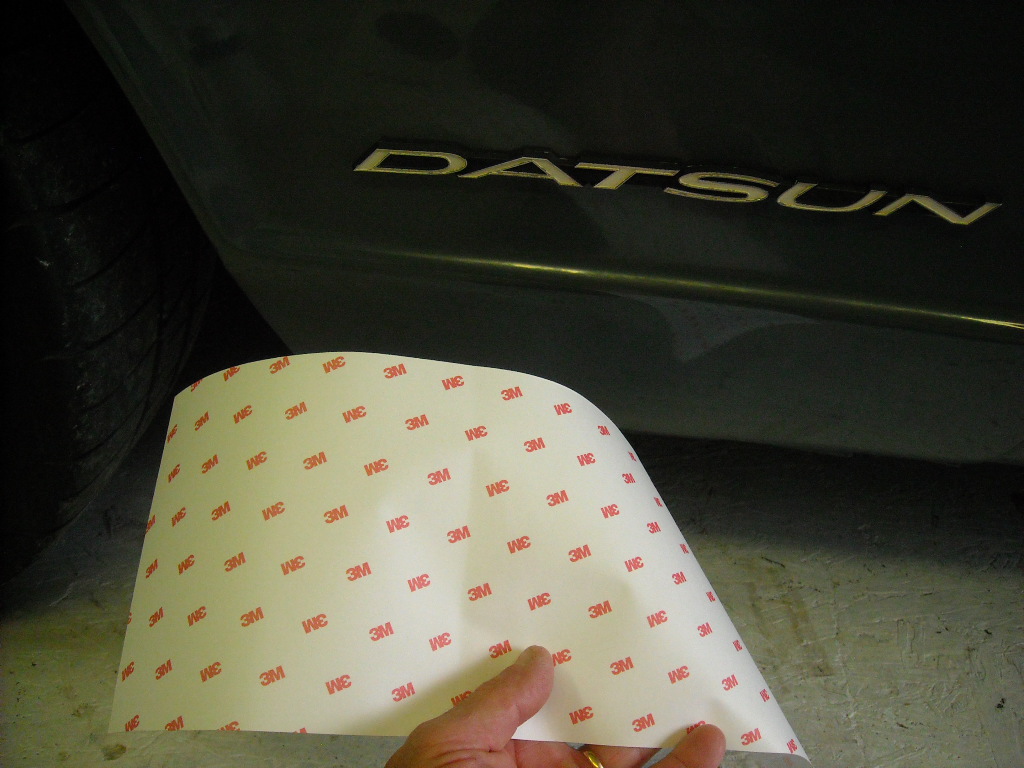
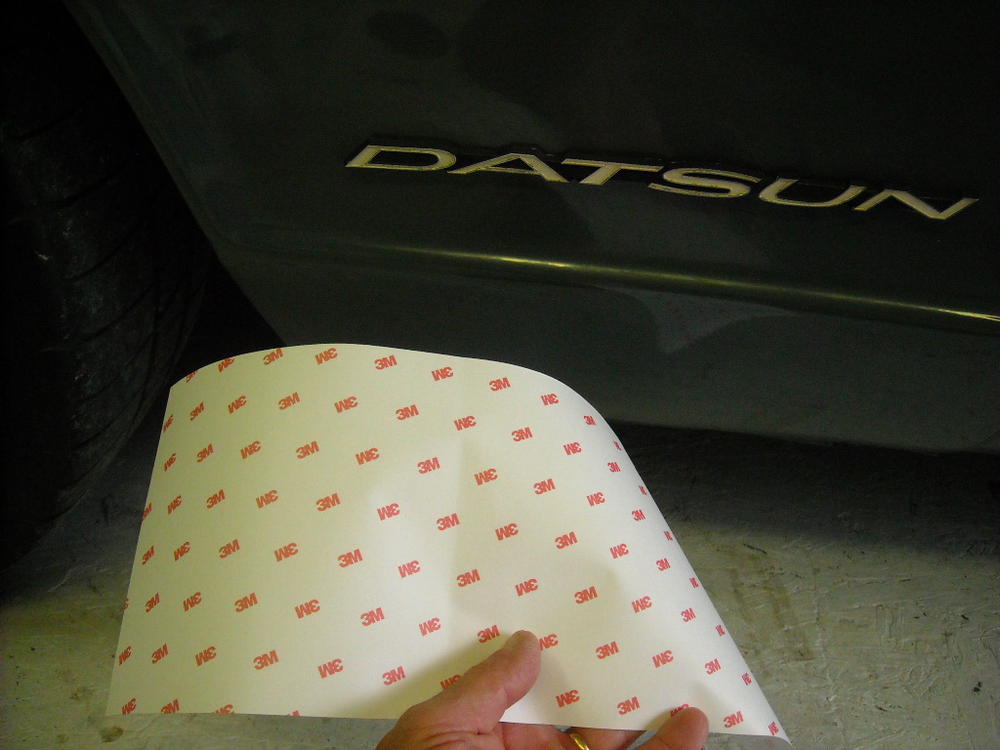
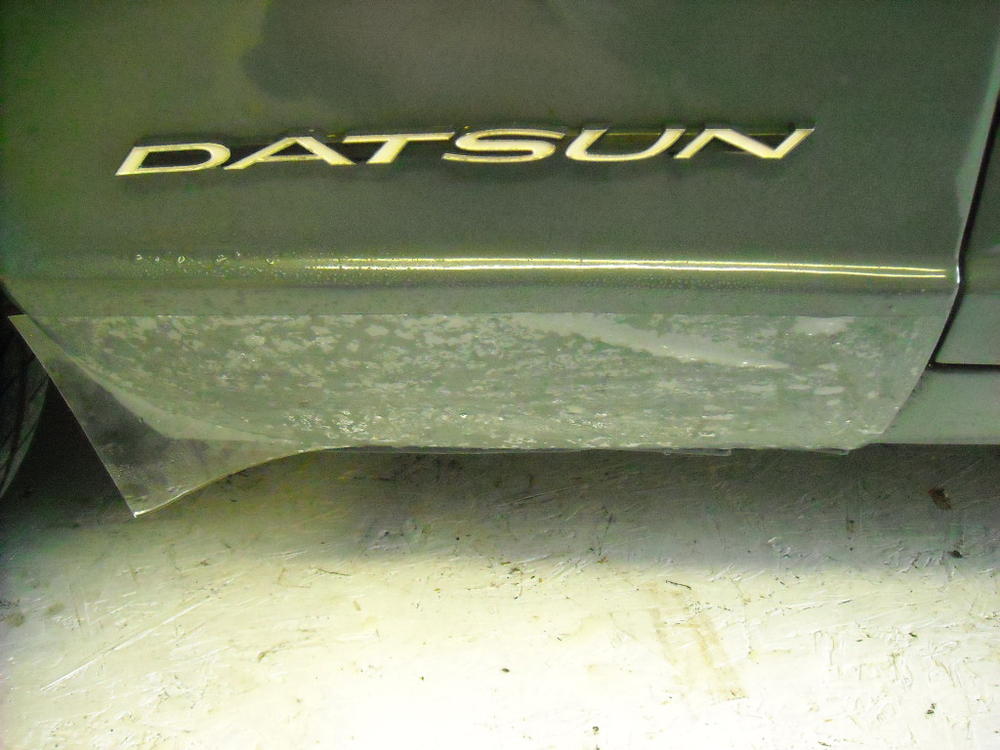
There was a noticeable difference but I also did the nylon steering puck change at the same time as the caster change so when I did the next test drive all I could really perceive was "just a better feel." While I'm at the track tomorrow I'll try to find one of the older racers and see if he will take my car out for a lap or two and give me some feedback. Already have a few small scratches on the rockers from gravel being thrown up by the tires so applied some 3m protective film to the lower sections.
 1 point
 -
1 pointnot sure what you are showing. but you have to have good gravity flow of fuel at least to the fuel pump. Make sure you have gas in the tank, disconnect the fuel line at the inlet to the pump, hold it down and gas should flow big time. Agree too many filters, a single G3 is more than enough. you should be able to hold it down and have gas flow out, if not the line is plugged or the tank does not have enough gas in it. put at least 5 gallons in right now.1 point
-
1 pointSo that clear Fram G3 is dry, right? I would remove that metal one for sure if it's "pre G3". You may have the flow arrow backwards or something. I think your best bet is running the supply hose to the pump straight out of a gas jug. Bypassing filters altogether.1 point
-
We arranged a little Datsun meet at a friends place! (2 more Datsun Z in his work shop)


 1 point
 -
1 pointAny videos, or performance numbers? I think that either of those would help sell it. Interior pictures also. Looks like a well-built car.1 point
-
1 point
-
1 pointi bought the same wire for my heater control cables. the outer part i bought at a local bike shop. less than $20 for everything1 point
-
1 pointBike cables are braided wire and wouldn't work well in this application as it has to push as well as pull1 point
-
1 pointHigh carbon steel, eh? Hope it doesn't rust out too quickly - not an issue in a piano, where it won't be exposed to wet conditions, but in an engine bay it will be. Interesting idea, but wouldn't bicycle brake cable be a better choice?1 point
-
1 pointAre the choke cables a different length in Series-1 cars than in later 240z's? The cables on my '70 were mangled, and so I replaced them with a set I had lying around, presumably from a later-model car. The cables are now stretch tight over the carbs - too tight. There are no kinks anywhere. All I can figure is since the position of the choke changed, they must have moved it forward a little as well, and hence shortened the cables.1 point
-
1 pointFWIW, I took some measuring tape to my choke cables this morning. I forgot to bring my notes to work so I'll have to go off of memory. My early 260Z choke cables were shorter than my 3/71 240Z cables. Measurements were taken from the flange that the rubber sheath butts up against, not the lever. Early 260Z: ~60"/54" (longer cable/shorter cable) 3/71 240Z: ~65"/59" So about a 5" difference between the two. Note: measurements are approximations. I used measuring tape and the cables were not perfectly straight.1 point
-
1 pointThey are a tad longer then the later consoled chokes, sorry I dont have exact measurements on hand. Series one center console the choke is attached a few inches farther back thus the increased length needed. You can get the later console length cables to work but as you already know its a tight fit. If you can not locate the correct length choke cable specific for the series 1 console your best bet is to find the 73 choke cable (the super long ones that went thru passenger firewall) and trim them back to fit.1 point
-
Darrel man! that was funny. KOalia I try to do it also, it was easy to take the old one out but it was hard to put it on, I end up taking it to a glass shop and charge me 30.00 they also have that special tool to put the molding. To me was worth it.1 point
-
Well my driving season is over for the year, I guess I was just having too much fun at the track, think I spun a bearing on the crank, really horrible sound. Everything was great, car was performing perfectly, brakes were holding up and I even passed a Viper. Then that sound happened so limped off the track and called the flatbed. Hopefully I will be able to save the crank, I'll let you know when I crack it open.0 points