Leaderboard


.JPG.cfcada9cf1c1b502df3f5f2f2ca3ff36.JPG)


 Subscriber
Popular Content
Showing content with the highest reputation on 06/20/2023 in all areas
-
1 pointMeasure voltage to ground on the backside of the connector. One pin should have voltage with the engine off. That is the battery sense. Also, look to see if the connector is corroded.1 point
-
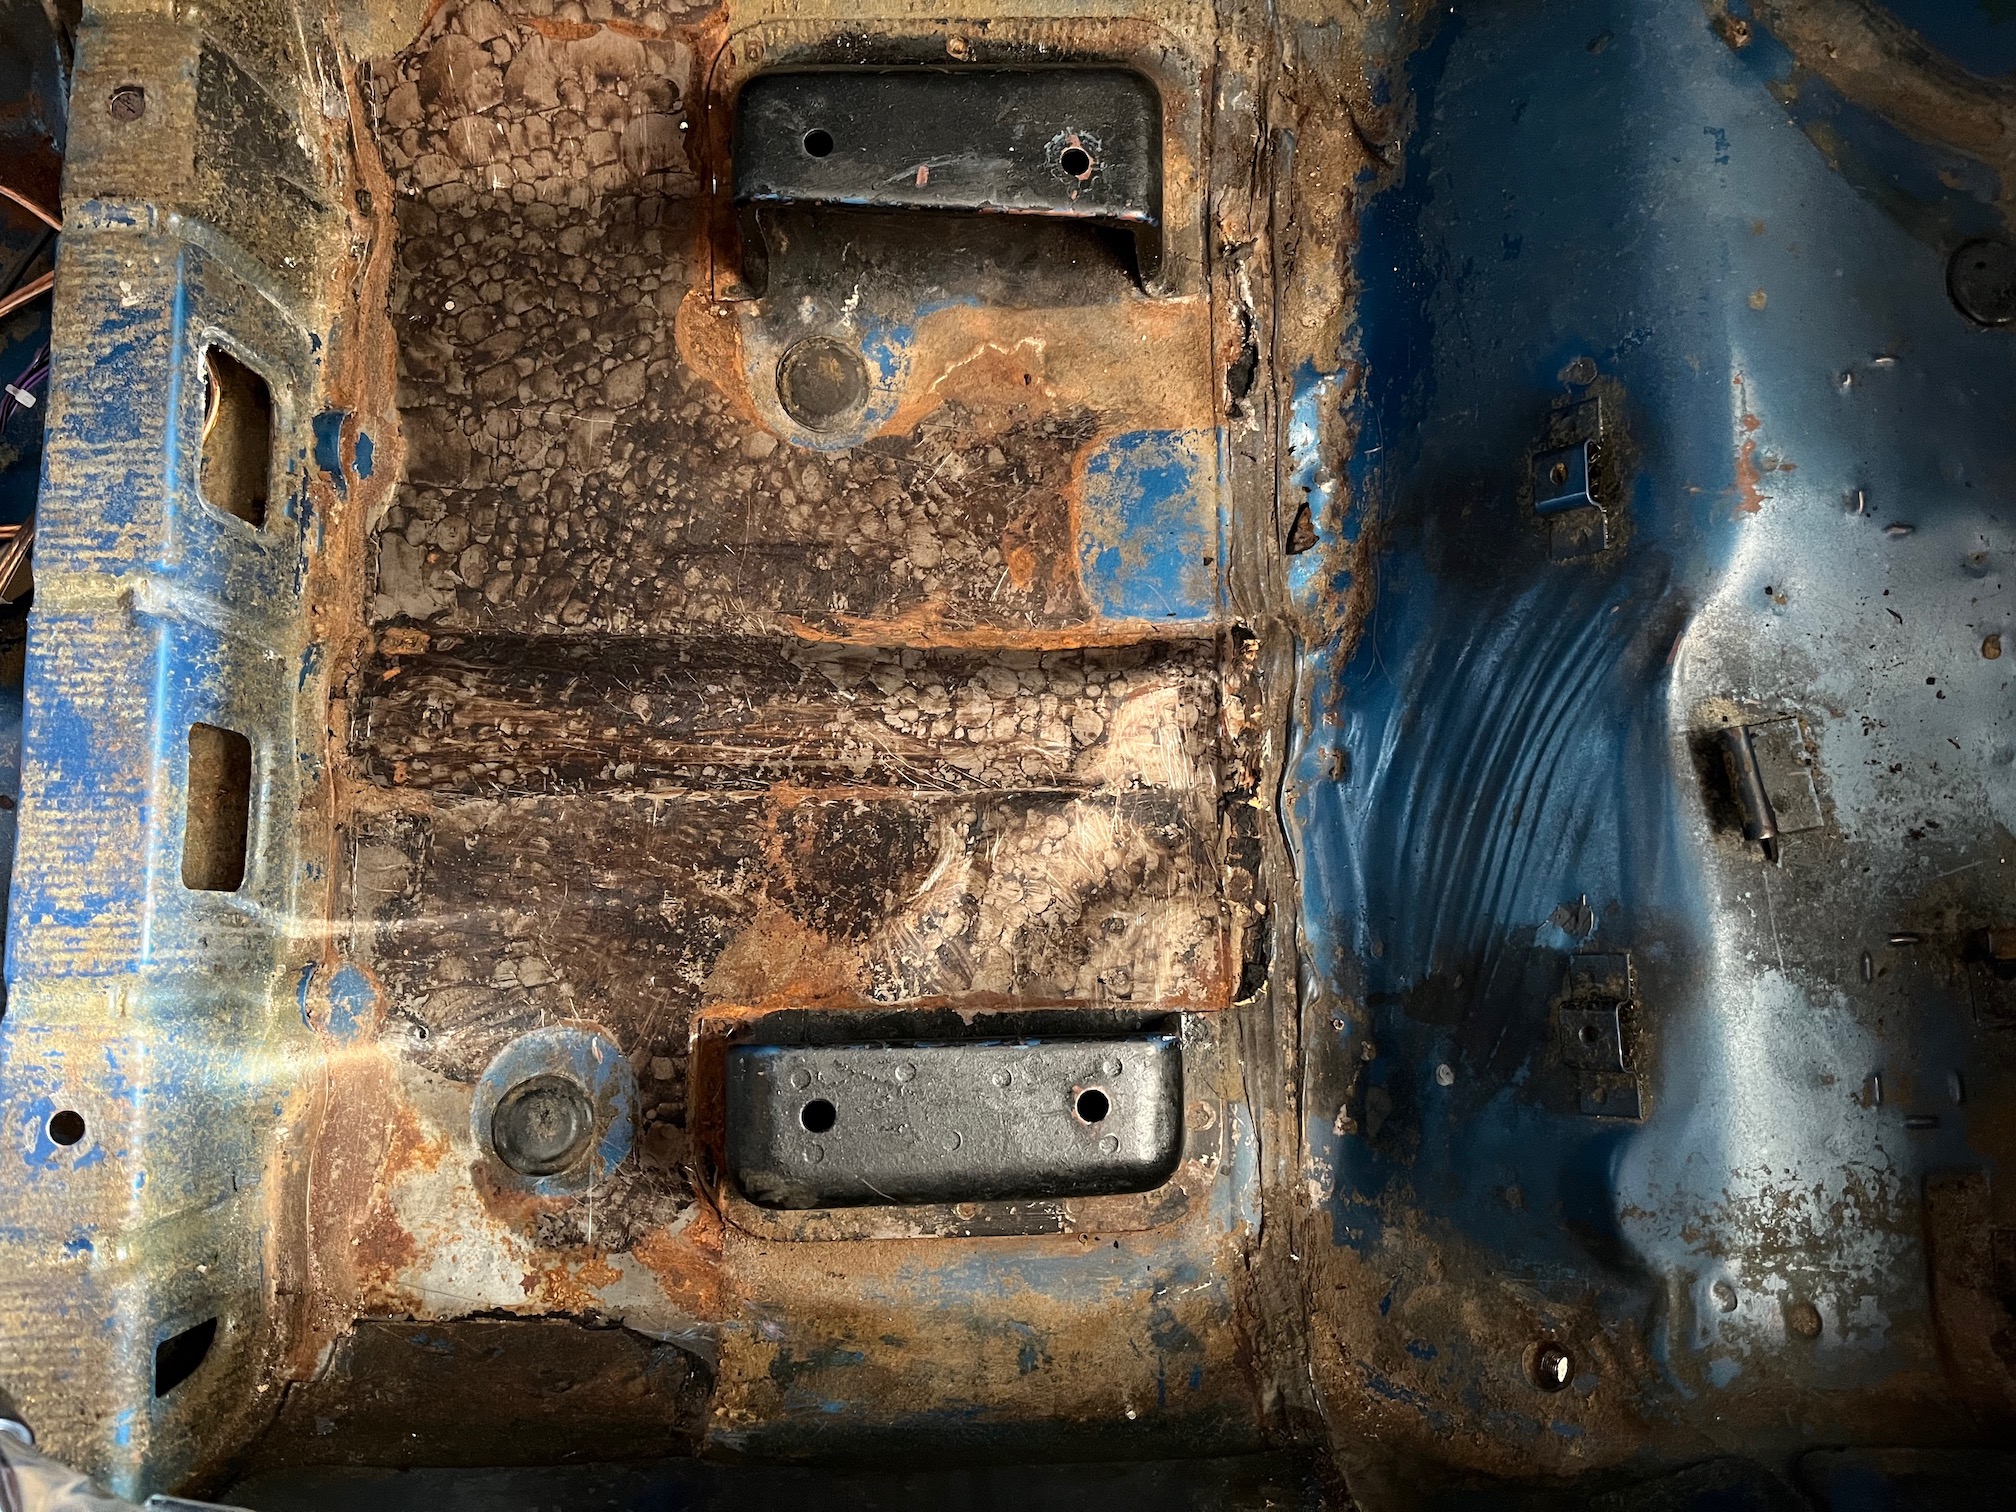
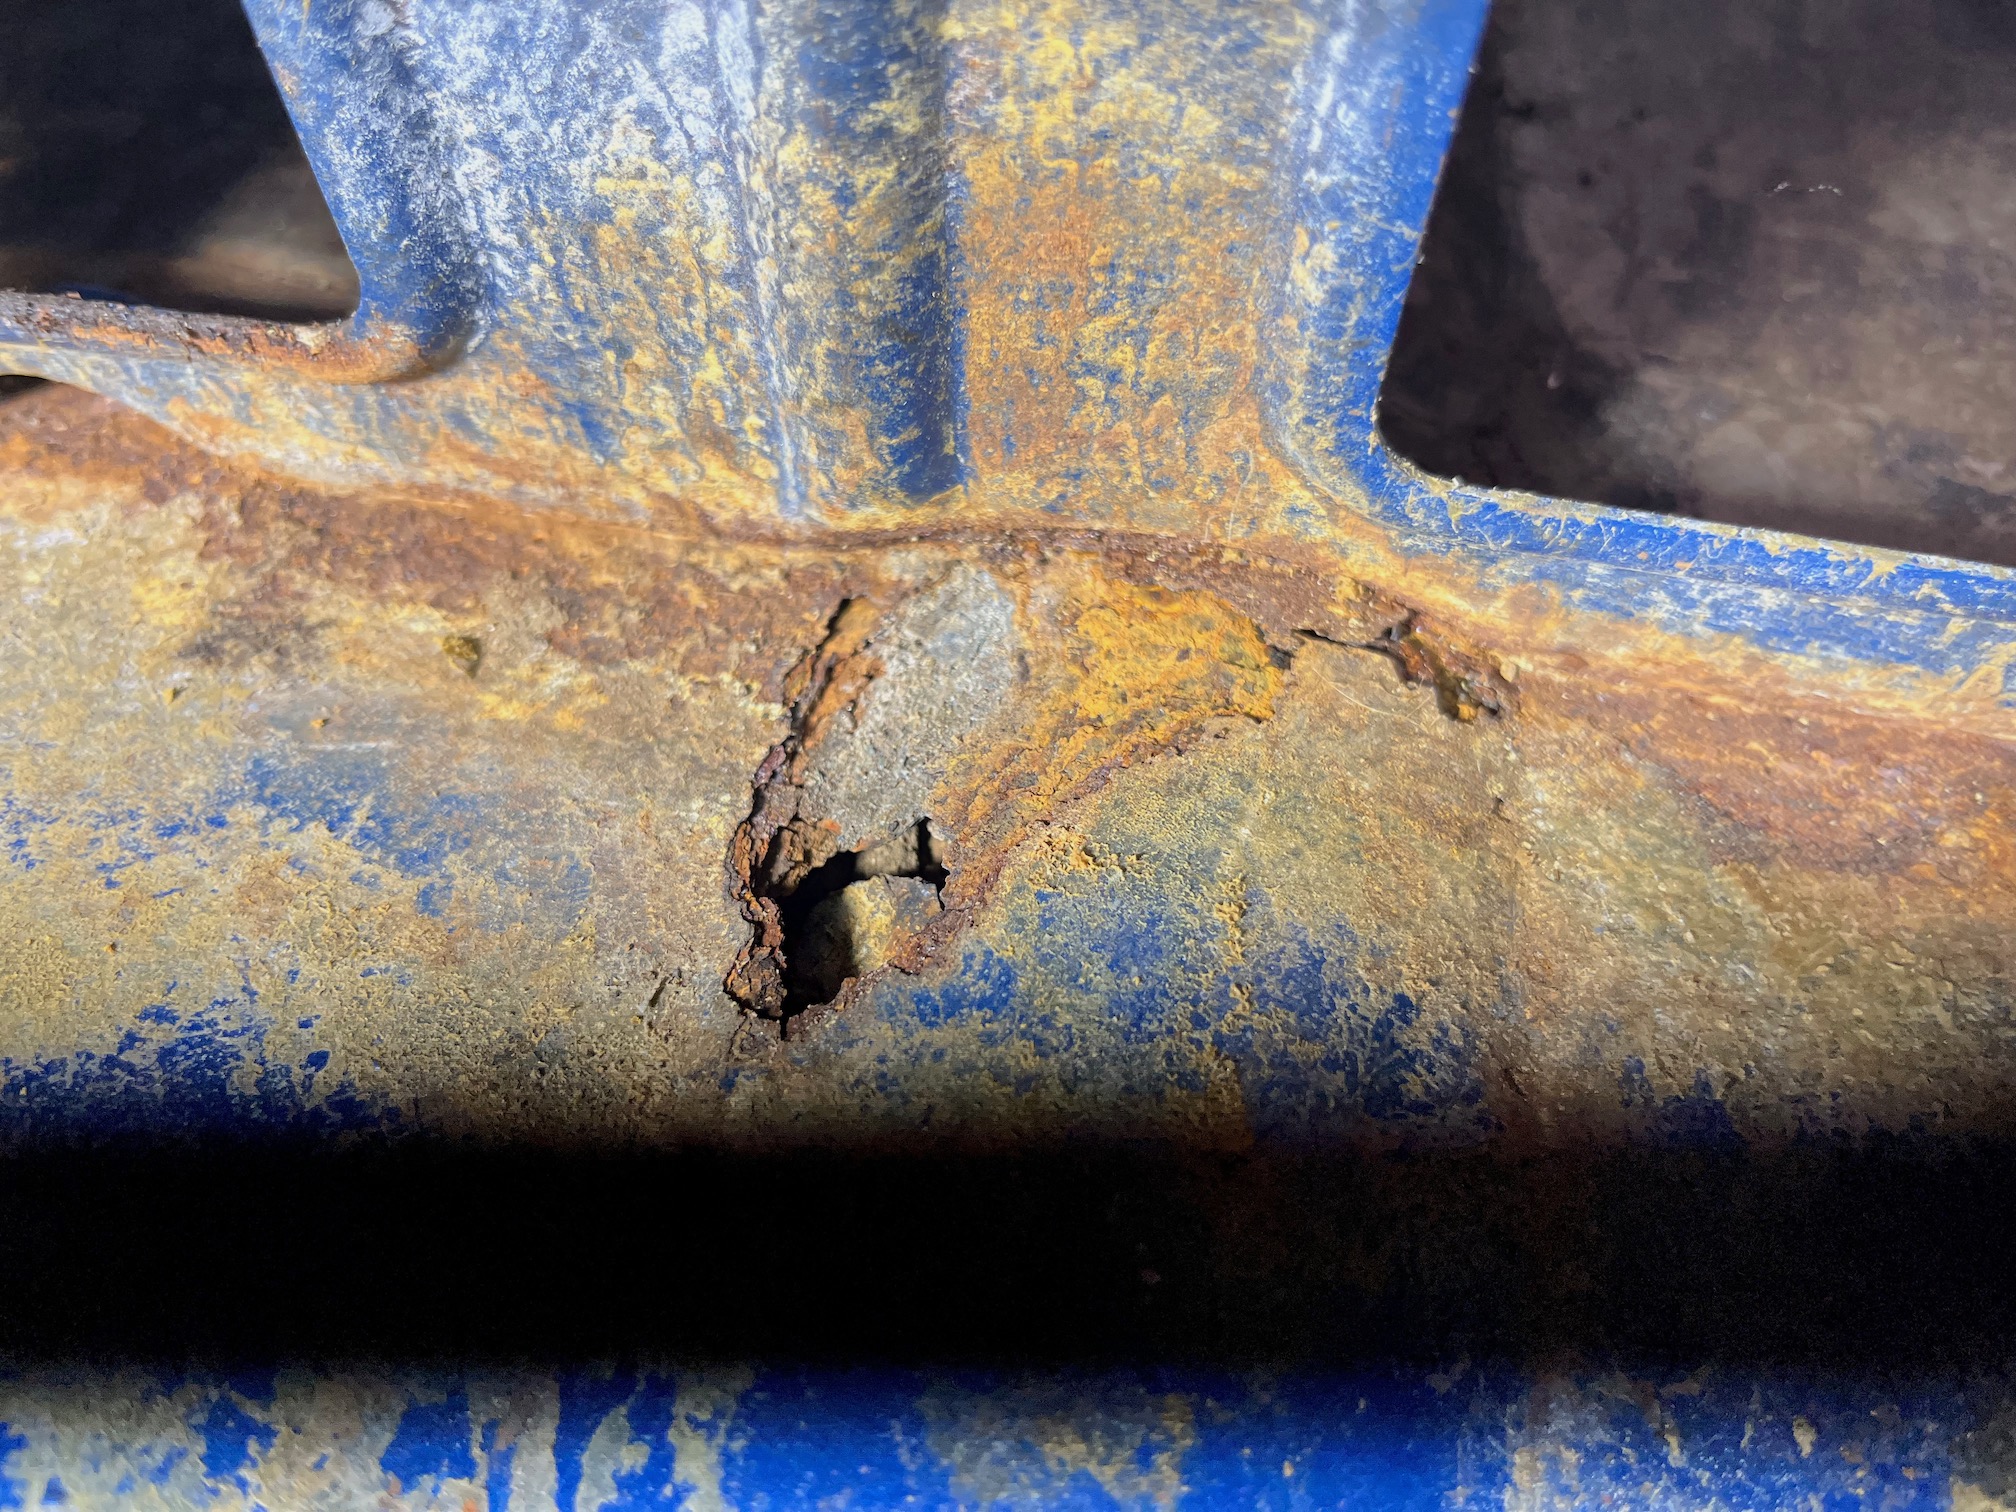
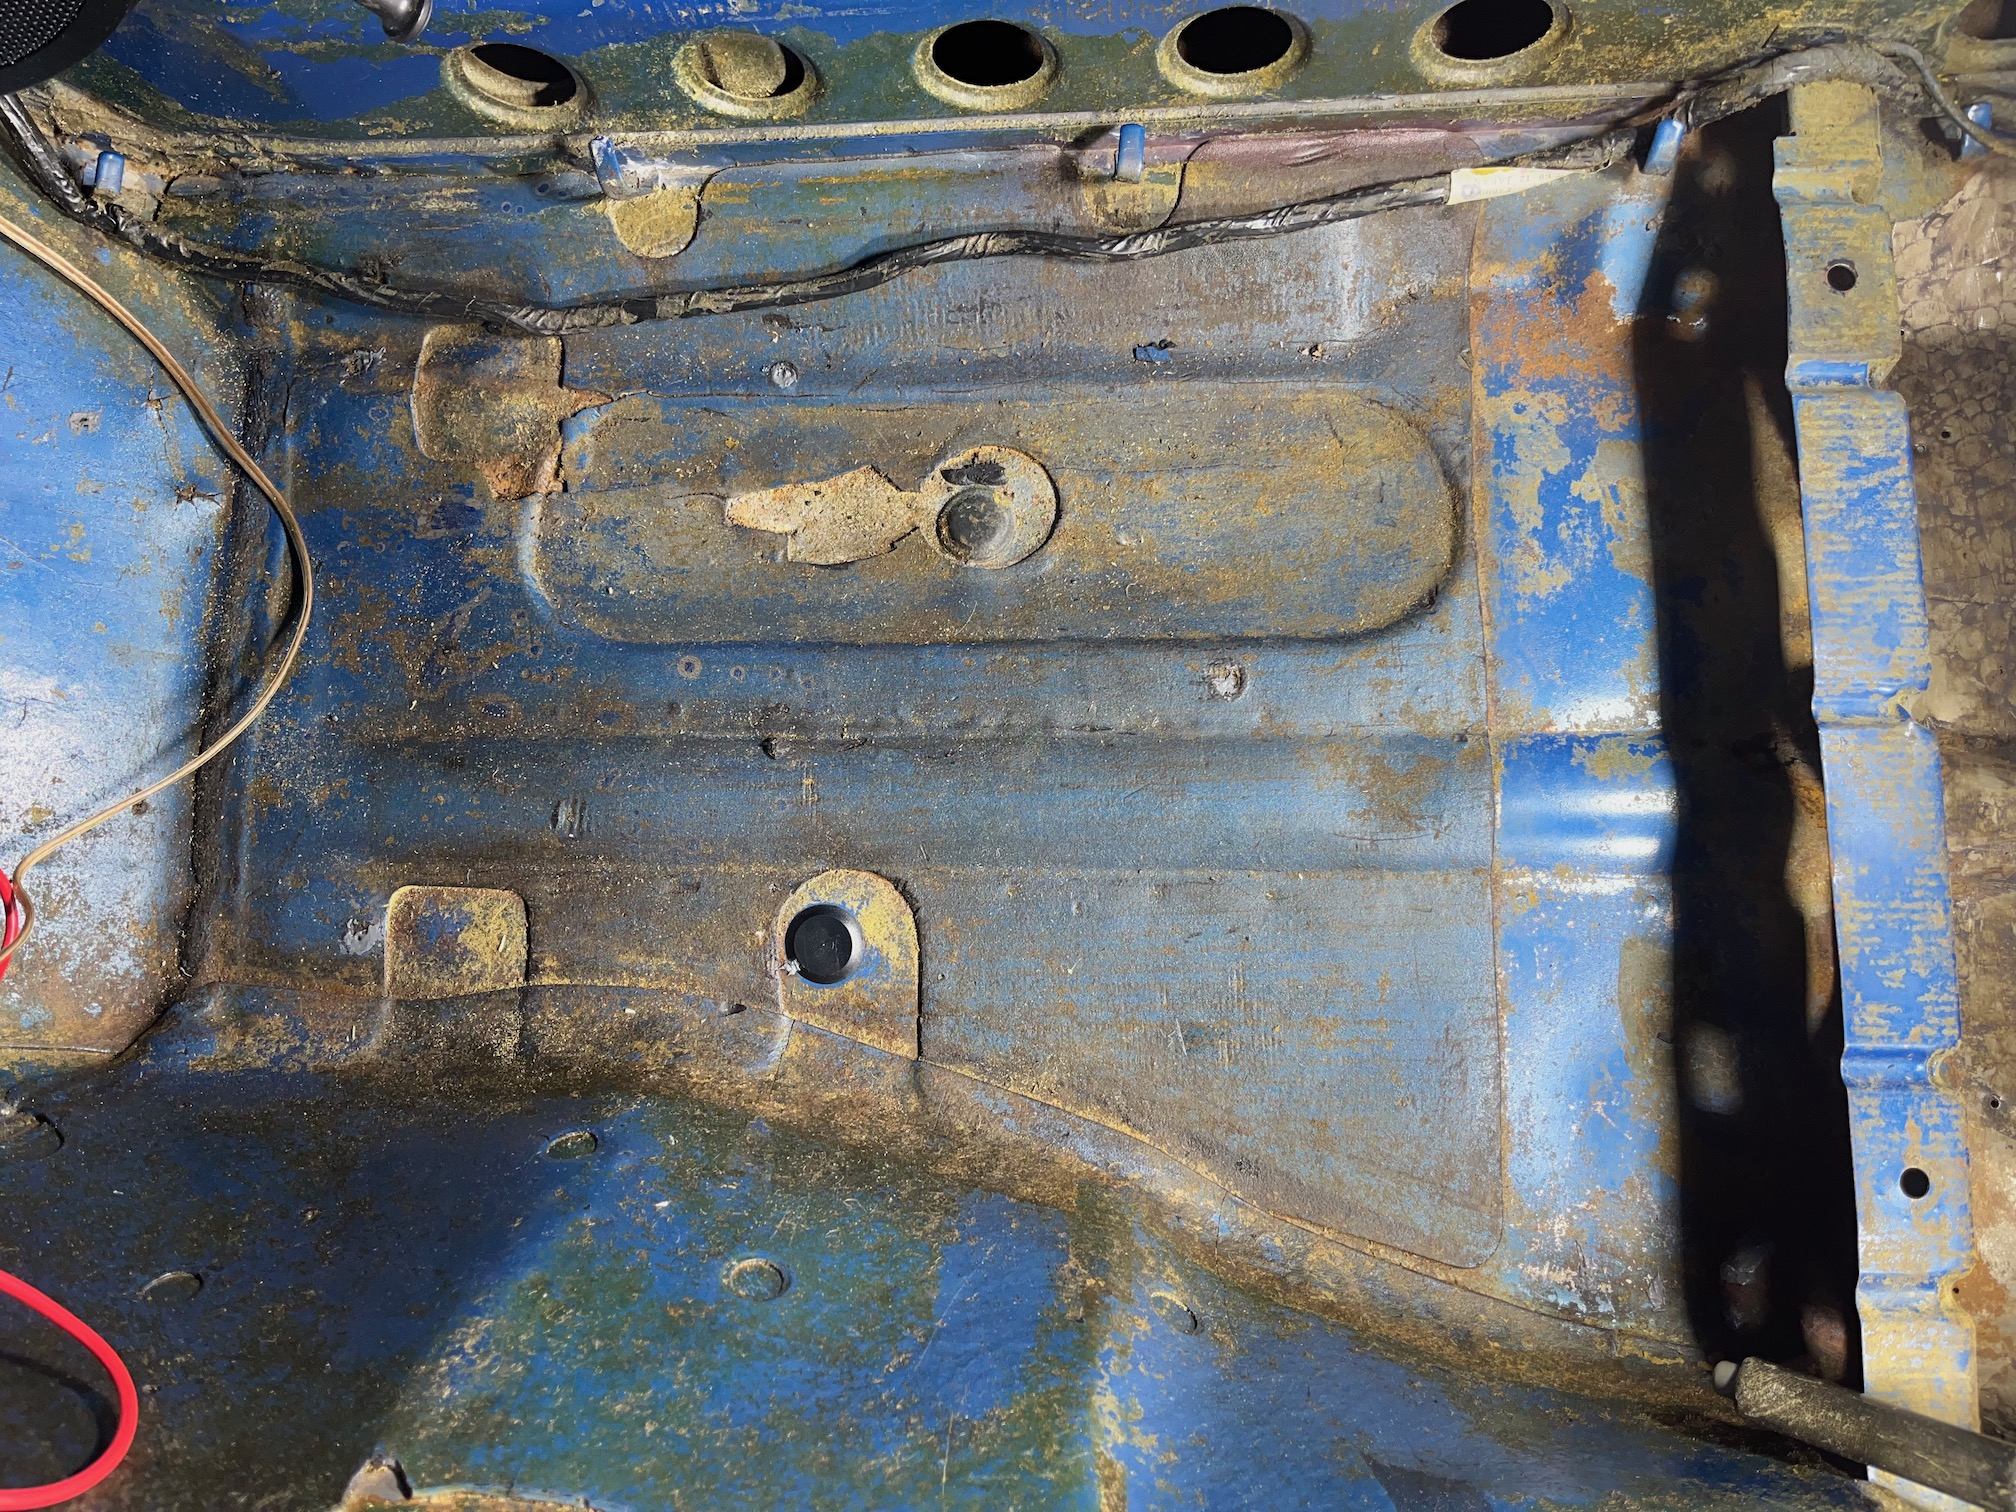
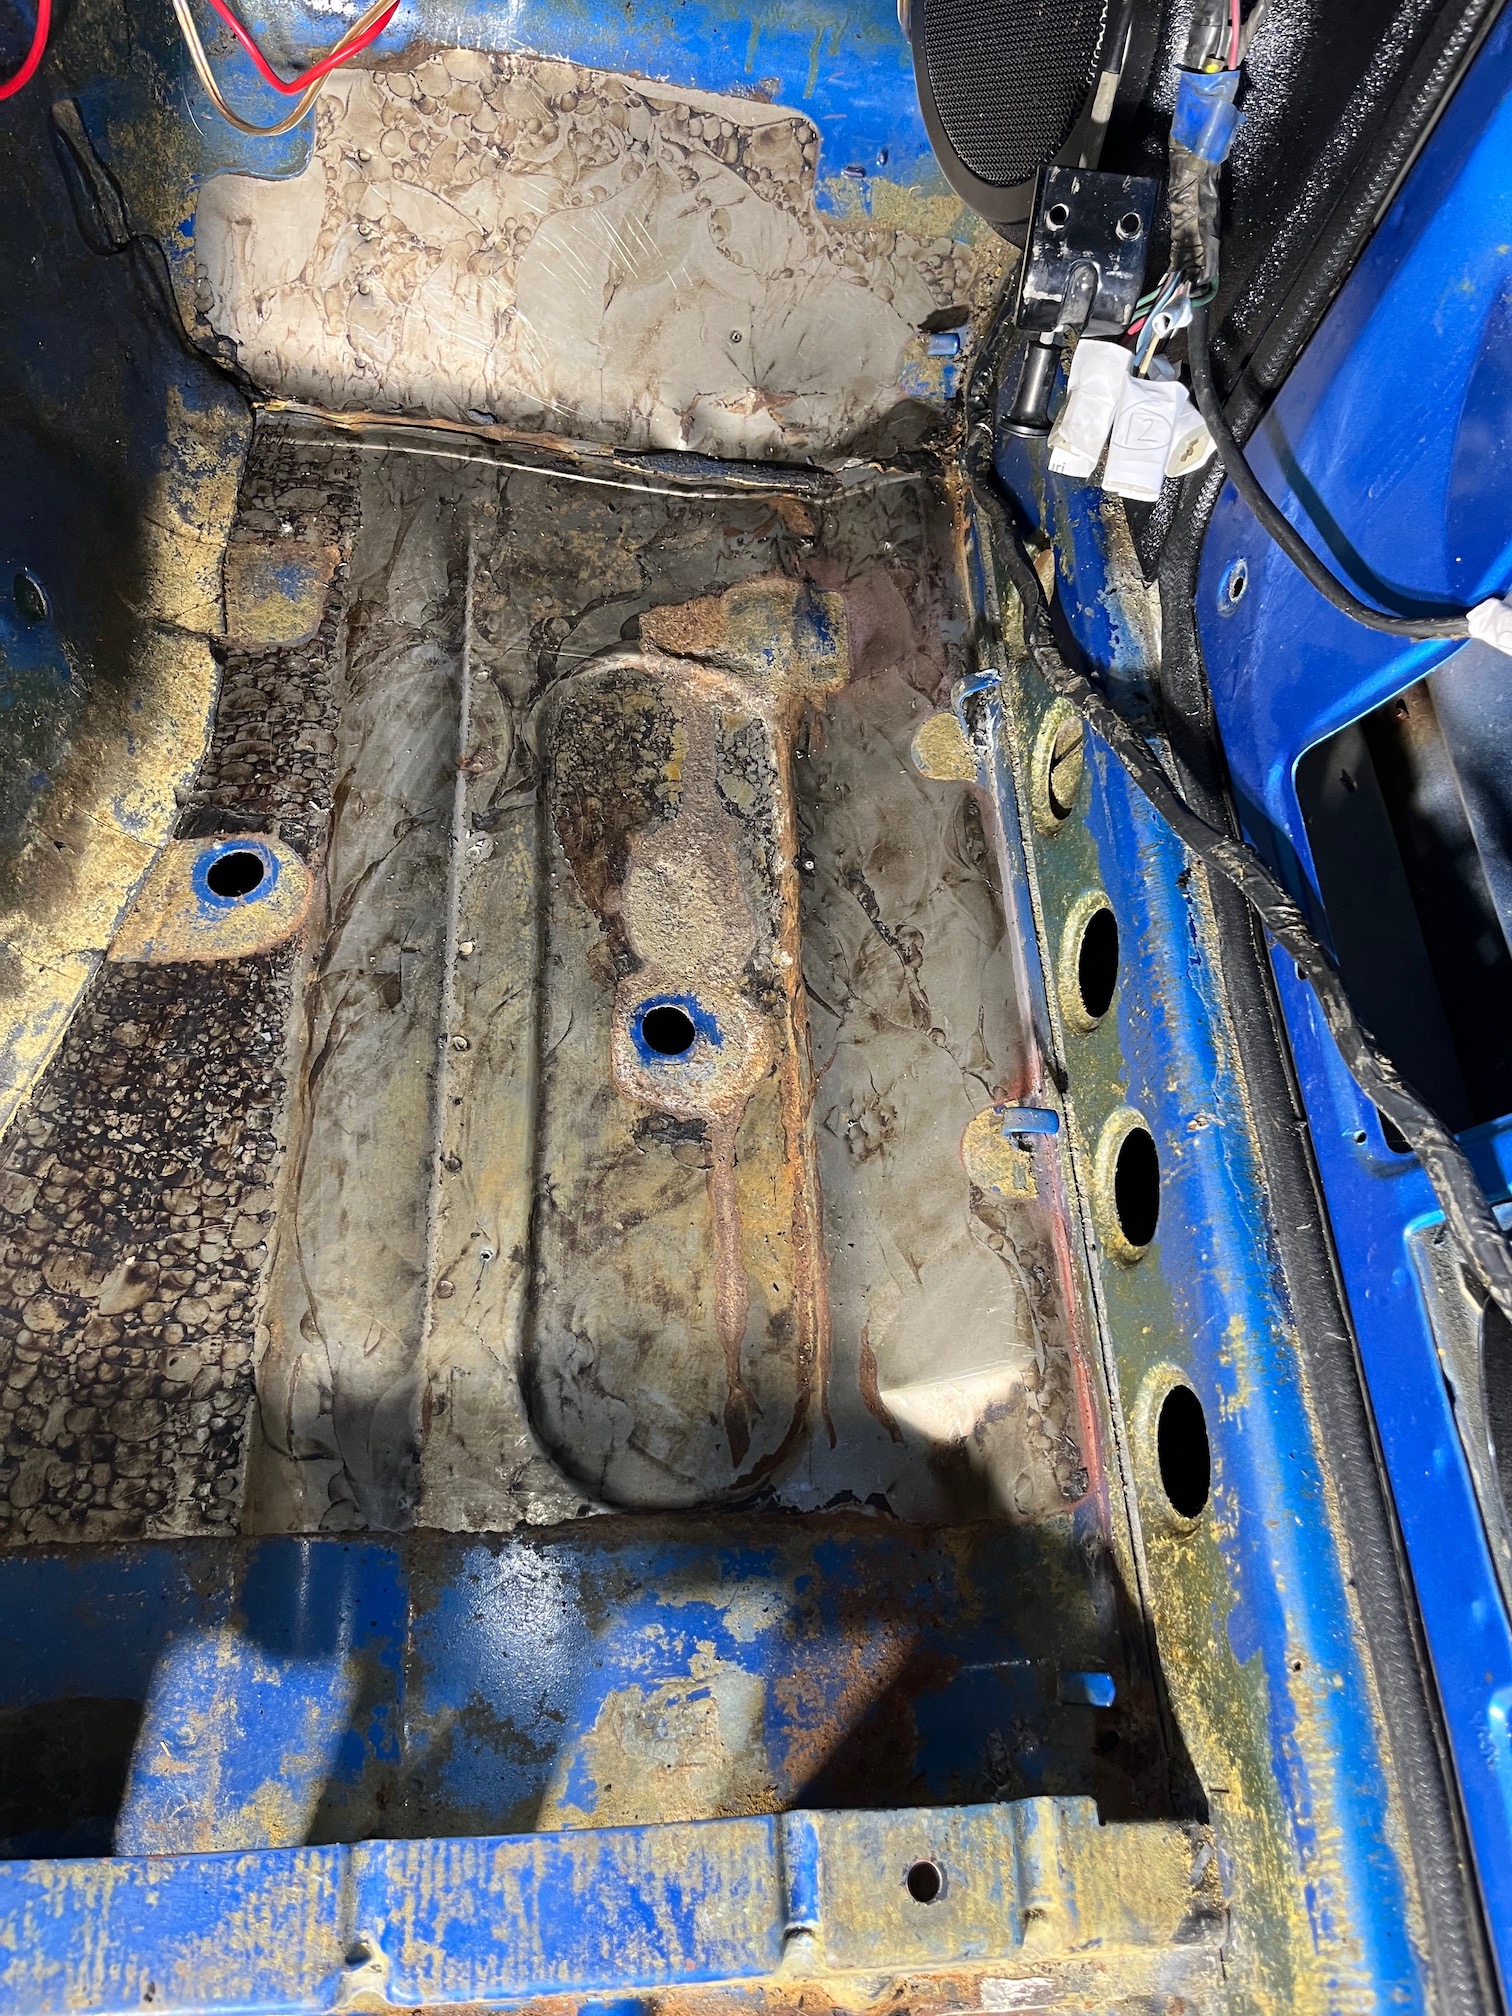
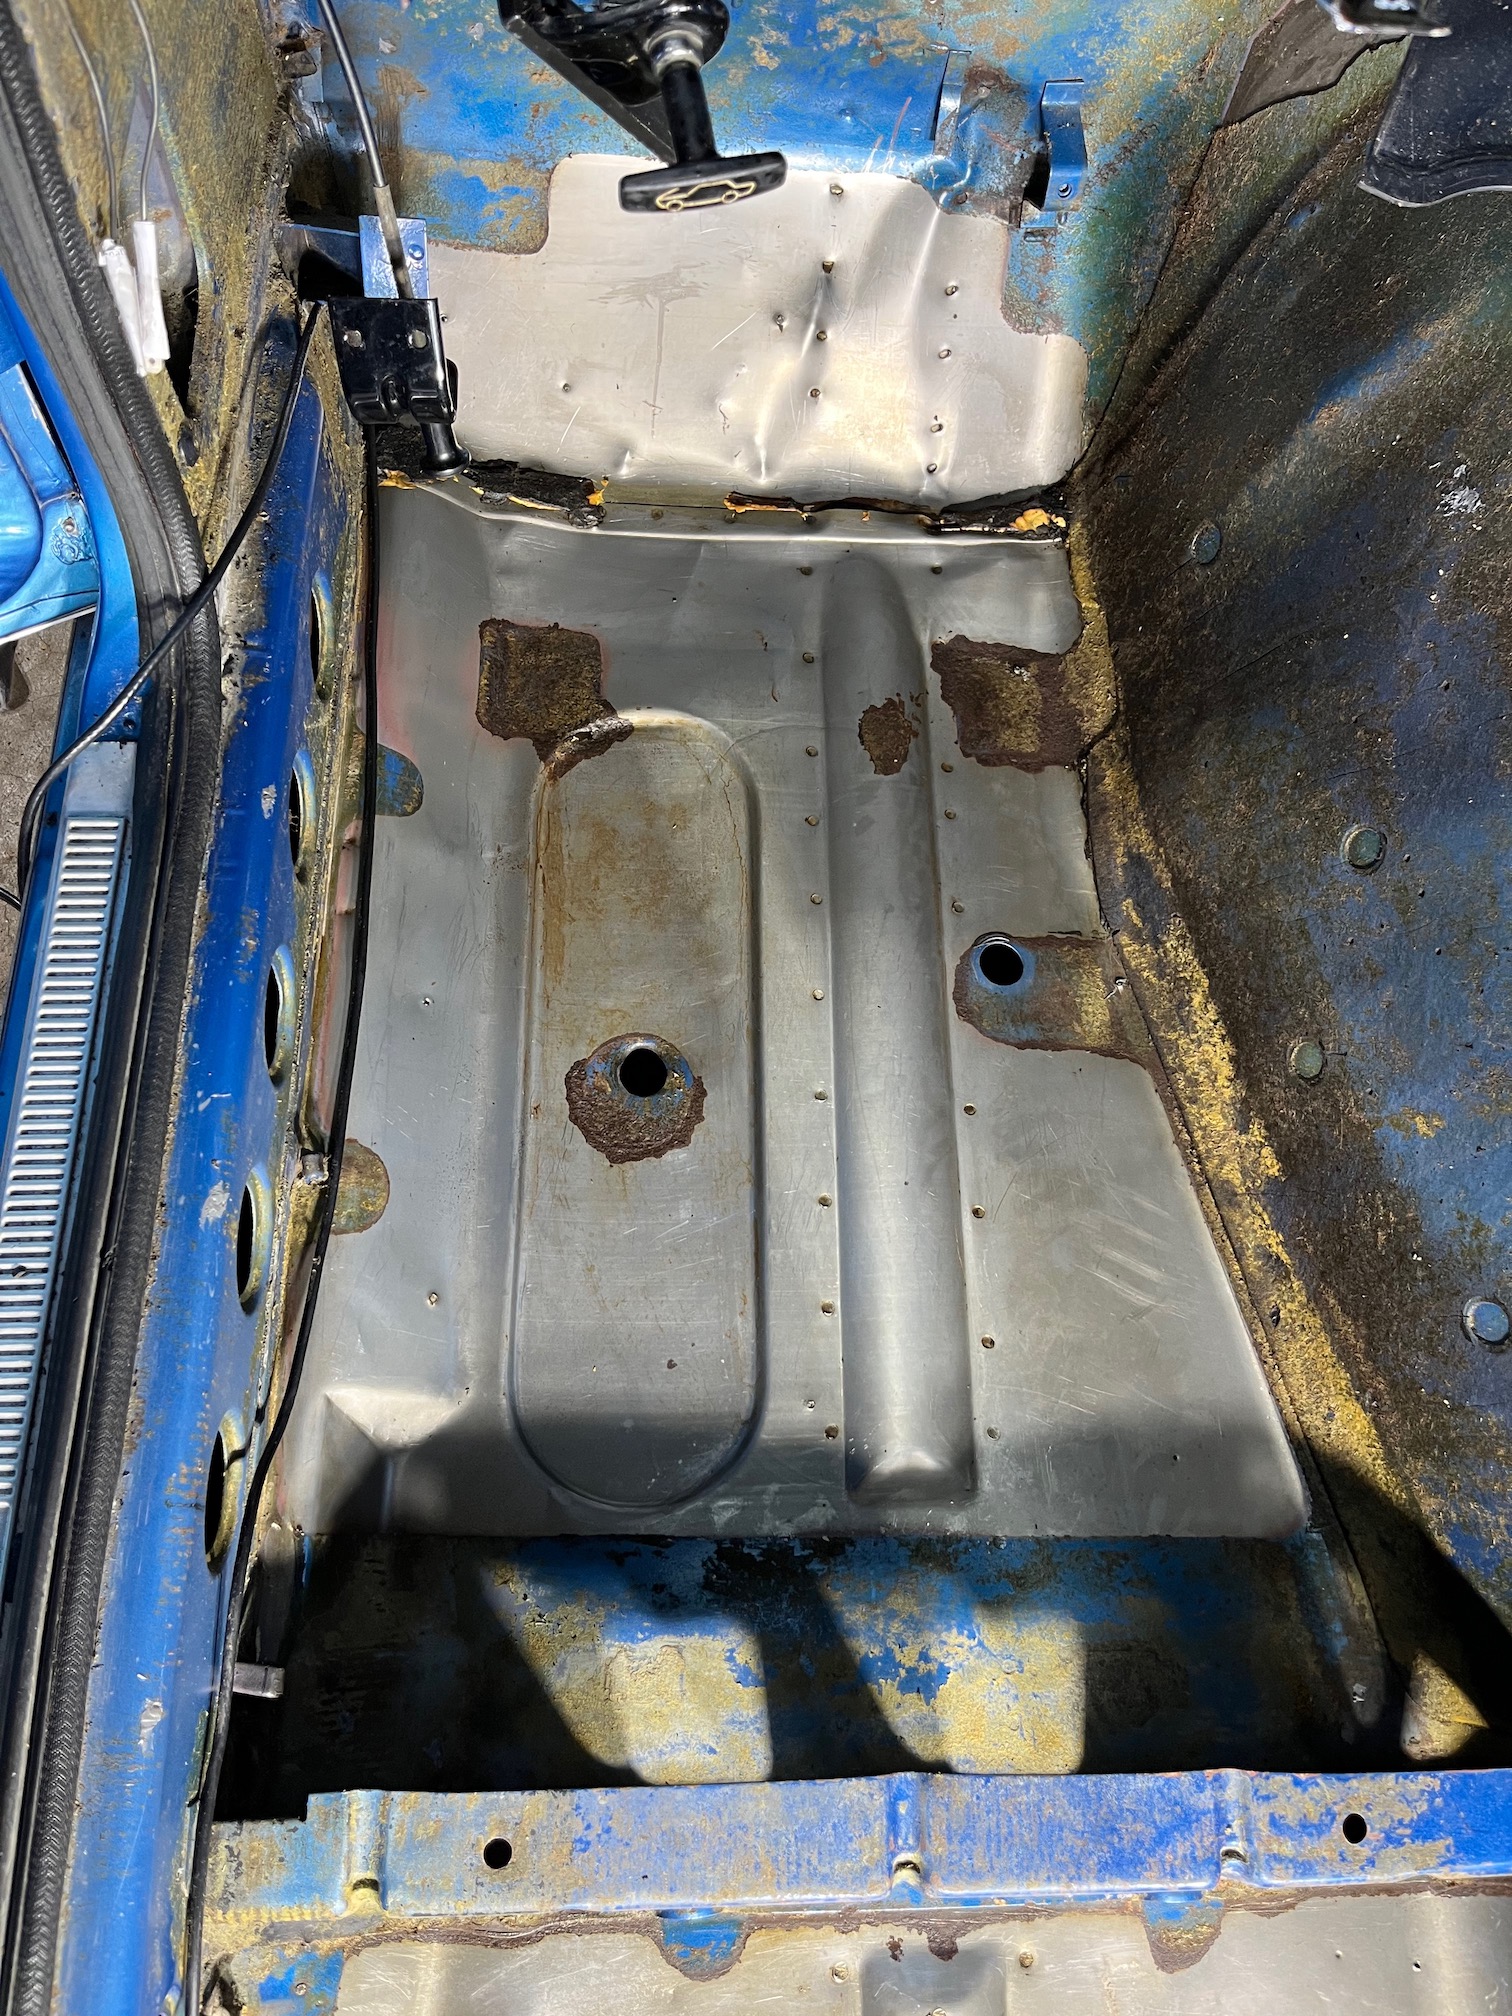
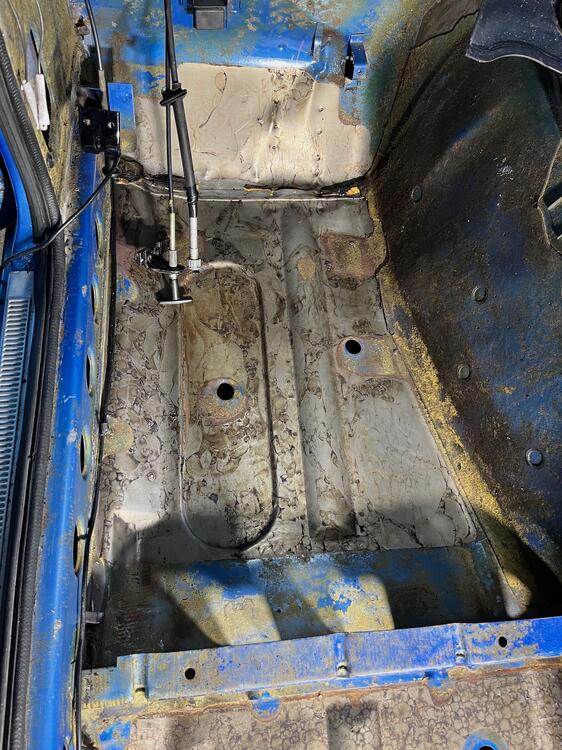
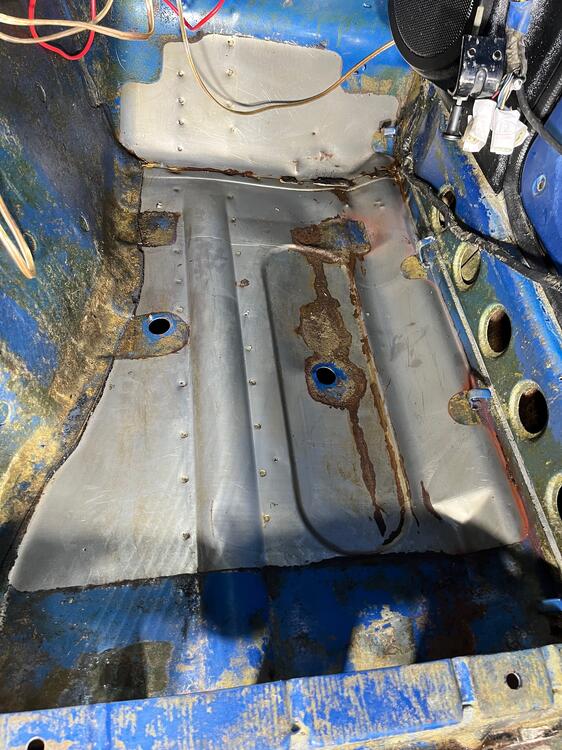
Thanks for the suggestion on the dry ice. I didn't see that until I had chipped up under both seats, but it saved a lot of time on the front pans. I didn't get it quite right when I started, but eventually figured out that I needed to crush it smaller, and use more alcohol. I used WD-40 to clean up the tar that was left after chipping. You can see where the rust was pretty clearly now. Passenger side worse, but a little rust on the driver side, too. This is my plan, please shout out if you think I should do something differently. treat rust and bare metal with RustBullet Metal Blast rust remover. Probably do some sanding/scrubbing of rust as well, depending on how magical Metal Blast ends up being. Apply POR-15 Patch (POR-15 epoxy in a paste form) to the 2 through holes, plus to the holes left by carpet screws. Sand away the remaining glue from the seat risers and other painted spaces that will be visible when carpet is peeled back. Apply Rustoleum primer (metal, light rust) (brush) lay down tar (do you glue tar in? or does it stick based on being heated with the heat gun?) apply primer to tar (brush) apply base coat 903 blue (sprayer) apply clear coat (sprayer)


 1 point
 -
1 point
-
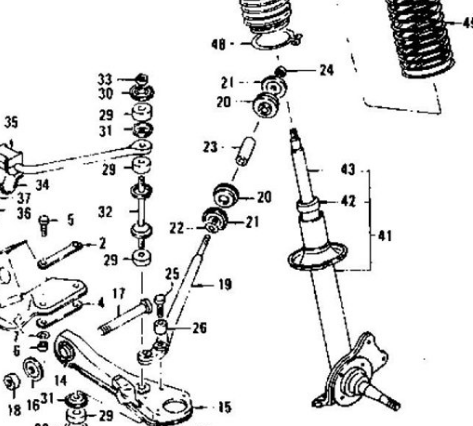
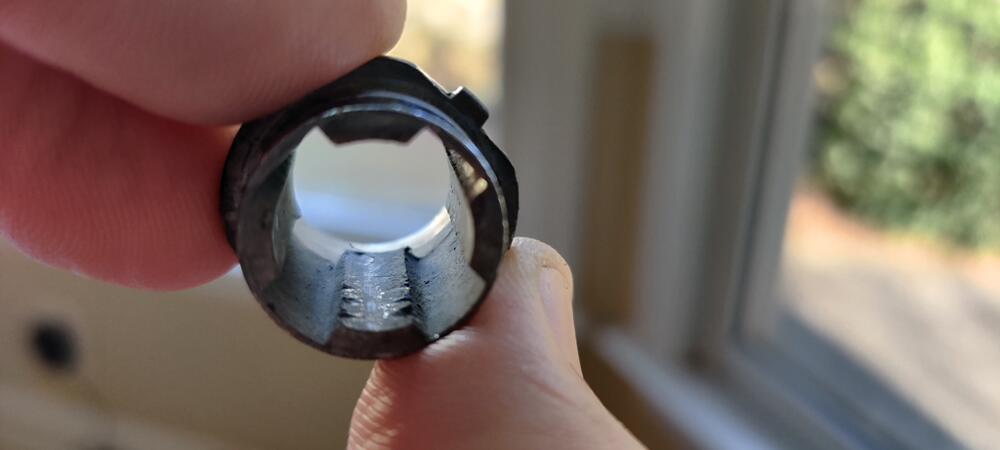
Here's a source showing it on the rod side. They don't show one on the nut side though. https://www.carpartsmanual.com/datsun/Z-1969-1978/axle/front-suspension
 1 point
 -
1 pointI don't recall it being asked before... I would be careful removing the tunnel. The car would have to be well braced if you are going to remove the tunnel. It is a very critical dimension holder in the frame. What don't you like about the 280z tunnel?1 point
-
1 pointI forgot the other advice often offered - take the bad OReilly unit to a shop that rebuilds alternators. See what they can do. Or, break out the soldering tools and replace the regulator. https://www.rockauto.com/en/catalog/nissan,1980,280zx,2.8l+l6,1209316,electrical,voltage+regulator,48841 point
-
1 pointAutozone's Duralast has the same part number as that new WAI Rockauto unit. https://www.autozone.com/batteries-starting-and-charging/alternator/p/duralast-gold-alternator-14592n/740842_0_0 https://www.rockauto.com/en/catalog/nissan,1980,280zx,2.8l+l6,1209316,electrical,alternator+/+generator,2412 Has a limited lifetime warranty. About $106 after shipping from RA. About $149 from Autozone. $43 from peace of mind knowing that Autozone is close by. I'd probably go to a salvage yard and look for a Frontier or Xterra. Just for fun.
 1 point
 -
1 pointI haven't had any issues with the Frontier alternator I bought from Rockauto. https://www.rockauto.com/en/moreinfo.php?pk=8829284&cc=1359200&pt=2412 Rockauto has several other brands listed as new (not reman). You also have to buy a plug like this to integrate it into the wiring. https://www.amazon.com/gp/product/B07ZMN2B59 Attach that plug to a 2 pin connector from Vintage Connections (http://www.vintageconnections.com/Products/Detail/79), and you can plug the new alternator into your car. Last, but not least, you'll need to replace the ring on the alternator charge wire with one that can go on the M8 post on the alternator.1 point
-
I used SilentCoat MLV with the silver backing. Watch yourself as the edges can get razor sharp. I didn’t go for the full coverage as some do as it’s overkill and adds too much weight. But, what I did find made a massive difference were: 1. Trans tunnel - fully covered. I feel a lot less heat coming off there now during and after a good blast. 2. Footwells - on those I went MLV where the original insulation would have been with 3mm self adhesive closed cell foam over the top 3. 1x piece Slap in the middle of the door skins and 3mm closed cell foam between door cards and doors. 4. The panels behind the seats 5. The rear boot deck area and wheel well act like a giant speaker so the flat bits got covered 70% and the wheel well about 50% - the wheel well may be worth fully covering for aesthetic reasons. Then overlaid with loose (not glued down) 25mm closed cell foam under the deck carpet. 6. Strut towers got MLV 7. Rear wings got a half or 3/4 piece each. 8. Oh and a couple of pieces of MLV on the fire wall - especially important on the exhaust side. BIG BIG difference when shutting doors or cruising. A lot less wind and road noise as the door skins etc don’t vibrate the same way anymore. Totally worth the little weight penalty. But certain areas like the strut towers and trans tunnel benefit from full coverage. It also helps the vinyl sit flatter. You need earphones to hear the difference but here’s a video I did for a friend: The panels without it rang like a bell. Trouble is, now I hear the transmission whining and all manner of other stuff I couldn’t hear before :p1 point
-
1 pointSure enough, a few weeks later on Y!.jp, up pops this piece for less than $200. Looks authentic enough. Now I have a spare.
 1 point
 -
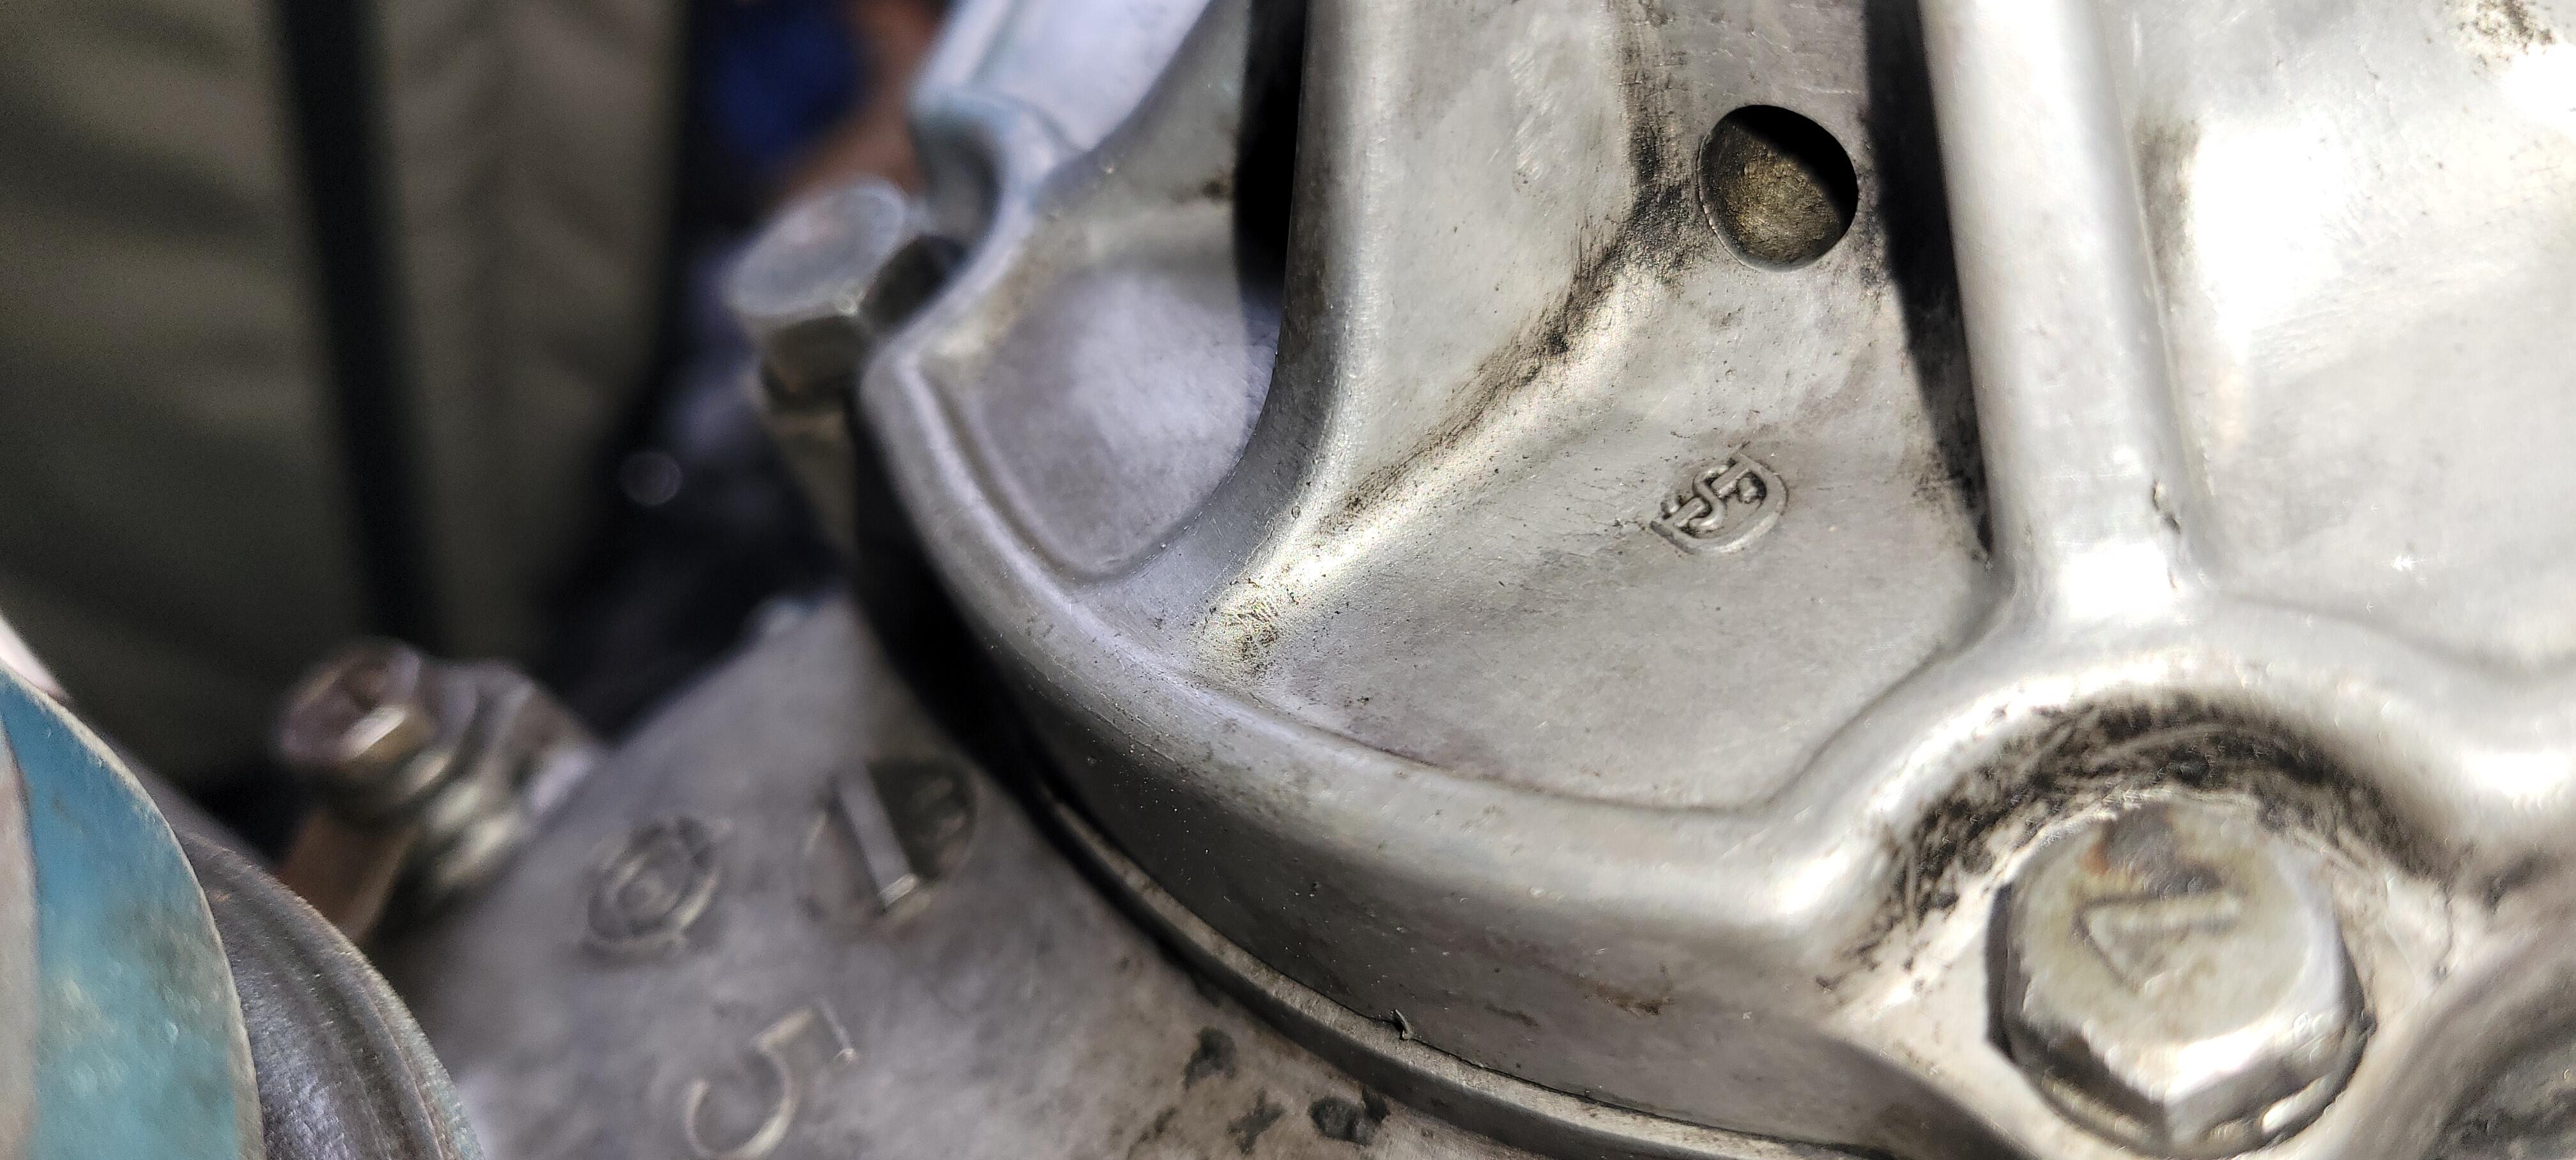
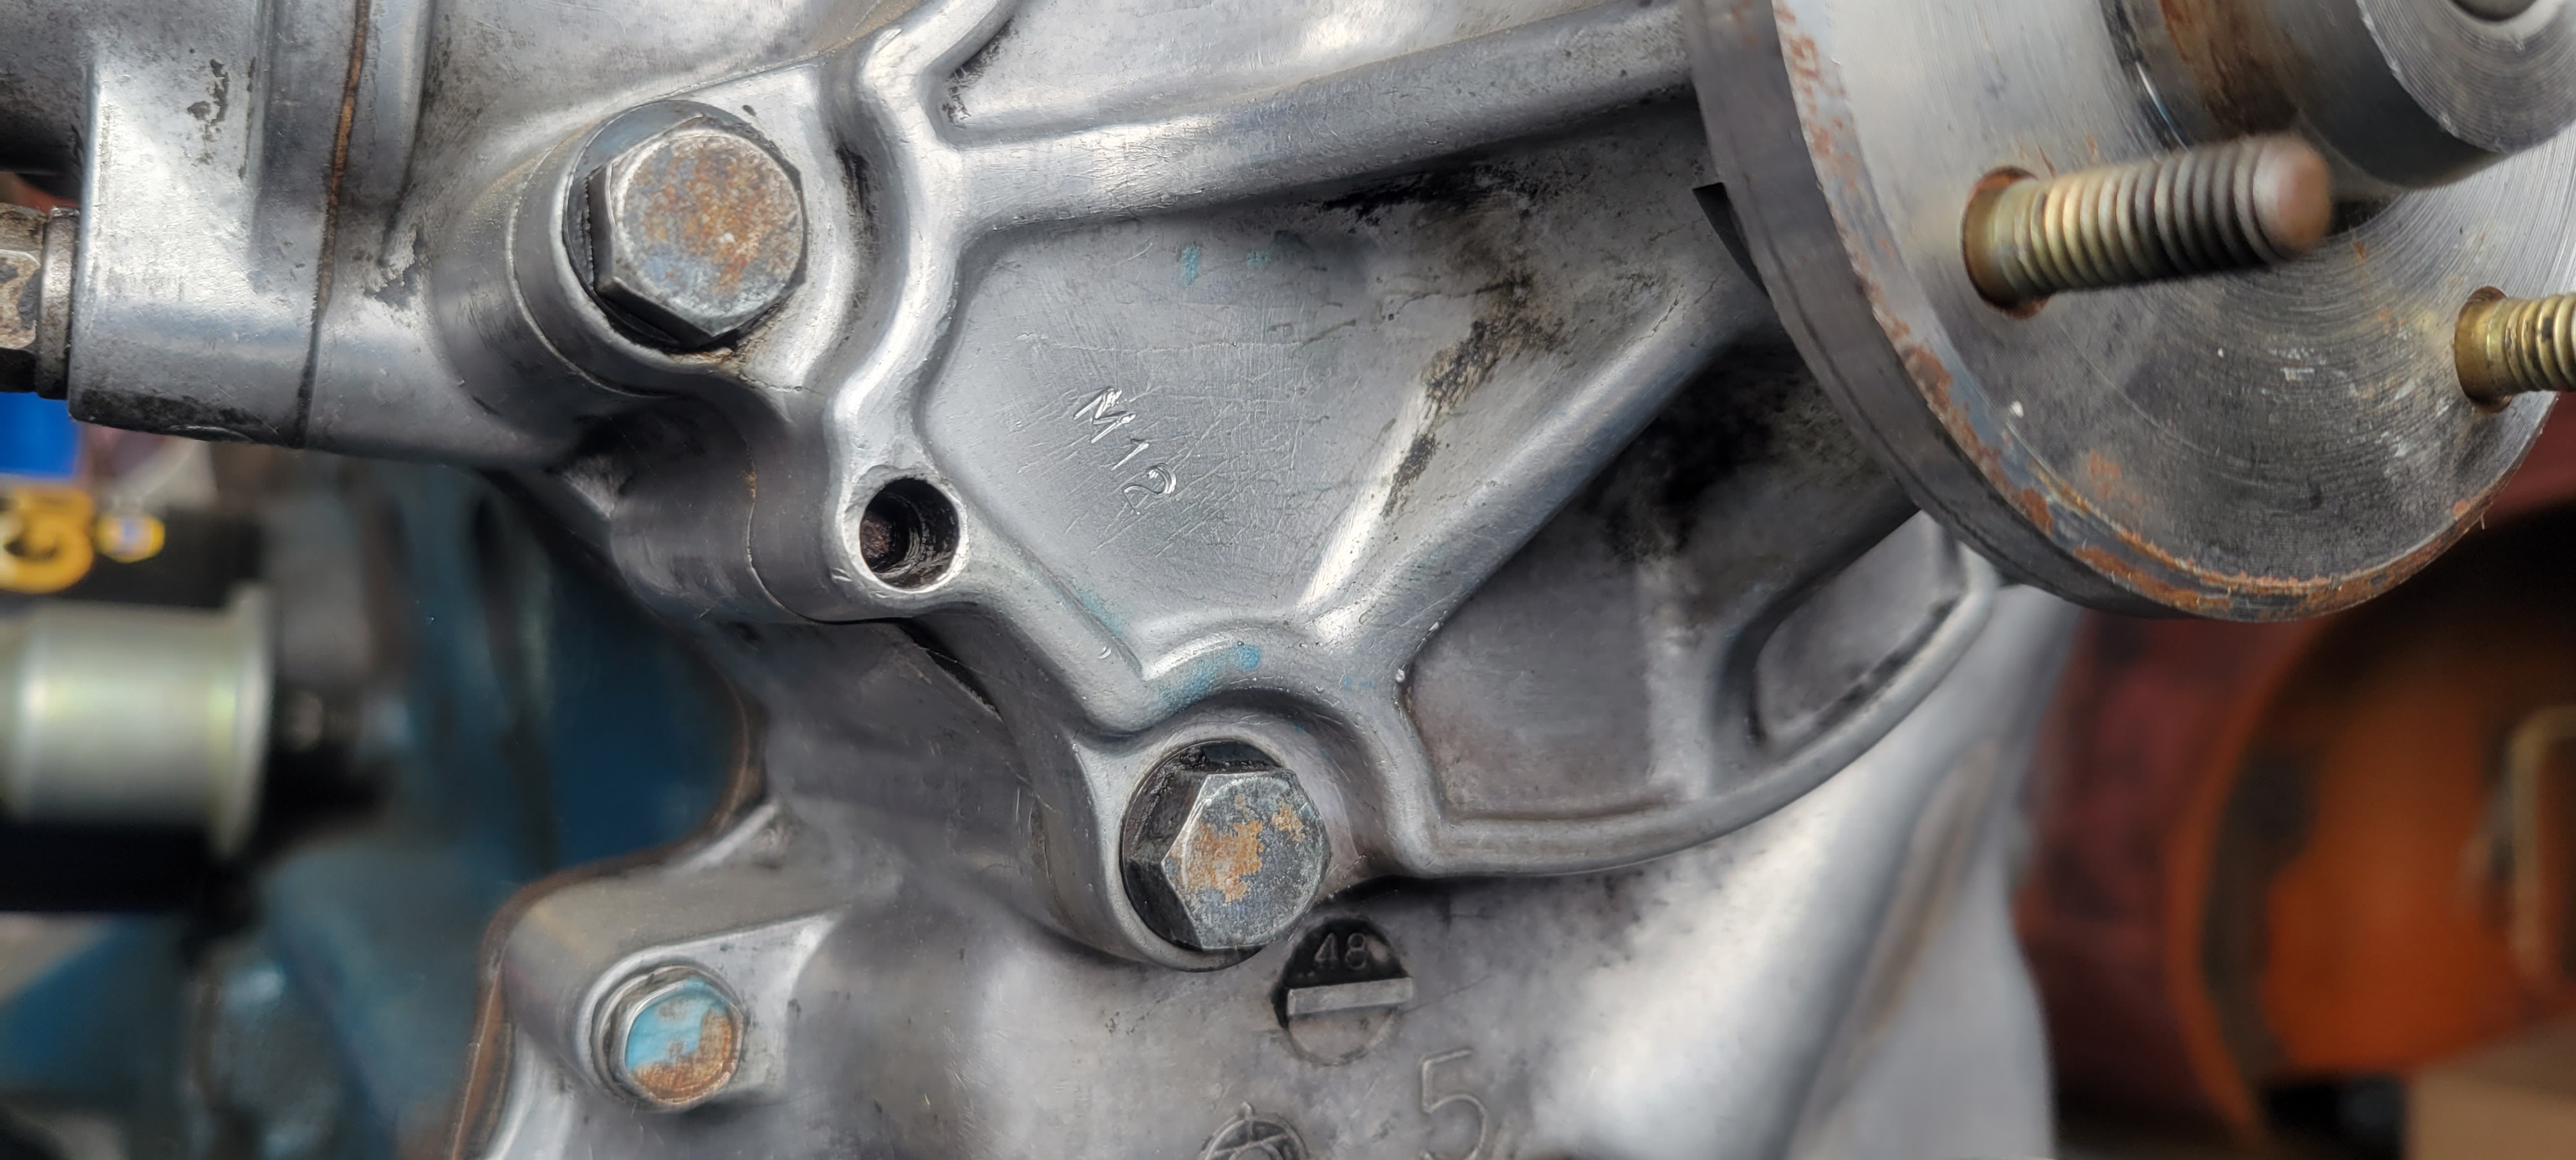
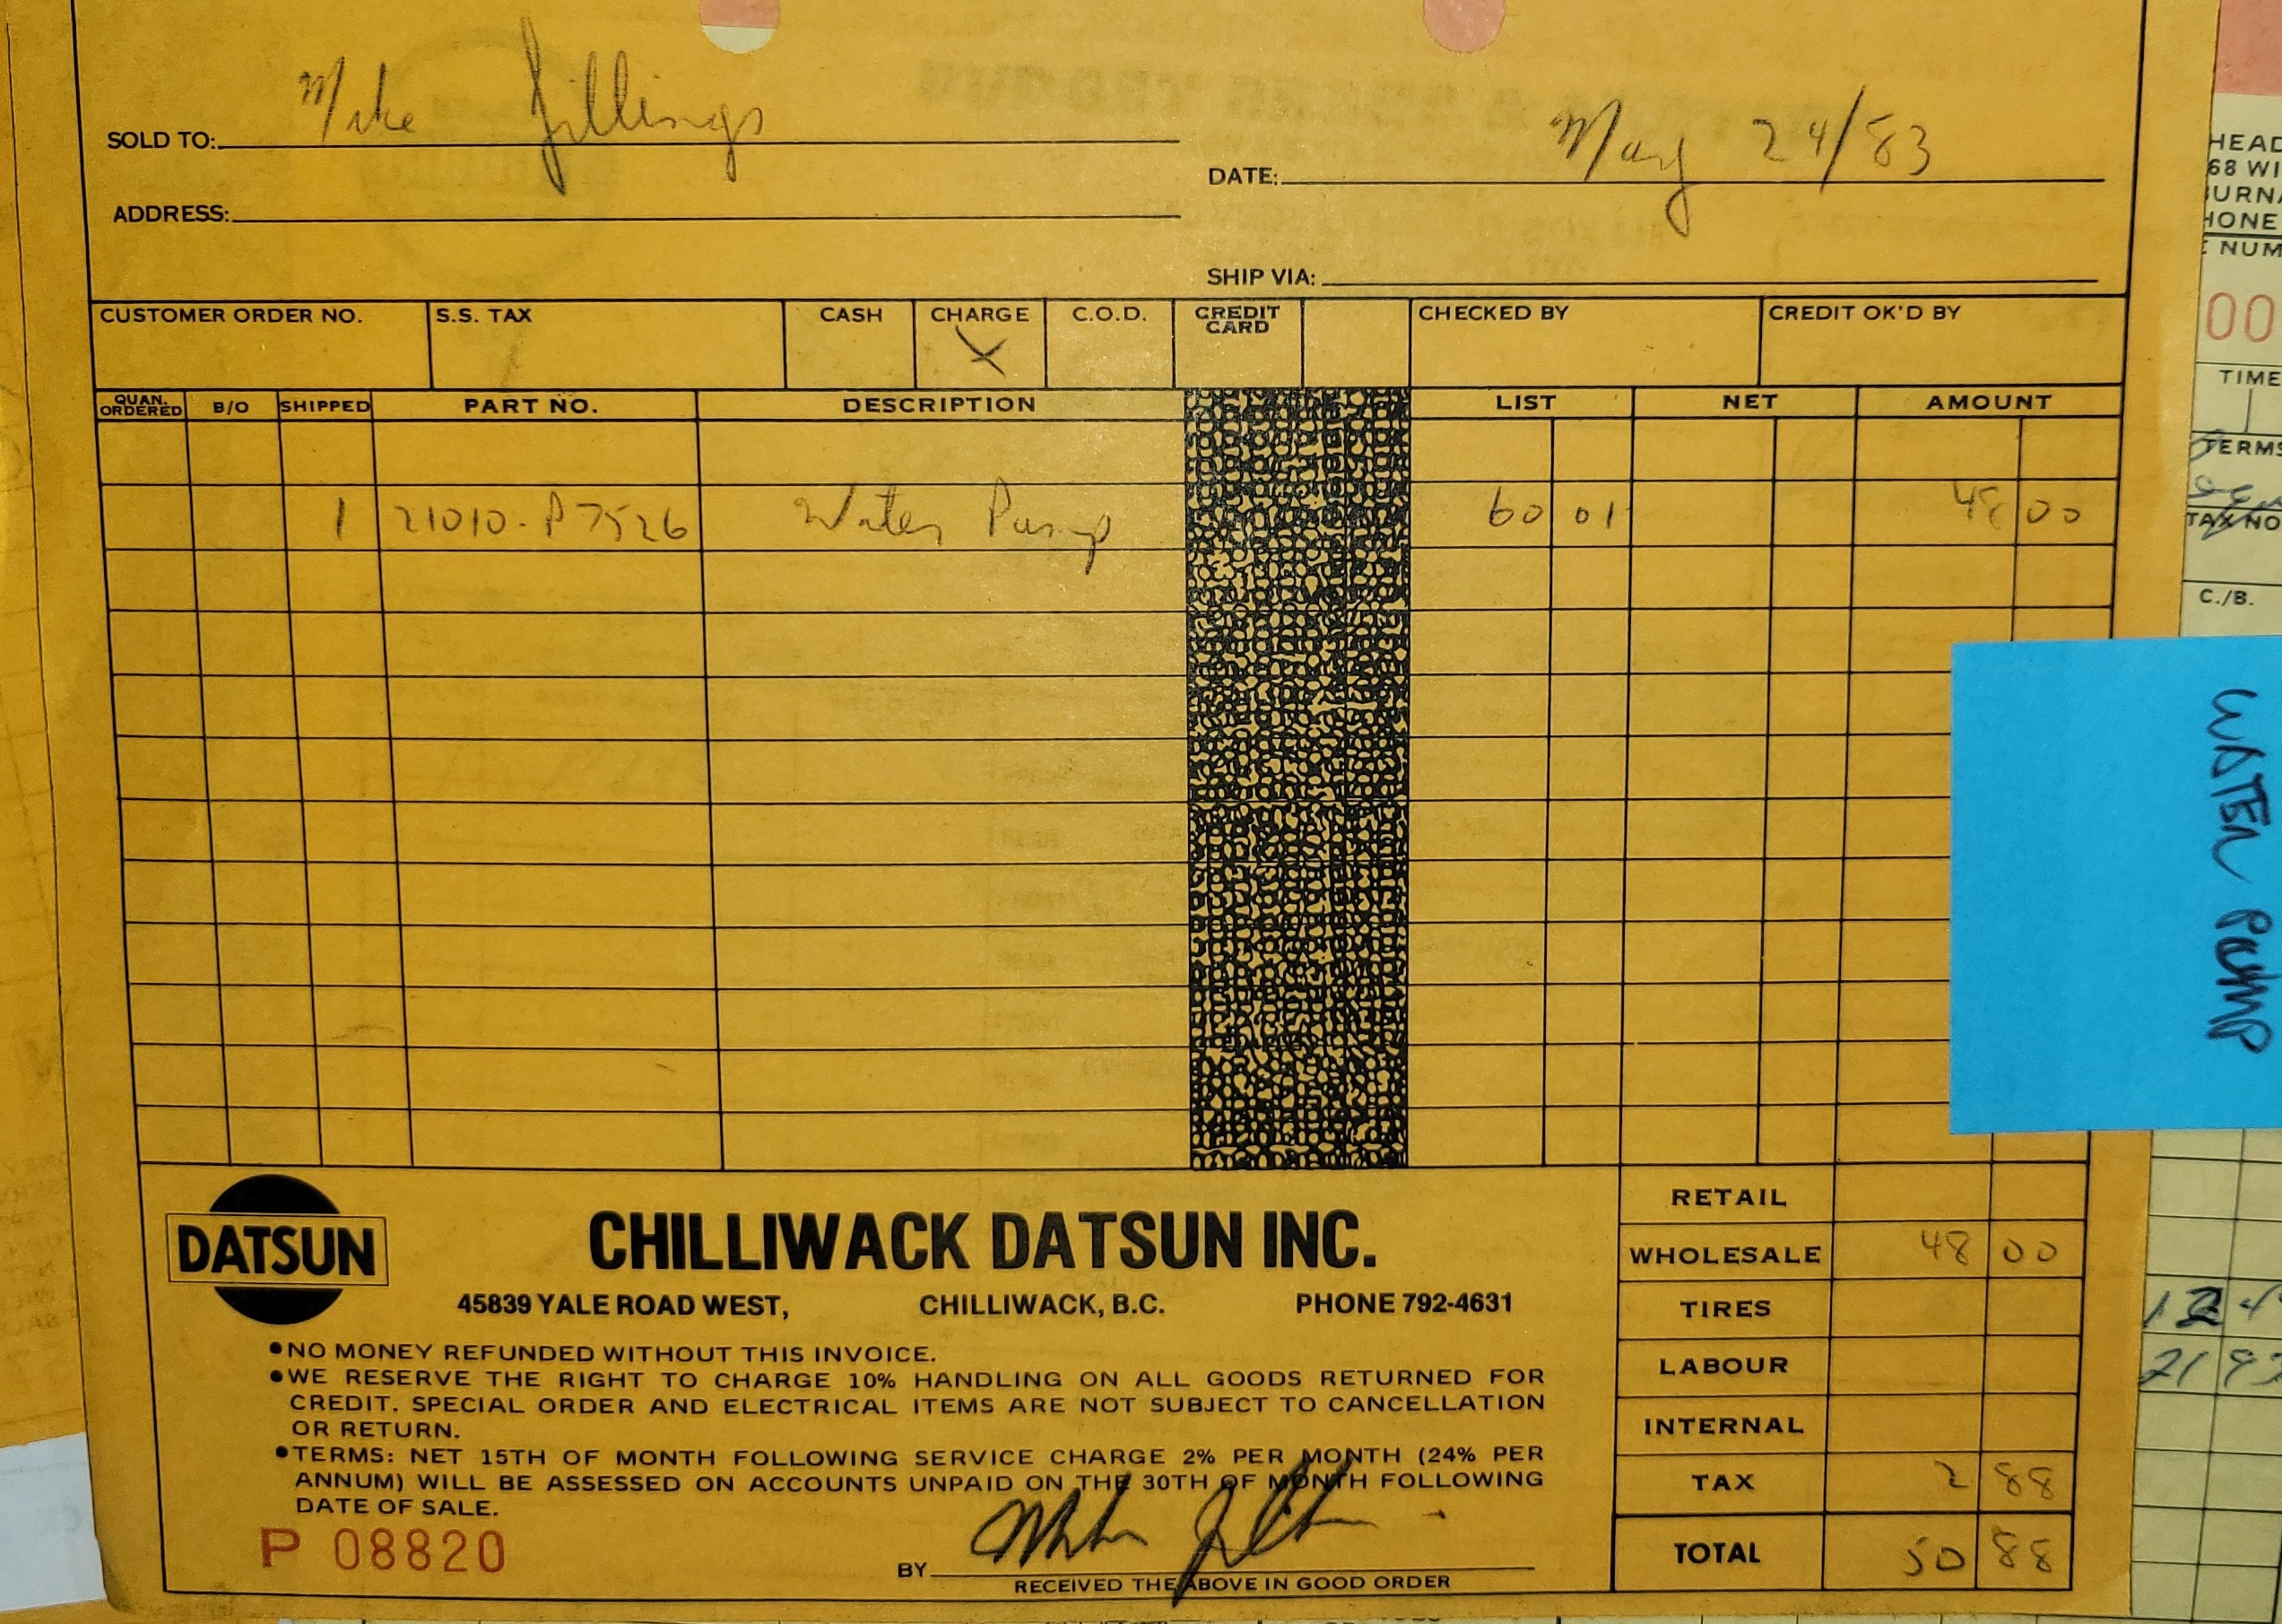
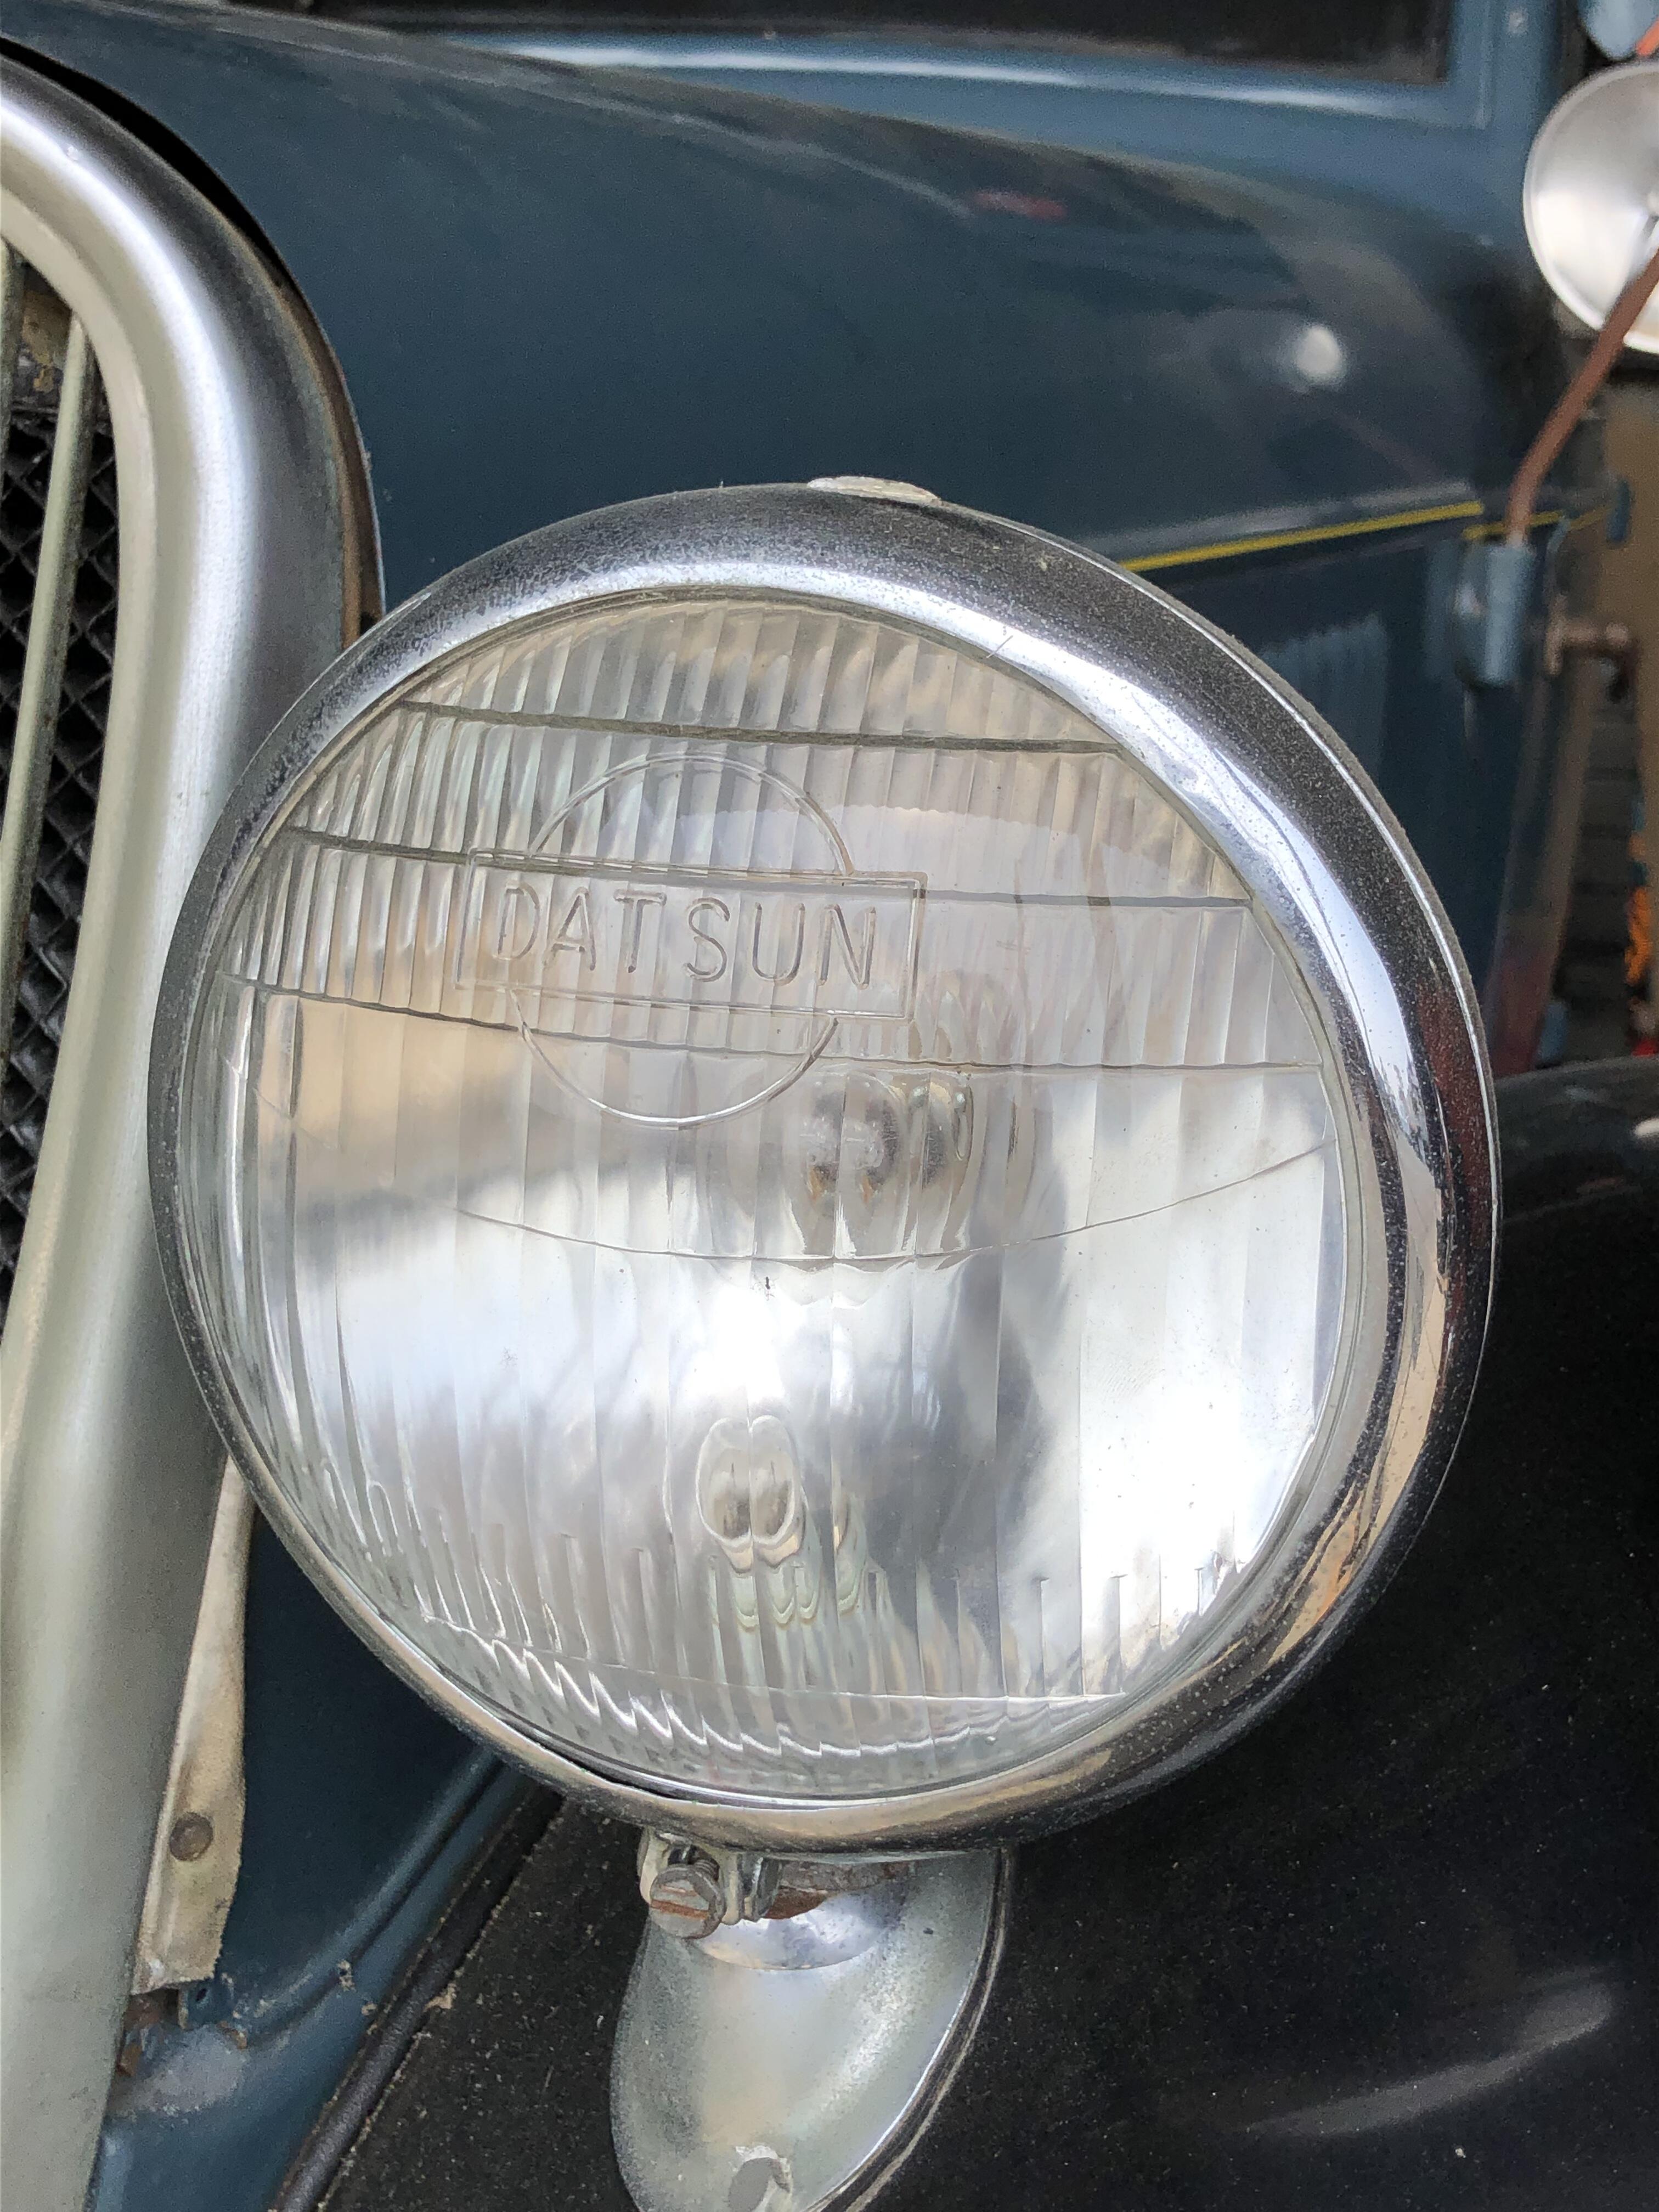
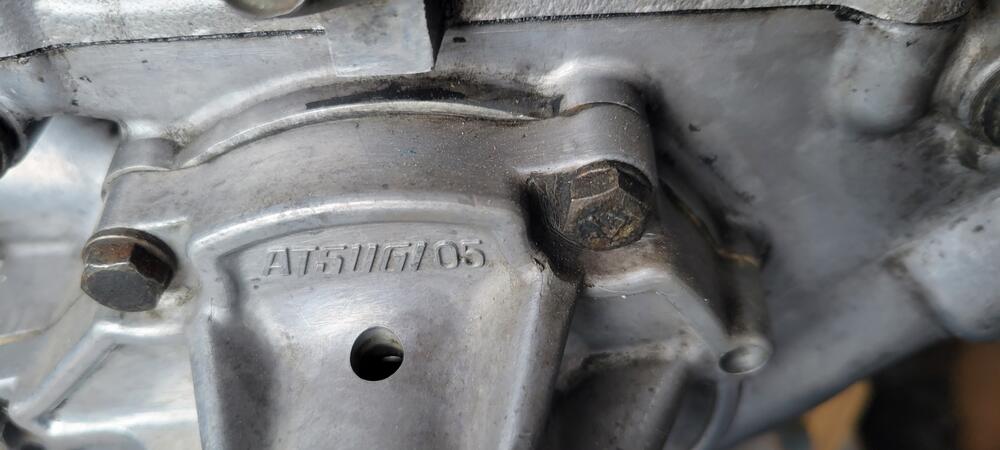
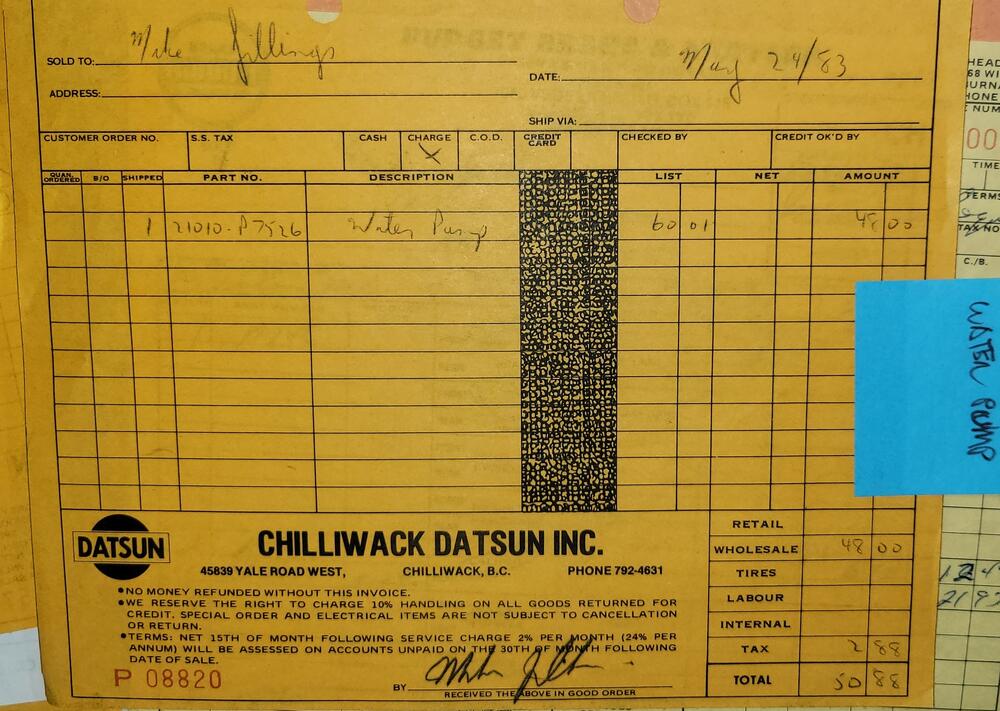
1 pointFor reference here are a few pics of mine (pump and markings) on the engine from my 7/70. And some trivia as well.🙂 I replaced mine in 1983 with one I purchased from my local Datsun dealership, I learned today that it's actually likely a 280ZX water pump based on what I can tell from the part number (21010-P7526) on the receipt that I still have. It is a backwards compatible OEM part with the manufacturer name, Atsugi, cast in. The original is long gone, it succumbed to the weight of the original metal clutch fan. The history of Atsugi is quite interesting, it started out as part of Nissan to later become part of Hitachi's auto parts division. Here is a snippet from a Hitachi automotive systems history web page, see the link below for more, if you're interested. https://www.hitachiastemo.com/en/corporate/history/automotive/


 1 point
 -
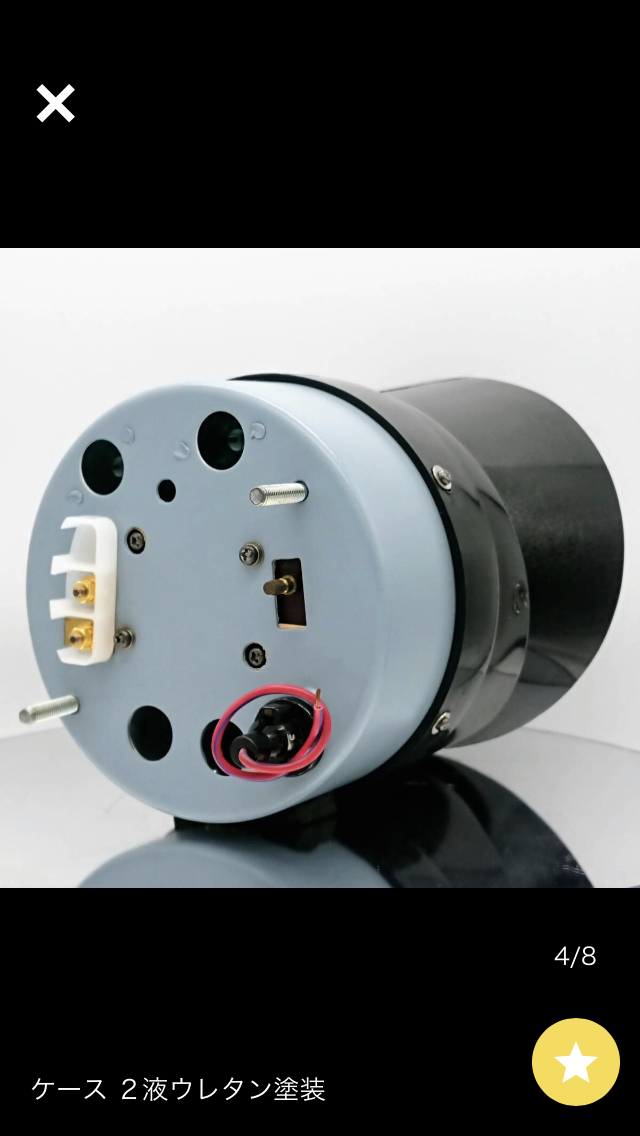
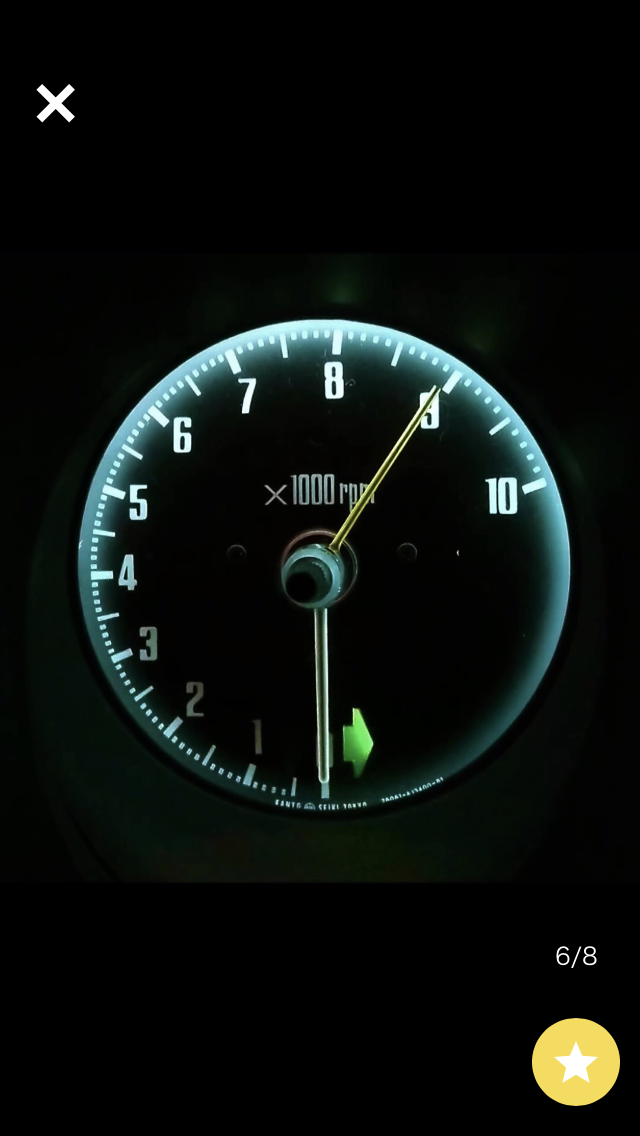
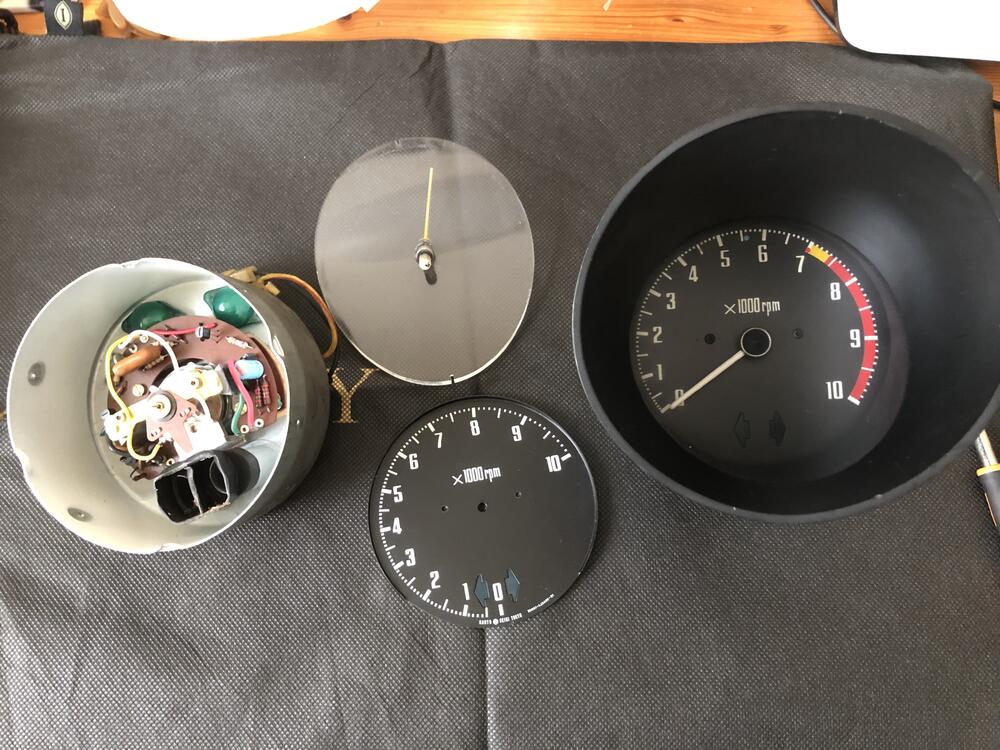
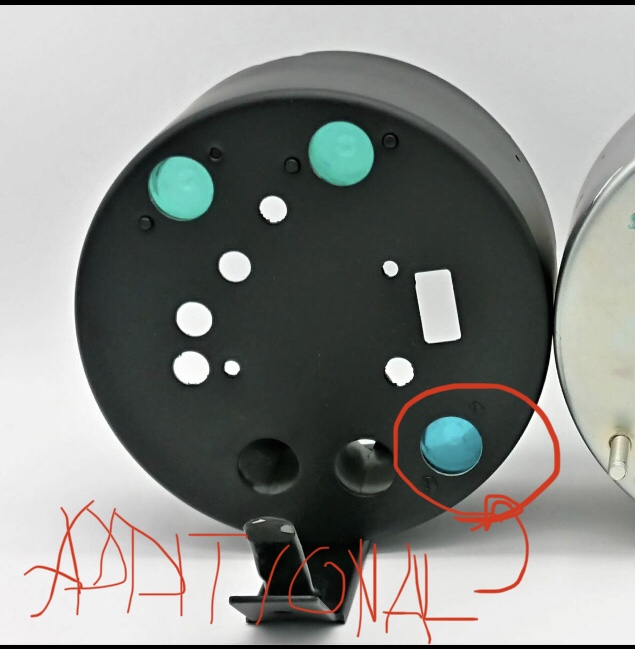
1 pointI worked for the Z432 tach which I want to make it being works look. The works tach which I have seems not working with a standard Z432 igniter system, so I decided to transfer its glass with a needle and scale Zero at 6 o’clock. It was very easy job but I found I need to make a hole for an additional illumination lamp just next to the left hand turn signal indicator. We don’t have the extra lamp because our cars don’t need it. For the Zero at 6 o’clock scale, it must be. Otherwise I can’t see it well esp IMG_1851.MOV ecially around 0 to 3000 rpm at night. I will do it when I have time. Kats

 1 point
 -
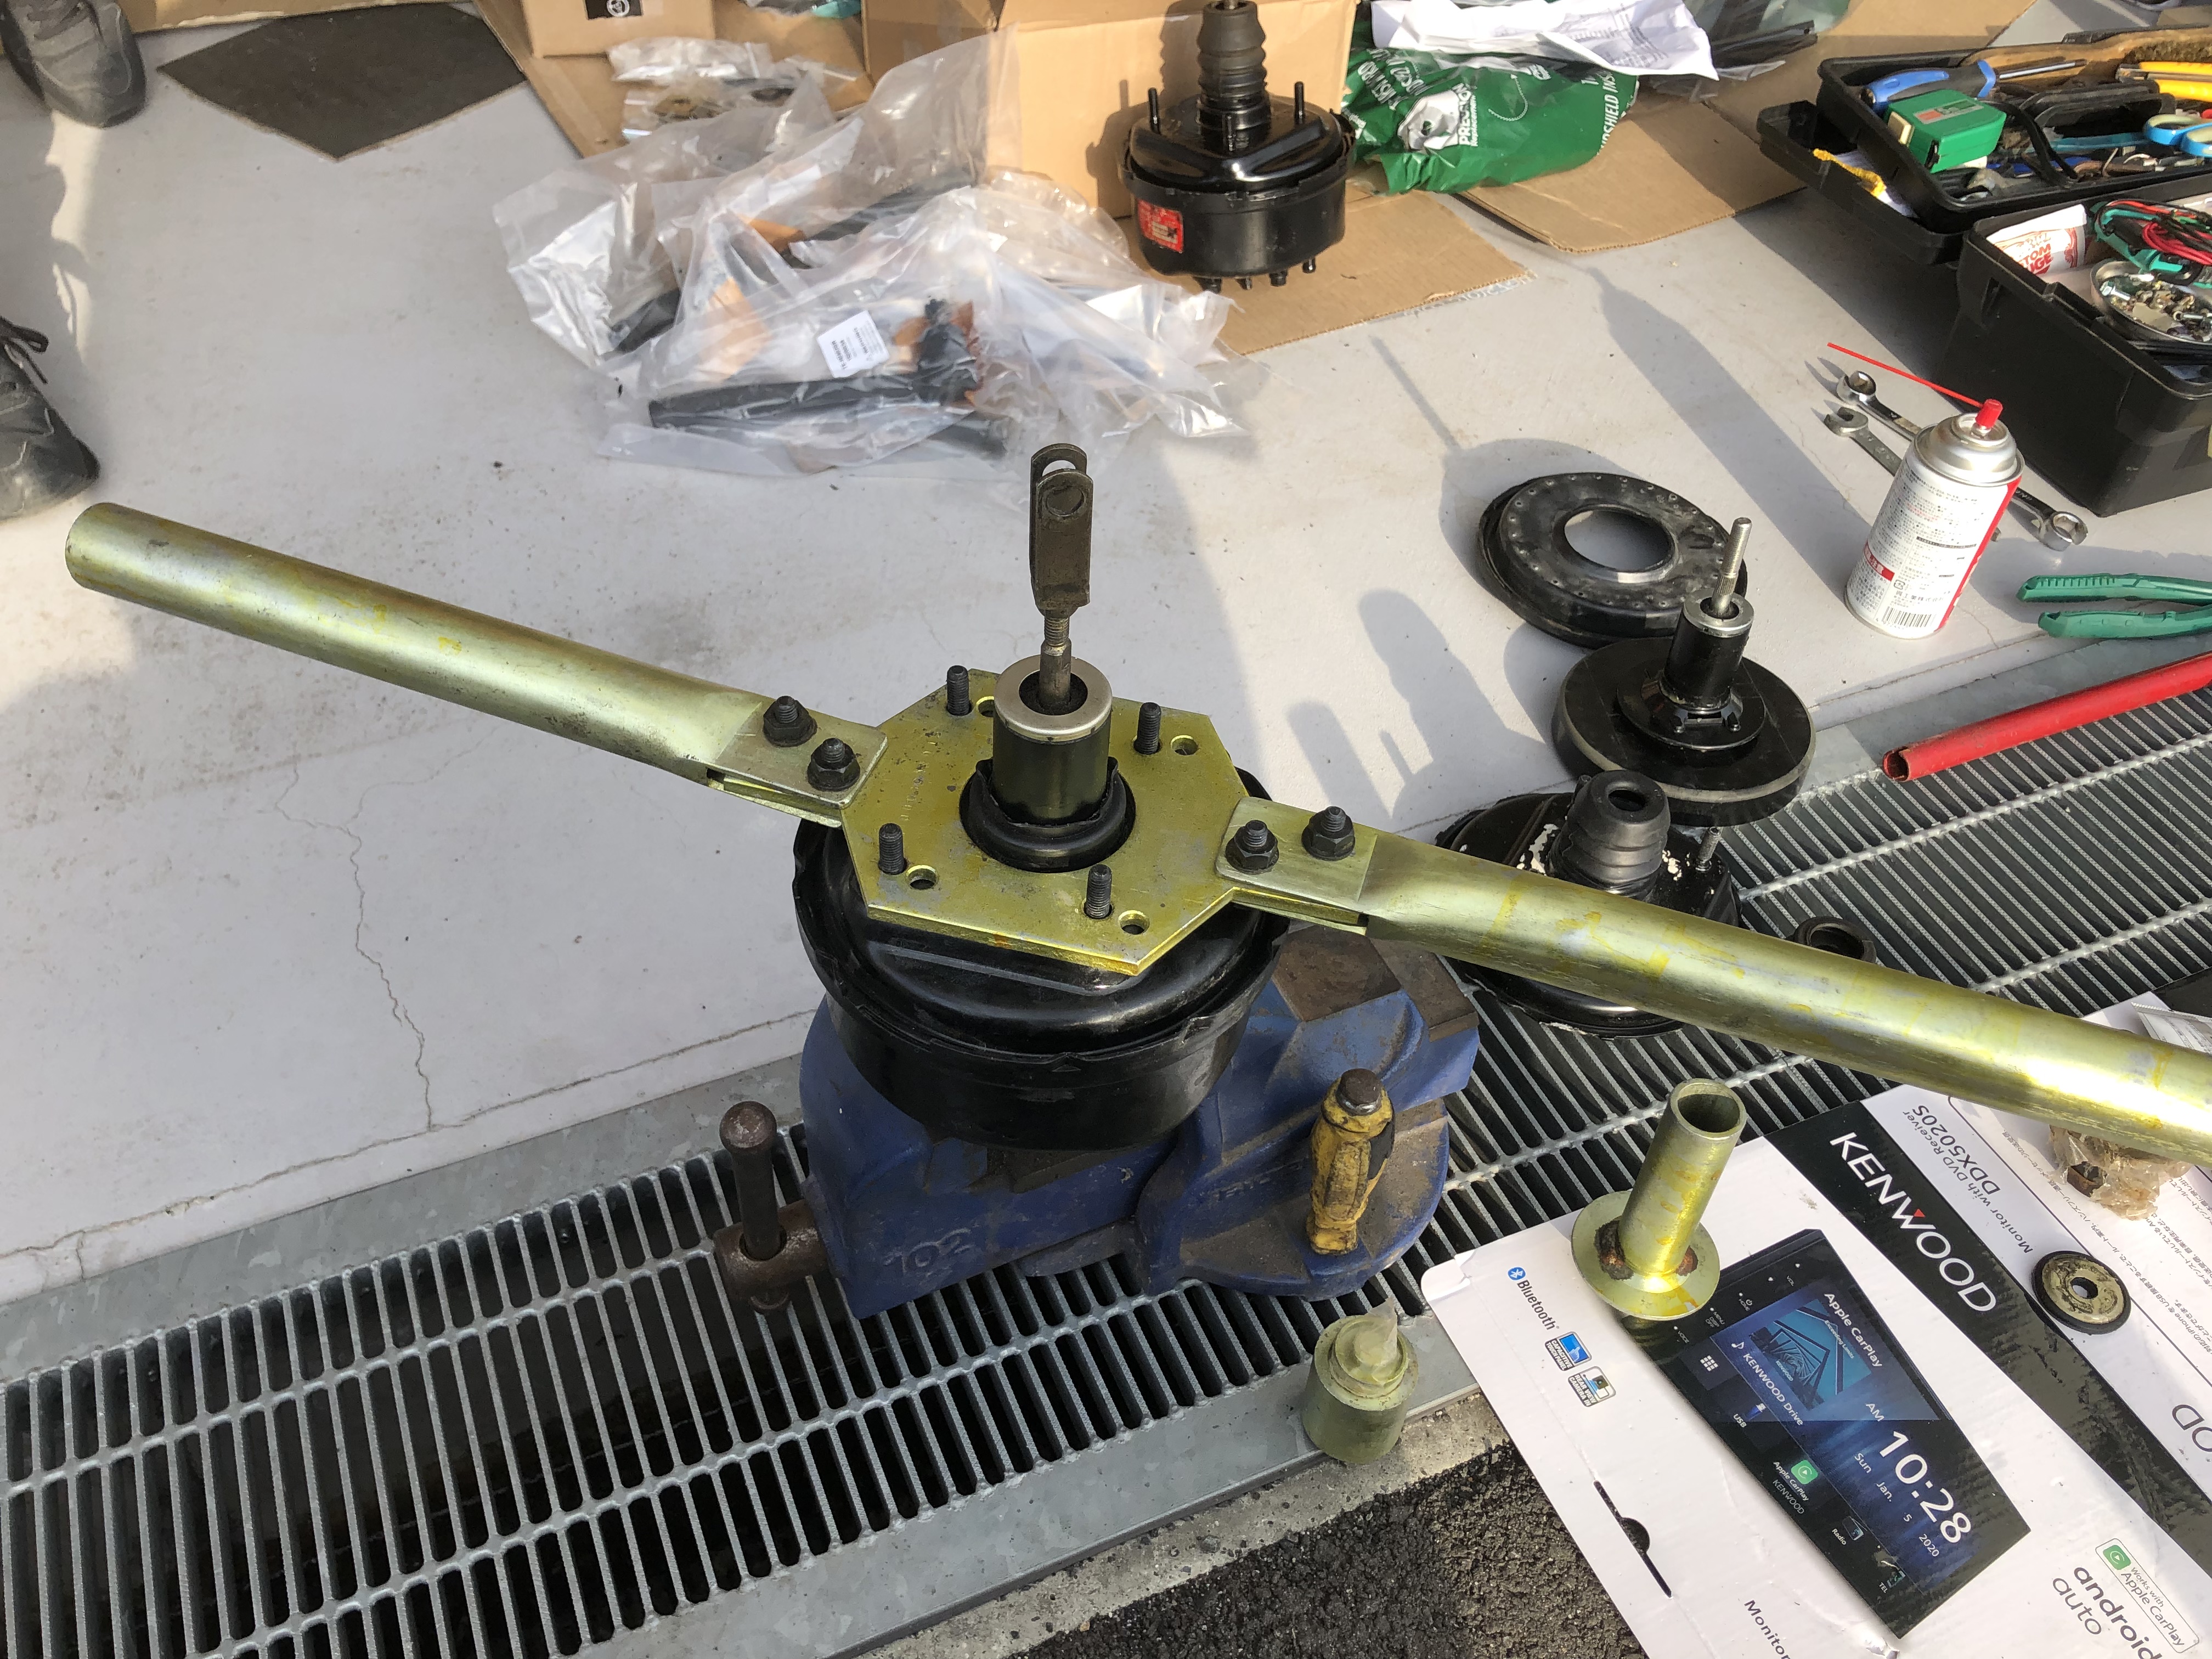
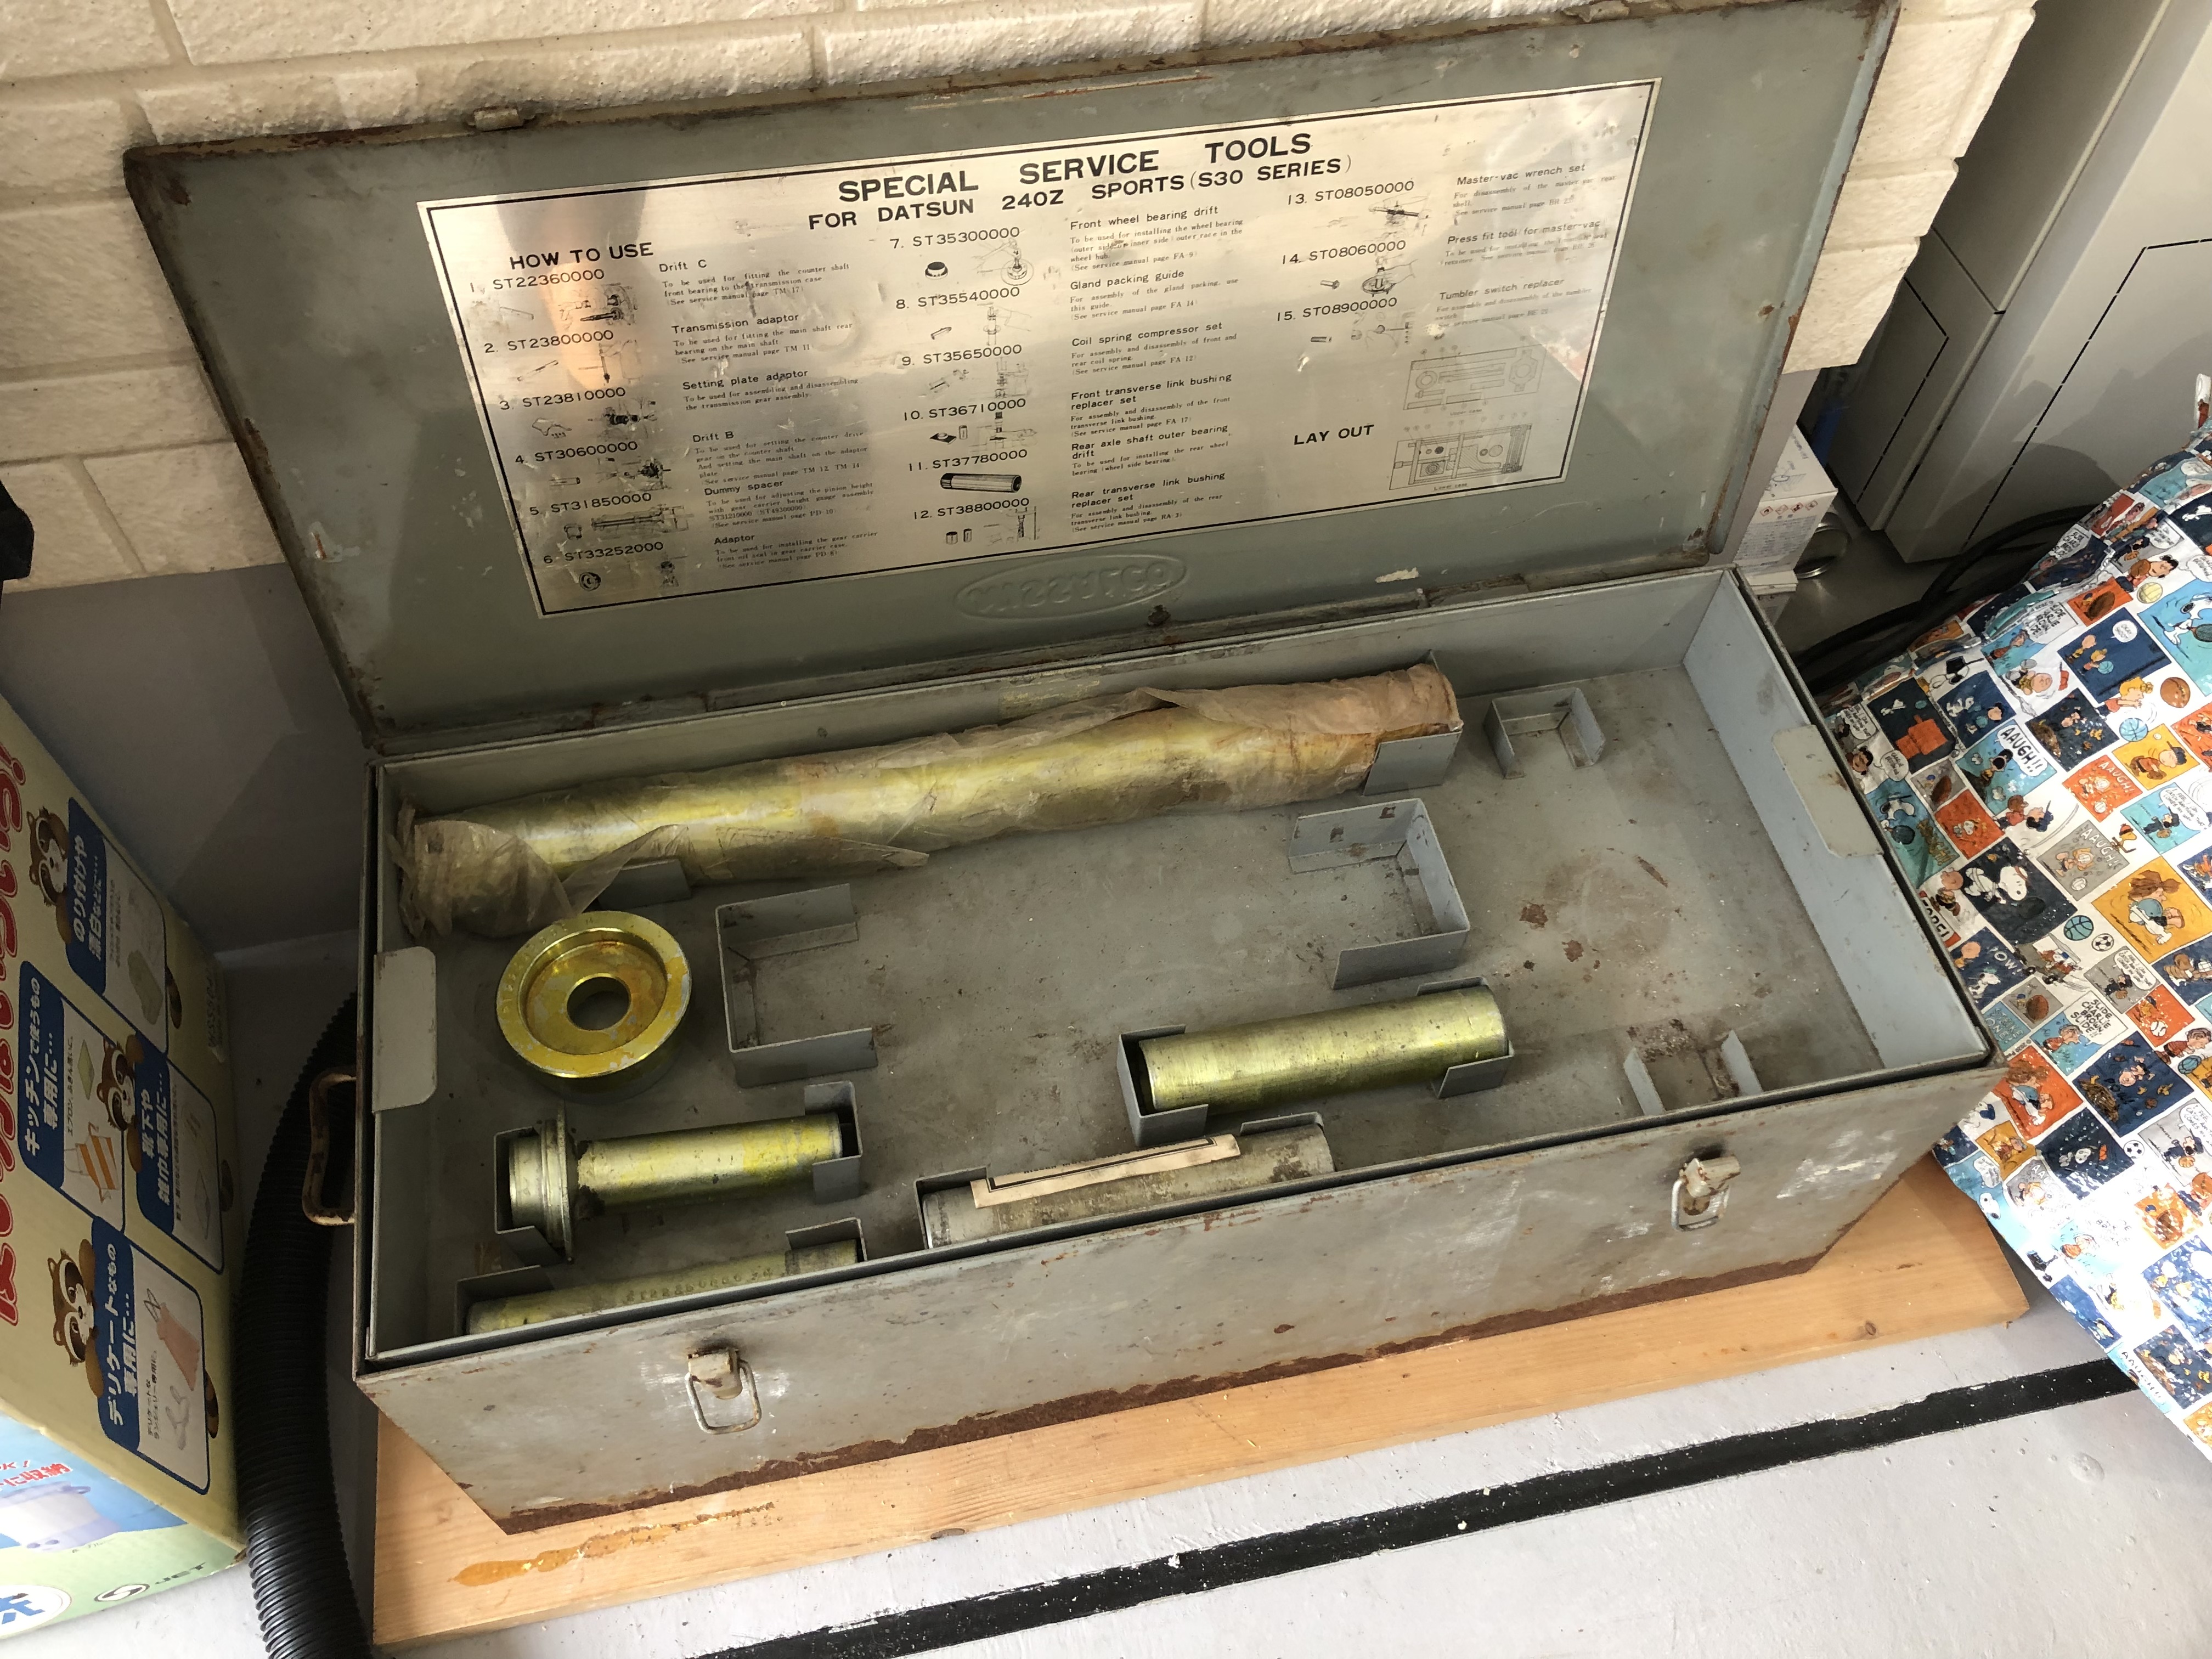
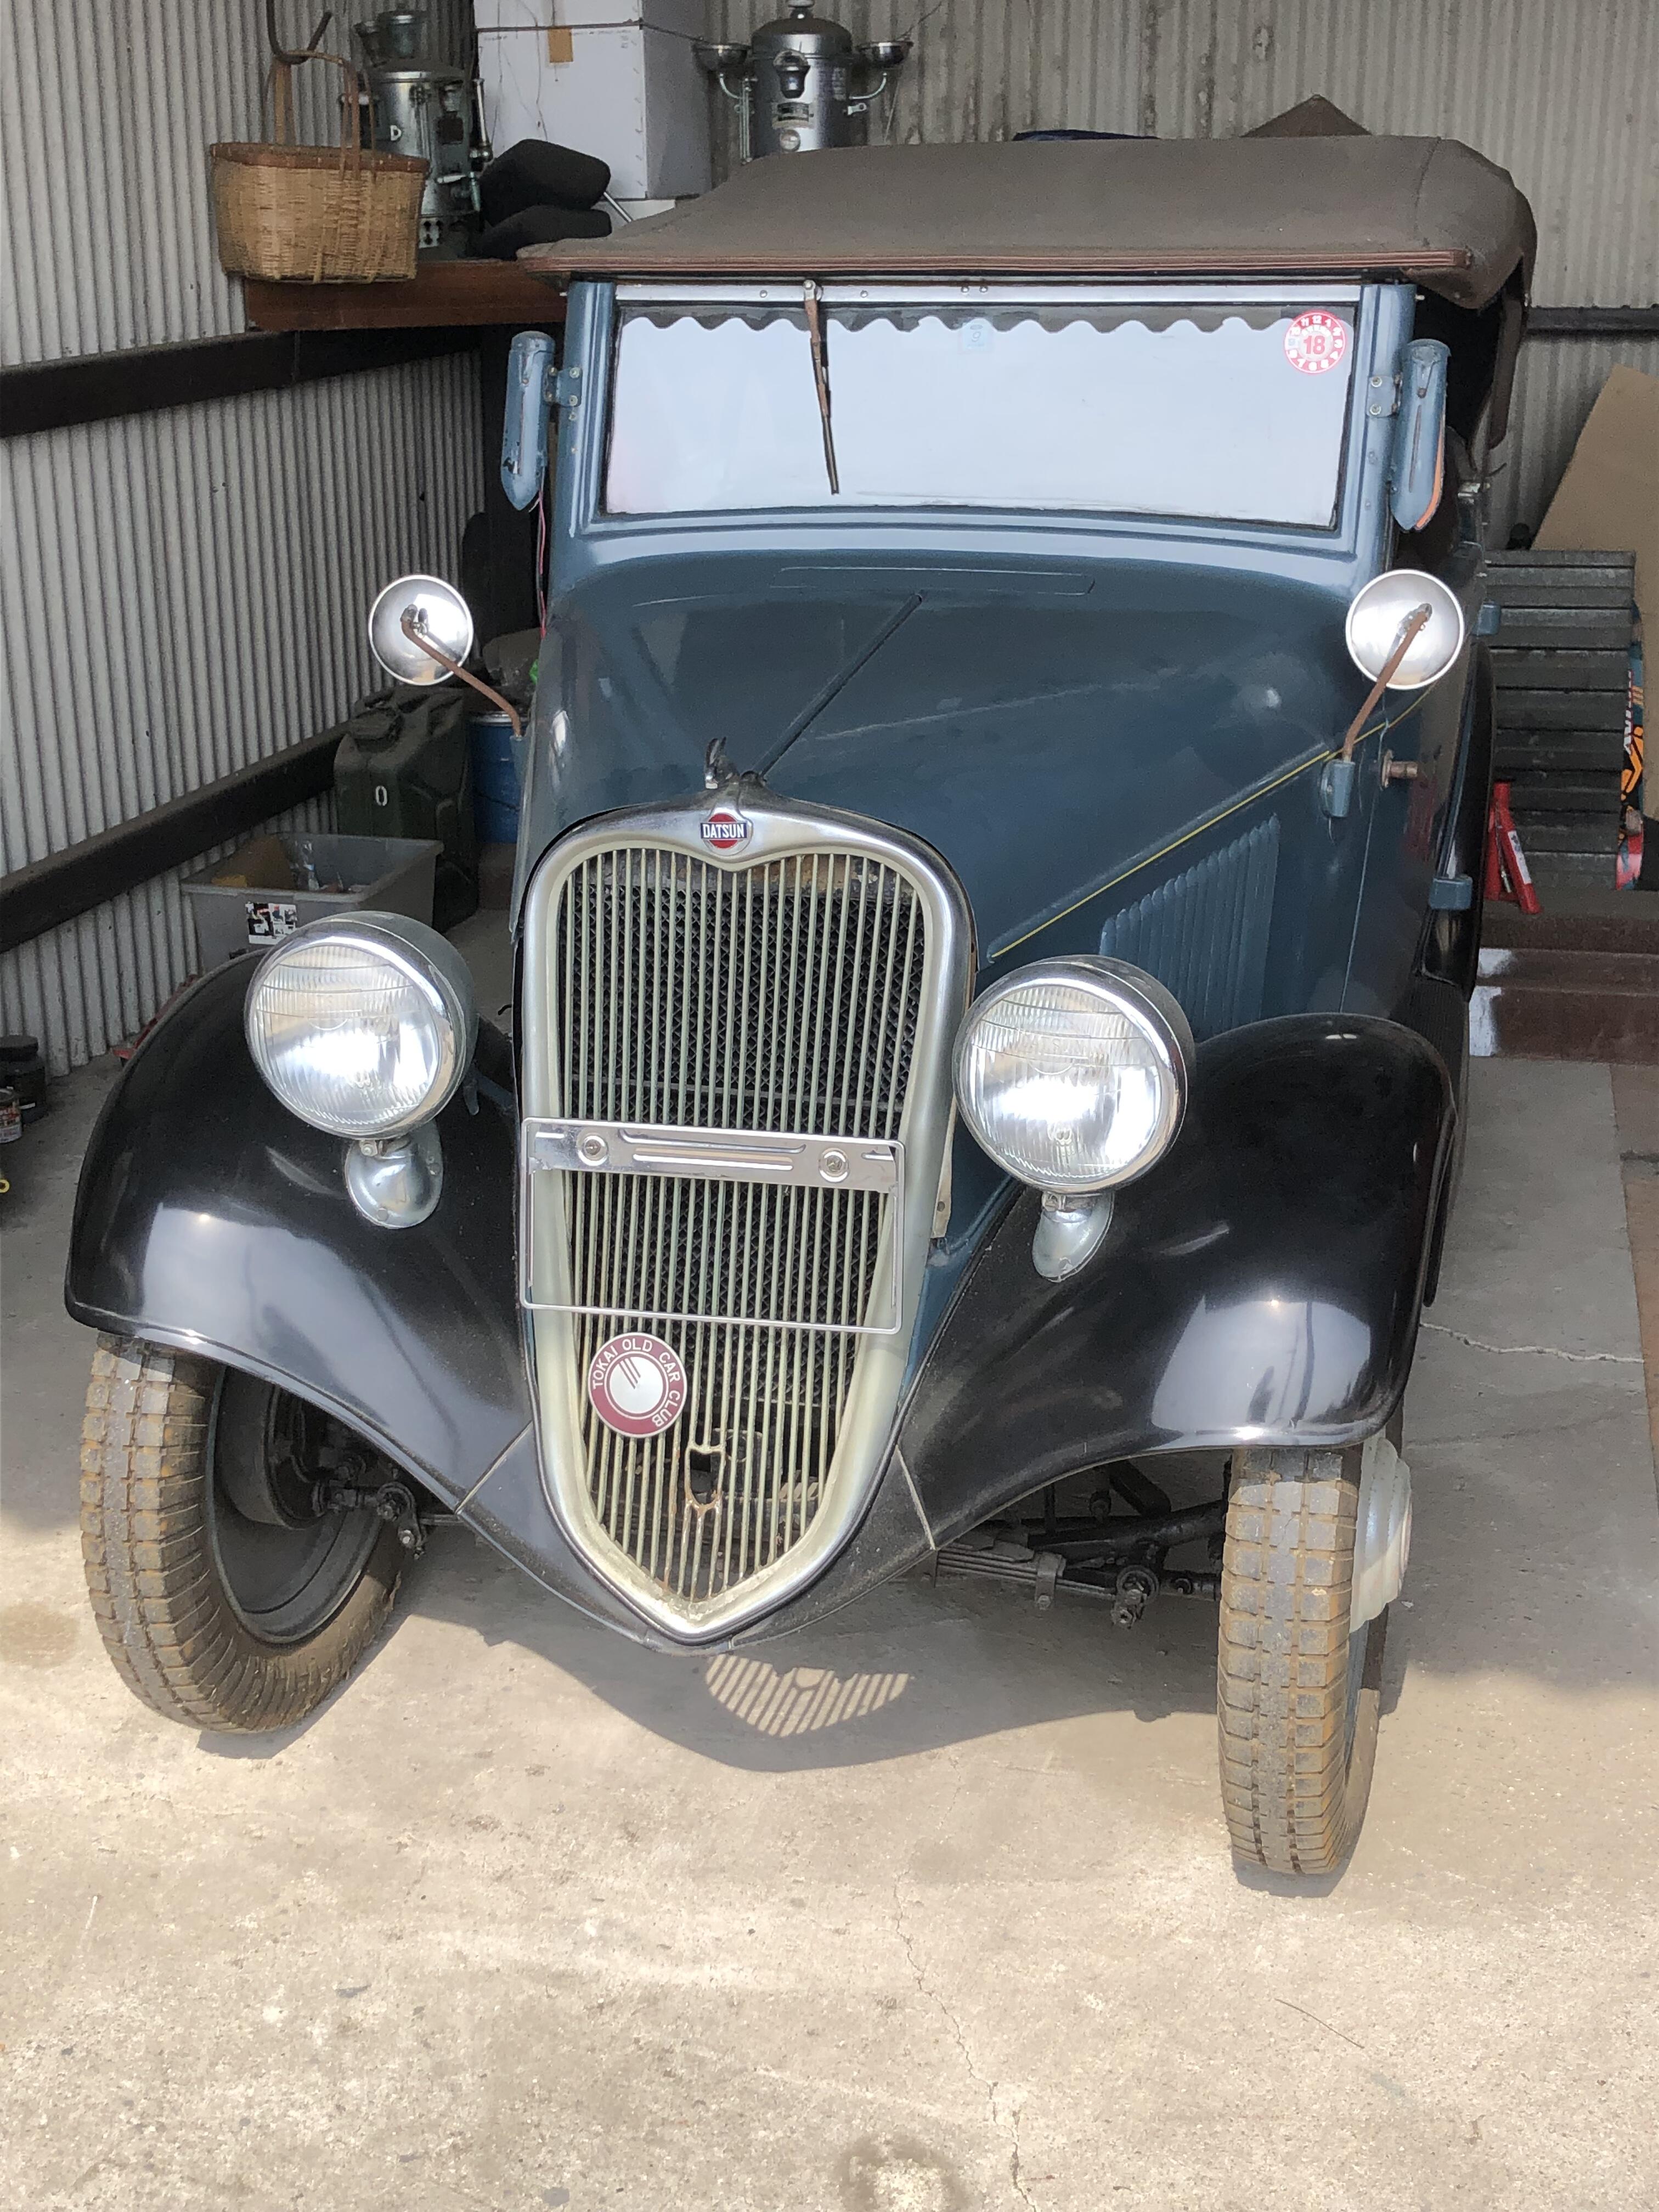
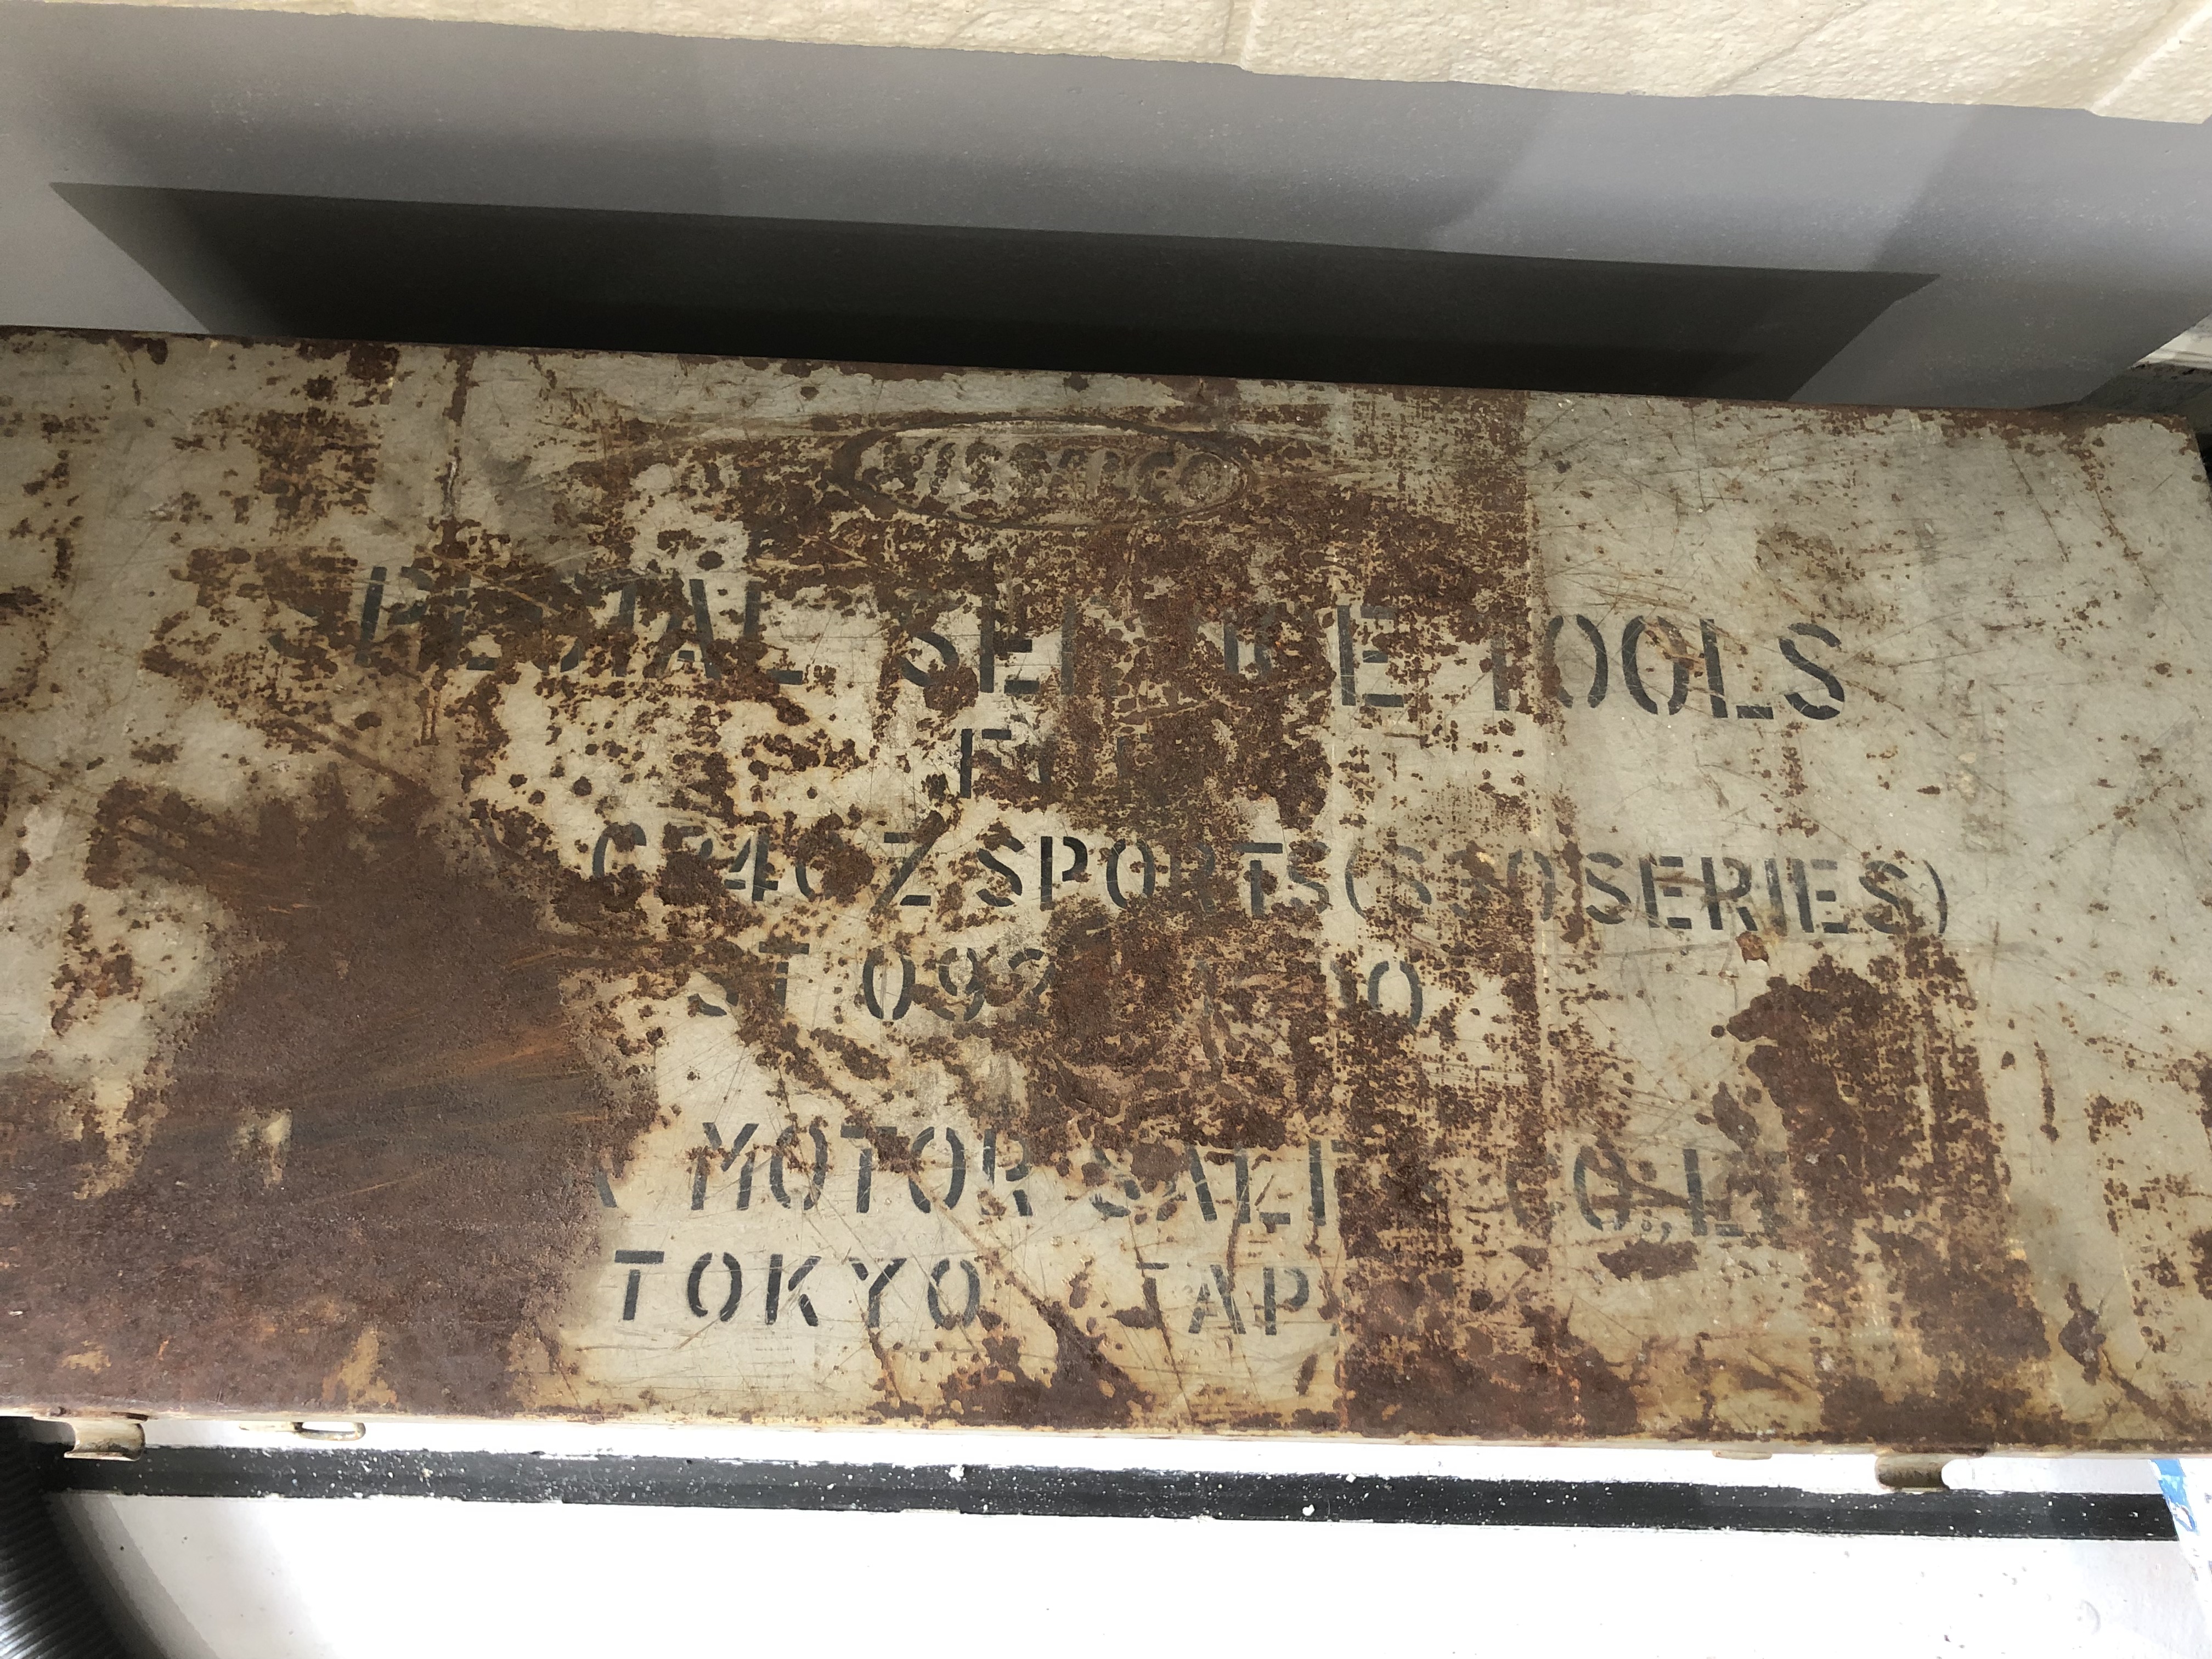
1 pointI did repair job of a master vac for my 240Z with my friend. I almost forgot that I have a special tool box for S30 series. This time I opened the box and pulled a tool which is for twisting the backplate of the master vac. It worked!! 1973 Skyline GTR’s master vac is still available from local Nissan dealership, I used it as a donor for my 240Z. Some of its Internal parts are interchangeable. My friend also needed to do the same thing for his Z cars. By the way he recently bought two Datsun cars, 1935 blue and 1936 orange. They are still good for driving. Amazing cars! Kats


 1 point
 -
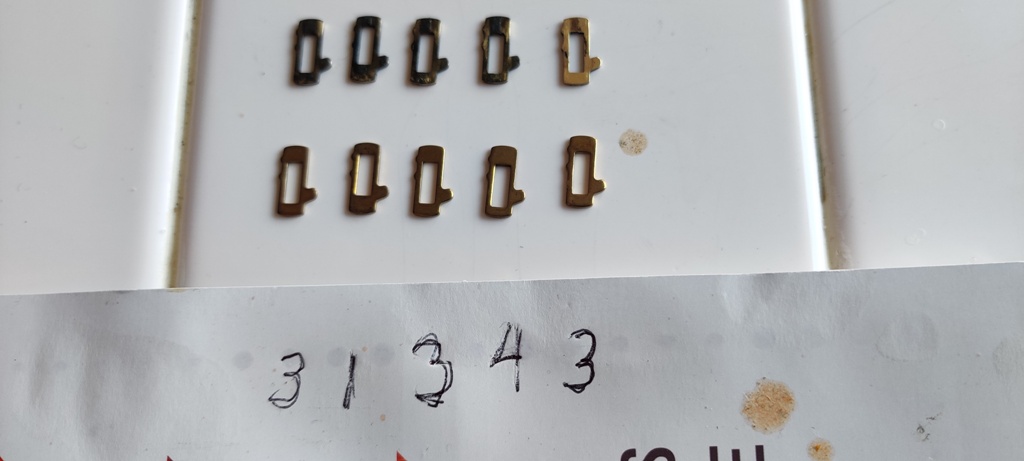
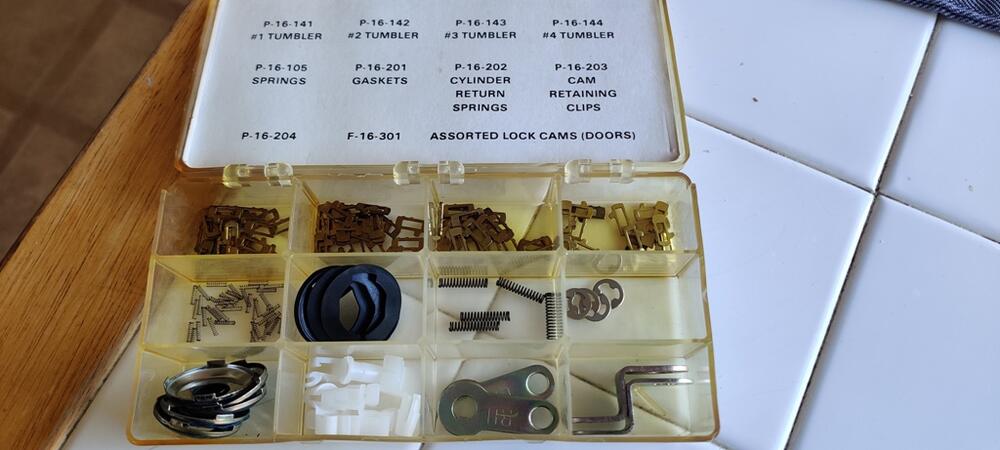
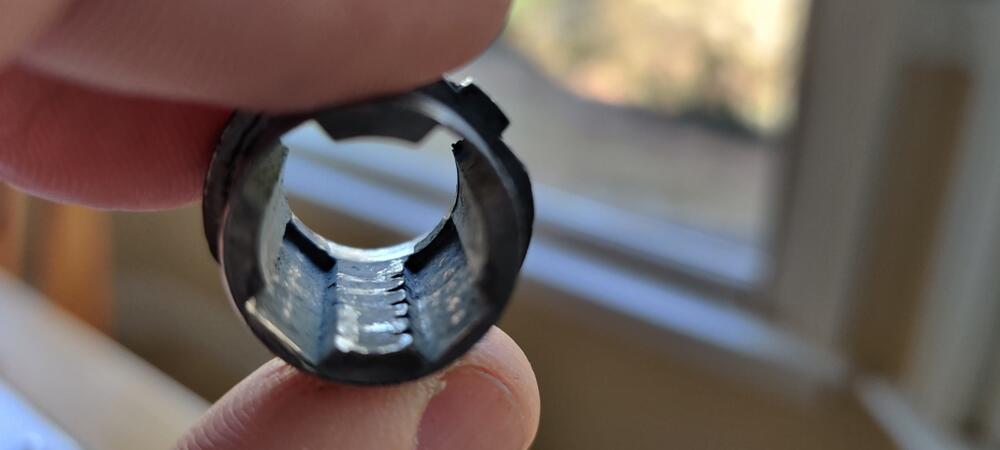
I received the keying kit I bought on eBay. Not sure how complete it is, but looks good: I took the wafers out of the hatch lock that I do not have a key for (row 1) and then looked through the kit to pull out matching wafers (row 2) along with the matching tumbler number from the kit (on the paper). So, if the kit calls them tumblers, they are not wafers? With the wafers (tumbers) all out of the cylinder, I can confirm that the cylinder is the part that is different with regard to R or L or whatever type keys. So, you need the cylinders to match for keying all locks to one key. Also, here are some pics of the part of the hatch lock that seems to wear most. This chrome plated sleeve has the "bar" inside that prevents the lock from rotating as the tumblers press up against it. I think this piece is really soft metal. Sure would be nice to have a quality replacement part for these sleeves. First pic is from my "ratty" hatch lock with no key, second and third pics are from my "nice" hatch lock - for this one I took pics of the lower "bar" and upper "bar". So much for appearances. This is the part that needs to be re-plated. Any ideas for repairing the damage to the bars? Get it chrome plated and then use a two part epoxy? Of course, there is always the quip "not worth the trouble" - I know.


 1 point
 -
I just remember it as: Right = Rich Left = Lean1 point