Leaderboard
-
zKars
 Subscriber
 8Points3,770Posts
 -
Mark Maras
Free Member5Points3,719Posts -
Reptoid Overlords
Free Member5Points805Posts -

Racer X
Free Member5Points1,877Posts


Popular Content
Showing content with the highest reputation on 02/23/2023 in all areas
-
3 pointsMowed mine and my neighbors yards. Let the 2 sleeping Zs idle in the garage for an hour, accidentally too! I forgot about them until I got my blower.3 points
-
3 pointsI like how they have the audacity to call that a Malibu. I drive a 2019 International medium duty commercial truck for work, and about every 3 months a fuse in the battery box blows. The fix: carry extra fuses and a box wrench. I'll bet you could buy an old Malibu from our beloved Beverly Hills auto club and it would be more reliable haha.3 points
-
3 points
-
3 pointsHi Richie, I completed this same project on my 1970 240Z (same color) in September 2020. You only want to drop the tank once, so do as much service to it as you can. It was a pain to reinstall, but otherwise a straight forward project. In addition to the hoses, I replaced or installed the following: 1. Fuel Neck (OEM) 2. Fuel Tank Lid Flap (ruined by PO using wrong fuel cap) 3. Fuel Tank Panel Shield (mine was missing) 4. Fuel Sender Connector Boots (old boots may be brittle) 5. Fuel Tank Rubber Strap Isolators You may want to get a new O-ring & locking tab for the fuel sender, in case you need them. If your fuel gauge is not working correctly, replace the fuel sender now. Consider replacing the associated Gas Tank Vent Hose Boots and Grommets. The are available from Banzai Motor Works (GF-17, 18, 19 and 20). Not sure how many of each you will need. Luckily, mine were still serviceable. Based on information at: https://woodworkerb.com/home/datsun-240z-rebuild/240z-fuel-tank/ I ordered five hoses from JBugs in CA. They are cloth braided and appear to be the same as the OEM hoses you are replacing. When you order, make sure all five are in stock. Otherwise, they will charge you for all five and send any out-of-stock hose later (when your project is already completed). In my case, I was sent four of five and I luckily sourced the missing hose (9 x 3MM) from a local, national auto parts store. I did not replace the simple, thin non-clamped vent hoses attached to vapor tank, so be careful removing them. I have no details on type or length. For the “funky” bend hose connection to work, I inserted spring coil (like on older screen doors) into the hose to make the connection work. JBugs Order: Note: Hoses are sold by minimum length requirements. In other words, longer than you need. 1. N203741 VW German Cloth Braided Breather Hose, 12X3.3mm, Length: 10 2. N203701 VW German Cloth Braided Breather Hose, 17X2mm, Length: 10 3. N203551 VW German Cloth Braided Fuel Hose, 5X2.5mm, Length: 3 4. N203571 VW German Cloth Braided Braided Fuel Hose, 7X2.5mm, Length: 3 5. N203761 VW German Cloth Braided Fuel Hose, 9X3mm, Length: 10 Total cost: $116, with free shipping in 2020 Tank Removal Process: 1. Disconnect battery 2. Loosen right rear wheel 3. Jack up car 4. Remove right rear tire remove rear interior panels (I think you have already completed this step) 5. Spray rusty strap nuts & bolts in advance 6. Drain the tank well; any remaining fuel can be drained by removing the fuel sender 7. Remove the wires for the sender 8. Carefully remove fuel hoses next to sender 9. Remove filler neck clamp at tank 10. Carefully remove hoses from expansion tank 11. Support the tank; use a floor jack or transmission jack & small piece of plywood 12. Take off the straps and lower the tank 13. Lower 4”-6” and disconnect remaining hoses 14. Pivot tank forward a bit due to the rear skirt 15. Detach all of the vent hoses, the filler hose & fuel lines 16. Remove the tank If you have no evidence that the tank was previously removed and cleaned or your fuel filter gets dirty quickly, have the tank cleaned. You will probably want to repaint the the exterior. Tank installation is is reverse order, but note: 1. You may have to raise the tank to connect some hoses. Some do not have much room for slack. 2. The tank drops out easier that it goes back in place. I have to fight with mine to clear the rear skirt. You may want to put good quality painters tape along the skirt to avoid skirt damage. Good luck with your project! Nate3 points
-
Greeting from freezing western Canada in February. When things get cold and you can’t drive, I spend the winters working on garage projects and this year is no different. Last winter I did a restoration on the latest 69 510 sedan I found, trying my dang-dest to do a as close to stock restoration as I could stand for a change. This one was kinda special, one owner, low miles, low rust and great backstory. I won’t share any of that story in this thread. Just suffice to say I had a hankering to drive a stock 510. Got it done and started driving it last fall, spent all of 2 months putting some miles on it and loving most of it. Gentle ride, decently quiet exhaust. Snappy little L!8 SSS motor. Ok, THAT’s not stock but it’s OEM un-modified SSS L18. So it was stock in SOMETHING, okay? Fine….. Then the first blast-O-winter hit Alberta in November and in the garage it went cause it had two problems. Noisy transmission in 5th and REALLY BAD seats. You think stock Z seats aren’t “perfectly comfortable and supportive”? Well 510 seats are AWFUL for long trips and or any sort of performance driving. Yes I had a very low mileage set that I restored to lovely appearance and function, but…… And so it began. Will I be able to restrain myself and limit the “upgrades” to just the barely acceptable minimums or will it get out of hand? Do I really have to tell you what happened?2 points
-
2 points
-
2. Speedo Upgrades The issue here is the ever changing differential gears and tire selections we just can’t help making. The limited choices of transmission pinions gear tooth counts means you might get close, but you will never be very close….. Well, there is a cure. Actually many cures GPS Speedometers. These have been around for a while a. Cheap dash mounted little box that displays speed. Amazon is loaded with options. b. Your cell phone. There are 150 free speedo apps out there. Did I say free? Hardly easy to use in continuous and easy fashion though c. Dedicated aftermarket gauge manufactures. Speedhut, Dakota Digital and others. Seen and owned the Speedhut GPS speedo for my Z, it was great. There are now shops making 3D printed mounting rings for Z’s for all 5 holes. Fabulous. D. Here is where it gets interesting. In my 69 510 (same issue for 68), I do NOT have a round speedometer. It is an old school rectangular sweep speedo. See pic below (not my car, 68 actually but ~same as 69). I love it, I want to keep it, but there are no aftermarket options for this style of electronic speedo. So I start searching for solutions. Step one was DIY stepper motors. Pun intended. Cool stuff. You tell a motor EXACTLY how fast to move, or even better, where to EXACTLY STOP at whatever rotation position you like. How do you think all the OEM’s have been building their instrument clusters for 1000 years? How do you think Speedhut and others build THEIR gauges today? But you say “how can a simple backyard mechanic figure out how to get this electronic gizmo’s to work?” Well it turns out that while we have been toiling in the garage and watching Bachelor in the evenings, the engineering world has been invented a huge range of DIY electronic packages designed at the “young” to get them into robotics and STEM learning. Search ARDUINO or RASPBERRY PIE on youtube. You will spend countless hours saying “OMG” to yourself…… Let me sum this up. After spending $50 bucks in boards and bits, and investing 15 minutes watching a YouTube video, I had a working tiny stepper motor (actually a 2$/100 generic GM instrument stepper motor) driven by a square wave frequency input (more on that in a minute) moving a toothpick speedo needle to anywhere I decreed. FM! Now I have to admit to being a actual engineer (EE) and this stuff ain’t completely new to me so it was “easy” for me to make this leap, but I just didn’t understand the breadth and scope of what is truly EASILY possible now. This leads to the following revelations. Got a fuel gauge that doesn’t match your new fuel sender in your new tank? No problem. Don’t want to spend the current insane $500 USD and up to find a used and rare stock tach for your 510? Make you’re own…… Now I’ll show the next link in this chain, The VSS. Vehicle speed sensor. To drive all this fancy stuff, you need to have a digital signal that tells you have fast your driveshaft is spinning (needed for cruise control too!) Well there is this cool little device, available from ProTunerZ. I first tound it years ago through a Toyota 4x4 supplier. https://www.marlincrawler.com/transfer-case/parts-upgrade/misc-hardware/vehicle-speed-sensor-mci Turns out the threads on the toyota tranny’s speedo cable pinion is the same as Datsun. Screw this little gem on YOUR speedo pinion add 12v and a 1K resistor, and you get this lovely perfect 12v 50% duty cycle square wave output at a frequency 4 times the pinion rotation rate. For $28 buck.s Yeah. BTW, the gear ratio of YOUR speedo pinion is computed by dividing 6 by the # of teeth on whatever pinion you have. 6/16 (yellow 16 tooth I think) is .375. So at 3000 RPM driveshaft speed your pinion is going 0.375 times slower. Use your tire circumference and diff gear ratio to compute Rotations per mile.

 2 points
 -
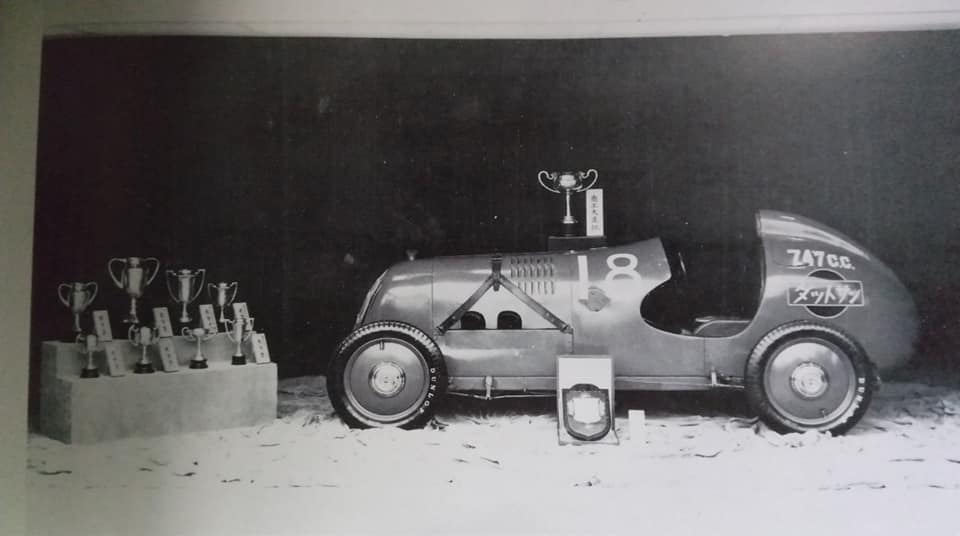
Another example of similar stying in the 1960's was the Datsun SP(L)310 and the MGB, with the usual western dribble of Nissan copied MG. In fact the Datsun was shown at the Toyko Motor show BEFORE the MG at its launch show, so, MG copied this model Datsun then?..... Simliar thing watching a Wayne Carini (sp?) program with someone "knowledgeable" from one of the presigious auction houses whilst discussing a Toyota 2000GT they were driving/looking at, that American German bloke was mentioned as the designer...more damage done...2 points
-
2 pointsGood eye, a lot of interesting cars can be seen in these late sixties, early seventies TV shows. Later in the same Cannon episode a very nice gold colored E-type Jag can be seen. The same era show, Mannix, has a lot of cool cars as well, including the collection of convertibles that Joe Mannix drove. Like this '68 Dodge Dart GTS. From season 4 (1970), on Mannix, a '70 240Z is seen as a background vehicle. (source IMCDB,org)
 2 points
 -
This is possibly the sequence of the show that troubles me most. I just don't understand how anyone can seriously imagine that the layout of the Nissan L-gata engine - with inlet and exhaust on the LH side - was somehow "...designed for the US market." Jay Ataka was pointing at the throttle linkage and waggling the vacuum booster hose when he was saying this. Yes, the throttle pedal and brake pedal/booster are on the RH side of the car in an RHD layout. So are the steering shaft and clutch pedal. Where else are they going to be? The key point is the handing of the inlet and outlet of the engine. Here on classiczcars we've had discussions in the past about the design 'inspiration' of Nissan's L-gata engine. One member was evangelically convinced that it was "copied" from the Mercedes Benz M180 engine (spoiler: it wasn't) which had inlet and exhaust on the RH side. Prince's G7 six sometimes gets a "Merc copy" mention (Prince and Nissan were competitors at the time) but the G7 had inlet and exhaust on the LH side, same as the Nissan. So, Nissan's L-gata engine range "...designed for the US market." Does anybody here want to try to convince me that's true? Go on, I dare you. 🙂2 points
-
2 points
-
2 pointsNot today, but last Saturday and Sunday removed the stock single cam 1.6L from my Civic and installed a dual cam 2.0L from a Japanese market CRV with a '90 Acura integra 5 speed. It currently runs I just have to finish up the exhaust. Next weekend maybe.2 points
-
2 pointsI put a new battery in a 2010 Malibu today (kinda weird family sorta thing). I swear, US auto manufacturers should be ashamed of the poor quality cars they produce. The only good thing about this car is the Delco Bose stereo. You couldn’t pay me enough to own one of these things, even with the great audio.2 points
-
31:30 Leno again: "When this car came out, there was no Japanese heritage. You know, ALFA Romeo had heritage, Ferrari, Bentley... had all raced in the 1930s and whatnot. So they (Datsun/Nissan) were brand new. So this really was the beginning of Japanese heritage. And now, 50 years later, it's got a real line. You can trace it all the way back". As mentioned in my previous post, you can trace it back a lot further than 50 years. I think this is Leno viewing things through the lens of the USA again. Maybe it looks like that to him - and 99% of his YouTube viewers will swallow it whole - but it is wrong. He mentions ALFA Romeo (established in 1910), Ferrari (established as a racing team in 1929 and not a manufacturer until long after that) and Bentley (established in 1919). Notwithstanding the 'DAT' car of 1914, Nissan was founded in 1933 and was racing soon after. As a brand it is not that much younger than the companies he cites. It was making (and racing) cars before Ferrari, Porsche and many other manufacturers.
 2 points
 -
1 pointMaking some progress putting it back together. I didn't like the way the fender and hood fit, so I decided to paint the inside and put it together enough to get it to a frame machine. Then go after the exterior bodywork. Not the ideal, but it is the next right thing to do. Two things I have learned over the years: You cant take too many pictures and never throw anything away! One other thing, aftermarket is never as good as the original.
 1 point
 -
1 point
-
My fingers are tired. I’m going back to wiring up MegaSquirt to my fancy EFI sensors and injectors. More later.1 point
-
Ok, we have a VSS that gives me a driveshaft rotation frequency, we have a “Way” to use that drive my fancy little ARDUINO board to make a little GM stepper motor point a needle at whatever speedo position I want. Just have to tear up my speedo and mount a stepper motor where that old ancient mechanical speedo and odo gear pile was and I’m flying! Wait just a doggone second….. Odometer….. Sheite….. what do I do about this? Well Mr inventor here thinks I could certainly get my Arduino thingy to add up covered distance and display a ODO number but then I need to include a small LED display thingy in my speedo. Well….. So back to searching for alternatives. Guess what both Speed hut and Dakota digital have invented? A box that converts a speed signal into a motor driven speedo cable. Takes my VSS singal and directly drives my existing and un-modified classic 69 510 speedometer via a 3 foot speedo cable. The ECD-200BT is the Dakota digital version https://www.dakotadigital.com/index.cfm/page/ptype=product/product_id=886/mode=prod/prd886.htm But do they make a Datsun compatible cable? No of course not! But so what. They make a GM cable (duh) that turns out to be 90% identical to a Datsun cable (left one in the picture). The dang threaded cap there is 5/8-16 thread (M16x1.5 Datsun), which JUST ABOUT threads right on, and the cable core is a perfect fit into the datsun speedo (510 and Z same same, don’t worry). So I just removed to GM metal crimped-on housing part and slipped on the nearly identical Datsun end bits. Bit of heat on the metal barrel, out slipped the sheath, same when putting the datsun end back on. Little piece of heat shrink over it if you’re worried about it coming off. So after a quick calibration i need to do when i get the car moving again, which itself is a bit of a modern miracle as the silly box Bluetooths wirelessly to an app on my phone!!! Love this stuff! Just as an aside, the Speedhut box is the same, with one important additional feature. It has a GPS optional input to get speed information from, you don’t need to use the transmission mounted VSS. Even easier. But quite a bit more $$. $320 for the DD box i have and over $500 for the Speedhut one.
 1 point
 -
1 pointThe car will be getting sold soon, providing nothing else major goes wrong with it. The granddaughter isn’t getting her poop in a group, so she won’t be getting it.1 point
-
1. EFI Conversion I am not going to tell you every detail about how to do this, just to make the point that while it can be daunting, it is SO WORTH IT. I did an EFI conversion on my “other” 69 510 back in 2018 and have never looked back. The increase in reliability, drivability, and maybe mostly the ability to be informed about the state of the engine, and the ease of monitoring any input or output has made it a pleasure to drive. I have done literally NOTHING other than routine maintenance in 5 years…. Hop in, drive it. Park it for the winter. Hop in April drive it till it snows. Repeat. It’s cool vintage looking. I used the Jenvey Heritage Throttle bodies that look like dual webber carbs. I get the classic look and appeal but it runs like a modern car. On this one I’m doing more or less what Datsun did with the 280z EFI, just the 4 cylinder version of that. Bit of rare kit, but that makes it fun. “L18E” is the thing to look up if you want to find out more. I’m only using the intake manifold. The high tech part of this that I will identify and name is summed up in one acronym, CANBUS. If you do an EFI conversion, get a system that has CANBUS at it’s heart. It will be give you control and monitoring in a hundred ways. I used HALTECH on the first 510, I’m using MegaSquirt 3 Pro/Evo on this one. There are “easier” options, like using a 4 barrel manifold and bolting on Holley’s EFI system with a 4 barrel EFI carb looking thing. But make no mistake, this is not for the faint of heart no matter what you do. Perhaps the hardest part is the need for an “outside”, ie a tuner to make it all run right after you build the hardware.1 point
-
Haven’t done this for a while (done 10+ before hand), but sourcing ATV700 part number u-joints never resulted in any issues during reassembly. If you have to do a little “clearancing” with whatever parts are now available, well it never hurts. Sounds like what I always have to do with GM alternator replacements. Some part of the case or mounting bracket has to be “relieved” to make it swing in close enough to get the belt on. Just what you have to do. What I do remember is the last time I ordered more from the u-joint store I think, they were having supply chain issues and couldn’t supply any. Will have to check again.1 point
-
1 pointin the Portland area we have an ON Point Credit Union ad on tv that has a beautiful blue 280. It only shows the hood and windshield but it's unmistakable.1 point
-
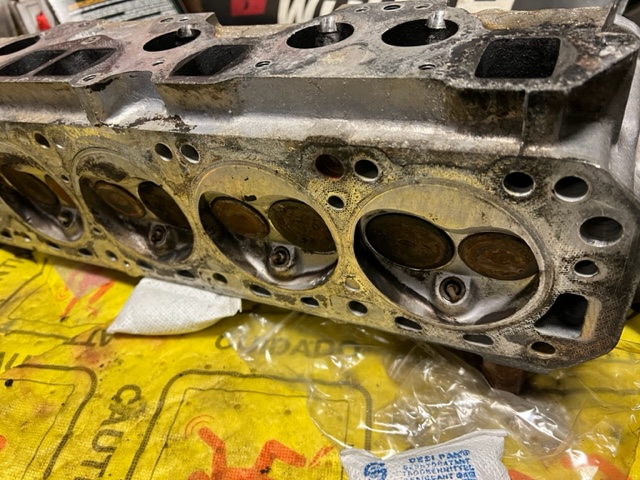
1 pointI'm not terribly sad... I bought a used motor that was a great deal and I gambled it was going to last a few years. I lost. The PO was super open about it's history and gave no indication that there was any potential issues with it. But, it seems to me that when I opened the pan to clean the engine before installation, I saw remnants of some bearing material, that I thought was timing chain case shavings as there was an old broken piece of timing chain guide in there too. So the oil starvation or bad bearing install was from well before I installed the motor. The pickup and pump are solid, no issues. The knock developed after I had been driving for over 600 miles, therefore there was no way the PO would have known without taking the pan off himself. Picture was taken before I installed the motor and at the time I was sure it was cover material, not bearings... Building a new motor is painfully expensive (especially when you have to import most of the pricey stuff from the states in USD), but the end result will be a custom built performance engine, totally refreshed and ready for years of service. I plan on this being the last time it will need a heart transplant as the car will not be abused in it's years to come. Some dyno testing and a little spirited driving at best! As for doing it myself, I had two options. Do it myself or do it right.... and I am good at a lot of things and I could theoretically learn, but.... nope. I have a great engine builder with 30 years experience locally near me so I trust that his experience will make the difference in my confidence in the new motor. I'm also away from home for a few months, so that gives him time to get it done for me by summer!
 1 point
 -
Is the black crud on #4 dry or oily and does it smell like fuel when you remove it?1 point
-
1 pointIt has been over 10 years ago since I did this but as best as I can recall I installed the grommet and then fed the in-cabin connectors and wires through it one-by-one. No removal of connectors from the wires.1 point
-
1 pointFound the issue. New harness was grounding out. One of the connections had red wire in wrong hole. So just had to move it over1 point
-
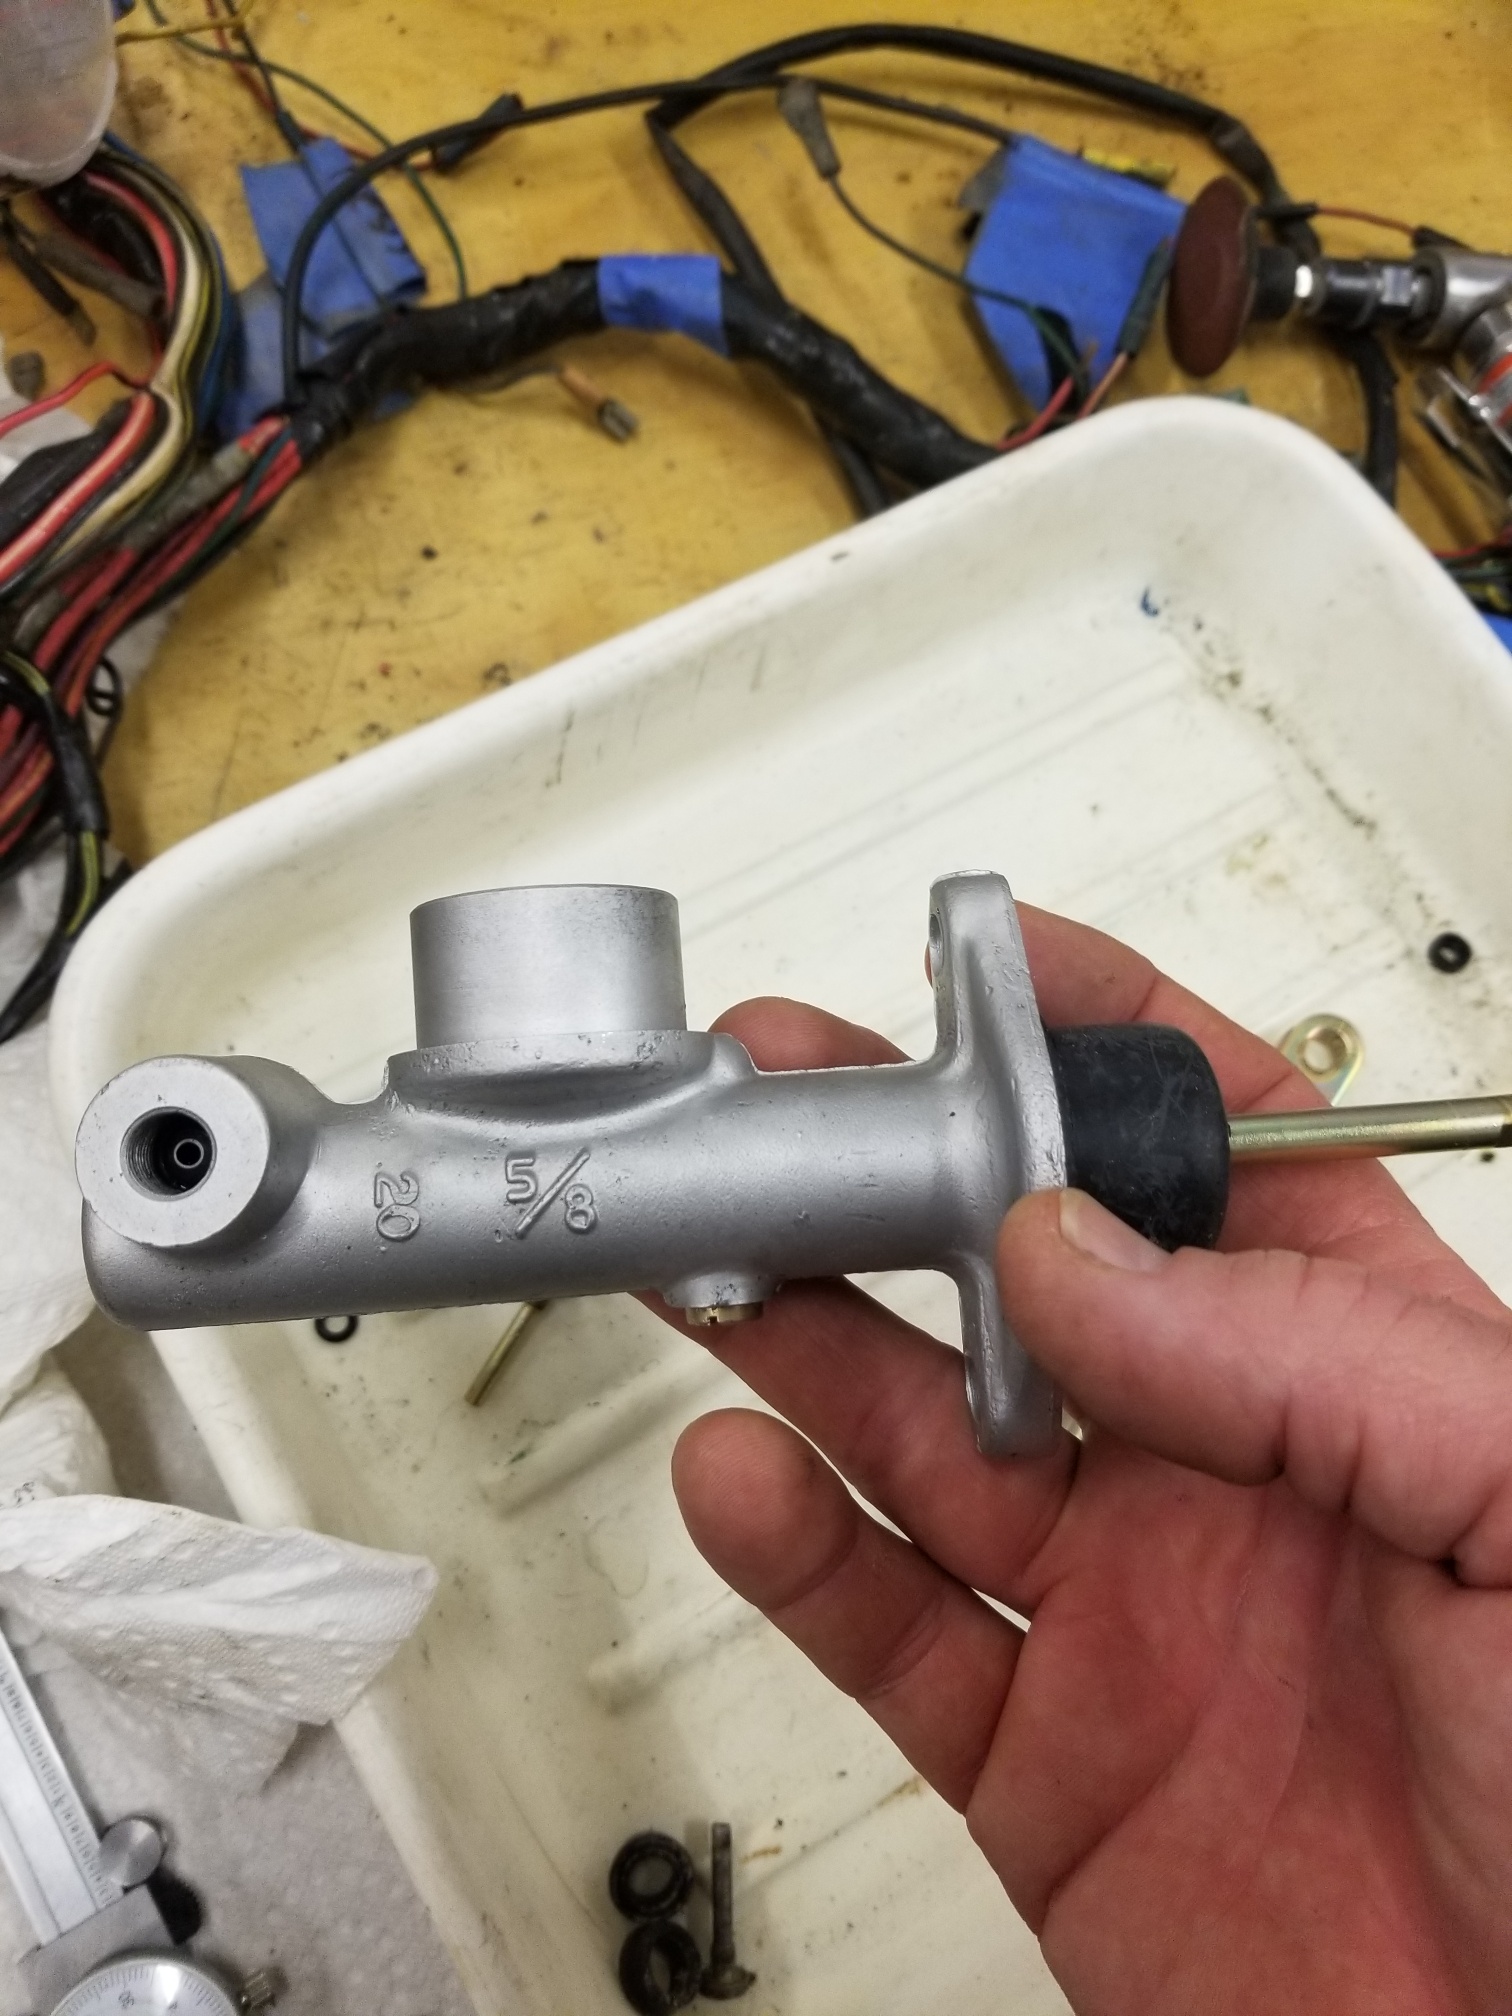
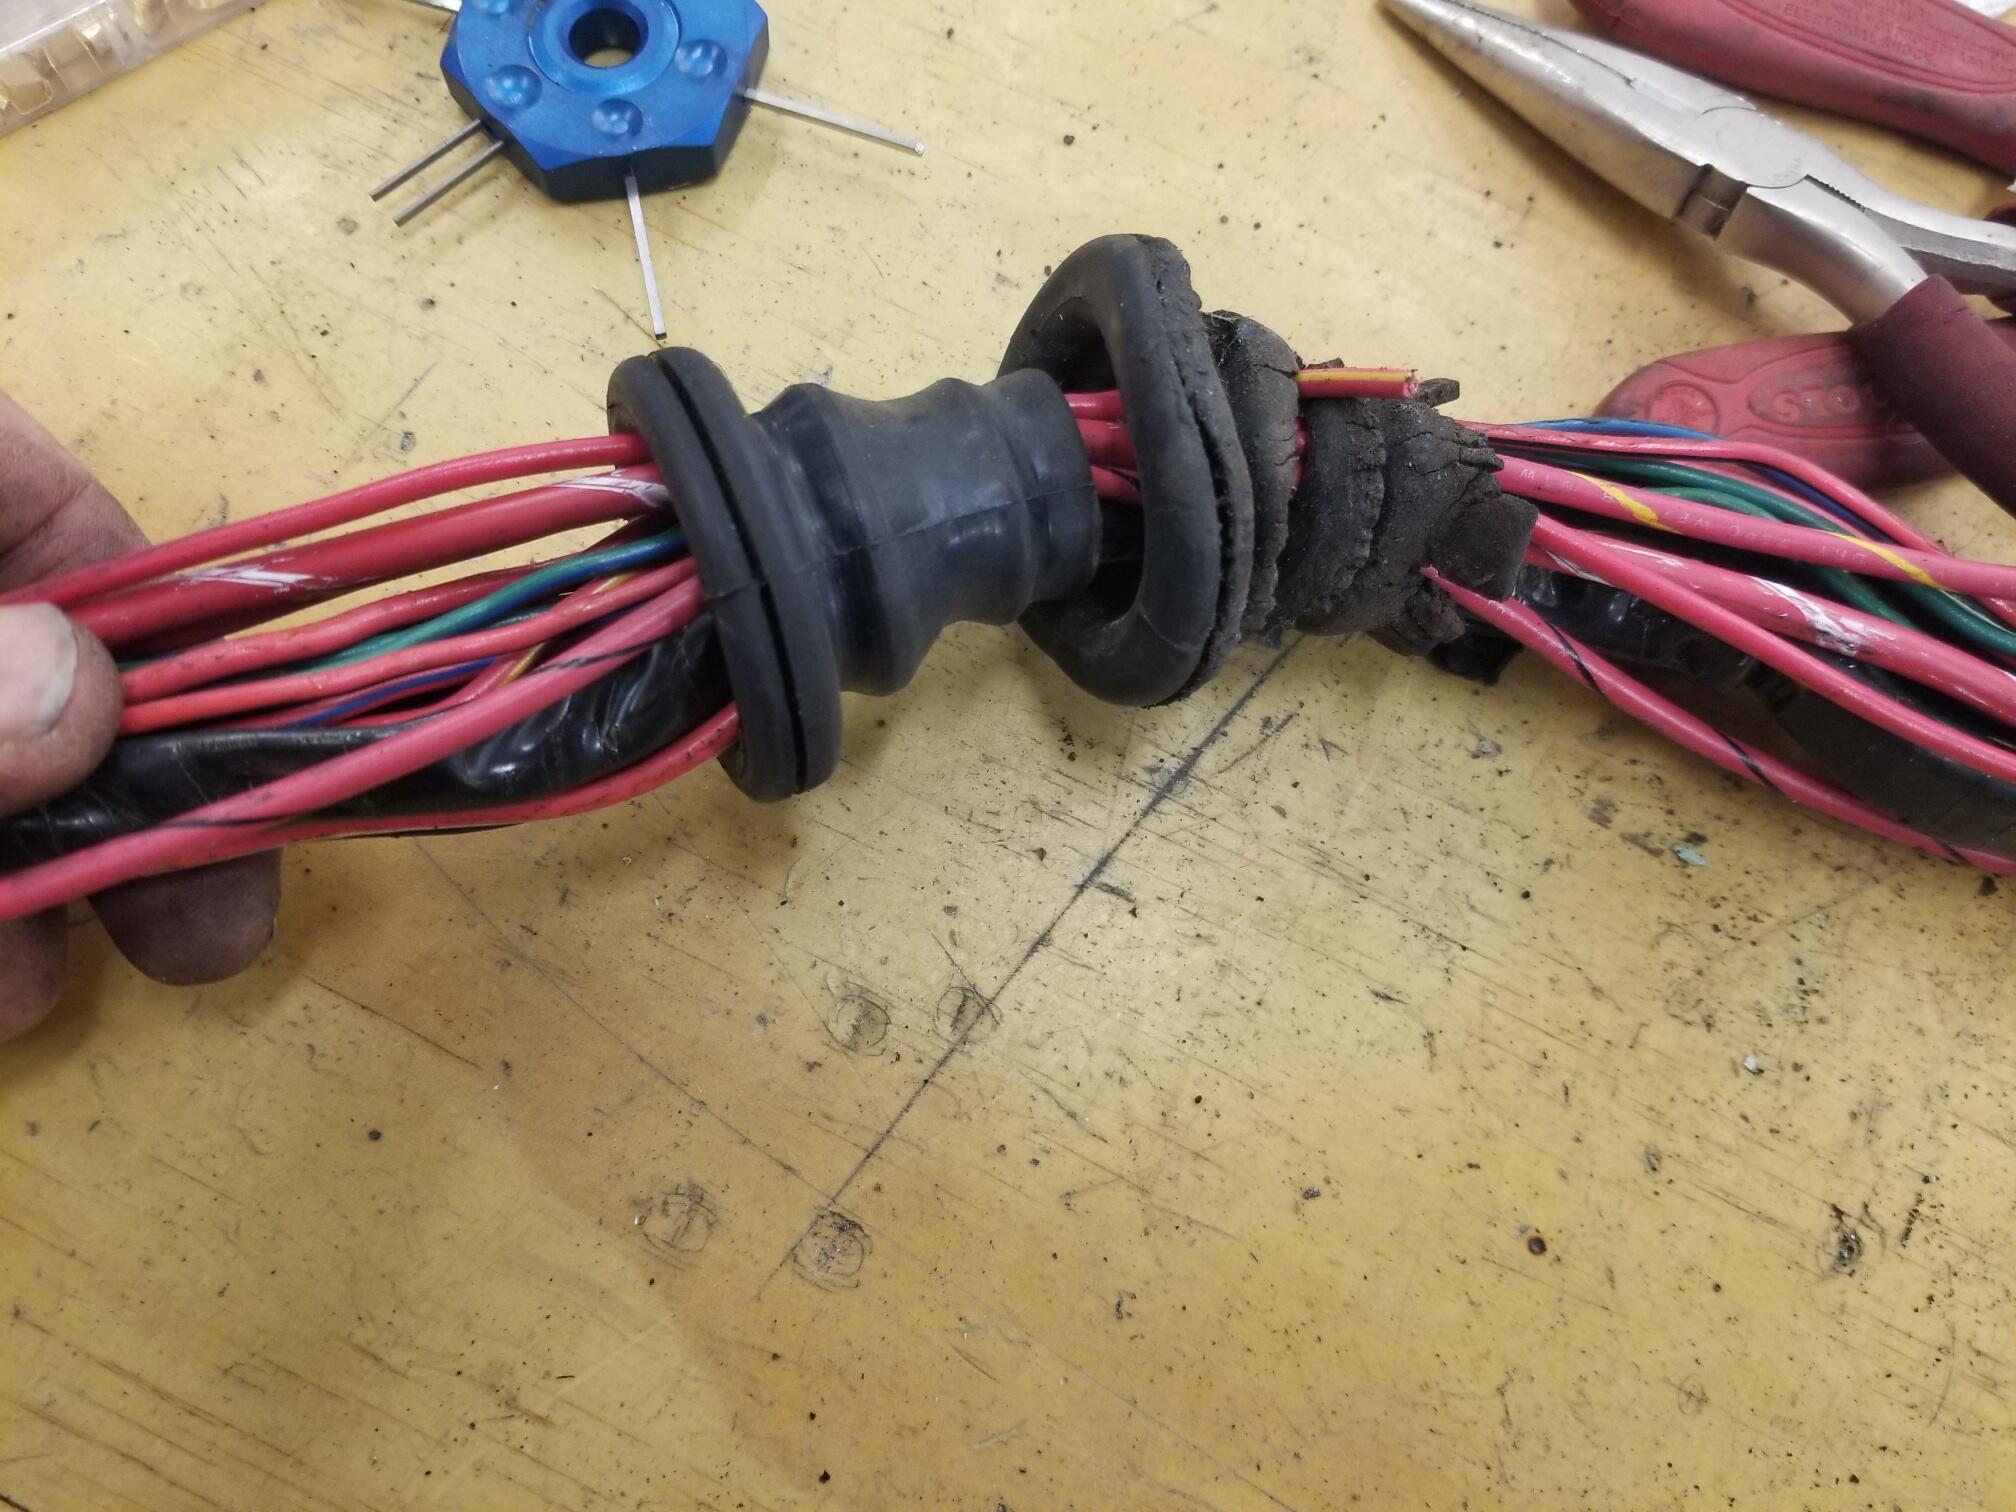
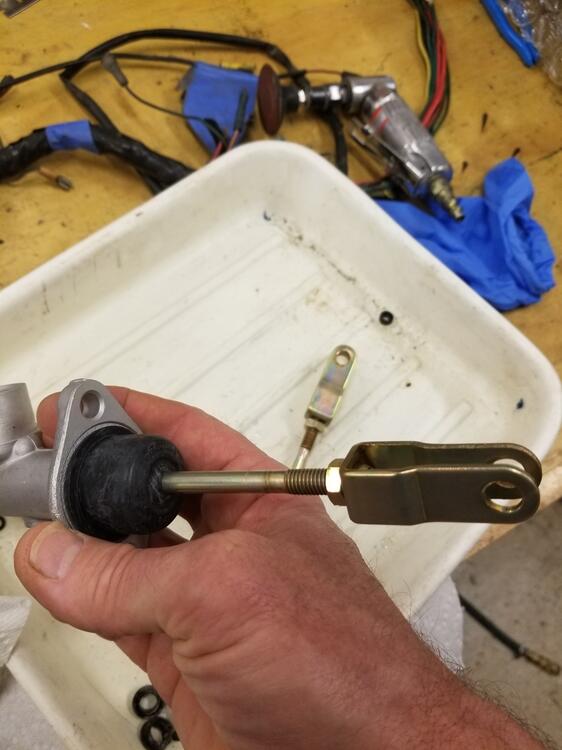
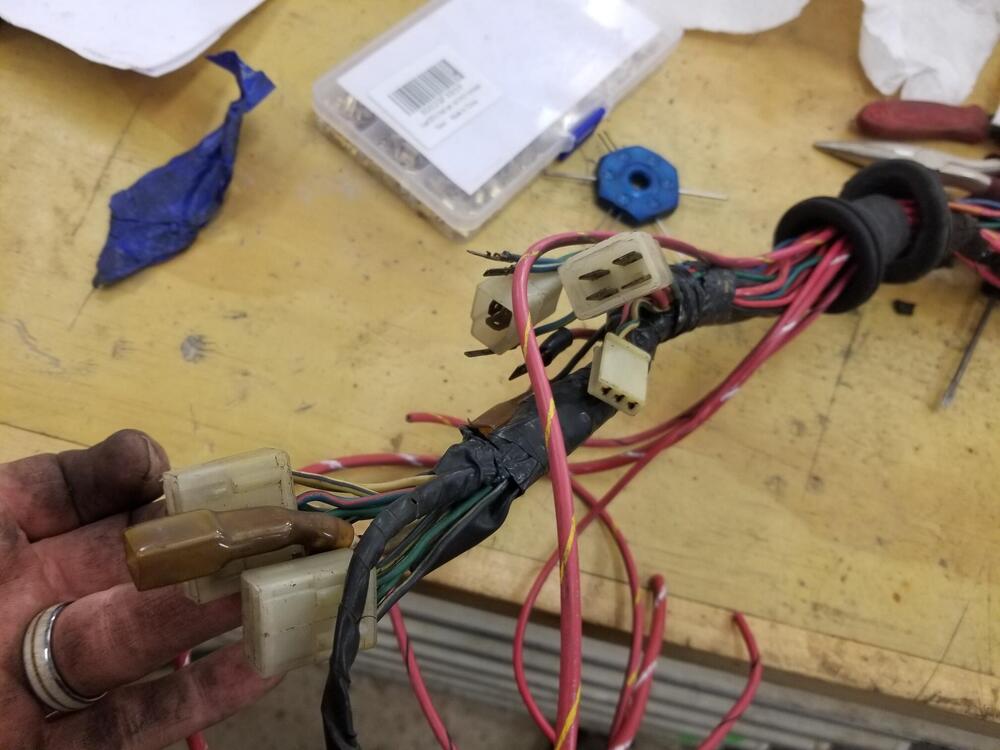
1 pointI did a little work on the car today. Finished assembling the rejuvenated clutch master. I also worked on the engine bay harness. I laid new wires into it and replace the firewall grommet. What a pain in the ...!!! You have to depin most of this to get it on. And some of those wires don't want to depin, even with the correct tools. I did finally get it. Hopefully I got them all back in the right spots. Otherwise SteveJ is gonna have a fit finding it!


 1 point
 -
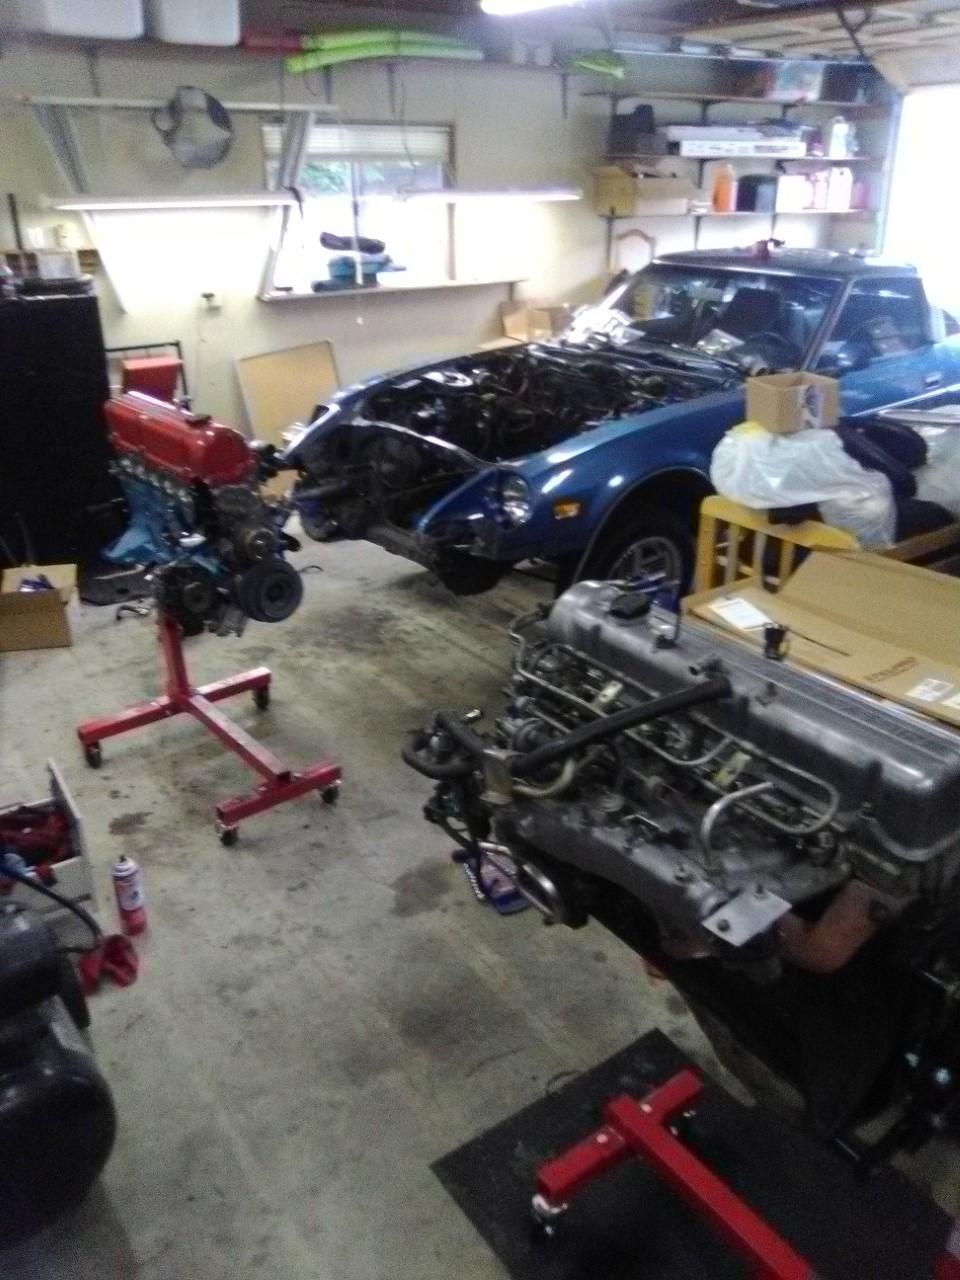
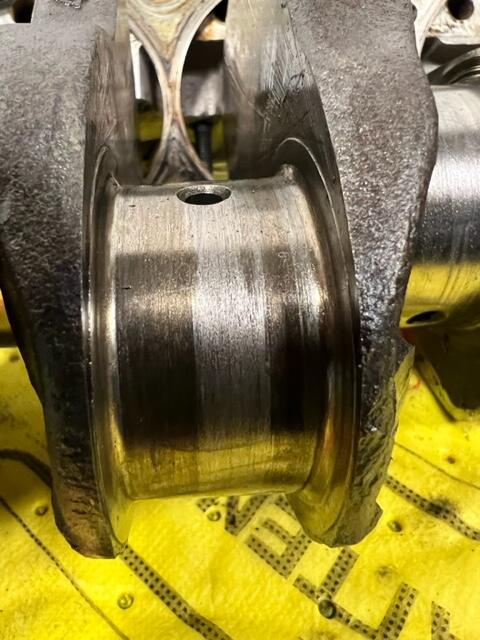
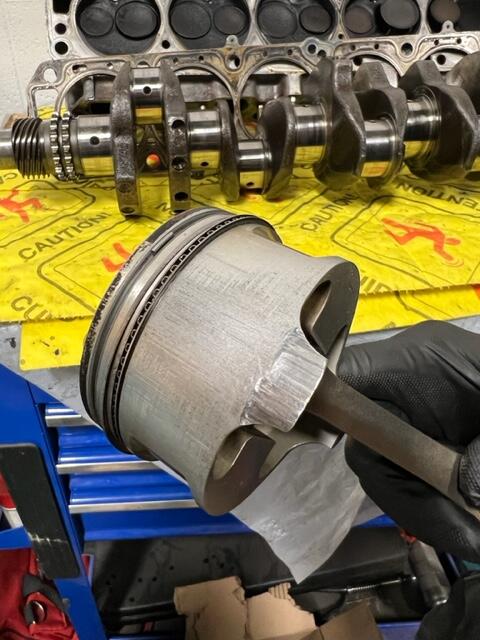
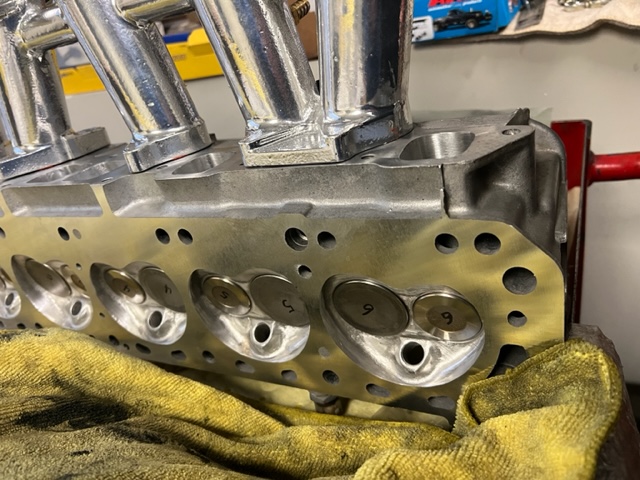
1 pointWell things never go according to plan, and even then the best laid plans never survive contact with the enemy... My plan being to refresh the engine with new bearings and a hone to the crank and cylinders. After mic'ing the crank, it was discovered that the PO had already honed .030" off the journals and there would not be enough meat left to machine them again. Bye bye V07 Crank 😞 Hmmm, doesn't look bad but.... So where do we go from there? Reg looked carefully at the pistons and the ring chamfers and concluded they were beyond hope too. More sad news but oh well. What else could go south? Well, apparently the block was maxed out at 90mm and there was not enough left to hone reliably for new 90mm pistons and rings. 😞 😞 My sad pistons and rings. Now what?? No crank, no pistons, no block and an E88 head with a corroded water jacket in need of a valve job and welding... After careful consideration, I decided I was not left with a lot of choice. Stay stock or start over. I decided to order a Dave Rebello 3.0 kit. Offset ground L28 crank, 88.5mm forged pistons, H beam rods, bearings, head gasket and rings. But where to put it? Lucky for me my builder had a stock F54 waiting for a future build in house. I convinced him to part ways with it, so that will be going out for some machining and prep for the Stroker kit. The E88 head was salvageable, but needed work to make it 100% again, so rather than re-use the E88, I decided now or never and brought my stock P90 to him for a 5 angle valve job, complete porting and polishing and custom fitting to the new block. Effectively the stroker engine will be all new with just the original valve cover and oil pan... New timing chain, cam shaft, valves, rockers, and paint. My stock state P90 The plan is to have all of this arrive in time for Reg to assemble and have ready for me to install in June when I am home. So much for the low budget rebuild! A nice pristine modded P90 from Reg...
 1 point
 -
1 point
 My friend and my lady...... The girl is my friend, *just friends* My zcar is still with me today (5 years), my friend.... she moved out of state to attend a Private University. I took this picture at church 2 years ago with a borrowed digital camera. The zcar is my first car, it took over a year to save for, with my minimum wage job. I used her to drive to work and school, in the mean time, I learned to work on cars, had my best and worst times with her and never plan on selling it! I love my Datsun 240z! This is my dream car!1 point
 -
0 pointsA bit more background on the Malibu. Mrs. Racer picked this thing up from the estate of the husband of a friend of her daughter’s. She wanted to give it to her oldest granddaughter who is a single mom and struggling to become established as an adult, and a young mother. She paid $3,000 for it. At the time she got it, the granddaughter was crossed up a bit, had another car, no driver’s license, no insurance. She had been involved in an accident, and because of no license, no insurance, and living on welfare, she wound up with a lien against her potential driver’s license (until she satisfies the judgement for the accident, she can’t get a driver’s license). Meanwhile, this car was sitting at our place. Oh, and my daily driver had a timing belt break, and I was driving Eddie, which at the time had his own issues, and had become undrivable. So Mrs. Racer told me to drive the Malibu. So I drove the Malibu to The Big Shed and back for work. Then one day the transmission went legs up. Apparently these things are known for transmission failures, an issue that caused GM to extend the warranty and time. But wait, it gets better. That extension of the warranty has expired, so no relief there. And given the electronic wizardry that modern automatic transmissions operate under these days, I would need to buy an expensive scan and programming tool if I was inclined to replace the transmission. Besides, I really dislike working on front wheel drive cars, and my Legacy is on the lift in my shop, so a transmission swap was out of the question, at least at that point in time. So I was driving Mrs. Racer’s Corolla, and getting Eddie drivable again. One day I came home from work and the Malibu was gone. Mrs. Racer decided to have AAMCO fix it. Um, OK, fine with me, I did mention my disdain for working on front wheel drive cars, right? That was last October. When we picked up the car, I drove it home. Immediately I noticed problems, the thing vibrated vigorously in gear at idle, it shifted randomly at the wrong time, refusing to downshift when needed, downshift when it shouldn’t, upshifting too soon or too late, shifting very hard, and also really soft. I immediately returned to the repair shop and complained. The kid said it has to relearn, and to give it a few hundred miles. Not wanting to be an arse I left, telling him I would be back. Our oldest grandson was killed November 13 when a guy got on the interstate going the wrong way and hit his car head on. The funeral was just after Thanksgiving. His father and stepmother came from Hawaii and we let them drive this POS Malibu . The vibrations never went way, the shifting did settle down, but the vibrations, not so much. So we took it back to AAMCO, and they fussed with it for a week, then called to say it needed a transmission, but it had to be ordered, and for the interim we needed to come get it so there wouldn’t be an issue with storage. Meanwhile, the TPMS sensors in the wheels died. So now the information display pesters us every time the car is started (and the buttons on the steering wheel work when they want to, not when they are pressed by one of us). So after a couple of weeks the transmission shop calls, the tranny is in, and we need to bring the car in. When driving the car in, Mrs. Racer notices a brief error message about the power steering. I do some research, and of course, the electric power steering unit has known issues. After a couple of weeks the calls and says the car would be ready, but when they try to start it a fuse keeps blowing. A few days go by, then they call and say the car is ready. We picked it up Monday, and the guy says the reason the fuse kept blowing is because the battery needs replacing. Really? I’ve been working on cars for a very long time, and never once experienced a vehicle blowing fuses because the battery is in poor condition. I asked what they did to fix the fuse blowing, and the guy said they had to replace the ECM. Again, really? Well, no charge for the ECM, or the fuses, and the transmission was replaced under warranty. Better not cost anything, the replacement transmission cost $6,000. So it appears that the transmission is working as expected now, but the TPMS sensors, the power steering unit, and now the system is unhappy with the airbags and displays a persistent “service airbag” nag. This car is such a pile of fecal matter. But hey, it has a killer stereo.0 points