


Leaderboard

 Subscriber


Popular Content
Showing content with the highest reputation on 02/18/2023 in all areas
-
2 pointsJust got an email from resurrected classics. They have repro fenders, hatch, etc in stock. No clue as to the quality, but I was unable to find a fender from anyone else in stock when I was looking. I ended up making one out of two. No affliation with the company, except I have bought stuff from them that was good quality. Just thought I would share in case someone else was looking for them.2 points
-
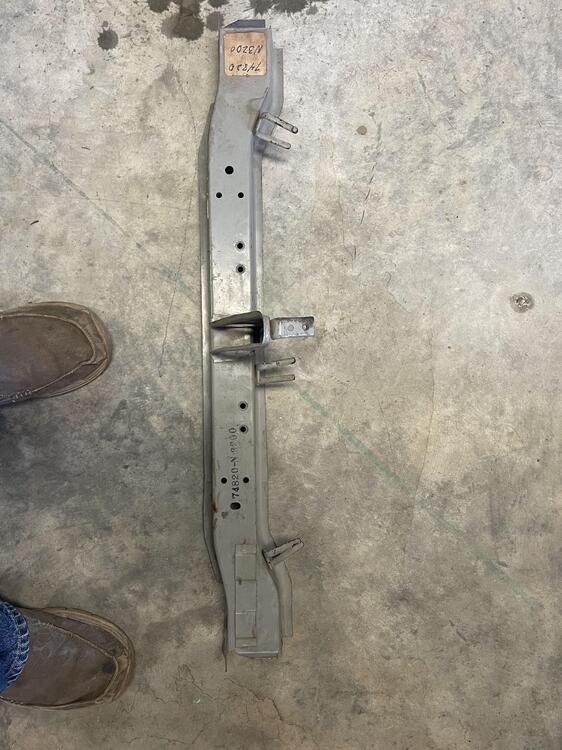
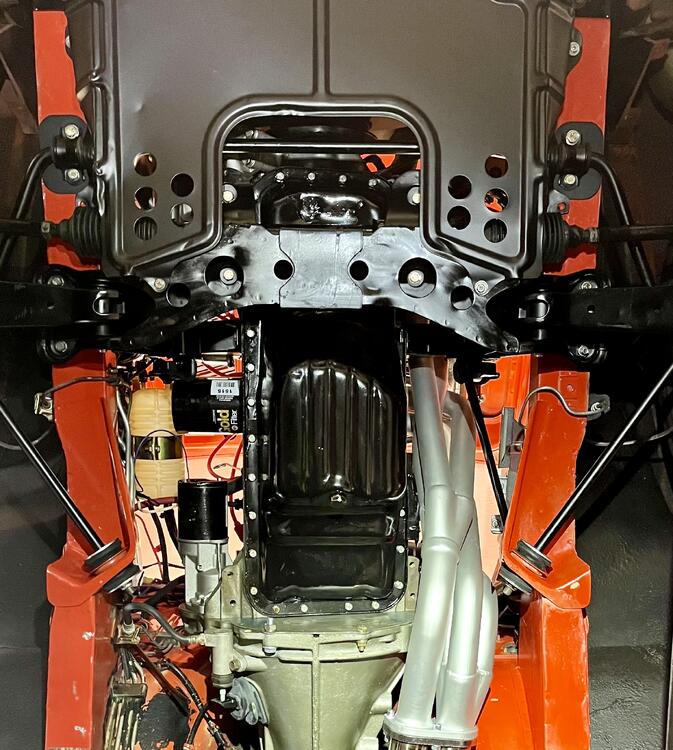
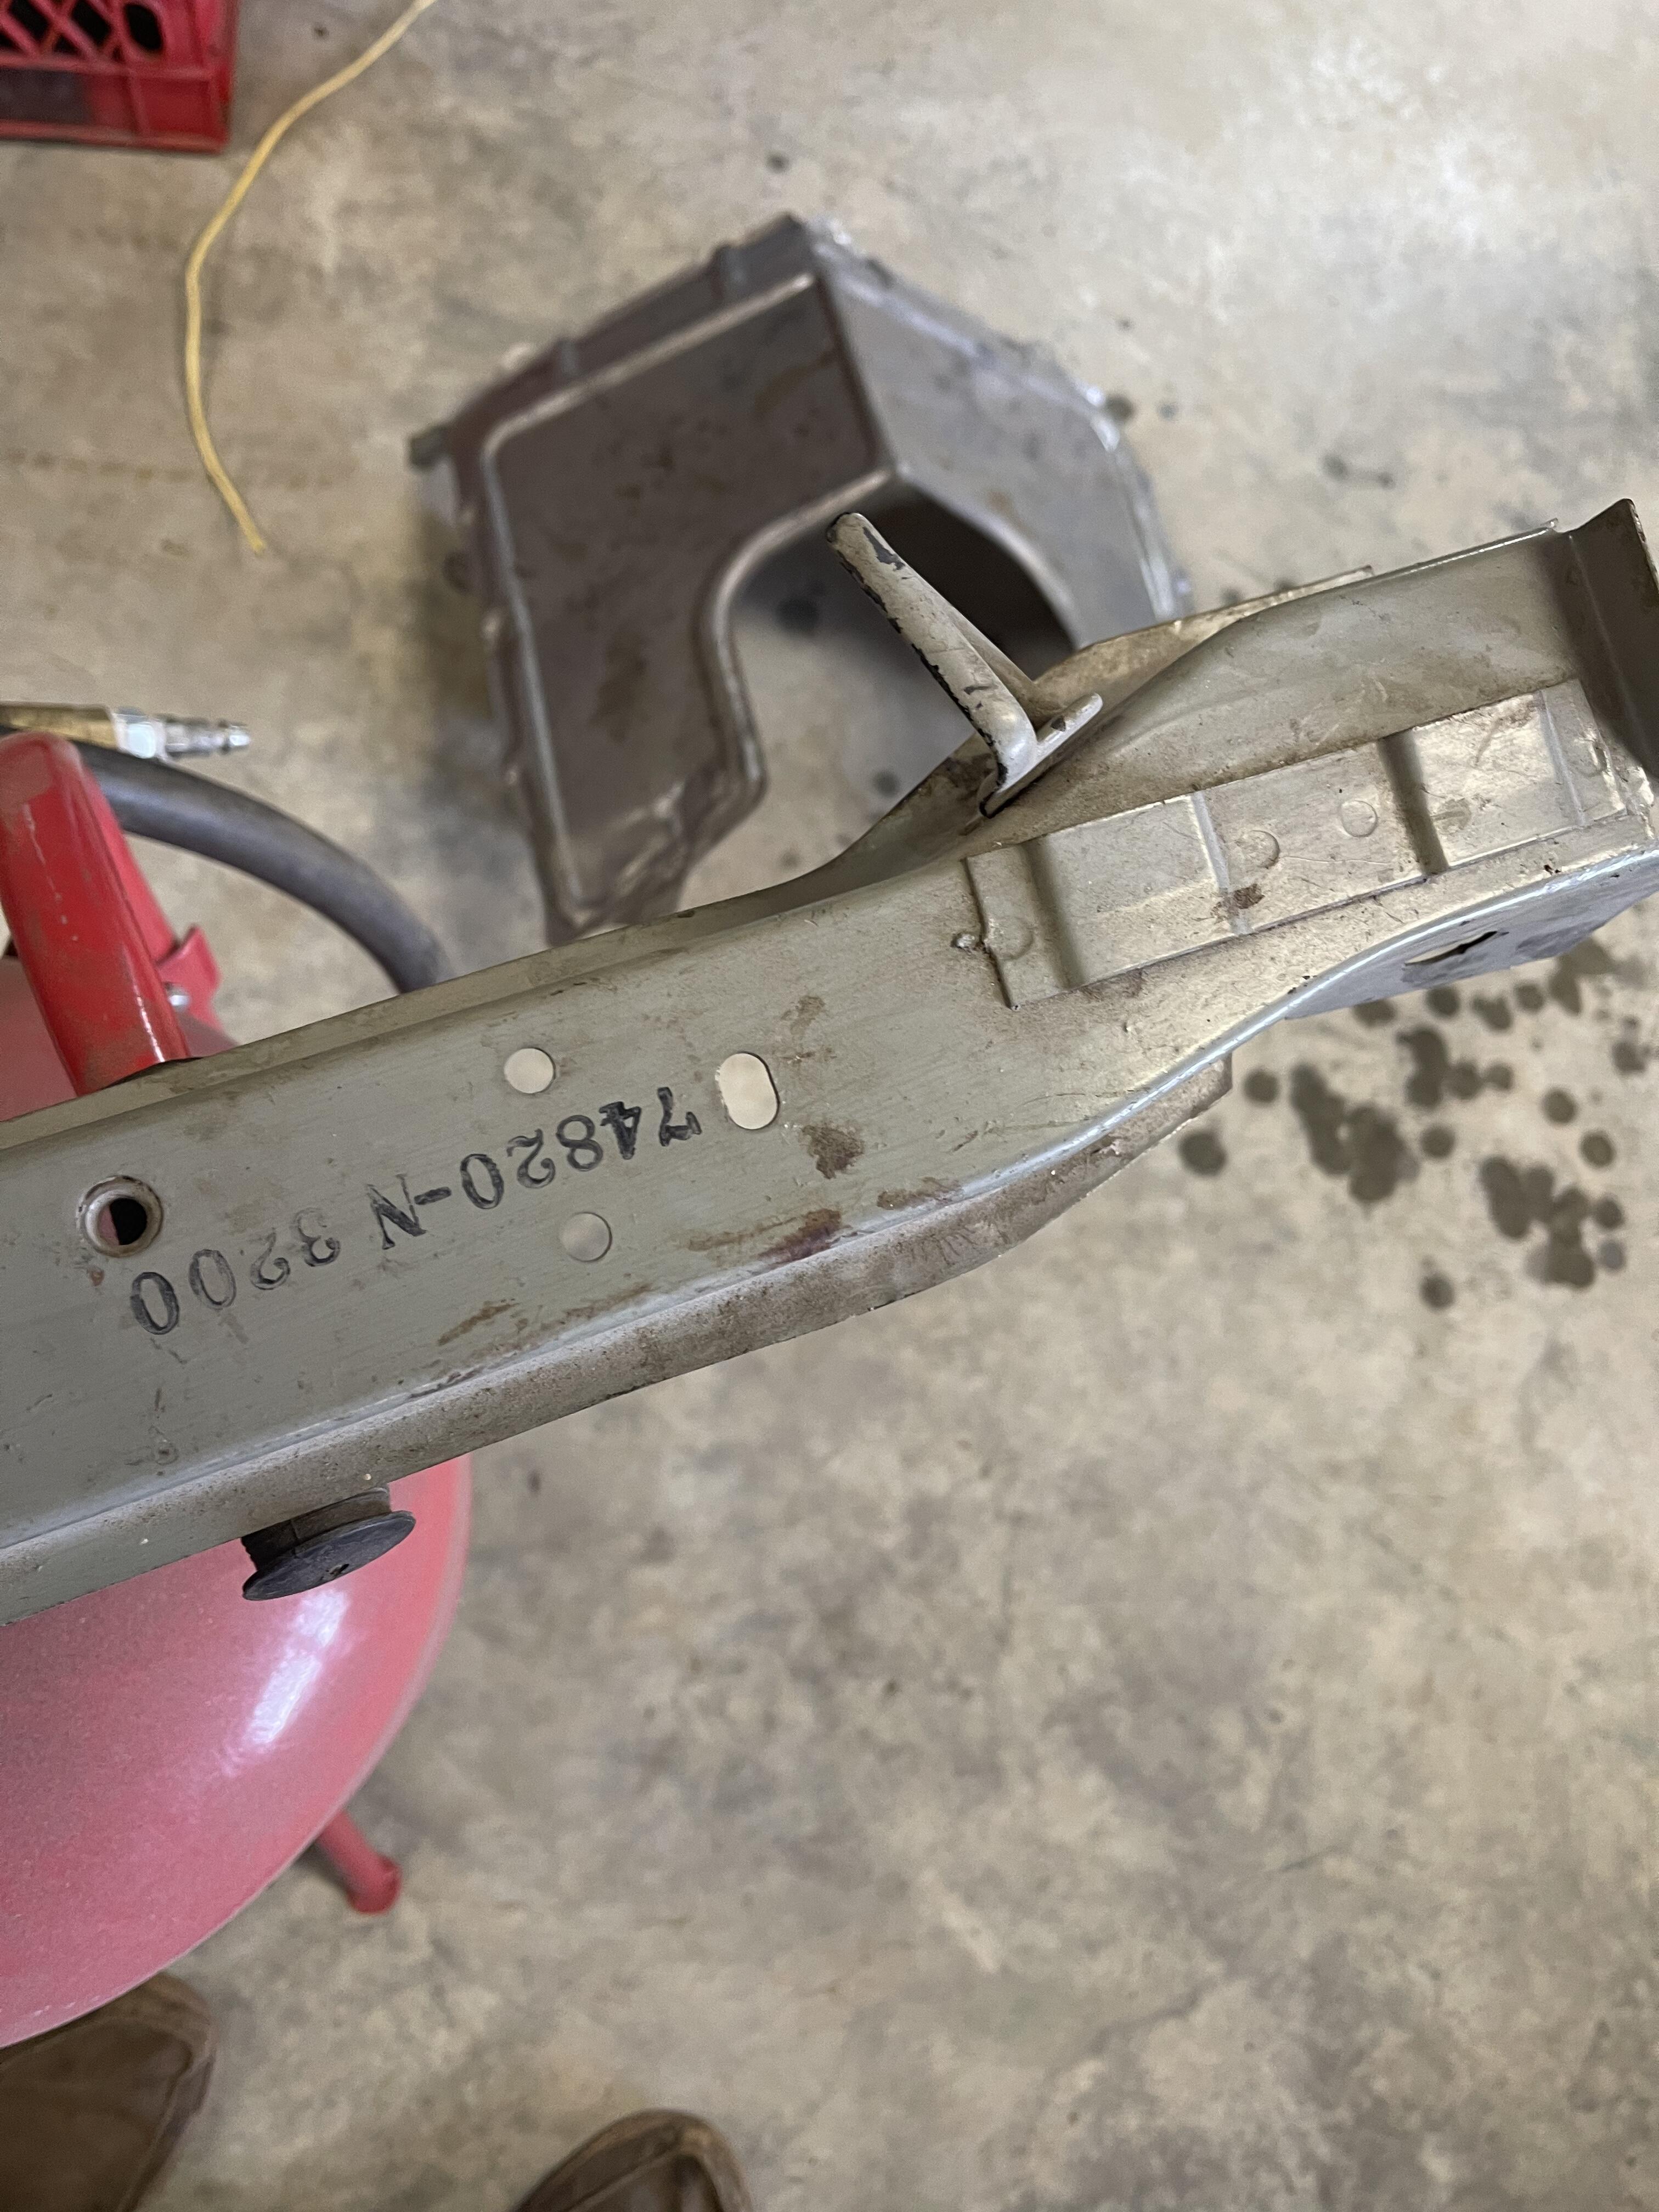
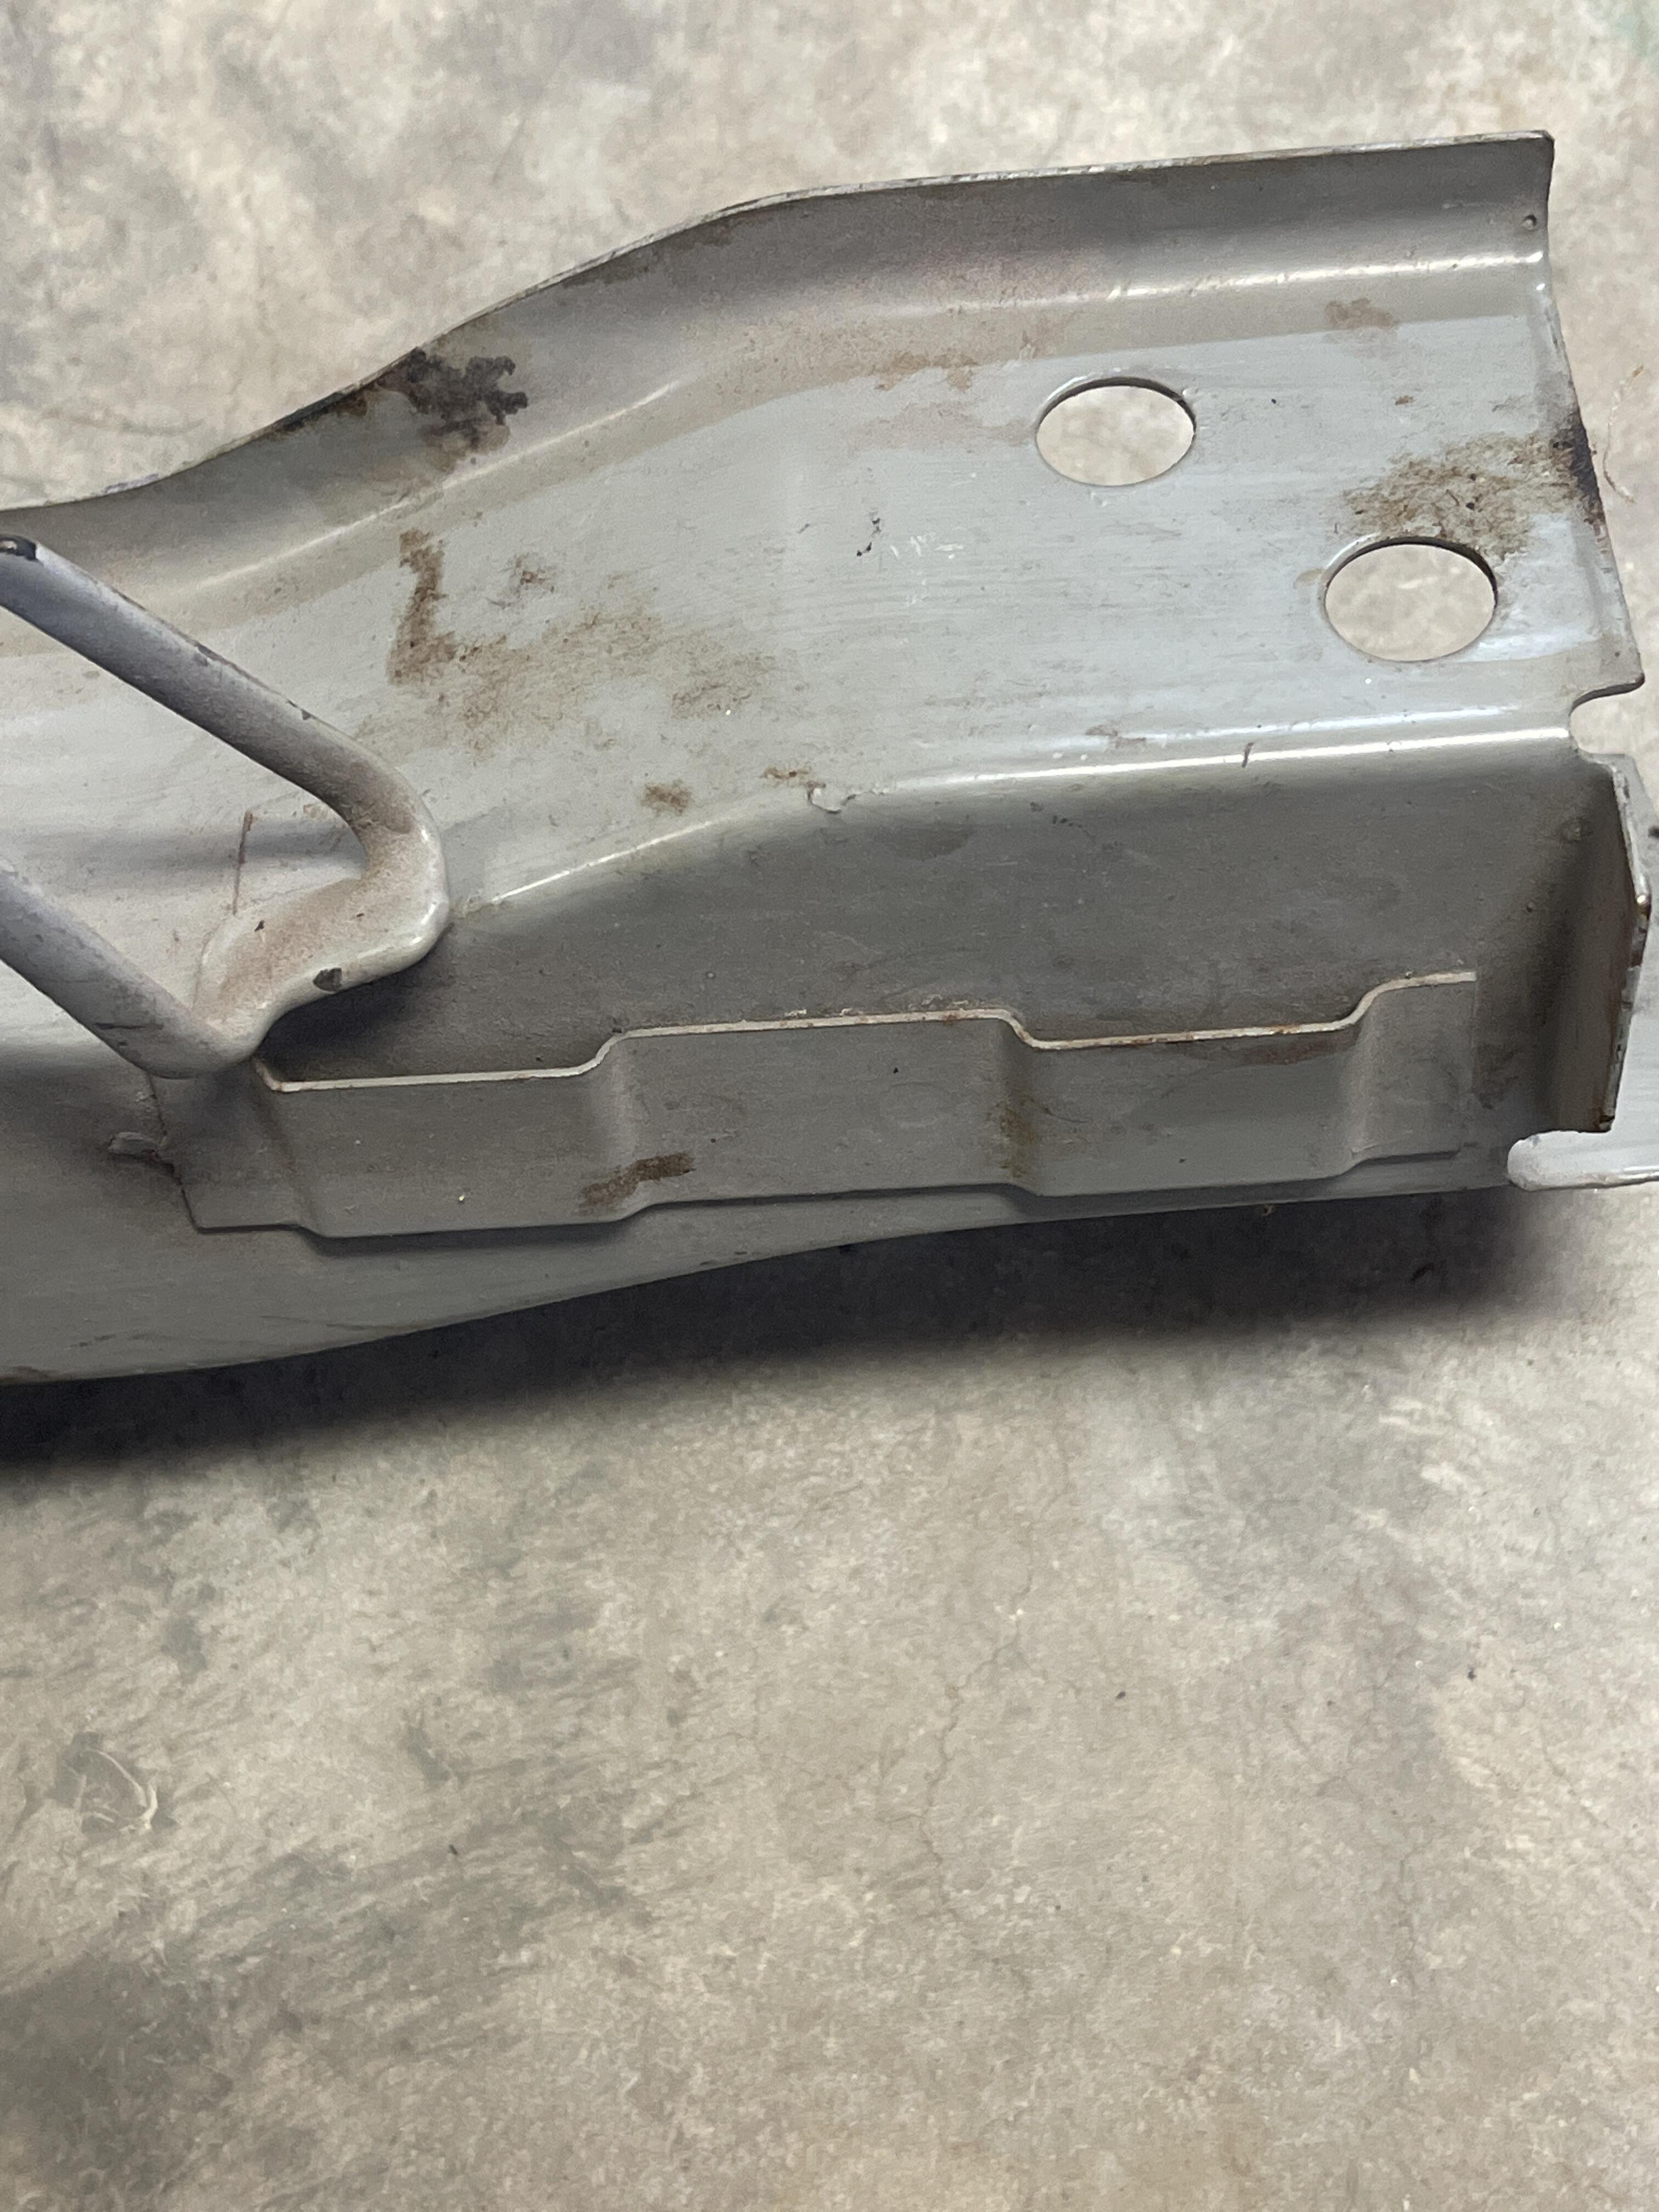
2 pointsFound this lower radiator support in a parts pile that has me befuddled once more….. I know the 2 clips for mounting the Japanese market 432 air filter on the drivers right side, but this piece has the same small clips on the passenger side left lower radiator support. What was mounted on this side before 1974 ?

 2 points
 -
2 pointsHey Ferg, I have "fixed" my 240z between 1998 and 2000, i had a accident at work and needed a car as my boss putted me after 13 years on the street.. (I had a company car) and the 240z was a hobby.. it failed in 23 years just twice and it was because of no fuel in it and a under hood light that had a burnt out bulb, and it came back to live through a shaking car and draint the battery! What i want to say: these s30's are one of the most reliable cars there are around. i always laugh when people with " modern " cars have all kind of trouble with theire cars.. As these s30 have a electric plan that fits on a A4 piece of paper there is not much that can go wrong! And when i see what some people have to pay for theire garage bill pfff.. Crazy Money!! 🤬2 points
-
1 pointMy friend Clay Beacham has the car that has the “432” lower radiator support with a/c condenser mounts and the mounts for the 432 air box….. both these pieces came from the same purchase that originally was from New Jersey area in mid 70s I’m sure the front of his car was repaired with that replacement body part1 point
-
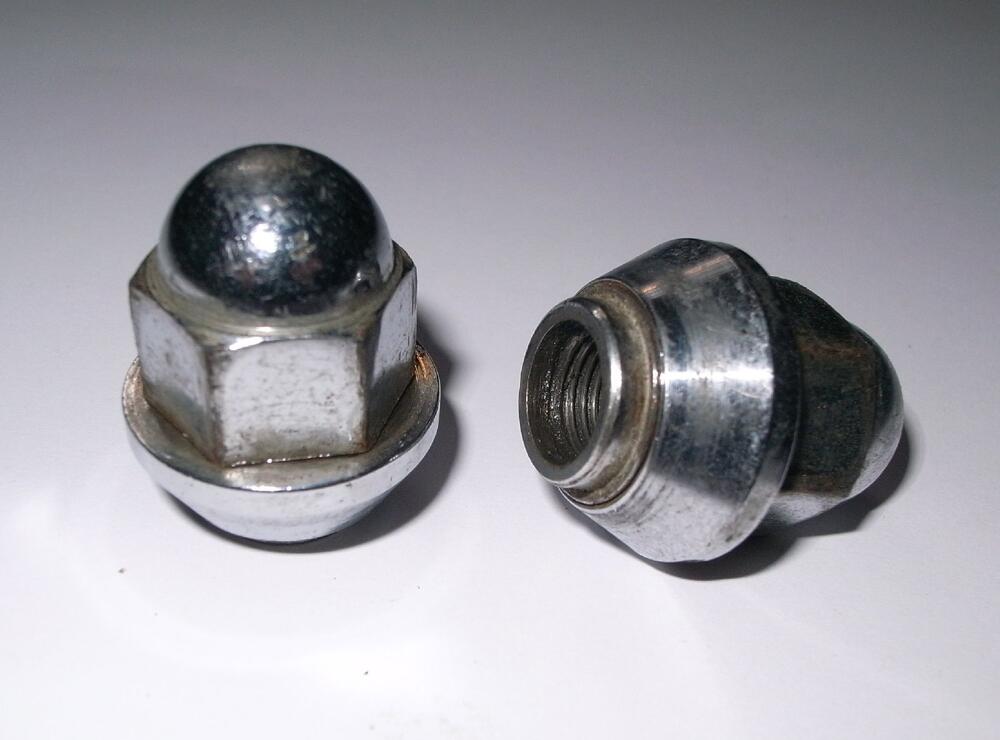
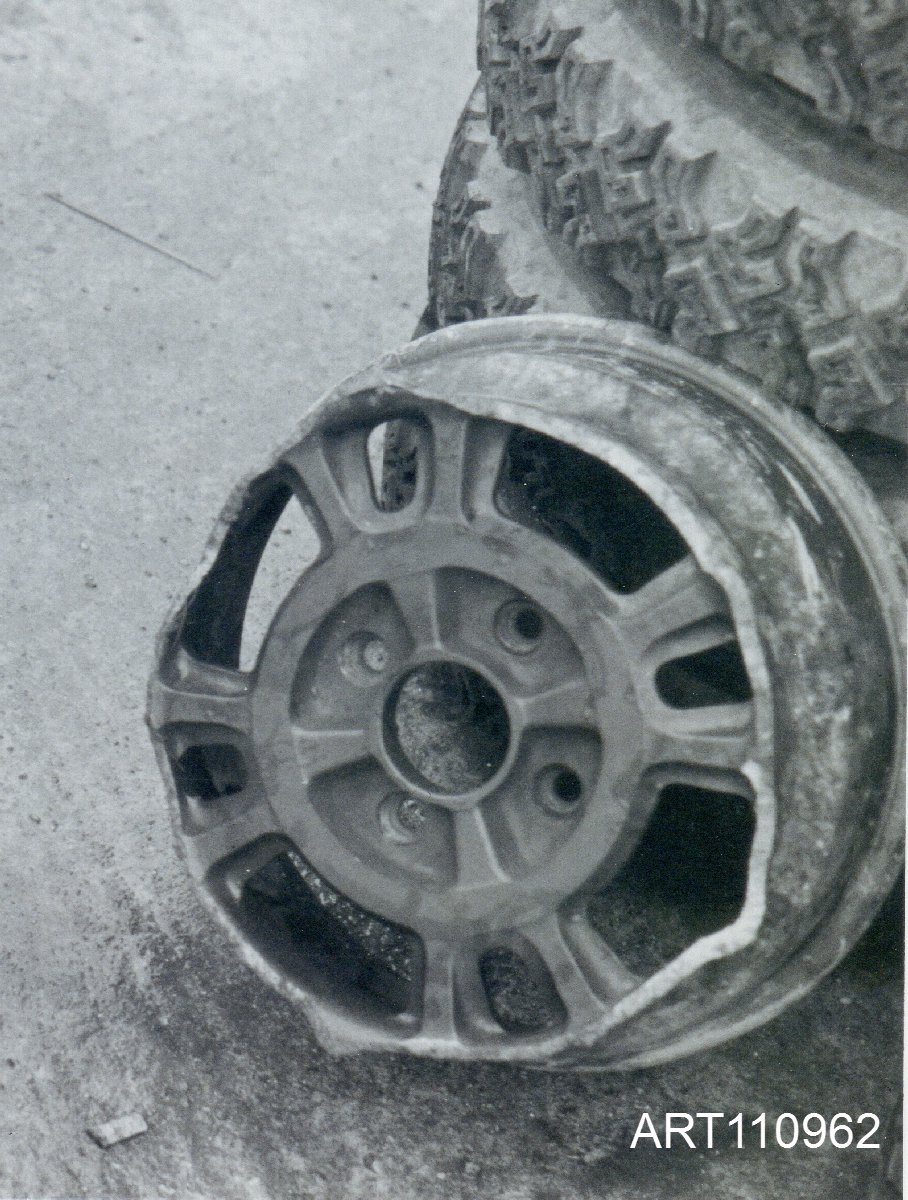
1 pointThanks Alan, I am so glad that you are sharing your fantastic pictures here, I appreciate it so much. We can see a lot of details, I can just stare those pictures all day long. What a shocking picture that is!! Broken apart wheel!! I just hope that never happens to me. By the way, do you think the reason why the open type spinning collar nut became dome type head nut would be to prevent studs from dirt and soil? I would like to know how about Works cars on the circuit at the same time frame. Kats1 point
-
1 pointThanks xs10shl, I am learning from you too. And more pictures, thanks! I didn’t expect that the Works wheel has a straight hole for the straight sleeve nut, it is interesting. For safety reasons, people don’t recommend using the old original magnesium wheel. Also Nissan says about care of it in the book “after driving in a salty water you must wash the wheel really well with the fresh water” I know most of Z432 owners are still riding on their original magnesium wheels. Never heard of bad news. Maybe they don’t travel far away? I know there is only one enthusiast who loves driving long-distance across Japan is Takeuchi-san, a PZR owner. I do drive like Takeuchi san, but he has been doing it from late 1970’s. Kats1 point
-
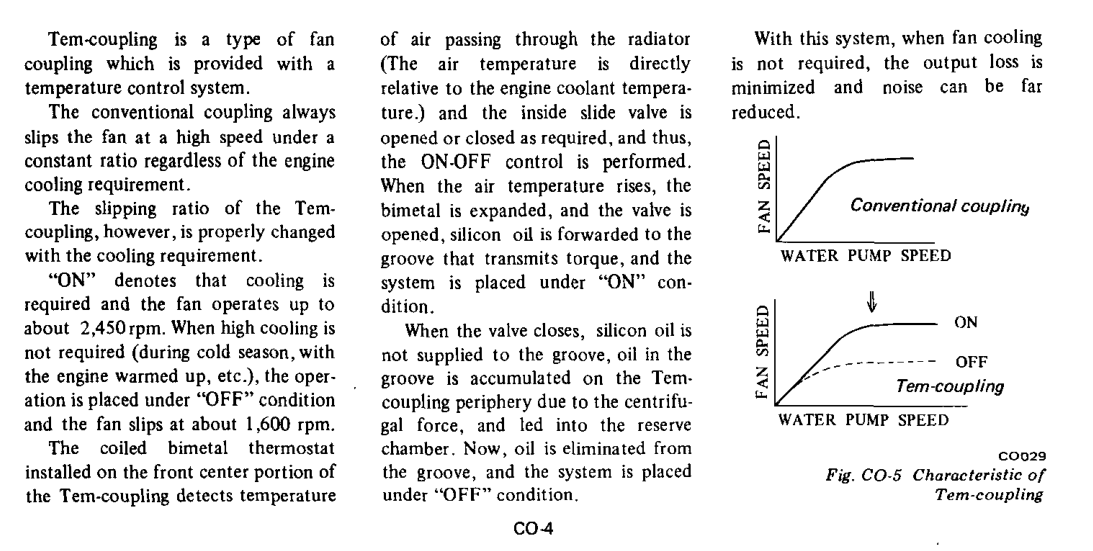
1 pointSee how many rounds you can spin the fan by hand when it's cold. I can't get one complete rotation on mine. I found the restore clutch from Blue's Tech Tips. It's a download now, the original site is unavailable. FAN 280zx Datsun rebuild fan clutch (1).pdf1 point
-
1 pointThanks Ian, now I have got you. I am not good at Physics but I can understand how the thick fixed washer does for the magnesium wheel. Then why did Kobe Seiko go to put tapered seat lately? I am wondering it like you. Also the Works car’s wheel too, put a tapered seat in a magnesium wheel. Is this something like a compromised engineering? Or, did a newly invented nut with a spinning collar achieve for both good clamping force and centering the wheel? Mr.Namba - the general manager of the Works rally team - said “ we applied it for patents “. I guess spinning collar would be nice because it doesn’t get scratched. Worn out-free collar is always keeping correct clamping force. Wheels were so many prepared and provided in the rally , but wheel nuts might have always been with the car(just my guess, I think each car had spare nuts however) . Kats1 point
-
1 pointI think this mount is related to the air filter housing of the fuel injected models, superseded in August 1974 by another design?1 point
-
1 pointI have dealt with resurrected classics and have been very pleased with their products.1 point
-
1 pointThe clutch gets stiffer as it heats up. The fan doesn't need to push much air on a cold engine.
 1 point
 -
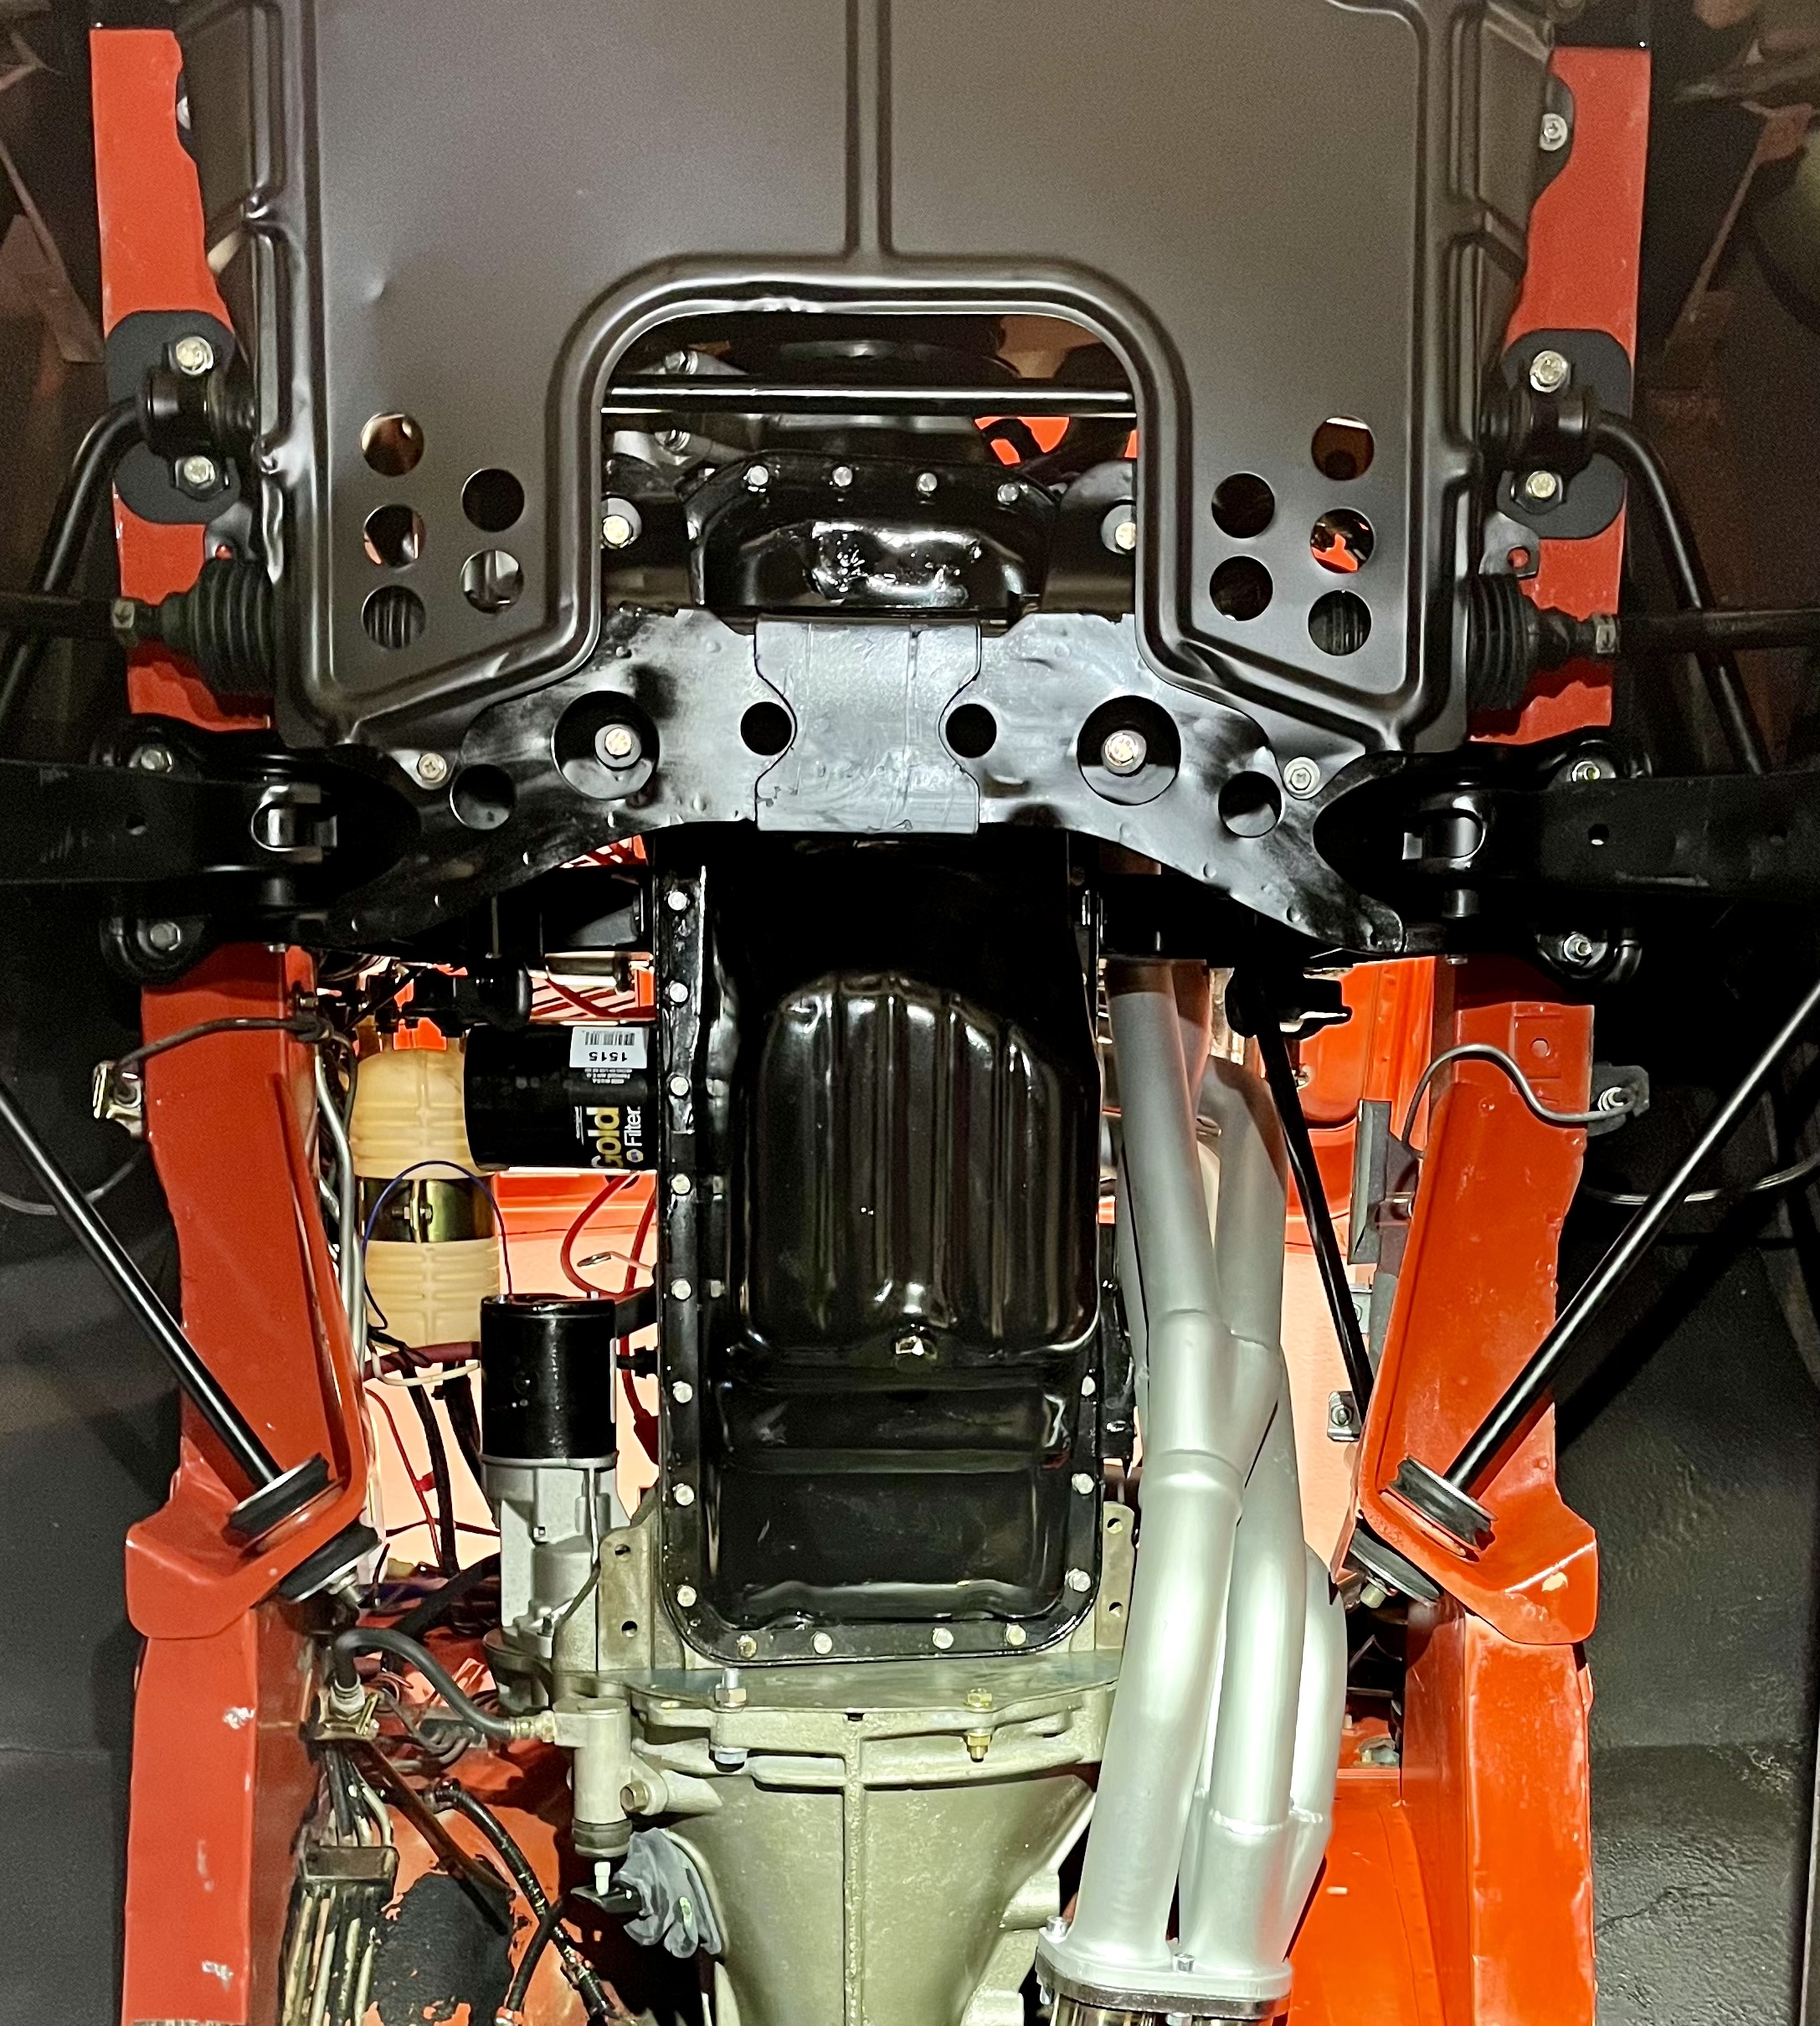
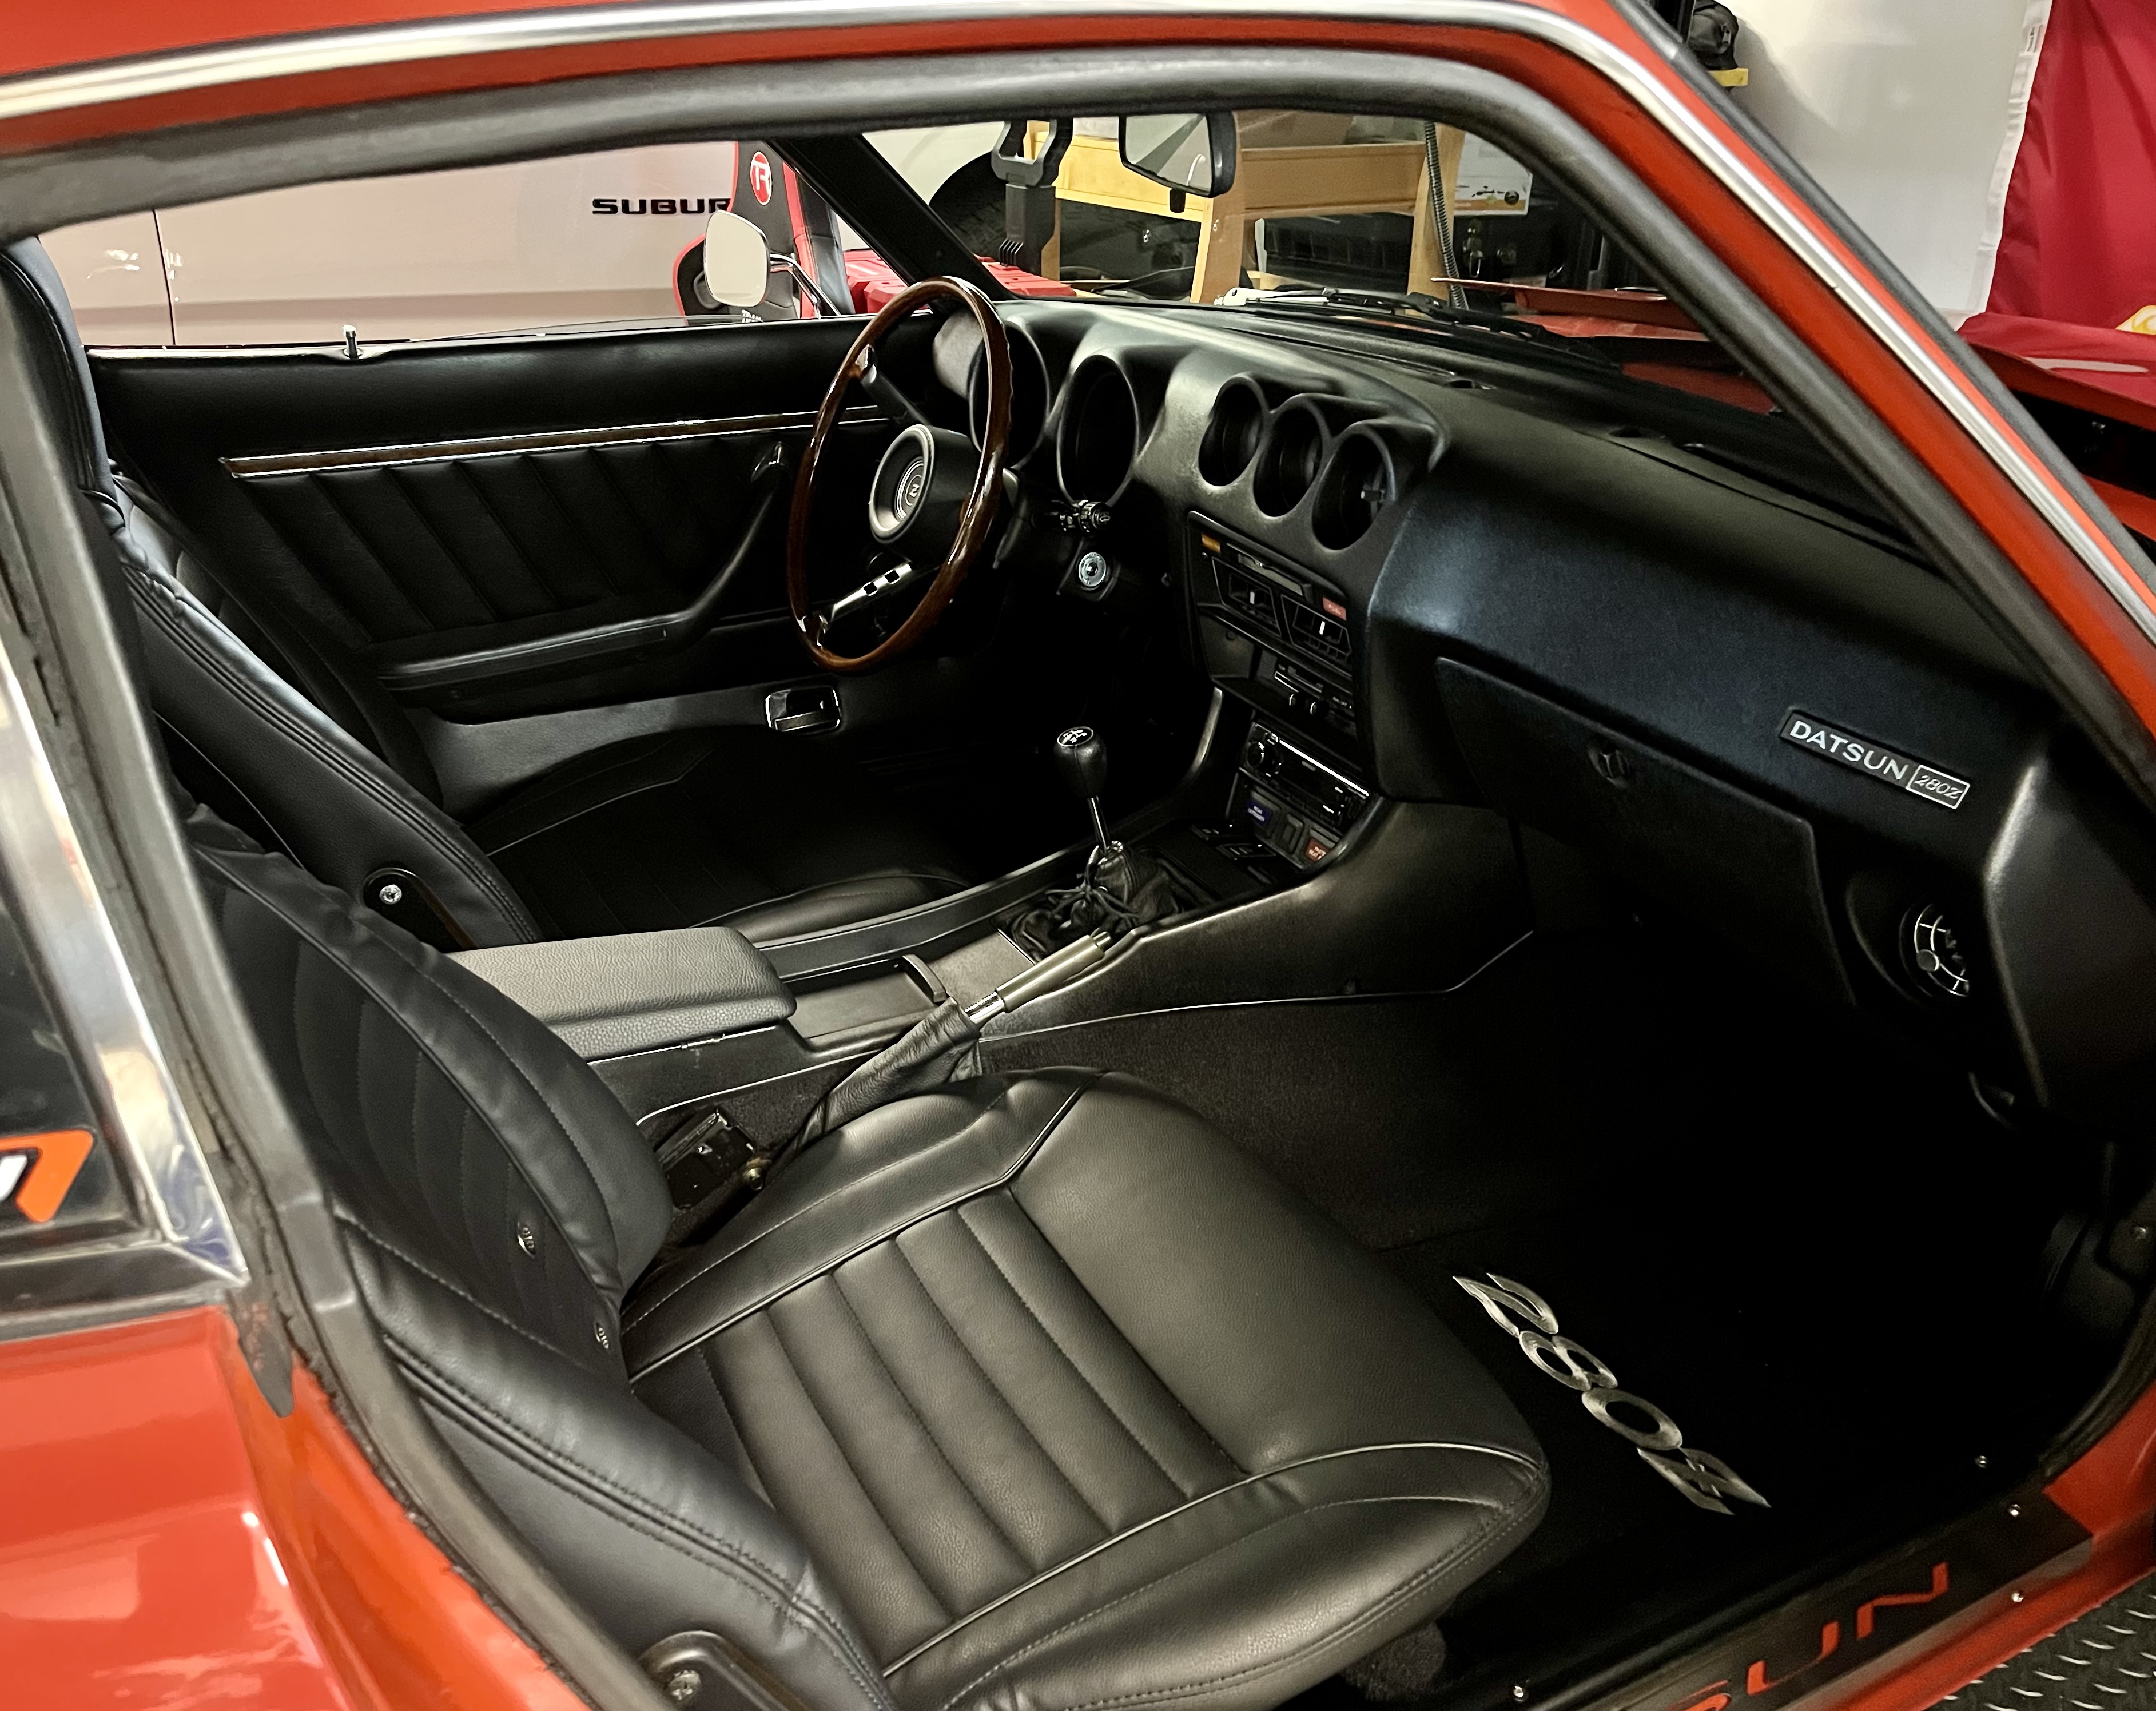
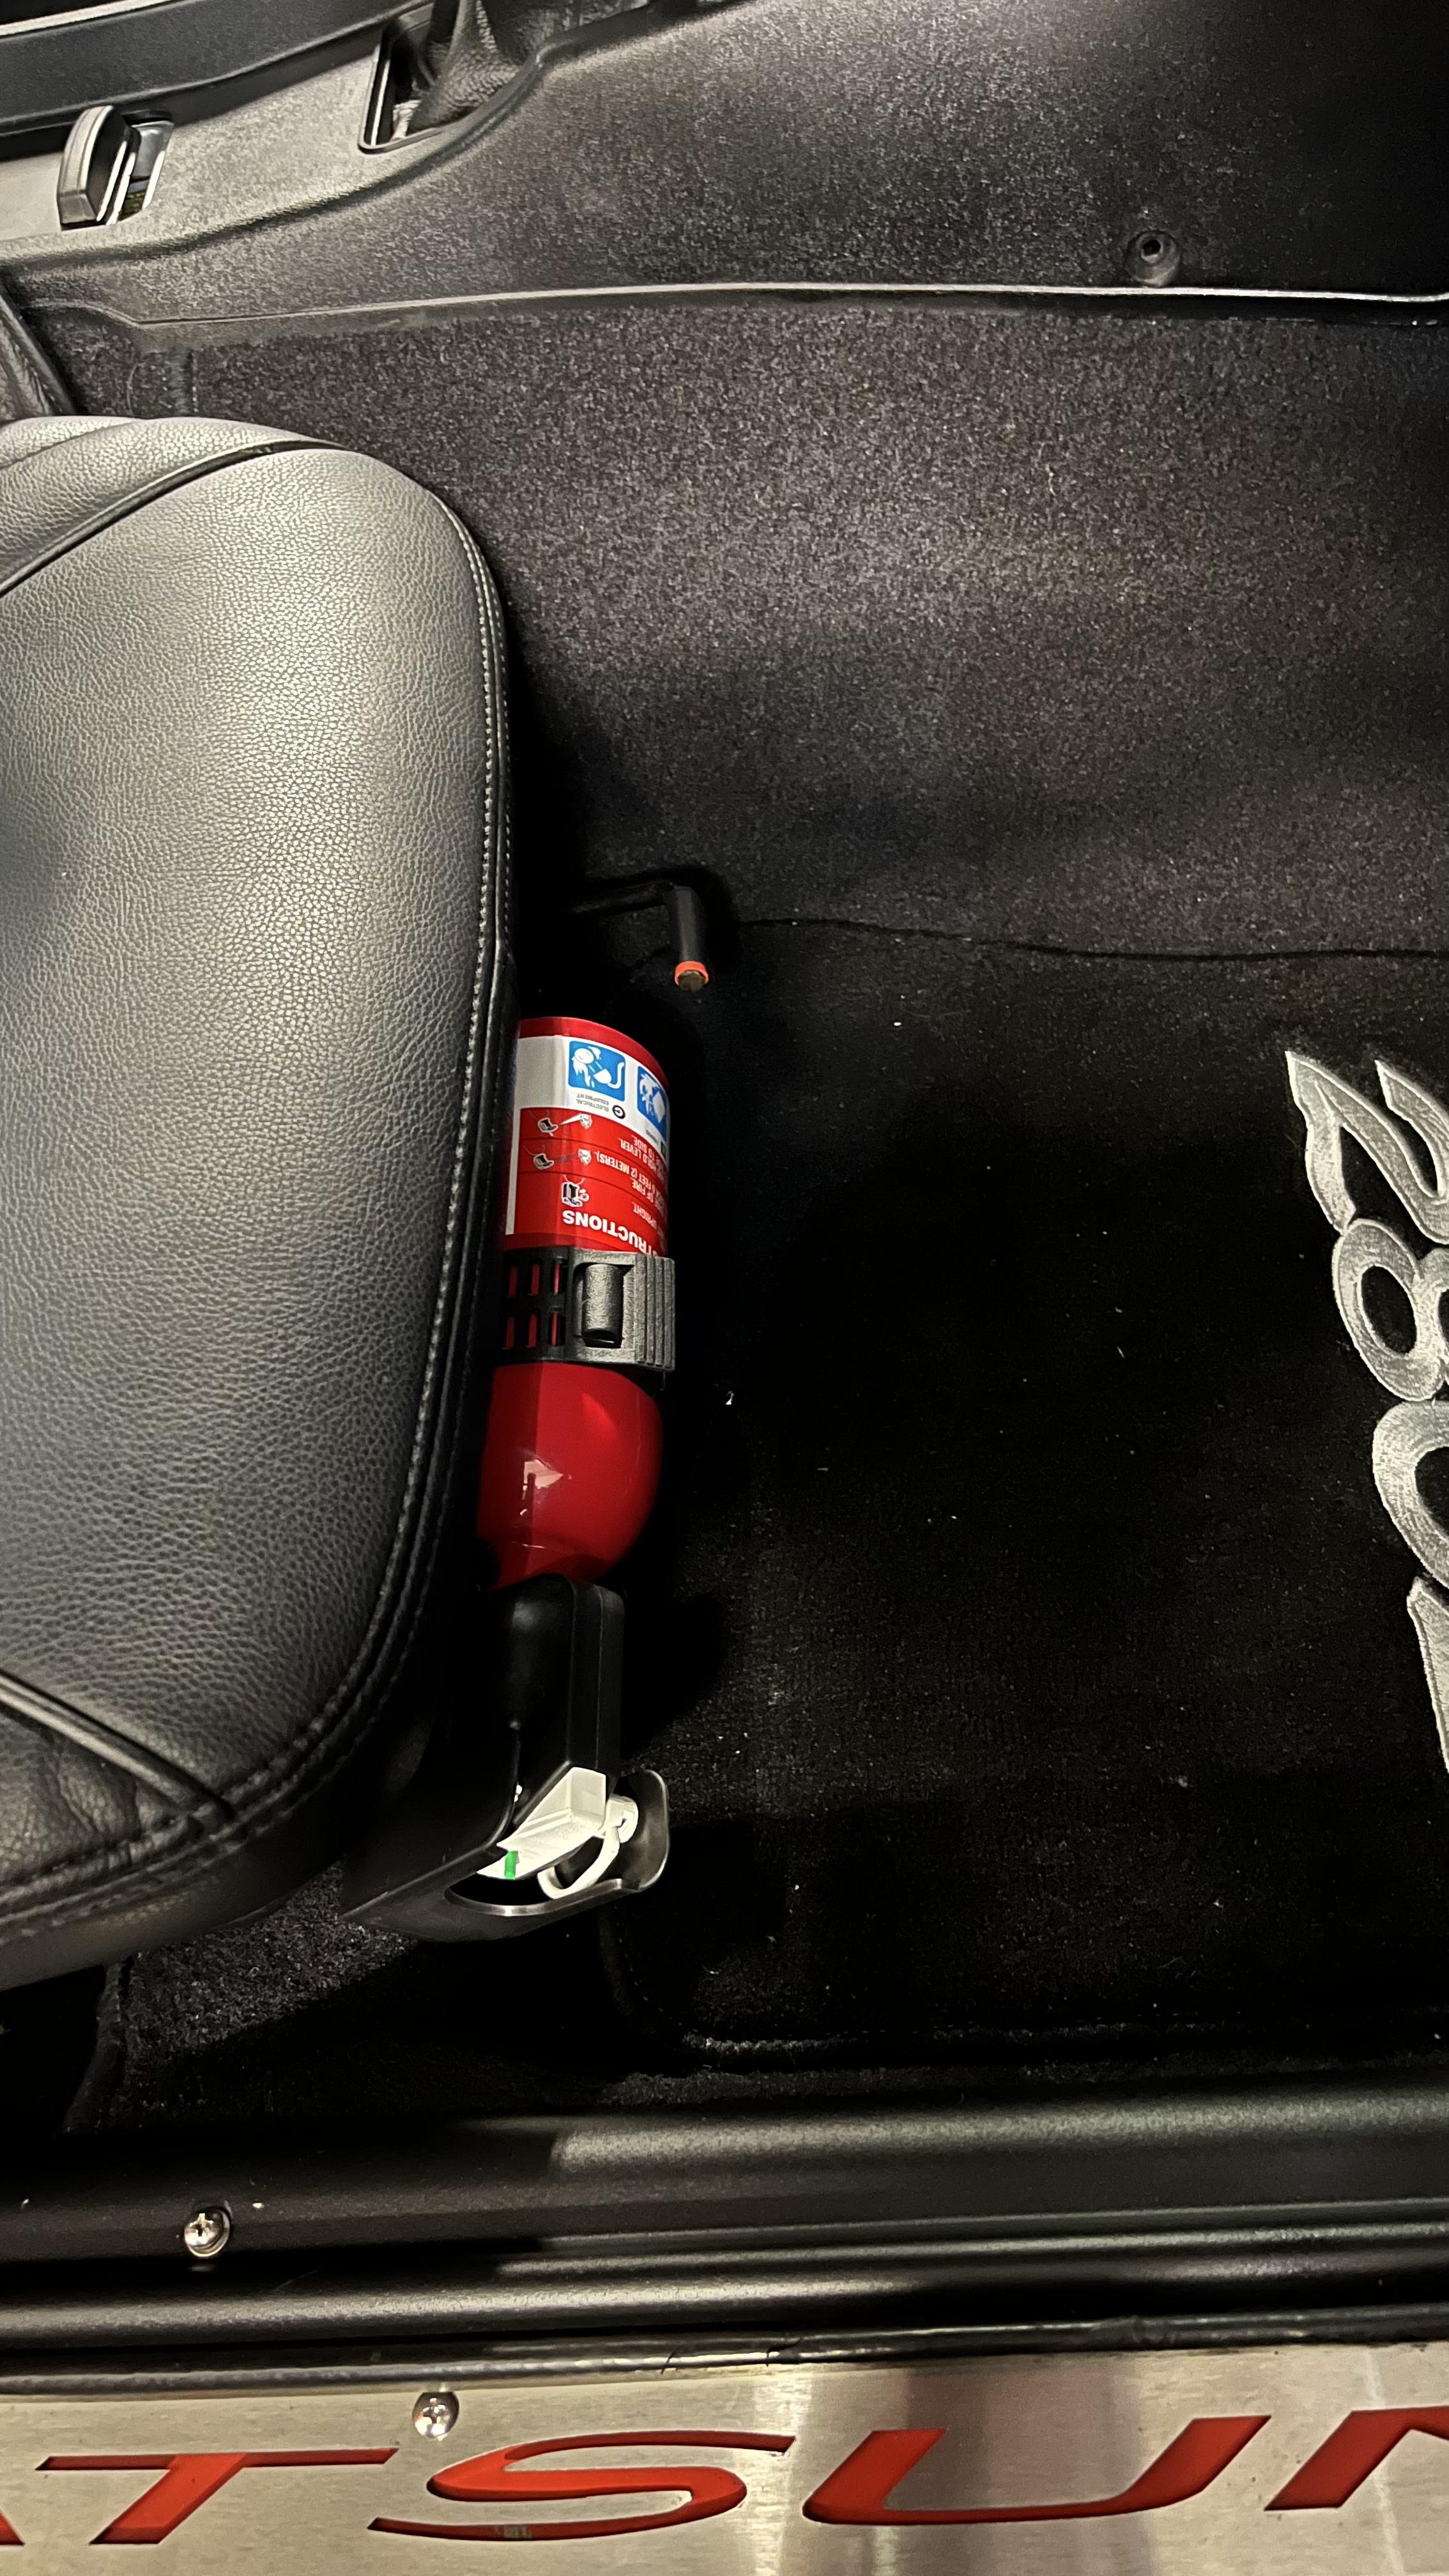
1 point1 point1 pointSo my son talked me into reupholstering the driver's seat, and adding a seat we found on eBay for the passenger's side from a 260Z. It all wound up costing more than a set of seats new, but I guess at least we keep the stock seats which are flat enough. I'll post pics when we get it done!1 point1 pointYes, this is the old style, I have them to on the z. It works but the clearance needs to be absolut minium or else vibration... Back in the day they used to do a lot of finish balancing to get most out1 point1 pointHere’s an update. I’ve been busy but have had a chance to make more progress on the Z. I took the car on a 100 mile round trip drive and it drove flawlessly. Got it to about 85mph. No shakes, or rattles, engine pulls hard and has good torque. This was the farthest I’ve been from home in it and I’m building a lot of confidence. Latest work completed. 1. Zstory headers came in a while back and I finally got around to ceramic coating them (at a local shop) and installed them. Very tight fit but worked fine. Scratched up the ceramic coating a bit on install unfortunately. 2. Finished mounting rear deck 6x9 speakers 3. Replaced the speedo gear to a 19 tooth to match my set up. 4. New Reverse Switch 5. Wrapped the center counsel armrest and installed that. 6. installed a fire extinguisher in the car. 7. Intalled new door trim (top of door rim) 8. New Skillard license plate light Turn signal stopped working again, hazards work fine. Haven’t looked it over yet. Here are the latest pics.


 1 pointThanks. That's something i honestly still have to find out. I know the RHD cars had dedicated holes for installing it. I was hoping since the LHD cars got this as an optional "competition" item, there might be some place to put it. But since the chassis is in the bodyshop atm i wasn't able to check it out yet. My plan was to find a place when i assemble it. but maybe i should check beforehand Thanks for the input. Yeah it's likely possible that it's a Zclocks restauration. The seller was based in America and claimed it to be 100% restored. The only guy i know doing this in the US is Zclocks. Anyway it's in excellent condition1 pointTo my eye, just based on the harness, that looks like it could be a ZClocks restoration. I've sent him 4 clocks, and they all came back looking perfect. He typically replaces the entire harness with new wiring (at least it appeared that way). One of the boxes I sent him had a cracked vibrating fork, so he replaced it with a PCB in the original case. A great service - highly recommended. Just as an option, mine appeared to have been mounted using a pair of thru-bolts on the upper-right firewall. I modified the design slightly by running a longer bolt through from the engine bay, and tightening it in place with a locknut. Then I could just slip the oscillator on and off over the remaining protrusion, and tighten using a second nut. JDMjunkies, perhaps this will give you an idea for mounting yours.1 point1 pointMy impression is that the 7x14" Kobe Seiko 'Rally Mag' wheels on your Works car are something of an anomaly, in that they use the same 'Sleeve Nut' style fixing as the OEM '432' Kobe Seiko mags. Of course, there was constant evolution within the specifications of the Works cars - even to the stage where there were differences between cars made in the same 'batch', and for the same event - so the concept of what may be 'correct' or 'original' for one Works car may not necessarily be applicable to another. However, I have a pretty good collection of wheels made by Kobe Seiko for Nissan's race and rally teams (maybe 40+ wheels now) and they all - without exception - have a steel insert with a conventional (60 degree?) taper to suit wheel nuts with the same tapered washer. At least six of my Rally Mag wheels came from the batch of cars built for the 1970 RAC Rally here in the UK, so they have some provenance. From what I can see of the wheels, they don't seem to have been modified from parallel bore 'sleeve nut' fixing to tapered seat steel inserts. The inserts look original, and match the later wheels in my collection. Looking at period photos and original Works cars, I see plenty of evidence of tapered seat fixing. Doesn't mean that they were all that way, but it looks like majority share to me. A couple more period photos, perhaps illustrating the destructive nature of top flight rallying (and drivers who insist on getting to the end of a stage despite having a puncture...). Tapered seats in evidence:
 1 point1 pointTwo basic different types of wheel nuts were used between the OEM '432' Kobe Seiko magnesium wheels and the Works 432-R/Works 'Rally Mag' wheel. The (narrow) '432' type used what I believe is called a 'Sleeve Nut', with a long parallel shank and a corresponding parallel hole in the wheel. These centred the wheels on the studs by having a close clearance between the shank on the nut and the hole in the wheel, and clamping force was distributed by a thick washer on the outside face. Personally speaking, I don't like this fixing method. It always seems to raise questions of balance and poor centering. The (wider) Works 'Rally Mag' type used a conventional nut with a (60 degree?) tapered washer that was pressed on - but free to spin to the short shank. The wheels had a steel insert with a matching taper. Clamping force was distributed around the tapered washer and centering was 'automatic' via the stud-centric nature of the tapered washers. These seem pretty much fool-proof to me. I've got a fairly big collection of Works Kobe Seiko wheels (7j x 14" Rally Mags, wide 15" 4-spoke circuit racing mags and 6j x 14" 'Violet' rally mags) and all of them use tapered steel inserts in the wheels to suit tapered nuts. Works rally cars started off in 1970 with open-ended wheel nuts, but switched to chromed dome nuts soon after.


 1 pointI just love this site. There is so much knowledge here, and everyone is so helpful. Thanks again to all of you! z3beemer (Paul)1 pointEnjoyed the pictures of your beautiful Z. I’ll give you my take on the cause and possible fix of your fuel/exhaust smells. I’ve done everything you did to seal all obvious sources of interior leaks. To make all the changes in grommets, weatherstripping, etc., I had removed all interior paneling and carpeting in the cargo deck area. Upon close inspection I found that the weld seams around the edges of the rear deck floor had some gaps showing daylight. A little rope calk fixed that and no more exhaust smells, window open or closed. this may be obvious, but, when you open a window, this causes a Venturi effect which sucks out cabin air and sucks in exhaust through leaks in the rear deck area, so the exhaust isn’t really coming in the open window. Hope this helps. Dan1 point1 pointJust remember it’s all about prep. For small parts I use a Harbor Freight tumbler with water and Dawn soap. If I have some parts that are stubborn, I will throw in a small handful of sheet rock screws into the tumbler. It’s amazing how much crap comes off after tumbling for a few hours. On the larger parts I use a dremel with the little scotch bright heads which can be purchased in bulk off EBay or Amazon. Dremel also makes what looks like a small rotary buffer that uses scotch bright pads and these can cover the larger parts like head light buckets.
 1 point1 pointYep! Thats the thought process for making these. Hopefully by using a larger radius during the first half of the pulley, it will give a somewhat noticeable increase in throttle modulation off idle. Then, it ramps down quickly for high throttle inputs.1 point1 pointI have found that when I have large parts plated (headlamp holders, door mechanisms etc) having it all aqua blasted first (water and glass beads), gives a much more consistent finish. The person who I use adds an inhibitor so rust doesn't start. It obviously gets rid of the dirt surface corrosion, but it may find (I'm guessing) it helps to get rid of impurites, which tend to "leak out" during the plating process. I know there is some washing at the platers prior to plating, but in a sense the parts get two cleans.1 point1 pointMade some progress. Big thanks to @Patcon for the rottisserie. Really a great way to work. I had trouble lining up the hood/fender. I think the strut tower was tweaked in a previous accident. My plan is to paint underside, inside, and engine bay, then put it together enough to get it checked out on a frame machine. Not ideal I know, but it's the next right thing to do.
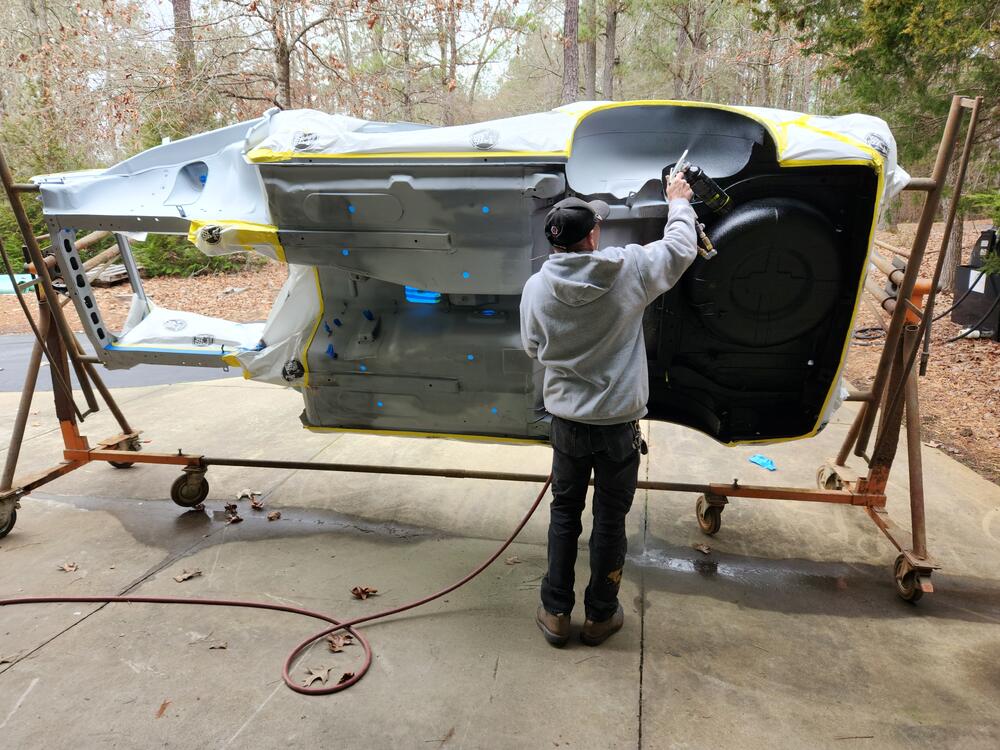 1 point


Important Information
By using this site, you agree to our Privacy Policy and Guidelines. We have placed cookies on your device to help make this website better. You can adjust your cookie settings, otherwise we'll assume you're okay to continue.