Leaderboard
-

siteunseen
Free Member7Points15,115Posts -
AK260
Free Member7Points999Posts -
jonathanrussell
Free Member6Points474Posts -

cgsheen1
Free Member5Points690Posts


Popular Content
Showing content with the highest reputation on 07/13/2021 in all areas
-
I don't know if this qualifies since I paid someone to produce it. It is a mustache bar bushing press tool. When used in a press, it folds the metal bushing sleeve tight at the original angle.
.thumb.jpg.449bdc89147e16ca2c14410ef2cbc2b3.jpg) 6 points
6 points -
Amen! The supermarket ramp can be tough to navigate you know! :p3 points
-
3 pointsI fiberglassed the seam. https://www.facebook.com/permalink.php?story_fbid=1287361148056433&id=555679747891247
 3 points
 -
3 pointsThe original hard lines use standard flare fittings for refrigeration tubing. (Journeyman Plumber (besides novice HVAC tech) - we used flare connections on soft copper water or air tubing as well...) HVAC Flare fittings aren't the same as AN fittings - they use a different bevel - you can't mix them. The liquid line in an early Z is just stock 3/8" soft copper refrigeration tubing - can be bent with a 3/8" tubing bender of you choice, can be cut and re-flared with an HVAC flaring tool, can be brazed. I don't think the stock copper can be made an o-ring connection but I don't know for sure... I do believe there must be a way to transition (if an o-ring fitting can be brazed onto copper tubing, there you go...). Euro is correct R-12 volume vs. R134a - I go off pressures, not exact refrigerant weight, but the conversion above will get you in the ballpark. (As a plumber I have a fondness for flare fittings and a subsequent ambivalence for o-ring fittings. (I said "ambivalence" but I really meant "dislike"...) I find the flares to be much more trouble free when done correctly. And since I have all that $^!# from my plumbing career, I can easily make or repair flare connections which, I guess, some people struggle with.)3 points
-
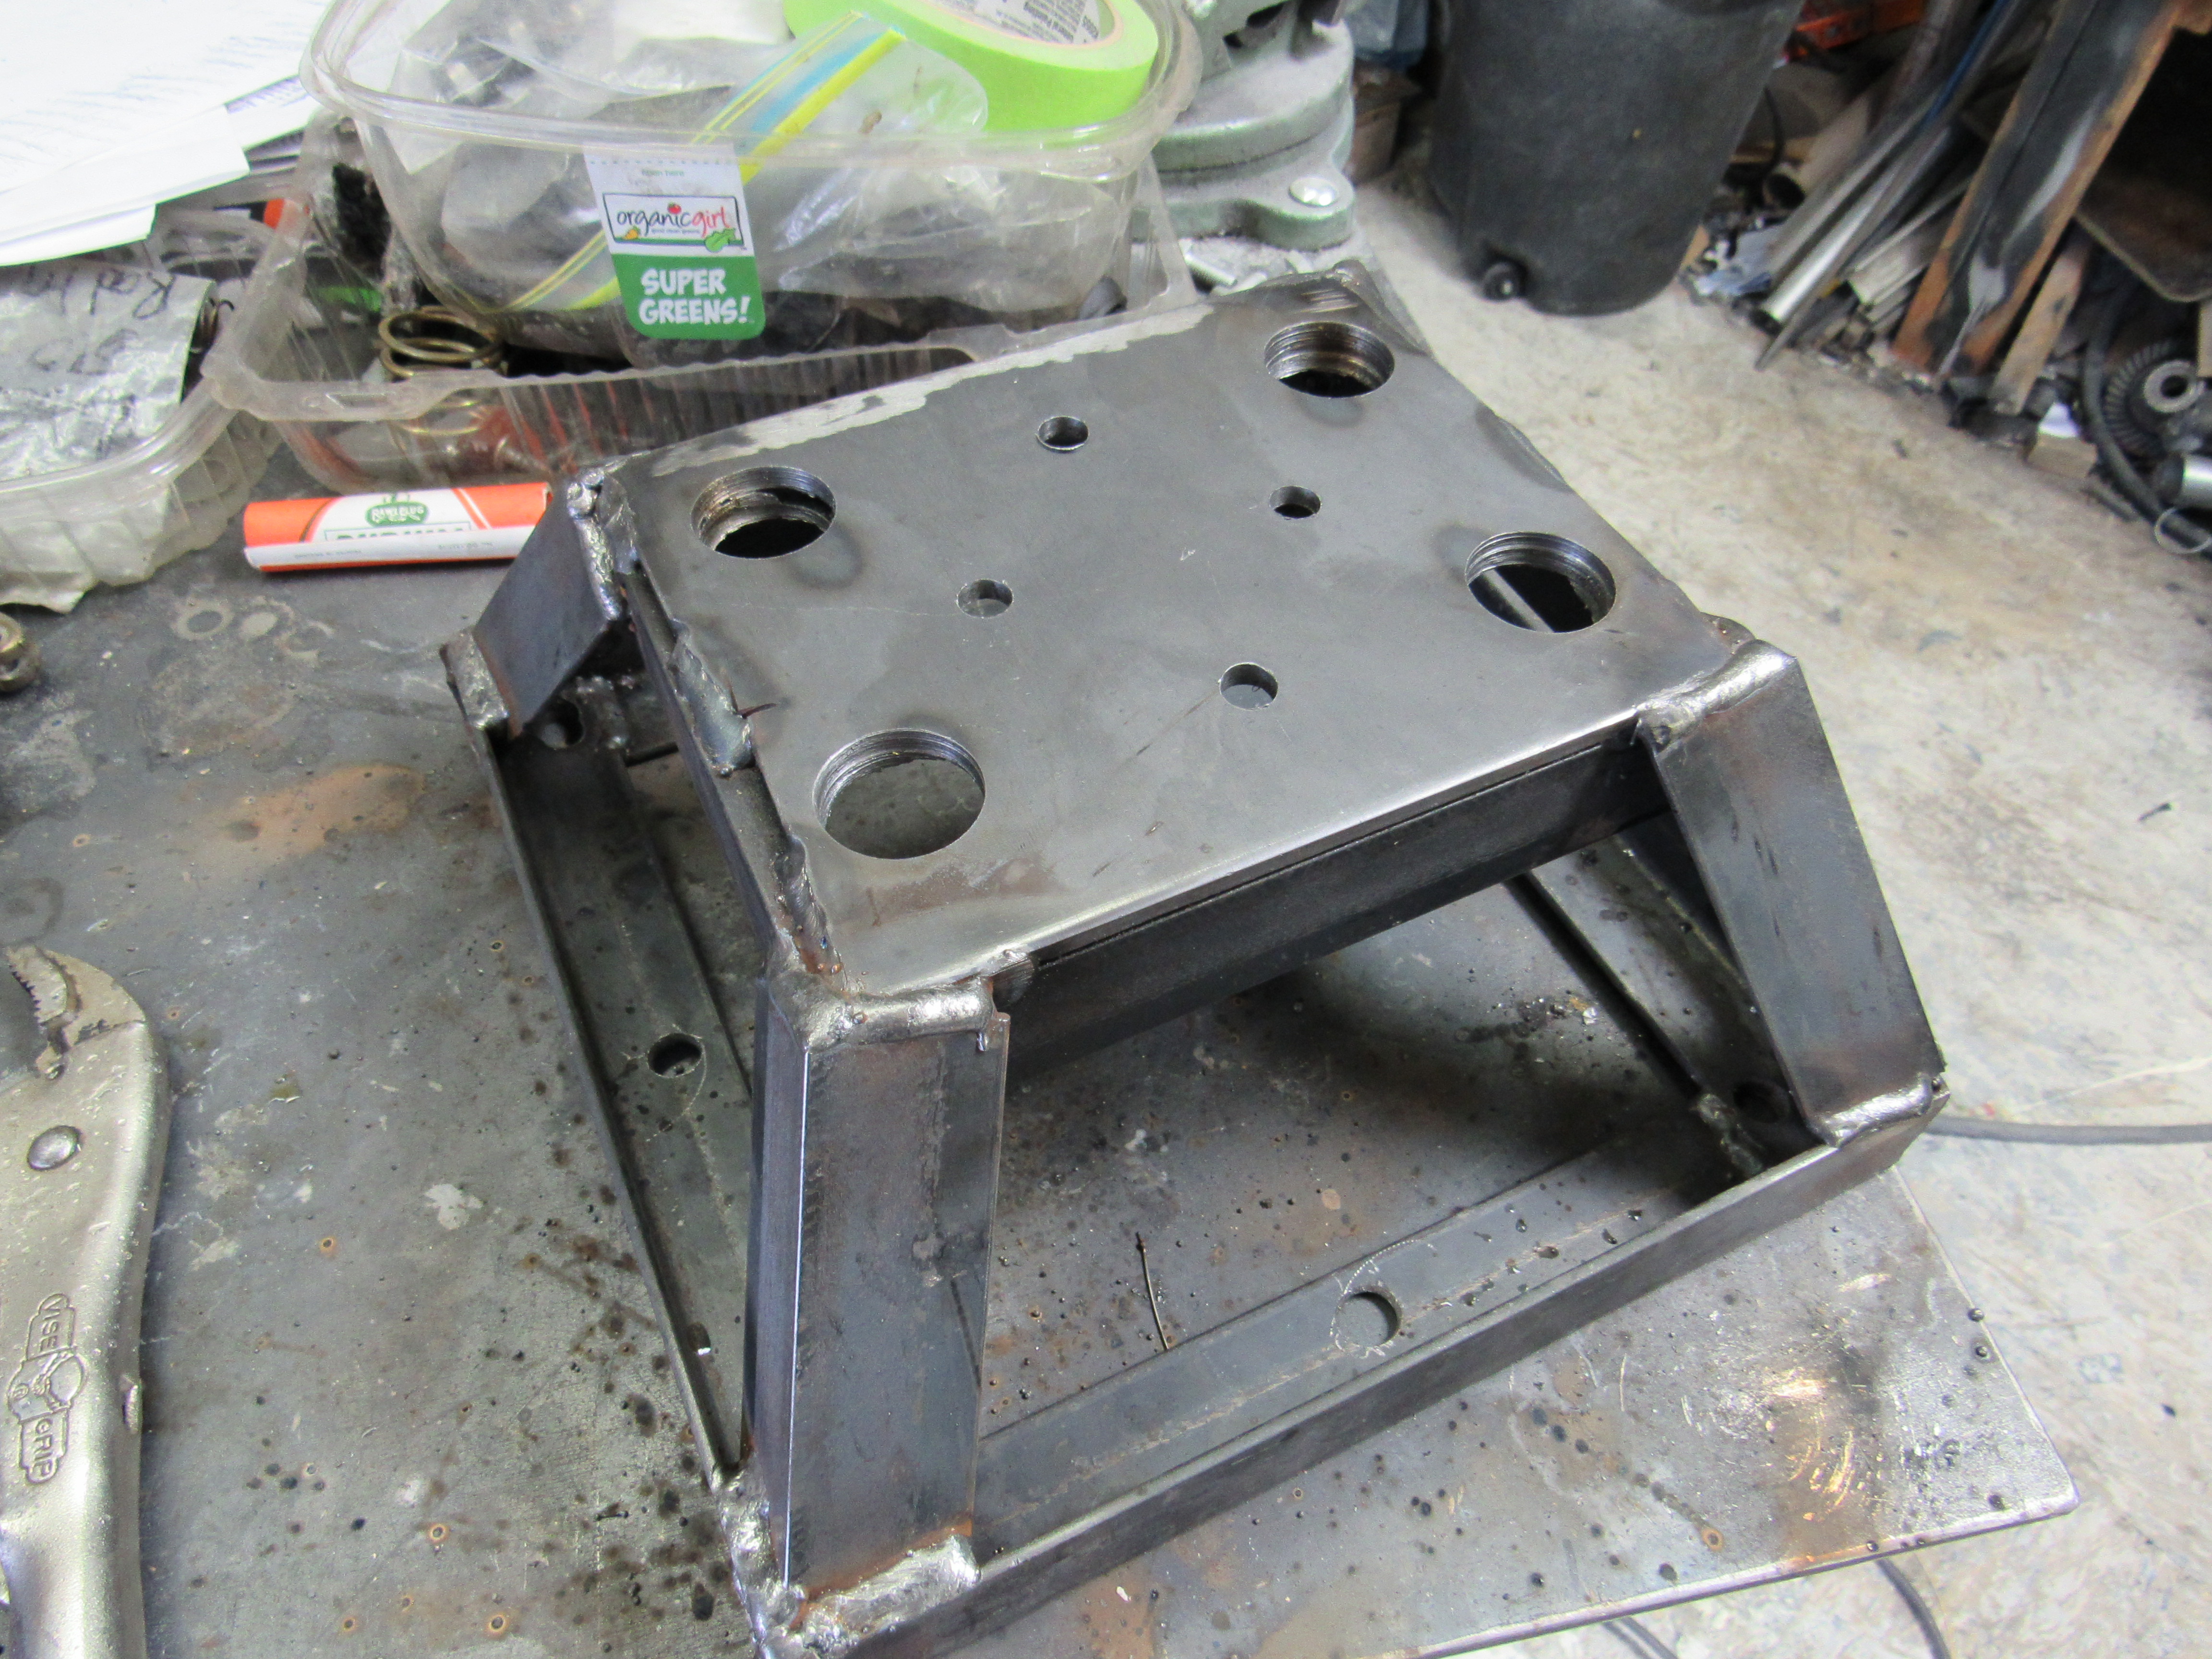
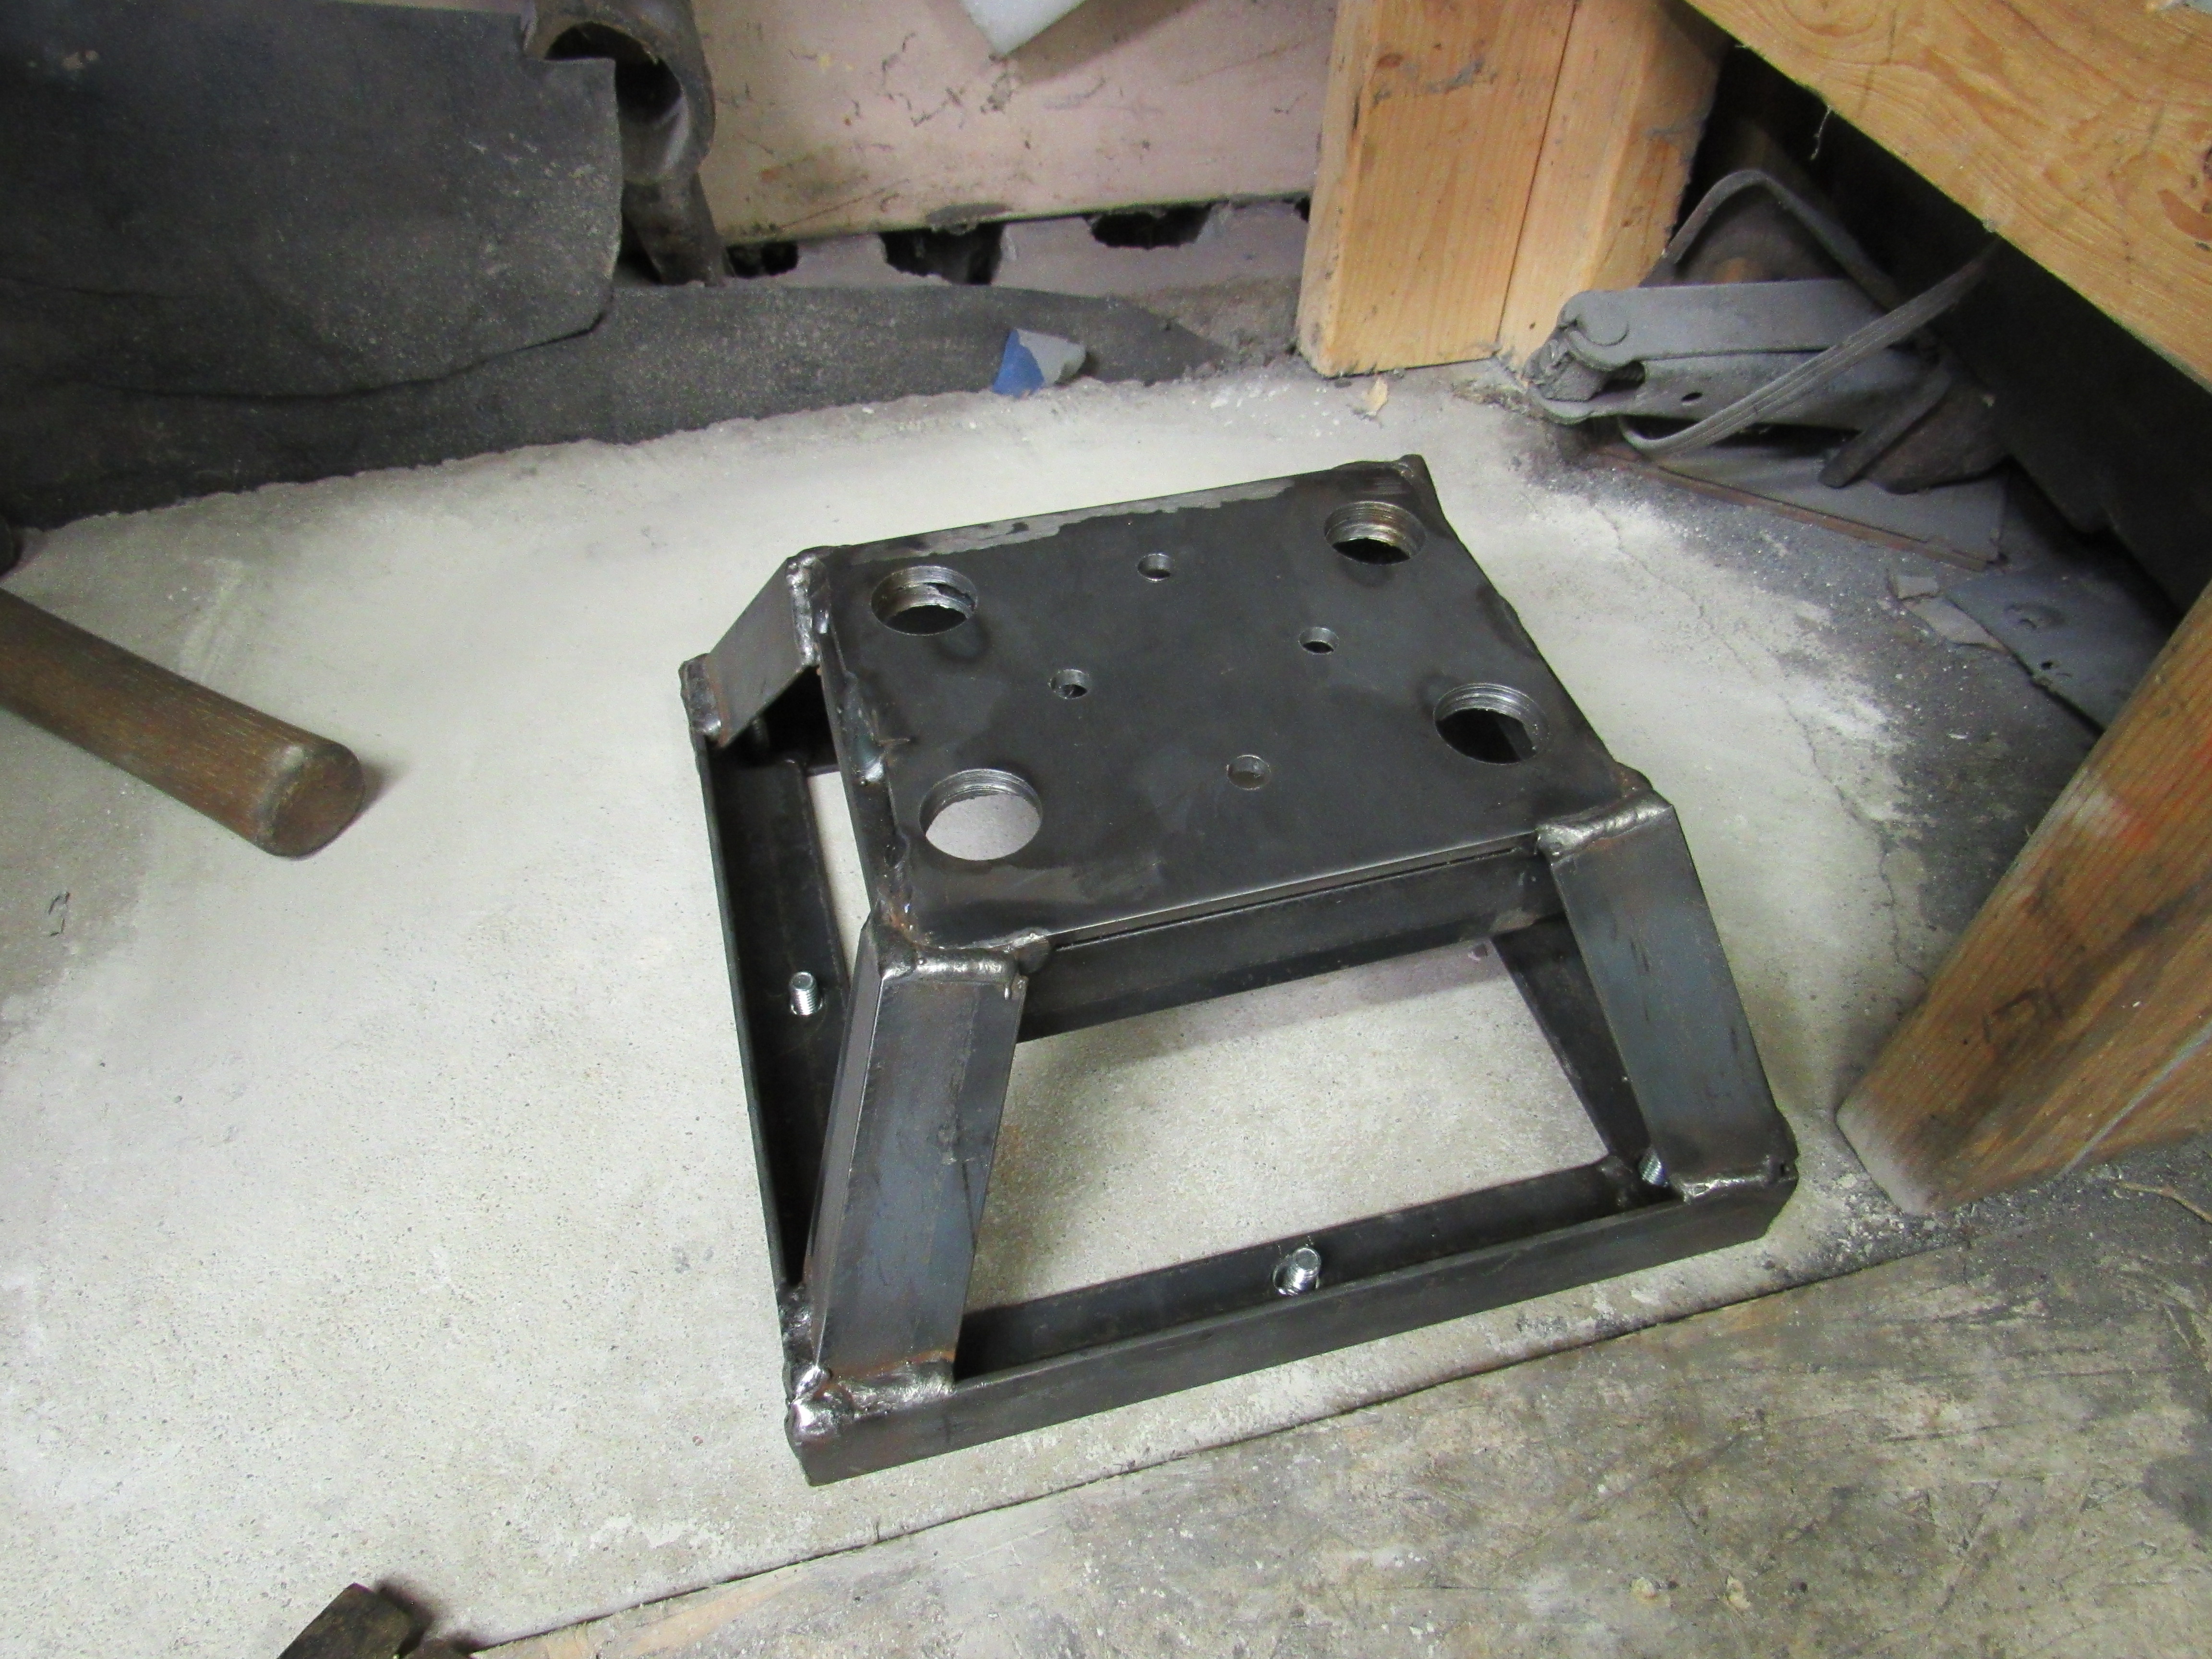
I don't know if this qualifies as a tool but it's going to be very useful to me, My shop has a bit of a slope leading up to it. A car that is running can just drive in but most of the cars that come in can't do it under their own power so I tow them up with the lawn tractor but have to stop 10-15 ft. away, then hook up tow straps and pull the car in with a come-along. A long and tiresome job, so I picked up a 12v 3,500 lb winch, built a base for it, hook it up to a battery, hook the battery charger up to it and turn it to Start. Lots of juice flowing and pull the car into the garage in seconds. I love it! Less work for my old back.


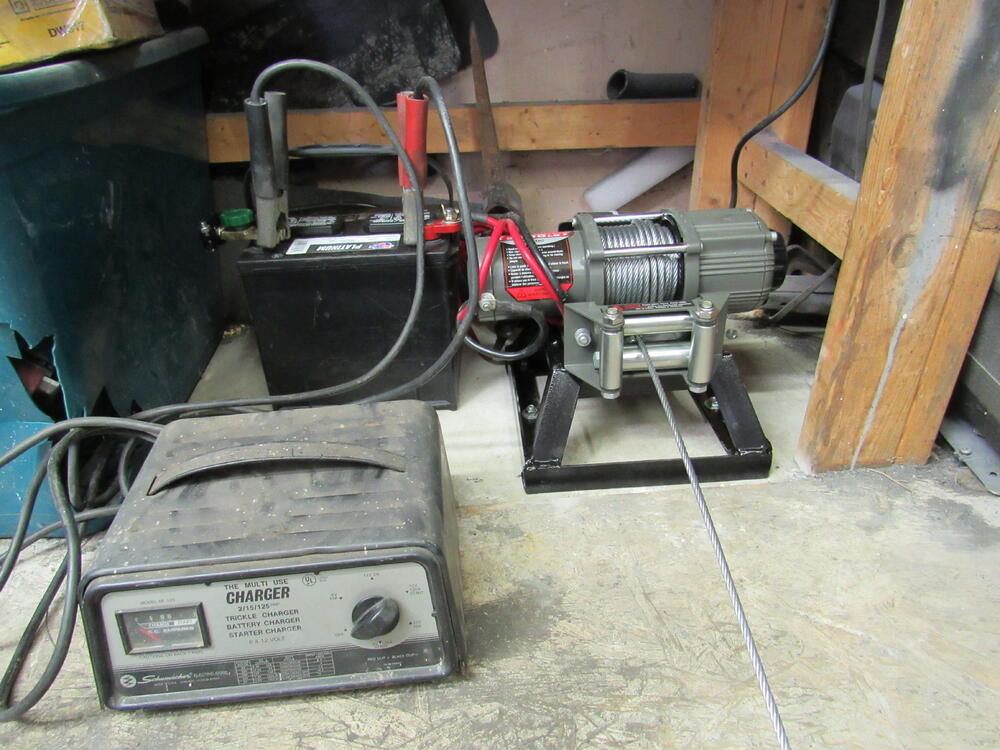 3 points
 -
Those speed bumps around the front entrance are like mountain trails but I think the Defender will be able to pull over them without damage. Now my 240 has to be parked coming in from the entrance to the parking lot. It's a lot of walking and the handicap placard is useless.2 points
-
2 pointsProbably won't know until you're in the middle of it. Hope for the best, plan for problems. Remember that you'll probably be tilting the engine down at the back so there will be more room to slide the transmission out. I think that's your potential bind though, having room to slide the transmission back past the end of the headers, without hitting the body in the tunnel, before you can drop it down. Just a guess. Don't let the fan blades hit the radiator.2 points
-
Most welcome. As you and Mr@patcon say, it does take a lot of nerve on both sides! Just shows how utterly confident that driver is. This is another video of the day, this time a lot slower but very impressive what the car can do - I was trying to relate what it must have felt like inside the car at the top, to my own experiences. All I could come up with was a roller coaster, before it goes for it!2 points
-
What do they say about like-minds? I also mounted a hand-cranked winch to my 4-poster lift. However, most of the time I run the winch with a battery powered drill with a 3/8" drive 3/4" socket chucked up. The drill works great until I have to "go over the hump".2 points
-
I also mounted a winch. In my case, I sometimes need to pull my car in and onto my 4-post lift. Pushing it up the lift ramps was too difficult so I attached a box hitch receiver at the other end of the lift. I have a small 12v winch that is welded to a hitch adapter. The winch can then be attached to the lift to pull my Z onto the lift. The winch can also attach to my Chevy Volt or my garden tractor with their box hitch receiver and run off their battery. I thought I was so original with my idea. I guess not.2 points
-
Went down to the Goodwood festival of speed yesterday. The Z got a HUGE lot of attention anywhere and everywhere. Sadly on the hill climb race with vehicles ranging from a 1906 car with 60bhp to 80s and 90s F1 cars to the R32 drift car, there was a rather sizeable crash of a Chevy NASCAR. So to entertain us while picking up the pieces, out came the naughty Jaguar. But this!! This for me was a cherry on the Jag’s cake - such incredible car control ... and self restraint by the marshals!2 points
-
That is a great tool, back when you could get a hold of those bushings I had to cut the top lip into petals and fold them down in order to secure the bushing.1 point
-
1 pointZed Head is right as usual. Put the rear up on ramps. It does make it easier. Let the air out of the front tires if it gets tight. Use a rope and foot long piece of wood through the shifter hole to keep the transmission up and snug.1 point
-
I've seen some of the new Defenders around. Sadly they are mostly a fashion accessory in this part of the world, and will likely never see their true capability off road. Glad the name lives on. They look like they come from the future.1 point
-
The 260 doesn't have the "bow out" in the tunnel for the catalytic converter. I'm not sure which 280's have that transmission tunnel change. I'm also not sure how that changes the carpet floor piece (just under the seat, right?) Newark makes kits for both early and late 280Z styles also. I should know - we have a totally stock '75 right there in the shop... Crap, we also have a 77-78 on the lift - I should look at that... Speaking of vinyl on the trans tunnel, I've always REALLY liked the "small diamond pattern" that the 260's have. I've also always thought the "large diamond pattern" of the 240's was lame... I know,,, It's just me,,,1 point
-
I bought the Newark Auto carpet kit for my 260Z and I'm very pleased with it. It's loop and they had two different kits - one that's stock (only carpet that the factory 260 would have) and a full kit that adds carpet pieces for the trans tunnel, flat vertical panel behind the seats, and under the door sill (interior to the rocker panel) which all have vinyl in the factory cars. I used the pieces for the door sill and behind the seats but I like the vinyl on the trans tunnel so I think I'll keep that carpet piece in the box. The fit of the Newark Auto kit is really good, they cut the padding perfectly to keep the carpet from moving around. I've been really impressed. The only negative is the floor pieces don't have slits cut and sewn for the two "keepers" at the seat end but they do come with snaps for the firewall. Even without the slits (I didn't bother to cut mine) the carpet stays in place.1 point
-
I have exactly the same issue with an approach slope to my garage... although the frequency of my new-project arrivals pales in comparison with GK's. I bought a hand-crank winch and bolted it to my workbench (which is bolted to the back wall of my garage). Motorized would have been better, but it was certainly an improvement over a come-along1 point
-
Wow! I can't determine who's got the bigger balls. The Marshall or the guy raising sand around him? Great video, thanks for sharing.1 point
-
1 point
-
1 pointHi Dave, Just went through my notes and you are correct. I found a formula: R12 charge x 0.9 - 0.12kg = R134a charge. It is an approximate calculation and generally results in 70 to 85% of the original charge. Ex. 1.2kg R12 x 0.9 = 1.08 - 0.12 = 0.96kg R134a (80%) Like I said, NO expert here......1 point
-
1 pointExactly what I did on my car. I really like the look and have (somewhat surprisingly) only seen a couple other cars where it's been done. Probably not great for the value of the car since it's not original, but my guess is Nissan would have made them this way if they could have. Hardest part of the job is not banging the fender into something when moving it around in the garage...the headlight bucket adds a surprising amount of length! Some photos in my build log starting here: And two pictures I took today after finishing the repairs from a fender bender last summer:

 1 point
 -
1 pointTo clarify what I have done, I have or had a working converted to R134a system but had a very slow leak requiring me to recharge the system every year or so. I have just rebuilt and installed a fresh motor and as part of that, I purchased a new Sanden 508 compressor to replace the factory unit. (the source of my leak) With the new compressor installed, I have to replace the 2 flex lines that connect to the compressor which has the high / low ports in a different location requiring about 5" longer lines and connections with modern o-ring fittings. Nissan used most all #8 flange fittings in the factory system. Currently waiting on delivery of the parts to build and crimp the new flex hoses, then... I can re-charge the system. If I remember right, I think I used close to 2+ 12oz cans to charge the evacuated system. Looking back, the drier was the easiest part of my upgrade, the copper hardlines connected easily, and fits perfectly in the stock bracket.1 point
-
1 pointI would pressure check with dry nitrogen not air. Air will introduce moisture. The nitrogen will help purge the system. Charge with niteogen. Then after testing, vacuum it down and charge with refrigerant1 point
-
1 point
-
That's like the difference between fitting and proper.1 point
-
You "can" pound a nail with a micrometer! Would you want to ...............................................????????????????1 point
-
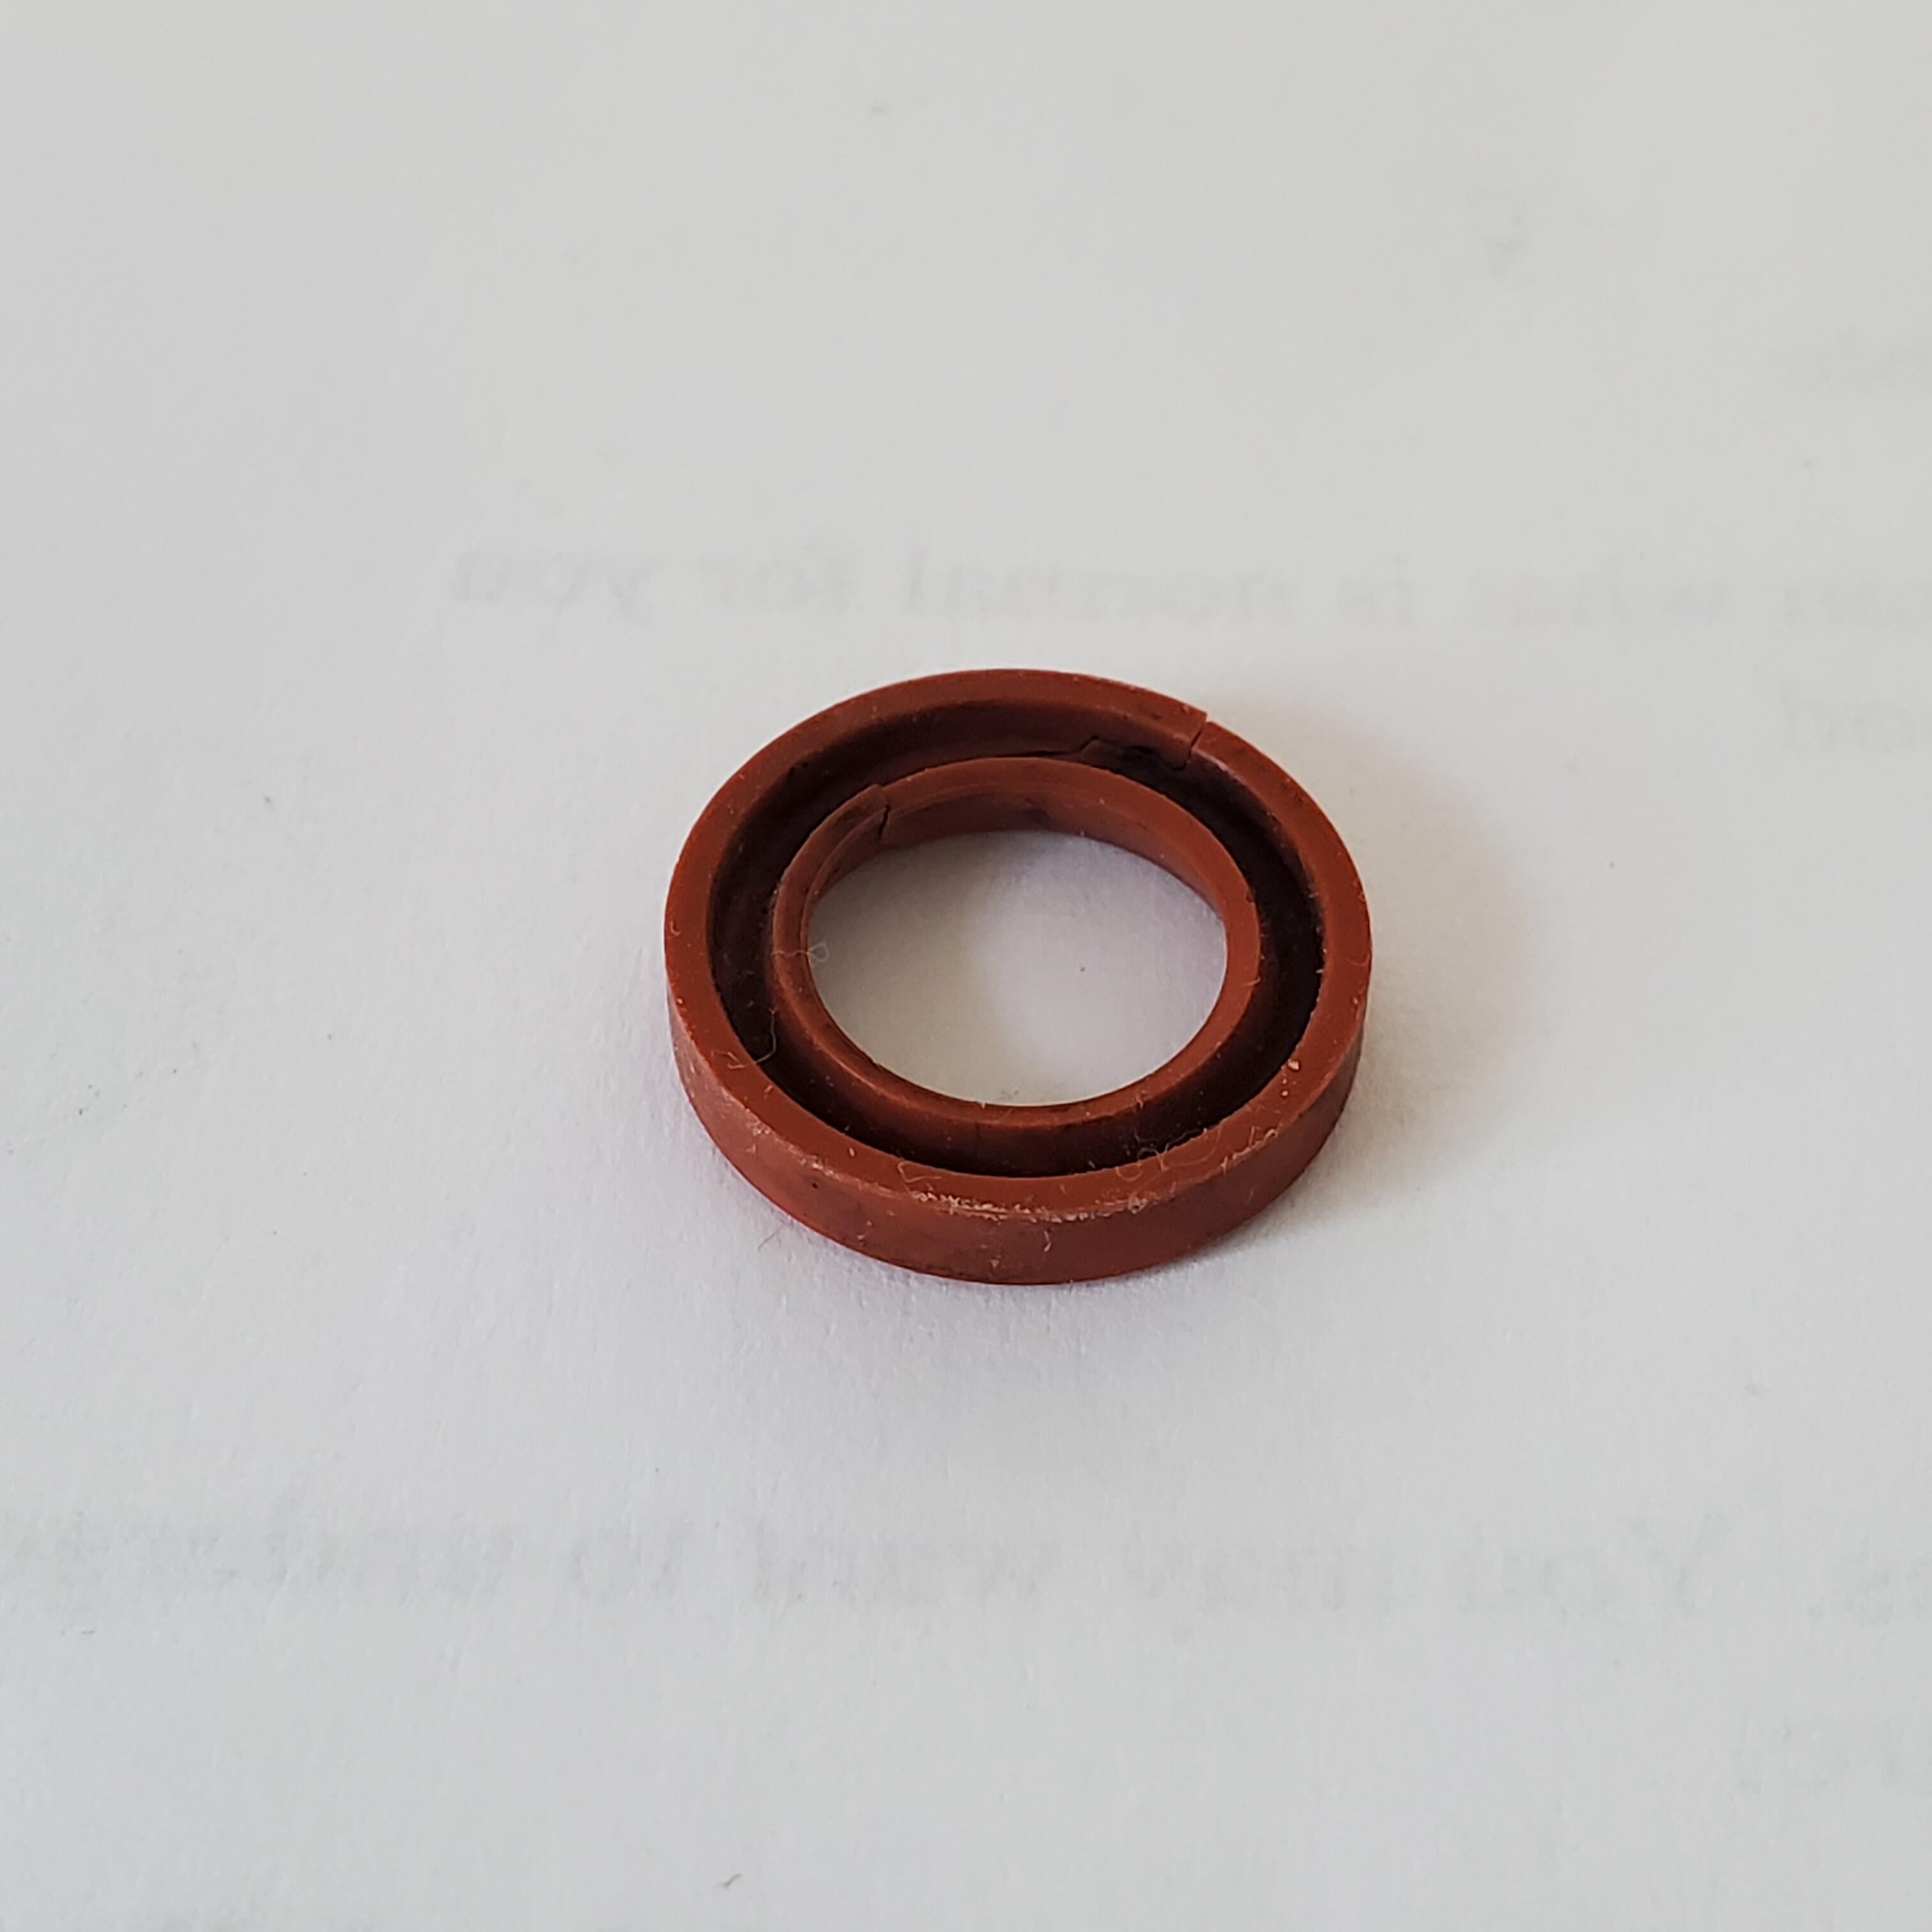
0 pointsTrying to keep this restoration going strong is a bit of a trick. I have to do enough work/investigation/reading about the next task in order to hunt down and order necessary materials so that when I am ready to actually start that task, I have what I need in hand. All of this of course while doing the previous task and dealing with the where to get and how to do that I didn't plan on. The latest is the ZX throttle body. Not ready to rebuild it, but I know I need some parts because I took it apart several weeks ago to see what kind of shape it's in. I actually removed the staked caps at the ends of the throttle body and found one bearing was iffy and, since I damaged one seal getting the cap off on one side, I'll replace the both u-cup shaft seals. They are 10 x 16 x 3. I have been searching for months to no avail, but a few days ago I stumbled upon Allied Metrics. They will make them, in any material I want with only a 10 piece minimum. Not bad until you consider they want $23 EACH. Still looking...😪
 0 points
.jpg.0c1e2c6b2c8d7c38feb094b501356d7c.jpg)