Leaderboard
-

Zed Head
Free Member3Points19,238Posts -

siteunseen
Free Member3Points15,115Posts -
240ZBUILTBYME
Free Member2Points237Posts -

wheee!
Free Member2Points4,607Posts


Popular Content
Showing content with the highest reputation on 02/16/2021 in all areas
-
It's a creative endeavour starting and maintaining a build thread from start to finish. It is like a collection of evidence to your own passion, grit, determination, skill and hard work. The product of a good build thread is it's ability to inspire your fellow enthusiasts, which yours most certainly does! Ryan2 points
-
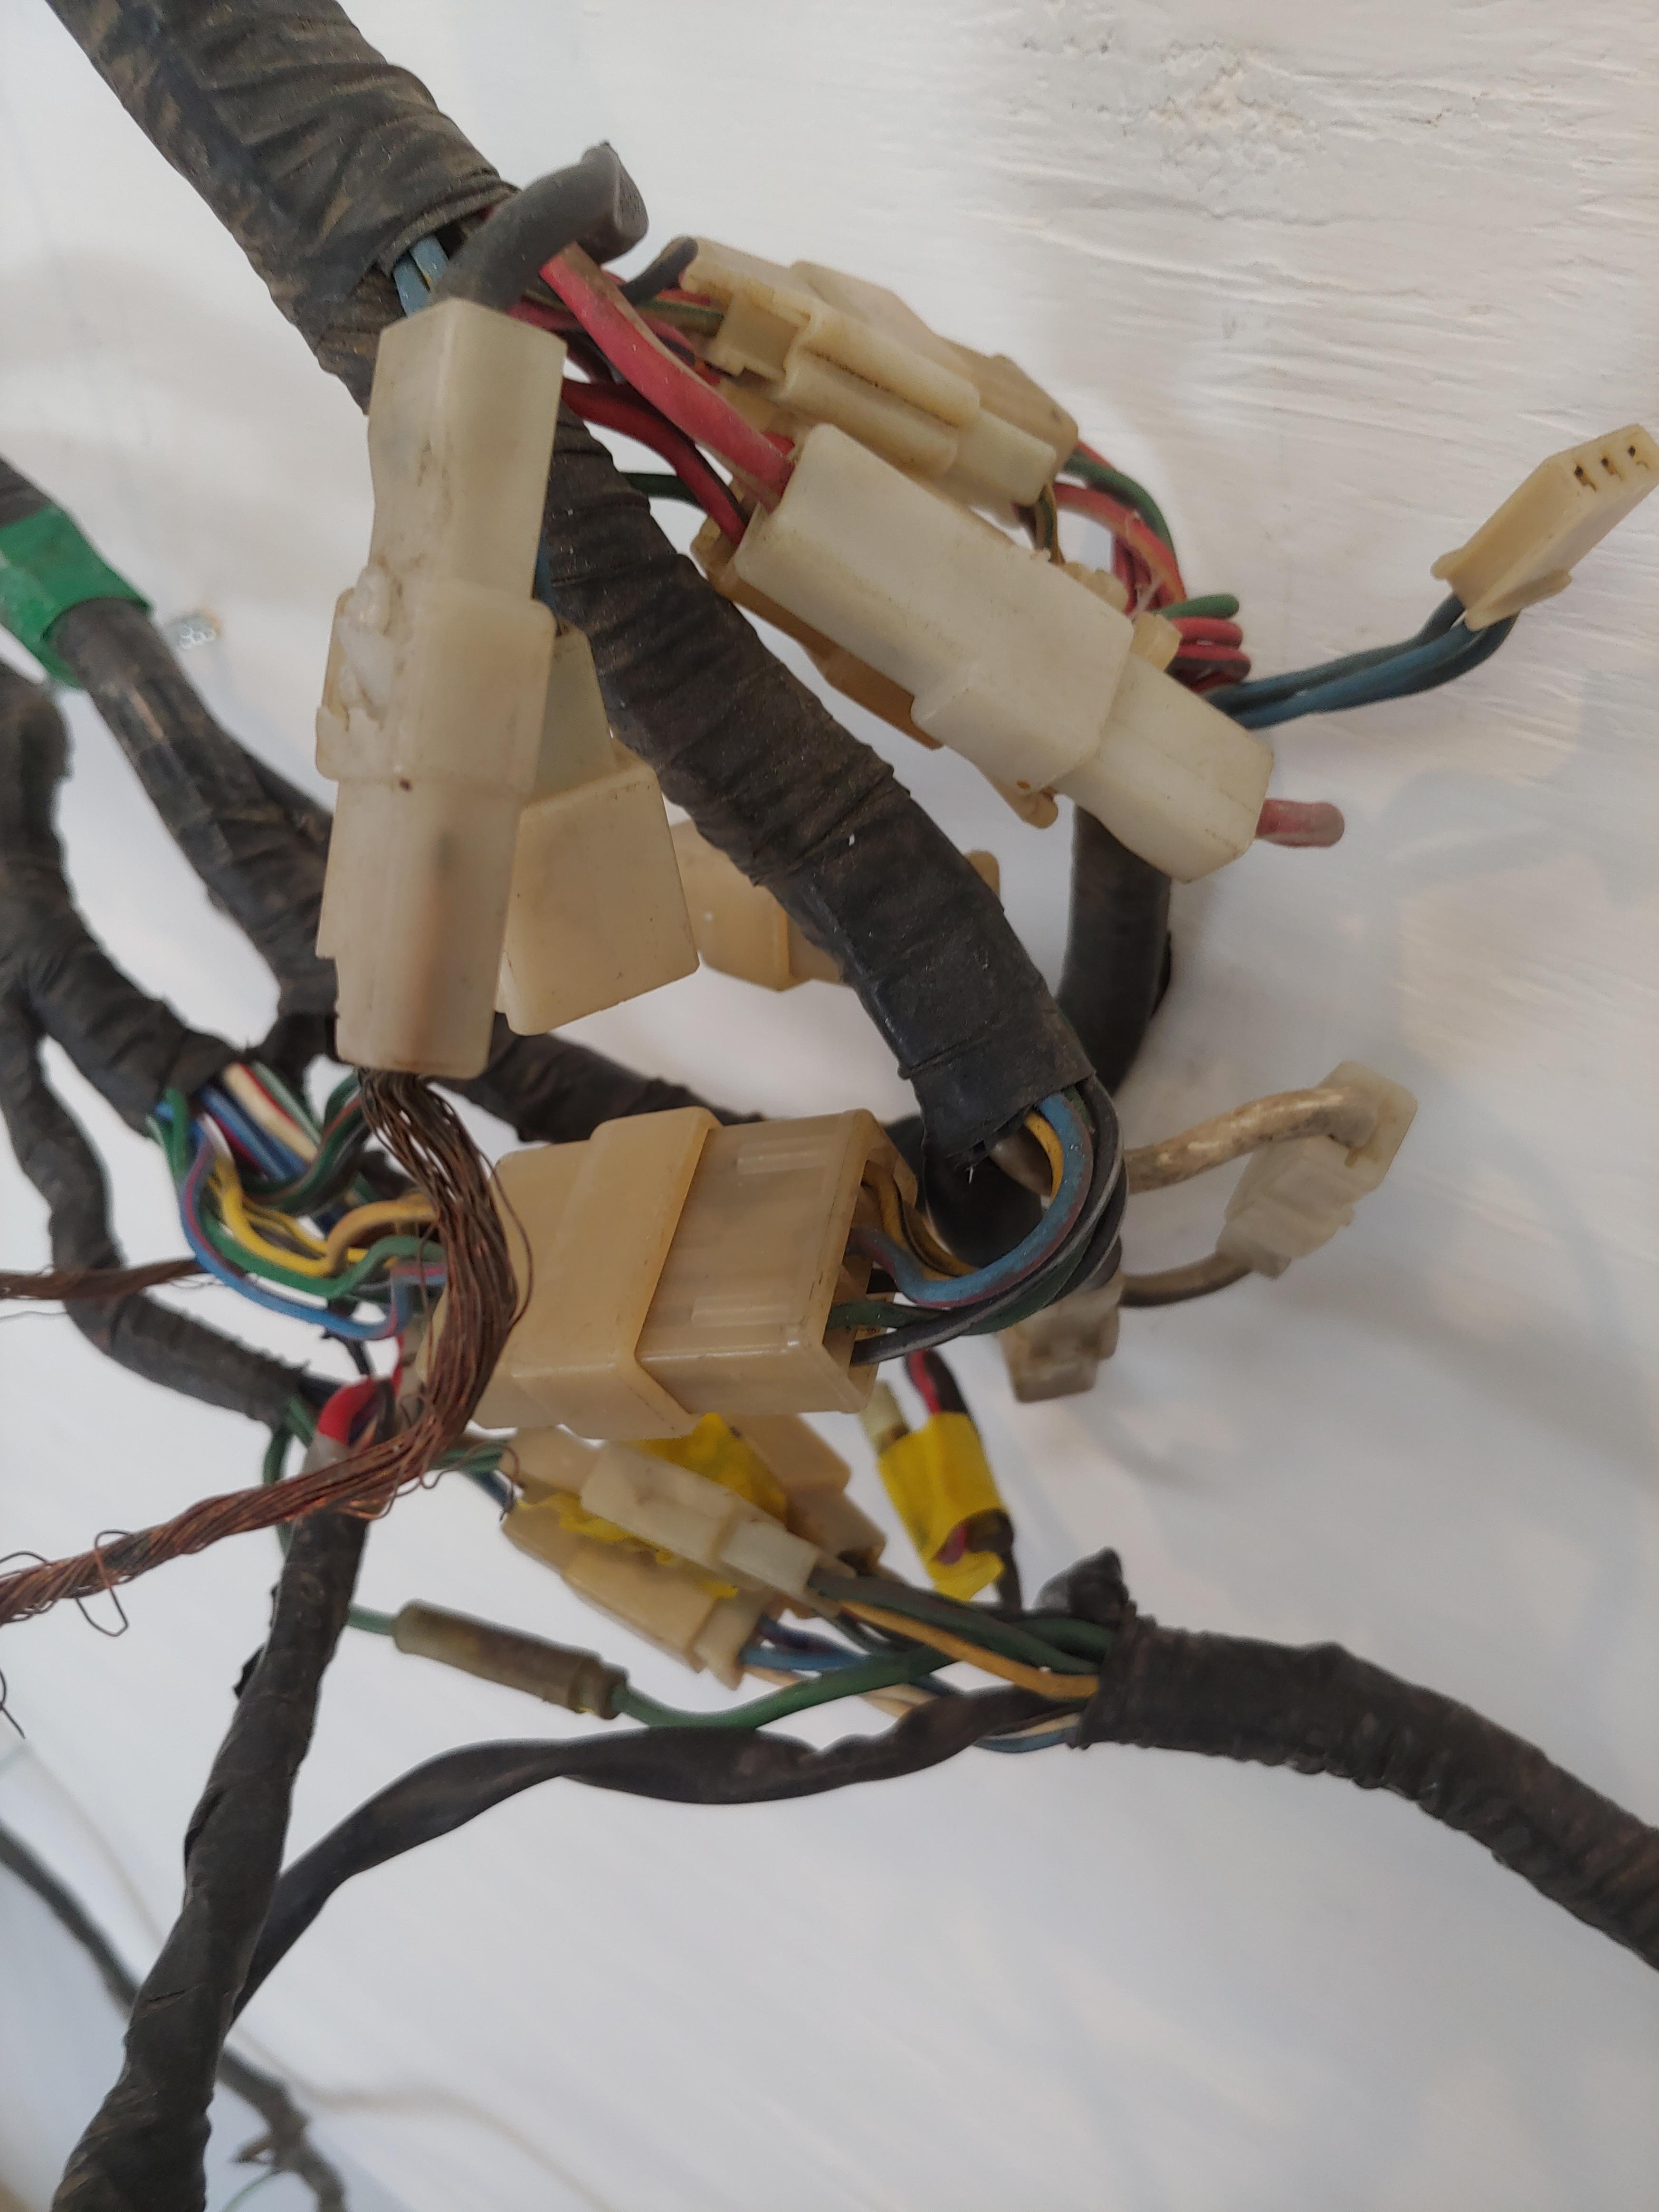
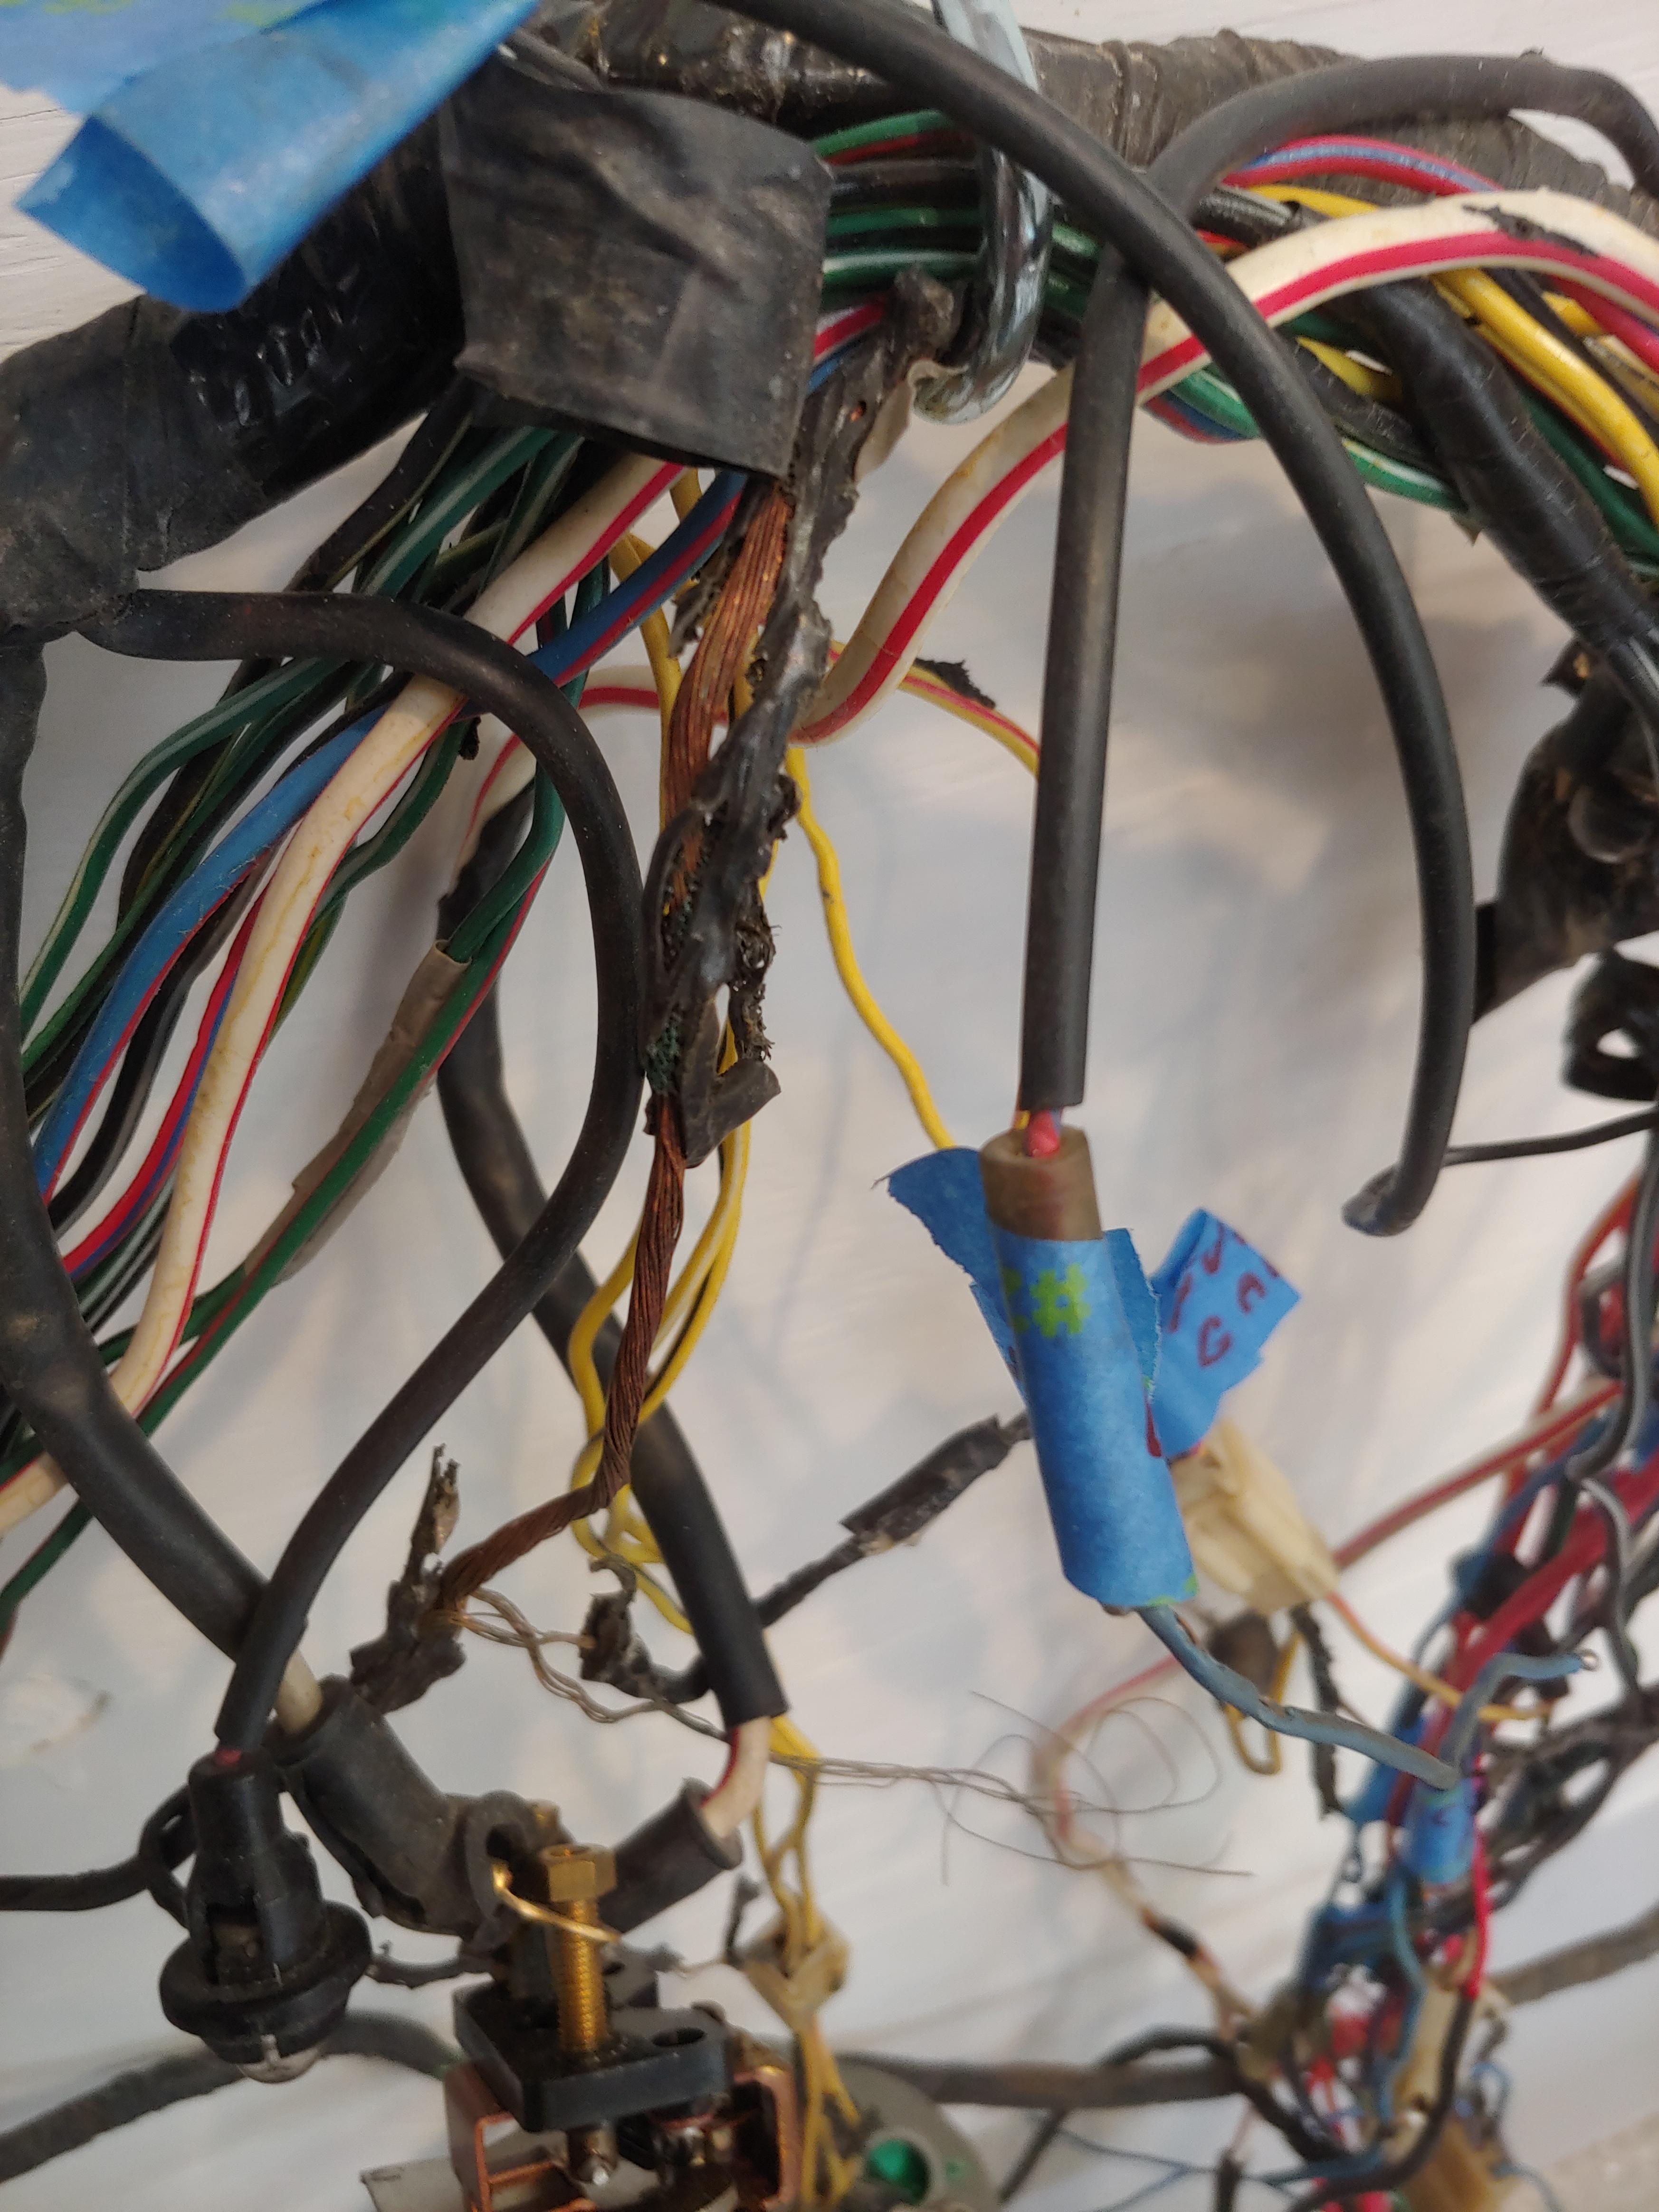
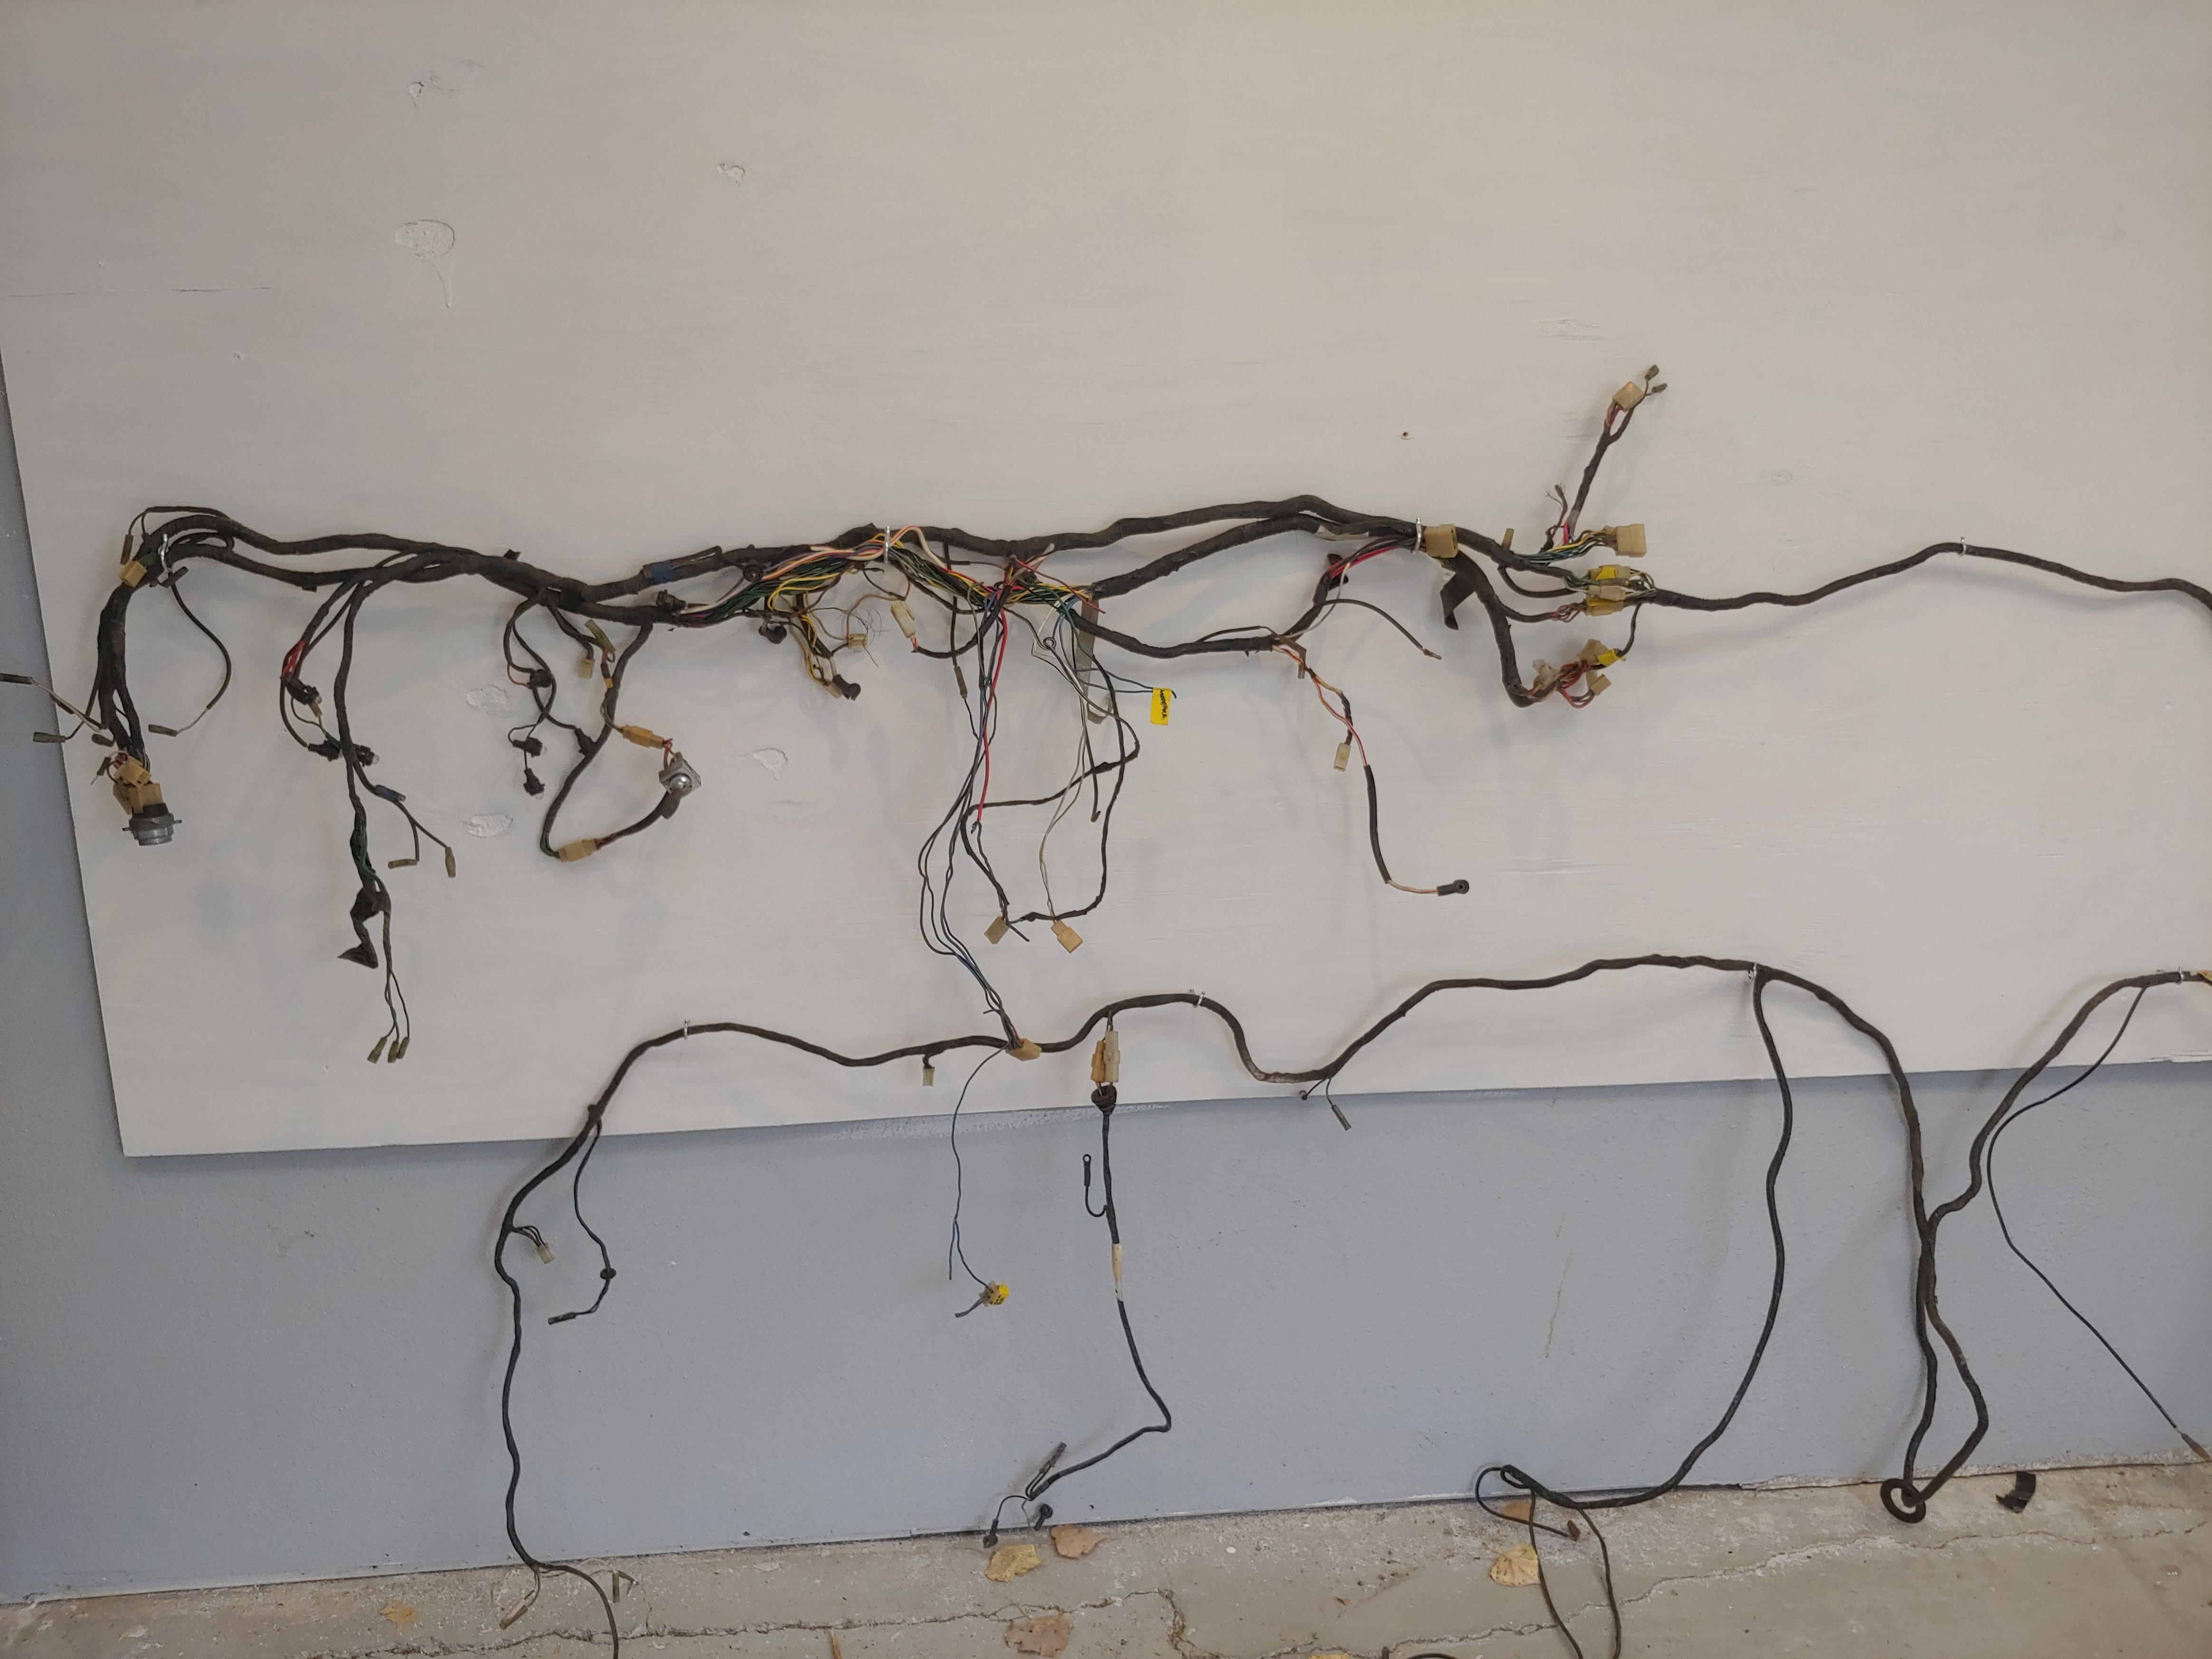
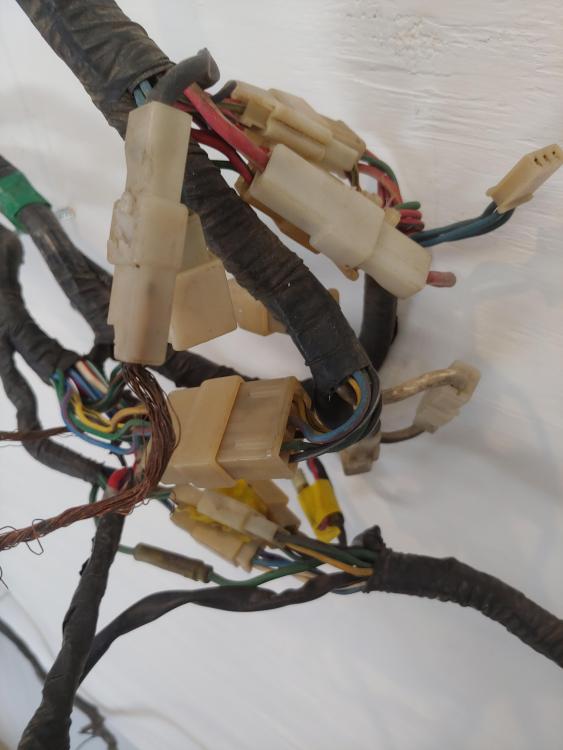
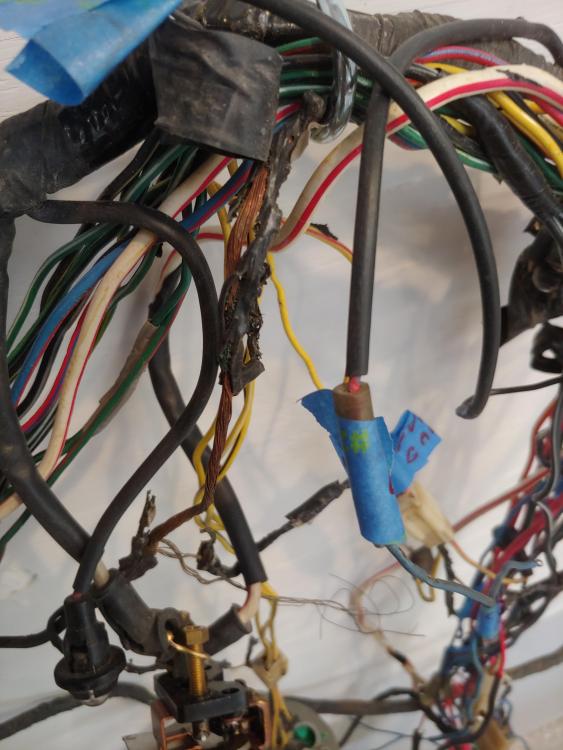
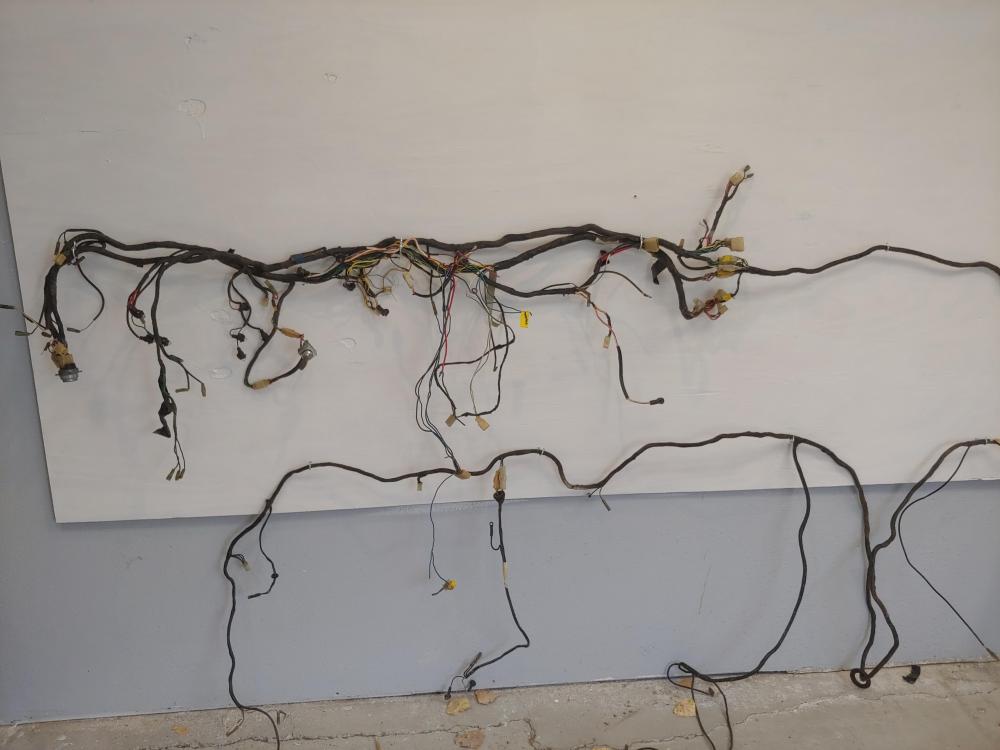
1 pointPOs had done some wiring for radios and amps. Melt down for main ground engine and dash harness. They preferred wire nuts to terminals. Fusible links to starter and alternator where removed and wires put back with wire nuts. I cannot believe datsun used all those plugs for the three harnesses to come together. That me will cause a problem,to much resistance. Made a harness board to make it easy to work on. 1. is going though all the wires with my fluke meter to check for damage and the locations of switches etc.Tagging the connectors with blue tape 2. making a power relay station for engine compartment. 3. removing all those connections 4. I may go to a bulkhead fitting for engine to body harness 5. Fuse box was total junk so installing a blue sea unit maybe in right kick panel I can post more as I build this harness if you would like

 1 point
 -
1 point
-
Dash to firewall are all M6 1.0 but are machine screws not self tapping, the ones under neath the ends are the same. Even the two in the middle at the trans tunnel (four for 280’s) are all M6 machine. They do have a starter tapered thread at the tip I suppose. The self tappers that hole the vent levers are #8 roughly, quite coarse. Sorry don’t have the exact spec. the four heater panel are M4 x 0.7 about 30 mm long, 25 at least. Run a tap into the threads on the dash to clean them up. They like to get cross threaded and nasty.1 point
-
1 pointIn the middle of sub 10 F temperatures, been working on the routings for the AC hoses. Being one of the very few things on the car that's not original, I wanted to do the AC installation with as few permanent cut ups to the car as possible. I plan on routing the hoses down the passenger frame rail so that they'll be tucked away and not as much of an eye sore as the dealer setup was previously. To do this, I created these mounting saddles that I can zip tie over the electrical harness, and will also saddle each of the lines. 3D printed two to rough-in the concept. I think it'll work out nicely with a few more.
 1 point
 -
Don't forget that it may not be just the shafts that wear. The bushes may get 'ovaled' because of the suction load (enormous ) put on on the throttle plates when the engine is operating at closed-to-part-throttle. I suspect that Z-Therapy decided on using roller bearing replacements not just because of the lower friction, but also because it allows them to re-use the old throttle shafts without having to worry about the worn-out friction surfaces. I'm not optimistic about your chances of finding NOS replacements. I suspect that whatever was out there was scooped up by racers and carb rebuilders long ago. For that reason, you may be forced to re-use your old throttle shafts. If you do, I don't think you need to worry about excessive friction caused by the worn-off chrome plating on the shaft ends (although they're going to wear even faster now that the hard chrome surface is gone). The real problem is going to be air leakage into the carb body because of the excessive clearances between the shaft ends and the bushings. Years ago, CZCC member, @240260280 (aka Mr. Hoover) wrote an interesting article on the old AtlanticZ website about his attempts to solve the air leak problem by sealing off the exposed ends of throttle shafts on the outside of the carb body. He glued a small plastic cap over bushing boss on the 'flat' side. On the other side, where the shaft extends out of the carb body, he installed an O-ring that was pushed up against the side of the bushing boss (and where -- theoretically -- the suction from inside the carb would pull the O-ring up tight against the surface of the carb body to create a good seal). Maybe Phil will offer some comments here about how that worked out. From what I can see, capping the flat end is easy and should be 100% effective at sealing off that end. The effectiveness of the O-ring on the other side is debatable, and there's also the possibility of binding. Nevertheless, the overall approach seems cheap and painless to implement and it could reduce the air leakage problem by ~ 75%.1 point
-
The sills were a thick, black, heavily-grained vinyl. The kit that I bought from MSA was much thinner and non-grained vinyl. I had carefully removed my originals, cleaned them up and am glad I did...! I returned the set to MSA and am very happy with the result. Your car had diamond vinyl on the transmission tunnel, the vertical surface behind the seats, the wheel arches and the rear strut towers (6 pieces). The transmission tunnel had jute padding underneath, the other pieces were adhered to the metal without padding. The diamond vinyl kit from MSA is VERY authentic. It is made by SEATZ Manufacturing and I cannot speak more highly about the quality. I chose to use a very thin (1/16") padding under the wheelarch and strut towers with excellent results. I also filled in the depressed areas of the luggage riser panel behind the seats with 1/4" foam...again, excellent results. I used 1/8" foam under the transmission tunnel and it turned out great after smoothing some of the original sound deadening material with a small disc sander. Original carpet was a nylon loop with whip-stitched edge binding. I bought the 5 piece kit from MSA. The edge binding is somewhat loose and I wonder what Newark's is like. I also like their 7 piece configuration, while not original, it provides pieces for directly under the seats. Carpet kits are available that eliminate the diamond vinyl all together and it is your choice as to what direction to go. I love the diamond vinyl and paid the price for professional install...well worth it in my book. All the best...Ryals in Ellijay, GA
 1 point
 -
Very cool story. Walt Maas was a hero of mine along with Morton and Sharp in the early 70’s. Those guys were responsible for more Datsun (Nissan sales) than anything else. I’m sure you’ve got some fun stories. Sorry about your folks....glad you experienced the beginnings personally! Guy1 point
-
My folks met while working at FAR back in the 70s and I was practically born in the pits racing with them. My Dad, George, was a mechanic, manager, & driver and my Mom, Deb worked in accounting. They got married on a dare in Reno one night and were together every since. Unfortunately, both my folks have passed, my dad just recently. I've been going through their stuff and have found quite a bit of F.A.R paraphernalia. If anyone would like it, please let me know. I would rather it was with someone who appreciated it rather than sitting in storage. I have decals, patches, stamps, key chains, slides, and a TON of pictures. I've kept what means the most to me but there's plenty to share. No cost - just trying to find a home for some of it.1 point
-
Lots of rust waiting on the other side of the undercoat.1 point
-
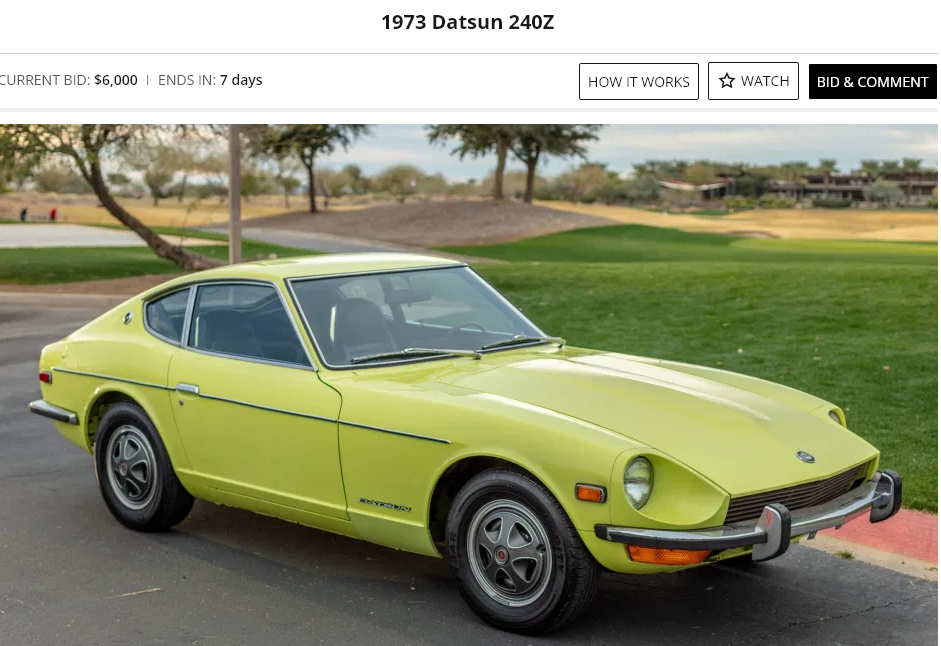
Limish colored 73 4 speed. Don't they know that limes are green? Arizona survivor. https://bringatrailer.com/listing/1973-datsun-240z-139/
 1 point
 -
1 point#00064 was dark green and they were asking $50K for it - it was in florida. That First Green Z - the pictures were for a car sold in Bring-A-Trailer...1 point
-
1 point
-
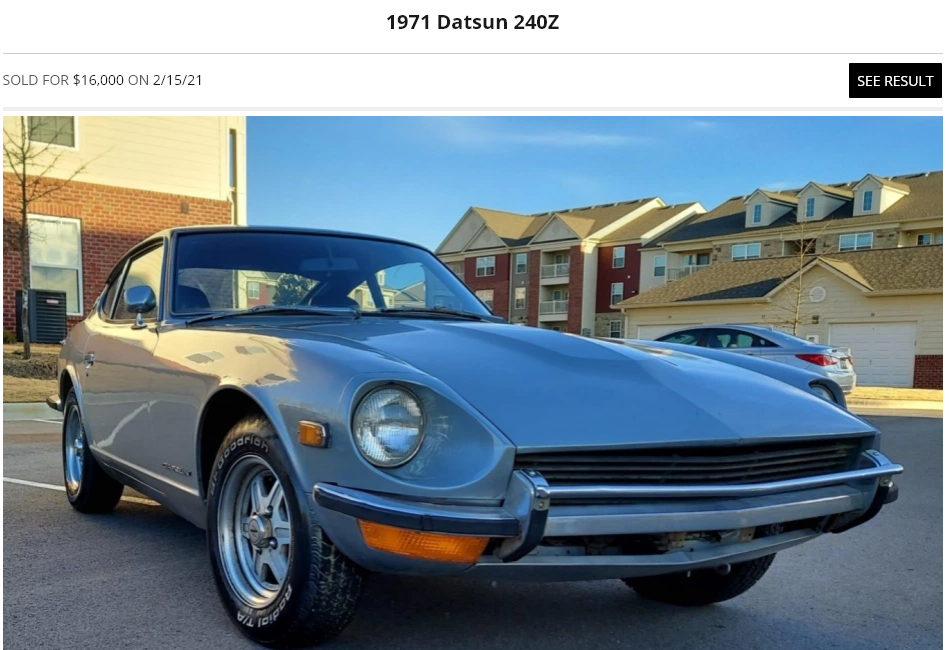
The 71 towel bar sold for $16,000. It had some rust, it's probably been to the beach a few times. South Carolina. https://bringatrailer.com/listing/1971-datsun-240z-166/
 1 point
 -
A free turning motor? Does that mean it spins but doesn't run? My '72 would spin over but it took about $2,000 and a lot of work to get it drivable. Would "misleading" be the right word, I'm a Beverly Hillbilly.1 point
-
1 pointI put an offer on a house with only a video walk through and I was in AZ over the weekend for the home inspection. I'm buying a house that has a big (for there) garage with a standard double garage door plus a golf cart door that's only a 6 foot door. I knew it would be tight to fit a real car through, but I measured it and found that the actual opening is 68" wide. The 280Z *should* be 64.2" wide according to the interwebs, so if I'm super careful, I should be able to just back it through the door with 1.5" on each side to spare. The golf cart bay is just long enough for the Z as well, but once I swap to 240Z bumpers, it will have plenty of garage length in that spot. I guess adding flares is out of the question.1 point
-
1 pointI was doing a motor rebuild and suspension refresh, all kinds of small stuff popped up so it was a month long at least. You could do it in a day or two once you get all the parts together. The steering rod is kind of a pain if the motor is in the car. I used polyurethane bushings for the steering rack. Here's what I used for reference way back when I did my '77. @240260280 always has some good photos which help me better than reading directions so THANK YOU! Phillip. https://atlanticz.ca/zclub/techtips/steering.htm1 point
-
Thanks. The thread has been my therapy and my school. Everything I have done has been a “first” for me. Thankfully this forum had been guide.1 point
-
Thats because these screws are NOT Phillips #2 they are JIS.. a Japanese type of screw recognizable by the little dot near the cross on the head! However you can use a phillips screwdriver if you are a bit careful.. Before turning check fitment and sometimes first a tap with a hammer on your screwdriver will also help unscrew.1 point
-
1 point42F here. And that's cold to these old bones. What's in Austin will be here tomorrow, damn it. Brown liquor helps me get through these 2 cold months.1 point
-
1 pointHa Ha...speaking of nice and cool it is 21 degrees in Austin TX right now!1 point
-
I wanna say thank you to everyone that was here and helped me out. Y'all are great.1 point
-
My connector pieces were built to match what was already there. Not perfect I’m sure, it is very close. The jack plates are my own design as far as I know. I don’t remember seeing them done before. But I’m sure someone else had the same idea. The TC bucket was removed by drilling out the spot welds and careful grinding. I just welded back through the spot welds to put it back on. And yes, my thread would benefit from “chapter markers” ....1 point
-
0 points