Leaderboard
-
Captain Obvious
Free Member5Points10,081Posts -
duffymahoney
Free Member4Points961Posts -
motorman7
 Subscriber
 4Points2,228Posts
 -
grannyknot
Free Member3Points5,158Posts


Popular Content
Showing content with the highest reputation on 07/08/2019 in all areas
-
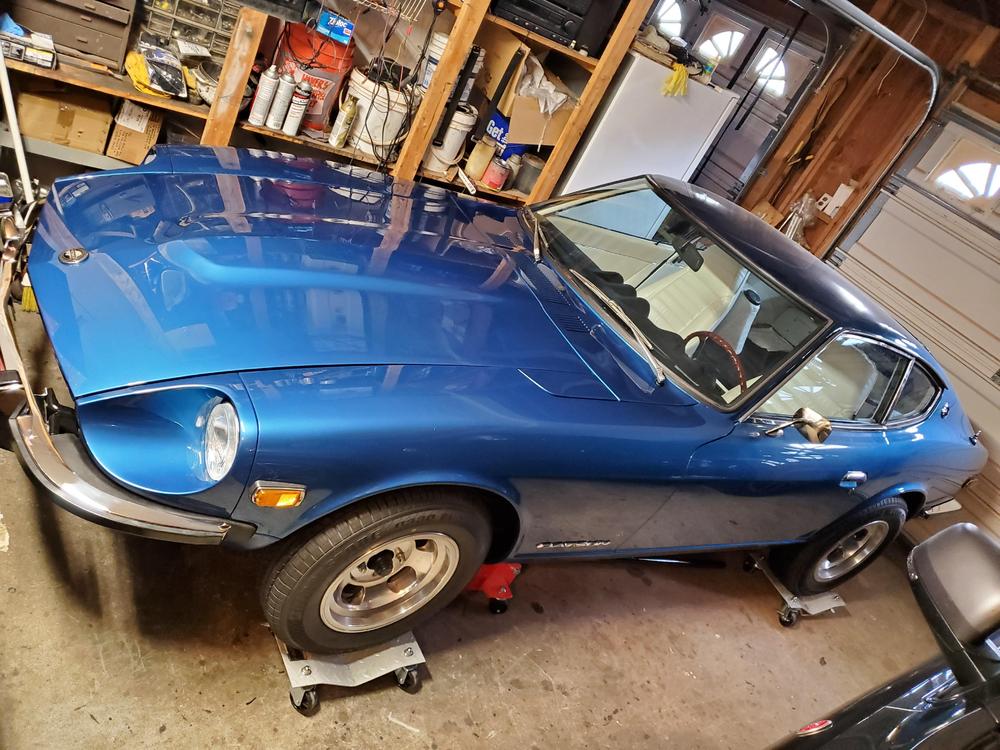
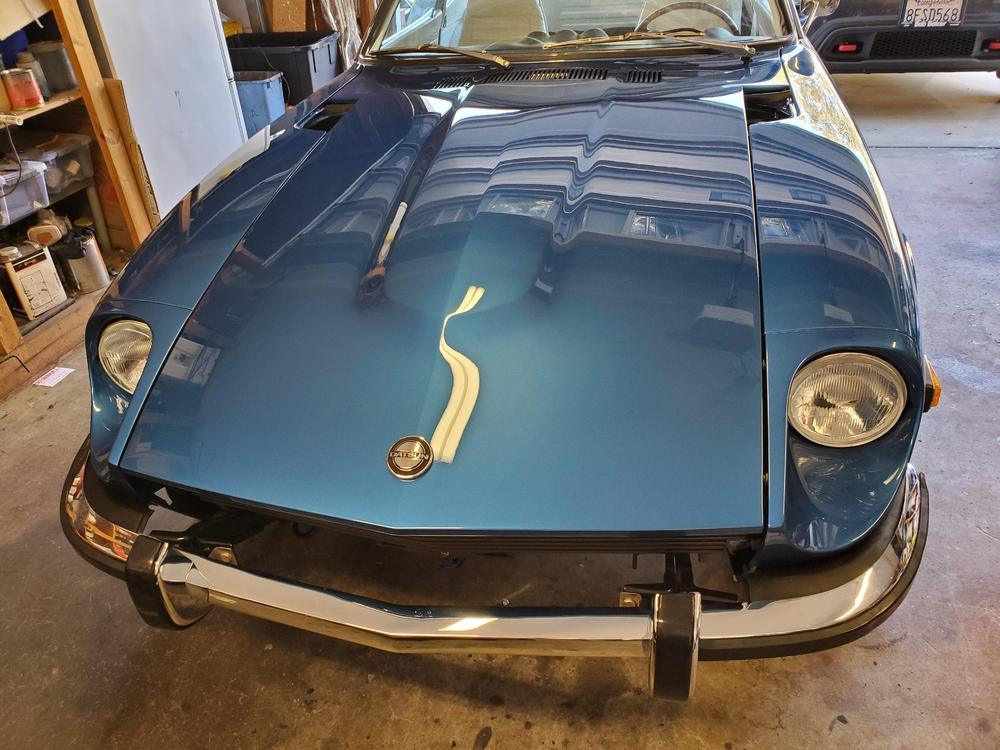
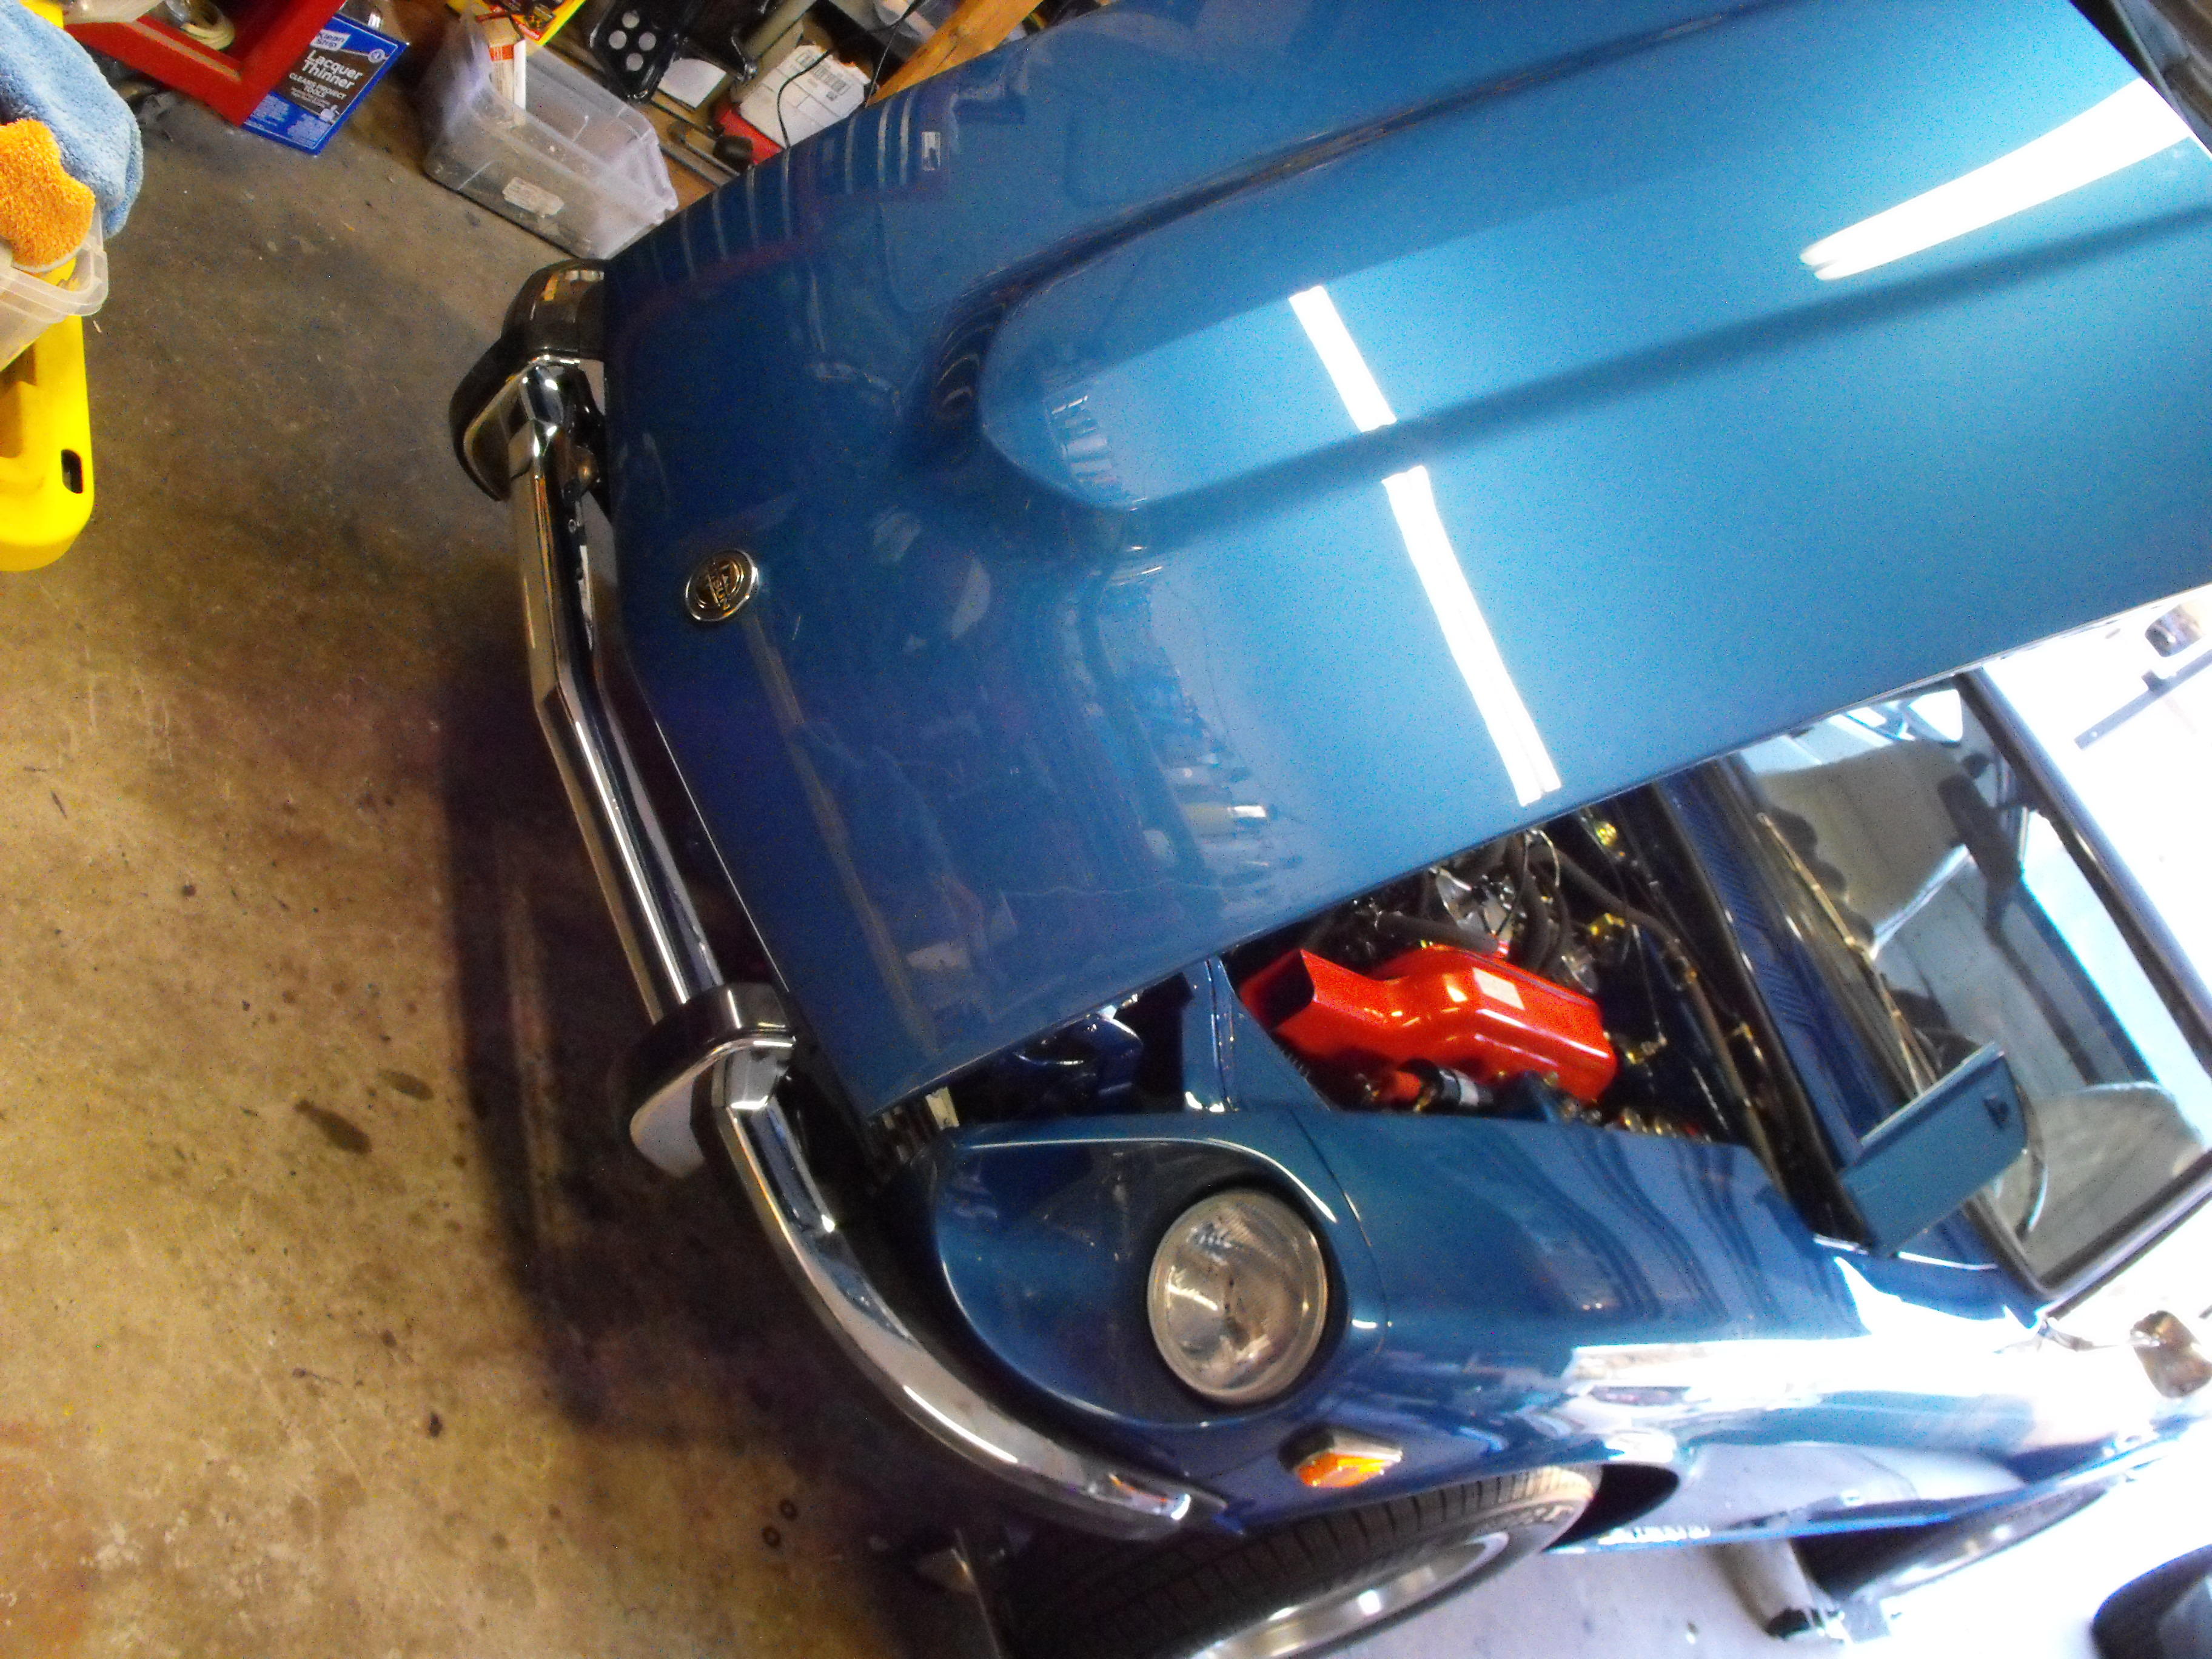
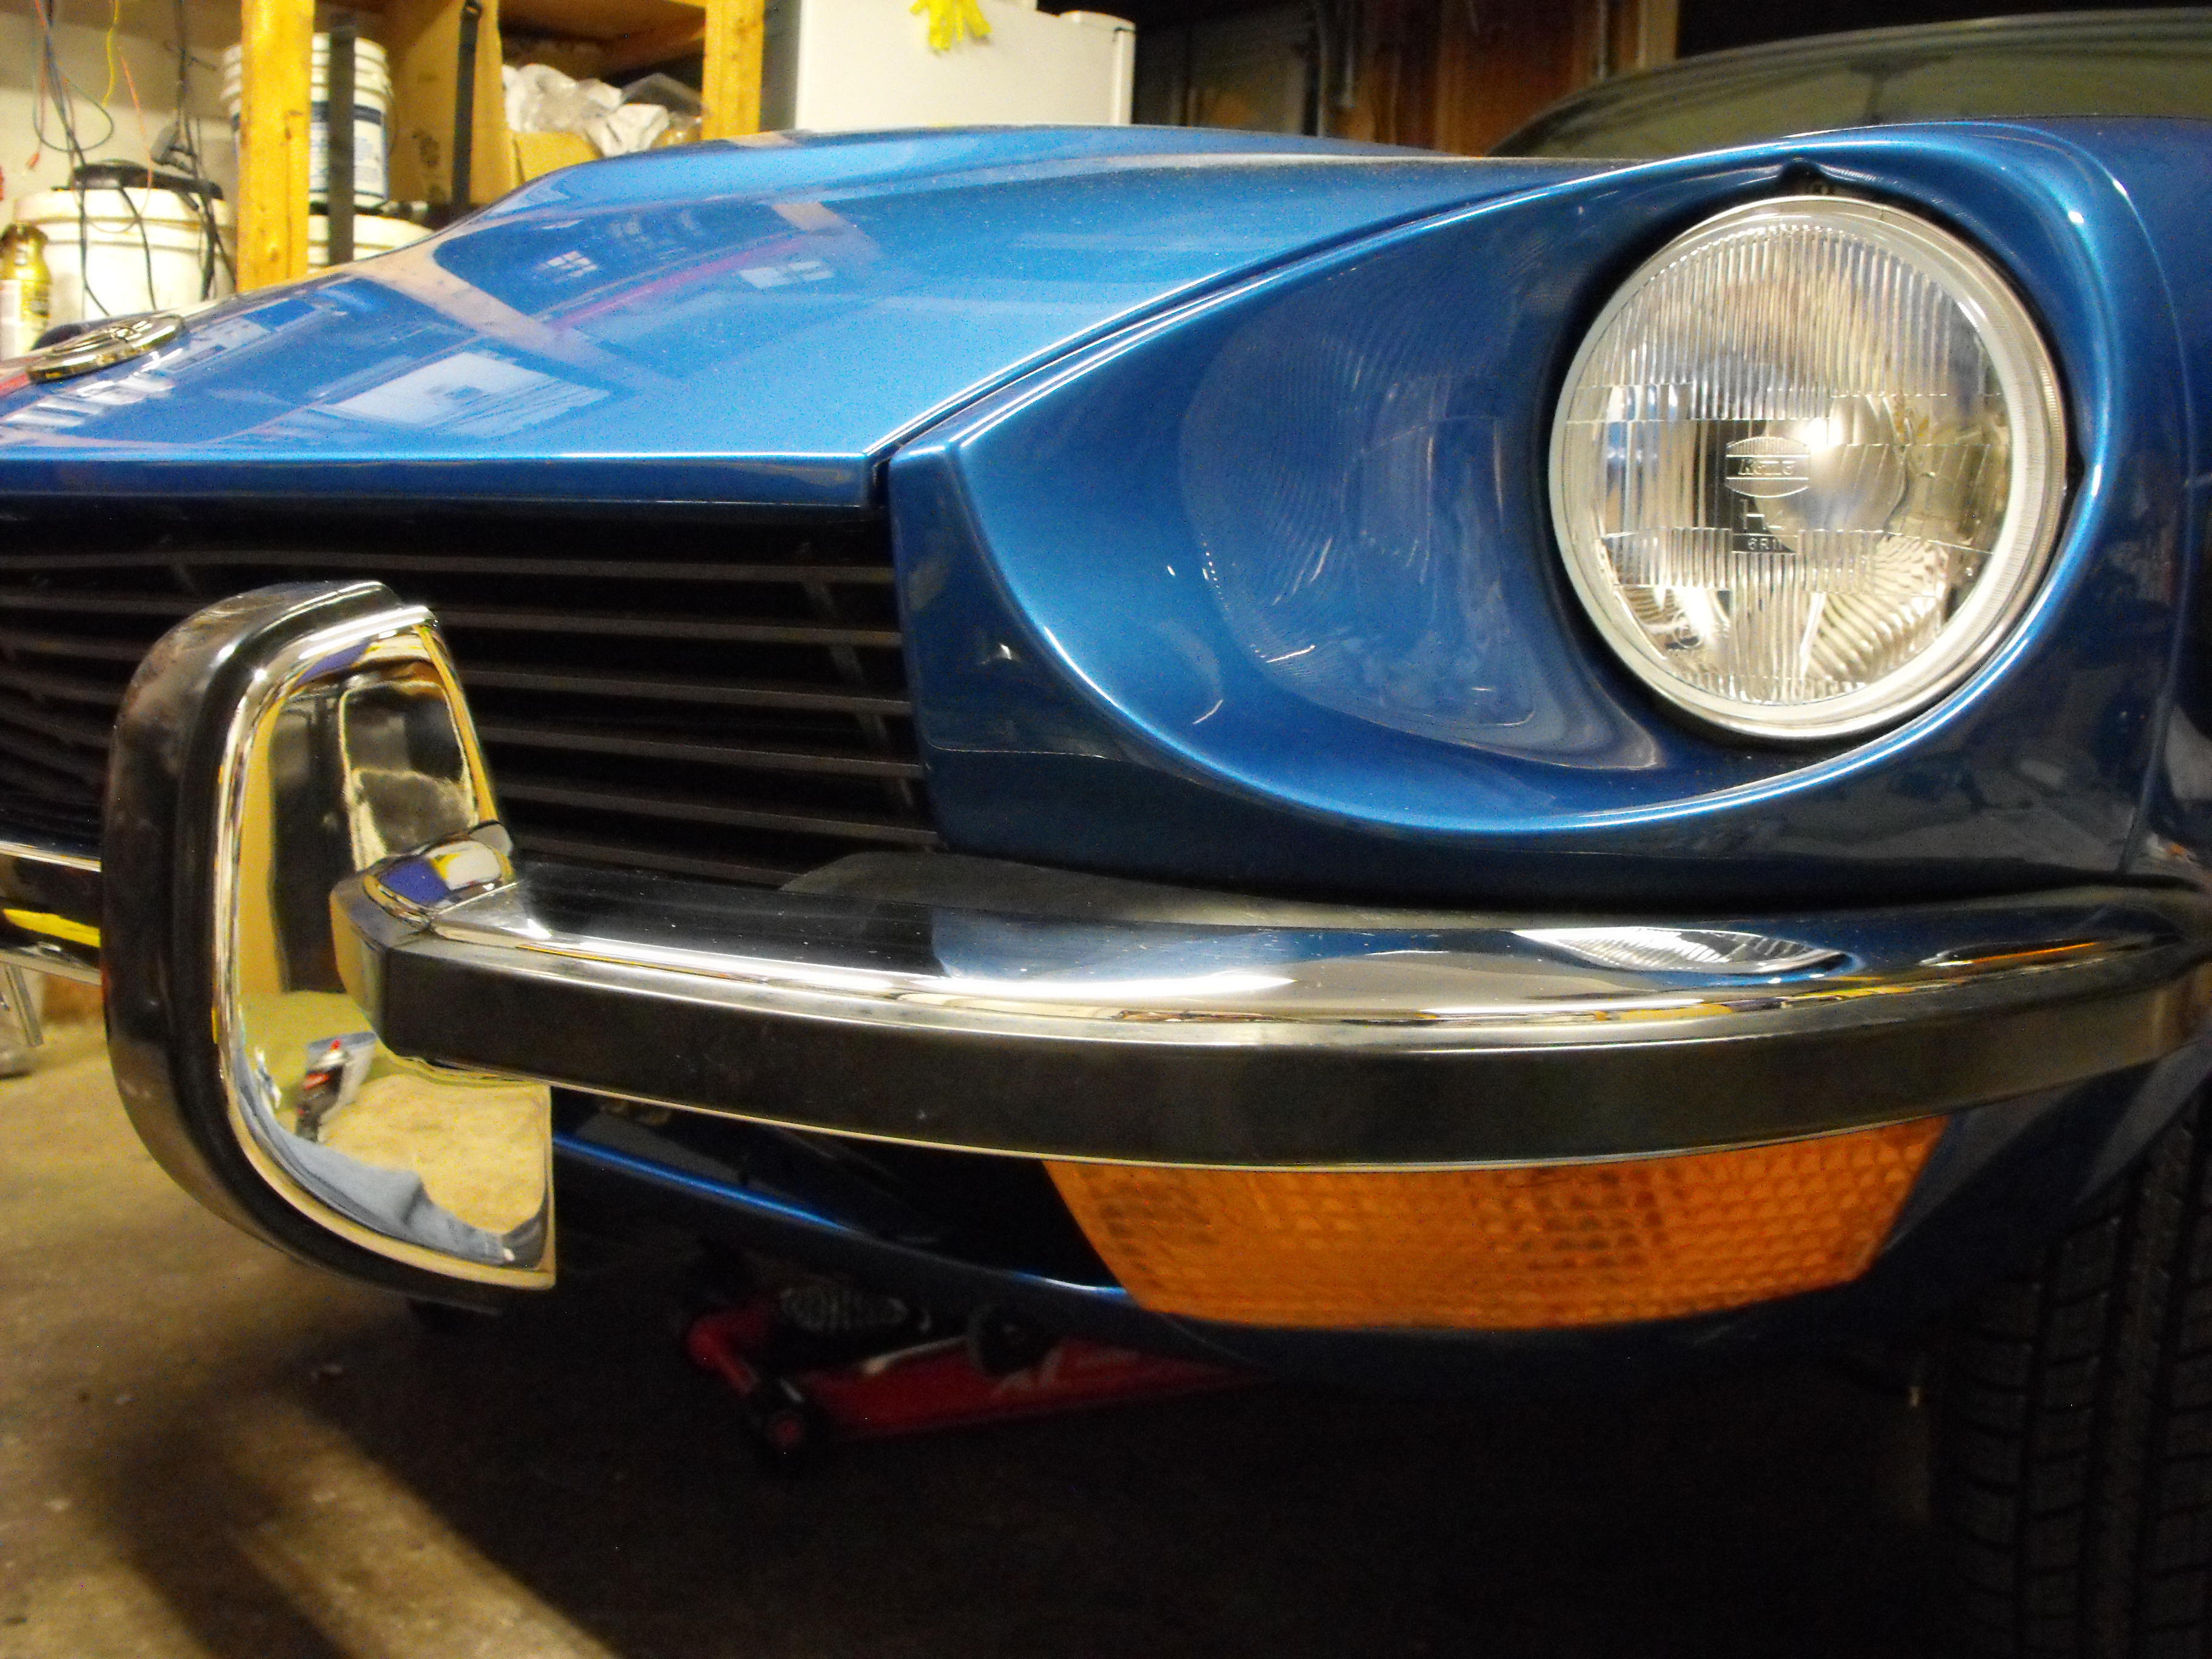
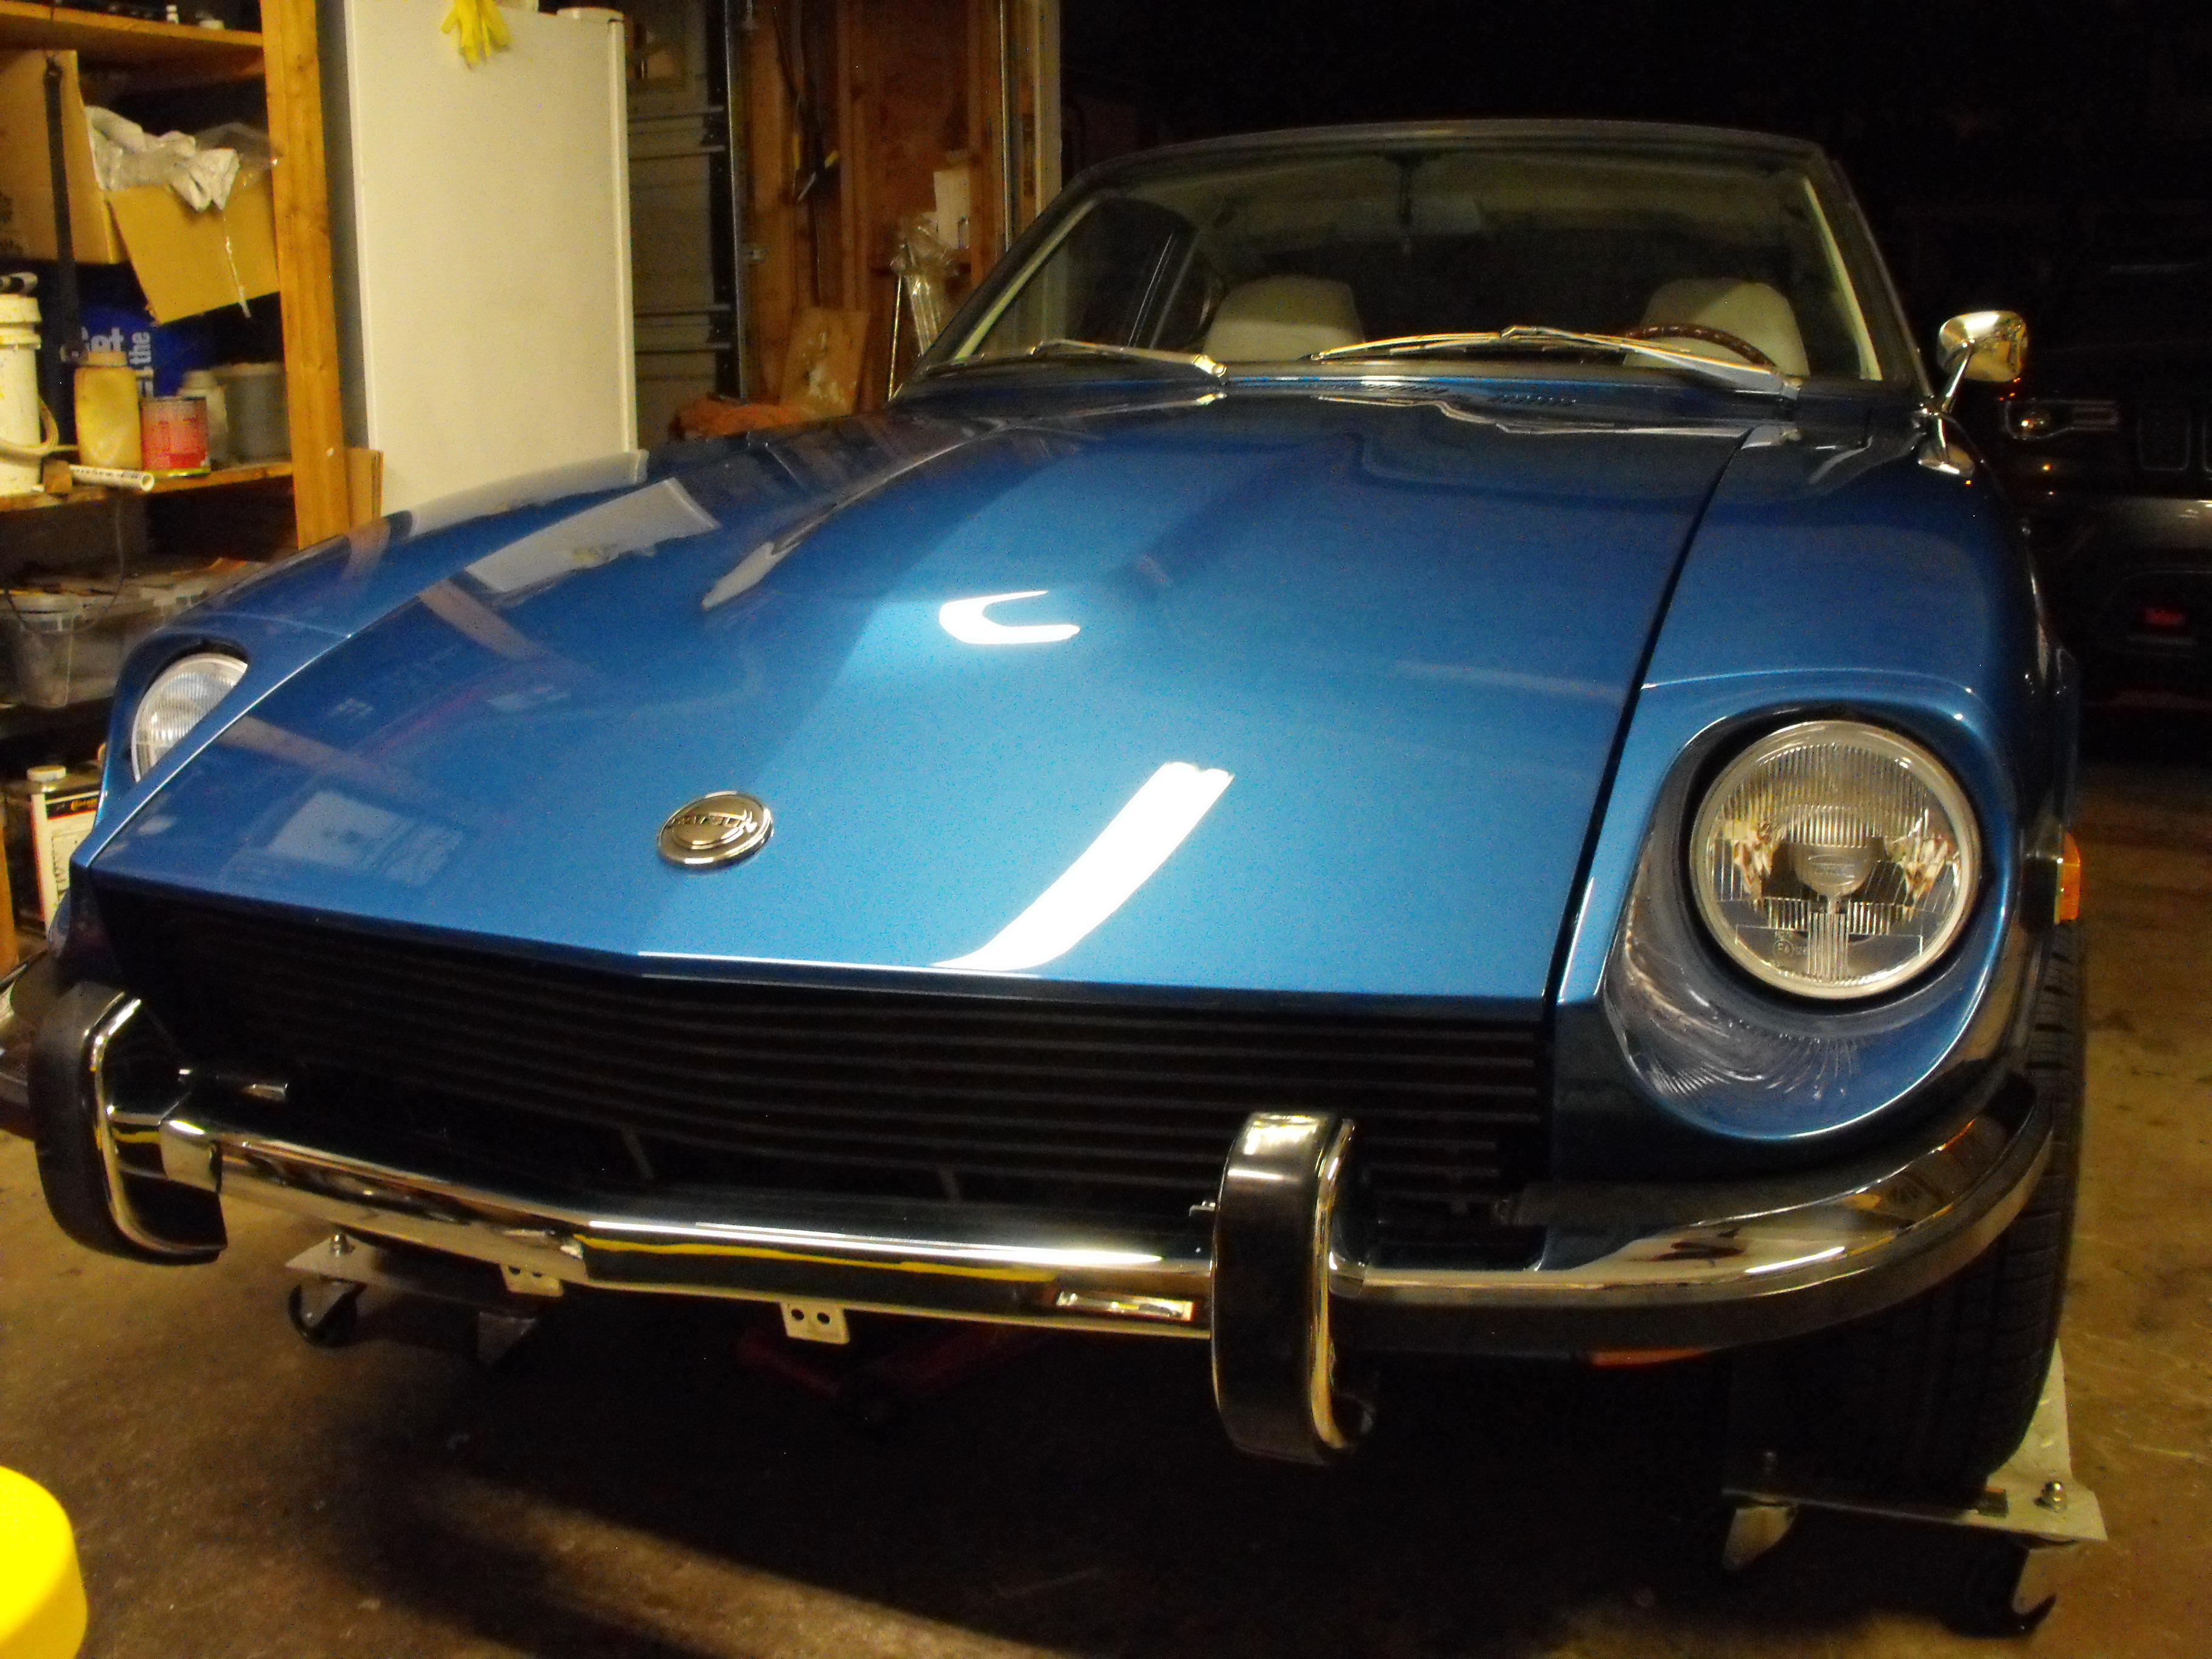
3 pointsVery close to finishing here. Got the clutch and brakes bled today. Also installed the final body panels. Just a few more details to finish up and she will be good to go. It's the mad scramble before ZCON in Branson. Right now we are in pretty good shape. Here are the latest pics. The body pics still do not show up well. The paint job is pretty amazing.


 3 points
 -
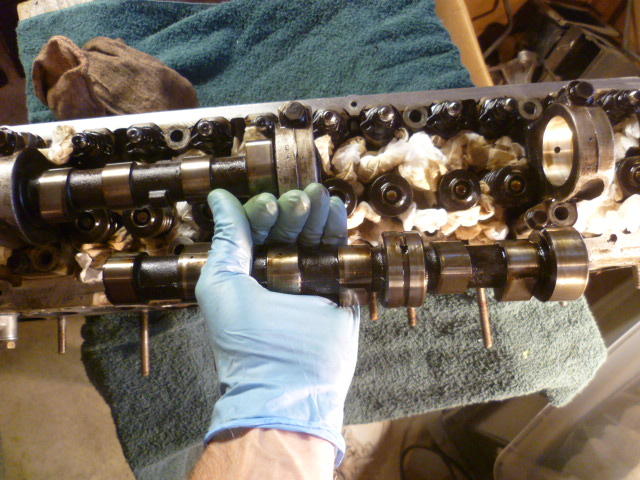
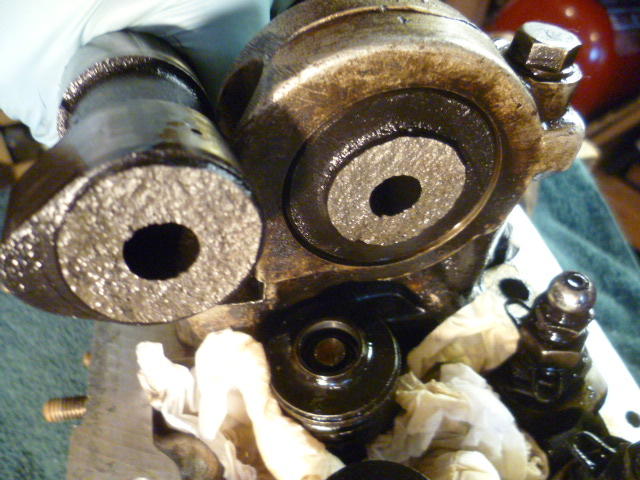
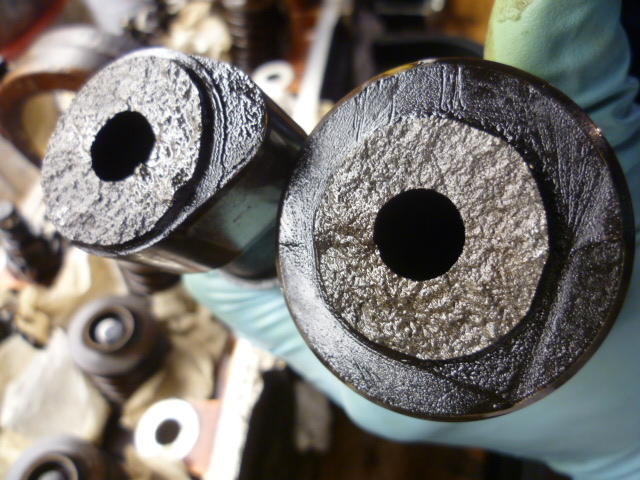
2 pointsHead is off, and by some incredible stroke of luck.... No contact between pistons and valves!! So I don't know if the engine isn't interference (with the dished pistons), or if I just got lucky and the rear half of the camshaft just happened to stop in a position where none of the valves were open enough to cause a problem, but whatever the reason, I'm thankful for small victories. Here's a pic of the valves from one of the rear cylinders. They all look like this. No clean spots and no hint of collision: My beautiful camshaft. The rear portion spun really easily in the two rear journals. I just slipped it out the rear of the head: The front portion of the camshaft spins relatively easily, but not as easy as the rear half. There is also one part of the front half rotation where it gets a little tighter. Not so tight that I can't turn it by hand, but to my calibrated hands, it's a little tighter in one spot then the rest. I wouldn't be surprised if there's some sort of alignment issue with the cam journals that was stressing the shaft for the past five years. Here's the break area. I don't have any of the typical beach marks of a gradual failure. It looks like it was a one time catastrophic snap: I took the front half out to get a better pic. Here's another close-up: Next chance I get, I'm going to put the front portion of the cam back in and see if I can loosen up the front towers and get them aligned better. I suspect that if I loosen them up and tighten them down again evenly I might be able to get rid of the rotational tight spot. Just to see if I can.
 2 points
 -
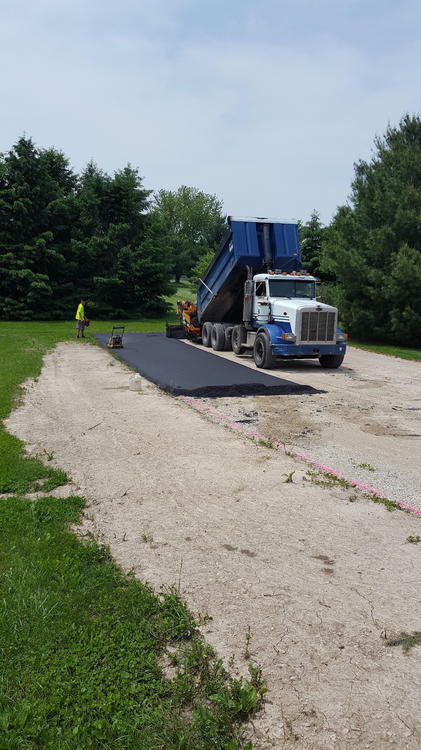
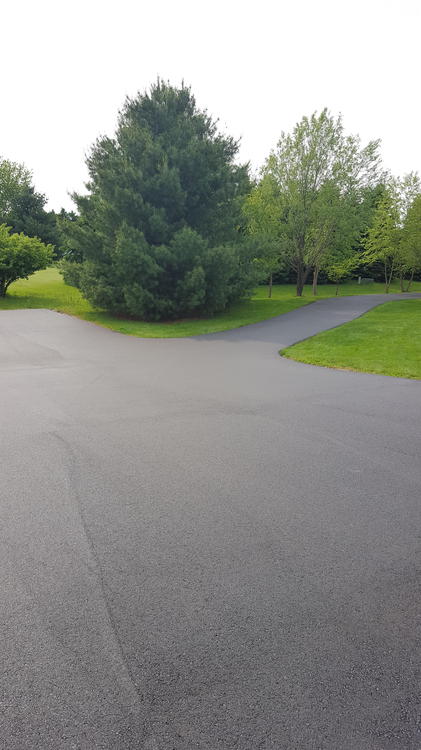
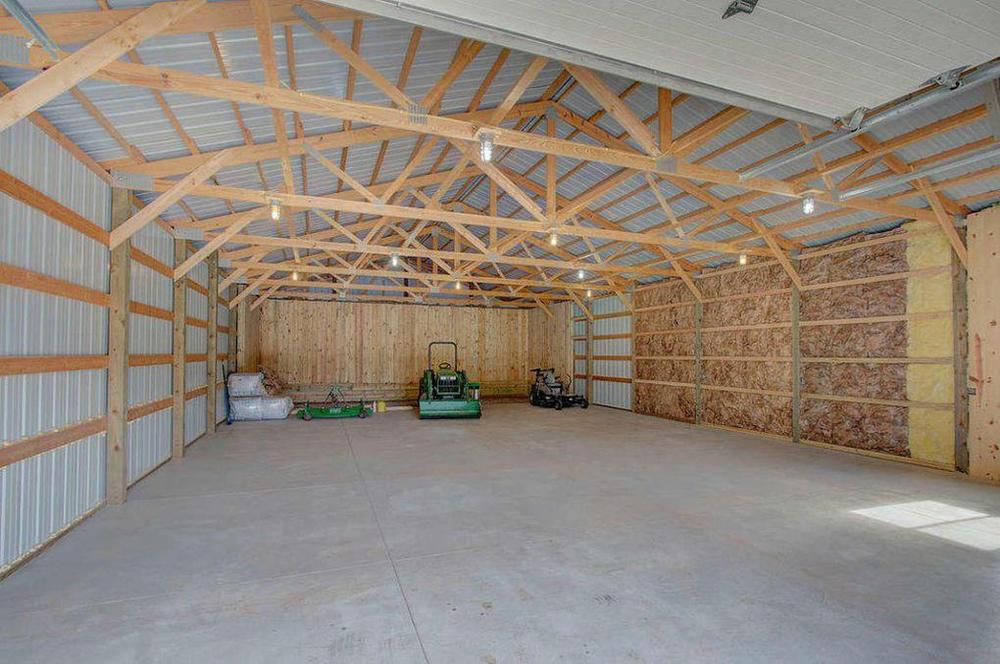
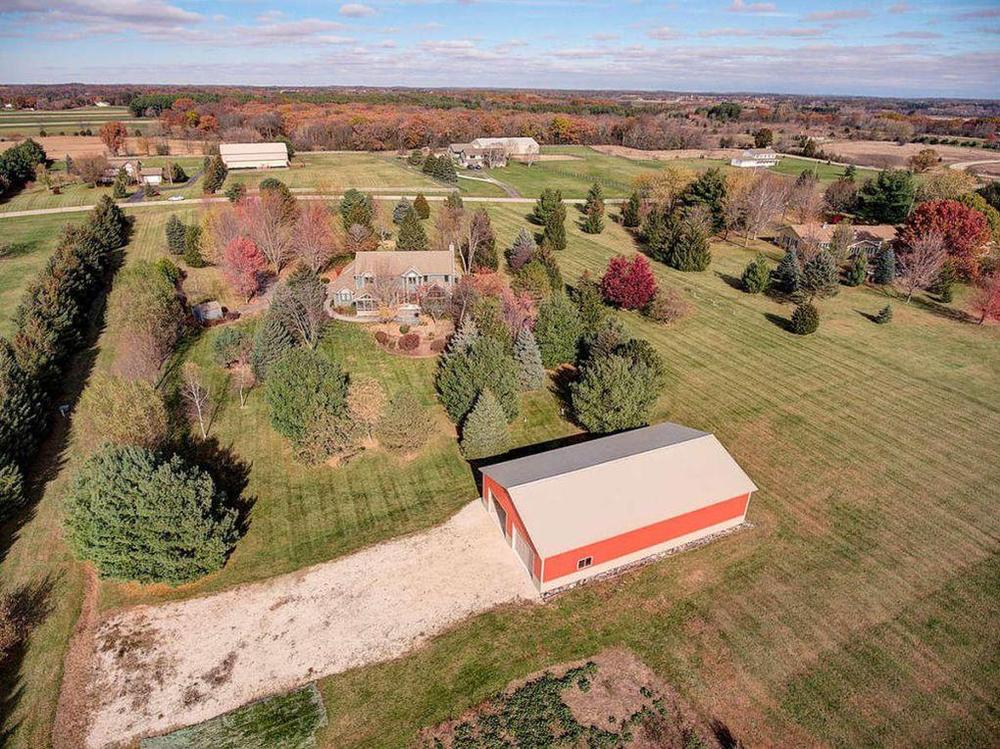
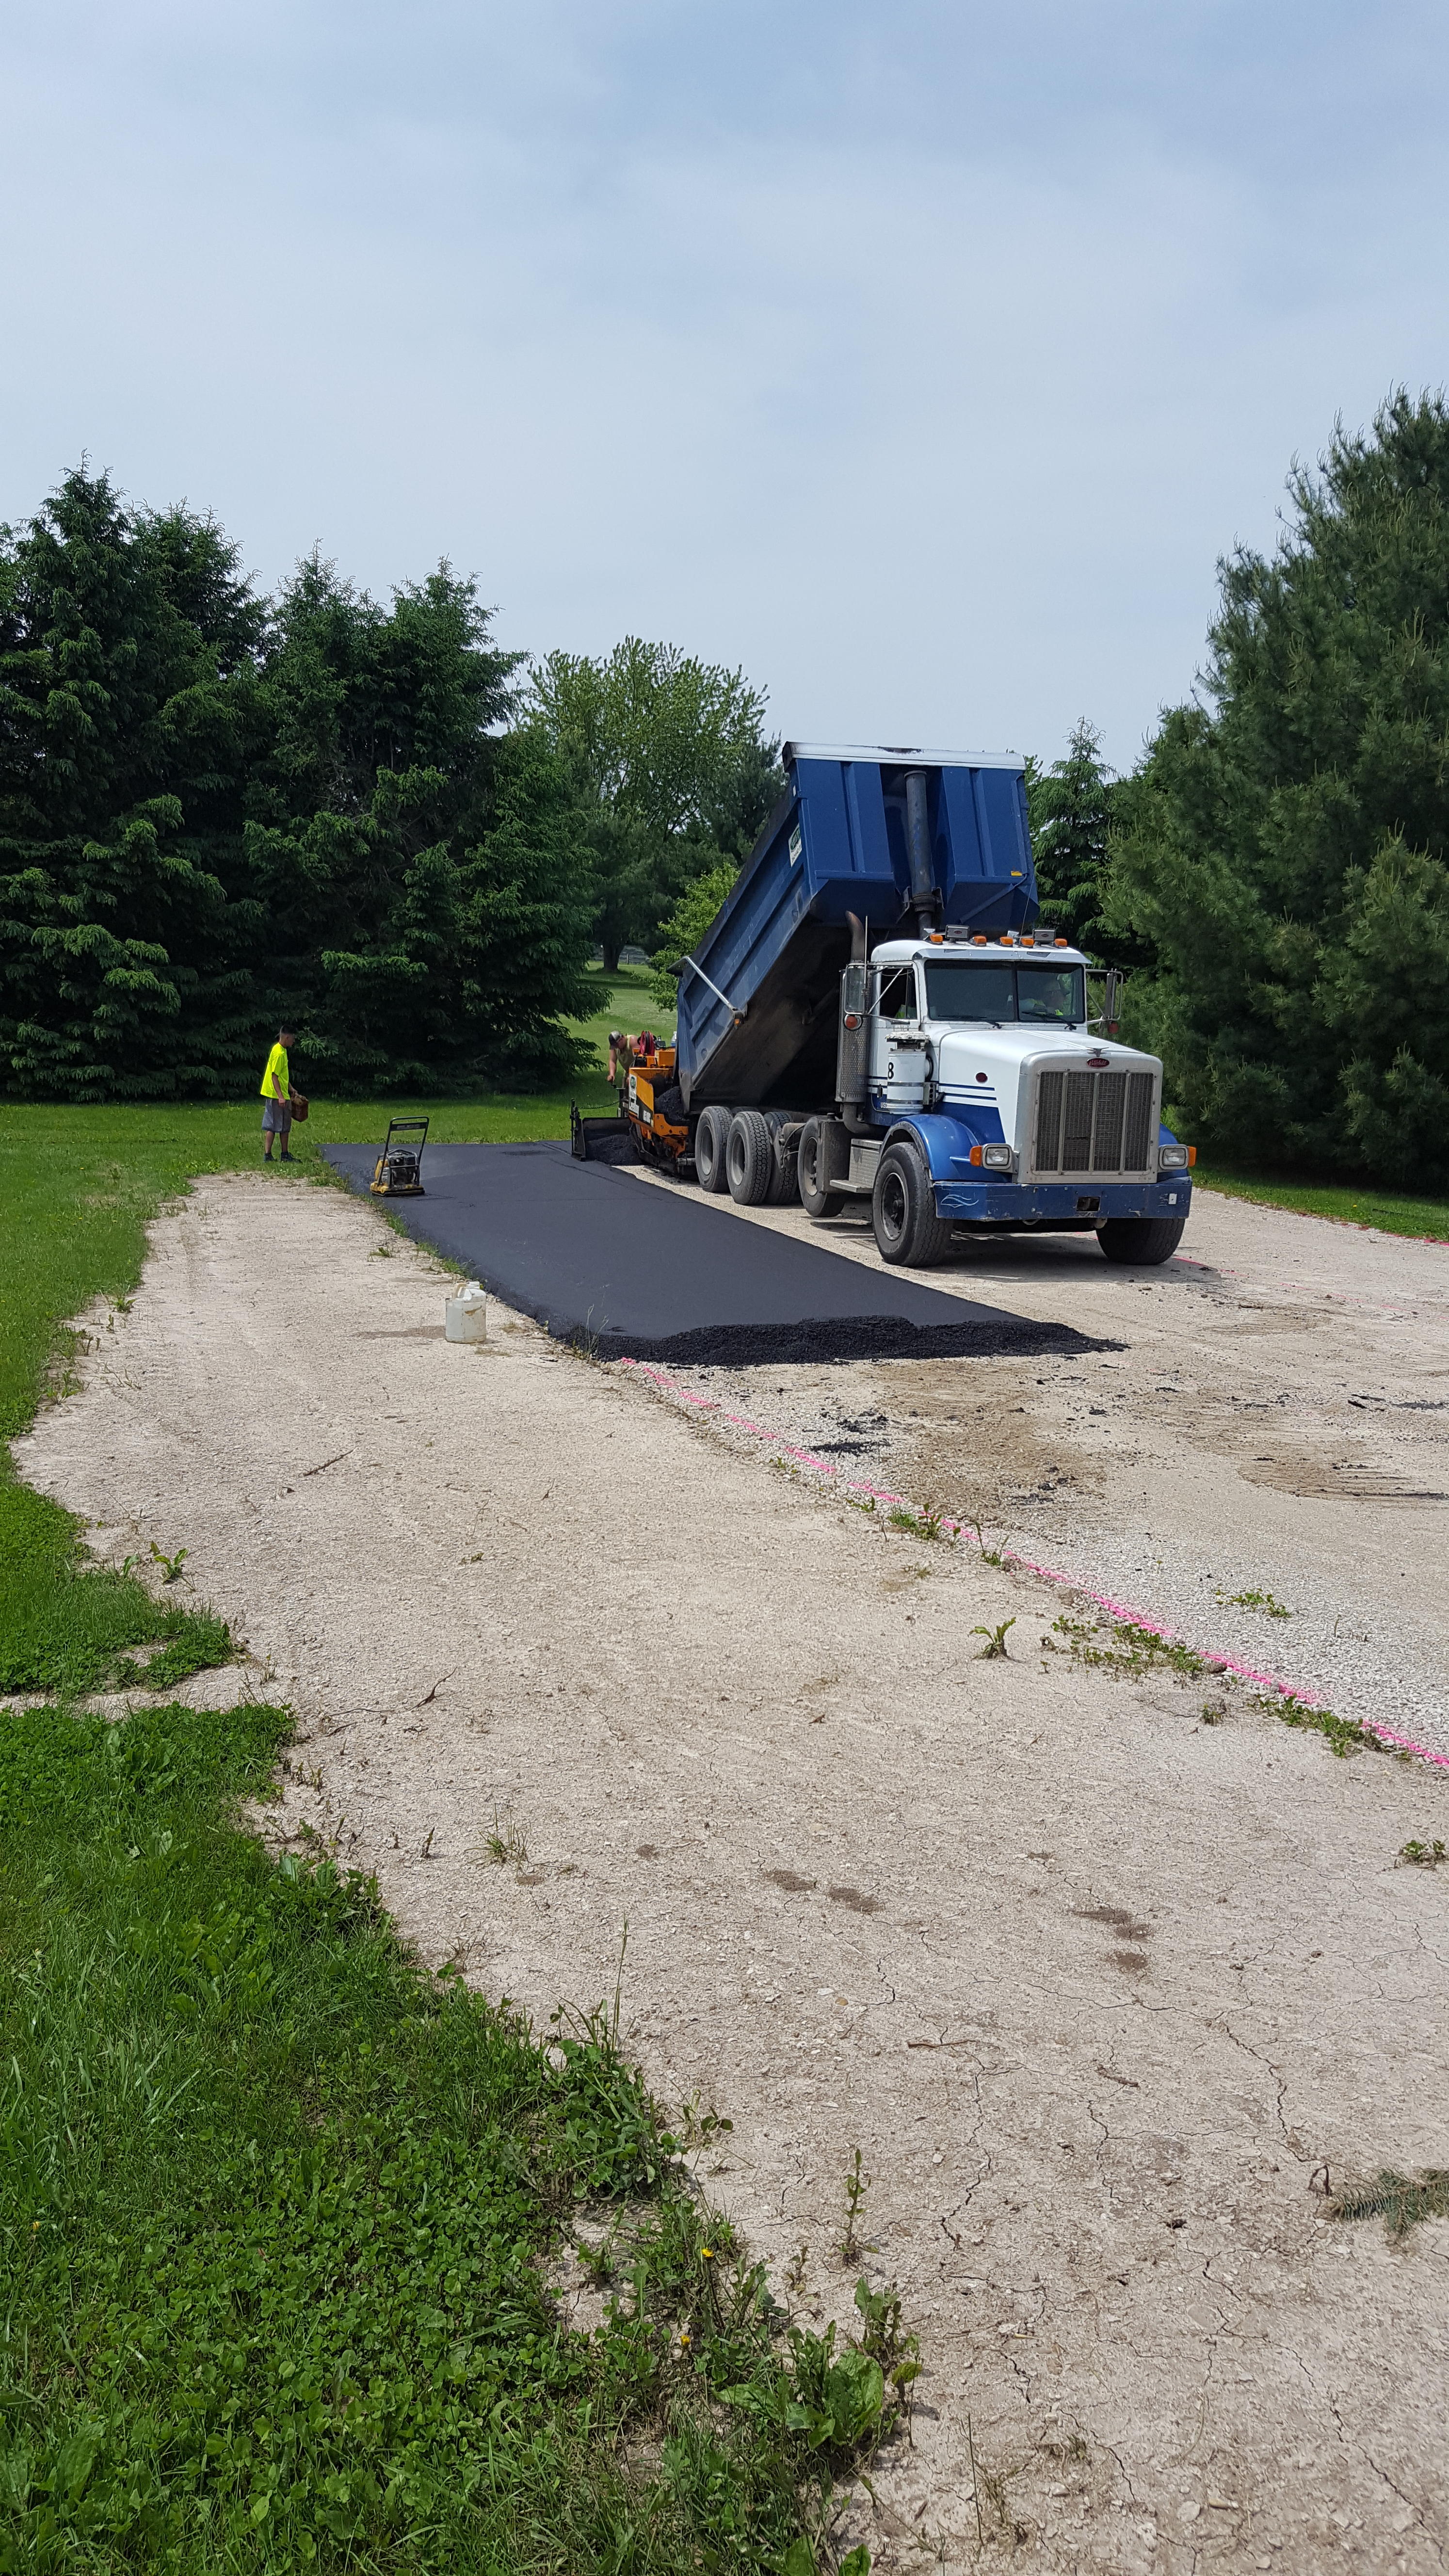
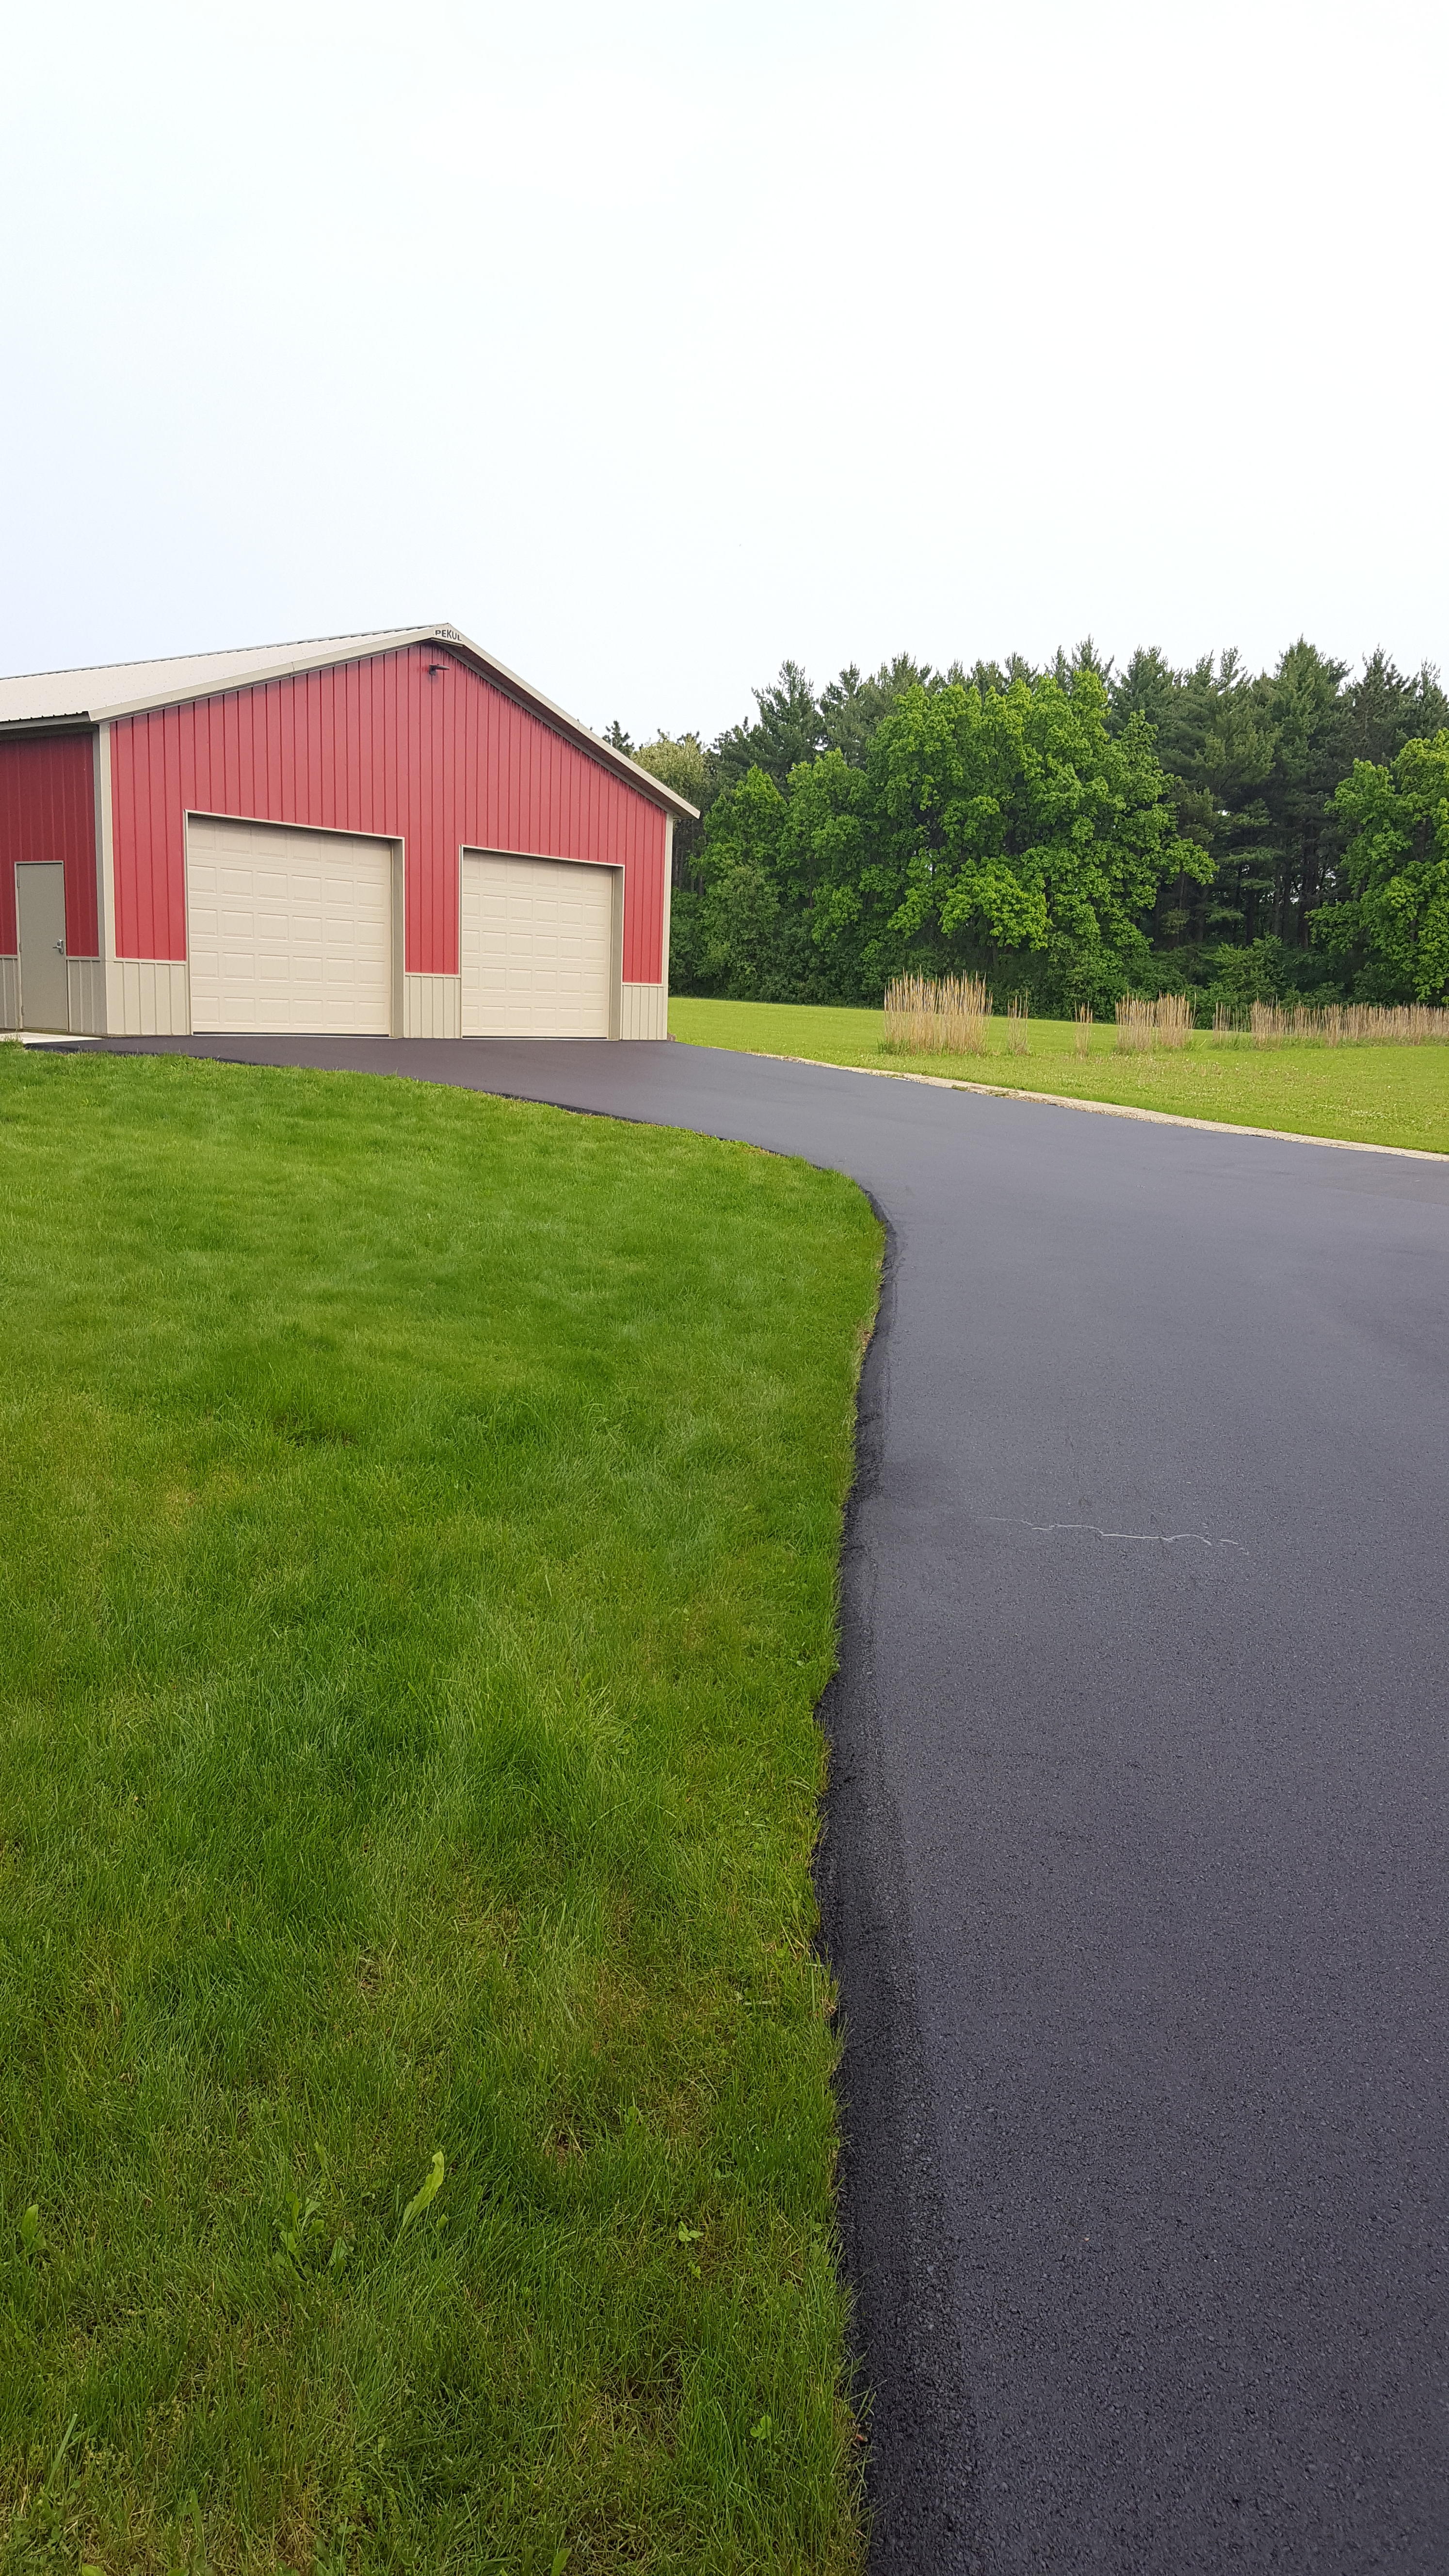
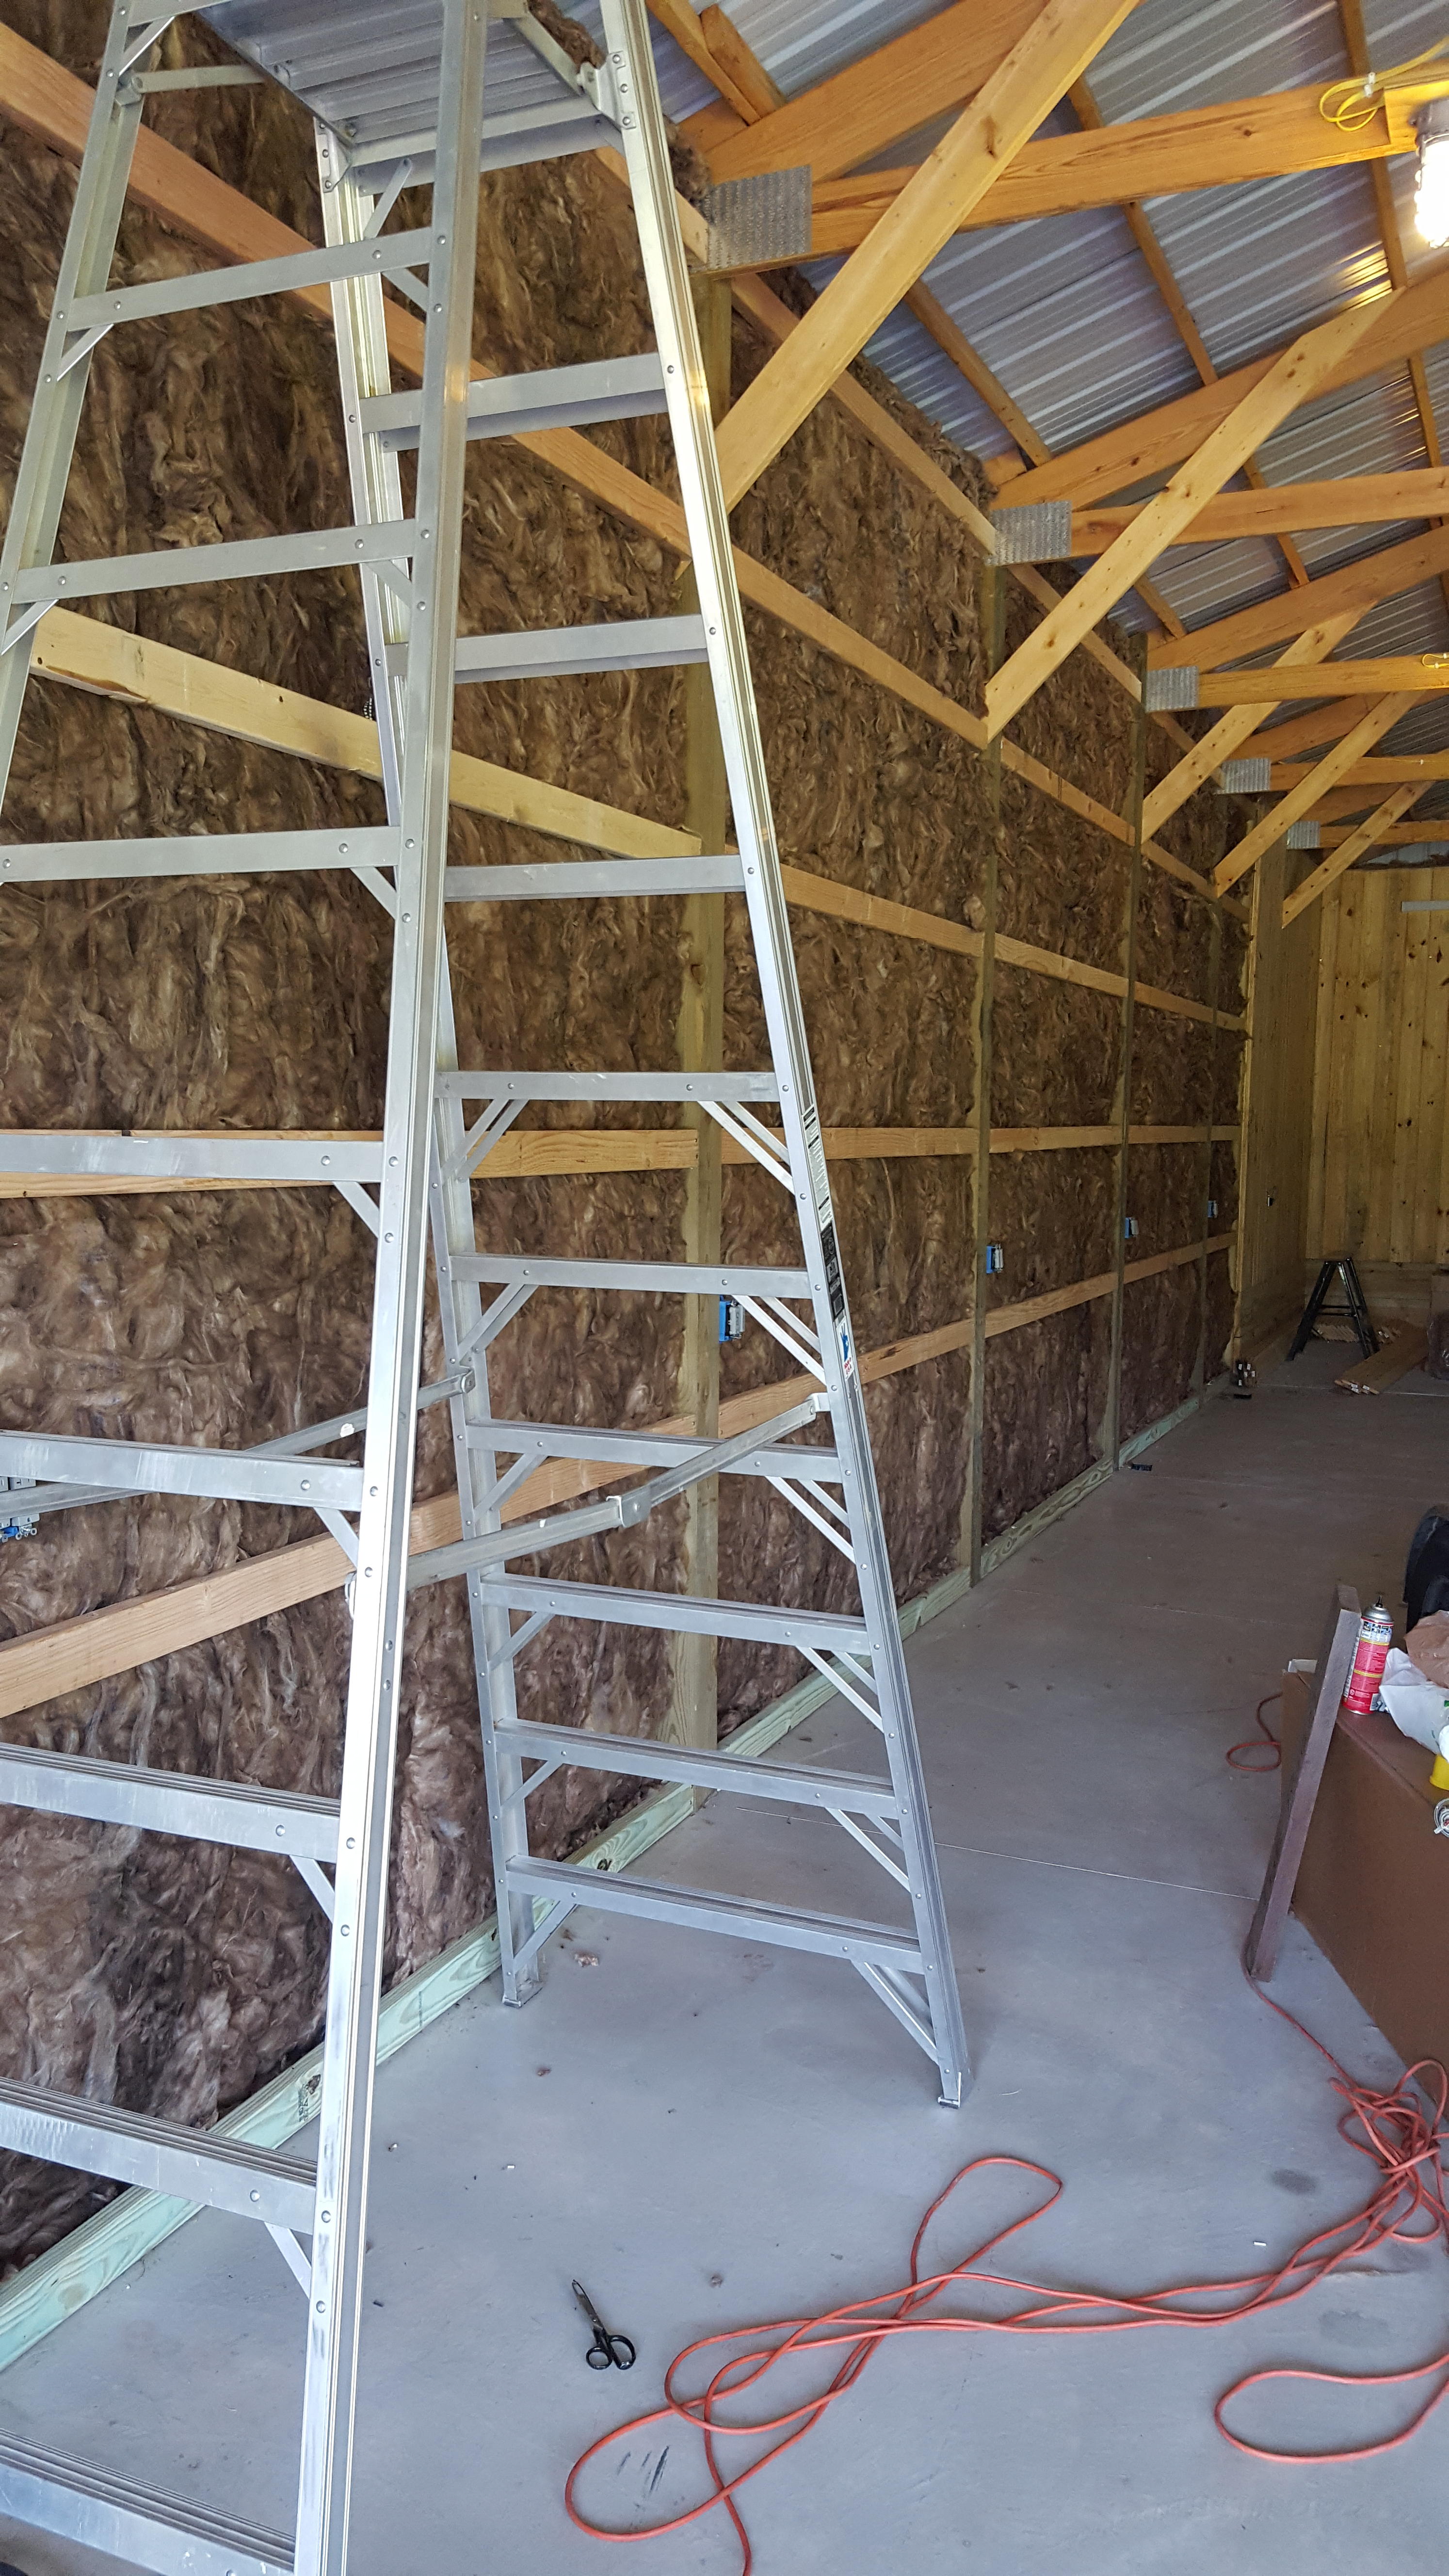
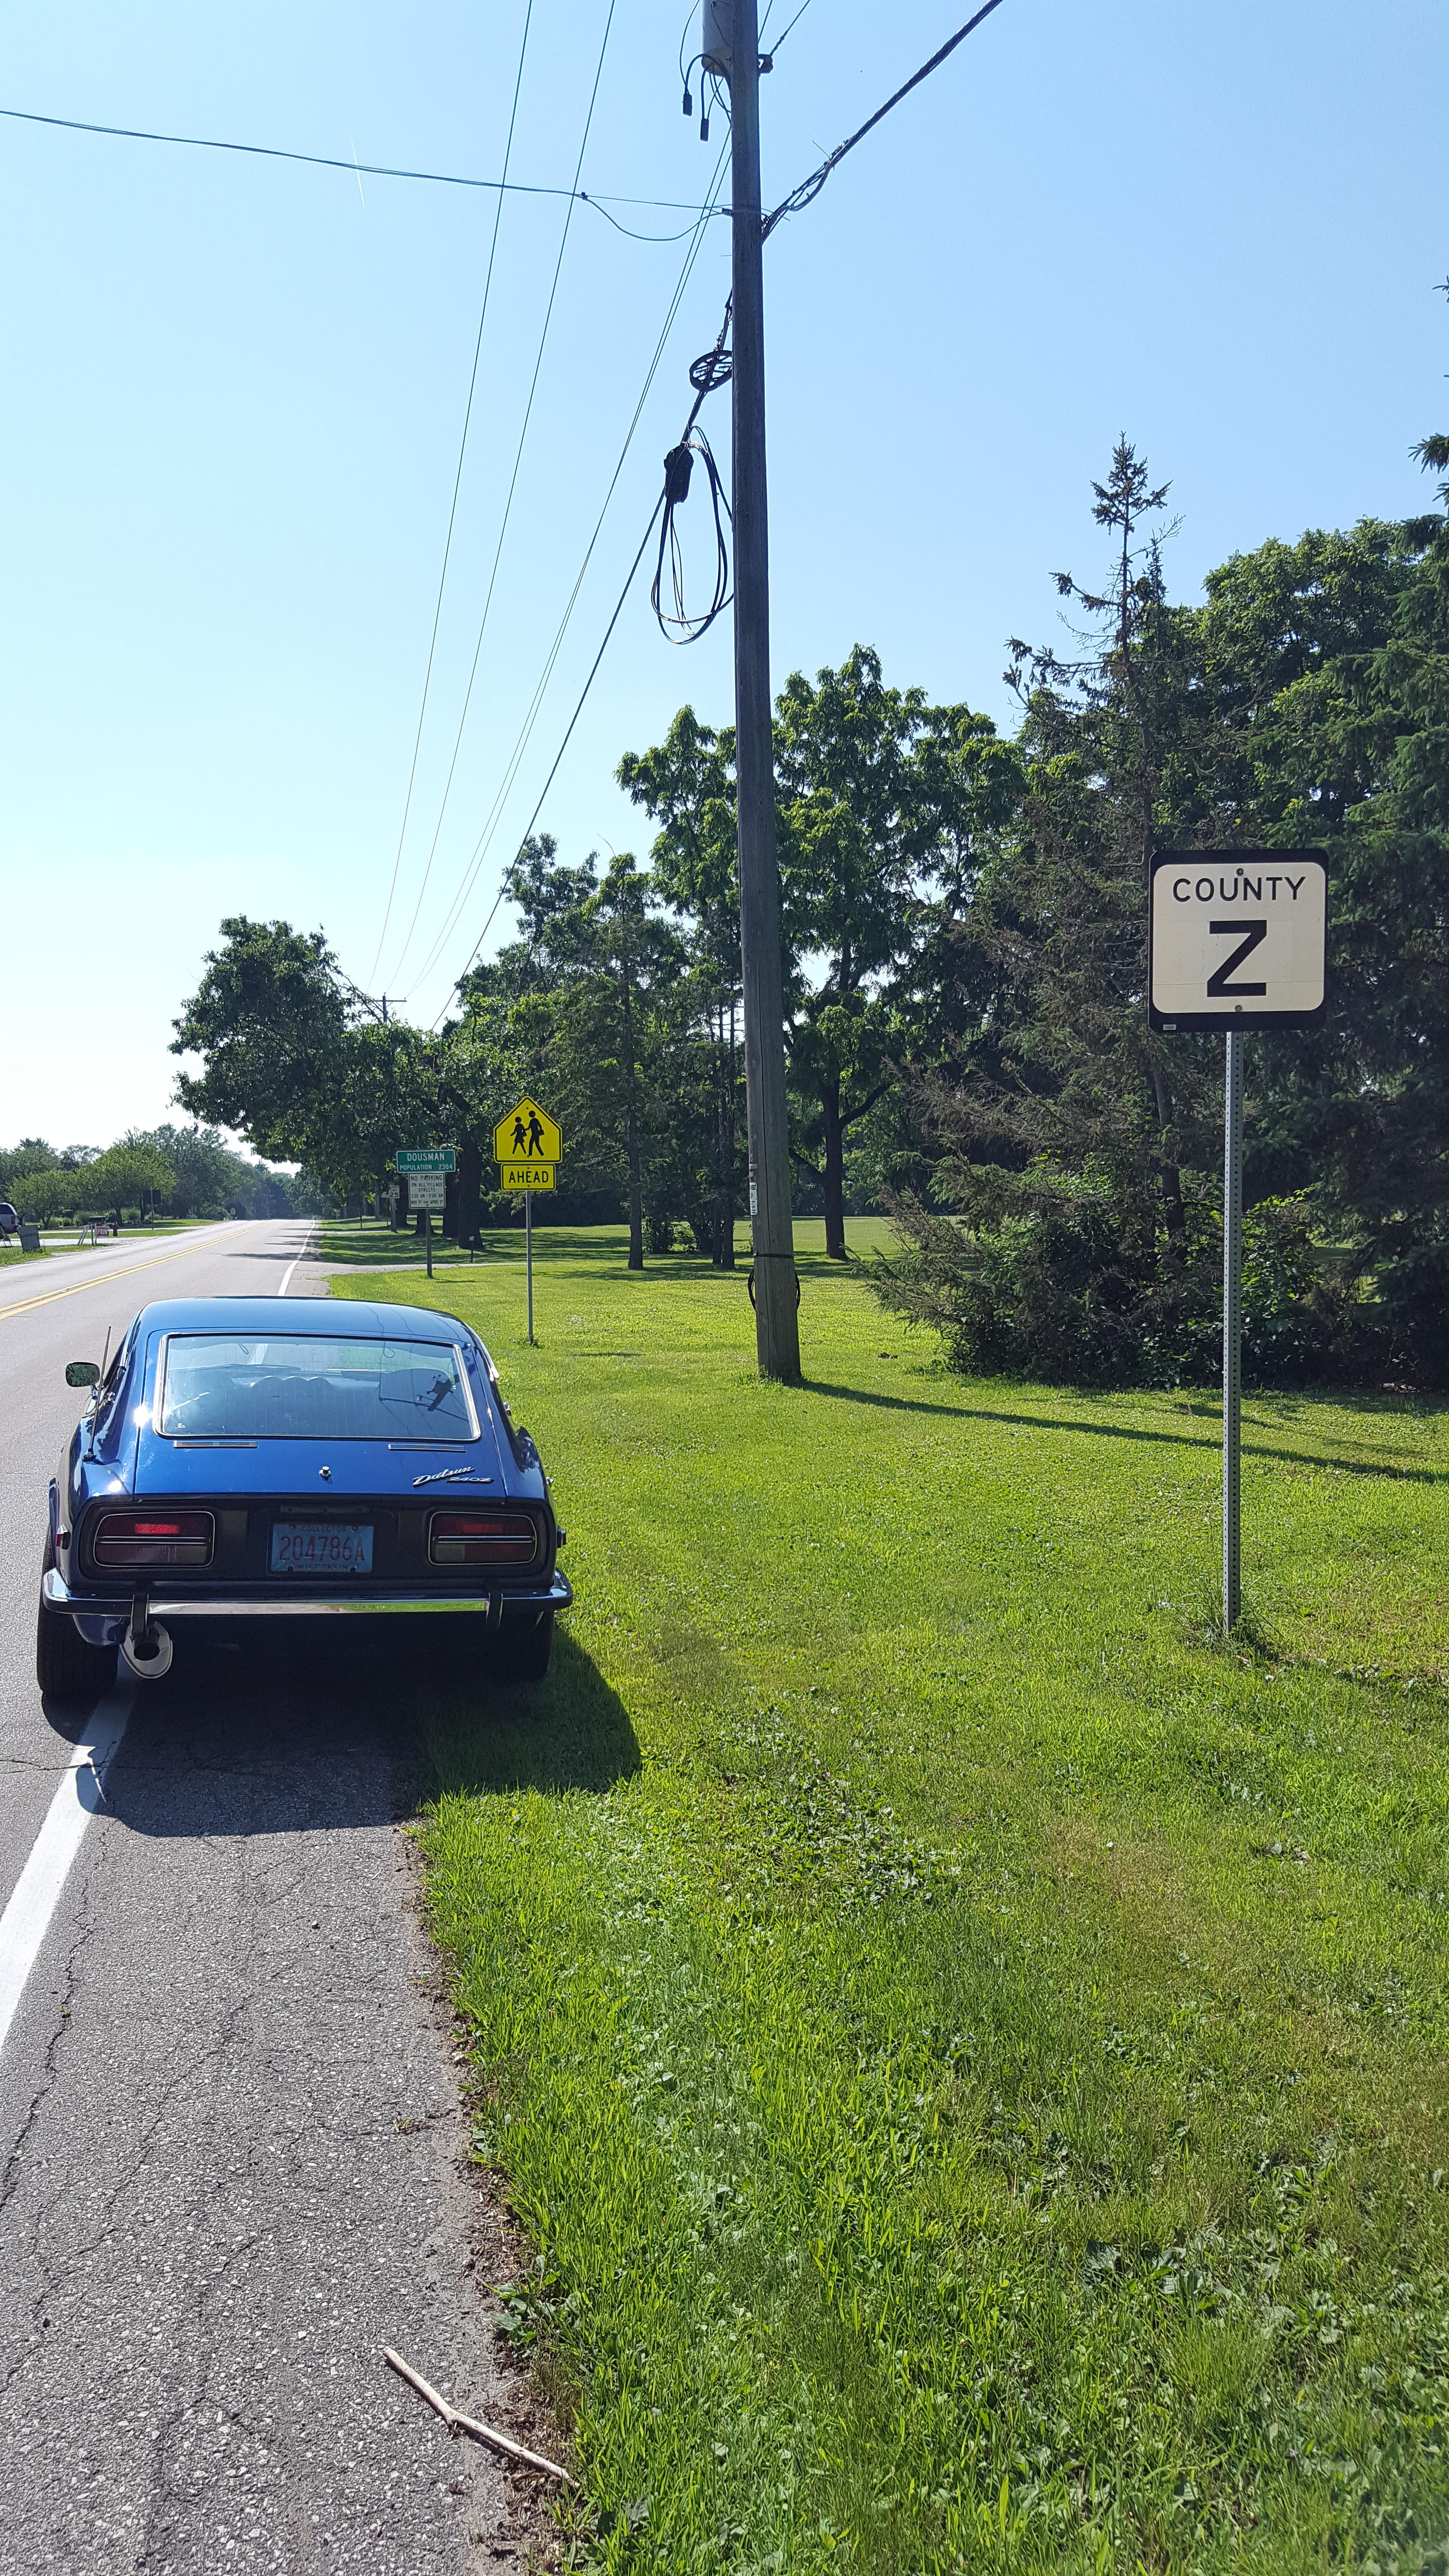
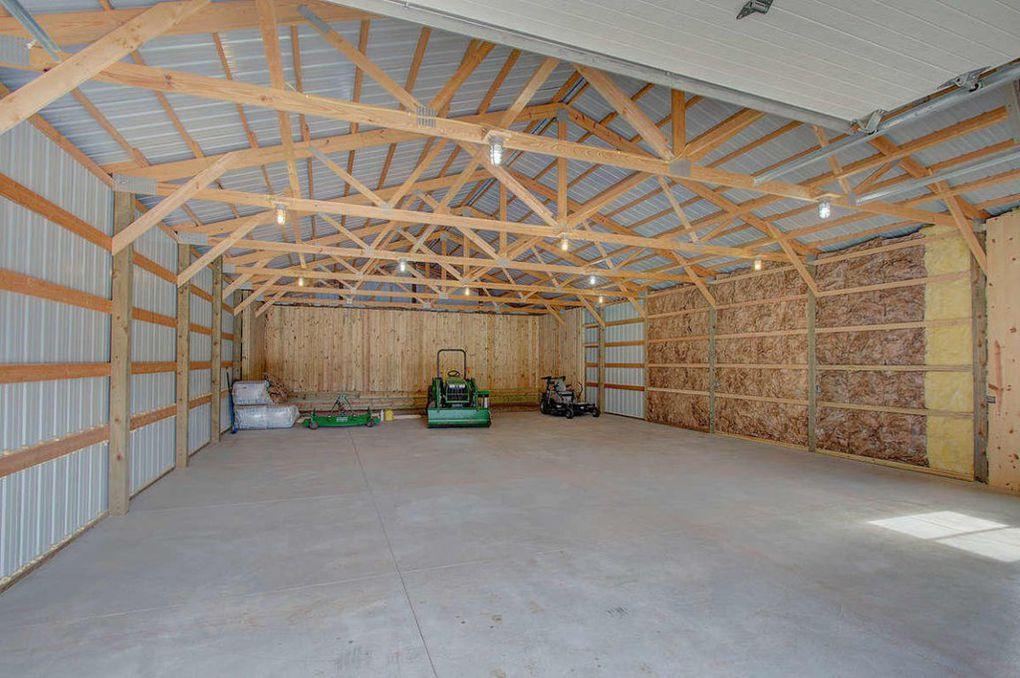
2 pointsWell, it has been a while, so I figured it was time for an update on the Garage Mahal. I was able to get the horse stall area concreted in this spring, so I now have 100% of the floor space in usable condition. In the first week of June, I had the asphalt drive way put in. They did a great job. I now have a lot of parking area and space to turn around with the trailer to back the race car into the barn. I can back to the whole rig in, with the truck still attached, close the door and just walk into the house. No more 45-60 minutes to unload when I get home from a track weekend. That used to really annoy the wife. The original builder of the barn came out to give me an estimate on the ceiling. He said that the trusses would have no trouble supporting a steel ceiling with R38 blown-in insulation. I am thinking about going with maybe R49 for better heating economy. I got several quotes on heating. The 12' ceiling height was not quite enough to make radiant tube heating work. They said it could bake the paint right off the cars. It needed to be at least 16' to make it work. So, I am going with a forced air unit. I just need to finalize my research to decide if I go with natural gas, or LP gas. The local gas company said it would cost me $3K to trench the gas lines out to the barn. I have got most of the wiring done. All of the wall outlets are in. I also put in a 220 line. I wired in 6 more lights for the ceiling and added 4 lights along the back wall over the work bench area. All of the lights will be 3810 lumens, so I am hoping it is pretty bright. My wife is always giving me crap by saying "Do you want to do surgery in there!?' My response ..."Exactly!!" The brighter the better in my book. I still need to figure out how to install 2 ceiling fans on the trusses. A lot of the quotes were coming in higher than I anticipated, so I am giving up on the idea of running water out to the barn. It would be nice, but it is not a necessity. All of the wall insulation is in. About half of the vapor barrier has been installed. About half of the previously installed wall has been put back up, and the rest of the wall materials have been purchased. Over the long 4th of July Holiday (took Friday off too), I put in a lot of hard work to get stuff done. So, as a little reward to myself, yesterday afternoon, I got the Z out for the first time this year and went for a drive up Route 67 in Southern WI. 67 is a nice curvy road that goes through the Kettle Moraine Valley. The Kettle is a really beautiful area and a popular destination for a car or motor cycle cruise. It feels good to get this much progress. There is still a lot left to do. That's it for now. Later, Marty


 2 points
 -
Thanks everyone. Your thoughts gave me the motivation to give it one more try. I was able to find one solution to the brain teaser that allowed me to mount the back plate and then then install/remove the air cleaner cover. I guess sometimes you need to let problems sit for awhile before trying again. thanks again.2 points
-
2 pointsIf you need 6 point restraint and a roll bar you also need a proper seat, something with bolsters to keep you in place. The stocks are a one person bench.2 points
-
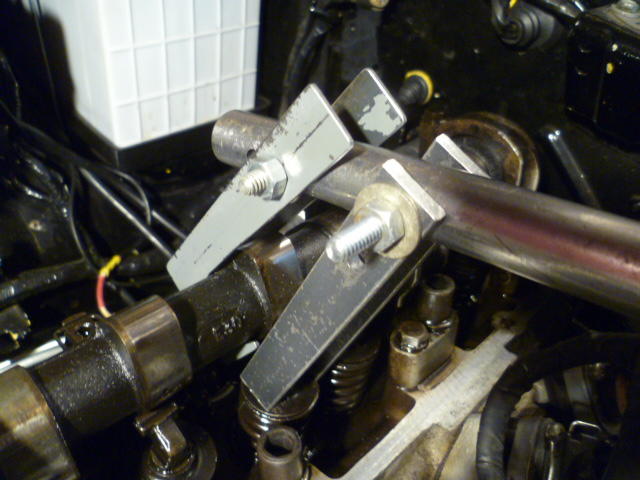
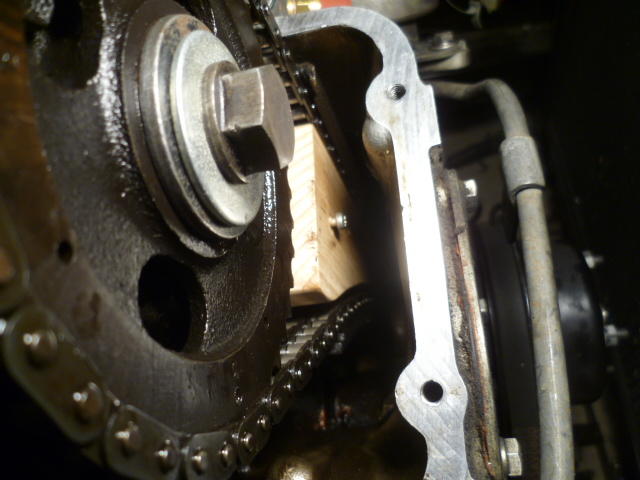
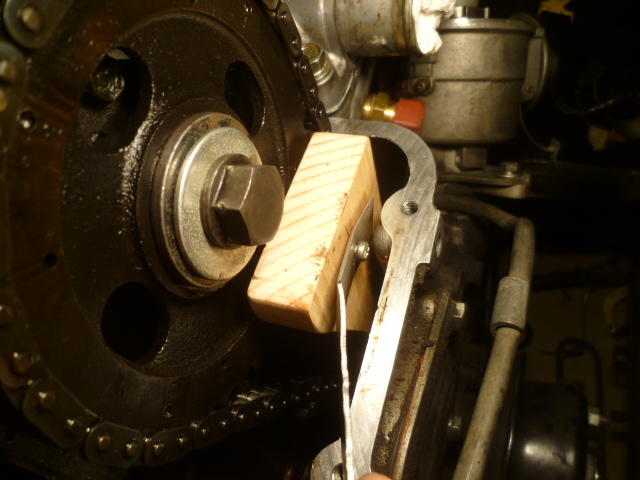
2 pointsUpdate on my dead engine project... I made a rocker removal tool. After multiple failures and spending waaaaaay too much time on it, I finally hit on a geometry that worked: I took the rockers out so I could turn the cam without having to worry about valve positions, etc. I put the engine on #1 TDC before taking stuff apart so I knew where everything was. Way easier to spin the engine over with the plugs out and all the rockers removed. Then I made a cam chain wedge tool. My tool is about an inch longer than average because that's just how I roll. I wanted to get the tool down as deep as possible to assure it was holding the tensioner shoe back. I also came up with a (yet to be fully tested and therefore potentially stupid) removal plan. That's the screw on the front and the metal removal handle: Since the tool is longer than most, I had to remove the cam gear bolt to get the tool into place. Being careful not to knock the gear off the end of the cam (not really a difficult task), I took out the bolt, slipped the tool into place, and then put the bolt back in until I was sure the tool was fully seated in place and holding the chain: Here's some pics of that whole process Bolt out just long enough to get the tool to clear the bolt head: Then get the bolt back in place for now: And here's the tool fully installed wedged into place: And here's how the removal tool is supposed to work: Hook the screw head with the hole in the metal handle: And pull the wedge back out: Worked in test. We'll find out later if it works as well in real practice.


 2 points
 -
1 pointHey guys, It has been my dream for many years to move to a spot where I could build my dream garage. Well, this year my dream was realized. We moved to a new house and I did not even need to build the garage. It came with a 36'x64' Pole Barn!! The barn is a great space. It really is a blank canvas at this point though. I have the shell, but I need to finish the interior. The previous owner got a start on the wiring and putting up some insulation and walls. They also left an area at the back in gravel, with the intent of building in 3 horse horse stalls. The first thing I will need to do is to get that filled in with concrete. After that I want to have an asphalt driveway put in. I had a gravel driveway put in this year as a temporary step, so I could get to the barn without having to drive over the lawn. This year I was consumed with working on the house and getting it to a point where the wife is happy with it. Is that even possible, LOL!! She always comes up with more stuff to do, or things she wants to add. So, next year is the year of the barn. I am just getting serious about putting a plan together. This is where you guys come in. I know a few of you have built some pretty nice garages. I would love to hear all of your ideas on what I should build into the garage. I am particularly interested in what I should do now, before the walls and ceiling are installed. All ideas on nice features to add and the timing of the build process are welcome. Thanks, Marty
 1 point
 -
Crap... now we have two Eagles fans on here. Just kidding, welcome aboard...good folks on this forum...even the Philly guys! Sent from my iPhone using Tapatalk1 point
-
1 point
-
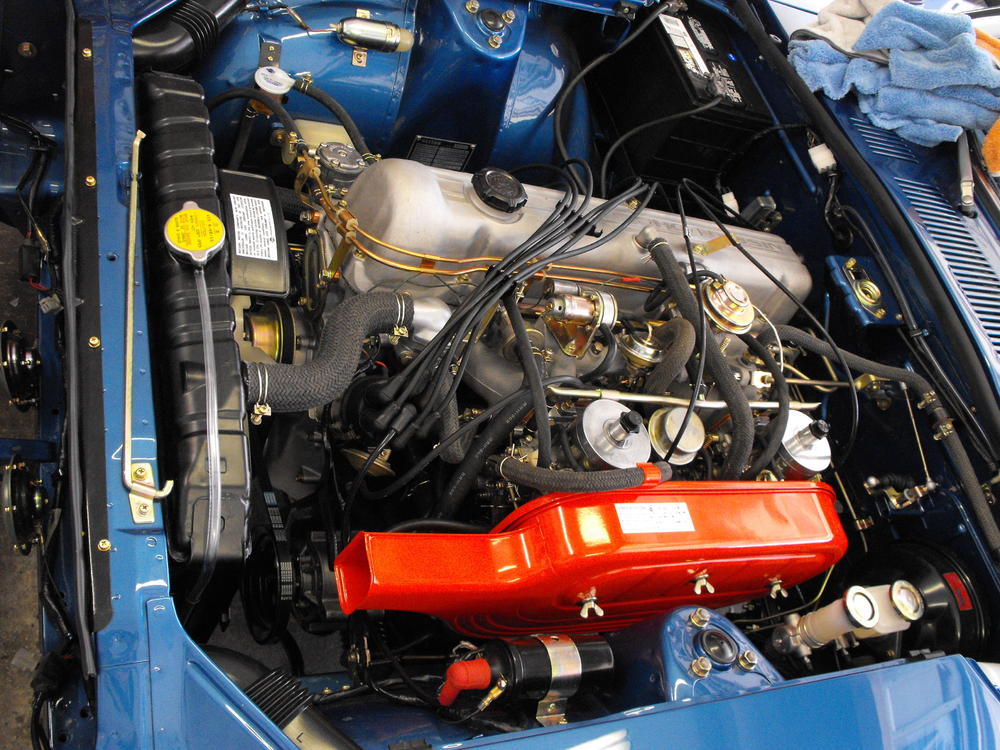
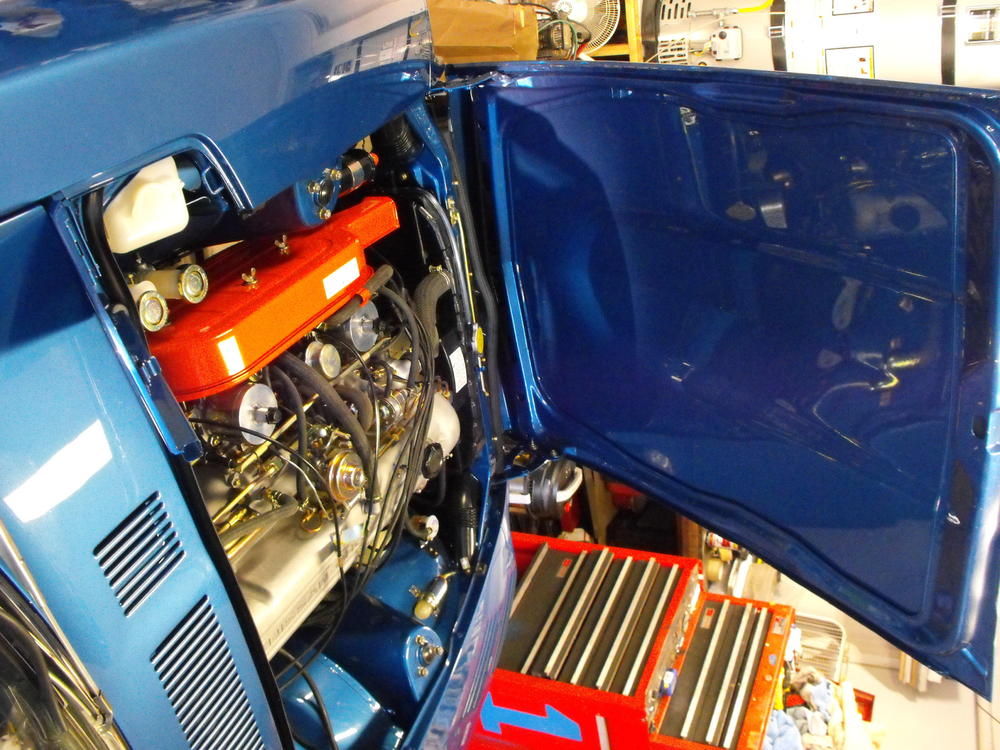
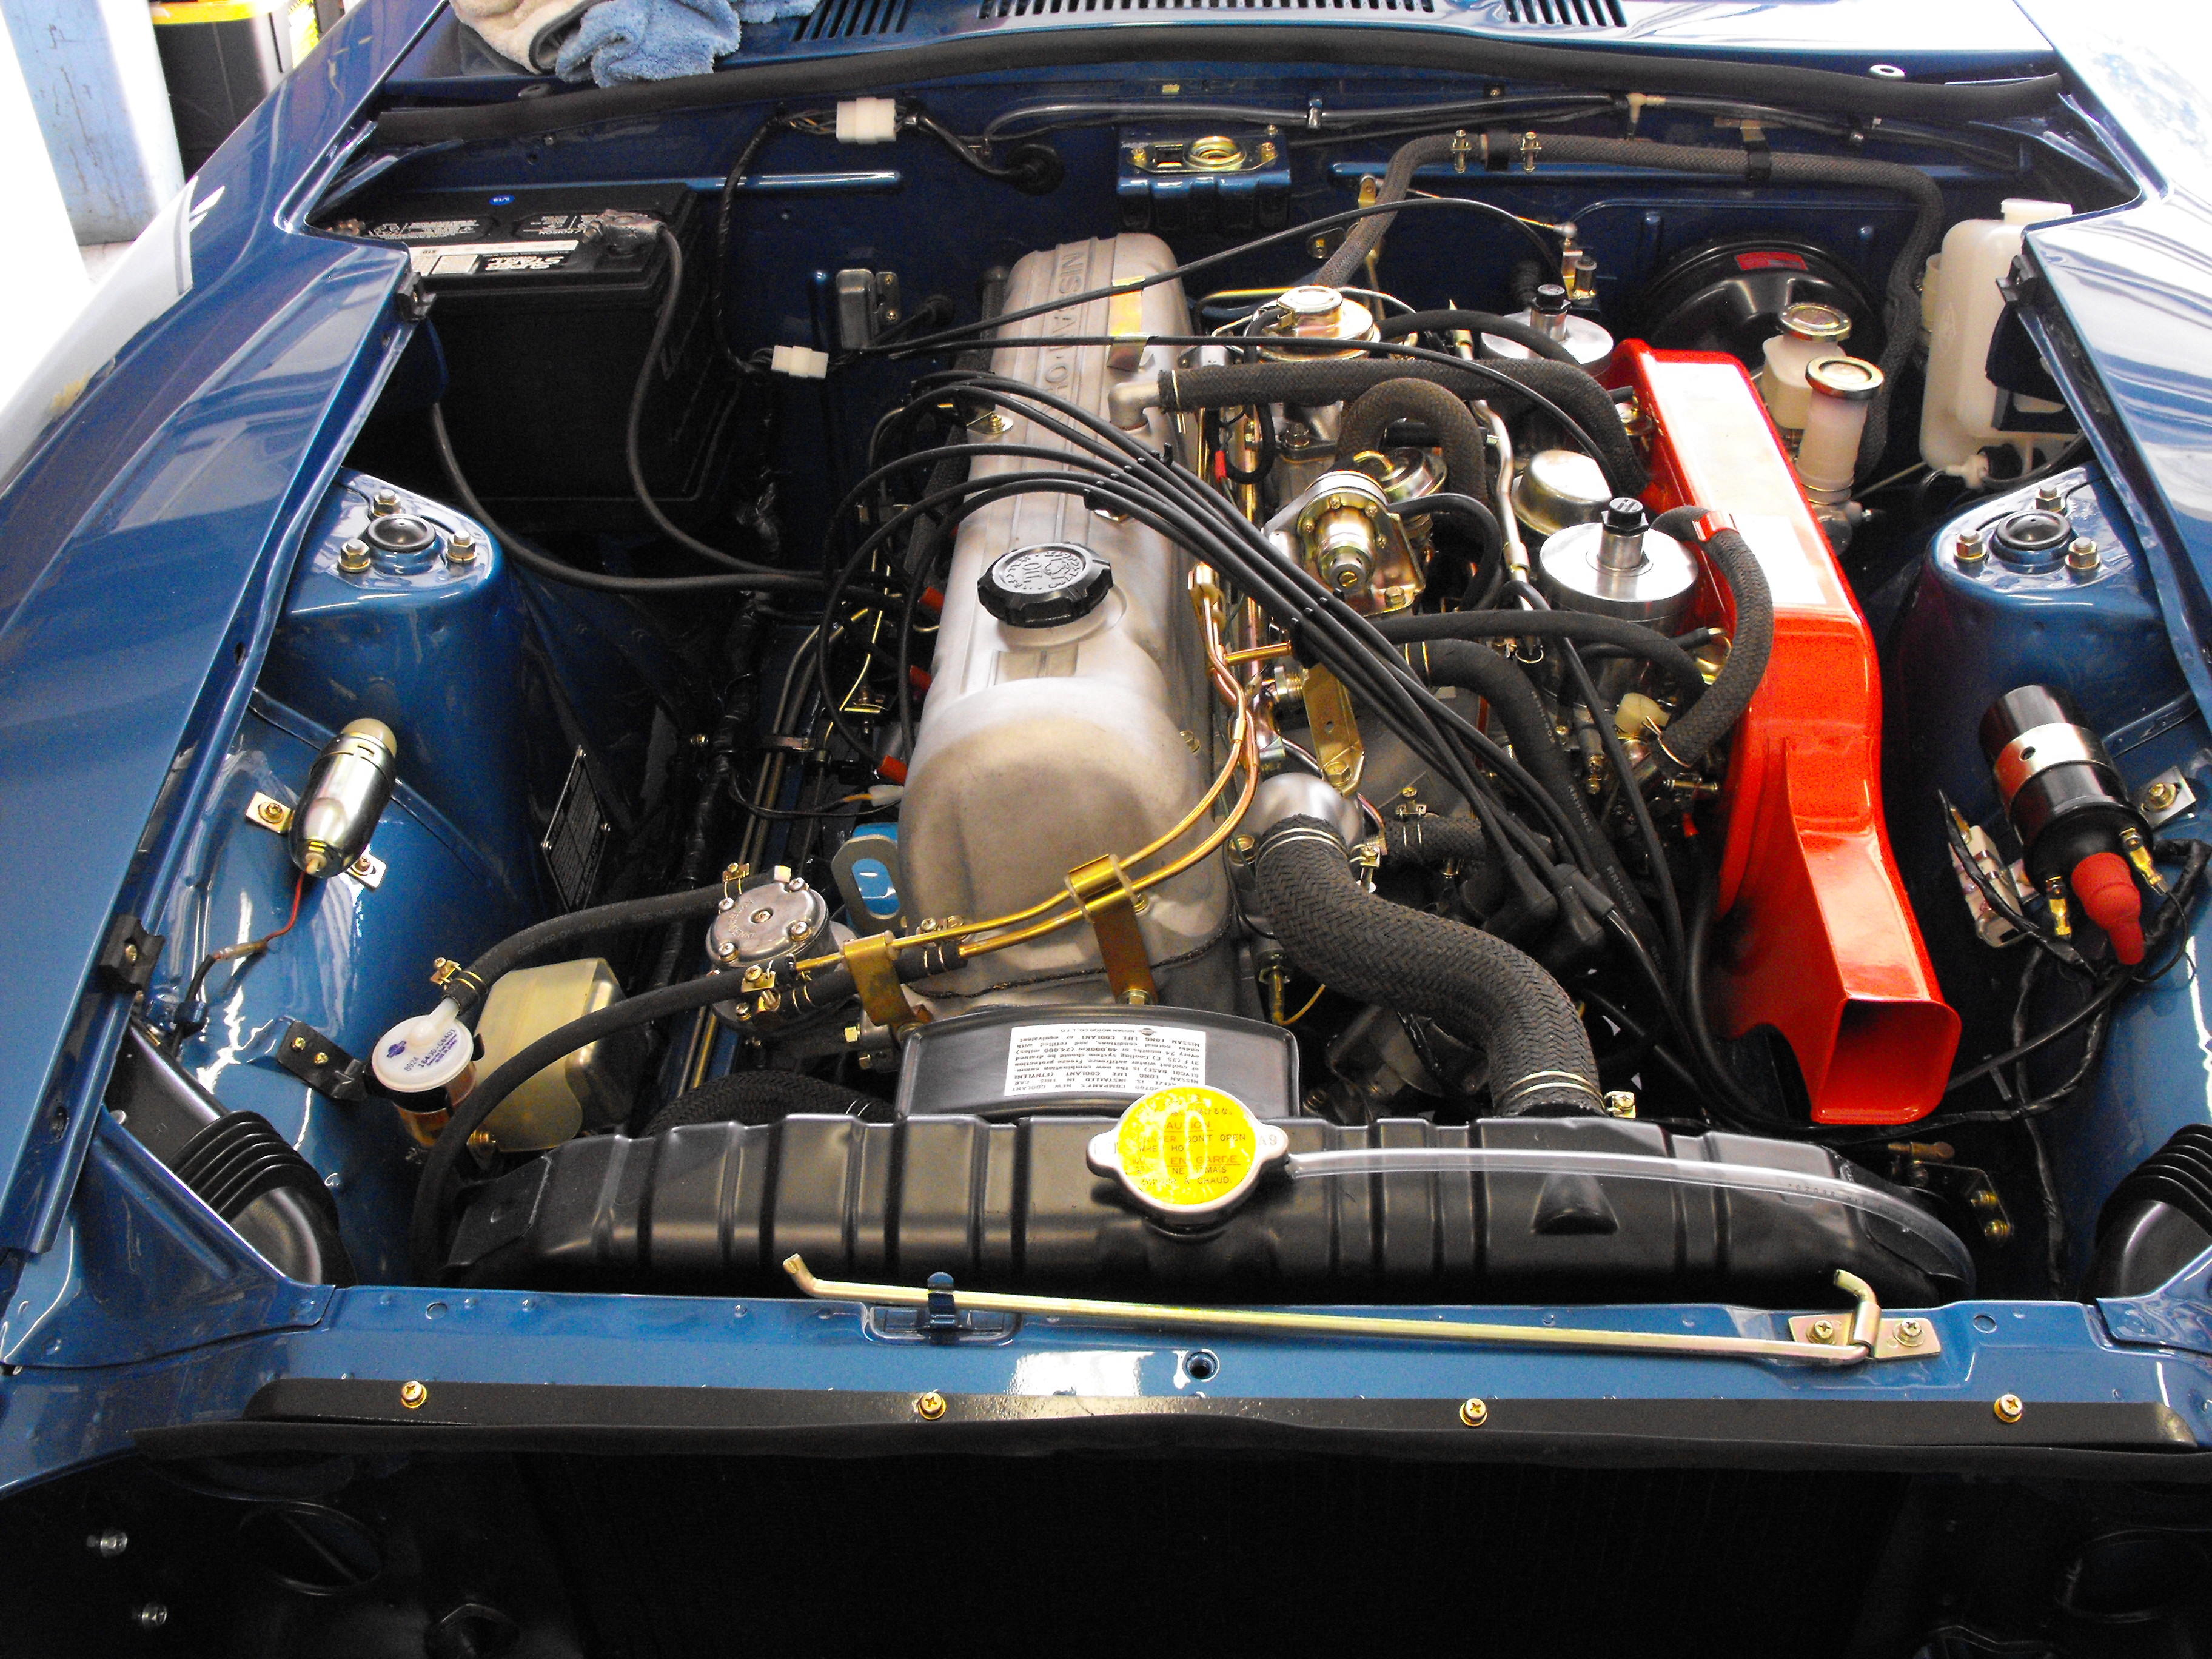
So here is the Status and some of the issues that I ran into: ENGINE BAY: the engine is running nicely now and all hoses are connected. I still have a few small clamps that need to be added to the vacuum hoses, but for the most part, the motor is done. I have some right angle battery terminals coming in today and will see what I can do to replicate the correct style battery cables (240zrubberparts cables are sold out, have not been able to contact via phone or e-mail). Not sure what I can do to re-crate terminal covers, but do have some on order that will be arriving too late. I am missing the original smog pump arm, but picked up one on ebay that should be in on Tuesday. That is about it for the engine items The only issues I had with the motor operation were a high idle and some RPM cycling oscillations. Even with everything backed off, the idle was sitting at around 1200 RPM. Not sure why that is. I remedied the situation by extending the needles in the two flat top pistons. Idle is now at around 700 RPMs. The RPM cycling was odd and I knew it was a result of one of the vacuum systems. The engine would oscillate from 600 RPM up to 1200 RPM and then back down in a continuous cycle (That would drive anyone crazy). Plugging the hose going the the anti-backfire valve fixed the issue. Looks like I need a new valve and those are pretty pricey. For now, I will leave it plugged. I have run the motor for over 30 minutes and temperature remains steady at a bit below 180F. Clutch and brakes have been bled and peddles feel good. INTERIOR: I have a few parts that were in pretty bad shape (the passenger side pull handle and one roll-up handle), so ordered new ones from Motorsport. All gauges work as well as the clock. The LED lights look nice in the dash but do not appear to be adjustable. I also put LED lights in the overhead interior light and the engine light. I am finishing up the luggage straps and should have them installed in the next day or two. EXTERIOR: Just need to install the center bumper finisher which I painted last night and connect front turn lights. Need new lug nuts for the mags and license plate frame. Will probably pick up from Pep Boys tonight. Also, Miguel wants to do one final polish on Thursday night before we load. Can't imagine the paint looking any better, but he wants to do the final polish on the car. That about completes the list. I will try and take the car out for outdoor pics in the next day or two. We load on Friday.
 1 point
 -
Pulled all (except roof liner) trim and carpets and sound proofed Z. Probably added 10-15kgs. With windows up it feels 3 times quieter. Quite amazing how noisy these panels were when knocked - spare wheel horizontal section, wheel houses, shock towers, trans tunnel, floor pans and body panels. I tried to only apply as much as required rather than covering the whole thing. Firewall was OK but got a couple of sheets for good measure especially next to trans tunnel next to where exhaust would reverberate. Floors already done by PO but quite thin MLV so I added more and covered with 3mm sticky backed closed cell foam on top, then carpets. Feels positively Audi like ;). You realise how loud it was inside before - when you wound windows down there was little difference before! Now it’s like someone whacked the volume knob up! Also bass from radio is now way deeper and audible over exhaust note! Very happy! Rear deck area will get 20mm closed cell foam under carpets for good measure soon!1 point
-
1 pointWhite Post Restoration has been around for decades and has a good reputation for the brake sleeve jobs they've done for the Studebaker community on wheel cylinders and disc brake master cylinders. When I've contacted them in the past, they'll give a price quickly. Dennis1 point
-
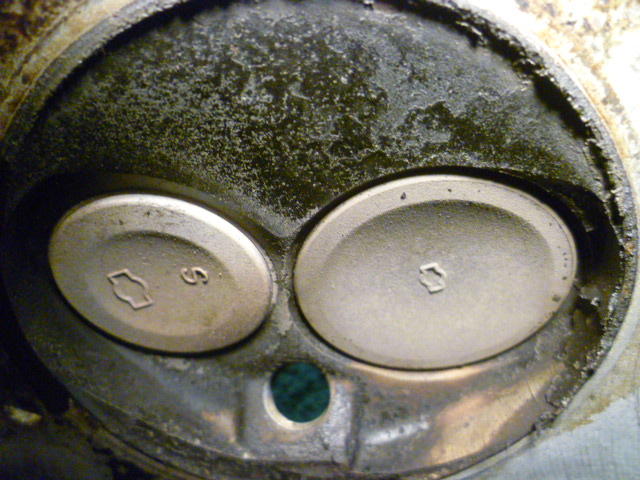
Thanks for the compassion. The general consensus is that the design IS an interference engine. So if that's true, depending on where the cam stopped, there may be some significant carnage. I should know for sure very soon. I don't have a borescope, but I did pull the plugs and have a peek in the holes. I see some stuff in there that doesn't look right. Can't tell if it's evidence of a collision or what, but something in there is weird.1 point
-
I had my 70 Z's brake m/c sleeved and rebuilt a couple of years ago at a cost of Cdn $275. A problem I encountered at the time was finding a rebuild kit (the design of the pistons, etc for the early-model m/c is quite different from that used for the later cars). The brake rebuilder that I used operates a big business and has been around for many years, so they had the parts in stock. That was in 2016. Maybe a new stash of rebuild kits has surfaced since then with one of the Z aftermarket suppliers. If not, be sure that you're happy with the condition of your seals and pistons before you invest any time in sleeving the casting.1 point
-
They're pretty smart when it comes to finding a comfortable place to live...1 point
-
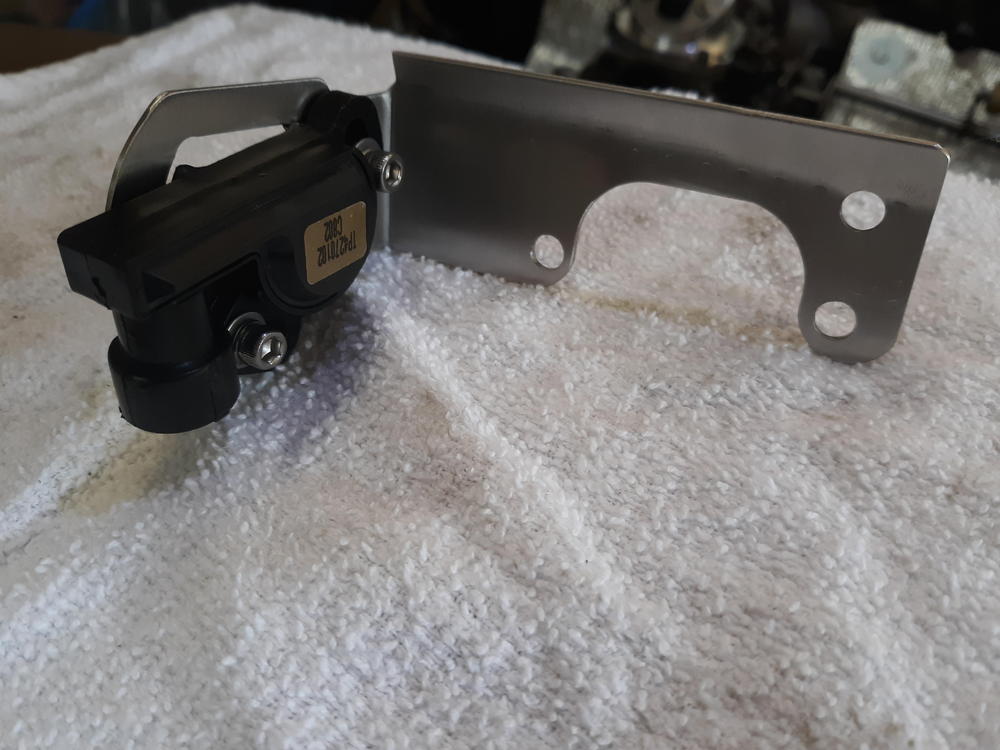
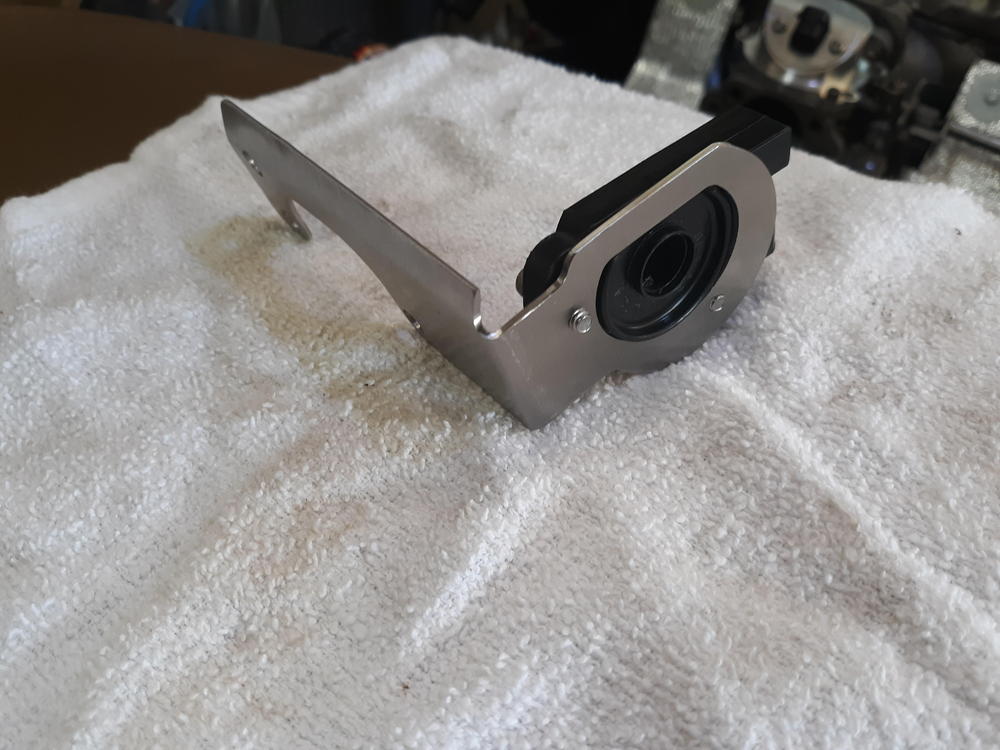
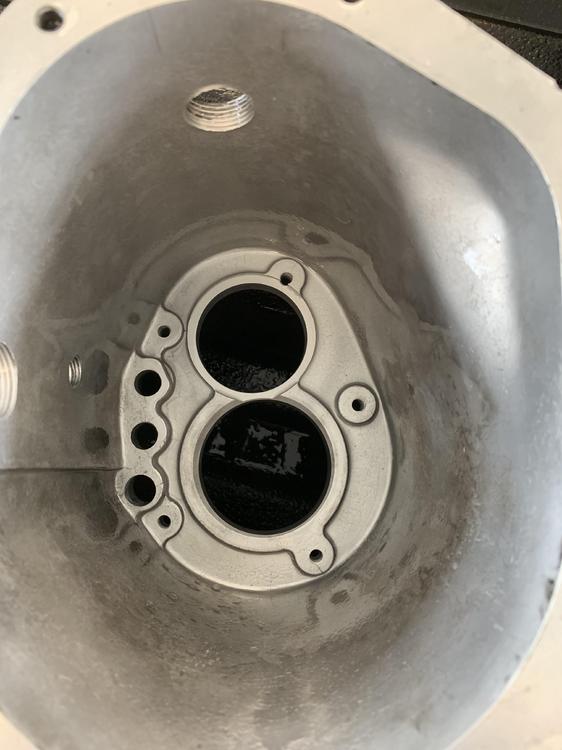
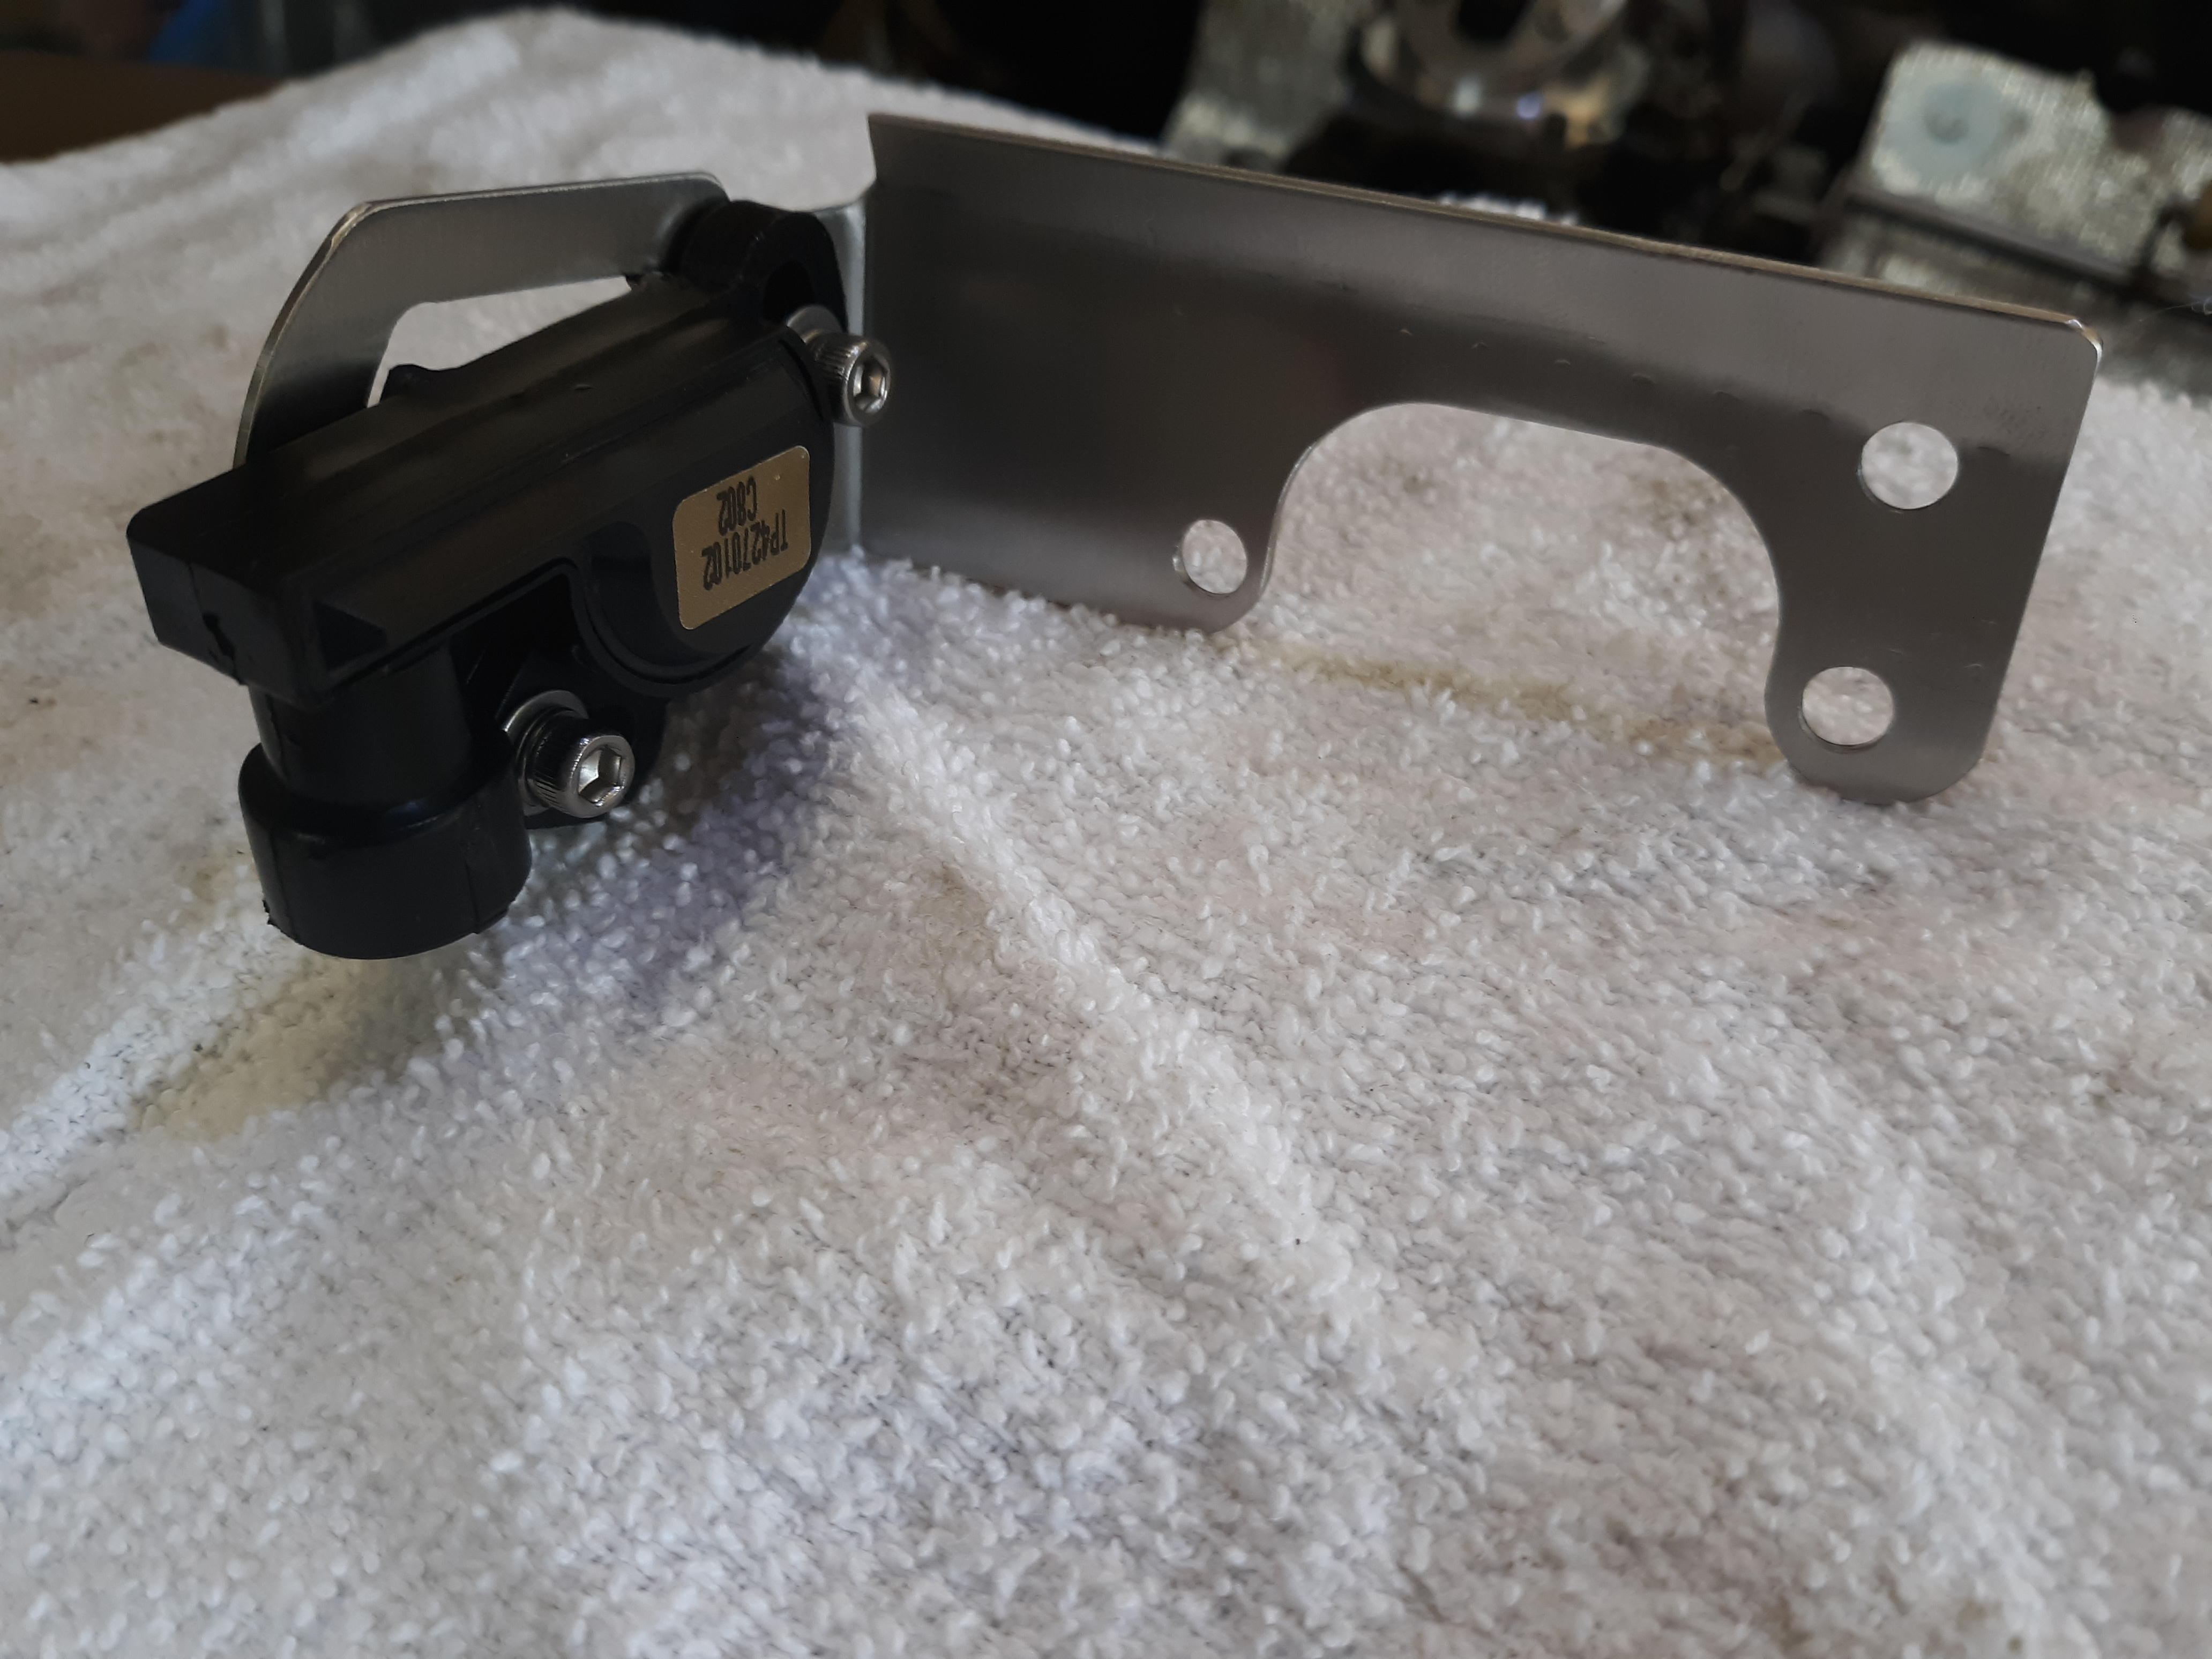
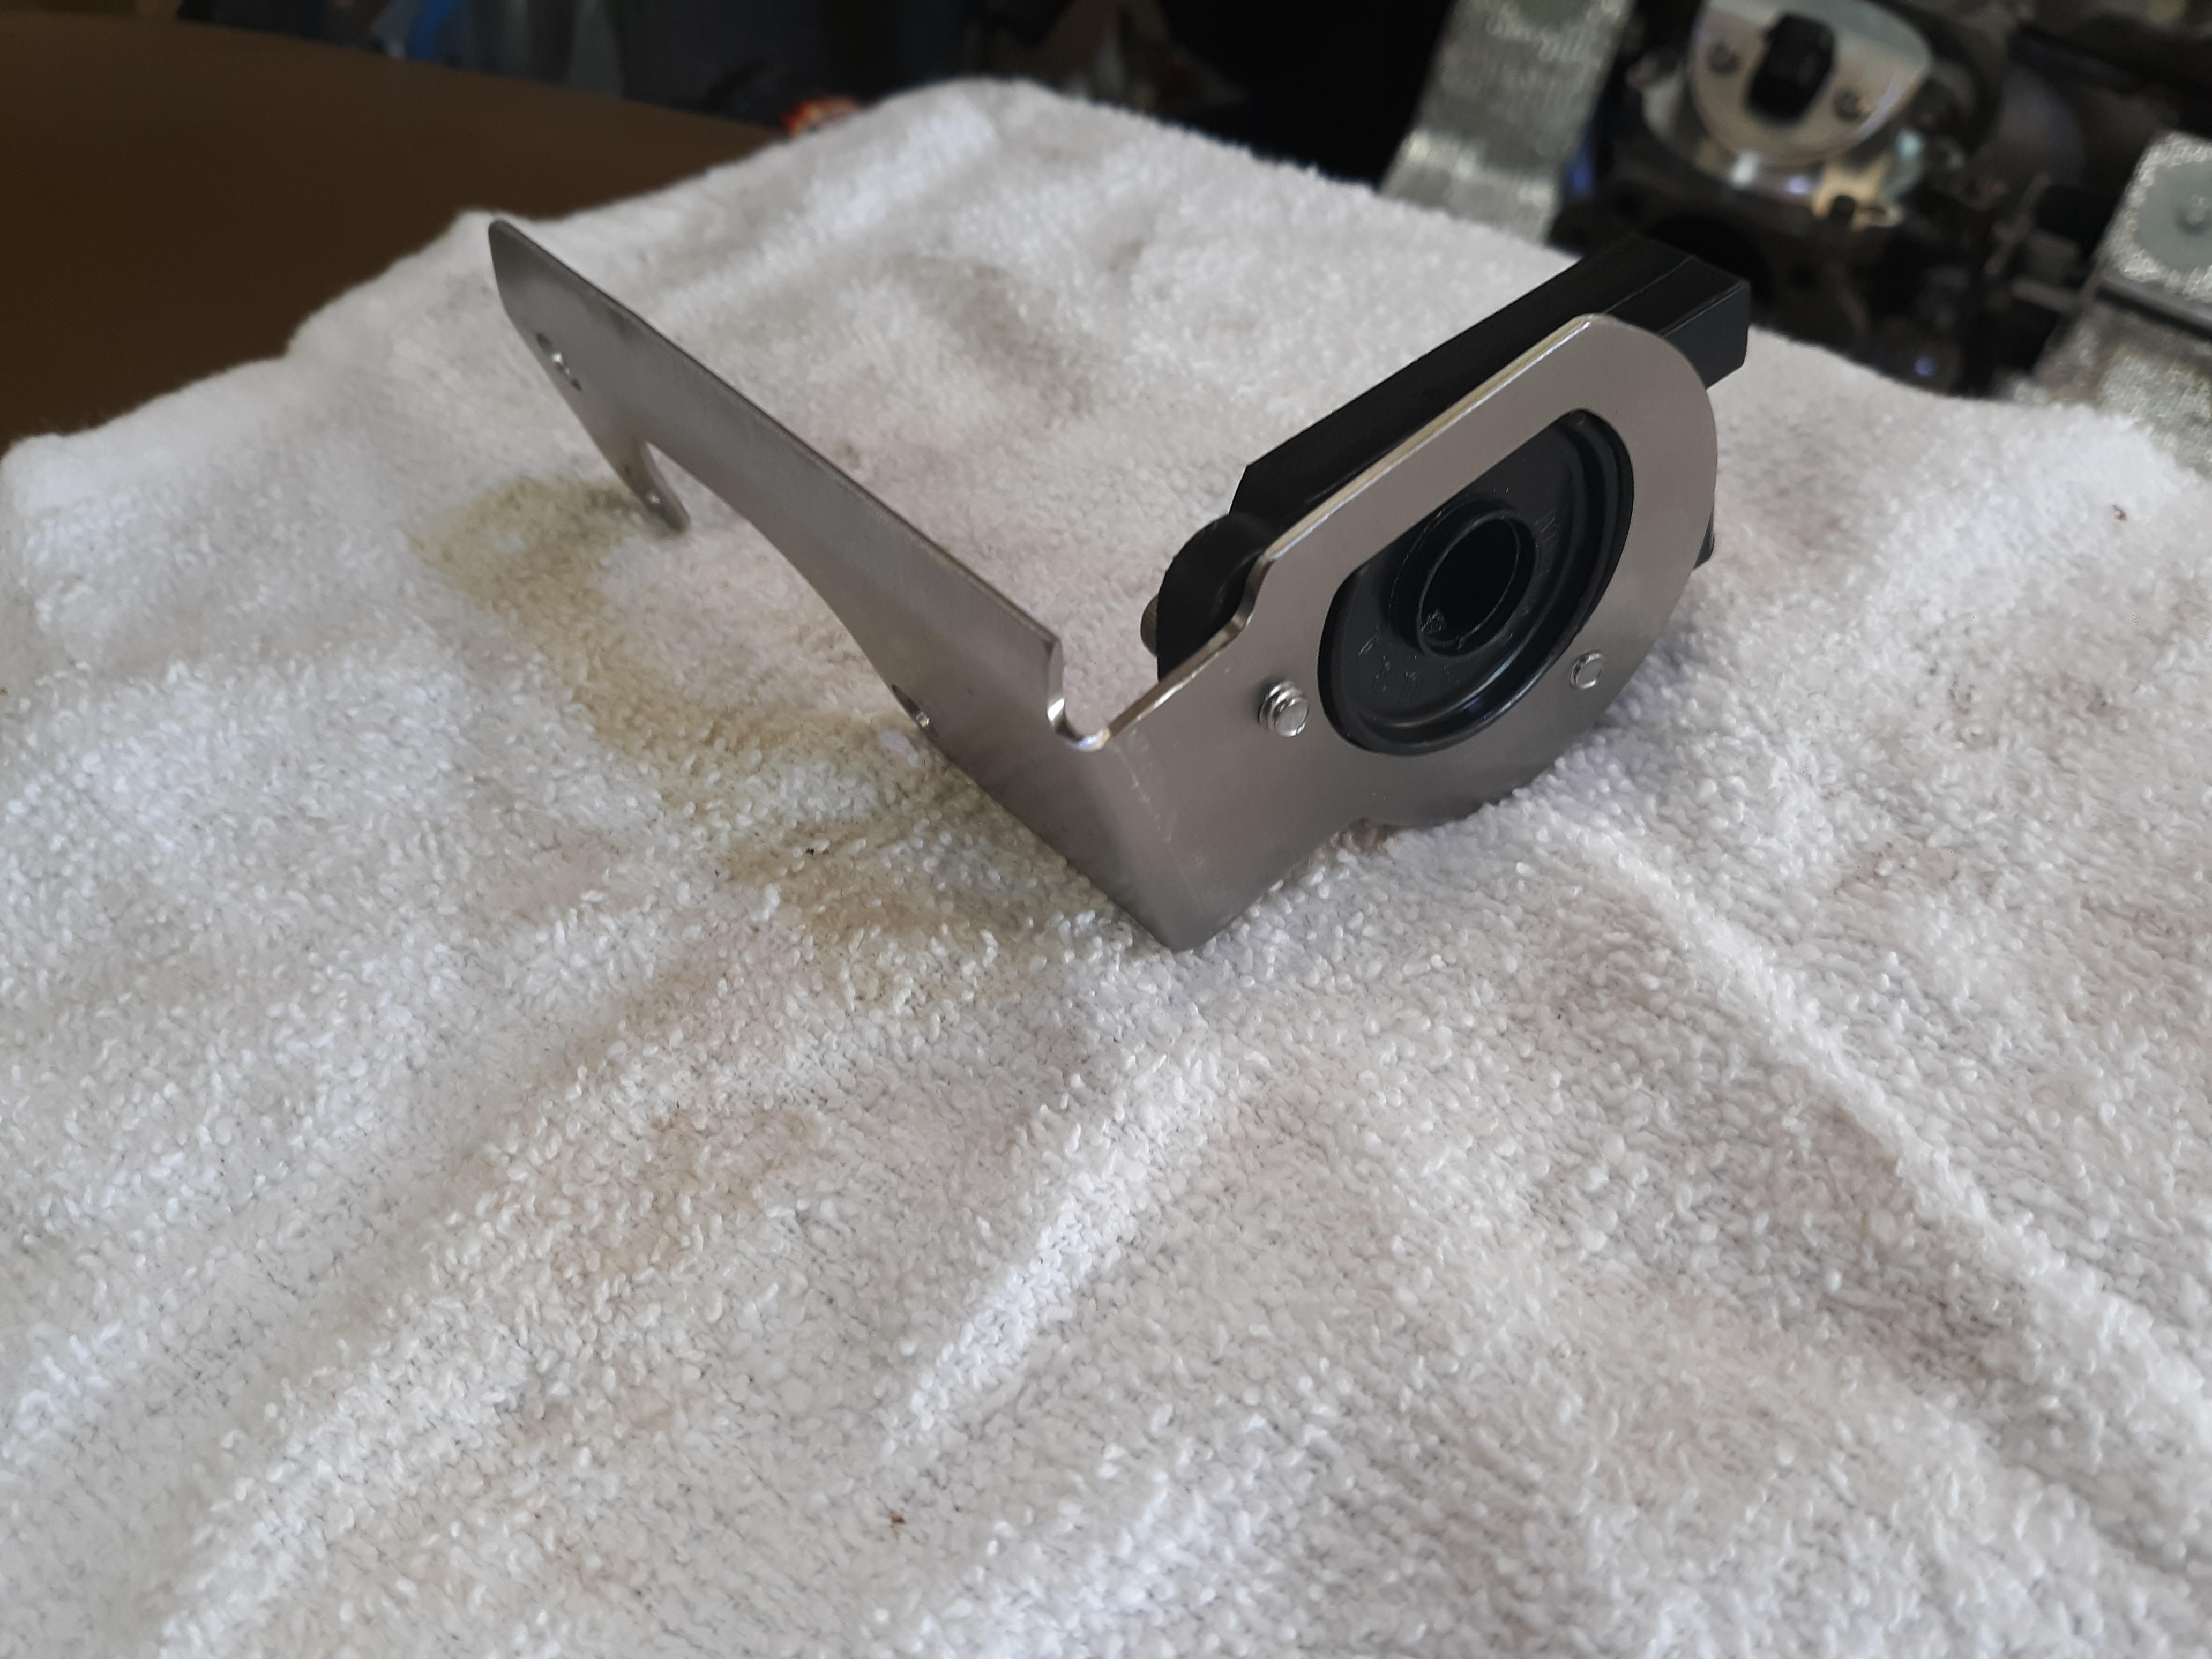
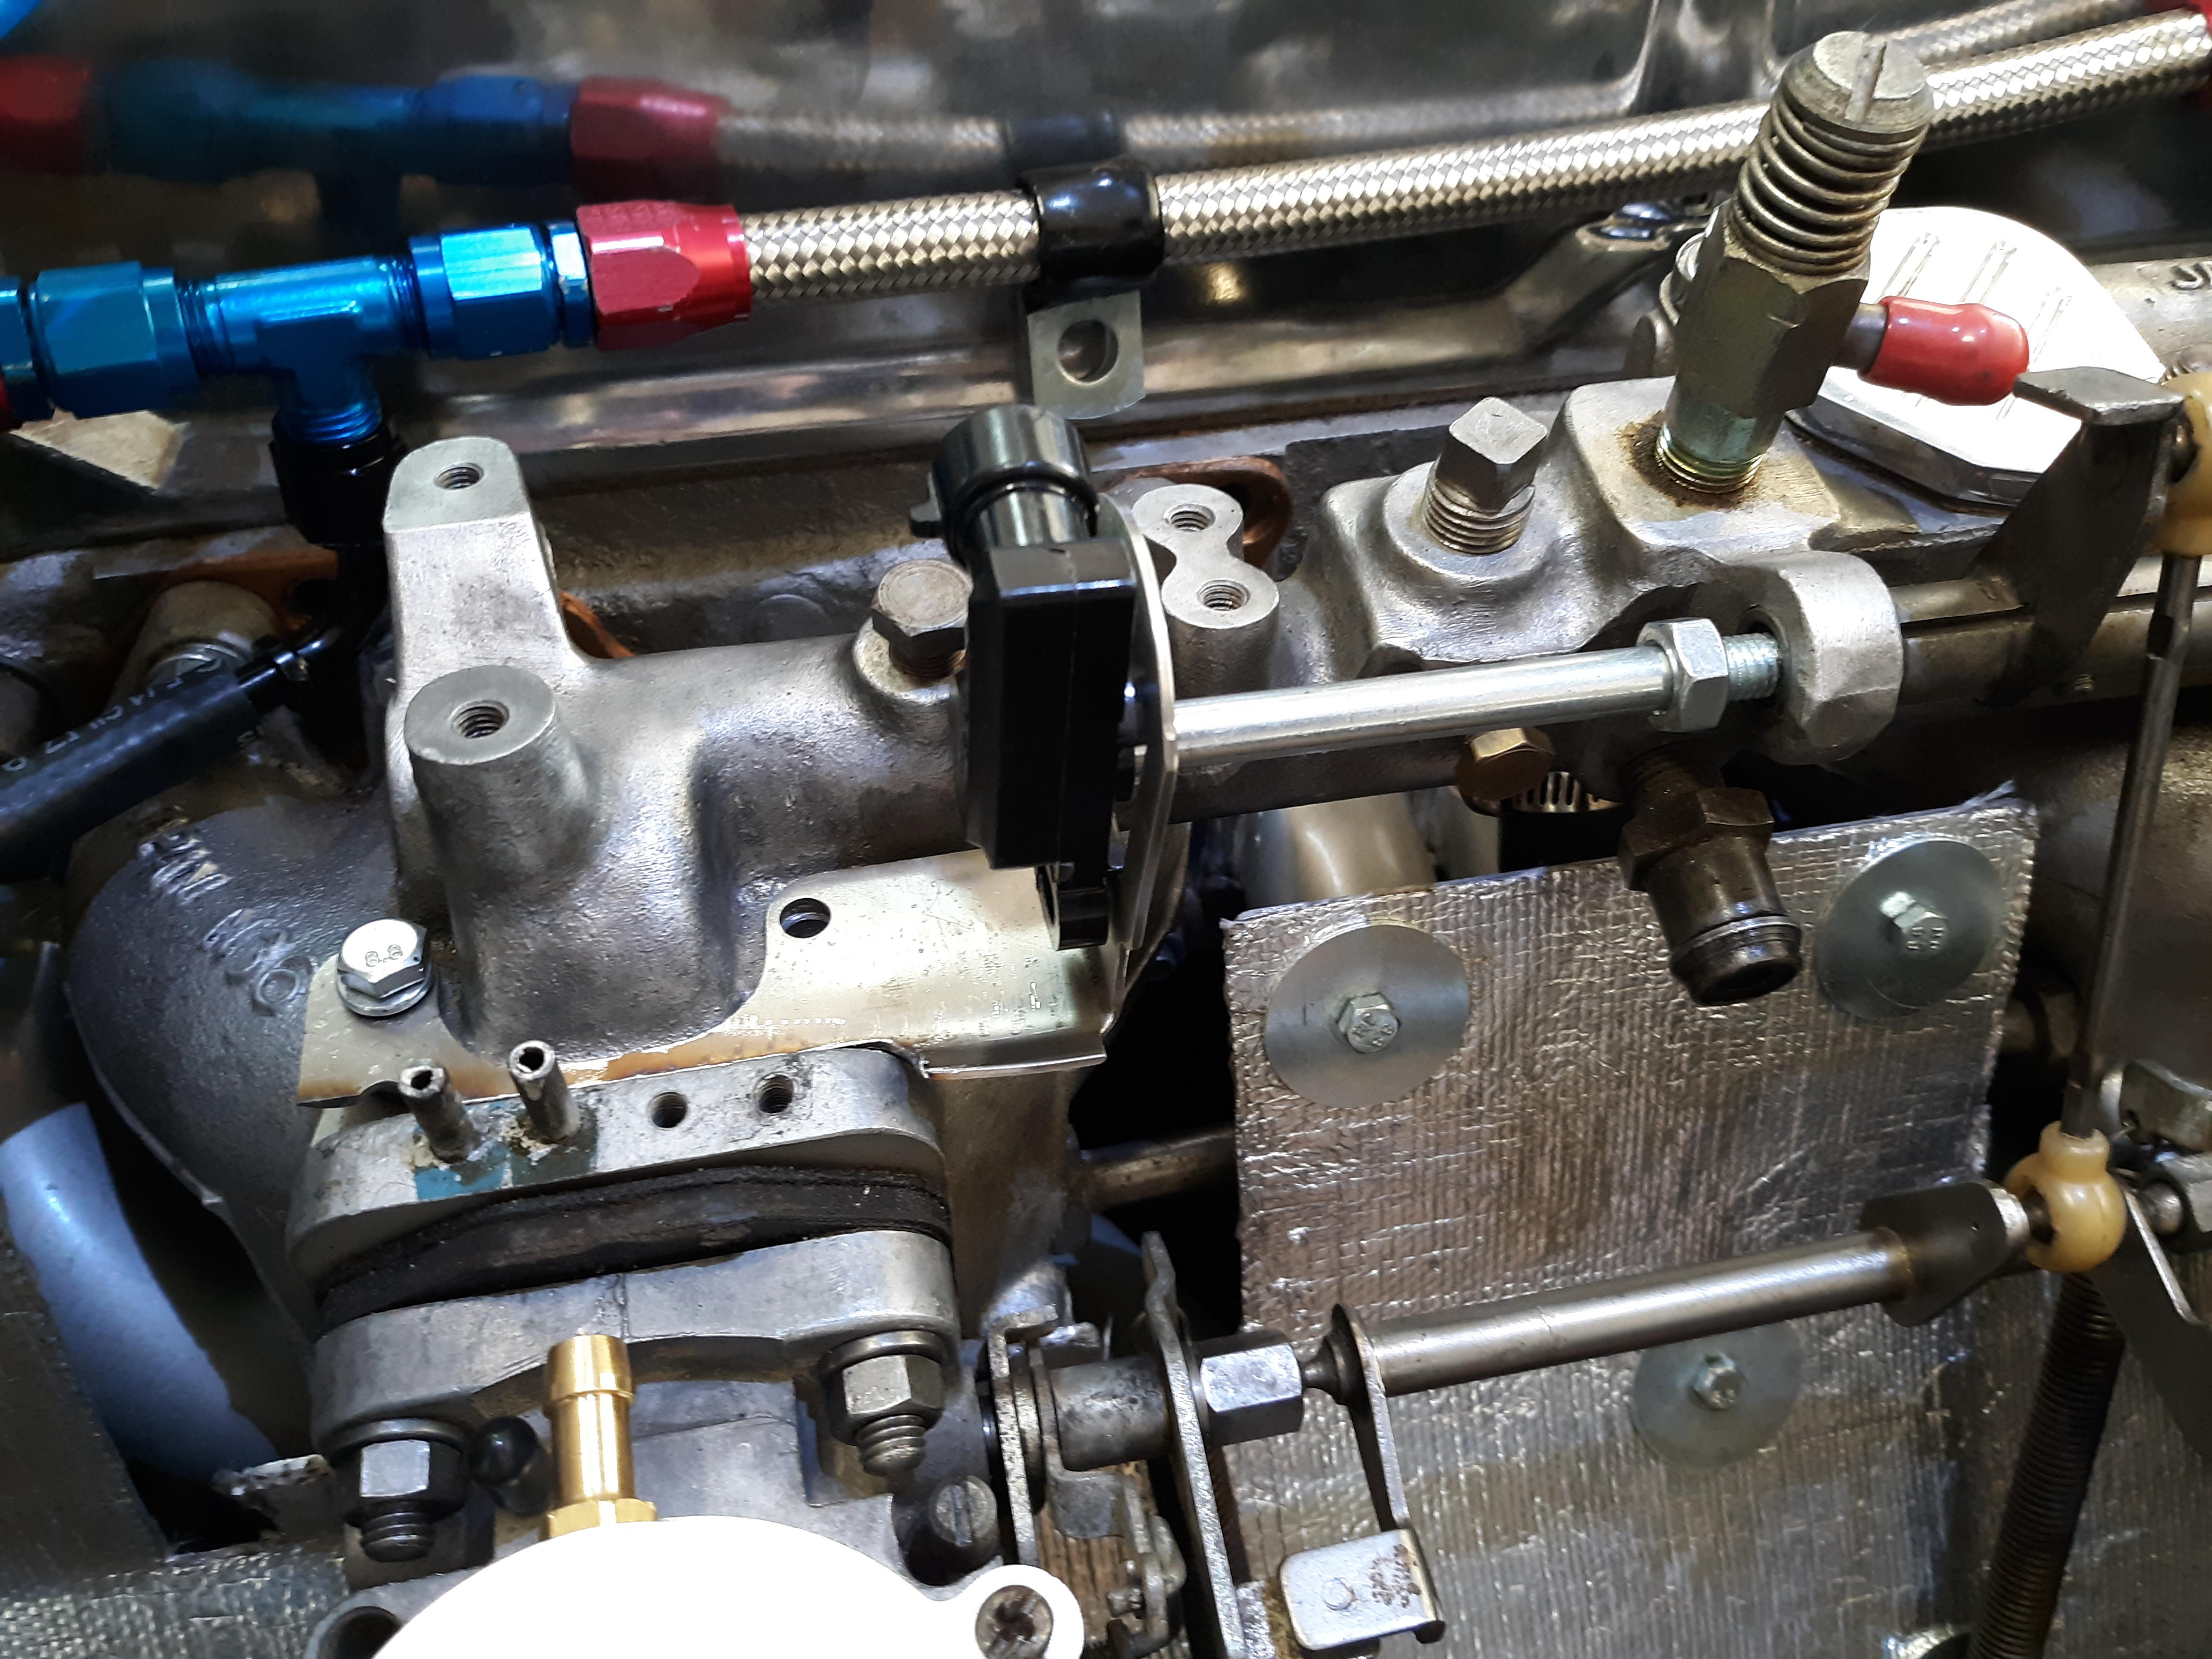
1 pointI didn't post about Day 4 since I didn't take any new photos. Today was Day 5 - The TPS Report. Mounting the TPS bracket was a challenge. First, there are two vacuum ports on the N36 intake that the bracket does not account for. Next, it didn't matter because there is a lip on the intake where the carburetor mounts that prevents the TPS mounting bracket from aligning with the throttle linkage. Oh well, I expected to have to make some modifications. It was a shame to have to cut into that nice bracket. However, everything lines up now.
 1 point
 -
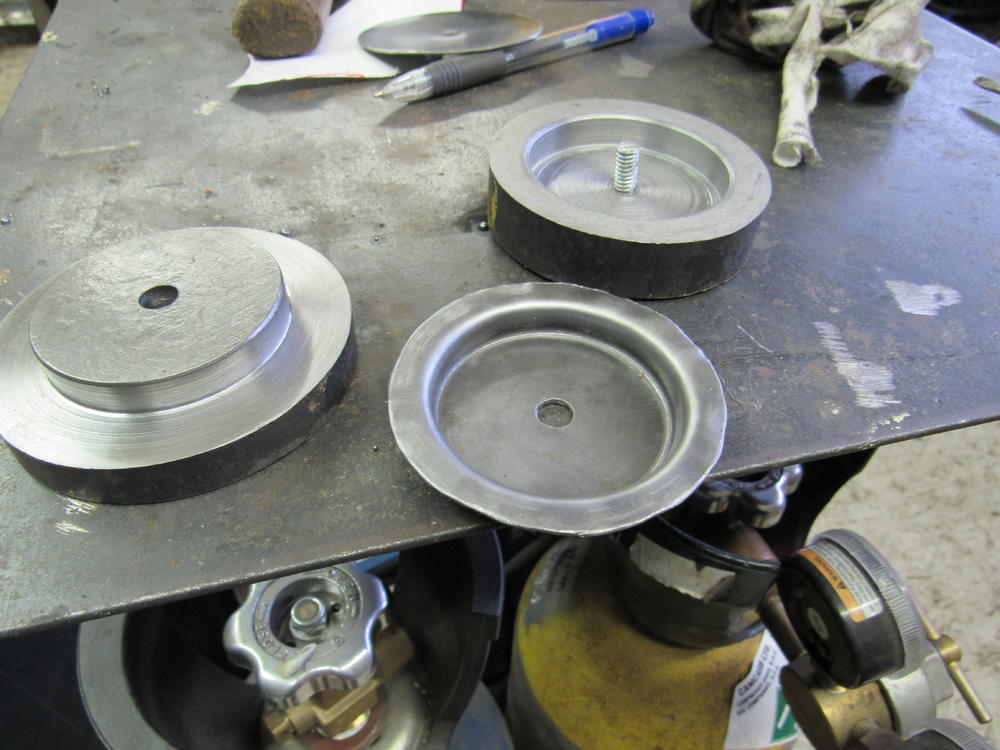
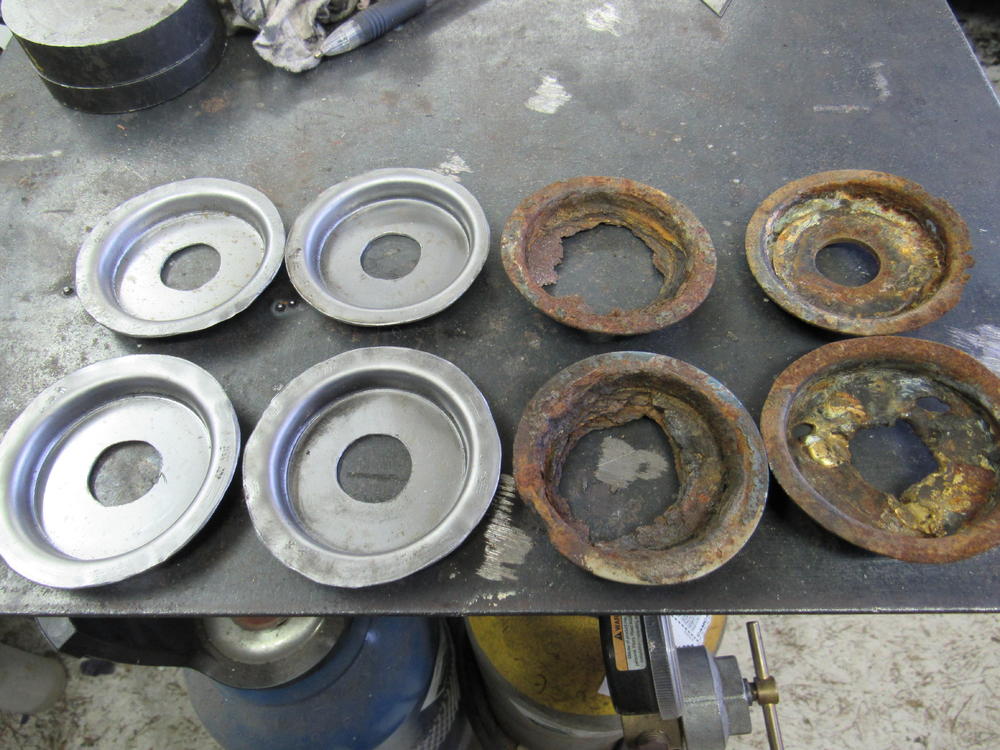
@grannyknot did you machine that die yourself? looks great1 point
-
No problem, jhm. I knew how old the post was, but had to ask!1 point
-
1 point
-
Mine weren't as bad as yours so I just removed the old bushing cups and made new ones. If you want to save that mount you're going to have to cut out that rusty hole and weld in some new plate then re drill the hole, I think it is about 8-9 gauge on that tension rod mount.
 1 point
 -
1 pointUpdate: By using the power of deduction I have determined that the bearing was probably pressed on backwards and therefore, once again, I am a total dumbass. The basic reasoning being around the throwout bearing is designed to press against the clutch spring and the shape of each side of the throwout bearing have different behaviors. If the side where the center is more pronounced faces the clutch, then the clutch springs can dig in and cause the entire thing to evaporate. If the side where the outer edge is more pronounced faces the clutch then the previous case cannot occur.1 point
-
Welcome from someone who's been there. I used a frame table that a body shop friend had. But I just did two floors and a frame rail. My rockers were in good shape except for one dogleg. Use your sway bar, mustache bar, and transmission support in place to help with alignment.1 point
-
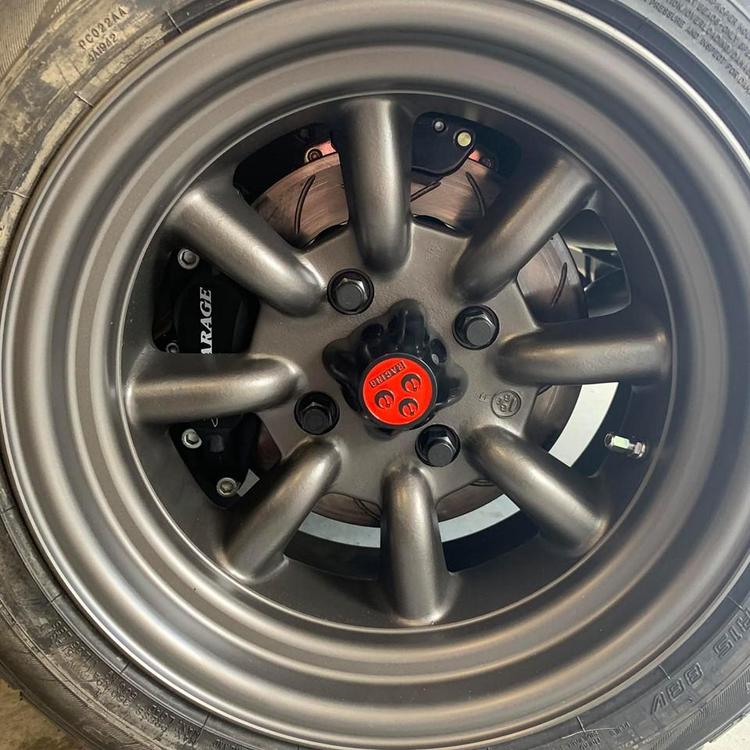
1 pointLooking snazzy. I went with stainless black lug nuts. I also have the raw stainless, it's a hard choice.
 1 point
 -
1 point
-
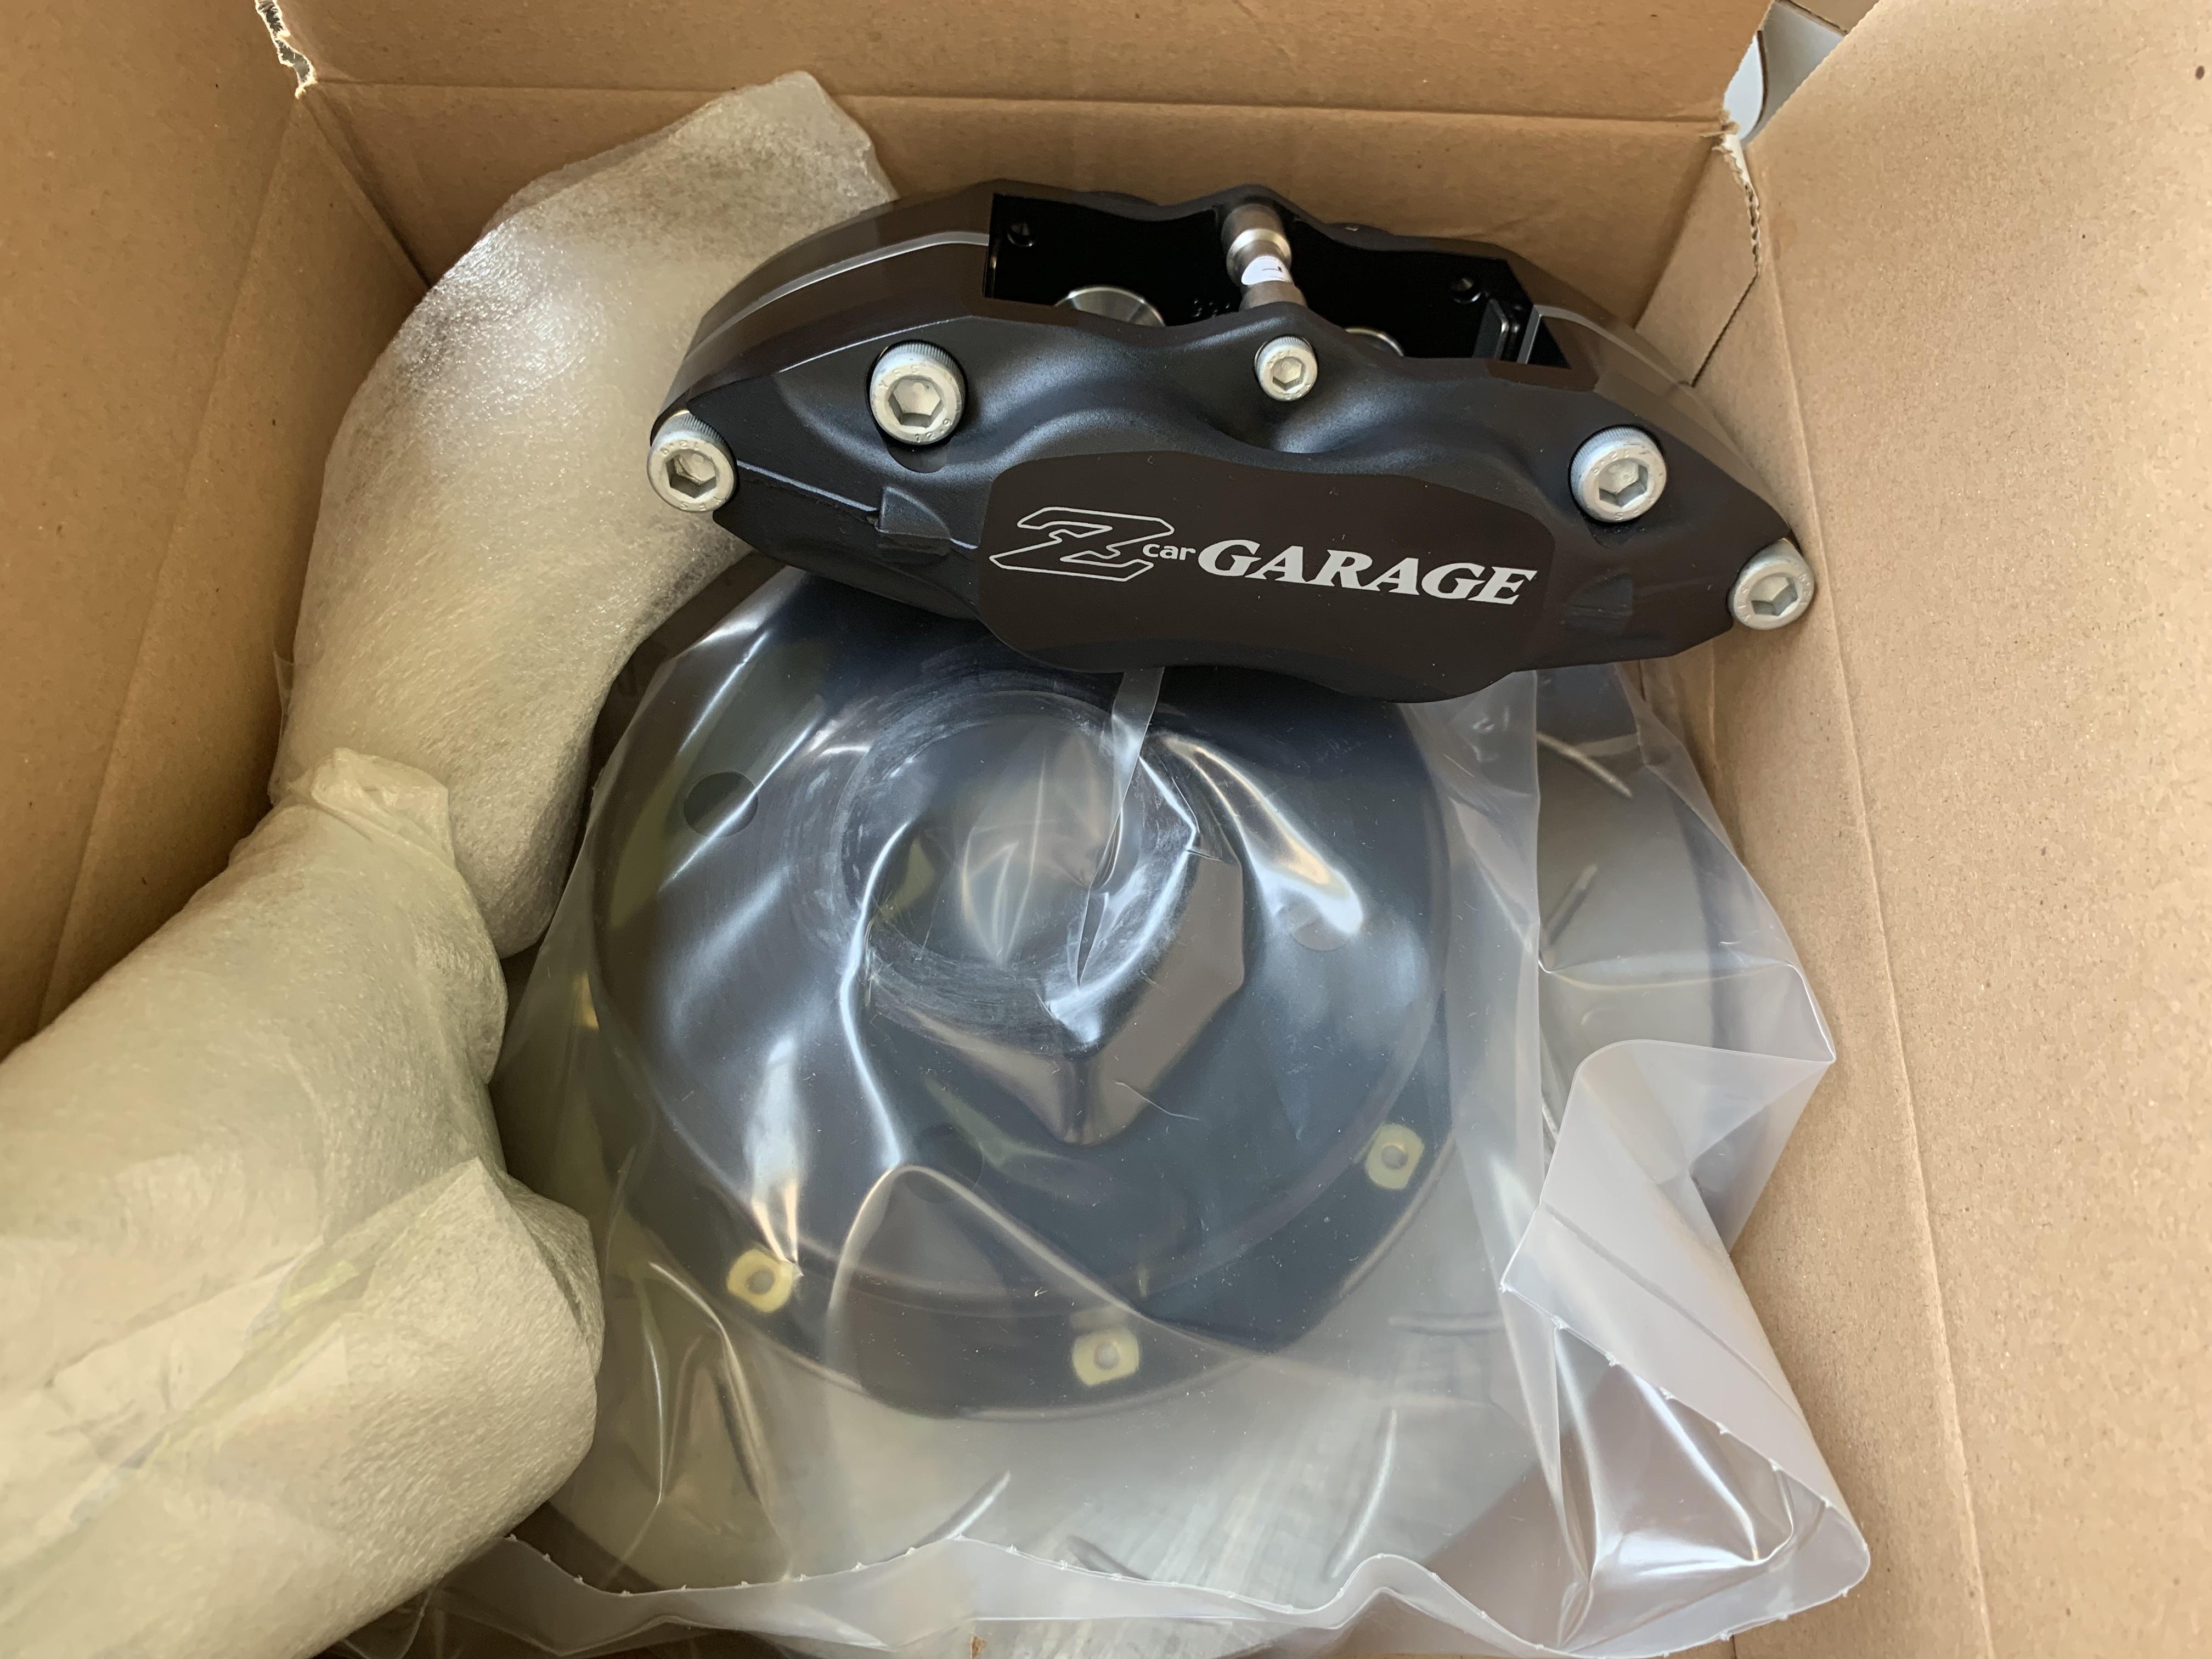
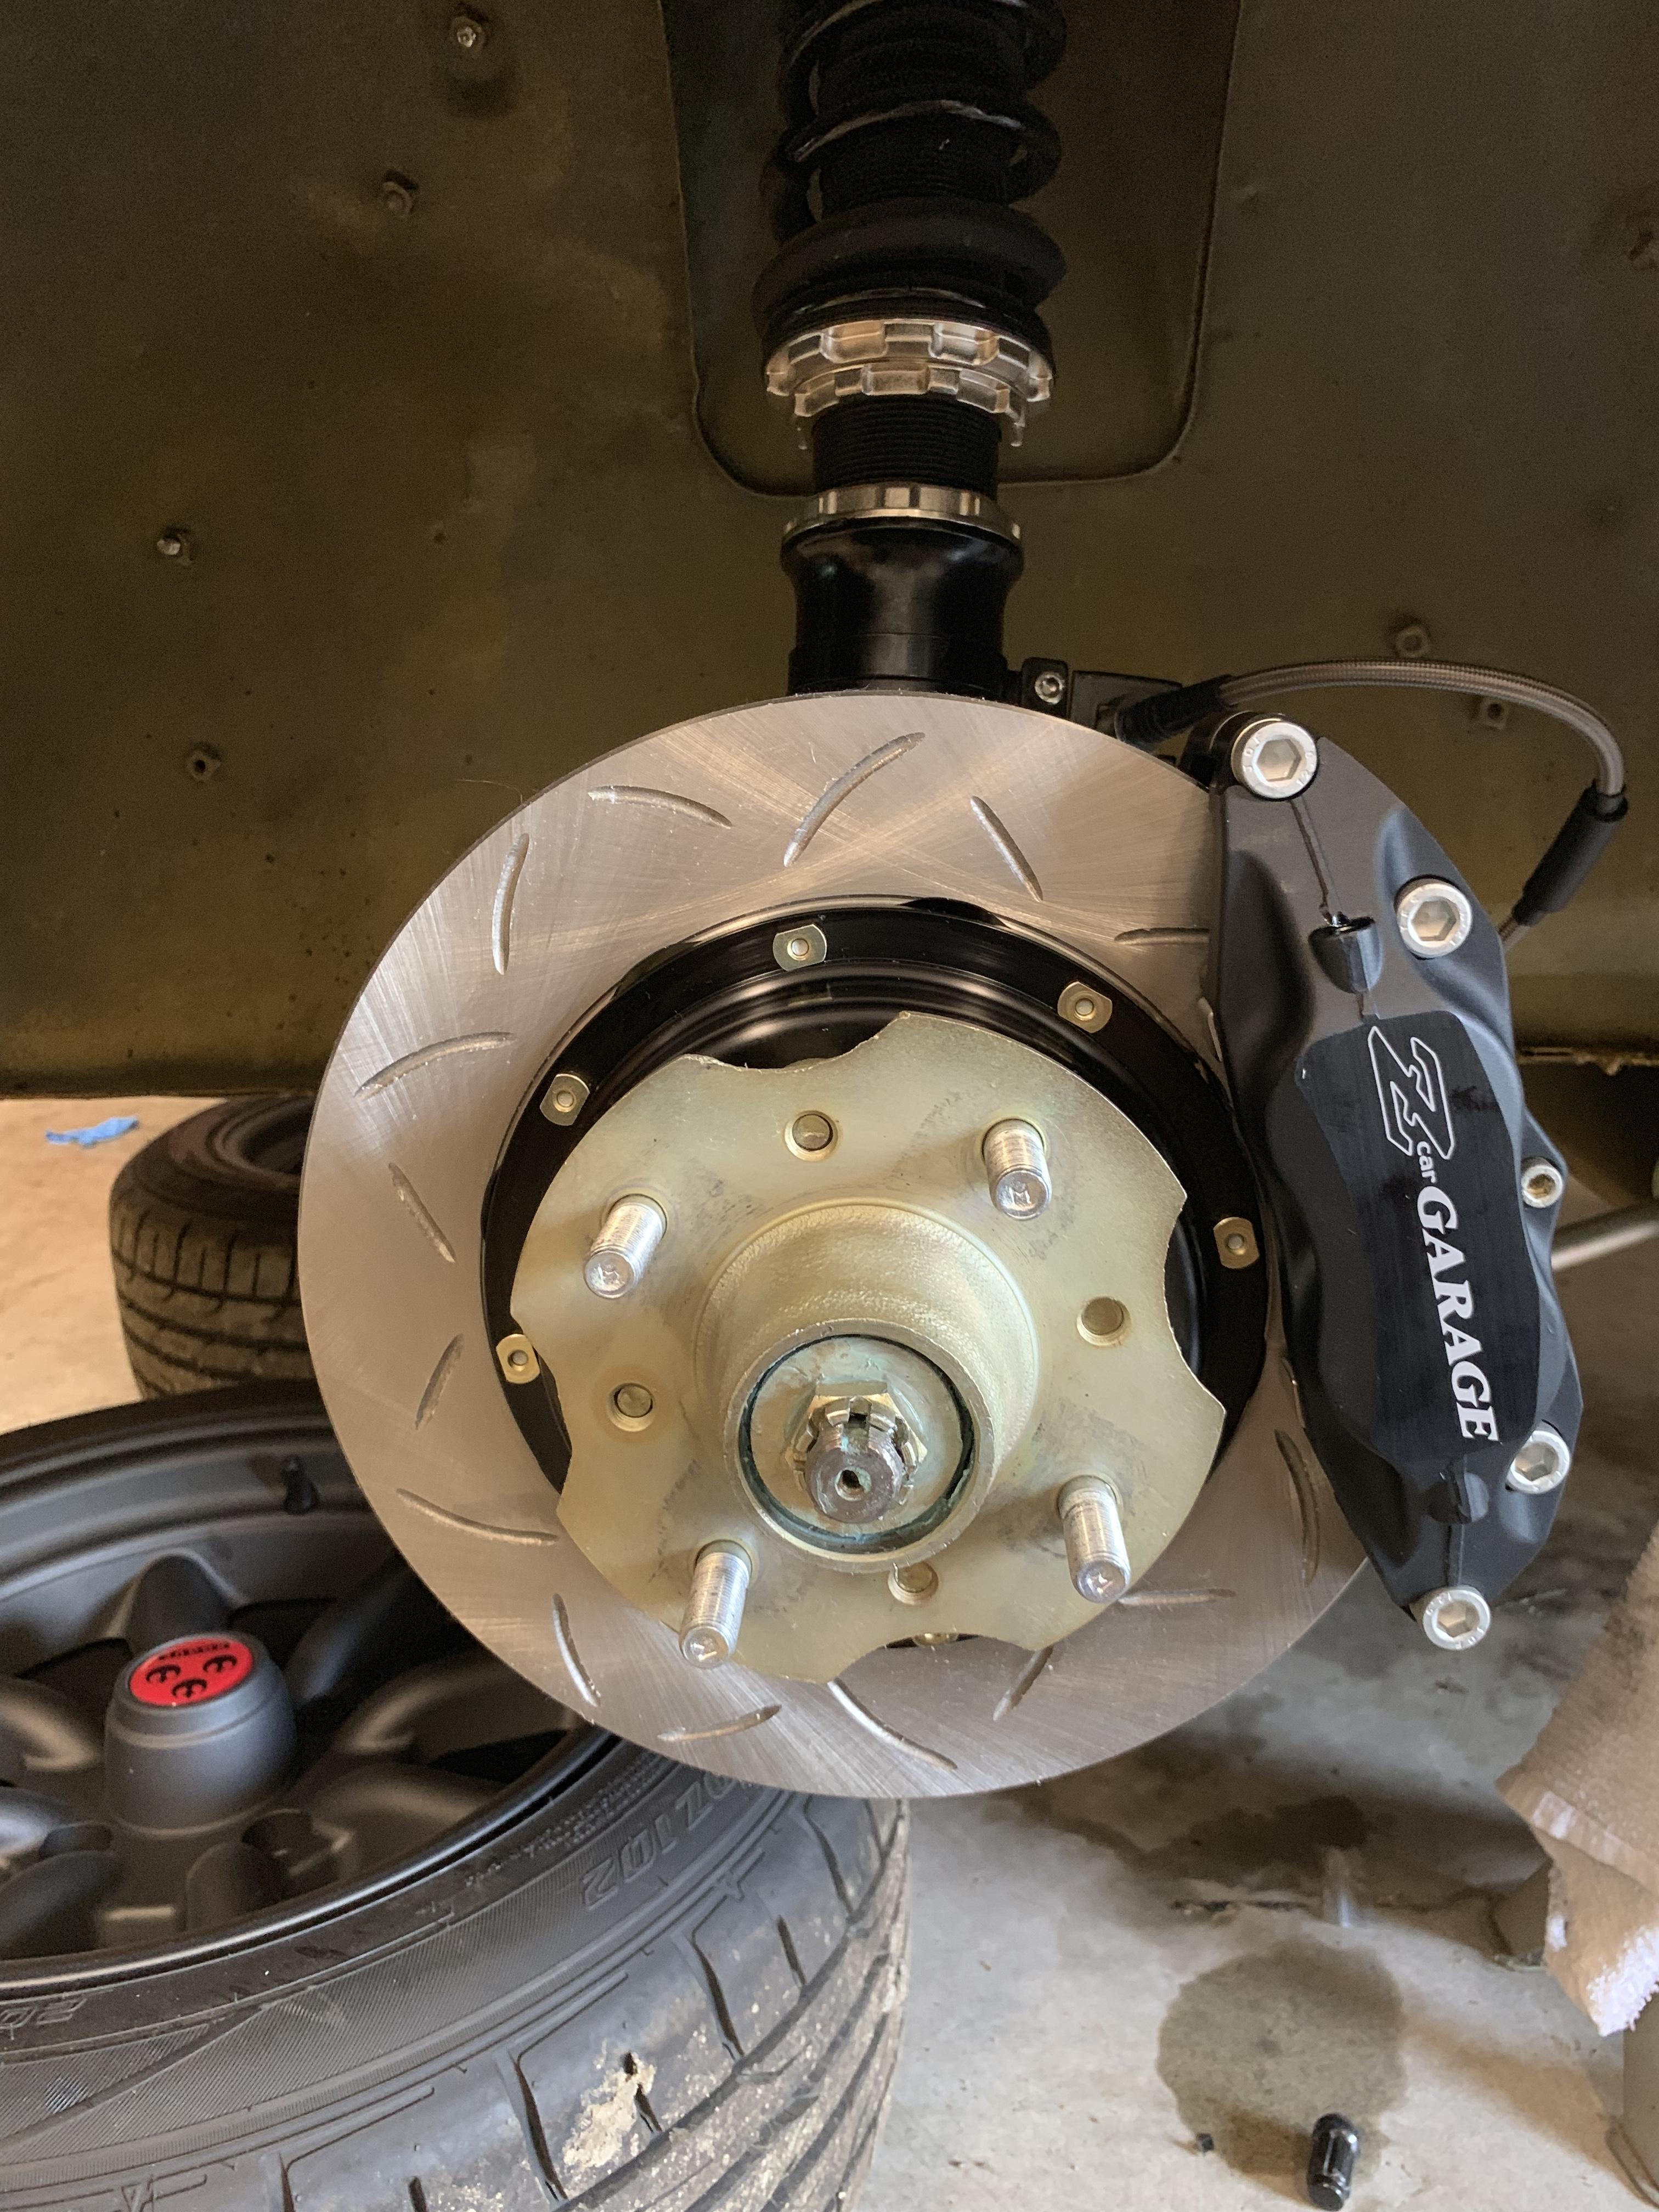
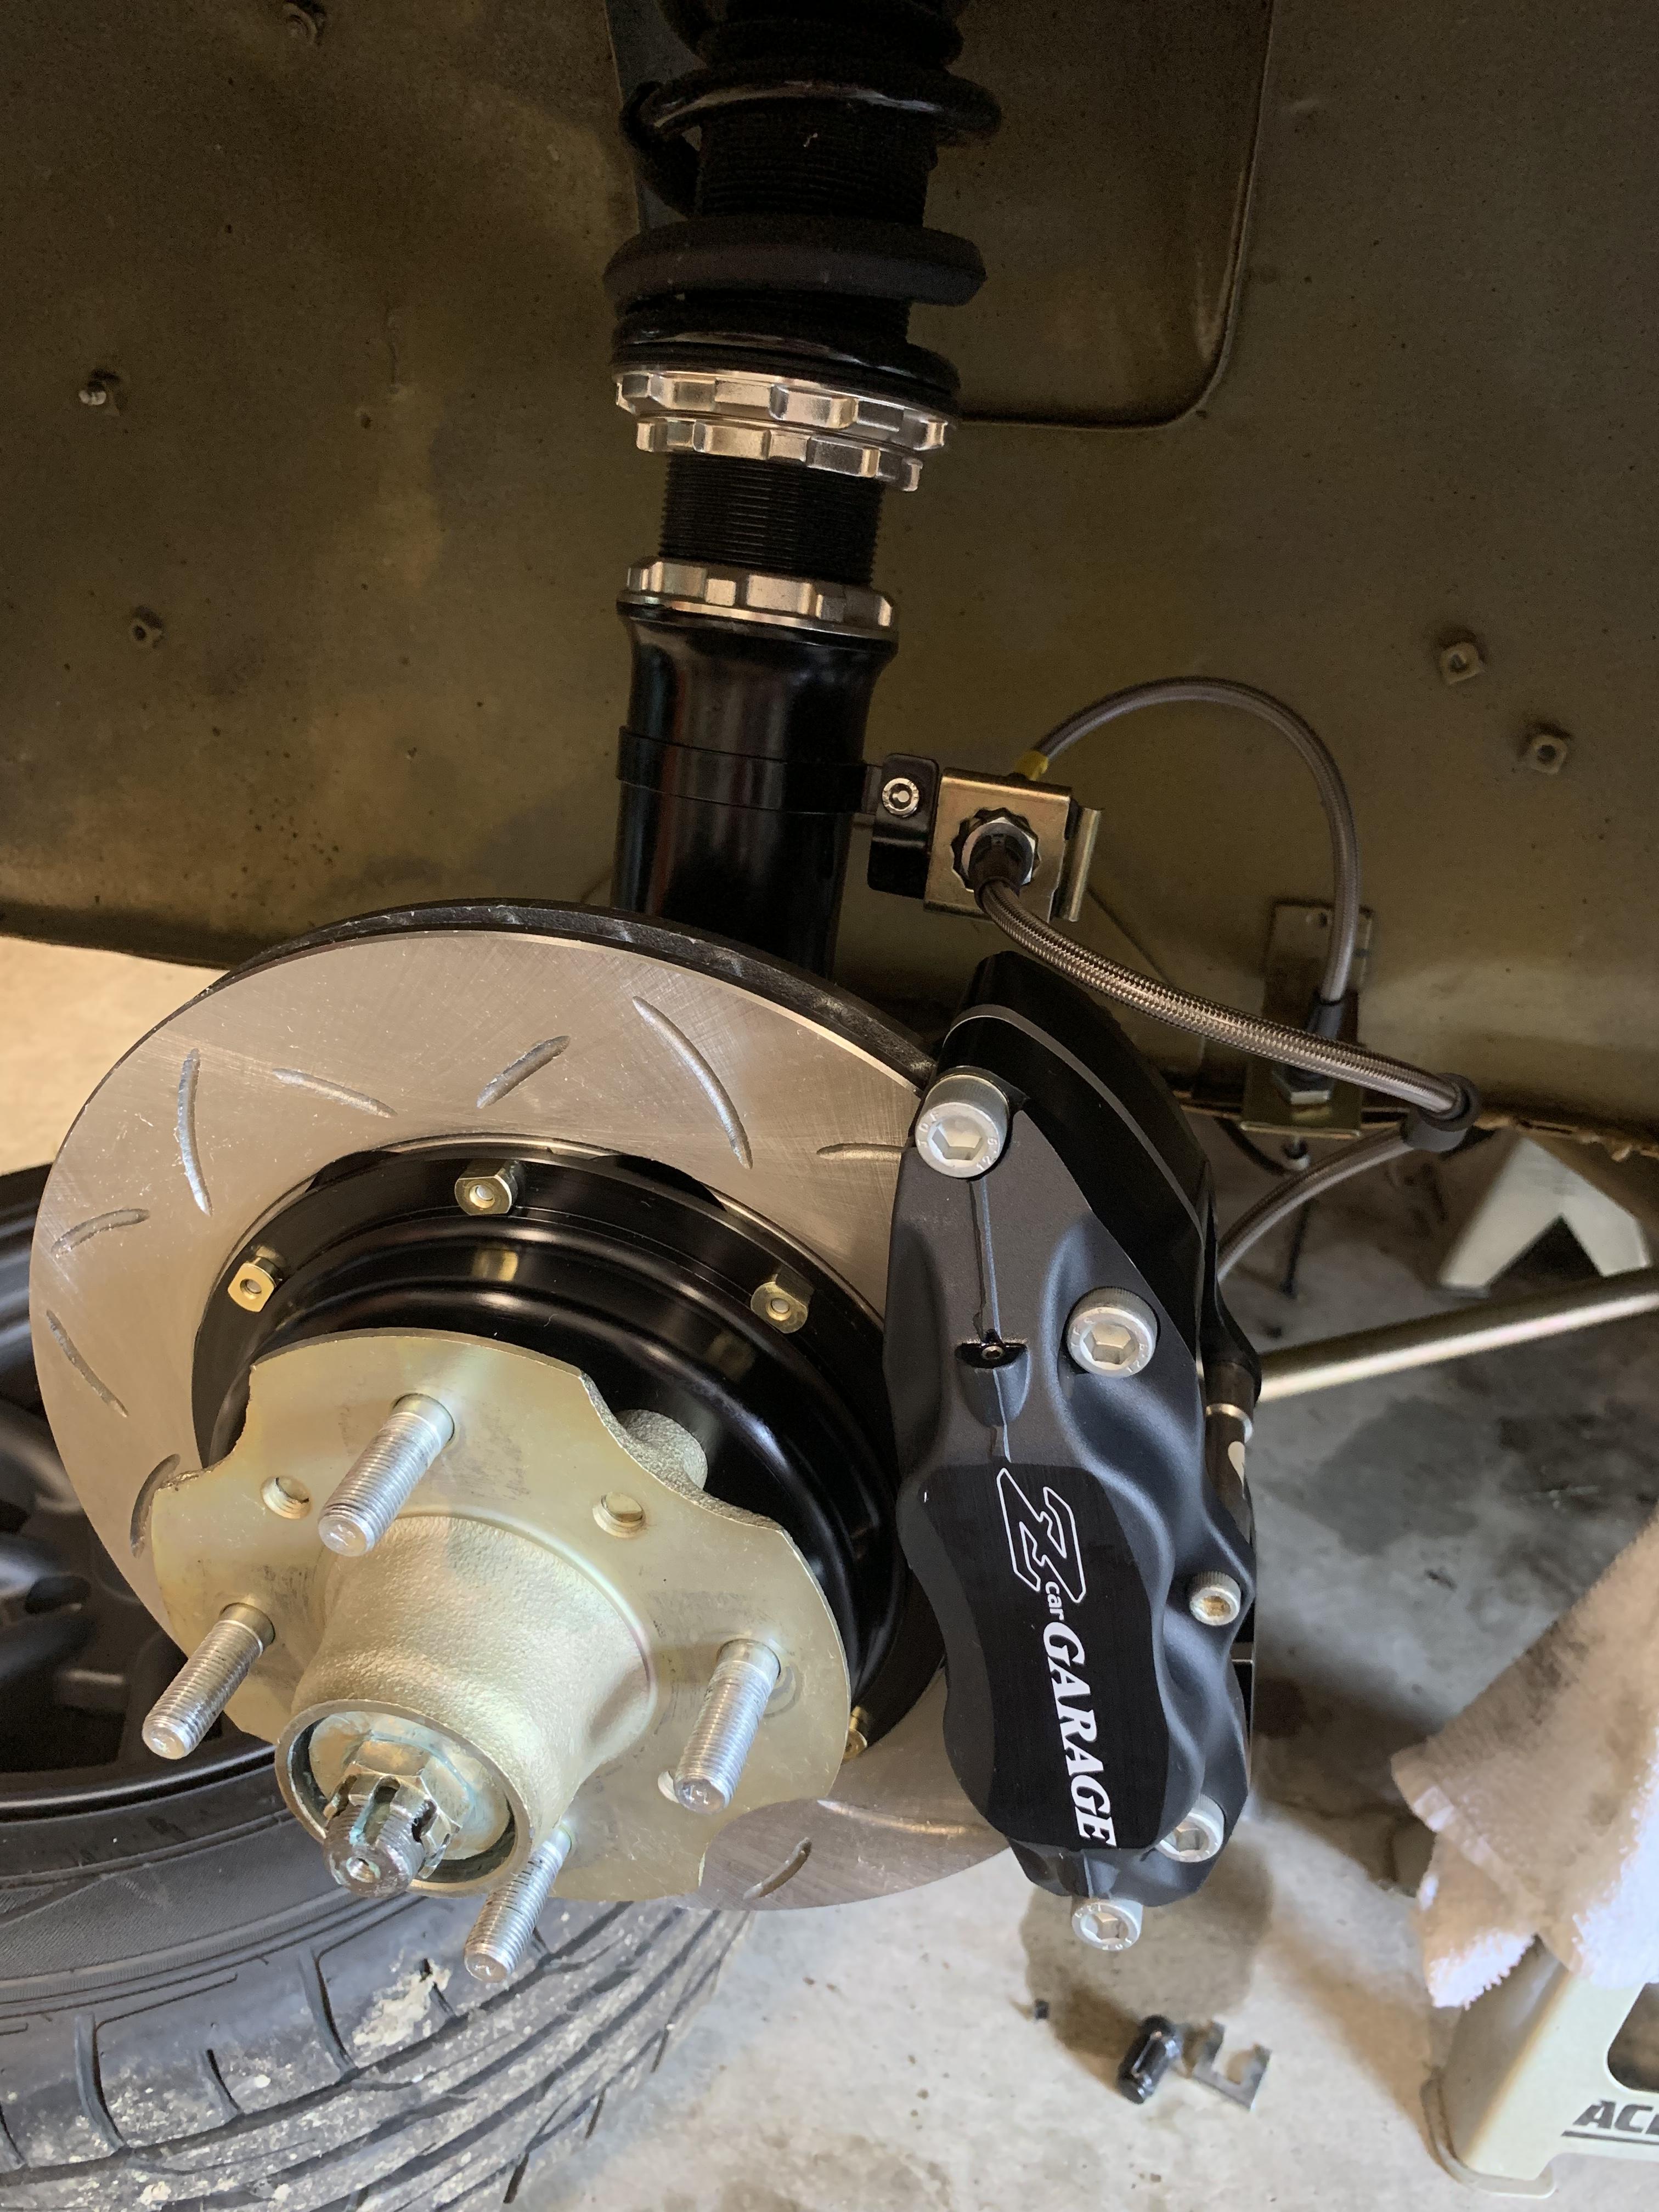
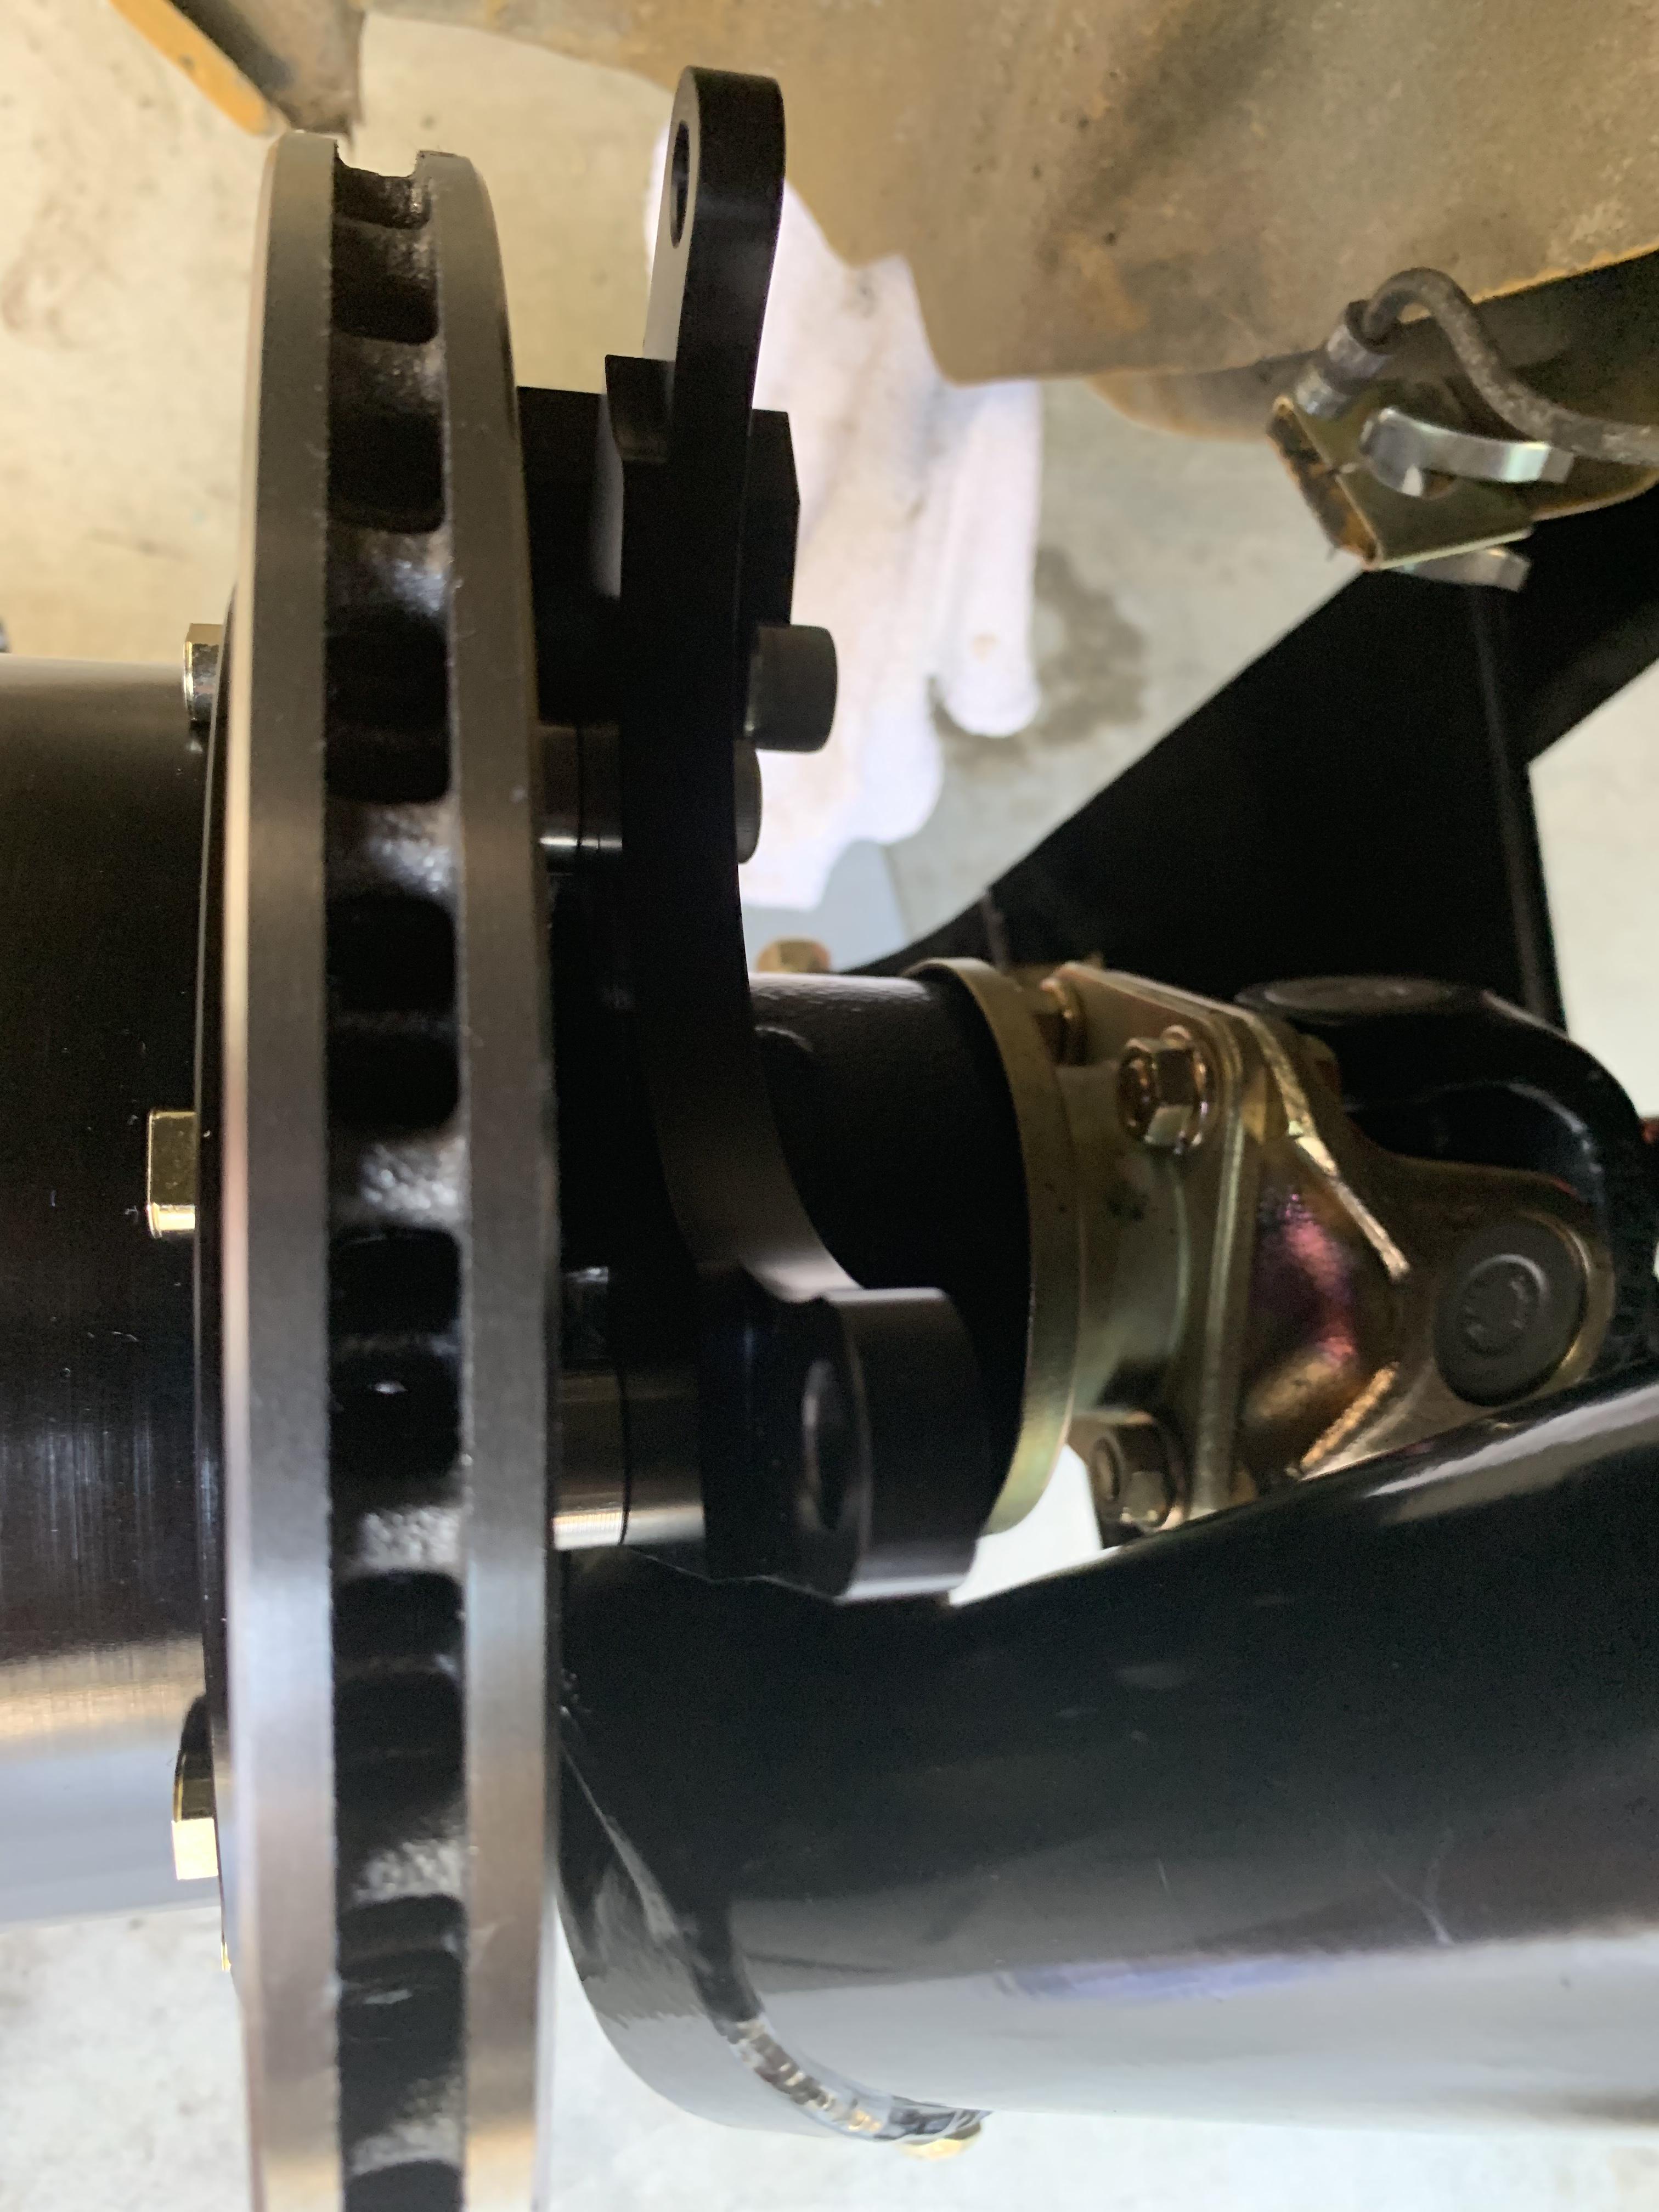
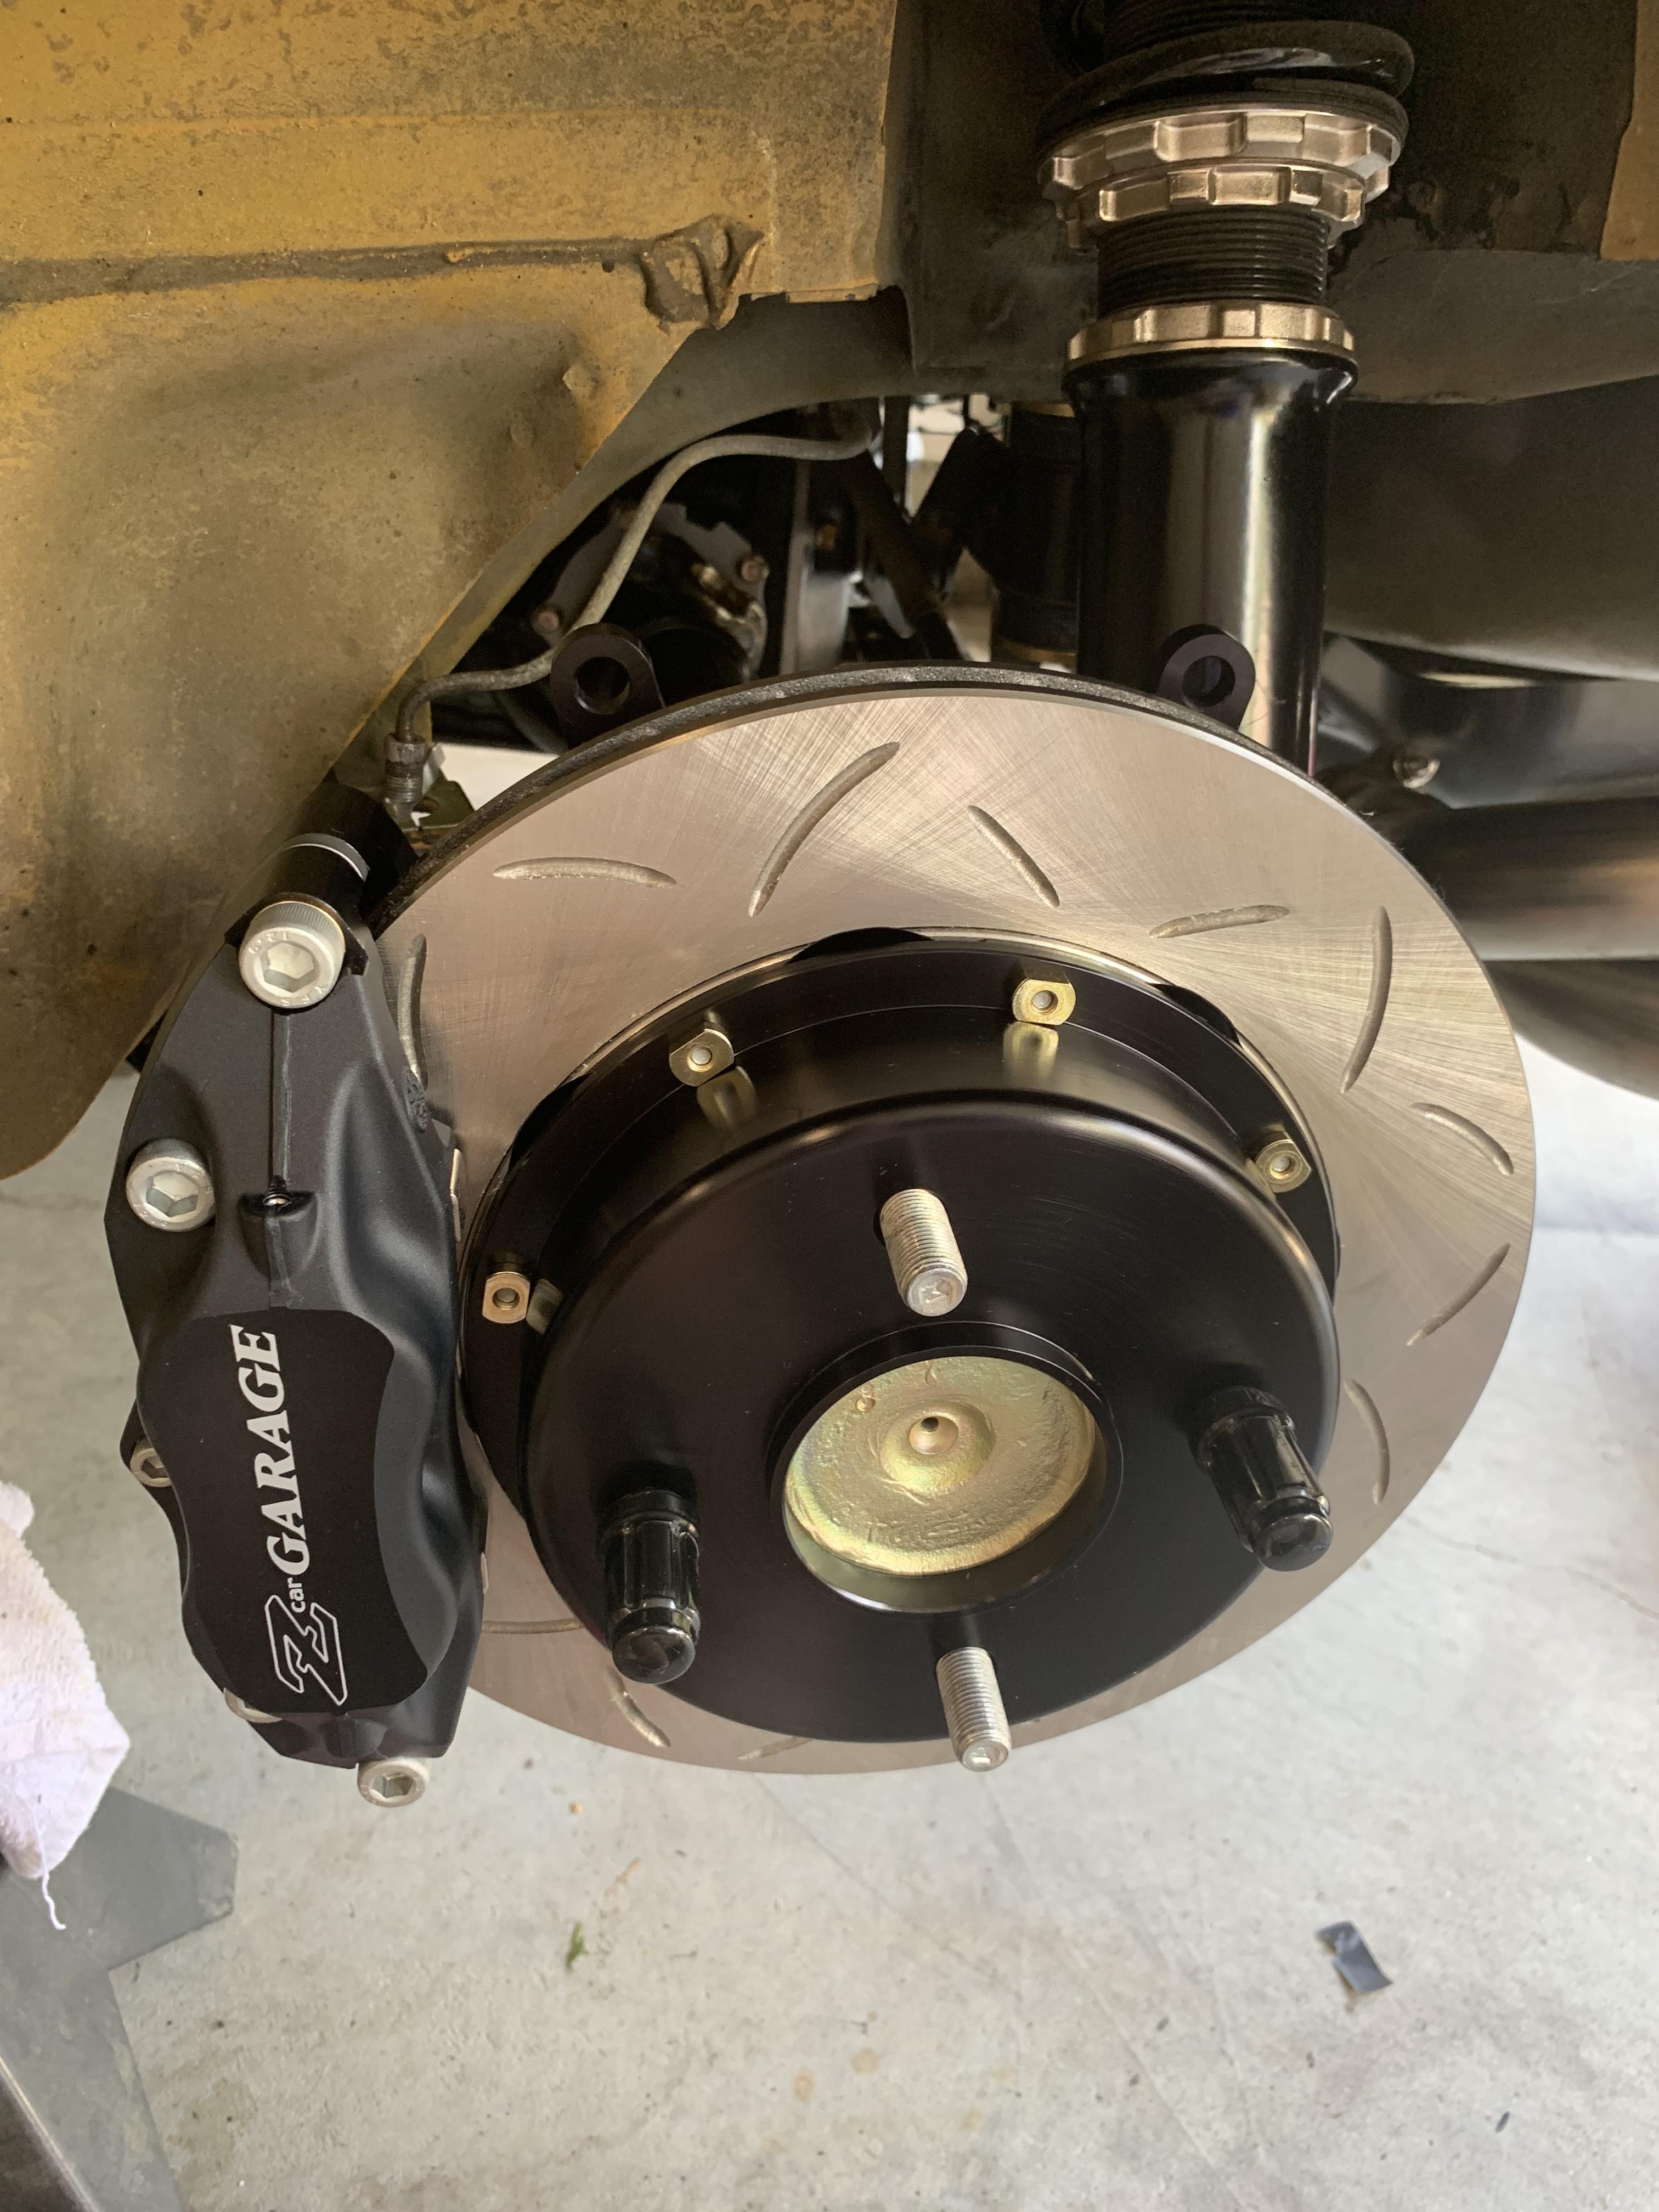
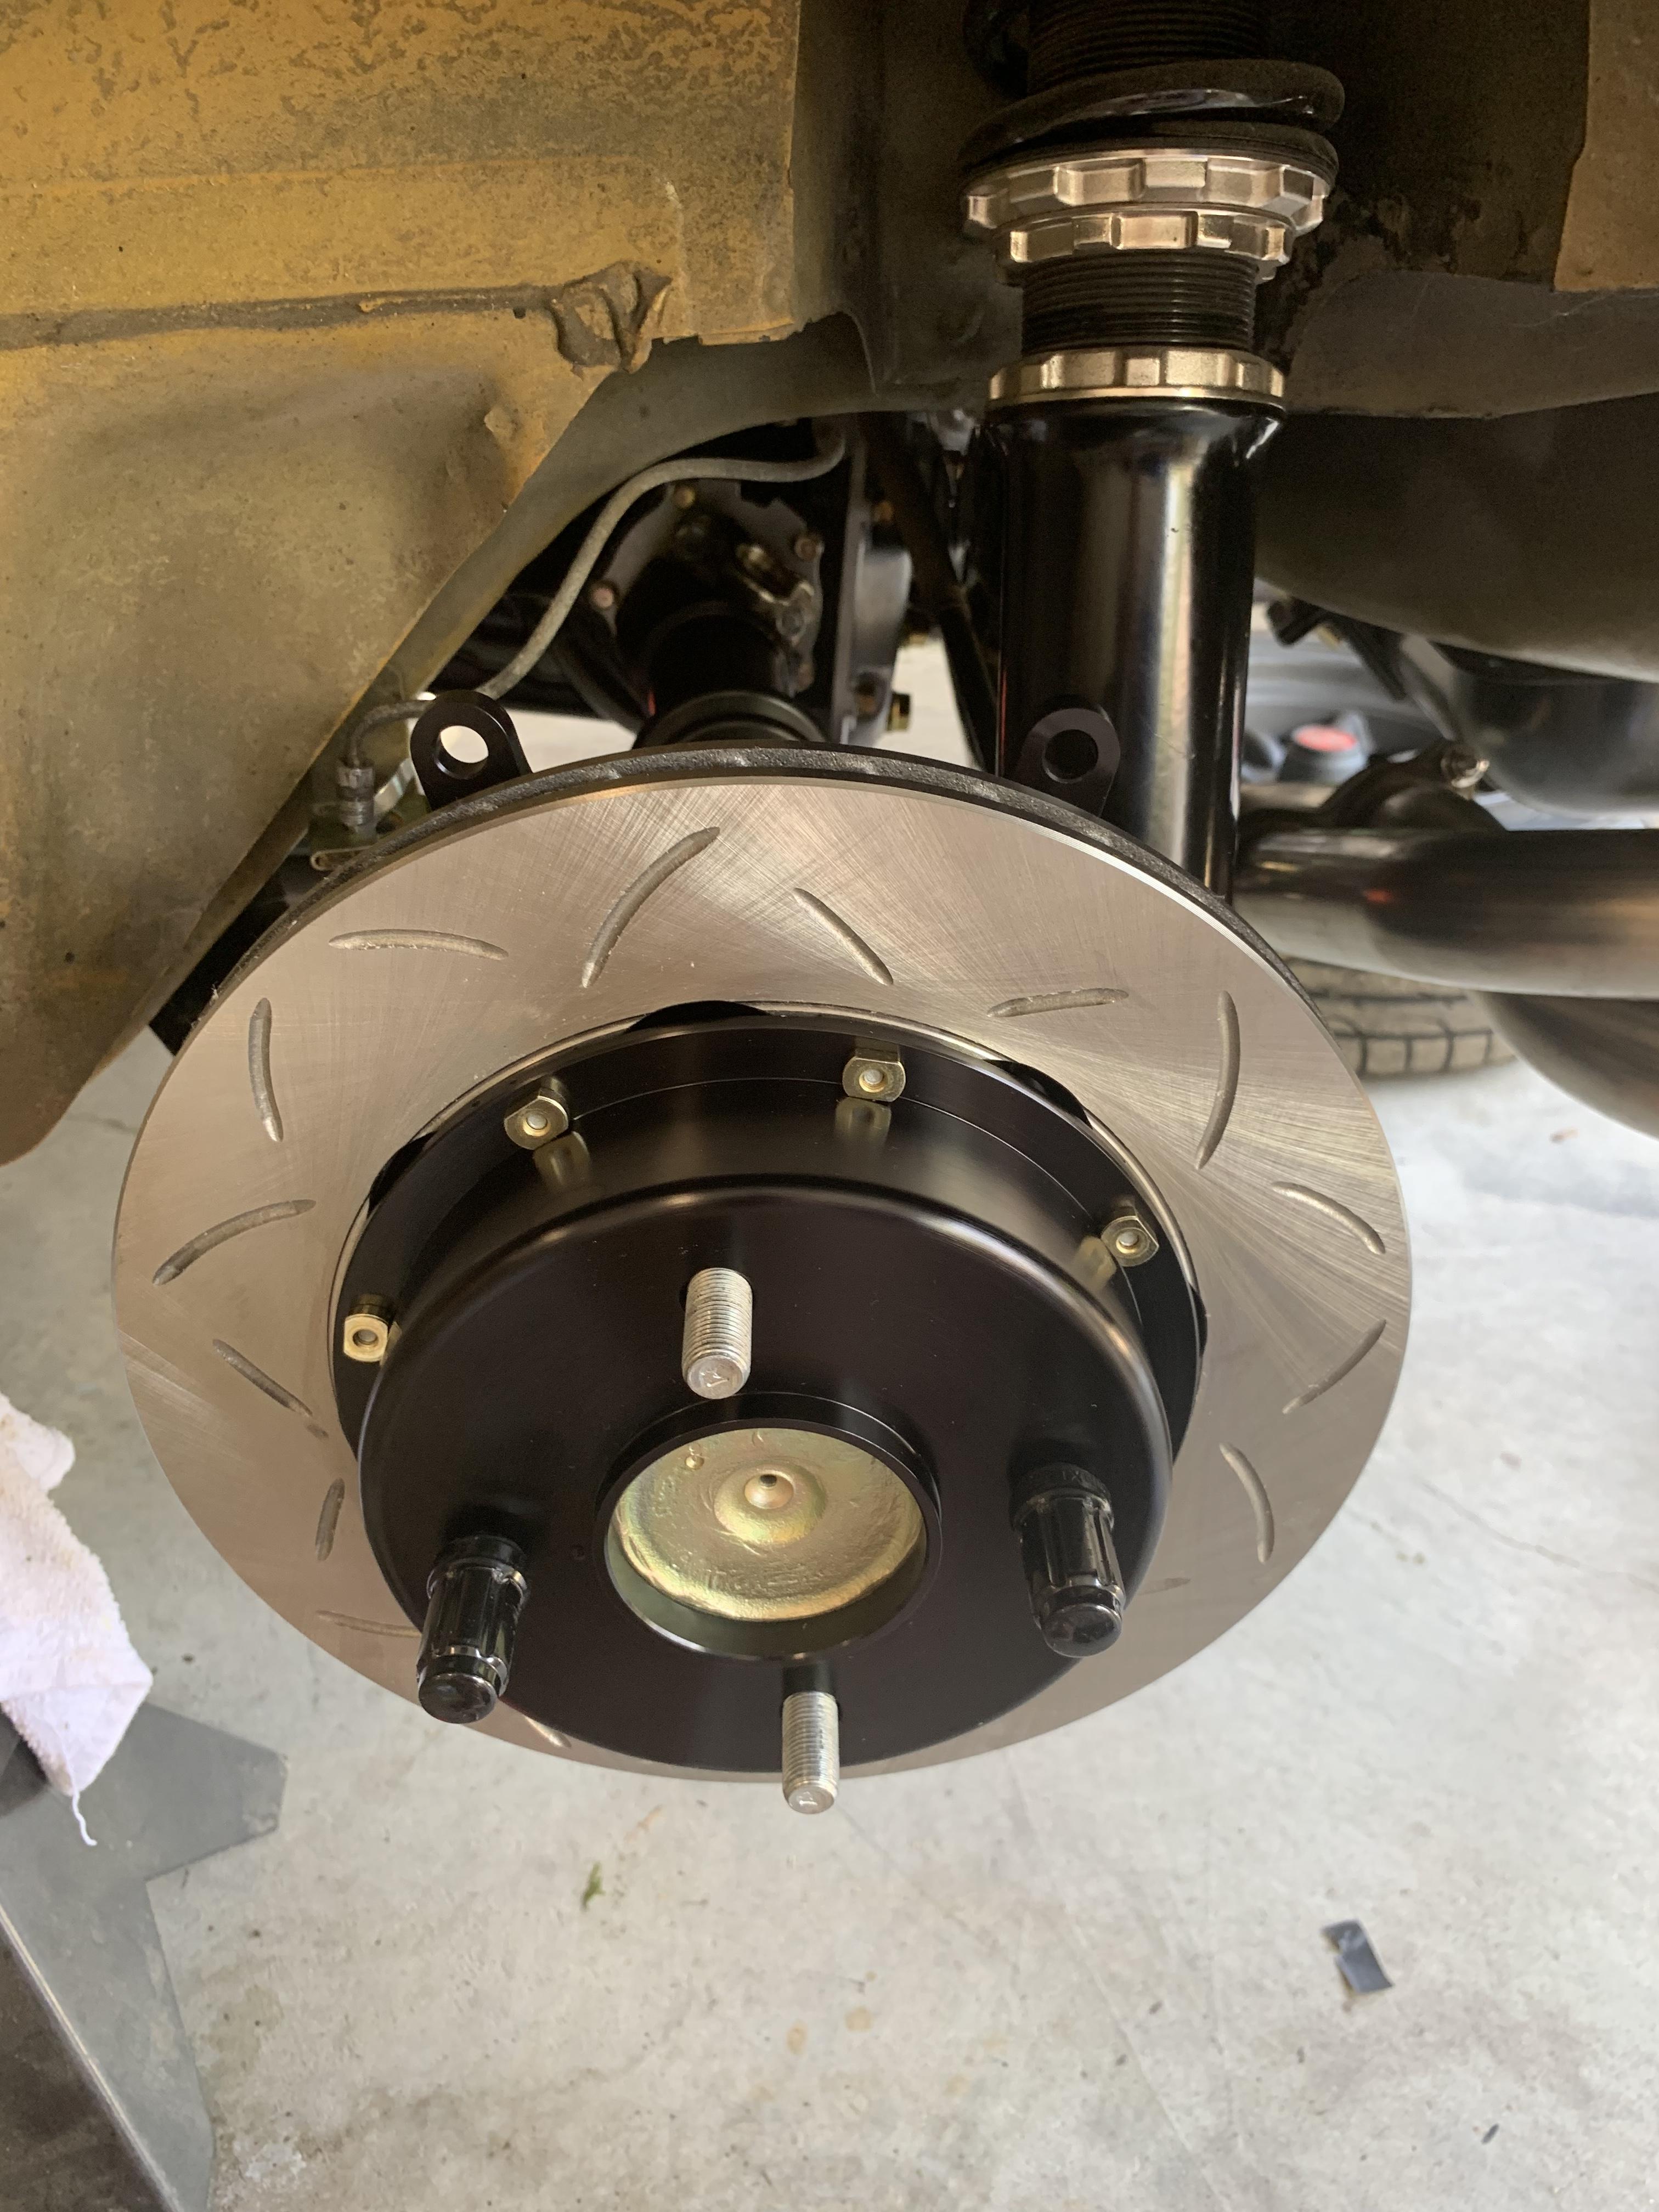
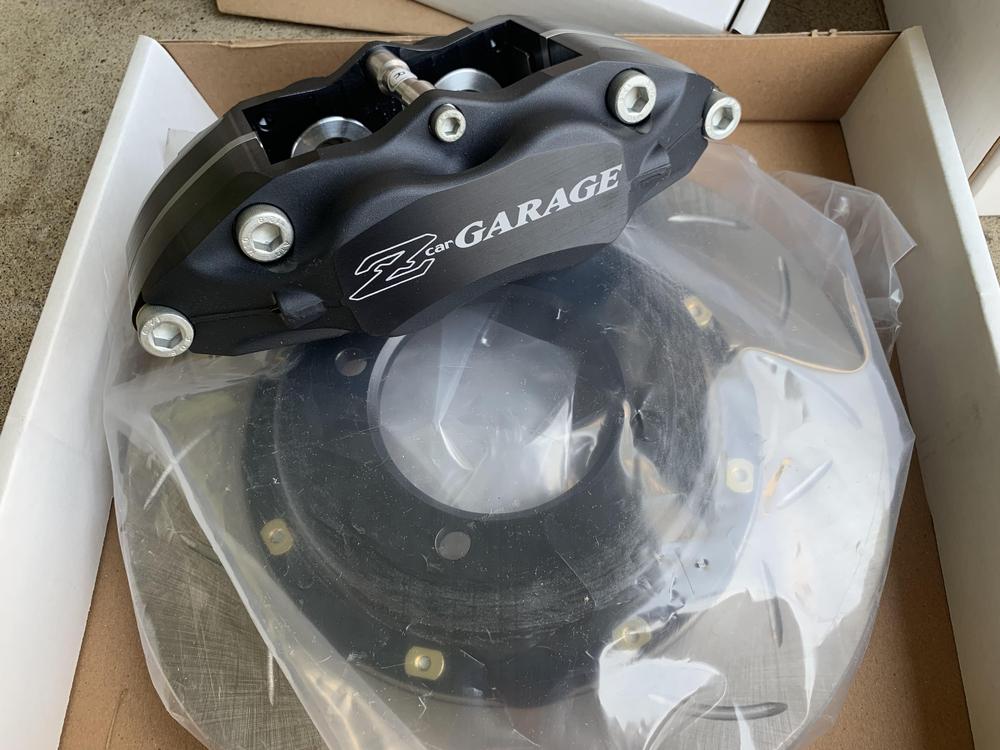
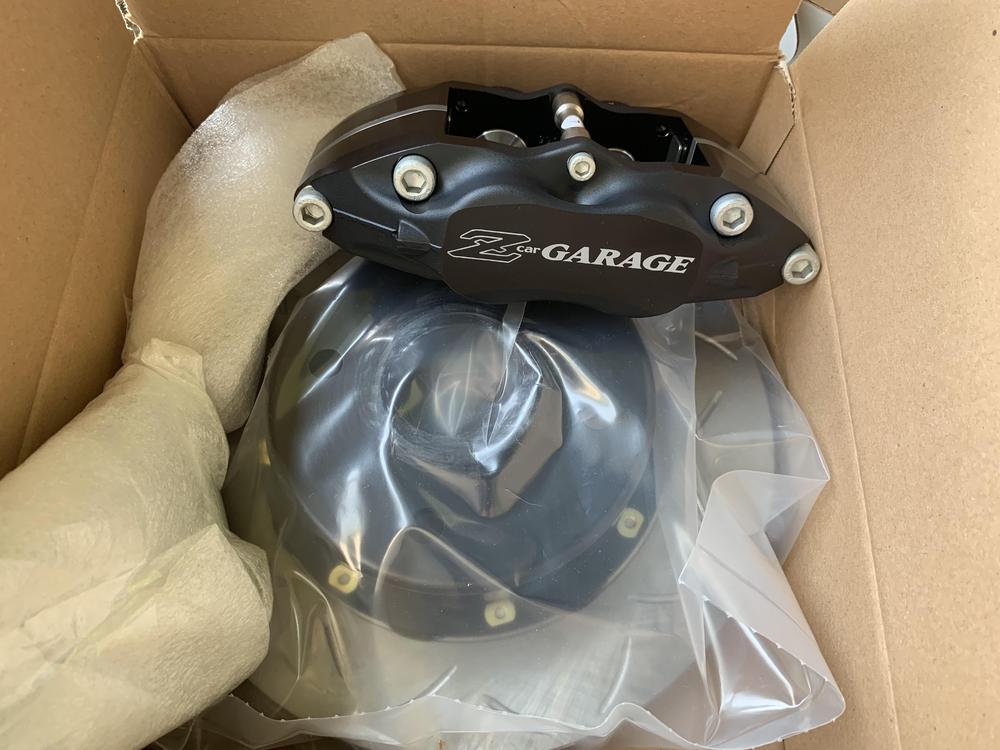
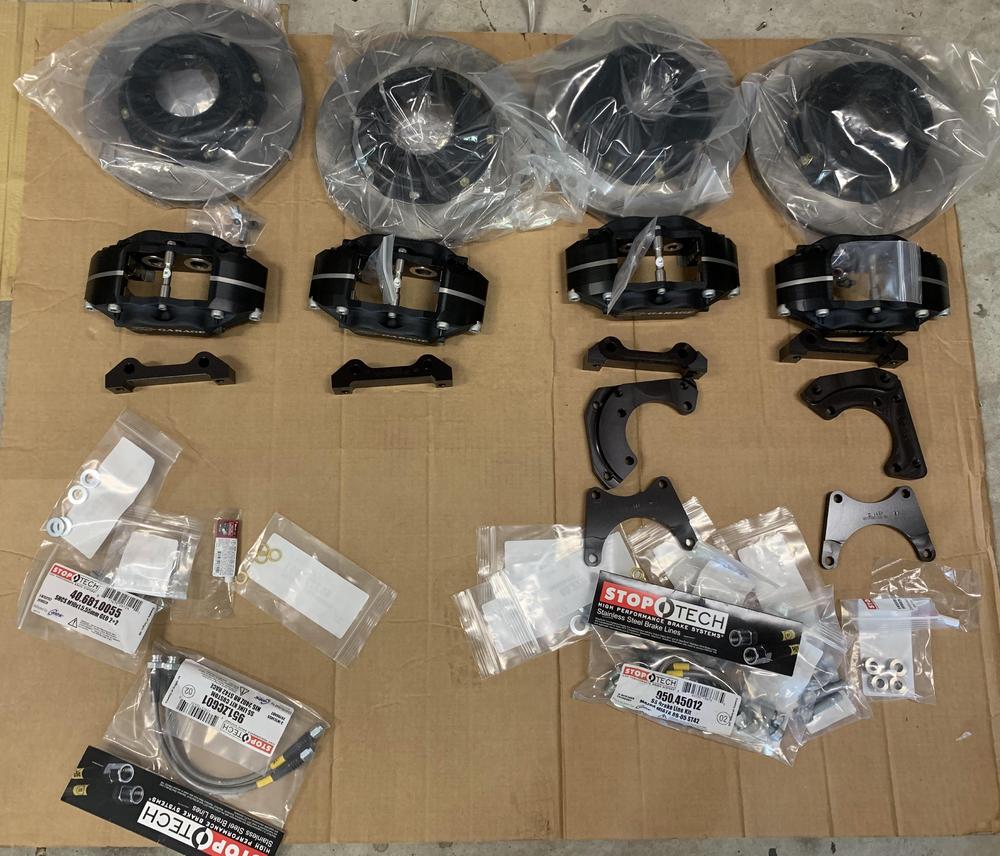
1 pointMy z is getting the BIG Brake Kit from zcargarage. I’m so happy with it. Here is my thread on it https://www.classiczcars.com/forums/topic/62261-zcargarage-big-brake-kit/?tab=comments#comment-576731


 1 point
 -
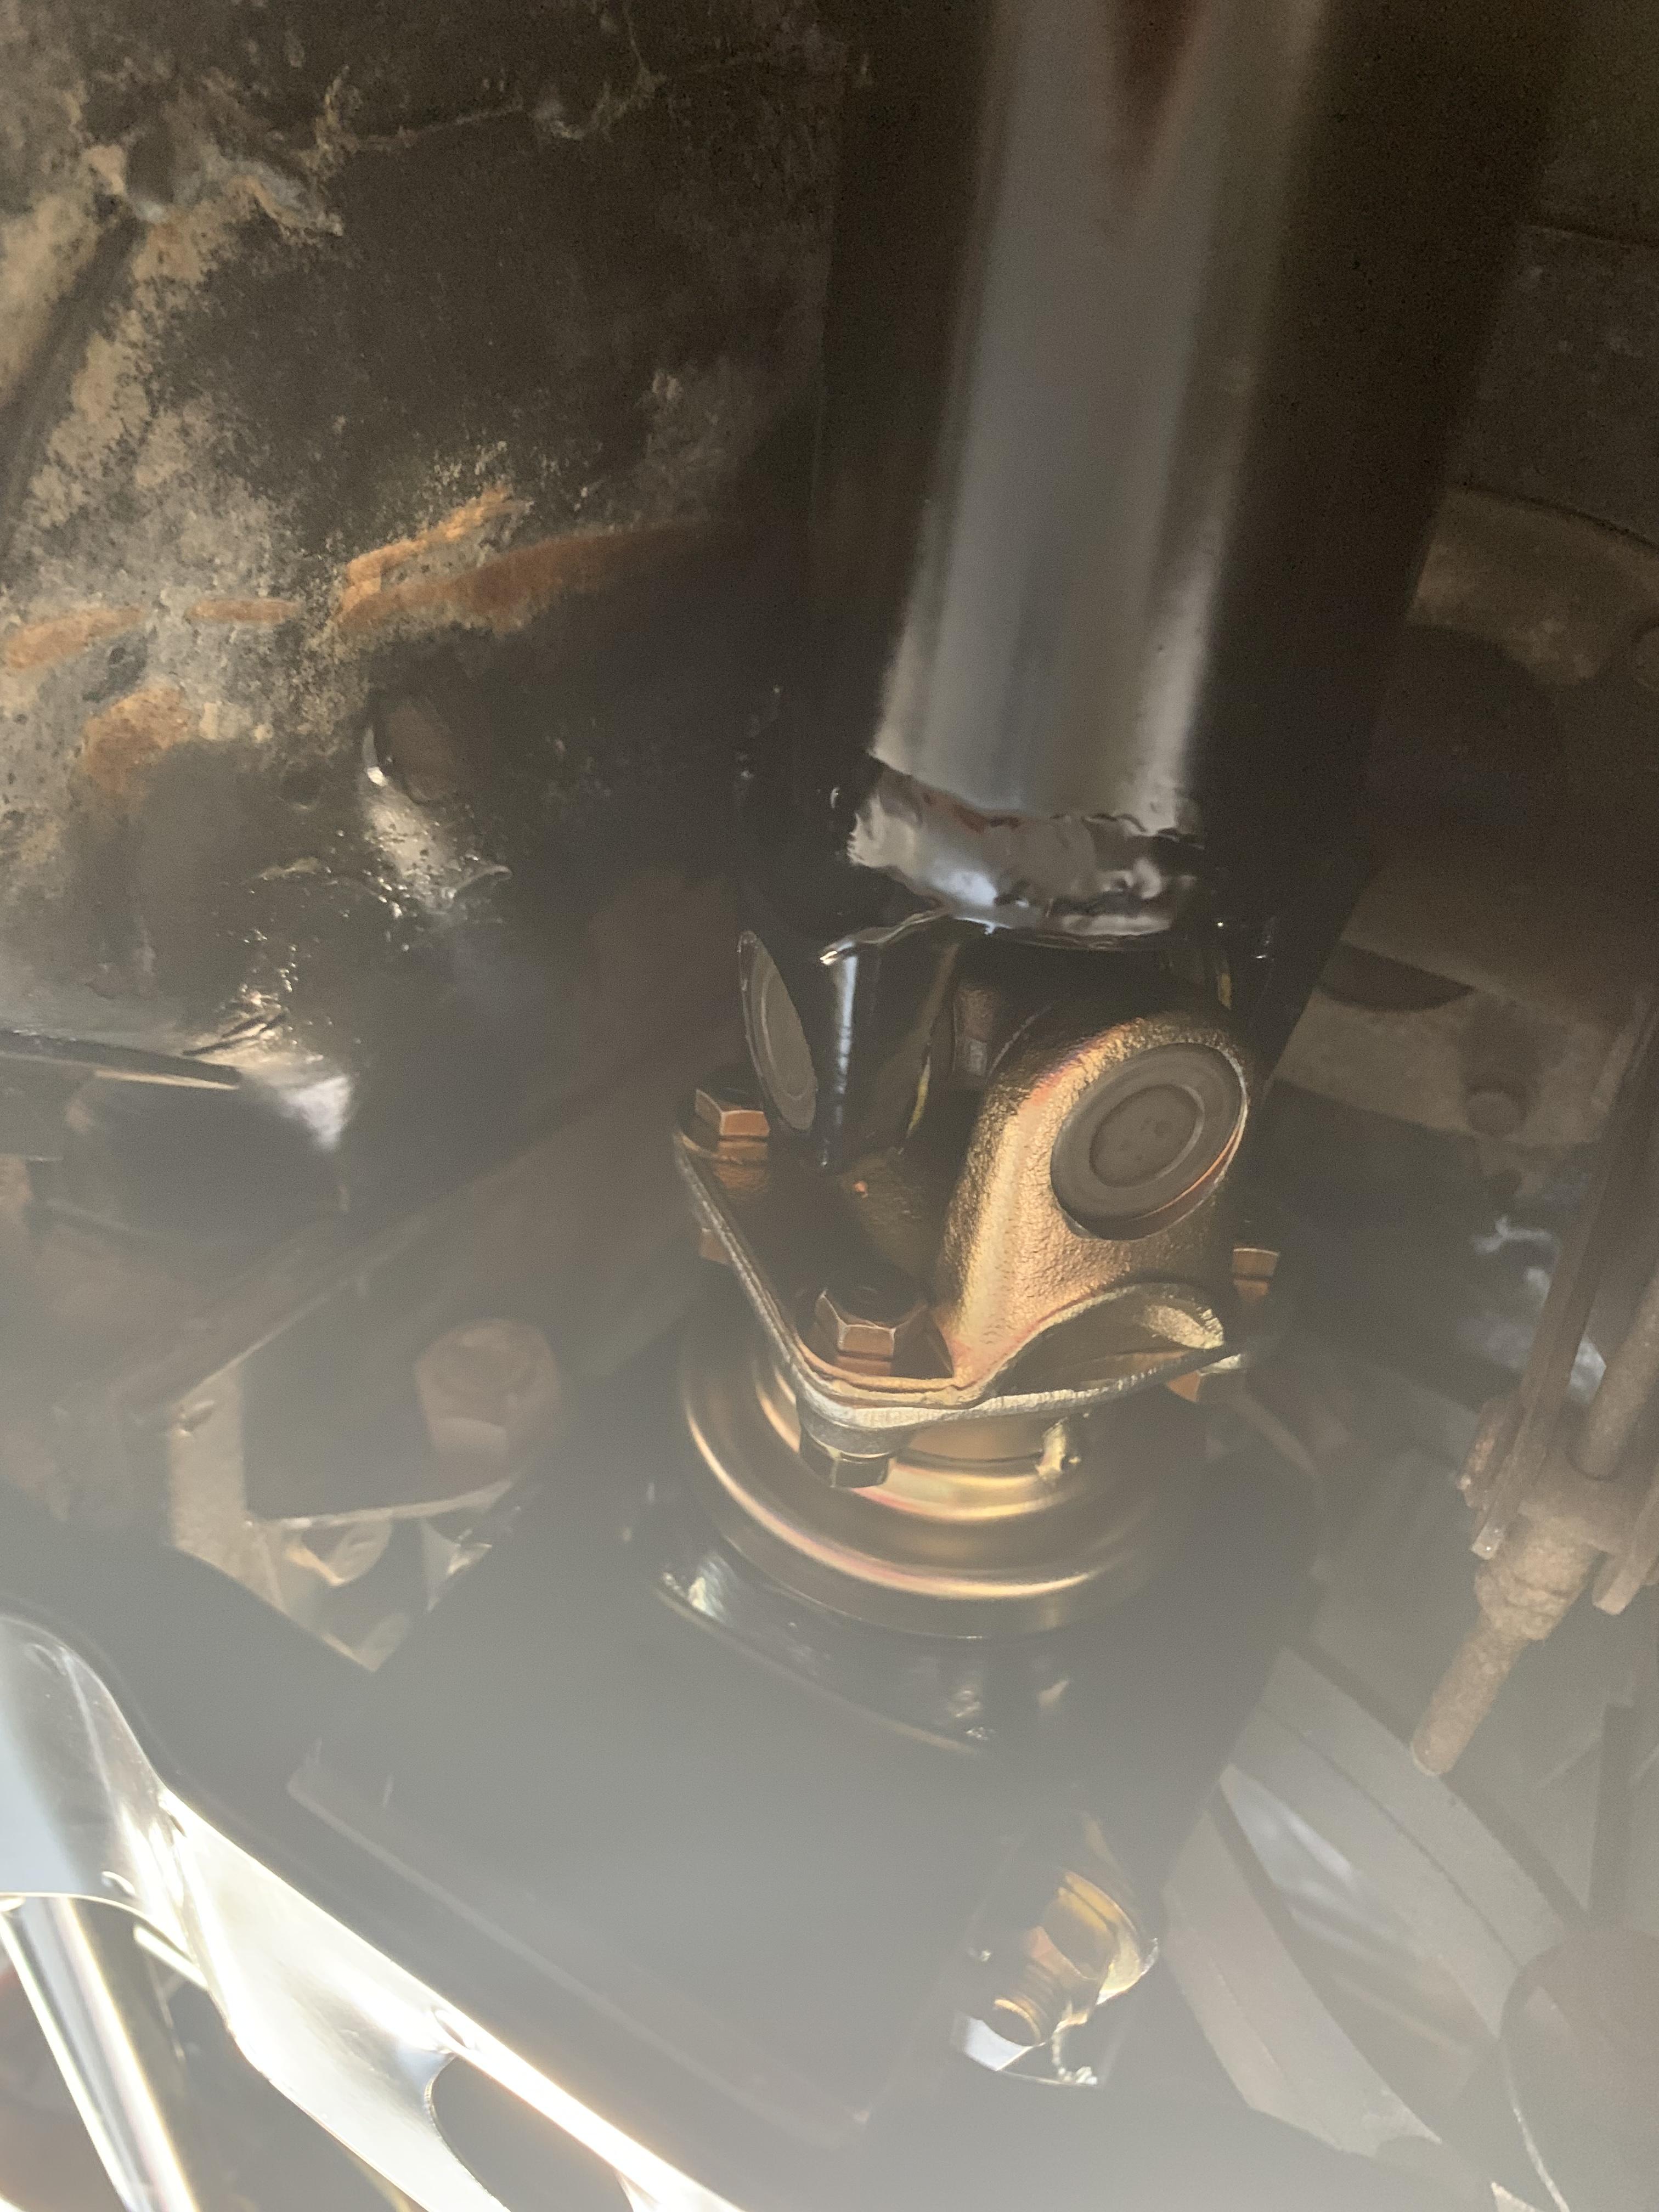
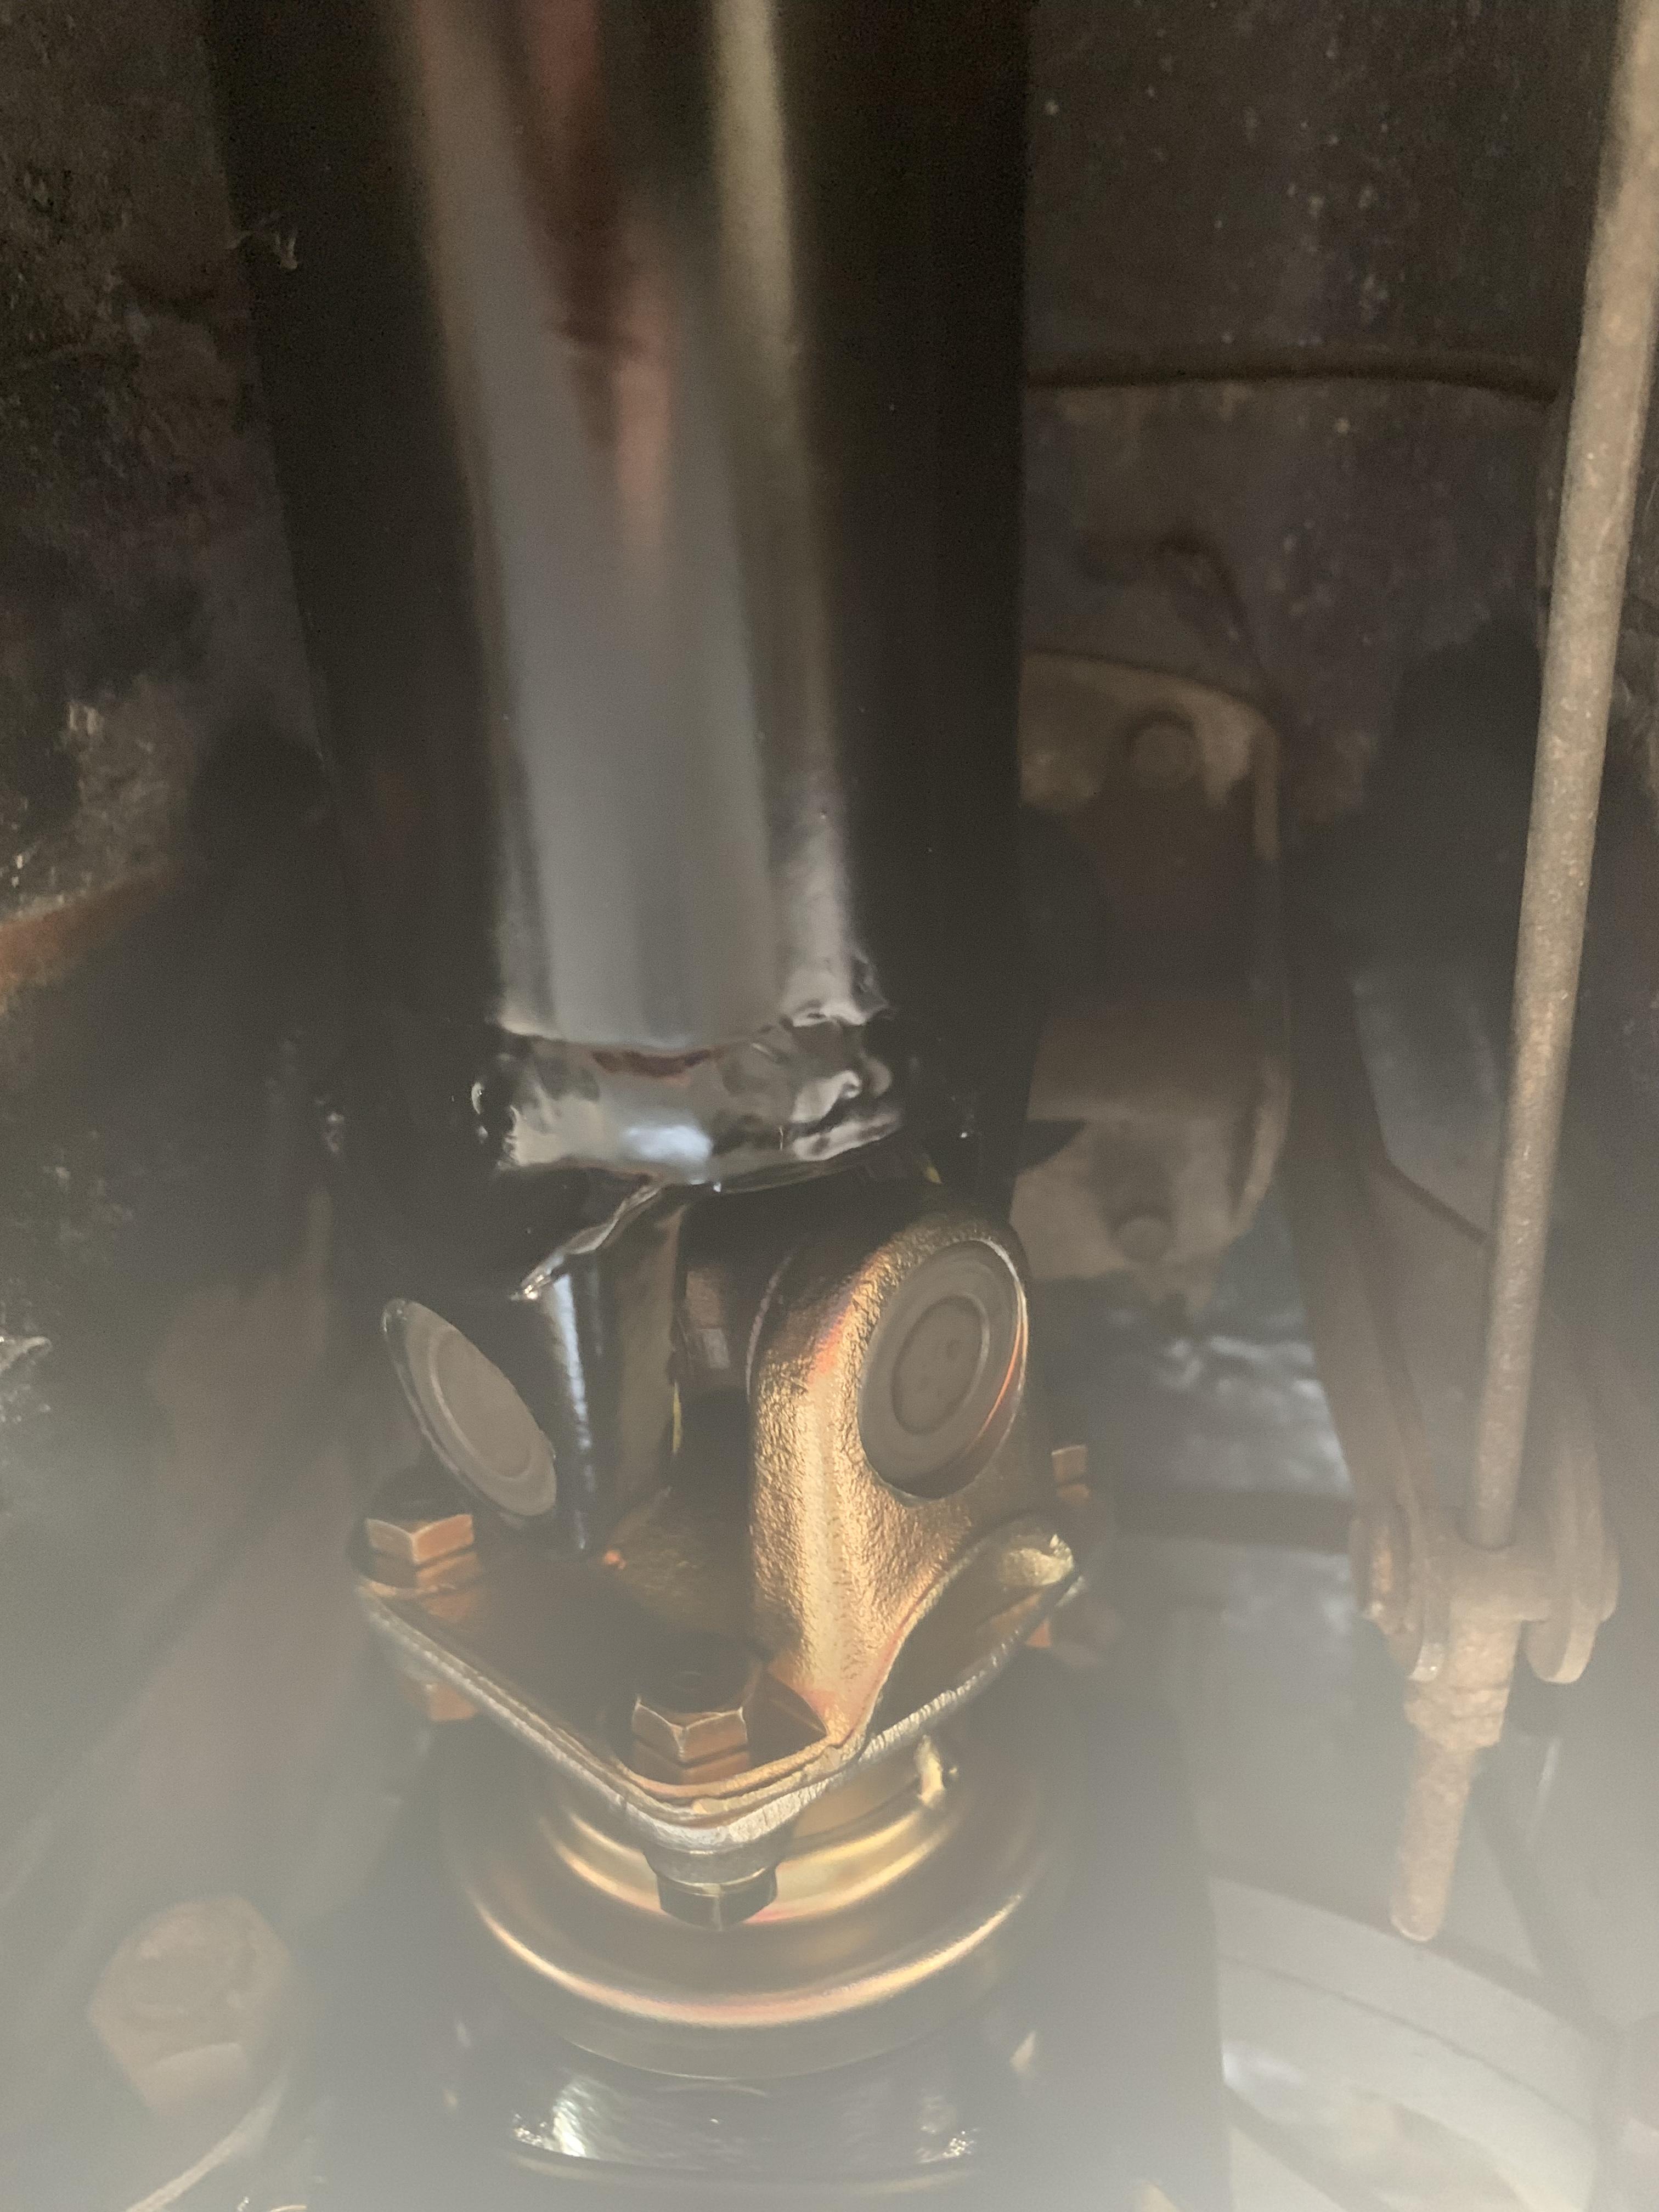
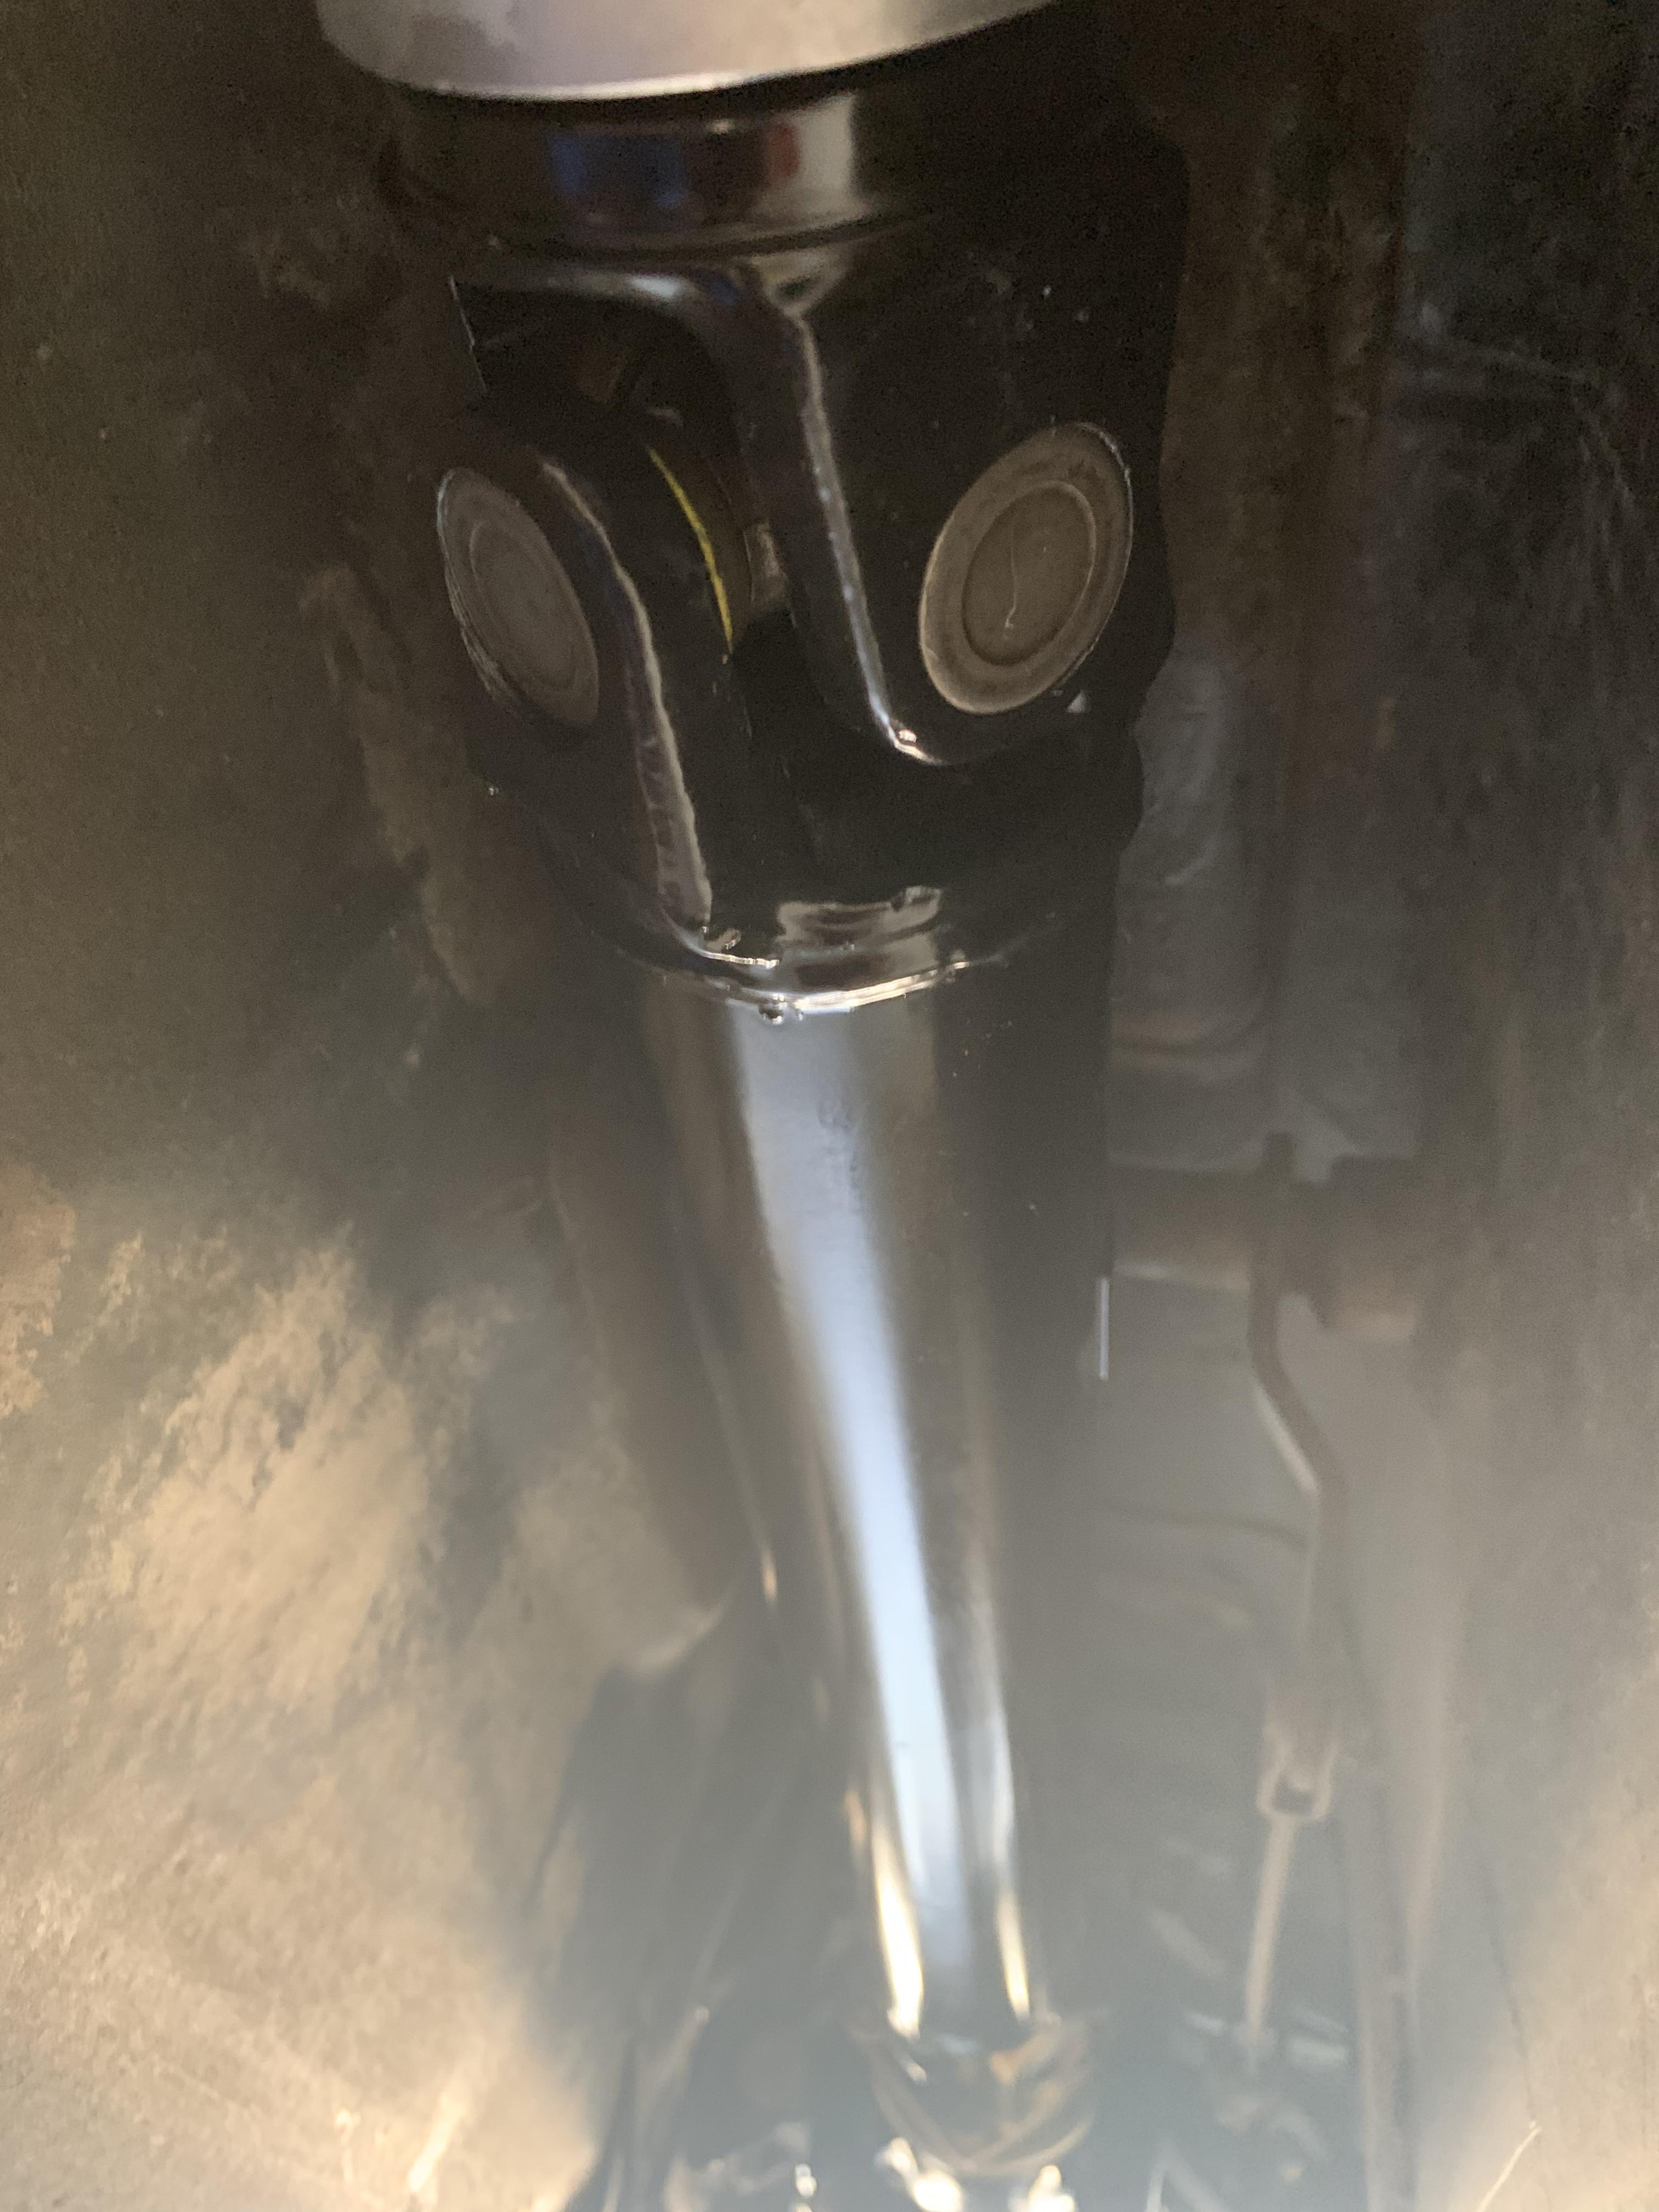
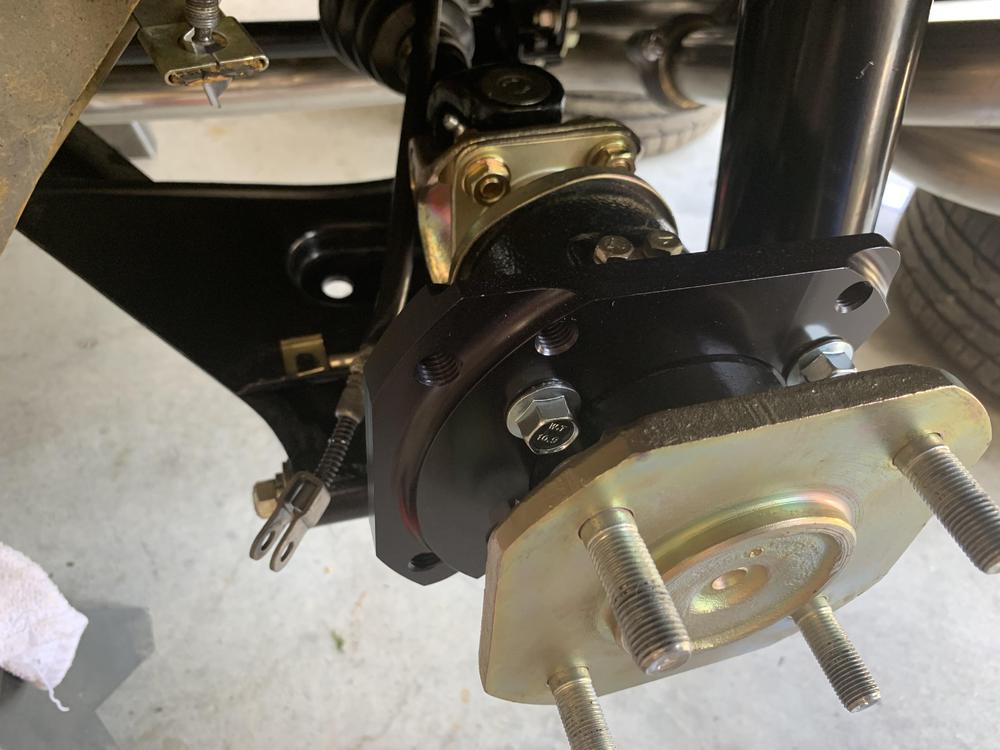
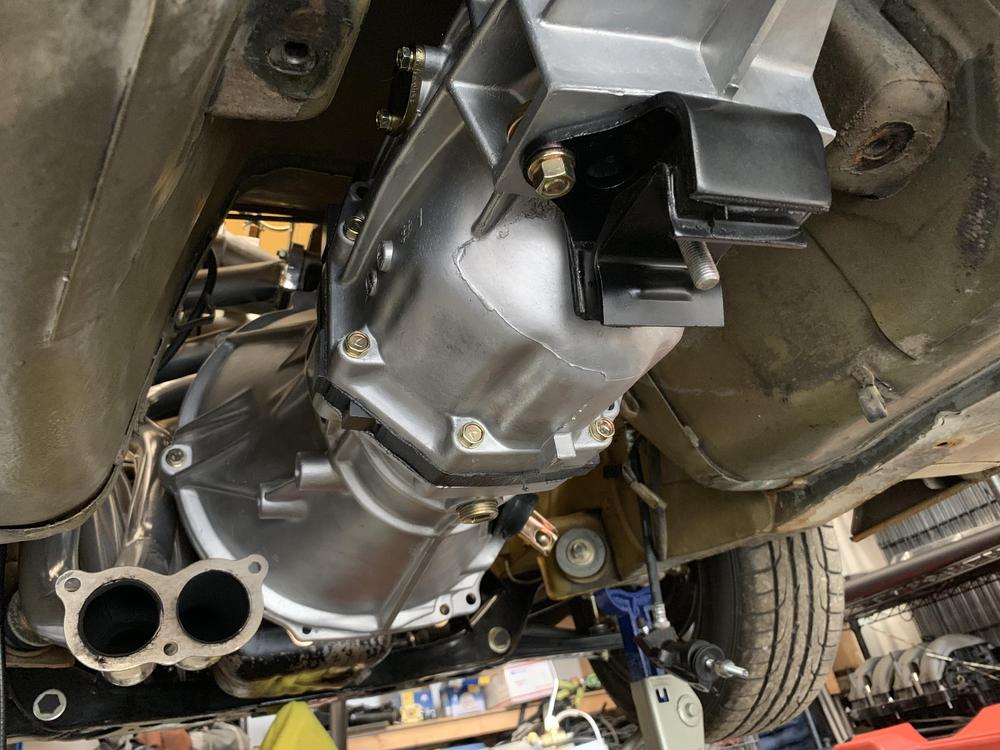
1 pointShorten drive shaft is in. I wish i would have gone 1/8-1/4” longer. Also got the exhaust back hung.


 1 point
 -
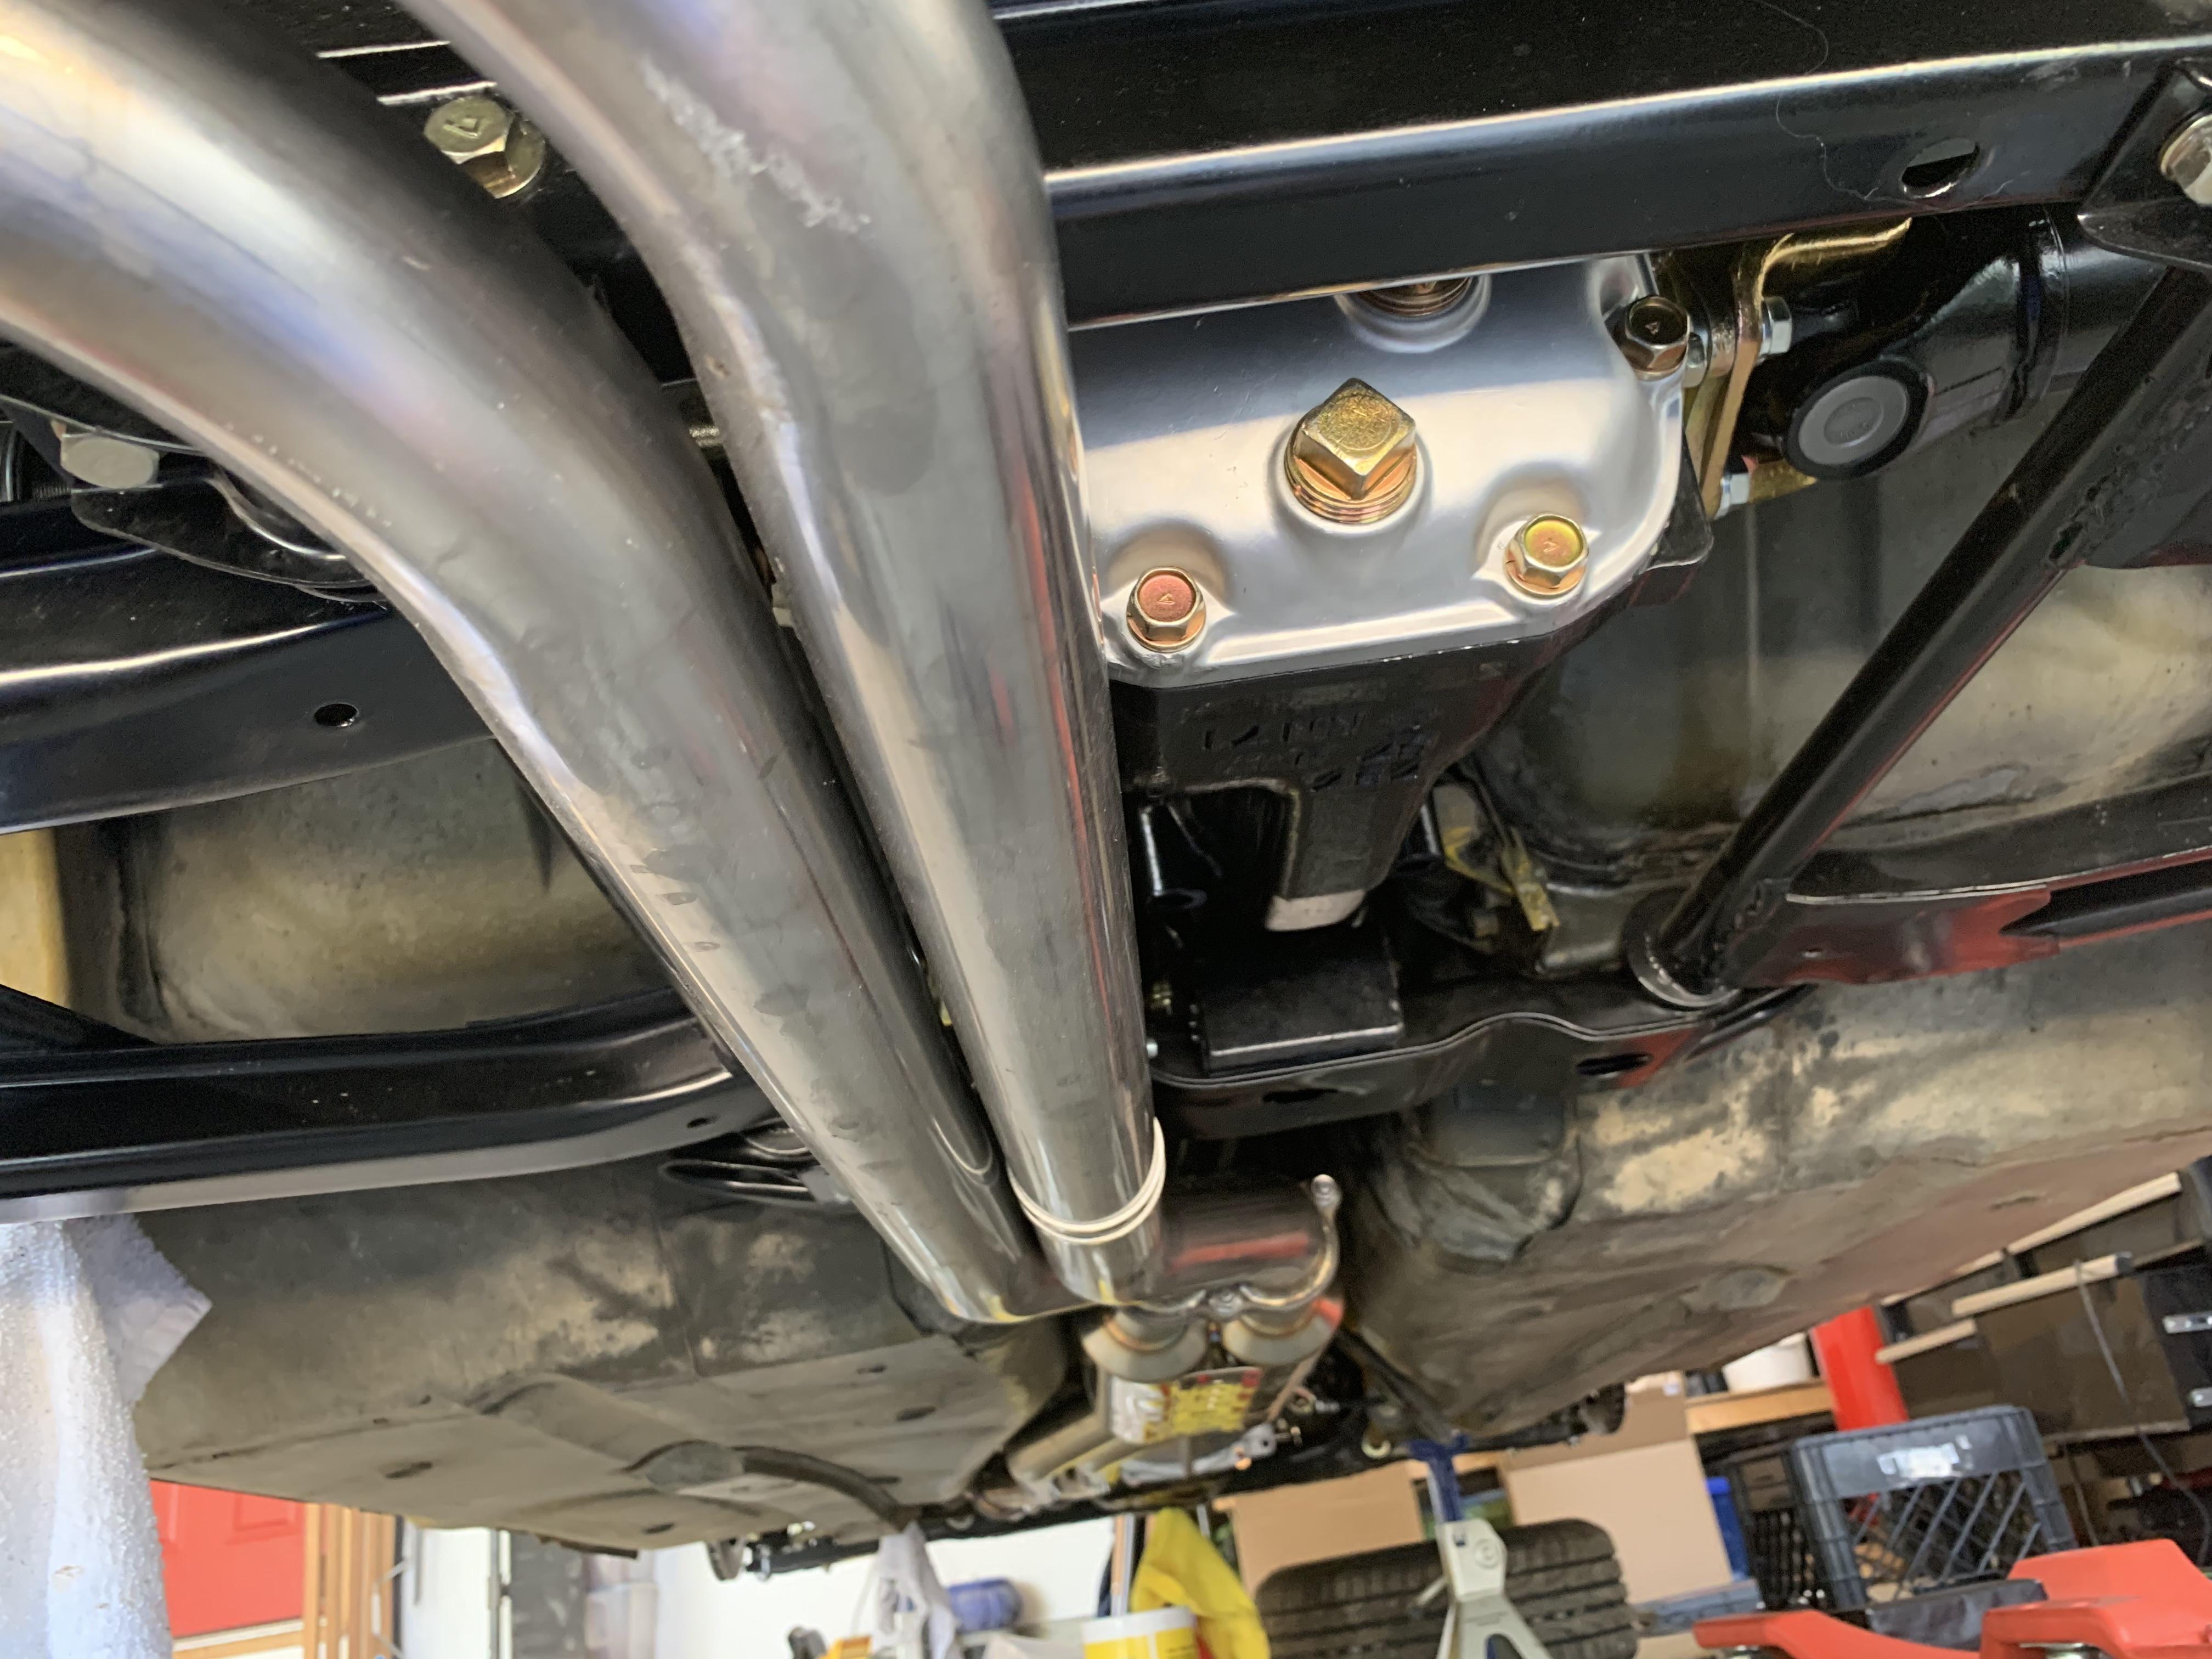
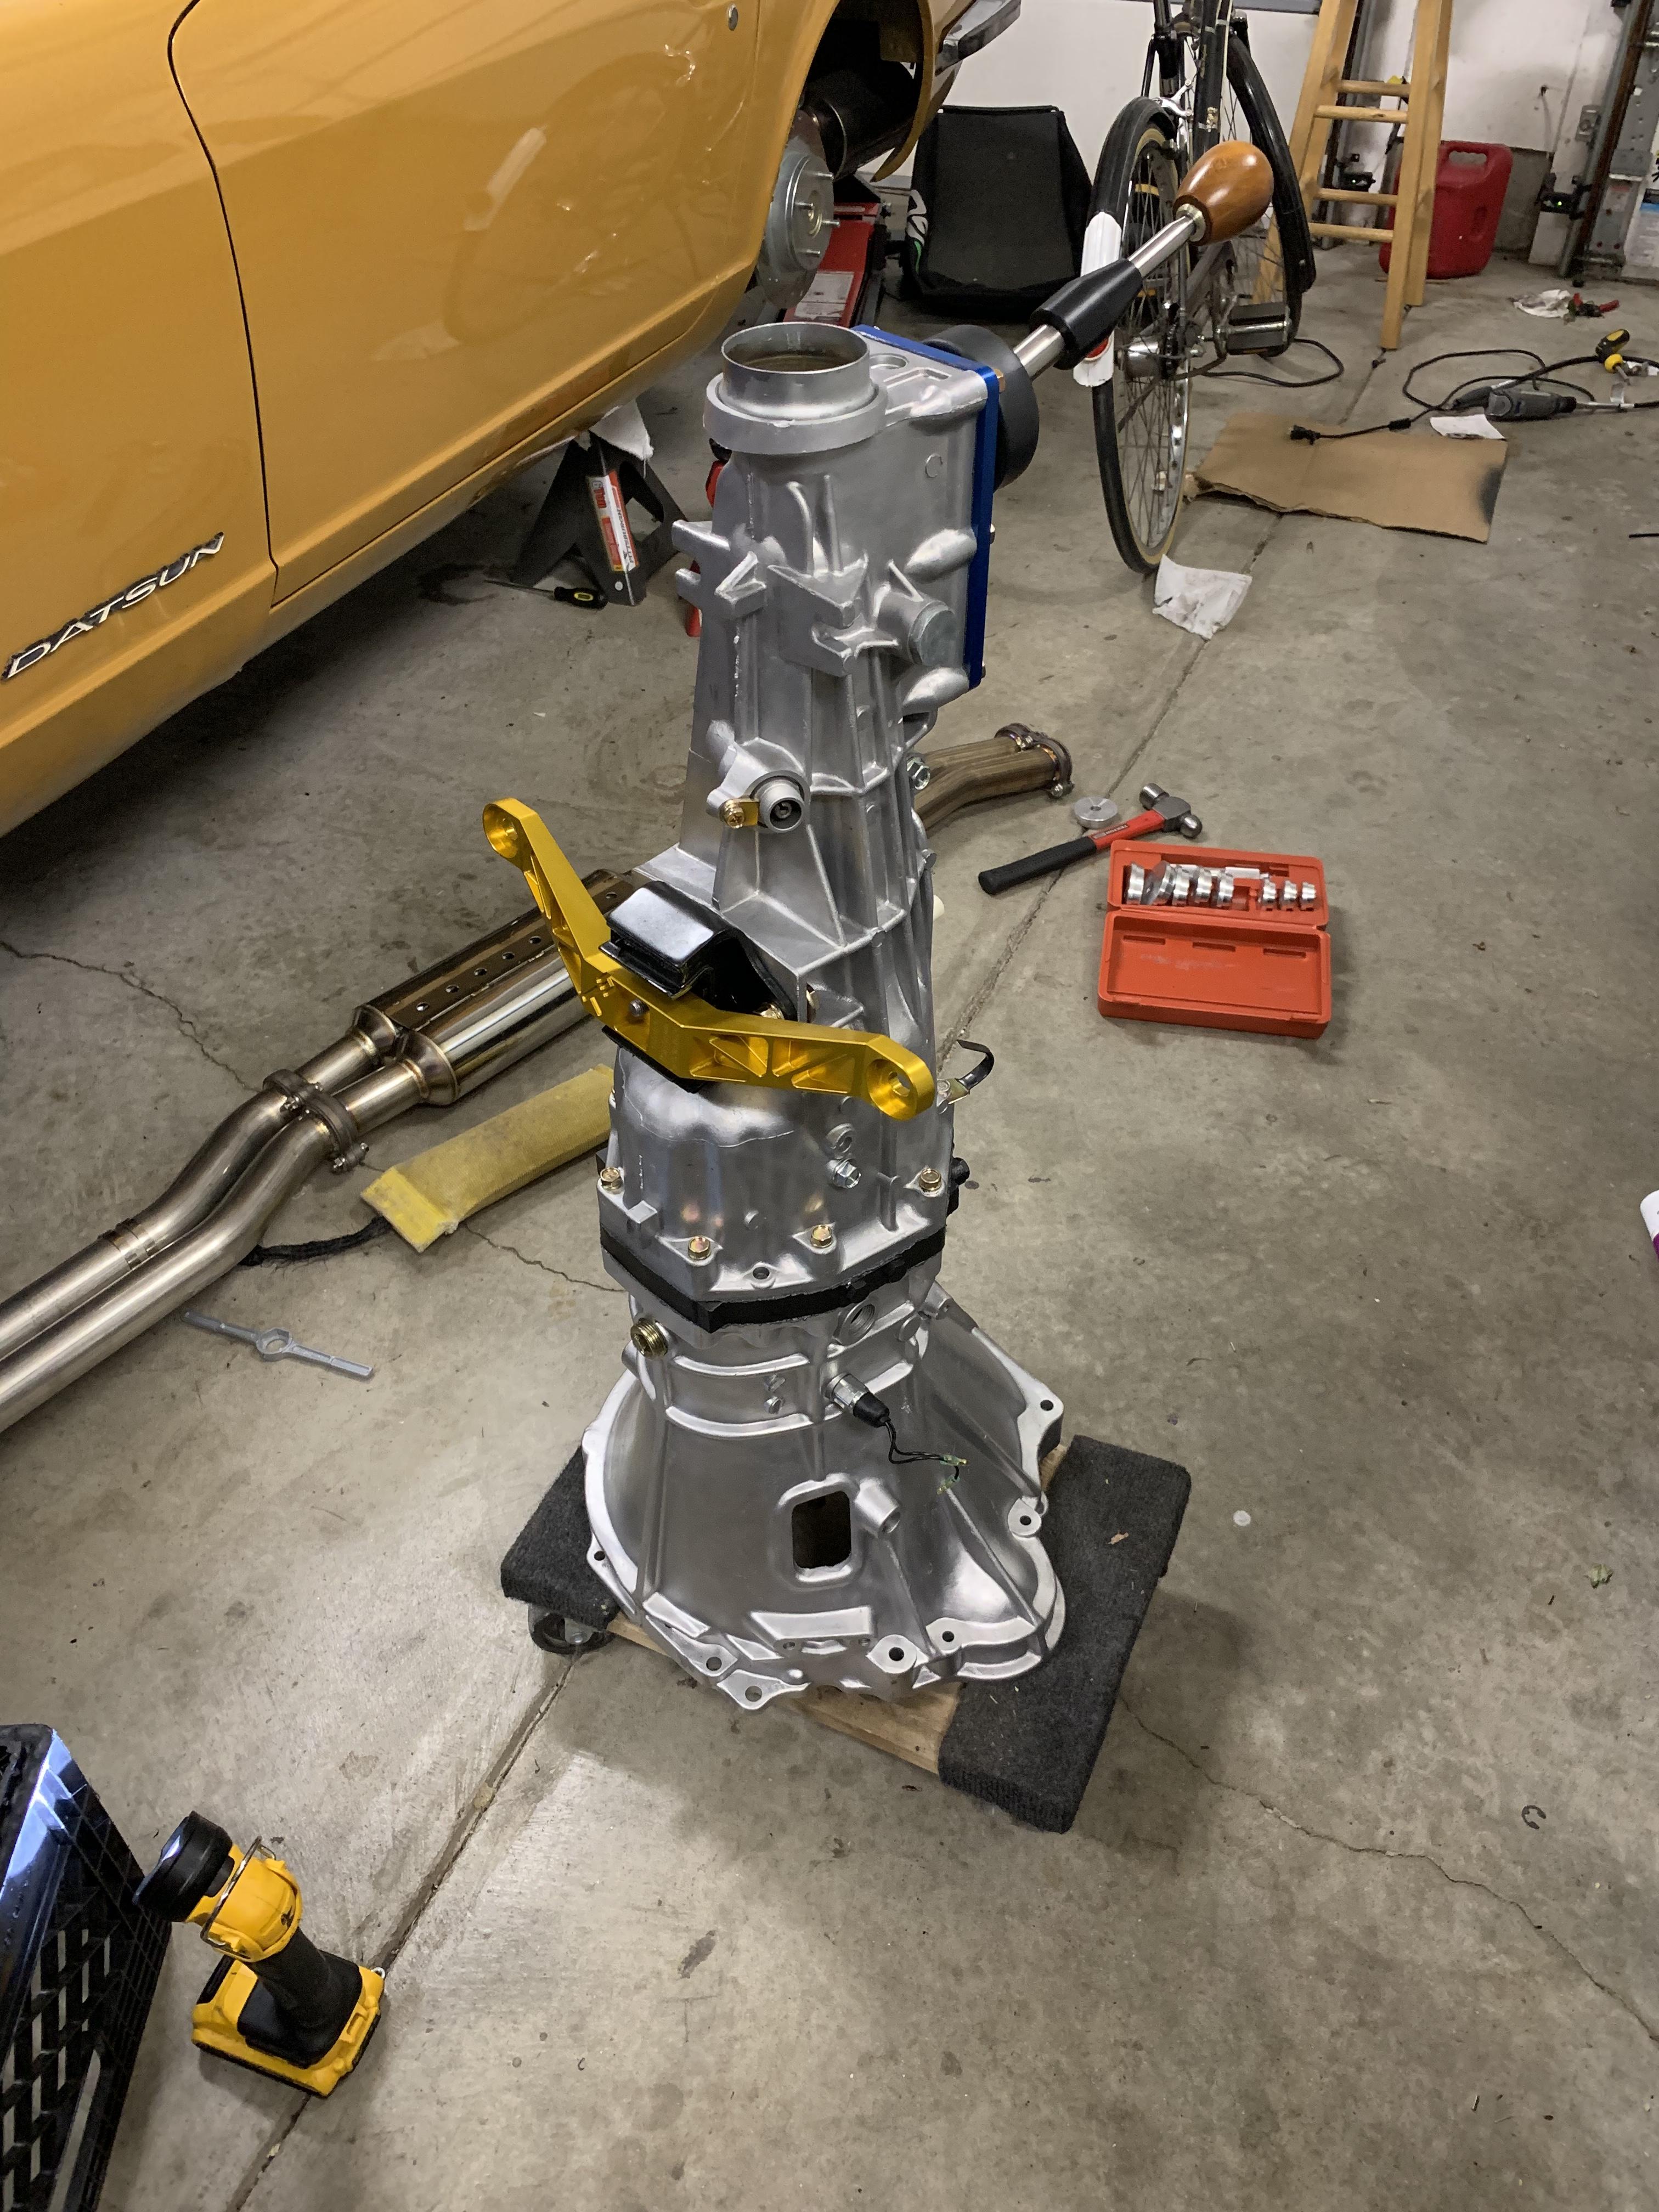
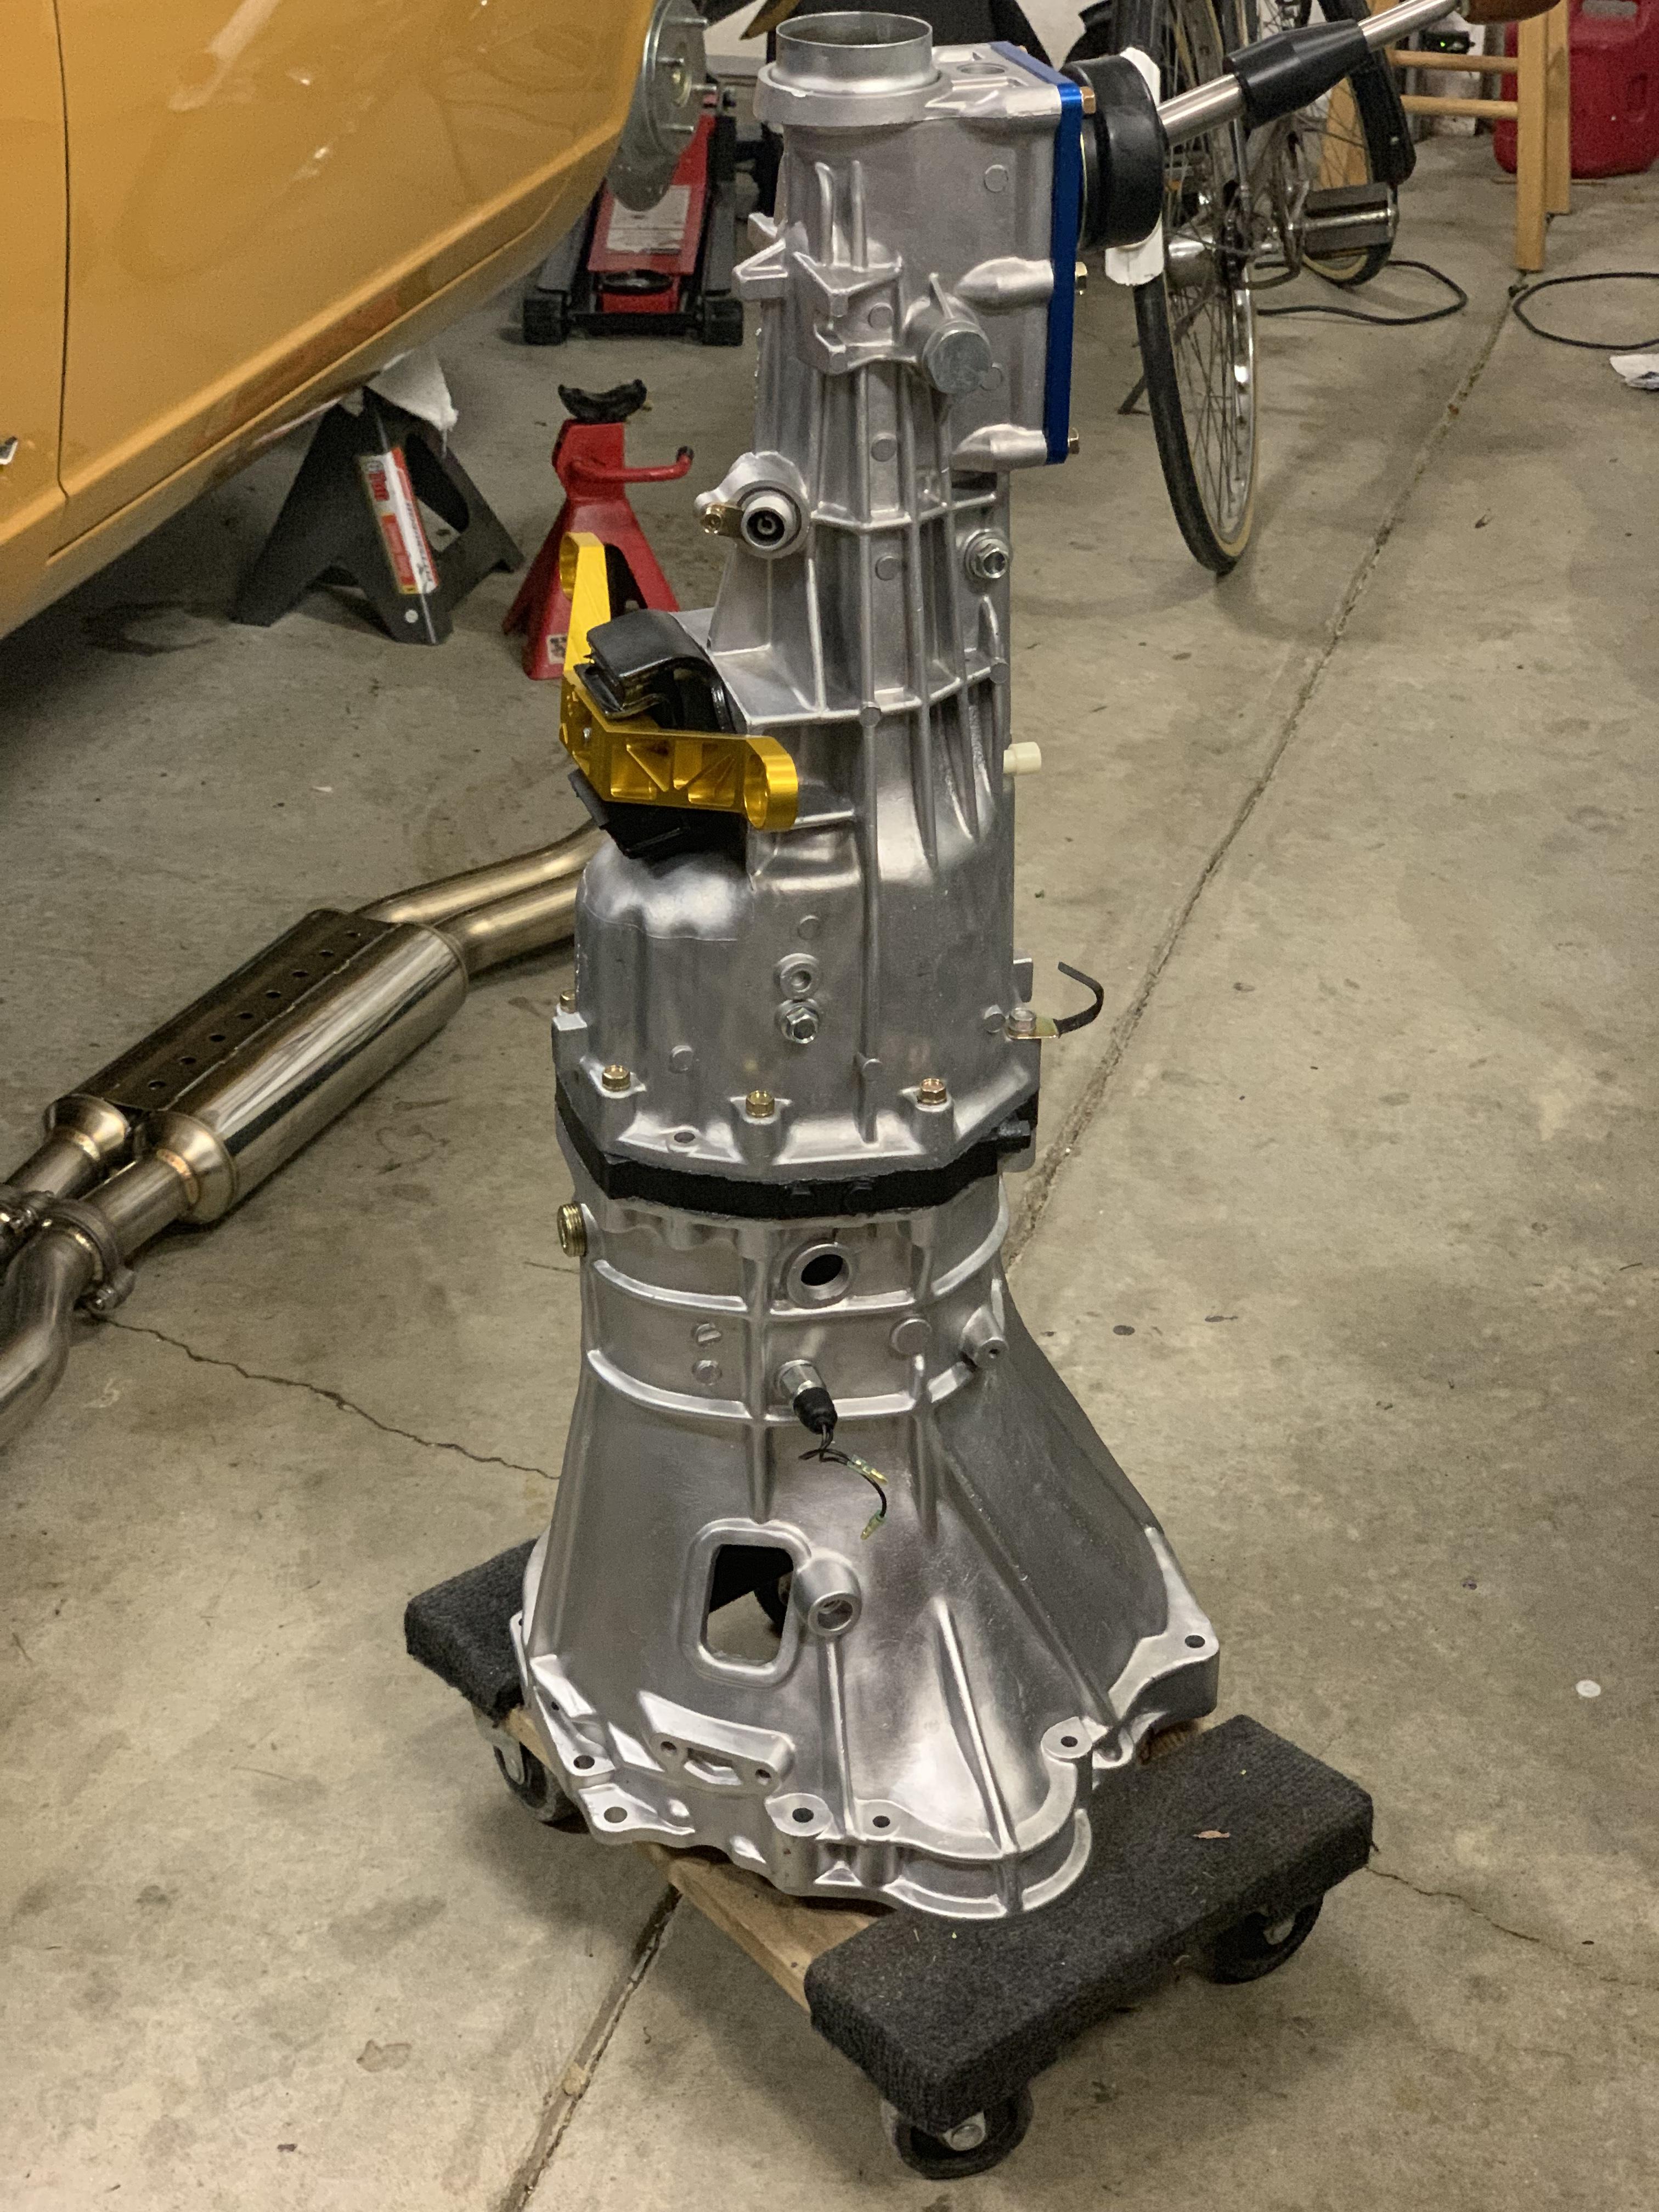
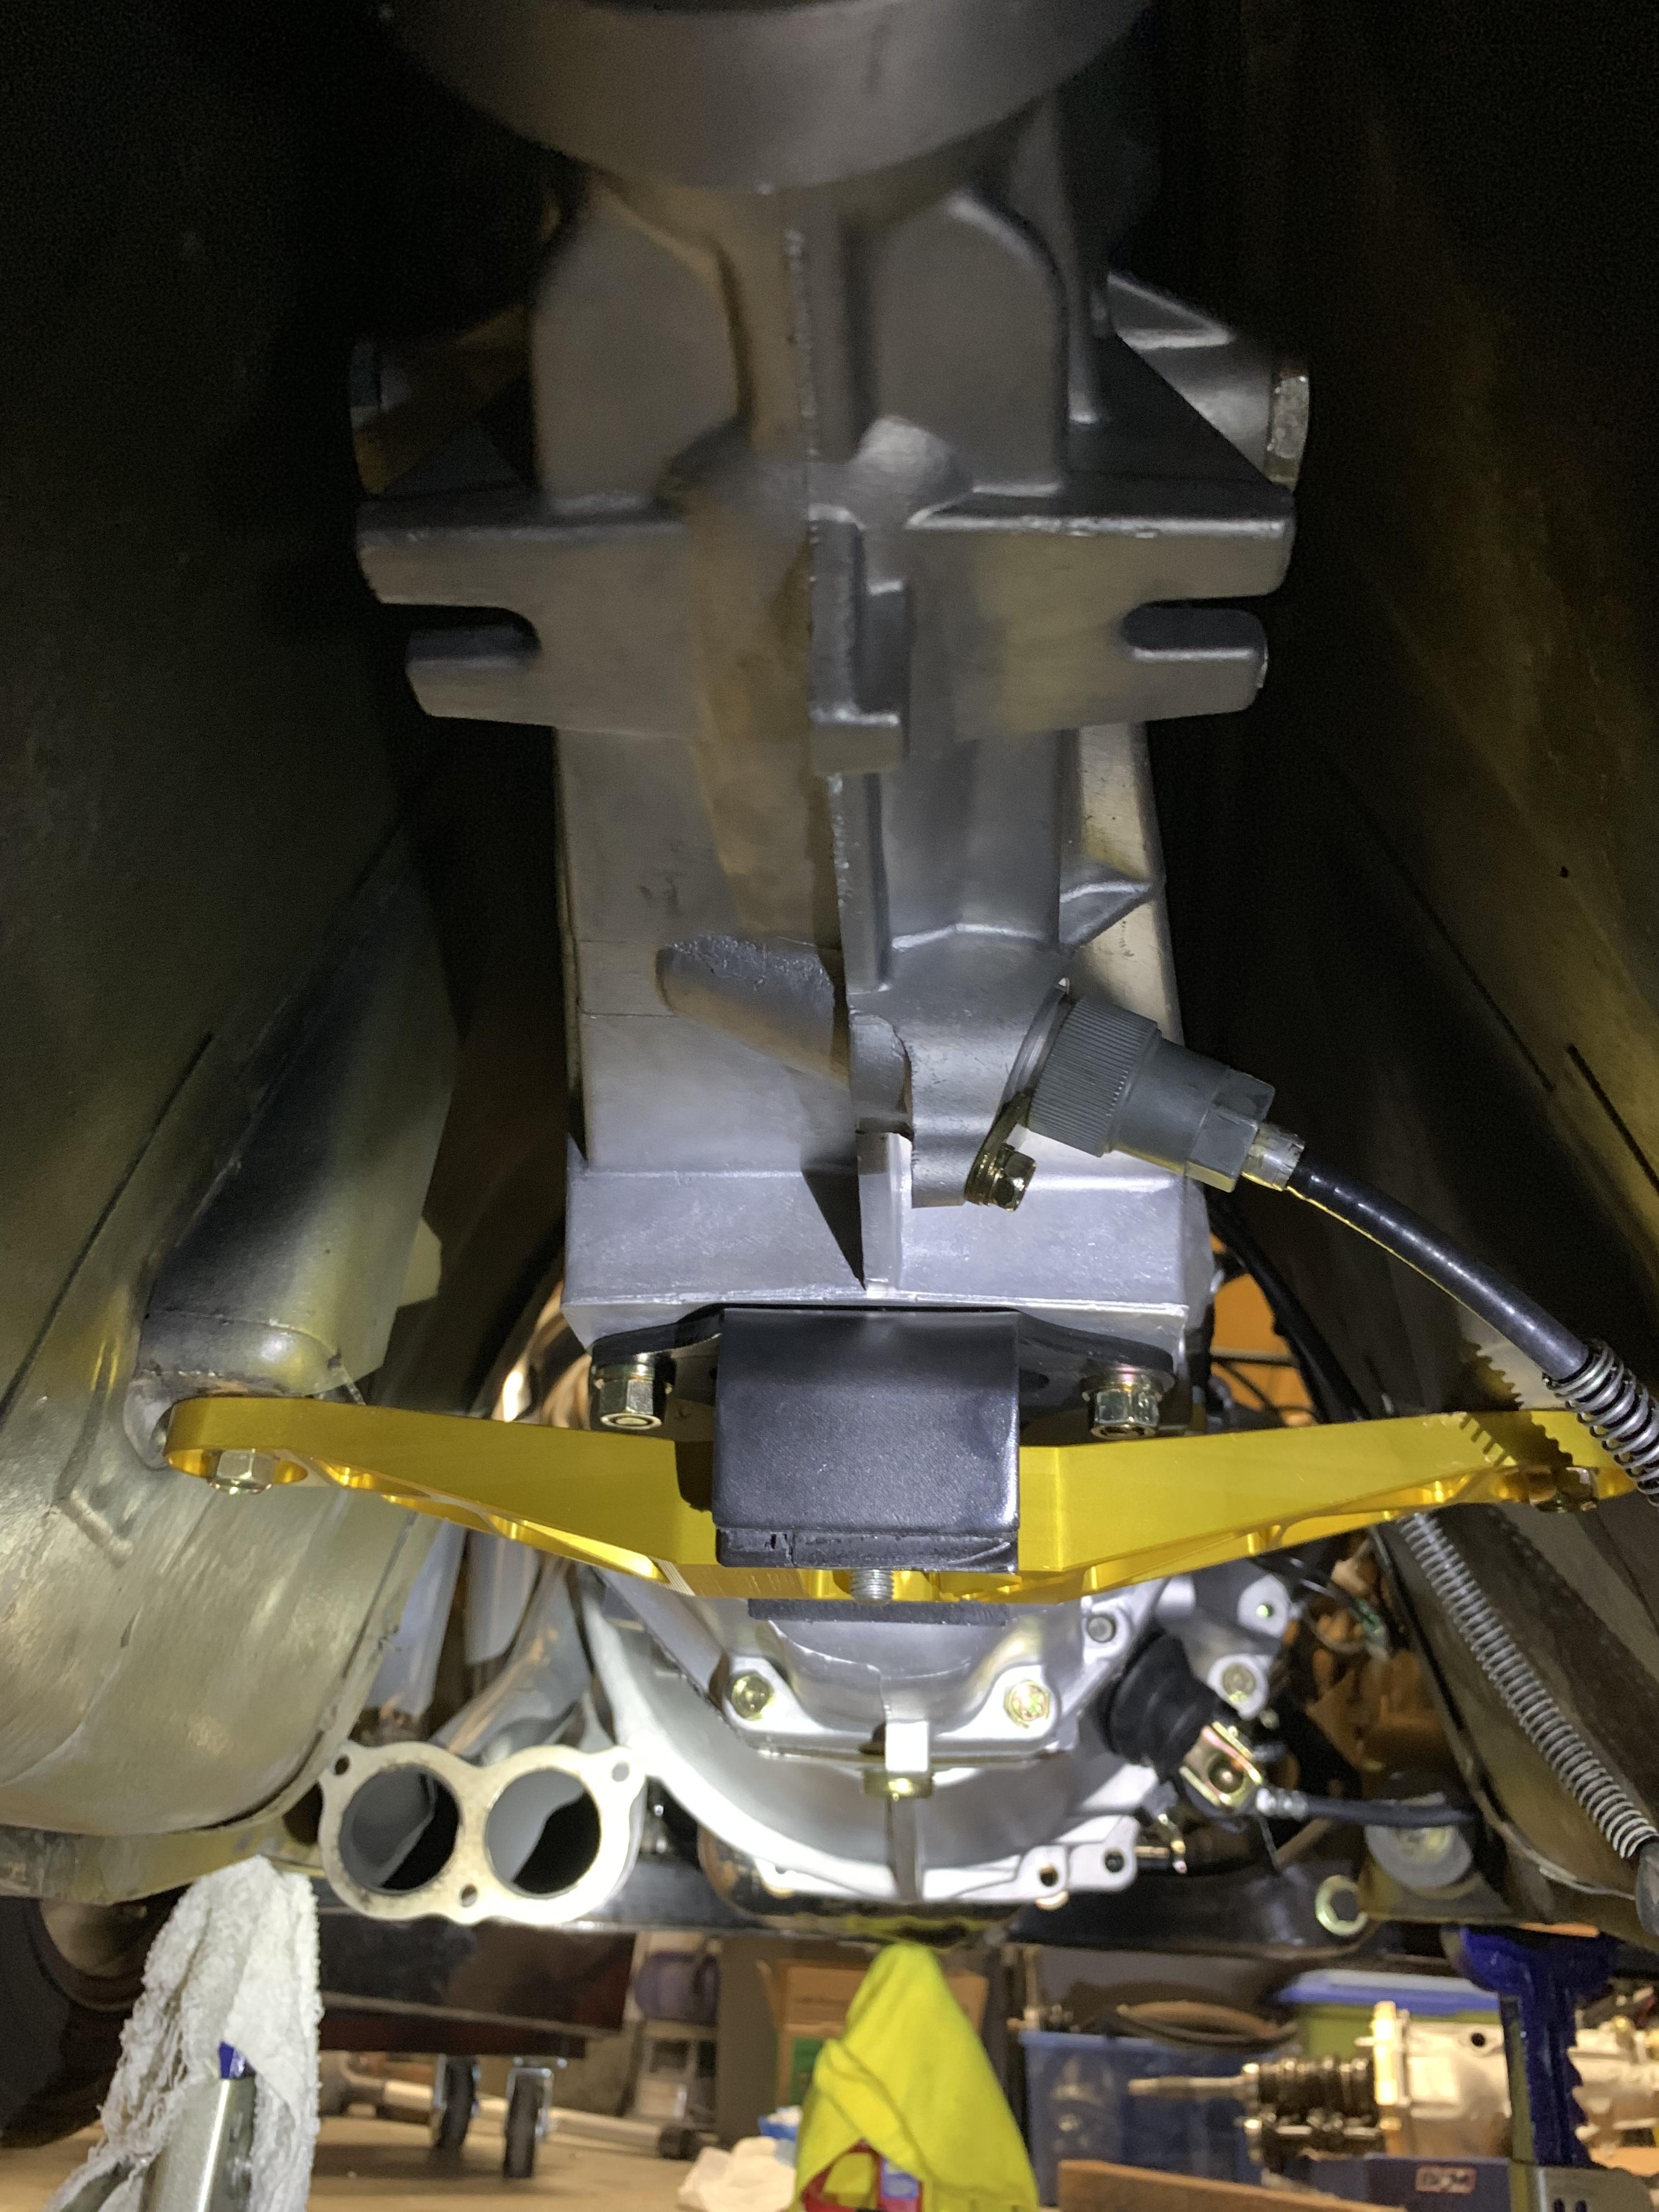
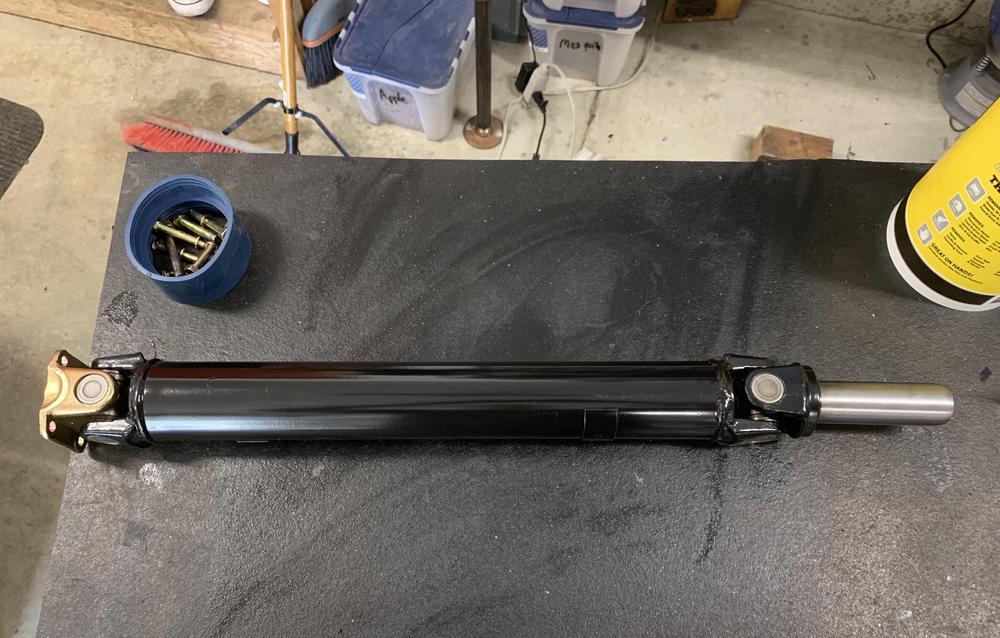
1 pointKa is in. But I cut down a driveshaft had it balanced and powdercoated. I just used some measurements from posts but they are super off from my z. I really want a 4 post lift. Working under a car on jack stands sucks

 1 point
 -
Holy Cow!!! [emoji15] Sorry this happened to you CO. Glad you didn’t have to leave your car in a less than affluent area. At least they wouldn’t have been able to drive it either. Well...the silver lining may be that this is what brakes the inertia and gets you starting that F54/P90 engine rebuilt and in your car? [emoji2369] If you gave me 100 guesses without that video on what caused that I would have never said.... “oh, easy a cracked cam” Sent from my iPhone using Tapatalk1 point
-
? was it a stock cam? Is there a possibility for the valve's to slap the pistons in this case?1 point
-
Is that really your engine in the video, or were you just telling a story to set up the puzzle? Pretty cool. Not sure why it ran like turd on three, seems like three should have been okay, unless this is a case where the timing chain actually did jump a tooth or two.1 point


.thumb.jpg.e9c1401d1fce1ad1a819e5ad8d6a1809.jpg)