Leaderboard

 Subscriber


Popular Content
Showing content with the highest reputation on 06/18/2019 in all areas
-
What if you remove most of the parts and save the 2k? Glass is still a question? You could have a glass company remove the windshield and hatch glass. You could do the quarter windows. $2,000 is a lot of money to strip the car. I can do it solo in maybe 4-5 hours if I drag butt. So double that or so for R&R. Even if it took you 20 hours to R&R all the outside bits, that's $100 an hour. If you make more than $200k a year, it makes sense to sub it out. I don't so I self perform stuff like this. If the rest of the car looks good, I don't know that I would remove the existing paint. It would be nice to sand it down good, so you don't have excessive thickness but the factory primer is bonded pretty well. Are they going to be doing metal patches for the rust repair? Any specific spot rust treatment?3 points
-
Another thought. Is the body shop aware of the thickness of the sheet metal in a Z? Sand (media) blasting on thin sheet metal should be done very carefully. It's easy to warp the panels.2 points
-
I agree with removing parts yourself. That way you can clean/ polish/repair while the car's in paint jail. You might even discover more rust spots that way and help avoid any surprises of more rust spots. All of that stuff is pretty easy to remove, except for the door handles and those aren't too difficult, just awkward for my gorilla fingers....2 points
-
Not to keep you from ordering from the other sources cited--- Mike McGinnis at http://www.zzxdatsun.com/catDecals.php has them as well.2 points
-
1 pointI'd check the basics, rotor button, cap, plug wires and finally the timing. If the timing is too low it'll be really slow turning over and wont start. Loosen the dizzy and get someone to crank it, turning the dizzy CCW (I think) then It'll spin over quicker. If it's starved for fuel your metal filter up front may be stopped up. There $10. Make sure the firing order is right.
 1 point
 -
Thanks for sharing your pricing! That's about what I was thinking too. A few more dollars with the glass out is the rubber seals. Some are quite expensive.1 point
-
1 pointSo I wanted to share one more thing for interest, feel free to shoot me down. Given that a lean mix needs more time to fully burn, it stand to reason that an oxygen starved over rich mix also needs extra time to burn as fully as possible. To put this to the test a few weeks ago, I used the 123 ignition to conservatively add a few more degrees at the dips building up to the troughs and then back again where the engine comes to life again. Ignoring the anti-stall peak at 800rpm -which works brilliantly BTW - I call this my twin peaks timing advance (but sadly no Sheryl Lee - am I showing my age again!?) ... The butt dyno told me that no longer did I feel a dip in power but I felt the dips behave more like flat spots. The flaw in this of course is that it is fixed regardless of throttle position or engine load. So at part throttle, I would have more timing than would normally be there - hence the conservative approach and not whacking it up by 5 or more degrees (above trend) at each point. But I like the fact that it worked. Why? Because I’m a middle aged man in suburbia with 2.4 children, living the dream! Some men have golf, I have my carbs and my timing curves!1 point
-
any glass out options? I agree that will look a lot better.1 point
-
1 pointJust some notes from my install this weekend. I purchased a JVC kd-x255bt I purchased it from amazon but they are sold many places. Because it does not have a CD player it’s almost half the length of a regular head unit it seems http:// https://www.bestbuy.com/site/jvc-in-dash-digital-media-receiver-built-in-bluetooth-with-detachable-faceplate-black/6191304.p?skuId=6191304 It does not have a CD player only digital media and AM/FM. It also charges my iPhone at 1.5amps. It has Bluetooth and I can stream pandora/iHeartRadio right from my phone wirelessly. Anyway here are my wiring notes From Car blue white wire attached to cigarette lighter to the stereo yellow:constant power always 12v for radio memory From Car blue wire on oem radio harness to stereo red wire is the ignition switched power 12v when key turned allows unit to turn on From Car green/white wire on oem radio harness to stereo orange/white wire for radio illumination when headlights are turned on New stereo black wire to ground point Install was pretty straight forward, since I have a new center console I had to trim some plastic out in order to slide the radio in. Sent from my iPhone using Tapatalk1 point
-
1 pointWhat a great question! I would imagine all carbed cars will have some level of this due to the high velocity charge causing shockwaves bouncing back from the intake valve as it shuts. In fact all Engines will have the intake shockwaves. Even modern ones. Some use a Helmholtz resonator to capitalise on it - almost like a spring storing energy and returning it at the right point. However cam overlap combines with this effect and magnifies it especially with performance cams. Exhaust velocity has a lot to do with it too. So if the exhaust is free flowing / has large primaries and the engine isn’t producing enough gas flow, the exhaust gases / pulses expand too quickly and lose their energy / speed and reversion becomes more prevalent. (God! That sounds like I almost know what I’m talking about!) I’m sure more wisened heads than mine can provide a better explanation.1 point
-
Our fellow member @AZ 240 may have this repro item.1 point
-
Here is another source. A bit pricey but very reliable. https://jdm-car-parts.com/products/master-vacuum-decal-for-datsun-240z-260z-280z1 point
-
Yes.....I reached out to Jay at Ground Control. He’s checking to see if they have a couple extra Tokicos. Just need to have plan B if they don’t. I’m sure that there are many folks here that know the answer. I’ve heard rear MR2 shocks in the front and front 240Z struts in the rear, but would like to confirm that before ordering.1 point
-
If you are searching for replacement parts - using the date of manufacture is a great starting point. Regular Model Change Over: (sold in the USA as Model Years) 1. 10 / 1969 to 02 / 1971 VIN’s Starting at HLS30 00013 (1969/1970/1971 Model Years) 16 months. 2. 02 /1971 into 09 /1971 VIN’s Starting at HLS30 21001(1971 Model Year) 8 months. 3. 09 /1971 into 08 / 1972 VIN’s Starting at HLS30 46001(1972 Model Year) 12 months 4 09 /1972 into 08 / 1973 VIN’s Starting at HLS30 120001 (1973 Model Year) 12 months. Production of the 1973 Datsun 240Z started in the 9th month of 1972. FWIW, Carl B.1 point
-
Common rust areas: under the battery, front frame rails, rocker panels, dog legs (it sounds like you have this), wheel arches (this too), slam panel under the hatch - especially the drivers side, spare tire well As for paint, take as much off the car as you can. The paint job will be cheaper and look and last better. If you can afford to do it with the glass out, even better.1 point
-
1 point
-
1 pointI already have two heat shields installed. The stock one at the rear of the carbs and another aluminium one under the carbs. Thanks for keeping me away from buying an unnecesary electric fan.1 point
-
I was taught at the Datsun factory service schools I attended in the 70s to refer to Datsun products by the production date found on the door jamb ID plate. The series 1, series 2 stuff thrown around today is an invention of the internet, NOT Datsun. However, speaking in general terms the model year for Datsuns changed in the 9th month of production. The exception is the 73 240. That model year started in the 7th month of 72. However, as my customers have pointed out to me over the years, there are anomalies (I love them, they help make the Z car hobby so interesting) that occurred mostly in 6/72. Some 72 parts/some 73 parts. Cheers1 point
-
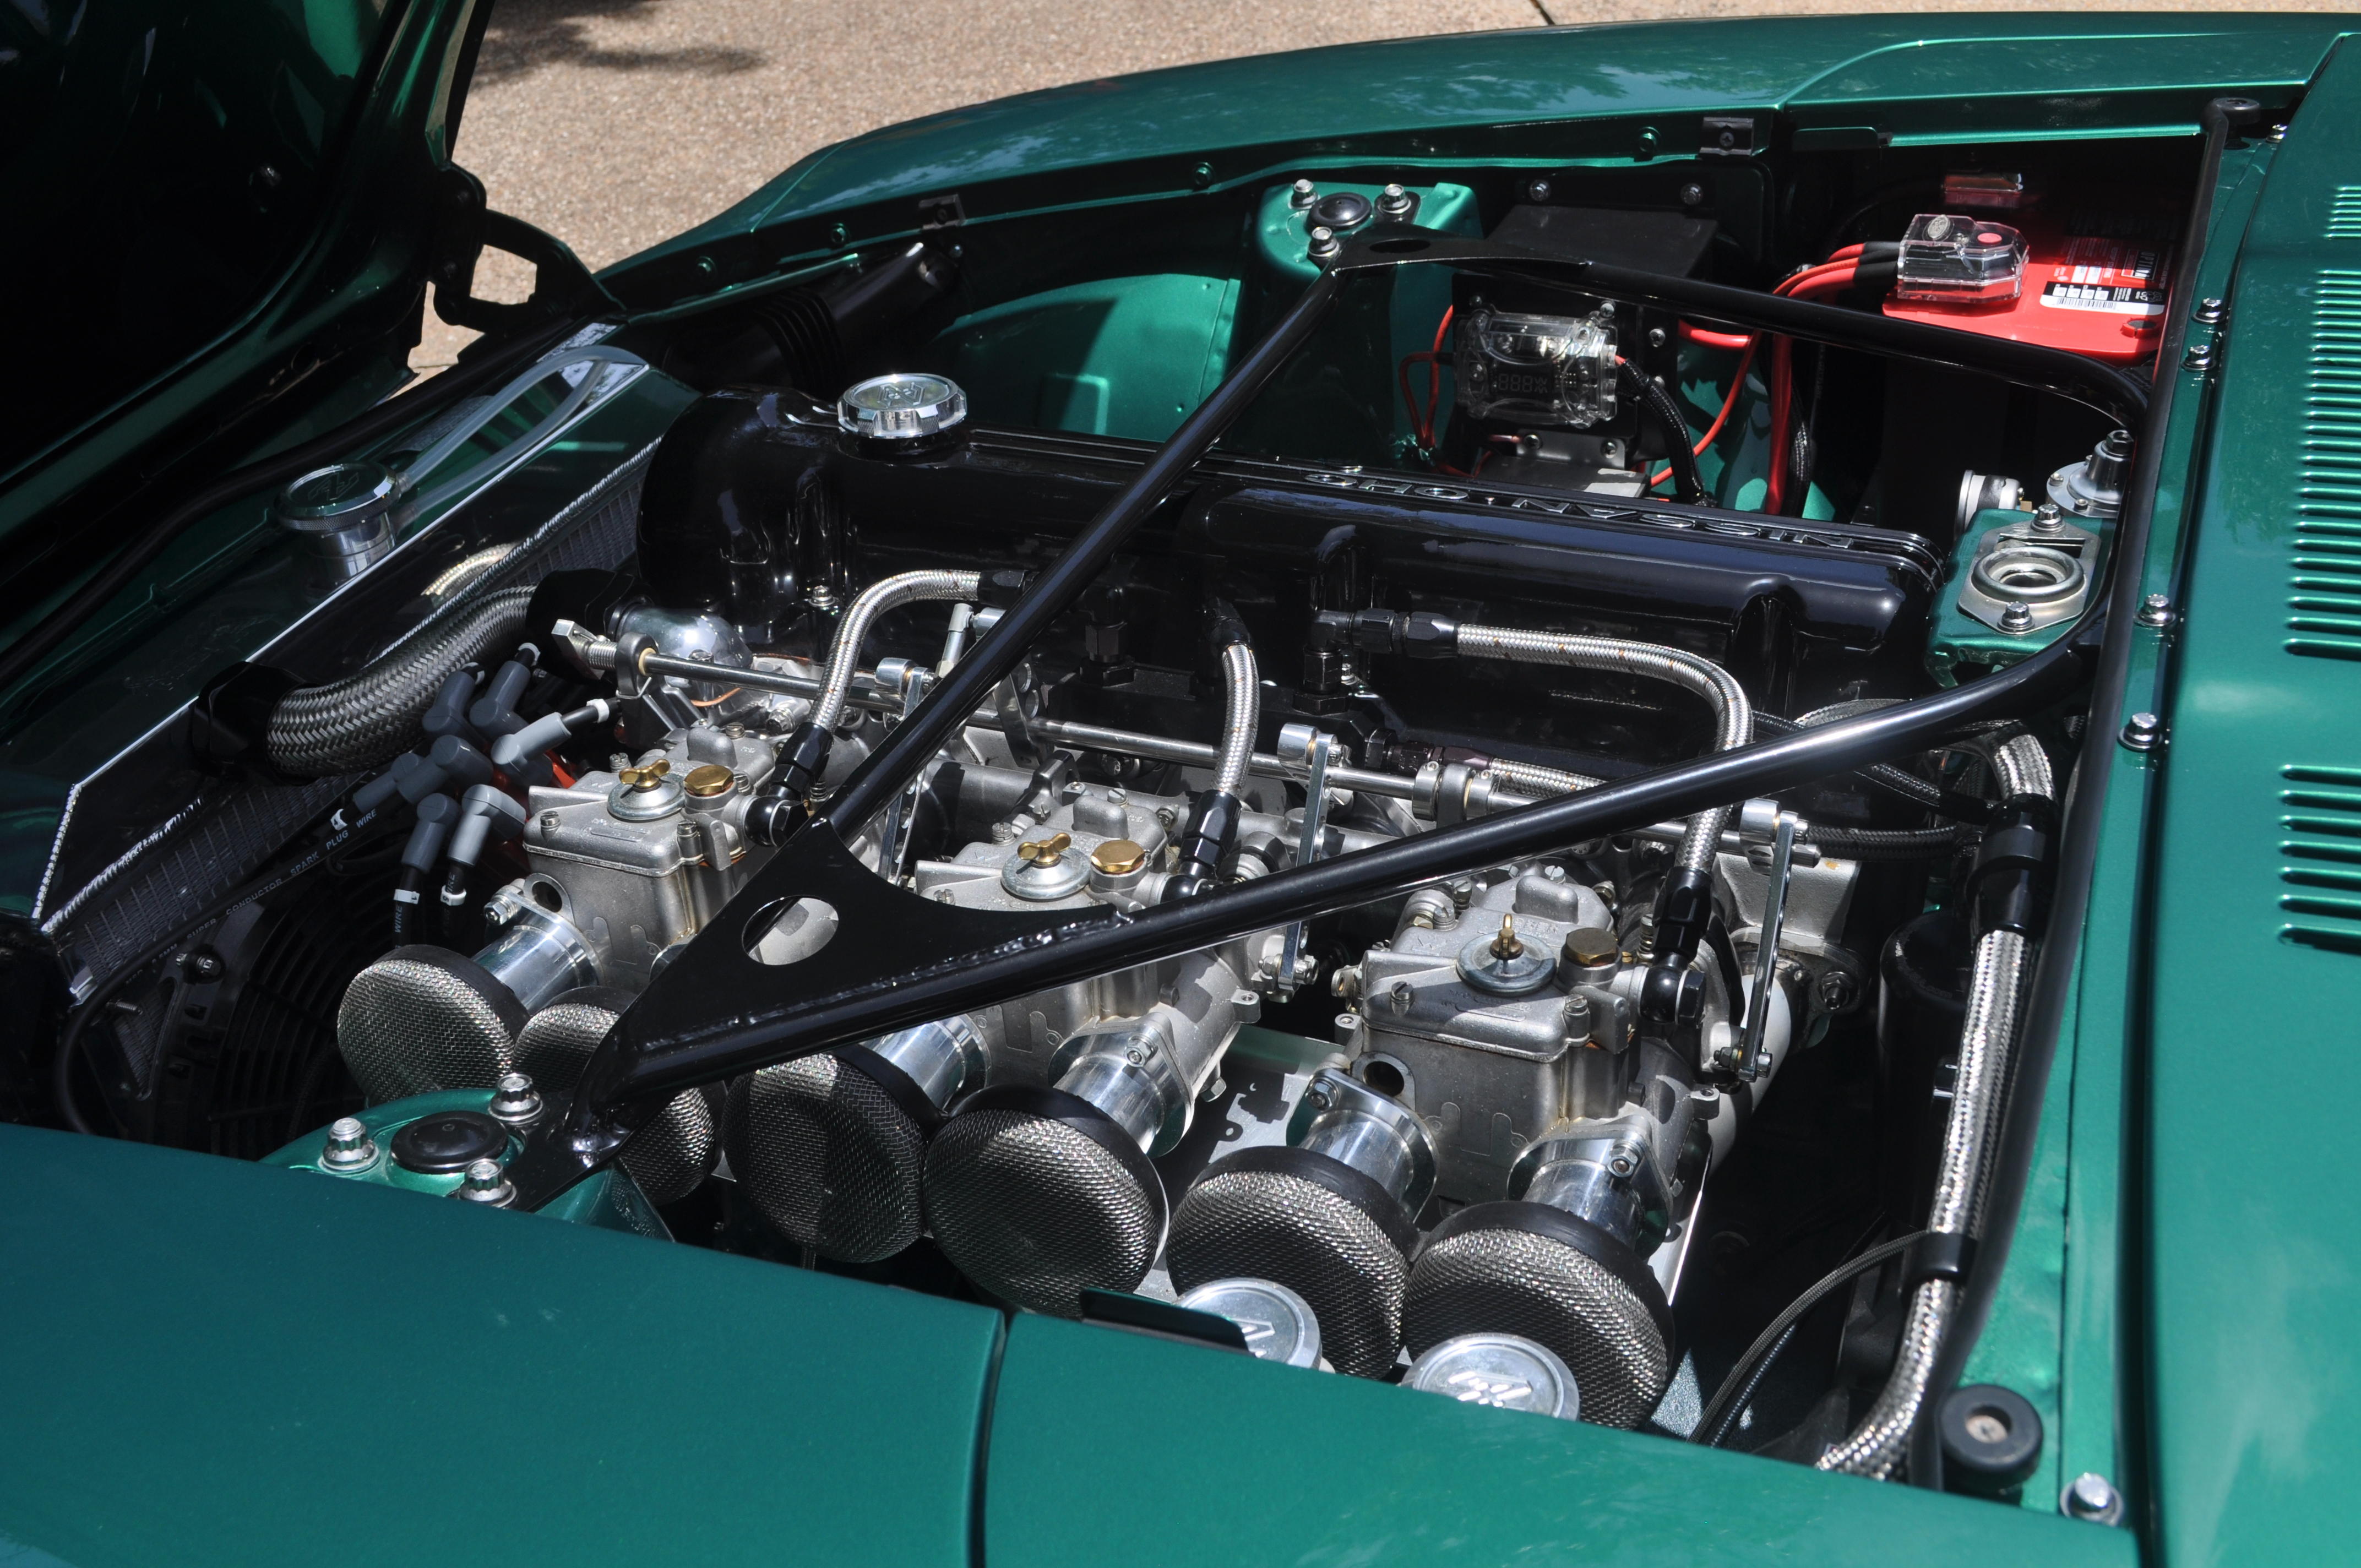
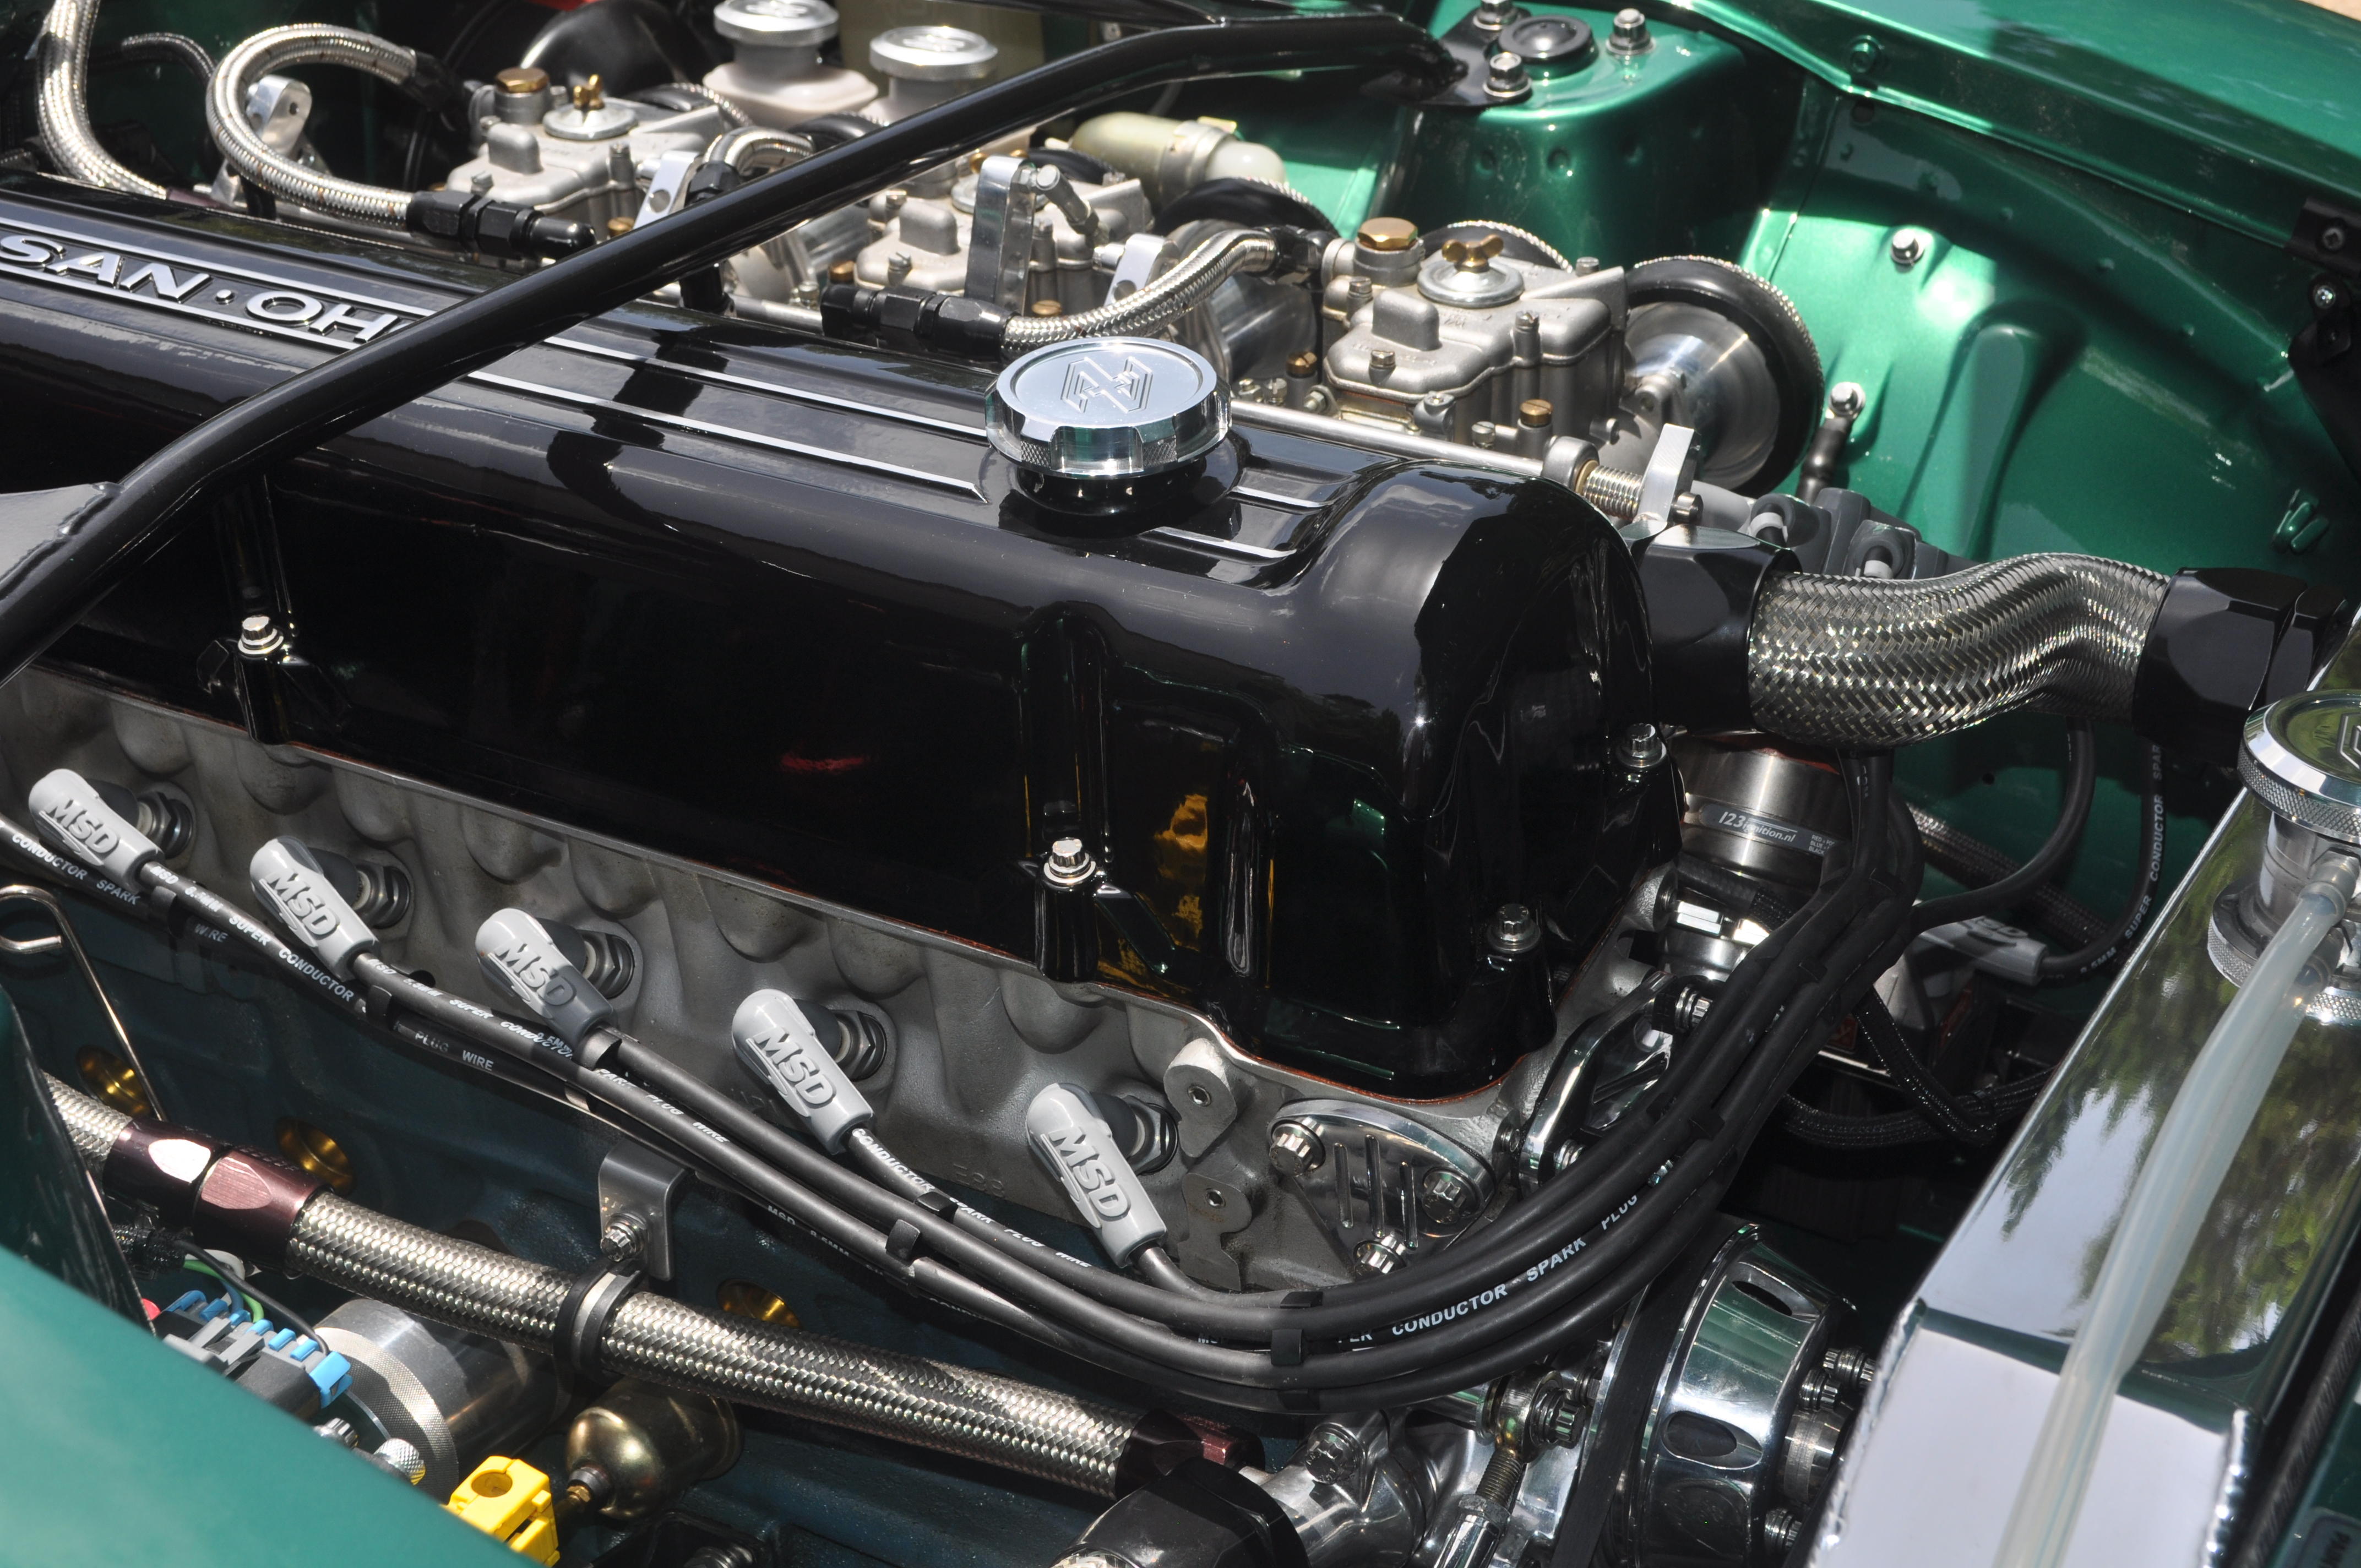
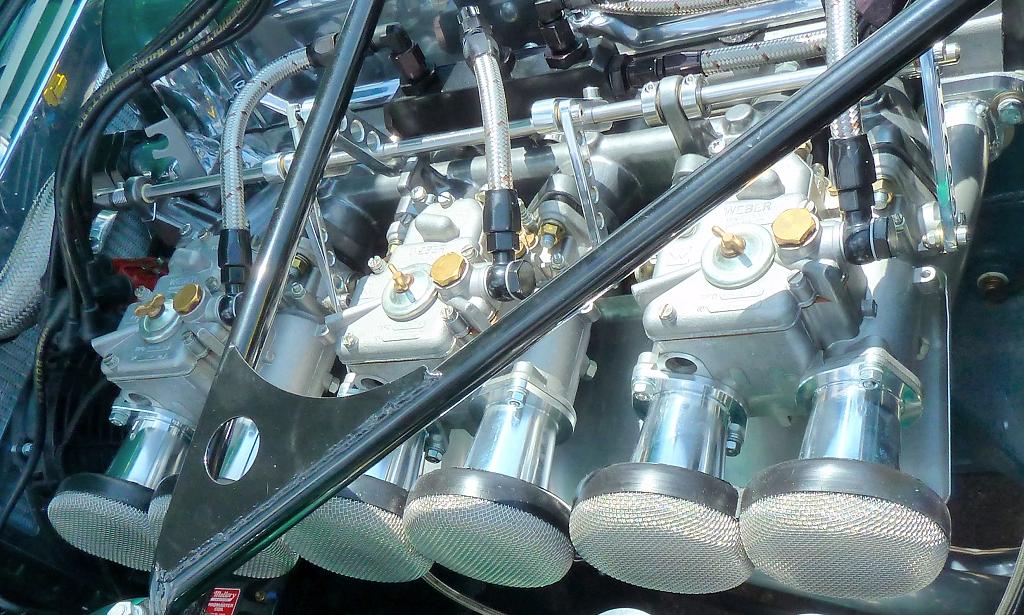
Thanks Blue for the compliments!! My engine bay is actually toned down a little now from the way it was in Memphis. I've replaced my valve cover with one that is powder coated black, moved the breather to the back of the cover, and routed my wires around the front of the cover rather than over it. You see more of the engine that way and given that its black its easier on the eyes!! Haha! Here's an update picture.

 1 point
 -
WOW MIKE! I AM THOROUGHLY IMPRESSED! GREAT WORK AND GREAT POST!!! Btw I still suffer eye damage from looking at your engine in the Memphis sun!!!
 1 point
 -
I was one of the first people to use the 123 ignition on a Z and I have been running this setup since 2015. I concur that the setup and install instructions are lacking and I too experienced an advanced timing situation after the initial "LED Install" procedure but unfortunately did not realize this for quite some time so I was running more advanced that I originally thought. Fortunately nothing catastrophic happened to my engine and I was able to correct this by checking the initial settings with a timing light. Although the 123 people indicated in their emails to the OP that timing should always be checked with a light, I have not seen that written in any of their instructions although it is possible that I might have missed it. One other issue that I have had with the 123 ignition is that periodically my car will refuse to start or it does start but does not run correctly (misfires) and the only thing that solves the issue is to replace the rotor. I was never able to completely figure out the cause of this or why the rotor just seemed to randomly "go bad" until I read through this thread and subsequently did some additional research. As it turns out, I also run an MSD with my ignition and when I was first considering the 123 distributor, I found a warning on their website that said not to use the 123 system with an MSD ignition. I did not understand the engineering reasoning behind this so I contacted the company directly to find out a little more. Their engineers told me that they already had customers using their product with an MSD with no issues being reported and so they really didn't seem to know why that warning was there. They basically told me that it should work without issues. Well fast forward to today and after a little more research I found the root cause of the problem. I happened to stumble on a Triumph TR site where the OP had a similar problem on a 123 ignition although in this case the rotor was actually burned. This led me to another thread on a forum called Pelican Parts and they apparently specialize in parts for older European cars. Well as it turns out, the engineers at 123 chose a readily available, off the shelf distributor where they could house their electronics and just change the drive mechanism to work with numerous different cars. So the cap and rotor, and I suspect even the dizzy body itself was very widely used in VW's, BMW's, Volvo's, etc of the late 60's going through the early 80's. Well during this time, the EU apparently was focused on RFI suppression in newer cars and mandated that auto electronics include RFI suppression hardware. I do not know exactly when this was mandated but I believe it was sometime in the 70's. Well believe it or not this mandate resulted in the inclusion of a resistor in the distributor rotor that sits between the center contact and the end contact. What I learned from the Pelican Parts forum (where a lot of these guys use this same cap and rotor setup as the 123 ignition as that's what the car originally came with) but they have also upgraded to MSD. Unfortunately these rotors with the internal resistors were designed and used at a time when ignition systems were not as powerful as today's systems, including MSD, and so the higher output power of the MSD essentially burns out the resistors over time. I must admit that I thought this seemed rather absurd as I had never heard of such a thing, but I happened to have a number of rotors that had "gone bad" so I decided to do my own checking. Well sure enough when I checked continuity between the center and end conductors, it was a total open! I really couldn't believe what I was seeing so I used a Dremel to cut away at the epoxy and sure enough buried under the epoxy and between the 2 conductors was a burned out resistor. The solution that I also found on the Pelican Parts forum was the Dremel out the epoxy and resistor and simply solder in a 12 gauge piece of wire to replace the resistor, and then simply use JB weld or some other suitable epoxy to seal it back up. You can find more info about this here: http://forums.pelicanparts.com/porsche-911-technical-forum/596559-msd-rotor-modification-detail.html Ironically, 123 Ignition now also sells a modified rotor that replaces the resistor with a wire: https://123ignitionusa.com/oem-rotor-modified-no-resistor-for-all-4-and-6-cyl-123-applications/ $45 for a rotor seemed a little excessive to me so I purchased a couple of Bosch rotors (p/n 04008) and did the mod myself. A little tedious but definitely better than paying $45. So after 4+ years of dealing with this random problem I believe it is finally solved. I will also say that despite some of the startup issues that I and others have had with the 123 system, I am very satisfied with the end result and would not hesitate to use this again. Fortunately my experience with the company and the product was a little more positive than the OP. I hope this helps others that may have experienced the same issue and that I've saved you from pulling your hair out as well. Mike.1 point
-
1 pointNaaaa. I would have said it like this. Remember to stop after the first 10 miles and re-torque the lug nuts when replacing studs. Completely different.1 point