Captain Obvious
Community Member
-
Joined
-
Last visited
Everything posted by Captain Obvious
-
Haha!! Not me, but I looked pretty much like that! Only cooler. And slower.
-
LOL! You and me both! I can also picture Granny frantically trying to cut the power before any more damage occurred!
-
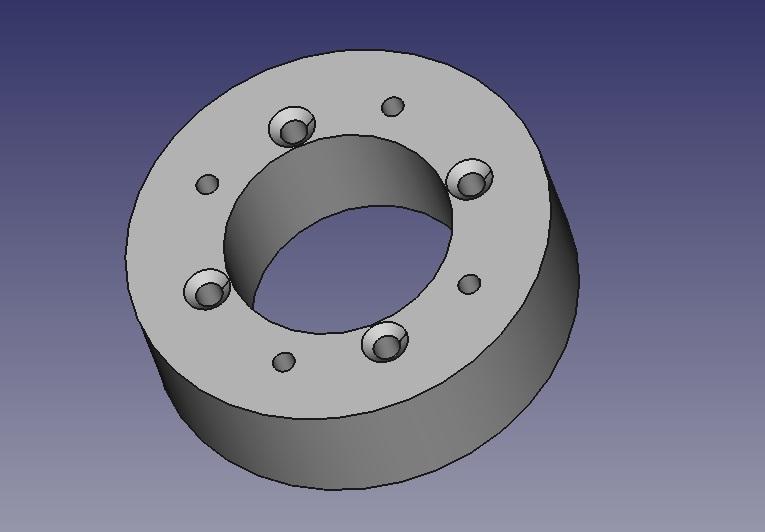
Good. And since I'm not a pain, maybe I just need to try a little harder. So using my (admittedly incomplete) understanding, here's a reality check of what the adapter could look like. 130mm OD and 70mm ID. I tossed in some countersinks too and it highlighted a potential issue. With a 70mm ID, there might not be enough meat for the countersinks. If that's the case, you might have to resort to a counterbore instead. In any event, here's what I whipped up:
-
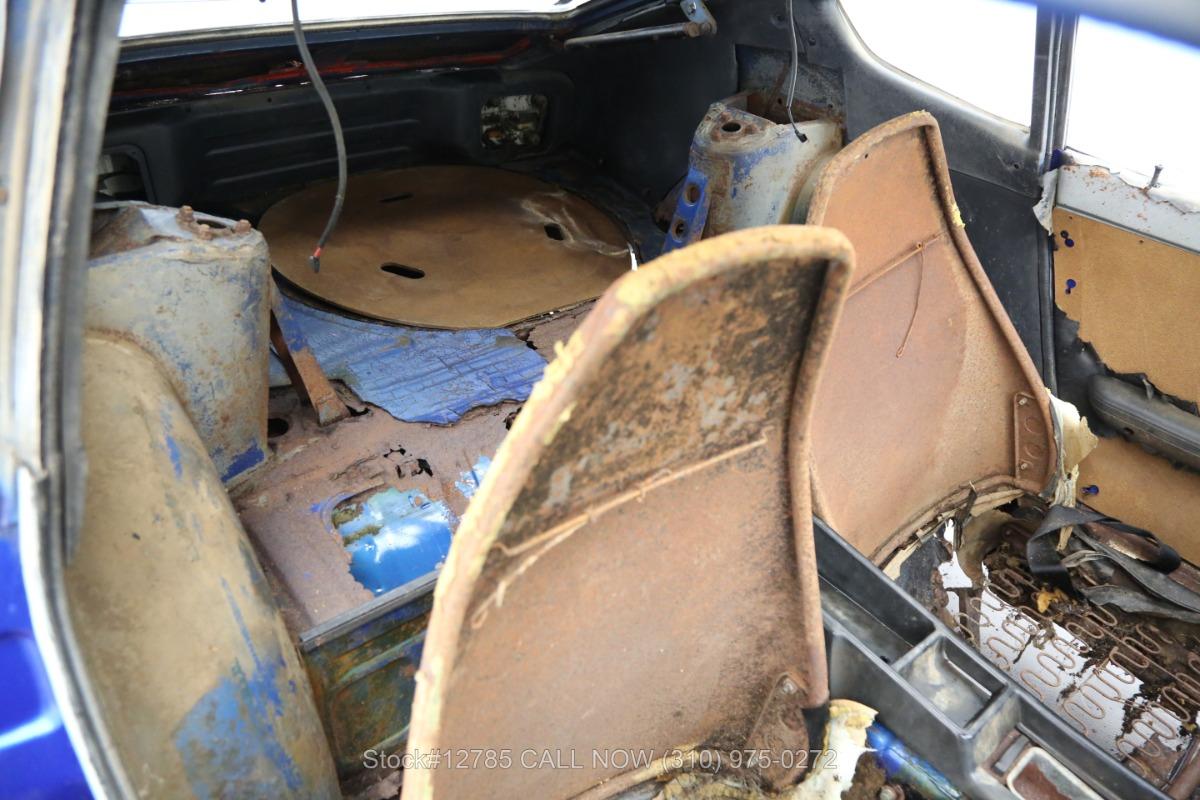
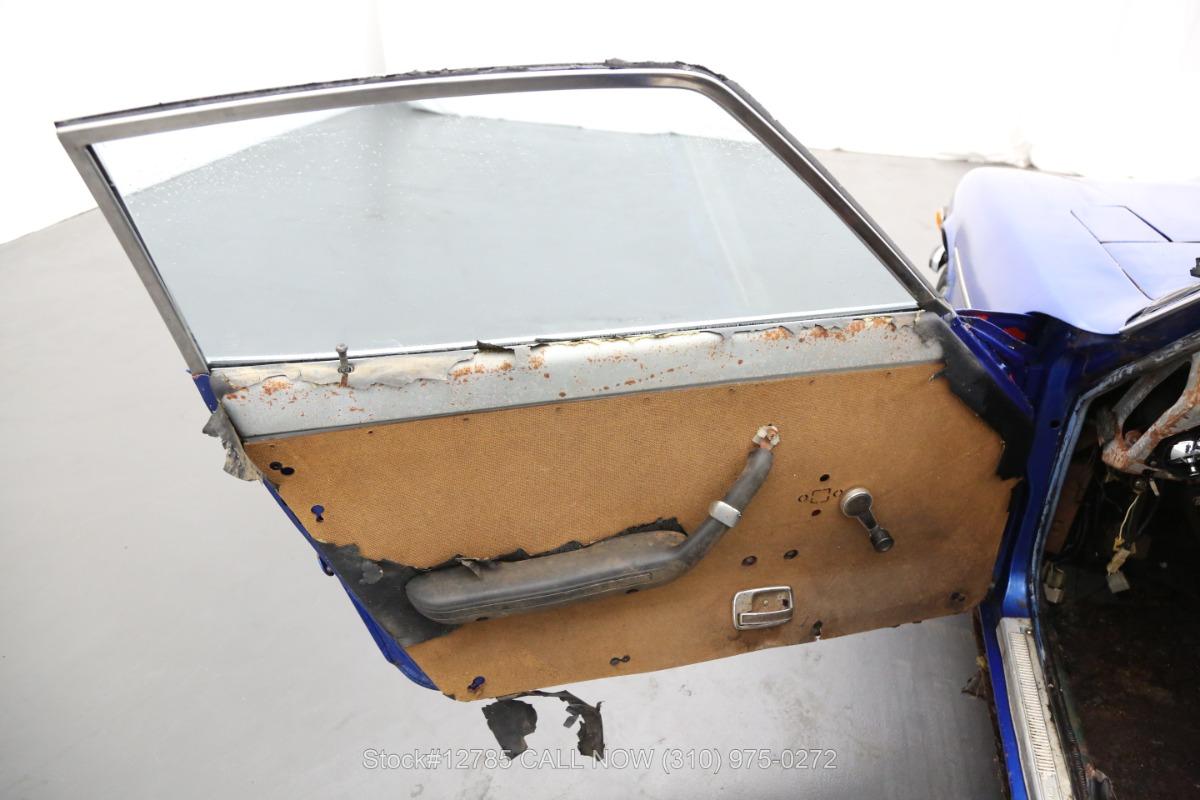
I wonder where this one will end up. Looks to me like a typical well loved and well used (but not abused) Z from a sunny part of the country. New paint covering worn out faded sun baked paint. Reasonably fitting dash cap covering a presumed sun-baked cracked dash. Missing emblem on the rear. Ill fitting dry-rotted weather stripping and lower door bumper hanging out of it's mounting holes. Holes in the seats (both of them, which IS a little unusual). Sun baked and faded rear carpet. Cracked A pillar trim and console mounting points. Spongy sun baked steering wheel. New fuel pump (which could be indicative od issues). And so on and so on. Nothing unusual and nothing irreparable. Worn (loved), but unmolested. Would just take money. The underside looks intact. Everything else can be bolted on.
-
Agreed. The fabric and plastic rot seems to be the exact same M.O. as what's left of the blue one. I still think an extraterrestrial pathogen may be involved.
-
Well I'm sure I'm just becoming a PITA at this point, but I got some questions about your adapter... First, why the two different sized holes? And if the answer is "the larger holes are clearance pass-thru holes for the screws into the intake manifold and the smaller holes are going to be threaded to accept bolts to hold the new throttle body", then there's a problem... You have the holes swapped. The holes on the smaller circle should be the pass-thru clearance holes and the ones on the larger bolt circle should be threaded. Other question is I don't see the countersinks for the heads of the screws to attach to the intake manifold. Are you just going to put those in manually after it comes out of the CNC? Same with the threads for the other holes? Sorry for being a pain!
-
It just seems like a lot of trouble for a little bit of vibration. Not saying that's not it, but just that it's a lot of trouble for something they lived with just fine for the first nine years. So any time you change gears from forward to back (like from 3 to 4, geometry says the vertical distance between the center of the pivot pin and the bottom of the plastic nub on the lower end of the shifter shaft changes. What is it that accounts for that? Is the hole the plastic nub fits into extra deep? Deeper than it needs to be to account for that? Not sure I'm explaining that well without pics. I've replaced my bushings, but that's as far as I've had to go into the transmission. Thankfully.
-
There are several graphs like that in @blodi thread where he's trying to tune his Webers: https://www.classiczcars.com/forums/topic/56375-weber-selection-and-initial-jet-tuning/ I don't know how applicable his Weber graphs would be to your round tops, but for example, they look like this:
-
Woof. Flying that mess doesn't sound like a lot of fun. Yeah, thankfully I got that final drive in that we were talking about. I meant to get in touch too, but every time I remember, then I forget again. It was nice final drive. Got gas, and then burned a couple gallons of it.
-
Maybe it's just me, but I have never, ever, ever, never seen anything come out of a spray can that even barely resembled chrome. Even if it has "chrome" in the name somewhere.
-
Wow. That's a lot of complexity for NVH. Are you sure it doesn't have anything to do with something more complicated than that? Reverse interlock or something?
-
Yeah, perfect. Just like that. I'm pretty sure you could hit the brown note with that much woofer!!
-
I'm just east of Snowmageddon. We're still probably going to get double digits, but the Poconos are expected to get almost two feet. As the forecasts gelled, I took the opportunity to get myself mentally prepared for the end of Z driving season. My last drive was Sunday afternoon. It rained on Monday, and they salted the roads on Tuesday in preparation for this storm on Weds. So I took the opportunity to go out and drive around for a couple hours since it was the last drive. At least this year, I got enough warning to prepare and go for that drive. The snow blower is now unreachable in the shed out back because I spent the time driving instead of getting it out and ready. Haha!! The snow will eventually melt.
-
Well if you aren't going to store any spare at all, that recess makes a great storage area. Or you could put a big sub-woofer speaker into the wood over it. So I just reused my original 77 taillight panel interior finish panel. Since I was making a new wood floor back there, I just trimmed the edges of the wood so it fit the new lower location on the panel.
-
Glad to help. On my car now, the forward section of my rear decking (from the strut towers forward) is carpet right over the metal decking. In other words, it's just like all the previous years. But further back, I went to a narrower spare tire and made new wood decking pieces for the rearmost section. I relocated the new wood floor as low as I could possibly install it while still fitting over the spare and those metal support braces. So, in the end, I've got a step back there... It's lower right behind the seats and then steps up about 25mm or so with a false floor over the spare. If you aren't going to install a spare at all, you could probably lower that false floor even lower back there.
-
I did pretty much exactly what you are planning. But first... some background. The 70-76 cars had a full sized spare and a full depth spare recess in the back deck. But in 77, they changed all that. They went to the space saver collapsible spare and reduced the depth of the spare tire well such that the spare now sits proud of the rear deck surface. And they also changed all the sheet metal and uni-body pretty much everywhere, including the rear decking. Those metal supports used to be located underneath the deck lid on earlier years, but moved to above the decking for 77. I wasn't there when they did all the modifications, but the rumor on the street is they did all that in order to allow a larger fuel tank for 77. In short... They traded less storage space in the rear for a larger gas tank. So with all that said... I drilled out the spot welds in the original piece spanning the two rear wheels. And no, I'm not worried at all about it changing the rigidity of the vehicle. 1) It never went all the way to the sides (there's about a 25mm gap at each end), and 2) The piece that it was spot welded to is identical to the previous years. They just spot welded an extension to the vertical piece they used from 70 to 76. Here's the piece in question. You can see about half the spot welds drilled out on the near side: And here's what it looks like once you get all the welds drilled and the piece loose from the car: Unfortunately, taking that piece out leaves a rough edge that does not look "finished": So to finish the now rough edge that exposed... I used the same piece they used in the previous years and screwed into place (just like the previous years): And as for the rest of it... I used foam to build up around those rear metal frame members to give me a flatter surface to build a new deck. I don't have any good pics of that process, but I'll see if I can get some of the finished product.


-
-
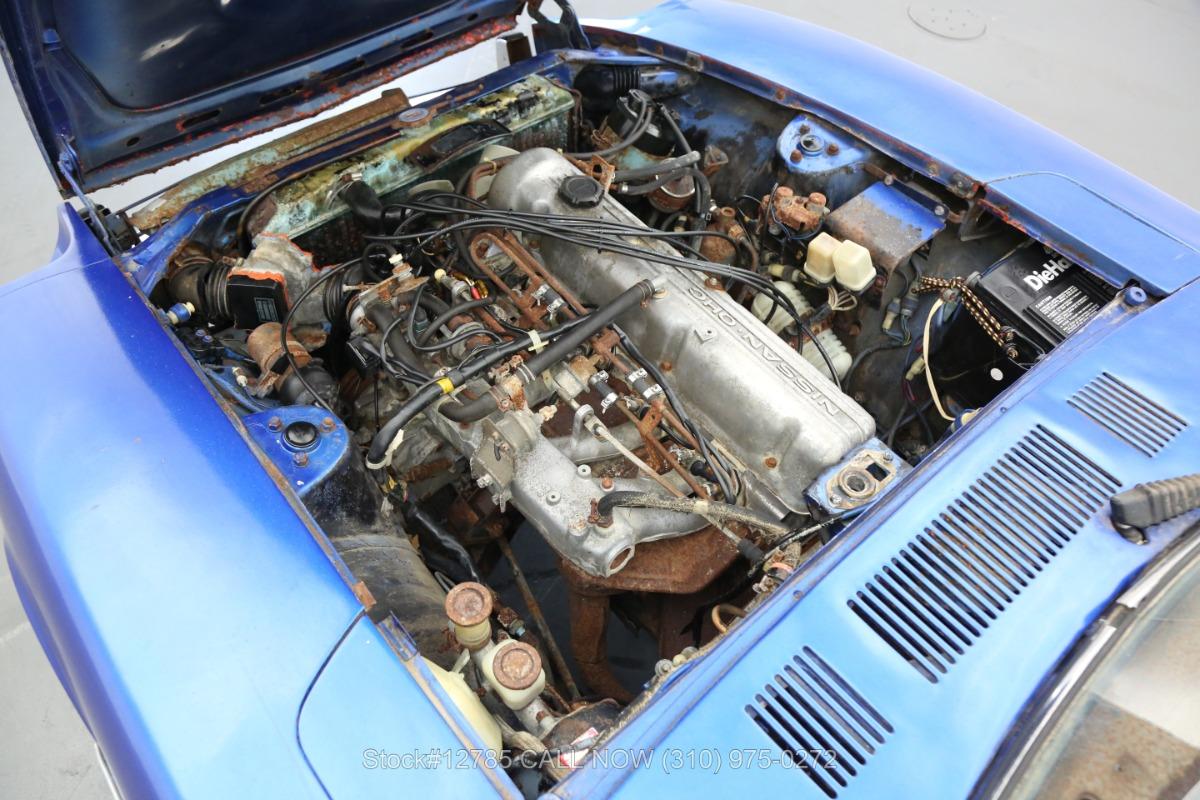
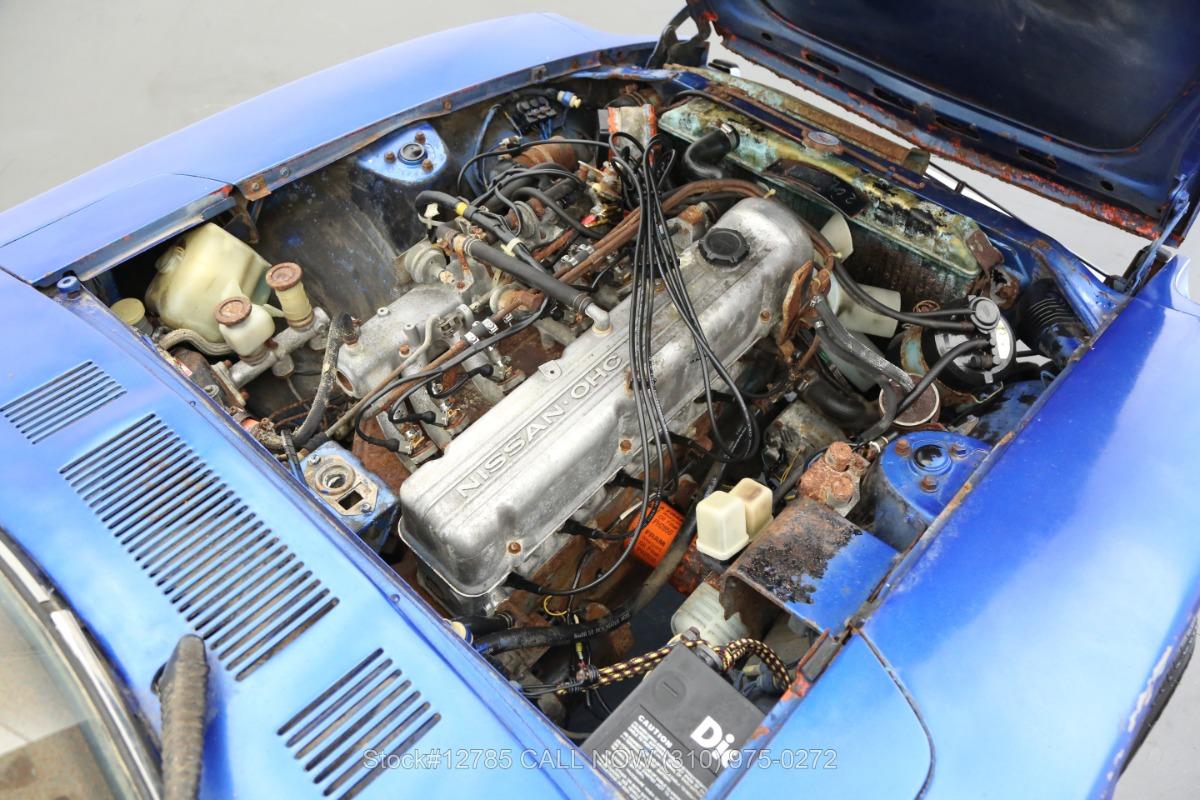
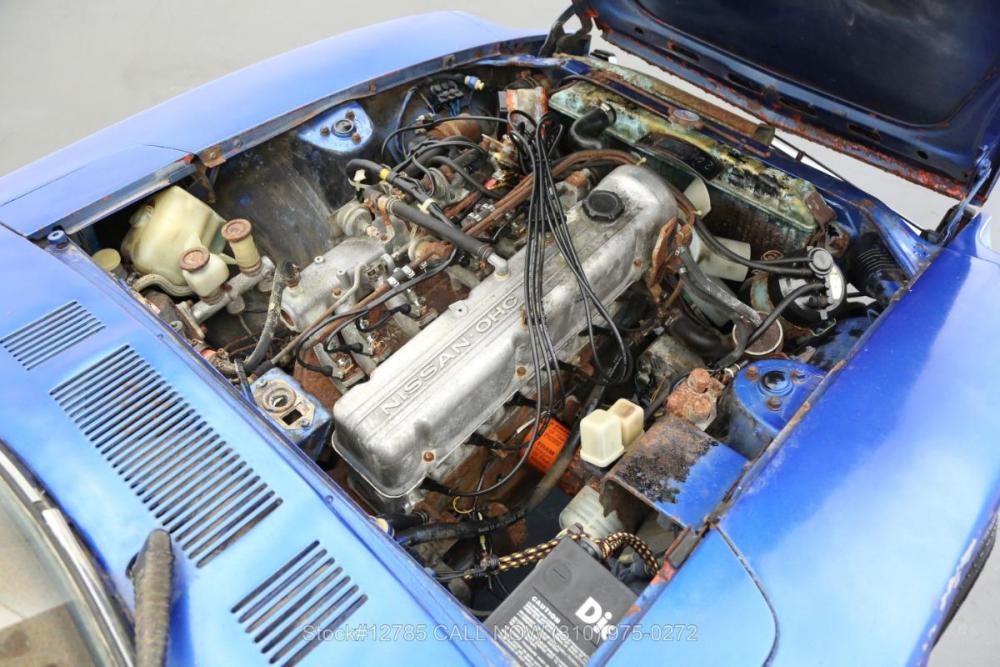
I'm not sure about the front clip thing. I mean, someone may have cut off the whole front end at the firewall and welded on a replacement, but I can't be sure from the pics. The entire engine and associated stuff IN the engine compartment is clearly 280, but I wouldn't be so sure that the uni-body sheet metal is. For example... It has the 280 fusible links and relay assembly in front of the battery. But if you look closely, you can see that the bracket which the relay assembly is bolted to is not stock. It's a piece of metal strapping grafted into place to give the relay assembly something to bolt to. So while there is a 280 relay assy in there and it's bolted in place, it looks like it didn't come from the factory like that: Another example is the carbon canister... It's screwed directly to the inner fenderwell instead of being bolted to a support bracket welded to the fenderwell. So again, while the 280 parts are there, they may be an adaptation: Darn you guys... Now my counter is reset to zero and I have to start all over again!!!

-
-
Yes, it is. And I managed to not look at any of those pics again today. So one day down... I'm continuing to lean towards your assessment that someone took two cars and put one car together from the pile of parts. Based on the height of the metal portion of the rear strut towers, I think the uni-body came from a 240 (presumably a 72) and pretty much everything else came from a 280 (presumably a 76). Weird that someone would have put all that 280 stuff onto and into a 240, but I guess you do what you think is the best path forward when you're in a situation like that, right? You got a 240 with a blown motor and a completely trashed interior? And you got a 280 that is already a flint-stone mobile? Mother of Invention stuff...
-
Take a read through this recent thread that talked a bunch about the same sort of stuff. There is discussion about the water lines and such that may help: https://www.classiczcars.com/forums/topic/64432-260z-round-top-conversion-a-couple-questions/
-
Wait... So this is turning into "post a pic of your bike"? 82 SECA 550

-
So I was poking around with the pics again and I'm starting to think that maybe @Racer X was right when he suggested that "someone has mixed two Z cars, and then rust happened." Looking at the rear strut towers again, the plastic trim is unquestionably 280 style with the high hip cutout. But the METAL part of the rear tower looks like it only comes up to 240 height. That results in a large gap between the top of the metal strut tower and the bottom of the plastic trim: And looking at the drivers door... Notice the weather strip along the top of the window frame. That is without question a 76 feature: Front lower valances where the turn signals aren't is without question a 280 feature. Taillight panels are at least 74. So even though it seems hard to believe, I'm starting to think that someone may have started with a 72 and put on so many parts from a 76 that it actually shows as a 76. If the firewall VIN comes back matching the other numbers, I'll have to assume that's what they did here. Butchering the VIN plate to fit the dash is probably still illegal (considered modification and/or defacing maybe?), but to give the seller the benefit of the doubt, the unibody section may have left the factory in 72. I gotta just stop looking at the pics and let the whole thing RIP.


-
-
Gotcha. Thanks for the lead. I'll let this sit for a few days and see if someone comes up with other options, and if not... It's a go.