


Captain Obvious
Free Member
-
Joined
-
Last visited
Everything posted by Captain Obvious
-

-
What were the other two options other than zell? I got scammed once, but thankfully I used PP and (it took some time, but) I was able to get my money back.
-
@Mike Might want to have a look here.
-
It was supposed to be "your typo" (not the contraction you're), but I doubt that will be enough to make the connection. Your typo in the title of this thread... "Frange", makes me think of an old movie scene.
-
Can you take a pic of where it's leaking?
-
"This conversation can serve no purpose anymore." You win this round of Spot The Bot!!
-
I can't add much to the bolt hunt that isn't already covered, but I just wanted to pop in here quick and salute your typo.

-
Now get some sleep. 🙂
-
And the magic number is 11 rotations of the cam, or 22 rotations of the crank. https://www.classiczcars.com/forums/topic/62752-bright-links-on-timing-chain-line-up-every-11-rotations/
-
Spot The Bot!!! @Mike
-
My daily for the last bunch of years... My trusty steed, my Civic hatch.

-
What he said. Just cap off the brake booster and the transmission vacuum lines for now. As for the intake/exhaust gasket, yes they are cheap and readily available. Only problem is in order to replace it, you need to pull both the intake and the exhaust off the head. And that extra trouble step is why sometimes people try to reuse the old gasket. If yours was in good enough condition to maybe reuse, then some silicone would probably make it leak free. But if half of your old gasket peeled off the head and stayed with you original flat top intake manifolds.... Well then, you're asking for trouble.
-
Oh, that was no accident. That was desperation and frustration right there!! Cutting wheel on a 4 1/2 angle grinder, and then a BFH to crack through the center portion that I only cut through partway (so I didn't cut into the axle flanges).
-
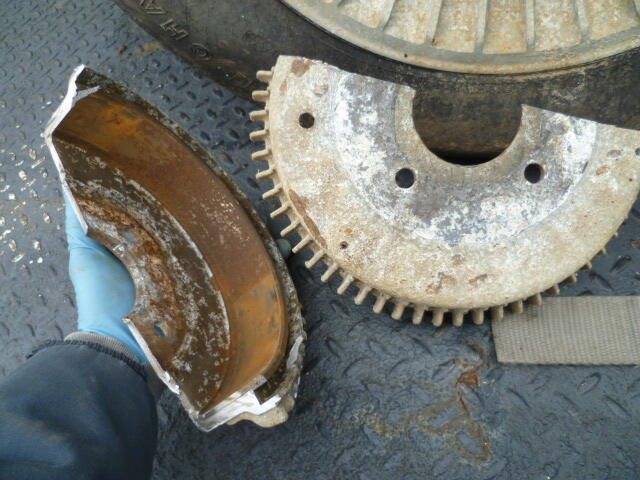
Glad you got it off. Now that it's off, can you tell why it wouldn't come off in the first place? In the past, I've encountered a thin "unswept" ridge of friction surface on the inside of the drums that would catch the edge of the brake shoes. Is that what was happening with yours?
-
Oh, and I don't see anything else glaringly wrong in the pic, but was wondering... When the flat top to round top conversion was done, did they (you?) use a new intake/exhaust manifold gasket, or reuse the old one?
-
Well let's hope fixing those two plugs helps your running issue. If the two 10mm head bolts were screwed in somewhat tight, they probably sealed "mostly". If those bolts are the only vacuum leak you found, they probably weren't large leaks.
-
Lol!! The Yarbinator. Love it! ☺️
-
Tapered pipe threads are supposed to tighten up on the threads, not the underside of the head. In fact, if the head were to bottom out, the threads would run the risk of not being tight enough to seal. In other words... The hex headed plugs you have there are working exactly like they should. You would stand a better chance of achieving your "clean look" with the recessed hex head "Allen screw" type plugs.
-
I found some good pics, etc. of that booster here >> https://irate4x4.com/threads/ibooster-electric-brake-booster.394316/ Mounting: The mounting bolt pattern is 2.375" x 3.1875" square with a 2.5" center bore pass through:
Yeah, hopefully it should be easy to tell. In any event, it's got to be better than this!!! Hahaha!
KYB is pretty specific about using no oil, but many people (including me) defy that recommendation and use some anyway. Since you aren't using the oil primarily for lubrication, but instead, more for rust prevention, I would recommend an R&O oil. That means "Rust and Oxidation". R&O oils have additives intended to minimize R&O. Here's a couple links for info: https://www.valvolineglobal.com/en/r-and-o-oils/ https://www.phillips66lubricants.com/product/multipurpose-r-o-oil-mining/
Do you have any more info for this? Where did you see it?
I believe that all the tapered fittings are BPT. Probably dictated by world manufacturing climate at the time. Some of the BPT and their respective NPT counterparts are different enough to easily tell the difference, and some of them are really similar. For example, with some thread sealant, it usually seals if you stuff a 1/8 NPT plug into a hole threaded for 1/8 BPT. But, I think the BPT is correct. There also does exist some locations where a straight thread was used (temp gauge sender unit for example), but I've found them to be straight up metric thread, not BSPP.
Well, according to the info Zed Head posted above, the longer spring goes on the RH side.


Important Information
By using this site, you agree to our Privacy Policy and Guidelines. We have placed cookies on your device to help make this website better. You can adjust your cookie settings, otherwise we'll assume you're okay to continue.