Captain Obvious
Community Member
-
Joined
-
Last visited
Everything posted by Captain Obvious
-
He didn't say he was a banker. He said he was in the "world of banking and manufacturing". I'm guessing he was "manufacturing" something that went into a bank.... They demand loyalty in the printing industry, right?
-
But without a zip-tie, that linkage piece will still be in there flopping around and buzzing with engine RPM. Even if there is a screw in it.
-
Yes, like the top picture:
-
So it seems that I guessed right and the oversized rings came off the same fixture and were just left longer than the standard rings? Cool. That's a good piece of info right there. Might not be the case for all manufacturers, but at least the one you bought was made that way. So what brand did you buy? And glad to see the math worked out on the overlap as they came out of the box. And as for the oil ring expander... I really have a hard time believing they were making different expander ring versions for STD and .010 oversized. That wavy ring is so compressible. I'm no expert, but I bet it's the exact same ring they put in the STD set. About the only thing they could do would be to remove two complete sections so the tips aligned. You couldn't remove just one section, you'd have to remove two. If you removed two sections that it would even wrap completely around?
-
Seconded. Nice work. So I once went through all the gyrations to never put force through the bearing balls to put everything together. Then I discovered that I had way overgreased the cavity and had to take it apart again anyway to pull most of the grease out. And there just isn't any way to take that thing apart without putting force through the balls. In the end, I decided that they had designed it such that there was a mild press fit to get things together and it was designed such that the amount of force required to press the stub into place isn't enough to damage the bearings. So I just started doing it the way the manual says to do it. You know... The easy way.
-
And if you do decide to move forward with the oversized rings and get to the ring grinding portion of the show... Just remember that details are important. You want nice clean parallel edges. You want square corners but you don't want burrs or knife edges. You need to remove the burrs, but you don't want to break the corners any more than that. It sounds easy. "File or grind the tips until you get the desired gap." But execution isn't as easy as the description. Plenty of info on the web to learn from. An admission from me... I've never done it. I have a ring grinder here (thanks @240260280), but after testing and measurement, I found that my ring gaps worked out fine without grinding. So I wasn't looking forward to doing it, and thankfully, I didn't have to.
-
I'm imagining the L25 means he put a 260 crank in his 240 motor and then had the block sleeved to run slightly undersized pistons he had custom made.
-
Make sure you clean all the carbon off the valve stems and guides before you run your wiggle test. I've seen situations where the built up coating of carbon was helping take up the gap. I could definitely feel a difference between dirty and clean.
-
Really hard to diagnose sounds like that over video. I would expect pinging at idle to coincide with the compression cycles, and the noise I hear is an intermittent buzzy kind of thing that is not at the same interval as the compressions. If I had to guess over the internets, I would look at your driven accessories first. Water pump, alternator... That sort of stuff. In any event, glad to hear you're doing better than you were. Those old needles really looked terrible and I'm glad the SM's have helped. So have you been out on the road yet? Idling is one thing... Engine under a real load is another. What oil are you running in the dampers?
-
Considering how much you have to compress the rings to get them into the bore, I would guess* that compressing them .010 more wouldn't even be noticeable. How much would the expansion force change with an additional .010 compression? I mean... five thousandths more compression per side really isn't much at all. Makes me wonder... Do the ring manufacturers have different fixtures for each ring size, or are they just grinding off more of the tips for the oversized rings? Maybe at the extremes there are different castings, but each raw casting can be machined into a couple different size categories or something? That's a common manufacturing technique. Bottom line... In a pinch, I'd be willing to try the same thing you're doing. *Strictly a guess since I've never done it
-
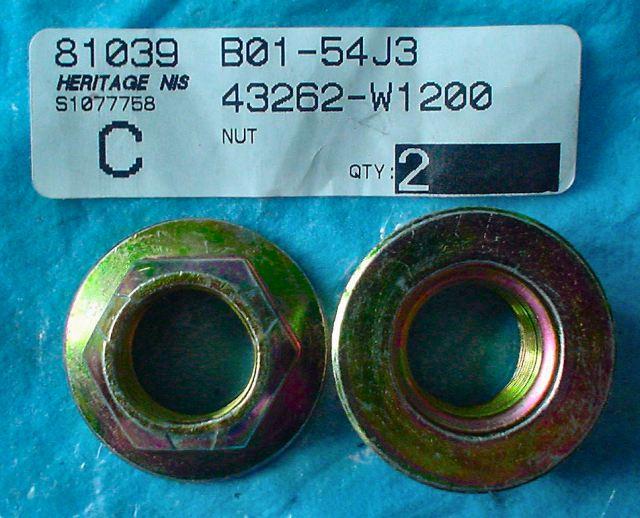
I just checked the 83 manual and the torque numbers are the same. 181-239 ft-lb That said... I bet @Dave WM uses the old style nut. I think he hates change even more than I do.
-
As for the fitment, the only change I can come up with is that you don't need to stake those ZX nuts after installation. The prevailing torque distorted threads do that for you. As for the torque, I'm no expert, but I would just torque them to the same torque as the original spec for the Z. You would lose a tiny bit of the torque number due to the friction of the distorted threads, but I bet it's such a small percentage of the total that it wouldn't be significant. I've got a ZX manual around here somewhere. When I get a chance, I'll dig up the torque spec they used in there.
-
Yeah, that doesn't sound good. I don't think I would toss up as much of an urgent "don't go on any long trips" as SteveJ did, but you should get to that in the near future. Many people (including myself) have switched over to the ZX style nuts for the stub axles. Photo courtesy of Blue:
-
I like it here too.
-
You care more about the circumference than the diameter. The difference in circumference between the 83mm and the 83.25mm ring is 0.785mm. If your current gap is .53 mm with the standard ring, then an 83.25mm ring would result in a .25 mm overlap. You would have to remove that overlap and then enough more to end up with the desired gap. That said, I have no idea if using the oversized rings would actually work or not. I'm just here for the math.
-
The internets say it will work faster and more effective if you add a little salt to the vinegar.
-
When I get a chance, I'll take another look at the wiring diagram and see if I can draw any conclusions. I still don't think you were really pushing 60A into anything. That's welding current.
-
sorry, but that harness is installed in my car. I put some parts in for A/C just like you're doing. I installed the whole A/C control head with the 4-position switch and also swapped out my original blower resistor for the one that works with the 4-position switch. And that's the only A/C sub-harness I have, sorry. Another complication is that the 4-position switch has another feature built into it that deals with the A/C system specifically. It has an output pin that is essentially "The fan is not in the OFF position." And that pin is used to disable/enable the A/C system. You see, it's potentially damaging to the compressor to run the A/C if the blower motor is not spinning. You run the risk of slugging the compressor with liquid refrigerant. So they make sure the compressor will not run unless the fan is spinning. The 3-position switch has no such feature. So you can either "always just remember to turn the fan on when the A/C is running", or you can use the 4-position switch to interlock automatically and do that for you. After a lot of words above, the bottom line is... I recommend you get your hands on the sub-harness that came with the A/C cars and run the 4-position switch.
-
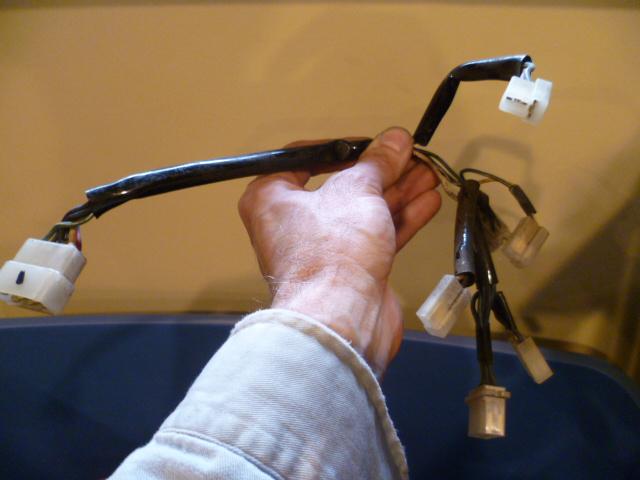
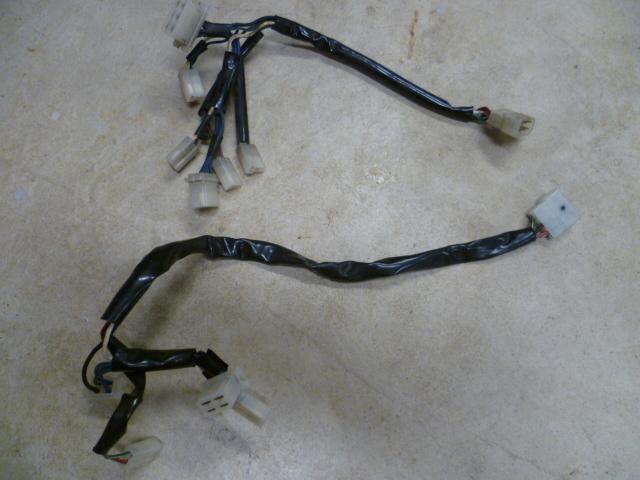
I'm not completely sure what you're asking with the blower upgrade question, but.... The resistor is mated to the switch. If you have a three position switch, then you need a three position resistor. If you want to use a four position switch, then you'll need to pair that with a four position resistor. You can run any of the fans (original, Kia, Honda, etc) with either switch, but you need the proper resistor for the switch. As for the sub-harness thingie... It looks like this. This is the one for an A/C system: And here's a low detailed shot of both options for the sub-harness. A/C on top, non-A/C on bottom. If you look closely and count connectors, you'll notice that the sub-harness for A/C has more connectors on it. The extra connectors are for A/C specific items like the compressor control:
-
Brass is not really a good bearing material. What you want is bronze, not brass. I don't know if all the racks used the same bearing sizes, but Mike W bought a chunk of bronze and had some bushing cut at a machine shop. Info and dimensions (for the later 260/280 racks at least) here: https://www.classiczcars.com/forums/topic/48621-steering-rack-disassembly-and-refurb/?page=7&tab=comments#comment-540657
-
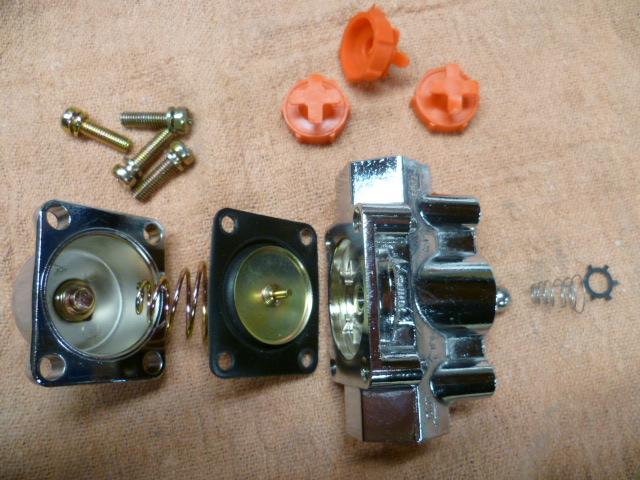
I don't know if all the holley regulators are the same, but I have been inside one of the little low pressure varieties. I made some internal changes, made some new parts for inside, had some parts left over... That sort of thing. But since it wasn't for my car, I don't remember exactly WHY I did it. It all made sense at the time, but I don't remember the details as to why it was necessary. My vague notes indicate that I modified it to work on a downstream by-pass configuration. Here's the pictorial summary:


-
I just doubt you were really stuffing 60A into the battery. If the battery only takes 100mA at 14.25 volts when fully charged (on my HF float charger), then I don't want to know how high the voltage would need to be in order to make it eat 60A. So getting off in the academic weeds... If you knew what the resistance of the shunt is. And you knew what the resistance of the ammeter coil is. You could calculate the current ratios. In other words, you could calculate "If there is 'X' flowing through the shunt, the meter will read 'Y' ". Armed with that info, you could back calculate what the actual system current was when your gauge was reading 60A? In other words, if the gauge current is supposed to be 1/100 of what the shunt current is, and the gauge was reading 60A, then the real system current was actually 600mA. And then if your clamp on gauge reads about the same, it'll confirm that's what happened? Maybe? Possibly? Like I said... Off in the weeds. The DC current clamp sounds cool. Maybe it'll shed some light. My prediction? It won't do anything wrong while you have the clamp installed. So just keep the clamp installed on the car. Haha!
-
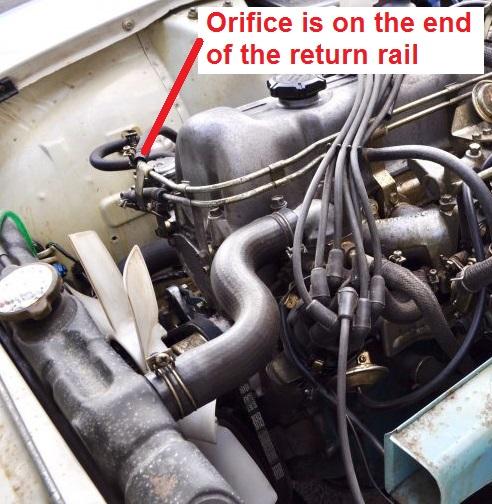
I believe the 240 has a similar restriction orifice to the 260. And about the fuel pressure regulator... I originally said it's dependent on the regulator design and I think I worded that all wrong. You can run the regulator in either dead-head configuration, or bypass configuration, but it depends on the rest of the system. So let me try again: If your fuel pump has enough flow capacity to power both carbs and still have flow to spare, then you can run the regulator in bypass mode after the carbs and send the extra fuel (bypass fuel) back to the tank. If your fuel pump does NOT have enough flow capacity to do the above, then you need to run the regulator in dead-head mode between the pump and the carbs with no return at all. But you'll need to make sure the fuel pump can deal with being dead-headed without overheating. Some pumps cannot deal with running in dead-head mode because they need fuel flow to cool the motor. Am I just making things worse?
-
Yeah, intermittent electrical issues are the worst. And at some point, you just have to call it. So about the battery being a big load... The battery can be a big load if it's not fully charged. But if you're driving the vehicle regularly and the battery is fully charged, it's not much of a load at all. Like a capacitor that is fully charged to the supply voltage. It's essentially an open circuit. The battery does the same thing. I've measured the quiescent current into a fully charged battery (a float charger sitting at about 14V) at maybe a hundred milli-amps. And about starting the car... "But I crank the starter and draw 40A out of the battery for a short period of time." The catch is you just can't put it all back in as quickly as you took it out. The battery just won't accept the energy that fast. But in any event, I hope you fixed the issue and it doesn't come back. Intermittent electrical issues suck.
-
The restriction orifice is a necked down small-ish hole on the end of the return side of the fuel rail. Where the return side connects to the rubber hose above the fuel pump: