Leaderboard
-
zKars
 Subscriber
 11Points3,770Posts
 -
.JPG.cfcada9cf1c1b502df3f5f2f2ca3ff36.JPG)
SteveJ
Free Member7Points9,646Posts -
Patcon
Subscriber5Points11,142Posts -

dutchzcarguy
Free Member3Points2,677Posts


Popular Content
Showing content with the highest reputation on 07/18/2022 in all areas
-
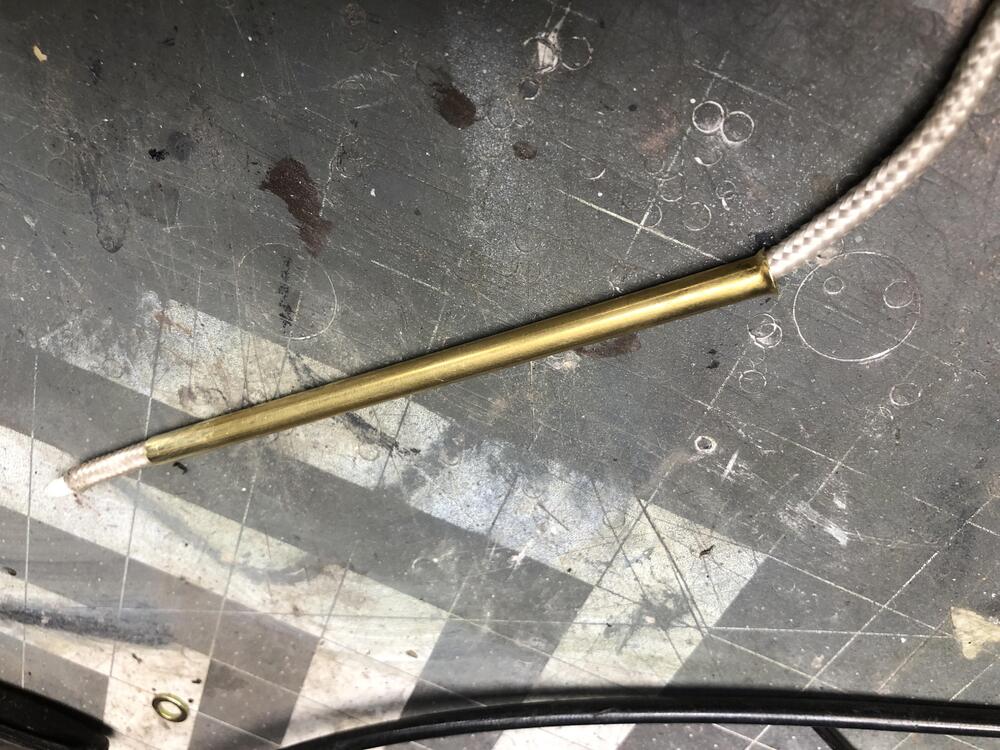
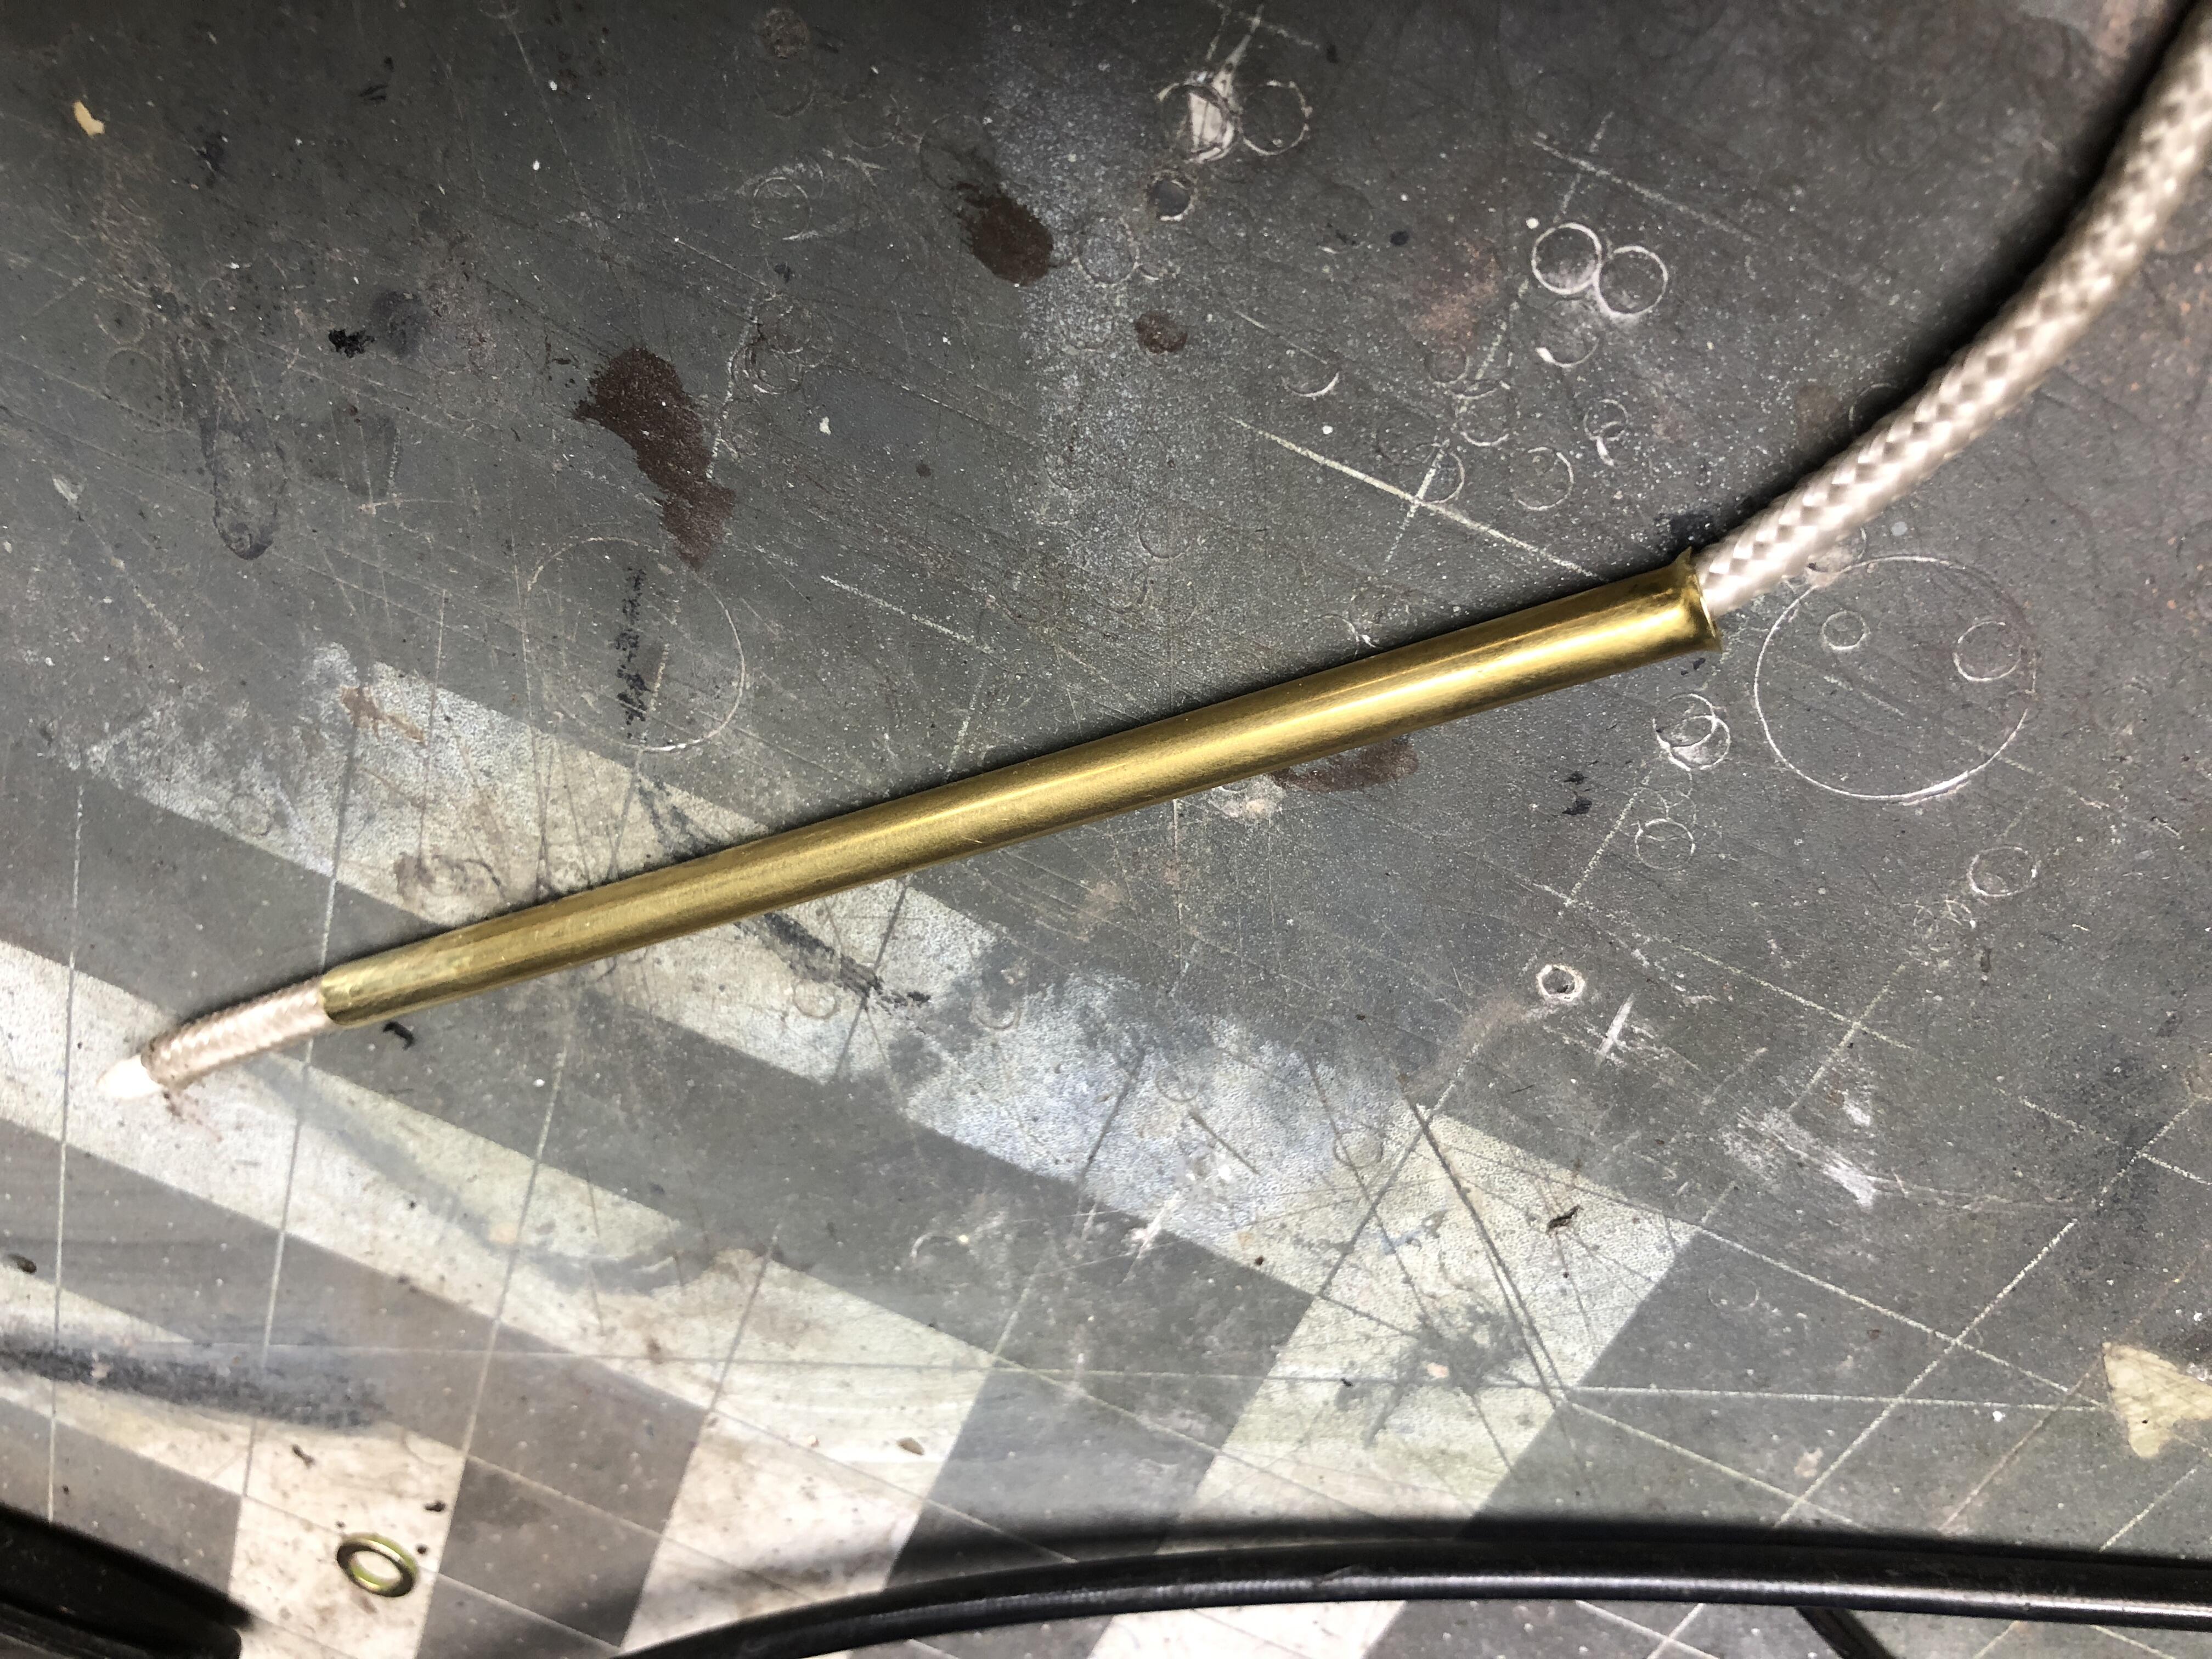
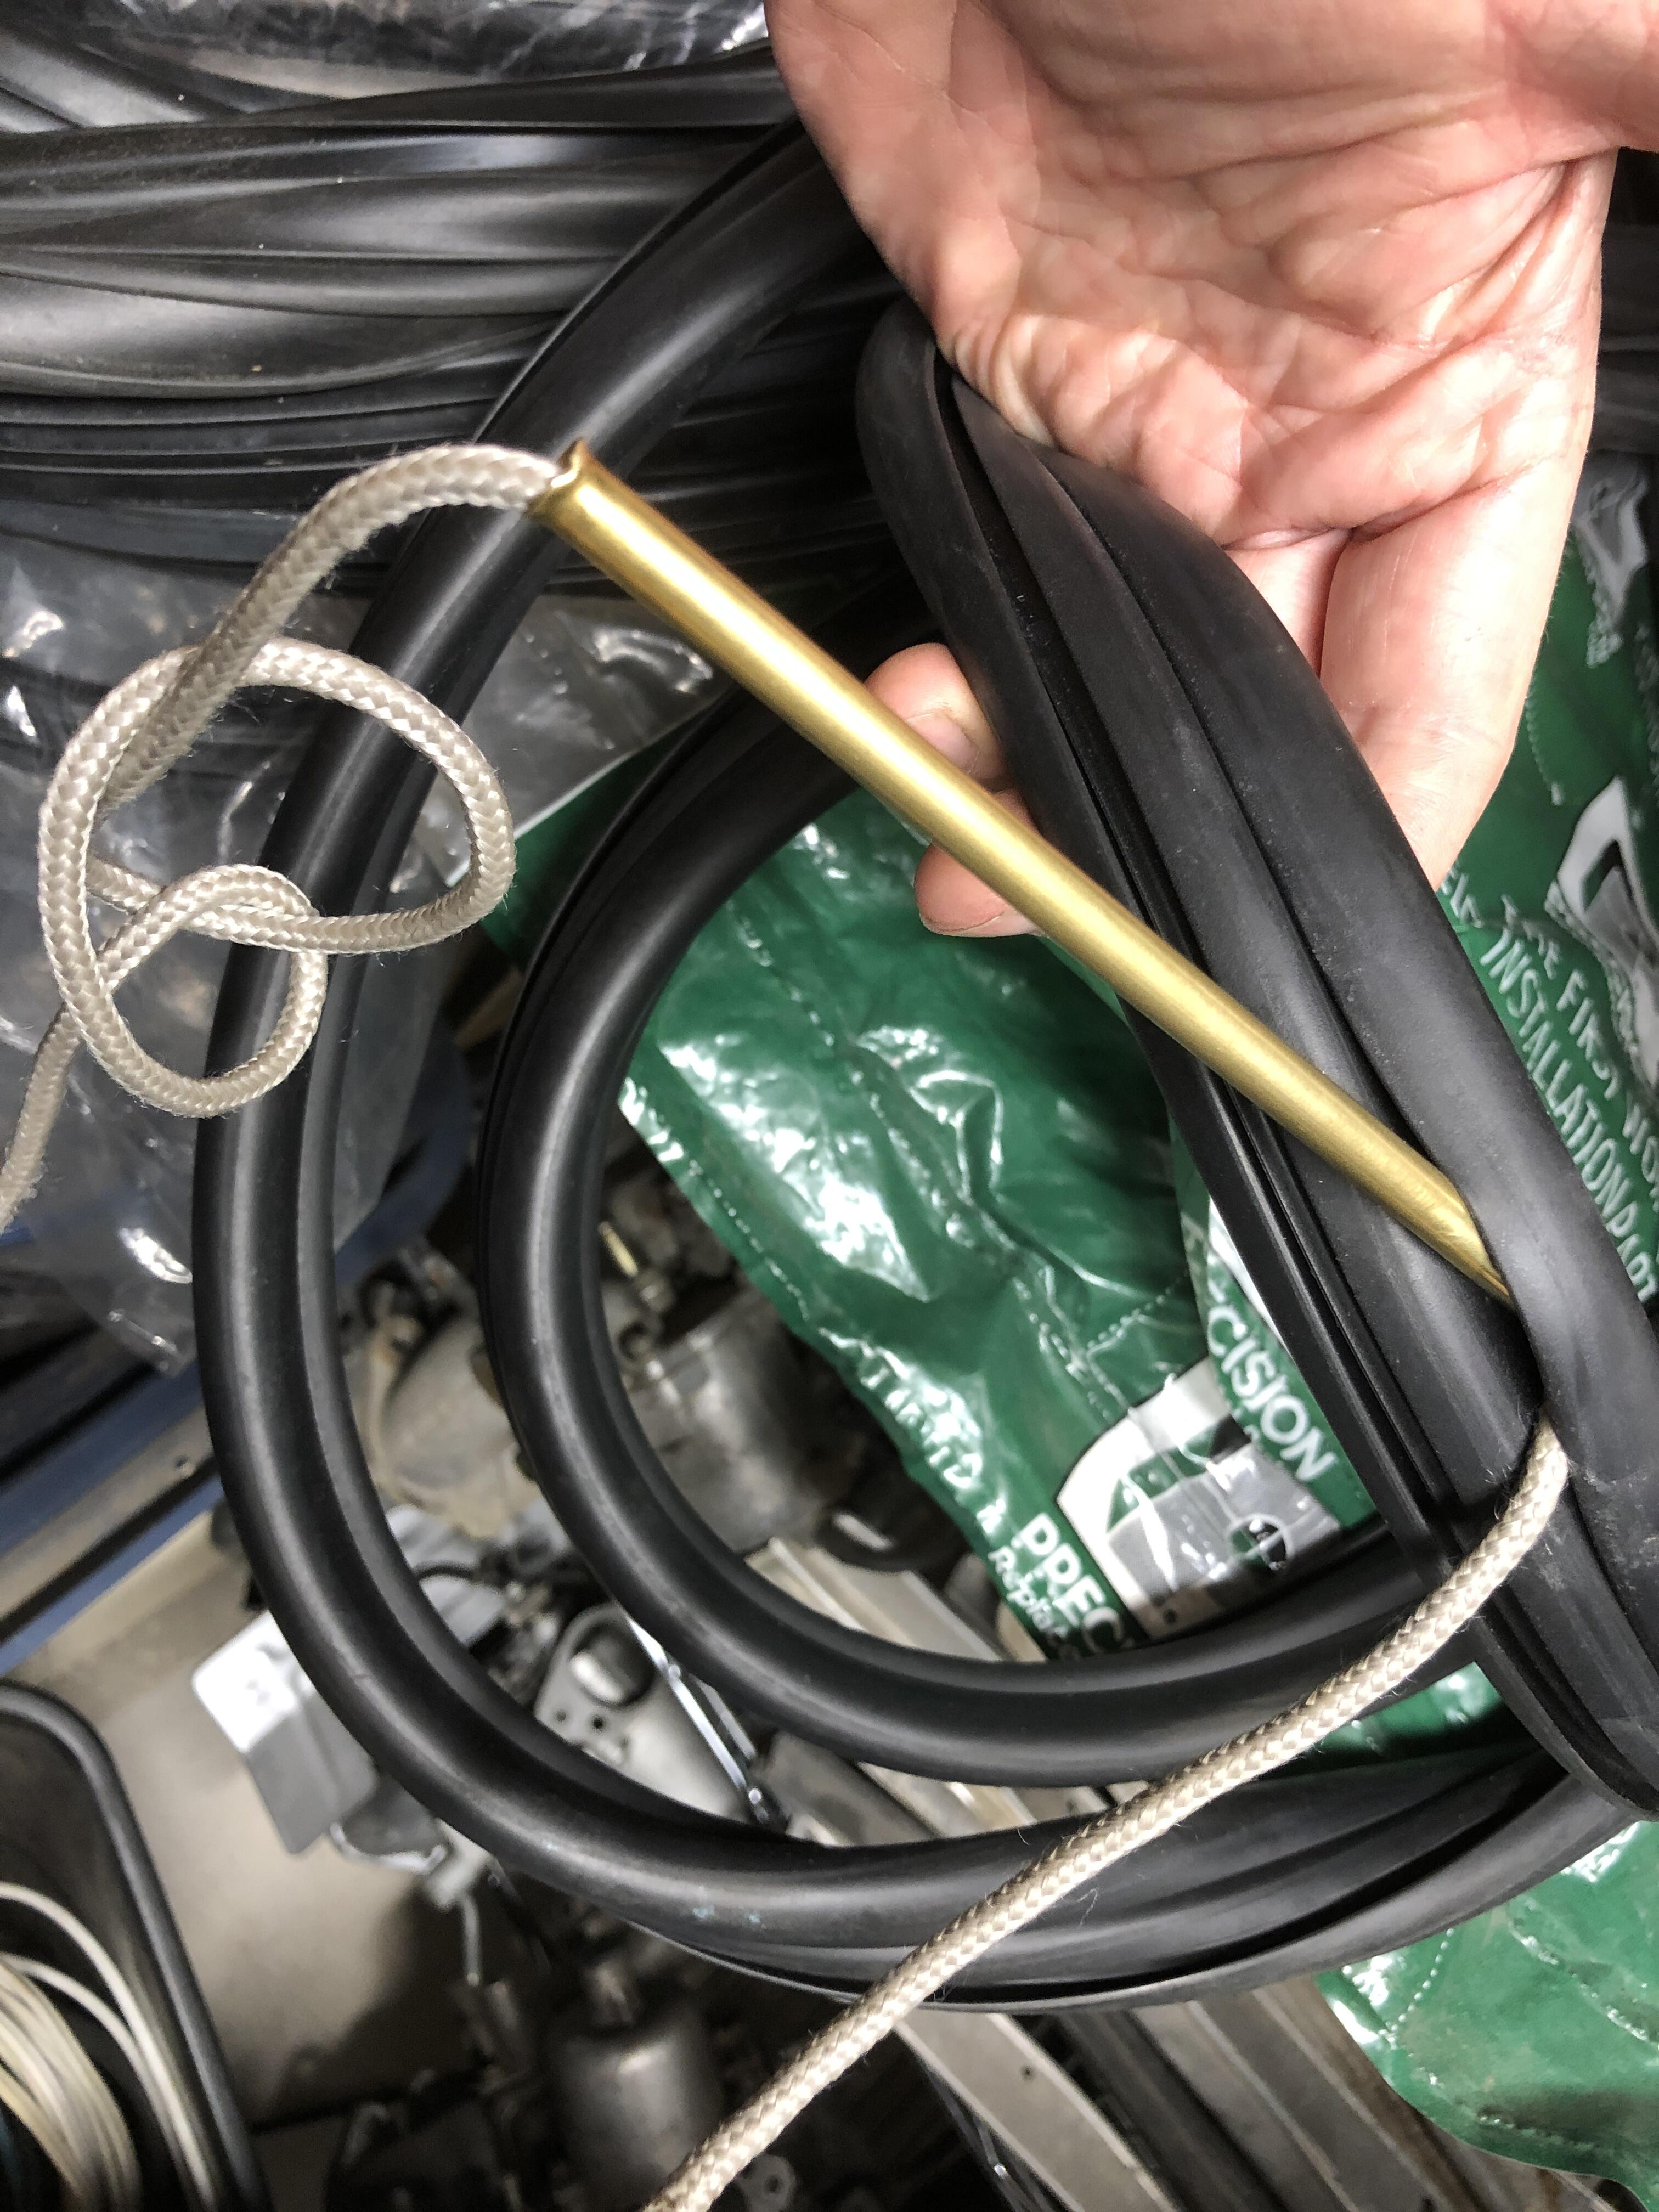
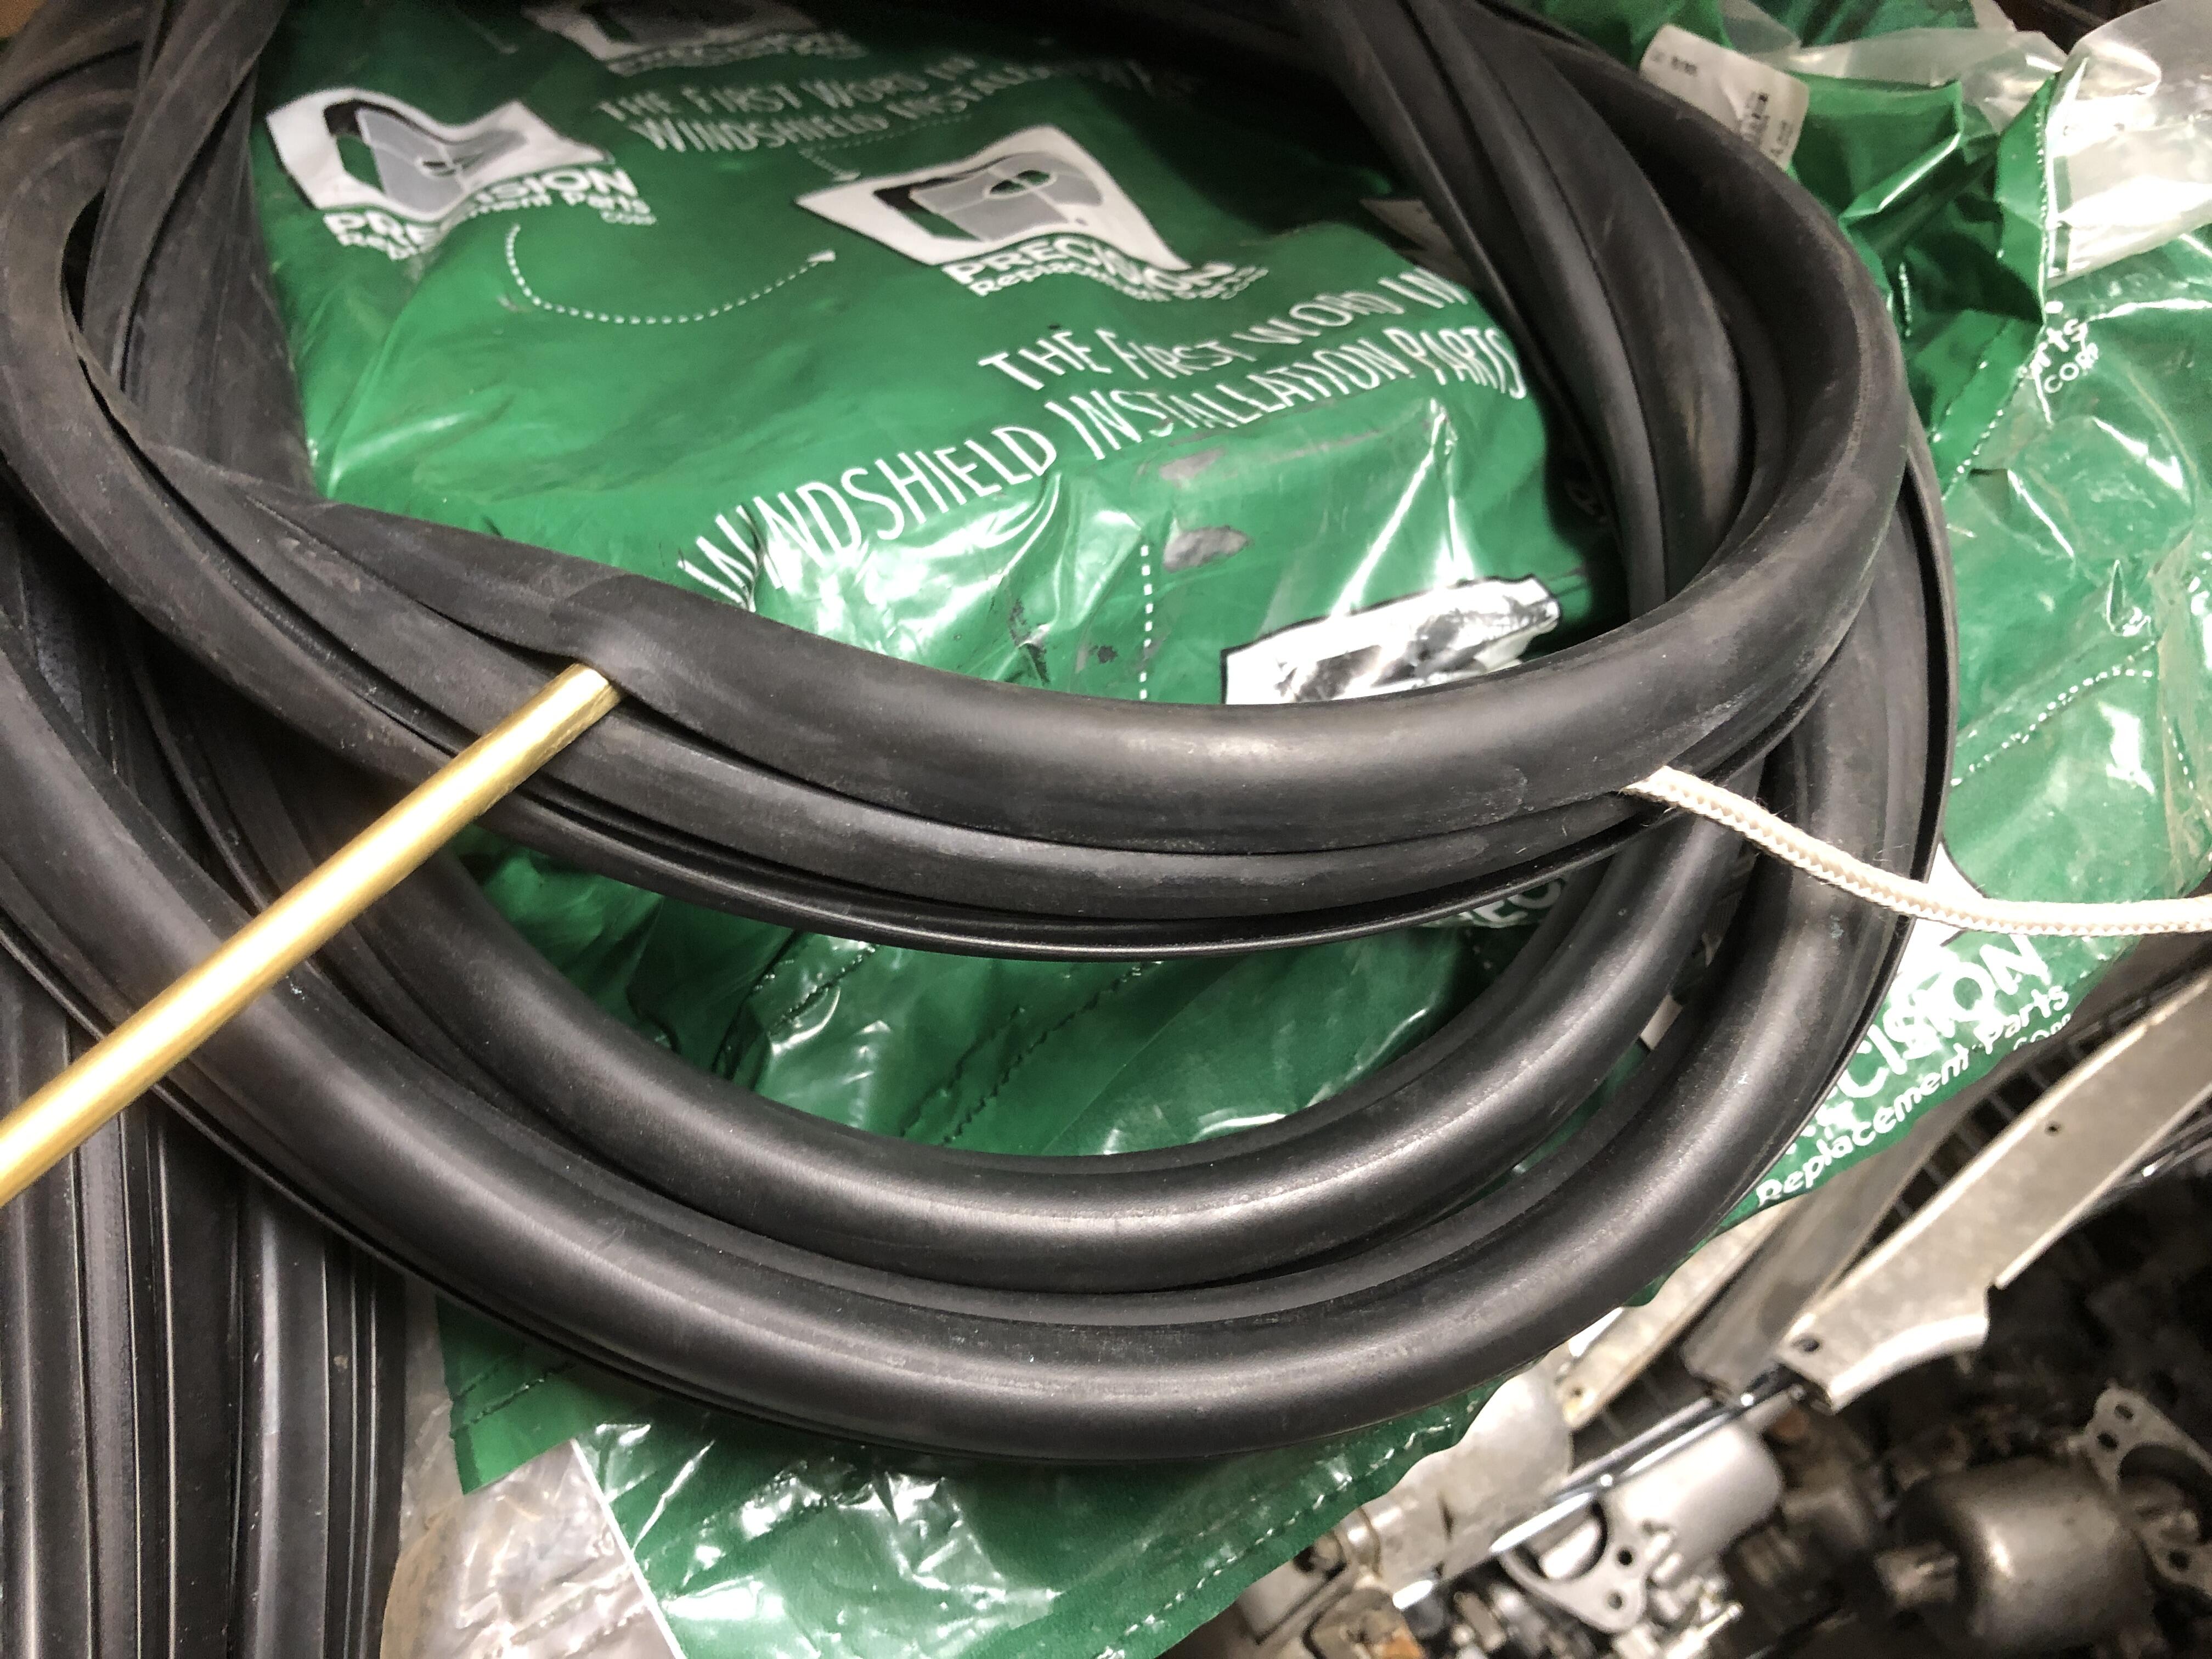
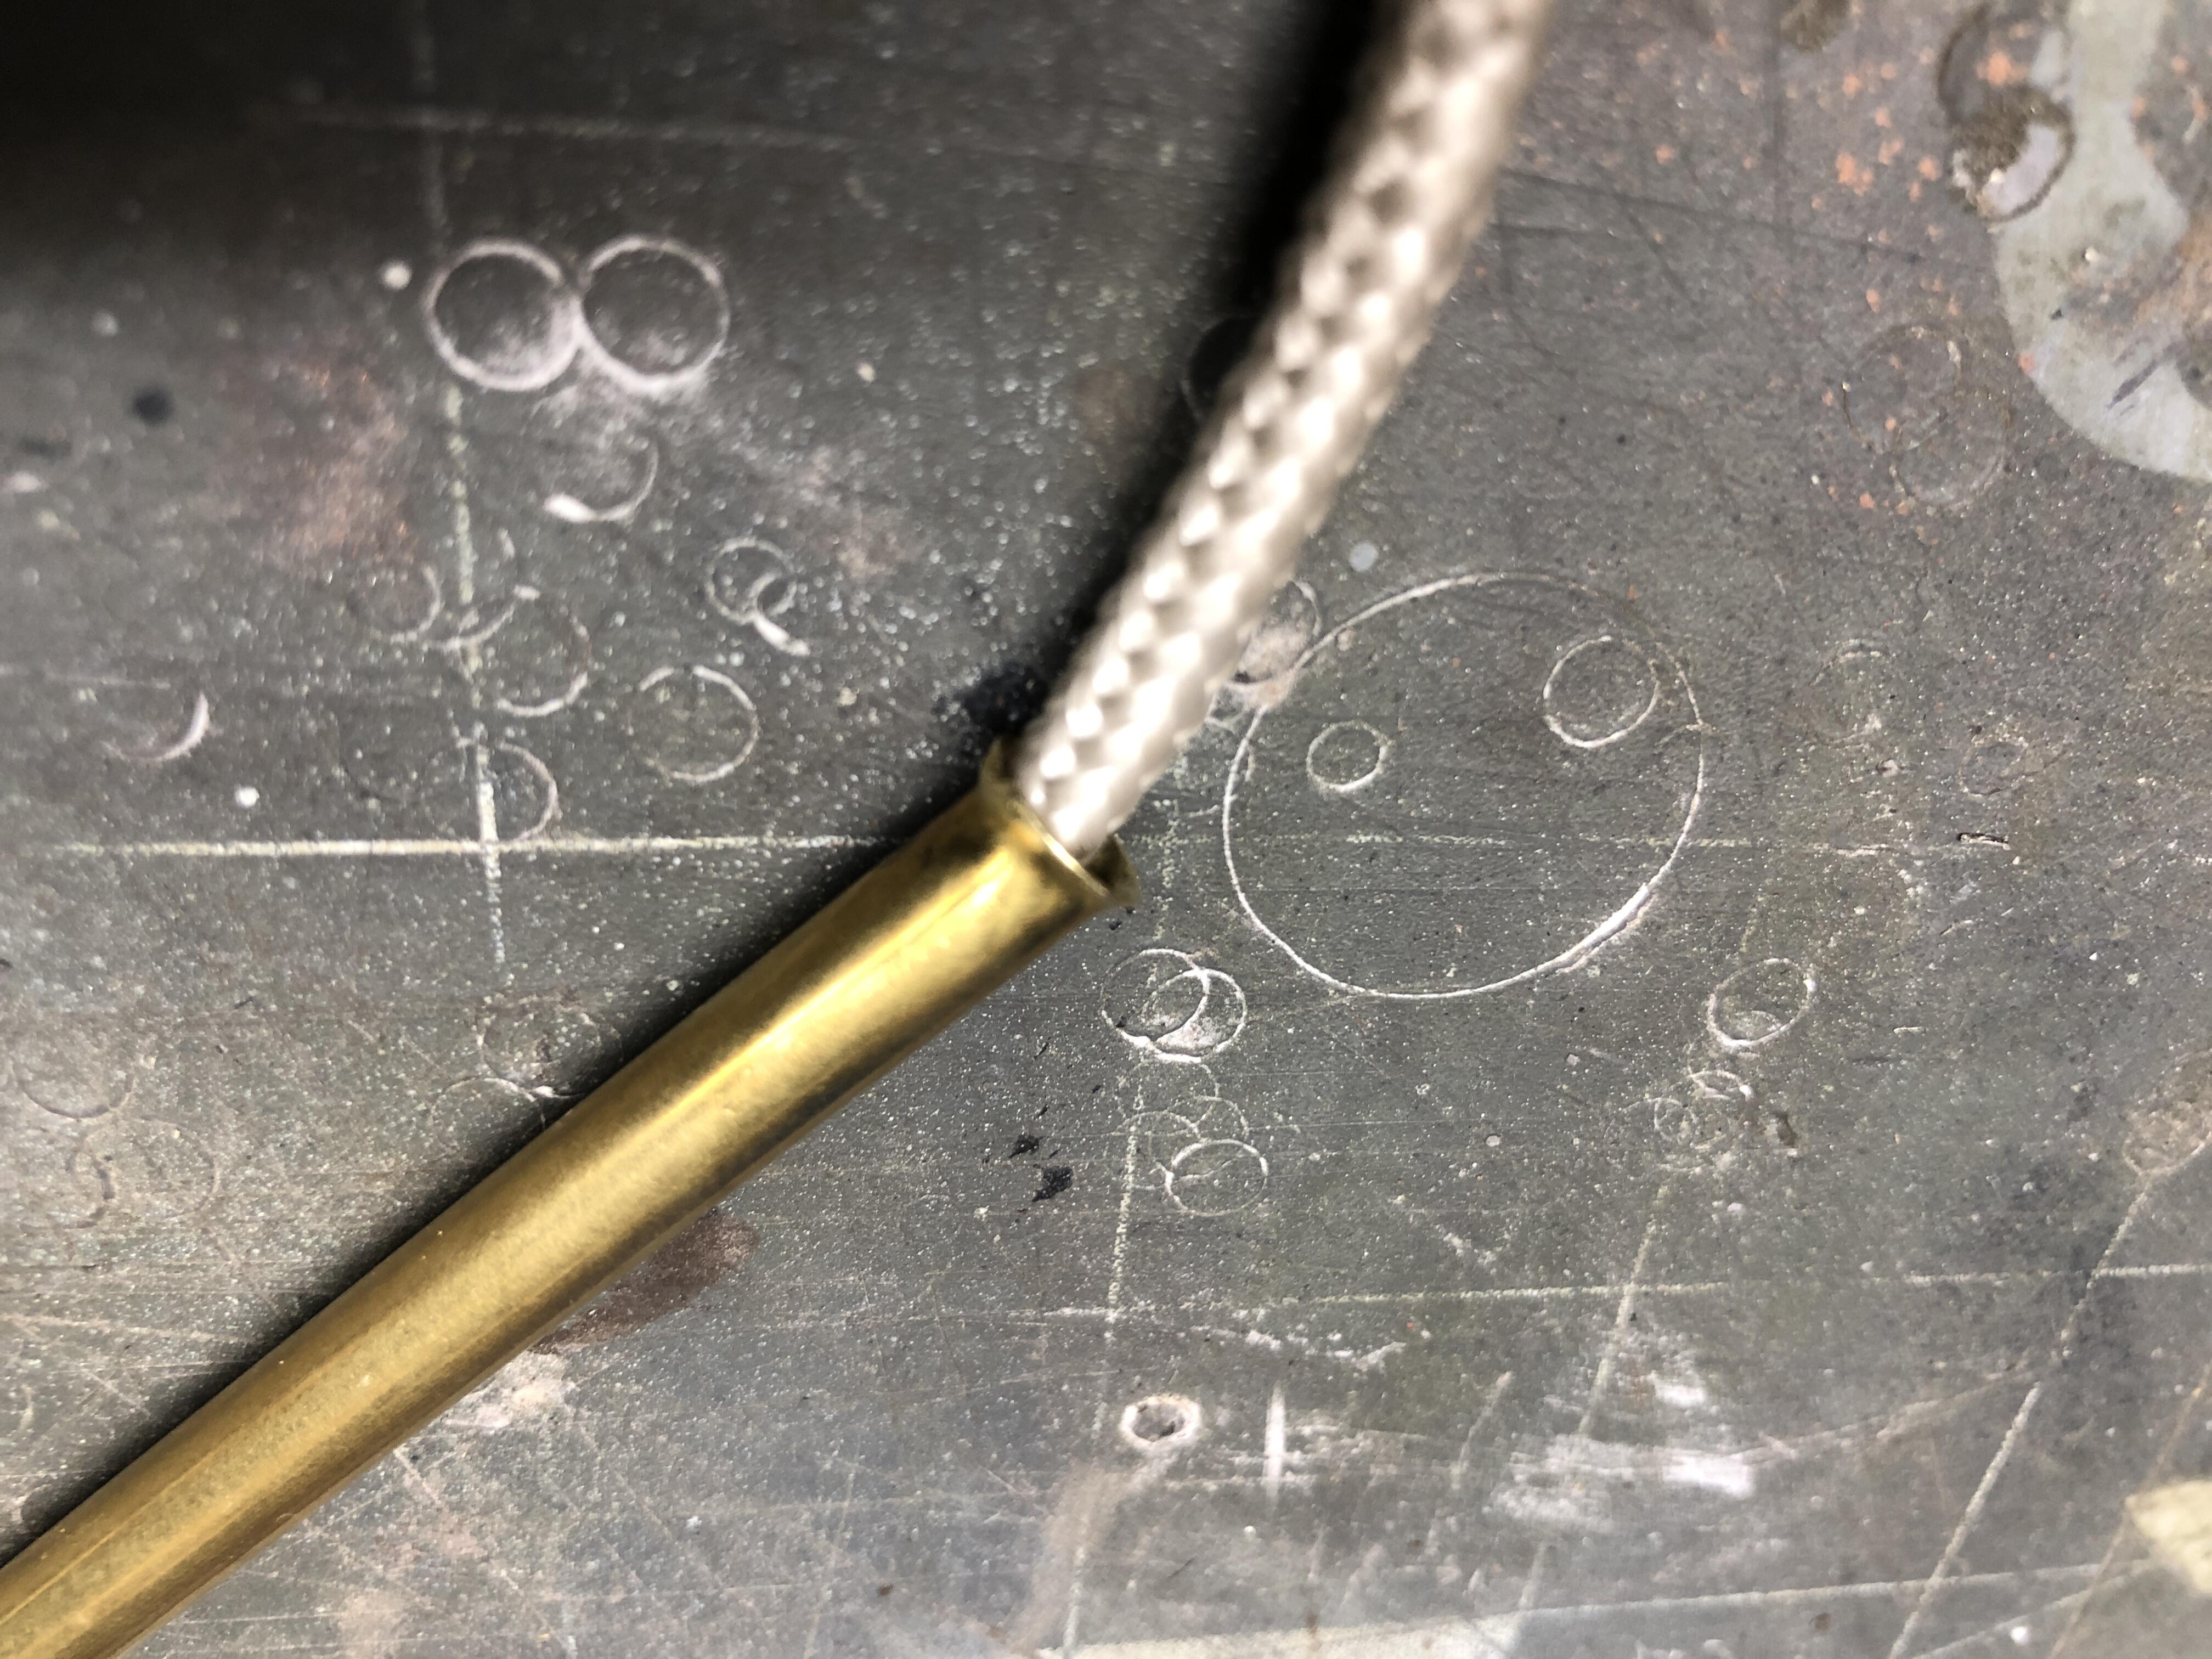
Just to add a couple of details that make this job easier for me. Tools. 1. Getting the rope in the groove. If getting one rope in the groove is tough for you, and my suggestion of using two ropes gives you the willies, then use this trick Go buy a 6 inch piece of 1/4 OD brass or aluminum thin wall tubing from a hobby supplier. Stuff your 3/16 rope through it (I flared one end to make it easier) and use this stiff piece of tubing to poke the rope into the groove (use the un-flared end), then just draw the tubing along the groove feeding rope into it as you pull it along. Keep it poked deep in the groove as you go. Should take you under 60 sec to get the rope all the way around and tucked in real pretty.


 3 points
 -
Yep! just seen this topic and.... YUUPP!! your Crazy! (Just kidding!)3 points
-
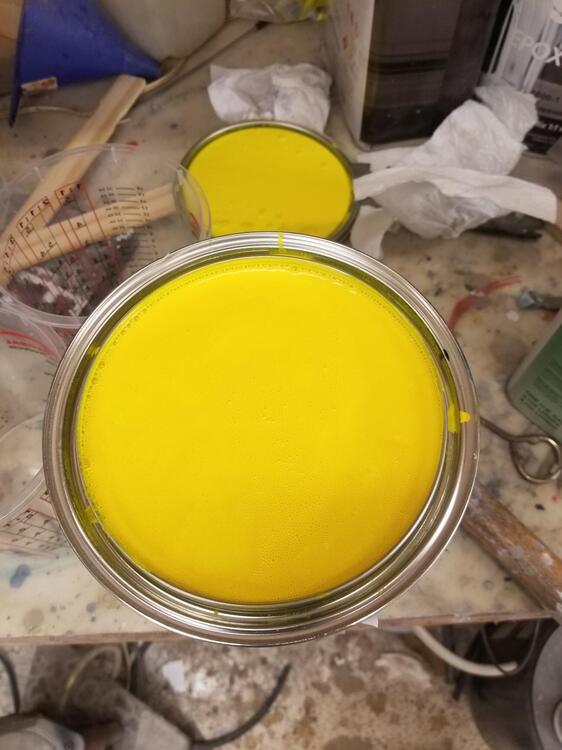
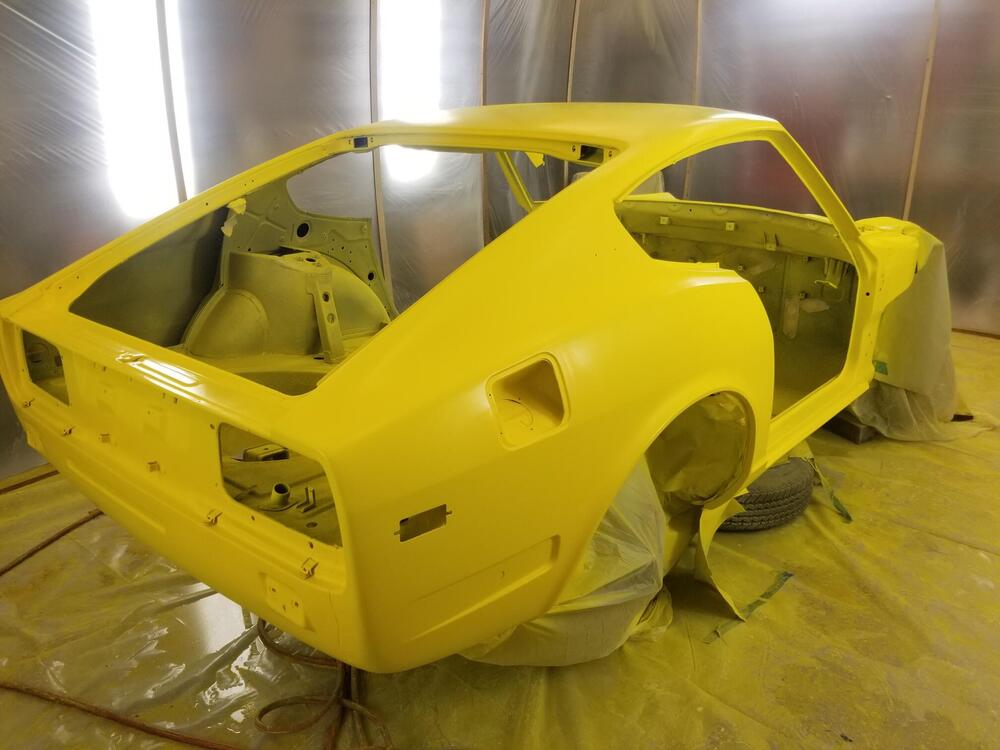
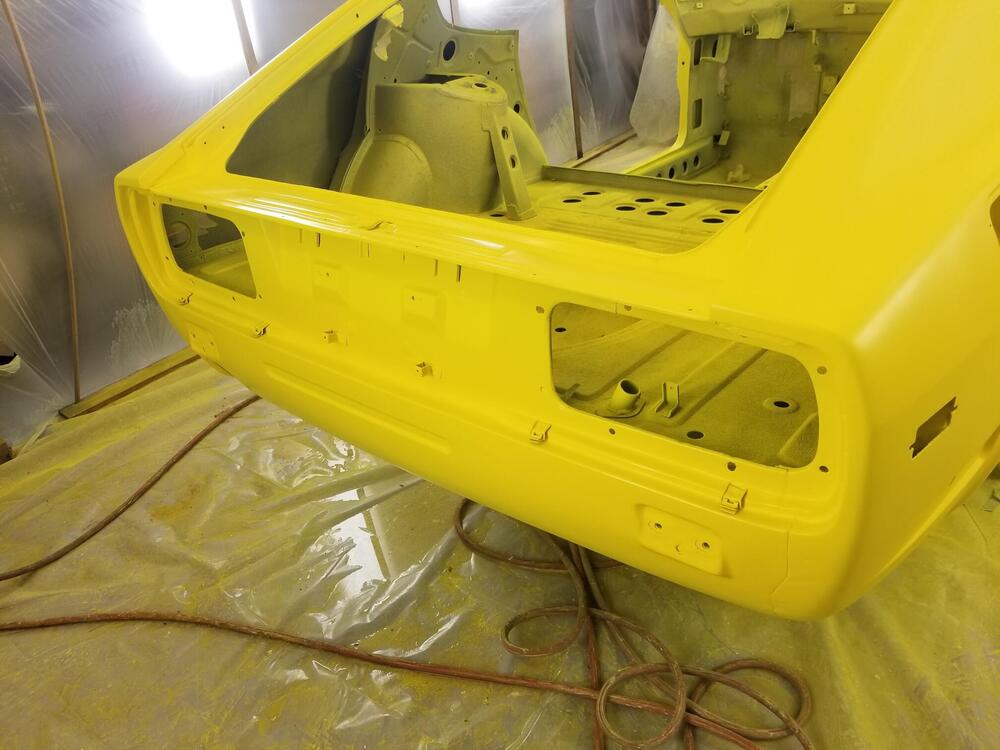
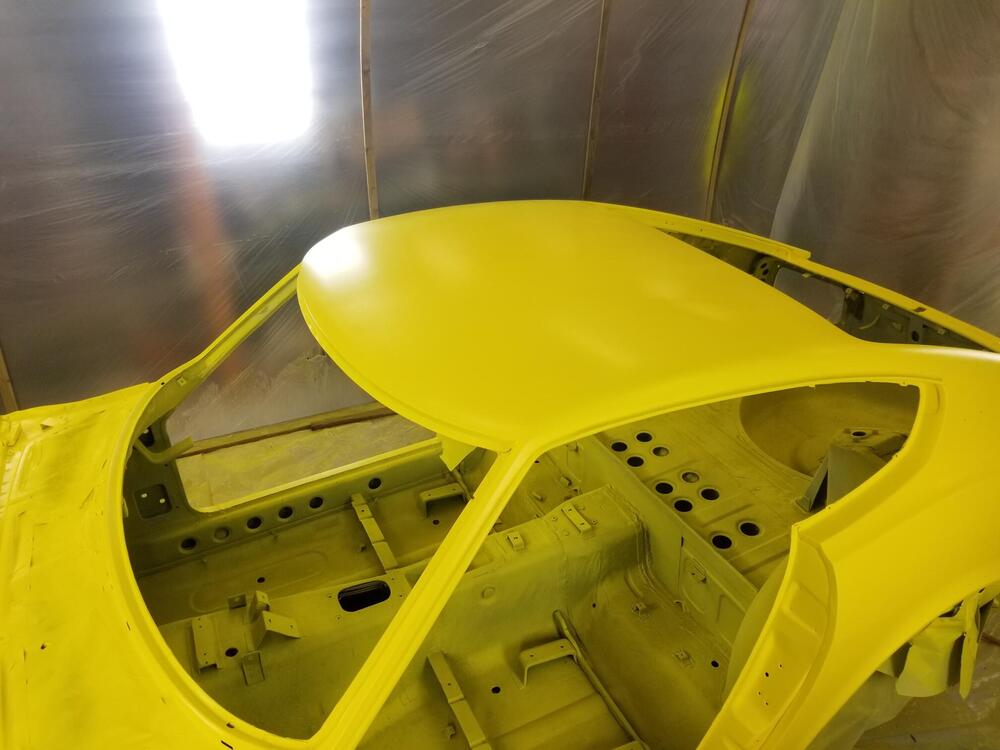
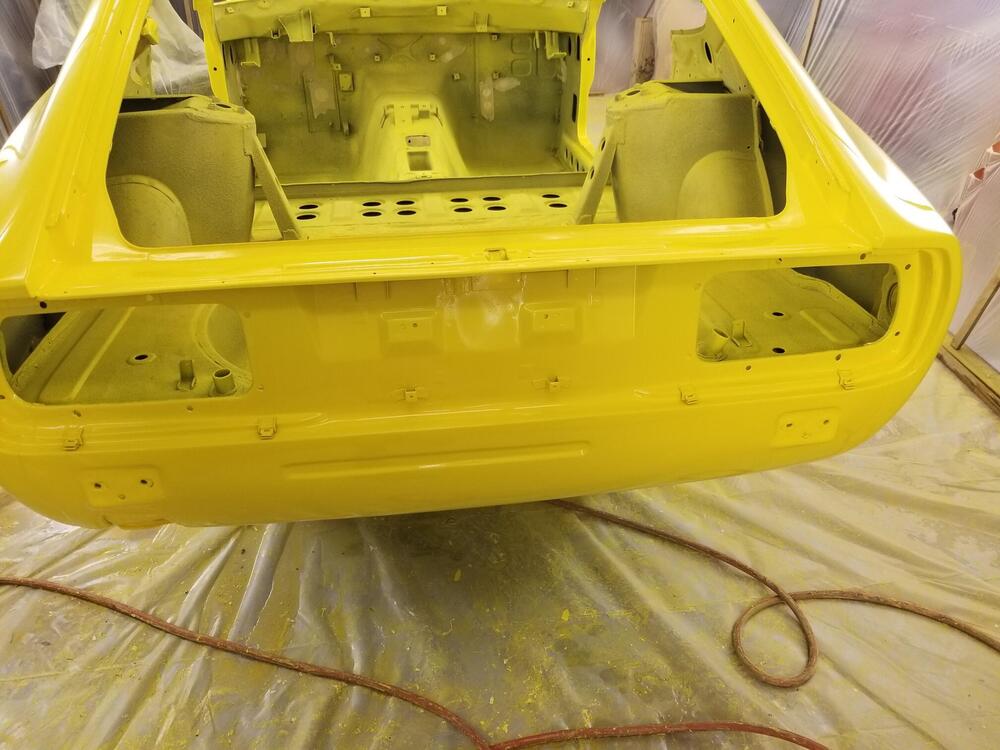
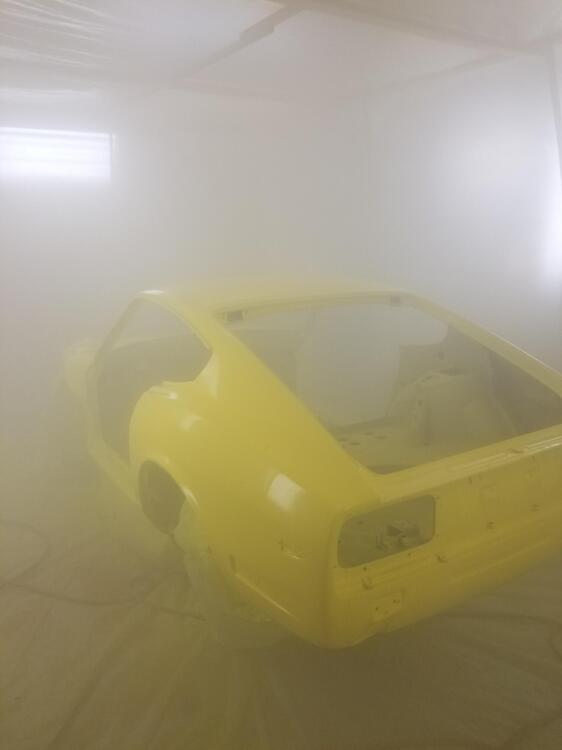
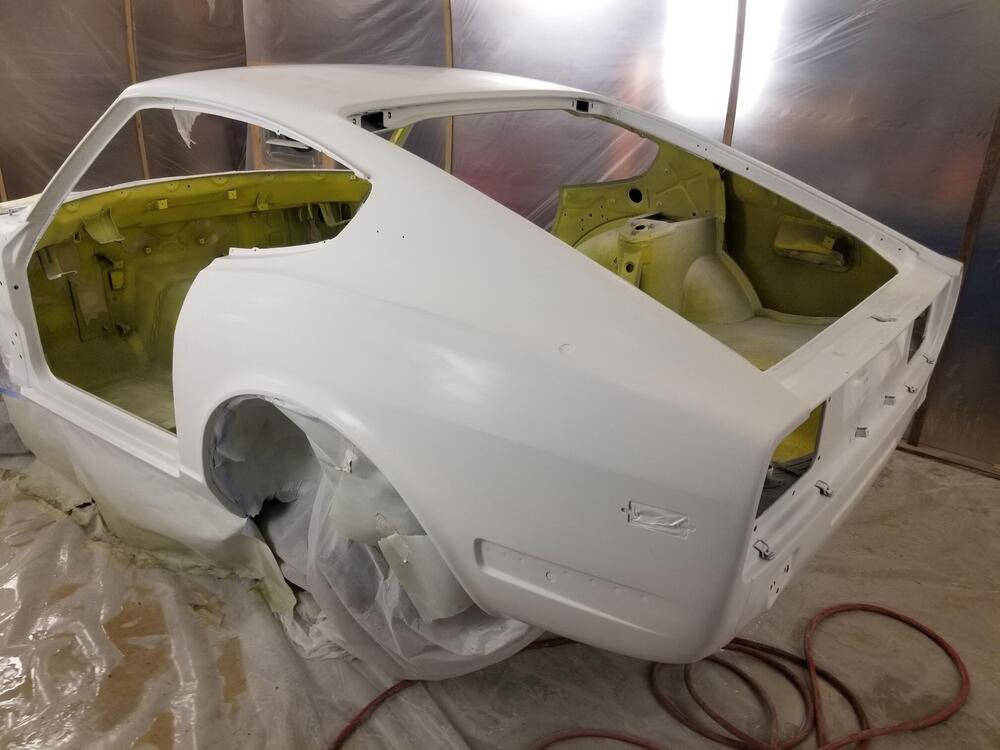
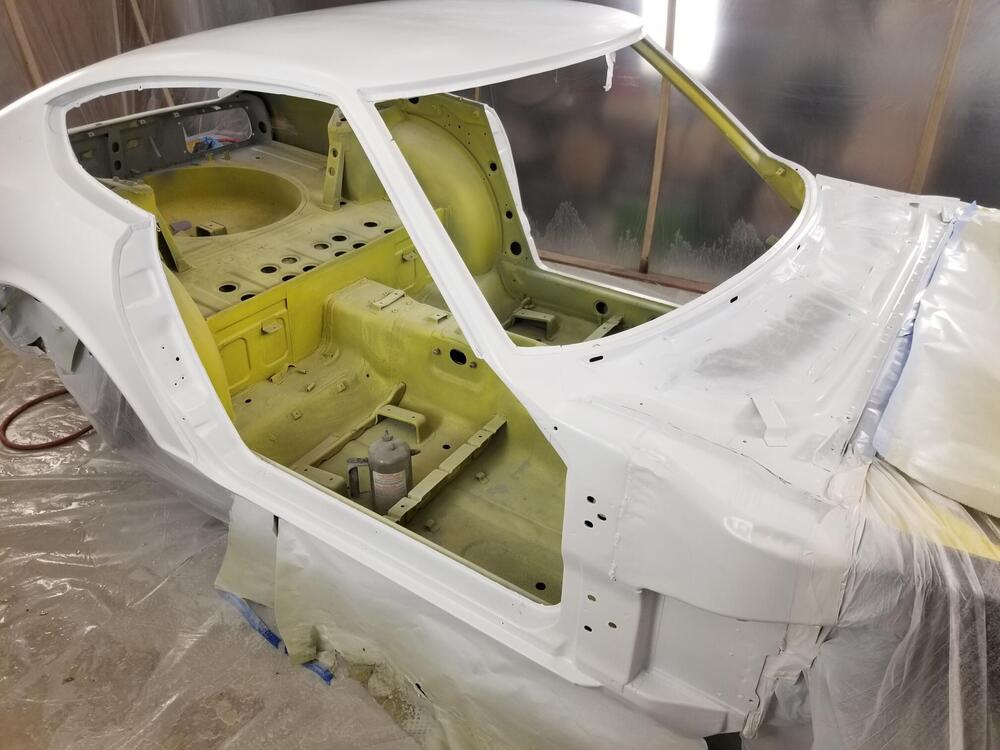
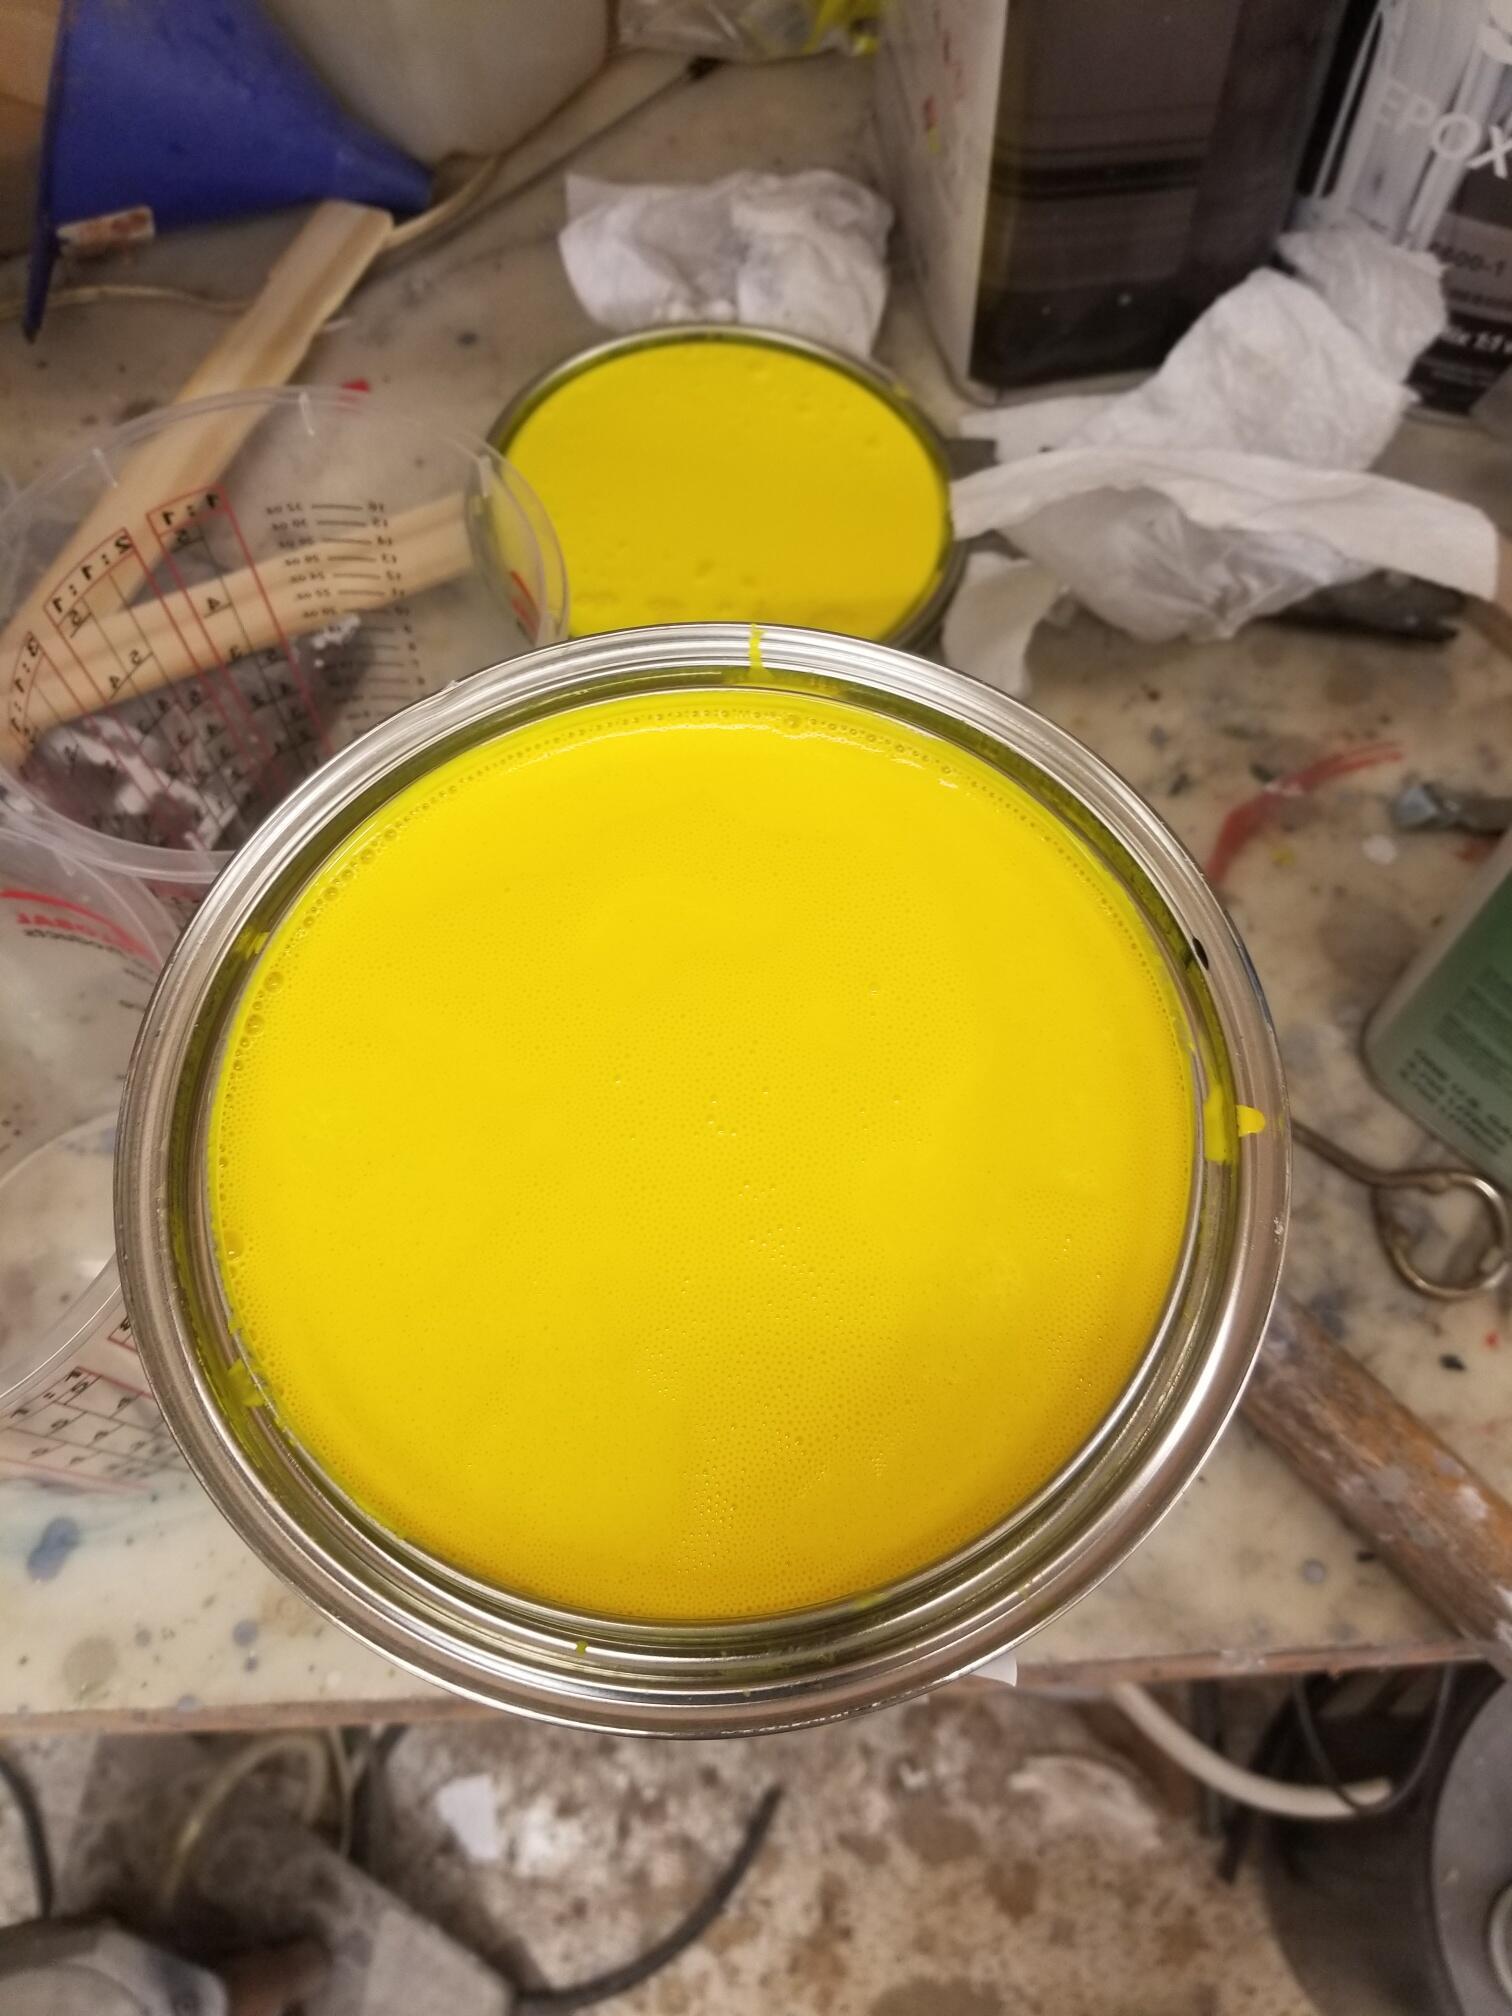
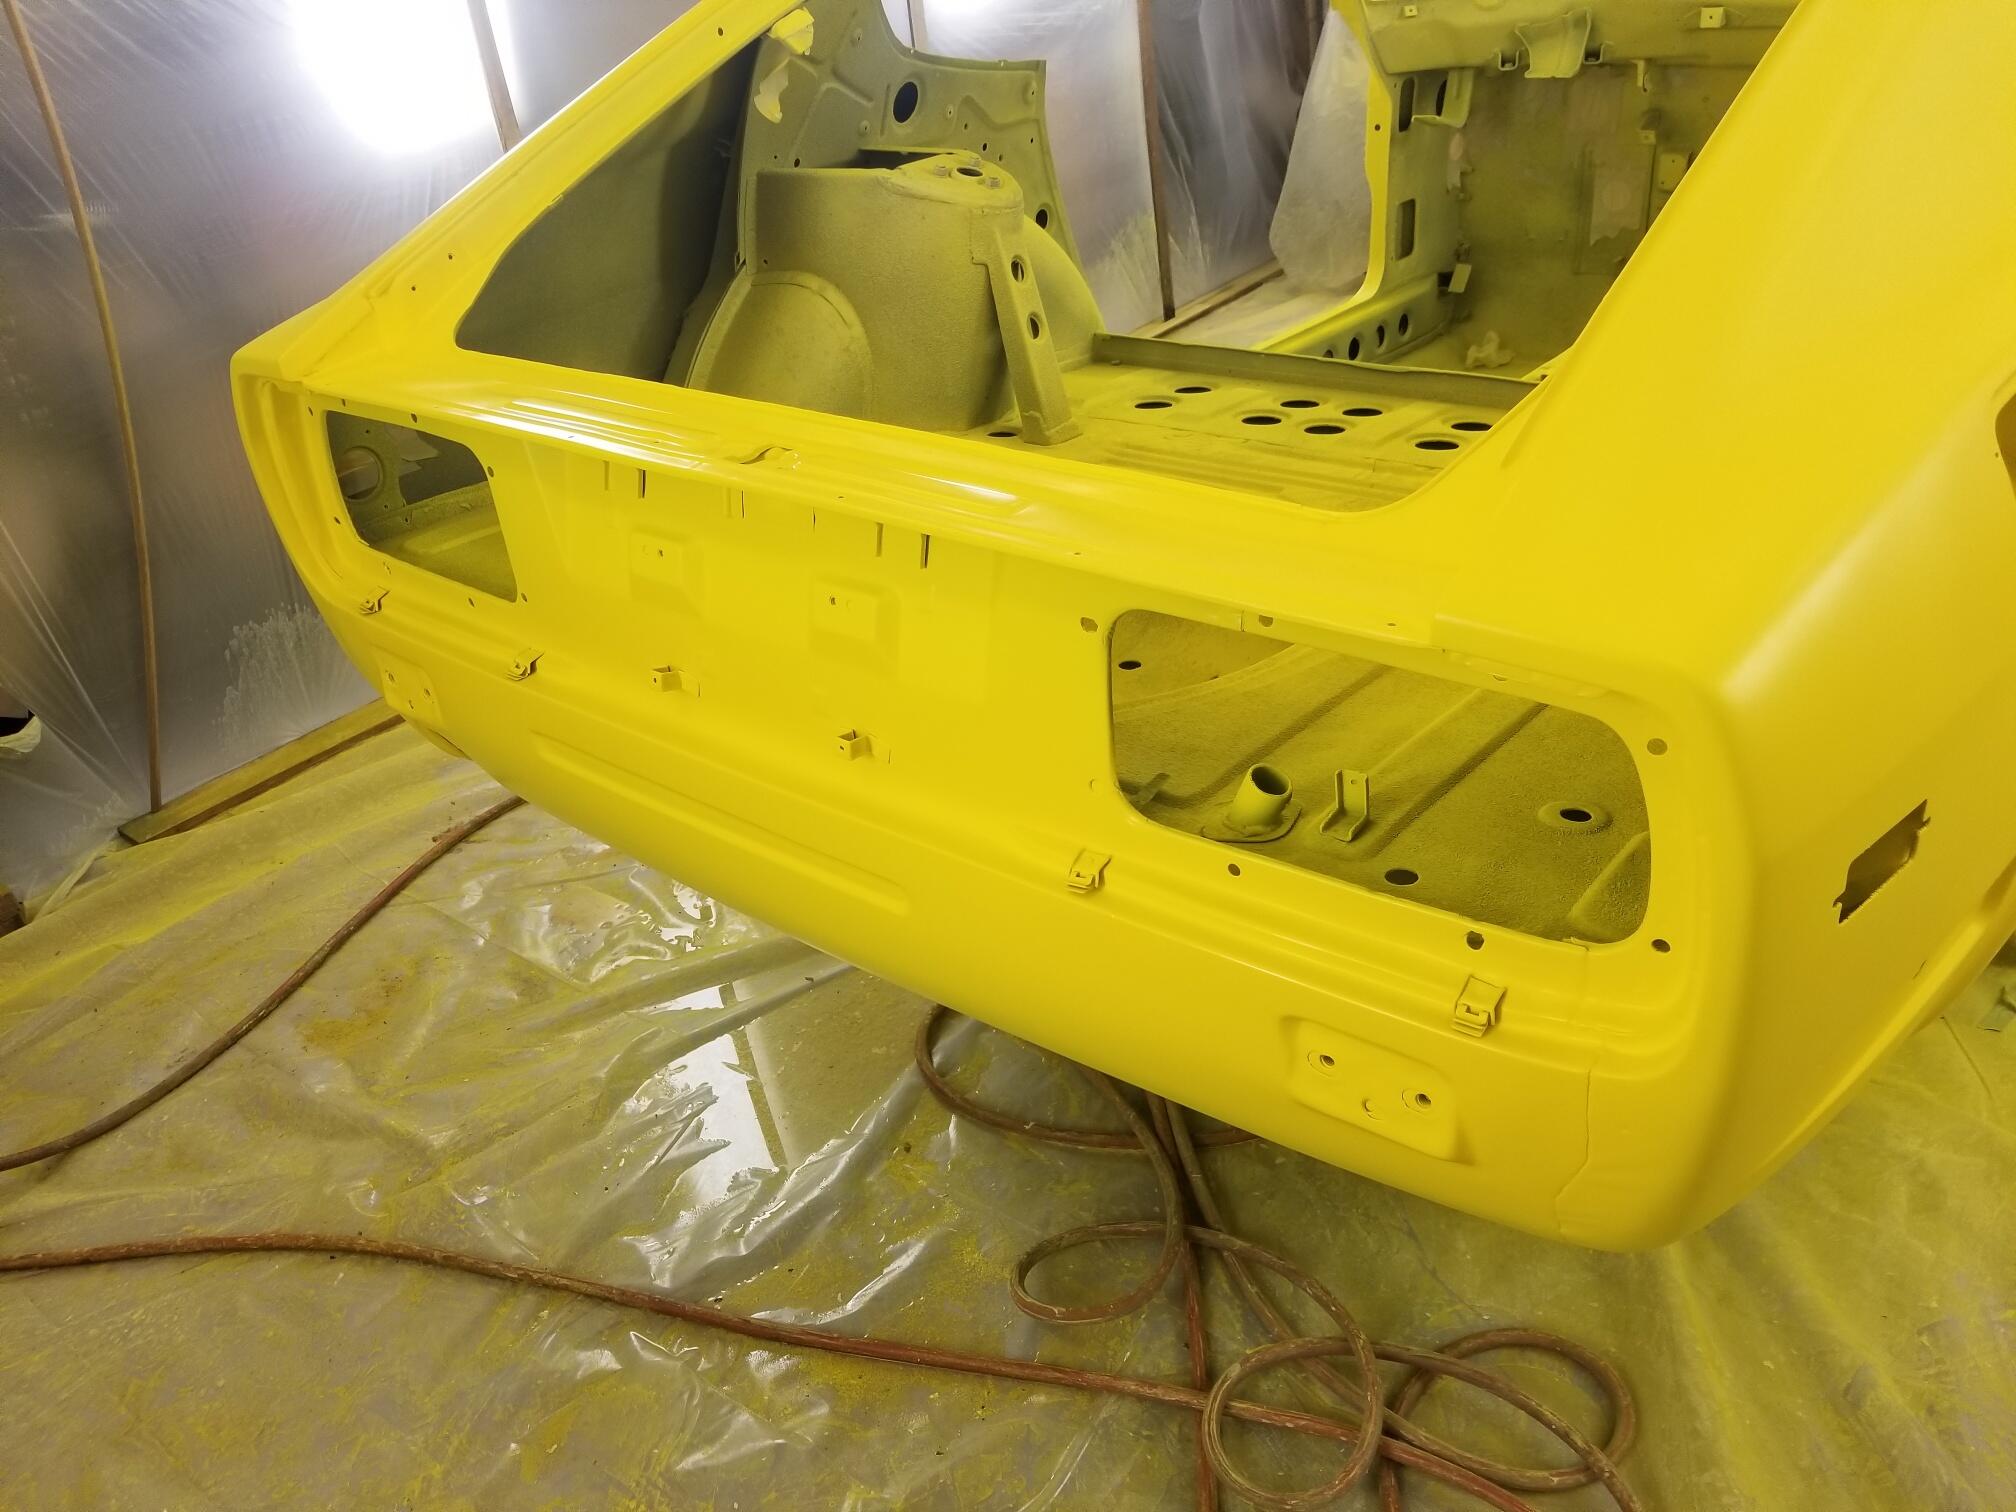
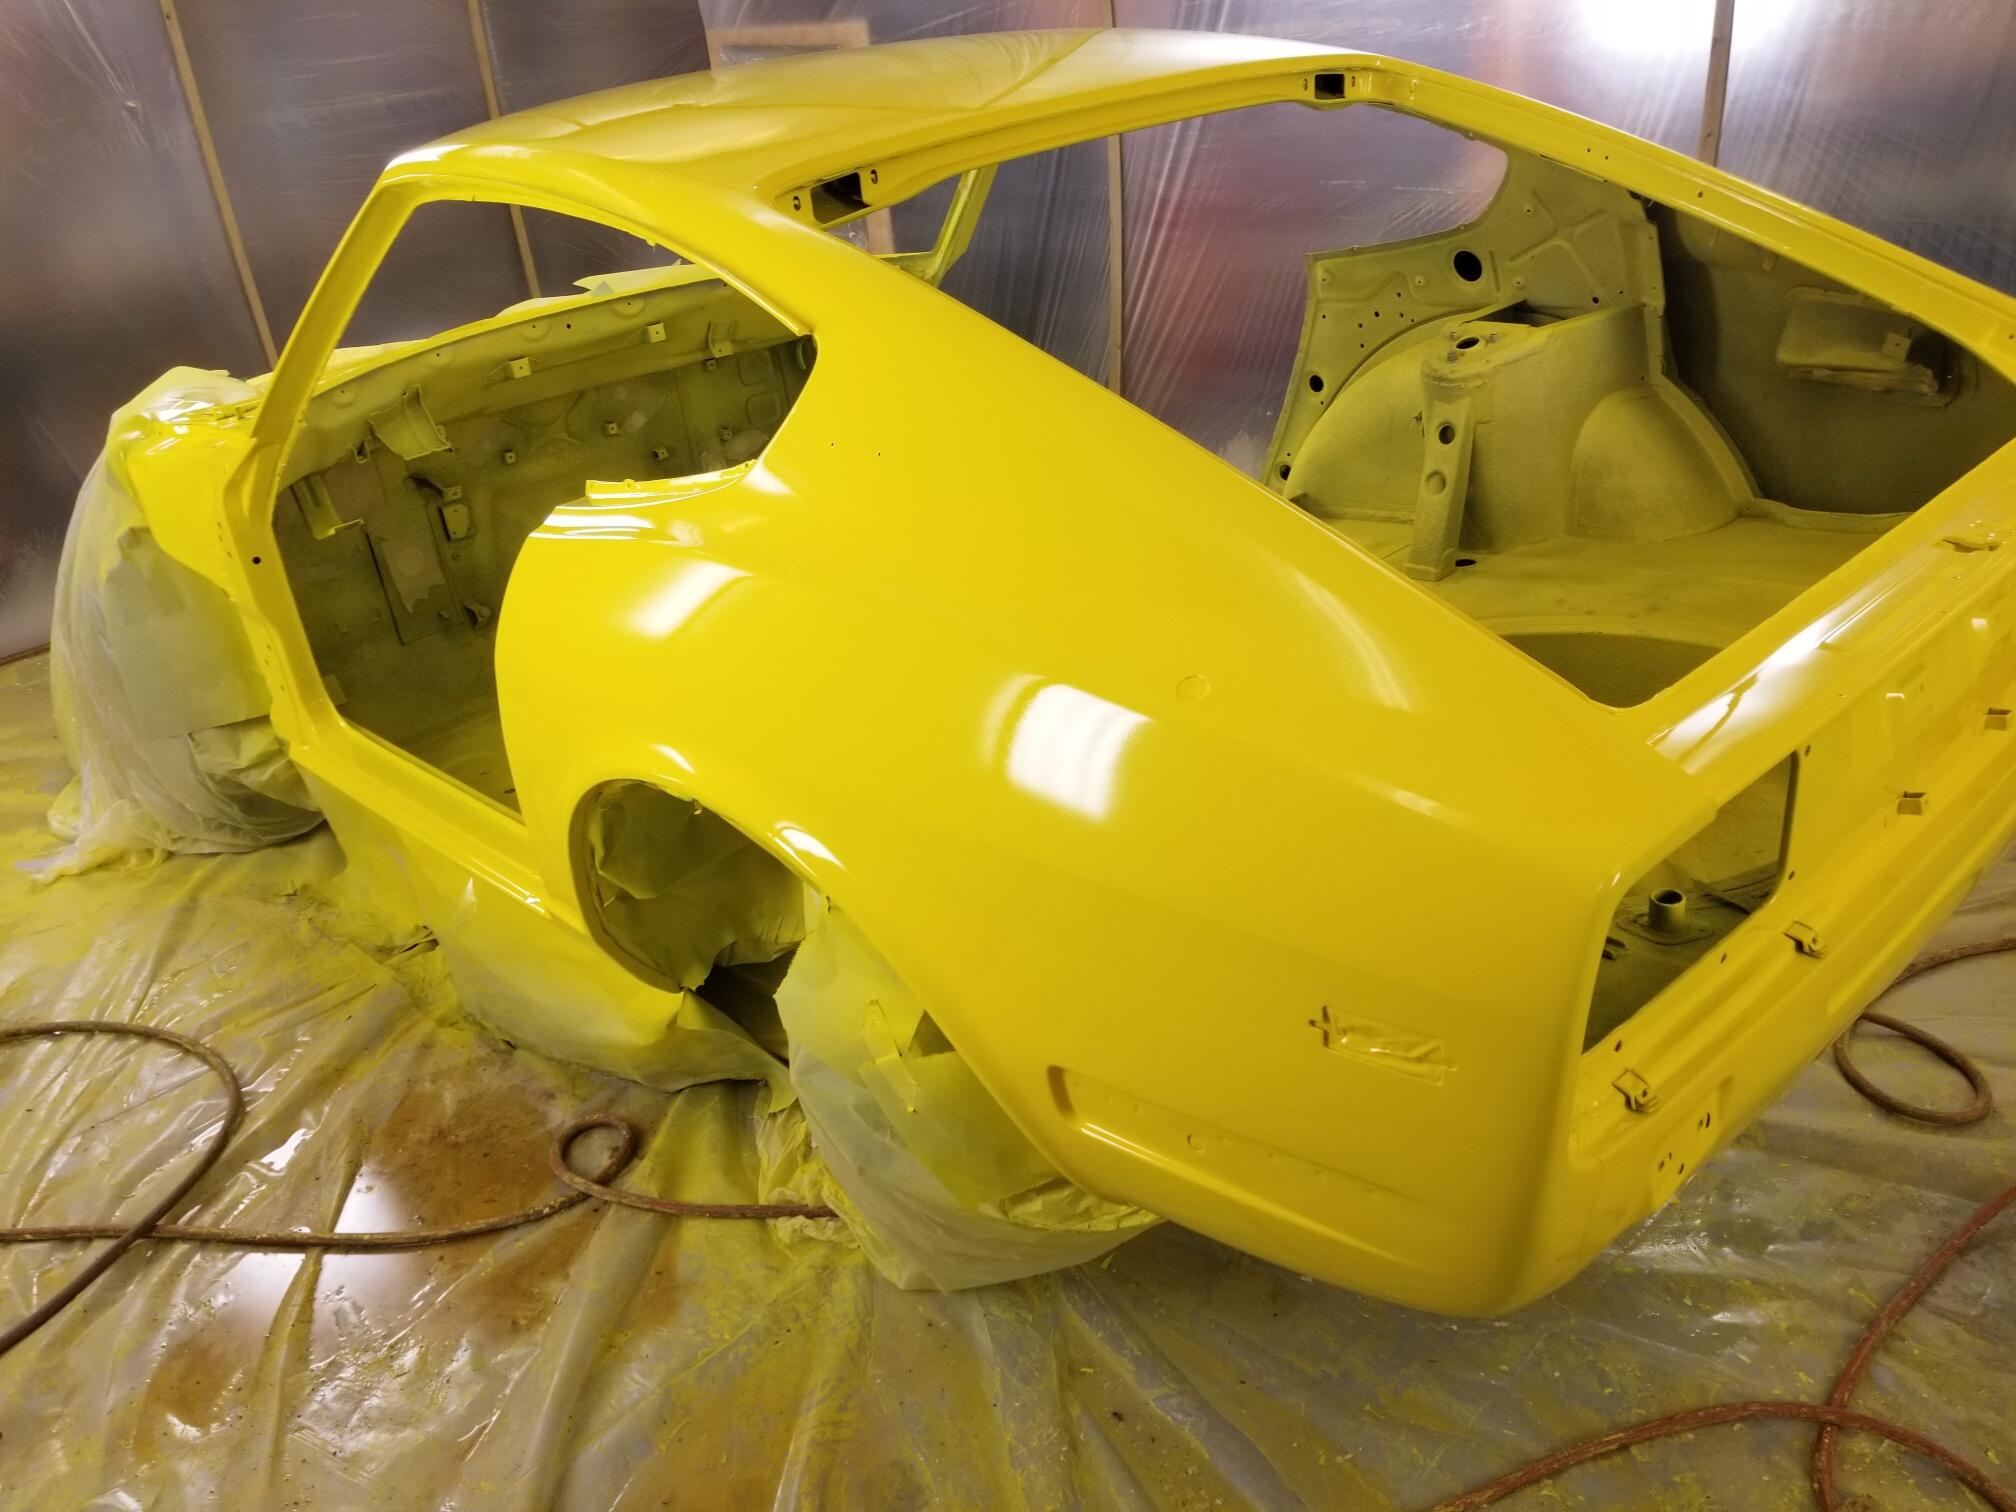
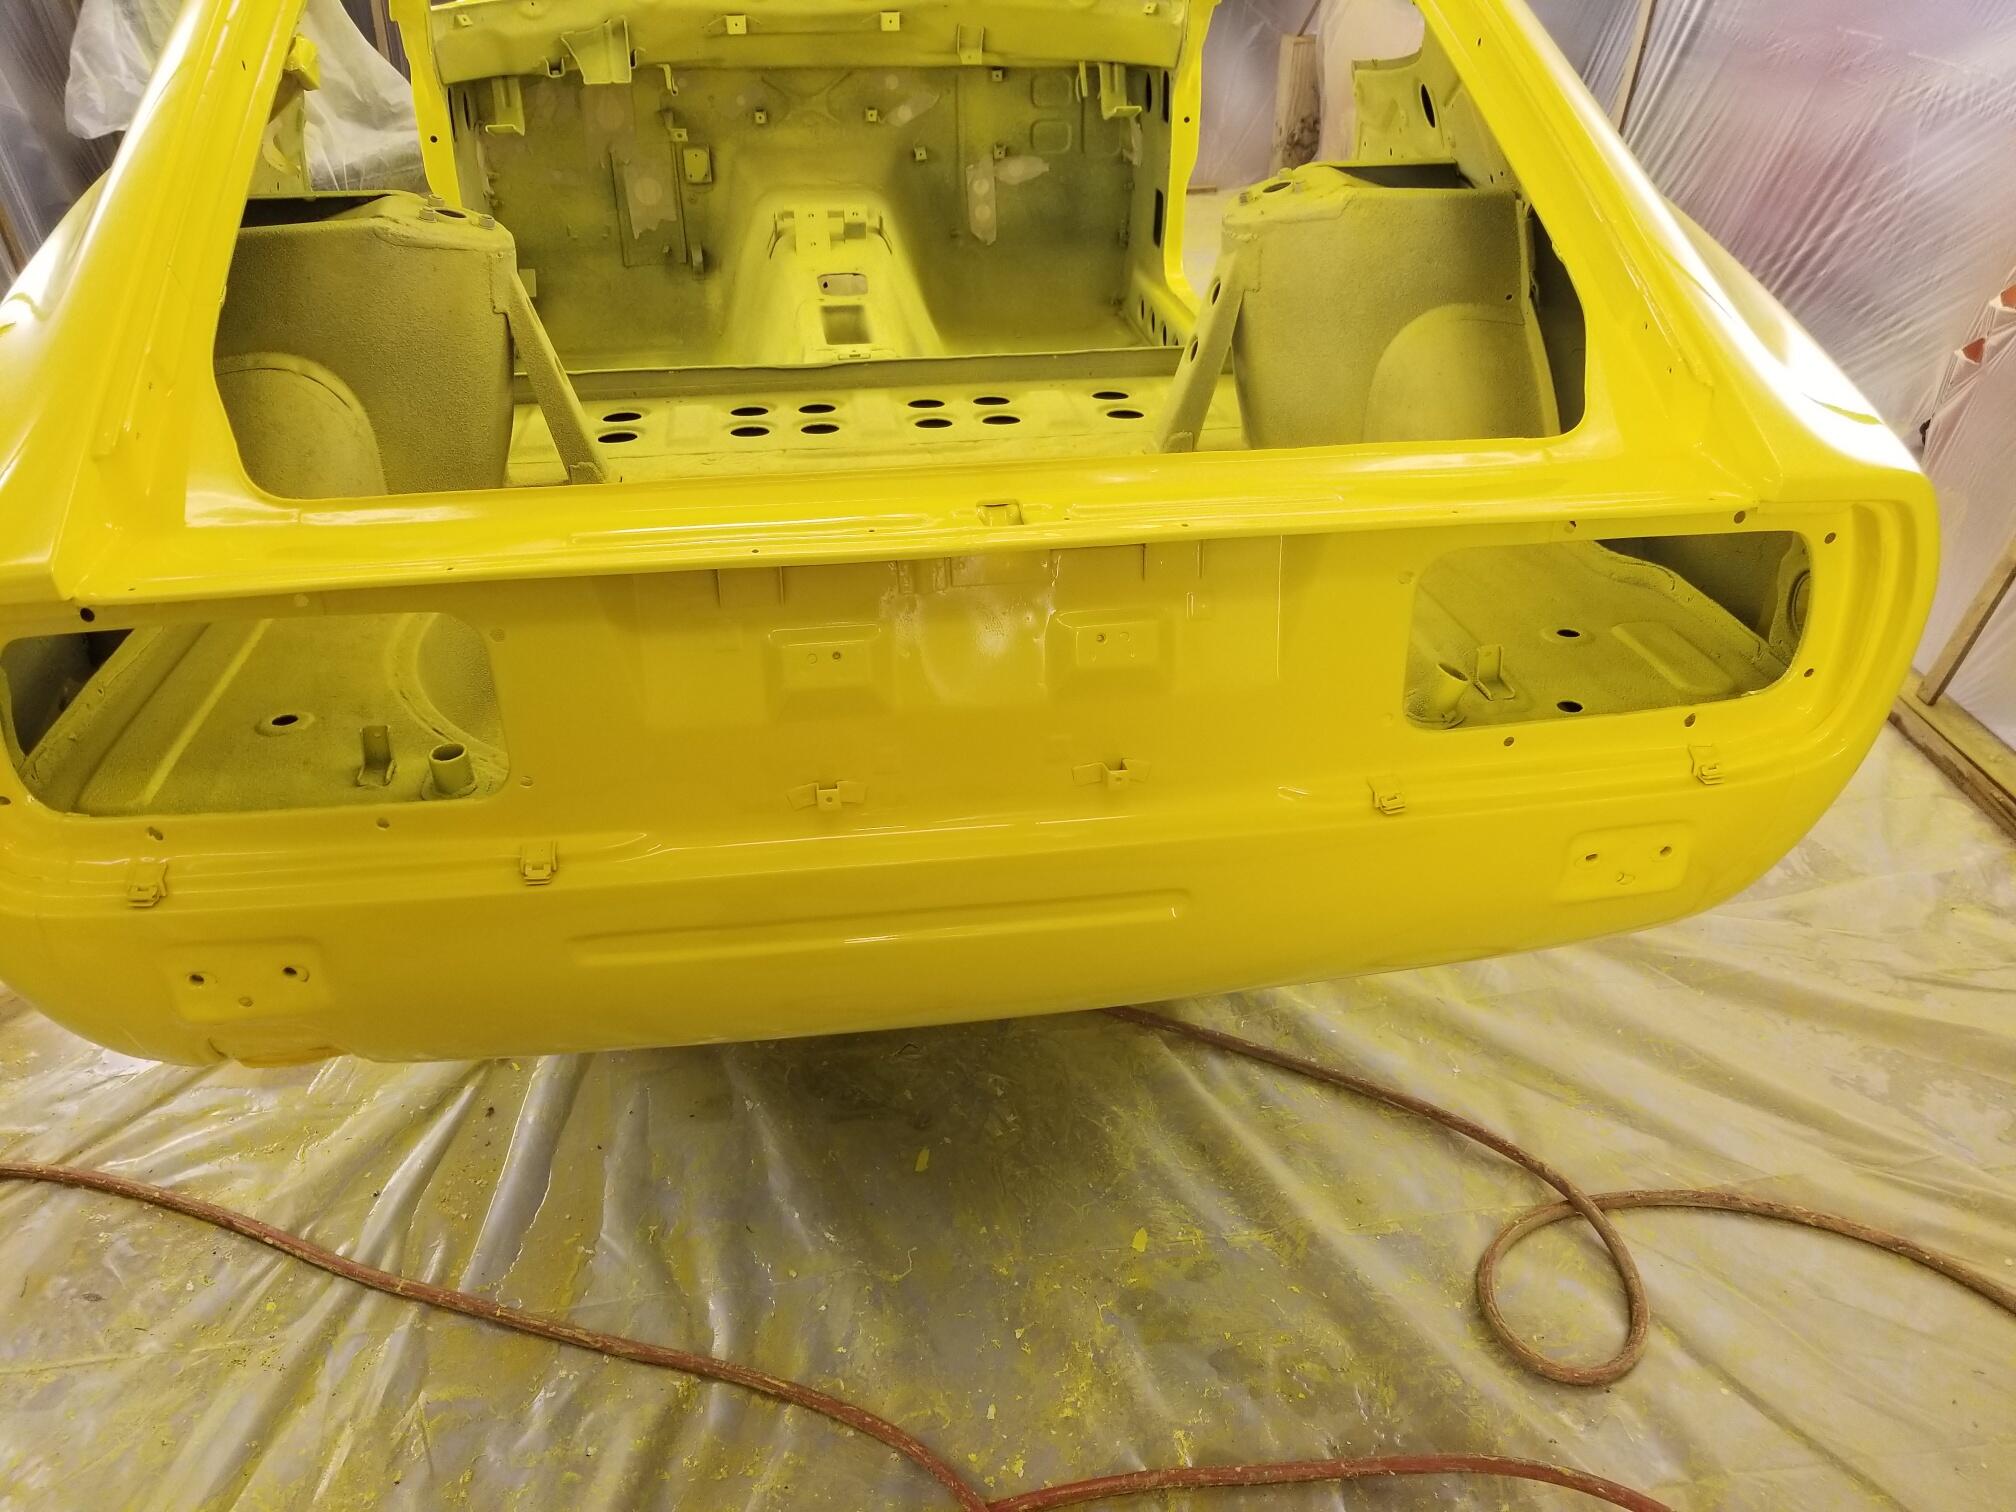
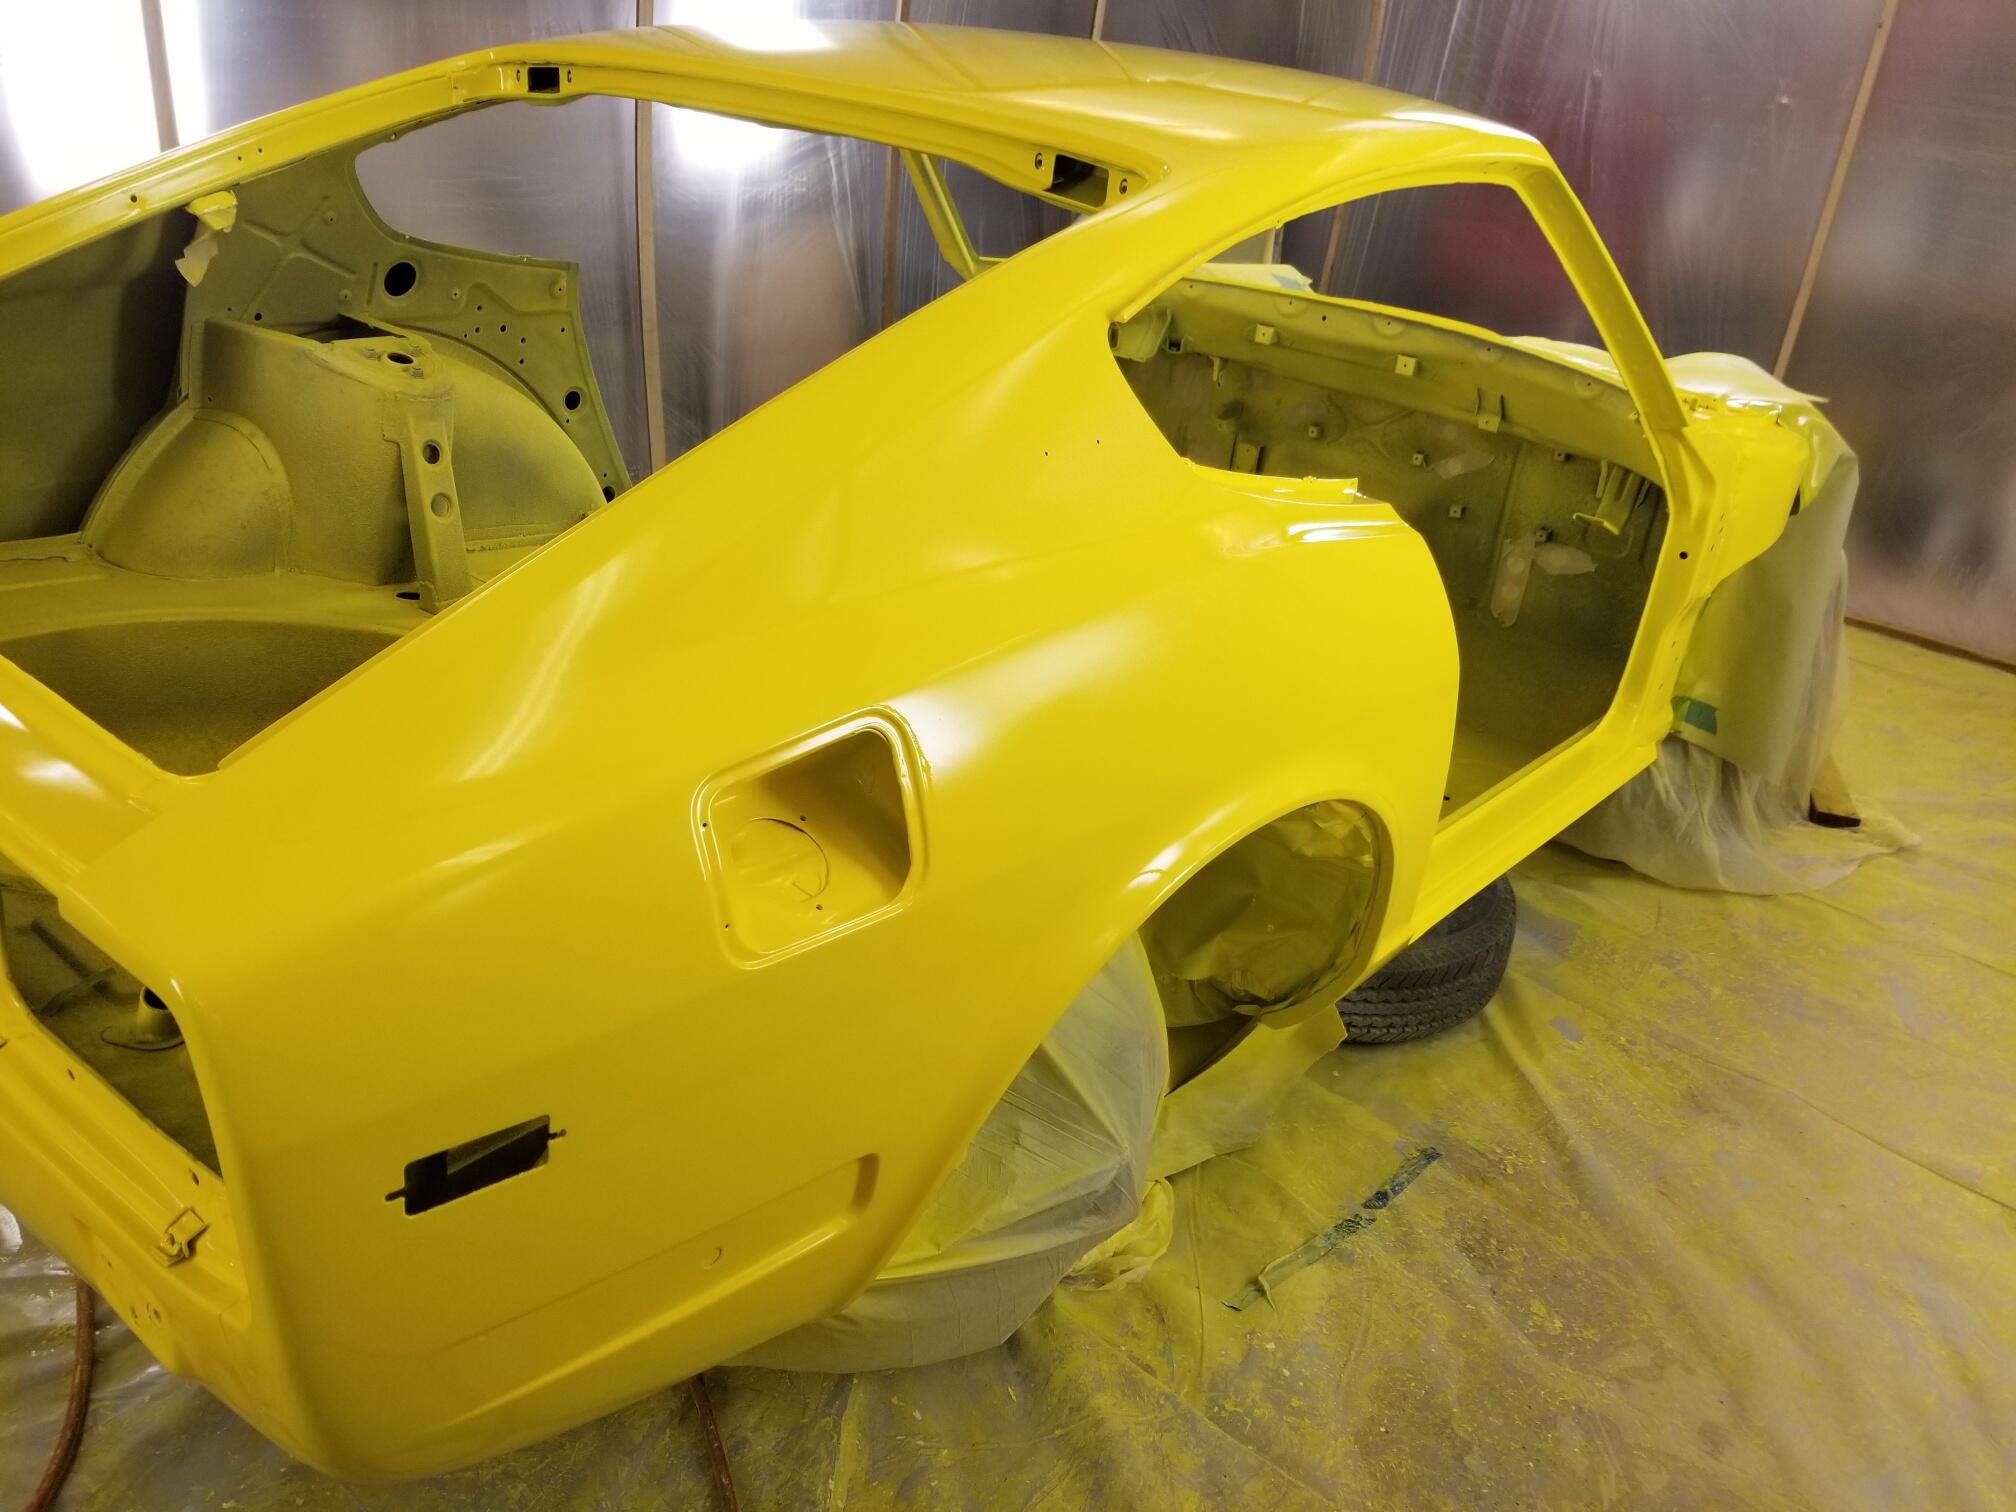
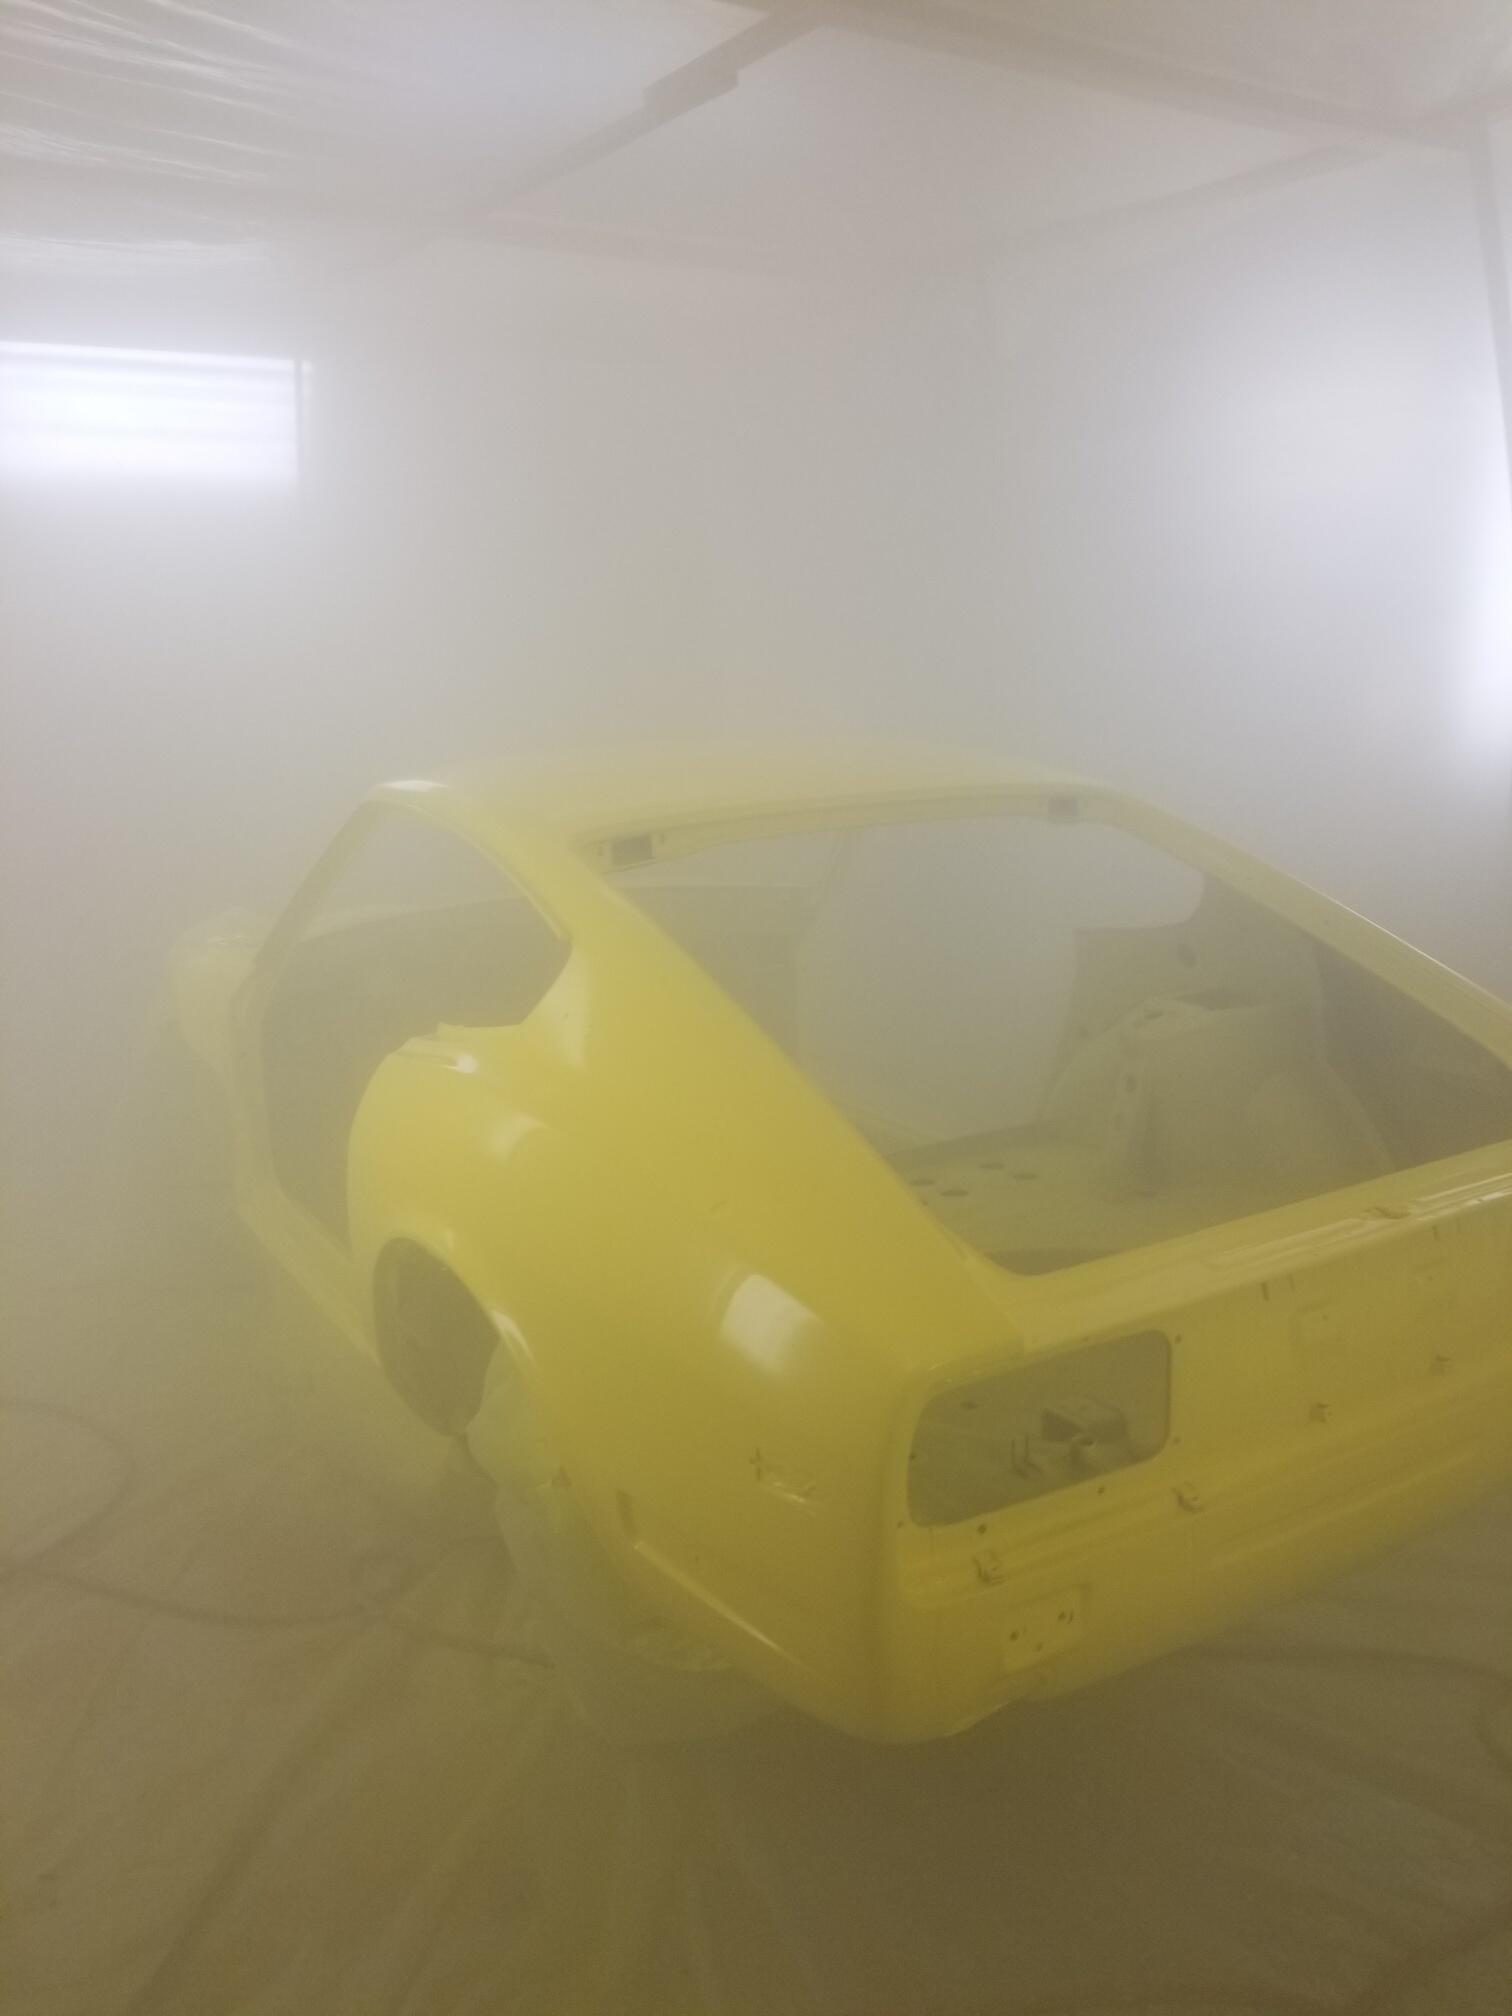
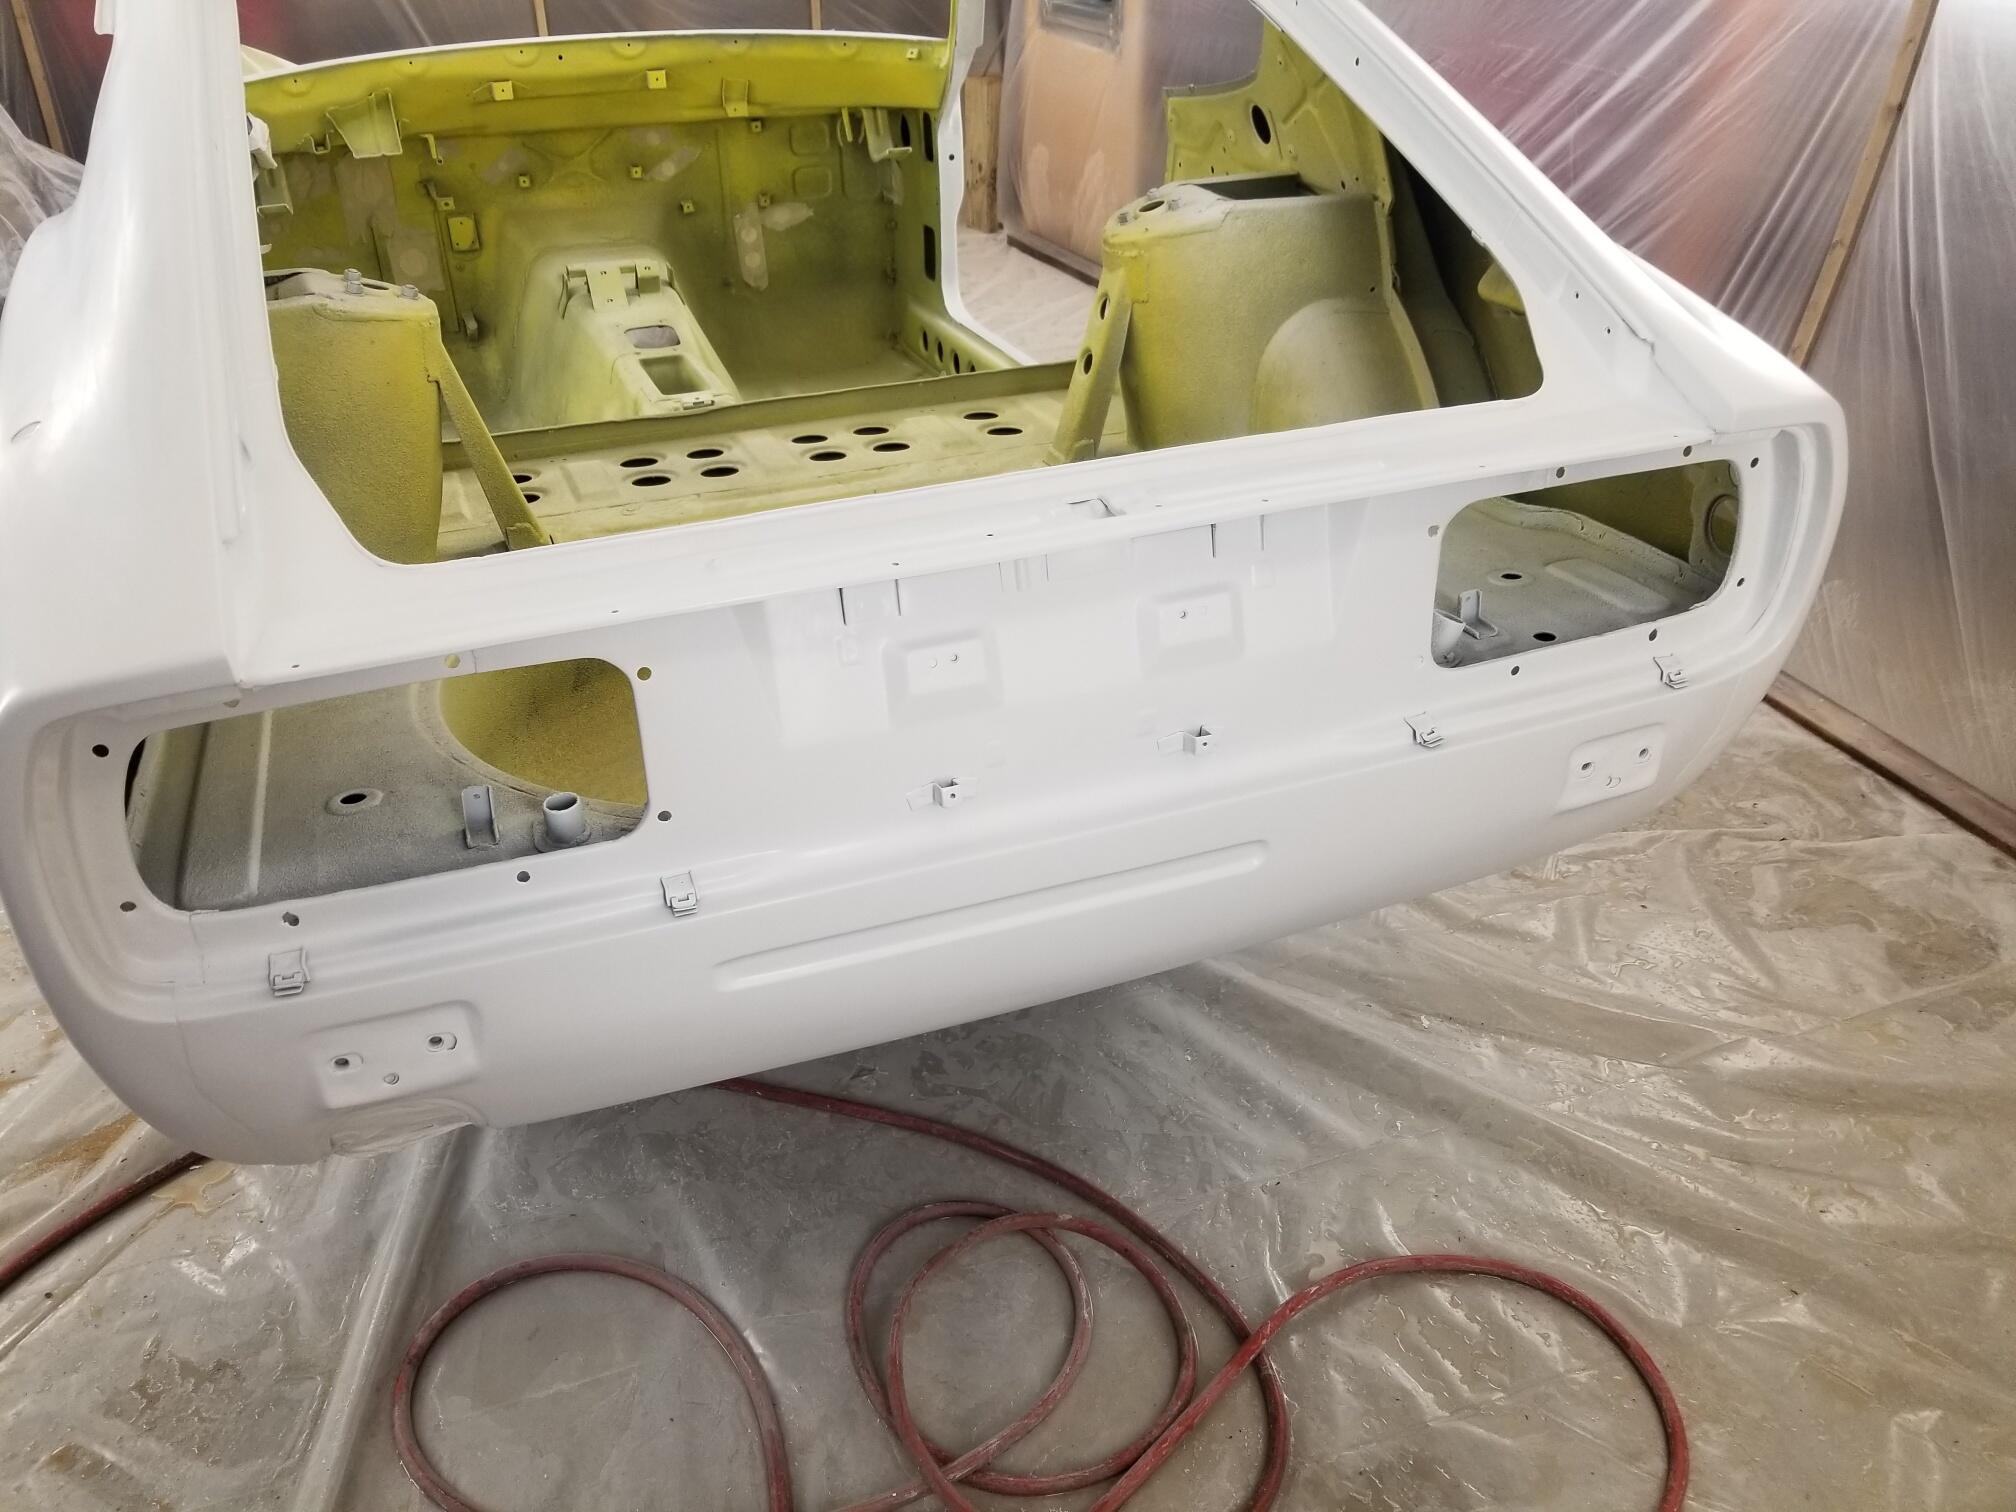
3 pointsToday A bright gallon Here is the yellow basecoat I think that was 3 coats of base. There were some areas that had a little gray show through and they were super hard to get covered with the yellow. It's just so transparent! 3 coats of clear. Overall, not too bad but one of my cans of clear had a little rust on it and it ended up in the mixing cup. the paint screens didn't get it all. So there are a few brown specs in the clear. I will have to cut them out. Hopefully I won't have to reclear. It's progress though. My booth didn't totally work the way I wanted. My intake fan filter ended up clogging with exhaust paint overspray coming back in another door of the shop. At the end the booth was pretty foggy! Don't light a match!! I probably should have worn my Tyveck suit but it was already hot in the booth... Colour!!!!


 3 points
 -
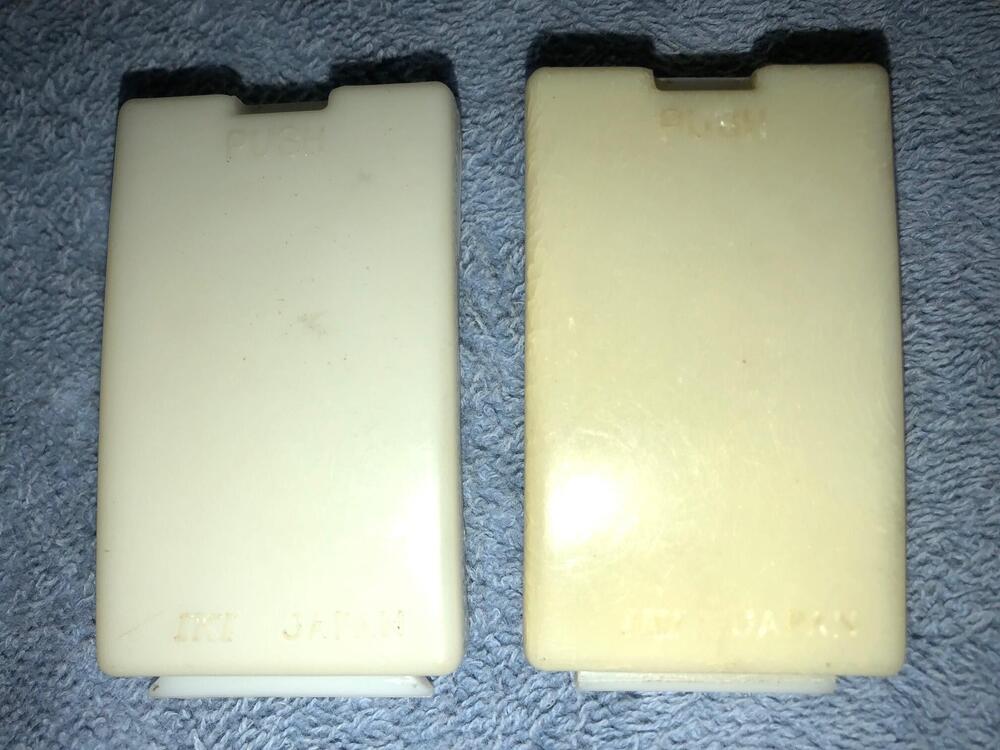
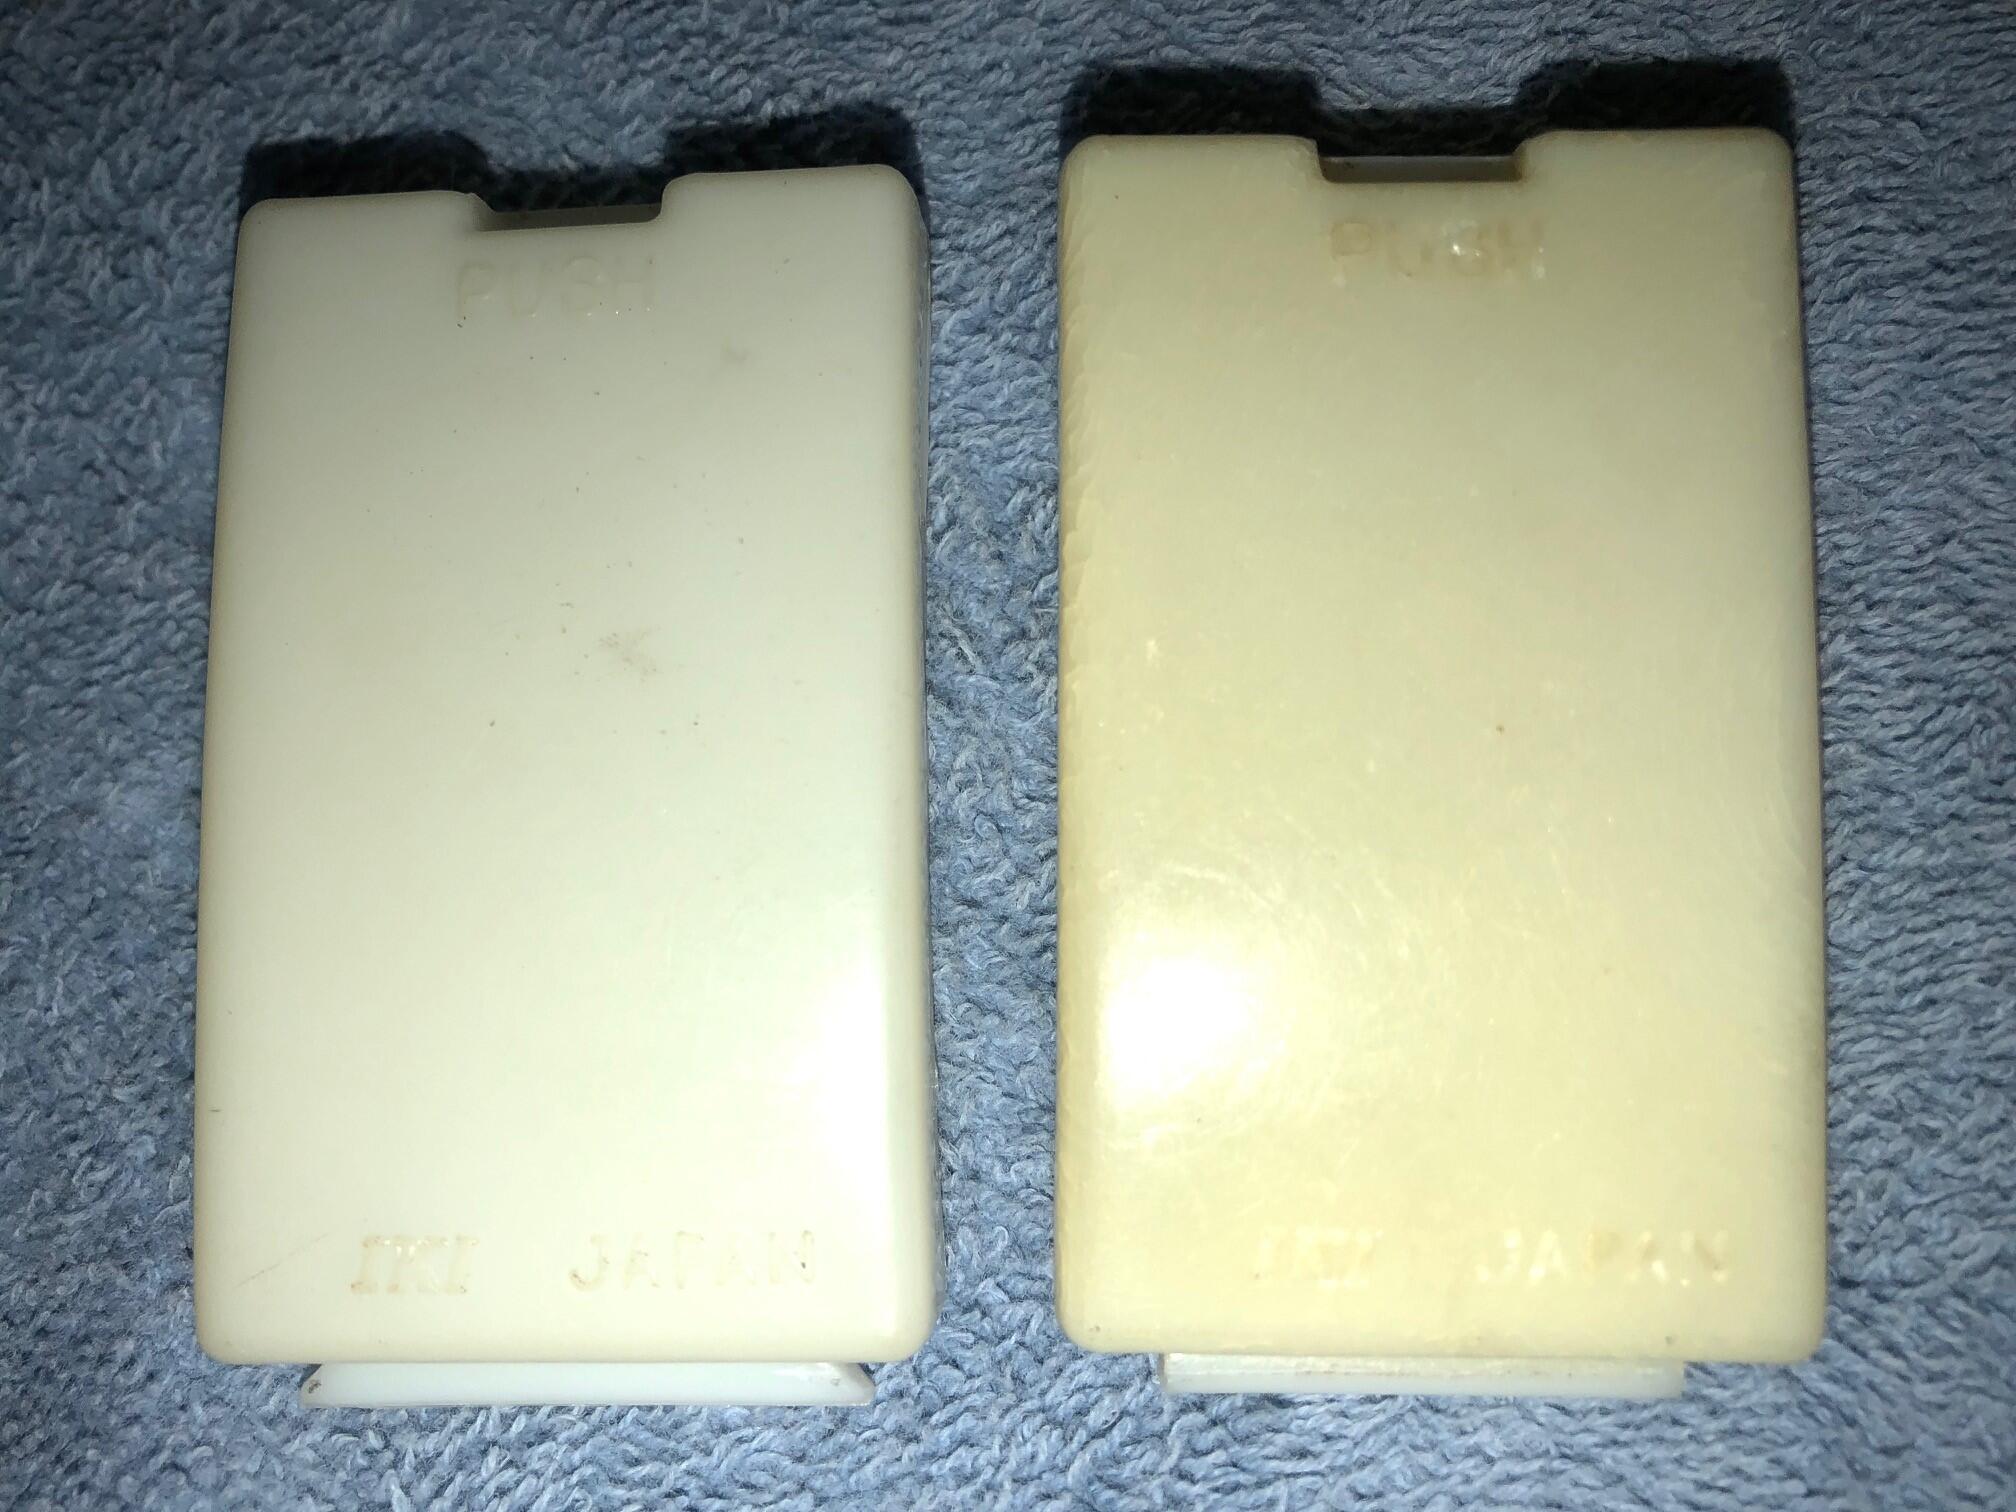
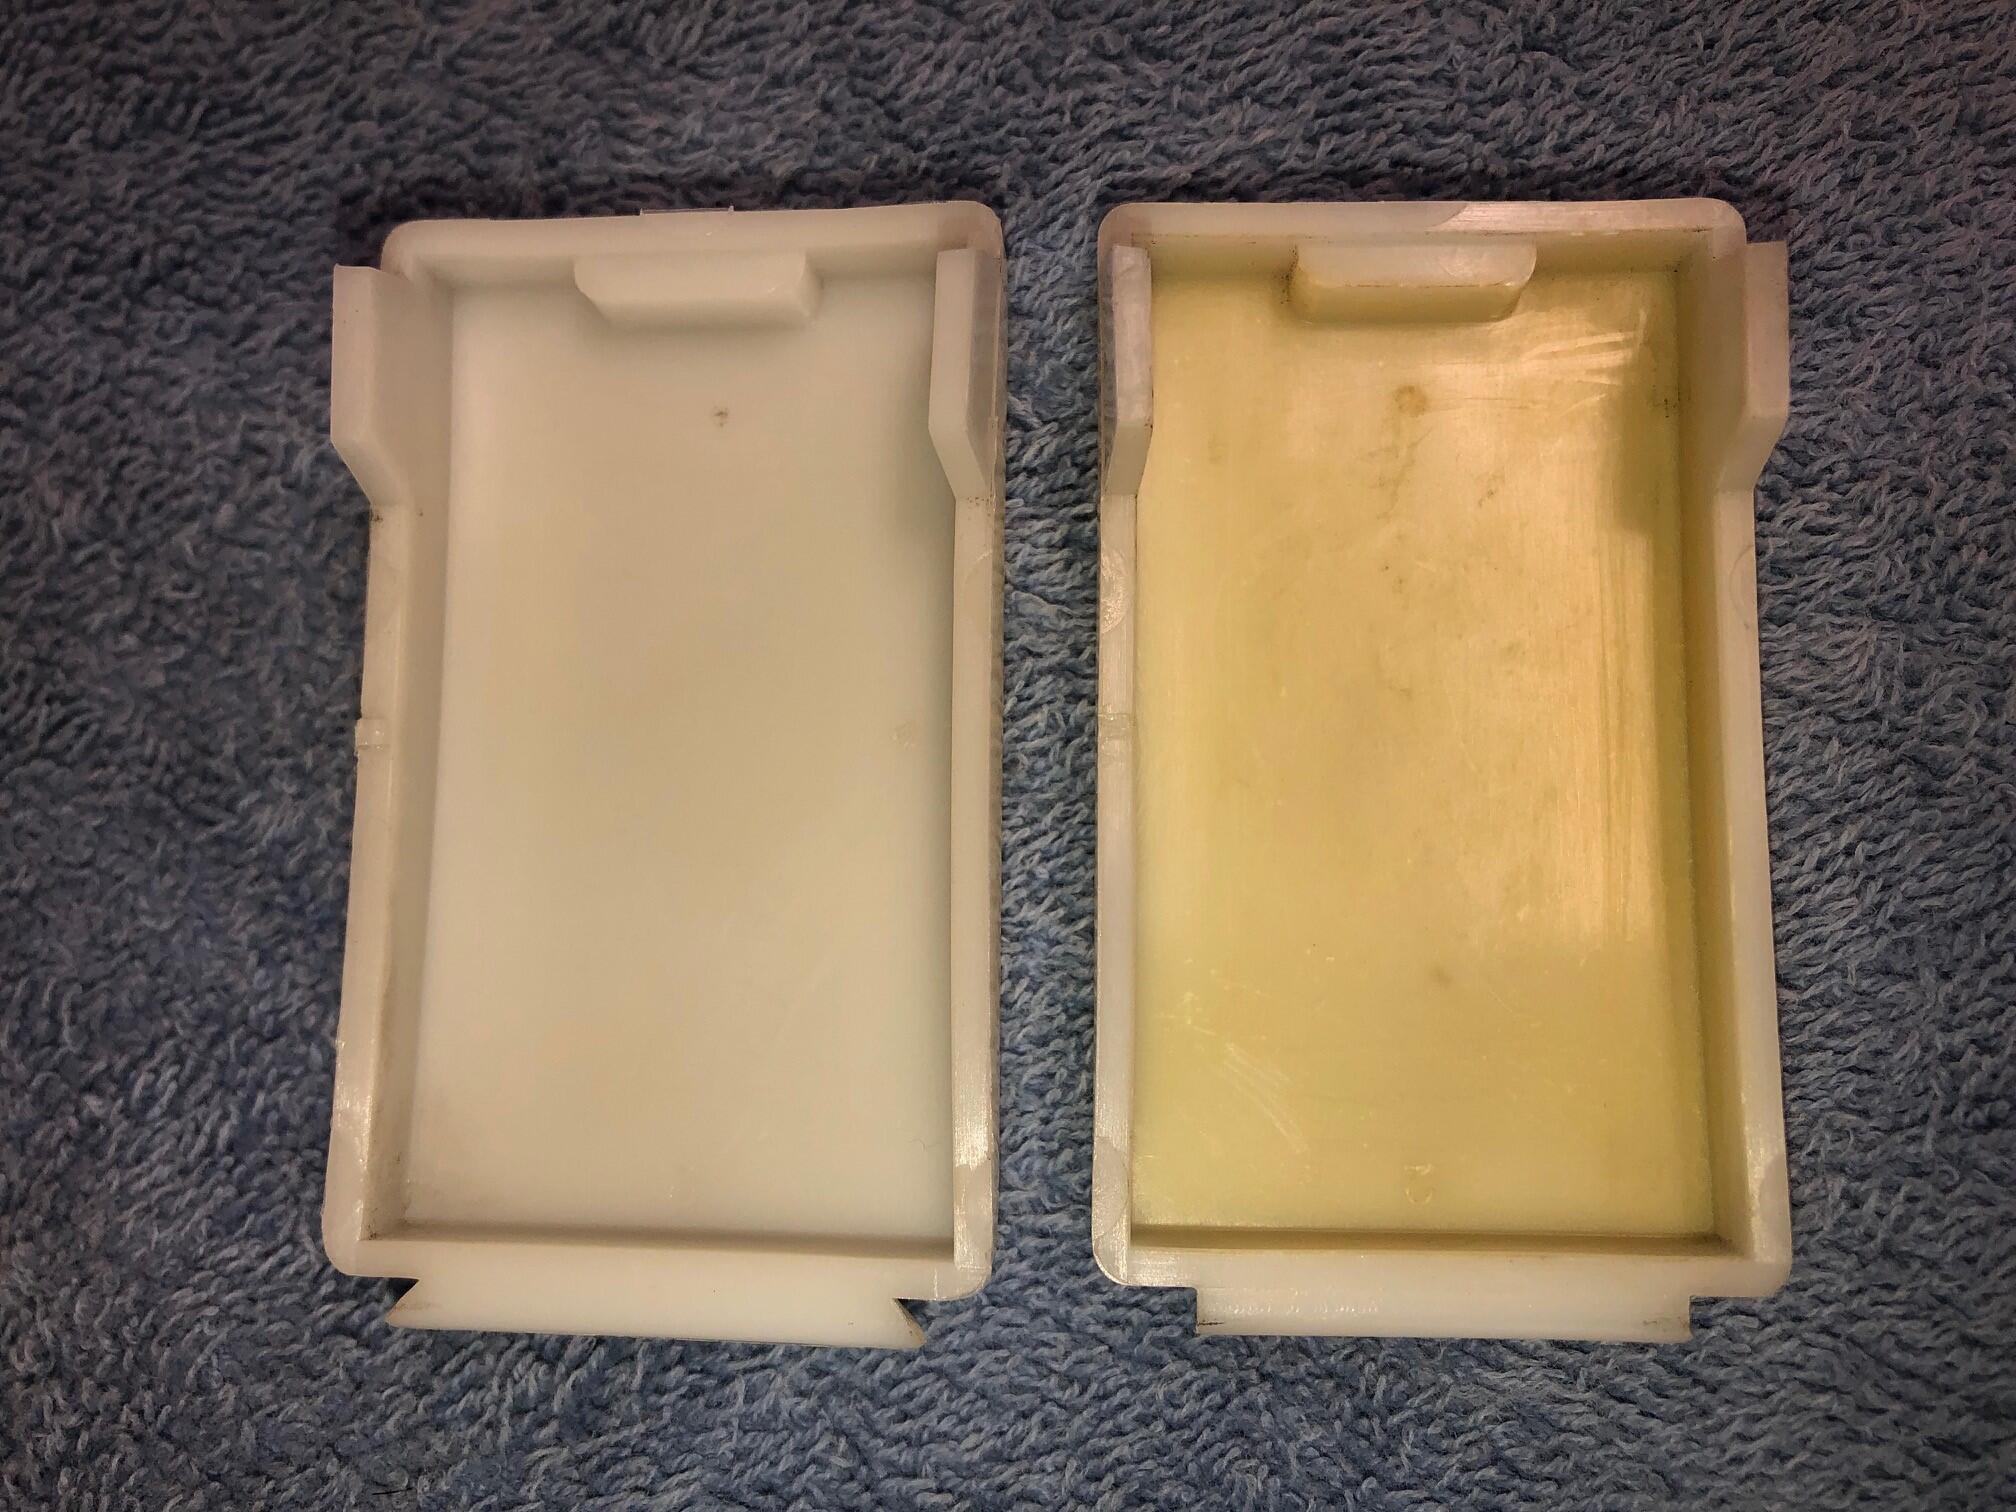
2 pointsTwo variations of lenses (note the shape of tab at the bottom of each lens: Keith
 2 points
 -
Tool #4 More of a technique. Pulling the rope around the corners. That top corner on an S30 is real pointy. But all you have to do is make circles with the rope as you pull it. Move in as big a circle as you can with about 2-3 inches of rope between your finger and the rubber. Rotate in the direction that moves the rope along the easiest. Watch the rope where it goes into the rubber to see which direction I mean, generally CW if your moving right to left at the bottom left corner for example. Keep making circles while you pull. And tool #4a, wear a leather glove while pulling rope, takes the pain away from the rope ripping into your delicate little patties with the rope wrapped around the digits and palm. You can concentrate better and whine less.2 points
-
Ok, this will seem real obvious when i say it, you’re going to kick yourself for not thinking of it, but here goes. Use two ropes. Start center top AND center bottom. Pull the bottom left and right a little, pull the top left and right a little, keep working out to the edges. Stop about an inch short of the sides. Keep prying the gasket all the way over the pinch weld with a flat plastic tool all the way across the top and bottom. Just put the tool between glass and gasket, and push the gasket down and toward you, away from the glass, and push it down hard over the pinch weld to seat it fully. Do not pry against the glass, no need to, you are pushing the rubber lip all the way (down at the bottom, up at the top) over the pinch weld. Once both top AND bottom lips are pulled over the pinch weld and seated, that sucker is trapped in place. Now go around the bottom two corners and up the two sides with the two separate ropes and finish by going around the top corners. Bang you’re done. I did the rear glass by myself. Did not require any outside pressure. Yes I went out a couple of times and taped the glass/gasket to help it lay as deep and flat as it can. Did not struggle in any way shape or form. Took under 10 minutes from start of pulling. Z windshields “should” work just as well. They have more curvature, maybe a friend to help keep the gasket/glass flat and seated deeply as you pull both top and bottom over the lip. Should have some to do this summer, will keep you posted.2 points
-
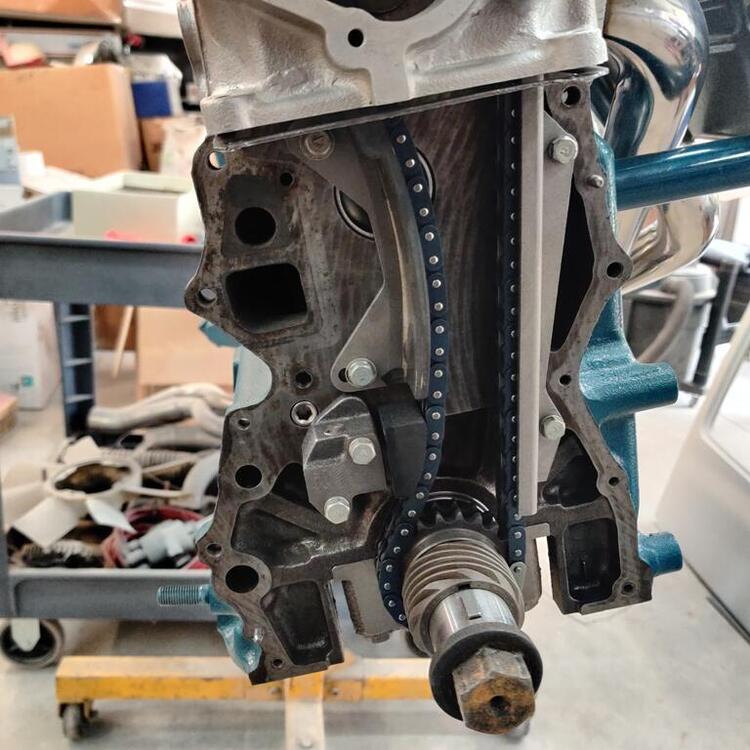
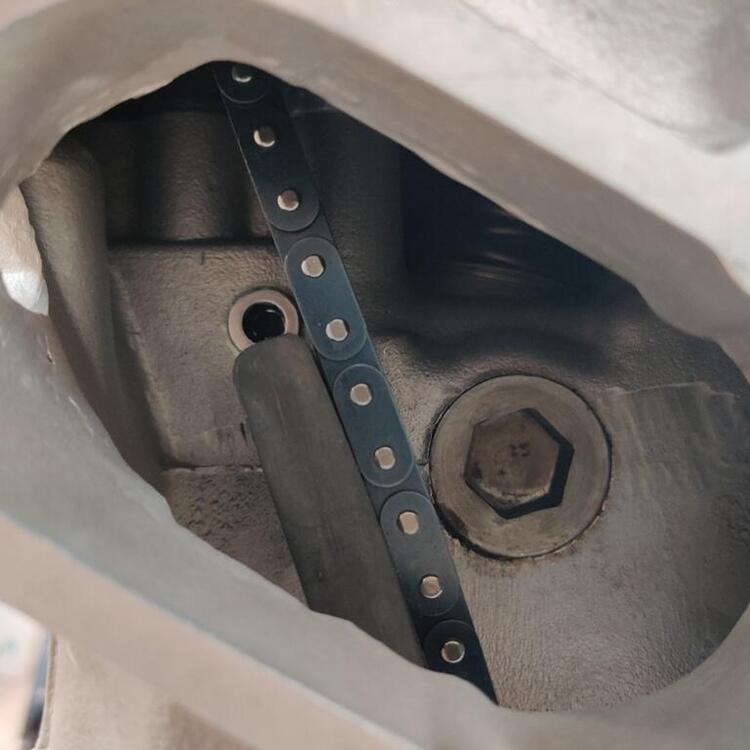
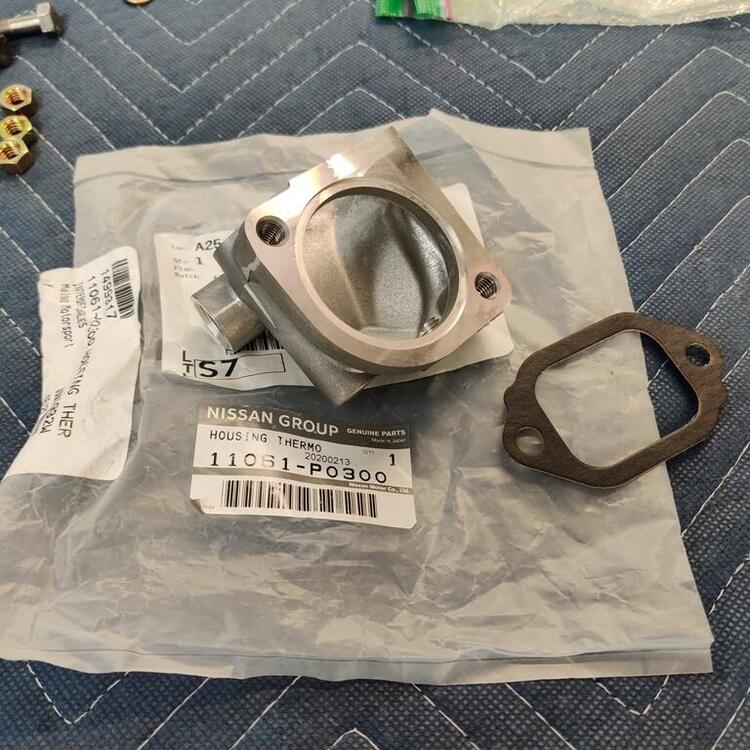
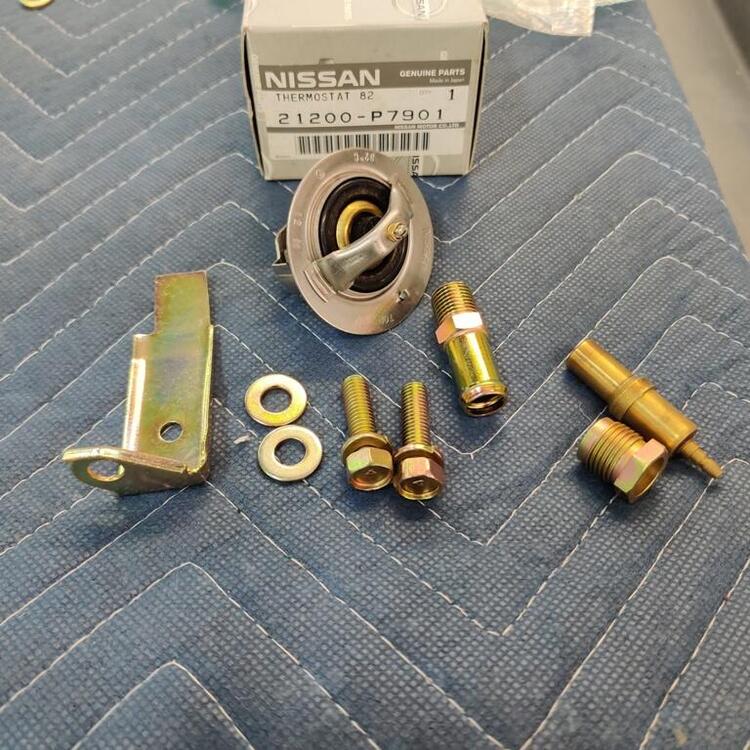
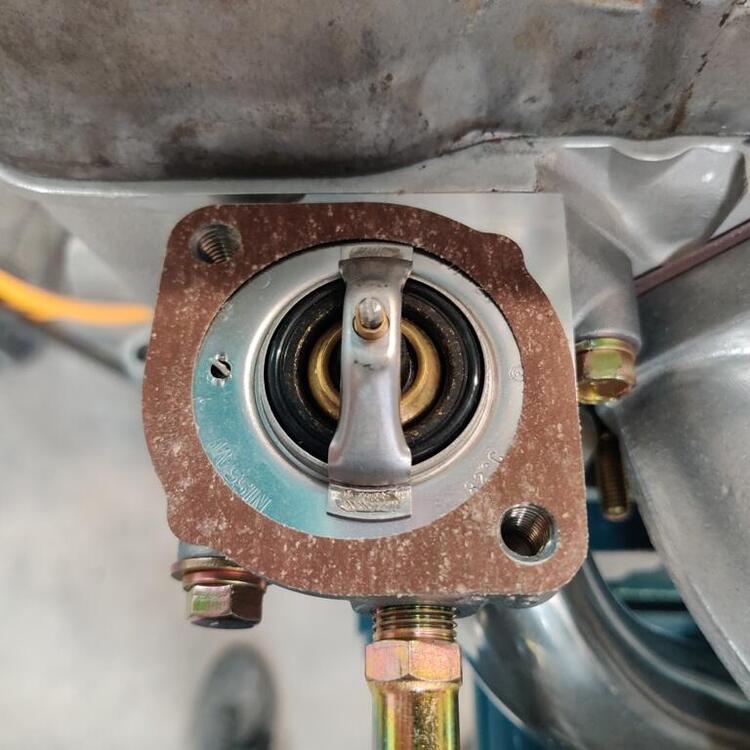
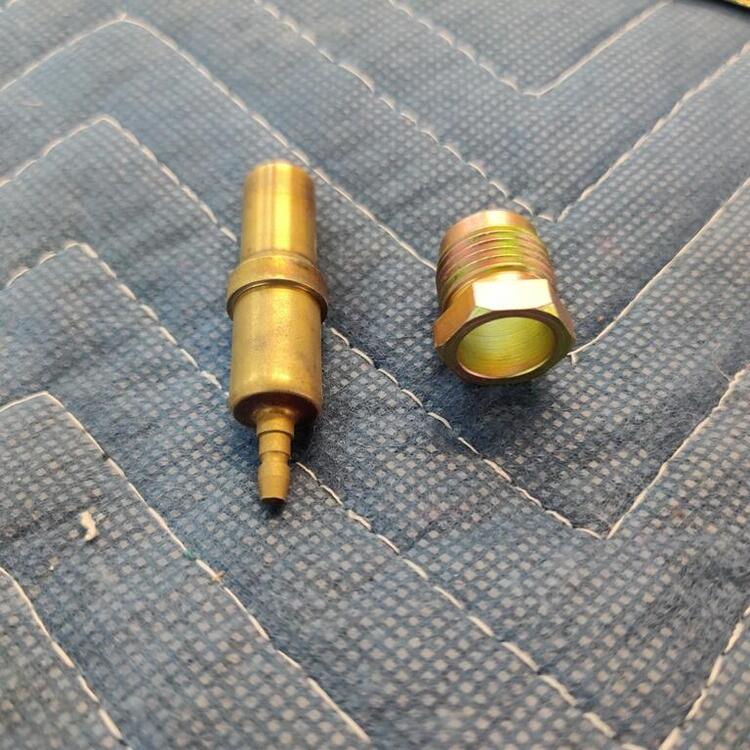
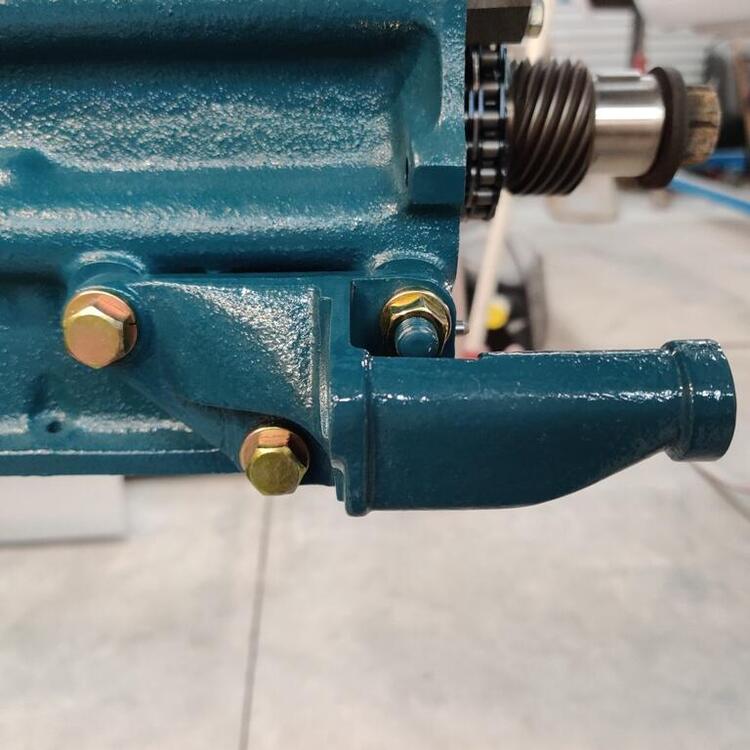
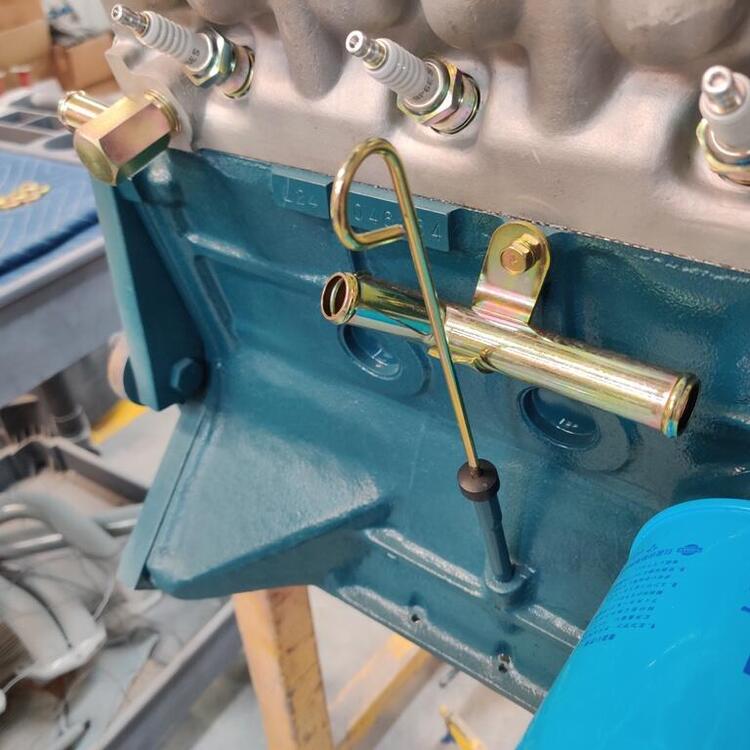
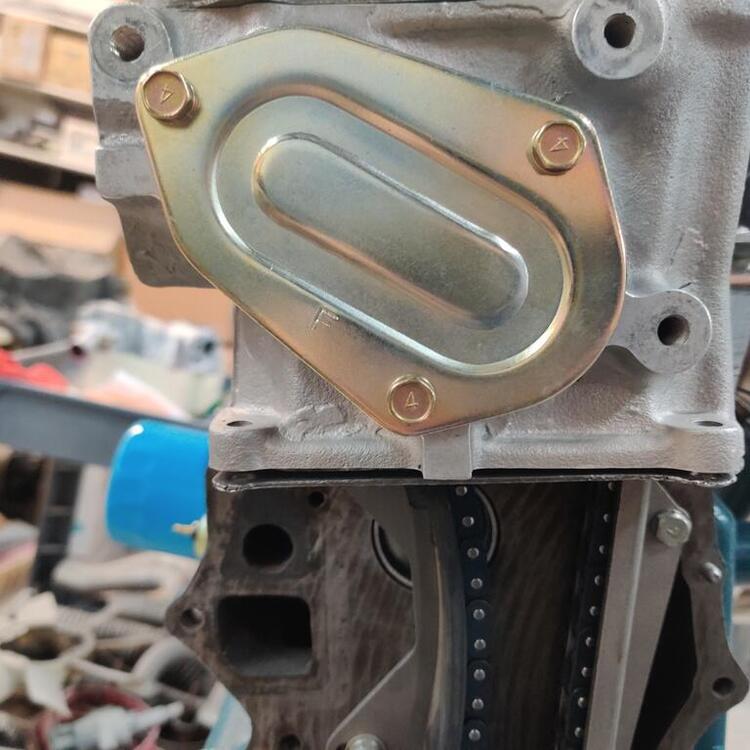
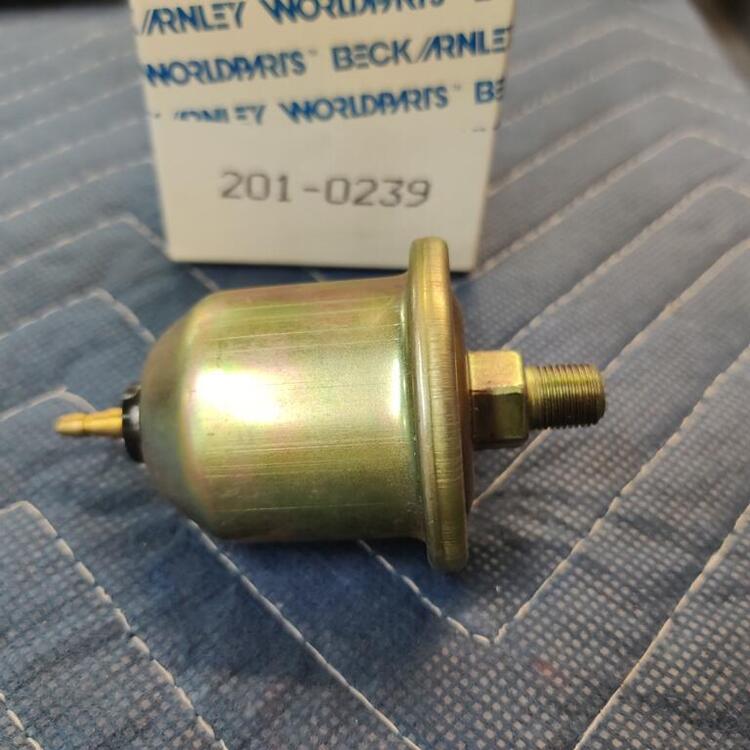
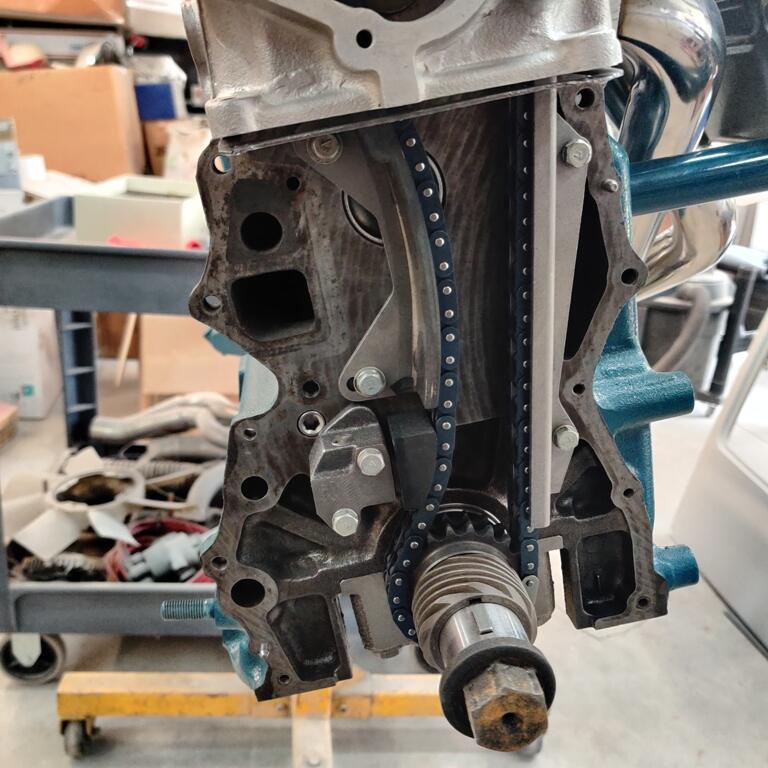
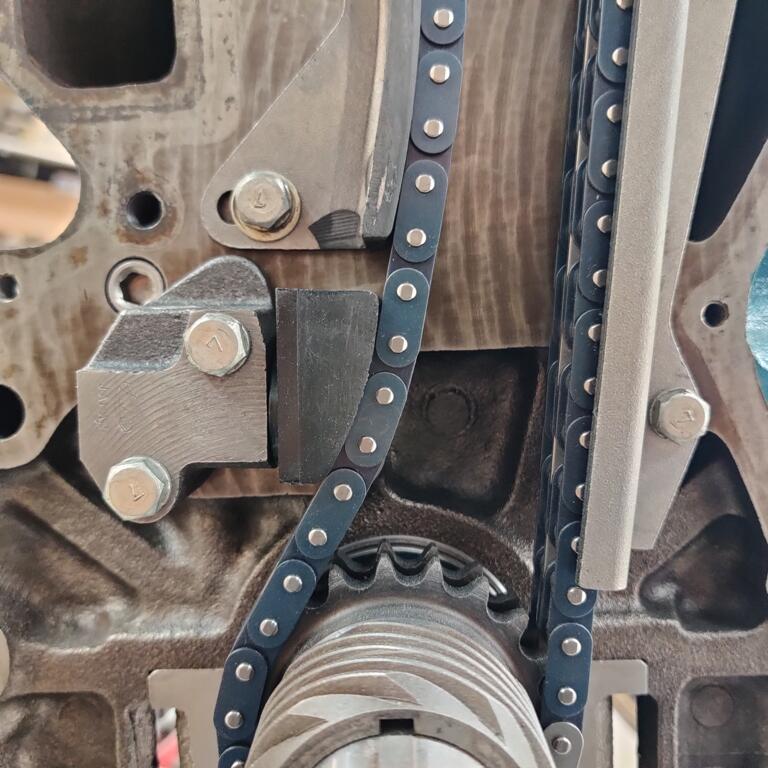
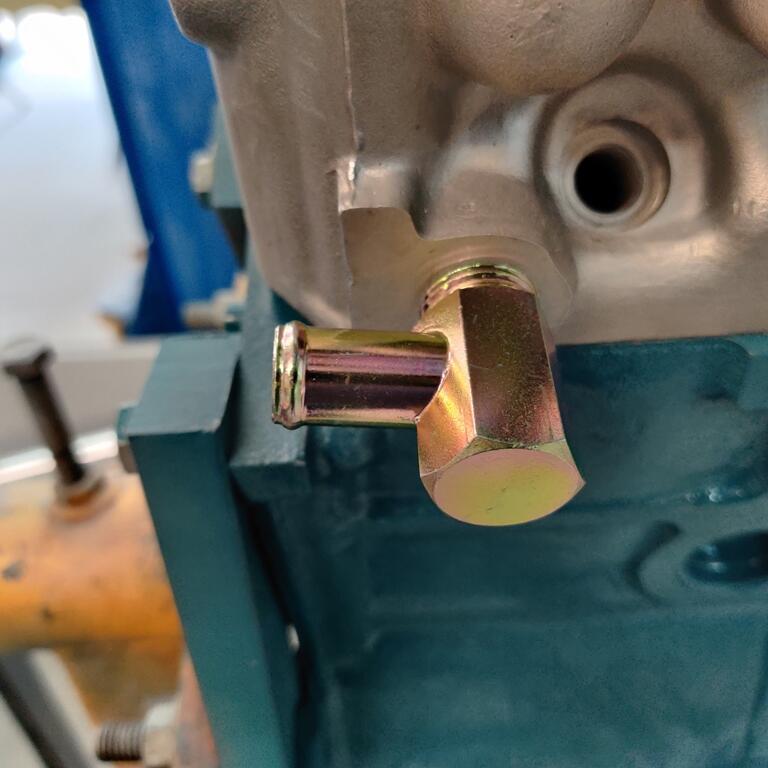
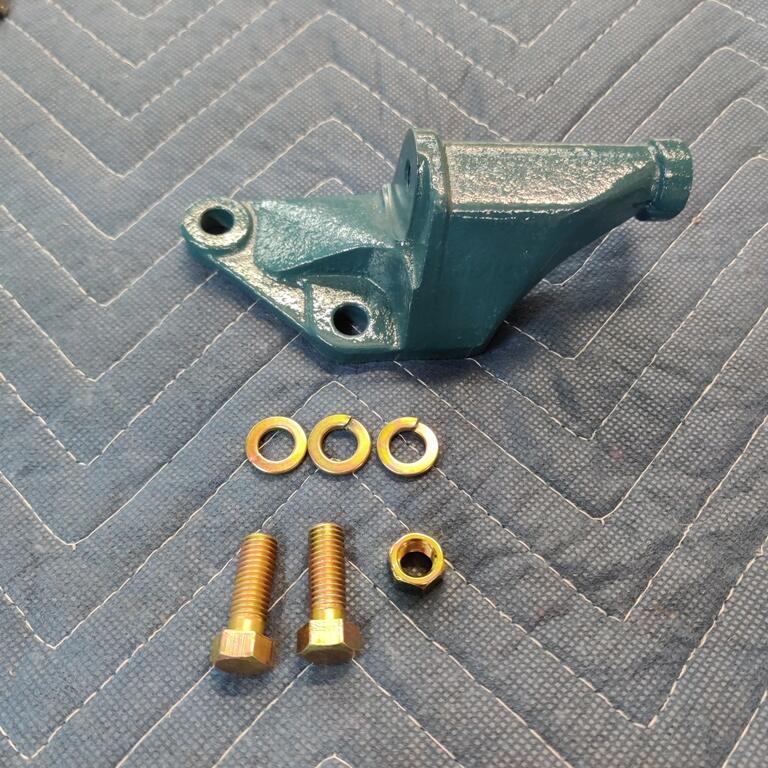
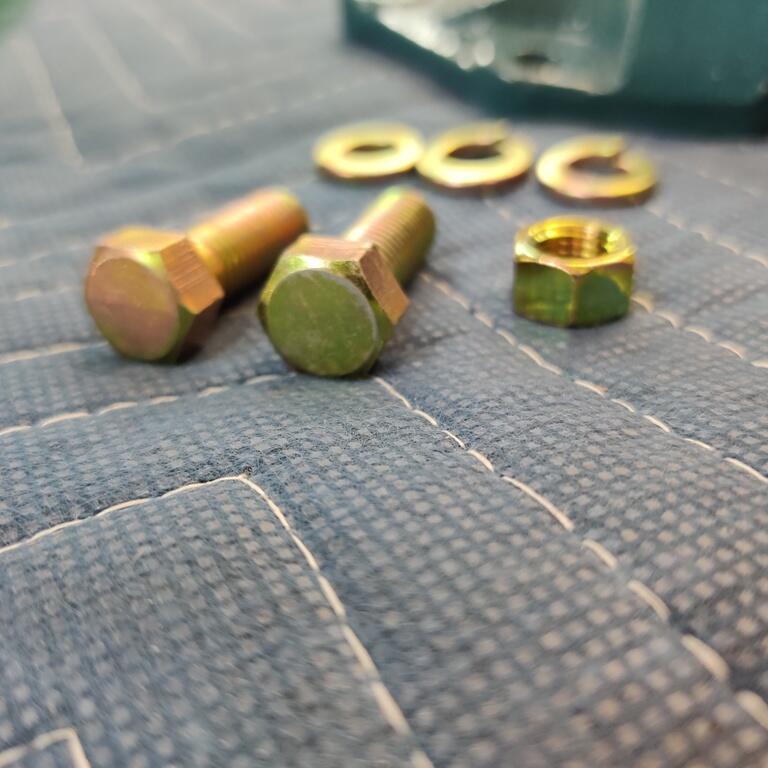
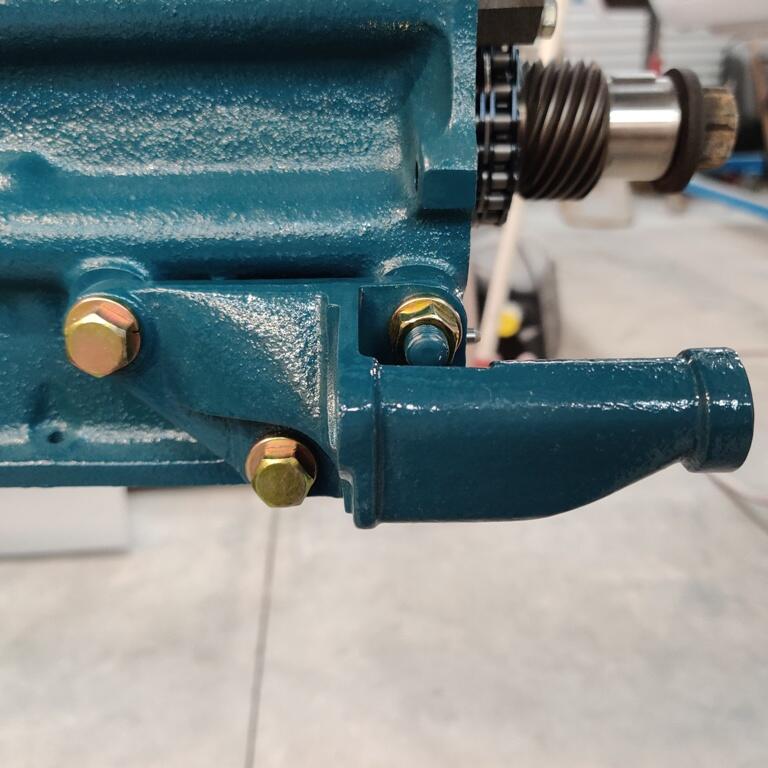
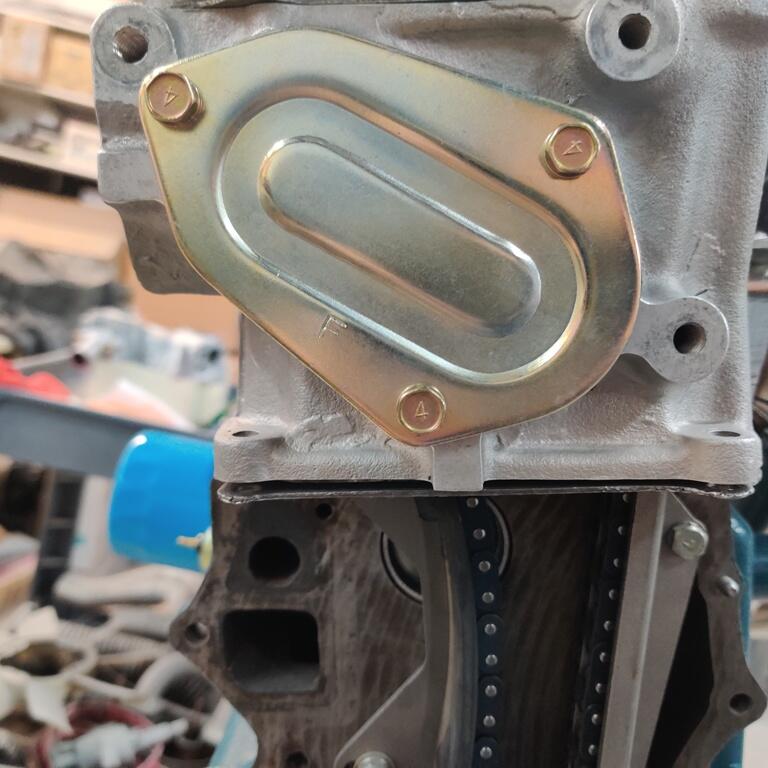
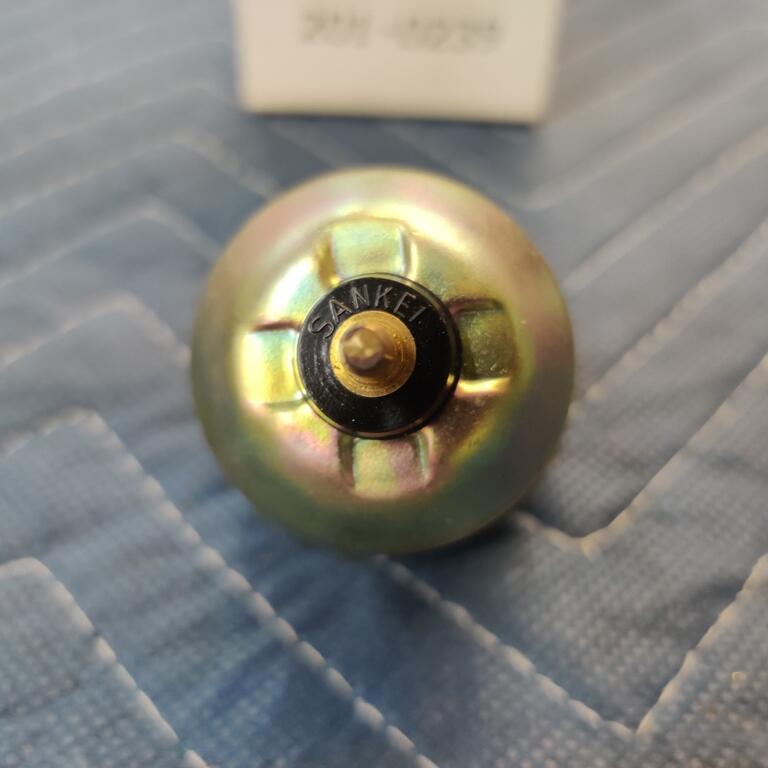
Before I put the front cover on the engine, wondering if I can get confirmation that this chain guide and tensioner alignment is good. What do you think? More pics: Oil pressure senders aren't available new from Nissan anymore, however, this "Sankei" from Beck Arnley looks like it could be an original one? More progress on both door panels and fenders this weekend as well. Getting panels flat is hard!


 2 points
 -
All day and not one of you had the guts to just reply “You’re Crazy” Fine. I’m not sharing what I found out. Ok, fine, I will. Don’t do it. The corner pulling is too tight, too much risk of tearing it. The wonderful soft rubber in the Datsport gaskets might survive it, but “No chancey Mr Dancey” for Precision brand. Besides, I devised a method to do it the conventional way that surpasses any previous method I had used up to now. Will share in a better thread.2 points
-
View Advert 240Z Combo Switches This is a matched set of steering column switches, removed from VIN #1818 – a 02/70 build date car. According to the online parts catalog, the light switch is P/N 25160-E4600 and the turn signal switch is P/N 25540-E4600. These switches will likely fit all 1969 – 1971 LHD models thru build date 08/71. The switches have been extensively refurbished. The light switch was completely disassembled and cleaned. All contacts burnished, treated with dielectric grease, and continuity tested to verify functionality. The plastic control stalk has been polished to a like-new finish, all symbols are fresh and clear. The wiring harness is in perfect condition as are the terminals and connector. The turn signal switch was disassembled and cleaned. Contacts for the turn signal function were burnished, treated with dielectric grease, and continuity tested. The high/low beam switch was not disassembled. The plastic case on these units is extremely fragile and usually breaks with any handling. The switch has been tested for full 12V functionality. The wiring harness is in perfect condition, the same for the terminals and connectors. The lever arm has a fresh coat of satin black. The two switch set is $450 which includes standard domestic shipping. International shipping is available at actual cost. Payment via PayPal. PM if interested, thanks. Advertiser jfa.series1 Date 07/18/2022 Price $450 Category Parts for Sale1 point
-
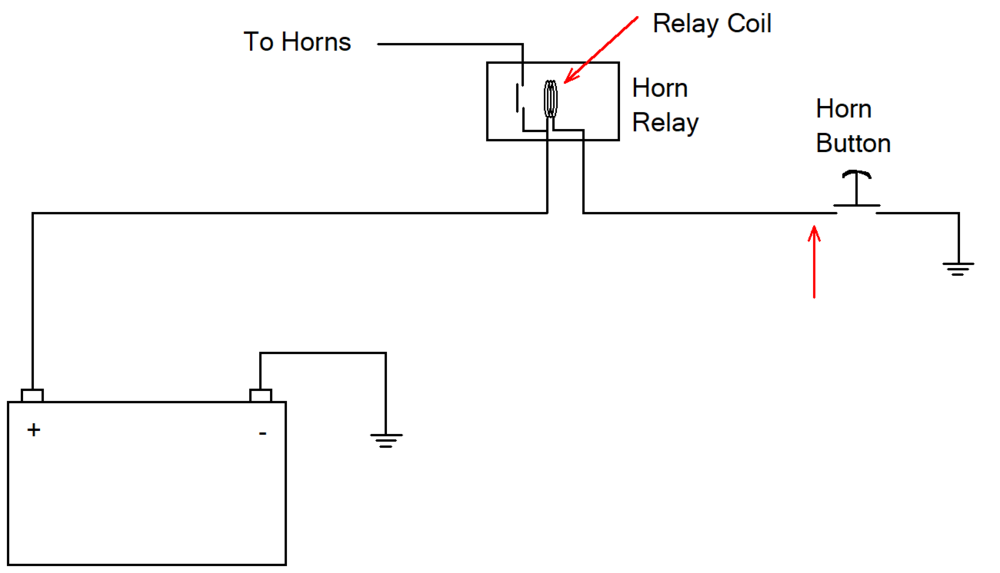
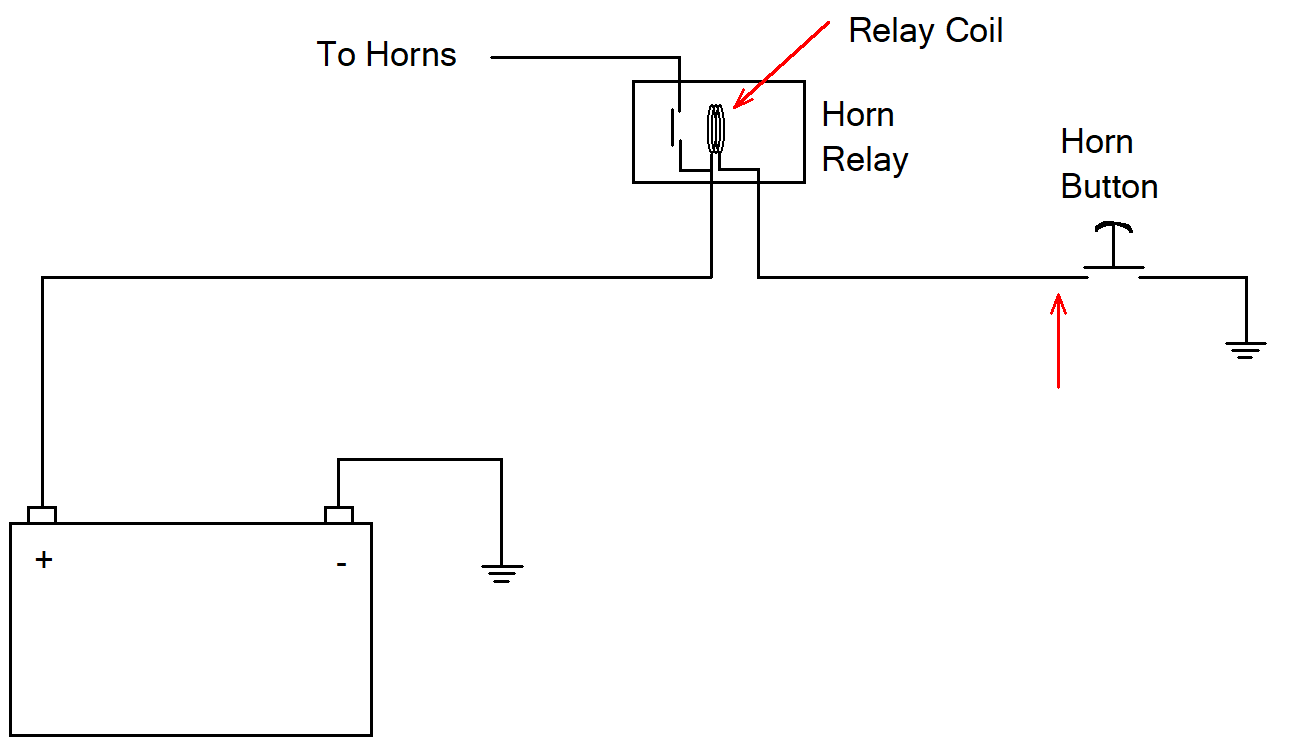
You're just not thinking about electricity the right way. Another term for voltage is potential because you have potential (aka stored) energy when the circuit is not complete. Here's a rough diagram of the horn circuit. You go from the positive of the battery to a fuse (not shown) to the horn relay. The electromagnet in the relay is just a long piece of wire. When the horn button is not depressed, there is no current flowing through the wire of the engine harness, dash harness, or horn relay. So you have a long piece of wire attached to the positive terminal of the battery, and that wire includes the red/black wire going to the horn button. Measuring along any point of that wire is the same as measuring at the positive terminal of the battery. The red/black is not at the ground state. When you press the horn button, you are putting the red/black wire at the ground state with the negative terminal of the battery. Now you have current flowing. The electromagnet in the relay is pulling in the contact to sound the horns. You're going from potential energy to kinetic energy because work is being done. So until you press the horn button, you should see voltage to ground at the green/red wire.
 1 point
 -
Woah, Cliff! Ease up there. Don't want to wear it out all at once. 😂1 point
-
I envy you guys who can do this. I was going to practice with my liftgate glass before trying the windshield, but I can't even do that. I'll give up and get a pro for both.1 point
-
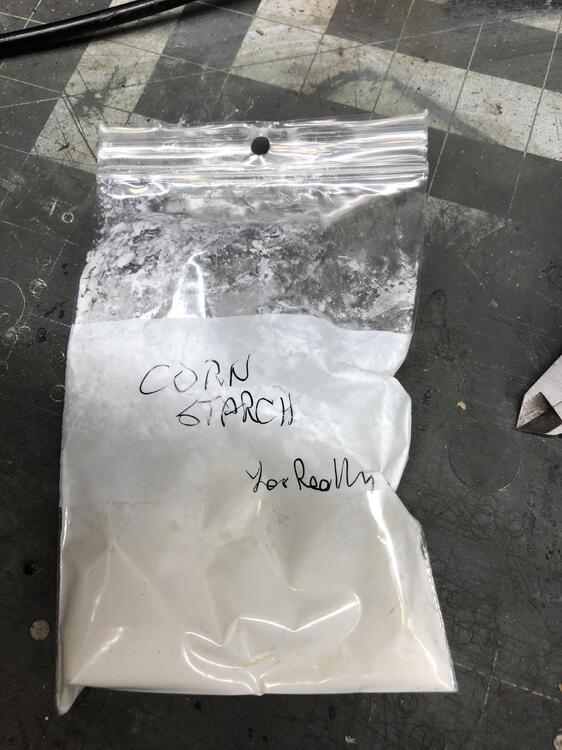
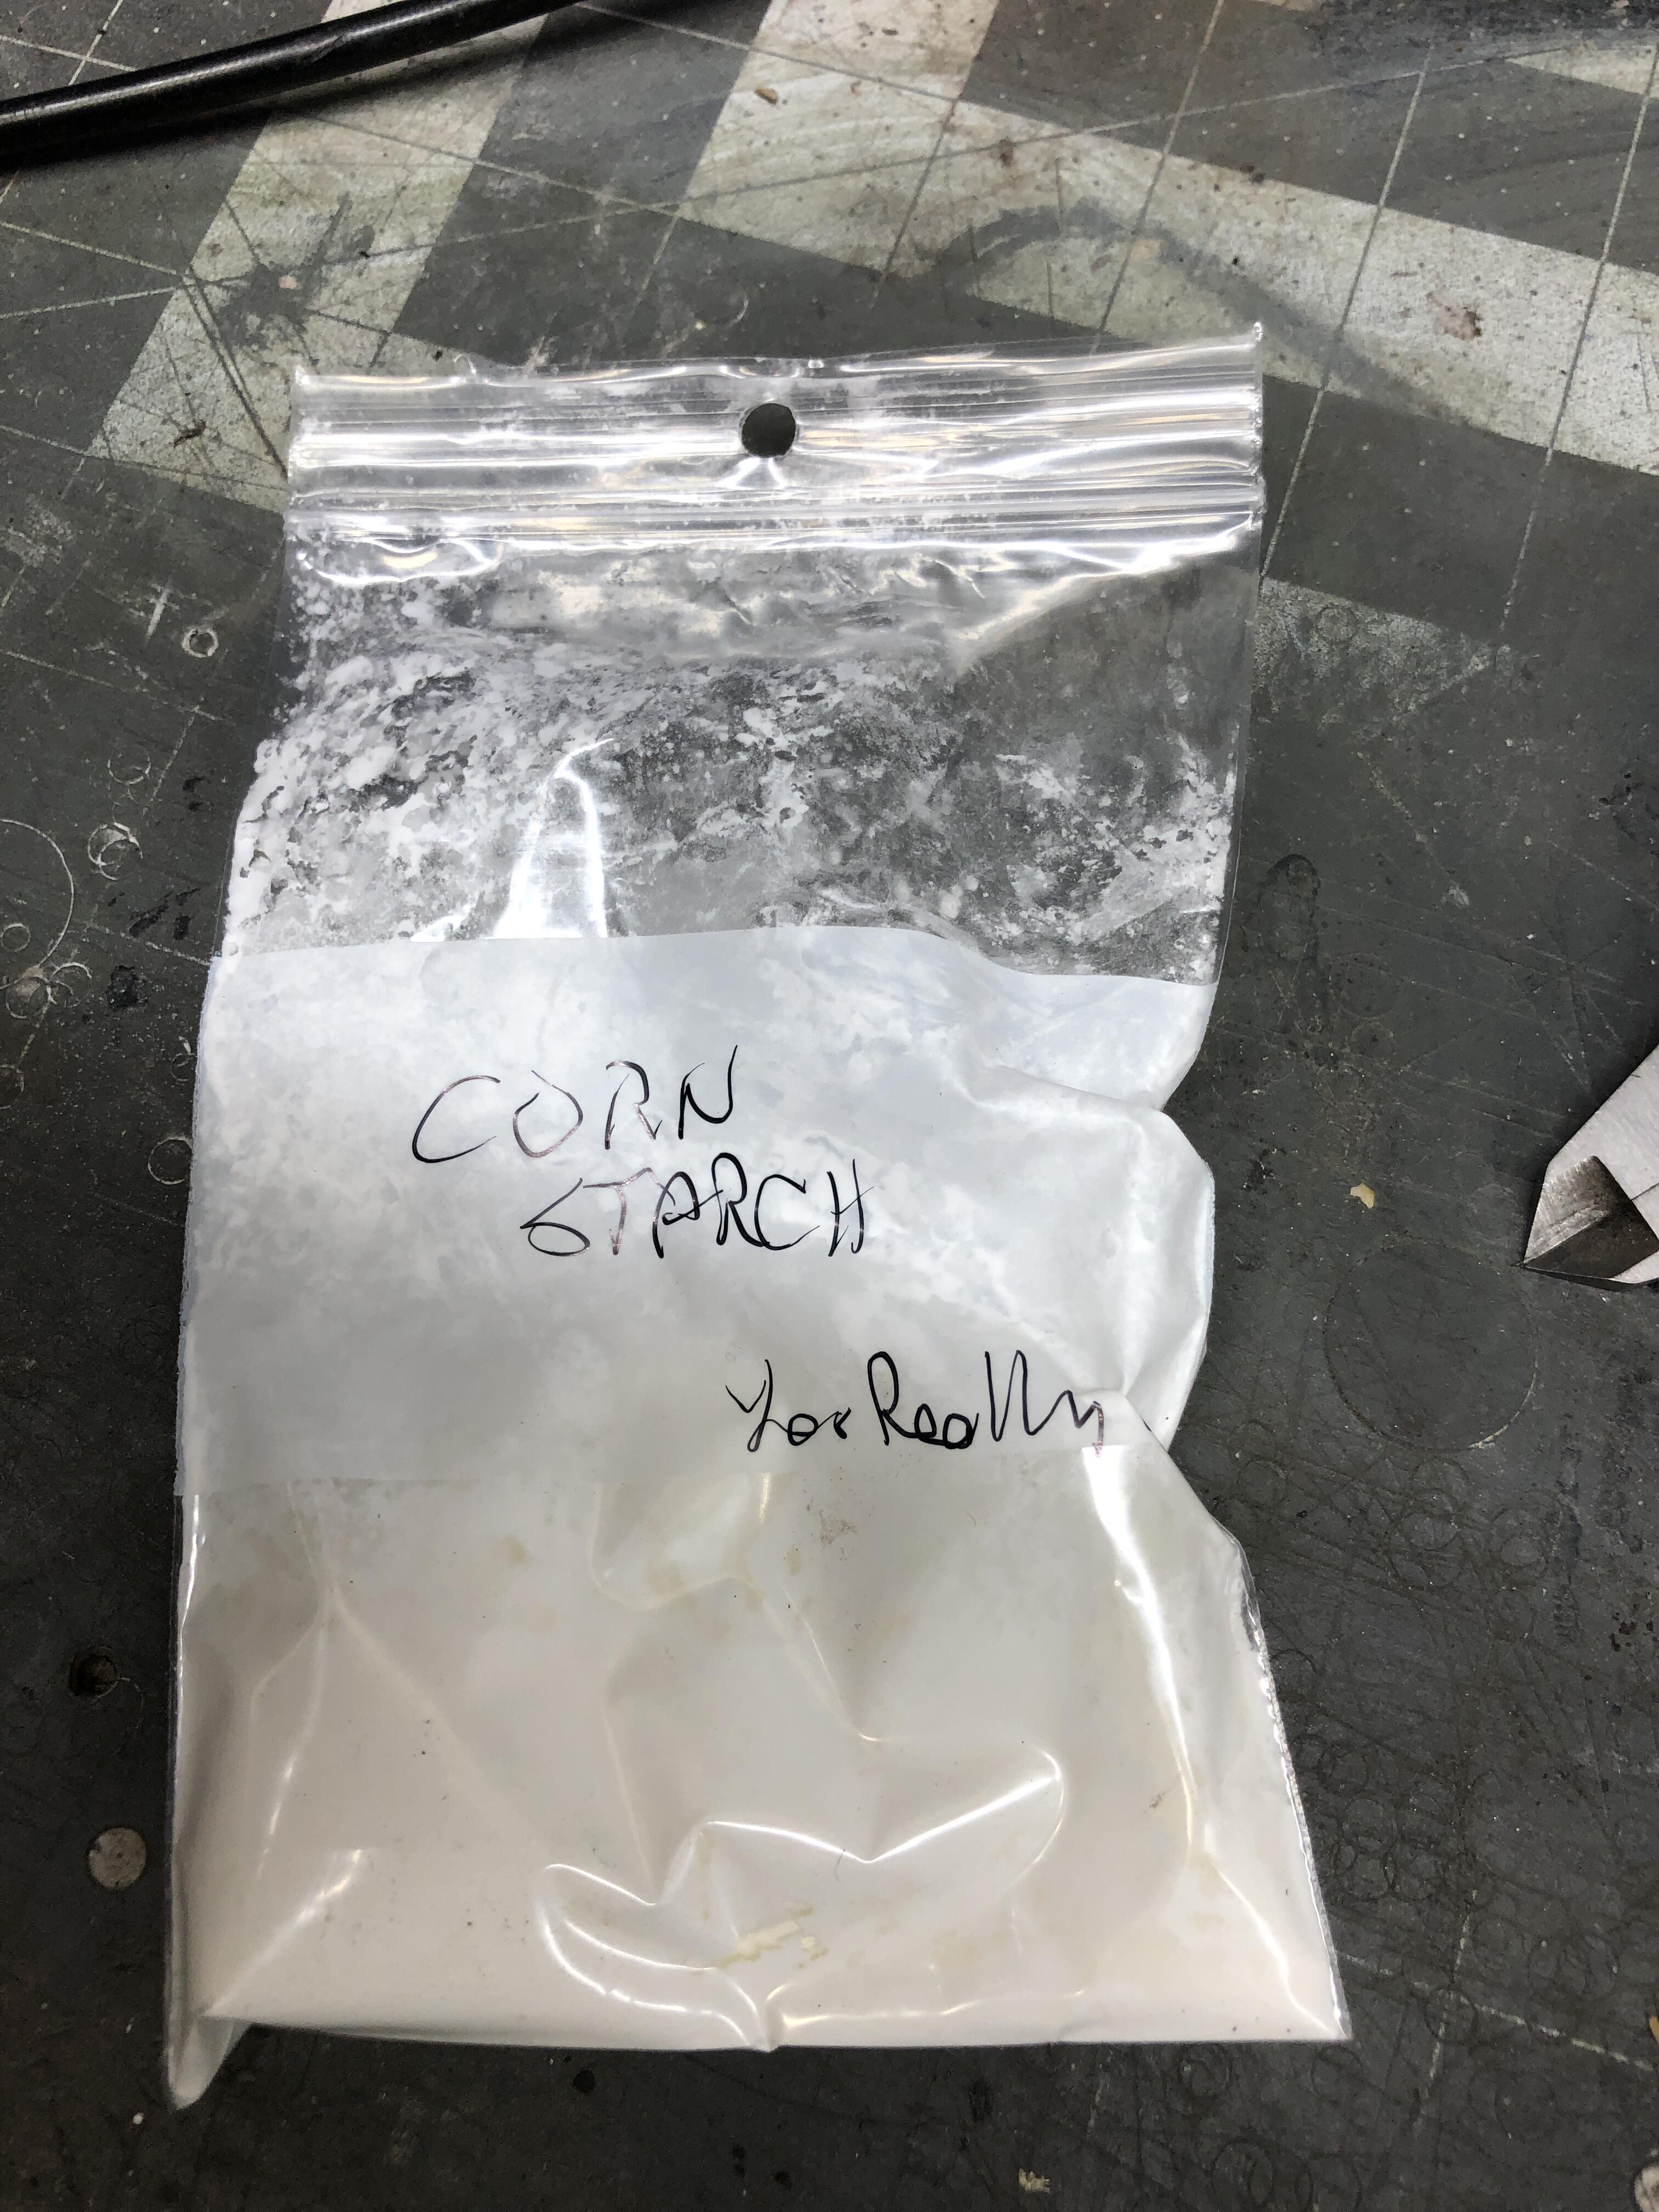
Tool #3: Lubricant When I first starting doing my glass, I followed almost all the on-line advice and used soapy water and / or window cleaner spray (windex or Invisible glass) to lube the rubber to help get it on the glass to start, and to get the gasket and rope to slide and slip easier during installation. I quickly found this was a messy and relatively in-effective thing to do. Both evaporate quickly and are never where and when you need them when you need it. I went dry from that point on. For one thing, keeping the gasket on the glass and having it stay there while you work on getting it all on the glass is someplace I want MORE friction to keep it in place, not less. And I have to problem pulling rope out of dry groove and if I spend time getting the whole thing settled into the window opening BEFORE I start pulling (see above about pinch weld distance) then being dry is just fine. BUT, that said, if I found a “better” lubricant, I’d use it. I think I have my holy grail on this as well. Baby powder. Well, actually Corn Starch. Dry, cheap, stays in place, wipes, blows or washed away when you’re done, and most importantly, takes away all rubber tackyness. A little goes a long way. Dip a finger in the powder, rub it on the rubber to leave a very very thin white dusting of powder where you want it. If you want to use Baby powder go for it, but you better be able to explain that pretty smell to your significant other… I’m looking forward to using it on the SS trim groove as well, to help get that nasty stuff in place a little easier.
 1 point
 -
1 pointthe kia may have a lower amp draw. Before doing anything I would check that at the fuse just to base line where you are. Generally speaking if you are moving more air the amp draw would be higher BUT maybe the kia is more efficent a motor, losing less power to heat and more toward useful work.1 point
-
1 pointOh wow, that's neat! Sorry, no can do. That Z passed on a few years ago, don't even have one at the moment. Dang picture makes me a bit misty, sniff..... You-all have fun this year! Drool over the new Z for me. I'll show up again next time the show is bit closer to home.1 point
-
1 pointHey, @zKars, I think this means you have to show up for ZCON since your car was featured.
 1 point
 -
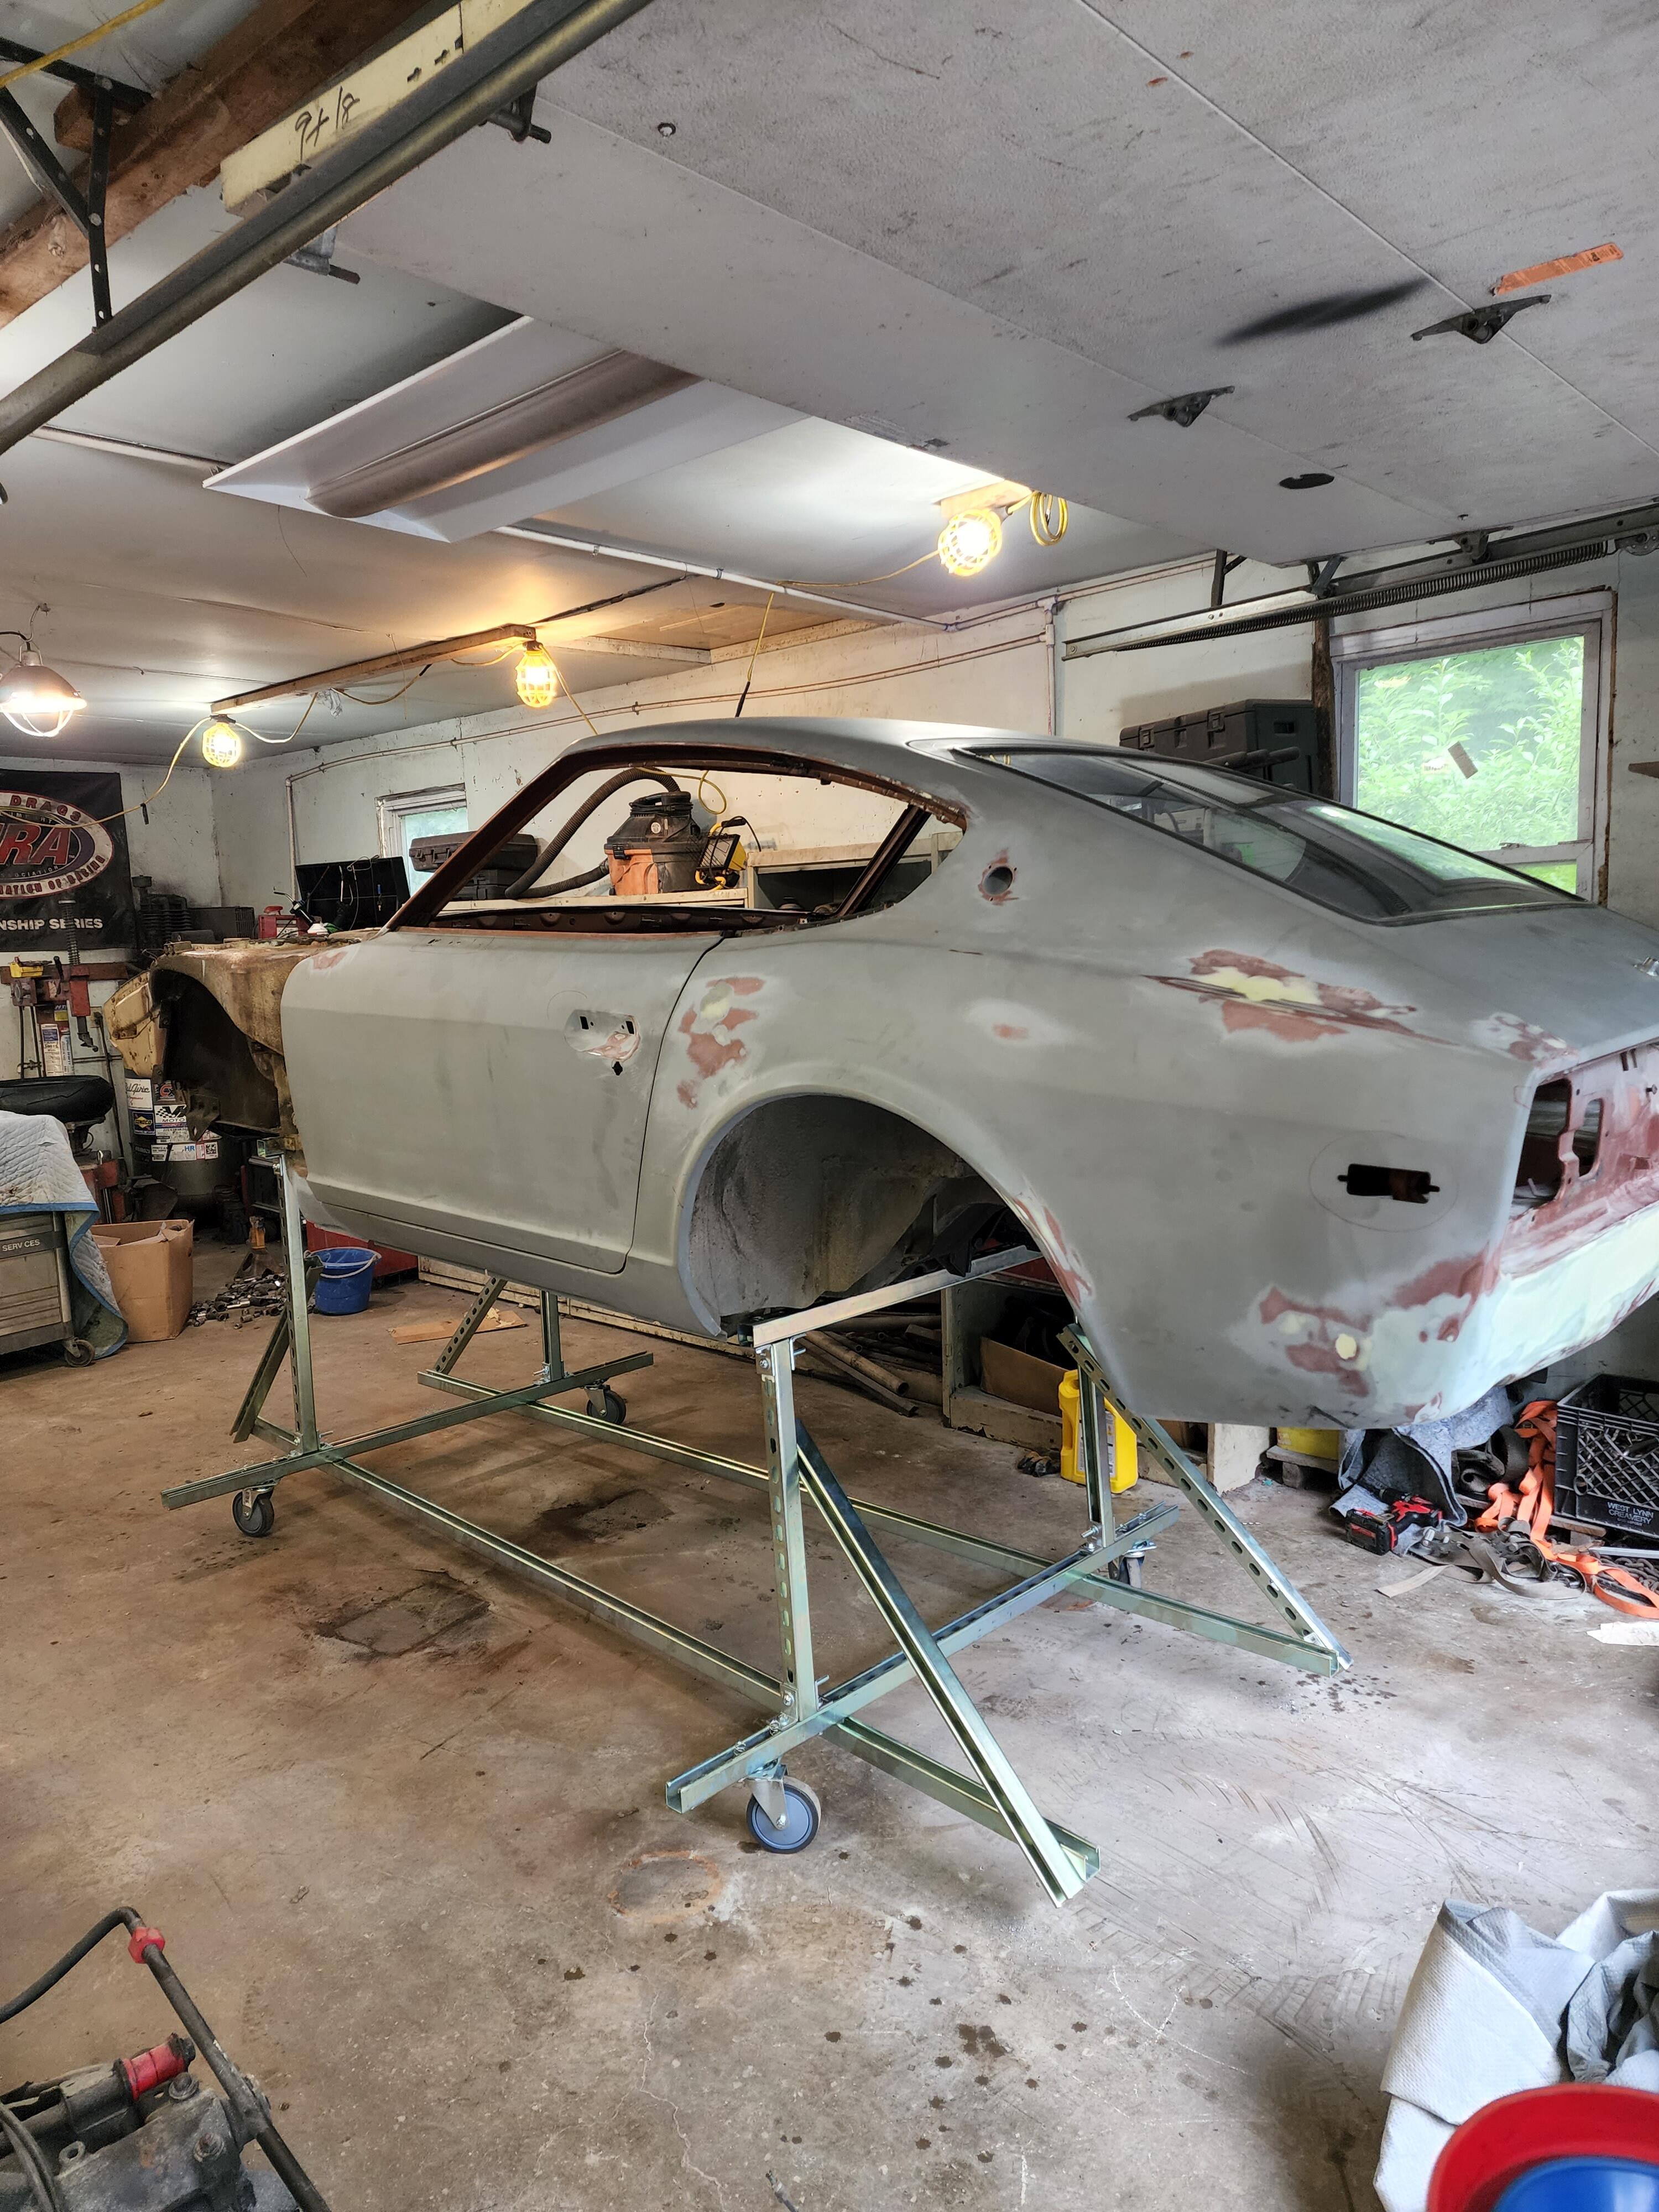
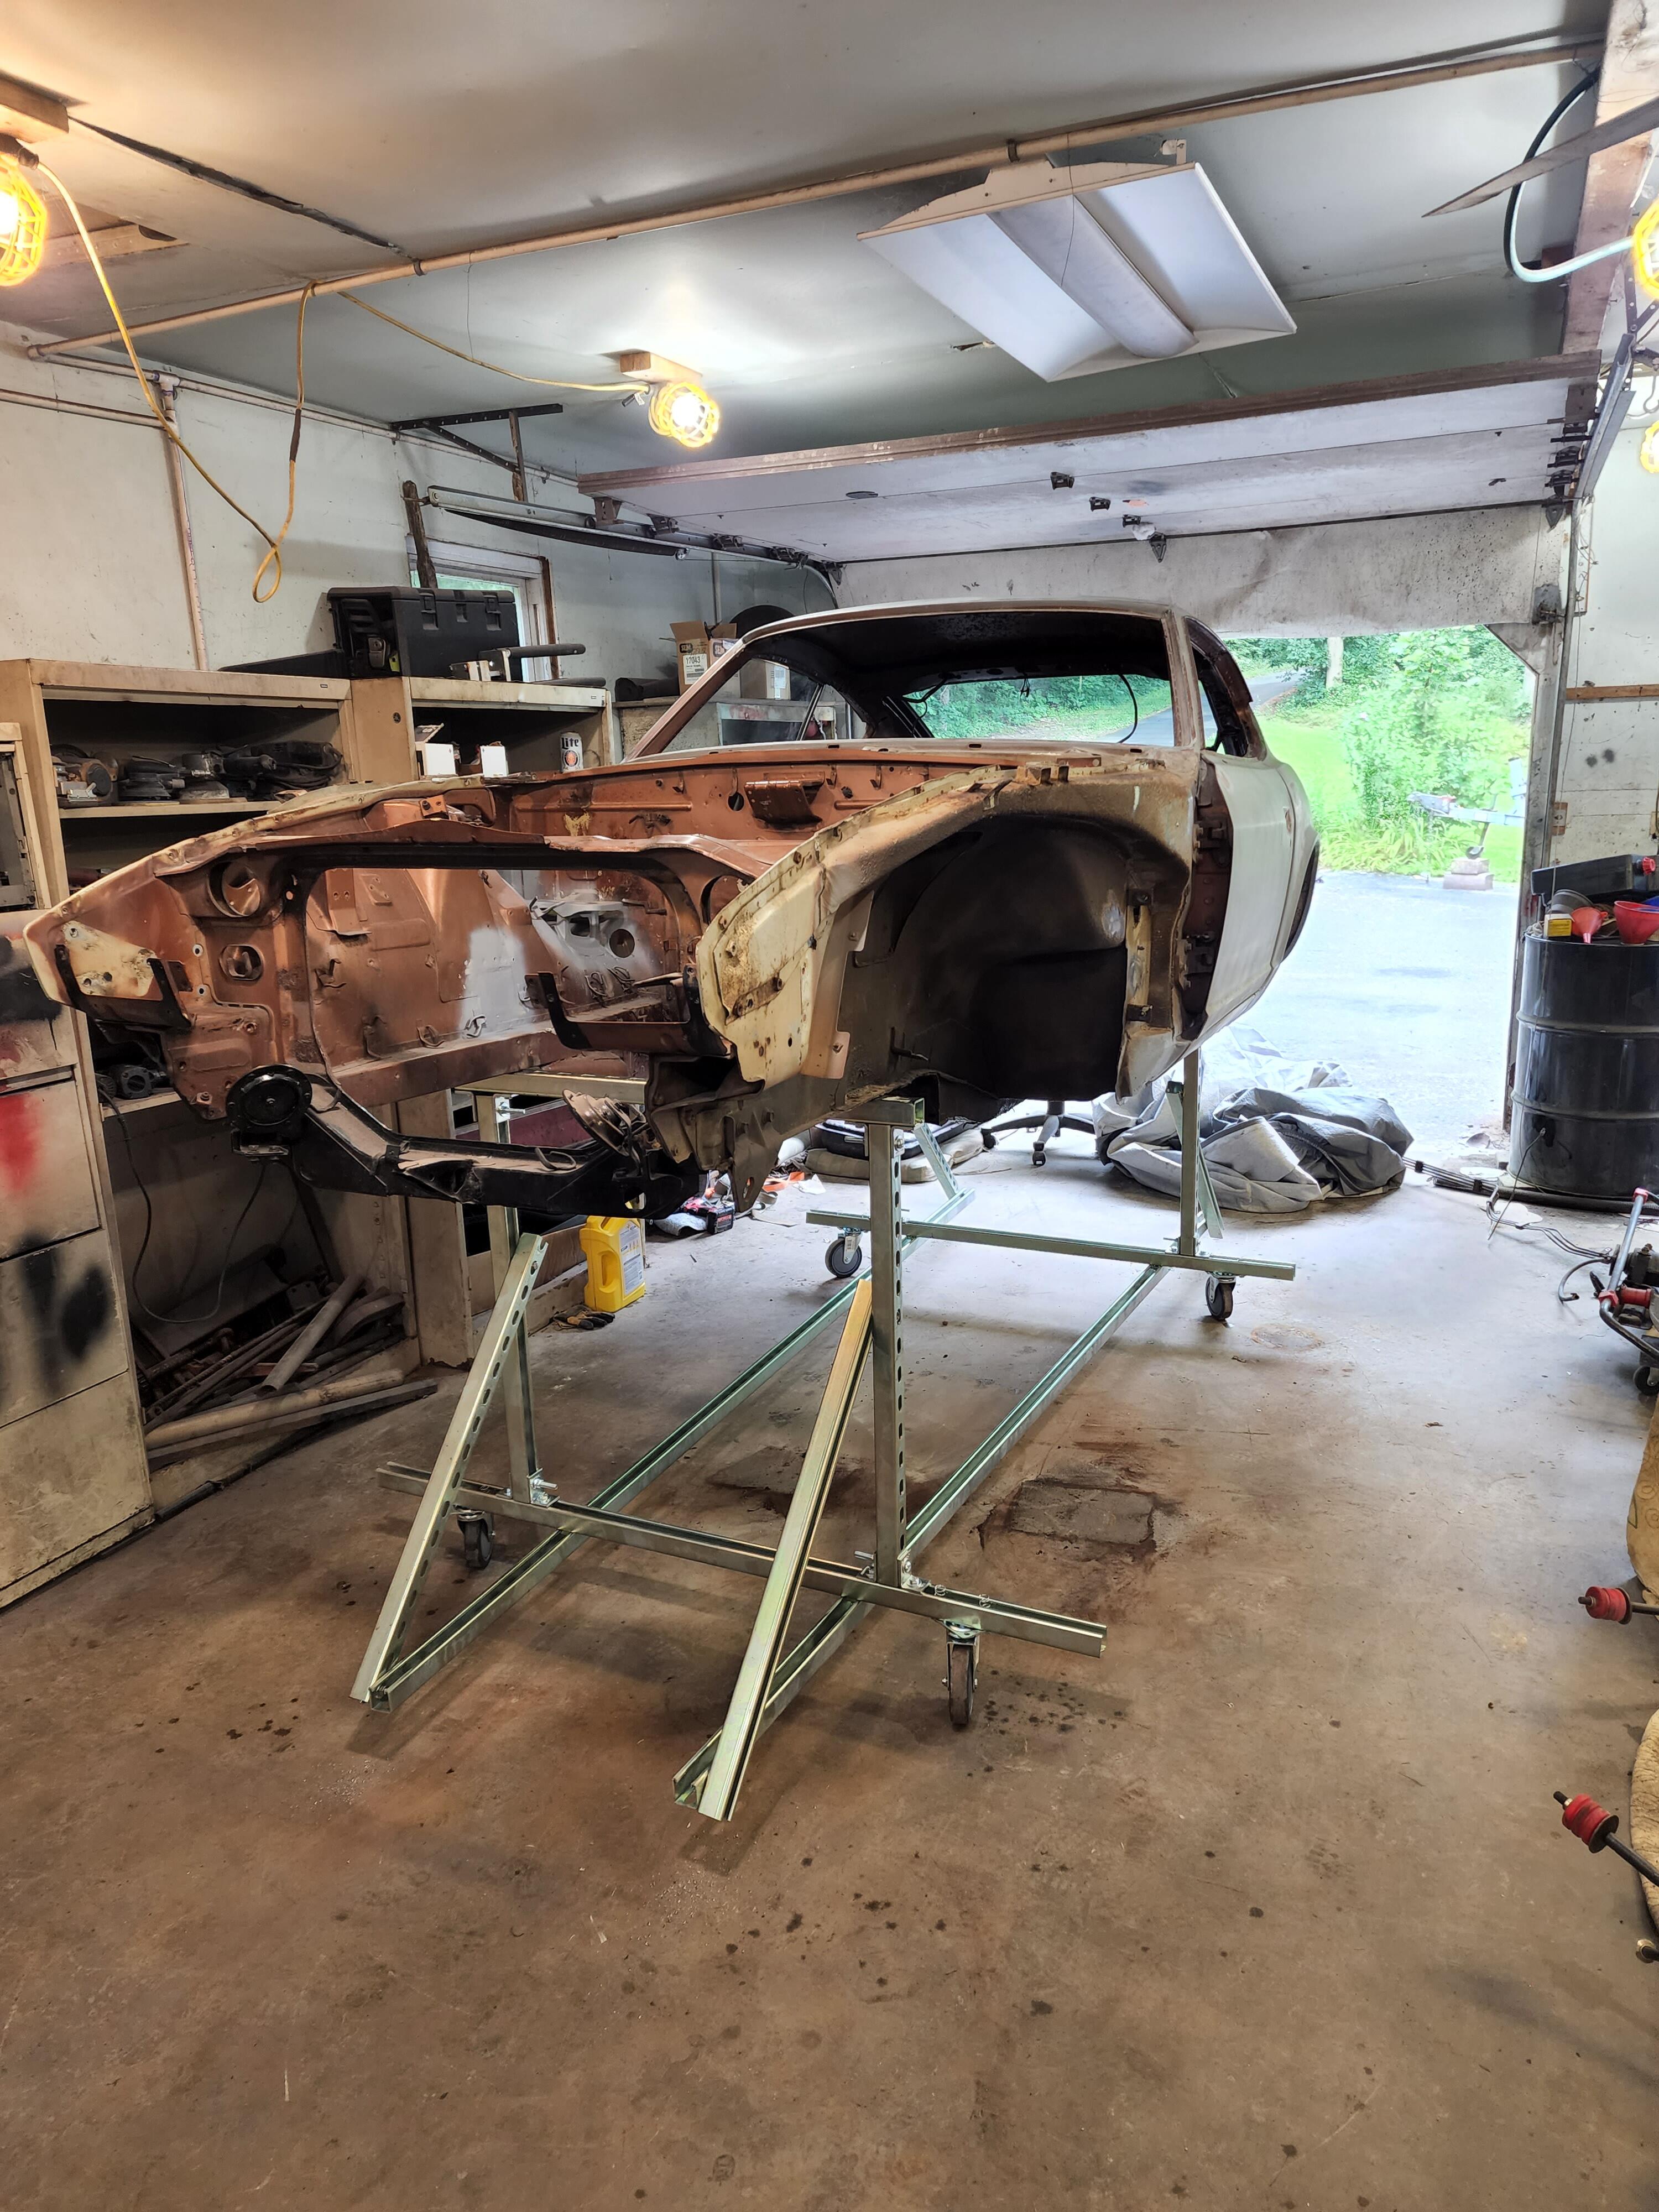
1 pointYes, it is good progress. The earlier mess added about 40 hrs of work but the car was still pretty straight. A little more work on the chassis and some reassembly can start. 🙂1 point
-
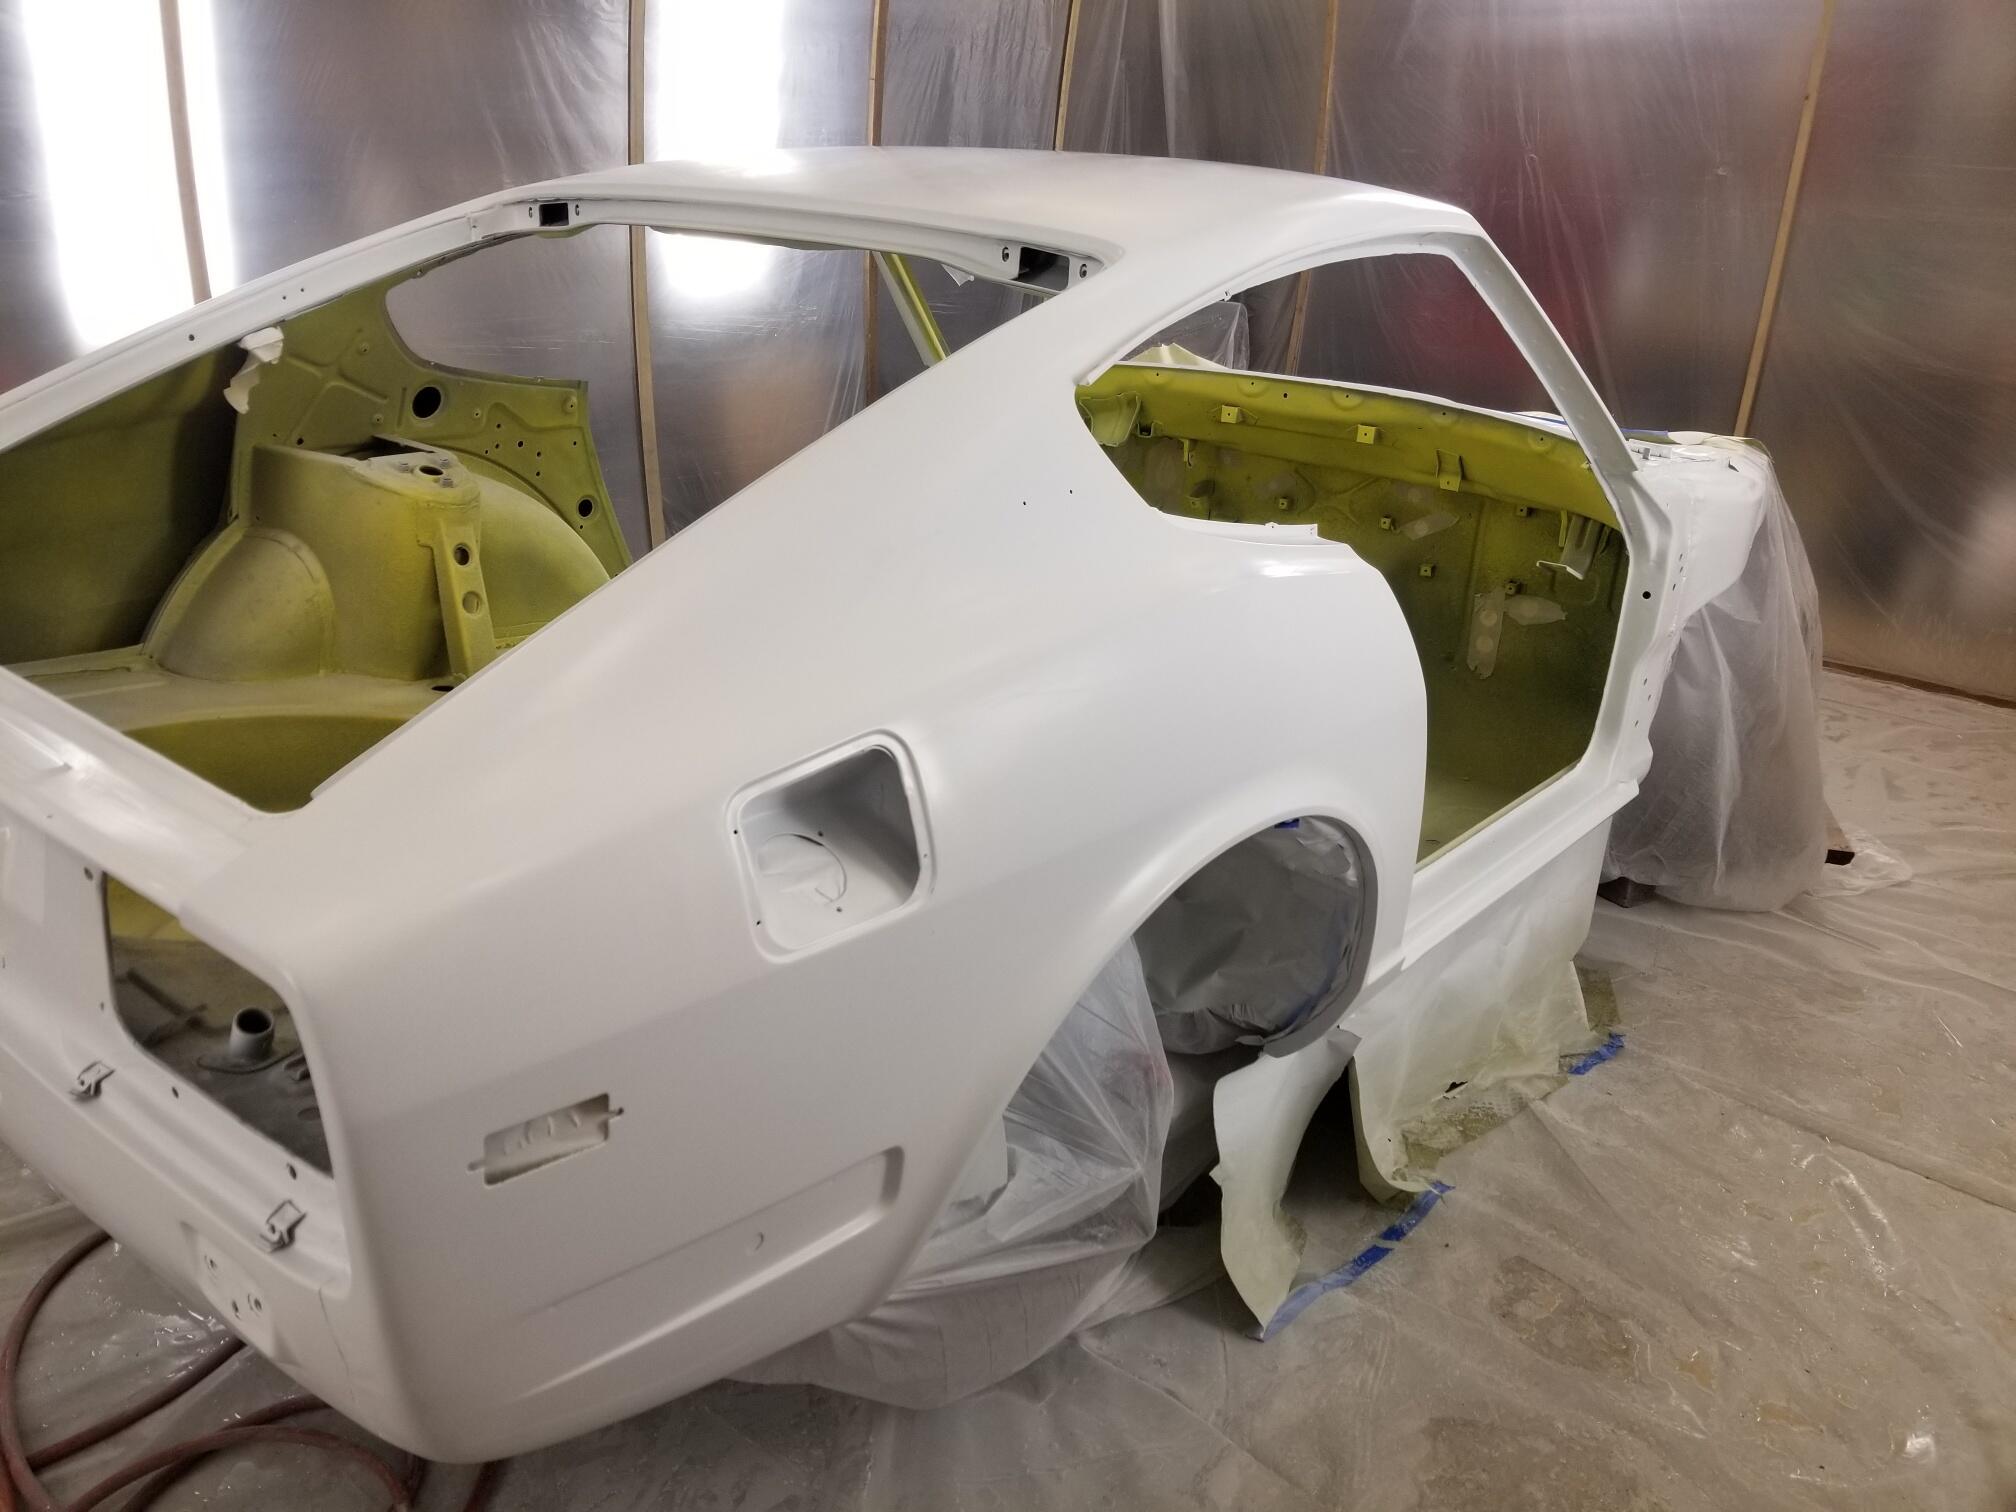
1 pointWell Charles, you can tick that off the list. A very but tick at that indeed. The end job looks great. Must feel fantastic seeing it finally paint after all the issues earlier this year.
 1 point
 -
1 pointSince my Mallory specific Pertronix failed, I am going to install an original 240Z dizzy. Should have it in a few days. Probably going to purchase a newer version of Pertronix and the OEM type cap and rotor. Do not think the Mallory parts will work on the OEM unit. Will provide and update when I get my parts. Thank you!1 point
-
1 pointI skimmed through the EF section of the 74 FSM. I didn't see that valve, and it wasn't described in the theory of operation on EF-32. I would not be surprised if the vent line from the tank was capped at the tank or in the engine bay.1 point
-
1 pointNo, it would just run richer, not faster. Unless, of course as Mark suggested, it was running really really lean and wanted the extra fuel. I really don't think that has anything to do with what's going on here. Float levels will need to be checked before this is all said and done. but that's not what's causing the idle to be at 2500 RPM with the screws backed all the way out.1 point
-
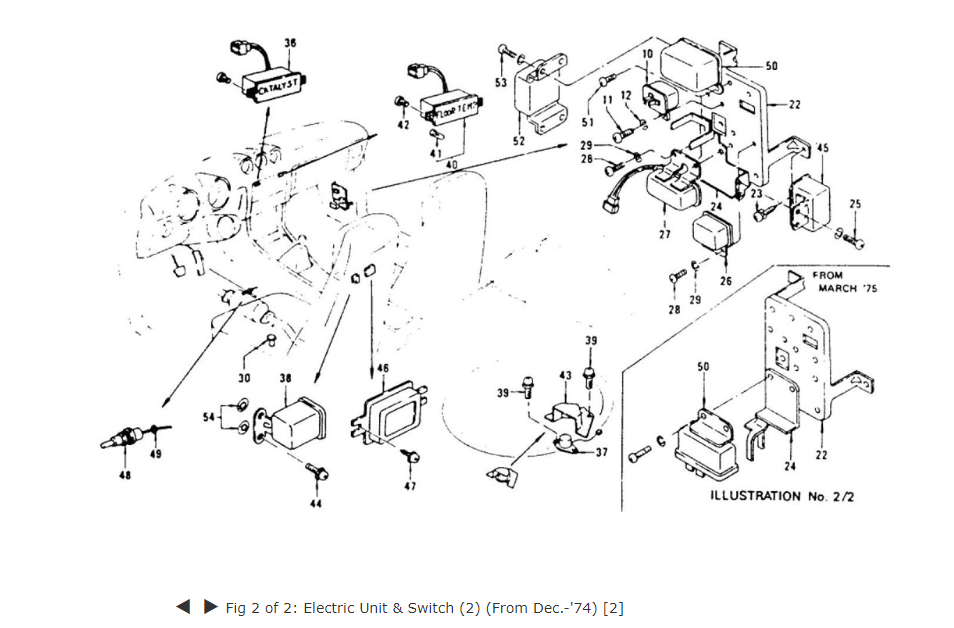
1 point@Dave WM I think you'll find the part numbers on this page: http://www.carpartsmanual.com/datsun/Z-1969-1978/electrical/electric-unit-switch/section-2/280z. Start around part 31 and work your way down. Be sure to go to figure 2 of 2.
 1 point
 -
The voltages look right for a 240Z with points. Unfortunately that probably means your tachometer has seen better days. Read through this thread: Of course, @beermanpete figured out how to fix his. I wish he was still hanging out around here. As for the fog lights, that green/white wire should only be used to control a relay along with a switch. Don't use that wire to power the fog lights. You would need a fused 12 volt source connected to the 87 terminal of a relay with the 30 terminal connected to the red wire. (Relay explanation here: https://fiddlingwithzcars.wordpress.com/2012/12/22/relays-simplified/)1 point
-
69F this morning so I uncovered the 240Z. Two hours driving around here, ran perfect. It had 72,xxx when I bought it in 2015 now it has 78,855.1 point
-
1 pointDecided to go a safer route based on the content of another user on the forum, thanks for the inspiration… this gives me quite a bit of room to get under the car with a roller board. Definitely money well worth spent. I’ll be able to pressure wash and then put on my undercoat outside of the garage.

 1 point
 -
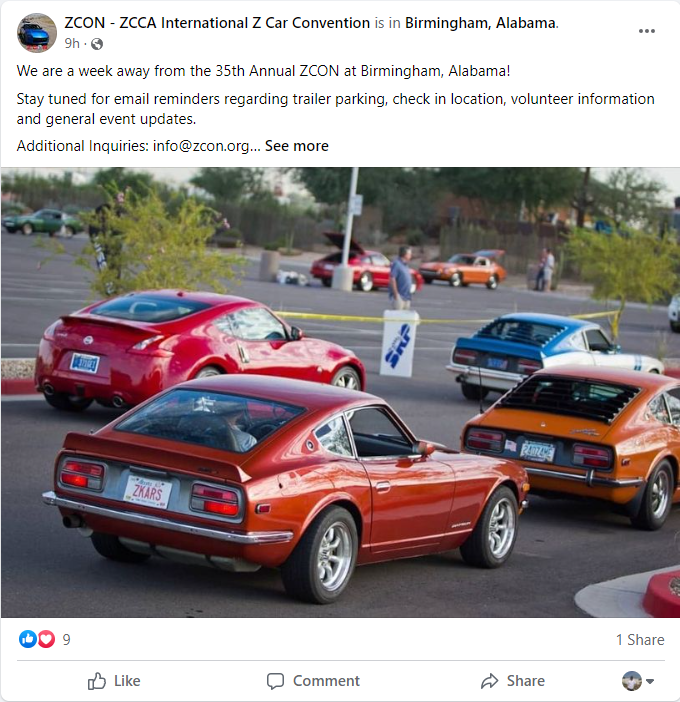
1 pointWell, if anyone is joining me in Birmingham, bring plenty of water and light clothing. It looks like it will be as hot as the Memphis or Austin conventions. https://www.wunderground.com/calendar/us/al/hoover/KBHM1 point
-
1 pointSo yesterday Shot some white basecoat There was still a little trash in the paint. No idea where it's coming from. So I worked those areas with a little 600 grit and then degreased again and tacked the car


_resized.thumb.jpg.5de577a3426af1269f51dfa40a830092.jpg)
 1 point
 -
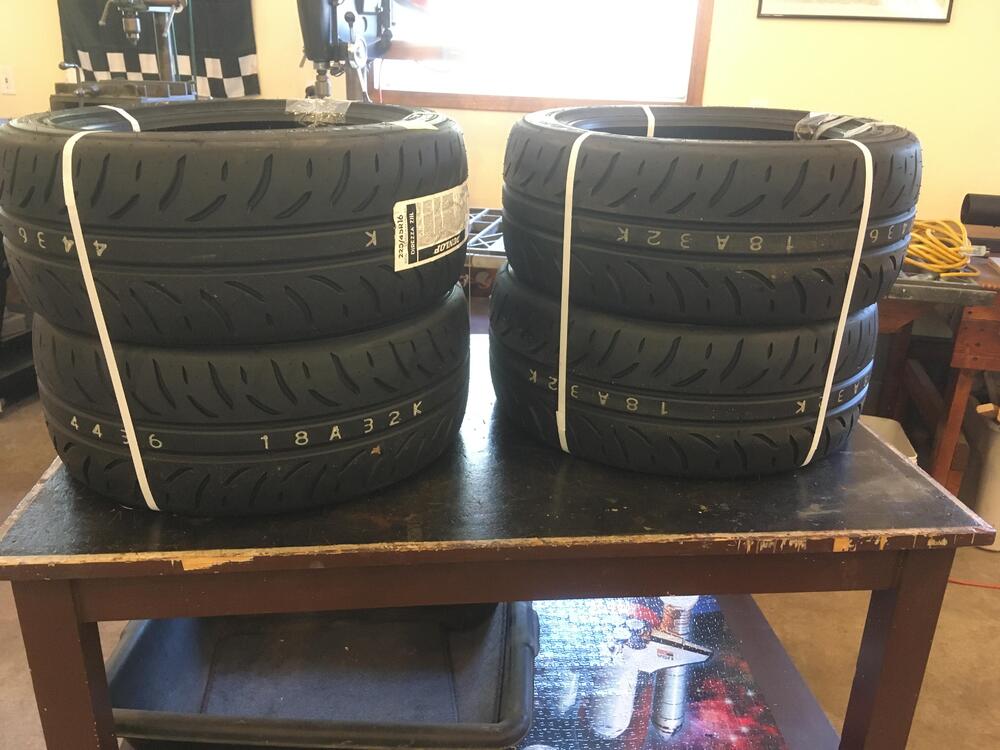
Good morning everyone, I know it's been over a year but I'll blame the delay on the pandemic and the lack of options for ordering tires as tire options went in and out of stock. This winter (2021/2022) I decided on the Dunlop Direzza ZIII tires and ordered them in the 225/45/R16 size from TireRack.com. It took about 6 months for Tire Rack to get them in stock and shipped, and another week or so to get them on the car. First impressions? They're super! The tread pattern is significantly different (two large lateral strips and much smaller "wave" indents--see photo) even though they're the upgraded version of the exact tires I had on the car already. Some of the improvement is simply that the tires are new...my old Dunlop Direzza Zs were 20 years old. On the age front, it's worth noting that these tires were manufactured in August of 2021. When I ordered the tires, I did call TireRack and asked for tires manufactured this year. When they arrived, I called TireRack to follow-up, and they said they couldn't say when 2022 models would be available, so I decided to keep these. I noticed so far that the ride is much smoother, and they make a wonderful "sticking" noise along the road...a high whine like duct tape getting unstuck from the pavement as you drive. Otherwise, they're pretty quiet. Cornering is amazing, though I noticed that the front end is slightly less responsive (read "less darty"), but I'm thinking that may be because the sidewalls aren't rock hard. It's a very predictable experience, though, and the car feels quicker around turns overall, with less squealing and sliding. Braking and acceleration has also improved, and the car feels more planted. I haven't driven them in the wet yet, and the tires came with warnings suggesting that wet and cold weather will not be friendly. Finally, like new tires should, these smell great! 😄 Again, I know it's been a while since my original post and these are relatively new, but at the moment I'm exceptionally pleased with the purchase. If something happens in the coming months/years that suggests an issue, I'll update this post. Happy driving!
 1 point
 -
1 pointI think I could pass with a stand-in copy? We could put a couple close together and do the "shake and bake"?
 1 point
 -
1 pointHow long did it take you to clean the seats after feeling something furry there?1 point
-
0 pointsI am unfortunately not going to make this one either. It's just not in the cards.0 points
-
0 points
-
0 pointsI'm going to work until 12pm Saturday the 30th. I could ride down and do the award's dinner but not 100% on that. My most loved dog has to have a benign (hopefully) tumor cut off on the 25th. It's going to be $500-ish or less, he's a big dog so things cost more. If I see you, lucky for me. I've got a shed full of parts that someone may need. In that case I could make a run down but would need to come back home for work.0 points


_resized.jpg.0fae711a767a3bfb80f96d05b2470d0a.jpg)