Leaderboard
-
Patcon
 Subscriber
 5Points11,142Posts
 -
Richard McDonel
Subscriber3Points381Posts -
grannyknot
Free Member3Points5,158Posts -
Captain Obvious
Free Member3Points10,081Posts


Popular Content
Showing content with the highest reputation on 12/08/2018 in all areas
-
2 pointsEarlier this evening I posted a query about the vents on the rear quarter panels; specifically how does any interior air get to the exterior vents on Series 2 240s? I found an informative discussion dating back to May 2011 that indicated there should be a set of holes, similar to those for the radio speakers, on each interior (plastic) quarter panel at about the same elevation as the exterior vent hole. A couple of hours later. mulching through the cluttered outbuilding I euphemistically refer to as my workshop, I found one interior panel that I had dumped in with a pile of discarded parts (who says hoarding is a bad thing?), and yes it does have a block of small holes at vent height. The replacements I bought from MSA and installed do not have these holes. They are sold as being the correct part for all 70 - 73 240s, but in reality they appear to be appropriate only for Series 1 cars with vents just below the hatch window. I can use my discard as a template and drill holes. Just beware that if you have a Series 2, the parts on offer for all 240s won't work on your car.2 points
-
2 pointsI really like the Waylens camera.. a bit on the pricey side. It also looks like this one can communicate with the cars computer (OBD-II) but we don't have the luxury in our classic Z.. https://www.waylens.com/ I really dislike the styling of most of the cheap cameras. They look like a phone or camera mounted on the dash or rear-view mirror (sometimes with cables sticking out). If I was going to do this, it would need to look like it's part of the car. Garmin seems to make some good products: https://buy.garmin.com/en-US/US/cOnTheRoad-c533-p1.html Whatever you end up buying, can you update us on the experience?2 points
-
2 pointsJust a public service announcement to make sure we're all talking about the same stuff... This is silicon bronze: But THIS is silicone bronze: I'm Captain Obvious, and I approve this message.2 points
-
2 pointsI would disagree on this. Rebadging to me is no different than blacking out window trim or different bumpers or different wheels. It looks different and has different exterior details, but nobody is suggesting it is a factory made Fairlady as re-Vinning implies2 points
-
2 pointsThanks Matthew, did just the same search as you suggested and still wasn't any closer to an answer. Will see what the paint shop comes back with. I think my cheapy camera phone isn't great at colours. Will dig out a decent camera and see what I get. Had a similar problem with another of my cars. The original factory formula for yellow (Giallo Modena) was nothing like what was on the car. Had to custom match to get it right. It looks pretty good now. Roo
 2 points
 -
While strolling the webs for good parts deals i stumbled upon this: A Niles Cigarette lighter with a built-in Thermometer. It's so useless and so japanese in a way, i couldn't resist. It was only a few bucks and i found it in greece of all countries: Btw: Niles is the company that made most of the electronic relays and switches in the 240Z and many other Datsuns / Nissans of that time. So while this item was never sold by Nissan, it somehow gives the whole thing a bit of a period correct OEM feel: And to be honest, it's so weird and odd, i just had to have it.2 points
-
2 pointsDid you have a paint code sticker by the radiator to identify it with? The reason I ask is that according to my monitor (calibrated) your color looks closer to 110 red. Both colors were available on the 240. I know there are a ton of variables (camera being the 1st one) when viewing on line. https://zcarguide.com/datsun-240z-stock-paint-and-interior-colors-us-and-canada/2 points
-
2 pointsUnless the project car has some other important provenance, I say go for it! Make it whatever you want and enjoy yourself! Have fun and document the process for all us armchair commentators!2 points
-
1 pointThis just popped up on my news feed from Jalopnik https://jalopnik.com/what-a-lifelong-z-mechanic-thinks-of-nissan-today-1830083808 It's nice to see that places are still out there that specializes in Z's. No bad there's no place like that in NE Ohio. Great discussion of the history of sports cars at Nissan.1 point
-
1 pointMe too! I'm sorry for the joking around but as Dennis says it rainy and cold out so that's my excuse, like it or not. Cliff1 point
-
1 pointThe use of "nitty-gritty" and "willy-nilly" is the the same post is okey dokey by me and an easy peasy way to liven up the discussion. Sorry, it's cold outside and I'm home alone, unsupervised. Dennis1 point
-
1 pointFor any late-arrivers. This is how the slide starts. Inability to be civil. Can't make an argument without calling names. Calling people stupid before trying to make the point is a sure sign that there's no substance to the words that follow. We're seeing a lot of it these days, by supposed leaders in both England and the US.1 point
-
1 pointThe low hanging fruit metaphor plays here. Get the girl then go back for the better trained cop.1 point
-
1 pointThe other problem with autonomous cars, is someone has to decide who dies and right it into the code. Sort of the iRobot conundrum. Do you hit the pedestrian or the oncoming car? Do you save the injured cop drowning or the little girl?1 point
-
1 pointI had other theories: didn't want to weld everything solid or it was easier to shape down the excess weld Thanks, Wheee!1 point
-
1 pointI agree. (and, 110 oxidizes toward orange over the years - even so, it's always completely different than 918 which is definitely a "burnt orange" without any apparent red in the tint - and 918 would never oxidize toward red) The engine bay is probably not the place to look for original color. Best to look for the factory overspray on the interior of the car. Check the spare tire well first, but it may have been shot over as well. Definitive proof is usually under the vinyl on the pillars... If it's 110 - oxidized 110 - the color you get from a supplier from their stock formula will never match the oxidized paint. It will be a deeper red. Remove one of your side maker lights and look at the paint underneath. You may see that it's darker, more red. If so, it isn't stained - that's the original unoxidized color.1 point
-
1 pointBecause it bonds to anything and flows under low heat with high tensile strength.1 point
-
1 pointYeah, I couldn't tell if they were on a cell phone or not, but whatever the deal was, I was happy they drifted backwards just a little bit when the light turned green and they let off the brake. Just enough to get them to realize they were in reverse. I wanted to hit my horn to try to get their attention, but was afraid that it would make them think the light turned green and make them stab the gas harder and quicker. So there I sat... Looking in my rear view mirror thinking that I had a couple feet I could use to back up closer to the car behind me if necessary. Anyway, it turned out to be a non-event, but just that this shite is happening day after day after day. As for the cell phone stuff, I don't think they can legislate it out of use. It's already illegal most everywhere and not much has changed. I know people who won't text while their car is actually moving, but at every red light they're checking their phone while stopped. They say "I wasn't driving, I was sitting". I think if the car is on a public road in traffic and you're sitting in the driver's seat, then you're "driving". And to support that argument... It would be illegal for a twelve year old kid with no driver's license to do that. Regardless if the car is moving at that instant or not. Why? Because he doesn't have a driver's license. Enough ranting... So nobody can pull me out of my abyss trying to come up with that movie scene? I just spent another half hour looking for it. One car is sitting still and another car comes up next to them in the other lane. There are teasing words exchanged, the light turns green, and one of the cars goes forward while the other goes backwards and slams into the car behind them? And I think you were supposed to think it was funny that the other guy did that? Like he was the "bad guy" in the movie? Is that the antagonist? Protagonist? Where's @siteunseen when you need him... He's seen all the same stupid movies I have.1 point
-
1 pointWealthy soccer Mom playing with her phone no doubt, I see this sort of thing everyday in traffic which is why I have a dash cam running all the time. The Province of Ontario has a law against driving while using any hand held device but almost no one pays any attention to the law and continue to use them. But I just received a note with my vehicle insurance renewal that states Insurance companies in Ontario at least now consider a ticket for using a hand held device a major conviction and will result in an annual increase of your premium by 40%! Now that may actually produce some positive results.1 point
-
1 pointI built a 'Fairlady 240Z' emblem-ed car (based on a UK market HS30) back in the 1990s. Sounds similar to what you are planning to do: Key points: You need the correct S30-series specific 'Z' bonnet emblem, not the flatter S130-series type. Good thing is that the vented-quarter Japanese market models used the same 'Z' vent emblems as the vented-quarter Export market cars, so two less emblems to source. Your 'Fairlady Z' glovebox emblem was also used on the 'Fairlady 240Z' models, so that's correct.1 point
-
So cool, I want. Allows you to test the fitness of your battery or the effectiveness of your A/C Where did you find it?1 point
-
1 pointI believe they used an Australian RB30 crankshaft, 90mm stroke, 90mm bore on a sonic tested L28 block (rare), Honda sized rods due to crank journal sizes, Stuart Wilkins Motorsport big bore headers and also a custom flywheel as the rear of the crankshaft is thinner altering the flywheel clutch position. It's a little over 3.4L.1 point
-
1 pointI am not sure that the invention of the smart phone and texting has improved American's driving skills!1 point
-
Not quite on topic, but my car was very hard to steer at low speed. The tires were low. Put some air today and now it's steering easy again.1 point
-
Fantastic forum. Seven and a half years after the initial post, this is exactly the info I was looking for. today. Thanks all. With respect to EScanlon's comments (May 6) on speaker-like vent holes in the interior plastic panel, I can't say for sure what my '71 Series 2 had originally, but the Motorsport Auto panels that are sold as covering all things '70 through '73 do not have any holes aside from the lower-elevation speaker location. Does anyone have a photo of what the original quarter panels are supposed to look for so I can take a try at replicating them?1 point
-
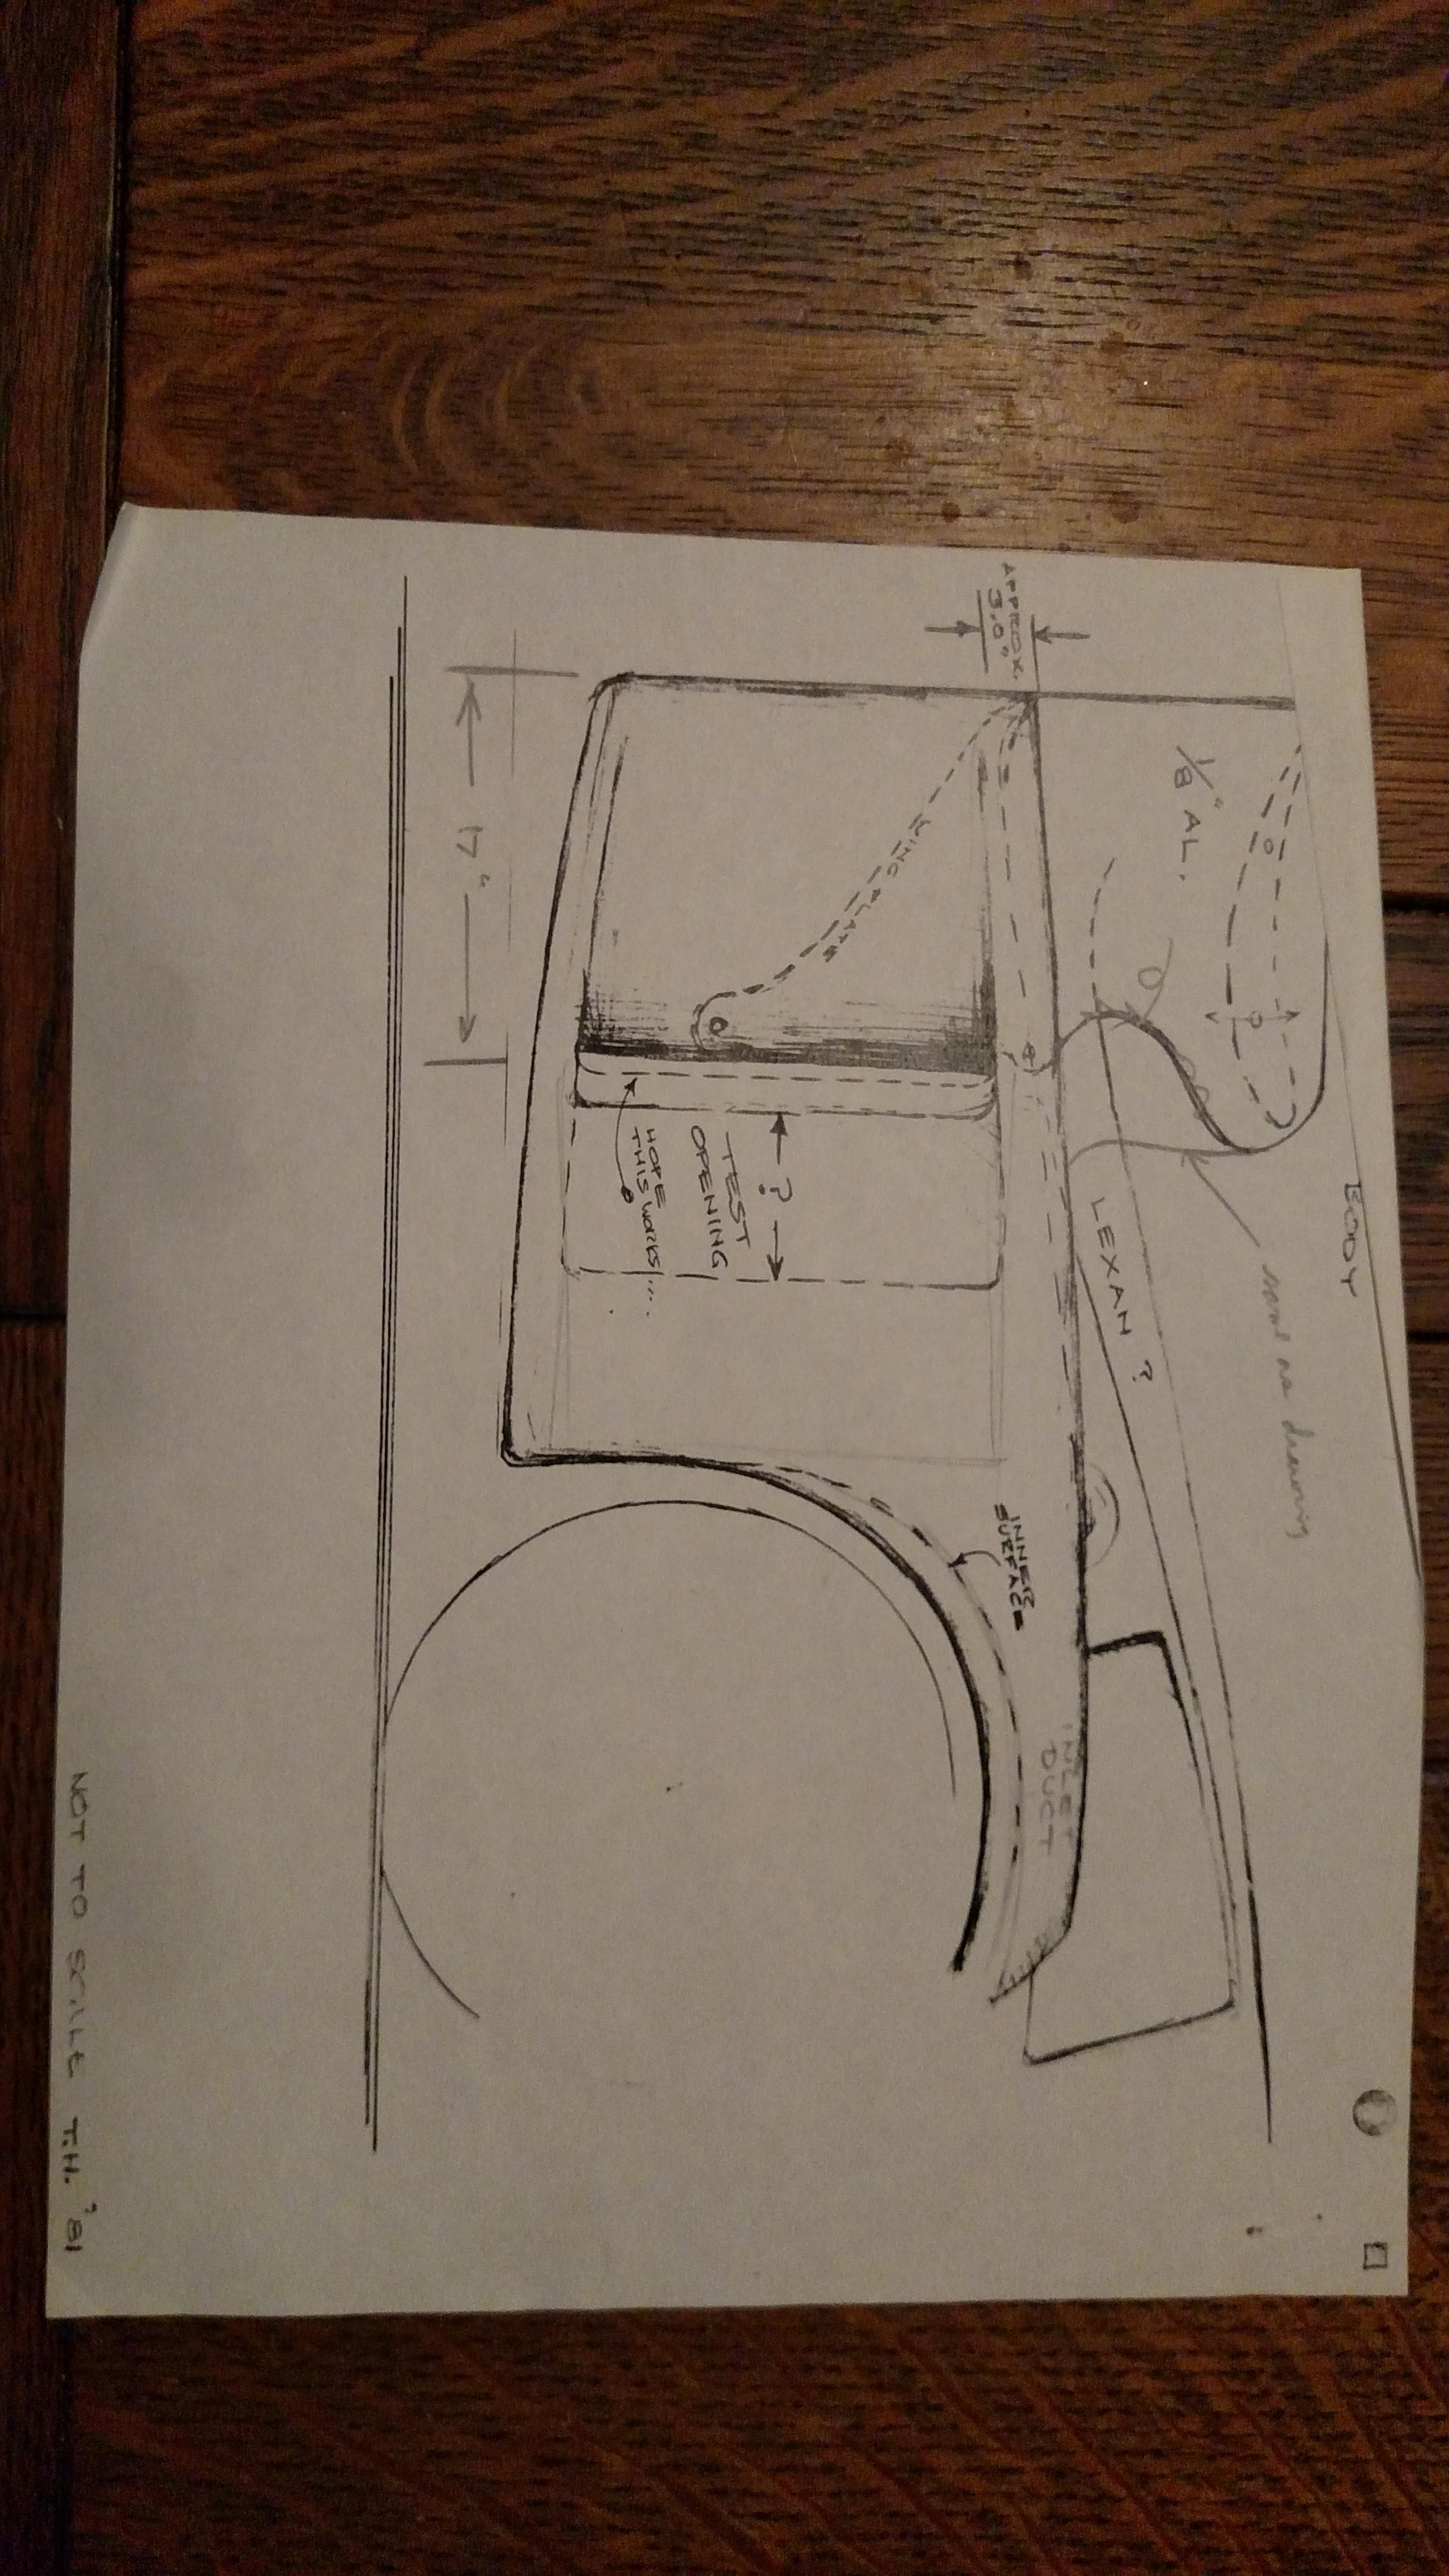
Perhaps this will help you understand what they were trying to do without the aid of a wind tunnel....
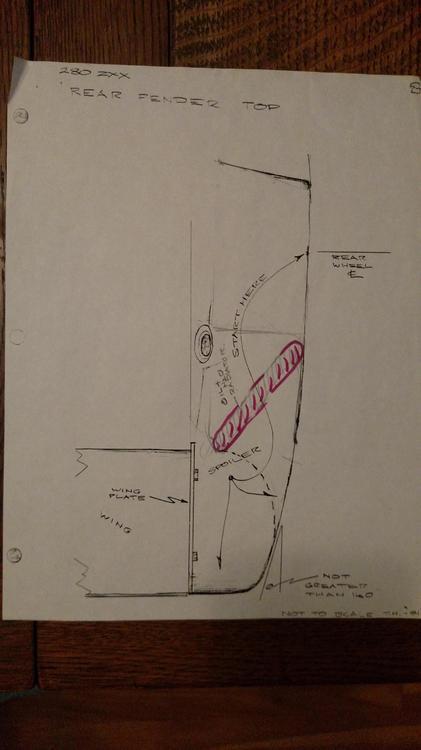
 1 point
 -
1 pointI can dunk a basketball on an 8 foot rim. But that doesn't mean I can dunk. Go for it. I'm not really in to collecting old stuff anyway, so my opinion means little. If I saw a real Fairlady Z my first thought would be "that thing must be hard to drive with the wheel on the wrong side".1 point
-
1 pointKats, I was just looking at the photos you posted in your new album and it reminded me of a question I've always wanted to ask, The front mounted fender mirrors on your 432 and Fairlady, are they as functional as door mounted mirrors? The fender mirrors without a doubt look very cool but are they as useful as conventional side mirrors for seeing traffic behind you? Thanks1 point
-
Z's are notorious for leaking exhaust gasses (or fumes) into the interior. This article details a procecss to find and eliminate the sources. To make the article easier to read, key photos are hot linked, while additional views just have a hyperlink you can click on. When driving with a window open, the air rushing around the windshield and drip moulding creates low pressure in the front half of the open window. This vacuum is what draws the air in the back half of the open window, and ultimately draws in exhaust fumes through any leak near the back of the car. If the windows and doors do not seal well, exhaust is drawn in (to a lesser effect), even with the windows closed. Granted when driving there is a low pressure area over the whole hatch and rear panel of the car, but not nearly as strong as the low pressure formed from an open window. This should also improve heater performance, since you can also find and eliminate high pressure air leaks. Equipment needed: To recreate the leaks in a garage, you need: A shop vacuum. Some cardboard. About 3 feet of 1/4" to 3/16" automotive vacuum hose (to act as a stethoscope). A roll of masking tape. Optionally you can also use a DJ smoke or fog machine (rented from an equipment/party rental facility). It makes finding leak areas easier. To seal the leaks you need: Seam sealer or caulk for tiny leaks (like GE Silicone II in clear and/or black available at home centers). Dum Dum (like 3M strip caulk #08578 available at NAPA) or duct seal (like Blackburn duct seal available at home centers) for small to medium leaks. Depending on where you have leaks, you may also need: Spray adhesive (like 3M general trim adhesive #08088) to attach interior vinyl. Replacement body plugs, grommets, gaskets and interior trim plastic rivets (from Nissan or aftermarket Z specialists). The test setup: If using a smoke machine, Set it on a piece of cardboard inside the hatch compartment (facing rearward) and send the power and remote cords out the passenger window. <IMG SRC="http://www.classiczcars.com/photopost/data/500/medium/Z_Air_Leak_Tests_004.jpg"> Close up of the Smoke Machine: http://www.classiczcars.com/photopost/data/500/medium/Z_Air_Leak_Tests_003.jpg Test firing the smoke machine... http://www.classiczcars.com/photopost/data/500/medium/Z_Air_Leak_Tests_005.jpg Open the passenger window about 3" and seal the shop vac floor nozzle to the upper rear corner of the window frame with tape. Cover the rest of the window opening with cardboard, and seal the opening inside and out with masking tape. <IMG SRC="http://www.classiczcars.com/photopost/data/500/medium/Z_Air_Leak_Tests_001.jpg"> Another view: http://www.classiczcars.com/photopost/data/500/medium/Z_Air_Leak_Tests_002.jpg Turn the dashboard vent control to "Off," and close both fresh air vents under the corners of the dash. The shop vac can now be used to pressurize (hook the hose up to "blowing" port) or depressurize (hook the hose up to the vacuum port) the interior. The depressurize test: Close the hatch and driver window, seal the round vents behind the quarter panel windows (if equipped) with tape, hook the shop vac hose to "vacuum," turn it on, get in the car and close the driver door. Feel for air coming in the dash vents and fresh air vents. Either repair the leaks now or temporarily seal them up with tape - these leaks hurt heater performance in the winter. With vacuum on, feel around the interior with the back of your hand for leaks. Below are some possible leak areas and fixes (fix each leak as you find it (either permanently or temporarily) and it will make it easier to find each successive leak): Hatch seal - check alignment of hatch (adjust hinges & striker), replace hatch seal and/or add additional "universal" weatherstrip to close gap as needed. Even with a new gasket and properly adjusted hatch, I needed to add a strip of "universal" foam to the upper edge of the hatch to get a seal. This image is with the hatch slightly open, showing how the gasket touches the hatch on either side of the hinge, but leaves a gap in the hinge centers. <IMG SRC="http://www.classiczcars.com/photopost/data/500/medium/Z_Air_Leak_Tests_012.jpg"> Hatch filler panel - remove and add thin universal weatherstrip around underside if leaking from edges, on Series I 240Z's (cars with 2 horizontal chrome vents on the outside of the hatch) if leaking from slots, remove panel and clean / repair vent flaps, on non-Series 1 cars, check the large rubber body plugs on the outside of the hatch about a foot from either side of the latch. Bottom of strut towers - under the diagonals for the strut towers (under the vinyl) there is a 1.5" diameter body hole with no grommet (this is over where the rear diff crossmember mounts to the frame rail). Where the diagonal mounts to the floor is also not fully sealed. All of these holes suck air through the frame rails. Nissan did not plug or seal these holes - the vinyl trim is supposed to seal off area. Either seal the vinyl to the floor, or peel back the vinyl and seal these areas (or do both). <IMG SRC="http://www.classiczcars.com/photopost/data/500/medium/Z_Air_Leak_Tests_015.jpg"> Tail lamp panel, dome lamp panel & speaker openings - the many possible sources will be checked with the pressurize test. If you remove the interior panels, the fuel tank vent hoses, antenna drain hose & grommet, tail light gaskets, unsealed sheet metal seams, and rust holes are common causes. Door or window seals - replace. Shifter - replace inner shift boot. The pressurize test: On Series 1 cars, seal up the body vents by taping up the slots on the inner hatch trim panel. From outside of the vehicle, close the doors, attach the vac hose to the "blowing" port, and if you have the smoke machine, plug it in and fill the interior with smoke. Filling up (the smoke does not stain)... <IMG SRC="http://www.classiczcars.com/photopost/data/500/medium/Z_Air_Leak_Tests_006.jpg"> All full... http://www.classiczcars.com/photopost/data/500/medium/Z_Air_Leak_Tests_007.jpg Turn on the vacuum and look for large leak areas (every Z has lots!). <IMG SRC="http://www.classiczcars.com/photopost/data/500/medium/Z_Air_Leak_Tests_008.jpg"> Feel with the back of your hand, confirming location with the "stethoscope" hose held up to your ear (note that you are doing this at your own risk - I accept no liability if you injure your ear drum, a bug crawls in your ear, of if you forgot the hose was full of some toxic substance). Starting from the rear of the vehicle (again, fix each leak as you find it -- it makes it easier to find remaining leaks): Tail lamp vents - (2 on bottom of each tail lamp). Remove felt "filters" if present and seal with clear caulk. The lamp sockets are not sealed, providing adequate ventilation without the outer vents. This should also stop the internal lens discoloration due to exhaust gasses flowing through the lamp. Under hatch - The hatch has a thick inner and a thin outer gasket. Any leak between the gaskets draws in exhaust. With the hatch open you can seal the opening with cardboard, taping it to the inner gasket and run a pressurize test or just open the hatch and seal the following: Round body plugs on either side of hatch rail. Pinch weld above hatch hinges (just below the outer seal along the roof edge) - caulk gaps. Hatch hinges to the body - Seal any gaps (exopsed adjustment or shim slots, seal the hinge gasket to the body, and if a pressure check confirms a leak from inside the hinge pocket, remove the hatch & hinges and seal any splits and cracks inside the rubber hinge pocket seals. This was a hard to find leak. In this photo, the hatch and hinges are removed. The hinges fit into a pocket along the roof edge. Behind the metal plate is a rubber boot that fits inside and seals the pocket. One of the pockets on this car had a crack deep inside the pocket and an area worn through from rubbing on the hinge. The part is no longer available from Nissan, so some glue and liquid rubber was used to seal it up. The gaskets also sealed poorly to the roof support (caulk sealed it up). There were also numerous leaks between the inner (thick) and outer (thin upper) gasket in the photo. Anywhere two pieces of sheet metal were spot welded together needed caulk. <IMG SRC="http://www.classiczcars.com/photopost/data/500/medium/Z_Air_Leak_Tests_013.jpg"> Continue the pressure test under the car: <IMG SRC="http://www.classiczcars.com/photopost/data/500/medium/Z_Air_Leak_Tests_010.jpg"> In the below photo, many leaks are sealed at this point, allowing the smoke coming from under the driver rear fender to be visible. <IMG SRC="http://www.classiczcars.com/photopost/data/500/medium/Z_Air_Leak_Tests_011.jpg" Potential under the car leak sources: Evap emission hoses & grommets - just behind the rear valence panel - use the stethescope to pinpoint. Seam welds around floor behind rear valence (you may need to remove the fuel tank, or use the stethescope hose to thoroughly check). Antenna drain hose and grommet - on driver's side behind wheel well. If lots of air comes out of the hose, it could be disconnected from the antenna or the antenna may need to be sealed. Remove the inner hatch trim panel to check. Pinch welds just forward of the antenna drain, and seam welds going back to rear valence panel. Evap hoses and grommets on passenger side, behind wheel well. Pinch welds just forward of evap hoses and seam welds going back to rear valence panel (removing the splash shield behind the passenger tire may ease access without needing to drop the tank. Wheel housing inner pinch weld in front of rear tire. Pinch weld under rocker panel (toward rear) Round holes under outside rocker panels (these can be plugged with the same rubber plugs used on either side of the hatch rails, and some sealant). Don't seal the oval drain ports in the inside of the frame rails. Body plugs in spare tire well and driver and passenger floors. Rest of car: Pinch welds on forward side of gas door opening (upper and lower corners). Hatch compartment floor rubber body plugs (remove carpet and check - these lead into the frame rails and can draw exhaust). Body plugs behind seats (remove carpet and check - for Series 1 these are in the storage bins). These lead into the frame rails. Grommets & throttle rod boot on firewall. Below are links to additional Exhaust Fume Articles: "Solving the Fume Problem in a 280Z" by Zhorse: http://www.classiczcars.com/forums/showthread.php?t=15466 "Exhaust Fumes in 1st Generation Z Cars" by rzola: http://www.classiczcars.com/forums/showthread.php?t=17367 Happy hunting... Here's to summer driving without burning eyes and a passed out passenger... This post has been promoted to an article1 point
-
0 pointsSo I have some errands to run today and take the Z out. I take my still camera along with me because I figure that since this might be the last time I drive the Z this season, I might take a nice pic of the car at a park or something. They are going to be salting the roads again soon and figure it would be nice to post a pic on maybe my last drive of the season. Anyway, I'm still running yesterday's near-miss over and over again in my head, and I pull up to a traffic light behind this car. Yes... They're sitting at a red light. In reverse. Waiting for the light to turn green so they can stab the throttle and fly backwards into the front of my Z because they forgot they were in reverse : Thankfully, when the light turned green and they let off the brake, they noticed their error before tragedy happened, but I'm really starting to wonder. I don't know if everyone is just crazy due to the holiday season or what, but I'm wondering if I should just park the Z now. ** Fifty bonus points for the name of the movie in which a similar scene occurred. I spent about a half hour searching for it, but just can't put my finger on it. Driver had backed up for some reason and subsequently forgot the car was in reverse... Another car pulled up next to them and taunted them into a race? Light turned green and they slammed into the car behind them. What was the movie???? Not American Graffiti. Not Hollywood Knights. Not Porky's. Not Animal House. Just can't come up with it and it's bugging me!
 0 points