


Leaderboard
-
conedodger
Free Member12Points12,513Posts -
grannyknot
Free Member6Points5,158Posts -
inline6
 Subscriber
 5Points1,282Posts
 -

Zed Head
Free Member5Points19,235Posts


Popular Content
Showing content with the highest reputation on 07/10/2024 in all areas
-
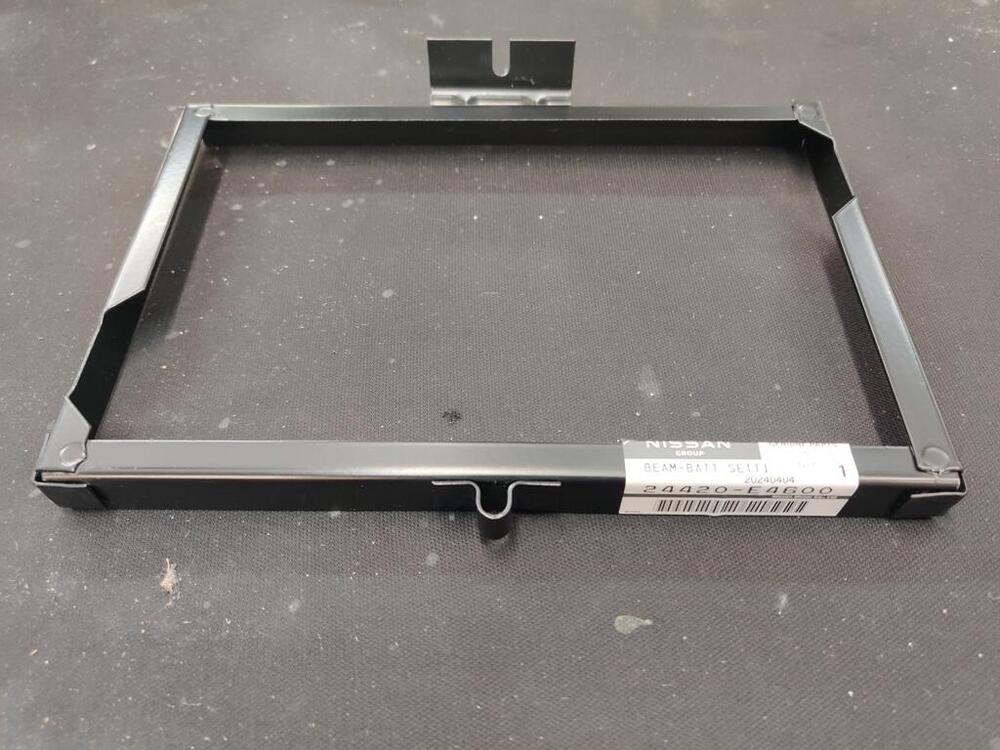
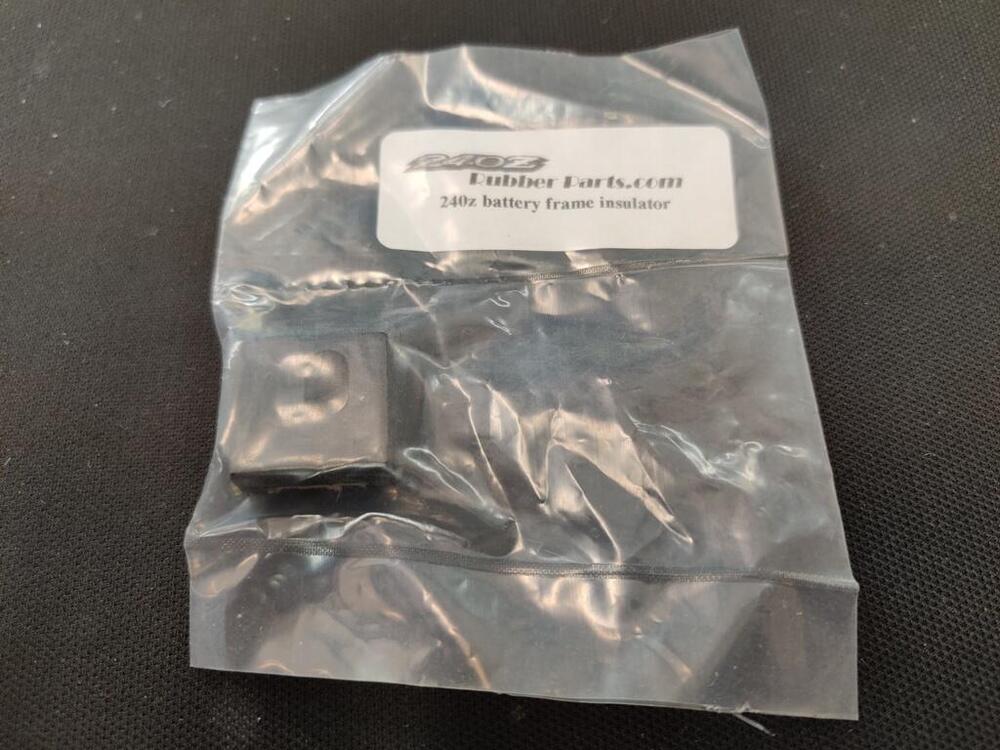
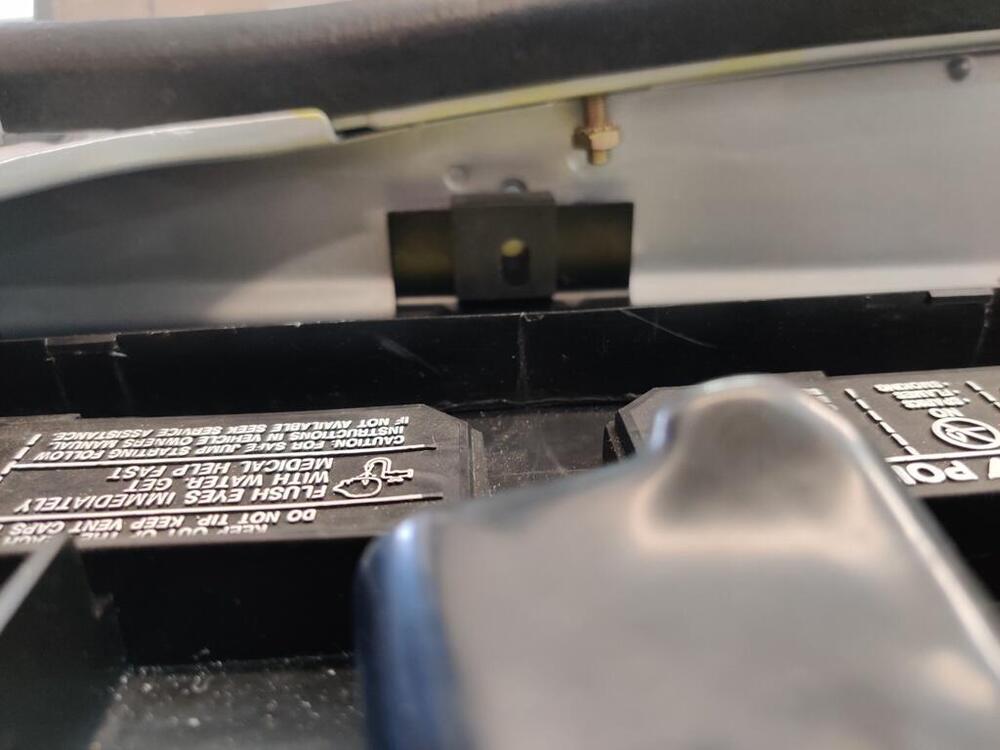
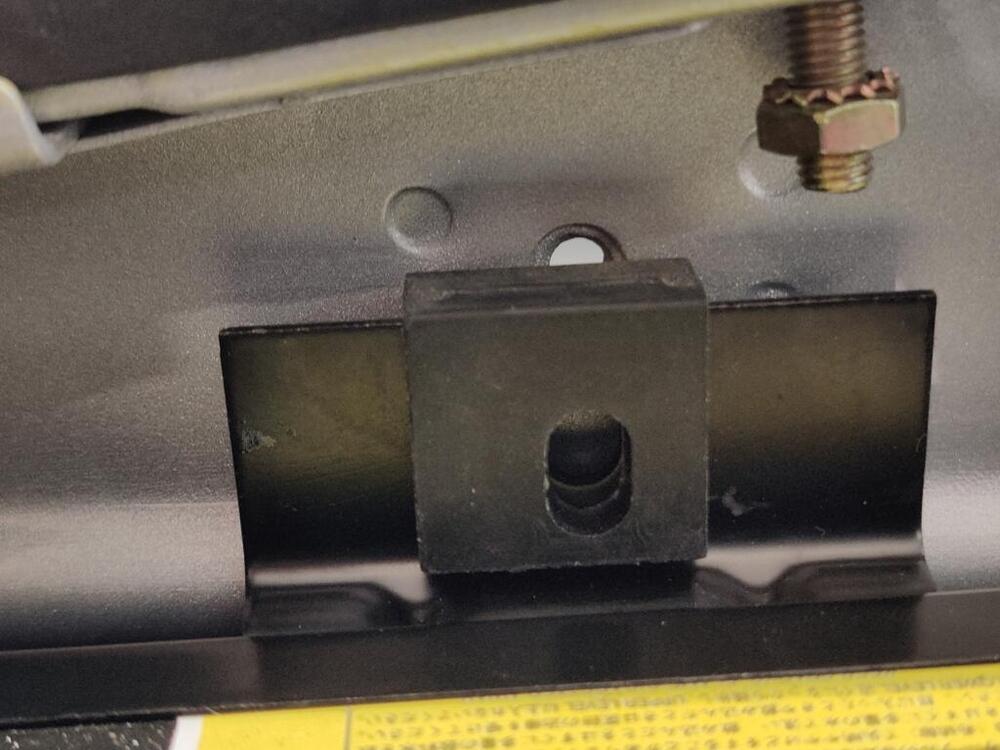
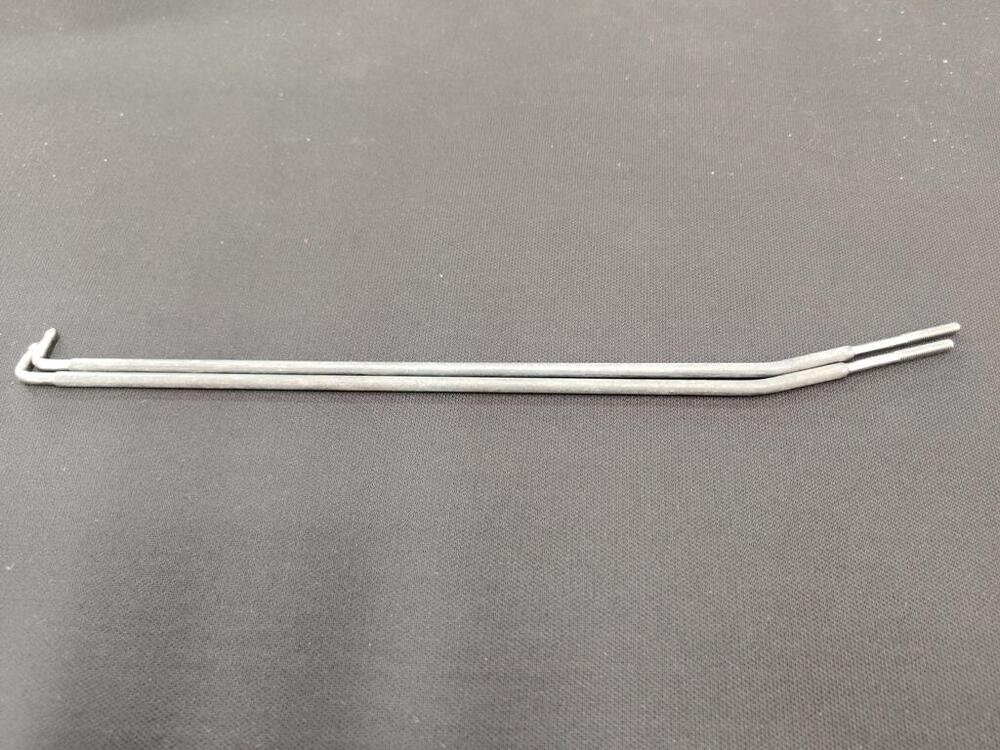
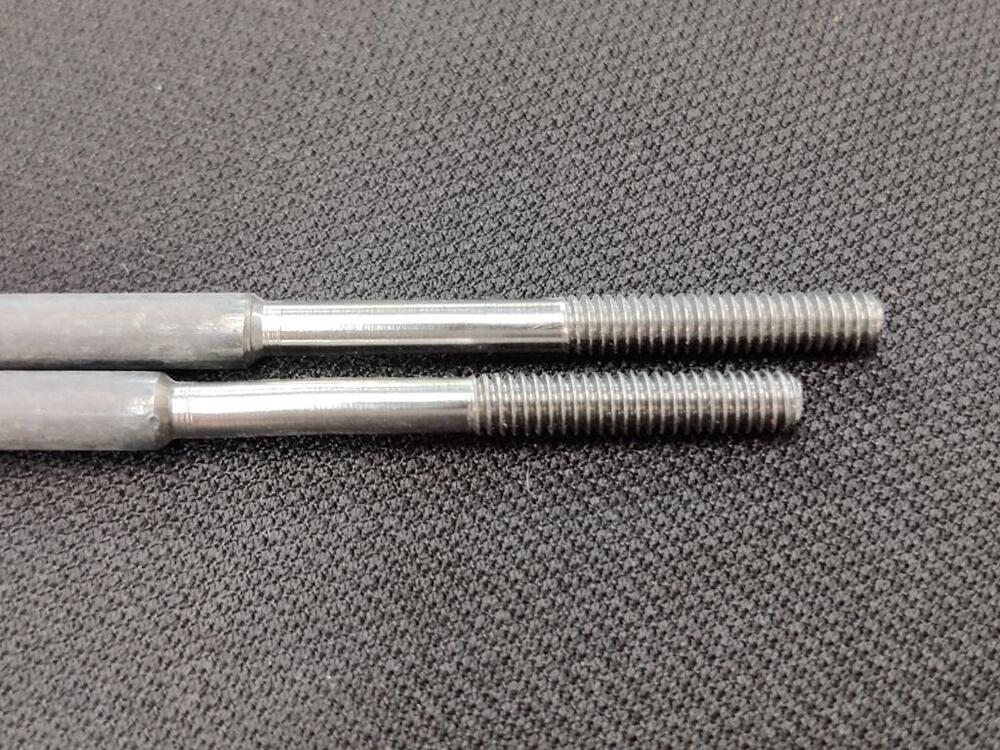
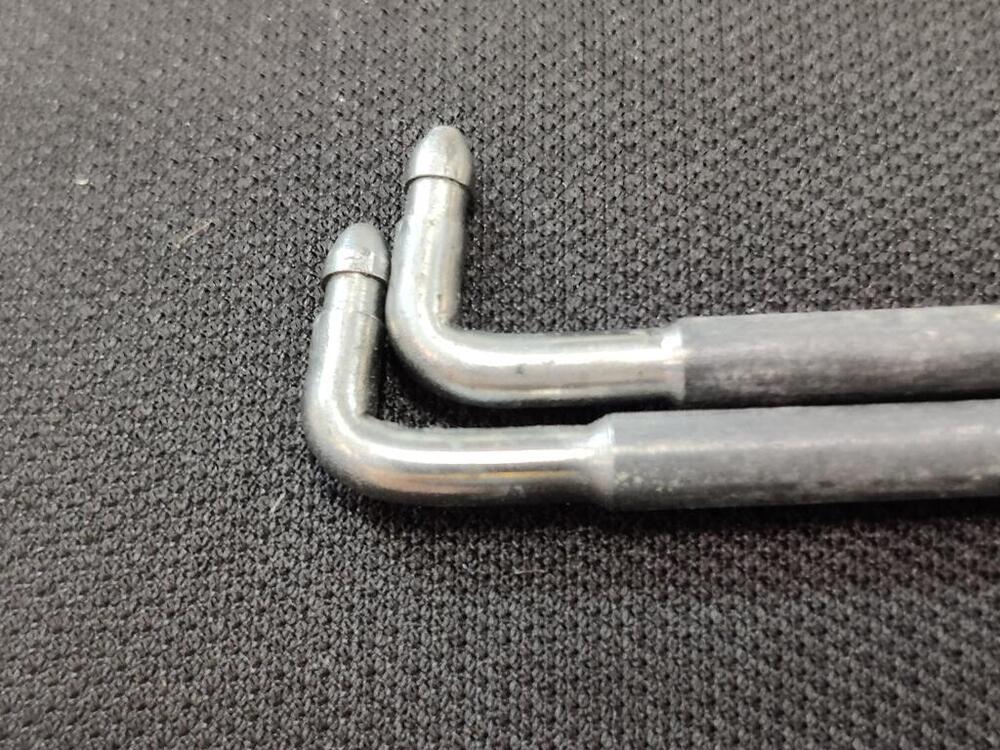
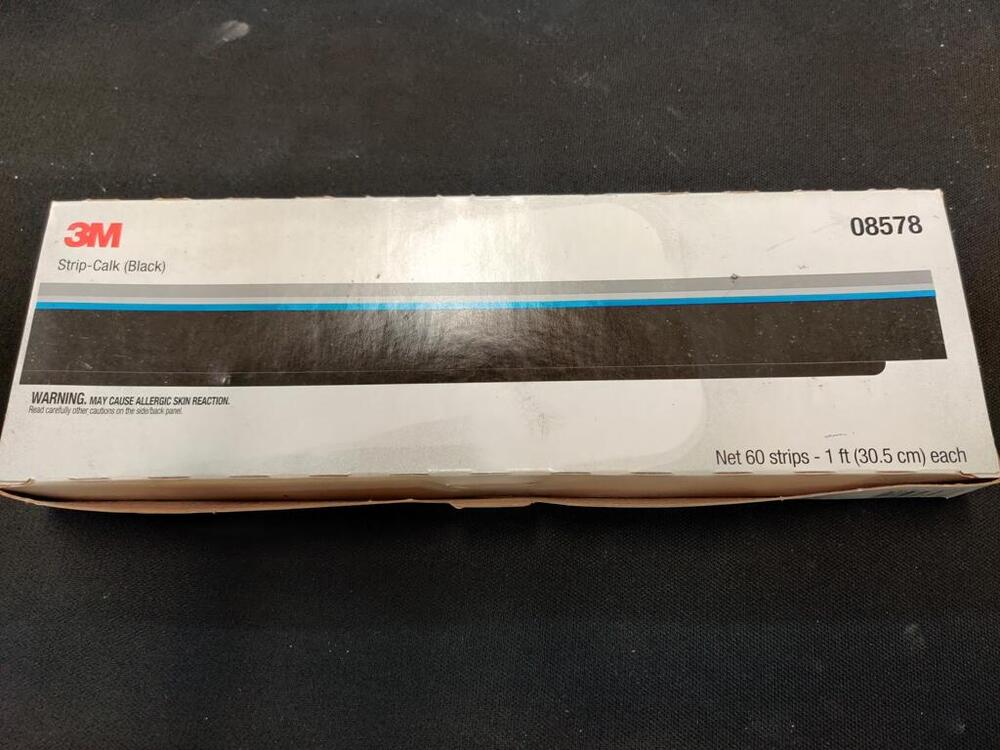
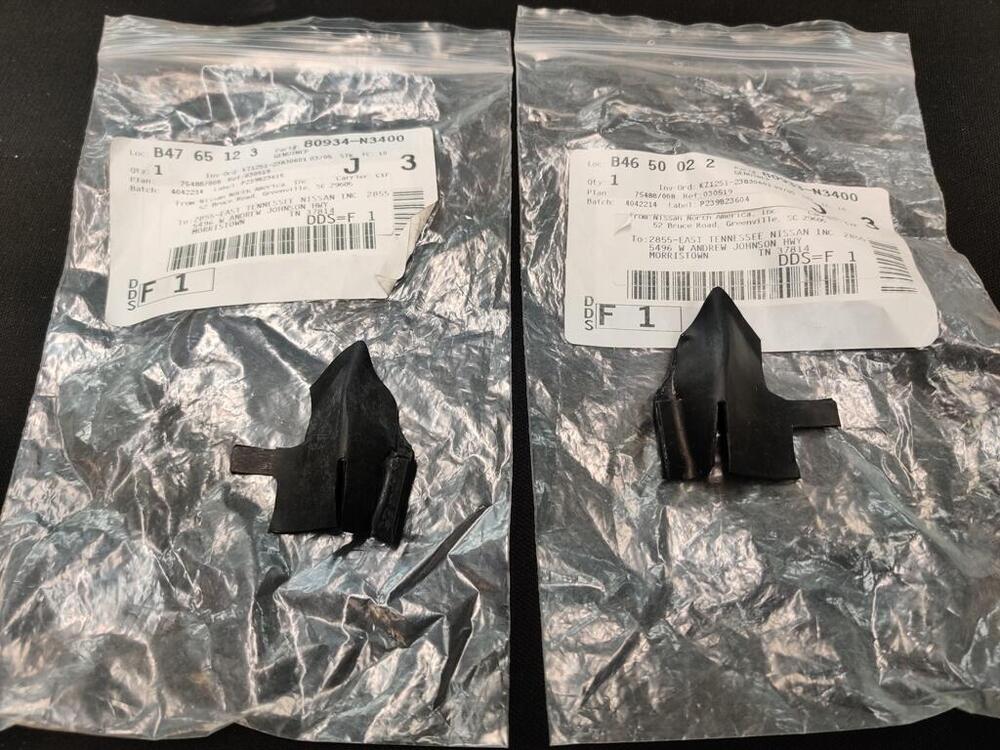
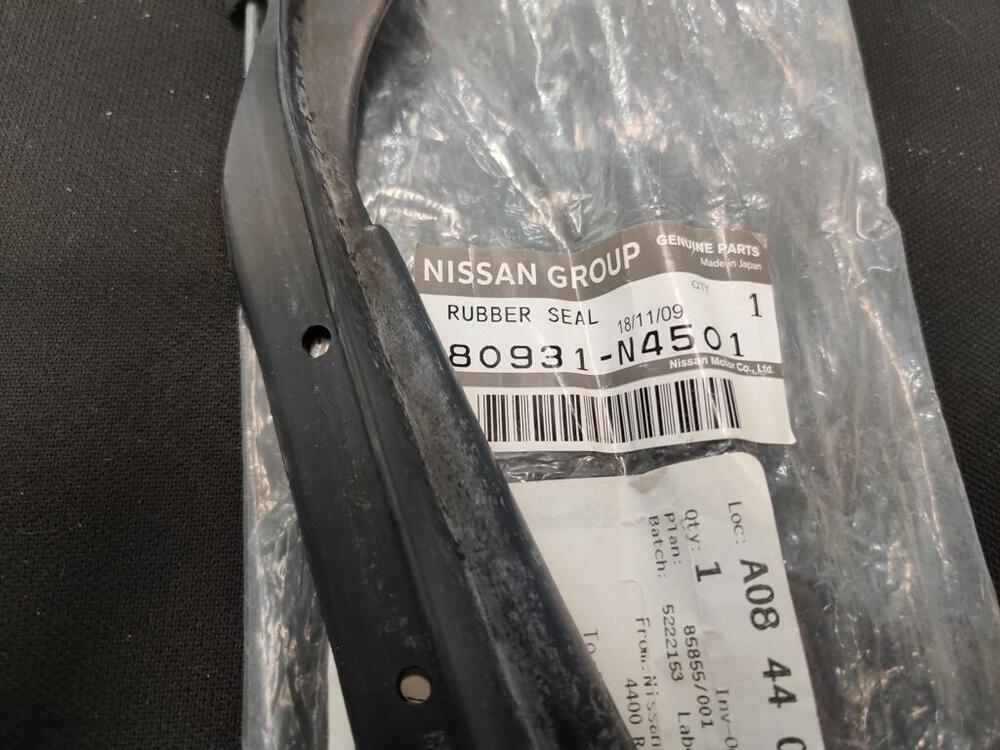
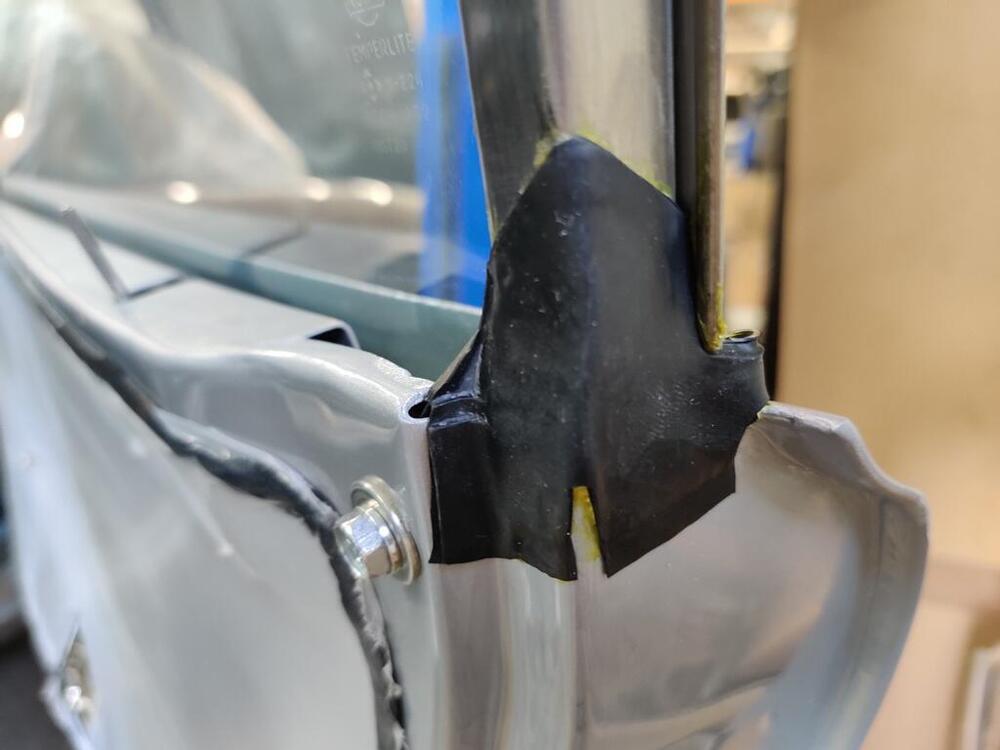
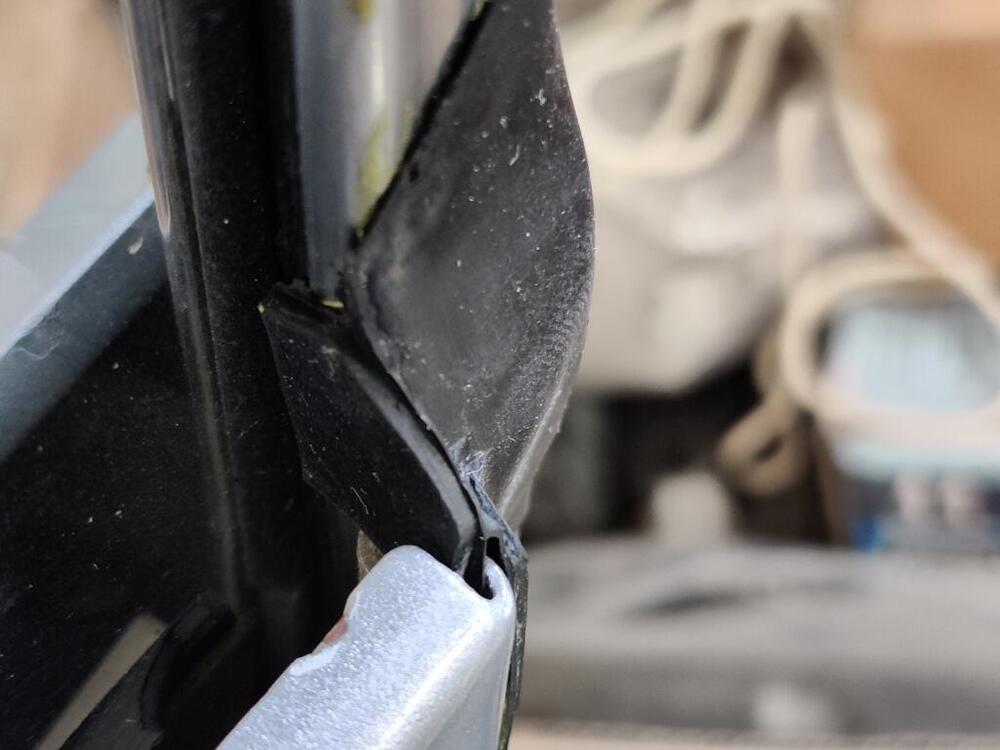
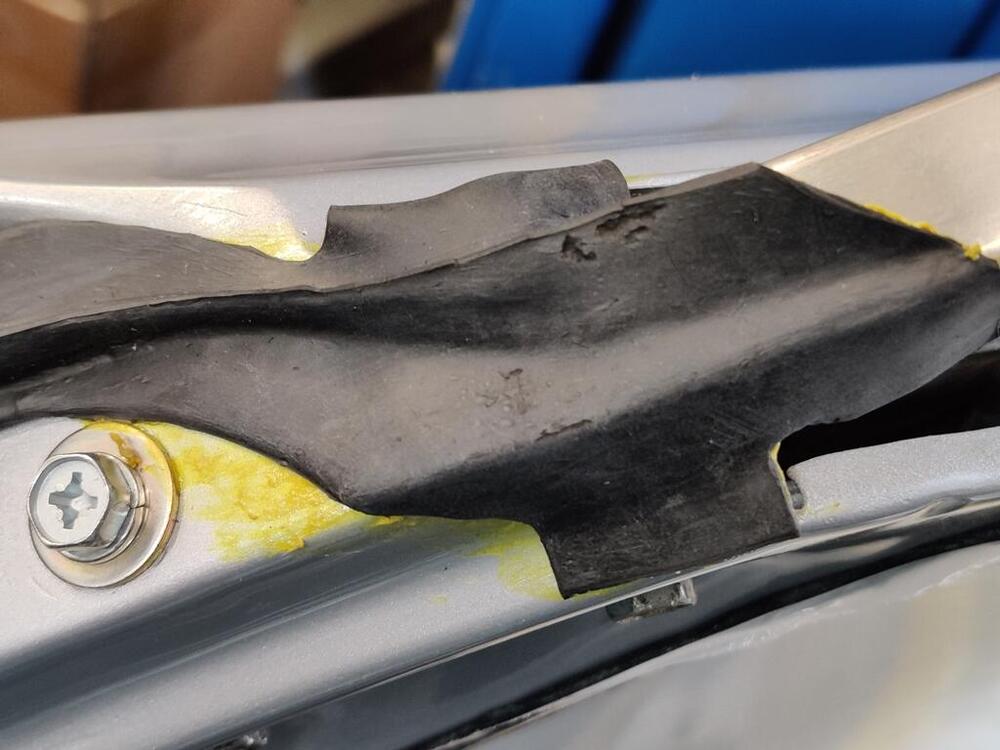
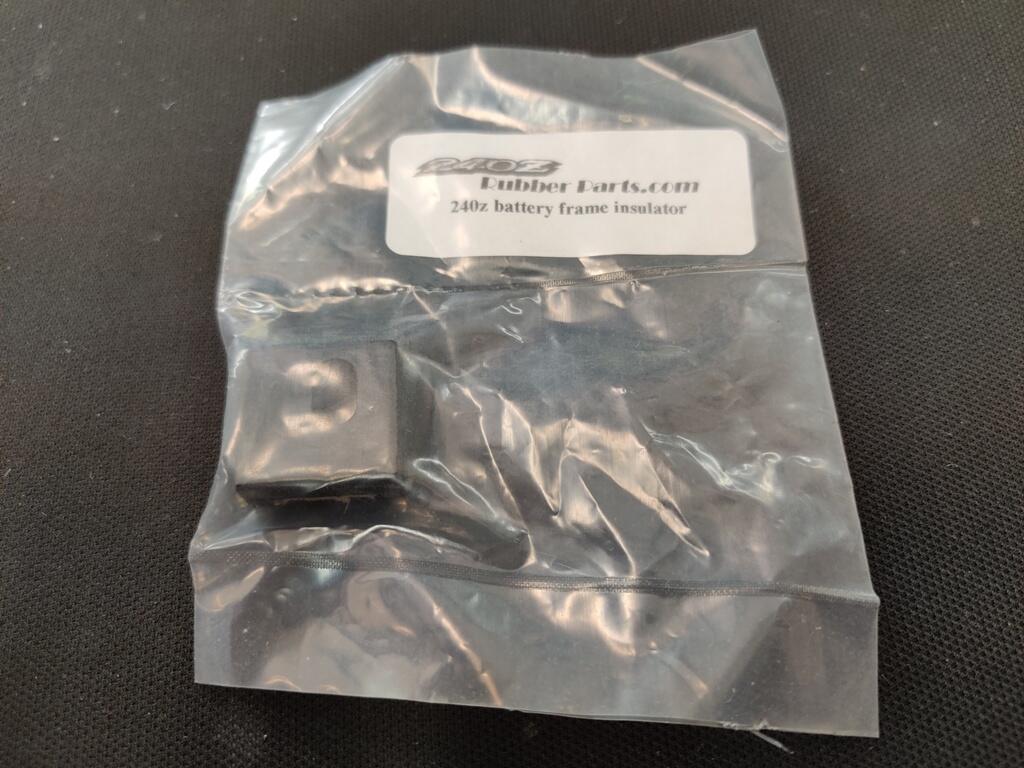
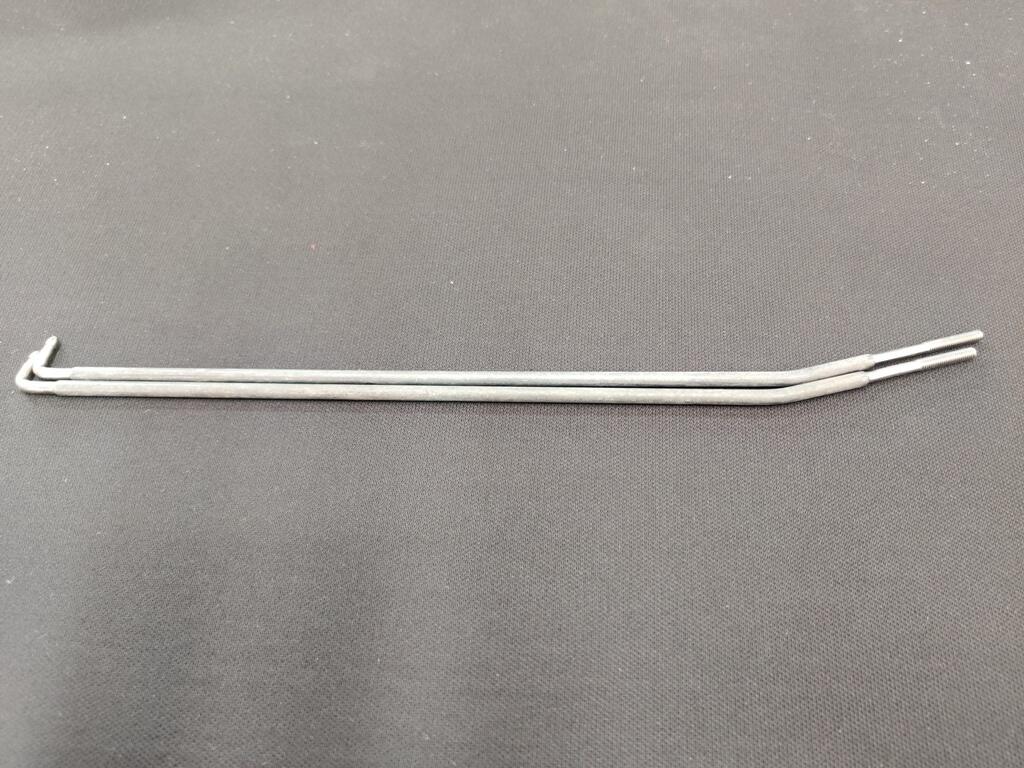
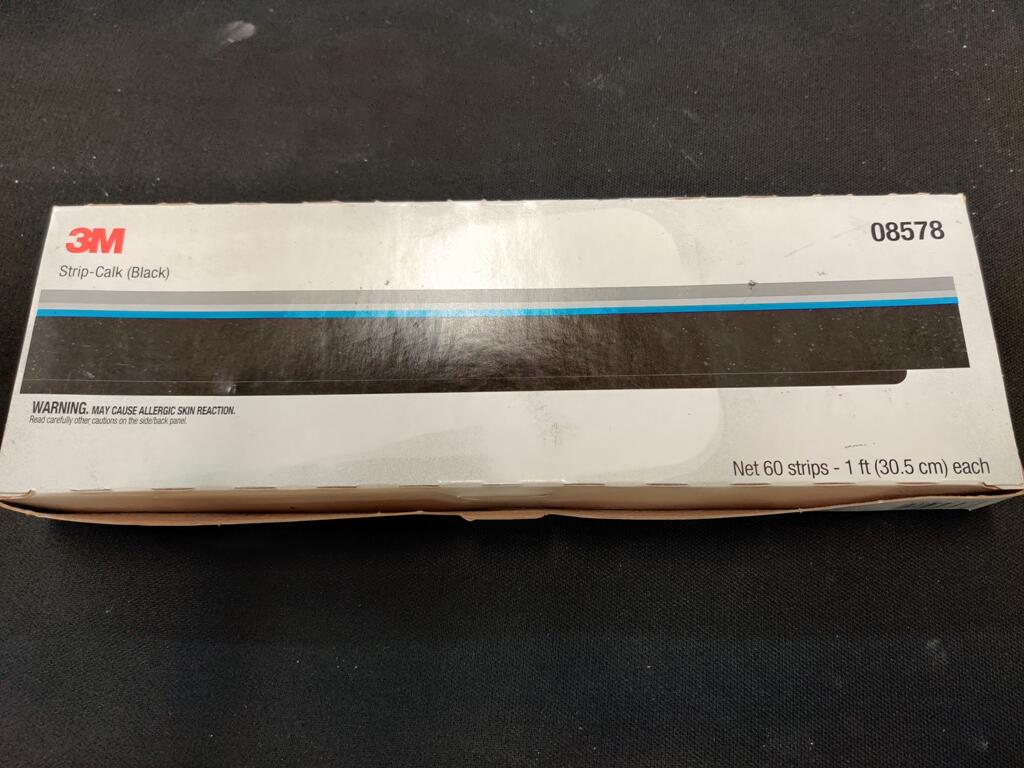
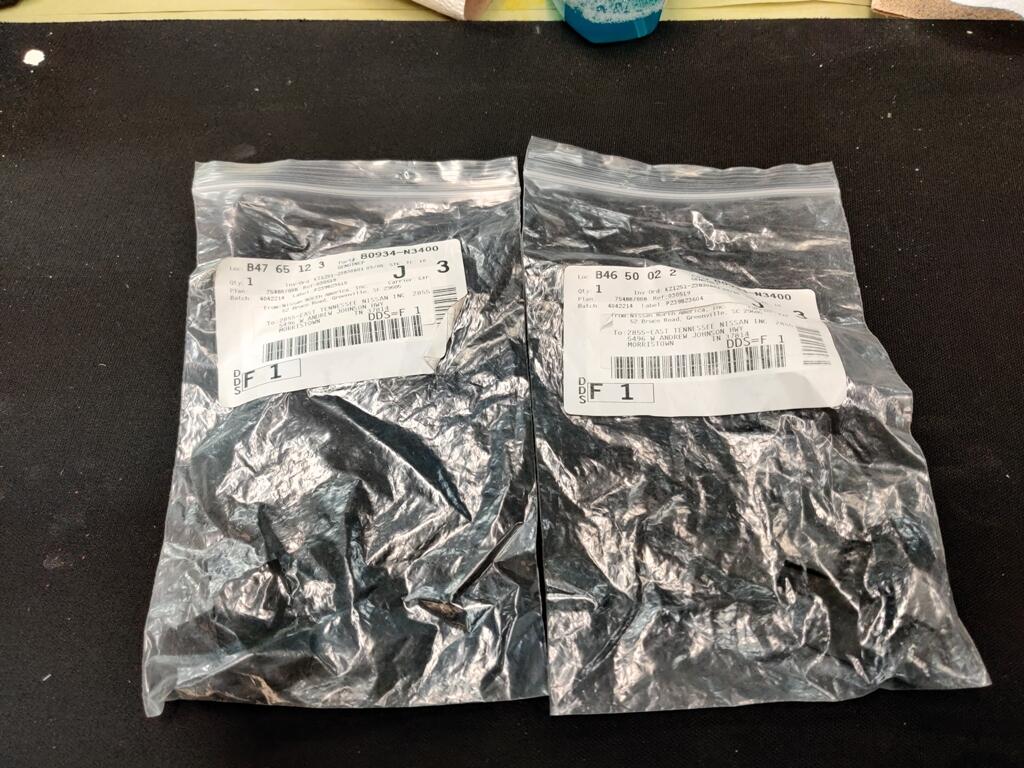
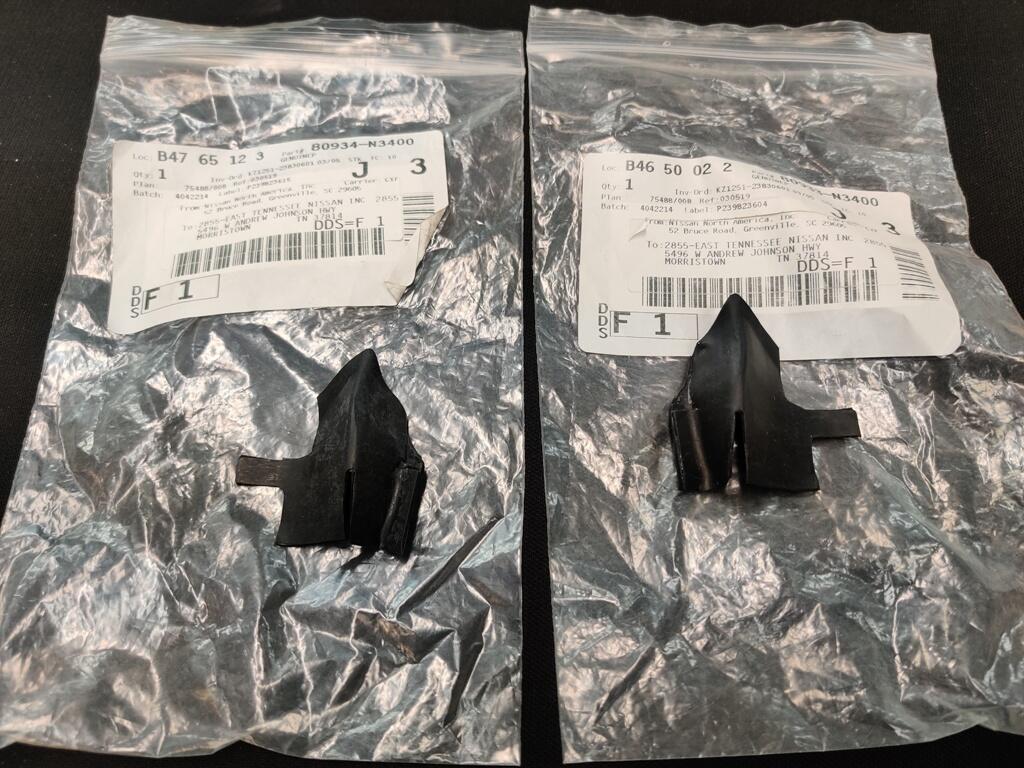
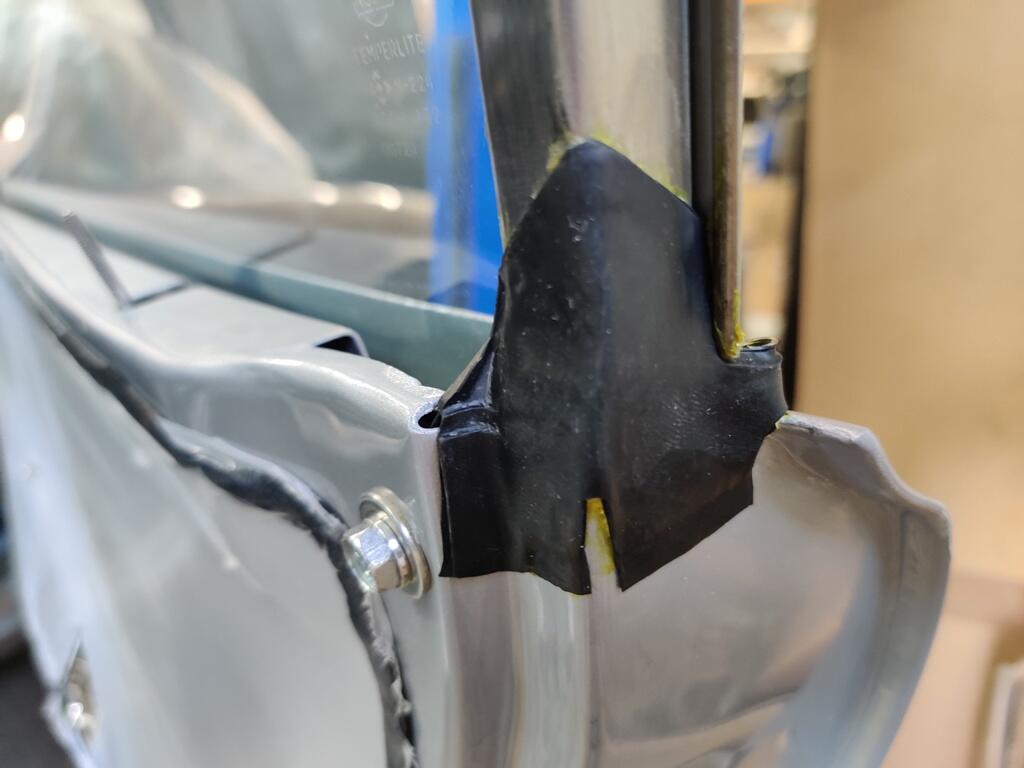
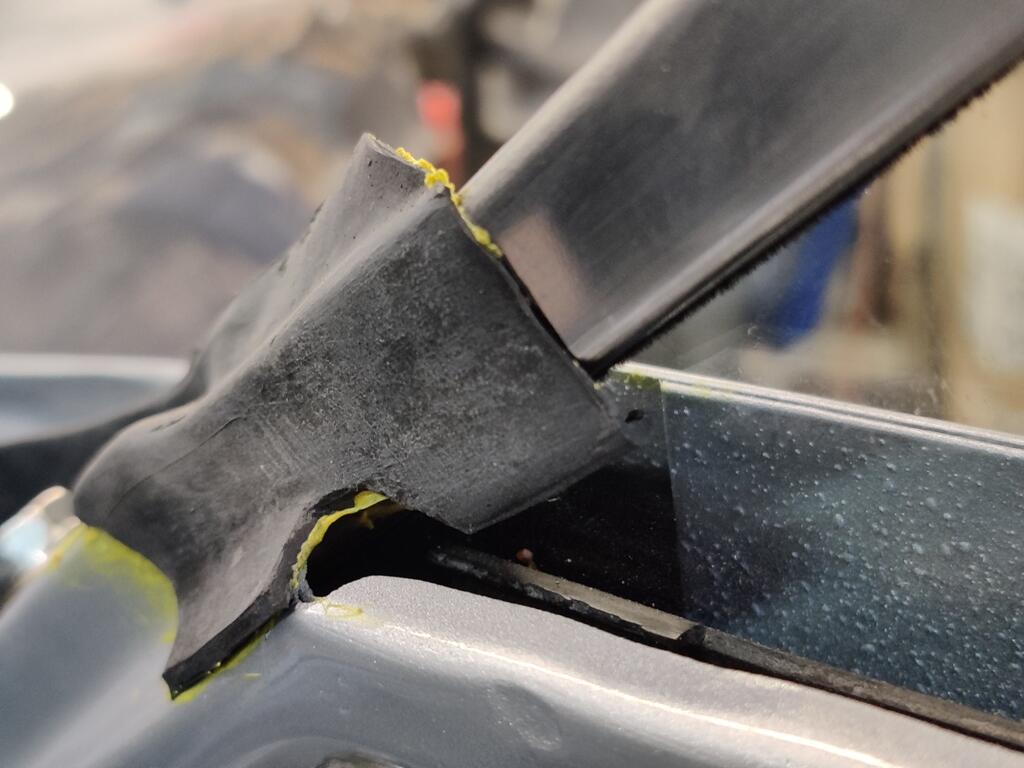
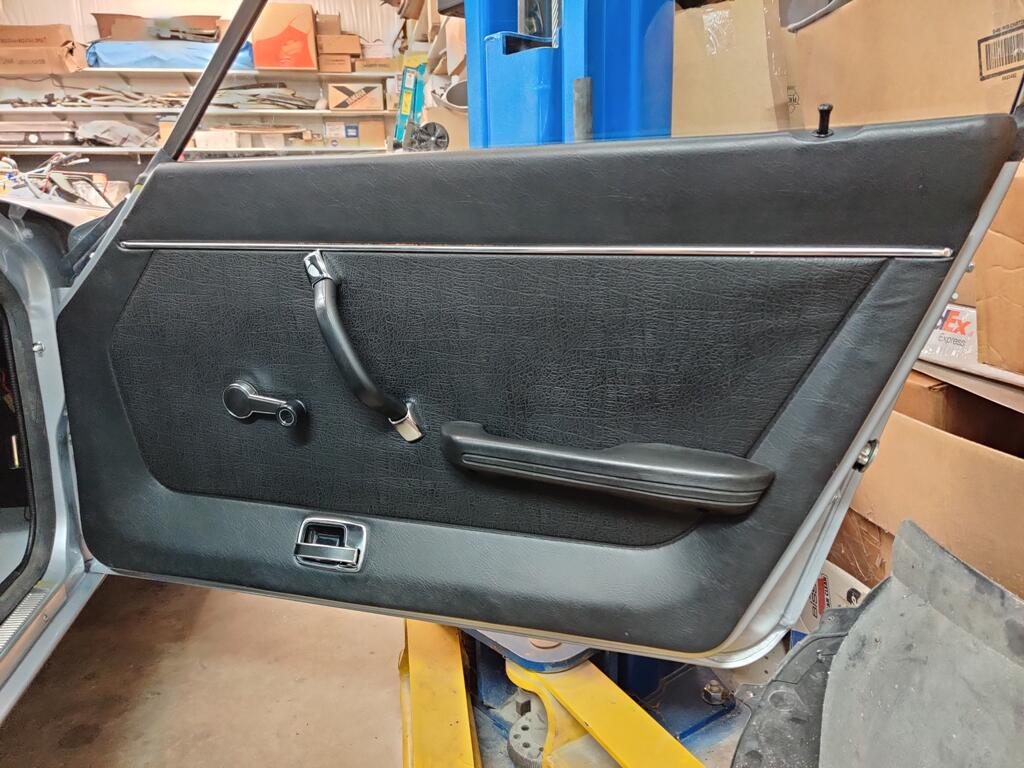
Lately, everything I attempt to do on this car fights back. For example, I have sourced a new battery, battery tray, and battery frame from a Nissan dealer. So, with all these "factory original" parts, how do I end up in this situation? A closer look: Is this battery shorter than the original? Is the battery tray thinner/shorter than the original? A combination? When I saw this, I just laughed and walked away to do something else. I am also wondering why the slot in the rubber part here is offset to one side. I have no clue. Next came more work on the right side door. I am still dealing with the consequences of the paint shop removing the doors (and I specifically said not to). Getting the right side door aligned exactly the way it was is a pain in the arse. Tightening the hinge locating bolts, loosening... rinse, repeat. I had them where they belong and did final body work finishing across the door gaps. I had it really close to perfect. Now, I am struggling. The door is made of thin metal. It is quite possible that by the time you bolt in the stainless steel window frame and put in the regulator and the glass, the shape of the door changes a bit. Probably a key piece of helpful info for those of you reading this and yet to apply paint to your car in the future. After quite a bit of fiddling, I got the "feel" of rolling the window up and down right - consistent slight amount of force throughout the travel both downwards and upwards. Next, I made a vapor barrier for the door and put that in place (sorry, no pics - I will remember when I do the left side). I had to straighten the lock pull rods as they were a bit "bent". The product I used to attach the vapor barrier to the door (first pic of three), and new door frame seals: For the front door frame seal, I couldn't get my favorite contact adhesive to stick to it properly until the third try. After the first two, I scuff sanded it. Only then did the adhesive stick to it properly. I have some adhesive clean up to do still. After these seals were glued into place, I could put the inner door panel on. I sourced reproduction door panels some time ago, probably a couple of years. They appear to be good quality, but I decided to move the door panels from my track car to this car. I purchased these new from a Nissan dealer around 1994. They are still in very good condition. The track car will get the repro panels. Getting the pull strap on took a crazy amount of time and effort. The chrome pieces do not want to snap into place. I had to massage and modify a bit here and there until they would finally latch into place. Anyway, that is how it can go sometimes. Much more difficult than it should be. But, I press onwards. 😉


 5 points
 -
Looks like a fantastic money pit, would love to get my hand on it.5 points
-
3 points95 degrees out there right now. Here is one overall pic, I can send more detail via PM. A little surface rust but overall in good shape. I don't see any cracks.
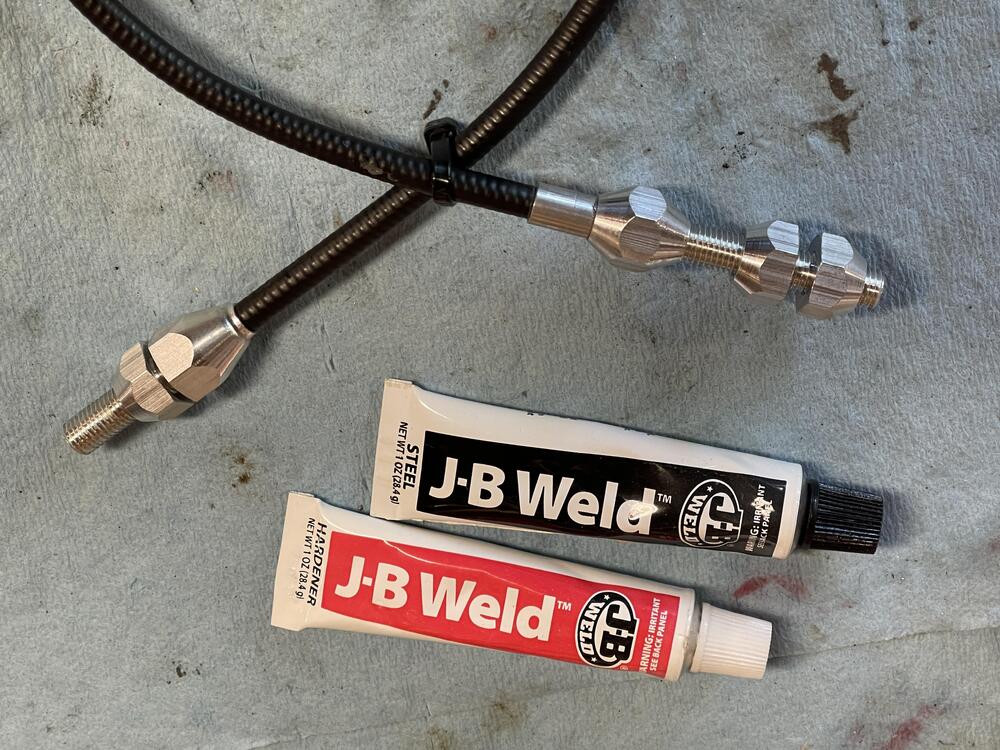
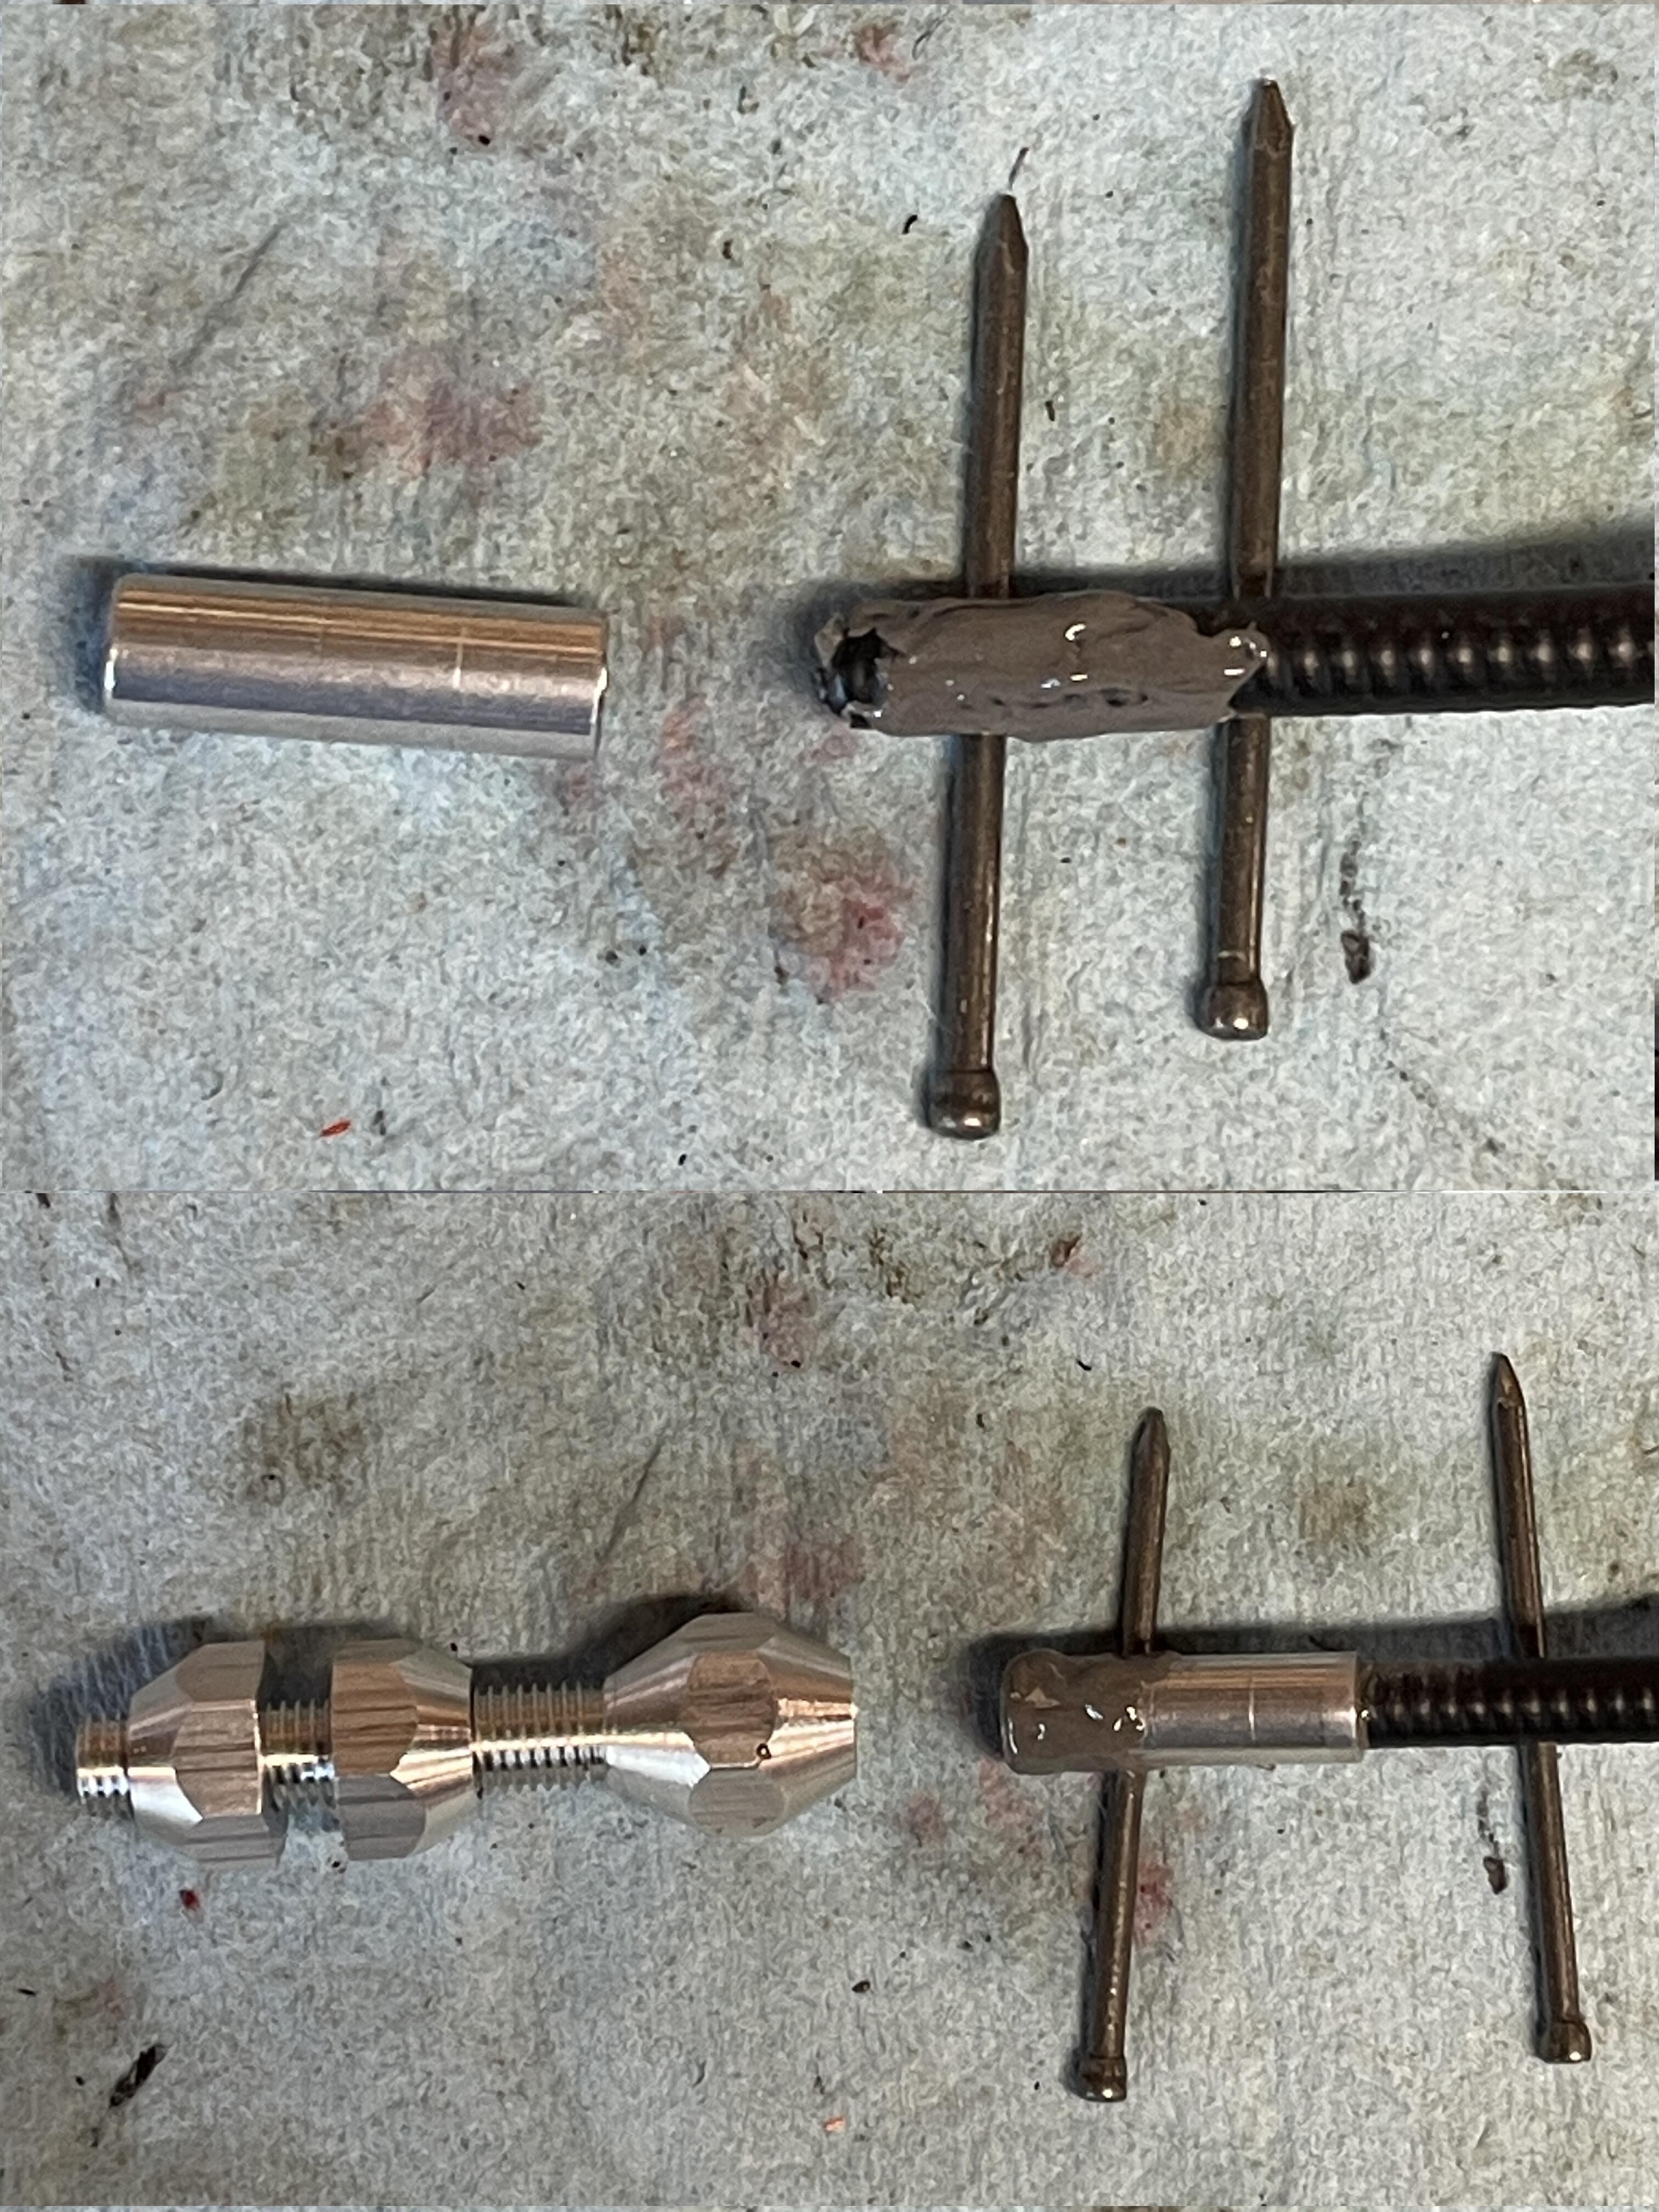
 3 points2 pointsI replaced my stainless Lokar cable with the black Lokar TC-1000U, I now think it's the best choice. Someone mentioned that when he manually blipped the throttle from the engine side, the cable ferrule dropped out of place at the bracket. I honestly never tried this on mine while working on this kit, but obviously would be necessary while balancing the carbs, or just playing around. The problem is when you push the cable (instead of pulling with gas pedal) back down the sheathing, the gas pedal spring is resisting and ferrule moves out of place. Worse, the engine can't return to idle. Not good. And if you're using the stainless one, it's a pain to get those little frayed strands back inside the ferrule. The black version is much easier to get back together. But, it shouldn't happen in the first place. The firewall side is crimped around the sheathing and isn't a problem there. I called Lokar Tech, but they couldn't offer a solution since they only make a kit for the 4 bbl carb on the 240Z, and just said it wasn't installed correctly. Whatever. So, the fix is to glue the sheathing to the ferrule with some sort of epoxy glue. I used J-B Weld. Two areas, the sheathing to the ferrule, and the ferrule to the aluminum adjuster. Apply to outside surfaces so no adhesive gets inside center hole when assembled. Wipe off excess and let dry throughly. Problem solved, blip away.
 2 points2 pointsThe valve seals are not hard to replace if you have the right tool to compress the valve spring with the head in place. I would just do that, and at least it will no longer be part of the discussion. You will know right away when you get to them. The whole job will take less that 1 hour.2 points2 pointsUnderstood. But it's a matter of AVAILABILITY, not performance. There is no performance change at all. It's more of an "unfortunate necessary substitution driven by inability to get the better fitting part". The OP asked if the 73-76 cylinders were a good upgrade, and I believe the answer is "no". I'm not trying to cause any trouble here.2 points2 pointsThe Lake Stevens Les Schwab store parking lot. I guess it’s a thing now. There were about two dozen cars, pickups, even a pretty slick Peterbilt tractor. And yes a car with excessive use of carbon fiber that isn’t painted and will look like crap after the sun bakes the resin to that ugly yellow crazed mess.2 pointsHere's a new offering that might be a fun resto-driver money pit garage project. Probably needs a little bit of work on everything. Has an odd rust pattern. No reserve. California. Gas tank cleaned but says it's not been run since 1991. https://bringatrailer.com/listing/1971-datsun-240z-297/
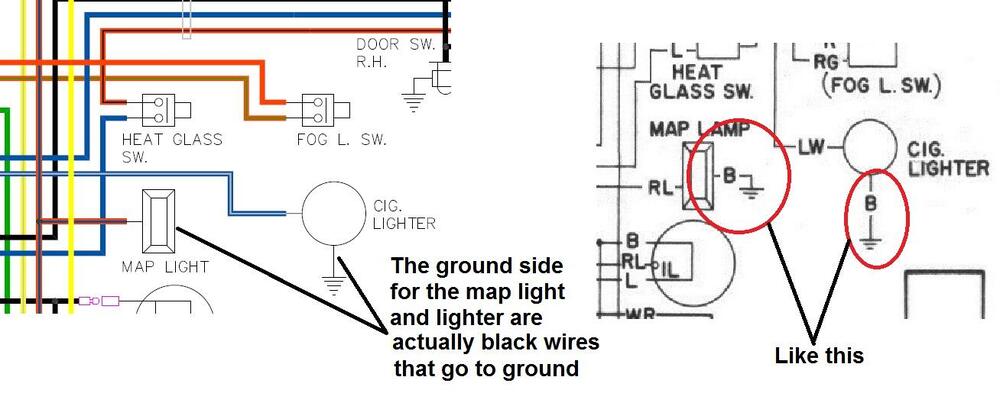
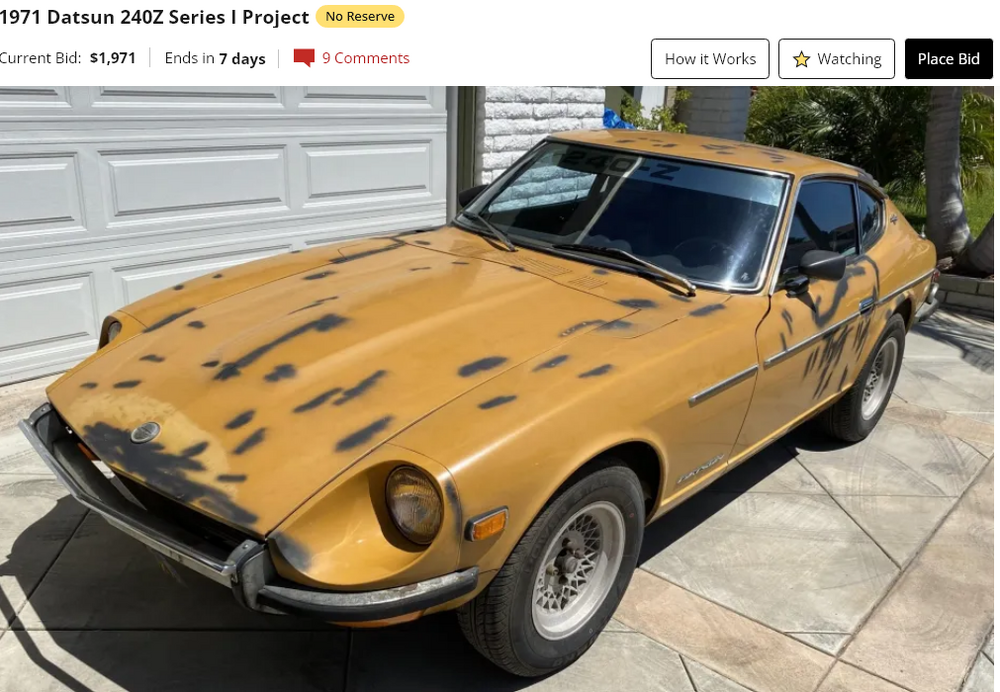 2 points2 pointsFind as many Factory bushings that are still available. Try to stay away from poly IMHO.2 points1 pointThe fsm says pulling the e-brake up a few times is the adjustment after changing shoes. Mine went from almost straight up to about half way. Kinda like ED as I got older.1 point1 point1 pointThe topic has come up several times over the years. Put the words below in to Google search and a bunch will come up. site:classiczcars.com valve seal replacement1 point1 pointI think that you're going to find a shoe retaining part, or a broken/loose spring inside a drum. The parking (not "E) brake "no longer" works, meaning that it did for a while. Something broke or came loose.1 pointThose trays were built for a 24 series battery. Height and width is the difference. You probably have a 34 series which is shorter. Had to put a thin plank of wood under the battery itself on mine.1 pointI am a bit new to the 280z rack. My rack might be OK and based on some videos I have seen I might very well change the inner and outer tie rods and just clean and paint the original one.1 point1 pointSnake oil for valve trains. I've tried a few in the past and been disappointed with the results but a mild cam seal leak and a severe rack and pinion leak on our 97 Outback (spare car) made me dig deeper. After watching many snake oil reviews I decided to try AT 205. This stuff is amazing. Project Farm confirmed this on YouTube. I added the recommended amount to the power steering and engine oil. Although the car gets driven less than a thousand miles a year, it's been almost 2 years and I have not had to top up either reservoir. I haven't tried it on old rubber grommets and bushings but it may revive those too. The only negative reviews I found were from some Toyota owners stating that it removed the paint in the oil pans causing a blockage in the oil pick-up screen1 pointAbsolutely. And parts are NLA to rebuild. I would not hesitate to buy one of the excellent reproduction racks from technotoytuning. Looks 100% stock and they are new new new. They were on sale just a while ago, $495USD I believe.1 point1 pointBut wait, I did this conversion back in 2017 and documented here;1 point1 pointChas, I took a couple pics of the radio area and will post them when I get a chance. In the meantime, here are a few things to look at: First, As drawn. there is no power being supplied to the accessory relay or ignition switch. You need a connection dot on the W/R wire: Second, the map light and lighter have black wires coming off them to make connection to ground. I have pics of these wires, but they were never shown well on the original documentation: Third, maybe I'm misunderstanding the intent of your drawing, but it appears the heater blower motor appears twice in two different shapes:
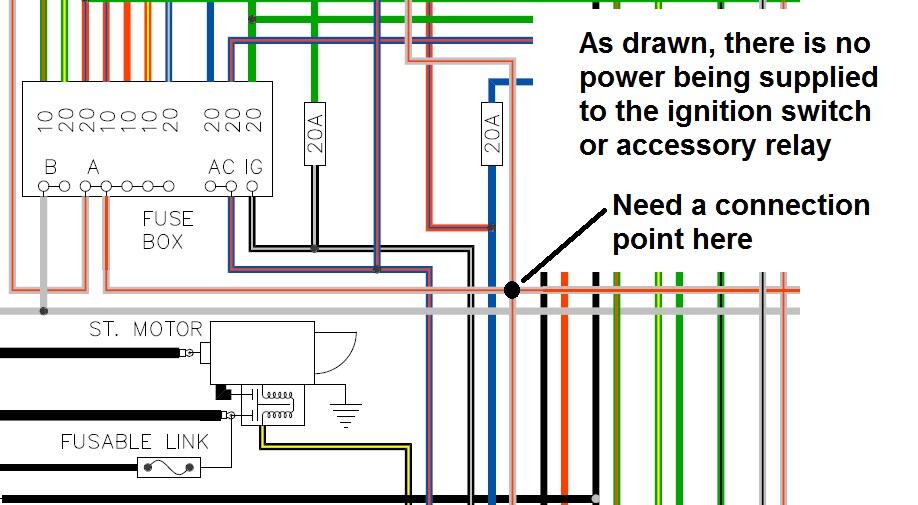
 1 point1 pointThe original wheel cylinders may be leaking and the newer style is a good compromise but a leaking wheel cyl wouldn't cause the grinding sound you describe. jack it up, remove the wheels and and spin the hubs, could just be the drums rubbing against the backing plate.1 point1 pointThank you for the responses and imput. Finally, in the last two days, my smoke issue has been controlled enough that I could take the car for an actual drive. Went 25 miles yesterday and a good 50 miles today. I brilliantly deduced, as I lost half a quart of oil in today's 50 miles, that my smoke has nothing to do with the fuel injection. Attached is a photo of how the plugs looked at the end of today's run. They only have about 80 miles on them. Smoke was most evident starting from a stop but also some accelerating and decelerating. As an aside, the car ran extremely well. I also did a compression test this afternoon and had 145 pounds in #5 and 150 in the others. I took the plugs to my neighborhood general repair shop. I've clearly got oil problems in cylinders 3 and 6 and they suggested I should be looking at the valve area as the source because of the decent even compression. Noting Zed Head's comment above about valve seals and seeing those seals in a number of post, would that be a potential culprit in this scenario and is there a way to confirm that as the case. They also mentioned trying an oil additive designed for valve trains. Has anyone had luck wit something like that. Thanks again.
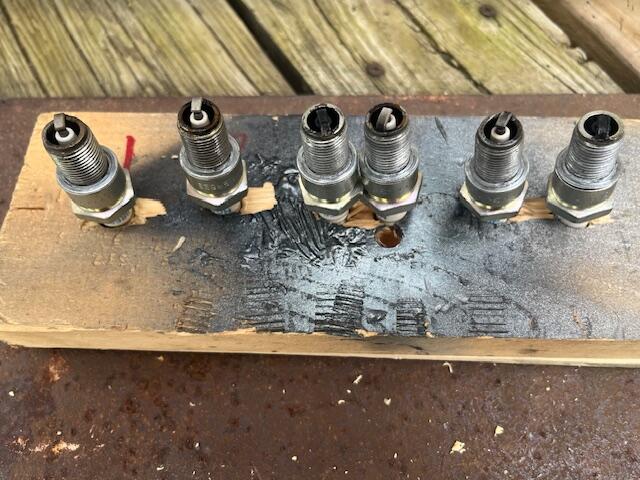 1 pointWhile I'm in wait mode for the TUS-11a Ujoint, I cleaned up the floors & undersills where the undercoat was either non existent or damaged, and primed exposed areas, then stone chip protection then undercoat. Have to wear a coat & respirator - this stuff is nasty. The ambient temps are in the 90's, so I think I lost about 5lbs in water weight by the time I was done. Area that was beaten to fit the 350Z seat wire-brushed the original undercoat & soaked with some turps to soften up the old stuff. Chipped off the loose bits. Replacement (warranty) tension rod bushings came, so I pout those in also1 pointThe thread has morphed in to a "1975 has a unique u-joint" topic, in part. It has a different bolt pattern at the diff flange and it appears that it uses a different size u-joint. The 430-10 doesn't work for a 1975 propeller shaft, at least this particular one. He started discussing it in Post #71. Lots of stuff in between.1 point


Important Information
By using this site, you agree to our Privacy Policy and Guidelines. We have placed cookies on your device to help make this website better. You can adjust your cookie settings, otherwise we'll assume you're okay to continue.