Leaderboard
-
grannyknot
Free Member10Points5,158Posts -
zKars
 Subscriber
 5Points3,770Posts
 -

Racer X
Free Member4Points1,877Posts -

dutchzcarguy
Free Member4Points2,677Posts


Popular Content
Showing content with the highest reputation on 07/17/2023 in all areas
-
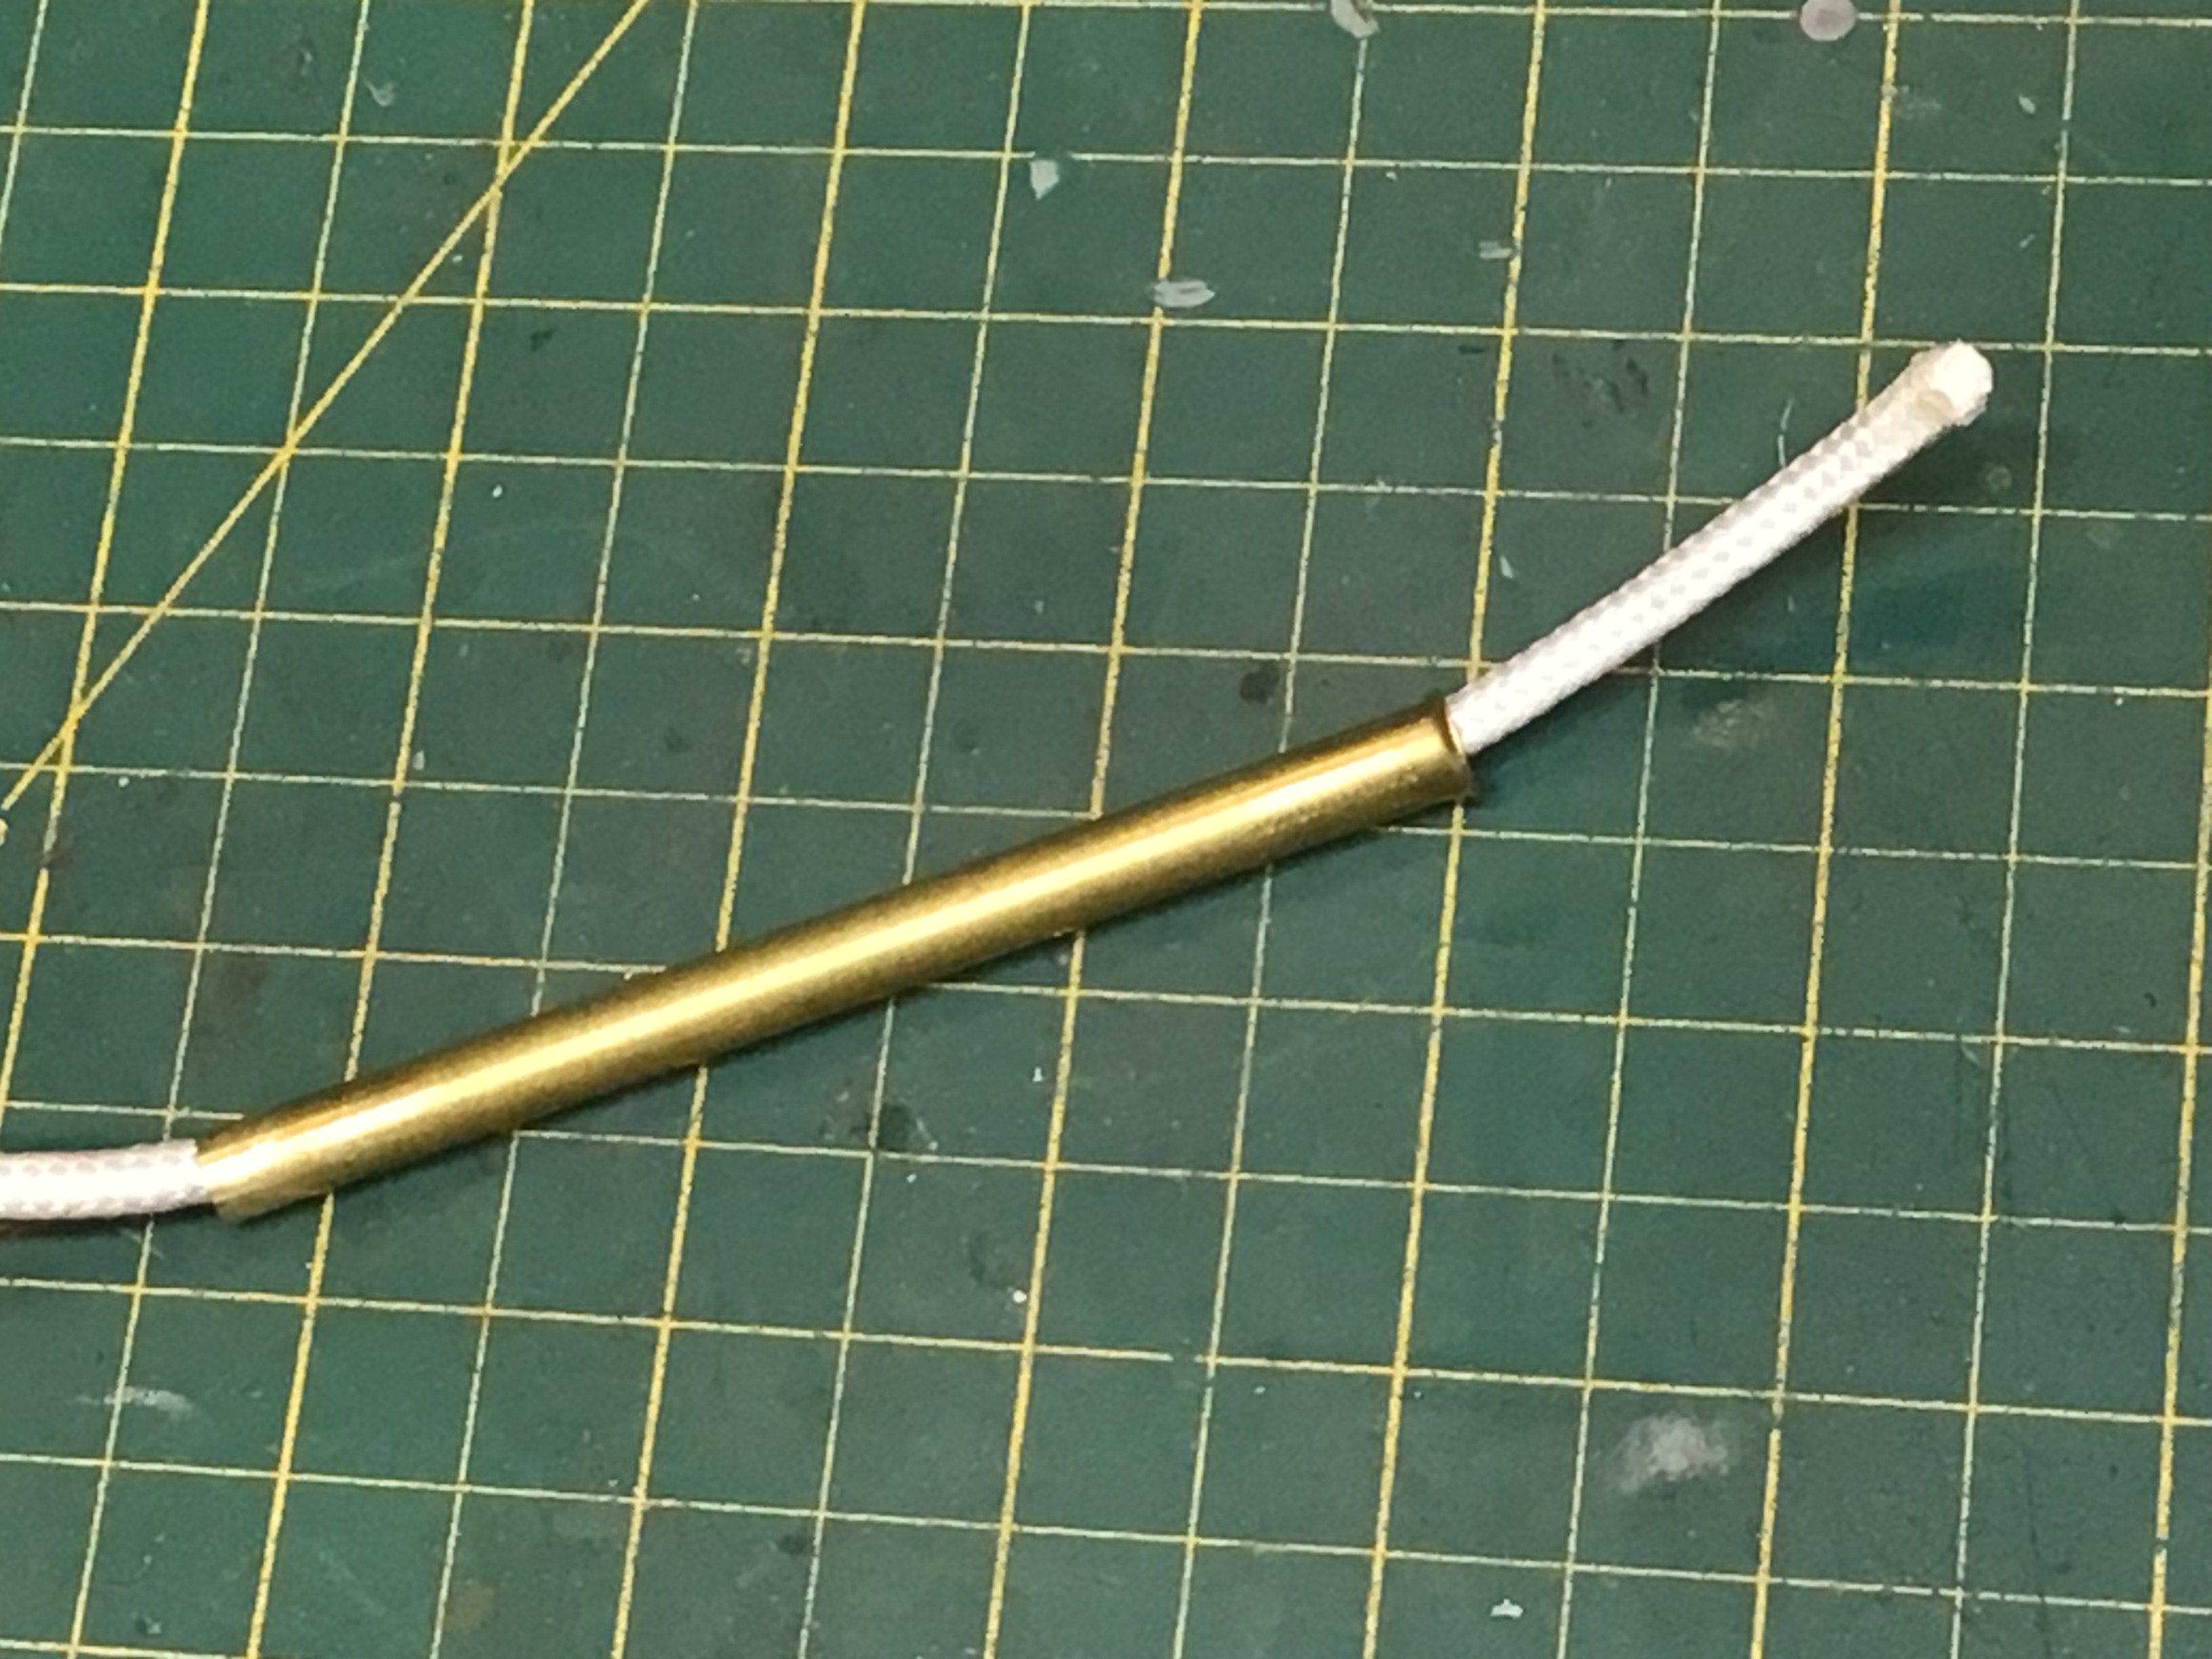
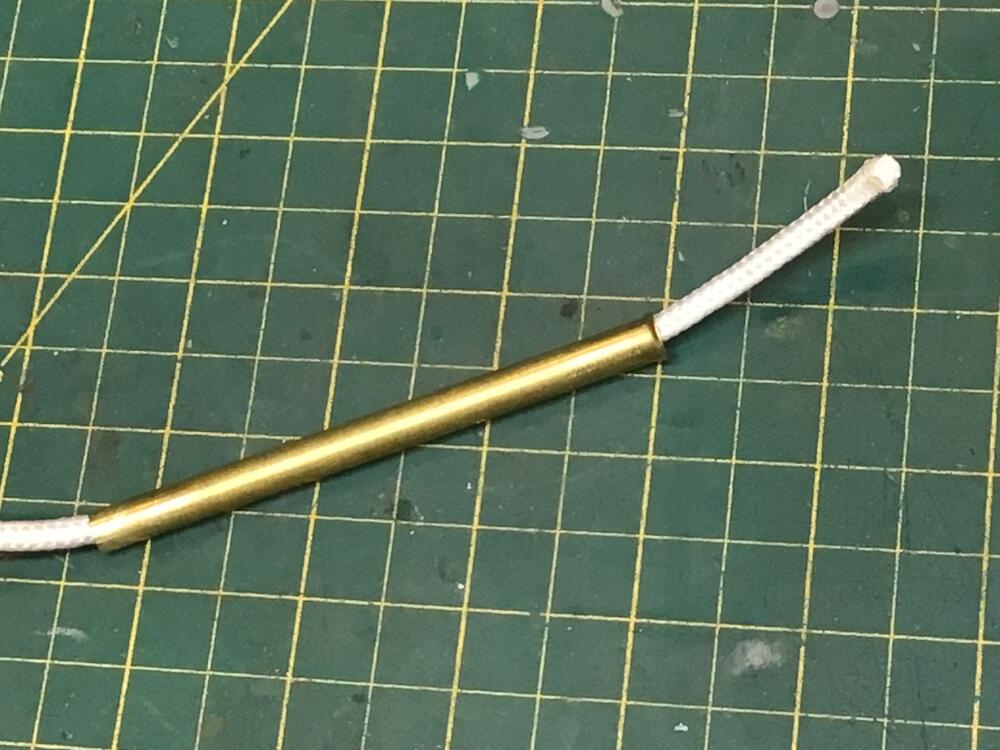
5 pointsExcellent write up. If I may add a couple of personal experience notes. 1. Putting the cord in the groove. I use a short piece of brass tubing, 1/4 OD or something, 4 inches longish, whatever will let your cord of choice pass through easily. Poke the end of the tube into the groove and drag it along, it will deposit the cord in the groove like magic. Should take you literally 30 seconds to do the entire circumference. 2. Lube. Tried all kinds of wet lubes, none were all that useful. If you feel compelled to use lube, try corn starch. Dry, stays put, cheap, easy clean up (blows away without doing anything actually) and makes rubber slippery without being greasy or drys out like soap. 4. Spend more time than you think you should getting the gasket/glass sitting as low and close into the window channel as you can, flush with the body all around, and centered left right. This will ensure an easy cord pull as the rubber lip is nice and close to the pinch weld. 3. Biggest trick of all is to use two cords instead of one. Start one top center and go around left, end at bottom center. Same for the right. Leave a foot at each end top and bottom. Pull a bit of the bottom, left and right six inches, then repeat on the top, left and right, continue left and right, balancing your pull top and bottom. Go around bottom corners first, then the top, though it really doesn’t matter. Why is this such a great deal? Balance. All the problem I had during the first dozen installs revolved around gravity. I always started at the pull at the bottom and ended at the top, if I went the other way, gravity would pull down and make the bottom sit far too far away from the pinch weld. At least if you set the bottom first, then the top is likely to stay closer. Still by the time you get around the top corners 3 of the 4 sides are in, and the top “tends” to be farther away from the pinch weld than is ideal and you end up fighting to get that rubber lip over the pinch weld. If you do the top and bottom at the same time, you have balanced gravity and trap the glass top and bottom, which are also the longer edges, so by the time you get to the sides, it’s all over but the beer drinking. You can also see if you’re slightly off center left/right before you do the sides, and have a chance of easily pushing it back out to start over. You do NOT want it off center of course. Leads to leaks. Bad enough that most seals I see don’t have molded bottom corners. Rubber never seems to sit right often exposing those bottom corners. Sealant time. See the picture below of what I use. Doing this balanced technique, I often don’t need a second person pushing on the glass from the outside. As long as ensure you get the glass/gasket down as tight to the body as possible before you start and maybe get out a couple of times to push it down as you get going around the top, or just before you start going around the corners. If you’re a social person, then get four buddies, one on each corner and you’ll be done in 5 minutes. 4. Setting the lip over the pinch weld. As you pull cord and the rubber lips slips over the pinch weld, I spend a few moments pushing the lip firmly down onto the pinch weld, seating it more completely than just where ever it sits after the rope passes that point. Makes double sure the glass is pulled down into place. I use a flat plastic tool to get between the glass and lip and press the lip away from then down over the pinch weld. I use a 5/32 white nylon cord, but I like the idea of thick string trimmer cord. Should have less friction. Whatever you use, wear thick leather gloves so you can pull without pain. Too old for that grin and bear it crap.

 5 points
 -
3 pointsDid I neglect to mention the neglect? I was actually pretty good with routine maintenance of the old Datsuns, although this one didn't get a tune-up for a long time toward the end. For those who weren't there, I commented to Chis the other day that I had a 2003 Mini Cooper S (great car) prior to my current 2013 model. Mini's recommended oil change interval was 25,000 km. The on-board computer adjusted that distance based on driving patterns. I was driving 150km per day on highways at the time. The longest interval the computer got to was 42,000 km. Mini dialed back their recommendation to 15,000 km (or two years) on the new models, but rumour has it that they only did it because of blowback from their service departments and garages that were appalled by the original recommendations. I'm sure synthetic oil, better filters, tighter tolerances, etc, have a lot to do with these variations. I drive a lot less these days, and do a lot more oil changes. I suspect I'll never see my car again if I don't agree to stay on top of this one. No need to worry. I don't plan to ever let this one go, so I'll behave!3 points
-
3 pointsI didn't recognize the hot nut at the time. thought maybe you'd sprung for a Malibu Barbie Easy Out.3 points
-
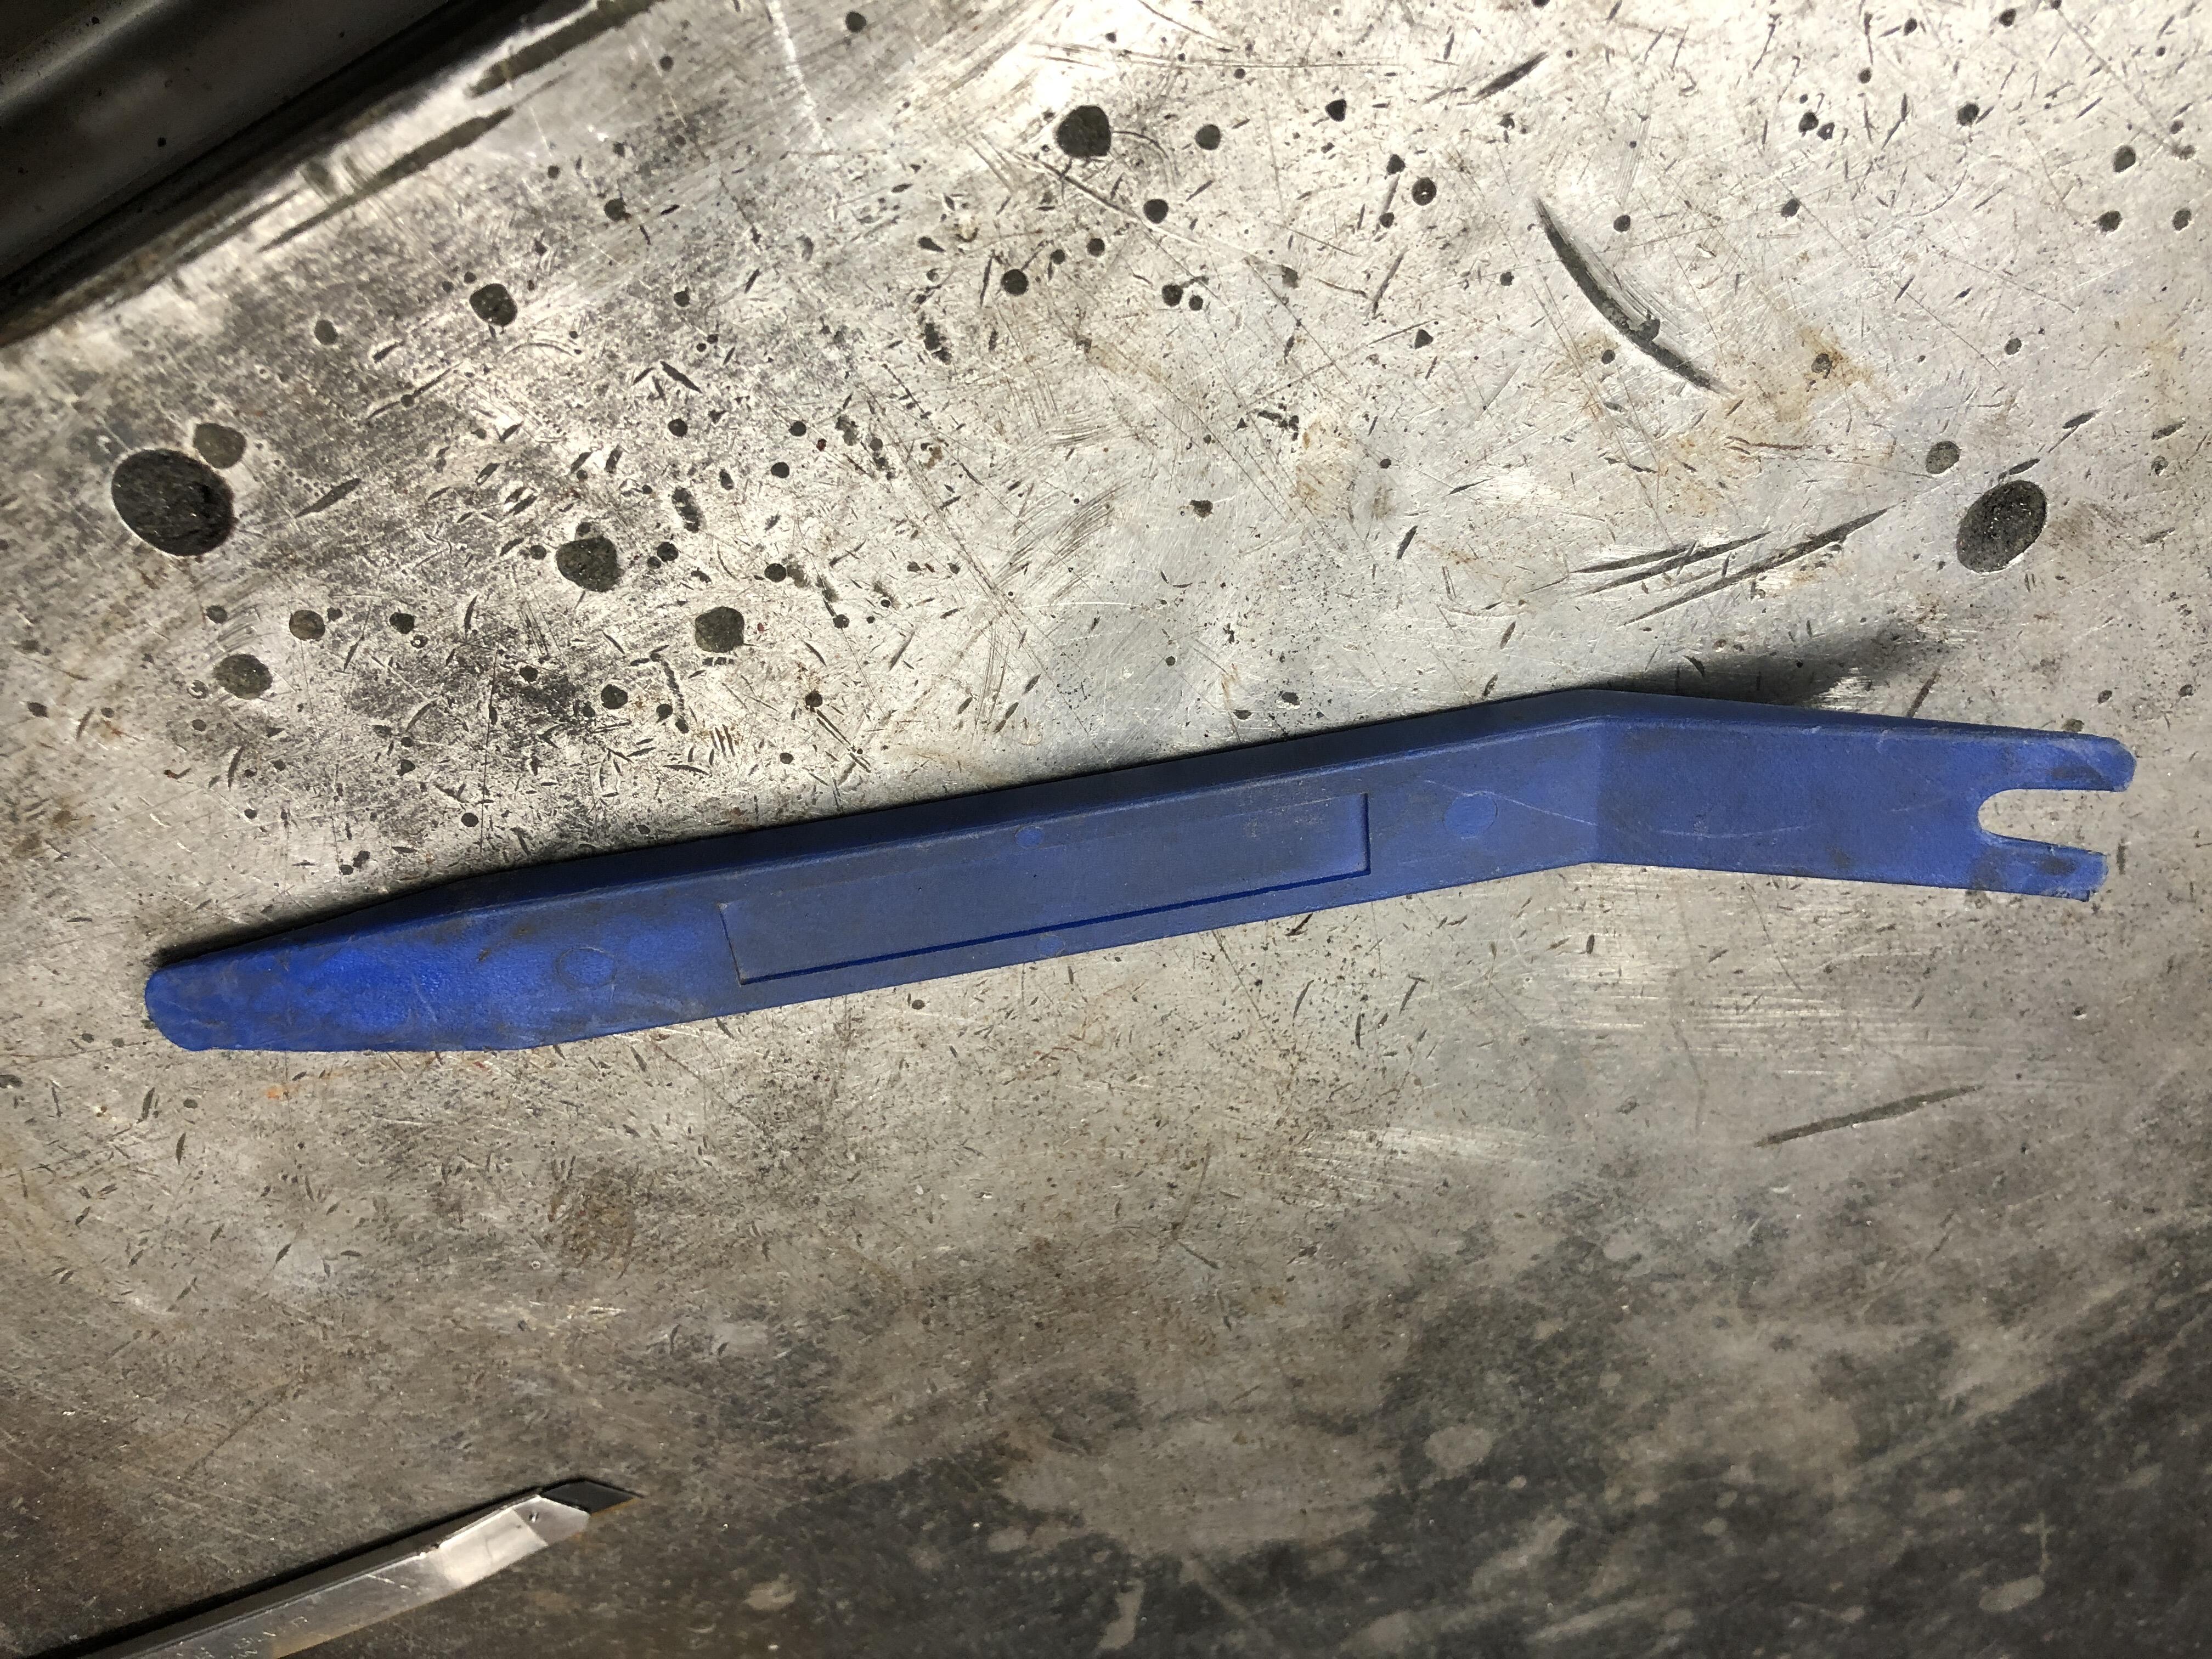
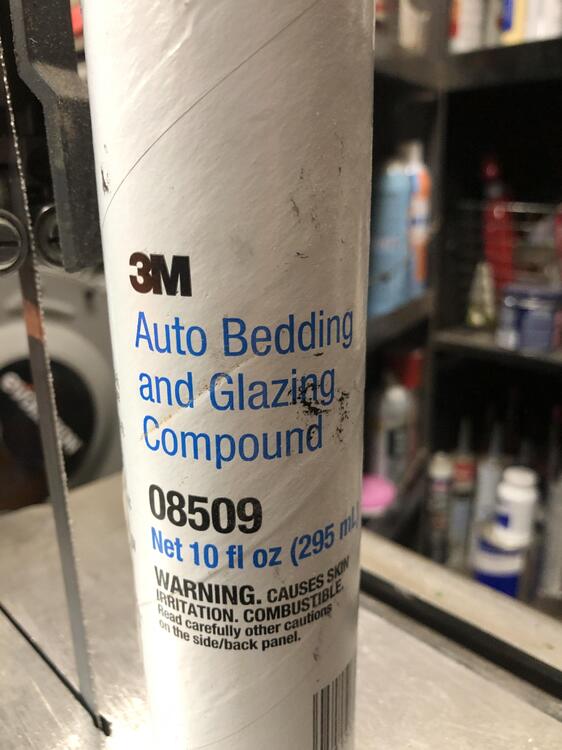
3 pointsWe have never broken one during removal or install. We were very nervous about removing and reinstalling the windshield with the crack so we were super careful (and had a fair amount of experience on our side at that point.) In the beginning, we were super careful because we weren't sure we could find a replacement. Then we had some solid experience, and had developed a removal method once we found that we could source replacements. I have broken a windshield out of the car... On our shop move a few years ago, I didn't pack one well enough... And, who says it doesn't get cold in Arizona? Why I've seen temps in the mid-to-upper 30's!! - well, until the sun comes up... (and I'm wearing a light jacket while these Arizonan's are bundled up in ski parkas - I grew up in Idaho and waited for the school bus in -30 temps.) Okay, I'll admit that we don't trust any modern windshield installers. They glue windshields in. That's pretty much all they know. A gasketed windshield installed over a flange is foreign to them. So, here's how we don't crack windshields: A. Use a utility knife (Xacto knife, single edge razor blade) to slice away the thin rubber that holds the trim on. Remove the stainless steel trim. 2. Utility knife - slice the exterior gasket carefully in the flat that was covered by the trim. You're looking for the edge of the glass. Once you find it, cut around it - all the way - enough that you can remove all the rubber from the outside face of the glass. 2b. You can do the above by yourself, but what follows really needs an assistant. Or two. c. Carefully push the glass out from inside the car. Lift just a little bit all along the perimeter until you're sure that all edges of the glass are unattached and it can be removed without interference. D. Remove the rest of the original gasket from the flange and clean the flange completely. REMOVE the dash finisher (the black crescent moon shape metal piece). 5. Get the new or exisiting windshield on a stand and install the new gasket on the glass. Be sure the glass is fully in the channel all around. Lube helps - very soapy water. 6. Install the stainless steel trim - not the corners, just the long pieces. Ya, do it now - it's MUCH easier than after the windshield is in place. The back side of the trim IS SHARP. It'll slice the rubber if you're not careful. You can file or sand the sharp edges if you're OCD (or even if you're not...) You have to raise the rubber flap up and over the edge of the trim. Lube helps - we use Meguiar's Hyper Dressing - and a smooth skinny tool: Awl, pick, screwdriver, smooth without sharp anything that will cut the thin flaps that hold the trim. g. Install a long cord in the gasket groove - thicker is better - like the olde tyme clothes line cord, cotton is better, but I have 3/8" polyester that works. WET the cord FIRST - yup, soak it in water. Add a little dish soap if you want, we need lubrication. The cord needs to pass each other at the meeting point by 10-12 inches. We like the meeting point at the top of the glass in the middle and the ends need to hang out fairly far - you need to get a good grip on either one - perhaps wrapping it around your hand. H. Lube up the windshield flange metal with some dish soap and water or Hyper Dressing. i. Two people - set the windshield - with the gasket snug all around - into the flange. Cord ends should be inside the car. Make sure it's centered all around. ii. One person is going to pull the cords inside to pull the rubber gasket into the interior of the car, sealing it to the interior side of the flange. At the top and on the pillars it'll be set over the vinyl. The other person is going to be on the outside holding the glass in place while the cord is being pulled. That person will use both hands as often as possible, palms down, fingers splayed on the glass. Their job is two-fold: 1. As the cord is pulled, the glass will want to move opposite of the pull (starts at the top, it'll want to move down, when the pull is on a side, it'll want to push to the other side. Exterior person needs to keep the edges of the glass/gasket from moving out of the hole the windshield sits in. 2. When the cord is pulled the glass needs to sink into the frame when the rubber is pulled into the interior. So, a certain amount of exterior pressure can be needed to keep the glass settling inward as the cord pull progresses. J. With the person with hands on the glass externally, the person inside starts to pull the cord. The cord hanging on the right side will be pulled to the left, and vice versa. Pull one cord only. Pull it at a 90 degree angle to the glass. Pull carefully and slowly if necessary. Don't pull so fast that the person on the exterior can't manage keeping the glass in place or help you get the glass to sink into the hole. I'll be easy until you get to the top corner(s). Stop at the corner and pull the gasket up on the inside and get it set into the flange as much as possible. The gasket needs to be pulled outward (like lifting it the same direction as the outside edge of the glass) getting it to set firmly in the flange. That helps the glass pull inward as well. At the corner, go very slowly and swing the cord in a circle as you're carefully pulling corner gasket rubber. Sounds stupid, but it works and doesn't cut the gasket. Once past, make sure your helper keeps the glass from moving out of the hole on the opposite side. Before getting to the bottom corner, pull the gasket into the flange - do it as you go and it'll help. Now pull across the bottom - it'll want to make the glass pop out of the side that's not pulled yet. All this time your helper needs to be getting the windshield to push inward as you're pulling cord and setting gasket into flange. If you have two helpers, it makes it very easy. Keep going around the entire windshield and do the second top corner same as the first. Pressure on the outside. Finish up by pressing firmly down on the outside, and pulling the gasket firmly into the flange on the inside. k. if it doesn't set right - have no fear - just remove it and start again. Pull the gasket rubber on the inside down on one corner and push that corner out carefully - continue around the whole windshield, take a deep breath, lube it up, try again. (But... It's a LOT easier if you're patient and get it right the first time...) L. Push the gasket out as far as you can - especially at the top corners. Install the trim corners and gap cover pieces. The stainless steel trim is not just for looks - it helps maintain the gasket in it's proper place and will help stop the gasket from pulling away from the top corners. Don't use it at you own peril... Note: I do not use any adhesive or gasket seal. These gaskets were designed to seal around the glass and flange without it. Now, I'm fully aware that that isn't always true. BUT, Arizona (no rain) and Z owners here wouldn't (don't) drive their Z's in the rain even if there was. Okay, they still wash their cars, but heat and NO humidity dries things FAST here. YOU can decide for yourself if you want to use such a thing - Nissan did - in spots - on the later models. I still don't. And: Patience is the key to Joy... Fortune cookie...3 points
-
2 pointsThe very long service intervals on today’s cars seem excessive to me. Sure, the oils available today are much better than 30 years ago, or more, but today’s car engines rebreathe the stuff that used to go out the crankcase vent into the atmosphere and onto the roadway. They also run hotter. I always change oil and filter every 5,000 miles, or once a year, whichever comes first. Oil is cheap insurance. Clean oil is essential to longevity.2 points
-
Webers and carbs alike are often a problem .. just my experience.. I like the HJG46W a lot! Have my 240z now for 25 years and drove not a lot but i only readjusted them once! (They are more or less without a problem! ) And another thing.. wait with buying a lot of stuff you don't need at the moment ( no don't ask haha how i know..) Yes it's nice to buy yourself a lot of sparkling new stuff but first GET THAT CHASSIS/BODY READY FIRST! 😮 You also must have won the lottery as you want a 3,1 L engine build? those are not cheap! And carbs like webers dito. the hitachi's are original and without problems and not expensive.. think twice.. 🙊2 points
-
Change of plans - I removed the front pipe. One of the Datsun guys on Turbobricks said the 2-1 junction is a severe choke point. His solution was to make a new 2-1 section in 2" pipe I can't weld something like that, Dealing with welding those to the flange, and the collector are extremely awkward, from my experience with the first header on the K24, I'm not willing to risk it. Stock front pipe. Flange. Making 2" pipes fit the flange would be tricky. I thought about using a 1 7/8" holesaw to get it close, then grinder to get the rest. I don't have a spare DP, so just not worth it. taper point, only about 1.5" ID in there So, I cut off the upper section of the DP where it's approx 3" wide & modded another section of my old C30 3" exhaust to fit. after a bunch of back & forth, I tacked it here. To minimize the reduction in the stock collector I cut it so there is only about 1/8" tuck. test fit - clears the heat shield (next to my finger) by the same amount as the stock pipe - just looks like there's no clearance It was raining at this point, so I took it down & seam welded the joint. But.. it moved, so I had to cut the pipe & add a pie cut (to be welded later) to get the pipe pointed where it needed to go New cat & used resonator from a Volvo S40 T5.2 points
-
2 pointsIt's a trick I've heard about but never got around to trying before, it didn't take 2 min to do, no good on a cast iron block of course.2 points
-
Take a look at OER carburetors out of Japan. My understanding from Datsun Spirit is they are a hybrid mix design of Mikuni & Webber carburetors. Eiji swears by them. They come in a complete kit as well. Just another avenue to investigate.2 points
-
Any carburetor setup will require frequent setting and adjusting to keep the engine in tune and performing well. I like the SU carbs because adjusting of jetting is a simple matter, just adjust the nozzles up or down, no pesky jet changing. If you are OK with the continual fiddling, or running the setup a bit fat as a compromise, go for it.2 points
-
2 pointsI remove and install windshields exactly as you describe except now I use 3mm string trimmer (weed wacker) filament line instead of cord, I would never go back. The filament slides over the lip and rubber seal very easily with hardly any resistance which is especially good rounding the corners.2 points
-
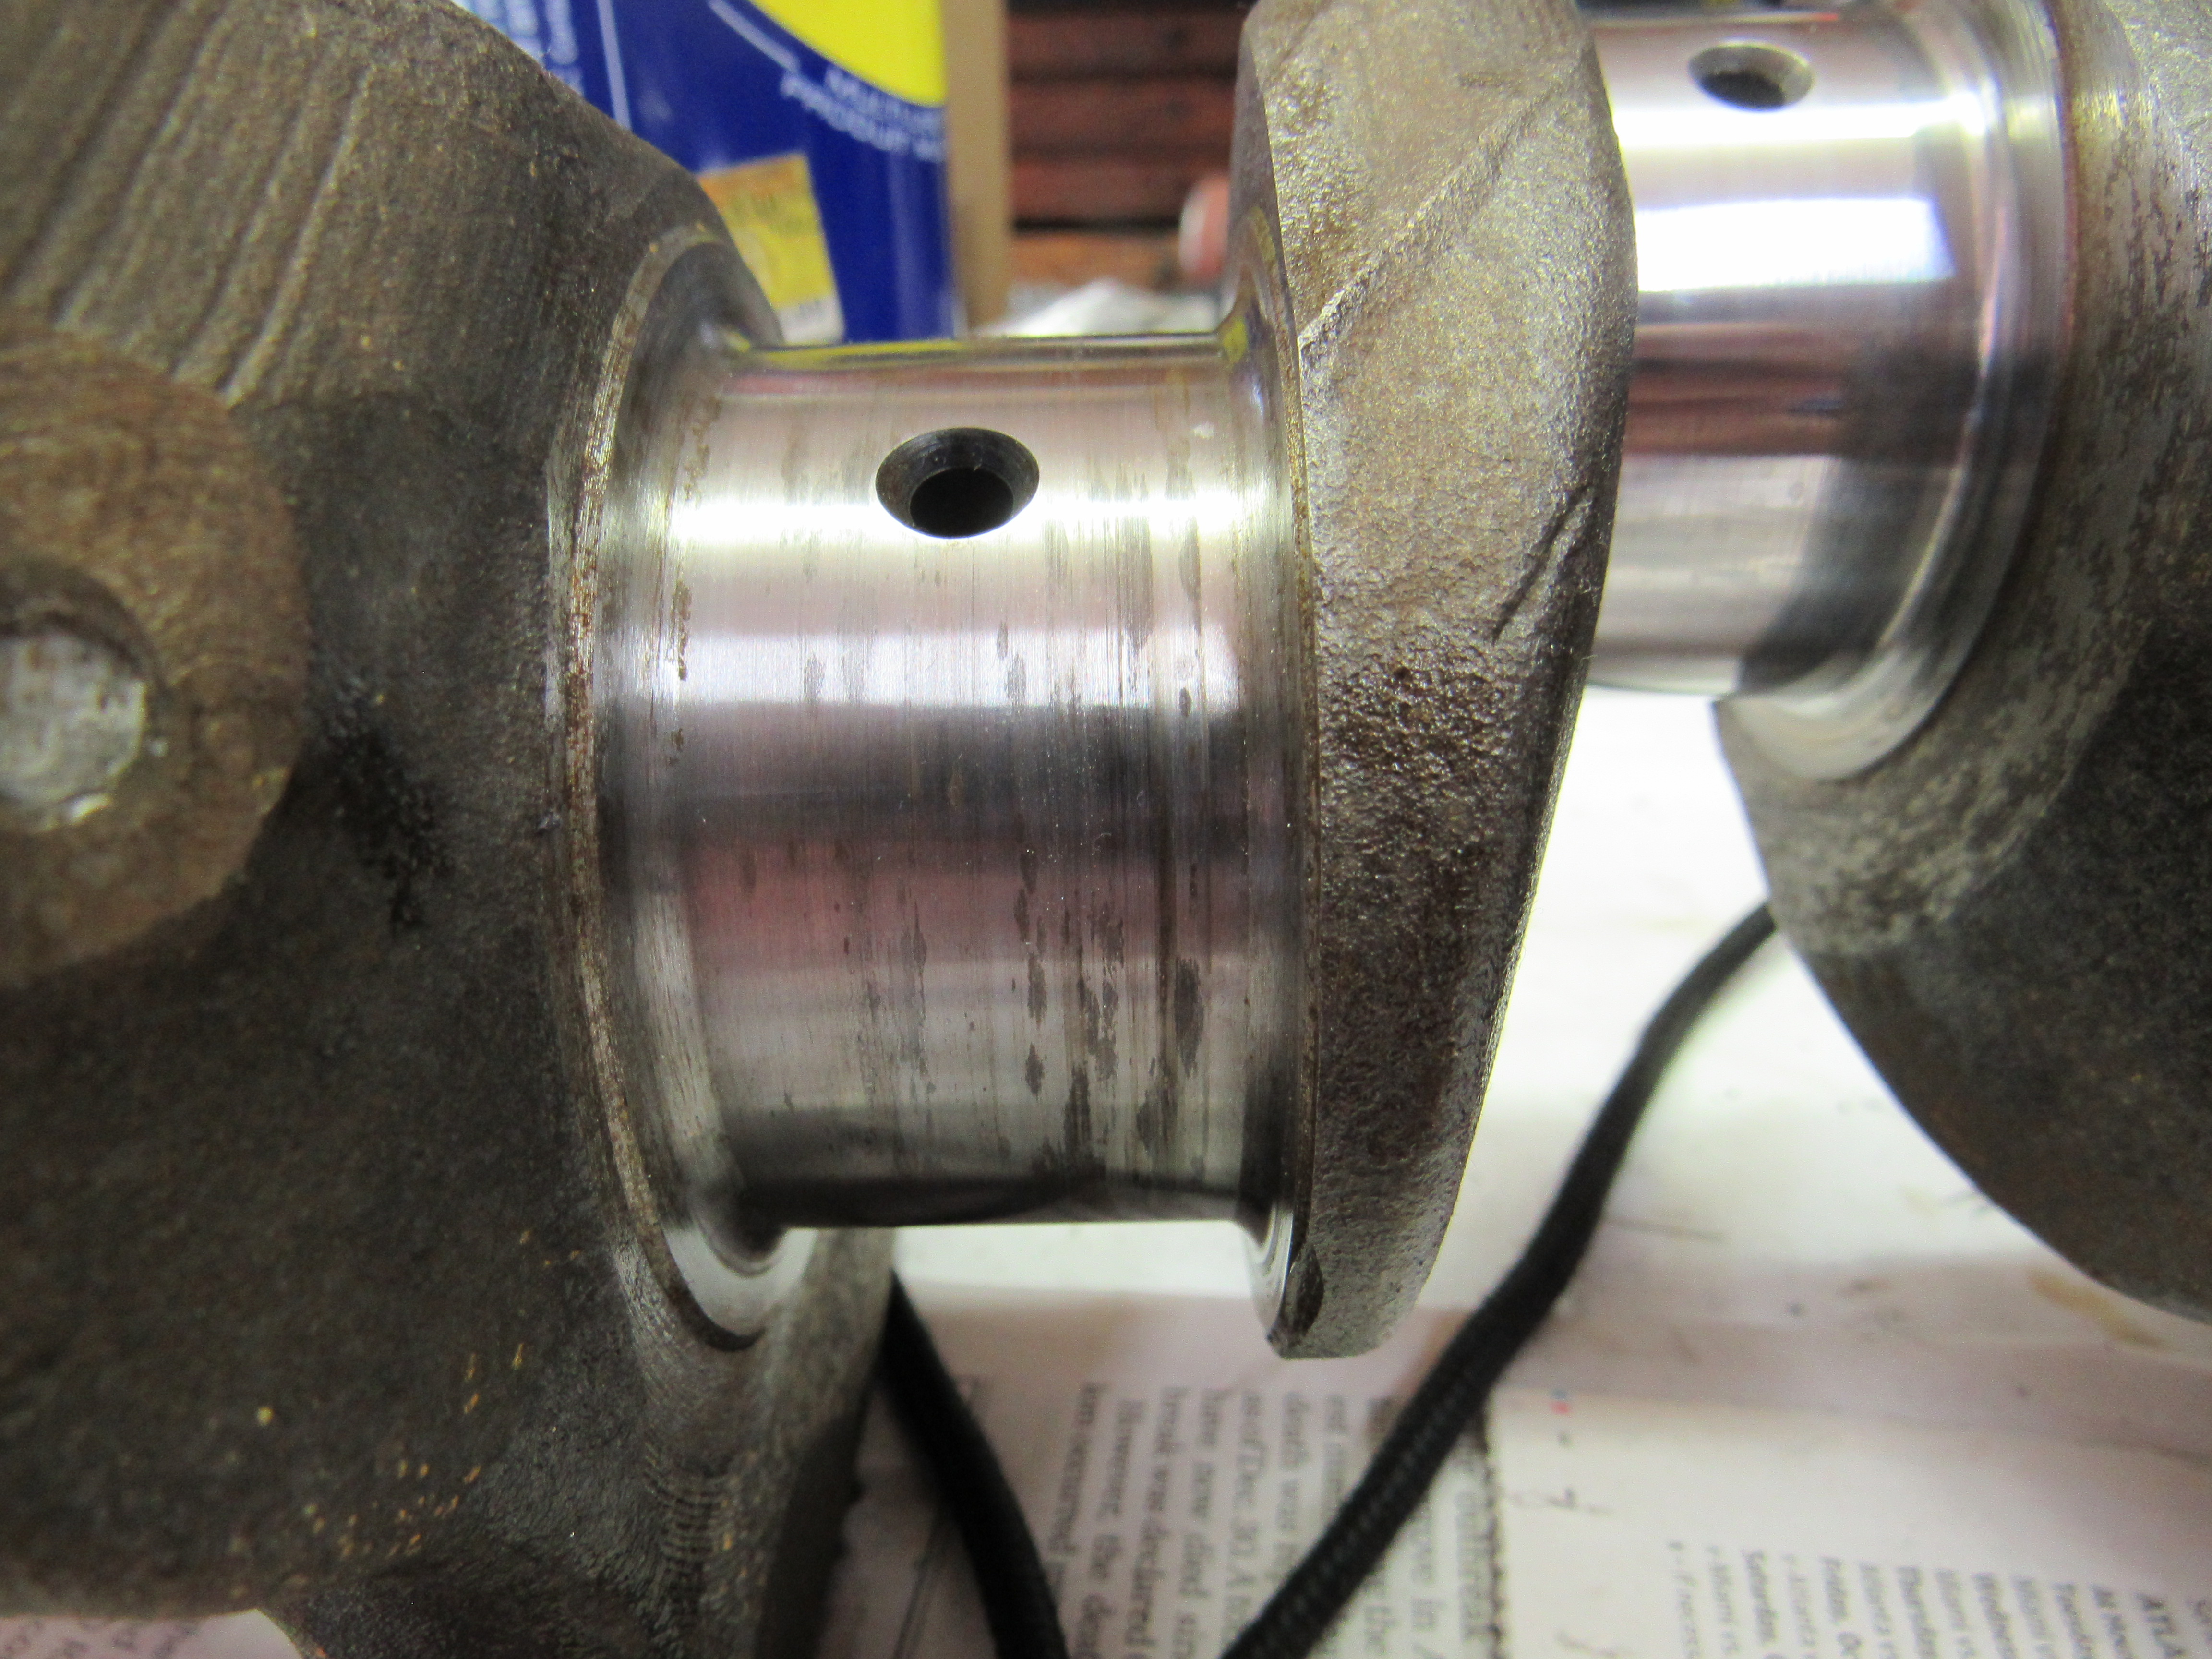
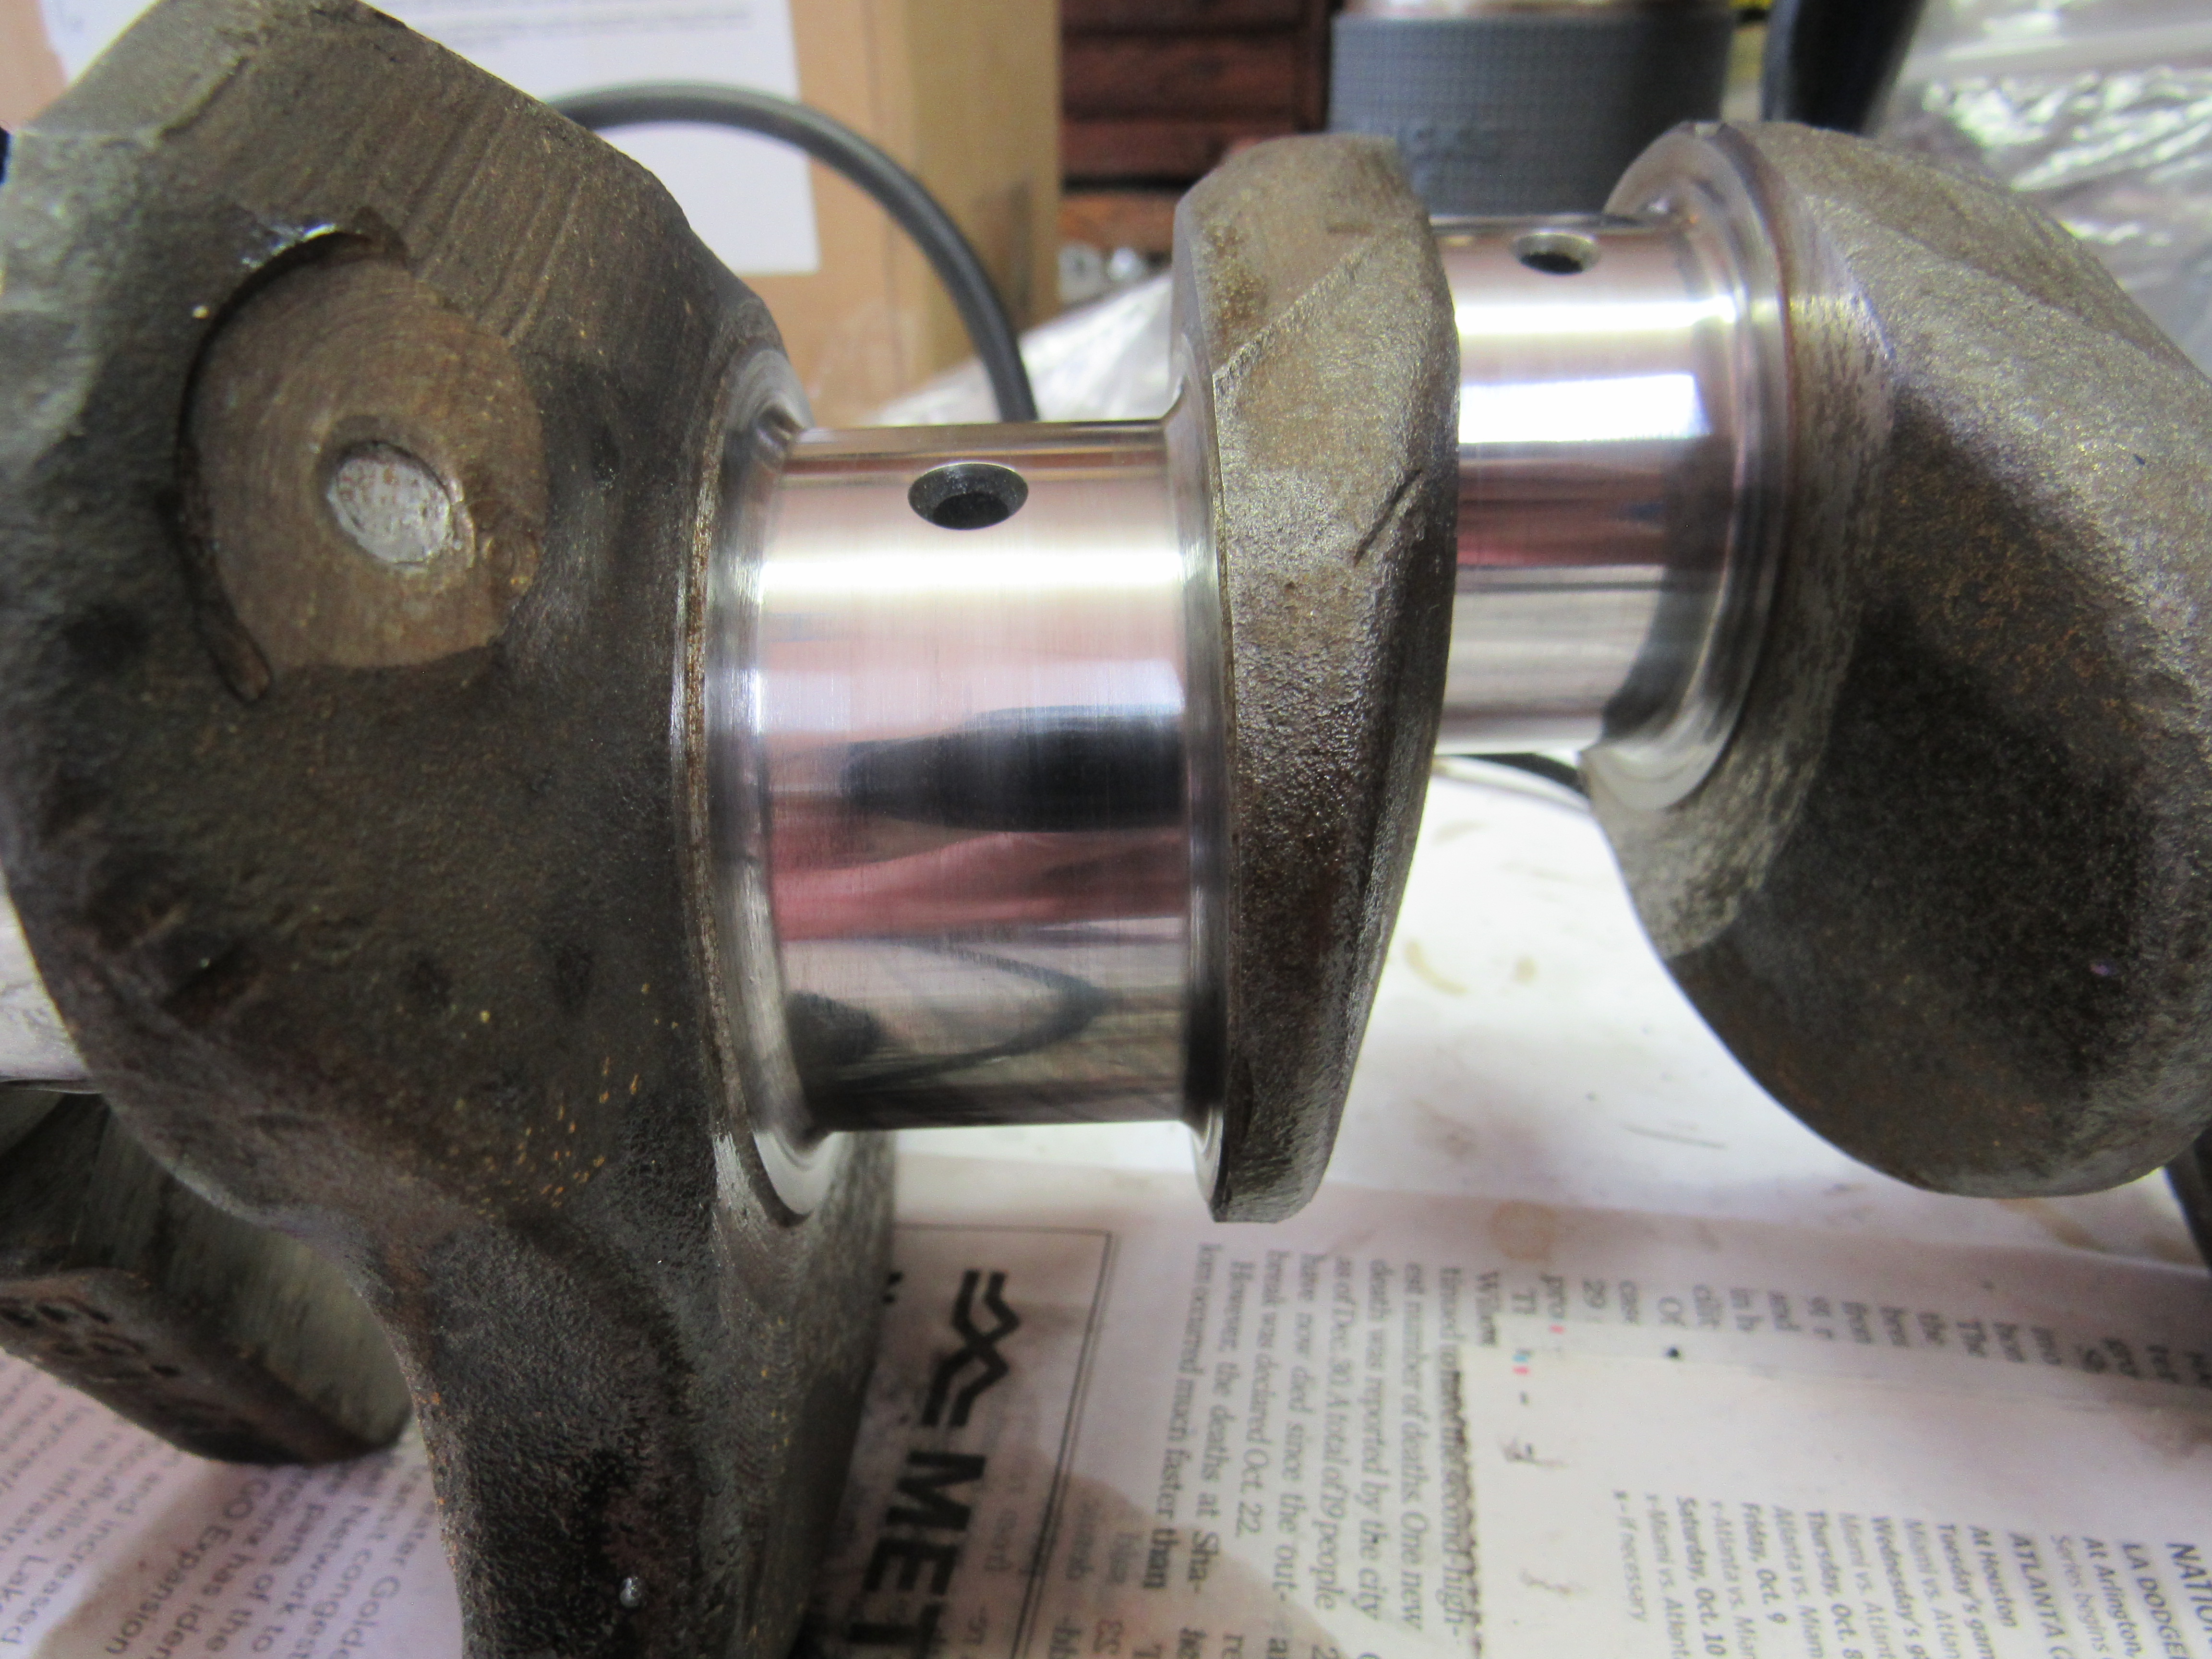
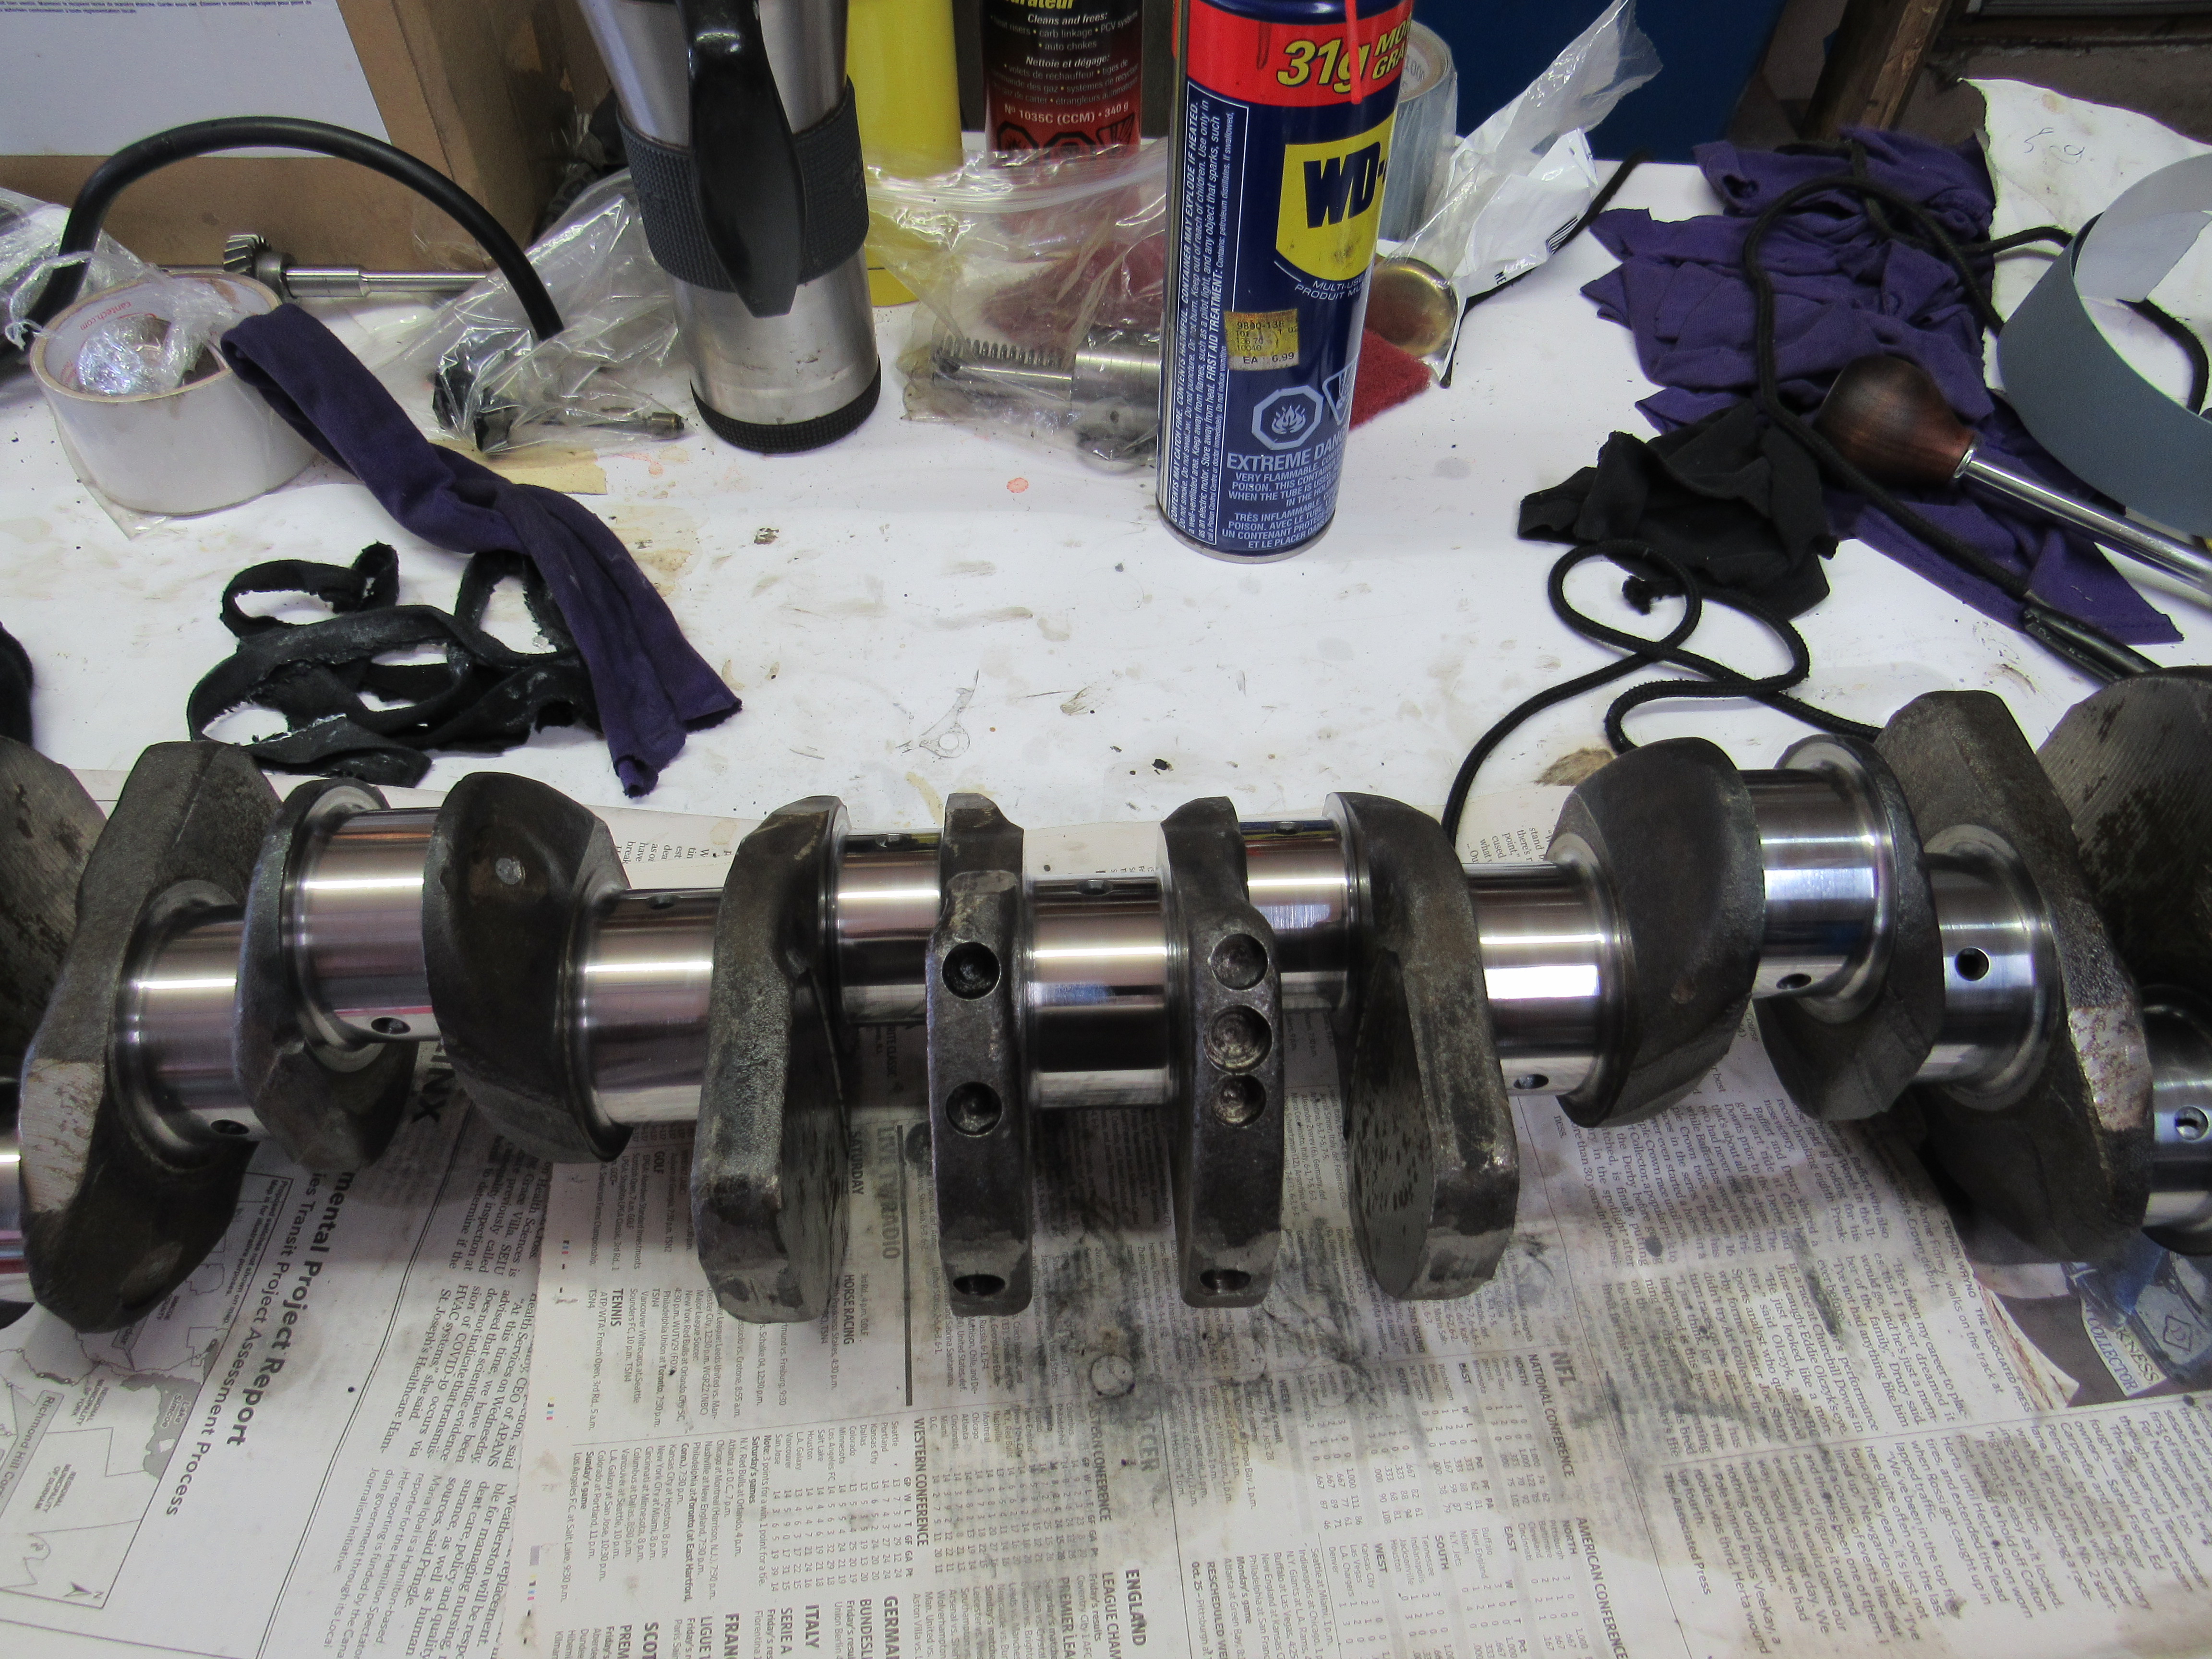
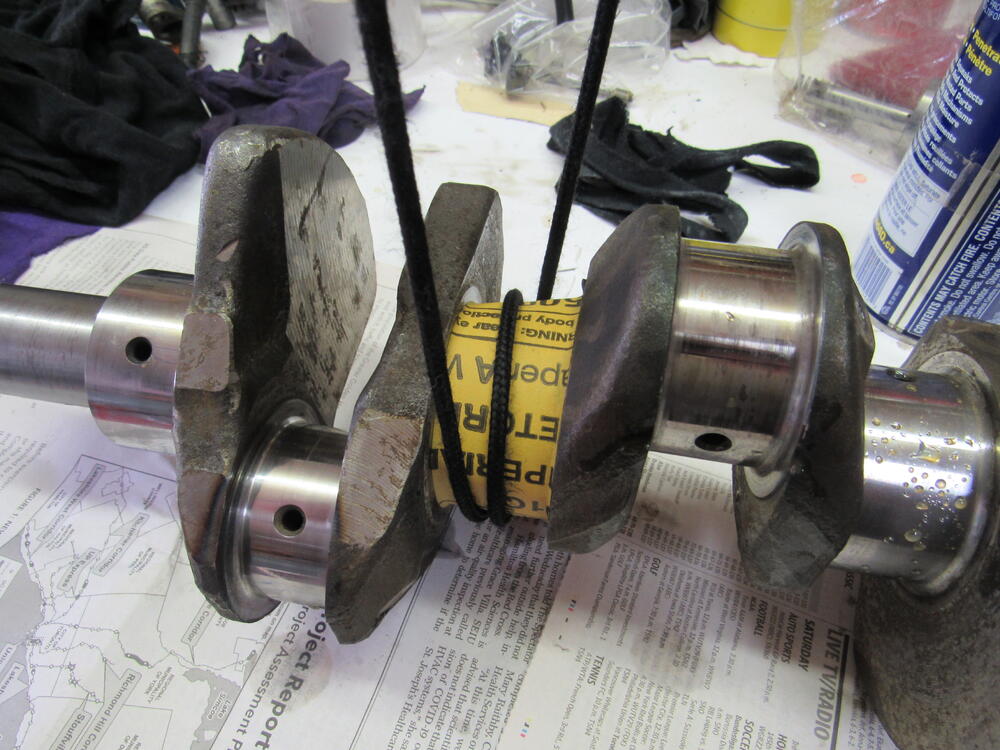
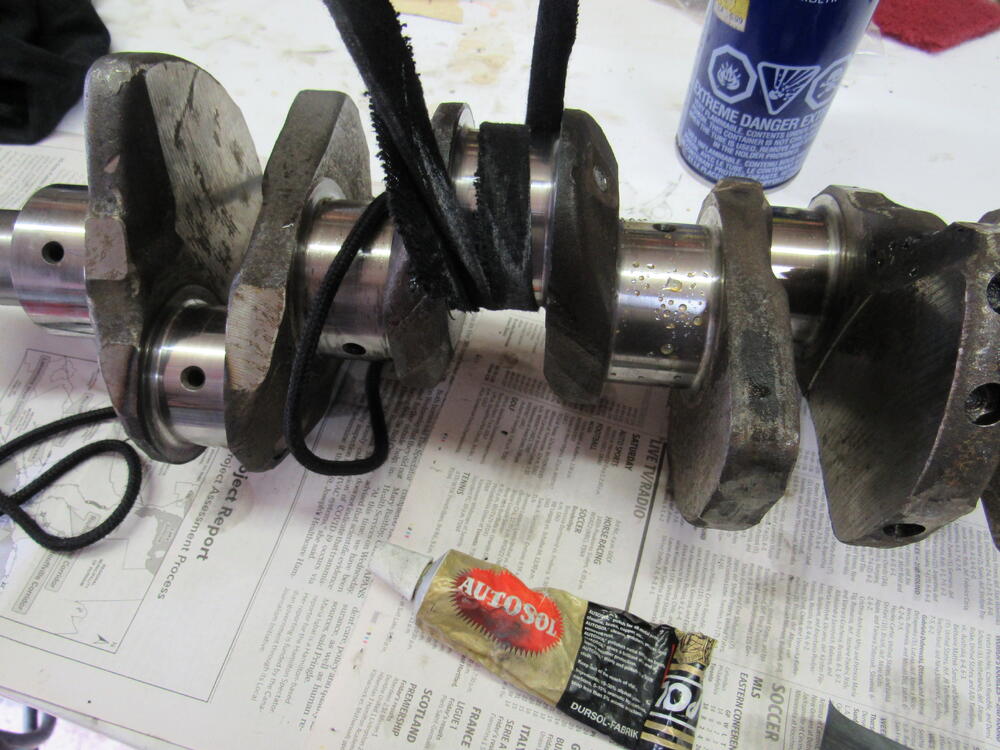
2 pointsI really don't like dropping off a crankshaft to be polished, very few machinists do it in house anymore so they job it out to a 3rd party that doesn't deal with the public. Once they have it, it can sit on their floor for months before they get to it. So I thought I would have a go at it myself, I started with 1500 wet/dry paper, lots of WD40 and an old shoelace. Spent about 2 min per journal, then cleaned it off and made a long strip of an old T shirt and some Autosol polish, about 1 min per and I'm done.


 2 points
 -
Something else i wanted to say about the 46's .. they are really lazy and easy to drive on the road for normal conditions. i see that lots of people have trouble with those big webers .. when i start my 240z it stays running ALWAYS!! It has very very few times died on me.. only times was because i didn't give it enough choke.. I see webers start with a lot of hesatating/stutter.. They are a p.i.t.a. on the road.. i would like them on a track.. not on the road.1 point
-
1 pointAgreed. @cgsheen1 Would you mind spending a couple of extra minutes to post your write-up in the CZCC 'Knowledge Base'?1 point
-
Make sure you can bring in a 10 AWG wire into that fuse box if you're going to be running the fan from there.1 point
-
If you smell the fuel.. and talk about a non original ignition.. i bet it's the ignition that's the culprit.. I don't drive much i got orig points and stuff and renewed the points last year or so ... for the first time. they were stil okay but i thought let's put new ones in.. never had one problem with it. Hihi.. i thought oh..oh... when i read that.. I'm sorry but i don't like electronics in a 240z that don't belong.. (Maybe it because as i'm a electronics engineer.. i know what can and will go wrong hahaha...)1 point
-
They were older carbs, some of the first produced, I had 40mm chokes as that's what worked out as the best all around for performance and driveability. It's been a few years now since I played with them so I'm a little foggy but I believe they will take weber jets. Much easier to adjust float levels and change jets as everything is accessible from the top of the carb, you don't have to take the take the lid off like webers. They are a superior design and if your mechanic can tune webers he won't have a problem with OER's, it is the same basic design.1 point
-
I ran OER's on a hot L2.8 for a couple of years and it was a great combo, they are easier to adjust float levels and change jets.1 point
-
Initially I was going to run the original 4 screw hitachi SU's to start with and upgrade later to triples, but these popped up and im tempted to just go straight triples1 point
-
It's my understanding that 40's are a better size unless you have a lot of displacement1 point
-
Good to know, "Won't post to the US" but an excellent solution overall. Probably a similar item available stateside1 point
-
Yeah I still see importing a car from the US as a bigger risk than going with the devil i know.1 point
-
Frankly I haven't worried too much about relay brands for a very simple reason. I try to reduce current flow through the mechanical switches, and I'm not adding load. The exception would be an electric fan for the radiator. If you're using a 20 or 30 A relay for an LED headlight circuit, you'll be well within the design parameters of most any relay you find.1 point
-
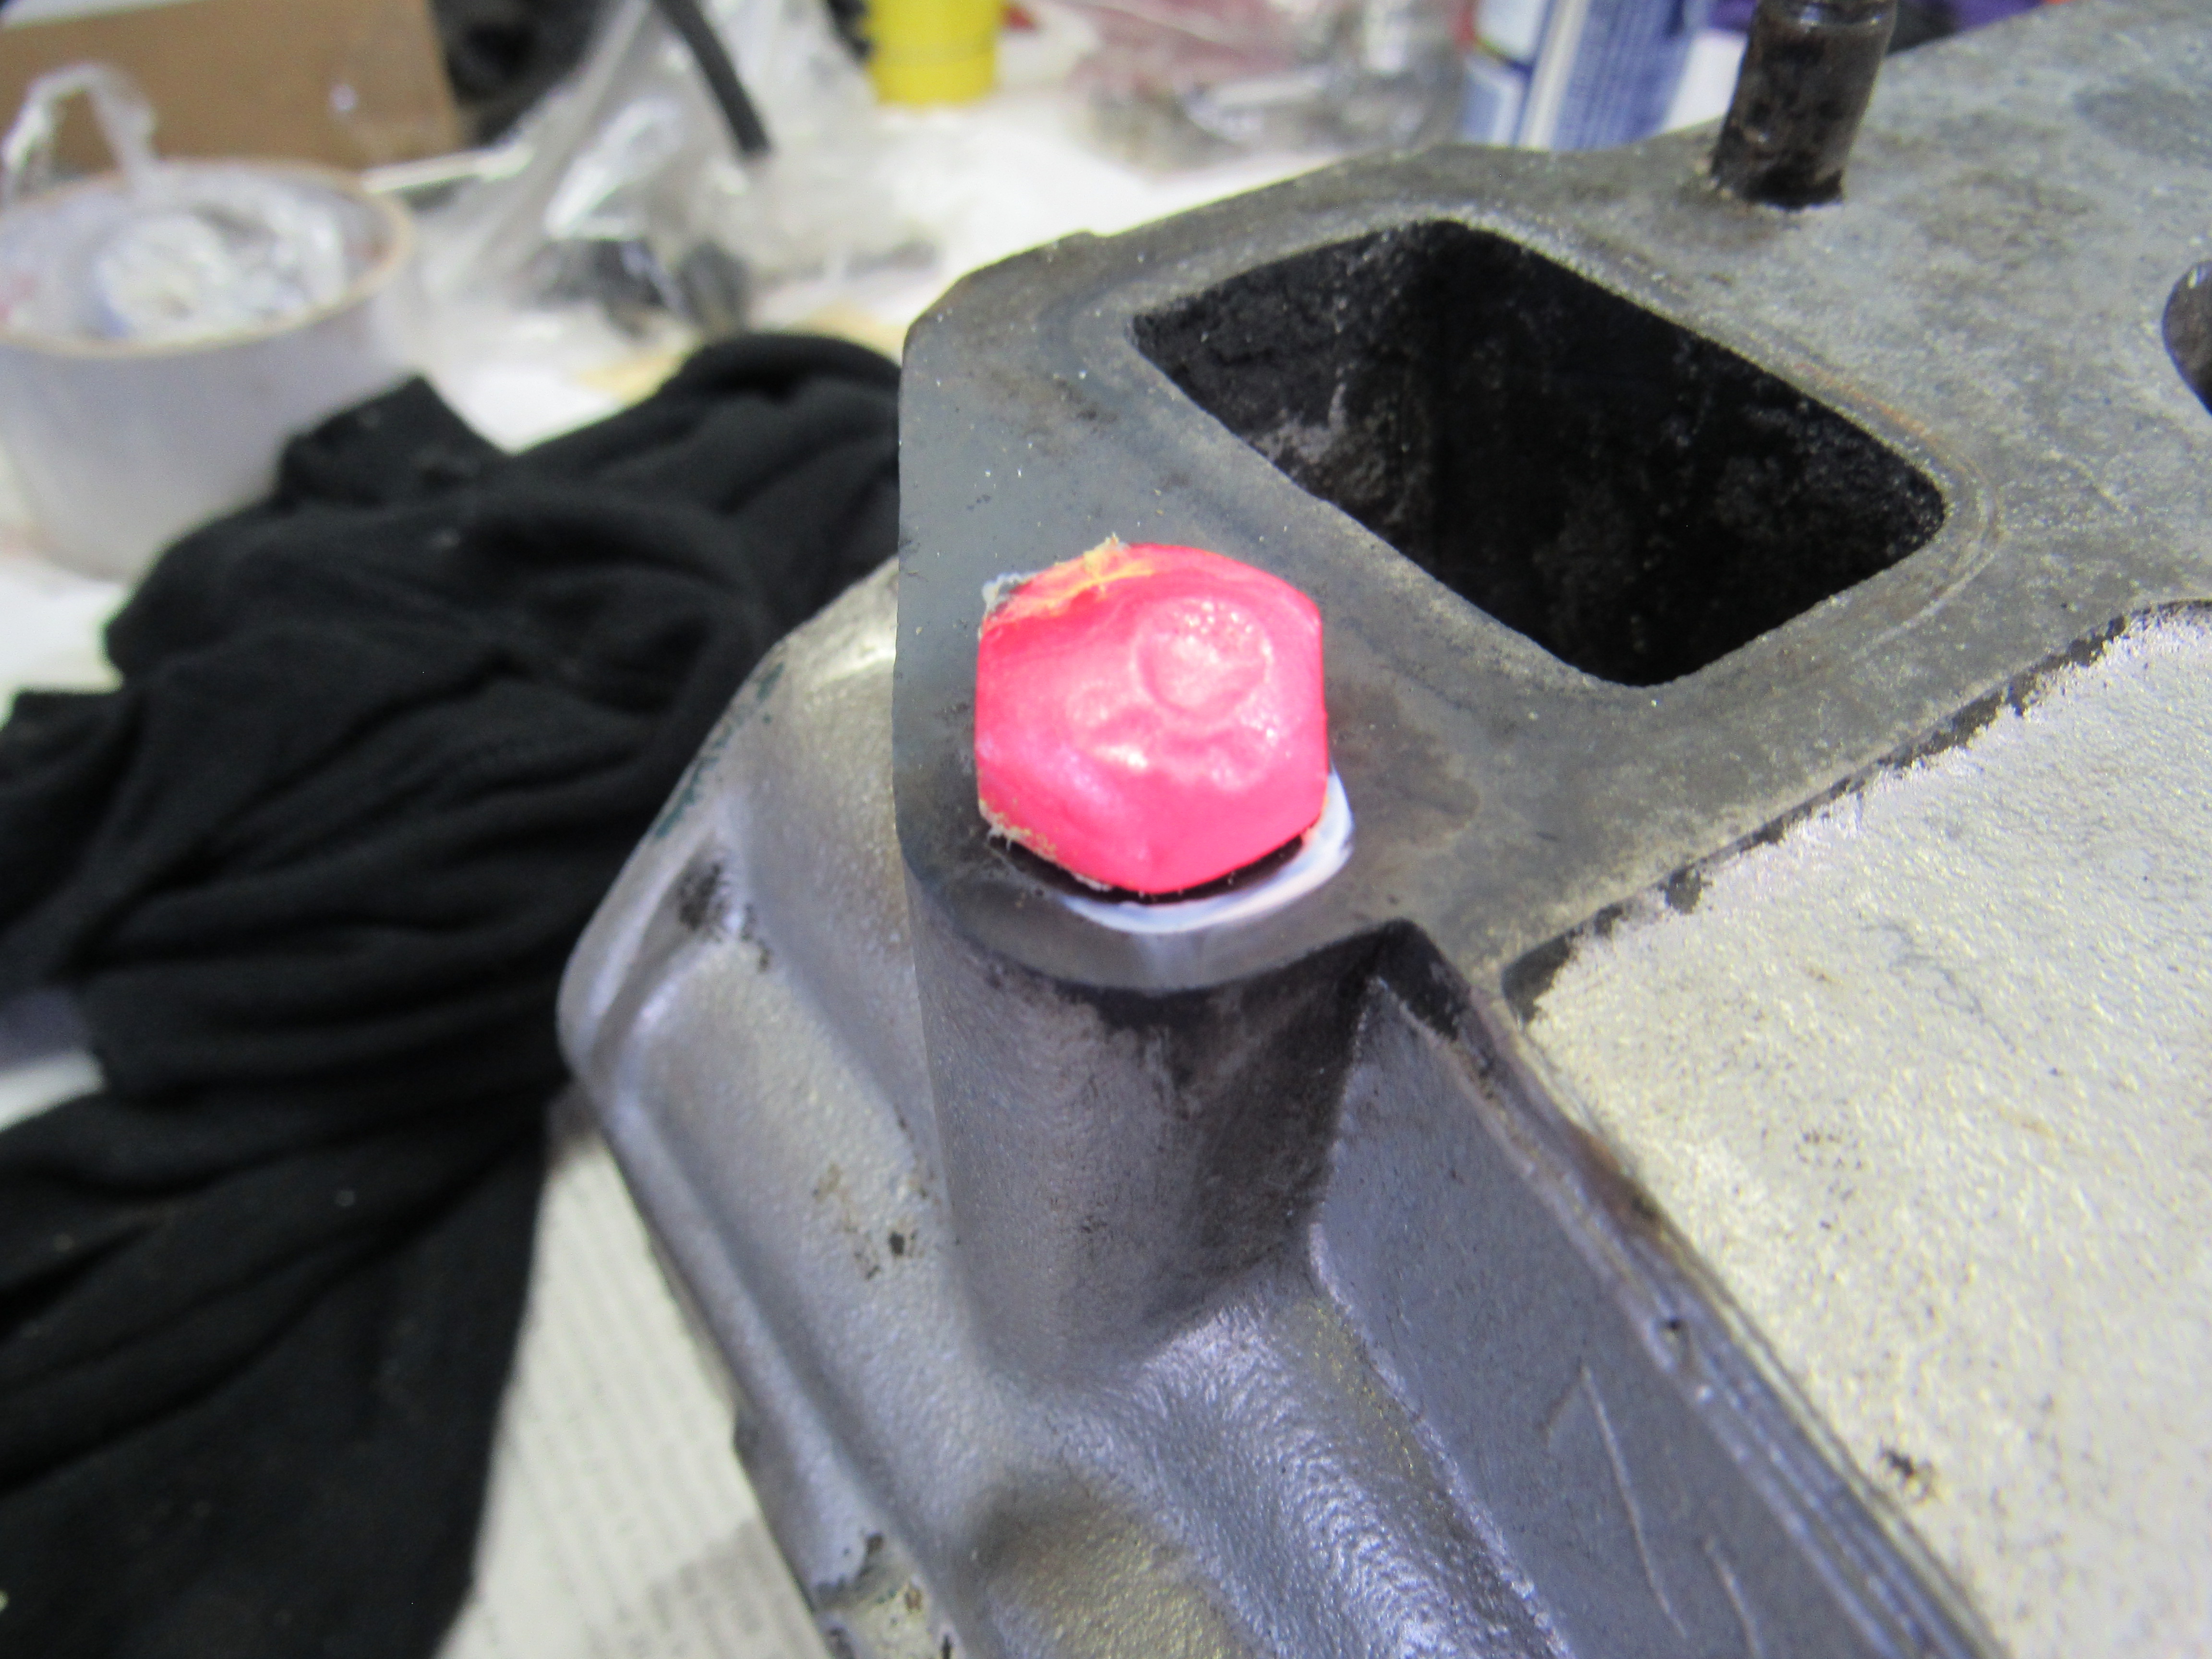
1 pointThe second pic down I've welded a blob on top of the broken stud, 3rd pic I rest a nut on top of the blob and weld those together, quench it with WD40 and unscrew it. Most of the work is done by the heat.1 point
-
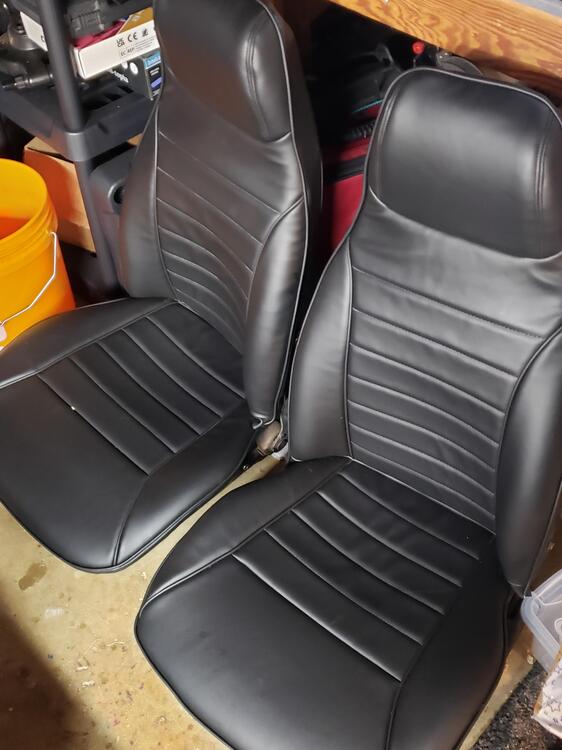
1 pointI'm in the process of redoing the interior on mine. I got the foam and vinyl for the seats from Motorsport and here's how that looks, if you're considering those kits:
 1 point
 -
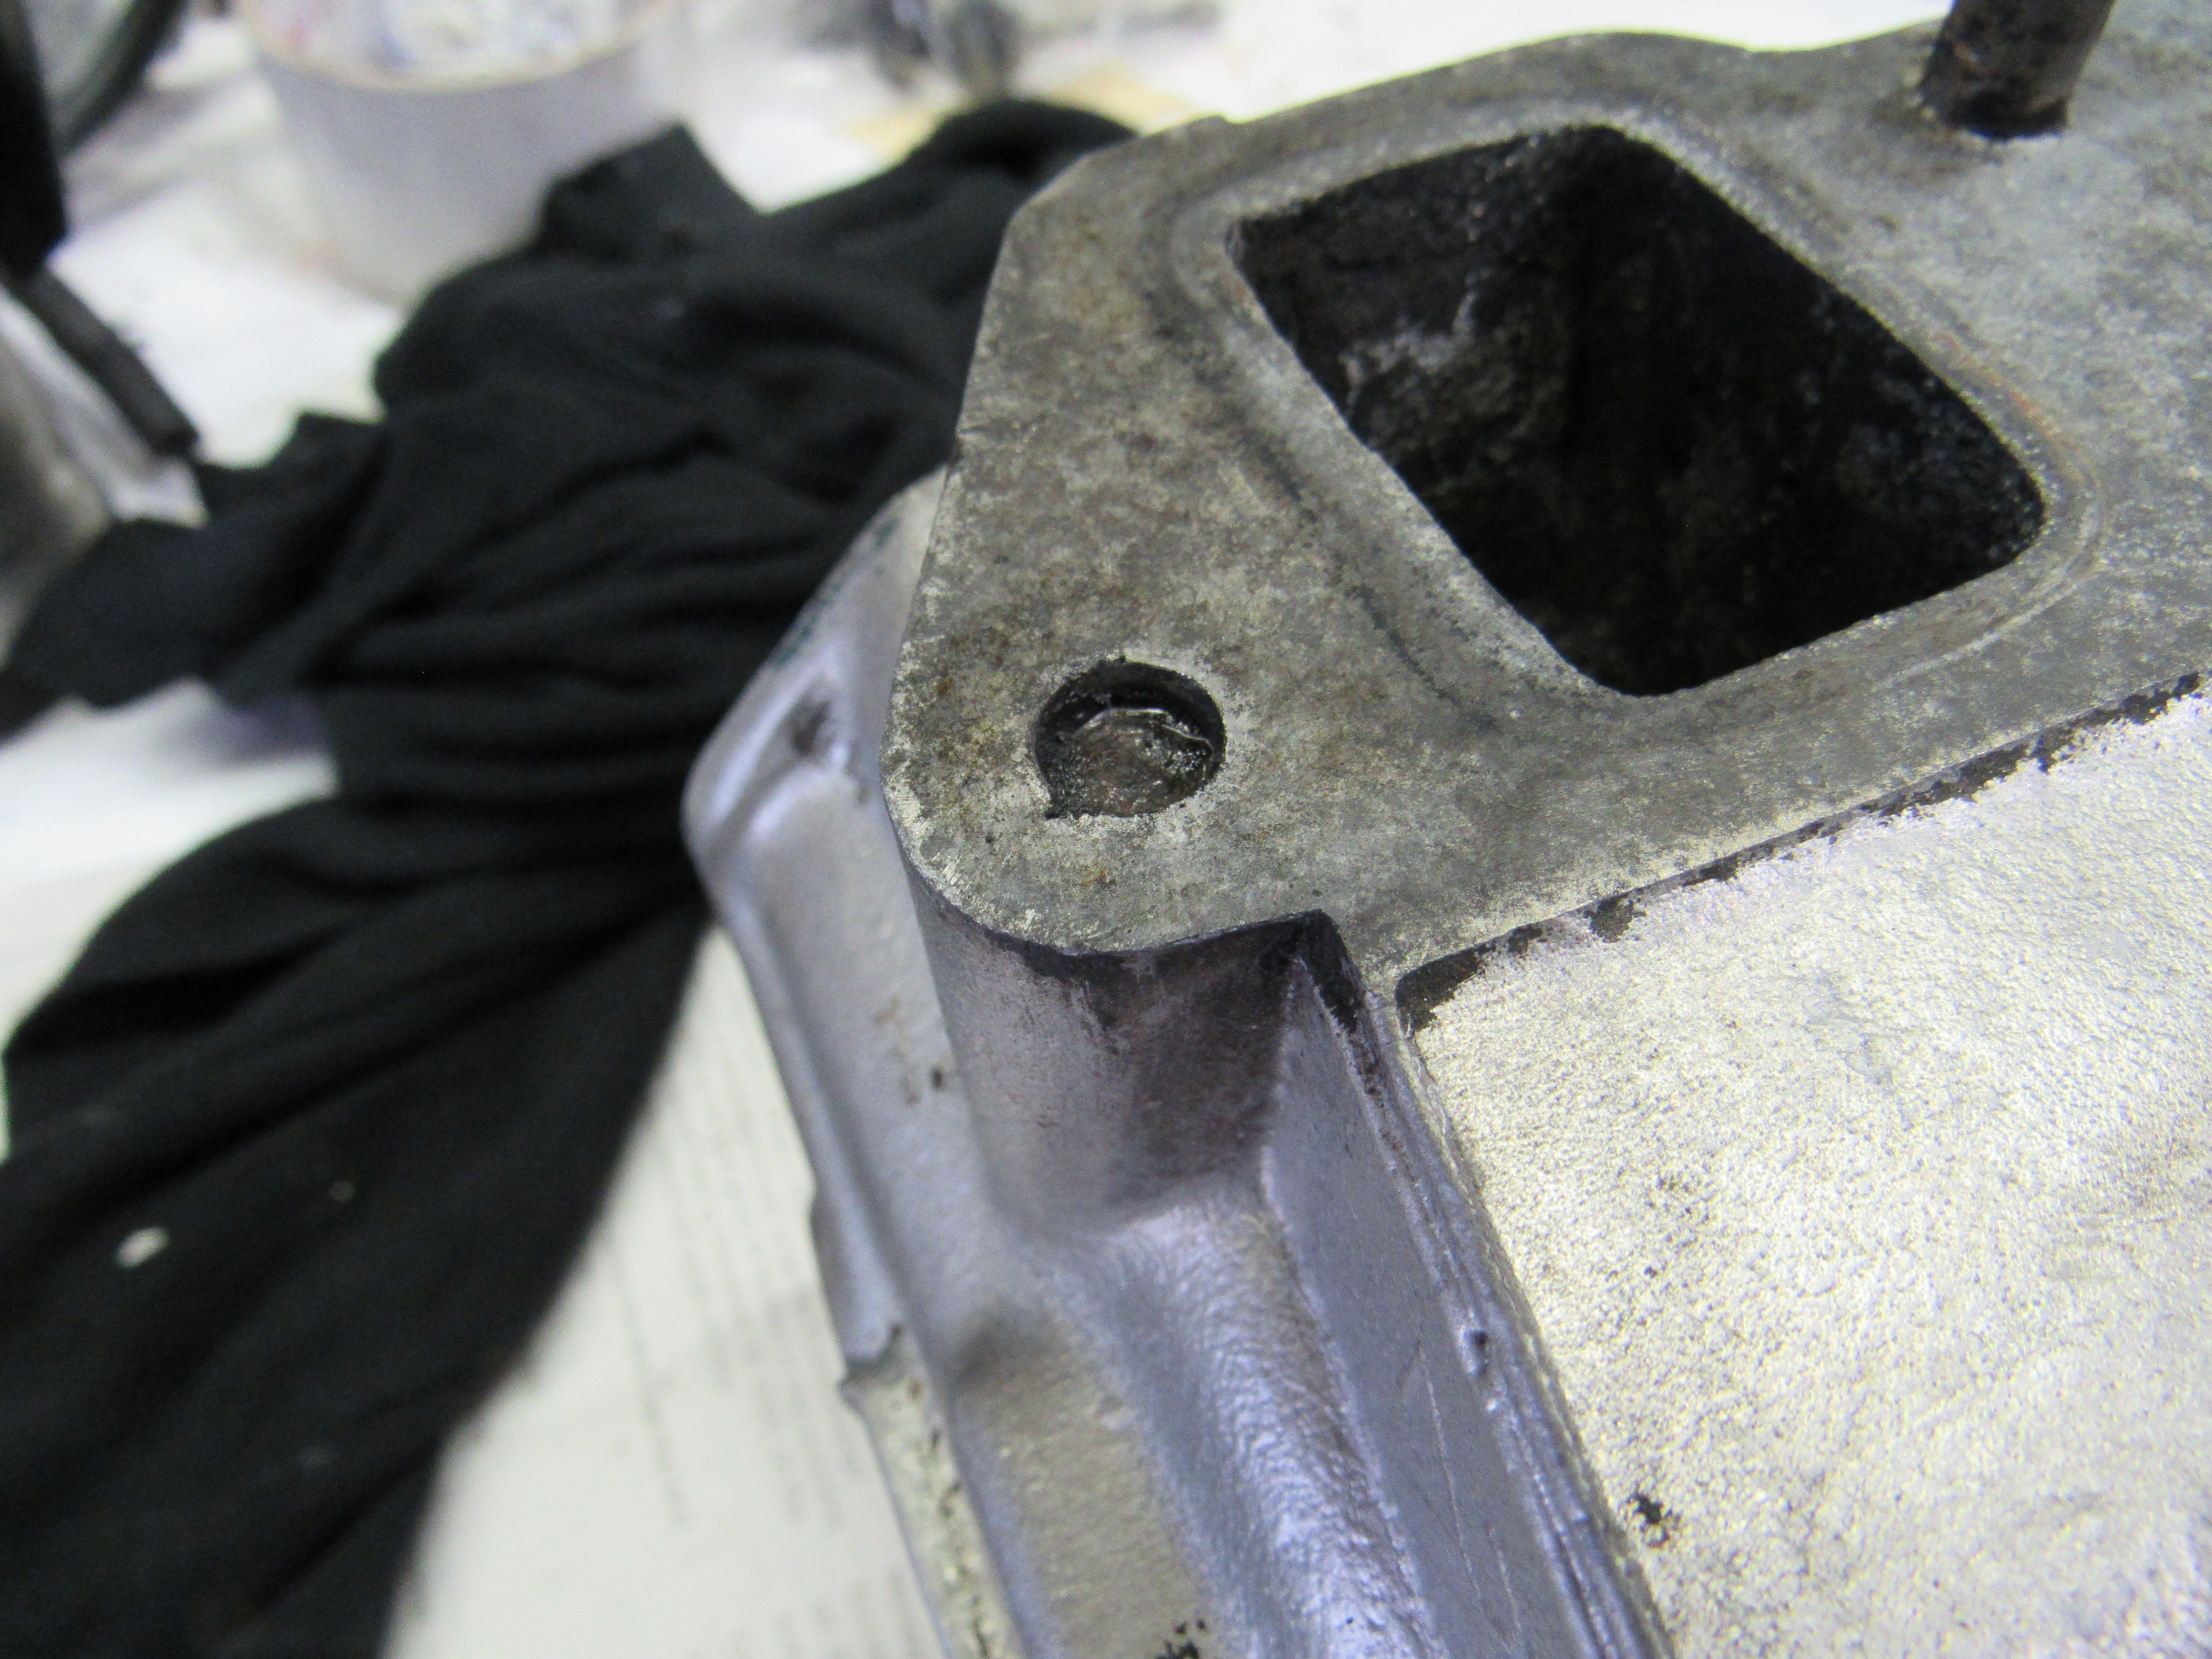
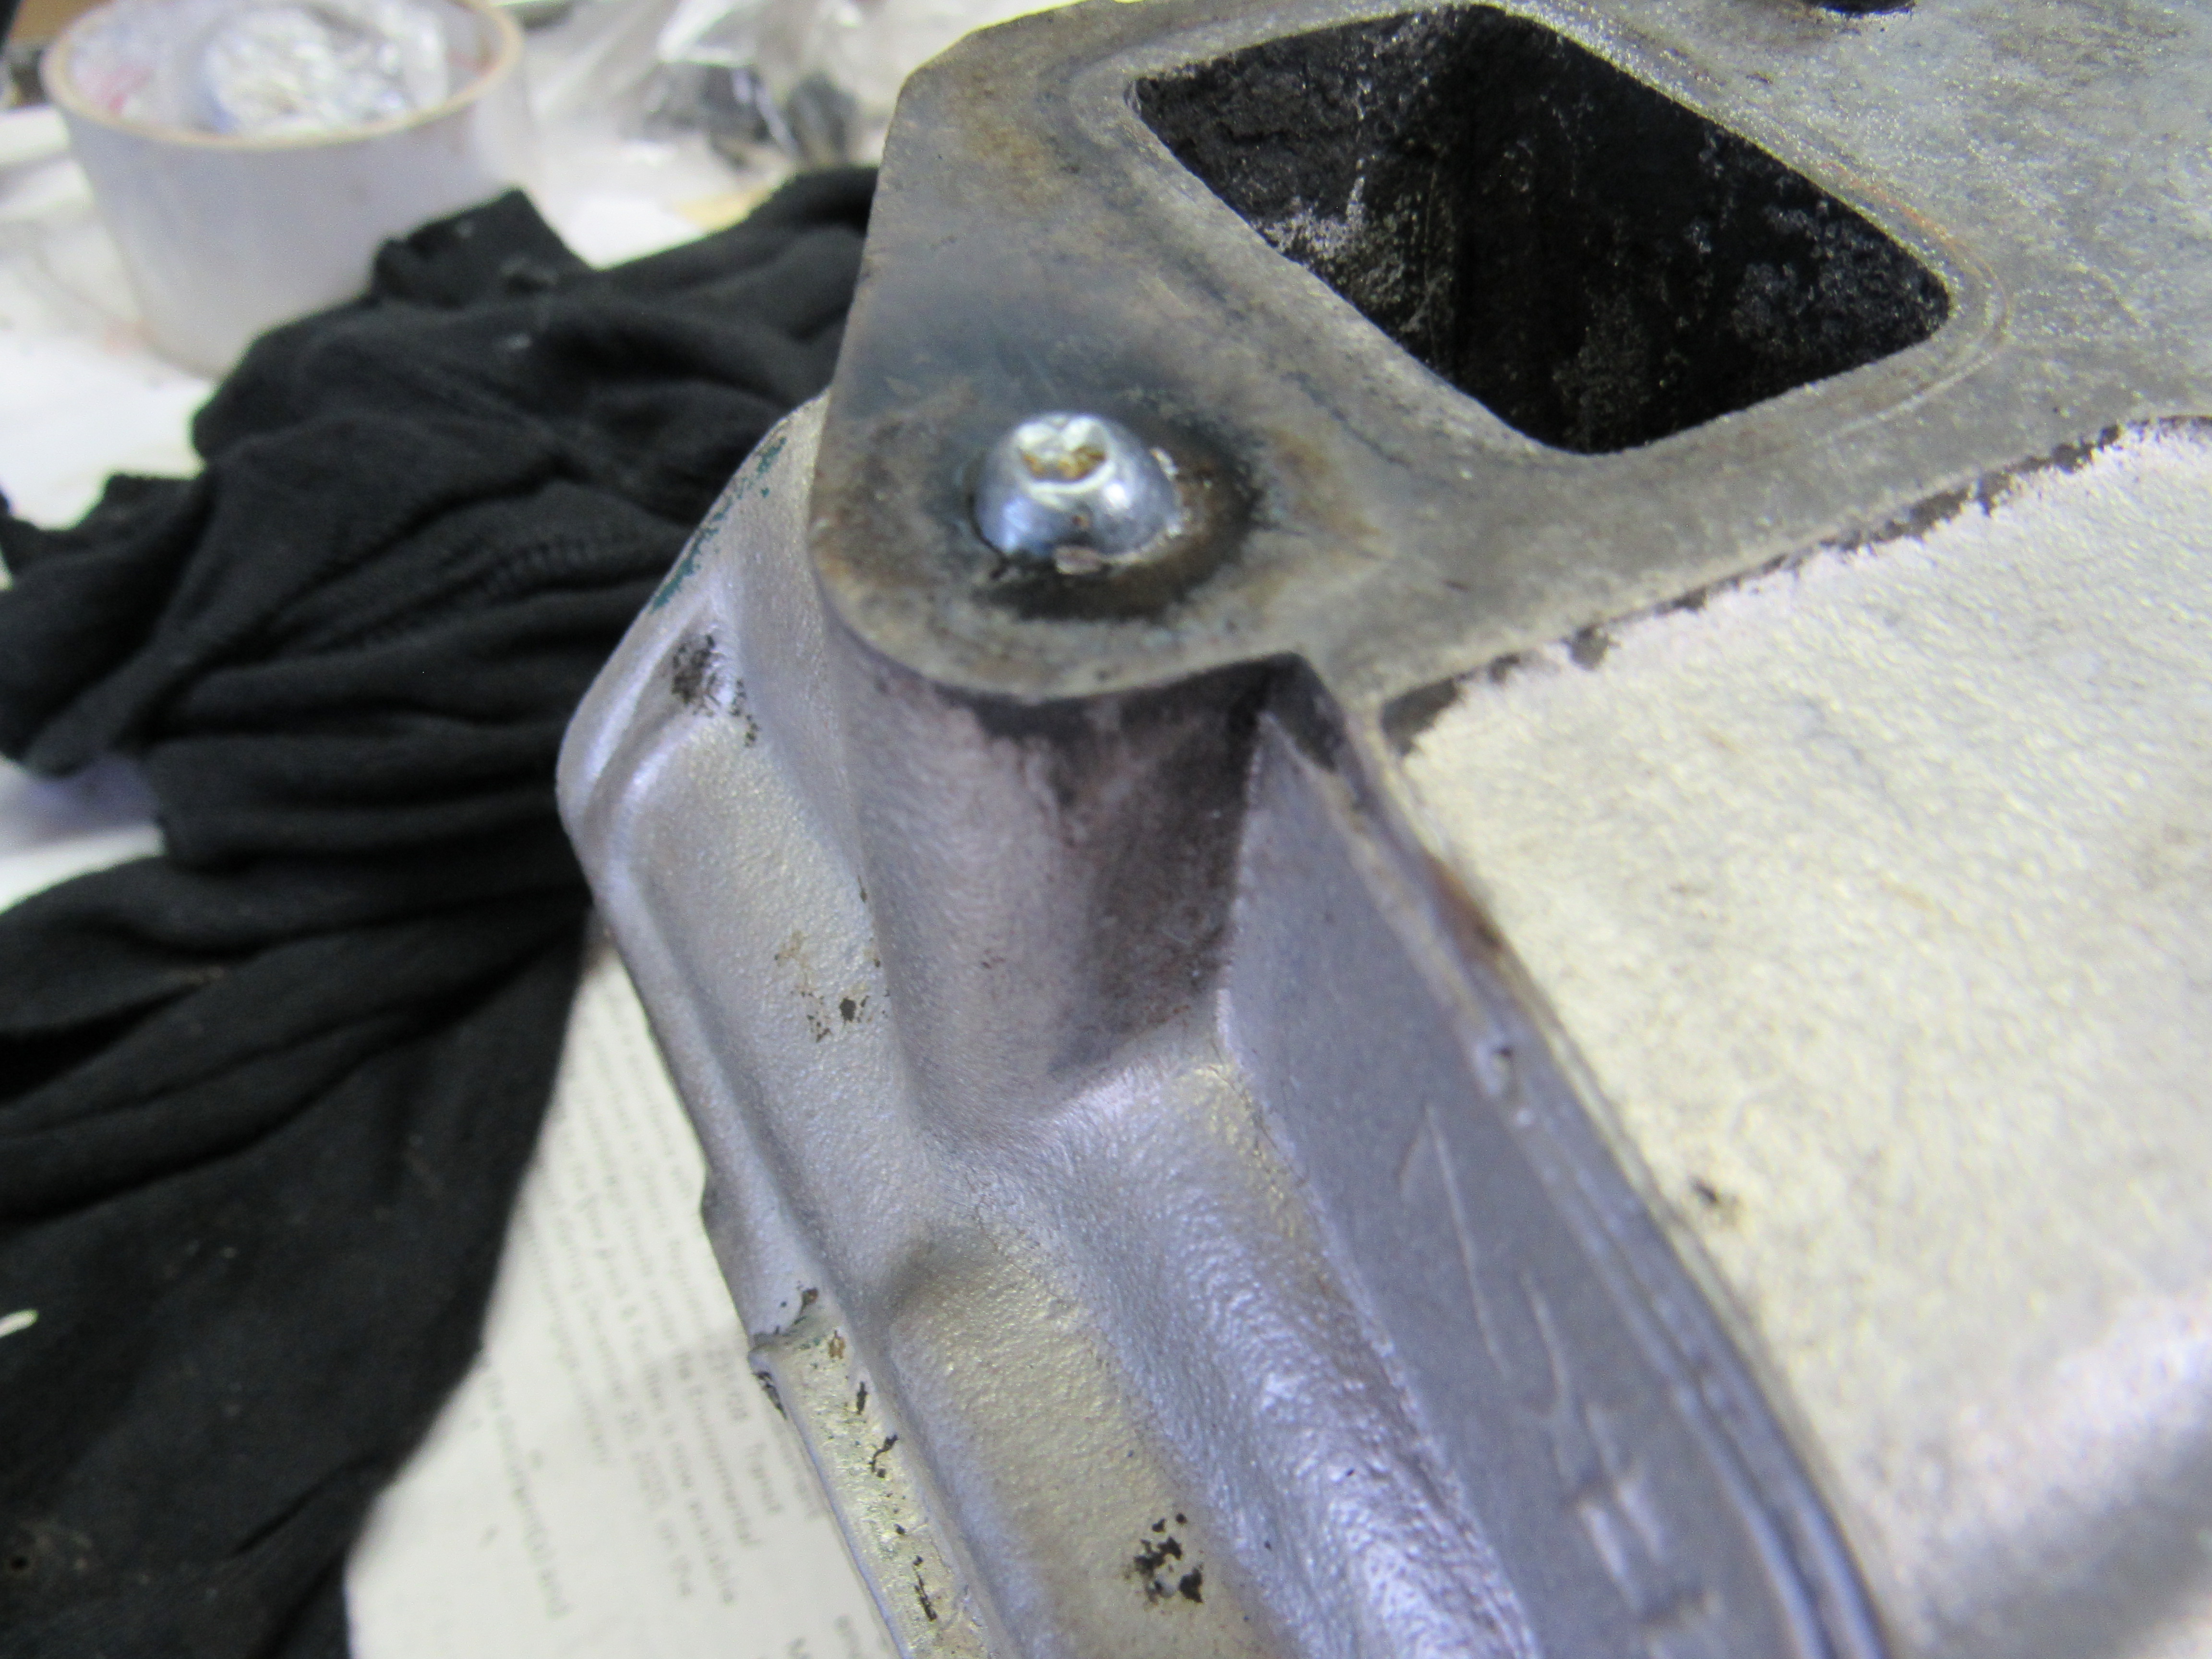
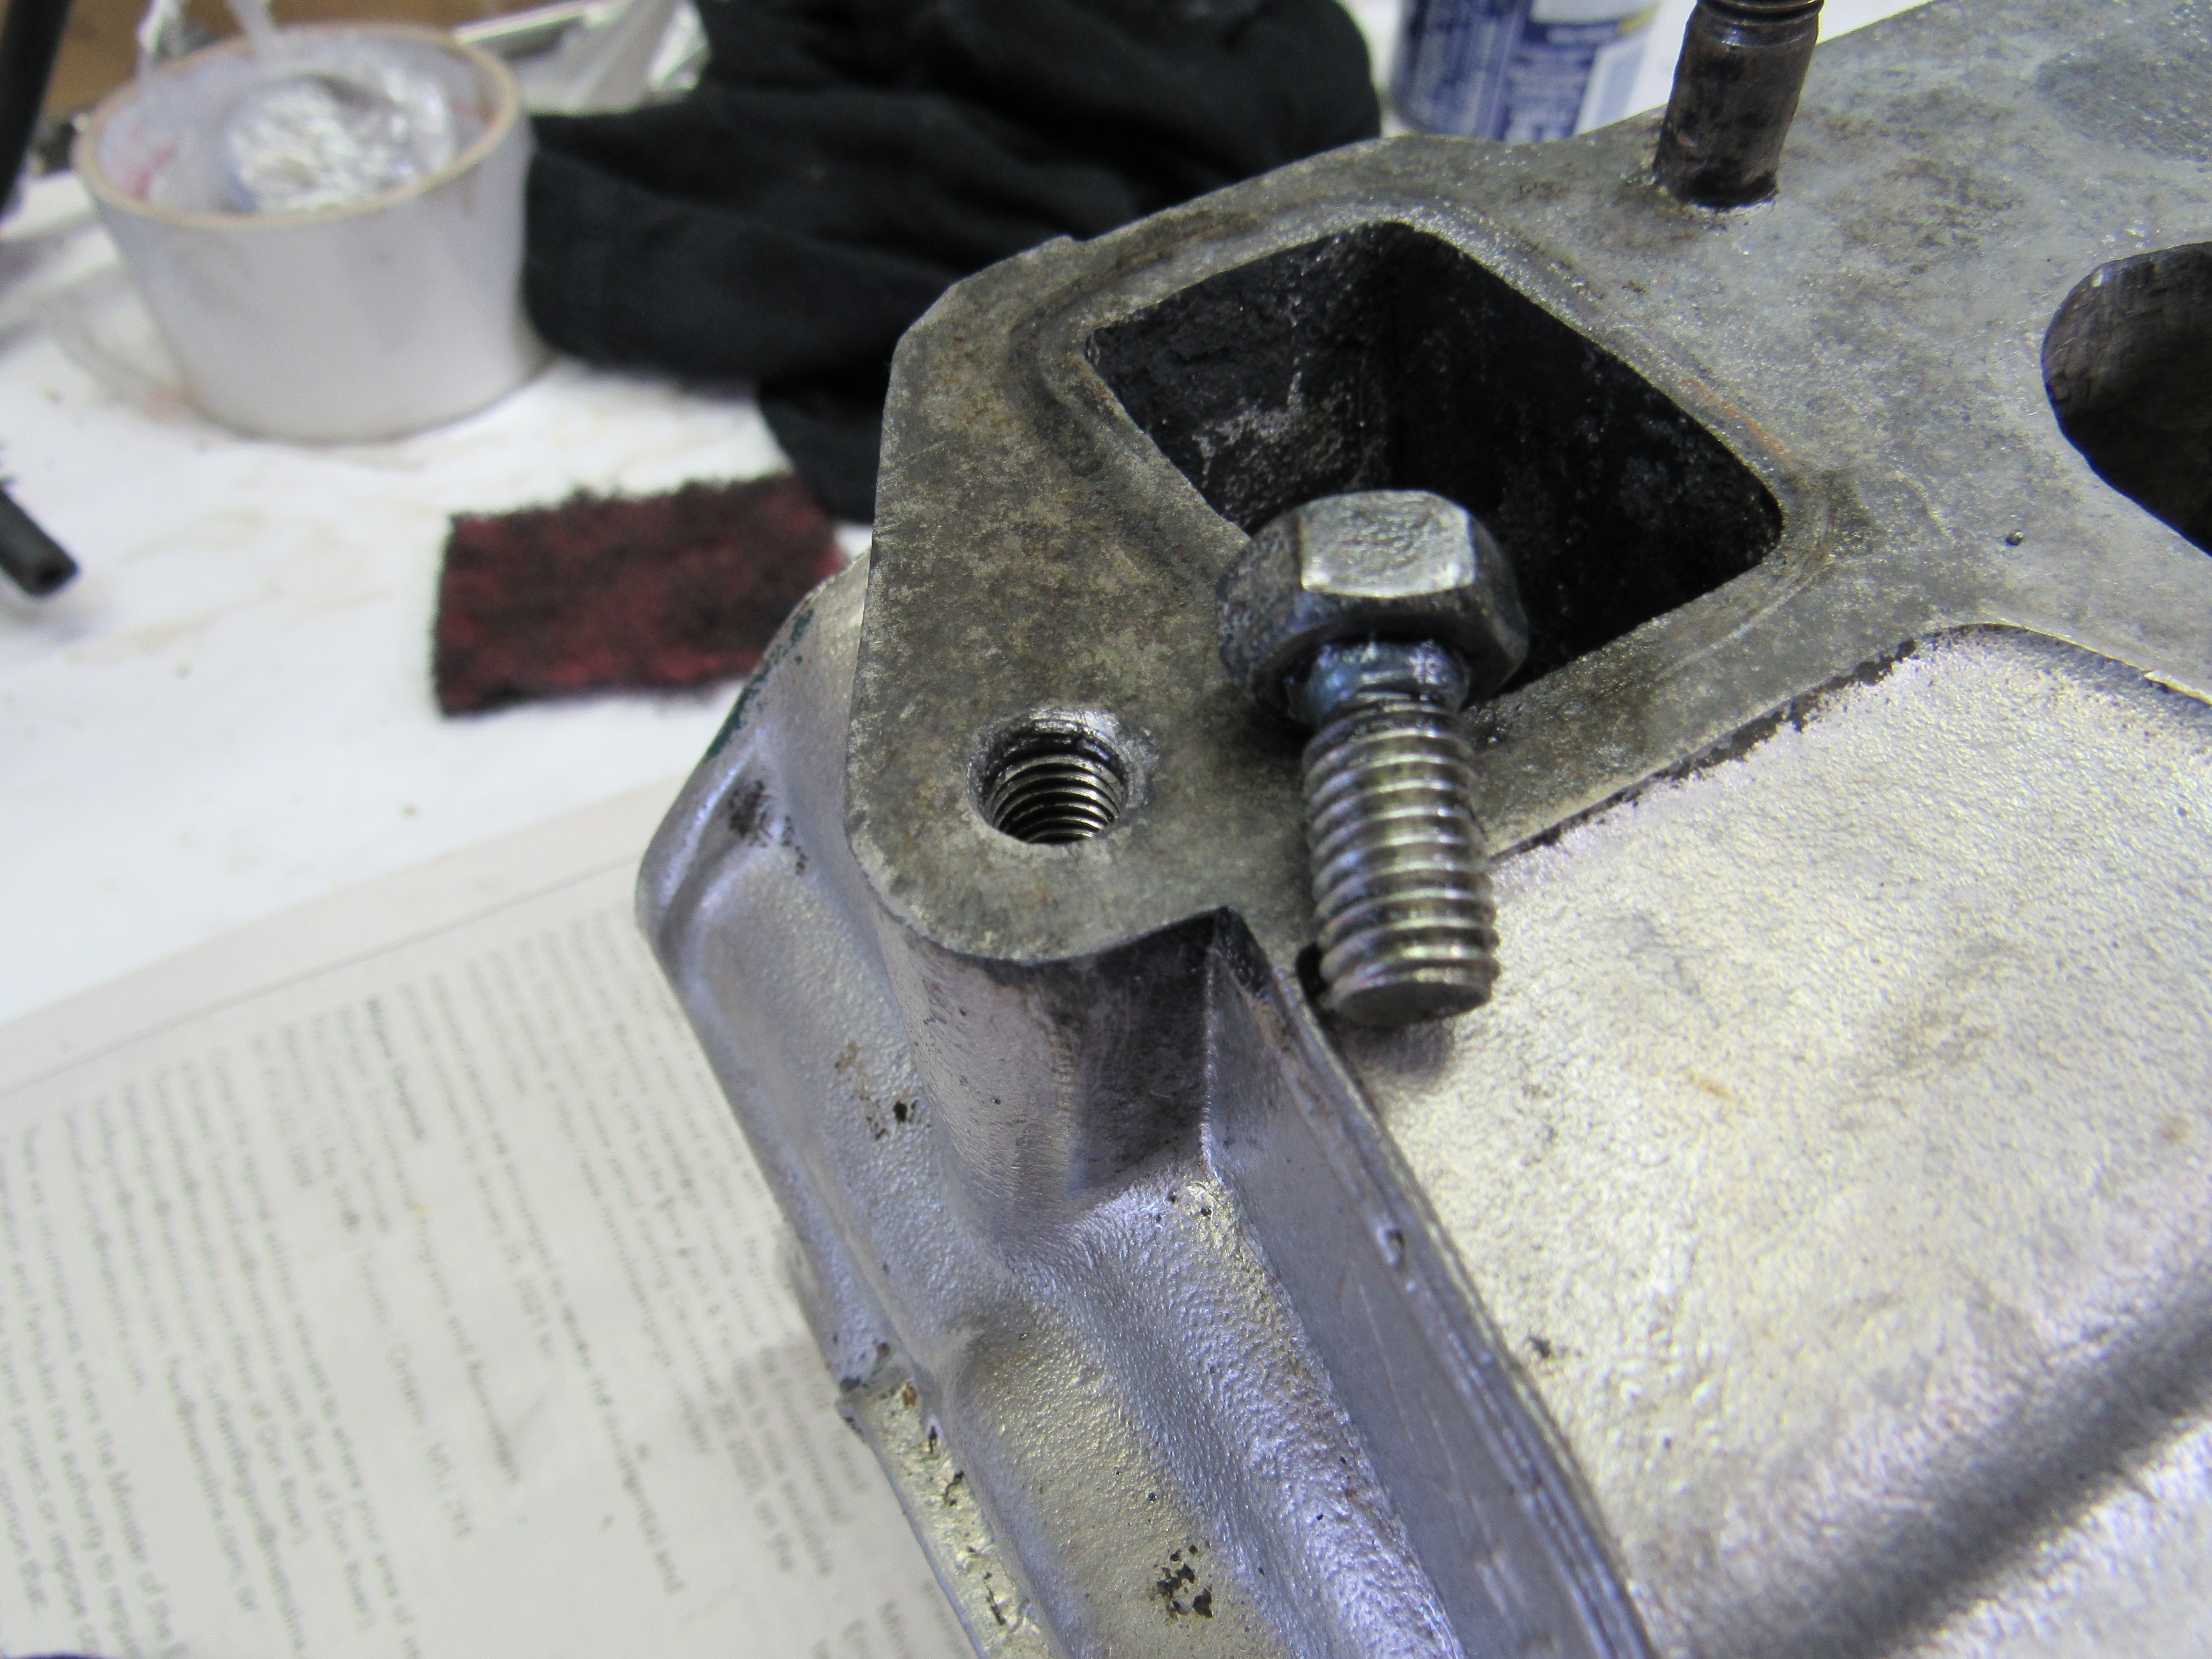
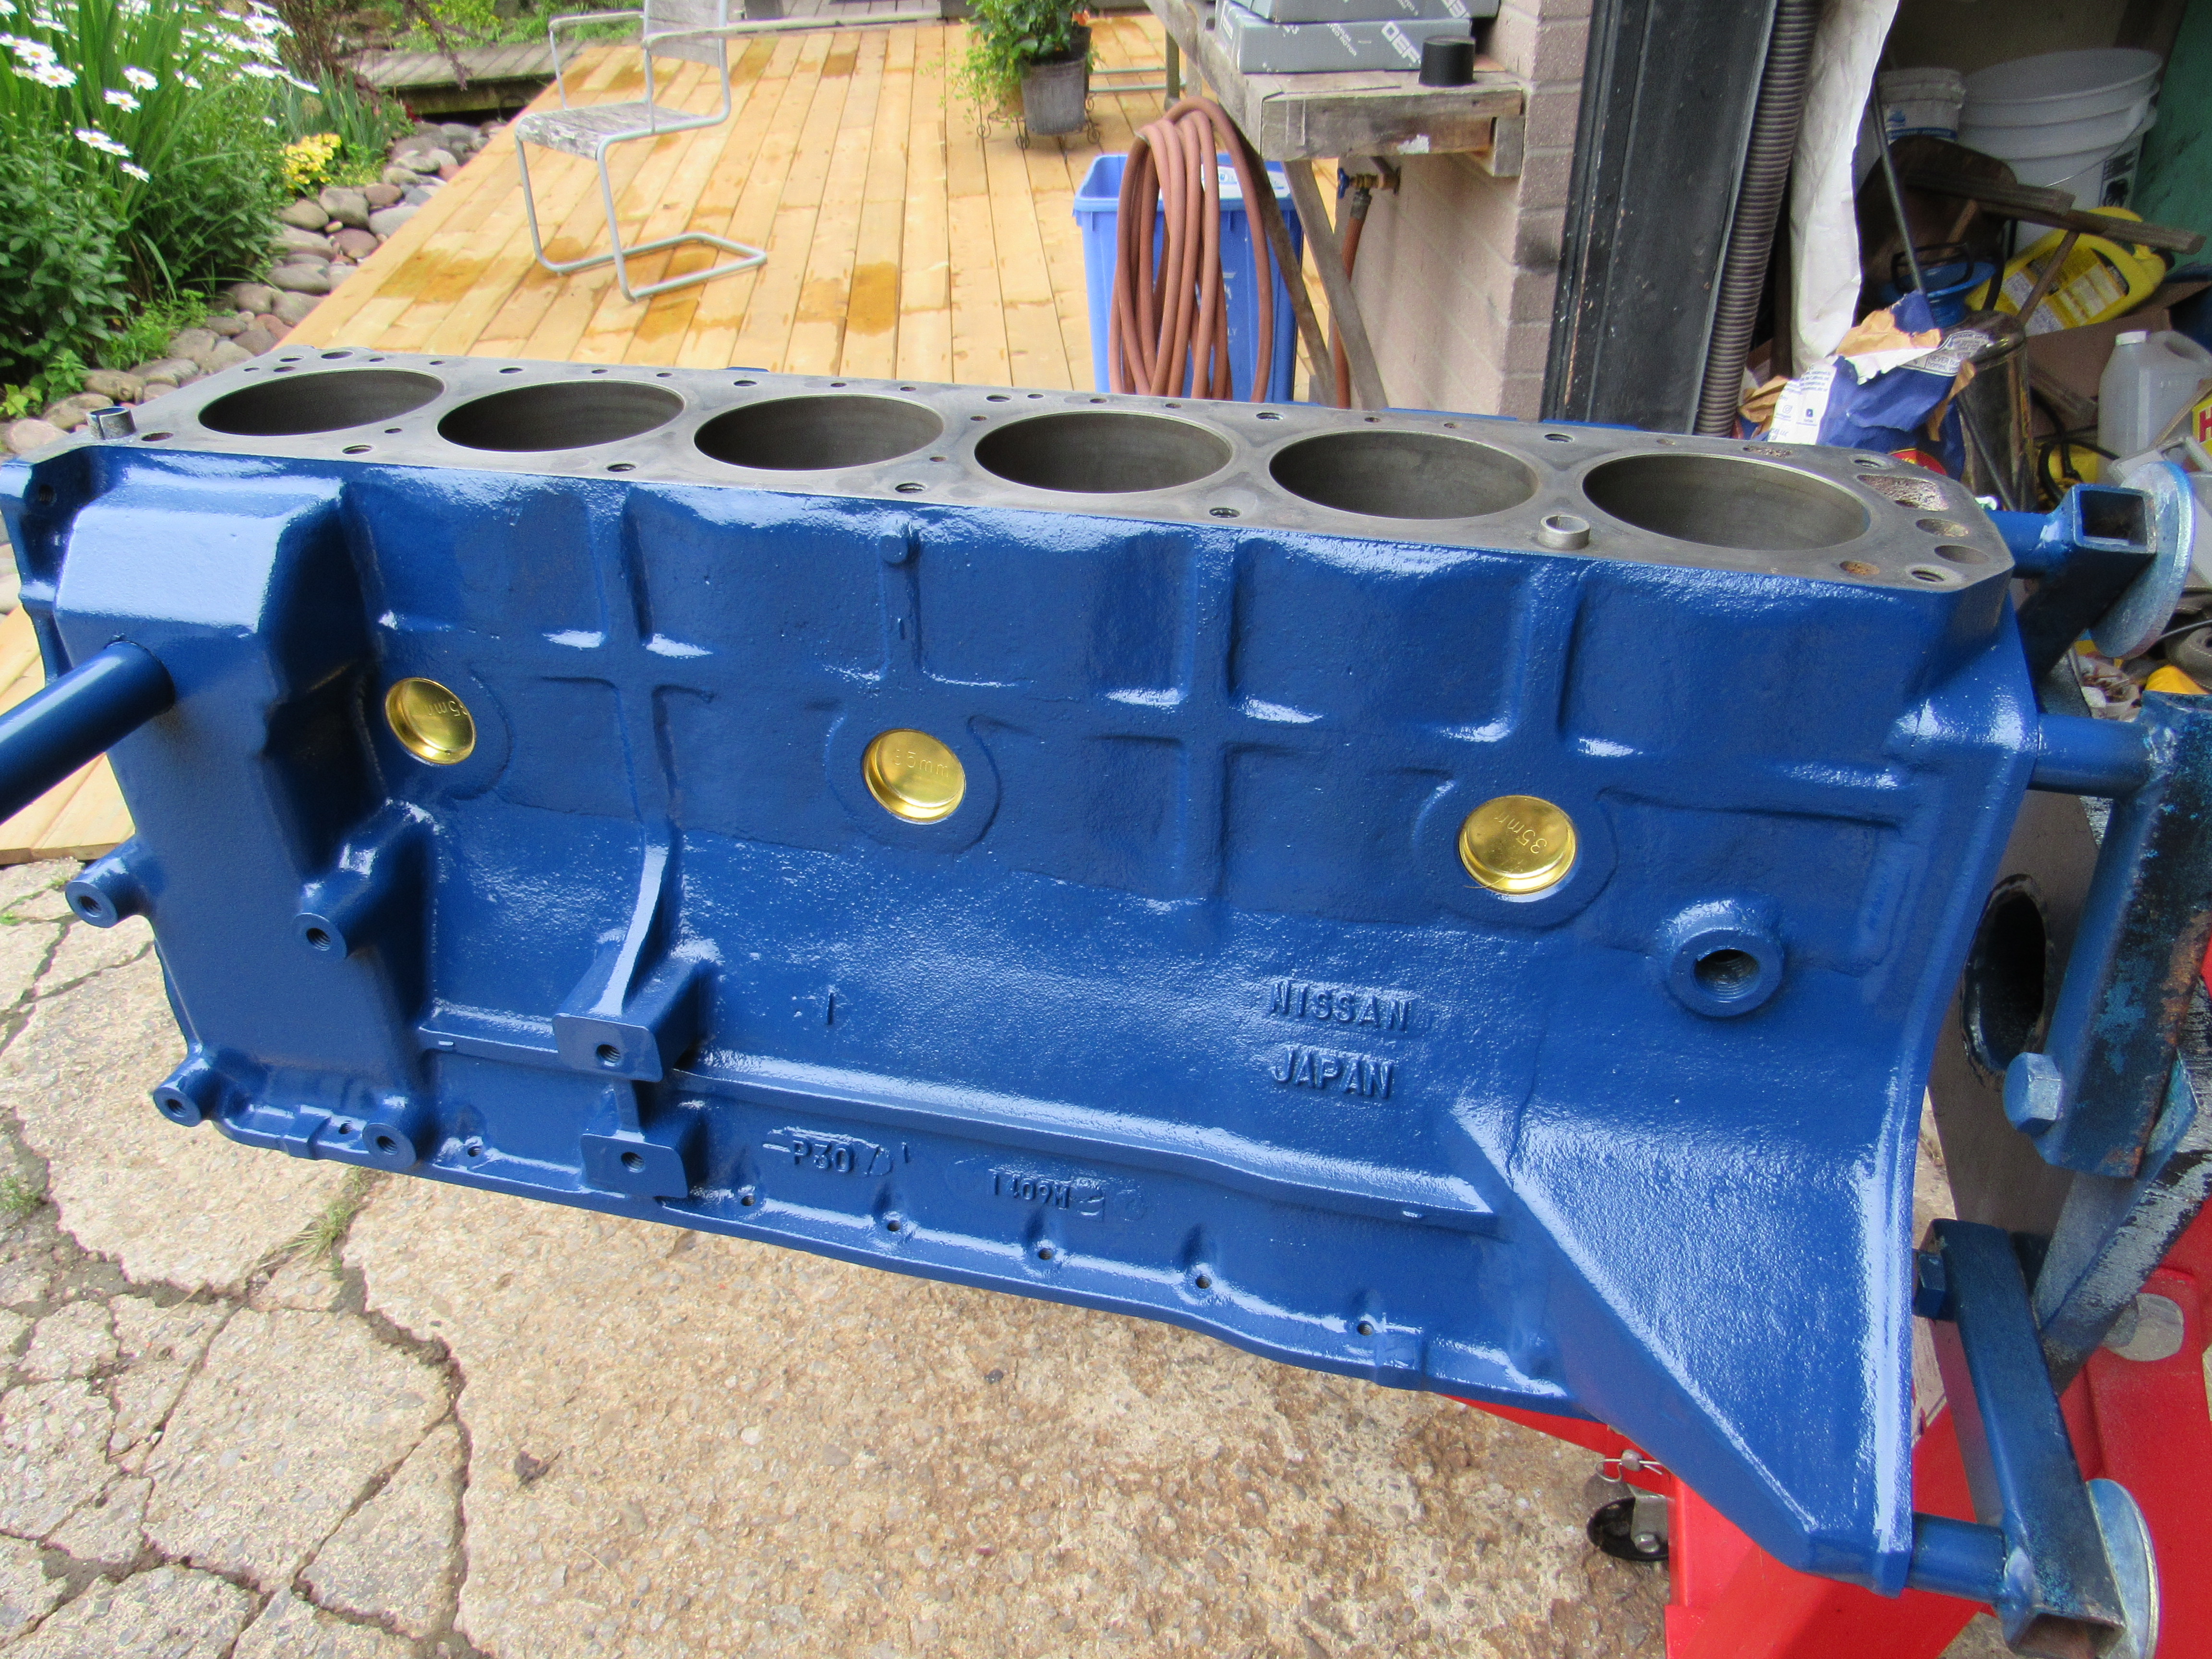
1 pointAfter having saved some of the budget on the crank, I thought I would have a go at the broken exhaust studs, ah a few more dollars saved! Also got some painting done today and added some bling to the engine block.


 1 point
 -
Could you describe the MSD ignition system? Your 240Z came with points and a ballast resistor. Are you using the points to run an MSD ignition box?1 point
-
1 pointI haven't, but my question would be how you are going to replicate the factory stitching / door panel design. IMO, flat stretched vinyl without the design/detail element is going to look pretty tacky, especially considering the labor intensive nature of the job. Another consideration would be the state of the door card itself. Unless it's really pristine & all mount points have no water damage, that will be another detractor when it comes to assembling the vinyl to the card. Do you have any experience sewing/ working with vinyl & patterns? It's no small undertaking.1 point