


.JPG.cfcada9cf1c1b502df3f5f2f2ca3ff36.JPG)

SteveJ
Community Member
-
Joined
-
Last visited
Everything posted by SteveJ
-
Lucky you. I gave away my 1 ton after two engine pulls because it didn't hold up well (and my garage was getting crowded.) The 2 ton isn't that much more ($70 when they are not on sale), and I think it would be safer in this application. @corbenBHere's another reference that might help you: https://www.amazon.com/Rebuild-Your-Nissan-Datsun-Engine/dp/1931128030
-
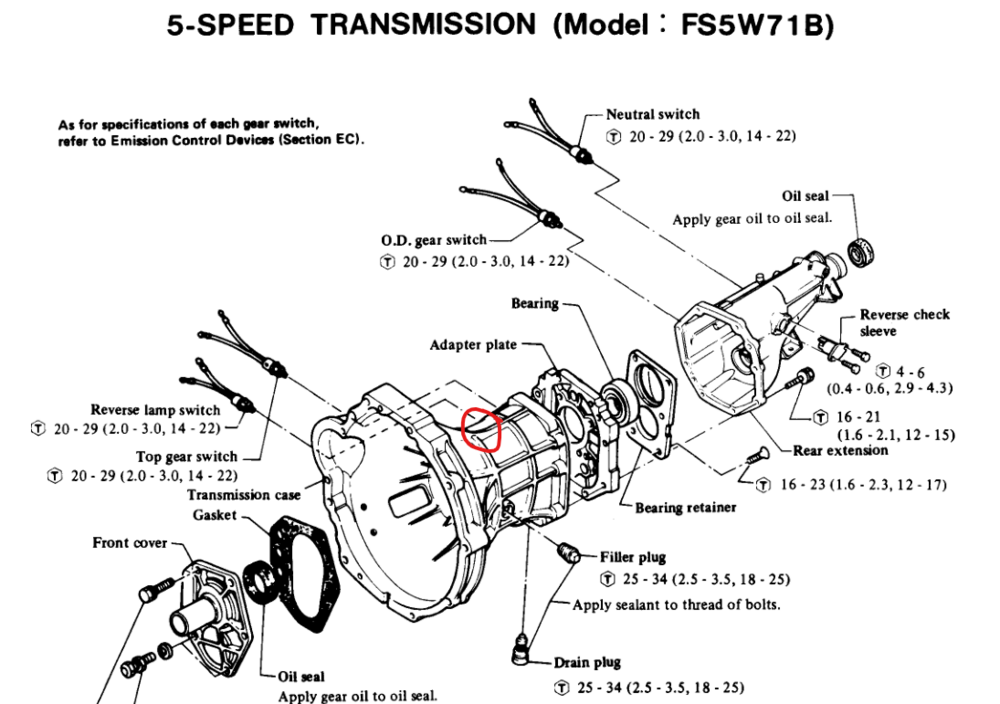
That is the oil pump. My suggestion is that you take the following steps. Stop what you're doing. Get a copy of the factory service manual for the car. If you are on a PC, you can find the link in my signature. Otherwise, go to the resources tab on this site to find the manuals. Study the FSM to find the relevant sections to what you're trying to work on. Don't even think about removing the oil pump before you have the engine at TDC. (Otherwise, you'll probably mess up the timing on the engine, especially if the oil pump gets turned while it is out.) On the other hand, why is the oil pump in the way? I'm pretty sure the cross member is more of an interference than the oil pump. By the way, from the amount of RTV on the oil pump, it looks like someone removed it in the past. I don't believe RTV is needed if you do it right. Also, why are you trying to take off the oil pan?
-
The Brake light in the speedometer is lit if any of the three conditions is present with the key in ON: The parking brake handle is pulled up enough for the switch to close. (Normally closed switch so the button is up.) The brake pressure differential pressure switch is closed. (BR-6 Brake indicator switch) The brake warning lamp relay is de-energized. (The relay coil is energized by the neutral of the alternator. For stock this means the key is ON but the engine isn't turning, or the alternator has failed.) So, how to test what conditions are present? Disconnect the green/yellow wire from the parking brake switch. Make sure it isn't touching a grounded surface. Disconnect the green/yellow wire from the brake indicator switch. Make sure it isn't touching a grounded surface. Unplug the brake warning lamp relay. Plug in only one wire at a time to see if the light comes on. If it does, unplug it, and try the other wires. More than one condition could be present. The brake warning lamp relay could also be affected by an alternator swap. An unplugged hazard switch will take out the turn signals. For the headlights and running lights/dashlights, I would look for wires that were not connected properly at the steering column. Also check fusible links and the connectors between the dash harness and engine harness.
-
Yep, in this case I'll get them tomorrow. I didn't quite luck out on next day.
-
I can show you the tricks for changing out springs, too, if you don't know them already.
-
On the other hand, JDM Car Parts shows the style I'm more familiar with and says it's for all years of the 240Z. I hope an owner of a 70 or 71 will clarify. https://jdm-car-parts.com/products/choke-cable-fire-wall-grommet-240z?variant=766761437
-
I believe for your car, the choke cable grommet should look like this: https://www.zeddsaver.com/products/240z-70-71-choke-cable-grommet-on-firewall There should only be the choke cables coming out. I cannot tell you what the wires are in your photo. Many previous owners have modified wiring and usually not for the better. In fact, I'm going through my cars and fixing many of the modifications made by myself and others.
-
The stock wiring for the reverse switch does NOT go through the choke cable grommet. (FYI - That is not the proper choke cable grommet.) The wires should come off the main engine harness where it goes through the firewall near the battery. The wire colors are listed as red/black and red. IIRC there should female bullet connectors on the ends of the wires. They should be routed so they come close to this area around the transmission. (See below) You have to be under the car to see the wires. Sorry, I didn't take photos when I was replacing the switch a few months back.
-
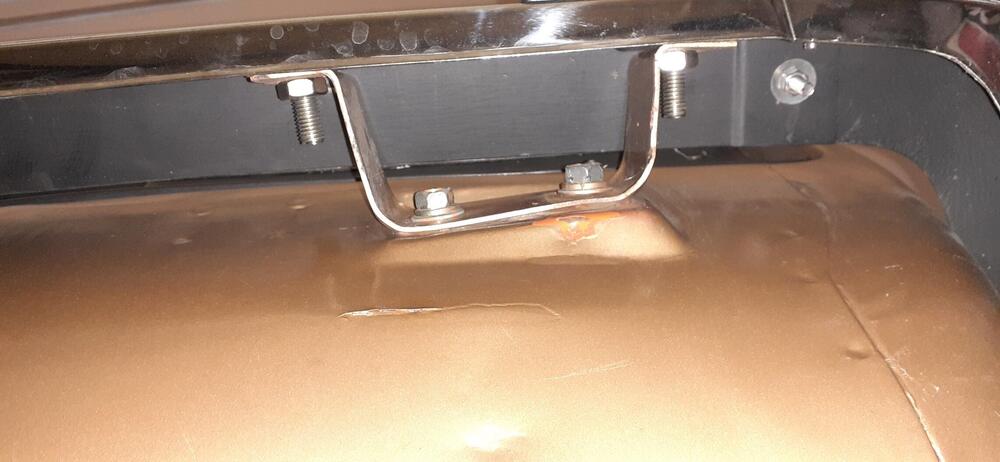
Take photos from the same angle I did and post them here.
-
The taller section goes toward the middle of the car. To orient yourself, I took the photo from under the bumper on the passenger side. You can see the angle on the mounting spot on the car.
-
You could bring it down to my place for me to look at.
-
Oops! The car has demonstrated a desire to pull to the left at freeway speeds. It isn't too bad, but it's noticeable. I put an IR thermometer in the car so I could check the brakes after a drive. Sure enough, the left brake was about 30 degrees or so warmer than the right. I bought some rebuilt calipers, rotors and pads. They arrived, and I set about changing the brakes today. No problems on the left with disassembly, though I realized I should have purchased new slider pins. At least I had plenty of cotter pins handy. I got new rotor mounted and went to put on the caliper...but it wouldn't go over the mounting holes on the spindle. I called up a friend who suggested they might be 280Z rotors (FYI: 260Z rotors are the same as 280Z). No, it couldn't be that. I knew I selected 240Z parts when I was on Rockauto. Measurements don't lie. The hats on the old rotors were definitely taller. (And there was enough of a groove toward the edge that I wasn't going to try turning them.) I double checked the part on Rockauto, and I picked up on the key detail I missed before. It said the rotors were for AFTER 8/73. In other words, they had 260Z rotors under the 240Z listing. D'oh! Anyway, I found the correct rotors at Summit Racing. They also have them at the Georgia location, so they should get here in a couple of days. I also ordered some new bolts and other brake hardware from ZCarDepot since it would be a good idea to replace all of that, too. Delayed gratification, but no real damage.
-
That orifice is the "fuel pressure regulator". That is what allows the pressure to stay around 3 to 4 PSI on the fuel rail.
-
Yes, that is normal. It is a return line, not a fuel vapor line. The vapor line is routed differently and ends down below the ballast resistor/coil area. As @siteunseenwas saying, when the floats rise in the float bowls, they cut off fuel from going into the float bowls. Since this is a low pressure system that is not dead-headed, the fuel must go somewhere. The block on the right end of the fuel rail is where you go from supply to return.
-
Can you get a photo of the backside? Someone might have a suggestion.
-
Most of the cars I have seen keep the hoses.
-
In case you need to look at the service manual for a 240SX for more info on putting it back together (or names of parts) - https://forums.nicoclub.com/nissan-240sx-factory-service-manuals-for-nicoclub-members-t549156.html
-
Go to https://www.nissanpartsdeal.com/ If you're sure the transmission is from a 95 - https://www.nissanpartsdeal.com/1995-nissan-240sx-parts.html Even closer...https://www.nissanpartsdeal.com/parts-list/1995-nissan-240sx/power_train/transmission_gear.html
-
-
Motorsport Auto - http://zcarparts.com/
-
Probably not. You're just hearing the contacts moving when the coil in the relay is energized or de-energized. If it sounds more like someone generating Morse code, then it would be a sign something is wrong,.
-
After I read the first sentence, I was thinking, "Change the ignition switch." I'm glad it's working for you. The sheer screws are there to deter theft...for a minute or less. You'd have better luck pulling the rotor out of the distributor or pocketing the fuel injection relay to discourage a thief without a tow truck.
-
I got the same error when I tried it on my phone.
-
If you're on Facebook, you can also watch it there (without Gayle's intro being interrupted by the backstage interview with Jack Rousch) go to https://www.facebook.com/MotorsportsHOF/ and scroll down to the livestream from the ceremony. The remarks start about 1:06:00 into the event.
-
From the induction ceremony last night...Be sure to watch through to the backstage interview with Peter.


