Leaderboard
-
conedodger
Free Member11Points12,513Posts -

dutchzcarguy
Free Member3Points2,677Posts -

siteunseen
Free Member3Points15,115Posts -
Patcon
 Subscriber
 2Points11,142Posts


Popular Content
Showing content with the highest reputation on 05/01/2023 in all areas
-
3 pointsReminds me of the time that a german firm installed my front fireblade tire in the wrong direction! (Yeah.. he said.. happens once in a 100 times..) The Honda fireblade drives like #^$% when the tire direction is wrong on the rim! I didn't know it made that kind of difference! Something like that is the case with your engine.. we are people we make mistakes.. (although i didn't make any mistake this last year!... why? i didn't do anything! 😒 )3 points
-
3 pointsYou can also put the pickup hose in a Jerry can of gas and bypass the whole tank and crap. That's how I nailed my my problem down. A 2 gallon jug fits perfect in front of the radiator. Bungee cord to keep it upright.3 points
-
1 pointI had a wire going through that area and used it to fish the harness in, but there are brackets and bolts welded up in that area of the car. The harnesses snag on those making it hard to get them back in1 point
-
Was there fuel in the fuel filter in the engine bay? I assume you have new hoses between the gas tank and the fuel lines and between the fuel lines, fuel pump, fuel rail, and carburetors. You could try blowing compressed air back to the tank from the fuel filter. If you don't hear air coming through, the fuel line could be clogged.1 point
-
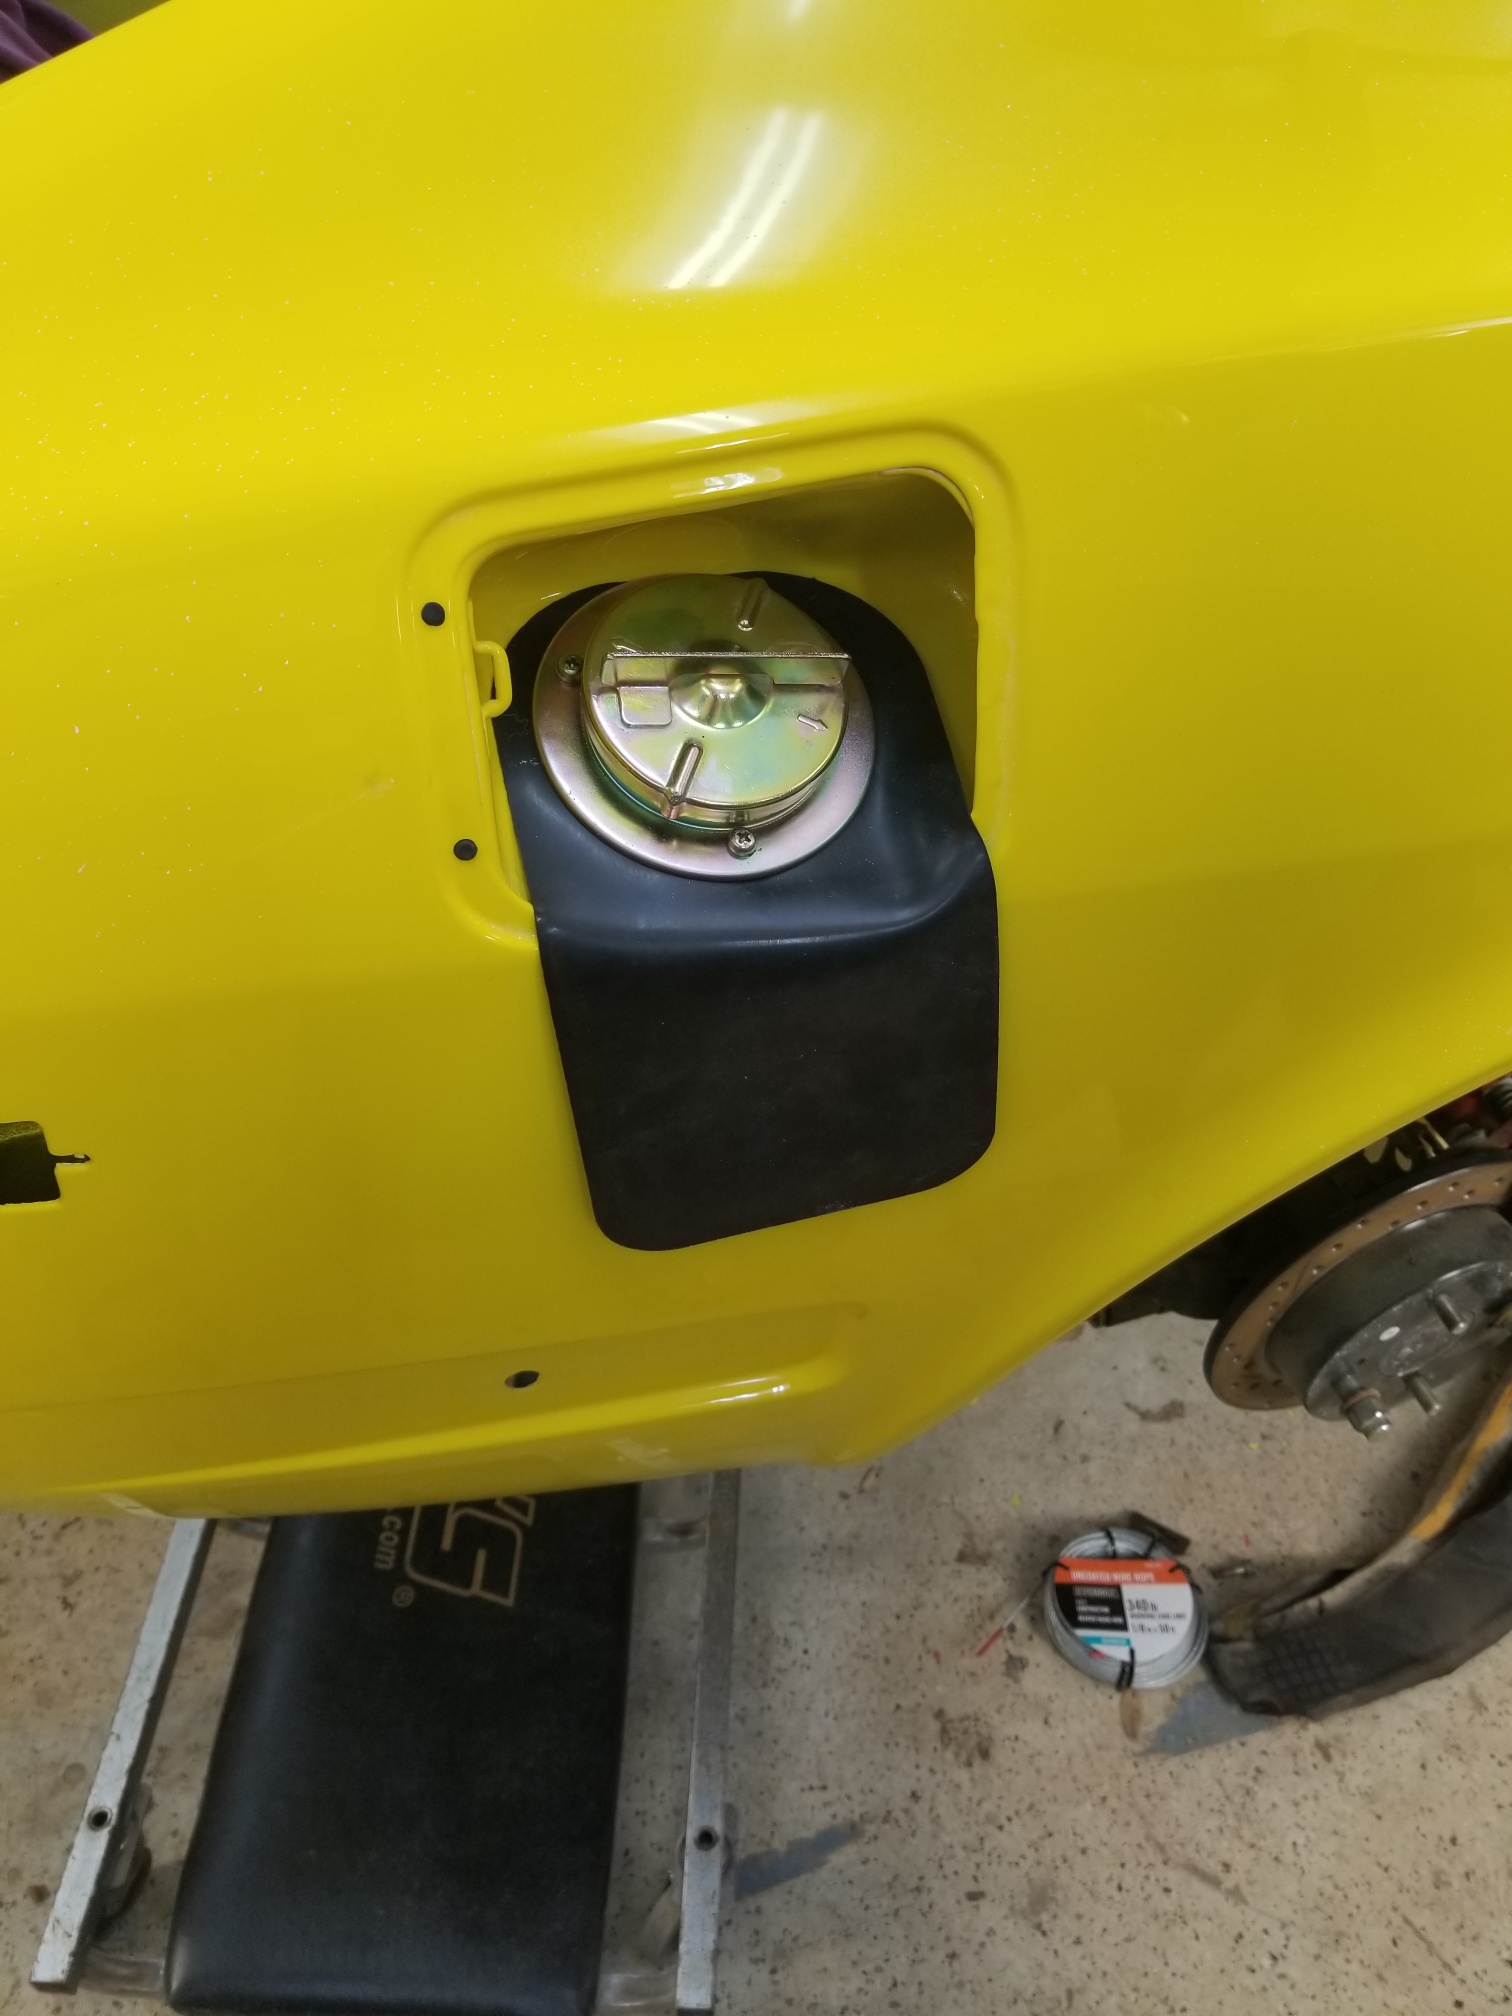
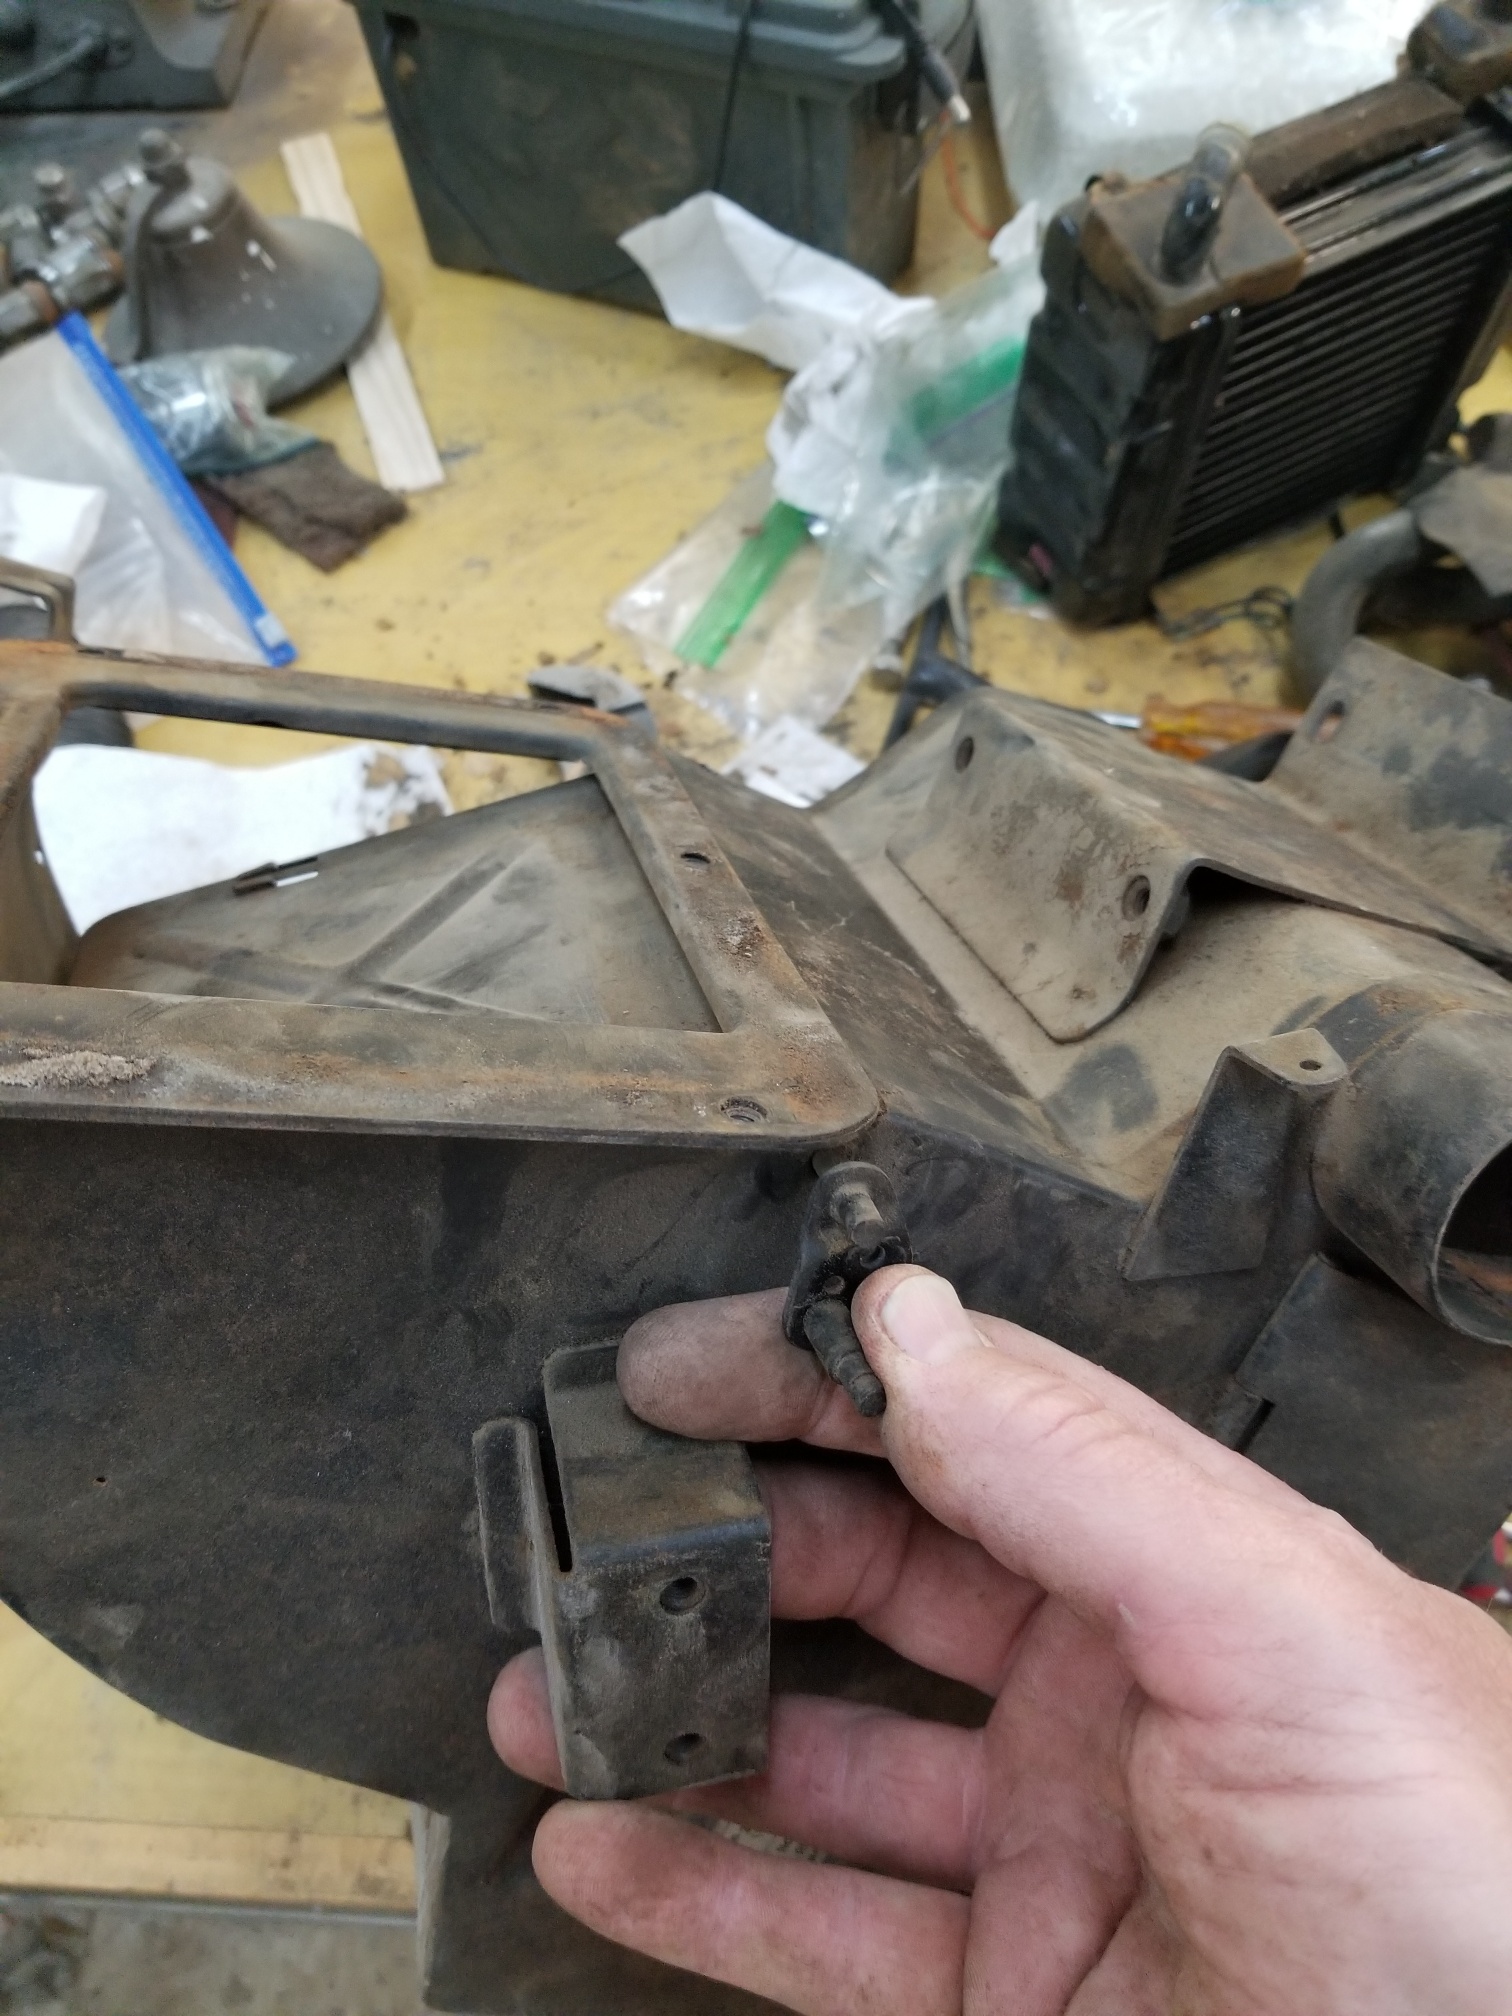
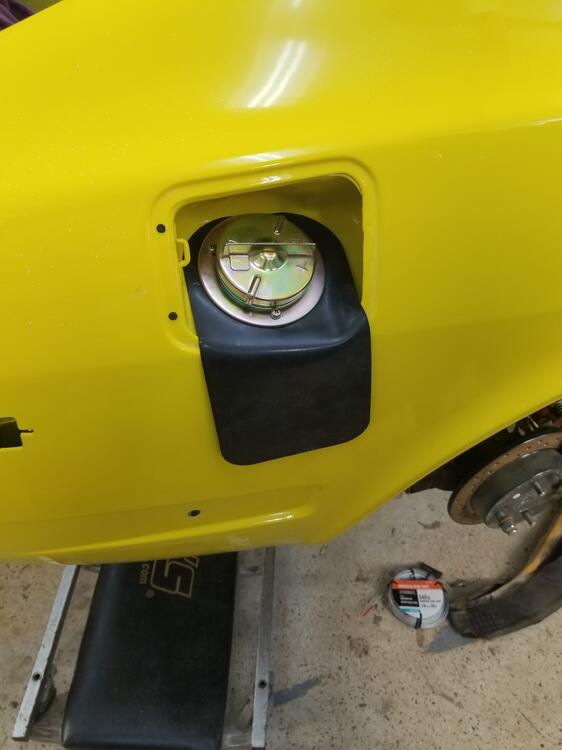
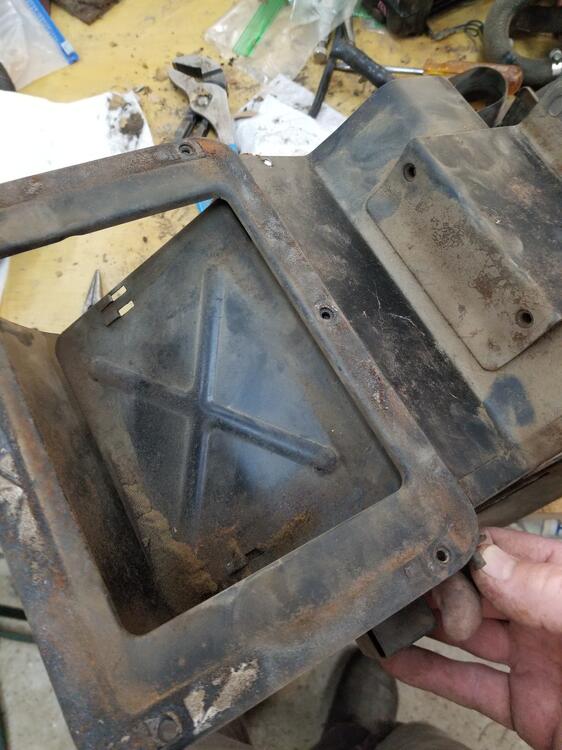
1 pointInstalled the gas flap and ring today Also I was stripping down the heater box for freshening up Do anyone know if I can get this flap out? I don't see anything retaining it but it seemed like it didn't want to come out. I would also like to two floor heat flaps out too but I don't know how to de-assemble those either. I finally got the rear harness pulled in. It was a huge pain. Took maybe ten tries to get the defrost and dome light harness pulled up from the quarter panel. I would suggest not pulling those out when you strip the car if possible. Wrap them up and leave them in place...

 1 point
 -
1 pointHi Charles ……. totalseal.com I can’t remember where I bought them, but I think I bought them direct from Total Seal. Seems to me they can make any set you need if you give em the specs. If not, you can call them and ask who stocks them. The oil ring retainers are really easy to match up and the rings are top quality. I hope the builder installed the other rings right side up (letters on top).1 point
-
One other thing to note is that due to the shape of the tank the gauge comes off "F" fairly quick because the top part of the tank is way smaller than the bottom part of the tank. The fuel gauge moves much slower in the bottom half of the gauge.
 1 point
 -
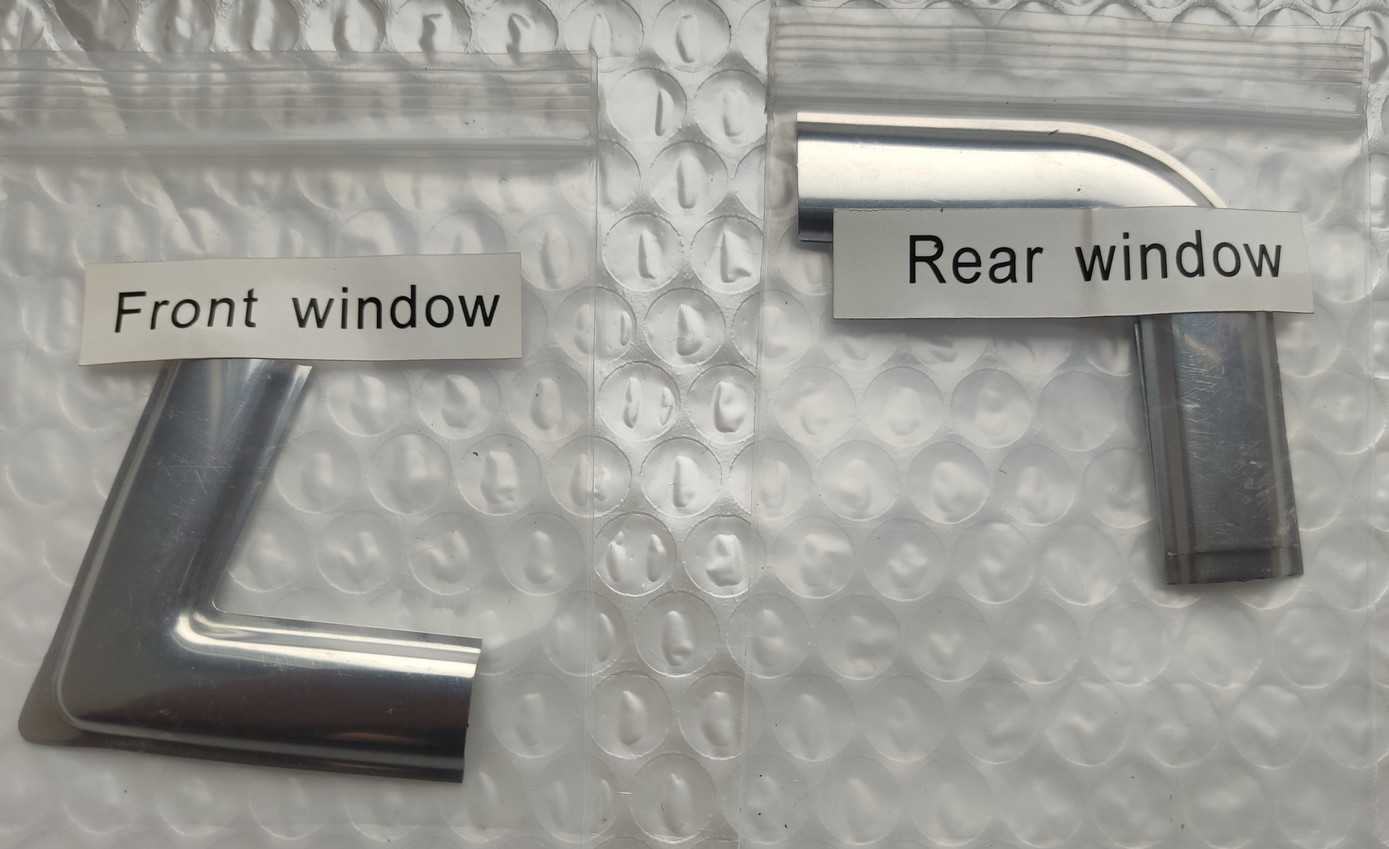
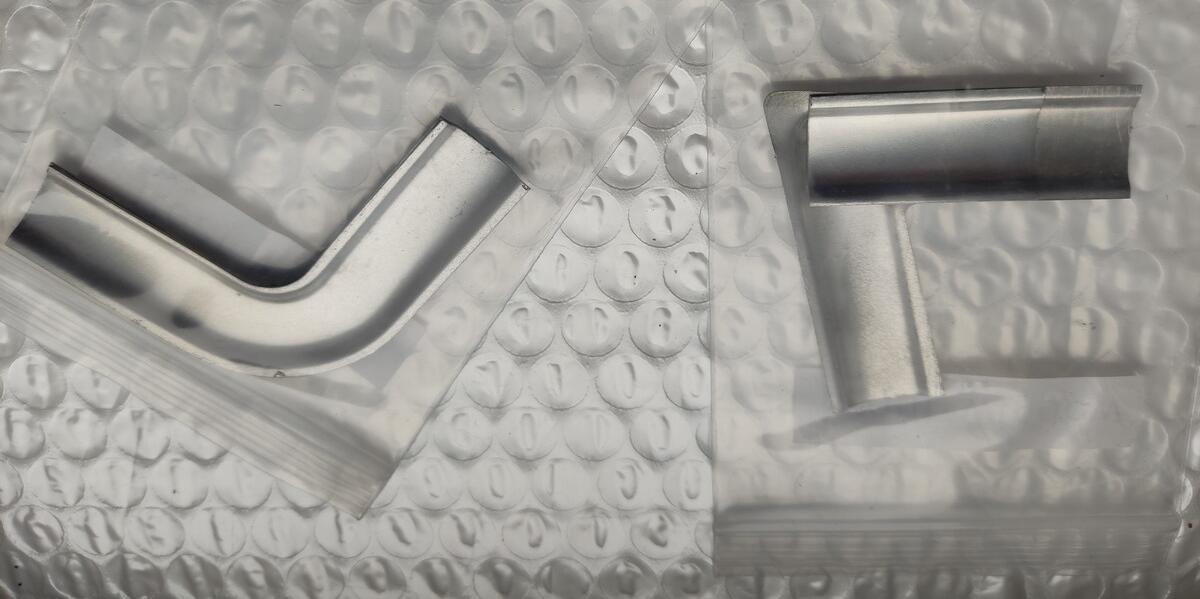
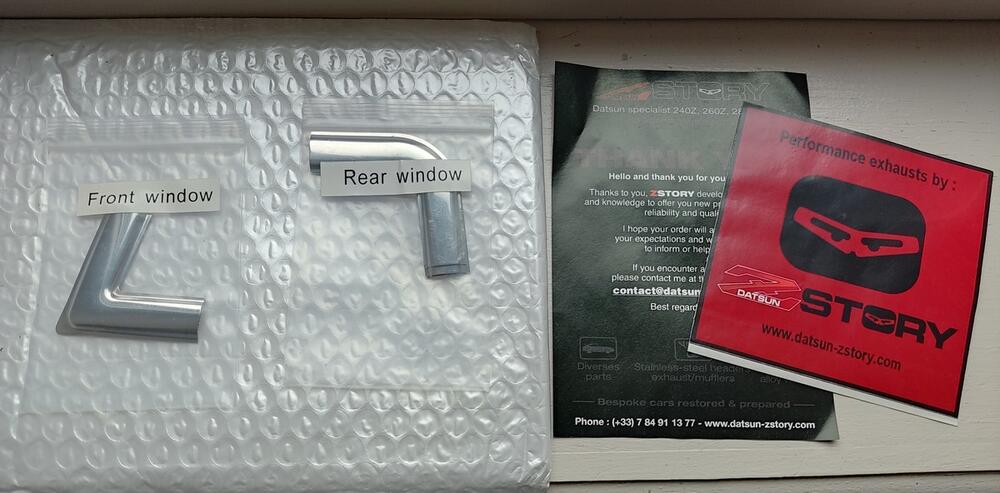
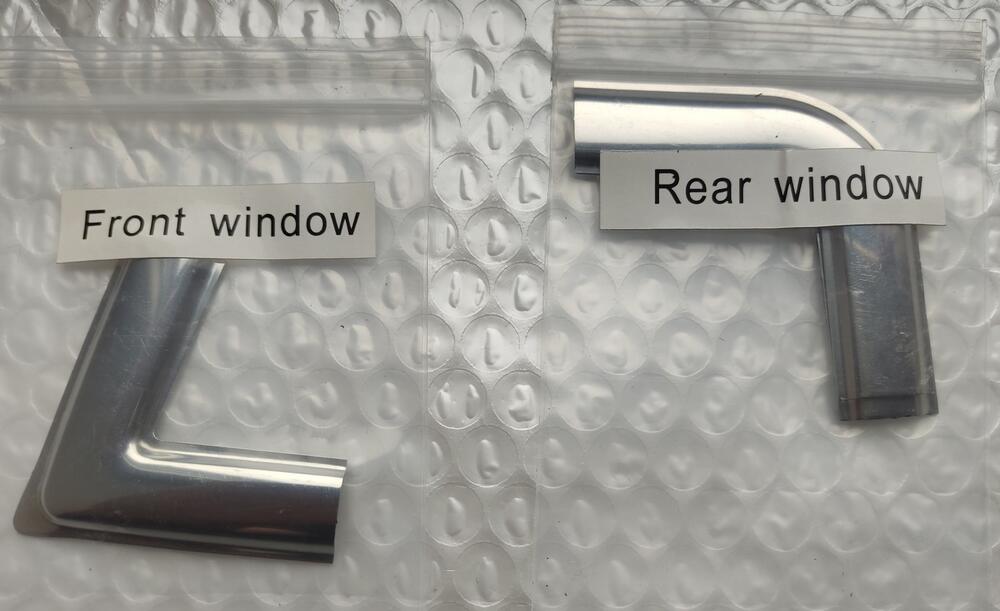
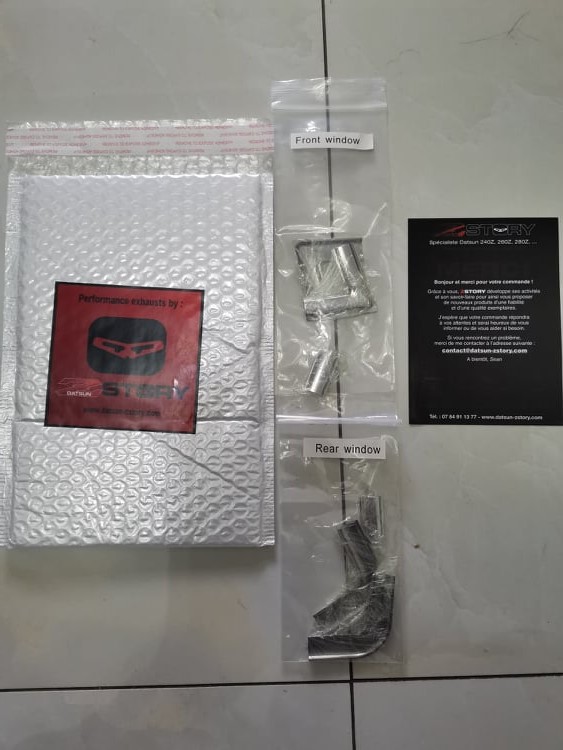
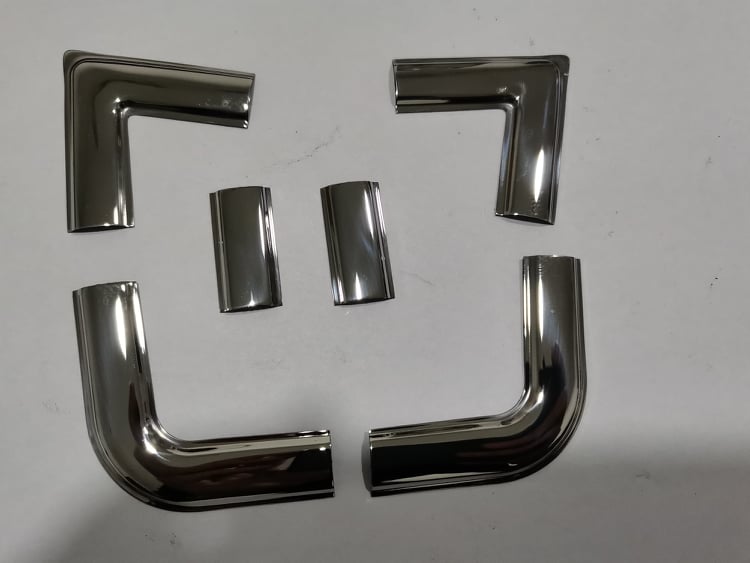
The new stainless-steel WINDOW CORNER TRIMS ARE HERE !😍 Front and rear upper corners with the lower, short-straight connexion strip. Buy both ends (full kit) or just front or rear (single kit) ! (kits will not be split eg 1x corner or 1x connexion strip !) Fitting both 2x seaters and 2+2s. Prices : Full kit :usd$120 aud$175 cad$160............. €110 £100 Postage : USA/AUS/CAD $6/9/8....................EU €5 £5 Group shipments available. Single kit : usd$65 aud$95 cad$90................€60 £55 Postage : same as above (same weight/price band) ! Payment available via Paypal, Wise-Transfer and int. bank wire. TO PLACE AND ORDER, please PM/DM me and quote your full name and postal address - thanks. These will be available via Ebay but more expensive so as to cover all the selling charges

 1 point
 -
1 pointits a nice looking dash, just make sure you install it as deeply onto the metal frame as possible. the mount holes allow for some movement, you want the dash as far back as possible to avoid spaces at the instruments and the sides where if fits next to the door openings. I had to tweek the instrument mounts a tiny bit to shove them forward just enough so there would be no visible gaps. the sides are not as important since you cant see the gaps unless the door is open, but if you are aware of the issue you maybe able to get the dash on deep enough to avoid any problems. I did not notice the door issue until after I had it installed, not a big enough deal to remove and try to shove back more on the metal frame. You will be glad when done. One last thing, work on the glove box door mounting area. check the OE dash materail thickness around the opening and try to get the same with the replacement dash. You may have to thin out some of the foam backing around the plastic where it cut open for the glove box.1 point
-
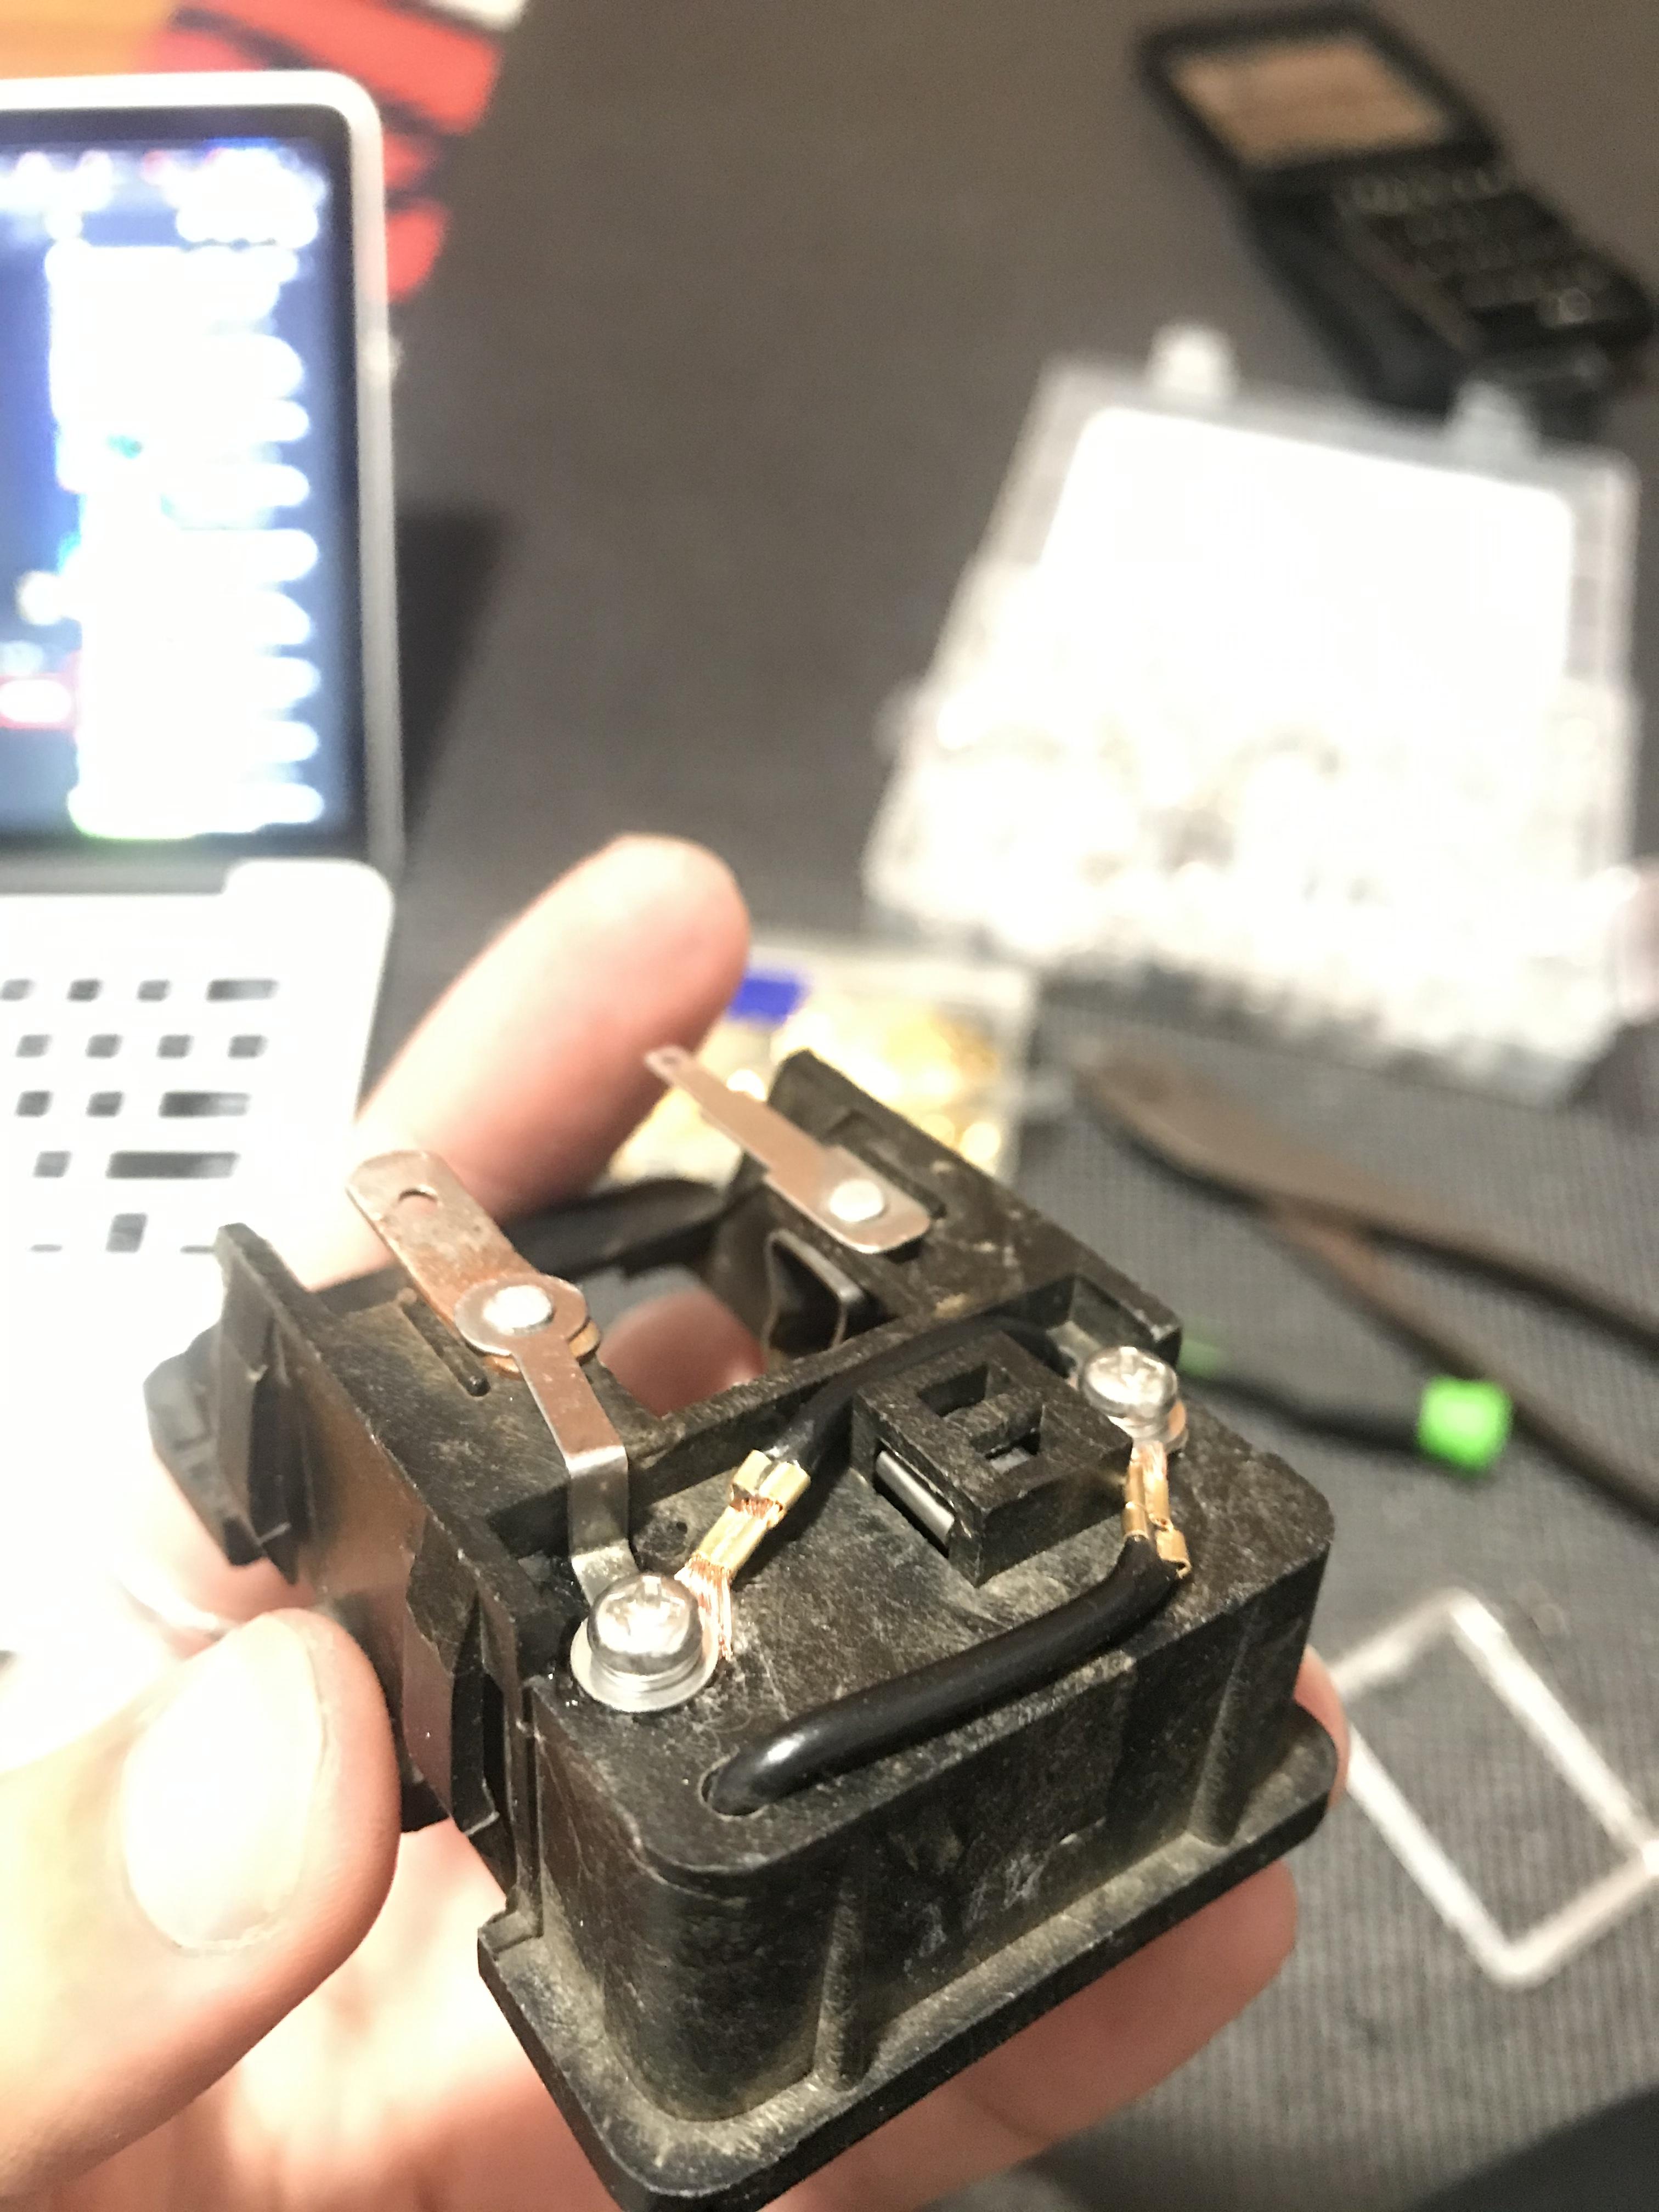
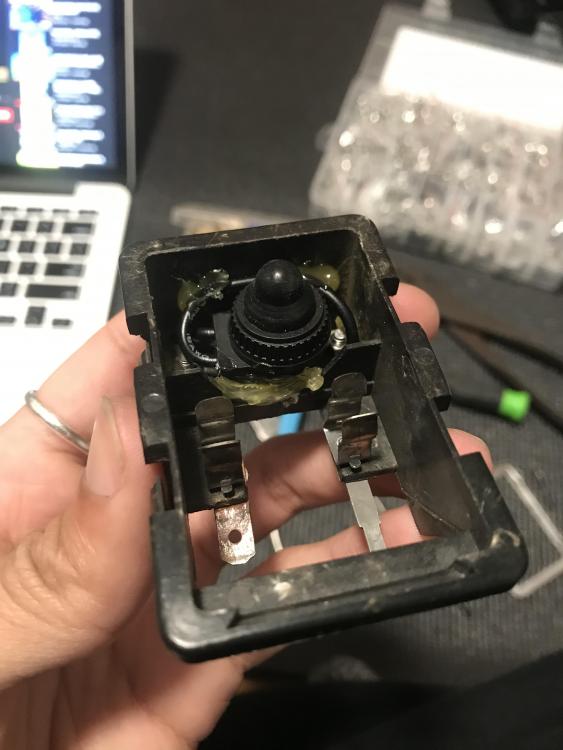
1 pointAHHH! I see what you mean by the casting process. Yeah that would be pretty swell. I could have an extra dome light for when this one fails.... (hopefully never) Common Capt. you know you wanna take that old heavy hood off and get some carbon goodness on there 🙂 I used 3mm hardware and some eye terminals to make contact with the “plated” material. I also added the rubber washer that came with the switch and it’s pretty snug now. Tested it out in the car and it works. Just waiting on the LEDs. I went back and added some heat shrink near the terminals just for safety. Keihin carbs on this cb500 actually. It’s not too bad to work on. Dialing in the SU kinda taught me how they work, at least how to approach it. Need more stuff to tinker with, this project was supposed to take longer.

 1 point
 -
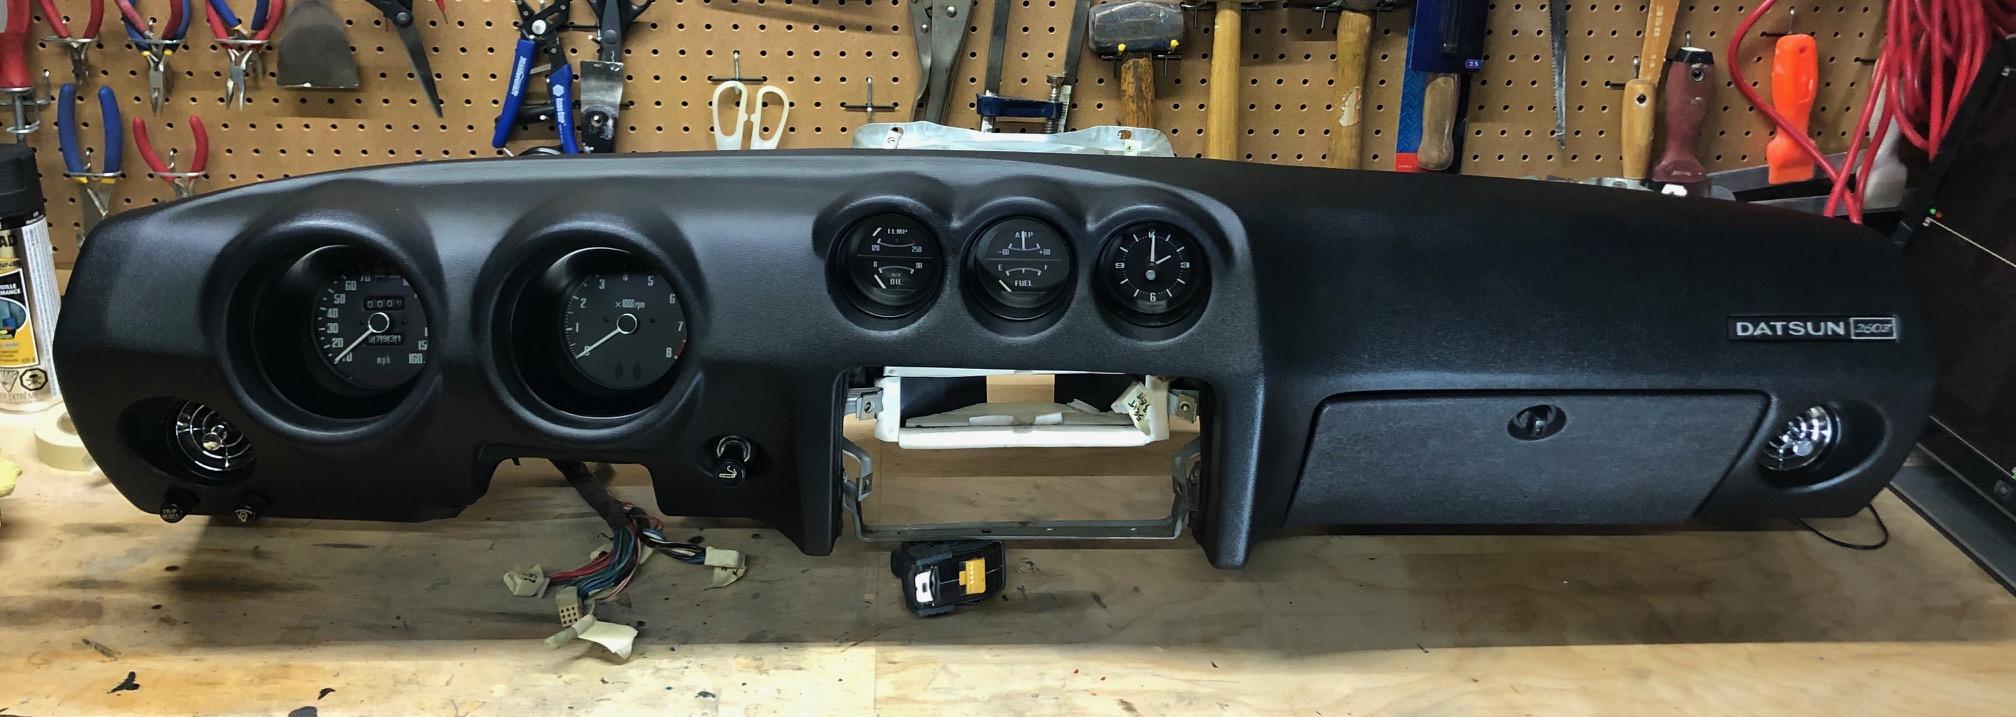
1 pointInstalled the dash this weekend. Overall, it's a great fit and had no issues with the fitment. I have to say, this is a high quality reproduction. The wiring was all labelled before I removed the dash, so it was just a matter of plugging it into the right connectors. While I had the dash out, I also installed the power steering unit and wired this up. Double checked all my connections and wiring and fired up the car. Everything worked including the power steering. So this had been a very productive weekend. Next weekend I'll complete the centre console, trim and install the bluetooth amp.
 1 point
 -
1 pointJust finished transferring the components from the old dash to the Vintage Dash pad. It was a bit of work, but I took my time and took lots of pics along the way to help me with the reassembly. Overall, I'm very happy with the end result and can't wait to install this back in the car. Will do this once the weather gets a bit warmer. A few thing to note for anyone that's taking this route: Read the treads above for the folks that have installed this already, they provided some great tips that helped with the install. I had to trim the back of the speedo and tach part of the dash, it was way too tight and there was a small lip of dash foam. I trimmed this with an exacto knife, about a couple of mm, and was able to fit the gauges in. This is fully covered by the gauges and not visible. There is a small gap on the top part of the Amp/Fuel gauge. From a sitting angle, this should not be noticeable. There are 21 screws that hold the frame to the dash pad. Some of the metal attachments on the dash pad are covered by foam, you should remove this with a blade before you install the foam. This will allow you to find the holes for the screws when the frame is on. I ended up putting 20 out of the 21 screws from the frame. The one above the cigarette lighter was difficult to attach, was not able to locate this with the frame on. I said screw it, and did not bother with it. There are already 20 screws and its already well fastened. For the hoses, I added some tape to the plastic ends for the small hoses, and some thin weather stripping to the large hoses. This provided a solid seal, the current ones were very loose. Hope this helps and good luck!
 1 point
 -
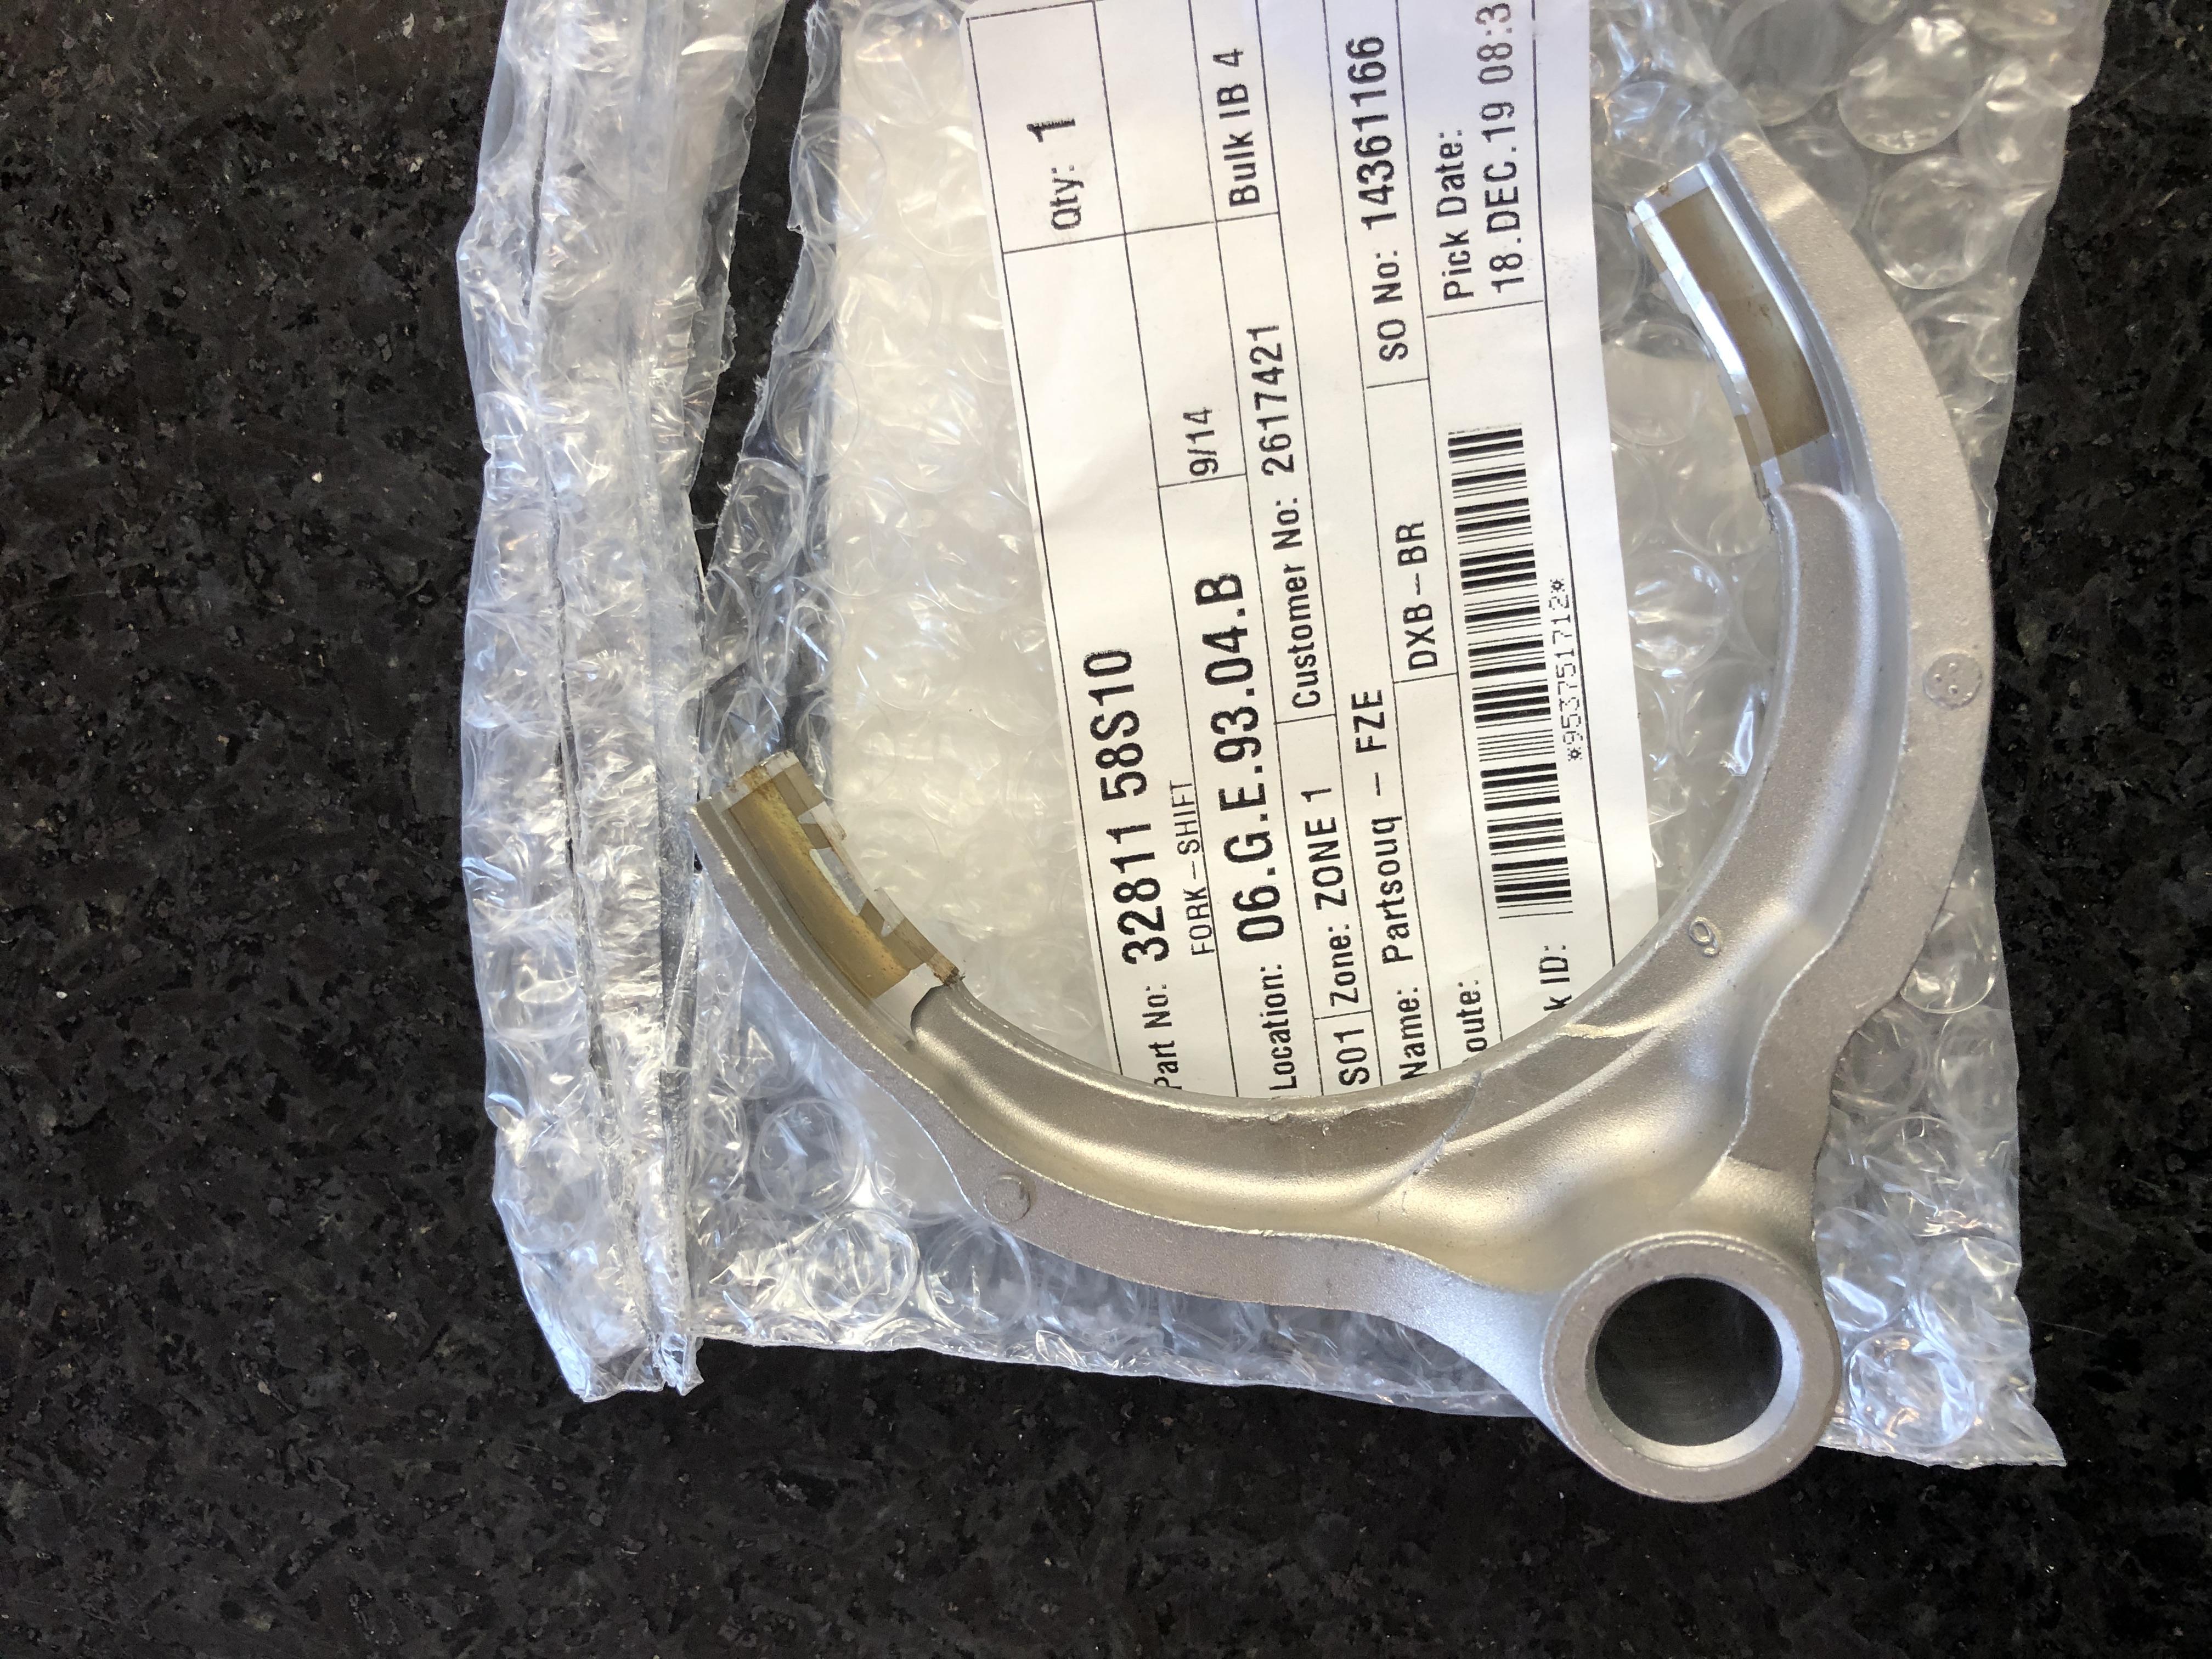
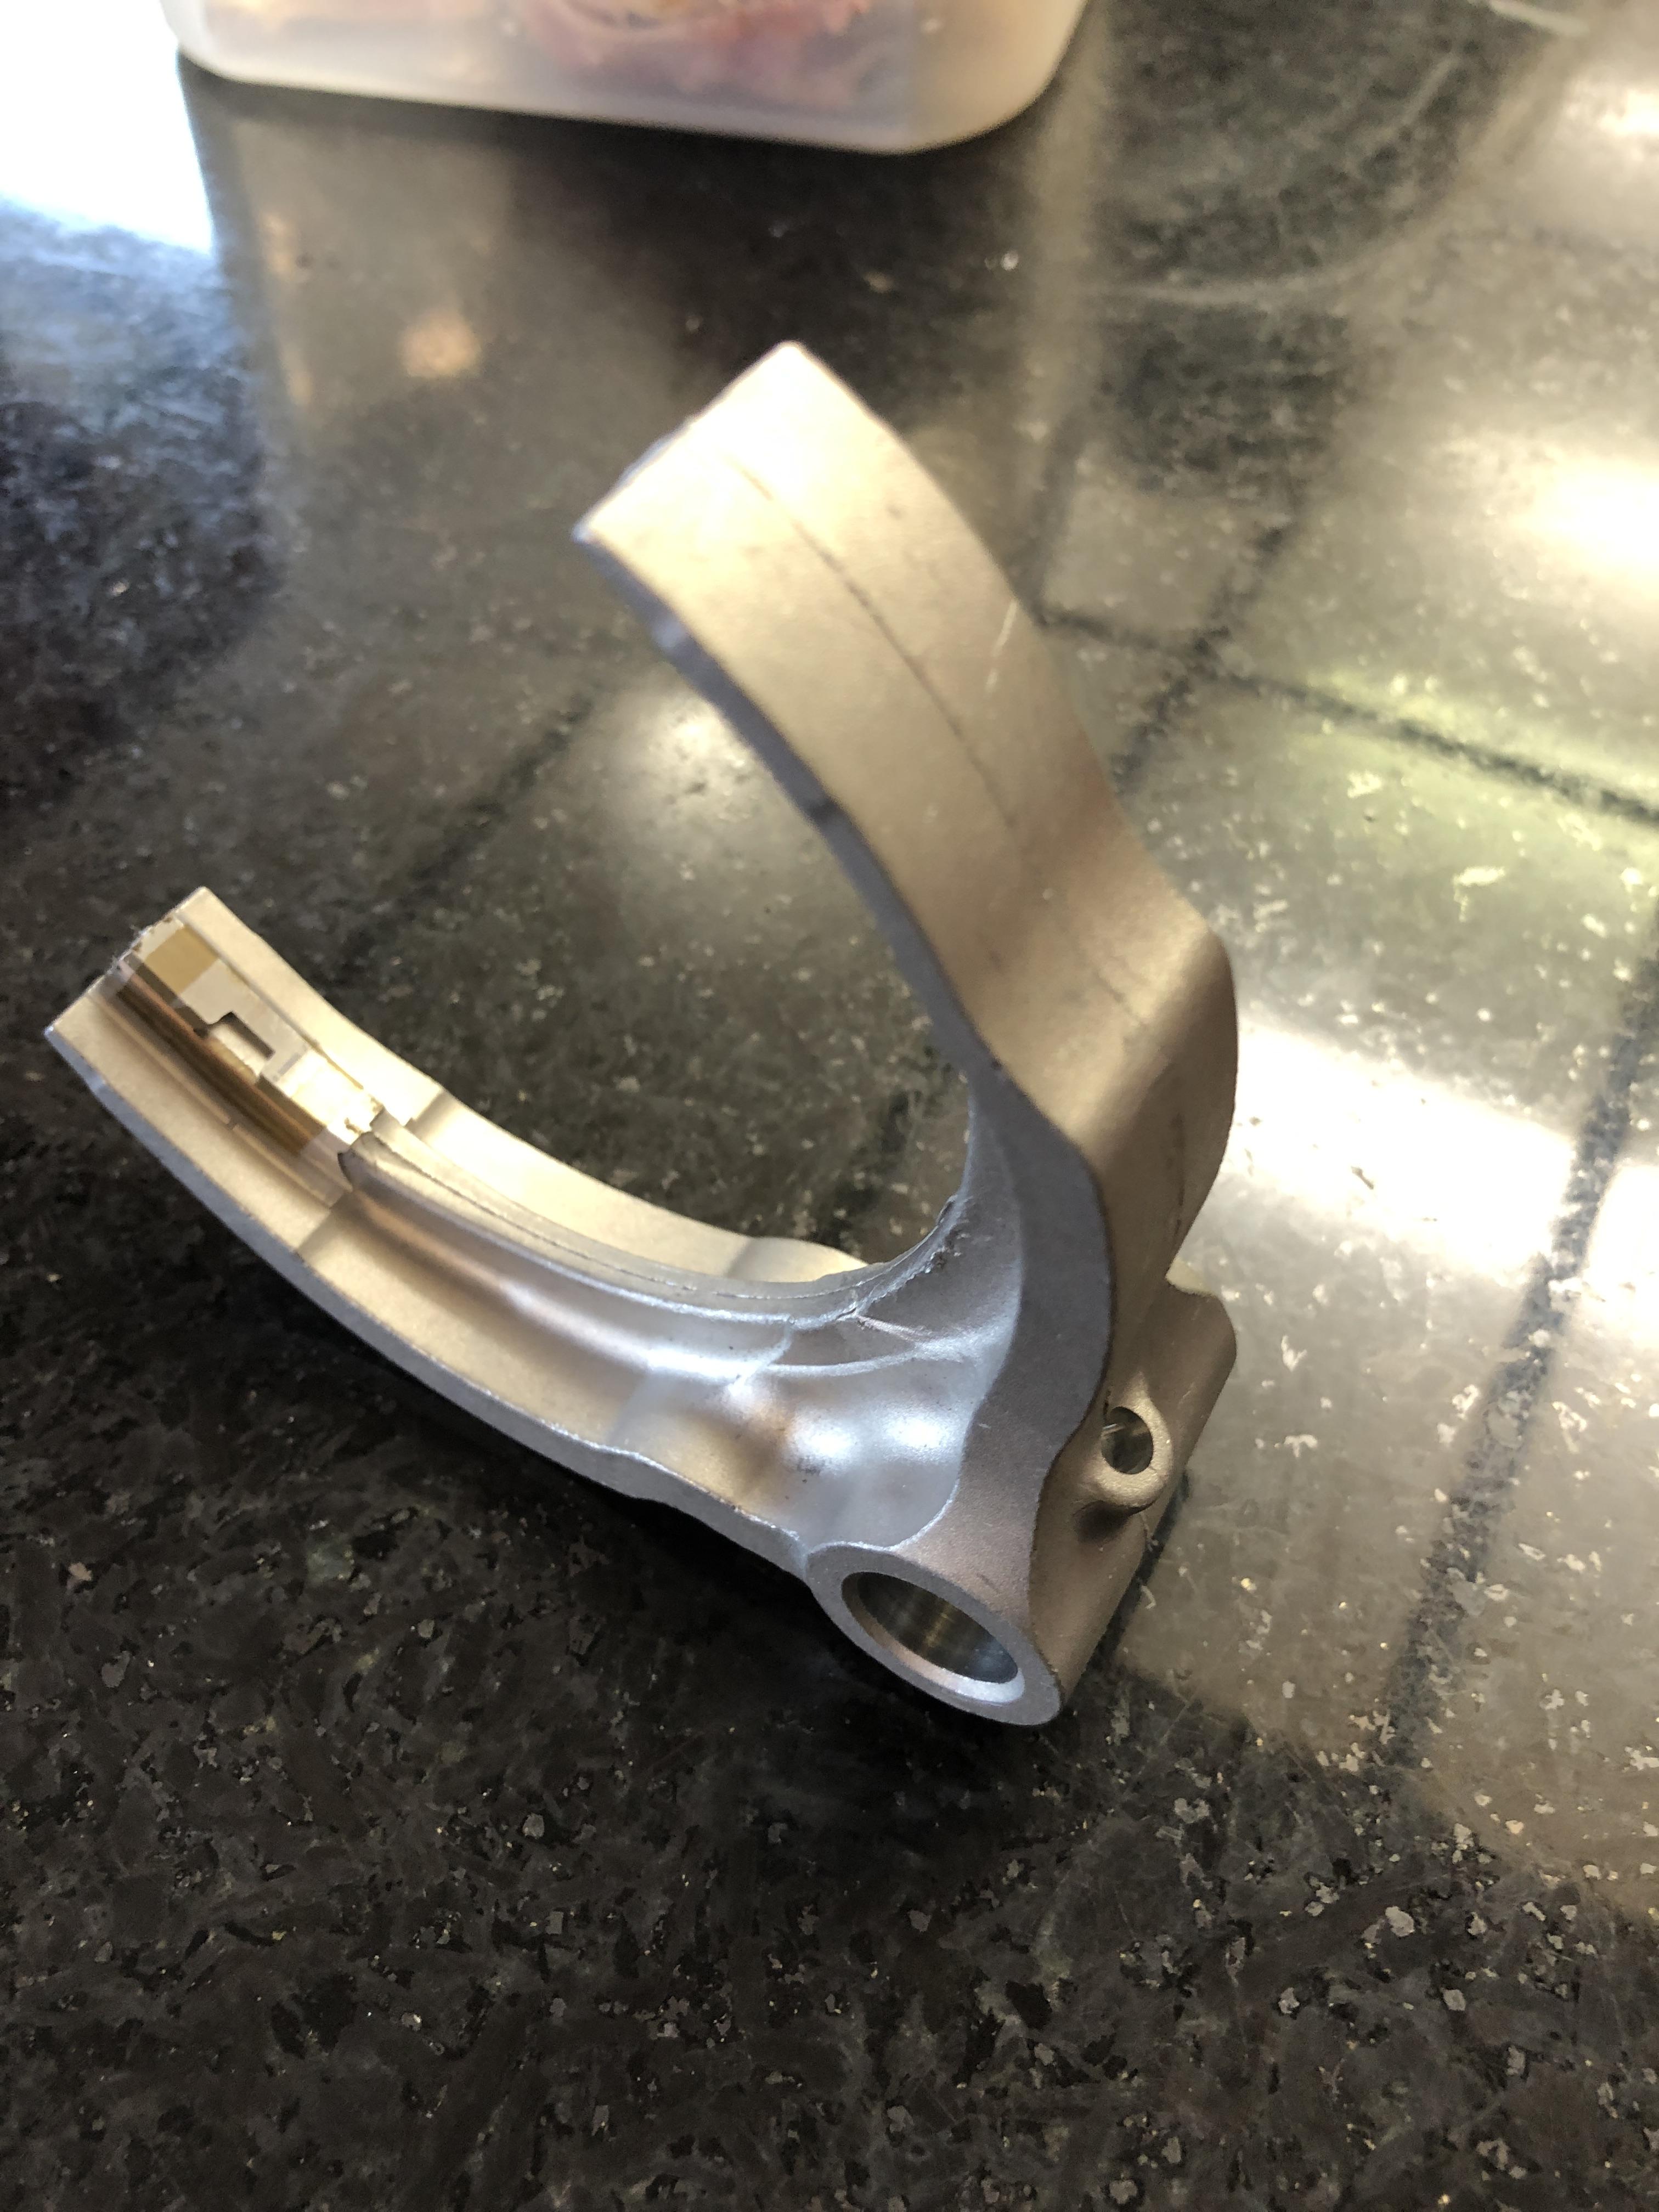
Ok, got a part today that is good news and confirms shift fork compatibility AND availability. One more Fs5W71B saved from the scrap heap. 32811-58S10 is the 3/4 shift fork from a Fs5W71C transmission. It is a usable replacement for both the 1-2 and 3-4 shift fork in FS5W71B with aluminum forks, and would also replace the 4 sp version metal forks. One tiny snag. The roll pin hole in the C and B type 5sp forks are larger than the 4 sp forks. If you break a 4 sp fork, you will need to drill the rod roll pine hole out to 0.195 or 15/64. A number 8 drill bit is good enough. Let me also repeat that the C type 1-2 shift fork will NOT WORK in the B types, it fits a larger diameter selector ring.

 1 point
 -
0 pointsNo news yet on the motor. However, the hits just keep coming. I had the heater core pressure tested before I put it all back together. Guess what? Yep, it is just barely dripping. I cant decide if the car should be named Christine or Murphy.0 points