



Zed Head
Community Member
-
Joined
-
Last visited
Everything posted by Zed Head
-
This popped in to my head the other day - I used to work with vacuum pumps and we would modify the exhaust ports with a piece of large water pipe filled with steel wool. The wool gave the vapors a place to condense and drain back in to the pump but let the gases flow through. Without the modification when you turned the pump on and it was evacuating it would often blow oil vapor out of the exhaust port. Used the same concept on the breather valve for my diff. Filled it with a piece of Scotchbrite. It stays clean now.
-
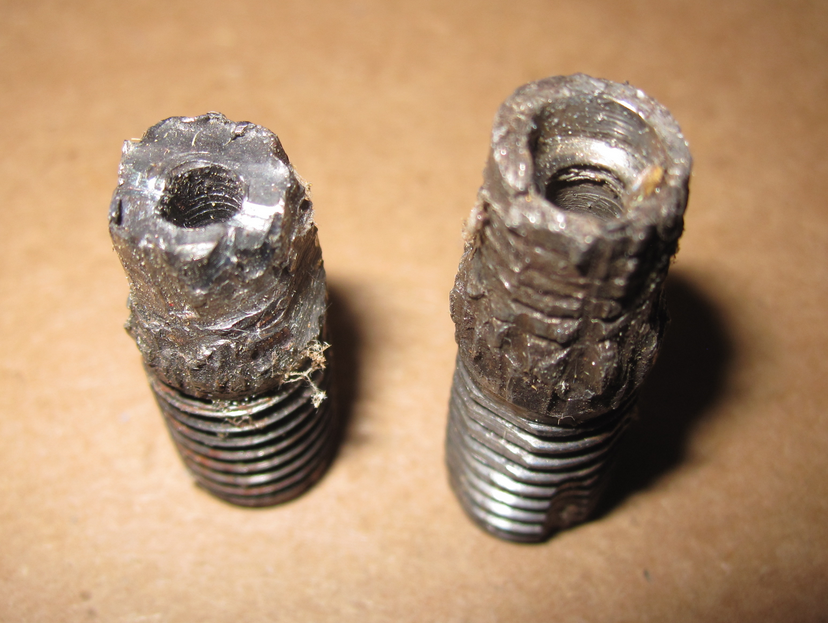
My 76 has what looks like two broken plastic mounts by the brake and clutch MC, as site suggested. Might go there if you're talking about your 76. If they came with the 78/79 motor, they might bolt on to the bottom shield, like the small one on the 76 bottom horizontal shield. There are drawings in the Engine Mechanical chapter, disassembly section. Looks like a vertical shield, not horizontal. Those hoses would go to the "magnet valves" (solenoids) for the AC.heating system. The vacuum bottle supplies the valves, which then control the system. IF the hoses still have their little tags on them, with letters, leave them on. They tell you what's what. In the 1976 AC chapter. With the motor out and in front of you stud extraction shouldn't be too hard. Just work slowly and be careful. Start a drill in the center of the stud and get a good hole drilled. If I was working on one, based on my last experience, I'd fabricate a drilling jig to guarantee the hole was square to the head. My eyeballing just isn't that good. People have had good luck with reverse direction drills. Worst case you just drill bigger and bigger until you end up peeling threads from the hole. That's how one of mine went, in the car, working sideways. If you loosen all of the bolts on left and right you can get enough wiggle room to get everything in its hole. Then tighten and torque. The rear cylinders are spendy for the early cars.
-
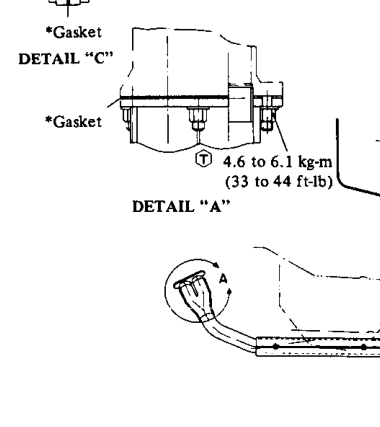
Shouldn't take much. Hopefully it's been off recently so he doesn't break any studs. You are talking about Detail A, right?
-
You're right, it should be parallel, and it should also be small, if any gap at all. The flange gasket has two metal rings that do the actual sealing but after torquing the bolts, the gap closes pretty tight around the edges, to about gasket thickness. Not uncommon for the header pipe to get bent if somebody runs over a curb or a speed bump. I had a bent one that gave me problems for quite a while. Found an unbent piece and replaced it. So much better to have the parts aligned properly.
-
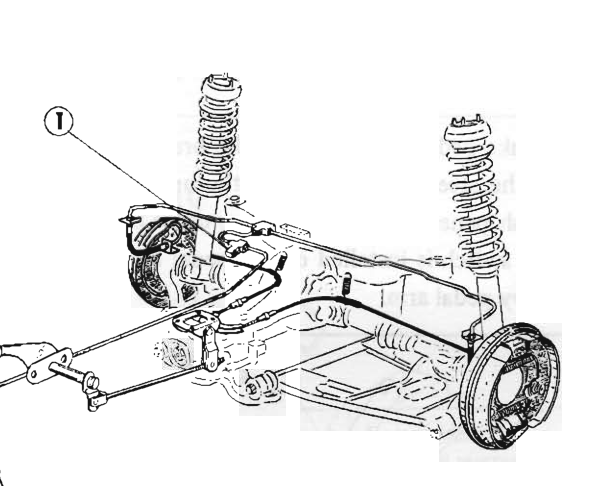
I think that he needs to distinguish between the "T" and the "valve". He hasn't really said what he's looking for. Seems like with all of the mods that we do and lowering and variety of brake pads out there that eliminating the factory valves altogether and replacing them with a true adjustable proportioning valve would be the way to go. I changed my front pads to ceramic a few thousand miles ago and I'm sure that it affected the ratio, front to back. The new pads don't have as much grab. But the wheels do stay cleaner. Probably eating up my rotors though. Digression.
-
The "T" and the proportioning valve aren't the same thing. There's one of each back there.
-
Post the Hybridz link and somebody could probably tell you if it's trustworthy. That is an odd spec. though.
-
What's a timeline, and what is Tapatalk? They don't show up in the Last 24 Hours page. Mike fixed it. And if you post your request as a Suggestion or a Bug, Mike will be more likely to see it. Not sure he does Chit-chat. http://www.classiczcars.com/discover/10/ http://www.classiczcars.com/tracker/
-
Nice. Some engineer out there probably cut his tolerances too close to the edge. Could be you and I got some +, +'s or -,-'s. We got a bad stack.
-
If you mean that you turn the key to Start and nothing happens until the 3rd or 4th try, I've had that problem. You can twist the actuating rod (the flat rod that connects the key to the electrical switch) to get earlier action out of it. Just grab each end with a pair of pliers on each, and bend it in a twisting motion.
-
-
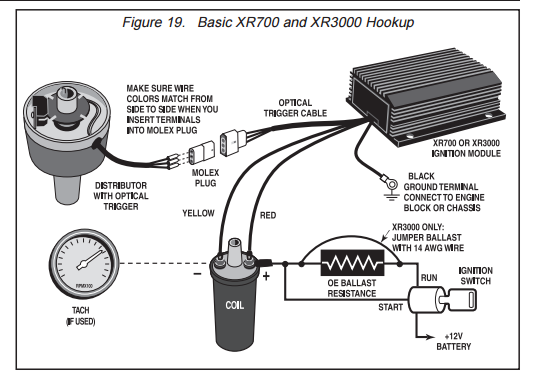
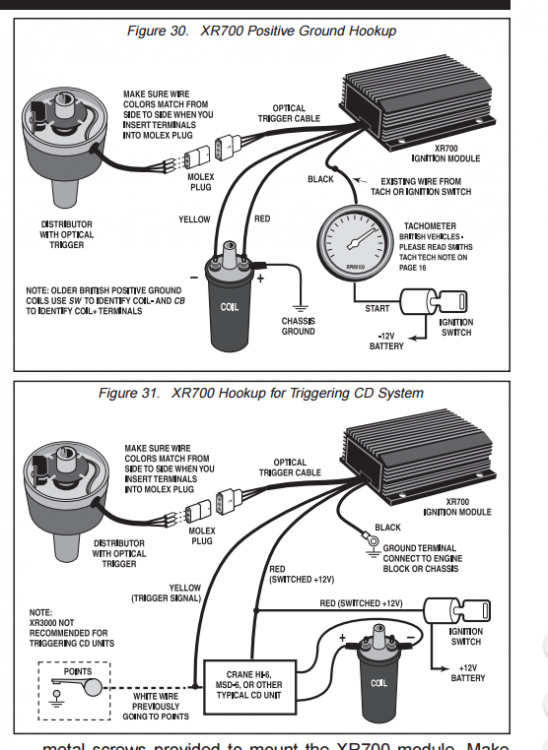
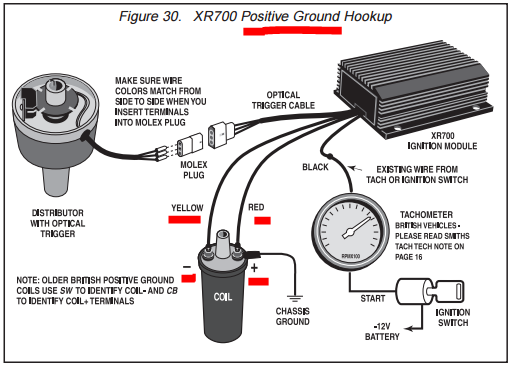
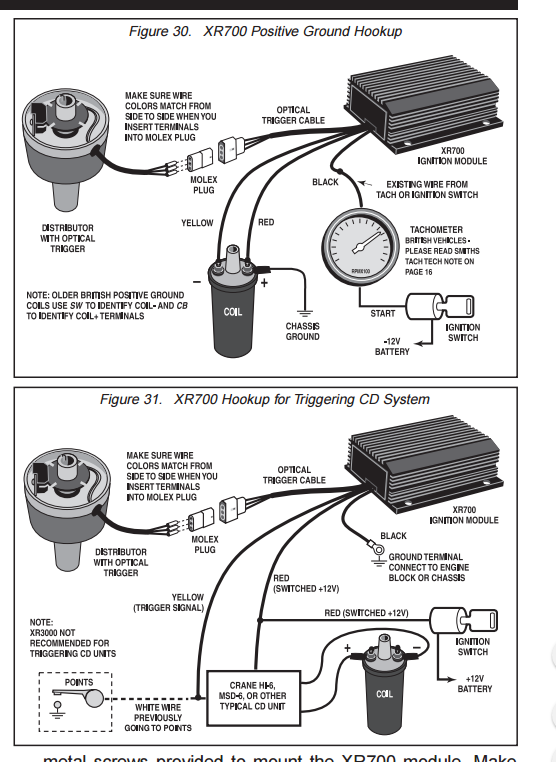
I should apologize, I didn't understand what Crane was showing in their instructions. Added a another picture from their manual. Apparently yellow negative, red positive is how negative ground systems are connected also. I had an electronic GM HEI module go bad and it produced a spark, but it was a weak orange spark. Not strong enough to ignite the fuel-air mixture. Could be that your Crane box has gone bad. You can see the Run/On, and Start wires in their diagram. At least get a meter and confirm that you have those wires connected to coil positive.
-
I've learned of the u-shaped device as a micrometer, and the device with the depth probe as a caliper. Although, in literal terms they both can measure on a small scale. Could be the point of the misunderstanding. I like the split-the-difference method. Mark the point on the damper pulley where the piston is 1 inch deep (or 2, pick your number) in the bore, go past TDC and mark 1 inch deep again. The mid-point between those two marks is TDC. The problem with trying to hit the top is that the piston barely moves at all at the top, for quite a few degrees of crankshaft movement.Willy-nilly wire connecting will damage parts. Hope you didn't damage the XR700 box. Red positive, yellow negative is a positive ground application according to the instructions. You're hooked up backward. Our cars are negative ground. I would get a meter and read the instructions (attached). Use the meter to confirm which wires have power when the key is On and which have power when the key is at Start. http://www.cranecams.com/uploads/instructions/9000-0700_.pdf
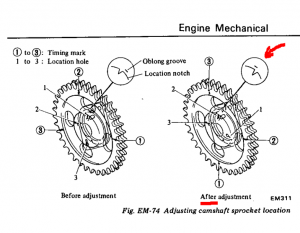
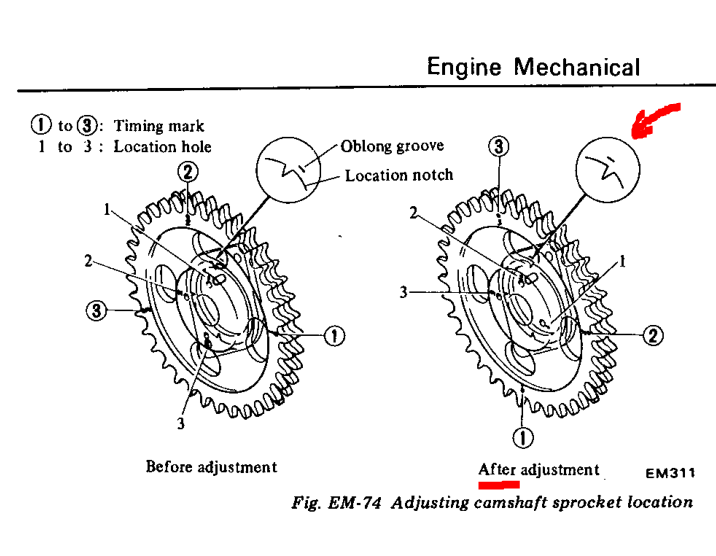
 I get lost sometimes when looking at floor pans and frame rails, but it looks to me like somebody replaced your floor pan, but didn't finish the job with a new frame (chassis) rail. Found a couple of internet links that show what I'm talking about. You floor pan is very flat and featureless, probably custom-made. http://forums.hybridz.org/topic/107012-i-know-its-another-dumb-floor-question/ www.youtube.com/watch?v=gjUJmDtKxyk Zedd Findings and Bad Dog parts both sell rails, and Zeed sells floor pans. This thread has some comments from gnosez, who is Bad Dog. http://www.datsunzparts.com/ http://baddogparts.com/The bright links help you get started. But when you're done, the check is to look at the notch and the groove on the chain sprocket and the cam shaft retaining plate. How do you find TDC with a micrometer? I haven't seen that method. Added the picture from the FSM of the notch and groove. Still doesn't tell you if the crank is at TDC, but it's something. Overall though, the problem here is that you're trying to figure out which indicator is wrong - your micrometer method, or the damper marks and tab. If you know that your micrometer method is right, there's no need to look at the chain, sprocket, or cam at all. The damper just indicates TDC. The damper mark should be correct even with the head completely off of the engine. No cam, sprocket, chain. Actually, that would be the very best time to check your damper and tab since you can easily measure TDC then. The damper mark and tab mark's only purpose is to show you where piston #1 is.
 You're on the right forum. I wonder if the PO is/was a member here. Is that a CB antenna? Not stock! I can see the big spring at the base. Easily fixed. Very nice car.If you consider what PCV offers, you might want to keep it. It purges the crankcase of fuel, and exhaust, and moisture. Keeps things clean. The only real downside is if you're racing and you need every fraction of a horsepower. It does allow some small amount of oxygen-deficient air (blow-by) in to the intake manifold. It won't fix a blowby problem but will cover for it. You have an L28, but it must have carbs. Right? Here's a link to MSA where they talk about the early PCV. Later Nissan FSM's put the description in the Emissions chapter. http://www.thezstore.com/page/TZS/PROD/18-9050One picture? 1970? No VIN? C'mmmoonnnnn..!!I wish that I still had all of the cars that I've had. I'd be sitting on some good money. The Dart Sport had the twin snorkel hood scoops, the later rounded fender body style (not the early squared off version), and a 340 with an 800 cfm ThermoQuad carburetor. I bought it for $600, rebuilt the carburetor (it had a sunk float), and made noise around the neighborhood for a few months. Can't remember why I sold it. Maybe I had a moment of sensibility.Yes you can. They overheat and boil fluid out with unregulated voltage (that's a good sign of a bad regulator). Then, if you have a 1974 Dodge Dart Sport, the electronic ignition module will die like somebody shot it, after you replace the external regulator, as you're heading in to town. If you're lucky a local mechanic will be standing in his yard and come over to tell you what happened after you describe the recent problems.If I had a nice-looking engine I'd only put the engine puller on when I was pulling an engine. I don't even know why Nissan leaves those on unless it just makes factory assembly easier, they don't want to add a step, and they're inexpensive. They're certainly not very attractive. I'd install the engine then remove it and put it in a drawer.Don't mean to get all pedantic and I hope I'm not irritating - but the chain's only purpose is to spin the camshaft and keep it oriented properly to the crankshaft. That's why I focus on the crankshaft and the camshaft and ignore the bright links. You have the cam and crank properly oriented, now you just have to put the chain and sprocket on so that that orientation is maintained with the straight side of the chain tight, like it will be when the engine is turning. If the damper and tab marks are off when you're done then change the damper and/or tab. Not the chain or sprocket or anything else. The damper marks and tab are just external indicators. If the parts aren't indicating what you just confirmed as correct, the problem is with them. Only reiterating to be sure. One place you can get screwed up on when confirming cam orientation is to not have the straight side of the chain tight. It has to be tight. Still wondering about the "straight up and down" part though. You're in the eyeballing it regime, there are no marks to go by. "With the crank key slot is straight up and down." Here's a thought - if you have an old damper try it and see if the marks are still off. Two identically bad parts would be unusual.What will you see under the timing chain cover that will tell you more than what you can see now? There's nothing under there. All of the marks you need are visible under the valve cover and on the damper and timing tab. There's no need to pull the cover. If you want to be exact, better to get a dial indicator down the #1 bore and verify TDC that way. That's the basis of your questions. Everything revolves around piston position.

Important Information
By using this site, you agree to our Privacy Policy and Guidelines. We have placed cookies on your device to help make this website better. You can adjust your cookie settings, otherwise we'll assume you're okay to continue.