Zed Head
Community Member
-
Joined
-
Last visited
Everything posted by Zed Head
-
The 280Z ECUs are all the same, essentially. I'm pretty sure that even the automatic ECU will work in a manual car. The FSM wiring diagrams are all the same, so any differences would be small. 1975 is missing the altitude switch but that's a California thing.
-
Oops. just saw the date on the build sheet. 1974. Wow. That was just a couple of years after BRE disbanded if I read my internet right. To be clear though - is that "Production date" for the factory engine or the Link-built engine?
-
Does for me also.
-
Is "Steve" Steve from here? Maybe we can get an ECU to him somehow for a test.
-
If you have access to a wrecking yard I've found that mid to late 90's Honda Passports and Isuzu Rodeos have a valve on a metal T on the front of the engine. They can be removed with some side-cutters, then cleaned up with a tubing cutter. Cheap and solid. I have one permanently mounted on my engine and a couple in the garage for whenever.
-
The last thing on most of the troubleshooting guides is "replace control unit". You're at that point, I think. It's relatively easy to do, for a flexible person with a Phillips head screwdriver, and almost impossible to break something while trying it. It's a no-brainer if you have one available.
-
-
No Schrader valve. The hose is 5/16". Get high pressure EFI hose, although plain old hose would probably work for the short time you'll be testing. Take some extra hose clamps. If the guy doesn't mind, it's actually easiest to just cut the hose between the filter and the fuel rail and slip the pressure gauge T-fitting in there. You'll have a heck of time trying to get the old hose off of the metal tube ends. Probably bend and maybe break things. Test the AFM switch first thing though. EuroDat's method, or mine, with the key On, will tell you if the switch is dirty or not. Then, if the switch works, do the same while starting the engine to see if there's enough air flow to keep the switch closed. Sometimes the idle speed will be so low or there's an air leak, and the switch will open and kill power to the pump. Air has to flow through the AFM to keep the switch closed.
-
Can't remember, but has the ECU been replaced? Pretty sure we've talked about it but don't know if it got swapped. Your problem still sounds lot like a bad ECU that I had, and has symptoms like others have described. Running rich, and dying suddenly. The oil usage seems high also. Oil fouled cylinders tend to stay fouled though, so if it was burning so much oil it caused the engine to die, doesn't seem like it would fix itself.
-
Sounds a lot like the AFM fuel pump relay contact switch. You can jump the switch under the AFM black cover with an alligator clip or just holding it closed with your finger. Clean it first with a match book striker or similar. I'd try that first, just to make sure the pump is staying running. It's the easiest. Posted a link with a picture. I wouldn't do the other stuff it shows at this time. http://www.atlanticz.ca/zclub/techtips/afm/index.html
-
I just use the factory labels. Pictures from 1971, 1973, and 1978.
-
Just learned something about Floyd Link - http://www.stevelinkracing.com/#!parts/c1k7w http://www.datsun.org/fairlady/BRECrew.htm
-
I had Rebello in mind for some reason. E88 head? Did Floyd do any port work on the head? There could be a lot more questions.
-
3.54 with a 1978 5 speed is the factory combination. The 2-3 gap is noticeable at times with the weak factory engine, like if accelerating up a hill, but not a huge deal. You probably won't be able to feel it unless you're racing. Did you send your L26 to Rebello? Is it still a 2.6 liter or did he increase displacement?
-
I meant unusual for general public consumption. I like the symbol that actually looks like a car battery. Especially good if you're trying to sell your product to non-technical people, for use in their cars. Typical problem with knowledge transfer to the public.

-
I didn't think about the dampers. So, for $100 savings, maybe not really a savings for a 280Z.
-
Aren't they weld on anyway? So you could set your own height. Seems like spring rate would be the only difference, and instructions. You could call jpn garage to be sure.
-
They'd probably bolt in but the spring rate might be too low, and the ride height, depending on where you wanted it and tires used, etc. You'd be starting at a lower spot if you used these in a 280Z. I was under the impression that the transverse link (aka control arm) did get beefed up for the later cars but the dimensions were the same. The spinlde pin itself appears to have gone unchanged. http://www.carpartsmanual.com/datsun/Z-1969-1978/axle/rear-suspension

-
Not uncommon. If I was having this problem I would remove the lines from the MC that supply the front and rear systems and block them (using old lines and fittings or sticking a piece of rubber under the fitting). Then use the MC bleeders to bleed the MC. That should give the firmest pedal you'll ever get. IF the MC seals are bad you'll never get a firm pedal. Then attach the rears and bleed them, then the fronts. Break the system down in to its three elements and test each. You have to remove those lines anyway to replace the MC. Might as well test it on the way out.
-
This sentence isn't super clear. Maybe you're saying that because fluid squirted during the bleeding process, there must have been pressure? But then after squirting a bunch of fluid and air bubbles, the bleeders were closed, but no pedal pressure could be built. So that could be a weak seal in the MC, or there's still air in the system. You can build low pressure to squirt fluid but then still have an air bubble that will compress when the bleeders are closed.
-
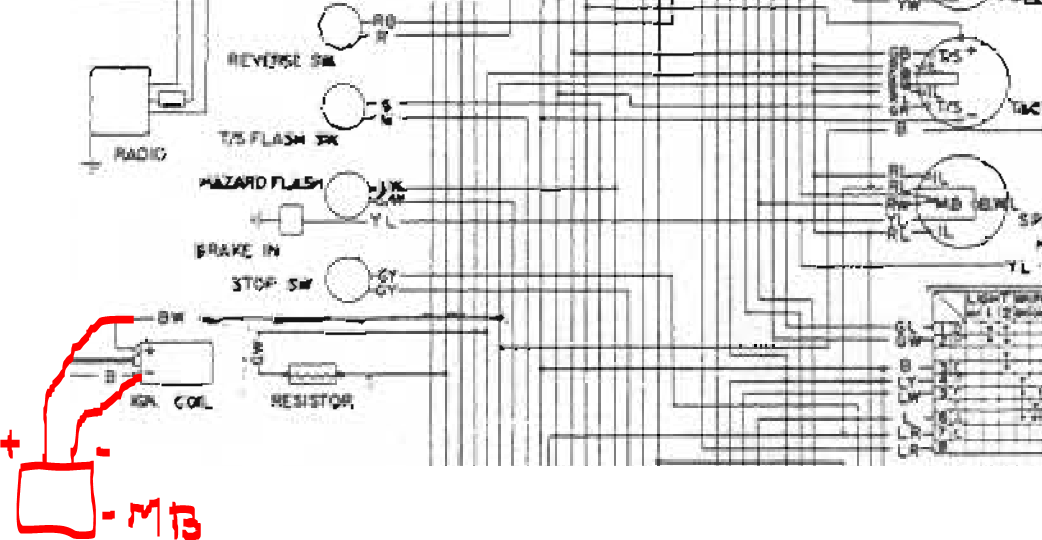
Seems like you're working with more wires than you need to. The "match box" is just taking the place of the points, so you really only need to deal with the distributor. The negative side of the coil needs to be attached to one terminal of the match box (not sure how they're labeled), and the positive side needs to stay attached to the black-white wire, but with an extra branch going to the other terminal of the matchbox (the extra power wire to the match box is because the module needs its own power, unlike the points). And the distributor body itself needs a good ground. You really shouldn't need to mess with the other wires to get the ZX distributor to work right. Then, if you want to remove the ballast resistor, you would need to connect other wires together, that also attach to the positive side of the coil.

-
How much time passed between the firm pedal and the no pressure pedal? Something's missing. If the reservoirs are still full of fluid then the pedal should push the pistons and the pistons should move fluid, like they did when you were bleeding them and everything worked right. If the reservoirs leaked fluid then you could see air getting back in to the system. Maybe you just have bad seals in the master cylinder. They may have been shrunken before but all of your pedal pressing opened them up. Maybe they took their natural smaller diameter set while sitting. The sitting allowed them to collapse and stop working. If so, a hard fast pedal push should open them up again. Just guessing. Odd situation.
-
That's the propeller shaft, not half-shaft. Did he mean the u-joints, or the differential mount? The u-joints look kind of dry. If you have a pre-74 shaft they're replaceable.
-
There are eight points of rubber contact holding the engine, transmission, and differential in place. The two motor mounts, the central transmission mount (called rear engine mount by Nissan), the two ends of the transmission mount crossmember (not readily noticed), the front differential mount, and the two mustache bar ends. They can all add some looseness to the whole system. The tail of the transmission is really not very tightly held. That's a spot for rotational vibration that might be hard to diagnose. Lots more mass also, small movement = big effect.
- 20 replies
-
- axle
- cv
- diff
- differential
-
Tagged with:
-
Just a note for anyone deciding to try this. I don't know what the gas bubbles are that released during the chemical reaction, but they should probably be avoided and/or dispersed. I don't think that it's boiling water. More likely either hydrogen, oxygen, or sulfur dioxide. Two somewhat flammable/explosive, one is toxic. The levels must be very low and dilute but still should be considered. The rotten egg smell leans toward sulfur dioxide. Aluminum oxide, iron sulphate (or sulphite? I don't know), and sulfur dioxide could be the end products. Maybe. I don't want to tax my brain with chemistry. Any chemists out there feel free to set me straight. The volume of gas from tiny watch screws is probably much less than from the large objects we're messing with. We might be in dangerous territory. Don't get poisoned or burned. I did boil up one of the rusty studs last night and the red rust turned to black, along with lots of fizzing. The stud and nut stayed black after the rust was gone, not shiny metal, and eventually I was able to remove the nut. I have some pictures. I'll post up later.