
Zed Head
Community Member
-
Joined
-
Last visited
Everything posted by Zed Head
-
That's only 5 things. I'd do the simple ones first - radio harness, heater harness, A/T indicator. The tail lights are on the other side of the Hazard switch so things kind of re-expand on the other side of it. You can unplug the Hazard switch but you won't know if it's the switch or the lights. Or just do the Hazard switch first. Down to 5, almost there.
-
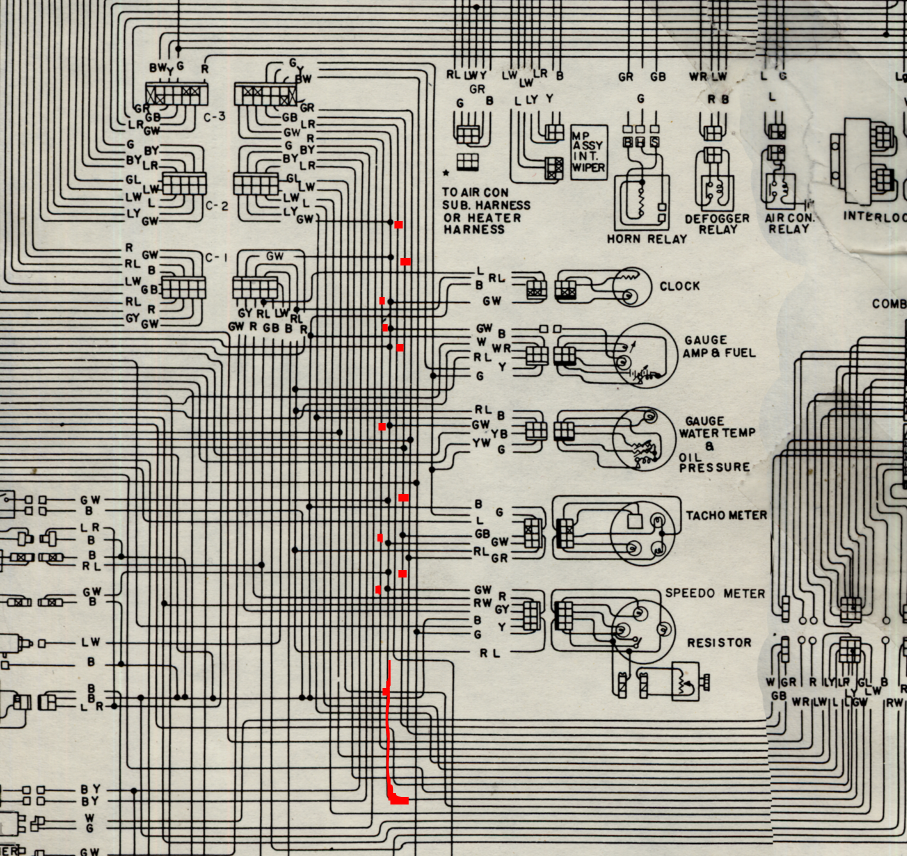
C-1, C-2, and C-3 are all on the Green-White wire circuit. Each one is a "branch". SteveJ's method of measuring current would save you fuses and get you to the solution quickest, probably. But, another way to narrow things down would be to unplug all three connectors, then turn the light switch on. If the fuse still blows, then you can ignore everything on 1, 2 and 3 and focus on the things not on those connectors. If it doesn't blow, plug each connector in, separately. Since current will be reduced with only one connector working, the fuse still may not blow. You have to blow several fuses plugging and unplugging connectors until you find one that always causes the fuse to blow. Your big dilemma is that you don't seem to have a dead short (low resistance) that blows a fuse a immediately. You apparently have a high resistance short circuit. It's flowing more current than it should but not enough to blow the fuse immediately. That makes your problem much more difficult to solve. If you even have a short. You might just have too many things on the circuit and dirty fuse connections. Dirty connections cause heat, which can be enough to melt a fuse. Keep track of what you do and what happens. Your observation about the dimmer switch was a good one, showing that you don't have a dead short (direct path to ground). Write those odd things down and you'll probably realize something.
-
Also, the back of the fuse and its connections at the fuse box have a tendency to corrode and get hot. Many 240Z's have a warped fuse cover over certain fuses. You might check the back of the fuse box.
-
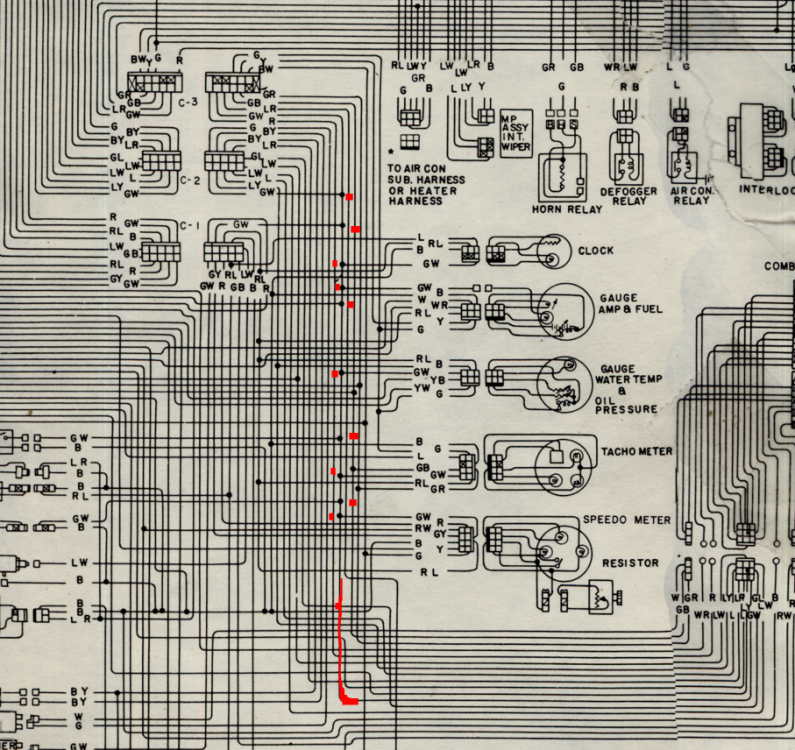
I think that's a good analogy. Also why more fuses blow when it's really hot out. Take a look at this fragment of a diagram I copied. The GW wire that gets hot feeds many small lights. Any single one of which could be your short. It also shows why C-3 didn't turn everything off. I put a red dot next to each branch. I think that you were on the right track by unplugging things. You just need to keep unplugging until the problem goes away. Here's one diagram source, a GIF file from atlanticz - http://atlanticz.ca/zclub/techtips/electrical.htm I used the pdf version from here - http://www.nicoclub.com/FSM/260z/1974/
-
But, it's in the ballpark of some people's used - http://www.datsunstore.com/oiler-7077-used-p-1429.html Feel like I should buy up those NOS parts and sell them for $150. easy money, but probably take ten years to break even. Here's the billet bar - http://www.datsunstore.com/oiler-7077-billet-aluminum-p-1428.html
-
Is that a Fairlady radio panel? Volume control on the right? Edit - I'm still not really clear on what "Fairlady" actually means. Pretty sure they're right-hand drive...
-
-
Looks nice. Still spendy, and it seems like the 280Z design is still available. Maybe that's why he put something on the page about drilled holes being better than stamped. Not really seeing it though, since the tiny oil orifice in the block (edited head) is what restricts flow. http://www.nissanpartsdeal.com/parts/nissan-tube-oil-cam~13100-e3004.html
-
Not really, what you did is still informative. I was trying to figure out how you got voltage from the alternator to the battery with your main link blown. No need to do it over, you've shown that the alternator works correctly. So if that link is blown then you must have been backfeeding through the other link or through other stuff wired in to the harness. According to the 1975 diagram the only other way in to the positive terminal is through the EFI circuit. Not really sure how it backfeeds in that way. I would measure resistance to ground on both sides of the main link that blew. If you have a short to ground it will just blow again.
-
72 or 77? I've noticed that Nissan seemed to do different wiring schemes over the years. On my 76, they run power directly from the alternator to the fusible link and to the fuse box. If the diagram I'm looking at is right (it shows the a red fusible link as the main one and black as a secondary - I think Saridout got the colors backward). 75 only has two links at the terminal blocks, they went to four in 76. So if the main one blows, the fuse box is all that gets power.
-
-
-
I was writing the above while posts were being posted. Not sure where it fits in to the latest data. Still, fusible links should never burn (that's why the Maxifuse upgrade seems like a fruitless endeavor, to me). I've never burnt one. So, your real concern should be about what caused the link to blow. Examine all of the wires involved for insulation breaks and contact to ground.
-
When you measured the 16.47 volts, was that at the A terminal, not the battery terminal? 1975 feeds two links directly, one from the alternator and the other after the Ammeter. The Black Alt/Ign. Relay link is the main charging wire, although I'd think it might backfeed through the green Ignition link, which might explain why you're still getting some charging. Maybe the meter is the problem after all. The Black link is fed through the Ammeter. If the Ammeter was shorted it would blow the link as battery current passed through it. Whatever is going on, you must have a short somewhere. http://atlanticz.ca/zclub/techtips/electrical.htm http://atlanticz.ca/zclub/techtips/fusiblelinks/index.html
-
Just thought this is odd. Seen it before with other words in other threads. "Disassembling" converted to "stripping". And the original thread wasn't edited. Edit - Maybe it's Tapatalk. Whatever that is.


-
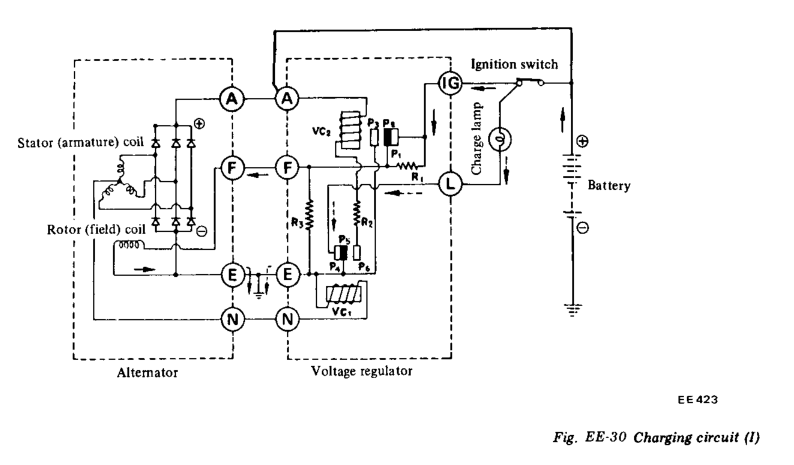
Do you mean regulator, not meter? When you connected F to A you had the voltage regulator (VR) out of the system ( I assume that you unplugged the F-N plug to do the test). I would remove the regulator and post a picture of it. See if you can tell if it's the original points VR, or a newer solid-state unit. Not really sure how the originals typically fail. Solid-state components can do odd things when they go bad though.
-
That's a good idea about the Charge light. On the internally regulated alternators, the Charge light would not light if the L wire was disconnected, and charging would stop. But with externally regulated systems L runs to the VR. Looks like F comes straight through from Ignition and the charge light just indicates the balnce between A and the battery. So, it should light if charging stops, I'd think. So, good question - what is the Charge light doing?
-
-
That's odd. Others might know a component level reason for it (I don't), but what you're saying is that either the VR or the alternator stops working at higher RPM or higher current/voltage. You really need find a way to attach your leads to the battery terminals and work the throttle by hand while watching the meter to get some more information. If you get charging at idle but it kicks off at higher RPM, then the F to Bat test might tell you if it's the alternator or the VR. I would connect the meter to the battery, start the car, and confirm that charging kicks out at higher RPM. Then connect F to Bat and do the same. If it keeps charging at higher RPM (don't rev too high) then you most likely have a VR problem. If it's a solid-state VR it could just be that the circuitry can't handle the heat. If it still stops charging at higher RPM with F to Bat, then it's the alternator.
-
Seems like some facts are being convoluted. The alternator charged, at least for a short while, according to the above. And the fusible link fried a year ago. But now the alternator doesn't charge. Post # 6 - " I just had tested the car when at 2000 RPM and it read 12.07v." Just saying there's odd things going on. Maybe a loose Lamp wire? No Lamp, no charge.
-
Looks to me like everything is working correctly. As noted, the alternators don't put much out at idle RPM. If your eight starts were just to get the engine idling so you could work on it, it might be that you just need to start driving it. The burning link though, from the past, might be because of an intermittent short. It could be the short that's your problem, not the charging system. If you rev the engine to ~2000 RPM and charging voltage increase to ~14 volts, there won't really be anything to fix in the charging system.
-
Pretty cool Jai. I feel like classiczcars.com won something. Looks great. I started to zoom in on that girl's belly to see what was written there but had to stop.
-
-
I bought some of the mounts with no attached nut and did not have the problem. But I had to supply my own four nuts and bolts, and the threads on the stud were buggered up. Poor quality overall. Can't remember the brand. Maybe people could list some brands, and we'll find a good one. Sounds like Anchor has the mismatched peg.
-
Do you mean the peg, not the circle? Basically made a 1/2 peg? You could also file the peg down flat,then drill and tap a hole n the right spot. Run a small bolt through, or just a press fit rivet in an unthreaded hole, and you have a new peg. Looks like the mounts changed in 73. http://www.carpartsmanual.com/datsun/Z-1969-1978/engine-240z-260z/engine-mounting/manual-from-c-hls30-46001-rls30-grls30