


Zed Head
Free Member
-
Joined
-
Last visited
Everything posted by Zed Head
-
 All of the links on SU's that I find say that 5 is too high and might cause problems. I don't even know exactly how the SU's maintain pressure but spec. is 3.4 psi according to the FSM. I assume that the mechanical pumps regulate internally, and there is an orifice in the carbs that provides back pressure. You'll need a pump that regulates pressure internally if you want to continue to use that method. If you don't, again assuming, you'll have to remove the blockages to allow flow and place a regulator in line, or dead- head the carburetors and replumb them, with a regulator at the T with the return line. From what I gather, the 240Z's all have a return line so there are lots of options. You still haven't described clearly how exactly your system is plumbed though. A regulator won't do you any good unless it's plumbed correctly. http://mgaguru.com/mgtech/fuel/fp202.htm Converting to mechanical might be good for you, (like a pond) - Some good information in this thread from a year and a half ago -
 There's a spot on his Facebook page to give some feedback - https://www.facebook.com/California-Datsun-Inc-1410415502525098/reviews/
What are you using for the work, and how? A drill press maybe, with a template? Or something more sophisticated? I've heard that some of the older flanges can get out of true over time and use. You might check run-out and fix it while they're off and the lugs are out. Could save you future balance problems. It can be especially problematic for disc brake swaps since they're more sensitive to run-out, if you're planning that in the long run.
Only curious. cbuczesk asked about the title VIN number but you didn't answer. Down here in the States most DMV's (Dept.'s of Motor Vehicles) do a VIN check by looking at the dash VIN. So if the dash VIN doesn't match the title whoever buys it will need to jump through a bunch of hoops. If you don't have the title, still many hoops required.
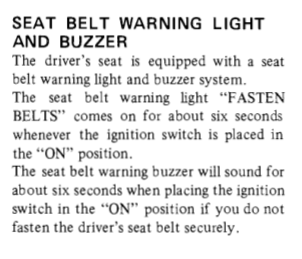
Maaaann, I thought I was learning something new but now I don't know. You know I love a puzzle so I went to the Owner's Manual, and found the section. In both 77 and 78. Copied 78 here. They even describe it like I do, by my "bonus" function. They mention the seat belt buzzer and timer. Not trying to one-up, just curious. Maybe your wires are crossed (in the car, not your head). Sorry Swede, This may actually be useful in the end when you get in to the swap. If you get done and your relay is still whining, we'll know more about what to do for it. Maybe it's actually your seat belt buzzer whining.
There's a spot on his Facebook page to give some feedback - https://www.facebook.com/California-Datsun-Inc-1410415502525098/reviews/
What are you using for the work, and how? A drill press maybe, with a template? Or something more sophisticated? I've heard that some of the older flanges can get out of true over time and use. You might check run-out and fix it while they're off and the lugs are out. Could save you future balance problems. It can be especially problematic for disc brake swaps since they're more sensitive to run-out, if you're planning that in the long run.
Only curious. cbuczesk asked about the title VIN number but you didn't answer. Down here in the States most DMV's (Dept.'s of Motor Vehicles) do a VIN check by looking at the dash VIN. So if the dash VIN doesn't match the title whoever buys it will need to jump through a bunch of hoops. If you don't have the title, still many hoops required.
Maaaann, I thought I was learning something new but now I don't know. You know I love a puzzle so I went to the Owner's Manual, and found the section. In both 77 and 78. Copied 78 here. They even describe it like I do, by my "bonus" function. They mention the seat belt buzzer and timer. Not trying to one-up, just curious. Maybe your wires are crossed (in the car, not your head). Sorry Swede, This may actually be useful in the end when you get in to the swap. If you get done and your relay is still whining, we'll know more about what to do for it. Maybe it's actually your seat belt buzzer whining.
 I ran a loop in mine. Let it project then loop it around to the destination. EFI system but same problem. If you put enough loops in it your gas mileage will probably increase.
Reread your post here and I think the incongruence is on the intent or the description of the intent by Nissan. Whether they intended it to show that the engine is running with the key on, or not, it does do that. As long as the brake lever is down. If the engine is running and it dies on you, the red brake light catches your eye pretty quickly. Alright, back to The Swede's issue. The alternator swap.
The light goes on when the key is turned On, right? That's the "check" function. Then when the engine starts, it goes off. Pretty sure that's the same for all of them. Otherwise the light stays on all the time, or it never "checks".. So, key on/engine running = no light, key on/engine stopped = light. Multi-function. Maybe you're saying that 77 gets its brake check warning lamp relay power from somewhere else? I was just commenting on the function of the light. I powered my light from the fuel pump power so I have the original function plus my bonus function.
Just thought of the other function of that light, the one that I've mainly used it for - ignition switch is on. Or - what happened? Oh, the light's on, the engine must have quit.
This is why we don't past after midnight. Captain's right, it's just a bulb check relay. I'm usually the one that rights out all the words for that thing too... For a small function, it has a lot of design effort in it, and can cause fairly significant problems. It's a weird little sub-system.
Goodbye old problems. We'll miss you...
No harm, besides maybe driving around with your parking brake on. I've generally thought that its other function, of showing a brake pressure imbalance, was kind of worthless. It shows up in the brake pedal anyway.
Do your colors match 76? As you note, the goal is to get the L and S wires what they need and the rest get disconnected. So a meter will tell you which is L, power with the key On, and which is S, power directly to the battery (actually to all of the loads on the system). But be careful if you have the 76 wiring, the brake check warning lamp relay is also powered from the yellow wire and will drain your battery. The external regulator must have competed that connection when the regulator powered up. I had to rewire the relay. You'll know if you have that problem because you'll hear the relay click when you reconnect the negative cable after making the connections.
The external regulator also routes power to the L terminal and contains the S wire connection. That's what the rewiring is for, in the AtlanticZ writeup. I would follow the AtlanticZ writeup, there are others out there that might disable your brake warning lamp relay. I did this work on my 76 and if I was doing it again, I would just cut the plug from the old bad external regulator (leave a good amount of wire to work with, crimp the relevant wires together there, cover them with heat shrink tubing, and then plug it back in. Nice, clean, weatherproof. Don't forget to put the tubing on before the crimping. Soldering would work also.
Are you talking about ignition timing or cam timing? Which marks, the notch and groove or the damper pulley marks and timing tab? How near is nowhere near? 100 degrees or 10? Maybe you have 240Z damper with a 280Z timing tab or vice versa. What parts are you working with? Another thought - the damper woodruff key is not in place. Wild guesses...
I don't have any nylon-based lock nuts on my 76 car, and it was essentially all original when I got it. And I have a bunch of old manifold nuts from a variety of apparently factory stock Datsuns, from the two cars I've owned and wrecking yard parts, and none of them are the crimped lock style. They're all plain old nuts. I also have the MSA nut/stud package and they're just nuts, no lock. The TC rod nuts are the crimped lockers, but not locking much any more after multiple removals. And the transmission mount cross member (aka rear engine mount) nuts, the ones on the long bolts, are the crimp style, but have plenty of lock left in them after several removals. In the immortal worlds of Adam - "I reject your reality and substitute my own". A safety wire or clip through a hole on the end of the rod would be a simple thing to do. You'd save the nut and washer if it got loose while you were trying to figure out your squirrelly steering problem.
These used to be called Phantom Grip. I always wonder when companies change the names of their products. http://3rdstrikeperformance.com/index.php?main_page=product_info&cPath=8140_144_10502&products_id=16749 It's probably "better" than welded if you want to drive it on the street, and just do an occasional two wheel burnout. That's why most people limit their slip.
To be clear, are the distributor green and red wires (or blue) completely disconnected from the factory terminal block by the coil, or did you just attach the HEI module G and W wires there. You said that you plugged the 78 module back in and it worked but you didn't mention disconnecting and reconnecting the distributor reluctor wires. Without specific details or a picture or a drawing it's hard to tell what people really did. Sometimes what you think doesn't matter, really matters. Also, you mentioned using the coil bracket to mount the module. So it's right next to the coil. Not sure that's a good idea, you can pick up a stray spark there, plus it might be affected by the coil's magnetic field. Might be screwing up the reluctor trigger. Just wild guesses. My module is on the fenderwell, pretty far from the coil, and the wires are run directly from the distributor to the module. I used a stock 78 coil for a while, 1 ohm resistance. And I also had a 78 ignition module also, in place of my 76 module, after it died. Both from a 78 parts car.
I've mentioned this before, but I damaged a module once by leaving two spark plugs disconnected after doing some work on the engine. Started the car, it ran poorly, I realized what I'd done, shut it off and reconnected the two plugs. But the module only put out a weak orange spark after that. It would start with starting fluid but not by the normal method. Replaced the module and everything was good. I don't know what exactly damaged it, maybe a stray spark, but it was ruined. Short answer - maybe you have a bad module. Did you do anything that might have damaged it? Incorrect wiring, even for a moment might do it. If you got the module from a parts store, they might exchange it and you'll be good to go. Also, I believe that you can get the module to spark by itself by applying battery power to the W terminal and grounding G. Each tap of battery power should cause a spark. But you've already shown that the distributor is doing its job, and you're getting spark with one plug. Is it a strong blue spark, or a weak yellow/orange? The 78 module is actually a high-energy system. No real benefit to the HEI unless you're just getting ahead of its eventual failure.
Have you let the temperatures even out? A cap straight from your warm clammy hands might be a little bit bigger than the cold slot it's going in to. Taking it a little further, some time in the refrigerator might help, although visions of a half-inserted, jammed cap come to mind.
Sounds like you have low voltage, or low current through the module. With 5 plugs out there's less load on the starter and more voltage for the module during cranking. You didn't answer the questions in the thread, about wiring or battery voltage. Could be a poor battery, or a poor ground through the module mounting points. The 4 pin modules are actually 5 contact devices.
One major difficulty is removing the colored connectors from the white plastic framework by the fusebox. It looks like Nissan meant for them to go in but never come out. I tried when I had a 78 parts car but couldn't come up with a method. I think I've seen one out on the internet somewhere though.
All four hoses to the can removes the "positive" pressure differential that causes the crankcase gases to be purged. Air could flow directly through the can to the PCV valve without going through the crankcase. The crankcase would be dead air. The ports are separated and placed to cause the "positive" part of PCV. The PCV system has some fine details. Looking at the diagram you can see that a stuck open PCV valve can also cause a leak past the throttle body. Could cause a high idle problem. I'll have to remember that one. I've wondered also why there are so many different PCV valves, all with the same threads and from factor. There must be some fine tuning of the springs inside. Your engine will probably run fine. Just might gunk up the oil sooner than normal. We could probably have a whole thread on PCV systems.
I ran a loop in mine. Let it project then loop it around to the destination. EFI system but same problem. If you put enough loops in it your gas mileage will probably increase.
Reread your post here and I think the incongruence is on the intent or the description of the intent by Nissan. Whether they intended it to show that the engine is running with the key on, or not, it does do that. As long as the brake lever is down. If the engine is running and it dies on you, the red brake light catches your eye pretty quickly. Alright, back to The Swede's issue. The alternator swap.
The light goes on when the key is turned On, right? That's the "check" function. Then when the engine starts, it goes off. Pretty sure that's the same for all of them. Otherwise the light stays on all the time, or it never "checks".. So, key on/engine running = no light, key on/engine stopped = light. Multi-function. Maybe you're saying that 77 gets its brake check warning lamp relay power from somewhere else? I was just commenting on the function of the light. I powered my light from the fuel pump power so I have the original function plus my bonus function.
Just thought of the other function of that light, the one that I've mainly used it for - ignition switch is on. Or - what happened? Oh, the light's on, the engine must have quit.
This is why we don't past after midnight. Captain's right, it's just a bulb check relay. I'm usually the one that rights out all the words for that thing too... For a small function, it has a lot of design effort in it, and can cause fairly significant problems. It's a weird little sub-system.
Goodbye old problems. We'll miss you...
No harm, besides maybe driving around with your parking brake on. I've generally thought that its other function, of showing a brake pressure imbalance, was kind of worthless. It shows up in the brake pedal anyway.
Do your colors match 76? As you note, the goal is to get the L and S wires what they need and the rest get disconnected. So a meter will tell you which is L, power with the key On, and which is S, power directly to the battery (actually to all of the loads on the system). But be careful if you have the 76 wiring, the brake check warning lamp relay is also powered from the yellow wire and will drain your battery. The external regulator must have competed that connection when the regulator powered up. I had to rewire the relay. You'll know if you have that problem because you'll hear the relay click when you reconnect the negative cable after making the connections.
The external regulator also routes power to the L terminal and contains the S wire connection. That's what the rewiring is for, in the AtlanticZ writeup. I would follow the AtlanticZ writeup, there are others out there that might disable your brake warning lamp relay. I did this work on my 76 and if I was doing it again, I would just cut the plug from the old bad external regulator (leave a good amount of wire to work with, crimp the relevant wires together there, cover them with heat shrink tubing, and then plug it back in. Nice, clean, weatherproof. Don't forget to put the tubing on before the crimping. Soldering would work also.
Are you talking about ignition timing or cam timing? Which marks, the notch and groove or the damper pulley marks and timing tab? How near is nowhere near? 100 degrees or 10? Maybe you have 240Z damper with a 280Z timing tab or vice versa. What parts are you working with? Another thought - the damper woodruff key is not in place. Wild guesses...
I don't have any nylon-based lock nuts on my 76 car, and it was essentially all original when I got it. And I have a bunch of old manifold nuts from a variety of apparently factory stock Datsuns, from the two cars I've owned and wrecking yard parts, and none of them are the crimped lock style. They're all plain old nuts. I also have the MSA nut/stud package and they're just nuts, no lock. The TC rod nuts are the crimped lockers, but not locking much any more after multiple removals. And the transmission mount cross member (aka rear engine mount) nuts, the ones on the long bolts, are the crimp style, but have plenty of lock left in them after several removals. In the immortal worlds of Adam - "I reject your reality and substitute my own". A safety wire or clip through a hole on the end of the rod would be a simple thing to do. You'd save the nut and washer if it got loose while you were trying to figure out your squirrelly steering problem.
These used to be called Phantom Grip. I always wonder when companies change the names of their products. http://3rdstrikeperformance.com/index.php?main_page=product_info&cPath=8140_144_10502&products_id=16749 It's probably "better" than welded if you want to drive it on the street, and just do an occasional two wheel burnout. That's why most people limit their slip.
To be clear, are the distributor green and red wires (or blue) completely disconnected from the factory terminal block by the coil, or did you just attach the HEI module G and W wires there. You said that you plugged the 78 module back in and it worked but you didn't mention disconnecting and reconnecting the distributor reluctor wires. Without specific details or a picture or a drawing it's hard to tell what people really did. Sometimes what you think doesn't matter, really matters. Also, you mentioned using the coil bracket to mount the module. So it's right next to the coil. Not sure that's a good idea, you can pick up a stray spark there, plus it might be affected by the coil's magnetic field. Might be screwing up the reluctor trigger. Just wild guesses. My module is on the fenderwell, pretty far from the coil, and the wires are run directly from the distributor to the module. I used a stock 78 coil for a while, 1 ohm resistance. And I also had a 78 ignition module also, in place of my 76 module, after it died. Both from a 78 parts car.
I've mentioned this before, but I damaged a module once by leaving two spark plugs disconnected after doing some work on the engine. Started the car, it ran poorly, I realized what I'd done, shut it off and reconnected the two plugs. But the module only put out a weak orange spark after that. It would start with starting fluid but not by the normal method. Replaced the module and everything was good. I don't know what exactly damaged it, maybe a stray spark, but it was ruined. Short answer - maybe you have a bad module. Did you do anything that might have damaged it? Incorrect wiring, even for a moment might do it. If you got the module from a parts store, they might exchange it and you'll be good to go. Also, I believe that you can get the module to spark by itself by applying battery power to the W terminal and grounding G. Each tap of battery power should cause a spark. But you've already shown that the distributor is doing its job, and you're getting spark with one plug. Is it a strong blue spark, or a weak yellow/orange? The 78 module is actually a high-energy system. No real benefit to the HEI unless you're just getting ahead of its eventual failure.
Have you let the temperatures even out? A cap straight from your warm clammy hands might be a little bit bigger than the cold slot it's going in to. Taking it a little further, some time in the refrigerator might help, although visions of a half-inserted, jammed cap come to mind.
Sounds like you have low voltage, or low current through the module. With 5 plugs out there's less load on the starter and more voltage for the module during cranking. You didn't answer the questions in the thread, about wiring or battery voltage. Could be a poor battery, or a poor ground through the module mounting points. The 4 pin modules are actually 5 contact devices.
One major difficulty is removing the colored connectors from the white plastic framework by the fusebox. It looks like Nissan meant for them to go in but never come out. I tried when I had a 78 parts car but couldn't come up with a method. I think I've seen one out on the internet somewhere though.
All four hoses to the can removes the "positive" pressure differential that causes the crankcase gases to be purged. Air could flow directly through the can to the PCV valve without going through the crankcase. The crankcase would be dead air. The ports are separated and placed to cause the "positive" part of PCV. The PCV system has some fine details. Looking at the diagram you can see that a stuck open PCV valve can also cause a leak past the throttle body. Could cause a high idle problem. I'll have to remember that one. I've wondered also why there are so many different PCV valves, all with the same threads and from factor. There must be some fine tuning of the springs inside. Your engine will probably run fine. Just might gunk up the oil sooner than normal. We could probably have a whole thread on PCV systems.

Important Information
By using this site, you agree to our Privacy Policy and Guidelines. We have placed cookies on your device to help make this website better. You can adjust your cookie settings, otherwise we'll assume you're okay to continue.