
Zed Head
Community Member
-
Joined
-
Last visited
Everything posted by Zed Head
-
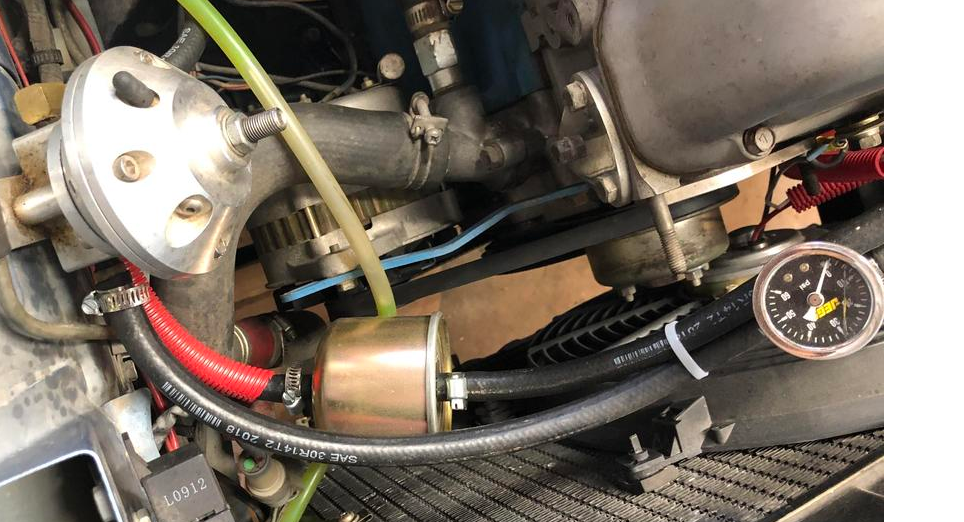
I just noticed something odd, but can't be sure. It looks like the pressure gauge might be on the return line to the tank. It should be between the fuel filter and the rail. Not really sure how the pressure would vary with the vacuum hose connected if it is on the return line, but worth double checking. Maybe the FPR is connected incorrectly.
-
-
Complete loss, partial, sporadic...? Did it die and refuse to start back up? Details will help. If your car is stock it will have the original electronic ignition module. Things can get weird when they start to go bad.
-
Keeping the injectors cool is probably worth doing. That is the source of the heat soak/hot start problem for many EFI systems, apparently. If the shields block air flow then they also block hot air rising from the exhaust system. So, dual function, radiant and convective.
-
He builds engines. He probably just rebuilds his every 20,000 miles. And never drives through construction zones or if the wind is blowing.
-
Another thought, and a reason to just go through the whole series of EFI component tests and measurements. If your coolant temperature sensor circuit is "open" the ECU will dump loads of extra fuel thinking that it's super cold out. It might be that that is the reason the PO lowered the fuel pressure. You already have many of the important numbers. Keep measuring and confirming. A multimeter is a very valuable tool for the EFI systems. You might save yourself some time and money by doing the full set of tests first.
-
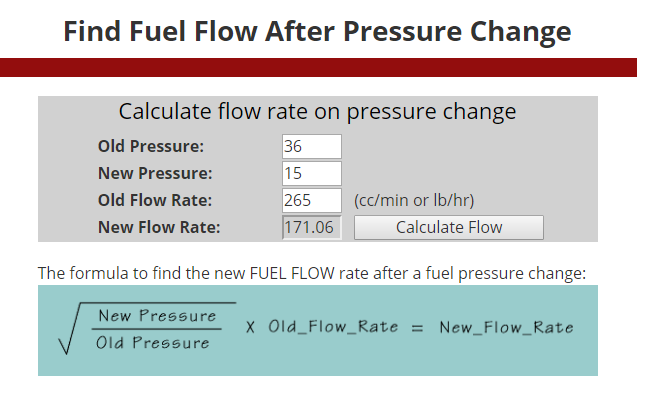
I used an online calculator just for fun and it comes up surprisingly close to "turbo" injector for your measured pressure. Assuming that the 188 cc number is at 36 psi. Some flow rate charts aren't clear on what pressure they measure at. Whatever you do, keep track of your starting points so you can reset them if needed. http://www.atlanticz.ca/zclub/techtips/injectors/index.html https://www.rcfuelinjection.com/technical
-
Click the little translucent trash can on the lower corner of the image in the separate images window to remove an image. If you just cut it from the message it will come back, as you've found.
-
If the glue blobs were intact after you removed the cover then leave it where it was with the intact glue blobs. Never adjust it. The procedure I linked to is for getting it back to where it is supposed to be. The AFM should never be adjusted from its factory position. There are better ways to tune the air-fuel ratio.
-
The pressure reading is actually great progress. The numbers are the most important part of working with EFI. You're at a point where you can calculate a cheapest path to where you want to be. Find the atlanticz.ca page about calibrating your AFM and see if it has been messed with. It might be most cost-effective for you to just buy the right injectors and calibrate your AFM. If you send your injectors out and they're high flow rate you'll need to buy new ones anyway. It's a learn-o-rama with the old EFI systems. Have fun. I found the page. It's worth a read. http://www.atlanticz.ca/zclub/techtips/afm/index.html
-
You could shim inside the fork also, instead, if you don't want to bend things. Seems like there's no magic one-shot fix. Usually on these types of things you just have to do several small fixes that will all add up to a tighter system. The first thing I'd do is wiggle the shift lever and see what's loose. Even if if you had a specific one-shot fix suggestion you'd want to do that. It's all right there in your picture.
-
Compare your ring baulk numbers here. Looks like they're the same part, A and B. http://www.carpartsmanual.com/datsun/Z-1969-1978/power-train/transmission-gears/4-speed/to-aug-71 http://www.carpartsmanual.com/datsun/Z-1969-1978/power-train/transmission-gears/4-speed/from-sep-71 http://www.carpartsmanual.com/datsun/Z-1969-1978/power-train/transmission-gears/4-speed
-
-
78 has its own special way to run the pump. Take the oil pressure switch/sensor plug off at the engine then turn the key on. The pump should get power. It's a flaw in the design but convenient.
-
The simple way to test the pump power circuit is to disconnect the small wire from the starter solenoid then turn the key to Start. The pump does not "turn on" when the key is on. Download the wiring diagram for your car and study it. Find the connectors for the pump power and clean them up. They might be corroded. There is a full test procedure for the relays in the FSM also, I believe. It also describes the other functions of the relay, if you're talking about the combined EFI/fuel pump relay. That one is not massive though, so not clear which one you're working with. Can you post a picture?
-
I'm not sure on the A or B part but that is what they call the "monkey motion" shifter. Early style. I don't know which parts wear out either. Apparently they tend to get loose, there's a bunch on the internet about it. https://www.google.com/search?q=datsun+monkey+motion+shifter&rlz=1C1SQJL_enUS862US862&oq=datsun+monkey+motion+shifter&aqs=chrome..69i57.9386j0j8&sourceid=chrome&ie=UTF-8
-
Have somebody press on the middle of the hood while you pull the handle, or vice-versa. Or put some weight on it. It probably has too much upward force on the latch now. You probably need to readjust it back to where it was now.
-
What have you adjusted? The corners would be held up by the two posts with the rubber bumpers. Was there a different hood on it that you've replaced? Don't overlook that it might be the cowl piece that is bent, not the hood.
-
Is the straight side, the driver's side, of the chain tight? If you rotate things backward you can make it loose and it will do what your picture shows. You can put a wrench on the sprocket bolt and tighten it up without turning the crankshaft. Beside that, when it wears a little it will retard slightly. But it's in range, looks good.
-
I used one from a spare alternator that I had laying around. Used the ground bolt on the manifold to mount it and ran the wire over to the coil post. I had to extend the wire though so there might be a more convenient mounting location. You can get that type at any auto parts store for a few bucks. By adding resistance to your coil power line you're reducing the strength of the spark at higher RPM, defeating the HE part of the HEI module, so it might be worth an experiment. On the red-green thing, you have two many wires in your picture, it's hard to know what's what. You might trace those wires back to the pickup coil itself and see what is connected where at the distributor. Maybe they're mixed up at the pickup coil. The HEI module is very sensitive and might even work with just one wire.
-
You never really said where red and green were to start so it's unclear what reversed is. But if your timing light is steady they're probably right now. Green goes to G and red goes to W, normally. I had a similar problem with my tach and the HEI module. I fixed it by putting a condenser/capacitor on the negative (blue) wire that feeds the tach, I assume that there was electrical noise generated by the HEI and the condenser knocked it down. I know it worked because many miles later the tach started acting up again and I found that the wire to the condenser had broken. Reconnected it and the tach was back.
-
If you find that your fuel pressure really is low and can't be raised then that would be an option. Or you could have them flow-tested to see what you have. It's just another unknown at this point.
-
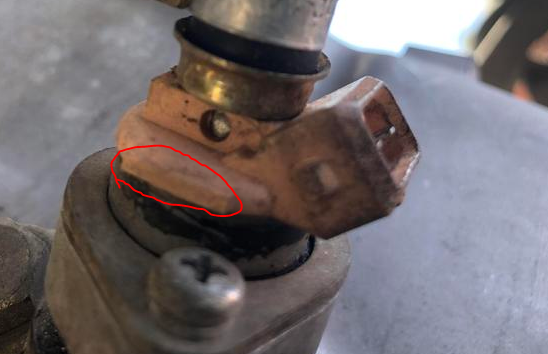
Those injectors aren't what I thought they were. Nissan injectors all have the same number on the side, and use different colors to differentiate volume. There should be a number/letter like A11000... in this spot, below. You have mystery injectors. They could be 265 cc aftermarket turbo injectors instead of 188 cc NA injectors. That might explain the low fuel pressure and the reason he used an adjustable regulator. Aftermarket injectors come in a variety of colors. So, unfortunately, you might find that you are unable to raise fuel pressure to spec. without causing the engine to run really rich.
-
Looks like mostly stock parts. Those pink injectors probably started as tan. The AFM is probably sideways in order to fit that hose connecting to the throttle body, the stock one probably fell apart as they do. So Dave's fuel pressure recommendation is back on the docket. Why is it so low? I wonder if the PO just used the CSV nipple to block a vacuum port. Maybe trying to pass the visual inspection. Overall, it seems close, although confusing. It runs and the emissions numbers are not terrible. The kit you're waiting for won't have much useful in it except a pressure gauge. You could probably go to your local auto parts store and borrow a gauge. Did any raw fuel come out of the vacuum port on the FPR when you were messing with it? The low pressure readings are still the big oddness. You should check your cam timing, valve lash, and ignition timing. You can get it to pass even without the PCV system working correctly. You might have to change the oil right before you go back. There's no major thing you're going to find that will make dramatic changes. Just a bunch of small things to get it right.
-
Setting dwell first is right. That's the time that the points are closed and charging the coil. So there's a beginning and an end. Once you set that it won't change as you adjust the timing itself. You're back in the old days...